

Page 1

QTech SMS Lite
Quick Start Guide
Page 2
QTech SMS Lite – Quick Start Guide V1.5 2
www.qtech.co.nz Ph: +64 3 366 3713 Page 2 of 21
Version Control
Document Name:
QTech SMS Lite Quick Start Guide V1.5
Product:
SMS Lite
Document Owner:
QTech Data Systems Ltd
Current Firmware:
Firmware V4.00
Date Updated:
23/2/2018
Version
Date
Author
Change Description
V1.0
10.11.14
IH
Original Format
V1.1
23.02.15
RH, FA
Addition of ‘debounce’ option for inputs Formatting update
V1.2
13.03.15
FA
Reword escalation sentence pg10. Edit diagram pg11 Input / Output
V1.3
22.08.16
RH
Minor alterations to suit V3.00 Firmware.
V1.4
20.09.16
RH
Added SIM Busy error code.
V1.5
23/2/2018
GP
Added notices marked important to clarify security conditions required for
messages to be processed. Added additional information on LED error
codes and how to deal with them
Page 3
QTech SMS Lite – Quick Start Guide V1.5 3
www.qtech.co.nz Ph: +64 3 366 3713 Page 3 of 21
Introduction
The SMS Lite is a powerful cellular remote control unit that uses text messages to
provide up to four people with status conditions, notifications and control options for its
four switched inputs and two relay outputs. It is operational within minutes with the
minimum configuration requirement being the registering of a single cellular number to
the SMS Lite. No external software is required.
The SMS Lite supports connection to all current New Zealand telecommunications
companies (Spark XT/Vodafone/2Degrees).
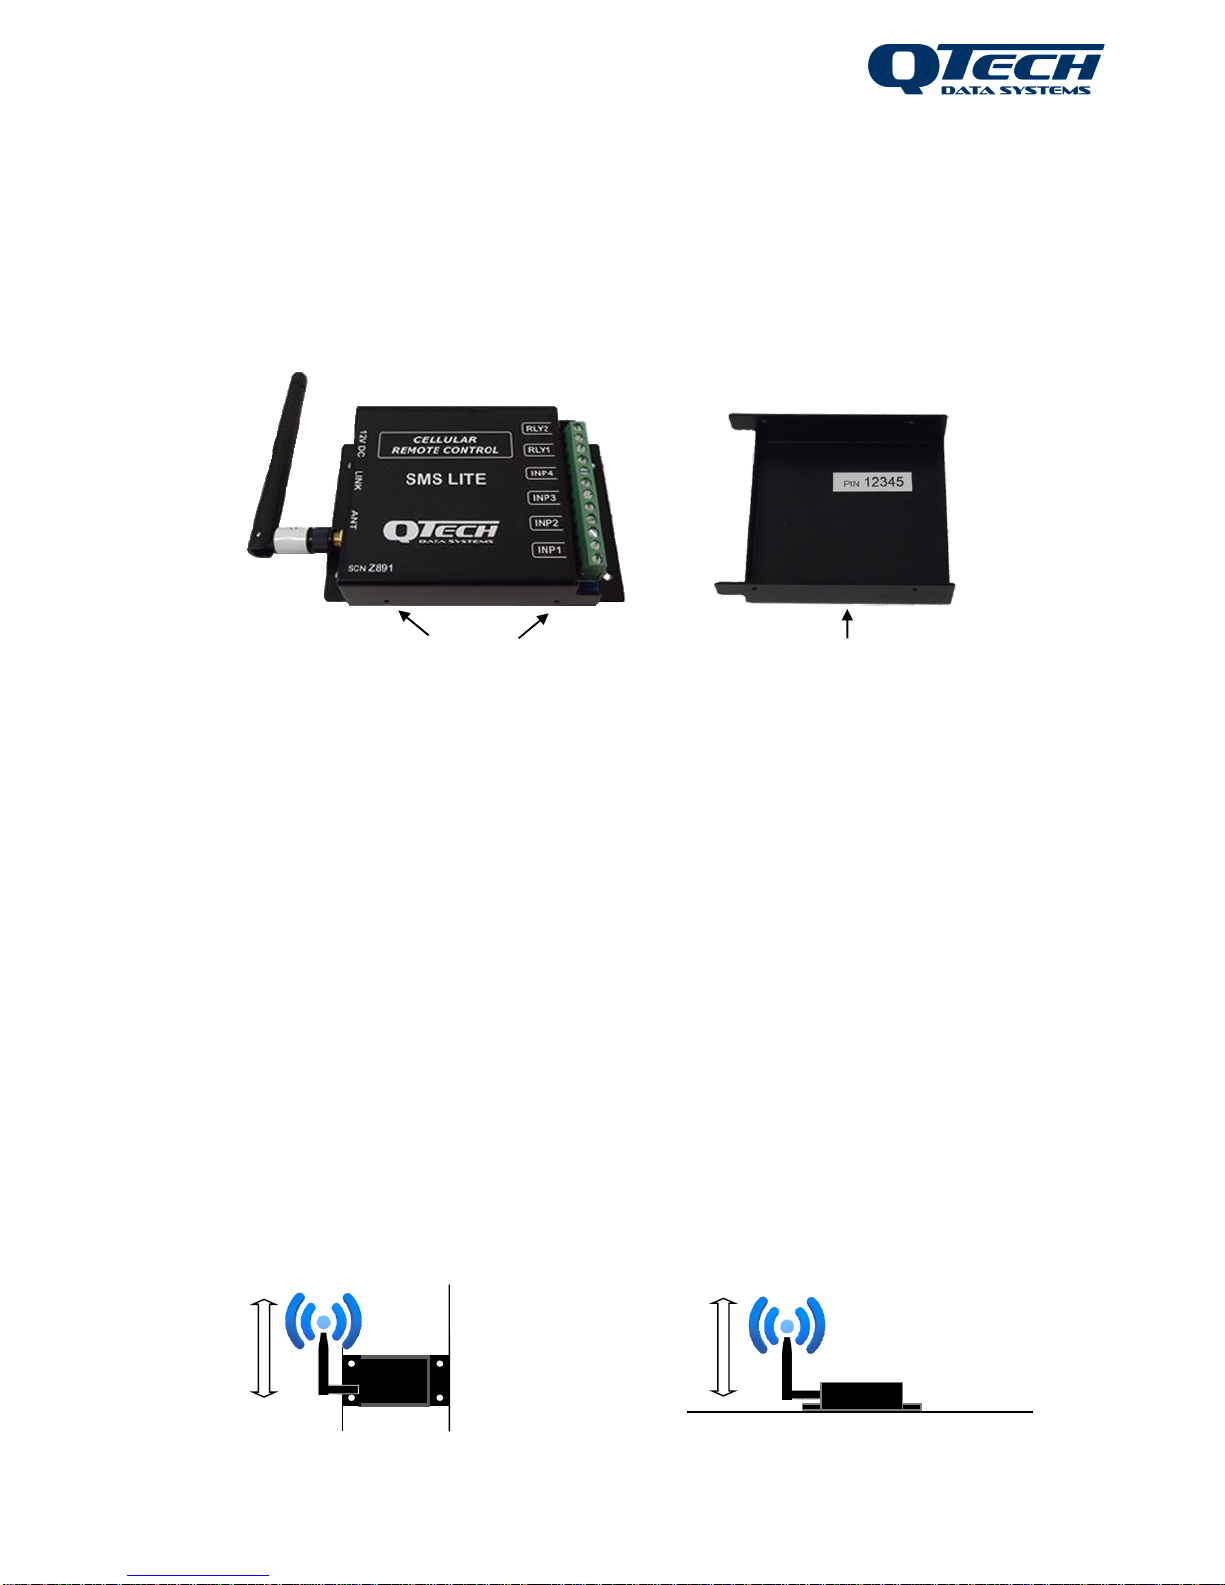
Each SMS Lite is supplied with the following:
Qty 1x SMS Lite Module
Qty 1x Aerial (stub type), 2dBi gain (P/N PD9230)
Qty 1x Plug pack power supply (P/N PD5412) (optional)
Please read this guide before using the SMS Lite. Please ensure you read the
technical details on Page 15 of this guide prior to connecting ANY external device
to the SMS Lite.
This version of the SMS Lite is configured for NZ cellular networks only.
(For use in other countries, please contact QTech)
Aerial Connection
Carefully connect the aerial. Do not operate the SMS Lite without an aerial connected.
Refer to Technical Details section on Page 15 for alternatives. The aerial must be
vertically orientated.
Aerial must be
vertical if
mounted flat
Aerial must be
vertical when
wall mounted
Parallel
to wall
surface
Perpendicular
to flat surface
Dimples
PIN located inside cover
Page 4
QTech SMS Lite – Quick Start Guide V1.5 4
www.qtech.co.nz Ph: +64 3 366 3713 Page 4 of 21
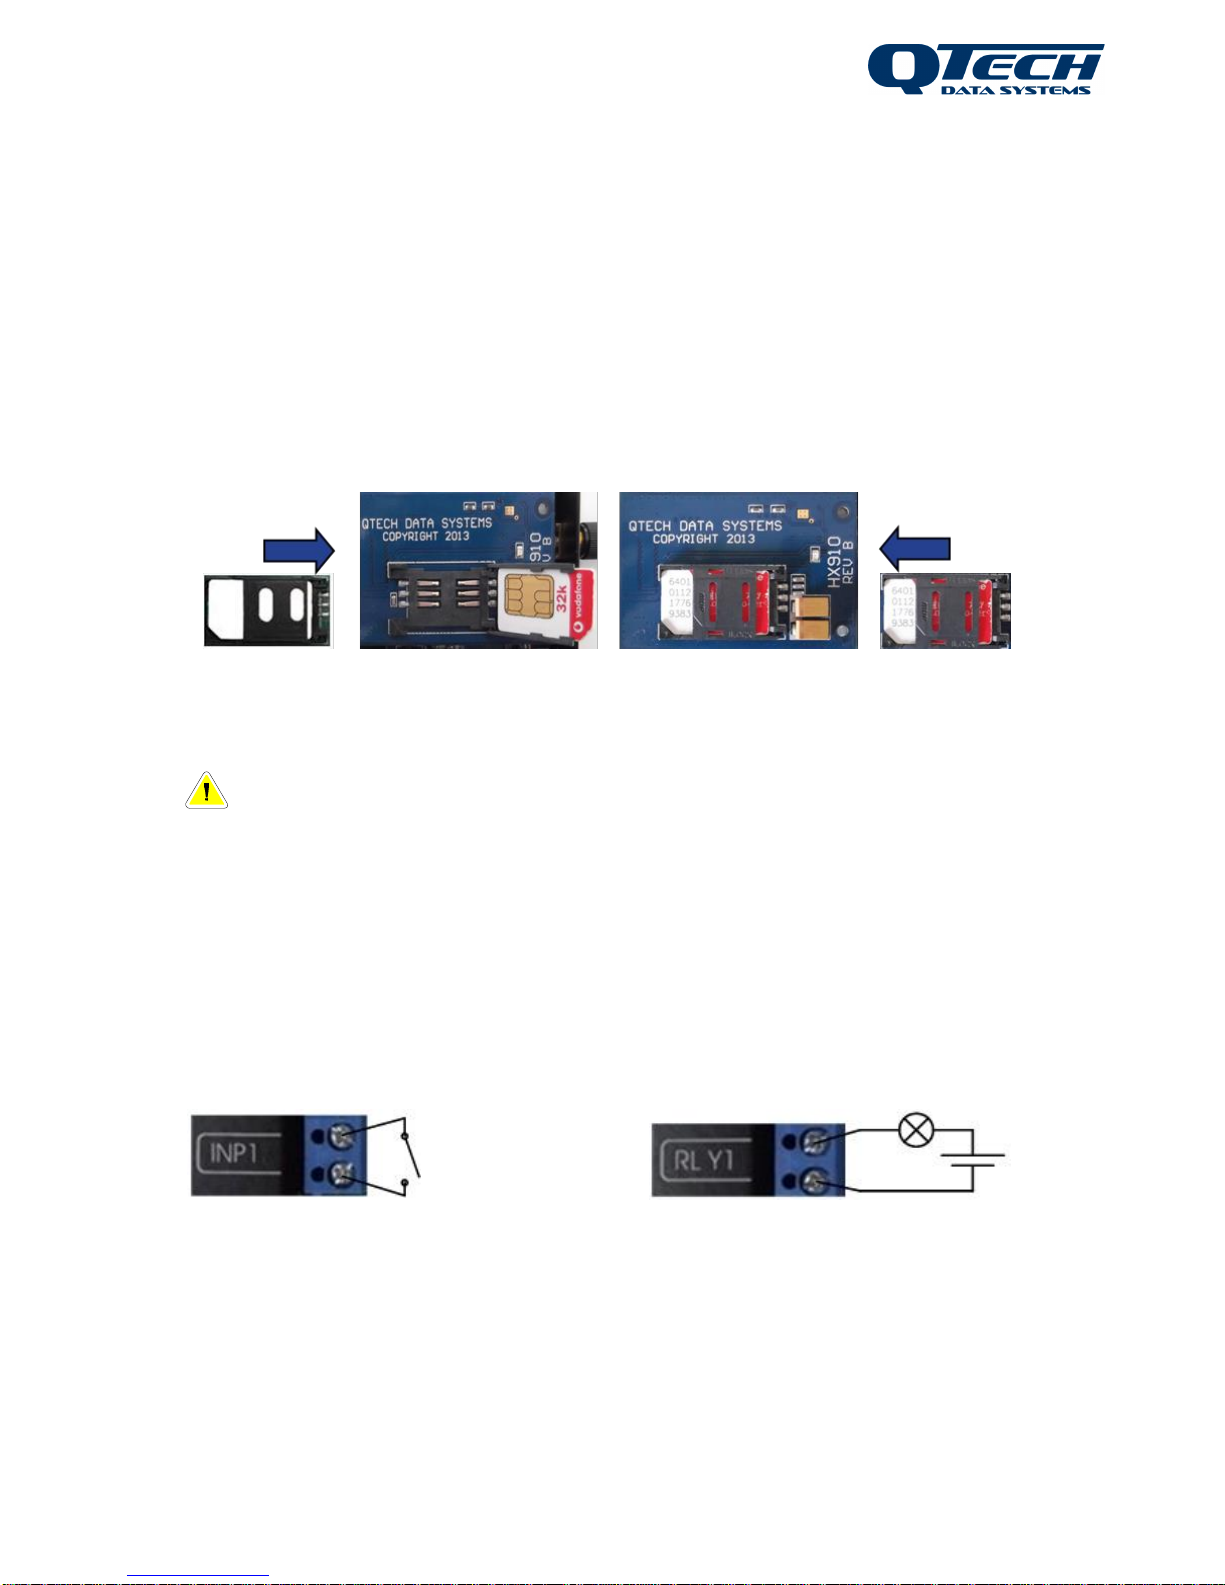
Install the SIM Card
Before installing the SIM card, ensure that it is activated. We recommend you insert the
SIM into a regular cell phone to check this. Carefully remove the SMS Lite cover by
prising the side panels close to the retaining dimples.
Locate the SIM card holder adjacent to the aerial. Push the top of the holder in the
direction of the “Open” arrows to “Unlock” (toward aerial), then flip open (away from the
aerial).
Carefully insert the SIM card from your chosen Telco. Be careful to orientate the card
correctly, once in place carefully slide the plastic retainer towards the aerial to “Lock”.
Unlock Holder Lift & Insert SIM Close Holder Lock Holder
Note – The SIM card must be a “full size” card, not a “micro SIM”.
Inputs & Outputs
The basic connection details are shown in the diagram below. More detailed information
can be found in the Technical Details section on Page 15.
Default Setting <input name>: INP1 INP2 INP3 INP4
These can be labelled – refer to Configuration Instructions on Page 7.
Close switch contact to turn “INP1” “ON” Send “ON” command to “RLY1”
closes operating light
Page 5
QTech SMS Lite – Quick Start Guide V1.5 5
www.qtech.co.nz Ph: +64 3 366 3713 Page 5 of 21
Getting Started
In order to operate the SMS Lite, the device must have a mobile number registered as
‘Phone 1’ referred to as Ph1. You must register this number before you can configure
any of the inputs or outputs.
The device can have up to 4 numbers registered; it is recommended that Ph1 is the
main contact as any alarm escalations programmed will step in numerical order Ph1,
Ph2, Ph3, and Ph4. If there is no response the next number in the list is sent a
notification after 10 minutes or if a busy message is received from the previous phone
the next person is also notified.
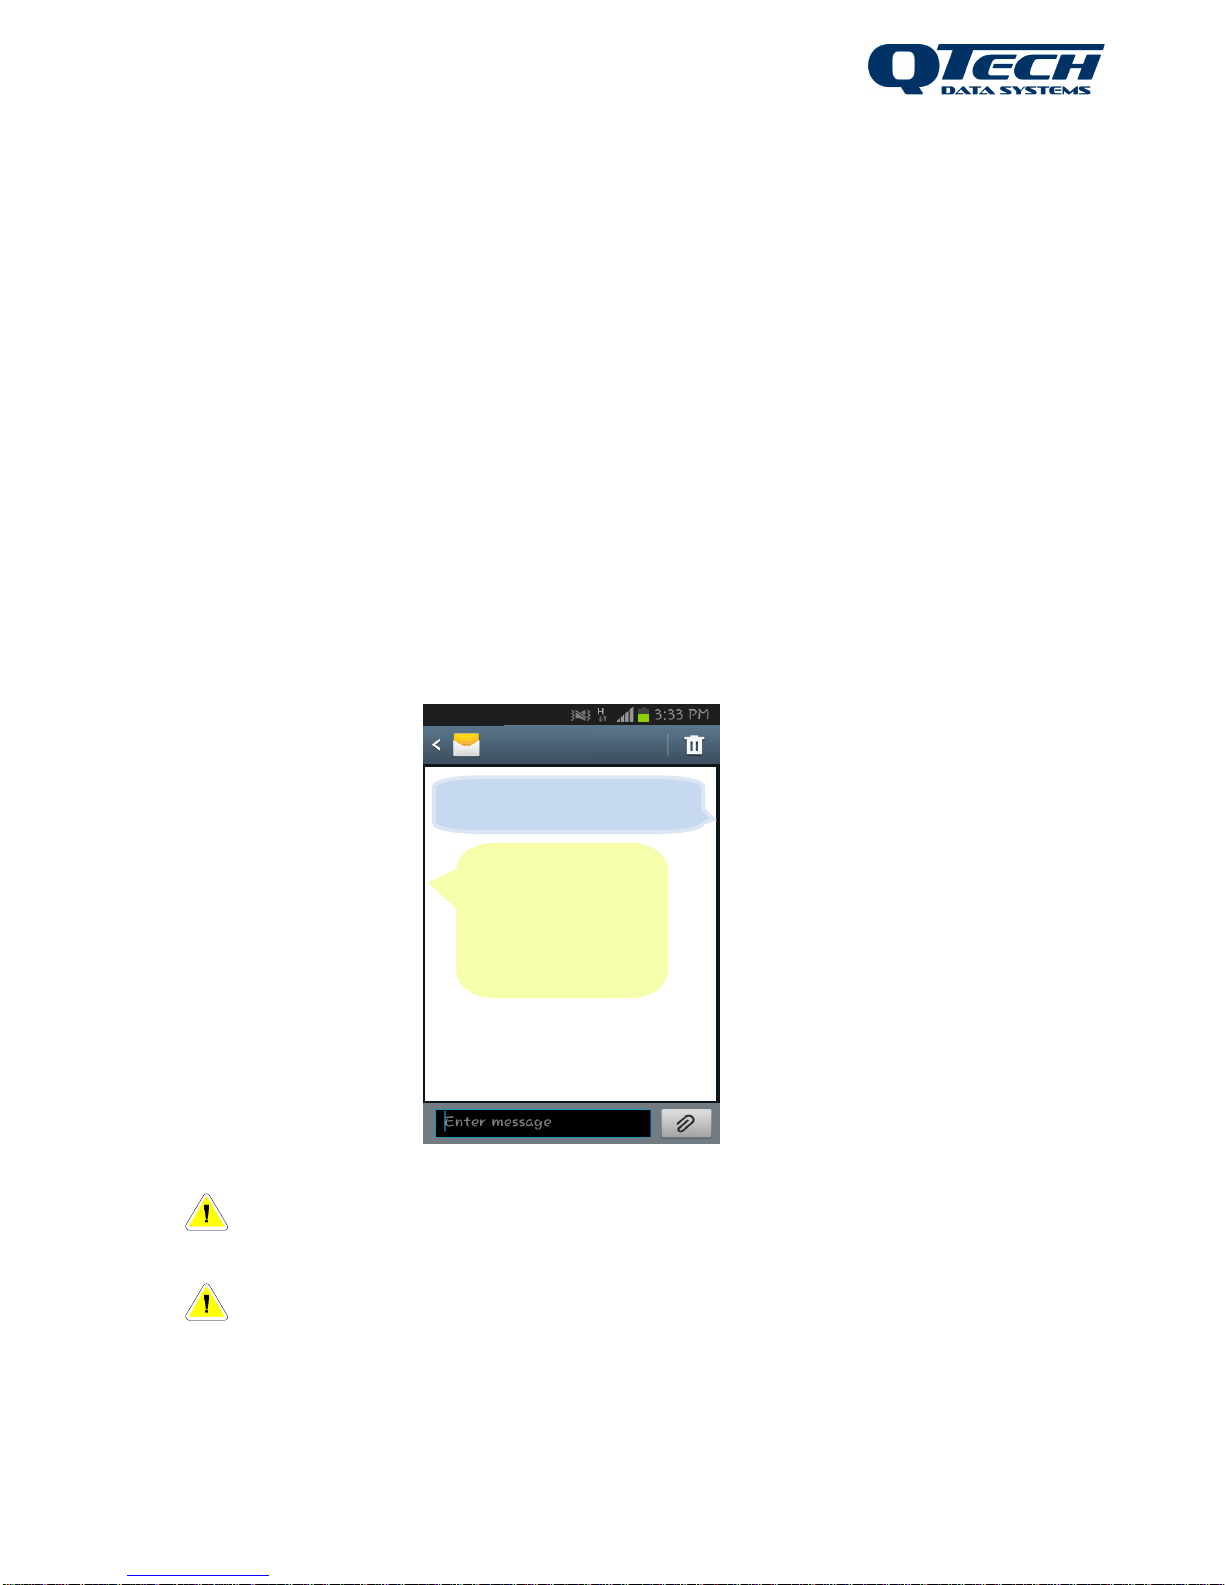
To Register Phone 1 (Ph1) – Master User
1. Locate the PIN (Personal Identification Number) printed inside your SMS Lite case.
2. Compose text message to the SMS Lite mobile number in the following format:
#[PIN][space]Ph1:number=0123456789[dot]
. e.g. #12345 Ph1:number=027987654.
3. A confirmation text will be sent to you acknowledging a configuration change.
Use the above format to programme up to 4 individual phone numbers.
Note – Each configuration command must be finished with a full stop.
i.e. #[PIN][space]Ph2:number=0123456789[dot]
Note – The PIN is used each time a configuration change is made.
If you make a mistake in any configuration message, you can override
the current setting by sending a new configuration message. You can also clear a
configured input, output or phone number by sending configuration message with a
blank value: #[PIN][space]Ph2:number=. e.g. #12345 Ph2:number=.
SMS Lite
SMS Lite
You have changed the
configuration of the SMS
Lite. Send “INPUTS”,
“OUTPUTS”, or
“PHONES” to view the
configuration.
#12345 ph1:number=027987654.
Page 6

QTech SMS Lite – Quick Start Guide V1.5 6
www.qtech.co.nz Ph: +64 3 366 3713 Page 6 of 21
You can now connect the SMS Lite to the required INPUTS and OUTPUTS and
configure them.
INPUTS Once the SMS Lite is configured, Phone 1 will be sent a message each
time any of the inputs turn on or off. They must acknowledge receipt of the
notification. Up to 3 other phones can be programmed to receive a
notification. If Phone 1 replies ‘busy’ or if there is no response after 10
minutes, the SMS Lite will send a text to the next programmed number.
OUTPUTS Once the SMS Lite is configured, Phone 1 can control the outputs by
sending the following commands:
Turn the specified output on
ON <output name> e.g. ON RLY1
Turn the specified output off
OFF <output name> e.g. OFF RLY1
To pulse an output on for one second then off again
PULSE <output name> e.g. PULSE RLY1
To allow control permissions to more than one phone, each output will need to be
configured.
If you do not rename the inputs and outputs they will operate under their default names
which are: <input name> INP1 → INP4 and <output name>: RLY1 & RLY2
This is all that is required for your configured phone number to receive
notifications from the SMS Lite Inputs and control the outputs. While it is not
necessary, we highly recommend programming the Site Name and the Input and
Output names, especially where you have multiple connections as these names
are used in the text messages and can save confusion.
Page 7
QTech SMS Lite – Quick Start Guide V1.5 7
www.qtech.co.nz Ph: +64 3 366 3713 Page 7 of 21
Configuration Overview
Further configuration is possible to allow personalisation of your SMS Lite. You can
assign a name to the SMS Lite which is referred to as the Site name as well as naming
of inputs and outputs, and assignment of phone(s) to these. The SMS Lite can be
configured with up to 4 phone numbers allowing multiple user notifications and control
options.
All configuration text messages sent to the SMS Lite must in the form of:
#[PIN][space]<object>:<item>=<value>[dot]
e.g. #12345 Site:Name=Shed1. or #12345 INP1:Name=Pump.
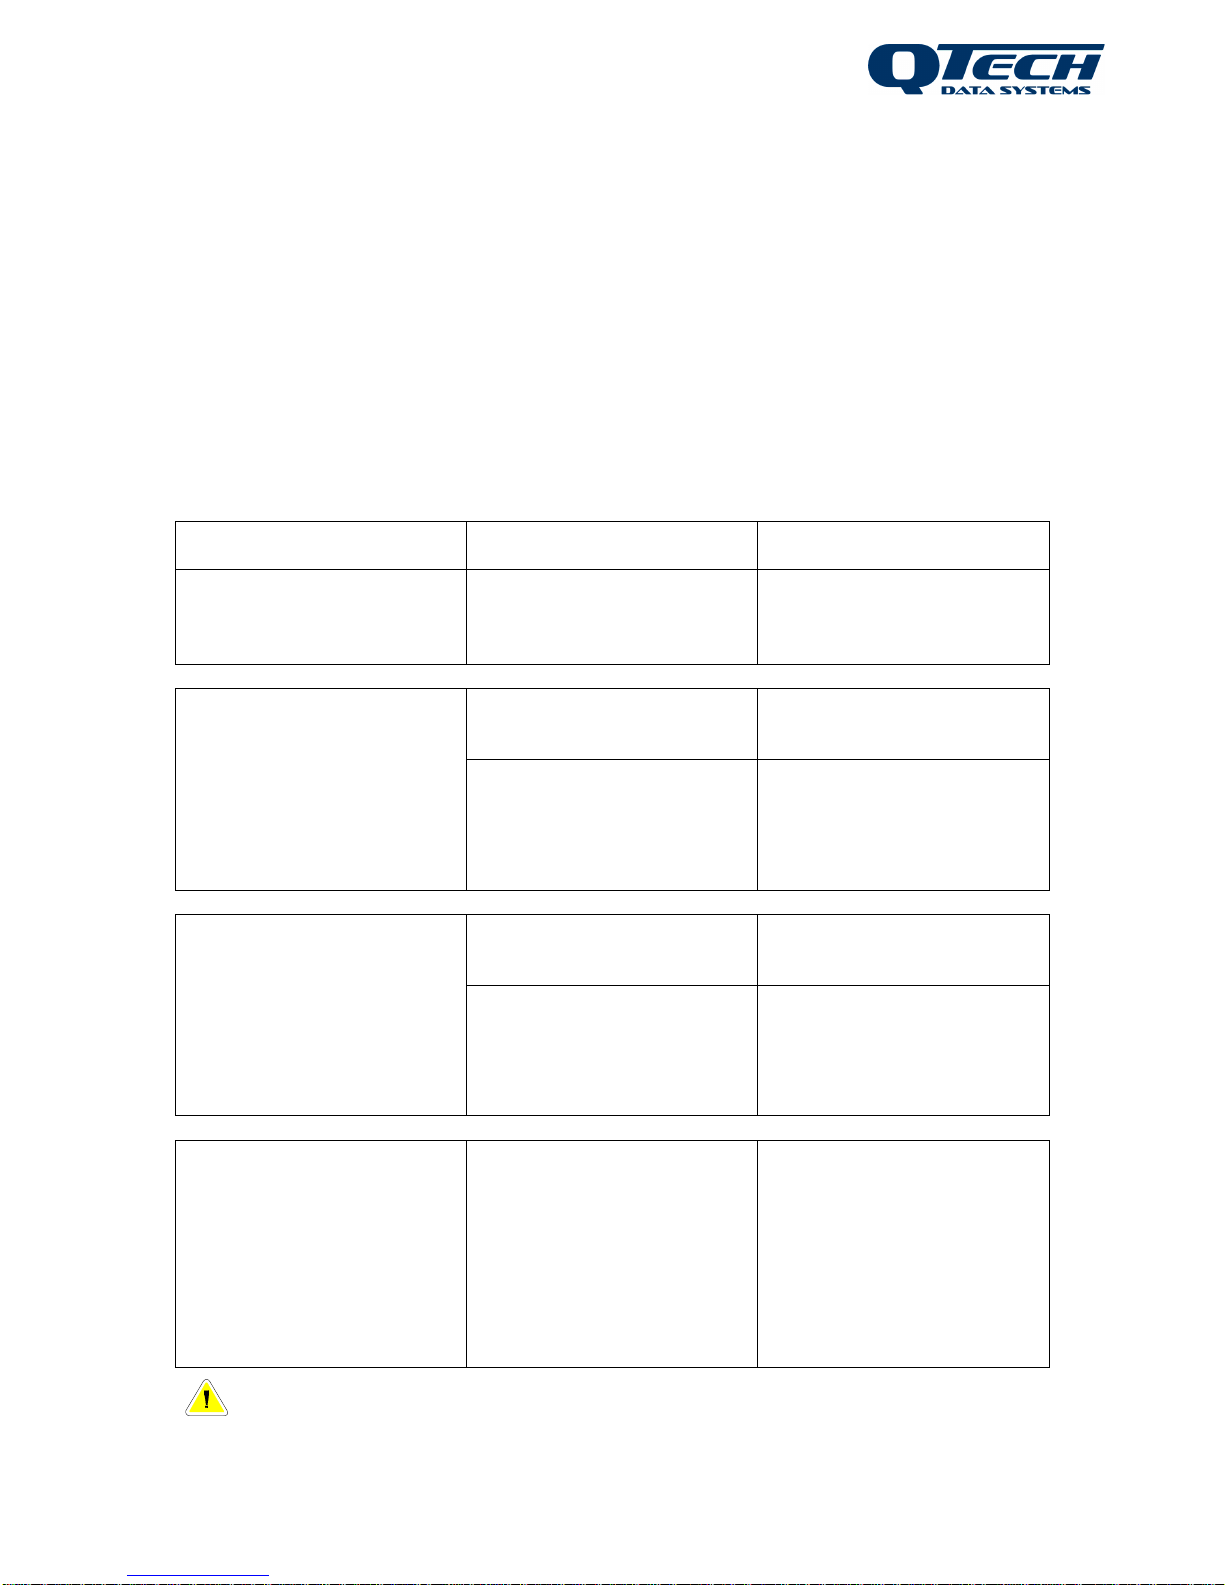
The Configuration options are shown in the following table:
Object
Item
Value
Site
Name
The name of the site where
the SMS Lite is installed. (8
character limit)
INP1, INP2, INP3, INP4
These are the 4 individually
configurable inputs
Name
An identifying name for the
input. (8 character limit)
Phones
Ph1→Ph4
Which configured phone
number(s) will receive
notifications from this input.
RLY1, RLY2
These are the 2 outputs
which allow you to turn on /
off or pulse
Name
An identifying name for the
output. (8 character limit)
Phones
Ph1→Ph4
Which configured phone
number(s) have permission
to control this output.
Ph1, Ph2, Ph3, Ph4
Phone numbers of people
who receive alarm
escalations or can control
inputs
Number
Local or International
format (e.g. 021….or
+6421….)
The phone number(s) that
will receive notifications
and/or have control. Up to 4
people.
Tip – A Configuration worksheet can be found on Pages 17 & 18. We
recommend you use this to record the Site, Input & Output names and phone numbers
and their escalation order. You can also download these from our website.
Page 8

QTech SMS Lite – Quick Start Guide V1.5 8
www.qtech.co.nz Ph: +64 3 366 3713 Page 8 of 21
Configuration can be sent individually with one text message per configuration
instruction or in a combined text message:
Example:
To programme the Site name to Shed1, name Input 1 as Pump and set notification
escalations to phones 1, 2 and 3.
You can either send the SMS Lite 3 individual configuration text messages:
e.g. #12345 Site:Name=Shed1.
#12345 INP1:Name=Pump.
#12345 INP1:Phones=Ph1,Ph3.
Or you can send 1 combined message:
e.g. #12345 Site:Name=Shed1. INP1:Name=Pump. INP1:Phones=Ph1,Ph2, Ph3.
When programming the alarm escalations to phone numbers it is important to note that
the numbers step in numerical order.
E.g. Ph1→Ph2→Ph4 and Ph1→Ph2→Ph3 will work however if you were to attempt to
programme Ph4→Ph2→Ph3, the configuration text would be accepted however the
escalation order would be Ph2→Ph3→Ph4.
After any configuration change you will receive either a confirmation message or an
error message. If you receive an error message, double check the configuration format
and check that there is a full stop at the end. Correct the error and resend.
Text commands can be in upper or lower case; however any capitalisation when
naming the Site, Input or Outputs will be retained.
e.g. #12345 Site:Name=Shed1. is valid as is #12345 site:name=shed1.
Note: Each Input and Output must have a unique name.
Important. The security for these messages is based on the PIN number being
correct. Any phone can be used for these commands as long as the PIN in
the message matches that printed on the SMS-Lite. If the PIN is not correct
messages will not be processed.
Examples:
#pin defaults
#pin inp1:name = alarm.
#pin inp1:phones = ph1, p2.
#pin ph1:number = 0221234567.
#pin ph2:number = 0227654321.
Page 9

QTech SMS Lite – Quick Start Guide V1.5 9
www.qtech.co.nz Ph: +64 3 366 3713 Page 9 of 21
Advanced Commands
A new feature has been introduced in SMS Lite Firmware Version 2.1 to enable you to
"debounce" the inputs.
The purpose of this feature is to prevent the SMS Lite from sending multiple messages
when connected to devices such as float switches, which can switch on and off several
times before settling (due to wave action in the tank). You need to programme a delay
before the text message is sent by the SMS Lite.
The trigger point / device that is connected to the SMS Lite must stay in that state for
the ‘debounce’ time that is set, before the SMS Lite will send a text message alerting
you of a status change.
Implementation
The delay is configurable and you can select one of the following options: 0, 5, 10, or 30
seconds, or 1, 5, 10, or 15 minutes.
The debounce value is "global" to all inputs and you cannot specify different values for
each input.
If the SMS Lite is connected to a device that will not be affected by this you do not need
to programme this as the default value is 0 and there will be no delay.
Configuration
Programme the ‘debounce’ option use the following instruction:
#[PIN][space]<object>:<item>=<value>[dot]
#12345 site:debounce=value. e.g #12345 site:debounce=1min
The value must be written in the following format "0 sec", "5 secs", "10 secs", "30 secs",
"1 min", "5 mins", "10 mins", "15 mins"
For example “#12345 site:debounce=10 secs.”
Clearing all of the SMS Lite configuration settings:
#[PIN][space]Defaults[dot]
Note: This command will also clear all the programmed telephone numbers
Page 10

QTech SMS Lite – Quick Start Guide V1.5 10
www.qtech.co.nz Ph: +64 3 366 3713 Page 10 of 21
Supply Voltage Alarm
If the SMS Lite is connected to an external battery or the mains, and the supply voltage
drops below 10.5V, Ph1 will receive a notification message:
The supply voltage at <site> has gone low.
When the voltage increases above 11.5 volts a Supply Voltage message will sent:
The supply voltage at <site> has returned to normal.
Note – Supply Voltage alarms do not escalate like input alarms. Supply voltage
can be queried at any time using the STATUS command.
Page 11

QTech SMS Lite – Quick Start Guide V1.5 11
www.qtech.co.nz Ph: +64 3 366 3713 Page 11 of 21
Operational Commands
Inputs
Acknowledge an alarm
OK <input name> e.g. Text: OK Pump
This will stop any further escalation of the alarm to the numbers in the phone list for that
input status change. It will begin at the top of the list the next time the input is activated.
Force the SMS Lite to send the alarm message to the next phone number in the list.
BUSY <input name> e.g. Text: BUSY Pump
Not available to the last phone number in the list of that input.
Alarm message for one person:
<Site> <Input> has turned ON. e.g. Text: Shed1 Pump has turned ON
Message Paths
The following diagrams are examples of the message flows for the SMS Lite. They
show the basic message flow, an example of a busy response, no response and also
the escalation flow to multiple phones.
INPUT
TURNS
ON / OFF
TXT
ALERT
SENT
Phone 1 Alerted – Alarm Acknowledged
OK
<INPUT>
END OF
PROCESS
INPUT
TURNS
ON / OFF
TXT
ALERT
SENT
BUSY
<INPUT>
2
nd
TXT
ALERT
SENT
OK
<INPUT>
END OF
PROCESS
Phone 1 Alerted, Busy – Escalate to Phone 2
Ph1
Ph2
SEND
RECEIVE
SEND
SEND
RECEIVE
Page 12

QTech SMS Lite – Quick Start Guide V1.5 12
www.qtech.co.nz Ph: +64 3 366 3713 Page 12 of 21
Phone 1 Alerted, No Response – Escalate to Phone 2 After 10 Mins
OK
<INPUT>
END OF
PROCESS
INPUT
TURNS
ON / OFF
TXT
ALERT
SENT
NO
RESPONSE
(10 Mins)
2
nd
TXT
ALERT
SENT
Ph1
Ph2
RECEIVE
SEND
SEND
Phone 1 No Response, Escalate to Phone 2 After 10 Mins, Busy– Escalate to Phone 3
SEND
RECEIVE
SEND
SEND
2
nd
TXT
ALERT
SENT
BUSY
<INPUT>
END OF
PROCESS
OK
<INPUT>
INPUT TURNS
ON / OFF
TXT
ALERT
SENT
NO
RESPONSE
(10 Mins)
Ph2
Ph1
Ph3
3
rd
TXT
ALERT
SENT
TXT
MESSAGE
SENT
Output – Control Output with Phone 1
OUTPUT
TURNS
ON / OFF
OR PULSE
Ph1
END OF
PROCESS
Page 13

QTech SMS Lite – Quick Start Guide V1.5 13
www.qtech.co.nz Ph: +64 3 366 3713 Page 13 of 21
Alarms
Alarm message for multi-person escalations:
<Site> <Input> has turned ON. Reply OK <Input> or BUSY <Input>. You are the <nth>
of N> to be sent this.
e.g. Shed1 Pump has turned ON. Reply OK Pump or BUSY Pump. You are the
2
nd
person of 3 to be sent this message
The last person in the escalation list receives a different message as they aren’t
given the option to reply BUSY:
<Site><Input> has turned ON. Reply OK <Input>. You are the <nth> of <N> to be sent
this.
e.g. Shed1 Pump has turned ON. Reply OK Pump. You are the 3rd
person of 3 to be sent this message
Other alarm messages always have the following form:
Alarm has been acknowledged message:
<Site><Input> alarm has been acknowledged.
Alarm has not been acknowledged message:
<Site> <Input> alarm was NOT acknowledged.
SMS Lite returns to normal (Idle) state:
<Site><Input> has turned OFF.
Output Control
Control outputs by sending a text message containing on/off or pulse and the output
name. In this example Output 1 has been renamed Fan
Turn the specified output on
ON <output name> e.g. ON Fan
Turn the specified output off
OFF <output name> e.g. OFF Fan
To pulse an output on for one second then off again
PULSE <output name> e.g. PULSE Fan
Important. The security for these commands above, is based on whether the
phone number that sent the message is in the SMS-Lite’s phone list. If it is not in the list
the command will not be processed.
Page 14

QTech SMS Lite – Quick Start Guide V1.5 14
www.qtech.co.nz Ph: +64 3 366 3713 Page 14 of 21
Information Commands
INPUTS e.g. Text: INPUTS
The SMS Lite will respond with a description of how the inputs are configured.
This includes the input names, and the phone number list for each input.
OUTPUTS e.g. Text: OUTPUTS
The SMS Lite will respond with a description of how the outputs are configured.
This includes the output names, and the list of phone numbers that are allowed to
control each output.
PHONES e.g. Text: PHONES
The SMS Lite will respond with a description of the phone number list it has configured.
STATUS e.g. Text: STATUS
The SMS Lite will respond with the current values of all inputs and outputs as well as
current supply voltage.
BAL e.g. Text: BAL
The SMS Lite will request the prepay account balance information from the cellular
operator then forward that message (or messages) to the phone number that requested
it. (Not available from 2 Degrees.)
Important. The security for these commands above, is based on whether the
phone number that sent the message is in the SMS-Lite’s phone list. If it is not in the list
the command will not be processed.
STATS e.g. Text: STATS
The SMS Lite will respond with information about the Radio Signal Strength.
This will range from -50dBm to -110dBm and is reported as Strong, Medium or Weak.
INFO e.g. Text: INFO
The SMS Lite will inform you of the version of firmware it is running.
Important. These two commands above do not care about the phone number -
any phone can be used for these commands.
Page 15

QTech SMS Lite – Quick Start Guide V1.5 15
www.qtech.co.nz Ph: +64 3 366 3713 Page 15 of 21
Status LED’s
The SMS Lite has an LED, labelled ‘Link’ situated next to the aerial connection. The
LED will indicate various events that have occurred:
▪ When it powers on it will toggle on and off 5 times slowly.
▪ While it is has connected to the network it will indicate 1 short pulse every two
seconds.
▪ Each time it sends an SMS OK it will indicate a burst of 5 short pulses.
▪ If it tried to send an SMS but there was a problem it will indicate 3 long pulses.
The SMS-Lite may indicate and error code that can be used to identify the following
issues:
▪ 2 pulses indicate that the Modem won't power on.
▪ 3 pulses indicate that the Modem won't respond to commands.
▪ 4 pulses indicate that the SIM card is not inserted.
▪ 5 pulses indicate that the SMS-Lite is not registered to the cellular network.
▪ 6 pulses means the cellular operator is not supported by the device (contact
QTech).
▪ 7 pulses indicate that the SIM card is currently busy. This can occur briefly during
the initialisation phase after it is powered on.
Errors 2 and 3 require the SMS-Lite be returned to QTech for service.
Error 4 may be fixed by checking the SIM card inside the SMS-Lite.
Error 5 is normally caused by a weak signal to the cell tower.
Error 6 may occur in some overseas locations.
Error 7 may occur if the SIM card is not compatible with the SMS-Lite.
There is one other type of error indication, and that is when the SMS-Lite tries to send a
message but gets an error code back from the phone network, it will blink 3 times
slowly. If the message was sent successfully it will blink 5 times quickly. The normal
reason for an error is that there is no credit on the SIM card, but could also be
something like the cell tower being busy.
Page 16

QTech SMS Lite – Quick Start Guide V1.5 16
www.qtech.co.nz Ph: +64 3 366 3713 Page 16 of 21
Technical Details
Operating Voltage1: 12 – 24 Volts DC
Power Connector: 2.1mm DC Socket, centre pin positive
Operating Current: ~13mA @ 12V
~9mA @ 24V
Aerial2: 50Ohms, SMA connector
Inputs3: Electrically isolated, normally open inputs
Outputs4: Normally open relay contacts (2Amps @ 32V max)
Operating Conditions: 0 - 70C
90% humidity, non-condensing
Case Size: 112 x 75 x 25mm (Overall)
Weight: 255 grams (with supplied aerial)
Mounting Holes: 4x M4 mounting holes at ~102 x 50mm centres
RSM SCN: Z891
Modem specifications5: GSM/UMTS bands (MHz) 800/850, 900, 2100
To comply with the New Zealand and Australian wiring regulations the SMS Lite cannot be
connected to any external voltages exceeding 32 volts AC or DC. To connect to or control higher
voltage equipment please consult a Registered Electrician.
1. The SMS Lite is over voltage protected by a 30 volt Zenner diode. Voltages greater than this will
blow the internal 2amp fast blow fuse.
The supply voltage should be clean, continuous and transient free.
Warning – Do NOT use Switch Mode Power Supplies (SMPS) with this product. The DC power
supply used for this product MUST have a grounded negative or be a “linear” transformer based
plug pack. The reason is that the aerial, programming port and external connections can provide
exposed earth points and the SMPS can impose an AC voltage on the DC ground, which can lead
to damage. Suitable cost effective plug packs are available from QTech P/N PD5412, PD5413 &
PD5414.
2. The reliability of all cellular products is dependent on good signal strength. Before deciding on the
Telco to choose, please check coverage. We suggest that a cellular phone is taken to site, to
check the signal strength, i.e. how many “bars” are displayed.
The supplied stub aerial (P/N PD9230) should be suitable for locations with good cellular
coverage (full bars) and where the SMS Lite is in a non-conductive enclosure (plastic etc).
Other external mounting aerial options are available; contact your equipment supplier for more
details.
Warning – Do NOT operate the SMS Lite without an aerial connection.
3. Inputs are connected to suitable mechanical switches, contacts and other closure devices. An
input is active or ON when the input switch is closed and inactive or OFF when the input switch is
open.
Warning – Only mechanical switches or mechanical closure devices should be connected to
the inputs. No external voltage or other electrical source is to be connected to the inputs.
4. The relays are internally protected by solid state snubbers for operating with inductive loads.
5. Provides connectivity with all current New Zealand telecommunications companies (Spark,
Vodafone and 2 Degrees).
Page 17

QTech SMS Lite – Quick Start Guide V1.5 17
www.qtech.co.nz Ph: +64 3 366 3713 Page 17 of 21
Programming Tips
▪ PIN Required For Any Configuration Text
The PIN is used each time a configuration change needs to be made. Each
configuration command must be finished with a full stop.
i.e. #[PIN][space]Ph1:number=0123456789[dot]
▪ Clear An Individual Phone Number
i.e. #[PIN][space] Ph2:number=.
We recommend that you do this if a staff member leaves and you don’t need to
replace that person in the list.
▪ Replace An Individual Phone Number
i.e. #[PIN][space] Ph2:number=027456789[dot]
If you wish to replace a number, simply send a new configuration message
containing the position in the list i.e. Ph2 and the new number. This number will
now have all the previous persons escalations and control permissions. You can
send a text containing ‘Inputs’ or ‘Outputs’ to check which escalations or control
permissions are assigned to this number.
▪ Clear All Settings
To clear all configuration settings and restore factory defaults, send the text:
#[PIN][space] Defaults
Use this to clear all programming.
▪ OUTPUT Permissions Default
If you do not programme the phone numbers for a output then each person (Ph1
– Ph4) will automatically have permission to send control commands to the output.
▪ Empty Configuration Values
As per the example above to clear an individual phone number, it is valid to
specify an empty value - this might be useful if you want to prevent all phones from
being able to control an output. e.g. #12345 RLY1:phones = .
▪ Active Alarm Interruption
After any configuration changes the SMS Lite will reinitialise all active alarm state
information – check there are no active alarms before reconfiguration as the
process will be halted. By sending ‘Status’ to the SMS Lite you can see the status
of any of the inputs or outputs, this can help identify if the alarm escalation has
been interrupted by a configuration change.
▪ Error Message
If you get an error message from the SMS Lite, check the previous message you
have sent. Key things to check are the PIN, object or item spelling or the full stop
may be missing. Correct the error and re-send.
▪ Case Sensitivity
The messages are not case sensitive, but the capitalisation of any names you
configure will be retained.
Page 18

QTech SMS Lite – Quick Start Guide V1.5 18
www.qtech.co.nz Ph: +64 3 366 3713 Page 18 of 21
Configuration Worksheet #1
e.g.
SMS Lite
Phone:
021234567
Site:
Shed1
Pin:
#12345
Phone
Number
Contact Person
Ph1:
Ph2:
Ph3:
Ph4:
e.g.
Input 1
Input 2
Input 3
Input 4
Name:
Pump
Phones:
Ph1,Ph2,Ph3
Programme the phones which will be included in each input escalation, if required.
e.g.
Output 1
Output 2
Name:
Fan
Phones:
Ph1,Ph2,Ph4
Programme the phones which will have permission to control outputs.
Additional sheets can be downloaded from our website: www.qtech.co.nz
Page 19

QTech SMS Lite – Quick Start Guide V1.5 19
www.qtech.co.nz Ph: +64 3 366 3713 Page 19 of 21
Configuration Worksheet #2
e.g.
SMS Lite
Phone:
021234567
Site:
Shed1
Pin:
#12345
Phone
Number
Contact Person
Ph1:
Ph2:
Ph3:
Ph4:
e.g.
Input 1
Input 2
Input 3
Input 4
Name:
Pump
Phones:
Ph1,Ph2,Ph3
Programme the phones which will be included in each input escalation, if required.
e.g.
Output 1
Output 2
Name:
Fan
Phones:
Ph1,Ph2,Ph4
Programme the phones which will have permission to control outputs.
Additional sheets can be downloaded from our website: www.qtech.co.nz
Page 20

QTech SMS Lite – Quick Start Guide V1.5 20
www.qtech.co.nz Ph: +64 3 366 3713 Page 20 of 21
User Notes and Installation Details
Page 21

QTech Data Systems Ltd
12 Midas Place, Middleton, Christchurch 8024
PO Box 9087, Tower Junction, Christchurch 8149
Ph: +64 3 366 3713
Fx: +64 3 365 2815
admin@qtech.co.nz
techsupport@qtech.co.nz
www.qtech.co.nz
 Loading...