


VioStor NVR
Network Video Recorder
User Manual (Version: 3.3.2)
©Copyright 2011. QNAP Systems, Inc. All Rights Reserved.

Thank you for choosing QNAP products! This user manual provides detailed instructions of using the product. Please read carefully and start to enjoy the powerful functions of the product!
VioStor NVR is hereafter referred to as VioStor or NVR.
This manual provides the description of all the functions of the VioStor NVR. The product you purchased may not support certain functions dedicated to specific models.
Legal Notices
All the features, functionality, and other product specifications are subject to change without prior notice or obligation. Information contained herein is subject to change without notice.
QNAP and the QNAP logo are trademarks of QNAP Systems, Inc. All other brands and product names referred to are trademarks of their respective holders.
Further, the ® or ™ symbols are not used in the text.
LIMITED WARRANTY
In no event shall the liability of QNAP Systems, Inc. (QNAP) exceed the price paid for the product from direct, indirect, special, incidental, or consequential software, or its documentation. QNAP makes no warranty or representation, expressed, implied, or statutory, with respect to its products or the contents or use of this documentation and all accompanying software, and specifically disclaims its quality, performance, merchantability, or fitness for any particular purpose. QNAP reserves the right to revise or update its products, software, or documentation without obligation to notify any individual or entity.
 CAUTION
1.Back up your system periodically to avoid any potential data loss. QNAP disclaims any responsibility of all sorts of data loss or recovery.
2.Should you return any components of the product package for refund or maintenance, make sure they are carefully packed for shipping. Any form of damages due to improper packaging will not be compensated.
2
Important Notice
Reading instructions
Please read the safety warnings and user manual carefully before using this product.
Power supply
This product can only be used with the power supply provided by the manufacturer.
Service
Please contact qualified technicians for any technical enquires. Do not repair this product by yourself to avoid any voltage danger and other risks caused by opening this product cover.
Warning
To avoid fire or electric shock, do not use this product in rain or humid environment. Do not place any objects on this product.
3
Regulatory Notice
 FCC STATEMENT
This equipment has been tested and found to comply with the limits for a Class B digital device, pursuant to Part 15 of FCC Rules. These limits are designed to provide reasonable protection against harmful interference in a residential installation. This equipment generates, uses, and can radiate radio frequency energy and, if not installed and used in accordance with the instructions, may cause harmful interference to radio communications. However, there is no guarantee that interference will not occur in particular installation. If this equipment does cause harmful interference to radio or television reception, which can be determined by turning the equipment off and on, the user is encouraged to try to correct the interference by one or more of the following measures:
Reorient or relocate the receiving antenna.
Increase the separation between the equipment and receiver.
Connect the equipment into an outlet on a circuit different from that to which the receiver is connected.
Consult the dealer or an experienced radio/television technician for help.
The changes or modifications not expressly approved by the party responsible for compliance could void the user’s authority to operate the equipment.
Shielded interface cables, if any, must be used in order to comply with the emission limits.
 CE NOTICE
Class B only.
4
Table of Contents
TABLE OF CONTENTS ..................................................................................................................................... |
5 |
||
SAFETY WARNING ........................................................................................................................................... |
9 |
||
CHAPTER 1. |
INTRODUCTION .............................................................................................................. |
10 |
|
1.1 |
OVERVIEW............................................................................................................................................. |
10 |
|
1.2 |
HARDWARE ILLUSTRATION ................................................................................................................... |
11 |
|
1.2.1 |
|
VS-8040U-RP/VS-8032U-RP/VS-8024U-RP................................................................................ |
11 |
1.2.2 |
|
VS-8040/VS-8032/VS-8024........................................................................................................... |
12 |
1.2.3 |
|
VS-6020 Pro/VS-6016 Pro/VS-6012 Pro ...................................................................................... |
13 |
1.2.4 |
|
VS-5020/VS-5012.......................................................................................................................... |
14 |
1.2.5 |
|
VS-4016U-RP Pro/VS-4012U-RP Pro/VS-4008U-RP Pro ........................................................... |
15 |
1.2.6 |
|
VS-4016 Pro/VS-4012 Pro/VS-4008 Pro ...................................................................................... |
16 |
1.2.7 |
|
VS-4016U-RP ............................................................................................................................... |
17 |
1.2.8 |
|
VS-2012 Pro/VS-2008 Pro............................................................................................................ |
18 |
1.2.9 |
|
VS-2012/VS-2008.......................................................................................................................... |
19 |
1.2.10 |
VS-2004L/VS-2008L ..................................................................................................................... |
20 |
|
1.2.11 |
VS-201P/V .................................................................................................................................... |
21 |
|
1.2.12 |
VS-1004L ...................................................................................................................................... |
22 |
|
1.2.13 |
NVR-104P/V ................................................................................................................................. |
23 |
|
1.2.14 |
VS-101P/V .................................................................................................................................... |
24 |
|
CHAPTER 2. |
INSTALL THE NVR.......................................................................................................... |
25 |
|
2.1 |
PERSONAL COMPUTER REQUIREMENTS................................................................................................. |
25 |
|
2.2 |
BROWSE CD-ROM................................................................................................................................ |
27 |
|
2.3 |
HARD DISK DRIVES COMPATIBILITY LIST............................................................................................. |
29 |
|
2.4 |
IP CAMERAS COMPATIBILITY LIST........................................................................................................ |
29 |
|
2.5 |
CHECK SYSTEM STATUS........................................................................................................................ |
30 |
|
2.6 |
SYSTEM CONFIGURATION...................................................................................................................... |
33 |
|
CHAPTER 3. USE THE NVR BY LOCAL DISPLAY............................................................................ |
37 |
|
3.1 |
QUICK CONFIGURATION ........................................................................................................................ |
39 |
3.2 |
SYSTEM CONFIGURATION...................................................................................................................... |
46 |
3.3 |
MONITORING......................................................................................................................................... |
48 |
3.4 |
VIDEO PLAYBACK ................................................................................................................................. |
59 |
|
5 |
|
CHAPTER 4. |
USE THE NVR BY WEB-BASED INTERFACE............................................................ |
61 |
||
4.1 |
CONNECT TO THE NVR ......................................................................................................................... |
61 |
||
4.2 |
|
MONITORING PAGE ............................................................................................................................... |
63 |
|
4.2.1 |
|
Live Video Window ....................................................................................................................... |
72 |
|
4.2.2 |
|
Display Mode................................................................................................................................ |
74 |
|
4.2.3 PTZ Camera Control Panel.......................................................................................................... |
74 |
|||
4.2.4 |
|
Multi-server Monitoring ............................................................................................................... |
75 |
|
4.2.5 |
|
Monitor Settings............................................................................................................................ |
76 |
|
4.2.6 |
|
Auto Cruising................................................................................................................................ |
79 |
|
CHAPTER 5. |
PLAY VIDEO FILES......................................................................................................... |
83 |
|
5.1 |
USE THE WEB-BASED PLAYBACK INTERFACE (VIOSTOR PLAYER)........................................................ |
84 |
|
5.1.1 |
|
Connect to Server for Playback .................................................................................................... |
85 |
5.1.2 |
|
Play Video Files from Your Computer.......................................................................................... |
95 |
5.1.3 |
|
Quad-view Playback..................................................................................................................... |
97 |
5.1.4 |
|
Intelligent Video Analytics (IVA) .................................................................................................. |
99 |
5.1.5 |
|
Convert to AVI File..................................................................................................................... |
106 |
5.2 |
DIGITAL WATERMARKING................................................................................................................... |
109 |
|
5.2.1 |
|
Export Files with Digital Watermark.......................................................................................... |
109 |
5.2.2 |
|
Watermark Proof ........................................................................................................................ |
112 |
5.3 |
ACCESS THE RECORDING DATA........................................................................................................... |
114 |
|
5.3.1 |
|
Windows Network Neighbourhood (SMB/CIFS) ........................................................................ |
115 |
5.3.2 |
|
Web File Manager (HTTP)......................................................................................................... |
115 |
5.3.3 |
|
FTP Server (FTP) ....................................................................................................................... |
116 |
CHAPTER 6. |
SYSTEM ADMINISTRATION....................................................................................... |
117 |
|
6.1 |
QUICK CONFIGURATION ...................................................................................................................... |
119 |
|
6.2 |
SYSTEM SETTINGS............................................................................................................................... |
126 |
|
6.2.1 |
|
Server Name................................................................................................................................ |
126 |
6.2.2 |
|
Date & Time ............................................................................................................................... |
127 |
6.2.3 |
|
View System Settings................................................................................................................... |
128 |
6.3 |
NETWORK SETTINGS ........................................................................................................................... |
129 |
|
6.3.1 |
|
TCP/IP Configuration................................................................................................................. |
129 |
6.3.2 |
|
DDNS (Dynamic Domain Name) Service ................................................................................... |
135 |
6.3.3 |
|
File Services................................................................................................................................ |
136 |
6.3.4 |
|
Host Access Control.................................................................................................................... |
137 |
6.3.5 |
|
Protocol Management................................................................................................................. |
138 |
6.3.6 |
|
View Network Settings ................................................................................................................ |
139 |
6.4 |
DEVICE CONFIGURATION .................................................................................................................... |
140 |
|
|
|
6 |
|
6.4.1 |
|
SATA Disk................................................................................................................................... |
140 |
6.4.2 |
|
RAID Management Tool ............................................................................................................. |
143 |
6.4.3 |
|
USB Disk..................................................................................................................................... |
145 |
6.4.4 |
|
UPS............................................................................................................................................. |
146 |
6.5 |
USER MANAGEMENT ........................................................................................................................... |
147 |
|
6.5.1 |
|
Create user.................................................................................................................................. |
149 |
6.5.2 |
|
Edit User..................................................................................................................................... |
150 |
6.5.3 |
|
Delete User ................................................................................................................................. |
150 |
6.5.4 |
|
User Access Rights Comparison................................................................................................. |
151 |
6.6 |
CAMERA SETTINGS.............................................................................................................................. |
154 |
|
6.6.1 |
|
Camera Configuration................................................................................................................ |
154 |
6.6.2 |
|
Recording Settings ...................................................................................................................... |
157 |
6.6.3 |
|
Schedule Settings ........................................................................................................................ |
159 |
6.6.4 |
|
Alarm Settings............................................................................................................................. |
160 |
6.6.5 |
|
Advanced Settings....................................................................................................................... |
178 |
6.7 |
SYSTEM TOOLS.................................................................................................................................... |
180 |
|
6.7.1 |
|
Alert Notification ........................................................................................................................ |
180 |
6.7.2 |
|
SMSC Settings............................................................................................................................. |
181 |
6.7.3 |
|
Restart/Shut Down ...................................................................................................................... |
183 |
6.7.4 |
|
Hardware Settings ...................................................................................................................... |
184 |
6.7.5 |
|
System Update ............................................................................................................................ |
187 |
6.7.6 |
|
Backup/Restore/Reset Settings.................................................................................................... |
188 |
6.7.7 |
|
Remote Replication..................................................................................................................... |
189 |
6.7.8 |
|
Hard Disk SMART ...................................................................................................................... |
193 |
6.7.9 |
|
E-map.......................................................................................................................................... |
194 |
6.7.10 |
Ping Test ..................................................................................................................................... |
194 |
|
6.7.11 |
Advanced System Settings........................................................................................................... |
195 |
|
6.8 |
LOGS & STATISTICS............................................................................................................................. |
196 |
|
6.8.1 |
|
System Event Logs ...................................................................................................................... |
196 |
6.8.2 |
|
Surveillance Logs........................................................................................................................ |
197 |
6.8.3 |
|
On-line Users List....................................................................................................................... |
198 |
6.8.4 |
|
Historical Users List................................................................................................................... |
198 |
6.8.5 |
|
System Connection Logs ............................................................................................................. |
199 |
6.8.6 |
|
System Information ..................................................................................................................... |
199 |
CHAPTER 7. |
SYSTEM MAINTENANCE ............................................................................................ |
200 |
|
7.1 |
RESET THE ADMINISTRATOR PASSWORD AND NETWORK SETTINGS.................................................... |
200 |
|
7.2 |
POWER OUTAGE OR ABNORMAL SHUTDOWN ...................................................................................... |
201 |
|
7.3 |
HOT SWAPPING HARD DISK DRIVES (RAID CONFIGURATION)........................................................... |
201 |
|
|
|
7 |
|
CHAPTER 8. |
LCD PANEL ..................................................................................................................... |
202 |
CHAPTER 9. |
TROUBLESHOOTING ................................................................................................... |
208 |
APPENDIX A |
DYNAMIC DOMAIN NAME REGISTRATION.......................................................... |
212 |
APPENDIX B |
CONFIGURATION EXAMPLES................................................................................... |
216 |
TECHNICAL SUPPORT ................................................................................................................................ |
221 |
|
GNU GENERAL PUBLIC LICENSE............................................................................................................ |
222 |
|
8

Safety Warning
1.This product can operate normally in the temperature of 0ºC–40ºC and relative humidity of 0%–90%. Please make sure the environment is well-ventilated.
2.The power cord and devices connected to this product must provide correct supply voltage.
3.Do not place this product in direct sunlight or near chemicals. Make sure the temperature and humidity of the environment are in optimized level.
4.Unplug the power cord and all connected cables before cleaning. Wipe this product with a wet towel. Do not use chemical or aerosol to clean this product.
5.Do not place any objects on this product for the server’s normal operation and to avoid overheat.
6.Use the flat head screws in the product package to lock the hard disks in this product when installing hard disks for proper operation.
7.Do not place this product near any liquid.
8.Do not place this product on any uneven surface to avoid falling off and damage.
9.Make sure the voltage is correct in your location when using this product. If you are not sure about the voltage, please contact the distributor or the local power supply company.
10.Do not place any object on the power cord.
11.Do not attempt to repair this product in any occasions. Improper disassembly of the product may expose you to electric shock or other risks. For any enquiries, please contact the distributor.
12.The chassis models should only be installed in the server room and maintained by the authorized server manager or IT administrator. The server room is locked by key or keycard access and only certified staff is allowed to enter the server room.
 Warning:
Danger of explosion if battery is incorrectly replaced. Replace only with the same or equivalent type recommended by the manufacturer. Dispose of used batteries according to the manufacturer’s instructions.
Do NOT touch the fan inside the system to avoid serious injuries.
9
Chapter 1. Introduction
1.1Overview
QNAP VioStor (hereafter referred to as NVR or VioStor) is the high performance network surveillance solution for network-based monitoring of IP cameras, video recording, playback, and remote data access. Up to 120 channels from multiple QNAP NVR servers can be monitored simultaneously. The NVR supports IP-based cameras and video servers from numerous brands, for more information please visit http://www.qnapsecurity.com/pro_compatibility_camera.asp.
The NVR supports video recording in H.264, MxPEG, MPEG-4, or MJPEG video compression. The NVR offers diversified display modes and recording features, e.g. scheduled recording, alarm recording, alarm recording schedule. The NVR also supports data search by date and time, timeline, event, and intelligent video analytics (IVA), including motion detection, missing object, foreign object, out of focus, and camera occlusion. All the functions can be configured by an IE web browser.
The VioStor Pro Series NVR is the world's first Linux-based NVR capable of truly PC-less quick configuration, monitoring of IP cameras on the network, and video playback via the VGA connector. You can connect a high-definition (HD) VGA monitor or TV, and a USB mouse (optional), USB keyboard (optional), and a USB sound card (optional) to the NVR to manage the surveillance system.
* The MxPEG video compression feature is not supported by VS-2004L, VS-2008L, VS-1004L, VS-201, VS-101, NVR-104.
10
1.2Hardware Illustration
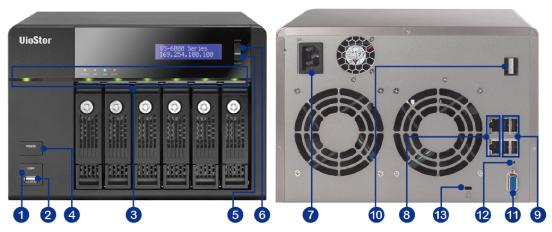
1.2.1VS-8040U-RP/VS-8032U-RP/VS-8024U-RP
1.LED indicators: Status, LAN, USB, HDD1–8
2.Power button
3.Select button
4.Enter button
5.Power connector
6.Password & network settings reset button
7.RS-232 port
8.VGA
9.USB x 4
10.Gigabit LAN x 2
11

1.2.2VS-8040/VS-8032/VS-8024
1.One-touch-auto-video-backup button
2.USB
3.LED indicators: Status, LAN, USB, HDD1–8
4.Power button
5.Select button
6.Enter button
7.Power connector
8.Gigabit LAN x 2
9.USB x 4
10.RS-232 port
11.VGA
12.Password & network settings reset button
13.Kensington security slot
12
1.2.3VS-6020 Pro/VS-6016 Pro/VS-6012 Pro
1.One-touch-auto-video-backup button
2.USB
3.LED indicators: Status, LAN, USB, eSATA, HDD1–6
4.Power button
5.Select button
6.Enter button
7.Power connector
8.Gigabit LAN x 2
9.USB x 4
10.eSATA x 2 (reserved)
11.VGA
12.Password & network settings reset button
13.Kensington security slot
13
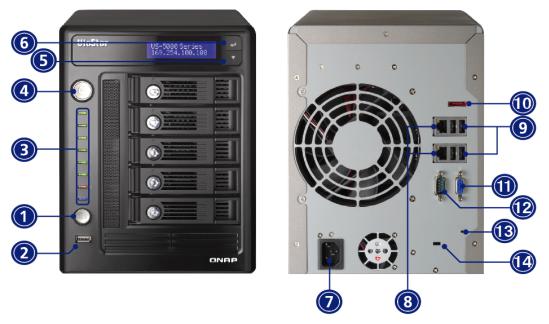
1.2.4VS-5020/VS-5012
1.One-touch-auto-video-backup button
2.USB
3.LED indicators: USB, Status, HDD1–5, LAN
4.Power button
5.Select button
6.Enter button
7.Power connector
8.Gigabit LAN x 2
9.USB x 4
10.eSATA (reserved)
11.VGA
12.RS-232 port
13.Password & network settings reset button
14.Kensington security slot
14

1.2.5VS-4016U-RP Pro/VS-4012U-RP Pro/VS-4008U-RP Pro
1.One-touch-auto-video-backup button
2.USB
3.LED indicators: Status, LAN, USB, eSATA, HDD1–4
4.Power button
5.Power connector
6.Gigabit LAN x 2
7.USB x 4
8.eSATA x 2 (reserved)
9.VGA
10.Password & network settings reset button
15

1.2.6VS-4016 Pro/VS-4012 Pro/VS-4008 Pro
1.One-touch-auto-video-backup button
2.USB
3.LED indicators: Status, LAN, USB, eSATA, HDD1–4
4.Power button
5.Select button
6.Enter button
7.Power connector
8.Gigabit LAN x 2
9.USB x 4
10.eSATA x 2 (Reserved)
11.VGA
12.Password & network settings reset button
13.Kensington security slot
16

1.2.7VS-4016U-RP
1.One-touch-auto-video-backup button
2.USB
3.LED indicators: USB, Status, HDD1–HDD4, LAN
4.Power button
5.Power connector
6.Gigabit LAN x 2
7.USB x 2
8.Password & network settings reset button
9.VGA
17

1.2.8VS-2012 Pro/VS-2008 Pro
1.One-touch-auto-video-backup button
2.USB
3.LED indicators: HDD1, HDD2, LAN, eSATA
4.Power button
5.Power connector
6.Gigabit LAN x 2
7.USB x 2
8.eSATA x 2 (reserved)
9.VGA
10.Password & network settings reset button
11.Kensington security slot
18

1.2.9VS-2012/VS-2008
1.One-touch-auto-video-backup button
2.USB
3.LED indicators: HDD1, HDD2, LAN, eSATA
4.Power button
5.Power connector
6.Gigabit LAN x 2
7.USB x 2
8.Password & network settings reset button
9.Kensington security slot
10.eSATA x 2 (reserved)
11.VGA
19
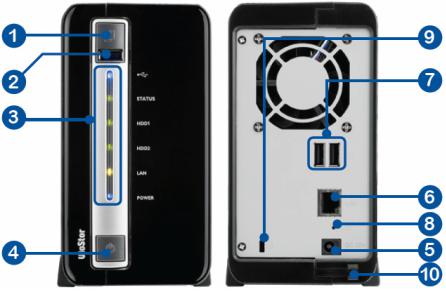
1.2.10 VS-2004L/VS-2008L
1.One-touch-auto-video-backup button
2.USB 2.0
3.LED Indicators: USB, status, HDD1, HDD2, LAN, power
4.Power button
5.Power connector
6.Gigabit LAN
7.USB 2.0 x 2
8.Password & network settings reset button
9.K-Lock security slot
10.Power cord hook
20
1.2.11 VS-201P/V
1.One-touch-auto-video-backup button
2.USB
3.LED indicators: USB, status, HDD1, HDD2, LAN, and power
4.Power button
5.Power connector
6.Gigabit LAN
7.USB x 2
8.Password & network settings reset button
9.Kensington security slot
21

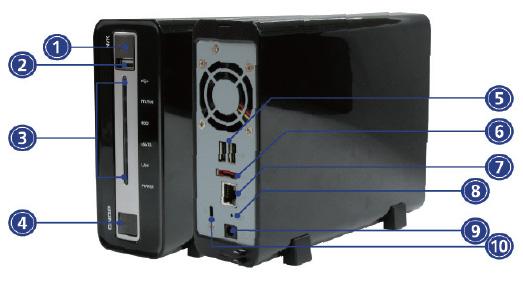
1.2.12 VS-1004L
1.One-touch-auto-video-backup button
2.USB 2.0
3.LED Indicators: USB, status, HDD, eSATA, LAN, power
4.Power button
5.Power connector
6.Gigabit LAN
7.USB 2.0 x 2
8.Password & network settings reset button
9.K-Lock security slot
10.eSATA
11.Power cord hook
22
1.2.13 NVR-104P/V
1.One-touch-auto-video-backup button
2.USB
3.LED indicators
4.Power button
5.USB x 2
6.eSATA port
7.Gigabit LAN
8.Password & network settings reset button
9.Power connector
10.Kensington security slot
23

1.2.14 VS-101P/V
1.One-touch-auto-video-backup button
2.USB
3.LED indicators
4.Power button
5.Power connector
6.Gigabit LAN
7.USB x 2
8.Password & network settings reset button
9.Kensington security slot
10.eSATA port (reserved)
24
Chapter 2. Install the NVR
For the information of hardware installation, see the ‘Quick Installation Guide’ (QIG) in the product package. You can also find the QIG in the product CD-ROM or QNAP website (http://www.qnapsecurity.com/).
2.1Personal Computer Requirements
For better system performance, your computer should at least fulfil the following requirements:
No. of |
Format |
CPU |
Others |
||
Channels |
|
|
|
|
|
|
|
|
|
|
|
4 |
M-JPEG |
Intel Pentium 4 CPU, |
|
Operation system: |
|
|
|
2.4GHz or above |
|
Microsoft Windows |
|
|
|
|
|
7, Vista, XP |
|
|
MPEG-4/MxPEG/H.264 |
Dual core CPU, 2.0GHz |
|
||
|
|
|
|||
|
|
or above |
|
Memory: 2GB or |
|
|
|
|
|
||
|
|
|
|
above |
|
8 |
M-JPEG |
Intel Pentium 4 CPU, |
|
||
|
Network port: |
||||
|
|
2.8GHz or above |
|
||
|
|
|
100Mbps Ethernet |
||
|
|
|
|
||
|
MPEG-4/MxPEG/H.264 |
Dual core CPU, 2.4GHz |
|
||
|
|
port or above |
|||
|
|
or above |
|
||
|
|
|
Web browser: |
||
|
|
|
|
||
12 |
M-JPEG |
Intel Pentium 4 CPU, |
|||
|
Microsoft Internet |
||||
|
|
3.0GHz or above |
|
||
|
|
|
Explorer 6.0 or |
||
|
|
|
|
||
|
MPEG-4/MxPEG/H.264 |
Dual core CPU, 2.8GHz |
|
||
|
|
above |
|||
|
|
or above |
|
||
|
|
|
CD-ROM drive |
||
|
|
|
|||
16 |
M-JPEG |
Dual core CPU, 2.4GHz |
|||
|
|
or above |
|
Recommended |
|
|
|
|
resolution: 1024 x |
||
|
|
|
|
||
|
MPEG-4/MxPEG/H.264 |
Quad core CPU, |
|
||
|
|
768 pixels or |
|||
|
|
2.33GHz or above |
|
||
|
|
|
above |
||
|
|
|
|
||
20 |
M-JPEG |
Dual core CPU, 2.6GHz |
|
||
|
|
||||
|
|
or above |
|
|
|
|
|
|
|
|
|
|
MPEG-4/MxPEG/H.264 |
Quad core CPU, 2.6GHz |
|
|
|
|
|
or above |
|
|
|
|
|
|
|
|
|
40 |
M-JPEG |
Quad core CPU 2.33GHz |
|
|
|
|
|
or above |
|
|
|
|
|
|
|
|
|
|
MPEG-4/MxPEG/H.264 |
Core i7 CPU 2.8GHz or |
|
|
|
|
|
above |
|
|
|
|
|
|
|
|
|
|
|
25 |
|
|
|

Security Settings of the Web Browser
Please make sure the security level of the IE browser in Internet Options is set to Medium or lower.
26

2.2Browse CD-ROM
Run the product CD-ROM on your Windows PC, you can view the Quick Installation Guide (QIG) and user manual, and install codec and software utilities Finder and VioStor Player.
27

You can browse the CD-ROM and access the following contents:
Finder: The setup program of QNAP Finder. This tool is used to discover the NVR servers available on the local network and configure the network settings of the NVR.
Manual: The user manuals of NVR.
QIG: View the hardware installation instructions of NVR.
Codec: The codec for playing AVI videos recorded by NVR on Windows Media Player.
Tool: This folder contains IPP library and monitor plugin. If you failed to install the ActiveX plugin when connecting to the monitoring page of NVR by an IE browser, you can install the plugin from the CD-ROM.
VioStorPlayer: The setup program of VioStor Player, a tool to play the videos recorded by the NVR. If you failed to install VioStor Player when connecting to the playback page of the NVR by an IE browser, you can install the plugin from the CD-ROM.
28

2.3Hard Disk Drives Compatibility List
This product works with 2.5-inch and 3.5-inch SATA hard disk drives from popular hard disk brands. For the hard disk compatibility list, please visit http://www.qnapsecurity.com/pro_compatibility.asp
 QNAP disclaims any responsibility for product damage/malfunction or data loss/recovery due to misuse or improper installation of hard disks in any occasions for any reasons.
2.4IP Cameras Compatibility List
For the information of supported IP camera models, please visit
http://www.qnapsecurity.com/pro_compatibility_camera.asp
29
2.5Check System Status
LED Display & System Status Overview
LED |
Colour |
LED Status |
|
Description |
|
|
|
|
|
|
|
|
|
|
1) |
A hard drive on the NVR is being formatted |
|
|
|
Flashes green |
2) |
The NVR is being initialised |
|
|
|
and red |
3) |
The system firmware is being updated |
|
|
|
4) |
RAID rebuilding is in process |
||
|
|
alternately |
|||
|
|
5) |
Online RAID Capacity Expansion is in |
||
|
|
every 0.5 sec |
|||
|
|
|
|
process |
|
|
|
|
6) |
Online RAID Level Migration is in process |
|
|
|
|
|
|
|
|
|
|
1) |
A hard drive is invalid |
|
|
|
|
2) |
The disk volume has reached its full |
|
|
|
|
|
capacity |
|
|
|
|
3) |
The disk volume is going to be full |
|
|
|
|
4) |
The system fan is out of function |
|
|
|
|
5) |
An error occurs when accessing |
|
System |
Red/ |
Red |
|
(read/write) the disk data |
|
|
6) |
A bad sector is detected on the hard drive |
|||
Status |
Green |
|
|||
|
7) |
The NVR is in degraded read-only mode (2 |
|||
|
|
|
|||
|
|
|
|
member drives fail in a RAID 5 or RAID 6 |
|
|
|
|
|
configuration, the disk data can still be |
|
|
|
|
|
read) |
|
|
|
|
8) |
(Hardware self-test error) |
|
|
|
|
|
||
|
|
Flashes red |
The NVR is in degraded mode (one member |
||
|
|
drive fails in RAID 1, RAID 5 or RAID 6 |
|||
|
|
every 0.5 sec |
|||
|
|
|
configuration) |
||
|
|
|
|
|
|
|
|
Flashes green |
1) |
The NVR is starting up |
|
|
|
every 0.5 sec |
2) |
The NVR is not configured |
|
|
|
|
3) |
A hard drive is not formatted |
|
|
|
|
|
||
|
|
Green |
The NVR is ready |
||
|
|
|
|
||
|
|
Off |
All the hard drives on the NVR are in standby |
||
|
|
mode |
|||
|
|
|
|||
|
|
|
|
||
|
|
Orange |
The NVR is connected to the network |
||
LAN |
Orange |
|
|
|
|
Flashes |
The NVR is being accessed from the network |
||||
|
|
||||
|
|
orange |
|||
|
|
|
|
||
|
|
|
|
|
|
30
 Loading...