


QNAP QGenie
QG-103N User Manual
© 2014. QNAP Systems, Inc. All Rights Reserved.
1 |

Table of Contents
How to use .......................................................................................................................................... 7
Read this first .............................................................................................................................. 7
Regarding copyrights ........................................................................................................... 7
Battery remaining charge related precautions ................................................................... 7
Disclaimer of guarantee of recorded content ..................................................................... 7
Regarding backup of memory device (SD card, USB flash drive, etc) ................................. 7
Product overview ........................................................................................................................ 7
What you can do with this unit ........................................................................................... 7
Supported devices ............................................................................................................. 10
Appearance ....................................................................................................................... 11
Getting started .......................................................................................................................... 16
Bundled items ................................................................................................................... 16
Charging this unit .............................................................................................................. 16
Turning the power on/off .................................................................................................. 19
Setting up an Android device ............................................................................................ 20
Setting up an iOS device .................................................................................................... 22
Connecting a device via wireless LAN ............................................................................... 23
Getting started by PC ................................................................................................................ 25
Charging QGenie ............................................................................................................... 25
Install Qfinder Utility ......................................................................................................... 27
Turning the power on/off .................................................................................................. 30
Connecting PCs to QGenie ................................................................................................ 30
Setup/use QGenie with Qfile .................................................................................................... 33
Login from Qfile ................................................................................................................. 33
Home Screen ..................................................................................................................... 35
2 |

Setup QGeine .................................................................................................................... 36
Access and manage files (Basic) ........................................................................................ 47
Access and manage files (Advance) .................................................................................. 52
Backup & restore phonebooks to/from QGenie ............................................................... 60
Setup Qfile ......................................................................................................................... 62
Setup/use QGenie with Qfinder ................................................................................................ 69
Login from Web Interface ................................................................................................. 69
Access QGeine’s contents ................................................................................................. 71
Checking the QGenie’s detail ............................................................................................ 74
Setup/use QGenie with Web Browser ...................................................................................... 75
Login from Web Interface ................................................................................................. 75
Setting Page ....................................................................................................................... 77
Setup QGenie’s Internet connection ................................................................................. 83
Access QGeine’s contents ................................................................................................. 86
myQNAPcloud Service ............................................................................................................... 88
Create myQNAPcloud ID ................................................................................................... 88
Register QGenie to myQNAPcloud .................................................................................... 89
Unregister QGenie from myQNAPcloud ........................................................................... 90
Precautions ................................................................................................................................ 90
General use ....................................................................................................................... 90
Maintenance ..................................................................................................................... 91
Notes on external storage ................................................................................................. 91
Specifications ............................................................................................................................ 92
Troubleshooting ................................................................................................................................ 95
Main unit ................................................................................................................................... 95
QGenie does not turn on. .................................................................................................. 95
3 |

The battery life is shorter than expected. ......................................................................... 95
The battery discharges very quickly, even when QGenie is off. ....................................... 95
The battery does not charge from a computer. ................................................................ 95
The battery indicator icon does not appear as charging. ................................................. 95
It takes a long time to charge the battery. ........................................................................ 95
QGenie does not supply power to other devices. ............................................................. 96
Heat ................................................................................................................................... 96
Charging .................................................................................................................................... 96
The battery does not charge from a computer. ................................................................ 96
The battery indicator lamp does not light while charging. ............................................... 96
The battery indicator lamp blinks while charging. ............................................................ 97
It takes a long time to charge the battery. ........................................................................ 97
The wireless LAN function cannot be used while charging. .............................................. 97
Power bank................................................................................................................................ 97
This unit does not supply power to other devices. ........................................................... 97
Wireless LAN connection .......................................................................................................... 98
Wireless LAN connection to a smartphone, tablet or computer cannot be established. . 98
I found two wireless names (SSIDs), both of which start with "QG" and I cannot
determine which one should be used. .............................................................................. 98
The wireless LAN connection has stopped. ....................................................................... 99
The wireless LAN connection between this unit and a smartphone, tablet or computer is
unstable. ............................................................................................................................ 99
It takes a long time to establish a wireless LAN connection between this unit and a
smartphone, tablet or computer. ..................................................................................... 99
Internet connection................................................................................................................. 100
Internet connection cannot be established. ................................................................... 100
Other ....................................................................................................................................... 100
4 |

How many wireless networks (SSIDs) can be registered as the external access points for
the Internet connection? ................................................................................................ 100
How many users can connect to this unit at the same time? ......................................... 101
File operation .......................................................................................................................... 101
Data playback/display ..................................................................................................... 101
Data copy ......................................................................................................................... 102
Data delete ...................................................................................................................... 103
Supported SD cards and devices ............................................................................................. 104
Which SD cards are supported? ...................................................................................... 104
Which USB devices (USB flash drive, etc.) are supported? ............................................. 104
Which Android devices are supported? .......................................................................... 104
Which iOS devices are supported? .................................................................................. 104
USB connection to a computer ............................................................................................... 104
This unit is connected to a computer with the USB cable but is not recognized. .......... 104
The battery indicator lamp lights orange. ....................................................................... 104
The wireless LAN connection has stopped after connect to PC ...................................... 105
myQNAPcloud ......................................................................................................................... 105
I can't register my QGenie to myQNAPcloud .................................................................. 105
"Qfile" ...................................................................................................................................... 105
"Qfile" cannot be installed. ............................................................................................. 105
What file formats are supported by "Qfile"? .................................................................. 105
Files cannot be edited by "Qfile." .................................................................................... 105
How can I check the version of "Qfile"? .......................................................................... 105
I can not login QGenie by Qfile ....................................................................................... 105
Additional Information ............................................................................................................ 106
Resetting.......................................................................................................................... 106
Security setting for wireless LAN of this unit .................................................................. 106
5 |

System software update ......................................................................................................... 106
About update of the system software of this unit .......................................................... 106
Update of the system software of this unit fails. ............................................................ 107
USB cable ................................................................................................................................. 107
The USB cable cannot be connected to this unit. ........................................................... 107
Customer Support ........................................................................................................................... 108
GNU GENERAL PUBLIC LICENSE....................................................................................................... 110
6 |

How to use
Read this first
Regarding copyrights
The items you copied can be enjoyed as an individual; and under the Copyright Act, they cannot be
used otherwise without consent from the rights holders.
Battery remaining charge related precautions
This device contains a rechargeable battery. If you copy to a memory device while the battery has
a low remaining charge, the battery charge can run out during the copying process, so the copying
can fail.
Disclaimer of guarantee of recorded content
Even in any situation, such as if you cannot copy to external media etc due to some cause such as
this device’s defects, or if some defect or repair etc causes damage or destruction of copied
content in external media, QNAP bears absolutely no responsibility of compensating for copied
content nor responsibility for any related damages. Also, QNAP does not do recovery, restoration,
duplication, etc of copied content, in any situation.
Regarding backup of memory device (SD card, USB flash drive, etc)
If the power is cut or the memory device is removed while the memory device is being accessed,
then data in the memory device … etc., can be damaged. To protect data, be sure to make backups.
Product overview
What you can do with this unit
QGenis is an innovative mobile NAS, design for file storage, backup and sharing on the go. QGenie
can also act as a wireless sharing router for internet access and as a power bank for charging
phone/tablet. QGenie provides a hassle-free solution to backup/restore phonebook from Android
and iPhone/iPad at any time. With a USB 3.0 port which provides extremely fast file transfer speeds
as a portable SSD.
7 |
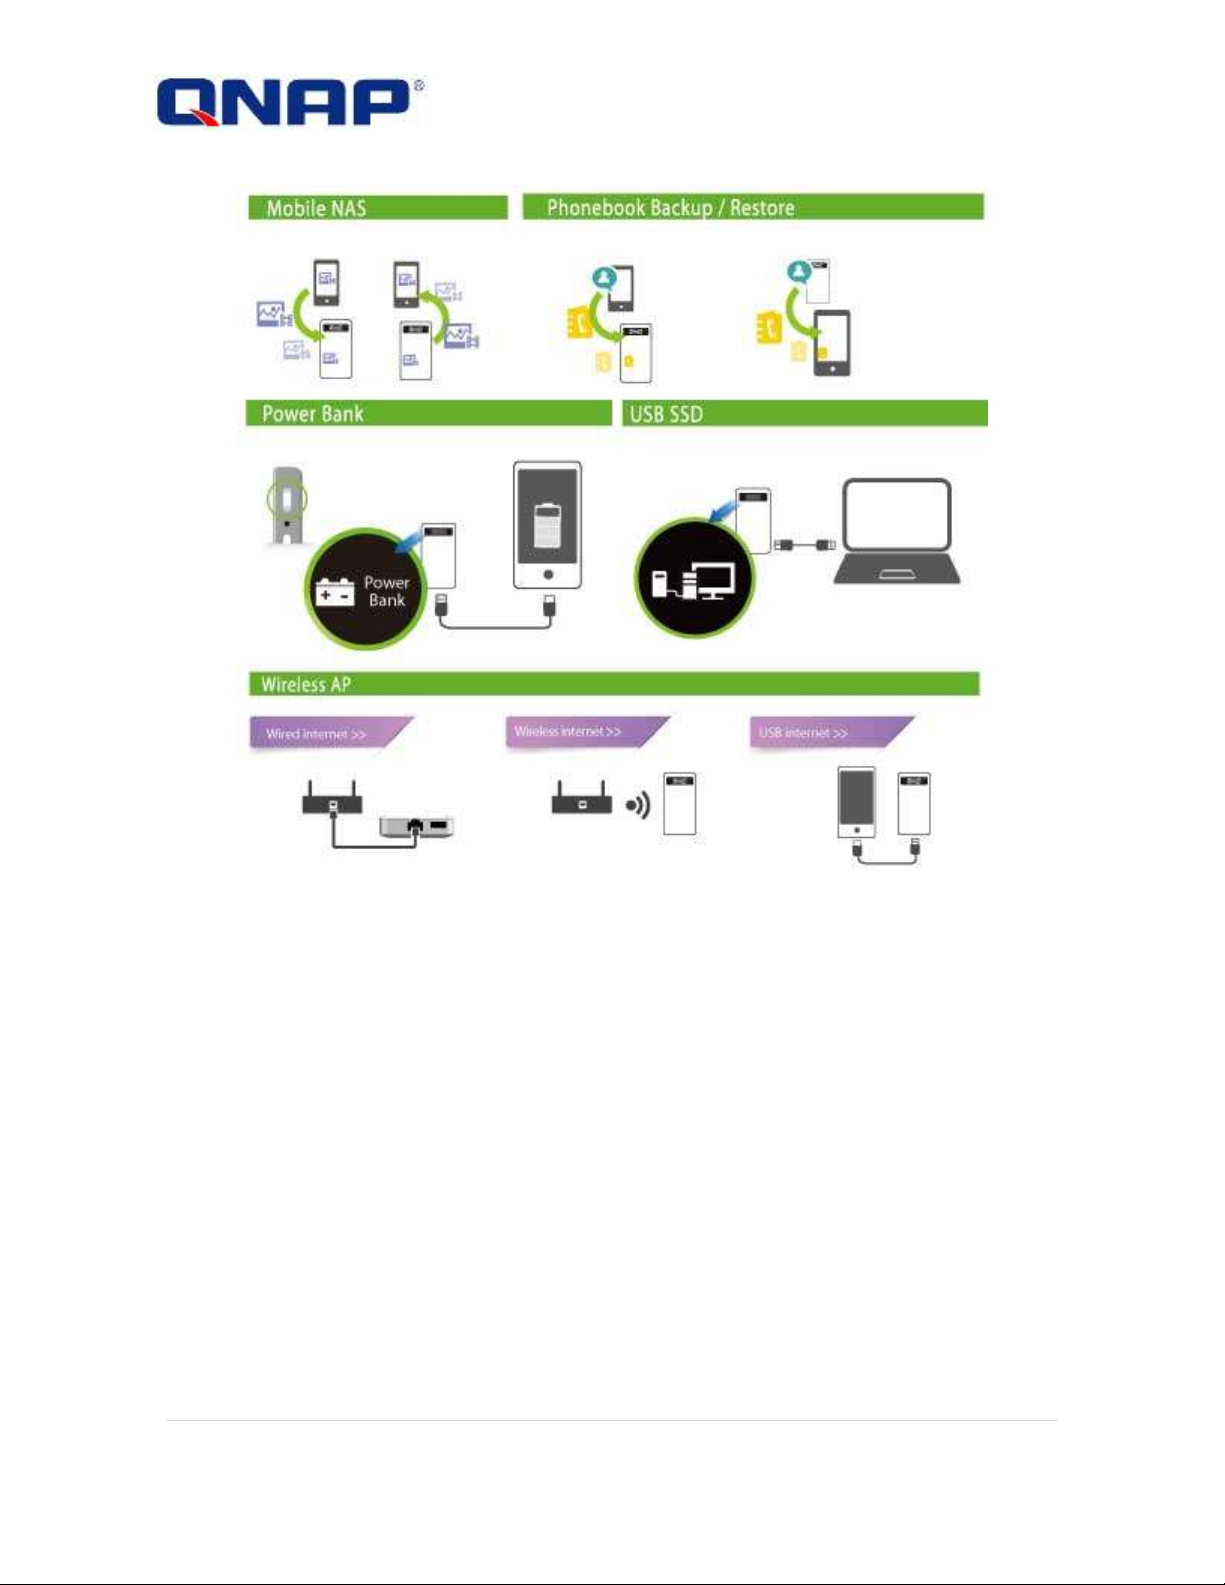
Mobile NAS
- Innovative mobile data center. Users can enjoy the benefit by NAS without complicated settings.
Rapid easy to install “Qfile.” Begin to access QGenie in 2 steps.
Connect wireless network on phone / tablet to QGenie.
Open Qfile and ready to go.
- Clear tree-based file management.
- Auto upload photos and videos taken by phone / tablet to QGenie.
- Supports multimedia player (OPlayer, MX Player..., etc.) to access contents on QGenie.
- Only 112g which is no hassle to carry with.
- Transfer files back to QNAP NAS with Qsync on PC.
Wireless Access Point
- Supports 20 devices connection.
- Maximum in-sight wireless range up to 50m.
- Share network during travel and in office.
- Transfer wired Internet to wireless.
- Plug with 3G/4G USB modem as hotspot
- Connect Android or iOS for tethering.
8 |

Power bank
- Supports 7 protections as power bank. Protect your phone / tablet from damaging during
charging.
Overcharge protection
Over-discharge protection
Over Temperature protection
Short Circuit protection
Over-Voltage protection
Over-Current protection
Advanced SDP/DCP support
- Supports serial charging. Charge your devices even when QGenie is being charged.
- Supports 1.5A/5V output. Able to charge iPad devices.
- 90% power conversion rate, powers are used efficiently.
Personal cloud
- When QGenie is nearby
Phone, tablet, and PC could access contents on QGenie at same time, even share files
between each other.
- When QGenie is far away / on Internet
Contents within QGenie could be accessed with myQNAPcloud services from Internet.
Phonebook backup and recovery
- 4 simple steps to backup and recovery phonebooks in phone / tablet.
- Able to recover phonebooks from/to different platforms such as iOS or Android.
- Provides scheduled backup mechanism. Saves time to perform actions repeatedly.
Portable multimedia server
- Playback music stored on QGenie.
- Qfile can playback variant formats of video files. (mp4, mkv, rmvb...etc)
- Multiple devices could access different contents at same time without influencing each other.
USB SSD super speed storage devices
- Connect to PC and QGenie will become super speed storage.
- Read 120MB/s, write for 40MB/s
- Connect QGenie to smart TV and browse photo and video directly.
High expandability
- Supports SDXC SD card up to 2TB.
- Supports USB Flash drive and USB hard drive up to 2TB.
OLED screen
- Provides clear view of current system status.
9 |

Supported devices
Android device
Android 2.3
Android 4.0 or later
Computer (Windows)
Windows XP SP3 or later
Windows Vista SP2 or later
Windows 7 SP1 or later
Windows 8
iOS device
iOS 5.0 or later
Computer (Mac)
Mac OS X Ver. 10.6 or later
Compatible SD memory card
SD memory card
SDHC memory card
SDXC memory card
microSD memory card (needs converter)
microSDHC memory card (needs converter)
microSDXC memory card (needs converter)
Compatible lists
Compatible USB devices
USB flash drive
USB hard drive
Smartphone (for charge and tethering)
Compatible lists
10 |
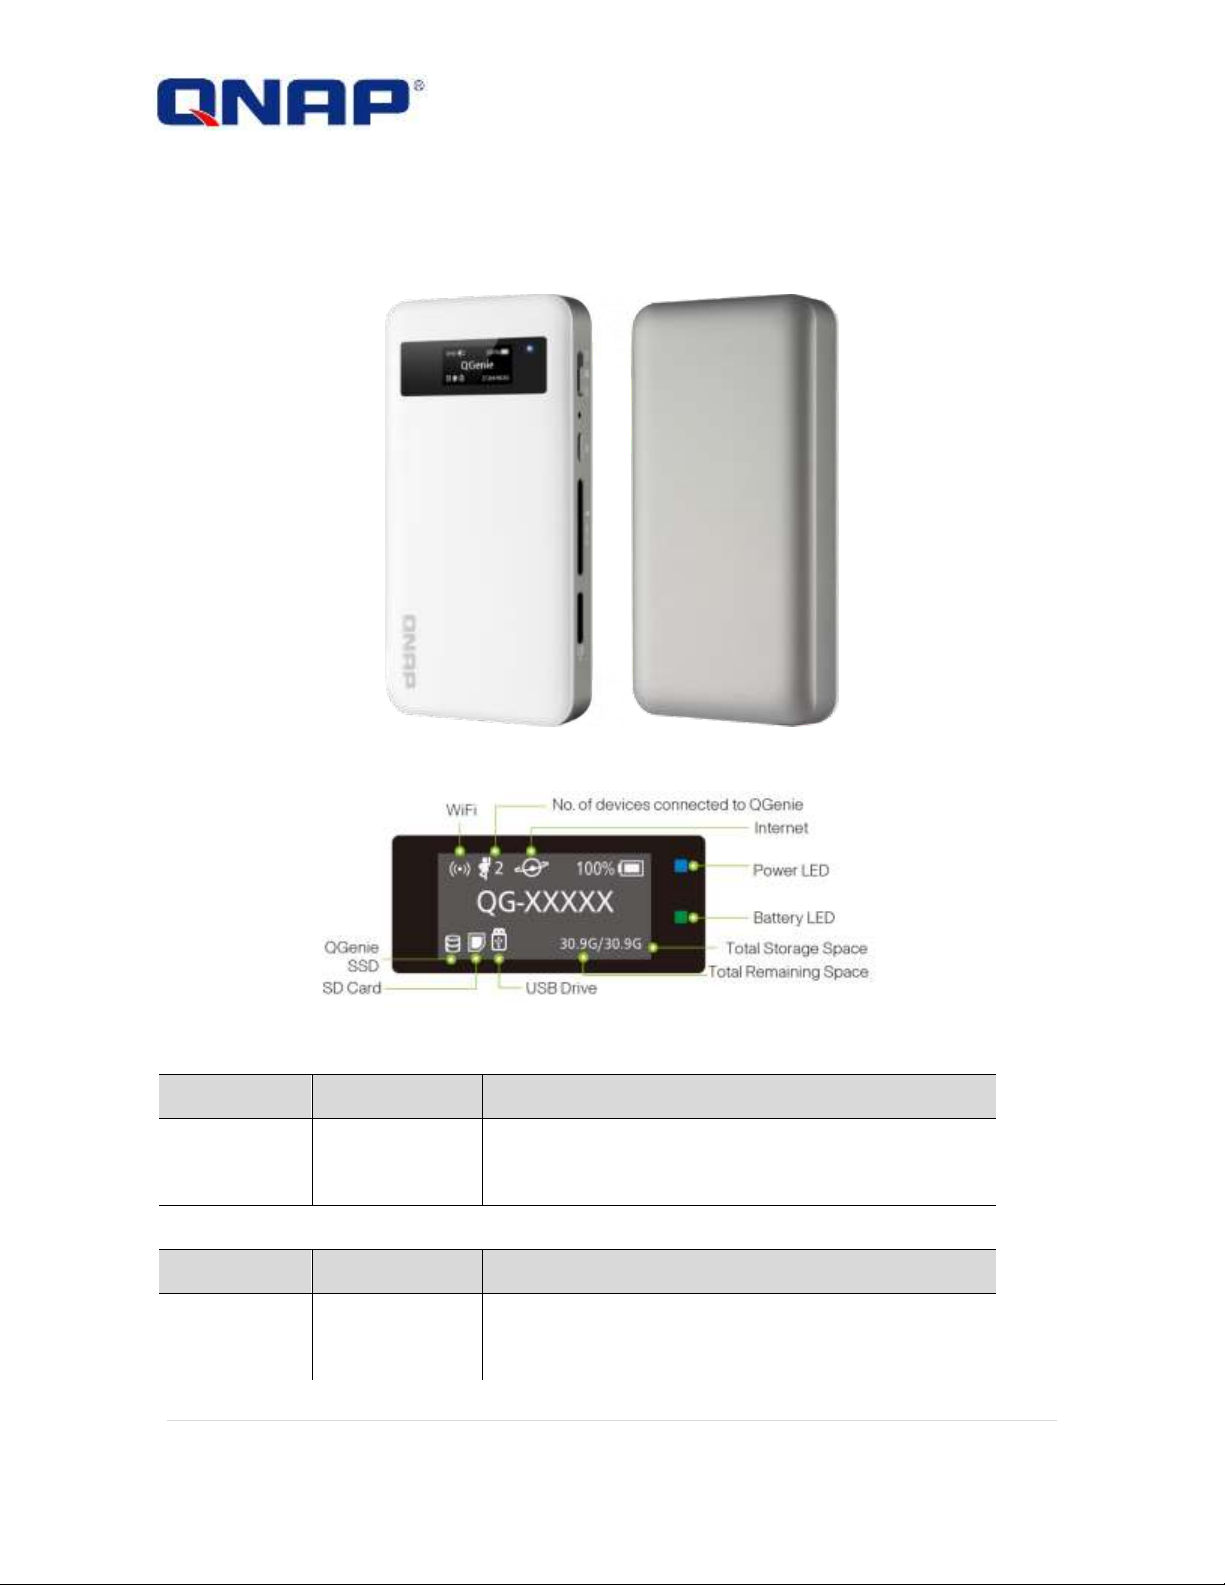
Power LED
Color
Status
Description
Blue
Blinking
System starting
Blue
on
WiFi sharing ready
Battery LED
Color
Status
Description
Green
On
Battery is full
Red
Blinking
Low battery
Appearance
Product Picture
OLED
11 |
Orange
On
Charging battery
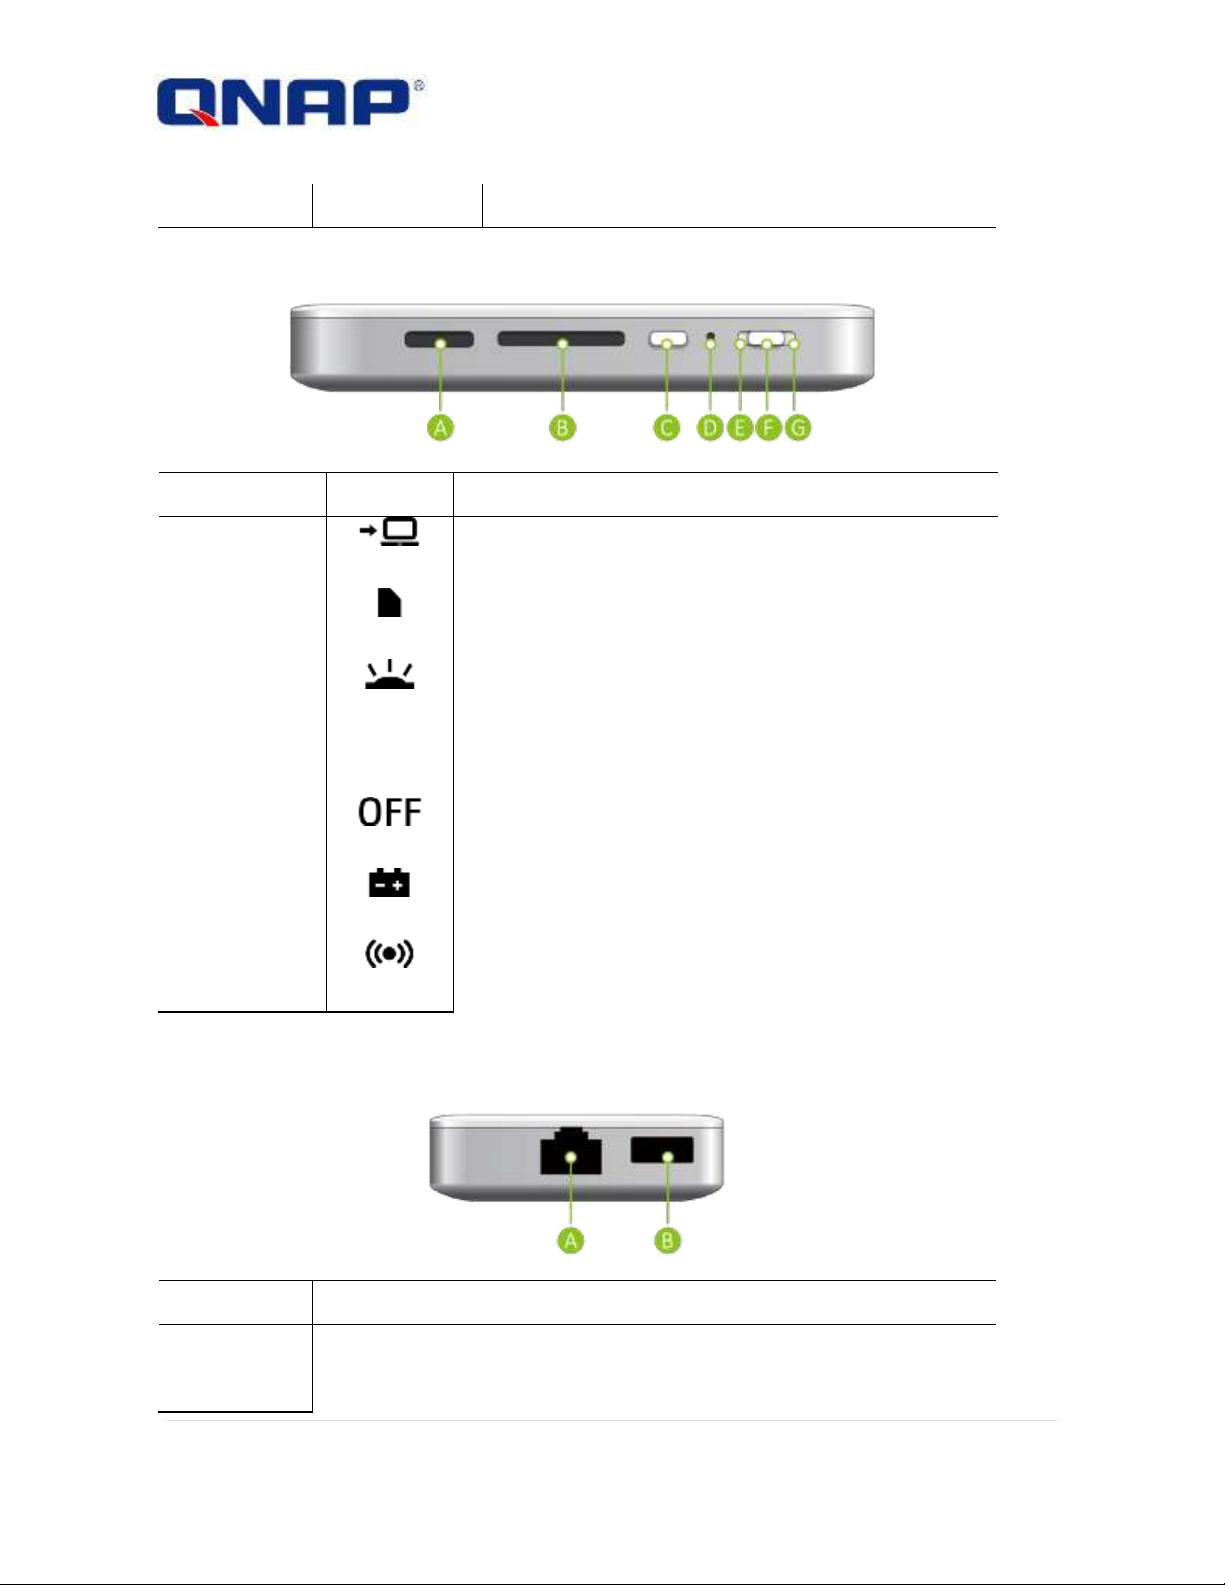
Ports/Switch
icon
Description
A
USB to PC/Charge
B
SD Card Slot
C
Info Button
D
X
Reset Button
E
Off Mode
F
Power Bank Mode
G
WiFi Sharing Mode
Ports
Description
A
Wired Internet
B
USB 3.0 Port
Side view
Bottom view
12 |

13 |

Hardware installation
NOTE
Please make sure that insert the SD card/USB storage correctly, as pushing it forcibly into the slot/USB port
may damage the device.
Insert SD card
Insert the SD card with its front side facing up.
If an SD card is correctly inserted, the QGenie OLED screen will show an SD icon on the storage
indicator. Users can access the data on the SD card after SD icon appears.
14 |

Insert USB storage
Insert USB storage to the bottom USB port.
If the USB storage is correctly inserted, the QGenie OLED screen will show the USB icon on the
storage indicator. Users can access the data on the USB storage after USB icon appears.
15 |
Getting started
Bundled items
Make sure that you have following bundled items. If any items are missing, contact
your dealer.
1. QGenie (QG-103N)
2. USB 3.0 cable
3. Quick installation guide
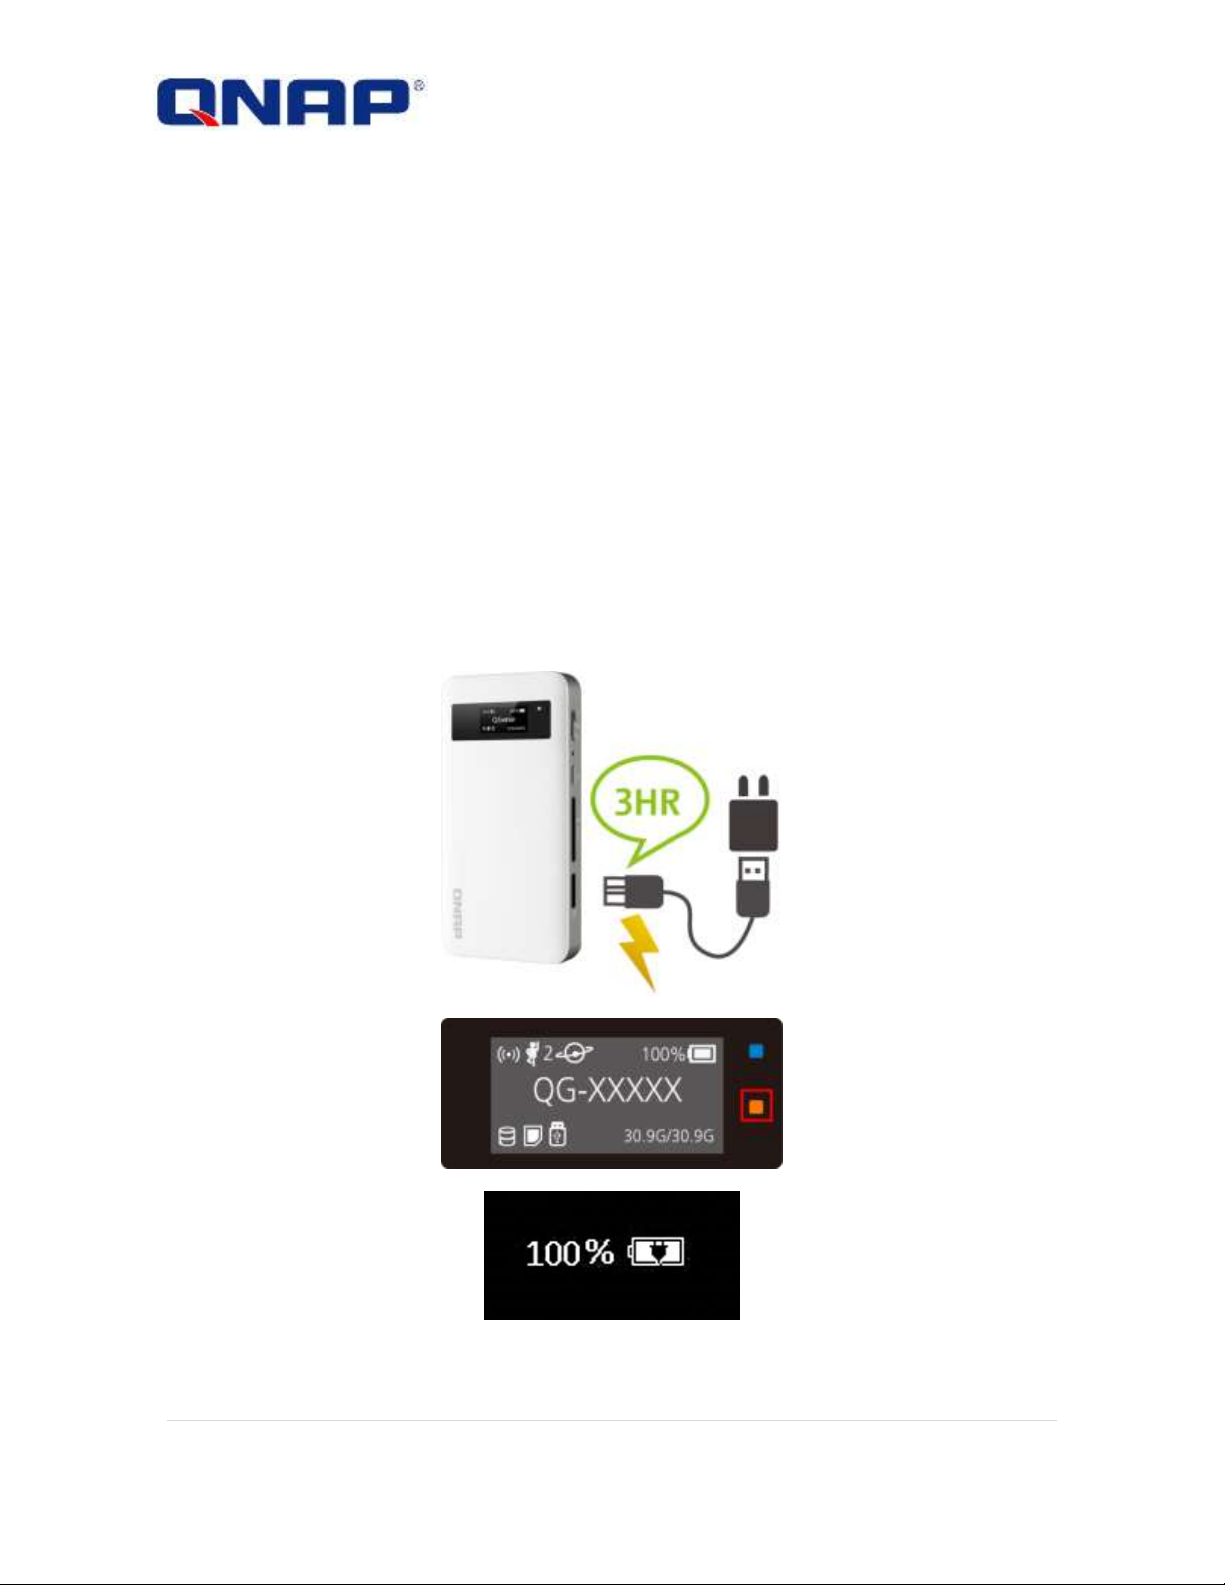
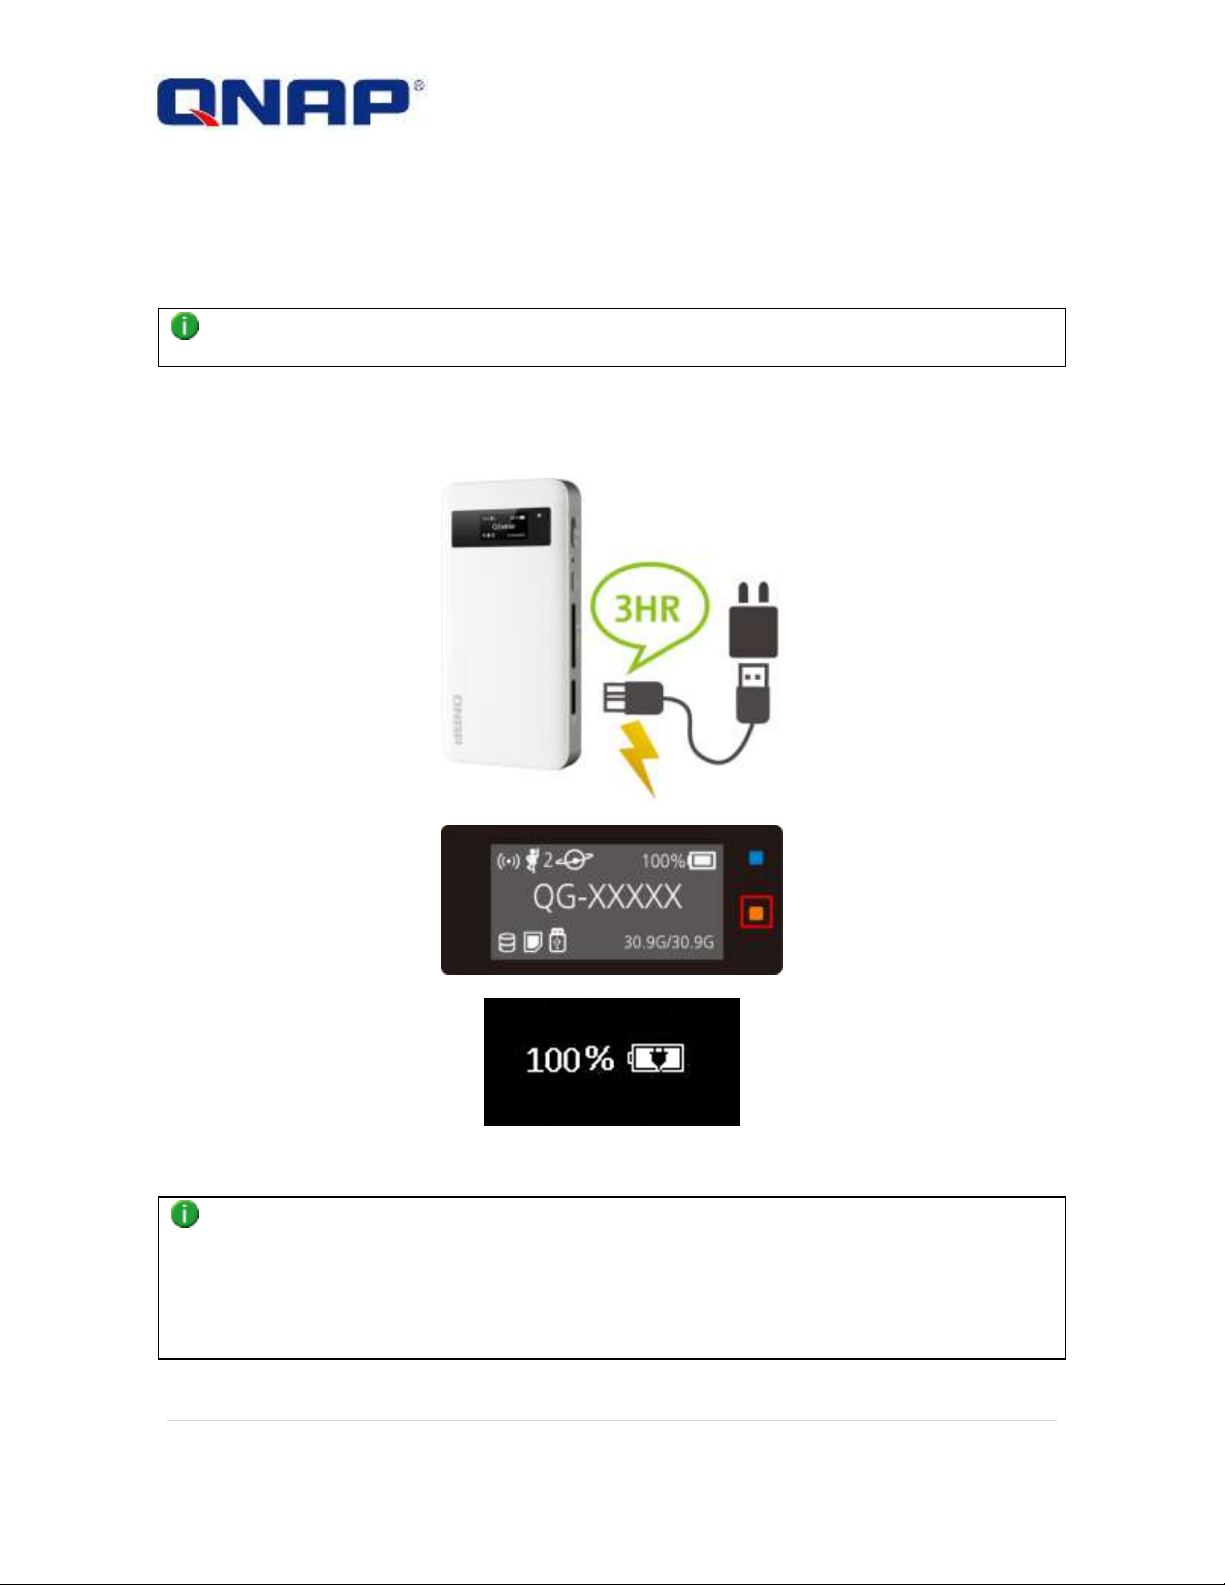
Charging this unit
Charging with a USB AC adaptor
1. Connect the USB AC adaptor to the USB to PC/Charger port.
Connect AC adaptor to a power outlet.
2. Battery LED indicator will display the orange on.
3. The OLED battery indicator will show 100% when QGenie is fully charged.
4. When charging is complete, disconnect the USB AC adaptor from QGenie.
5. The approximate charging time is 3 hours.
16 |
NOTE
Be sure to insert the cable correctly. Pushing the cable forcibly into the port may damage the port.
For optimum performance of the rechargeable lithium-ion battery, it is recommended to charge in an
ambient temperature between 10 °C – 35 °C (50 °F - 95 °F).
If an abnormality (increased temperature, insufficient power supply, etc) occurs while charging, the
OLED screen may show an error, the battery LED will blink orange, and charging may stop. If this occurs
when QGenie is on, please turn it off or try with a different USB adaptor.
17 |
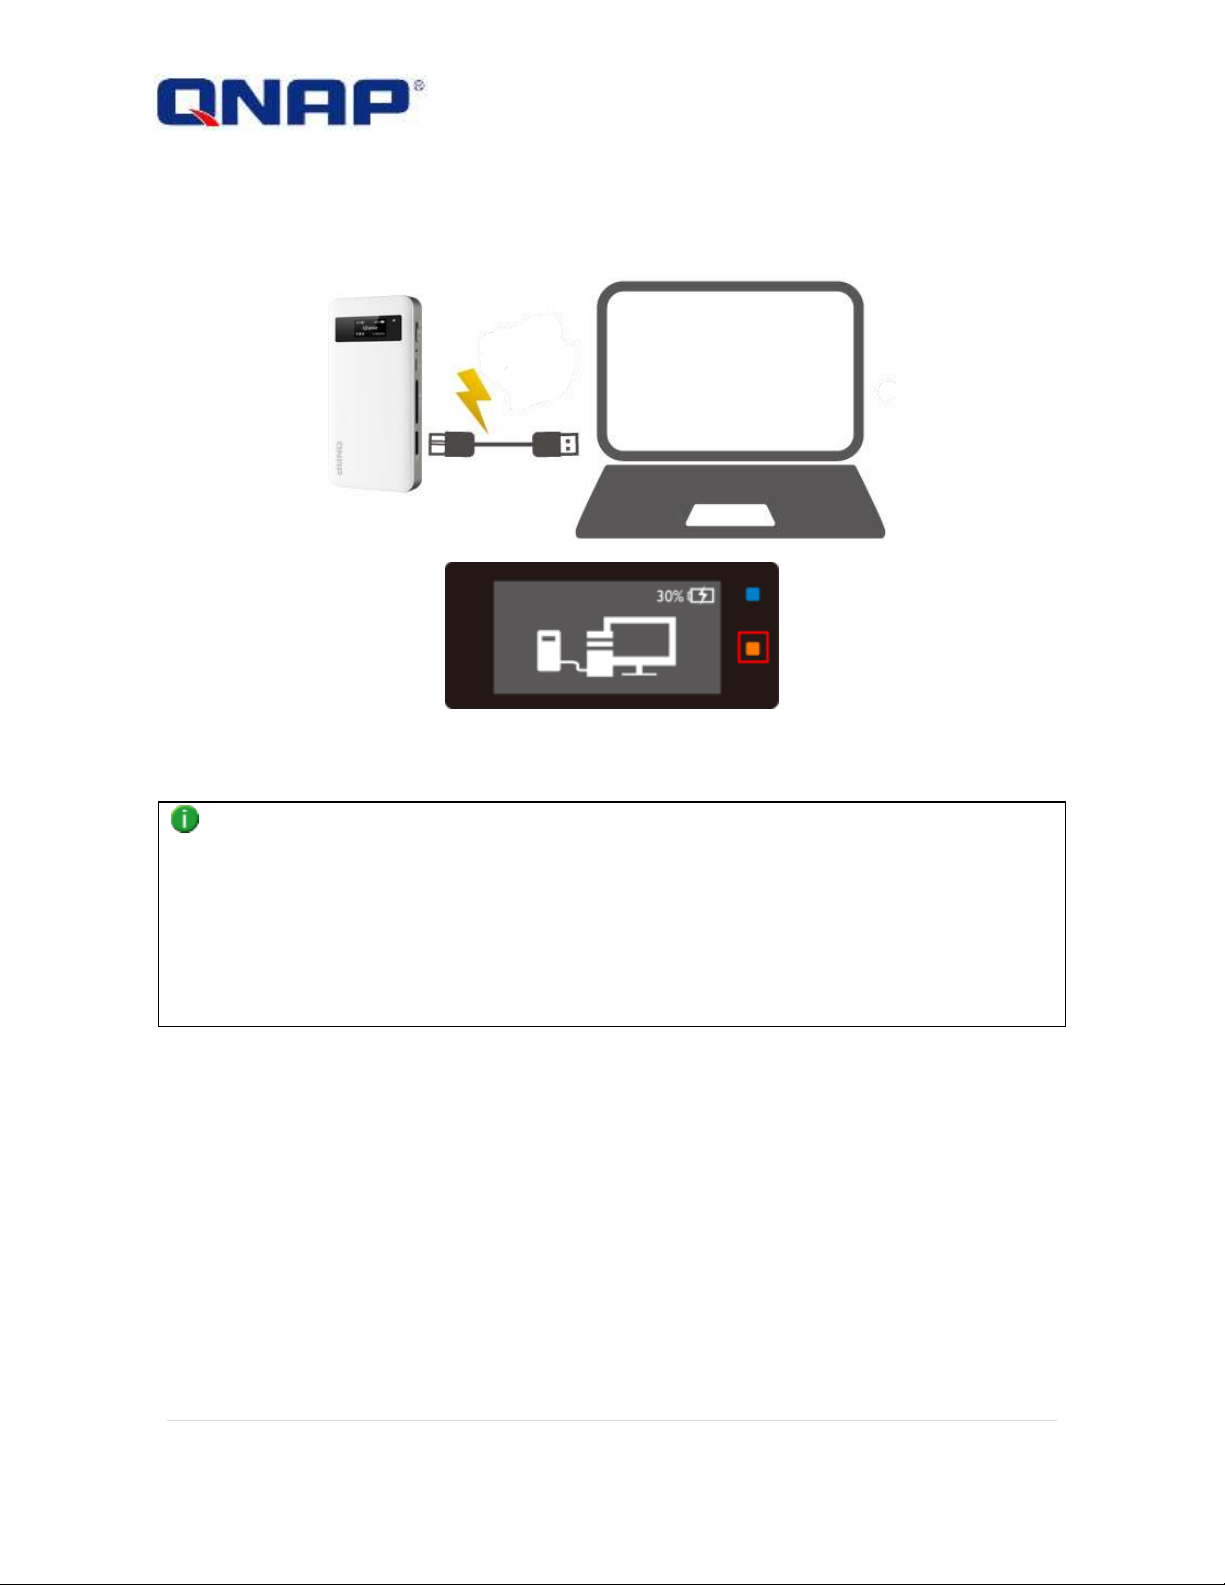
Charging with a PC
1. Connect QGenie to a computer using a USB cable.
2. Battery LED indicator will display the orange on.
3. The OLED battery indicator will show 100% when QGenie is fully charged.
4. When charging is complete, disconnect the USB cable from QGenie and the computer.
NOTE
QGenie cannot be charged when the PC is turned off or in sleep mode.
QGenie will be recognized as USB storage when connected to a PC.
Be sure to insert the cable correctly. Pushing the cable forcibly into the port may damage the port and
result in malfunction.
For optimum performance of the rechargeable lithium-ion battery, it is recommended to charge in an
ambient temperature between 10 °C – 35 °C (50 °F - 95 °F).
If an abnormality (increased temperature, insufficient power supply, etc) occurs while charging, the
OLED screen may show an error, the battery LED will blink orange, and charging may stop. Please try
other ports of PC to continue charging.
18 |
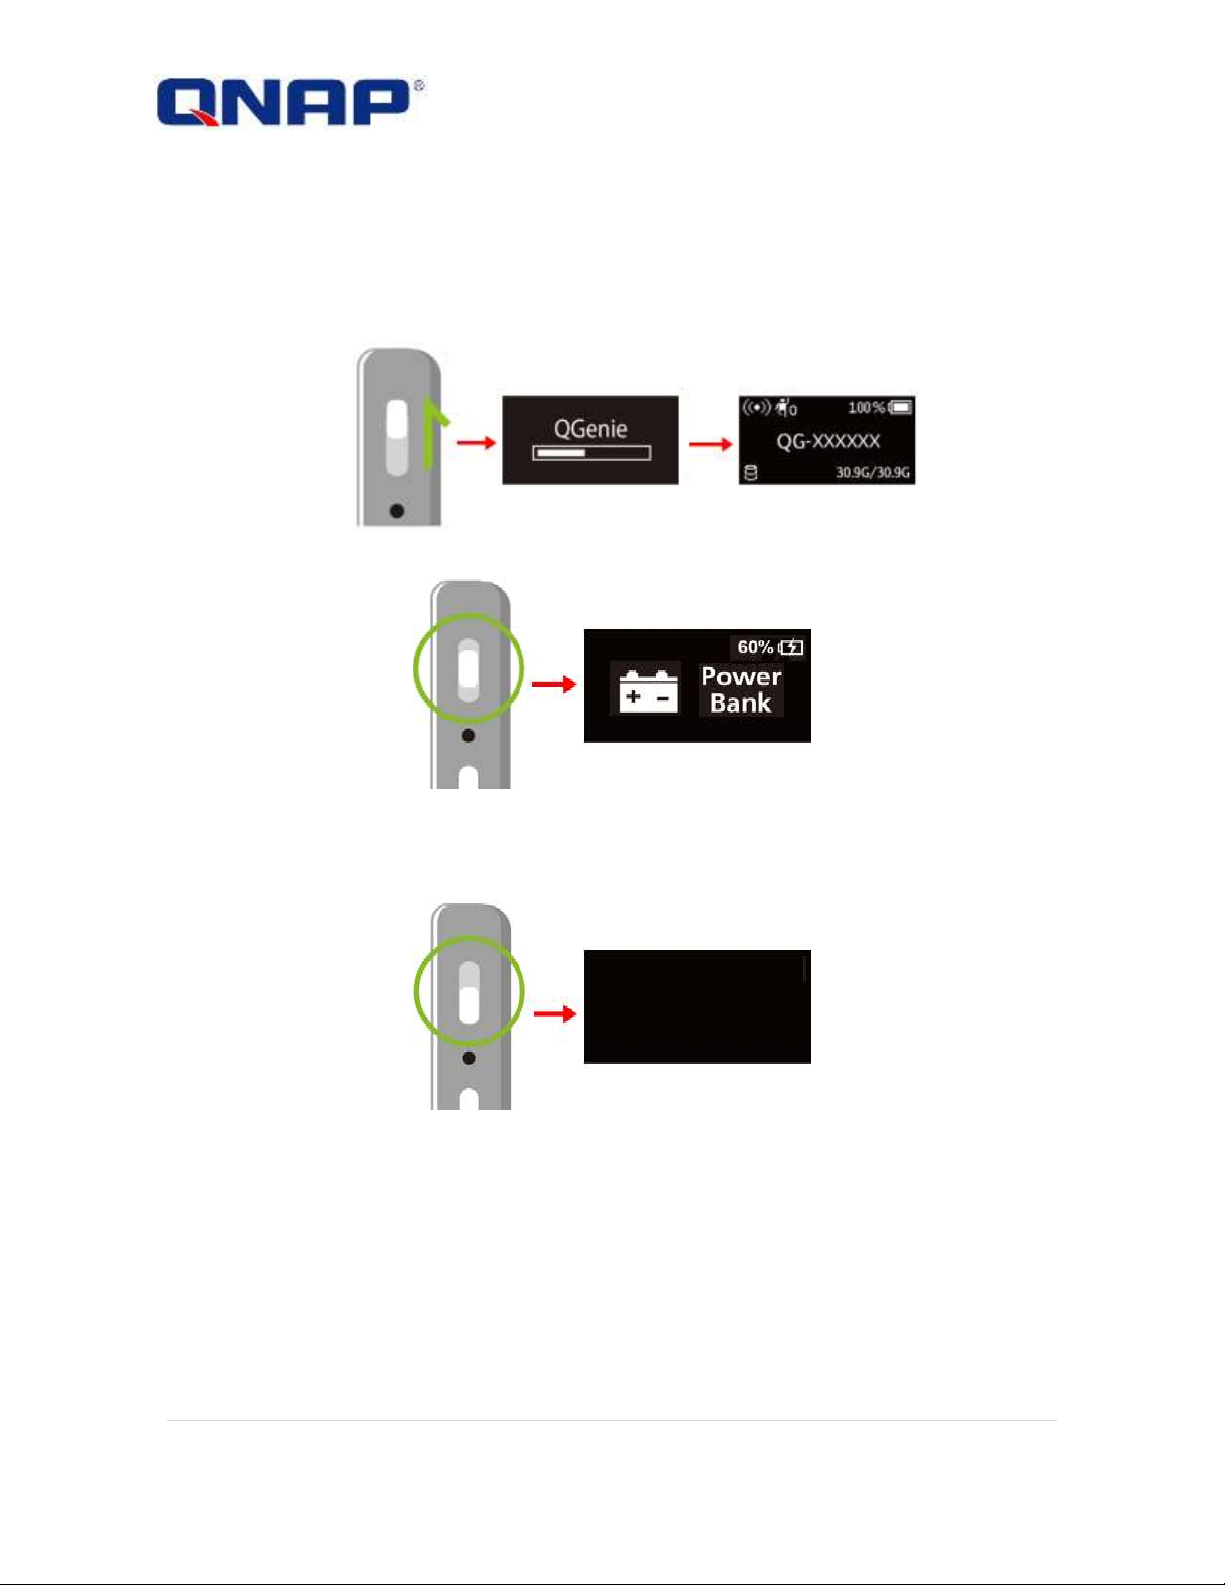
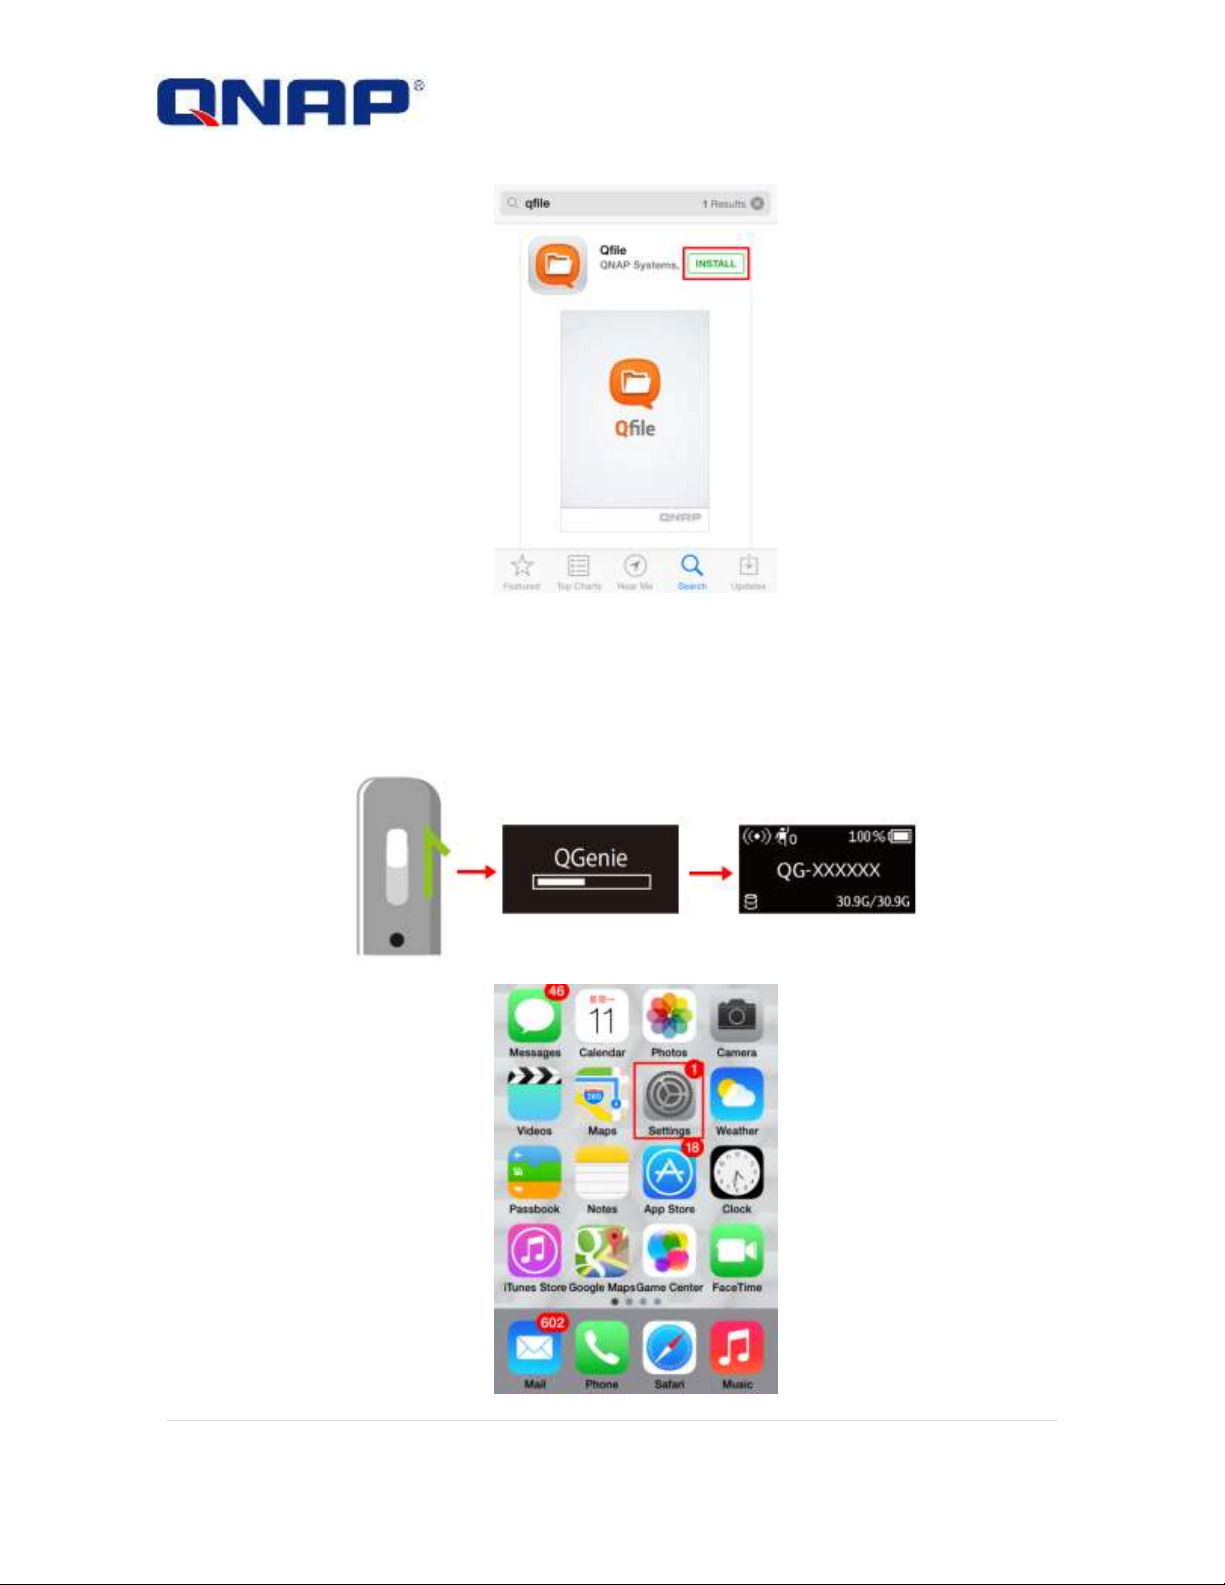
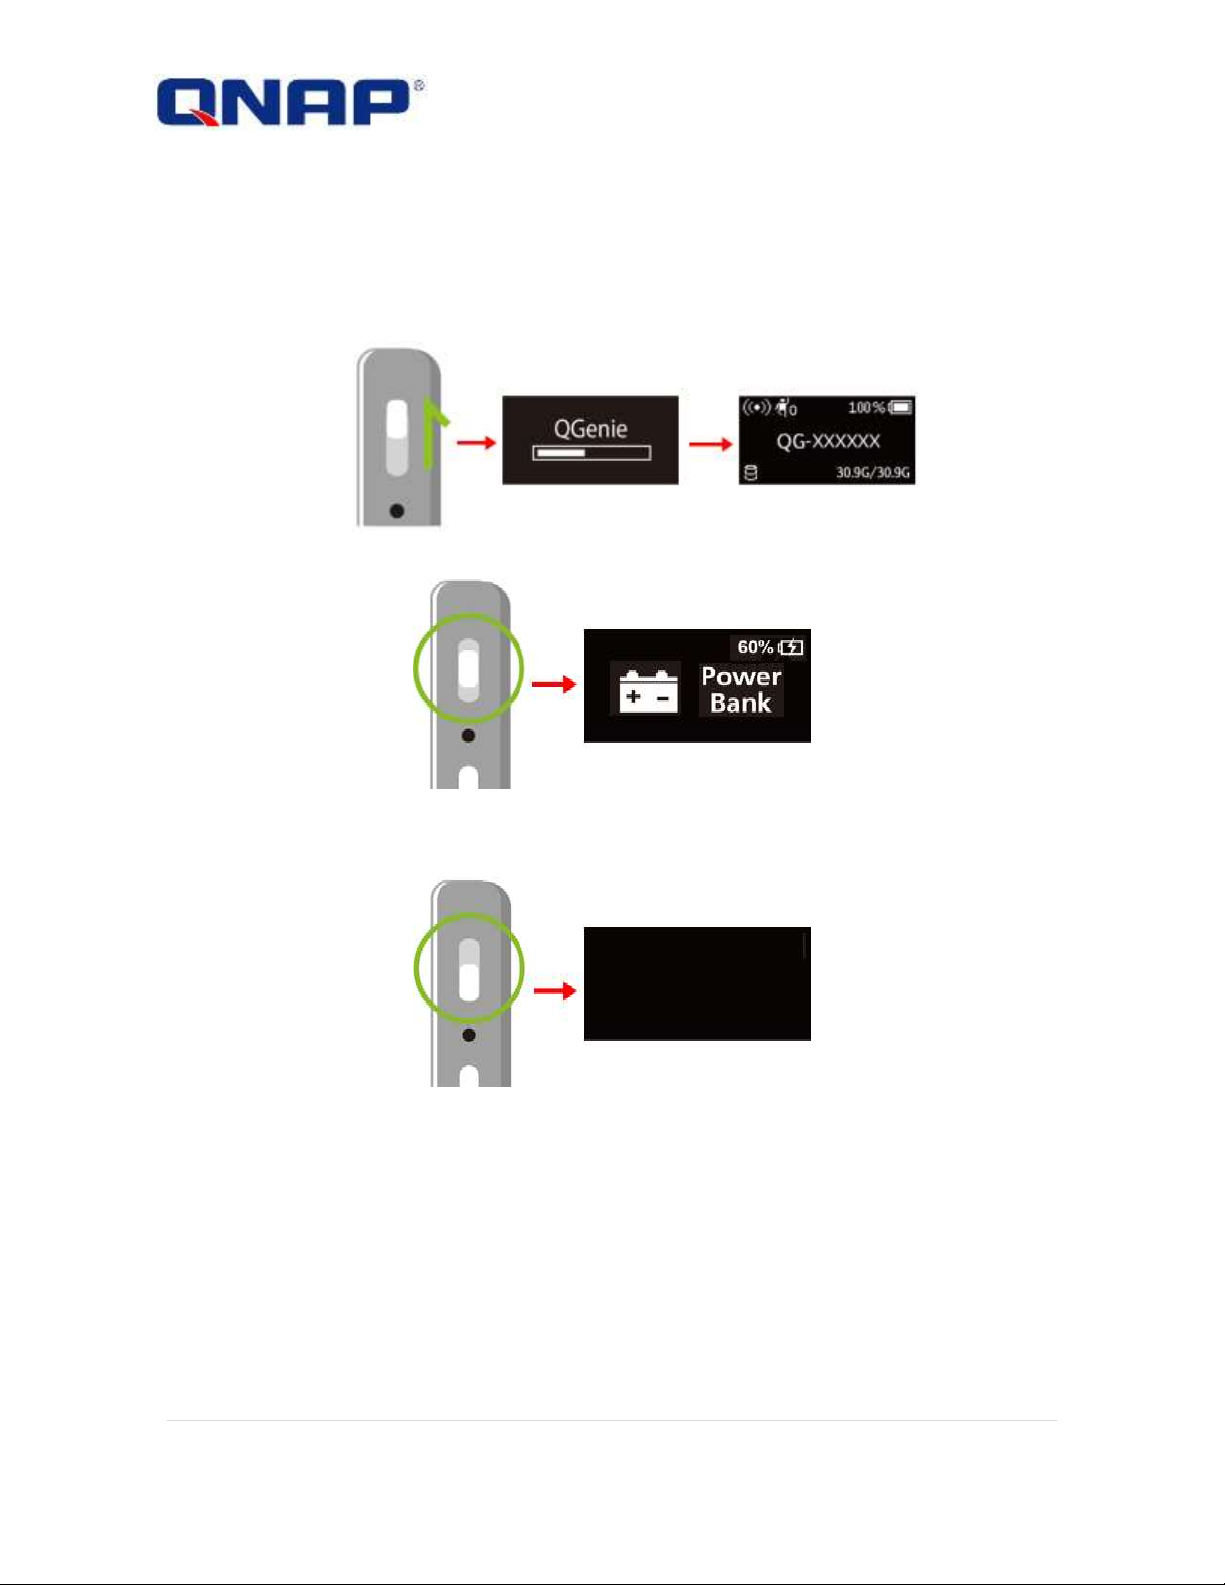
Turning the power on/off
Turning the power on
1. Turn on QGenie into Wi-Fi sharing mode
Slide the power switch to the top, and the OLED screen will display “QG-XXXXXX” and startup.
2. Turn on QGenie into Power bank mode
Slide the power switch to the middle, and the OLED screen will show “Power Bank.”
Turning the power off
Slide the power switch to the bottom, the OLED screen will switch off.
19 |
Setting up an Android device
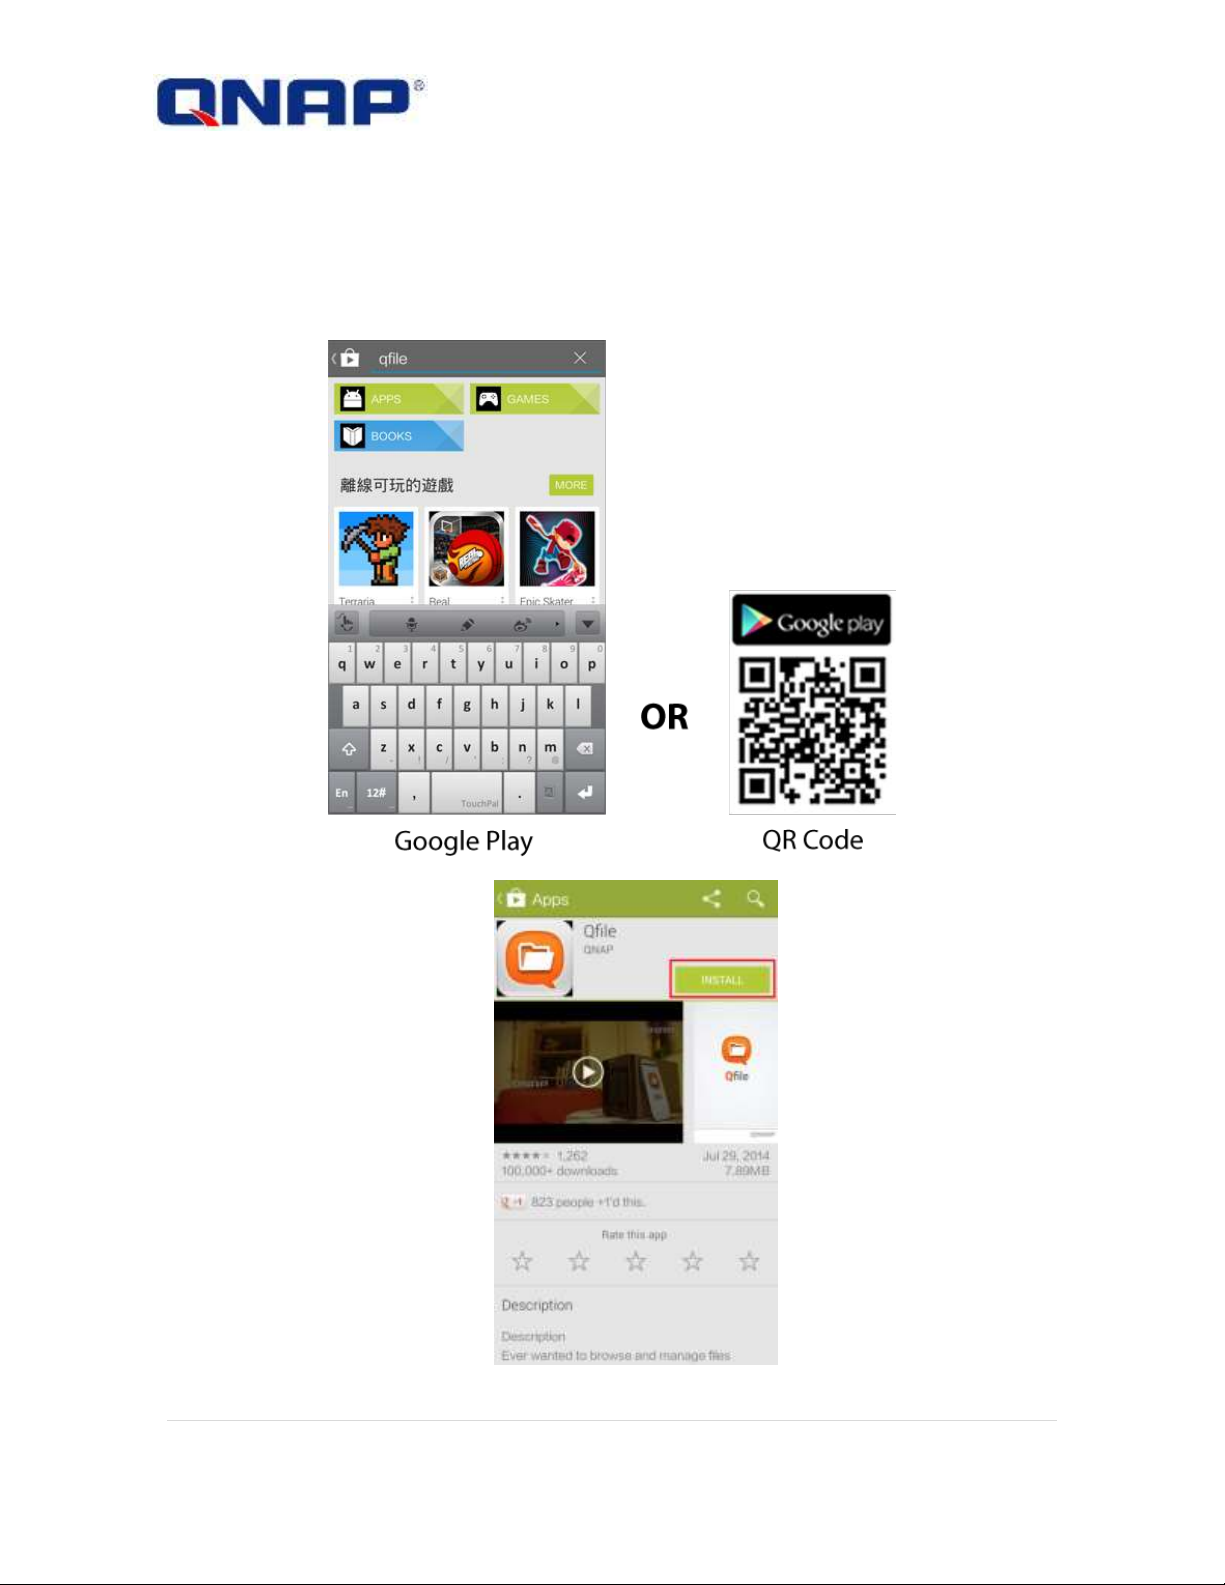
Installing "Qfile" to an Android device
1. Open the Google play from Android phone/tablet and search for “Qfile” or scan QR code as
blow.
2. Locate and select the Qfile App and tap the [INSTALL] button.
3. After selecting [INSTALL], user will need to accept the App permission to installation “Qfile”
App.
20 |

21 |

Setting up an iOS device
Installing "Qfile" to an iOS device
1. Open the App Store from iPhone/iPad and search for “Qfile” or scan QR code as blow.
2. Locate and select the Qfile App. Please tap the [FREE] button.
3. After selecting [FREE], the blue button will turn to green and change to [INSTALL]. Please tap
this button and complete installation of the Qfile App.
22 |
Connecting a device via wireless LAN
1. Turn on QGenie by sliding its power switch to the top and wait until the progress bar
disappears.
2. Go to the [Setting] of phone/tablet.
23 |
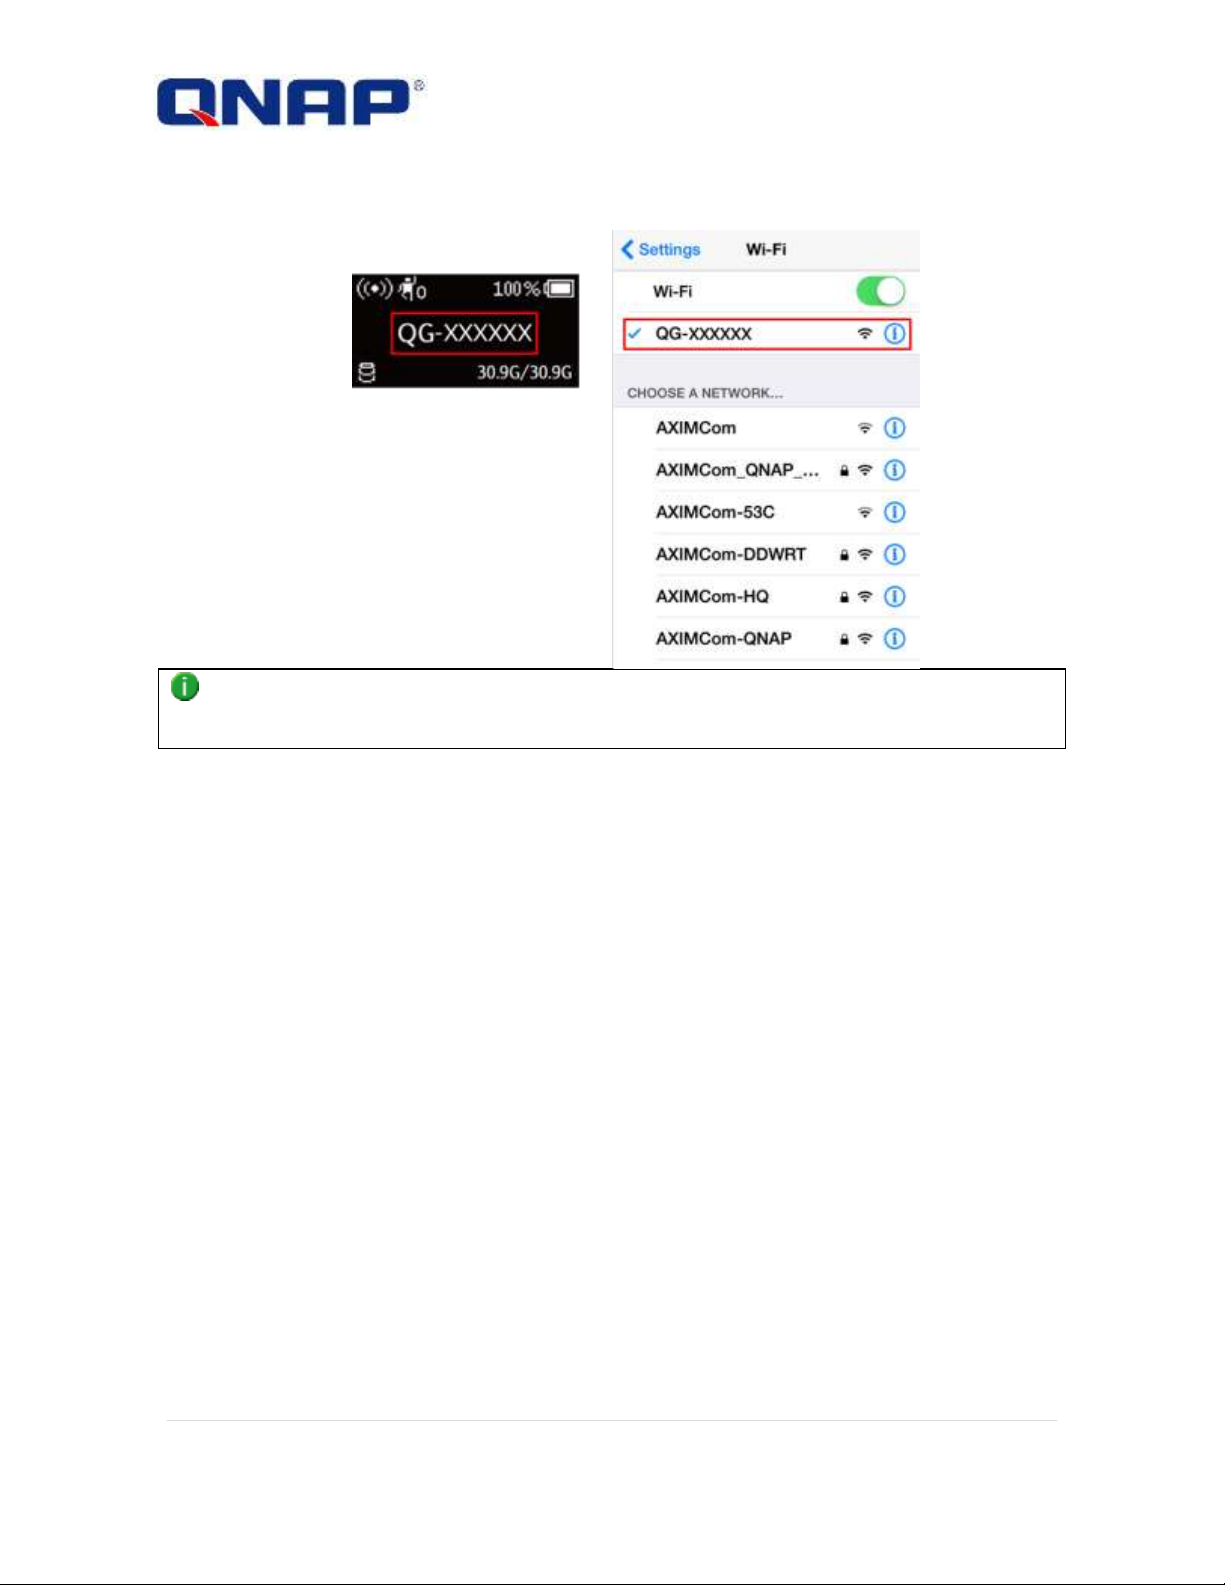
3. Find QGenie’s wireless name (SSID) and connect (the Wireless name (SSID) on QGenie’s
OLED screen).
NOTE
iPhone/iPad will still show the “3G/4G” icon when connected to QGenie without an Internet connection.
This is normal case that iPhone/iPad connect to WiFi (QGenie) and 3G/4G at same time.
24 |
Getting started by PC
Charging QGenie
NOTE
For first time use, we recommended charging QGenie by USB AC adaptor.
Charging with a USB AC adaptor
1. Connect the USB AC adaptor to the USB to PC/Charger port.
Connect AC adaptor to power outlet.
2. Battery LED indicator will display the orange on.
3. The OLED battery indicator will show 100% when QGenie is fully charged.
4. When charging is complete, disconnect the USB AC adaptor from QGenie.
5. The approximate charging time is 3 hours .
NOTE
Be sure to insert the cable correctly. Pushing the cable forcibly into the port may damage the port.
For optimum performance of the rechargeable lithium-ion battery, it is recommended to charge in an
ambient temperature between 10 °C – 35 °C (50 °F - 95 °F).
If an abnormality (increased temperature, insufficient power supply, etc) occurs while charging, the
OLED screen may show an error, the battery LED will blink orange, and charging may stop. If this occurs
when QGenie is on, please turn it off or try with a different USB adaptor.
25 |

Charging with a PC
1. Connect QGenie to a computer using a USB cable.
2. Battery LED indicator will display the orange on.
3. The OLED battery indicator will show 100% when QGenie is fully charged.
4. When charging is complete, disconnect the USB cable from QGenie and the computer.
NOTE
QGenie cannot be charged when the PC is turned off or in sleep mode.
QGenie will be recognized as USB storage when connected to a PC.
Be sure to insert the cable correctly. Pushing the cable forcibly into the port may damage the port.
For optimum performance of the rechargeable lithium-ion battery, it is recommended to charge in an
ambient temperature between 10 °C – 35 °C (50 °F - 95 °F).
If an abnormality (increased temperature, insufficient power supply, etc) occurs while charging, the
OLED screen may show an error, the battery LED will blink orange, and charging may stop. Please try
other ports of PC to continue charging.
26 |
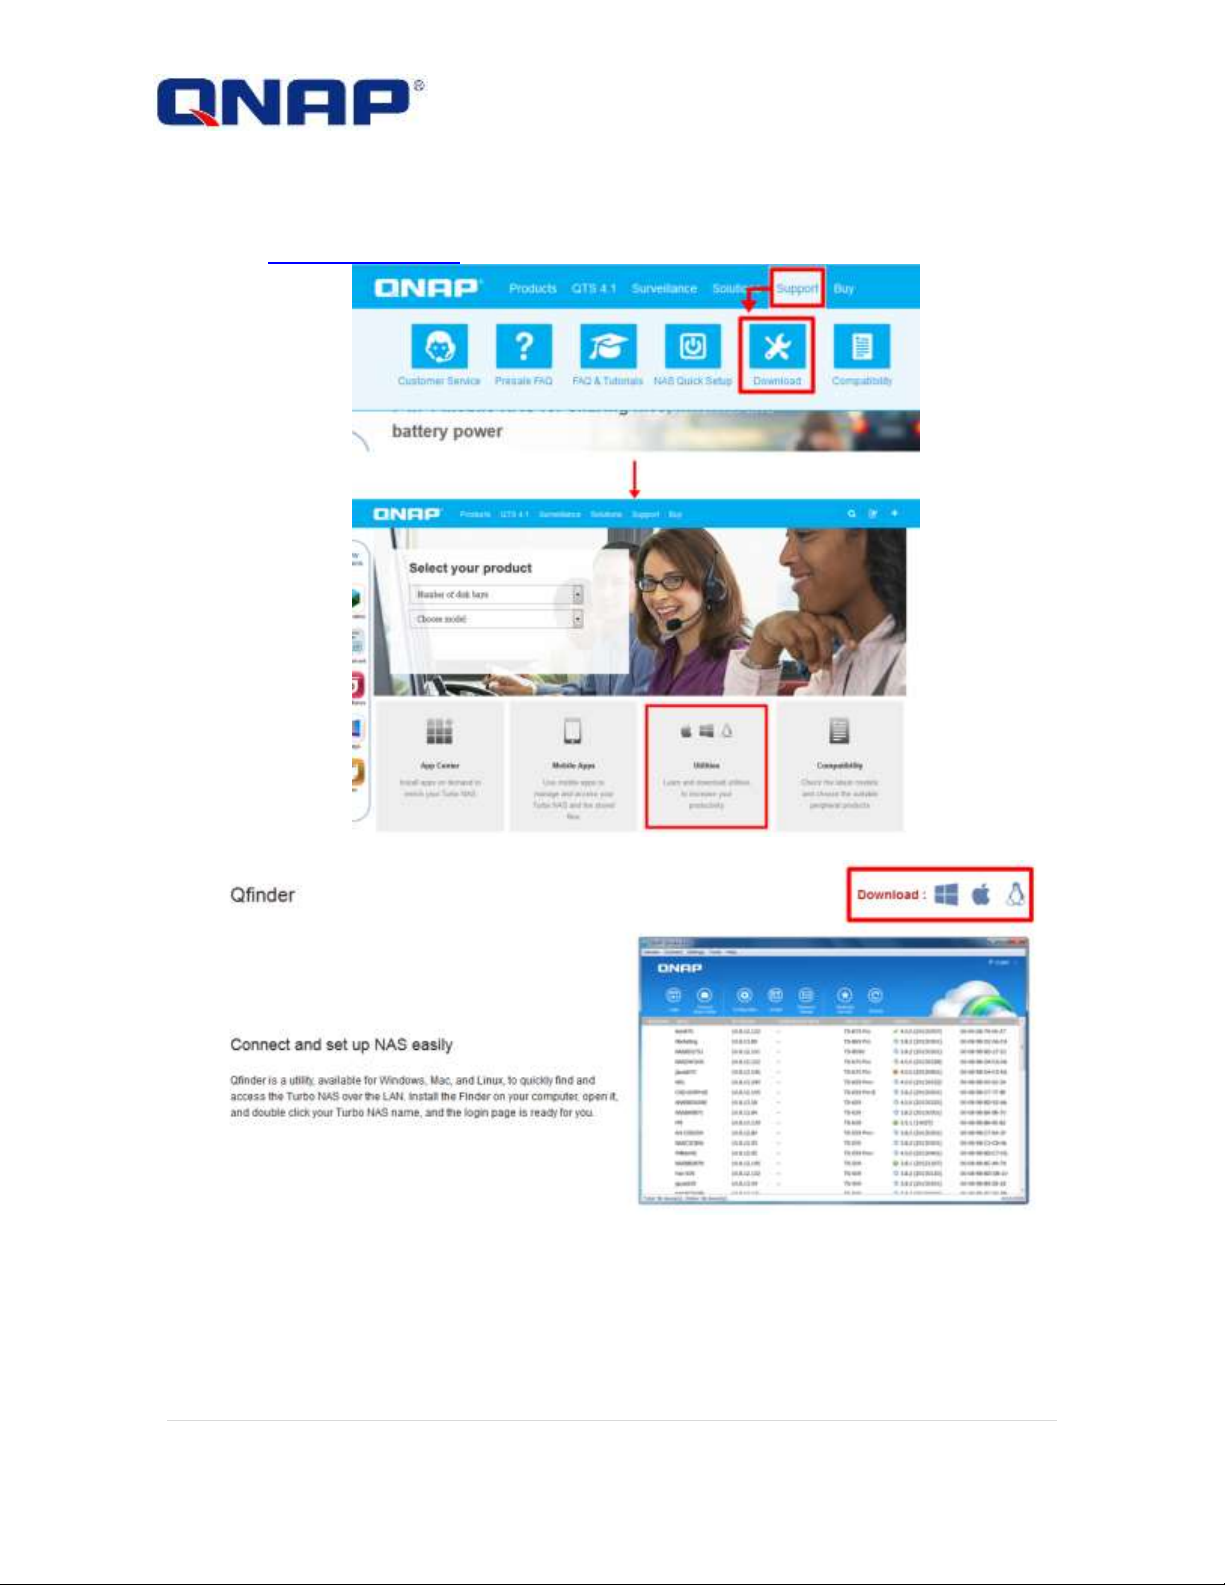
Install Qfinder Utility
1. Type http://www.qnap.com/ in web browser, Go to “support”> “download”> “utility”.
2. Download QNAP utility [Qfinder] based on operating system.
3. Launch the QNAP Qfinder installer from computer, select a language and click [Next].
27 |

4. Read the license agreement, check [I accept the terms of the License Agreement], and click
[Next].
5. Select components to install and click [Next].
6. Choose install location and click [Install] for process the Qfinder installation.
28 |

29 |
Turning the power on/off
Turning the Power on
1. Turn on QGenie into Wi-Fi sharing mode
Slide the power switch to the top, and the OLED screen will display “QG-XXXXXX” and startup.
2. Turn on QGenie into Power bank mode
Slide the power switch to the middle, and the OLED screen will show “Power Bank.”
Turning the Power off
Slide the power switch to the bottom, the OLED screen will switch off.
Connecting PCs to QGenie
Connecting to QGenie with Windows
1. Turn on QGenie by sliding its power switch to the top and wait until the progress bar
disappears.
30 |

2. Click the icon on the task tray in the lower right of the computer screen.
3. Find QGenie’s wireless name (SSID) and connect (the wireless name (SSID) on QGenie’s
OLED screen).
4. Click the icon on the task tray in the lower right of the computer screen. When it is displayed
on the same line as QGeine’s wireless name, the QGenie and computer are connected.
31 |

NOTE
Internet connections will temporarily be interrupted after connecting to QGenie. Please refer to below
sections for how to configure an outbound network.
32 |

Connecting to QGenie with Mac
1. Turn on QGenie by sliding its power switch to the top and wait until the progress bar
disappears.
2. Click the icon on the menu bar in the upper right of the computer screen.
3. Find QGenie’s wireless name (SSID) and connect (the wireless name (SSID) on QGenie’s
OLED screen).
4. Click the icon on the menu bar in the upper right of the computer screen. When it is displayed
on the same line as QGenie’s wireless name, the QGenie and computer are connected.
Setup/use QGenie with Qfile
Login from Qfile
1. Turn on QGenie in Wi-Fi sharing mode and launch [Qfile] on phone/tablet once connected.
33 |

2. After connect, tap [Add NAS] and find QGenie.
3. After select QGenie, choose [Admin] for login QGenie.
34 |

icon
Description
Browse the download file of QGenie
QGenie setting
Phonebook restore and backup
Qfile Settings
Refresh the list
Add a folder
Upload files from phone/tablet to the QGenie
Show the current status of the file transferring
Home Screen
35 |

Setup QGeine
After logging in to QGenie using the Admin account, Qfile can configure QGenie’s settings.
1. Turn on QGenie in Wi-Fi sharing mode and launch [Qfile].
2. After device has connected to QGenie, select [ ] and choose [ ]
3. Configure QGenie settings as displayed in the below screen.
Setup QGenie’s Device ID
The QGenie’s device ID can be changed to a preferred name by using Qfile. Please reference to
instruction as below (using the iOS App as an example).
1. Choose [Device]
36 |

2. Select [Name], enter a new name, and select [YES] to change the QGenie’s device ID.
NOTE
Changing the QGeine’s device ID will also change the Wireless name (SSID). After changing, please
reconnect to the new network SSID and reopen Qfile.
Setup QGenie’s Admin Password
IMPORTANT
To avoid unauthorized access, please make sure the admin password of QGenie has been changed.
1. Choose [Admin Password]
37 |

2. Enter and confirm the new admin password.
3. Select [Done] and reconnect to QGenie using the new password.
NOTE
If the password has forgotten, please reset QGenie.
Setup QGenie’s Wireless security
IMPORTANT
To avoid unauthorized access, please make sure the wireless password of QGenie has been changed.
1. Choose [Wireless Security]
38 |

2. Select the security type (WEP/WPA/WPA2) to be used. For the best level of security, it is
recommended to use WPA2.
3. Enter and confirm the new password.
4. After the new password has been set, select [Done] and reconnect to QGenie’s wireless LAN
using the new password.
39 |

NOTE
If “Disable” is selected, the wireless LAN will have no password protection.
After changing the QGenie's wireless security settings, users must reconnect to QGenie using the new
wireless password.
If the password has forgotten, please reset QGenie.
WPA/WPA2, the valid password length is between 8 ~ 63 characters long.
WEP, the valid password length is between 5 or 13 characters long.
40 |

Setup QGenie’s Internet connection
QGenie supports 3 methods to connect to Internet:
1. Wired Internet
Plug an Ethernet cable to QGenie and use Ethernet internet connection.
2. Wireless Internet
QGenie connect to an existing wireless internet connection.
3. USB Internet
QGenie can work with (1) internet tethering (iPhone/Adnroid), or (2) 3G/4G USB dongle.
Setup Wired Internet
1. Choose [Internet] → [Wired Internet]
2. Select proper type of wired connection.
DHCP: The most common method, choose this if connect the cable to a home router.
Static IP: Similar with DHCP, but required to manually input proper IP settings.
PPPoE: If plug QGenie directly to an ADSL/VDSL modem and need to enter username
and password.
*If doesn’t know kind of connection type are using, please contact the network administrator or internet
service provider for assistance.
3. Press [Connect] to apply settings.
41 |

42 |

Setup Wireless Internet
1. Choose [Internet] → [Wireless Internet]
2. QGenie will scan nearby wireless networks and display them in a list.
3. Select the wireless network and enter the password as necessary. These settings will be
applied to QGenie once select [OK].
43 |

44 |

Setup USB Internet
1. Turn on QGenie and connect it to a USB Internet device (3G/4G dongle, smartphone, etc).
2. Choose [Internet] → [USB Internet]
3. Select the type of USB device, and select connect.
User will need to reconnect phone/tablet to QGenie once these settings are changed.
45 |

Upgrade the Firmware
1. Turn on QGenie. Connect the phone/tablet to QGenie’s wireless LAN.
2. Open Qfile and connect to QGenie
3. Select [ ]→[ ] →[Status]
4. The [Firmware] will show in the settings page. Select [Firmware check] and [OK]. The
firmware will be installed to QGenie.
5. The QGenie OLED screen will display “Upgrading” and indicate its progress.
46 |

icon
Description
Copy the selected file(s) or folder(s)
Move the selected file(s) or folder(s).
Download the selected file(s)
Note: Folders cannot be downloaded
Delete the selected file(s) or folder(s), or swipe a file to delete.
1
Show the file(s) has selected currently
Access and manage files (Basic)
Home page
47 |

Copying file/folder
1. Click the [ ] in the upper right of the playback screen. On the data list, selecting a
file/folder that want to copy then tap [ ].
2. Select the copy destination then tap [Copy]
48 |

Move file/folder
1. Click the [ ] in the upper right of the playback screen. On the data list, selecting a
file/folder that want to move then tap [ ].
2. Select the copy destination then tap [Move]
49 |

Download file/folder to local folder
1. Click the [ ] in the upper right of the playback screen. On the data list, selecting a
file/folder that want to download then tap [ ].
2. After downloaded, the file will show in the [Download folder].
50 |

Delete file/folder
1. Click the [ ] in the upper right of the playback screen. On the data list, selecting a
file/folder that want to delete then tap [ ].
2. When the [delete] screen is display, please tap [Confirm] then delete file starting.
51 |

Access and manage files (Advance)
Checking the file information
On the data list, select file/folder that want to check information. Tap [ ] icon next to the
file/folder then file information will show on the screen.
52 |

Download file/folder to local folder
1. On the data list, selecting file/folder that want to download. Tap [ ] icon next to the
file/folder then choose [Download to download folder].
2. After downloaded, the file/folder will show in the [Download folder].
53 |

Share file via email
1. On the data list, selecting files that want to share. Tap [ ] icon next to the file then choose
[Share by email attachment].
2. Specify the recipients and send message.
Note: Attachments should smaller than 20MB
54 |

Editing the file/folder name
1. On the data list, selecting file/folder that want to edit. Tap [ ] in the playback screen then
choose [Rename].
2. Enter a new file/folder name, tap [OK].
55 |

Copying file/folder
1. On the data list, selecting file/folder that want to copy. Tap [ ] in the playback screen then
choose [Copy].
2. Select the copy destination then tap [Copy]
56 |

Moving file/folder
1. On the data list, selecting file/folder that want to move. Tap [ ] in the playback screen then
choose [Move].
2. Select the move destination then tap [Move]
57 |

Deleting data
1. On the data list, selecting file/folder that want to delete. Tap [ ] in the playback screen then
choose [Delete].
2. When the [delete] screen is display, please tap [Confirm] then delete file starting.
58 |

Upload photo/video
1. Select the upload destination and tap [ ].
2. Tap [Camera Roll] and select image(s) and click [Done] or [Upload] to start uploading.
59 |

Backup & restore phonebooks to/from QGenie
1. Turn on QGenie. Connect the phone/tablet to QGenie’s wireless LAN.
2. Open Qfile and connect to QGenie
3. Select [ ]→[ ]
Phonebook backup
Select [Back up now] and all the contacts on phone/tablet will be saved to QGenie.
Phonebook restore
Select [Restore now] and select the phonebook backup file that want to restore then choose [Create
New Contacts] or [Merge with Contacts].
60 |

NOTE
Qfile will not import duplicate contacts.
Phonebook auto backup
Select phonebook auto backup is occur in [Each week] or [Each month] then press [Done]. The
backup files will be stored in \Qsync\Phonebook\
61 |

Setup Qfile
Local Storage
Specify the storage space that can be used by Qfile on phone/tablet. This includes the total size of
the Local Folder and cache.
Clear Cache
The files that have previewed are saved in the Local Folder as a cache. Tap [Clear Cache] to clear
all the temporary data in the Local Folder.
62 |

Default file exists action for uploads/downloads
1. Default file exists action for uploads
Select to [Overwrite] a file or [Skip] uploading if a file already exists on the QGenie.
2. Default file exists action for downloads
Select to [Overwrite] a file or [Skip] downloading if a file already exists on phone/tablet.
63 |

Auto Login
Enable automatic login to QGenie.
File list sorting
Select the sort by [File name], [Data modified], [File size].
64 |

Browsing photo setting
Selecting browse photo by [Thumbnail size], or [Original size].
65 |

Auto upload photo from photo gallery
Upload the photo library from phone/tablet to the QGenie.
Set up auto upload photo
1. Select [Set up now] and photo upload destination then tap [Select]
2. Tap [Yes] for upload all the photos from phone/tablet.
66 |

Chang/Remove auto upload photo
1. Change auto upload photo destination folder
Select [Change], photo upload destination then tap [Select] and tap [Yes] for confirm change
photo upload destination.
2. Remove auto upload photo destination
Tap [Remove] and press [OK] for remove auto upload photo setting.
67 |

Upload from inbox settings
Upload the mail inbox from phone/tablet to the QGenie.
1. Setup upload folder
Select [Set up now] and select [upload destination] then tap [Select]
2. Remove upload folder
Tap [Remove] and press [OK] for remove upload the mail inbox setting.
68 |

Setup/use QGenie with Qfinder
QGenie supports a Qfinder utility for users to access the file and check the QGenie’s status.
Login from Web Interface
1. Turn on QGenie. Connect the PC to QGenie’s wireless LAN. By default, the name of QGenie
is [QG-XXXXXX] (the wireless name (SSID) on QGenie’s OLED screen).
2. After connected to the Wireless LAN, please go to Qfinder and choose [login].
3. It will open browser and go to http://192.168.60.1/. The welcome page as below.
69 |

Admin Account
Guest Account
Password
Admin
None
Account permission
Change QGenie setting
Only view the current status
of QGenie
Folder access
Qsync/SD card/USB
SD card/USB
4. Users can login with Admin account or Guest account. The different between admin account
and guest as below.
70 |

Access QGeine’s contents
Use a Network neighborhood (Samba) to access QGenie contents
1. Connect QGenie to the PC via wireless LAN.
2. For Windows operating systems, there are two methods to access QGenie contents
Method 1: Open File Explorer and type “ \\192.168.60.1” in the address bar.
Method 2: Launch the QNAP Qfinder and tap [Network Drive].
3. Users can choose Qsync, SD or USB and access the stored content.
Use a Mac to access QGenie contents
1. Connect QGenie to the Mac via wireless LAN.
2. For Mac operating systems, there are two methods to access QGenie contents
71 |

Method 1: [Go] →[Connect to Server] and enter “smb://192.168.60.1”.
Method 2: Launch the QNAP Qfinder and tap [Network Drive].
3. Users can choose Qsync or SD or USB and access the stored content.
72 |

NOTE
Unplugged devices will appear in the list, but they will inaccessible.
73 |

Checking the QGenie’s detail
1. Connect QGenie to the PC via wireless LAN.
2. Launch the QNAP Qfinder and tap [Detail].
3. The QGeine’s detail will show on the screen.
74 |

Setup/use QGenie with Web Browser
QGenie provides a web interface for users to setup basic functions, allowing users to use a web
browser from their PC or other devices to change its settings.
Login from Web Interface
1. Turn on QGenie. Connect the PC to QGenie’s wireless LAN. By default, the name of QGenie
is [QG-XXXXXX] (the wireless name (SSID) on QGenie’s OLED screen).
2. After connected, open browser and go to http://192.168.60.1/. The welcome screen as below.
75 |

Admin Account
Guest Account
Password
Admin
None
Account permission
Change QGenie setting
Only view the current status
of QGenie
Folder access
Qsync/SD card/USB
SD card/USB
3. Users can login with Admin account or Guest account. The different between admin account
and guest as below.
76 |

Setting Page
Setup Device ID with Web Interface
1. Login to the Web Interface using the Admin account.
2. Select [Setting] from the navigation panel.
3. Enter a new name on the [Device Name] field.
4. Select [Save] to apply new Device name and QGenie will restart with a new Device Name.
NOTE
After change device name, please reconnect to the QGenie’s Wireless LAN by using the new Device Name.
77 |

Setup Wireless Security with Web Interface
1. Login to the Web Interface using the Admin account.
2. Select [Setting] from the navigation panel.
3. Select [Security Type] in Wireless Security. For the best level of security, it is recommended to
use WPA2.
4. After entering the password twice, select [Save] to apply new security settings.
NOTE
After change Wireless security, please reconnect to the QGenie by using the new password.
WPA/WPA2, the valid password length is between 8 ~ 63 characters long.
WEP, the valid password length is between 5 or 13 characters long.
Firmware upgrade with Web Interface
1. Turn on QGenie. Connect the PC to QGenie’s Wireless LAN.
2. Open browser and go to http://192.168.60.1/. Login to the Web Interface using the Admin
account.
78 |

3. Select [Setting] from the navigation panel.
4. [Firmware] will show in the settings page. Choose the firmware to apply from PC, and select
[Update].
79 |

5. The QGenie OLED screen will display “Upgrading” and indicate its progress.
80 |

Setup Admin Password with Web Interface
1. Login to the Web Interface using the Admin account.
2. Select [Setting] from the navigation panel.
3. [Admin Password] will show in the settings page. After entering the password twice, select
[Save] to apply new admin password.
NOTE
After change admin password, please reopen Qfile by using new admin password.
81 |

Allow or Deny guest access
1. Login to the Web Interface using the Admin account
2. Select [Setting] from the navigation panel.
(Available in 3.1.1 or later)
3. [Guest Access] will show in the setting page. Default it is "Deny."
4. Set to "Allow" to accept guest login to Network Neighborhood (Samba), Web File Manager, and
Qfile.
82 |

Setup QGenie’s Internet connection
QGenie supports 3 methods to connect to Internet:
1. Wired Internet
Plug an Ethernet cable to QGenie and use Ethernet internet connection.
2. Wireless Internet
QGenie connect to an existing wireless internet connection.
3. USB Internet
QGenie can work with (1) internet tethering (iPhone/Adnroid), or (2) 3G/4G USB dongle.
Setup Wired Internet
1. Login to the Web Interface using the Admin account.
2. Select [Internet] from the navigation panel.
3. Select wired connection type from [Wired Internet] and press [Connect]
DHCP: The most common method, choose this if connect the cable to a home router.
Static IP: Similar with DHCP, but required to manually input proper IP settings.
PPPoE: If plug QGenie directly to an ADSL/VDSL modem and need to enter a username
and password.
* If doesn’t know kind of connection type are using, please contact the network administrator or
internet service provider for assistance.
Setup Wireless Internet
1. Login to the Web Interface using the Admin account.
2. Select [Internet] from the navigation panel.
83 |

3. Select [Search] next to Wireless connection
4. Select the Wireless network that want to connect, and enter the password if necessary.
After these settings are applied, QGenie will restart. Please reconnect to QGenie manually.
NOTE
QGenie will remember the previous six successful wireless internet connections including passwords and will
attempt to automatically connect to them if start QGenie with Wireless Internet settings.
Setup USB Internet
1. Login to the Web Interface using the Admin account.
2. Select [Internet] from the navigation panel.
3. Select the type of USB device, and press [connect].
84 |

85 |

Access QGeine’s contents
1. Turn on QGenie. Connect the PC to QGenie’s Wireless LAN.
2. Open browser and go to http://192.168.60.1/. Login to the Web Interface using the Admin
account or Guest account.
3. Select [Web Folder].
4. Begin browsing files on SD card and USB storage device.
86 |

NOTE
If the Web Folder does not appear in the Web Interface, please make sure that the storage device is properly
inserted.
87 |

myQNAPcloud Service
(Available on QGenie with firmware 3.1.1+)
myQNAPcloud service is a function which provides host name registration, mapping of the dynamic
NAS IP to a domain name, and auto port mapping of UPnP router on the local network. Use the
myQNAPcloud setup to register a unique host name for QGenie, configure automatic port
forwarding on the UPnP router, and publish QGenie services for remote access over the Internet.
To use the myQNAPcloud service, make sure QGenie has been connected to an UPnP router and
the Internet. Goto myQNAPcloud the QGenie's dashboard.
Create myQNAPcloud ID
This step can be skipped when already have myQNAPcloud ID.
Click [sign up now!] and fill out all required fields to create new myQNAPcloud ID.
88 |

Register QGenie to myQNAPcloud
Fill myQNAPcloud ID (Email,) password, and device name to register QGenie to myQNAPcloud.
Note: Register and configure router's UPnP may take several minutes. Please wait after press [Sign
In]
89 |

After register, the QGenie will appear in myQNAPcloud portal.
Unregister QGenie from myQNAPcloud
Click [Sign Out], and QGenie will be ungistered from myQNAPcloud.
Please note the device name been unregistered will be available for others.
Precautions
General use
1. To avoid malfunctions and hardware failure:
QGenie should not be dropped, have heavy objects placed on it, hit with a strong force or put
physical pressure on.
2. Do not leave QGenie in the following places:
Very hot places (including under direct sunlight, beside a heater, on a car dashboard, in
a car with windows closed during summer, etc). This can lead to product discoloration,
physical deformation or hardware failure.
In environments with lots of dust or vibration.
On an unstable or inclined surface.
In a humid environment.
Near magnets or beside a device that creates a magnetic signal.
90 |

3. If you hear static on the radio or TV, turn off the power to QGenie and move it away from the
radio or TV.
4. To avoid physical damage to QGenie, avoid following situations:
Do not sit down after putting QGenie in back pocket.
When a USB device/cable is attached to QGenie, avoid putting QGenie in a bag or
impacting QGenie with a strong force.
5. QGenie is not waterproof. Be careful when using QGenie in situations where QGenie can get
wet and do not expose QGenie to rain, moisture or humid environments.
6. Be wary of rapid temperature changes, as temperature can create condensation on the
surface or inside QGenie. If condensation is happen on QGenie, do not turn QGenie on until
the condensation goes away otherwise condensation may lead to hardware failure.
7. QGenie transmits data by using 2.4GHz radio waves. If other nearby devices use the same
frequency, interference may prevent QGenie from functioning correctly.
8. Battery may be unable to fully charged when do not use QGenie for a long time. To fix this:
charge and drain the battery for 2-3 cycles.
9. Store QGenie in safe place and disconnect all attached USB cables/devices if do not use
QGenie for a long period.
10. Before using QGenie as a power bank for other devices, please check the user manual of
those other devices before doing so to ensure compatibility and correct charging procedures.
11. Before using QGenie to supply power to another device, check the power requirements of the
device. QGenie’s USB port supports a maximum output of 1500mA and will limit output to this
level for safety.
12. When powering a device from QGenie, the charging time will differ based on the remaining
battery charge.
If a USB hub or extension cable is used, QGenie may not operate correctly.
Maintenance
Clean QGenie using a soft cloth that is free of any cleansers or product. Take care if using water to
clean its appearance.
Notes on external storage
1. Do not remove SD cards or other storage devices when being accessed by QGenie as this
may result in data corruption or loss.
2. Data can be corrupted or lost if QGenie loses power when accessing external storage or if
QGenie is used in an environment with significant electromagnetic interference.
3. Do not touch the USB port or SD card slot with hand or metal objects.
4. Using excessive force to insert an SD card into QGenie may damage both devices.
5. QGenie cannot access data that uses copyright protection technology.
6. The maximum file size of an SD/SDHC memory card is 4GB due to the FAT file system.
Please reformat SD/SDHC card with exFAT or NTFS if need to store large files.
91 |

CPU
MIPS 24KEc 600MHz
Dram
64MB RAM
Flash Memory
16MB
Internal SSD
32GB
WiFi
802.11n 1T1R 150Mbps
LAN Port
1 x 100Megabit RJ-45 Ethernet port
OLED Display
Yes
LED Indicators
Power, Battery
USB
1 x USB 3.0 port
SD Card Slot
1 x SDXC
Buttons
Info, Reset
Mode Switch
WiFi Sharing/Power Bank/Off
Dimensions
115 (H) x 58.5 (W) x 17.5 (D) mm
Weight
122 g
Power Consumption (W)
0.8w
Operating temperatures
0 °C to 45 °C (32 °F to 112 °F) (During normal
operation)
0 °C to 45 °C (32 °F to 112 °F) (When charging
the built-in battery)
Specifications
Hardware
92 |

Supported Client OS
Windows XP, Vista, Windows 7 (32/64-bit),
Windows 8 (32/64-bit), Windows Server
2003/2008 R2/2012
Apple Mac OS X
Linux & UNIX
Wired Internet Sharing
ADSL/VDSL (PPPoE)
Cable Modem (DHCP)
Hotel/Office LAN (DHCP)
User Defined Network (Static)
Supported Browsers
Microsoft Internet Explorer 10+
Mozilla Firefox 8+
Apple Safari 4+
Google Chrome
Apps/Utilities
Qfile (iOS/Android)
Qsync (Windows)
Qfinder (Windows)
Access Right Management
Guest/Admin Mode
Access Password Protection
Multimedia Formats (**)
Photos: JPG, GIF, PNG, TIFF, BMP
Documents: DOC, DOCX, PPT, PPTX, XLS,
XLSX, KEY, NUMBERS, PAGES, TXT, RTF, PDF
Audio: MP3, AAC, M4A, AIF, WAV, WMA, OGG,
APE, FLAC
Video: WMV, AVI, MKV, RM, RMVB, XVID, MP4,
MOV, 3GP, MPG, M4V
(**) The support of all formats comes from the mobile
devices or 3rd party software. QGenie and Qfile don't
encode/decode the multimedia data.
File System
FAT32, NTFS, exFAT, HFS+, ext2, ext3, ext4 (up to
2TB)
Software
93 |

File Access
Discovery Protocols
Qfile API
WebDAV
Network Neighborhood (CIFS/Samba)
UPnP Discovery
Bonjour Discovery
USB Internet Sharing
iPhone Tethering (iOS 6, iOS7)
Android Tethering (4.0/4.1/4.2/4.3/4.4)
4G/3G/LTE USB Modem
Multilingual Support
English/Chinese
Management
Firmware Upgrade
Factory Default
Dashboard-based Resource Monitor
94 |

Troubleshooting
Main unit
QGenie does not turn on.
QGenie’s battery may be running out. Please charge it using a PC or USB AC adaptor.
The battery life is shorter than expected.
The usage time will vary depending on different circumstances..
The battery discharges very quickly, even when QGenie is off.
If QGenie has not been used in a long time, please recharge the battery sufficiently for
optimum use.
If the battery life is noticeably short, even with a full charge, it may have reached the end
of its life.
If QGenie is left unused for over a year, the battery may have deteriorated.
Due to the nature of lithium-ion batteries, it may discharge quickly if the air temperature
is below 5 °C (41 °F).
The battery does not charge from a computer.
If a USB hub or extension cable is used, QGenie may not charge correctly.
QGenie cannot be charged when the PC is turned off or in sleep mode.
Try disconnecting and reconnecting QGenie or using another USB port.
Make sure that computer meets QGenie’s requirements.
The battery indicator icon does not appear as charging.
Ensure that the USB cable is correctly connected.
For optimum performance of the rechargeable lithium-ion battery, it is recommended to
charge between 10 °C to 35 °C (50 °F - 95 °F).
Maybe using an incompatible USB AC adaptor. Please try with another adaptor.
If charging from a completely discharged battery, it may take a while until the OLED
indicator appears.
It takes a long time to charge the battery.
The charging time will vary depending on different circumstances.
If QGenie is charged with power turned on and with other USB devices attached, the
time to fully charge the other devices may change.
95 |

QGenie does not supply power to other devices.
Make sure that the device cable is connected correctly.
QGenie’s battery may be too low to supply power to other devices.
Check the user manual of the other device to ensure compatibility and correct charging
procedures.
Check the power requirements of the other device. QGenie’s USB port supports a
maximum output of 1500mA and will limit output to this level for safety.
If a USB hub or extension cable is used, QGenie may not charge correctly.
Heat
This unit becomes warm.
This unit may become warm during use, including charging or while it supplies power to
other devices. This is not a malfunction. Stop using the unit and allow it to cool down.
Do not use this unit at a location where heat can accumulate.
Charging
The battery does not charge from a computer.
Use the supplied USB cable to charge this unit.
Correct operation is not assured if a USB hub or USB extension is used. Use the supplied
USB cable only to connect this unit to a computer or USB AC adaptor.
Make sure that the computer is turned on and not in standby mode or sleep mode. This
unit cannot be charged from a computer that is not turned on or in standby/sleep mode.
Disconnect this unit from the computer, then connect again.
Make sure that your computer meets the requirements for this unit.
The battery indicator lamp does not light while charging.
Make sure that the USB cable is connected correctly.
Charge this unit in an air temperature within this limit.
For optimum performance of the rechargeable lithium-ion battery, it is recommended
to charge between 10 °C to 30 °C (50 °F - 86 °F).
The USB AC adaptor being used may be an unsupported model. Please try with another
USB AC adaptor.
96 |

When the battery is completely discharged, recharging starts immediately; however, it
may take a while until the battery indicator lamp lights.
The battery indicator lamp blinks while charging.
If an abnormality (e.g. increased unit temperature, or insufficient power input) occurs
while charging, the battery indicator lamp may blink orange, and charging may stop.
Please try with another USB AC adaptor, or change another port when charge with PC.
It takes a long time to charge the battery.
The charge time detailed in this Help Guide is approximate. Charge time may be long
depending on usage conditions.
Charge by PC may take longer time than using USB AC adapter.
The wireless LAN function cannot be used while charging.
While charging from a computer, the wireless LAN function turns off automatically.
Power bank
This unit does not supply power to other devices.
Make sure that the USB cable is connected correctly.
Use this unit within this operating temperature range.
The remaining battery charge of this unit may be low. Recharge QGenie and try again.
The device to be supplied power is not ready for charging. For details on how to charge
the device, refer to its instruction manual.
The maximum output current of the USB port of this unit is 1.5A. If the supply output
current exceeds 1.5A, the power is stopped for safety.
Before supplying power to another device, be sure to check the voltage and current
ratings of the device.
If battery life is considerably short, even when the battery is fully charged, the battery
may have reached the end of its lifespan. (The lifespan of the battery varies depending
on usage conditions.)
97 |

Wireless LAN connection
Wireless LAN connection to a smartphone, tablet or computer cannot be established.
Make sure that this unit and your device are turned on and the wireless LAN function of
your device is enabled.
Ambient conditions (obstacles between this unit and your device, electromagnetic
interference, wall materials, etc.) may adversely affect the wireless communication
range. Change the location of this unit, or move your device and this unit closer
together. If the problem is not resolved, restart the unit or press the RESET switch to set
the unit to the factory defaults (*)
This unit and your device may be too far away from each other. Move them closer
together.
The wireless LAN this unit is connected to may have a problem. Consult the network
administrator.
The number of users connected to this unit may have reached the maximum limit (20).
Equipment that uses the 2.4 GHz frequency band, such as a microwave oven or
Bluetooth device, may be in use near this unit. Move such equipment away from this
unit, or turn the equipment off.
When you are using a password to secure connection between this unit and your device,
make sure that you are entering the correct password. If you have forgotten the
password, restore the factory default settings by pressing RESET switch (*).
The wireless LAN function cannot be used while connecting this unit to a computer
using a USB cable.
While connecting this unit to a USB AC adaptor, the memory card inserted in this unit
can be read or written via the wireless LAN function; however, the USB device
connected to this unit cannot be read or written.
*Since all settings on this unit will be initialized, it is recommended that you take notes of
settings before restoring the factory defaults.
I found two wireless names (SSIDs), both of which start with "QG" and I cannot determine which one should be used.
Another person may be using their QGenie nearby. Press the information button and
check wireless name shown on OLED screen. Select that wireless network.
98 |

The wireless LAN connection has stopped.
If this unit is connected to a computer with the USB cable, the wireless connection will
be stopped and USB connection will be established.
When changing from wireless LAN connection to USB connection, make sure that data
copy via wireless LAN is not in progress. If you change to USB connection while data
copy is in progress via wireless LAN, data may be damaged.
Phone / tablet need to use new settings after change device name or wireless security
settings of QGenie.
The wireless LAN connection between this unit and a smartphone, tablet or computer is unstable.
Ambient conditions (obstacles between this unit and your device, electromagnetic
interference, wall materials, etc.) may adversely affect the wireless communication
range. Change the location of this unit, or move your device and this unit closer
together. If the problem is not resolved, restart the unit or press the RESET switch to set
the unit to the factory defaults (*).
Equipment that uses the 2.4 GHz frequency band, such as a microwave oven or
Bluetooth device, may be in use near this unit. Move such equipment away from this
unit, or turn the equipment off.
*Since all settings on this unit will be initialized, it is recommended that you take notes of
settings before restoring the factory defaults.
It takes a long time to establish a wireless LAN connection between this unit and a smartphone, tablet or computer.
Ambient conditions (obstacles between this unit and your device, electromagnetic
interference, wall materials, etc.) may adversely affect the wireless communication
range. Change the location of this unit, or move your device and this unit closer
together. If the problem is not resolved, restart the unit or press the RESET switch to set
the unit to the factory defaults (*).
Equipment that uses the 2.4 GHz frequency band, such as a microwave oven or
Bluetooth device, may be in use near this unit. Move such equipment away from this
unit, or turn the equipment off.
*Since all settings on this unit will be initialized, it is recommended that you take notes of
settings before restoring the factory defaults.
99 |

Internet connection
Internet connection cannot be established.
Make sure that your network equipment (wireless router, etc.) is turned on. Make sure
that the wireless LAN function of your device is enabled.
Ambient conditions (obstacles between this unit and your device or wireless router,
electromagnetic interference, wall materials, etc.) may adversely affect the wireless
communication range. Change the location of this unit, or move your device, wireless
router and this unit closer together. If the problem is not resolved, restart the unit or
press the RESET switch to set the unit to the factory defaults (*).
The wireless LAN this unit is connected to may have a problem. Consult the network
administrator.
Equipment that uses the 2.4 GHz frequency band, such as a microwave oven or
Bluetooth device, may be in use near this unit. Move such equipment away from this
unit, or turn the equipment off.
When you are using a password to secure connection to your wireless router, make
sure that you are entering the correct password.
When your wireless router is set to hide its SSID, this unit cannot connect to the router.
In this case, set the router not to hide its SSID.
QGenie could not connect to wireless network using enterprise encryption.
Some public access wireless LANs require a login ID and password to be input via a web
browser to access the wireless connection provided. Consult the service provider of the
hotspot.
*Since all settings on this unit will be initialized, it is recommended that you take notes of
settings before restoring the factory defaults.
Other
How many wireless networks (SSIDs) can be registered as the external access points for the Internet connection?
Up to 6 SSIDs are automatically registered as the external access points.
The entry least used wireless network will be deleted when connect to 7
network.
th
wireless
100 |
 Loading...