

Page 1

NAC-300N/ NAC-300P
User Manual
- 1 -
Page 2

NAC-300N/ NAC-300P
Network Attached Camera
User Manual (Version 1.0.0)
©Copyright 2006. QNAP Systems, Inc. All Rights Reserved.
January 17, 2006
- 2 -
Page 3

TRADEMARKS
®
QNAP
and Internet Explorer
is a registered trademark of QNAP Systems, Inc. Microsoft®, Windows®
®
are registered trademarks of Microsoft Inc. All other brand
or product names are trademarks of their respective companies or organizations.
LIMITED WARRANTY
In no event shall the liability of QNAP exceed the price paid for the product from
direct, indirect, special, incidental, or consequential software, or its documentation.
QNAP offers no refunds for its products. QNAP makes no warranty or
representation, expressed, implied, or statutory, with respect to its products or the
contents or use of this documentation and all accompanying software, and
specifically disclaims its quality, performance, merchantability, or fitness for any
particular purpose. QNAP reserves the right to revise or update its products,
software, or documentation without the obligation to notify any individual or entity.
IMPORTANT NOTICE
Read Instructions
Please read all the safety and operating instructions before using this product.
Power Source
Use the product with the type of the power source provided by the manufacturer
only.
Servicing
Please contact qualified technicians for any service requests. Do not attempt to
repair the product yourself, as opening the cover may expose you to dangerous
voltage and other hazards.
Warning
To prevent fire or electric shock, do not expose this product to rain or moisture.
Do not place heavy items on the product.
- 3 -
Page 4

Table of Contents
Chapter 1. NAC-300 Introduction .......................................................... 6
1.1 Main Features...............................................................................6
1.2 Package Contents .........................................................................7
1.3 System Overview..........................................................................8
1.4 System Requirement .....................................................................9
Chapter 2. Install NAC-300..................................................................10
2.1 Set up NAC-300.......................................................................... 10
2.2 Access NAC-300 .........................................................................12
Chapter 3. Use NAC-300 ...................................................................... 14
3.1 Enter Configuration Page ................................................... 14
3.2 Configure NAC-300 Settings ......................................................... 17
3.2.1 Camera Settings...................................................................... 19
3.2.2 System Settings ...................................................................... 24
3.2.3 Motion Detection ..................................................................... 31
3.2.4 Alarm Management..................................................................34
3.2.5 Schedule Profile....................................................................... 36
3.2.6 System Information ................................................................. 38
Chapter 4. NAC-300 Operation ............................................................39
4.1 Monitoring Page.......................................................................... 39
4.2 Snapshot Screen ............................................................... 40
4.3 Record Video ................................................................... 41
4.4 Download QNAP Player and Playback ................................... 42
4.5 Resize Display Window ............................................ 43
4.6 Network Camera Status ............................................................... 43
4.7 Log out NAC-300 .......................................................... 43
- 4 -
Page 5

Chapter 5. NAC-300 Maintenance ........................................................44
5.1 Restart/ Shut down NAC-300 ........................................................ 44
5.2 Reset Administrator Password & Network Settings ........................... 44
5.3 Operation of NAC-300 Alarm Output .............................................. 45
5.4 System Update........................................................................... 46
5.5 Troubleshooting― Event & System Logs ......................................... 47
Appendix A. Terms and Glossary ........................................................48
Appendix B. Using NAC-300 with IP Sharing Router...........................51
Appendix C. Connecting NAC-300 via PC ............................................52
Appendix D. Dynamic Domain Name Registration...............................55
- 5 -
Page 6

Chapter 1. NAC-300 Introduction
1.1 Main Features
NAC-300* is a networked surveillance camera that provides instant monitoring,
recording, snapshot taking for personal and home security. NAC-300 has the
following main features:
• Built-in 1/3” CCD sensor to provide high image quality
• Support AUTO-IRIS functon
• TV-Out for local monitoring, NAC-300P for PAL, NAC-300N for NTSC
• Dedicated hardware design: MPEG-4 IC for video encoding
• The best DVD quality and performance: Full-D1, 30 frames/second
• 1 set of alarm input and output
• Motion detection to protect the most important monitoring area
• Support SMS and e-mail notification
*NAC-300 refers to NAC-300N and NAC-300P generally in this document.
Note: NAC-300 is designed for indoor use only.
- 6 -
Page 7

1.2 Package Contents
;
NAC-300
;
CCTV LENS
;
Camera Bracket
;
Power Adapter
;
GPIO Connector
;
Ethernet Cable
;
CD-ROM
;
CS Ring
;
Quick Installation Guide
- 7 -
Page 8

3
9
1.3 System Overview
1
2
8
7
4
5
6
1. CCTV LENS
2. IRIS LENS Connector
3. Power Connector
Video Out
4.
Network Connector
5.
Audio Input*
6.
Alarm I/O Connector
7.
8. Reset Button
Power Indicator
9.
*Reserved. QNAP will support this function in the near future.
- 8 -
Page 9

1.4 System Requirement
To use NAC-300, please make sure your PC is equipped with the following:
• CPU: Intel Pentium III 1GHz processor or above
• Memory: 256 MB or above
• Interface: 10/100/1000 Mbps network environment
• Independent display card (nVIDIA graphic chip is recommended)
• Operating system: Windows 2000/XP
• Browser: Microsoft Internet Explorer 6.0 or later
• DirectX: 9.0 or above
• Protocol: TCP/IP
Note: If you have any inquiries regarding your PC, please contact your PC
dealer.
- 9 -
Page 10

Chapter 2. Install NAC-300
2.1 Set up NAC-300
Please follow the steps below to install NAC-300.
1. Remove the cap of NAC-300.
Don’t touch CCD
sensors!
When using auto
IRIS LENS, please
connect the cable
to here!
2. Take out CCTV LENS from the box
and connect lens to NAC-300 and
rotate it clockwise to the end.
- 10 -
Page 11

5.
4.
You can install a
sensor and send
signal to other
devices by Alarm
I/O Connector.
Power
Adapter
Power
Source
3.
You can monitor video
on TV via Video Out
connector.
TV (Not included)
Switch/ Hub/ Router
(Not included)
3. Connect LAN port to a switch/ hub/ router by a network cable.
Connect the power adapter to NAC-300.
4.
Connect the power adapter to power source, and NAC-300 will turn on.
5.
mportant Notice
I
It is recommended to install
QNAP Finder in any PC in the same subnet to search for NAC-300.
NAC-300 in LAN with DHCP service. You can then run
- 11 -
Page 12

2.2 Access NAC-300
After installing NAC-300 and turning on the power, please follow the steps below to
connect your PC to NAC-300. Make sure NAC-300 is connected to the network.
Insert NAC-300 CD-ROM in a PC
connected to the network of NAC-300.
After auto running, click QNAP Finder to
install QNAP Finder.
Execute on Windows desktop to
launch QNAP Finder.
Double click the name of your NAC-300
to login NAC-300.
NAC-300 will get an IP address from
DHCP automatically.
If you do not have DHCP service,
NAC-300 will use the default settings.
Default Settings:
IP Address: 192.168.0.1
Subnet Mask: 255.255.255.0
- 12 -
Page 13

When the login window is shown, enter the
default user name and password.
Default Settings
User name: administrator
Password: admin
When you login NAC-300, the IE browser
will request to install ActiveX. Please click
the notice in the browser.
When a window pops up, select [Install].
After installing ActiveX, the IE browser will
show live video from NAC-300.
If the image is blurred, please adjust the
focus of CCTV LENS until it is clear.
Note: It is required to use Microsoft Internet Explorer 6.0 or above to
access NAC-300.
- 13 -
Page 14

Chapter 3. Use NAC-300
3.1 Enter Configuration Page
Please follow the steps below to enter the configuration page of NAC-300.
1. Run NAC-300 Finder, select the appropriate network camera and double click the
server name.
- 14 -
Page 15

2. Enter the administrator name and password.
Default user name: administrator
Password: admin
3. The first time you login NAC-300, please install ActiveX control so that you can
view the image properly.
- 15 -
Page 16

4. You can view the monitoring image of NAC-300 and click
start to configure the settings.
on the top to
- 16 -
Page 17

3.2 Configure NAC-300 Settings
Buttons on Monitoring Page
Snapshot
Start recording
Set snapshot/ recording folder
Download QNAP Player
Enlarge
Shrink
Settings
Logout
Select display language: English, Traditional Chinese, Simplified
Chinese, or Japanese
- 17 -
Page 18

- 18 -
Page 19

When you first login NAC-300 configuration page, you have to enter Settings page
by clicking
To return to monitoring page, click
3.2.1 Camera Settings
on the live monitoring page to configure the settings of NAC-300.
on the top right hand corner.
9 Camera Name
Enter the camera name of NAC-300. The camera name can contain 20 English
characters at maximum.
- 19 -
Page 20

9 Video Settings
You can choose the most suitable video settings for your network environment.
If your network environment is not available on the drop down list, please set up
the resolution, frame rate, and bit rate manually.
i. Quick Selection
Select your network connection type or modify the video settings manually
by choosing “Customization”.
ii. Resolution
NAC-300N supports 720x480, 720x240, 352x240, and 176x112.
NAC-300P supports 720x576, 720x288, 352x288, and 176x144.
iii. Frame Rate
NAC-300N supports 1, 2, 3, 5, 10, 15, and 30; and NAC-300P supports 1, 5,
and 25 for the frame rate of the video screen. The higher the frame rate,
the more number of frames are played per second.
iv. Bit Rate
Select the bit rate for the camera. Bit rate controls the storage space
required by recording files. You can refer to the approximate disk space
required every day by each channel for all bit rate options. The total bit rate
of the camera will be affected by network bandwidth.
- 20 -
Page 21

->
Further description of resolution, frame rate, and bit rate
9 Resolution
A viewable digital image is composed by series of spots (pixels). The more
pixels contained, the clearer the image will be. Higher resolution means more
pixels are contained within the image. High resolution = More pixels = Clearer
image.
50x50 means the picture is composed by 2,500 pixels. The quality of a 25x25
picture is only 1/4 of 50x50’s. The quality will become 1/16 if the resolution is
12x12.
If you enlarge 12x12 picture, 25x25 picture, and 50x50 picture to the same size,
you will see the difference.
->
50x50 50x50 25x25
50x50
12x12
->
50x50
9 Frame Rate
A video is a continuous series of still pictures (movie/ film). By connecting all
the still pictures one by one, it becomes a movie. Each still picture in the movie
is known as “frame”. The more frames a video has, the easier and smoother to
play the video.
We use “frame per second (fps)”to indicate the smoothness of a video.
Changing the frame rate of NAC-300 will not make any difference on the
recorded video file size, but will influence the smoothness of the video.
Selecting higher frame rate will reduce the video quality and lower frame rate
will increase the video quality.
- 21 -
Page 22

9 Bit Rate
In digital video field, higher bit rate means more data (bit) is needed to be
handled in one second and higher video quality. The video file size can be
calculated by bit rate, which helps user to estimate the storage capacity needed.
Calculation formula:
(NAC-300’s bit rate) x time (second) / 8 = video file size in KByte.
(NAC-300’s bit rate) x time (second) / 8 / 1024 = video file size in MB
(NAC-300’s bit rate) x time (second) / 8 / 1024 / 1024 = video file size in GB
For example:
The file size of 512bps video recorded for one hour is 512 Kbps x 3600 seconds
(1 hour) / 8 = 230400 Kbytes = 225 MB
- 22 -
Page 23

9 Image Settings
i. Brightness
Brightness is the amount of light in an image. Enter a number (0~100) to
define the brightness of your image.
ii. Saturation
Saturation is the degree of color difference from a gray of equal brightness.
Enter a number (0~100) to adjust the saturation level of the image.
iii. Contrast
Contrast is the difference between the light and dark colors in an image.
Enter a number (0~100) to define the contrast of the image.
iv. Hue
Hue is the perceptual attribute associated with elementary color names – red,
orange, yellow, green, blue and purple. Enter a number (0~100) to define
the hue of the image.
- 23 -
Page 24

3.2.2 System Settings
You can configure system settings including date & time, network, user
authentication and system tools in this section.
3.2.2.1 Date & Time
Select the correct time zone of your location, or set the date and time manually for
NAC-300.
9 Enable NTP
You can enable NTP (Network Time Protocol) and select to use default NTP
server (pool.ntp.org) or enter a time server (server name or IP address) which
will update your server time automatically.
The NTP design of NAC-300 will not change the camera time immediately unless
the time difference with the system time is more than 2 minutes to avoid
non-continuous or duplicated recording time of the data. To adjust the time,
NTP will accelerate the time per second or slower the time by several micro
seconds to maintain the time difference in one second.
- 24 -
Page 25

9 Set Date & Time
Use computer time: Select this option to set the time of NAC-300 the same as
your computer’s time. This function will only change the system date and time
but will not synchronize the time zone settings.
You can also enter the date and time manually.
Note: It is recom mended t hat you use NT P to adjust the date and time of
the camera to the accurate settings.
- 25 -
Page 26

3.2.2.2 Network
Select the appropriate network settings for NAC-300. NAC-300 supports DHCP and
static IP for LAN connection.
9 LAN Settings
• Obtain IP address automatically
By selecting this option, NAC-300 will obtain an IP address automatically from
the DHCP server.
• Static IP
To use static IP, select this option and enter the IP address for subnet mask,
gateway and DNS server.
9 PPPoE Settings
For dynamic ADSL connection, enable PPPoE settings. Enter the user name and
password provided by your ISP for connection.
- 26 -
Page 27

9 DDNS Settings
To access NAC-300 via a domain name, enable dynamic DNS service. You
should first apply for DDNS service from a service provider. Upon successful
registration, you can use DDNS service for NAC-300. Check the box Enabled
DDNS to enable dynamic DNS server.
• DDNS Service
Select a DDNS provider from the drop-down menu: DynDNS, ODS, DHS, or
DyNS. Please refer to
Appendix D for DDNS service registration.
• Dynamic IP
Check the box Dynamic IP if your NAC-300 is assigned a dynamic IP
address.
• User name, password, host name
Enter the user name, password and the host name of the DDNS service.
Please click Apply to confirm all the changes made in this section.
- 27 -
Page 28

3.2.2.3 Authentication
NAC-300 has created a default user administrator. You can create users in this
page. In Add New User section, enter the new user name and password, and click
Add User. The new user will appear in “All Authorized Users” section. To delete a
user, click Delete User.
Change Password
To change the password of an existing user, select the user in “All Authorized Users”
section and click Change Password. Enter the new password and verify again.
Then click Change to confirm.
Note: User name and password are case-sensitive and support 50
characters at maximum. They can only contain alphanumeric characters,
period (.), dash (-), and underscore (_).
- 28 -
Page 29

3.2.2.4 System Tools
9 Reset to Default
To restore system settings to default, click Reset to Default.
9 Backup Settings
To back up current system settings for restoring, click Backup Settings.
9 Import Settings
To restore system settings of NAC-300 from previously backup file, browse and
select the appropriate file and click Import Settings.
9 Reboot
To restart NAC-300, click Reboot in this section.
- 29 -
Page 30

9 Graceful Shutdown
For more long-lasting use of NAC-300, QNAP has designed a protection
mechanism for NAC-300. When you change the settings of NAC-300 and want
to shut down the server immediately, please click Graceful Shutdown in this
page to save the settings before shutting down the server.
9 Update
To update the firmware of NAC-300, please download the correct firmware file
from QNAP website
click Update to update your system. Please make sure the power is always on
during firmware update.
www.qnap.com.tw. Browse and select the correct file and
- 30 -
Page 31

3.2.3 Motion Detection
Motion detection is an intelligent function to monitor an area for users. You can
simply select the monitoring area on the screen and NAC-300 will detect all motion
taken place in the area and record the events. When further equipped with alarm
management function, motion detection can help trigger instant alert to users when
motion is detected.
- 31 -
Page 32

3.2.3.1 Active Schedule
NAC-300 supports motion detection, which when enabled, any movement detected
in the monitoring area will trigger a notification sent by the system. To enable this
function, check the box Enable Motion Detection in Active Schedule page. Then
select a schedule profile for the function to be active.
Schedule Profile Active Time for Motion Detection
Always Continuous
Every Night 19:00-23:00 every night
Rush Hour 7:00-9:00 and 17:00-19:00, Mon to Fri
Weekend Sat 0:00-Mon 0:00
While Sleeping Sun 23:00-Mon 7:00, Mon 23:00-Tue 7:00, Tue
23:00-Thu 7:00, Thur 23:00-Fri 7:00, Fri 23:00-Sat
7:00, Sat 23:00-Sun 7:00
While Working 9:00-18:00, Mon-Fri
- 32 -
Page 33

3.2.3.2 Area & Sensitivity
Select the alert area for motion detection by using Add, Remove, and Reverse
function. Then set the sensitivity for motion detection. Please adjust the
sensitivity level according to the frequency of motion occurrence of the monitoring
area.
Click Apply to save or Reset to cancel the settings.
- 33 -
Page 34

3.2.4 Alarm Management
Alarm Management section enables you to set alarms for motion detection, network
failure and alarm input.
9 Send Alert E-mail
This option is available for motion detection and alarm input. When motion is
detected or an alarm input is triggered, you can configure mail server settings
and an alert e-mail will be sent to a specified e-mail address. Enter the SMTP
server IP or domain and other relevant information. It is recommended that
you send a test mail first to make sure the mail server settings are correct.
When there are multiple recipients, please use semi-colon (;) to separate the
e-mail addresses.
- 34 -
Page 35

9 Send SMS
This option is available for motion detection and alarm input. When motion is
detected or alarm input is triggered, an SMS message will be sent to a
particular phone number. You must purchase SMS package from a supported
vendor, e.g. TW SMS to use this service. After entering all necessary
information, you can send a test message before saving the settings.
Note: QNAP will provide worldwide SMS service in the near future.
For new firmware information, please visit QNAP website:
http://www.qnap.com.tw.
9 Alarm Output
You can connect GPIO devices to NAC-300 which will be activated when motion
detection, network failure or alarm input is detected.
- 35 -
Page 36

3.2.5
NAC-300 provides default schedules: Always, Every Night, While Sleeping, While
Working, Rush Hour, and Weekend for motion detection. You can add, edit or
delete schedule in this section.
Schedule Profile
To add a schedule profile, click Add Schedule.
- 36 -
Page 37
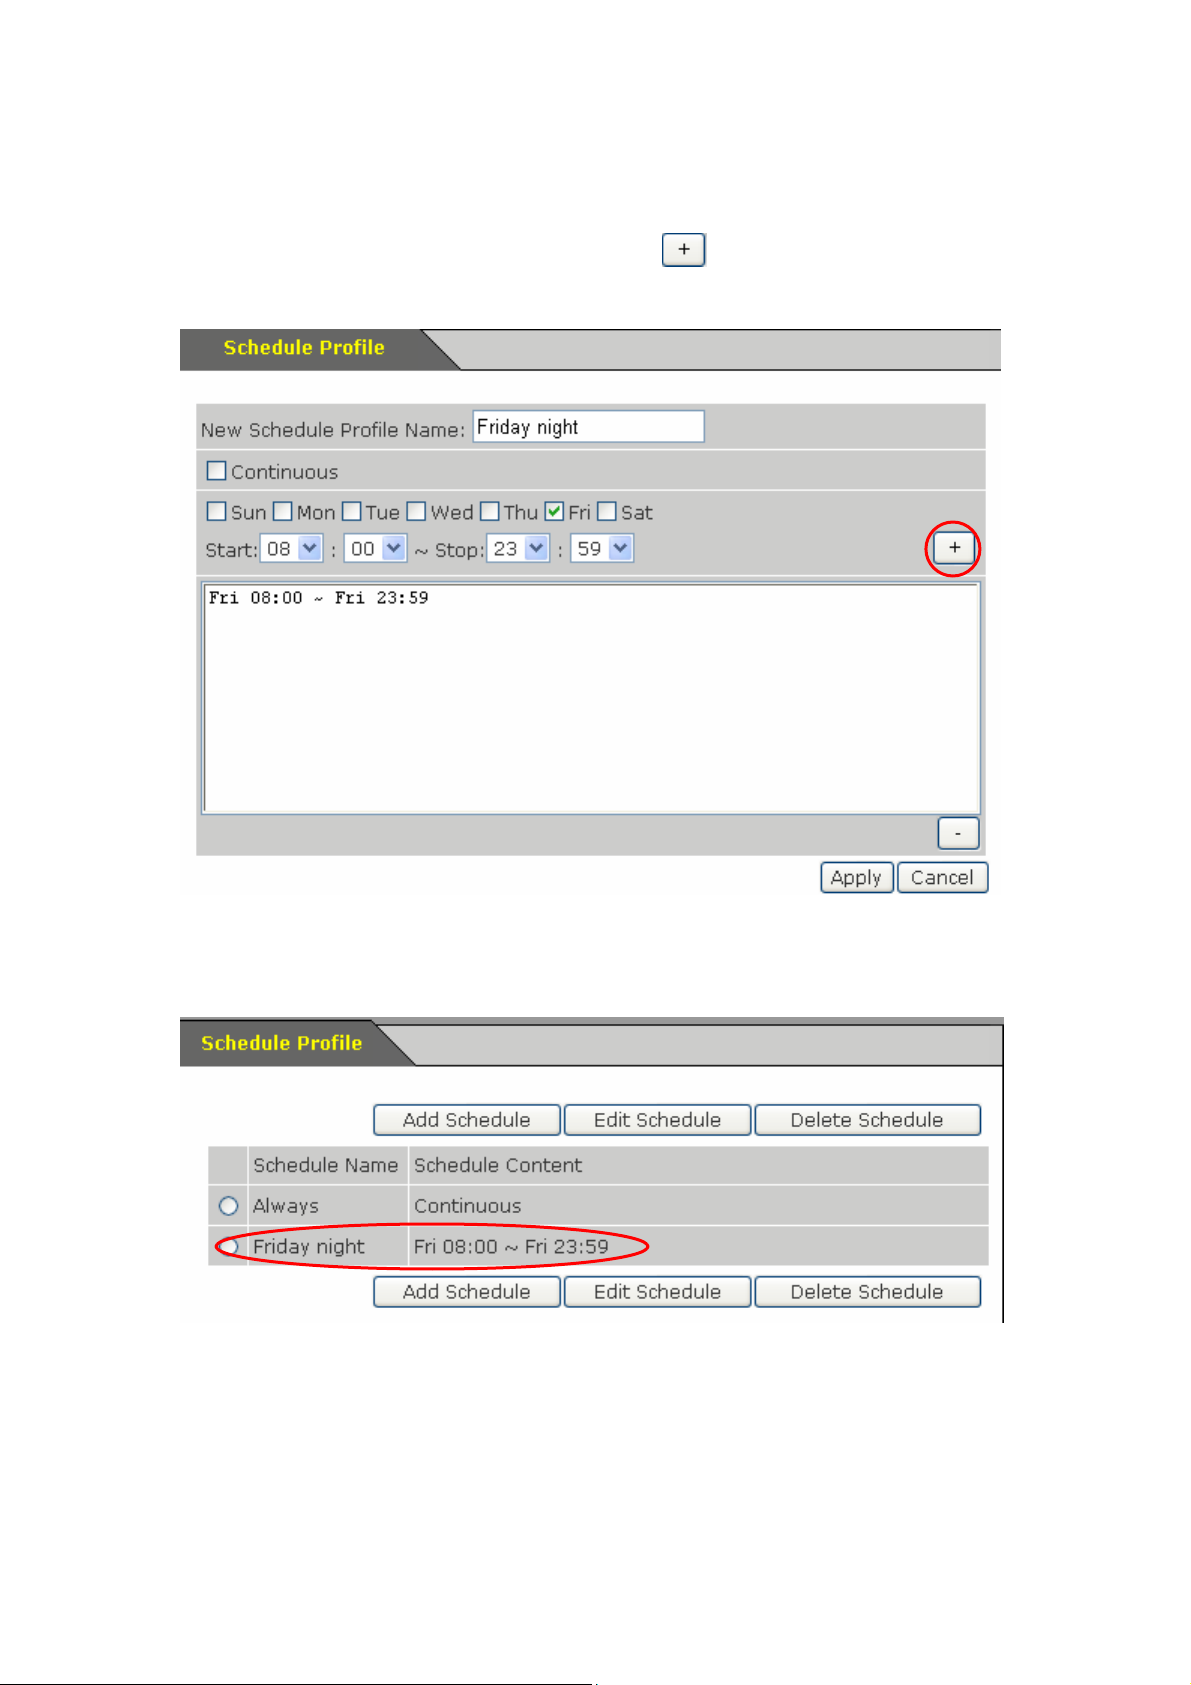
Enter the schedule profile name, e.g. Friday night. Select the day and time for
recording, e.g. 8:00~23:59, Friday. Then click
the box below. Click Apply to save the profile.
. The time will be displayed in
The new profile will appear in Schedule Profile page. To edit or delete the schedule,
click Edit Schedule or Delete Schedule.
- 37 -
Page 38

3.2.6 System Information
You can view event logs and system logs in System Information page.
- 38 -
Page 39
Chapter 4. NAC-300 Operation
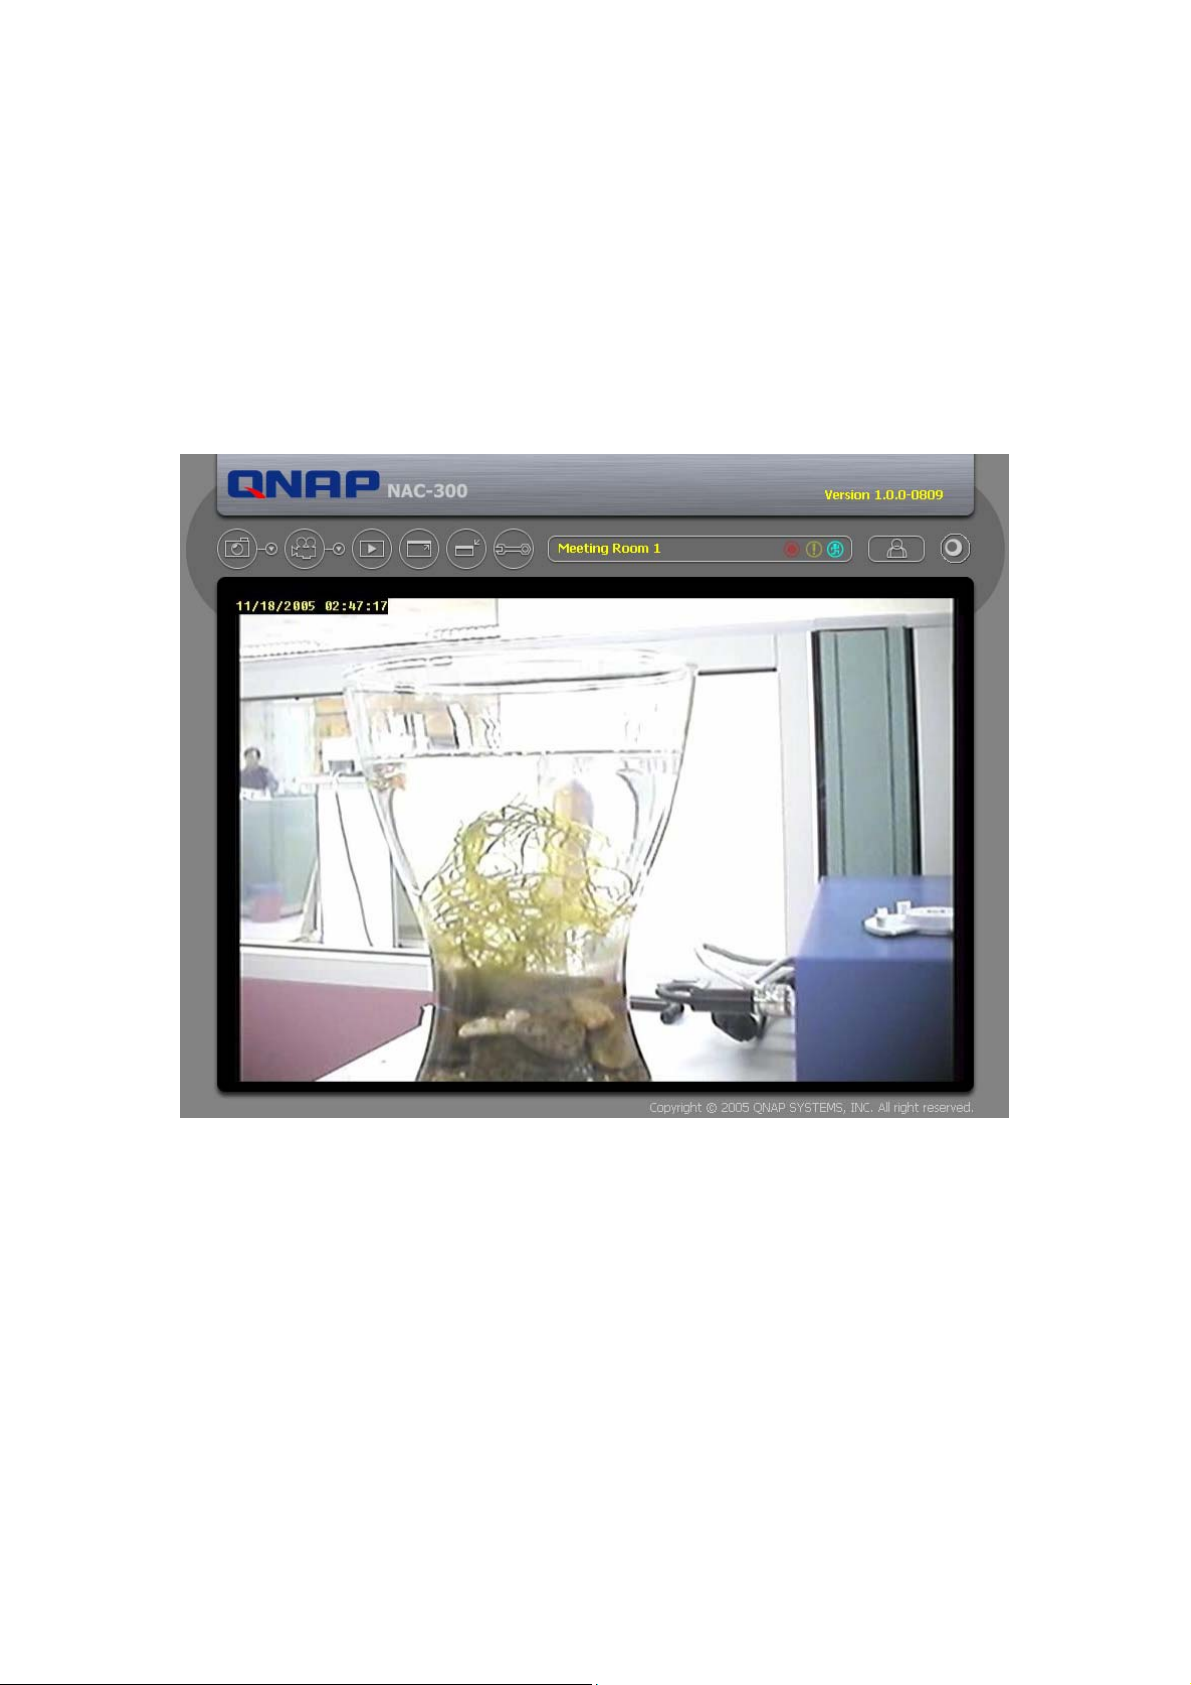
4.1 Monitoring Page
When you have configured the settings of NAC-300, you can start to view the live
video and manage the camera, e.g. snapshot the screen and record video.
- 39 -
Page 40

4.2 Snapshot Screen
To take a snapshot of the monitoring video, click the snapshot button
picture will be saved automatically in the default folder in My
Documents\QNAP\Snapshots. To change the folder for saving snapshot
pictures, click
named in the time when it is taken, as year-month-date hour-minute-second.
next to the snapshot button and select the folder. The file will be
. A
- 40 -
Page 41

4.3 Record Video
To record the monitoring video, click the record button . When recording is
in process, the record status indicator
recording. To stop recording, click the button
be saved automatically in the default folder in My Documents\QNAP\Record in
separate files of 1 minute long each. To change the folder for saving video, click
next to the record button and select the folder.
will blink continuously until you stop
again. Recording video will
Note: When the location where NAC-300 is installed is completely dark or
the brightness is below standard requirement, the noise created by CCD will
cause mass data recording of NAC-300 which will increase the size of
recording file. Please note that the brightness of the environment must be
higher than the minimum brightness requirement of NAC-300.
- 41 -
Page 42
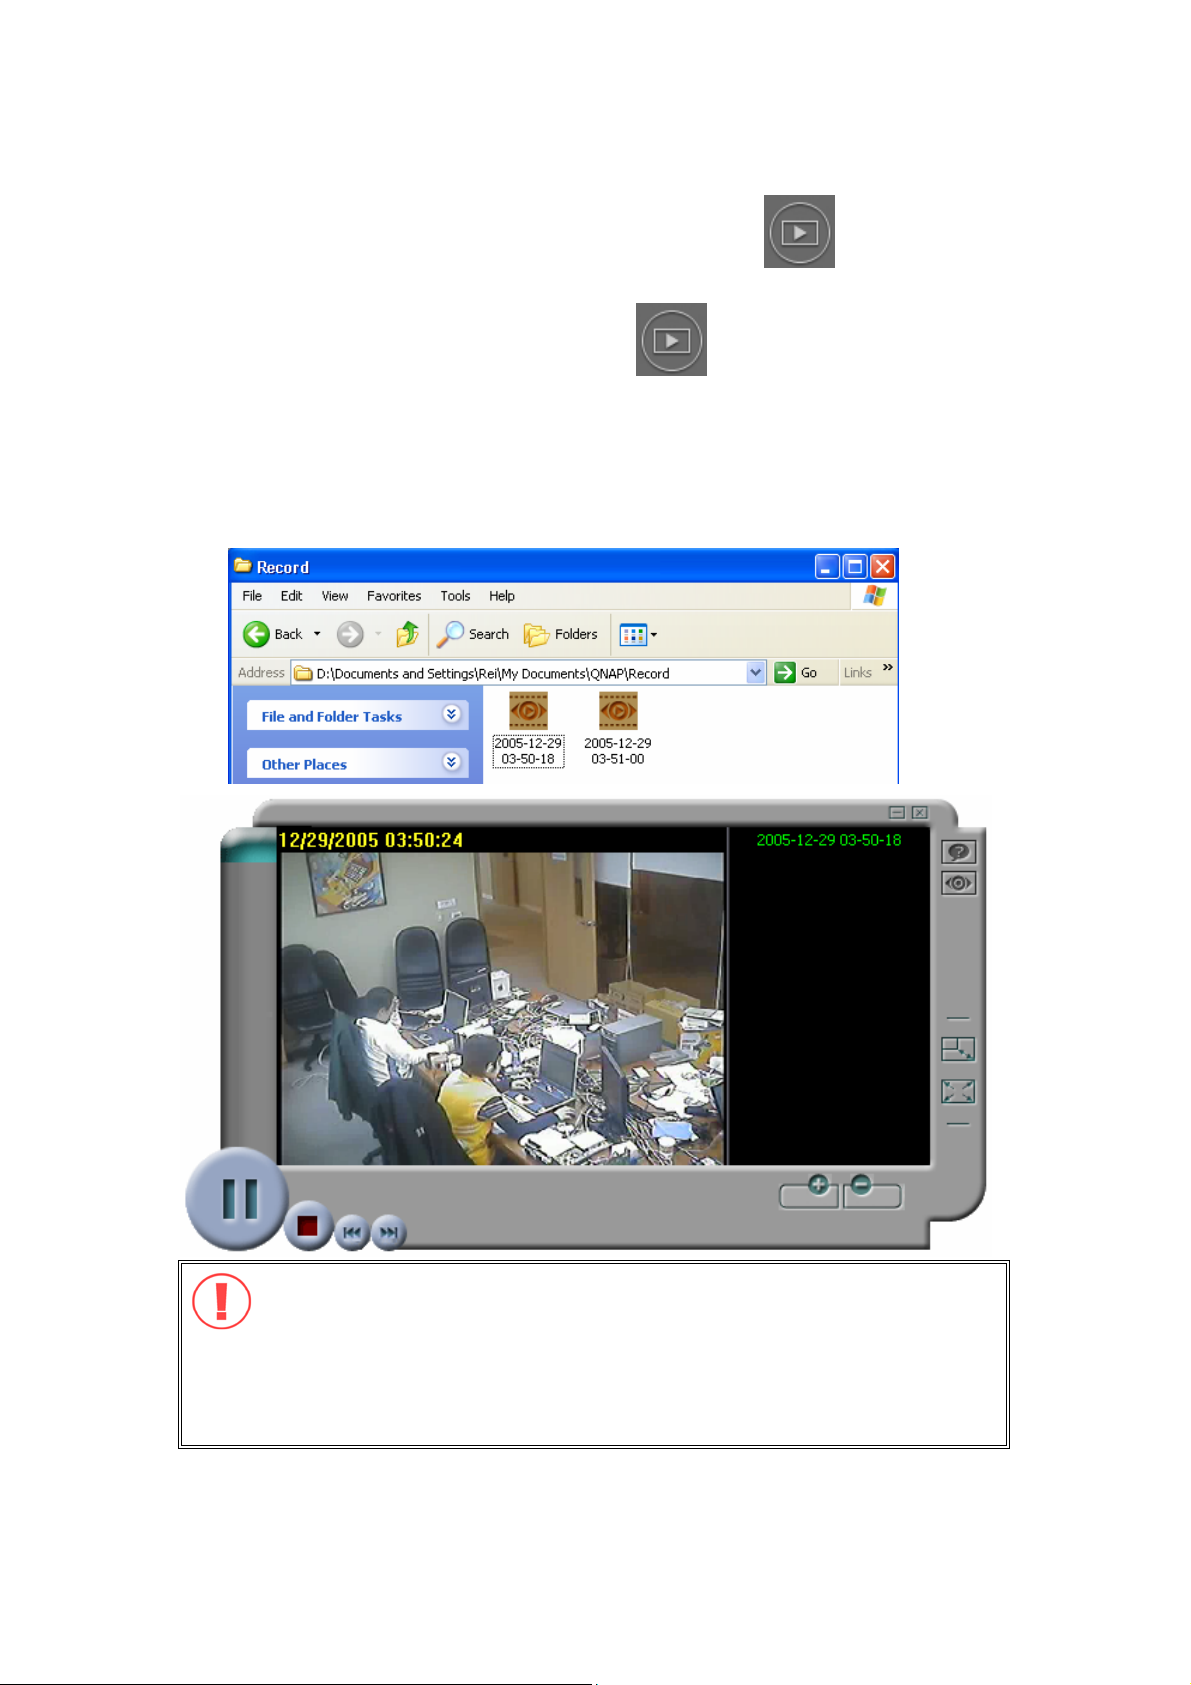
4.4 Download QNAP Player and Playback
To playback recorded video files, please click to download and install QNAP
Player to your PC first. If your PC has installed QNAP player, it will launch QNAP
Player automatically. To play recorded video files, open the default Record folder in
My Documents or your specified directory. Double click the video file to play it by
QNAP Player.
Note: It may take several seconds for decompression when playing
MPEG-4 recording file, depending on your PC performance. Please wait
patiently during the process. It is recommended that you update the
driver of your display card and upgrade DirectX to 9.0 or above before
playing MPEG-4 recording file for better performance.
- 42 -
Page 43
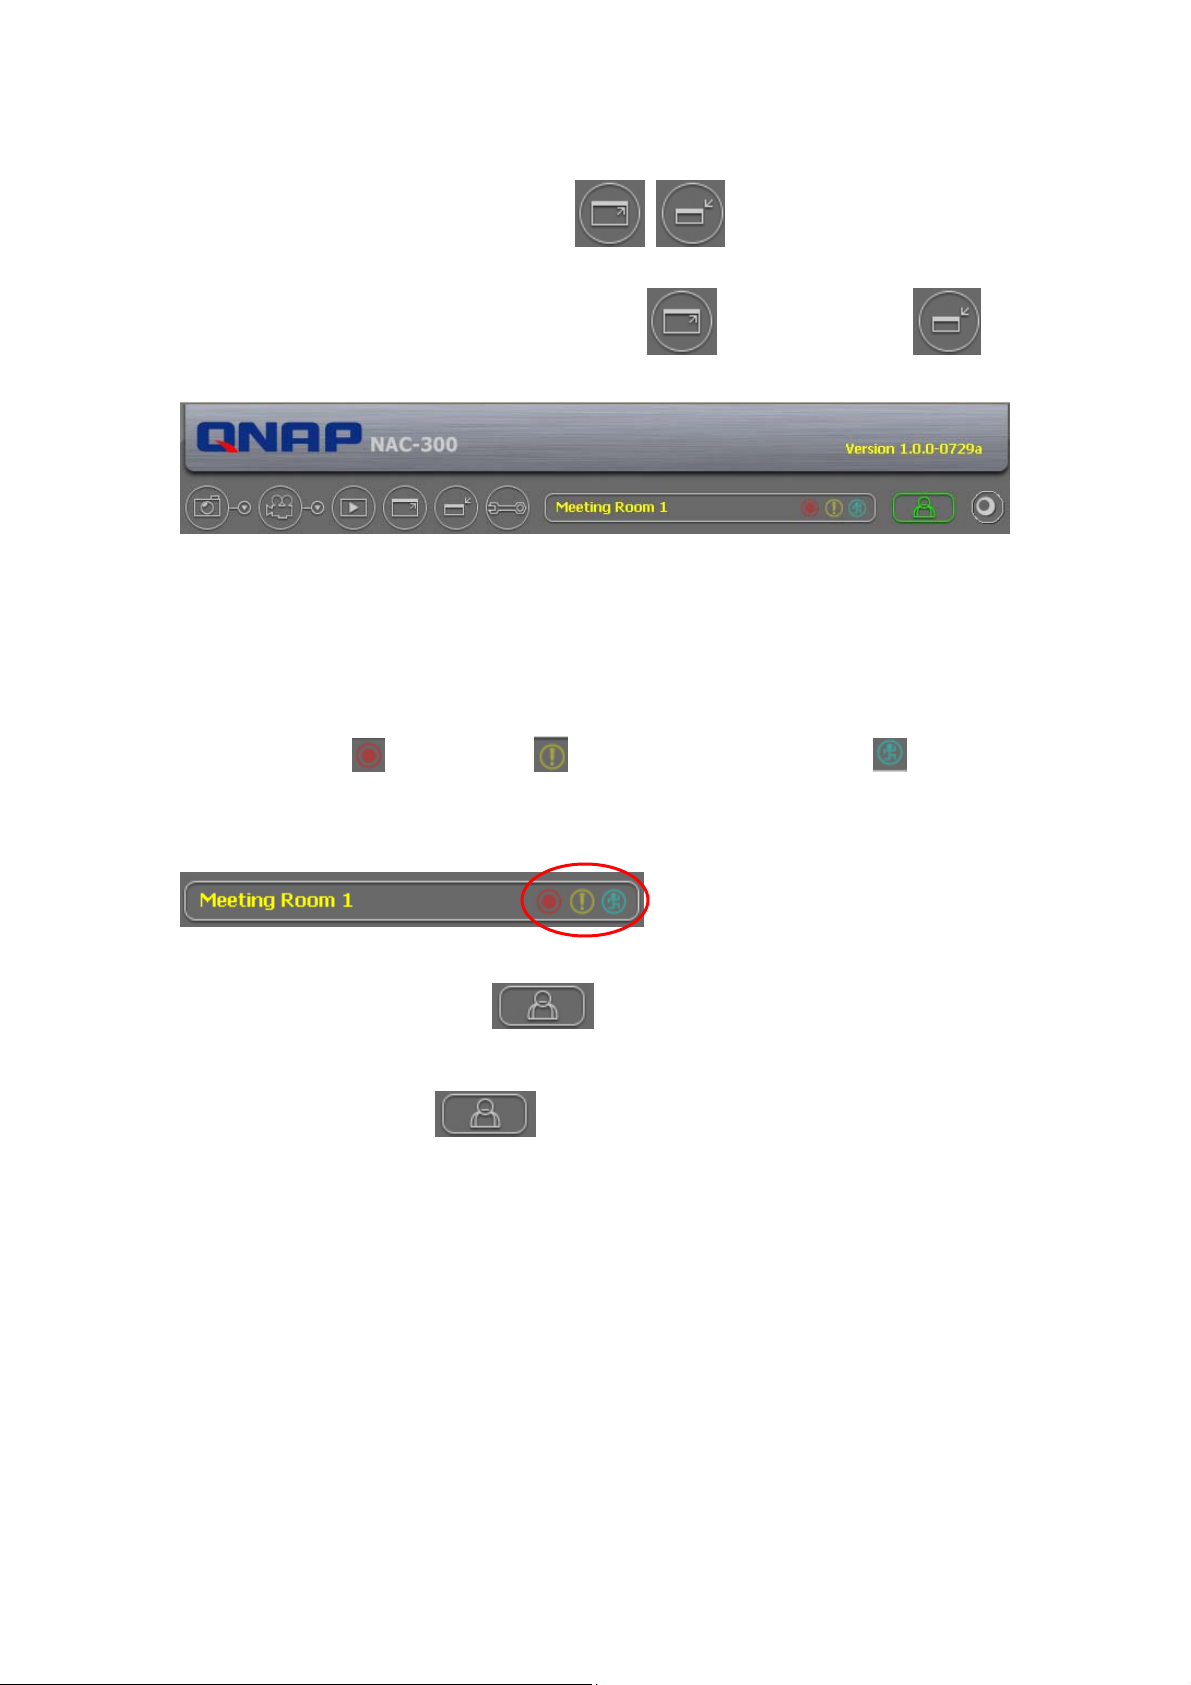
4.5 Resize Display Window
To resize the display window of NAC-300, click
shrink.
to enlarge or click to
4.6 Network Camera Status
There are three icons on top of the monitoring screen of NAC-300 to display
recording status
the functions are enabled, their corresponding icons will blink on the monitoring
page.
, alarm status , and motion detection status . When
4.7 Log out NAC-300
To logout NAC-300, click
page.
on the top right hand corner of the monitoring
- 43 -
Page 44

Chapter 5. NAC-300 Maintenance
5.1 Restart/ Shut down NAC-300
To restart NAC-300, please go to System Settings—System Tools and click Reboot.
To shut down NAC-300, click Graceful Shutdown.
5.2 Reset All Settings
To reset all settings, including administrator password and network settings, of
NAC-300 to default, please go to System Settings—System Tools and click Reset to
Default.
- 44 -
Page 45

5.3 Operation of NAC-300 Alarm Output
NAC-300 provides an alarm input and an alarm output for receiving external device
signals, e.g. infrared sensor and controlling external device like alarms by alarm
output. To enable this function, please go to Alarm Management, select Alarm
Input and check the box Alarm Output. Then click Apply.
Pin assignment
Pin No. Description
1 Alarm IN
2 IN GND
3 Alarm OUT
4 OUT GND
Reserved. QNAP will support this feature in
the near future.
- 45 -
Page 46

5.4 System Update
To update system firmware of NAC-300, you can download the appropriate file from
QNAP website
and go to System Settings-System Tools. Browse and select the firmware file and
click Update. Please wait patiently when the system is being updated.
www.qnap.com.tw and save the file to your PC. Then login NAC-300
- 46 -
Page 47

5.5 Troubleshooting― Event & System Logs
All actions related to NAC-300 will be recorded in System Information section as
event and system logs. For enquiries of NAC-300 operation, please check the logs
to view the events of NAC-300. If any errors persist, please contact your network
administrator or technician to check the network connection or other relevant
devices and their settings.
- 47 -
Page 48

Appendix A. Terms and Glossary
1. Pixel Size
The actual size of each pixel, measured in micrometer (µm). The larger the pixel
size, the shorter the time for exposure but the resolution may be lower. The
smaller the pixel size, the longer the time for exposure and the resolution is better.
2. AGC (Automatic Gain Control)
A circuit designed to maintain gain automatically at a constant mean intensity level.
3. Aspect Ratio
The aspect ratio is the ratio of the width of the image to the height of the image.
For most television images the current aspect ratio is 4:3. HDTV uses an aspect
ratio of 16:9.
4. ATW (Auto Tracking White Balance)
In ATW mode, white balance is automatically adjusted in real time to match the
lighting of the object.
5. Backlight Compensation
The ability of a camera to compensate in cases where a subject with a large amount
of background light would otherwise be obscured by blooming or silhouetting.
6. Bayonet Mount
A method of attaching lens to a body that makes use of interlocking flanges on the
body and lens rather than a threaded tube that is screwed into a threaded base.
The length between the mounting side and CCD side of camera is 38mm or 48mm.
7. C-mount
Type of camera mount which measures 17.526mm from the camera's CCD to the
rear mounting surface of the lens.
8. CCD (Charge Coupled Devices)
Charged Coupled Device. A sensor that collects light and turns it into an electrical
signal.
- 48 -
Page 49

9. CCD IRIS
Automatic adjustment of a CCD device's 'exposure time' (particularly useful when
using fixed aperture lenses). Number of steps (multiple levels of brightness)
available varies dependent on the camera model. While there are tremendous
advantages to use a camera with CCD Iris, use of lenses with manual and/or
Auto-iris will enhance the efficiency of the camera in certain set-up conditions.
10. NTSC (National Television Systems Committee)
Standard of broadcasting color television in the US and Japan formulated by the
National Television Standards Committee. This is commonly referred to as
composite video because of the convergence of luminance and color into a single
analog signal. NTSC delivers 525 lines of resolution at 30 frames per second.
11. PAL (Phase Alternation Line)
It is the standard format for television broadcasts in Australia, most Western
European, South American and Asian countries. PAL delivers 625 lines of
resolution at 25 frames per second.
12. DSP (Digital signal processing)
Manipulating an audio signal digitally to create various possible effects at the output.
Often refers to artificially generated surround effects derived from and applied to
two-channel sources
13. Electronic Shutter
A camera feature that compensates for changes in light conditions, from bright
sunlight to dim outdoor lighting.
14. Field
One-half of a NTSC television frame. A field contains 262.5 lines and has duration
of 1/60th of a second. The odd numbered scanning lines are known as field 1, the
even numbered as field 2. When these fields are combined by interlacing, a 525
line frame results.
- 49 -
Page 50

15. Frame
A standard unit of video information containing one complete image. The NTSC
system standard in the United States and many other countries transmits nominal
30 frames per second. A frame is made up of two television fields, one odd and one
even. Each field is made up o 262.5 lines of information. When interlaced the two
fields generate a video frame of 525 lines.
16. Interlace Scanning
With interlaced scanning, the lines of a frame are displayed in two passes—half in
each pass. The NTSC system is composed of 525 lines. When the fresh rate of the
image is higher than 25 or 30 fps, interlaces scanning is not applicable.
17. Minimum Illumination
The smallest amount of light that allows the camera to "get" a picture.
18. S/N (Signal to noise) Ratio
Measured in Decibels, this is the ratio between a useful video signal and unwanted
noise.
19. Analog to Digital
The format of video signal output by CCD camera. Standard CCD constituted in the
early time adopted analog signal out mainly. While currently all producers release
digital camera with built-in analog-to-digital-converter (ADC) circuit. The image
resolution of the camera depends on the bit rate of A/D converter circuit. For
example, 8-bit camera can support 256 gray levels, and 10-bit supports 1024 gray
levels, so on so forth.
- 50 -
Page 51

Appendix B. Using NAC-300 with IP Sharing Router
Configuration for the virtual server on an IP sharing router connecting to
NAC-300: a fixed IP address mapping approach.
If NAC-300 is in the same network with an IP sharing router using a fixed IP address,
it can be accessed via some assigned ports of the virtual server on the IP sharing
router mapping to the given ports on NAC-300, with two different ports for
monitoring live video on NAC-300 and playing the recorded video files.
In this case, the following settings of the configuration for the virtual server on the
IP sharing router should be reset:
• Monitoring live video
You can assign any available port on the IP sharing router to map to port 80 on
NAC-300.
- 51 -
Page 52

Appendix C. Connecting NAC-300 via PC
To access NAC-300 by a PC, connect the computer to NAC-300 by a crossover cable.
Configure the network settings of your PC and NAC-300 in the same network
domain. To connect NAC-300 by default IP address, please configure the network
settings of your PC as below:
IP address: 192.168.0.2
Subnet Mask: 255.255.255.0
Please follow the steps below to access NAC-300 by a PC. The example is based on
Windows XP.
1. Right click “My Network Places” shortcut on the desktop, and choose “Properties”.
Right click your network device, and choose “Properties”.
- 52 -
Page 53

2. Highlight Internet Protocol (TCP/IP), and click “Properties”.
- 53 -
Page 54

3. Set the IP address and subnet mask as the following:
4. Restart your personal computer. Launch the web browser (Internet Explorer),
and enter the IP address of NAC-300 192.168.0.1 in the address bar.
Upon successful connection to NAC-300, enter the default user name and
password to login the administration page:
User name: administrator
Password: admin
- 54 -
Page 55

Appendix D. Dynamic Domain Name Registration
NAC-300 supports DDNS service provided by DynDNS, ODS, DHS, and DyNS. For
example, you can go to the web site of DynDNS (
register for a dynamic domain name. Configure and activate DDNS service, then
the Internet users will be able to access your NAC-300 via this dynamic domain
name. When the ISP assigns a new WAN IP address, NAC-300 will update the new
address to the DynDNS server automatically.
Registration Procedure
Please follow the steps below to register a dynamic domain name.
Note: This guide is for reference only. If there are any changes, please refer to the
instructions or documents on the web site.
1. Open the browser and connect to
Now to begin registration.
http://www.dyndns.org/. Click Sign Up
http://www.dyndns.org/) and
- 55 -
Page 56

2. Check the box “I have read and agree to the Acceptable Use Policy above”.
- 56 -
Page 57

3. Enter the user name, email address and password to create an account for
DDNS service. Please verify your email address to receive the confirmation
message from the server. Then click Create Account to proceed.
- 57 -
Page 58
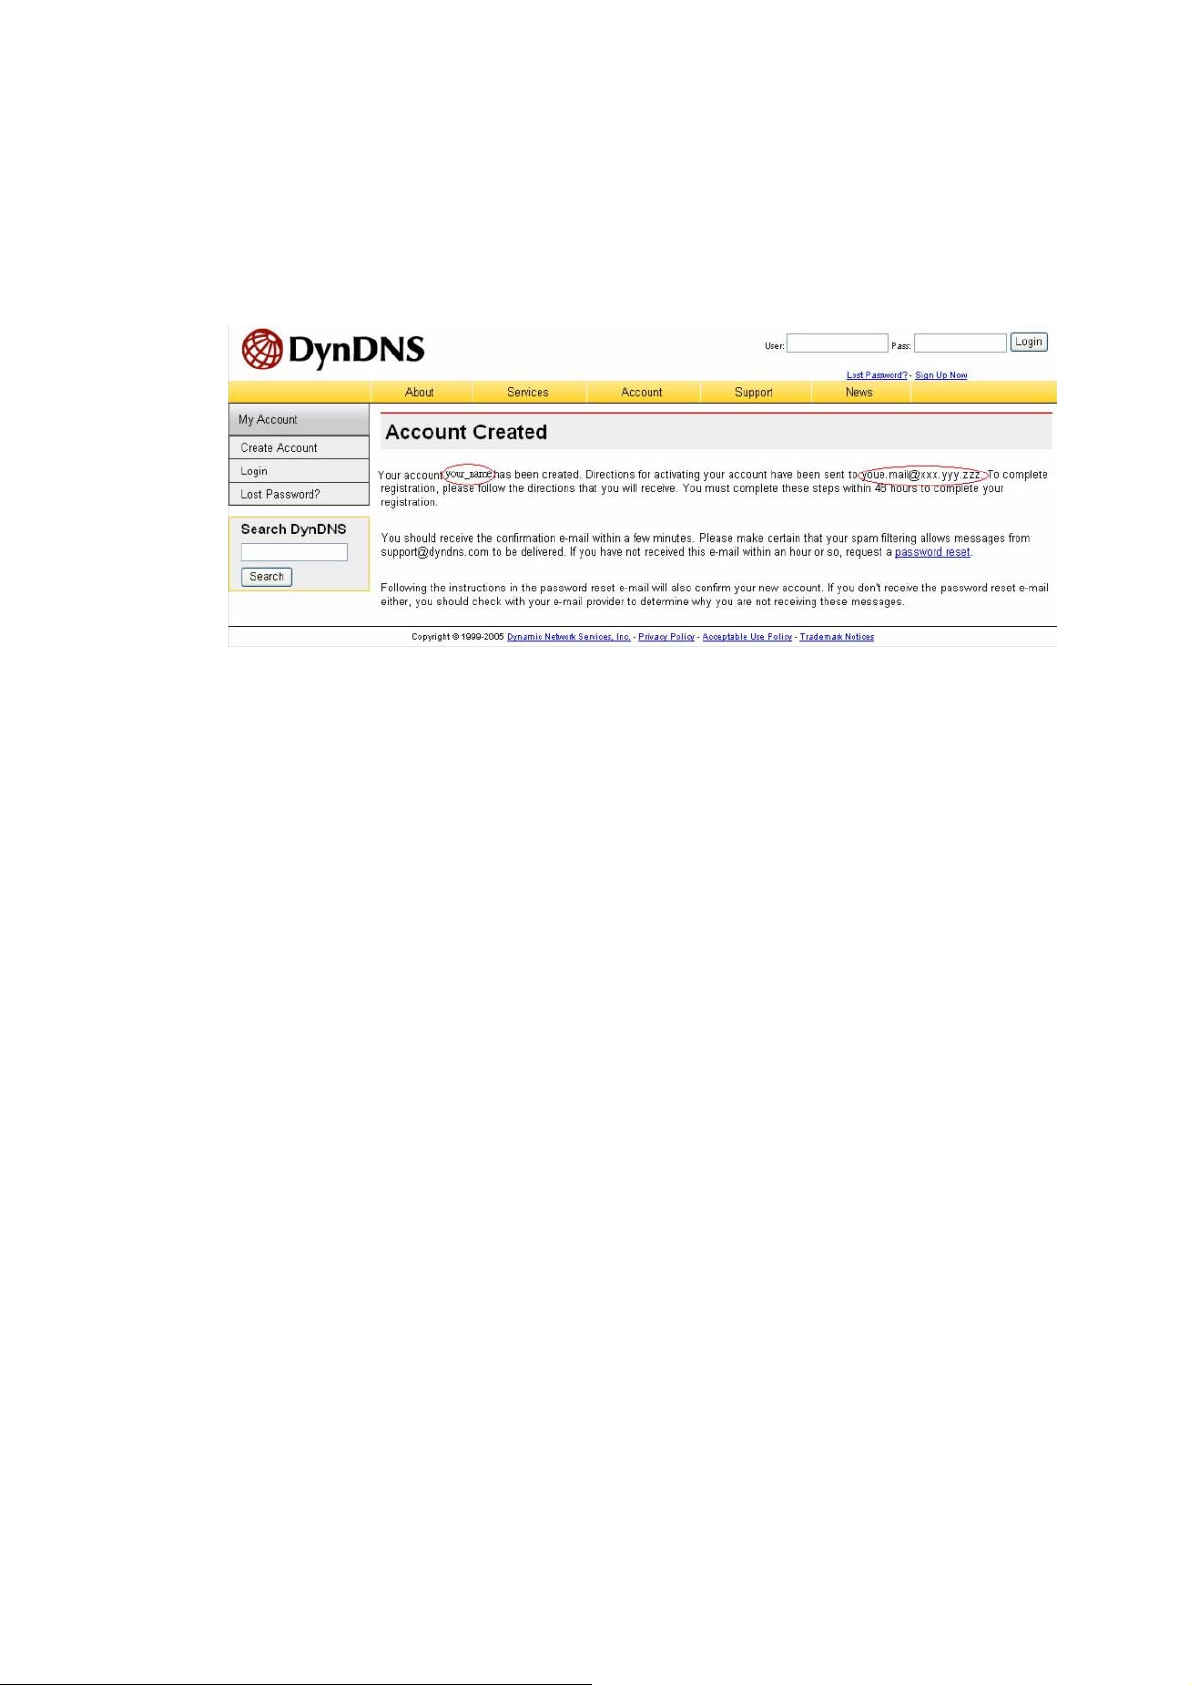
4. If the following web page appears on the screen, your account has been
successfully created and a confirmation message has been sent to your e-mail
address. Please follow the instructions in the e-mail to activate your account
within 48 hours.
When you have finished the confirmation process, you can apply for your own
dynamic domain name.
- 58 -
 Loading...