

Page 1

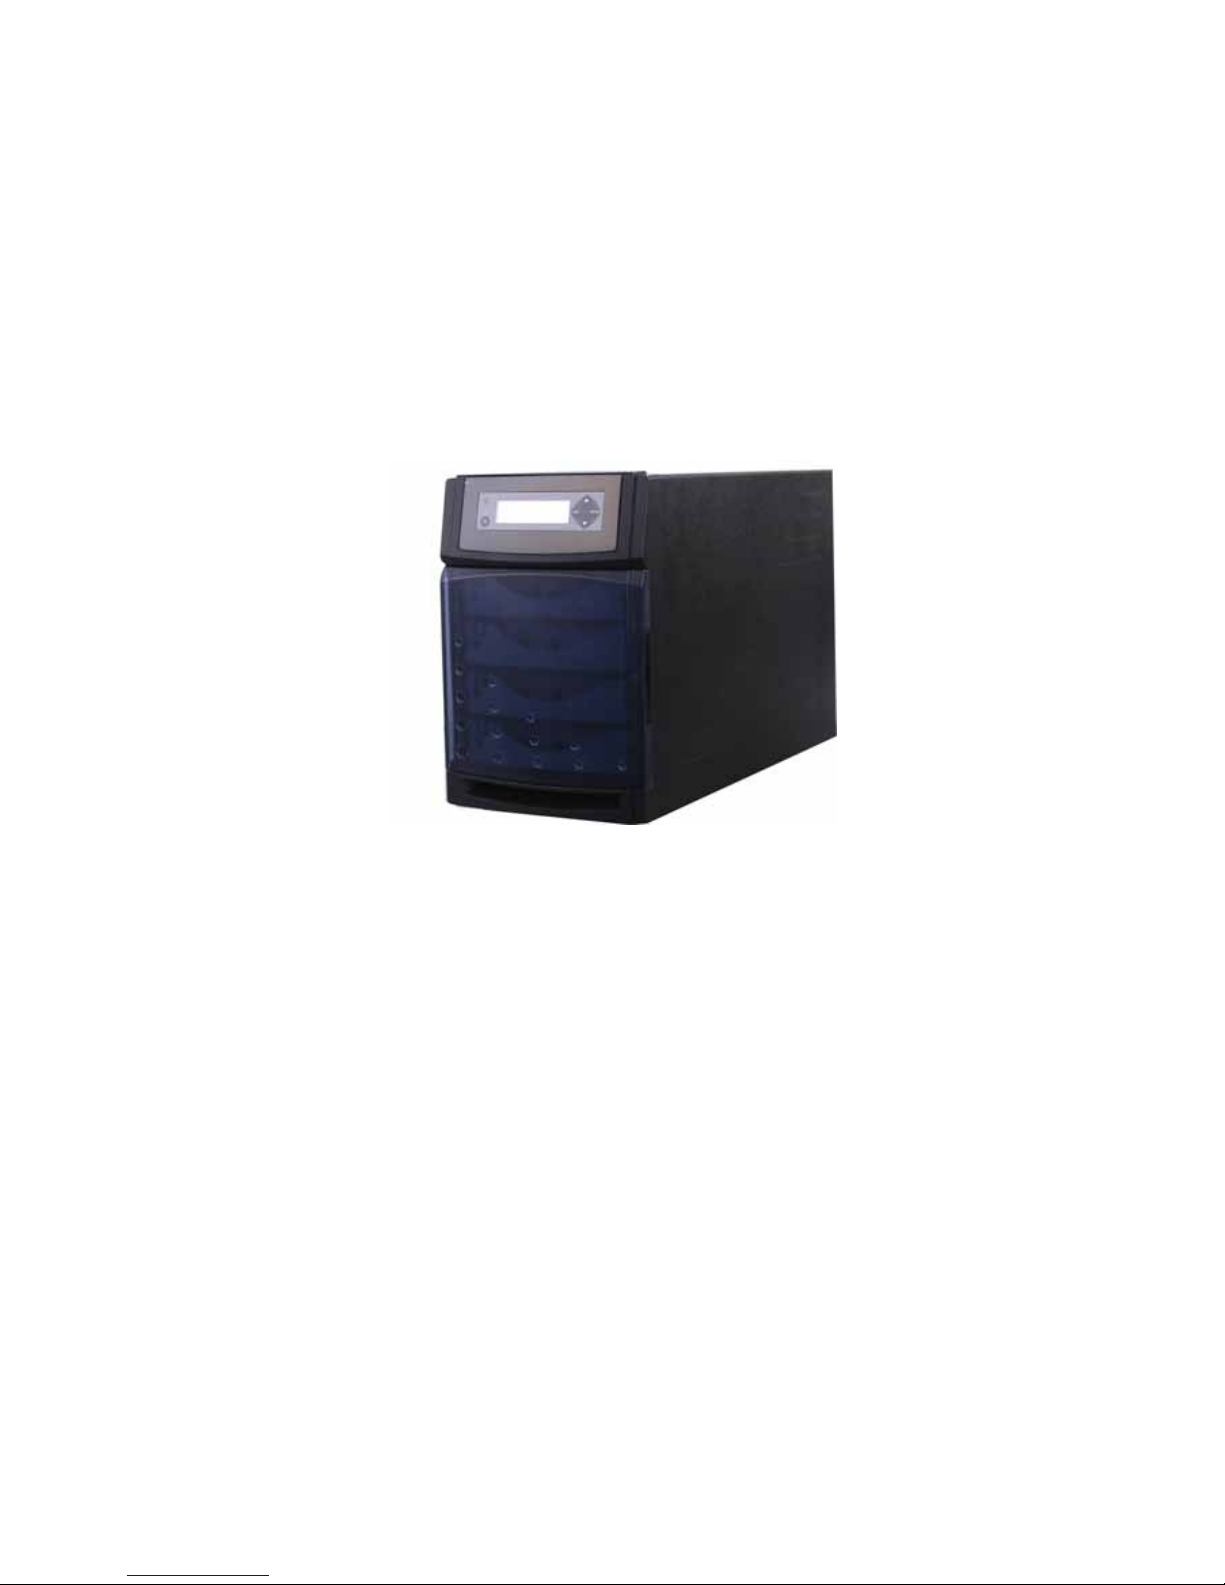
EvoStor-400CA
SCSI-to-ATA RAID Subsystem
User Manual
Page 2
2
EvoStor-400CA
User Manual (Version 1.1)
©Copyright 2004. QNAP Systems, Inc. All rights reserved.
This user manual (version 1.1) applies to EvoStor-400CA version 1.00 or later
versions.
June 17, 2004
Page 3

3
CUSTOMER SERVICE
To obtain service or technical support for your system, please refer to the
registration card for information.
LIMITED WARRANTY
In no event shall the liability of QNAP Systems, Inc. exceed the price paid for the
product from direct, indirect, special, incidental, or consequent ial software, or its
documentation. QNAP offers no refunds for its products. QNAP makes no
warranty or representation, expressed, implied, or statutory, with respect to its
products or the contents or use of this documentation and all accompanying
software, and specifically disclaims its quality, performance, merchantability, or
fitness for any particular purpose. QNAP reserves the right to revise or update its
products, software, or documentation without obligation to n otify any individual
or entity.
FCC STATEMENT
QNAP EvoStor-400CA has been tested and found to comply with the limits for a
Class B digital device, pursuant to Part 15 of the FCC Rules. These limits are
designed to provide reasonable protection against harmful interference in a
residential installation. This equipment generates, uses, and can radiate radio
frequency energy and, if not installed and used according to the instructions, may
cause harmful interference to radio communications. However, there is no
guarantee that interference will not occur in a particular installation. If this
equipment does cause harmful interference to radio or television reception, which
is found by turning the equipment off and on, the user is encouraged to try to
correct the interference by one or more of the following measures:
• Reorient or relocate the receiving antenna.
• Increase the separation between the equipment and device.
• Connect the equipment to an outlet other than the receiver.
• Consult a dealer or an experienced radio/TV technician for assistance.
CAUTION
1. There is a danger of explosion if battery is incorrectly replaced.
2. Replace only with the same or equivalent type recommended by the
manufacturer. Dispose of used batteries according to the manufacturer's
instruction.
3. Should you return any components of EvoStor-400CA package for refund or
maintenance, make sure they are carefully packed for shipping. Any form of
damages due to improper packaging will not be compensated.
Page 4

4
Table of Contents
Chapter 1
EvoStor-400CA Overview......................................................5
1.1 Introduction...................................................................................5
1.2 Product Overview ............................................................................5
1.3 Package Contents............................................................................5
1.4 System Requirements......................................................................6
Chapter 2 System Overview and Installation ........................................7
2.1 System Overview ............................................................................7
2.2 Installation.....................................................................................8
Chapter 3 System Configuration .........................................................13
3.1 Configuring EvoStor via the LCD panel .............................................13
3.2 Using EvoStor Management Utilities.................................................20
Chapter 4 Accessing EvoStor...............................................................37
4.1 Using Microsoft Windows 2000........................................................37
4.2 Using Red Hat Linux ......................................................................46
Chapter 5 EvoStor Maintenance ..........................................................49
5.1 Entering Diagnosis Mode................................................................49
5.2 Exiting Diagnosis Mode ..................................................................50
5.3 Restoring Firmware .......................................................................50
5.4 Auto Test .....................................................................................51
5.5 Resetting Password .......................................................................51
5.6 RAID Recovery .............................................................................52
Appendix A SCSI.................................................................................53
Appendix B RAID ................................................................................55
Appendix C Abbreviations for RAID Status .........................................57
Page 5

5
Chapter 1 EvoStor-400CA Overview
1.1 Introduction
RAID (Redundant Array of Inexpensive Disks) is a group of disk drives combined
with two or more hard disks, accompanied with software and controller to provide
a high performance of data transfer at relatively low cost. More and more users
are employing RAID for disk configuration to obtain a high transfer rate of data as
well as secure data protection. As two or more disks are used in RAID
configuration, disk data can be stored and backed up more conveniently.
1.2 Product Overview
EvoStor-400CA (hereafter referred as EvoStor) external RAID system is designed
to offer high performance, high reliability and low cost alternatives to SCSI to IDE
RAID subsystems. It utilizes cost-effective IDE drives with simple storage setup
and management process making it ideal for small to mid-sized companies and
departments.
System Features
• Intel 64-bit RISC I/O Processor
• Built-in 128 MB cache memory, expandable up to 1 GB
• Compatible with all SCSI-3 and SCSI-2/LVD host adapters up to 160 MB/s
• LCD panel for easy RAID configuration and status monitoring
• EvoStor Management Technology: Windows-based utility monitors status of
RAIDs through in-band SCSI command, enable remote management
• Supports up to 4 hot-swappable Ultra DMA 133 hard drives
• Local audible event notification buzzer
• Real time drive activity and status indicators
• Supports RAID levels 0, 1, 0+1, 3, 5 and NRAID
• Supports multiple logic volume creation, each logic volume could be
configured as one RAID level independently
• Supports hot spare and automatic hot rebuild
• Transparent data transfer for all popular operating systems
1.3 Package Contents
EvoStor subsystem package contains the following items:
• EvoStor subsystem
• 68-pin SCSI 160 LVD cable
• SCSI terminator
• Power cord
• Quick installation guide
• Companion CD (user manual inclusive)
Page 6

6
1.4 System Requirements
• An Ultra 160 SCSI host bus adaptor
• A personal computer installed with an O.S. that supports SCSI device access
Page 7
7
Chapter 2 System Overview and Installation
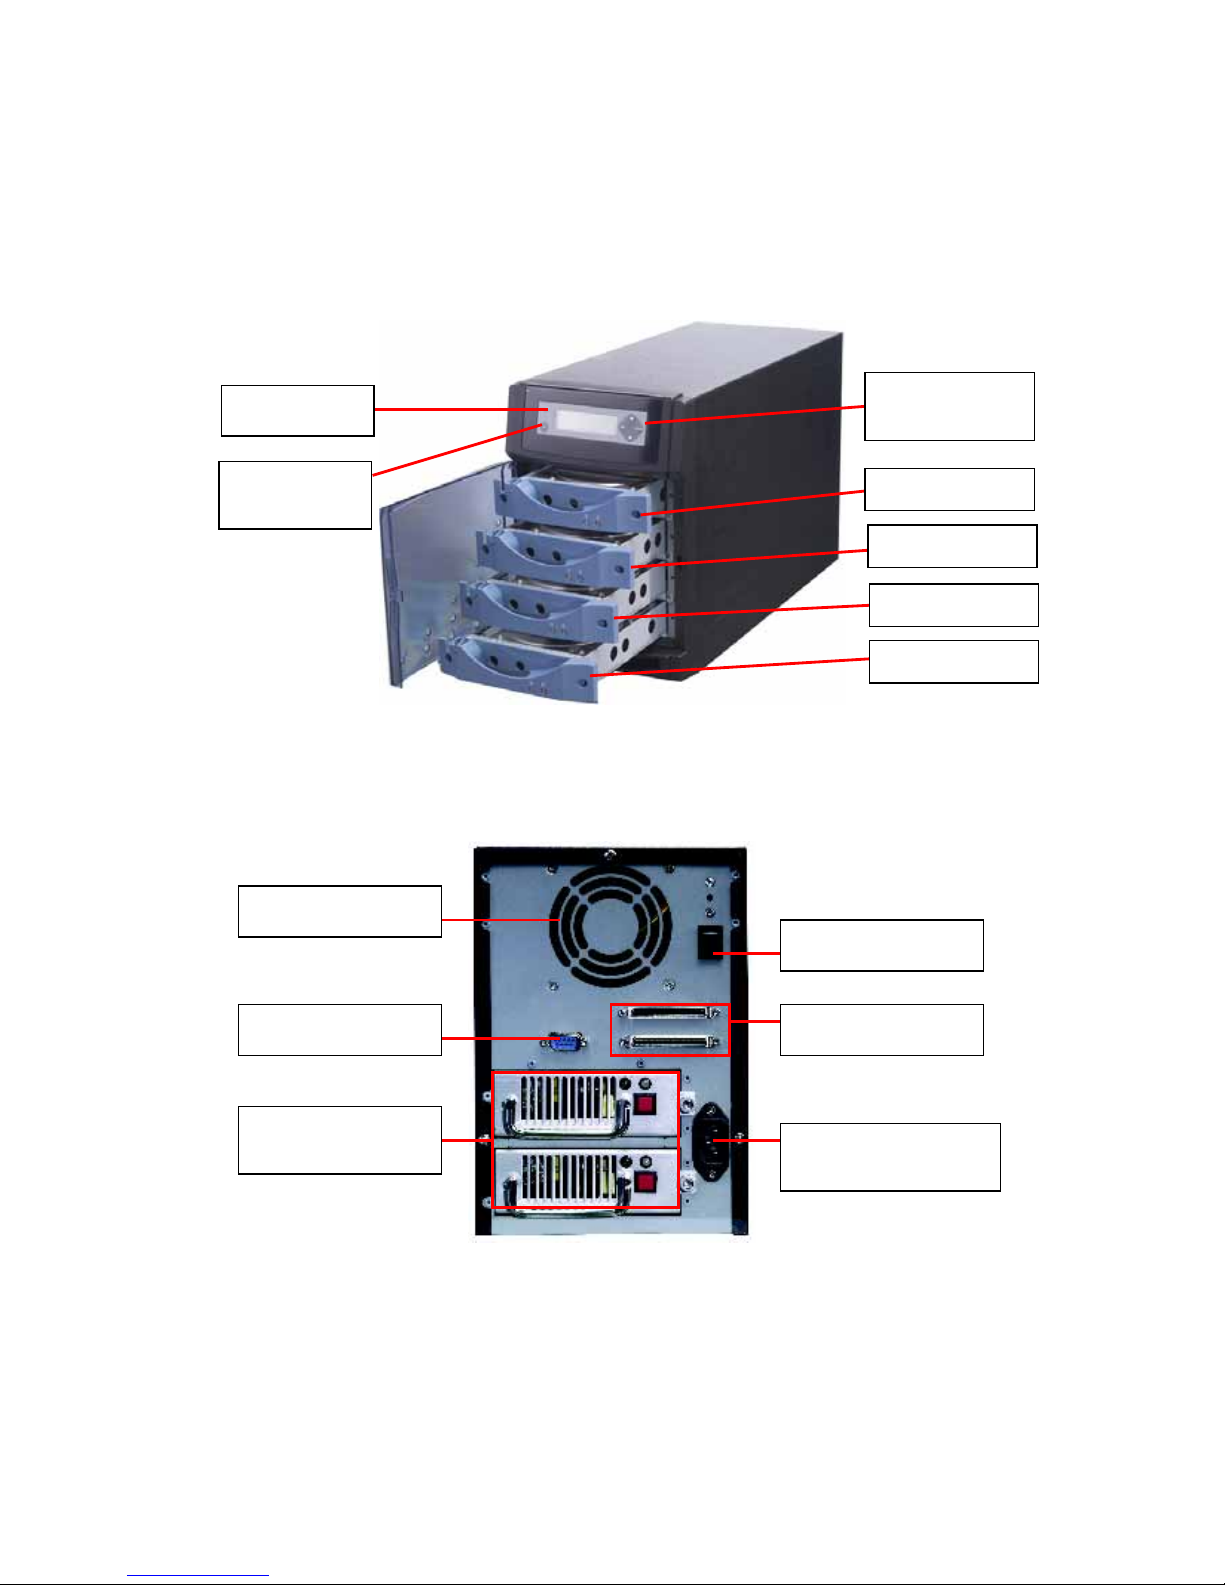
2.1 System Overview
• Front view
• Rear View
Power Switch
SCSI Connectors RS-232 Connector
ATX Redundant
Power Sup ply
Fan
Power Sup ply
Connector
Function
Switch
LCD Panel
Configuration
Switch
Disk 1
Disk 2
Disk 3
Disk 4
Page 8

8
2.2 Installation
Follow the steps below to install EvoStor system:
1. Unpack EvoStor package.
2. Install hard disk. (Skip this step if a hard disk is included in the package).
Note: Set the jumper of the hard disk in Master mode before installation.
3. Connect the power cable.
4. Turn on EvoStor. Upon successful switching on of the sy stem, the following
message will be displayed on the LCD panel.
Note: Please refer to Appendix C for further information on symbols of
disk channel status.
5. Set the SCSI ID for EvoStor via the LCD panel if the ID duplicates with other
SCSI devices.
6. Create disk volume via the LCD panel. If you configure EvoStor as RAID 1,
0+1, 3, or 5, the percentage of initialization will be shown . Complete
initialization before proceeding to step 7.
Note: Please select LUN0 as the ID for this logic volume, as some O.S.
are not able to recognize logic volume ID other than LUN0. For
information about creating more than one logic volume, please contact the
O.S. distributor. For more details on Steps 5 and 6, please refer to
Chapter 3.1.2.
System Name
Disk Channel Status
(Displays the channel
status of the four
disks)
SCSI ID
Page 9

9
7. Connect a SCSI terminator to EvoStor. Then connect EvoStor to the host
computer via a SCSI cable.
8. Turn on the host computer. In the startup screen of BIOS, it will be shown
that EvoStor is detected. Note that if you create the logic volume on LUN0,
EvoStor RAID Controller resided on LUN0 will not be shown.
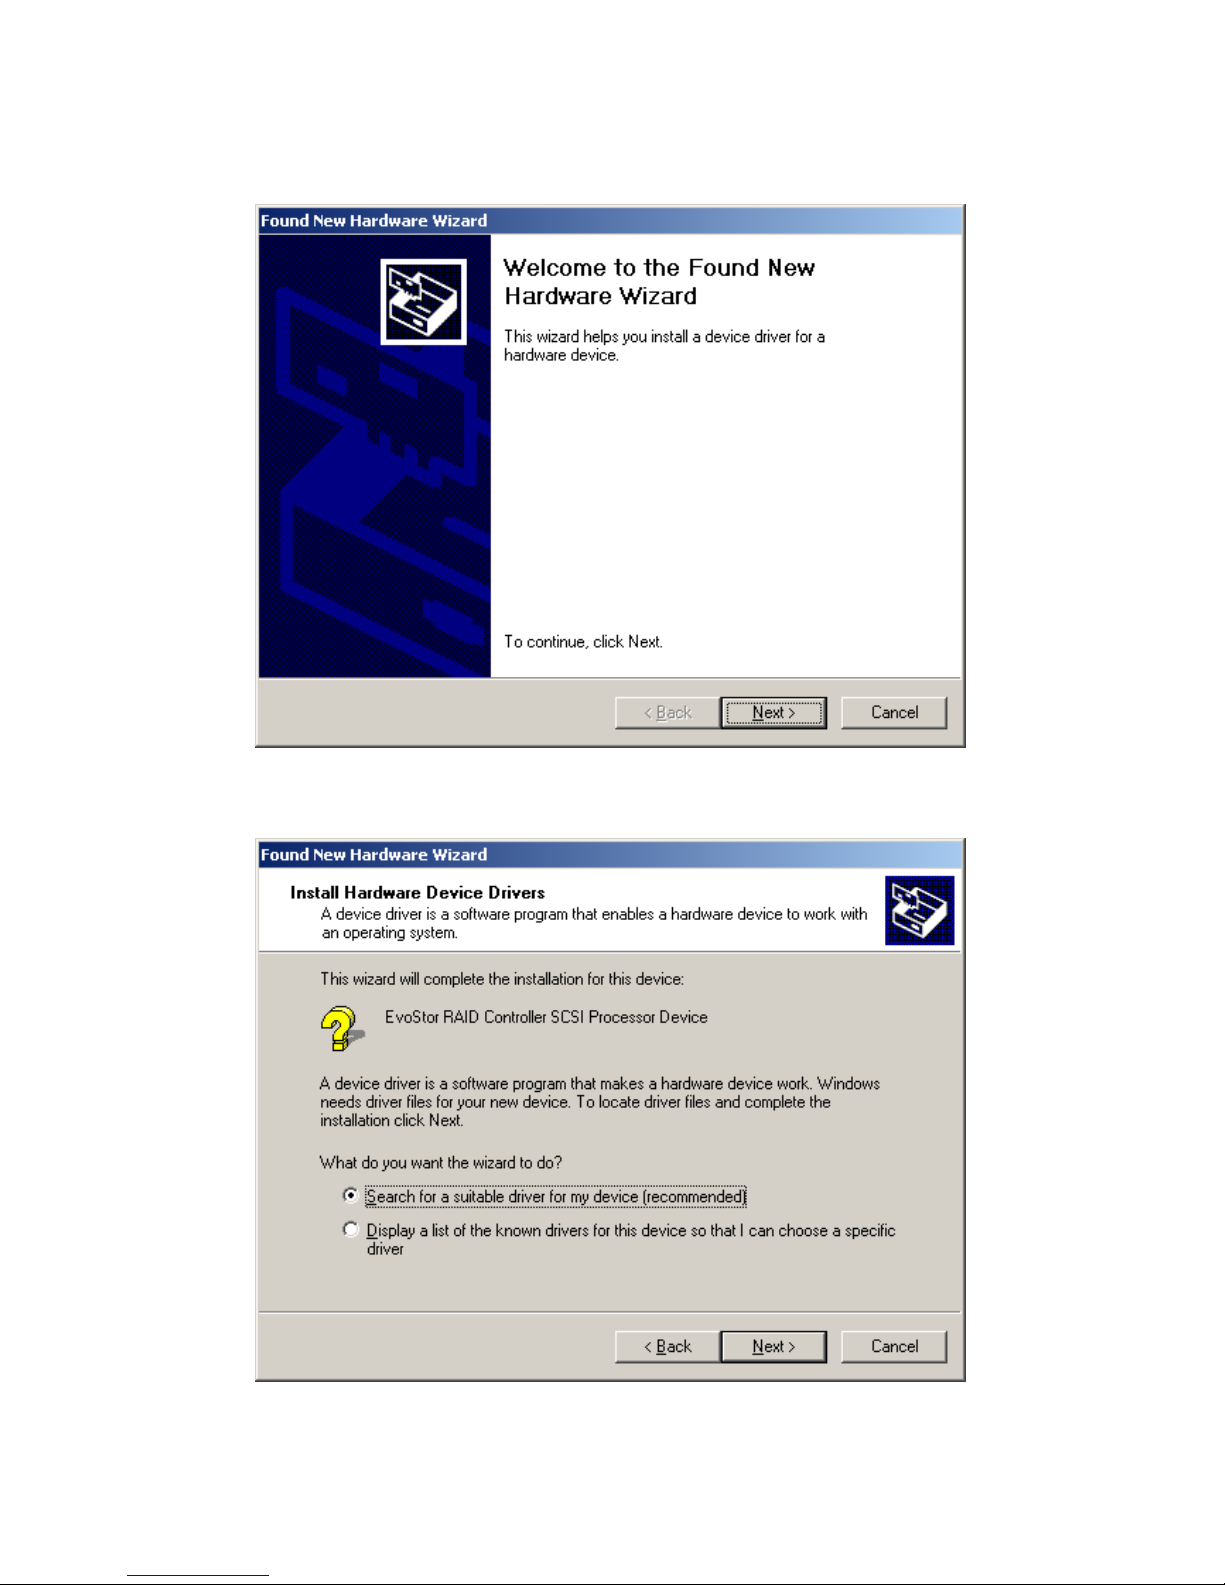
9. Skip the following steps if the above logic volume is resided on LUN0. After
Windows starts, the Found New Hardware Wizard will appear.
SCSI
Terminator
Page 10
10
10. In the Found New Hardware Wizard dialog box, click Next.
11. Insert the companion CD and select “Search for a suitable driver for my
device (recommended)”. Then click Next.
Page 11

11
12. In Optional search locations, select CD-ROM drives and click Next.
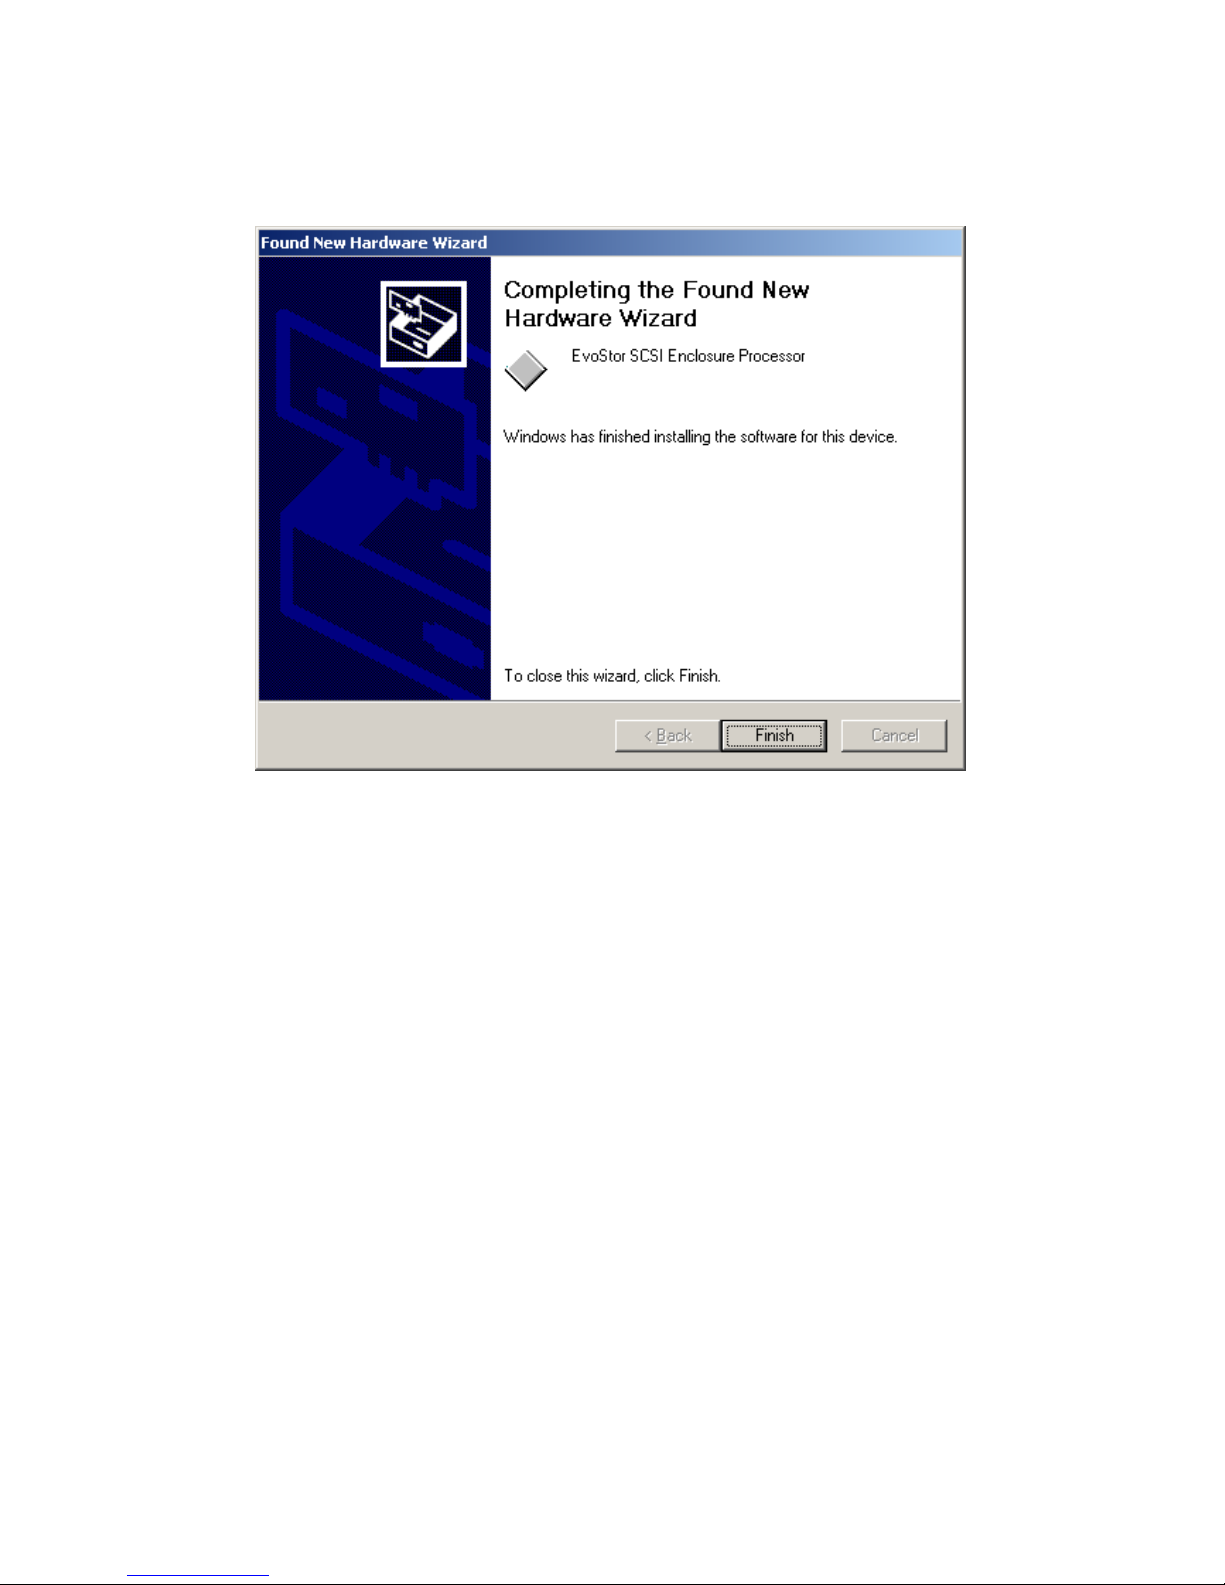
13. The Found New Hardware Wizard will find the driver to install in the CD. Click
Next.
Page 12
12
14. Click Finish to complete the installation. Format EvoStor before using the
system.
For information on EvoStor management software installation, please refer to
Chapter 3.2.
Page 13
13
Chapter 3 System Configuration
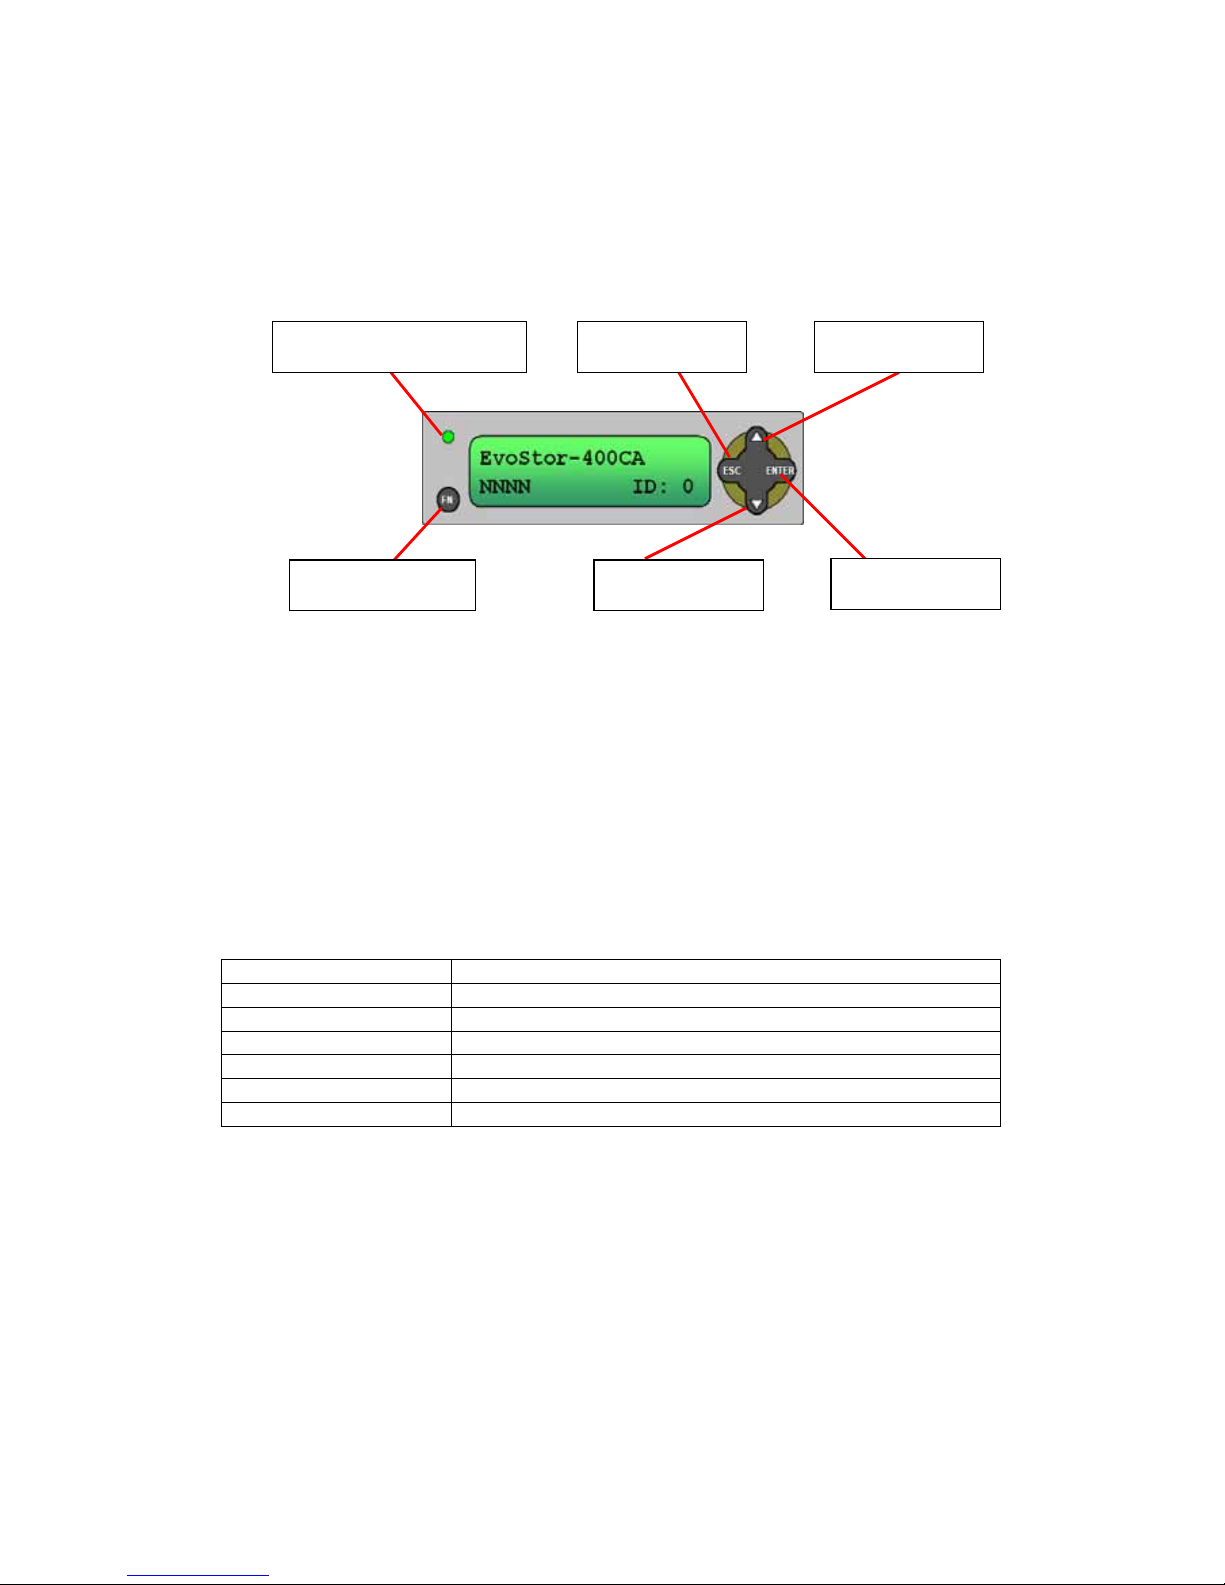
3.1 Configuring EvoStor via the LCD panel
The buttons and LED indicators of the LCD panel are described as below:
• Up and Down buttons: To navigate up and down to select the appropriate
function.
• Enter: To confirm the selection or enter a value.
• ESC: To return to the previous menu.
• Function switch: To enter system configuration menu.
• Power LED Indicator: The light will be on when power is connected.
3.1.1 System Messages
To view system messages of EvoStor, press enter when the system is successfully
turned on. Then press the Up and Down buttons to select the information you
want to view. After that, press ESC to return to the previous menu. The
following information is available currently:
Field Description
SCSI ID Info Current SCSI ID of EvoStor
Volume Info Available logic volume information
Disk Info Physical disk model name and capacity
Hardware Status System temperature, power and fan status
Firmware Version Firmware version of EvoStor
Mute Beeper Turn off the beeper of EvoStor
Power LED Indicator
Function Switch
Escape Button
Enter Button
Up Button
Down Button
Page 14

14
3.1.2 Configuring EvoStor
By factory default, the value of SCSI ID Set is 0 and the password is eight empty
characters.
• Configure SCSI ID Set
Step 1
Press the Function switch and the LCD panel will display the following
information:
Press the Enter button to proceed.
Step 2
Use the Up and Down buttons to enter the password. The following
message will then be shown:
Press the Enter button to confirm or ESC button to return to the previous
menu.
Step 3
Use the Up and Down buttons to adjust the SCSI value and press the
Enter button. Make sure the SCSI ID does not duplicate with that of other
SCSI devices.
Step 4
Press the Enter button to confirm the SCSI value or press ESC to cancel.
Step 5
When completing the setting, restart the computer. Press any key to
return to the menu on the LCD panel.
Page 15

15
• Create Volume
Step 1
Press the Function switch and use the Up and Down buttons to select
Create Volume. Then press Enter.
Step 2
Use the Up and Down, and Enter buttons to enter password. When
finished, the following message will be displayed:
Press Enter to confirm the setting or ESC to cancel.
Step 3
You can further configure the volume with the following advanced options:
Advanced Setting Description Sub-menu
Volume ID The ID number of logic
volume
LUN 0 ~ LUN 7 (Logic Unit
Number)
RAID Level RAID level NRAID, RAID 0, 1, 0+1, 3
and 5
Spare Disks Spare disks of EvoStor Select spare disk
Data Disks Data disks of EvoStor Select data disks
Stripe Size The size of striped block 4, 8, 16, 32, 64, and 128K
Create LUN Now Create logic volume
instantly
Yes or No
Use the Up and Down buttons to select the configuration item and press
Enter to proceed to the sub-menu.
Step 4
Use the Up and Down buttons to select the value and press Enter to
confirm.
Step 5
When finished, restart the computer. Press any button to return to the
menu.
Page 16

16
• Delete Volume
Step 1
Press the Function switch and use the Up and Down buttons to select
Delete Volume. Press Enter to proceed.
Step 2
Use the Up and Down, and the Enter buttons to enter the password.
When finished, the following message will be displayed on the LCD panel:
Step 3
Use the Up and Down buttons to select the appropriate option. Then press
Enter to confirm.
Step 4
Press Enter to confirm and return to the main menu or press ESC to cancel.
• Set Clock Timer
Step 1
Press the Function switch, and Up and Down buttons to select Set Clock
Timer. Then press Enter to proceed:
Step 2
Use the Up and Down, and the Enter buttons to enter the password.
When finished, the following message will be displayed:
Press Enter to confirm or ESC to exit.
Step 3
Set the time and press Enter to confirm.
Page 17

17
Step 4
Press Enter to save the time or ESC to exit.
• Change Password
Step 1
Press Enter and the Up and Down buttons to select Change Password.
Then press Enter to proceed.
Step 2
Enter the password. The following message will be displayed on the LCD
panel:
Press Enter to confirm or ESC to exit.
Step 3
Enter the new password and press Enter.
Step 4
Press Enter to save the new password or ESC to exit.
Page 18

18
• Restore Configuration
Step 1
Press the Function button and select Restore Config.
Step 2
Enter the password and Press Enter to confirm.
Step 3
Wait for the system to restart.
Note: The password will not be restored when selecting restoring
configuration. To restore the password to default, refer to Chapter 5.5.
• Restart System
Step 1
Press the Function switch and select Restart System. Press Enter to
confirm.
Step 2
Enter the password and press Enter to confirm. To quit, press ESC.
Step 3
Wait for the system to restart.
Page 19

19
• Shut down System
Step 1
Press the Function switch and select Shutdown System. Then press ESC
to proceed.
Step 2
Enter the password and press Enter to confirm.
Step 3
The system will shut down and the following message will be shown.
Page 20

20
3.2 Using EvoStor Management Utilities
Besides configuration via the LCD panel, you can also configure EvoStor via the
management utilities included in the companion CD. The utilities are:
• EvoStor Manager
EvoStor Manager is a GUI software which provides system monitoring and
configuration functions via the Internet. Make sure EvoStor Agent has been
run before running EvoStor Manager.
• EvoStor Agent
EvoStor Agent works as a communication means between EvoStor and
EvoStor Manager. It receives management request from EvoStor Manager in
the Internet and transfers the request to SCSI command of EvoStor to provide
remote management and monitoring functions.
• EvoStor ActiveX Control
EvoStor ActiveX Control is a standard ActiveX control using Microsoft®
ActiveX and Component Object Model (COM) technology. This ActiveX control
provides an interface for web page script or other OLE control container
programs to use the functions of EvoStor Manager. For further information,
please refer to section 3.2.3.
3.2.1 EvoStor Management Software (EvoStor Manager)
1. Run Install EvoStor Manager in the companion CD.
Page 21

21
2. Follow the instructions to complete the installation. When fin ished, a shortcut
will be created on the desktop.
• Using EvoStor Manager
Run EvoStor Manager, the following screen will pop up. Click the Connect icon
or select Connect in System.
Enter the agent address, e.g. 172.17.12.168 and port number (default value:
2058). Then click OK.
Note: The port number must be the same as that preset by EvoStor
Agent for successful connection. For further details on port number
configuration of EvoStor Agent, please refer to Chapter 3.2.2.
Note: The port number for EvoStor Manager must be the same as that for
EvoStor Agent for successful connection.
Page 22

22
• Monitoring Page Overview
Upon successful connection, the following screen will be displayed:
Four options in the main menu:
1. System
Manager Menu Options
Connect: To establish connection with EvoStor.
Disconnect: To disconnect from EvoStor.
Alert Setting: To specify the alert level for sending notification email and
the recipients.
Page 23

23
Click Option and the window below will be shown:
Advanced Options
Page 24

24
Field Option
Type Alert type: warning or error messages.
Interval Time interval for sending an alert mail.
Range Monitoring items and the safety range, including
voltage, CPU temperature (℃), system temperature
(℃), and fan speed.
Alert emails will be sent to particular recipients when the values of the
items being monitored are out of the safety range.
Upgrade Firmware: To upgrade the firmware version.
Rescan: Enable this option to detect the status of connection to Agent.
Save Log As: To back up event logs.
Clear All Logs: To clear all event logs.
Exit: To exit the monitoring page and EvoStor Manager.
2. Configuration
A password must be entered when modifying any setting in Configuration. The
default password is 8 empty characters. Hence, you can press Enter directly.
The options include:
SCSI ID Setting: Set SCSI ID.
Page 25

25
Create Logic Volume
Follow the steps below to create logic volume for EvoStor:
Step 1
Select logic volume ID.
Note: Please select LUN0 as the ID for EvoStor, as some O.S. are not able
to recognize logic volume ID other than LUN0. For information about
creating more than one logic volume, please contact the O.S. distributor.
Page 26

26
Step 2
Select the RAID level and stripe size to create for EvoStor.
Page 27

27
Step 3
Select the data and spare disk(s) to create for a volume. Then click Finish.
When finished, the following screen will be shown to display new volume
information.
Page 28

28
Step 5
When the system is being configured and begins to initialize logic volumes,
the number of percentage for initialization will be displayed on the tool bar.
Field Option
Logic Volume Select logic volume (LUN 0 ~ 7)
Spare Disks: Configure spare disks Member Disks
Data Disks: Configure data disks
Delete Logic Volume: To remove logic volume.
Change password: To change password.
3. View
Select the items for viewing in Manager Menu.
Available options include:
Agents:
Field Description
Name The server name running EvoStor Agent.
Port Number The TCP port number for Manager/Agent connection.
Operating System The OS of the server running EvoStor Agent.
HBA Counts The number of ASPI interface cards supported by the
server.
RAID Counts The number of EvoStor connected to this agent.
Page 29

29
RAIDS:
Field Description
Model Name EvoStor model
Agent The server running EvoStor Agent
HBA ID The ID of SCSI adaptor connected by EvoStor
SCSI ID The SCSI ID of EvoStor
Firmware Version EvoStor firmware version
Power The voltage value of EvoStor 5V and 3.3V
Fan Fan speed
Temperature The CPU temperature and system temperature of
EvoStor.
Logic Volumes:
Field Description
Logic Volume ID The ID number of logic volume
Agent The server running EvoStor Agent
HBA ID The ID of SCSI adaptor connected by EvoStor
SCSI ID The SCSI ID of EvoStor
Status Status of EvoStor:
Degrading
Initializing
Ready
Rebuilding
Error
RAID Level RAID level configured for EvoStor
Data Disks The data disk ID number of EvoStor
Spare Disks The spare disk ID number of EvoStor
Capacity The capacity of logic volume
Page 30

30
Physical Disks
Field Description
Disk ID The slot ID of ATA hard disk
Agent The server running EvoStor Agent
HBA ID The ID of SCSI adaptor connected by EvoStor
SCSI ID The SCSI ID of EvoStor
Logic Volume ID The logic volume ID of EvoStor
Status Status of ATA hard disk:
Degrading
Error
Initializing
On line
Off line
Rebuilding
Vacant
Model Name The model name of ATA hard disk
Capacity The disk capacity of ATA hard disk
4. Help
The version number of EvoStor Manager will be shown:
Page 31

31
3.2.2 EvoStor Agent
1. Run Install EvoStor Agent in the companion CD.
Follow the instructions to complete the installation. A short cut
will be
created on the desktop.
Note: You will be prompted to install ASPI (Advanced SCSI Programming
Interface) if it has not been installed to the PC. Restart the PC after
installation. For further details, please refer to Appendix A.
Using EvoStor Agent
When EvoStor Agent is installed, it will be run every time when Windows
starts up. An icon will be created in the toolbar.
Right click the icon and choose to stop or exit EvoStor Agent.
- Stop: Stop the functions of EvoStor Agent. The communication and
processing between EvoStor Agent and EvoStor will stop. Right click the
mouse and a list will be displayed:
Page 32

32
i. Start: To restart EvoStor Agent. EvoStor Agent will accept and process
the commands between EvoStor Manager and EvoStor.
ii. Configuration: To configure the parameters of EvoStor Agent. The
available parameters are shown in the following screen:
TCP Port: The TCP port number for EvoStor service. The default value
is 2058. Make sure the port number is the same as the one entered
for EvoStor Manager connection.
Polling Interval: The time interval for EvoStor Agent to inquire RAID
status. The default value is 5 seconds. Setting the time interval to
close affect system performance.
iii. Exit: Shut down EvoStor Agent. The agent icon will be removed from
the toolbar. You need to run the agent again from the desktop.
- Exit: Same as the above exit function.
Page 33

33
3.2.3 EvorStor View ActiveX Control
• Introduction
EvoStor View ActiveX Control is a standard ActiveX control using Microsoft
®
ActiveX and Component Object Model (COM) technology. This ActiveX control
provides an interface for web page script or other OLE control container
programs to use the functions of EvoStor Manager. Instead of monitoring disk
array status provided by EvoStor Manager, this ActiveX control can help easily
build your own manager application or manager web page.
• System Requirements
PC: IBM or IBM-compatible PC.
Operation system: Windows 98 SE, Windows ME, Windows 2000, or Windows
XP.
• Installation Instruction
Run “Install EvoStor ActiveX Control” from companion CD to inst all the
software. After the setup program complete, all files will be installed to:
“[Program Files] \QNAP\EvoStorActiveX\”
Note: [Program Files] is the path of Windows Program Files folder. The
typical path is “C:\Program Files”. The setup program also creates a
shortcut of a demo html file. You can open it to see if this ActiveX control
has been installed correctly.
Page 34

34
• Un-installation Instruction
To remove EvoStor ActiveX control, follow the steps below:
i. Open the Control Panel by choosing Settings from the Start Menu.
ii. Select "Add/Remove Program" and choose "EvoStor ActiveX Control" from
the list.
iii. Click on the "Add/Remove" button and follow the instructions to uninst all the
program.
• Usage
Open “EvoStorDemo.htm” in a web browser to see this ActiveX control in an
html file. Click on the “Connect” button and input the IP address and IP port
of EvoStor Agent, of which the EvoStor is on.
EvoStor View ActiveX Control resides in Control Panel. You can manipulate
most of EvoStor’s functions by using the buttons and Windows controls on
it. The functions and commands available are listed below:
Connect
Connect an EvoStor Agent to manage EvoStor.
Disconnect
To disconnect EvoStor Agent.
Connect
Disconnect
Alert Setting
Log
Command Line
Control Panel
Page 35

35
Alert Setting
After you click this button, an alert setting dialog box will pop up and
prompt you to configure alert email and hardware status settings.
Command Line
Use the Up/Down key to select a command and click this button to
execute it.
Log
After you click this button, an event log dialog box will pop up and prompt
you for filename to store the event logs.
• Object Interface
EvoStor View ActiveX Control uses the concept of objects to expose
programming functions. You can configure EvoStor or other monitoring
functions of EvoStor Manager by issuing a simple programming statement.
The complete list of the programming interface is described in the following
section “Object Interface List”.
• Web Support
To let users distribute ActiveX control on their own web page to manage
EvoStor. Here is an HTML page example as following:
<HTML>
<BODY>
<OBJECT
ID=”EvoStorViewCtrl”
CLASSID=”CLSID:31AA7BDE-2F5D-4845-A4CD-014BD9FA9B5C”
HEIGHT=400
WIDTH=491>
</OBJECT>
</BODY>
</HTML>
• Object Interface List
Methods
[Name] [Param] [Note]
BOOL Connect() Pop up a dialog for
inputting IP address and
IP port of EvoStor Agent
to establish a connection
to an EvoStor Agent
BOOL Connect(LPCTSTR
pszAgentAddr, short
sAgentPort)
pszAgentAddr: IP address of
EvoStor Agent
sAgentPort: IP port of
EvoStor Agent
Establish a connection to
a specified IP address
and IP port of EvoStor
Agent
BOOL DisConnect() Disconnect from EvoStor
Agent
BOOL CreateLun() Pop up a create volume
wizard to create a
Page 36

36
volume on the specified
EvoStor
BOOL DeleteLun() Delete a volume from a
specified EvoStor
BOOL ChangeSCSIID() Pop up a dialog to
change the SCSI ID of a
specified EvoStor
BOOL ChangePasswd() Pop up a dialog to
change the password of a
specified EvoStor
void Rescan() Rescan all SCSI bus on
all host adapters, and
identify the EvoStor
devices available on the
SCSI bus
void AlertSetting() Pop up a dialog to set
alert configuration
BOOL
UpgradeFirmware()
Upgrade firmware on a
specified EvoStor
Events
[Name] [Param] [Note]
void EventLog(BSTR
pszOwner, short sType,
BSTR pszTime, BSTR
pszContent)
pszOwner: Which EvoStor
send out the event log
sType: 1(Debug), 2(Error),
3(Warning), 4(Information)
pszTime: The time of event
log occurs
pszContent: The content of
event log
Fired when an event
takes place for EvoStor
Void SocketClosure() Fired when receiving
notification of socket
closure
Examples:
CRaidView m_RAIDViewCtrl;
m_RAIDViewCtrl.Connect(); // Connect to EvoStor Agent
m_RAIDViewCtrl.Rescan(); // Rescan EvoStor devices on all
SCSI bus
m_RAIDViewCtrl.AlertSetting() // Set alert configuration
m_RAIDViewCtrl.CreateLun(); // Create a logic volume on EvoStor
m_RAIDViewCtrl.DeleteLun(); // Delete a logic volume on EvoStor
m_RAIDViewCtrl.UpgradeFirmware(); // Upgrade firmware of EvoStor
m_RAIDViewCtrl.ChangeSCSIID(); // Change SCSI ID of EvoStor
m_RAIDViewCtrl.ChangePasswd(); // Change password of EvoStor
m_RAIDViewCtrl.DisConnect(); // Disconnect
Page 37

37
Chapter 4 Accessing EvoStor
EvoStor emulates a standard SCSI-3 direct access device (hard disk) to host, it is
compatible with all SCSI-3 or SCSI-2/LVD host adapters, so no special access
software for specific operating system is required. Like any other type of fixed
disk media in your system, a RAID must also be partitioned and formatted before
use. The method of partitioning and formatting on a RAID is the same as that for
other disks. The following sections provide a brief overview on how to access
EvoStor in Windows 2000 and Red Hat Linux operating system. For other
operating system, please contact your operating system supplier for further
information.
4.1 Using Microsoft Windows 2000
i. Detecting new drive
Right click My Computer on the desktop and select Manage. Select Disk
Management when the following screen pops up, the computer will detect the
new logical disk. If there is an existing hard disk, the newly detected one will be
numbered as disk 1.
Page 38

38
ii. Writing Signature
Before using new disk, the host computer will prompt for writing signature for the
newly detected disk. Click Next to proceed.
iii. The following example is based on Disk 1. Select Disk 1 and click Next.
Page 39

39
iv. Click Finish to complete writing signature for Disk 1. Do not select to
upgrade the disk.
Page 40

40
v. Click Finish to complete.
Page 41

41
vi. Creating disk volume.
Right click the newly detected disk and select Create Volume.
 Loading...