

Page 1

Simplify
SANblade 2300 Series User’s Guide
2-Gb Fibre Channel to PCI-X Host Bus Adapters
FC2354601-00 A Page i
Page 2

Information furnished in this manual is believed to be accurate and reliable.
However, QLogic Corporation assumes no responsibility for its use, nor for any
infringements of patents or other rights of third parties which may result from its
use. QLogic Corporation reserves the right to change product specifications at any
time without notice. Applications described in this document for any of these
products are for illustrative purposes only. QLogic Corporation makes no
representation nor warranty that such applications are suitable for the specified use
without further testing or modification. QLogic Corporation assumes no
responsibility for any errors that may appear in this document.
No part of this document may be copied nor reproduced by any means, nor
translated nor transmitted to any magnetic medium without the express written
consent of QLogic Corporation.
Microsoft, Windows NT, and Windows 2000 are trademarks of Microsoft
Corporation.
QLogic is a trademark of QLogic Corporation.
Solaris is a registered trademark of Sun Microsystems, Inc.
SPARC is a registered trademark of SPARC International, Inc. Products bearing
SPARC trademarks are based on an architecture developed by Sun
Microsystems, Inc.
All other brand and product names are trademarks or registered trademarks of
their respective owners.
Rev. A, release, 3/8/02
QLogic Corporation, 26600 Laguna Hills Drive, Aliso Viejo, CA 92656
Page ii
Document Revision History
© 2002 QLogic Corporation
First Printed: January 2002
All Rights Reserved Worldwide.
Printed in U.S.A.
(800) 867-7274 or (949) 389-6000
Page 3

Table of Conten ts
Section 1 Introduction
1.1 How to Use this Guide. . . . . . . . . . . . . . . . . . . . . . . . . . . . . . 1-1
1.2 General Description. . . . . . . . . . . . . . . . . . . . . . . . . . . . . . . . 1-1
1.3 What is Fibre Channel?. . . . . . . . . . . . . . . . . . . . . . . . . . . . . 1-1
1.4 Features . . . . . . . . . . . . . . . . . . . . . . . . . . . . . . . . . . . . . . . . 1-2
Part I Hardware
Section 2 QLA2340 /234 0L
2.1 QLA2340/2340L HBA Components. . . . . . . . . . . . . . . . . . . . 2-1
2.1.1 LEDs . . . . . . . . . . . . . . . . . . . . . . . . . . . . . . . . . . . . . . . . 2-2
2.1.2 Jumpers . . . . . . . . . . . . . . . . . . . . . . . . . . . . . . . . . . . . . . 2-2
2.2 Installation in the Computer. . . . . . . . . . . . . . . . . . . . . . . . . . 2-2
2.2.1 Installation Help . . . . . . . . . . . . . . . . . . . . . . . . . . . . . . . . 2-4
2.3 Fast!UTIL . . . . . . . . . . . . . . . . . . . . . . . . . . . . . . . . . . . . . . . 2-5
2.3.1 Introduction . . . . . . . . . . . . . . . . . . . . . . . . . . . . . . . . . . . 2-5
2.3.2 Configuration Settings . . . . . . . . . . . . . . . . . . . . . . . . . . . 2-5
2.3.2.1 Host Adapter Settings . . . . . . . . . . . . . . . . . . . . . . . . . 2-6
2.3.2.2 Selectable Boot Settings . . . . . . . . . . . . . . . . . . . . . . . 2-6
2.3.2.3 Restore Default Settings . . . . . . . . . . . . . . . . . . . . . . . 2-7
2.3.2.4 Raw NVRAM Data . . . . . . . . . . . . . . . . . . . . . . . . . . . 2-7
2.3.2.5 Advanced Adapter Settings . . . . . . . . . . . . . . . . . . . . 2-7
2.3.2.6 Extended Firmware Settings . . . . . . . . . . . . . . . . . . . . 2-9
2.3.3 Scan Fibre Channel Devices . . . . . . . . . . . . . . . . . . . . . . 2-11
2.3.4 Fibre Disk Utility . . . . . . . . . . . . . . . . . . . . . . . . . . . . . . . . 2-11
2.3.5 Select Host Adapter . . . . . . . . . . . . . . . . . . . . . . . . . . . . . 2-11
2.4 FCode . . . . . . . . . . . . . . . . . . . . . . . . . . . . . . . . . . . . . . . . . . 2-12
2.4.1 Flashing a QLA2340/2340L HBA with FCode . . . . . . . . . 2-12
2.4.2 Setting the QLA2340/2340L HBA Connection Mode . . . . 2-13
2.4.3 Setting the QLA2340/2340L HBA Loop ID . . . . . . . . . . . 2-14
2.4.4 Setting and Viewing the Fibre Channel Data Rate . . . . . 2-14
2.4.5 Selecting the Boot Device . . . . . . . . . . . . . . . . . . . . . . . . 2-15
2.4.6 Building the Bootable Disk . . . . . . . . . . . . . . . . . . . . . . . . 2-16
2.5 Specifications . . . . . . . . . . . . . . . . . . . . . . . . . . . . . . . . . . . . 2-19
2.6 Label . . . . . . . . . . . . . . . . . . . . . . . . . . . . . . . . . . . . . . . . . . . 2-20
FC2354601-00 A Page iii
Page 4

SANblade 2300 Series User’s Guide
2-Gb Fibre Channel to PCI-X Host Bus Adapters
2.7 Agency Certification . . . . . . . . . . . . . . . . . . . . . . . . . . . . . . . 2-20
2.7.1 EMI and EMC Requirements . . . . . . . . . . . . . . . . . . . . . 2-20
2.7.2 Product Safety Requirements . . . . . . . . . . . . . . . . . . . . . 2-21
Section 3 QLA2342/2342L
3.1 QLA2342/2342L HBA Components . . . . . . . . . . . . . . . . . . . 3-1
3.1.1 LEDs . . . . . . . . . . . . . . . . . . . . . . . . . . . . . . . . . . . . . . . . 3-2
3.1.2 Jumpers . . . . . . . . . . . . . . . . . . . . . . . . . . . . . . . . . . . . . 3-2
3.2 Installation in the Computer . . . . . . . . . . . . . . . . . . . . . . . . . 3-2
3.2.1 Installation Help . . . . . . . . . . . . . . . . . . . . . . . . . . . . . . . 3-4
3.3 Fast!UTIL. . . . . . . . . . . . . . . . . . . . . . . . . . . . . . . . . . . . . . . 3-5
3.3.1 Introduction . . . . . . . . . . . . . . . . . . . . . . . . . . . . . . . . . . . 3-5
3.3.2 Configuration Settings . . . . . . . . . . . . . . . . . . . . . . . . . . 3-5
3.3.2.1 Host Adapter Settings . . . . . . . . . . . . . . . . . . . . . . . . 3-6
3.3.2.2 Selectable Boot Settings . . . . . . . . . . . . . . . . . . . . . . 3-6
3.3.2.3 Restore Default Settings . . . . . . . . . . . . . . . . . . . . . . 3-7
3.3.2.4 Raw NVRAM Data . . . . . . . . . . . . . . . . . . . . . . . . . . . 3-7
3.3.2.5 Advanced Adapter Settings . . . . . . . . . . . . . . . . . . . . 3-7
3.3.2.6 Extended Firmware Settings . . . . . . . . . . . . . . . . . . . 3-9
3.3.3 Scan Fibre Channel Devices . . . . . . . . . . . . . . . . . . . . . 3-11
3.3.4 Fibre Disk Utility . . . . . . . . . . . . . . . . . . . . . . . . . . . . . . . 3-11
3.3.5 Select Host Adapter . . . . . . . . . . . . . . . . . . . . . . . . . . . . 3-11
3.4 FCode. . . . . . . . . . . . . . . . . . . . . . . . . . . . . . . . . . . . . . . . . . 3-12
3.4.1 Flashing a QLA2342/2342L HBA with FCode . . . . . . . . . 3-12
3.4.2 Setting the QLA2342/2342L HBA Connection Mode . . . 3-13
3.4.3 Setting the QLA2342/2342L HBA Loop ID . . . . . . . . . . . 3-14
3.4.4 Setting and Viewing the Fibre Channel Data Rate . . . . . 3-14
3.4.5 Selecting the Boot Device . . . . . . . . . . . . . . . . . . . . . . . . 3-15
3.4.6 Building the Bootable Disk . . . . . . . . . . . . . . . . . . . . . . . 3-16
3.5 Specifications . . . . . . . . . . . . . . . . . . . . . . . . . . . . . . . . . . . . 3-19
3.6 Label. . . . . . . . . . . . . . . . . . . . . . . . . . . . . . . . . . . . . . . . . . . 3-20
3.7 Agency Certification . . . . . . . . . . . . . . . . . . . . . . . . . . . . . . . 3-20
3.7.1 EMI and EMC Requirements . . . . . . . . . . . . . . . . . . . . . 3-20
3.7.2 Product Safety Requirements . . . . . . . . . . . . . . . . . . . . . 3-21
Section 4 Troubleshooting
4.1 Problems After Installation . . . . . . . . . . . . . . . . . . . . . . . . . . 4-1
4.2 Hardware Problem Checklist . . . . . . . . . . . . . . . . . . . . . . . . 4-1
4.3 System Configuration Problem Checklist . . . . . . . . . . . . . . . 4-1
4.4 Fibre Channel Problem Checklist . . . . . . . . . . . . . . . . . . . . . 4-2
Page iv FC2354601-00 A
Page 5

2-Gb Fibre Channel to PCI-X Host Bus Adapters
SANblade 2300 Series User’s Guide
Part II Software
Section 5 Windows NT Driver Installation
5.1 Introduction . . . . . . . . . . . . . . . . . . . . . . . . . . . . . . . . . . . . . . 5-1
5.2 Windows NT Driver Files. . . . . . . . . . . . . . . . . . . . . . . . . . . . 5-1
5.3 Windows NT Installation . . . . . . . . . . . . . . . . . . . . . . . . . . . . 5-1
5.3.1 Initial Installation of Windows NT and the
5.3.2 Installing or Updating the Windows NT Driver . . . . . . . . . 5-2
5.3.3 Updating the Windows NT Driver . . . . . . . . . . . . . . . . . . 5-3
5.4 QLDIRECT . . . . . . . . . . . . . . . . . . . . . . . . . . . . . . . . . . . . . . 5-3
5.4.1 QLDIRECT Driver Files . . . . . . . . . . . . . . . . . . . . . . . . . . 5-4
5.4.2 QLDIRECT Installation . . . . . . . . . . . . . . . . . . . . . . . . . . 5-4
5.4.2.1 Initial Installation of QLDIRECT . . . . . . . . . . . . . . . . . 5-4
5.4.2.2 Updating to QLDIRECT from QLFILTER . . . . . . . . . . 5-4
5.5 QL2x00IP NDIS Network Driver Installation . . . . . . . . . . . . . 5-5
5.5.1 Initial Installation of the QL2x00IP NDIS Network
5.5.2 Updating the QL2x00IP NDIS Network Driver . . . . . . . . . 5-6
5.5.3 QL2x00IP NDIS Driver and IP Address Configuration . . . 5-7
5.5.3.1 Driver Configuration . . . . . . . . . . . . . . . . . . . . . . . . . . 5-7
5.5.3.2 IP Address Configuration . . . . . . . . . . . . . . . . . . . . . . 5-8
5.5.4 Removing the QL2x00IP NDIS Driver . . . . . . . . . . . . . . . 5-9
Windows NT Driver . . . . . . . . . . . . . . . . . . . . . . . . . . . . . 5-2
Driver . . . . . . . . . . . . . . . . . . . . . . . . . . . . . . . . . . . . . . . . 5-5
Section 6 Windows 2000 Driver Installation
6.1 Introduction . . . . . . . . . . . . . . . . . . . . . . . . . . . . . . . . . . . . . . 6-1
6.2 Creating the Driver Disk . . . . . . . . . . . . . . . . . . . . . . . . . . . . 6-1
6.3 Windows 2000 Installation. . . . . . . . . . . . . . . . . . . . . . . . . . . 6-1
6.3.1 Initial Installation of Windows 2000 and the
Windows 2000 Driver . . . . . . . . . . . . . . . . . . . . . . . . . . . 6-2
6.3.2 Installing the Windows 2000 Driver . . . . . . . . . . . . . . . . . 6-2
6.3.3 Updating the Windows 2000 Driver . . . . . . . . . . . . . . . . . 6-3
6.4 QLDIRECT . . . . . . . . . . . . . . . . . . . . . . . . . . . . . . . . . . . . . . 6-4
6.4.1 QLDIRECT Driver Files . . . . . . . . . . . . . . . . . . . . . . . . . . 6-4
6.4.2 QLDIRECT Installation . . . . . . . . . . . . . . . . . . . . . . . . . . 6-4
6.4.2.1 Initial Installation of QLDIRECT . . . . . . . . . . . . . . . . . 6-4
6.4.2.2 Updating to QLDIRECT from QLFILTER . . . . . . . . . . 6-5
6.5 QL2x00IP NDIS Network Driver Installation . . . . . . . . . . . . . 6-5
6.5.1 Initial Installation of the QL2x00IP NDIS Network
Driver . . . . . . . . . . . . . . . . . . . . . . . . . . . . . . . . . . . . . . . . 6-6
6.5.2 Updating the QL2x00IP NDIS Network Driver . . . . . . . . . 6-6
FC2354601-00 A Page v
Page 6

SANblade 2300 Series User’s Guide
2-Gb Fibre Channel to PCI-X Host Bus Adapters
6.5.3 QL2x00IP NDIS Driver Configuration . . . . . . . . . . . . . . . 6-7
6.5.4 Removing the QL2x00IP NDIS Driver . . . . . . . . . . . . . . . 6-9
Section 7 Windows XP Driver Installation
7.1 Introduction. . . . . . . . . . . . . . . . . . . . . . . . . . . . . . . . . . . . . . 7-1
7.2 Creating the Driver Disk . . . . . . . . . . . . . . . . . . . . . . . . . . . . 7-1
7.3 Installing the Windows XP Driver . . . . . . . . . . . . . . . . . . . . . 7-1
7.3.1 Installing Windows XP with the QLA23xx HBA
7.3.2 Installing Windows XP with the QLA23xx HBA
7.3.3 Installing the QL2300.SYS Driver . . . . . . . . . . . . . . . . . . 7-3
7.3.4 Updating the Existing QLA2300.SYS Driver . . . . . . . . . . 7-4
7.4 Removing the Driver. . . . . . . . . . . . . . . . . . . . . . . . . . . . . . . 7-5
7.5 System Registry Parameters . . . . . . . . . . . . . . . . . . . . . . . . 7-5
7.5.1 MaximumSGList . . . . . . . . . . . . . . . . . . . . . . . . . . . . . . . 7-5
7.5.2 NumberOfRequests . . . . . . . . . . . . . . . . . . . . . . . . . . . . 7-6
7.5.3 FCTape . . . . . . . . . . . . . . . . . . . . . . . . . . . . . . . . . . . . . . 7-6
7.5.4 UseSameNN . . . . . . . . . . . . . . . . . . . . . . . . . . . . . . . . . . 7-7
as the Boot Device . . . . . . . . . . . . . . . . . . . . . . . . . . . . . 7-2
as an Add-On . . . . . . . . . . . . . . . . . . . . . . . . . . . . . . . . . 7-2
Section 8 NetWare Driver Installation
8.1 Introduction. . . . . . . . . . . . . . . . . . . . . . . . . . . . . . . . . . . . . . 8-1
8.2 NetWare Driver Files and Parameters . . . . . . . . . . . . . . . . . 8-1
8.3 Installing the NetWare Driver . . . . . . . . . . . . . . . . . . . . . . . . 8-2
Section 9 Red Hat Linux Driver Installation
9.1 Introduction. . . . . . . . . . . . . . . . . . . . . . . . . . . . . . . . . . . . . . 9-1
9.2 Creating the Driver Floppy Disk . . . . . . . . . . . . . . . . . . . . . . 9-1
9.2.1 Driver Floppy Disk 1 (New Operating System
9.2.2 Driver Floppy Disk 2 (Installed Operating System) . . . . . 9-2
9.2.3 Source Code Driver Floppy Disk . . . . . . . . . . . . . . . . . . . 9-2
9.3 Install a New Operating System and Driver
9.4 Install or Update the Driver (Installed Operating
9.4.1 Installing the Driver on the Boot Drive . . . . . . . . . . . . . . 9-4
9.4.2 Loading the Driver . . . . . . . . . . . . . . . . . . . . . . . . . . . . . 9-5
9.4.2.1 Building a Custom Kernel to Load the
9.4.2.2 Building a Ramdisk Image to Load the Driver
Page vi FC2354601-00 A
Installation) . . . . . . . . . . . . . . . . . . . . . . . . . . . . . . . . . . . 9-1
(Red Hat Linux 6.2) . . . . . . . . . . . . . . . . . . . . . . . . . . . . . . . 9-3
System) . . . . . . . . . . . . . . . . . . . . . . . . . . . . . . . . . . . . . . . . 9-3
qla2x00 (v4.x) Driver Automatically . . . . . . . . . . . . . . 9-5
Automatically . . . . . . . . . . . . . . . . . . . . . . . . . . . . . . . 9-9
Page 7

2-Gb Fibre Channel to PCI-X Host Bus Adapters
SANblade 2300 Series User’s Guide
9.4.2.3 Loading and Unloading the qla2x00 Driver
9.4.2.4 Building a Ramdisk Image to Load the
9.4.2.5 Loading and Unloading the qla2300 Driver
9.5 Building a Driver from the Sources . . . . . . . . . . . . . . . . . . . . 9-12
9.5.1 Building a Uniprocessor Version of the Driver . . . . . . . . . 9-12
9.5.2 Building a Multiprocessor Version of the Driver . . . . . . . . 9-13
Manually . . . . . . . . . . . . . . . . . . . . . . . . . . . . . . . . . . . 9-10
qla2300 Driver . . . . . . . . . . . . . . . . . . . . . . . . . . . . . . 9-10
Manually . . . . . . . . . . . . . . . . . . . . . . . . . . . . . . . . . . . 9-11
Section 10 Solaris SPARC Driver Installation
10.1 Introduction . . . . . . . . . . . . . . . . . . . . . . . . . . . . . . . . . . . . . . 10-1
10.2 Installing the Solaris SPARC Driver from a CD-ROM . . . . . . 10-1
10.3 Installing the Solaris SPARC Driver from the QLogic
10.4 FCode . . . . . . . . . . . . . . . . . . . . . . . . . . . . . . . . . . . . . . . . . . 10-4
Web Site . . . . . . . . . . . . . . . . . . . . . . . . . . . . . . . . . . . . . . . . 10-2
FIGURES
Figure Page
2-1 QLA2340/2340L HBA Layout. . . . . . . . . . . . . . . . . . . . . . . . . . . . 2-1
2-2 QLA2340/2340L HBA LED Activity . . . . . . . . . . . . . . . . . . . . . . . 2-2
3-1 QLA2342/2342L HBA Layout. . . . . . . . . . . . . . . . . . . . . . . . . . . . 3-1
3-2 QLA2342/2342L HBA LED Activity . . . . . . . . . . . . . . . . . . . . . . . 3-2
TABLES
Table Page
2-1 Host Adapter Settings . . . . . . . . . . . . . . . . . . . . . . . . . . . . . . . . . 2-6
2-2 Advanced Adapter Settings . . . . . . . . . . . . . . . . . . . . . . . . . . . . . 2-7
2-3 Extended Firmware Settings . . . . . . . . . . . . . . . . . . . . . . . . . . . . 2-9
2-4 RIO Operation Modes . . . . . . . . . . . . . . . . . . . . . . . . . . . . . . . . . 2-10
2-5 Connection Options . . . . . . . . . . . . . . . . . . . . . . . . . . . . . . . . . . . 2-10
2-6 Fibre Channel Data Rates . . . . . . . . . . . . . . . . . . . . . . . . . . . . . . 2-15
2-7 QLA2340/2340L HBA Operating Environment . . . . . . . . . . . . . . 2-19
2-8 QLA2340/2340L HBA Specifications . . . . . . . . . . . . . . . . . . . . . . 2-19
3-1 Host Adapter Settings . . . . . . . . . . . . . . . . . . . . . . . . . . . . . . . . . 3-6
3-2 Advanced Adapter Settings . . . . . . . . . . . . . . . . . . . . . . . . . . . . . 3-7
3-3 Extended Firmware Settings . . . . . . . . . . . . . . . . . . . . . . . . . . . . 3-9
3-4 RIO Operation Modes . . . . . . . . . . . . . . . . . . . . . . . . . . . . . . . . . 3-10
3-5 Connection Options . . . . . . . . . . . . . . . . . . . . . . . . . . . . . . . . . . . 3-10
FC2354601-00 A Page vii
Page 8

SANblade 2300 Series User’s Guide
2-Gb Fibre Channel to PCI-X Host Bus Adapters
3-6 Fibre Channel Data Rates. . . . . . . . . . . . . . . . . . . . . . . . . . . . . . 3-15
3-7 QLA2342/2342L HBA Operating Environment . . . . . . . . . . . . . . 3-19
3-8 QLA2342/2342L HBA Specifications . . . . . . . . . . . . . . . . . . . . . 3-19
5-1 Ql2x00ip.sys Configuration Parameters . . . . . . . . . . . . . . . . . . . 5-7
6-1 Ql2x00ip.sys Configuration Parameters . . . . . . . . . . . . . . . . . . . 6-7
8-1 QL2300.HAM Driver Parameters . . . . . . . . . . . . . . . . . . . . . . . . 8-1
Page viii FC2354601-00 A
Page 9

Section 1
Introduction
1.1
How to Use this Guide
The SANblade QLogic host bus adapters (HBAs) supported in this document are
described in the following paragraphs; they are collectively referred to as the
QLA23xx HBA unless otherwise noted. These HBAs are all low-profile, 64-bit PCI
to Fibre Channel optical media.
■ QLA2340 (single channel, full-height bracket)
■ QLA2340L (single channel, low-profile bracket)
■ QLA2342 (dual channel, full-height bracket)
■ QLA2342L (dual channel, low-profile bracket)
First, install the QLA23xx HBA according to the directions in the appropriate
hardware installation section. Secondly, install the software driver according to the
directions in the appropriate section.
1.2
General Description
Thank you for selecting the QLA23xx Fibre Channel (FC) HBA. The QLA23xx HBA
is an intelligent, high-performance, DMA bus master host adapter designed for
high-end systems. The intelligence and performance are derived from the ISP23xx
chips, making the QLA23xx HBA a leading-edge host adapter. The ISP23xx
combines a powerful RISC processor, a Fibre Channel protocol manager (FPM)
with one 2-Gb Fibre Channel transceiver, and a peripheral component
interconnect-extended (PCI-X) local bus interface in a single-chip solution. The
QLA23xx HBA supports all FC peripherals that support private loop direct attach
(PLDA) and fabric loop attach (FLA). Installation of the QLA23xx HBA is quick and
easy.
1.3
What is Fibre Channel?
Fibre Channel technology is outlined in the SCSI-3 Fibre Channel Protocol
(SCSI-FCP) standard. Fibre Channel is a high-speed data transport technology
used for mass storage and networking. It connects mainframes, super computers,
workstations, storage devices, and servers.
Fibre Channel supports data transfer rates up to 200 MBps half-duplex and
400 MBps full-duplex on copper and optical interfaces. The QLA23xx HBAs use a
multimode optical interface for intermediate distances (less than 500 meters at the
data rate of 1 Gbps; less than 300 meters at the data rate of 2 Gbps).
FC2354601-00 A 1-1
Page 10

1 – Introduction
Features
With its increased connectivity and performance, Fibre Channel is the I/O
technology preferred and used by system designers.
1.4
Features
■ Compliance with PCI Local Bus Specificatio n revision 2.2
■ Compliance with PCI-X Addendum (revision 1.0) to the PCI Local Bus
Specification
■ Compliance with Third Generation Fibre Channel-Physical and Signaling
Interface (FC-PH-3) standard
■ Compliance with Fibre Channel-Arbitrate d Loop (FC-AL-2) standard
■ Compliance with U.S. and international safety and emissions standards
■ Support for bus master DMA
■ Fast!UTIL BIOS utility to customize the configuration parameters on the
QLA23xx HBA and attached drives
■ Two independent channels on a single HBA
■ Supports Fibre Channel protocol-SCSI (FCP-SCSI), IP, and Fibre
Channel-virtual interface (FC-VI) protocols
■ Supports point-to-point fabric connection (F-PORT FABRIC LOGIN)
1-2 FC2354601-00 A
Page 11

Part I
Hardware
This part of the SANblade 2300 User’s Guide describes the host bus adapters
(HBAs) and how to install and configure them. See the section that corresponds to
your HBA. Section 4 contains troubleshooting information.
HBA Section
QLA2340/2340L 2
QLA2342/2342L 3
FC2354601-00 A I-1
Page 12

I – Hardware
I-2 FC2354601-00 A
Page 13
Section 2
QLA2340/2340L
2.1
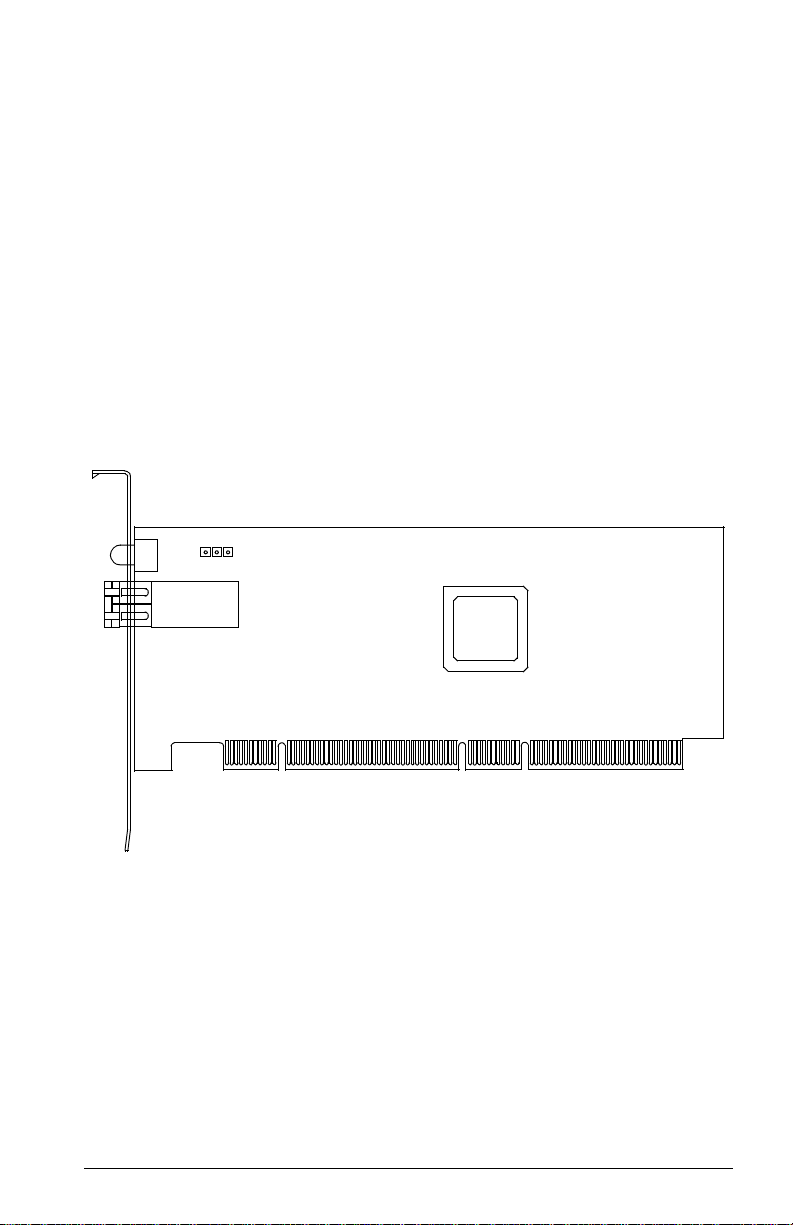
QLA2340/2340L HBA Components
Figure 2-1 identifies the QLA2340/2340L HBA components referenced throughout
this section.
Each QLA2340/2340L HBA has a unique serial number; its location on the HBA is
noted in figure 2-1. Take a minute to write down the serial number of the
QLA2340/2340L HBA.
J3
LED1
31
J1
ISP CHIP
NOTE: The serial number is on the other side of the HBA.
The QLA2340 has a full-height bracket (as shown in this
figure). The QLA2340L has a low-profile bracket (shorter
than the bracket in this figure).
Figure 2-1. QLA2340/2340L HBA Layout
FC2354601-00 A 2-1
Page 14

2 – QLA2340/2340L
Installation in the Computer
2.1.1
LEDs
Figure 2-2 identifies and describes the activity of the QLA2340/2340L HBA LEDs.
AMBER LED
GREEN LED
J1 CONNECTOR LEDs
J1 CONNECTOR
Green
LED
On On Power
On Off Online
Off On Signal acquired
Off Flashing Loss of synchronization
Flashing Flashing Firmware error
Figure 2-2. QLA2340/2340L HBA LED Activity
Amber
LED
Activity
2.1.2
Jumpers
The jumpers on the QLA2340/2340L HBAs set the default state of the laser and are
set at the factory with a jumper plug on pins 2–3 of the J3 jumper.
CAUTION!
Changing the jumper settings can result in the HBA being inoperable.
2.2
Installation in the Computer
Before you install the QLA2340/2340L HBA in your computer, you need the
following:
■ A screwdriver (usually a Phillips #1)
■ An optical mutimode cable with an LC-style duplex connector
CAUTION!
2-2 FC2354601-00 A
The QLA2340/2340L HBA contains parts that can be damaged by
ESD. Before handling the QLA2340/2340L HBA, use standard
methods to discharge static electricity. Keep the QLA2340/2340L HBA
in the antistatic bag until you are ready to install it. Place the HBA on
the bag when you examine or configure it. Retain the bag for future use.
Page 15

2 – QLA2340/2340L
Perform the following steps to install the QLA2340/2340L HBA in your PC:
1. Check the motherboard and make any configuration changes necessary to
accommodate the QLA2340/2340L HBA.
The QLA2340/2340L HBA is self-configuring; however, some motherboards
require manual configuration. For example, some systems have a PCI
Device Configuration menu in the motherboard setup BIOS where you
must enable HBAs, bus master slots, and IRQ levels. If the motherboard
supports triggering, use level triggering for the QLA2340/2340L HBA. See
the documentation supplied with your computer, or contact your computer
dealer to determine if your motherboard requires configuration.
2. Power down the peripherals, then the computer.
3. Remove the computer cover and save the screws.
4. Choose any PCI bus slot that supports bus mastering. Most motherboards
automatically assign an IRQ level and interrupt line; if your motherboard
does not, you must assign the IRQ level and use interrupt line A for this slot.
NOTE:
■ Some motherboards have two kinds of PCI bus slots: master
and slave. The QLA2340/2340L HBA must be in a PCI bus
master slot. (Some motherboards have PCI bus master slots
that are shared with onboard devices. QLA2340/2340L HBAs
do not work in shared slots.)
■ PCI connectors vary among system HBA manufacturers. The
QLA2340/2340L HBA is a 64-bit PCI device that can function
in a 32-bit PCI slot; the slot conforms to the PCI specification
(the rear edge of the PCI slot is notched). If you try to install the
QLA2340/2340L HBA into a PCI slot that does not conform to
the PCI specification, you may damage the QLA2340/2340L
HBA.
■ PCI and PCI-X slots look the same. If the PC contains both PCI
and PCI-X slots, refer to the PC manufacturer’s instructions to
determine the slot type.
■ The QLA2340/2340L HBAs are designed and tested to operate
at PCI bus speeds of up to 133 MHz.
Installation in the Computer
5. Remove the slot cover for the slot in which you will install the
QLA2340/2340L HBA.
6. Place the QLA2340/2340L HBA into the slot. Carefully press the HBA into
the slot until it seats firmly.
7. Secure the QLA2340/2340L HBA to the chassis. Follow the PC
manufacturer’s instructions.
FC2354601-00 A 2-3
Page 16

2 – QLA2340/2340L
Installation in the Computer
8. Connect the appropriate cable from the devices to the corresponding
connector.
9. Carefully reinstall the computer cover. Insert and tighten the computer cover
screws.
10. Power up all external FC devices, then power up the PC and observe the
monitor. The BIOS is disabled by default. Consequently, the devices
attached to the QLA2340/2340L HBA are not identified. For example:
QLogic Corporation
QLA23xx PCI Fibre Channel ROM BIOS Version x.xx
Copyright (C) QLogic Corporation 2000 All rights reserved.
www.qlogic.com
Press <CNTRL-Q> for Fast!UTIL
BIOS for Adapter 0 is disabled
ROM BIOS not installed
NOTE:
■ SunSPARC systems do not display the BIOS banner.
■ Enable the BIOS only if the boot device is attached to the
QLA2340/2340L HBA. This allows the system to boot faster.
■ For further information about enabling the QLA2340/2340L
HBA BIOS, see section 2.3.
If the information displayed on your monitor is correct, congratulations! You have
successfully installed the QLA2340/2340L HBA in your computer.
If you need FCode (Solaris SPARC systems), see section 2.4 for instructions on
how to install or update the FCode on the QLA2340/2340L HBA.
See the appropriate section for detailed instructions on how to install the software
drivers.
If the information displayed is not correct and you have checked the QLA2340/2340L
HBA’s configuration, see section 4 for troubleshooting information.
2.2.1
Installation Help
If your system has an IDE hard disk, it may be assigned device number 80, which
is the boot device. If your system does not have an IDE hard disk, a parallel SCSI
host bus adapter (HBA), or a RAID adapter, the first bootable FC hard disk
configured (the one with the lowest ID) is assigned device number 80 and becomes
the boot device. The QLA2340/2340L HBA BIOS must be enabled if the boot device
is connected to the QLA2340/2340L HBA.
2-4 FC2354601-00 A
Page 17

2 – QLA2340/2340L
If you have a selectable boot BIOS and want to boot to an FC hard disk, set the
motherboard BIOS parameters to None or Not Installed. The ROM BIOS on the
QLA2340/2340L HBA automatically configures the FC peripherals.
Some new system BIOSs support selectable boot, which supersedes the
QLA2340/2340L HBA BIOS selectable boot setting. Select the QLA2340/2340L
HBA FC hard disk in the system BIOS to boot from an FC hard disk attached to the
QLA2340/2340L HBA.
2.3
Fast!UTIL
Fast!UTIL
NOTE: The Fast!UTIL BIOS utility does not run on SunSPARC systems. Refer to
section 2.4 for information regarding adapter configuration settings and for
installing FCode on a QLA2340/2340L HBA in a SunSPARC system.
2.3.1
Introduction
This appendix provides detailed configuration information for advanced users who
want to customize the configuration of the QLA2340/2340L HBA and the connected
devices.
The QLA2340/2340L HBA can be configured using Fast!UTIL, QLogic’s
BIOS-resident configuration tool. Access Fast!UTIL by pressing CNTRL+Q during
the QLA2340/2340L HBA BIOS initialization (it may take a few seconds for the
Fast!UTIL Options menu to display). If you have more than one QLA2340/2340L
HBA, Fast!UTIL asks you to select the QLA2340/2340L HBA you want to configure.
After changing the settings and exiting the utility, Fast!UTIL restarts your system to
load the new parameters.
CAUTION!
If the configuration settings are incorrect, your QLA2340/2340L HBA
may not function properly.
The following sections describe the Fast!UTIL options.
2.3.2
Configuration Settings
The first selection on the Fast!UTIL Options menu is Configuration Settings.
These settings configure the FC devices and the QLA2340/2340L HBA to which
they are attached.
FC2354601-00 A 2-5
Page 18

2 – QLA2340/2340L
Fast!UTIL
2.3.2.1
Host Adapter Settings
From the Configuration Settings menu in Fast!UTIL, select Host Adapter
Settings. The default settings for the QLA2340/2340L HBA are listed in table 2-1
and described in the following paragraphs.
Table 2-1. Host Adapter Settin gs
Setting Options Default
Host Adapter BIOS Enabled, Disabled Disabled
Frame Size 512, 1024, 2048 2048
Loop Reset Delay 0–60 seconds 5 seconds
Adapter Hard Loop ID Enabled, Disabled Disabled
Hard Loop ID 0–125 0
Spin Up Delay Enabled, Disabled Disabled
■ Host Adapter BIOS. When this setting is Disabled, the ROM BIOS on the
QLA2340/2340L HBA is disabled, freeing space in upper memory. This
setting must be enabled if you are booting from an FC hard disk attached to
the QLA2340/2340L HBA. The default is Disabled.
■ Frame Size. This setting specifies the maximum frame length supported by
the QLA2340/2340L HBA. The default size is 2048, which provides
maximum performance for F-Port (point-to-point) connections.
■ Loop Reset Delay. After resetting the loop, the firmware refrains from
initiating any loop activity for the number of seconds specified in this setting.
The default is 5 seconds.
■ Adapter Hard Loop ID. This setting forces the adapter to attempt to use
the ID specified in the Hard Loop ID setting. The default is Disabled.
■ Hard Loop ID. If the Adapter Hard Loop ID setting is enabled, the adapter
attempts to use the ID specified in this setting. The default ID is 0.
■ Spin Up Delay . When this setting is Enabled, the BIOS waits up to 5 minutes
to find the first drive. The default is Disabled.
2.3.2.2
Selectable Boot Settings
The Select able Boot Settings option is accessed from the Configuration Settings
menu. If you enable this option, you can select the node name from which you want
to boot. Once enabled, this option forces the system to boot on the selected FC
hard disk, ignoring any IDE hard disks attached to your system. If you disable this
option, the system looks for a boot device (as selected in the system BIOS). In
disabled mode, the Boot ID and Boot LUN parameters have no effect.
2-6 FC2354601-00 A
Page 19

2 – QLA2340/2340L
Fast!UTIL
Some new system BIOSs support selectable boot, which supersedes the Fast!UTIL
selectable boot setting. To boot from an FC hard disk attached to the
QLA2340/2340L HBA, select the QLA2340/2340L HBA FC hard disk on the system
BIOS.
NOTE: This option applies only to hard disks; it does not apply to tape drives and
other nondisk devices.
2.3.2.3
Restore Default Settings
The Resto re Default s option from the Configuration Settings menu restores the
QLA2340/2340L HBA default settings.
2.3.2.4
Raw NVRAM Data
This option displays the adapter’s NVRAM contents in hexadecimal format. This is
a QLogic troubleshooting tool; you cannot modify the data.
2.3.2.5
Advanced Adapter Settings
From the Configuration Settings menu in Fast!UTIL, select Advanced Adapter
Settings. The default settings for the QLA2340/2340L HBA are listed in table 2-2
and described in the following paragraphs.
Table 2-2. Advanced Adapter Settings
Setting Options Default
Execution Throttle 1–256 16
Fast Command Posting Enabled, Disabled Disabled
>4GByte Addressing Enabled, Disabled Disabled
Luns per Target 0, 8, 16, 32, 64, 128, 256 8
Enable LIP Reset Yes, No No
Enable LIP Full Login Yes, No Yes
Enable Target Reset Yes, No Yes
Login Retry Count 0–255 8
Port Down Retry Count 0–255 30
Drivers Load RISC Code Enabled, Disabled Enabled
Enable Database Updates Yes, No No
FC2354601-00 A 2-7
Page 20

2 – QLA2340/2340L
Fast!UTIL
Table 2-2. Advanced Adapter Settings (Continued)
Setting Options Default
Disable Database Load Ye s , No No
IOCB Allocation 1–512 buffers 256 buffers
Extended Error Logging Enabled, Disabled Disabled
■ Execution Throttle. This setting specifies the maximum number of
commands executing on any one port. When a port’s execution throttle is
reached, no new commands are executed until the current command
finishes executing. The valid options for this setting are 1–256. The default
is 16.
■ Fast Command Posting. This setting decreases command execution time
by minimizing the number of interrupts. The default is Disabled.
■ >4GByte Addressing. This option should be Enabled if the system has
more than 4 GB of memory available. The default is Disabled.
■ LUNs per Target. This setting specifies the number of LUNs per target.
Multiple LUN support is typically for RAID boxes that use LUNs to map drives.
The default is 8. If you do not need multiple LUN support, set the number of
LUNs to 0.
■ Enable LIP Reset. This setting determines the type of loop initialization
process (LIP) reset that is used when the operating system initiates a bus
reset routine. When this setting is Yes, the driver initiates a global LIP reset
to clear the target device reservations. When this setting is No, the driver
initiates a global LIP reset with full login. The default is No.
■ Enable LIP Full Login. This setting instructs the ISP chip to re-login to all
ports after any LIP. The default is Yes.
■ Enable Target Reset. This setting enables the drivers to issue a Target
Reset command to all devices on the loop when a SCSI Bus Reset command
is issued. The default is Yes.
■ Login Retry Count. This setting specifies the number of times the software
tries to log in to a device. The default is 8 retries.
■ Port Down Retry Count. This setting specifies the number of times the
software retries a command to a port returning port down status. The default
is 30 retries.
■ Drivers Load RISC Code. When this setting is Enabled, the
QLA2340/2340L HBA uses the RISC firmware that is embedded in the
software driver. When this setting is Disabled, the software driver loads the
RISC firmware that is stored in the QLA2340/2340L HBA BIOS. The default
is Enabled.
2-8 FC2354601-00 A
Page 21

2 – QLA2340/2340L
Fast!UTIL
NOTE: The driver being loaded must support this setting. If the driver does
not support this setting, the result is the same as Disabled
regardless of the setting. Leaving this option enabled guaranties a
certified combination of software driver and RISC firmware.
■ Enable Databa se Updates . When enabled, this setting allows the software
to save the loop configuration information in flash memory when the system
powers down. The default is No.
■ Disable Database Loa d. When enabled, the device database is read from
the Registry during driver initialization. When disabled, the device database
is created dynamically during driver initialization. The default is No.
NOTE: This option usually applies to the Windows NT and Windows 2000
operating environments.
■ IOCB Allocation. This setting specifies the maximum number of buffers
from the firmware’s buffer pool that are allocated to any one port. The default
is 256 buffers.
■ Extended Error Logging. This setting provides additional error and debug
information to the operating system. When Enabled, events are logged into
the Windows NT/Windows 2000 Event Viewer. The default is Disabled.
2.3.2.6
Extended Firmware Settings
From the Configuration Settings menu in Fast!UTIL, select Exte nded Firmware
Settings. The default settings for the QLA2340/2340L HBA are listed in table 2-3
and described in the following paragraphs.
Table 2-3. Extended Firmware Settings
Setting Options Default
Extended Control Block Enabled, Disabled Enabled
RIO Operation Mode 0, 1, 2, 3, 4 0
Connection Options 0, 1, 2 2
Class 2 Service Enabled, Disabled Disabled
ACK0 Enabled, Disabled Disabled
Fibre Channel Tape Support Enabled, Disabled Enabled
Fibre Channel Confirm Enabled, Disabled Enabled
Command Reference Number Enabled, Disabled Disabled
Read Transfer Ready Enabled, Disabled Disabled
Response Timer 0–255 0
FC2354601-00 A 2-9
Page 22

2 – QLA2340/2340L
Fast!UTIL
Table 2-3. Extended Firmware Settings (Continued)
Setting Options Default
Interrupt Delay Timer 0–255 0
Data Rate 0, 1, 2 2
■ Extended Control Block. This setting enables all other extended firmware
settings. The default is Enabled.
■ RIO Operation Mode. This setting specifies the reduced interrupt operation
(RIO) modes, if supported by the software driver. RIO modes allow posting
multiple command completions in a single interrupt (see table 2-4). The
default is 0.
Table 2-4. RIO Operation Modes
Option Operation Mode
0 No multiple responses
1 Multiple responses, 16-bit handles, interrupt host
2 Multiple responses, 32-bit handles, interrupt host
3 Multiple responses, 16-bit handles, delay host interrupt
4 Multiple responses, 32-bit handles, delay host interrupt
■ Connection Options. This setting defines the type of connection (loop or
point-to-point) or connection preference (see table 2-5). The default is 2.
Table 2-5. Connection Options
Option Type of Conne c tion
0 Loop only
1 Point-to-point only
2 Loop preferred, otherwise point-to-point
■ Class 2 Service. This setting enables Class 2 service parameters to be
provided during all automatic logins (loop ports). The default is Disabled.
■ ACK0. This setting determines the type of ACK used. When this setting is
Enabled, sequence ACK is used. When this setting is Disabled, frame ACK
is used. The default is Disabled.
NOTE: The Class 2 Service setting must be Enabled to use the ACK0
setting.
■ Fibre Channel Tape Support. This setting enables FCP-2 recovery. The
default is Enabled.
2-10 FC2354601-00 A
Page 23

2 – QLA2340/2340L
■ Fibre Channel Confirm. This setting enables the host to send the FCP
confirmation frame when requested by the target. The default is Enabled.
This setting must be Enabled if the Fibre Channel Tape Support setting is
Enabled.
■ Command Reference Number. This setting is reserved. The default is
Disabled.
■ Read Transfer Ready. This setting is reserved. The default is Disabled.
■ Response Timer. This setting contains the value (in 100-microsecond
increments) used by a timer to limit the time waiting accumulating multiple
responses. For example, if this field is 8, the time limit is 800 microseconds.
The default is 0.
■ Interrupt Delay Timer . This setting contains the value (in 100-microsecond
increments) used by a timer to set the wait time between accessing (DMA)
a set of handles and generating an interrupt. The default is 0.
■ Data Rate. This setting determines the data rate. When this setting is 1, the
QLA2340/2340L HBA runs at 2 Gbps. When this setting is 2, Fast!UTIL
determines what rate your system can accommodate and sets the rate
accordingly. The default is 2.
2.3.3
Fast!UTIL
Scan Fibre Channel Devices
This option scans the FC loop and lists all the connected devices by loop ID.
Information about each device is listed, for example, vendor name, product name,
and revision. This information is useful when configuring your QLA2340/2340L HBA
and attached devices.
2.3.4
Fibre Disk Utility
This option scans the FC loop and lists all the connected devices by loop ID. You
can select a hard disk and perform a low-level format or verify the hard disk.
CAUTION!
2.3.5
Performing a low-level format destroys all data on the hard disk.
Select Host Adapter
If you have multiple QLA2340/2340L HBAs in your system, use this setting to select
and then configure or view the settings of a specific QLA2340/2340L HBA.
FC2354601-00 A 2-11
Page 24

2 – QLA2340/2340L
FCode
2.4
FCode
This section provides instructions for installing FCode on a QLA2340/2340L HBA
installed in a Solaris SPARC system. A QLA2340/2340L HBA with FCode loaded
in its flash ROM provides boot capability to its attached devices.
The following files are included. Be sure to review the Readme.txt file for both new
and changed information.
■ ifp2312.prom—FCode code binary file
■ readme.txt—FCode readme file
■ qla2x00flash—Solaris flash utility
■ readme—readme for qla2x00flash
The procedure for installing FCode flash is summarized in the following steps and
explained in detail in the following sections.
1. Flash the QLA2340/2340L HBA with FCode (see section 2.4.1).
2. Set the QLA2340/2340L HBA connection mode (see section 2.4.2).
3. Set the QLA2340/2340L HBA loop ID (see section 2.4.3).
4. Select the boot device (see section 2.4.5).
5. Build the bootable disk (see section 2.4.6).
2.4.1
Flashing a QLA2340/2340L HBA with FCode
Flash the QLA2340/2340L HBA with FCode if you want to update the existing FCode
on the QLA2340/2340L HBA. A QLogic Solaris SPARC driver revision 3.06 or later
must be installed before the flash utility can be run.
WARNING!!
Be careful when changing flash contents; incorrect data may render
the QLA2340/2340L HBA unusable to the point that the operating
system may not function.
Perform the following steps to run the flash utility:
1. Copy the qla2x00flash file and the ifp2312.prom file to the desired directory.
2. At the command line, enter the appropriate path. Use the information
obtained with the show-devs command (see step 1 in section 2.4.5). For
example:
./qla2x00flash -l /devices/pci@1f,0/pci@1/QLGC,qla@4:
devctl ifp2312.prom
2-12 FC2354601-00 A
Page 25

2 – QLA2340/2340L
2.4.2
FCode
Setting the QLA2340/2340L HBA Connection Mode
Perform the following steps to view the current QLA2340/2340L HBA connection
mode and change it if necessary.
NOTE: Due to possible equipment incompatibility, QLogic does not recommend
selecting connection mode 3.
1. Select the QLA2340/2340L HBA attached to the Fibre Channel device from
which you want to boot. For example, type the following at the ok prompt:
ok " /pci@1f,0/pci@1/QLGC,qla@4" select-dev
2. To view the current connection mode, type the show-connection-mode
command:
ok show-connection-mode
The connection mode and options display. For example:
Current HBA connection mode: 3 - Point-to-point
preferred, otherwise loop
Possible connection mode choices:
0 - Loop Only
1 - Point-to-point only
2 - Loop preferred, otherwise point-to-point
3. If the connection mode is not correct based on the devices connected to
the QLA2340/2340L HBA, change it using the set-connection-mode
command. For example:
ok 0 set-connection-mode
The new connection mode displays. For example:
Calculating NVRAM checksum, please wait...
Current HBA connection mode: 0 - Loop Only
Possible connection mode choices:
0 - Loop Only
1 - Point-to-point only
2 - Loop preferred, otherwise point-to-point
FC2354601-00 A 2-13
Page 26

2 – QLA2340/2340L
FCode
2.4.3
Setting the QLA2340/2340L HBA Loop ID
When the QLA2340/2340L HBA is currently operating in loop mode (through
connection mode 0 or connection mode 2), perform the following steps to view its
loop ID and change it if necessary:
1. Select the QLA2340/2340L HBA attached to the Fibre Channel device from
which you want to boot. For example, type the following at the ok prompt:
ok " /pci@1f,0/pci@1/QLGC,qla@4" select-dev
2. To view the loop ID, type the show-adapter-loopid command.
ok show-adapter-loopid
The loop ID displays. For example:
Adapter loopid - 7c
3. If the loop ID is not correct, change it using the set-adapter-loopid
command. For example:
ok 0 set-adapter-loopid
The new loop ID displays. For example:
Adapter loopid - 0
2.4.4
Setting and Viewing the Fibre Channel Data Rate
Use the show-data-rate command to view the current QLA2340/2340L Fibre
Channel data rate. For example:
1. Select the QLA2340/2340L HBA attached to the Fibre Channel device from
which you want to boot. For example, type the following at the ok prompt:
ok " /pci@1f,0/pci@1/QLGC,qla@4" select-dev
2. Type the following:
ok show-data-rate
3. The current data rate displays. For example:
Current HBA data rate: One Gigabit rate
2-14 FC2354601-00 A
Page 27

2 – QLA2340/2340L
Use the set-data-rate command to change the current QLA2340/2340L Fibre
Channel data rate. For example:
ok 1 set-data-rate
Calculating NVRAM checksum, please wait...
Current HBA data rate: Two Gigabit rate
Table 2-6 lists the values to enter and their corresponding data rates. QLogic
recommends the Auto-negotiated rate (2), which works for most devices.
Table 2-6. Fibre Channel Data Rates
Value Data Rate
0 One gigabit
1 Two gigabits
2 Auto-negotiated rate
2.4.5
FCode
Selecting the Boot Device
Perform the following steps to select a Fibre Channel device that is attached to the
QLA2340/2340L HBA as the boot device:
1. Use the show-devs command to display the device tree for all devices
attached to the machine.
ok show-devs
The device tree displays. The QLA2340/2340L HBAs with FCode are
referenced with QLGC,qla@. For example:
ok show-devs
.
.
/pci@1f,0/pci@1/QLGC,qla@4
2. Select the QLA2340/2340L HBA attached to the Fibre Channel device from
which you want to boot. For example, type the following at the ok prompt:
ok " /pci@1f,0/pci@1/QLGC,qla@4" select-dev
3. Use the show-children command to view the devices attached to the
QLA2340/2340L HBA. For example:
ok show-children
4. The list of devices displays. Write down the boot device’s world wide name
(WWN), loop ID, and logical unit number (LUN).
5. Save the boot device information to the QLA2340/2340L HBA’s NVRAM.
Use the set-boot-id command. Include the selected QLA2340/2340L HBA’s
WWN, loop ID, and LUN. For example:
ok 2200002037009eeb 82 0 set-boot-id
FC2354601-00 A 2-15
Page 28

2 – QLA2340/2340L
FCode
The following displays:
Calculating NVRAM checksum, please wait.... done
Boot device login successful
Boot WWN - 20000020 37009eeb WWPN - 22000020 37009eeb
Id - 82 Lun - 0
ok
6. To boot the QLA2340/2340L HBA, type the complete boot path, including
the loop ID and LUN. The loop ID and LUN must match those entered in
step 5. For example:
ok boot /pci@1f,0/pci@1/QLGC,qla@4/sd@82,0
NOTE: Enter the reset command before attempting to boot if the boot was
interrupted or any of the QLogic FCode commands were executed.
2.4.6
Building the Bootable Disk
This procedure assumes that the system is already booted from an existing system
hard disk, and that you have already performed a full system backup.
The device path on each system differs, depending on the PCI bus slot, target ID,
LUN, etc. The device name shown in this example is for a device on the third PCI
bus slot, target ID 130, LUN 0, slice 0.
You must have already completed the steps in the previous sections before
attempting to create a bootable disk.
To build a bootable disk, perform the following steps:
1. Determine the amount of disk space used/available on your current boot
disk. Use the df command for a listing. For example:
/usr/bin/df -k -l
Filesystem
/dev/dsk/c0t0d0s0
/proc
fd
mnttab
swap
swap
/dev/dsk/c0t0d0s7
kbytes
2577118
1310480
1311344
5135326
0
0
0
used
1650245
864
114
0
0
0
0
avail
875331
1310480
1310480
5083859
capacity
0
0
0
66%
0%
0%
0%
0%
1%
1%
Mounted on
/
/proc
/dev/fd
/etc/mnttab
/var/run
/tmp
/home
This df example shows that the current boot disk is /dev/dsk/c0t0d0s(x).
There are two partitions of interest, slice 0 (/) and slice 7 (/home). Slice 0
uses 1.65 GB and has 875 MB free. Slice 7 uses 114 MB and has 5 GB
free. Therefore, slice 7 (/home) contains enough disk space to store the
temporary saveset files.
2-16 FC2354601-00 A
Page 29

2 – QLA2340/2340L
If there were not at least 1.7 GB free on this disk, you would need to create
a partition on the new bootable disk large enough to hold the largest
temporary saveset files plus the largest used space on a partition. In this
example, it would be a 3.2 GB (1.6 GB+1.6 GB) partition.
2. Use the format command to create, label, and format partitions on the new
bootable disk. These partitions must be able to contain the contents of your
temporary saveset files. If you are not familiar with the format command,
refer to the Solaris documentation.
WARNING!!
a. At the root prompt, type format.
b. A list of available hard disks displays. Specify the disk.
c. At the format prompt, type partition.
d. At the partition prompt, type print. The partition table displays, as in
the following example.
Misusing the format command can destroy the data on your
current disk drives.
FCode
Part
0
1
2
3
4
5
6
7
unassigned
unassigned
unassigned
unassigned
unassigned
Tag
root
swap
backup
Flag
wm
wu
wu
wm
wm
wm
wm
wm
Cylinders
0 - 8738
8739 - 9188
0 - 9201
210.94MB
0
0
0
0
0
Size
4.00GB
4.21GB
(8739/0/0) 8389440
(450/0/0) 432000
(9202/0/0) 8833920
0
(0/0/0) 0
0
(0/0/0) 0
0
(0/0/0) 0
0
(0/0/0) 0
0
(0/0/0) 0
e. At the partition prompt, type label. Enter the label.
f. At the label prompt, type quit.
g. Type quit until the system prompt displays.
3. To create the file system, use the newfs command. For example:
newfs -v /dev/rdsk/c3t130d0s0
NOTE: The target device ID (t130) is in decimal. The hexadecimal value
for the target ID is used in the boot command line shown in step 11.
4. Mount the boot partition to the /mnt mount point. For example:
mount /dev/dsk/c3t130d0s0 /mnt
5. Change to the root partition mount point directory. For example:
cd /mnt
Blocks
FC2354601-00 A 2-17
Page 30

2 – QLA2340/2340L
FCode
6. Use the ufsdump utility to copy the root partition to the new book disk. For
example:
ufsdump 0f - / | ufsrestore rf -
7. Use the rm command to delete the restoresymtable file:
rm restoresymtable
8. Install the boot block on the new boot disk. For example:
installboot /usr/platform/’uname -i’
/lib/fs/ufs/bootblk /dev/rdsk/c3t130d0s0
NOTE: Platform-specific information (’uname -i’) varies depending on
the hardware platform.
9. Edit the new vfstab file to properly mount the new partitions during boot. In
this case, each reference to c0t0d0s0 is changed to c3t130d0s0. For
example:
vi /mnt/etc/vfstab
10. Shut down the system. Type the following:
/sbin/init 0
11. Boot from the newly created boot disk. For example:
boot /pci@1f,0/pci@1/QLGC,qla@4/sd@82,0
NOTE: The target device ID (sd@82) is in hexadecimal. The decimal value
is used in step 3.
12. View the current dump device setting. For example:
# dumpadm
Dump content: kernel pages
Dump device: /dev/dsk/c0t0d0s1 (swap)
Savecore directory: /var/crash/saturn
Savecore enabled: yes
13. Change the dump device to the swap area of the new boot drive. For
example:
# dumpadm -d /dev/dsk/c3t130d0s1
NOTE: Steps 14 and 15 set the newly created boot disk as the default boot
2-18 FC2354601-00 A
disk. These steps are performed at the system OBP (ok) prompt.
Page 31

2 – QLA2340/2340L
Specifications
14. Create an alias entry for the new boot device (optional). For example:
ok nvalias fibredisk
/pci@1f,0/pci@1/QLGC,qla@4/sd@82,0
15. Set default boot device to be the new boot device (optional). For example:
ok setenv boot-disk fibredisk
2.5
Specifications
Tables 2-7 and 2-8 define the QLA2340/2340L specifications.
Table 2-7. QLA2340/2340L HBA Operating Environment
Environment Minimum Maxim um
Operating temperature 0°C/32°F 55°C/131°F
Storage temperature -20 °C/-4 °F 70°C/158°F
Relative humidity (noncondensing) 10% 90%
Storage humidity (noncondensing) 5% 95%
Table 2-8. QLA2340/2340L HBA Specifications
Type Specification
Host bus Conforms to PCI Local Bus Specification , revision 2.2 and the PCI-X
PCI/PCI-X
signaling
environment
PCI/PCI-X
transfer rate
Fibre
Channel
specifications
CPU Single-chip design that includes a QLogic RISC processor, Fibre Channel
RAM 256 KB of sync SRAM supporting parity protection
BIOS ROM 128 KB of flash ROM in two 64-KB, software selectable banks. The flash
Addendum, revision 1.0
3.3 V and 5.0 V buses supported
132 MBps maximum burst rate for 32-bit PCI operation at 33 MHz
264 MBps maximum burst rate for 32-bit PCI/PCI-X operation at 66 MHz
264 MBps maximum burst rate for 64-bit PCI operation at 33 MHz
528 MBps maximum burst rate for 64-bit PCI/PCI-X operation at 66 MHz
1GBps maximum burst rate for 64-bit PCI-X operation at 133 MHz
Bus type: Multimode fibre optic media
Bus transfer rate: 200 MBps maximum at half-duplex
400 MBps maximum at full-duplex
Interface chip: ISP2312
protocol manager, PCI/PCI-X DMA controller, and integrated
serializer/deserializer (SERDES) and electrical transceivers that can
auto-negotiate a data rate of 1 Gbps or 2 Gbps
is field programmable.
FC2354601-00 A 2-19
Page 32

2 – QLA2340/2340L
Label
Table 2-8. QLA2340/2340L HBA Specifications (Continued)
Type Specification
NVRAM 256 bytes, field programmable
Onboard
DMA
Frame buffer
FIFO
Connectors LC-style connector that supports non-OFC, multimode fibre optic cabling
Form factor 16.93 cm×5.15 cm (6.7"×2.5")
Operating
power
Five-channel DMA controller: two data, one command, one auto-DMA
request, and one auto-DMA response
Integrated 4-KB transmit and 6-KB receive frame buffer FIFO for each data
channel
using a small form factor optical transceiver module
Less than 15 watts
2.6
Label
The transceiver on the QLA2340/2340L HBA is a Class I laser product. It complies
with IEC 825-1 and FDA 21 CFR 1040.10 and 1040.11. The transceiver must be
operated under recommended operating conditions.
CLASS I LASER PRODUCT
2.7
Agency Certification
The following sections contains a summary of the EMC/EMI test specifications
performed on the QLA2340/2340L (FC5010409-xx) to comply with radiated
emission, radiated immunity and product safety standards.
2.7.1
EMI and EMC Requirements
The QLA2340/2340L conform to the following requirements:
■ FCC Part 15, Class B
❑ EN 50081-1
❑ Radiated Emission Class B
❑ Conducted Emission Class B
■ ICES-003 Class B
2-20 FC2354601-00 A
Page 33

■ CE Mark 89/336/EEC EMC Directive
❑ EN55022:1998/CISPR22:1997 Class B
❑ Radiated Emission Class B
❑ Conducted Emission Class B
❑ EN55024:1998
❑ Immunity Standards
❑ EN61000-4-2 :1995 ESD
❑ EN61000-4-3 :1995 RF Electro Magnetic Field
❑ EN61000-4-4 :1995 Fast Transient/Burst
❑ EN61000-4-5 :1995 Fast Surge Common/Differential
❑ EN61000-4-6 :1996 RF Conducted Susceptibility
❑ EN61000-4-8 : 1994 Power Frequency Magnetic Filed
❑ EN61000-4-11: 1994 Voltage Dips and Interrupt
❑ EN61000-3-2:1995 Harmonic Current Emission
❑ EN61000-3-3:1994 Voltage Fluctuation and Flicker
■ VCCI, Class B
■ CNS 13438 Class B
■ AS/NZS 3548 Class B
2.7.2
Product Safety Requirements
■ UL, cUL
❑ UL60950
❑ CSA C22.2 No.60950
2 – QLA2340/2340L
Agency Certification
■ 73/23/EEC Low Voltage Directive
❑ TUV:
❑ EN60950:1992+A1,2,3,4,11
❑ EN60825-1:1994+Al l
❑ EN60825-2:1994
FC2354601-00 A 2-21
Page 34

2 – QLA2340/2340L
Agency Certification
2-22 FC2354601-00 A
Page 35
Section 3
QLA2342/2342L
3.1
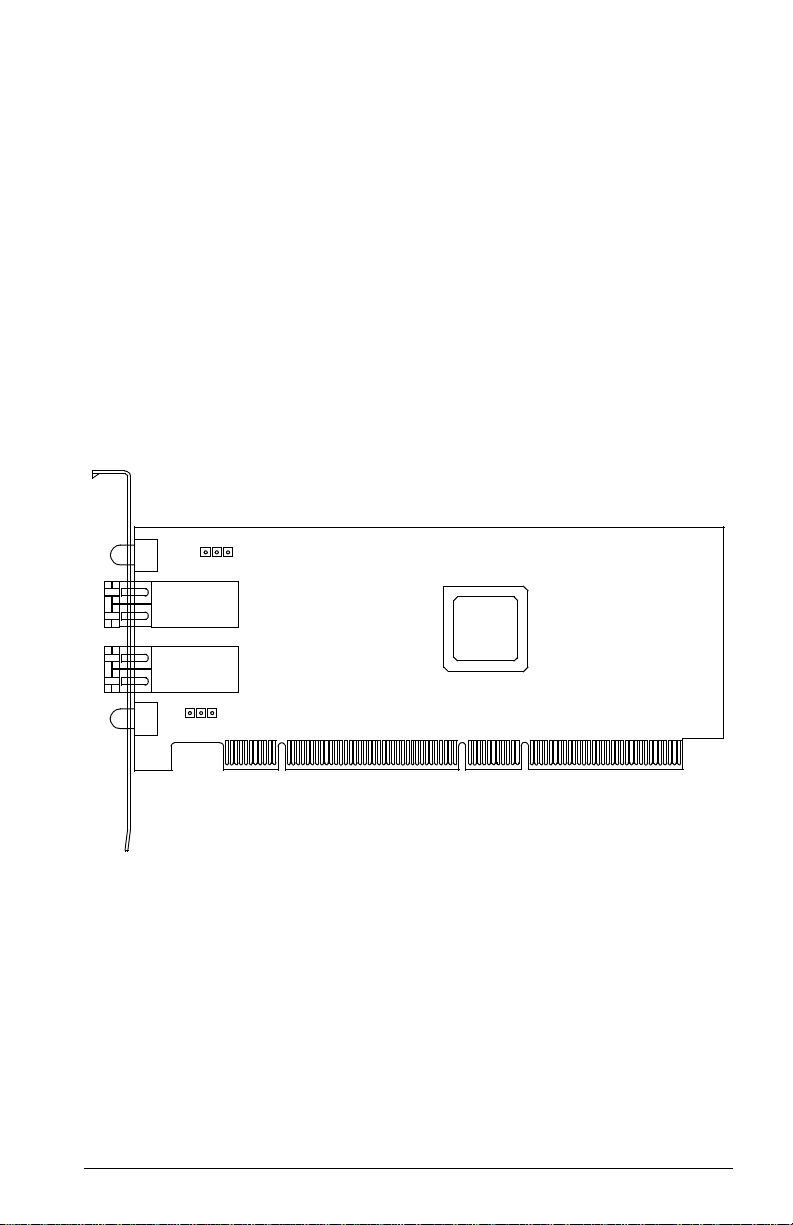
QLA2342/2342L HBA Components
Figure 3-1 identifies the QLA2342/2342L HBA components referenced throughout
this section.
Each QLA2342/2342L HBA has a unique serial number; its location on the HBA is
noted in figure 3-1. Take a minute to write down the serial number of the
QLA2342/2342L HBA.
J3
LED1
31
J1
J2
J4
31
LED2
NOTE: The serial number is on the other side of the HBA.
The QLA2342 has a full-height bracket (as shown in this
figure). The QLA2342L has a low-profile bracket (shorter
than the bracket in this figure).
ISP CHIP
Figure 3-1. QLA2342/2342L HBA Layout
FC2354601-00 A 3-1
Page 36

3 – QLA2342/2342L
Installation in the Computer
3.1.1
LEDs
Figure 3-2 identifies and describes the activity of the QLA2342/2342L HBA LEDs.
AMBER LED
GREEN LED
J1 CONNECTOR LEDs
J1 CONNECTOR
J2 CONNECTOR
J2 CONNECTOR LEDs
GREEN LED
AMBER LED
Figure 3-2. QLA2342/2342L HBA LED Activity
Green
LED
On On Power
On Off Online
Off On Signal acquired
Off Flashing Loss of synchronization
Flashing Flashing Firmware error
Amber
LED
Activity
3.1.2
Jumpers
The jumpers on the QLA2342/2342L HBAs set the default state of the laser and are
set at the factory with a jumper plug on pins 2–3 of the J3 and J4 jumpers.
CAUTION!
Changing the jumper settings can result in the HBA being inoperable.
3.2
Installation in the Computer
Before you install the QLA2342/2342L HBA in your computer, you need the
following:
■ A screwdriver (usually a Phillips #1)
■ Two optical mutimode cables with LC-style duplex connectors
CAUTION!
3-2 FC2354601-00 A
The QLA2342/2342L HBA contains parts that can be damaged by
ESD. Before handling the QLA2342/2342L HBA, use standard
methods to discharge static electricity. Keep the QLA2342/2342L HBA
in the antistatic bag until you are ready to install it. Place the HBA on
the bag when you examine or configure it. Retain the bag for future use.
Page 37

3 – QLA2342/2342L
Perform the following steps to install the QLA2342/2342L HBA in your PC:
1. Check the motherboard and make any configuration changes necessary to
accommodate the QLA2342/2342L HBA.
The QLA2342/2342L HBA is self-configuring; however, some motherboards
require manual configuration. For example, some systems have a PCI
Device Configuration menu in the motherboard setup BIOS where you
must enable HBAs, bus master slots, and IRQ levels. If the motherboard
supports triggering, use level triggering for the QLA2342/2342L HBA. See
the documentation supplied with your computer, or contact your computer
dealer to determine if your motherboard requires configuration.
2. Power down the peripherals, then the computer.
3. Remove the computer cover and save the screws.
4. Choose any PCI bus slot that supports bus mastering. Most motherboards
automatically assign an IRQ level and interrupt line; if your motherboard
does not, you must assign the IRQ level and use interrupt line A for this slot.
NOTE:
■ Some motherboards have two kinds of PCI bus slots: master
and slave. The QLA2342/2342L HBA must be in a PCI bus
master slot. (Some motherboards have PCI bus master slots
that are shared with onboard devices. QLA2342/2342L HBAs
do not work in shared slots.)
■ PCI connectors vary among system HBA manufacturers. The
QLA2342/2342L HBA is a 64-bit PCI device that can function
in a 32-bit PCI slot; the slot conforms to the PCI specification
(the rear edge of the PCI slot is notched). If you try to install the
QLA2342/2342L HBA into a PCI slot that does not conform to
the PCI specification, you may damage the QLA2342/2342L
HBA.
■ PCI and PCI-X slots look the same. If the PC contains both PCI
and PCI-X slots, refer to the PC manufacturer’s instructions to
determine the slot type.
■ The QLA2342/2342L HBAs are designed and tested to operate
at PCI bus speeds of up to 133 MHz.
Installation in the Computer
5. Remove the slot cover for the slot in which you will install the
QLA2342/2342L HBA.
6. Place the QLA2342/2342L HBA into the slot. Carefully press the HBA into
the slot until it seats firmly.
7. Secure the QLA2342/2342L HBA to the chassis. Follow the PC
manufacturer’s instructions.
FC2354601-00 A 3-3
Page 38

3 – QLA2342/2342L
Installation in the Computer
8. Connect the appropriate cable from the devices to the corresponding
connector.
9. Carefully reinstall the computer cover. Insert and tighten the computer cover
screws.
10. Power up all external FC devices, then power up the PC and observe the
monitor. The BIOS is disabled by default. Consequently, the devices
attached to the QLA2342/2342L HBA are not identified. For example:
QLogic Corporation
QLA23xx PCI Fibre Channel ROM BIOS Version x.xx
Copyright (C) QLogic Corporation 2000 All rights reserved.
www.qlogic.com
Press <CNTRL-Q> for Fast!UTIL
BIOS for Adapter 0 is disabled
ROM BIOS not installed
NOTE:
■ SunSPARC systems do not display the BIOS banner.
■ Enable the BIOS only if the boot device is attached to the
QLA2342/2342L HBA. This allows the system to boot faster.
■ For further information about enabling the QLA2342/2342L
HBA BIOS, see section 3.3.
If the information displayed on your monitor is correct, congratulations! You have
successfully installed the QLA2342/2342L HBA in your computer.
If you need FCode (Solaris SPARC systems), see section 3.4 for instructions on
how to install or update the FCode on the QLA2342/2342L HBA.
See the appropriate section for detailed instructions on how to install the software
drivers.
If the information displayed is not correct and you have checked the QLA2342/2342L
HBA’s configuration, see section 4 for troubleshooting information.
3.2.1
Installation Help
If your system has an IDE hard disk, it may be assigned device number 80, which
is the boot device. If your system does not have an IDE hard disk, a parallel SCSI
host bus adapter (HBA), or a RAID adapter, the first bootable FC hard disk
configured (the one with the lowest ID) is assigned device number 80 and becomes
the boot device. The QLA2342/2342L HBA BIOS must be enabled if the boot device
is connected to the QLA2342/2342L HBA.
3-4 FC2354601-00 A
Page 39

3 – QLA2342/2342L
If you have a selectable boot BIOS and want to boot to an FC hard disk, set the
motherboard BIOS parameters to None or Not Installed. The ROM BIOS on the
QLA2342/2342L HBA automatically configures the FC peripherals.
Some new system BIOSs support selectable boot, which supersedes the
QLA2342/2342L HBA BIOS selectable boot setting. Select the QLA2342/2342L
HBA FC hard disk in the system BIOS to boot from an FC hard disk attached to the
QLA2342/2342L HBA.
3.3
Fast!UTIL
Fast!UTIL
NOTE: The Fast!UTIL BIOS utility does not run on SunSPARC systems. Refer to
section 3.4 for information regarding adapter configuration settings and for
installing FCode on a QLA2342/2342L HBA in a SunSPARC system.
3.3.1
Introduction
This appendix provides detailed configuration information for advanced users who
want to customize the configuration of the QLA2342/2342L HBA and the connected
devices.
The QLA2342/2342L HBA can be configured using Fast!UTIL, QLogic’s
BIOS-resident configuration tool. Access Fast!UTIL by pressing CNTRL+Q during
the QLA2342/2342L HBA BIOS initialization (it may take a few seconds for the
Fast!UTIL Options menu to display). If you have more than one QLA2342/2342L
HBA, Fast!UTIL asks you to select the QLA2342/2342L HBA you want to configure.
After changing the settings and exiting the utility, Fast!UTIL restarts your system to
load the new parameters.
CAUTION!
If the configuration settings are incorrect, your QLA2342/2342L HBA
may not function properly.
The following sections describe the Fast!UTIL options.
3.3.2
Configuration Settings
The first selection on the Fast!UTIL Options menu is Configuration Settings.
These settings configure the FC devices and the QLA2342/2342L HBA to which
they are attached.
FC2354601-00 A 3-5
Page 40

3 – QLA2342/2342L
Fast!UTIL
3.3.2.1
Host Adapter Settings
From the Configuration Settings menu in Fast!UTIL, select Host Adapter
Settings. The default settings for the QLA2342/2342L HBA are listed in table 3-1
and described in the following paragraphs.
Table 3-1. Host Adapter Settin gs
Setting Options Default
Host Adapter BIOS Enabled, Disabled Disabled
Frame Size 512, 1024, 2048 2048
Loop Reset Delay 0–60 seconds 5 seconds
Adapter Hard Loop ID Enabled, Disabled Disabled
Hard Loop ID 0–125 0
Spin Up Delay Enabled, Disabled Disabled
■ Host Adapter BIOS. When this setting is Disabled, the ROM BIOS on the
QLA2342/2342L HBA is disabled, freeing space in upper memory. This
setting must be enabled if you are booting from an FC hard disk attached to
the QLA2342/2342L HBA. The default is Disabled.
■ Frame Size. This setting specifies the maximum frame length supported by
the QLA2342/2342L HBA. The default size is 2048, which provides
maximum performance for F-Port (point-to-point) connections.
■ Loop Reset Delay. After resetting the loop, the firmware refrains from
initiating any loop activity for the number of seconds specified in this setting.
The default is 5 seconds.
■ Adapter Hard Loop ID. This setting forces the adapter to attempt to use
the ID specified in the Hard Loop ID setting. The default is Disabled.
■ Hard Loop ID. If the Adapter Hard Loop ID setting is enabled, the adapter
attempts to use the ID specified in this setting. The default ID is 0.
■ Spin Up Delay . When this setting is Enabled, the BIOS waits up to 5 minutes
to find the first drive. The default is Disabled.
3.3.2.2
Selectable Boot Settings
The Selectable Boot Settings option is accessed from the Config uration Settings
menu. If you enable this option, you can select the node name from which to boot.
Once enabled, this option forces the system to boot on the selected FC hard disk,
ignoring any IDE hard disks attached to your system. If you disable this option, the
system looks for a boot device (as selected in the system BIOS). In disabled mode,
the Boot ID and Boot LUN parameters have no effect.
3-6 FC2354601-00 A
Page 41

3 – QLA2342/2342L
Fast!UTIL
Some new system BIOSs support selectable boot, which supersedes the Fast!UTIL
selectable boot setting. To boot from an FC hard disk attached to the
QLA2342/2342L HBA, select the QLA2342/2342L HBA FC hard disk on the system
BIOS.
NOTE: This option applies only to hard disks; it does not apply to tape drives and
other nondisk devices.
3.3.2.3
Restore Default Settings
The Resto re Default s option from the Configuration Settings menu restores the
QLA2342/2342L HBA default settings.
3.3.2.4
Raw NVRAM Data
This option displays the adapter’s NVRAM contents in hexadecimal format. This is
a QLogic troubleshooting tool; you cannot modify the data.
3.3.2.5
Advanced Adapter Settings
From the Configuration Settings menu in Fast!UTIL, select Advanced Adapter
Settings. The default settings for the QLA2342/2342L HBA are listed in table 3-2
and described in the following paragraphs.
Table 3-2. Advanced Adapter Settings
Setting Options Default
Execution Throttle 1–256 16
Fast Command Posting Enabled, Disabled Disabled
>4GByte Addressing Enabled, Disabled Disabled
Luns per Target 0, 8, 16, 32, 64, 128, 256 8
Enable LIP Reset Yes, No No
Enable LIP Full Login Yes, No Yes
Enable Target Reset Yes, No Yes
Login Retry Count 0–255 8
Port Down Retry Count 0–255 30
Drivers Load RISC Code Enabled, Disabled Enabled
Enable Database Updates Yes, No No
FC2354601-00 A 3-7
Page 42

3 – QLA2342/2342L
Fast!UTIL
Table 3-2. Advanced Adapter Settings (Continued)
Setting Options Default
Disable Database Load Ye s , No No
IOCB Allocation 1–512 buffers 256 buffers
Extended Error Logging Enabled, Disabled Disabled
■ Execution Throttle. This setting specifies the maximum number of
commands executing on any one port. When a port’s execution throttle is
reached, no new commands are executed until the current command
finishes executing. The valid options for this setting are 1–256. The default
is 16.
■ Fast Command Posting. This setting decreases command execution time
by minimizing the number of interrupts. The default is Disabled.
■ >4GByte Addressing. This option should be Enabled if the system has
more than 4 GB of memory available. The default is Disabled.
■ LUNs per Target. This setting specifies the number of LUNs per target.
Multiple LUN support is typically for RAID boxes that use LUNs to map drives.
The default is 8. If you do not need multiple LUN support, set the number of
LUNs to 0.
■ Enable LIP Reset. This setting determines the type of loop initialization
process (LIP) reset that is used when the operating system initiates a bus
reset routine. When this setting is Yes, the driver initiates a global LIP reset
to clear the target device reservations. When this setting is No, the driver
initiates a global LIP reset with full login. The default is No.
■ Enable LIP Full Login. This setting instructs the ISP chip to re-login to all
ports after any LIP. The default is Yes.
■ Enable Target Reset. This setting enables the drivers to issue a Target
Reset command to all devices on the loop when a SCSI Bus Reset command
is issued. The default is Yes.
■ Login Retry Count. This setting specifies the number of times the software
tries to log in to a device. The default is 8 retries.
■ Port Down Retry Count. This setting specifies the number of times the
software retries a command to a port returning port down status. The default
is 30 retries.
■ Drivers Load RISC Code. When this setting is Enabled, the
QLA2342/2342L HBA uses the RISC firmware that is embedded in the
software driver. When this setting is Disabled, the software driver loads the
RISC firmware that is stored in the QLA2342/2342L HBA BIOS. The default
is Enabled.
3-8 FC2354601-00 A
Page 43

3 – QLA2342/2342L
Fast!UTIL
NOTE: The driver being loaded must support this setting. If the driver does
not support this setting, the result is the same as Disabled
regardless of the setting. Leaving this option enabled guaranties a
certified combination of software driver and RISC firmware.
■ Enable Databa se Updates . When enabled, this setting allows the software
to save the loop configuration information in flash memory when the system
powers down. The default is No.
■ Disable Database Loa d. When enabled, the device database is read from
the Registry during driver initialization. When disabled, the device database
is created dynamically during driver initialization. The default is No.
NOTE: This option usually applies to the Windows NT and Windows 2000
operating environments.
■ IOCB Allocation. This setting specifies the maximum number of buffers
from the firmware’s buffer pool that are allocated to any one port. The default
is 256 buffers.
■ Extended Error Logging. This setting provides additional error and debug
information to the operating system. When Enabled, events are logged into
the Windows NT/Windows 2000 Event Viewer. The default is Disabled.
3.3.2.6
Extended Firmware Settings
From the Configuration Settings menu in Fast!UTIL, select Exte nded Firmware
Settings. The default settings for the QLA2342/2342L HBA are listed in table 3-3
and described in the following paragraphs.
Table 3-3. Extended Firmware Settings
Setting Options Default
Extended Control Block Enabled, Disabled Enabled
RIO Operation Mode 0, 1, 2, 3, 4 0
Connection Options 0, 1, 2 2
Class 2 Service Enabled, Disabled Disabled
ACK0 Enabled, Disabled Disabled
Fibre Channel Tape Support Enabled, Disabled Enabled
Fibre Channel Confirm Enabled, Disabled Enabled
Command Reference Number Enabled, Disabled Disabled
Read Transfer Ready Enabled, Disabled Disabled
Response Timer 0–255 0
FC2354601-00 A 3-9
Page 44

3 – QLA2342/2342L
Fast!UTIL
Table 3-3. Extended Firmware Settings (Continued)
Setting Options Default
Interrupt Delay Timer 0–255 0
Data Rate 0, 1, 2 2
■ Extended Control Block. This setting enables all other extended firmware
settings. The default is Enabled.
■ RIO Operation Mode. This setting specifies the reduced interrupt operation
(RIO) modes, if supported by the software driver. RIO modes allow posting
multiple command completions in a single interrupt (see table 3-4). The
default is 0.
Table 3-4. RIO Operation Modes
Option Operation Mode
0 No multiple responses
1 Multiple responses, 16-bit handles, interrupt host
2 Multiple responses, 32-bit handles, interrupt host
3 Multiple responses, 16-bit handles, delay host interrupt
4 Multiple responses, 32-bit handles, delay host interrupt
■ Connection Options. This setting defines the type of connection (loop or
point-to-point) or connection preference (see table 3-5). The default is 2.
Table 3-5. Connection Options
Option Type of Conne c tion
0 Loop only
1 Point-to-point only
2 Loop preferred, otherwise point-to-point
■ Class 2 Service. This setting enables Class 2 service parameters to be
provided during all automatic logins (loop ports). The default is Disabled.
■ ACK0. This setting determines the type of ACK used. When this setting is
Enabled, sequence ACK is used. When this setting is Disabled, frame ACK
is used. The default is Disabled.
NOTE: The Class 2 Service setting must be Enabled to use the ACK0
setting.
■ Fibre Channel Tape Support. This setting enables FCP-2 recovery. The
default is Enabled.
3-10 FC2354601-00 A
Page 45

3 – QLA2342/2342L
■ Fibre Channel Confirm. This setting enables the host to send the FCP
confirmation frame when requested by the target. The default is Enabled.
This setting must be Enabled if the Fibre Channel Tape Support setting is
Enabled.
■ Command Reference Number. This setting is reserved. The default is
Disabled.
■ Read Transfer Ready. This setting is reserved. The default is Disabled.
■ Response Timer. This setting contains the value (in 100-microsecond
increments) used by a timer to limit the time waiting accumulating multiple
responses. For example, if this field is 8, the time limit is 800 microseconds.
The default is 0.
■ Interrupt Delay Timer . This setting contains the value (in 100-microsecond
increments) used by a timer to set the wait time between accessing (DMA)
a set of handles and generating an interrupt. The default is 0.
■ Data Rate. This setting determines the data rate. When this setting is 1, the
QLA2342/2342L HBA runs at 2 Gbps. When this setting is 2, Fast!UTIL
determines what rate your system can accommodate and sets the rate
accordingly. The default is 2.
3.3.3
Fast!UTIL
Scan Fibre Channel Devices
This option scans the FC loop and lists all the connected devices by loop ID.
Information about each device is listed, for example, vendor name, product name,
and revision. This information is useful when configuring your QLA2342/2342L HBA
and attached devices.
3.3.4
Fibre Disk Utility
This option scans the FC loop and lists all the connected devices by loop ID. You
can select a hard disk and perform a low-level format or verify the hard disk.
CAUTION!
3.3.5
Performing a low-level format destroys all data on the hard disk.
Select Host Adapter
If you have multiple QLA2342/2342L HBAs in your system, use this setting to select
and then configure or view the settings of a specific QLA2342/2342L HBA.
FC2354601-00 A 3-11
Page 46

3 – QLA2342/2342L
FCode
3.4
FCode
This section provides instructions for installing FCode on a QLA2342/2342L HBA
installed in a Solaris SPARC system. A QLA2342/2342L HBA with FCode loaded
in its flash ROM provides boot capability to its attached devices.
The following files are included. Be sure to review the Readme.txt file for both new
and changed information.
■ ifp2312.prom—FCode code binary file
■ readme.txt—FCode readme file
■ qla2x00flash—Solaris flash utility
■ readme—readme for qla2x00flash
The procedure for installing FCode flash is summarized in the following steps and
explained in detail in the following sections.
1. Flash the QLA2342/2342L HBA with FCode (see section 3.4.1).
2. Set the QLA2342/2342L HBA connection mode (see section 3.4.2).
3. Set the QLA2342/2342L HBA loop ID (see section 3.4.3).
4. Select the boot device (see section 3.4.5).
5. Build the bootable disk (see section 3.4.6).
3.4.1
Flashing a QLA2342/2342L HBA with FCode
Flash the QLA2342/2342L HBA with FCode if you want to update the existing FCode
on the QLA2342/2342L HBA. A QLogic Solaris SPARC driver revision 3.06 or later
must be installed before the flash utility can be run.
WARNING!!
Be careful when changing flash contents; incorrect data may render
the QLA2342/2342L HBA unusable to the point that the operating
system may not function.
Perform the following steps to run the flash utility:
1. Copy the qla2x00flash file and the ifp2312.prom file to the desired directory.
2. At the command line, enter the appropriate path. Use the information
obtained with the show-devs command (see step 1 in section 3.4.5). For
example:
./qla2x00flash -l /devices/pci@1f,0/pci@1/QLGC,qla@4:
devctl ifp2312.prom
3-12 FC2354601-00 A
Page 47

3 – QLA2342/2342L
3.4.2
FCode
Setting the QLA2342/2342L HBA Connection Mode
Perform the following steps to view the current QLA2342/2342L HBA connection
mode and change it if necessary.
NOTE: Due to possible equipment incompatibility, QLogic does not recommend
selecting connection mode 3.
1. Select the QLA2342/2342L HBA attached to the Fibre Channel device from
which you want to boot. For example, type the following at the ok prompt:
ok " /pci@1f,0/pci@1/QLGC,qla@4" select-dev
2. To view the current connection mode, type the show-connection-mode
command:
ok show-connection-mode
The connection mode and options display. For example:
Current HBA connection mode: 3 - Point-to-point
preferred, otherwise loop
Possible connection mode choices:
0 - Loop Only
1 - Point-to-point only
2 - Loop preferred, otherwise point-to-point
3. If the connection mode is not correct based on the devices connected to
the QLA2342/2342L HBA, change it using the set-connection-mode
command. For example:
ok 0 set-connection-mode
The new connection mode displays. For example:
Calculating NVRAM checksum, please wait...
Current HBA connection mode: 0 - Loop Only
Possible connection mode choices:
0 - Loop Only
1 - Point-to-point only
2 - Loop preferred, otherwise point-to-point
FC2354601-00 A 3-13
Page 48

3 – QLA2342/2342L
FCode
3.4.3
Setting the QLA2342/2342L HBA Loop ID
When the QLA2342/2342L HBA is currently operating in loop mode (through
connection mode 0 or connection mode 2), perform the following steps to view its
loop ID and change it if necessary:
1. Select the QLA2342/2342L HBA attached to the Fibre Channel device from
which you want to boot. For example, type the following at the ok prompt:
ok " /pci@1f,0/pci@1/QLGC,qla@4" select-dev
2. To view the loop ID, type the show-adapter-loopid command.
ok show-adapter-loopid
The loop ID displays. For example:
Adapter loopid - 7c
3. If the loop ID is not correct, change it using the set-adapter-loopid
command. For example:
ok 0 set-adapter-loopid
The new loop ID displays. For example:
Adapter loopid - 0
3.4.4
Setting and Viewing the Fibre Channel Data Rate
Use the show-data-rate command to view the current QLA2342/2342L Fibre
Channel data rate. For example:
1. Select the QLA2342/2342L HBA attached to the Fibre Channel device from
which you want to boot. For example, type the following at the ok prompt:
ok " /pci@1f,0/pci@1/QLGC,qla@4" select-dev
2. Type the following:
ok show-data-rate
3. The current data rate displays. For example:
Current HBA data rate: One Gigabit rate
3-14 FC2354601-00 A
Page 49

3 – QLA2342/2342L
Use the set-data-rate command to change the current QLA2342/2342L Fibre
Channel data rate. For example:
ok 1 set-data-rate
Calculating NVRAM checksum, please wait...
Current HBA data rate: Two Gigabit rate
Table 3-6 lists the values to enter and their corresponding data rates. QLogic
recommends the Auto-negotiated rate (2), which works for most devices.
Table 3-6. Fibre Channel Data Rates
Value Data Rate
0 One gigabit
1 Two gigabits
2 Auto-negotiated rate
3.4.5
FCode
Selecting the Boot Device
Perform the following steps to select a Fibre Channel device that is attached to the
QLA2342/2342L HBA as the boot device:
1. Use the show-devs command to display the device tree for all devices
attached to the machine.
ok show-devs
The device tree displays. The QLA2342/2342L HBAs with FCode are
referenced with QLGC,qla@. For example:
ok show-devs
.
.
/pci@1f,0/pci@1/QLGC,qla@4
2. Select the QLA2342/2342L HBA attached to the Fibre Channel device from
which you want to boot. For example, type the following at the ok prompt:
ok " /pci@1f,0/pci@1/QLGC,qla@4" select-dev
3. Use the show-children command to view the devices attached to the
QLA2342/2342L HBA. For example:
ok show-children
4. The list of devices displays. Write down the boot device’s world wide name
(WWN), loop ID, and logical unit number (LUN).
5. Save the boot device information to the QLA2342/2342L HBA’s NVRAM.
Use the set-boot-id command. Include the selected QLA2342/2342L HBA’s
WWN, loop ID, and LUN. For example:
ok 2200002037009eeb 82 0 set-boot-id
FC2354601-00 A 3-15
Page 50

3 – QLA2342/2342L
FCode
The following displays:
Calculating NVRAM checksum, please wait.... done
Boot device login successful
Boot WWN - 20000020 37009eeb WWPN - 22000020 37009eeb
Id - 82 Lun - 0
ok
6. To boot the QLA2342/2342L HBA, type the complete boot path, including
the loop ID and LUN. The loop ID and LUN must match those entered in
step 5. For example:
ok boot /pci@1f,0/pci@1/QLGC,qla@4/sd@82,0
NOTE: Enter the reset command before attempting to boot if the boot was
interrupted or any of the QLogic FCode commands were executed.
3.4.6
Building the Bootable Disk
This procedure assumes that the system is already booted from an existing system
hard disk, and that you have already performed a full system backup.
The device path on each system differs, depending on the PCI bus slot, target ID,
LUN, etc. The device name shown in this example is for a device on the third PCI
bus slot, target ID 130, LUN 0, slice 0.
You must have already completed the steps in the previous sections before
attempting to create a bootable disk.
To build a bootable disk, perform the following steps:
1. Determine the amount of disk space used/available on your current boot
disk. Use the df command for a listing. For example:
/usr/bin/df -k -l
Filesystem
/dev/dsk/c0t0d0s0
/proc
fd
mnttab
swap
swap
/dev/dsk/c0t0d0s7
kbytes
2577118
1310480
1311344
5135326
0
0
0
used
1650245
864
114
0
0
0
0
avail
875331
1310480
1310480
5083859
capacity
0
0
0
66%
0%
0%
0%
0%
1%
1%
Mounted on
/
/proc
/dev/fd
/etc/mnttab
/var/run
/tmp
/home
This df example shows that the current boot disk is /dev/dsk/c0t0d0s(x).
There are two partitions of interest, slice 0 (/) and slice 7 (/home). Slice 0
uses 1.65 GB and has 875 MB free. Slice 7 uses 114 MB and has 5 GB
free. Therefore, slice 7 (/home) contains enough disk space to store the
temporary saveset files.
3-16 FC2354601-00 A
Page 51

3 – QLA2342/2342L
If there were not at least 1.7 GB free on this disk, you would need to create
a partition on the new bootable disk large enough to hold the largest
temporary saveset files plus the largest used space on a partition. In this
example, it would be a 3.2 GB (1.6 GB+1.6 GB) partition.
2. Use the format command to create, label, and format partitions on the new
bootable disk. These partitions must be able to contain the contents of your
temporary saveset files. If you are not familiar with the format command,
refer to the Solaris documentation.
WARNING!!
a. At the root prompt, type format.
b. A list of available hard disks displays. Specify the disk.
c. At the format prompt, type partition.
d. At the partition prompt, type print. The partition table displays, as in
the following example.
Misusing the format command can destroy the data on your
current disk drives.
FCode
Part
0
1
2
3
4
5
6
7
unassigned
unassigned
unassigned
unassigned
unassigned
Tag
root
swap
backup
Flag
wm
wu
wu
wm
wm
wm
wm
wm
Cylinders
0 - 8738
8739 - 9188
0 - 9201
210.94MB
0
0
0
0
0
Size
4.00GB
4.21GB
(8739/0/0) 8389440
(450/0/0) 432000
(9202/0/0) 8833920
0
(0/0/0) 0
0
(0/0/0) 0
0
(0/0/0) 0
0
(0/0/0) 0
0
(0/0/0) 0
e. At the partition prompt, type label. Enter the label.
f. At the label prompt, type quit.
g. Type quit until the system prompt displays.
3. To create the file system, use the newfs command. For example:
newfs -v /dev/rdsk/c3t130d0s0
NOTE: The target device ID (t130) is in decimal. The hexadecimal value
for the target ID is used in the boot command line shown in step 11.
4. Mount the boot partition to the /mnt mount point. For example:
mount /dev/dsk/c3t130d0s0 /mnt
5. Change to the root partition mount point directory. For example:
cd /mnt
Blocks
FC2354601-00 A 3-17
Page 52

3 – QLA2342/2342L
FCode
6. Use the ufsdump utility to copy the root partition to the new book disk. For
example:
ufsdump 0f - / | ufsrestore rf -
7. Use the rm command to delete the restoresymtable file:
rm restoresymtable
8. Install the boot block on the new boot disk. For example:
installboot /usr/platform/’uname -i’
/lib/fs/ufs/bootblk /dev/rdsk/c3t130d0s0
NOTE: Platform-specific information (’uname -i’) varies depending on
the hardware platform.
9. Edit the new vfstab file to properly mount the new partitions during boot. In
this case, each reference to c0t0d0s0 is changed to c3t130d0s0. For
example:
vi /mnt/etc/vfstab
10. Shut down the system. Type the following:
/sbin/init 0
11. Boot from the newly created boot disk. For example:
boot /pci@1f,0/pci@1/QLGC,qla@4/sd@82,0
NOTE: The target device ID (sd@82) is in hexadecimal. The decimal value
is used in step 3.
12. View the current dump device setting. For example:
# dumpadm
Dump content: kernel pages
Dump device: /dev/dsk/c0t0d0s1 (swap)
Savecore directory: /var/crash/saturn
Savecore enabled: yes
13. Change the dump device to the swap area of the new boot drive. For
example:
# dumpadm -d /dev/dsk/c3t130d0s1
NOTE: Steps 14 and 15 set the newly created boot disk as the default boot
3-18 FC2354601-00 A
disk. These steps are performed at the system OBP (ok) prompt.
Page 53

3 – QLA2342/2342L
Specifications
14. Create an alias entry for the new boot device (optional). For example:
ok nvalias fibredisk
/pci@1f,0/pci@1/QLGC,qla@4/sd@82,0
15. Set default boot device to be the new boot device (optional). For example:
ok setenv boot-disk fibredisk
3.5
Specifications
Tables 3-7 and 3-8 define the QLA2342/2342L specifications.
Table 3-7. QLA2342/2342L HBA Operating Environment
Environment Minimum Maxim um
Operating temperature 0°C/32°F 55°C/131°F
Storage temperature -20 °C/-4 °F 70°C/158°F
Relative humidity (noncondensing) 10% 90%
Storage humidity (noncondensing) 5% 95%
Table 3-8. QLA2342/2342L HBA Specifications
Type Specification
Host bus Conforms to PCI Local Bus Specification , revision 2.2 and the PCI-X
PCI/PCI-X
signaling
environment
PCI/PCI-X
transfer rate
Fibre
Channel
specifications
CPU Single-chip design that includes a QLogic RISC processor, Fibre Channel
RAM 256 KB of sync SRAM supporting parity protection
BIOS ROM 128 KB of flash ROM in two 64-KB, software selectable banks. The flash
Addendum, revision 1.0
3.3 V and 5.0 V buses supported
132 MBps maximum burst rate for 32-bit PCI operation at 33 MHz
264 MBps maximum burst rate for 32-bit PCI/PCI-X operation at 66 MHz
264 MBps maximum burst rate for 64-bit PCI operation at 33 MHz
528 MBps maximum burst rate for 64-bit PCI/PCI-X operation at 66 MHz
1GBps maximum burst rate for 64-bit PCI-X operation at 133 MHz
Bus type: Multimode fibre optic media
Bus transfer rate: 200 MBps maximum at half-duplex
400 MBps maximum at full-duplex
Interface chip: ISP2312
protocol manager, PCI/PCI-X DMA controller, and integrated
serializer/deserializer (SERDES) and electrical transceivers that can
auto-negotiate a data rate of 1 Gbps or 2 Gbps
is field programmable.
FC2354601-00 A 3-19
Page 54

3 – QLA2342/2342L
Label
Table 3-8. QLA2342/2342L HBA Specifications (Continued)
Type Specification
NVRAM 256 bytes, field programmable
Onboard
DMA
Frame buffer
FIFO
Connectors Two LC-style connectors for multimode fibre optic cabling using a small
Form factor 16.93 cm×5.15 cm (6.7"×2.5")
Operating
power
Five-channel DMA controller: two data, one command, one auto-DMA
request, and one auto-DMA response
Integrated 4-KB transmit and 6-KB receive frame buffer FIFO for each data
channel
form factor optical transceiver module
Less than 15 watts
3.6
Label
The transceiver on the QLA2340/2340L HBA is a Class I laser product. It complies
with IEC 825-1 and FDA 21 CFR 1040.10 and 1040.11. The transceiver must be
operated under recommended operating conditions.
CLASS I LASER PRODUCT
3.7
Agency Certification
The following sections contains a summary of the EMC/EMI test specifications
performed on the QLA2342/2342L (FC5010409-xx) to comply with radiated
emission, radiated immunity and product safety standards.
3.7.1
EMI and EMC Requirements
The QLA2340/2340L conform to the following requirements:
■ FCC Part 15, Class B
❑ EN 50081-1
❑ Radiated Emission Class B
❑ Conducted Emission Class B
■ ICES-003 Class B
3-20 FC2354601-00 A
Page 55

■ CE Mark 89/336/EEC EMC Directive
❑ EN55022:1998/CISPR22:1997 Class B
❑ Radiated Emission Class B
❑ Conducted Emission Class B
❑ EN55024:1998
❑ Immunity Standards
❑ EN61000-4-2 :1995 ESD
❑ EN61000-4-3 :1995 RF Electro Magnetic Field
❑ EN61000-4-4 :1995 Fast Transient/Burst
❑ EN61000-4-5 :1995 Fast Surge Common/Differential
❑ EN61000-4-6 :1996 RF Conducted Susceptibility
❑ EN61000-4-8 : 1994 Power Frequency Magnetic Filed
❑ EN61000-4-11: 1994 Voltage Dips and Interrupt
❑ EN61000-3-2:1995 Harmonic Current Emission
❑ EN61000-3-3:1994 Voltage Fluctuation and Flicker
■ VCCI, Class B
■ CNS 13438 Class B
■ AS/NZS 3548 Class B
3.7.2
Product Safety Requirements
■ UL, cUL
❑ UL60950
❑ CSA C22.2 No.60950
3 – QLA2342/2342L
Agency Certification
■ 73/23/EEC Low Voltage Directive
❑ TUV:
❑ EN60950:1992+A1,2,3,4,11
❑ EN60825-1:1994+Al l
❑ EN60825-2:1994
FC2354601-00 A 3-21
Page 56

3 – QLA2342/2342L
Agency Certification
3-22 FC2354601-00 A
Page 57

Section 4
Troubleshooting
4.1
Problems After Installation
There are three basic types of installation problems that can cause your QLA23xx
HBA to function incorrectly: hardware problems, system configuration problems,
and Fibre Channel problems. The following section provides itemized checklists to
help you determine why your QLA23xx HBA is not functioning.
4.2
Hardware Problem Checklist
■ Are all of the circuit cards installed securely in the system?
■ Are all of the cables securely connected to the correct connectors? Be sure
that the FC cables that attach from the QLA23xx HBA connectors to the
device are connected correctly. For example, the optical transmit connector
on the QLA23xx HBA must be connected to the optical receive connector
on the device. Some connectors require a firm push to ensure proper seating.
An easy way to check for correct seating is to switch the connectors on either
the QLA23xx HBA or the device, then restart your system. If the BIOS is
enabled, devices attached to the QLA23xx HBA are displayed on the screen.
■ Is the QLA23xx HBA installed correctly in the PCI slot? Is it seated firmly in
the slot?
■ Check for interference due to nonstandard PCI connectors.
■ Is the Fast!UTIL data rate setting correct? See the appropriate Fast!UTIL
section for information about setting the data rate.
■ Are all external peripherals properly powered up? See the appropriate
Fast!UTIL section for information about displaying attached devices.
4.3
System Configuration Problem Checklist
All PCI-compliant and PCI-X-compliant systems automatically detect 32-bit or 64-bit
HBAs and set the appropriate bus speed (for example, 33 MHz or 133 MHz). Check
the motherboard for proper configuration (see the appropriate installation section
for more information.
See the documentation supplied with your computer, or contact your computer
dealer to determine if your motherboard requires special configuration.
FC5051101-00 A 4-1
Page 58

4 – Troubleshooting
Fibre Channel Problem Checklist
4.4
Fibre Channel Problem Checklist
■ Were all of the FC devices powered up before you powered up the PC?
■ Check that all cables are properly connected.
■ Have you configured your RAID controller using the utilities provided by the
manufacturer?
■ Some Fibre Channel switches support zoning. Make sure that your switch
is configured correctly.
■ Make sure that Data Rate setting on the QLA23xx matches the target device.
For example, if the QLA23xx is set to 2 Gb, set the target device to 2 Gb
■ If you are using a Raidbox, modify the following settings in Fast!UTIL:
❑ Login Retry Count = 60
❑ Port Down Retry Count = 60
❑ Execution Throttle = 100
.
4-2 FC5051101-00 A
Page 59

Part II
Software
This part of the SANblade 2300 User’s Guide describes how to install the software
drivers for the supported operating systems. See the section that corresponds to
your computer’s operating system:
Operating System Section
Windows NT 4.0 5
Windows 2000 6
Windows XP 7
NetWare 4.2, 5.x, or 6.x 8
Red Hat Linux 6.2, 7.0, 7.1, 7.2 9
Solaris SPARC v2.6, 7, and 8 10
Before you install the software drivers, you need to locate and download the
appropriate drivers for your operating system. The latest version of the QLA23xx
drivers are located on the QLogic Web site, http://www.qlogic.com.
QLogic drivers are self-extracting and meant to be downloaded onto disks. The
installation instructions in this guide assume that the QLogic drivers reside on disks.
FC2354601-00 A II-1
Page 60

II – Software
II-2 FC2354601-00 A
Page 61

Section 5
Windows NT Driver Installation
(QL2300.SYS)
5.1
Introduction
This section provides instructions for installing the Windows NT driver under the
following operating system conditions:
■ Initial installation of the Windows NT 4.0 operating system and the
Windows NT driver
■ Installation of the Windows NT driver in an already installed Windows NT 4.0
operating system
■ Installing an updated Windows NT driver in an already installed
Windows NT 4.0 operating system that has an older version of the driver
5.2
Windows NT Driver Files
The latest version of the software drivers and documentation for Windows NT are
available on the QLogic Web site. Be sure to review the Readme.txt file for both
new and changed information.
5.3
Windows NT Installation
To install Windows NT 4.0 on a Fibre Channel hard disk attached to a QLA23xx
HBA, perform the installation procedures in section 5.3.1. If Windows NT 4.0 is
already loaded on your system, perform the installation procedures in section 5.3.2.
If Windows NT 4.0 and an older Windows NT driver are already installed on your
system, perform the update procedures in section 5.3.3.
FC2354601-00 A 5-1
Page 62

5 – Windows NT Driver Installation
Windows NT Installation
5.3.1
Initial Installation of Windows NT and the Windows NT Driver
Perform the following steps to install Windows NT 4.0 on a Fibre Channel hard disk
attached to a QLA23xx HBA:
1. Insert the Windows NT setup disk or CD-ROM (if booting from a bootable
CD-ROM drive) in an appropriate drive.
2. Restart your system.
3. When the Windows NT Setup screen displays, press F6 immediately to
display the screen from which you can install a third-party SCSI or RAID
driver.
4. Press S to specify an additional device.
5. Select Other, then press ENTER.
6. Insert the disk that contains the QLogic driver in an appropriate drive, then
press ENTER.
7. Select QLogic QLA2300 PCI Fibre Channel Adapter , then press ENTER.
8. Follow the standard Windows NT installation instructions to complete the
Windows NT setup.
5.3.2
Installing or Updating the Windows NT Driver
Perform the following steps to add the Windows NT driver to a previously installed
Windows NT 4.0 system.
NOTE: This procedure restores the default registry parameters for the QLA2300
Windows NT driver.
1. Click Start, point to Settings, and click Control Panel.
2. Double-click the SCSI Adapters icon, click the Drivers tab, then click Add.
3. Insert the disk that contains the QLogic driver in an appropriate drive and
click Have Disk.
4. Type the path to the NT driver. For example:
A:\Nt
5. Click OK.
6. Select the QLogic QLA2300 PCI Fibre Channel Adapter, then click OK.
7. Remove the disk, then click Yes to restart the computer.
5-2 FC2354601-00 A
Page 63

5 – Windows NT Driver Installation
5.3.3
QLDIRECT
Updating the Windows NT Driver
Perform the following steps if a Windows NT driver is already installed on a Fibre
Channel hard disk attached to a QLA23xx HBA and you want to install an updated
version of the driver.
NOTE: This procedure does not modify the current registry parameters for the
QLA2300 Windows NT driver.
1. Open a DOS command prompt window.
2. Change the current directory to the Windows NT driver directory. For
example:
cd \Winnt\System32\Drivers
3. Make a backup copy of the old driver. You can copy the file into the same
directory with a .SAV extension indicating that it is the saved file. For
example:
copy Ql2300.sys Ql2300.sav
4. Insert the disk that contains the updated QLogic driver in an appropriate
drive.
5. Copy the new driver over the old driver. For example:
copy A:\Nt\Ql2300.sys
6. Remove the disk that contains the QLogic driver.
7. Restart your system to load the updated driver.
5.4
QLDIRECT
The QLDIRECT driver, coupled with the QLogic Windows NT enhanced miniport
driver, provides the following features:
■ A highly optimized I/O path for normal read and write operations with reduced
CPU utilization and increased parallelization
■ Failover and failback features to reroute I/O operations to the correct path
This section provides installation instructions for the QLDIRECT driver in an already
installed Windows NT 4.0 operating system. Earlier versions of this operating
system are not supported.
FC2354601-00 A 5-3
Page 64

5 – Windows NT Driver Installation
QLDIRECT
5.4.1
QLDIRECT Driver Files
Qldirect.sys requires the Ql2300.sys enhanced miniport driver version 7.00.00 or
above. The latest version of the QLDIRECT driver and Ql2300.sys enhanced
miniport driver for Windows NT are available on the QLogic Web site.
5.4.2
QLDIRECT Installation
If QLDIRECT is not installed on your system, perform the installation procedures in
section 5.4.2.1. If the QLFILTER driver is installed on your system, perform the
update procedures in section 5.4.2.2.
5.4.2.1
Initial Installation of QLDIRECT
Perform the following steps to add the QLDIRECT driver to a previously installed
Windows NT 4.0 system:
1. If necessary, install the QLA2300 Windows NT 4.0 enhanced miniport
driver.
2. Insert the disk that contains the QLDIRECT driver in an appropriate drive.
3. Execute the Setup.exe installation program on the disk and follow the
instructions on the screen.
4. Remove the disk that contains the QLDIRECT driver.
5. Restart your system to load the driver.
5.4.2.2
Updating to QLDIRECT from QLFILTER
The QLDIRECT driver replaces the QLogic QLFILTER driver. You must first uninstall
the QLFILTER driver before installing the QLDIRECT driver.
NOTE: Windows NT does not always remove driver files and registry keys when
Perform the following steps to update from the QLFILTER driver to the QLDIRECT
driver:
5-4 FC2354601-00 A
uninstalling a driver. You must manually remove the Qlfilter.sys file and
associated registry key to ensure that Windows NT does not load the
Qldirect.sys and Qlfilter.sys drivers.
1. Manually delete the Qlfilter.sys file from the following directory. For example:
del C:\Winnt\System32\Drivers\Qlfilter.sys
2. Manually remove the QLFILTER key from the following registry location:
\HKEY_LOCAL_MACHINE\System\CurrentControlSet
\Services
Page 65

5 – Windows NT Driver Installation
QL2x00IP NDIS Network Driver Installation
3. Insert the disk that contains the QLDIRECT driver in an appropriate drive.
4. Execute the Setup.exe installation program on the disk and follow the
instructions on the screen.
5. Remove the disk that contains the QLDIRECT driver.
6. Restart your system to load the driver.
5.5
QL2x00IP NDIS Network Driver Installation
Your system must meet the following requirements for the QL2x00IP network driver
interface specification (NDIS) network driver to function properly:
■ The QL2300 SCSI miniport driver must be installed.
■ The Fast!Util Drivers Load RISC Code adapter parameter must be enabled
(see the Fast!UTIL section that corresponds to your QLA23xx HBA).
■ Windows NT networking software must be installed.
■ All QLA22xx/QLA23xx HBAs on the network must have the same value set
for the maximum transfer unit (MTU) size (IP configuration parameter).
If a QL2x00IP NDIS network driver is not installed on your system, perform the
installation procedures in section 5.5.1. If an older QL2x00IP network driver is
already installed on your system, perform the update procedures in section 5.5.2.
The following files are provided for installation:
■ Oemsetup.inf — driver installation script for the Windows NT setup program
■ Ql2x00ip.sys —QLogic QL2x00IP NDIS driver for Windows NT
■ Ql2xipcu.exe —QLogic QL2x00IP Configuration Utility
■ Release.txt—release notes for the QL2x00IP driver
■ Readme.txt—readme file
5.5.1
Initial Installation of the QL2x00IP NDIS Network Driver
Perform the following steps to install the QL2x00IP NDIS network driver:
1. Click the Start button, point to Settings, then click Control Panel.
2. Double-click the Network icon, click the Adapters tab, then click Add.
3. Insert the disk that contains the QLogic driver in an appropriate drive.
4. In the Select Network Adapter dialog box, click Have Disk.
5. In the Insert Disk dialog box, type the path to the QL2x00IP NDIS network
driver. For example:
A:\Nt\Ip
6. Click OK.
FC2354601-00 A 5-5
Page 66

5 – Windows NT Driver Installation
QL2x00IP NDIS Network Driver Installation
7. In the Select OEM Option dialog box, select the QLogic QL2X00IP
Network Driver, then click OK.
8. In the QLogic IP Configuration Utility dialog box, change the IP driver
configuration parameters as appropriate. See the description of these
parameters in section 5.5.3.1. Make sure the MTU size is set to the same
value used on the other QLA22xx/QLA23xx HBAs in the network. Click OK.
9. Click Close.
10. In the Microsoft TCP/IP Properties dialog box, select the QLA23xx HBA
you just installed, select Specify an IP address, then type the IP address
and subnet mask for the QLA23xx HBA.
For each QLA23xx HBA on the network, the IP address must be unique and
all QLA22xx/QLA23xx HBAs must use the same subnet mask. For example:
Adapter 1
IP address: 10.0.0.1
Subnet mask:255.255.0.0
Adapter 2
IP address: 10.0.0.2
Subnet mask:255.255.0.0
11. Click OK.
12. Remove the disk and click Yes to restart the computer.
5.5.2
Updating the QL2x00IP NDIS Network Driver
Perform the following steps if a QL2x00IP NDIS network driver is already installed
and you want to install an updated version of the driver:
1. Open a DOS command prompt window.
2. Change the current directory to the Windows NT driver directory. For
example:
cd \Winnt\System32\Drivers
3. Make a backup copy of the old driver. You can copy the file into the same
directory with a .SAV extension indicating that it is the saved file. For
example:
copy Ql2x00ip.sys Ql2x00ip.sav
4. Insert the disk that contains the updated QLogic driver in an appropriate
drive.
5. Copy the new driver over the old driver. For example:
copy A:\Nt\Ip\Ql2x00ip.sys
5-6 FC2354601-00 A
Page 67

5 – Windows NT Driver Installation
QL2x00IP NDIS Network Driver Installation
6. Remove the disk that contains the QLogic driver.
7. Restart your system to load the updated driver.
5.5.3
QL2x00IP NDIS Driver and IP Address Configuration
You must configure the IP address and modify the driver parameters during the
initial configuration as specified in section 5.5.1. You can also modify these later as
appropriate using the following procedures.
5.5.3.1
Driver Configuration
The QL2x00IP NDIS driver provides configuration parameters. The driver
configuration parameters are listed in table 5-1 and described in the following
paragraphs.
Table 5-1. Ql2x00ip.sys Configuration Parameters
Parameter Minimum Maximum
MTU Size 92 65280 8192
Buffer Count 8 128 32
Buffer Size 512 65536 4096
Header Split Size 24 Buffer size –1 0
Adapter Node Name — — —
Table Notes
a
A value of 0 indicates that the headers and data are not split.
Recommended
Default
a
■ MTU Size. This parameter specifies the maximum transfer or packet size
that the host system sends or receives. All QLA22xx/QLA23xx HBAs on the
same network must have the same MTU size value. QLogic recommends
a default value of 8192.
■ Buffer Count. This parameter specifies the number of receive buffers that
the QL2x00IP driver allocates during initialization. The number of buffers
multiplied by the buffer size must be greater than or equal to the MTU size.
QLogic recommends a default value of 32.
■ Buffer Size. This parameter specifies the size of each receive buffer. The
buffer size multiplied by the number of buffers must be greater than or equal
to the MTU size. Incoming packets cannot be broken into more than
23 buffers. Therefore, the buffer size multiplied by 23 must be at least as
large as the MTU size. QLogic recommends a default value of 4096.
FC2354601-00 A 5-7
Page 68

5 – Windows NT Driver Installation
QL2x00IP NDIS Network Driver Installation
■ Header Split Size. This parameter accounts for packets with split headers
and data. The parameter value specifies the number of bytes at the
beginning of an incoming packet that must be isolated in the first receive
buffer. A value of 0 indicates that the packet header and data are not split.
QLogic recommends a default value of 0.
■ Adapter Node Name. This parameter specifies the world wide name (node
name) of the QLA23xx HBA to use for this IP connection. The parameter is
required on systems with more than one QLA23xx HBA. You can use
Fast!UTIL to determine the node names for all QLA22xx/QLA23xx HBAs in
the system (see the Fast!UTIL section that corresponds to your QLA23xx
HBA).
Perform the following steps to modify the QL2x00IP NDIS driver configuration:
1. Click the Start button, point to Settings, and click Control Panel.
2. Double-click the Network icon, click the Adapters tab, select the QLogic
QL2X00IP Network Driver, then click Properties.
3. Make configuration parameter modifications as necessary.
4. Click OK. The Network dialog box redisplays.
5. Click Close.
6. Click Yes to restart the computer.
5.5.3.2
IP Address Configuration
Perform the following steps to modify the IP address:
1. Click the Start button, point to Settings, and click Control Panel.
2. Double-click the Network icon, click the Protocols tab, select the TCP/IP
Protocol, then click Properties.
3. On the IP Address ta b , s e l e c t t h e Q L A 2 3 xx HBA, then modify the IP address
and subnet mask as appropriate. Each IP address must be unique and all
QLA22xx/QLA23xx HBAs on the loop must use the same subnet mask. For
example:
Adapter 1
IP address: 10.0.0.1
Subnet mask:255.255.0.0
Adapter 2
IP address: 10.0.0.2
Subnet mask:255.255.0.0
4. Click OK. The Network dialog box redisplays.
5-8 FC2354601-00 A
Page 69

5 – Windows NT Driver Installation
5. Click Close.
6. Click Yes to restart the computer.
5.5.4
QL2x00IP NDIS Network Driver Installation
Removing the QL2x00IP NDIS Driver
If you need to remove the QLA2x00IP NDIS driver, perform the following steps:
1. Click the Start button, point to Settings, and then click Control Panel.
2. Double-click the Network icon, click the Adapters tab, select the QLA23xx
HBA to be removed, and click Remove.
3. When the warning displays, click Yes to remove the driver.
4. The Network dialog box redisplays. Click Close.
5. Click Yes to restart the computer.
FC2354601-00 A 5-9
Page 70

5 – Windows NT Driver Installation
QL2x00IP NDIS Network Driver Installation
5-10 FC2354601-00 A
Page 71

Section 6
Windows 2000 Driver Installation
(QL2300.SYS)
6.1
Introduction
This section provides instructions for installing the Windows 2000 driver under the
following operating system conditions:
■ Initial installation of the Windows 2000 operating system and the
Windows 2000 driver
■ Installation of the Windows 2000 driver in an already installed Windows 2000
operating system
■ Installing an updated Windows 2000 driver in an already installed
Windows 2000 operating system that has an older version of the driver
6.2
Creating the Driver Disk
Follow these steps to create driver disk containing the files needed to install the
Windows XP driver:
1. Locate the driver you want on the QLogic web site (http://www.qlogic.com)
and click Link to driver.
2. If prompted Wha t would you like to do with this fil e?, choose Save this
program to disk. Specify a temporary location on the hard drive and
download the driver.
3. Insert a blank disk in drive A.
4. Run the self-extracting file you just downloaded, specifying A:\ for Unzip
T o Fold er.
6.3
Windows 2000 Installation
To install Windows 2000 on your system, perform the installation procedures in
section 6.3.1. If Windows 2000 is already loaded on your system, perform the
installation procedures in section 6.3.2. If Windows 2000 and an older
Windows 2000 driver are already installed on your system, perform the update
procedures in section 6.3.3.
FC2354601-00 A 6-1
Page 72

6 – Windows 2000 Driver Installation
Windows 2000 Installation
6.3.1
Initial Installation of Windows 2000 and the Windows 2000 Driver
Perform the following steps to install Windows 2000 on a Fibre Channel hard disk
attached to the QLA23xx HBA:
1. Insert the Windows 2000 setup disk or CD-ROM (if booting from a bootable
CD-ROM drive) in an appropriate drive.
2. Restart your system.
3. Follow the standard Windows 2000 installation instructions.
4. When prompted from the Windows 2000 Setup screen, press F6 to display
the screen from which you can install a third-party SCSI or RAID driver.
5. Press S to specify an additional device.
6. Insert the disk that contains the QLogic driver in an appropriate drive, then
press ENTER.
7. Windows 2000 detects the QLA23xx HBA. Press ENTER to continue the
driver installation.
8. Press ENTER to continue the Windows 2000 installation.
9. Follow the instructions on the screen to complete the Windows 2000
installation.
6.3.2
Installing the Windows 2000 Driver
The QLA23xx HBAs are plug-and-play devices that are automatically detected by
Windows 2000. Perform the following steps to add the Windows 2000 driver to a
previously installed Windows 2000 system:
1. Install the QLA23xx HBA.
2. Power up the computer. Windows 2000 detects the QLA23xx and starts the
Found New Hardware Wizard.
3. Click Next.
4. Select Search for a suitable driver for my device (recommended). Click
Next.
5. Insert the disk that contains the QLogic driver in an appropriate drive.
6. Select Floppy disk drives to specify the location of the driver files. Click
Next.
7. The search result displays drive:\w2k\oemsetup.inf. Click Next.
8. If the Digital Signature Not Found dialog box displays, click Yes.
6-2 FC2354601-00 A
Page 73

6 – Windows 2000 Driver Installation
9. Click Finish.
10. Remove the disk that contains the QLogic driver from the drive, then click
Yes to restart the system.
6.3.3
Windows 2000 Installation
Updating the Windows 2000 Driver
Perform the following steps if a Windows 2000 driver is already installed and you
want to install an updated version of the driver.
NOTE: The latest versions of the software drivers and documentation are available
on the QLogic Web site, http://www.qlogic.com.
1. Click the Start button, point to Programs, point to Administrative Tools,
point to Computer Management, and then click Device Manager.
2. Double-click the SCSI and RAID controllers icon.
3. Double-click the QLogic Q LA2300 PCI Fibre Channel Ada pter icon, click
the Drivers tab, and then click Update Driver.
4. The Upgrade Device Driver Wizard dialog box displays. Click Next.
5. Select Display a list of the known device drivers for thi s device so that
I can choose a specific driver. Click Next.
6. Click Have Disk. The Install From Disk dialog box displays.
7. Insert the disk that contains the QLogic driver in an appropriate drive, then
type the location of the Windows 2000 driver. For example:
A:\W2k
8. Click OK.
9. Select QLogic QLA23xx PCI Fibre Channel Adapter, then click Next.
Windows 2000 indicates that the wizard is ready to install the device.
10. Click Next.
11. If the Digital Signature Not Found dialog box displays, click Yes.
12. Click Finish.
13. Remove the disk that contains the QLogic driver from the drive, then click
Yes to restart the system.
FC2354601-00 A 6-3
Page 74

6 – Windows 2000 Driver Installation
QLDIRECT
6.4
QLDIRECT
The QLDIRECT driver, coupled with the QLogic Windows 2000 enhanced miniport
driver, provides the following features:
■ A highly optimized I/O path for normal read and write operations with reduced
CPU utilization and increased parallelization
■ Failover and failback features to reroute I/O operations to the correct path
This section provides installation instructions for the QLDIRECT driver in an already
installed Windows 2000 operating system. Earlier versions of this operating system
are not supported.
6.4.1
QLDIRECT Driver Files
Qldirect.sys requires the Ql2300.sys enhanced miniport driver version 7.00.00 or
above. The latest version of the QLDIRECT driver and Ql2300.sys enhanced
miniport driver for Windows 2000 are available on the QLogic Web site.
6.4.2
QLDIRECT Installation
If QLDIRECT is not installed on your system, perform the installation procedures in
section 6.4.2.1. If the QLFILTER driver is installed on your system, perform the
update procedures in section 6.4.2.2.
6.4.2.1
Initial Installation of QLDIRECT
Perform the following steps to add the QLDIRECT driver to a previously installed
Windows 2000 system:
1. If necessary, install the QLA2300 Windows 2000 enhanced miniport driver.
2. Insert the disk that contains the QLDIRECT driver in an appropriate drive.
3. Execute the Setup.exe installation program on the disk and follow the
instructions on the screen.
4. Remove the disk that contains the QLDIRECT driver.
5. Restart your system to load the driver.
6-4 FC2354601-00 A
Page 75

6 – Windows 2000 Driver Installation
QL2x00IP NDIS Network Driver Installation
6.4.2.2
Updating to QLDIRECT from QLFILTER
The QLDIRECT driver replaces the QLogic QLFILTER driver. You must first uninstall
the QLFILTER driver before installing the QLDIRECT driver.
Perform the following steps to update from the QLFILTER driver to the QLDIRECT
driver:
1. Manually delete the Qlfilter.sys file from the following directory. For example:
del C:\Winnt\System32\Drivers\Qlfilter.sys
2. Manually remove the QLFILTER key from the following registry location:
\HKEY_LOCAL_MACHINE\System\CurrentControlSet
\Services
3. Insert the disk that contains the QLDIRECT driver in an appropriate drive.
4. Execute the Setup.exe installation program on the disk and follow the
instructions on the screen.
5. Remove the disk that contains the QLDIRECT driver.
6. Restart your system to load the driver.
6.5
QL2x00IP NDIS Network Driver Installation
Your system must meet the following requirements for the QL2x00IP network driver
interface specification (NDIS) network driver to function properly:
■ The QL2300 SCSI miniport driver must be installed.
■ The Fast!Util Drivers Load RISC Code adapter parameter must be enabled
(see the FCode section that corresponds to your HBA).
■ Windows 2000 networking software must be installed.
■ All QLA22xx/QLA23xx HBAs on the network must have the same value set
for the maximum transfer unit (MTU) size (IP configuration parameter).
If a QL2x00IP NDIS network driver is not installed on your system, perform the
installation procedures in section 6.5.1. If an older QL2x00IP network driver is
already installed on your system, perform the update procedures in section 6.5.2.
The following files are provided for installation:
■ Netql2x.inf—driver installation script for the Windows 2000 setup program
■ Ql2x00ip.sys —QLogic QL2x00IP NDIS driver for Windows 2000
■ Ql2xipcu.exe —QLogic QL2x00IP Configuration Utility
■ Release.txt—release notes for the QL2x00IP driver
■ Readme.txt—readme file
FC2354601-00 A 6-5
Page 76

6 – Windows 2000 Driver Installation
QL2x00IP NDIS Network Driver Installation
6.5.1
Initial Installation of the QL2x00IP NDIS Network Driver
Perform the following steps to install the QL2x00IP NDIS network driver:
1. Click the Start button, point to Settings, then click Control Panel.
2. Double-click the Add/Remove Hardware icon.
3. The Add/Remove Hardware Wizard welcome screen displays. Click Next.
4. In the Choose a Hardware Task dialog box, click Add/Troubleshoot a
device and click Next.
5. In the Choose a Hardware Device dialog box, select Add a new device
and click Next.
6. In the Find New Hardware dialog box, click No, I want to select the
hardware from a list and click Next.
7. In the Hardware Type dialog box, select Network Adapters and click Next.
8. Insert the disk that contains the QLogic driver in an appropriate drive.
9. In the Select Network Adapter dialog box, click Have Disk.
10. Type the path to the QL2x00IP NDIS network driver. For example:
A:\W2k\Ip
11. Click OK.
12. In the Network Adapter list, click QLogic QLA2X00 PCI Adapter, then
click Next.
13. In the Start Hardware Installation dialog box, click Next to install the driver.
14. If the Digital Signature Not Found dialog box displays, click Yes.
15. In the Add/Remove Hardware Wizard dialog box, click Finish to complete
the driver installation.
16. Modify the IP address parameters and driver parameters. See section 6.5.3
for details.
6.5.2
Updating the QL2x00IP NDIS Network Driver
Perform the following steps if a QL2x00IP NDIS network driver is already installed
and you want to install an updated version of the driver:
1. Open a DOS command prompt window.
2. Change the current directory to the Windows 2000 driver directory. For
example:
cd \Winnt\System32\Drivers
6-6 FC2354601-00 A
Page 77

6 – Windows 2000 Driver Installation
QL2x00IP NDIS Network Driver Installation
3. Make a backup copy of the old driver. You can copy the file into the same
directory with a .SAV extension indicating that it is the saved file. For
example:
copy Ql2x00ip.sys Ql2x00ip.sav
4. Insert the disk that contains the updated QLogic driver in an appropriate
drive.
5. Copy the new driver over the old driver. For example:
copy A:\W2k\Ip\Ql2x00ip.sys
6. Remove the disk that contains the QLogic driver.
7. Restart your system to load the updated driver.
6.5.3
QL2x00IP NDIS Driver Configuration
You must configure the IP address and modify the driver parameters during the
initial installation (see section 6.5.1). You can also modify these later as appropriate
using the following procedures.
The QL2x00IP NDIS driver provides drive configuration parameters. The drive
configuration parameters are listed in table 6-1 and described in the following
paragraphs.
Table 6-1. Ql2x00ip.sys Configuration Parameters
Parameter Minimum Maximum
MTU Size 92 65280 8192
Buffer Count 8 128 32
Buffer Size 512 65536 4096
Header Split Size 24 Buffer size - 1 0
Adapter Node Name — — —
Table Notes
a
A value of 0 indicates that the headers and data are not split.
Recommended
Default
a
■ MTU Size. This parameter specifies the maximum transfer or packet size
that the host system sends or receives. All QLA22xx/QLA23xx HBAs on the
same network must have the same MTU size value. QLogic recommends
a default value of 8192.
■ Buffer Count. This parameter specifies the number of receive buffers that
the QL2x00IP driver allocates during initialization. The number of buffers
multiplied by the buffer size must be greater than or equal to the MTU size.
QLogic recommends a default value of 32.
FC2354601-00 A 6-7
Page 78

6 – Windows 2000 Driver Installation
QL2x00IP NDIS Network Driver Installation
■ Buffer Size. This parameter specifies the size of each receive buffer. The
buffer size multiplied by the number of buffers must be greater than or equal
to the MTU size. Incoming packets cannot be broken into more than
23 buffers. Therefore, the buffer size multiplied by 23 must be at least as
large as the MTU size. QLogic recommends a default value of 4096.
■ Header Split Size. This parameter accounts for packets with split headers
and data. The parameter value specifies the number of bytes at the
beginning of an incoming packet that must be isolated in the first receive
buffer. A value of 0 indicates that the packet header and data are not split.
QLogic recommends a default value of 0.
■ Adapter Node Name. This parameter specifies the world wide name (node
name) of the QLA23xx HBA to use for this IP connection. The parameter is
required on systems with more than one QLA23xx HBA. You can use
Fast!UTIL to determine the node names for all QLA22xx/QLA23xx HBAs in
the system (see the Fast!UTIL section that corresponds to your QLA23xx
HBA).
Perform the following steps to make QL2x00IP NDIS driver parameter and IP
address modifications:
1. Click Start, point to Settings, point to Control Panel, and double-click the
Network and Dial-Up Connections icon.
2. Right-click the Lo cal Area Connection icon for the QLA23xx HBA, then
click Properties.
NOTE: If your system has multiple Local Area Connection icons, select the
connection that uses the QLA23xx HBA that you are modifying.
3. In the Local Area Connection n Properties dialog box, select Internet
Protocol (TCP/IP).
4. In the Internet Protocol (TCP/IP) Properties dialog box, select Use the
following IP address, then click Properties.
5. Type an IP address and subnet mask for the QLA23xx HBA. Each IP
address must be unique and all QLA22xx/QLA23xx HBAs must use the
same subnet mask. For example:
Adapter 1
IP address: 10.0.0.1
Subnet mask:255.255.0.0
Adapter 2
IP address: 10.0.0.2
Subnet mask:255.255.0.0
6. Click OK.
7. In the Local Area Connection n Properties dialog box, click Configure.
6-8 FC2354601-00 A
Page 79

6 – Windows 2000 Driver Installation
8. In the QLogic QL A 2X00 PCI Adap ter #n Properties dialog box, click the
Advanced tab.
9. The Property list displays the configuration parameters. Click the parameter
that you want to modify. The values display to the right.
10. Make configuration parameter modifications as necessary, then click OK.
11. In the Local Area Connection n Properties dialog box, click OK.
12. Restart the computer.
6.5.4
QL2x00IP NDIS Network Driver Installation
Removing the QL2x00IP NDIS Driver
If you need to remove the QLA2x00IP NDIS driver, perform the following steps:
1. Click the Start button, point to Settings, and then click Control Panel.
2. Double-click the Add/Remove Hardware icon.
3. The Add/Remove Hardware Wizard welcome screen displays. Click Next.
4. In the Choose a Hardware Task dialog box, click Uninstall/Unplug a
device and click Next.
5. In the Choose a Removal Task dialog box, click Uninstall a device and
click Next.
6. From the Device list, click the appropriate QLA23xx HBA. Click Next.
7. Click Yes, I want to uninstall this device. Click Next.
8. In the Add/Remove Hardware Wizard dialog box, click Finish to complete
the removal of the driver.
FC2354601-00 A 6-9
Page 80

6 – Windows 2000 Driver Installation
QL2x00IP NDIS Network Driver Installation
6-10 FC2354601-00 A
Page 81

Section 7
Windows XP Driver Installation
(QL2300.SYS)
7.1
Introduction
This section provides instructions for installing the Windows XP driver under the
following operating system conditions:
■ Initial installation of Windows XP with the QLA23xx HBA as the boot device
■ Initial installation of Windows XP with the QLA23xx HBA as an add-on
■ Installation of the Windows XP driver in an already installed Windows XP
operating system
■ Installing an updated Windows XP driver in an already installed Windows XP
operating system that has an older version of the driver
7.2
Creating the Driver Disk
Follow these steps to create driver disk containing the files needed to install the
Windows XP driver:
1. Locate the driver you want on the QLogic web site (http://www.qlogic.com)
and click Link to driver.
2. If prompted Wha t would you like to do with this fil e?, choose Save this
program to disk. Specify a temporary location on the hard drive and
download the driver.
3. Insert a blank disk in drive A.
4. Run the self-extracting file you just downloaded, specifying A:\ for Unzip
T o Fold er.
7.3
Installing the Windows XP Driver
If you have not installed Windows XP, follow the instructions in section 7.3.1 if the
QLA23xx HBA is the boot device; follow the instructions in section 7.3.2 if the
QLA23xx HBA is not the boot device (add-on).
If Windows XP is installed, follow the instructions in section 7.3.3 if this is the first
time you are installing the Windows XP driver; follow the instructions in section 7.3.4
to update an older version of the Windows XP driver.
FC2354601-00 A 7-1
Page 82

7 – Windows XP Driver Installation
Installing the Windows XP Driver
7.3.1
Installing Windows XP with the QLA23xx HBA as the Boot Device
Follow these steps to initially install Windows XP and the QL2300.SYS driver on
the boot disk attached to the QLA23xx HBA:
1. Start the Windows XP installation using the Setup disks or CD-ROM (CD).
2. If you are booting from the CD, press F6 if you see the message Press F6
if you want to install a third party SCSI or RAID Driver...
After all the standard devices have been loaded, press S to Specify
Additional Device. Go to step 5.
3. If you are booting from the Setup disks, after the standard devices have
been detected and configured, press S to Specify Additional Device.
4. Select Other and press ENTER.
5. Insert the QLogic disk created in section 7.2 into drive A. Press ENTER.
6. The following message displays:
The software you are installing for this hardware:
QLogic QLA22xx PCI Fibre Channel Adapter has not passed
Windows Logo testing to verify its compatibility with
Windows XP. Do you want to continue installing the
software for this hardware?
Click Yes to continue with the installation.
7. Continue with standard installation procedure.
7.3.2
Installing Windows XP with the QLA23xx HBA as an Add-On
Follow these steps to install Windows XP and the QL2300.SYS driver on a device
that is not attached to the QLA23xx HBA:
1. Start the Windows XP installation procedure using the Setup disks or
CD-ROM (CD).
2. If you are booting from the CD and the following message appears, press F6:
Press F6 if you need to install a third party SCSI or
RAID Driver...
After all the standard devices have been loaded, press S to Specify
Additional Device. Go to step 4.
3. If you are booting from the Setup disks, after the standard devices have
been detected and configured, press S to Specify Additional Device.
7-2 FC2354601-00 A
Page 83

7 – Windows XP Driver Installation
4. Insert the QLogic disk created in section 7.2 into drive A. Press ENTER.
5. The following message displays:
The software you are installing for this hardware:
QLogic QLA23xx PCI Fibre Channel Adapter has not passed
Windows Logo testing to verify its compatibility with
Windows XP. Do you want to continue installing the
software for this hardware?
Click Yes to continue with the installation.
6. Press ENTER to select the QLogic QLA2300 PCI Fibre Channel Adapter.
7. After the system installs the required files to support the new QLA23xx HBA,
press ENTER to continue with the Windows XP setup.
8. Continue with the standard installation procedure.
7.3.3
Installing the Windows XP Driver
Installing the QL2300.SYS Dri ver
The QLA23xx HBAs are plug-and-play devices that are automatically detected by
Windows XP. Perform the following steps to add the QL2300.SYS driver to a
previously installed Windows XP system:
1. Connect the QLA23xx HBA to the appropriate slot on your computer.
2. Restart or power up your computer.
3. When your computer powers up, Windows detects the newly installed
device, then displays the Found New Hardware with SCSI controller
message. The Found Ne w Hardware Wizard program is launched to begin
installing the QL2300.SYS driver for the QLA23xx HBA.
4. Insert QLogic disk created in section 7.2 into drive A.
5. Select Search for a suitable driver for my device (recommended).
Click Next.
6. In the Start Device Driver Installation dialog box, click Next.
7. The following message displays:
The software you are installing for this hardware:
QLogic QLA2300 PCI Fibre Channel Adapter has not passed
Windows Logo testing to verify its compatibility with
Windows XP. Do you want to continue installing the
software for this hardware?
Click Yes.
FC2354601-00 A 7-3
Page 84

7 – Windows XP Driver Installation
Installing the Windows XP Driver
8. In the Upgrade Device Driver W iza rd/Com pleti ng th e Upgra de De vic e
Driver Wizard dialog box, click Finish.
9. The following message displays:
Your hardware settings have changed. You must restart
your computer for these changes to take effect. Do you
want to restart your computer now?
Click Yes.
NOTE: QLogic is in the process of obtaining a Digital Signature for the driver
7.3.4
through the official WHQL process from Microsoft. Once a valid Digital
Signature has been obtained and put in the CAT file, the Digital Signature
Not found screen will not appear.
Updating the Existing QLA2300.SYS Driver
Perform the following steps if the QL2300.SYS driver is already installed and you
want to install an updated version of the driver:
1. To start the Device Manager, click Start, right-click My Computer, click
Properties, select Hardware T ab (Top Bar) Open Device Manager, then
select SCSI and RAID controller.
2. Double-click QLogic QLA2300 PCI Fibre Channel Adapter.
3. Click the Driver tab, then click Update Driver to start the Upgrade Device
Driver Wizard.
4. Insert the QLogic disk created in section 7.2 into drive A. Select Install the
Software Automatically (Recommended).
5. When the Qlogic XXXX has not passed Windows logo displays, click
Continue Anyway.
6. When the Completing the Hardware Up date Wizard dialog box displays,
click Finish.
7. Restart the system.
NOTE:
■ QLogic is in the process of obtaining a Digital Signature for the driver through
the official WHQL process from Microsoft. Once a valid Digital Signature has
been obtained and put in the CAT file, the Digital Signature Not found screen
will not appear.
■ If the QL2300.SYS driver was previously installed and an additional
QLA23xx HBA is added to the system, the HBA is detected when the system
powers up. The Found New Hardware with QL ogic QLA23 00 PCI Fibre
Channel Adapter message displays.
7-4 FC2354601-00 A
Page 85

7 – Windows XP Driver Installation
Follow these steps to complete the driver installation:
1. When the Digital Signature Not Found dialog box displays, click Yes.
2. When the Insert Disk message displays, insert the QLogic disk created in
section 7.2 into drive A. Click OK.
3. In the Found New Hardware Wizard/Completing the Found New
Hardware Wizard dialog box, click Finish.
4. The following message displays:
Your hardware settings have changed. You must restart
your computer for these changes to take effect.
Do you want to restart your computer now?
Click Yes.
7.4
System Registry Parameters
Removing the Driver
To uninstall the QLA23xx HBA, power down your computer and remove the HBA
from your computer according to the manufacturer’s instructions.
NOTE: You do not have to use the Device Manager or the Hardware Wizard to
uninstall the QLA23xx HBA. After you have removed the HBA and restarted
your computer, Windows XP recognizes that the HBA has been removed.
7.5
System Registry Parameters
The available driver parameters are listed below and described in the following
sections:
■ MaximumSGList
■ NumberOfRequests
■ FCTape
■ UseSameNN
7.5.1
MaximumSGList
Windows XP includes enhanced scatter/gather list support for doing large SCSI I/O
transfers. Windows XP supports up to 256 scatter/gather segments of 4096 bytes
each, allowing transfers up to 1048576 bytes.
NOTE: OEMSETUP.INF automatically updates the registry to support
FC2354601-00 A 7-5
33 scatter/gather segments. This setting provides the best overall
performance.
Page 86

7 – Windows XP Driver Installation
System Registry Parameters
To change this value, follow these steps:
1. Click Start, select Run, and open the REGEDT32 program.
2. Select HKEY_LOCAL_MACHINE and follow the tree structure to the
QL2300.SYS driver:
HKEY_LOCAL_MACHINE
SYSTEM
CurrentControlSet
Services
Ql2300
Parameters
Device
3. Double-click MaximumSGList:REG_DWORD:0x21.
4. Enter a value from 16 to 255 (10h to FFh). A value of 255 (FFh) enables
the maximum 1-MB transfer size. Any value above 255 enables
64K transfers. The default value is 33 (21h).
5. Click OK.
6. Exit the REGEDT32 program, then restart the system.
7.5.2
NumberOfRequests
The NumberOfRequests registry parameter specifies the maximum number of
outstanding requests per adapter. When the QL2300.SYS driver is installed, the
registry is automatically updated with this parameter set to 150 (96h).
CAUTION!
Increasing this parameter above 150 can result in a system failure.
7.5.3
FCTape
Follow these steps to configure the QL2300.SYS driver to support FC tape:
1. Click Start, select Run, and open the REGEDT32 program.
2. Select HKEY_LOCAL_MACHINE and follow the tree structure to the
QL2300.SYS driver:
HKEY_LOCAL_MACHINE
SYSTEM
CurrentControlSet
Services
Ql2300
Parameters
Device
3. Double-click DriverParameters:REG_SZ:MSCS=2;UseSameNN=1.
7-6 FC2354601-00 A
Page 87

7 – Windows XP Driver Installation
4. If the string FCTape= does not display, add the following text to the end of
the string:
;FCTape=1
5. If the string FCTape=0 displays, change the value from 0 to 1.
6. Click OK.
7. Exit the REGEDT32 program, then restart the system.
7.5.4
System Registry Parameters
UseSameNN
If you have multiple QLA23xx HBAs on the same system, the driver assigns the
world wide node name obtained from the first HBA to the rest of the HBAs.
If you want to have the world wide node name for each HBA to be based on its own
NVRAM content, set the UseSameNN parameter to 0.
Follow these steps to change the UseSameNN parameter:
1. Click Start, select Run, and open the REGEDT32 program.
2. Select HKEY_LOCAL_MACHINE and follow the tree structure to the
QL2300.SYS driver:
HKEY_LOCAL_MACHINE
SYSTEM
CurrentControlSet
Services
Ql2300
Parameters
Device
3. Double-click DriverParameters:REG_SZ:MSCS=2;UseSameNN=1.
4. If the string UseSameNN= does not display, add the following text to the
end of the string:
;UseSameNN=0
5. If the string UseSameNN=1 displays, change the value from 1 to 0.
6. Click OK.
7. Exit the REGEDT32 program, then restart the system.
FC2354601-00 A 7-7
Page 88

7 – Windows XP Driver Installation
System Registry Parameters
7-8 FC2354601-00 A
Page 89

Section 8
NetWare Driver Installation
(QL2300.HAM)
8.1
Introduction
This section provides instructions for installing the NetWare driver in an already
installed Novell NetWare 4.2, 5.x, or 6.x system.
NOTE: References to Novell NetWare 5.x and 6.x refer to versions that are
currently supported by Novell.
8.2
NetWare Driver Files and Parameters
The latest versions of the software drivers and documentation for NetWare 4.2, 5.x,
and 6.x are available on the QLogic Web site. Be sure to review the README.TXT
file for both new and changed information.
You can load the QL2300.HAM driver with optional switches to modify driver
functionality. The switches are described in table 8-1.
Table 8-1. QL2300.HAM Driver Parameters
Parameter Description
SLOT = n This switch specifies the PCI slot (slot n) in which the QLA23xx HBA
/LUNS This switch specifies that all logical unit number (LUN) devices are
is installed. The driver must be loaded once for each QLA23xx HBA
in your system. For example:
LOAD QL2300.HAM SLOT=3
scanned after the driver loads. Otherwise, NetWare only scans for
LUN 0 devices. This switch is required for multi-LUN storage
subsystems, for example, RAID subsystems. For example:
LOAD QL2300.HAM SLOT=3 /LUNS
FC2354601-00 A 8-1
Page 90

8 – NetWare Driver Installation
Installing the NetWare Driver
8.3
Installing the NetWare Driver
NOTE: The QL2300.HAM driver may not be compatible with NetWare versions
Perform the following steps to install the NetWare driver in a previously installed
NetWare 4.2, 5.x, or 6.x system.
NOTE: The following procedure modifies your NetWare STARTUP.NCF file to load
earlier than 4.2.
the driver automatically when your system boots.
1. Start NetWare and load the NetWare Install program from the NetWare
server prompt (SERVERNAME:).
Type the following command when you are using NetWare 4.2:
LOAD INSTALL
Type the following command when you are using NetWare 5.x or 6.x:
LOAD NWCONFIG
2. Select Driver options from the main menu.
3. Select Configure disk and storage device drivers.
4. Select Select an additional driver.
5. Press INSERT to install an unlisted driver.
6. Insert the disk that contains the QLogic driver in an appropriate drive.
7. Press F3 and specify the root path as the disk drive (A:\).
8. Press ENTER to select the QL2300.HAM driver.
9. If prompted, select Yes to copy the driver.
10. You are prompted for the server directory. Type the path of the server
directory, or press ENTER to accept the default.
11. If necessary, select Select/Modify Driver Parameters to modify the default
settings.
You can select a different PCI slot or select to not scan all LUNs. Press F10
to save the parameter settings.
12. Select Save parameter s an d l oad driver to complete the NetWare setup.
13. When finished, exit the installation program.
NOTE: If ASPI support is required for the SCSI devices, you must load the
8-2 FC2354601-00 A
NWASPI.CDM module, which is provided by Novell. For example:
LOAD QL2300.HAM
LOAD NWASPI.CDM
Page 91

Section 9
Red Hat Linux Driver Installation
9.1
Introduction
This section provides instructions for installing the qla2300 Linux driver under the
following operating system conditions:
■ Initial installation of the Red Hat Linux 6.2 operating system and the qla2x00
(v4.x) driver
■ Installing a new or upgrading an older version of the qla2x00 (v4.x) and
qla2300 (v5.x and above) driver on an already installed Red Hat Linux 6.2,
7.0, 7.1, and 7.2 operating system.
The latest version of the software drivers and documentation for Red Hat Linux are
available on the QLogic Web site. Be sure to review the README.qla2x00 and
release.txt files for both new and changed information.
9.2
Creating the Driver Floppy Disk
To create a driver floppy disk for an initial installation of the Red Hat Linux 6.2
operating system and the qla2x00 driver, perform the procedures in section 9.2.1.
To create a driver floppy disk for installing a new or upgrading an older version of
the qla2x00 driver on an already installed Red Hat Linux 6.2 or 7.0 operating system,
perform the procedures in section 9.2.2. To create a qla2x00 or qla2300 driver floppy
disk that contains the source code (Red Hat Linux 6.2, 7.0, 7.1, and 7.2), perform
the procedures in section 9.2.3.
9.2.1
Driver Floppy Disk 1 (New Operating System Installation)
Perform the following steps to create a driver floppy disk for an initial installation of
the Red Hat Linux 6.2 operating system and the qla2x00 driver:
1. Download the rh_boot4[1].xxx.zip file from the QLogic Web site.
2. If What would you like to do with this file ? displays, select Save this file
to disk.
3. Specify a temporary directory on the hard disk of the computer to store the
driver. For example:
C:\temp
4. Download the driver to the temporary directory.
FC2354601-00 A 9-1
Page 92

9 – Red Hat Linux Driver Installation
Creating the Driver Floppy Disk
5. Insert a blank floppy disk.
6. Run the self-extracting file you downloaded. At the Unzip To Folder prompt,
specify A:\.
Verify that the floppy disk contains the following files:
■ modules.cgz
■ modules.dep
■ modinfo
■ pcitable
■ rhdd-6.1
9.2.2
Driver Floppy Disk 2 (Installed Ope rating System)
Perform the following steps to create a driver floppy disk for installing a new or
upgrading an older version of the qla2x00 driver on an already installed Red Hat
Linux 6.2 or 7.0 operating system:
1. Download the qla2x00-x.xx-xx.i386.rpm file from the QLogic Web site.
2. If What would you like to do with this file? displays, select Save this file
to disk.
3. Insert a blank floppy disk.
4. Download the file to the floppy disk.
9.2.3
Source Code Driver Floppy Disk
Perform the following steps to create a qla2x00 or qla2300 driver floppy disk that
contains the source code. This floppy disk can be created for use on Red Hat
Linux 6.2, 7.0, 7.1, and 7.2.
1. Download the qla2x00src-vx.xx.tgz file from the QLogic Web site.
2. If What would you like to do with this file? displays, select Save this file
to disk.
3. Insert a blank floppy disk.
4. Download the file to the floppy disk.
9-2 FC2354601-00 A
Page 93

Install or Update the Driver (Installed Operating
9.3
9 – Red Hat Linux Driver Installation
System)
Install a New Operating System and Driver (Red Hat Linux 6.2)
NOTE: To install the qla2x00 driver, the following requirements must be met:
■ For Red Hat Linux 6.2, you must have created the qla2x00 driver floppy
disk 1(see section 9.2.1).
■ The QLA23xx HBA must be installed in the system before installing the
qla2x00 driver.
■ The QLA23xx HBA must be the only boot device in the system during
driver installation.
Perform the following steps to install the Red Hat Linux operating system and the
qla2x00 driver for the first time. These steps outline the procedure when installing
from an IDE CD-ROM.
1. Insert the Red Hat Installation disk and boot the computer.
2. When the computer comes up, the welcome window and boot prompt
display. If you want to continue in text mode, type the following command.
Otherwise, the installation continues in graphical mode.
boot: expert text
3. When the system prompts for the driver disk, insert the floppy disk 1 created
in section 9.2.1. Tab to OK, then press ENTER.
NOTE: If you are installing Red Hat Linux 7.0 or later, you must complete
the operating system installation, then continue with the instructions
in sections 9.4.1 and 9.4.2 to add the driver.
4. After selecting the language and keyboard settings, the system prompts for
the installation method. Select Local CDROM, then tab to OK.
5. When the system asks for devices, select Add Device. Select SCSI on the
following screen. Tab to OK.
6. When the list of devices displays, select QLogic QLA2100/2200/2300
qla2x00 V4.xx Driver. The system loads the driver.
7. If the system detects the device for the selected module, the device is listed
in the next screen under I have found the following devic es. Select Done.
8. Continue the Red Hat installation with the loaded qla2x00 driver. Restart
the system when the installation is complete.
9.4
Install or Update the Driver (Instal led Operating System)
Perform the following steps to install a new or upgrade an older version of the
qla2x00 (v4.x) driver on an already installed Red Hat Linux operating system. The
procedure consists of installing the driver on the boot drive (see section 9.4.1) and
FC2354601-00 A 9-3
Page 94

9 – Red Hat Linux Driver Installation
Install or Update the Driver (Installed Operating
System)
loading the new driver automatically (see sections 9.4.2.1 and 9.4.2.2) or manually
(see section 9.4.2). To load the qla2300 (v5.x) driver, see sections sections 9.4.2.2
and 9.4.2.3.
NOTE: You must have created driver floppy disk 2 (from section 9.2.2) and a source
code driver floppy disk (from section 9.2.3) before installing or updating the
driver.
9.4.1
Installing the Driver on the Boot Drive
NOTE: To install or update the qla2x00 driver, the following requirements must be
Perform the following steps to install the qla2x00 driver on the boot drive.
met:
■ For Red Hat Linux 6.2, you must have created the qla2x00 driver floppy
disk 2 (see section 9.2.2).
■ The QLA23xx HBA must be installed in the system before installing the
qla2x00 driver.
■ The QLA23xx HBA must be the only boot device in the system during
qla2x00 driver installation.
1. Create a directory for the Red Hat Package Manager (RPM) files unless it
already exists. For example:
# mkdir /home/qla2x00
2. Change the current directory to the QLogic Linux driver directory. For
example:
cd /home/qla2x00
3. Insert the floppy disk that contains the qla2x00 driver.
4. Copy the driver files to the directory created in step 2. For example:
mcopy a:qla2x00-x.xx-xx.i386.rpm .
The period (.) at the end is required.
5. Do one of the following:
❑ To invoke the RPM and install the qla2x00 drivers for the first time, type:
# rpm -iv qla2x00-x.xx-xx.i386.rpm
❑ To upgrade the existing qla2x00 drivers, type:
# rpm -iv --force qla2x00-x.xx-xx.i386.rpm
The qla2x00 driver is now installed on your boot drive. However, the driver must be
loaded before the system can access the devices attached to the QLA23xx HBA
(see section 9.4.2).
9-4 FC2354601-00 A
Page 95

Install or Update the Driver (Installed Operating
9.4.2
9 – Red Hat Linux Driver Installation
System)
Loading the Driver
The qla2x00 or qla2300 driver must be loaded before the system can access the
devices attached to the QLA23xx HBA. To build a custom kernel to automatically
load the driver at boot time, see section 9.4.2.1. To build a ramdisk image to
automatically load the qla2x00 driver at boot time, see section 9.4.2.2. To load the
qla2x00 driver manually, see section 9.4.2.3. To build a ramdisk image to
automatically load the qla2300 driver at boot time, see section 9.4.2.4. To load the
qla2300 driver manually, see section section 9.4.2.5.
9.4.2.1
Building a Custom Kernel to Load the qla2x00 (v4.x) Driver Automatically
The kernel automatically loads the qla2x00 driver at boot time if you include it in a
custom kernel. Perform the following steps to build a custom kernel:
1. Copy the qla2x00src-vx.xx.tgz file on the qla2x00 source code driver floppy
disk you created in section 9.2.3 to the /home/qla2x00 directory on the boot
drive. Extract the driver source and additional information files from the .tgz
file. For example:
# cd /home
# mkdir qla2x00
# cd /home/qla2x00
# mcopy a:*.tgz . (The period [.] at the end is required.)
# tar -xvzf qla*.tgz
2. Extract the kernel-header and kernel-source RPM files from the first Red
Hat CD-ROM.
# cd /mnt/cdrom/RedHat/RPMS
# rpm -iv kernel-headers*.rpm
# rpm -iv kernel-source*.rpm
3. Add the driver to the kernel.
NOTE: These instructions are for qla2x00 (in Red Hat Linux 6.2, 7.0, 7.1,
and 7.2). The line number listed may not be correct for other
releases of the kernel.
The following details are from addkernel.txt, which can be obtained from
the following source:
# tar -xvzf qla2x00src-x.xx.tgz
FC2354601-00 A 9-5
Page 96

9 – Red Hat Linux Driver Installation
Install or Update the Driver (Installed Operating
System)
a. If you have Red Hat Linux 6.2 and want the qla2x00 driver added as a
choice in make config, make menuconfig, or make xconfig, add the
following line to the /usr/src/linux/drivers/scsi/Config.in file after line 116:
dep_tristate ’QLA2x00 QLC driver support’
CONFIG_SCSI_QLOGIC_QLA2100 $CONFIG_SCSI
b. Copy all the zipped qla2x00 source files to the /usr/src/linux/drivers/scsi
directory.
# cp /home/qla2x00/*.c /usr/src/linux/drivers/scsi
# cp /home/qla2x00/*.h /usr/src/linux/drivers/scsi
c. For Red Hat Linux 6.2, add the following lines to the Makefile in
/usr/src/linux/drivers/scsi. Use the vi editor or equivalent text editor to
edit the file.
After line 634 add:
**************** (Makefile) ****************
ifeq ($(CONFIG_SCSI_QLOGIC_QLA2100),y)
L_OBJS += qla2x00.o
else
ifeq ($(CONFIG_SCSI_QLOGIC_QLA2100),m)
M_OBJS += qla2x00.o
endif
endif
****************** (end) *******************
After line 664 add the following. Use the TAB key to move the $ (CC)....
line:
**************** (Makefile) ****************
qla2x00.o: ql2100_fw.h ql2200_fw.h ql2300_fw.h
qla2x00.h qla2x00.c
$(CC) $(CFLAGS) -c qla2x00.c -o qla2x00.o
****************** (end) *******************
After line 338 add:
**************** (hosts.c) *****************
#ifdef CONFIG_SCSI_QLOGIC_QLA2100
#include "qla2x00.h"
#endif
****************** (end) *******************
9-6 FC2354601-00 A
Page 97

Install or Update the Driver (Installed Operating
9 – Red Hat Linux Driver Installation
After line 609 add:
**************** (hosts.c) *****************
#ifdef CONFIG_SCSI_QLOGIC_QLA2100
QLA2100_LINUX_TEMPLATE,
#endif
****************** (end) *******************
4. Build the kernel by first changing to the source directory.
# cd /usr/src/linux (for Red Hat Linux 6.2 and 7.0)
# cd /usr/src/linux-2.4 (for Red Hat Linux 7.1 and 7.2)
5. Type the following command to remove everything. You need to do this
when you build a symmetric multiprocessor (SMP) kernel for the first time.
# make mrproper
6. Type the following command to access the Main Menu:
# make menuconfig
a. From the Main Menu, select SCSI support and press ENTER.
b. From the SCSI Support Menu, select SCSI low-level drivers and press
ENTER.
c. From the SCSI Low-Level Drivers Menu, scroll down and select
QLA2x00 QLC driver support <New>. Press the SPACEBAR twice to
select QLA2x00 QLC driver support <New>.
d. Select Exit until you return to the Main Menu.
e. If you are building an SMP kernel on an SMP system, do the following:
❑ From the Main Menu, select Pr oces sor t ype and feat ures and
press the SPACEBAR.
❑ From the Processor T ype and Features Menu, select Symmetric
multiprocessor and press the SPACEBAR.
❑ Select Exit until you return to the Main Menu.
System)
f. To exit the Main Menu, select Exit.
The system prompts Do you wish to save your new kernel
configuration? Select Yes. The system saves a new config file .config
in the current directory.
7. Create a bootable kernel image by typing the following:
# make dep
# make bzImage
FC2354601-00 A 9-7
Page 98

9 – Red Hat Linux Driver Installation
Install or Update the Driver (Installed Operating
System)
8. Copy the new kernel image to the boot directory. In the following example,
newsmp is the label for the kernel image.
# cd arch/i386/boot
# cp bzImage /boot/newsmp
9. Modify the /etc/lilo.conf file to make the boot loader load a new image. For
example:
image=/boot/newsmp
label=newsmp
root=/dev/hda5 (This is the location of the boot partition on your
system.)
read-only
In the above example, the lines tell the Linux boot loader to load the new
kernel image called newsmp in /boot and mount the root partition using
device /dev/hda5.
10. Change default=linux or default=linux-up to default=newsmp.
11. Load the new boot configuration by typing the following:
# lilo
The lilo program echoes the names of loadable kernels to the screen. For
example:
newsmp *
12. Restart the system.
13. The new kernel image containing the qla2x00 driver is now the default boot
image.
14. Type the following command to determine whether your custom kernel is
loaded:
# cat /proc/version
9-8 FC2354601-00 A
Page 99

Install or Update the Driver (Installed Operating
9.4.2.2
9 – Red Hat Linux Driver Installation
System)
Building a Ramdisk Image to Load the Driver Automatically
You can load the qla2x00 driver at boot time using a ramdisk image. For more
information, refer to the Red Hat installation guide.
Perform the following steps to load the qla2x00 driver using a ramdisk image:
1. For Red Hat Linux 6.2, add the following line to the file /etc/conf.modules.
For Red Hat Linux 7.0, 7.1, and 7.2, add the following line to the file
/etc/modules.conf. For example:
alias scsi_hostadapter qla2x00
NOTE: If there are other SCSI HBAs installed on your system and the
2. Copy the object file to:
/lib/modules/<kernel release version>/scsi (Red Hat Linux 6.2 or 7.0)
/lib/modules/<kerne l rel ea se vers io n>/drivers/scsi (Red Hat Linux 7.1 and
7.2)
3. Build a new ramdisk image that contains the qla2x00.o object file.
For a single-processor system, type the following commands, where
x.x.xx–x.x is the Red Hat Linux version number:
For a multiprocessor system, type the following commands, where
x.x.xx–x.x is the Red Hat Linux version number:
4. Modify the /etc/lilo.conf file to load the new ramdisk image. In the following
examples, .x.xx–x.x is the Red Hat Linux version number.
For a single-processor system, change the following line from:
to:
For a multiprocessor system, change the following line from:
to:
scsi_hostadapter alias is used, define a different alias (for example,
scsi_hostadaptern (where n is a number from 1–9)).
/sbin/mkinitrd /boot/newinitrd-image x.x.xx-x.x
/sbin/mkinitrd /boot/newinitrd-image x.x.xx-x.xsmp
initrd=/boot/initrd-x.x.xx-x.x.img
initrd=/boot/initrd-image
initrd=/boot/initrd-x.x.xx-x.x.smp.img
initrd=/boot/initrd-image
FC2354601-00 A 9-9
Page 100

9 – Red Hat Linux Driver Installation
Install or Update the Driver (Installed Operating
System)
5. Type the following command to load the new lilo file:
# lilo
6. Restart the system. The qla2x00 driver loads automatically.
9.4.2.3
Loading and Unloading the qla2x00 Driver Manually
Before loading the driver manually, first build the driver from the driver source files
on the source code driver floppy disk (see section 9.5).After you manually load the
qla2x00 driver, you can access the devices and unload the driver manually without
restarting the system. The driver is also unloaded each time the system is restarted.
To load the qla2x00 driver, do one of the following:
■ Copy the qla2x00.9o file:
❑ For Red Hat Linux 6.2 and 7.0:
/lib/modules/<kernel release version>/scsi directory
❑ For Red Hat Linux 7.1 and 7.2:
/lib/modules/<kernel release version>/drivers/scsi directory
Type the following command to load the driver:
# modprobe qla2x00
■ Under the directory that contains the qla2x.00.o file, type:
# insmod qla2x00.o
Type the following command to unload the driver:
# modprobe –r qla2x00
9.4.2.4
Building a Ramdisk Image to Load the qla2300 Driver
You can load the qla2300 driver at boot time using a ramdisk image.
1. For Red Hat Linux 6.2, add the following line to the file /etc/conf.modules.
For Red Hat Linux 7.0, 7.1, and 7.2, add the following line to the file
/etc/modules.conf. For example:
alias scsi_hostadapter qla2300
NOTE: If there are other SCSI HBAs installed on your system and the
2. Build a new ramdisk image that contains the qla2300.o object file. First,
copy the object file to /lib/modules/<kernel release v ers ion>/scsi (Red Hat
9-10 FC2354601-00 A
scsi_hostadapter alias is used, define a different alias (for example,
scsi_hostadaptern (where n is a number in the range 1–9)).
 Loading...