

Page 1

User’s Guide
IOCTL to Open-iSCSI Interface
QLogic 4000 Series iSCSI Adapters and 8200 Series
Converged Network Adapters
IS0054604-00 A
Page 2

User’s Guide—IOCTL to Open-iSCSI Interface
QLogic 4000 Series iSCSI Adapters and 8200 Series Converged Network Adapters
Information furnished in this manual is believed to be accurate and reliable. However, QLogic Corporation assumes no
responsibility for its use, nor for any infringements of patents or other rights of third parties which may result from its
use. QLogic Corporation reserves the right to change product specifications at any time without notice. Applications
described in this document for any of these products are for illustrative purposes only. QLogic Corporation makes no
representation nor warranty that such applications are suitable for the specified use without further testing or
modification. QLogic Corporation assumes no responsibility for any errors that may appear in this document.
Document Revision History
Revision A, June 19, 2012
Changes Sections Affected
Initial release
ii IS0054604-00 A
Page 3

Table of Contents
Preface
What is in This Guide . . . . . . . . . . . . . . . . . . . . . . . . . . . . . . . . . . . . . . . . . . vii
Intended Audience . . . . . . . . . . . . . . . . . . . . . . . . . . . . . . . . . . . . . . . . . . . . vii
Related Materials . . . . . . . . . . . . . . . . . . . . . . . . . . . . . . . . . . . . . . . . . . . . . viii
Documentation Conventions . . . . . . . . . . . . . . . . . . . . . . . . . . . . . . . . . . . . viii
Technical Support. . . . . . . . . . . . . . . . . . . . . . . . . . . . . . . . . . . . . . . . . . . . . ix
Downloading Firmware and Documentation . . . . . . . . . . . . . . . . . . . . ix
Training . . . . . . . . . . . . . . . . . . . . . . . . . . . . . . . . . . . . . . . . . . . . . . . . x
Contact Information . . . . . . . . . . . . . . . . . . . . . . . . . . . . . . . . . . . . . . . x
Knowledge Database . . . . . . . . . . . . . . . . . . . . . . . . . . . . . . . . . . . . . x
1 Legacy vs. Open-iSCSI
Summary of Major Differences. . . . . . . . . . . . . . . . . . . . . . . . . . . . . . . . . . . 1-2
Functional Flows . . . . . . . . . . . . . . . . . . . . . . . . . . . . . . . . . . . . . . . . . . . . . 1-7
Discovery. . . . . . . . . . . . . . . . . . . . . . . . . . . . . . . . . . . . . . . . . . . . . . . 1-8
Target Login. . . . . . . . . . . . . . . . . . . . . . . . . . . . . . . . . . . . . . . . . . . . . 1-10
Session Recovery . . . . . . . . . . . . . . . . . . . . . . . . . . . . . . . . . . . . . . . . 1-11
State Transition Diagrams . . . . . . . . . . . . . . . . . . . . . . . . . . . . . . . . . . . . . . 1-13
2 Boot from SAN
New Parameter: ql4disablesysfsboot . . . . . . . . . . . . . . . . . . . . . . . . . 2-2
Boot from SAN Configuration Matrix . . . . . . . . . . . . . . . . . . . . . . . . . . . . . . 2-2
Configuring Boot from SAN . . . . . . . . . . . . . . . . . . . . . . . . . . . . . . . . . . . . . 2-4
Boot from SAN Installation on SLES 11 SP2 and RHEL 6.2 . . . . . . . . 2-4
Boot from SAN Installation on SLES 11 SP2. . . . . . . . . . . . . . . . . . . . 2-13
Configuring Boot from SAN on RHEL 6.2 . . . . . . . . . . . . . . . . . . . . . . . . . . 2-19
Installing RHEL 6.2 . . . . . . . . . . . . . . . . . . . . . . . . . . . . . . . . . . . . . . . 2-19
ql4xdisablesysfsboot Settings and Adapter Boot Mode . . . . . . . . . . . . . . . . 2-33
3 Open-iSCSI User’s Guide
Open-iSCSI Supported Features . . . . . . . . . . . . . . . . . . . . . . . . . . . . . . . . . 3-2
Discovery, Login, and Logout . . . . . . . . . . . . . . . . . . . . . . . . . . . . . . . 3-2
IS0054604-00 A iii
Page 4

User’s Guide—IOCTL to Open-iSCSI Interface
QLogic 4000 Series iSCSI Adapters and 8200 Series Converged Network Adapters
Boot Target Login . . . . . . . . . . . . . . . . . . . . . . . . . . . . . . . . . . . . . . . . 3-2
Default Behavior on RHEL 6.2 . . . . . . . . . . . . . . . . . . . . . . . . . . 3-2
Default Behavior on SLES 11 SP2 . . . . . . . . . . . . . . . . . . . . . . . 3-3
Persistence through Flash and Open-iSCSI Database . . . . . . . . . . . . 3-3
Managing QLogic iSCSI Adapters Using iscsiadm . . . . . . . . . . . . . . . . . . 3-4
iSCSI Configuration Files and Persistent Databases . . . . . . . . . . . . . 3-4
Configuring Targets for qla4xxx Using Open-iSCSI . . . . . . . . . . . . . 3-4
iSCSI Interface Configuration . . . . . . . . . . . . . . . . . . . . . . . . . . . . . . . 3-6
iSCSI Configuration Parameters . . . . . . . . . . . . . . . . . . . . . . . . 3-6
List All ifaces. . . . . . . . . . . . . . . . . . . . . . . . . . . . . . . . . . . . . . . . 3-7
Display iface Configuration Details. . . . . . . . . . . . . . . . . . . . . . . 3-8
Create an iface . . . . . . . . . . . . . . . . . . . . . . . . . . . . . . . . . . . . . . 3-8
Update iface Network Parameters . . . . . . . . . . . . . . . . . . . . . . . 3-9
Unidirectional and Bidirectional CHAP settings . . . . . . . . . . . . . 3-11
Target Discovery . . . . . . . . . . . . . . . . . . . . . . . . . . . . . . . . . . . . . . . . . 3-12
Discover Targets using sendtarget . . . . . . . . . . . . . . . . . . . . . . . 3-12
Adding a New discoverydb for sendtarget . . . . . . . . . . . . . . . . . 3-13
Remove sendtarget Node. . . . . . . . . . . . . . . . . . . . . . . . . . . . . . 3-14
Adding and Deleting Targets . . . . . . . . . . . . . . . . . . . . . . . . . . . . . . . . 3-14
Adding a New Target . . . . . . . . . . . . . . . . . . . . . . . . . . . . . . . . . 3-14
List All Targets . . . . . . . . . . . . . . . . . . . . . . . . . . . . . . . . . . . . . . 3-15
Deleting a Target Node . . . . . . . . . . . . . . . . . . . . . . . . . . . . . . . . 3-15
Target Login and Logout . . . . . . . . . . . . . . . . . . . . . . . . . . . . . . . . . . . 3-15
Login to a Target . . . . . . . . . . . . . . . . . . . . . . . . . . . . . . . . . . . . . 3-15
Login to All Targets . . . . . . . . . . . . . . . . . . . . . . . . . . . . . . . . . . . 3-16
Login All Sessions with Specified Parameters . . . . . . . . . . . . . . 3-16
Logout from a Target . . . . . . . . . . . . . . . . . . . . . . . . . . . . . . . . . 3-16
Logout from All Targets. . . . . . . . . . . . . . . . . . . . . . . . . . . . . . . . 3-16
Features Not Supported. . . . . . . . . . . . . . . . . . . . . . . . . . . . . . . . . . . . . . . . 3-17
Migrating to Open-iSCSI Driver . . . . . . . . . . . . . . . . . . . . . . . . . . . . . . . . . . 3-17
Linux Open-iSCSI README . . . . . . . . . . . . . . . . . . . . . . . . . . . . . . . . . . . . 3-18
4 Known Issues
List of Figures
Figure Page
1-1 Noninteractive Discovery in IOCTL Mode (Legacy) . . . . . . . . . . . . . . . . . . . . . . . . . 1-8
1-2 Interactive Discovery in IOCTL Mode (Legacy) . . . . . . . . . . . . . . . . . . . . . . . . . . . . 1-8
1-3 Open-iSCSI Discovery . . . . . . . . . . . . . . . . . . . . . . . . . . . . . . . . . . . . . . . . . . . . . . . 1-9
1-4 IOCTL iSCSI Target Login . . . . . . . . . . . . . . . . . . . . . . . . . . . . . . . . . . . . . . . . . . . . 1-10
iv IS0054604-00 A
Page 5

User’s Guide—IOCTL to Open-iSCSI Interface
QLogic 4000 Series iSCSI Adapters and 8200 Series Converged Network Adapters
1-5 Open-iSCSI Target Login . . . . . . . . . . . . . . . . . . . . . . . . . . . . . . . . . . . . . . . . . . . . . 1-10
1-6 IOCTL Session Recovery. . . . . . . . . . . . . . . . . . . . . . . . . . . . . . . . . . . . . . . . . . . . . 1-11
1-7 Open-iSCSI Session Recovery . . . . . . . . . . . . . . . . . . . . . . . . . . . . . . . . . . . . . . . . 1-12
1-8 IOCTL State Transition Diagram . . . . . . . . . . . . . . . . . . . . . . . . . . . . . . . . . . . . . . . 1-13
1-9 Open-iSCSI State Transition Diagram . . . . . . . . . . . . . . . . . . . . . . . . . . . . . . . . . . . 1-14
2-1 Entering Fast!UTIL from the Adapter’s BIOS. . . . . . . . . . . . . . . . . . . . . . . . . . . . . . 2-4
2-2 Selecting the Port to Be Configured. . . . . . . . . . . . . . . . . . . . . . . . . . . . . . . . . . . . . 2-5
2-3 Fast!UTIL Options Menu—Selecting Configuration Settings . . . . . . . . . . . . . . . . . . 2-5
2-4 Selecting the Host Adapter Settings Option. . . . . . . . . . . . . . . . . . . . . . . . . . . . . . . 2-6
2-5 Selecting the Initiator IP Settings . . . . . . . . . . . . . . . . . . . . . . . . . . . . . . . . . . . . . . . 2-6
2-6 Providing the Initiator IP Address. . . . . . . . . . . . . . . . . . . . . . . . . . . . . . . . . . . . . . . 2-7
2-7 Configuration Settings Menu . . . . . . . . . . . . . . . . . . . . . . . . . . . . . . . . . . . . . . . . . . 2-7
2-8 Selecting Primary Boot Device Settings. . . . . . . . . . . . . . . . . . . . . . . . . . . . . . . . . . 2-8
2-9 Providing Target IP Address for Primary Boot Device . . . . . . . . . . . . . . . . . . . . . . . 2-8
2-10 Selecting Alternate Boot Device Settings. . . . . . . . . . . . . . . . . . . . . . . . . . . . . . . . . 2-9
2-11 Providing Target IP Address for Alternate Boot Device . . . . . . . . . . . . . . . . . . . . . . 2-9
2-12 Fast!UTIL Options . . . . . . . . . . . . . . . . . . . . . . . . . . . . . . . . . . . . . . . . . . . . . . . . . . 2-10
2-13 Selecting the Primary LUN. . . . . . . . . . . . . . . . . . . . . . . . . . . . . . . . . . . . . . . . . . . . 2-10
2-14 List of Devices on the Port . . . . . . . . . . . . . . . . . . . . . . . . . . . . . . . . . . . . . . . . . . . . 2-11
2-15 Editing Alternate Boot Device Settings . . . . . . . . . . . . . . . . . . . . . . . . . . . . . . . . . . 2-11
2-16 Setting the Boot Mode to Manual. . . . . . . . . . . . . . . . . . . . . . . . . . . . . . . . . . . . . . . 2-12
2-17 Entering the Boot BIOS . . . . . . . . . . . . . . . . . . . . . . . . . . . . . . . . . . . . . . . . . . . . . . 2-13
2-18 Providing the withiscsi Boot Option . . . . . . . . . . . . . . . . . . . . . . . . . . . . . . . . . . 2-13
2-19 Installation Welcome Screen . . . . . . . . . . . . . . . . . . . . . . . . . . . . . . . . . . . . . . . . . . 2-14
2-20 Media Check . . . . . . . . . . . . . . . . . . . . . . . . . . . . . . . . . . . . . . . . . . . . . . . . . . . . . . 2-14
2-21 iSCSI Initiator Overview . . . . . . . . . . . . . . . . . . . . . . . . . . . . . . . . . . . . . . . . . . . . . . 2-15
2-22 Selecting System Probing . . . . . . . . . . . . . . . . . . . . . . . . . . . . . . . . . . . . . . . . . . . . 2-15
2-23 Selecting the Installation Mode . . . . . . . . . . . . . . . . . . . . . . . . . . . . . . . . . . . . . . . . 2-16
2-24 Setting the Clock and Time Zone. . . . . . . . . . . . . . . . . . . . . . . . . . . . . . . . . . . . . . . 2-16
2-25 Selecting the Server Base Scenario . . . . . . . . . . . . . . . . . . . . . . . . . . . . . . . . . . . . 2-17
2-26 Preparing the Hard Disk. . . . . . . . . . . . . . . . . . . . . . . . . . . . . . . . . . . . . . . . . . . . . . 2-17
2-27 Performing the Installation . . . . . . . . . . . . . . . . . . . . . . . . . . . . . . . . . . . . . . . . . . . . 2-18
2-28 Booting From the Installation Media. . . . . . . . . . . . . . . . . . . . . . . . . . . . . . . . . . . . . 2-19
2-29 Choosing to Test Media Disk or Skip Test . . . . . . . . . . . . . . . . . . . . . . . . . . . . . . . . 2-19
2-30 Selecting Network Interface for Installation . . . . . . . . . . . . . . . . . . . . . . . . . . . . . . . 2-20
2-31 Configuring the IP Address . . . . . . . . . . . . . . . . . . . . . . . . . . . . . . . . . . . . . . . . . . . 2-20
2-32 Start of RHEL 6.2 Installation . . . . . . . . . . . . . . . . . . . . . . . . . . . . . . . . . . . . . . . . . . 2-21
2-33 Selecting the Language for the Installation . . . . . . . . . . . . . . . . . . . . . . . . . . . . . . . 2-22
2-34 Selecting the Keyboard . . . . . . . . . . . . . . . . . . . . . . . . . . . . . . . . . . . . . . . . . . . . . . 2-23
2-35 Selecting Storage Device Type . . . . . . . . . . . . . . . . . . . . . . . . . . . . . . . . . . . . . . . . 2-24
2-36 Verifying Paths to the Disk . . . . . . . . . . . . . . . . . . . . . . . . . . . . . . . . . . . . . . . . . . . . 2-25
2-37 Specifying the Host Name . . . . . . . . . . . . . . . . . . . . . . . . . . . . . . . . . . . . . . . . . . . . 2-26
2-38 Selecting the Time Zone . . . . . . . . . . . . . . . . . . . . . . . . . . . . . . . . . . . . . . . . . . . . . 2-27
2-39 Entering the Root Credentials . . . . . . . . . . . . . . . . . . . . . . . . . . . . . . . . . . . . . . . . . 2-28
2-40 Selecting the Partition Layout Type . . . . . . . . . . . . . . . . . . . . . . . . . . . . . . . . . . . . . 2-29
IS0054604-00 A v
Page 6

User’s Guide—IOCTL to Open-iSCSI Interface
QLogic 4000 Series iSCSI Adapters and 8200 Series Converged Network Adapters
2-41 Selecting the Installation Type . . . . . . . . . . . . . . . . . . . . . . . . . . . . . . . . . . . . . . . . . 2-30
2-42 Installation in Progress. . . . . . . . . . . . . . . . . . . . . . . . . . . . . . . . . . . . . . . . . . . . . . . 2-31
2-43 Installation Completed . . . . . . . . . . . . . . . . . . . . . . . . . . . . . . . . . . . . . . . . . . . . . . . 2-32
List of Tables
Table Page
1-1 Differences Between IOCTL and Open-iSCSI Driver Models . . . . . . . . . . . . . . . . . 1-2
2-1 Boot from SAN Configuration Matrix . . . . . . . . . . . . . . . . . . . . . . . . . . . . . . . . . . . . 2-3
2-2 Configurations and Tools for Checking iSCSI Sessions. . . . . . . . . . . . . . . . . . . . . . 2-33
3-1 Configuration and Persistent Database Files. . . . . . . . . . . . . . . . . . . . . . . . . . . . . . 3-4
3-2 Hardware iSCSI Interface Config File Fields . . . . . . . . . . . . . . . . . . . . . . . . . . . . . . 3-6
vi IS0054604-00 A
Page 7

Preface
Starting with Red Hat® Enterprise Linux® (RHEL™) 6.2 and Novell® SUSE® Linux
Enterprise Server (SLES
Linux) supports the Open-iSCSI tool iscsiadm. As a result, iscsiadm can now
be used to perform management functions (configuring network settings,
managing iSCSI targets, and so on) on QLogic 4000 Series 1GbE iSCSI Adapters
and 8200 Series 10GbE Converged Network Adapters.
®
What is in This Guide
This document describes the differences between the legacy (IOCTL-based) and
Open-iSCSI management models of the QLogic qla4xxx driver, and provides
brief guidelines for migrating from the legacy to the Open-iSCSI model.
This preface specifies the intended audience, lists related documents, describes
the typographic conventions used in this guide, and provides technical support
and contact information.
The remainder of this user’s guide is organized into the following chapters:
Section 1 Legacy vs. Open-iSCSI describes the major differences between
the legacy driver which has an IOCTL-based interface for user space
application communications, and the Open-iSCSI model.
Section 2 Boot from SAN provides information on configuring Boot from
SAN (BFS) when migrating to the Open-iSCSI model.
) 11 SP2, the QLogic qla4xxx driver (iSCSI driver for
Section 3 Open-iSCSI User’s Guide provides a User’s Guide for
Open-iSCSI.
Section 4 Known Issues provides a list of currently known issues.
Intended Audience
This document is intended for end users who manage QLogic 4000 Series iSCSI
adapters or 8200 Series Converged Network Adapters on Linux (RHEL 6.2, SLES
11 SP2, or later), using the IOCTL-based management model.
IS0054604-00 A vii
Page 8

Preface
Related Materials
Related Materials
For additional information, refer to the following:
Technical Note, 2.10. Kernel
http://docs.redhat.com/docs/en-US/Red_Hat_Enterprise_Linux/6/html/6.2_T
echnical_Notes/kernel_issues.html
Release Notes for SUSE Linux Enterprise Server 11 Service Pack 2
http://www.novell.com/linux/releasenotes/i386/SUSE-SLES/11-SP2/
Linux Open-iSCSI README
http://www.open-iscsi.org/docs/README
Documentation Conventions
This guide uses the following documentation conventions:
NOTE provides additional information.
Tex t i n blue font indicates a hyperlink (jump) to a figure, table, or section in
this guide, and links to Web sites are shown in underlined blue
example:
Table 9-2 lists problems related to the user interface and remote agent.
See “Installation Checklist” on page 3-6.
For more information, visit www.qlogic.com
Tex t i n bold font indicates user interface elements such as a menu items,
buttons, check boxes, or column headings. For example:
Click the Start button, point to Programs, point to Accessories, and
then click Command Prompt.
Under Notification Options, select the Warning Alarms check box.
Tex t i n Courier font indicates a file name, directory path, or command line
text. For example:
To return to the root directory from anywhere in the file structure:
Type
cd /root and press ENTER.
Enter the following command: sh ./install.bin
Key names and key strokes are indicated with UPPERCASE:
.
. For
Press CTRL+P.
Press the UP ARROW key.
viii IS0054604-00 A
Page 9

Tex t i n italics indicates terms, emphasis, variables, or document titles:
For a complete listing of license agreements, refer to the QLogic
Software End User License Agreement.
What are shortcut keys?
To enter the date type mm/dd/yyyy (where mm is the month, dd is the
day, and yyyy is the year).
Topic titles between quotation marks identify related topics either within this
manual or in the online help, which is also referred to as the help system
throughout this document.
Technical Support
Customers should contact their authorized maintenance provider for technical
support of their QLogic products. QLogic-direct customers may contact QLogic
Technical Support; others will be redirected to their authorized maintenance
provider. Visit the QLogic support Web site listed in Contact Information for the
latest firmware and software updates.
Preface
Technical Support
For details about available service plans, or for information about renewing and
extending your service, visit the Service Program web page at
http://www.qlogic.com/services
.
Downloading Firmware and Documentation
To download firmware and documentation:
1. Go to the QLogic Downloads and Documentation page:
http://driverdownloads.qlogic.com
2. Under QLogic Products, type the QLogic model name in the search box.
Alternatively, you can click Guided Search to obtain assistance in locating
the firmware and documentation to download.
3. In the search results list, locate and select the firmware and documentation,
for your product.
4. View the product details Web page to ensure that you have the correct
firmware and documentation.
Click the Read Me and Release Notes icons under Support Files for
additional information.
5. Click Download Now.
6. Save the file to your computer.
.
7. If you have downloaded firmware, follow the installation instructions in the
Readme file.
IS0054604-00 A ix
Page 10

Preface
Technical Support
Training
QLogic Global Training maintains a Web site at www.qlogictraining.com offering
online and instructor-led training for all QLogic products. In addition, sales and
technical professionals may obtain Associate and Specialist-level certifications to
qualify for additional benefits from QLogic.
Contact Information
QLogic Technical Support for products under warranty is available during local
standard working hours excluding QLogic Observed Holidays. For customers with
extended service, consult your plan for available hours. For Support phone
numbers, see the Contact Support link at support.qlogic.com
.
Support Headquarters
QLogic Web Site
Technical Support Web Site
Technical Support E-mail
Technical Training E-mail
Knowledge Database
The QLogic knowledge database is an extensive collection of QLogic product
information that you can search for specific solutions. We are constantly adding to
the collection of information in our database to provide answers to your most
urgent questions. Access the database from the QLogic Support Center:
http://support.qlogic.com.
QLogic Corporation
4601 Dean Lakes Blvd.
Shakopee, MN 55379 USA
www.qlogic.com
http://support.qlogic.com
support@qlogic.com
training@qlogic.com
x IS0054604-00 A
Page 11

1 Legacy vs. Open-iSCSI
This section describes the major differences between the legacy driver which has
an IOCTL-based interface for user space application communications, and the
Open-iSCSI model.
This section includes the following topics:
“Summary of Major Differences” on page 1-2
“Functional Flows” on page 1-7
“State Transition Diagrams” on page 1-13
IS0054604-00 A 1-1
Page 12

1–Legacy vs. Open-iSCSI
Summary of Major Differences
Summary of Major Differences
Table 1-1 summarizes the major differences between the legacy IOCTL-based
and Open-iSCSI models.
Table 1-1. Differences Between IOCTL and Open-iSCSI Driver Models
Serial
No.
1 Firmware
Feature IOCTL-based Driver Open-iSCSI-based Driver Remarks
Operational
Mode
Firmware is configured in
AUTO CONNECT
MODE. In this mode:
The firmware reads
the DDB entries from
the predefined area in
the Flash.
For a Send Target the
firmware initiates dis-
covery, discovers the
target, and initiates
login to the discov-
ered target.
The firmware posts an
AEN to the driver,
identifying each dis-
covered target.
For the DDBs that rep-
resent a Normal tar-
get, the firmware logs
into them and posts an
AEN to the driver to
report the login status.
Firmware is configured in NON
AUTO CONNECT MODE. In
this mode:
The driver reads the DDB
entries from the predefined
area in the Flash.
For a Send Target the
driver initiates a discovery
session through the mail-
box command, queries the
firmware for discovered targets, and then initiates
login to the targets using
the mailbox command.
The firmware posts an AEN
to the driver to report login
status after login completes.
For DDBs which represent
a Normal Target, driver initiates login using mailbox
command. Then, the firmware posts an AEN to the
driver to report the login
status after login completes.
2Target
Persistence
1-2 IS0054604-00 A
Persistence is maintained by storing Discovery Target and Normal
Target records on the
adapter Flash using the
QLogic application
a
.
Persistence is maintained by
storing Discovery Target and
Normal Target records in the
local file system using the
iscsiadm tool.
Page 13

1–Legacy vs. Open-iSCSI
Summary of Major Differences
Table 1-1. Differences Between IOCTL and Open-iSCSI Driver Models (Continued)
Serial
No.
3 Boot Target During driver load, the
4 Re-login
Feature IOCTL-based Driver Open-iSCSI-based Driver Remarks
firmware performs auto
discovery and login to the
boot targets based on the
target information saved
in the Flash, and posts an
AEN to inform the driver
of the targets and their
login status.
Session management or
Handling
re-login is handled by the
driver.
Login to boot targets is triggered by the driver, or the user
space is dependent on the
ql4xdisablesysfsboot
driver command line parameter:
For RHEL 6.2 it is enabled
by default, so that the driver
initiates the login.
For SLES 11 SP2 it is dis-
abled by default, so that
yast2-iscsi-client
must be used to perform
login.
Re-login is handled either by
iscsiadm and iscsid, or by
the driver, depending how the
session is initiated:
If iscsiadm created the
session, session management is handled using
iscsid (in other words,
handled by the user space).
For the target record which
is persistent in the Flash,
the driver initiates the session and is responsible for
re-login or session management.
Note: For more
details on adapter
mode and the
ql4xdisables-y
sfsboot driver,
refer to “Configur-
ing Boot from SAN
on RHEL 6.2” on
page 2-19.
Session re-login is
also initiated on
chip or adapter
reset.
5 Network con-
figuration
IS0054604-00 A 1-3
Adapter ports are configured using the QLogic
application
a
.
Adapter ports are configured
using iscsiadm for network
configuration. By default,
iscsiadm creates an iface
for each QLogic adapter port.
The iface name is of the form
qla4xxx.00:0e:1e:04:8b:2e
. You can change or update
the network setting for the port
using various iface parameters
and iface operations.
Page 14

1–Legacy vs. Open-iSCSI
Summary of Major Differences
Table 1-1. Differences Between IOCTL and Open-iSCSI Driver Models (Continued)
Serial
No.
6 How to view
7 Target scan-
Feature IOCTL-based Driver Open-iSCSI-based Driver Remarks
sessions
logged in
ning
Qlogic application
Login and target scanning
is done in kernel space as
follows:
1. When the driver
receives an AEN for
the DDB indicating
that the target is
logged in, the driver
publishes the session
to the iSCSI transport
layer and unblocks the
session.
2. This triggers the SCSI
midlayer LUN scanning to discover all
LUNs behind the target.
a
Use the following command:
iscsiadm -m session
Login and target scanning is
done by user space as follows:
1. When the driver receives
an AEN for the DDB indicating that the target is
logged in, it sends an event
to the iscsid (user
space) indicating that the
session is in the logged-in
state.
2. iscsid then unblocks the
session and kicks off the
target/LUN scanning.
8 Link Down
impact on
SCSI Device
Handling
No change in the behavior of session and SCSI
device state handling.
The default session
recovery time-out is equal
to the firmware keep alive
timeout. The default value
is 30 seconds. This can
be modified by the driver
command line parameter
ql4xkeepalive.
No change in the behavior of
session and SCSI device state
handling.
For Open-iSCSI, default
recovery time-out is 120 seconds. This can be configured
on an individual session basis
dynamically; that is, it does not
require driver unload.
Session recovery time-out can
be configured by modifying the
replacement_timeout
parameter in the node record.
1-4 IS0054604-00 A
Page 15

1–Legacy vs. Open-iSCSI
Summary of Major Differences
Table 1-1. Differences Between IOCTL and Open-iSCSI Driver Models (Continued)
Serial
No.
9 Dynamic
10 Tearing Down
Feature IOCTL-based Driver Open-iSCSI-based Driver Remarks
mapping/unmapping of LUNs
added to the
back-end storage
Session/Connection
objects
The driver handles the
following check condition/sense data:
UNIT_ATTENTION
ASC/ASCQ : 0x3F/0x0E
to figure out that a new
LUN has been added on
the back-end storage and
makes an upcall to the
SCSI midlayer to trigger a
LUN scan for that particular target.
The session object can
be destroyed using
QLogic applications
a
No explicit support to dynamically discover newly added
LUNs on the back-end storage. Requires manual rescanning using iscsiadm
command line option.
The session object lifecycle is
completely determined by
Open-iSCSI. If the node
record exists, sessions will be
created by iscsid and will
remain there unless logout is
explicitly issued using iscsi-
adm.
11 Multisession
handling
The QLogic applicationa
allows you to create multiple sessions using the
duplicate target option.
This duplicate target is
persistent in the Flash
Open-iSCSI also has multiple
session support—iscsiadm
allows creating multiple sessions for a single iface or a single port. The main difference is
that target records are persistent in user space as part of
node records.
Multisession using
qla4xxx will be
available from
RHEL 6.3 and
above.
IS0054604-00 A 1-5
Page 16

1–Legacy vs. Open-iSCSI
Summary of Major Differences
Table 1-1. Differences Between IOCTL and Open-iSCSI Driver Models (Continued)
Serial
No.
12 Flash DDBs
Feature IOCTL-based Driver Open-iSCSI-based Driver Remarks
with
Open-iSCSI
model driver
Not applicable The Open-iSCSI driver will
support existing Flash DDB
entries in the adapter.
iscsiadm has no control
over these sessions. Session
management of Flash DDB
entries is done by the driver
itself.
Note: iscsiadm
is not capable of
managing the
Flash target
entries.
Before migrating to
the Open-iSCSI
model, save this
DDB/target information to node
records using
iscsiadm and
use the QLogic
application
delete Flash
entries apart from
boot targets before
the upgrade. Then,
upgrade to the
Open-iSCSI
model. Boot targets are always in
the Flash in both
models.
a
to
1-6 IS0054604-00 A
Page 17

1–Legacy vs. Open-iSCSI
Functional Flows
Table 1-1. Differences Between IOCTL and Open-iSCSI Driver Models (Continued)
Serial
No.
13 CHAP CHAP settings are
a
The QLogic management applications are iscli (SANsurfer® iSCSI CLI) and qaucli (QConvergeConsole® CLI).
Feature IOCTL-based Driver Open-iSCSI-based Driver Remarks
applied using the QLogic
application
a
.
With CHAP support in
iscsiadm, CHAP entries can
now be added, deleted, and
listed from the user space.
Note: Before you
migrate, delete all
CHAP information
from Flash using
the QLogic applica-
a
tion
, and then
update the same
CHAP information
in the respective
node records using
iscsiadm commands.
When migration
begins, any CHAP
information in the
Flash will be honored, but it must be
updated in the
node records using
iscsiadm.
Open-iSCSI CHAP
management is not
supported in RHEL
6.2 and SLES 11
SP2.
CTRL+Q options
let you set unidirectional and bidirectional CHAP
only for boot targets. In both models, CHAP
information for boot
targets is always
stored in Flash.
Functional Flows
This section provides functional flow diagrams for discovery, target login, and
session recovery.
IS0054604-00 A 1-7
Page 18

1–Legacy vs. Open-iSCSI
Functional Flows
Discovery
Figures 1-1 through 1-3 provide functional flow diagrams of the discovery process
for IOCTL and Open-iSCSI.
Figure 1-1. Noninteractive Discovery in IOCTL Mode (Legacy)
Figure 1-2. Interactive Discovery in IOCTL Mode (Legacy)
1-8 IS0054604-00 A
Page 19

1–Legacy vs. Open-iSCSI
Functional Flows
Figure 1-3. Open-iSCSI Discovery
IS0054604-00 A 1-9
Page 20

1–Legacy vs. Open-iSCSI
Functional Flows
Target Login
Figures 1-4 through 1-5 provide functional flow diagrams of the target login
process for IOCTL and Open-iSCSI.
Figure 1-4. IOCTL iSCSI Target Login
Figure 1-5. Open-iSCSI Target Login
1-10 IS0054604-00 A
Page 21

Session Recovery
Figures 1-6 through 1-7 provide functional flow diagrams of the session recovery
process for IOCTL and Open-iSCSI.
1–Legacy vs. Open-iSCSI
Functional Flows
Figure 1-6. IOCTL Session Recovery
IS0054604-00 A 1-11
Page 22

1–Legacy vs. Open-iSCSI
Functional Flows
Figure 1-7. Open-iSCSI Session Recovery
1-12 IS0054604-00 A
Page 23

State Transition Diagrams
Figures 1-8 through 1-9 provide state transition diagrams for IOCTL and
Open-iSCSI. These diagrams illustrate the management of the session/target life
cycle.
1–Legacy vs. Open-iSCSI
State Transition Diagrams
Figure 1-8. IOCTL State Transition Diagram
IS0054604-00 A 1-13
Page 24

1–Legacy vs. Open-iSCSI
State Transition Diagrams
Figure 1-9. Open-iSCSI State Transition Diagram
1-14 IS0054604-00 A
Page 25

2 Boot from SAN
This section provides information on configuring Boot from SAN (BFS) when
migrating to the Open-iSCSI model.
This section includes the following topics:
“New Parameter: ql4disablesysfsboot” on page 2-2
“Boot from SAN Configuration Matrix” on page 2-2
“Configuring Boot from SAN” on page 2-4
“Configuring Boot from SAN on RHEL 6.2” on page 2-19
“ql4xdisablesysfsboot Settings and Adapter Boot Mode” on page 2-33
IS0054604-00 A 2-1
Page 26

2–Boot from SAN
NOTE
New Parameter: ql4disablesysfsboot
New Parameter: ql4disablesysfsboot
The ql4disablesysfsboot parameter is a new driver module parameter for
the Open-iSCSI based driver model (it is not supported by the ioctl based
driver). This parameter controls the behavior of boot target login in the
Open-iSCSI base driver, which provides two ways to log in to the boot targets.
Option 1: If ql4disablesysfsboot is 0, the Boot targets are exported
through sysfs and iscsistart will issue a login to the boot target (that is,
the login to the boot target will be triggered from the user space).
Option 2: If ql4disablesysfsboot is 1, the qla4xxx driver will handle
the login to the boot targets.
Some environments require support for driver login (Option 2) to the boot targets
for these reasons:
If the boot entry is a sendtarget entry, then iscsistart or
open-iscsi cannot discover and log in to the discovered target.
The system will not boot up if you only do the kernel upgrade and do not
upgrade the iSCSI tools.
Boot from SAN Configuration Matrix
Table 2-1 lists the different boot from SAN combinations for the
ql4xdisablesysfsboot module parameter and its corresponding effect on the
behavior of sysfs, iscsistart, and the qla4xxx driver when using the
sendtarget entry (ST) and the iSCSI target entry (NT).
All boot from SAN cases assume that iSCSI BIOS is enabled.
2-2 IS0054604-00 A
Page 27

Boot from SAN Configuration Matrix
Table 2-1. Boot from SAN Configuration Matrix
ql4xdisablesysfsboot = 0 ql4xdisablesysfsboot = 1
2–Boot from SAN
Boot Target as
sendtarget (ST)
Export boot target
through sysfs
(/sys/firmware/
iscsi_bootx/
where x is 1, 2,...)
iscsistart iscsistart does
Driver
qla4xxx)
(
The Boot Target will
be exported through
sysfs (with IP
address and port
only)
Note: If the iSCSI
BIOS login is disabled, the entry
made at the boot
index will not be
exported to sysfs.
not do discovery
and login to the discovered targets.
The driver scans the
Flash entries, creates the list of sendtargets, and
discovers and logs
in to the targets.
Boot Target as
Normal target
(NT)
The Boot Target will
be exported through
sysfs.
Note: If the iSCSI
BIOS login is disabled, the entry
made at the boot
index will not be
exported to sysfs.
iscsistart logs
in to the NT.
Note: If the iSCSI
BIOS login is disabled, the driver will
handle logging in to
the boot target.
The driver does not
log in to normal targets. The open-iscsi
tools (iscsistart) log
in to boot targets.
Boot Target as
sendtarget (ST)
The Boot Target
will not be
exported through
sysfs.
iscsistart will
not log in to ST
targets.
The driver scans
the Flash entries,
creates the list of
sendtargets, and
discovers and
logs in to the targets.
Boot Target as
Normal target
(NT)
The Boot Target
will not be
exported through
sysfs.
iscsistart will
not log in to NT
targets.
The driver doesthe login to the
normal target
which is configured as boot targets.
IS0054604-00 A 2-3
Page 28

2–Boot from SAN
Configuring Boot from SAN
Configuring Boot from SAN
Boot from SAN Installation on SLES 11 SP2 and RHEL 6.2
To configure the adapter for BFS on SLES 11 SP2 or RHEL 6.2, follow these
steps:
1. While the system is booting up, press CTRL+Q to enter Fast!UTIL on the
iSCSI BIOS banner, as shown in Figure 2-1.
Figure 2-1. Entering Fast!UTIL from the Adapter’s BIOS
2-4 IS0054604-00 A
Page 29

2–Boot from SAN
Configuring Boot from SAN
2. Once in, select the port to be configured, as shown in Figure 2-2.
Figure 2-2. Selecting the Port to Be Configured
3. Select Configuration Settings, as shown in Figure 2-3.
Figure 2-3. Fast!UTIL Options Menu—Selecting Configuration Settings
IS0054604-00 A 2-5
Page 30

2–Boot from SAN
Configuring Boot from SAN
4. Select Host Adapter Settings, as shown in Figure 2-4.
Figure 2-4. Selecting the Host Adapter Settings Option
5. Select the Initiator IP Settings field, as shown in Figure 2-5.
Figure 2-5. Selecting the Initiator IP Settings
2-6 IS0054604-00 A
Page 31

Configuring Boot from SAN
6. Provide the initiator IP address, as shown in Figure 2-6.
2–Boot from SAN
Figure 2-6. Providing the Initiator IP Address
7. Press ESC repeatedly until the screen shown in Figure 2-7 appears. Then,
select the iSCSI Boot Settings option.
Figure 2-7. Configuration Settings Menu
IS0054604-00 A 2-7
Page 32

2–Boot from SAN
Configuring Boot from SAN
8. Select Primary Boot Device Settings, as shown in Figure 2-8.
Figure 2-8. Selecting Primary Boot Device Settings
9. Provide the target IP address, as shown in Figure 2-9.
Figure 2-9. Providing Target IP Address for Primary Boot Device
2-8 IS0054604-00 A
Page 33

2–Boot from SAN
Configuring Boot from SAN
10. Select Alternate Boot Device Settings, as shown in Figure 2-10.
Figure 2-10. Selecting Alternate Boot Device Settings
11. Provide the target IP address, as shown in Figure 2-11.
Figure 2-11. Providing Target IP Address for Alternate Boot Device
IS0054604-00 A 2-9
Page 34

2–Boot from SAN
Configuring Boot from SAN
12. Press ESC until the menu in Figure 2-12 appears. Select Reinit Adapter to
save all IP settings.
Figure 2-12. Fast!UTIL Options
13. In iSCSI Boot Settings, select Primary (LUN), as shown in Figure 2-13.
Figure 2-13. Selecting the Primary LUN
2-10 IS0054604-00 A
Page 35

2–Boot from SAN
Configuring Boot from SAN
14. A list of the port’s devices is displayed, as shown in Figure 2-14. Select the
device to be used as the boot device and press ENTER.
Figure 2-14. List of Devices on the Port
15. Repeat steps 13–14 to edit the alternate boot device setting, as in
Figure 2-15
.
Figure 2-15. Editing Alternate Boot Device Settings
IS0054604-00 A 2-11
Page 36

2–Boot from SAN
Configuring Boot from SAN
16. Change the adapter’s boot mode to
Figure 2-16. Setting the Boot Mode to Manual
Manual
, as
Figure 2-16
shows.
17. Save the settings for the port.
18. Repeat steps 2–14, but select the second port, and configure the boot
targets on the port.
19. Save the settings and reboot the system with the installation disk.
2-12 IS0054604-00 A
Page 37

Boot from SAN Installation on SLES 11 SP2
To configure the adapter for BFS on SLES 11 SP2, follow these steps:
1. Boot from the SLES 11 SP2 DVD, as shown in Figure 2-17.
2–Boot from SAN
Configuring Boot from SAN
Figure 2-17. Entering the Boot BIOS
2. Provide the withiscsi=1 boot option, as shown in Figure 2-18.
Figure 2-18. Providing the withiscsi Boot Option
IS0054604-00 A 2-13
Page 38

2–Boot from SAN
Configuring Boot from SAN
3. The Welcome screen appears, as shown in Figure 2-19. Follow the
instructions on this screen to begin the installation.
Figure 2-19. Installation Welcome Screen
4. Complete the installation by following the instructions on all subsequent
screens, as shown in Figures 2-20 through 2-27.
Figure 2-20. Media Check
2-14 IS0054604-00 A
Page 39

2–Boot from SAN
Configuring Boot from SAN
Figure 2-21. iSCSI Initiator Overview
Figure 2-22. Selecting System Probing
IS0054604-00 A 2-15
Page 40

2–Boot from SAN
Configuring Boot from SAN
Figure 2-23. Selecting the Installation Mode
Figure 2-24. Setting the Clock and Time Zone
2-16 IS0054604-00 A
Page 41

2–Boot from SAN
Configuring Boot from SAN
Figure 2-25. Selecting the Server Base Scenario
Figure 2-26. Preparing the Hard Disk
IS0054604-00 A 2-17
Page 42

2–Boot from SAN
Configuring Boot from SAN
Figure 2-27. Performing the Installation
5. When the installation is completed, reboot the system and boot from the
iSCSI adapter.
2-18 IS0054604-00 A
Page 43

Configuring Boot from SAN on RHEL 6.2
Configuring Boot from SAN on RHEL 6.2
Installing RHEL 6.2
To install RHEL 6.2, follow these steps:
1. Boot from the installation media, as shown in Figure 2-28.
2–Boot from SAN
Figure 2-28. Booting From the Installation Media
2. Choose either to test the media disk or skip the test, as Figure 2-29 shows.
Figure 2-29. Choosing to Test Media Disk or Skip Test
IS0054604-00 A 2-19
Page 44

2–Boot from SAN
Configuring Boot from SAN on RHEL 6.2
3. Select the network interface through which the installation is to be done, as
Figure 2-30 shows.
Figure 2-30. Selecting Network Interface for Installation
4. Configure the IP address either statically or using, as Figure 2-31 shows.
Figure 2-31. Configuring the IP Address
2-20 IS0054604-00 A
Page 45

2–Boot from SAN
Configuring Boot from SAN on RHEL 6.2
5. Once the network interface is configured, the installation starts, as shown in
Figure 2-32.
Figure 2-32. Start of RHEL 6.2 Installation
IS0054604-00 A 2-21
Page 46

2–Boot from SAN
Configuring Boot from SAN on RHEL 6.2
6. Select the language to use during the installation, as shown in Figure 2-33.
Figure 2-33. Selecting the Language for the Installation
2-22 IS0054604-00 A
Page 47

2–Boot from SAN
Configuring Boot from SAN on RHEL 6.2
7. Select the type of keyboard that is connected to your system, as shown in
Figure 2-34.
Figure 2-34. Selecting the Keyboard
IS0054604-00 A 2-23
Page 48

2–Boot from SAN
Configuring Boot from SAN on RHEL 6.2
8. Select one the two options shown in Figure 2-35: Basic Storage Devices or
Specialized Storage Devices. You may select either option since the LUN
has been added in the adapter’s BIOS.
Figure 2-35. Selecting Storage Device Type
2-24 IS0054604-00 A
Page 49
2–Boot from SAN
Configuring Boot from SAN on RHEL 6.2
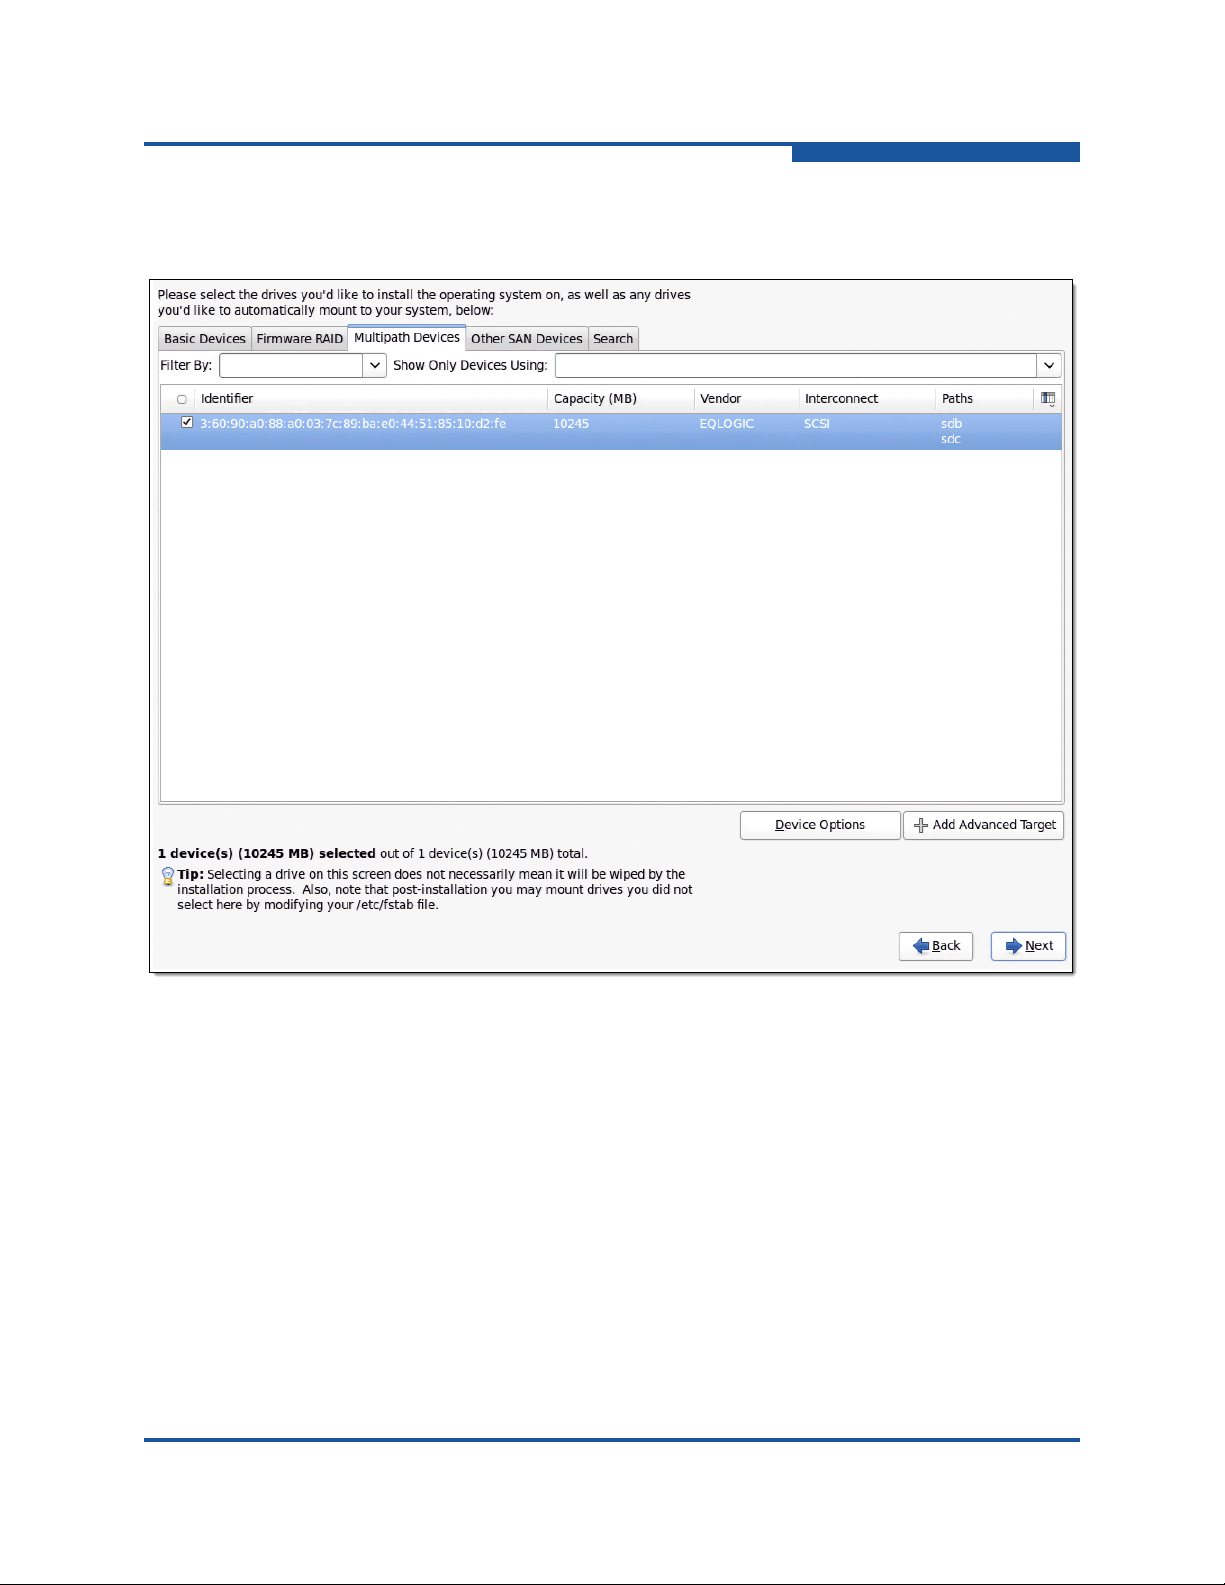
9. Select the disk that was added in the adapter’s BIOS and verify that it has
two paths to it, as shown in Figure 2-36.
Figure 2-36. Verifying Paths to the Disk
IS0054604-00 A 2-25
Page 50

2–Boot from SAN
Configuring Boot from SAN on RHEL 6.2
10. Enter the host name, as shown in Figure 2-37.
Figure 2-37. Specifying the Host Name
2-26 IS0054604-00 A
Page 51

Configuring Boot from SAN on RHEL 6.2
11. Select the time zone, as shown in Figure 2-38.
2–Boot from SAN
Figure 2-38. Selecting the Time Zone
IS0054604-00 A 2-27
Page 52

2–Boot from SAN
Configuring Boot from SAN on RHEL 6.2
12. Enter the root credentials that you want to set for the system, as shown in
Figure 2-39.
Figure 2-39. Entering the Root Credentials
2-28 IS0054604-00 A
Page 53

2–Boot from SAN
Configuring Boot from SAN on RHEL 6.2
13. Select the type of partition layout you want, as shown in Figure 2-40.
Figure 2-40. Selecting the Partition Layout Type
IS0054604-00 A 2-29
Page 54

2–Boot from SAN
Configuring Boot from SAN on RHEL 6.2
14. Select the type of installation, as shown in Figure 2-41.
Figure 2-41. Selecting the Installation Type
2-30 IS0054604-00 A
Page 55

2–Boot from SAN
Configuring Boot from SAN on RHEL 6.2
15. The installer creates the partitions on the disk and begins to copy files to it,
as shown in Figure 2-42.
Figure 2-42. Installation in Progress
IS0054604-00 A 2-31
Page 56

2–Boot from SAN
Configuring Boot from SAN on RHEL 6.2
16. Once the files have been copied, the installer will prompt you to reboot the
machine, as shown in Figure 2-42.
Figure 2-43. Installation Completed
2-32 IS0054604-00 A
Page 57

2–Boot from SAN
NOTE
ql4xdisablesysfsboot Settings and Adapter Boot Mode
ql4xdisablesysfsboot Settings and Adapter Boot
Mode
This section demonstrates the effect of the ql4xdisablesysfsboot parameter
under different adapter boot modes.
For target discovery and login to work, the adapter’s IP address must be
configured using either BIOS settings or iscsiadm. The following examples
show the iscsiadm commands to use to set the IP address.
# iscsiadm -m iface -I qla4xxx.00:c0:dd:07:59:f2.ipv4.0 -n
iface.ipaddress -v 10.0.10.183 -o update
# iscsiadm -m iface -I qla4xxx.00:c0:dd:07:59:f2.ipv4.0 -n
iface.subnet_mask -v 255.255.0.0 -o update
# iscsiadm -m iface -I qla4xxx.00:c0:dd:07:59:f2.ipv4.0 -n
iface.gateway -v 10.0.0.1 -o update
# iscsiadm -m iface -I qla4xxx.00:c0:dd:07:59:f2.ipv4.0 -o apply
Table 2-2. Configurations and Tools for Checking iSCSI Sessions
Configu-
No.
1 Non-Boot
ration
from SAN
Use the following sysfs path to check if the IP address has been applied:
/sys/class/iscsi_host/host<Number>/ipaddress
Table 2-2 shows the various configurations one can have, as well as the
iscisadm commands or yast tool to use to check iSCSI sessions.
Target
info
Target info
is in the
firmware
(set up
using the
BIOS)
ql4xdisable
sysfsboot
1 or 0 Disable To check sessions
Adapter
Boot
Mode
iscsiadm command Remarks
Since the target info is
# iscsiadm -m session
in the firmware, keep
ql4xdisablesysfsboot
set to 1. The
driver does the login to
the target.
IS0054604-00 A 2-33
Page 58

2–Boot from SAN
NOTE
ql4xdisablesysfsboot Settings and Adapter Boot Mode
Table 2-2. Configurations and Tools for Checking iSCSI Sessions (Continued)
Configu-
No.
ration
2 Non-Boot
from SAN
Target
No target
a
info is in
the firmware
info
ql4xdisable
sysfsboot
1 or 0 Disable Use
Adapter
Boot
Mode
iscsiadm command Remarks
iscsiadm
ery and login to targets. The
correct
qla4xxx
must be used.
for discov-
iface
Discovery:
# iscsiadm -m
discovery -t st -p
<target IP> -I
<qla4xxx iface>
Login:
#iscsiadm -m node -l
To check the sessions:
# iscsiadm -m session
3 Boot from
SAN
Boot target info is
1 Manual To check sessions:
#iscsiadm -m session
in the firmware/
Flash
4 Boot from
SAN
Boot target info is
in the firmware/
Flash
0 Manual To check boot target info:
#iscsiadm -m fw
To check sessions:
# iscsiadm -m session
If login is not done automatically use:
# iscsiadm -m fw -l
a
In this configuration you can use the iscsi-client from yast to add targets and login to the targets.
b
This configuration is basically compatible with older qla4xxx infrastructure in SLES 11 SP1.
Since there are no
entries in Flash or firmware, target management is done by
iscsiadm
sid
and
isc-
. The driver is just
pass-through.
Since
ql4xdisablesysfsboot
qla4xxx
the login to the target.
Since
sysfsboot
= 1, the
driver does
b
ql4xdisable-
= 0, the
driver will not log in to
boot targets. The iscsi
initiator tools (such as
iscsistart
in
RHEL) do the login to
the boot targets.
In all these configurations you can use the iscsiadm command to do
additional discovery and login. The only exception is boot targets for Boot
from SAN. For Boot from SAN, target information must be in the firmware or
Flash, having been added using the CTRL+Q option of BIOS.
2-34 IS0054604-00 A
Page 59

3 Open-iSCSI User’s Guide
This section provides a User’s Guide for Open-iSCSI. It includes the following
topics:
“Open-iSCSI Supported Features” on page 3-2
“Managing QLogic iSCSI Adapters Using iscsiadm” on page 3-4
“Features Not Supported” on page 3-17
“Migrating to Open-iSCSI Driver” on page 3-17
“Linux Open-iSCSI README” on page 3-18
IS0054604-00 A 3-1
Page 60

3–Open-iSCSI User’s Guide
Open-iSCSI Supported Features
Open-iSCSI Supported Features
Open-iSCSI support has been added to the QLogic iSCSI driver in Red Hat
Enterprise Linux 6.2 and SUSE Linux Enterprise Server 11 Service Pack 2.
Open-iSCSI infrastructure supports discovery, login to and logout from iSCSI
targets, and modification and display of iSCSI configuration parameters. The
QLogic iSCSI driver provides persistence through Flash and Open-iSCSI nodes
and sendtargets databases.
Discovery, Login, and Logout
Prior to RHEL 6.2 and SLES 11 SP2, discovery and login to iSCSI targets was
hardware offloaded and managed by the QLogic iSCSI adapter firmware. In
RHEL 6.2 and SLES 11 SP2, the Open-iSCSI infrastructure allows the system
administrator to manage QLogic iSCSI target discovery and login through the
QLogic adapter. This provides the system administrator with a uniform and
standard way to manage different vendor interfaces.
Boot Target Login
Default Behavior on RHEL 6.2
Open-iSCSI is enabled by default on RHEL 6.2 and login to boot targets is
triggered by iscsistart through sysfs. The default behavior can be changed by
setting ql4xdisablesysfsboot to 1, this disables exporting boot targets in
Flash to sysfs and login to boot targets is done by the driver.
1. With ql4xdisablesysfsboot=0, list boot targets if present.
# iscsiadm -m fw
2. Disable sysfs boot.
# echo "options qla4xxx ql4xdisablesysfsboot=1" >>
/etc/modprobe.d/qla4xxx.conf
3. Reload the qla4xxx driver.
# rmmod qla4xxx
# modprobe qla4xxx
4. Update ramdisk.
Reboot the system, if the system is booted using the iSCSI boot target.
3-2 IS0054604-00 A
Page 61

NOTE
Refer to the following Red Hat Technical Note about issues and
NOTE
NOTE
workarounds when upgrading from RHEL 6.1 to RHEL 6.2:
http://docs.redhat.com/docs/en-US/Red_Hat_Enterprise_Linux/6/html/6.2_T
echnical_Notes/kernel_issues.html
Default Behavior on SLES 11 SP2
Open-iSCSI is enabled by default on SLES 11 SP2 and login to boot targets is
triggered by iscsiadm during installation.
The additional command line kernel parameter withiscsi=1 must be
passed before beginning the OS installation. If not, the iSCSI disks will
not be detected.
The modules qla3xxx and qlcnic should be loaded respectively for
the 1G and 10G QLogic iSCSI initiator entries to appear in the
iscsi-client through YaST.
3–Open-iSCSI User’s Guide
Open-iSCSI Supported Features
The default behavior can be changed by setting the driver parameter
ql4xdisablesysfsboot to 1, in which case the boot targets in Flash are not
exported to sysfs, and the driver logs in to the boot targets. The kernel parameter
withiscsi=1 is not used when ql4xdisablesysfsboot is set to 1.
Refer to the following Release Notes for SLES 11 SP2 for the kernel
parameter withiscsi=1:
http://www.novell.com/linux/releasenotes/i386/SUSE-SLES/11-SP2/
Persistence through Flash and Open-iSCSI Database
Prior to RHEL 6.2 and SLES 11 SP2, targets were made persistent by saving the
entries in Flash. In RHEL 6.2 and SLES 11 SP2, targets managed by Open-iSCSI
are made persistent by saving them in the user space node and sendtarget
persistent database.
For targets in Flash, auto-login is triggered by the QLogic iSCSI driver and
firmware. For targets saved in the Open-iSCSI persistent database, the iSCSI
daemon iscsid can be configured to automatically start discovery and login
through the sendtarget and node persistent databases.
IS0054604-00 A 3-3
Page 62

3–Open-iSCSI User’s Guide
Managing QLogic iSCSI Adapters Using iscsiadm
Managing QLogic iSCSI Adapters Using iscsiadm
iSCSI Configuration Files and Persistent Databases
The Open-iSCSI daemon iscsid can be configured to use the default node
configuration and persistent database to automatically start discovery on startup.
Table 3-1 lists the configuration and persistent database files for SLES 11 SP2
and RHEL6.2.
Table 3-1. Configuration and Persistent Database Files
File Path and Name Description
Configuration File—SLES 11 SP2 and RHEL 6.2
/etc/iscsi/iscsid.conf Read by iscsid and iscsiadm on
startup; applied to all newly created nodes
Persistent Database Files—SLES 11 SP2
/etc/iscsi/nodes/<node_iqn_name>/
<ip_address:port_number>
/etc/iscsi/nodes Persistent node database
/etc/iscsi/sendtargets
Persistent Database Files—RHEL 6.2
/var/lib/iscsi/nodes/<node_iqn_name>/
<ip_address:port_number>
/var/lib/iscsi/nodes Persistent node database
/var/lib/iscsi/sendtargets
Contains node-specific configuration
P
ersistent Sendtargets discovery database
Contains node-specific configuration
P
ersistent Sendtargets discovery database
Configuring Targets for qla4xxx Using Open-iSCSI
To configure targets for qla4xxx using Open-iSCSI, follow these steps:
1. Configure the qla4xxx port.
# iscsiadm -m iface -I qla4xxx. 00:0e:1e:05:38:42.ipv4.0 -o update -n
iface.ipaddress -v 192.168.1.115
# iscsiadm -m iface -I qla4xxx. 00:0e:1e:05:38:42.ipv4.0 -o apply
3-4 IS0054604-00 A
Page 63

3–Open-iSCSI User’s Guide
Managing QLogic iSCSI Adapters Using iscsiadm
2. Discover the iSCSI target.
# iscsiadm -m discovery -t st -p 192.168.1.11 -I qla4xxx.00:0e:1e:05:38:42.ipv4.0
192.168.1.11:3260,1 iqn.1992-04.com.emc:cx.ckm00101200392.a2
192.168.1.8:3260,3 iqn.1992-04.com.emc:cx.ckm00101200392.a3
192.168.1.12:3260,2 iqn.1992-04.com.emc:cx.ckm00101200392.b2
192.168.1.9:3260,4 iqn.1992-04.com.emc:cx.ckm00101200392.b3
3. List all discovered targets.
# iscsiadm -m node
192.168.1.8:3260,3 iqn.1992-04.com.emc:cx.ckm00101200392.a3
192.168.1.11:3260,1 iqn.1992-04.com.emc:cx.ckm00101200392.a2
192.168.1.12:3260,2 iqn.1992-04.com.emc:cx.ckm00101200392.b2
192.168.1.9:3260,4 iqn.1992-04.com.emc:cx.ckm00101200392.b3
4. Log in to all discovered targets.
# iscsiadm -m node -l
Logging in to [iface: qla4xxx.00:0e:1e:05:38:42.ipv4.0, target:
iqn.1992-04.com.emc:cx.ckm00101200392.a3, portal: 192.168.1.8,3260] (multiple)
Logging in to [iface: qla4xxx.00:0e:1e:05:38:42.ipv4.0, target:
iqn.1992-04.com.emc:cx.ckm00101200392.a2, portal: 192.168.1.11,3260] (multiple)
Logging in to [iface: qla4xxx.00:0e:1e:05:38:42.ipv4.0, target:
iqn.1992-04.com.emc:cx.ckm00101200392.b2, portal: 192.168.1.12,3260] (multiple)
Logging in to [iface: qla4xxx.00:0e:1e:05:38:42.ipv4.0, target:
iqn.1992-04.com.emc:cx.ckm00101200392.b3, portal: 192.168.1.9,3260] (multiple)
Login to [iface: qla4xxx.00:0e:1e:05:38:42.ipv4.0, target:
iqn.1992-04.com.emc:cx.ckm00101200392.a3, portal: 192.168.1.8,3260] successful.
Login to [iface: qla4xxx.00:0e:1e:05:38:42.ipv4.0, target:
iqn.1992-04.com.emc:cx.ckm00101200392.a2, portal: 192.168.1.11,3260] successful.
Login to [iface: qla4xxx.00:0e:1e:05:38:42.ipv4.0, target:
iqn.1992-04.com.emc:cx.ckm00101200392.b2, portal: 192.168.1.12,3260] successful.
Login to [iface: qla4xxx.00:0e:1e:05:38:42.ipv4.0, target:
iqn.1992-04.com.emc:cx.ckm00101200392.b3, portal: 192.168.1.9,3260] successful.
5. List all sessions.
#iscsiadm -m session
qla4xxx: [2] 192.168.1.11:3260,1 iqn.1992-04.com.emc:cx.ckm00101200392.a2
qla4xxx: [3] 192.168.1.8:3260,3 iqn.1992-04.com.emc:cx.ckm00101200392.a3
qla4xxx: [4] 192.168.1.12:3260,2 iqn.1992-04.com.emc:cx.ckm00101200392.b2
qla4xxx: [5] 192.168.1.9:3260,4 iqn.1992-04.com.emc:cx.ckm00101200392.b3
IS0054604-00 A 3-5
Page 64

3–Open-iSCSI User’s Guide
Managing QLogic iSCSI Adapters Using iscsiadm
iSCSI Interface Configuration
iSCSI Configuration Parameters
Each iSCSI Host Bus Adapter, NIC, or network interface to which sessions are
bound should have its own iSCSI interface config file in /etc/iscsi/ifaces.
For hardware offload iSCSI, iscsiadm creates ifaces for QLogic iSCSI ports.
Before the iface can be used, the IP address for the port must be set as shown in
“Update iface Network Parameters” on page 3-9. Table 3-2 lists hardware iSCSI
interface config file fields.
Table 3-2. Hardware iSCSI Interface Config File Fields
Needed Field Name Description
Yes iface.transport_name The iscsi_transport or driver to use for iface
No iface.initiatorname Set if the
initiatorname is not to be used for normal sessions. For discovery sessions, /etc/iscsi/
initiatorname.iscsi is used.
Yes iface.hwaddress Sets MAC address to bind by hardware address
Yes iface.ipaddress The IP address configured for the iface, on the
same subnet as the target
No iface.bootproto Set to dhcp if IPv4 address must be obtained
dynamically through DHCP, or set to static if IPv4
address is set to a static IP address.
No iface.vlan_priority Used to set VLAN priority for the iSCSI interface
No iface.vlan_state
(disable/enable)
No iface.ipv6_linklocal Used to specify the IPV6 Link Local Address with
No iface.ipv6_autocfg
(nd-neighbor discovery)
No iface.linklocal_autocfg For transport like qla4xxx, this allows you to
Used to enable or disable the VLAN on the iSCSI
interface
the link local prefix of FE80::0/64
Used to set the discovery protocol to obtain IPV6
address
autoconfigure the # IPV6 link local address based
on the MAC address of the iSCSI interface.
/etc/iscsi/initiatorame.iscsi
No
No
Yes iface.iface_num Used when more than one interface is configured
3-6 IS0054604-00 A
iface.router_autocfg
iface.state
Required to set the IPv6 router discovery protocol
Set to enable by default.To disable the iface, set it
to disable.
for a transport
Page 65

Managing QLogic iSCSI Adapters Using iscsiadm
Example: IPv4 sample config file with static IP address
# BEGIN RECORD 2.0-872
iface.iscsi_ifacename = qla4xxx-3
iface.ipaddress = 192.168.1.75
iface.hwaddress = 00:0e:1e:04:93:92
iface.transport_name = qla4xxx
iface.bootproto = static
iface.subnet_mask = 255.255.255.0
iface.gateway = 192.168.1.1
iface.state = enable
iface.vlan = <empty>
iface.iface_num = 0
END RECORD
3–Open-iSCSI User’s Guide
List All ifaces
# iscsiadm -m iface
Example:
# iscsiadm -m iface
default tcp,<empty>,<empty>,<empty>,<empty>
iser iser,<empty>,<empty>,<empty>,<empty>
qla4xxx-4032-2 qla4xxx,00:c0:dd:0b:13:f1,192.168.2.214,<empty>,<empty>
qla4xxx.00:c0:dd:0b:13:f1.ipv6.0 qla4xxx,00:c0:dd:0b:13:f1,<empty>,
<empty>,<empty>
qla4xxx.00:0e:1e:04:11:e2.ipv4.0 qla4xxx,00:0e:1e:04:11:e2,192.168.7.9,
<empty>,<empty>
bnx2i.00:00:00:00:00:00 bnx2i,00:00:00:00:00:00,<empty>,<empty>,<empty>
IS0054604-00 A 3-7
Page 66

3–Open-iSCSI User’s Guide
NOTE
Managing QLogic iSCSI Adapters Using iscsiadm
Display iface Configuration Details
# iscsiadm -m iface -I <iface_name>
Example:
# iscsiadm -m iface -I qla4xxx.00:c0:dd:0b:13:f1.ipv4.0
# BEGIN RECORD 2.0-872.28.el6-1031
iface.iscsi_ifacename = qla4xxx.00:c0:dd:0b:13:f1.ipv4.0
iface.net_ifacename = <empty>
iface.ipaddress = 192.168.2.214
iface.hwaddress = 00:c0:dd:0b:13:f1
iface.transport_name = qla4xxx
iface.initiatorname = <empty>
iface.bootproto = <empty>
iface.subnet_mask = <empty>
iface.gateway = <empty>
iface.ipv6_autocfg = <empty>
iface.linklocal_autocfg = <empty>
iface.router_autocfg = <empty>
iface.ipv6_linklocal = <empty>
iface.ipv6_router = <empty>
iface.state = <empty>
iface.vlan_id = 0
iface.vlan_priority = 0
iface.vlan_state = <empty>
iface.iface_num = 0
iface.mtu = 0
iface.port = 0
# END RECORD
Create an iface
# iscsiadm -m iface -I <iface_name> -o new
The iface.transport_name is set to tcp by default, for a software
initiator. The iface.transport_name should be updated to qla4xxx for
Hardware Offload iface. The iface parameters ipaddress, hwaddress,
and initiatorname can be updated using the -o update option as shown
in “Update iface Network Parameters” on page 3-9.
3-8 IS0054604-00 A
Page 67

Managing QLogic iSCSI Adapters Using iscsiadm
Example:
# iscsiadm -m iface -I qla4xxx-4
# BEGIN RECORD 2.0-872
iface.iscsi_ifacename = qla4xxx-4
iface.net_ifacename = <empty>
iface.ipaddress = <empty>
iface.hwaddress = <empty>
iface.transport_name = qla4xxx
iface.initiatorname = <empty>
iface.bootproto = <empty>
iface.subnet_mask = <empty>
iface.gateway = <empty>
iface.ipv6_autocfg = <empty>
iface.linklocal_autocfg = <empty>
iface.router_autocfg = <empty>
iface.ipv6_linklocal = <empty>
iface.ipv6_router = <empty>
iface.state = <empty>
iface.vlan_id = 0
iface.vlan_priority = 0
iface.vlan_state = <empty>
iface.iface_num = 0
# END RECORD
3–Open-iSCSI User’s Guide
Update iface Network Parameters
# iscsiadm -m iface -I <iface_name> -o update -n <rec_name> -v <value>
# iscsiadm -m iface -I <iface_name> -o apply
# iscsiadm -m iface -I <iface_name> -o applyall
Where:
update updates the record <rec_name> with the specified <value>
apply causes the network settings to take effect on the specified iface
applyall causes the network settings to take effect on every iface
IS0054604-00 A 3-9
Page 68

3–Open-iSCSI User’s Guide
Managing QLogic iSCSI Adapters Using iscsiadm
Example: IPv4 Settings (static)
# iscsiadm -m iface -I qla4xxx.00:c0:dd:0b:13:f1.ipv4.0 -o update -n
iface.ipaddress -v 192.168.2.214
qla4xxx.00:c0:dd:0b:13:f1.ipv4.0 updated.
# iscsiadm -m iface -I qla4xxx.00:c0:dd:0b:13:f1.ipv4.0 -o apply
qla4xxx.00:c0:dd:0b:13:f1.ipv4.0 applied.
Example: IPv4 Settings (DHCP)
# iscsiadm -m iface -I qla4xxx.00:c0:dd:0b:13:f1.ipv4.0 -o update -n
iface.bootproto -v dhcp
qla4xxx.00:c0:dd:0b:13:f1.ipv4.0 updated.
# iscsiadm -m iface -I qla4xxx.00:c0:dd:0b:13:f1.ipv4.0 -o apply
qla4xxx.00:c0:dd:0b:13:f1.ipv4.0 applied.
Example: IPv6 Settings (manual)
# iscsiadm -m iface -I qla4xxx.00:c0:dd:0b:13:f1.ipv6.0 -o update -n
iface.ipaddress -v fec0:ce00:7014:0041:1111:2222:1e04:9392
qla4xxx.00:c0:dd:0b:13:f1.ipv6.0 updated.
# iscsiadm -m iface -I qla4xxx.00:c0:dd:0b:13:f1.ipv6.0 -o update -n
iface.ipv6.linklocal -v fe80:0000:0000:0000:0000:0000:1e04:9392
qla4xxx.00:c0:dd:0b:13:f1.ipv6.0 updated.
# iscsiadm -m iface -I qla4xxx.00:c0:dd:0b:13:f1.ipv6.0 -o update -n
iface.ipv6.router -v fe80:0000:0000:0000:7ae7:d1ff:fe72:4048
qla4xxx.00:c0:dd:0b:13:f1.ipv6.0 updated.
# iscsiadm -m iface -I qla4xxx.00:c0:dd:0b:13:f1.ipv6.0 -o apply
qla4xxx.00:c0:dd:0b:13:f1.ipv6.0 applied.
Example: IPv6 Settings (neighbor discovery)
# iscsiadm -m iface -I qla4xxx.00:c0:dd:0b:13:f1.ipv6.0 -o update -n
iface.ipv6.autocfg -v nd
qla4xxx.00:c0:dd:0b:13:f1.ipv6.0 updated.
# iscsiadm -m iface -I qla4xxx.00:c0:dd:0b:13:f1.ipv6.0 -o apply
qla4xxx.00:c0:dd:0b:13:f1.ipv6.0 applied.
3-10 IS0054604-00 A
Page 69

3–Open-iSCSI User’s Guide
NOTE
Managing QLogic iSCSI Adapters Using iscsiadm
The target should be logged out before updating the network parameters.
iscsiadm will give the following warning if a network parameter of an iface
with active sessions is updated:
iscsiadm: Updating iface while iscsi sessions are using
it. You must logout the running sessions then log back
in for the new settings to take affect.
Unidirectional and Bidirectional CHAP settings
# iscsiadm -m node -p 192.168.1.84:3260 -T iqn.2011.com.vm-base:disk1 -o
update -n node.session.auth.authmethod -v CHAP
# iscsiadm -m node -p 192.168.1.84:3260 -T iqn.2011.com.vm-base:disk1 -o
update -n node.session.auth.username -v chapuser
# iscsiadm -m node -p 192.168.1.84:3260 -T iqn.2011.com.vm-base:disk1 -o
update -n node.session.auth.password -v chapsecret
# iscsiadm -m node -p 192.168.1.84:3260 -T iqn.2011.com.vm-base:disk1 -o
update -n node.session.auth.username_in -v biuser
# iscsiadm -m node -p 192.168.1.84:3260 -T iqn.2011.com.vm-base:disk1 -o
update -n node.session.auth.password_in -v bidirsecret
Example: Display changes made to the 192.168.1.84:3260 CHAP settings:
# iscsiadm -m node -p 192.168.1.84:3260
.
.
node.session.auth.authmethod = CHAP
node.session.auth.username = chapuser
node.session.auth.password = ********
node.session.auth.username_in = biuser
node.session.auth.password_in = ********
.
.
IS0054604-00 A 3-11
Page 70

3–Open-iSCSI User’s Guide
Managing QLogic iSCSI Adapters Using iscsiadm
Target Discovery
Discover Targets using sendtarget
# iscsiadm -m discovery -t st -p <target_ip:target_port> -I
<iface_name> -o new, delete, update, nonpersistent
In discovery mode, iscsiadm will use the iscsid.conf discovery settings and
overwrite the discovery record settings with it. By default, it will remove records for
portals not returned. For portals returned, the discovery command will create a
new record or modify an existing one with values from iscsid.conf and the
command line.
Values passed with the -o option:
new—iscsiadm will add records for portals that do not yet have records in
the database.
delete—iscsiadm deletes records for portals that were not returned during
discovery.
update—iscsiadm updates records for portals returned during discovery
using info from iscsid.conf and command line.
nonpersistent—iscsiadm will not store the portals found in node
database.
Example:
# iscsiadm -m discovery -t st -p 192.168.2.104 -I qla4xxx-3 -o new
192.168.2.104:3260,1
iqn.2001-05.com.equallogic:0-8a0906-32e33fe02-517000ecd724ea83-karen-1
192.168.2.104:3260,1
iqn.2001-05.com.equallogic:0-8a0906-eddd93203-dc1000ece454e721-karen-2
192.168.2.104:3260,1
iqn.2001-05.com.equallogic:0-8a0906-ef8d93203-e99000ece484e721-karen-3
192.168.2.104:3260,1
iqn.2001-05.com.equallogic:0-8a0906-f16d93203-92d000ece4b4e721-karen-4
3-12 IS0054604-00 A
Page 71

3–Open-iSCSI User’s Guide
Managing QLogic iSCSI Adapters Using iscsiadm
Adding a New discoverydb for sendtarget
# iscsiadm -m discoverydb -t st -p 192.168.2.105 -I qla4xxx-3 -o new
New discovery record for [192.168.2.105,3260] added.
# cat /var/lib/iscsi/send_targets/192.168.2.105,3260/st_config
# BEGIN RECORD 2.0-872.28.el6-1031
discovery.startup = manual
discovery.type = sendtargets
discovery.sendtargets.address = 192.168.2.105
discovery.sendtargets.port = 3260
discovery.sendtargets.auth.authmethod = None
discovery.sendtargets.timeo.login_timeout = 15
discovery.sendtargets.use_discoveryd = No
discovery.sendtargets.discoveryd_poll_inval = 30
discovery.sendtargets.reopen_max = 5
discovery.sendtargets.timeo.auth_timeout = 45
discovery.sendtargets.timeo.active_timeout = 30
discovery.sendtargets.iscsi.MaxRecvDataSegmentLength = 32768
# END RECORD
# iscsiadm -m discoverydb -t st -p 192.168.2.105 -I qla4xxx-3 -o update -n
discovery.sendtargets.auth.authmethod -v CHAP
# iscsiadm -m discoverydb -t st -p 192.168.2.105 -o update -n
discovery.sendtargets.auth.username -v joe
# iscsiadm -m discoverydb -t st -p 192.168.2.105 -o update -n
discovery.sendtargets.auth.password -v secret
# iscsiadm -m discoverydb -t st -p 192.168.2.105 -I qla4xxx-3 --discover
192.168.2.105:3260,1
iqn.2001-05.com.equallogic:0-8a0906-32e33fe02-517000ecd724ea83-karen-1
192.168.2.105:3260,1
iqn.2001-05.com.equallogic:0-8a0906-eddd93203-dc1000ece454e721-karen-2
192.168.2.105:3260,1
iqn.2001-05.com.equallogic:0-8a0906-ef8d93203-e99000ece484e721-karen-3
192.168.2.105:3260,1
iqn.2001-05.com.equallogic:0-8a0906-f16d93203-92d000ece4b4e721-karen-4
IS0054604-00 A 3-13
Page 72

3–Open-iSCSI User’s Guide
Managing QLogic iSCSI Adapters Using iscsiadm
# cat /var/lib/iscsi/send_targets/192.168.2.105,3260/st_config
# BEGIN RECORD 2.0-872.28.el6-1031
discovery.startup = manual
discovery.type = sendtargets
discovery.sendtargets.address = 192.168.2.105
discovery.sendtargets.port = 3260
discovery.sendtargets.auth.authmethod = CHAP
discovery.sendtargets.auth.username = joe
discovery.sendtargets.auth.password = secret
discovery.sendtargets.timeo.login_timeout = 15
discovery.sendtargets.use_discoveryd = No
discovery.sendtargets.discoveryd_poll_inval = 30
discovery.sendtargets.reopen_max = 5
discovery.sendtargets.timeo.auth_timeout = 45
discovery.sendtargets.timeo.active_timeout = 30
discovery.sendtargets.iscsi.MaxRecvDataSegmentLength = 32768
# END RECORD
Remove sendtarget Node
# iscsiadm -m discoverydb -t st -p <target IP> -I <iface> -o delete
Example:
# iscsiadm -m discoverydb -t st -p 192.168.2.105 -I qla4xxx-3 -o
delete
Adding and Deleting Targets
Adding a New Target
# iscsiadm -m node -T <target name> -p <target portal> -I <iface>
-o new
Example:
# iscsiadm -m node -T iqn.2001-05.com.equallogic:0-8a0906-2d733fe02-d25000ecd
7a4eac6-bfs-2 -p 192.168.2.104:3260 -I qla4xxx-3 -o new
New iSCSI node [qla4xxx:[hw=00:0e:1e:04:11:e6,ip=192.168.2.212,net_if=,
iscsi_if=qla4xxx-3] 192.168.2.104,3260,-1 iqn.2001-05.com.equallogic:
0-8a0906-2d733fe02-d25000ecd7a4eac6-bfs-2] added
3-14 IS0054604-00 A
Page 73

3–Open-iSCSI User’s Guide
Managing QLogic iSCSI Adapters Using iscsiadm
List All Targets
# iscsiadm -m node
Example:
# iscsiadm -m node
192.168.2.105:3260,1
iqn.2001-05.com.equallogic:0-8a0906-32e33fe02-517000ecd724ea83-karen-1
192.168.2.105:3260,1
iqn.2001-05.com.equallogic:0-8a0906-eddd93203-dc1000ece454e721-karen-2
192.168.2.105:3260,1
iqn.2001-05.com.equallogic:0-8a0906-ef8d93203-e99000ece484e721-karen-3
192.168.2.105:3260,1
iqn.2001-05.com.equallogic:0-8a0906-f16d93203-92d000ece4b4e721-karen-4
192.168.2.104:3260,-1
iqn.2001-05.com.equallogic:0-8a0906-2d733fe02-d25000ecd7a4eac6-bfs-2
Deleting a Target Node
# iscsiadm -m node -T <target name> -p <target portal> -I <iface>
-o delete
Example:
# iscsiadm -m node -T
iqn.2001-05.com.equallogic:0-8a0906-2d733fe02-d25000ecd7a4eac6-bfs
-2 -p 192.168.2.104:3260 -I qla4xxx-3 -o delete
Target Login and Logout
Login to a Target
# iscsiadm -m node -T <target name> -p <target portal> -I <iface> -l
Example:
# iscsiadm -d 7 -m node --targetname
iqn.1986-03.com.hp:storage.msa2012i.0911d7e161.b --portal 192.168.2.24:3260
-I qla4xxx-3 -l
Logging in to [iface: qla4xxx-3, target:
iqn.1986-03.com.hp:storage.msa2012i.0911d7e161.b, portal: 192.168.2.24,3260]
(multiple)
Login to [iface: qla4xxx-3, target:
iqn.1986-03.com.hp:storage.msa2012i.0911d7e161.b, portal: 192.168.2.24,3260]
successful.
IS0054604-00 A 3-15
Page 74

3–Open-iSCSI User’s Guide
Managing QLogic iSCSI Adapters Using iscsiadm
Login to All Targets
Not specifying the target name, portal, and iface name results in login to all portals
on all nodes/targets through each interface specified in the node configuration.
# iscsiadm -m node -l
To login to all portals on a node/target through each interface:
# iscsiadm -m node -T <target_name> -l
To login to all targets from the specified initiator port:
# iscsiadm -m node -I <iface_name> -l
Login All Sessions with Specified Parameters
For node mode, login all sessions with the node or conn startup values passed in,
except ones marked onboot, if all is passed in.
iscsiadm -m node -T <target_name> -p <target_portal> -I
<iface_name> -L all,manual,automatic
Logout from a Target
# iscsiadm -m node -T <target name> -p <target portal> -I <iface>
-u
Example:
# iscsiadm -d 7 -m node --targetname
iqn.1986-03.com.hp:storage.msa2012i.0911d7e161.b --portal
192.168.2.24:3260 -I qla4xxx-3 -u
Logging out of [iface: qla4xxx-3, target:
iqn.1986-03.com.hp:storage.msa2012i.0911d7e161.b, portal:
192.168.2.24,3260]
Logout of [sid: 32, target:
iqn.1986-03.com.hp:storage.msa2012i.0911d7e161.b, portal:
192.168.2.24,3260] successful.
Logout from All Targets
# iscsiadm -m node -u
To log out from all portals on a node/target through each interface:
# iscsiadm -m node -T <target_name> -u
To log out from all targets from the specified initiator port:
# iscsiadm -m node -I <iface_name> -u
3-16 IS0054604-00 A
Page 75

NOTE
If targets are logged in through Open-iSCSI, all targets should be logged out
NOTE
NOTE
before unloading the QLogic iSCSI driver, otherwise driver unload will fail
with the following error:
ERROR: Module qla4xxx is in use
Features Not Supported
The features below are not supported in Red Hat Enterprise Linux 6.2. These
features will be supported in Red Hat Enterprise Linux 6.3.
1. iSNS
2. Ping
Migrating to Open-iSCSI Driver
3–Open-iSCSI User’s Guide
Features Not Supported
On a system that was successfully upgraded from RHEL 6.1 to RHEL 6.2,
discovery and login of targets in Flash is managed by the QLogic iSCSI driver and
firmware. These targets (except boot targets) are exported to sysfs and can be
viewed from sysfs.
For information about upgrading from RHEL 6.1 to RHEL 6.2, refer to the
following Technical Note:
http://docs.redhat.com/docs/en-US/Red_Hat_Enterprise_Linux/6/html/6.2_T
echnical_Notes/kernel_issues.html
Because the RHEL 6.2 Inbox driver does not support the QLogic management
applications iscli (SANsurfer iSCSI CLI) and qaucli (QConvergeConsole
CLI), Open-iSCSI must be used for all new target management.
Targets added through iscsiadm are saved in the Open-iSCSI persistent
database. The operations listed in “Managing QLogic iSCSI Adapters Using
iscsiadm” on page 3-4 are available for management of targets added through
Open-iSCSI.
Targets added from Flash cannot be managed using the iscsiadm
interface.
IS0054604-00 A 3-17
Page 76

3–Open-iSCSI User’s Guide
Linux Open-iSCSI README
Linux Open-iSCSI README
Go to http://www.open-iscsi.org/docs/README for more detailed information
about Linux Open-iSCSI.
3-18 IS0054604-00 A
Page 77

4 Known Issues
This section lists currently known issues and provides a brief explanation of each
issue.
QLogic Application Limitations
The RHEL 6.2 and SLES 11 SP2 inbox drivers do not support the following
QLogic applications:
iscli (SANsurfer iSCSI CLI)
qaucli (QConvergeConsole CLI)
The QLogic iSCSI driver and firmware handle discovery and login to targets
in Flash and also export them to sysfs where they can be viewed.
Target entries that have been made persistent in Flash on RHEL 6.2 and
SLES 11 SP2 cannot be managed by the Open-iSCSI iscsiadm interface.
All newly added targets can be managed by Open-iSCSI.
CHAP Limitations
At present, the CHAP entries in Flash cannot be updated or deleted using
iscsiadm.
IS0054604-00 A 4-1
Page 78

4–Known Issues
CHAP Limitations
4-2 IS0054604-00 A
Page 79

Page 80

Corporate Headquarters QLogic Corporation 26650 Aliso Viejo Parkway Aliso Viejo, CA 92656 949.389.6000 www.qlogic.com
International Offices UK | Ireland | Germany | France | India | Japan | China | Hong Kong | Singapore | Taiwan
© 2012 QLogic Corporation. Specifications are subject to change without notice. All rights reserved worldwide. QConvergeConsole, QLogic, the
QLogic logo, and SANsurfer are registered trademarks of QLogic Corporation. Linux is a registered trademark of Linus Torvalds. Novell, SLES, and
SUSE are registered trademarks of Novell, Inc. Red Hat and RHEL are trademarks or registered trademarks of Red Hat, Inc. All other brand and
product names are trademarks or registered trademarks of their respective owners. Information supplied by QLogic Corporation is believed to be
accurate and reliable. QLogic Corporation assumes no responsibility for any errors in this brochure. QLogic Corporation reserves the right, without
notice, to make changes in product design or specifications.
 Loading...