

Page 1

Q
Simplify
SANbox 8200 Series
Storage Services Platform
Installation and Configuration Guide
for StoreAge SVM
SN0054628-00 A Page i
Page 2

SANbox 8200 Series Storage Services Platform
0
Installation and Configuration Guide for StoreAge SVM
Information furnished in this manual is believed to be accurate and reliable. However, QLogic Corporation assumes no
responsibility for its use, nor for any infringements of patents or other rights of third parties which may result from its use.
QLogic Corporation reserves the right to change product specifications at any time without notice. Applications described
in this document for any of these products are for illustrative purposes only. QLogic Corporation makes no representation
nor warranty that such applications are suitable for the specified use without further testing or modification. QLogic
Corporation assumes no responsibility for any errors that may appear in this document.
No part of this document may be copied nor reproduced by any means, nor translated nor transmitted to any magnetic
medium without the express written consent of QLogic Corporation.
QLogic, the QLogic logo, ReadyPath, SANbox, and SANblade are trademarks or registered trademarks of QLogic
Corporation.
HP-UX is a trademark or registered trademark of Hewlett-Packard Company.
Sun Microsystems and Java are trademarks or registered trademarks of Sun Microsystems, Inc.
Microsoft, Windows XP, Windows 2000, Windows 2003, and Internet Explorer are registered trademarks of Microsoft
Corporation.
Netscape Navigator and Mozilla are trademarks or registered trademarks of Netscape Communications Corporation.
StoreAge, the StoreAge logo, and SVM are trademarks or registered trademarks of StoreAge Network
Technologies, Ltd.
VMWare is a trademark or registered trademark of VMWare, Inc.
All other brand and product names are trademarks or registered trademarks of their respective owners.
Q
Rev. A, initial release, 3/23/06
Document Revision History
© 2006 QLogic Corporation. All rights reserved worldwide.
First Printed: March 2006
Printed in U.S.A.
QLogic Corporation, 26650 Aliso Viejo Parkway, Aliso Viejo, CA 92656, (800) 662-4471 or (949) 389-600
Page ii SN0054628-00 A
Page 3

Table of Contents
Section 1 Introduction
1.1 Audience. . . . . . . . . . . . . . . . . . . . . . . . . . . . . . . . . . . . . . . . . . . . . . . . . . 1-2
1.2 Readme File . . . . . . . . . . . . . . . . . . . . . . . . . . . . . . . . . . . . . . . . . . . . . . . 1-2
1.3 Related Documentation . . . . . . . . . . . . . . . . . . . . . . . . . . . . . . . . . . . . . . 1-2
1.4 New in this Release . . . . . . . . . . . . . . . . . . . . . . . . . . . . . . . . . . . . . . . . . 1-3
1.5 Style Conventions. . . . . . . . . . . . . . . . . . . . . . . . . . . . . . . . . . . . . . . . . . . 1-3
1.6 Regulatory and Safety Notices . . . . . . . . . . . . . . . . . . . . . . . . . . . . . . . . . 1-3
1.6.1 FCC . . . . . . . . . . . . . . . . . . . . . . . . . . . . . . . . . . . . . . . . . . . . . . . . . . . 1-3
1.6.2 Class I Laser Safety Information – Certification and
Classification Information . . . . . . . . . . . . . . . . . . . . . . . . . . . . . . . . . . . 1-4
1.6.3 Declaration of Conformity . . . . . . . . . . . . . . . . . . . . . . . . . . . . . . . . . . 1-4
1.7 Warranty and Technical Support . . . . . . . . . . . . . . . . . . . . . . . . . . . . . . . 1-6
1.7.1 Warranty . . . . . . . . . . . . . . . . . . . . . . . . . . . . . . . . . . . . . . . . . . . . . . . 1-6
1.7.2 Technical Support . . . . . . . . . . . . . . . . . . . . . . . . . . . . . . . . . . . . . . . . 1-6
Section 2 General Description
2.1 SANbox SSP and StoreAge Solution Overview . . . . . . . . . . . . . . . . . . . . 2-1
2.2 SANbox SSP Overview . . . . . . . . . . . . . . . . . . . . . . . . . . . . . . . . . . . . . . 2-3
2.2.1 Features . . . . . . . . . . . . . . . . . . . . . . . . . . . . . . . . . . . . . . . . . . . . . . . . 2-3
2.3 Supported Network Configurations. . . . . . . . . . . . . . . . . . . . . . . . . . . . . . 2-4
2.3.1 Small SAN Deployment Configuration with Zoning . . . . . . . . . . . . . . . 2-4
2.3.2 Small SAN Configuration with Front/Back-Side SANs . . . . . . . . . . . . . 2-5
2.3.3 High-Availability Configuration . . . . . . . . . . . . . . . . . . . . . . . . . . . . . . . 2-6
2.4 Port Connections . . . . . . . . . . . . . . . . . . . . . . . . . . . . . . . . . . . . . . . . . . . 2-9
2.4.1 Fibre Channel Port Connections . . . . . . . . . . . . . . . . . . . . . . . . . . . . . 2-9
2.4.2 Ethernet Connections . . . . . . . . . . . . . . . . . . . . . . . . . . . . . . . . . . . . . 2-9
2.4.3 Console Port Connection . . . . . . . . . . . . . . . . . . . . . . . . . . . . . . . . . . . 2-9
Section 3 Getting Started with SANbox SSP
3.1 Task Roadmap . . . . . . . . . . . . . . . . . . . . . . . . . . . . . . . . . . . . . . . . . . . . . 3-1
3.2 Checking Package Contents . . . . . . . . . . . . . . . . . . . . . . . . . . . . . . . . . . 3-2
3.3 Setting Up SANbox SSP. . . . . . . . . . . . . . . . . . . . . . . . . . . . . . . . . . . . . . 3-3
3.3.1 Setting Up SANbox SSP Hardware . . . . . . . . . . . . . . . . . . . . . . . . . . . 3-4
3.3.2 Accessing SANbox SSP for the First Time . . . . . . . . . . . . . . . . . . . . . 3-7
SN0054628-00 A Page iii
Page 4

SANbox 8200 Series Storage Services Platform
Installation and Configuration Guide for StoreAge SVM
3.4 Connecting to the SAN . . . . . . . . . . . . . . . . . . . . . . . . . . . . . . . . . . . . . . . 3-9
3.4.1 Connecting StoreAge SVM Appliances to the SAN . . . . . . . . . . . . . . . 3-9
3.4.2 Connecting SANbox SSPs to the SAN . . . . . . . . . . . . . . . . . . . . . . . . 3-10
3.4.3 Connecting Hosts to the SAN . . . . . . . . . . . . . . . . . . . . . . . . . . . . . . . 3-11
3.5 Managing your Configuration . . . . . . . . . . . . . . . . . . . . . . . . . . . . . . . . . . 3-11
Q
Section 4 SANbox SSP Management GUI Reference
4.1 Managing SANbox SSP . . . . . . . . . . . . . . . . . . . . . . . . . . . . . . . . . . . . . . 4-1
4.1.1 Using the SANbox SSP Management GUI . . . . . . . . . . . . . . . . . . . . . 4-2
4.1.2 Using the Command Line Interface (Remotely) . . . . . . . . . . . . . . . . . . 4-5
4.1.3 Using the Command Line Interface (Locally) . . . . . . . . . . . . . . . . . . . . 4-5
4.2 Navigating the SANbox SSP Management GUI . . . . . . . . . . . . . . . . . . . . 4-6
4.2.1 System . . . . . . . . . . . . . . . . . . . . . . . . . . . . . . . . . . . . . . . . . . . . . . . . . 4-7
4.2.2 Diagnostics . . . . . . . . . . . . . . . . . . . . . . . . . . . . . . . . . . . . . . . . . . . . . 4-11
4.2.3 Telnet . . . . . . . . . . . . . . . . . . . . . . . . . . . . . . . . . . . . . . . . . . . . . . . . . . 4-12
4.2.4 Log . . . . . . . . . . . . . . . . . . . . . . . . . . . . . . . . . . . . . . . . . . . . . . . . . . . . 4-13
Section 5 Using the SANbox SSP
5.1 Setting up a High-Availability Configuration . . . . . . . . . . . . . . . . . . . . . . . 5-1
5.2 SAN Zoning . . . . . . . . . . . . . . . . . . . . . . . . . . . . . . . . . . . . . . . . . . . . . . . 5-3
5.3 Directly Connecting Devices to SANbox SSP . . . . . . . . . . . . . . . . . . . . . 5-5
5.4 Configuring Storage . . . . . . . . . . . . . . . . . . . . . . . . . . . . . . . . . . . . . . . . . 5-6
5.4.1 Zoning . . . . . . . . . . . . . . . . . . . . . . . . . . . . . . . . . . . . . . . . . . . . . . . . . 5-6
5.4.2 Access . . . . . . . . . . . . . . . . . . . . . . . . . . . . . . . . . . . . . . . . . . . . . . . . . 5-6
5.4.3 Maximum Frame Size . . . . . . . . . . . . . . . . . . . . . . . . . . . . . . . . . . . . . 5-7
5.4.4 Configuration Restriction on RAID Devices . . . . . . . . . . . . . . . . . . . . . 5-7
5.5 Using the SVM GUI to Manage Virtual Storage . . . . . . . . . . . . . . . . . . . . 5-8
5.5.1 Failing Back . . . . . . . . . . . . . . . . . . . . . . . . . . . . . . . . . . . . . . . . . . . . . 5-10
5.6 Shutting Down SANbox SSP . . . . . . . . . . . . . . . . . . . . . . . . . . . . . . . . . . 5-11
Section 6 Maintaining the SANbox SSP
6.1 SANbox SSP System Software . . . . . . . . . . . . . . . . . . . . . . . . . . . . . . . . 6-1
6.2 Boot Sets . . . . . . . . . . . . . . . . . . . . . . . . . . . . . . . . . . . . . . . . . . . . . . . . . 6-2
6.3 Maintenance Mode . . . . . . . . . . . . . . . . . . . . . . . . . . . . . . . . . . . . . . . . . . 6-3
6.4 Updating SANbox SSP System Software. . . . . . . . . . . . . . . . . . . . . . . . . 6-4
6.5 Interpreting the LED Patterns . . . . . . . . . . . . . . . . . . . . . . . . . . . . . . . . . . 6-5
6.5.1 POST and the LEDs . . . . . . . . . . . . . . . . . . . . . . . . . . . . . . . . . . . . . . 6-6
6.6 Replacing Hardware Components . . . . . . . . . . . . . . . . . . . . . . . . . . . . . . 6-6
6.6.1 About the Transceivers . . . . . . . . . . . . . . . . . . . . . . . . . . . . . . . . . . . . 6-7
Page iv SN0054628-00 A
Page 5

SANbox 8200 Series Storage Services Platform
Q
Installation and Configuration Guide for StoreAge SVM
Section 7 Troubleshooting
7.1 Before Looking at the Problem Statements . . . . . . . . . . . . . . . . . . . . . . . 7-1
7.2 Problem Statements and Troubleshooting Procedures . . . . . . . . . . . . . . 7-2
Appendix A Specifications
A.1 Performance Characteristics . . . . . . . . . . . . . . . . . . . . . . . . . . . . . . . . . . A-1
A.2 Media . . . . . . . . . . . . . . . . . . . . . . . . . . . . . . . . . . . . . . . . . . . . . . . . . . . . A-1
A.3 Storage Management . . . . . . . . . . . . . . . . . . . . . . . . . . . . . . . . . . . . . . . A-2
A.4 High Availability Features . . . . . . . . . . . . . . . . . . . . . . . . . . . . . . . . . . . . A-2
A.5 Standards . . . . . . . . . . . . . . . . . . . . . . . . . . . . . . . . . . . . . . . . . . . . . . . . . A-2
A.6 Device Management . . . . . . . . . . . . . . . . . . . . . . . . . . . . . . . . . . . . . . . . A-3
A.7 Mechanical . . . . . . . . . . . . . . . . . . . . . . . . . . . . . . . . . . . . . . . . . . . . . . . . A-3
A.8 Environmental . . . . . . . . . . . . . . . . . . . . . . . . . . . . . . . . . . . . . . . . . . . . . A-3
A.9 Electrical . . . . . . . . . . . . . . . . . . . . . . . . . . . . . . . . . . . . . . . . . . . . . . . . . A-3
A.10 Regulatory . . . . . . . . . . . . . . . . . . . . . . . . . . . . . . . . . . . . . . . . . . . . . . . . A-4
Appendix B Command Reference
B.1 Command Line Interface (CLI) Overview . . . . . . . . . . . . . . . . . . . . . . . . B-1
B.1.1 Command Quick Reference by Object . . . . . . . . . . . . . . . . . . . . . . . . B-1
B.1.2 Command Syntax and Command Completion . . . . . . . . . . . . . . . . . . . B-2
B.1.3 Online Help . . . . . . . . . . . . . . . . . . . . . . . . . . . . . . . . . . . . . . . . . . . . . B-3
B.2 Accessing the CLI . . . . . . . . . . . . . . . . . . . . . . . . . . . . . . . . . . . . . . . . . . B-4
B.2.1 Users and Groups . . . . . . . . . . . . . . . . . . . . . . . . . . . . . . . . . . . . . . . . B-6
B.3 Commands . . . . . . . . . . . . . . . . . . . . . . . . . . . . . . . . . . . . . . . . . . . . . . . B-8
Glossary
Index
SN0054628-00 A Page v
Page 6

SANbox 8200 Series Storage Services Platform
Installation and Configuration Guide for StoreAge SVM
Q
Figures
Figure Page
2-1 SANbox SSP/StoreAge Solution . . . . . . . . . . . . . . . . . . . . . . . . . . . . . . . . . . . . . . . . 2-2
2-2 Single (Zoned) Fabric Configuration . . . . . . . . . . . . . . . . . . . . . . . . . . . . . . . . . . . . . 2-4
2-3 Dual Fabric Configuration . . . . . . . . . . . . . . . . . . . . . . . . . . . . . . . . . . . . . . . . . . . . . 2-5
2-4 High-Availability Fabric Configuration . . . . . . . . . . . . . . . . . . . . . . . . . . . . . . . . . . . . 2-7
3-1 SANbox 8200/8202 SSP – Port Side . . . . . . . . . . . . . . . . . . . . . . . . . . . . . . . . . . . . 3-3
3-2 SANbox 8200/8202 SSP – Fan Side. . . . . . . . . . . . . . . . . . . . . . . . . . . . . . . . . . . . . 3-4
3-3 Inserting the Left Power Supply . . . . . . . . . . . . . . . . . . . . . . . . . . . . . . . . . . . . . . . . 3-5
3-4 Inserting the Right Power Supply . . . . . . . . . . . . . . . . . . . . . . . . . . . . . . . . . . . . . . . 3-6
3-5 SANbox 8200/8202 SSP Port LED Transitions. . . . . . . . . . . . . . . . . . . . . . . . . . . . . 3-10
4-1 QLogic SANbox Storage Services Platform (SSP) Screen . . . . . . . . . . . . . . . . . . . . 4-3
4-2 SANbox SSP Management GUI Application Installation Screen . . . . . . . . . . . . . . . 4-4
4-3 SANbox SSP Management GUI Login Screen . . . . . . . . . . . . . . . . . . . . . . . . . . . . . 4-4
4-4 SANbox SSP Management GUI Screen . . . . . . . . . . . . . . . . . . . . . . . . . . . . . . . . . . 4-6
4-5 System Port Information Screen . . . . . . . . . . . . . . . . . . . . . . . . . . . . . . . . . . . . . . . . 4-7
4-6 System Ethernet Panel . . . . . . . . . . . . . . . . . . . . . . . . . . . . . . . . . . . . . . . . . . . . . . . 4-9
4-7 System Sensors Panel . . . . . . . . . . . . . . . . . . . . . . . . . . . . . . . . . . . . . . . . . . . . . . . 4-10
4-8 Diagnostic Screen Displaying Port Utilization . . . . . . . . . . . . . . . . . . . . . . . . . . . . . . 4-11
4-9 Telnet Screen Initiated from the SANbox SSP Management GUI . . . . . . . . . . . . . . 4-12
4-10 Diagnostic Screen Log Panel . . . . . . . . . . . . . . . . . . . . . . . . . . . . . . . . . . . . . . . . . . 4-13
5-1 Single (Zoned) Fabric Configuration . . . . . . . . . . . . . . . . . . . . . . . . . . . . . . . . . . . . 5-3
5-2 High-Availability Fabric Configuration with Zoning . . . . . . . . . . . . . . . . . . . . . . . . . . 5-4
5-3 Connecting Initiators Directly to SANbox SSP . . . . . . . . . . . . . . . . . . . . . . . . . . . . . 5-6
5-4 StoreAge Configuration Restriction on Back-Side Storage RAID Devices . . . . . . . . 5-8
6-1 SANbox SSP LED Panel Indicator Lights (Port Side) . . . . . . . . . . . . . . . . . . . . . . . . 6-5
B-1 QLogic SANbox Storage Services Platform (SSP) Screen . . . . . . . . . . . . . . . . . . . . B-4
B-2 Telnet Console Login Screen . . . . . . . . . . . . . . . . . . . . . . . . . . . . . . . . . . . . . . . . . . B-5
B-3 Telnet Console Menu Options. . . . . . . . . . . . . . . . . . . . . . . . . . . . . . . . . . . . . . . . . . B-6
Page vi SN0054628-00 A
Page 7

SANbox 8200 Series Storage Services Platform
Q
Table Page
2-1 High-Availability Solution Protection Against Network Failures. . . . . . . . . . . . . . . . . 2-8
3-1 Roadmap of Setup Tasks . . . . . . . . . . . . . . . . . . . . . . . . . . . . . . . . . . . . . . . . . . . . . 3-1
4-1 SANbox SSP Management GUI Functions . . . . . . . . . . . . . . . . . . . . . . . . . . . . . . . . 4-6
5-1 Required Configuration for the Components of a High-Availability System . . . . . . . 5-1
5-2 Guidelines for Selecting the Storage Device Profile . . . . . . . . . . . . . . . . . . . . . . . . . 5-9
B-1 Commands by Object Type. . . . . . . . . . . . . . . . . . . . . . . . . . . . . . . . . . . . . . . . . . . . B-1
B-2 Built-In Users and Groups . . . . . . . . . . . . . . . . . . . . . . . . . . . . . . . . . . . . . . . . . . . . . B-7
Installation and Configuration Guide for StoreAge SVM
Tables
SN0054628-00 A Page vii
Page 8

SANbox 8200 Series Storage Services Platform
Installation and Configuration Guide for StoreAge SVM
Notes
Q
Page viii SN0054628-00 A
Page 9

Section 1
Introduction
This installation and configuration guide explains the initial hardware installation
and basic configuration procedures for the SANbox
Platform (SSP). It contains procedures for installing the system, configuring the
different components of the system, and completing basic storage operations. After
completing the installation and basic configuration procedures covered in this guide,
an administrator can use the SANbox SSP to provision and manage storage and
related services, such as virtualization, migration, mirroring, and replication.
The major sections of this guide are as follows:
Section 2 includes intended audience, related documentation, regulatory and
safety notices, and warranty and technical support.
Section 3 provides step-by-step instructions for getting started with the SANbox
SSP.
Section 3 references each screen and panel in the SANbox SSP Management
GUI. Use the SANbox SSP Management GUI to manage the SANbox SSP chassis.
The SANbox SSP Management GUI provides the same functions as the command
line interface.
Section 4 describes the procedures for using various aspects of the SANbox SSP
and the SVM appliance, including SAN zoning, configuring storage, creating virtual
volumes, interpreting LEDs, and shutting down.
Section 5 describes the procedures for maintaining the SANbox SSP. Maintenance
tasks include updating the SANbox SSP system software, applying software
patches, interpreting LED patterns, and replacing hardware.
®
8200 Series Storage Services
Section 6 provides troubleshooting
during system start-up or configuration of the SANbox SSP.
Appendix A lists the SANbox SSP specifications.
Appendix B describes the Telnet command line interface. The commands provide
the same functions as the SANbox SSP Management GUI.
SN0054628-00 A 1-1
procedures for issues that you may experience
Page 10

1 – Introduction
Audience
1.1
Audience
Q
This section is organized as follows:
■ Audience
■ Readme File
■ Related Documentation
■ New in this Release
■ Style Conventions
■ Regulatory and Safety Notices
■ Warranty and Technical Support
To use this guide, you should be familiar not only with basic networking installation
tasks but also with standard storage networking configuration, management, and
troubleshooting procedures. You should also have experience configuring,
installing, and maintaining different storage components and devices including host
bus adapters (HBAs), Fibre Channel switches, and storage arrays.
1.2
Readme File
See the readme.txt file included on the SANbox 8200 Series SSP for StoreAge SVM
CD-ROM for updates to this guide.
1.3
Related Documentation
The following websites, manuals, and materials are referenced in the text and/or
provide additional information.
■ SANbox 8200 Series Storage Services Platform Quick Start Guide for StoreAge
SVM
■ SANbox SSP solution guide for your configuration
The solution guides are documents that address the specific host operating
systems and storage devices present in your configuration.
■ SANbox SSP Release Notes
■ QLogic’s website: http://www.qlogic.com
1-2 SN0054628-00 A
Page 11

Q
■ StoreAge documents:
❑ MultiCopy User Manual
❑ MultiMirror User manual
❑ MultiView User Manual
❑ SVM Install Guide
❑ SVM User Manual
1.4
New in this Release
This is the initial release of this document.
1.5
Style Conventions
CAUTION! A Caution notice indicates the presence of a hazard that has the
1 – Introduction
Regulatory and Safety Notices
potential of causing damage to the equipment or loss of data.
WARNING!!
1.6
A Warning notice indicates the presence of a hazard that has the
potential of causing personal injury.
Regulatory and Safety Notices
1.6.1
FCC
This device complies with part 15 of the FCC Rules. Operation is subject to the
following two conditions:
■ This device may not cause harmful interference.
■ This device must accept any interference received, including interference that
may cause undesired operation.
The reader is cautioned that changes or modifications made to the equipment not
expressly approved by QLogic Corporation could void the user's authority to operate
this equipment.
To comply with radiated emissions, only use SFPs recommended by QLogic
Corporation.
The above statements apply to products marketed in the USA.
SN0054628-00 A 1-3
Page 12

1 – Introduction
Regulatory and Safety Notices
This Class A digital apparatus meets all requirements of the Canadian InterferenceCausing Equipment Regulations.
Cet Appareil numérique de la classe A respecte toutes les exigences du réglement
sur le matériel brouilleur du Canada.
The above statement applies to products marketed in Canada.
1.6.2
Q
Class I Laser Safety Information – Certification and Classification
Information
The SANbox SSP contains a laser product called an optical SFP transceiver. Models
of optical SFPs sold by QLogic Corporation are certified as Class I laser products
that conform to the requirement contained in the Department of Health and Human
Services (DHHS) regulation 21 CFR Subchapter J. The certification is indicated by
a UL registered mark and a statement of compliance to DHHS regulation 21 CFR
Subchapter J on the label located on the SFP. If another optical SFP is used, other
than one recommended and sold by QLogic Corporation, the user must ensure
compliance with UL recognized standards and DHHS regulations.
1.6.3
Declaration of Conformity
This Declaration identifies the product, manufacturer's name and address, and
applicable specifications recognized in the United States and Canada.
Manufacturer
QLogic Corporation
26650 Aliso Viejo Parkway
Aliso Viejo, California 92656
USA
Product
SANbox 8202-16 Storage Services Platform
SANbox 8202-08 Storage Services Platform
SANbox 8200-08 Storage Services Platform
The Manufacturer declares under sole responsibility that the products to which this
Declaration relates is in conformity with the following standards or other documents:
Safety: UL 60950 Listed
CSA C22.2 No.60950
IEC 60950
1-4 SN0054628-00 A
Page 13

Q
1 – Introduction
Regulatory and Safety Notices
EN 60825-1:1994+A11
EMC: FCC Rules Part 15, Subpart B,2001.Class A (US)
ICES-003:1997. Class A
ANSI C63.4:2000
EN55022 (1998), Performance Criteria A
EN50081-1 (1992)
EN50082-1 (1997)
EN55024 (1998)
EN61000-3-2 (1995) A14:2000, Performance Criteria A
EN61000-3-3 (1995), Performance Criteria B
IEC61000-4-2 (1995) A1:1998, Performance Criteria B
IEC61000-4-3 (1995) A1:1998, Performance Criteria B
IEC 61000-4-4 (1995), Performance Criteria B
IEC61000-4-5 (1995), Performance Criteria B
IEC61000-4-6 (1996), Performance Criteria A
IEC61000-4-11 (1994), Performance Criteria B and C following the provisions of
the Low Voltage Directive 72/23/EEC and EMC Directive 89/336/EEC and is Marked
in accordance with the CE Marking Directive 93/68/EEC.
Any device that uses electricity must be handled carefully; follow these guidelines
to ensure general safety:
■ Keep SANbox SSP area clear and dust-free during and after testing.
■ Place SANbox SSP in a secure and stable area.
Use the appropriate AC power for the system. The system components operate on
input voltages and frequencies within the ranges of 100 to 240 VRMS and 50/60 Hz
without the need for operator adjustments.
WARNING!!
SN0054628-00 A 1-5
SANbox SSP may have more than one power supply connection for
standard operation. All power supply connections need to be
removed to fully de-energize the unit.
Page 14

1 – Introduction
Warranty and Technical Support
WARNING!! To prevent personal injury or damage to the SANbox SSP, never
attempt to lift or tilt the system using component mounts or device
levers; these types of handles are not designed to support additional
weight beyond specification. Move the SANbox SSP by lifting the
entire unit with both hands.
1.7
Warranty and Technical Support
1.7.1
Warranty
Every QLogic solution is backed by a worldwide warranty for hardware and software
products and related services furnished by QLogic. For complete warranty details,
go to: http://support.qlogic.com/support/warranty.asp
1.7.2
Technical Support
Q
.
Customers should contact their authorized maintenance provider for technical
support of their QLogic switch products. QLogic-direct customers may contact
QLogic Technical Support; others will be redirected to their authorized maintenance
provider. Visit the QLogic support Web site listed in "Contact Information" on
page 1-7 for the latest firmware and software updates.
1.7.2.1
Before Contacting Technical Support
Before contacting technical support, run show debug dump in the command line
interface, and create a trace file in the SVM GUI. QLogic technical support
representatives may request this file to assist them in diagnosing issues with your
system. For more information about Show Debug Dump, see "Show Debug
Command" on page B-19.
To create a trace file in the SVM GUI:
1. Open the SVM GUI, and open Information in the tree view.
2. Click Trace Dump, then click Confirm to start creating the file.
NOTE: The system requires several minutes to generate the trace file.
3. View the file in the c:\Svm_Trace directory.
The name of each trace file takes this form:
SVM_TraceN.txt
where N is an incremental number. For example, if the last trace file that was
generated is SVM_Trace1.txt, then the next one is SVM_Trace2.txt.
1-6 SN0054628-00 A
Page 15

Q
1.7.2.2
Availability
QLogic Technical Support is available from 7:00 AM to 7:00 PM Central Standard
Time, Monday through Friday, excluding QLogic-observed holidays.
1.7.2.3
Training
QLogic offers certification training for the technical professional for SANblade®
HBAs, SANbox switches, and SANbox SSPs. From the training link at
www.qlogic.com
intensive "hands-on" Certification course. Technical Certification courses include
installation, maintenance and troubleshooting QLogic SAN products. Upon
demonstrating knowledge using live equipment, QLogic awards a certificate
identifying the student as a Certified Professional. The training professionals at
QLogic may be reached by email at tech.training@qlogic.com
1.7.2.4
Contact Information
1 – Introduction
Warranty and Technical Support
, you may choose Electronic-Based Training or schedule an
.
Telephone: +1 952.932.4040
Fax: +1 952.932.4018
Email:
Technical Service
Technical Training
Support Web Site: support.qlogic.com
support@qlogic.com
tech.training@qlogic.com
SN0054628-00 A 1-7
Page 16

1 – Introduction
Warranty and Technical Support
Notes
Q
1-8 SN0054628-00 A
Page 17

Section 2
General Description
This section provides physical and functional overviews of the SANbox Storage
Services Platform (SSP) Management GUI, the StoreAge Storage Virtualization
Manager (SVM) solution, and related hardware.
This section covers the following topics:
■ SANbox SSP and StoreAge Solution Overview
■ SANbox SSP Overview
■ Supported Network Configurations
■ Port Connections
2.1
SANbox SSP and StoreAge Solution Overview
StoreAge SVM is a SAN appliance that together with the SANbox SSP enables
highly available networks and provides centralized, network-based volume
management, snapshot, replication, and mirroring across all storage devices within
a SAN. For more information about high-availability, see "High-Availability
Configuration" on page 2-6 for more information and a diagram.
Unlike host-based or storage-based volume management and data replication
technologies, StoreAge SVM is a network-based solution that centrally manages
all storage regardless of the operating systems or storage devices in use. By
deploying SVM agents on SANbox SSP, StoreAge leverages QLogic’s intelligent
storage application technology to deliver centralized storage management,
business continuity, and disaster recovery capabilities across all attached servers
and storage subsystems within a SAN.
The SVM GUI is a web-based interface to the SVM appliance. You can access the
SVM GUI from a local or remote location using a standard browser. Use the SVM
GUI to configure storage pools, provision virtual volumes and manage access to
them, and manage point-in-time copies of virtual volumes.
Using a standard web browser, you can configure, maintain, and monitor the
SANbox SSP chassis through the SANbox SSP Management GUI. The GUI
provides access to all chassis management functions, including SANbox SSP
status, port management and configuration, diagnostics, and a telnet window.
Alternatively, use the command line interface (CLI), which provides the same
functions as the SANbox SSP Management GUI through serial, telnet, or ssh
connections. All configuration, maintenance, and monitoring tasks for the SANbox
SSP chassis are accessible through the CLI.
SN0054628-00 A 2-1
Page 18
2 – General Description
SANbox SSP and StoreAge Solution Overview
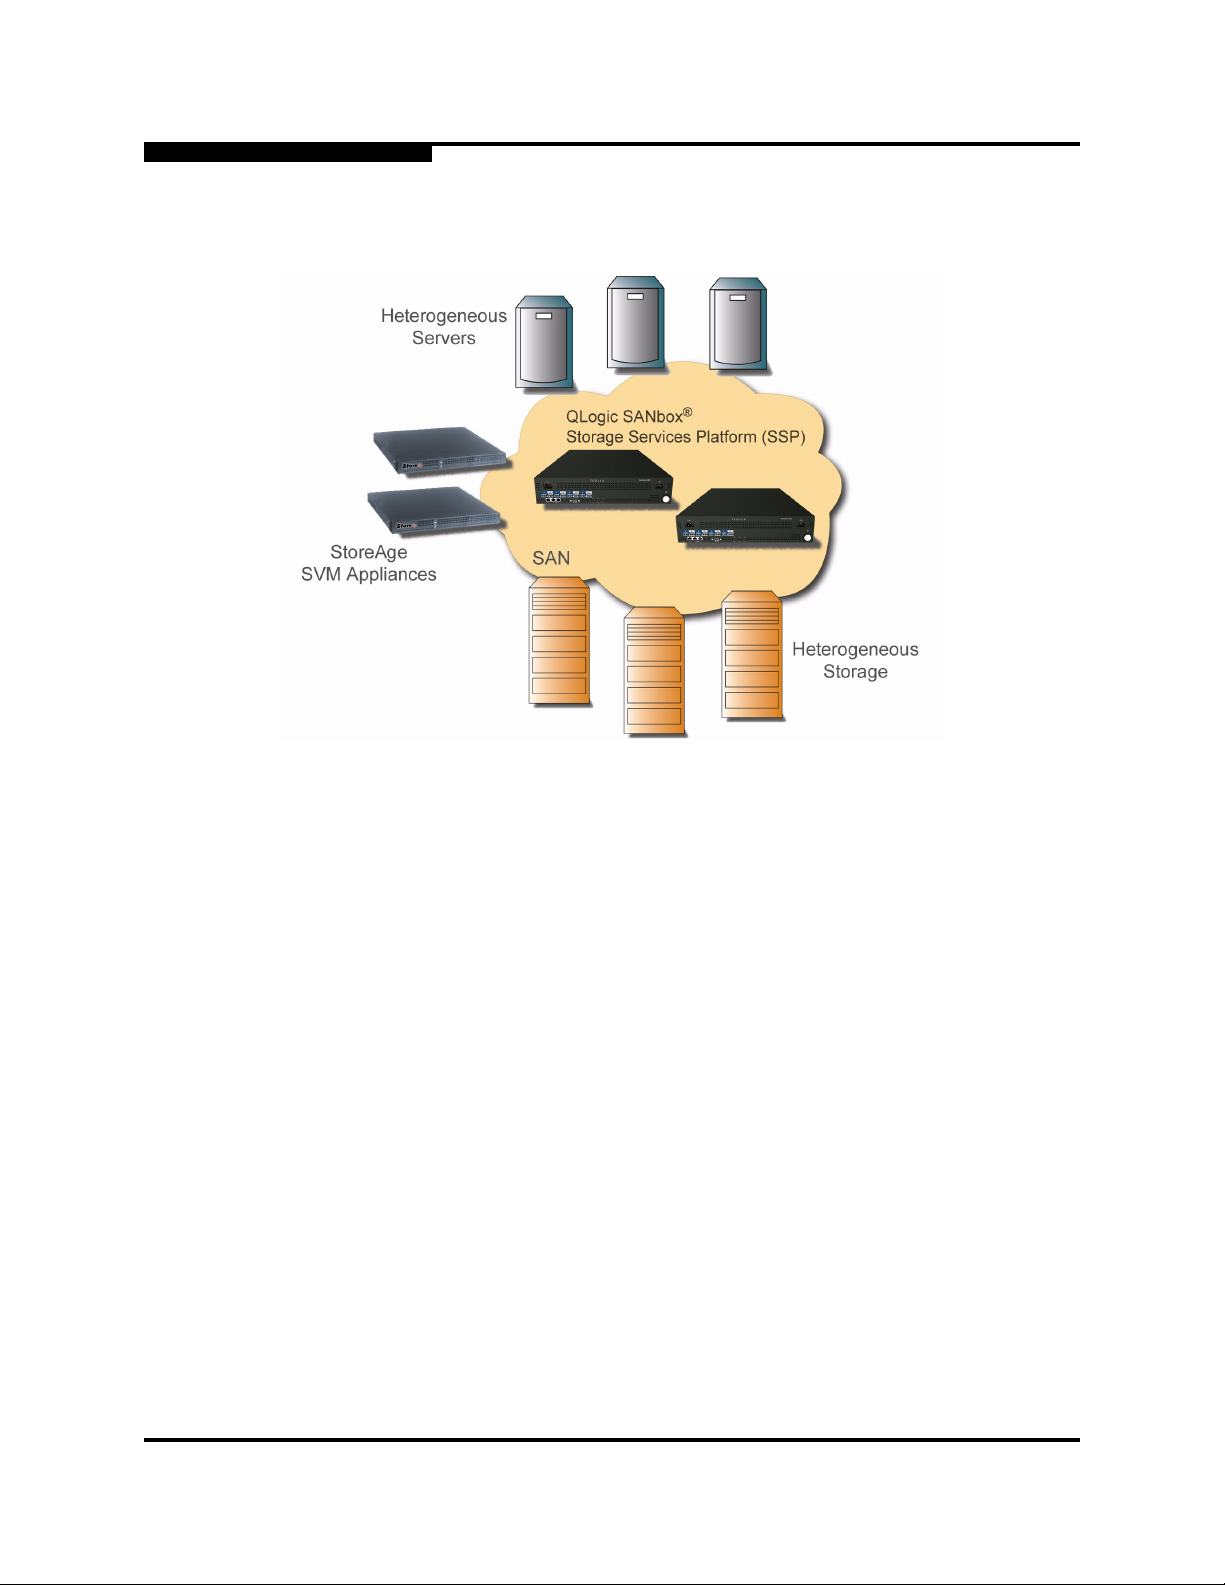
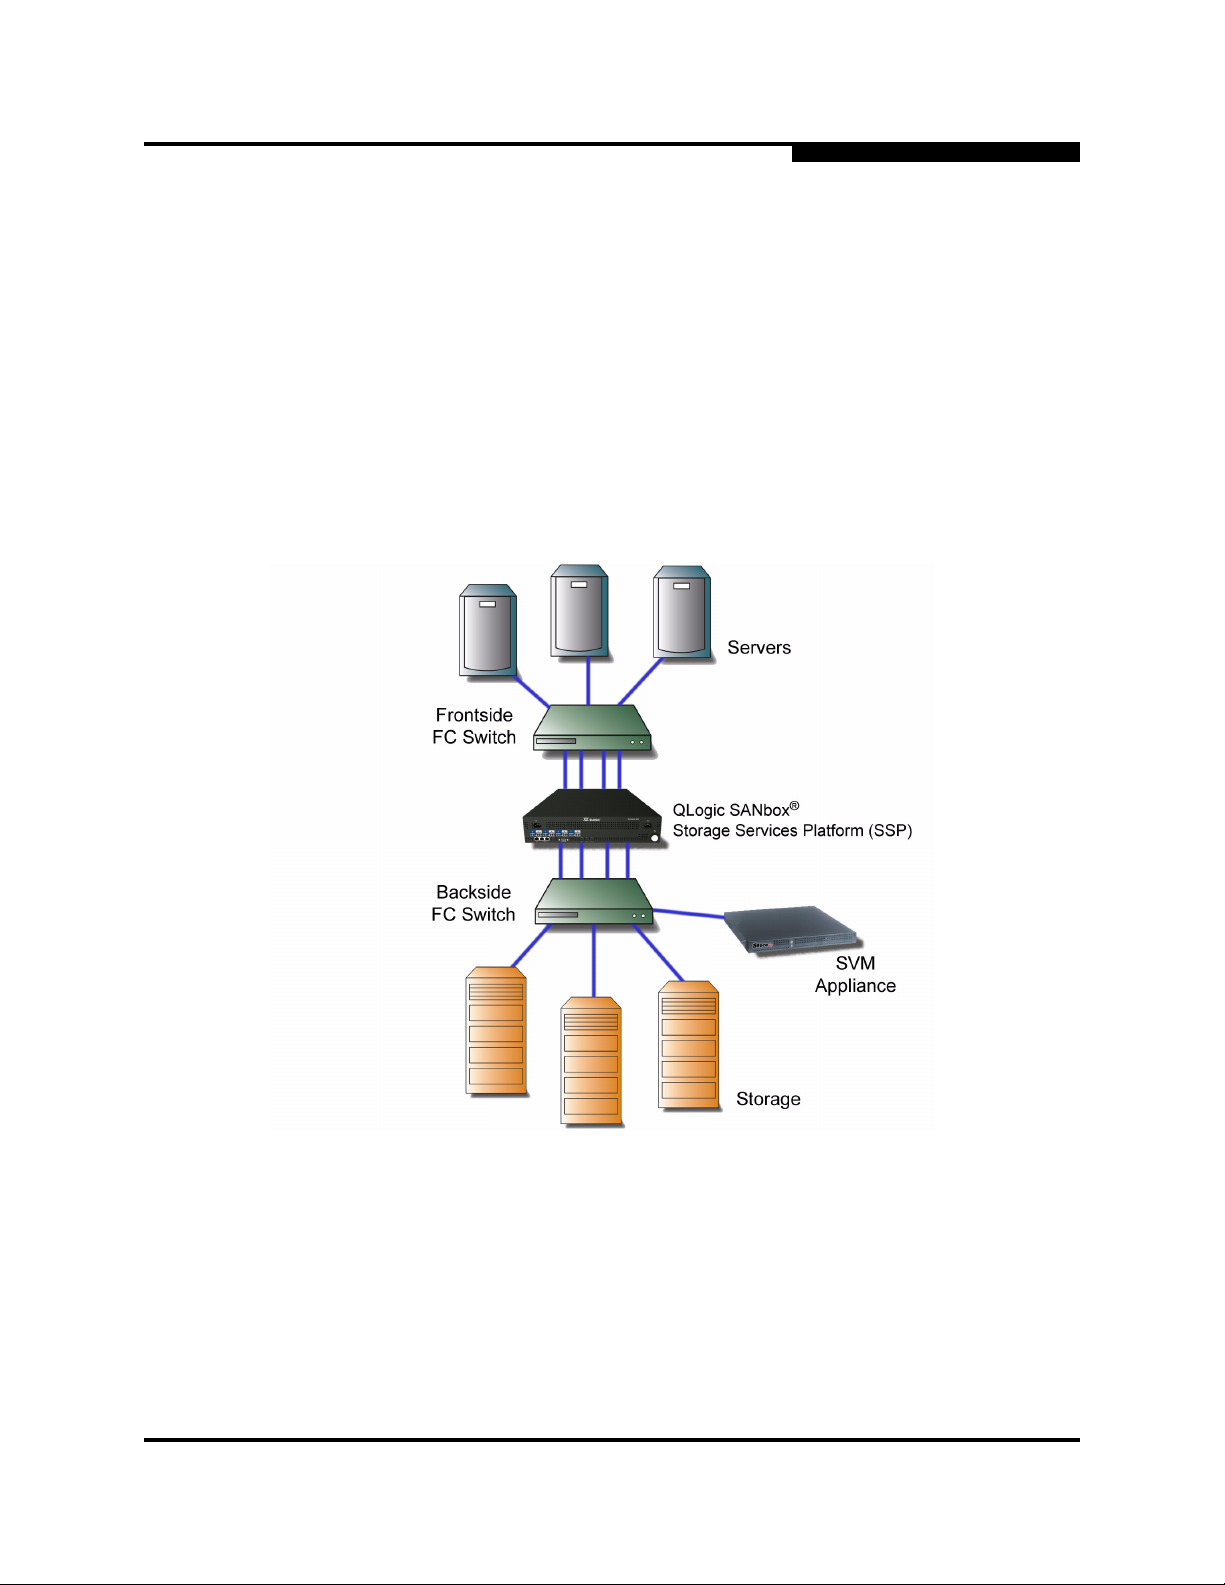
Figure 2-1 shows a StoreAge-enabled SAN with dual SANbox SSPs. The SANbox
SSP provides drop-in deployment of StoreAge capability into the SAN.
Q
Figure 2-1. SANbox SSP/StoreAge Solution
2-2 SN0054628-00 A
Page 19

Q
2.2
SANbox SSP Overview
The SANbox 8200/8202 SSP represents a new category of storage virtualization
devices that centralizes the management and delivery of storage and related
services, without creating performance bottlenecks in the storage network. Storage
services such as virtualization and volume management, snapshots, replication,
backup, and mirroring can be deployed and provisioned from the SANbox SSP.
While SANbox SSP can process and switch Fibre Channel packets at wire speed,
it is not itself a Fibre Channel fabric switch. Rather, SANbox SSP complements your
Fibre Channel fabrics, allowing you to provide storage services uniformly across
heterogeneous fabrics, and to configure and manage access between devices on
different fabrics. SANbox SSP provides these capabilities without the complication
and risk of merging Fibre Channel fabrics.
2.2.1
Features
Three models of SANbox SSPs are available:
2 – General Description
SANbox SSP Overview
SANbox 8200-08 SSP (single power supply integrated with 8 ports)
SANbox 8202-08 SSP (dual hot-swappable power supplies with 8 ports)
SANbox 8202-16 SSP (dual hot-swappable power supplies with 16 ports)
SANbox SSP:
■ Adds new storage services to any existing SAN environment
■ Reduces complexity of managing and protecting data resources by centralizing
storage services within the network
■ Integrates host-based agent functionality, avoiding the complexity of managing
distributed agents
■ Extends the reach of storage services across multiple SAN islands, eliminating
the need for multiple independent deployments
For SANbox SSP specifications, see Appendix A Specifications.
SN0054628-00 A 2-3
Page 20

2 – General Description
Supported Network Configurations
2.3
Supported Network Configurations
The SANbox SSP supports both single-fabric and multiple-fabric configurations.
This section shows three examples of supported configurations.
2.3.1
Small SAN Deployment Configuration with Zoning
In the following example of a typical small SAN deployment (Figure 2-2), a single
Fibre Channel switch is used to connect all storage and initiators. Zoning is used
to partition the front-side initiator ports, and back-side storage and StoreAge SVM
into two separate logical SANs. See "SAN Zoning" on page 5-3 for more detailed
information about proper zoning configuration.
Q
Figure 2-2. Single (Zoned) Fabric Configuration
2-4 SN0054628-00 A
Page 21

Q
2.3.2
Supported Network Configurations
Small SAN Configuration with Front/Back-Side SANs
In a small SAN deployment with multiple switches, the SANbox SSP is used to
physically partition the front-side and back-side SANs. The storage and the
StoreAge SVM must be placed on the back-side of the SAN, and the initiators are
physically placed on the front-side of the SAN. See Figure 2-2.
2 – General Description
Figure 2-3. Dual Fabric Configuration
SN0054628-00 A 2-5
Page 22

2 – General Description
Supported Network Configurations
2.3.3
High-Availability Configuration
High availability describes a system that is operational a high percentage of the
time. Through dual redundancy, a system can maintain high availability in the
presence of any single component failure.
Use of redundant components, multipathing, and failover help protect against
failures and ensure high availability. Implementing SVM agents on SANbox SSP
provides high availability by allowing the use of multiple paths between servers and
storage, and ensuring that no single point of failure can prevent access to data.
Failover is a backup operational mode in which the functions of a system component
(such as, a server, network, or storage controller, for example) are assumed by
secondary system components when the primary component becomes unavailable
through either failure or scheduled down time.
With the proper multipathing software running on the host, a high-availability
configuration can guarantee access to data even in the event of one or possibly
more hardware, software, or infrastructure failures. With the addition of multiple
hosts running supported clustering software, even host failures can be tolerated
without interrupting critical applications.
Q
In addition to continuous operation through unplanned failures, a correctly set up
high-availability configuration enables administrators to take components of the
system offline for maintenance or replacement, again without interrupting access
to data.
Figure 2-4 shows a recommended high-availability configuration with
cross-connected fabric. Within each fabric, zoning is used to partition the front-side
initiator ports, both StoreAge SVM ports, and back-side storage. Each server has
multiple HBAs installed, with at least one HBA connected to each of two redundant
front-side fabrics. Each HBA sees the same virtual disks on each of two redundant
SANbox SSPs. Each SANbox SSP has access to physical storage through at least
two paths, across two fabrics and at least two RAID controllers. Two SVMs can
each manage either or both SANbox SSP units. Two independent fabrics and host
failover software ensure availability.
2-6 SN0054628-00 A
Page 23

Q
2 – General Description
Supported Network Configurations
Figure 2-4. High-Availability Fabric Configuration
SN0054628-00 A 2-7
Page 24

2 – General Description
Supported Network Configurations
2.3.3.1
How the Solution Protects Against Failures
The following tables provides a list of common failure points in a network and the
corresponding protection that this high-availability solution provides.
Table 2-1. High-Availability Solution Protection Against Network Failures
Failed Component: Protection:
HBA or path to
SANbox SSP
All HBAs or paths to
one SANbox SSP
One SANbox SSP Virtual volume becomes active on alternate SANbox SSP, host
One path between
one SANbox SSP
and storage
All paths between
one SANbox SSP
and storage
Storage controller
SVM appliance Alternate SVM appliance takes over system management
One or more paths
between one SVM
and one SANbox
SSP
Host software uses a remaining HBA or path to the same SANbox
SSP
Virtual volume becomes active on alternate SANbox SSP, host
software uses alternate HBA
software uses alternate HBA
■ Back-side I/O uses alternate path
■ LUN uses alternate storage controller, if necessary
■ Virtual volume becomes active on alternate SANbox SSP
■ Host software uses alternate HBA
■ Back-side I/O uses path to alternate storage controller
Alternate SVM appliance takes over system management
Q
2.3.3.2
Setup Requirements
To configure a high-availability solution using SVM appliances and SANbox SSPs,
you must make sure that:
■ Each HBA sees only one SANbox SSP.
■ Each host sees both SANbox SSP in the high-availability solution, and no others.
■ Each StoreAge SVM appliance sees both SANbox SSPs.
■ Each StoreAge SVM appliance sees all storage ports.
■ If the storage includes dual-controller active/passive RAIDs, each SANbox SSP
is cross-connected with the controllers, which means that each SANbox SSP
must see both controllers in the RAID.
2-8 SN0054628-00 A
Page 25

Q
For more information about setting up your high-availability system, see "Setting
up a High-Availability Configuration" on page 5-1. In addition, see the SANbox SSP
solution guide for your application environment for detailed information about
configuring SANbox SSPs for specific high-availability configurations.
2.4
Port Connections
2.4.1
Fibre Channel Port Connections
SANbox SSP Fibre Channel ports support Small Form-Factor Pluggable (SFP)
industry standard transceivers. All ports can be configured as initiator mode, target
mode, or dual mode (initiator/target) to support different configuration topologies.
Ports can be configured for fixed 1 Gbps or 2 Gbps data rates, or they can be
configured to auto-negotiate between 1 Gbps and 2 Gbps.
By default, ports are configured for dual mode (initiator/target), and also to
auto-negotiate the data rate.
2 – General Description
Port Connections
2.4.2
Ethernet Connections
SANbox SSP supports one 10/100 Fast Ethernet connection for management and
two 10/100 Fast Ethernet connections for high availability cluster communication
(labeled HA1 and HA2). The management port is labeled on the port side of
SANbox SSP and named MGMT if you are accessing using the CLI.
Each Ethernet port is configured with a default IP address. It is recommended that
you change the IP address during initial startup. To change IP address settings, see
"Modify Eth Command" on page B-13.
NOTE: StoreAge SVM performs cluster communication using Fibre Channel, so
the Ethernet HA1 and HA2 ports are not used. These ports should not be
connected or configured when using StoreAge SVM.
2.4.3
Console Port Connection
SANbox SSP supports an EIA/TIA-232 asynchronous serial connection through a
standard DB-9 port connection. To connect an ASCII terminal to the SANbox SSP,
attach one end of the null modem DB-9 cable (included) to the serial port (labeled
) of SANbox SSP and the other end to an ASCII terminal port (such as
HyperTerminal).
SN0054628-00 A 2-9
Page 26

2 – General Description
Port Connections
Notes
Q
2-10 SN0054628-00 A
Page 27

This section describes the tasks you must perform before you begin to install,
configure, and operate the SANbox SSP. The tasks should be performed in the
order presented in this section.
This section covers the following tasks:
■ Task Roadmap
■ Checking Package Contents
■ Setting Up SANbox SSP
■ Managing your Configuration
3.1
Task Roadmap
Table 3-1 presents the roadmap for setup tasks.
1. For a high-availability system,
obtain information about
high-availability configurations
that use SANbox SSPs and SVM
appliances.
2. Unpack and set up the hardware:
mount the SANbox SSP in a rack,
install the power supplies, and
connect the console port.
3. Start up and configure the SANbox
SSPs: configure the terminal
settings on the host, use the serial
console port, and modify the
Ethernet settings for remote
access.
4. Connect SVM appliances,
SANbox SSPs, and hosts to the
SAN.
Section 3
Getting Started with SANbox SSP
Table 3-1. Roadmap of Setup Tasks
For This Setup Step: See:
■ "High-Availability Configuration" on page 2-6 for
overview information.
■ "Setting up a High-Availability Configuration" on
page 5-1 for specific information about setting up
each component of a high-availability system.
■ "Checking Package Contents" on page 3-2.
■ "Setting Up SANbox SSP Hardware" on
page 3-4.
■ "Accessing SANbox SSP for the First Time" on
page 3-7.
■ "Accessing SANbox SSP for the First Time" on
page 3-7.
■ "Connecting to the SAN" on page 3-9.
SN0054628-00 A 3-1
Page 28

3 – Getting Started with SANbox SSP
Checking Package Contents
Table 3-1. Roadmap of Setup Tasks (Continued)
For This Setup Step: See:
5. In Section 4 SANbox SSP
Management GUI Reference get
tips about zoning your SAN and
configuring storage, and use the
SVM GUI to manage your
configuration.
6. Review the troubleshooting
information as needed.
3.2
Checking Package Contents
CAUTION! Before shipping SANbox SSP to another site, remove the power
supplies. SANbox SSP must not be shipped with the power supplies
installed.
Ensure that all the components of the SANbox SSP arrived in the package. Save
the shipping container, foam inserts, and anti-static bags; returning SANbox SSP
without this packaging may void its warranty. Check the contents of the package to
make sure that you received the following items and components:
Q
■ "SAN Zoning" on page 5-3
■ "Configuring Storage" on page 5-6.
■ "To create storage pools:" on page 5-8.
■ "To create a user defined host (UDH) and set the
SCSI personality:" on page 5-9.
■ Section 7 Troubleshooting
■ 1 SANbox 8200-08 SSP, SANbox 8202-08 SSP, or SANbox 8202-16 SSP
■ 1 SANbox SSP CD-ROM:
❑ SANbox 8200 Series Storage Services Platform Quick Start Guide for
StoreAge SVM
❑ SANbox SSP Release Notes
❑ Installation/Upgrade software including OS and application
❑ End User License Agreement
❑ Release Notes
■ 1 RS-232 serial null modem cable
■ 2 SANbox SSP power supplies (SANbox 8202-08 SSP and SANbox 8202-16
SSP) or
1 SANbox SSP power supply (SANbox 8200-08 SSP)
■ 2 U.S. power supply cords (SANbox 8202-08 SSP and SANbox 8202-16 SSP) or
1 U.S. power supply cord (SANbox 8200-08 SSP)
■ Rack mount kit, if ordered
3-2 SN0054628-00 A
Page 29

Q
6
■ Mounting instructions included with kit, if ordered
■ Warranty card
NOTE: All rack mount kits, including slide, direct, and shelf mount kits for the
SANbox SSP are ordered separately.
3.3
Setting Up SANbox SSP
The SANbox SSP has two serviceable panels: port side and fan side.
Port Side: includes the primary ports. See Figure 3-1.
3 – Getting Started with SANbox SSP
Setting Up SANbox SSP
1 7
8 9 10 11
1 Power Connector 1 6 Ports 9-16 (SANbox 8202-16 SSP only) 11 Console Port
2 Ports 1-8 7 Power Connector 2 12 Fan 1 LED
3 Power Supply 1 LED 8 Management Port 13 Fan 2 LED
4 Alert LED 9 High-Availability Port 1 14 Fan 3 LED
5 Power Supply 2 LED 10 High-Availability Port 2 15 Main Power Switch
NOTE: StoreAge SVM performs cluster communication using Fibre Channel, so
2
Figure 3-1. SANbox 8200/8202 SSP – Port Side
the Ethernet HA1 and HA2 ports are not used.
3 54
12 13 14
15
SN0054628-00 A 3-3
Page 30

3 – Getting Started with SANbox SSP
41
2 53
Setting Up SANbox SSP
Fan Side: includes the fans and power supplies. See Figure 3-2.
2 1
3 1
Q
2
6
1 Power Supply 2 4 Power Supply 1 6 Fan Assembly 3
2 Locking Knob 5 Locking Knob 7 Fan Assembly 1
3 Fan Assembly 2
NOTE: For SANbox 8200-08 SSP, Power Supply 1, Fan 1, Fan 2, and Fan 3 are covered.
Power Supply 2 is removed.
Figure 3-2. SANbox 8200/8202 SSP – Fan Side
3.3.1
Setting Up SANbox SSP Hardware
Setting up SANbox SSP hardware includes: mounting SANbox SSP in a rack,
installing the power supplies, and connecting the power cables.
WARNING!!
The SANbox 8200/8202 SSP can be mounted in the following configurations:
■ Slide mount with separate slide mount kit (preferred)
■ Shelf mount with separate rack mount kit
■ Standard rack mount with four mounting brackets
The SANbox SSP cannot be directly rack mounted with only two
supports. SANbox SSP MUST be mounted using a slide, shelf, or
four support brackets.
7
3-4 SN0054628-00 A
Page 31

Q
3 – Getting Started with SANbox SSP
Setting Up SANbox SSP
To mount SANbox SSP in a rack:
NOTE:
■ See manufacturer’s instructions included with the slide mount kit, the rack
mount kit, and the brackets.
■ Shelf mounting is independent of rack depth.
There are two types of rack mount kits available: the slide kit accommodates rack
depths from 20 inches to 30 inches. The direct rack mount kit requires a rack depth
of 21.5 inches.
NOTE: Air flows from the fan side to the port side in the SANbox SSP. When
installing SANbox SSP in a rack, orient the unit so that the port side faces
the rack's air exit.
You can see the Small Form-Factor Pluggable transceivers and power
and Ethernet cables from the port side.
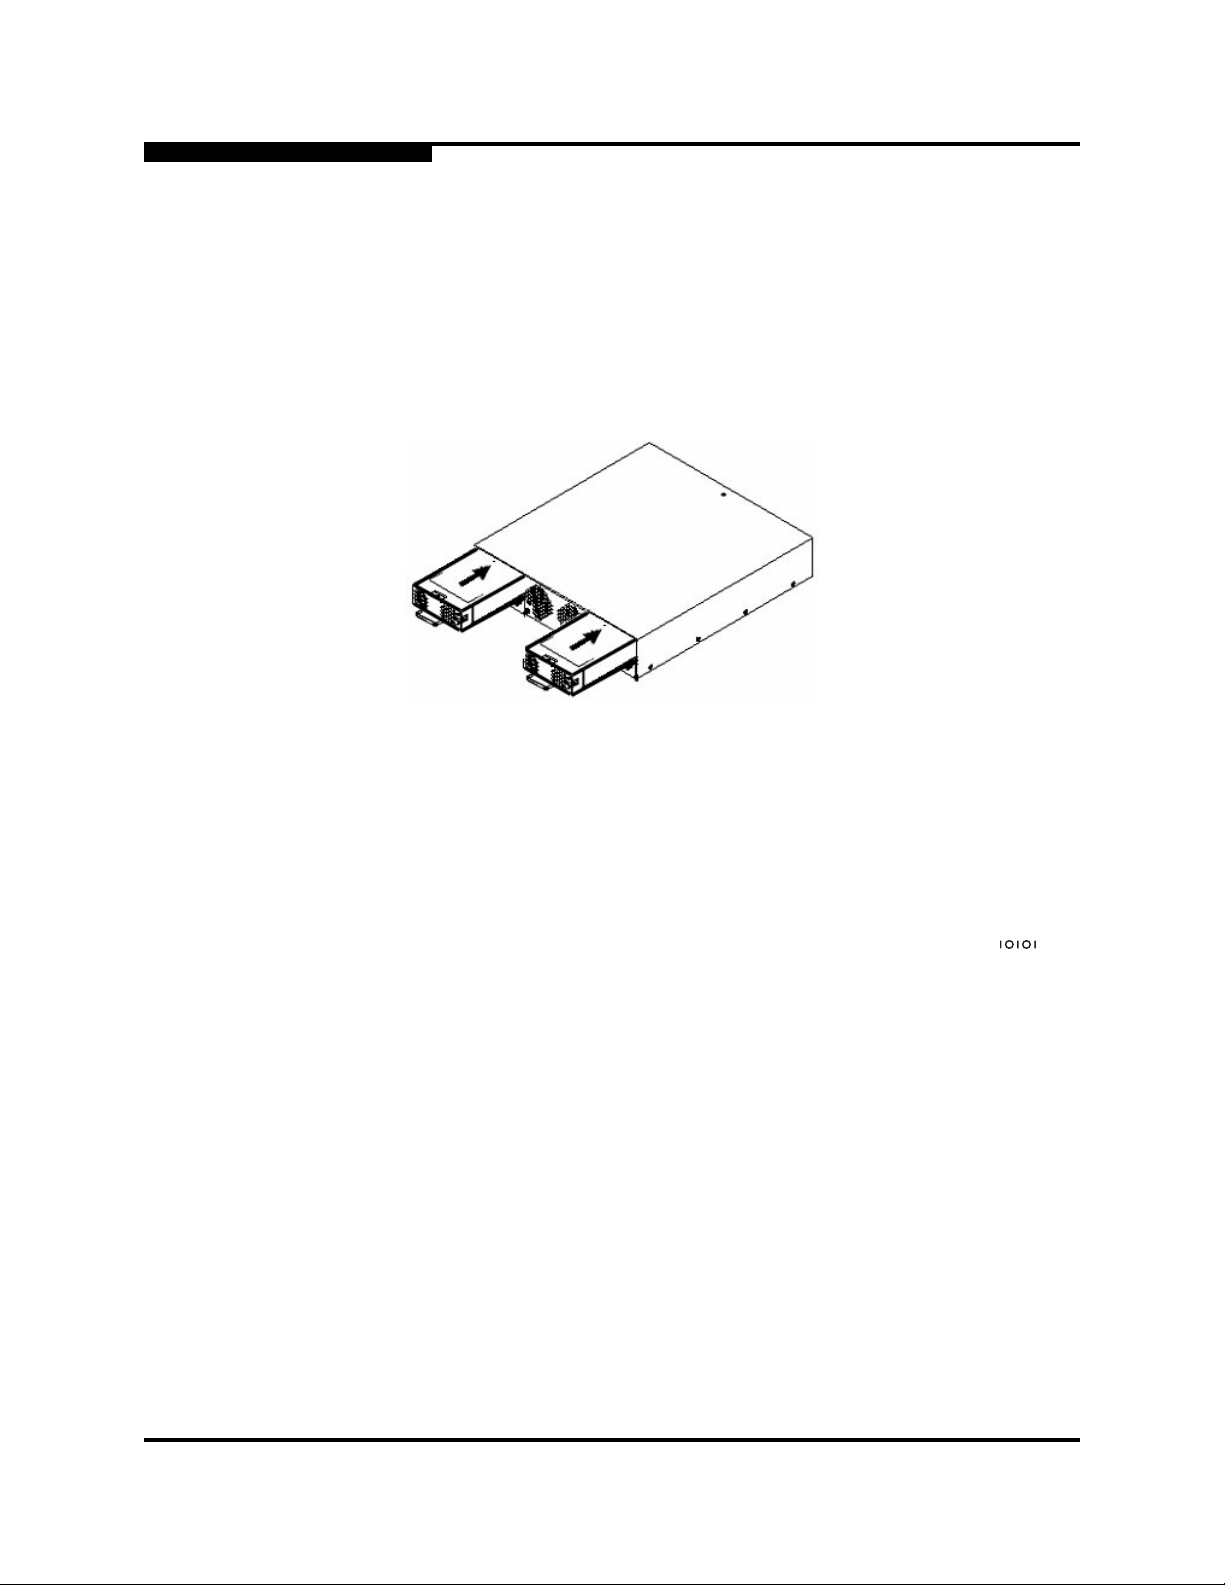
To install the power supplies:
1. Remove the power supply from the packaging container.
2. Insert the power supply into the designated slot on the far left, which is located
above the fan assembly as shown in the following diagram, so that the power
supply is flush with the fan assembly and the label is facing up.
You may need to apply force when inserting the power supply to make sure it
is installed all the way into the slot.
Figure 3-3. Inserting the Left Power Supply
SN0054628-00 A 3-5
Page 32
3 – Getting Started with SANbox SSP
Setting Up SANbox SSP
3. Lock the supply in place by rotating the knob clockwise until it stops.
4. Once the power supply has been properly inserted, connect a power cable from
an electrical outlet to the power connector on the port side.
The corresponding power supply LED should be illuminated indicating that the
power supply and power cable have been properly installed.
5. Repeat step 1 through step 4 for the second power supply, inserting the power
supply into the power supply slot on the far right.
Q
Figure 3-4. Inserting the Right Power Supply
6. Plug in both power cables.
NOTE: Note: For maximum fault tolerance, plug the power cables into
separate circuits.
To connect the console port:
Attach the provided serial cable between the serial (console) port (labeled ) on
SANbox SSP and an RS-232 serial port on your laptop or host computer.
If the serial cable provided with SANbox SSP is not available, use a standard RS-232
null-modem cable to connect the console port to a host computer.
See Figure 3-1 to see exactly where the console port is located.
3-6 SN0054628-00 A
Page 33

Q
3.3.2
Accessing SANbox SSP for the First Time
The SANbox SSP supports accessing the command line interface (CLI) through
the serial console port. Once you have access to the CLI through the local console,
you can modify the Ethernet settings to enable remote access to SANbox SSP
through the SANbox SSP Management GUI or the CLI.
NOTE: Please allow sufficient time (approximately 2 minutes) for SANbox SSP
to load all the necessary drivers and system software and complete
necessary Power-On Self Test (POST) diagnostics.
To power up SANbox SSP:
Power on SANbox SSP by pressing the Main Power Switch on the port side.
The Main Power Switch should be illuminated, indicating the unit has begun the
power on cycle. See Figure 3-1 to view a picture of the port side of SANbox SSP.
While POST is in progress, the port status LEDs turn amber in color and flicker
intermittently. POST is complete when the port LEDs turn off; this takes
approximately 1-2 minutes. See "POST and the LEDs" on page 6-6 for more
information.
3 – Getting Started with SANbox SSP
Setting Up SANbox SSP
You can also use the Main Power Switch to shut down the SANbox SSP. For more
information, see "Shutting Down SANbox SSP" on page 5-11.
To configure the terminal settings on the host computer:
1. Run a terminal emulation program such as HyperTerminal on the host computer.
NOTE: For best results, configure the terminal program for ANSI terminal
emulation.
2. Configure the terminal on your host computer for 9600 baud, 8 data bits, no
parity, 1 stop bit, and no flow control.
To access the CLI through the serial console port:
1. Press the Enter key to get a prompt on your terminal emulation program.
2. If prompted, enter a login and password to gain administrative privileges.
The default login is kadmin, and the default password is kahuna.
3. QLogic recommends that you change the password; run the Modify User
command to change the password. See "Modify User Command" on page B-16
for more information.
Now that you are locally logged on to the command line interface (CLI),
configure the Ethernet settings for remote access to SANbox SSP. See the
next section, "To modify Ethernet settings for remote access:" on page 3-8.
SN0054628-00 A 3-7
Page 34

3 – Getting Started with SANbox SSP
Setting Up SANbox SSP
To modify Ethernet settings for remote access:
1. Type modify eth to configure the IP address for the management port (labeled
on the port side of SANbox SSP), and enter your IP address, subnet mask,
and gateway parameters.
NOTE: Use the management port, labeled ,to connect your SANbox SSP
to your LAN for management access. If you are connecting SANbox
SSP to a host computer instead of an Ethernet network, you must
use a crossover Ethernet cable.
NOTE: You can connect your host computer directly to the management port
using a crossover cable. If you want to do so without first configuring
the management Ethernet port via the serial console, the default
parameters for the port are:
IP address: 192.168.1.4
Gateway: 192.168.1.1
Netmask: 255.255.255.0
Q
For example, if the Ethernet name of the device is MGMT, the IP address is
192.168.1.4, the gateway is 10.4.2.1, and the subnet mask is
255.255.255.255, here is the command line to enter:
modify eth MGMT ip 192.168.1.4 gateway 10.4.2.1 netmask
255.255.255.255
See "Modify Eth Command" on page B-13 for more information about the
Modify Eth command and configuring the management port.
2. See "Managing SANbox SSP" on page 4-1 to begin managing SANbox SSP
remotely using the SANbox SSP Management GUI and the command line
interface.
Once the management port has been properly configured, IP based
management (telnet and web) can be accessed by using the newly defined IP
address, or the default address of 192.168.1.4 if using a crossover cable.
3-8 SN0054628-00 A
Page 35

3 – Getting Started with SANbox SSP
Q
3.4
Connecting to the SAN
This section provides instructions for connecting StoreAge SVM appliances,
SANbox SSPs, and hosts to the storage area network.
3.4.1
Connecting StoreAge SVM Appliances to the SAN
When setting up a high-availability configuration, you must make sure that each
SVM appliance:
■ Is connected through the back-side fabric to both SANbox SSPs.
■ Can access all storage ports.
To connect SVM appliances to the SAN in a high-availability configuration:
1. Power up one SVM appliance, and connect the first port to the switch labeled
FC Switch A in the configuration diagram, shown in Figure 2-4.
2. Connect the SVM appliance’s second port to the switch labeled FC Switch B.
Connecting to the SAN
3. Power up the other SVM appliance, connect its first port to the switch labeled
FC Switch A, and then connect its second port to the switch labeled FC Switch B.
4. Create two zones: one zone on FC Switch A named Zone back_A, and another
zone on FC switch B named Zone back_B.
5. Add the ports on the SVM appliance to the new zones.
SN0054628-00 A 3-9
Page 36
3 – Getting Started with SANbox SSP
Connecting to the SAN
3.4.2
Connecting SANbox SSPs to the SAN
For high-availability configurations, you must make sure that each SANbox SSP:
■ Can access all storage ports.
■ Is connected to both SVM appliances through the back-side fabric.
To connect SANbox SSPs to the SAN:
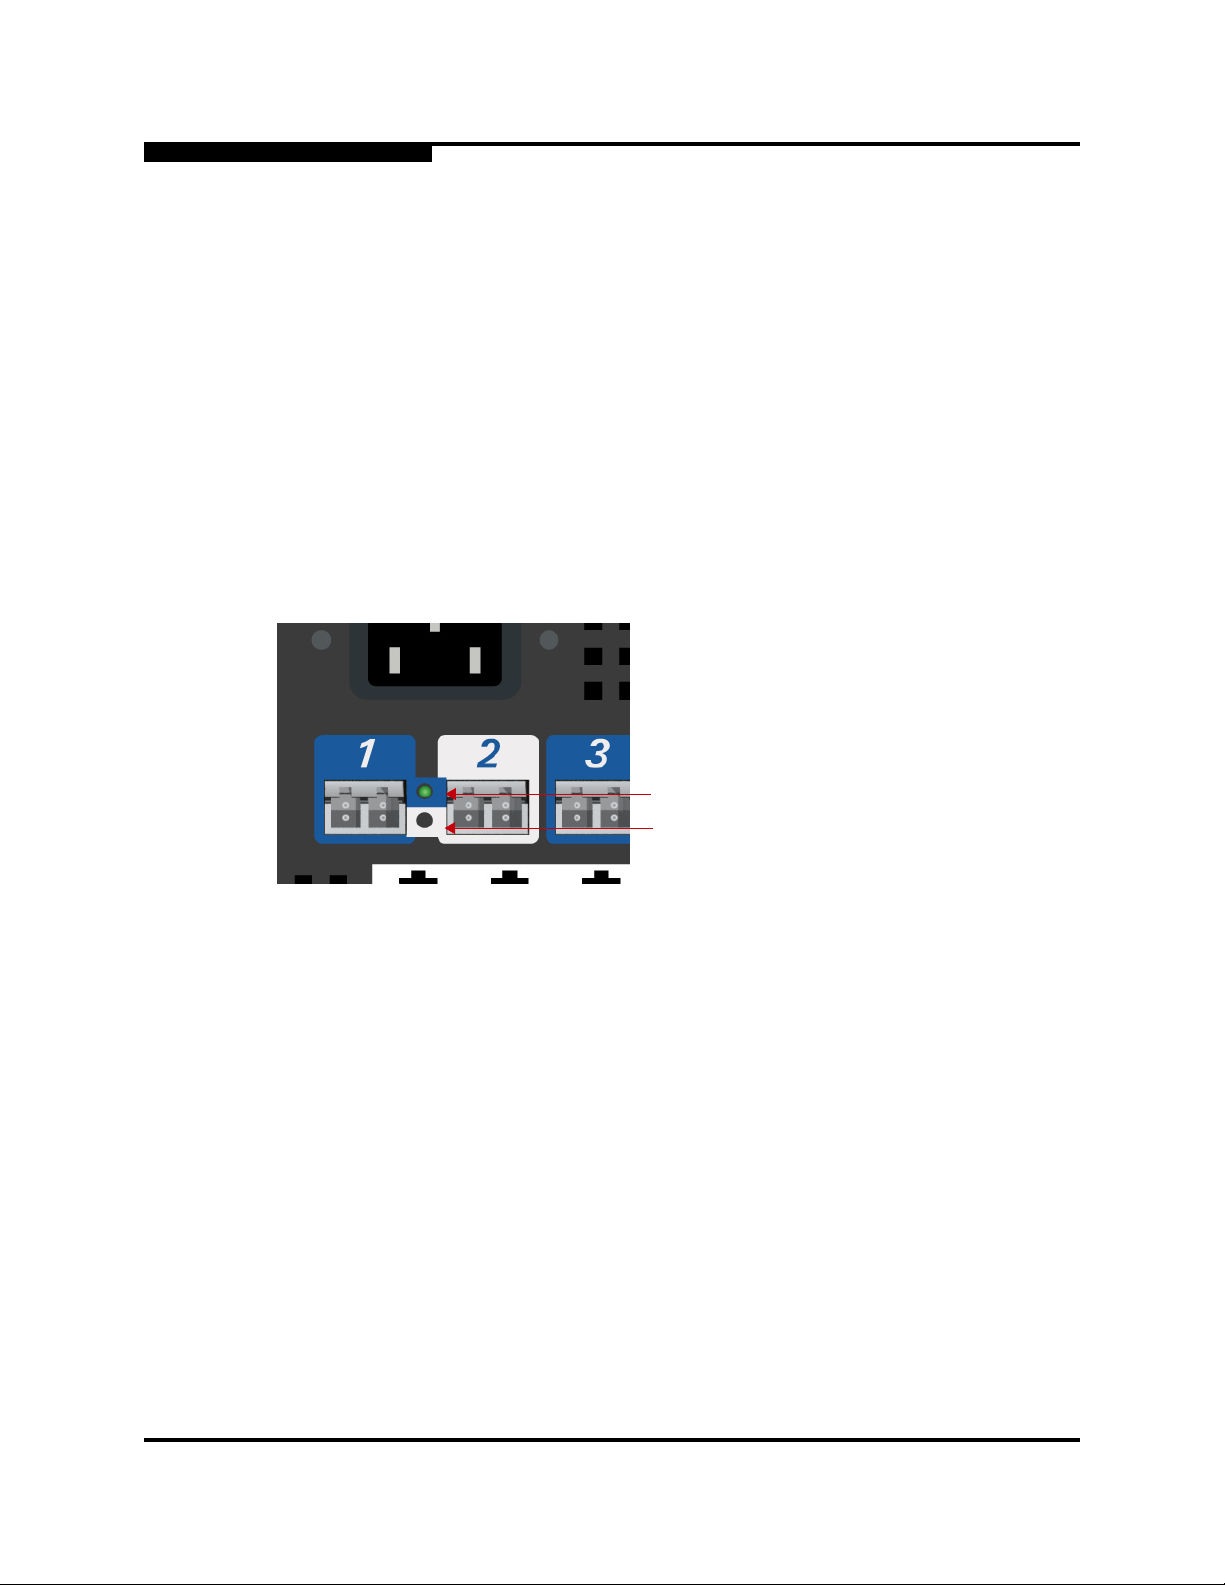
1. Using a standard multi-mode (62.5/125um) optical cable, connect ports 1 and
2 of both SANbox SSPs to the switch labeled FC Switch A in the configuration
diagram, shown in Figure 2-4.
The status LED for each SANbox SSP port transitions from off (no light) to
green when the port is connected to the SAN and the Fibre Channel link
becomes active; the port LEDs are shown in Figure 3-5:
Q
Port 1 LED. Link is up when LED
is green (cable not shown).
Port 2 LED. Link is down.
Figure 3-5. SANbox 8200/8202 SSP Port LED Transitions
2. Connect ports 3 and 4 of both SANbox SSP to the switch labeled FC Switch B
in the configuration diagram.
3. Create two zones: one on FC Switch A named Zone front_A, and another
zone on FC Switch B named Zone front_B.
4. Add the SANbox SSP ports connected to FC Switch A to both Zone front_A
and Zone back_A.
5. Add the SANbox SSP ports connected to FC Switch B to both Zone front_B
and Zone back_B.
3-10 SN0054628-00 A
Page 37

Q
3.4.3
Connecting Hosts to the SAN
When setting up a high-availability configuration, you must make sure that each
host:
■ Includes installed and supported high-availability or multi-pathing software.
■ Is connected to both SANbox SSPs in the high-availability solution, and not
connected to any other SANbox SSPs.
To connect hosts to the SAN:
1. Connect one HBA port on each host to the switch labeled FC Switch A in the
configuration diagram in Figure 2-4, and add each of these ports to Zone
front_A.
2. Connect the other HBA port on each host to the switch labeled FC Switch B in
the configuration diagram, and add each of these ports to Zone front_B.
3. To access the SVM GUI, start a web browser and point to the IP address you
configured for the SVM appliance.
3 – Getting Started with SANbox SSP
Managing your Configuration
4. Use SVMAdministrator as the user name, and SVMAdministrator for the
password the first time you access the SVM GUI.
5. Configure a new password to use for the SVM GUI.
3.5
Managing your Configuration
See Section 5 Using the SANbox SSP for information about configuring storage,
zoning your SAN, and managing your SAN using the SVM GUI.
Use the SVM GUI to complete management tasks, such as creating storage pools,
virtual volumes, and user-defined hosts (UDH); and assigning a SCSI personality
to each UDH.
SN0054628-00 A 3-11
Page 38

3 – Getting Started with SANbox SSP
Managing your Configuration
Notes
Q
3-12 SN0054628-00 A
Page 39

SANbox SSP Management GUI Reference
This section provides a reference for each screen and panel in the SANbox SSP
Management GUI. Use the SANbox SSP Management GUI to manage the SANbox
SSP chassis. The SANbox SSP Management GUI provides the same functions as
the command line interface.
This section covers the following topics:
■ Managing SANbox SSP
■ Navigating the SANbox SSP Management GUI
3.1
Managing SANbox SSP
You can manage the SANbox SSP in three ways:
■ Remotely through the SANbox SSP Management GUI.
■ Remotely through the command line interface (CLI)
■ Locally through the CLI using the local administrative console
Section 3
The following sections provide more detailed information about each of the three
ways of accessing SANbox SSP.
NOTE: The examples shown in this section illustrate the interface for the
SANbox 8202-16 Storage Services Platform. Operation of the
SANbox 8200-08 SSP and SANbox 8202-08 SSP are identical with
SANbox 8202-16 SSP, with the exception that eight fewer ports are
shown in the SANbox SSP Management GUI and command line interface.
SN0054628-00 A 3-1
Page 40

3 – SANbox SSP Management GUI Reference
Managing SANbox SSP
3.1.1
Using the SANbox SSP Management GUI
The SANbox SSP Management GUI is supported on Microsoft Windows platforms
running Internet Explorer version 5 or greater. To run the SANbox SSP Management
GUI, Java WebStart must be installed on your management station. Java WebStart
is an application that allows you to download and run a full-featured Java application,
such as the SANbox SSP Management GUI, directly from a web page.
SANbox SSP simplifies the task of configuring the management station by
automatically detecting whether Java WebStart needs to be installed when the
management station first accesses SANbox SSP. If Java WebStart is not present
on the management station, SANbox SSP can provide a copy of the application
that you can download and install. See "To install Java WebStart:" on page 4-2 and
"To download the SANbox SSP Management GUI from a web browser:" on page 4-3
for more information.
Once you've installed the WebStart application, the web console enables you to
access the SANbox SSP Management GUI remotely using your standard web
browser. For web browsers already running Sun's Java WebStart application, skip
the next two sections and see "To log into the SANbox SSP Management GUI:" on
page 4-4.
Q
NOTE: Sun Microsystems provides versions of Java WebStart for Windows and
other platforms through its Java website. You may be able to use the
SANbox SSP Management GUI from non-Windows management
stations using a version of Java WebStart provided by Sun; however,
QLogic only supports the use of the SANbox SSP Management GUI on
Windows platforms running Internet Explorer version 5 or greater in
conjunction with the version of the Java WebStart application provided
with your SANbox SSP.
To install Java WebStart:
For web browsers on Windows platforms that are already running Sun's Java
WebStart application, see the next section “Using the Web Console” instead. For
web browsers on Windows platforms that do not yet have Sun's Java WebStart
application installed, follow this procedure:
1. From a web browser, enter the management port (labeled ) IP address as
the URL and press the Enter key.
2. In the screen that displays, click Here is a local copy for Windows users to
install the Sun Java WebStart Application on your machine.
3. The License Agreement dialog box displays. In the License Agreement dialog
box, click Accept to begin software installation.
3-2 SN0054628-00 A
Page 41

Q
3 – SANbox SSP Management GUI Reference
Managing SANbox SSP
4. In the Installation Directory dialog box, enter the path for the directory to install
the Sun Java WebStart application.
5. The Installation Directory dialog box displays. Click Next and then Finish to
complete the installation.
To download the SANbox SSP Management GUI from a web browser:
NOTE: At least 100MB of free disk space must be available on your host system’s
hard drive for the SANbox SSP Management GUI and WebStart software.
WebStart must be installed from the browser from which you will access
the SANbox SSP Management GUI. For example, you cannot install
WebStart using Netscape and run the SANbox SSP Management GUI
from Internet Explorer.
1. In your web browser, type the IP address of the SANbox SSP management
port, labeled , (example: http://10.4.2.123). The following screen
displays.
Figure 3-1. QLogic SANbox Storage Services Platform (SSP) Screen
NOTE: The version number of SANbox SSP is listed next to the Version label.
SN0054628-00 A 3-3
Page 42

3 – SANbox SSP Management GUI Reference
Managing SANbox SSP
2. Click Web Console to start loading the SANbox SSP Management GUI
application. The following screen displays.
Figure 3-2. SANbox SSP Management GUI Application Installation Screen
WebStart downloads the SANbox SSP Management GUI from the web server
and installs it on your host system.
3. Click Yes when WebStart prompts Do you want to install this application?
The SANbox SSP Management GUI application start ups automatically after
WebStart downloads the jar.
To log into the SANbox SSP Management GUI:
Q
1. From a web browser, log in with your username and password, using the same
web browser from which the WebStart application was installed:
username: kadmin
password: kahuna
Figure 3-3. SANbox SSP Management GUI Login Screen
3-4 SN0054628-00 A
Page 43

3 – SANbox SSP Management GUI Reference
Q
2. After typing the username and password, click Logon.
3. QLogic recommends that you change the password if you did not already do
so during setup:
■ If you are using the SANbox SSP Management GUI, change the password
on the Telnet screen. See "Telnet" on page 4-12 for more information.
■ If you are using the CLI, run the Modify User command to change the
password. See "Modify User Command" on page B-16.
3.1.2
Using the Command Line Interface (Remotely)
You can remotely connect to the CLI through telnet or ssh. Before you can access
the CLI remotely, you must configure the management port (labeled on the port
side of SANbox SSP). If you did not yet configure the management port for remote
access, see "Accessing SANbox SSP for the First Time" on page 3-7.
After you access the CLI through telnet or ssh, see Appendix B Command
Reference for information about basic operation and configuration commands.
Managing SANbox SSP
To access the CLI using telnet:
For more information about remotely accessing the CLI through telnet, see "To telnet
to the CLI from a web browser:" on page B-4.
To access the CLI using ssh:
You can download a free ssh client from http://www.ssh.com. The ssh command
line to log in to the management IP address is:
ssh kadmin@10.4.2.123
3.1.3
Using the Command Line Interface (Locally)
Most users access the CLI locally only once for configuration when starting the
SANbox SSP for the first time. If you have not yet completed this step, see
"Accessing SANbox SSP for the First Time" on page 3-7.
SN0054628-00 A 3-5
Page 44

3 – SANbox SSP Management GUI Reference
Navigating the SANbox SSP Management GUI
3.2
Navigating the SANbox SSP Management GUI
The top-level navigation point for the SANbox SSP Management GUI is the Chassis
panel on the System tab. The Chassis panel provides property information for the
SANbox SSP.
Q
Figure 3-4. SANbox SSP Management GUI Screen
Using the SANbox SSP Management GUI, you can access these functions.
Table 3-1. SANbox SSP Management GUI Functions
GUI Area Function For more information, see:
System Overall system functionality, SANbox SSP
status, port management, system
configuration
Topology The Topology tab is not used for the SANbox
SSP implementation that runs the StoreAge
software
Storage The Storage tab is not used for the SANbox
SSP implementation that runs the StoreAge
software
Diagnostics Diagnostics for ports and virtual disks "Diagnostics" on page 4-11
Telnet Telnet window "Telnet" on page 4-12
Log List of system events "Log" on page 4-13
"System" on page 4-7
not applicable
not applicable
3-6 SN0054628-00 A
Page 45

Q
3.2.1
System
3 – SANbox SSP Management GUI Reference
Navigating the SANbox SSP Management GUI
System allows you to manage and configure port settings on the SANbox SSP.
To manage external port behavior:
1. Click System on the left pane window.
2. Navigate within the lower window to the Ports folder.
3. Click the specific port to manage. The Port Information screen displays (see
Figure 3-5).
Figure 3-5. System Port Information Screen
The following information displays:
■ World Wide Port Name
■ World Wide Node Name
■ Link State
■ Link Type
■ Current Port Settings
■ Force Fabric
■ Initiator
■ Target
■ Port Speed
■ Enabled/Disable Port
SN0054628-00 A 3-7
Page 46

3 – SANbox SSP Management GUI Reference
Navigating the SANbox SSP Management GUI
In addition, the following settings can be changed on the System screen:
NOTE: For all the Force Fabric, Initiator, Target, and Speed settings, you must
click Apply before the settings are saved. The Initiator, Target, and Max
Frame Size settings take effect only after rebooting the SANbox SSP.
Force Fabric: selecting this box forces this port to operate in Fabric Mode Only (no
loop support).
Initiator: selecting this box enables initiator (storage back-end) operations through
this port.
Target: selecting this box enables target (front-end) operations through this port.
Speed: changing this box enables you to force the speed operation of the SANbox
SSP port.
Enabling and Disabling Ports
NOTE: Enabling and Disabling ports takes effect immediately after clicking the
Enable/Disable buttons.
Q
Disable: click Disable to disable a port.
Enable: click Enable to enable a port.
3-8 SN0054628-00 A
Page 47

Q
3 – SANbox SSP Management GUI Reference
Navigating the SANbox SSP Management GUI
Ethernet Panel (System)
The Ethernet panel in the System area shows Ethernet configuration information
for the SANbox SSP. To view the Ethernet panel, click the top-level icon in the tree
hierarchy on the left side. Figure 3-6 displays the System Ethernet panel.
Figure 3-6. System Ethernet Panel
An amber LED indicates that the corresponding component is missing, has failed,
or will likely fail soon. Even if your SANbox SSPs appear to be performing normally,
you should replace parts if their corresponding LED has turned amber. See
"Replacing Hardware Components" on page 6-6 for information about ordering and
installing replacement parts.
SN0054628-00 A 3-9
Page 48
3 – SANbox SSP Management GUI Reference
Navigating the SANbox SSP Management GUI
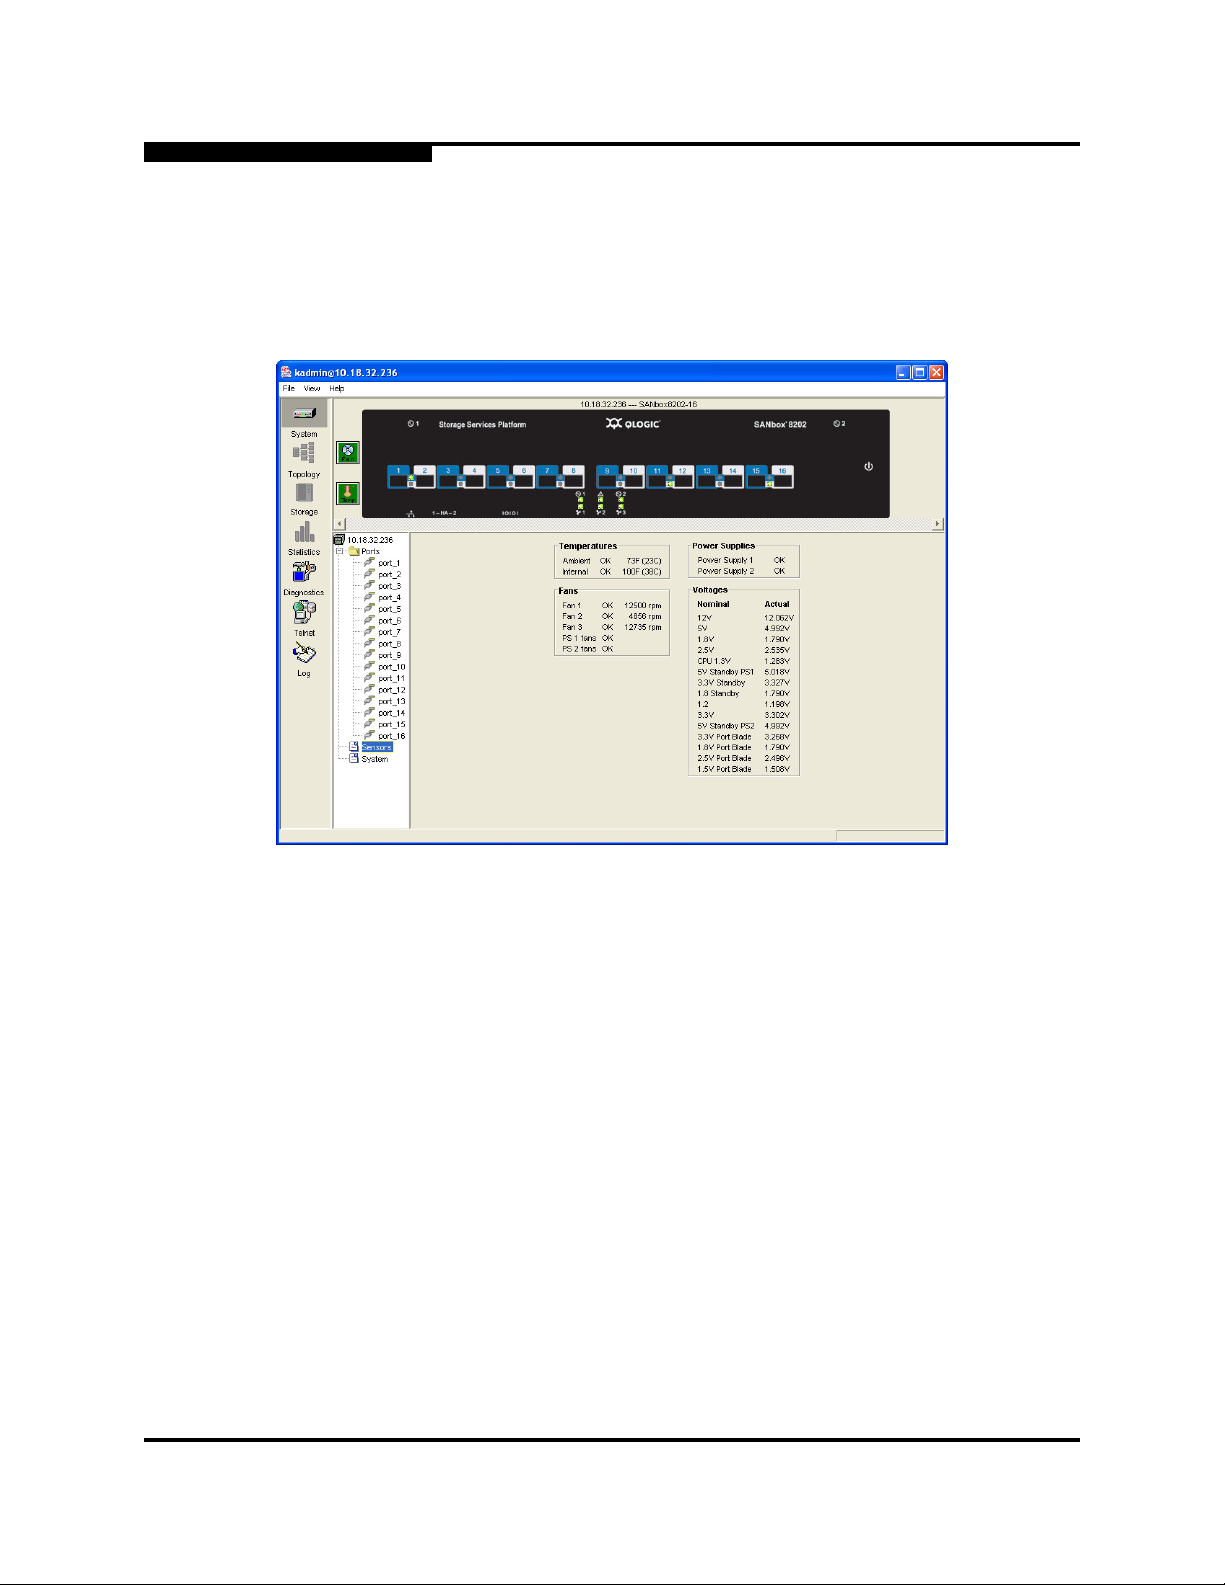
Sensors Panel (System)
The Sensors panel in the System area shows diagnostic information for
temperatures, fans, power supplies, and voltages for the power supplies on the
SANbox SSP. To the view the Sensors panel, click Sensors in the tree hierarchy
on the left. Figure 3-6 displays the System Sensors panel.
Q
Figure 3-7. System Sensors Panel
3-10 SN0054628-00 A
Page 49
Q
3.2.2
Diagnostics
3 – SANbox SSP Management GUI Reference
Navigating the SANbox SSP Management GUI
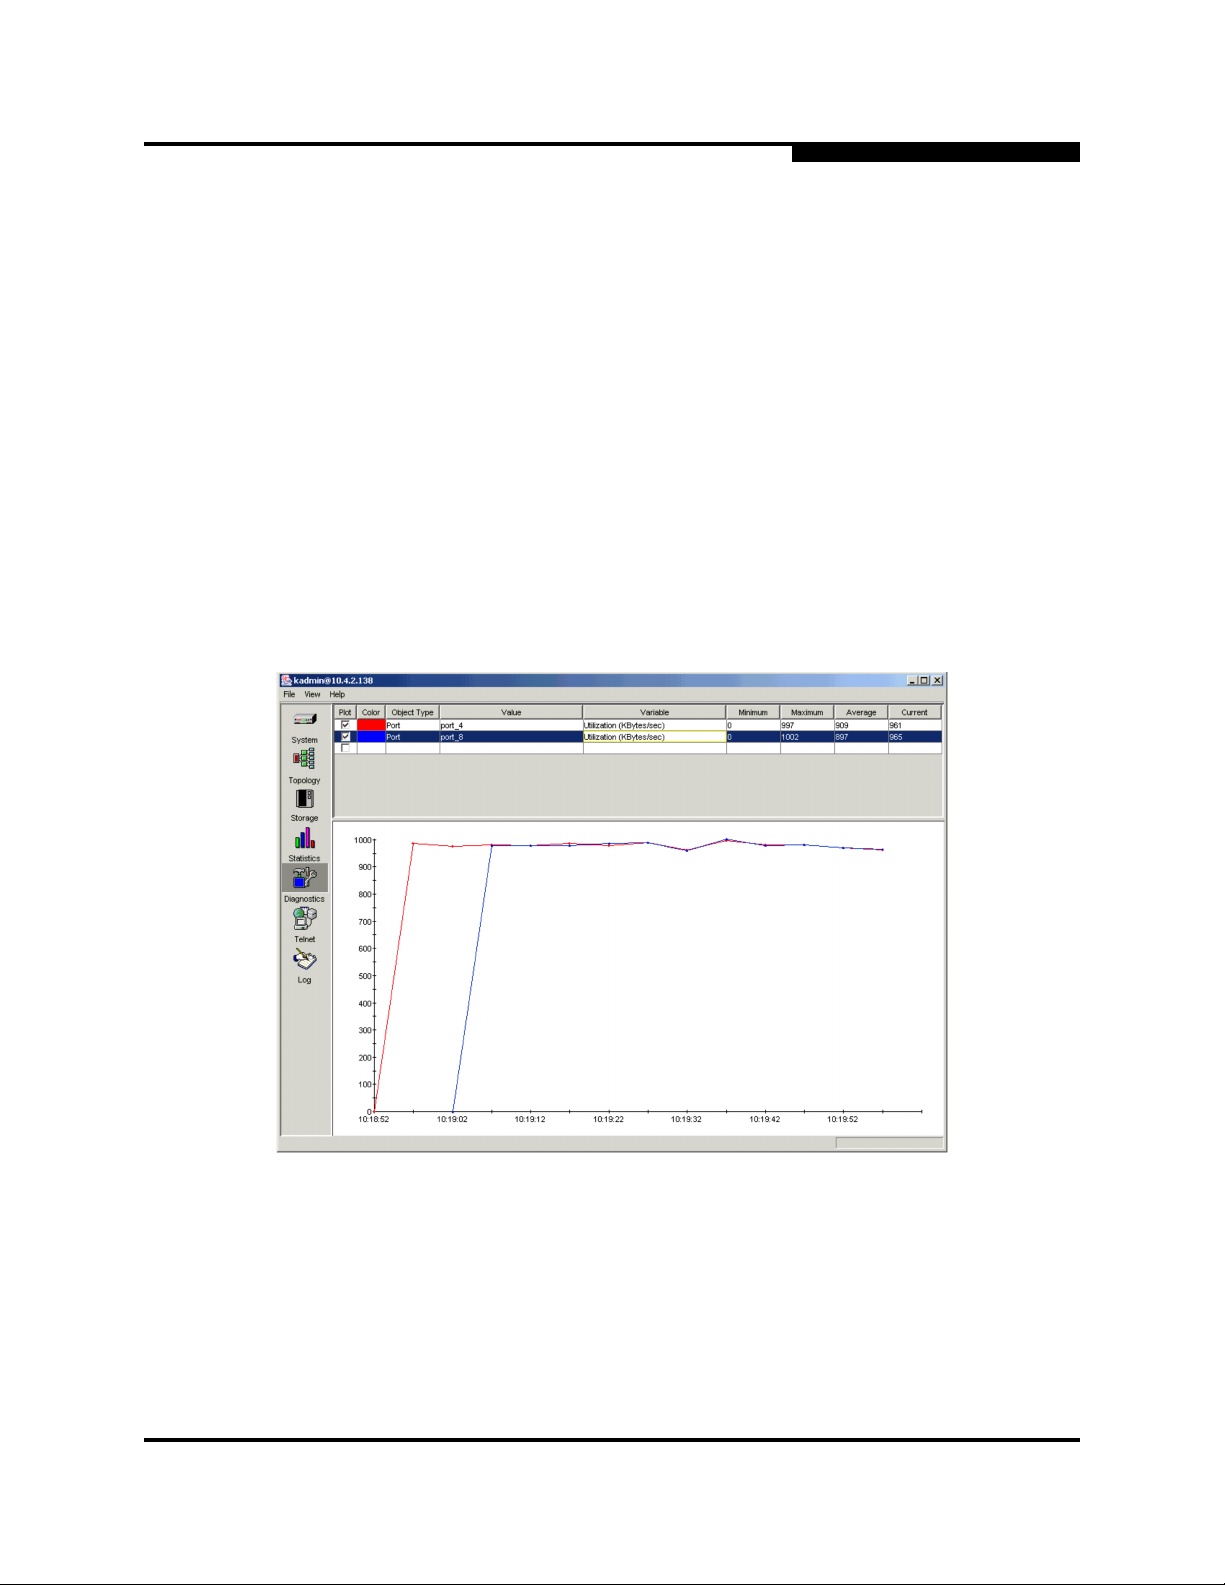
The Diagnostics screen provides statistics for various aspects of the system.
To use the Diagnostics panel:
1. Select an object type:
■ Port
■ Virtual Volume
2. Select a value for the object, such as port number if the object is port.
3. Select a variable to graph.
For example, utilization, errors, and transmit frames are among the variables
that you can graph for a port on the Diagnostics screen.
The following screen shows utilization for ports 4 and 8 (see Figure 3-8):
Figure 3-8. Diagnostic Screen Displaying Port Utilization
SN0054628-00 A 3-11
Page 50
3 – SANbox SSP Management GUI Reference
Navigating the SANbox SSP Management GUI
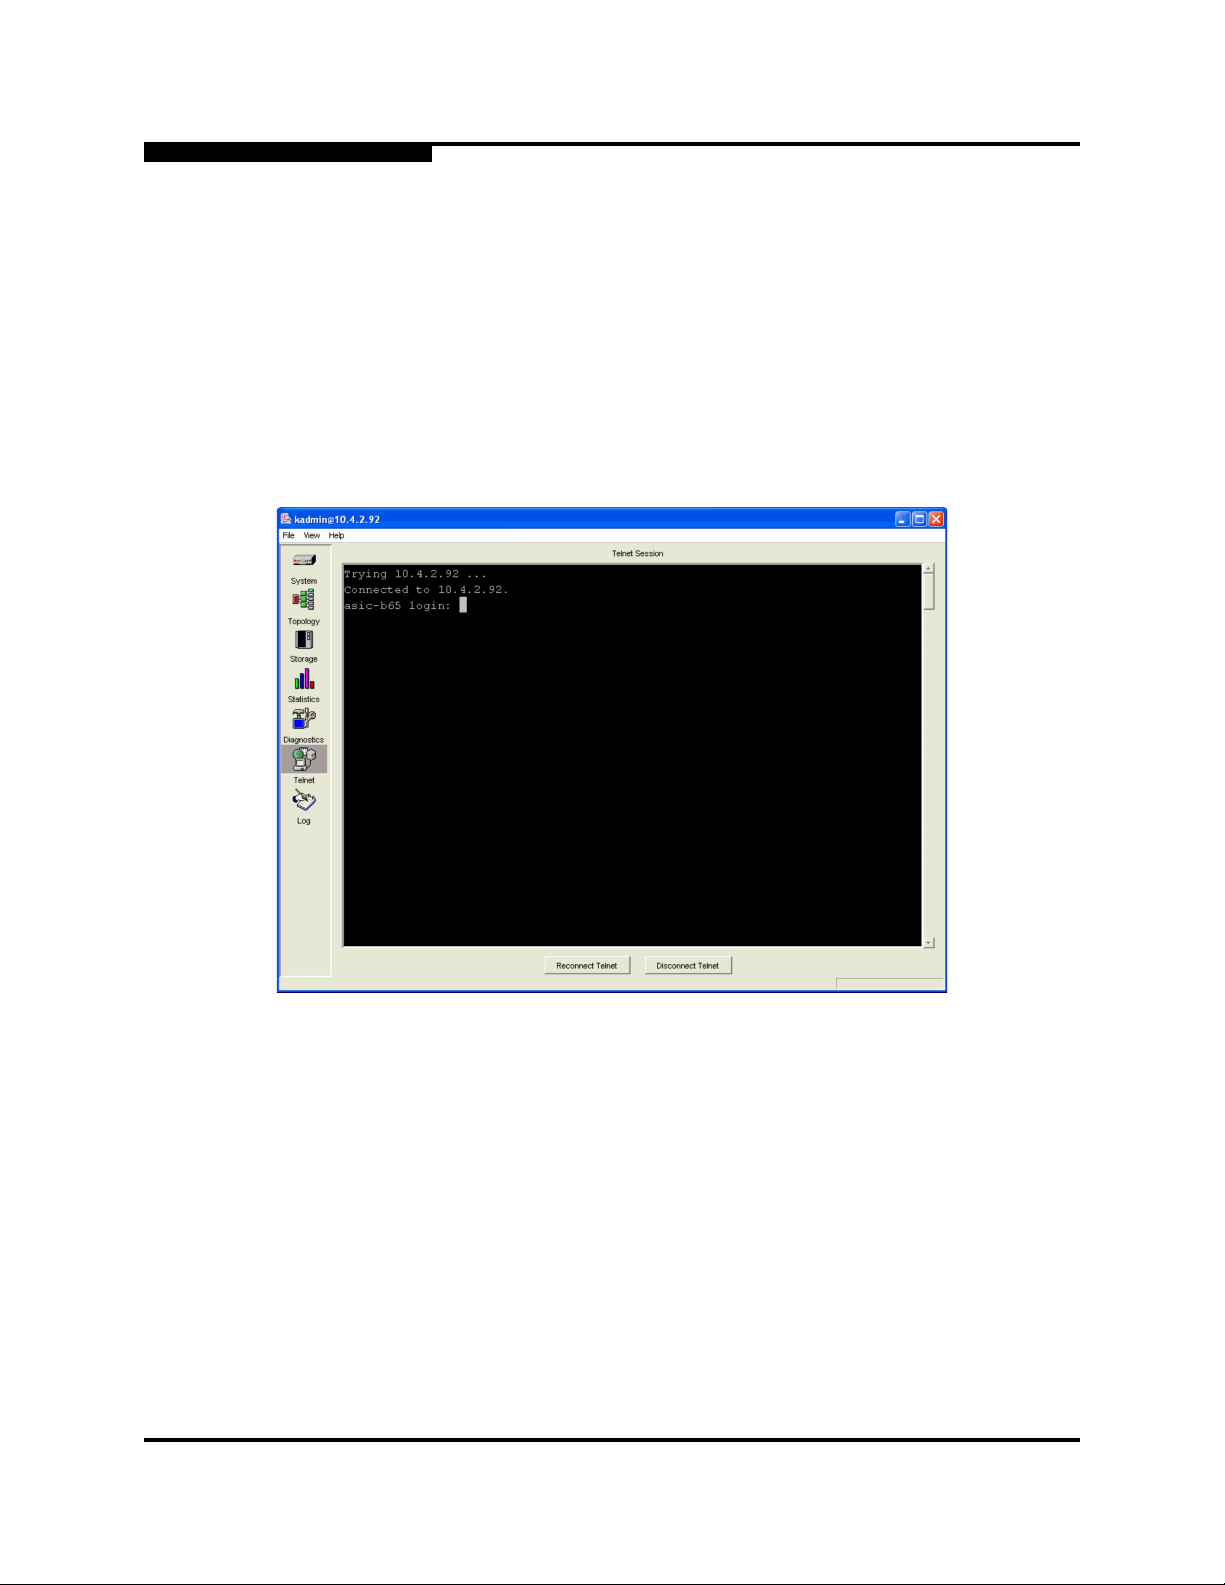
3.2.3
Telnet
The Telnet screen enables you to initiate a telnet session from the SANbox SSP
Management GUI.
To begin a telnet session from the SANbox SSP Management GUI:
1. Click Telnet in the left-most pane.
2. Enter the correct administrative login and password.
The following Telnet screen displays (see Figure 3-9):
Q
Figure 3-9. Telnet Screen Initiated from the SANbox SSP Management GUI
The options in the lower window are:
Reconnect Telnet: Re-establishes a telnet session.
Disconnect Telnet: Disconnects a telnet session.
3-12 SN0054628-00 A
Page 51
Q
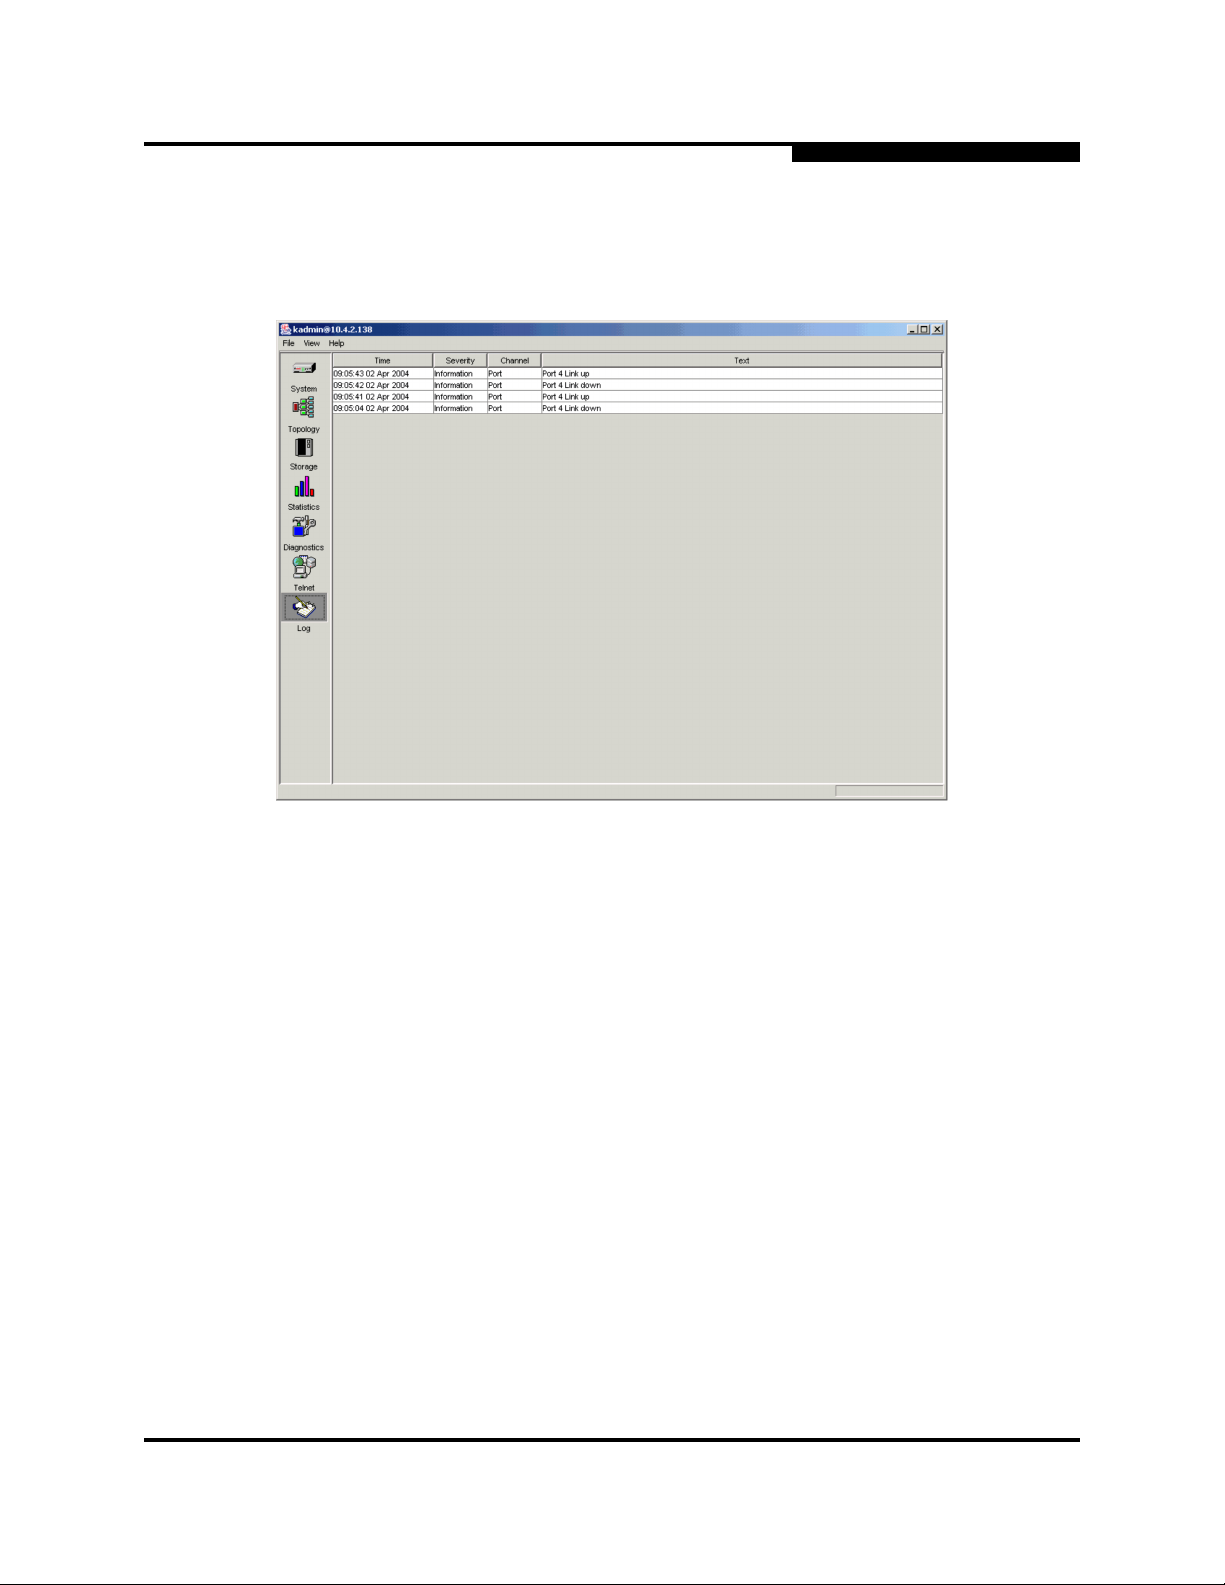
3.2.4
Log
3 – SANbox SSP Management GUI Reference
Navigating the SANbox SSP Management GUI
The Log panel shows a list of system events (see Figure 3-10)
Figure 3-10. Diagnostic Screen Log Panel
Events are reported for the following channels on the Log screen:
■ System
■ Port
■ Chassis
■ Hardware
■ Storage Application
Each event is assigned one of the following severity levels:
■ Emergency
■ Alert
■ Critical
■ Error
■ Warning
■ Notice
■ Information
■ Debug
SN0054628-00 A 3-13
Page 52

3 – SANbox SSP Management GUI Reference
Navigating the SANbox SSP Management GUI
Notes
Q
3-14 SN0054628-00 A
Page 53

Section 4
Using the SANbox SSP
This section provides procedures for using the SANbox SSP, including SAN zoning,
configuring storage, creating virtual disks, interpreting LEDs, and shutting down.
This section describes the following procedures:
■ Setting up a High-Availability Configuration
■ SAN Zoning
■ Directly Connecting Devices to SANbox SSP
■ Configuring Storage
■ Using the SVM GUI to Manage Virtual Storage
■ Shutting Down SANbox SSP
4.1
Setting up a High-Availability Configuration
Table 4-1 provides the specific requirements for each component that is part of the
recommended high-availability configuration. The table presents the information for
a highly available configuration with a single host.
Table 4-1. Required Configuration for the Components
of a High-Availability System
Component
a
Type
Host 1
Minimum
Required
Required Configuration per Component
■ Supported high-availability or multi-pathing software
installed.
■ Connected to both SANbox SSPs in the high-availability
solution, and not connected to any other SANbox SSPs.
HBA 2 per host
■ Each connected to one SANbox SSP (directly or through
a fabric). Each must see only one SANbox SSP.
SANbox SSP 2
■ Each can access all storage ports.
■ Each connected to both SVM appliances through the
back-side fabric.
StoreAge SVM
Appliance
2
■ Each one connected through the back-side fabric to both
SANbox SSPs.
■ Each one can access all storage ports.
SN0054628-00 A 4-1
Page 54

4 – Using the SANbox SSP
Setting up a High-Availability Configuration
Table 4-1. Required Configuration for the Components
of a High-Availability System (Continued)
Q
Component
a
Type
Storage array At least
Fibre Channel
switches
or
Director-class
switch
a
See the SANbox SSP release notes for the list of supported hardware including host
operating systems, HBAs, storage, and FC switches.
Minimum
Required
1 device
2 or more
1
Required Configuration per Component
■ Supported RAID device with two or more independent
controllers.
■ All ports are accessible from both SVM appliances.
■ If a dual-controller active/passive RAID is used, the
SANbox SSPs must be cross-connected with the
controllers, which means that each SANbox SSP must
see both controllers in the RAID.
■ Supported Fibre Channel switch.
■ High availability
■ Multiple zones
4-2 SN0054628-00 A
Page 55
Q
4.2
SAN Zoning
NOTE: If you configure your SAN zoning using Fibre Channel World Wide Port
Zoning is a SAN management technique for making the most efficient use of storage
devices in the SAN. This section provides two examples of zoning.
In Figure 4-1, a single Fibre Channel switch is used to connect all storage and
initiators. Zoning is used to partition the front-side initiators (HBAs) and back-side
(target) storage and SVM appliances into two separate logical SANs.
4 – Using the SANbox SSP
SAN Zoning
Names (WWPNs), note that SANbox SSP WWPNs begin with the
hexadecimal digits 5009066. StoreAge SVM appliance WWPNs begin
with 2000111.
Figure 4-1. Single (Zoned) Fabric Configuration
SN0054628-00 A 4-3
Page 56

4 – Using the SANbox SSP
SAN Zoning
Note the following about Figure 4-1:
■ Zone A (pink-shaded area): initiators. All initiators and SANbox 8200-08 SSP
front-side ports (ports 1-4) are zoned together.
■ Zone B (orange-shaded area): storage. All storage ports, the StoreAge SVM
appliance, and SANbox 8200-08 SSP back-side ports (ports 5-8) are zoned
together.
■ The figure shows a configuration that does not use high-availability features.
In Figure 4-2, two independent fabrics and host failover software are used to ensure
availability. Within each switch, zoning is used to partition the front-side initiators,
and back-side (target) storage and both SVM ports. The figure uses
SANbox 8200-08 SSPs/SANbox 8202-08 SSPs.
Q
Figure 4-2. High-Availability Fabric Configuration with Zoning
4-4 SN0054628-00 A
Page 57

Q
Note the following about Figure 4-2:
Primary Fabric (FC Switch A) Secondary Fabric (FC Switch B)
Zone front_A: Primary Initiators
(yellow zone)
All primary HBA ports for each host All secondary HBA ports for each host
SANbox SSP 1, Ports 1-4 SANbox SSP 2, Ports 1-4
Zone back_A: Primary Storage
(green zone)
All Primary storage ports All Secondary storage ports
SANbox SSP 1, Ports 5-6 SANbox SSP 1, Ports 7-8
SANbox SSP 2, Ports 5-6 SANbox SSP 2, Ports 7-8
StoreAge SVM Appliances, primary ports StoreAge SVM Appliances, secondary
4.3
Directly Connecting Devices to SANbox SSP
Zone front_B: Secondary Initiators
(pink zone)
Zone back_B: Secondary Storage
(orange zone)
ports
Directly Connecting Devices to SANbox SSP
4 – Using the SANbox SSP
SANbox SSP supports the direct connection of its ports to initiator devices. When
directly connecting a device to an SANbox SSP port, make sure that:
■ The device is explicitly configured for loop-only operation (point-to-point is not
supported for directly connecting at this time). See the documentation for your
device for more information.
■ if you are attaching a host, the SANbox SSP port mode is set to target or
initiator-target mode. Do not directly connect storage devices or the SVM
appliance to the SANbox SSP.
See "Modify Port Command" on page B-14 for details on configuring port modes.
SN0054628-00 A 4-5
Page 58

4 – Using the SANbox SSP
Configuring Storage
Figure 4-3 shows initiators connected directly to a SANbox 8202-16 SSP:
Q
Figure 4-3. Connecting Initiators Directly to SANbox SSP
4.4
Configuring Storage
This section provides guidelines for proper zoning, storage access, and maximum
frame size when configuring storage for use with SANbox SSP.
4.4.1
Zoning
See "SAN Zoning" on page 5-3 for zoning examples using the SANbox SSP. As
you configure your storage and plan the zoning, consider the specific requirements
of your particular installation.
4.4.2
Access
The SANbox SSP port connected to the storage must have permission to access
the storage. If you are using a RAID with LUN masking, you must make sure that
the SANbox SSP port has access to the LUN.
4-6 SN0054628-00 A
Page 59

Q
4.4.3
Maximum Frame Size
The default maximum frame size for the SANbox SSP is 1024 bytes. The maximum
frame size must be set to the smallest maximum frame size of any device on the
SAN.
If no device on the SAN is less than 2048 bytes, set the maximum frame size to
2048 bytes for a potential performance advantage. See "Modify Ports Command"
on page B-15 for more information about setting the maximum frame size.
NOTE: The maximum frame size for most SANs can be set to 2048.
4.4.4
Configuration Restriction on RAID Devices
CAUTION! Failure to comply with this restriction can cause the SVM to be unable
to see or access the available storage, or, in the most extreme cases,
data corruption.
4 – Using the SANbox SSP
Configuring Storage
This StoreAge-specific restriction affects RAID devices that are used as back-side
storage.
Some RAID devices allow the administrator to expose multiple logical units on
multiple ports of the RAID device using the same logical unit number (LUN). This
means that a logical unit can be exposed on controller A port 1 as LUN 3, for
example, while simultaneously a different logical unit can be exposed on controller B
port 2, also as LUN 3.
While this is a legal configuration for the RAID devices in question, the device
manager in the SVM GUI (Storage Virtualization Manager Graphical User Interface)
interprets those two distinct LUNs as a single piece of physical storage, with two
available paths.
When accessing storage through SVM GUI, it is important that the administrator
not assign the same LUN ID to different logical units on the same RAID device,
even if those logical units are visible on different ports. Each logical unit on a given
RAID device must have a unique LUN ID.
SN0054628-00 A 4-7
Page 60

4 – Using the SANbox SSP
Using the SVM GUI to Manage Virtual Storage
See Figure 4-4 for a visual representation of the StoreAge-specific restriction affects
RAID devices.
Q
Valid LUN
Configuration
Controller A, Port 1
LUN 1 - Logical Unit 1
LUN 2 - Logical Unit 2
LUN 3 - Logical Unit 3
Incompatible with
StoreAge SVM
Controller B, Port 2
LUN 1 - Logical Unit 1
LUN 2 - Logical Unit 2
LUN 3 - Logical Unit 4
Logical Unit 1
Logical Unit 2
Logical Unit 3
Logical Unit 4
Figure 4-4. StoreAge Configuration Restriction on Back-Side Storage RAID Devices
4.5
Using the SVM GUI to Manage Virtual Storage
This section provides general instructions for creating storage pools and virtual
volumes, creating groups of HBAs, called UDHs (user defined hosts), and assigning
a storage device profile to a UDH. For more information, see the StoreAge
documentation.
NOTE: This information is provided for your convenience. For additional details
about the SVM GUI, see the StoreAge documentation. If there are
differences between the StoreAge documentation and this installation and
configuration guide, follow the StoreAge documentation.
To create storage pools:
1. Open the SVM GUI, and open Volume Manager in tree view.
2. Click Pool, click Create, and then select the physical disks that you want to
include in the pool.
WARNING!!
This step removes the data on the physical disks that are added
to the pool. Once a physical disk is added to a pool, the SVM
GUI controls that disk. The data on disks that are not in a pool
are not subject to this issue.
NOTE: When you create the first storage pool, you are prompted to provide
a domain name that identifies the management domain for the SVM
appliance. Enter a domain name, and then click the Submit button
to commit the new name to the configuration.
3. Enter a name for the pool, and then click Continue.
4-8 SN0054628-00 A
Page 61

Q
4 – Using the SANbox SSP
Using the SVM GUI to Manage Virtual Storage
To create a user defined host (UDH) and set the SCSI personality:
1. Open the SVM GUI, and open Volume Manager in tree view.
2. Click Host, then select Create UDH.
3. Type the name of the host, select the operating system type, and then select
the HBAs to be included in this UDH.
NOTE: A UDH, which is a group of HBAs, enables you to easily control the
virtual volumes exposed to multiple HBAs installed in a single server.
4. Click Confirm to save the association between the host and the selected HBAs.
5. Click Manage under the Host tree, and then click the Manage button on the far
right side of the host to which you want to assign a storage device profile.
NOTE: The storage device profile is called a SCSI Personality in the SVM
GUI.
6. Click the Set SCSI Personality button, and select the personality that you want
to assign to the selected UDH.
See Table 4-2 for the guidelines for selecting the storage device profile. Make
sure you select the personality that is supported for your high-availability
configuration. For a given high-availability configuration, only one personality
type is supported. See the solution guide that corresponds to your
high-availability setup for more information.
:
VMWare LSI RDAC
Windows StoreAge Default
HP-UX HPUX Personality
a
If your platform is not listed, see the SANbox SSP solution guide for your configuration.
7. Click Confirm.
NOTE: You can expose the same virtual volume to different hosts with different
To create virtual volumes:
1. Open the SVM GUI, and open Volume Manager in the tree view.
2. Click Volume, select Create, and then type a name for the new volume.
Table 4-2. Guidelines for Selecting the Storage Device Profile
If you have:a Select this Personality:
personality settings.
3. Select the pool to use for the volume, and enter the capacity that you want to
use from the pool.
SN0054628-00 A 4-9
Page 62

4 – Using the SANbox SSP
Using the SVM GUI to Manage Virtual Storage
4. Assign permissions: R/W for read and write or Off (read only is not supported),
and then click Continue.
5. The new volume displays in the volume list.
6. Perform a hardware rescan on the system. Depending on the system, you may
also need to reboot the initiator to discover the new volume.
4.5.1
Failing Back
Failover to secondary paths on the back-side and front-side is automatic when you
are using an SVM appliance, while failback is manual. Failback causes I/O traffic
to resume using the primary paths. The system does not automatically fail back
once the primary back-side paths are restored. The administrator must perform an
operation on the primary paths to make them active. Until the primary paths are
also active, the system continues using the secondary paths.
On the back-side, if primary path failure has forced the activation of secondary
paths, the primary paths must be made available and active as soon as possible.
This requires both addressing the cause of the failure, and performing a manual
failback operation once the primary paths are made available. If you do not manually
fail back, and all secondary back-side paths fail, the system does not automatically
activate the primary paths on the back-side. Even if the primary paths are available,
the system does not automatically activate the primary paths.
Q
The failback behavior between front-side and back-side paths differs in the case
that all secondary paths fail. For both front-side and back-side paths, primary paths
are not automatically made active once they are available. On some systems,
however, host-based front-side multipathing software does activate the primary
paths if all secondary paths fail on the front-side. This reduces the urgency of
performing the failback operation on the front-side, since a path failure can still be
tolerated. The administrator must still address the failure on the front-side paths
and return the primary paths to an available state.
To fail back front-side traffic (to resume using primary paths ):
1. Open the SVM GUI, and open Volume Manager in the tree view.
2. Click Volume, select Manage under the host tree, and then click the Manage
button on the far right side of the host that you want to failback.
3. Click Fail Back.
The SVM GUI provides the name of the SANbox SSP that the selected host resumes
using.
4-10 SN0054628-00 A
Page 63

Q
To fail back back-side traffic (to resume using primary paths ):
1. Open the SVM GUI, and open Physical Devices in the tree view.
2. Click Manage, and then click the Manage button on the far right side of the
device that you want to failback.
3. Click Fail Back.
4.6
Shutting Down SANbox SSP
This section provides the steps for restarting or shutting down the SANbox SSP.
To restart SANbox SSP from the CLI:
1. Issue the Reboot command from the CLI.
2. Confirm that you are rebooting the system by typing Y at the Reboot system?
prompt.
The system shuts down and restarts, terminating active management sessions
in the process. SANbox SSP will accept new management sessions once the
system is restarted.
4 – Using the SANbox SSP
Shutting Down SANbox SSP
To shut down SANbox SSP from the CLI:
1. Issue the Shutdown command from the CLI.
2. Confirm that you are shutting down the system by typing Y at the Shut down
system? prompt.
To shut down SANbox SSP using the Main Power Switch:
WARNING!!
■ AC power must be removed from both power supplies to cut power to the
SANbox SSP electronics.
■ If AC power is removed before the unit is placed into standby, SANbox
SSP automatically starts the boot sequence when power is restored.
To initiate shutdown, press the power button, and wait until the Alert, FAN 1, FAN 2,
and FAN 3 LEDs turn amber.
Once shutdown is complete, the system is in standby mode, and the Alert, FAN 1,
FAN 2, and FAN 3 LEDs turn off.
NOTE: The PS 1 and PS 2 LEDs remain illuminated with a green light as long
as the AC power is connected to the power supplies.
SN0054628-00 A 4-11
Page 64

4 – Using the SANbox SSP
Shutting Down SANbox SSP
Notes
Q
4-12 SN0054628-00 A
Page 65

Maintaining the SANbox SSP
This section provides information about maintaining the SANbox SSP. Maintenance
tasks include updating the SANbox SSP system software, applying software
patches, interpreting LED patterns, and replacing hardware.
The software may require periodic updates to reflect current software releases and
ensure optimum product performance and functionality.
This section covers the following topics:
■ SANbox SSP System Software
■ Boot Sets
■ Maintenance Mode
■ Updating SANbox SSP System Software
■ Interpreting the LED Patterns
■ Replacing Hardware Components
5.1
SANbox SSP System Software
Section 5
SANbox SSP has two system software components that can be updated:
■ System software image: The system software image contains the operating
environment for SANbox SSP, including the StoreAge SVM Agent for SANbox
SSP.
■ Maintenance Mode image: The Maintenance Mode image contains software
that implements basic system maintenance functions for the platform, including
system update capability.
Each release of the SANbox SSP system software includes the system software
image file used to update the SANbox SSP. Maintenance Mode functionality,
however, rarely changes. The release notes for each system software release
indicate whether a new Maintenance Mode image is included, and whether
installation of the new Maintenance Mode image is required to update the system.
The system update capability provided by SANbox SSP also supports the
incremental update of an existing system image by applying a patch file supplied
by QLogic. This system patching capability allows QLogic to distribute critical system
updates between full releases of the system software.
SN0054628-00 A 5-1
Page 66

5 – Maintaining the SANbox SSP
Boot Sets
5.2
Boot Sets
SANbox SSP allows you to install two system images on the platform at once, and
to choose which system image loads when the system boots. The two locations
where system images can be installed are called boot sets.
A valid boot set is one that has been successfully installed with a system image.
An invalid boot set is either empty or contains an image that cannot be used by
SANbox SSP.
The default boot set, selected during system startup, supplies the system software
that the SANbox SSP uses when booted. You can override this default selection
from the local administrative console when the system starts. See "To select the
active boot set from the local console:" below. The selected boot set is used to boot
the system and becomes the active boot set; the boot set that was not selected is
called the inactive boot set.
To s
elect the active boot set from the local console:
1. Connect to the local administrative console using a terminal emulator, such as
HyperTerm.
Q
2. Start or reboot the system.
After the first phase of system initialization completes, output that is similar to
the following displays:
GNU GRUB version 0.93 (630K lower / 2096128K upper memory)
------------------------------------------------------------
0: Boot Set 1 - StoreAge SVM Version 1.1.0-8 Ide0
1: Boot Set 1 - StoreAge SVM Version 1.1.0-8 Ide0 DIAG
2: Maintenance mode - Version 1.1.0-8 Ide0
3: Maintenance mode - Version 1.1.0-8 Ide0 ip=dhcp
------------------------------------------------------------
Use the ^ and v keys to select which entry is highlighted.
Press enter to boot the selected OS, 'e' to edit the commands
before booting, or 'c' for a command-line.
The selected entry is 0
Entry 0 will be booted automatically in 10 seconds.
5-2 SN0054628-00 A
Page 67

Q
3. Use the arrow keys to select a boot set, and then press the Enter key to boot
using the selection.
The selected boot set becomes the default boot set when the system is next
restarted.
NOTE: Boot set items marked DIAG are for use by QLogic field service
5.3
Maintenance Mode
Maintenance Mode provides menu options for installing and upgrading your
SANbox SSP software. Maintenance Mode is accessible even when no valid boot
set is installed on the system.
To access Maintenance Mode from the local console:
1. Connect to the local administrative console using a terminal emulator, such as
HyperTerm.
5 – Maintaining the SANbox SSP
Maintenance Mode
personnel; they should not be selected under normal operating
conditions.
2. Start or reboot the system. At the boot menu, use the arrow keys to select an
entry labeled Maintenance Mode, and then press the Enter key to boot using
the selection.
If the entry tagged with ip=dhcp is selected, the system attempts to obtain an
IP address automatically from a DHCP server. Otherwise, you must manually
configure IP from Maintenance Mode to enable access to the SANbox SSP
management port (labeled on the port side of the SANbox SSP).
3. Log into the system as kadmin.
The Maintenance Mode menu displays. The options are:
e: Reconfigure Ethernet
g: Get image package from network
i: Install image package
d: Delete image file
l: List available images to install
s: Show installed versions
r: Reboot
m: Show Menu
SN0054628-00 A 5-3
Page 68

5 – Maintaining the SANbox SSP
Updating SANbox SSP System Software
5.4
Updating SANbox SSP System Software
This section provides procedures for the following:
■ Installing a new system software image
■ Applying a system software patch
■ Installing a new Maintenance Mode image
To install a new system software image on SANbox SSP:
1. Load the current system image file onto a server that is accessible via SCP
from the SANbox SSP to be updated.
A system image for this release has a name similar to:
t3-prod_name-image_1.1.0-15_i386.deb
where prod_name is a string specific to your product.
NOTE: The current system image file is available through ftp or on CD-ROM.
Q
2. Install the new release on one of the boot sets of the SANbox SSP.
a. Reboot the system.
b. Select Maintenance Mode in the boot menu.
c. Log in as kadmin to enter the Maintenance Mode menu.
d. Type e to configure the Ethernet port, if it is not already configured.
e. Choose option g to transfer the image file from the network:
t3-prod_name-image_1.1.0-15_i386.deb
f. Choose option i to install that image.
g. Choose the boot set to which the image will be installed (either 1 or 2), and
type YES to confirm erasure of the boot set.
h. After the image is installed, select option r to reboot the system.
To apply a system software patch:
1. Reboot into Maintenance Mode.
2. Login as kadmin user.
3. Choose option e to configure network (if not configured).
4. Choose option g to transfer the following file:
t3-patch_1.1.0-15c_i386.deb
5-4 SN0054628-00 A
Page 69
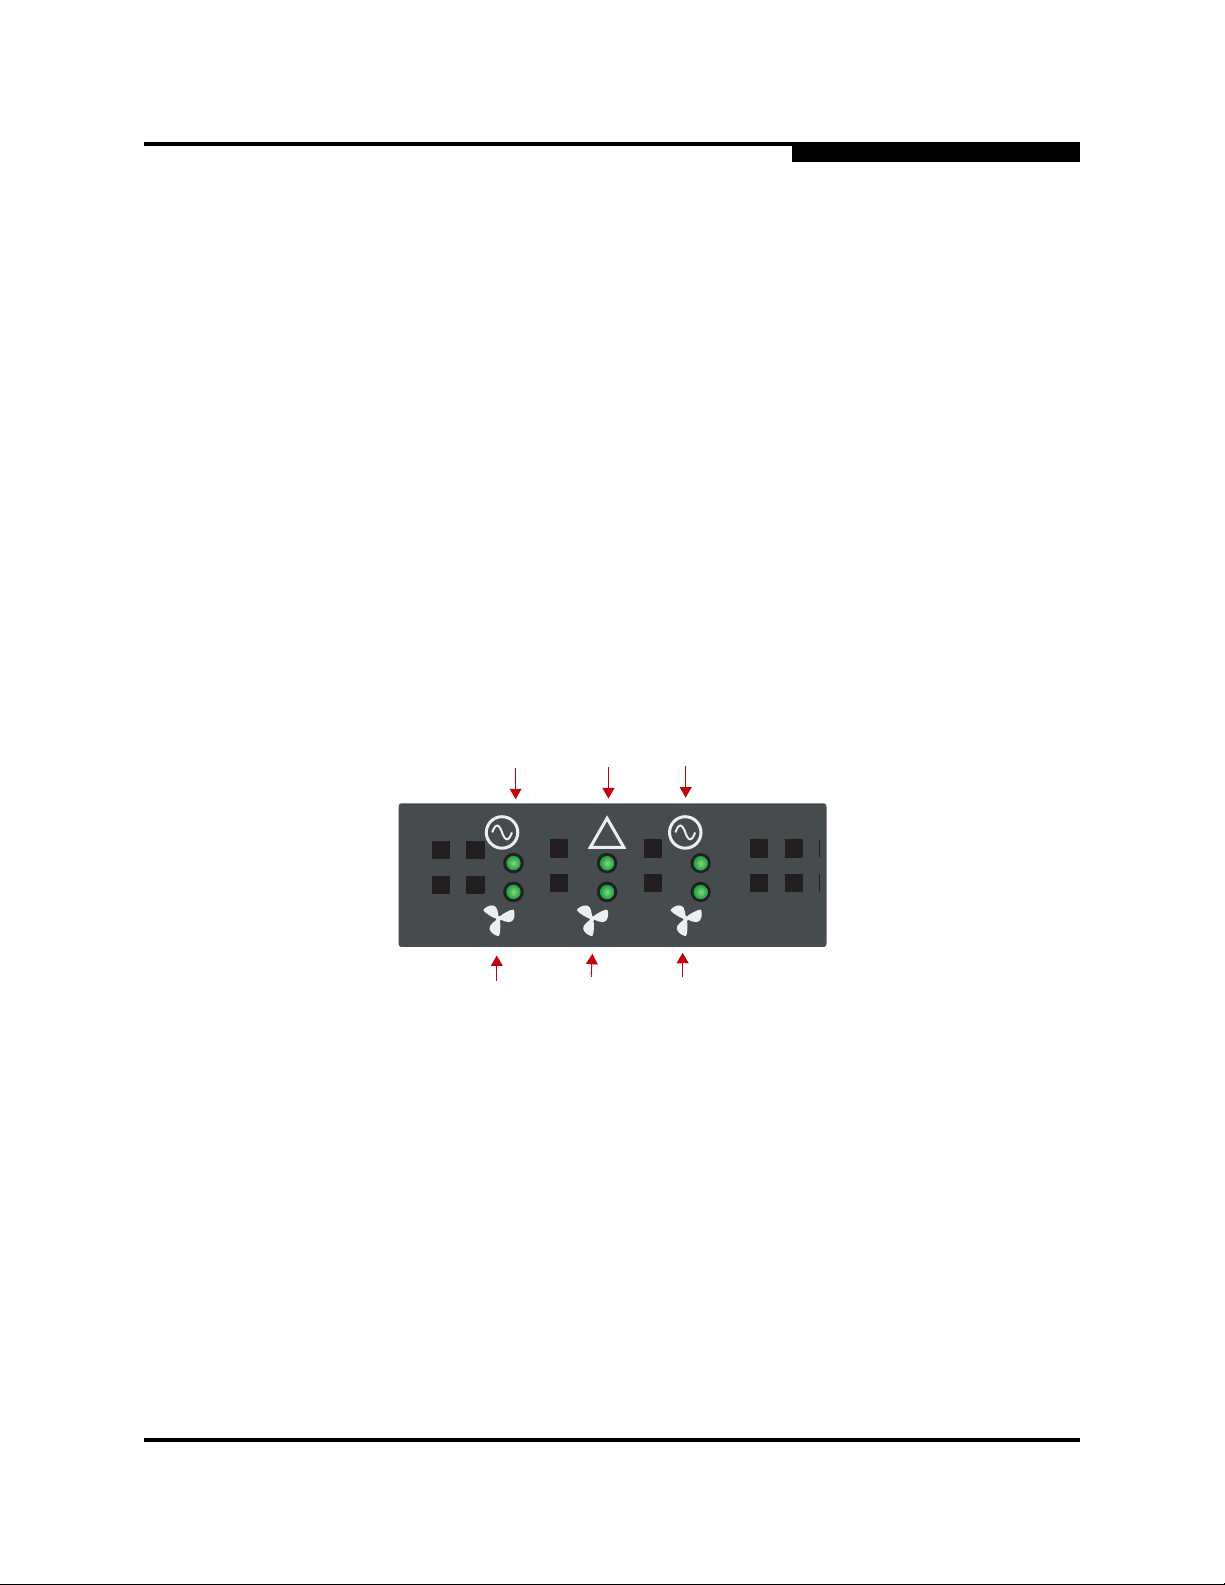
Q
5. Choose option i to install the following (or the desired boot set):
t3-patch_1.1.0-15c on bootset 1
6. Choose option r to reboot.
To install a new Maintenance Mode image on SANbox SSP:
The release notes for a given SANbox SSP software release indicate whether an
update to Maintenance Mode is necessary. See the release notes for instructions
on installing the Maintenance Mode image.
5.5
Interpreting the LED Patterns
Figure 5-1 shows the six LED indicator lights on SANbox SSP and the function to
which each light corresponds. A green light indicates normal operation.
An amber LED indicates that the corresponding component is missing, has failed,
or will likely fail soon. Even if your SANbox SSPs appear to be performing normally,
you should replace parts if their corresponding LED has turned amber. See
"Replacing Hardware Components" on page 6-6 for information about ordering and
installing replacement parts.
5 – Maintaining the SANbox SSP
Interpreting the LED Patterns
1
1 2
2
!
3
1 2 3
4
1 Power Supply 1 LED indicator light.
2 Alert LED indicator light: amber indicates a
temperature alert or an internal voltage fault.
3 Power Supply 2 LED indicator light.
4 Fan 1 LED indicator light.
5 Fan 2 LED indicator light.
6 Fan 3 LED indicator light.
Figure 5-1. SANbox SSP LED Panel Indicator Lights (Port Side)
5
6
SN0054628-00 A 5-5
Page 70

5 – Maintaining the SANbox SSP
Replacing Hardware Components
5.5.1
POST and the LEDs
Power-On Self Test (POST) is a diagnostic testing sequence that the SANbox SSP
runs while powering on. If all the hardware is detected and found to be operating
properly, SANbox SSP begins to boot.
While the software is loading, all the port LEDs turn amber and then turn off.
POST has successfully completed when all LED activity has stopped; this takes
approximately 1-2 minutes. SANbox SSP has powered on successfully when the
Alert LED is green, and all port lights are off. If POST never completes, all six LEDs
remain amber.
NOTE: The port LEDs blinks if there is traffic on the SAN.
5.6
Replacing Hardware Components
SANbox SSP comes with transceivers and fans already installed. This section
provides information if you need to replace a fan, transceiver, or power supply.
Q
To replace the fans:
To replace Fan 1 or Fan 3 (40 mm fan), order replacement fan 097-0005 from QLogic
Corporation. The kit includes instructions for replacing the fan.
To replace Fan 2 (80 mm fan), order replacement fan 097-0004 from QLogic
Corporation. The kit includes instructions for replacing the fan.
To replace the power supplies:
Order replacement power supply 097-0006 from QLogic Corporation. The kit
includes instructions for replacing the power supplies.
If you need to install the power supplies, see "To install the power supplies:" on
page 3-5.
5-6 SN0054628-00 A
Page 71

Q
5.6.1
About the Transceivers
NOTE:
■ If the port is not being used, leave the rubber dust cover plugged into the
transceiver.
■ Always use the bail latch to remove and insert the transceiver; do not pull
on the transceiver body.
■ Always put the bail latch into the up position before inserting the Fibre
Channel cable.
SANbox SSP comes with a full set of transceivers already installed, one in each
port. QLogic’s transceivers include a bail latch that must be in the down position
before removing the transceiver and put in the up position before inserting the Fibre
Channel cable.
NOTE: QLogic highly recommends that you use only transceivers certified and
sold by QLogic. The transceivers that QLogic sells are Small Form-Factor
Pluggable industry standard transceivers. If another optical SFP
transceiver is used, other than one recommended and sold by QLogic
Corporation, the user must ensure compliance with UL recognized
standards and DHHS regulations.
5 – Maintaining the SANbox SSP
Replacing Hardware Components
To replace a transceiver:
1. Order replacement transceivers, part number 097-0007.
The kit includes four transceivers.
2. Pull down on the bail latch, and then pull the old transceiver out of the port.
3. Insert the new transceiver into the port.
4. Remove the rubber dust cover from the transceiver before inserting the Fibre
Channel cable.
SN0054628-00 A 5-7
Page 72

5 – Maintaining the SANbox SSP
Replacing Hardware Components
Notes
Q
5-8 SN0054628-00 A
Page 73

Section 6
Troubleshooting
This section provides resolutions for issues that you may experience during system
start-up and configuration of the SANbox SSP.
NOTE: The recommended actions in this section assume that you are
troubleshooting components of the SANbox SSP, and that the platform
is in the original factory configuration. If you have removed or replaced
components or changed any default settings or driver firmware, the
recommendations in this section may not apply.
This section discusses:
■ Before Looking at the Problem Statements
■ Problem Statements and Troubleshooting Procedures
6.1
Before Looking at the Problem Statements
Before looking through the list of problem statements:
■ Confirm that the SANbox SSP is powered on and that the Alert LED is green.
■ Configure the IP address for the management port: from the command line
interface (CLI), run the Modify eth command. See "Modify Eth Command" on
page B-13 for more information about this command.
■ Confirm that all connected ports are fully seated and the link LED is illuminated.
■ Confirm that all the other components of the system (fabric switches, storage
arrays, and so on) are powered up and properly configured.
Before contacting technical support, see “Warranty and Technical Support” for more
information, including how to run Show Debug Dump and how to create a trace file.
SN0054628-00 A 6-1
Page 74

6 – Troubleshooting
Problem Statements and Troubleshooting Procedures
6.2
Problem Statements and Troubleshooting Procedures
This section discusses the troubleshooting procedures for each problem statement.
BACK-END STORAGE NOT FOUND (LOOP/FABRIC)
Check that:
■ SANbox SSP is correctly connected to the fabric.
■ Storage device is correctly connected to the fabric.
■ Zoning of storage-side fabric is correct.
See "SAN Zoning" on page 5-3 for zoning tips.
■ Storage device is configured to allow the SANbox SSP to access the appropriate
LUN.
If you are using a RAID with LUN masking, make sure that the SANbox SSP
port has access to the LUN. In addition, make sure that physical LUNs from the
storage array are configured for Open Systems host mode. The SANbox SSP
supports LUNs 0-255 only.
Q
■ Maximum frame size is correctly set.
Check that SANbox SSP ports are set to the lowest maximum frame size of any
device connected to the fabric. See "Configuring Storage" on page 5-6 for more
information.
BACK-END STORAGE NOT FOUND BY SVM
Check that:
■ SVM device is correctly connected to the fabric.
■ Storage device is correctly connected to the fabric.
The storage device must be configured to allow access to the SVM appliance
and the SANbox SSP. The LUN may be accessible by the SVM appliance but
not by the SANbox SSP. In this case, new virtual volumes created in SVM are
not actually created and are missing from the Show Debug Kdisks list.
See "Show Debug Command" on page B-19 for more information about this
command.
■ Zoning of storage-side fabric is correct. See "SAN Zoning" on page 5-3 for zoning
tips.
■ Storage device is configured to allow SVM to access the appropriate LUN.
Configure storage devices to allow access to the SVM appliance and the SANbox
SSP. If you are using a RAID with LUN masking, you must make sure that the
SANbox SSP port has access to the LUN.
6-2 SN0054628-00 A
Page 75

Q
6 – Troubleshooting
Problem Statements and Troubleshooting Procedures
■ Different logical units have different LUN identifiers.
When accessing storage through the SVM GUI, it is important that the
administrator not assign the same LUN ID to different logical units on the same
RAID device, even if those logical units are visible on different ports. Each logical
unit on a given RAID device must have a unique LUN ID.
See "Configuration Restriction on RAID Devices" on page 5-7 for more
information about this topic.
■ See also "Back-End Storage Not Found (Loop/Fabric)" on page 7-2.
CANNOT ACCESS SANbox SSP CONSOLE PORT
Make sure the terminal settings are properly configured. Set the terminal parameters
for 9600 baud, 8 data bits, no parity, 1 stop bit, and no flow control. In addition, make
sure you are connected to the correct COM port on your system.
CANNOT LOG INTO SANbox SSP (GUI or CLI)
Make sure that:
■ IP address is properly configured.
From the command line interface (CLI), run the Modify eth command. See
"Modify Eth Command" on page B-13 for more information about this command.
■ Make sure your Ethernet cable is connected to the management port (labeled
), which is the first Ethernet port from the left. The high-availability ports are
the two Ethernet ports on the right.
■ Username and password are correct.
■ SANbox SSP is powered on and that the Alert LED is green.
INITIATOR NOT FOUND (LOOP/FABRIC)
Check that:
■ SANbox SSP is correctly connected to fabric.
■ Initiator is correctly connected to the fabric.
■ Zoning of storage-side fabric is correct. See "SAN Zoning" on page 5-3 for zoning
tips.
■ Maximum frame size correctly set.
Check that SANbox SSP ports are set to the lowest maximum frame size of any
device connected to the fabric. See "Configuring Storage" on page 5-6 for more
information.
SN0054628-00 A 6-3
Page 76

6 – Troubleshooting
Problem Statements and Troubleshooting Procedures
INITIATOR NOT FOUND BY SVM
Check that:
■ SVM device is correctly connected to the fabric.
The switch must show that the SVM port is present. Unplug and then plug in the
SANbox SSP front-side connections to the fabric.
■ Initiator is visible to SANbox SSP. If not, try rebooting the SANbox SSP.
Run show debug wwpn in the command line interface. If the initiator is visible
to the SANbox SSP, it displays in the output of this command. See
Command" on page B-19 for more information about this command.
■ See also "Initiator Not Found (Loop/Fabric)" on page 7-3.
■ SANbox SSP is visible to the SVM.
Perform a reinit config on SVM, and then try rebooting the SVM appliance.
■ Reboot the fabric switch.
Q
"Show Debug
VIRTUAL VOLUME NOT DISCOVERED BY INITIATOR
Verify that:
■ Initiator is visible to SANbox SSP.
■ Storage is visible to SANbox SSP.
Perform or run these operations:
■ Run show debug wwpn in the CLI. See "Show Debug Command" on page B-19
for more information about this command.
■ Perform a rescan on the initiator.
■ Reset the initiator's Fibre Channel link. See your initiator documentation for more
information.
■ Reboot the initiator.
6-4 SN0054628-00 A
Page 77

Specifications
This appendix contains the specifications for the SANbox 5602 Fibre Channel
switch. Refer to Section 2 General Description for the location of all connections,
switches, controls, and components.
A.1
Performance Characteristics
Processors
■ SANbox 8202-16 .......................
■ SANbox 8202-08/8200-08 .........
Memory
■ SANbox 8202-16 .......................
■ SANbox 8202-08/8200-08 .........
Ports
■ SANbox 8202-16 .......................
■ SANbox 8202-08/8200-08 .........
Appendix A
Dual Intel Pentium Xeon
Single Intel Pentium Xeon
2 GB
1 GB
16 Fibre Channel ports, each N_port or
NL_port configurable
8 Fibre Channel ports, each N_port or
NL_port configurable
Port Speed...................................... Auto-negotiating 2 Gbps full duplex
(2.125 Gbps)
Backplane....................................... Non-blocking 80 Gbps
Performance
■ SANbox 8202-16 .......................
■ SANbox 8202-08 .......................
■ SANbox 8200-08 .......................
A.2
460,000 IOPs aggregate
285,000 IOPs aggregate
195,000 IOPs aggregate
Media
Media.............................................. Hot-plug, Small Form-Factor Pluggable
(SFP)
SN0054628-00 A A-1
Page 78

A – Specifications
Storage Management
A.3
Storage Management
Maximum physical back-end
storage............................................
Maximum virtual LUN size.............. 2 TB
Maximum number of virtual LUNs
per port (assigned to initiator).........
Maximum number of virtual
LUNs per port (assigned to initiator)
■ SANbox 8202-16 .......................
■ SANbox 8202-08 .......................
■ SANbox 8200-08 .......................
Maximum number of initiators: ....... 32,768
Q
131,072 TB
256
4,096
2,048
1,024
Maximum number of LUNs:............ 65,536
A.4
High Availability Features
Clustering ....................................... ■ Supports Active/Active ñ Active/Passive
Hot swappable fans ........................ SANbox 8202-16/8202-08
Redundant, hot swappable power
supplies
■ SANbox 8202-16/8202-08 ........
■ SANbox 8200-08 ......................
A.5
Standards
........................................................ ■ FC-PH
failover
■ Dual 10/100 Ethernet RJ-45 connections
for clustering
Standard
Not available
■ FC-AL
■ FCP-SCSI
■ Fibre Alliance MIB
■ SNMP v1,2,3
A-2 SN0054628-00 A
Page 79

Q
A.6
Device Management
Access ............................................ SSH, Telnet, Web Browser, SOAP/XML,
Interfaces........................................ ■ 1 10/100 Ethernet RJ-45 for management
A.7
Mechanical
Dimensions..................................... 17 in. (W) x 3.5 in. (H) x 21 in. (D)
Enclosure........................................ 2U rack mountable
Weight
■ SANbox 8202-16 .......................
■ SANbox 8202-08/8200-08 .........
A – Specifications
Electrical
SNMP Interfaces
■ 1 Serial DB-9 RS232 for configuration
35 lbs.
30 lbs.
A.8
Environmental
Temperature ................................... +10°C to +40°C
Humidity.......................................... 5% to 85% noncondensing
Altitude............................................ 0 to 10,000 feet
Shock.............................................. 5g, 11ms, half sine
Vibration ......................................... 0.5g, 40 to 3000 Hz
A.9
Electrical
Power ............................................. 100-230VAC
Frequency....................................... 50-60Hz
SN0054628-00 A A-3
Page 80

A – Specifications
Regulatory
A.10
Regulatory
Q
........................................................
■ UL
■ CE
■ cUL
■ FCC
A-4 SN0054628-00 A
Page 81

Appendix B
Command Reference
Using the SANbox SSP command line interface (CLI), you can configure and
manage SANbox SSP with common command sets.
This appendix provides a reference for each command in the command line
interface for the SANbox SSP. The commands provide the same functions as the
SANbox SSP Management GUI.
You can access the CLI through either the Local Administrative Console or a telnet
session. This appendix provides the steps for accessing the CLI and describes each
of the commands.
This appendix covers the following topics:
■ Command Line Interface (CLI) Overview
■ Accessing the CLI
■ Commands
B.1
Command Line Interface (CLI) Overview
The SANbox SSP provides a command line user interface through serial, telnet,
and ssh connections. All configuration, maintenance, and monitoring of the SANbox
SSP are accessible through the command line interface.
B.1.1
Command Quick Reference by Object
Table B-1 shows which commands are available for the major object types.
Table B-1. Commands by Object Type
Object Type Command Page
eths Disable Eth Command
Enable Eth Command
Modify Eth Command
Show Eth Command
Show Eths Command
ports Disable Port Command
Enable Port Command
Modify Port Command
Modify Ports Command
Reset Port Command
page B-9
page B-10
page B-13
page B-21
page B-22
page B-9
page B-11
page B-14
page B-15
page B-17
SN0054628-00 A B-1
Page 82

B – Command Reference
Command Line Interface (CLI) Overview
Table B-1. Commands by Object Type (Continued)
Object Type Command Page
users Create User Command
community Set Community Command
date/timezone Modify Date Command
fans Show Fan Command
groups Show Group Command
therms Show Therm Command
voltages Show Voltage Command
Delete User Command
Disable User Command
Enable User Command
Show Community Command
Modify Timezone Command
Show Date Command
Show Fans Command
Show Groups Command
Show Therms Command
Show Voltages Command
Q
page B-8
page B-8
page B-10
page B-11
page B-18
page B-19
page B-13
page B-16
page B-19
page B-22
page B-23
page B-23
page B-23
page B-26
page B-27
page B-28
page B-28
B.1.2
Command Syntax and Command Completion
The CLI command syntax is as follows:
command
keyword [value]
keyword [value1] [value2]
The command is followed by one or more keywords. Consider the following rules
and conventions:
■ Commands and keywords are case sensitive.
■ Required keyword values appear in standard font: [value]. Optional keyword
values are shown in italics: [value].
This CLI provides command completion to minimize the typing needed to run
commands. This feature enables you to press the completion key (the Tab key) to
complete a partially typed command line. If the command line fragment is
unambiguous, it is completed with the remainder of the command line.
If there is more than one possible match for a command line fragment, continue
pressing the Tab key to see each of the possible matches. You then type enough
of the command line to distinguish it from the other possible matches.
B-2 SN0054628-00 A
Page 83

Q
B.1.3
Online Help
B – Command Reference
Command Line Interface (CLI) Overview
In addition, you can get a list of legal fields at any point in the command line. For
example if you type show user, and then press the Tab key, a list of existing users
is returned.
The completion feature in the CLI also validates previously typed input. If there is
an error in the command line prior to the point where you have requested completion,
an error is printed and the cursor is set to the point where the command line breaks
the defined syntax rules.
The CLI for the SANbox SSP includes online help. Type part of a command to view
the help information, such as a list of arguments or the proper syntax.
Help Commands
For information about getting a list of commands, see "Help Commands"
(page B-13). For information about getting help with a particular command, see
"Help Command" (page B-12).
Example 1:
Typing modify returns these results:
required arg not present
one of [therm, port, ports, timezone, date, user, eth, '?'] required
Example 2:
Typing show user returns these results:
kadmin@k-> show user
user - (syntax: show user <user name>)
users - (syntax: show users)
"user" is ambiguous, must differentiate between: [user, users]
Please refer to command syntax for detail.
SN0054628-00 A B-3
Page 84
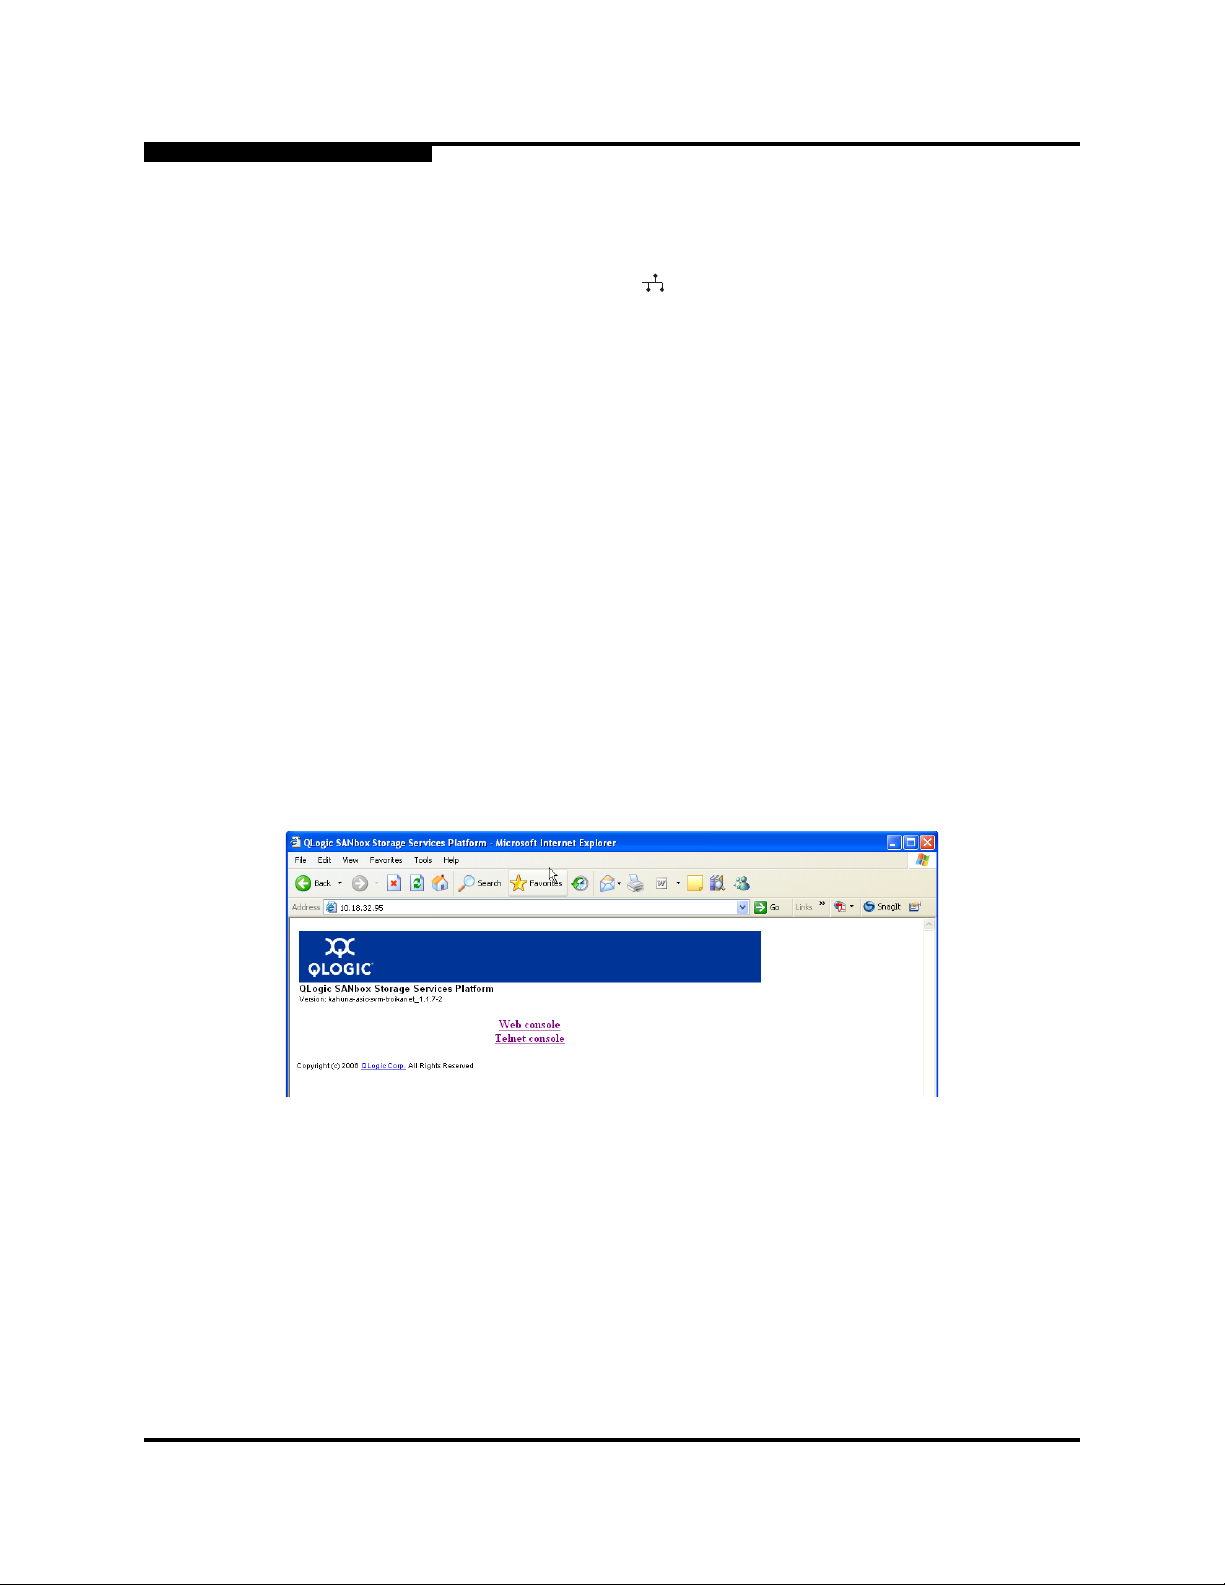
B – Command Reference
Accessing the CLI
B.2
Accessing the CLI
Once the management port (labeled on the port side of SANbox SSP) has been
properly configured with an IP address, a user can telnet to the SANbox SSP using
a web browser or standard telnet application. After successful bootup, the
management port is available for management purposes.
See "To modify Ethernet settings for remote access:" on page 3-8 or "Modify Eth
Command" (page B-13), if you did not already configure the management port for
remote access.
NOTE: To gain access to the CLI, type the default login and password.
To telnet to the CLI from a web browser:
1. In your web browser, type the IP address of SANbox SSP (example:
http://10.4.2.123).
Q
login: kadmin
password: kahuna
The following screen displays (see Figure B-1):
NOTE: The version number of the SANbox SSP is listed next to the Version
label at the top of the screen.
Figure B-1. QLogic SANbox Storage Services Platform (SSP) Screen
B-4 SN0054628-00 A
Page 85

Q
B – Command Reference
Accessing the CLI
2. Click Telnet Console to run a HyperTerminal session. The following screen
displays (see Figure B-2):
Figure B-2. Telnet Console Login Screen
Log in with the default login and password.
NOTE: QLogic recommends that you change the default password. If you
have not already done so, run the "Modify User Command"
(page B-16) to change the password.
login: kadmin
password: kahuna
SN0054628-00 A B-5
Page 86
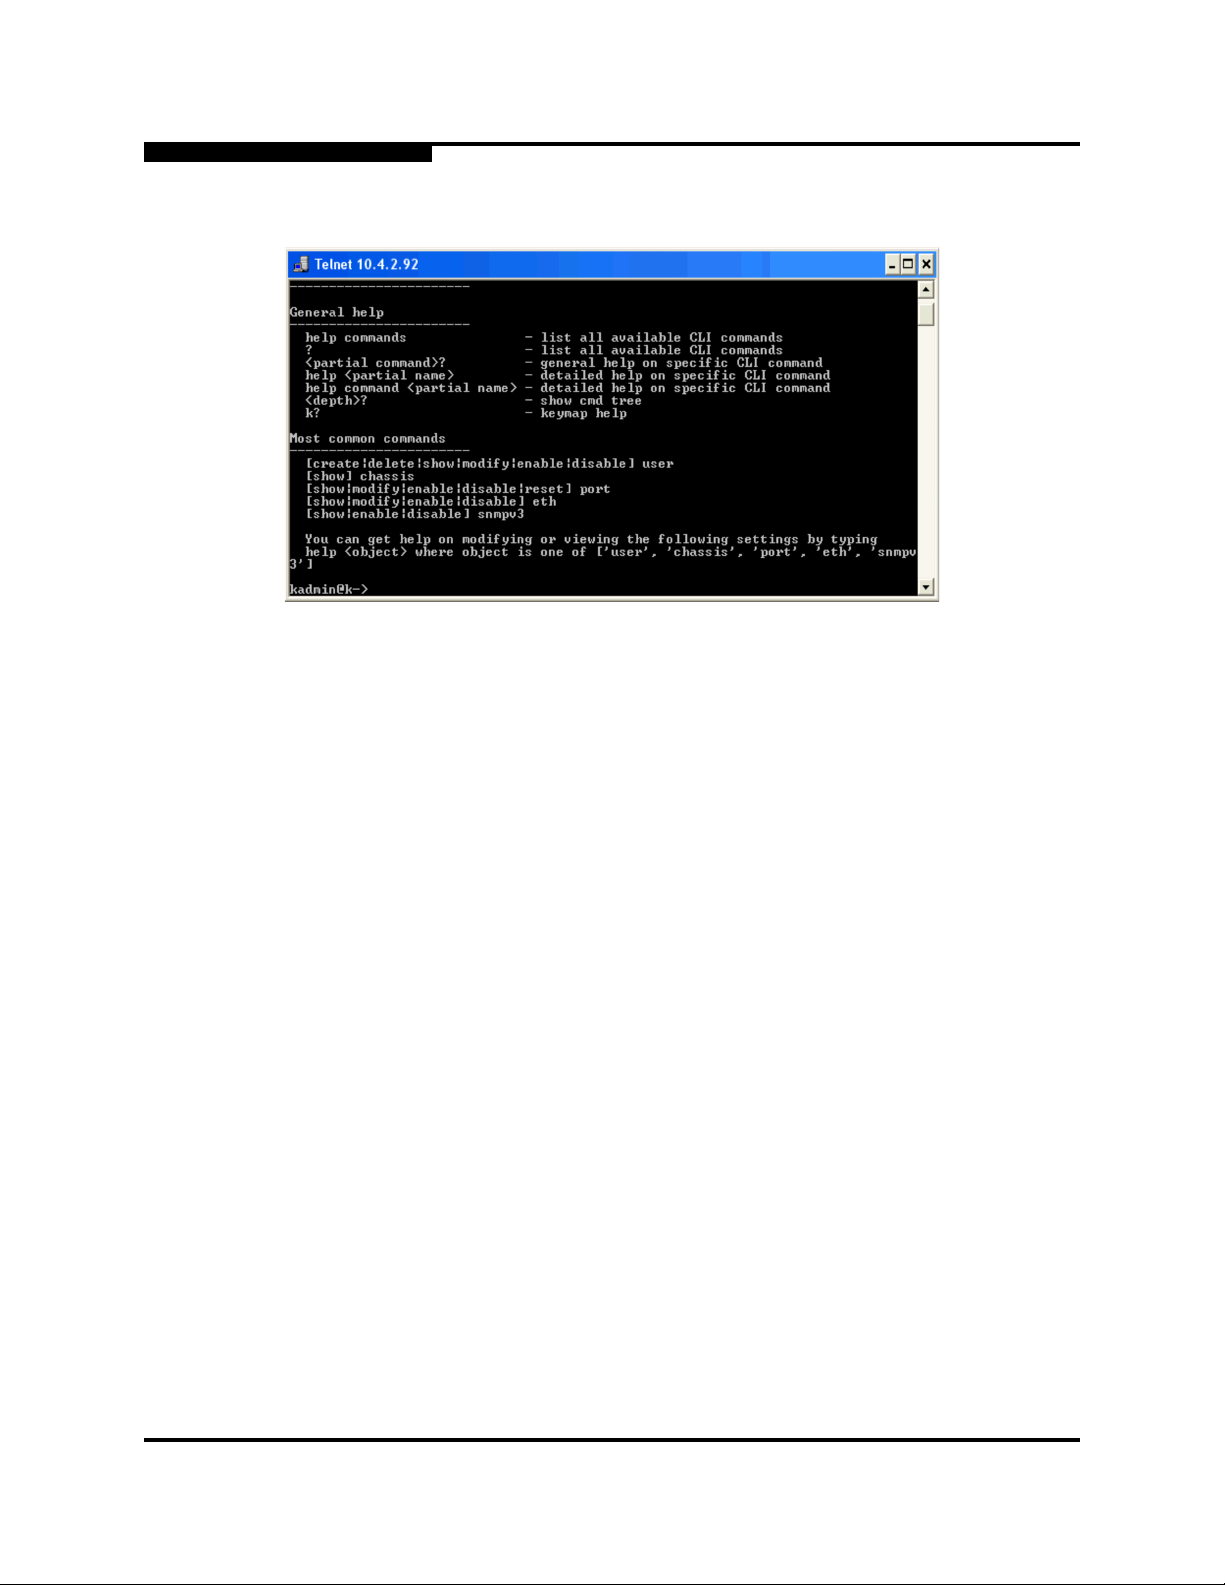
B – Command Reference
Accessing the CLI
The following menu options display (see Figure B-3):
Q
Figure B-3. Telnet Console Menu Options
3. Enter commands into the telnet window to begin managing the SANbox SSP
with the CLI commands.
B.2.1
Users and Groups
The SANbox SSP provides two built-in users and two built-in groups: kadmin is a
member of the Administrator group, and kmonitor is a member of the
Monitor group.
The default password for both accounts is kahuna. See "Modify User Command"
(page B-16) for information about changing the password.
Users in the Monitor group are limited to commands that only view system
configuration and status; Monitor users cannot change the system configuration.
See the show commands, such as "Show User Command" (page B-27) and "Show
Port Command" (page B-23), and so on, for more information.
Users in the Administrator group can create and delete users, and can also
modify users, eths, and ports. See "Create User Command" (page B-8), "Delete
User Command" (page B-8), "Modify User Command" (page B-16), "Modify Eth
Command" (page B-13), "Modify Port Command" (page B-14), and "Modify Ports
Command" (page B-15) for more information.
B-6 SN0054628-00 A
Page 87

Q
B – Command Reference
Accessing the CLI
Table B-2 summarizes the features of the built-in users and built-in groups.
Table B-2. Built-In Users and Groups
View System
Built-in
Users
kadmin Administrator kahuna yes yes
kmonitor Monitor kahuna yes no
Built-in
Groups
Default
Password
Configuration
and Status
Create/Delete Users
and Modify
Eths/Ports/Users
SN0054628-00 A B-7
Page 88

B – Command Reference
Commands
B.3
Commands
Clear Command
Clears the screen of text.
Syntax clear
Create User Command
Creates a new user in the specified group, or views user settings. The groups
defined for SANbox SSP are Administrator and Monitor. When new users
are added, they get the same permissions as the existing kadmin and kmonitor
users. When you issue this command, you must enter an SNMP password greater
than eight characters in length, in addition to your normal account password.
Syntax create user [user name] group [group name]
Q
Keywords create user [user name]
Name of the new user
group [group name]
Name of the group to which the user will belong: Administrator or kmonitor.
Notes Only users belonging to the Administrator group can add, delete, and
disable/enable users, and the current user cannot be disabled or deleted.
See Also "Delete User Command" on page B-8
"Disable User Command" on page B-10
"Enable User Command" on page B-11
"Show User Command" on page B-27
"Show Users Command" on page B-27
Delete User Command
Removes the specified user from the list of administrators who can manage the
SANbox SSP.
Syntax delete user [user name]
Keywords delete user [user name]
Name of the user that you are removing from the system.
Notes Only users belonging to the Administrator group can add, delete, and
disable/enable users, and the current user cannot be disabled or deleted.
B-8 SN0054628-00 A
Page 89

Q
See Also "Create User Command" on page B-8
"Disable User Command" on page B-10
"Enable User Command" on page B-11
"Show User Command" on page B-27
"Show Users Command" on page B-27
Disable Eth Command
SANbox SSP includes three Ethernet connections, MGMT, HA1, and HA2. This
command disables the specified Ethernet connection so that it cannot send or
receive network traffic.
This command is used for tightened security purposes. Once you disable the
Ethernet connections using this command, you can access the CLI and administer
SANbox SSP only from the serial console.
Syntax disable eth [ethernet name]
Keywords disable eth [ethernet name]
Name of the Ethernet that you are disabling: MGMT, HA1, or HA2.
B – Command Reference
Commands
Notes If you are connected through the management port, disabling the MGMT Ethernet
terminates any active network GUI and CLI sessions, requiring relogin. If you are
using the CLI on the serial console, the connection is not be disrupted.
See Also "Enable Eth Command" on page B-10
"Modify Eth Command" on page B-13
"Show Eth Command" on page B-21
"Show Eths Command" on page B-22
Disable Port Command
Disables the specified Fibre Channel port number so that it cannot send and
receive Fibre Channel traffic.
Syntax disable port
[port number]
[*]
Keywords disable port [port number]
Port number is an integer 1-8 for SANbox 8200-08 SSP/SANbox 8202-08 SSP or
1-16 for SANbox 8202-16 SSP to indicate the Fibre Channel port.
disable port [*]
* indicates all Fibre Channel ports.
SN0054628-00 A B-9
Page 90

B – Command Reference
Commands
See Also "Enable Port Command" on page B-11
"Modify Port Command" on page B-14
"Modify Ports Command" on page B-15
"Show Port Command" on page B-23
"Show Ports Command" on page B-24
Disable snmpv3 Command
This command does not turn off Simple Management Protocol. By default, the
system runs Simple Network Management Protocol, version 2. Disabling SNMPv3
means that SNMPv2 is running instead of SNMPv3.
Syntax disable snmpv3
See Also "Enable snmpv3 Command" on page B-11
"Show snmpv3 Command" on page B-26
Disable User Command
Q
Temporarily disables the user account without deleting it. The account can later be
enabled using the Enable User Command command.
Notes Only users belonging to the Administrator group can add, delete, and
disable/enable users, and the current user cannot be disabled or deleted.
Syntax disable user [user name]
Keywords disable user [user name]
Name of the user account that you are disabling.
See Also "Enable User Command" on page B-11
"Modify User Command" on page B-16
"Show User Command" on page B-27
"Show Users Command" on page B-27
Enable Eth Command
SANbox SSP includes three Ethernet connections, MGMT, HA1, and HA2. This
command enables the specified Ethernet connection so that it can send or receive
network traffic.
Syntax enable eth [ethernet name]
Keywords enable eth [ethernet name]
Name of the Ethernet that you are enabling: MGMT, HA1, or HA2.
B-10 SN0054628-00 A
Page 91

Q
See Also "Disable Eth Command" on page B-9
"Modify Eth Command" on page B-13
"Show Eth Command" on page B-21
"Show Eths Command" on page B-22
Enable Port Command
Enables the specified Fibre Channel port number so that it can send and receive
Fibre Channel traffic.
Syntax enable port
[port number]
[*]
Keywords enable port [port number]
An integer 1-8 for SANbox 8200-08 SSP/SANbox 8202-08 SSP or 1-16 for
SANbox 8202-16 SSP to indicate the Fibre Channel port.
B – Command Reference
Commands
enable port [*]
* indicates all Fibre Channel ports.
See Also "Disable Port Command" on page B-9
"Modify Port Command" on page B-14
"Modify Ports Command" on page B-15
"Show Port Command" on page B-23
"Show Ports Command" on page B-24
Enable snmpv3 Command
By default, the system runs Simple Network Management Protocol, version 2.
Enabling SNMPv3 means that SNMPv3 is running instead of SNMPv2.
Syntax enable snmpv3
See Also "Disable snmpv3 Command" on page B-10
"Show snmpv3 Command" on page B-26
Enable User Command
Enables the user account that was previously disabled using the Disable User
Command command.
Syntax enable user [user name]
Keywords enable user [user name]
Name of the user account that you are enabling.
SN0054628-00 A B-11
Page 92

B – Command Reference
Commands
Notes Only users belonging to the Administrator group can add, delete, and
disable/enable users, and the current user cannot be disabled or deleted.
See Also "Disable User Command" on page B-10
"Modify User Command" on page B-16
"Show User Command" on page B-27
"Show Users Command" on page B-27
Exit Command
Quits this command line interface session, terminates the telnet session, and logs
the user out.
Syntax exit
See Also "Quit Command" on page B-17
Help Command
Q
Provides information about using the specified commands.
Syntax help
[partial command name]
[command name]
Keywords help [partial command name]
Part of a help command (enough of the command to uniquely identify it).
help [command name]
Entire command name.
Examples Executing the command help mod provides the same information as help
modify.
help re returns this help information:
reset - (Reset to known state.)
restart - (Restart a process.)
reboot - (Reboot the host.)
See Also "Help Commands" on page B-13
B-12 SN0054628-00 A
Page 93

Q
Help Commands
Provides a list of the first-level commands available in this command line
interface.
Syntax help commands
See Also "Help Command" on page B-12
Modify Date Command
Sets the system date and time.
Syntax modify date [MM/DD/YYYY hh:mm:ss]
Keywords modify date [MM/DD/YYYY hh:mm:ss]
MM/DD/YYYY is the month, day, and year for the system time (year must be
4-digits long). hh:mm:ss is the hours, minutes, and seconds for the system time.
B – Command Reference
Commands
Notes Once the time zone is set, the system automatically switches between Standard
Time and Daylight Saving Time.
See Also "Modify Timezone Command" on page B-16
Modify Eth Command
Configures the Ethernet properties — ip address, gateway, and subnet — for the
specified Ethernet connection.
Syntax modify eth [ethernet name]
ip [ip addr]
gateway [gateway router]
netmask [subnet mask]
Keywords At least one of the optional keywords is required:
modify eth [ethernet name]
Ethernet connection that you are modifying: MGMT, HA1, or HA2.
ip [ip addr]
IP address of the specified Ethernet.
gateway [gateway router]
Router for the specified Ethernet.
netmask [subnet mask]
Subnet mask for the specified Ethernet.
SN0054628-00 A B-13
Page 94

B – Command Reference
Commands
Q
Notes If you are connected through the management port, modifying the MGMT
Ethernet terminates any active network GUI and CLI sessions, requiring relogin. If
you are using the CLI on the serial console, the connection is not disrupted.
See Also "Disable Eth Command" on page B-9
"Enable Eth Command" on page B-10
"Show Eth Command" on page B-21
"Show Eths Command" on page B-22
Modify Port Command
Changes the specified keywords—type, capability, speed—for the specified Fibre
Channel port number.
Syntax modify port [port number]
type [port type]
capability [port capability]
speed [port speed]
Keywords At least one of the optional keywords is required:
modify port [port number]
An integer 1-8 for SANbox 8200-08 SSP/SANbox 8202-08 SSP or 1-16 for
SANbox 8202-16 SSP to indicate the Fibre Channel port.
capability [port capability]
FCP_TARGET: to enable the port to be used as a front-end (looks like a storage
array port).
FCP_INITIATOR: to initiate back-end traffic to disks (cannot receive storage).
both: traffic can go both ways.
speed [port speed]
1G, 2G, NEGOTIATE
type [port type]
N_PORT: the port functions only in conjunction with a single-attached device that is
capable of fabric mode operation.
AUTO: enables the port to initialize in the most appropriate mode, either loop
(NL_Port) or fabric (N_Port), according to what is on the other end of the link.
NOTE: Ports should generally run in fabric mode because fabric yields better
throughput and links recover more quickly.
Notes You must restart the system for port capability or port speed changes to take
effect.
B-14 SN0054628-00 A
Page 95

Q
maxframesize is not a keyword for this command because all ports must share the
same frame size.
See Also "Disable Port Command" (page B-9)
"Enable Port Command" (page B-11)
"Modify Ports Command" (page B-15)
"Reset Port Command" (page B-17)
"Show Port Command" (page B-23)
"Show Ports Command" (page B-24)
Modify Ports Command
Changes the specified keywords — type, capability, speed — for all SANbox SSP
ports.
Syntax modify
ports type [port type]
capability [port capability]
speed [port speed]
maxframesize [size (in bytes)]
B – Command Reference
Commands
Keywords At least one of the following keywords is required:
capability [port capability]
FCP_TARGET: to enable the port to be used as a front-end (looks like a storage
array port)
FCP_INITIATOR: to initiate back-end traffic to disks (cannot receive storage)
both: traffic can go both ways
maxframesize [size (in bytes)]
Smallest maximum frame size of any device on the SAN, usually 2048. Some
systems require 1024, or even smaller.
This number specifies the maximum frame size that Kahuna can negotiate to
exchange with other Fibre Channel devices. This number must be the same
throughout the SAN.
ports type [port type]
N_PORT: the port functions only in conjunction with a single attached device that is
capable of fabric mode operation.
AUTO: enables the port to initialize in the most appropriate mode, either loop
(NL_Port) or fabric (N_Port), according to what is on the other end of the link.
NOTE: Ports should generally run in fabric mode because fabric yields better
throughput and links recover more quickly.
SN0054628-00 A B-15
Page 96

B – Command Reference
Commands
speed [port speed]
NEGOTIATE, 1G, 2G
Q
Notes You must restart the system for port capability, port speed, or frame size changes
to take effect.
See Also "Disable Port Command" on page B-9
"Enable Port Command" on page B-11
"Modify Ports Command" on page B-15
"Reset Port Command" on page B-17
"Show Port Command" on page B-23
"Show Ports Command" on page B-24
Modify Timezone Command
Starts a Time Zone Configuration utility that enables you to select your
geographical area and time zone, and then modify your local time if needed.
Syntax modify timezone
Notes Once the time zone is set, the system automatically switches between Standard
Time and Daylight Saving Time.
See Also "Show Timezone Command" on page B-27
Modify User Command
Adds the specified user to the specified group. This command also changes the
password defined for the specified user.
The groups defined for SANbox SSP are Administrator and Monitor. When
new users are added, they get the same permissions as the existing kadmin and
kmonitor users.
Syntax modify user [user name]
group [group name]
password
Keywords modify user [user name]
User name that you want to add to the specified group.
group [group name]
Name of the group to which you are adding the specified user: Administrator
or Monitor.
password
Include this keyword if you want to change the password.
B-16 SN0054628-00 A
Page 97

Q
See Also "Disable User Command" on page B-10
"Enable User Command" on page B-11
"Modify User Command" on page B-16
"Show User Command" on page B-27
"Show Users Command" on page B-27
Quit Command
Exits this command line interface session, terminates the telnet session, and logs
the user out.
Syntax quit
See Also "Exit Command" on page B-12
Reboot Command
Restarts the SANbox SSP.
B – Command Reference
Commands
Syntax reboot
Reset Port Command
Shuts down the port and then restarts it, leaving the properties of the port
unchanged. Use this command to clear a port that is in an unknown state and
trigger the discovery process.
WARNING!!
Syntax reset port
[port number]
*
Keywords reset port [port number]
An integer 1-8 for SANbox 8200-08 SSP/SANbox 8202-08 SSP or 1-16 for
SANbox 8202-16 SSP to indicate the Fibre Channel port.
reset port *
* indicates all Fibre Channel ports.
Running this command disrupts any traffic on this port, and should
never be performed on a port that is moving data. Doing so could
cause read/write failure and error conditions in software if traffic has
occurred.
See Also "Modify Ports Command" on page B-15
"Show Port Command" on page B-23
"Show Ports Command" on page B-24
SN0054628-00 A B-17
Page 98

B – Command Reference
Commands
Q
Restart snmp Command
Stops and then restarts the Simple Network Management Protocol process.
Syntax restart snmp
Set Community Command
Changes the name of the community string. The community string for SANbox
SSP is public.
Syntax set community [community name]
Keywords set community [community name]
Name to which you want to change the community string.
Notes The SNMP Community string is similar to a user id or password that allows
access to a router's or other device's statistics. It is standard practice for network
managers to change the community string so that outsiders cannot see
information about the internal network.
See Also "Show Community Command" on page B-19
Show Chassis Command
Returns the part number, MAC base address, serial number, or original
manufacture date for the SANbox SSP.
Syntax show chassis
[part_num]
[MAC_base_address]
[serial_num]
[orig_mfg_date]
Keywords At least one of the following keywords is required:
MAC_base_address
Indicates the base address for the Ethernet MAC on SANbox SSP.
orig_mfg_date
Indicates the original manufacturing date for this SANbox SSP.
part_num
Indicates the part number of SANbox SSP. Use it to determine the OEM or
manufacturing information about the switch.
B-18 SN0054628-00 A
Page 99

B – Command Reference
Q
serial_num
Indicates the serial number for this SANbox SSP.
Examples show chassis part_num
show chassis MAC_base_address orig_mfg_date
show chassis orig_mfg_date serial_num
Commands
Show Community Command
Returns the name of the community string and whether the string is read-only or
read-write. The community string for SANbox SSP is public.
Syntax show community
Notes The SNMP Community string is similar to a user id or password that allows
access to a router's or other device's statistics.
See Also "Set Community Command" on page B-18
Show Date Command
Returns the current date, time, and the time zone.
Syntax show date
Show Debug Command
Returns information that may be helpful to QLogic support engineers in debugging
a problem.
Notes As this command returns a large amount of information to the screen, turn on
logging in your terminal program so that you can capture all the information in a
file to send to QLogic.
Syntax show debug
[dump]
[fcptstate]
[fcsexch]
[fcsluns]
.
.
.
[wwpn]
Keywords At least one of the following keywords is required:
SN0054628-00 A B-19
Page 100

B – Command Reference
Commands
dump
Shows cumulative system debug information.
fcptstate
Provides the state of the SCSI target driver.
fcsexch
Provides per port FCS exchange allocation diagnostic.
fcsluns
FCS LUN discovery. Local port database of remote ports with LUNs per remote
port.
fcsstate
Provides a summary table showing how many targets, LUNs, and initiators are
discovered by each port. Each port discovers itself.
fpsdiag
Shows firmware debugging information.
Q
fpspsc
Provides a list of the physical disks in use by the firmware/fastpath.
fpsstats
Shows the firmware/fastpath statistics.
hwstate
Provides the state of the HBA hardware driver.
interrupts
Shows interrupt load.
kdisks
Shows the virtual disks created by the application, remote initiator WWN, port
WWN, LUN identifier, current state, type, and handle.
kdstats
Shows virtual disk I/O statistics, such as number of forwarded commands and the
number of reads handled by the SANbox SSP software.
meminfo
Shows memory usage.
modules
Provides a list of the loaded kernel modules.
ppeinfo
Shows the firmware status.
B-20 SN0054628-00 A
 Loading...