

Page 1

QLogic 3000 and 3100 Series Intelligent
Ethernet Adapters
Users Guide
NE0154601-00 A
Page 2

QLogic 3000 and 3100 Series Intelligent Ethernet Adapters Users Guide
Version 4.6
Information furnished in this manual is believed to be accurate and reliable. However, QLogic Corporation assumes no
responsibility for its use, nor for any infringements of patents or other rights of third parties which may result from its
use. QLogic Corporation reserves the right to change product specifications at any time without notice. Applications
described in this document for any of these products are for illustrative purposes only. QLogic Corporation makes no
representation nor warranty that such applications are suitable for the specified use without further testing or
modification. QLogic Corporation assumes no responsibility for any errors that may appear in this document.
Document Revision History
Version 4.0, 1/07/09
Version 4.1, 1/27/09
Version 4.2, 3/23/09
Version 4.3, 4/09/09
Version 4.4, 4/30/09
Version 4.5, 4/30/09
Version 4.6, 6/15/09
Changes Sections Affected
Updated with new release information. All
ii NE0154601-00 A
Page 3

Table of Contents
Preface
Intended Audience . . . . . . . . . . . . . . . . . . . . . . . . . . . . . . . . . . . . . . . . . . . . ix
Related Materials . . . . . . . . . . . . . . . . . . . . . . . . . . . . . . . . . . . . . . . . . . . . . ix
Documentation Conventions . . . . . . . . . . . . . . . . . . . . . . . . . . . . . . . . . . . . ix
Technical Support. . . . . . . . . . . . . . . . . . . . . . . . . . . . . . . . . . . . . . . . . . . . . x
Availability . . . . . . . . . . . . . . . . . . . . . . . . . . . . . . . . . . . . . . . . . . . . . . x
Training . . . . . . . . . . . . . . . . . . . . . . . . . . . . . . . . . . . . . . . . . . . . . . . . xi
Contact Information . . . . . . . . . . . . . . . . . . . . . . . . . . . . . . . . . . . . . . . xi
1Overview
Obtaining the Latest Software Release Information. . . . . . . . . . . . . . . . . . . 1-1
Supported QLogic 3000 and 3100 Series Intelligent Ethernet Adapters . . . 1-2
Application Notes . . . . . . . . . . . . . . . . . . . . . . . . . . . . . . . . . . . . . . . . . . . . . 1-2
2 System Requirements
Hardware Requirements . . . . . . . . . . . . . . . . . . . . . . . . . . . . . . . . . . . . . . . 2-1
Cable Specifications . . . . . . . . . . . . . . . . . . . . . . . . . . . . . . . . . . . . . . 2-1
SFP+ Optical Module Requirements . . . . . . . . . . . . . . . . . . . . . . . . . . 2-2
System and Software Requirements . . . . . . . . . . . . . . . . . . . . . . . . . . . . . . 2-2
Supported QLogic Adapters . . . . . . . . . . . . . . . . . . . . . . . . . . . . . . . . . . . . . 2-2
3 Installation Instructions
QLogic Adapter Installation and Verification. . . . . . . . . . . . . . . . . . . . . . . . . 3-1
Pre-installation Checklist . . . . . . . . . . . . . . . . . . . . . . . . . . . . . . . . . . . 3-1
QLogic Adapter Installation . . . . . . . . . . . . . . . . . . . . . . . . . . . . . . . . . 3-1
Verify the QLogic Adapter Installation . . . . . . . . . . . . . . . . . . . . . . . . . 3-1
Linux . . . . . . . . . . . . . . . . . . . . . . . . . . . . . . . . . . . . . . . . . . . . . . 3-1
Windows Server . . . . . . . . . . . . . . . . . . . . . . . . . . . . . . . . . . . . . 3-2
Windows Server Driver Installation . . . . . . . . . . . . . . . . . . . . . . . . . . . . . . . 3-2
Windows Server 2003 . . . . . . . . . . . . . . . . . . . . . . . . . . . . . . . . . . . . . 3-2
Windows Server 2008 . . . . . . . . . . . . . . . . . . . . . . . . . . . . . . . . . . . . . 3-3
NE0154601-00 A iii
Page 4

QLogic 3000 and 3100 Series Intelligent Ethernet Adapters Users Guide
Version 4.6
Linux Driver Installation . . . . . . . . . . . . . . . . . . . . . . . . . . . . . . . . . . . . . . . . 3-4
Verify and Remove Existing QLogic Adapter Driver and Tools Package 3-4
Install the Driver (RPM) . . . . . . . . . . . . . . . . . . . . . . . . . . . . . . . . . . . . 3-4
Red Hat
SUSE
®
. . . . . . . . . . . . . . . . . . . . . . . . . . . . . . . . . . . . . . . . . . . 3-4
®
. . . . . . . . . . . . . . . . . . . . . . . . . . . . . . . . . . . . . . . . . . . . . 3-5
QLogic Adapter Configuration . . . . . . . . . . . . . . . . . . . . . . . . . . . . . . . 3-5
4 Hardware Installation
QLE3044 Installation . . . . . . . . . . . . . . . . . . . . . . . . . . . . . . . . . . . . . . . . . . 4-1
Ethernet Port Mapping. . . . . . . . . . . . . . . . . . . . . . . . . . . . . . . . . . . . . 4-2
QLE3044 Status LEDs. . . . . . . . . . . . . . . . . . . . . . . . . . . . . . . . . . . . . 4-2
QLE3044 Bracket Removal and Replacement . . . . . . . . . . . . . . . . . . 4-3
QLE3142 Installation . . . . . . . . . . . . . . . . . . . . . . . . . . . . . . . . . . . . . . . . . . 4-4
QLE3142 Status LEDs. . . . . . . . . . . . . . . . . . . . . . . . . . . . . . . . . . . . . 4-5
QLE3142 Bracket Removal and Replacement . . . . . . . . . . . . . . . . . . 4-5
5 Windows Server 2003 and 2008 Driver Installation and Configuration
Windows Server Driver Checklist . . . . . . . . . . . . . . . . . . . . . . . . . . . . . . . . . 5-1
Windows Server Service Pack Requirements. . . . . . . . . . . . . . . . . . . 5-1
Firmware ROM Image Location. . . . . . . . . . . . . . . . . . . . . . . . . . . . . . 5-1
Windows Server Driver Installation and Verification. . . . . . . . . . . . . . . . . . . 5-2
Windows Server Driver Configuration . . . . . . . . . . . . . . . . . . . . . . . . . . . . . 5-7
General Tab . . . . . . . . . . . . . . . . . . . . . . . . . . . . . . . . . . . . . . . . . . . . . 5-7
Advanced Tab . . . . . . . . . . . . . . . . . . . . . . . . . . . . . . . . . . . . . . . . . . . 5-8
Information Tab . . . . . . . . . . . . . . . . . . . . . . . . . . . . . . . . . . . . . . . . . . 5-15
Diagnostics Tab . . . . . . . . . . . . . . . . . . . . . . . . . . . . . . . . . . . . . . . . . . 5-16
Statistics Tab . . . . . . . . . . . . . . . . . . . . . . . . . . . . . . . . . . . . . . . . . . . . 5-17
Flash Update Tab . . . . . . . . . . . . . . . . . . . . . . . . . . . . . . . . . . . . . . . . 5-18
Driver Tab . . . . . . . . . . . . . . . . . . . . . . . . . . . . . . . . . . . . . . . . . . . . . . 5-19
Resources Tab. . . . . . . . . . . . . . . . . . . . . . . . . . . . . . . . . . . . . . . . . . . 5-20
Configure the QLogic Adapter in Windows Server. . . . . . . . . . . . . . . . . . . . 5-21
Uninstall the QLogic Adapter Driver in Windows Server . . . . . . . . . . . . . . . 5-23
QLogic Adapter Diagnostic Tests — Windows Server . . . . . . . . . . . . . . . . . 5-24
Windows Server Performance . . . . . . . . . . . . . . . . . . . . . . . . . . . . . . . . . . . 5-25
Performance Testing the QLogic Adapter with ntttcp . . . . . . . . . . . 5-26
ntttcp Overview . . . . . . . . . . . . . . . . . . . . . . . . . . . . . . . . . . . . . . . . 5-27
ntttcps and ntttcpr Command Line Options . . . . . . . . . . . . . . . . 5-28
iv NE0154601-00 A
Page 5

QLogic 3000 and 3100 Series Intelligent Ethernet Adapters Users Guide
Tcp1323Opts Parameter . . . . . . . . . . . . . . . . . . . . . . . . . . . . . . . . . . 5-29
Modifying the Tcp1323Opts Parameter . . . . . . . . . . . . . . . . . . 5-30
Creating the Tcp1323Opts Parameter . . . . . . . . . . . . . . . . . . . 5-31
Setting the TcpWindowSize Parameter . . . . . . . . . . . . . . . . . . . . . . 5-32
6 Linux Driver Installation and Configuration
Linux Driver Checklist. . . . . . . . . . . . . . . . . . . . . . . . . . . . . . . . . . . . . . . . . . 6-1
Locate the Firmware ROM Image . . . . . . . . . . . . . . . . . . . . . . . . . . . . 6-1
Locate the Driver File . . . . . . . . . . . . . . . . . . . . . . . . . . . . . . . . . . . . . 6-2
Verify the Firmware Version. . . . . . . . . . . . . . . . . . . . . . . . . . . . . . . . . 6-2
Verify the Driver Version and Module Information . . . . . . . . . . . . . . . . 6-2
Locate the QLogic Tools . . . . . . . . . . . . . . . . . . . . . . . . . . . . . . . . . . . 6-2
Build the Linux Driver Source Code . . . . . . . . . . . . . . . . . . . . . . . . . . 6-2
Enable the Inbox Kernel GPL and Commercial Drivers . . . . . . . . . . . 6-2
Check for MSI-X Support. . . . . . . . . . . . . . . . . . . . . . . . . . . . . . . . . . . 6-3
Check for Receive Side Scaling (RSS) Support . . . . . . . . . . . . . . . . . 6-4
Inbox Kernel GPL Driver and Blacklisting . . . . . . . . . . . . . . . . . . . . . . . . . . 6-4
Preparing for QLogic Adapter Driver Installation . . . . . . . . . . . . . . . . . . . . . 6-5
QLogic Adapter Driver Installation (RPM Format) . . . . . . . . . . . . . . . . . . . . 6-5
Install the Linux Driver Source in RPM Format . . . . . . . . . . . . . . . . . . 6-5
Create the Binary. . . . . . . . . . . . . . . . . . . . . . . . . . . . . . . . . . . . . . . . . 6-6
Install the Binary . . . . . . . . . . . . . . . . . . . . . . . . . . . . . . . . . . . . . . . . . 6-6
Install the QLogic Tools . . . . . . . . . . . . . . . . . . . . . . . . . . . . . . . . . . . . 6-6
Linux QLogic Adapter Driver Options. . . . . . . . . . . . . . . . . . . . . . . . . . . . . . 6-6
Ethtool Utility . . . . . . . . . . . . . . . . . . . . . . . . . . . . . . . . . . . . . . . . . . 6-7
Configure the QLogic Adapter on Linux . . . . . . . . . . . . . . . . . . . . . . . . . . . . 6-8
Uninstall the Commercial GPL Driver and Tools Package . . . . . . . . . . . . . . 6-8
Diagnostic Tests for the QLogic Adapter . . . . . . . . . . . . . . . . . . . . . . . . . . . 6-8
Linux Performance Tuning . . . . . . . . . . . . . . . . . . . . . . . . . . . . . . . . . . . . . . 6-9
Performance Tools. . . . . . . . . . . . . . . . . . . . . . . . . . . . . . . . . . . . . . . . 6-9
Using the iperf Tool . . . . . . . . . . . . . . . . . . . . . . . . . . . . . . . . . 6-9
Optimization. . . . . . . . . . . . . . . . . . . . . . . . . . . . . . . . . . . . . . . . . . . . . 6-10
Version 4.6
7 Linux Configuration for Bonding Mode and Virtual LAN (VLAN)
Linux Bonding Mode. . . . . . . . . . . . . . . . . . . . . . . . . . . . . . . . . . . . . . . . . . . 7-1
Active-Backup or Mode=1 . . . . . . . . . . . . . . . . . . . . . . . . . . . . . . . . . . 7-2
Round-Robin or Mode=0 . . . . . . . . . . . . . . . . . . . . . . . . . . . . . . . . . . . 7-3
Bonding Driver Options . . . . . . . . . . . . . . . . . . . . . . . . . . . . . . . . . . . . 7-4
NE0154601-00 A v
Page 6

QLogic 3000 and 3100 Series Intelligent Ethernet Adapters Users Guide
Version 4.6
Bonding Driver Parameters . . . . . . . . . . . . . . . . . . . . . . . . . . . . . . . . . 7-4
arp_interval . . . . . . . . . . . . . . . . . . . . . . . . . . . . . . . . . . . . . 7-5
arp_ip_target . . . . . . . . . . . . . . . . . . . . . . . . . . . . . . . . . . . . 7-5
downdelay . . . . . . . . . . . . . . . . . . . . . . . . . . . . . . . . . . . . . . . . 7-5
lacp_rate . . . . . . . . . . . . . . . . . . . . . . . . . . . . . . . . . . . . . . . . 7-5
QLogic Adapter Bonding Modes Under Linux . . . . . . . . . . . . . . . . . . . 7-5
Configuring Virtual LAN (VLAN) Under Linux. . . . . . . . . . . . . . . . . . . . . . . . 7-7
8 Firmware Management
Windows Server Dynamic Firmware Download . . . . . . . . . . . . . . . . . . . . . . 8-1
Linux Dynamic Firmware Download. . . . . . . . . . . . . . . . . . . . . . . . . . . . . . . 8-1
9 Troubleshooting Guidelines
Unable to Boot the Host System with the QLogic Adapter Installed . . . . . . 9-1
Unable to Send/Receive Network Traffic Using the QLogic Adapter . . . . . . 9-1
Troubleshooting Tools . . . . . . . . . . . . . . . . . . . . . . . . . . . . . . . . . . . . . . . . . 9-2
Windows Server Tools . . . . . . . . . . . . . . . . . . . . . . . . . . . . . . . . . . . . . 9-2
Linux Tools. . . . . . . . . . . . . . . . . . . . . . . . . . . . . . . . . . . . . . . . . . . . . . 9-3
Check for System Errors . . . . . . . . . . . . . . . . . . . . . . . . . . . . . . . . . . . . . . . 9-3
Linux . . . . . . . . . . . . . . . . . . . . . . . . . . . . . . . . . . . . . . . . . . . . . . . . . . 9-3
Windows Server . . . . . . . . . . . . . . . . . . . . . . . . . . . . . . . . . . . . . . . . . 9-4
Caveats . . . . . . . . . . . . . . . . . . . . . . . . . . . . . . . . . . . . . . . . . . . . . . . . . . . . 9-4
MSI-X Interrupts for Linux . . . . . . . . . . . . . . . . . . . . . . . . . . . . . . . . . . 9-4
PCI Express Slot . . . . . . . . . . . . . . . . . . . . . . . . . . . . . . . . . . . . . . . . . 9-4
Windows Server 2003 RSS and SNP Support. . . . . . . . . . . . . . . . . . . . . . . 9-6
A Diagnostic Utility Commands
B Solaris Driver, nxflash Utility, and Firmware Installation
QLogic Adapter Driver Installation . . . . . . . . . . . . . . . . . . . . . . . . . . . . . . . . B-1
nxflash Utility and Firmware Files Installation. . . . . . . . . . . . . . . . . . . . . . B-2
C Flash Update
Flash Update and Tool Guidelines . . . . . . . . . . . . . . . . . . . . . . . . . . . . . . . . C-1
Flash Update Options. . . . . . . . . . . . . . . . . . . . . . . . . . . . . . . . . . . . . . . . . . C-1
nxflash Command . . . . . . . . . . . . . . . . . . . . . . . . . . . . . . . . . . . . . . C-1
Windows Server . . . . . . . . . . . . . . . . . . . . . . . . . . . . . . . . . . . . . C-1
Linux . . . . . . . . . . . . . . . . . . . . . . . . . . . . . . . . . . . . . . . . . . . . . . C-2
NX Live CD . . . . . . . . . . . . . . . . . . . . . . . . . . . . . . . . . . . . . . . . . . . . . C-2
NX Live USB . . . . . . . . . . . . . . . . . . . . . . . . . . . . . . . . . . . . . . . . . . . . C-2
NX Live Menu Options. . . . . . . . . . . . . . . . . . . . . . . . . . . . . . . . . . . . . C-3
vi NE0154601-00 A
Page 7

QLogic 3000 and 3100 Series Intelligent Ethernet Adapters Users Guide
Version 4.6
QLogic Adapter Flash Update — Windows Server . . . . . . . . . . . . . . . . . . . C-3
Using the Flash Utility . . . . . . . . . . . . . . . . . . . . . . . . . . . . . . . . . . . . . C-4
Flash Update Procedure . . . . . . . . . . . . . . . . . . . . . . . . . . . . . . . . . . . C-5
Updating the Flash on Multiple Standalone Adapters . . . . . . . . . . . . . C-7
QLogic Adapter Flash Update — Linux . . . . . . . . . . . . . . . . . . . . . . . . . . . . C-8
Using the Flash Utility . . . . . . . . . . . . . . . . . . . . . . . . . . . . . . . . . . . . . C-8
Flash Update Procedure . . . . . . . . . . . . . . . . . . . . . . . . . . . . . . . . . . . C-10
Glossary
List of Figures
Figure Page
4-1 QLE3044 Port Assignments. . . . . . . . . . . . . . . . . . . . . . . . . . . . . . . . . . . . . . . . . . . 4-1
4-2 QLE3044 Status LEDs — Front View . . . . . . . . . . . . . . . . . . . . . . . . . . . . . . . . . . . 4-2
4-3 QLE3044 Bracket Removal . . . . . . . . . . . . . . . . . . . . . . . . . . . . . . . . . . . . . . . . . . . 4-3
4-4 QLE3044 Bracket Replacement. . . . . . . . . . . . . . . . . . . . . . . . . . . . . . . . . . . . . . . . 4-3
4-5 QLE3142 Installation and Removal . . . . . . . . . . . . . . . . . . . . . . . . . . . . . . . . . . . . . 4-5
4-6 QLE3142 Status LEDs — Side View . . . . . . . . . . . . . . . . . . . . . . . . . . . . . . . . . . . . 4-5
4-7 QLE3142 Bracket Removal . . . . . . . . . . . . . . . . . . . . . . . . . . . . . . . . . . . . . . . . . . . 4-6
4-8 QLE3142 Bracket Replacement. . . . . . . . . . . . . . . . . . . . . . . . . . . . . . . . . . . . . . . . 4-6
5-1 Found New Hardware Wizard Dialog Box . . . . . . . . . . . . . . . . . . . . . . . . . . . . . . . . 5-2
5-2 Driver Location Information . . . . . . . . . . . . . . . . . . . . . . . . . . . . . . . . . . . . . . . . . . . 5-3
5-3 Select Driver Location . . . . . . . . . . . . . . . . . . . . . . . . . . . . . . . . . . . . . . . . . . . . . . . 5-4
5-4 Browse for Folder. . . . . . . . . . . . . . . . . . . . . . . . . . . . . . . . . . . . . . . . . . . . . . . . . . . 5-5
5-5 Software Installation Progress . . . . . . . . . . . . . . . . . . . . . . . . . . . . . . . . . . . . . . . . . 5-5
5-6 Software Installation Complete . . . . . . . . . . . . . . . . . . . . . . . . . . . . . . . . . . . . . . . . 5-6
5-7 Driver Installation Verification. . . . . . . . . . . . . . . . . . . . . . . . . . . . . . . . . . . . . . . . . . 5-6
5-8 Adapter Properties — General Tab . . . . . . . . . . . . . . . . . . . . . . . . . . . . . . . . . . . . . 5-7
5-9 Adapter Properties — Advanced Tab. . . . . . . . . . . . . . . . . . . . . . . . . . . . . . . . . . . . 5-8
5-10 Adapter Properties — Information Tab . . . . . . . . . . . . . . . . . . . . . . . . . . . . . . . . . . . 5-15
5-11 Adapter Properties — Diagnostics Tab . . . . . . . . . . . . . . . . . . . . . . . . . . . . . . . . . . 5-16
5-12 Adapter Properties — Statistics Tab. . . . . . . . . . . . . . . . . . . . . . . . . . . . . . . . . . . . . 5-17
5-13 Adapter Properties — Flash Update Tab . . . . . . . . . . . . . . . . . . . . . . . . . . . . . . . . . 5-18
5-14 Adapter Properties — Driver Tab . . . . . . . . . . . . . . . . . . . . . . . . . . . . . . . . . . . . . . . 5-19
5-15 Adapter Properties — Resources Tab . . . . . . . . . . . . . . . . . . . . . . . . . . . . . . . . . . . 5-20
5-16 Network Connections Window . . . . . . . . . . . . . . . . . . . . . . . . . . . . . . . . . . . . . . . . . 5-21
5-17 Local Area Connection Properties Dialog Box. . . . . . . . . . . . . . . . . . . . . . . . . . . . . 5-22
5-18 Internet Protocol (TCP/IP) Properties Dialog Box . . . . . . . . . . . . . . . . . . . . . . . . . . 5-23
5-19 Adapter Properties — Diagnostics Tab . . . . . . . . . . . . . . . . . . . . . . . . . . . . . . . . . . 5-25
5-20 Run Dialog Box . . . . . . . . . . . . . . . . . . . . . . . . . . . . . . . . . . . . . . . . . . . . . . . . . . . . 5-26
5-21 Location of ntttcp . . . . . . . . . . . . . . . . . . . . . . . . . . . . . . . . . . . . . . . . . . . . . . . . . 5-27
5-22 Run Window. . . . . . . . . . . . . . . . . . . . . . . . . . . . . . . . . . . . . . . . . . . . . . . . . . . . . . . 5-30
5-23 Registry Editor — HKEY_LOCAL_MACHINE Directory . . . . . . . . . . . . . . . . . . . . . 5-30
5-24 Registry Editor — Parameter Directory . . . . . . . . . . . . . . . . . . . . . . . . . . . . . . . . . . 5-31
NE0154601-00 A vii
Page 8

QLogic 3000 and 3100 Series Intelligent Ethernet Adapters Users Guide
Version 4.6
5-25 New Key — DWORD . . . . . . . . . . . . . . . . . . . . . . . . . . . . . . . . . . . . . . . . . . . . . . . . 5-32
5-26 Creating Tcp1323Opts. . . . . . . . . . . . . . . . . . . . . . . . . . . . . . . . . . . . . . . . . . . . . . 5-32
5-27 Edit DWORD Value Window — Tcp1323Opts Parameter . . . . . . . . . . . . . . . . . . . 5-32
5-28 Modifying the TcpWindowSize Parameter. . . . . . . . . . . . . . . . . . . . . . . . . . . . . . . 5-33
5-29 Edit DWORD Value Window — TcpWindowSize Parameter. . . . . . . . . . . . . . . . . 5-33
List of Tables
Table Page
1-1 QLogic 3000 and 3100 Series Intelligent Ethernet Adapters . . . . . . . . . . . . . . . . . 1-2
2-1 Cable Specifications — Optical . . . . . . . . . . . . . . . . . . . . . . . . . . . . . . . . . . . . . . . . 2-1
2-2 Cable Specifications — Copper . . . . . . . . . . . . . . . . . . . . . . . . . . . . . . . . . . . . . . . . 2-2
4-1 Mapping of Port Number, PCI Function, and Ethernet Interface . . . . . . . . . . . . . . . 4-2
4-2 QLE3044 LED Definitions . . . . . . . . . . . . . . . . . . . . . . . . . . . . . . . . . . . . . . . . . . . . 4-2
5-1 Advanced Properties Parameters . . . . . . . . . . . . . . . . . . . . . . . . . . . . . . . . . . . . . . 5-9
5-2 ntttcps and ntttcpr Command Line Options . . . . . . . . . . . . . . . . . . . . . . . . . . 5-28
5-3 Tcp1323Opts . . . . . . . . . . . . . . . . . . . . . . . . . . . . . . . . . . . . . . . . . . . . . . . . . . . . . 5-29
5-4 Range. . . . . . . . . . . . . . . . . . . . . . . . . . . . . . . . . . . . . . . . . . . . . . . . . . . . . . . . . . . . 5-29
6-1 modprobe Command Optional Parameters . . . . . . . . . . . . . . . . . . . . . . . . . . . . . . 6-7
7-1 Bonding Modes . . . . . . . . . . . . . . . . . . . . . . . . . . . . . . . . . . . . . . . . . . . . . . . . . . . . 7-6
9-1 Troubleshooting Tools in Windows Server . . . . . . . . . . . . . . . . . . . . . . . . . . . . . . . . 9-2
9-2 Troubleshooting Tools in Linux. . . . . . . . . . . . . . . . . . . . . . . . . . . . . . . . . . . . . . . . . 9-3
9-3 QLogic Adapter Device IDs . . . . . . . . . . . . . . . . . . . . . . . . . . . . . . . . . . . . . . . . . . . 9-5
A-1 Diagnostic Utility Commands . . . . . . . . . . . . . . . . . . . . . . . . . . . . . . . . . . . . . . . . . . A-1
C-1 Flash Utility Commands — Windows Server . . . . . . . . . . . . . . . . . . . . . . . . . . . . . . C-4
C-2 Flash Utility Commands — Linux . . . . . . . . . . . . . . . . . . . . . . . . . . . . . . . . . . . . . . . C-8
viii NE0154601-00 A
Page 9

Preface
Intended Audience
This guide is for system administrators and end-users of the QLogic 3000 and
3100 Series Intelligent Ethernet adapters.
Related Materials
Release Notes included in the software release.
Linux
nxudiag utility help (diagnostics)
Check the QLogic Web site for updates.
Documentation Conventions
®
man page % man nx_nic
nxudiag -h or nxudiag --help (Windows
% ./nxudiag -h or nxudiag --help (Linux)
®
)
This guide uses the following documentation conventions:
NOTE: provides additional information.
Te xt i n blue font indicates a hyperlink (jump) to a figure, table, or section in
this guide, and links to Web sites are shown in underlined blue
example:
Table 9-2 lists problems related to the installation.
See “Installation Checklist” on page 3-6.
For more information, visit www.qlogic.com
Te xt i n bold font indicates user interface elements such as a menu items,
buttons, check boxes, or column headings. For example:
Click Start, point to Programs, point to Accessories, and then click
Command Prompt.
The Adapter Properties window opens with the General tab in front.
.
. For
NE0154601-00 A ix
Page 10

Preface
Technical Support
Te xt i n Courier font indicates a file name, directory path, command, or
screen text. For example:
nx3fwct.bin
C:\WINDOWS\system32\drivers
Te xt i n Bold Courier font indicates a command to enter that performs a
specific task. For example:
rpm -iv nx_nic-[version].src.rpm
The italic text (version) indicates a variable.
A percent sign (%) is the cursor prompt when executing Linux commands.
The term <current release> refers to the current release of the software. For
example, release 4.0.305. Check the Release Notes for the most up-to-date
release version.
Key names and key strokes are indicated with UPPERCASE:
Press CTRL+P.
Press the UP ARROW key.
Te xt i n italics indicates terms, emphasis, variables, or document titles. For
example:
For a complete listing of license agreements, refer to the QLogic
Software End User License Agreement.
What are shortcut keys?
/lib/modules/<kernel-version>/kernel/net/netxen
Technical Support
Customers should contact their authorized maintenance provider for technical
support of their QLogic products. QLogic-direct customers may contact QLogic
Technical Support; others will be redirected to their authorized maintenance
provider.
Visit the QLogic support Web site listed in Contact Information for the latest
firmware and software updates.
Availability
QLogic Technical Support for products under warranty is available during local
standard working hours excluding QLogic Observed Holidays.
x NE0154601-00 A
Page 11

Training
QLogic offers training for technical professionals for all iSCSI, InfiniBand, Fibre
Channel, and Intelligent Ethernet products. From the main QLogic Web page at
www.qlogic.com
the Education & Training tab on the left. The QLogic Global Training Portal offers
online courses, certification exams, and scheduling of in-person training.
Technical Certification courses include installation, maintenance and
troubleshooting QLogic SAN products. Upon demonstrating knowledge using live
equipment, QLogic awards a certificate identifying the student as a Certified
Professional. The training professionals at QLogic may be reached by e-mail at
training@qlogic.com.
Contact Information
Please feel free to contact your QLogic approved reseller or QLogic Technical
Support at any phase of integration for assistance. QLogic Technical Support can
be reached by the following methods:
Preface
Technical Support
, click the Education and Resources tab at the top, then click
Web http://support.qlogic.com
Email support@qlogic.com
The QLogic knowledge database contains troubleshooting information for the
QLogic adapters. Access the data base from the QLogic Support Web page,
http://support.qlogic.com
specific troubleshooting information.
. Use the Support Center search engine to look for
NE0154601-00 A xi
Page 12

Preface
Technical Support
Notes
xii NE0154601-00 A
Page 13

1 Overview
This guide describes the system requirements, installation, and setup required for
the QLogic 3000 and 3100 Series Intelligent Ethernet adapters listed in Tab l e 1 -1 .
This guide should be used in conjunction with the Release Notes.
Obtaining the Latest Software Release
Information
Refer to the Release Notes for more information on the software release package
contents.
The Release Notes document contains:
Software release package contents
Current driver and firmware release version
Known issues
Additional system software requirements
To download the latest version of the drivers and Release Notes for this product,
refer to the QLogic Web site Downloads section:
http://driverdownloads.qlogic.com/QLogicDriverDownloads_UI/default.aspx
NE0154601-00 A 1-1
.
Page 14

1–Overview
Supported QLogic 3000 and 3100 Series Intelligent Ethernet Adapters
Supported QLogic 3000 and 3100 Series
Intelligent Ethernet Adapters
The products in Tab le 1 -1 are supported in this document.
Table 1-1. QLogic 3000 and 3100 Series Intelligent Ethernet Adapters
Product Product Definition
QLE3044 Quad-port 1GbE Intelligent Ethernet Adapter Copper
QLE3142-CU Dual-port 10GbE Intelligent Ethernet Adapter Twinax
QLE3142-SR Dual-port 10GbE Intelligent Ethernet Adapter (short
range fiber)
QLE3142-LR Dual-port 10GbE Intelligent Ethernet Adapter (long
range fiber)
Table Notes
For OEM-branded QLogic 3000 and 3100 Series Intelligent Ethernet adapters, see the QLogic Web
site.
These products are collectively referred to as the QLogic adapter unless
otherwise noted.
The QLogic adapters are compatible with Windows
Systems (OSes). For more information about supported operating systems, see
the Release Notes.
Application Notes
Transfer
Medium
Optical
Optical
®
, Linux®, and other Operating
For information about Linux PXE and iSCSI boot, see the following applications
notes:
Setting up Linux PXE on Server and Client Systems, part
number FE0051401-00
iSCSI Boot Setup, part number IS0051404-00
1-2 NE0154601-00 A
Page 15

2 System Requirements
Before installing the QLogic adapter, make sure your system meets the
requirements listed in this section:
“Hardware Requirements” on page 2-1
“System and Software Requirements” on page 2-2
“Supported QLogic Adapters” on page 2-2
Hardware Requirements
Cable Specifications
Make sure the cables you are using meet the specifications listed in Tables 2-1
and 2-2.
Table 2-1. Cable Specifications — Optical
Core
Product
QLE3142-SR 50 OM2 850 400 66
QLE3142-LR 9 n/a 1310 N/A 10,000
Diameter
(μm)
62.5 OM1 160 26
10 n/a N/A 10,000
Optical
Mode
OM3 2000 300
Wavelength
(nm)
Bandwidth
(MHz)
500 82
200 33
Distance
(m)
NE0154601-00 A 2-1
Page 16

2–System Requirements
System and Software Requirements
Table 2-2. Cable Specifications — Copper
Product Cable Type
QLE3044-RJ Cat5 LAN 100
QLE3142-CU Copper direct attach twinax LAN 10
Network
Type
SFP+ Optical Module Requirements
Use only the optical modules validated and shipped with the QLogic adapter.
System and Software Requirements
See the Release Notes for more information on the particular system and software
requirements for the current software release. The drivers and Release Notes are
on the QLogic Web site at:
to://driverdownloads.qlogic.com/QLogicDriverDownloads_UI/default.aspx
Supported QLogic Adapters
Make sure you have one of the adapters listed in Tab le 1 -1 .
Cable Length
(meters)
2-2 NE0154601-00 A
Page 17

3 Installation Instructions
This section provides instructions for advanced users who are already familiar
with hardware and software installation procedures. See the appropriate section,
as applicable:
“QLogic Adapter Installation and Verification” on page 3-1
“Windows Server Driver Installation” on page 3-2
“Linux Driver Installation” on page 3-4
QLogic Adapter Installation and Verification
The following sections provide high-level instructions for installing the QLogic
adapter. For more detailed instructions, see “Hardware Installation” on page 4-1.
Pre-installation Checklist
Before installing the QLogic adapter:
1. Verify that the system meets the requirements specified in “System
Requirements” on page 2-1 and in the Release Notes.
2. Power down the system.
QLogic Adapter Installation
To install the QLogic adapter:
®
1. Insert the QLogic adapter into an available PCI Express
2. Connect the appropriate cables to the QLogic adapter.
3. Power up the system.
slot.
Verify the QLogic Adapter Installation
To verify that the QLogic adapter has been installed correctly, perform the steps in
the appropriate section.
Linux
On Linux systems, execute the following command:
# lspci -vvv -d 4040:
NE0154601-00 A 3-1
Page 18

3–Installation Instructions
Windows Server Driver Installation
Windows Server
On Windows Server systems, perform the following steps:
1. Open the Start menu.
2. Highlight My Computer, then right-click the mouse button. On the shortcut
menu, select Manage. The Computer Management window opens.
3. Select Device Manager under Computer Management.
4. Check under Other devices for an Unknown Device. The QLogic adapter
will be listed as an Unknown Device. It will have a yellow question mark next
to it prior to having the QLogic adapter driver installed.
5. Right-click the device and select Properties from the shortcut menu.
6. Click the Details tab. Look for VEN_4040 as part of the string. This text
indicates that the QLogic adapter is installed correctly.
Windows Server Driver Installation
Before installing the driver, download the driver package and the Release Notes
from the QLogic Web site, www.qlogic.com
See “Windows Server Driver Checklist” on page 5-1 for more information.
Windows Server 2003
To install the QLogic adapter driver:
1. Open the Start menu.
2. Highlight My Computer, then right-click the mouse button. On the shortcut
menu, select Manage. The Computer Management window opens.
3. Select Device Manager under Computer Management.
4. Select scan for new hardware changes.
5. When prompted to connect to Windows Update, Click No, not at this time,
and then click Next.
6. In the next window, click Install from a list of specific location, then click
Next.
7. Select Search for the best driver in these locations. Deselect the Search
removable media option. Select Include this location in the search.
8. Click Browse, then provide the path to the directory where the driver is
located. The file name is either nxnd5x86.sys (Windows Server 2003,
32 bit) or nxnd5x64.sys (Windows Server 2003, 64 bit)
.
.
3-2 NE0154601-00 A
Page 19

9. Locate the following files in the driver directory:
nx3fwct.bin
nx3fwmn.bin
nxnd5x86.sys (Windows 2003, 32 bit) or
nxnd5x64.sys (Windows 2003, 64 bit)
Click OK in the Browse for Folder window.
10. Click the Next button from the Hardware Update Wizard window.
To configure the QLogic adapter:
1. On the Start menu, select Control Panel.
2. Select Network Connections.
3. Verify that Ethernet adapter icon says Connected.
4. Assign an IP address to the network interface.
Windows Server 2008
3–Installation Instructions
Windows Server Driver Installation
To install the QLogic adapter driver:
1. Open the Start menu.
2. Highlight My Computer, then right-click the mouse button. On the shortcut
menu, select Manage. The Computer Management window opens.
3. Select Device Manager under Computer Management.
4. From the Device Manager window, select scan for new hardware. The
Update Driver Software window opens.
5. Select Browse my computer for driver software, then click Browse.
6. Locate the following files in the driver directory:
nx3fwct.bin
nx3fwmn.bin
nxnd6x86.sys (Windows Server 2008, 32 bit) or
nxnd6x64.sys (Windows Server 2008, 64 bit)
Click OK in the Browse for Folder window.
7. From the Update Driver Software window, click Next.
To configure the QLogic adapter:
1. On the Start menu, select Control Panel.
2. Select Network Connections.
3. Verify that Ethernet adapter icon says Connected.
4. Assign an IP address to the network interface.
NE0154601-00 A 3-3
Page 20

3–Installation Instructions
Linux Driver Installation
Linux Driver Installation
Before installing the driver, download the driver package and the Release Notes
from the QLogic Web site, www.qlogic.com
See “Linux Driver Checklist” on page 6-1 for more information.
Verify and Remove Existing QLogic Adapter Driver and Tools
Package
If you have a previous version of the QLogic adapter driver, perform the following
steps to remove the driver and tools package:
1. Type:
rpm -qa | grep nx_
2. Type:
ifconfig eth[n] down
3. Type:
.
rmmod nx_nic.ko
4. Type:
rpm -e nx_nic-[version]
5. Type:
rpm -e nx_tools-[version]
Install the Driver (RPM)
Red Hat
®
To install the driver on a Red Hat system:
1. Type the following command to install the RPM source:
rpm -iv nx_nic-[version].src.rpm
2. Type the following command to build the binary RPM:
rpmbuild -bb /usr/src/redhat/SPECS/nx_nic-[version].spec
3. Type the following command to install the binary RPM:
rpm -ivh /usr/src/redhat/RPMS/[arch]/nx_nic-[version].[arch].rpm
The [arch] variable designates the system architecture. Some [arch]
variables are i386, i586, i686, x86_64, depending on the system.
3-4 NE0154601-00 A
Page 21

4. Type the following command to install the tools RPM:
rpm -ivh nx_tools-[version].rpm
5. Type the following command to load the driver:
modprobe -v nx_nic
3–Installation Instructions
Linux Driver Installation
SUSE
®
To install the driver on a SUSE system:
1. Type the following command to install the RPM source:
rpm -iv nx_nic-[version].src.rpm
2. Type the following command to build the binary RPM:
rpmbuild -bb /usr/src/packages/SPECS/nx_nic-[version].spec
3. Type the following command to install the binary RPM:
rpm -ivh /usr/src/packages/RPMS/[arch]2/nx_nic-[version].[arch].rpm
The [arch] variable designates the system architecture. Some [arch]
variables are i386, i586, i686, x86_64, depending on the system.
4. Type the following command to install the tools RPM:
rpm -ivh nx_tools-[version].rpm
5. Type the following command to load the driver:
modprobe firmware_class
modprobe -v nx_nic
QLogic Adapter Configuration
To configure the QLogic adapter:
1. Type the following command to identify the Ethernet interface:
cat /proc/net/nx_nic/dev0/stats
2. Type the following command to assign an IP address:
ifconfig eth[n] [ip address]
NE0154601-00 A 3-5
Page 22

3–Installation Instructions
Linux Driver Installation
Notes
3-6 NE0154601-00 A
Page 23

4 Hardware Installation
RJ45
RJ45
RJ45
RJ45
Port 1
Port 2
Port 3
Port 4
This section provides installation instructions for the QLogic adapters. Please
follow all applicable ESD precautions when handling the QLogic adapter.
QLE3044 Installation
To install the QLE3044:
1. Verify that the system is powered off and unplug the power cord.
2. Remove the system cover.
3. Locate an empty x4 or higher PCIe
4. Insert the QLE3044 into the PCIe slot. Apply uniform pressure on top of the
QLE3044 until it is firmly seated in the PCIe bus connector.
5. Secure the bracket to the chassis and replace the cover.
6. Connect the appropriate cables to the QLE3044.
7. Plug in the power cord and power up the system.
®
slot.
The QLE3044 contains four ports that are organized as shown in Figure 4-1. Note
that the portion of the bracket covering the four RJ45 jacks is not shown.
Figure 4-1. QLE3044 Port Assignments
NE0154601-00 A 4-1
Page 24

4–Hardware Installation
Port 1
Port 2
Port 3
Port 4
Top of board
Bi-color
Link LED
Green
Activity LED
PCIe connector
QLE3044 Installation
Ethernet Port Mapping
The mapping of port numbers on the QLE3044 is shown in Table 4-1.
Table 4-1. Mapping of Port Number, PCI Function, and Ethernet
Port Number PCI Function Ethernet Interface
1 0 Ethernet interface numbers are dynamically allo-
21
3 2
43
QLE3044 Status LEDs
The QLE3044 has two status LEDs per port. These LEDs are located on the
actual port itself as shown in Figure 4-2. When viewing the QLE3044 from the
front, the bi-color green/orange link LED is on the left, and the green activity LED
is on the right.
Interface
cated by the host. As such, any eth[n] interface can
be connected to any port.
Figure 4-2. QLE3044 Status LEDs — Front View
The bi-color link LED indicates the speed of the connection as shown in Tab le 4 -2 .
Table 4-2. QLE3044 LED Definitions
Green/Orange
Speed
Bi-color Link
LED
10 Mbps Off During power-up, the activity LED is on continu-
100 Mbps Green On
1000 Mbps Orange On
4-2 NE0154601-00 A
ously (solid). The LED blinks during normal operation when there is activity on the port for any of the
speed settings.
Green Activity LED
Page 25

QLE3044 Bracket Removal and Replacement
1. Remove screw using
a Phillips screwdriver.
2. Slide the bracket upward
Bracket
until it clears the four RJ45
Ethernet jacks.
2. Fasten the screw using
a Phillips screwdriver.
1. Slide the bracket down
Bracket
over the four RJ45
Ethernet jacks.
RJ45
RJ45
RJ45
RJ45
Depending on the type of system, installation of the QLE3044 requires either a
long bracket or a short bracket. QLogic provides both of these brackets with the
product. The brackets for the QLE3044 are different from previous brackets in that
they slide over the top of the four RJ45 Ethernet jacks.
To remove and replace the bracket:
1. Remove the screw at the top of the QLE3044 that holds the bracket in place.
2. The bracket covers the top of the RJ45 Ethernet jacks. Slide the bracket
upward towards the top of the QLE3044 until it clears all of the Ethernet
jacks.
3. To replace with a different bracket, reverse the process, sliding the new
bracket over the Ethernet jacks. Then fasten in place with the screw.
The removal and replacement process is illustrated in Figure 4-3 and Figure 4-4,
respectively.
4–Hardware Installation
QLE3044 Installation
Figure 4-3. QLE3044 Bracket Removal
Figure 4-4. QLE3044 Bracket Replacement
NE0154601-00 A 4-3
Page 26

4–Hardware Installation
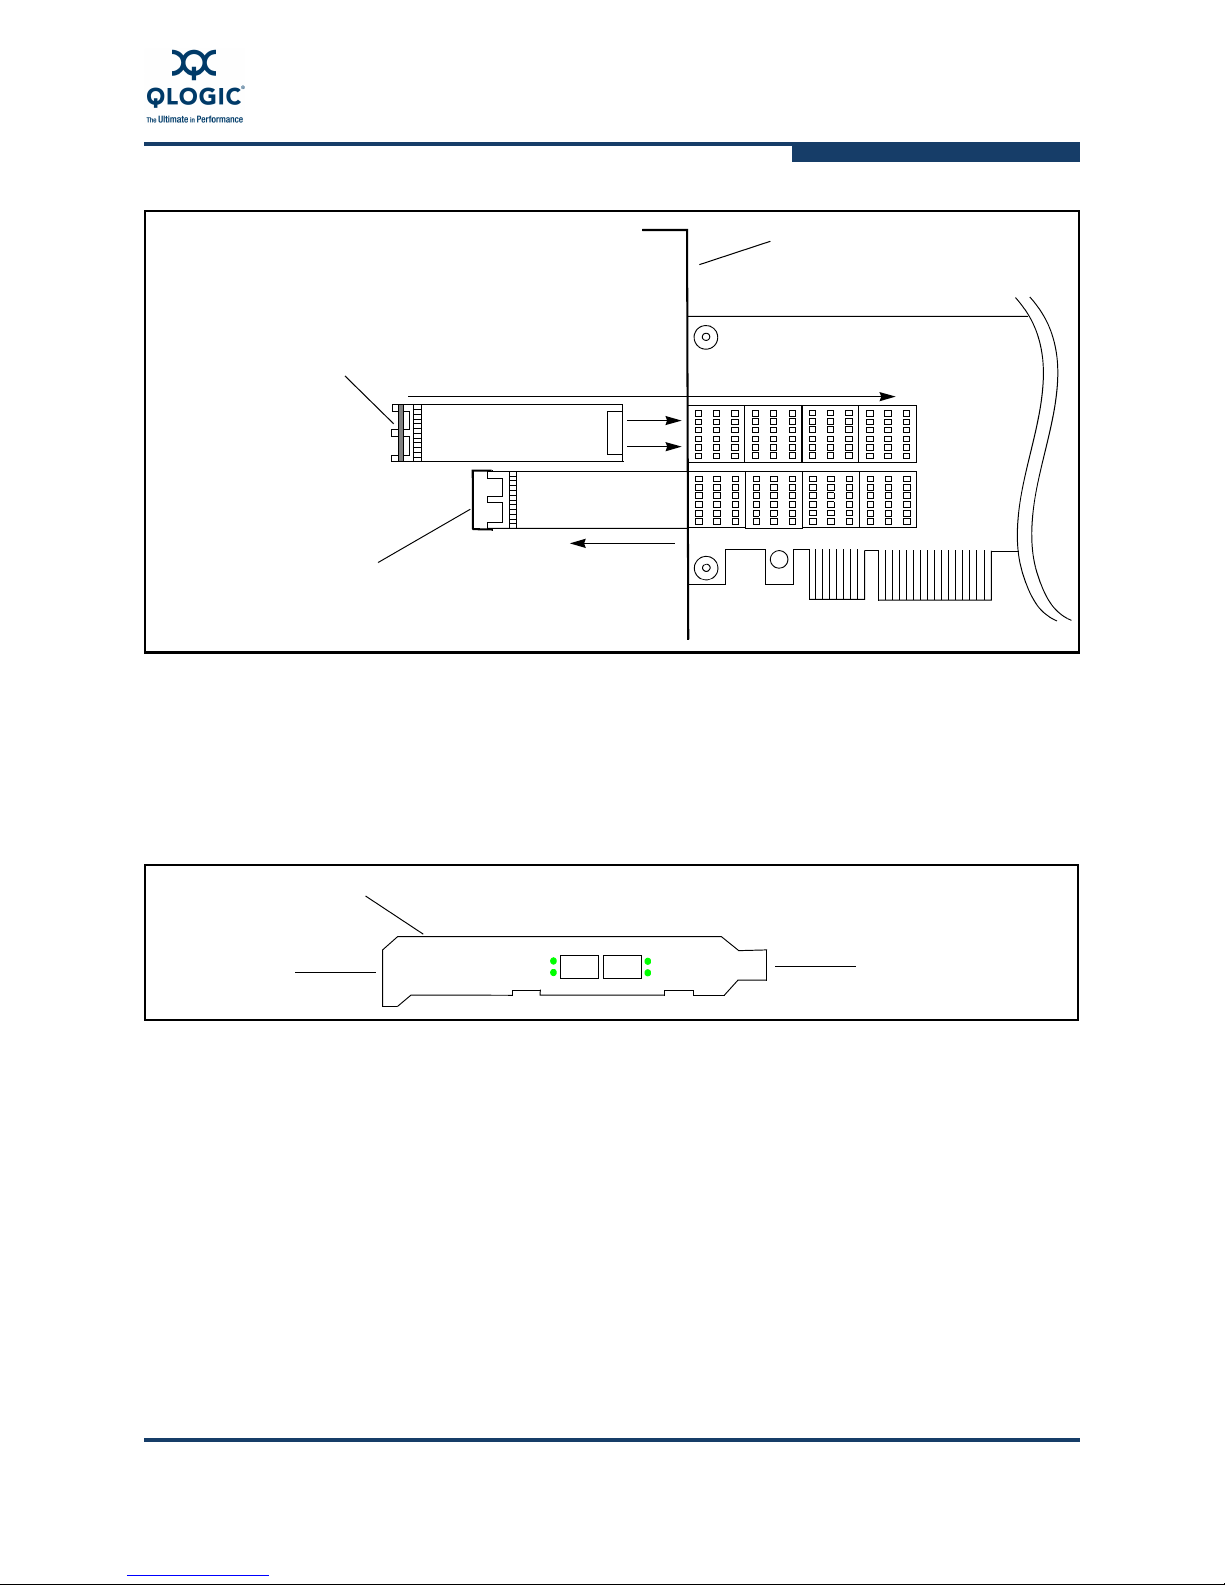
QLE3142 Installation
QLE3142 Installation
To install the QLE3142:
1. Verify that the system is powered down and unplug the power cord.
2. Remove the system cover.
3. Locate an empty x8 PCIe slot.
4. Remove the SFP+ optical modules from the QLE3142 if they are already
inserted (see Figure 4-5).
5. Insert the QLE3142 into the x8 PCIe slot. Apply uniform pressure on top of
the QLE3142 until it is firmly seated in the bus connector.
6. Connect the SFP+ module or copper direct attach twinax cable. Listen for an
audible clicking sound when the optical module is inserted into the housing
(see Figure 4-5).
7. Secure the bracket to the chassis and replace the cover.
8. Connect the appropriate cables to the QLE3142.
9. Plug in the power cord and power up the system.
NOTE:
The optical module must be seated correctly in the housing to ensure proper
operation.
4-4 NE0154601-00 A
Page 27
4–Hardware Installation
QLE3142
SFP+ module slides into
housing on the board
Ensure hinge is in upright position
when inserting module.
When the module is inserted
correctly, an audible ‘clicking’
SFP+ Optical
To remove optical module, flip the hinge
downward. Pull on the hinge to remove
the module from the housing.
Housing
Housing
Module
SFP+ Optical
Module
sound will be heard.
Bracket
Port 1Port 2
Link
Link
Activity
Activity
Mounting bracket
Top of card
PCIe connector end
QLE3142 Installation
QLE3142 Status LEDs
QLE3142 Bracket Removal and Replacement
Figure 4-5. QLE3142 Installation and Removal
The QLE3142 has two status LEDs per port, one for link status and one for
activity. These LEDs are located next to the ports as shown in Figure 4-6. Both
SFP+ ports operate at 10Gbps.
Figure 4-6. QLE3142 Status LEDs — Side View
Depending on the type of system, installation of the QLE3142 requires either a
long bracket or a short bracket. QLogic provides both of these brackets with the
product.
To remove and replace the bracket:
1. Remove the SFP+ optical modules from their housing (see Figure 4-7).
2. Remove the two screws at the top and bottom of the QLE3142 that hold the
bracket in place.
NE0154601-00 A 4-5
Page 28

4–Hardware Installation
QLE3142
Housing
Housing
Mounting Bracket
1. Remove the two mounting screws.
2. Gently pull the bracket away from
the board until it clears the optical
module housings.
QLE3142
Housing
Housing
2. Fasten the two mounting screws.
1. Attach the new bracket. The two optical module
cutouts on the bracket slide over the housings on
the QLE3142. The mounting screw tabs on the bracket
should line up with the mounting screw holes
on the QLE3142. Note that the tabs will be on the
solder side of the board.
QLE3142 Installation
3. Gently pull the bracket away from the QLE3142 until it disconnects from the
4. To replace with a different bracket, reverse the process, sliding the new
optical module housings.
bracket over the module housings (see Figure 4-8). Note that the screw
mounting tabs on the bracket go on the solder side of the QLE3142. Fasten
the bracket in place with the two screws.
Figure 4-7. QLE3142 Bracket Removal
Figure 4-8. QLE3142 Bracket Replacement
4-6 NE0154601-00 A
Page 29

5 Windows Server 2003 and
2008 Driver Installation and
Configuration
This section describes the installation and configuration procedure for Windows
Server 2003 and 2008 operating systems (OSes), collectively referred to as
Windows Server unless otherwise noted. For Linux driver installation instructions,
see Section 6. Throughout this section, some screen shots show both the
Windows Server 2003 and the Windows Server 2008 versions.
Windows Server Driver Checklist
Here is a brief summary of Windows installation guidelines with which you should
be familiar before installing the QLogic adapter driver on a Windows Server OS.
Windows Server Service Pack (SP) requirements
Location of auto-load firmware files
System requirements (see the Release Notes)
Each of these guidelines is described in more detail in the following sections.
See “Uninstall the QLogic Adapter Driver in Windows Server” on page 5-23 for the
location of the driver and firmware files (after the driver plug-ins are installed).
Windows Server Service Pack Requirements
SP2 must be installed for the Windows 2003 OS fixes.
Firmware ROM Image Location
The firmware ROM image files (nx3fwct.bin and nx3fwmn.bin) are placed in
the C:\WINDOWS\system32\drivers directory.
QLogic provides both a GUI and command line interface (CLI) for communicating
with the Flash utility.
NE0154601-00 A 5-1
Page 30

5–Windows Server 2003 and 2008 Driver Installation and Configuration
Windows Server Driver Installation and Verification
Windows Server Driver Installation and
Verification
Note that the following procedure is for a new driver installation.
1. Copy the QLogic adapter release package to a directory on the host.
2. After the server system is powered up, Windows detects the QLogic adapter,
and the Found New Hardware Wizard dialog box opens (Figure 5-1).
Figure 5-1. Found New Hardware Wizard Dialog Box
Select No, not at this time, and then click Next. The wizard opens another
dialog box prompting for driver location information.
5-2 NE0154601-00 A
Page 31

5–Windows Server 2003 and 2008 Driver Installation and Configuration
Windows Server 2003 Windows Server 2008
Windows Server Driver Installation and Verification
3. Do one of the following:
Windows Server 2003: select Install from a list or specific location
(Advanced), and then click the Next button (Figure 5-2).
Windows Server 2008: select Browse my computer for driver
software (Figure 5-2).
Figure 5-2. Driver Location Information
A dialog box opens prompting for more information about the driver location.
NE0154601-00 A 5-3
Page 32

5–Windows Server 2003 and 2008 Driver Installation and Configuration
Windows Server 2003 Windows Server 2008
Windows Server Driver Installation and Verification
4. Do one of the following:
Windows Server 2003: select Search for the best driver in these
locations, and then select Include this location in the search
(Figure 5-3).
Windows Server 2008: in the Update Driver Software dialog box,
select Browse for driver software on your computer.
Type the appropriate path to the QLogic adapter driver directory in the
accompanying field, then click the Next button (Figure 5-3).
Figure 5-3. Select Driver Location
If you do not know the exact directory path, click Browse, and then select
the QLogic adapter driver directory.
5-4 NE0154601-00 A
Page 33

5–Windows Server 2003 and 2008 Driver Installation and Configuration
Windows Server 2003 Windows Server 2008
Windows 2003 Windows 2008
Windows Server Driver Installation and Verification
Select the appropriate directory (x86 or x64), and then click the OK button
(Figure 5-4). The QLogic adapter supports both 32-bit and 64-bit OSes (see
the Release Notes for more information). The x86 directory contains the
32-bit driver. The x64 directory contains the 64-bit driver.
Figure 5-4. Browse for Folder
5. Do one of the following:
Windows Server 2003: click Next in the Hardware Update Wizard
dialog box to install the driver.
Windows Server 2008: click Next in the Update Driver Software dialog
box to install the driver.
The Please wait while the wizard installs the software dialog box is displayed
while the driver is being installed (Figure 5-5).
Figure 5-5. Software Installation Progress
NE0154601-00 A 5-5
Page 34

5–Windows Server 2003 and 2008 Driver Installation and Configuration
Windows Server 2003 Windows Server 2008
Windows Server 2003 Windows Server 2008
Windows Server Driver Installation and Verification
6. Click the Finish button on the final dialog box (Figure 5-6).
Figure 5-6. Software Installation Complete
To verify that the driver was properly installed:
1. On the Start menu, right-click My Computer, and then select Device
Manager. A list of devices appears in right side of the window.
2. Verify that the QLogic adapter is listed under Network Adapters, as shown in
Figure 5-7.
Figure 5-7. Driver Installation Verification
5-6 NE0154601-00 A
Page 35

5–Windows Server 2003 and 2008 Driver Installation and Configuration
Windows Server 2003 Windows Server 2008
Windows Server Driver Configuration
Windows Server Driver Configuration
The QLogic adapter driver can be configured through the adapter properties in
Device Manager.
To access the Device Manager:
1. On the Start menu, right-click My Computer, and then select Device
Manager. A list of devices appears in right side of the window.
2. Under Network Adapters, right-click the QLogic adapter (see Figure 5-7),
and then select Properties.
General Tab
The adapter properties window opens with the General tab in front (Figure 5-8).
Figure 5-8. Adapter Properties — General Tab
NE0154601-00 A 5-7
Page 36

5–Windows Server 2003 and 2008 Driver Installation and Configuration
Windows Server 2003 Windows Server 2008
Windows Server Driver Configuration
Advanced Tab
Click the Advanced tab to display the driver properties (Figure 5-9).
Figure 5-9. Adapter Properties — Advanced Tab
5-8 NE0154601-00 A
Page 37

5–Windows Server 2003 and 2008 Driver Installation and Configuration
Windows Server Driver Configuration
Table 5-1 describes the Advanced tab selections.
Table 5-1. Advanced Properties Parameters
Parameter Description
Completion Queue Size This parameter indicates the size of the completion
queue.
Registry Key: CompletionQueueSize
Default: 4 (16,384 entries).
Values (entries): 0 (1024), 1 (2048), 2 (4096),
3 (8192), 4 (16,384), 5 (32,768)
Flow Control This parameter sets flow control parameters. There
are four flow control options: 0 (off), 1 (transmit),
2 (receive), and 3 (transmit/receive).
Registry Key: FlowControl
Default: 3 (Transmit and receive flow control
enabled).
Values: 0, 1, 2, 3
Health Monitoring This parameter maintains the health of the device.
Disabling this parameter should performed under
advisement from QLogic.
Registry Key: Watchdog
Default: Health monitoring enabled.
Values: Enabled/Disabled
Interrupt Moderation This parameter provides interrupt moderation. When
this parameter is enabled, interrupts are moderated
automatically based on traffic patterns.
Registry Key: InterruptModeration
Default: Disabled
Values: Enabled/Disabled
IPv4 Checksum Offload This parameter enables/disables the IPv4 checksum
offload. There are four flow checksum options: 0 (off),
1 (transmit), 2 (receive), and 3 (transmit/receive).
Registry Key: IPChecksumOffloadv4
Default: 3 (Transmit and receive checksum
enabled)
Values: 0, 1, 2, 3
NE0154601-00 A 5-9
Page 38

5–Windows Server 2003 and 2008 Driver Installation and Configuration
Windows Server Driver Configuration
Table 5-1. Advanced Properties Parameters (Continued)
Parameter Description
Large Receive Offload (LRO) This parameter specifies the large receive offload —
enable/disable options.
Registry Key: LRO
Default: Enabled
Values: Enabled/Disabled
Large Send Offload V1 IPv4 This parameter specifies the large send offload —
enable/disable options.
Registry Key: LsoV1IPv4
Default: Enabled
Values: Enabled/Disabled
Size of LSO: 64K maximum
Large Send Offload V2 IPv4
Large Send Offload V2 IPv6
a
This parameter specifies the large send offload —
enable/disable options.
Registry Key: LsoV2IPv4
Default: Enabled
Values: Enabled/Disabled
Size of LSO: 64K maximum
a
This parameter specifies the large send offload —
enable/disable options.
Registry Key: LsoV2IPv6
Default: Enabled
Values: Enabled/Disabled
Size of LSO: 64K maximum
Locally Administered Address This is the locally administered address (LAA) that
5-10 NE0154601-00 A
users/administrators can set on this interface to override the permanent address of the QLogic adapter
(that may have been flashed into the hardware).
Registry Key: NetworkAddress
Format: Hex
Options: Value. (A value is required — enter the
12 hex bytes of the MAC address to be used, or
not present.)
Page 39

5–Windows Server 2003 and 2008 Driver Installation and Configuration
Windows Server Driver Configuration
Table 5-1. Advanced Properties Parameters (Continued)
Parameter Description
Max Ethernet Frame Size This parameter specifies the Ethernet frame size for
packet transmission and receive (it does not include
the MAC header).
Reg Key: MaxFrameSize
Default: 1500 (corresponds to 1514 bytes on the
wire + 4 bytes of CRC)
Max: 9000
Min: 64
Step: 1
Max Jumbo Buffers This parameter specifies the maximum number of
receive buffers per Jumbo frame.
Reg Key: RxJumboRingSize
Default: 2 (4096 buffers)
Values: 0 (1024), 1 (2048), 2 (4096), 3 (8192)
Max Offload Connections This parameter specifies the maximum number of
offload connections.
Reg Key: MaxOffloadConnections
Default: 512
Max: 512
Min: 0
Step: 1
NOTE: this feature is not supported at the time of
publication.
Number of Receive Buffers This parameter specifies the packet buffers used by
the driver for receive operations (DMA memory and
indicated to stack). Each buffer is 1536 bytes.
Registry Key: ReceiveBuffers
Default: 4 (16,384 entries)
Values (entries): 0 (1024), 1 (2048), 2 (4096),
3 (8192), 4 (16,384), 5 (32,768)
NE0154601-00 A 5-11
Page 40

5–Windows Server 2003 and 2008 Driver Installation and Configuration
Windows Server Driver Configuration
Table 5-1. Advanced Properties Parameters (Continued)
Parameter Description
Number of Transmit Buffers This parameter specifies the packet buffers used by
the driver for transmit operations (DMA memory and
indicated to stack). Each buffer is 1536 bytes.
Registry Key: TransmitBuffers
Min: 1K
Max: 2K
Default: 1024
Values: 0 (1024), 1 (2048)
Optimization This parameter controls optimization and IP forward-
ing. Enable this function when the QLogic adapter is
used for IP forwarding.
Registry Key: Optimization
Default: Disabled
Values: Disabled/Enabled
Priority and VLAN Tag This parameter controls support for 802.1p/q priority
tagging. Enable this parameter to set the VLAN ID.
There are four options.
0: Both 802.1p/q priority tagging and VLAN tagging
disabled.
1: Priority tagging enabled, VLAN tagging disabled.
2: VLAN tagging enabled, priority tagging disabled.
3: Both 802.1p/q priority tagging and VLAN tagging
enabled.
Registry Key: PriorityVLANTag
Default: 3
Values: 0, 1, 2, 3
Receive Side Scaling This parameter enables/disables the receive side
scaling (RSS) feature.
Registry Key: RSS
Default: Enabled
Values: Enabled/Disabled
5-12 NE0154601-00 A
Page 41

5–Windows Server 2003 and 2008 Driver Installation and Configuration
Windows Server Driver Configuration
Table 5-1. Advanced Properties Parameters (Continued)
Parameter Description
Receive Side Scaling Rings This parameter controls the number of rings used.
n
The total is calculated by 1KB ×2
with a value of 5 for
a maximum of 32KB.
Registry Key: MaxStatusRings
Default: 2
Max: 4
Min: 1
Step: 1
TCP Checksum Offload IPv4 This parameter enables/disables the TCP checksum
offload for IPv4. There are four TCP checksum
options: 0 (off), 1 (transmit), 2 (receive), and 3 (transmit/receive).
Registry Key: TCPChecksumOffloadv4
Default: 3 (Transmit and receive checksum
enabled)
Values: 0, 1, 2, 3
TCP Checksum Offload IPv6 aThis parameter enables/disables the TCP checksum
offload for IPv6. There are four TCP checksum
options: off (0), transmit (1), receive (2), and transmit/receive (3).
Registry Key: TCPChecksumOffloadv6
Default: 3 (Transmit and receive checksum
enabled)
Values: 0, 1, 2, 3
UDP Checksum Offload IPv4 This parameter enables/disables the UDP checksum
NE0154601-00 A 5-13
offload. There are four UDP checksum options: 0 (off),
1 (transmit), 2 (receive), and 3 (transmit/receive).
Registry Key: UDPChecksumOffloadv4
Default: 3 (Transmit and receive checksum
enabled)
Values: 0, 1, 2, 3
Page 42

5–Windows Server 2003 and 2008 Driver Installation and Configuration
Windows Server Driver Configuration
Table 5-1. Advanced Properties Parameters (Continued)
Parameter Description
UDP Checksum Offload IPv6 aThis parameter enables/disables the UDP checksum
offload. There are four UDP checksum options: 0 (off),
1 (transmit), 2 (receive), and 3 (transmit/receive).
Registry Key: UDPChecksumOffloadv6
Default: 3 (Transmit and receive checksum
enabled)
Values: 0, 1, 2, 3
VLAN ID This parameter sets the VLAN ID for this interface
(also exposed through the standard OID).
Registry Key: VlanId
Default: 0 (no VLAN)
Max: 4094
Min: 0
Step: 1
Range: 0–4094
Table Notes
a
Windows Server 2008 only
5-14 NE0154601-00 A
Page 43

Information Tab
Windows Server 2003 Windows Server 2008
Click the Information tab for information about the firmware version, BIOS
version, driver version, and other QLogic adapter properties (Figure 5-10).
5–Windows Server 2003 and 2008 Driver Installation and Configuration
Windows Server Driver Configuration
Figure 5-10. Adapter Properties — Information Tab
NE0154601-00 A 5-15
Page 44

5–Windows Server 2003 and 2008 Driver Installation and Configuration
Windows Server 2003 Windows Server 2008
Windows Server Driver Configuration
Diagnostics Tab
Click the Diagnostics tab to test the QLogic adapter’s Flash, LED, and other
functions (Figure 5-11).
Figure 5-11. Adapter Properties — Diagnostics Tab
5-16 NE0154601-00 A
Page 45

Statistics Tab
Windows Server 2003 Windows Server 2008
Click the Statistics tab to view information about the QLogic adapter
(Figure 5-12).
5–Windows Server 2003 and 2008 Driver Installation and Configuration
Windows Server Driver Configuration
Figure 5-12. Adapter Properties — Statistics Tab
NE0154601-00 A 5-17
Page 46

5–Windows Server 2003 and 2008 Driver Installation and Configuration
Windows Server 2003 Windows Server 2008
Windows Server Driver Configuration
Flash Update Tab
Click the Flash update tab to view the current firmware version on the QLogic
adapter and update the firmware if required (Figure 5-13).
Figure 5-13. Adapter Properties — Flash Update Tab
5-18 NE0154601-00 A
Page 47

Driver Tab
Windows Server 2003 Windows Server 2008
5–Windows Server 2003 and 2008 Driver Installation and Configuration
Windows Server Driver Configuration
Click the Driver tab to view driver information and update, uninstall, or restore a
previous version of the QLogic adapter driver (Figure 5-14).
Figure 5-14. Adapter Properties — Driver Tab
NE0154601-00 A 5-19
Page 48

5–Windows Server 2003 and 2008 Driver Installation and Configuration
Windows Server 2003 Windows Server 2008
Windows Server Driver Configuration
Resources Tab
Click the Resources tab to view the resource settings for the QLogic adapter
(Figure 5-15).
Figure 5-15. Adapter Properties — Resources Tab
5-20 NE0154601-00 A
Page 49

5–Windows Server 2003 and 2008 Driver Installation and Configuration
Configure the QLogic Adapter in Windows Server
Configure the QLogic Adapter in Windows Server
To enable the connections to the QLogic adapter:
1. Open the Network Connections window in the Control Panel, or directly from
the desktop if the icon exists (Figure 5-16).
Figure 5-16. Network Connections Window
Note that if an IP address has not been assigned, the QLogic adapter entry
says Limited or no connectivity.
If there is a red X next to QLogic adapter icon, the link is down. In this case,
do the following:
Verify that the card is seated properly in the PCI slot.
Make sure that the network cable is connected properly at both ends.
Make sure that the cable is good.
Assign an IP address to the interface if you have not already.
Verify that the SFP+ module is installed correctly (QLE3142).
See Section 9 for more information.
To check the status of the connection, right-click the adapter icon in the
Network Connections window and select Properties. The Local Area
Connection Properties dialog box opens.
NE0154601-00 A 5-21
Page 50

5–Windows Server 2003 and 2008 Driver Installation and Configuration
Configure the QLogic Adapter in Windows Server
2. Assign an IP address manually by selecting the Internet Protocol (TCP/IP)
entry, and then clicking the Properties button (Figure 5-17).
Figure 5-17. Local Area Connection Properties Dialog Box
The Internet Protocol (TCP/IP) Properties dialog box opens.
5-22 NE0154601-00 A
Page 51

5–Windows Server 2003 and 2008 Driver Installation and Configuration
Uninstall the QLogic Adapter Driver in Windows Server
3. Assign the appropriate IP, subnet mask, and default gateway values In the
Internet Protocol (TCP/IP) Properties dialog box (Figure 5-18), and then
click the OK button.
Figure 5-18. Internet Protocol (TCP/IP) Properties Dialog Box
4. Verify connectivity with another card or switch using the ping utility.
Uninstall the QLogic Adapter Driver in Windows
Server
To uninstall the QLogic adapter driver in Windows Server 2003:
1. On the Start menu, right-click My Computer, and then click Manage. The
Computer Management window opens.
2. Double-click Device Manager. The list of devices in the computer is
displayed on the right side of the window.
3. Locate and right-click the QLogic adapter.
4. Click Uninstall to perform the operation.
NE0154601-00 A 5-23
Page 52

5–Windows Server 2003 and 2008 Driver Installation and Configuration
QLogic Adapter Diagnostic Tests — Windows Server
5. Delete the following files for the corresponding directory.
Windows Server 2003:
nxcoinst.dll C:\WINDOWS\system32
nx3fwct.bin C:\WINDOWS\system32\drivers
nx3fwmn.bin C:\WINDOWS\system32\drivers
nxnd5x64.sys C:\WINDOWS\system32\drivers
Windows Server 2008:
a. Double-click Computer, navigate to the local disk (C:), and then to the
Windows directory.
b. Search for nx* and remove all of the following files from each of the
folder locations found in the search:
nxcoinstl.dll
nx3fwct.bin
nx3fwmn.bin
nxnd6x64.sys
QLogic Adapter Diagnostic Tests — Windows
Server
The Windows user diagnostics utility performs different tests using the
nxudiag.exe command. The syntax for these tests is:
nxudiag.exe [command-options-and-arguments]
See Table A-1 for a list of Windows diagnostic command options and arguments.
The QLogic adapter will be offline at this time.
5-24 NE0154601-00 A
Page 53

5–Windows Server 2003 and 2008 Driver Installation and Configuration
Windows Server 2003 Windows Server 2008
Windows Server Performance
Alternately, there is a Diagnostics tab in the QLogic adapter property sheet that
can perform the same tests (Figure 5-19).
Figure 5-19. Adapter Properties — Diagnostics Tab
Windows Server Performance
This section describes Windows performance tuning.
NOTE:
The tunable performance parameters are system and application specific.
Understanding the relationship between the parameter values, target
workload, performance applications, operating system, and system
configuration provides a better understanding of performance optimization
and bottlenecks.
NE0154601-00 A 5-25
Page 54

5–Windows Server 2003 and 2008 Driver Installation and Configuration
Windows Server Performance
Performance Testing the QLogic Adapter with ntttcp
To enhance Windows Server performance, change these parameters in the order
listed.
1. Enable Windows Server scaling.
Set the TCp1323Opts parameter value to 1. Note that this parameter is not
created by default. For more information about modifying a previously
created parameter, or creating a new parameter, see “Tcp1323Opts
Parameter” on page 5-29.
2. Set the TcpWindowSize parameter.
In the TcpWindowSize parameter window, set the value in the Value Data
box to either 200000 hexadecimal, or 2,097,152 decimal. Be sure to click
either hexadecimal or decimal in the Base box depending on the value
entered.
If the TcpWindowSize parameter does not exist, it can be created using
regedit. See “Setting the TcpWindowSize Parameter” on page 5-32 for
more information.
3. Run ntttcp.
a. On the Start menu, click Run. The Run dialog box opens.
b. Type cmd in the Open: box, and then click the OK button
(Figure 5-20).
Figure 5-20. Run Dialog Box
5-26 NE0154601-00 A
Page 55

5–Windows Server 2003 and 2008 Driver Installation and Configuration
Windows Server Performance
c. Change the directory path to the location to where ntttcp was
downloaded or copied. An example directory tree is shown in
Figure 5-21.
For scripts, see the tools package included with the release.
ntttcp Overview
There are two switches on ntttcp that boost performance: -a and -rb.
ntttcp can be run without an optimal value for the -a switch and without the -rb
switch for the QLE3044.
When running ntttcp with the QLE3142, and in particular with fewer threads on
Windows Server, performance is limited by the receive window and by the
outstanding I/O (-a) value, regardless of hardware limitations.
For the receive side, the optimal value is 16 for -a and 512000 for -rb (or
something similar). With these values, a single thread should perform closer to a
multi-thread configuration. From a DOS command prompt, type the following
command. Note that the command must be executed from the same directory in
which the executable files are located.
ntttcpr -m 16,0,<rcv ipaddr> -n <# of tcp segs for snd/rcv> -a 16
For the transmit side, -a should be a value less than 8. The more threads, the
lower the value.
Figure 5-21. Location of ntttcp
NOTE:
The send (transmit) and receive side ntttcp commands must use the
receive side’s IP address.
NE0154601-00 A 5-27
Page 56

5–Windows Server 2003 and 2008 Driver Installation and Configuration
Windows Server Performance
ntttcps and ntttcpr Command Line Options
The ntttcps and ntttcpr command line options are listed in Table 5-2.
Table 5-2. ntttcps and ntttcpr Command Line Options
Command Default Notes
-l <length of buffer>
-n <number of buffers>
-p <port base>
-a <outstanding I/O>
-x <packet array size>
-rb <receive buffer size>
-sb <send buffer size>
-i
-f <file name>
-u
-w
-d
-t <runtime>
-v
-6
64K
20K
5001
2
1
64K
0
— Infinite loop
output.txt
— UDP send/receive
—
— Verify flag
— Runtime is in seconds.
— Enable verbose mode.
— Enable IPv6 mode.
-fr
-mb
-m <mapping>
5-28 NE0154601-00 A
— Full buffers posted on read opera-
tions.
— Multiple buffer post mode
— mapping is a session or sessions,
processor, receiver, and IP set. The
following example sets up four sessions on processor 0 to test a network on 1.2.3.4:
-m 4,0,1.2.3.4
Page 57

5–Windows Server 2003 and 2008 Driver Installation and Configuration
Tcp1323Opts Parameter
This parameter determines whether TCP uses the time-stamping and window
scaling features described in RFC 1323, TCP Extensions for High Performance.
For more efficient use of high bandwidth networks, use a larger TCP window size.
The TCP window size field controls the flow of data and is limited to 2 bytes, or a
window size of 65,535 bytes.
Since the size field cannot be expanded, a scaling factor is used. The TCP
window option increases the maximum window size from 65,535 bytes to
1 gigabyte. The TCP receive window is the amount of data the sending host can
send at one time on a connection.
When the value for window size is added to the registry and its size is larger than
the default value, Windows attempts to use a scale value that accommodates the
new window size.
Tables 5-3 and 5-4 show the four Tcp1323Opts settings.
Windows Server Performance
Table 5-3. Tcp1323Opts
Data Type
REG_DWORD 0 | 1 | 2 | 3 1
Table Notes
a
See Table 5-4
Range
a
Value
Table 5-4. Range
Hex Value Meaning
0 Timestamps and window scaling are disabled.
1 Window scaling is enabled.
2 Timestamps are enabled.
3 Timestamps and window scaling are enabled.
The modify the scale factor, set Tcp1323Opts to 1. Note that this parameter is
not created by default. To modify a previously created parameter, see “Modifying
the Tcp1323Opts Parameter” on page 5-30. To create a new parameter, see
“Creating the Tcp1323Opts Parameter” on page 5-31.
NE0154601-00 A 5-29
Page 58

5–Windows Server 2003 and 2008 Driver Installation and Configuration
Windows Server Performance
Modifying the Tcp1323Opts Parameter
If the parameter was created previously, it can be modified as follows:
1. On the Start menu, click Run. The Run dialog box opens.
2. Type regedit in Open: box (Figure 5-22), and then click the OK button.
Figure 5-22. Run Window
The Registry Editor window opens.
3. Click the HKEY_LOCAL_MACHINE directory (Figure 5-23).
Figure 5-23. Registry Editor — HKEY_LOCAL_MACHINE Directory
4. Navigate to the following directory path from the HKEY_LOCAL_MACHINE
directory:
HKEY_LOCAL_MACHINE
SYSTEM
CurrentControlSet
Services
Tc pi p
Parameters
5. Locate the TCp1323Opts entry and change the value to 1.
5-30 NE0154601-00 A
Page 59

5–Windows Server 2003 and 2008 Driver Installation and Configuration
Creating the Tcp1323Opts Parameter
If the TCp1323Opts parameter does not exist, it can be created as follows:
1. On the Start menu, click Run. The Run dialog box opens.
2. Type regedit in the Open: box, and then click the OK button (Figure 5-22).
The Registry Editor window opens.
3. Click the HKEY_LOCAL_MACHINE directory (Figure 5-23).
4. Navigate to the following directory path from the HKEY_LOCAL_MACHINE
directory:
HKEY_LOCAL_MACHINE
SYSTEM
CurrentControlSet
Services
Tc pi p
Parameters
The Registry Editor window displays the parameters on the right side
(Figure 5-24).
Windows Server Performance
Figure 5-24. Registry Editor — Parameter Directory
NE0154601-00 A 5-31
Page 60

5–Windows Server 2003 and 2008 Driver Installation and Configuration
Windows Server Performance
5. Right-click anywhere in the right side of the window and create a new key
with a DWORD value (Figure 5-25).
Figure 5-25. New Key — DWORD
6. Rename New Value #1 to TCp1323Opts (Figure 5-26).
Figure 5-26. Creating Tcp1323Opts
7. Right-click TCp1323Opts, and then select Modify. In the Value data box,
type 1 (the default value is 0), and then click the OK button. (Figure 5-27).
Figure 5-27. Edit DWORD Value Window — Tcp1323Opts Parameter
Setting the TcpWindowSize Parameter
To set the TcpWindowSize parameter:
1. On the Start menu, click Run. The Run dialog box opens.
2. Type regedit in the Open: box, and then click the OK button (Figure 5-22).
3. Click the HKEY_LOCAL_MACHINE directory (Figure 5-23).
5-32 NE0154601-00 A
Page 61

5–Windows Server 2003 and 2008 Driver Installation and Configuration
Windows Server Performance
4. Navigate to the following directory path from the HKEY_LOCAL_MACHINE
directory:
HKEY_LOCAL_MACHINE
SYSTEM
CurrentControlSet
Services
Tc pi p
Parameters
The Registry Editor window displays the parameters on the right side
(Figure 5-24).
5. Right-click anywhere in the right side of the window and create a new key
with a DWORD value (Figure 5-25).
6. Rename New Value #1 to TCpWindowSize.
7. Right-click TcpWindowSize, and then select Modify (Figure 5-28).
Figure 5-28. Modifying the TcpWindowSize Parameter
The Edit DWORD Value dialog box opens.
8. Type a the value in the Value data: box: either 200000 hexadecimal or
2,097,152 decimal. Be sure to click either the Hexadecimal or Decimal
radio button in the Base section depending on the value entered
(Figure 5-29).
Figure 5-29. Edit DWORD Value Window — TcpWindowSize Parameter
For more information on setting the TCP window size, see “Tcp1323Opts
Parameter” on page 5-29.
NE0154601-00 A 5-33
Page 62

5–Windows Server 2003 and 2008 Driver Installation and Configuration
Windows Server Performance
Notes
5-34 NE0154601-00 A
Page 63

6 Linux Driver Installation
and Configuration
This section describes the Linux driver installation and configuration procedure.
For the Windows Server driver installation procedure, see Section 5.
Linux Driver Checklist
Before installing and configuring the Linux driver, following the instructions in
these sections:
“Locate the Firmware ROM Image” on page 6-1
“Locate the Driver File” on page 6-2
“Verify the Firmware Version” on page 6-2
“Verify the Driver Version and Module Information” on page 6-2
“Locate the QLogic Tools” on page 6-2
“Build the Linux Driver Source Code” on page 6-2
“Enable the Inbox Kernel GPL and Commercial Drivers” on page 6-2
“Check for MSI-X Support” on page 6-3
Locate the Firmware ROM Image
After installing the binary RPM, the firmware ROM image files (nx3fwct.bin and
nx3fwmn.bin) are placed in the /lib/firmware directory
(/usr/lib/hotplug/firmware for SLES9).
When the driver module is loaded, the firmware files located in the
/lib/firmware directory are dynamically loaded onto the QLogic adapter.
The dynamically downloaded firmware becomes the active firmware and
supersedes the default firmware flashed on the QLogic adapter.
NE0154601-00 A 6-1
Page 64

6–Linux Driver Installation and Configuration
Linux Driver Checklist
Locate the Driver File
The QLogic adapter driver is located at:
SUSE:
Red Hat 5: /lib/modules/[kernel version]/update
Red Hat 4:
/lib/modules/[kernel version]/update/drivers/net
/lib/modules/[kernel version]/kernel/drivers/net
Verify the Firmware Version
Type the following commands to view the firmware version, where n is the port
number:
% ethtool -i eth[n]
% dmesg | grep nx
Verify the Driver Version and Module Information
Type the following commands to view the driver version and module information,
where n is the port number:
% modinfo nx_nic
% ethtool -i eth[n]
Locate the QLogic Tools
Type the following command to go to the directory where the tools are located:
% cd /opt/netxen
These tools include:
nxflash
nxudiag
phantomcore_P3
[card type]-romimage
Build the Linux Driver Source Code
Linux kernel source/headers are required to compile the drivers provided in
source code format. Some Linux operating system (OS) distributions may not
install the kernel source/headers by default. The headers can be added from the
Linux OS Distribution disk using the RPM package manager.
Enable the Inbox Kernel GPL and Commercial Drivers
The inbox kernel GPL and commercial drivers are included in the Linux kernels
available from kernel.org.
6-2 NE0154601-00 A
Page 65

6–Linux Driver Installation and Configuration
Linux Driver Checklist
NOTE:
The commercial GPL version of the driver (nx_nic.ko) contains the most
recent updates.
To determine which driver to use:
1. See the Release Notes for more information about which Linux distributions
contain the inbox kernel GPL driver. The driver name is:
netxen_nic.ko
2. Type the following command to identify the netxen_nic.ko driver:
% lsmod | grep netxen_nic
Note that the netxen_nic.ko file is automatically blacklisted when the
Linux commercial GPL driver RPM is installed.
3. To disable the inbox kernel GPL driver (netxen_nic.ko):
a. Type the following command to remove the driver from the OS
memory:
% rmmod netxen_nic
b. Remove or rename the netxen_nic.ko file from the
/lib/modules/<uname -r>/kernel/drivers/net/netxen
directory.
The commercial GPL driver (nx_nic.ko) can be enabled after the inbox kernel
GPL driver module is disabled.
Check for MSI-X Support
MSI and MSI-X are supported by the QLogic adapter driver and firmware. Ensure
that the OS, kernel, and hardware support MSI-X.
Type the following command to see if MSI-X is supported:
% cat /proc/interrupts
NE0154601-00 A 6-3
Page 66

6–Linux Driver Installation and Configuration
Inbox Kernel GPL Driver and Blacklisting
The output of this command is similar to the following:
[root@apps4242 ~]# cat /proc/interrupts
CPU0 CPU1
58: 164 7 PCI-MSI-X eth2
66: 0 0 PCI-MSI-X eth2:1
74: 6 0 PCI-MSI-X eth2:2
82: 0 0 PCI-MSI-X eth2:3
122: 3195 0 PCI-MSI-X eth3
130: 0 0 PCI-MSI-X eth3:1
138: 0 0 PCI-MSI-X eth3:2
146: 0 0 PCI-MSI-X eth3:3
NOTE:
Some older Linux kernel versions may not support MSI-X.
Check for Receive Side Scaling (RSS) Support
To support RSS, each port has four MSI-X interrupts to send interrupts to any
CPU.
NOTE:
MSI-X support is required for RSS.
Inbox Kernel GPL Driver and Blacklisting
NOTE:
There are two drivers for the QLogic adapter:
netxen_nic.ko. This is the in-kernel (inbox) GPL driver. It is released
into the Linux upstream kernel and included in major Linux distributions.
nx_nic. This is the commercial GPL driver released by QLogic.
6-4 NE0154601-00 A
Page 67

6–Linux Driver Installation and Configuration
Preparing for QLogic Adapter Driver Installation
When the QLogic RPM binary package is installed, the inbox kernel GPL driver
(netxen_nic.ko) is blacklisted. Consequently, when the system is powered up,
the netxen_nic.ko driver will not load. To prevent this from happening, you can
1
execute the RPM erase command (rpm -e nx_nic-[version]
), which will
remove the QLogic RPM binary package so that the blacklisting will revert back to
the prior setting and the netxen_nic.ko driver will load when the system is
powered up.
To check if the inbox kernel GPL driver has been installed on the system, check
the /lib/modules/<kernel-version>/kernel/net/netxen directory for
the netxen_nic.ko driver. Remove or rename this file, and then reboot.
Alternately, uninstall the driver by typing the following command before continuing
with the following steps in this section.
% rmmod netxen_nic
The following sections describe how to install a new driver.
Preparing for QLogic Adapter Driver Installation
Check for prior versions of the QLogic adapter driver and tools. Remove the
packages from the system to prepare for installing the new release.
Use RPM to check for prior packages. For example, type:
% rpm -qa | grep nx_
Look for output similar to the following:
nx_nic-[prior_version]
nx_tools-[prior_version]
Remove each of the prior packages by typing the following commands:
% rpm -e nx_nic-[prior_version]
% rpm -e nx_tools-[prior_version]
QLogic Adapter Driver Installation (RPM Format)
The following sections describe how to install the Linux driver in RPM format,
create the binary, install the binary, and install the QLogic tools.
Install the Linux Driver Source in RPM Format
Type the following command to install the Linux driver RPM source:
% rpm -iv nx_nic-[version].src.rpm
1
[version] refers to the RPM package currently on the system. RPM packages can be located by
typing the command: rpm -qa | grep nx_.
NE0154601-00 A 6-5
Page 68

6–Linux Driver Installation and Configuration
Linux QLogic Adapter Driver Options
Create the Binary
Type the following command to create the binary RPM for Red Hat systems:
% rpmbuild -bb usr/src/redhat/SPECS/nx_nic-[version].spec
Type the following command to create the binary RPM for SUSE systems:
% rpmbuild -bb usr/src/packages/SPECS/nx_nic-[version].spec
Install the Binary
Type the following command to install the binary RPM for Red Hat systems:
% rpm -i usr/src/redhat/RPMS/[arch]/nx_nic-[version].[arch].rpm
Type the following command to install the binary RPM for SUSE systems:
% rpm -i usr/src/packages/RPMS/[arch]/nx_nic-[version].[arch].rpm
In the previous commands, the [arch] variable designates the system
architecture. Some [arch] variables include i386, i586, i686, x86_64, depending
on the system. The installed QLogic driver binary will be located in one of the
following two directories:
/lib/modules/<uname -r>/updates/drivers/net/
/lib/modules/<uname -r>/kernel/drivers/net
Install the QLogic Tools
Execute the following command to install the tools:
% rpm -ivh nx_tools-[version].rpm
Type the following command to go to the directory where the tools are located:
% cd /opt/netxen
These tools include:
nxflash
nxudiag
phantomcore_P3
[card type]-romimage ([card type] refers to the exact ROM image)
The release may contain multiple ROM images. See the Release Notes for more
information on the ROM image types.
Linux QLogic Adapter Driver Options
Type the modprobe command to pass optional parameters to the driver, for
example:
% modprobe -v nx_nic <parameter>
6-6 NE0154601-00 A
Page 69

The parameters are listed in Table 6-1.
Table 6-1. modprobe Command Optional Parameters
6–Linux Driver Installation and Configuration
Linux QLogic Adapter Driver Options
Parameter
tx_desc Sets the size of the command descrip-
tor rings (transmit).
jumbo_desc_1g
jumbo_desc Sets the size of the receive ring for
rdesc_1g Sets the size of the receive ring for
rdesc_10g Sets the size of the receive ring for
Sets the size of the receive ring for
jumbo frames (1GbE ports).
jumbo frames (10GbE ports).
normal packets (1GbE ports)
For firmware version 4.0.xyz, the maximum size is 8192.
normal packets (10GbE ports).
For firmware version 4.0.xyz, the maximum size is 8192.
Description Default Range
1024 256–1024
(must be
power of two)
1024
(x86 64 bit)
512
(x86 32 bit)
1024 64–1024
8192
(x86 64 bit)
2048
(x86 32 bit)
8192
(x86 64 bit)
4096
(x86 32 bit)
64–1024
(must be
power of two)
(must be
power of two)
64–8192
(must be
power of two)
64–8192
(must be
power of two)
use_msi Enables MSI interrupts. 1 0: Disabled
1: Enabled
use_msi_x Enables MSIx interrupts.
This parameter is available only in
kernel versions later than 2.6.8. When
this parameter is enabled, it takes precedence over MSI interrupts and the
use_msi parameter is ignored.
rss_enable Enables receive side scaling. This
parameter is available only when
MSI-X interrupts are enabled.
1 0: Disabled
1: Enabled
1 0: Disabled
1: Enabled
Ethtool Utility
The ethtool utility checks and configures additional driver options. See the
nx_nic Linux man pages for driver option configuration examples. See the
ethtool Linux man pages for additional details. Here is an example command:
% ethtool -K eth[n] tso off
NE0154601-00 A 6-7
Page 70

6–Linux Driver Installation and Configuration
Configure the QLogic Adapter on Linux
Configure the QLogic Adapter on Linux
To configure the QLogic adapter:
1. Type one of the following commands to identify the Ethernet interface
(eth1, eth2, etc.) and the nx_nic driver from the command line:
% cat /proc/net/nx_nic/dev0/stats | grep eth or
% ifconfig -a
Look for the interface with a MAC address (HWaddr) prefix of
00:0E:1E:XX:XX:XX
2. Type the following to commands assign an IP Address and activate the
interface:
% ifconfig eth[n] down
% ifconfig eth[n] <IP Address> netmask <Netmask Value> up
3. Verify that the network services are running, and then type:
% service network restart
Ping a different IP address to verify connectivity.
Uninstall the Commercial GPL Driver and Tools
Package
Type the following commands to uninstall the commercial GPL driver and tools,
which are part of the RPM package:
% rpm -qa | grep nx_
% ifconfig eth[n] down
% rmmod nx_nic.ko
% rpm -e nx_nic-[version]
% rpm -e nx_tools-[version]
1
Diagnostic Tests for the QLogic Adapter
The Linux user diagnostics utility performs various tests using the
./nxudiag -i eth[n] command.
The syntax for these tests is:
% ./nxudiag [command-options-and-arguments]
See Table A-1 for a list of Linux diagnostic utility commands.
1
[version] refers to the RPM package currently on the system. RPM packages can be located
by executing the command: rpm -qa | grep nx_.
6-8 NE0154601-00 A
Page 71

NOTE:
While running these tests, the network traffic will be interrupted.
Linux Performance Tuning
This section describes Linux performance tuning.
NOTE:
The tunable performance parameters are system and application specific.
Understanding the relationship between the parameter values, target
workload, performance applications, operating system, and system
configuration provides a better understanding of performance optimization
and bottlenecks.
Performance Tools
6–Linux Driver Installation and Configuration
Linux Performance Tuning
Add the following parameters for performance tuning on Linux systems in the
/etc/sysctl.conf file:
net.core.rmem_max = 16777216
net.core.wmem_max = 16777216
net.core.optmem_max = 524287
net.core.netdev_max_backlog = 250000
net.ipv4.tcp_rmem = 4096 87380 16777216
net.ipv4.tcp_wmem = 4096 87380 16777216
net.ipv4.tcp_timestamps = 0
net.ipv4.tcp_sack = 1
net.ipv4.tcp_low_latency = 0
net.ipv4.tcp_window_scaling = 1
net.ipv4.tcp_moderate_rcvbuf = 1
net.ipv4.route.flush = 1
NOTE:
Various factors including tools, kernel, stacks, and related parameters affect
system performance.
Using the iperf Tool
The iperf tool measures network performance. The following paragraphs show
how to use iperf; however, it can be further tuned depending on your system’s
requirements.
NE0154601-00 A 6-9
Page 72

6–Linux Driver Installation and Configuration
Linux Performance Tuning
Here is an example of iperf from the server side:
% iperf -s -w lM -1 16k
Here is an example of iperf from the client side:
% iperf -c <ipAddr of Server> -w 1M -P12 -l 16k -P<number of threads>
Optimization
Note the following:
PCIe x8 provides optimal performance for 10GbE.
MSI and MSI-X interrupts perform better than legacy interrupts.
Linux kernel versions 2.6.15 or later provide better performance
optimization.
Check CPU utilization on the host for CPU-bound bottlenecks.
6-10 NE0154601-00 A
Page 73

7 Linux Configuration for
Bonding Mode and Virtual
LAN (VLAN)
Linux Bonding Mode
Ensure that the steps required for installing the RPM source, creating the binary,
and installing the binary have been performed as described in “QLogic Adapter
Driver Installation (RPM Format)” on page 6-5 before setting up Linux bonding
mode.
Type the following command to verify that the QLogic adapter driver has been
installed:
% lsmod | grep nx_nic
Type the following command to install the driver (if it has not yet been installed):
% modprobe -v nx_nic
The steps for setting the Linux bonding mode are as follows. Note that these are
example commands. The actual commands may be different depending on the
system configuration.
1. % modprobe bonding mode=1 miimon=100 updelay=50000
primary=eth16
2. % ifconfig bond0 25.145.1.199 netmask 255.255.255.0
broadcast 25.145.1.255 up
3. % ifenslave bond0 eth15 eth16
Type the following command to bring down the bond:
% ifconfig bond0 down
NOTE:
These commands and steps have been tested under RHEL5. Other Linux
distributions and versions may enable and utilize bonding differently.
NE0154601-00 A 7-1
Page 74

7–Linux Configuration for Bonding Mode and Virtual LAN (VLAN)
Linux Bonding Mode
After bonding, the MAC addresses for the two ports that were bonded appear to
be the same when running the ifconfig command. This is due to the formation
of a bond to permit traffic to be passed between the ports.
After the bond has been brought down and the bonding driver removed, the
QLogic adapter’s original MAC addresses will resume on the ports.
Active-Backup or Mode=1
The active-backup policy allows only one slave in the bond to be active. A
different slave becomes active only if the active slave fails.
By setting mode=1, when ifenslave is executed, the bonding driver calls into
the bond_enslave() function and sets the slave link modes for the
corresponding two Ethernet ports to BOND_LINK_DOWN.
When the bond mode is 1 (BOND_MODE_ACTIVEBACKUP) and the primary device
is indicated, one slave device is configured as the active slave. The dmesg
command displays the primary port. Here is an example output of the dmesg
command:
bonding: bond0: making interface eth16 the new active one 0 ms
earlier
If the active connection goes down, then the slave port becomes the primary port.
Type the following command to monitor the bonding process during the
switch-over or port priority:
% cat /proc/net/bonding/bond0
The following message is displayed:
MII Status: up (for eth16)
The dmesg command can show the status of the slave port, for example:
bonding: bond0: link status up for interface eth15, enabling it in
50000 ms.
Type the following command to check the status of the primary port:
% cat /proc/net/bonding/bond0
The output for this command is:
MII Status: down (for eth16)
After 50 seconds, the dmesg command will print:
bonding: bond0: link status definitely up for interface eth15.
bonding: bond0: making interface eth15 the new active one.
Type the following command to check the status of the new primary port:
% cat /proc/net/bonding/bond0
7-2 NE0154601-00 A
Page 75

The output for this command is:
MII Status: up (for eth15)
Round-Robin or Mode=0
This mode implements a round-robin scheme between the two Ethernet ports. To
set the round-robin mode, type the following command:
% modprobe bonding mode=0 miimon=100 updelay=50000 primary=eth16
After the command is executed, both links delay for 50 seconds before their states
are set to BOND_LINK_UP.
Type the following command to check the status of the bonding process:
% cat /proc/net/bonding/bond0
The output for this command is:
Ethernet Channel Bonding Driver: v3.0.1
Bonding Mode: load balancing (round-robin) MII Status: up MII
Polling Interval (ms): 100 Up Delay (ms): 50000 Down Delay (ms): 0
Slave Interface: eth16
MII Status: down
Link Failure Count: 0
Permanent HW addr: 00:0e:1e:00:11:d2
7–Linux Configuration for Bonding Mode and Virtual LAN (VLAN)
Linux Bonding Mode
<========== down state
Slave Interface: eth15
MII Status: down
Link Failure Count: 0
Permanent HW addr: 00:0e:1e:00:11:d3
<========= down state
After 50 seconds, type the command again to verify the MII status of the Ethernet
ports:
% cat /proc/net/bonding/bond0
NE0154601-00 A 7-3
Page 76

7–Linux Configuration for Bonding Mode and Virtual LAN (VLAN)
Linux Bonding Mode
The output for this command is:
Ethernet Channel Bonding Driver: v3.0.1 (January 9, 2006)
Bonding Mode: load balancing (round-robin) MII Status: up MII
Polling Interval (ms): 100 Up Delay (ms): 50000 Down Delay (ms): 0
Slave Interface: eth16
MII Status: up
Link Failure Count: 0
Permanent HW addr: 00:0e:1e:00:11:d2
Slave Interface: eth15
MII Status: up
Link Failure Count: 0
Permanent HW addr: 00:0e:1e:00:11:d3
The dmesg command output is:
bonding: bond0: link status definitely up for interface eth16.
bonding: bond0: link status definitely up for interface eth15.
<=========== up state
<=========== up state
Bonding Driver Options
Options for the bonding driver are supplied as parameters to the bonding module
at load time. They may be given as command line arguments to the modprobe
command, but are usually specified in the /etc/modules.conf or
/etc/modprobe.conf configuration file, or in a distribution-specific
configuration file (some of which are detailed in the next section).
Bonding Driver Parameters
The available bonding driver parameters are listed in the following sections. If a
parameter is not specified, the default value is used. When initially configuring a
bond, QLogic recommends that tail -f /var/log/messages be run in a
separate window to watch for bonding driver error messages.
It is critical to specify the following parameters; otherwise, serious network
degradation will occur during link failures.
miimon or arp_interval and
arp_ip_target
Most devices support miimon, so it is safe to use.
Options with textual values will accept either the text name or, for backwards
compatibility, the option value. For example, mode=802.3ad and mode=4 set the
same mode.
7-4 NE0154601-00 A
Page 77

arp_interval
This parameter specifies the ARP link monitoring frequency in milliseconds. When
ARP monitoring is used in an etherchannel compatible mode (modes 0 and 2), the
switch must be configured in a mode that evenly distributes packets across all
links.
When the switch is configured to distribute the packets in an XOR fashion, all
replies from the ARP targets are received on the same link, which could cause the
other team members to fail. ARP monitoring should not be used with miimon. A
value of 0 disables ARP monitoring. The default value is 0.
arp_ip_target
This parameter specifies the IP addresses to use as ARP monitoring peers when
arp_interval is greater than 0. These are the targets of the ARP request sent
to determine the health of the link to the targets.
Specify these values in ddd.ddd.ddd.ddd format. Multiple IP addresses must
be separated by a comma. At least one IP address must be given for ARP
monitoring to function. The maximum number of targets that can be specified
is 16. The default value is no IP addresses.
7–Linux Configuration for Bonding Mode and Virtual LAN (VLAN)
Linux Bonding Mode
downdelay
This parameter specifies the time, in milliseconds, to wait before disabling a slave
after a link failure has been detected. This option is valid only for the miimon link
monitor. The downdelay value must be a multiple of the miimon value;
otherwise, the value will be rounded down to the nearest multiple. The default
value is 0.
lacp_rate
This parameter specifies the rate at which the link partner transmits LACPDU
packets in 802.3ad mode. Possible values are:
Slow or 0: Request partner to transmit LACPDUs every 30 seconds
(default).
Fast or 1: Request partner to transmit LACPDUs every 1 second.
QLogic Adapter Bonding Modes Under Linux
There are several modes that can be used for bonding the QLogic adapter under
Linux. Note that there are variations in support and usage with respect to the
hardware and Linux distributions, and that not all the modes are favorable for a
given system and network topology.
NE0154601-00 A 7-5
Page 78

7–Linux Configuration for Bonding Mode and Virtual LAN (VLAN)
Linux Bonding Mode
The bonding modes are described in Table 7-1.
Table 7-1. Bonding Modes
Mode
Number
0 balance-rr This mode uses a round-robin policy; it transmits
1 active-backup In this mode, one slave interface is active at any
2 balance-xor In this mode, transmissions are balanced across the
3 broadcast This mode transmits everything on all slave inter-
4 802.3a This mode provides classic IEEE 802.3ad dynamic
Mode Name Description
packets in sequential order from the first available
slave through the last. This mode provides load balancing and fault tolerance.
time. If one interface fails, another interface takes
over the MAC address and becomes the active
interface. This mode provides only fault tolerance.
This mode does not require special switch support.
slave interfaces based on ((source MAC) XOR (dest
MAC)) modulo slave count. The same slave is
selected for each destination MAC. This mode provides load balancing and fault tolerance.
faces. This mode provides fault tolerance.
link aggregation. It requires 802.3ad support in the
switch and driver support for retrieving the speed
and duplex of each slave.
5 balance-tlb This mode provides adaptive transmit load balanc-
ing. Incoming traffic is received only on the active
slave. Outgoing traffic is distributed according to the
current load on each slave. This mode does not
require special switch support.
6 balance-alb This mode provides adaptive load balancing (both
transmit load balancing (TLB) and receive load balancing) for IPv4 through ARP negotiation. This
mode does not require special switch support, but
does require the ability to change the MAC address
of a device while it is open.
7-6 NE0154601-00 A
Page 79

7–Linux Configuration for Bonding Mode and Virtual LAN (VLAN)
Configuring Virtual LAN (VLAN) Under Linux
Configuring Virtual LAN (VLAN) Under Linux
To configure the VLAN function:
1. Type the following command to see if the 8021q.ko driver has been
loaded:
% lsmod | grep 8021q
Type the following command if the driver has not been loaded:
% modprobe -v 8021q
2. The vconfig add command creates a VLAN device on eth0 and will, in
turn, create an eth0.5 interface. Type the following command for eth0 to
add VLAN ID 5:
% vconfig add eth0 5
3. Type the ifconfig command to assign an IP address to the VLAN
interface:
% ifconfig eth0.5 192.168.1.100 netmask 255.255.255.0
broadcast 192.168.1.255 up
4. Type the following command to get detailed information about the VLAN
interface:
% cat /proc/net/vlan/eth0.5
Repeat Steps 2 and 3 if more than one VLAN is required.
Type the following commands to delete a VLAN interface:
% ifconfig eth0.5 down
% vconfig rem eth0.5
NE0154601-00 A 7-7
Page 80

7–Linux Configuration for Bonding Mode and Virtual LAN (VLAN)
Configuring Virtual LAN (VLAN) Under Linux
Notes
7-8 NE0154601-00 A
Page 81

8 Firmware Management
This section describes the firmware download process. When the driver package
is installed, the firmware files are installed onto the host operating system (OS).
The dynamic firmware download takes place when the driver module is loaded.
As the driver module is loaded, the firmware file downloaded from the host OS
becomes the active firmware version on the QLogic adapter.
Windows Server Dynamic Firmware Download
During the driver installation process, the firmware ROM image files are placed in
the C:\WINDOWS\system32\drivers directory.
Type the following command to determine if the firmware loaded successfully in
Windows Server. The n in “Local Area Connection n” refers to the port
being flashed.
nxflash.exe -i “Local Area Connection n” --info (the quotation marks
are required)
Check for the following entry:
Active Firmware version: 4.0.305
To determine the port number (n), click Start, right-click My Network Places, and
then click Properties. The Network Connections window opens.
The Network Connections window lists all of the ports and the type of device to
which they are connected.
Linux Dynamic Firmware Download
After the installation of the driver RPM, the firmware ROM image files are placed
in the /lib/firmware directory (/usr/lib/hotplug/firmware for SLES9).
When the driver is installed, the firmware file located in the /lib/firmware
directory is dynamically loaded onto the QLogic adapter.
Type the following command to determine if the firmware has loaded successfully.
The [n] refers to the port number.
ethtool -i eth[n]
NE0154601-00 A 8-1
Page 82

8–Firmware Management
Linux Dynamic Firmware Download
Check for the following entry:
Active Firmware version: 4.0.305
8-2 NE0154601-00 A
Page 83

9 Troubleshooting Guidelines
Unable to Boot the Host System with the QLogic
Adapter Installed
If the system does not boot after installing the QLogic adapter:
1. Remove the QLogic adapter and power up the system. Does the system
boot without the QLogic adapter? If so, power down the system, insert the
QLogic adapter into a different PCIe slot, and power up the system.
2. Ensure that the system BIOS configuration is up to date during the system
boot up process.
3. Ensure that the recommended minimum memory is installed on the host
system.
4. Note any error messages that appear during the operating system (OS) boot
sequence.
5. Check for system error messages:
Windows event viewer
% dmesg (display system messages on Linux)
Unable to Send/Receive Network Traffic Using
the QLogic Adapter
If network traffic cannot be sent/received with the QLogic adapter:
1. Ensure that the network cable is plugged in properly.
2. Ensure that the SFP+ module is installed correctly (see “QLE3142
Installation” on page 4-4).
3. Ensure that the client machine is configured correctly and able to
communicate with other machines.
4. Type lspci -v and look for vendor ID
a. Check to see if the QLogic adapter is visible on the PCI bus.
b. Check to see if the QLogic adapter is plugged into the appropriate PCIe slot.
NE0154601-00 A 9-1
4040.
Page 84

9–Troubleshooting Guidelines
Troubleshooting Tools
5. Check if the driver is loaded correctly and the card is initialized.
Windows event viewer
6. Check the network configuration.
a. Check for a valid IP address and subnet.
b. Check for duplicate IP address and subnet numbers.
c. Check the gateway address and network path (if connected through a
d. Check the QLogic adapter MAC address values.
e. Verify the network link status as seen by the host OS.
dmesg (display system messages on Linux)
gateway).
f. Check for LED activity (using
g. Analyze the transmit and receive packets for the QLogic adapter using
network monitoring tools.
h. Verify the ARP entry and response.
If none of the previous steps resolve the problem, run the QLogic user
diagnostics.
Troubleshooting Tools
The following sections explain how to use the tools under Windows and Linux to
help solve potential problems.
Windows Server Tools
The troubleshooting tools available in Windows Server are described in Tab le 9 -1 .
Table 9-1. Troubleshooting Tools in Windows Server
Tool What it Provides
systeminfo systeminfo provides detailed information about the operat-
ing system version, CPU, system manufacturer and model,
memory configuration, hot fixes, and network cards.
ping).
.
Device manager The device manager shows the hardware configured on the
Driver tab The driver tab displays device status, QLogic adapter informa-
9-2 NE0154601-00 A
system.
tion, debug counters for gathering support log details, diagnostics test cases, statistics, driver version, and resources (see
“Driver Tab” on page 5-19).
Page 85

ipconfig ipconfig shows IP network settings; it also releases and
Windows event log The Windows event log is the main source of information for
Linux Tools
The troubleshooting tools available in Linux are described in Table 9-2.
9–Troubleshooting Guidelines
Check for System Errors
Table 9-1. Troubleshooting Tools in Windows Server (Continued)
Tool What it Provides
renews by adapter or connection.
device driver problems and events. The
device drivers indicate status by logging events in the system
event log.
QLogic adapter’s
Table 9-2. Troubleshooting Tools in Linux
Tool What is Provides
nxdebug1 Linux script does not require the nx_nic driver to be loaded and
gathers information on the kernel, any GPL or nx_nic driver loaded,
RPM packages, processor, memory, interrupts, PCI bus, dmesg (last
50 messages), and network configuration.
nxdebug2 Linux script does require the nx_nic driver to be loaded and gathers
kernel configuration, nx_nic device stats, multicast settings, nx_nic
driver messages from the /var/log/messages file, modprobe info,
SLAB information, buddy information, I/O memory information, sys-
ctl information, the complete dmesg log, ethtool details on the
nx_nic interface, and specific nx_nic status.
Check for System Errors
Linux
The following paragraphs describe how to check for system errors in Linux:
Check for error messages from the kernel using the following commands:
% dmesg
% cat /var/log/messages
Check routing table, gateway, and IP address conflicts for all interfaces
using the following command:
% route
NE0154601-00 A 9-3
Page 86

9–Troubleshooting Guidelines
Caveats
Check network interface transmit and receive counts during pings using the
following command:
% ifconfig <network interface>
Use the wireshark, ethereal, tethereal, or tcpdump utilities to capture
packets.
Windows Server
The following paragraphs describe how to check for system errors in Windows
Server:
Use the
Check for system error messages using the Windows event viewer.
wireshark or ethereal utilities to capture packets.
Caveats
MSI-X Interrupts for Linux
Newer Linux OS distributions or kernel versions support MSI-X interrupt; some
older versions do not support MSI-X. If MSI-X is not available on the OS, then use
MSI or legacy mode in the OS.
Type the following command on the Linux host to check that PCI-MSI-X or
PCI-MSI is enabled for the Ethernet interface:
% cat /proc/interrupts
Determine if the installed Linux kernel has the MSI configuration option enabled
(earlier versions of the kernel may require an MSI patch).
Type the following command from the directory
version>
% make menuconfig
PCI Express Slot
and verify that the MSI configuration option is supported/enabled:
/usr/src/kernels/<kernel
The QLogic adapter can be located on the PCI Express bus using the following
Linux procedures.
Determine the vendor and device ID. To check if the PCIe slot has a x8
link for optimal PCIe performance, first determine the PCI vendor ID and
device ID codes by typing the following command:
% lspci -n
You should see a message similar to:
06:00.0 0200: 4040:0100 (rev 42)
9-4 NE0154601-00 A
Page 87

9–Troubleshooting Guidelines
...... 82 04 00 00 01 00 82
Supported
link width
Negotiated
link width
Caveats
The QLogic vendor ID is 0x4040. A list of QLogic adapter device IDs is listed
in Tab le 9 -3 .
Table 9-3. QLogic Adapter Device IDs
Product Device ID Description
QLE3044 0124 Quad-port 1GbE copper interface
QLE3142-CU 0126 Dual-port 10GbE with twinax interface
QLE3142-SR 0126 Dual-port 10GbE with short range fiber interface
QLE3142-LR 0126 Dual-port 10GbE with long range fiber interface
Determine the interface attributes. To determine the attributes of the
interface, type the following command:
% lspci -n -d 4040:0100 -vvv | grep -i width
You should see a message similar to:
Link: Supported Speed 2.5 Gb/s, Width x8, ASPM L0s, Port 0
Link: Speed 2.5Gb/s, Width x8
Determine the width parameters. Check if the lspci output “negotiated
width” (the second width in the output) reflects the actual “supported width”.
In an system with a QLE3044, for example, type the following command to
determine if these two widths are the same:
% lspci -xxx -vvv -d 4040:0100
In the previous command, 4040 indicates the QLogic vendor ID and 0124
indicates a QLE3044. The device ID is 0126.
Examine the following hex output:
NE0154601-00 A 9-5
Page 88

9–Troubleshooting Guidelines
||_________ capability. “82 04" = x8 PCIe Gen2
c0: 10 00 02 00 02 80 00 00 00 10 0b 00 82 04 00 00
Windows Server 2003 RSS and SNP Support
From the lspci hex output:
Note that some PCIe chip sets with a x16 link may not support a x8 PCI
Express link width. A link is required to support only its maximum width and
x1. Check the motherboard specification to determine if its PCIe x16 slot can
autonegotiate to x8.
On some motherboards, the PCIe slots are all the same physical size
required by a x16 slot, but electrically they are different widths. Check the
motherboard specification for the supported width of each of the PCIe slots.
Windows Server 2003 RSS and SNP Support
If you have problems with server applications when RSS or SNP is enabled under
Windows Server 2003 with SP2 (in offload mode), go to the following link and see
if Microsoft has addressed the specific issue.
http://support.microsoft.com/kb/948496
Read the bulletin entitled: An update to turn off default SNP features is available
for Windows Server 2003-based and Small Business Server 2003-based
computers.
9-6 NE0154601-00 A
Page 89

A Diagnostic Utility
Commands
Table A-1 lists user-level diagnostic utility commands for the Linux and Windows
Server OSes.
Table A-1. Diagnostic Utility Commands
Command Description
-i
--interface
-a
--all
-D
--default
-R
--CRegs
-F
-FLASH
-I
--IRQS
-L
--IntLB
-H
--Hw
-S
--LinkST
This command specifies the interface type (Local Area Connection 1, Local Area Connection 2, etc.).
This command performs all tests, regardless of the default.
This command performs only the default test.
This command tests all control registers (default).
This command tests the Flash (default).
This command tests the interrupt mechanism (default).
This command performs an internal loopback test (default).
This command performs a hardware test (default).
This command tests the link status (default).
-l
--LED
NE0154601-00 A A-1
This command tests the LEDs (default).
Page 90

A–Diagnostic Utility Commands
Table A-1. Diagnostic Utility Commands (Continued)
Command Description
-nR
--noCRegs
-nF
--noFLASH
-nl
--noIRQS
-nL
--noIntLB
-nH
--noHw
-nS
--noLinkSt
-nl
--noLED
-E
--ExtLB
-h
--help
This command disables control register testing (use with -D or
-a).
This command disables Flash testing (use with -D or -a).
This command disables interrupt testing (use with -D or -a).
This command disables internal loopback testing (use with -D or
-a).
This command disables hardware testing (use with -D or -a).
This command disables link status testing (use with -D or -a).
This command disables LED status testing (use with -D or -a).
This command performs an external full-duplex loopback test.
This command prints the help message.
-v
--version
-C
--Cmdif
A-2 NE0154601-00 A
This command displays version information.
This command performs an interface status test.
NOTE: This command is valid only in Linux.
Page 91

B Solaris Driver, nxflash
Utility, and Firmware
Installation
QLogic Adapter Driver Installation
To extract and install the Solaris QLogic adapter driver using the
Sol<ver>_ntxn_1.7.tar.gz package:
1. Unzip the driver package file using the
2. Untar the driver package file using the
3. Remove any previous driver version.
a. Type one of the following commands:
For a 64-bit operating system (OS), type:
pkgchk –l –p /kernel/drv/amd64/ntxn
For a 32-bit OS, type:
pkgchk –l –p /kernel/drv/ntxn
b. For both OSes, type the following commands:
pkgchk –l NTXNxge
pkgrm NTXNxge
4. Install the new driver, pointing to the directory where /NTXNxge is located.
For example:
pkgadd –d /tmp/Sol<ver>_ntxn_1.7/Solaris
5. Type the following to make sure that the package is installed:
pkginfo –l NTXNxge
gunzip command.
tar xfp command.
NE0154601-00 A B-1
Page 92

B–Solaris Driver, nxflash Utility, and Firmware Installation
nxflash Utility and Firmware Files Installation
nxflash Utility and Firmware Files Installation
To extract and utilize the Solaris nxflash utility and firmware files using the
Sol<ver>_ntxn_<ver>_tools.tar.gz and
Sol_nxtn_<ver>_firmware_files.gz packages:
1. Unzip the firmware package using the
2. Untar the firmware package using the
3. Unzip the tools package using the
4. Untar the tools package using the
gunzip command.
tar xfp command.
gunzip command.
tar xfp command.
5. Type the following to navigate to the tools directory:
cd /tmp/Sol<ver>_ntxn_4.0.305_tools
6. Copy the QLogic romimage files into the tools directory by typing:
cp <path>/Sol_ntxn_<ver>_firmware_files/*
7. Perform the Flash update by using nxflash. For Solaris 10, type the
following command:
./nxflash –i /dev/ntxn0 –a <file>_romimage
8. After the nxflash utility has finished, reboot the system.
B-2 NE0154601-00 A
Page 93

C Flash Update
Under rare circumstances, it may be necessary update the Flash on the QLogic
adapter. Read the Release Notes to see if a Flash update is required. If so, follow
the instructions in this appendix.
Flash Update and Tool Guidelines
Consider the following before updating the Flash:
During the Flash update process, do not reboot or stop the update process.
A backup image of the existing Flash will be created at the start of the Flash
update process. The Flash utility will use the backup image to recover if
required.
The Flash tool will not start the Flash update process if the QLogic adapter
driver is not loaded.
The Flash tool auto-identifies the appropriate Flash image for the QLogic
adapter.
Flash Update Options
Options for updating the Flash are listed below and described in the following
sections. Do use these options unless specified in the Release Notes.
“nxflash Command” on page C-1
“NX Live CD” on page C-2
“NX Live USB” on page C-2
nxflash Command
Run the appropriate command from Linux or Windows Server, as described in the
following paragraphs.
Windows Server
Type the following command, where “Local Area Connection n” specifies
the adapter being flashed:
nxflash -i “Local Area Connection n” --all (the quotes are required)
NE0154601-00 A C-1
Page 94

C–Flash Update
Flash Update Options
You are prompted to answer Y(es) or N(o) to allow the upgrading of the Flash to
continue. Press the Y key to continue.
See “QLogic Adapter Flash Update — Windows Server” on page C-3 for more
information.
Linux
Type the following command, where [n] indicates the number of the Ethernet
device (0, 1, 2, etc.):
./nxflash -i [n] --all
See “QLogic Adapter Flash Update — Linux” on page C-8 for more information.
NX Live CD
To install the NX Live CD:
1. Download the QLogic Live ISO image file from the QLogic Web site,
2. Burn the ISO image onto a CD writable media (make sure your system has a
www.qlogic.com
CD burner).
.
3. Insert the NX Live CD into the system that contains the QLogic adapter.
4. Change any BIOS settings to permit the CD to boot before the other devices
5. Boot the system from the CD.
6. Use the menu options (see “NX Live Menu Options” on page C-3) to show
Refer to the support page on the on QLogic Web site for more information on
downloading the NX Live CD.
NX Live USB
To install the NX Live USB:
1. Download the NX Live USB zip image file from the QLogic Web site,
2. Insert a USB flash device in a USB slot.
on the system.
current board information, update the firmware, or reboot the system
(remember to remove the NX Live CD if you need to revert back to the
operating system (OS) on the hard disk).
www.qlogic.com
.
C-2 NE0154601-00 A
Page 95

C–Flash Update
QLogic Adapter Flash Update — Windows Server
3. Format the USB flash device to a FAT file system (if required):
a. Right-click the Start menu, and then click Explore.
b. Right-click the USB flash drive, and then click Format.
c. Format the USB flash drive to a FAT file system.
4. Unzip the NX Live USB file into its own directory.
a. Right-click the file and click Open With, and then click Compressed
(zipped) Folders.
b. Copy the two folders boot and slax onto the USB flash drive.
5. On the Start menu, click Run. Type cmd in the Open: box, and then click
the OK button.
6. Change to the drive letter assigned for the USB flash drive, for example:
C:\Documents and Settings>F:
7. Change the directory to the boot folder on the USB flash drive.
8. Execute the bootinst.bat file. Press the ENTER key twice to complete
the process of making the USB flash drive bootable.
9. Insert the NX Live USB flash drive into the server with the QLogic adapter.
10. Change any BIOS settings to permit the USB flash drive to boot before the
other devices on the system.
11. Use the menu options (see NX Live Menu Options) to show current board
information, update the firmware, or reboot the system (remember to
remove the NX Live USB if you need to revert back to the OS on the hard
disk).
NX Live Menu Options
Here is an example of the NX Live menu options:
NX Live Firmware Update
Menu Options:
1. Show adapter information
2. Update to latest firmware on adapter
3. Reboot system if firmware has been updated
Enter here:
QLogic Adapter Flash Update — Windows Server
This section provides information on how to perform a Flash update in Windows
Server 2003 and 2008. Note that the QLogic adapter is shipped with a default
Flash version.
NE0154601-00 A C-3
Page 96

C–Flash Update
QLogic Adapter Flash Update — Windows Server
Using the Flash Utility
When invoking the nxflash.exe utility, use the following syntax:
nxflash -i “Local Area Connection n” --all
In this command, the -i indicates the interface command and the “Local Area
Connection n” specifies the adapter being flashed. (The quotation marks are
required.)
To determine the adapter number:
1. On the Start menu, right-click My Network Places.
2. Click Properties. The Network Connections window opens.
The Network Connections window lists all of the cards and the type of device to
which they are connected.
Along with the interface (-i in the nxflash command syntax), additional
commands are listed in Table C-1.
Table C-1. Flash Utility Commands — Windows Server
Command Definition Description
-i
--interface
--info Information This command prints board information such
-a
--all
-a <image file>
--all <image file>
-r <backup file>
--restore <backup
file>
Interface This command specifies the interface type
(Local Area Connection 1, Local Area Connection 2, etc.).
as board type, chip revision, serial ID, firmware version, BIOS version, MAC address,
etc.
Flash
update
Flash
update
Restore When an update is performed, the previous
This command performs a complete update
of BIOS and firmware.
This command performs a complete update
of BIOS and firmware using a user-renamed
ROM image.
Flash version is stored to a file in the current
working directory. Executing this command
restores the specified backup Flash version
to the QLogic adapter. Here is an example of
a backup file name:
flashbackup_[serial number]_[version]_[date-time]
--pxe-on PXE This command enables PXE (default).
C-4 NE0154601-00 A
Page 97

C–Flash Update
QLogic Adapter Flash Update — Windows Server
Table C-1. Flash Utility Commands — Windows Server (Continued)
Command Definition Description
--pxe-off PXE This command disables PXE.
--wol-on WOL This command enables wake on LAN.
--wol-off WOL This command disables wake on LAN
(default).
-d name.xml Create XML This command creates an XML file that con-
tains QLogic adapter/firmware information.
For Windows Server, the XML file will be in
the current directory.
-h
--help
-v
--version
Flash Update Procedure
To update the Windows Server 2003 and 2008 operating system (OS) Flash:
1. On the Start menu, click Run. The Run dialog box opens.
2. Type cmd in the Open: box, and then click the OK button.
3. Go to the utils directory in the driver package provided.
The following binaries must be in the same directory from where the Flash
command will be executed:
nxflash.exe
[card type]-romimage
The release may contain multiple ROM images. The [card type] variable
in the previous command refers to the exact ROM image. See the Release
Notes for more information on the ROM image types.
Help This command displays the help menu.
Version This command displays the version informa-
tion.
Note that the nxflash utility and ROM image files must be in the same
directory from where the nxflash command is executed.
4. Type the following command, where n is the number of the port being
flashed:
nxflash.exe -i “Local Area Connection n” --all (the quotation
marks are required)
Writing the Flash takes a few minutes. Do not interrupt or reboot the system
during this time.
NE0154601-00 A C-5
Page 98

C–Flash Update
QLogic Adapter Flash Update — Windows Server
Here is an example of the Windows Server nxflash --all output for local
area connection 8:
C:\netxen\4.0.223\utils>nxflash -i "Local Area Connection 8"
--all
NETXEN Port is Port 0
Verifying flash...Done.
0/9 - Init
*** Currently in flash ***
Board Type : Quad Gig LP
Firmware Version : 4.0.222
MAC Address 0 : 00:0E:1E:00:7F:24
MAC Address 1 : 00:0E:1E:00:7F:25
MAC Address 2 : 00:0E:1E:00:7F:26
MAC Address 3 : 00:0E:1E:00:7F:27
Serial Number : QG88BK0130
NIC binary romimage found in C:\netxen\4.0.223\utils
Rom Image :
C:\netxen\4.0.223\utils\lp_qg_cut_thru_b1_romimage
1/9 - Extracting Romimage
Firmware version From Board: 4.0.222
Firmware version From Romimage: 4.0.223
WARNING: This operation will take the NIC off line.
Do you wish to upgrade? (Y/N) y
5. Reboot the system.
6. Type the following command to verify that the Flash has been updated (n is
the number of the port being flashed):
nxflash.exe -i “Local Area Connection n” --info (the quotation
marks are required)
C-6 NE0154601-00 A
Page 99

C–Flash Update
QLogic Adapter Flash Update — Windows Server
Here is an example of a Windows Server nxflash --info output for local
area connection 0:
C:\Users\Administrator\Desktop\4.0.223\utils>nxflash.exe -i
“Local Area Connection 0” --info
NETXEN Port is Port 0
Verifying flash...Done.
Board Type : 0x24 (Quad Gig LP)
Board Chip Rev : B1
Serial Id : QG87BK0092
Efuse ID : 0x4e36343633340f08
Firmware version (on Flash) : 4.0.228
Active Firmware version : 4.0.229
Firmware in : CUT-THRU mode
Driver version : 4.0.229
BIOS version : 2.0.0
MAC Addr 0 : 00:0E:1E:00:79:DC
MAC Addr 1 : 00:0E:1E:00:79:DD
MAC Addr 2 : 00:0E:1E:00:79:DE
MAC Addr 3 : 00:0E:1E:00:79:DF
Subsystem ID : 0x01244040
PHY Type : UNKNOWN PHY
PXE Status : Disabled
Updating the Flash on Multiple Standalone Adapters
The Flash can be updated on multiple QLogic adapters on the same host using
one of the following procedures.
To perform updates from the same directory tree, type the following
commands sequentially after the Flash update has completed. In these
commands, n represents two different port numbers, for example, “Local
Area Connection 4” and “Local Area Connection 5” (the
quotation marks are required).
nxflash.exe -i “Local Area Connection n” --all (first
QLogic adapter)
nxflash.exe -i “Local Area Connection n” --all (second
QLogic adapter)
NE0154601-00 A C-7
Page 100

C–Flash Update
QLogic Adapter Flash Update — Linux
To perform updates simultaneously from two different directory trees, type
the following commands from two separate directory trees. In these
commands, n represents two different port numbers, for example, “Local
Area Connection 4” and “Local Area Connection 5” (the
quotation marks are required).
c:\[version]-a\utils\ nxflash.exe -i “Local Area
Connection n” --all (first QLogic adapter)
c:\[version]-b\utils\ nxflash.exe -i “Local Area
Connection n” --all (second QLogic adapter)
QLogic Adapter Flash Update — Linux
This section provides information on how to perform a Flash update in Linux. Note
that the QLogic adapter is shipped with a default Flash version.
Using the Flash Utility
When invoking the nxflash utility, use the following syntax:
% ./nxflash -i [n] [command]
In this command, the [n] indicates the QLogic adapter device number (0, 1, etc).
Along with the interface type (-i in the nxflash command syntax), additional
commands ([command] in the nxflash command syntax) are listed in
Table C-2.
Table C-2. Flash Utility Commands — Linux
Command Definition Description
-l
--list
-i
--interface
--info Information This command prints board information
-a
--all
List devices This command shows all QLogic devices
installed.
Interface This command specifies the interface type
(0, 1, 2, etc.).
such as the board type, chip revision, serial
ID, firmware version, BIOS version, MAC
address, etc.
Flash update This command performs a complete
update of the BIOS and firmware. This
command is used when the default ROM
image is used.
C-8 NE0154601-00 A
 Loading...