


INSTALLATION
INSTRUCTIONS
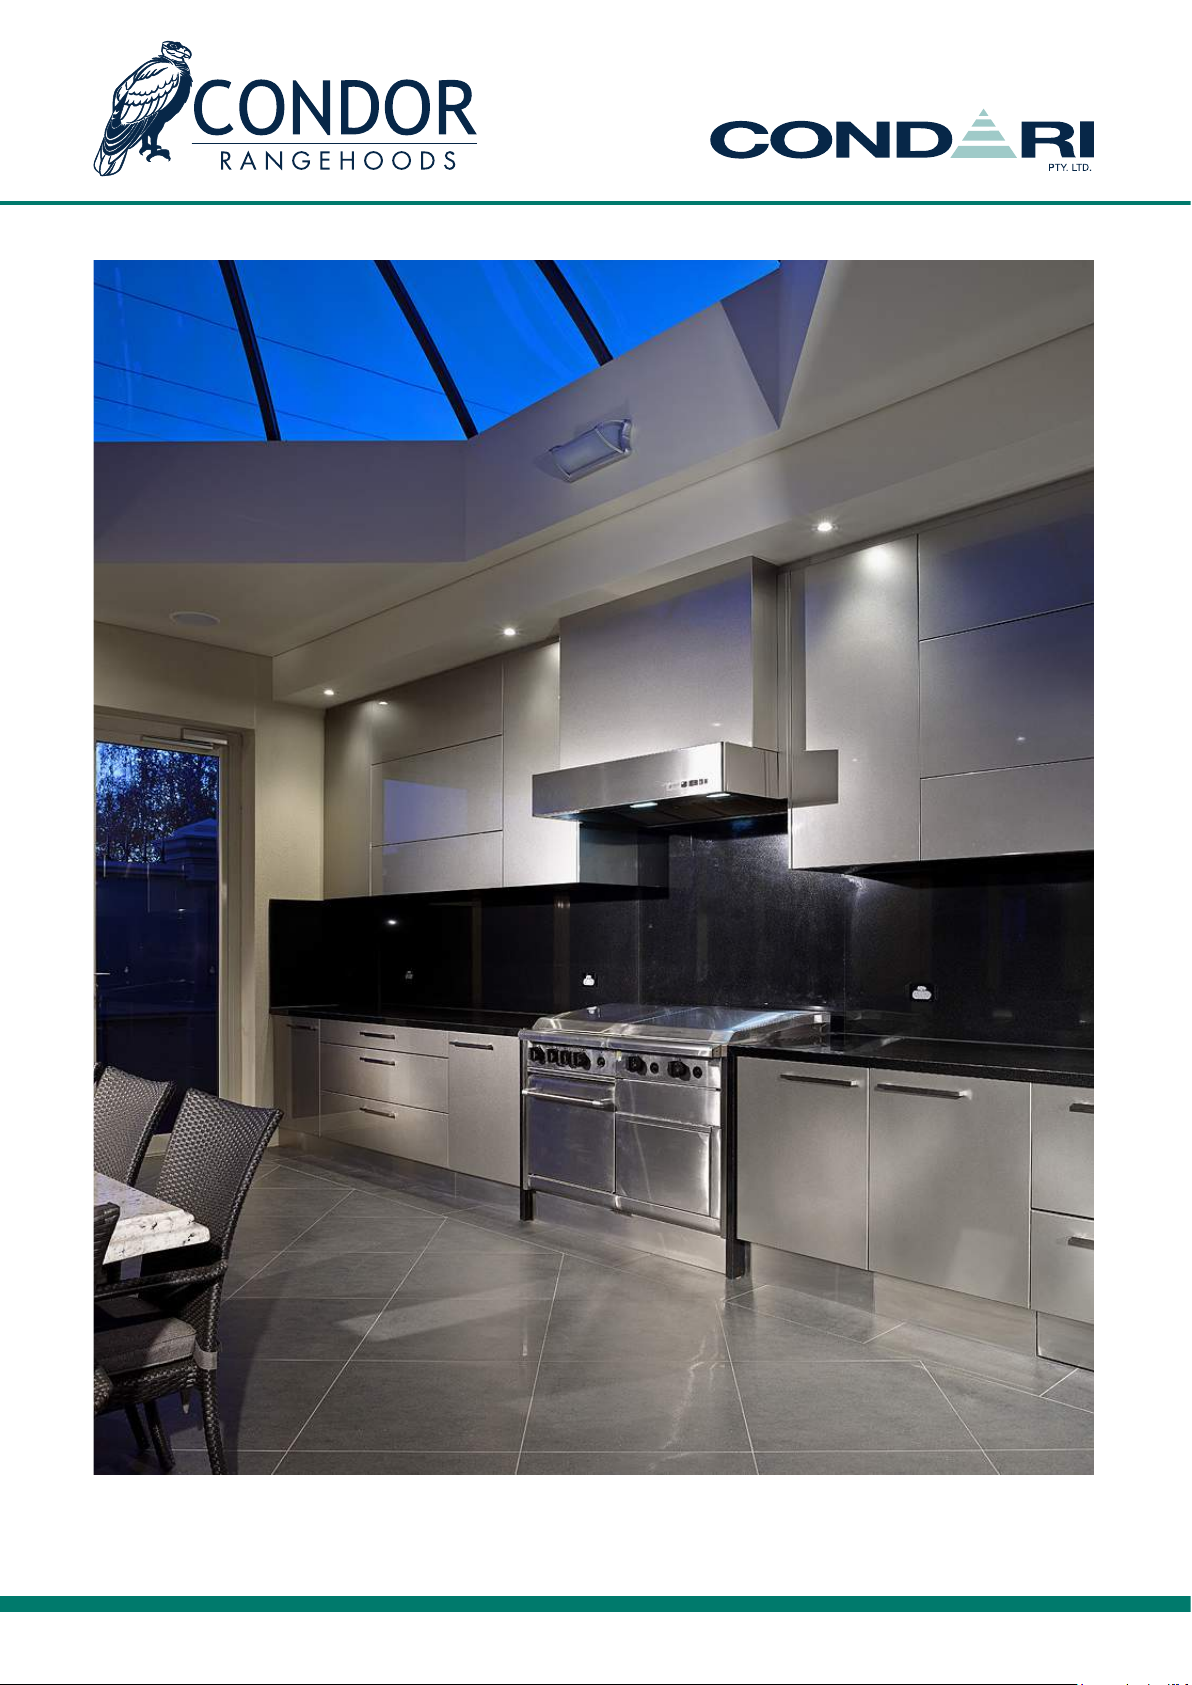
Boston Rangehood
2
Condor Rangehood Installation Instructions
Important Information
4
Instructions for Models
BSF / BCM / C / BAL
Instructions for Models
DAR / FAL / ICU / CUB
Ducting Pieces
Cleaning
Guarantee & Exclusions
Warranty
6
12
18
20
21
23
Condor Rangehood Installation Instructions
3

IMPORTANT INFORMATION
CONDARI PTY LTD makes over 120 different models of QASAIR and CONDOR Rangehoods plus many
specials designed by architects and interior designers.
It is important to follow the installation instructions for different models.
The following is general advice for the installation of CONDOR Rangehoods and is meant as a guide.
Firstly, there are many different cooking appliances on the market today and we list some here.
Electric Eco, Ceramic hotplates, Teppanyaki plates and Induction hotplates, which need special cooking
equipment. There are gas hotplates with four burners and a wok burner or sh burner of all different heat output.
Many companies offer a vario system with individual two gas burners, a wok burner, electric ceramic hotplate, an
electric griller or barbecue and an induction hotplate. There are three gas cooking appliances with an open ame
griller or barbecue.
Gas regulations require different heights for different brands of hoods. CONDOR hoods can be tted between
1000 mm to 1400 mm above the barbecue. This is due to the fact they do not have plastic motors.
1. The installation of CONDOR Rangehoods must comply with the information in this booklet. CONDOR
Rangehoods are designed and made to work efciently over all domestic cookware available on the
Australian market.
2. Every CONDOR Rangehood must be ducted to the outside atmosphere by the use of zinc-alume duct or
non-porous and non-ammable materials. We do not recommend the use of any type of exible ducting
or plastic PVC piping (barbecue heat output will affect exible ducting and cause it to desintegrate).
Rangehoods must not be vented into a wall cavity or a ceiling space. This prevents a build up of grease,
which can be a re risk. Ensure the external outlet vent does not restrict the airow in any way, as this may
result in reduced performance.
3. CONDOR Rangehoods must be ducted in duct work equivalent to the outlet of the rangehood
ie: The cross sectional area of the rangehood outlet and the duct work must be equal. Do not reduce the
duct size or have sharp bends. Enlarge the duct size if the duct is to run 6 metres or longer. Advice from
CONDOR is available to ensure optimum performance. Always use nonammable materials to minimise the
risk of re in the duct at a later date.
4. Ensure all ducting pieces are correctly tted and sealed with either duct tape or silicone to ensure that fumes
do not escape into the ceiling space and seep into living areas through vents or light ttings. The installation
and tting of the rangehood should be done in such a way that will allow the unit to be removed if service is
required. Additional costs incurred in the removal of wall tiles, damage to walls or bench tops are not covered
by warranty.
5. Always adequately ventilate the room when the rangehood is in use at the same time as appliances burning
gas or other fuels.
6. WARNING: Incorrect venting will result in additional noise and a reduction in efciency. Exhaust air must not
4
Condor Rangehood Installation Instructions

be discharged into any chimney or ue, which may carry combustible products from other sources.
a) Do not discharge the air-ow from the rangehood into a ue used for exhausting fumes
from burning gas or fuel;
b) A reduction in ducting size will result in the motors eventually failing and will need replacement.
c) For cleaning purposes please refer to page 20 of installation instructions for stainless steel;
d) If cleaning is not carried out in accordance with the instructions as listed on page 20, you
may have an increased risk of re;
e) Accessible parts of the rangehood may become hot when used with cooking appliances;
f) This appliance is not intended for use by persons (including children) with reduced physical,
sensory or mental capabilities, or lack of experience and knowledge, unless they have been given
supervision or instruction concerning use of the appliance by a person responsible for their safety.
7. If the supply cord is damaged, an authorised service centre or licensed electrician must replace it.
8. NOTE: CONDOR recommend minimum air movement of 2000 cubic metres per hour and recomment up to
2700 cubic metres per hour over a barbecue, depending on the length of the duct run. Barbecues should be
positioned under the centre of the hood where the fans are mounted and not near the outer edges where
leakage may occur. Please also note barbecue lid position, as if it does not open to a 90 degree angle the
smoke and by-products can be diverted forward and away from the rangehood catchemt area.
9. The lights in the rangehoods are LED.
10. To reduce the risk of xing screws coming in contact with live parts, do not drill or screw into the rangehood.
Live wires are encapsulated where possible to prevent user contact. If necessary drill from the inside out and
only through single sheet material.
11. CONDARI PTY LTD can manufacture rangehoods to be used over commercial cookers in domestic
applications.
NOTE: Installation must comply with local State & Council regulations.
Condor Rangehood Installation Instructions
5
INSTALLATION INSTRUCTIONS
CONDOR WALL MOUNTED
g.
e perforated panel.
INSTALLATION INSTRUCTIONS CONDOR RANGE
To suit wall mounted models:
• Balmoral
• Boston
• Cubica
• Baltimore
1. Determine hood position on wall 1000mm to 1400mm above barbecue.
2. Unpack Rangehood.
3. Mark centre line on wall.
4. Mark base line on wall (Note: if shroud being used, the height of the shroud will determine
the height of the hood).
5. Mark the outlet hole in the ceiling for the ue and cut out, removing any obstructions
allowing clear access for the ue (Note: if using rear duct, mark and cut hole at this time).
6. Remove the perforated rear panel in hood by removing bolts with a 7mm hex socket.
7. Drill xing holes in rear of hood to suit available xing points on wall making sure to get
xing as high and as wide as possible in Rangehood to avoid sagging from wall. (Please
refer to Rangehood diagram for example of possible xing points)
8. Remove plastic cover from rear mounting plate and x to wall at base height of hood
making sure this is level and exactly central.
9. Transfer xing locations from hood to wall and drill xing holes. Insert plugs to allow or use
Dyna bolts as an alternative.
10. Locate position for power cable and drill hole for cable using a hole saw. Consult your
electrician for his preferred location.
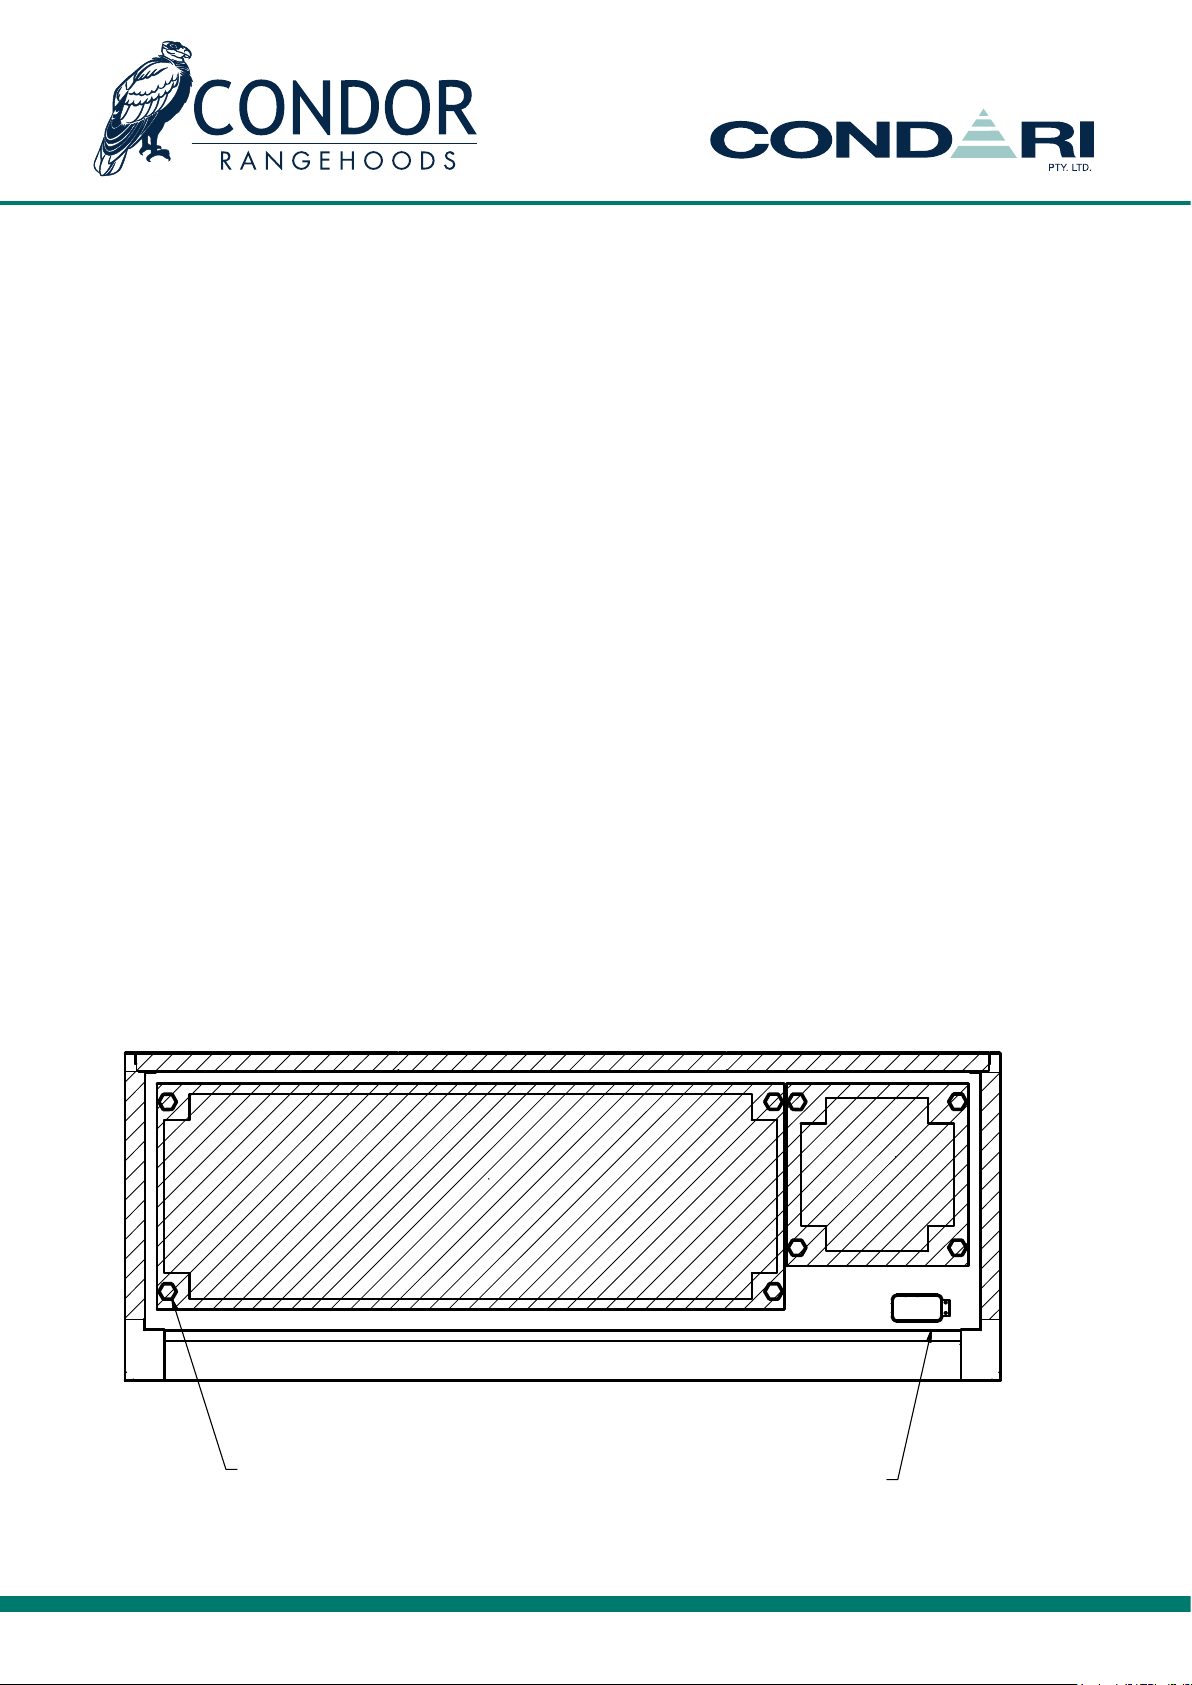
Perforated
panels
7mm hex bolt head
6
Electrical
junction box
Condor Rangehood Installation Instructions

11. Fit stainless ue to top of hood with 4 supplied xing screws while hood is on ground to
avoid having to drop stainless ue down through hole in the ceiling and causing possible
damage to the ue. (If using shroud it can be tted either at this stage or carefully after
hood is on wall)
12. Remove fans if needed and lift hood up onto mounting bracket carefully guiding ue
through hole in ceiling and bringing power cable into hood during this process. You will
require up to 3 people for this lifting stage as hood is quite awkward and heavy to lift.
13. Screw or bolt hood to wall securely making sure hood is level and sitting properly on
mounting bracket. It is advisable to have portable stands ready for this stage as hood will
get quite heavy.
14. Ret perforated panel in the rear or the hood and ret fans if they have been removed.
15. Make electrical connection to junction box inside bottom right side of hood.
16. Extend ducting through roof to exterior and t roof cowl making sure to seal roof
penetration with preferred ashing material. (Note: there are several on the market to suit
the type of roof you have, so consult your plumber for the best product to suit)
Condor Rangehood Installation Instructions
7
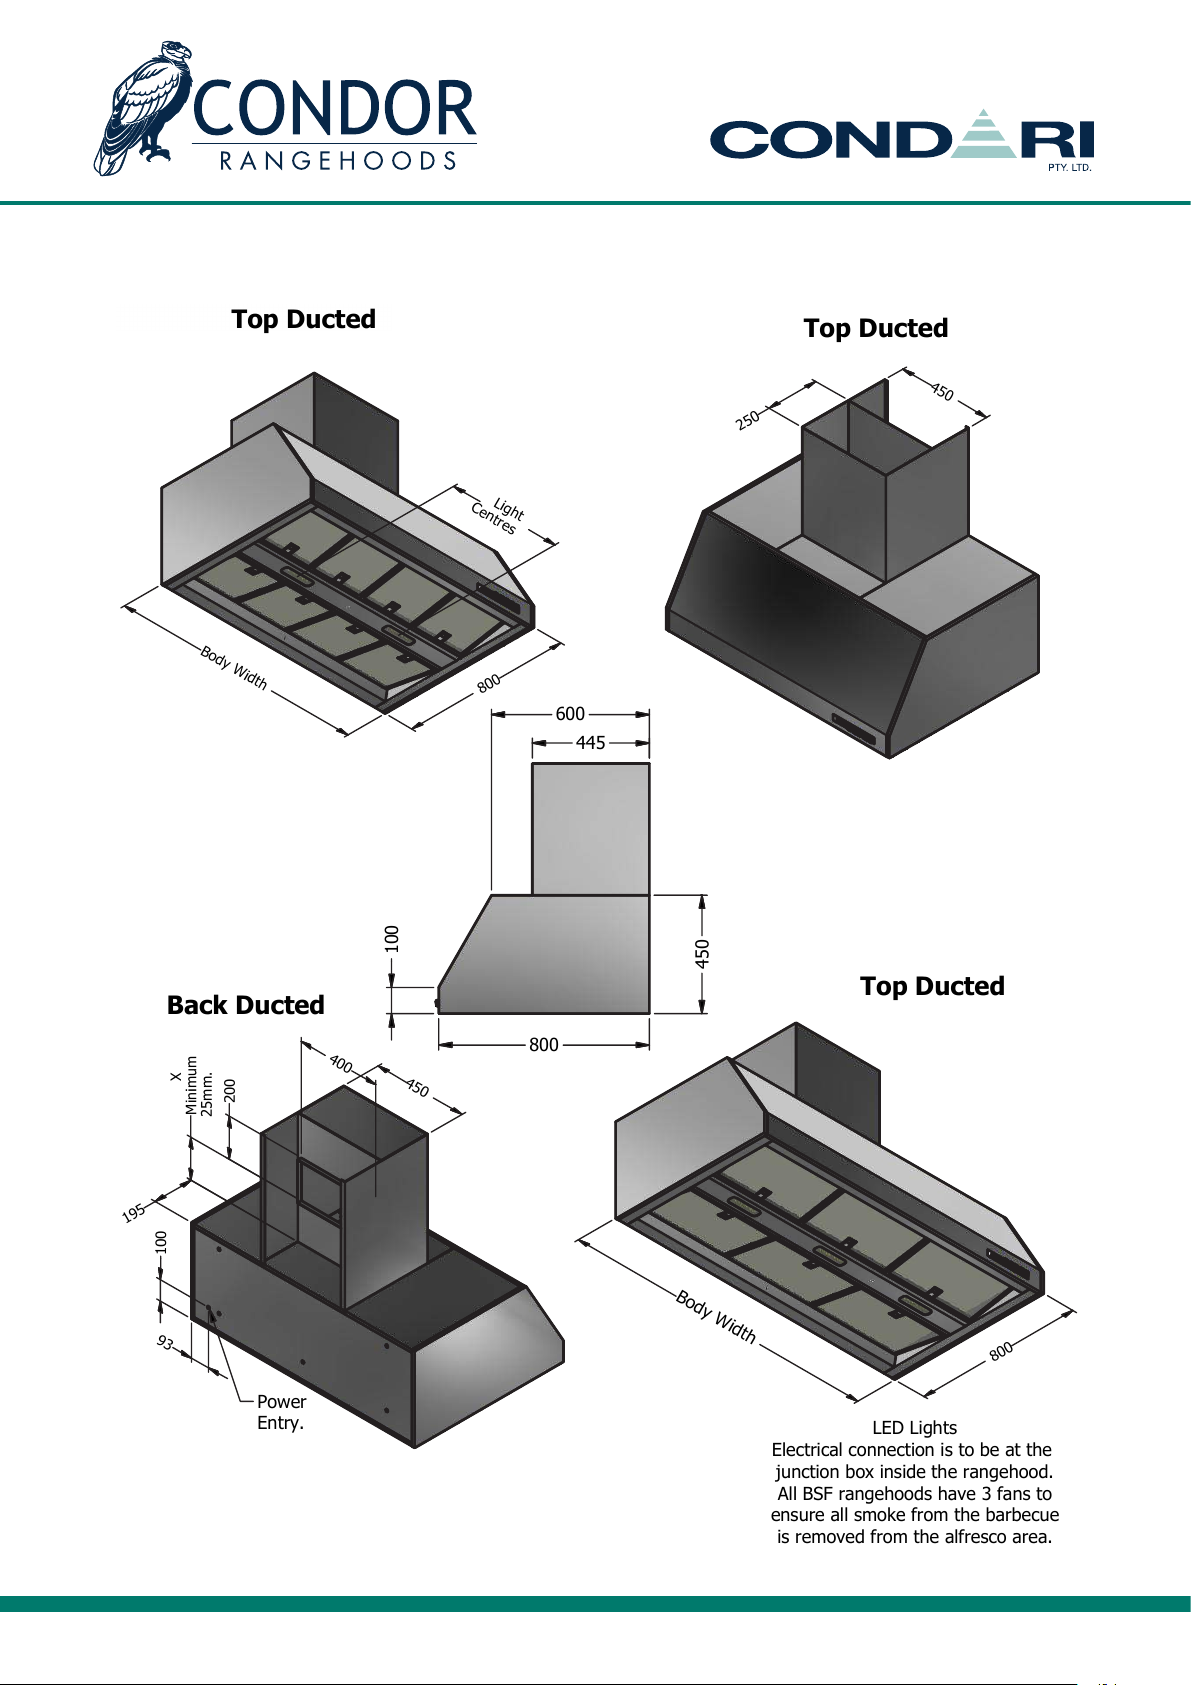
LED Lights
Electrical connection is to be at the
junction box inside the rangehood.
All BSF rangehoods have 3 fans to
ensure all smoke from the barbecue
is removed from the alfresco area.
BSF
BALMORAL Specification Sheet
Top Ducted
Back Ducted
Wall Mounted
The flues available for BSF rangehoods
are model No DL-BC and come in lengths
of 600, 900, or 1200mm.
800
450
100
4
5
0
4
0
0
2
0
0
X
M
i
n
i
m
u
m
2
5
m
m
.
1
0
0
9
3
1
9
5
Power
Entry.
Top Ducted
Top Ducted
B
o
d
y
W
i
d
t
h
8
0
0
445
600
4
5
0
2
5
0
B
o
d
y
W
i
d
t
h
L
i
g
h
t
C
e
n
t
r
e
s
8
0
0
500
BALMORAL (BSF)
The ues available for BSF rangehoods are
model No DL-BC BSF and come in lengths of
600, 900 or 1200mm.
8
Condor Rangehood Installation Instructions

LED Lights
Electrical connection is to be at the
junction box inside the rangehood.
All BCM rangehoods have 3 fans to
ensure all smoke from the barbecue
is removed from the alfresco area.
BCM
BOSTON Specification Sheet
Top Ducted
Back Ducted
Wall Mounted
The flues available for BCM rangehoods
are model No DL-BC and come in lengths
of 600, 900, or 1200mm.
4
0
0
2
0
0
X
M
i
n
i
m
u
m
2
5
m
m
.
4
5
0
9
3
1
0
0
1
7
5
Top Ducted
200
800
450
Power
Entry.
B
o
d
y
W
i
d
t
h
8
0
0
4
2
5
Top Ducted
F
a
n
b
o
x
W
i
d
t
h
2
5
0
4
5
0
425
600
B
o
d
y
W
i
d
t
h
BOSTON (BCM)
The ues available for BCM rangehoods are
model No DL-BC BCM and come in lengths of
600, 900 or 1200mm.
Condor Rangehood Installation Instructions
9

C
CUBICA Specification Sheet
Wall Mounted
LED Lights
Electrical connection is to be at the
junction box inside the rangehood.
All island CUBICA rangehoods Have
3 fans to ensure all smoke from the
barbecue is removed from the
alfresco area.
Top Ducted
Back Ducted
2
7
5
2
5
0
4
5
0
B
o
d
y
W
i
d
t
h
8
0
0
1
0
0
.
0
4
5
0
2
5
0
1
7
0
M
i
n
i
m
u
m
B
o
d
y
W
i
d
t
h
Switches on Right Hand
End Panel.
500mm - Min
1160mm - Max
1
2
0
.
0
8
0
0
B
o
d
y
W
i
d
t
h
CUBICA (C) - WALL MOUNTED
10
Condor Rangehood Installation Instructions

LED Lights
Electrical connection is to be at the
junction box inside the rangehood.
All BALTIMORE rangehoods have
3 fans to ensure all smoke from
the barbecue is removed from the
alfresco area.
BAL
BALTIMORE Specification Sheet
Top Ducted
Back Ducted
Wall Mounted
1
0
0
450
800
100
700
X
M
i
n
i
m
u
m
2
5
m
m
2
0
0
.
0
4
0
0
.
0
4
5
0
.
0
9
3
1
0
0
.
0
Top Ducted
1
4
5
Power
Entry.
B
o
d
y
W
i
d
t
h
Top Ducted
3
9
5
The flues available for Baltimore
rangehoods are model No DL-BC
and come in lengths of 600, 900,
or 1200mm.
395
2
5
0
4
5
0
.
0
540
B
o
d
y
W
i
d
t
h
8
0
0
4
5
0
BALTIMORE (BAL)
The ues available for BAL rangehoods are
model No DL-BC BAL and come in lengths of
600, 900 or 1200mm.
Condor Rangehood Installation Instructions
11

INSTALLATION INSTRUCTIONS CONDOR RANGE
To suit island models:
• Darlington
• Falcon
• Cubica (Island)
• Cubica (Undercupboard)
It is recommended that the rangehood be mounted 100mm back from the edge of the
benchtop.
1. The rangehood can be installed between 1000mm and 1400mm above the cooking
surface. The installer should check for local requirements in case additional provisions
apply.
2. It is advisable to remove fans for easier handling of unit by removing retaining bolts or clips
and unplugging electrical connector.
3. Measure hole centres and duct size on top of the rangehood. This will vary with the hood
size, model and number of fans tted and will determine the ducting required.
4. Using a plumb line, mark the ceiling before making the cut out. Check for obstructions like
electrical cables etc.
5. Cut two (2) supporting beams approximately 1.0m long and pre-drill hole centres so that
the supporting beams are 90 degrees to the ceiling joists.
6. Fit 8mm all thread (threaded rod) through holes provided and secure with nuts and
washers.
7. Level unit by tensioning the 8mm nuts. Do not over tighten.
8. Fit off ducting as required.
12
Condor Rangehood Installation Instructions

ISLAND CONDOR INSTALLATION DETAILS
8mm NUT
CEILING JOISTS
8mm WASHER
8mm
ALLTHREAD
Condor Rangehood Installation Instructions
POWER
ENTRY
13

DAR
DARLINGTON Specification Sheet
B
o
d
y
W
i
d
t
h
4
5
0
2
5
0
8
0
0
1
1
0
0
LED Lights.
Electrical connection is to be at the
junction box inside the rangehood.
All DARLINGTON rangehoods have
3 fans to ensure all smoke from
the barbecue is removed from the
240v Power Entry
Island Mounted
1200
Overall Width
Minimum Height - 500mm.
859
Allthread
Fixing Points.
6
7
0
M
o
u
n
t
i
n
g
C
e
n
t
r
e
s
500mm - Min
1160mm - Max
DARLINGTON (DAR)
14
LED lights
Electrical connection by 3-pin
plug and lead.
Condor Rangehood Installation Instructions

LED Lights
Electrical connection is to be at the
junction box inside the rangehood.
All FALCON rangehoods have 3 fans
to ensure all smoke from the
barbecue is removed from the
alfresco area.
FAL
FALCON Specification Sheet
Island Mounted
B
o
d
y
W
i
d
t
h
8
0
0
1
2
0
5
0
0
2
5
0
M
o
u
n
t
i
n
g
C
e
n
t
r
e
s
4
0
0
.
0
Power
Entry
4
5
0
F
a
n
b
o
x
W
i
d
t
h
All-thread
Fixing Points.
B
o
d
y
W
i
d
t
h
8
0
0
F
a
n
b
o
x
W
i
d
t
h
5
0
0
480mm - Min
1300mm - Max
120.0
FALCON (FAL)
Condor Rangehood Installation Instructions
LED lights
Electrical connection by 3-pin
plug and lead.
15

ICU
ISLAND CUBICA Specification Sheet
Island Mounted
LED Lights
Electrical connection is to be at the
junction box inside the rangehood.
All ISLAND CUBICA rangehoods Have
3 Fans to ensure all smoke from the
barbecue is removed from the
alfresco area.
7
0
0
M
o
u
n
t
i
n
g
C
e
n
t
r
e
s
3
5
0
Power
Entry
4
5
0
2
5
0
B
o
d
y
W
i
d
t
h
Alltread
Fixing Points.
B
o
d
y
W
i
d
t
h
8
0
0
Switches on Right Hand
End Panel.
500mm - Min
1160mm - Max
L
i
g
h
t
C
e
n
t
r
e
s
B
o
d
y
W
i
d
t
h
CUBICA (ICU) - ISLAND
16
LED lights
Electrical connection by 3-pin
plug and lead.
Condor Rangehood Installation Instructions

CUB
CUB Specification Sheet
Cupboard Cavity Mounted
4
0
450
800
50
750
A
l
l
-
t
h
r
e
a
d
f
i
x
i
n
g
p
o
i
n
t
s
6
6
5
A
l
l
-
t
h
r
e
a
d
f
i
x
i
n
g
p
o
i
n
t
s
F
a
n
b
o
x
W
i
d
t
h
B
o
d
y
W
i
d
t
h
Power entry
4
5
0
2
5
0
CUBICA (CUB) - UNDERCUPBOARD
LED lights
Electrical connection by 3-pin
plug and lead.
Condor Rangehood Installation Instructions
17

CONDOR DUCTING
All Condor ducting pieces are available in zincalume, stainless steel,
colourbond material or powderkote colour.
400. DL-4
DL-4 S/S
DL-4 C/P
402. VB-450X250
VB-450X250 S/S
VB-450X250 C/P
401. HB-450X250
HB-450X250 S/S
HB-450X250 C/P
403. HB-450X250/45
HB-450X250/45 S/S
HB-450X250/45 C/P
404. VB-450X250/45
VB-450X250/45 S/S
VB-450X250/45 C/P
18
405. BD/WV-H-450X250
BD/WV-H-450X250 S/S
BD/WV-H-450X250 C/P
Condor Rangehood Installation Instructions

CONDOR DUCTING
All Condor ducting pieces are available in zincalume, stainless steel,
colourbond material or powderkote colour.
406. BD/WV-V-450X250
BD/WV-V-450X250 S/S
BD/WV-V-450X250 C/P
408. RCBA
RCBA S/S
RCBA C/P
407. RCB
RCB S/S
RCB C/P
409. WVC-H-450X250
WVC-H-450X250 S/S
WVC-H-450X250 C/P
410. WVC-V-450X250
WVC-V-450X250 S/S
WVC-V-450X250 C/P
Condor Rangehood Installation Instructions
19

FILTER CLEANING
For the best results, please clean filters regularly. Condari recommends cleaning filters
every 3-4 weeks, or immediately after heavy use.
You can do this by hand washing in warm soapy water, or by placing filtres in the dishwasher.
Condari does not recommend the use of any citrus or caustic products as this can cause
corrosion on the metal filters.
RANGEHOOD CLEANING
CONDOR rangehoods are made from stainless steel, either type 304 or type 316.
• Type 304 is classied as 18/8 stainless steel
• Type 316 is classied as 18/10 stainless steel.
This means that the stainless is made of 18% nickel and either 8% or 10% of chromium
respectively.
Stainless steel gets its protective coating from the chromium oxidising in the air to form a
protective surface of chromium oxide.
This protective surface can be attacked by salt in the air and by salt water, and then
corrosion can occur on the steel. It is important to clean and polish the stainless steel by
hand, allowing the chromium to oxidise again. Therefore if the alfresco area is by the sea,
one should take measures to protect the rangehood from corrosion.
It is suggested to wipe the hood down with vegetable oil if it is left in the open for long
periods of time.
20
Condor Rangehood Installation Instructions

CONDARI PTY LTD APPLIANCE GUARANTEE
The benefits conferred by this warranty are in addition to all other rights and remedies in
respect of the product which the consumer has under the Trade Practices Act and similar
state and territory laws.
Condari P/L in Melbourne (and by their agency in Country Areas and other States) warrants
that the appliance will be free from defects in materials and workmanship for a period of 36
months from the date of purchase of the appliance to the consumer.
If there is a breach of this warranty, Condari will rectify, free of charge, at it’s nearest service
centre or authorised service agency any fault caused by faulty workmanship or material at
the time of manufacture occurring in the appliance within 36 months from the date of delivery
of the appliance to the customer.
This warranty is conditional upon the appliance being used only for personal, domestic and
household purposes and installed and operated in accordance with CONDOR Instructions
and does not apply to articles which by their nature are consumable.
If a defect is caused by neglect, misuse, or failure to follow operating instructions where
special precautions are detailed for user attention then a charge shall be made for the service
call.
For example:
With the filters the user is specifically requested:
• To clean filter regularly by handwashing or placing in a dishwasher at least once a month.
• To turn off after each use.
Where a claim is made under warranty, CONDOR reserves the right to determine whether or
not the fault is caused by faulty workmanship or material or that the part is defective.
The consumer shall be fully responsible for all expenses whatsoever incidental to the
removal of parts from the unit or to their replacement. Interalia, such responsibility shall
extend to damaged walls, tiles, fixtures and fittings whether or not the unit has been built
into a cupboard and irrespective of the stage either of its installation or the fitting of any other
item whatsoever in its vicinity.
No other person, or firm or corporation is authorised by Condari to offer or give on its behalf
any other greater warranty that given by Condari under this warranty.
Condor Rangehood Installation Instructions
21

EXCLUSIONS
There are some exclusions from the Condari Pty Ltd Guarantee. (on previous page)
CONDOR Rangehoods are designed to be used over all domestic barbecues available
in AUSTRALIA.
QASAIR Rangehoods are not to be used over barbecues approved for outdoor use only.
Outdoor barbecues will have a rating plate on them specifying that they are approved for
outdoor use only and also a mega joule rating per burner or a total mega joule rating.
In practice any barbecue or outdoor cooking appliance over 50 mega joule will need a
specially made rangehood with an air movement exceeding 2000 cubic meters per hour.
QASAIR have hoods to go over domestic cookers such as VIKING, WOLF and CAPITAL
cooking appliances. These brands have a mega joule rating of up to 95 mj and therefore
special hoods are required for the appliances.
QASAIR will manufacture special rangehoods to go over commercial cooking appliances
situated in domestic kitchens.
Once the heat output is over 50 mega joule a special rangehood is required.
22
Condor Rangehood Installation Instructions

STANDARD
WARRANTY
Date purchased
Purchased from
Model
Serial No
The purchaser must fill in the above information and keep this with the
original purchase document. This form must be produced if and when
a claim is made under this warranty.
CONDOR Rangehoods are made in Ringwood, Australia.
Tel: +61 3 9482 7088
Fax: +61 3 9482 7011
Email: sales@condari.com.au
Condor Rangehood Installation Instructions
23

DISTRIBUTED IN AUSTRALIA BY CONDARI PTY LTD
www.condari.com.au
Tel: 1300 360 563
HEAD OFFICE
VIC Tel: 03 9482 7088 Fax: 03 9482 7011
Email: sales@condari.com.au
Website: www.condari.com.au
YOUR DISTRIBUTORS
NSW/ACT Tel: 02 9316 4599 Fax: 02 9316 9299 Email: salesnsw@qasair.com.au
QLD Tel: 07 3423 3503 Fax: 07 3282 9122 Email: salesqld@qasair.com.au
WA Tel: 08 9242 5387 Fax: 08 9201 0887 Email: saleswa@qasair.com.au
SA/NT Tel: 1300 360 563 Fax: 03 9482 7011 Email: sales@qasair.com.au
TAS Tel: 03 9482 7088 Fax: 03 9482 7011 Email: sales@qasair.com.au
rev. 082014F
New Zealand
Kitchen Appliance Specialist Ltd
320 Manchester Street
Christchurch New Zealand
Tel: +64 3 379 0360 Fax: +64 3 365 5623
Kouzina Appliances
155 The Strand, Parnell
Auckland New Zealand
Tel: +64 9 377 7822 Fax: +64 9 377 7824
Email: sales@kouzina.co.nz
Singapore
Eldric Marketing Pte Ltd
176 Orchard Road
#05-03 Centrepoint Singapore 238843
Tel: +65 6339 1168 Fax: +65 6733 8133
5 Pereira Road
#02-01 Asiawide Industrial Building
Singapore 238843
Tel: +65 6743 8388 Fax: +65 6743 0202
CONDARI RESERVES THE RIGHT TO CHANGE SPECIFICATION WITHOUT NOTICE
CONDOR RANGEHOODS MADE IN RINGWOOD 3134
 Loading...