

Page 1

JITRBUD Main
User Guide
Version 5.0
Part Number 108741-01
Page 2

Page 3

JITRBUD
User Guide
Main
Version 5.0
Page 4

JITRBUD Main User Guide
Changes in equipment, software, or procedures may occur
periodically; information describing these changes will be included
in future editions of the manual and periodic change-page releases.
July 2002
RBUD Main
JIT
User Guide
Part # 108741-01
JIT
RBUD is a registered trademark
of Pyxis Corporation. The Pyxis
logo is a registered trademark
of Pyxis Corporation.
© 2002
Pyxis Corporation
3750 Torrey View Court
San Diego, CA 92130
1-800-367-9947
Fax: 1-858-480-6329
www.pyxis.com
All rights reserved.
Printed in the
United States of America.
Because of the inherent delays involved in producing documentation,
information in this document is subject to change without notice and
does not represent a commitment on the part of Pyxis Corporation to
provide additional services or enhancements.
Unless otherwise noted, all names of companies, products, street
addresses, and persons contained herein are part of a completely
fictitious model or models, and are designed solely to document and
illustrate the use of the JIT
RBUD product.
Warning : This equipment generates, uses, and can radiate
radio frequency energy and if not installed and used in
accordance with the instruction manual, may cause
interference with radio communications. It has been tested and
found to comply with the limits for a Class “A” digital device
pursuant to Subpart B of Part 15 of the FCC Rules, which are
designed to provide reasonable protection against such
interference when equipment is operated in a commercial
environment. Operation of this equipment in a residential area
may cause interference, in which case the user, at their own
expense, will be required to take whatever measures may be
required to correct the interference.
This device complies with Part 15 of the FCC Rules and with
RSS-210 of Industry Canada. Operation is subject to the
following two conditions:
1.This device may not cause harmful interference, and
2.This device must accept any interference received, including
interference that may cause undesired operation.
Changes or modifications not expressly approved by the party
responsible for compliance could void the user’s authority to
operate this equipment.
ii JITRBUD Main User Guide
Page 5

Contents
Preface...... ............ ............ ............ ............ ............ vii
Welcome ......................................................................................... vii
How this Guide is Organized....................................................... viii
Manual Overview............................................................................ viii
User Guide Conventions ................................................................ ix
Text.................................................................................................... ix
Icons .................................................................................................. ix
User Guide Terminology................................................................. x
Chapter 1
System Overview.................................................1-1
Benefits and Features.................................................................... 1-2
System Components ...................................................................... 1-3
RBUD Stations........................................................................ 1-3
JIT
UPPLYCENTER Console ..............................................................1-3
S
The Network Information ............................................................ 1-3
Comprehensive Reporting............................................................ 1-4
Chapter 2
Station Basics......................................................2-1
Station Basics .................................................................................2-2
Using the Touch-Screen...............................................................2-2
Using the Keyboard .....................................................................2-2
JITRBUD Main User Guide iii
Page 6

Contents
Using the JITRBUD Transmitters ................................................2-3
Using Window and Screen Features............................................ 2-3
Command Buttons ....................................................................2-3
Scroll Bars.................................................................................2-3
Lists........................................................................................... 2-4
Drop-down Lists ....................................................................... 2-4
Check Boxes ............................................................................. 2-4
Search Boxes............................................................................. 2-4
Confirmation Screens ...............................................................2-4
Logging In ...................................................................................... 2-5
Logging In Using ID and Password............................................. 2-5
Logging Out ...................................................................................2-6
To log out..................................................................................2-6
Changing Your Password.............................................................2-7
Main Menu..................................................................................... 2-8
Main Menu Functions .................................................................. 2-9
Using Additional Tools................................................................ 2-11
Station Communication .............................................................. 2-12
Verifying Communication ......................................................... 2-12
Device Status.............................................................................. 2-13
Methods Status........................................................................... 2-15
Sessions Status ...........................................................................2-16
Protocol Status ...........................................................................2-17
Receiving Status......................................................................... 2-19
Transmitting Status .................................................................... 2-20
Chapter 3
Patient Care Functions .......................................3-1
Take-Return...................................................................................3-2
Searching for Patients .................................................................. 3-2
Sorting Lists .................................................................................3-3
Taking Items ................................................................................3-4
Taking Items with Multiple Patient Selection Feature ............. 3-4
Quick Take................................................................................ 3-5
Taking Items in No Patient Mode.............................................3-6
Taking Items with Lot/Serial Number Tracking.......................3-7
Using the Procedure Date Feature ............................................... 3-9
Patient Lists................................................................................ 3-10
Global Patient List (Global).................................................... 3-10
Local Patient List (Local) ....................................................... 3-10
My Patient List (My List).......................................................3-10
Adding Patients to My List..................................................... 3-11
Deleting Patients from My List .............................................. 3-12
Finding Items ............................................................................. 3-13
Global Find Item..................................................................... 3-14
Returning Items.......................................................................... 3-16
Returning Items in No Patient Mode...................................... 3-17
iv JITRBUD Main User Guide
Page 7

Emergency Access ..................................................................... 3-18
Patients ......................................................................................... 3-20
Searching for Patients ................................................................ 3-20
Adding Patients.......................................................................... 3-21
Editing Patients .......................................................................... 3-23
Reconcile ADT ..........................................................................3-24
Request Item ................................................................................ 3-26
Requesting Items........................................................................3-26
Chapter 4
Inventory Management Functions .....................4-1
Inventory ........................................................................................4-2
Searching for Items ......................................................................4-3
Verifying Quantity ....................................................................... 4-4
Editing Items in Inventory ...........................................................4-6
Outdating Expired Items in Inventory .........................................4-8
Load-Unload ................................................................................4-10
Searching for Items ....................................................................4-10
Loading Items ............................................................................4-11
Loading Empty Bins ............................................................... 4-12
Loading Pending Bins............................................................. 4-14
Unloading Items......................................................................... 4-16
Moving Items to a New Location .............................................. 4-17
Item Alias .....................................................................................4-19
Searching for Items ....................................................................4-19
Creating an Item Alias ...............................................................4-20
Editing an Alias.......................................................................... 4-21
Deleting an Alias........................................................................ 4-22
Refill.............................................................................................. 4-23
Refilling Items............................................................................ 4-24
Spot Refill............................................................................... 4-25
Outdating Expired Items in Refill.............................................. 4-27
Refill By Request Order.............................................................. 4-30
Contents
Chapter 5
Station Management Functions .........................5-1
Users ............................................................................................... 5-2
Searching for Users...................................................................... 5-2
Creating Users..............................................................................5-3
Editing Users................................................................................5-9
Deleting Users............................................................................5-14
Creating User Templates............................................................ 5-15
Creating Users From Templates ................................................ 5-22
Editing User Templates.............................................................. 5-23
Deleting User Templates............................................................ 5-24
Station Options ............................................................................ 5-25
JITRBUD Main User Guide v
Page 8

Contents
Setting Station Options .............................................................. 5-25
Hardware Setup........................................................................... 5-31
Adding JIT
Editing Cabinet Information ......................................................5-35
Clearing the Hardware Setup Table...........................................5-36
Deleting Devices ........................................................................5-37
Appendix A
RBUD Cabinets (Locations) .................................... 5-33
Troubleshooting ................................................. A-1
Transmitters Not Communicating to Receiver ........................... A-2
Patients Not Showing Up At A Station....................................... A-2
Station Screen Is Black ............................................................... A-3
Keyboard Is Unresponsive.......................................................... A-3
Touch Screen Is Unresponsive.................................................... A-4
Supply Is Not Listed In Find Item .............................................. A-4
Wrong Supply Removed ............................................................ A-5
ID Is Not Working ..................................................................... A-5
Brain Transplant.......................................................................... A-6
Appendix B
Safety and Maintenance..................................... B-1
General Safety Tips ..................................................................... B-2
Safe Computing ............................................................................ B-3
Regulatory Compliance ............................................................... B-3
Electrical Guidelines................................................................... B-4
Power Requirements .................................................................... B-5
Appendix C
Specifications ..................................................... C-1
Appendix D
Glossary .............................................................. D-1
Index ..............................................................Index-1
vi JITRBUD Main User Guide
Page 9

Welcome
Thank you for choosing the JITRBUD system.
Preface
The JIT
Console and JIT
JIT
This document covers using the JIT
S
documents.
The JITRBUD Main User Guide does not cover service and repair procedures.
Instead, it focuses on the daily use, minor maintenance, and troubleshooting of the
system. For information about the JIT
document, please call the Pyxis Worldwide Service Center at 1-800-727-6102.
RBUD system consists of two primary components: the SUPPLYCENTER
RBUD Stations. There are two types of JITRBUD Stations: the
RBUD Main Station and the SUPPLYSTATION 30 with the JITRBUD option.
RBUD Main Station. The user guides for the
UPPLYCENTER Console and the SUPPLYSTATION 30 are provided as separate
RBUD Station that is not covered in this
JITRBUD Main User Guide vii
Page 10

Preface
How this Guide is Org anized
This manual is designed to help you quickly gain experience and confidence using
the JIT
levels of need and interests. Refer to the following for more information:
Manual Overview
This manual contains the following:
• Chapter 1, System Overview - Introduces the JITrBUD system, its purpose,
• Chapter 2, Station Basics - Provides general information about the JITrBUD
• Chapter 3, Patient Care Functions - Contains information and procedures
• Chapter 4, Inventory Management Functions - Provides information and
RBUD Main Station. The chapters and appendixes are directed to varying
and components.
Main and explains how to use menus and screens.
for using the patient care functions at the JIT
RBUD Main: Removing Items,
Returning Items, and Discarding Items.
procedures for performing inventory management functions at the JIT
RBUD
Main, including loading and unloading items, taking inventory, and refilling
stock.
• Chapter 5, Station Management Functions - Explains how to use the
RBUD Main to manage the supply system at your facility, including
JIT
defining user and Station access privileges, adding items alias’s to your
system and assigning them to the Stations; and how to run reports at the
Station.
• Appendix A, Troubleshooting - Describes troubleshooting techniques for the
RBUD Main, such as what to do if the Station is down or a if a patient is
JIT
not appearing at the Station.
• Appendix B, Safety and Maintenance - Provides important safety and
maintenance information.
• Appendix C, Specifications - Describes JIT
RBUD system equipment,
dimensions and components.
• Appendix D, Glossary - Definitions of terms used in this guide as they apply
to the JIT
RBUD system.
viii JITRBUD Main User Guide
Page 11
Preface
User Guide Conventions
This guide uses the following conventions.
Text
• The name of a document title, field, screen, or tab is formatted in italics.
• The name of a button, command, option, or icon is formatted in
bold.
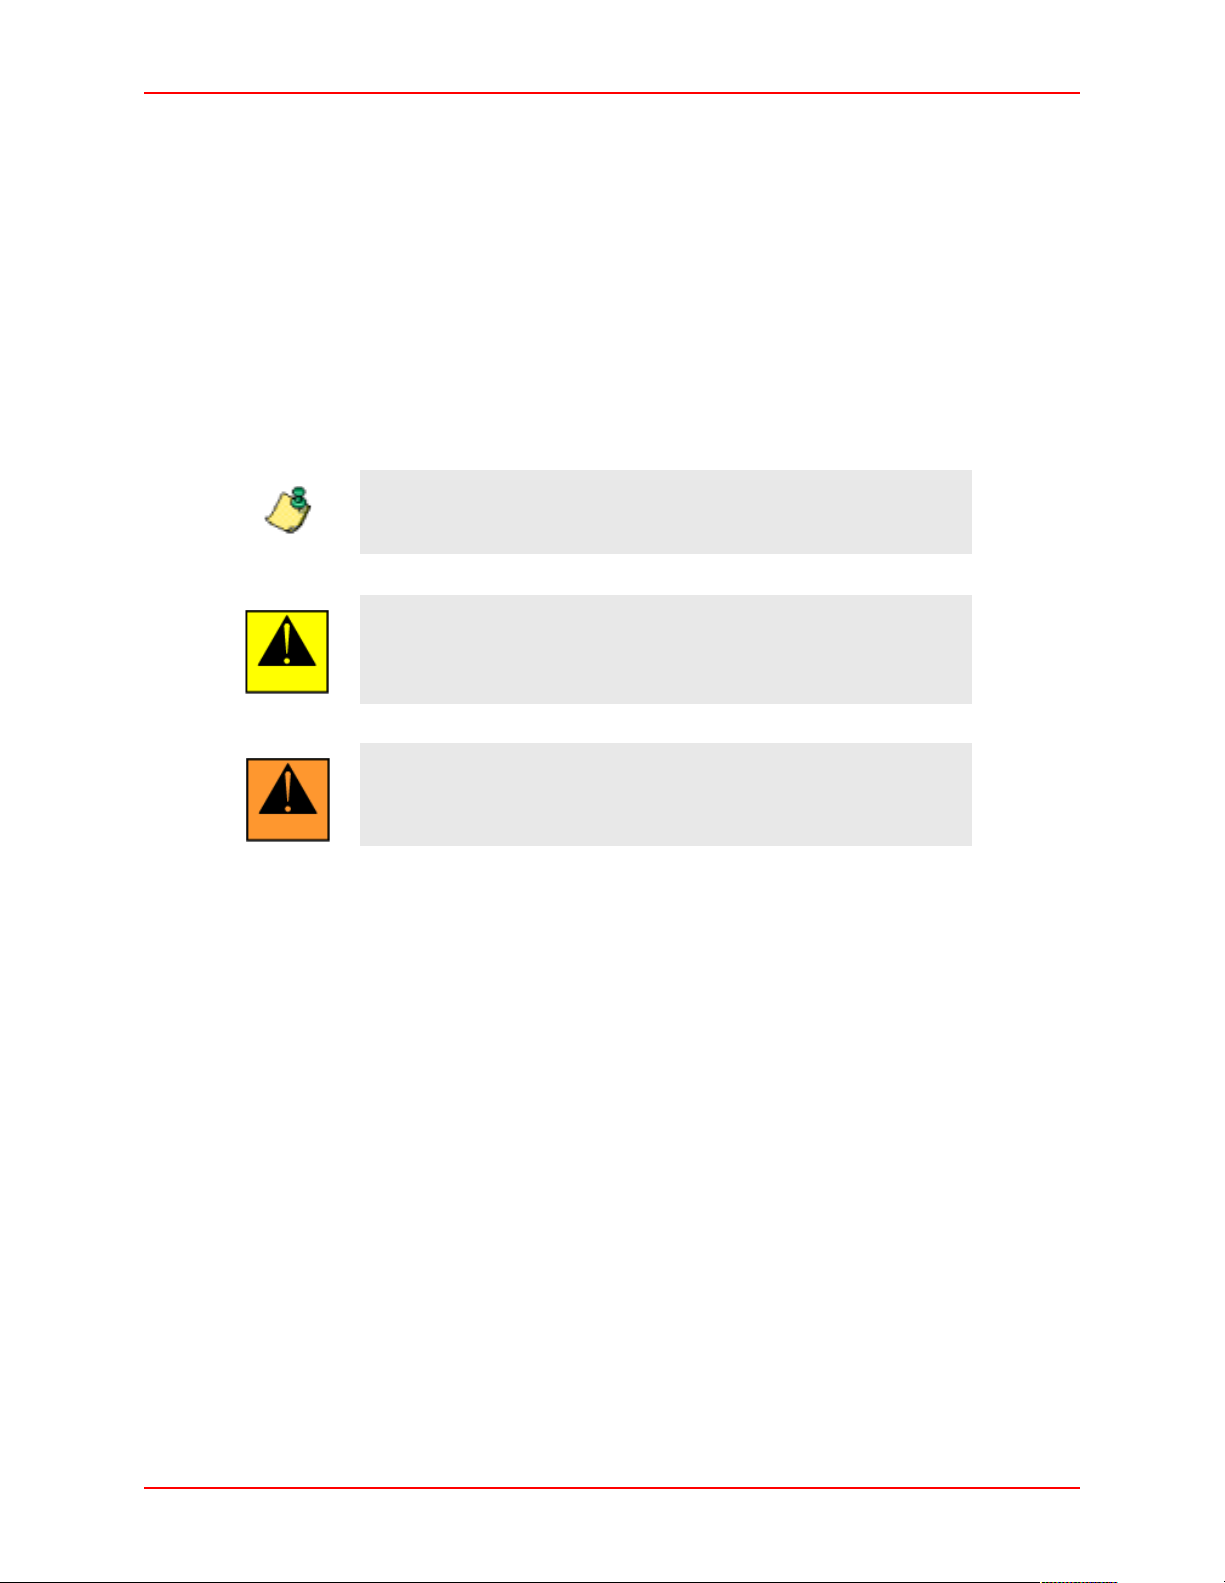
Note
Caution
Warn in g
• The name of a key on the keyboard is formatted in
SMALL CAPS.
Icons
This document uses the following symbols:
Note text contains supplementary information or emphasizes a point
or procedure.
Caution indicates a potentially hazardous situation which, if not
avoided, could result in minor or moderate injury. Caution is also
used to alert against unsafe practices that could result in
unpredictable results or data loss.
Warning indicates a potentially hazardous situation which, if not
avoided, could result in death or serious injury.
JITRBUD Main User Guide ix
Page 12

Preface
User Guide Terminology
Familiarity with the following terms will help you to understand and use the
information and procedures in this guide. Appendix D provides a glossary of
additional terms.
• Station — The device that stores and tracks supplies. Each Station has an
internal computer that tracks access and item usage information and
communicates with the S
Main unit and any attached auxiliaries.
UPPLYCENTER Console — The central repository for all information is the
• S
UPPLYCENTER Console (also referred to as the Central Console). This
S
computer directs Stations in a facility. The S
communicates and receives data and updates activity information to all of the
Stations. The S
UPPLYCENTER Console also maintains all patient and activity
information used to generate reports.
• ProCar Computer — The ProCar computer is responsible for interface
communications, including the ADT, billing, and Material Management
Information Systems (MMIS). The interface communications software is
developed, configured, and installed by Pyxis during the Station system
installation. Pyxis considers this communication hardware and software
interface proprietary.
• Auxiliary Unit — A unit that can be added to a Station for additional
capacity. An auxiliary unit does not have an internal computer; the Station
controls access to the auxiliary unit.
UPPLYCENTER Console. Station may refer to the
UPPLYCENTER Console
• Users — Nurses or other personnel in the facility that use the Stations.
• Item — A supply that is stored, dispensed, and managed by the system. Item
is used to refer to the name of the supply assigned to a bin.
• Bin — A specific location of an item. Each item is assigned to a Station and to
a unique bin within the Station.
x JITRBUD Main User Guide
Page 13

Chapter
1
System Overview
The JITRBUD system automates the distribution and management of hospital
supplies. The system tracks items when they are removed from the JIT
Main and used for a patient. All transaction information including the name of the
patient, and the description and quantity of supplies removed, is automatically
recorded at the Station and sent to the Console for accounting, restocking, and
billing purposes.
RBUD
The JIT
• Control costs and capture lost charges by creating an electronic transaction
• Increase nursing and central supply productivity by reducing or eliminating
• Improve response time by utilizing existing storage solutions and providing
• Optimize inventory levels using real-time usage information.
JITRBUD Main User Guide 1-1
RBUD system is used to perform the following:
record for supplies managed by the JITRBUD Main.
time-consuming and labor-intensive tasks in these areas.
information when stock is needed.
Page 14

Benefits and Features
Benefits and Features
• Open storage system - immediate access to all patient supplies
• Utilizes existing supply storage hardware
• Transmitters have wireless push-to-take buttons that use RF technology
• Expiration date tracking for flagged supplies
• No Patient Mode - eliminates patient selection for appropriate supply areas
• Patient reconciliation - ability to reconcile a temporary patient and all the
associated charges to be reconciled with a permanent patient at the
SUPPLYCENTER Console and Station
• Refill by Request - when restock report is flagged to notify Station, the
associated order appears at the Station with all the items expected to be
refilled.
• Ability to interface and send refill orders from vendors to the Station.
• Ability to create item aliases at the Station
• Ability to create user templates
1-2 JITRBUD Main User Guide
Page 15

System Components
System Components
There is no one-size-fits-all implementation of the JITRBUD system; the
installation of equipment is configured specifically for your needs and the way
you do business. After working with you to evaluate various options, Pyxis
implements the required components necessary to meet your specific needs.
JITRBUD Stations
There are two types of Stations that utilize JITRBUD transmitters: the JITRBUD
Main and the S
UPPLYSTATION System 30 with JITRBUD option:
•The JIT
RBUD Main is an open-shelf system that integrates JITRBUD
transmitters with existing supply storage cabinets, shelves and bins at a
hospital facility.
•The S
The JIT
UPPLYSTATION 30 with JITRBUD option integrates JITRBUD
transmitters with S
capacity. For more information about the S
option, see the S
RBUD transmitters have push-to-take buttons that use radio frequency
UPPLYSTATION System 30 cabinets to expand system
UPPLYSTATION 30 with JITRBUD
UPPLYSTATION System 30 User Guide (version 6.0+).
(RF) to send transaction information from the storage location to the Station
computer. Supply inventory information is tracked at the Station and sent to the
Console to automate supply distribution and management.
SUPPLYCENTER Console
The SUPPLYCENTER Console is the computer that controls all Stations in your
facility. Each Station reports to the S
accessed and whenever a transaction is completed. The S
is also used to manage users, patients, and inventory throughout the facility. It is
interfaced to the Hospital Information System (HIS) through the ProCar for
updating patient census information and to the Materials Management
Information System (MMIS) for the transfer of usage data.
UPPLYCENTER Console every time an item is
UPPLYCENTER Console
The Network Information
The ProCar is also part of the SUPPLYCENTER Console communications hub.
Since Pyxis systems use information from the hospital and materials management
information systems, there must be a way to translate all the information into the
format used by Pyxis systems. This translation is the job of the Pyxis ProCar
computer which serves as a connection, or interface, between Pyxis systems and
hospital and MMIS.
Additionally, the following Station interface options are available:
1. Admission, Discharge and Transfer (ADT)
2. Automated Billing
3. Materials Management Information System (MMIS)
4. Direct Vendor Interfaces
JITRBUD Main User Guide 1-3
Page 16

System Components
Comprehensi ve Reporting
Given the possibility of dozens of Stations spread throughout a variety of patient
care areas, the need for comprehensive and accurate reporting is critical to
Materials and System Managers.
UPPLYCENTER Console keeps up to forty five days of transactional data and
The S
six months of data summary, including supply removal, refilling, inventory
verification, discarding, and returning items from all Stations. This data can be
sorted and printed into a variety of reports and kept as a permanent record of
supply usage. Reports on every aspect of the Station—including door or bin
accesses, inventory, patient ADT, and status—by Station and system-wide are
available from the S
this information for reference, safekeeping, or creating spreadsheets, you can
easily archive the S
import the data into several popular database and spreadsheet programs.
UPPLYCENTER Console. If you want to electronically store
UPPLYCENTER Console’s transaction data to diskette and
1-4 JITRBUD Main User Guide
Page 17

Station Basics
This section describes the following information:
• Using the Touch Screen
• Using the Keyboard
Chapter
2
• Using the JIT
• Using Window and Screen Features
• Logging in and out of the Station
• Changing Your Password
• Using the Main Menu
• Using Additional Tools
• Viewing Communication status
The examples used throughout this guide show screens with full
access privileges and most Station options turned on. The screens
Note
JITRBUD Main User Guide 2-1
you see on your system may vary depending on your access
privileges and Station Option settings.
RBUD Transmitters
Page 18

Station Basics
Station Basics
This section gives an overview of the Station user interface. There are three ways
to make selections and enter information at the Station:
• Touch-screen
• Keyboard
• Take/Return Remote Transmitters
Using th e Touch-Screen
The Station has a touch-screen. Rather than typing commands, simply touch your
selection on the screen. For example, to select a patient, scroll through the list
using the up and down arrows to the right of the list until the patient’s name
appears, then touch the patient’s name. The patient is highlighted when selected.
Using the Keyboard
Some information, such as your password, is entered using the keyboard. If you
make a mistake, simply press the
BACKSPACE key to erase keystrokes.
To select an item from a list, type the first few letters of the name to display all
items that match your entry. Continue entering letters until the correct item is
listed.
The following table lists keyboard keys to perform various functions.
Keys Function
UP ARROW
DOWN ARROW
BACKSPACE
DEL
HOME
END
ENTER
Scrolls up a line in a list.
Scrolls down a line in a list.
Deleted previous character in a field.
Deletes one character forward in a field.
Takes you to the top item in a list.
Takes you to the bottom item in a list.
Accepts entries and clears open dialog boxes.
2-2 JITRBUD Main User Guide
Page 19
Station Basics
Using the JITRBUD Transmitters
JITRBUDs are battery powered transmitters that use radio frequency (RF) to send
transaction data to the Station. Press the
the JIT
RBUDs to adjust the inventory count when you remove and return items at
Take and Return buttons on the front of
the Station.
JIT
RBUD transmitters emit an audible tone to confirm the successful receipt of
transaction information. The tone emitted for Take and Return transactions are
different so you can distinguish whether you pressed the appropriate button.
Using Window and Screen Features
The features described in the following section will help you navigate through the
Station screens.
Command Buttons
Command buttons let you accept and cancel changes and execute a selected
option.
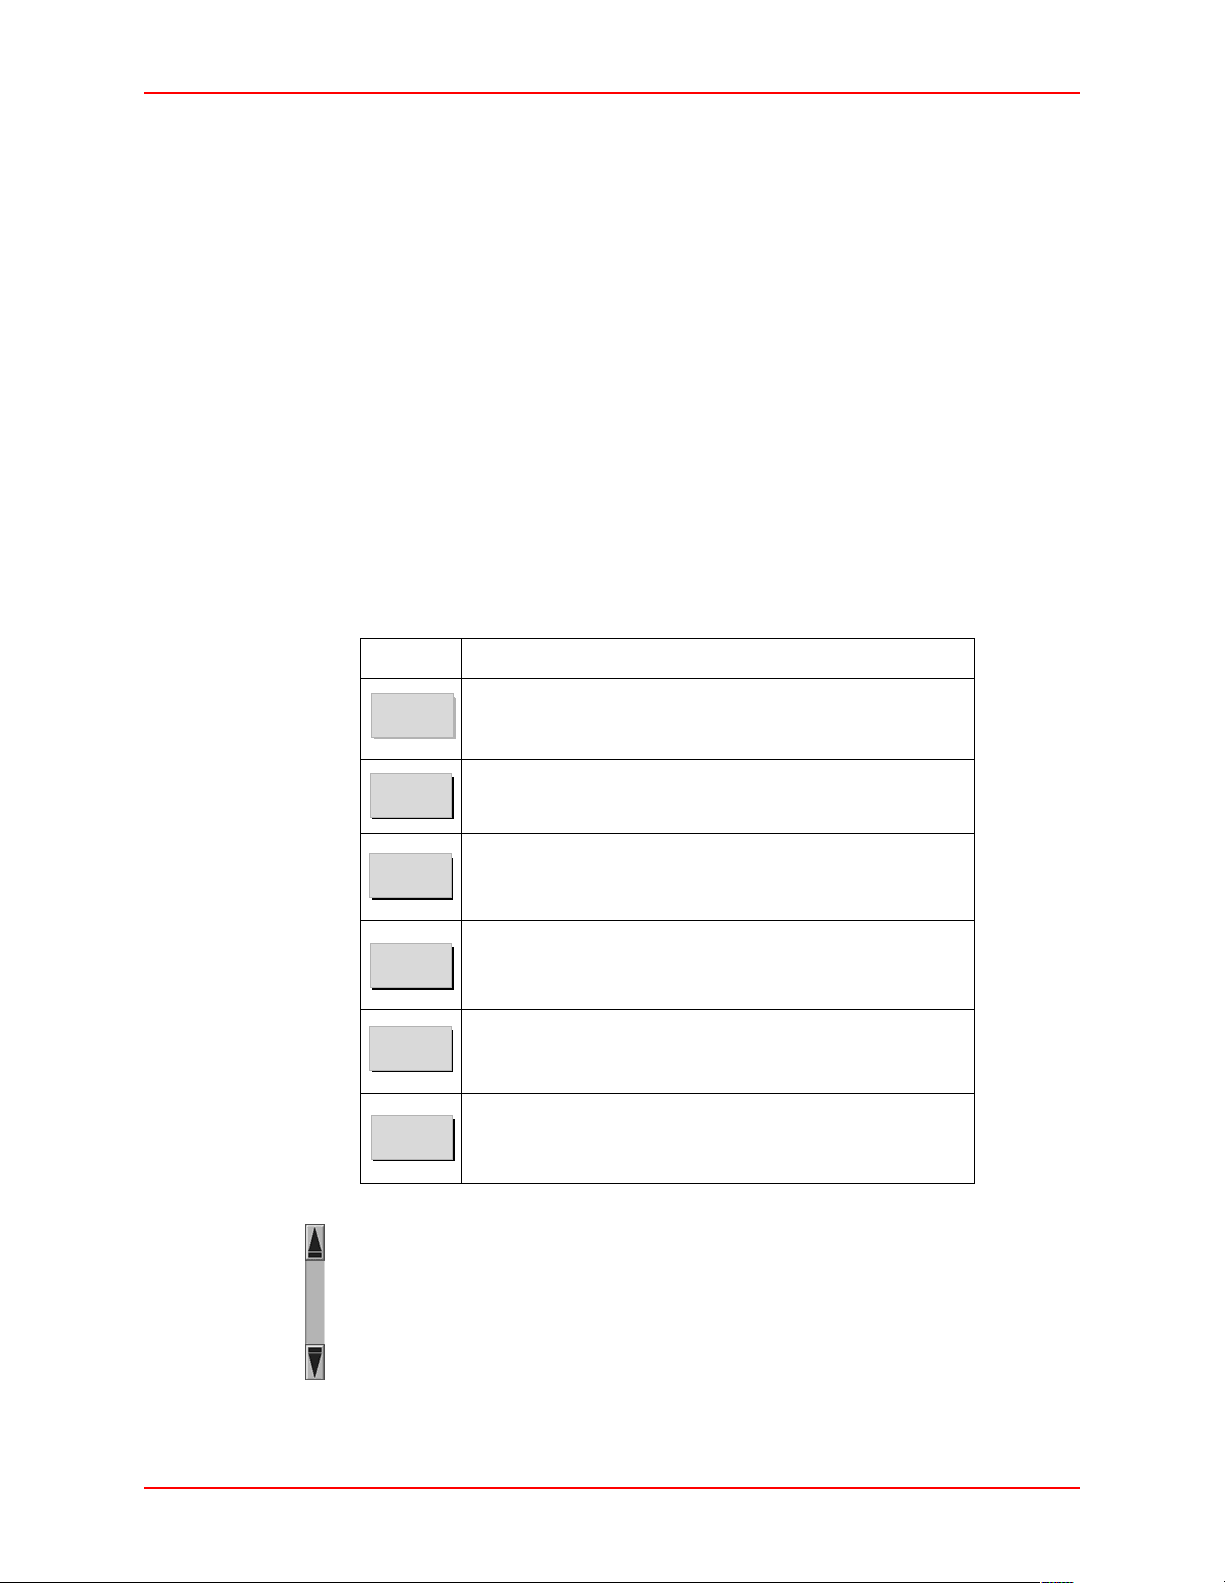
Button Description
Done
Done
Cancel
Close
Continue
OK
Next
—Press this button to accept entries, save changes, and
complete an activity. On some screens this button also closes the
screen.
Cancel
—On some screens, pressing this button cancels entries
and the current operation.
Close
—Press this button to close the screen.
Continue
OK
Next
—Press this button to move forward in the process.
—Press this button to accept entries and settings.
—Press this button to go to the next item.
Scroll Bars
1. Touch the up- and down-arrows. The arrows in the scroll bar are used to move
through lists.
– or –
Use the up- and down-arrows on the computer keyboard and scroll one item at
a time.
JITRBUD Main User Guide 2-3
Page 20
Station Basics
Lists
• Select the desired item. The item will be highlighted.
• To select multiple items in a list, press and hold down the C
TRL key and
highlight each item.
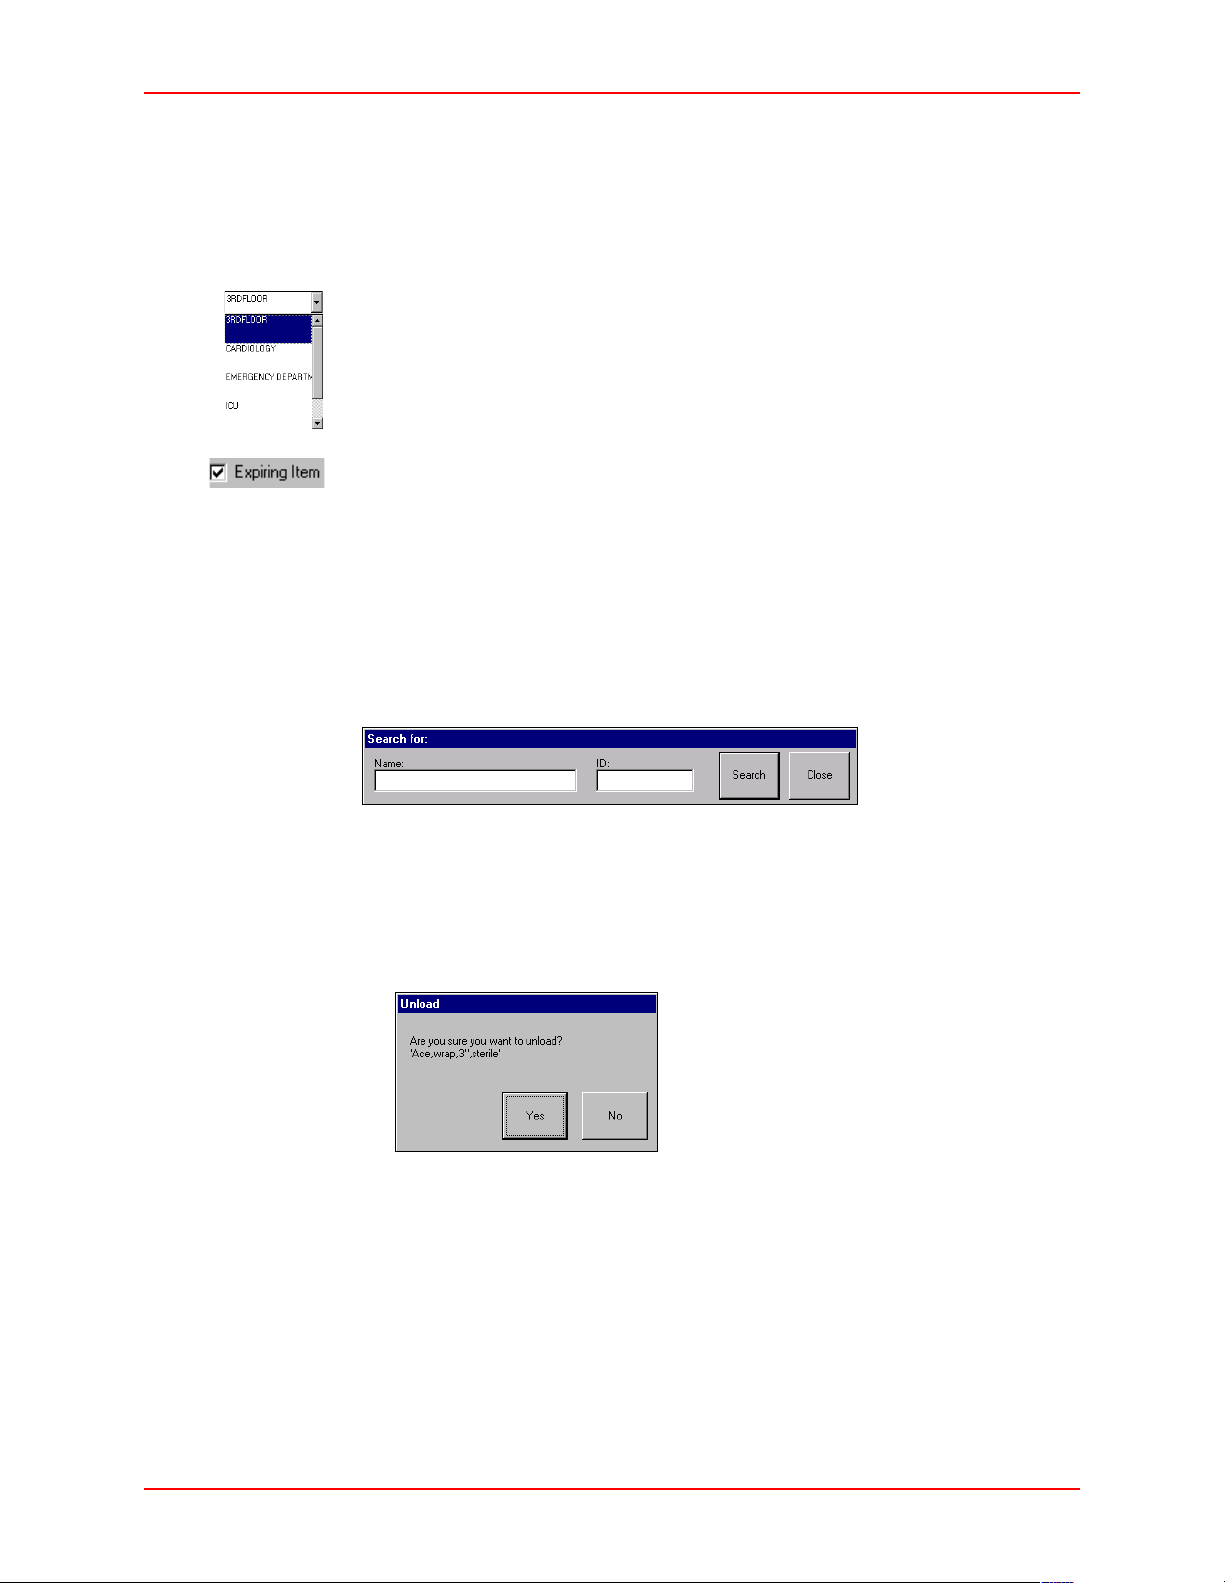
Drop-down Lists
Select the top arrow to display a list of options.
Check Boxes
A check box is used to select multiple options. You can select one, a few, or all
options listed. When the option is selected, the box contains a check mark
. To
clear the selection, touch the box again.
Search Boxes
Search boxes are used to find patients or items in a list. The patient search box
provides a way to search for the patient name, Room, or ID. The Item search
feature provides a way to search for the Item name or ID.
Confirmation Screens
A confirmation screen may appear after selecting an option.
• Press
• Press
Yes to verify the action.
No to cancel the action.
2-4 JITRBUD Main User Guide
Page 21
Logging In
Logging In
Only authorized users can access the Station. The system administrator can assign
each Station one of the following modes of access:
• User ID only (not recommended by Pyxis)
• User ID and password
You must log in before you can access the system. Logging in verifies your
identity and allows the system to track your transactions. You must always log in
before performing any activity at the Station.
When you log out, or after the system has been inactive for the pre-determined
time-out interval, the screen reverts to the Login screen until the next user logs in.
Logging In Using ID and Password
Logging in with a user ID and password protects the security of a Station. Use the
touch screen and keyboard to log in to the Station.
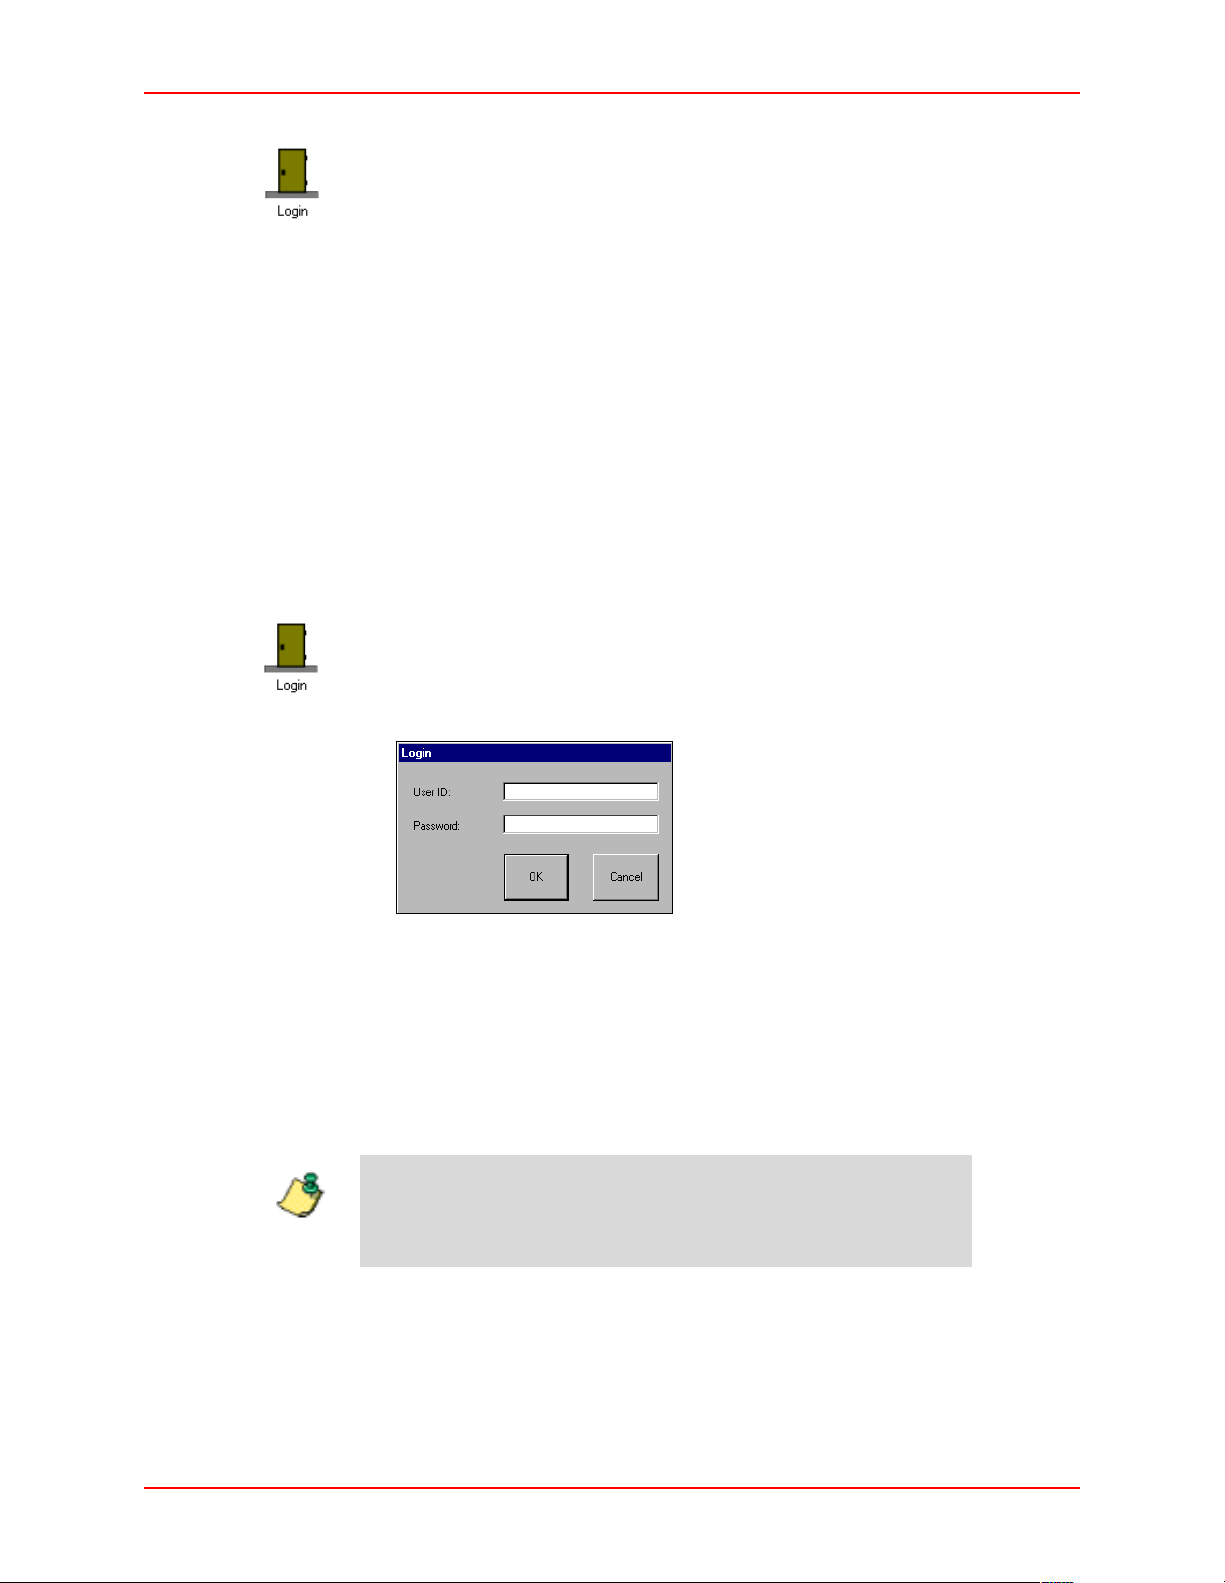
To log in using ID and Password
Note
1. Press the
Login icon.
The Login window appears.
2. Type your User ID and press
TAB or ENTER.
The cursor moves to the Password field.
3. Type your Password and press
OK or ENTER.
The screen that appears depends on your security privileges and the
preferences selected on the My Settings window at the Station. The default
screen is the Main Menu. To change the default screen, modify your user
preferences.
For more information about setting user preferences, refer to
Chapter 5, My Settings.
JITRBUD Main User Guide 2-5
Page 22

Logging Out
Logging Out
You must log out of the system when you leave the Station. As a safeguard
determined by the System Manager, the system will automatically revert to the
Login screen if the Station is inactive for a predetermined period of time even if
you have not logged out. However, you should never leave the Station without
logging out to ensure transactions are not performed by other users using your
login ID.
To log out
1. Press the Exit icon to log out when you are finished using the Station.
The Login screen appears and the Station is ready for the next user to login.
If you have initiated an activity that requires a response, you will
be prompted to complete the activity.
Note
2-6 JITRBUD Main User Guide
Page 23
Changing Your Password
Changing Your Password
The first time you access the Station, you will use the password assigned to you
by the System Manager. If your user ID on the S
Expire Initial Password, you will be prompted to change your password the first
time you log in. You can also change your password at any time as a safety
measure, or when you are notified that your password is about to expire.
To change your password
UPPLYCENTER Console is set to
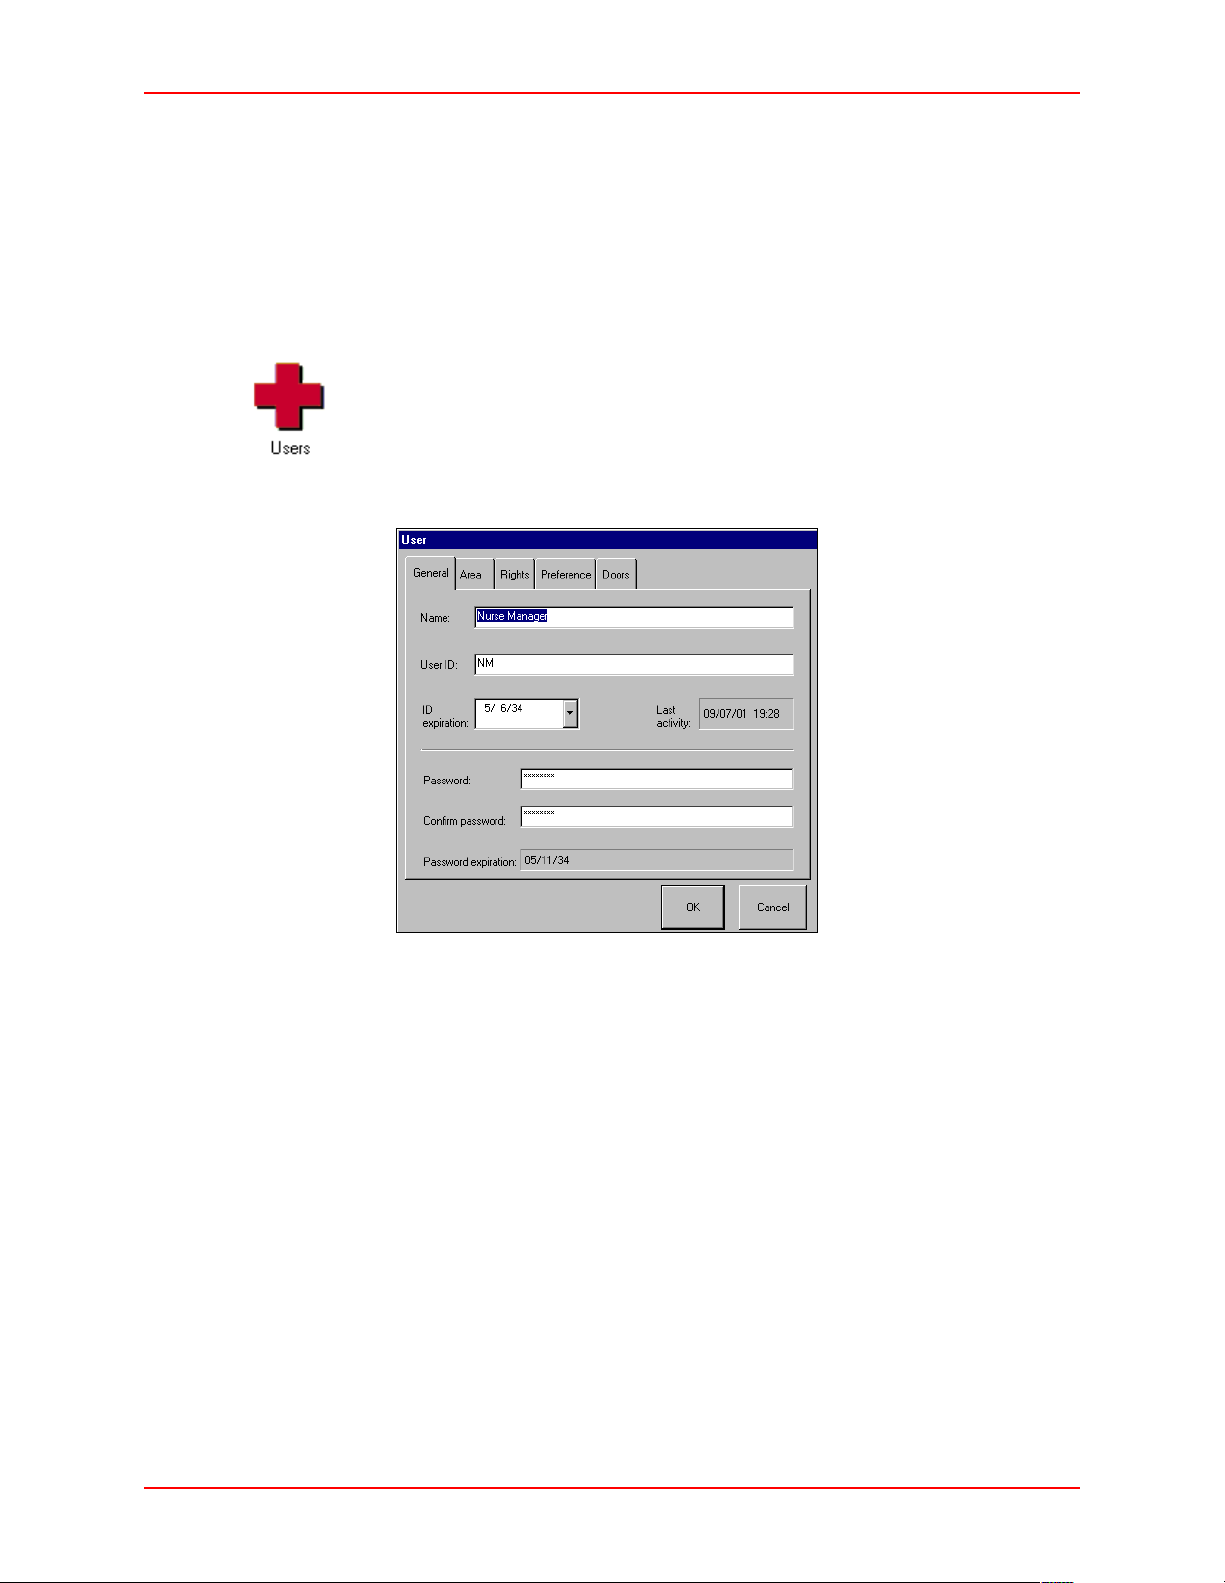
1. From the Main Menu, press the
Users icon.
The Users screen appears.
2. Select your name and press
Edit.
The User window appears.
3. Enter a new password in the Password and Confirm Password fields.
4. Press
5. Press
JITRBUD Main User Guide 2-7
OK.
Exit to log out of the Station.
Page 24
Main Menu
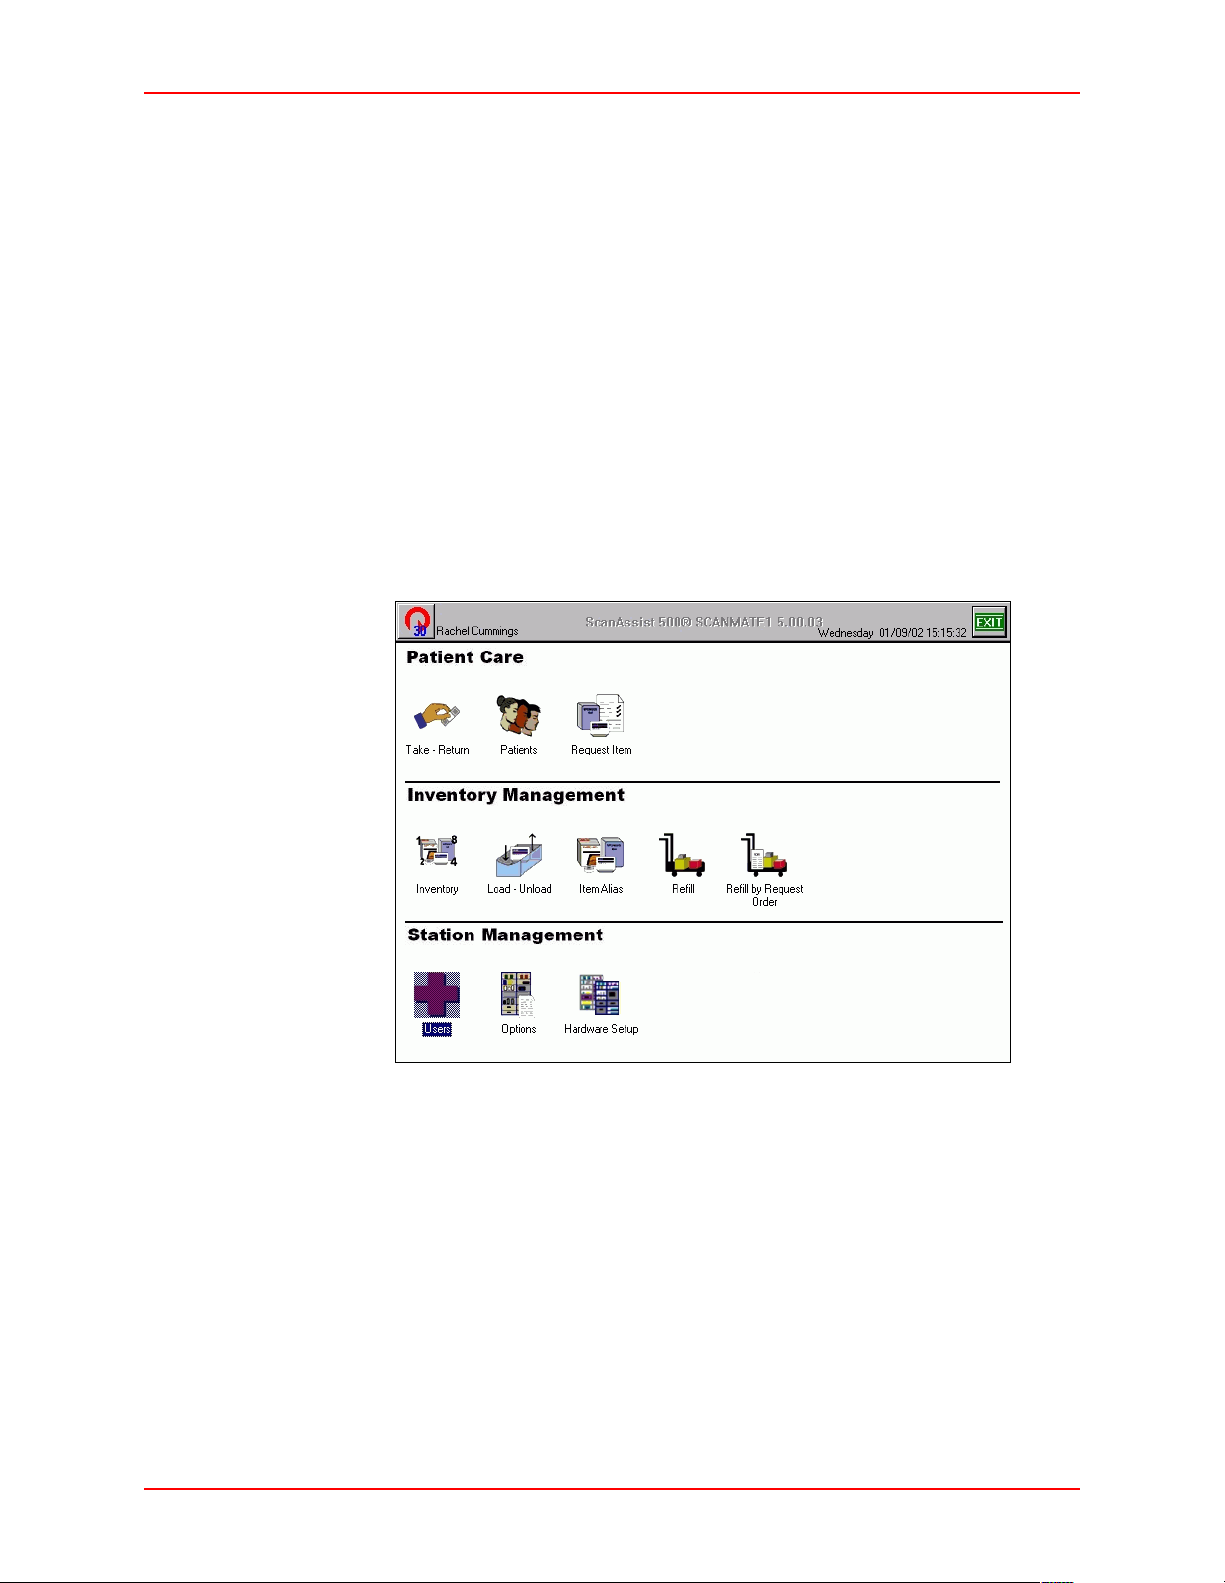
Main Menu
After you successfully login at the Station, the Main Menu appears unless you are
assigned a different Start screen on the Preference tab on the User window. The
Main Menu allows you to access all the functions available with your user access
privilege level.
• Patient Care—Provides access to the Take/Return, Patients, and Request
Item features at the Station. Instructions for these functions are included in
Chapter 3, Patient Care Functions.
• Inventory Management—Provides access to the Inventory, Load/Unload,
Item Alias, Refill, and Refill by Request Order features at the Station.
Instructions for these functions are included in Chapter 4, Inventory
Management Functions.
• Station Management—Provides access to the Users, Options, Hardware and
Setup features at the Station. Instructions for these functions are included in
Chapter 5, Station Management Functions.
2-8 JITRBUD Main User Guide
Page 25
Main Menu Functions
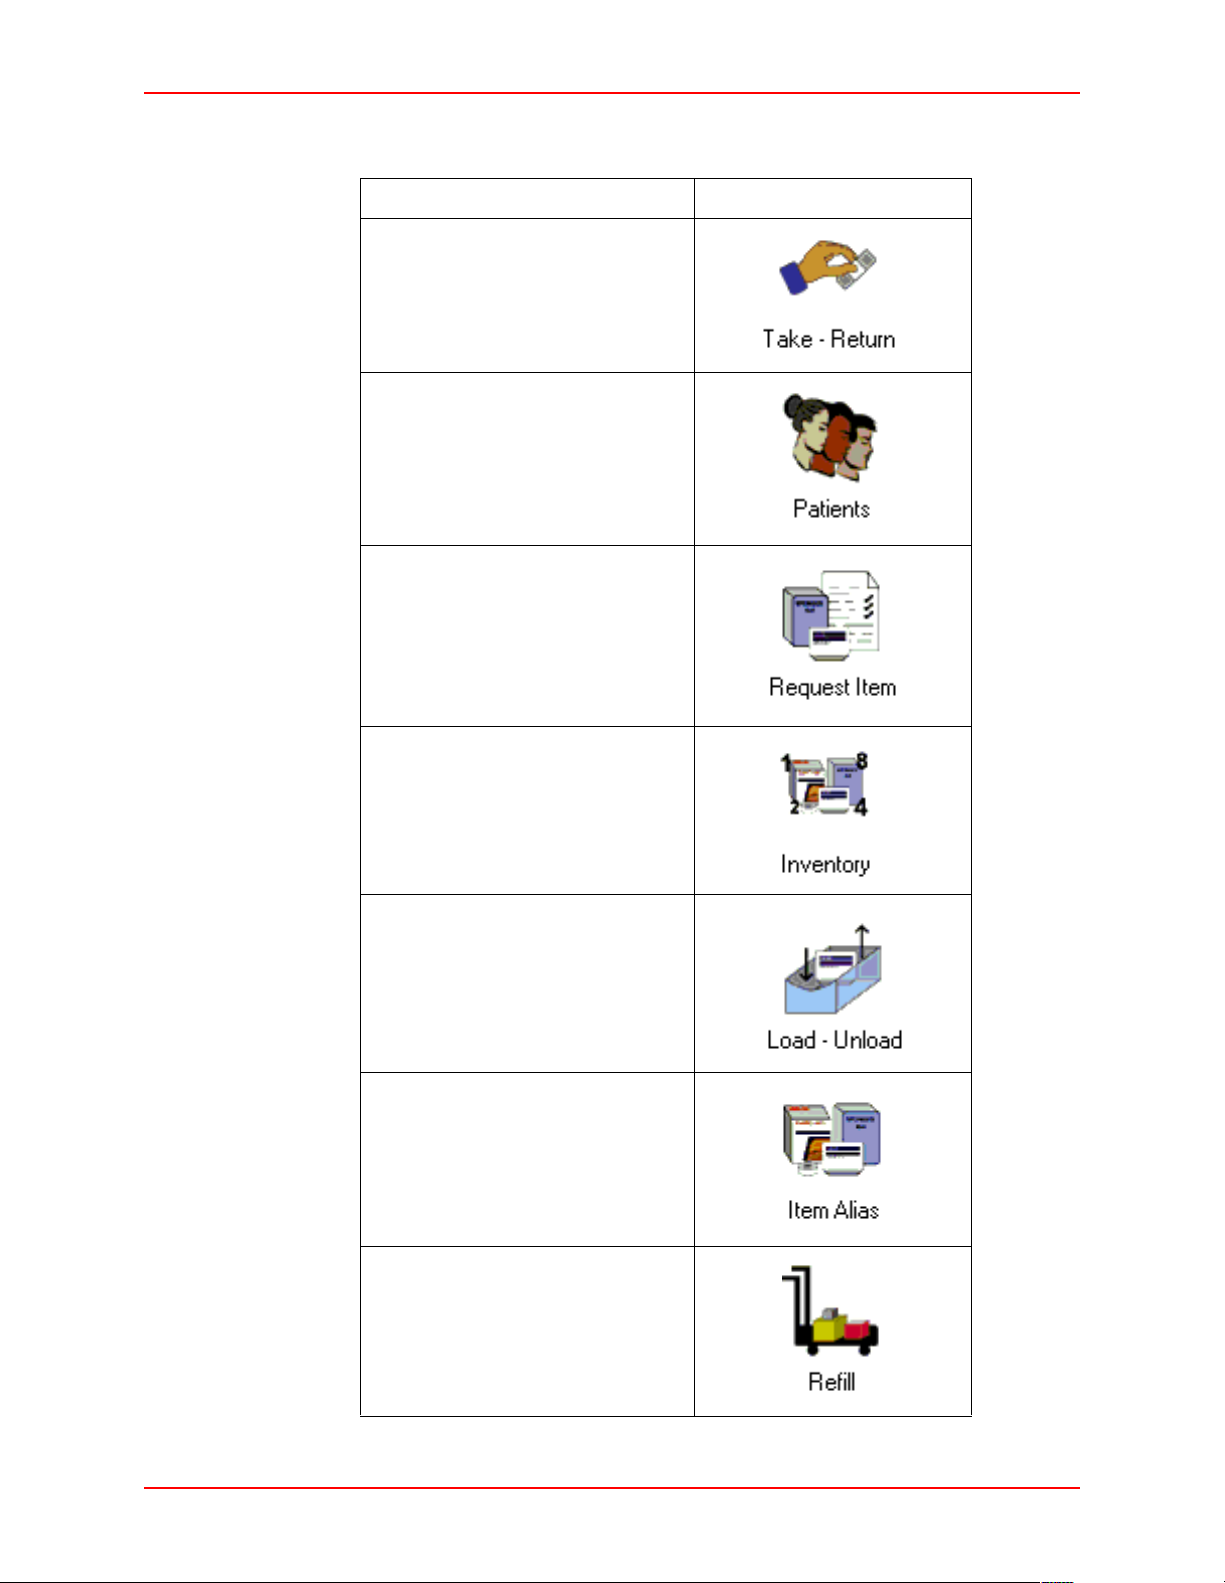
Description Graphic
Use the Take-Return feature to take or
return items for patient care.
Use the Patients feature to add, edit, and
delete patients, and reconcile ADT. Only
temporary patients can be created at the
Station.
Use the Request Item feature to inform the
SUPPLYCENTER
needed at the Station. The message sent to
the
SUPPLYCENTER
Item name, Item ID, User name, User ID
and a text message. Upon sending the
message, the materials management is
alerted.
Console that a supply is
Console contains the
Main Menu
Use the Inventory feature to maintain
current counts of items at the Station.
Use the Load feature to assign an item to a
location in the Station.
Use the Unload feature to remove an item
from a location in the Station.
Use the Item Alias feature to create an
alternate name for an item. The alias can
be added, edited, or deleted. The item
alias appears on the item list.
Use the Refill feature to replenish items at
the Station. You can refill items at Below
Par, At Refill, At Critical Low, or do a
Spot Refill.
JITRBUD Main User Guide 2-9
Page 26
Main Menu
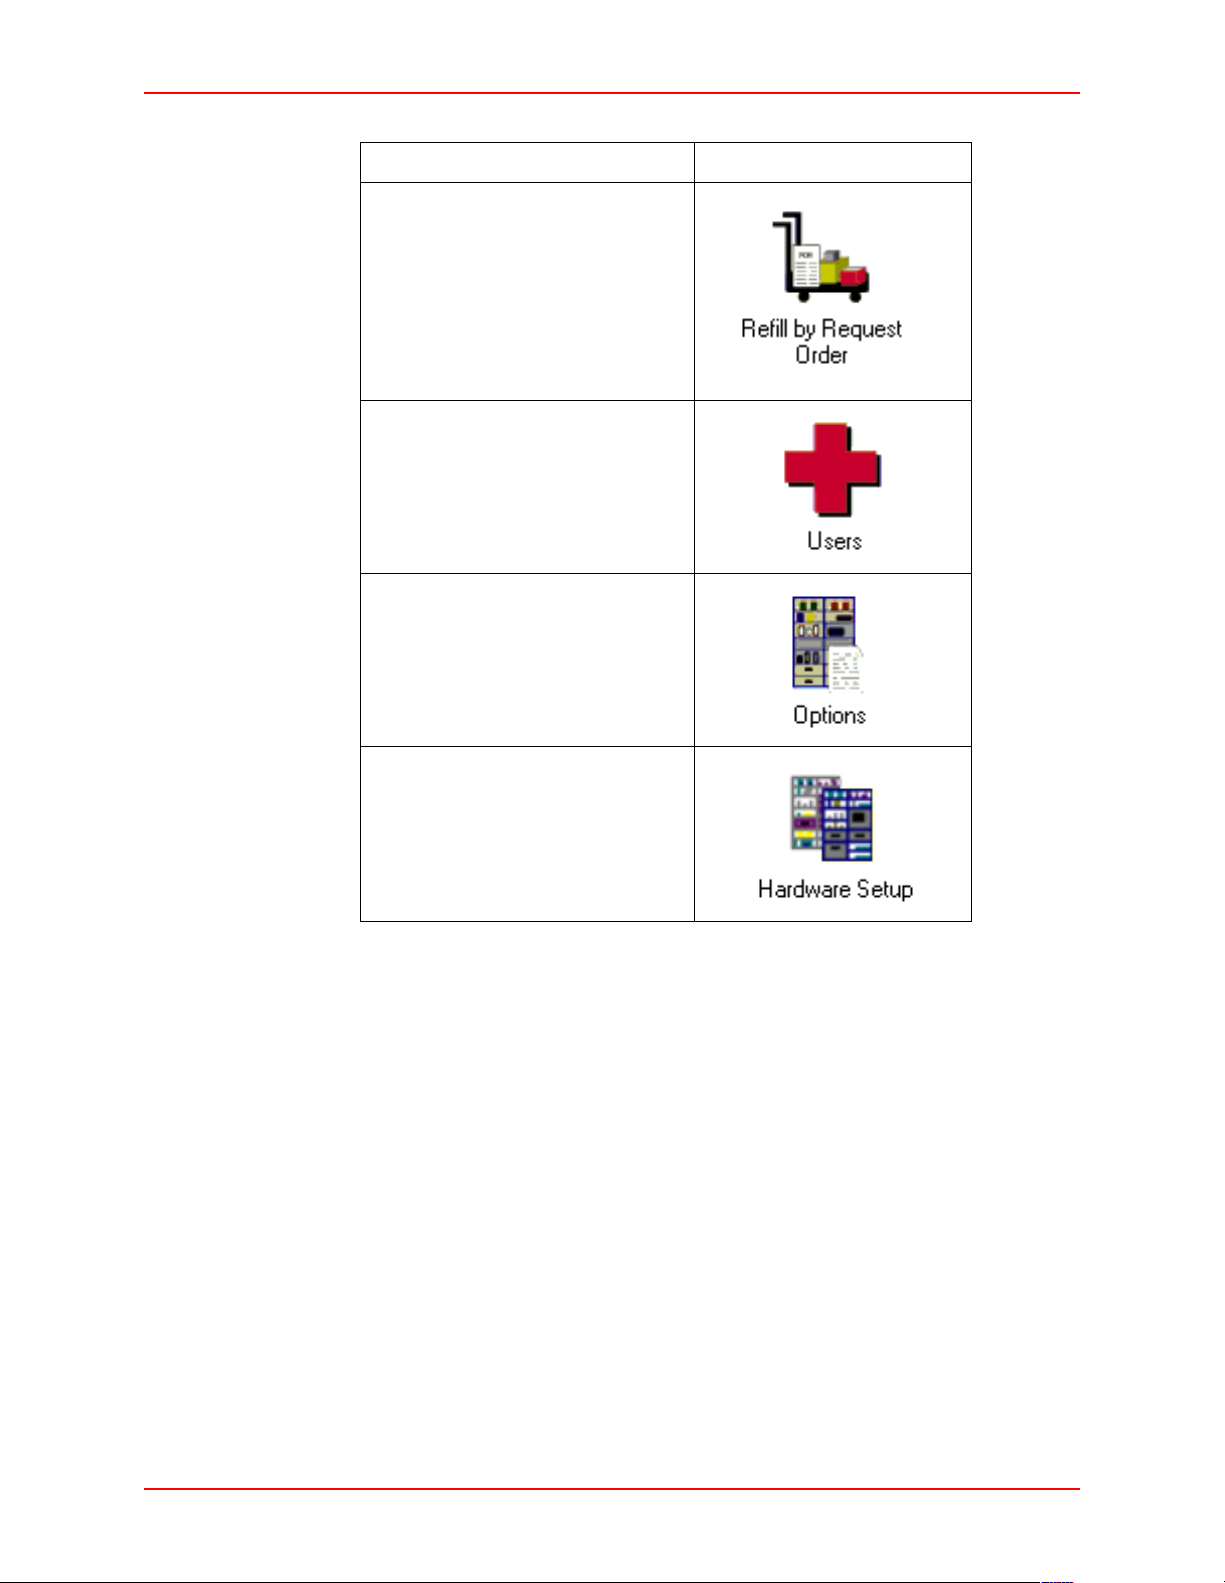
Description Graphic
Use the Refill by Request Order feature to
replenish the Station in one simple step.
Replenishment information is received
electronically from the
Console or outside vendors and transmits
data directly to the Station with an
associated PO number.
Use the Users feature to create a user or a
user template. You can also edit user
settings, delete a user, or extend an ID
Expiration.
Use the Options feature to customize the
Station for specific needs and purposes.
Included are General Station Information,
Options, Time Options, Printing Options,
and Station Communication Settings.
SUPPLYCENTER
Use the Hardware Setup feature to add,
edit, or delete a cabinet or device. For
additional assistance or information call
the Pyxis Worldwide Service Center at:
1-800-727-6102.
2-10 JITRBUD Main User Guide
Page 27
Using Additional Tools
Using Additional Tools
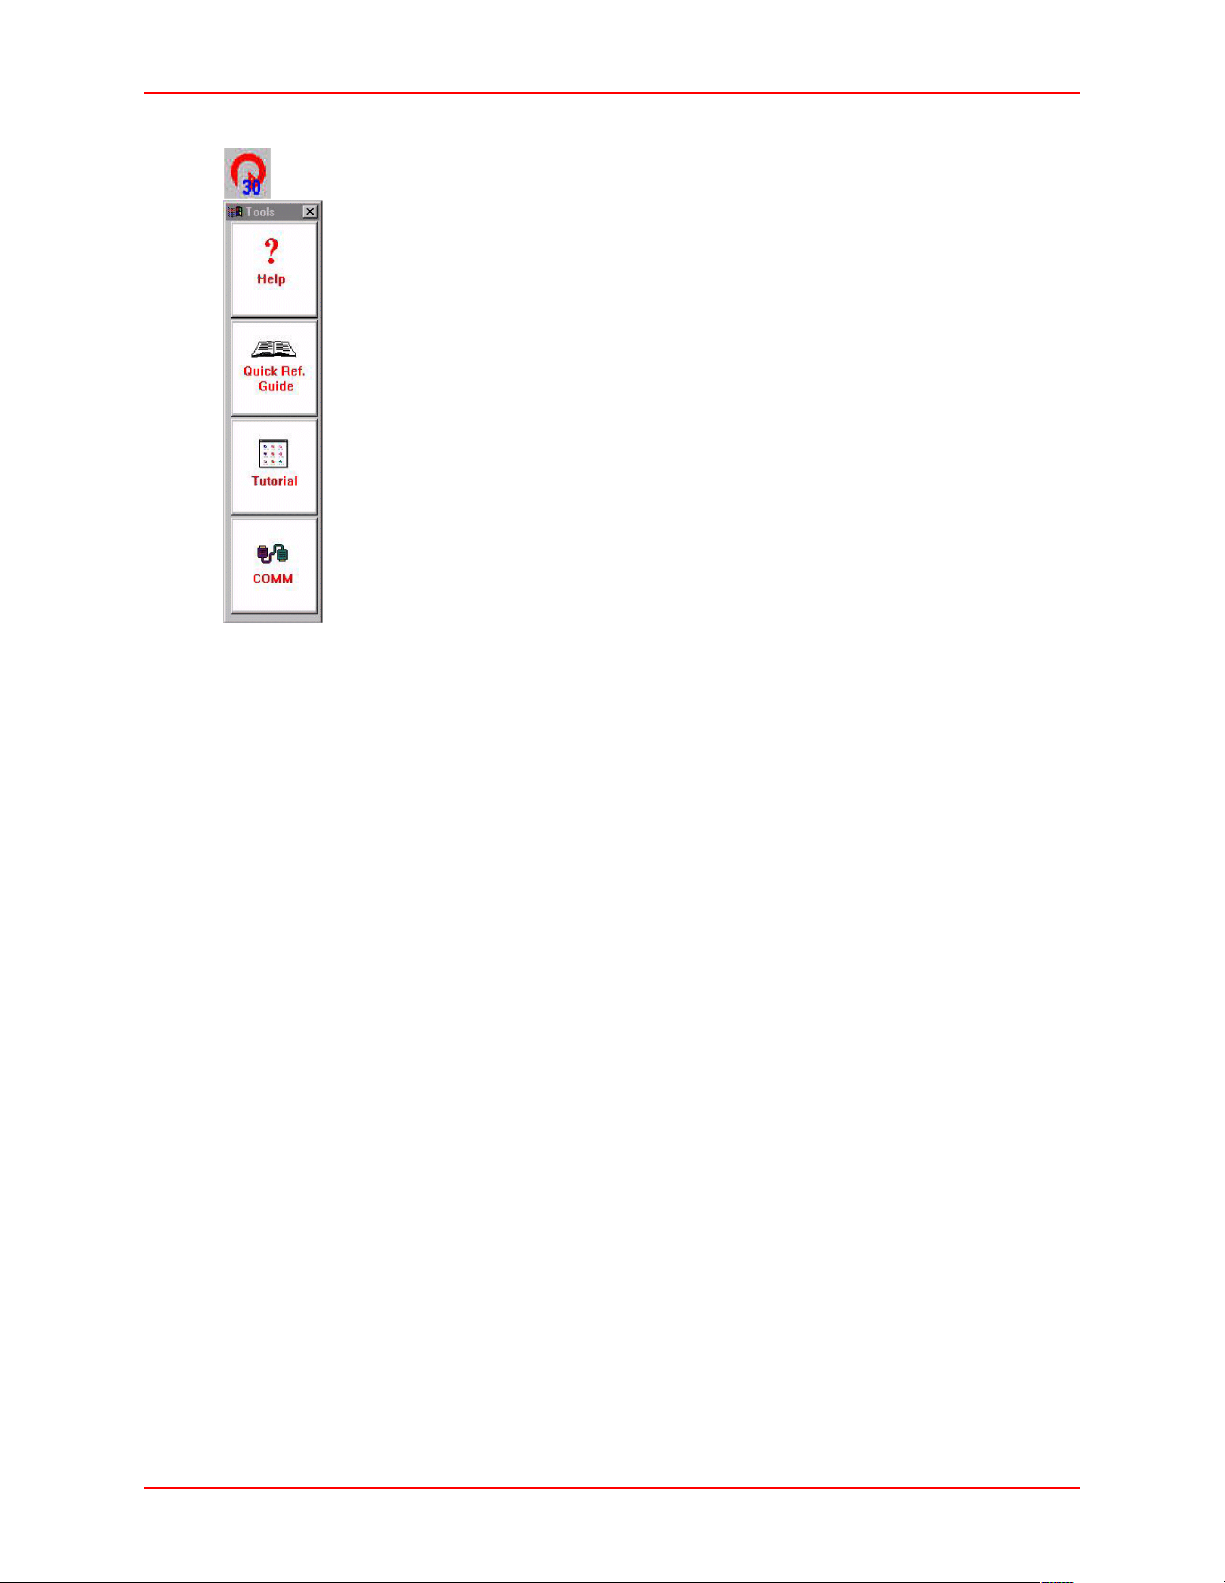
Select the Pyxis icon to display the toolbar.You can access the tools when you are
logged in or out of the Station.
1. Press the Pyxis icon in the upper left corner of the screen.
The Tools drop-down menu appears.
2. Press the icon to select one of the following Station tools:
• Help - provides a Help Menu to display the online Help file
• Quick Reference Guide - provides a Quick Reference Guide for the
Station functions.
• Tutorial - provides a tutorial that includes the basic steps of the major
tasks you will perform at the Station. You can not run the tutorial while
you are logged on to the Station.
• COMM - displays the status of communication between the Station and
the Console.
3. Press the close X button in the upper right corner of the Tools menu to exit.
JITRBUD Main User Guide 2-11
Page 28
Station Communication
Station Communication
Communication Status at the Station shows diagnostic information about the
communication link between the Station and the S
Comm Status window can be accessed from the toolbar menu after logging in or
from the Login screen.
There are 5 different types of communication methods:
• XT - Network
• FA - Direct Serial (9600 baud)
• RS - RS 485 (2400 baud, also NS 9600 baud)
• MO - Modem
• DA - Direct Access
Verifying Communication
To verify communication
UPPLYCENTER Console. The
1. Press the tools menu icon.
The tools menu appears.
2. Press the
The Device Status screen appears.
Communication icon.
2-12 JITRBUD Main User Guide
Page 29
Statio n C o m m u ni c a t i o n
Device Status
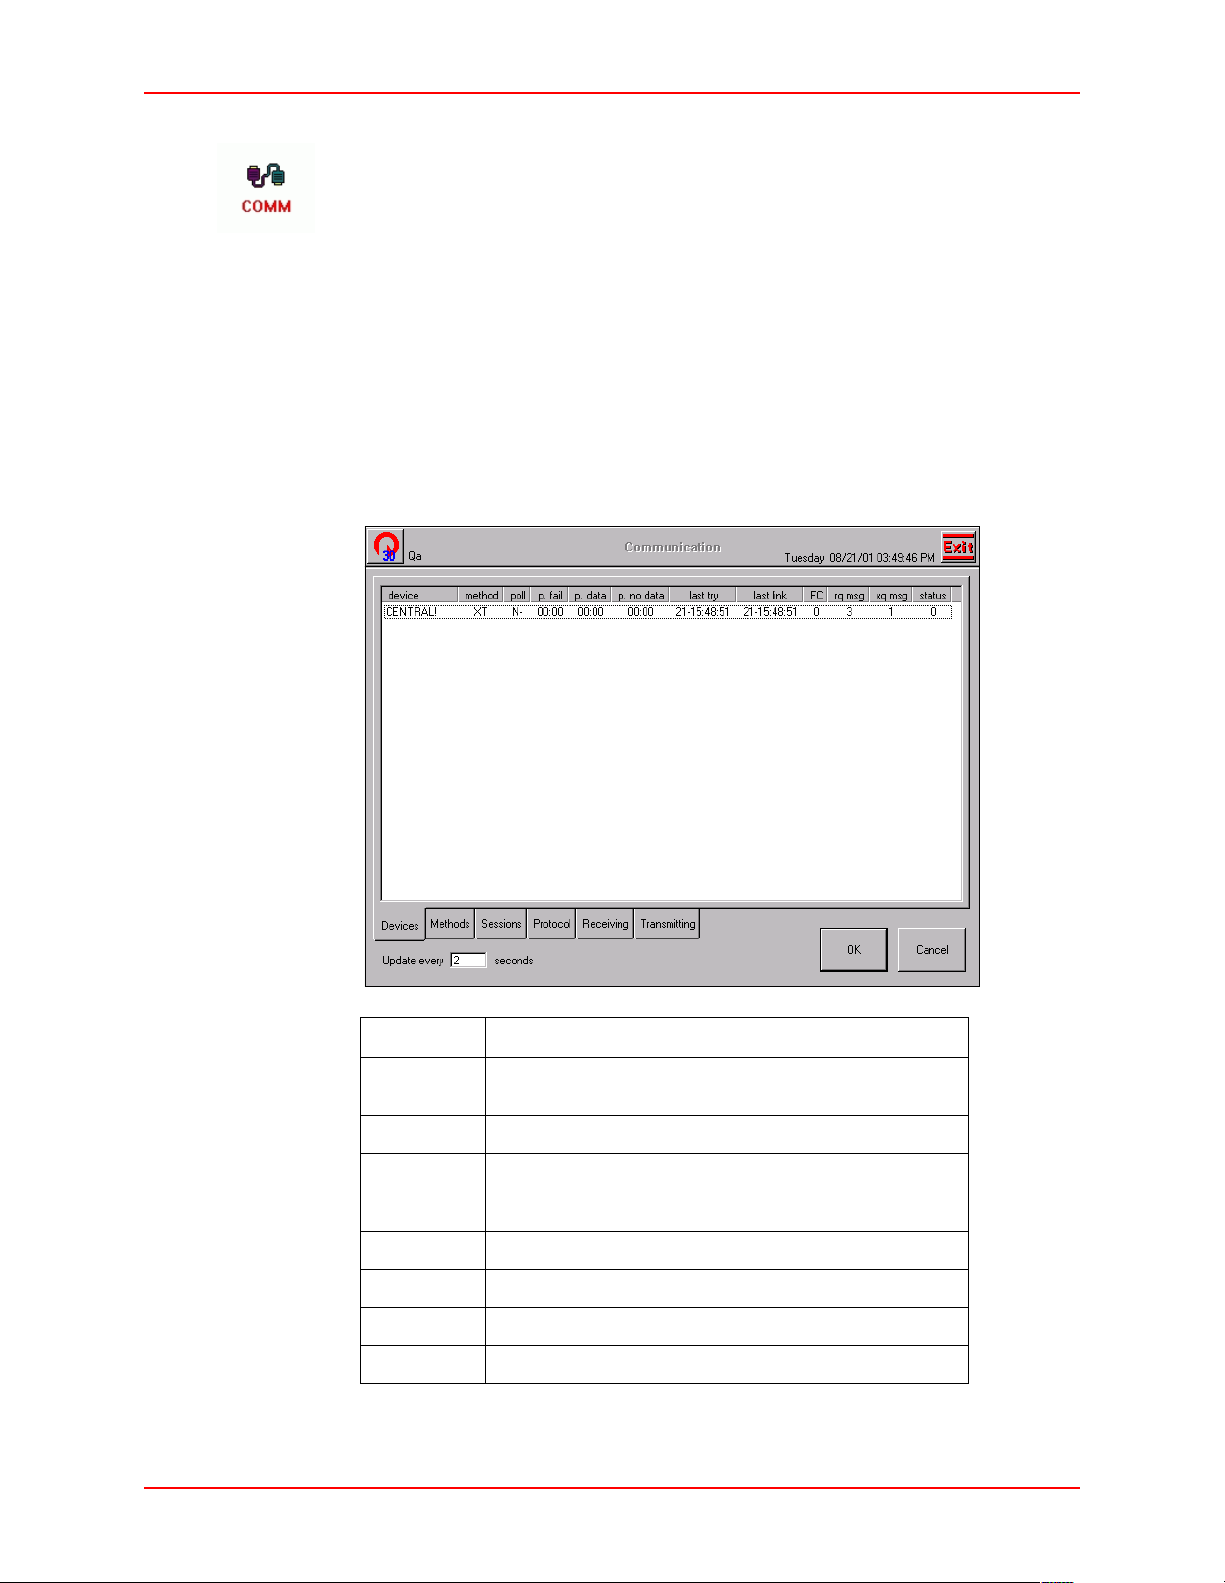
Device Status is the most commonly used comm status screen, showing the status
of the communication links between the Console and the various devices--i.e.,
Stations, ProCars, etc. Devices list in rows, with columns for the name, the polling
status and polling period, the time when last polled, how late the next poll is, the
time when the Console and device last communicated successfully, the poll fail
count, the number of messages in the memory message queue, the number of
messages in the overflow message queue on disk, and the finish status.
The only devices you will see on the Station’s communication status is the
Console. The Device Status screen is used to check the communications between
the Station and the Console. This is the first and most important screen to review
if a communication failure is suspected. For information about the Device Status
screen, refer to the following table.
Message Description
Device any piece of equipment that communicates directly with the
Console, such as the Station or ProCar computer
Method method type used
Poll indicates if the device is set up to be polled: Y for Yes, N for
No. (The Station should be
Usually, the Console polls the Station.)
p.fail the Console polls the Station, so value will always be 00:00
p.data the Console polls the Station, so value will always be 00:00
p. no data the Console polls the Station, so value will always be 00:00
last try data and time the device was last polled by the Console
JITRBUD Main User Guide 2-13
N
unless the Station is polling.
Page 30

Station Communication
Message Description
last link date and time the device was last successfully linked with the
FC (Failure Count) the number of times the Console and Station
rq msg messages received at the Station from other units
xq msg (Disk Message) number of messages that the Station has
status finish status code. The code shows what the last status was
Console
have failed to link
temporarily stored in the database for transmission to the
Console. This number is normally zero, but it may increment
if overall traffic is heavy and memory becomes depleted or if
the Stations are off-line. When memory becomes available,
the xq msg should quickly drop to zero as the messages are
again queued in memory.
between Station and Console.
2-14 JITRBUD Main User Guide
Page 31
Statio n C o m m u ni c a t i o n
Methods Status
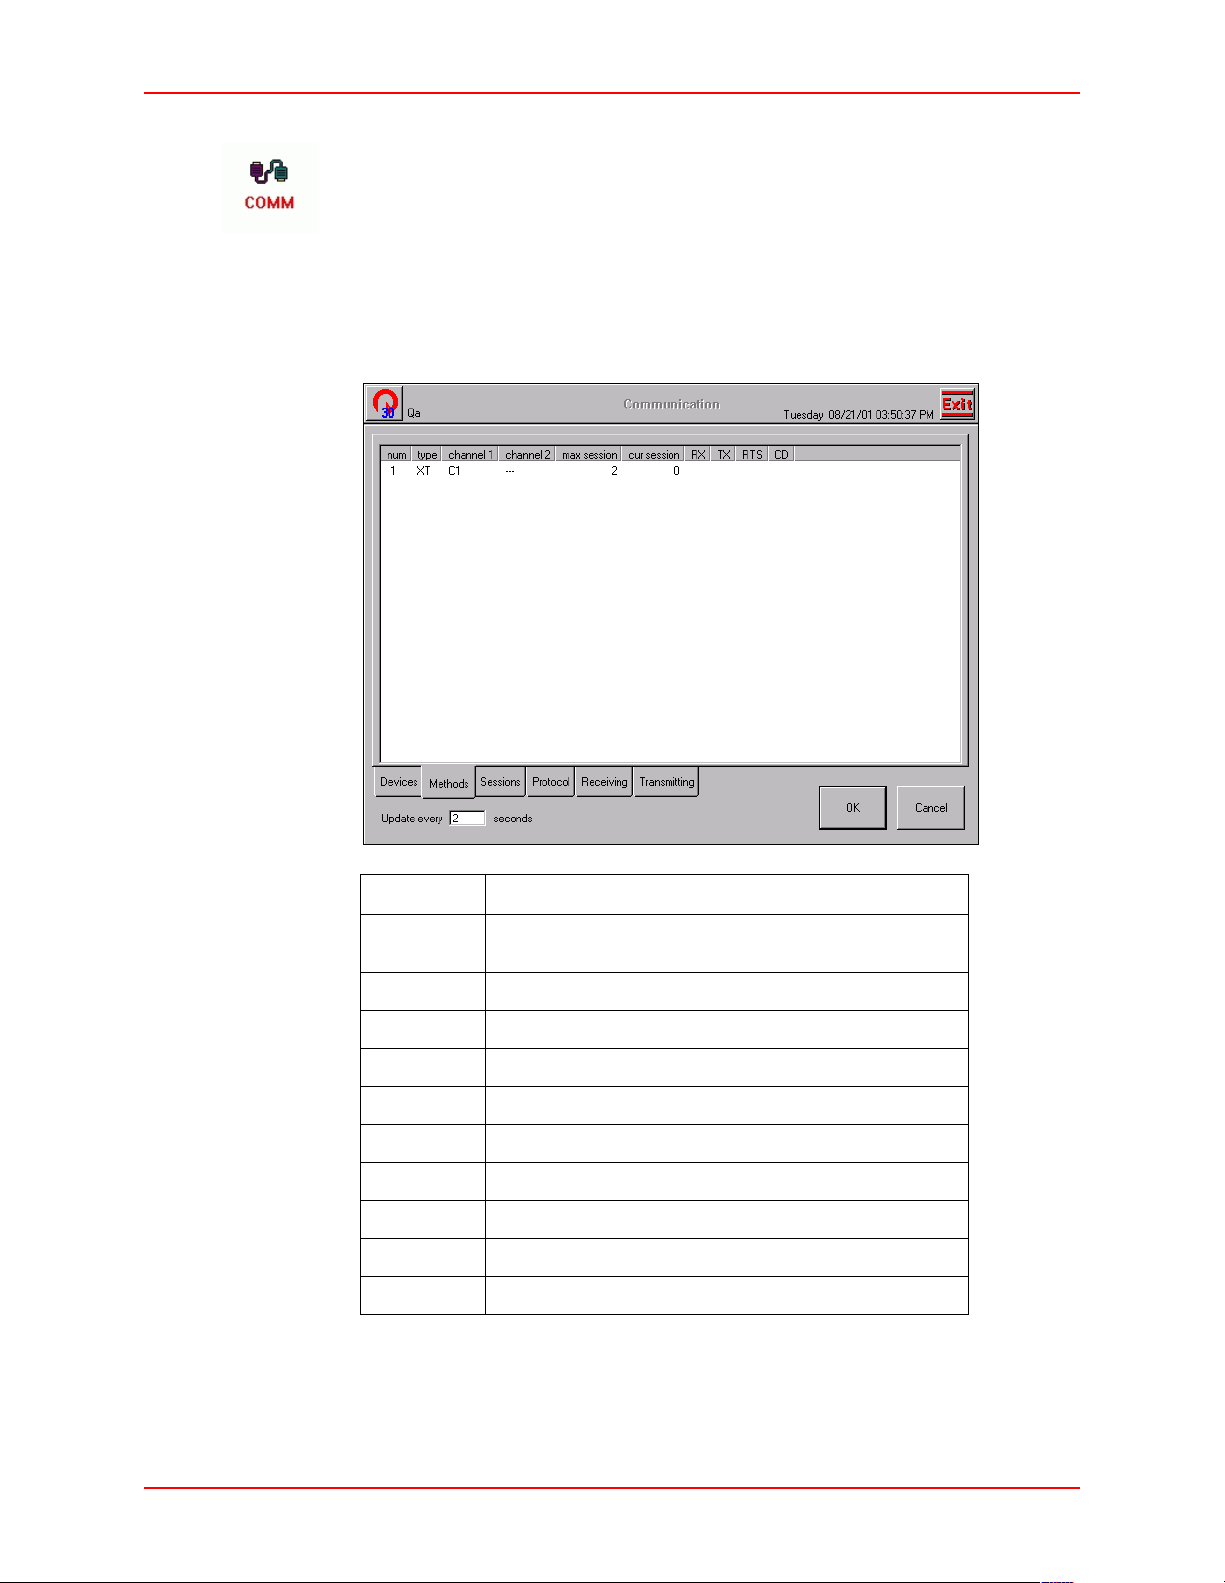
Methods Status shows how each method has been set up and which session is
active in the event the method supports multiple sessions. Each method has a row.
The columns show the method number, method, primary channel (comm port),
secondary channel (for serial port expander), maximum sessions allowed, and the
number of the current active session. In all the Comm Status screens, pressing a
tab (e.g., Methods) refreshes the screen. For information about the Methods Status
screen, refer to the following table.
Message Description
num method number - number referenced from the Protocol and
type method type
channel 1 primary communication channel
channel 2 secondary communication channel
max session maximum number of sessions allowed
cur session current number of active sessions
RX Not Used - no blinking on screen
TX Not Used - no blinking on screen
RTS Not Used - no blinking on screen
CD Not Used - no blinking on screen
Session Status screens.
JITRBUD Main User Guide 2-15
Page 32
Station Communication
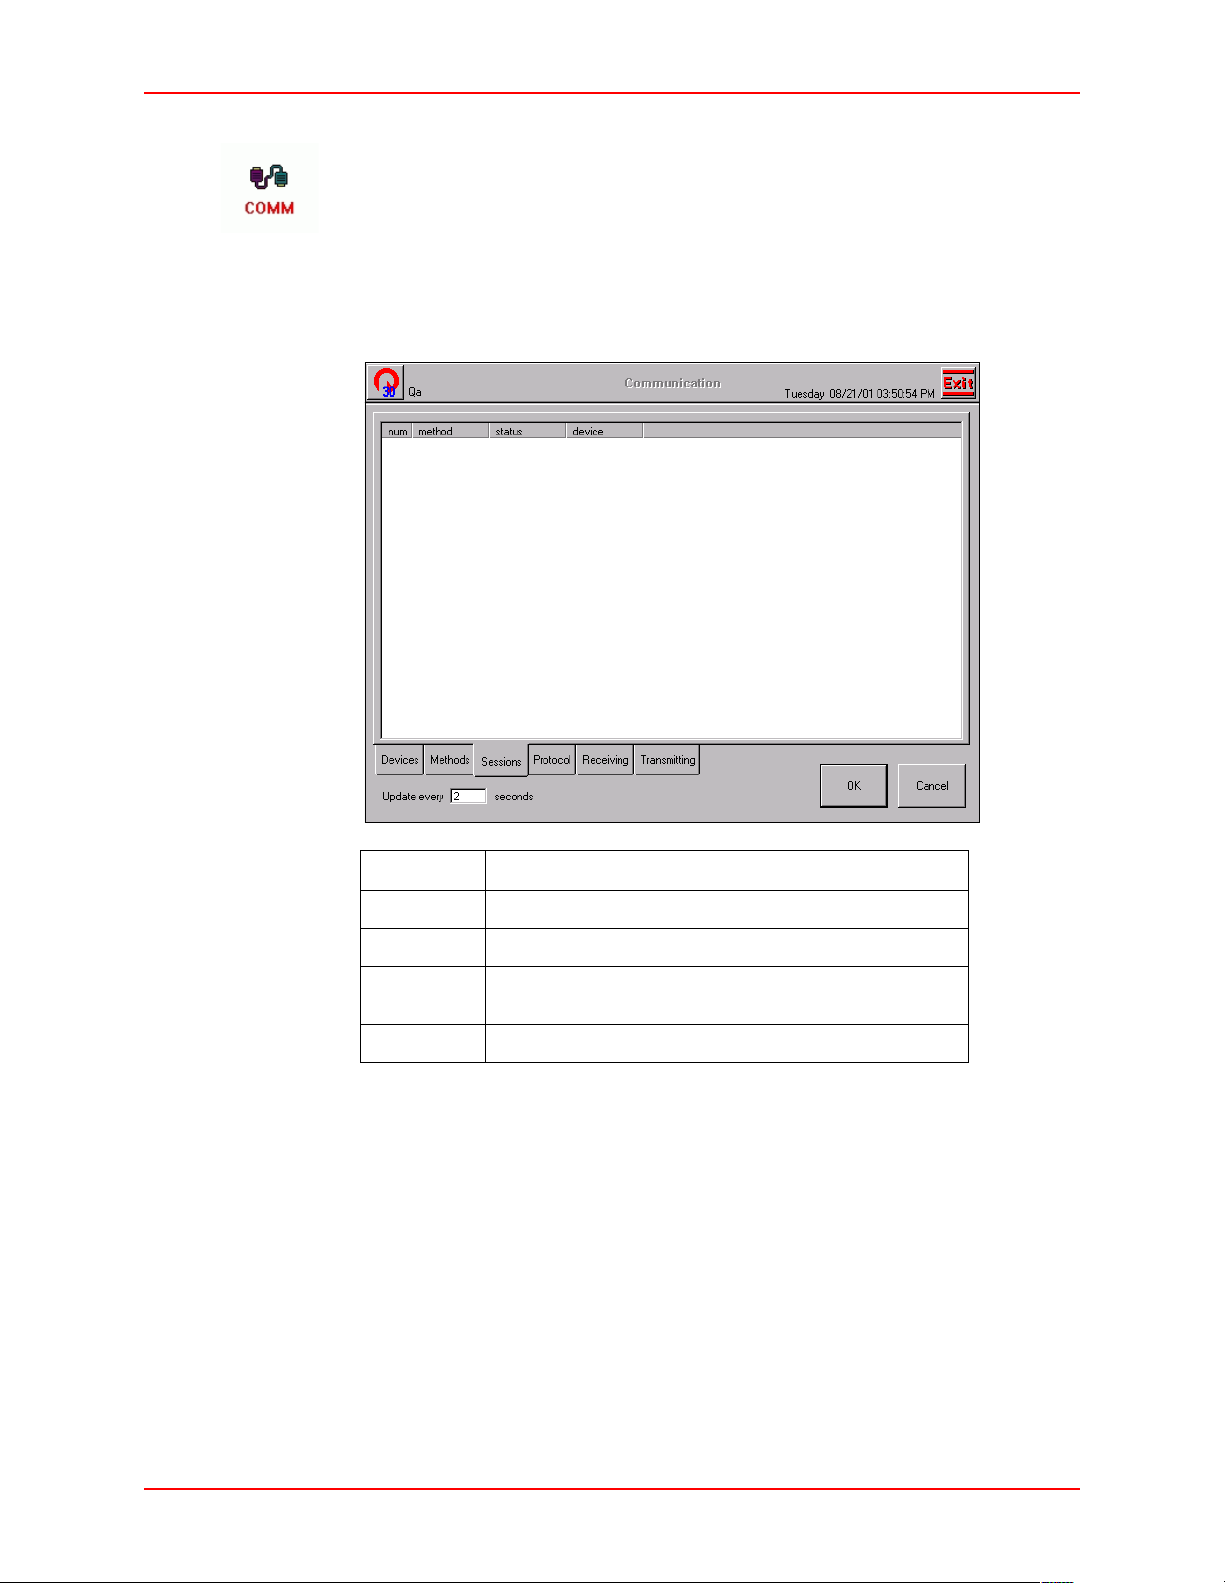
Sessions Status
Session Status shows the stage in the session for each device currently in a comm
session with the Console. A session is the whole comm process from start to
finish. There is a row for each session for each method. The columns for each
session include the method number and method, stage in the session, and name of
the device with which the Console is communicating in that session. For
information about the Session Status screen, refer to the following table.
Message Description
num session number
method number and type of method being used
status current stage in the session for this device (idle, poll, protocol,
device name of the linked device
transmission, end)
2-16 JITRBUD Main User Guide
Page 33
Statio n C o m m u ni c a t i o n
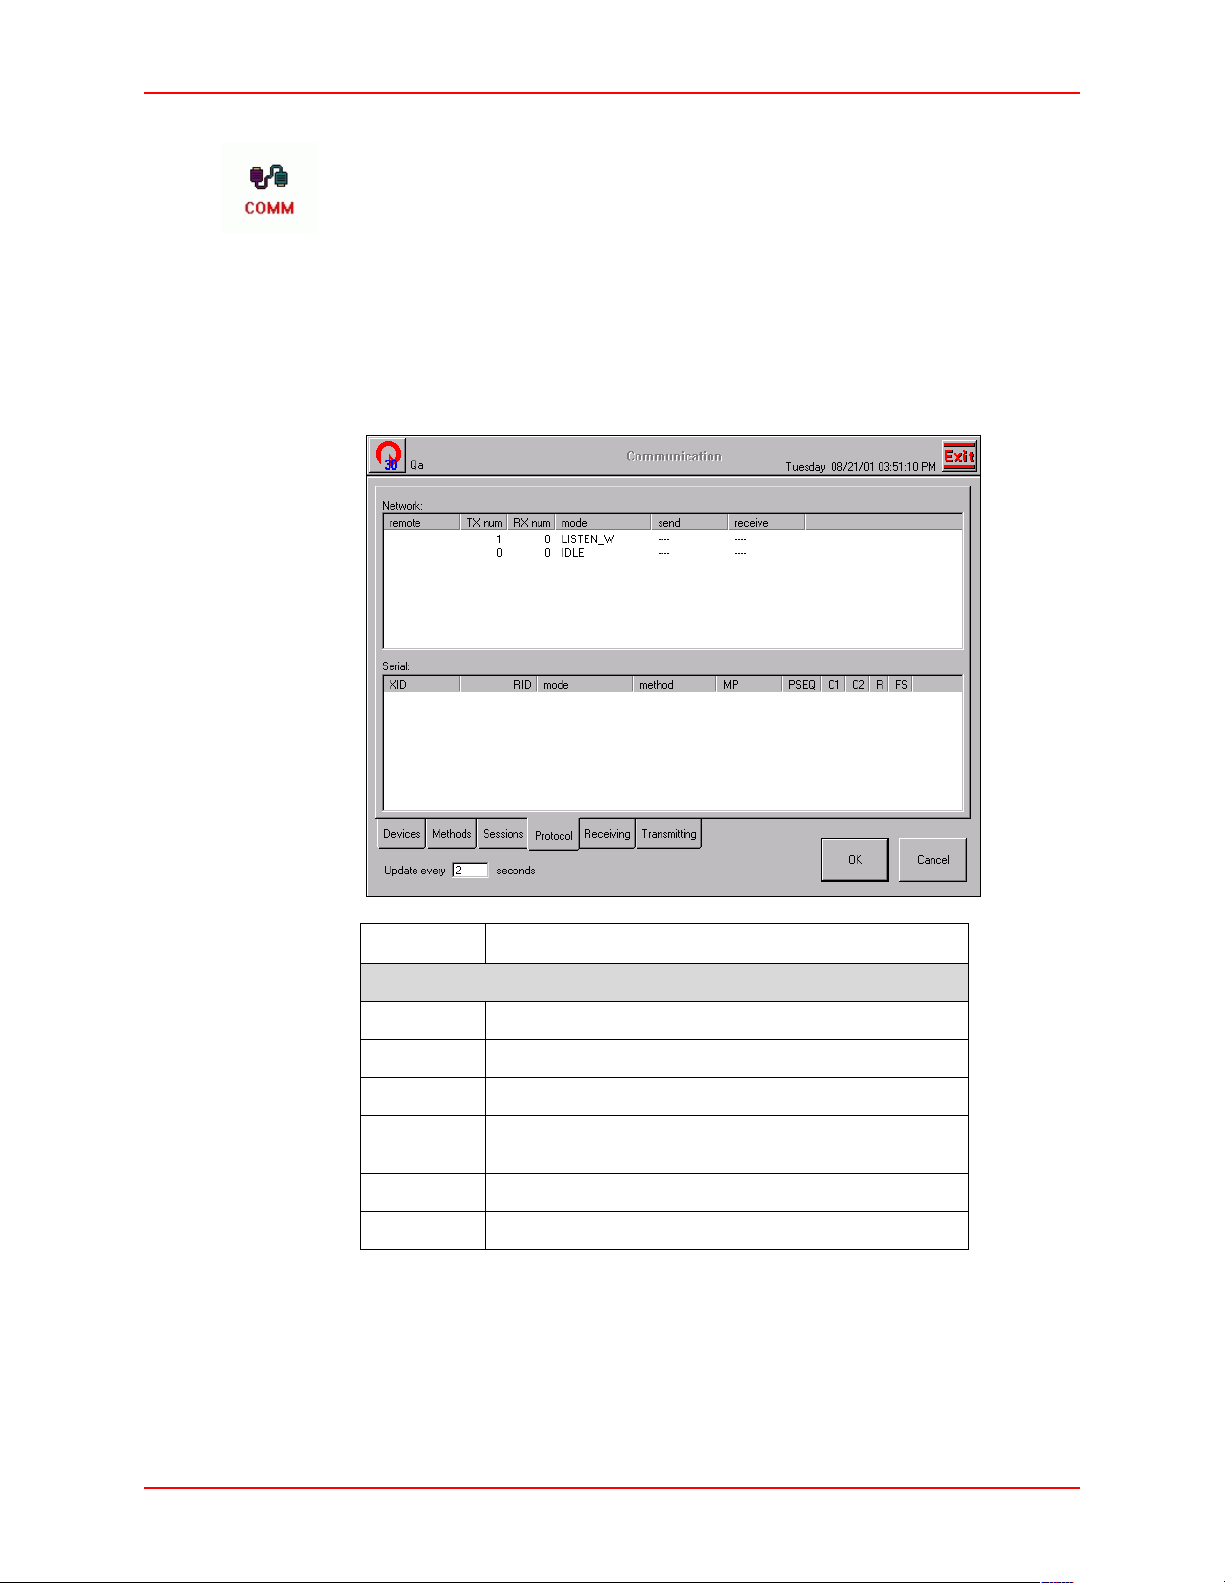
Protocol Status
Protocol Status shows the stage in the protocol for each device currently in
protocol with the Console. There is a row for each protocol session (the number of
sessions per method depends on the method). The columns for each session
include the name of the device polled, the name of the device that is polling, the
mode or stage in the protocol, method number in the methods.cfg, the 1st few
characters of the message, the packet sequence (i.e., the number of messages
sent), the retry counter value (fails at 7), a try again status flag of T or F, and finish
status. Network protocol has its own, unique status data layout. For information
about the Protocol Status screen, refer to the following tables.
Message Description
Network
remote type of device
TX num messages transmitting
RX num messages receiving
mode
(Network)
send messages sent
receive messages received
JITRBUD Main User Guide 2-17
current step in the protocol
Page 34

Station Communication
Message Description
Serial
XID The name of the device polled.
RID The name of the poller, usually the Console.
mode The current step in the protocol.
method The method used which corresponds to the method number in
MP The first few characters of the message being sent.
PSEQ Packet sequence, the number of messages transmitted during
C1 The first retry counter which increment when a message
C2 The second retry counter which increment when a message
R Indicates the direction of transmission: ‘T” indicates
FS Finish status. The result of the last poll.
the method status screen.
the session.
packet is received with an apparent error. The packet is
retransmitted until it is error-free or fails seven times, after
which the transmission is aborted.
packet is received with an apparent error. The packet is
retransmitted until it is error-free or fails seven times, after
which the transmission is aborted.
communications to the polled device not yet reversed). “F”
indicates communications from the device.
2-18 JITRBUD Main User Guide
Page 35
Statio n C o m m u ni c a t i o n
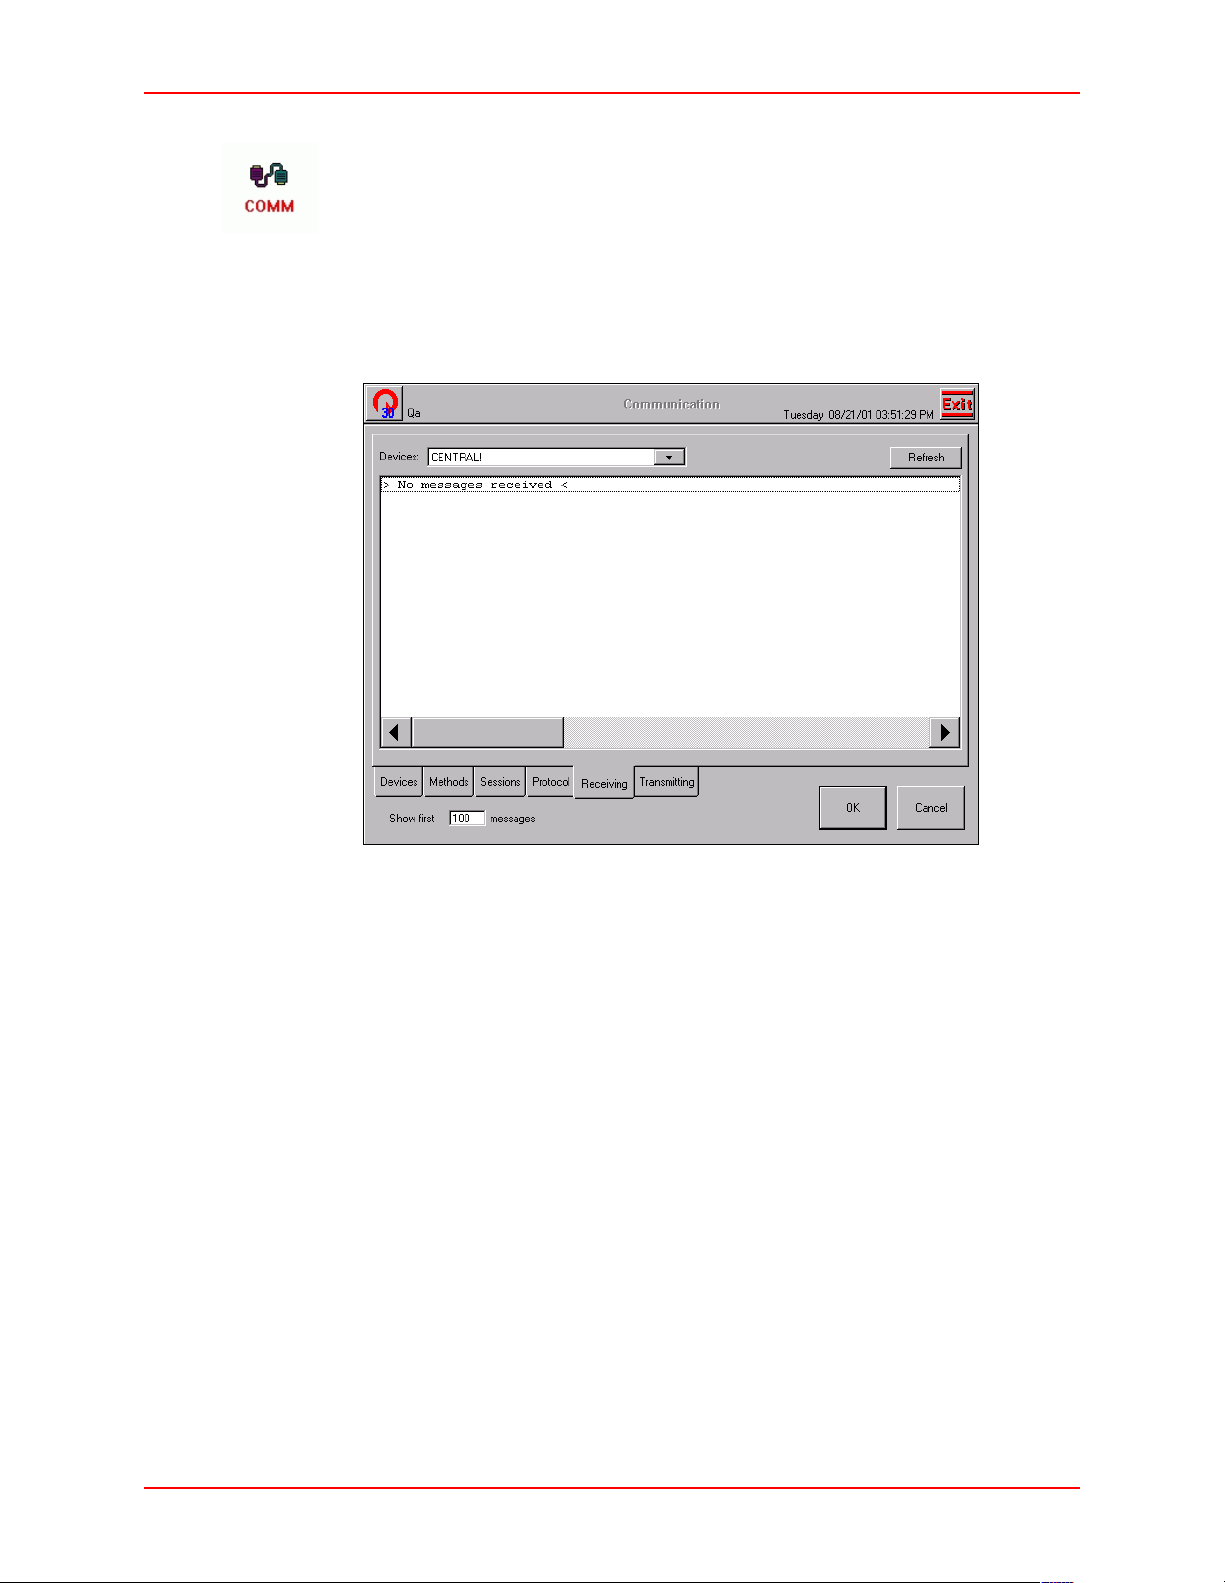
Receiving Status
The Receiving Status screen displays the messages received from a Console, other
Stations, or a Procar. The receiving status screen contains the following:
• Devices choice list - Displays the devices communicating
• Refresh button - Refreshes the display
• Show first ___ messages box - Displays the designated number of messages
received.
JITRBUD Main User Guide 2-19
Page 36
Station Communication
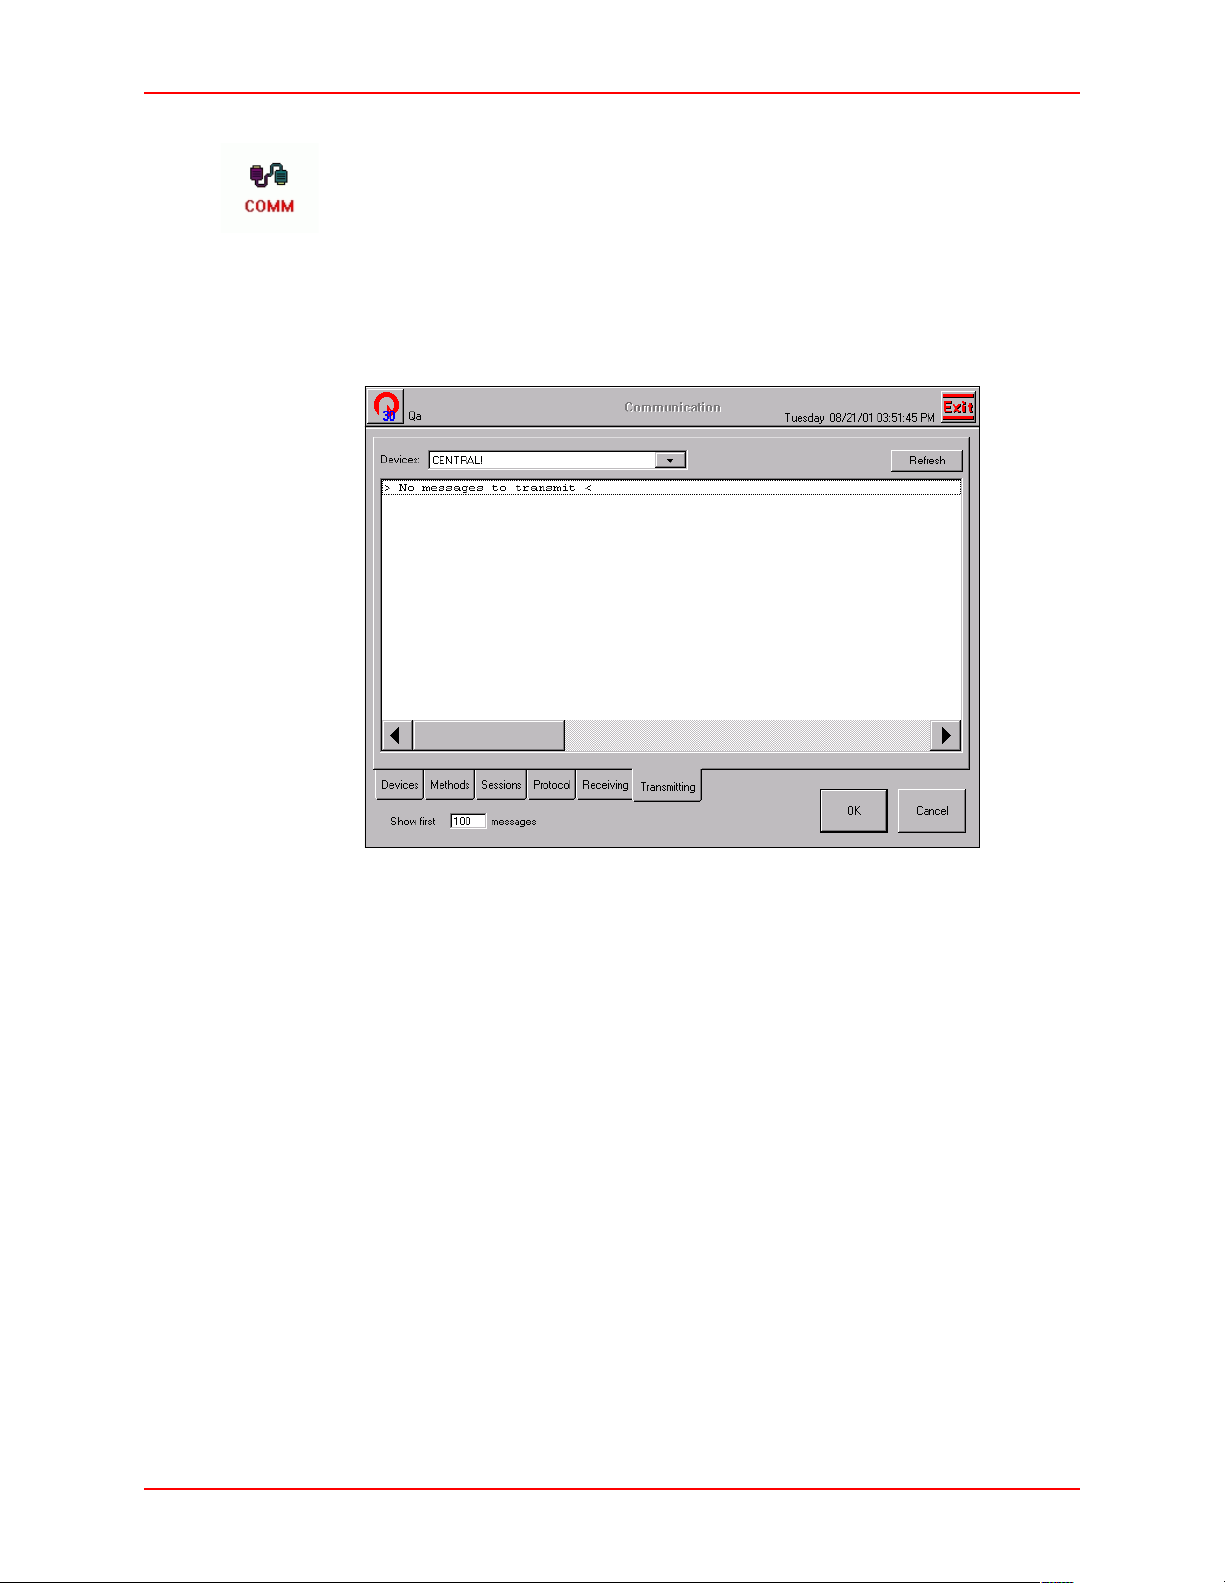
Transmitting Status
The Transmitting Status screen displays outgoing messages to a Console, other
Stations, or a PROcar. The transmitting status screen contains the following:
• Devices choice list—displays the devices communicating
• Refresh button—refreshes the display
• Show first ___ messages box—displays the designated number of messages
transmitted.
2-20 JITRBUD Main User Guide
Page 37

Chapter
3
Patient Care Functions
This chapter provides the following Patient Care features accessed from the
Patient Care section of the Main Menu:
• Take/Return—take or return items for patient care.
• Patients—add, edit, and delete patients and reconcile ADT. Only temporary
patients are created at the Station.
• Request Items—inform the SUPPLYCENTER Console that a supply is needed
at the Station.
The appropriate use of the Patient Care features is determined by your hospital’s
policies and procedures. Your user Rights determine the icons that appear on the
Main Menu.
JITRBUD Main User Guide 3-1
Page 38
Take-Return
Note
Take-Return
Use the Take-Return feature to remove supplies from the system. The TakeReturn process records transactional data and sends information to the
UPPLYCENTER Console.
S
Use the Emergency Access feature to quickly take items from the
Station without selecting a patient. The Emergency Access feature is
available only when the Emergency Access option is selected in
Station Options.
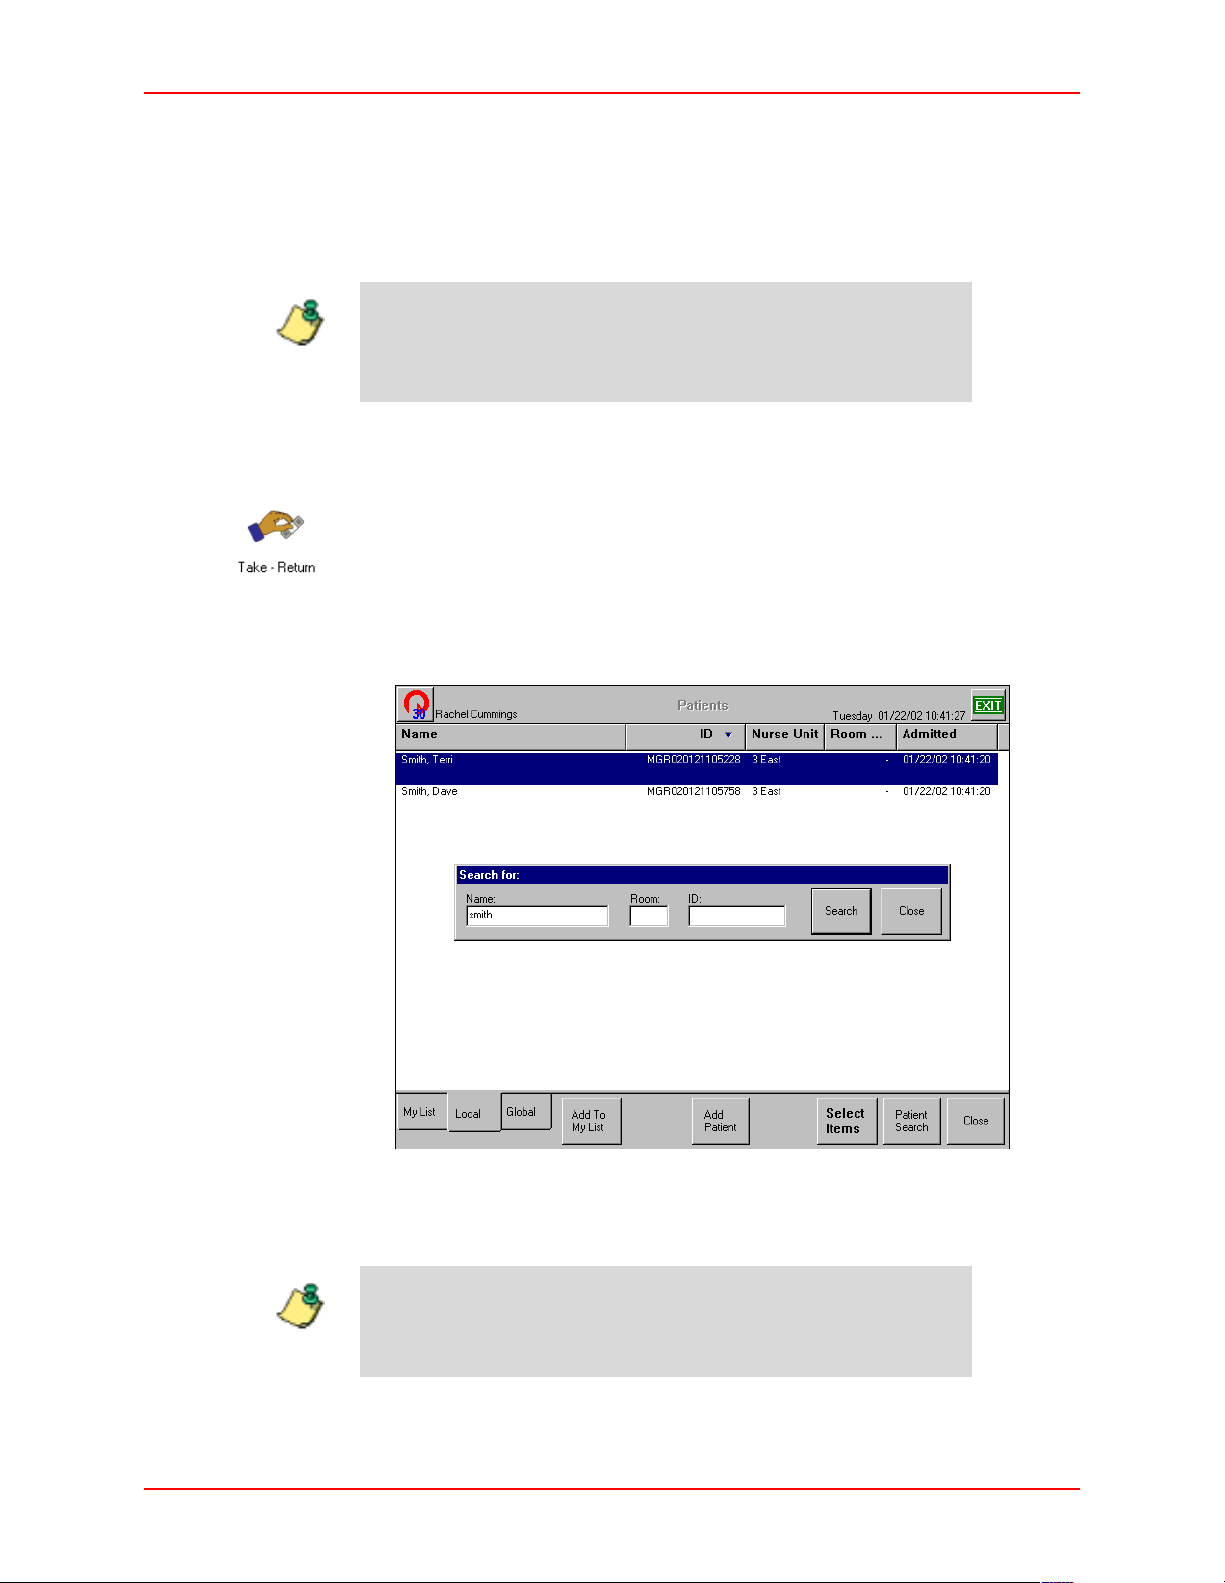
Searching for Patients
To search for a patient
1. From the Main Menu, press the
The Patient’s window appears.
2. Press the
Patient Search button.
The Search For window appears.
Take-Return icon.
3. Type the first letters of the name or ID you are searching for. If necessary,
press the
Search button or the ENTER key.
The name appears in the Patients window.
If you type the entire name, the name appears in the window. If
you type in the first few letters of the name, a list of names
Note
3-2 JITRBUD Main User Guide
appears to select the appropriate patient.
Page 39
Take-Return
4. To display the entire list again, delete the text in the Search For window and
Search.
press
The complete list appears.
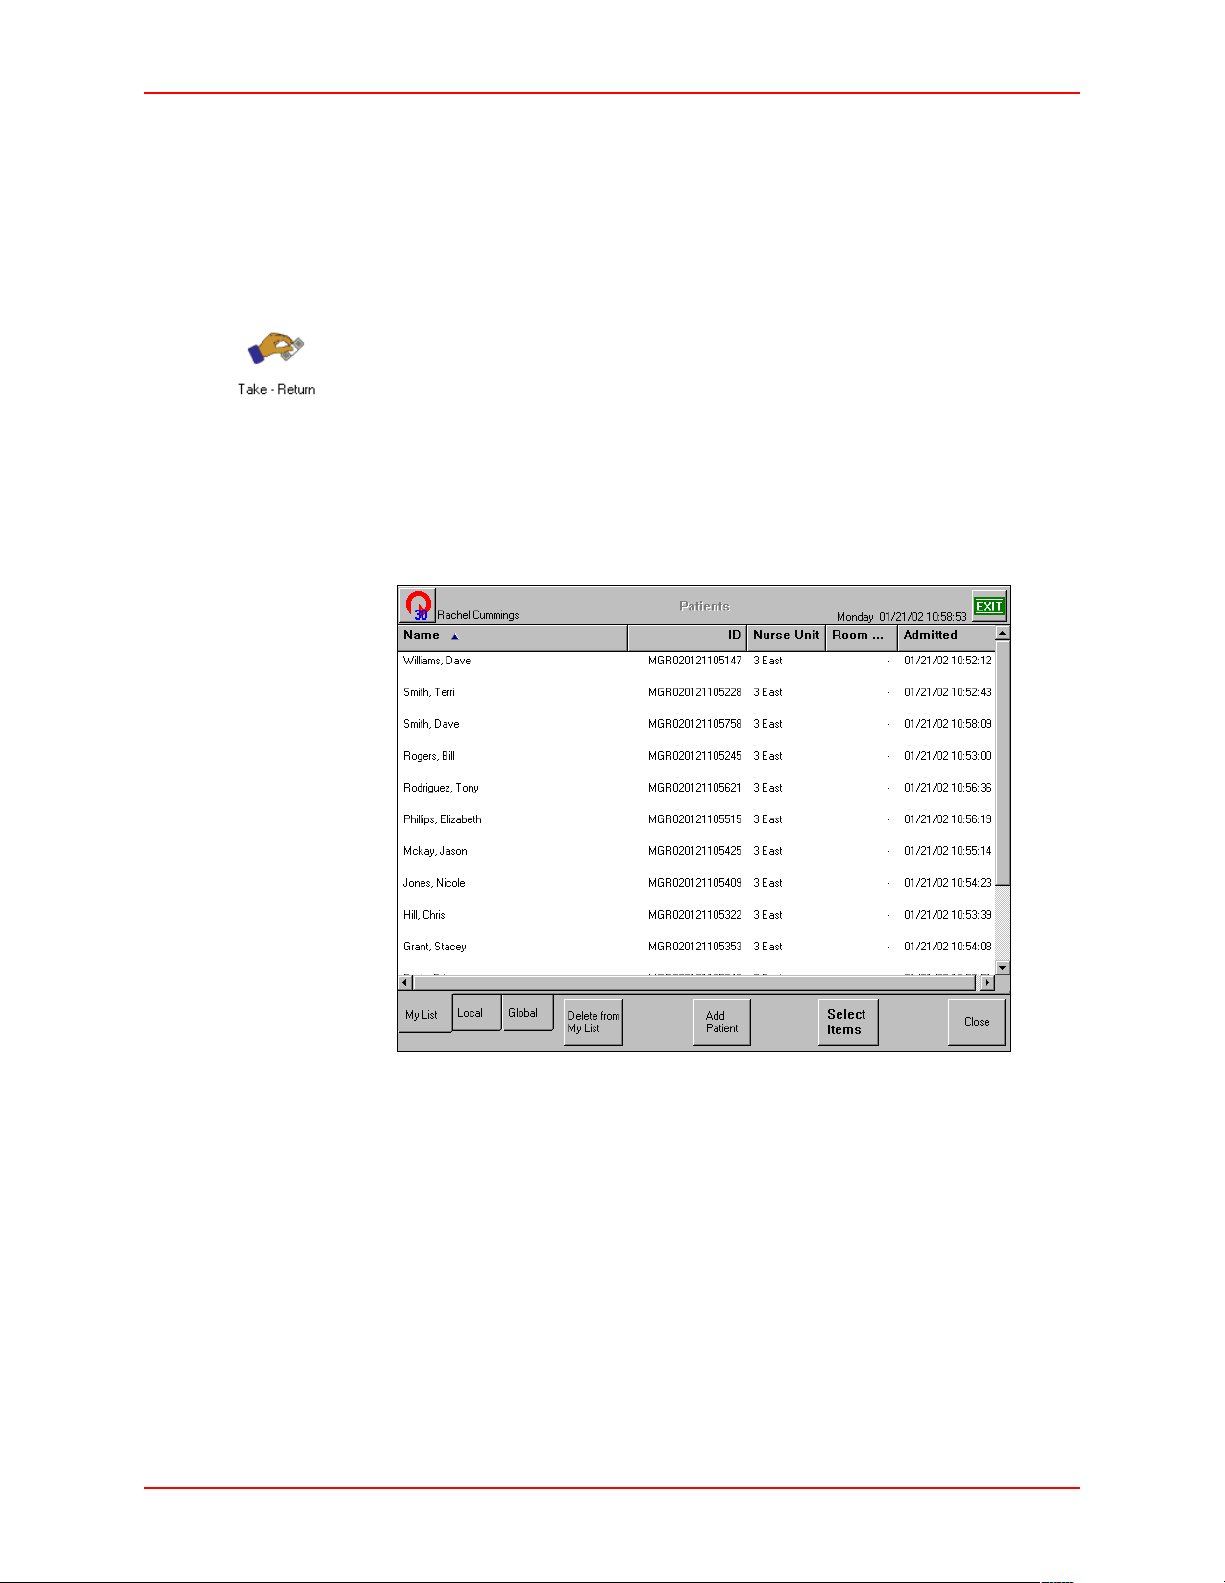
Sorting Lists
To sort a list
1. From the Main Menu, press the
Take-Return icon.
The Patient’s window appears. The patients appear as you have specified on
the preference tab in the My Settings window.
2. To sort the Patient’s Name, ID, Nurse Unit, or Room and Bed, press the
information bar at the top of the column.
An arrow appears as the system sorts each column in order, as shown in the
following illustration.
JITRBUD Main User Guide 3-3
Page 40
Take-Return
Note
Taking Items
The Station Options menu includes the Multiple Patient Selection and No Patient
Mode options. The selected options determine the Take-Return process at the
Station.
Use the Emergency Access feature to quickly take items from the
Station without selecting a patient. The Emergency Access feature is
available only when the Emergency Access option is selected in
Station Options.
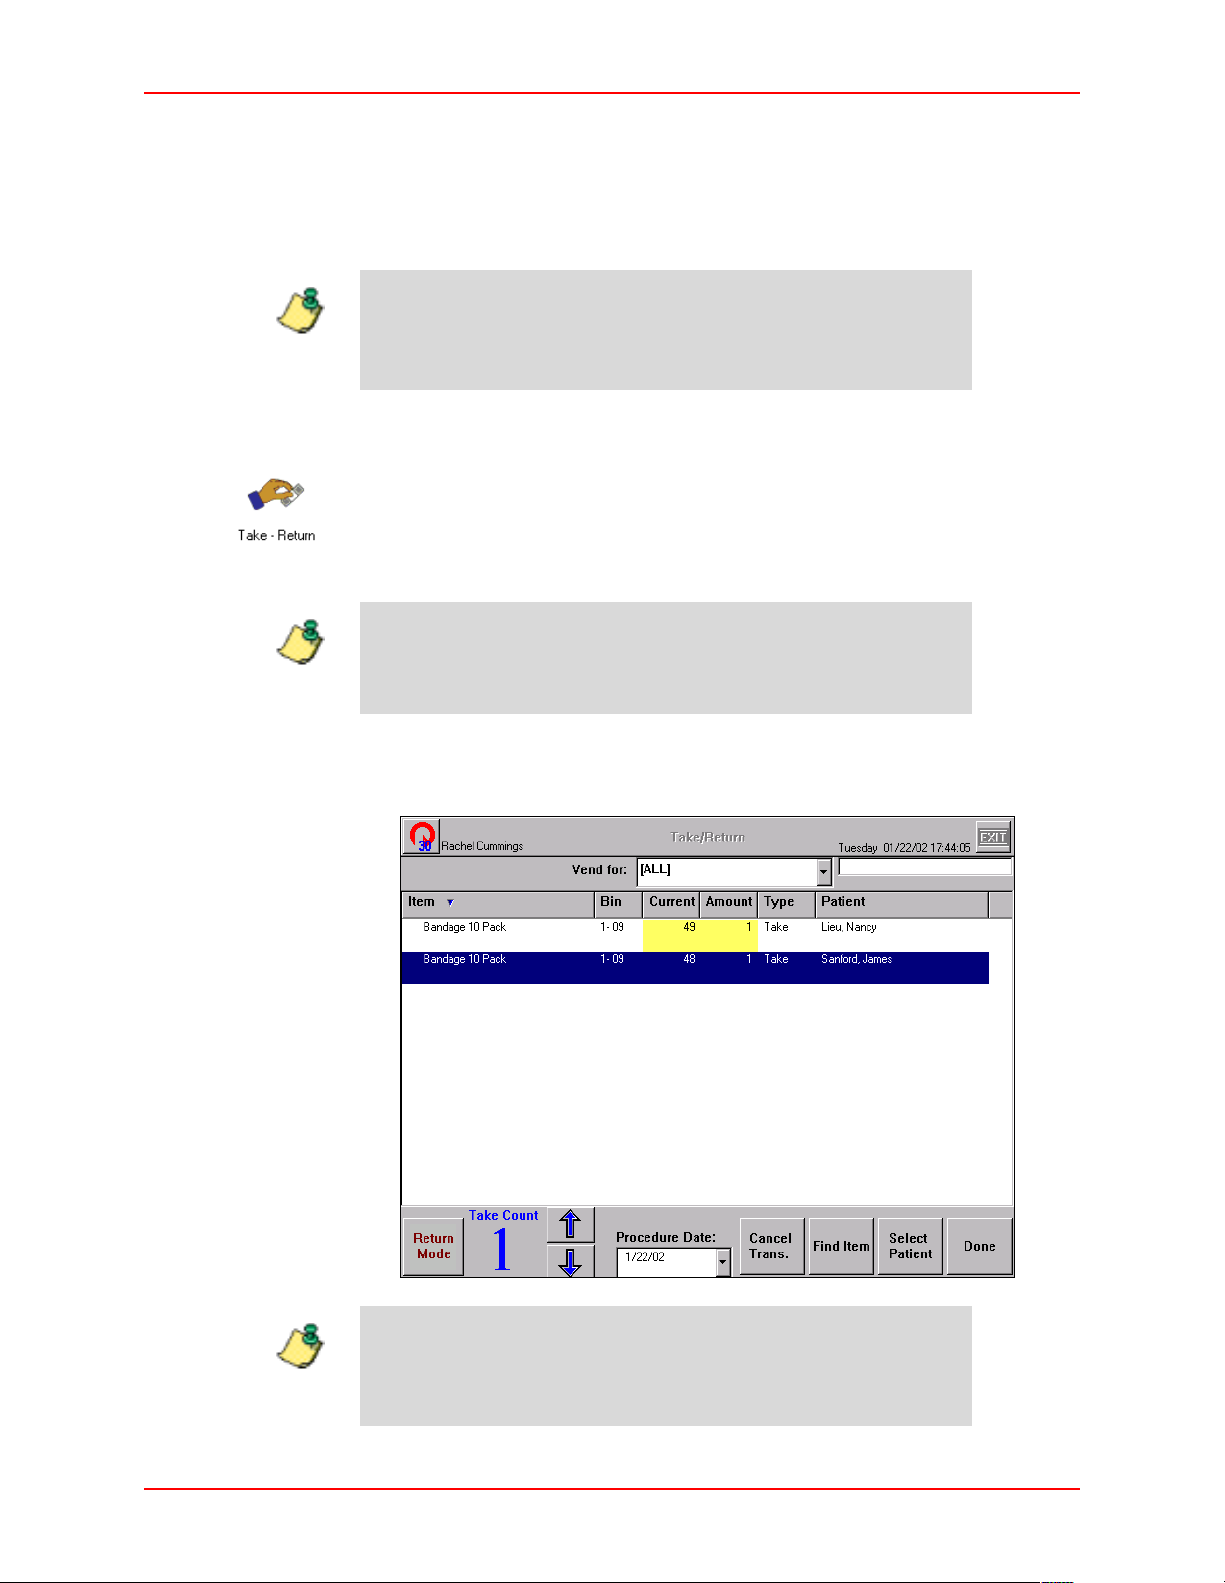
Taking Items with Multiple Patient Selection Feature
To take items with Multiple Patient Selection feature
Note
1. From the Main Menu, press the
Take-Return icon.
2. Select the patient by touching the screen. To take the same item for multiple
patients, press and hold down the
CTRL key and select multiple patients.
Use the Patient Search feature to quickly find patients. For more
information, Searching for Patients on page 3-2.
3. Press
4. Press the
Select Items.
Take button on the remote transmitter once for each item removed.
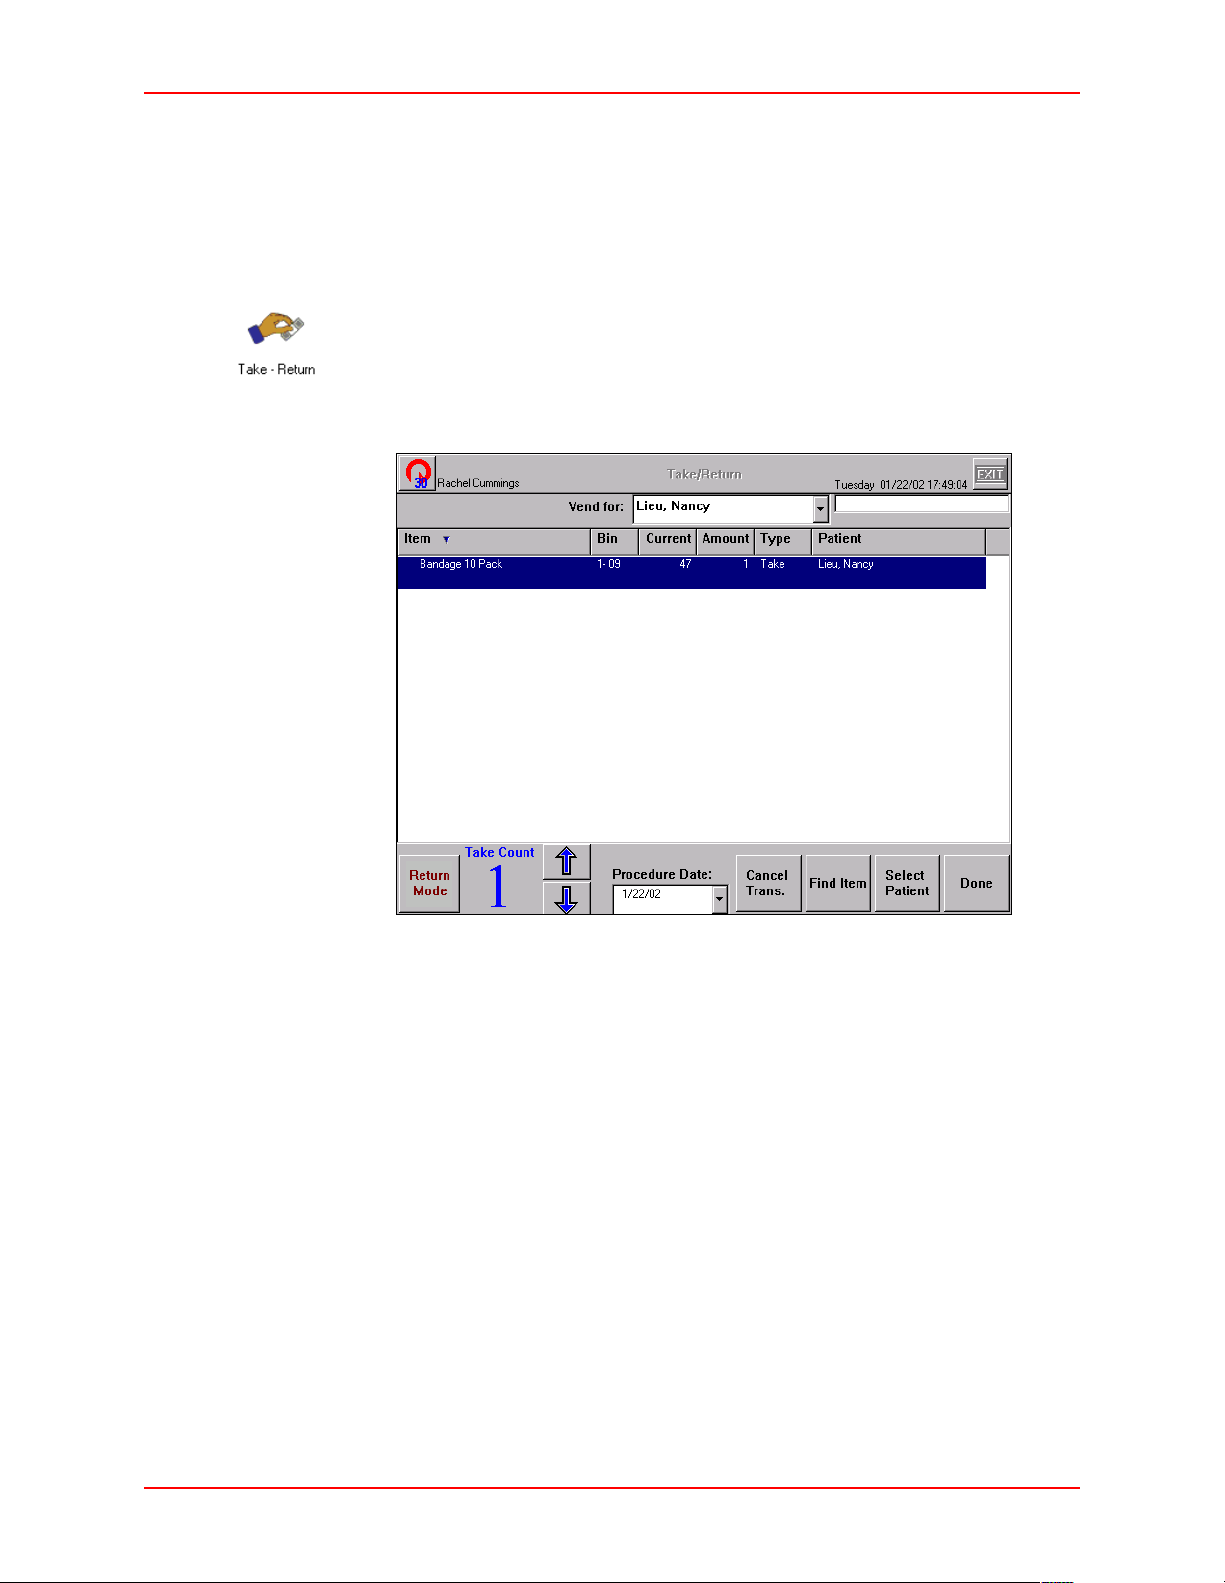
All is displayed in the Vend For field when you are taking items
for multiple patients. At this point, you can take an item for only
Note
3-4 JITRBUD Main User Guide
one of the patients by selecting the desired patient name from the
Vend For list.
Page 41
Take-Return
5. To adjust the Take Count, select the item and press the Up or Down arrow
buttons.
6. Press
Done to return to the Main Menu, or Exit to log out of the Station.
Quick Take
To take items (Multiple Patient Selection option deselected)
1. From the Main Menu, press the
2. Select a patient.
3. Press the
Take button on the remote transmitter once for each item removed.
Take-Return icon.
4. To adjust the Take Count using the touch screen, select the item and press the
Up and Down arrow buttons.
5. Press
JITRBUD Main User Guide 3-5
Done to return to the Main Menu, or Exit to log out of the Station.
Page 42
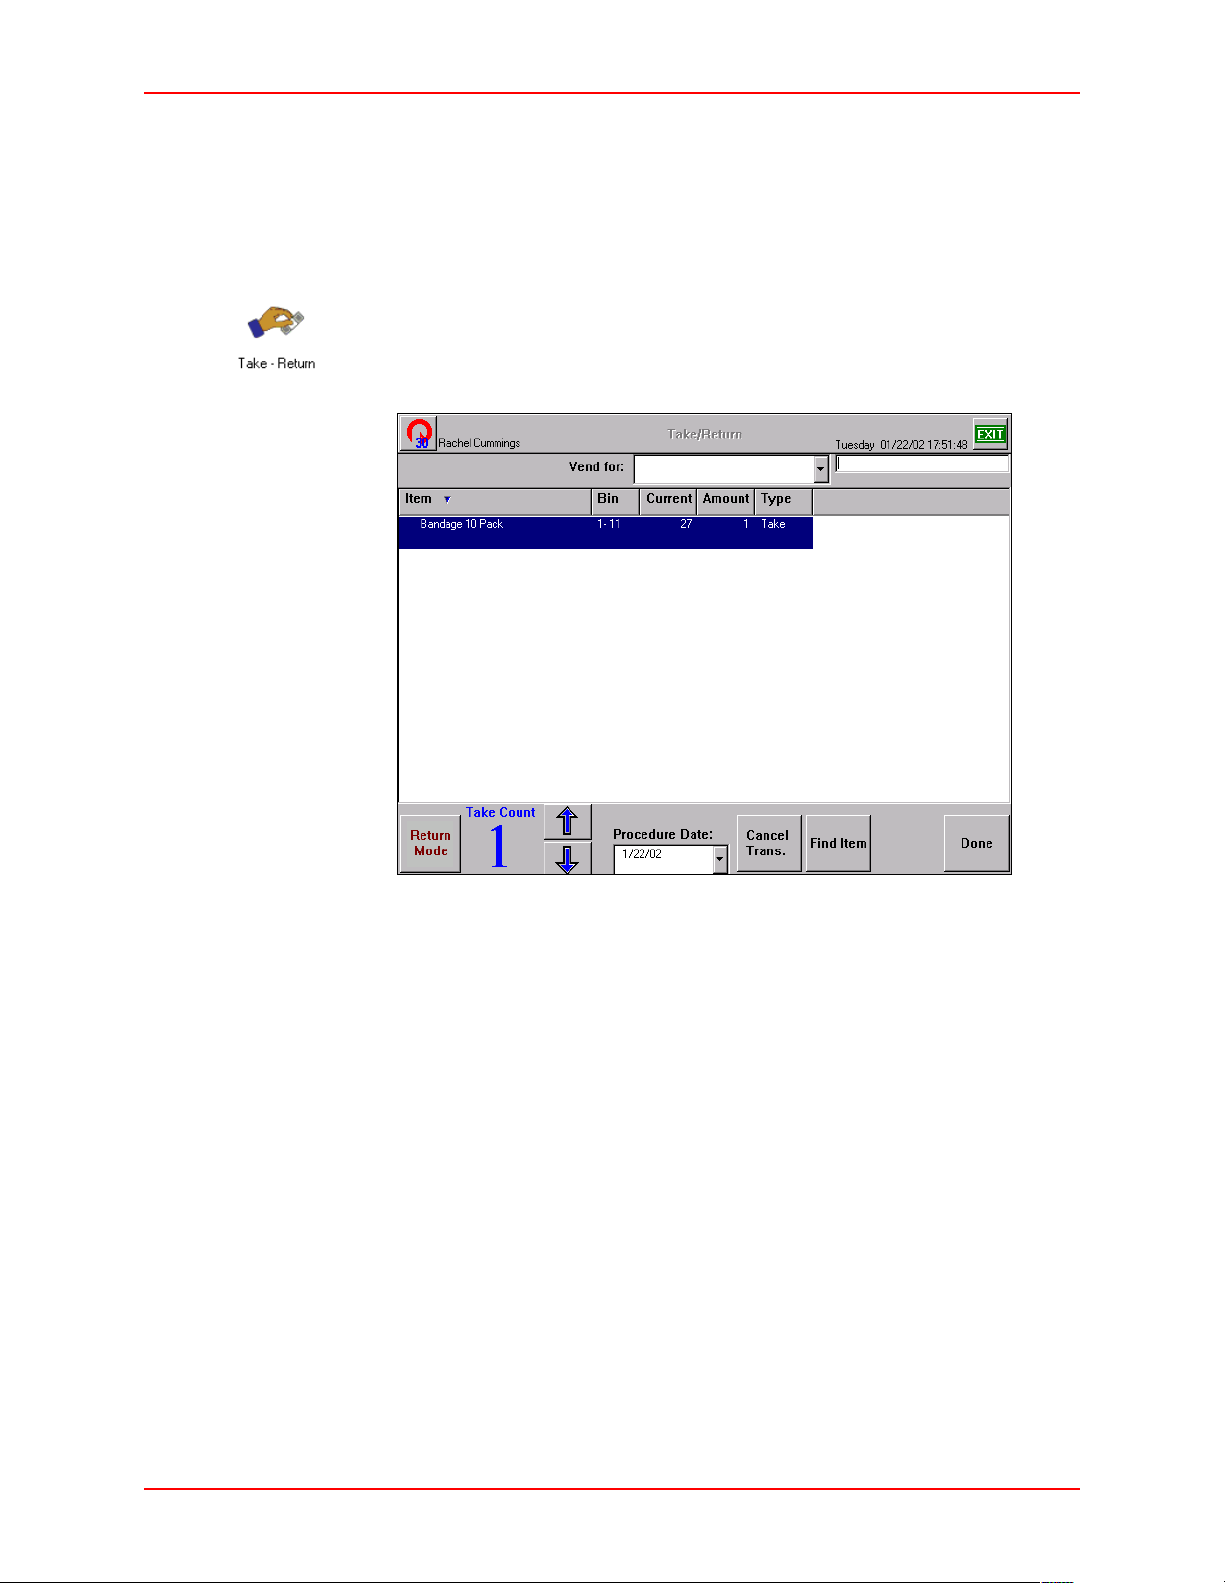
Take-Return
Taking Items in No Patient Mode
The No Patient Mode feature does not require you to select a patient in order to
perform Take and Return transactions. Use the No Patient Mode feature if you do
not want to associate supplies with patient records for billing purposes. The No
Patient Mode feature is available in Station Options.
To take items in No Patient Mode
1. From the Main Menu, press the
2. Press the
Take button on the remote transmitter once for each item removed.
Take-Return icon.
3. To adjust the Take Count using the touch screen, select the item and press the
Up and Down arrow buttons.
4. Press
Done to return to the Main Menu, or Exit to log out of the Station.
3-6 JITRBUD Main User Guide
Page 43
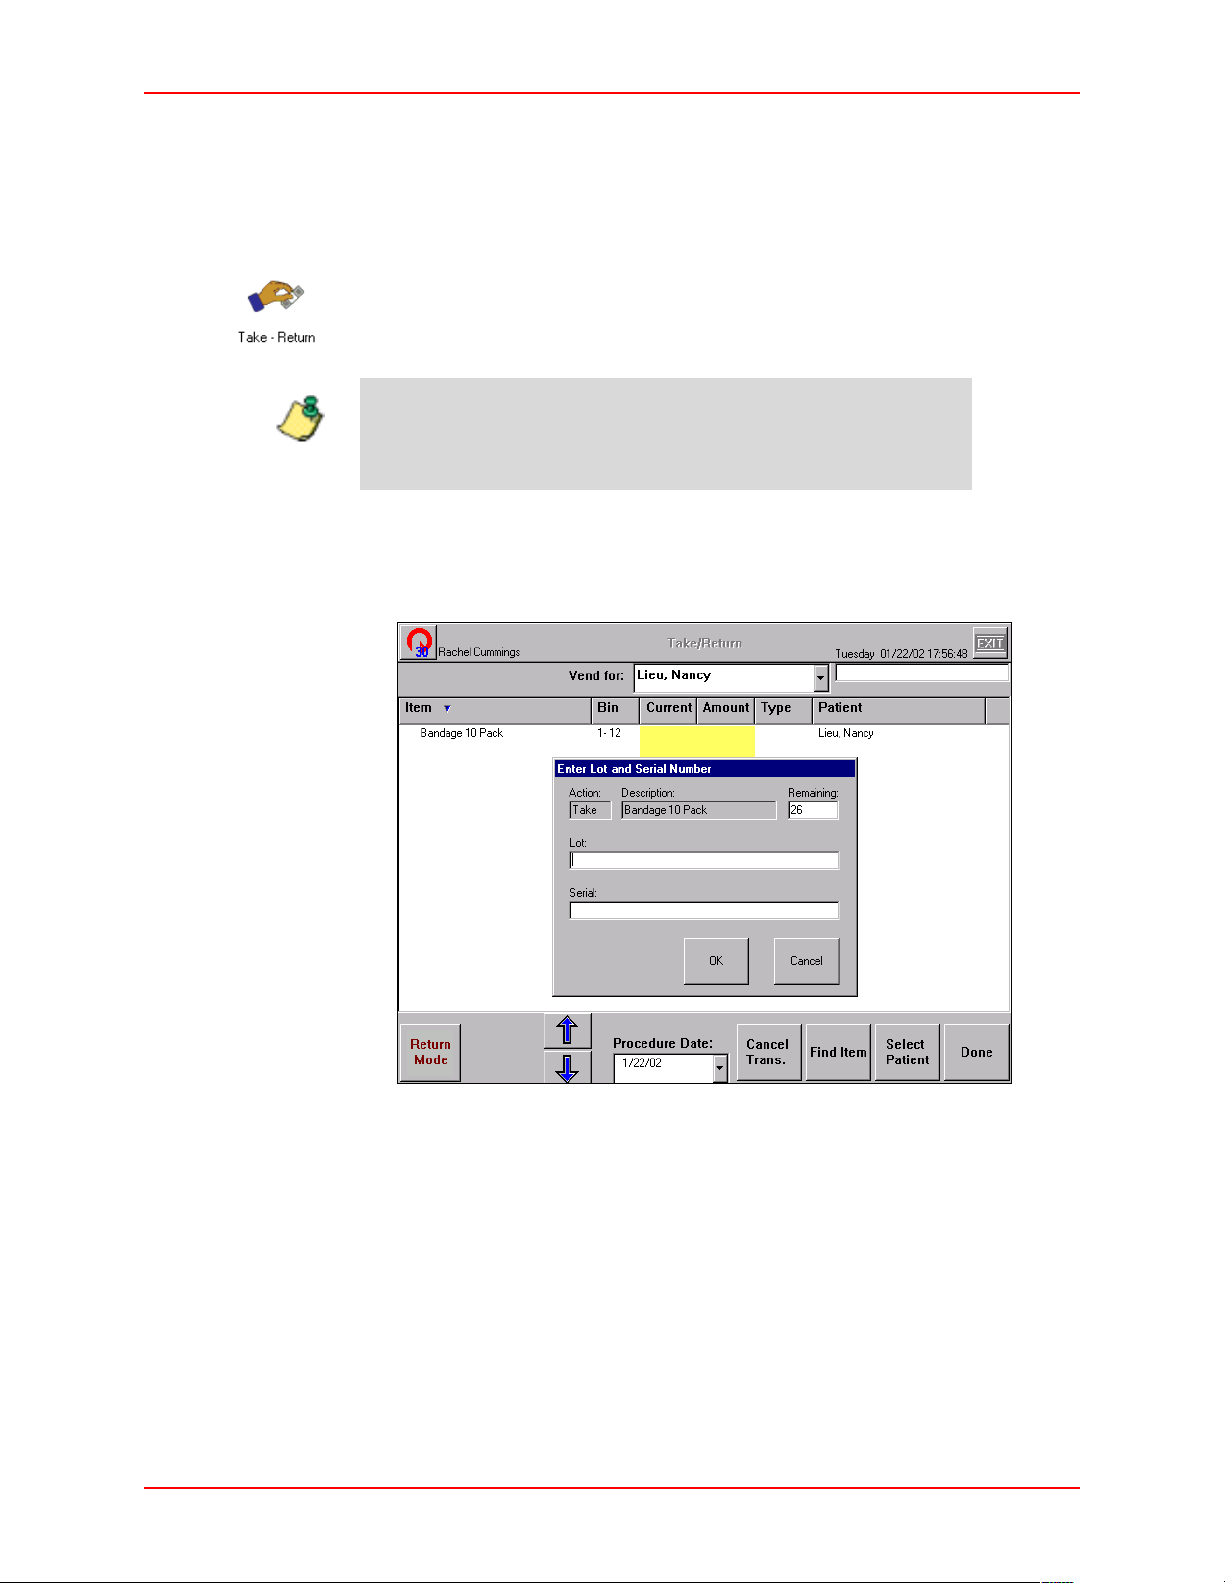
Take-Return
Taking Items with Lot/Serial Number Tracking
To track an item with a lot and/or serial number, the item must be flagged at the
UPPLYCENTER Console and the Lot/Serial Number option must be selected in
S
Station Options.
To take items with lot/serial number tracking
Note
1. From the Main Menu, press the
Take-Return icon.
2. Select a patient.
Use the Patient Search feature to quickly find patients. For more
information, Searching for Patients on page 3-2.
3. Press
4. Press the
Select Items.
Take button on the remote transmitter.
The Enter Lot and Serial number window appears.
5. Type the Lot and/or Serial numbers.
6. Press
JITRBUD Main User Guide 3-7
OK.
Page 44
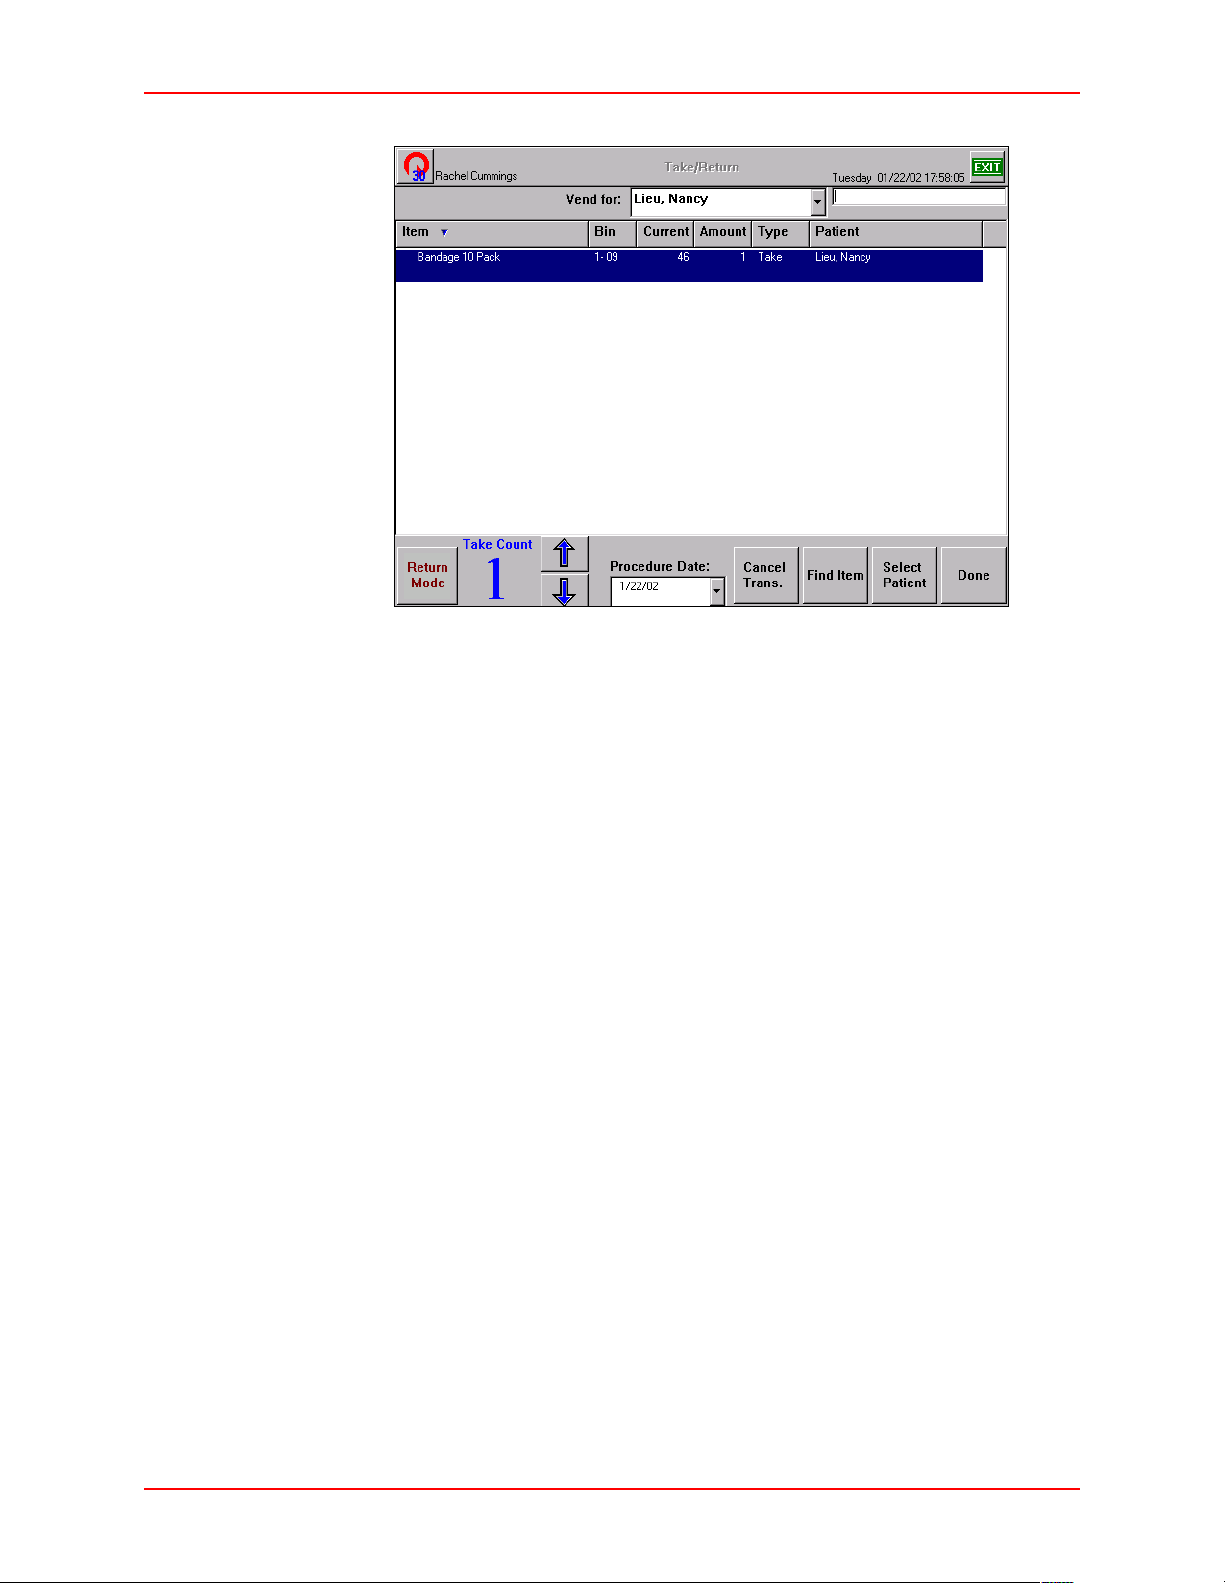
Take-Return
7. To adjust the Take Count using the touch screen, select the item and press the
Up and Down arrow buttons.
8. Press
Done to return to the Main Menu, or Exit to log out of the Station.
3-8 JITRBUD Main User Guide
Page 45
Note
Take-Return
Using the Procedure Date Feature
The Procedure Date feature is designed for the Supply application in an O.R.
setting. It allows users to remove items for a patient and select a procedure date
(typically for the purpose of delaying the charge until the patient’s procedure
date).
The system logs the actual time the item is removed to ensure inventory and
activity reports are accurate. The procedure date is also noted.
The Procar computer must be set up properly for the Procedure Date
feature to function correctly.
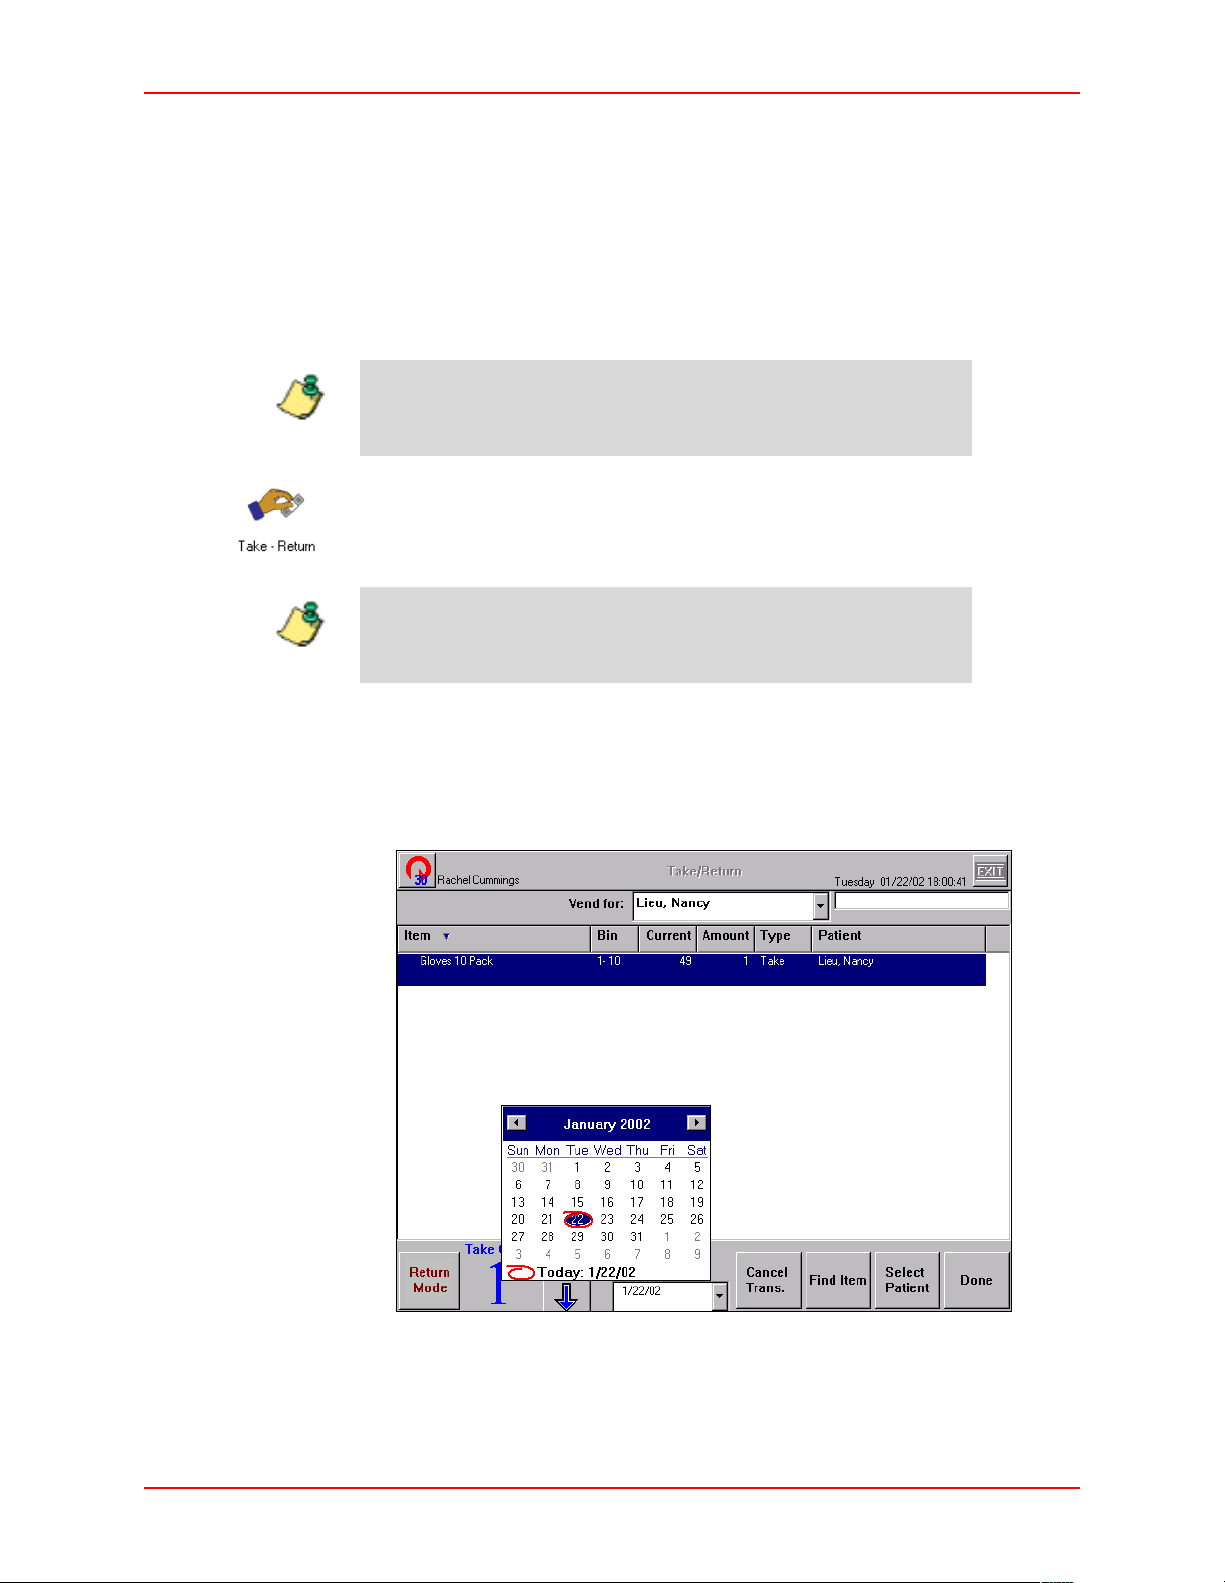
To Take Items using the Procedure Date feature
Note
1. From the Main Menu, press the
Take-Return icon.
2. Select a patient.
Use the Patient Search feature to quickly find patients. For more
information, Searching for Patients on page 3-2.
3. Press
4. Press the
5. Press the arrow next to the
Select Items.
Take button on the remote transmitter once for each item removed.
Procedure Date field.
The Procedure Date calendar appears.
6. Select a procedure date for the selected items on the
7. Press
JITRBUD Main User Guide 3-9
Done to return to the Main Menu, or Exit to log out of the Station.
Procedure Date calendar.
Page 46

Take-Return
Note
Patient Lists
There are three patient list tabs at the bottom of the Patients screen: My List,
Local, and Global.
Global Patient List (Global)
The Global patient list tab allows you to select all patients from the hospital’s
ADT. When the Global patient list is active, it appears as a tab on the Patient List
screen under Take-Return and Discard.
The Global patient list is a Station option and can be turned on and
off in the Station Options window. For more information, see Station
Options on page 5-25.
Local Patient List (Local)
The Local patient list tab includes patients whose nursing unit is assigned to a
specific Station’s area (for example, CCU or ER only).
Note
My Patient List (My List)
The My List tab is a customized patient list that each user can use to include or
delete patients under their care.
When you take an item for a patient, the patient is automatically
added to your patient list (My List).
3-10 JITRBUD Main User Guide
Page 47
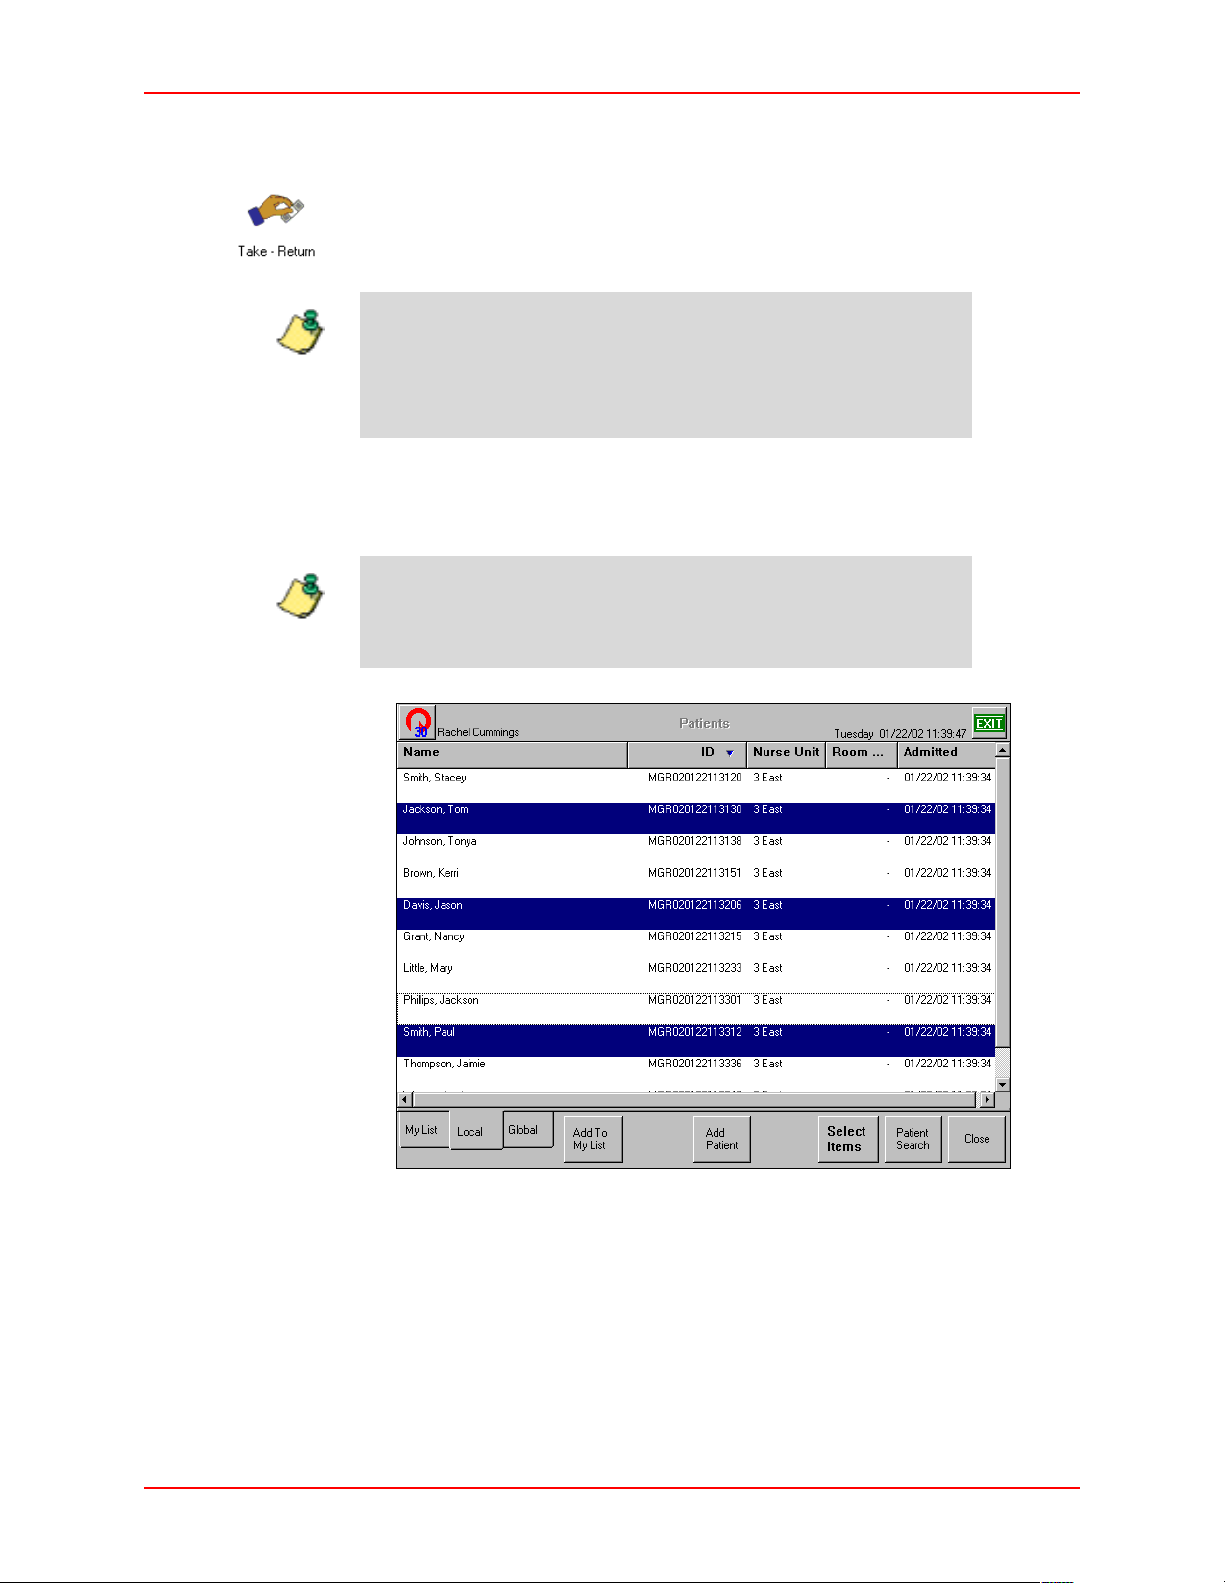
Adding Patients to My List
To add a patient
Take-Return
Note
Note
1. From the Main Menu, press the
Take-Return icon.
The Patients window appears.
The Global tab contains a list of patients from all Stations for
purposes of transaction activity. The Global, Local, and My List
tabs are present at the Patient List screen for the Take/Return,
and Discard functions if privileges are assigned and options are
turned on
2. Select the Local
in Station Options.
or Global tab.
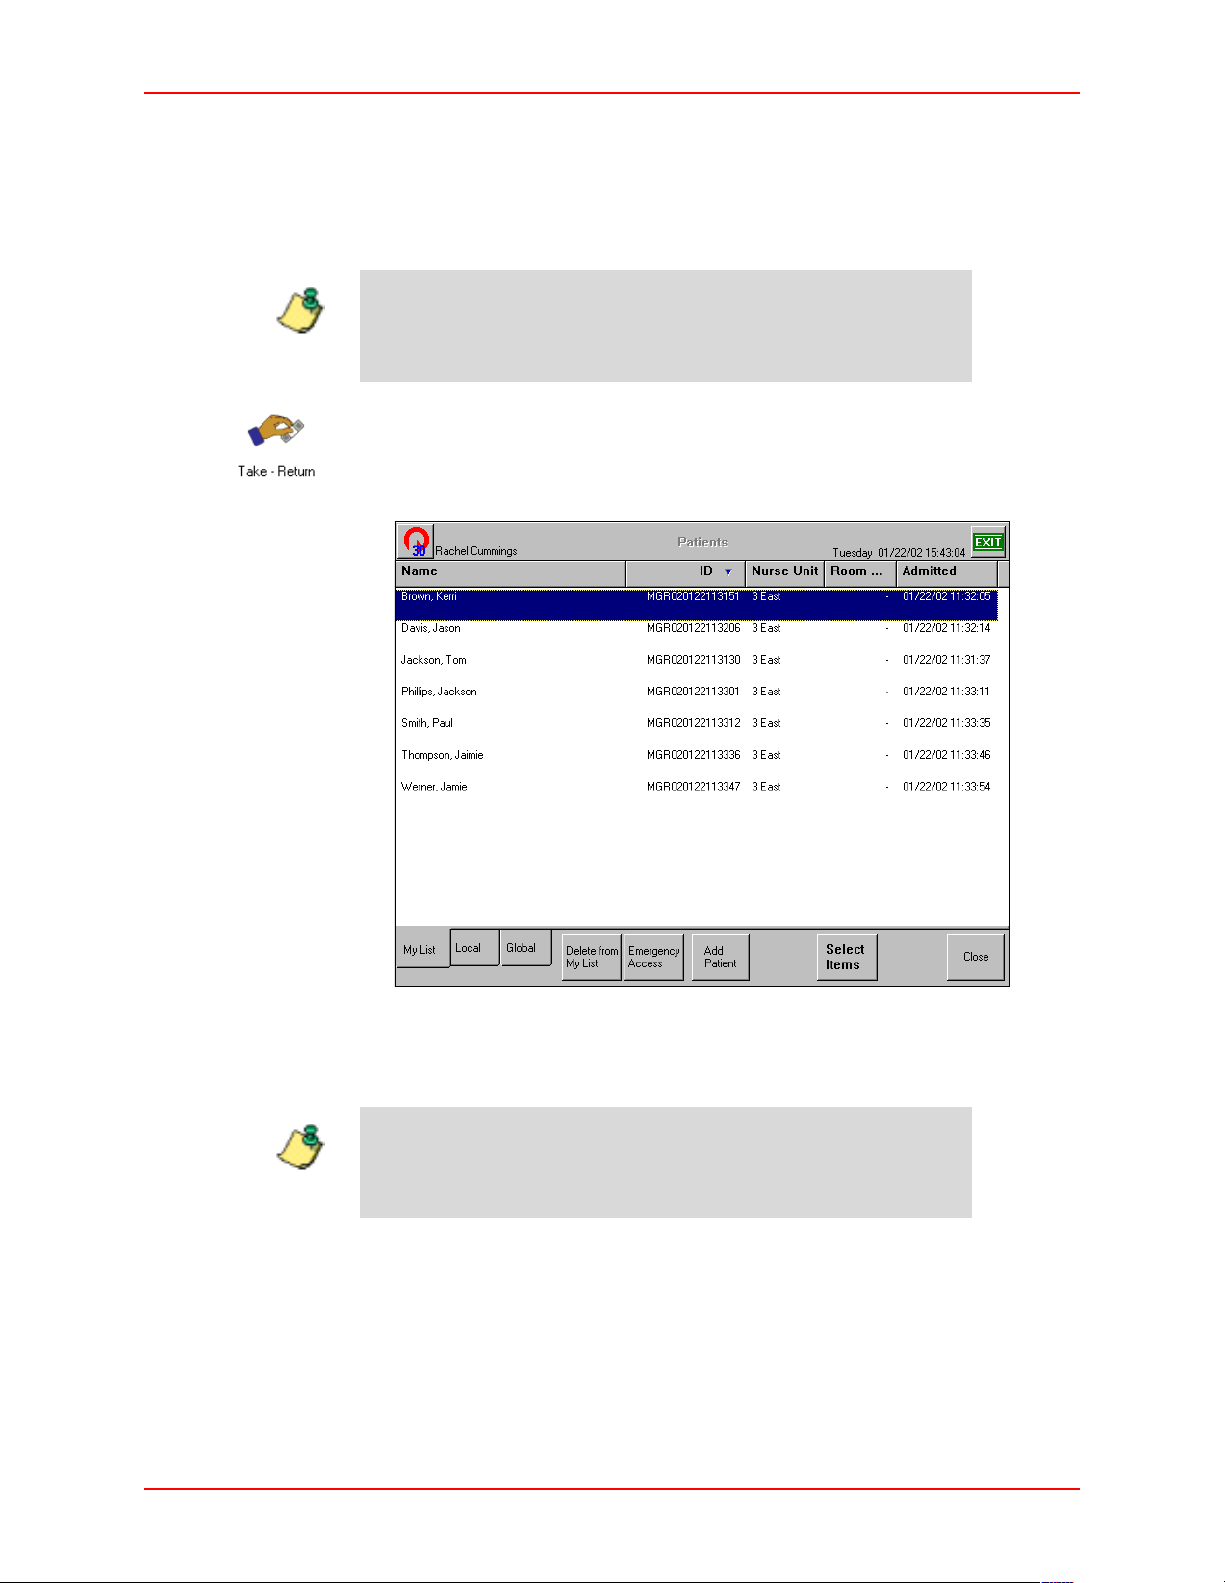
3. Select the patient to add to the My List tab. To select multiple patients, press
and hold down the
CTRL key while you highlight the patients.
The Multiple Patient Selection option must be selected in Station
Options to select multiple patients.
4. Press
Add To My List.
The patients appear under the My List Patients tab.
5. Press
JITRBUD Main User Guide 3-11
Close to return to the Main Menu, or Exit to log out of the Station.
Page 48
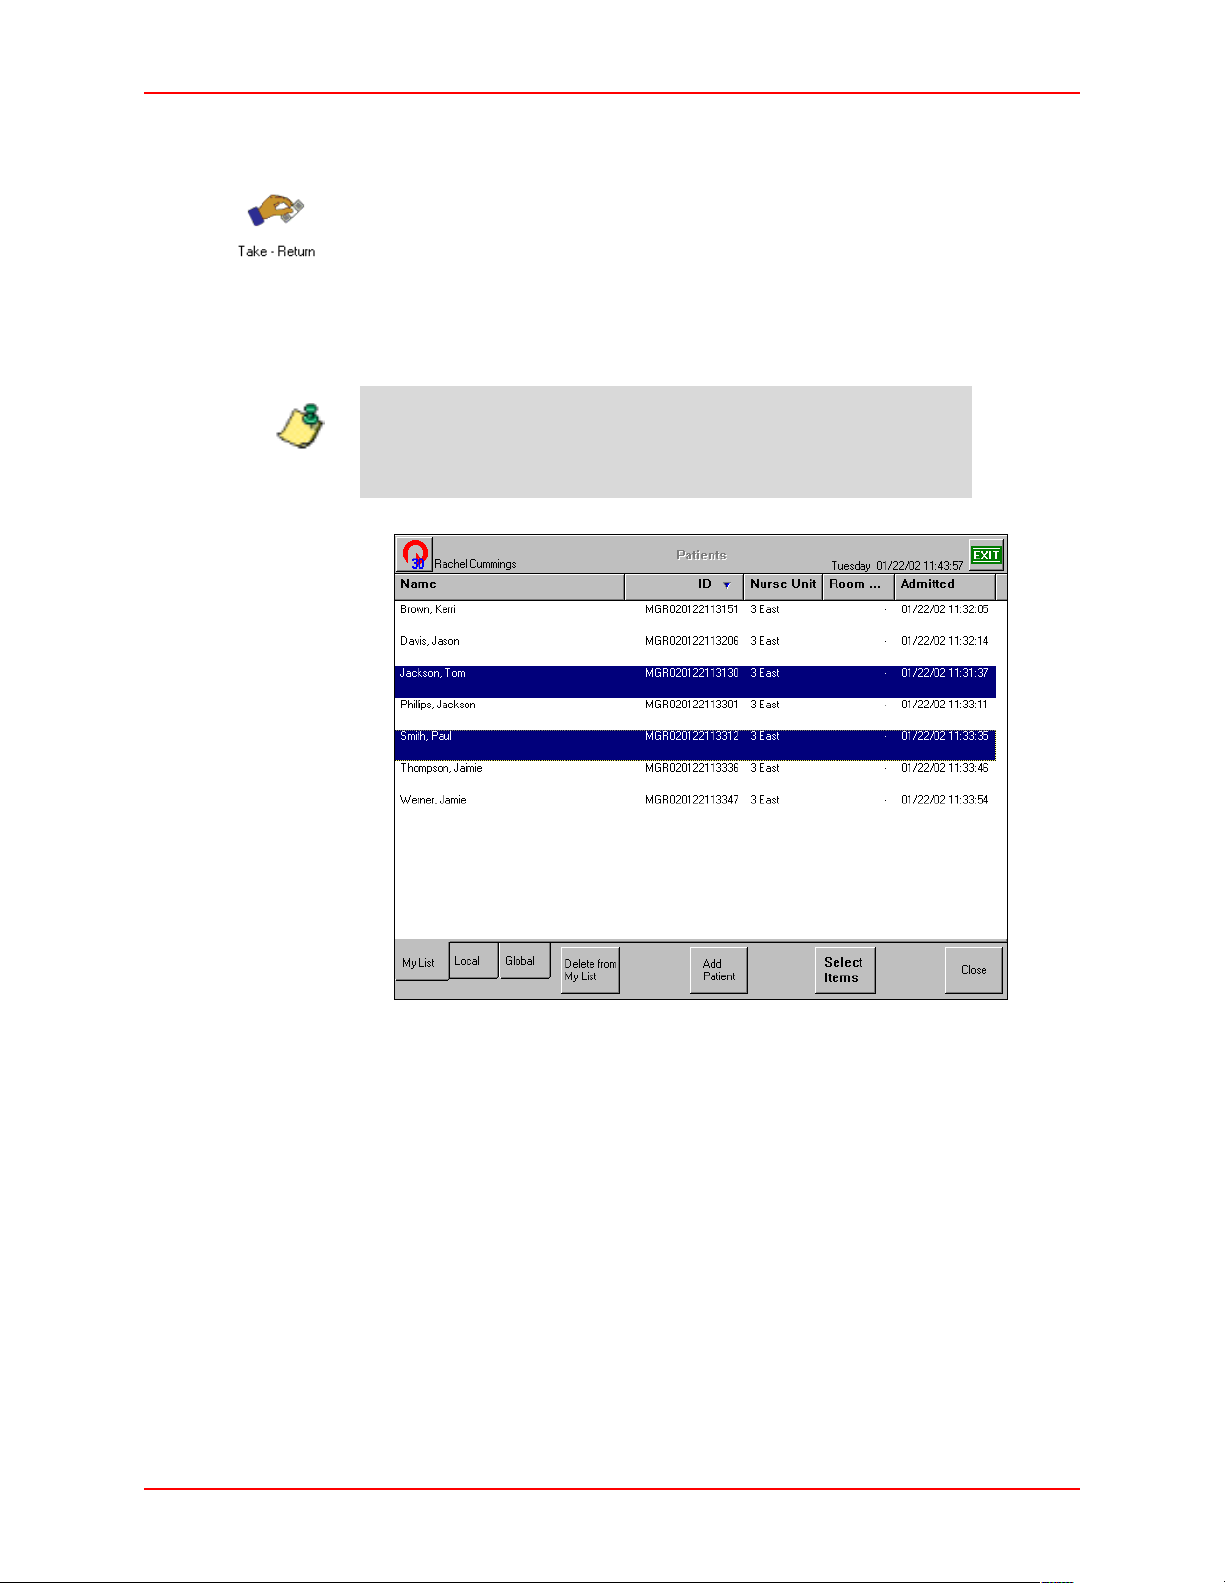
Take-Return
Deleting Patients from My List
To delete a patient
Note
1. From the Main Menu, press the
Take-Return icon.
The Patients window appears.
2. Select the My List tab.
3. Select the patient to delete from the My List tab. To select multiple patients,
press and hold down the CTRL key while you highlight the patients.
The Multiple Patient Selection option must be selected in Station
Options to select multiple patients.
4. Press
Delete From My List.
The patients are deleted from the My List tab.
5. Press
3-12 JITRBUD Main User Guide
Close to return to the Main Menu, or Exit to log out of the Station.
Page 49
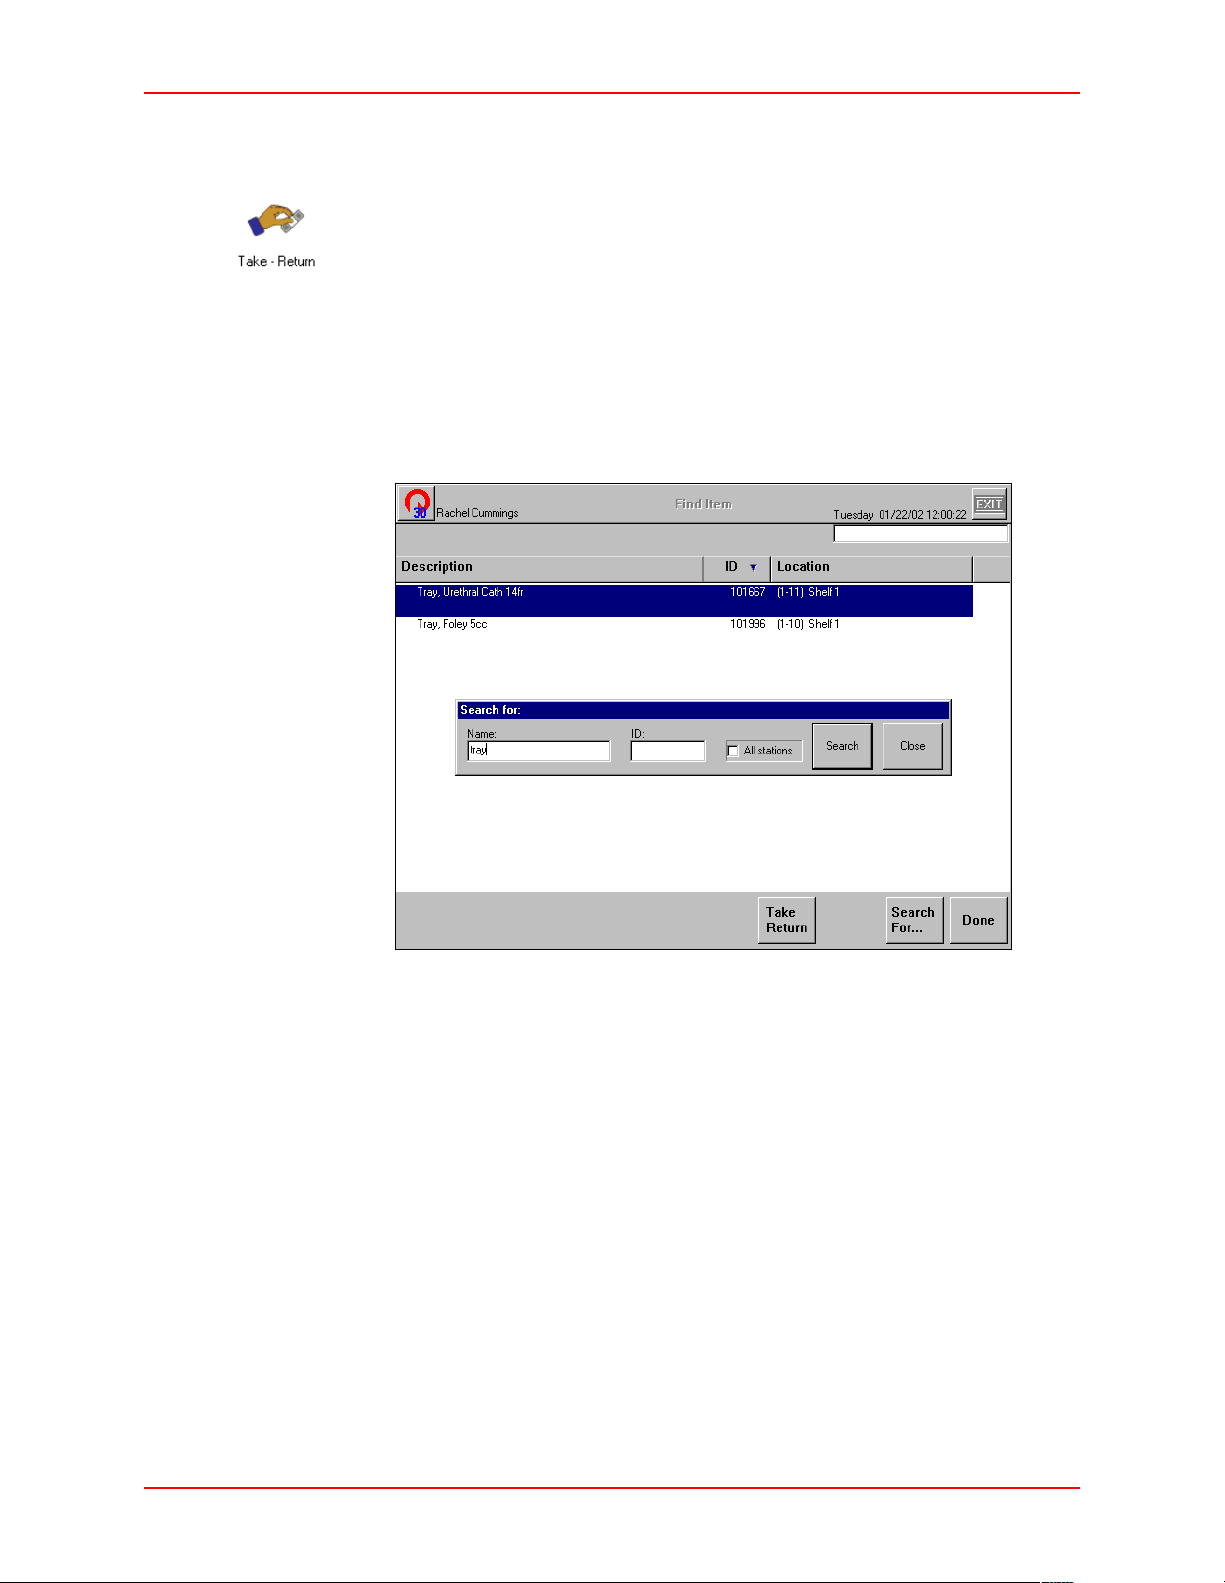
Finding Items
To find an item at the Station
Take-Return
1. From the Main Menu, press the
Take-Return icon.
The Patients window appears.
2. Select a patient.
3. Press
4. Press
Select Items.
Find Item.
The Search For window appears.
5. Type the first few letters of the item name or ID.
6. If necessary, press the
Search button.
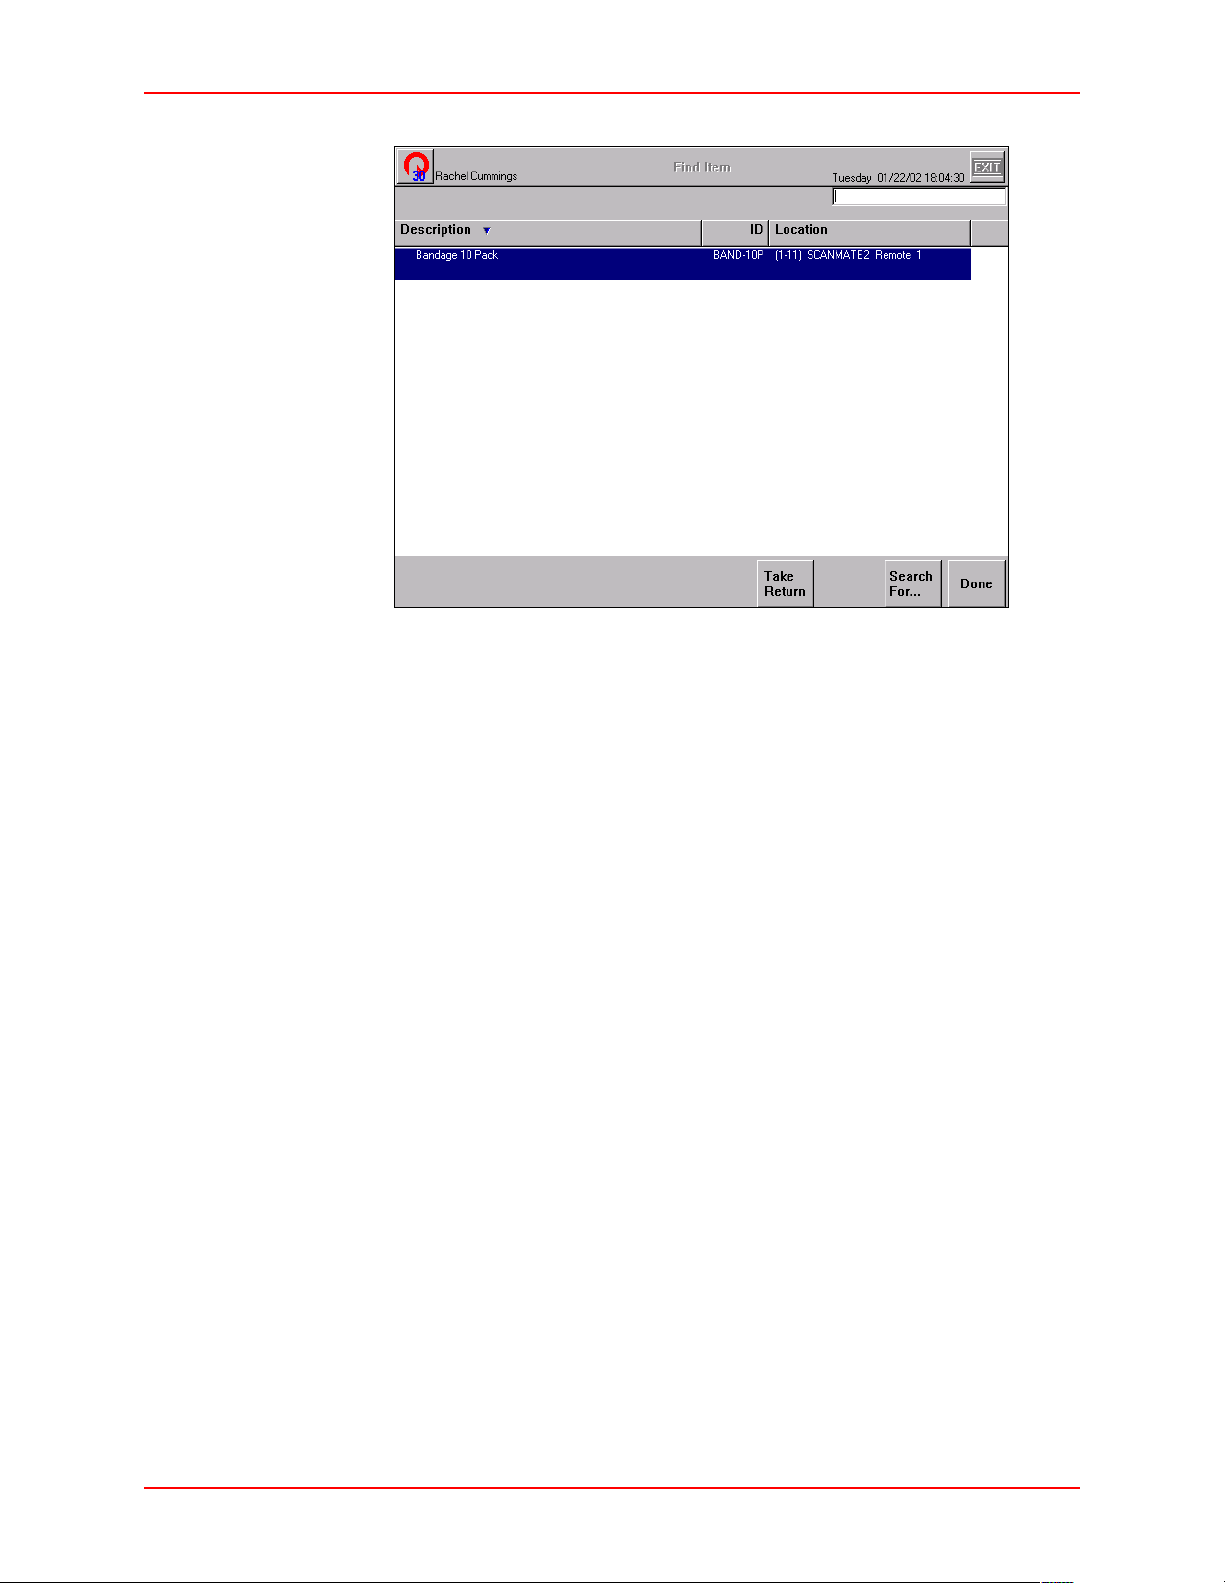
The item appears on the Find Item screen.
7. To display the entire list again, delete the text in the Search For window and
Search.
press
The complete list appears.
JITRBUD Main User Guide 3-13
Page 50
Take-Return
Global Find Item
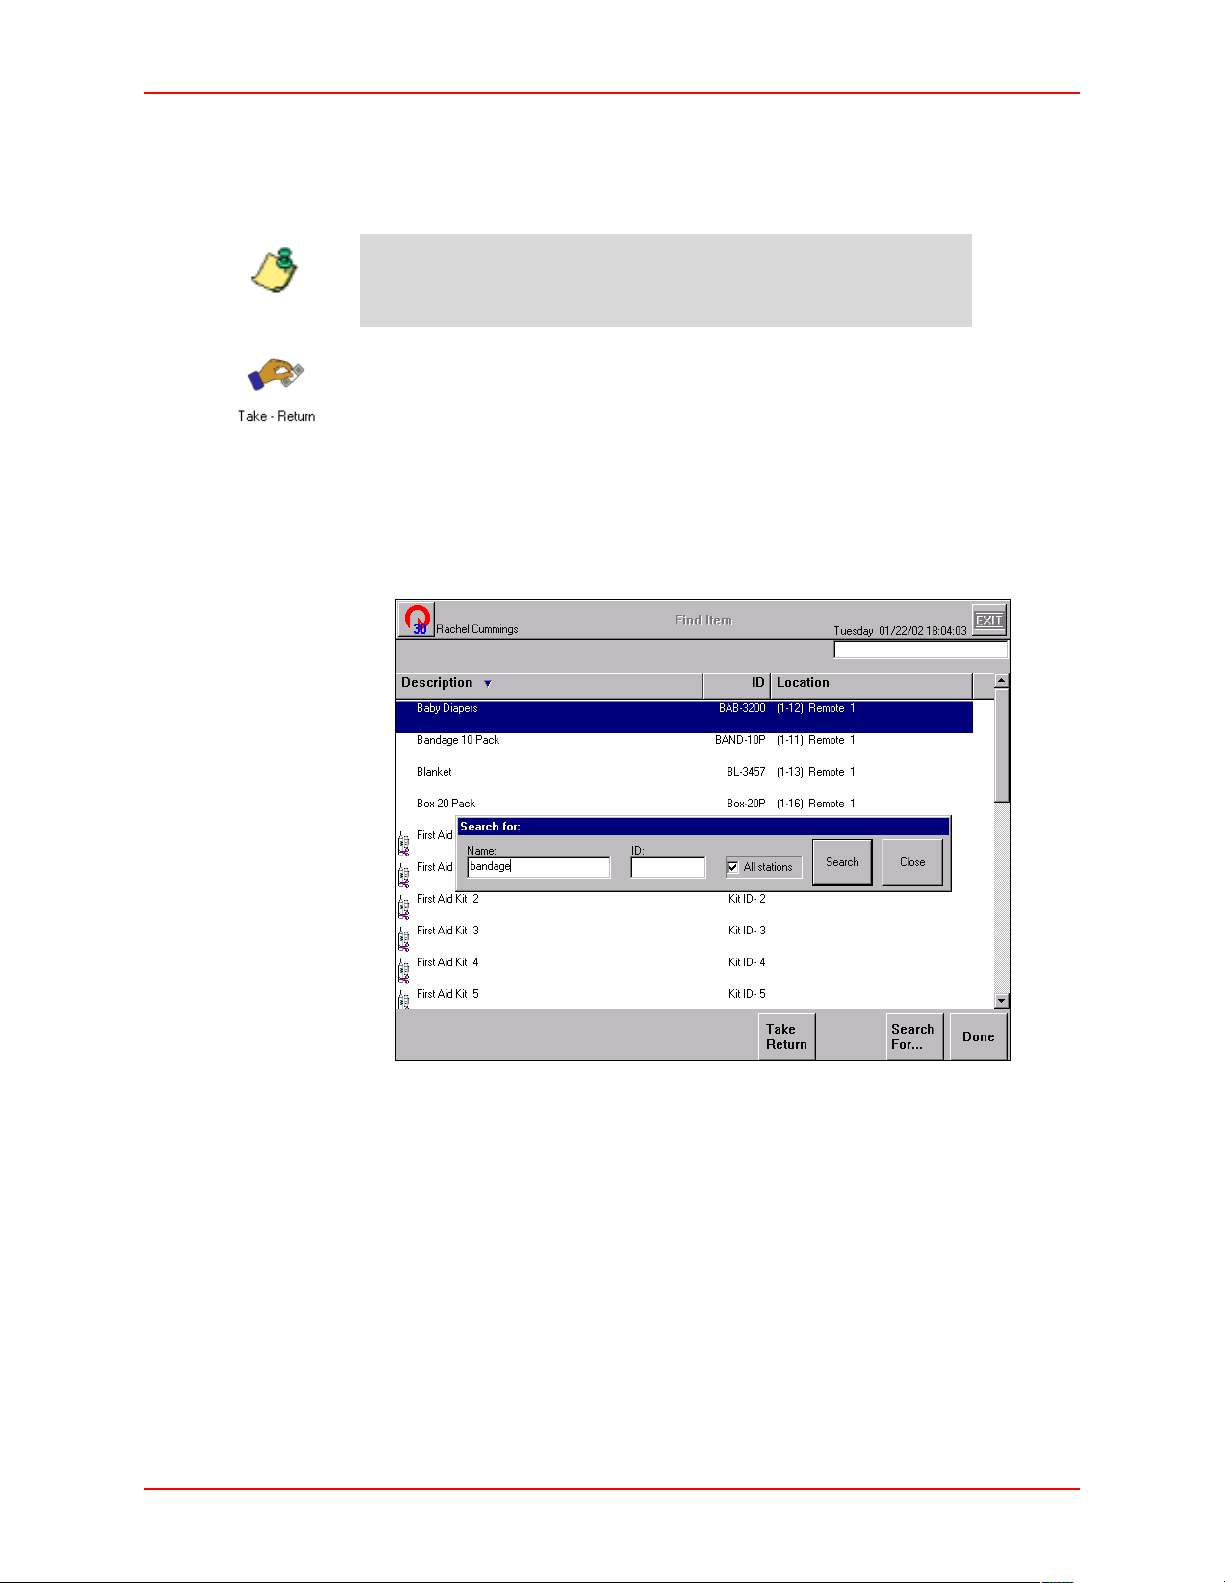
The Global Find feature is used to locate an item that is in another Station if the
item is Out of Stock or not stored at your Station.
The Global Item Find feature must be selected in Station Options to
locate items in other Stations.
Note
To find an item at another Station
1. From the Main Menu, press the
The Patients window appears.
2. Select a patient.
3. Press
4. Press
Select Items.
Find Item.
The Search For window appears.
Take-Return icon.
5. Select the
All Stations check box.
6. Enter the item Name or ID.
7. Press
Search.
The item appears in the Find Item screen. The system identifies the location of
the item at all Stations.
3-14 JITRBUD Main User Guide
Page 51
Take-Return
8. Press Done to return to the Main Menu, or Exit to log out of the Station.
9. Go to the identified Station to take the item.
JITRBUD Main User Guide 3-15
Page 52
Take-Return
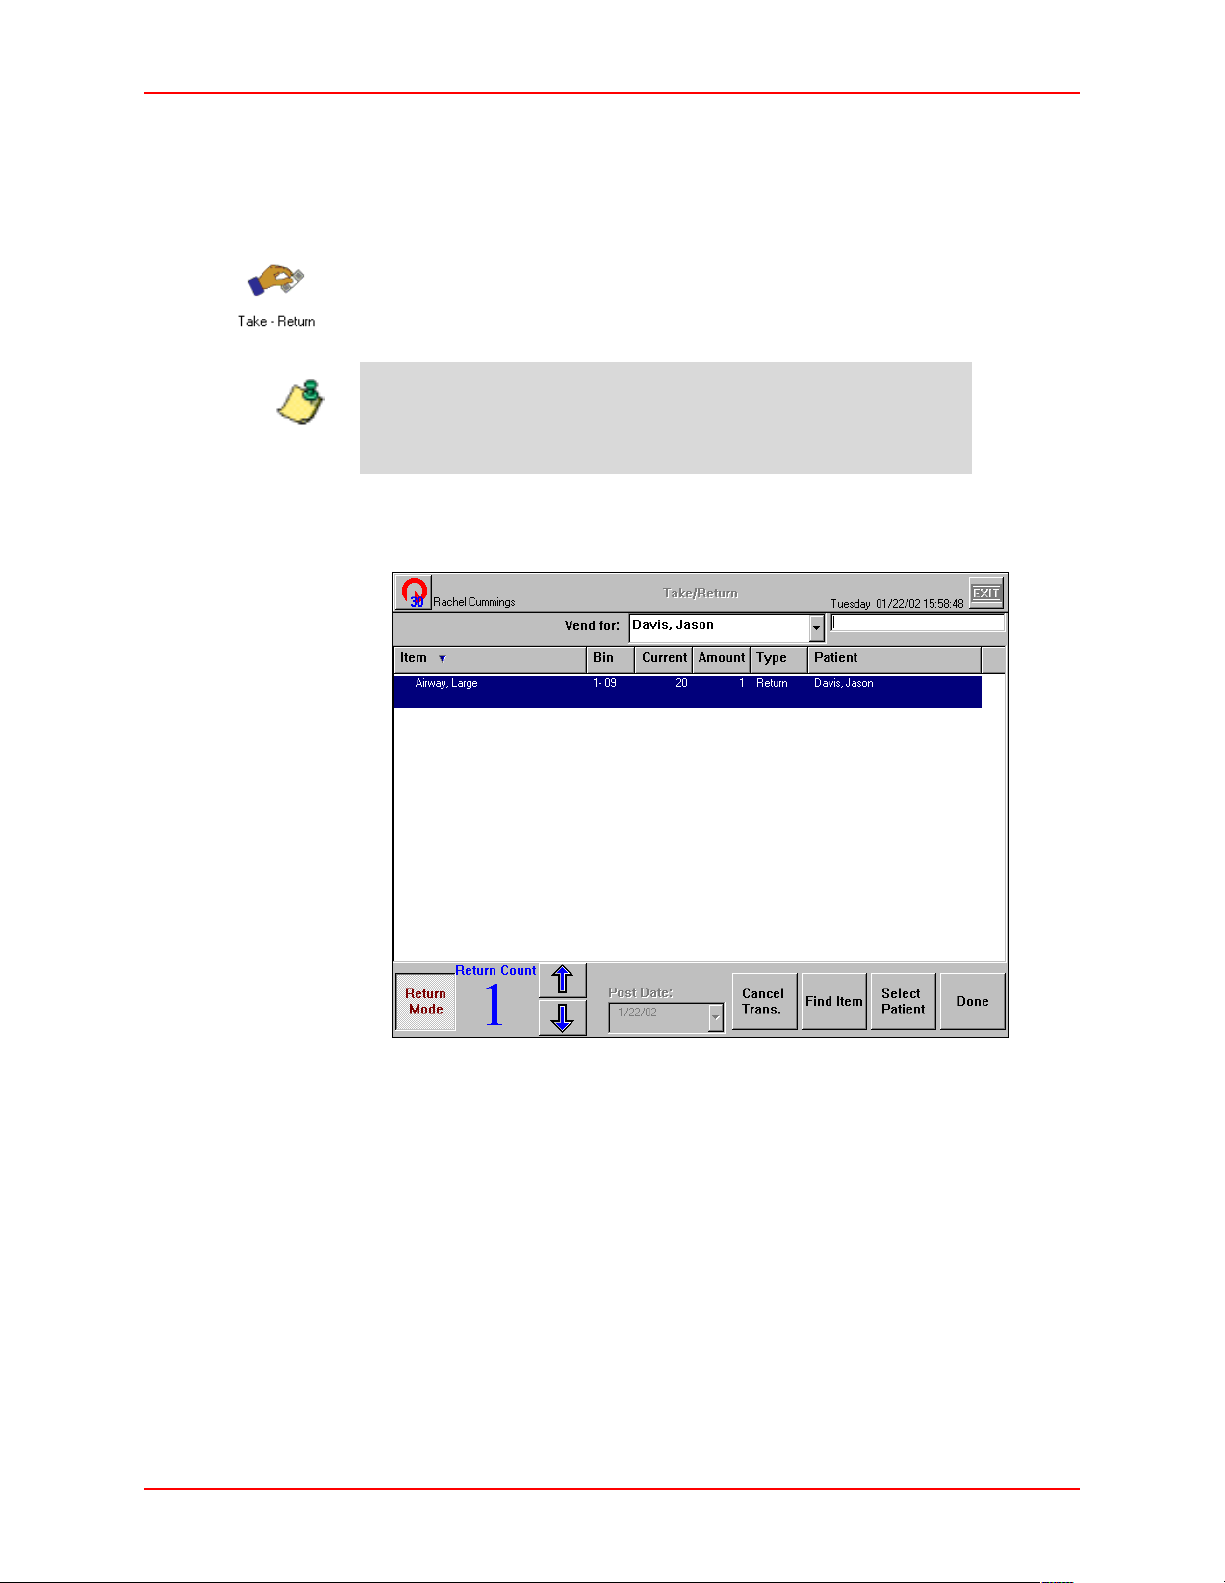
Returning Items
Use the Return feature to return an unused item to inventory and credit the
associated patient billing record.
To return items
Note
1. From the Main Menu, press the
Take-Return icon.
2. Select a patient.
Use the Patient Search feature to quickly find patients. For more
information, Searching for Patients on page 3-2.
3. Press
4. Press the
Select Items.
Return button on the remote transmitter once for each item returned.
5. To adjust the Return Count using the touch screen, select the item and press
Up and Down arrow buttons.
the
6. Press
3-16 JITRBUD Main User Guide
Done to return to the Main Menu, or Exit to log out of the Station.
Page 53
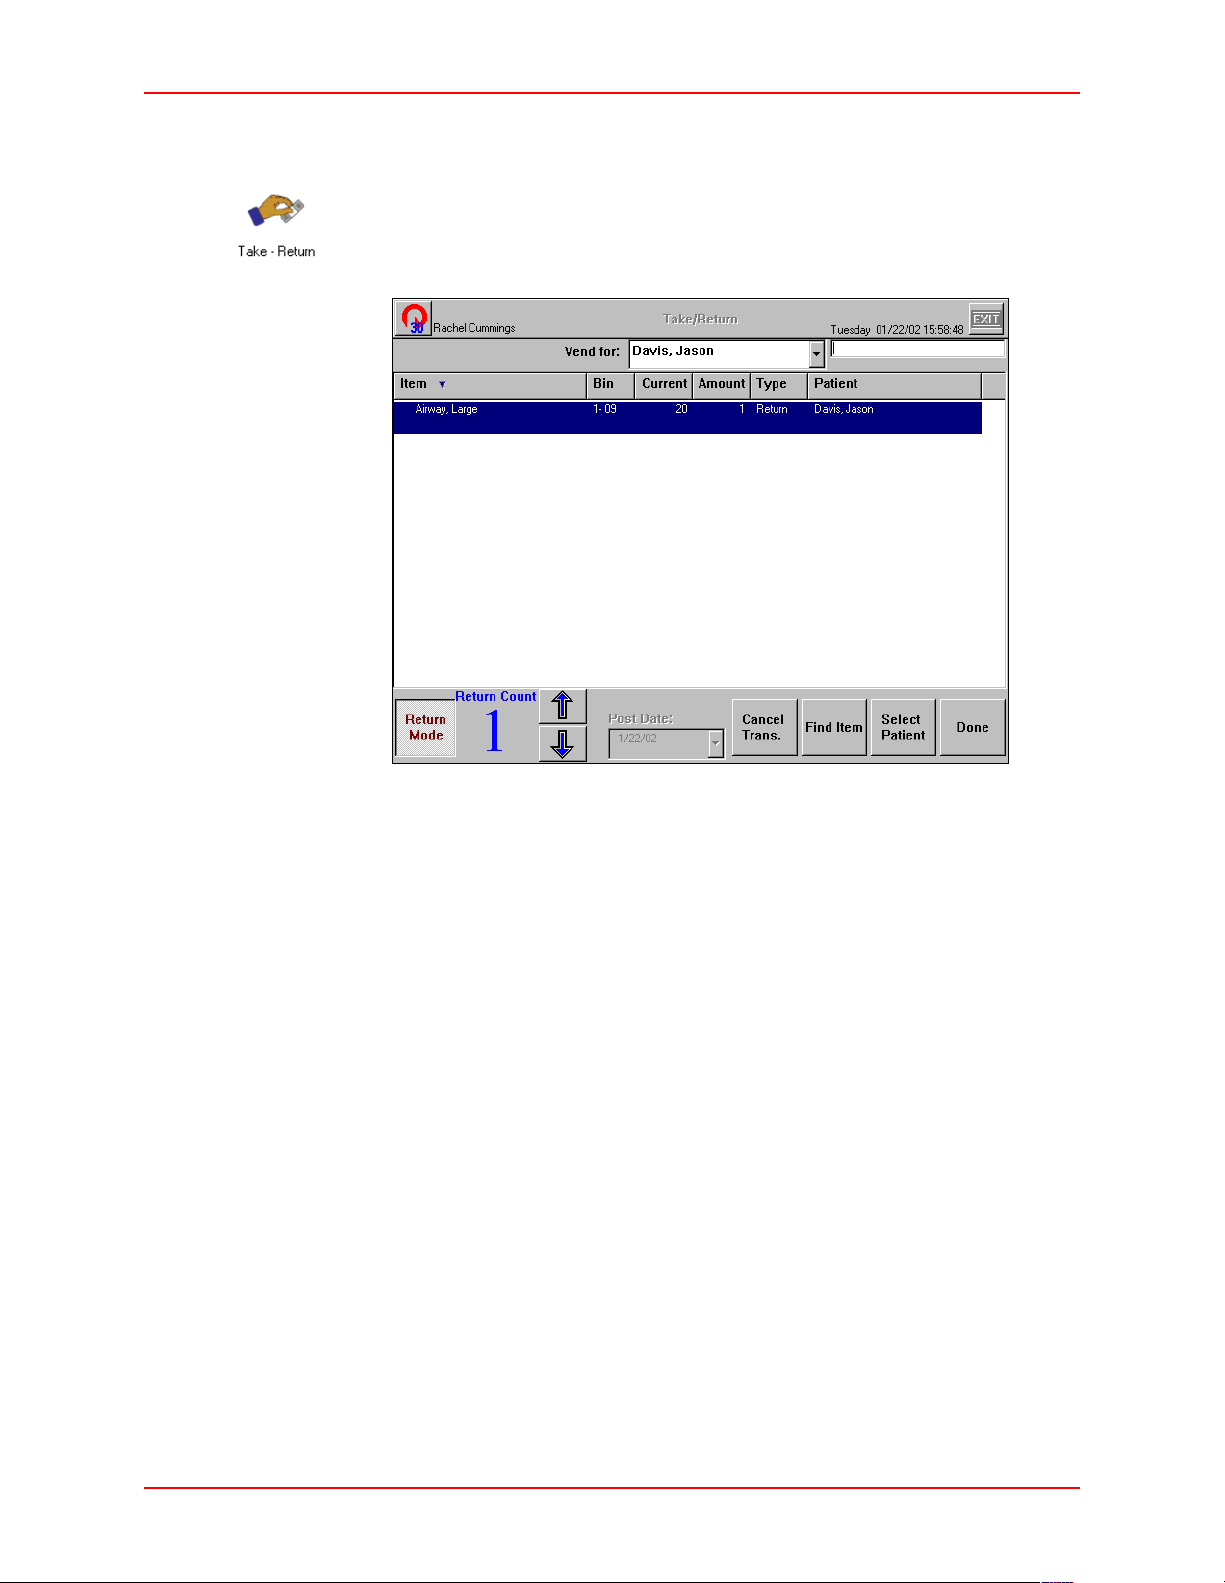
Returning Items in No Patient Mode
To return items in No Patient Mode
Take-Return
1. From the Main Menu, press the
2. Press the
Return button on the remote transmitter once for each item returned.
Take-Return icon.
3. To adjust the Return Count using the touch screen, select the item and press
Up and Down arrow buttons.
the
4. Press
Done to return to the Main Menu, or Exit to log out of the Station.
JITRBUD Main User Guide 3-17
Page 54
Take-Return
Emergency Access
Use the Emergency Access feature to quickly take or return items without
selecting a patient. The Emergency Access option must be selected in Station
Options to enable the Emergency Access feature.
The Emergency Access feature is not available if the No Patient
Mode feature is selected.
Note
To gain emergency access from Take-Return
1. From the Main Menu, press the
The Patients screen appears.
2. Press
Emergency Access.
Take-Return icon.
3. Press the
Take or Return button on the remote transmitter to indicate the item
quantity you are taking or returning.
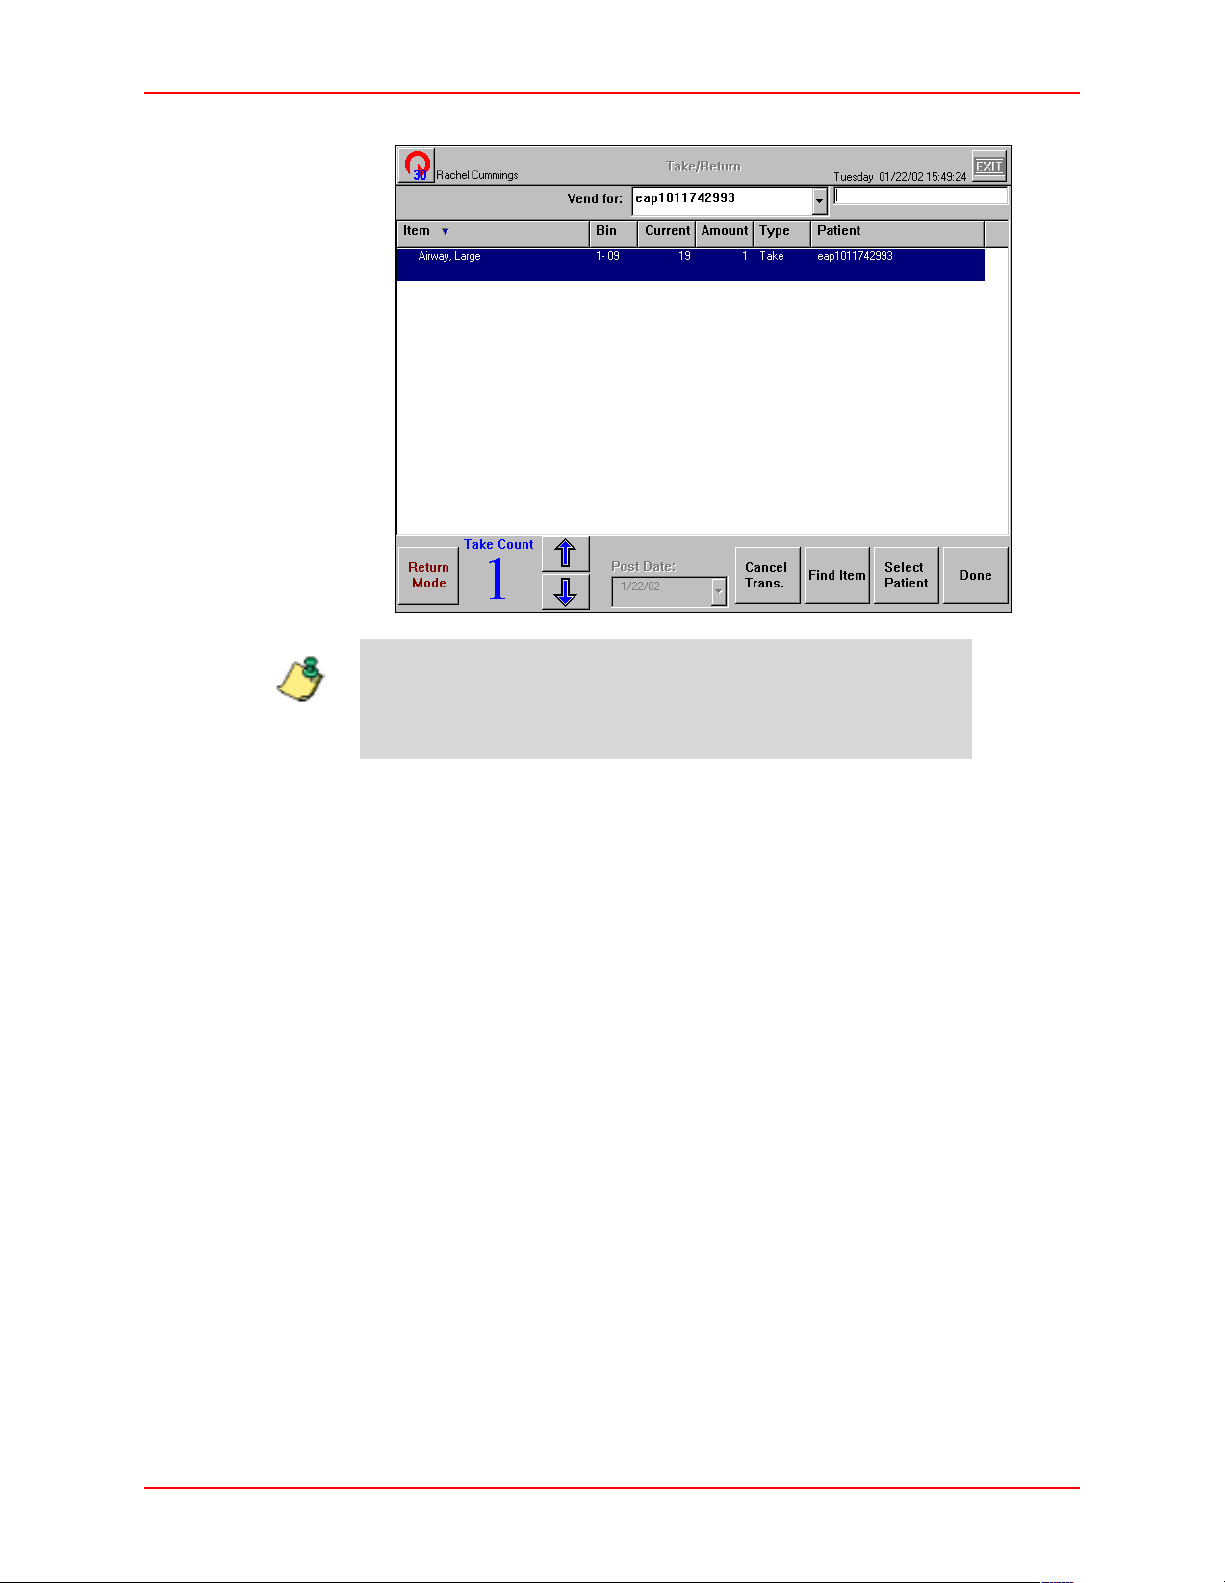
The Return Count or Take C oun t appears in the lower left portion
of the window to indicate the quantity returned or taken.
Note
3-18 JITRBUD Main User Guide
Page 55
Take-Return
Note
An emergency access patient is created for the emergency access
transaction. The emergency access patient is listed in the Vend
For field. You must reconcile the emergency access patient with
the real patient at a later time.
4. To adjust the Take Count or Return Count using the touch screen, select the
item and press the
5. Press
Done to return to the Main Menu, or Exit to log out of the Station.
Up and Down arrow buttons.
JITRBUD Main User Guide 3-19
Page 56
Patients
Patients
Use the Patients feature to view, add, edit, or reconcile patients. You must have
patient management rights to use the Patients feature.
Unlike patients added through ADT, all patients added at the Station
are temporary patients.
Note
Searching for Patients
To search for a patient
1. From the Main Menu, press the
Patients icon.
The Patients window appears.
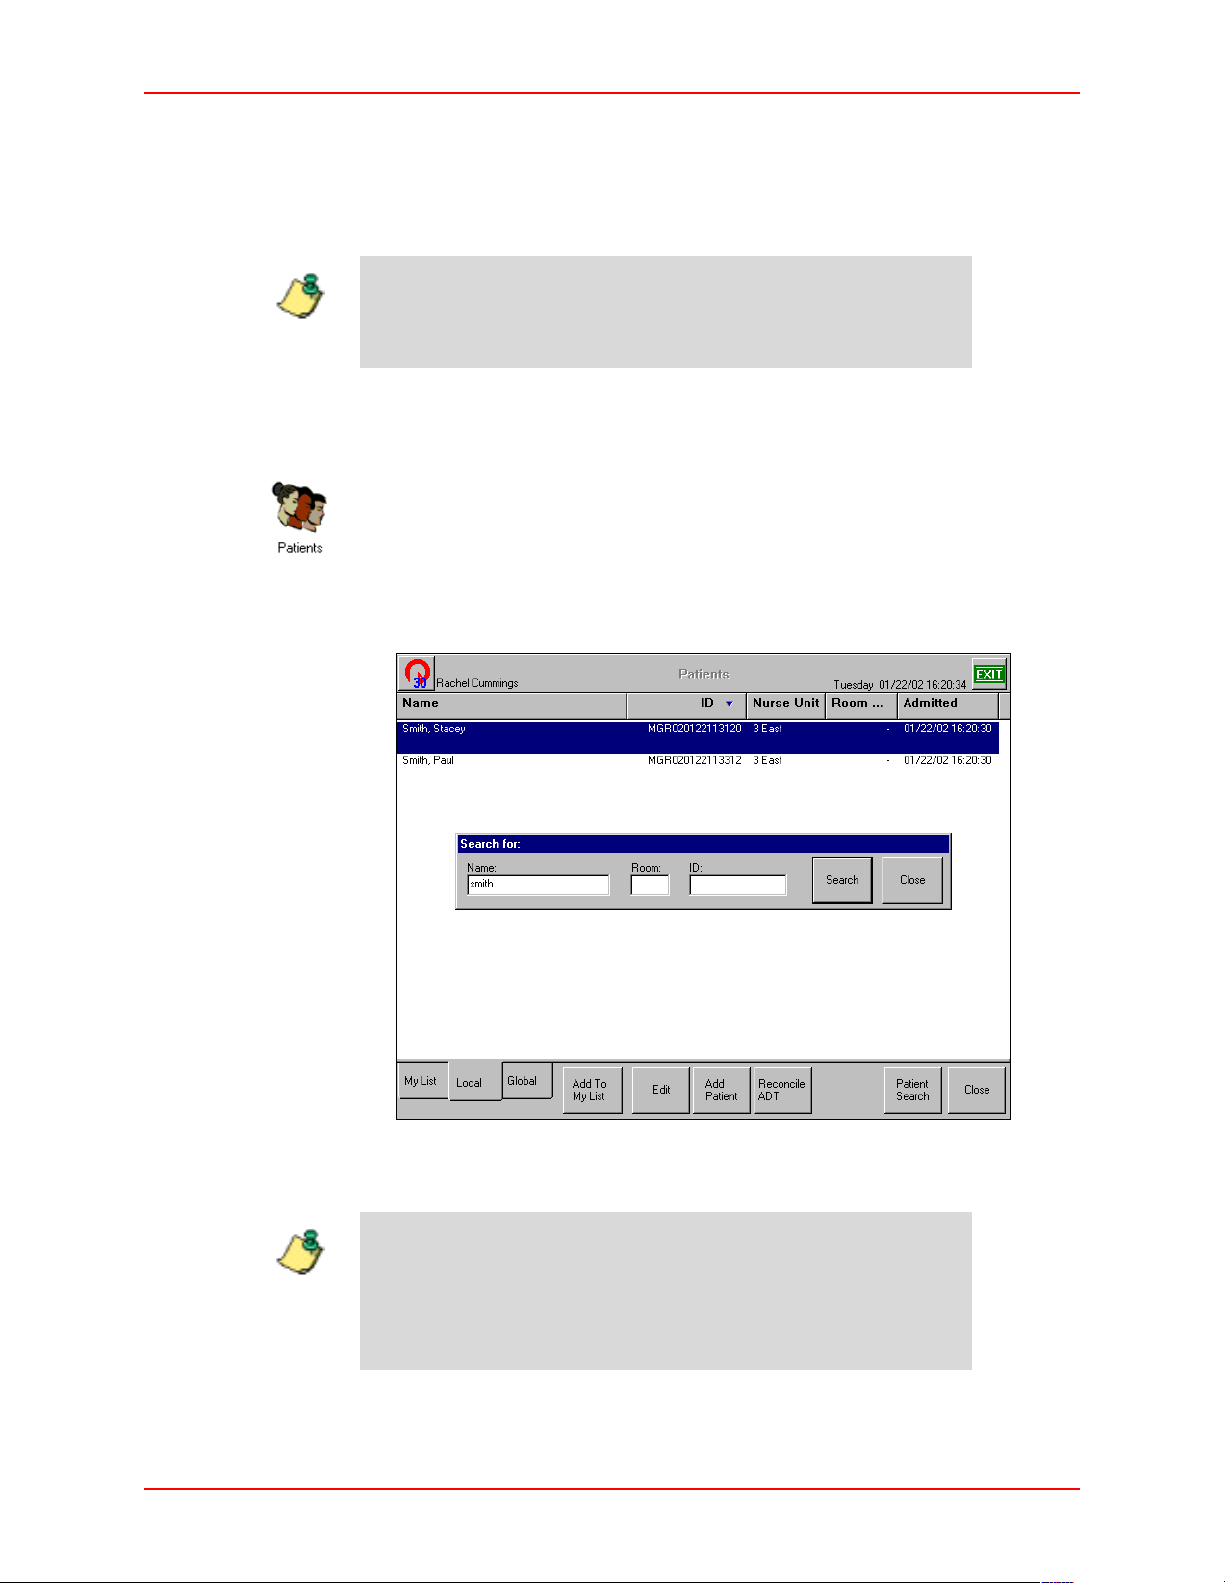
2. Type the first letters of the patient name.
The Search For window appears.
3. If necessary, press the
Search button or the ENTER key.
The patient appears in the Patients window.
If you type the entire patient name, the patient appears in the
patients window. If you type the first few letters of the patient
Note
name, a list of patients appears to select the appropriate patient.
You can add patients to the Patient List if they are not found in
the search.
3-20 JITRBUD Main User Guide
Page 57
Patients
4. To display the entire patient list again, delete the text in the Search For
window and press
Search.
The patient list appears.
Adding Patients
To add a patient
1. From the Main Menu, press the
Patients icon.
The Patients window appears.
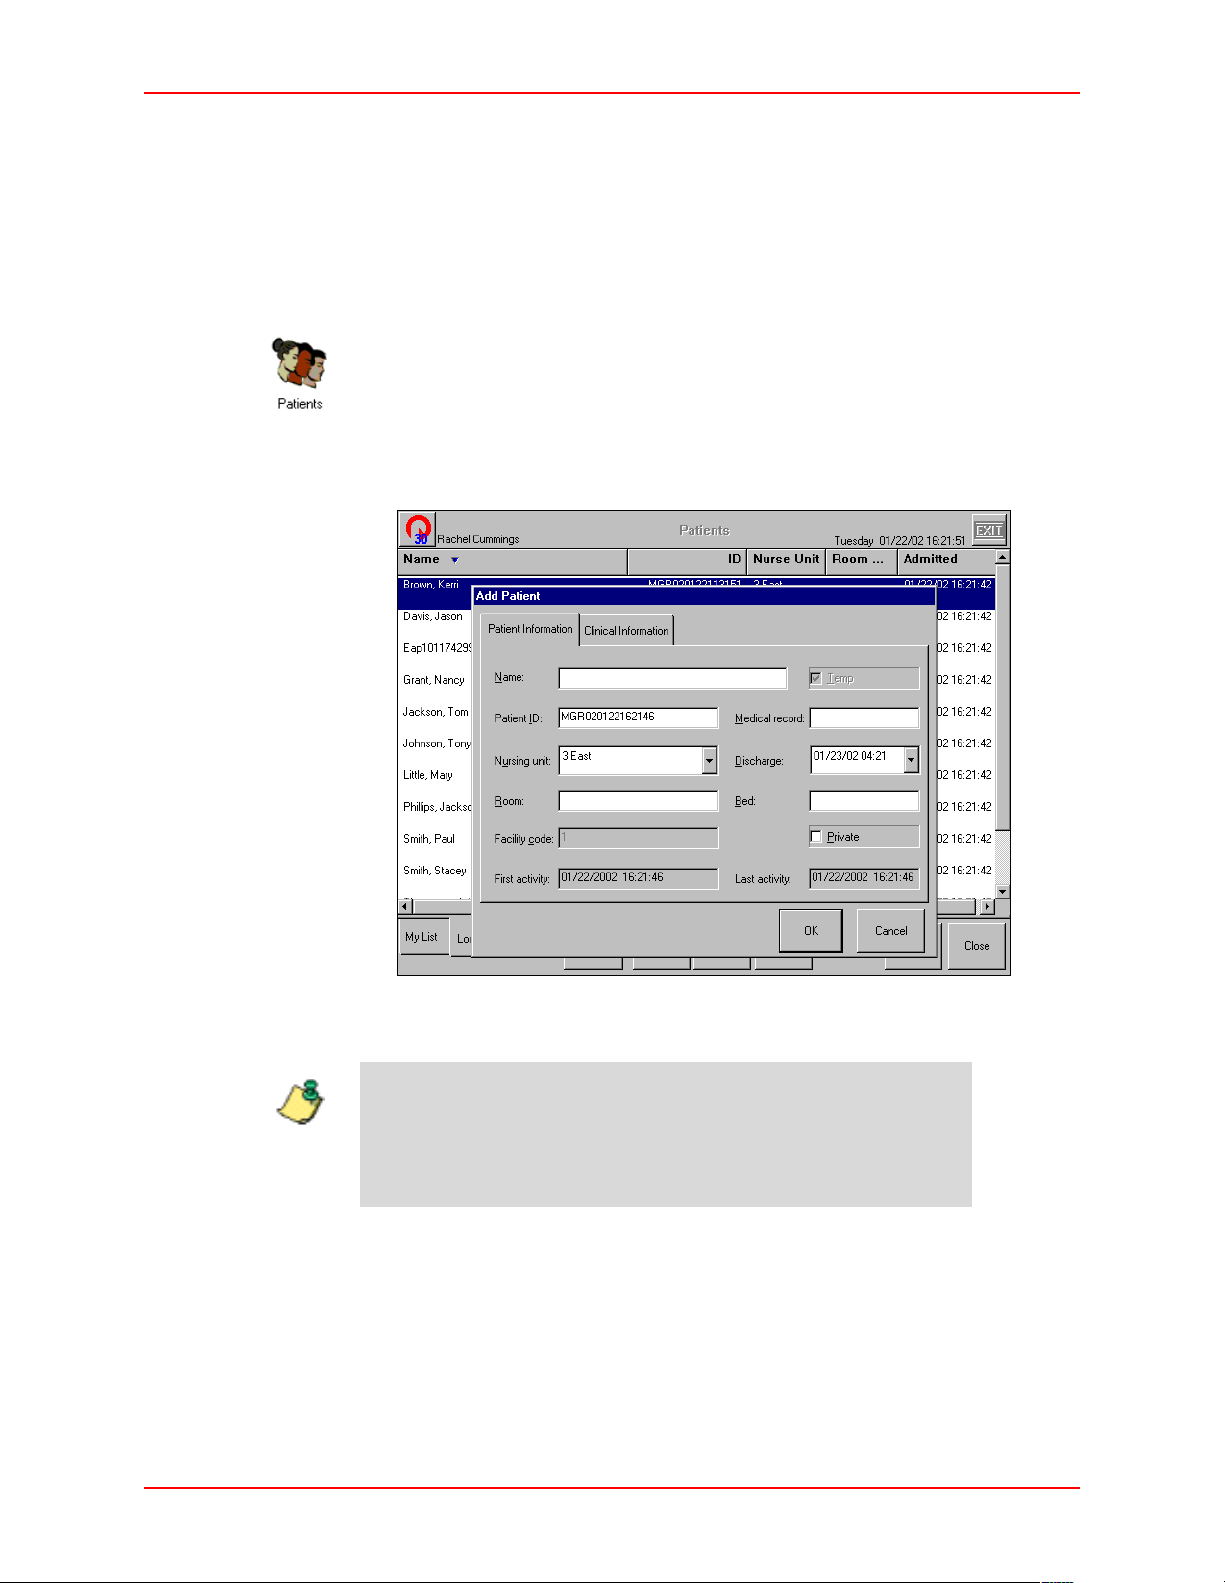
2. Press
Add Patient.
The Add Patient window appears with the Patients Information tab selected.
3. Enter the Patient’s Name and ID (Optional - Room Number, Medical Record
Number, Discharge Date, and Bed Number).
The Patient ID auto fills in with date and time created along with
the Discharge Date. To delete the predetermined ID, highlight
Note
and press the
DELETE key. You can then add a new patient ID if
available. Nursing unit defaults to the Nursing Unit that the
Station is assigned to.
4. Check the Private check box if you do not want the patient information listed
on the Global patient list.
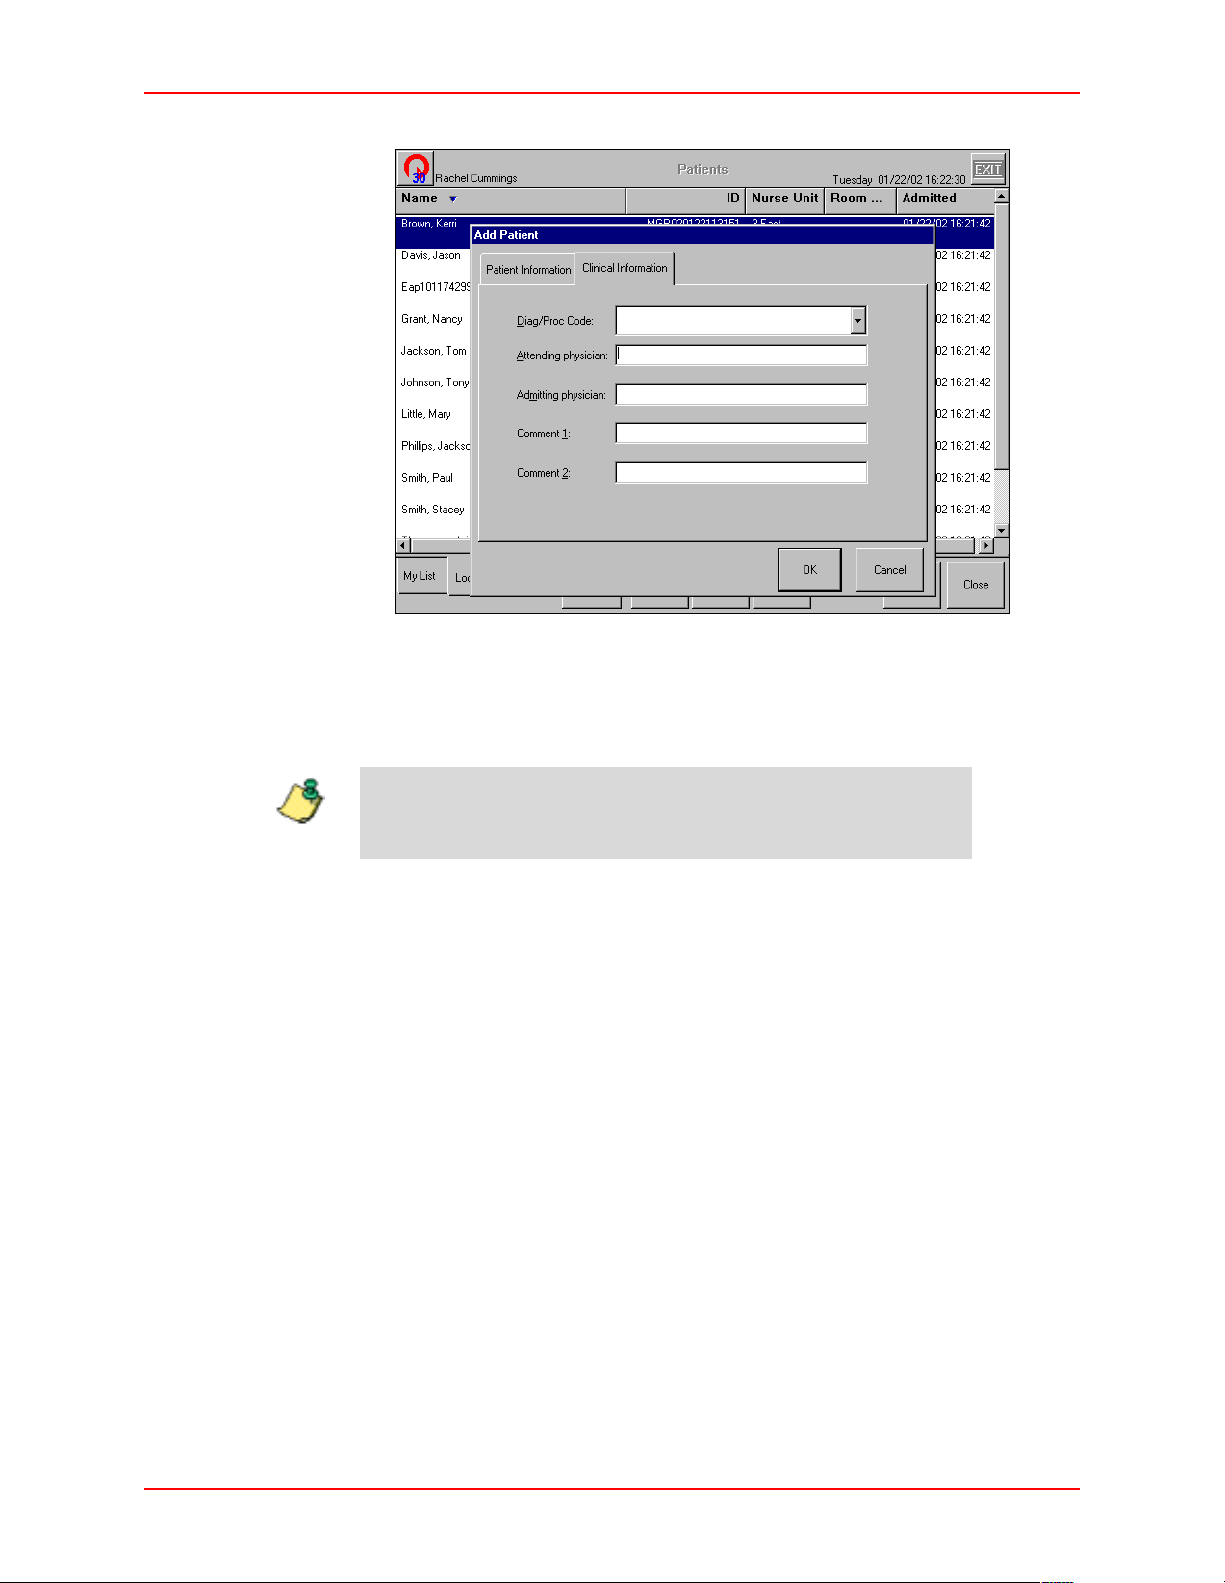
5. Select the Clinical Information tab.
JITRBUD Main User Guide 3-21
Page 58
Patients
6. (Optional) Enter the Attending Physician, Admitting Physician, and any
Comments if needed.
7. Press
OK to save the new patient information.
Note
8. Press
Close to return to the Main Menu, or Exit to log out of the Station.
You can also add a patient in the Take/Return screen.
3-22 JITRBUD Main User Guide
Page 59
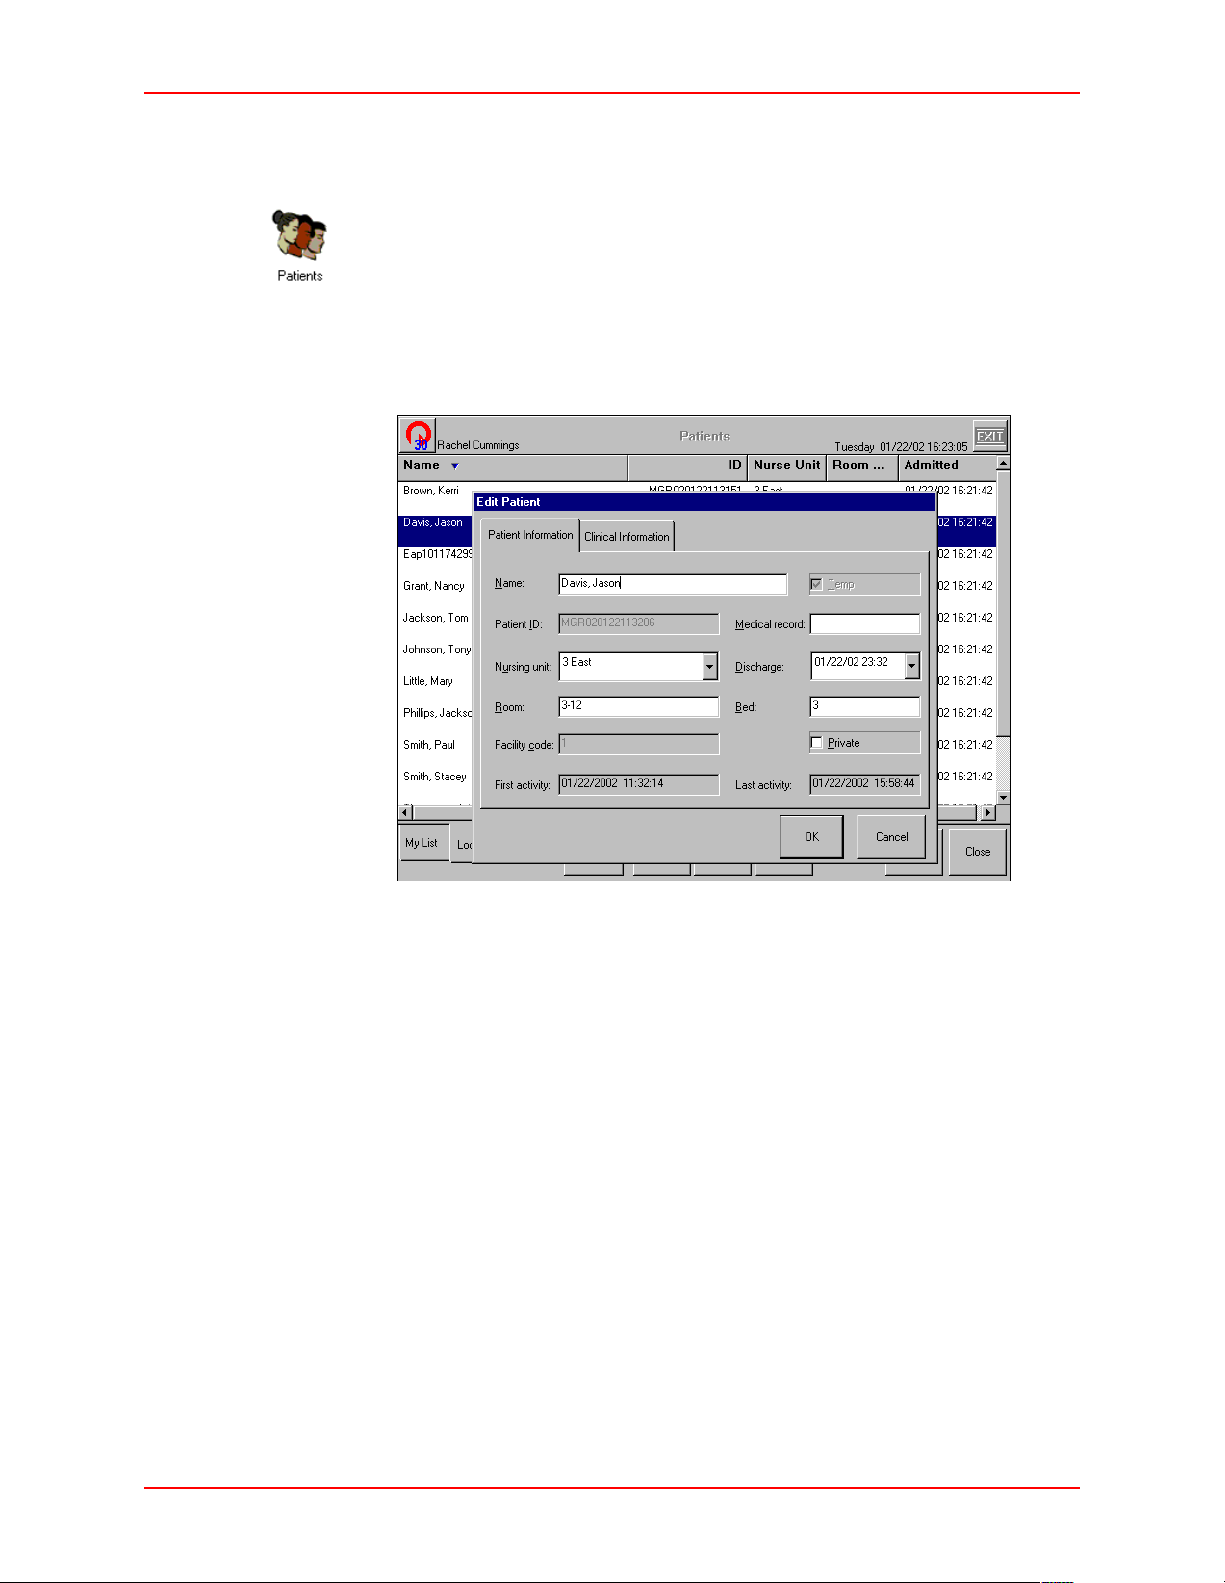
Editing Patients
To edit a patient
Patients
1. From the Main Menu, press the
Patients icon.
The Patients window appears.
2. Select a patient.
3. Press
Edit.
The Edit Patient window appears with the Patients Information tab selected.
4. Edit the Patient’s Name, Nursing Unit, Room Number, Medical Record
Number, Discharge Date, and Bed Number.
5. Select the Private check box if this patient’s information is not to be viewed
on the Global patient list.
6. Select the Clinical Information tab.
7. (Optional) Edit the Attending Physician, Admitting Physician, and any
Comments if necessary.
8. Press
9. Press
OK to save the new patients information.
Close to return to the Main Menu, or Exit to log out of the Station.
JITRBUD Main User Guide 3-23
Page 60
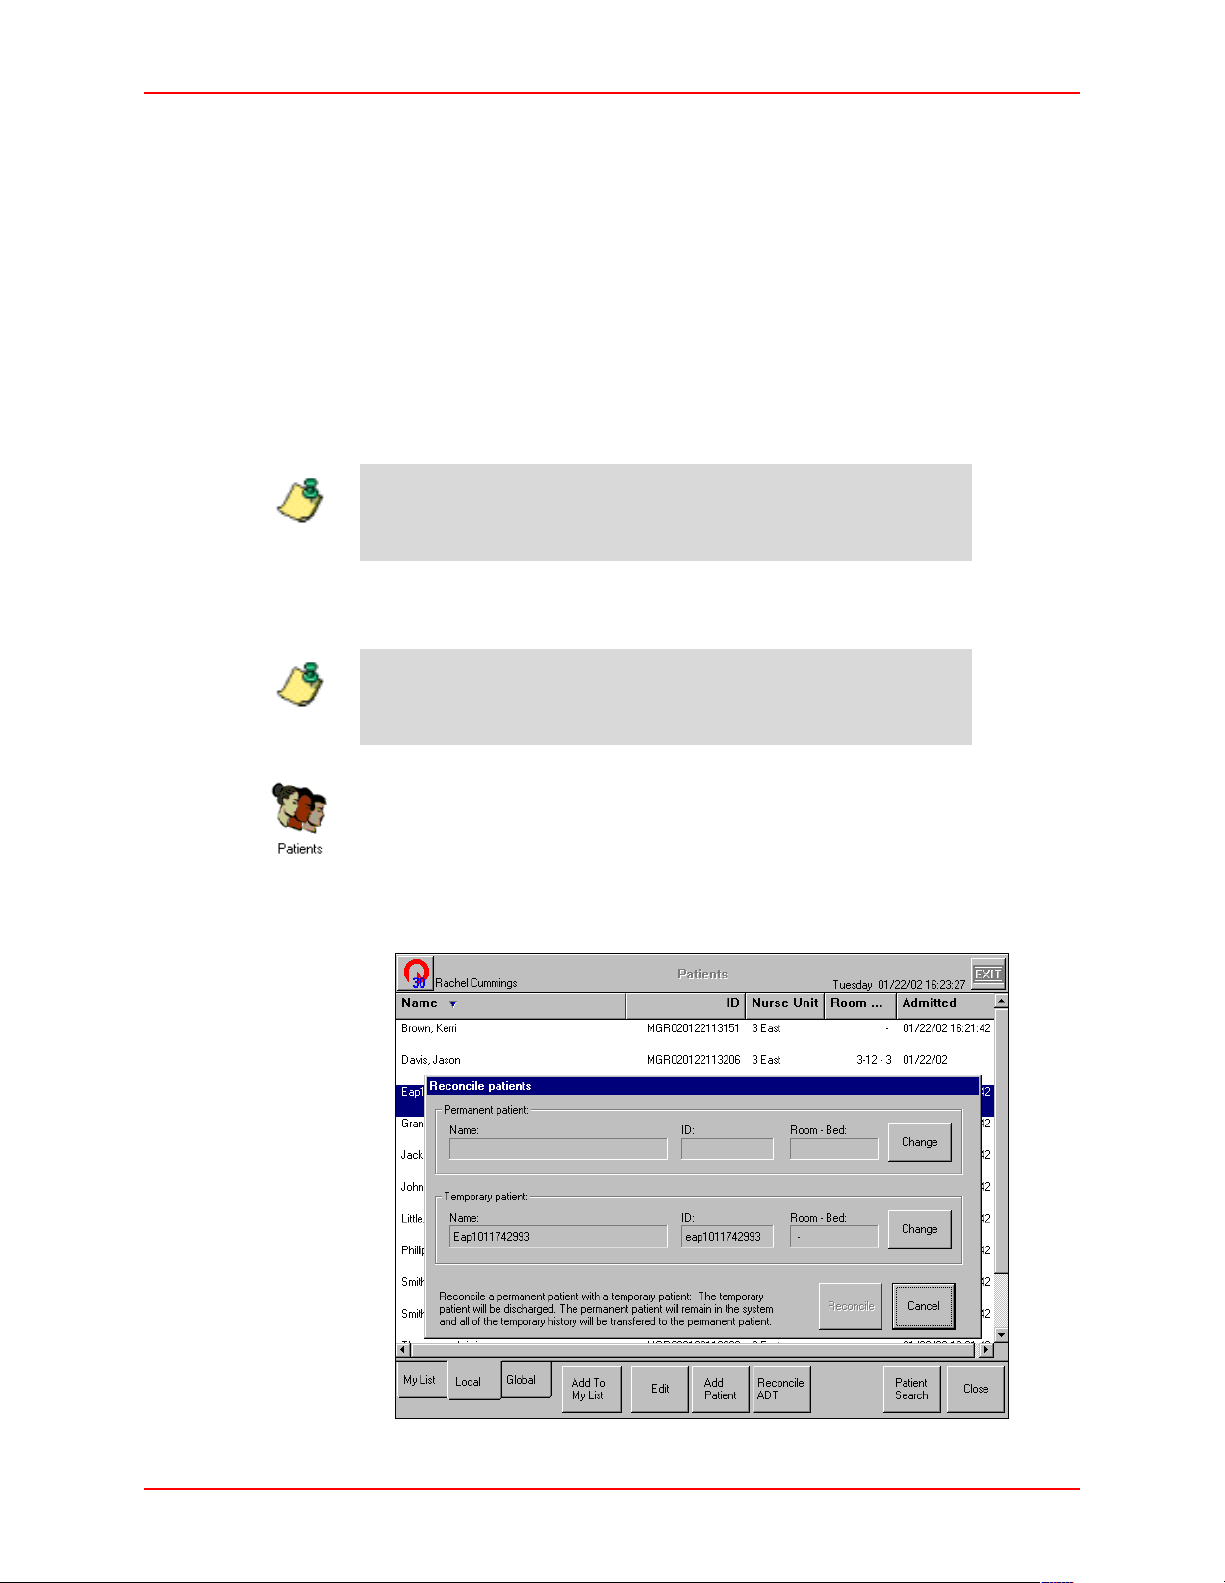
Patients
Reconcile ADT
Use the Reconcile ADT feature to match temporary patient records with
permanent patient records. The temporary patient transaction information is
transferred to the permanent patient record.
The Reconcile ADT feature is necessary when a user takes an item for a patient
that is not in the system (for example, when the patient record has not come across
the ADT interface into Pyxis). The user can create a temporary patient record or
use the Emergency Access feature. The Emergency Access feature automatically
creates an Emergency Access Patient (EAP) record. Without the Reconcile ADT
feature, the process of reconciling temporary patient activity to the permanent
patient record must be completed outside of the Pyxis system.
The Procar manages the billing of the reconciled patients.
Note
You must have patient management rights to reconcile a temporary patient record
with a permanent patient record.
Note
The Reconcile ADT feature is also available at the SUPPLYCENTER
Console.
To reconcile ADT
1. From the Main Menu, press the
Patients icon.
2. Select a temporary patient.
3. Press
Reconcile ADT.
The Reconcile Patients window appears.
3-24 JITRBUD Main User Guide
Page 61
Patients
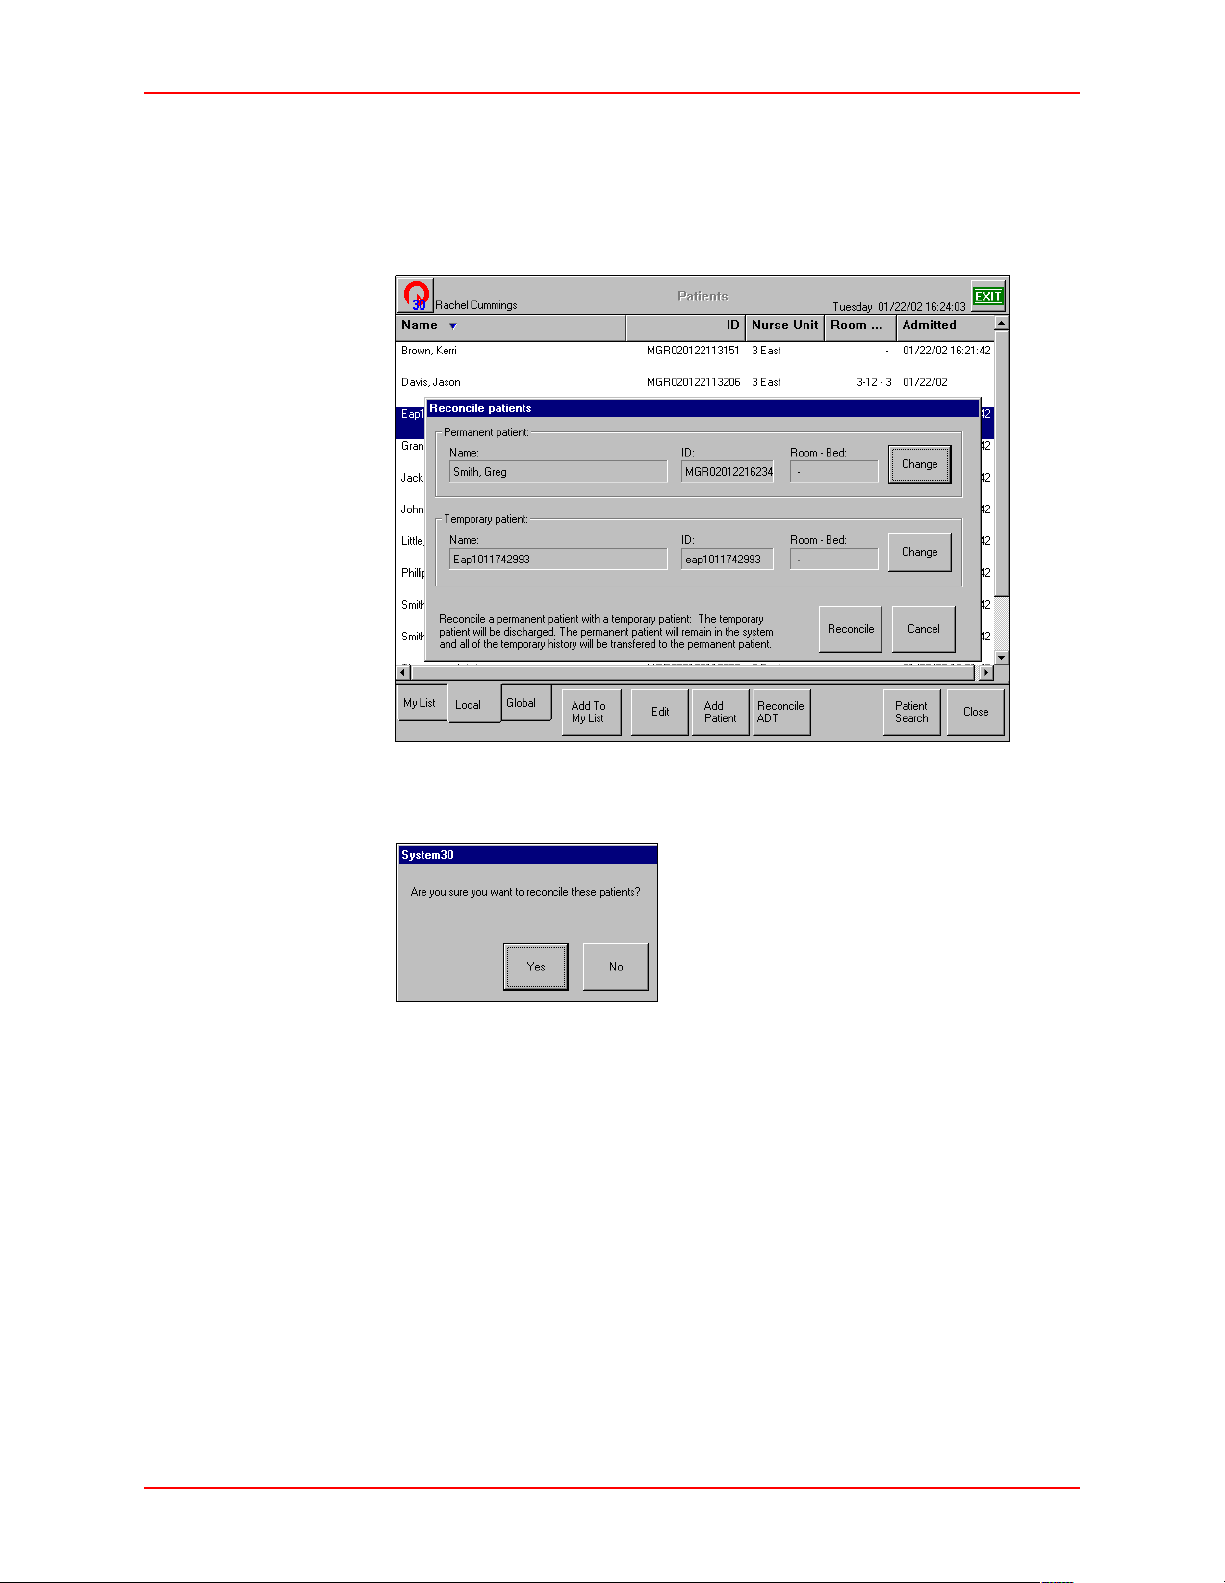
4. Press the Change button next to the Permanent Patient Room-Bed field to
access the list of permanent patients.
5. Select the permanent patient to reconcile.
6. Press
7. Press
Continue.
Reconcile.
A confirmation window appears.
8. Press
Yes to reconcile the patient records or press No to cancel the transaction.
If you select Yes, the temporary patient is deleted and all the temporary
history is transferred to the permanent patient.
9. Press
JITRBUD Main User Guide 3-25
Close to return to the Main Menu, or Exit to log out of the Station.
Page 62
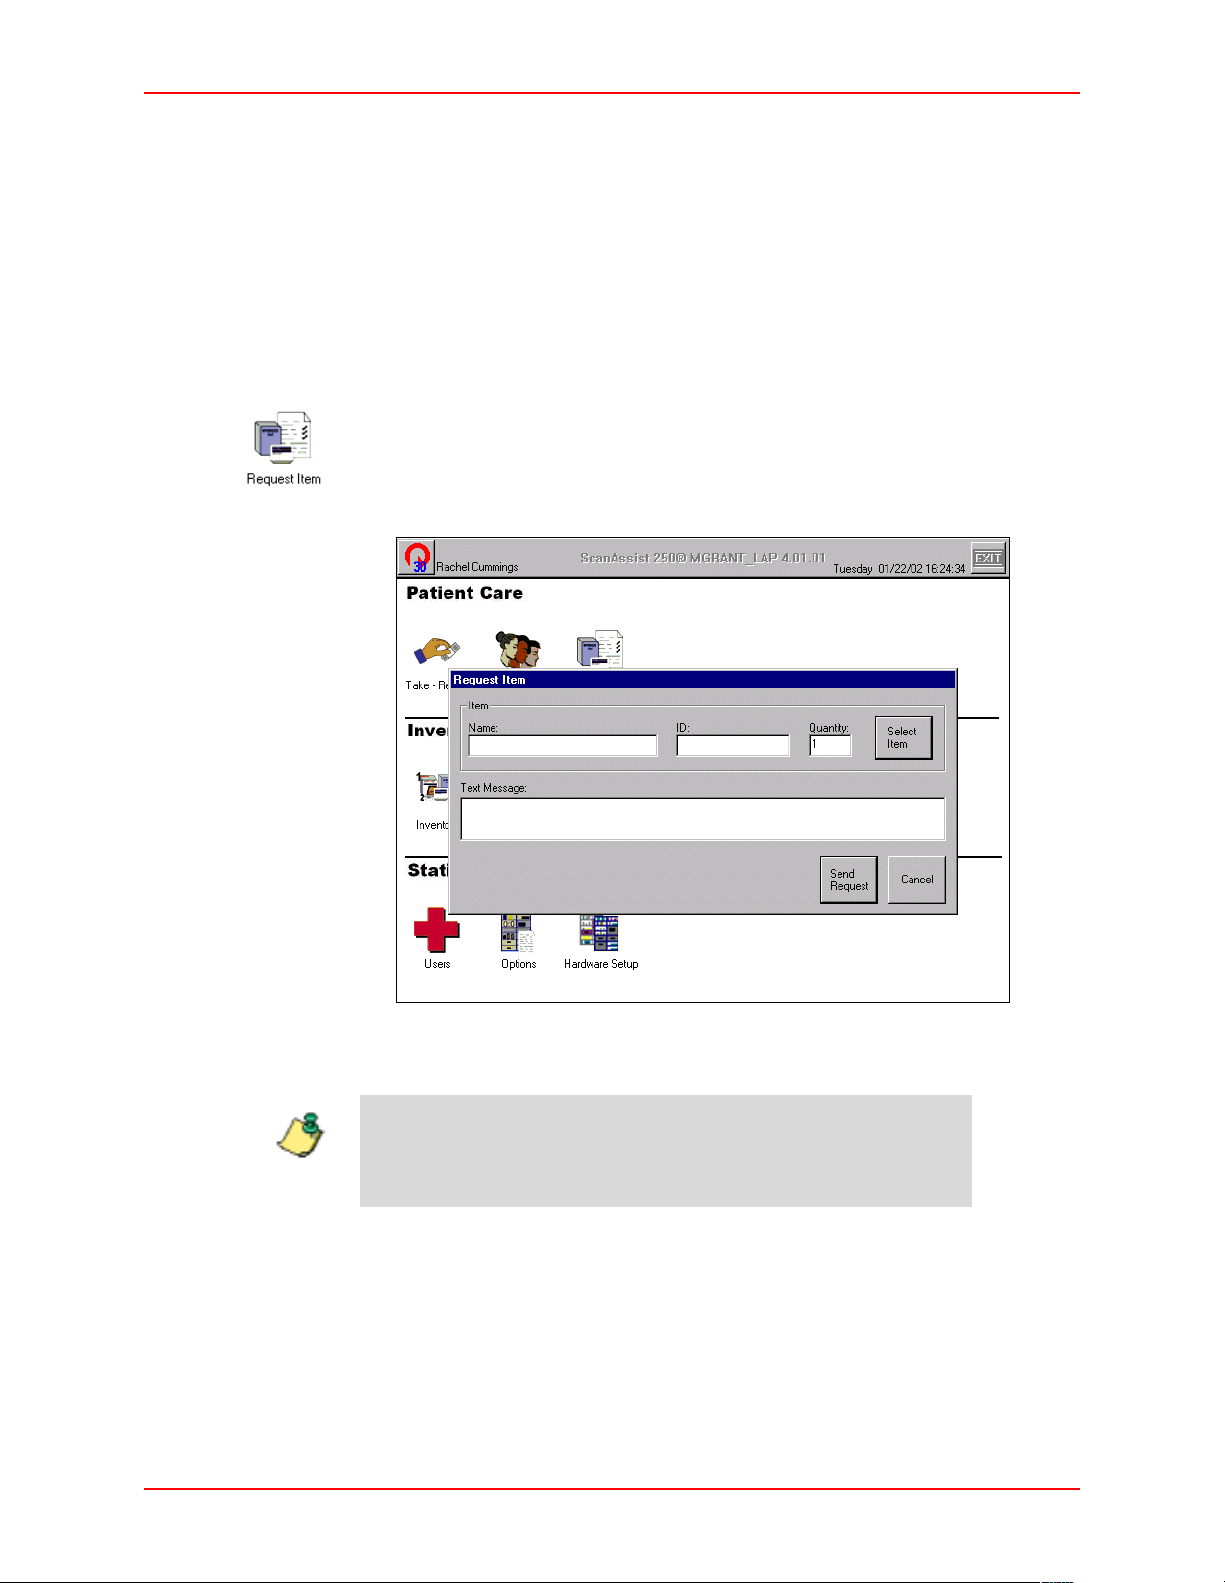
Request Item
Request Item
Use the Request Item feature to send a message to the SUPPLYCENTER Console
when a supply is needed at the Station. The message sent to the S
Console contains the Item name, Item ID, User name, User ID and a free format
message. A message is printed in the Attention window and a report is printed at
UPPLYCENTER Console.
the S
Requesting Items
To request items
UPPLYCENTER
1. From the Main Menu, press the
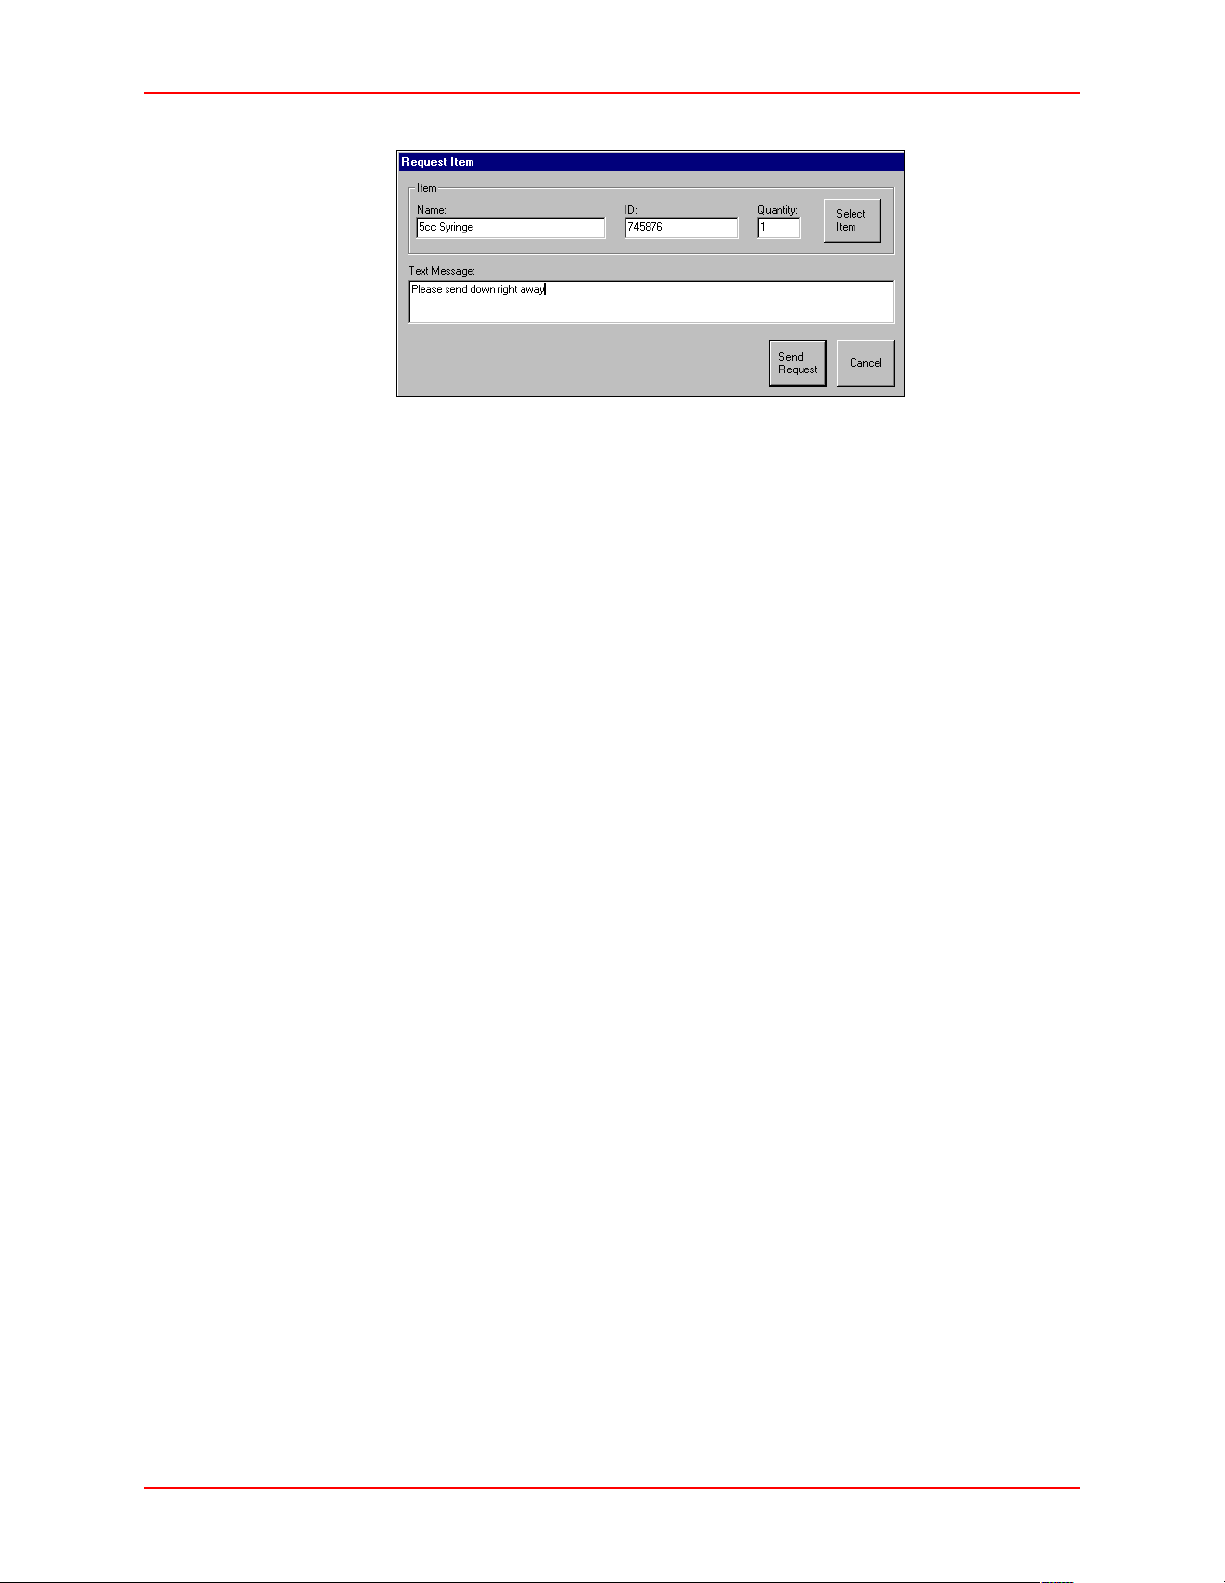
The Request Item window appears.
2. Press
Select Item.
Request Item icon.
The Item List window appears.
To quickly select the items, use the Search For box, the PAGE UP
PAGE DOWN keys, or the UP and DOWN arrows to scroll through
and
Note
the list until the name appears.
3. Select the item and press
Request Item.
The selected item appears in the Item Name field.
3-26 JITRBUD Main User Guide
Page 63
Request Item
4. Enter the quantity needed in the Quantity field and enter any additional notes
(optional) in the Text Message field.
5. Press
Send Request to complete the transaction.
The message is sent to the S
UPPLYCENTER Console.
JITRBUD Main User Guide 3-27
Page 64

Request Item
3-28 JITRBUD Main User Guide
Page 65
Chapter
4
Inventory Management
Functions
This chapter provides the following Inventory Management functions accessed
from the Inventory Management section of the Main Menu. The functions you
have access to depend on the privileges that have been assigned to you.
• Inventory—maintain current and accurate counts of items at the Station.
• Load-Unload—assign an item to a specific location in a Station. The Unload
function removes items from the Station.
• Item Alias—create an alternate name for an item. The item alias can be
added, edited, or deleted.
• Refill—replenish items at the Station. You can refill items at Below Par, At
Refill, At Critical, or do a Spot Refill.
• Refill by Request Order—replenish items at a Station that are associated
with a PO# generated from the S
UPPLYCENTER Console or Vendor.
JITRBUD Main User Guide 4-1
Page 66

Inventory
All Station items are tracked by bin location. The bin is a location of a single
supply. A bin will be in one of three states:
• Loaded—supplies have been assigned to and physically placed in the bin
• Unloaded—supplies have not been assigned to or physically placed in the bin.
• Pending—supplies have been assigned to but not yet physically placed in the
bin.
Inventory
Inventory is the process of verifying the current supply of items in one or more
bins. The Inventory feature uses the standard count verification process for each
bin. The edit function provided in Inventory allows the User to update Par, Refill
Point, Critical Low, and Current fields for the bin. Flags for the Expiring Item,
Standard Stock and Chargeable Item can also be set. The Expiration date for an
expiring item can be set and any items that are expired can be outdated.
4-2 JITRBUD Main User Guide
Page 67
Searching for Items
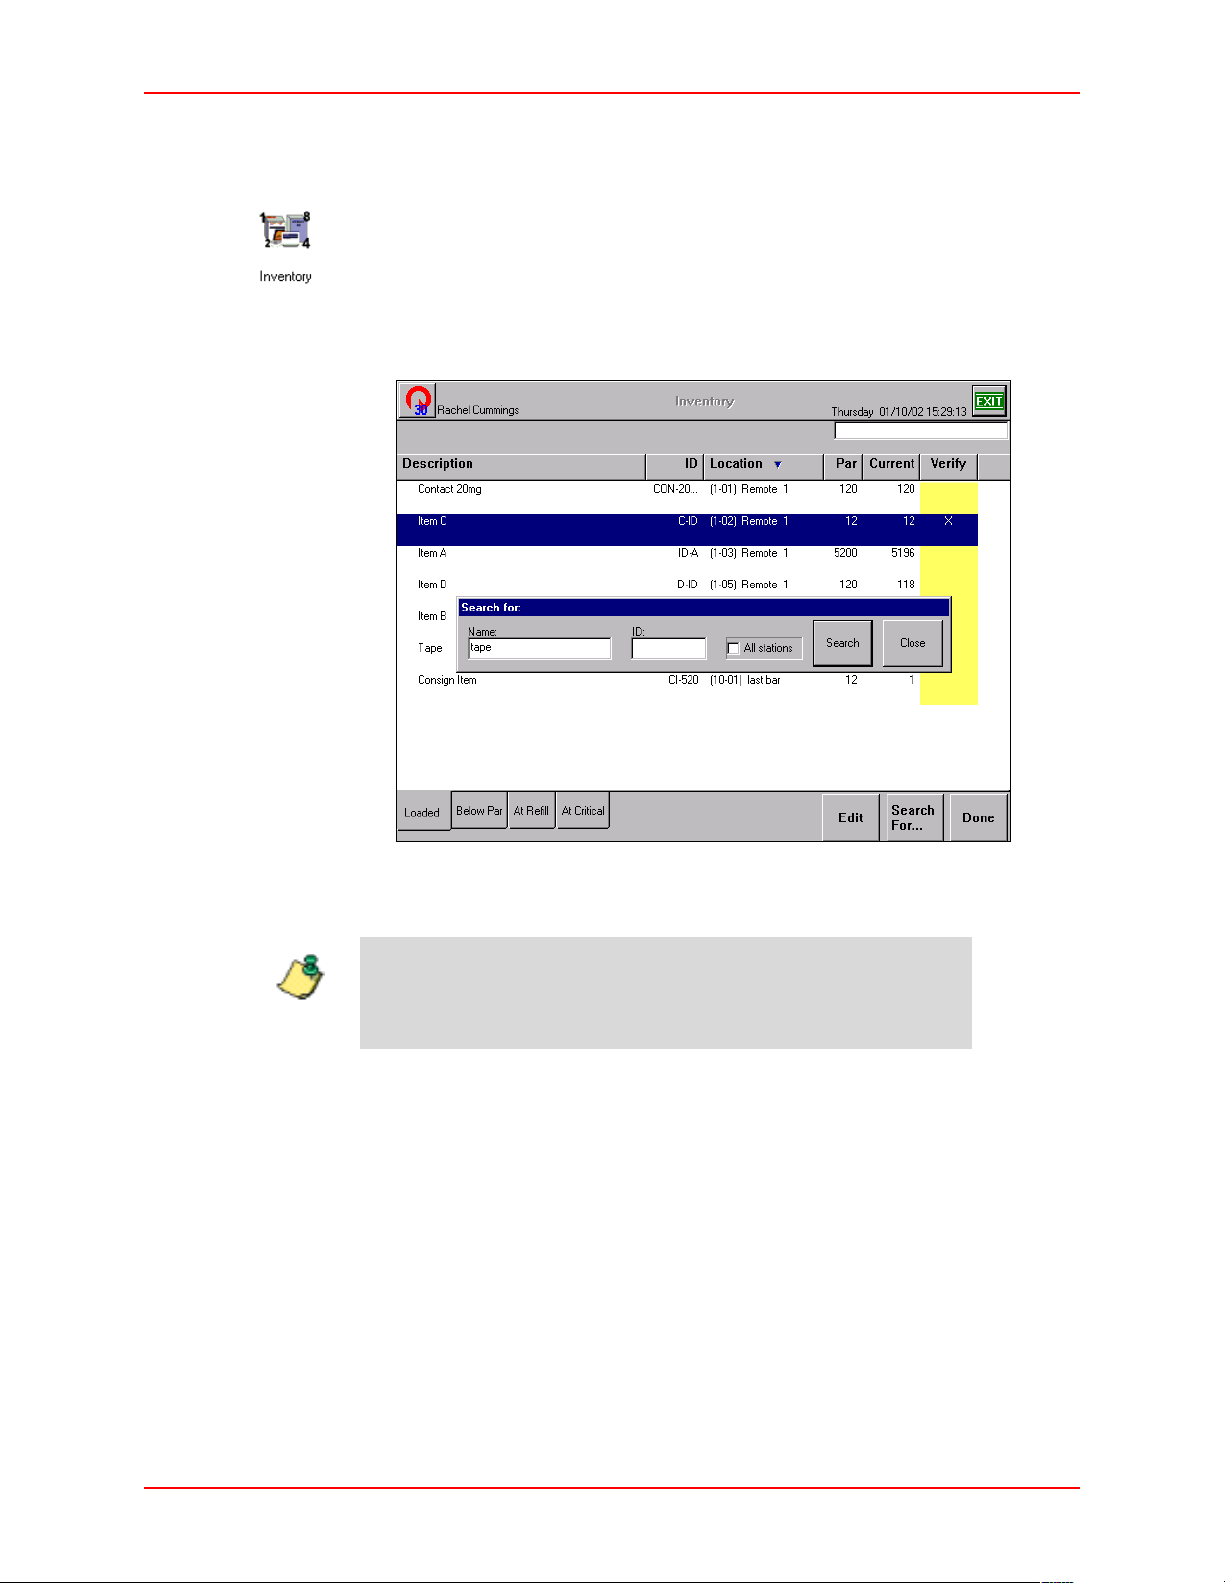
To search for an item
Inventory
1. From the Main Menu, press the
The Inventory window appears.
2. Press
Search For.
The Search For window appears.
Inventory icon.
Note
3. Type the first letters of the item name and press
Search.
The item appears in the Inventory window.
If you type the entire item name, the item appears in the
inventory window. If you type in the first few letters of the item
name, a list of items appears to select the appropriate item.
4. To display the entire item list again, delete the text in the Search For window
and press
Search.
The item list appears.
JITRBUD Main User Guide 4-3
Page 68
Inventory
Verifying Quantity
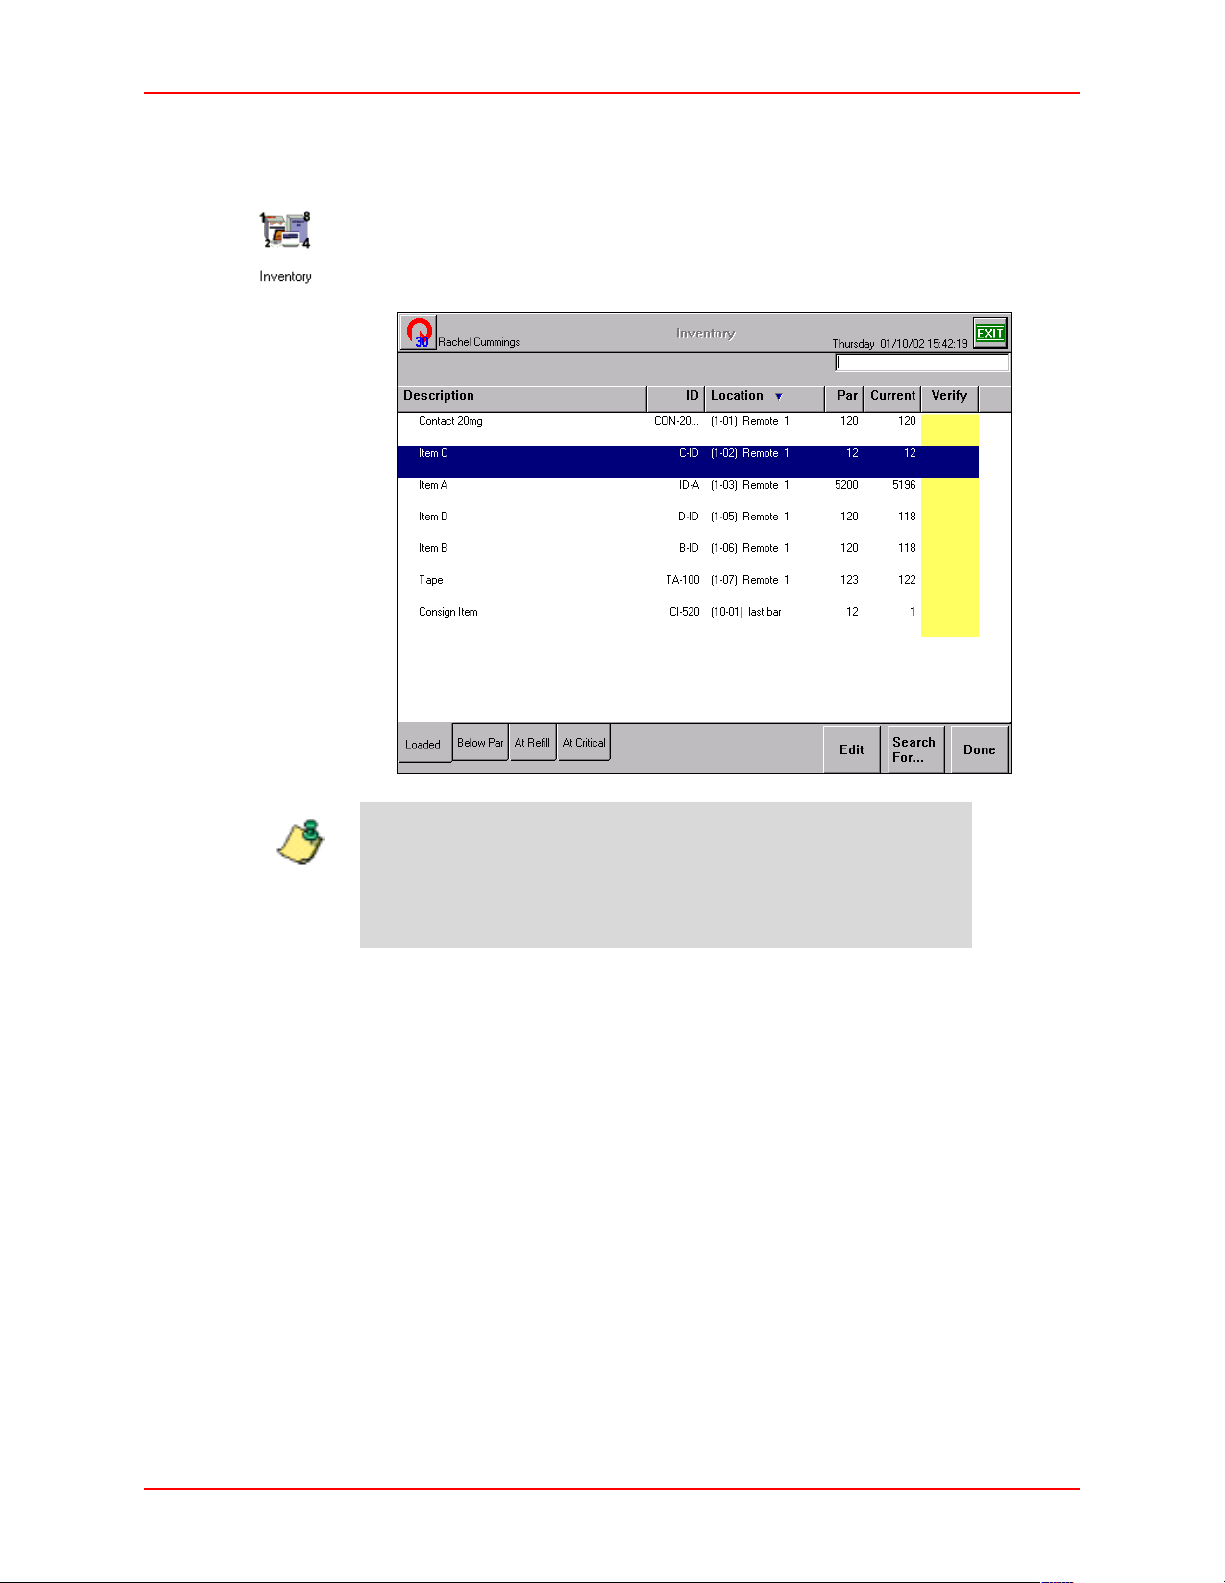
To verify quantity
Note
1. From the Main Menu, press the
Inventory icon.
The Inventory screen appears.
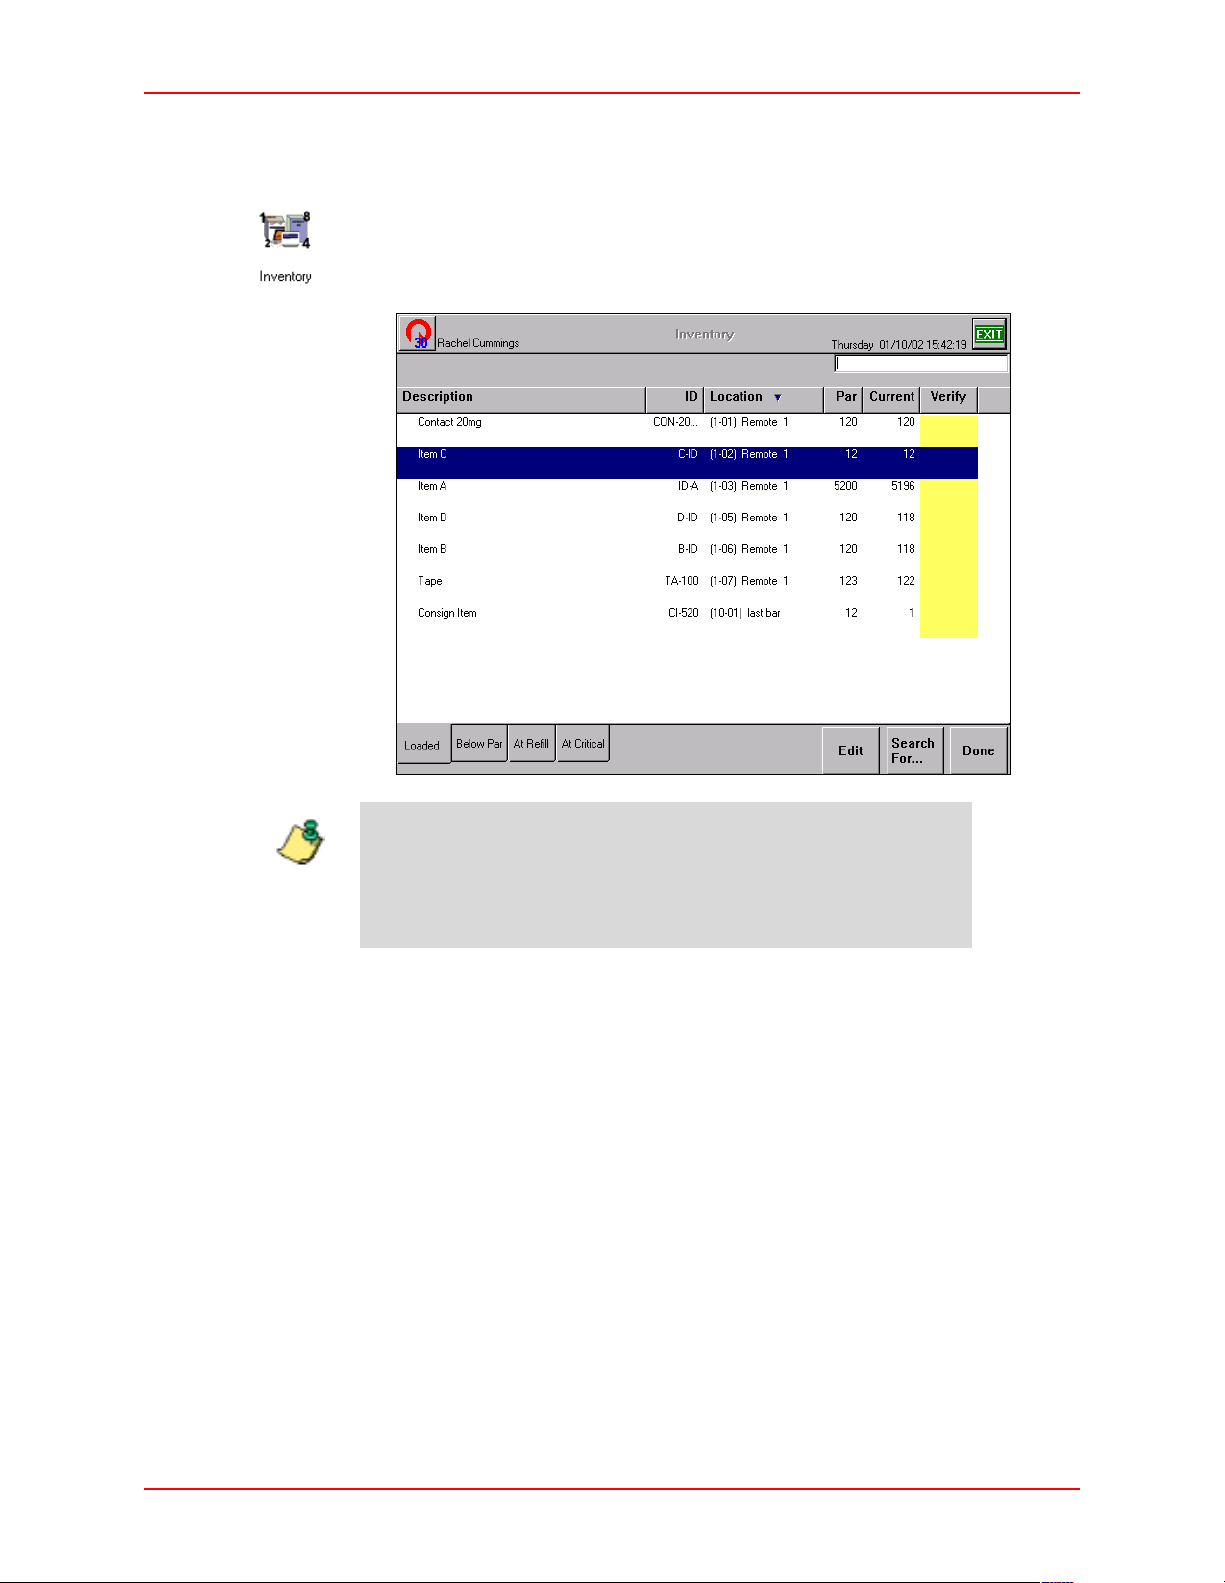
Notice the tabs at the bottom of the screen. The Loaded tab lists
all loaded items in the Station. The Below Par tab lists only
items that are at or below Par levels. The At Refill tab lists only
items at Refill level. The At Critical tab lists all items at or below
Critical levels.
2. Select the item to verify by pressing the
RBUD transmitter.
JIT
Take or Return button on the
An X appears in the Verify column to indicate the item has been selected for
inventory.
3. Count the quantity of the item.
4. If you need to edit the item information, press Edit. If not, repeat Steps 2-3 for
each Inventory item.
4-4 JITRBUD Main User Guide
Page 69
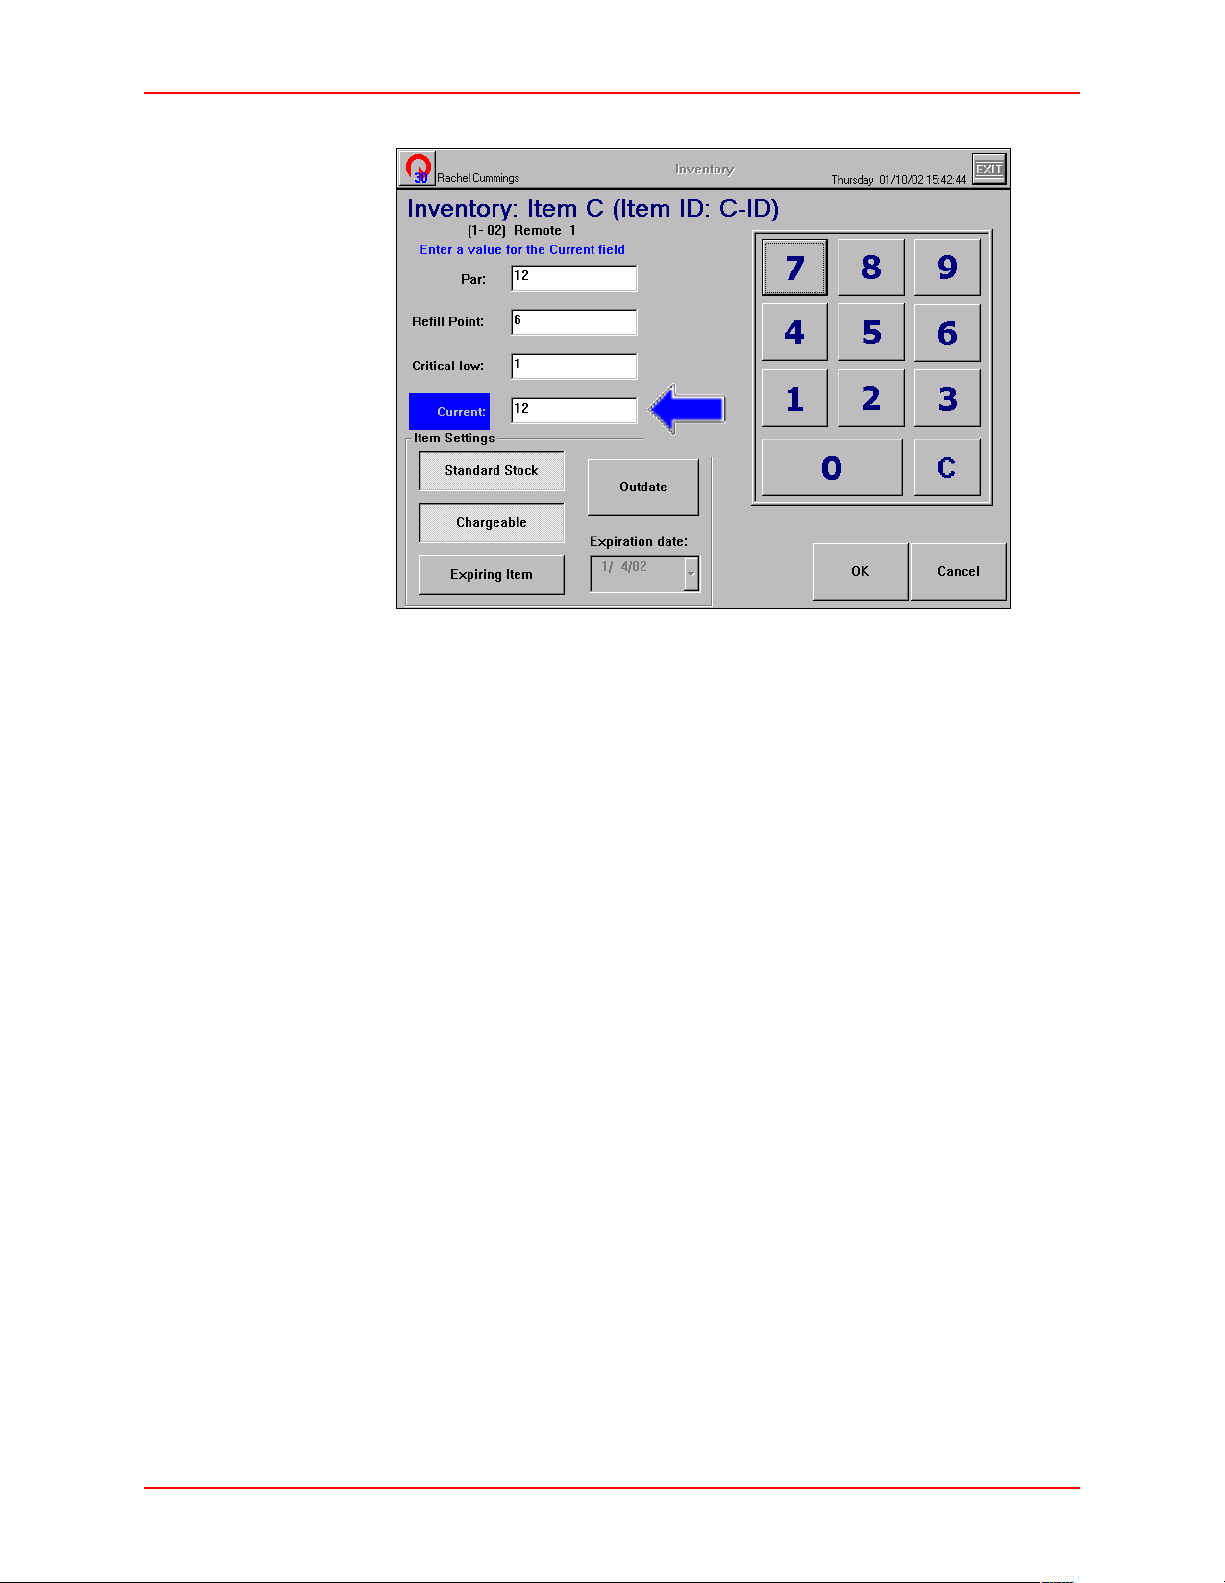
5. Edit the quantity in the Current field. Press OK.
Inventory
6. Press
Done to return to the Main Menu, or Exit to log out of the Station.
JITRBUD Main User Guide 4-5
Page 70
Inventory
Editing Items in Inventory
To edit an item in Inventory
Note
1. From the Main Menu, press the
Inventory icon.
The Inventory screen appears.
Notice the tabs at the bottom of the screen. The Loaded tab lists
all loaded items in the Station. The Below Par tab lists only
items that are at or below Par levels. The At Refill tab lists only
items at Refill level. The At Critical tab lists all items at or below
Critical levels.
2. Select the item on the screen, or press the
RBUD transmitter.
JIT
3. Press
4-6 JITRBUD Main User Guide
Edit.
Take or Return button on the
Page 71
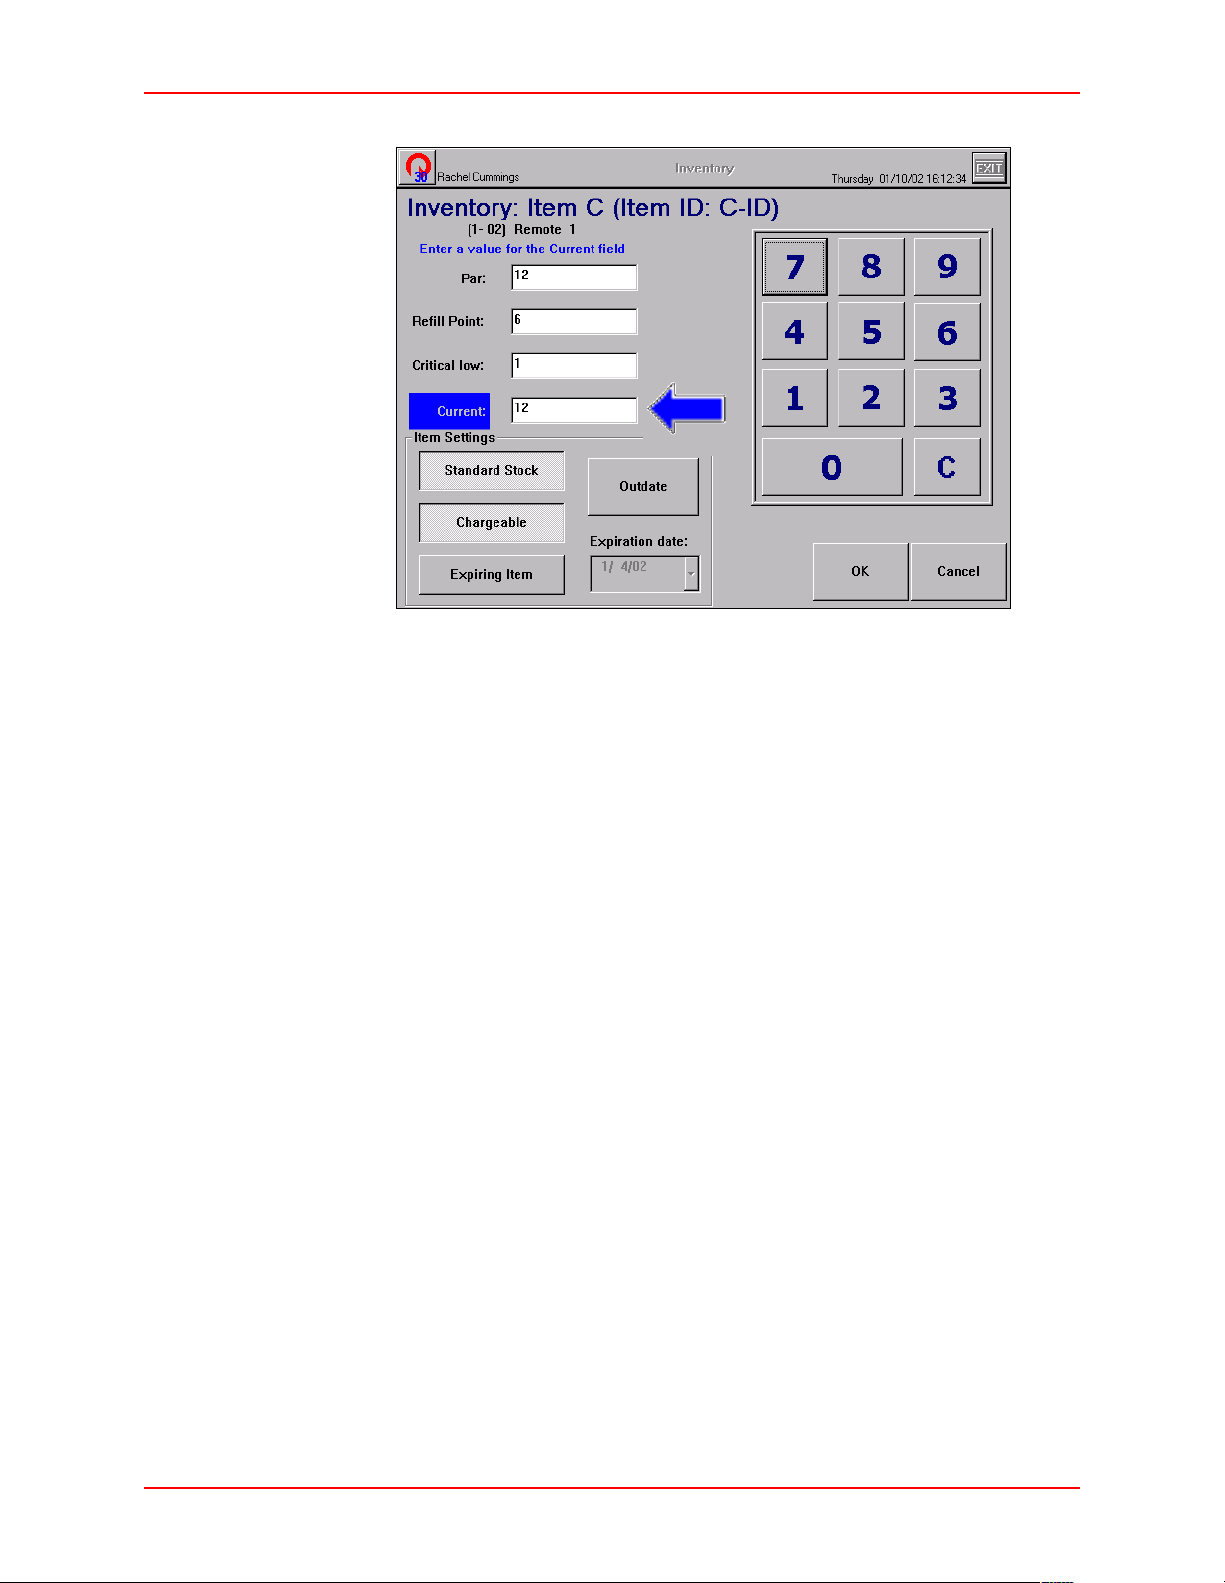
4. Edit the item information as necessary.
Inventory
• Press the
• Press the
• Press the
5. Press
6. Press
Expiring Item button if item has an expiration date. Select the
Expiration date
OK.
Done to return to the Main Menu, or Exit to log out of the Station.
for the item.
Standard Stock button to label the item as standard stock.
Chargeable button to allow the item to be charged to patients.
JITRBUD Main User Guide 4-7
Page 72
Inventory
Note
Outdating Expired Items in Inventory
The Outdate feature is used to outdate an item and remove it from inventory due
to expiration. Items that are configured with an expiration date will be tracked by
the system and a calendar icon will appear on the Inventory list when the item is
expired, or will expire within the specified Item outdated warning days. When an
item that has a calendar icon is selected for Inventory, an expiration warning
message will appear.
The Expiring Item option and Expiration Date is assigned to an item
in the Edit Bin window.
The Item outdated warning days is the number of days before an
item is set to expire that the system is configured to display the
calendar icon. The Item outdated warning days is configured in
Station Options on the Time Options tab. For more information, see
Station Options on page 5-25.
You can also outdate an item that is not configured with an expiration date.
However, if an item is not configured with an expiration date in the system, the
calendar icon will not appear for the item and the system will not warn users to
check the expiration date of the item.
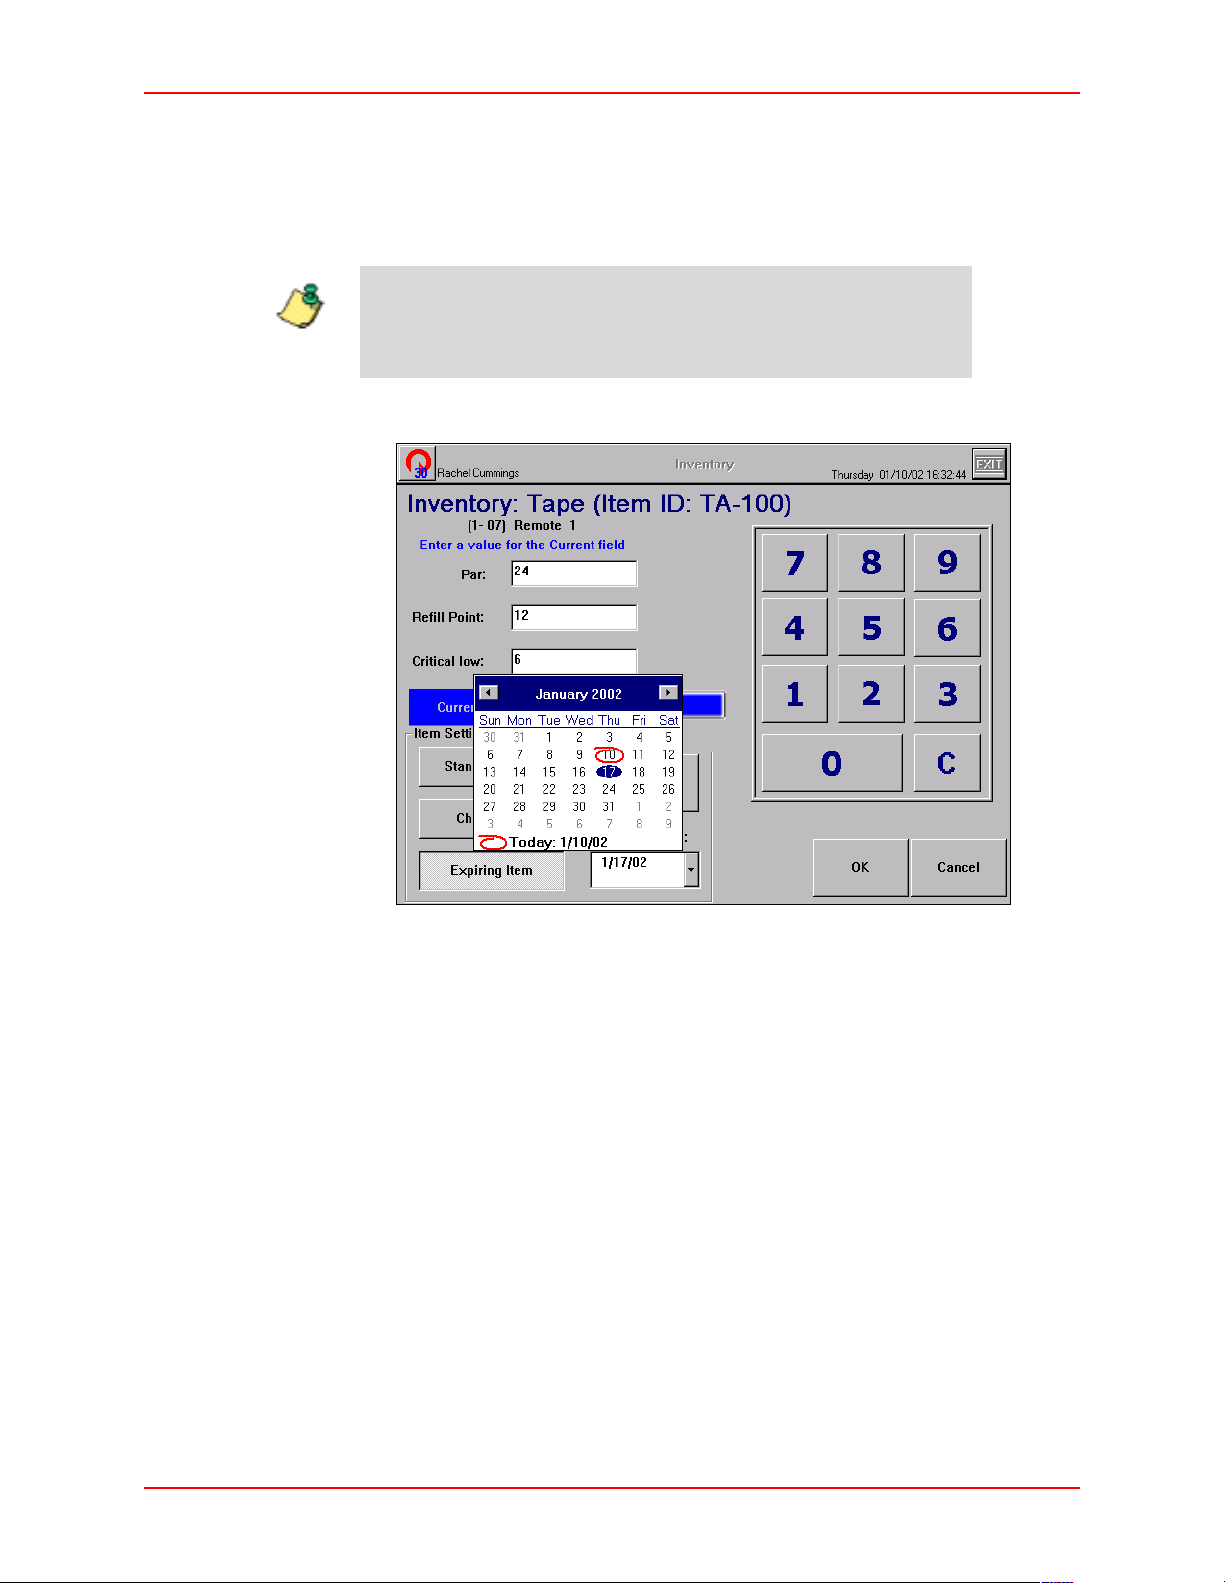
To outdate an e x pi red item in Inventory
1. From the Main Menu, press the
Inventory icon.
2. Select the item on the screen, or press the
RBUD transmitter.
JIT
3. Press
4. Press
Edit.
Outdate.
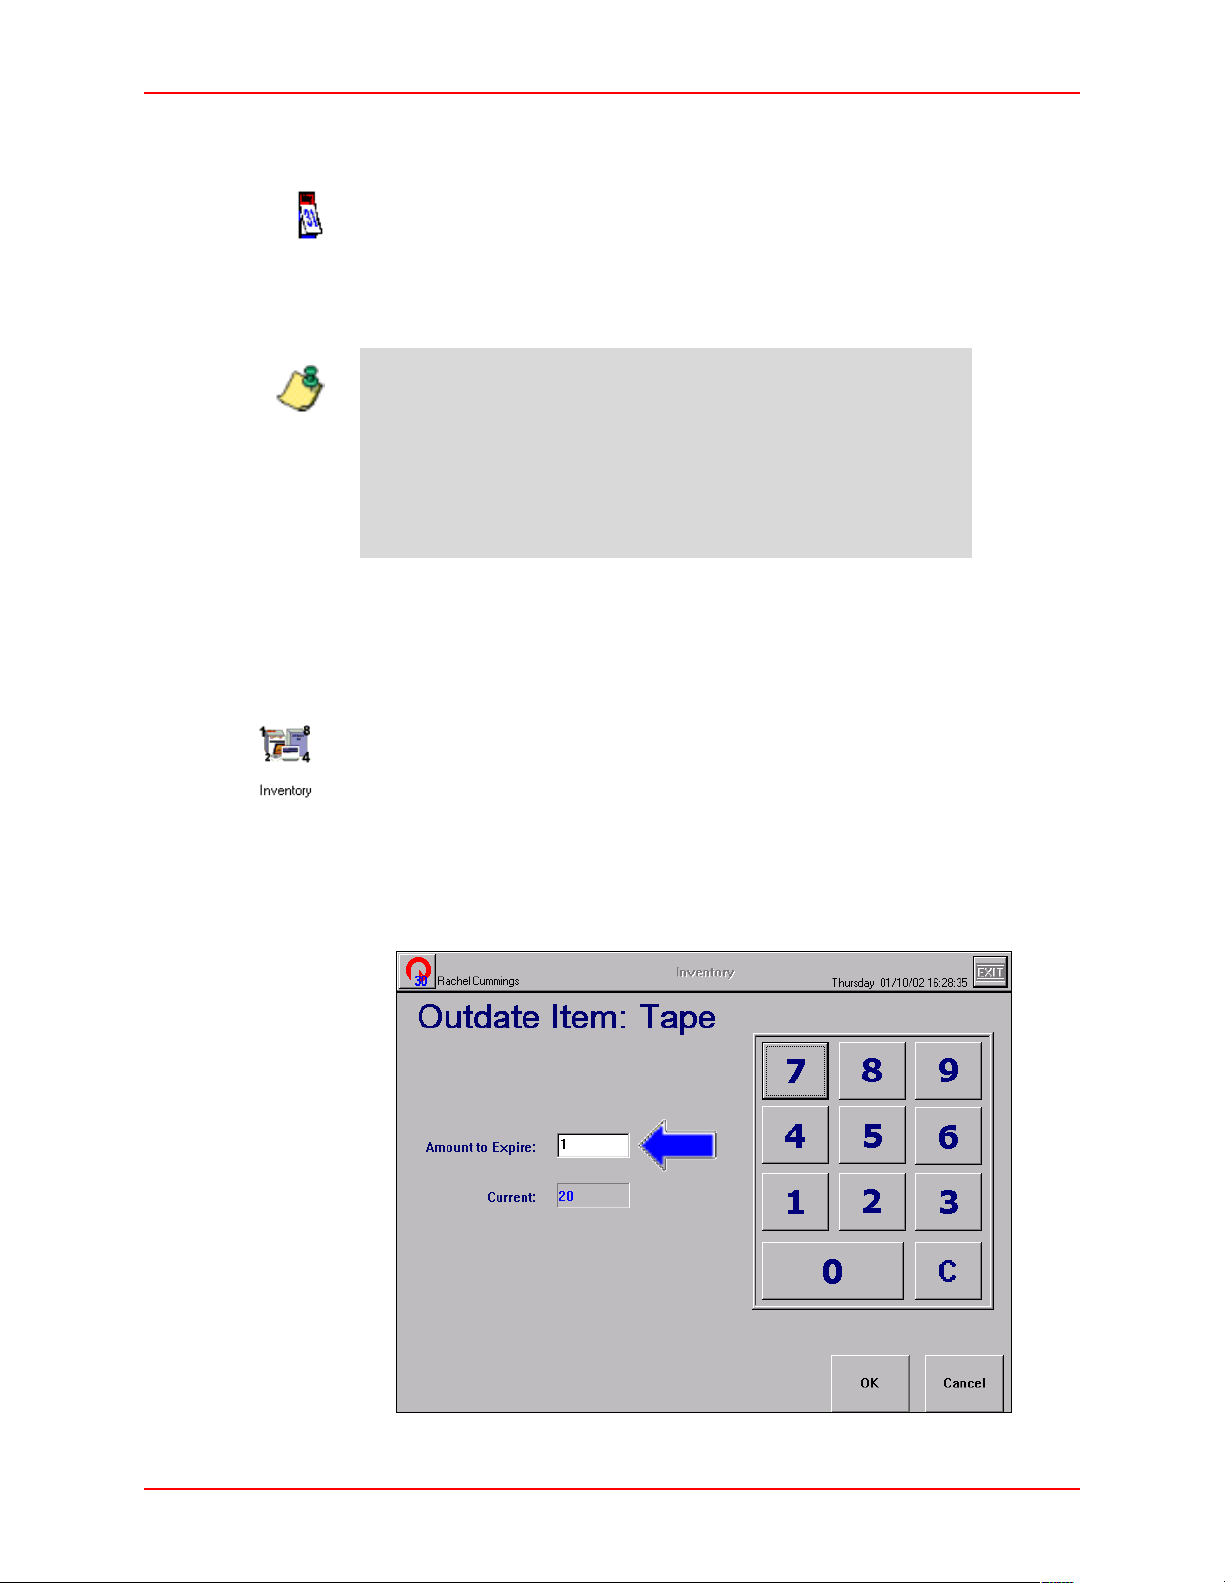
The Outdate Item screen appears.
Take or Return button on the
4-8 JITRBUD Main User Guide
Page 73
Inventory
5. Enter the amount of the item to outdate in the Amount to Expire field.
Note
6. Press
OK.
7. Select the expiration date for the item in the bin that will expire next from the
Expiration date calendar.
The expiration date calendar is not available if the item is not
flagged as an expiring item.
The pull-down menu displays a calendar to select an appropriate date.
8. Press
9. Press
OK.
Done to return to the Main Menu, or Exit to log out of the Station.
10. Dispose of the outdated item(s) according to the policies and procedures at
your facility.
JITRBUD Main User Guide 4-9
Page 74
Load-Unload
Load-Unload
Use the Load-Unload feature to load or unload the inventory of items in bins. You
can load empty bins, load pending items, edit bin settings, outdate any expired
items and unload loaded bins. You can also move the items to a new location in
the Station or to a new location at a different Station.
Load is used to assign an item to a specific location, or bin, in the Station. Unload
is used to remove items from the Station. The unload process removes an existing
item at the Station to make the bin available for a different item.
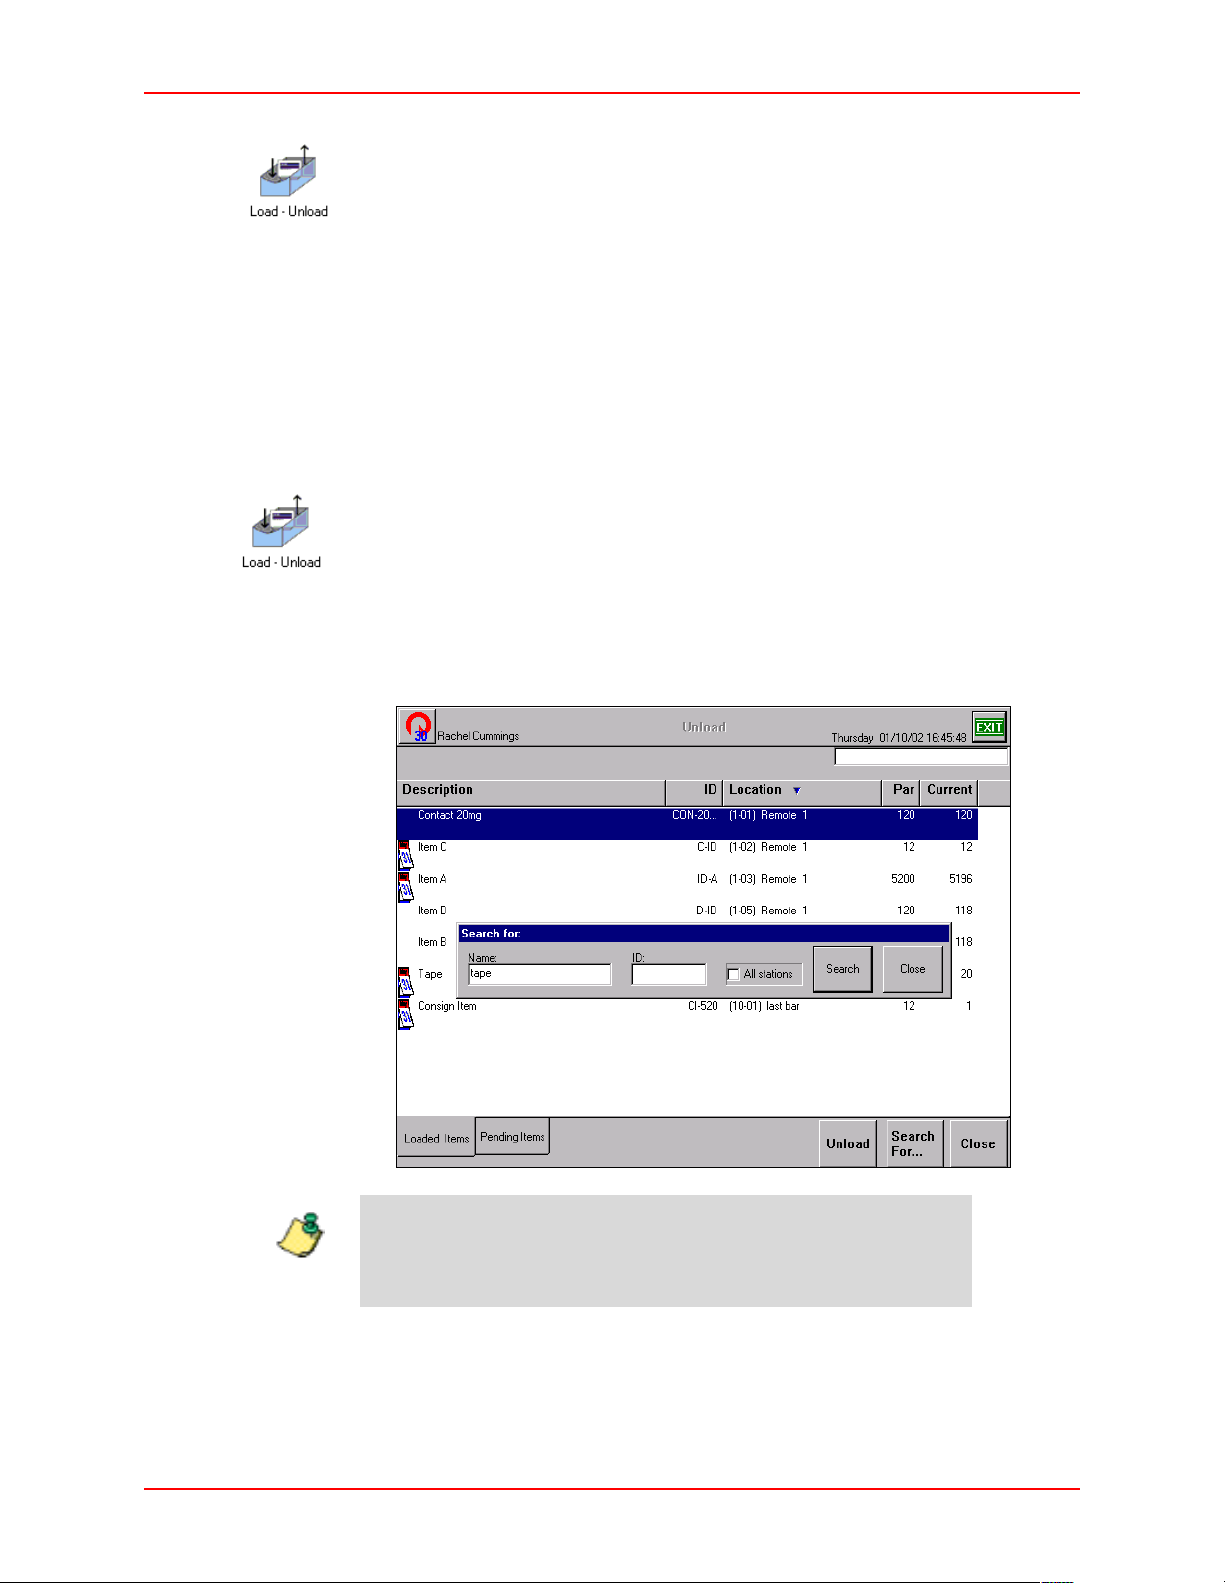
Searching for Items
To search for an item
1. From the Main Menu, press the
2. Press
3. Press
Load Items or Unload Items.
Search For.
Load-Unload icon.
The Search For window appears.
4. Type the first letters of the item name and press
Search.
If you type the entire item name, the item appears in the window.
If you type in the first few letters of the item name, a list of items
Note
appears to select the appropriate item.
5. To display the entire item list again, delete the text in the Search For window
and press
Search.
The item list appears.
4-10 JITRBUD Main User Guide
Page 75

Load-Unload
Loading Items
Load is the process of initially supplying a Station with an item. In order to load
an item at a Station, the item must be entered in the system at the S
Console. You can load items to empty bins from the item list or you can load
pending items sent by the S
UPPLYCENTER Console to the Station for a designated
location.
When the pending item is loaded, it disappears from the Pending list (the
UPPLYCENTER Console inventory screen also updates the status of the item from
S
pending to loaded).
UPPLYCENTER
JITRBUD Main User Guide 4-11
Page 76
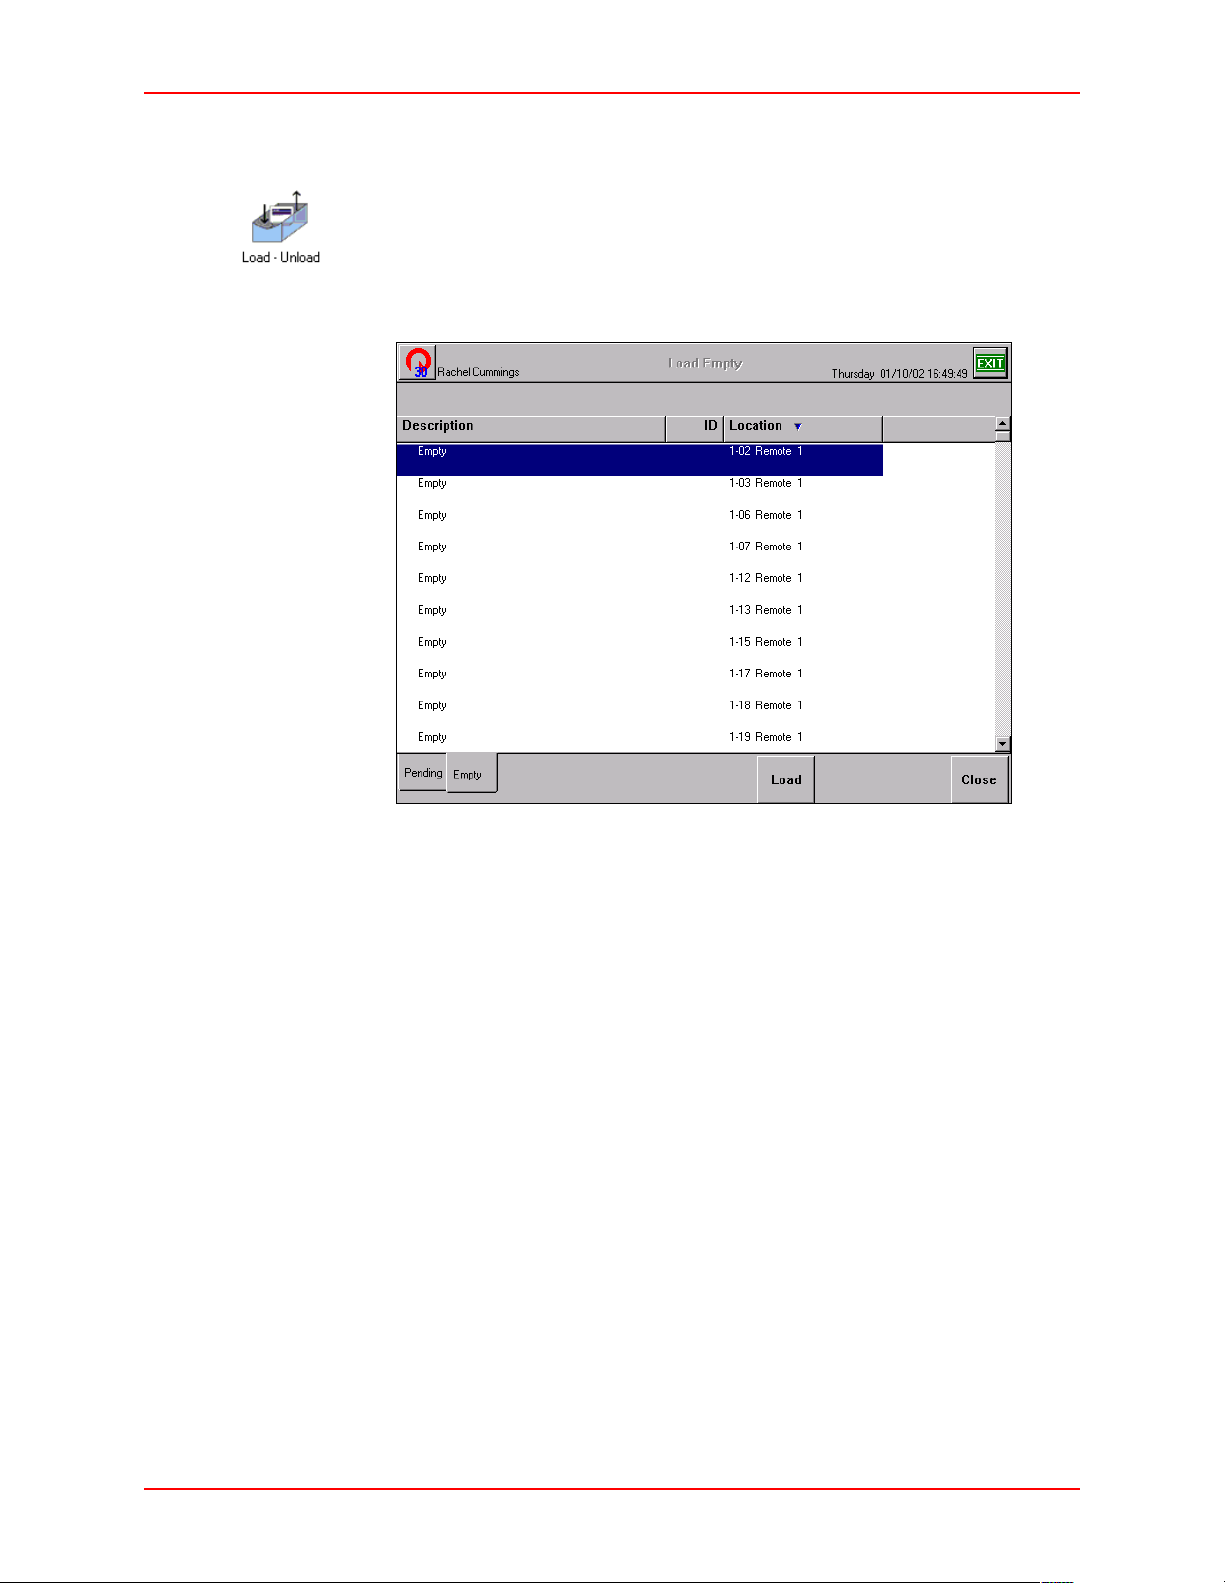
Load-Unload
Loading Empty Bins
To load an empty bin
1. From the Main Menu, press the
2. Press
Load Items.
3. Select the Empty tab.
Load-Unload icon.
4. Select an empty location by pressing the
RBUD transmitter.
JIT
5. Press
Load.
Take or Return button on the
The Item List appears.
6. Select the item from the item list and press
The Load Item window appears.
Add To Bin.
4-12 JITRBUD Main User Guide
Page 77
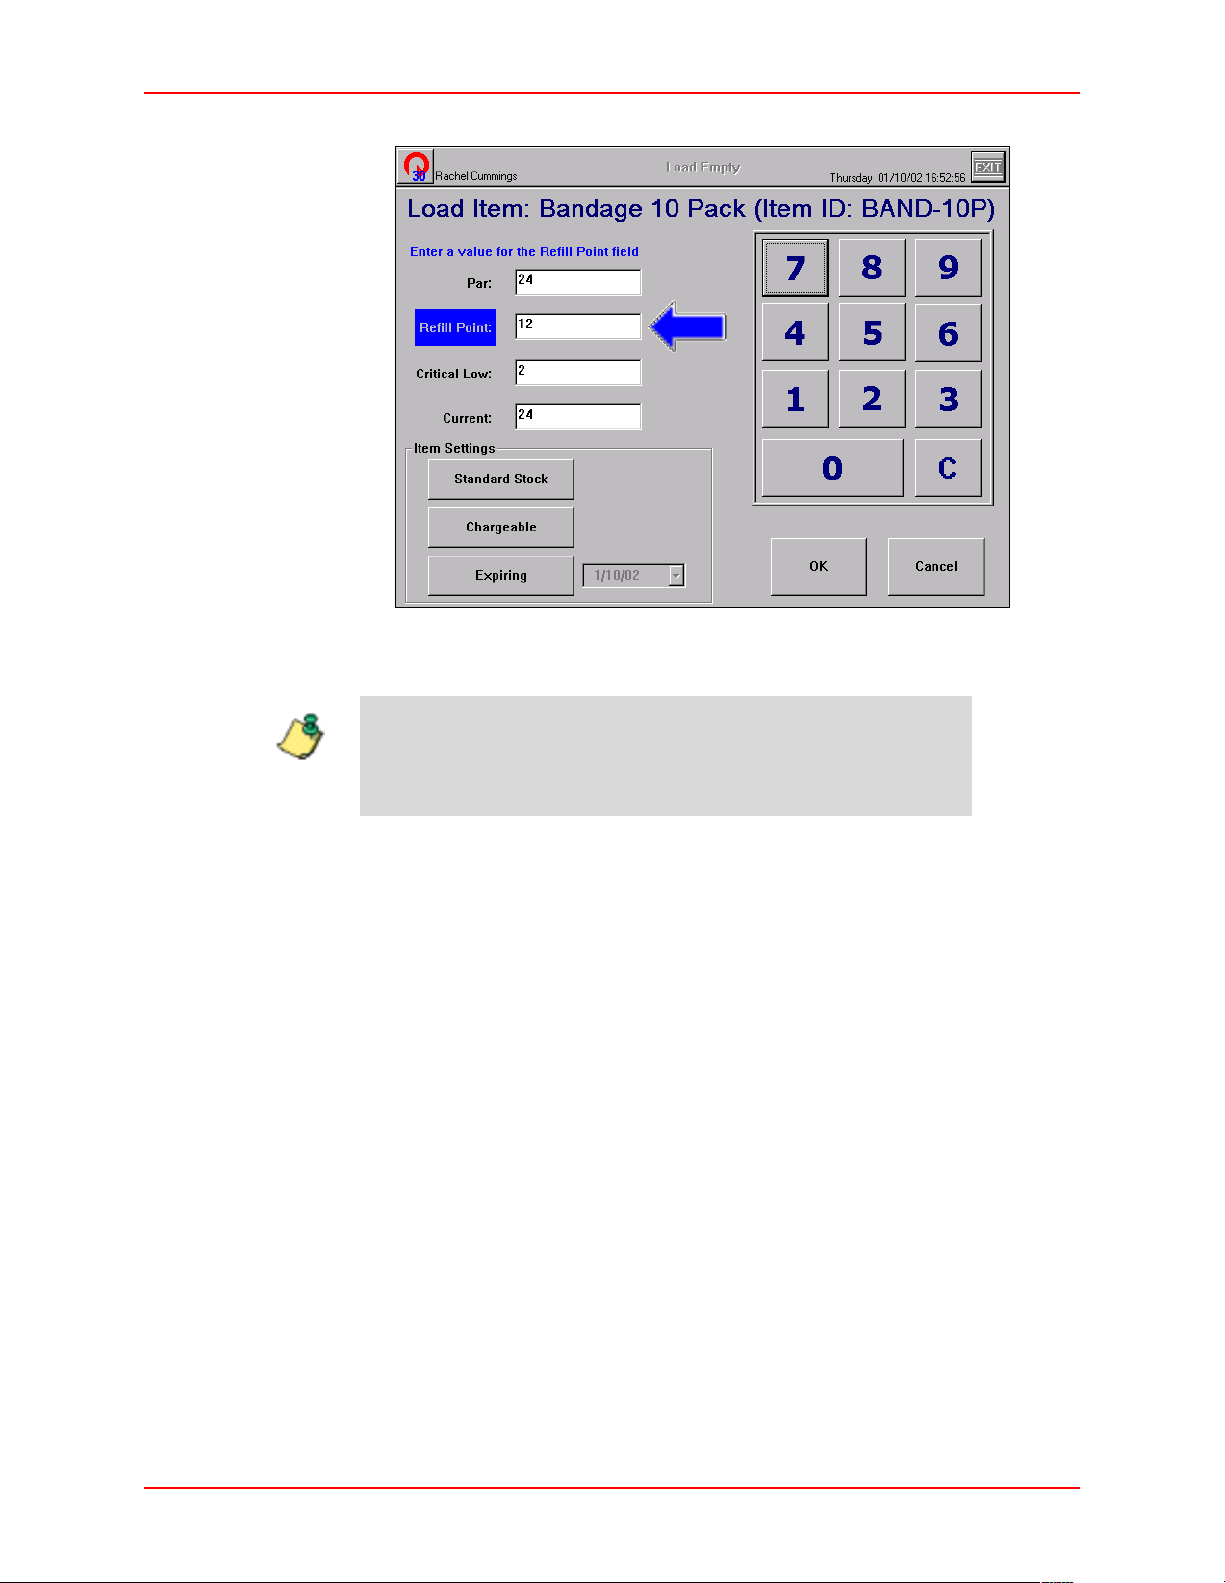
Load-Unload
7. Enter the maximum quantity in the Par field and press the TAB key on the
keyboard.
Note
The Refill Point (50% of Par), Critical Low (10% of Par), Current
(equal to Par) and Phys Max (equal to Par) fields will fill
automatically based on the
Par level. The quantities can be
changed if needed.
8. Press the
9. Press the
10. Press the
Expiration date
11. Press
Standard Stock button to label the item as standard stock.
Chargeable button to allow the item to be charged to patients.
Expiring Item button if item has an expiration date. Select the
of item from the calendar.
OK.
The item is listed on the Loaded tab.
12. Press
Close and Main Menu to return to the Main Menu, or Exit to log out of the
Station.
JITRBUD Main User Guide 4-13
Page 78
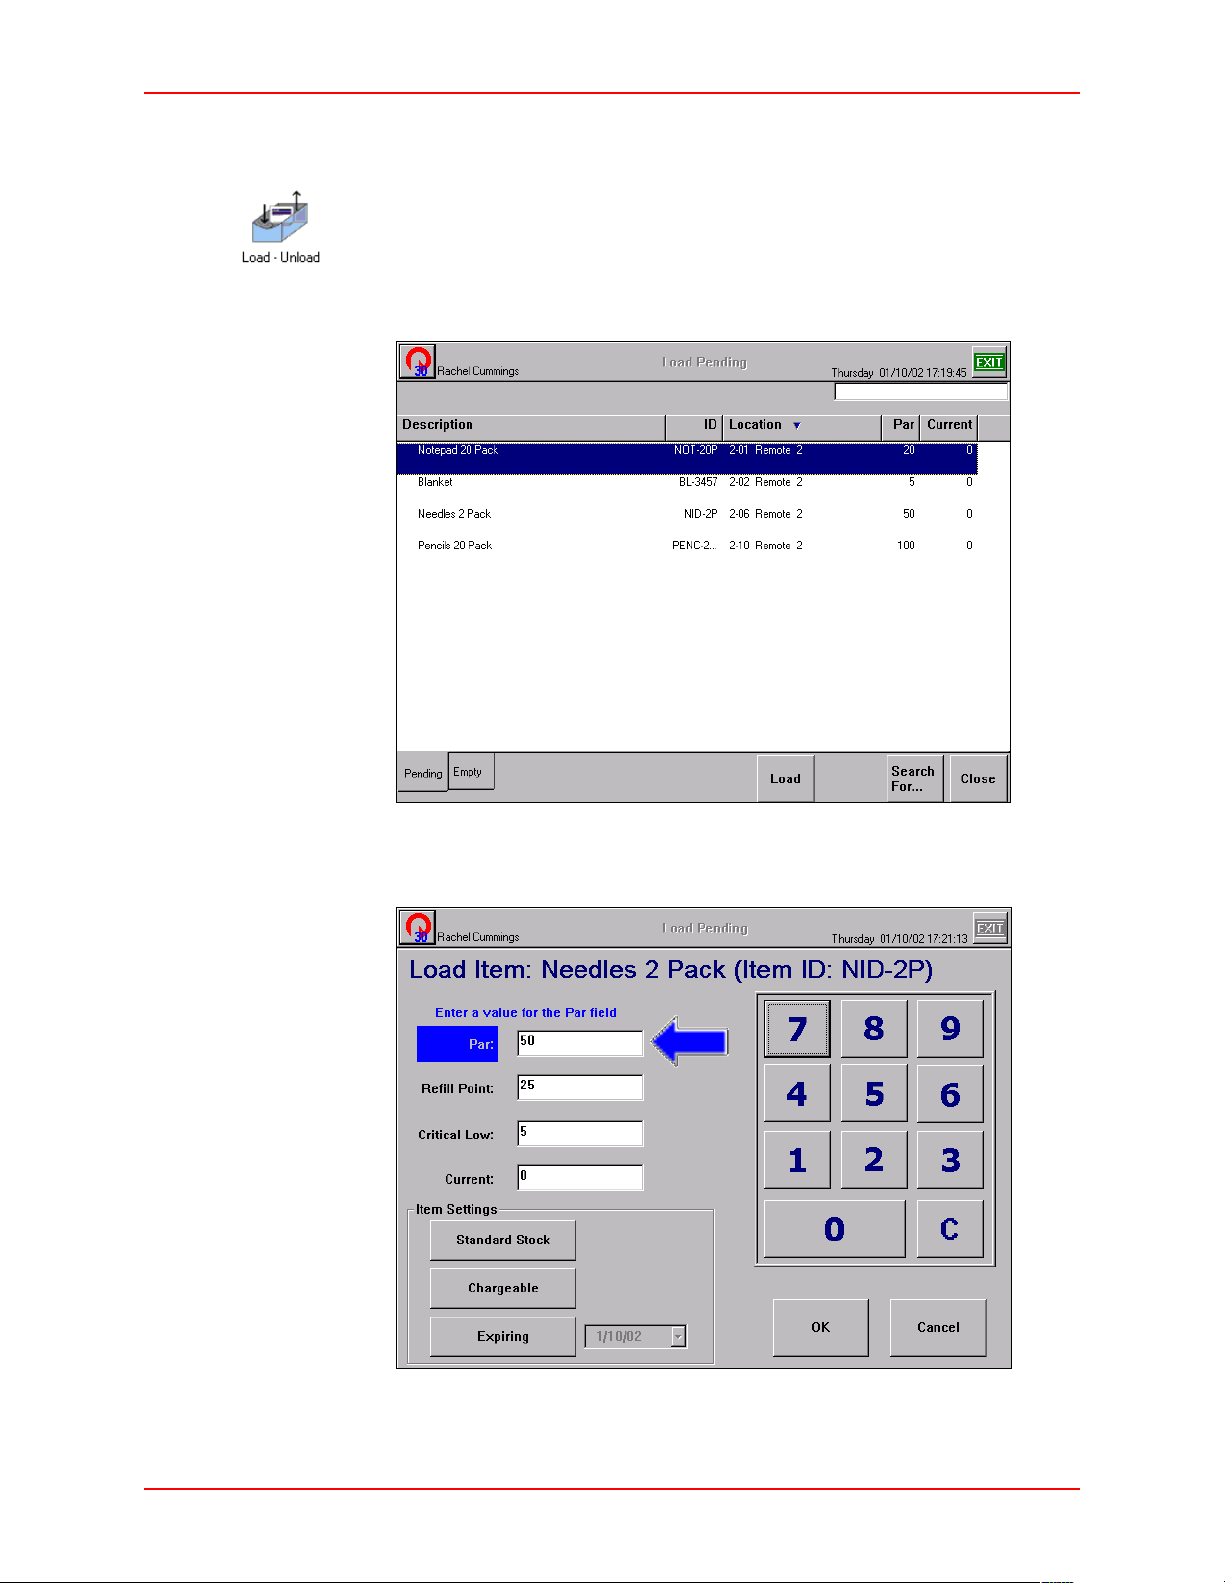
Load-Unload
Loading Pending Bins
To load a pending bin
1. From the Main Menu, press the
2. Press
Load Items.
3. Select the Pending tab.
Load-Unload icon.
4. Select the item from the item list and press
The Load Item window appears.
5. Edit the item information if necessary.
Load.
4-14 JITRBUD Main User Guide
Page 79

Load-Unload
• Press the Standard Stock button to label the item as standard stock.
• Press the
• Press the
6. Press
Expiration date
OK.
Chargeable button to allow the item to be charged to patients.
Expiring Item button if item has an expiration date. Select the
of item from the calendar.
The item is listed on the Loaded tab.
7. Press
Close and Main Menu to return to the Main Menu, or Exit to log out of the
Station.
JITRBUD Main User Guide 4-15
Page 80
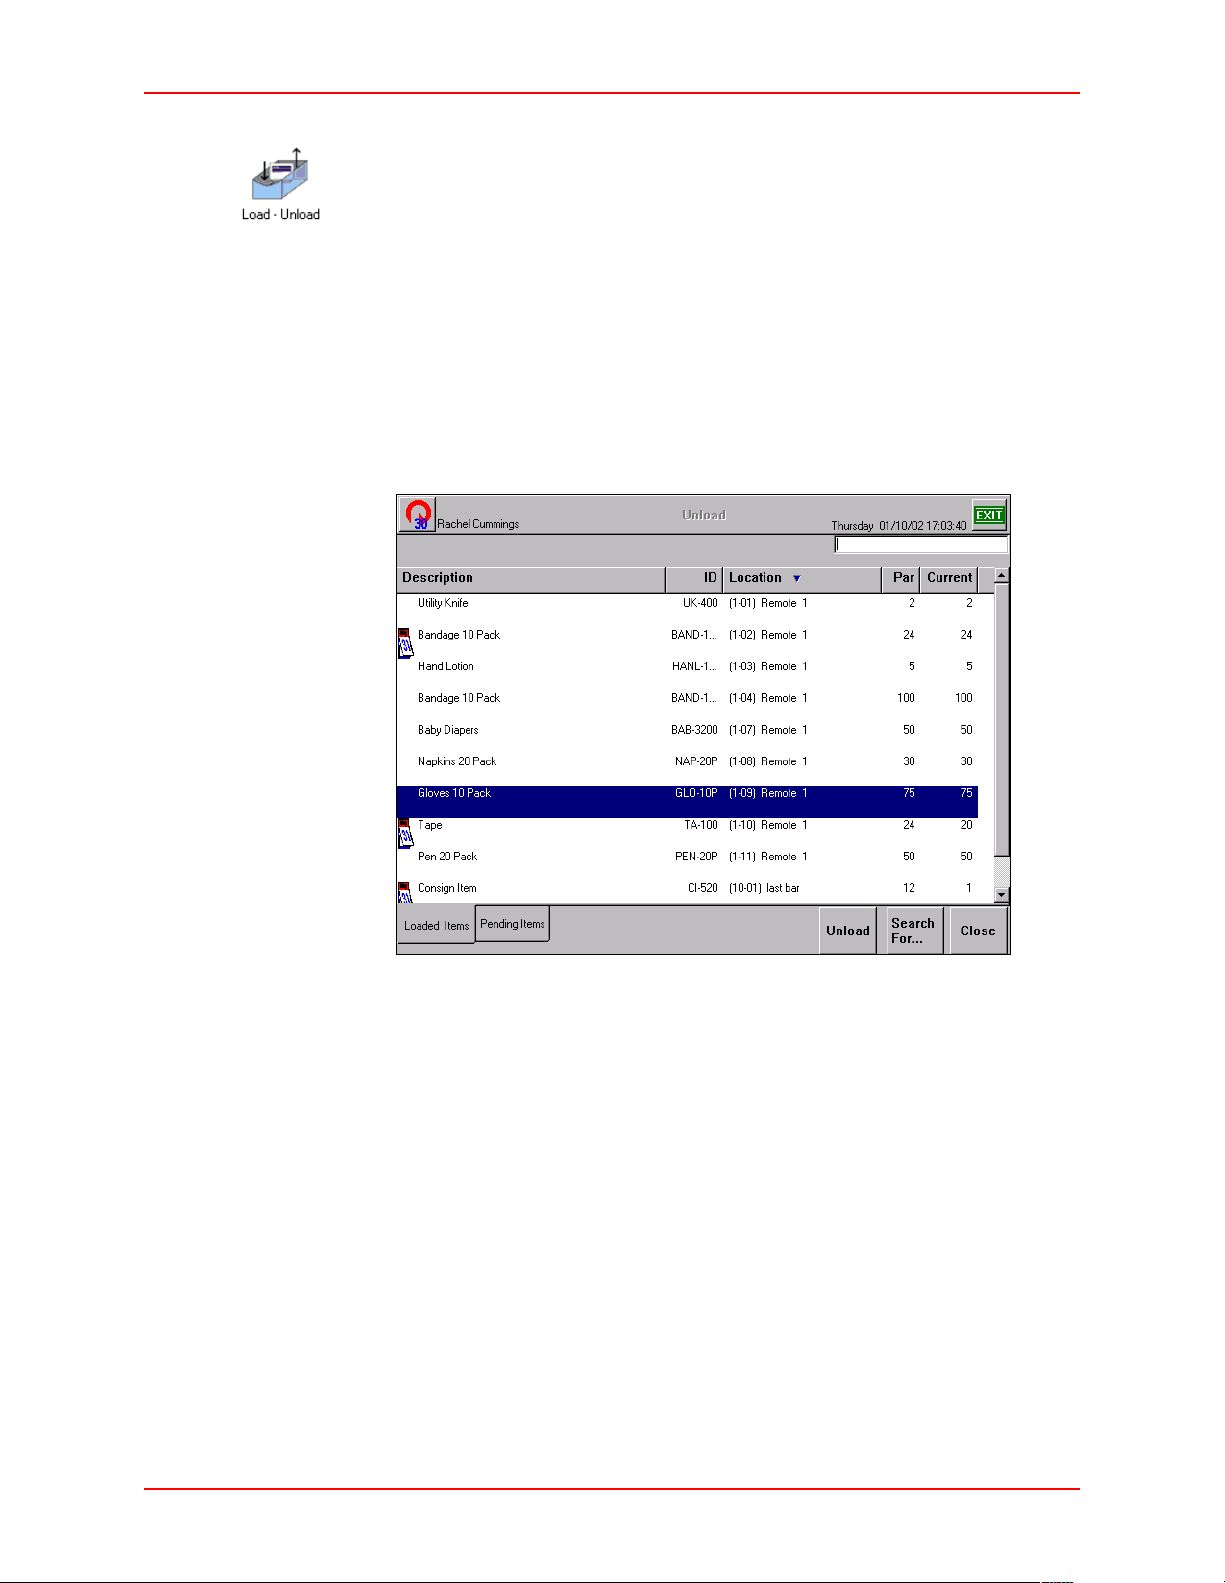
Load-Unload
Unloading Items
Unload is the process of physically removing the entire supply of an item from a
location. After an item is unloaded, the bin is available for another item.
If an item is loaded in multiple bins, the Station will provide a prompt to select the
location you want to unload. When the item is unloaded, the item is no longer
assigned at that location on the S
To unload an item
UPPLYCENTER Console Inventory screen.
1. From the Main Menu, press the
2. Press
Unload Items.
3. Select the Loaded Items tab.
Load-Unload icon.
4. Select the item to unload by pressing the
RBUD transmitter.
JIT
5. Press
Unload.
Take or Return button on the
A confirmation screen appears.
6. Press
Yes.
The item is removed from the bin location.
7. Press
Close and Main Menu to return to the Main Menu, or Exit to log out of the
Station.
4-16 JITRBUD Main User Guide
Page 81
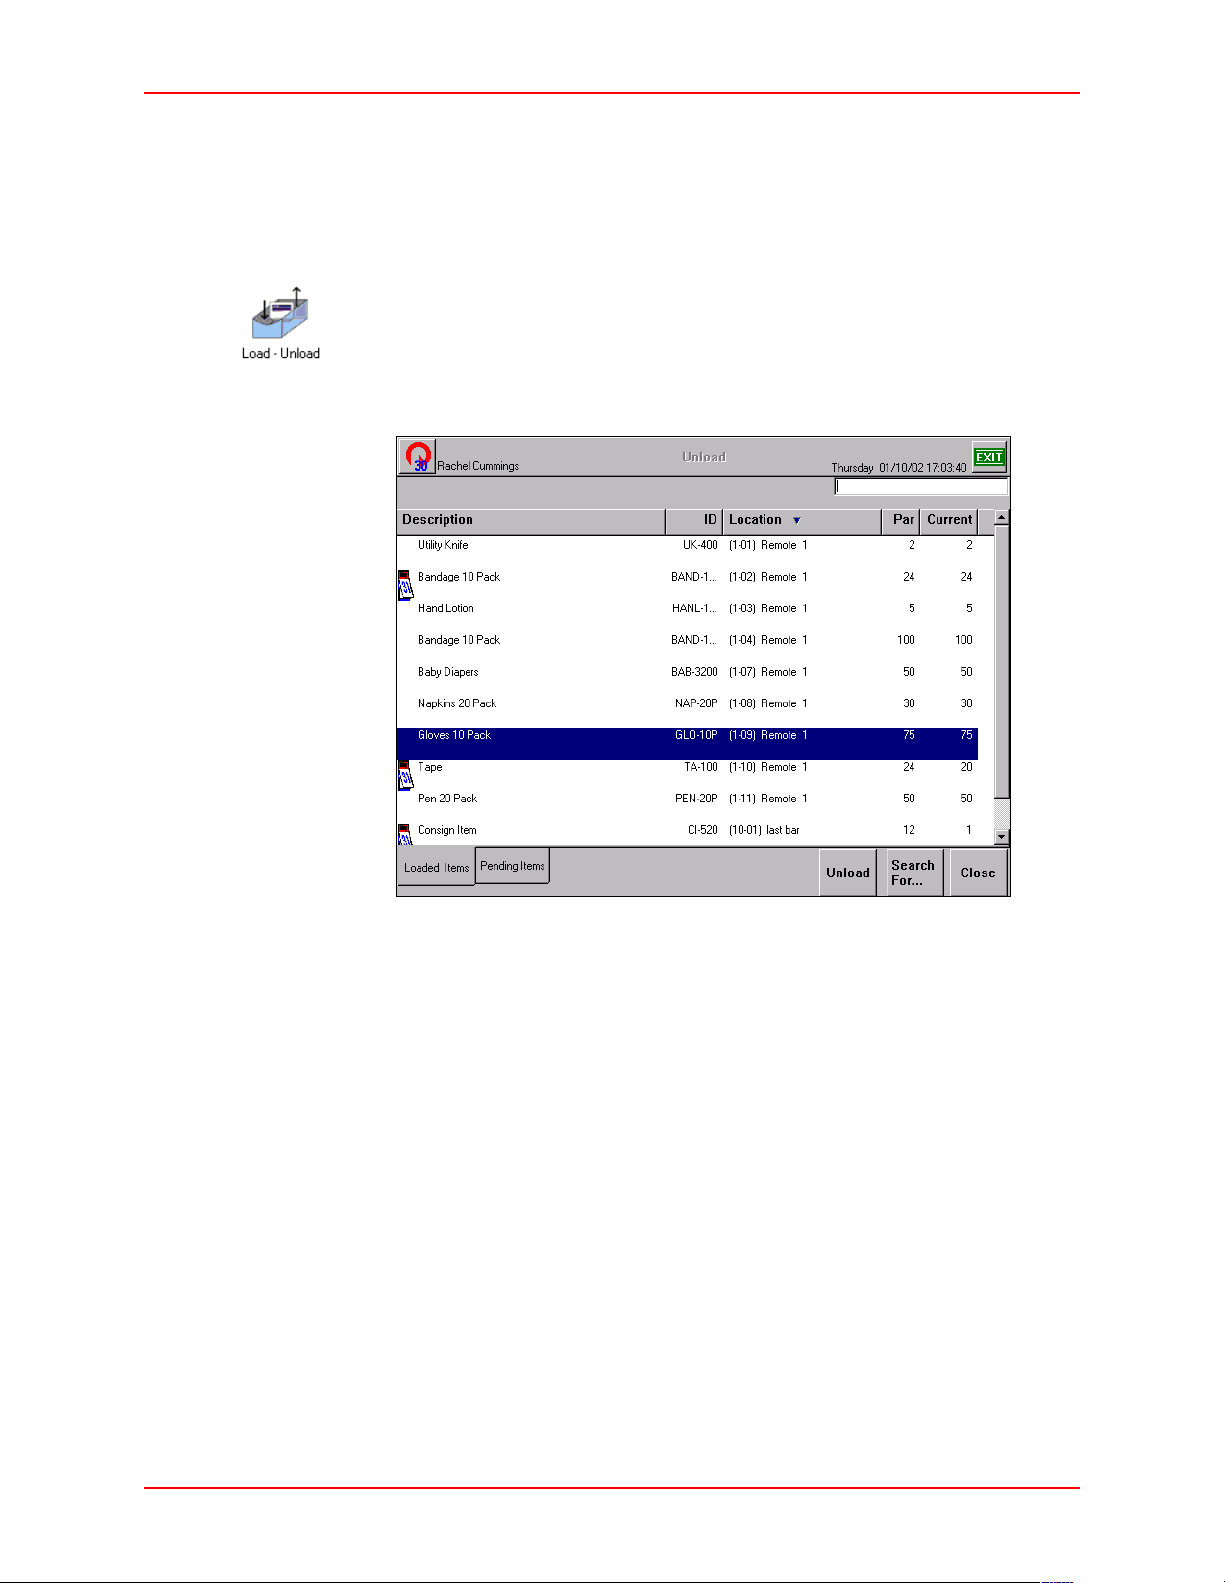
Load-Unload
Moving Items to a New Location
To move an item from one location to another, perform an Unload transaction to
remove the item from its current location and then perform a Load transaction to
move the item to its new location.
To move items to a new location
1. From the Main Menu, press the
2. Press
Unload Items.
3. Select the Loaded Items tab.
Load-Unload icon.
4. Select the item to move by pressing the
RBUD transmitter.
JIT
5. Press
Unload.
Take or Return button on the
A confirmation screen appears.
6. Press
Yes.
The item is removed from the bin location.
7. Press
Close.
8. Press Load Items.
9. Select the Empty tab.
10. Select a new location for the item by pressing the
RBUD transmitter.
JIT
11. Press
12. Select the item to move and press
JITRBUD Main User Guide 4-17
Load.
Add to Bin.
Take or Return button on the
Page 82
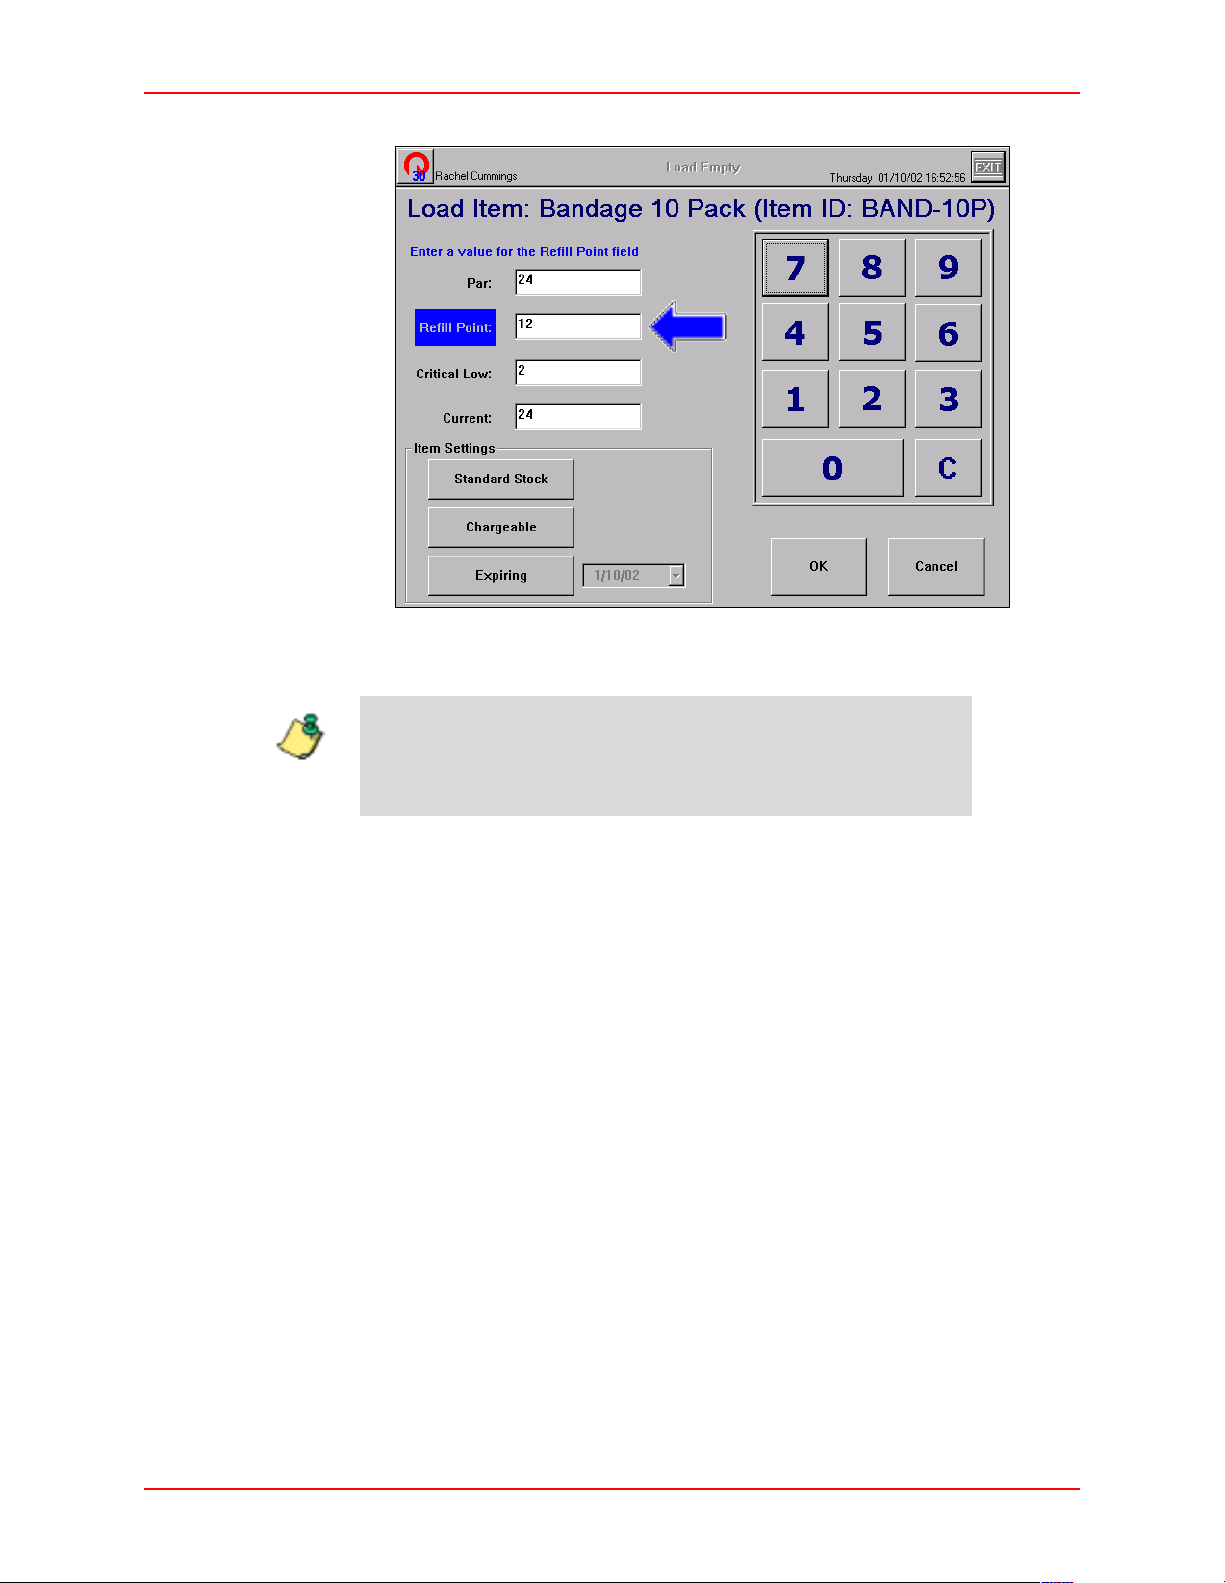
Load-Unload
13. Enter the maximum quantity in the Par field and press the TAB key on the
keyboard.
Note
The Refill Point (50% of Par), Critical Low (10% of Par), Current
(equal to Par) and Phys Max (equal to Par) fields will fill
automatically based on the
Par level. The quantities can be
changed if needed.
14. Press the
15. Press the
16. Press the
Expiration date
17. Press
Standard Stock button to label the item as standard stock.
Chargeable button to allow the item to be charged to patients.
Expiring Item button if item has an expiration date. Select the
of item from the calendar.
OK.
The item is listed on the Loaded tab.
18. Press
Close and Main Menu to return to the Main Menu, or Exit to log out of the
Station.
4-18 JITRBUD Main User Guide
Page 83
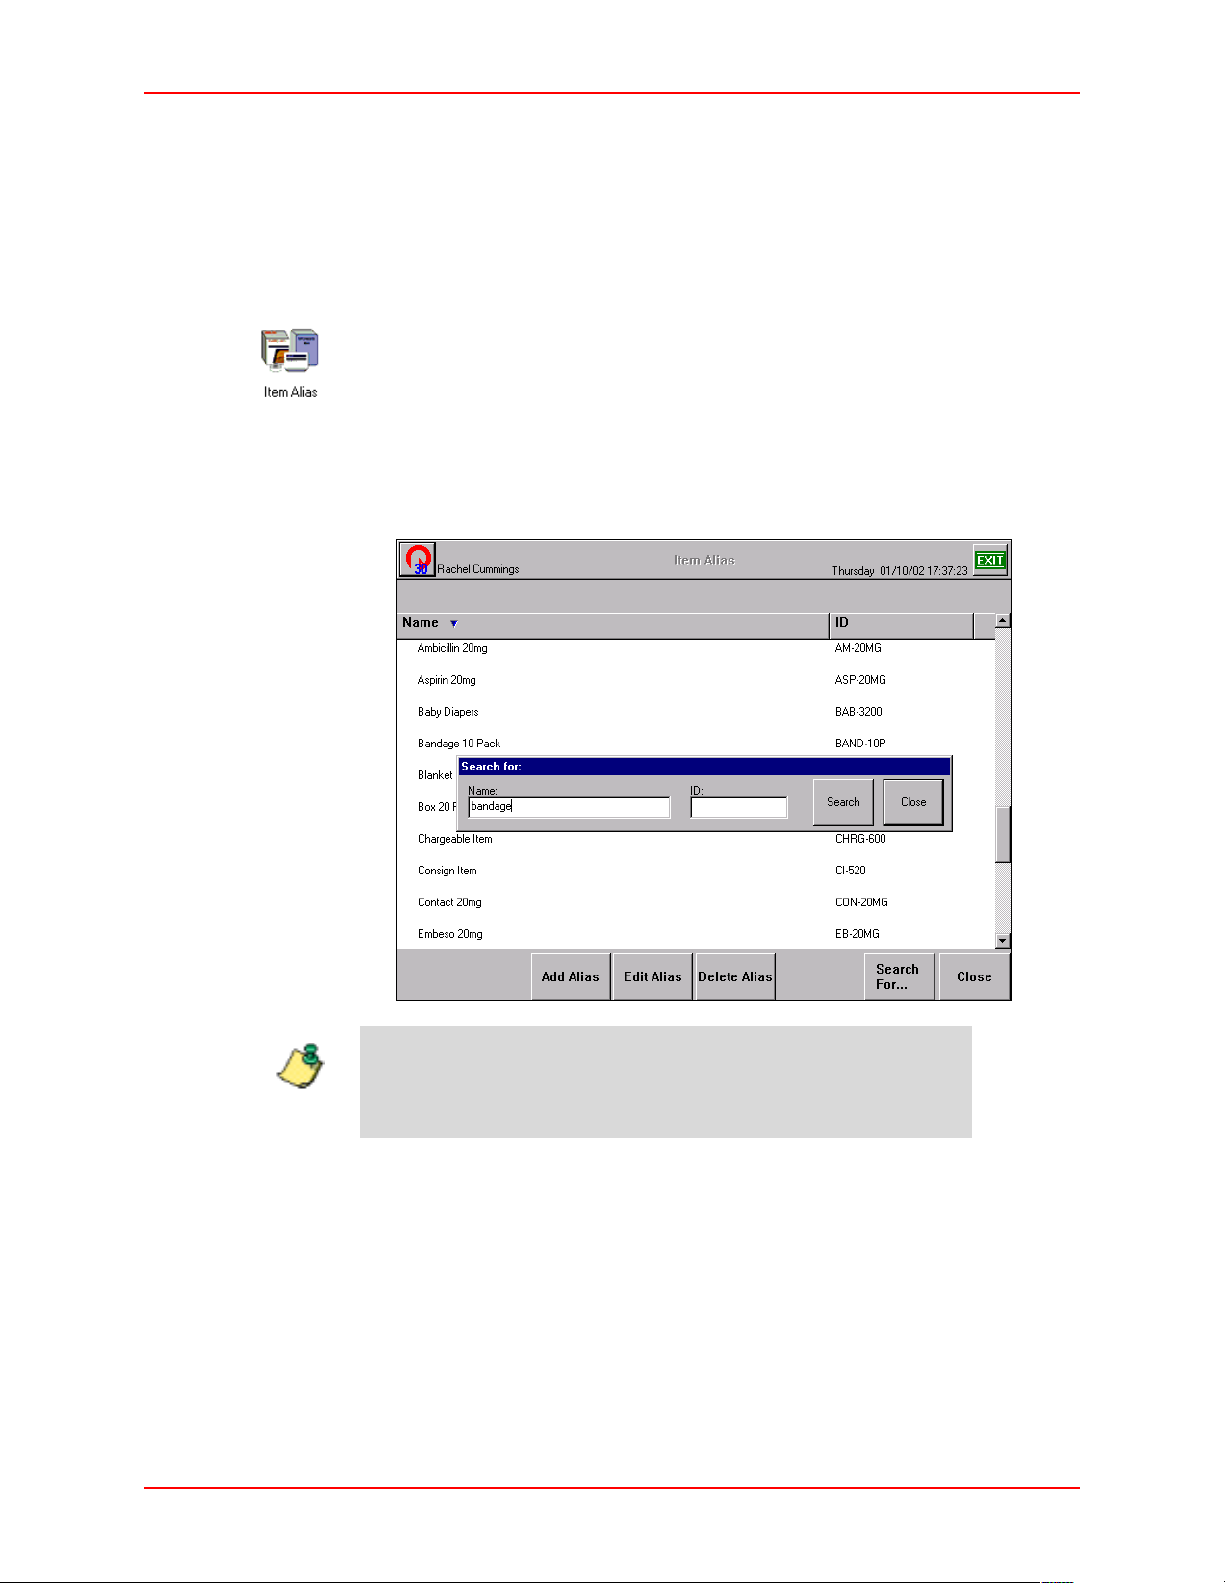
Item Alias
An Alias is an alternate name for an item that is created by a user.
Searching for Items
To search for an item
Item Alias
1. From the Main Menu, press the
Item Alias icon.
The Item Alias window appears.
2. Press
Search For.
The Search For window appears.
3. Type the first letters of the item name and press
Search.
.
If you type the entire item name, the item appears in the Item
Alias window. If you type in the first few letters of the item
Note
name, a list of items appears to select the appropriate item.
4. To display the entire item list again, delete the text in the Search For window
and press
Search.
The item list appears.
JITRBUD Main User Guide 4-19
Page 84
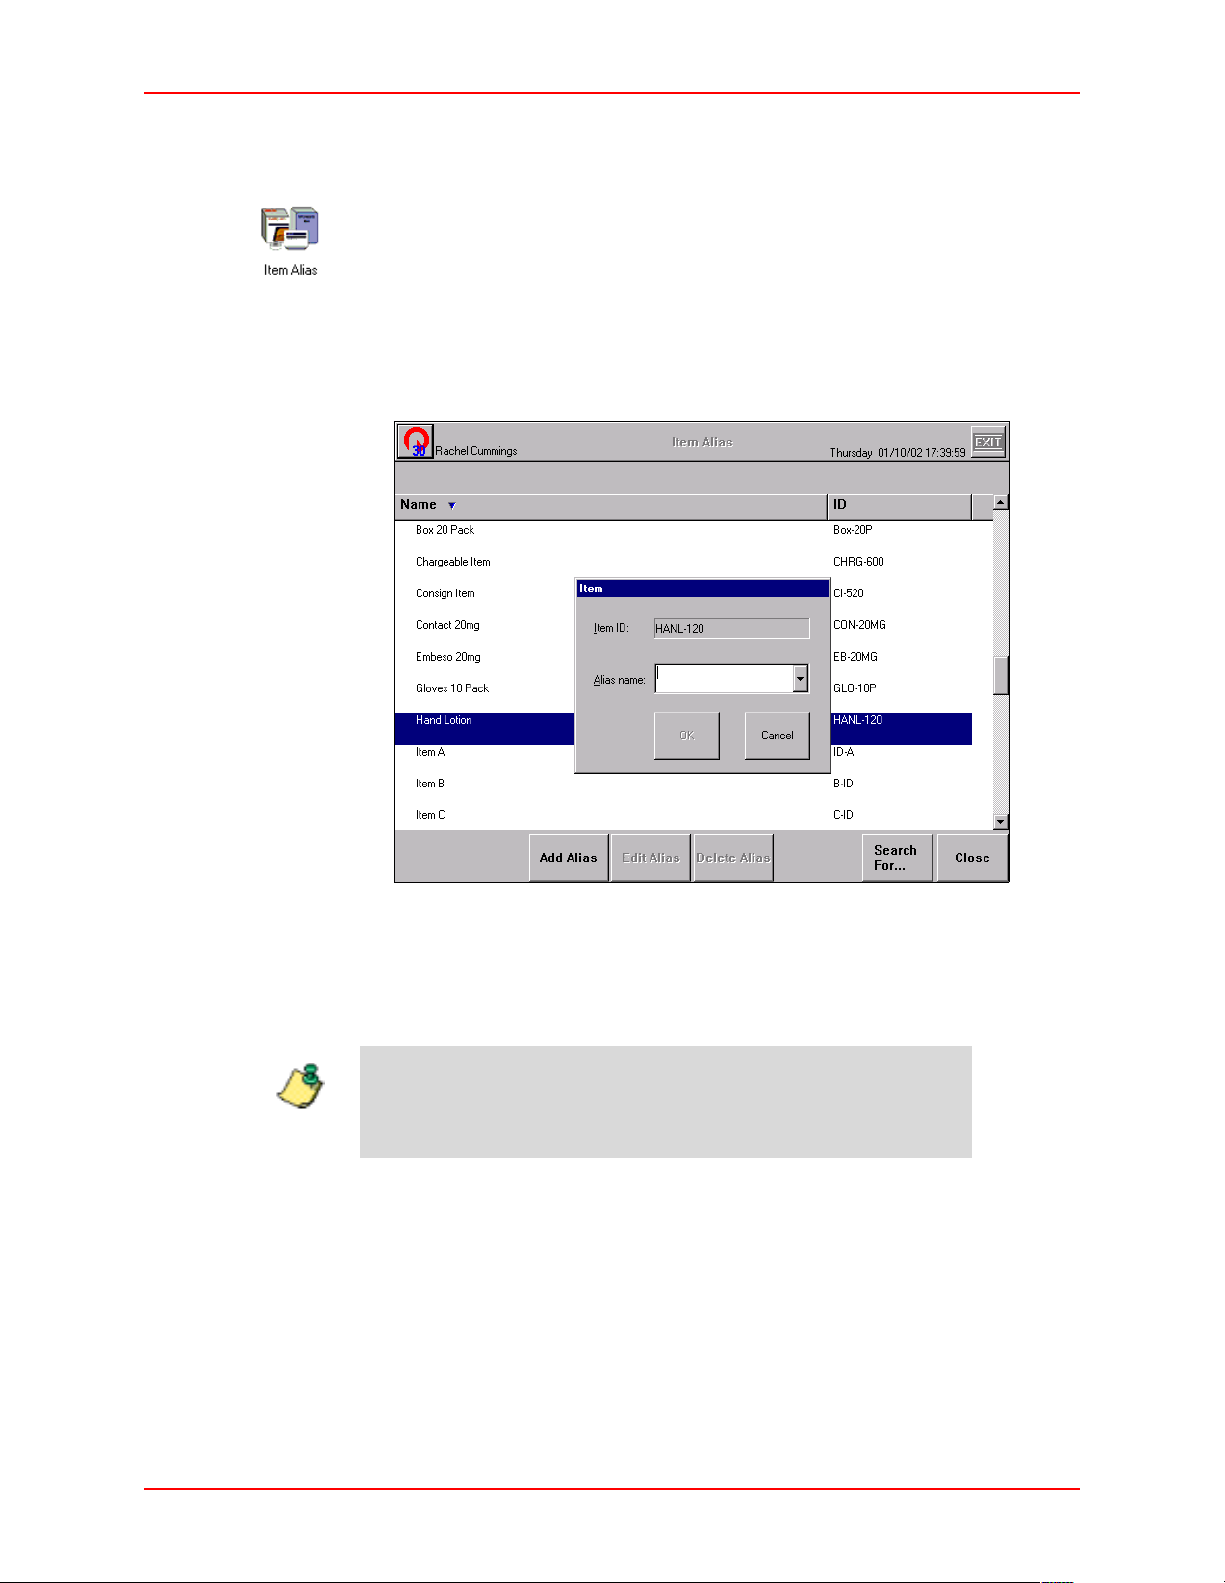
Item Alias
Creating an Item Alias
To create an item alias
1. From the Main Menu, press the
Item Alias icon.
The Item Alias screen appears.
2. Select the item for which you are creating an alias.
3. Press
Add Alias.
The Item window appears.
4. Enter the Alias name for the item.
5. Press
OK.
The Alias name is added to the item list.
6. Press
Close to return to the Main Menu, or Exit to log out of the Station.
You can create up to 25 aliases per item.
Note
4-20 JITRBUD Main User Guide
Page 85
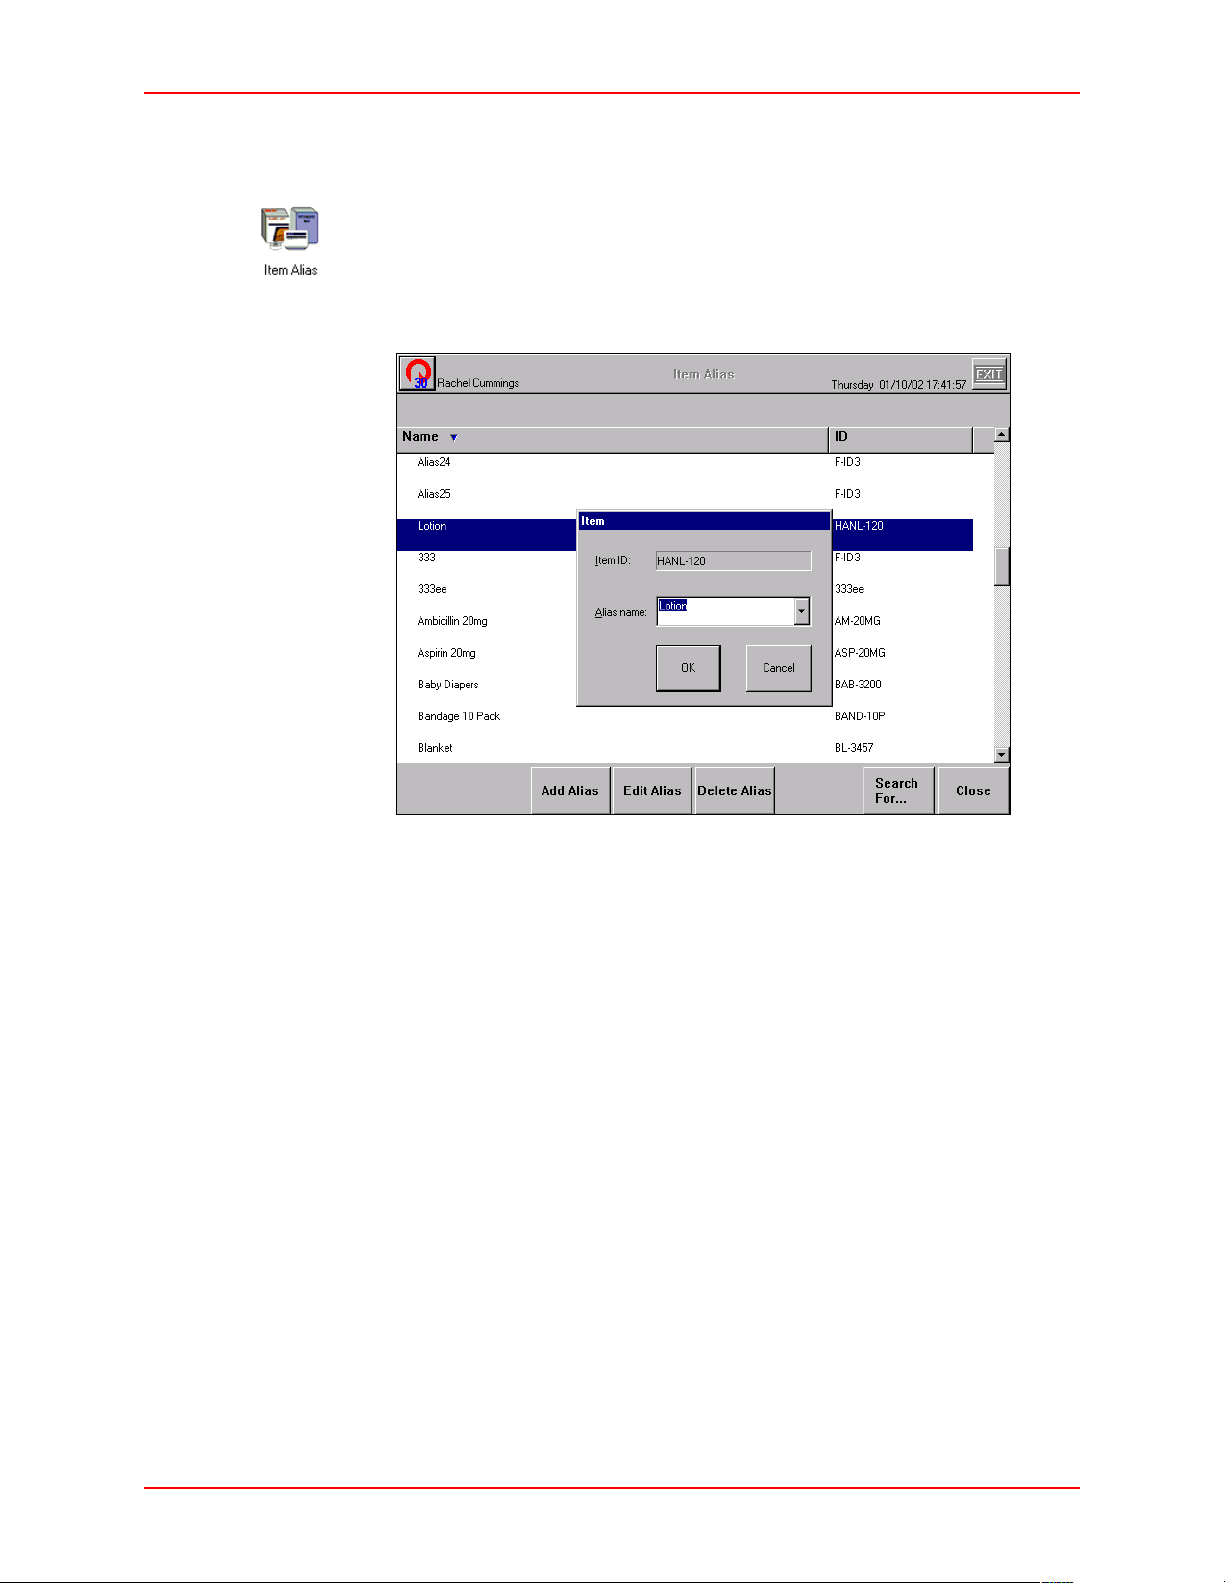
Editing an Alias
To edit an alias
Item Alias
1. From the Main Menu, press the
2. Highlight the item alias to edit.
3. Press
Edit Alias.
Item Alias icon.
4. Edit the Alias name.
5. Press
OK.
The change will be reflected in the item list.
6. Press
Close to return to the Main Menu, or Exit to log out of the Station.
JITRBUD Main User Guide 4-21
Page 86
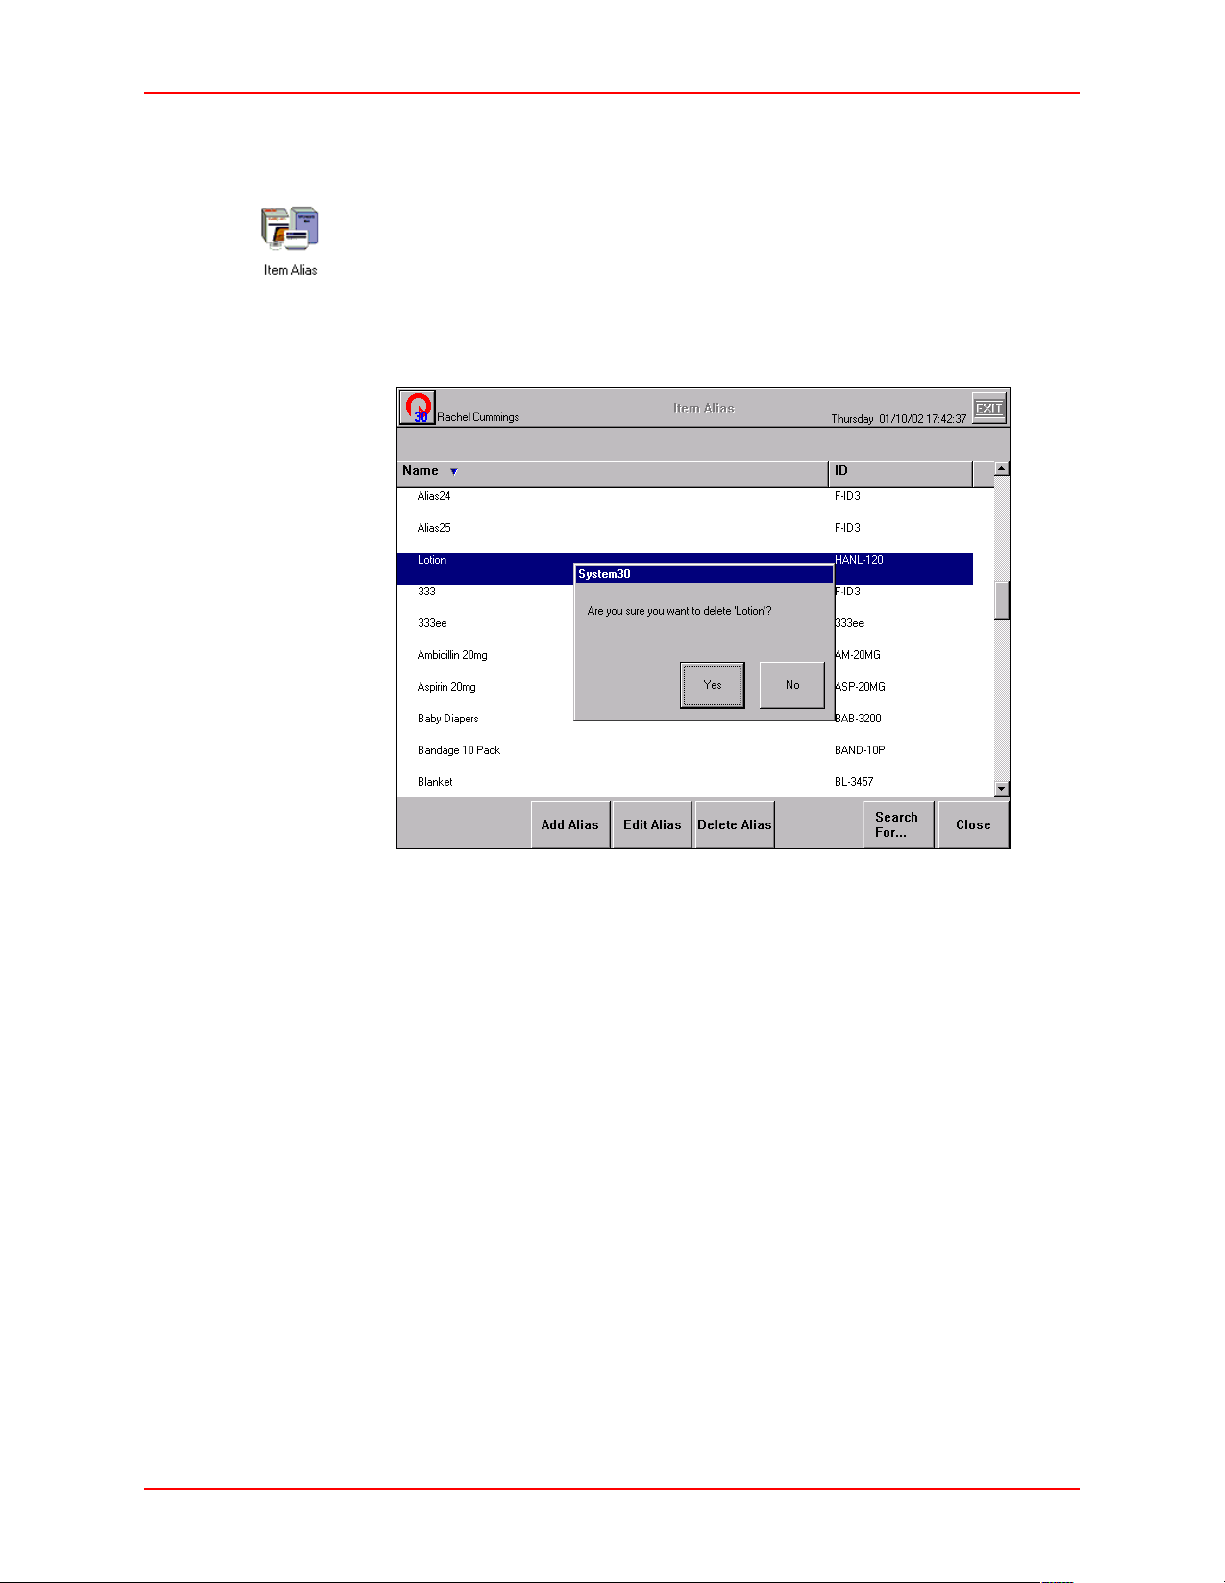
Item Alias
Deleting an Alias
To Delete an Alias
1. From the Main Menu, press the
2. Highlight the item alias to delete.
3. Press
Delete Alias.
A confirmation window appears.
Item Alias icon.
4. Press
Yes.
The item alias no longer appears on the item list.
5. Press
Close to return to the Main Menu, or Exit to log out of the Station.
4-22 JITRBUD Main User Guide
Page 87
Note
Refill
Refill
Use the Refill feature to restock items in the JITrBUD system. The Refill screen
has four tabs that list items that are Below Par, At Refill or At Critical.
The default tab that is selected on the Refill screen is set in the
Station Options window on the General Configuration tab.
After you select the appropriate tab, you can select items to refill on the screen.
The Refill Amount and Current Amount appears for the selected item. The Refill
Amount and Current Amount can be adjusted using the keyboard. Complete the
refill process by pressing the
UPPLYCENTER Console and a refill receipt is printed at the Station (if configured
S
to print a receipt for refill).
The calendar icon appears in front of Expiring Items that will expire within the
time period specified in the Item outdated warning days field on the Time Options
tab in Station Options.
Done button. A message is sent to the
JITRBUD Main User Guide 4-23
Page 88
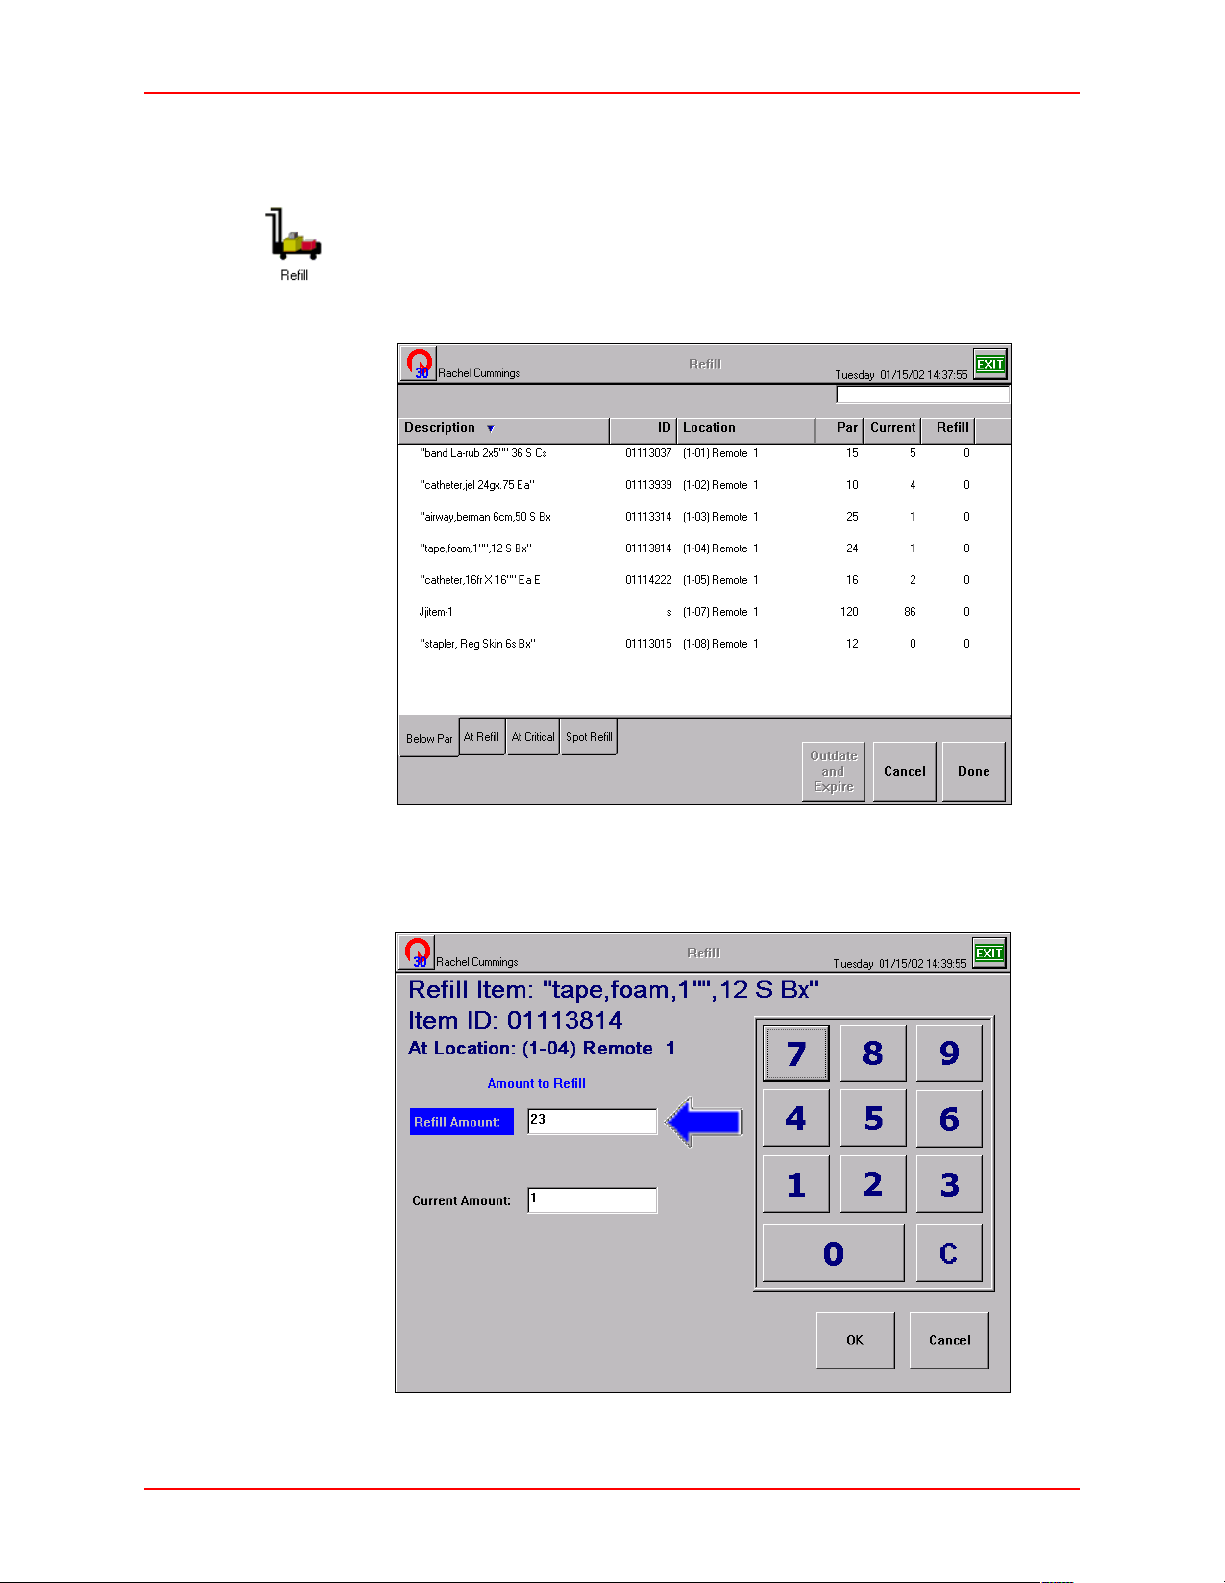
Refill
Refilling Items
To Refill Items
1. From the Main Menu, press the
Refill icon.
The Refill screen appears.
2. Select the appropriate tab at the bottom of the screen.
3. Select the item to refill using the touch screen, or by pressing the
Return button on the JITRBUD transmitter.
The Refill Item screen appears.
Take or
4-24 JITRBUD Main User Guide
Page 89
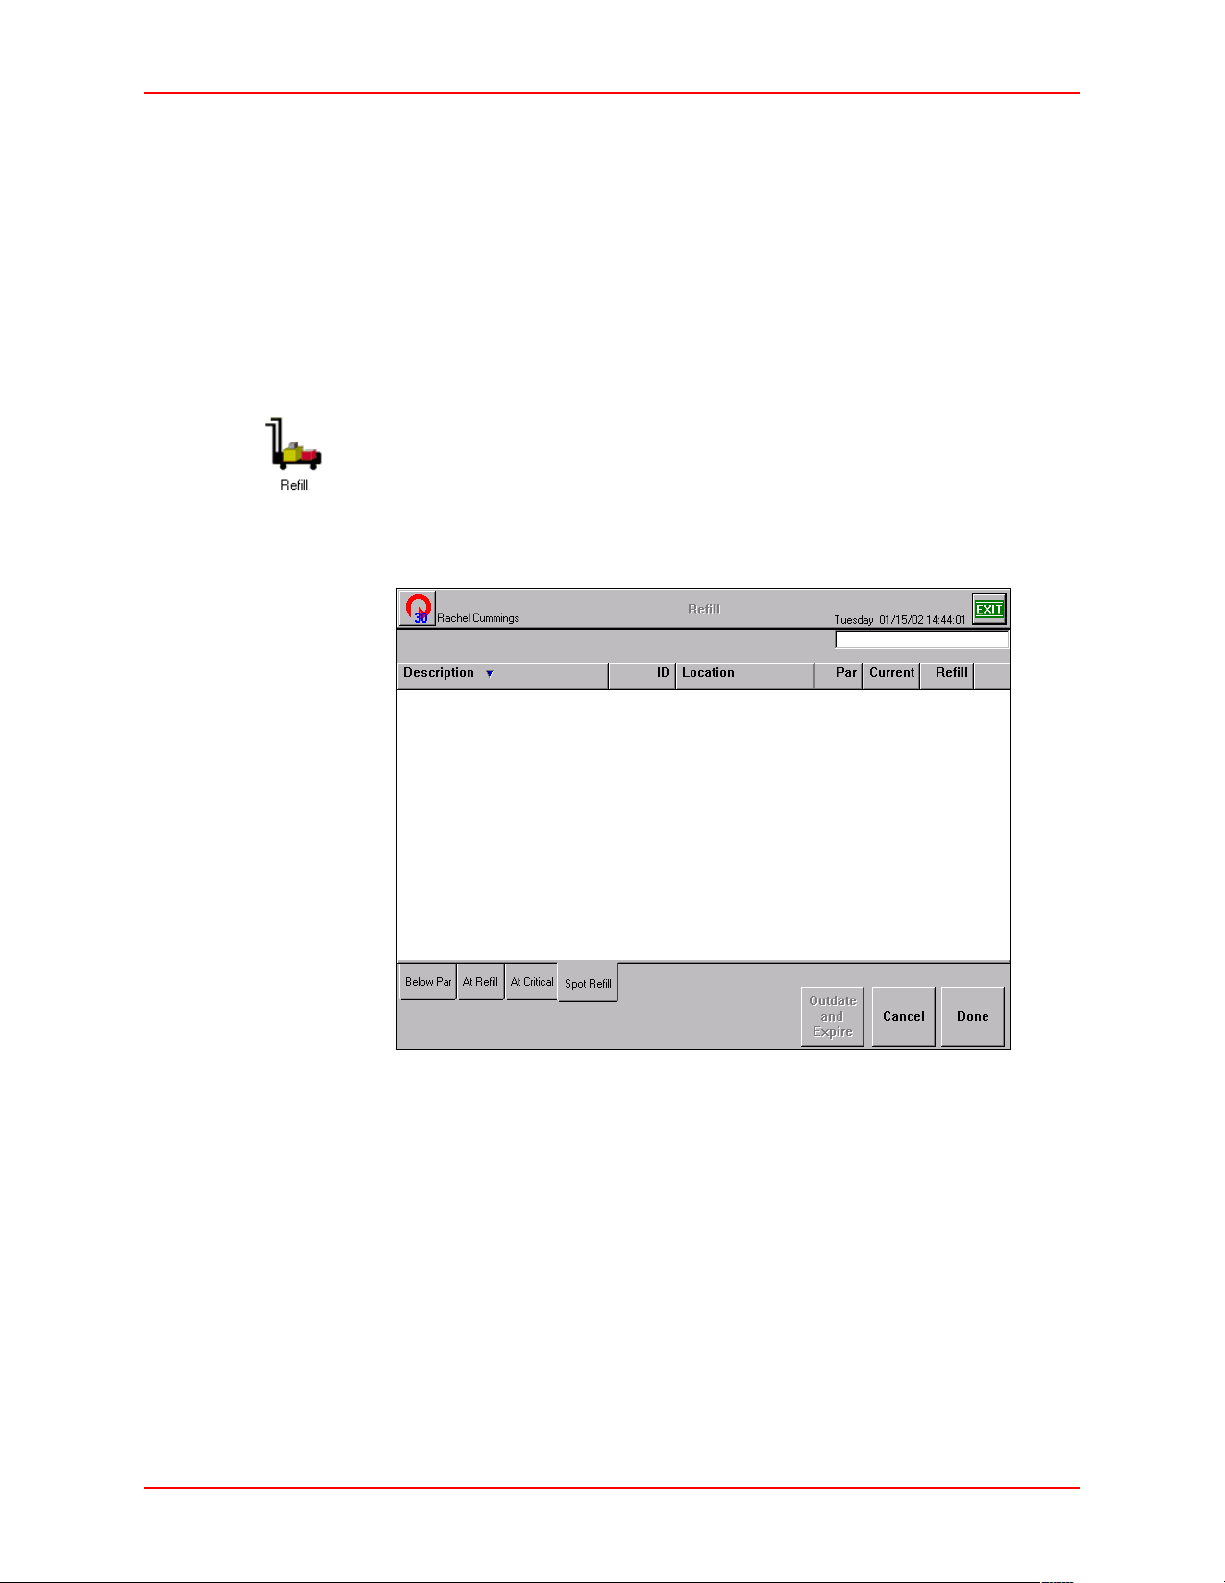
4. Edit the Refill Amount and Current Amount if necessary.
Refill
5. Press
OK.
6. Place the items in the bin.
7. Select the next item to refill and repeat steps 3-6 until you are finished
refilling items.
8. Press
Done to return to the Main Menu, or Exit to log out of the Station.
Spot Refill
To spot refill
1. From the Main Menu, press the
The Refill screen appears.
2. Select the Spot Refill tab at the bottom of the screen.
Items are not listed on the Spot Refill list.
Refill icon.
3. Select the item to refill by pressing the
Take or Return button on the JITRBUD
transmitter.
The Refill Item screen appears.
JITRBUD Main User Guide 4-25
Page 90
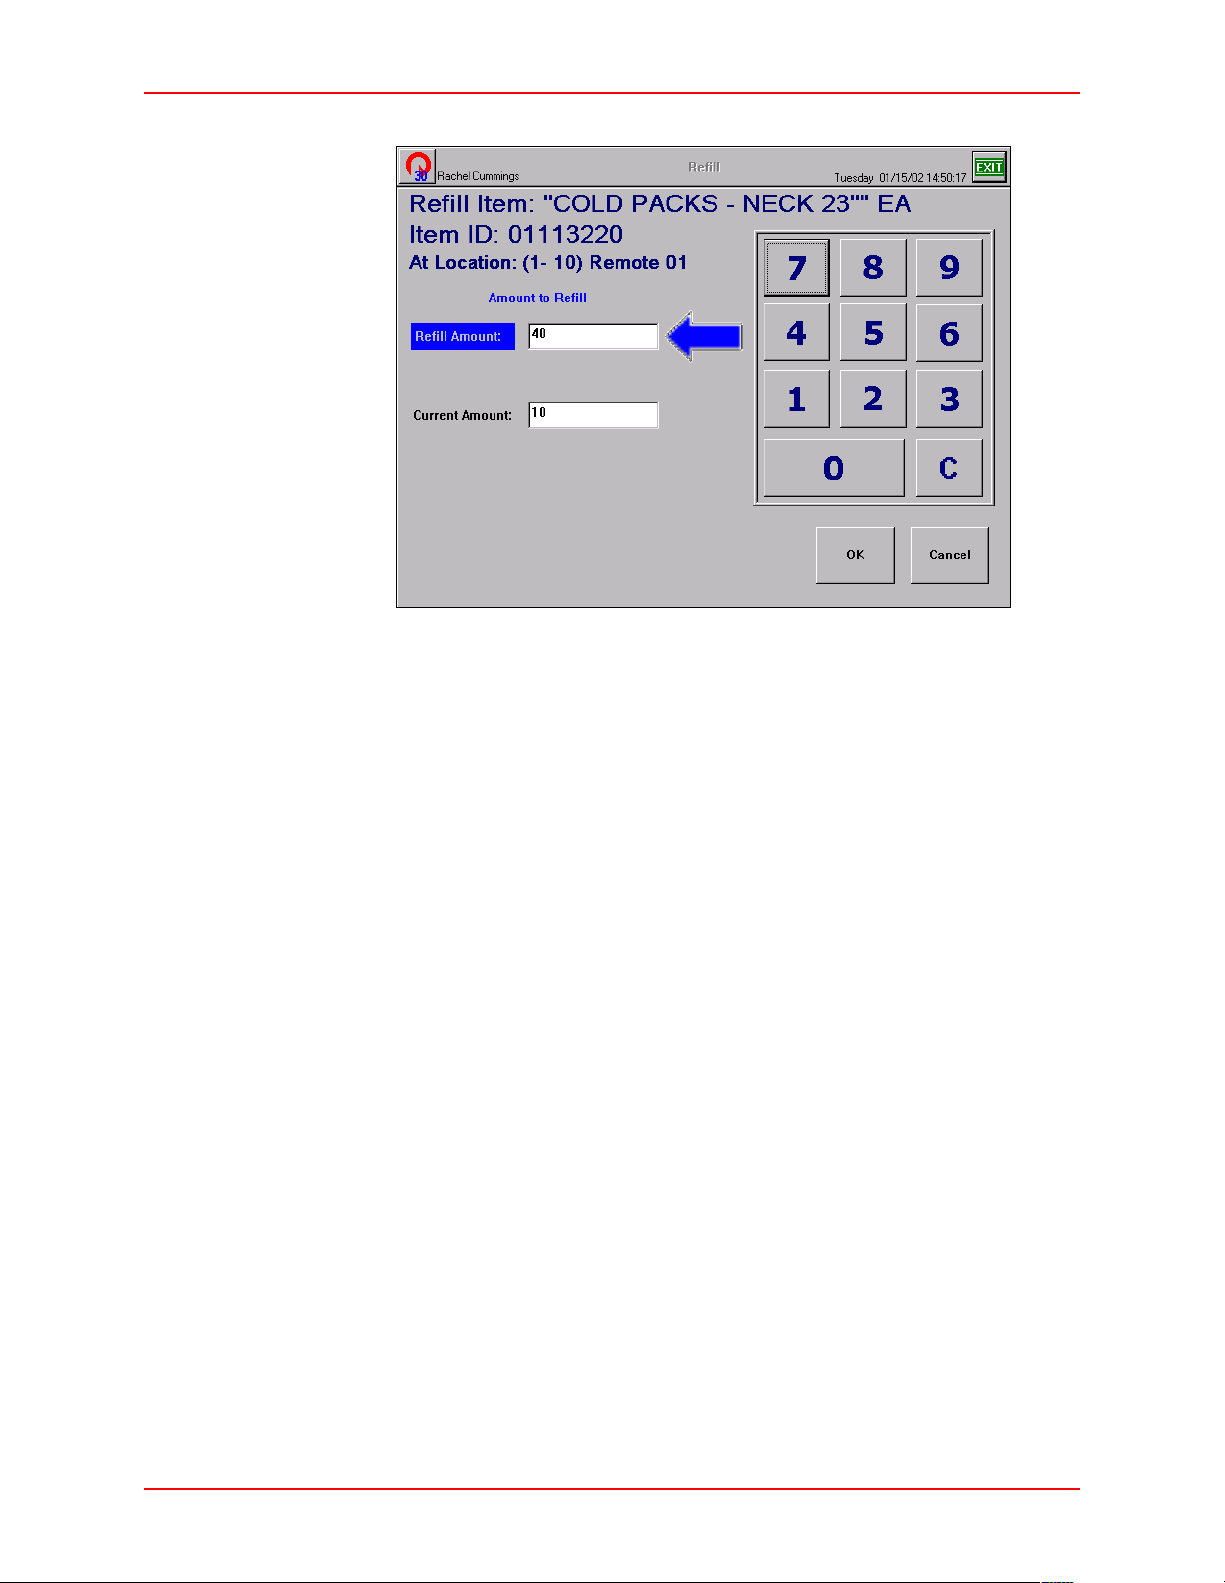
Refill
4. Adjust the Refill Amount and Current Amount if necessary.
5. Press
OK.
6. Place the items in the bin.
7. Press
Done to return to the Main Menu, or Exit to log out of the Station.
4-26 JITRBUD Main User Guide
Page 91
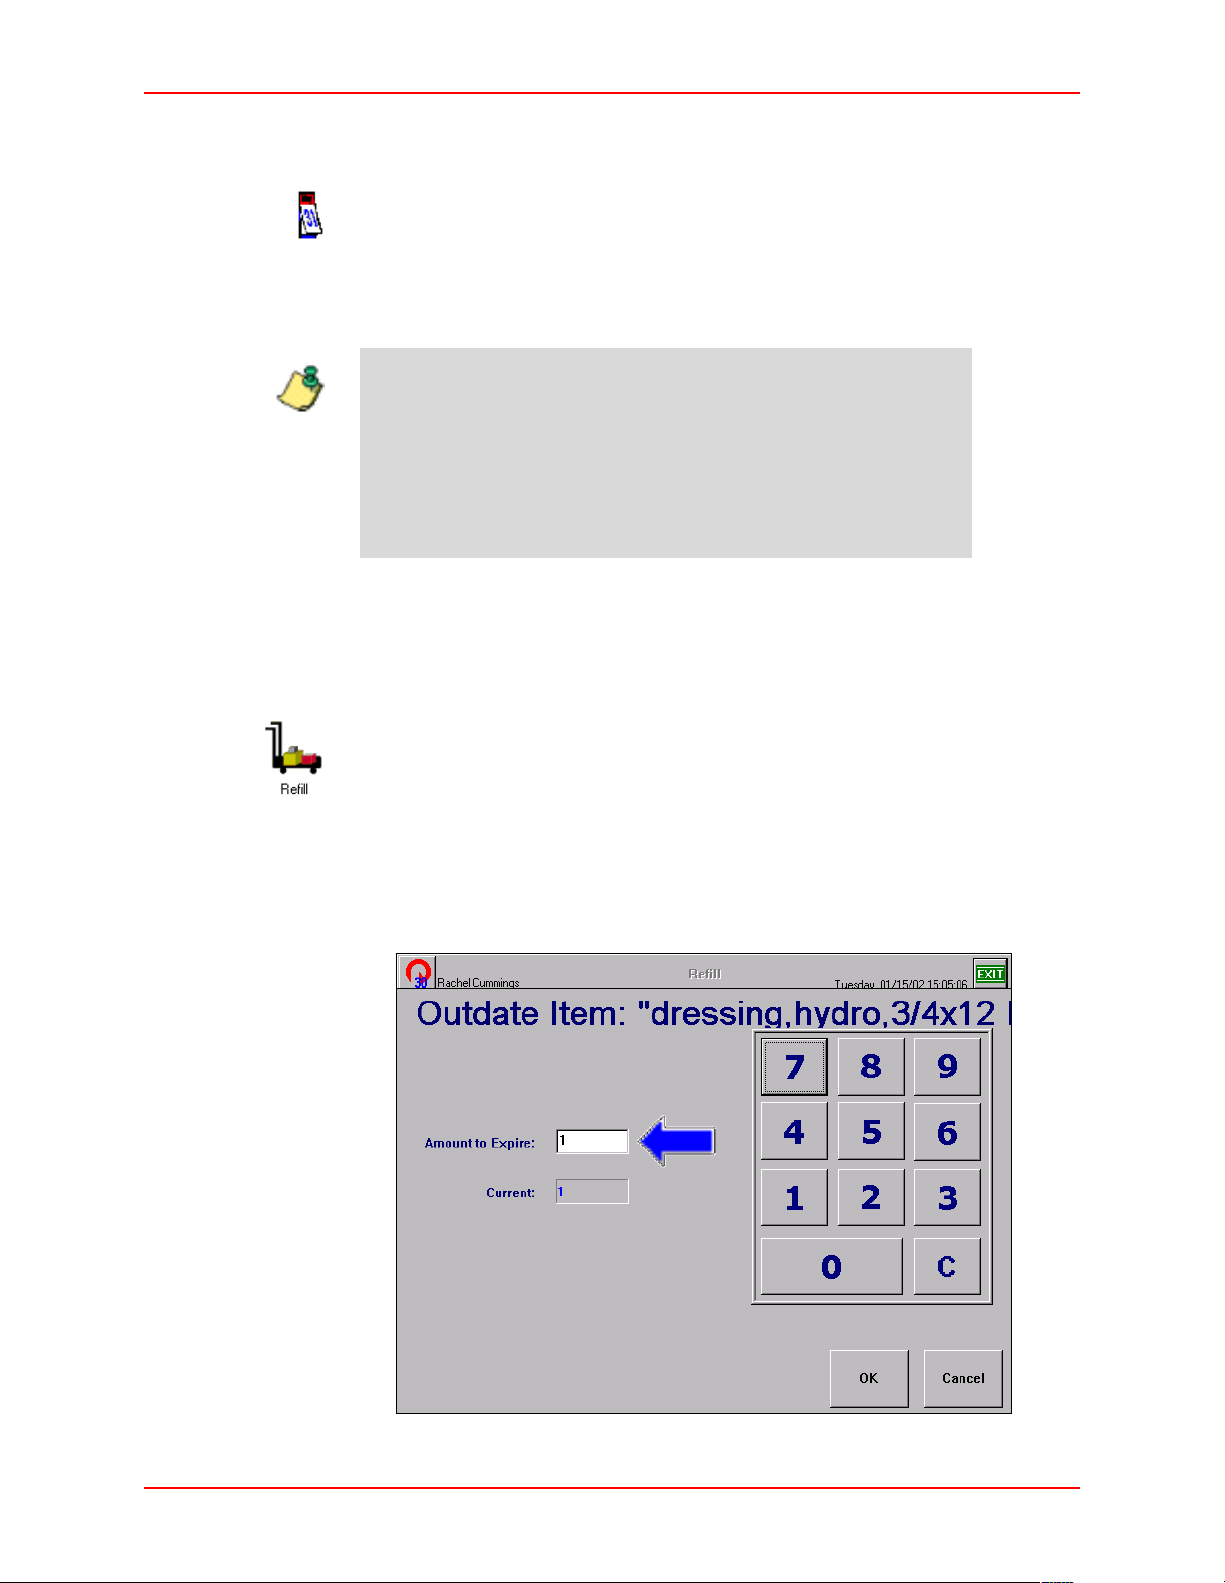
Note
Refill
Outdating Expired Items in Refill
Use the Outdate and Expiration feature to outdate an item and remove it from the
Station due to expiration. Items that are flagged as Expiring Items are tracked by
the system. When an expiring item is expired, or will expire within the specified
Item outdated warning days, a calendar icon appears next to the item name on the
Refill list. If an item with a calendar icon is selected for refill, an expiration
warning message appears.
The Expiring Item option and Expiration Date is configured using
Edit button in Inventory.
the
The Item outdated warning days is the number of days before an
item is set to expire that the system is configured to display the
calendar icon. The Item outdated warning days is configured in
Station Options on the Time Options tab. For more information, see
Station Options on page 5-25.
You can outdate an item that is not configured with an expiration date. However,
if an item is not configured with an expiration date in the system, the calendar
icon will not appear for the item and the system will not warn users to check the
expiration date for the item.
To outdate expired items
1. From the Main Menu, press the
Refill icon.
2. Select the expired item to outdate using the touch screen, or by pressing the
Take or Return button on the JITRBUD transmitter.
The Please Check the expiration date window appears.
3. Press
Outdate.
The Outdate Item window appears.
JITRBUD Main User Guide 4-27
Page 92
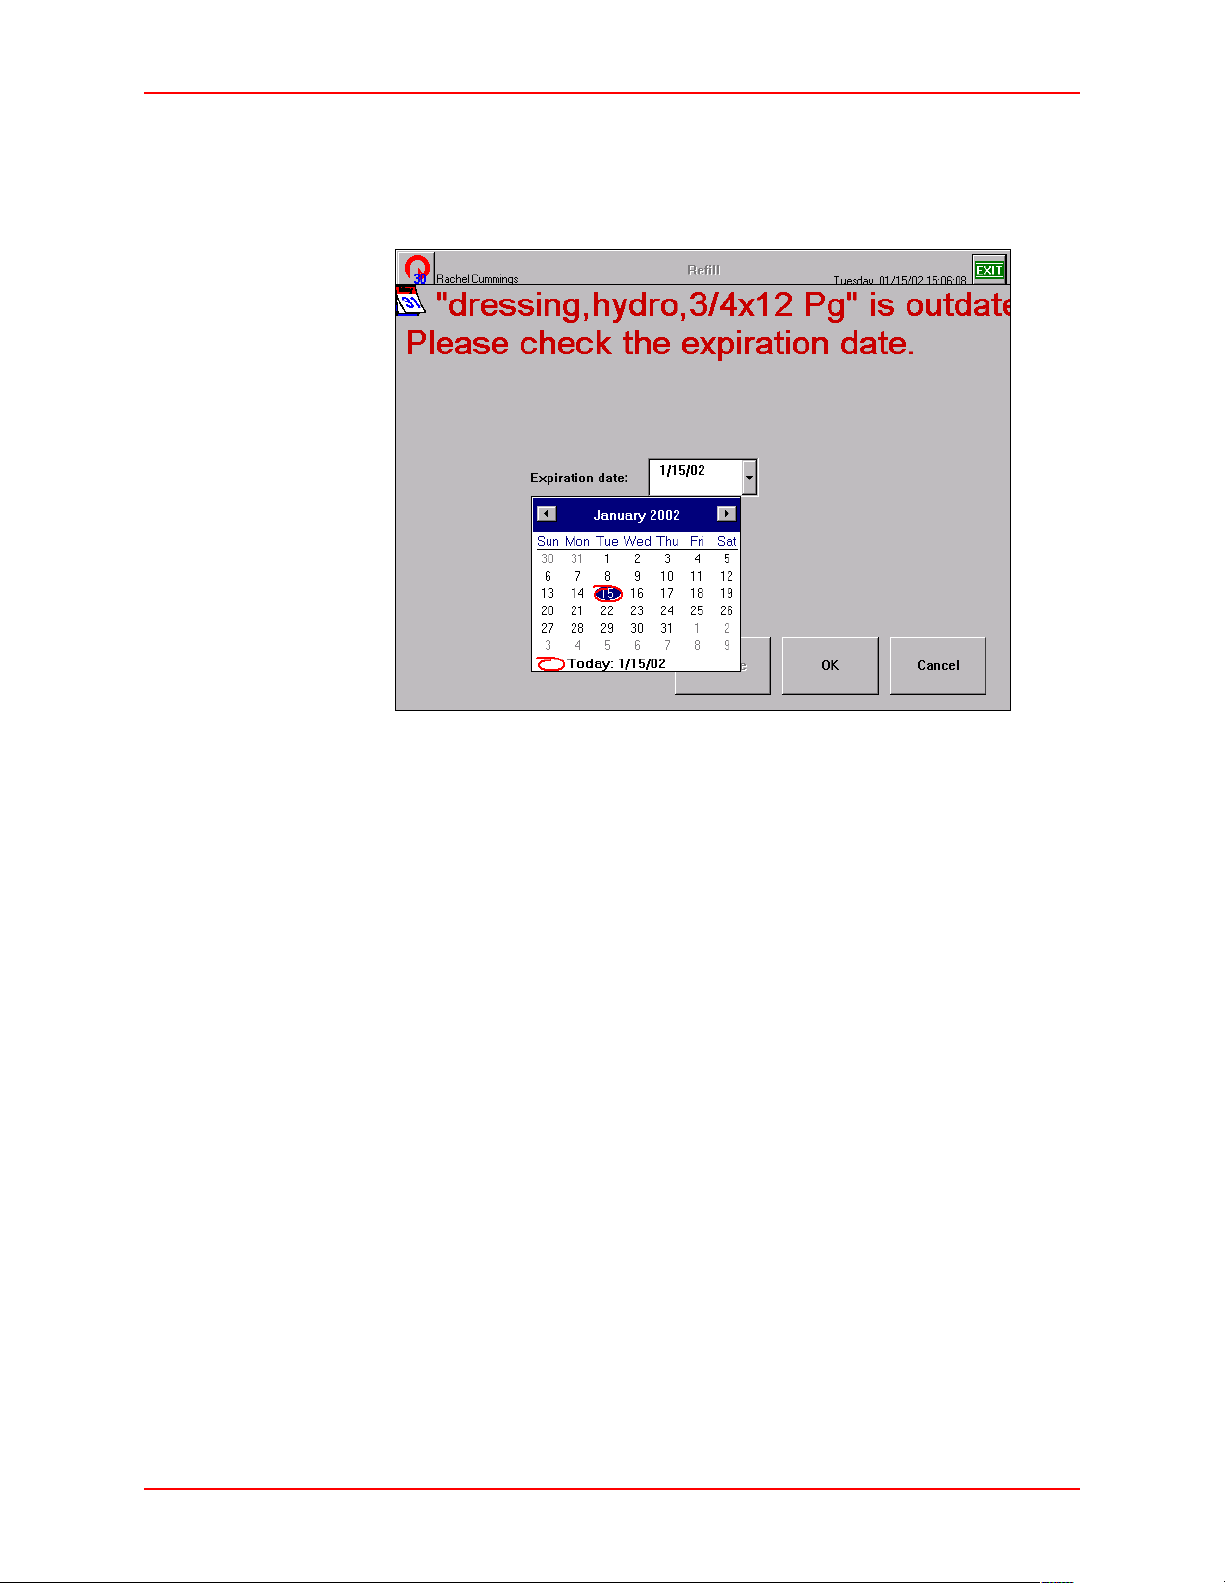
Refill
4. Enter the quantity of expired items in the Amount to Expire field.
5. Press
OK.
The Please Check the expiration date window appears.
6. Select the new expiration date for the remaining items using the calendar.
7. Press
OK.
8. Physically remove the expired items from the bin and press
9. Press
Done to return to the Main Menu, or Exit to log out of the Station.
OK.
4-28 JITRBUD Main User Guide
Page 93
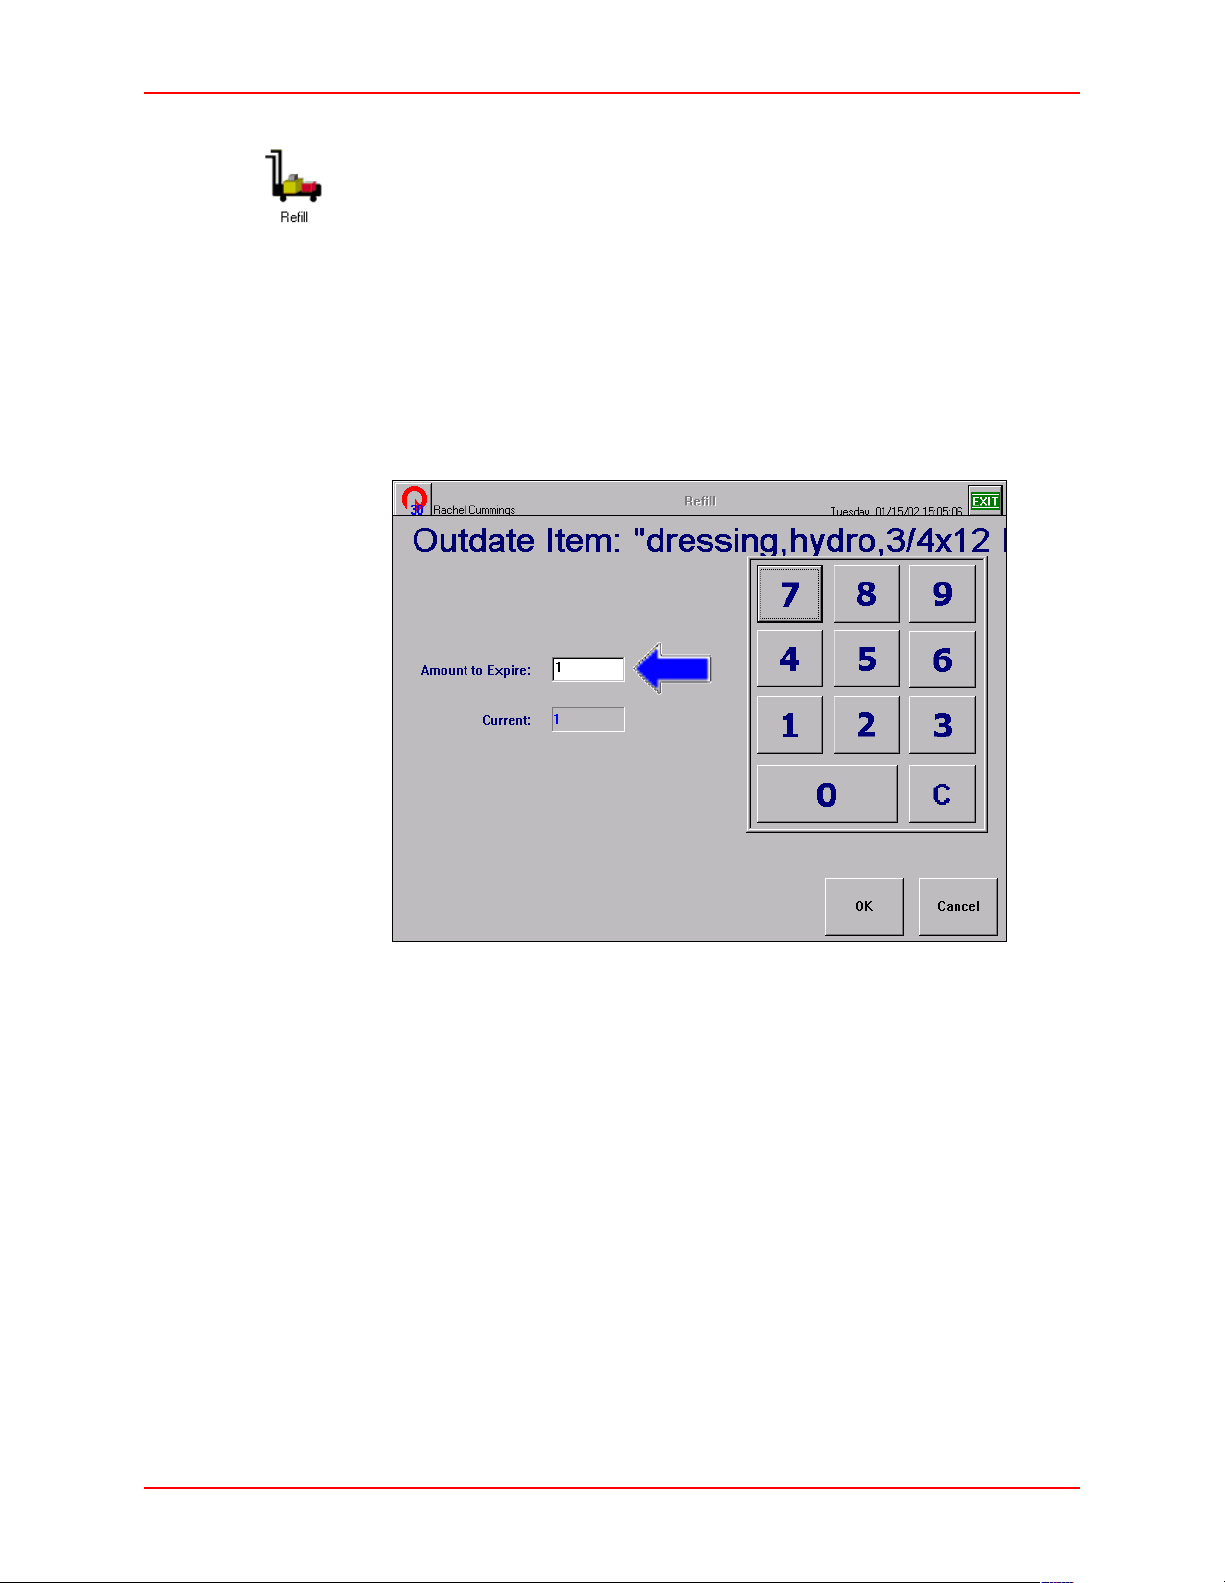
To outdate items not configured with Expiring Item feature
Refill
1. From the Main Menu, press the
Refill icon.
2. Select the item to outdate using the touch screen, or by pressing the
Return button on the JITRBUD transmitter.
The Refill Item window appears.
3. Press
4. Press
Cancel to return to the Refill screen.
Outdate and Expiration.
The Outdate and Expire Item window appears.
5. Press
Outdate.
The Outdate Item window appears.
Take or
6. Enter the quantity of expired items in the Amount to Expire field.
7. Press
OK.
The Outdate and Expire Item screen appears.
8. Press
9. Press
JITRBUD Main User Guide 4-29
OK.
Done to return to the Main Menu, or Exit to log out of the Station.
Page 94

Refill By Request Order
Refill By Request Order
Use the Refill by Request Order feature to restock the Station with items
identified by a purchase order or report number. The Refill by Request Order
feature enables refill technicians to replenish the Station in one simple step, by
receiving replenishment information electronically from the S
Console or outside vendor and transmitting the data directly to the Station.
UPPLYCENTER
Note
To view a refill request order, select the
Menu. A list of outstanding refills sent from the S
Refill by Request Order icon on the Main
UPPLYCENTER Console or
outside vendor is displayed with an associated PO or Report ID. Select the refill
order number and press the
Continue button. A list of all items in the order appears
with the Location, Current amount, and the Refill amount.
To send a Refill Report ID from the SUPPLYCENTER Console to the
Station, select the Notify Station of restock check box when printing
a Restock List or Pick List report.
You can select individual items on the Refill Order list screen, or you can press the
Refill All button to refill all items in the refill order. The bin lights identify the
location of the items on the Refill Order List. A receipt will print for each line
item refilled at the Station, if the print option is selected in Station Options.
4-30 JITRBUD Main User Guide
Page 95
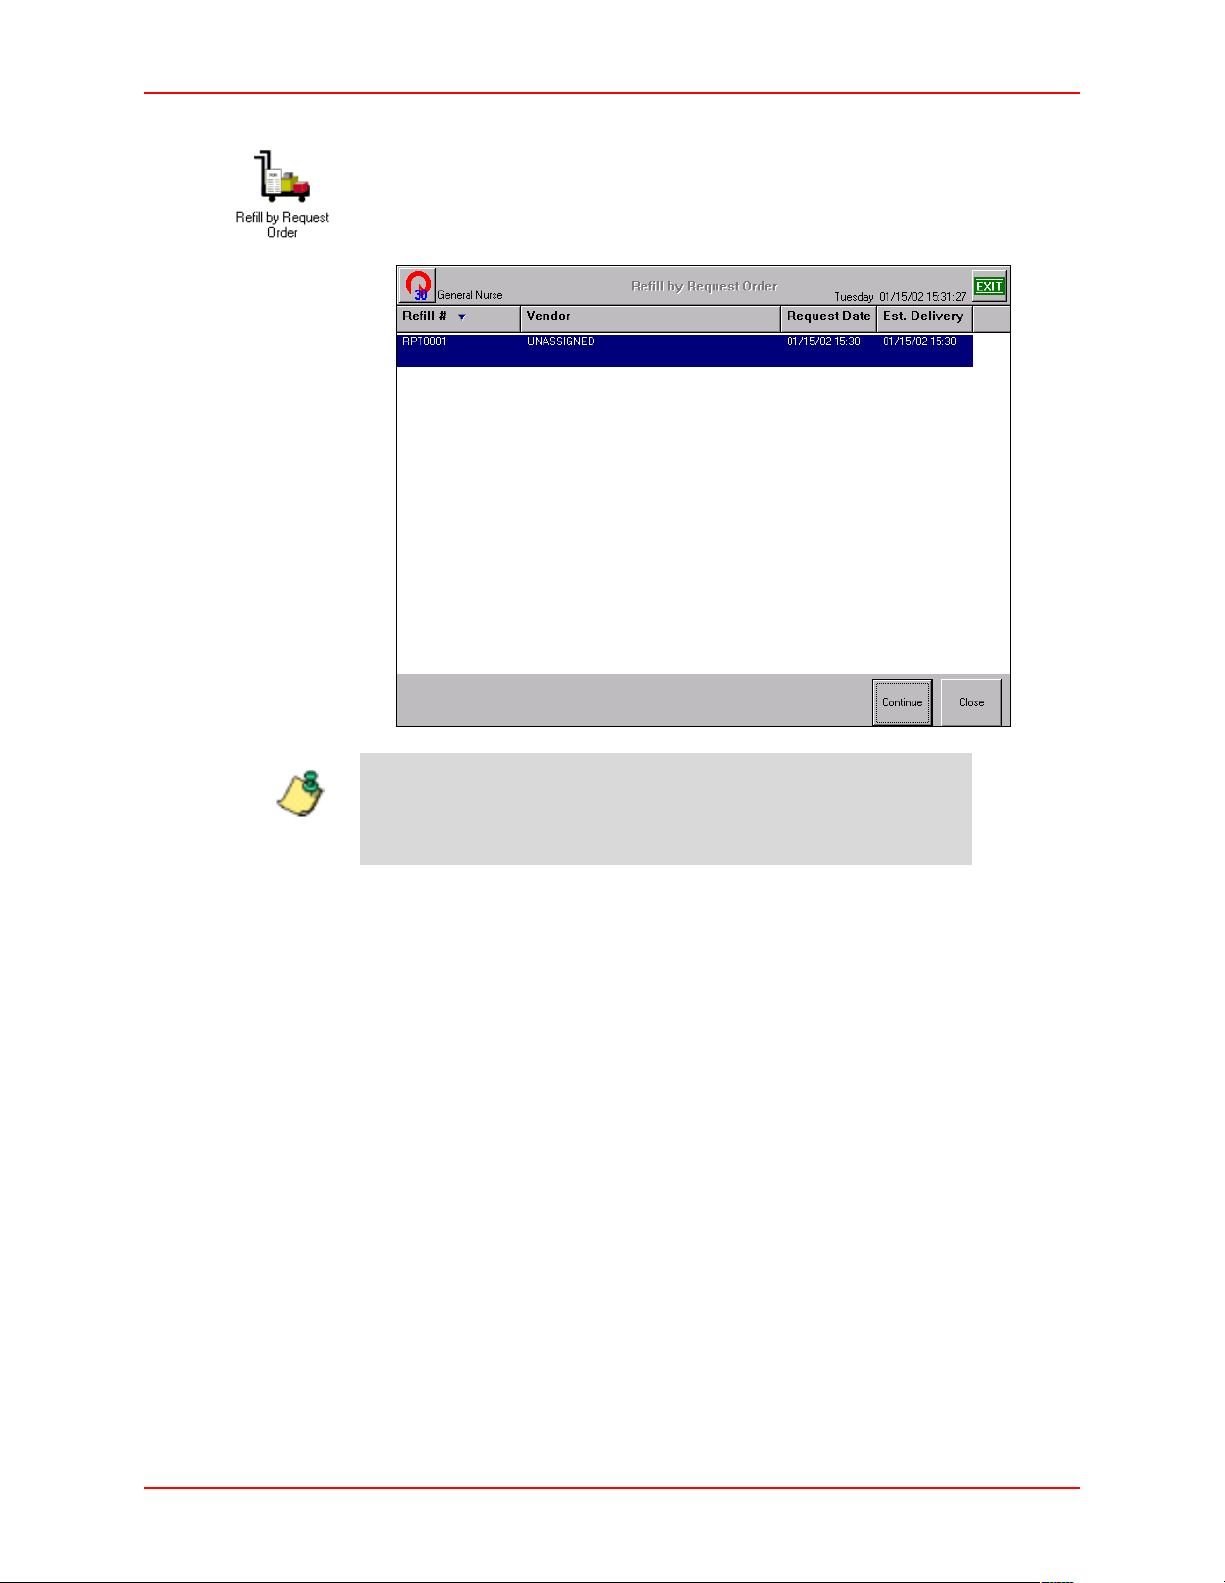
To Refill By Request Order
Refill By Request Order
Note
1. From the Main Menu, press the
Refill by Request Order icon.
The Refill by Request Order screen lists the refill orders for the Station.
If Notify Station of restock check box was selected at the
UPPLYCENTER Console, the Console Restock Report will have
S
same number as Refill Number at the Station.
.
2. Select the refill order and press
The Refill Order List screen appears.
Continue.
JITRBUD Main User Guide 4-31
Page 96
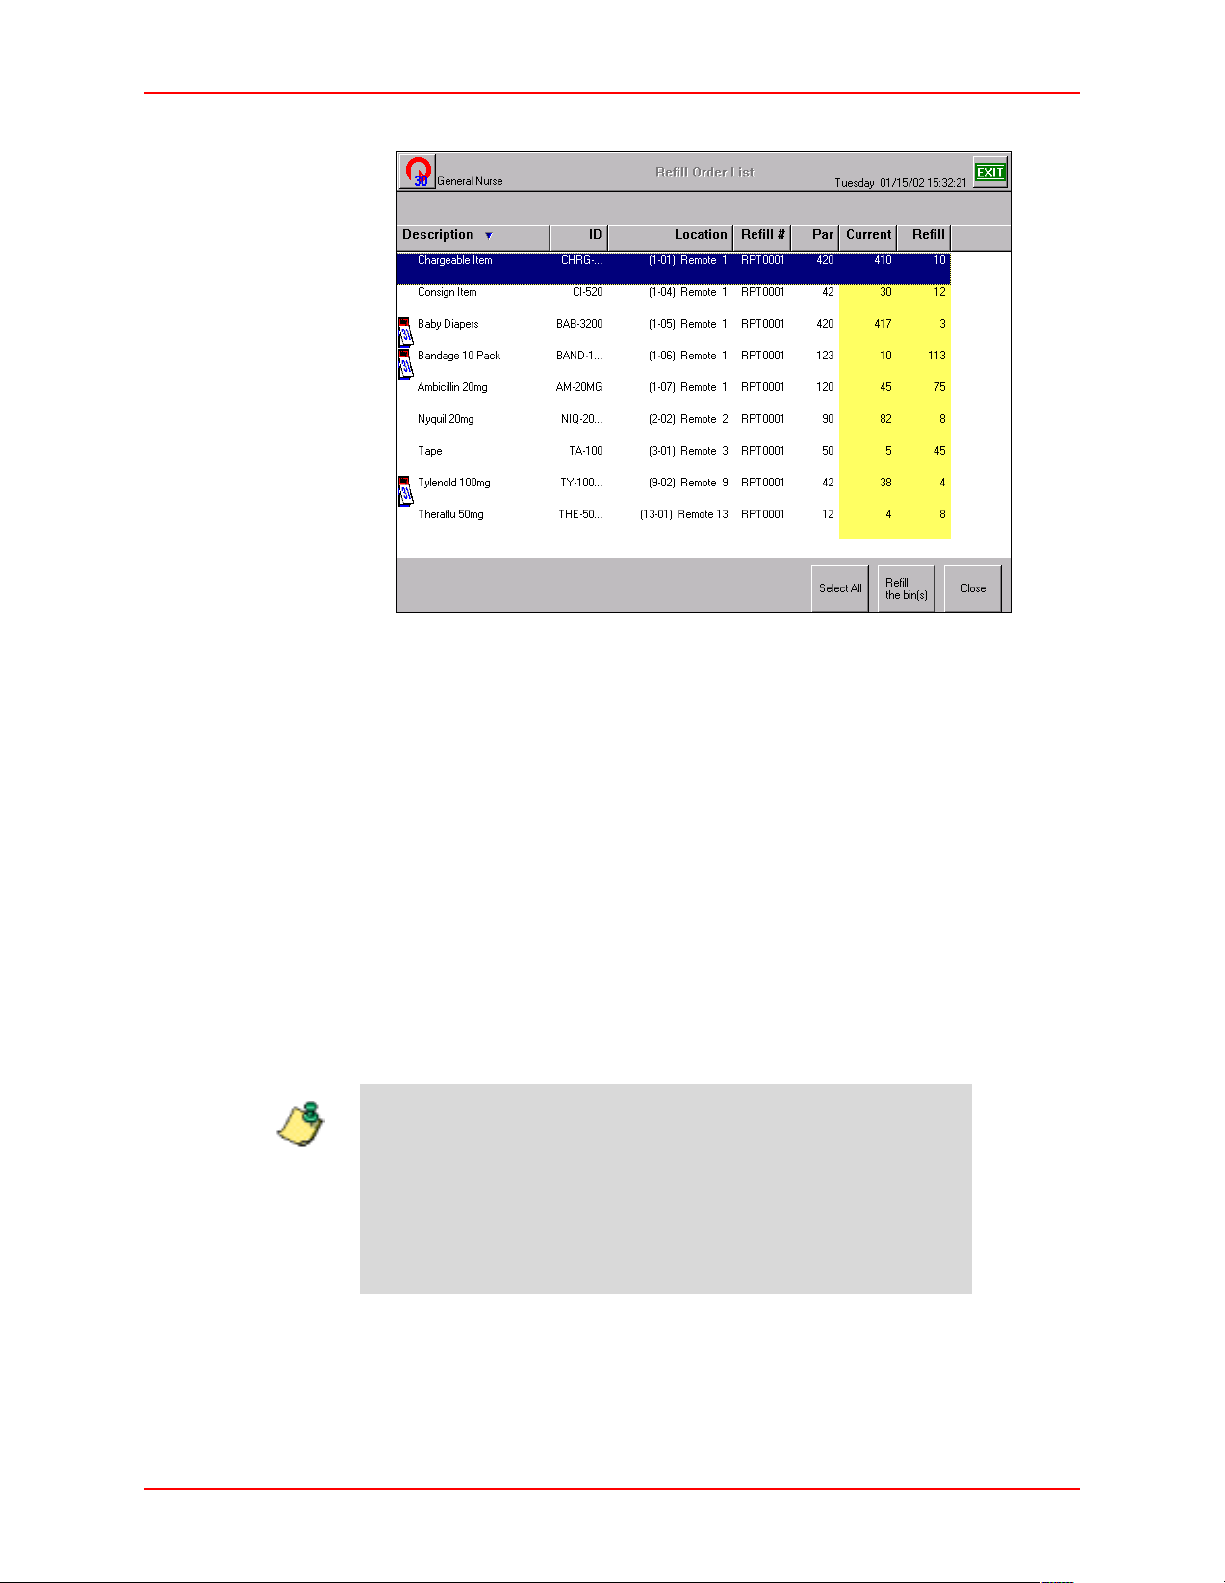
Refill By Request Order
• To change the Refill Count, double tap the Refill field on the screen and
enter the correct quantity using the keyboard.
• To change the Current Count, double tap the Current field on the screen
and enter the correct quantity on the keyboard.
3. To refill individual items, select an item using the touch screen, or by pressing
Take or Return button on the JITRBUD transmitter. To select multiple
the
items using the touch screen, press and hold down the C
the bin(s)
.
TRL key. Press Refill
Note
- or -
To refill all items on the Refill Order List, press
Select All.
The selected items are removed from the Refill Order List.
4. Physically refill the items.
5. Press
6. Press
Close.
Close to return to the Main Menu, or Exit to log out of the Station.
The refill order is not complete until all items are refilled or the
refill amount for the items is changed to zero.
If you do not complete the refill order, the refill order will
remain at the Station until it is removed by the system
maintenance program. For more information about the
maintenance program, see the S
UPPLYCENTER Console User
Guide.
4-32 JITRBUD Main User Guide
Page 97
Chapter
5
Station Management Functions
This chapter provides the following Station Management functions accessed from
the Station Management section of the Main Menu. The functions you have access
to depend upon the privileges that have been assigned to you.
• User—create a user with or without a template. Rights, privileges, and door
access are assigned at this screen.
• Options—customize each Station for specific needs and purposes. Included
are General Station Information, Options, Time Options, Printing Options,
and Station Communication Settings.
• Hardware Setup—add, edit, or delete a device at the Station.
JITRBUD Main User Guide 5-1
Page 98
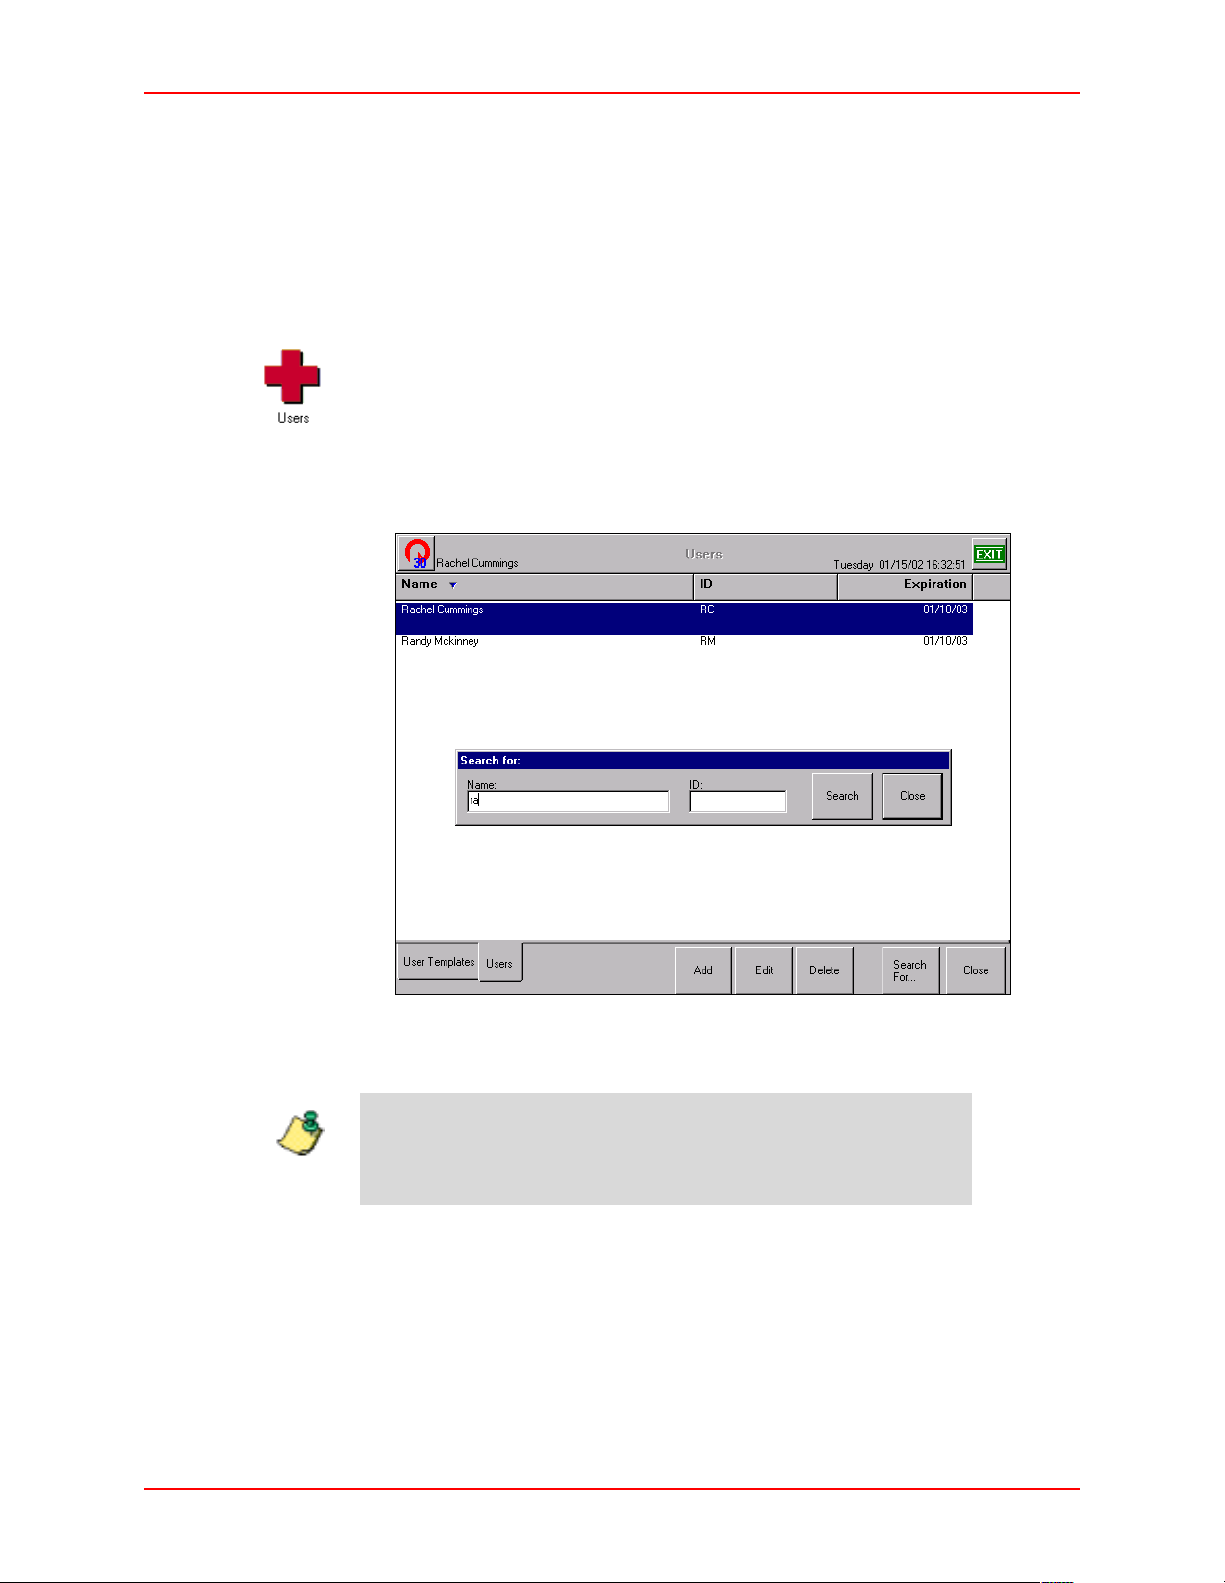
Users
Users
Use the Users feature to add users to the system. You can also add users to the
system at the S
Searching for Users
To search for a User
UPPLYCENTER Console.
1. From the Main Menu, press the
Users icon.
The Users window appears.
2. Type the first letters of the user name.
The Search For window appears.
3. If necessary, press the
Search button or ENTER key.
The User appears in the Users window.
If you type the entire user name, the user appears in the Users
window. If you type in the first few letters of the user name, a list
Note
of users appears to select the appropriate user.
4. To display the entire user list again, delete the text in the Search For window
and press
Search.
The user list appears.
5-2 JITRBUD Main User Guide
Page 99
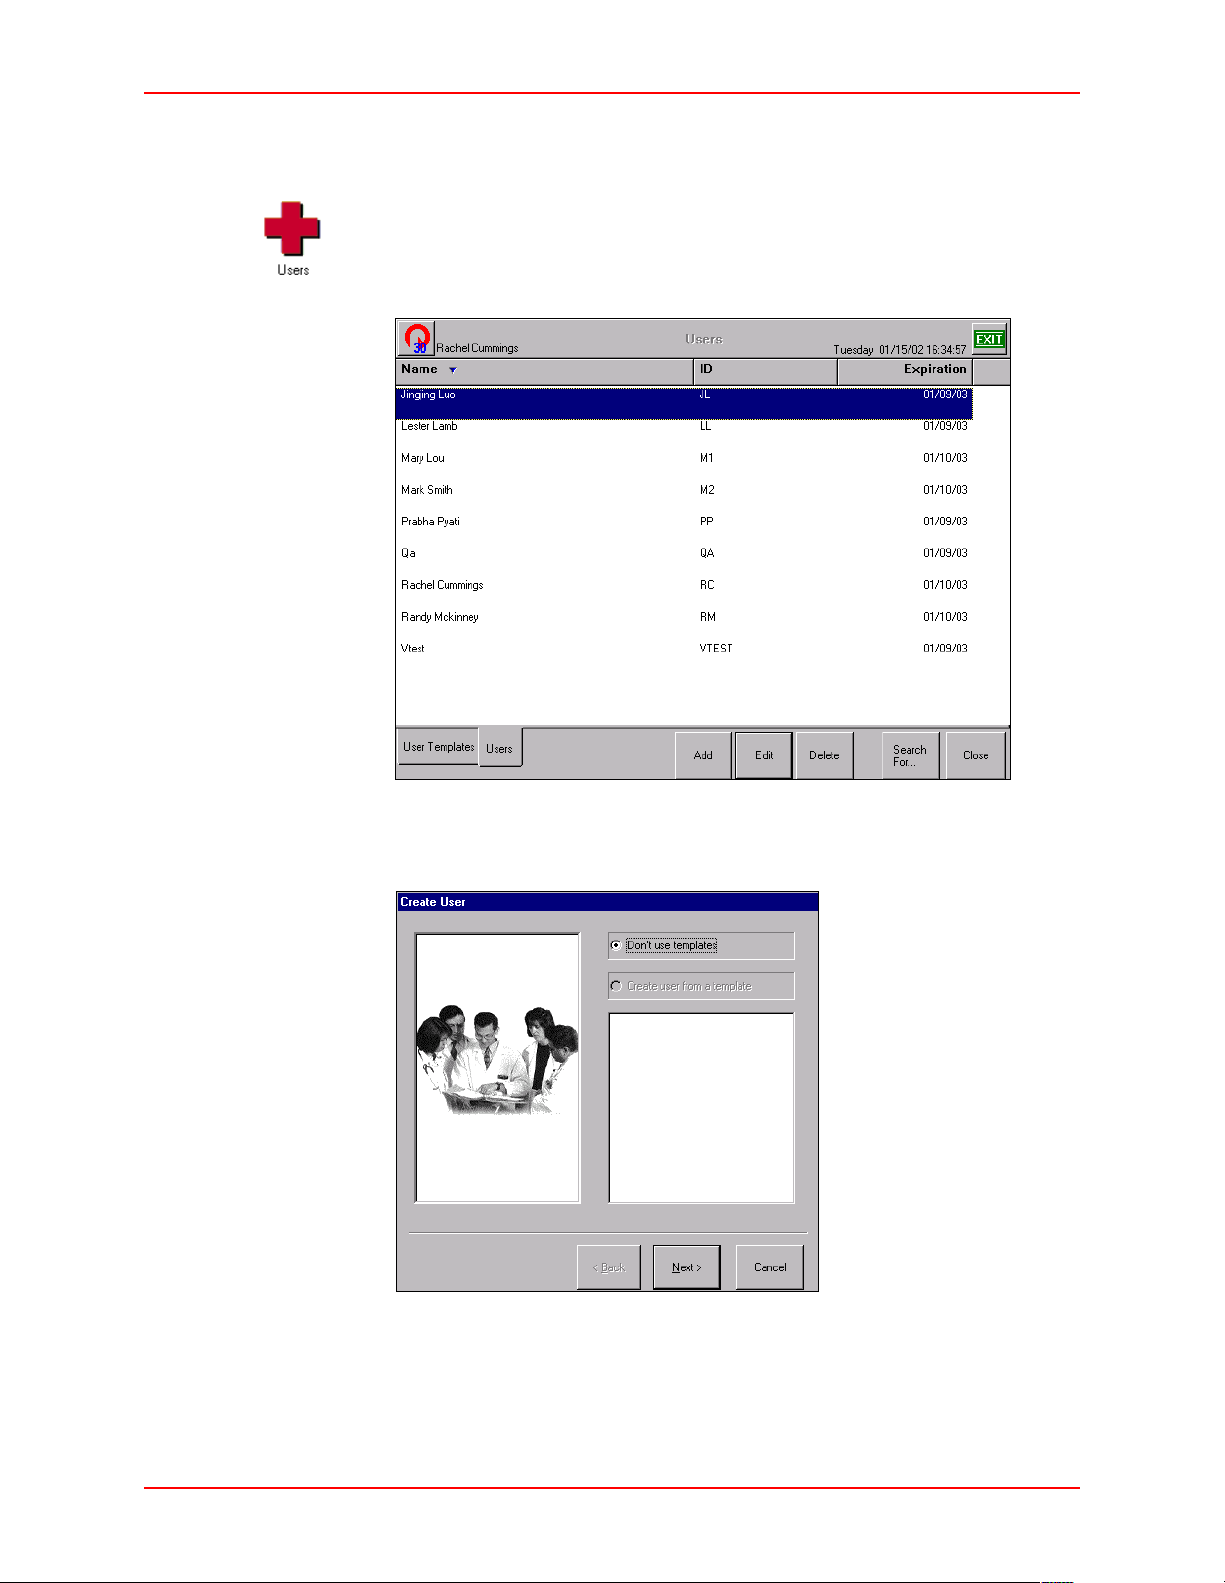
Creating Users
To create a user
Users
1. From the Main Menu, press the
The Users screen appears.
2. Press
Add.
Users icon.
The Create User window appears.
3. Select the
4. Press
Don’t use template button.
Next.
The General window appears.
JITRBUD Main User Guide 5-3
Page 100
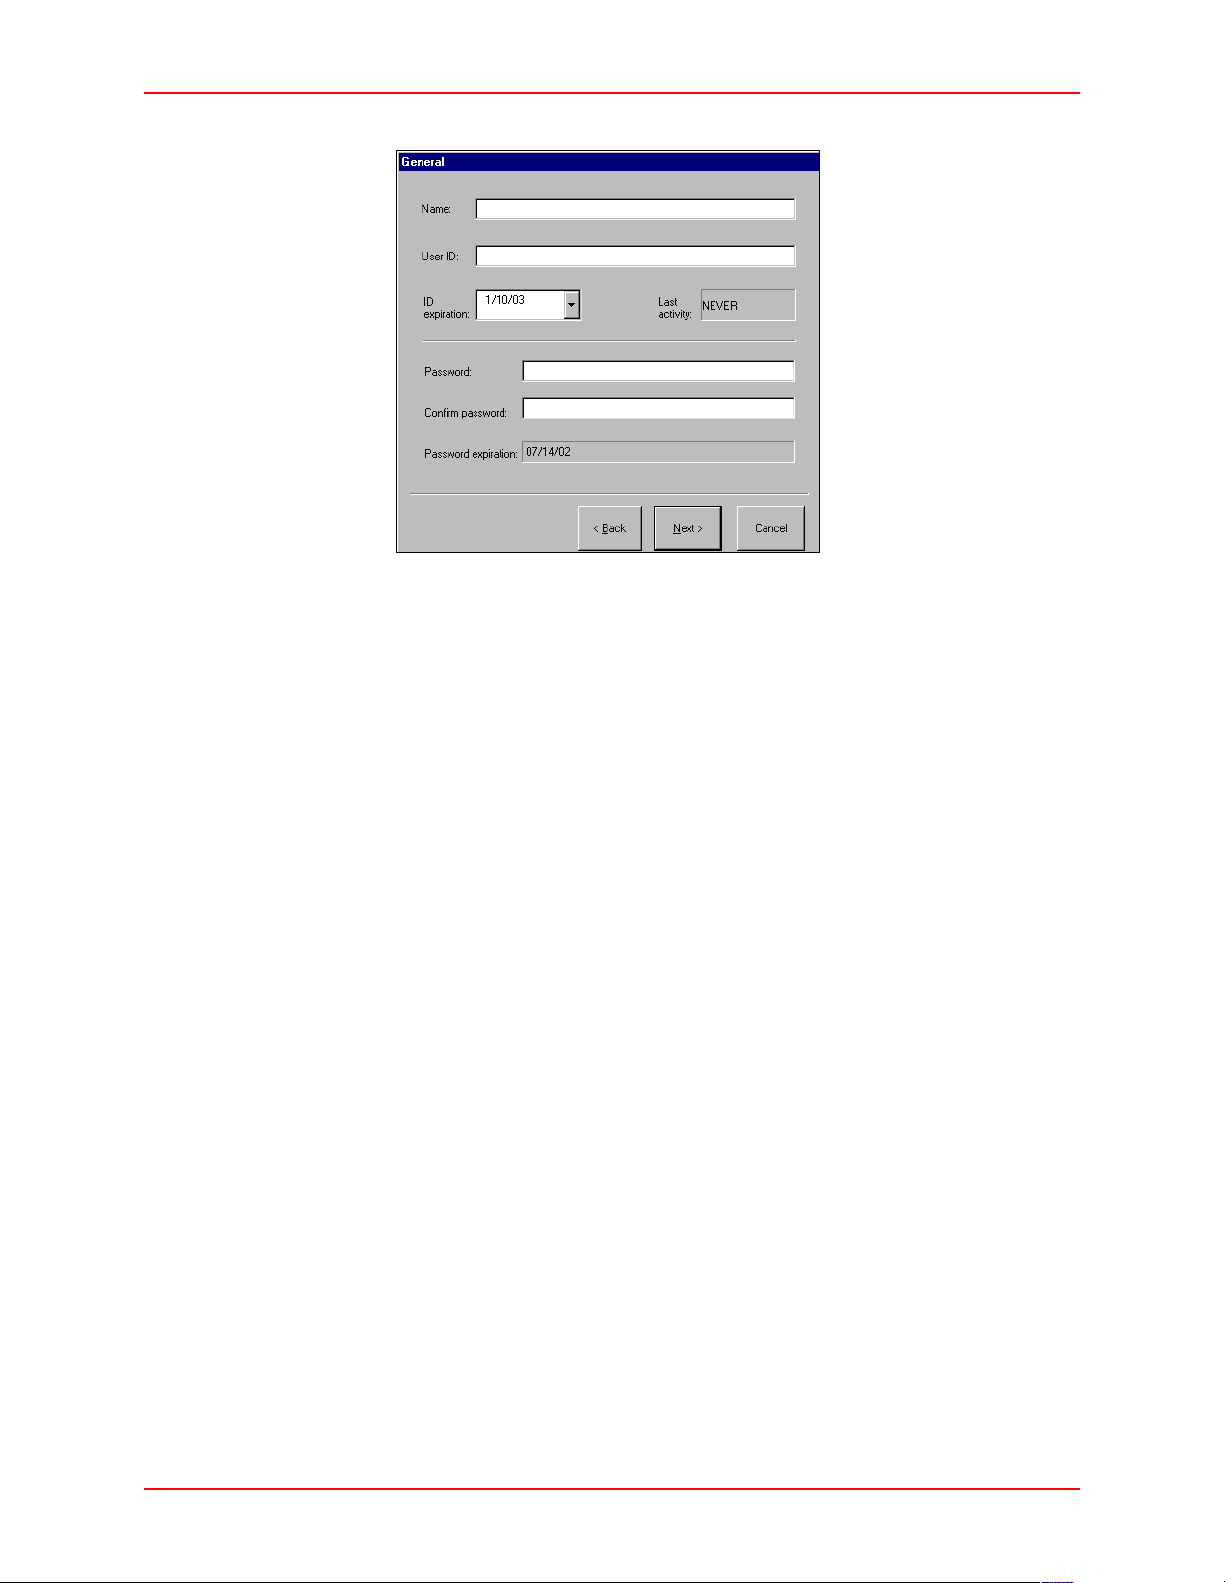
Users
5. Enter the user’s information:
• Name—name of the user.
• User ID—ID of the user.
• ID expiration—expiration date of the User ID.
• Password—password for the user.
• Confirm password—confirmation of the password for the user.
• Password expiration—expiration date of the user password (configured
at the S
6. Press
UPPLYCENTER Console).
Next.
The Area window appears.
5-4 JITRBUD Main User Guide
 Loading...