


Auto Aligning Time Clock
User Guide


 Pro
Pro
PM
24
pyramidtimesystems.com

Auto Aligning time CloCk inStRuCtionS model 2500/2650
Copyright Information
© 2016 Pyramid Time Systems, LLC. All rights reserved.
Reproduction, adaptation or translation without prior written permission is prohibited, except as allowed under the copyright laws.
The information contained herein is subject to change without notice.
The only warranties for Pyramid Time Systems products are set forth in the express warranty statements accompanying such products. Nothing herein should be construed as constituting an additional warranty. Pyramid Time Systems shall not be liable for technical or editorial errors or omissions contained herein.

Auto Aligning time CloCk inStRuCtionS model 2500/2650
TABLE OF CONTENTS
PRODUCT OVERVIEW . . . . . . . . . . . . . . . . . . . . . . . 2 FEATURES . . . . . . . . . . . . . . . . . . . . . . . . . . . . 2
CONTENTS . . . . . . . . . . . . . . . . . . |
. . . . . |
. . . |
. 3 |
WALL MOUNTING . . . . . . . . . . . . . . . |
. . . . . |
. . . |
4 |
PROGRAMMING . . . . . . . . . . . . . . . . |
. . . . . |
. . 5-10 |
|
AUTOMATIC COLUMN ADVANCE . . . . . . . . . |
. . . . . |
. . . |
9 |
CHANGING A SETTING . . . . . . . . . . . . . |
. . . . . |
. . . |
9 |
DELETING A SETTING . . . . . . . . . . . . . . |
. . . . . |
. . . |
9 |
TIME CARD & PRINT FORMAT . . . . . . . . . . |
. . . . . . . . 11 |
||
USING THE CLOCK . . . . . . . . . . . . . . . . . . . . . . . 12 |
|||
REPLACING RIBBON CARTRIDGE . . . . . . . . . |
. . . . . |
. . . |
13 |
TROUBLESHOOTING & PRINT ADJUST . . . . . . |
. . . . . . . . 14 |
||
MASTER RESET. . . . . . . . . . . . . . . . . . . . . . . . . 14 |
|||
ACCESSORIES & CUSTOMER SUPPORT . . . . . . |
. . . . . . . . 15 |
||
SPECIFICATIONS . . . . . . . . . . . . . . . . . . . . . . . . 16 |
|||
WARRANTY . . . . . . . . . . . . . . . . . . . . . . . . . . 17 |
|||
ESPAÑOL . . . . . . . . . . . . . . . . . . . |
. . . . . . . 18-34 |
||
FRANÇAIS . . . . . . . . . . . . . . . . . . . |
. . . . . |
. . 35-51 |
|
pyramidtimesystems.com |
TABLE OF CONTENTS |
1 |

Auto Aligning time CloCk inStRuCtionS model 2500/2650
PRODUCT OVERVIEW
Thank you for choosing the 2500/2650Pro Auto Aligning Time Clock! The 2500/2650Pro stays on top of employee arrival time, breaks & departure time. The 6-column time card accommodates up to 3 In & Out punch intervals for lunch or breaks. Simple set-up, simple operation & a compact design makes this time clock the perfect fit for small workplaces!
Please read through this User Guide for simple set-up & operation.
AUTO ALIGNING TIME CLOCK : FEATURES
Employee Capacity |
Unlimited |
|
Card Alignment |
Top |
|
Ribbon Ink Color |
Black |
|
Display |
Time backlit LCD screen |
|
Printing Format |
Hour & minutes |
|
Printing |
Dot matrix |
|
Automatic Time Reset |
Short months, Leap Year & USA Daylight Saving Time |
|
Battery Back-Up |
Safeguards data & settings for up to 30 days |
|
without power |
||
|
||
Tamper-Proof |
Security lock protects against costly time theft |
|
Warranty |
1-Year manufacturer's limited warranty |
2 |
PRODUCT OVERVIEW & FEATURES |
888.479.7264 |

Auto Aligning time CloCk inStRuCtionS model 2500/2650
CONTENTS
|
Pro |
|
|
Auto Aligning Time Clock |
|
|
User Guide |
|
|
24 |
|
PM |
|
|
24 |
|
|
|
pyramidtimesystems.com |
|
2500/2650Pro Auto Aligning |
2500/2650pro User Guide |
42415 |
Time Clock |
|
Time Cards |
|
|
2650Pro (25) |
|
|
2500 (100) |
|
10 Pocket |
|
|
Time Card Rack |
|
(included with 2500 model) |
|
|
|
|
Security |
|
|
Keys (2) |
WHAT YOU WILL NEED
Tape Measure |
Pencil |
Phillips Head |
Power Drill |
|
|
Screw Driver |
(Optional) |
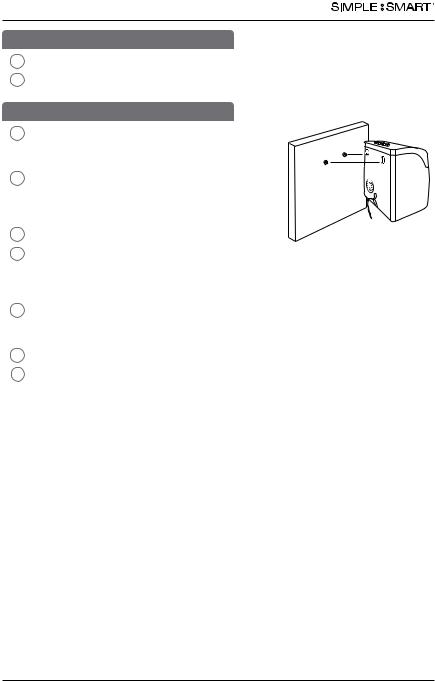
KNOW YOUR SERIAL #
IMPORTANT:
Please write down serial # located on back of time clock before mounting.
SAMPLE
Write your serial # here:


 σ
σ
pyramidtimesystems.com |
CONTENTS |
3 |
AUTO ALIGNING TIME CLOCK INSTRUCTIONS
Model 2500/2650
DESKTOP SET UP
1Remove time clock from carton & place on a flat, level surface.
2Plug unit into AC wall outlet.
WALL MOUNTING
1Select a location convenient to employees clocking IN & OUT. Be sure power outlet is within 5 feet of mounting location.
2Use masking tape to hold mounting template on wall, making certain template is positioned so bottom of time clock is approximately
45 inches from floor.
3Drill holes using template as a guide.
4Remove template from wall & install #10 screws, leaving approximately 3/16 inch of screws exposed. For sheetrock walls, use plastic anchors.
5Hang time clock on wall, aligning keyholes on the rear with screw heads. Press downward on time clock until it lowers onto screws.
6Plug unit into AC wall outlet.
7It is recommended to remove the clock from bracket to complete programming set up which begins on page 5.
Model 2500/2650Pro
4 |
WALL MOUNTING |
888.479.7264 |
AUTO ALIGNING TIME CLOCK INSTRUCTIONS
Model 2500/2650
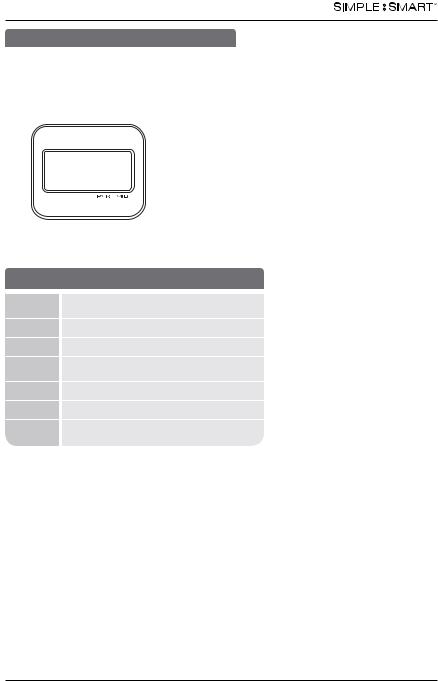
PROGRAMMING
+ |
Enter Back Clear |
Reset |
Setting |
|
PM
24
Use the key to unlock & remove top/front cover.
BUTTONS
SETTING Activates SETTING Mode (right) or Operation Mode (left)
+Next setting or adjust setting
-Previous setting or adjust setting
ENTER |
Save current or new settings and advance to |
|
next function |
BACK |
Previous setting or value |
CLEAR |
Default setting or value |
RESET |
Reset time clock hardware settings. |
|
Does not reset program settings. |
DISPLAY/BUTTONS
01 |
Indicates active setting mode or function |
IN |
OUT |
IN |
OUT |
IN |
+ |
|
Enter |
Back |
Clear |
Setting |
|
OUT
Reset
pyramidtimesystems.com |
PROGRAMMING |
5 |
AUTO ALIGNING TIME CLOCK INSTRUCTIONS
Model 2500/2650
PROGRAMMING
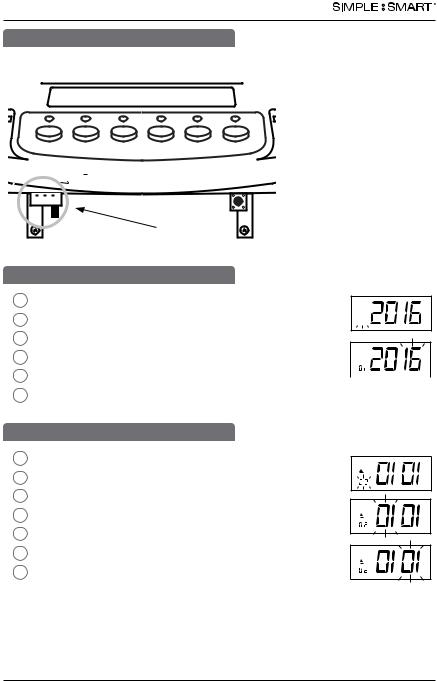
To activate setting mode, slide the black “SETTING” switch to the right.
IN |
OUT |
IN |
OUT |
IN |
+ |
|
Enter |
Back |
Clear |
Setting |
|
|
|
|
OUT
Reset
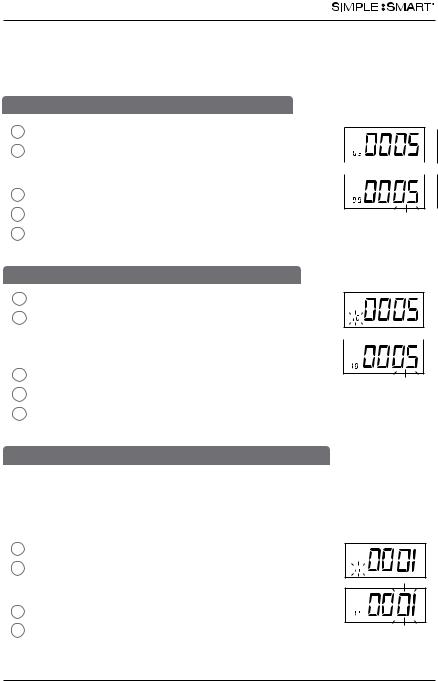
01-SET YEAR
1In SETTING mode, Press “ENTER” to begin “01” setting mode.
2The default setting is 2016. Press “ENTER” 


3To change the year, press “+” or “-” to advance to current year.
4Press “ENTER” to confirm.
5The setting mode advances to “02”. 
6Continue to next steps or slide the SETTING switch to the left to exit setting mode.
02-SET DATE
1In SETTING mode, Press “ENTER” to begin “02” setting mode.
2Press “+” or “-” to advance to current month.
3Press “ENTER” to confirm.
4Press “+” or “-” to advance to current date.
5Press “ENTER” to confirm.
6The setting mode advances to “03”.
7Continue to next steps or slide the SETTING switch to the left to exit setting mode.
6 |
PROGRAMMING |
888.479.7264 |

AUTO ALIGNING TIME CLOCK INSTRUCTIONS
Model 2500/2650
03-SET PRINT & DISPLAY TIME FORMAT
This function sets the time clock to display and print time in either AM/PM (12 hour) or Military time.
1 In SETTING mode, Press “ENTER” to begin “03” setting mode.
2 Press “ENTER” to select “12” for AM/PM or “+” and “ENTER” to select “24” for Military time.
3 The setting mode advances to “04”.
4 Continue to next steps or slide the SETTING switch to the left to exit setting mode.
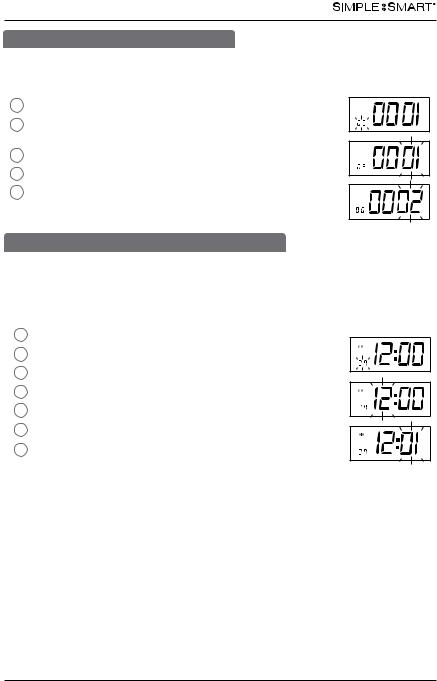
04-SET TIME
1 |
In SETTING mode, Press “ENTER” to begin “04” setting mode. |
|
2 |
Press “+” or “-” to subtract or advance hour. |
|
3 |
Press “ENTER” to confirm. |
|
4 |
Press “+” or “-” to subtract or advance minute. |
|
5 |
Press “ENTER” to confirm. |
|
6 |
The setting mode advances to “05”. |
|
7 |
Continue to next steps or slide the SETTING switch to the |
|
left to exit setting mode. |
||
|
05-SET MINUTE PRINT FORMAT
This function sets how the minutes will print on the time card.
1 In SETTING mode, Press “ENTER” to begin “05” setting mode.
2 Press “+” or “-” to select desired printing mode. 01-standard minutes (60 minute format)
02-minutes in hundredths (ie. 12:45 will print as 12:75)
3 Press “ENTER” to confirm setting.
4 The setting mode advances to “06”.
5 Continue to next steps or slide the SETTING switch to the left to exit setting mode.
pyramidtimesystems.com |
PROGRAMMING |
7 |
AUTO ALIGNING TIME CLOCK INSTRUCTIONS
Model 2500/2650
06-SET DAYLIGHT SAVING TIME
This feature sets the time clock to automatically adjust the time for USA Daylight Saving Time.
1 In SETTING mode, Press “ENTER” to begin “06” setting mode.
2 Press “+” or “-” to select desired Daylight Saving Time mode. 01-Automatic DST, 02-No DST
3 Press “ENTER” to confirm setting.
4 The setting mode advances to “07”.
5Continue to next steps or slide the SETTING switch to the left to exit setting mode.
07-SET AUTOMATIC DAY/ROW ADVANCE TIME
This function allows you to set the time of the day the time clock will advance to the next day/row on the time card (default setting 12am). For example, if your company has a shift beginning at 8am, it is recommended to set the row advance time for 6am to ensure employees punching in will have all in/out punches in the same row on the time card.
1 |
In SETUP mode, Press “ENTER” to begin “07” setting mode. |
2 |
Press “+” or “-” to subtract or advance hour. |
3 |
Press “ENTER” to confirm. |
4 |
Press “+” or “-” to subtract or advance minute. |
5 |
Press “ENTER” to confirm. |
6 |
The setting mode advances to “08”. |
7 |
Continue to next steps or slide the SETUP switch to the |
|
right to exit setting mode. |
8 |
PROGRAMMING |
888.479.7264 |
AUTO ALIGNING TIME CLOCK INSTRUCTIONS
Model 2500/2650
08-AUTOMATIC COLUMN ADVANCE
This function automatically advances the In/Out buttons to the next column at a selected time. Employees will not need to manually select the column for In/Out punches, however, the automatic selection may be overridden by pressing the In/Out button to select the desired column. This feature is recommended for single shift only. User may override automatic column advance by simply pressing the In or Out button for desired column.
1 In SETUP mode, Press “ENTER” to begin “08” setting mode.
2 Press “+” or “-” to select column 1-6 for print punch. column 1= ---1
column 2= ---2 column 3= ---3 column 4= ---4 column 5= ---5 column 6= ---6
3 Press “ENTER” to confirm setting. The indicator light will activate for the selected column.
4Press “+” or “-” to select desired hour for column auto advance. 
5Press “ENTER” to confirm setting.
6 Press “+” or “-” to select desired minute for column auto advance.
7Press “ENTER” to confirm setting.
8The setting mode advances to column 2 (– – – 2).
9Repeat steps 3-7 (total of 6 settings allowed) to continue to next setting or slide the “SETTING” switch to the left to exit setting mode.
10 The setting mode advances to “09”.
pyramidtimesystems.com |
PROGRAMMING |
9 |
AUTO ALIGNING TIME CLOCK INSTRUCTIONS
Model 2500/2650
Functions 09 and 10 are only necessary if adjustment is required to properly align the print position within the “punch square” on the time card. To perform a “print test” to determine if the time clock is printing properly, switch the SETTING button to the left. Run a test card through the time clock. If the alignment is acceptable, skip sections 09 & 10 and proceed to stop 11.
09-SET PRINT POSITION UP/DOWN OPTIONAL
1 In SETTING mode, Press “ENTER” to begin “09” setting mode.
2 Press “+” or “-” to adjust the desired vertical printing position. 

 Increasing the number (06-09) will move the print up on the card.
Decreasing the number (00-04) will move the print down on the card.
3 Press “ENTER” to confirm setting.
4 The setting mode advances to “10”.
5Continue to next steps or slide the SETTING switch to the left to exit setting mode.
10-SET PRINT POSITION LEFT/RIGHT OPTIONAL
1 In SETTING mode, Press “ENTER” to begin “10” setting mode.
2 Press “+” or “-” to select the desired horizontal printing position. Increasing the number (06-09) will move the print to
the right on the card. Decreasing the number (00-04) will move  the print left on the card.
3 Press “ENTER” to confirm setting.
4The setting mode advances to “11”.
5Continue to next steps or slide the SETTING switch to the left to exit setting mode.
11-SET ON/OFF FUNCTION FOR AUTO-DETECT TIME CARD SIDE
Because this time clock uses a double sided time card, the auto-detect feature assures the time card is inserted on the correct side corresponding to the date printed on the time card (days 1-31) If the time card is inserted backwards (on the wrong side), the time clock will eject the card until the correct side is inserted. Auto-detection “01” is recommended.
1 In SETTING mode, Press “ENTER” to begin “11” setting mode.
2 Press “+ or “-” to select “01” or “02” 01-auto-detect time card
02-turns off auto-detect time card
3 Press “ENTER” to confirm setting.
4 Slide the SETTING switch to the left to exit setting mode.
10 |
PROGRAMMING |
888.479.7264 |
AutoUTO AligningLIGNING timeTIME CloLOCkK inINStTRuUCtionTIONS mModel 2500/2650
CHANGING A SETTING
1Slide the “SETTING” switch to right.
2Press “+” or “-” to select the setting to be changed.
3Follow the instructions for the selected feature.
4Slide the “SETTING” switch to the left when complete.
TIME CARDS
A
No. _________________ Period ___________________________________________
Name __________________________________________________________________
Regular Hours |
______________ |
Rate ________________ Amount ______________ |
|||||
Overtime Hours ______________ |
Rate ________________ Amount ______________ |
||||||
|
|
|
|
|
Deductions |
_____________ |
|
|
|
|
|
|
Actual Pay |
_____________ |
|
|
|
|
|
|
Pay Date |
_____________ |
|
|
|
|
|
|
|
|
|
DATE |
IN |
OUT |
IN |
OUT |
IN |
OUT |
TOTAL |
1
2
3
4
5
6
7
8
9
10
11
12
13
14
15
Signature ____________________________________________________
Approval ____________________________________________________
pyramidtimesystems.com |
|
ITEM |
|||
|
© 2009 Pyramid Time Systems, LLC #42415 Rev. G |
||||
|
|
|
|
Made in USA |
|
|
|
|
|||
|
|
|
|
|
|
FRONT
Time Card #42415
B
No. _________________ Period ___________________________________________
Name __________________________________________________________________
Regular Hours |
______________ |
Rate ________________ Amount ______________ |
|||||
Overtime Hours ______________ |
Rate ________________ Amount ______________ |
||||||
|
|
|
|
|
Deductions |
_____________ |
|
|
|
|
|
|
Actual Pay |
_____________ |
|
|
|
|
|
|
Pay Date |
_____________ |
|
|
|
|
|
|
|
|
|
DATE |
IN |
OUT |
IN |
OUT |
IN |
OUT |
TOTAL |
16
17
18
19
20
21
22
23
24
25
26
27
28
29
30
31
Signature ____________________________________________________
Approval ____________________________________________________
pyramidtimesystems.com |
|
|
ITEM |
© 2009 Pyramid Time Systems, LLC #42415 Rev. G |
|||
|
|
|
Made in USA |
BACK
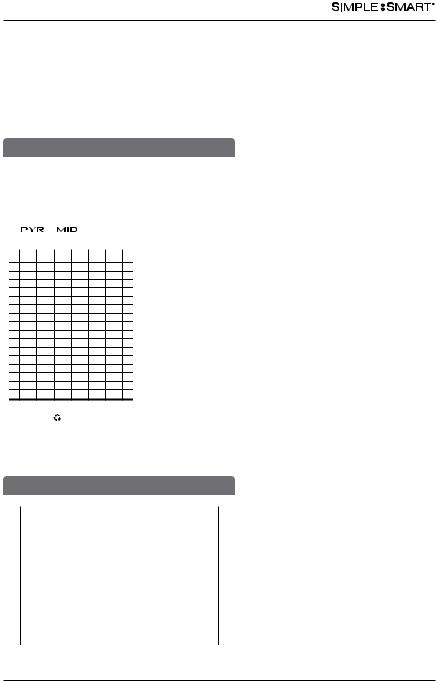
TIME CARD PRINT FORMAT
DATE |
IN |
OUT |
IN |
OUT |
IN |
OUT |
TOTAL |
1 |
7:02A 12:00P |
12:40P |
4:00P |
4:32P |
5:54P |
2 |
|
|
|
|
|
3 |
|
|
|
|
|
4 |
|
|
|
|
|
5 |
|
|
|
|
|
6 |
|
|
|
|
|
7 |
|
|
|
|
|
8 |
|
|
|
|
|
Hour & Minute, up to 6 columns.
Use only time card #42415 which includes official Pyramid
Time Systems Trademark. Using time cards other than Pyramid item #42415 voids the warranty.
pyramidtimesystems.com |
TIME CARD & PRINT FORMAT |
11 |

Auto Aligning time CloCk inStRuCtionS model 2500/2650
USING TIME CLOCK
MANUAL COLUMN SELECTION PUNCH METHOD
1To Punch IN or OUT, select the IN or OUT button that corresponds with the desired punch column.
2Gently feed time card (#42415) into time card slot located at the top of the time clock, making sure the side of the time
card with current date is facing towards user.
3Quickly release the card, as it will automatically be pulled.
4Do not force or jam the time card.
5Card will release back to user once punch is printed.
Date
AUTOMATIC COLUMN ADVANCE PUNCH METHOD
1To punch In or Out, gently feed time card (#42415) into time card slot located at the top of the time clock Making sure correct side of time card is facing towards user.
2Quickly release the card, as it will automatically be pulled.
3Do not force or jam the time card.
4Card will release back to user once punch is printed.
A
No. _________________ Period ___________________________________________
Name __________________________________________________________________
Regular Hours ______________ Rate ________________ Amount ______________
Overtime Hours ______________ Rate ________________ Amount ______________
|
|
|
|
|
Deductions |
_____________ |
|
|
|
|
|
|
Actual Pay |
_____________ |
|
|
|
|
|
|
Pay Date |
_____________ |
|
|
|
|
|
|
|
|
|
DATE |
IN |
OUT |
IN |
OUT |
IN |
OUT |
TOTAL |
1
2
3
4
Day
PM
24
IN |
OUT |
IN |
OUT |
IN |
OUT |
+ |
Enter |
Back |
Clear |
Setting |
Reset
Note: To override Automatic Column Advance, select the IN or OUT button that corresponds with the desired punch column.
12 |
OPERATION |
888.479.7264 |
Auto Aligning time CloCk inStRuCtionS model 2500/2650
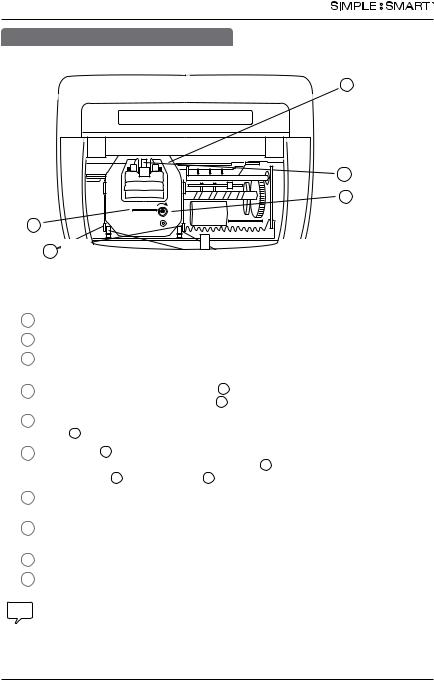
REPLACING RIBBON CARTRIDGE
For optimum performance, replace ribbon cartridge every 6 months.
A
|
|
|
D |
|
|
|
E |
C |
|
|
|
F |
|
|
|
A – Ribbon Cartridge |
C – Tab |
B |
E - Manual Advance Knob |
|
|||
B – Clips |
D – Ribbon Guide |
F – Retaining Pins |
|
1Use only genuine Pyramid part number 43079 Replacement Ink Ribbon Cartridge.
2Unlock and remove the time clock cover.
3Prior to removing old ribbon, slide “SETTING” switch to the right. CAUTION: Do not attempt to change the ribbon when in operation mode, as this may result in injury.
4To remove old ribbon, pull two clips B towards you & simultaneously lift ribbon cartridge, pull straight up using tab C located on top of cartridge.
5Remove new ribbon cartridge from packaging & turn the manual ribbon advance
knob E clockwise to straighten ribbon.
6 Holding tab C install ribbon cartridge into print carriage, making certain to lower the ribbon in front of the ribbon guide D first, then make certain retaining pins F are within clips B (see diagram).
7Gently push down cartridge until it snaps into carriage while turning the manual ribbon advance knob clockwise.
8Turn manual ribbon advance knob clockwise a few rotations to ensure ribbon is positioned correctly in front of print head.
9Replace the cover & lock unit.
10 Feed a time card through unit to test print quality.
If time clock prints incomplete characters, the ribbon is not fully installed over print head. If time clock prints lines that become increasingly light, the cartridge is not fully snapped into the holder. Reinstall ribbon cartridge, following steps 1-7 until a complete & consistent time card prints.
For assistance, please contact customer support at 888.479.7264.
pyramidtimesystems.com |
REPLACING RIBBON CARTRIDGE |
13 |

Auto Aligning time CloCk inStRuCtionS model 2500/2650
TROUBLESHOOTING
TIME CARD MISFEED
In the event the time card will not feed, re-feed the time card. If issue persists, please check list for possible causes:
TIME CARD MISFEED
POSSIBLE CAUSES |
|
ACTION |
Time card inserted too hard into time clock |
|
Re-Feed Card |
Time card held too long |
|
Re-Feed Card |
Time card inserted into time clock on an angle |
|
Re-Feed Card |
Time card is wet or damaged |
|
Use new time card |
WRONG SIDE PRINTING
PROBABLE CAUSE |
ACTION |
Time card is facing wrong way |
Make sure correct date on time card side is facing user |
IMPAIRED PRINTING
In the event the time clock printing is impaired, please check list for possible causes:
IMPAIRED PRINTING
SYMPTOM |
PROBABLE CAUSE |
ACTION |
Time card feeds |
Ribbon not installed properly |
Check that ribbon cartridge is |
with no printing |
|
properly installed. See page 13. |
Punches print outside |
Print needs adjustment |
Follow Print Adjustment |
of date box |
|
instructions on page 10. |
MASTER RESET
Erases time clock’s memory & restores default factory settings.
1Unlock & remove time clock cover.
2Slide SETTING switch to right to begin “reset” setting mode.
3In SETTING mode, press the 1st, 5th and 6th column buttons at the same time.
4 Re-program time clock.
+ |
Enter Back Clear |
Reset |
Setting |
|
COLUMN RESET
1Slide the “SETTING” switch to right.
2Press the 2nd, 5th and 6th column buttons at same time to reset to default settings.
3Re-program time clock.
14 |
TROUBLESHOOTING, PRINT ADJUST & MASTER RESET |
888.479.7264 |

Auto Aligning time CloCk inStRuCtionS model 2500/2650
ACCESSORIES
2500/2650Pro |
: ACCESSORIES |
||
|
|
|
|
ITEM # |
|
|
DESCRIPTION |
43079 |
|
|
Replacement Ink Ribbon Cartridge |
42415 |
|
|
Time Cards (100pk) |
2500K |
|
|
Replacement Key |
43087 |
|
|
10 Capacity Time Card Rack |
To order accessories visit pyramidtimesystems.com,
call 888.479.7264, or visit an authorized Pyramid dealer.
CONTACT US:
For more information, visit pyramidtimesystems.com or call customer care at 888.479.7264 during regular business hours: 8:00am-5:00pm EST, M-F.
pyramidtimesystems.com |
ACCESSORIES |
15 |
 Loading...