

Page 1
DIGITAL PROJECTOR
Model: PRJLEDLP205
INSTRUCTION MANUAL
Page 2

FCC Notice
This equipment has been tested and found to comply with the limits for a Class B
digital device, pursuant to part 15 of the FCC Rules. These limits are designed to
provide reasonable protection against harmful interference in residential installation.
This equipment generates, uses and can radiate radio frequency energy and if not
installed and used in accordance with the instructions, may cause harmful
interference to radio communications. However, there is no guarantee that
interference will not occur in a particular installation. If this equipment does cause
harmful interference to radio or television reception, detectable by turning the
equipment in question off and on, the user is encouraged to try to correct the
interference by one or more of the following measures:
• Reorient or relocate the receiving antenna
• Increase the distance between the equipment and the receiver
• Connect the equipment to an outlet on a different circuit than that which the receiver
is connected to
• Or consult the dealer or an experienced radio/TV technician for help.
This device complies with Part 15 of the FCC Rules. Operation is subject to following
two conditions:
1. This device may not cause harmful interference, and
2. This device must accept any interference that may cause undesired operation.
EN-1
Page 3

Safety Instructions
Read all of these instructions before you operate your projector and save for future
reference.
1. Read instructions
All the safety and operating instructions should be read before the appliance is
operated.
2. Notes and warnings
All notes and warnings in the operating instructions should be adhered to.
3. Cleaning
Unplug the projector from the wall socket before cleaning. Use a damp cloth for
cleaning the projector housing. Do not use liquid or aerosol cleaners.
4. Accessories
Do not place this product on an unstable cart, stand, or table. The product may fall,
causing serious damage to the product.
Keep the plastic packing materials (from the projector, accessories and optional
parts) out of the reach of children as these bags may result in death by suffocation.
Be particularly careful around the small children.
5. Ventilation
The projector is equipped with ventilation holes (intake) and ventilation holes (exhaust). Do
not block or place anything near these slots, or internal heat build-up may occur,
causing picture degradation or damage to the projector.
6. Power sources
Check that the operating voltage of your unit is identical with the voltage of your local
power supply.
7. Servicing
Do not attempt to service this projector yourself. Refer all servicing to qualified
service personnel.
8. Replacement parts
When replacement parts are required, be sure that the replacement parts are
specified by the manufacture. Unauthorized substitutions may result in fire, electric
shock or other hazards.
9. Moisture Condensation
Never operate this projector immediately after moving it from a cold location to a
warm one. When the projector is exposed to such a change in temperature,
moisture may condense on the lens and the crucial internal parts. To prevent the
unit from possible damage, do not use the projector for at least 2 hours when there
is an extreme or sudden change in temperature.
EN-2
Page 4
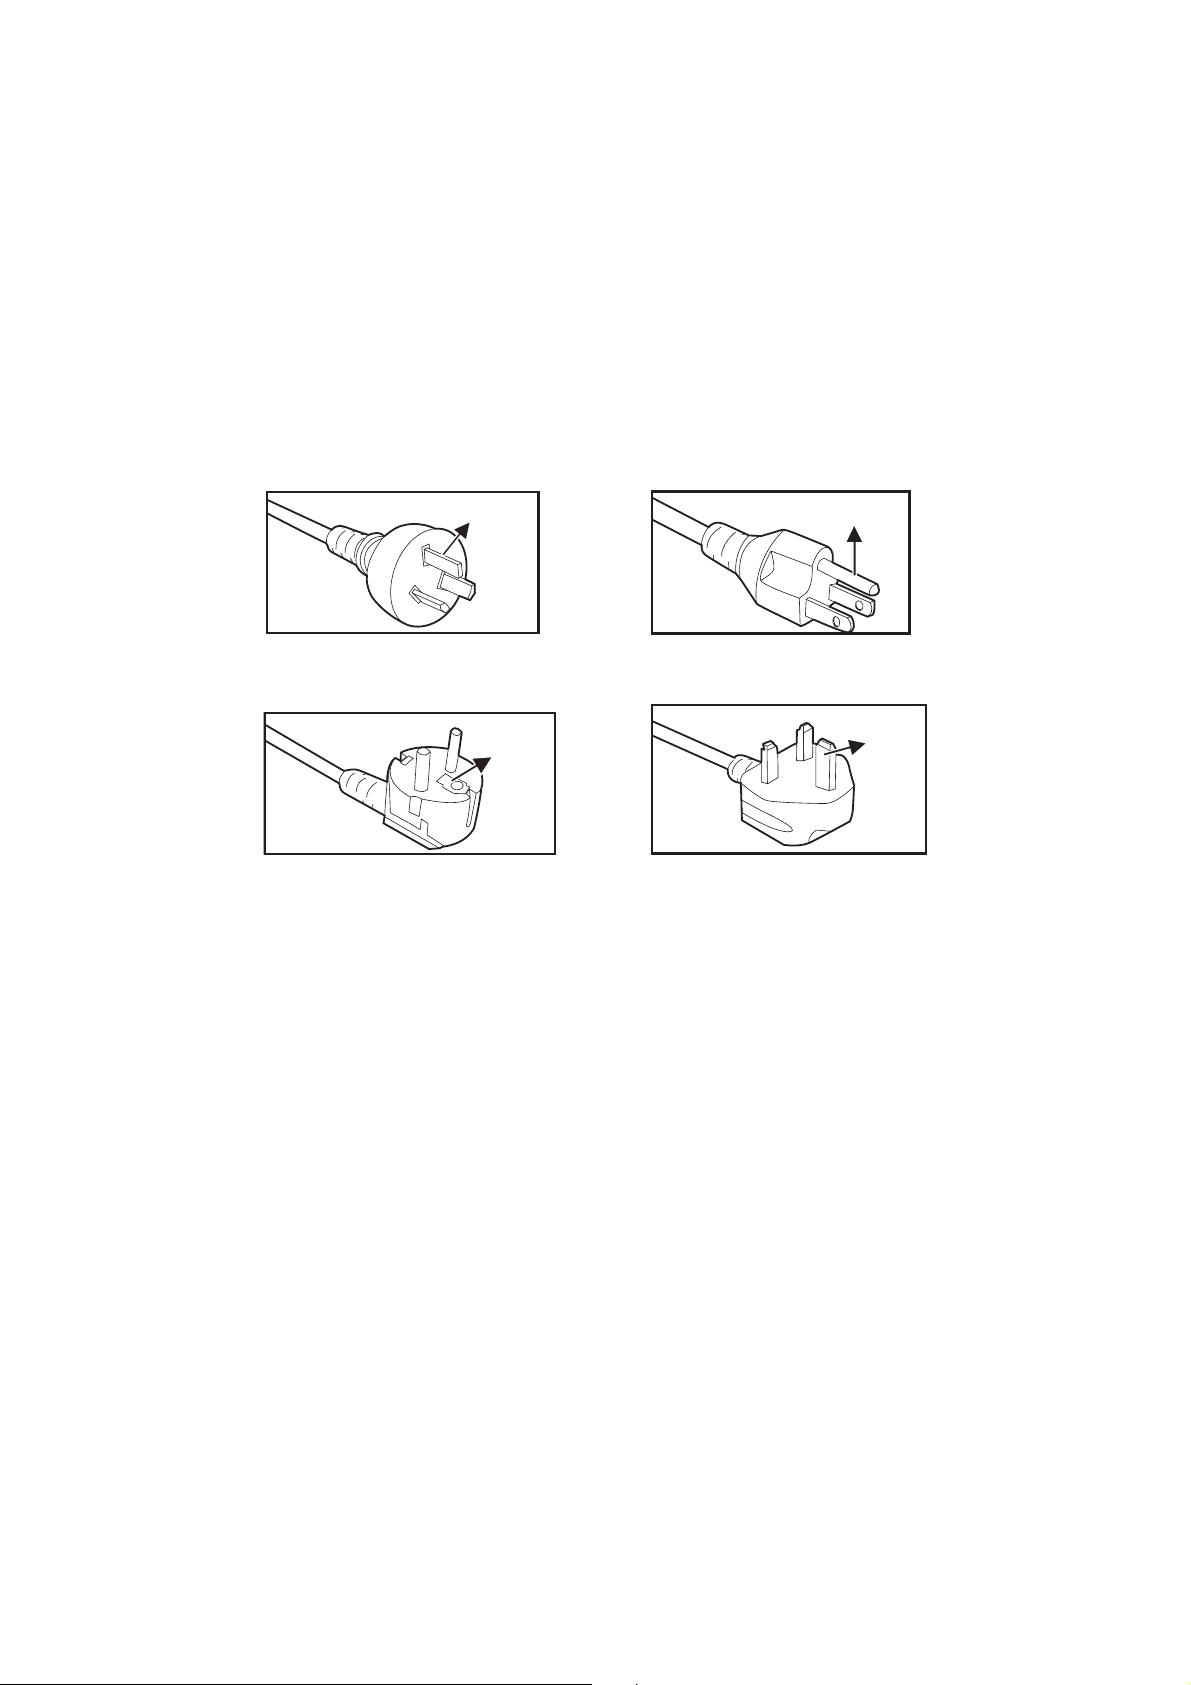
Notes on the AC Power Cord
AC Power Cord must meet the requirement of countries where you use this projector.
Please confirm your AC plug type with the graphics below and ensure that the proper
AC Power Cord is used. If the supplied AC Power Cord does not match your AC
outlet, please contact your sales dealer. This projector is equipped with a grounding
type AC line plug. Please ensure that your outlet fits the plug. Do not defeat the safety
purpose of this grounding type plug. We highly recommend using a video source
device also equipped with a grounding type AC line plug to prevent signal interference
due to voltage fluctuations.
Ground
For Australia and
Mainland China
Ground
For Continental
Europe
Ground
For the U.S.A. and
Canada
Ground
For the U.K.
EN-3
Page 5

Contents
Introduction ............................................................................................ 5
Projector Features .................................................................................................................................. 5
Projector Overview.................................................................................................................................. 6
Using the Product .................................................................................. 8
Control Panel .......................................................................................................................................... 8
Connection Ports .................................................................................................................................... 9
........................................................................................................ 10
Remote Control.........................
Installing the Batteries........................................................................................................................... 13
Remote Control Operation .................................................................................................................... 14
Connection ........................................................................................... 15
Connecting a computer ........................................................................................................................ 16
Connecting Video source devices......................................................................................................... 16
Operation .............................................................................................. 18
Powering On/Off the Projector .............................................................................................................. 18
Adjusting the Projector Height .............................................................................................................. 19
Adjusting the Projector Zoom and Focus .............................................................................................. 19
Adjusting Projection Image Size ........................................................................................................... 20
Menu Operation ................................................................................................................................
....
.... 21
Maintenance ......................................................................................... 29
Cleaning the Lens ................................................................................................................................. 29
Cleaning the Projector Housing ............................................................................................................ 29
Replacing the Lamp .............................................................................................................................. 30
Specifications....................................................................................... 32
Dimensions ........................................................................................................................................... 33
Appendix............................................................................................... 34
LED Indicator Messages....................................................................................................................... 35
Compatibility Modes.............................................................................................................................. 35
Troubleshooting .................................................................................................................................... 36
RS-232 Command and Configuration................................................................................................... 37
IR Control Table.................................................................................................................................... 38
EN-1
Page 6

Introduction
Projector
The projector integrates high-performance optical engine projection and a user - friendly
design to deliver high reliability and ease of use.
The projector offers the following features:
Single chip 0.55" Texas Instruments DLP technology
•
• XGA (1024 x 768 pixels)
• Compatibility with Macintosh computers
• Compatibility with NTSC, PAL, SECAM and HDTV
• D-Sub 15-pin terminal for analog video connectivity
• User-friendly, multi-language on-screen display
• Advanced electronic keystone correction
• RS-232 connector for serial control
• Less than 0.5 W power consumption in standby mode
• SmartEco?mode lowers the po wer consumption to increase the lamp life hours
Note
•
•
Features
The information in this manual is subject to change without notices.
The reproduction, transfer or copy of all or any part of this document is not permitted
without express written consent.
EN-5
Page 7
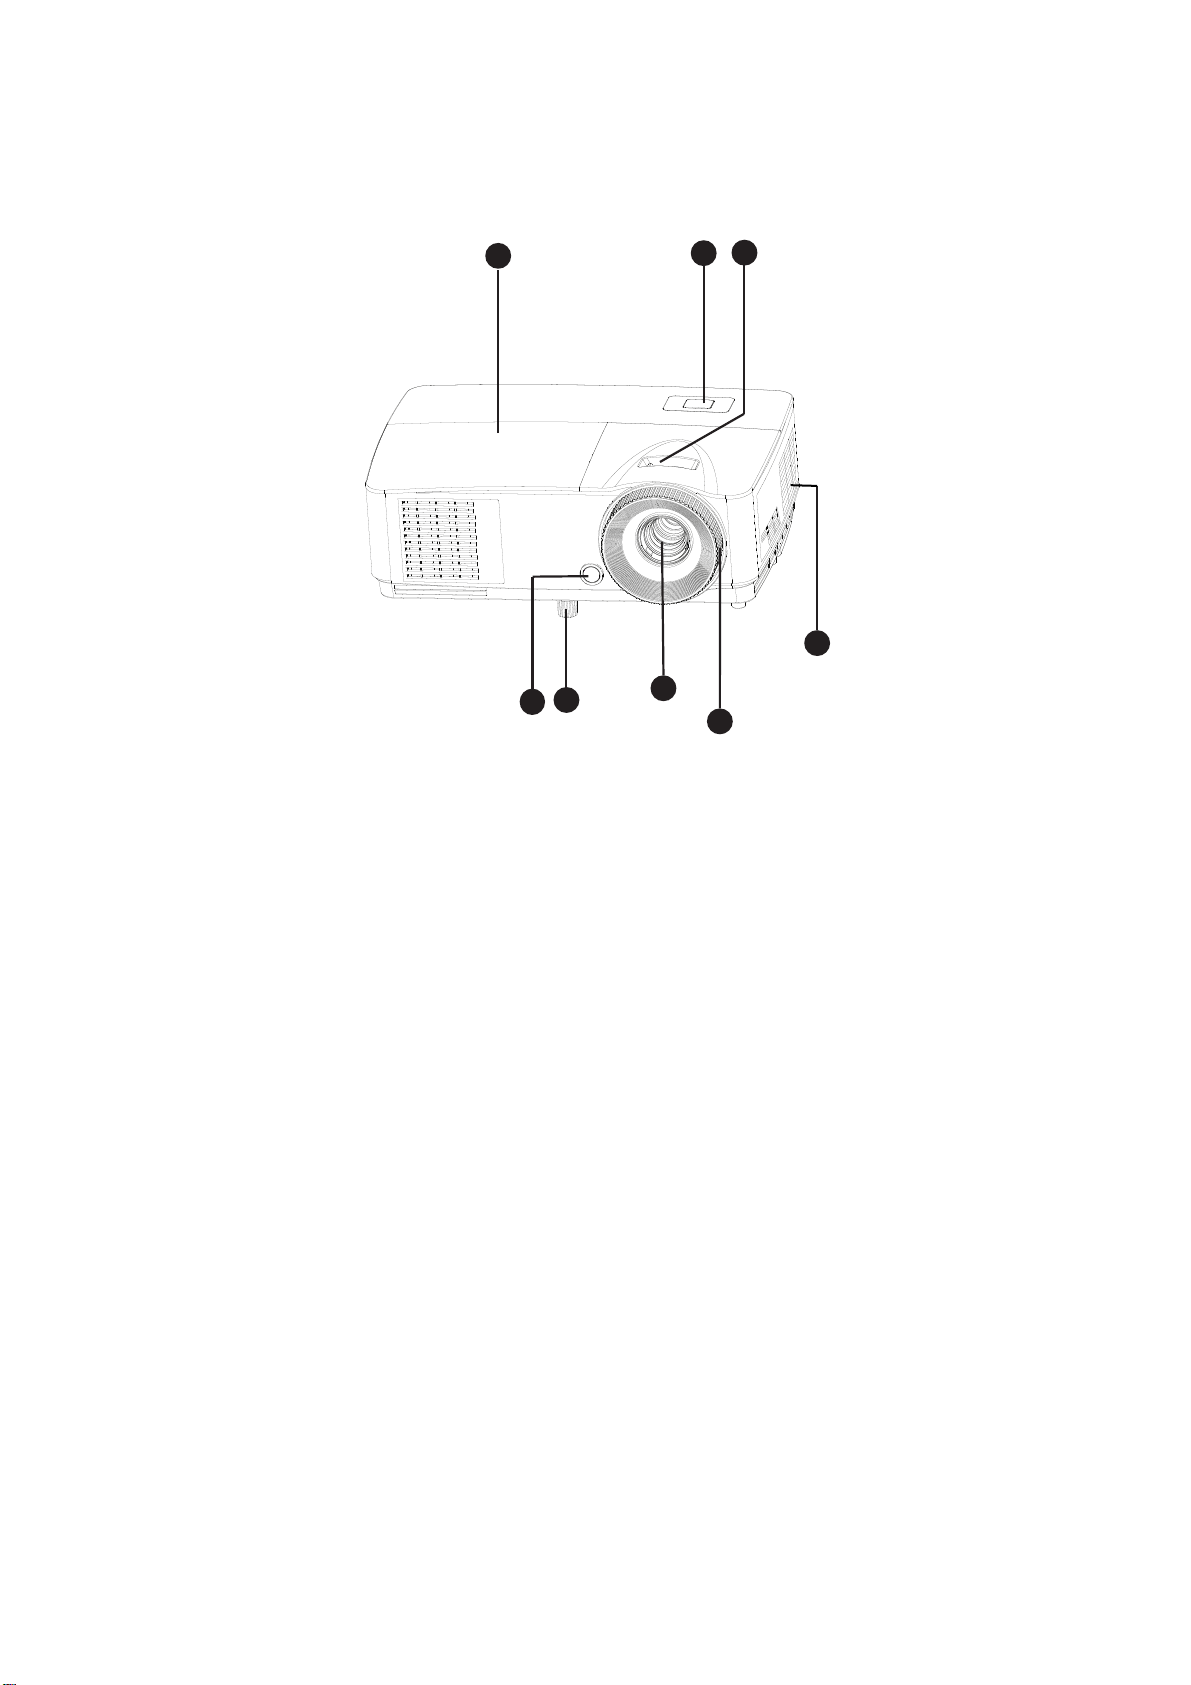
Projector Overview
Front View
7
8
6
5
2
1
3
4
1. Front IR remote control sensor 2. Elevator foot
gnir sucoF.4snel noitcejorP.3
seloh noitalitneV
.7
lenap lortnoC
.6.5
.8
gnir mooZ
revoc pmaL
EN-6
Page 8
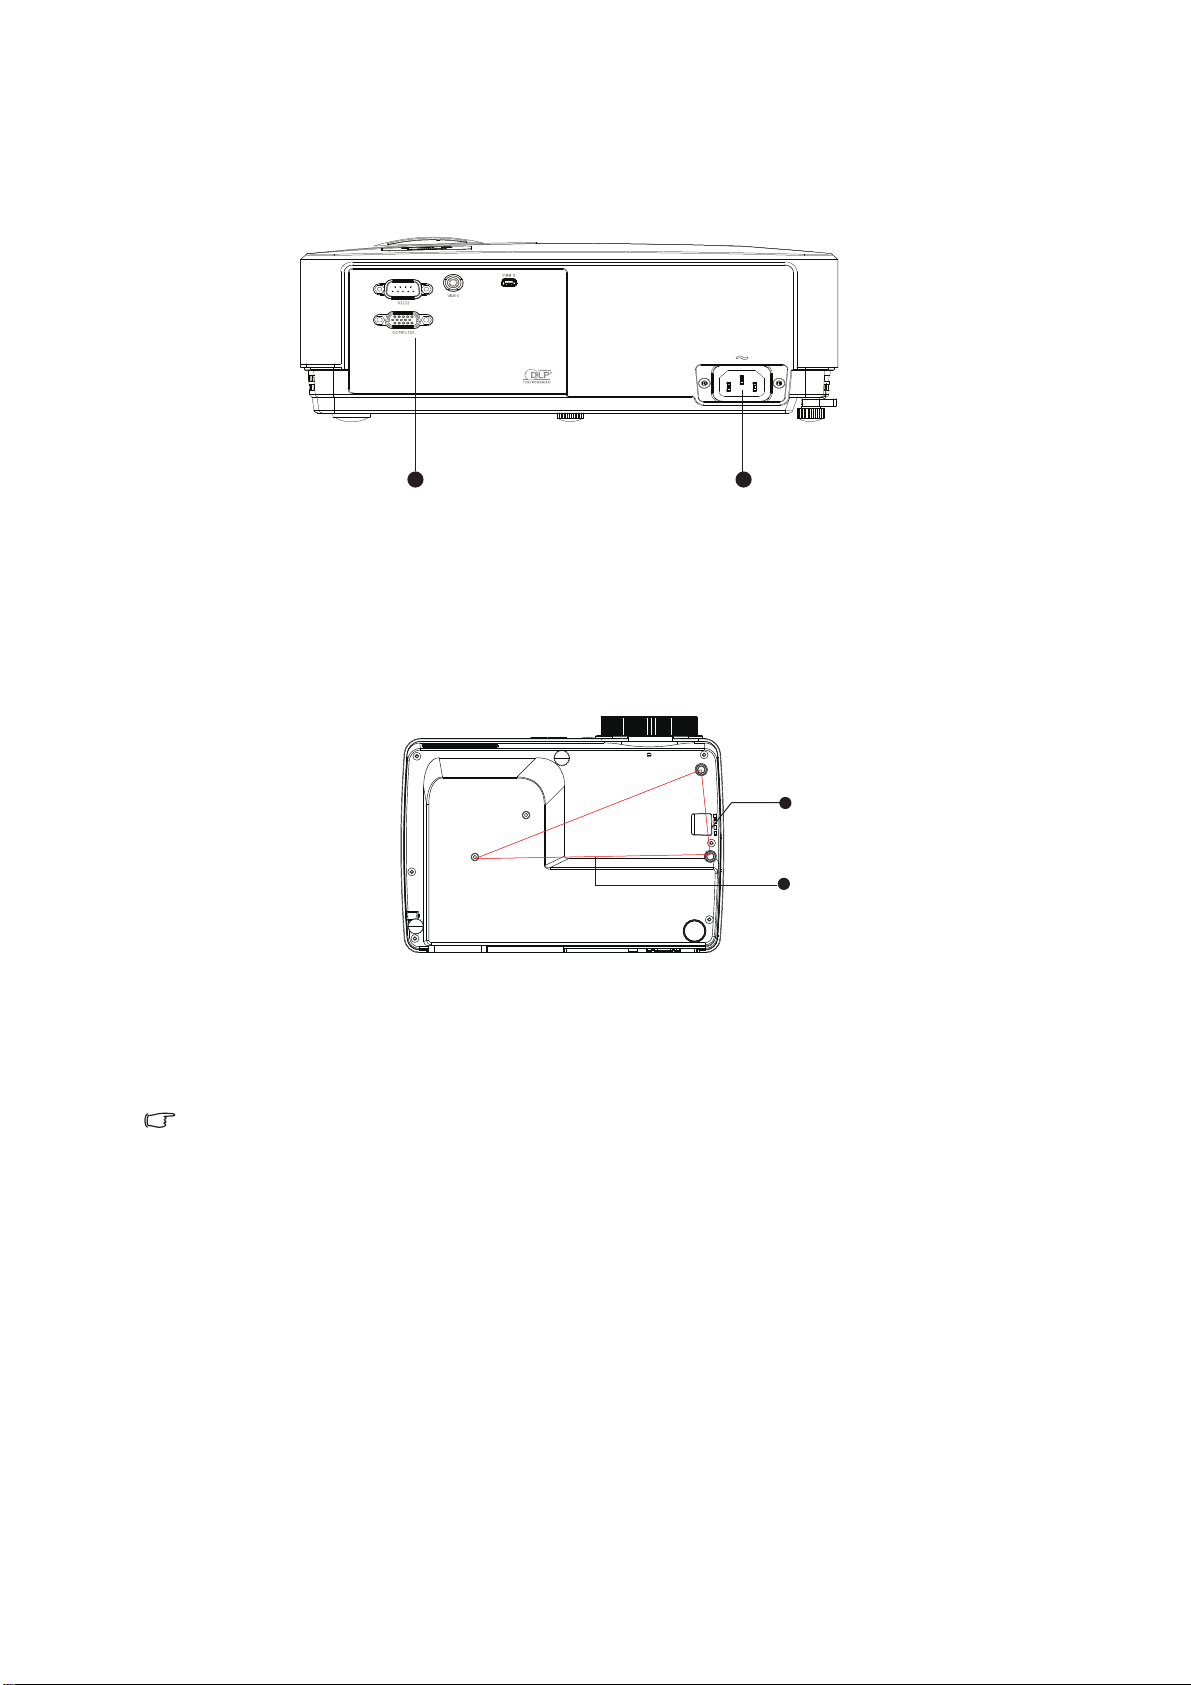
Rear View
1. AC power socke strop noitcennoC.2t
Bottom View
2
1
1
1
2
seloh tnuom gnilieC.2rab ytiruceS.1
Note
This projector can be used with a ceiling mount for support. The ceiling mount is not
•
included in the package.
Contact your dealer for information to mount the projector on a ceiling.
•
EN-7
Page 9
Using the Product
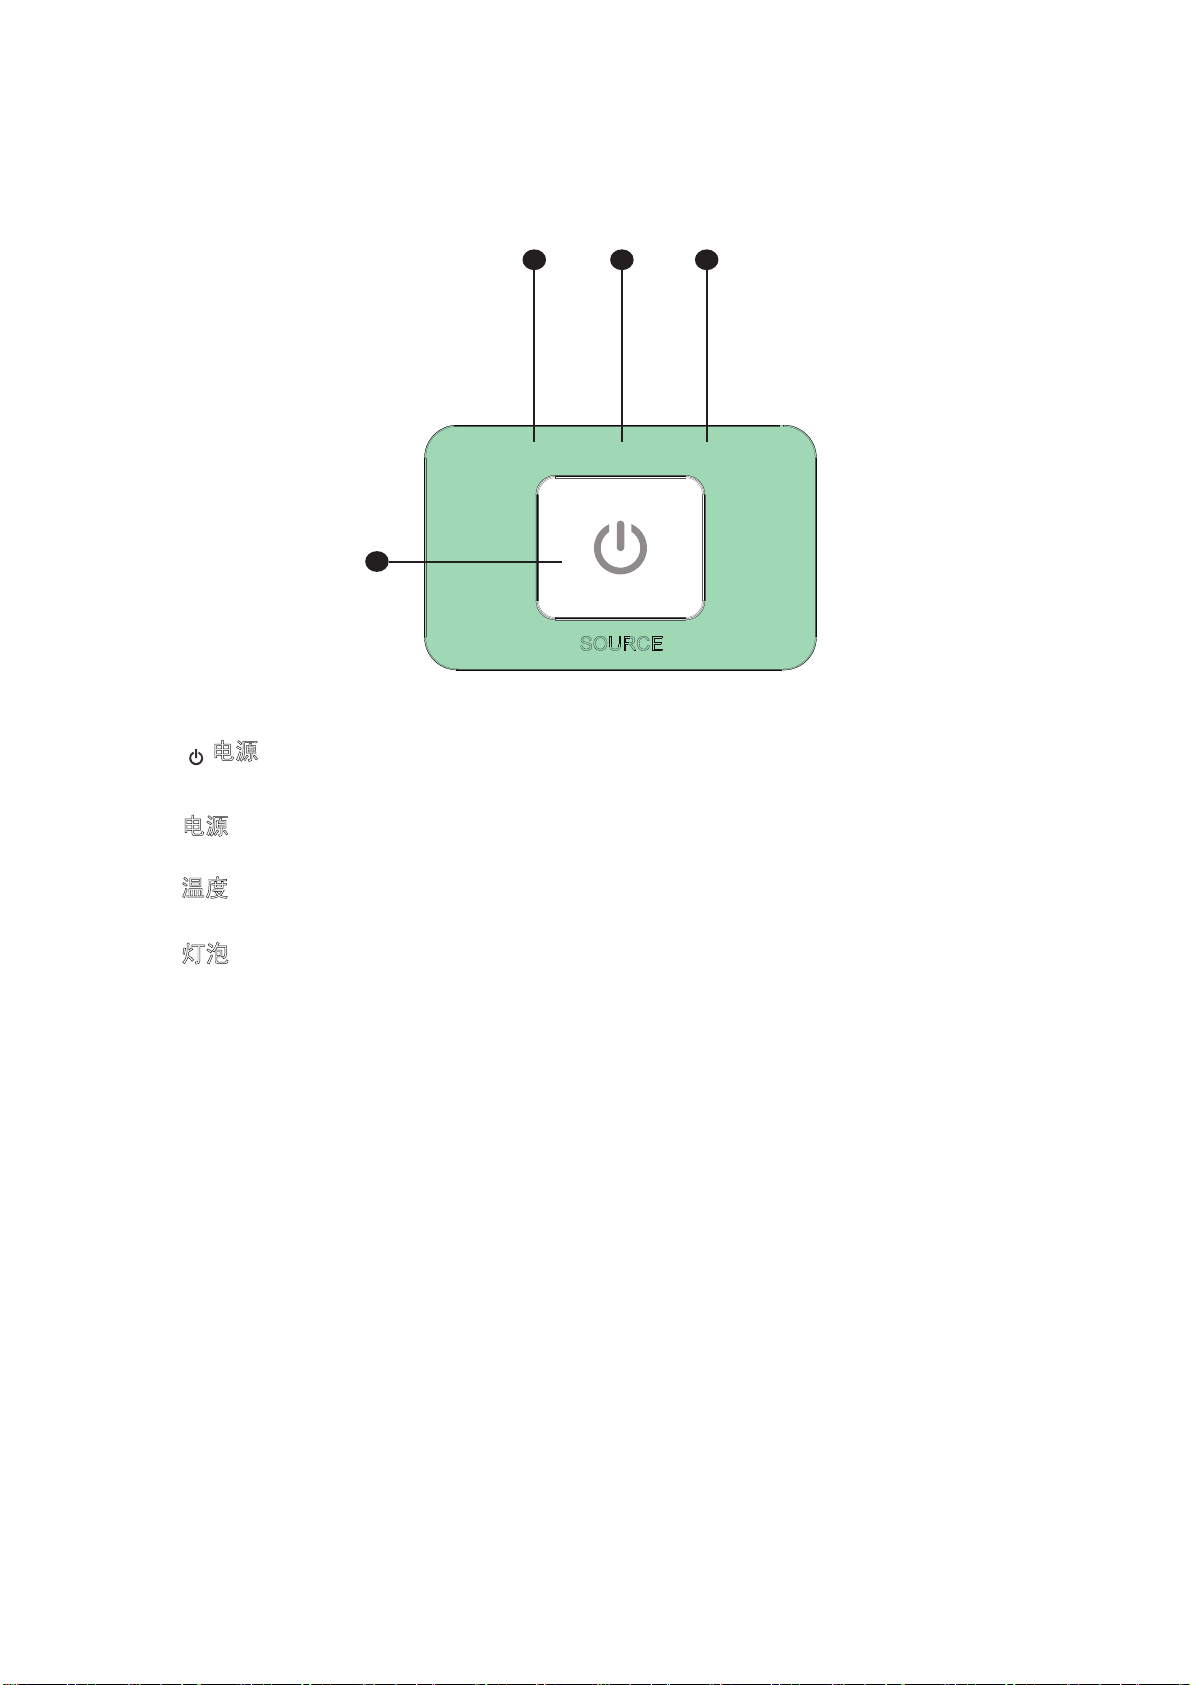
Control Panel
2 3 4
9
1
1. 电源 (Power)
Turn the projector on or off
2.
源 (Pow ) (Power LED indicator)
电
Refer to “LED Indicator Messages”.
3.
温
度 (Temp) (Temp LED indicator)
Refer to "LED Indicator Messages”.
4. 灯
泡 (Lamp) (Lamp LED indicator)
Refer to "LED Indicator Messages”.
POW LAMP
TEMP
EN-8
Page 10
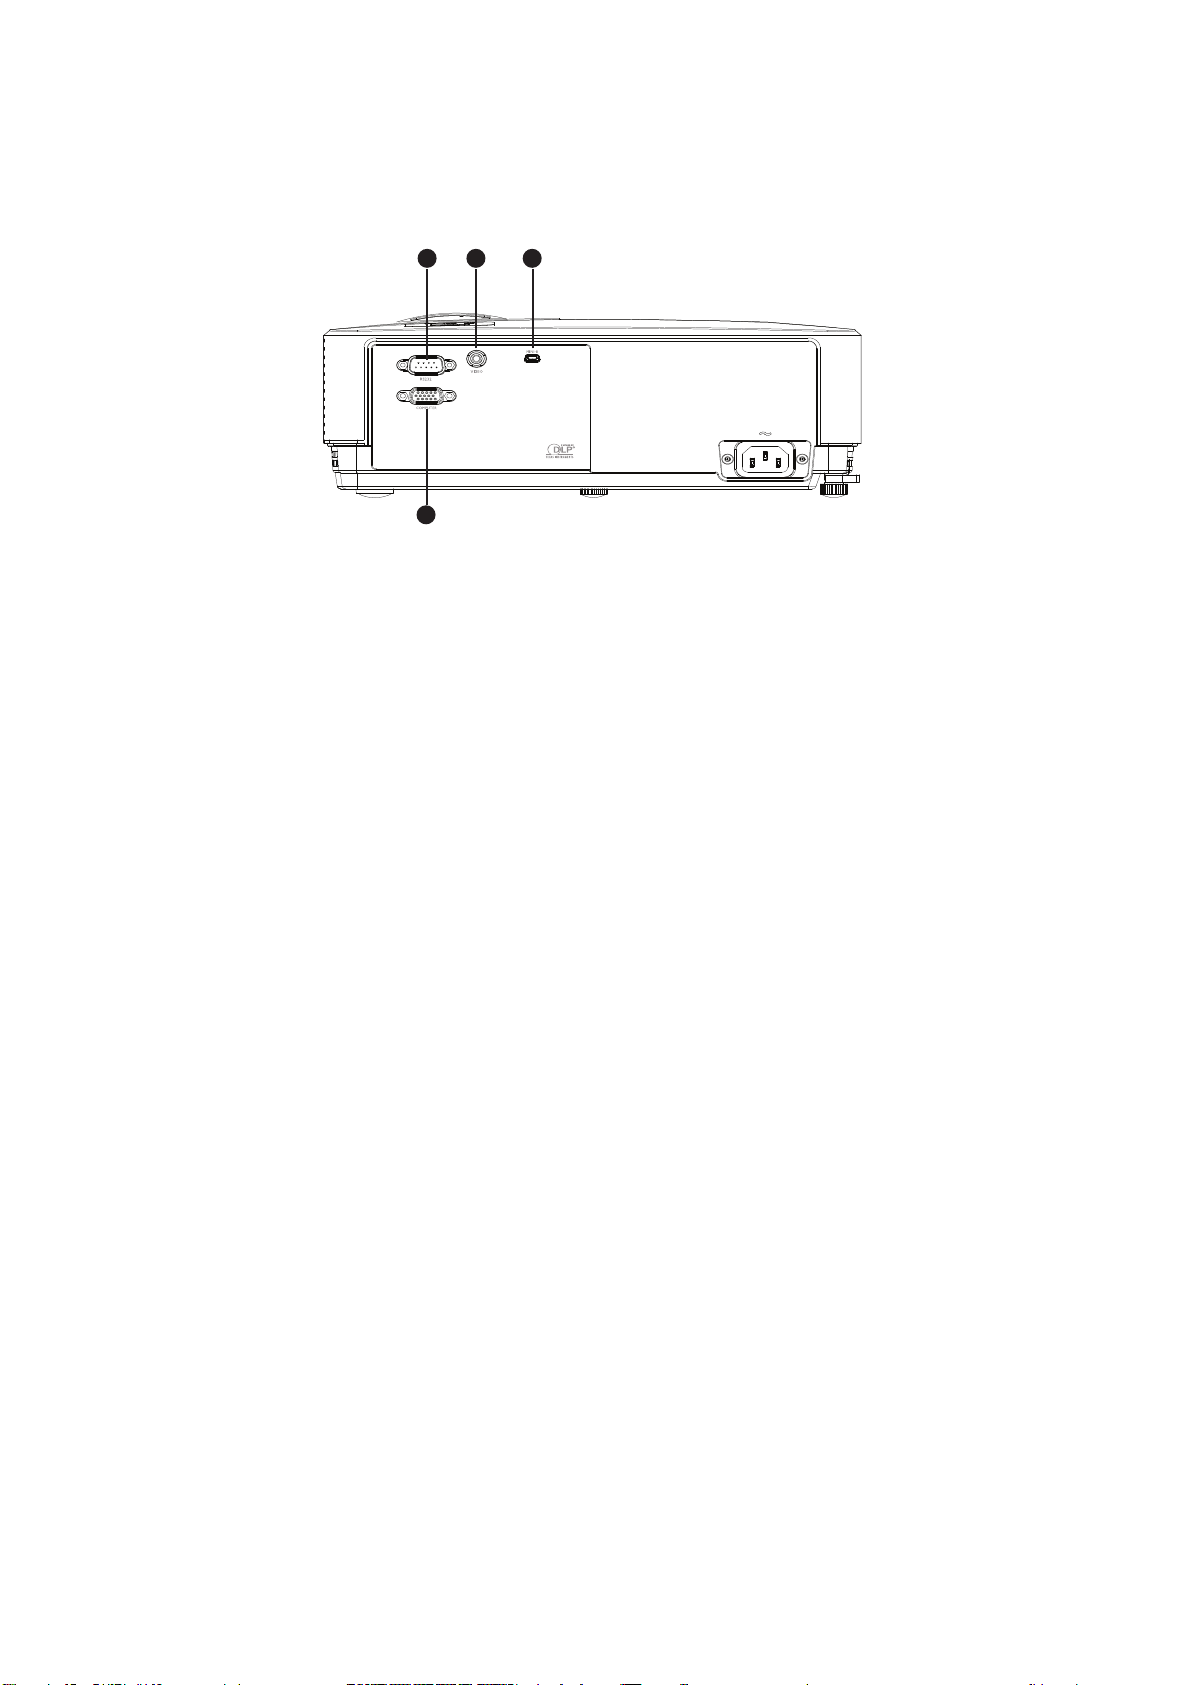
Connection Ports
1 2
4
3
1. RS-232
When operating the projector via a computer, connect this to the controlling
computer's RS-232C port.
2. VIDEO
Connect composite video output from video equipment to this jack.
3. TYPE B USB
This connector is for firmware update.
4. COMPUTER
Connect image input signal (analog RGB or component) to this jack.
EN-9
Page 11
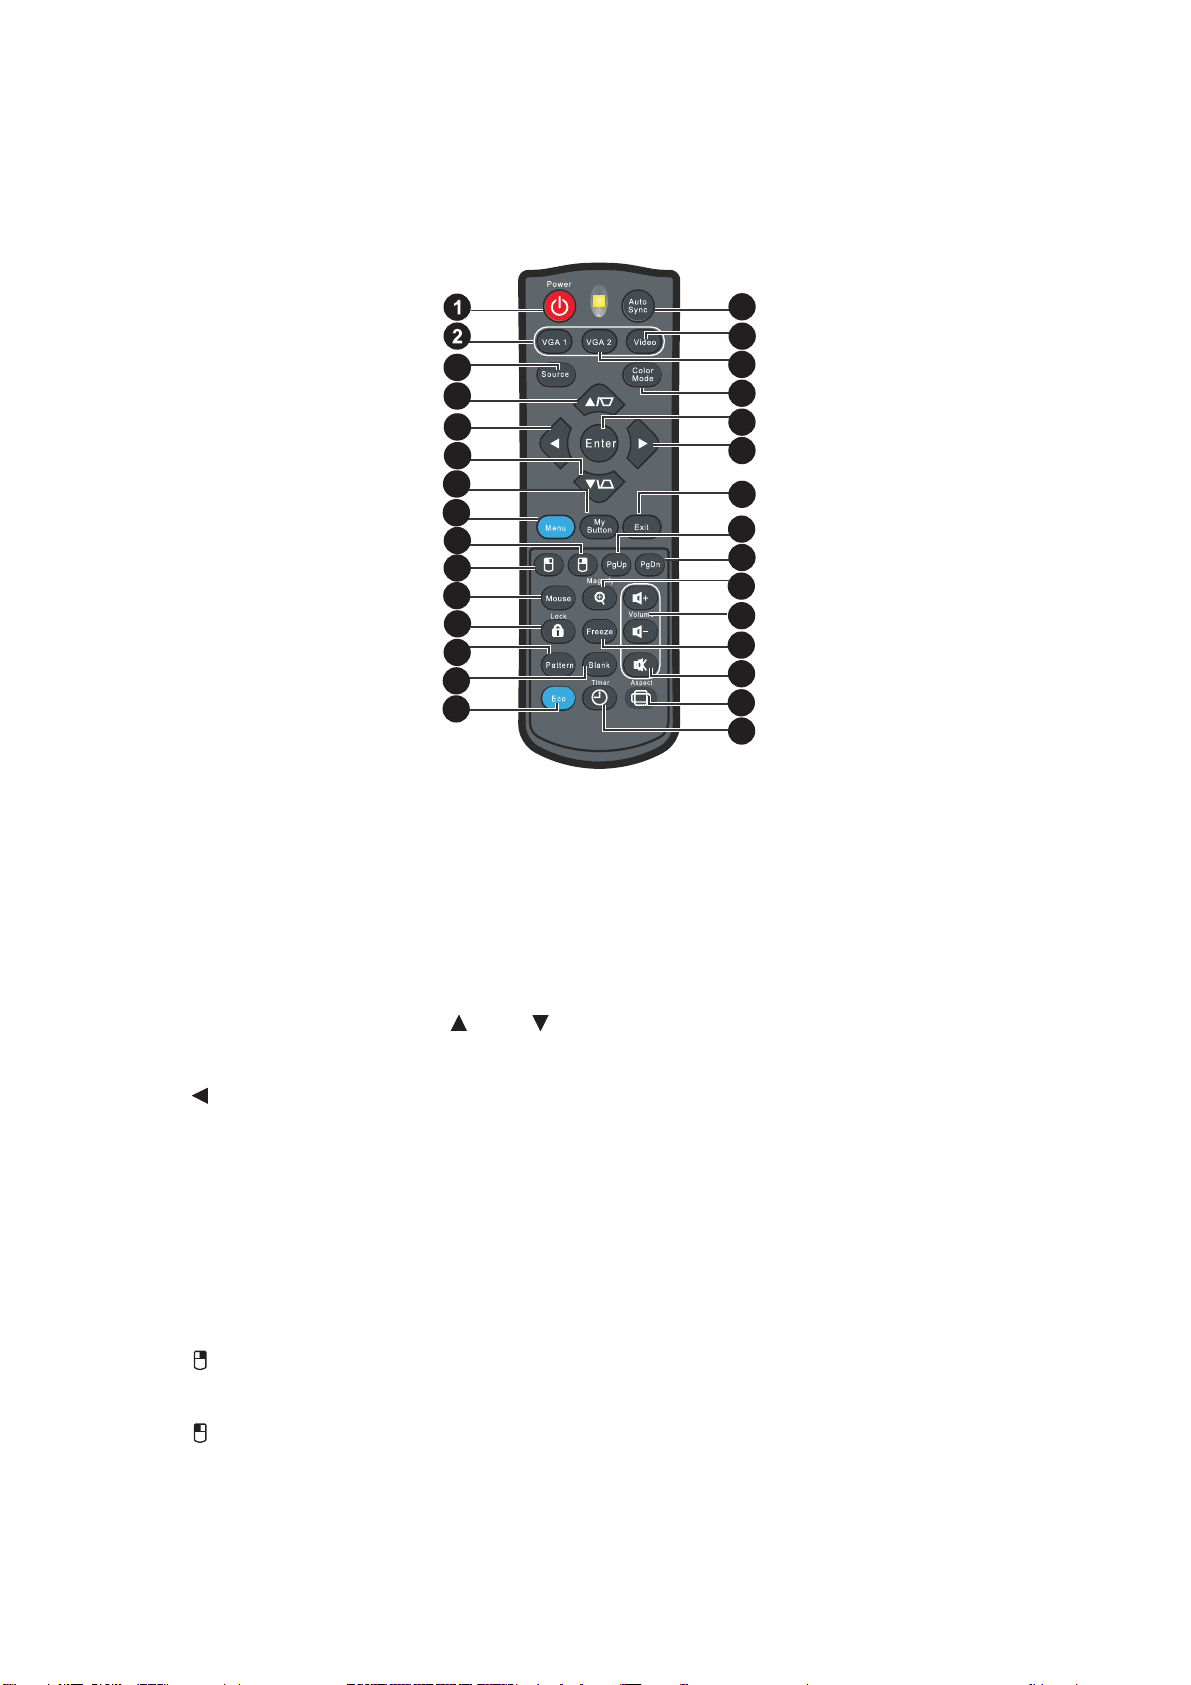
Remote Control
3
4
5
4
6
7
8
9
10
11
12
13
14
15
16
17
18
19
20
21
22
23
24
25
26
27
28
29
1. Power
Turn the projector on or off.
2. VGA1
Display COMPUTER IN 1 signal.
3. Source
Display the source selection bar.
4. Keystone/Arrow keys ( /Up, /Down)
Manually correct distorted images resulting from an angled projection.
5. Left
When the On-Screen Display (OSD) menu is activated, the #4, #5, and #20 keys
are used as directional arrows to select the desired menu items and to make
adjustments.
6. My Button
No function.
7. Menu
Display on-screen display menus.
8. Right mouse
No function.
9. Left mouse
No function.
EN-10
Page 12

10. Mouse
No function.
11. Lock
No function.
12. Pattern
No function.
13. Blank
Hide the screen picture.
14. Eco
Decreases the power consumption of the lamp by up to 70%.
Note: It takes some time to initiate this function. Make sure the projector has been
turned on for more than 4 minutes.
15. Auto Sync
Automatically determines the best picture timings for the displayed image.
Note: Switch input source to Composite/ Video by sequence.
16. Video
Switch input source to Composite/S-Video by sequence.
17. VGA2
Display COMPUTER IN 1 signal.
18. Color Mode
Select the picture setup mode.
19. Enter
Confirmed selections.
20. Right
When the On-Screen Display (OSD) menu is activated, the #4, #5, and #20 keys
are used as directional arrows to select the desired menu items and to make
adjustments.
21. Exit
Goes back to previous OSD menu.
22. Page Up
Perform page up function when mouse mode is activated.
23. Page Down
Perform page down function when mouse mode is activated.
24. Magnify
Magnifies the projected picture size.
25. Volume
No function.
26. Freeze
Freeze the projected image.
27. Mute
No function.
EN-11
Page 13

28. Aspect
Select the display aspect ratio.
29. Timer
Activate P-Timer OSD menu.
Using the remote mouse control
Connect the projector to your PC or notebook with a USB cable prior to using the paging
the paging function.
You can operate your display software program (on a connected PC) which responds to
page up/down commands (like Microsoft PowerPoint) by pressing Page Up/Down
on the remote control.
If remote paging function doesn't work, check if the USB connection is correctly made and
the mouse driver on your computer is updated to the latest version.
EN-12
Page 14

Installing the Batteries
1. Open the battery cover in the
direction shown.
2. Install batteries as indicated by the
diagram inside the compartment.
3. Close the battery cover into position.
Caution
Risk of explosion if battery is replaced by an incorrect type.
•
Dispose of used batteries according to the instructions.
•
Make sure the plus and minus terminals are correctly aligned when loading a battery.
•
Note
Keep the batteries out of the reach of children.
•
Remove batteries from remote control when not using for extended periods.
•
Do not charge the battery or throw it into fire or water.
•
Do not dis
•
according to local regulations.
•
Danger of explosion may happen if batteries are incorrectly replaced. Replce all the batteries
with new ones.
Batteries should not be in or near to fire or water, keep batteries in a dark, cool and dry
•
place.
If suspect battery leakage, wipe out the leakage and then replace new batteries. If the
•
leakage adheres to your body or clothes, rinse well with water immediat
pose of the used batteries along with household waste. Dispose of used batteries
ely.
EN-13
Page 15

Remote Control Operation
7m
15
15
8m
Point the remote control at the infrared remote sensor and press a button.
•
Operating the projector from the
front
Note
•
The remote control may not operate when there is sunlight or other strong light such as
a fluorescent lamp shining on the remote sensor.
5m
•
Operate the remote control from a position where the remote sensor is visible.
•
Do not drop the remote control or jolt it.
•
Keep the remote control out of locations with excessively high temperature or humidity.
•
Do not get water on the remote control o
•
Do not disassemble the remote control.
r place wet objects on it.
EN-14
Page 16

Connection
When connecting a signal source to the projector, be sure to:
1. Turn all equipment off before making any connections.
2. Use the correct signal cables for each source.
3. Ensure the cables are firmly inserted.
1 2
3
4
1. VGA cable 2. USB cable
4. Composite Video cable3. VGA (D-Sub) to HDTV (RCA) cable
Important
In the connections shown above, some cables may not be included with the projector
•
(see included “Packing List”). They are commercially available from electronics stores.
•
The connection illustrations above are for reference only. The rear connecting jacks
available on the projector vary with each projector model.
EN-15
Page 17

Connecting a computer or monitor
Connecting a computer
The projector provides two VGA input sockets that allow you to connect them to both
®
IBM
compatibles and Macintosh® computers. A Mac adapter is needed if you are
connecting legacy version Macintosh computers.
To connect the projector to a notebook or desktop computer:
1. Take the supplied VGA cable and connect one end to the D-Sub output socket of
the computer.
2. Connect the other end of the VGA cable to the COMPUTER signal input socket
on the projector.
Important
Many notebooks do not turn on their external video ports when connected to a
•
projector. Usually a key combo like FN + F3 or CRT/LCD key turns the external display
on/off. Locate a function key labeled CRT/LCD or a function key with a monitor symbol
the notebook. Press FN and the labeled function key simultaneously. Refer to your
on
notebook's documentation to find your notebook's key combination.
Connecting Video source devices
You need only connect the projector to a Video source device using just one of the
above connecting methods, however each provides a different level of video quality.
The method you choose will most likely depend upon the availability of matching
terminals on both the projector and the Video source device as described below:
Terminal name Terminal appearance Reference Picture quality
"Connecting a
Component Video
COMPUTER
Component Video
source device" on
Better
page 17
VIDEO "Connecting a
Video
composite Video
source device" on
Good
page 17
EN-16
Page 18

Connecting a Component Video source device
Examine your Video source device to determine if it has a set of unused output jacks
available:
If so, you can continue with this procedure.
•
If not, you will need to reassess which method you can use to connect to the
•
device.
To connect the projector to a Component Video source device:
1. Take a Component Video to VGA (D-Sub) adaptor cable and connect the end with
3 RCA type connectors to the Component Video output jacks of the Video source
device. Match the color of the plugs to the color of the jacks; green to green, blue
to blue, and red to red.
2. Connect the other end of the Component Video to VGA (D-Sub) adaptor cable
(with a D-Sub type connector) to the COMPUTER jack on the projector.
Important
If the selected video image is not displayed after the projector is turned on and the
•
correct video source has been selected, check that the Video source device is turned on
and operating correctly.
Connecting a composite Video source device
Examine your Video source device to determine if it has a set of unused composite
Video output sockets available:
If so, you can continue with this procedure.
•
•
If not, you will need to reassess which method you can use to connect to the
device.
To connect the projector to a composite Video source device:
1. Take a Video cable and connect one end to the composite Video output socket of
the Video source device.
2. Connect the other end of the Video cable to the VIDEO socket on the projector.
Important
If the selected video image is not displayed after the projector is turned on and the
correct video source has been selected, check that the Video source device is turned on
and operating correctly. Also check that the signal cables have been connected
correctly.
EN-17
Page 19

Operation
Powering On/Off the Projector
Powering On the Projector:
1. Complete the AC power cord and peripheral signal cable(s) connections.
2. Press to turn on the projector.
The projector takes a minute or so to warm up.
3. Turn on your source (computer, notebook, DVD, etc.). The projector automatically
detects your source.
•
If you are connecting multiple sources to the projector simultaneously, press
SOURCE on the projector or Source on the remote control to select your
desired signal or press your desired signal key on the remote control.
Warning
Never look into the lens when the lamp is on. This can damage your eyes.
•
•
This focal point concentrates high temperature. Do not place any object near it to avoid
possible fire hazard.
Powering Off the Projector:
1. Press to turn off the projector lamp. You will see a message "Power off? Press
Power again" appear on the screen.
2. Press again to confirm.
•
When
cooling.
•
When
mode.
If you want to turn the projector back on, you must wait until the projector has
•
completed the cooling cycle and has entered stand-by mode. Once in stand-by
mode, simply press to restart the projector.
3. Disconnect the AC power cord from the electrical outlet and the projector.
4. Do not turn on the projector right after power off.
the Power LED flashes orange, the projector becomes normal power-down
the Power LED becomes steady orange, the projector has entered stand-by
EN-18
Page 20

Adjusting the Projector Height
Elevator foot
The projector is equipped with an elevator foot to adjust the image height. To raise or
lower the image, turn the elevator foot to fine-tune the height.
Adjusting the Projector Zoom and Focus
Zoom ring
Focus ring
1. Focus the image by rotating the focus ring. A still image is recommended for focusing.
2. Adjust the image size by rotating the zoom ring.
EN-19
Page 21

Adjusting Projection Image Size
.
Refer to the graphic and table below to determine the screen size and projection distance.
Maximum zoom
Minimum zoom
Screen
Vertical offset
Projection distance
The screen aspect ratio is 4:3 and the projected picture is 4:3
Screen size Projection distance (mm)
Diagonal
Inch mm
W
(mm)H(mm)
Min
distance
(max.
zoom)
Average
Max
distance
(min.
zoom)
Vertical offset
35 889 711 533 1401 1472 1543 80
40 1016 813 610 1600 1680 1760 91
50 1270 1016 762 2000 2100 2200 114
60 1524 1219 914 2400 2520 2640 137
80 2032 1626 1219 3200 3360 3520 183
100 2540 2032 1524 4000 4200 4400 229
120 3048 2438 1829 4800 5040 5280 274
150 3810 3048 2286 6000 6300 6600 343
200 5080 4064 3048 8000 8400 8800 457
220 5588 4470 3353 8800 9240 9680 503
250 6350 5080 3810 10000 10500 11000 572
300 7620 6096 4572 12000 12600 13200 686
Center of lens
(mm)
EN-20
Note
Position the projector in a horizontal position; other positions can cause heat build-up
•
and damage to the projector.
•
Keep a space of 30 cm or more between the sides of the projector.
•
Do not use the projector in a smoky environment. Smoke residue may build-up on
critical parts and damage the projector or its performance
•
It is recommended that if you intend to permanently install the projector, you should
physically test the projection size and distance using the actual projector in situ before
you permanently install it, so as to make allowance for this projector's optical
characteristics. This will help you determine the exact mounting position so that it best
suits your installation location.
Page 22

Menu Operation
The projector has multilingual on-screen display menus that allow you to make image
adjustments and change a variety of settings.
How to operate
1. Press the Menu button to open the OSD menu.
2. When OSD is displayed, use
3. After selecting the desired main menu item, press to enter sub-menu for feature
setting.
4. Use / to select the desired item and adjust the settings with / .
5. Press the Menu button, the screen will return to the main menu.
To exit OSD, press the
6.
projector will automatically save the new settings.
OSD Menu
Menu
Main menu Sub-menu Options
/ to select any feature in the main menu.
button again. The OSD menu will close and the
1. DISPLAY
Wall Color
Off /Light Yellow/Pink/Light
Green/Blue/Blackboard
Aspect Ratio Auto /Real/4:3/16:9/16:10
Auto
Keystone
On /Off
Keystone
Position
Phase
H. Size
0-31
-15 - +15
Digital Zoom
Top- Bottom/
3D Mode
3D
Apply 3D
Settings
Blackboard
Teaching
Template
Whiteboard
Auto/
Frame Sequential/
Frame Packing/
Side by Side/Off
Off
Off /Letter Formation/
Worksheet/Coordinate Chart
Off /Letter Formation/
Worksheet/Coordinate Chart
EN-21
Page 23

Picture Mode
Dynamic /Presentation /sRGB/Cinema /
User 1 /User 2
2.
PICTURE
3. SOURCE
Reference Mode
Dynamic /Presentation /sRGB/Cinema
Brightness
Contrast
Sharpness
Tint
Color
Temperature
Color
Temperature
Fine Tuning
Cool/Normal /Warm
R Gain/G Gain/B Gain/R Offset/G
Offset/B Offset
Primary Color R/G/B/C/M/Y
3D Color
Management
Hue
Saturation
Gain
Reset Picture
Settings
Current/All/
Cancel
Quick Auto Search On/Off
EN-22
Page 24

Timer Period 1~240 minutes
Timer Display
Always/3 min/2 min/1 min/
Never
4.
SYSTEM
SETUP:
Basic
Timer Position
Presentation
Timer
Timer
Counting
Direction
Language
Projector Installation
Menu Display
Time
Menu Settings
Menu Position
Top-Left /Bottom-Left/TopRight/Bottom-Right
Count Down /Count Up
Front Table /Rear Table/Rear
Ceiling/Front Ceiling
5 sec/10 sec/ 20 sec/30 sec/
Always
Center /Top-Left/Top-Right/
Bottom-Right/Bottom-Left
Operation
Settings
Reminder
Message
Direct Power
On
Signal Power
On
Auto Power Off
Quick Cooling On/Of
On /Off
On/Off
On/Off
Disable/3 min/10 min/15 min/20
min /25 m
f
Instant Restart On/Off
Blank Timer
Sleep Timer
Background
Color
Disable/5 min/10 min/15 min/20
min/25 min/30 min
Disable/30 min/1 hr/2 hr/3 hr/4
hr/8 hr/12 hr
Black/Blue/Purple
Splash Screen Black/Blue
in/30 min
EN-23
Page 25

High Altitude
Mode
On/Off Yes/No
Lamp Mode Normal/Economic/SmartEco
Lamp Spa
Lamp
Settings
Mode
Reset lamp
timer
Equivalent lamp hour
5.
SYSTEM
SETUP:
Security
Settings
Change Password
Change
Security
Advanced
Baud Rate
Test Pattern On/Off
Closed Caption
Reset All
Settings
6
.
Reset/Cancel
INFORMATIONCurrent System Status
On /Off
Reset / Cancel
Power On Lock
2400/4800/9600/14400/19200/
38400/57600/ 115200
• Source
• Picture Mode
• Resolution
• Lamp Mode
• 3D Format
• Color System
• Equivalent Lamp
• Firmware Version
Note that the menu items are available when the projector detects at least one valid
signal. If there is no equipment connected to the projector or no signal detected,
limited menu items are accessible.
EN-24
Page 26

DISPLAY
Wall Corlor
Brighten or darken the image.
Aspect Ratio
Select how the picture fits on the screen:
• Auto : Scales an image proportionally to fit the projector's native resolution in its
horizontal or vertical width.
• Real:
Minimizes the aspect ratio distortion by maintaining close to the original
aspect ratio in the center of the image and distributing the majority of distortion at
the edges of the displayed image.
• 4:3 : Scales an image so that it is displayed in the center of the screen with a 4:3
aspect ratio.
• 16:9 : Scales an image so that it is displayed in the center of the screen with a 16:9
aspect ratio.
• 16:10: Scale an image so that it is displayed in the center of the screen with a 16:10
aspect ratio.
Auto Keystone
Automatically correct distorted images resulting from an angled projection.
Keystone
Manually correct distorted images resulting from an angled projection.
Press Keystone / on the projector or remote control to display the Keystone
correction page.
Press to correct keystone at the top of the image.
Press to correct keystone at the bottom of the image.
Position
Adjust the image up or down or left or right within the projection area.
Phase
Adjust the phase of the projector relative to the computer.
Digital Zoom
Using the remote control
1. Press Magnify on the remote control to display the Zoom bar.
2. Press / to magnify the picture to a desired size.
3. Press “Enter” on the projector or remote control to switch to the paning mode and
press the directional arrows to navigate the picture. The zoom bar needed to be
shown on screen if we want to switch the paning mode.
4. To reduce size of the picture, press Magnify and press repeatedly until it is
restored to the original size.
Using the OSD menu
1. Press Menu and then press until the Video/Audio menu is highlighted.
2. Press to highlight Zoom.
3. Repeat steps 2-4 in the section of Using the remote control above.
EN-25
Page 27

3D Settings
This projector features a 3D function which enables you to enjoy the 3D movies, videos, and sporting events in a more realistic way by presenting the depth of the
images. You need to wear a pair of 3D glasses to view the 3D images.
3D Format
Use this function to choose an appropriate 3D format if the projector cannot recognize
the 3D format.
If the 3D signal is input from an HDMI 1.4a compatible device, the projector detects
the signal for 3D Sync information and once detected, it projects images in 3D format
automatically. In other cases, you may need to manually select a 3D Sync format for
the projector to project 3D images correctly.
Note
•
3D Format will be available when 3D Sync is “On”.
• The default setting is “Auto” when input source is HDMI.
• The default setting is “Side-by-Side” when input source is video or computer. “Auto”
will be unavailable.
• The brightness level of the projected image will decrease.
Picture
Picture Mode
There are many factory presets optimized for various types of images.
•
Dynamic mode : Maximizes the brightness of the projected image. This mode
is suitable for environments where extra-high brightness is required, such as
using the projector in well lit rooms.
Presentation mode : Is designed for presentations. The brightness
•
is emphasized in this mode.
sRGB mode : Maximizes the purity of RGB colors to provide true-to-life
•
images regardless of brightness setting. It is most suitable for viewing photos
take
n with an sRGB compatible and properly calibrated camera, and for viewing
PC graphic and drawing applications such as AutoCAD.
Cinema mode : Is appropriate for playing colorful movies, video clips from
•
digital cameras or DVs through the PC input for best viewing in a blackened
(little light) environment.
• User 1:Memorize user 1 defined settings.
• User 2:Memorize user 2 defined settings.
Reference Mode
Select a picture mode that best suits your need for the image quality and further finetune the image. This function is only available when User 1 or User 2 is selected.
•
Dynamic mode : Maximizes the brightness of the projected image. This mode
is suitable for environments where extra-high brightness is required, such as
using the projector in well lit rooms.
Presentation mode : Is designed for presentations. The brightness
•
is emphasized in this mode.
•
EN-26
sRGB mode : Maximizes the purity
of RGB colors to p
rovide true-to-life
images regardless of brightness setting. It is most suitable for viewing photos
taken with an sRGB compatible and properly calibrated camera, and for viewing
Page 28

PC graphic and drawing applications such as AutoCAD.
Cinema mode : Is appropriate for playing colorful movies, video clips from
•
digital cameras or DVs through the PC input for best viewing in a blackened
(little light) environment.
Brightness
Brighten or darken the image.
Contrast
Set the difference between light and dark areas.
Sharpness
Sharpen or soften the image.
Tint
Shift colors toward red or green.
Color Temperature
Adjust the color temperature. At higher temperature the screen looks colder; at lower
temperature, the screen looks warmer. If you select “User”, then you can change the
intensity of each of 3 color (Red Gain, Green Gain, Blue Gain) to customize user color
temperature.
3D Color Management
User Color provides six sets (RGBCMY) of colors to be adjusted. When you select
each color, you can independently adjust its range, hue, saturation and gain according
to your preference.
SOURCE
Quick Auto Source
Automatically scan through all the input source if the function in the OSD menu is On.
The function will stop the signal auto scan process and fix the signal source you
preferred if you turn Off the Auto Source.
SESTEM SETUP:BASIC
Presentation Timer
Remind the presenter to finish the presentation within a certain time frame.
• Timer Period: Set a preferred length of time for presentation.
• Display Timer: Set whether to display the timer on screen.
• Timer Position: Set the position where the timer displays on screen.
• Timer Counting Direction: Set the timer counting direction.
Language
Select the language used by the on-screen menu.
Projector Installation
Adjust the picture to match the orientation of the projector: upright or upside-down, in
front of or behind the screen. Invert or reverse the image accordingly.
Menu Setting
Allow you to enter the Menu Setting menu.
EN-27
Page 29

• Menu Position: Choose the menu location on the display screen.
• Menu Display Time: Duration of OSD menu display countly starts (at
idle state by
second).
Opration Setting
Direct Power On
• On: The projector will turn on in 3 seconds.
• Off: The projector will turn on following normal power on procedure.
Auto Power Off
Allows the projector to turn off automatically if no input signal is detected after a set
period of time.
Sleep Timer
No matter whether the projector detect signal or not, the projector will turn off
automatically when the countdown has finished.
SYSTEM SETUP:Advanced
High Altitude
Use this function to allow the fans operates at full speed continuously to achieve
proper high altitude cooling of the projector.
Lamp Setting
Allow you to enter the Lamp Setting menu.
Lamp Mode
Normal: 100% lamp brightness.
•
Economic: Saves 20% lamp power consumption.
•
SmartEco: Saves up to 70% lamp power consumption depending on the content
•
brightness level.
• Lamp Hours: Display the lamp’s elapsed operating time (in hours).
• Lamp Hours Reset: Reset the lamp Hour to 0 hours.
Closed Caption
Enable or disable closed captions by selecting CC1 (closed caption1, the most
common channel), CC2, CC3, CC4, T1, T2 or OFF.
Reset all settings
Restore settings to factory default.
INFORMATION
Current System Status
• Source
• Picture Mode
• Resolution
• Lamp Mode
• 3D Format
• Color System
• Equivalent Lamp
• Firmware Version
EN-28
Page 30

Maintenance
The projector needs proper maintenance. You should keep the lens clean as dust, dirt
or spots will project on the screen and diminish image quality. If any other parts need
replacing, contact your dealer or qualified service personnel. When cleaning any part
of the projector, always switch off and unplug the projector first.
Warning
Never open any of the covers on the projector. Dangerous electrical voltages inside the
•
projector can cause severe injury. Do not attempt to service this product yourself. Refer
all servicing to qualified service personnel.
Cleaning the Lens
Gently wipe the lens with lens cleaning paper. Do not touch the lens with your hands.
Cleaning the Projector Housing
Gently wipe with a soft cloth. If dirt and stains are not easily removed, use a soft cloth
damped with water, or water and neutral detergent, and wipe dry with a soft, dry cloth.
Note
Turn off the projector and remove the AC power cord from the power outlet before
•
beginning maintenance work.
•
Make sure the lens is cool before cleaning.
•
Do not use detergents or chemicals other than those noted above. Do not use benzene
or thinners.
•
Do not use chemical sprays.
•
Use a soft cloth or lens paper only.
EN-29
Page 31

Replacing the Lamp
As the projector operates over time, the brightness of the projector lamp gradually
decreases and the lamp becomes more susceptible to breakage. We recommend
replacing the lamp if a warning message is displayed. Do not attempt to replace the
lamp yourself. Contact the qualified service personnel for replacement.
Note
•
The lamp is extremely hot right after turning off the projector. If you touch the lamp, you
may scald your finger. When you replace the lamp, wait for at least 45 minutes for the
lamp to cool down.
•
Do not touch the lamp glass at any time. The lamp may explode due to improper
handling, including the t
Lamp lifetime may differ from lamp to lamp and according to the environment of use.
•
There is no guarantee of the same lifetime for each lamp. Some lamps may fail or
terminate their lifetime in a shorter period of time than other similar lamps.
•
A lamp may explode as a result of vibration, shock or degradation as a result of hours of
use as its lifetime draws to an end. Risk of explosi
environment or conditions in which the projector and lamp are being used.
•
Wear protective gloves and eyeglasses when fixing or detaching the lamp.
Faster on-off-cycles will damage the lamp and reduce lamp life. Wait at least for 5
•
minutes to turn off the projector after powering on.
ouching of the lamp glass.
on may differ according to the
•
Do not operate the lamp in proximity to paper, cloth, or other combustible material nor
r it with such materials.
cove
•
Do not op
as thinner.
•
Thoroughly ventilate the area or the room when operating the lamp in an oxygen
atmosphere (in the air). If ozone is inhaled, it could cause headaches, nausea, dizziness,
and other symptoms.
•
The inorganic mercury is involved in the lamp. If the lamp bursts, the mercury inside the
lamp will
operated and ventilate the area for at least 30 minutes in order to avoid the inhalation of
mercury fumes. Otherwise it could be harmful to user’s health.
erate the lamp in an atmosphere containing an inflammable substance, such
be exposed. Leave the area immediately if the lamp shatters while being
EN-30
Page 32

1. Turn off the projector.
2. If the projector is installed in a ceiling mount, remove it
3. Unplug the power cord.
4. Loosen the screw in the side of the lamp cover and remove the cover.
5. Remove the screws from the lamp module, raise the handle, and lift out the
module.
6. Insert the new lamp module into the projector and tighten the screws.
7. Replace the lamp cover and tighten the screw.
8. Turn on the projector. If the lamp does not turn on after the warm-up period, try
reinstalling the lamp.
9. Reset the lamp hour. Refer to the “Setting > Lamp Time Reset” menu.
Note
Dispose the used lamp according to local regulations.
•
•
Ensure that screws are tightened properly. Screws not tightened fully may result in
injury or accidents.
•
Since the lamp is made of glass, do not drop the unit and do not scratch the gl
•
Do not reuse the old lamp. This could cause the lamp to explode.
•
Be sure to turn off the projector and unplug the AC power cord before replacing the
lamp.
•
Do not use the projector with the lamp cover removed.
ass.
EN-31
Page 33

Specifications
Display system Single 0.55" DLP panel
Resolution XGA
(1024 x 768 pixels)
Zoom 1.1X
F/No. 2.5
Focal length 22.08 - 24.28mm
Screen size 30" - 300"
Lamp
Input terminal
-
2.7
190W
D-Sub 15-pin x 1,
Video x 1,
Output terminal
Control terminal
Speaker
Video compatibility NTSC, NTSC 4.43
Scanning frequency
Horizontal frequency
Vertical frequency
Environment Operating:
Power requirement
Power consumption
Dimension
(W x D x H)
Weight
NA
RS-232 x 1, USB B type x1 (supports firmware upgrade)
NA
PAL, PAL-N, PAL M
SECAM, Composite video
31 - 100 KHz
50 - 120 Hz
Temperature: 0 C to 40 C
Humidity: 10%-80%
Storage:
Temperature: -20 C to 60 C
Humidity: 30%-85%
AC 100-240 V, 50 - 60 Hz, 2.6A
265W (Max.)
285 x 208 x 116mm (Projector)
390 x 270 x 163mm(Outer carton)
1.95kg (Projector)
2.8kg (With projector and outer carton)
Note: Design and Specifications are subject to change without prior notice.
EN-32
Page 34

Dimensions
285 mm (W) x 208 mm (D) x 116 mm (H)
285
208
TEMP
LAMP
POW
Ceiling mount installation
198
116
Ceiling mount screws:
M4 x 8 (Max. L = 8mm)
Unit: mm
77
9
EN-33
Page 35

Appendix
LED Indicator Messages
电源 LED 温度 LED (Red) 灯泡 LED (Red)
Power Events
Solid Orange Off Off Stand-by
1Hz Green Blinking Off Off Powering up
Solid Green Off Off Normal operation
1Hz Orange Blinking Off Off Normal power-down cooling
Lamp Error Message
Off Off Solid First Lamp-lit error cooling
Off Off Blinking 1 Hz Lamp error in normal operation
Thermal Error Message
Off Blinking 1 time Off Fan 1 error
Off Blinking 2 times Off Fan 2 error
Off Blinking 3 times Off Fan 3 error
Off Solid Off Over temperature
5Hz Orange Blinking Off Off Thermal break
Off Blinking 5 Hz Off Thermal sensor fail
System Error Message
Description
error
rorre DMDzH 1 gniknilBffO
rorre
leehw roloCdiloSffO
EN-34
Page 36

Compatibility Modes
Computer:
640 x 480
720 x 400
800 x 600
1024 x 768
1280 x 960
]zH[ cnyS-V]zHK[ cnyS-HnoituloseR
0.589.73053 x 046
0.056.42
9.955.13
8.279.73
0.575.73
0.583.34
0219.16
0.075.13
0.589.73
0.050.13
0.652.53
3.069.73
0.271.84
0.579.64
1.587.35
0.0213.67
0.064.84
1.075.65
0.570.06
0.587.86
0.575.76468 x 2511
0.068.74867 x 0821
0.067.94008 x 0821
0.060.06
0.589.58
0.060.464201 x 0821
0.063.560501 x 0041
0.060.570021 x 0061
Video:
Compatibility Re
solution H-Sync
[KHz] V-Sync [Hz]
068.51084 x 027i084
065.13084 x 027p084
056.51675 x 027i675
053.13675 x 027p675
055.73027 x 0821p027
0654027 x 0821p027
068.330801 x 0291i0801
051.820801 x 0291i0801
065.760801 x 0291p0801
053.650801 x 0291p0801
EN-35
Page 37

Troubleshooting
Refer to the symptoms and measures listed below before sending the projector for
repairs. If the problem persists, contact your local reseller or service center. Please
refer to "LED Indicator Messages" as well.
Start-up problems
no lights turn on:
Be sure that the power cord is securely connected to the projector and the other end
•
plugged into an outlet with power.
Press the power button again.
•
Unplug the power cord and wait for a short while, then plug it in and press the power
•
button again.
Image problems
If the searching source is displayed:
Press
•
Be sure the external source is turned on and connected.
•
For a computer connection, ensure your notebook computer’s external video port is
•
turned on. Refer to the computer manual.
If the image is out of focus:
While displaying the on-screen menu, adjust the focus ring. (The image size should
•
not change; if it does, you are adjusting the zoom, not the focus.)
Check the projection lens to see if it needs cleaning.
•
If the image is flickering or unstable for a computer connection:
Press
•
Source to select an active input source.
Menu
, go to Computer Image and adjust Frequency or Tracking.
is
Remote control problems
If the remote control does not operate:
Be sure nothing is blocking the remote control receiver on the front of the projector.
•
Use the remote control within the effective range.
Aim the remote control at the screen or at the front of the projector.
•
Move the remote control so it is more directly in front of the projector and
•
to the side.
not as far
EN-36
Page 38

RS-232 Command and Configuration
D-Sub 9 pin
1 1 CD
2 RXD
3 TXD
4 DTR
5 GND
6 DSR
7 RTS
8 CTS
9 RI
Wire List
SHELL DW SHELL
C1 COLOR C2
1 Black 1
2 Brown 3
3 Red 2
4 Orange 6
5 Yellow 5
6 Green 4
7 Blue 8
8 Purple 7
9 White 9
etaR duaB
htgneL ataD
kcehC ytiraP
tiB potS
lortnoC wolF
2400/4800/9600/14400/19200/38400/57600/115200
tib 8
enoN
tib 1
enoN
spb
EN-37
Page 39

IR Control Table
Customer code: 0X2626
Format : NEC
36
17
41
40
30
31
8E
55
37
45
0b
15
0c
56
18
03
07
06
08
52
10
0f0e
28
05
82
83
14
2B
27
13
EN-38
Page 40

Auto Sync NEC 83 F4 08 f7
eb144F38CEN1AGV
Color Mode NEC 83 F4 10 ef
Up / Keystne+ NEC 83 F4 0b f4
Down / Keystone- NEC 83 F4 0c f3
1fe04F38CEN tfeL
0ff04F38CENthgiR
My Button(Function) NEC 83 F4 56 A9
Mouse left NEC 83 F4 36 C9
Mouse right NEC 83 F4 37 C8
Mouse Page Up NEC 83 F4 06 F9
Mouse Page Down NEC 83 F4 05 F
Lock(Key pad) NEC 83 F
Pattern NEC 83 F4 55 AA
Magnify + NEC 83 F4 18 e7
Timer (Presentation) NEC 83 F4 27 d8
Volume+ NEC 83 F4 82 7D
Volume- NEC 83 F4 83 7C
4 8E 71
A
cf304F38CENezeerF
8f704F38CENknalB
be414F38CENetuM
4etyB3etyB2etyB1etyBtamroFyeK
8E714F38CENrewoP
ab544F38CEN2AGV
da254F38CENoediV
fb044F38CENecruoS
ae514F38CENretnE
FC034F38CENuneM
7D824F38CENtixE
EC134F38CENesuoM
4DB24F38CENocE
CE314F38CENtcepsA
EN-39
Page 41

 Loading...