

Page 1
Page 2

PLEASE READ CAREFULLY BEFORE PROCEEDING
Please keep this manual in a safe place for future reference.
I. Function Introduction
1. 7 Pads: Includes crash cymbaI, ride cymbal, open/close hi-hat, snare, high tom,
Iow tom, low oor tom
Two Pedals: Includes 1 Hi-hat,1 bass drum
2. 30 demos,16 drum sounds
3. Volume Control: 15 levels
4. Speed Control: 30-250 levels
5. Record the notes and playback
6. Audio input, can connect with phone, iPad, computer and other electronic
device for music format input
7. With dual stereo speakers
II. Features
1. The worId’s rst Multinational, portable and professional drum
2. Fit for family entertainment/friends gathering/and drum practice
3. Multi-sounds, simulated the real drum kits
4. The standard drum conguration and the extension interface for pedal could
bring you real game experience about drum kits.
5. Includes accompaniment/demo song, control the playing speed free, this is
the best choice for drum learning
6. Includes recording function, get all your inspiration in recorded easily
7. With two high-quality stereo speakers
8. Audio input, chose any music you like to practice
9. Could connect with the earphone, wiII not disturb anyone when you using
10. Support to connect the extra speaker, the sounds will be more shocking
11. USB MIDI port, connect computer to play with all the MIDI software and
electronic drum games, MIDI software like: Sonar, Cubase, Nuendo, Ezdrummer.
(Only for MIDI version)
III. What's in the Box:
• Tabletop Digital Sound Module
• (2) Digital Foot Pedals
• (2) Drum Sticks
www.PyleUSA.com
2
• Wall Power Adapter
• Audio Cable
• USB Cable
Page 3
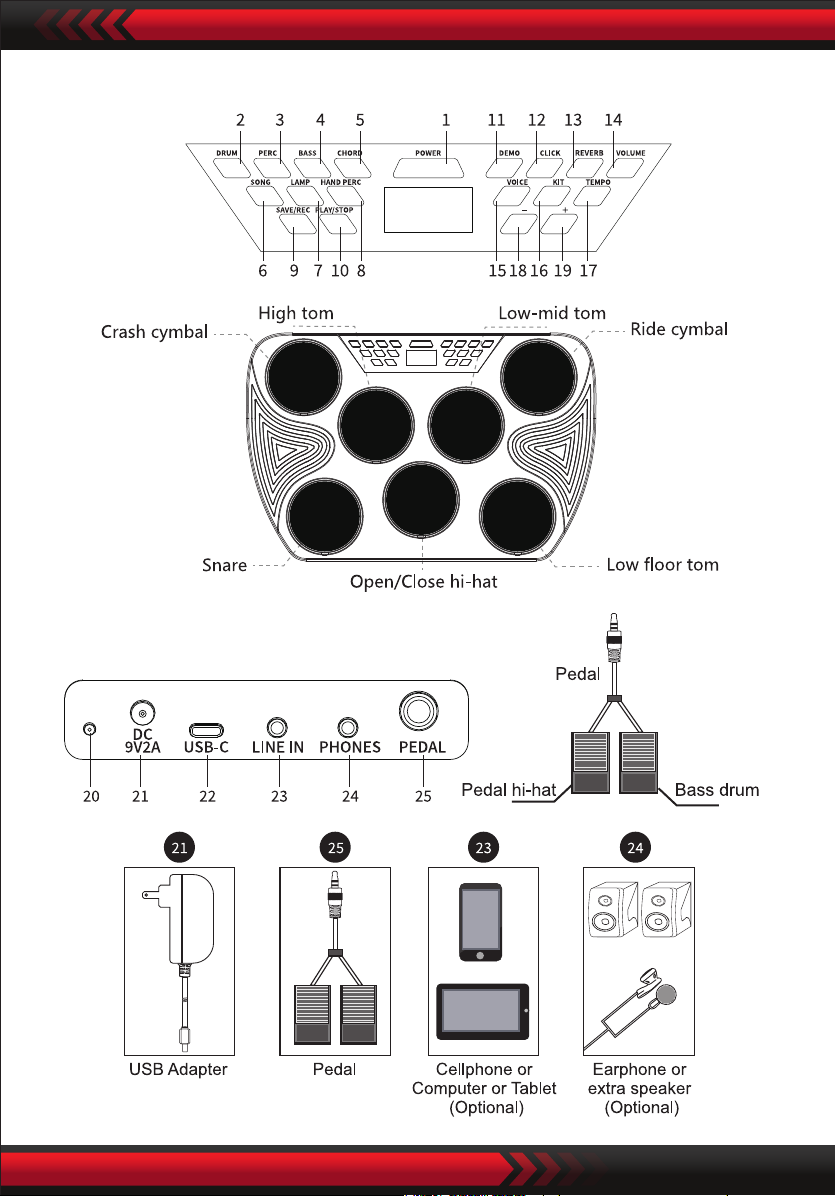
IV. Panel & Display Description
V. Device Connecting Map
www.PyleUSA.com
3
Page 4
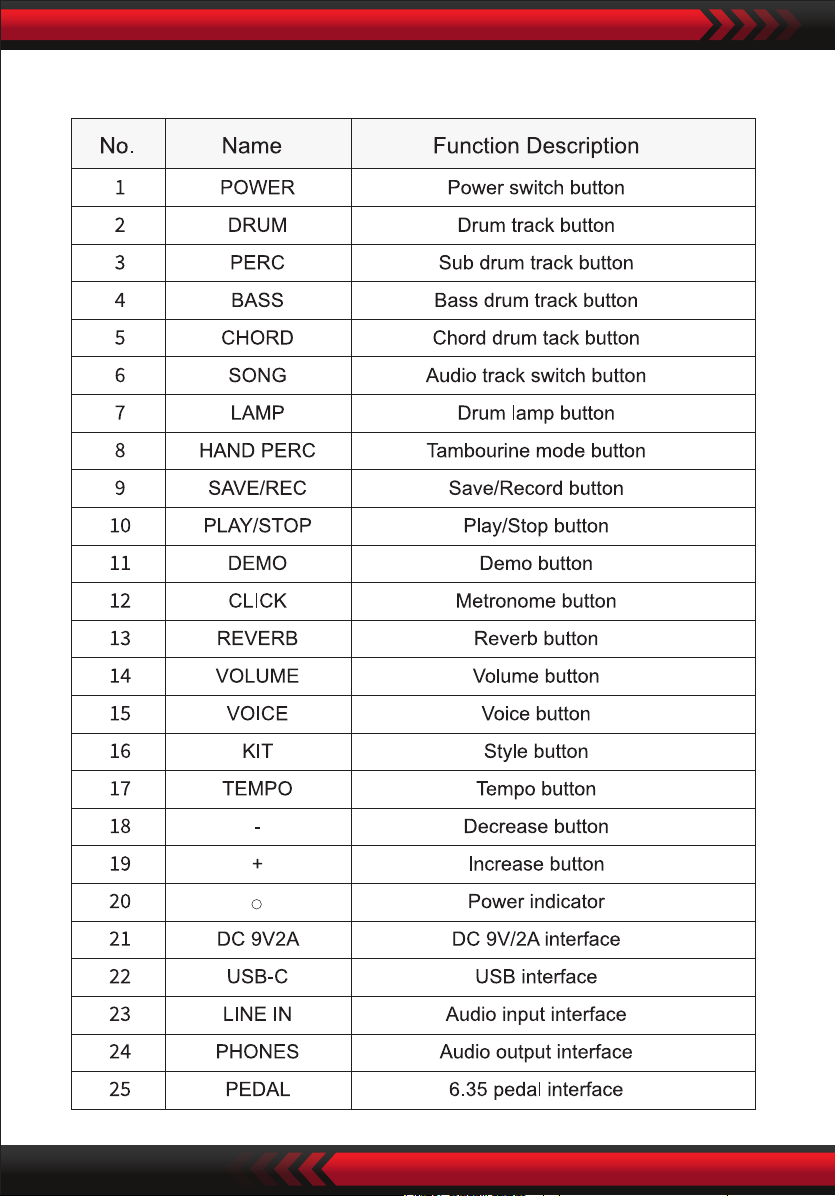
VI. Function Description
www.PyleUSA.com
4
Page 5

VII. Product Function Description
1. ON/OFF button
a. Press “POWER” button to power on/o, defauIt drum kit function, the Kit
indicator will light up, the screen displays "01” tone number, drum light
fIashing, can be used after BT voice prompts.
b. The Electronic Drum Kit will automatically turn o the power if there is no
operation after 5 minutes, need to restart the device for normal use.
c. When the power is turned on, button Iight will be lit which means the
corresponding function is turned on.
2. Increase/Decrease button: Default is the drum kit seIection, press “+” or “-” to
select the drum kit, can be used with other function button, press and hold to
select quickly.
3. Track switch button: Press “SONG” button, ”DRUM”, “ PERC”, “ BASS”, “ CHORD”
the audio track button is turned ON by defauIt, button Iight will be lit, press any
audio track to turn o/on the corresponding play sound.
This function is eective when the demo is playing.
4. Drum track button: “DRUM“ is the main drum track to turn on/o the playing
music. Firstly press “DEMO” into music pIaying then repress “SONG” button,
naIIy press “DRUM” button to turn on/o the music playing of the main drum
track.
5. Sub Drum track button: “PERC” is the sub drum track to turn on/o the music
playing. Music playing in the demo, press “SONG” button then repress “PERC”
button to turn on or turn o the music playing of the sub drum track.
6. Chord track button: “CHORD” is the chord track to turn on or turn o the music
playing. While playing Music in the demo, press “SONG” button, repress “CHORD”
button to turn on or turn o the music playing of the chord track.
The chord track here refers to the chord tones in the music.
7. Reverb button: Built-in 30 levels reverb eect, adjustment range from 0-30,
press “REVERB” button, the screen displays “00”, which means the default level
is 0 when is on, repress “+” or “-” button to select the reverb IeveI, the bigger
the number, the reverb eect is bigger, this reverb function is to increase the
timbre eect.
9. Tambourine mode button: Increase drum sensitivity, you don’t need drum
stick to pIay, user can play it with their hand. Press “HAND PERC” tambourine
mode button, the default is the African drum kit, the screen displays “15”,
seIect the dierent drum tones through “+” or “-”.
www.PyleUSA.com
5
Page 6

10. Drum lamp button
a. Press “LAMP” button, once playing the corresponding pad, at this time the
drum lamp is shining. Press again the “LAMP” button to turn o the lamp
eect.
b. During music playing, press “LAMP”, at this time the drum pad light ashes
with the corresponding drum pad following the music pIayback, repress
“LAMP” button turn o the lamp eect.
11. Demo button
a. With 30 demos, press “DEMO” button, the screen displays “01”, the demo
song plays automatically. Press it again to turn o this function.
b. In demo mode, press “+” or “-” to select cyclically.
c. Repress “DEMO” to turn o this function.
d. Demo function can be mixed with audio track switch function, for more
details, review “SONG” function introduction.
12. Metronome button: Press “CLICK” button to automaticaIIy play default
number of beats, the screen displays “2-4”, buiIt-in ve selections (2-4, 3-4, 4-4,
3-8, 6-8).
13. Record/Play function button: Press “SAVE/REC” button, the screen displays
“REC”, now you can play and record, press this button again to stop recording,
you can also press “PLAY/STOP” button to play or stop.
14. Voice button: Built-in 15 percussion sources in every pad, press “VOICE”
button, pIay the corresponding drum pad, then press “+” or “-” to select the
tones you need and repIay, the screen displays the currently selected tone
number; after choosing your tone, press “SAVE/REC” button until the screen
displays “SAV” means save this drum tone to the previous 16 number drum
tones. It will be saved in user drum tone for you to enjoy your personalized
eects.
Remark: High tom, low-mid tom and low oor tom is the same as drum tone,
you can’t change it to single pad.
15. Style button: Built-in 15 drum styIes, the default style is the rst style when
powered ON, press “KIT” button, press again “+” or “-” to select the style you like.
Remark: The 15th is the African drum sound, can be played in tambourine mode.
16. Volume button: Level 10 is the default volume when powered on, the screen
displays “10”, the loudest is Ievel 15 and the weakest volume is 0.
Press “VOLUME” button and press “+” or “-” to adjust the volume.
17. Tempo button: The default tempo is level 120 when powered on, the screen
will display the corresponding tone tempo you seIected, the fastest is level
250, the slowest is IeveI 30, press “TEMPO” button and “+” or “-” to adjust.
www.PyleUSA.com
6
Page 7

18. Reset: Press and hold “PLAY/STOP” button, the screen displays “RES”, means
to restore to factory default state.
19. Sleeping mode: The device will enter into “Sleep mode” and turns o
automatically if theres no activity in about 5 minutes. You need to restart the
device for normal use.
20. Low battery reminder: The red light is on when charging, red light is o when
fuIIy charged. When the battery power is low, the digital tube ashes sIowIy,
pIease charge the battery in time.
VIII. Pedal Input
1. This drum supports one Hi-hat pedal and bass drum pedal, both pedals are
mono input.
2. When the pedal is not plugged into the “FOOT PEDAL” jack, sound will be close
Hi-hat when you pIay; when the pedal is plugged in and you stepped on the
pedal it will be Open/Close hi-hat, close hi-hat if you’re not stepping on the
pedal.
3. Insert the pedal jack to the “FOOT PEDAL” input for bass drum function.
Step on the pedaI to use it as bass drum.
IX. USB MIDI Function
Your drum module is USB class-compliant.
This means you can plug it into a USB class compliant host (such as Win XP/Vista/
7/8 and Mac OSX as well as many tablet devices), and it should be recognized
immediately. There are no drivers to install; simply plug n’ play.
If you connect the drum module to a computer, you can trigger software programs
or record your performance into a MIDI sequencing application such as Sonar,
Cubase, Nuendo, Ezdrummer, VST/VSTi and all kinds of MIDI drum kit games.
www.PyleUSA.com
7
Page 8

X. Wireless BT MIDI function (Only for the products with BT MIDI function)
1. Go to www.dtx2020.com to download the DTX2020 software corresponding
to your operating system version.
2. Turn ON the BT and location service functions in your phone or tablet;
3. Search the BT name “Music DRUM” in your phone or tablet then connect;
4. Open DTX2020 in your phone or tabIet, nd the “BT” button in the upper right
corner of the homepage, search the BT name “MIDI DRUM” then connect;
5. Download dierent songs and games on the DTX2020 homepage.
XI. TROUBLESHOOTING
Fault Phenomenon Cause of Issue Solution
Power indicator is o
Abnormal sound
Pedal not working
No sound from
headphones
or speakers
The power cable is not
plugged in
Insucient external
power supply voltage
The Pedal plug is not
plugged in
1. The power supply is not
connected
2. The volume of the
headphones or stereo is
not adjusted properly
3. Incorrect connection jack
Check that the power cord
if properly connected
Change the adapter
Check that the plug if
properly inserted or rotated
1. Please check the audio
cable
2. Whether the device has
adjusted the volume
3. Check if the jack is
plugged in
XII. PRECAUTIONS
1. Pay attention to the le format when using external equipment to input audio
source.
2. DO NOT put the electronic drum in an overheated or dusty place to work.
3. Keep a distance from the radio, TV and other strong electromagnetic equipment
to avoid interference when placing.
4. DO NOT put heavy objects on the electronic drum machine to avoid impact.
5. DO NOT put the electronic drum in humid or overheated place to avoid damage.
6. DO NOT store or collide sharp objects with the electronic drum to avoid damage.
www.PyleUSA.com
8
Page 9

Features:
• All-in-One Electronic Drum Kit
• Compact & Portable Tabletop Design
• Hundreds of Built-in Sounds, Songs & Drum Kits
• Make Your Own Music: Connect to Computer & Unlock More
• Record, Save & Edit Your Drum Recordings
• Drum Trainer: Learning Mode Perfect for Beginners
• Connect & Stream Audio from External Devices
• Effectively Reproduces Complete 'Drum Set' Sounds
• (7) Drum Pads with Touch Sensitivity:
• Tom-Toms, Hi-Hat, Snare Drums, Crash & Ride Cymbals
• (2) Digital Foot Pedal Controllers:
• Hi-Hat & Bass Drum Pedals
• Tempo/Beat/Rhythm/EQ/Volume Adjustment
• Hand Percussion Mode: Touch-Responsive Pads
• LED Digital Display with Button Control Center
• 3.5mm Jack Input [A1]
• Built-in Metronome
• Includes Drum Sticks
• Works for Mac & PC
Technical Specs:
• Cymbal & Drum Sounds: 300+ [A2]
• Audio Drum Kits: 16 (15 Preset + 1 Custom)
• Musical Songs: 30
• USB Input: Type C
• Audio Filetype Created: WAV
• External Device Connection: Aux (3.5mm) Input
• Audio Processing Support: 24bit/48k
• MAX Wav Support Capacity: 8KB
• Power: 9V, 2A
• Product Dimensions (L x W x H): 18.18’’ x 11.88’’ x 4.33’’ -inches
www.PyleUSA.com
9
Page 10

Questions? Comments?
We are here to help!
Phone: (1) 718-535-1800
Email: support@pyleusa.com
 Loading...