

Page 1
3/08
23(5$7,210$18$/
AM/FM-MPX Electronic Tuning Radio w/USB/SD/MMC Reader
ZZZS\OHDXGLRFRP
Page 2

&217(176
Contents ------------------------------------------------------ 1
Welcome ----------------------------------------------------- 2
Note on Installation ---------------------------------------- 2
Precautions -------------------------------------------------- 2
Installation --------------------------------------------------- 3 – 4
Wiring Diagram --------------------------------------------- 5
Main Unit – Controls Location -------------------------- 6
Main Unit – General Operation ------------------------- 7 – 8
Main Unit – Radio Operation ---------------------------- 9
Main Unit – USB/SD Input Operation ----------------- 10
Remote Handset – Control Location------------------- 11
Remote Handset – General Operation --------------- 12 – 14
Remote Handset – Radio Operation ------------------ 14 – 15
Remote Handset – USB/SD Input Operation ------- 15 – 16
Specification ------------------------------------------------- 17
Simple Trouble Shooting Guide ------------------------ 18
1
Page 3

:(/&20(
Thank you for purchasing our company multi-media player! To operate the unit correctly,
please read the operation manual carefully before using. Keep this operation manual for
future reference.
127(21,167$//$7,21
The unit is designed for DC 12V negative ground operation system only. Before installing
the unit, make sure your vehicle is connected to DC 12V negative ground electrical system.
The negative battery terminal must be disconnected before making connections. By doing
so, it can reduce the chance of damaging the unit to short circuit.
Be sure to connect the colour coded leads correctly accordingly to the wiring diagram.
Incorrect connections may cause the unit malfunction or damage the vehicle’s electrical
system.
Be sure to connect the speaker(-) leads to the speaker(-) terminal. Never connect the left
and right channel speaker wires together or to the vehicle body.
Do not block vents or radiator panels of the unit. Blocking them will cause heat to build up
inside the unit and may cause damage or fire.
After the completion of installation (or after replacing the battery of vehicle), make sure to
press the RESET button on the main unit with pointed object (such as ball-point pen) to set
the unit to its initial status.
35(&$87,216
- This unit can play MP3 & WMA digital music files.
- Do not attempt to modify the unit, modifying the unit may cause the malfunction and
damage of the unit.
- Stop the vehicle before carrying out any operation that could interfere with your driving.
- Do not work in extreme high or low temperature. The normal temperature for
operation is between -20 and +60 degree Celsius.
2
Page 4

,167$//$7,21
3
Page 5
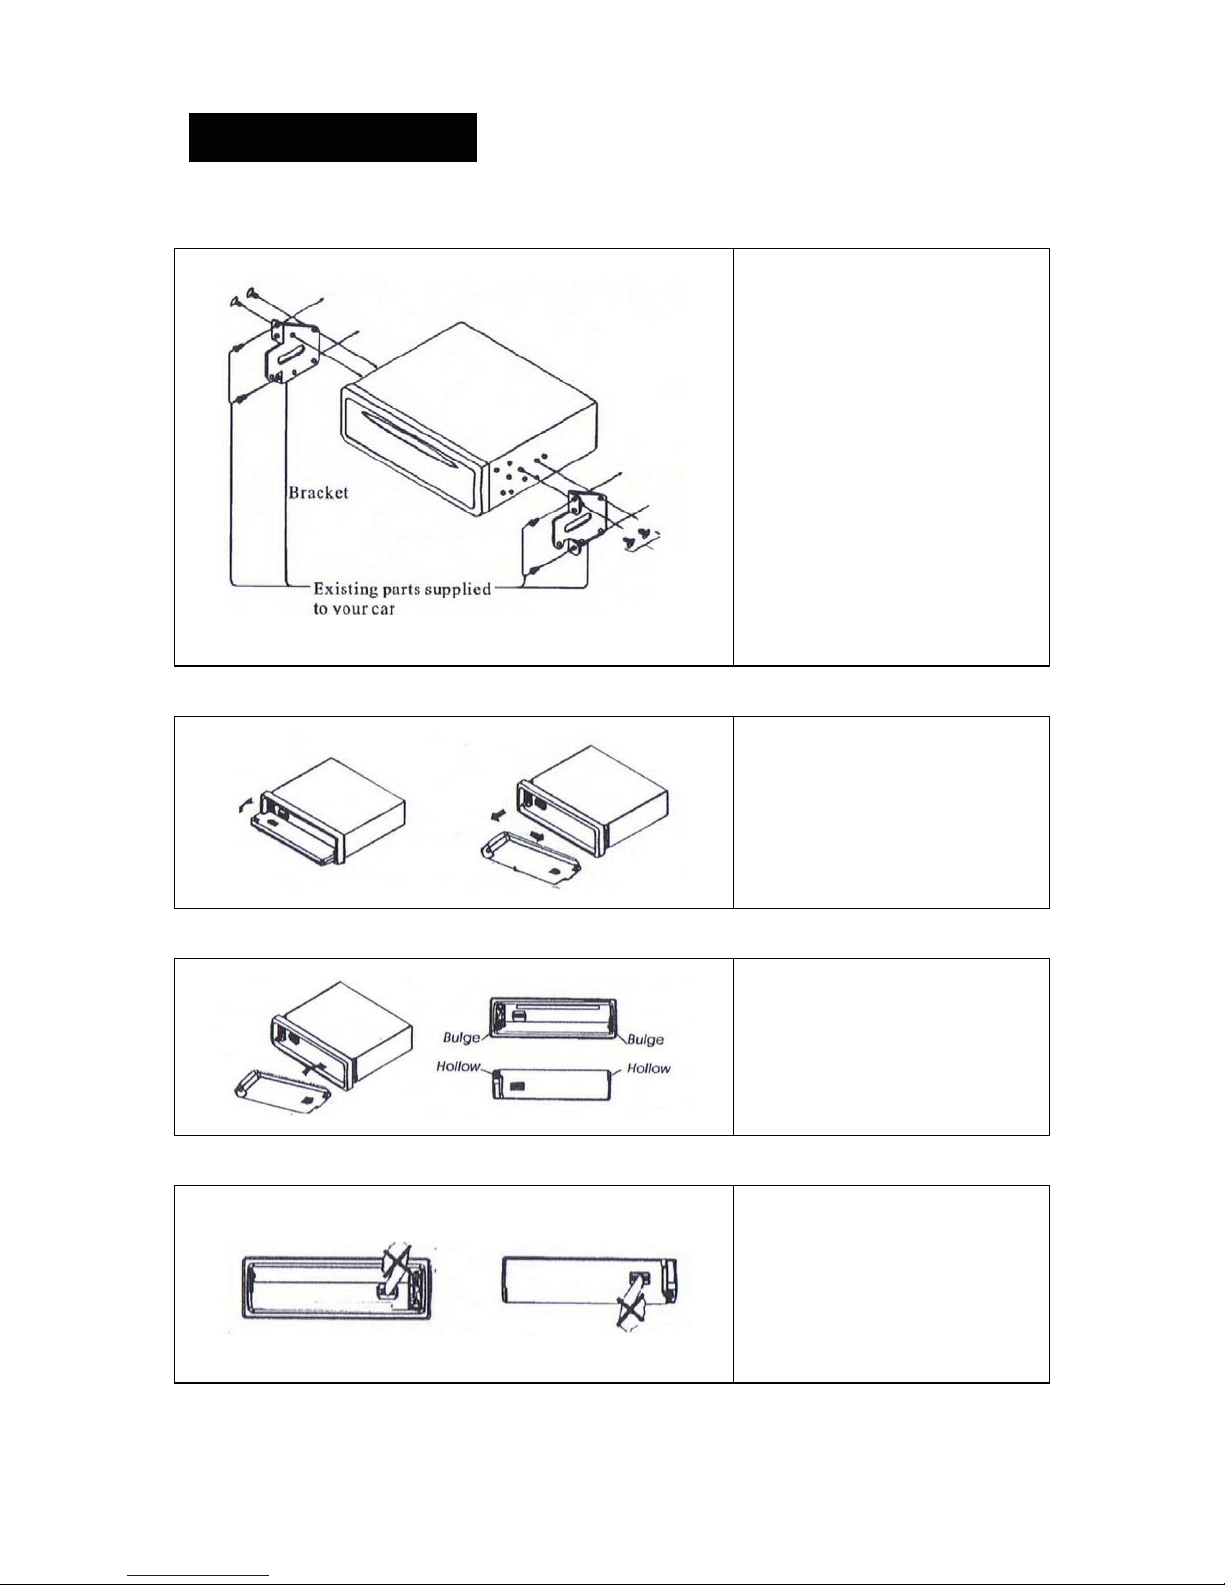
,167$//$7,21
Mounting Method B
To Detach the Front Panel
To Replace the Front Panel
Precautions
4
This mounting method is used
for most Japanese cars. The
actual mounting method
should depend on the type of
cars and the supplied parts.
Note:
- Store small articles in
places not accessible to
children
- Install only with the
supplied screws
- Installation varies on
type of cars and supplied
parts. You should have
the unit installed by
qualified technician
Before detaching the front
panel, be sure to turn off the
unit. Press the release button
and the front panel will fold
down to the level, slide the
front panel to the right and
pull it off forward you.
First, insert the right hand side
of the front panel into the
main unit. Then push the left
hand side of the front panel
into the main unit until it locks
firmly.
Do not touch the connectors
on the front panel and main
unit, it will result in poor
electrical contact. Only wipe
the connectors with a clean
and dry cloth. Put the front
panel into the carry case after
it detached from the main unit.
Page 6

:,5,1*',$*5$0
5
Page 7

/2&$7,212)0$,181,7&21752/6
23 2 7 10 12 5 4 3
22 21 11 8 6 15 16 17 18 19 20 9 13
14 1
1. Unit Reset 13 USB Slot
2.
3.
4. Remote Control Sensor (IR) 16. Intro Play Control (INT)
5. LCD Display 17. Repeat Play Control (RPT)
6. Audio Control / Function Selector 18. Random Play Control (RDM)
7. Band / MP3 ID3 Selector (BND) 19. Tracks Down (5)
8. Mono/Stereo Selector (MO/ST) 20. Tracks Up (6)
9. Auto Memory Store/Scan (APS) 21. Mute Control (MUTE)
10. Mode Selector (MOD) 22. Auxiliary Input Jack (AUX IN)
11. Tuning / Tracks Control (
Power On/Off Control (
Panel Open Button (
)
)
ŹŹű/ŲŻŻ
)
12. Preset Station Buttons (1-6)
Note
Printings & symbols on the above drawing may be varied from the exact main unit. Referred
to the main unit for exact functions & features that applied.
14. SD/MMC Card Port
15. Play & Pause Control (
23. Clock Display / Adjustment (CLK)
6
Źűű
)
Page 8

0$,181,7²*(1(5$/23(5$7,21
INITIAL SYSTEM SETUP (RESET OF UNIT)
Operating the unit for the first time or after replacing the car battery, it is necessary to reset
the unit. Press UNIT RESET (1) with a pointed object (such as a ball point pen) to reset the
unit to its initial setting by the factory (default stage). When some errors occur in the LCD
DISPLAY (5), press UNIT RESET (1) will resume the unit to its default stage. It will also
erase all the setting and some memorized functions of the unit.
POWER ON/OFF
Press (2) to turn on the unit. Press it again to turn off the unit. All the memorized setting
will retain after the unit turned off.
LCD DISPLAY
The LCD DISPLAY (5) shows the status of operation of the unit.
OPERATING MODE SELECTION
Press MOD (10) to choose your desired listening modes among radio, USB input, SD/MMC
card input and auxiliary input.
USB SLOT
Insert USB device to the USB SLOT (13) to play MP3/WMA music files that recorded.
SD / MMC CARD PORT
Insert SD or MMC card to the SD/MMC CARD PORT (14) to play MP3/WMA music files
that recorded.
AUXILIARY INPUT JACK
Insert an external device to this AUX IN (22) jack in order to have audio output of the device
through the unit.
CLOCK DISPLAY AND ADJUSTMENT
During unit operation, press CLK (23) to recall the time display. Press it again or after 5
seconds, the display will return to its original status.
Time Setting & Adjustment
At clock mode, press and hold CLK (23) until the digits of hour starts blinking. Rotary
FUNCTION SELECTOR (6) to adjust hour and confirm the setting by pressing FUNCTION
SELECTOR (6), it will then change to minute setting. Rotary FUNCTION SELECTOR (6) to
adjust minute and after the setting, press CLK (23) to confirm.
REMOTE CONTROL SENSOR
The main unit can be controlled by the remote control handset. Pointing the remote control
handset to the remote control sensor IR (4) and press the control keys for operation.
7
Page 9

0$,181,7²*(1(5$/23(5$7,21
RELEASE OF FRONT PANEL
Press (3) to fold down the front panel. After the folded down of front panel, you can
detach the removable front panel from the main unit for anti-theft security purpose.
FUNCTION SELECTOR
Press and hold the FUNCTION SELECTOR (6) for two seconds will activate control on
different functions. When the control is activated, repeatedly pressing the FUNCTION
SELECTOR (6) to select the following control modes
PRESET EQUALIZER CONTROL
At preset equalizer control mode, rotary FUNCTION SELECTOR (6) clockwise or anticlockwise to select the following equalization modes: Î DSP OFF Î CLASSIC Î POP
Î ROCK Î
(Note: When preset equalizer control is activated, bass and treble will resume to its default
stage)
BEEP SOUND CONTROL
At beep sound control mode, rotary FUNCTION SELECTOR (6) to select beep sound on or
off during function keys operation.
AUDIO CONTROL
Rotate AUDIO CONTROL (6) clockwise to increase the sound level, rotate it anti-clockwise
to decrease the sound level. Repeatedly pressing FUNCTION SELECTOR (6) to move the
display through bass (BAS), treble (TRE), balance (BAL), fader (FAD) and volume (VOL)
controls. When the desired mode is selected, rotate AUDIO CONTROL (6) clockwise or
anti-clockwise to adjust the sound level. When the selected mode has not been adjusted for
several seconds, the display will return to its normal operating mode.
MUTE CONTROL
Press MUTE (21) to cut down the sound output and word “MUTE” appears on the LCD
DISPLAY (5). Press it again to release the mode and recover the previous volume level.
8
Page 10

0$,181,7²5$',223(5$7,21
BAND SELECTION
At radio mode, repeatedly pressing BND (7) to select the desired band in the following
orders: > FM1 > FM2 > FM3 > AM1(MW1) > AM2(MW2) >
AUTO MEMORY STORE
At radio mode, press APS (9) for 2 seconds to start searching from the current frequency
and storing the strongest signal stations into the corresponding preset station number 1 – 6
(12). The searching will stop until one cycle search is finished.
AUTO MEMORY SCAN
At radio mode, press APS (9) shortly to scan all the preset stations on the selected radio
band and stop for several seconds on each preset station scanned. During scanning, press
APS (9) again to stop this scanning and the current radio station will be broadcasted.
AUTOMATIC SEEK UP/DOWN
At radio mode press ŹŹű/ŲŻŻ (11) for automatic seeking the frequency upward or
downward to the next strong station received. By pressing the preset number 1 – 6 (12) for
two seconds can store the station on the respective preset number.
MANUAL TUNING UP/DOWN
At radio mode, press ŹŹű/ŲŻŻ (11) for two seconds to activate the manual tuning mode
and the word “MANUAL” will show in the LCD DISPLAY (5) shortly. At manual tuning mode,
press ŹŹű/ŲŻŻ (11) repeatedly to tune the radio frequency upward or downward to your
desired frequency. When a radio station signal is received, pressing the preset number 1 –
6 (12) for 2 seconds can store the station on the respective preset number. In case the
manual tuning mode has not been operated for 5 seconds, it will resume to automatic mode
and the word “AUTO” will appear shortly in the LCD display.
PRESET MEMORY
At radio mode, press any one of the preset number 1 – 6 (12) to select a station which had
been stored in the memory. Press any one of the preset number 1 – 6 (12) for two seconds
can store the current broadcasting station in the memory. This unit can store up to 30
stations (FM1 x 6, FM2 x 6, FM3 x 6, AM1 x 6, AM2 x 6).
MONO / STEREO CONTROL
At radio mode, press MO/ST (8) to select FM reception in stereo or mono mode.
9
Page 11

0$,181,7²86%6',138723(5$7,21
USB SLOT
Insert USB device to the USB SLOT (13) to play MP3/WMA music files that recorded. The
device will have playback automatically after the USB device inserted.
SD / MMC CARD PORT
Insert SD or MMC card to the SD/MMC CARD PORT (14) to play MP3/WMA music files
that recorded. The device will have playback automatically after the SD/MMC card inserted.
PLAY & PAUSE
At USB/SD/MMC device playback mode, press Źűű(15) to pause playback and “PAUSE”
appears on the LCD DISPLAY (5). Press it again to resume to normal playback.
SELECT TRACKS
At USB/SD/MMC device playback mode, press ŹŹű/ŲŻŻ (11) repeatedly to choose
tracks upward or downward for playback. Press NUMBER KEY 5 / 6 (19 / 20) for every 10
tracks downward or upward respectively in order to select the desired track.
REVIEW ALL TRACKS
At USB/SD/MMC device playback mode, press INT (16) to play first 10 seconds of each
track of the device. During intro play, “INT” appears on the LCD DISPLAY (5). Press it
again to stop intro play and playback will resume on the current track.
REPEAT PLAYBACK
At USB/SD/MMC device playback mode, press RPT (17) to continuously repeat playback
the same track of the device. During repeat playback mode, “RPT” appears on the LCD
DISPLAY (5). Press it again to stop this repeat playback.
RANDOM PLAYBACK
At USB/SD/MMC device playback mode, press RDM (18) to play tracks on device in
random order and “RDM” appears on the LCD DISPLAY (5). Press it again to resume to
normal playback at the current track.
MUSIC SEARCH
At disc or USB/SD/MMC device playback mode, press APS (12) will shift to different music
searching modes that may include directory; file; track; time….. Under respective searching
mode, rotary FUNCTION SELECTOR (8) for selection and confirm the setting by pressing
FUNCTION SELECTOR (8).
(Note: Depends on the music files that recorded, searching modes will be varied or not
available)
MP3 ID3 DISPLAY
At MP3 devices playback mode, repeatedly pressing BND (7) will show on LCD DISPLAY
(5) the ID3 contains of the music files that recorded. These will include directory, album,
title, artist and music.
(Note: Depends on the music files recorded, ID3 display will be varied or not available)
10
Page 12

5(027(+$1'6(7²&21752//2&$7,21
(For unit with remote control only)
1. Power On/Off Control 11. Clock Display/Adjustment
2. Mono/Stereo Selector 12. Volume & Function Control
3. Loudness Control 13. Audio / Function Selector
4. Local/Distant Selector 14. Radio Band / MP3 ID3 Selector
5. Radio Scan Control 15. Tracks Play/Pause Control
6. Tuning / Tracks Select Control 16. Tracks Random Play Control
7. APS / Music Search Control 17. Tracks Intro Play Control
8. Preset Station Buttons 18. Mode Selector
9. Tracks Upward Selector 19. Tracks Repeat Play Control
10. Tracks Downward Selector 20. Mute Control
Note
Printings & symbols on the above drawing may be varied from the exact remote control
handset. Referred to the remote control handset for exact functions & features that applied.
11
Page 13

5(027(+$1'6(7²*(1(5$/23(5$7,21
12
Page 14

5(027(+$1'6(7²*(1(5$/23(5$7,21
POWER ON/OFF
Press PWR (1) to turn on the unit. Press it again to turn off the unit. All the memorized
setting will retain after the unit turned off. The unit can be turned on by pressing any key of
the remote handset.
OPERATING MODE SELECTION
Press MOD (18) to choose your desired listening modes among radio, disc, USB input,
SD/MMC card input and auxiliary input.
AUDIO CONTROL
Press VOL + / VOL – (12) to increase or decrease the sound level. Pressing SEL (13)
repeatedly to move the display through bass (BAS), treble (TRE), balance (BAL), fader
(FAD) and volume (VOL) controls. When the desired mode is selected, press VOL + /
VOL – (12) to adjust the sound level. When the selected mode has not been adjusted for
several seconds, the display will return to normal operating mode.
MUTE CONTROL
Press MUTE (20) to cut down the sound output and word “MUTE” appears on the LCD
display. Press it again to release the mode and recover the previous volume level.
FUNCTION SELECTOR
Press and hold FUNCTION SELECTOR (13) for two seconds will activate control on
different functions. When the control is activated, repeatedly pressing the FUNCTION
SELECTOR (13) to select the following control modes
PRESET EQUALIZER CONTROL
At preset equalizer control mode, press VOL + / VOL – (12) to select the following
equalization modes: Î DSP OFF Î CLASSIC Î POP Î ROCK Î
(Note: When preset equalizer control is activated, bass and treble will resume to its default
stage)
BEEP SOUND CONTROL
At beep sound control mode, press VOL + / VOL – (12) to select beep sound on or off
during function keys operation.
CLOCK DISPLAY AND ADJUSTMENT
During unit operation, press DISP (11) to recall the time display. Press it again or after 5
seconds, the display will return to its original status.
Time Setting & Adjustment
At clock mode, press DISP (11) until the digits of hour starts blinking. Press VOL + / VOL –
(12) to adjust hour and confirm the setting by pressing ENTER (13), it will then change to
minute setting. Press VOL + / VOL – (12) to adjust minute and confirm the setting by
pressing ENTER (13). When the setting completed, press DISP (11) to resume to normal
time display.
13
Page 15

5(027(+$1'6(7²*(1(5$/23(5$7,21
LOUDNESS CONTROL
Press LOUD (3) to increase the bass specially when listening at low volume level. “LOUD
ON” will indicate shortly on LCD display. Press LOUD (3) again to shut down loudness and
LCD display will show “LOUD OFF” shortly.
5(027(+$1'6(7²5$',223(5$7,21
BAND SELECTION
At radio mode, repeatedly pressing BND (14) to select the desired band in the following
orders: > FM1 > FM2 > FM3 > AM1(MW1) > AM2(MW2) >
AUTO MEMORY STORING
At radio mode press APS (7) for two seconds, the radio searches from the current
frequency and checks the signal strength until one cycle search is finished. The 6 strongest
stations are then stored into the corresponding preset number 1 – 6 (8). Press APS (7)
again to stop operating this function.
AUTO PRESET SCANNING
At radio mode, press APS (7) shortly will scan all the preset stations in memory and stop for
5 seconds on each stations. By pressing the preset number 1 – 6 (8) for two seconds can
store the stations. Press APS (7) again to stop operating this function.
AUTOMATIC SEEK UP/DOWN
At radio mode, press Ź/Ż (6) for automatic seeking the frequency upward or downward to
the next strong station received. By pressing the preset number 1 – 6 (8) for two seconds
can store the station on the respective preset number.
MANUAL TUNING UP/DOWN
At radio mode, press Ź/Ż (6) for two seconds to activate the manual tuning mode and the
word “MANUAL” will show in the LCD display shortly. At manual tuning mode, press Ź/Ż
(6) repeatedly to tune the radio frequency upward or downward to your desired frequency.
When a radio station signal is received, pressing the preset number 1 – 6 (8) for 2 seconds
can store the station on the respective preset number. In case the manual tuning mode has
not been operated for 5 seconds, it will resume to automatic mode and the word “AUTO” will
appear shortly in the LCD display.
14
Page 16

5(027(+$1'6(7²5$',223(5$7,21
PRESET MEMORY
At radio mode, press any one of the preset number 1 – 6 (8) to select a station which had
been stored in the memory. Press any one of the preset number 1 – 6 (8) for two seconds
can store the current broadcasting station in the memory. This unit can store up to 30
stations (FM1 x 6, FM2 x 6, FM3 x 6, AM1 x 6, AM2 x 6).
AUTO SCAN
At radio mode, press SCAN (5) to start searching the station of radio being received and
stopped for several seconds. By pressing the preset station button 1 – 6 (8) for 2 seconds,
you can store the scanned station in your desired memory button. Press SCAN (5) to stop
this scanning.
MONO / STEREO CONTROL
At radio mode, press MO/ST (8) to select FM reception in stereo or mono mode.
LOCAL / DISTANT SELECTION
At radio mode, press LOC/DX (4) to switch between a local (LOCAL) setting for reception of
strong stations, and a distance (DX) setting for reception of weak stations.
5(027(+$1'6(7²86%6',1387
23(5$7,21
PLAY & PAUSE
At USB/SD/MMC device playback mode, press Źűű(15) to pause playback and “PAUSE”
appears on the LCD display. Press it again to resume to normal playback.
SELECT TRACKS
At USB/SD/MMC device playback mode, repeatedly pressing Ź/Ż (6) to choose tracks
upward or downward. At USB/SD/MMC device playback mode, press the number button
+10 / -10 (9 / 10) for every 10 tracks upward or downward in order to select the desired
track.
REVIEW ALL TRACKS
At USB/SD/MMC device playback mode, press INT (17) to play first 10 seconds of each
track of the disc or device. During intro play, “INT” appears on the LCD display. Press it
again to stop intro play and playback will resume on the current track.
15
Page 17

5(027(+$1'6(7²86%6',1387
23(5$7,21
REPEAT PLAYBACK
At USB/SD/MMC device playback mode, press RPT (19) to continuously repeat playback
the same track. During repeat playback mode, “RPT” appears on the LCD display. Press it
again to stop this repeat playback.
RANDOM PLAYBACK
At USB/SD/MMC device playback mode, press RDM (16) to play tracks on disc or device in
random order and “RDM” appears on the LCD display. Press it again to resume to normal
playback at the current track.
MUSIC SEARCH
At USB/SD/MMC device playback mode, press SEARCH (7) will shift to different music
searching modes that may include directory; file; track; time….. Under respective searching
mode, press VOL + / VOL – (12) for selection and confirm the setting by pressing ENTER
(13).
(Note: Depends on the music files that recorded, searching modes will be varied or not
available)
ID3 DISPLAY
At MP3 devices playback mode, repeatedly pressing ID3 (14) will show on LCD display the
ID3 contains of the music files that recorded. These will include directory, album, title, artist
and music.
(Note: Depends on the music files recorded, ID3 display will be varied or not available)
16
Page 18

63(&,),&$7,21
GENERAL
Power Requirement --------------------------------------------- DC 12 Volts, negative ground
Load Impedance ------------------------------------------------- 4 Ohms
Maximum Power Output --------------------------------------- 60 watts x 4 channels
Tone Control – Bass (at 100 Hz) --------------------------- Treble (at 10 KHz) -------------------------Chassis Dimension ---------------------------------------------- 178(W) x 140(D) x 50(H) mm
Net Weight --------------------------------------------------------- Approximate 0.8 kgs
AUDIO SECTION
Maximum Output Level ----------------------------------------- 2 Vrms (+/-3 dB)
Frequency Response ------------------------------------------- 20 Hz to 20 KHz
Signal to Noise Ratio ------------------------------------------- 85 dB
Channel Separation --------------------------------------------- 80 dB
AM RADIO SECTION
Frequency Range ------------------------------------------------ 530 – 1710 KHz
IF --------------------------------------------------------------------- 450 KHz
Usable Sensitivity (-20 dB) ------------------------------------ 25 dB
FM RADIO SECTION
Frequency Range ------------------------------------------------ 87.5 – 107.9 MHz
IF --------------------------------------------------------------------- 10.7 MHz
Usable Sensitivity (-20 dB) ------------------------------------ 15 dB
Signal to Noise Ratio ------------------------------------------- 60 dB
Stereo Separation (at 1 KHz) --------------------------------- 30 dB
Frequency Response ------------------------------------------- 30 Hz – 15 KHz
Note
Specification and design; functions and features; unit colour; illumination and display segment are
subject to change without prior notice. Photo or drawing as shown on gift box and operation manual
might be varied from the exact unit. Depends on the input devices, operation might be varied from the
operation manual described.
17
+/-8 dB
+/-8 dB
Page 19

6,03/(7528%/(6+227,1**8,'(
352%/(06&$86(662/87,216
No power
- Check and make sure the connecting wires are connected correctly
- Check whether the fuse is blown. Replace with the proper value fuse if necessary.
No sound
- Check and make sure the speaker wires are connected correctly.
Unit hand-up
- Press the RESET button to reset the unit to its default stage.
No function when pressing the buttons
- Press the RESET button to reset the unit to its default stage.
Poor effect or unable to receive radio
- Check whether the radio antenna is inserted or properly connected.
- Antenna may not be the proper length. Make sure the antenna is fully extended.
- Antenna may be poorly grounded. Check and make sure the antenna is properly grounded.
Stereo cannot be received under radio mode
- Tune the radio frequency accurately.
- The broadcasting signal is too week, set the mode to MONO.
Devices inserted but cannot play
- Check whether the device is properly inserted
- Check whether the device is recorded with media files that can be played by the unit
Remote handset does not work
- Replace new battery of the remote handset.
- Point the remote handset directly at the remote sensor of the main unit.
- Clean the surface of the remote sensor.
Note
After the above efforts, if the unit still cannot be worked normally, consult your service dealer.
Never attempt to disassemble the unit by yourself. No service part inside the unit.
18
Page 20

IB-B049-0007-00
 Loading...