

Page 1
www.puretecfitness.com
1
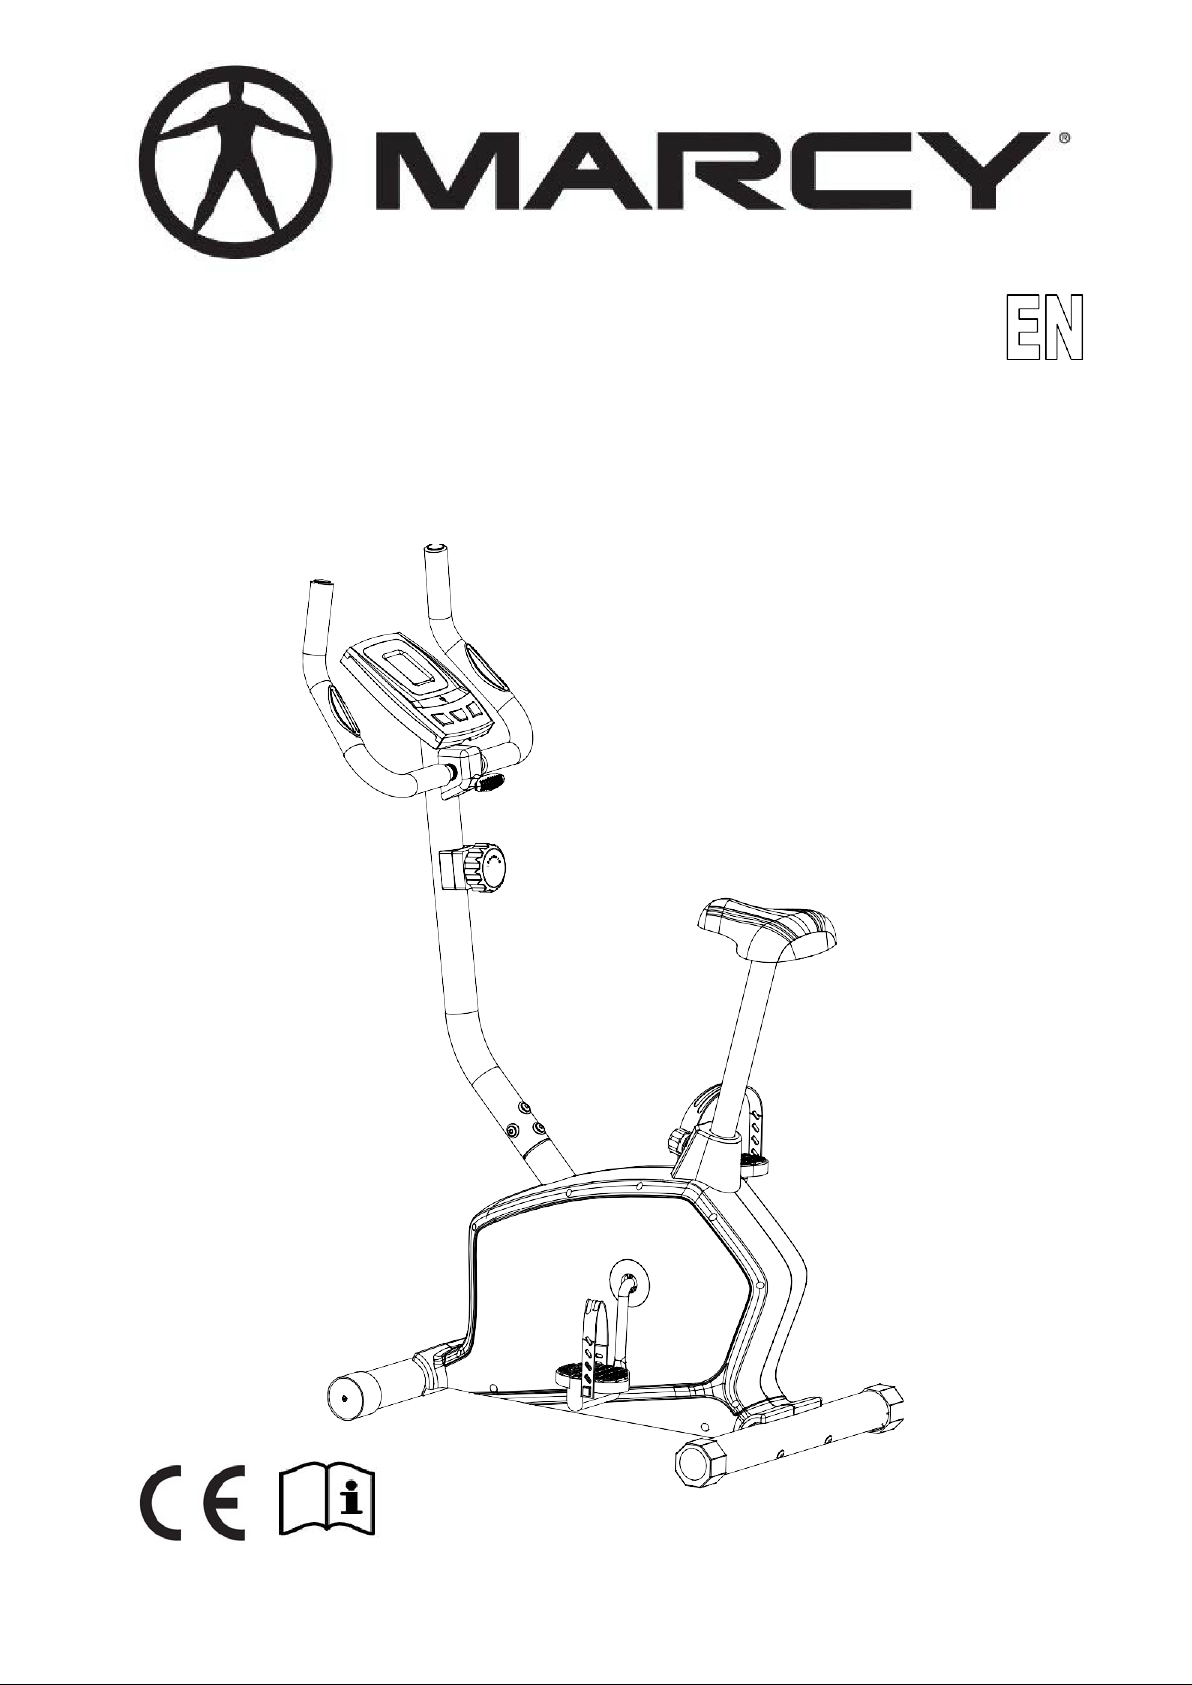
1201U
UPRIGHT BIKE
USER MANUAL
Distributed By:
Pure-Tec Limited
www.puretecfitness.com
Page 2

www.puretecfitness.com
2
CONTENTS
Important Safety Informati on
Warranty Information
18
Weight Limit Ca pacities
Hardware Parts Lis t
Pre Assembly Check List
Assembly Instructions
Computer Instruct ions
Exercise Instructions
Exploded Diagram
Parts List
Additional Inf ormation
3
4
5
6 - 9
10-11
12-13
14
15-16
17
BEFORE YOU BEGIN
Thank you for selecting the MARCY 1201U Upright Bike. For your
safety and benefit, read this manual carefully before using the equipment.
As the official distributor for Marcy, we are committed to providing
complete customer satisfaction. If you have any questions, or find there are
missing or damaged parts, we guarantee you complete satisfaction
through direct assistance. To avoid unnecessary delays, please contact
our Customer Solutions Department, Monday to Friday 8am – 5pm GMT.
Pure-Tec Limited
www.puretecfitness.com
Tel: +44 (0) 1482 212098
Email: [email protected]
Monday - Friday 0800 - 1700GMT
Page 3

www.puretecfitness.com
3
IMPORTANT SAFETY INFORMATION
READ ALL INSTRUCTIONS BEFORE USING
THIS OWNER’S MANUAL CONTAINS ASSEMBLY, OPERATION, MAINTENANCE AND
SAFETY INFORMATION. IN THE INTEREST OF SAFETY, PLEASE MAKE CERTAIN THAT
YOU READ AND UNDERSTAND ALL THE INFORMATION BELOW.
1. This Bike is intended for class H (H=Domestic) use only. It is not designed for
commercial use.
2. This machine has been tested to EN 957.
3. Read the OWNER’S OPERATION MANUAL and all accompanying literature and follow it
carefully bef or e using your Bike.
4. Keep children and pets away from the Bike at all times. Do not leave children unattended
in the same room with the Bike. The Bike is not a toy and therefore parents and
guardians should be aware of the natural tendency for children to play, leading to
situations and behaviour for which the Bik e is not intended.
5. If chil dren are a llowe d to use t he Bik e their ph ysical/ mental develop ment an d above al l,
temperament s hould be taken into account. Consta nt supervision is t herefore needed.
6. Position the Bike on a clear levelled surface which is clear of all obstacles as not to
restrict mov em ent whilst exercising. DO NOT use the Bike near water or outdoors.
7. Exercise equ ipment has moving parts . In the interes t of safet y, keep others , especially
children, at a s afe distance while exercising.
8. Never hold your breath while exercis ing. Breathing should remain at a normal rate in
conjunctio n with the level of exerc ise being performed.
9. Rest adequately between workouts. Muscle tone develops during these rest periods.
Beginners should work out twice a week and increase gradually to 4 to 5 times per
week.
10. Remove all jewellery, inc luding rings, chains and pins before c ommencing exercise.
11. Always wear suit able clothing and fo otwear during exercis e. Do not wear loose fittin g
clothing that c ould become enta ngled with the moving parts of your exer cise machine.
IMPORT ANT!! ! THE MAXIMUM RECOMMENDED WEIGHT C APACITY F OR YOUR BIKE IS 110KGS.
Page 4
www.puretecfitness.com
4
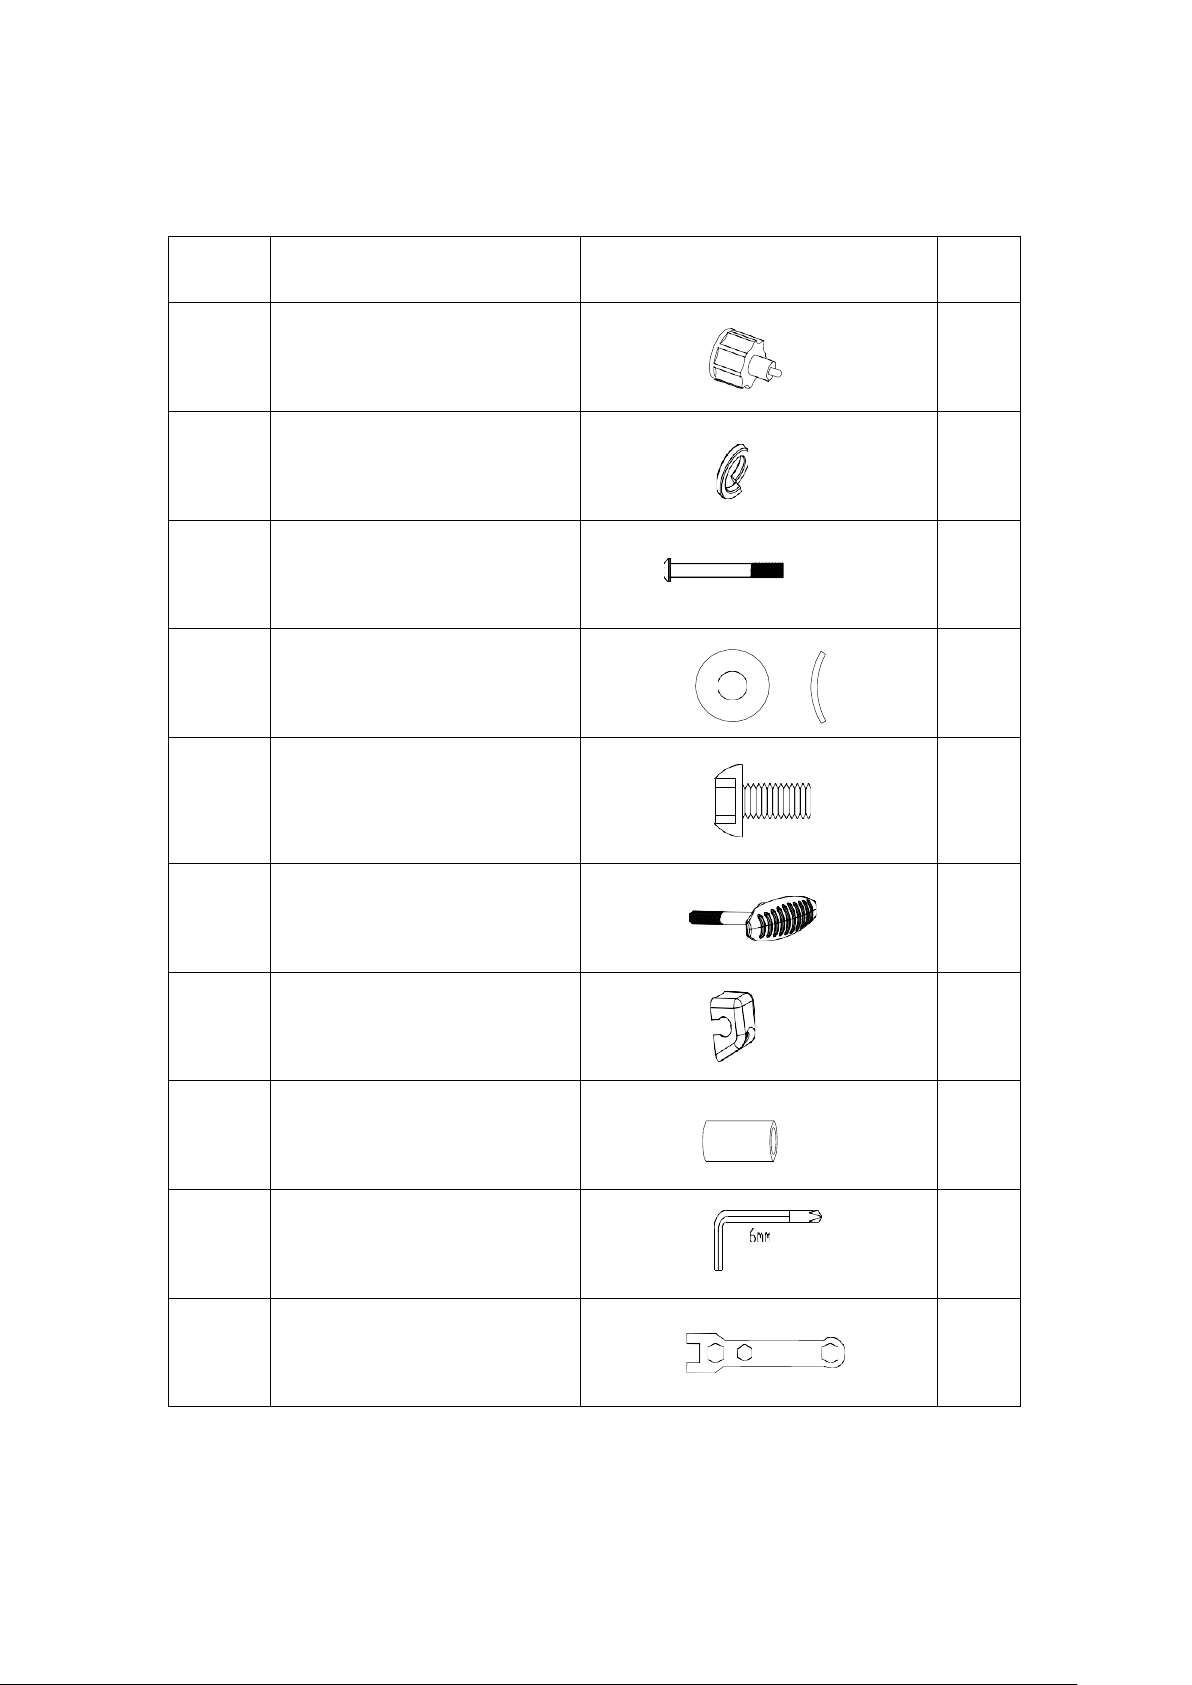
HARDWARE PACKI NG LIST
1
NO. DESCRIPTION DRAWING QTY
11
13
15
16
18
21
Quick Release Lock Knob
Spring Washer
Allen Bolt M8*75
Curved Washer Φ20* Φ8
Allen Bolt M8*16
T-shaped Lock Knob
4
4
8
4
1
37
19
Decorative Cover
Bushing
Allen key L6
Box Wrench
1
1
1
1
Page 5
www.puretecfitness.com
5
4
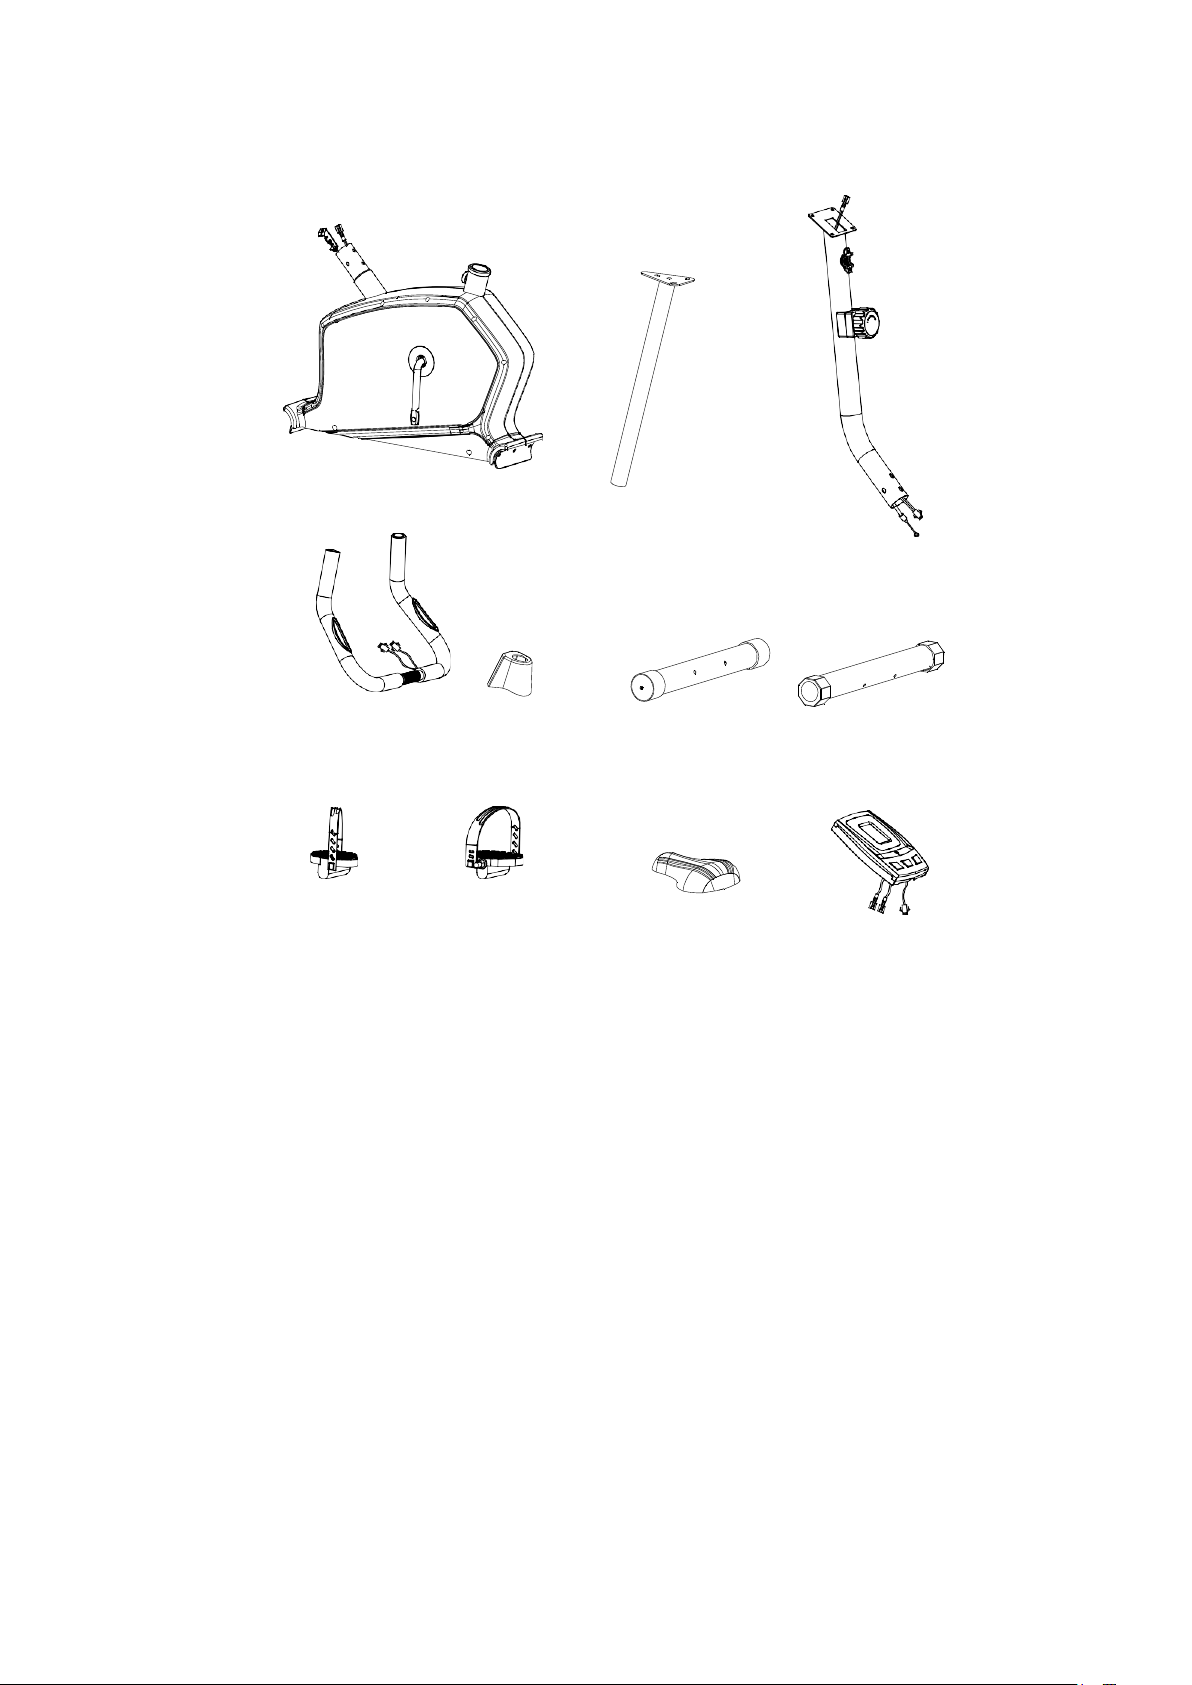
PRE-ASSEMBLY CHECK LIST
1
7
5
17 2
3
9 10 8 6
PART NO.
DESCRIPTION
Q’TY
3
Rear stabili zer
1
1 Main frame 1
4 Front support 1
7 Seat support 1
6 Meter 1
9/10 Pedal ( L/R ) 1/1
17 Front support c over 1
8 Seat 1
5 Handlebar 1
2 Front stabilizer 1
Page 6
www.puretecfitness.com
6
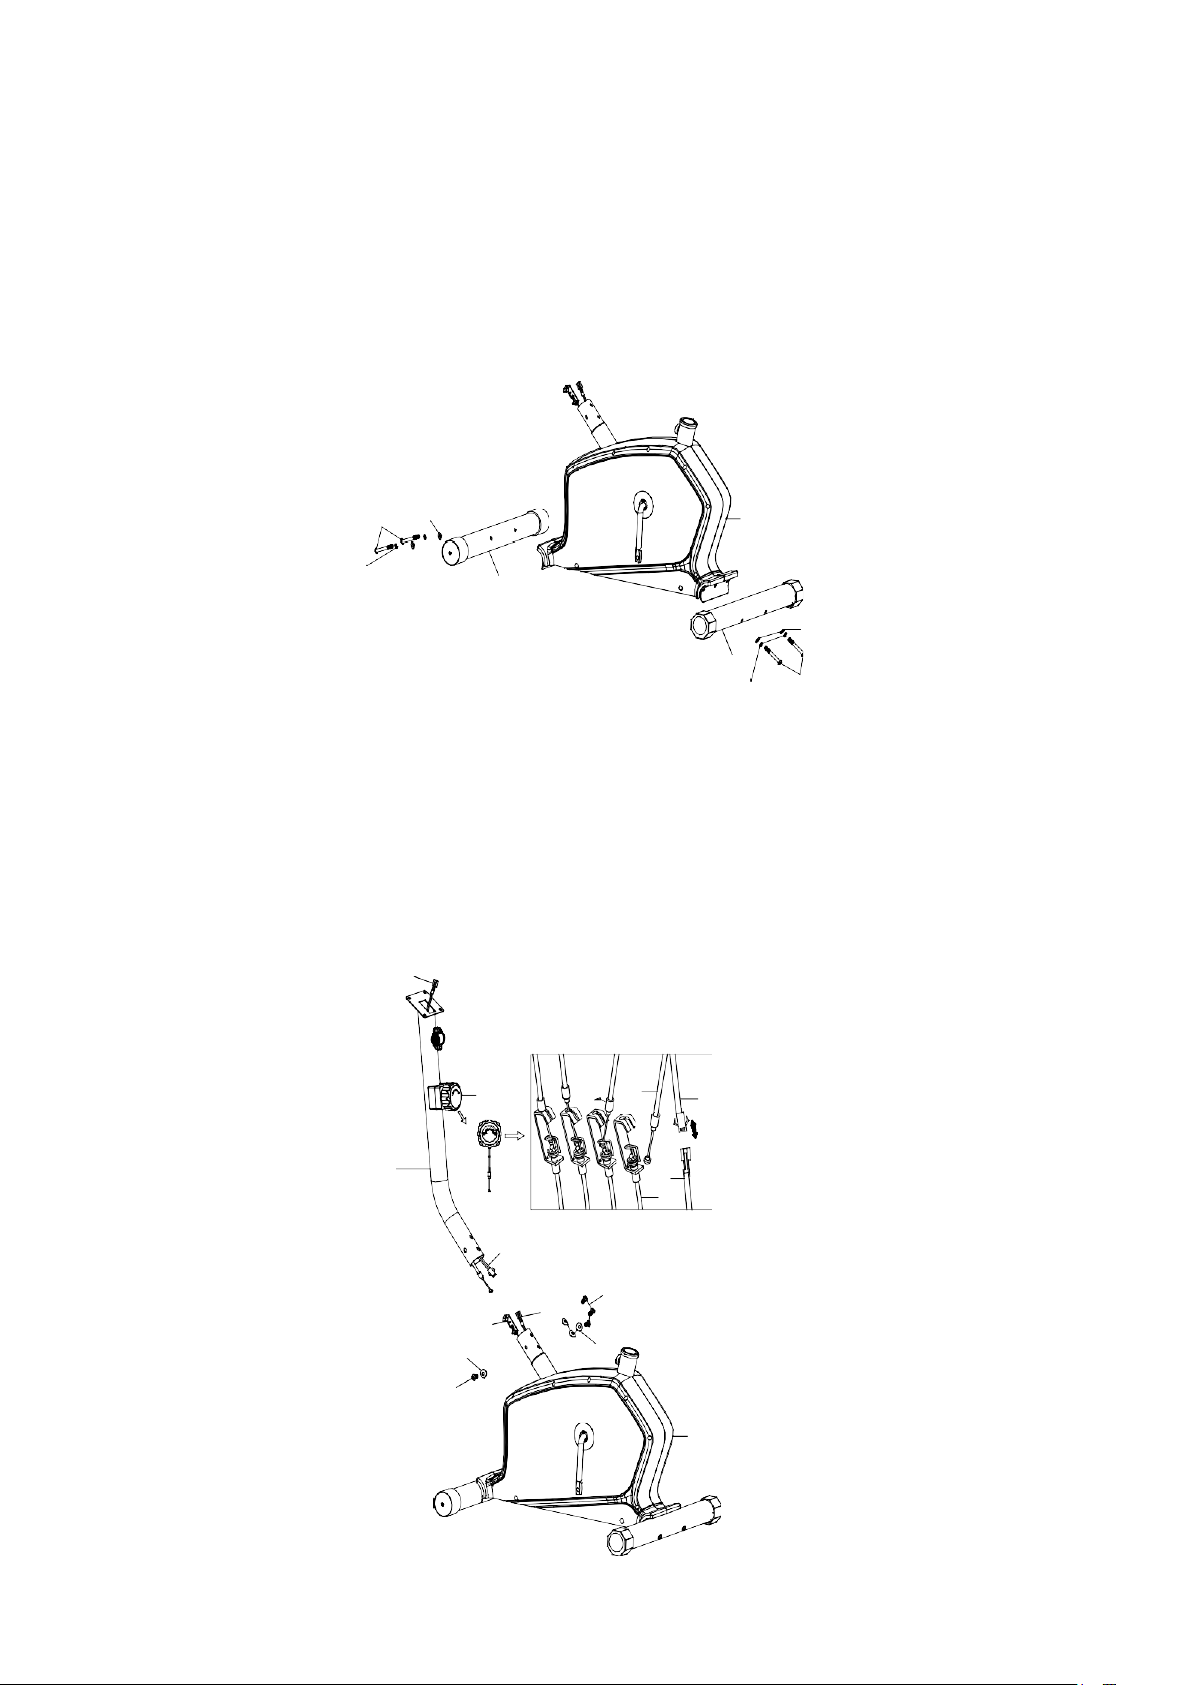
ASSEMBLY INS T RUCTION
STEP 1
Attach the f r ont s tabilizer (2) to the main frame (1), Sec ur e using two curved washer (16),
two Spring Washer (13) and Allen Bolt (15).
Attach the rear s tabilizer (3) to t he m ain frame (1), Sec ur e us ing two curved washer ( 16),
two Spring Washer (13) and Allen Bolt (15).
13
STEP 2
15
16
1
2
16
3
15
13
Connect the middle computer wire ( 33) with lower computer wire (34) .
Turn the t ens ion knob (60) to level 8 and connect the t ens ion knob w/upper tension cable
(60) to the extens ion with the low er tension cable (61).
Insert the front pos t (04) into the main frame (1) and secure using four al len screws (18)
and four curved washers (16).
33
60
4
33
61
34
16
18
18
16
60
34
61
33
1
Page 7
www.puretecfitness.com
7
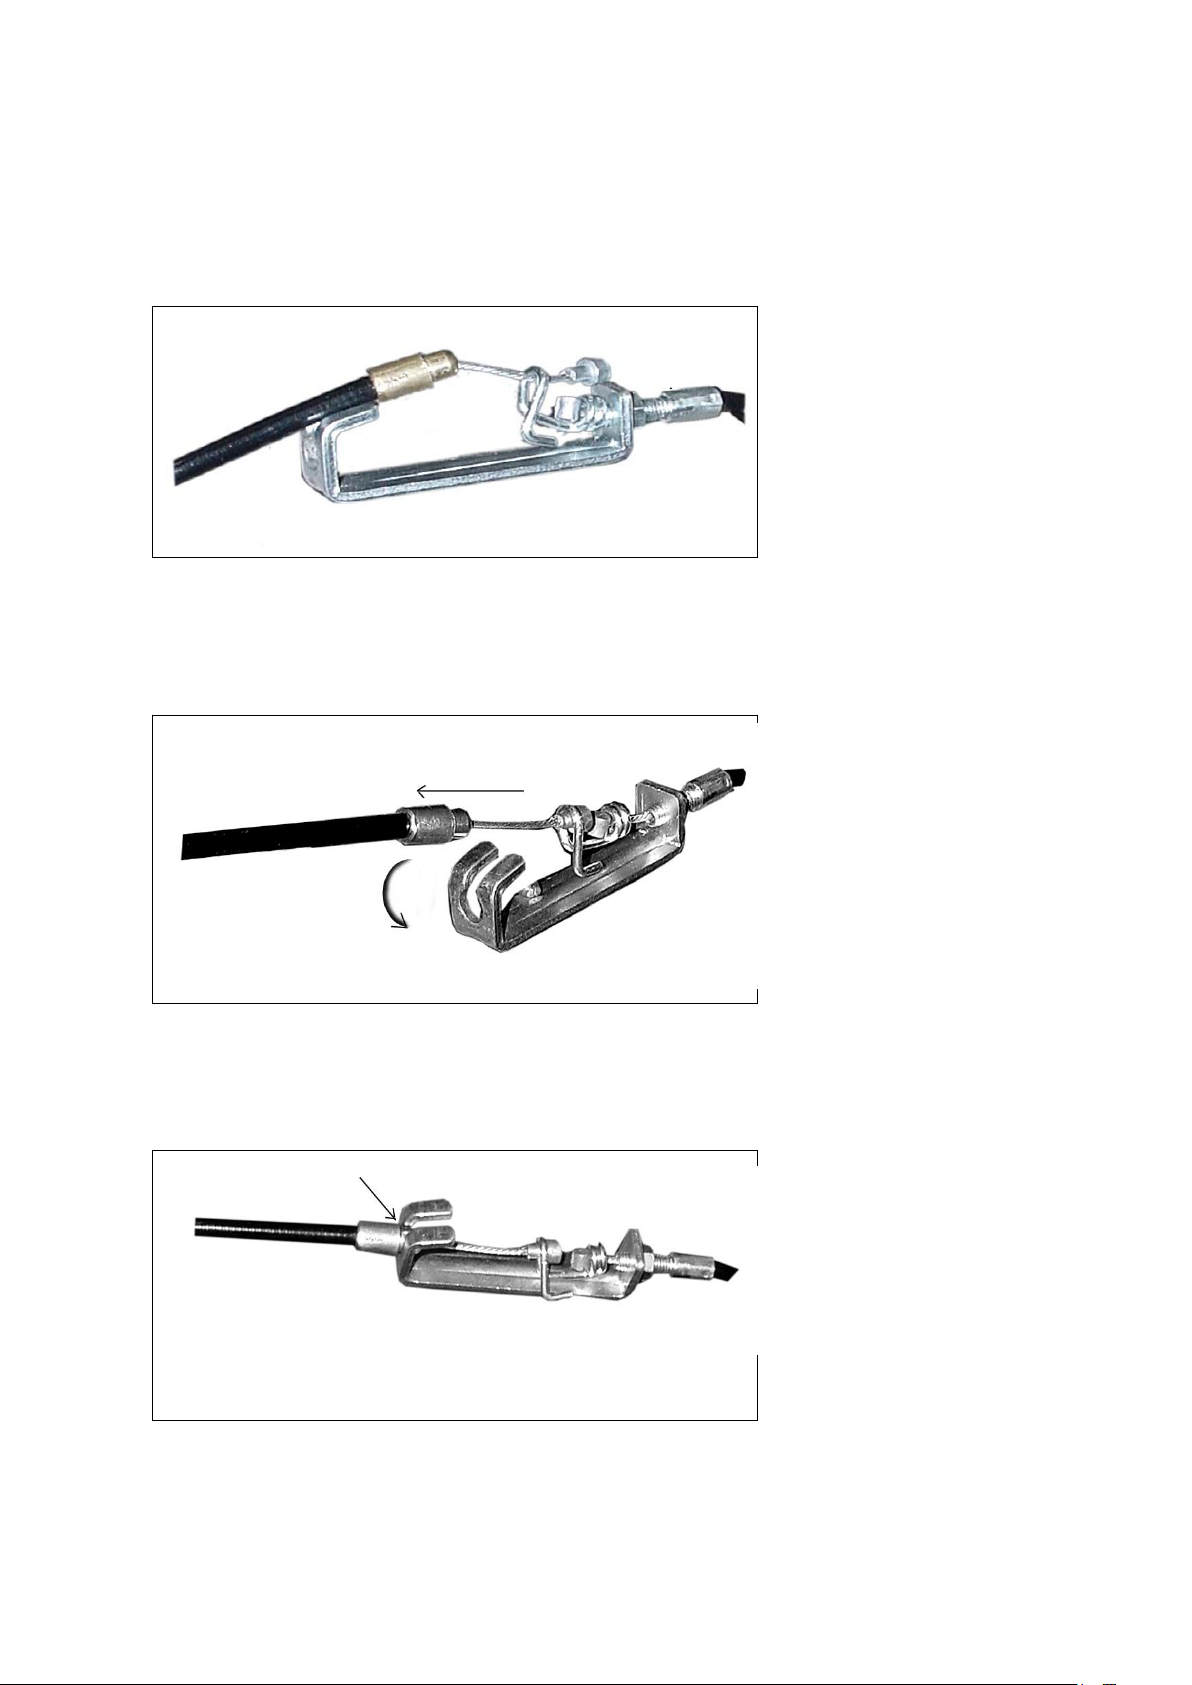
HOW TO CONNECT TENSION CONNECTOR
,
Slide the Cable wire from the
extension sensor wire
Connector in between the
opening on the wir e holder on
sensor wire Co nnec tor.
Pull the extension sensor
wire Connector backward and
slide the wire through the slot
on the bracket .
NOTE: In able to hold the Front Post while connecting the cables and wires
extra help ma y be needed
Drop down the Connector
so the fitting sits firmly on top
of the brack et.
Page 8
www.puretecfitness.com
8
5
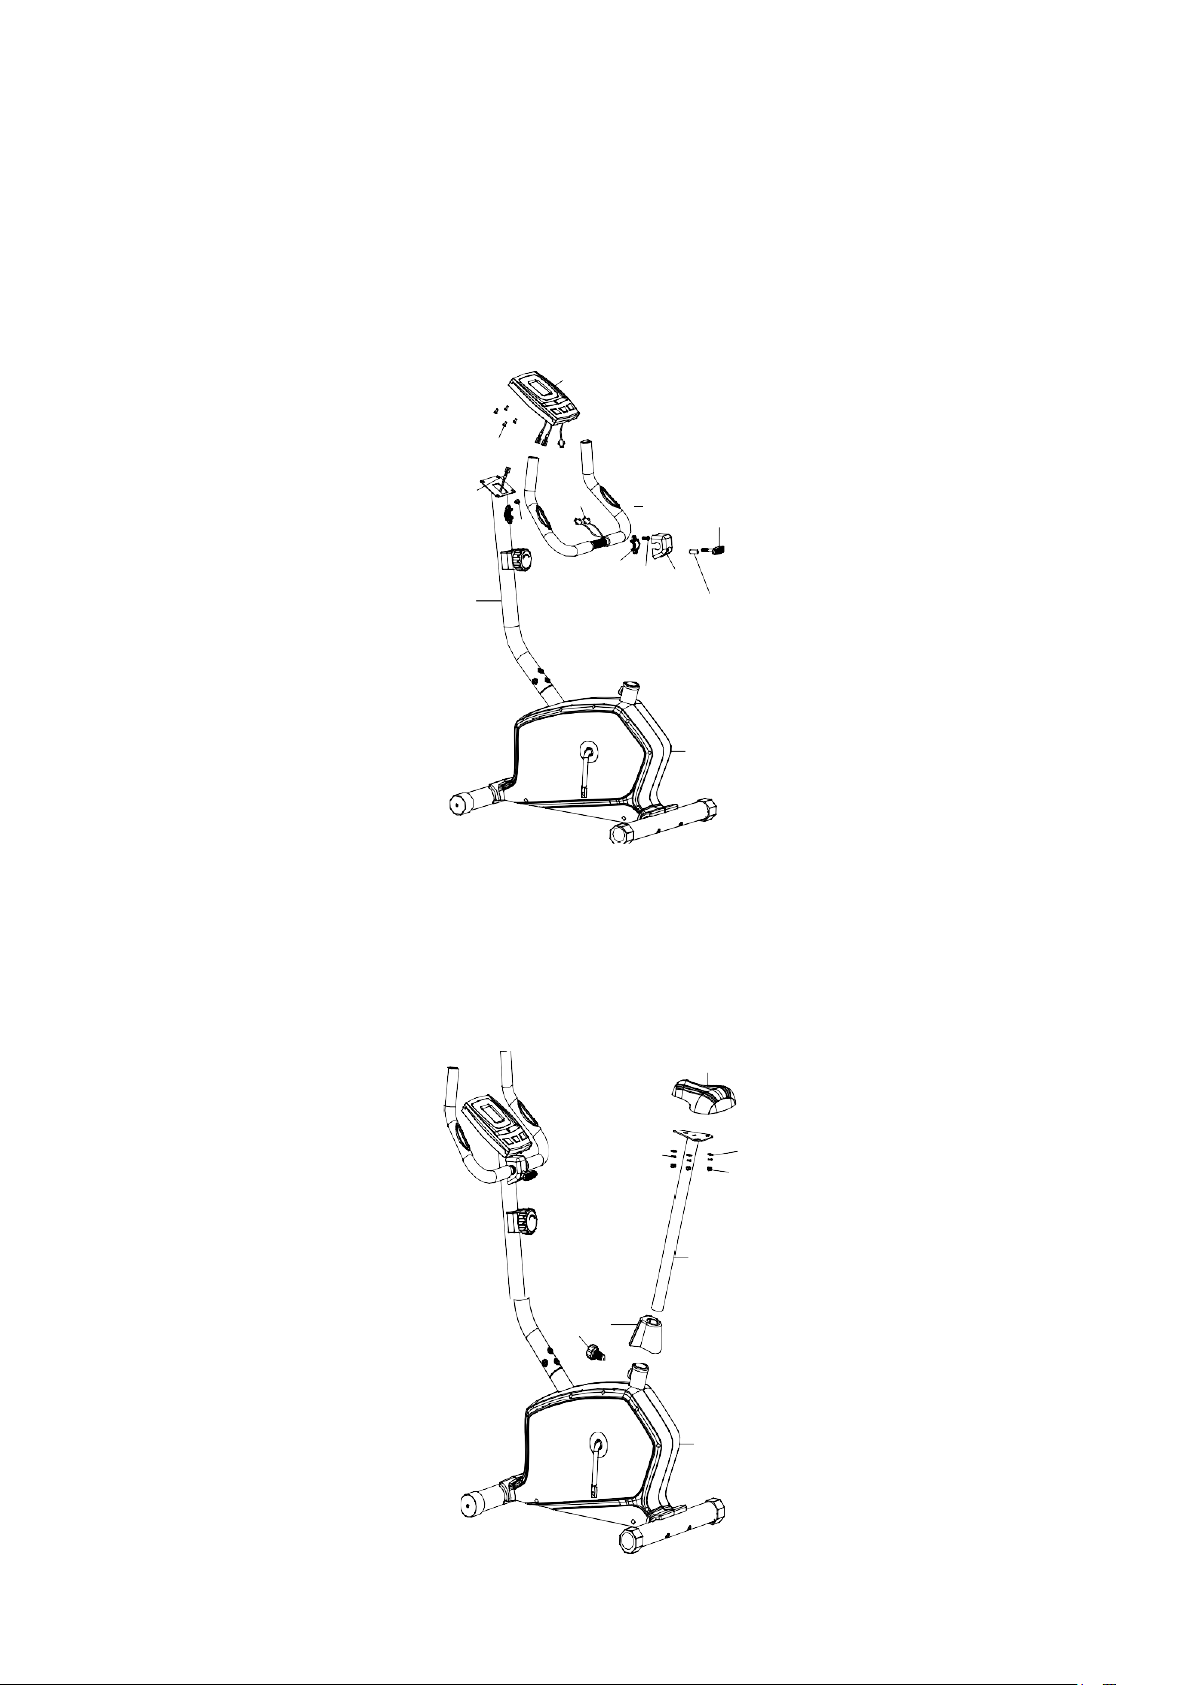
STEP 3
Attach the hand l ebar (05) to front of the front post (4), secure using one cl ip (25), one alle n
bolt (22), one c over for clamp (37), one bushing( 19) and one T Type Knob (21) .
Insert the lower pulse (20) through Grommet (32) on front post (04) a nd pull the hand pulse
wire (20) out of front post (04).
Connect l ower pulse wire (20) with hand pulse wire from computer (06).
Connect midd le c omputer wire (33) to back of upper computer wire from computer (06).
Slide the co mputer ( 06) onto the front post. Secure four s c r ew for computer ( 27) .
6
27
33
32
4
20
25
22
37
21
19
1
STEP 4
Attach t he seat (08) t o the seat post (07), Secure using three was hers (12), t hree spring
washers (13) and three nylon nuts (14) found un der neath the seat.
Put the seat post (7) into the cover for seat post (17).Insert the seat post (7) into main
frame(01), line up the holes and secure the seat in position with the quick release knob (11).
The correc t height for the seat c an be adjusted after the bike is fully assembled.
8
13
14
12
7
17
11
1
Page 9
www.puretecfitness.com
9
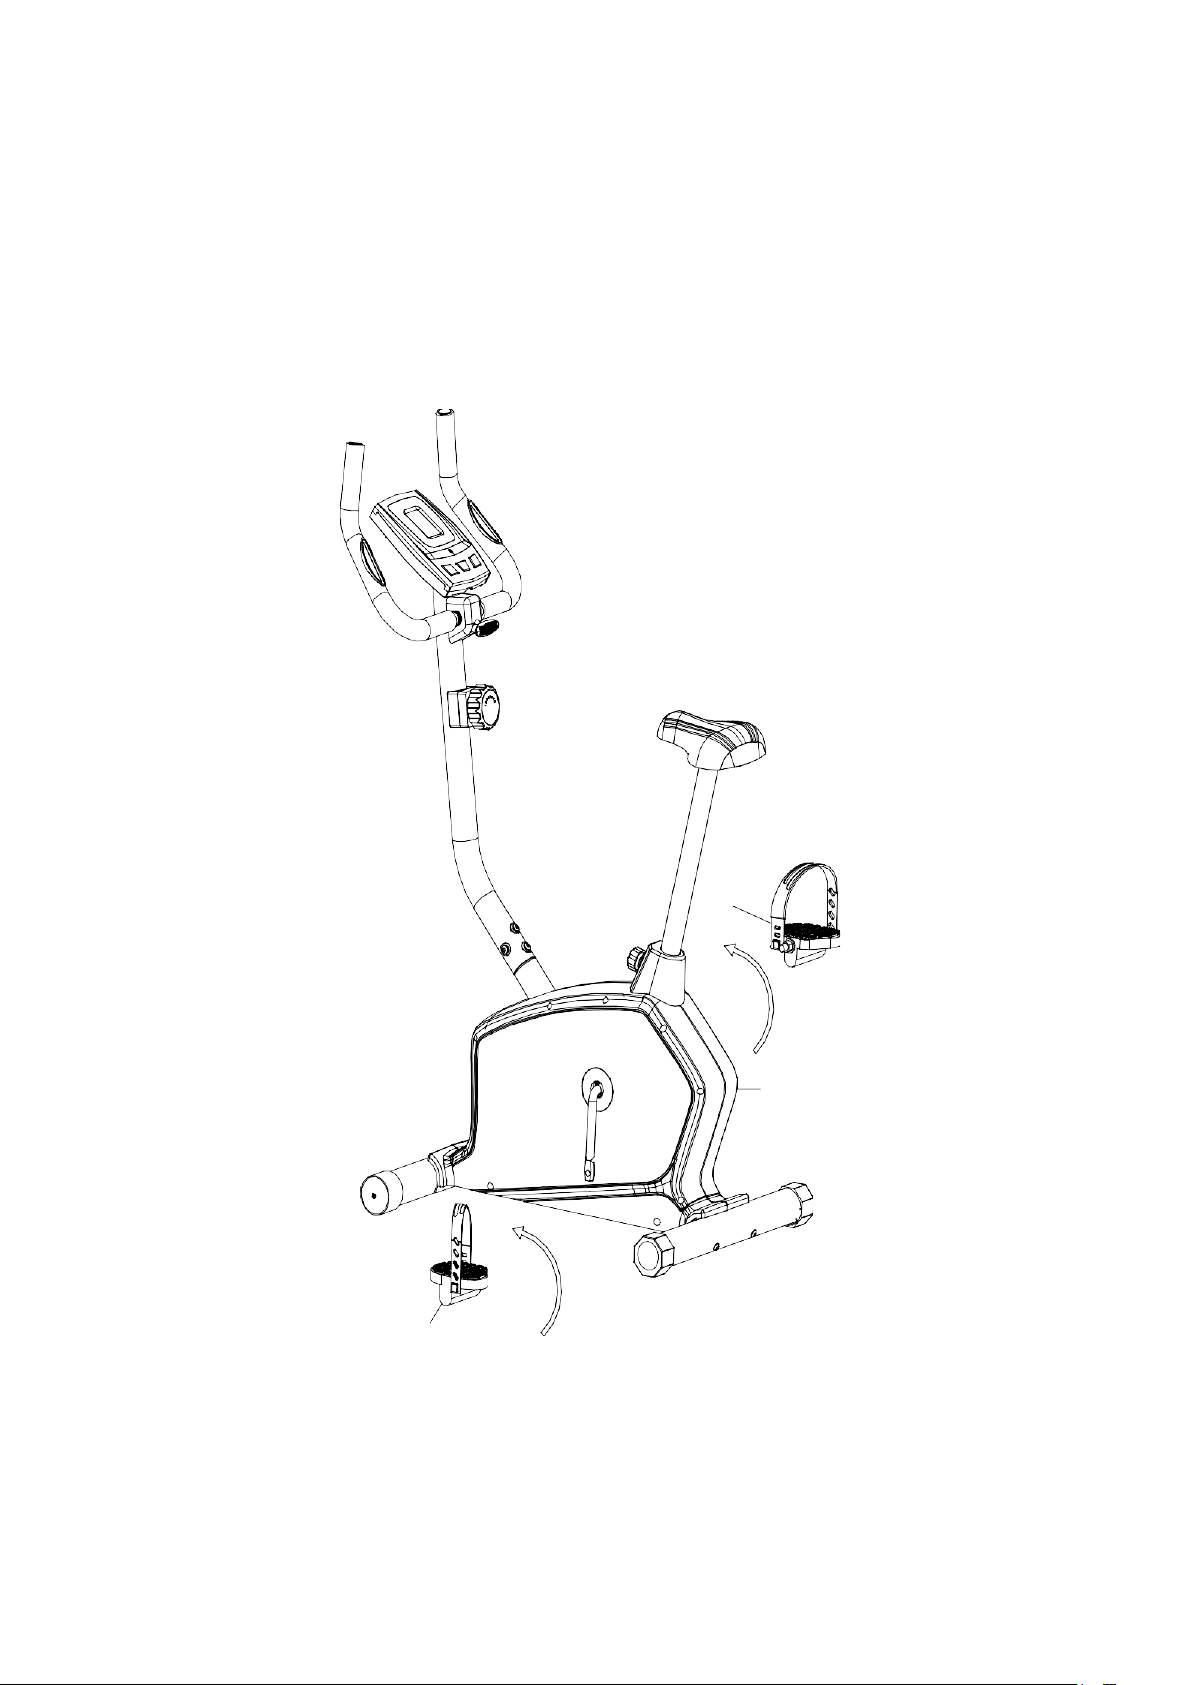
STEP 5
Attach the lef t and right pedal st r aps to the left and right pedals (9/10).
Attach the lef t and right pedals ( 9/ 10) to the left and right crank arms.
Note: The pedals and crank arms are marked with "R" and "L". The left pedal ( L) s hould be
threaded on cl oc kwise and the right pedal (R) should be t hr eaded on counter-clockwise.
10
1
9
CHECK ALL BOLTS AND NUTS ARE TIGHTENED
BEFORE USING THE MACHINE
Page 10

www.puretecfitness.com
10
COMPUTER INSTRUCTI ONS
FUNCTIONAL BUTTONS:
MODE - Push down for s electing functions.
SET - To set the values of time、distance、calories and pulse when not in scan mode.
RESET - Push down for resetting time 、dis tance and calories.
FUNCTION AND OPERATIONS:
1. SCAN: Press “MODE” button unti l “SCAN” appears, monitor will r otate through all the
5 functions: Time、speed、distance、calorie and pulse. Each display will be hold 4
seconds.
2. TIME: (1) Count the total tim e from exercise start to end. (2) Press “MODE” button until
“TIME” appears, press “SET” button to set exercis e time. When the “set” is zero,
the computer will alar m 15 seconds.
3. SPEED: Display current speed.
4. DIST: (1) Count the distance f rom exercise start to end.
(2) Press “MODE” button until “DIST” appears. Press “SET” button to set exercis e
distance. When the “set” is zero, the computer will alarm 15 seconds.
5. CALORIES: (1) Count the total calories from exercise star t to end.
(2) Press “MODE” button unit “CAL” appears. Press “SET” button to set exercise
calories. When the “set” is zero, the computer will alarm 15 seconds.
6. PULSE: Press MODE button until “P U LSE ” appears. Before measur ing your pulse rate, please
plac e yo ur pal ms o f your hands on B oth o f your cont act pads and the moni tor will s how your c urre nt
heart beat rate in beats per minute(BPM) on the LCD after 6~7 seconds. Remark: During the process of
pulse measurem ent, because of the c ontact j amming, the meas urement value ma y be higher than t he
virtual pulse r ate dur ing the f irst 2~3 sec onds, then w ill ret urn to norm al lev el. The meas urement v alue
can not be regarded as the basis of medical treatment.
NOTE:
1.
2.
3.
in.
4.
If the displa y is f aint or shows no fig ur es ,please replace t he batteries.
The monitor will automatically shut off if there is no sig nal r eceived after 4 mi nutes .
The monitor will be auto-powered on when starting to exercise push button w/signal
The monitor will automatically start calc ulating when you star t to exercise and
will stop calculating when you stop exercising for 4 seconds .
Page 11

www.puretecfitness.com
11
SPECIFICATIONS:
AUTO SCAN
Every 4 seconds
TIME
00:00’~99:59’
CURRENT
SPEED
The maximum sig nal can be pickup is
99.9KM/H
TRIP DISTANCE
0.00~99.99KM or 0.00~9999KM
CALORIES
0.1~999.9kCAL
PULSE RATE
40~206BPM
BATTERY TYPE
2pcs of SIZE –AA or UM –3
OPERATING TEMPERATURE
0°C ~ +40°C
STORAGE TEMPERATURE
-10°C ~ +60°C
FUNCTION
Page 12
www.puretecfitness.com
12
EXERCISE INS T RUCTIONS
Using your UPRIGHT BIKE will provide you with several benefits, it will improve your
physical fit ness, to ne musc le and in c onju nct io n with a ca lori e co nt roll ed die t help you los e
weight.
1.
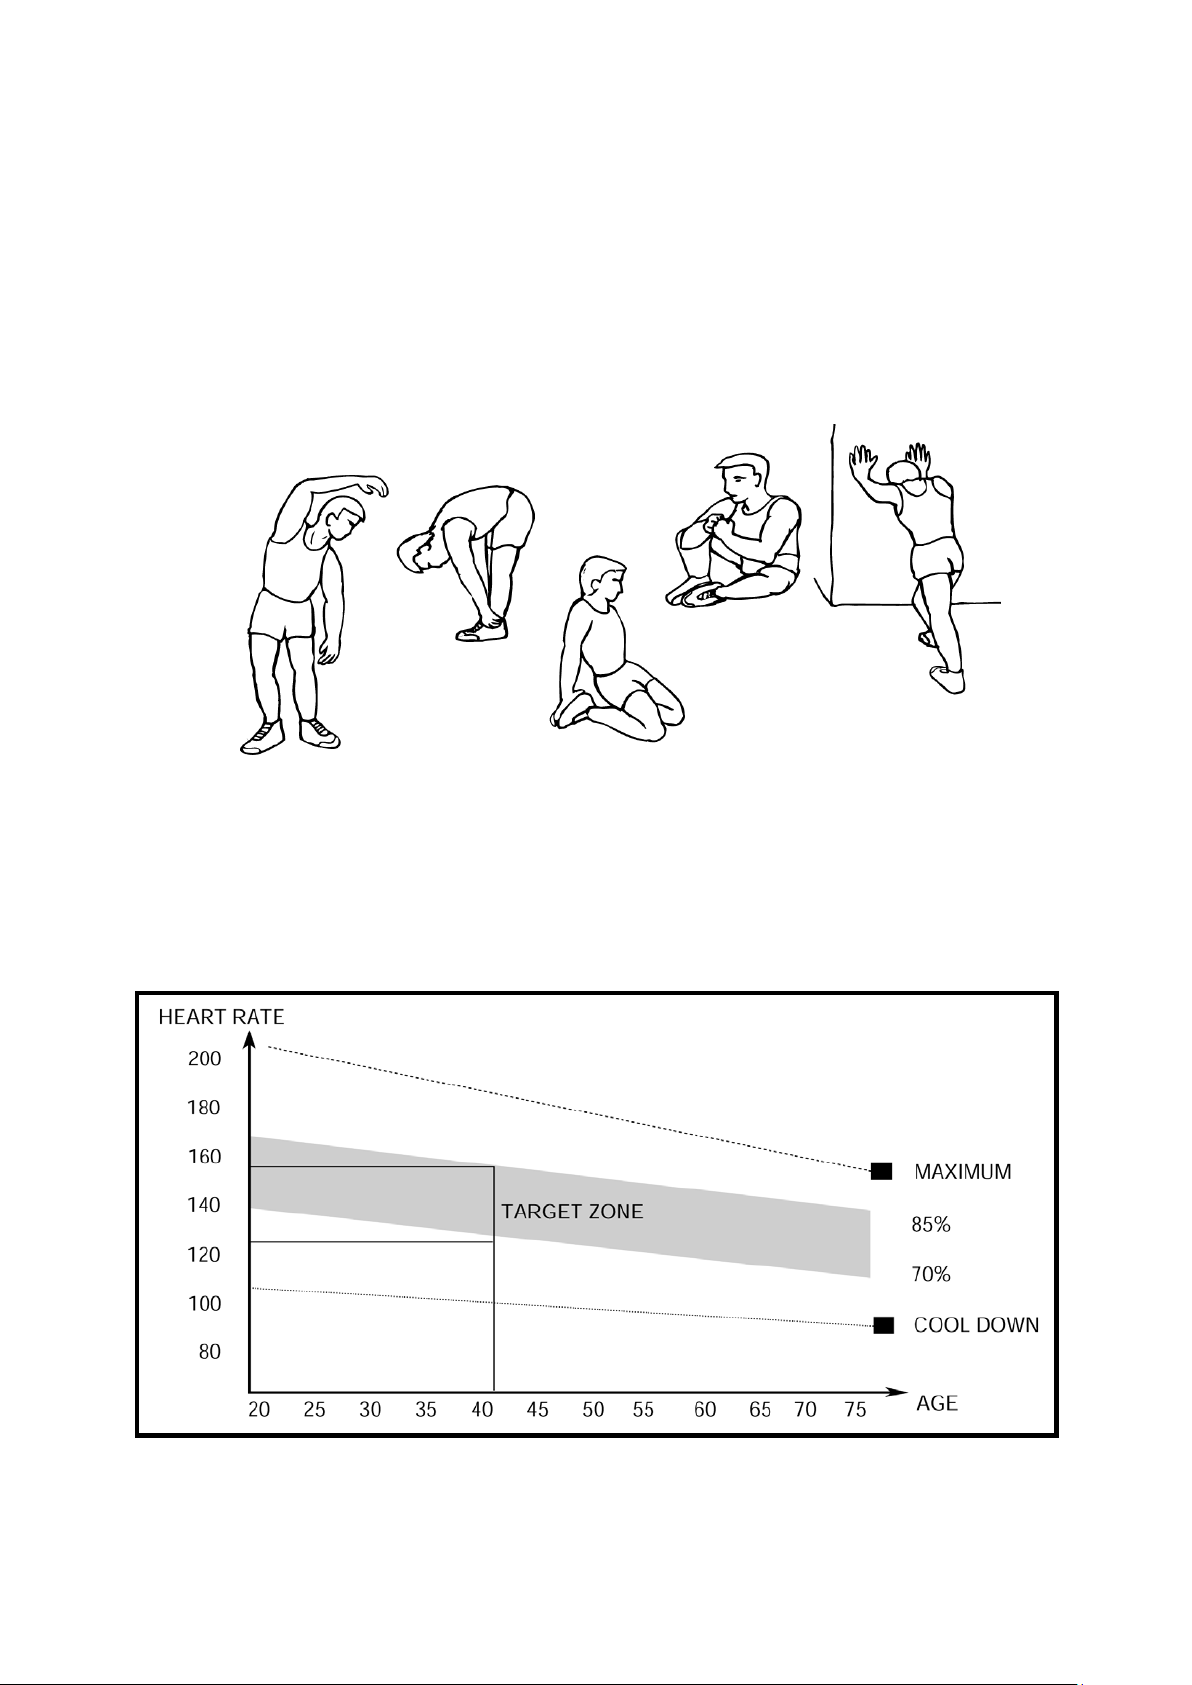
The Warm Up Phase
This stage helps get the blood flowing around the body and the muscles working properly. It
will also reduce t he risk of cramp and muscl e injury. It is advisabl e to do a few stretching
exercises as s hown below. E ach stret ch shoul d be held for appr oximatel y 30 seconds, do
not force or jerk your muscles into a stretch - if it hurts, STOP.
FORWARD
BENDS
INNER THIGH
SIDE BENDS OUTER THIGH
2.
The Exercise Phase
This is the s tage where you put the effort in. After r egular use, the muscl es in your legs will
become more flexible. Work to your but it is very imp or tant to maintain a steady tempo
throughout. The rate of work s hould be sufficient t o r ais e your heart beat into the target
zone shown on the gr aph below.
CALF / ACHILLES
This stage should last for a minimum of 12 minutes though most people start at about 15-20
minutes
Page 13

www.puretecfitness.com
13
3.
The Cool Down Phase
This stage is to let your Cardio-vascular System and muscles wind down. This is a repeat of
the warm up ex ercise e.g. r educe your t empo, continu e for approxi mately 5 min utes. The
stretching ex ercises shou ld now be re peated, agai n remember ing not to f orce or jerk your
muscles into the stretch.
As you get fitter you ma y need to trai n longer and h arder. It is adv isable to tr ain at least
three times a week, and if possible space your workouts evenl y thr oughout the week.
MUSCLE TONI NG
To tone muscle while on your UPRIGHT BIKE you will need to have the resistance set quite
high. This wi ll put more strai n on our leg muscles and may mean you c annot train for as
long as you would lik e. If you ar e also trying to i mprov e your fitness you need t o alter your
training pr ogram. You should tr ain as normal dur ing the warm up an d cool down phas es,
but towards the end of the exercise phase you should increase resistance making your legs
work harder. You will have to reduc e your speed to keep your heart rat e in the target zone.
WEIGHT LOSS
The important factor here is the amount of effort you put in. The harder and longer
you work th e more calo ries you w ill b urn. Effect ively thi s is the sam e as if you were
training to improve your fitness, the difference is the goal.
Page 14
www.puretecfitness.com
14
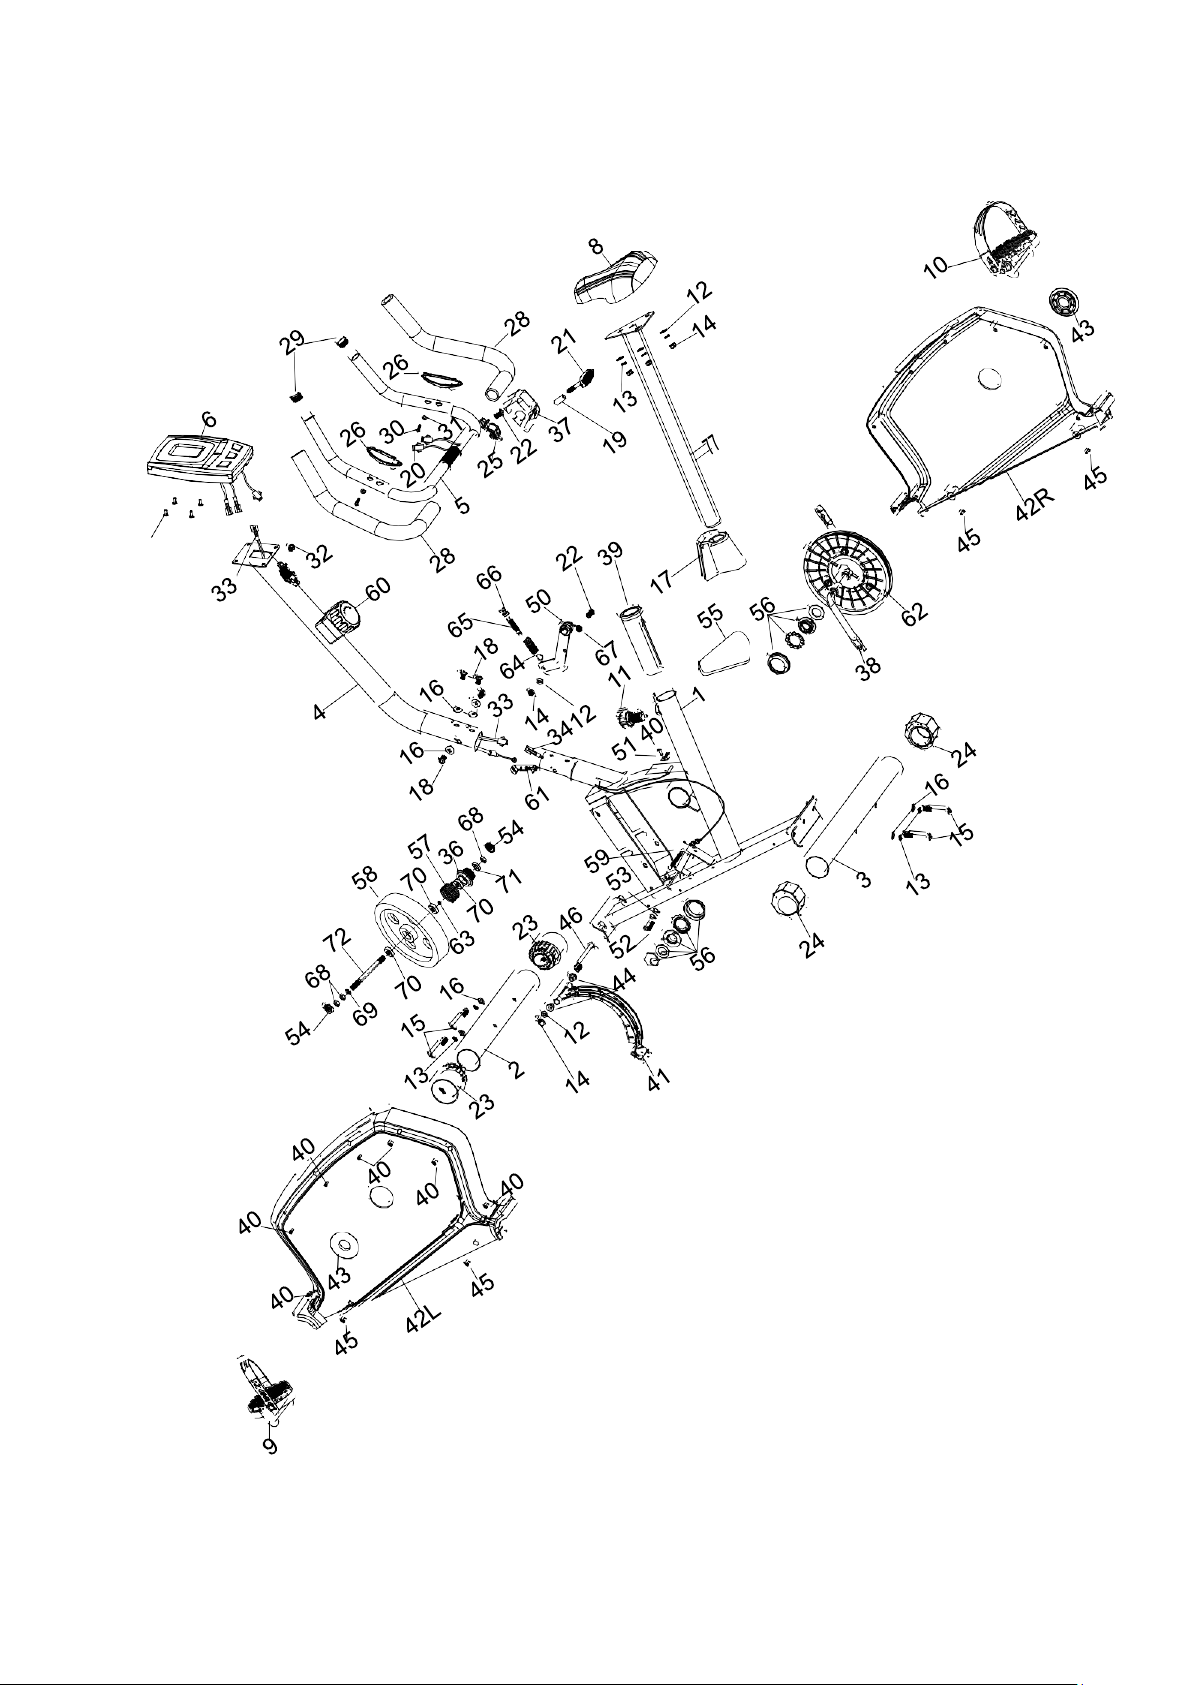
EXPLODED DIAGRAM
Page 15

www.puretecfitness.com
15
PART NO.
DESCRIPTION
Q’TY
1
Main fr ame
1
2
Front stabilizer
1
3
Rear stabilizer
1
4
Front post
1
5
Handlebar
1
6
Computer
1
7
Seat post
1
8
Seat
1
9
Pedal ( Left)
1
10
Pedal ( Right)
1
11
Quick release Knob
1
12
Washer Φ8*Φ17
5
13
Spring washer Φ8
7
14
Nylon Nut M8
5
15
Allen bolt M8*75
4
16
Curved washer Φ8*Φ20
8
17
Decorative cover
1
18
Allen bolt M8*16
4
19
Bushing
1
20
Lower pulse wire
2
21
T Type knob
1
22
Allen bolt M8*20
2
23
End cap for front stabiliz er
2
24
End cap for rear stabilizer
2
25
Clip
1
26
Hand pulse sensor
2
27
Screw for computer M5*12
4
28
Foam grip
2
29
End cap for ha ndlebar
2
30
Self tapping screw ST 4*20
2
31
Washer Φ4.2*Φ12
2
32
Grommet
1
33
Upper sensor w ir e
1
34
Lower sensor w ir e
1
36
Little belt pulley
1
37
Decorative cover
1
38
Crank
1
39
Bushing
1
PARTS LIST
Page 16

www.puretecfitness.com
16
PART NO.
DESCRIPTION
Q’TY
40
Self tapping screw ST 5*15
8
41
Magnet assembly
1
42
Chain cover (L/R)
1/1
43
Crank cover)
2
44
Powder bushing
2
45
Self tapping screw
4
46
Hex head bolt M8*105
1
50
Idler wheel
1
51
Sensor brac ket
1
52
Hex head bolt M6*25
1
53
Hex head Nut M6
2
54
French Nut
2
55
Belt
1
56
BB parts
1 set
57
Spring clutch
1
58
Flywheel
1
59
Spring for magnet assembly
1
60
Tension k nob w/Upper tension c able
1
61
Lower tensio n c able
1
62
Belt driver
1
63
Washer
1
64
Spring for belt
1
65
Bolt for belt adjustor
1
66
Nut M8
1
67
Spacer
1
68
Nut M8
3
69
Bowl shaped spacer
1
70
Bearing
3
71
Bearing
1
72
Axle
1
PARTS LIST
Page 17
www.puretecfitness.com
17
ADDITIONAL INFORMATION
Packaging Disposal
Government guidelines ask that we r educe the amount of waste materi al disposed of in
land fill sites. We therefore ask that you dispose of all packaging waste responsibly at
public recycling centres.
End of Life Disposal
We at Pure-Tec Limited hope you enjoy many years of enjoyable use from your Bike.
However, a time will come w hen your Bike will come to the end of its useful life. Under
‘European WEEE Legislation‘ you are responsible for the appropriate disposal of your
Bike to a recognis ed public collection facilit y.
CARE AND MAI NTENANCE
1. Inspect and tig hten all parts before using the Bike.
2. The Bike can be cleaned using a dam p c loth and mild non-abr as ive deterge nt . DO
NOT use solvents.
3. Examine the Bike regularly for signs of damage or wear.
4. Failure to examine the Bike regularly ma y affect the safety le vel of the equipment.
5. Replace any defective com ponents immediat ely and/or keep the Bike out of use until
repair.
Page 18

www.puretecfitness.com
18
LIMITED WARRANTY
Pure-Tec warrants this product to be free fr om defects in wor kmanship a nd material, under
normal use and service conditions. Please refer to www.puretecfitness.com for warranty
terms. This war rant y exten ds o nl y to t he orig ina l pur chas er and is v alid for home us e on l y.
Pure-Tec’s obligat ion under this W arranty is limited to r eplacing damaged or f aulty parts
at Pure-Tec ’s option.
All returns must be pre-authorised by Pure-Tec. This warranty does not extend to any
product or d amage to a product caused by or at tributable to fre ight damage, a buse,
misuse, impr oper or ab nor mal us age, purc has ers own r epa irs or for pr oduc ts us e d for
commercial or rental purposes. No other warr anty beyond that specifically set forth above
is authorised by Pure-Tec .
Pure-Tec is not respons ible or li able for indirect , special or c onseq uential d amages ar ising
out of or in connec tion with th e use or performanc e of the product or other damages wit h
respect to any economic loss, loss of property, loss of revenues or profits, loss of
enjoyments or use, costs of removal, installation or other consequential damages or
whatsoever nat ures.
The warranty ext ende d her eun der is in lie u of any an d all ot her war r anties and an y im plied
warranties of merchantabilit y or fitness for a part icular purpose is limite d in its scope and
duration to t he t er ms s et forth herein.
Your statutory rights are not affected.
ORDERING REPLACEMENT PARTS
Replacement par ts can be ordered by contactin g our Cus t omer Solutions
Department, Monday to Friday, 8am – 5pm GMT :
Pure-Tec Limited
www.puret
ecfitness.com
Tel:+44 (0) 1482 212098
Email:[email protected]
Monday - Friday 0800 - 1700GMT
When orderin g r eplacement part s , please give the following information,
1.
2.
3.
4.
Model
Description of Parts
Part Number
Date of Purchase
 Loading...