

Page 1
MV-374 / MV-378
V
oIP GSM Gateway
User Manual
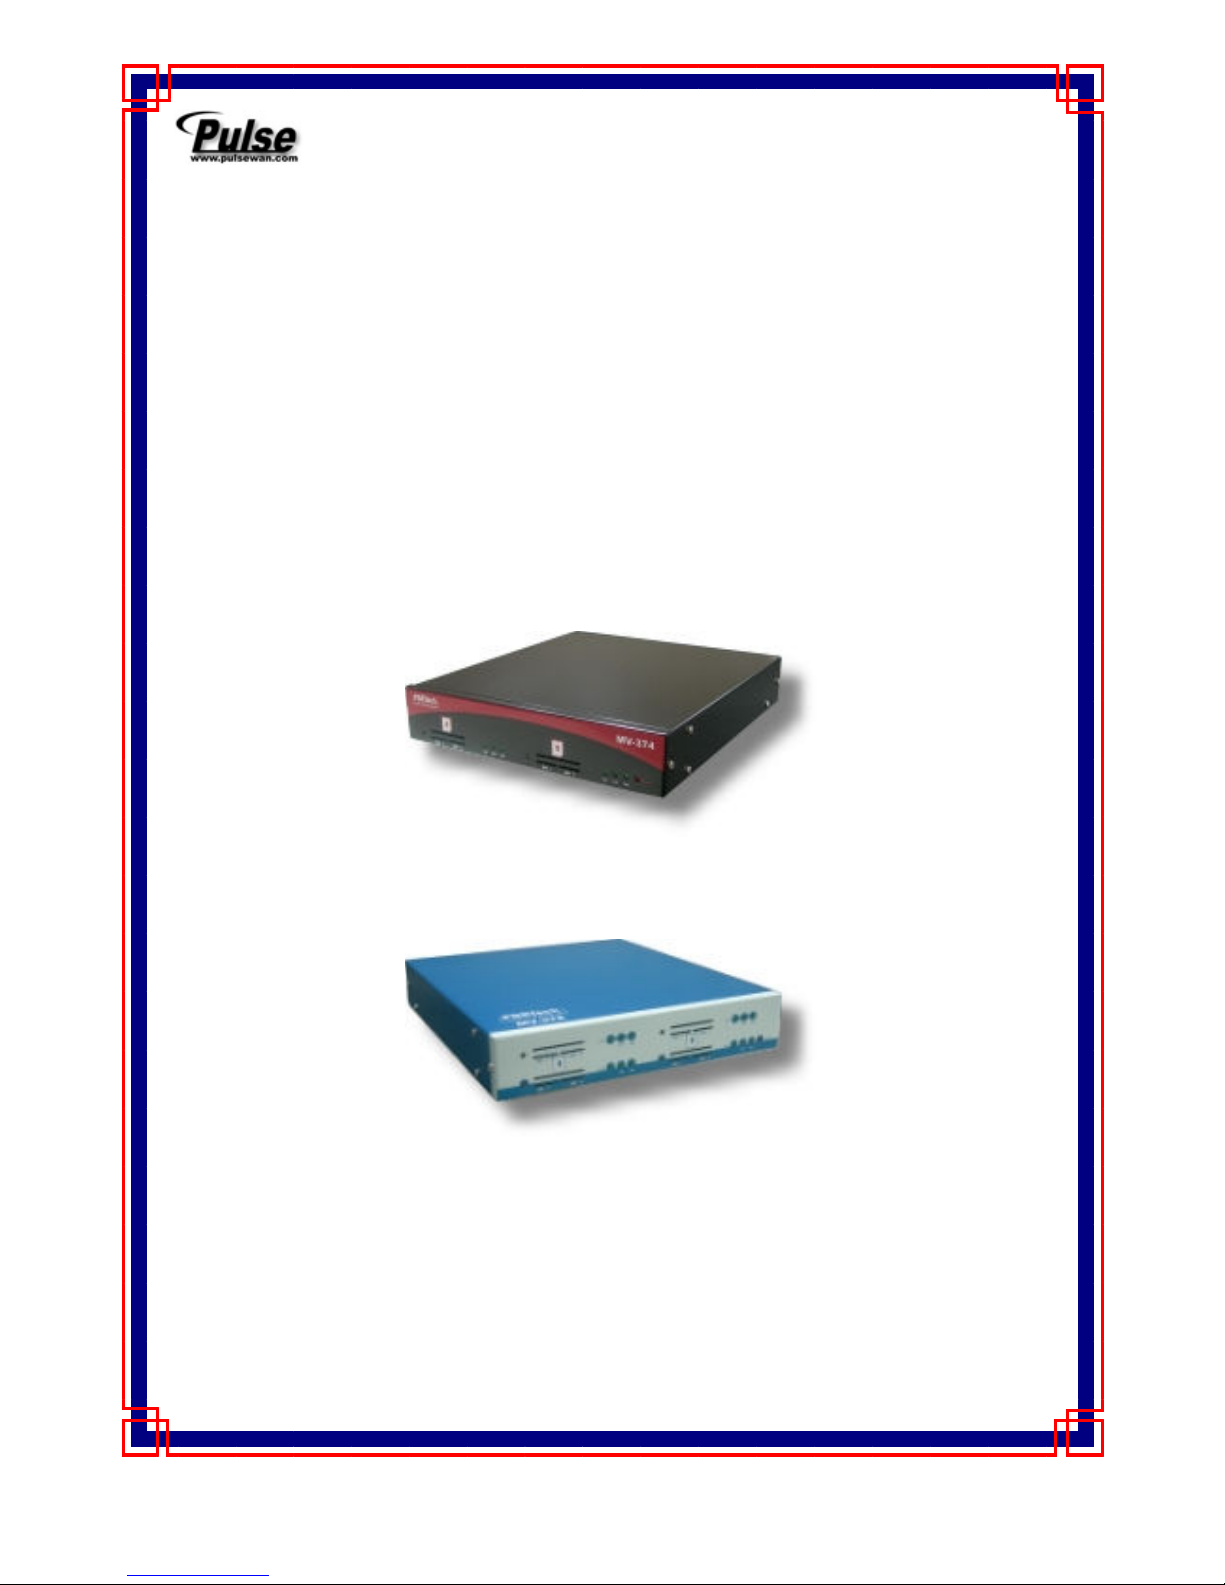
MV-374
MV-378
Page 2

【Content】
1.Introduction............................................................................................................ 1
2.Function description ............................................................................................. 1
3.Parts list ................................................................................................................. 1
4.Dimension : 30x28x4 cm ....................................................................................... 2
5.Chart of the device ................................................................................................ 3
6.Web Page Setting .................................................................................................. 4
7.System Information. .............................................................................................. 5
8. Route ..................................................................................................................... 5
8.1 Mobile TO LAN Settings .............................................................................................. 6
8.2 Call Back Service (50 sets) ......................................................................................... 8
8.3 Mobile to LAN Speed Dial Settings............................................................................ 9
8.4 LAN to Mobile Settings............................................................................................... 10
8.5 Dial Peer Status .......................................................................................................... 12
9.Mobile ................................................................................................................... 13
9.1 Mobile Status ............................................................................................................... 13
9.2 Mobile Setting.............................................................................................................. 14
9.3 Mobile / Forward Setting :.......................................................................................... 17
9.4 Mobile / SMS Agent :.................................................................................................. 19
9.5 Send Bulk of SMS via Microsoft Excel .................................................................... 21
9.6 use AT Command via Telnet or your program...................................................... 29
10.Network .............................................................................................................. 30
11.SIP Setting.......................................................................................................... 33
11.1 Service Domain Setting ........................................................................................... 33
11.2 Ports Setting .............................................................................................................. 35
11.3 Codec Settings:......................................................................................................... 36
11.4 Codec ID Setting...................................................................................................... 37
11.5 DTMF Setting ........................................................................................................... 38
11.6 RPort Function: ......................................................................................................... 39
Page 3

11.7 SIP Responses ......................................................................................................... 40
11.7.1 486(busy here), 503(Service unavailable): .............................................. 40
11.7.2 180 Ring on/off: ............................................................................................ 40
11.7.3 183(Session Progress)................................................................................ 40
11.7.4 Dial Peer ........................................................................................................ 41
11.8 Other Settings ........................................................................................................... 45
12. STUN Setting..................................................................................................... 46
13.System Authority............................................................................................... 47
14.Update ................................................................................................................ 48
15.Save Change ...................................................................................................... 51
16.Reboot ................................................................................................................ 52
17.Specification ...................................................................................................... 53
17.1 Protocols .................................................................................................................... 53
17.2 TCP/IP ........................................................................................................................ 53
17.3 Codec ......................................................................................................................... 53
17.4 Voice Quality ............................................................................................................. 53
17.5 GSM (MV-374/MV-378) ........................................................................................... 54
18. Simple Steps ..................................................................................................... 55
19. Appendix: Setup MV-37x with Asterisk .......................................................... 56
Page 4

Page 5

-1-
1.Introduction
MV-374/MV-378 is a 4 / 8 channels VoIP GSM Gateway for call
termination (VoIP to GSM ) and origination (GSM to VoIP). It is SIP
based and compatible with Asterisk. It can enable to make 4 / 8 calls
simultaneously from IP phones to GSM networks and GSM network to IP
phone.
2.Function description
2.1 VoIP(SIP)、GSM conversion.
2.2 50 sets of LAN->MOBILE routes setting,50 sets of MOBILE->LAN
routes setting.
2.3 Voice response for setting and status (dial in from mobile).
2.4 Series connections to save bills.
2.5 Standard SIP(RFC2543,RFC3261) protocol,
Communicates with other gateway or PC.
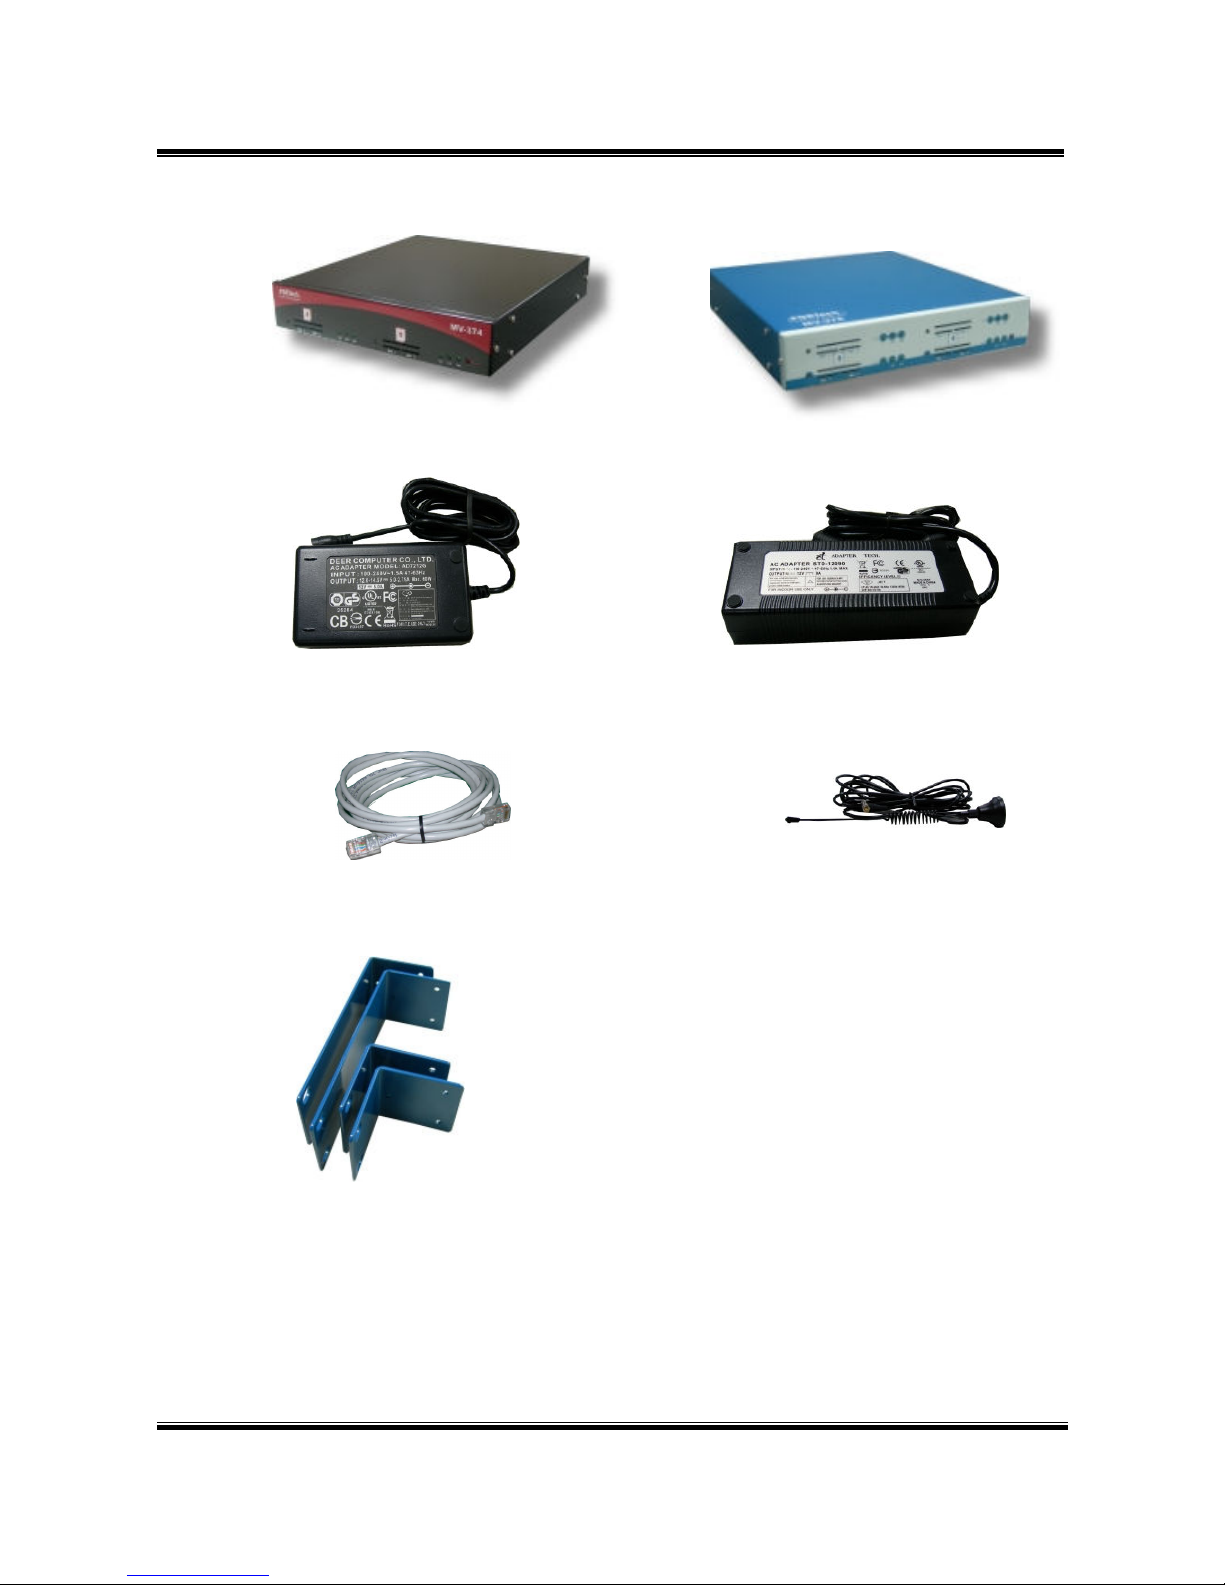
3.Parts list
Please check the parts for any missing parts. If do, please contact
our agents:
3.1 「MV-374/MV-378」main body
3.2 Power adaptor AC-DC (110V AC – 12V DC) or (220V AC – 12V DC)
3.3 Network cable
3.4 Antenna: MV-374:1 pcs / MV-378: 2 pcs
3.5 Rack-mount accessories (compatible with 19“Rack) – option
3.6 User Manual
Page 6
-2-
(3.5) option
4.Dimension : 30x28x4 cm
(3.1)
MV-374
(3.2) MV-374
(3.4)
(3.3)
(3.1) MV-378
(3.2) MV-378
Page 7
-3-
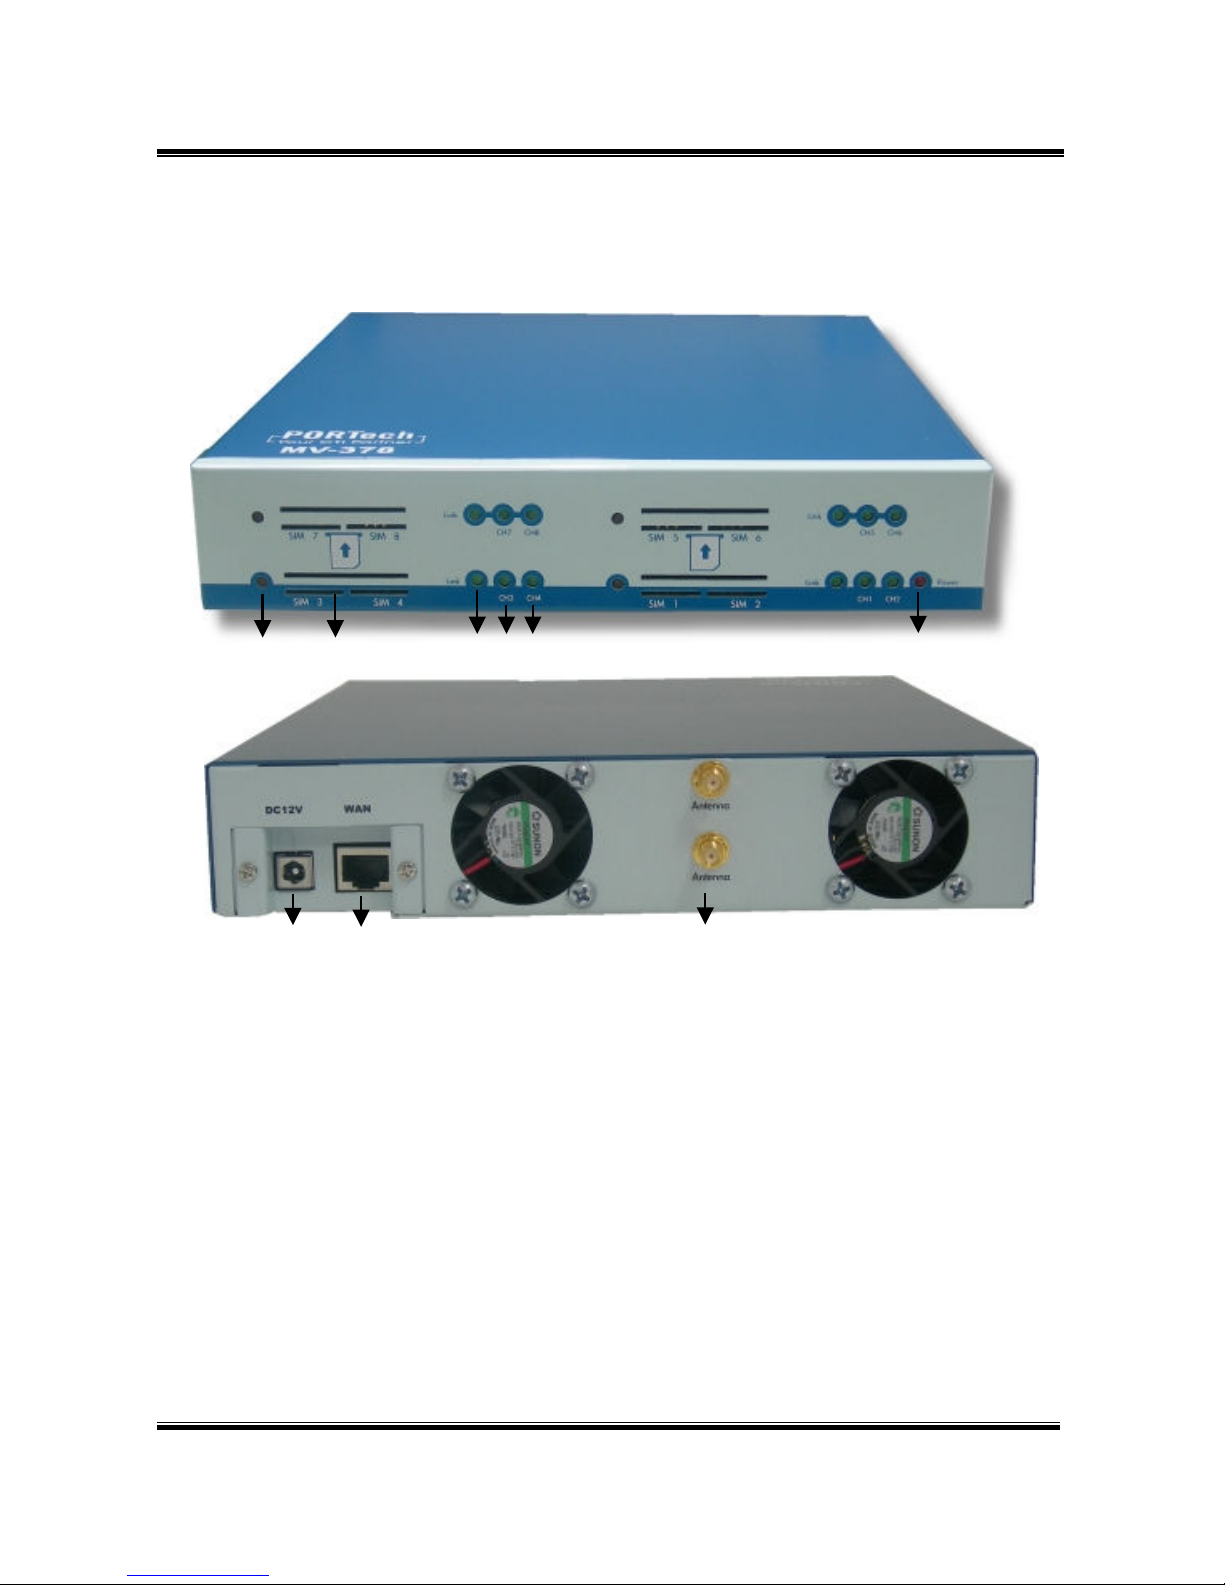
5.Chart of the device
5.1 Antenna:Antenna connector.
5.2 WAN: RJ-45 internet connector,standard RJ-45 socket,connect to HUB.
5.3 DC 12V:Power input.
5.4 SIM Card
5.5 LINK Indicator:Light up when network is connected.
5.6 CH3:an indicator light of VoIP3
5.7 CH4:an indicator light of VoIP4
5.8 PWR (Power LED):Light up when power is normal.
5.9 reboot button: reboot ch1-2 without power off
5.1
5.3
5.4
5.2
5.5 5.6 5.7
5.8
5.9
Page 8
-4-
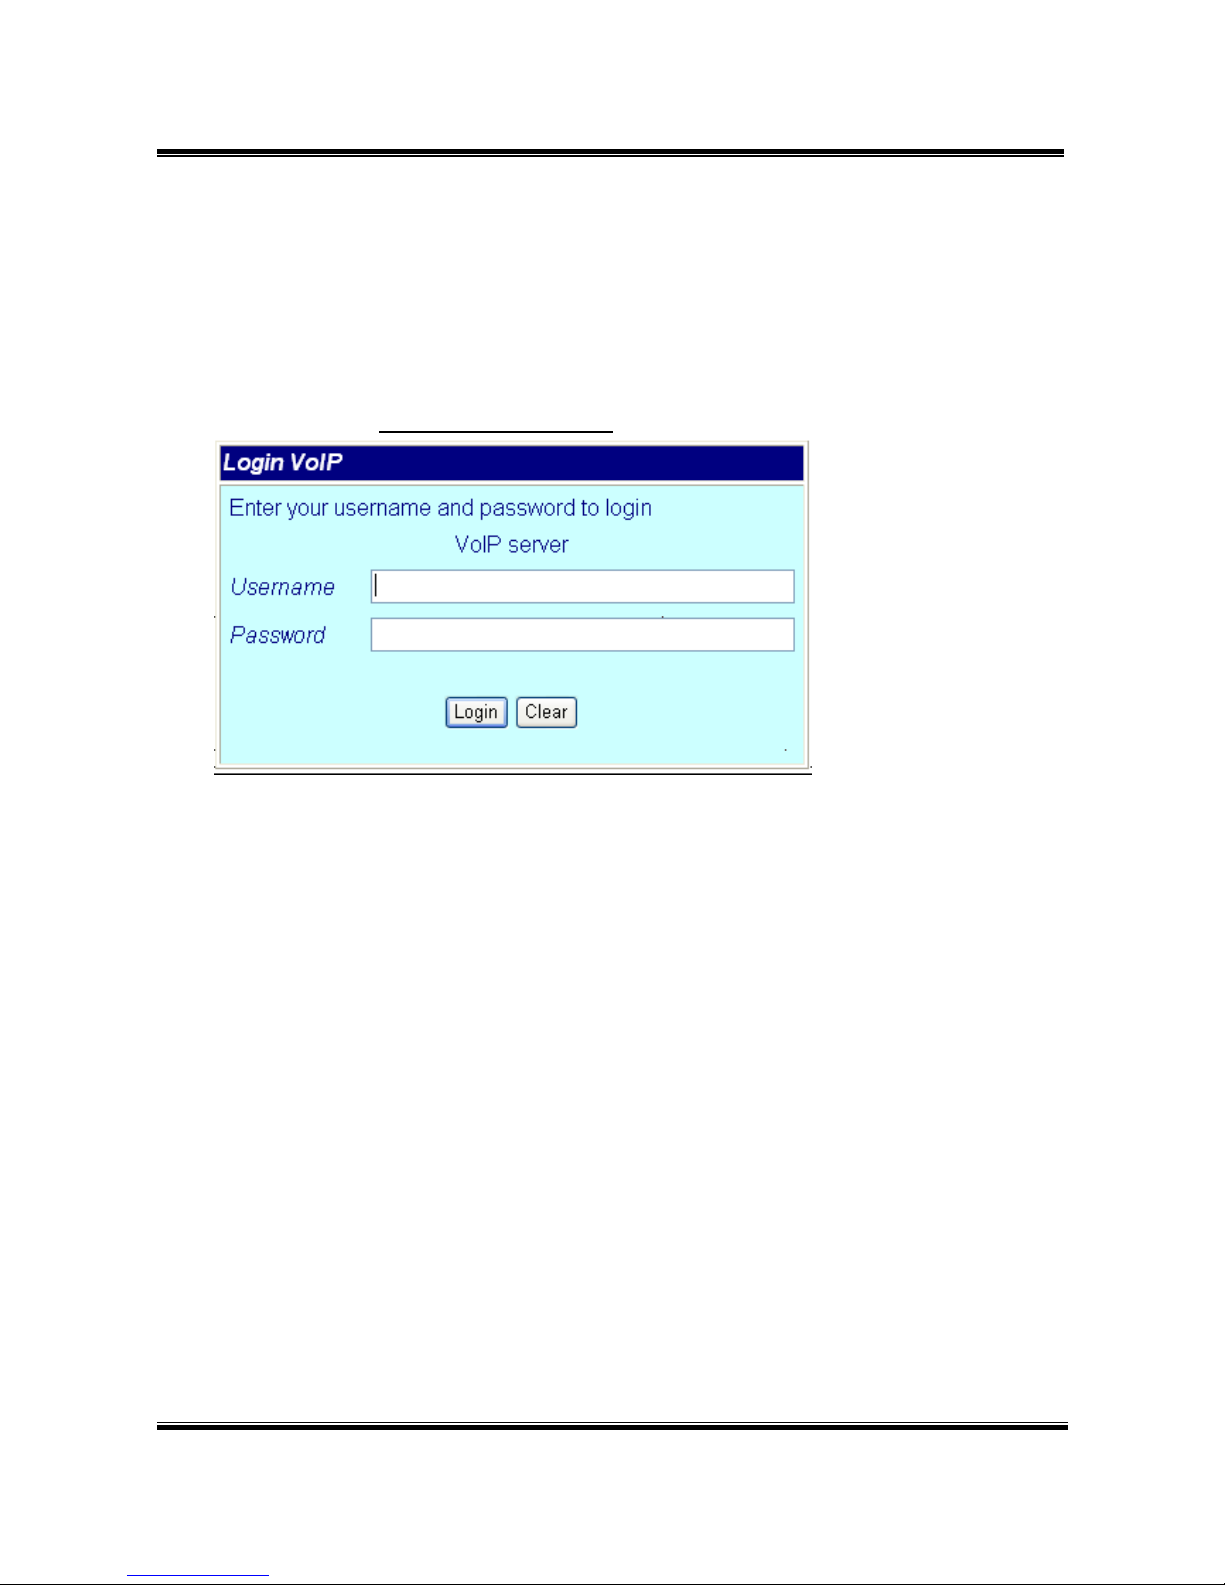
6.Web Page Setting
When the IP setting is done, the operator may setup all the rest
parameters via web page. Browse the IP address from Internet
Explorer (e.g. http://192.168.0.100)。The following page shows up:
Enter the username and password for authentication. (default
username=voip, password=1234). The page follows when the
username and password are correct.
Page 9

-5-
7.System Information.
7.1 When you login the web page, you can see the demo system current
system information like firmware version, company… etc in this
page.
7.2 Also you can see the function lists in the left side. You can use
mouse to click the function you want to set up.
8. Route
Important:
The route table -50 sets can share by two channels(1,2 ch / 3,4 ch /
5,6 ch / 7,8 ch ) . The setting,please refer 9.2 Mobile setting
ex: Mobile 1 use the route table for item 0-24,
Mobile 2 use the route table for item 25-49
Page 10
-6-
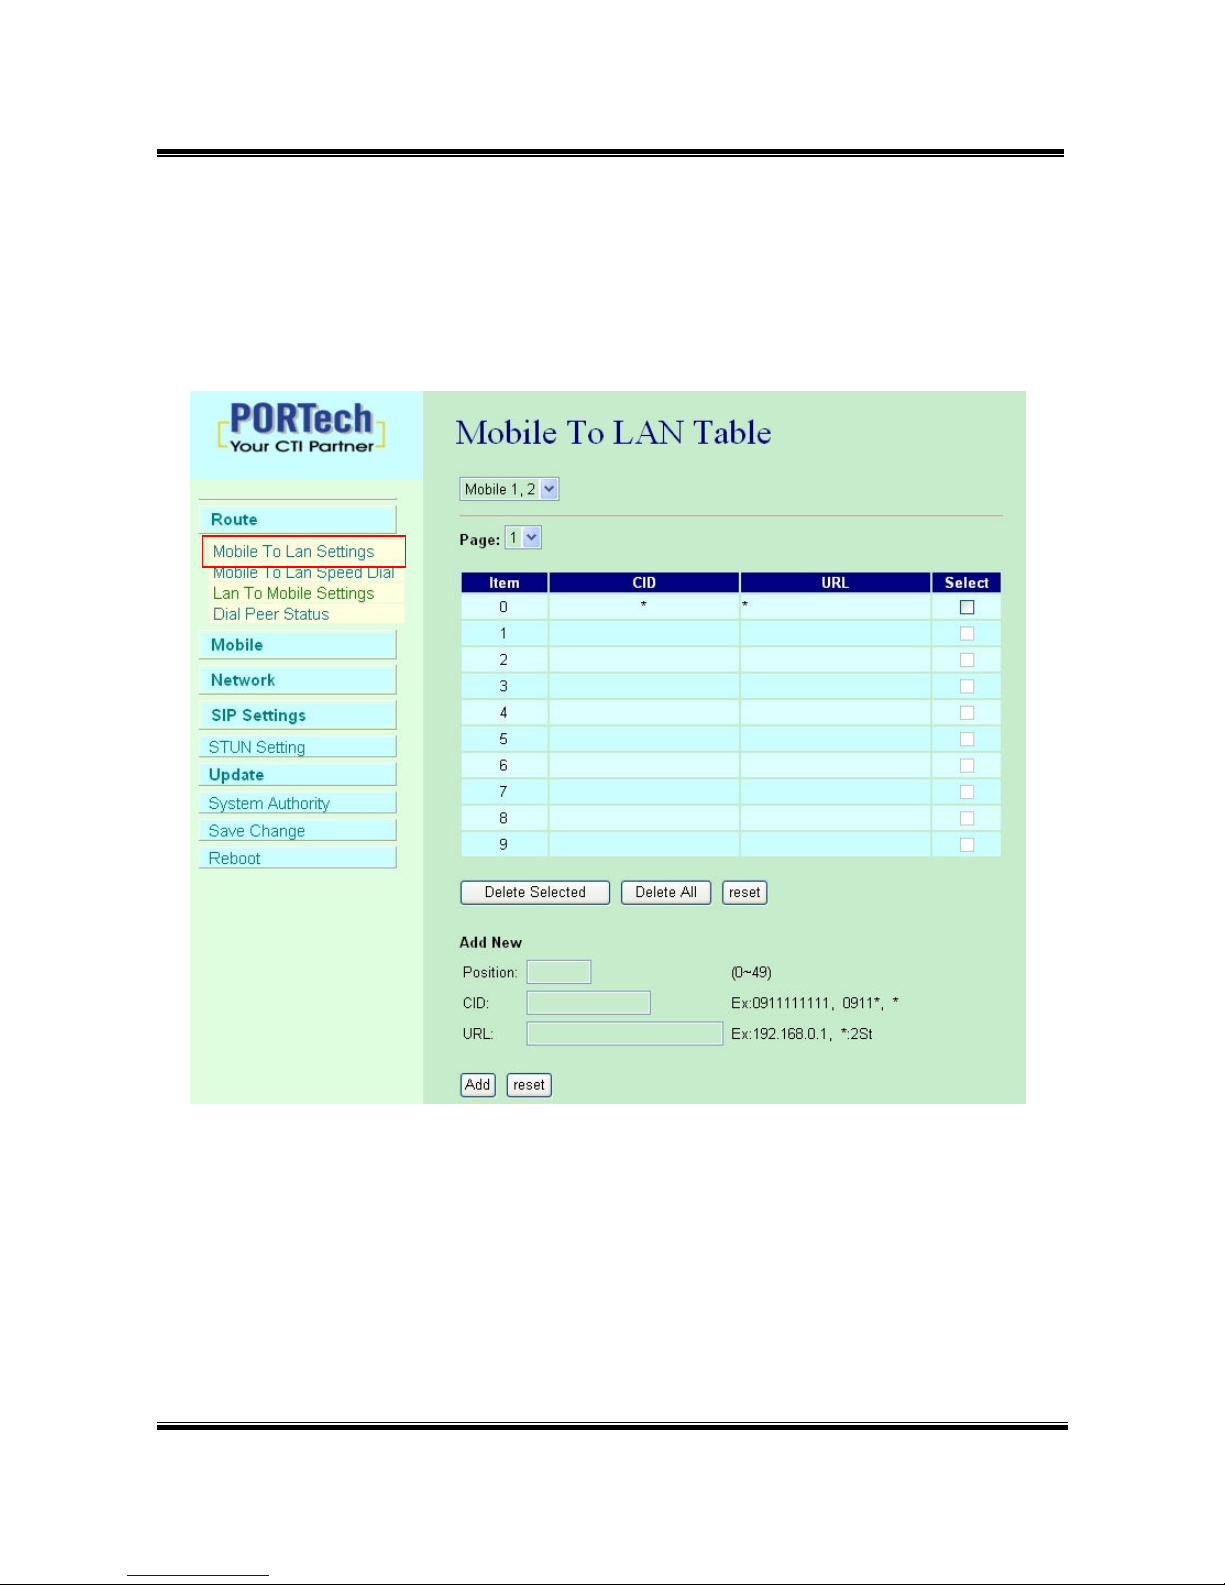
8.1 Mobile TO LAN Settings
The operator may assign 50 sets of routing rule to transfer the call
incoming from MOBILE to LAN.
The MV-374/MV-378 will transfer to the URL according to the caller ID of
the Mobile.
*CID:
(1) may enter the whole number, e.g. 0911111111
(2) only part of the number (prefix) e.g. 0911* means any number
starting with 0911 will be accepted
Page 11

-7-
(3) * means all numbers can be accepted
(4) N means the calls without the CID
Please note the priority of the rules. The item which has more digits will
have higher priority. If the digits are the same, then former one gets the
higher priority.
*URL:The IP address to transfer this call
(1) may enter the whole IP address, e.g. 192.168.0.101 or proxy
extension or phone number.
(2) If this field is blank or simply ‘N’, it means refuse to transfer.
(3) If an ‘*’ entered, it means 2-stages-dialing. The call will be
answered and prompt dial tone again to receive the IP address/sip
extension or any phone number as the destination. The caller may
enter the IP such as 192*168*0*101#.
*If the device have register proxy server/Asterisk ,you can enter any
destination phone number. Please note the proxy server/Asterisk
need to set the route of destination phone number.
Example:
(1) Mobile to Lan: 0932*,0911123456
MV-374/MV-378 have register proxy server/Asterisk
The proxy server/Asterisk have the route “09”
When the caller’s prefix number is 0932,MV-374/MV-378 will
connect 0911123456 automaticlly
(2) Mobile to Lan: *,*
Any caller call the MV-374/MV-378’s sim,MV-374/MV-378 will prompt
dial tone.Caller can enter IP or sip extension or phone number.
*sip extension or phone number both need to register SIP Proxy
Server or Asterisk.
*Phone number, SIP Proxy Server or Asterisk need to set the route
of this phone number.
Page 12
-8-
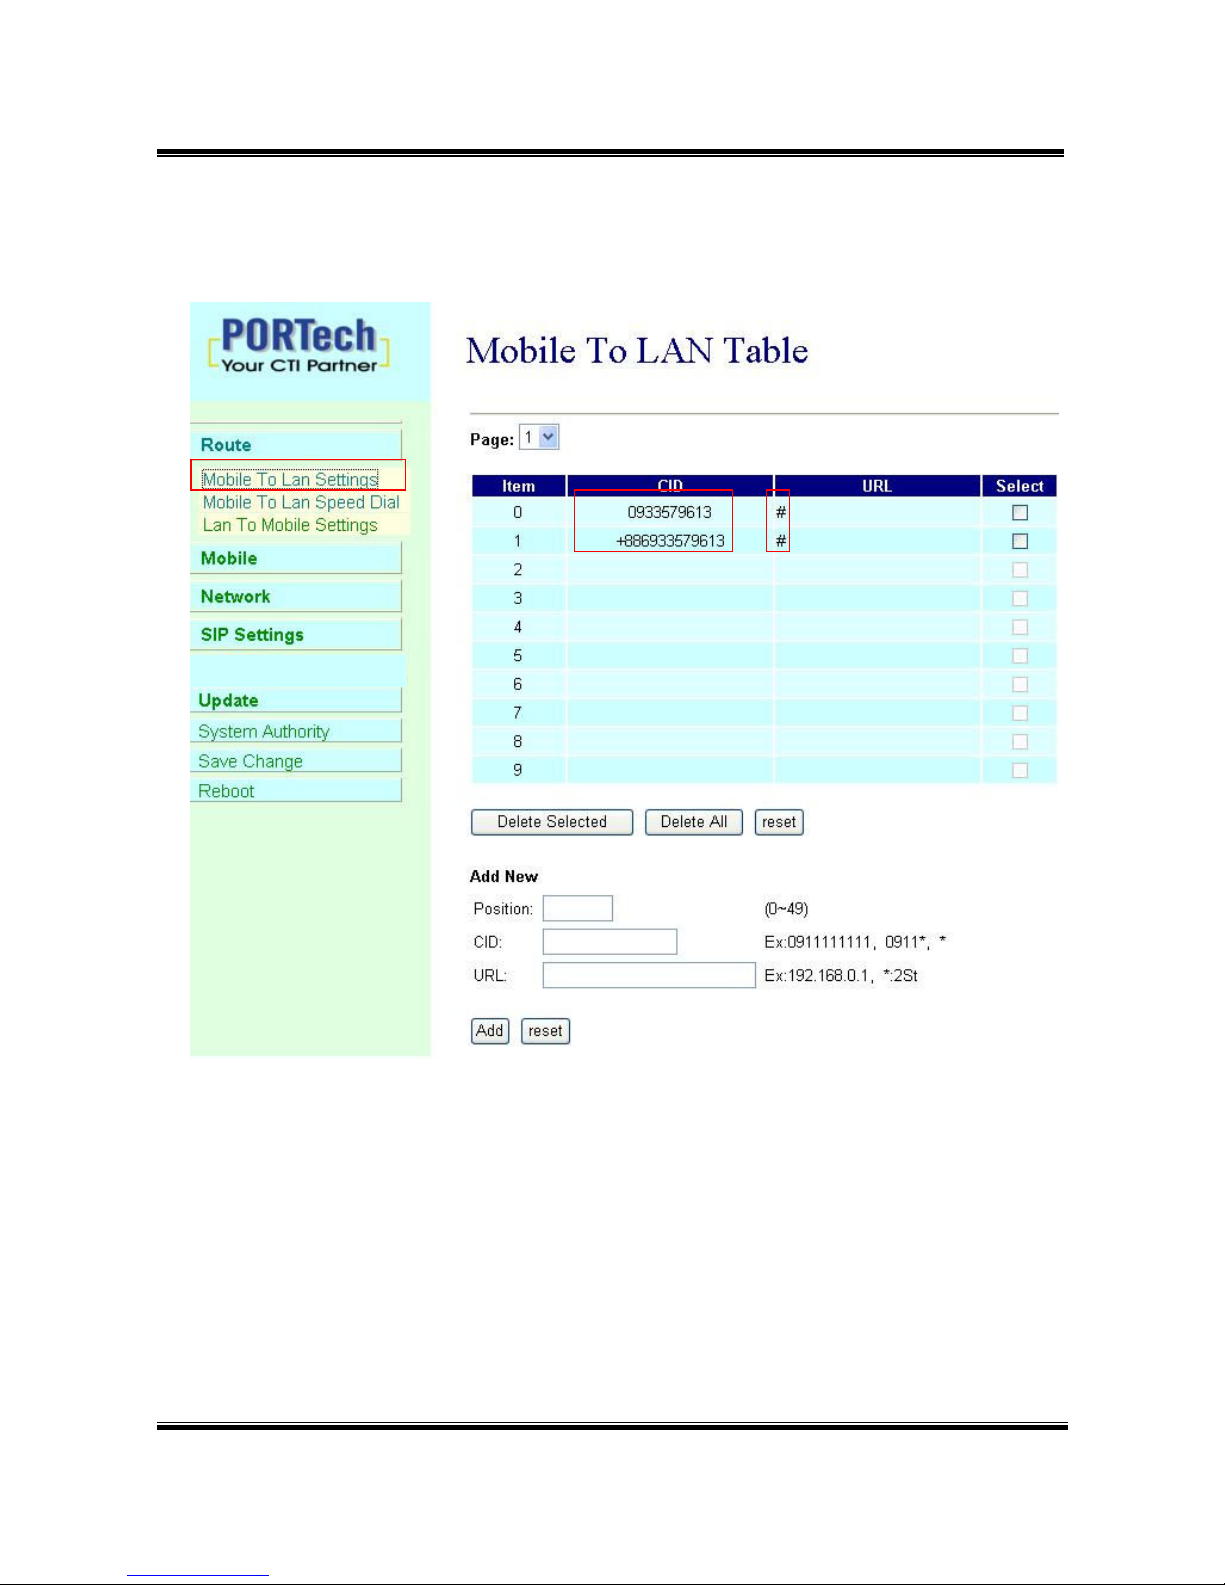
8.2 Call Back Service (50 sets)
You can set call back service as the following steps
(1) CID : set the phone number here (up to 50 sets)
(2) URL: # (# is the command of call back)
Application:
a. Call MV-374/MV-378
b. MV-374/MV-378 will detect the phone number is in call back list or not
c. If yes, MV-374/MV-378 will reject the call, and call it back
d. You will receive the call from MV-374/MV-378, and prompt a dial tone
Page 13
-9-
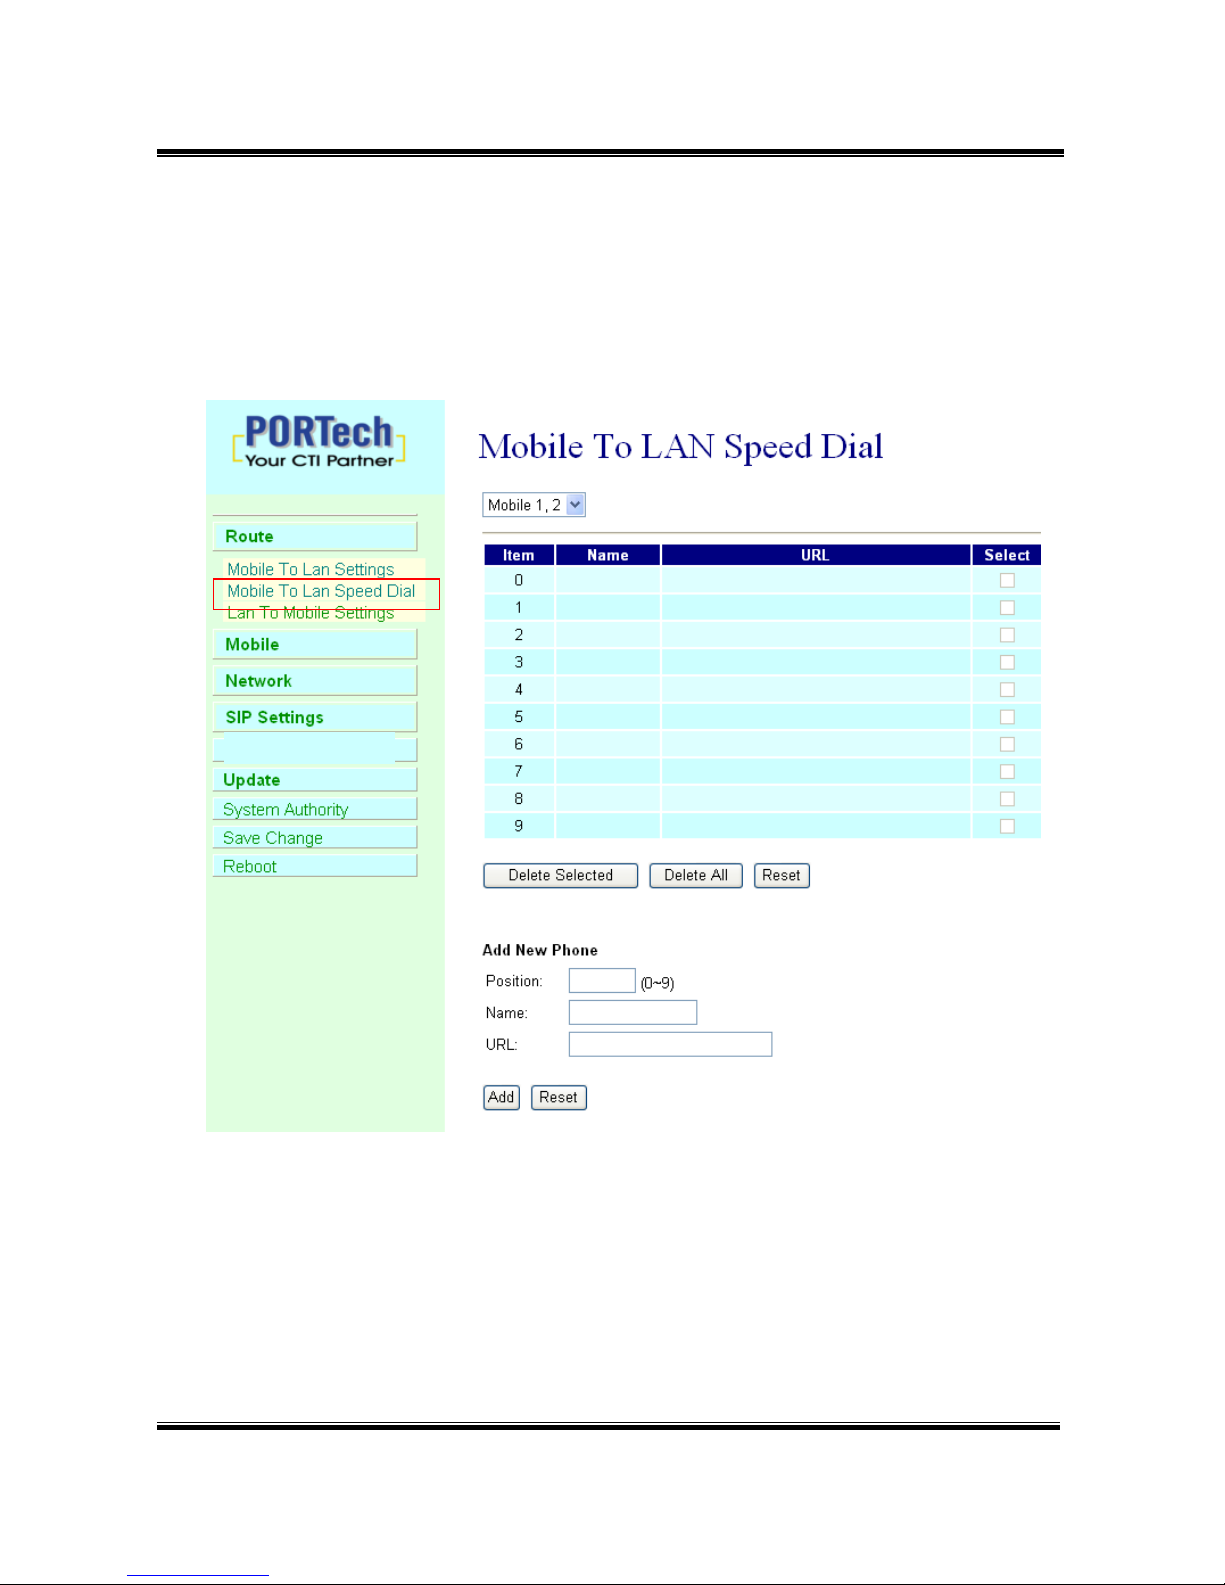
8.3 Mobile to LAN Speed Dial Settings
When you set Mobile to LAN Speed Dial Settings and Mobile to
LAN at the same time,MV-374/MV-378 will give priority to Mobile to LAN
Speed Dial Settings.
*The call will be answered and prompt dial tone again. When the caller
may enter the “Num”, system will connect the “URL” as destination.
E.g Num:0 Name:test URL:192.168.0.107
When the caller hear dial tone and enter 0, system will connect
192.168.0.107
Page 14
-10-
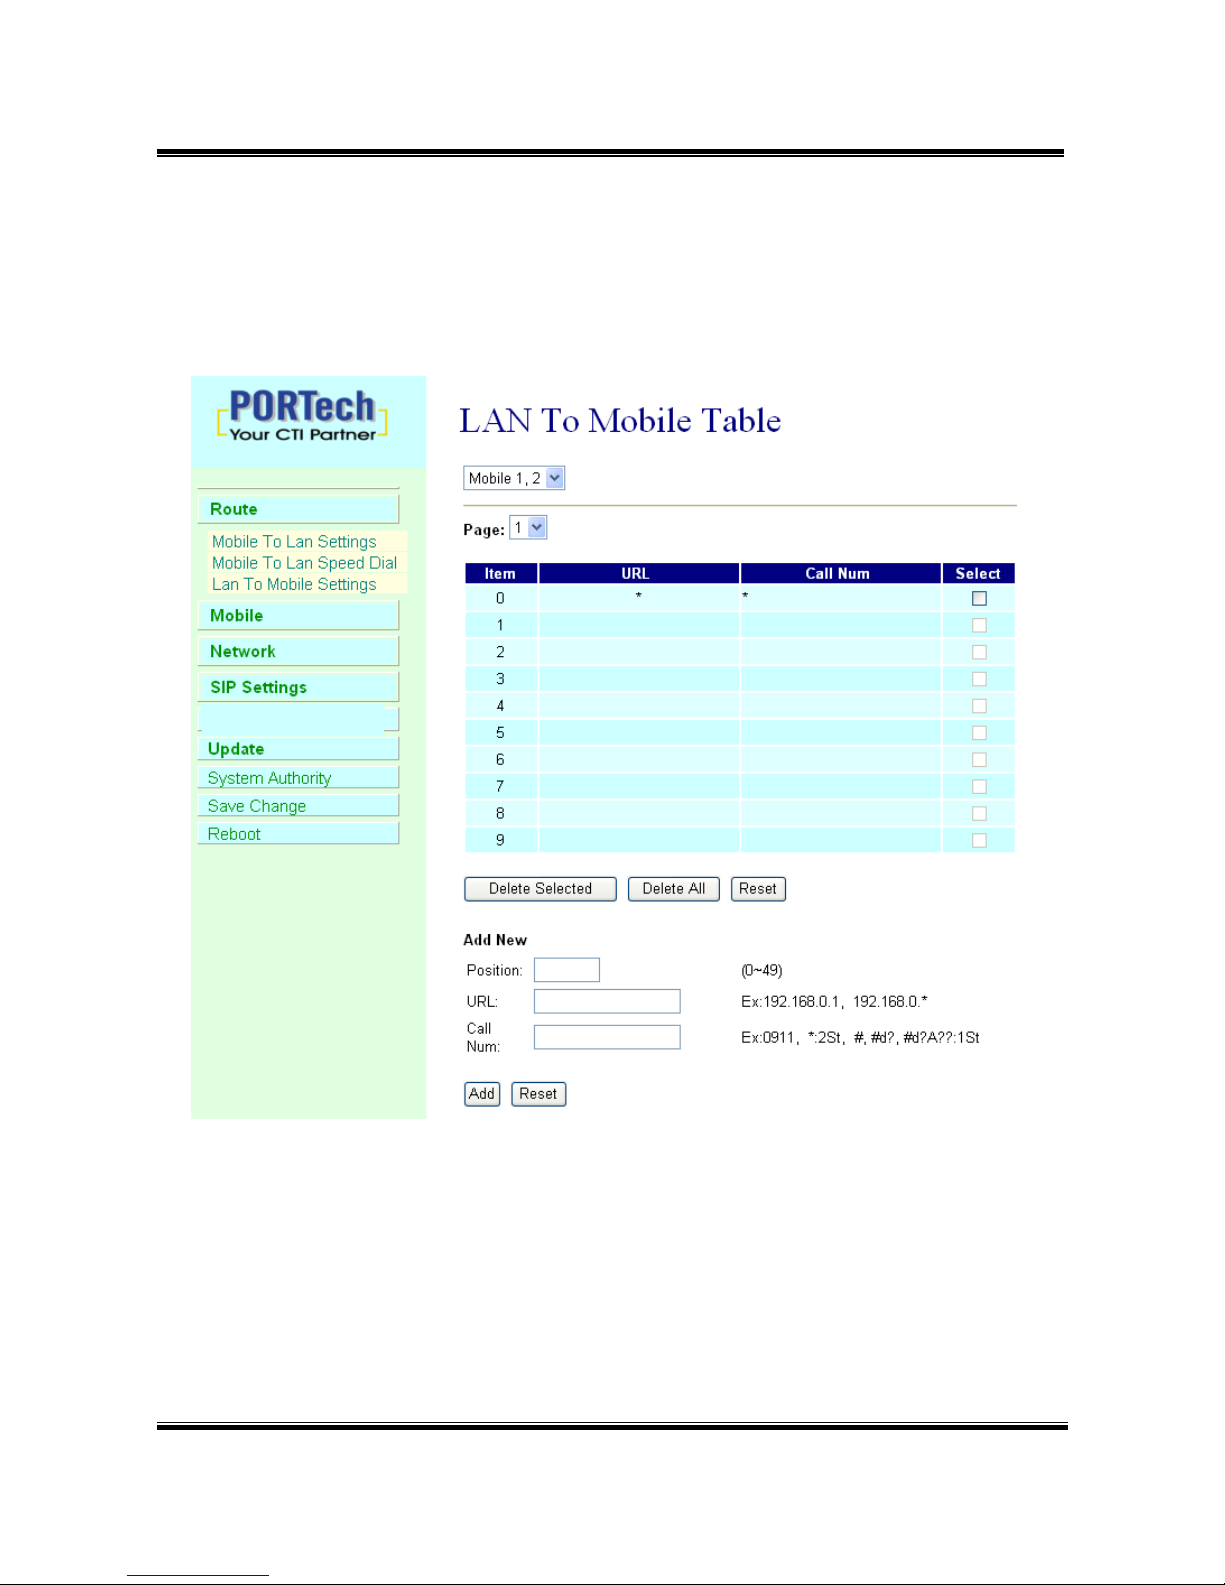
8.4 LAN to Mobile Settings
The operator may assign 50 sets of routing rule to transfer the call
incoming from LAN to MOBILE.
The MV-374/MV-378 will transfer to the mobile number according to the
incoming URL
*URL:The IP address of the incoming call.
may enter the whole IP address, e.g. 192.168.0.101 or proxy server’s
extension. If a simple ‘*’ is entered, means no restriction for the
incoming IP address.
Page 15

-11-
*Call Num:
1.may enter the whole number, e.g. 0911111111
2.a simple *”means 2-stages-dialing. The call will be answered and
prompt dial tone again to receive the called number as the
destination, e.g. 0911111111 or 0911111111#
3.#['d'n]['a'ppp] for one-stage dialing
[...] is option
'd'n means to delete the beginning n codes,
'a'ppp means to add 'ppp' in front.
for example #d2a09 means one-stage dialing,
delete the first 2 codes from your destination number,
then add 09 in front as the new destination number.
Example:
Lan to Mobile: *, #
(1)MV-374/MV-378 and Lan Phone both need to register proxy server or Asterisk.
(2)Proxy server/asterisk set the route that the prefix of destination number
(3)When you dial any destination phone number from lan phone,MV-374/MV-378 will
connect this call auto.
Example of Application:
When you call the ch.1 MV-374/MV-378 gsm number,it will provide dial tone and you
enter a destination number.
Then ch.2 MV-374/MV-378 will dial this number and connect.
ch.1 MV-374/MV-378: mobile to lan set route table *,*
ch.2 MV-374/MV-378:lan to mobile set route table *,#
Additionally, two channels MV-374/MV-378 both need to register proxy server or
Asterisk.
And proxy server/asterisk set the route that the prefix of destination number dial out
from ch.2 MV-374/MV-378.
Page 16
-12-
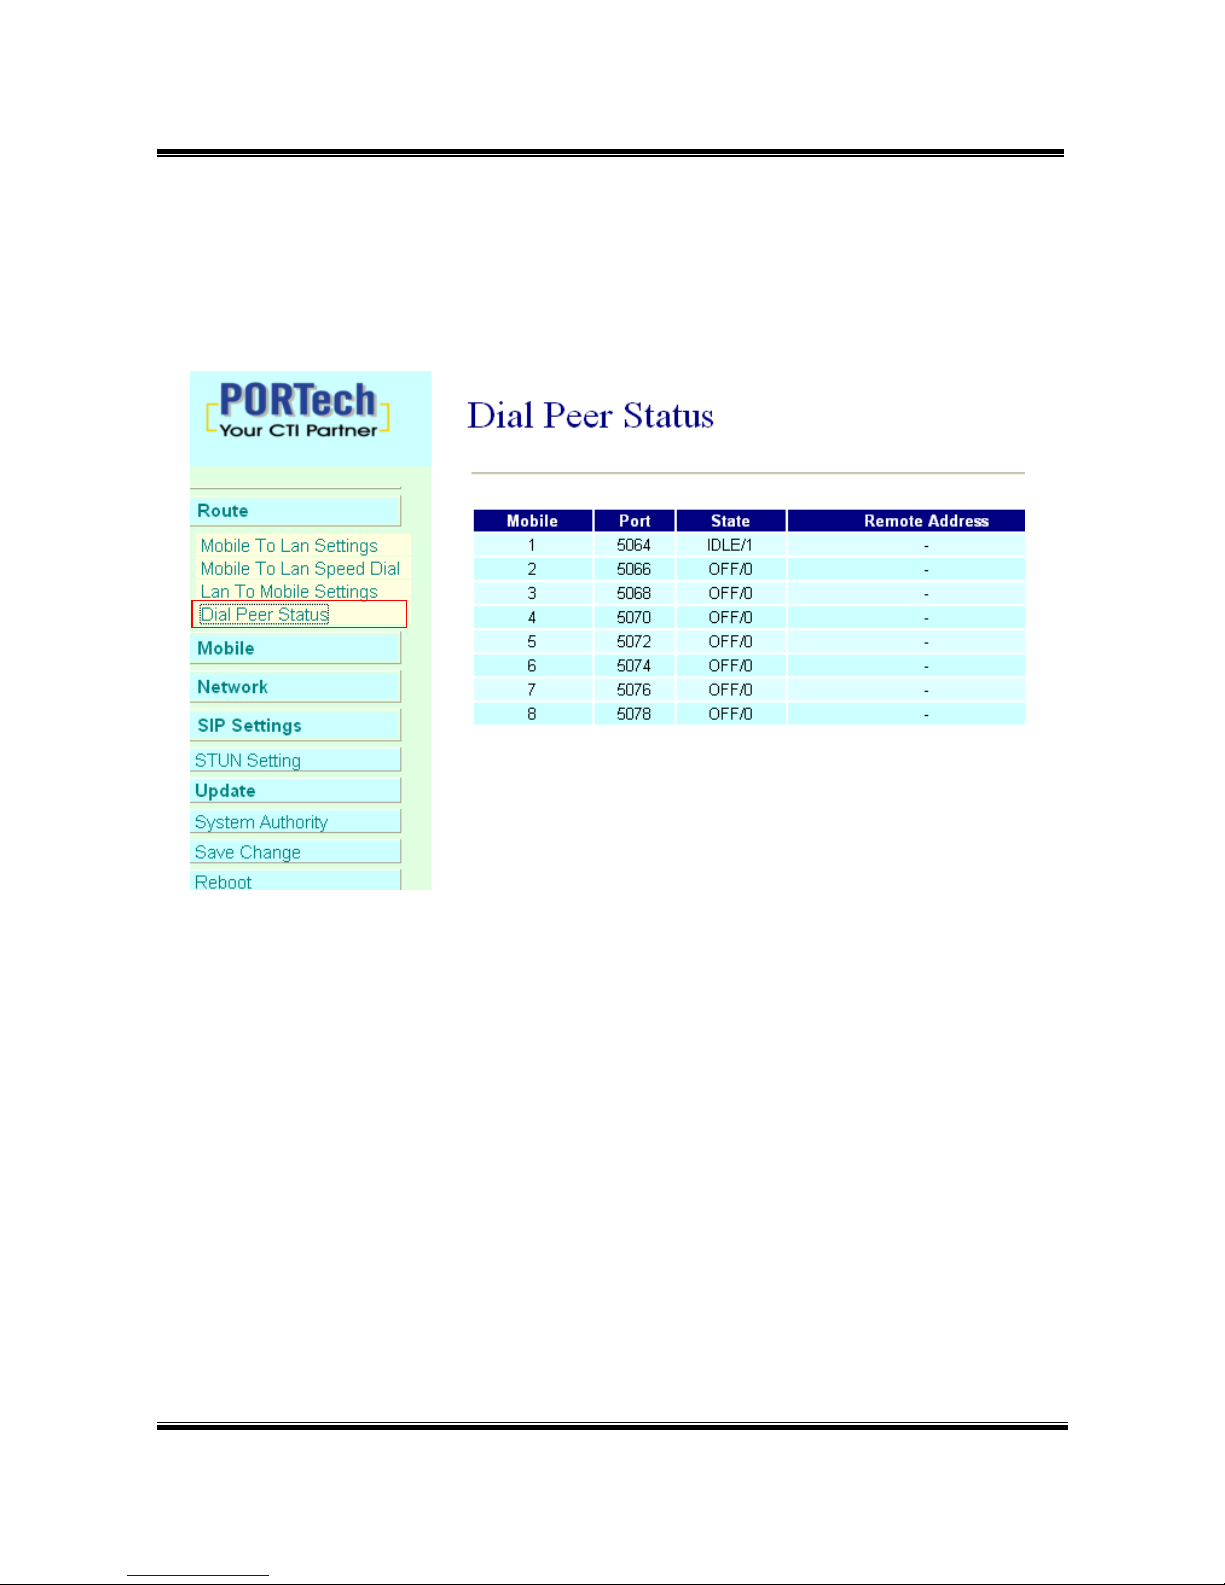
8.5 Dial Peer Status
You can check Dial Peer Status here
All the information will be shown on this page.
Default: Ch1: 5064 Ch2: 5066 Ch3: 5068 Ch4:5070….…
You can change the ports on SIP Settings/Ports settings
State status:
INIT/0 : GSM module is initialing
IDLE/0: GSM module not register
IDLE/1: GSM module resisted
BUSY: Call is online.
Remote Address:
The IP Address which came from Lan side
Page 17
-13-
9.Mobile
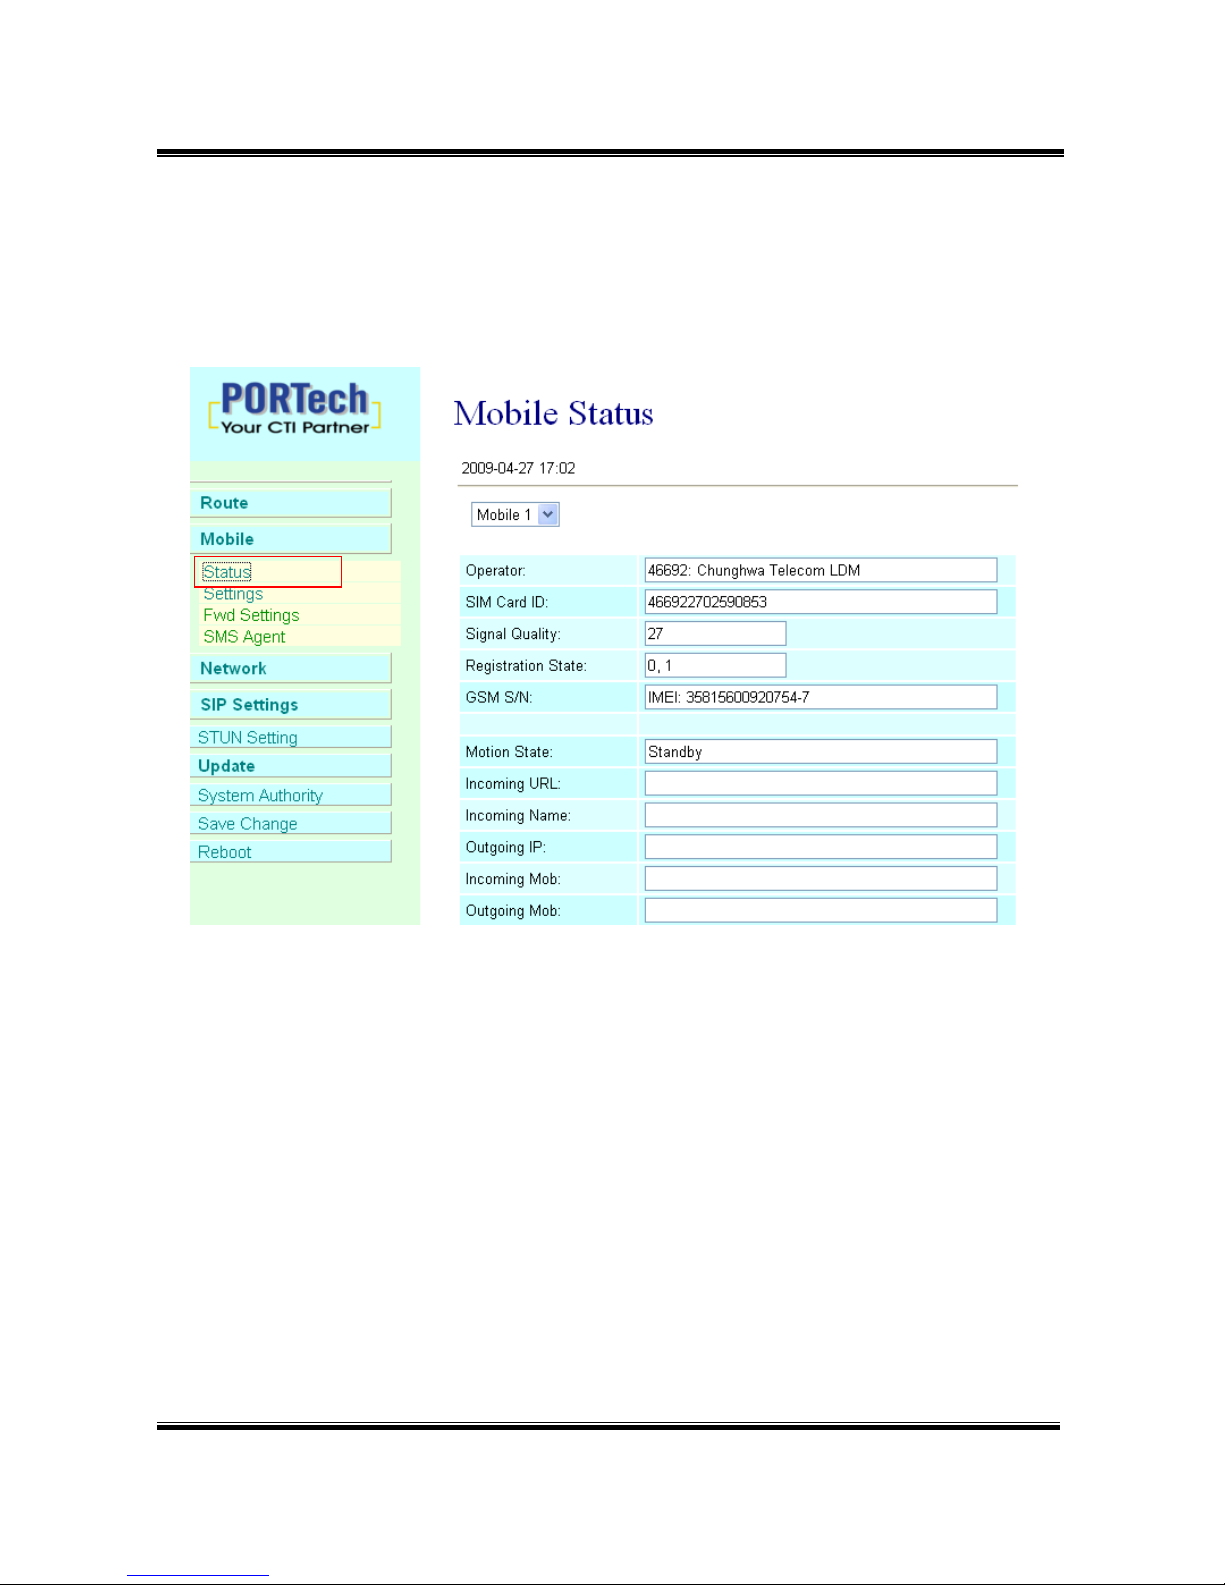
9.1 Mobile Status
(1)Choose Mobile 1,2,3 or 4 (MV-378: Mobile 1,2,3,4,5,6,7,8)
(2)Network Registration:The telecom carrier which the SIM card been
registered.
(3)SIM Card ID:SIM card ID. (4)Signal Quality:Signal quality.
(5)GSM S/N : IMEI Number
(6)Incoming IP:The IP address of the last incoming call from LAN.
(7)Incoming IP Name: proxy server name
(8)Outgoing IP:The IP address of the last outgoing call to LAN.
(9)Incoming Mob:The caller ID of the last incoming call from MOBILE.
(10)Outgoing Mob: The called number of the last outgoing call to
MOBILE.
Page 18
-14-
9.2 Mobile Setting
(1) VoIP Tx Gain: To adjust the volume of LAN side.
(2) VoIP Rx Gain: To adjust the volume of Mobile side.
(3)LAN Dialtone Gain: DTMF Reciver is not good, you can adjust gain
down.
(4)Routing Range:The route table -50 sets can share by two
channels(1,2 ch / 3,4 ch / 5,6 ch / 7,8 ch )
ex: Mobile 1 use the route table for item 0-24,
GSM VoIP Codec
LAN
(6)Rx
(5) Tx
DTMF
(1)VoIP Tx Gain
(2) VoIP Rx Gain
GSM Codec
Rx
Tx
DTMF
Mobile 1:
Mobile 2:
(1)
(3)
(2)
(4)
(5) (6)
(7)
(8)
(9)
(10)
(11)
(13)
Only change “mobile” into “on”
or “off”,just click “submit”, no
need to click “save change”
(12)
Page 19

-15-
Mobile 2 use the route table for item 25-49
(5)CODEC Tx Gain: as above
(6)CODEC Rx Gain: as above
(7) SIP From: Caller ID transfer
Tel/User(Standard): If you need to register to Asterisk and proxy
server, please choose this option. And how to transfer the caller ID
to LAN, please refer 21.How to setup Asterisk to receive Caller ID
from MV-374/MV-378 (page 42)
MV-374/MV-378 will send the message as follows in the Packet.
From: " caller number " <sip:3001@192.168.0.228>;tag=51088abb
User/User(Standard): If you need to register to Asterisk and proxy
server, please choose this option.
MV-374/MV-378 will send the message as follows in the Packet.
From: " 3001" <sip:3001@192.168.0.228>;tag=51088abb
Tel/Tel :
MV-374/MV-378 will send the message as follows in the Packet.
From: "caller number" <sip: caller number @192.168.0.228>;tag=6ac93f7c
※Please note: If you choose this option, please don’t register to
Asterisk and proxy server. Please only fill proxy server IP and
choose Active: on (else field empty) in sip setting/service demain
User/Tel
MV-374/MV-378 will send the message as follows in the Packet.
From: " Username " <sip: caller number @192.168.0.228>;tag=7f130947
※ If you choose this option, please don’t register to Asterisk and
proxy server. Please only fill proxy server ip,Username and
choose Active: on (else field empty) in sip setting/service
demain
Page 20

-16-
(8)Answer Delay: Delay for incoming call when the ring.
(9)Presentation CLIR : If you need to block the Caller Id for call
termination, please choose Suppression
(10)Mobile PIN Code: If you need to unlock pin code via
MV-374/MV-378,you can click “On” and enter pin code.
(11)LAN Answer Mode:
Answered : when mobile answer,then connect the call
Alerted : when the mobile is ringing back tone,then connect the call
Income : when lan dial out,then connect soon
(12) Band Type: You can manual setting according to your GSM
Frequency of carrier.
(13) ON/Off: If you use this channel, please click on. Otherwise, please
click off.
Page 21
-17-
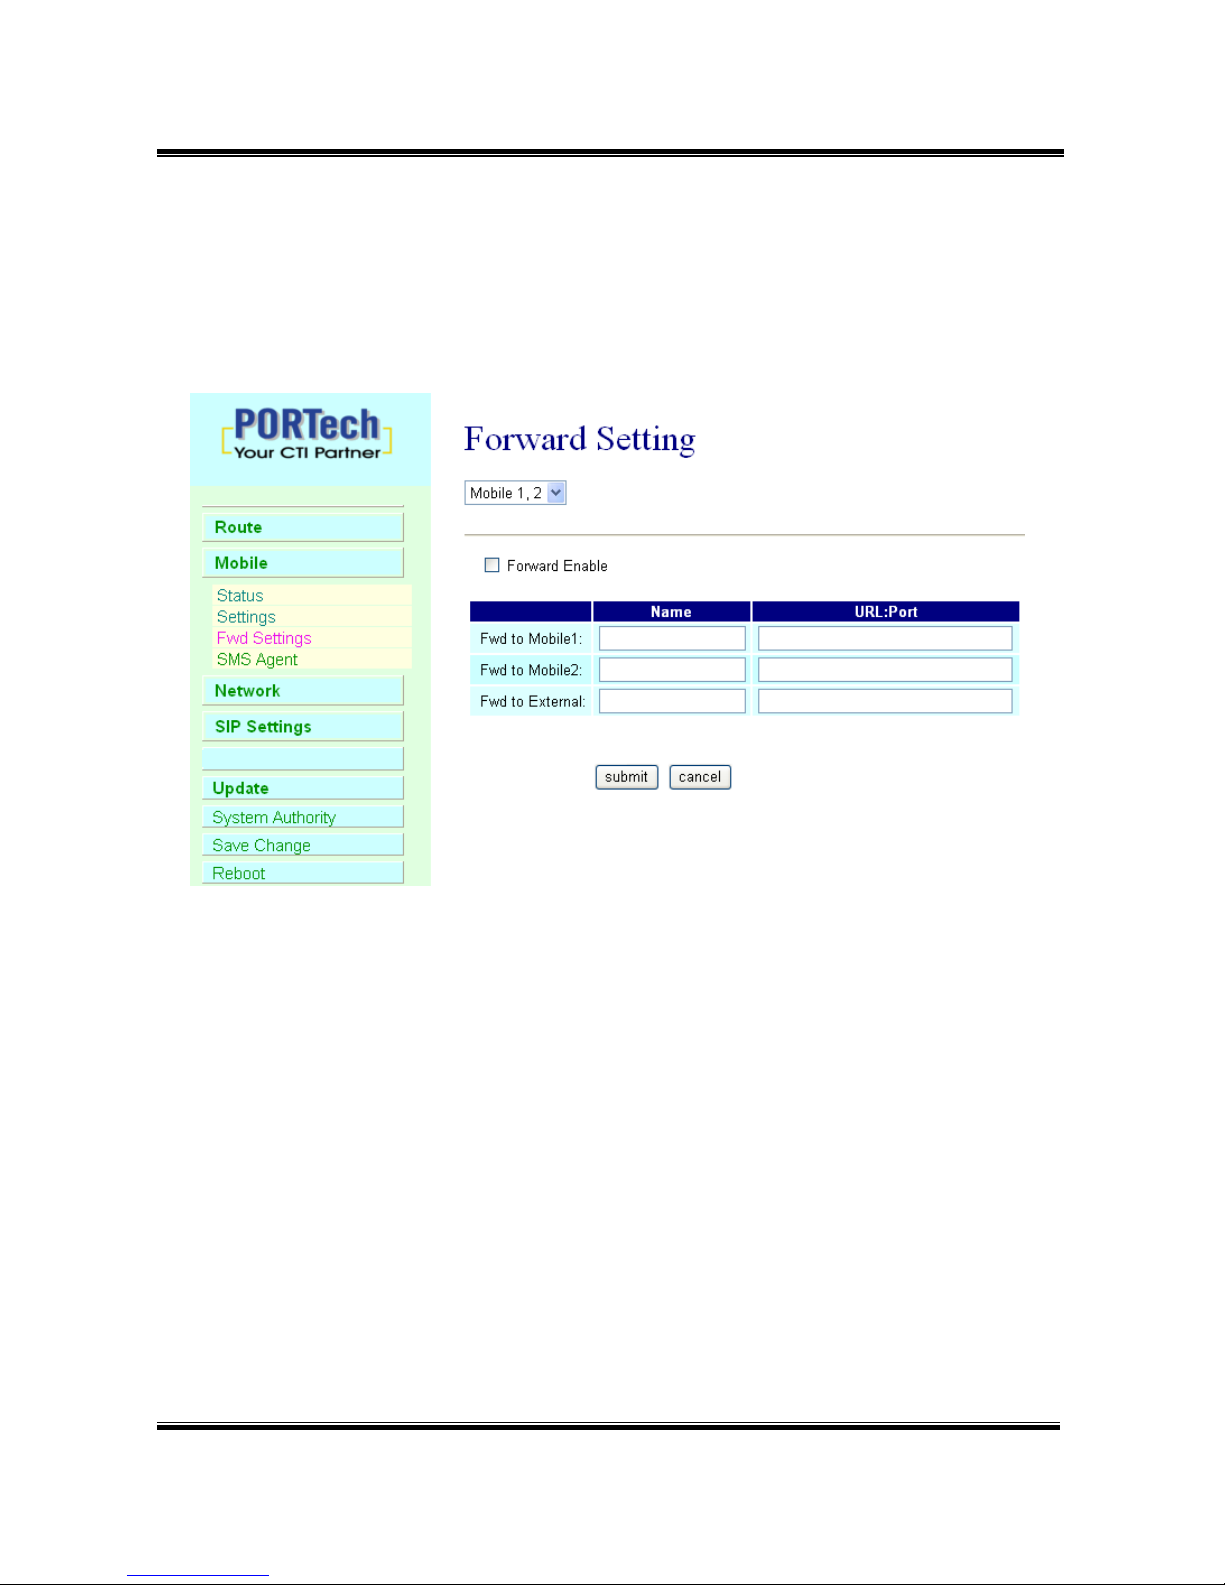
9.3 Mobile / Forward Setting :
When the first route are busying, SIP can transfer phone call to
another free route. When the device are busying, the phone call
can be transfer to another device (external equipments).
* "Forward Enable" is not motivate on Defualt value.
So please, mark "Forward Enable" this blank to motivate this function.
Take SJ Phone for example: Profiles -> Edit -> Advanced -> Accept
redirection replies (Turn on the "Forward Enable", therefore the SJ
Phone can designate a port which are free to use.)
Page 22

-18-
Name URL:Port
Fwd to Mobile1:
192.168.0.100:5060
Fwd to Mobile2:
192.168.0.100:5062
Fwd to External:
The Explanation of Picture:
Fwd to Mobile1:192.168.0.100 : 5060, it means when 5062 Port are
busying, SJ Phone can transfer the call to 5060 Port (192.168.0.100).
Fwd to Mobile2:192.168.0.100 : 5062, it means when 5060 Port are
busying, SJ Phone can transfer the call to 5062 Port (192.168.0.100).
If both 5060 port and 5062 port are busying at same time, you can set
up "Fwd to External", then you can transfer the phone call to another
designate device.
Page 23

-19-
9.4 Mobile / SMS Agent :
(1) Rx List: Read received SMS
(2) Dest Num: the Receiver’s phone number
(3) Message: Please fill the message that want to send to receiver.
When you click Rx List, you can view all received SMS as follows.
Read received SMS
2 mode:
ASC7(ASCII 7 bit)
UCS2(Unicode 16 bit)
Page 24

-20-
Click the serial no,you can view message as follows.
Page 25

-21-
9.5 Send Bulk of SMS via Microsoft Excel
First of all, please open a new Excel file.
Step 1 Format Cells
Here, we need you to format cells to “Text” first.
Please click mouse right key, and choose “Format Cells”
Blank A
Page 26

-22-
Blank B
Step 2
In the Format Cells, please select “Text”
Please do this action for Blank A and B both.
Page 27

-23-
Step 3
Blank A: is for you to key “phone numbers”
Blank B: is for you to key “text”
Step 4 Save the file
Page 28

-24-
Save the type as “Unicode Text”
Step 5
Open MVsms_exe - MV-SMS (Configuration Settings)
Page 29

-25-
Step 6
Please do the configuration as following:
MV-378
MV-374
=2
Page 30

-26-
MV-372 & MV-370
Step 7
Run MV-SMS program
=1
Page 31

-27-
Step 8
1. Open File
2. Open the “Excel file” that you just saved
Page 32

-28-
Step 9
Sending
Step 10
Send SMS Complete
Page 33

-29-
9.6 use AT Command via Telnet or your program
Allows your program or Telnet Send/receive SMS with AT Command
available in PCB194A (approximately after April , 2008)
Telnet PORT Corresponding port as follows:
SLAVE 1 :8023
SLAVE 2 :8123
SLAVE 3 :8223
SLAVE 4 :8323
Please enter account
and password
Choose module
Enter “ate1”,then you can see
your at command below
Enter at+cmgs=”phone number”
Enter short message
Page 34

-30-
10.Network
In Network you can check the Network status, configure the WLAN
Settings , LAN Setting and SNTP settings.
10.1 Network Status: You can check the current Network setting in this
page.
Page 35

-31-
10.2 WAN Settings:
WAN IP (Master) Default: 192.168.0.100
Slaver1 : Master ip:8080
Slaver2 : Master ip:8180
Slaver3 : Master ip:8280 Slaver4: Master ip:8380
WAN IP Corresponding port 5064 5066 5068 5070 5072 5074 5076 5078
(1) The TCP/IP Configuration item is to setup the WAN port’s network
environment. You may refer to your current network environment to
configure the system properly.
(2) The PPPoE Configuration item is to setup the PPPoE Username and
Password. If you have the PPPoE account from your Service
Provider, please input the Username and the Password correctly.
(3) The Bridge Item is to setup the system Bridge mode Enable/Disable.
If you set the Bridge On, then the two Fast Ethernet ports will be
transparent.
(4) When you finished the setting, please click the Submit button.
Page 36

-32-
10.3 SNTP Settings:
SNTP Setting function: you can setup the primary and second SNTP
Server IP Address, to get the date/time information. Also you can base
on your location to set the Time Zone, and how long need to synchronize
again. When you finished the setting, please click the Submit button.
Page 37

-33-
11.SIP Setting
In SIP Setting you can setup the Service Domain,Port Settings,Codec
Settings,RTP setting,RPort Setting and Other SettingS. If the VoIP
service is provided by ISP,you need to setup the related informations
correctly then you can register to SIP Proxy Server correctly.
11.1 Service Domain Setting
In Servcie Domain Function you need to input the account and the
related informations in this page, please refer to your ISP Provider.
You can register three SIP accounts . You can dial the VoIP phone
to your friends via first enable SIP account and receive the phone
from the tree SIP account.
First you need to click Active to enable the Service Domain, then you can
input the following items.
Page 38

-34-
(1) Choose Mobile 1 , 2, 3 or 4
(2) Display name: you can input the name you want to display.
(3) User name: you need to input the User Name get from your ISP.
(4) Register Name: you need to input the Register Name get from your
ISP.
(5) Register Password: you need to input the Register Password get
from ISP.
(6) Domain Server: you need to input the Domain Server get from your
ISP.
(7) Proxy Server: you need to input the Proxy Server get from your ISP.
(8) Outbound Proxy: you need to input the Outbound Proxy get from your
ISP. If your ISP does not provide the information, then you can skip
this item.
(9) You can see the Register Status in the Status item.
(10) When you finished the setting, please click the Submit button.
Remember to click “Save Charge”
Example:
Register VoipBuster
Your Voipbuster username
Your Voipbuster password
Proxy Server’s IP
Page 39

-35-
11.2 Ports Setting
In Ports Setting, you can change dialpeer port, SIP port, and RTP port.
Internal Dial Peer Port: default = 5060 (*important* this port number can’t coincide
with SIP port or RTP port)
SIP port: default = ch1:5064 ch2:5066 ch3:5068…etc (*important* this port number
can’t coincide with dialpeer port or RTP port)
You can only change the port number on Ch1, other Channels will be changed
automatically
RTP port: default = ch1:20004 ch2:20006 ch3:20008…etc (*important* this port
number can’t coincide with dialpeer port or SIP port)
You can only change the port number on Ch1, other Channels will be changed
automatically
Page 40

-36-
11.3 Codec Settings:
You can setup the Codec priority, RTP packet length in this page. You
need to follow the ISP suggestion to setup these items. When you
finished the setting, please click the Submit button.
Page 41

-37-
11.4 Codec ID Setting
You can setup the Codec ID in this page.
Page 42

-38-
11.5 DTMF Setting
You can setup the DTMF Setting in this page.
Page 43

-39-
11.6 RPort Function:
You can setup the RPort Enable/Disable in this page. To change this
setting, please following your ISP information. When you finished the
setting, please click the Submit button.
Page 44

-40-
11.7 SIP Responses
11.7.1 486(busy here), 503(Service unavailable):
When Device is busy, you can select 486 or 505 to response to SIP.
11.7.2 180 Ring on/off:
LAN TO MOBILE two stage dialing can be turn off, therefore there will be
no the Ring Back Tone, all the phone call will be transferred to prompt
voice directly. (For this function, 183 must be turn on)
11.7.3 183(Session Progress)
[It means "on progressing"]: When you turn 183 on, it means you can
hear the prompt voice while GSM side is busy We recommend you to
turn this on if you use SIP Proxy.
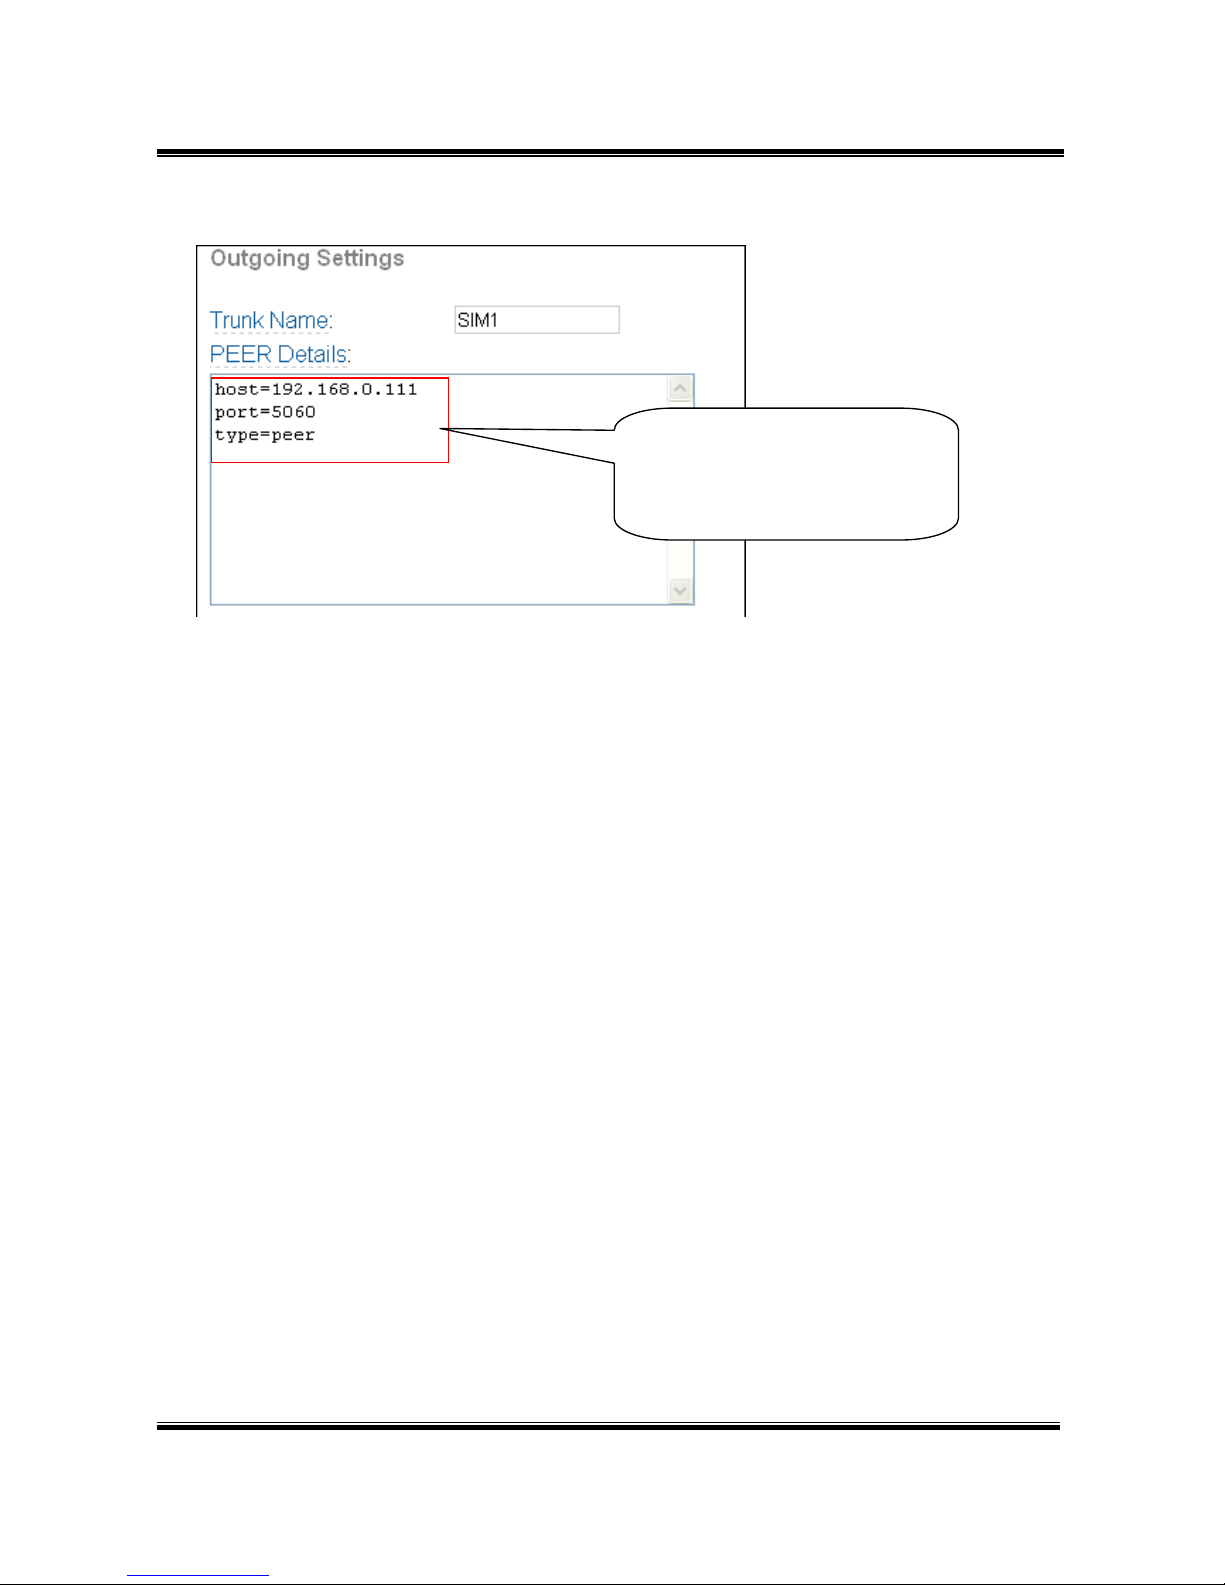
Dial Peer Configuration Table corresponding IP
(please read next page)
*** If you have dial peer server, Sip
server/Asterisk set GSM route,please set Dial
Page 45

-41-
11.7.4 Dial Peer
Lan to mobile *,#: Dial peer software will look for available channel to dial out.
Working Mode: OFF To disable diapeer, so MV-378 will working under one IP and
8 ports
Internal To motivate diapeer, so MV-378 will working under one IP
and one Port.
Mode: calls will come to dialpeer, and dialpeer will route
calls to idle channels.
E.g SIP Server send call to MV-378 IP: 5060
When the first port is busy, MV-378 will use the second port
to dail out…and so forth.
External MV-378/MV-374 will be controlled by external dialpeer
program.
External URL External dialpeer program’s IP address and port
number.
Page 46

-42-
Edit DialPeer.ini (
External Dial Peer)
[Window]
Xpos=512
Ypos=252
Width=471
Height=399
[Info]
Total=16
[VoipIP]
1=192.168.0.100
2=192.168.0.100
3=192.168.0.100
4=192.168.0.100
5=192.168.0.100
6=192.168.0.100
7=192.168.0.100
8=192.168.0.100
9=192.168.0.110
10=192.168.0.110
11=192.168.0.110
12=192.168.0.110
13=192.168.0.110
14=192.168.0.110
15=192.168.0.110
16=192.168.0.110
[SipPort]
1=5060
2=5062
3=5064
4=5066
5=5068
6=5070
7=5072
8=5074
9=5060
10=5062
11=5064
12=5066
13=5068
14=5070
15=5072
16=5074
[RtpPort]
1=60000
2=60002
3=60004
4=60006
5=60008
6=60010
7=60012
8=60014
9=60000
10=60002
11=60004
12=60006
13=60008
14=60010
15=60012
16=60014
[PtcPort]
1=40000
2=40000
3=40008
4=40008
5=40016
6=40016
7=40024
8=40024
9=40000
10=40000
11=40008
12=40008
13=40016
14=40016
15=40024
16=40024
Total ip / port
The first
MV-378
The second
MV-378
The first
MV-378
The second
MV-378
The second
MV-378
The first
MV-378
The second
MV-378
The first
MV-378
The second
MV-378
Page 47

-43-
Log
Page 48

-44-
Status
The first MV-378
doesn’
t register dial
peer software
The 1,4-8ch of
Second MV-378
turn off
The 2,3ch of
Second MV-378
idle
Page 49

-45-
11.8 Other Settings
Other Settings: you can setup the Hold by RFC and QoS in this page. To
change these settings. please following your ISP information. When you
finished the setting, please click the Submit button. The QoS setting is to
set the voice packets’ priority. If you set the value higher than 0, then the
voice packets will get the higher priority to the Internet. But the QoS
function still need to cooperate with the others Internet devices.
Page 50

-46-
12. STUN Setting
In NAT Trans. you can setup STUN and uPnP function. These functions
can help your VoIP device working properly behind NAT.
12.1 STUN Setting: you can setup the STUN Enable/Disable and STUN
Server IP address in this page. This function can help your VoIP
device working properly behind NAT. To change these settings
please following your ISP information. When you finished the
setting, please click the Submit button.
Public STUN OFF Default is OFF, While MV-374/MV-378’s WAN Setting is in
Static IP or Private IP, please select Public STUN OFF.
Public STUN ON While MV-374/MV-378 is working under Firewall or behind
NAT, It will cause SIP can’t register, or one side
communicate, please select Public STUN ON.
Page 51

-47-
13.System Authority
In System Authority you can change your login name and password.
Page 52

-48-
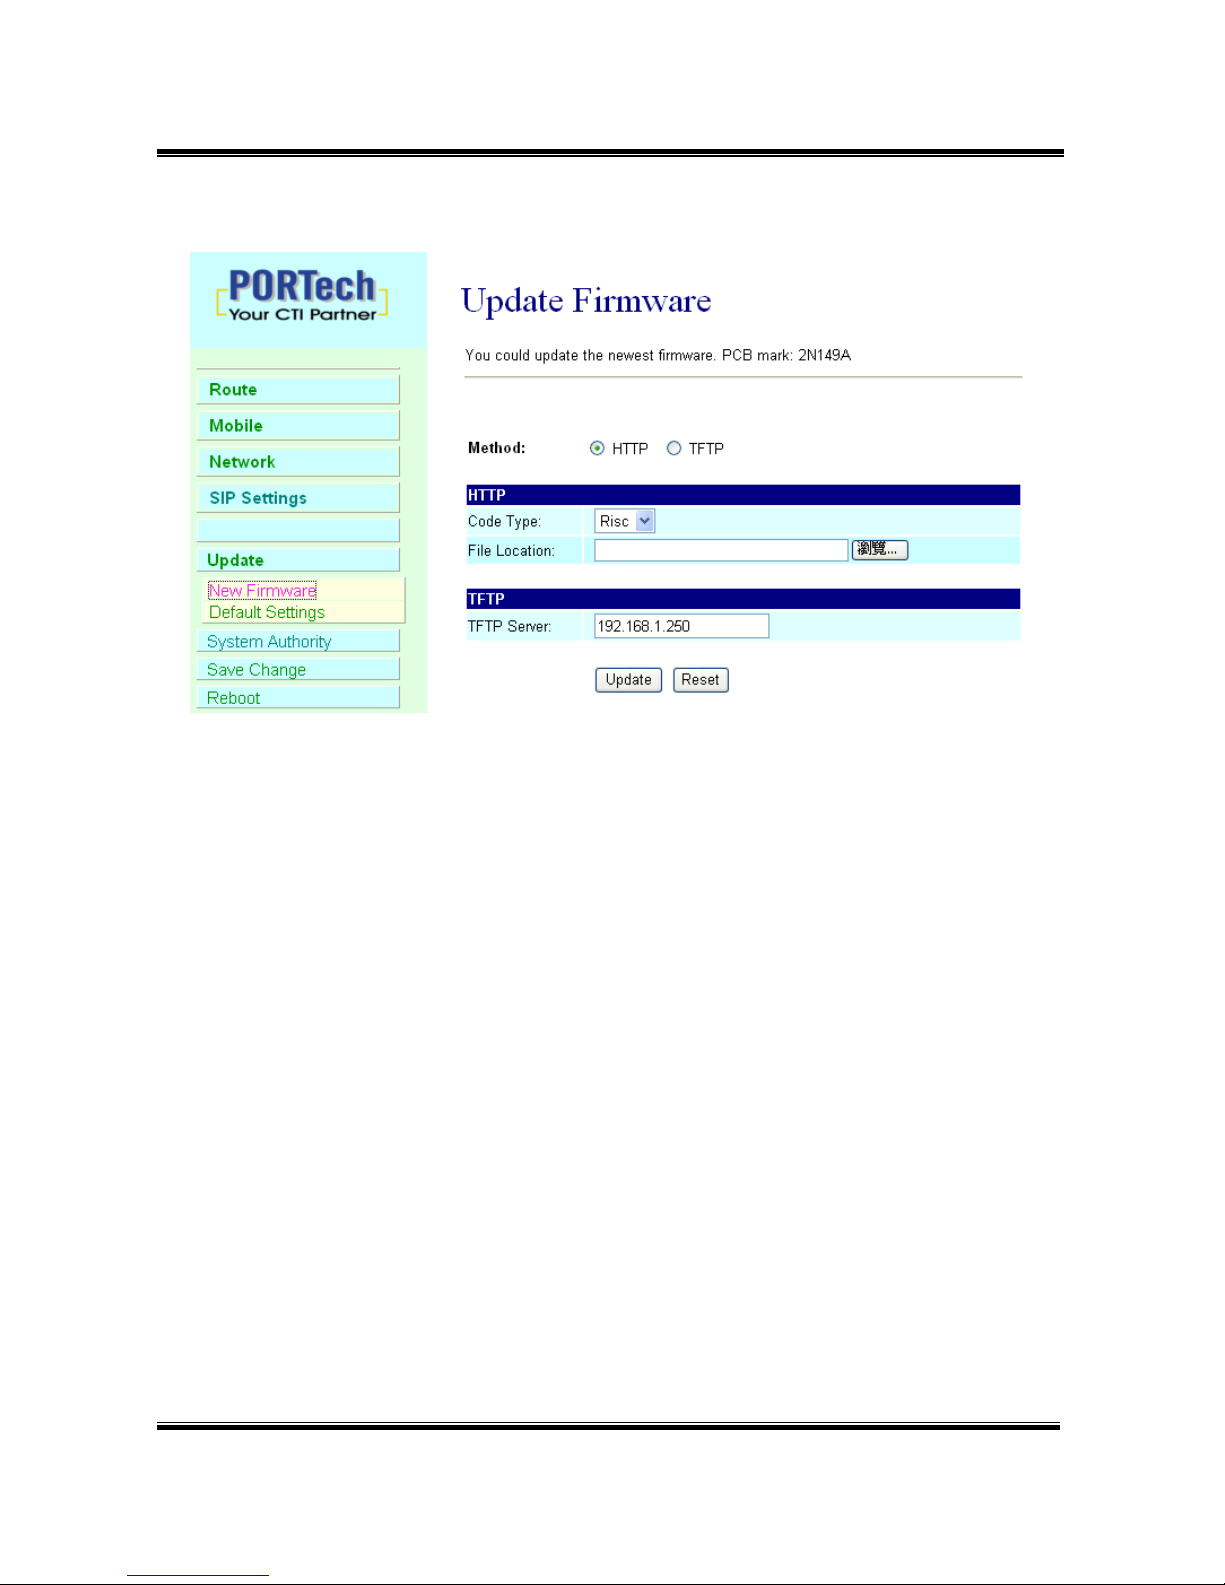
14.Update
In Update you can update the system’s firmware to the new one or do the
factory reset to let the system back to default setting.
14.1 Update firmware
You can down load new firmware from here:
https://www.portech.com.tw/p3-HowtoupdateMV-374.asp
Please update firmware by to following steps.
14.1.1 MV-374
Need to update firmware for 3 times (Master, Slave1 and Slave2)
Step 1: MASTER: 192.168.0.100 please update this firmware nat_portech_XXX
Step 2: Slave 1 : 192.168.0.100:8080 please update this firmware Mv_4-8p_portech_XXX
Step 3: Slave 2 : 192.168.0.100:8180 please update this firmware Mv_4-8p_portech_XXX
14.1.2 MV-378
Need to update firmware for 5 times (Master, Slave1, Slave2, Slave3,
and Slave4)
Step 1: MASTER: 192.168.0.100 please update this firmware nat_portech_XXX
Step 2: Slave 1 : 192.168.0.100:8080 please update this firmware Mv_4-8p_portech_XXX
Step 3: Slave 2 : 192.168.0.100:8180 please update this firmware Mv_4-8p_portech_XXX
Step 4: Slave 3 : 192.168.0.100:8280 please update this firmware Mv_4-8p_portech_XXX
Step 5: Slave 4 : 192.168.0.100:8380 please update this firmware Mv_4-8p_portech_XXX
*Important
*Important*Important
*Important* After you
* After you * After you
* After you upgrade
upgradeupgrade
upgrade all the firmwares, please click Default Setting on 192.168.0.100
all the firmwares, please click Default Setting on 192.168.0.100 all the firmwares, please click Default Setting on 192.168.0.100
all the firmwares, please click Default Setting on 192.168.0.100
*Important* Please
*Important* Please *Important* Please
*Important* Please do not
do not do not
do not change
change change
change firmware 's files
firmware 's filesfirmware 's files
firmware 's files name
namename
name....
Page 53
-49-
(1) In New Firmware function you can update new firmware via HTTP in
this page. You can upgrade the firmware by the following steps:
(2)Select the firmware code type, Risc code.
(3)Click the “Browse” button in the right side of the File Location or you
can type the correct path and the filename in File Location blank.
(4)Select the correct file you want to download to the system then click
the Update button.
(5) Please click update/default setting after update firmware
Page 54

-50-
14.2 Restore Default Settings
In this page: Update/ Default Settings, you could restore the factory
default settings to the system. All setting will restore default setting.
IP will retain original IP as usual not default IP.
Factory all: all setting include ip will restore default setting.
Page 55

-51-
15.Save Change
In Save Change you can save the changes you have done. If you want to
use new setting in the VoIP system, You have to click the Save button.
After you click the Save button, the system will automatically restart and
the new setting will effect.
Page 56
-52-
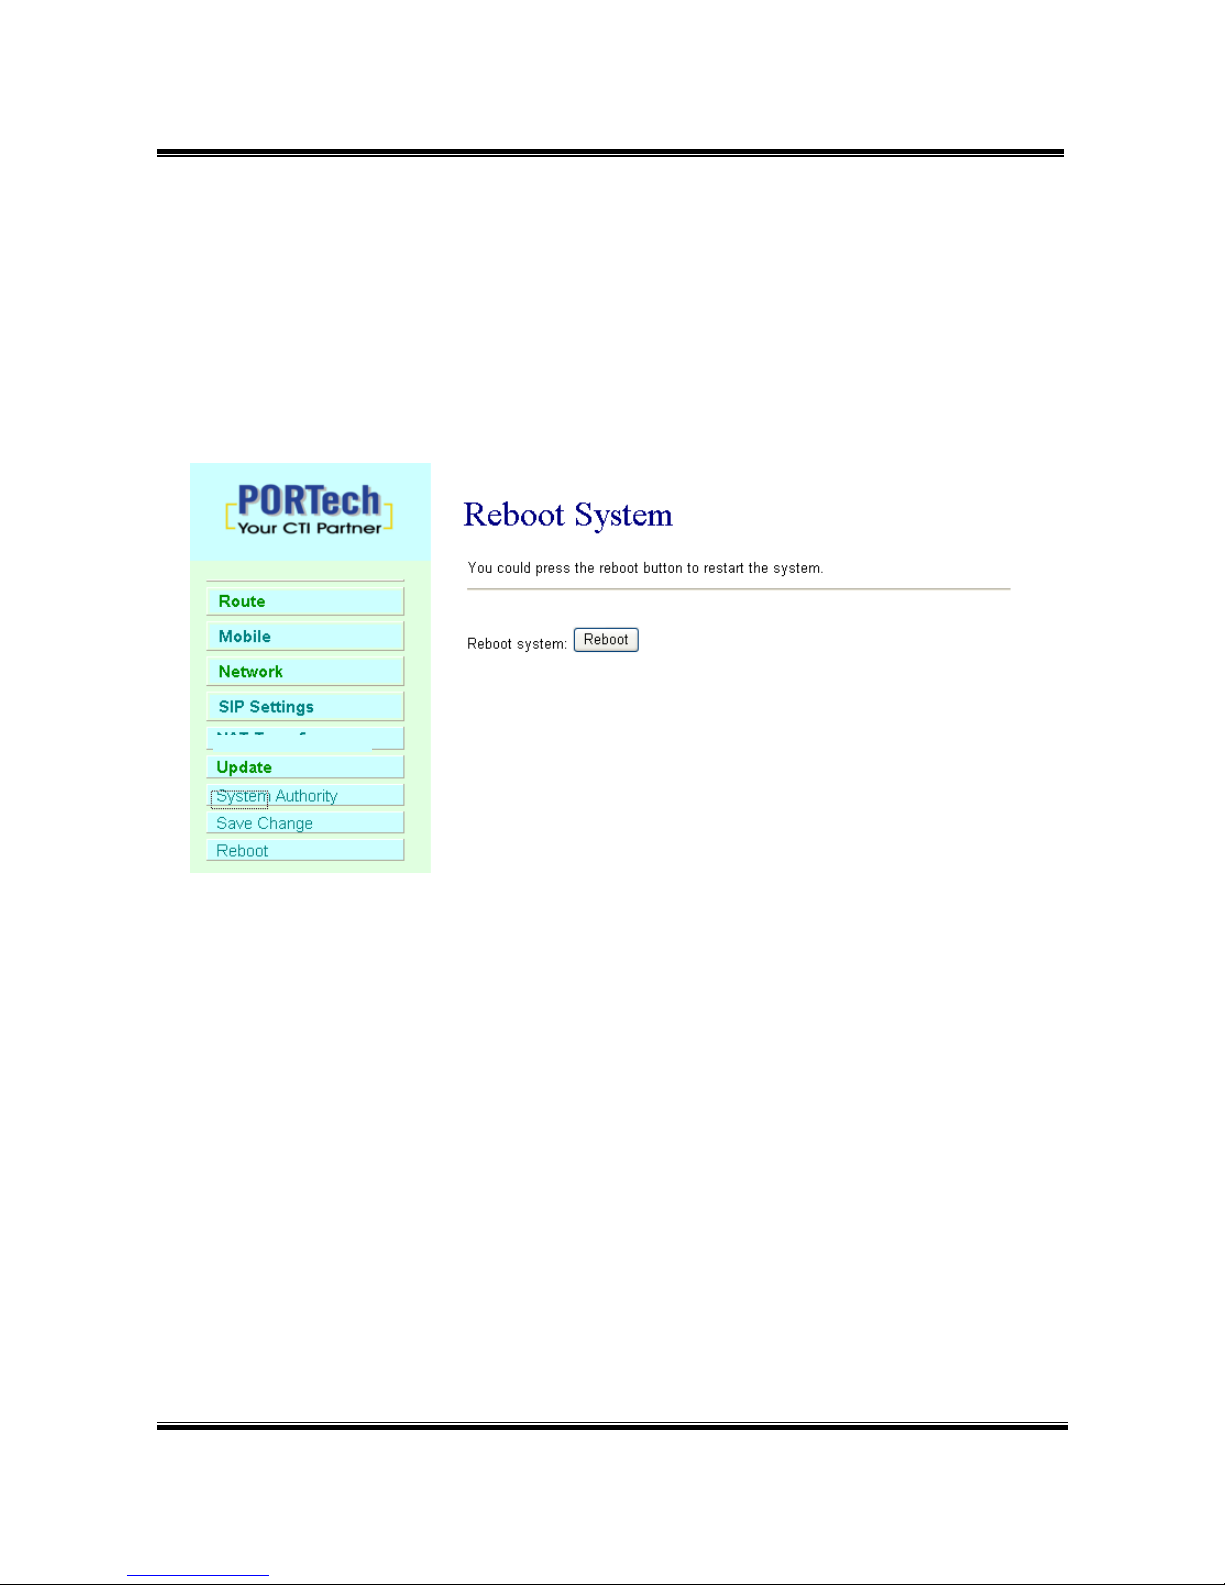
16.Reboot
Reboot function you can restart the system. If you want to restart the
system, you can just click the Reboor button, then the system will
automatically.
Page 57

-53-
17.Specification
17.1 Protocols
SIP (RFC2543,RFC3261)
17.2 TCP/IP
IP/TCP/UDP/RTP/RTCP/
CMP/ARP/RARP/SNTP
DHCP/DNS Client
IEEE802.1P/Q
ToS/DiffServ
NAT Traversal
STUN
uPnP
IP Assignment
Static IP
DHCP
PPPoE
17.3 Codec
G.711 u-Law
G.711 a-Law
G.723.1 (5.3k)
G.723.1 (6.3k)
G.729A
G.729A/B
17.4 Voice Quality
VAD
Page 58

-54-
CNG
AEC, LEC
Packet loss
17.5 GSM (MV-374/MV-378)
Quad Band:900/1800/1900/850MHZ
3G/UMTS: for all world and Japan (SoftBank Mobile,Docomo)
3G:EDGE/GPRS 850, 900, 1800, 1900 MHz / HSDPA/UMTS 850,
1900, 2100 MHz
CDMA 2000(800MHZ/1900MHZ)
**Please note**
Most CDMA operators don't offer Polarity reversing . So VoIP to
Mobile, MV-370 will connect soon. CDMA operators will start billing
soon. It doesn't wait mobile side answer.
CDMA Version doesn't support SMS Feature and 180/183
unavailable
Page 59

-55-
18. Simple Steps
Step 1. Change the Network setting as you need (Network/network setting)
Step 2. Register SIP proxy Server or Asterisk or VoipBuster as you need
(sip setting/service domain)
Step 3. Set Mobile setting –adjust your gain as you need
Step 4. Set Route ( request )
mobile to lan:
(1) *,* --->it is two stage dialing.
when mobile call in,MV-37x will provide dial tone and you
can enter ip
or asterisk extension or phone number.
*
If you want to enter phone number,please note your asterisk need to
have route of destination number.
(2) *, specific extension or IP or phone number
when mobile call in,MV-37x will connect with
this specific extension or
IP or phone number auto
* If you want to set specific phone number,please note your asterisk
need to have route of destination number.
Lan to Mobile:
(1)
*,* --->it is two stage dialing.
when lan phone call in,MV-37x wi
ll provide dial tone and you can enter
mobile number.
(2) *, specific mobile number
when lan phone call in,MV-37x will connect with the specific mobile
number auto.
(3) *,#--->It is 1 stage dialing
When lan phone and MV-37x both register Asterisk,
you can dial any destination number from lan phone directly.
* Please note:Asterisk need to set route of destination number that
dial out from MV-37x
* All changes both need to click "save and change"
Page 60

-56-
19. Appendix: Setup MV-37x with Asterisk
MV-37x Settings
Can register Asterisk or not
Asterisk want to transfer
CLID,please choose Tel/Tel
(Not Reg)
Page 61

-57-
Set your Asterisk IP or extension or *
As Asterisk GSM
Route
Page 62

-58-
Page 63

-59-
Don't forget to Save changes and then reboot
Page 64

-60-
Asterisk / Trixbox setting
Add SIP Trunk:
Type your mobile
number
MV-374: 4
MV-378: 8
Page 65
-61-
Type MV-37X’s ip and port
Page 66

-62-
Set GSM Route that dial out via MV-37X
The prefix of route :
09XXXXXXXX
After change , please press “Sumbit
changes” and “apply configuration
changes”
Choose SIP Trunk
Page 67

-63-
15.21
Federal Communications Commission (FCC) Statement
You are cautioned that changes or modifications not expressly approved by the part
responsible for compliance could void the user’s authority to operate the equipment.
15.105(b)
Federal Communications Commission (FCC) Statement
This equipment has been tested and found to comply with the limits for a Class B digital
device, pursuant to part 15 of the FCC rules. These limits are designed to provide reasonable
protection against harmful interference in a residential installation. This equipment generates,
uses and can radiate radio frequency energy and, if not installed and used in accordance with
the instructions, may cause harmful interference to radio communications. However, there is
no guarantee that interference will not occur in a particular installation. If this equipment does
cause harmful interference to radio or television reception, which can be determined by
turning the equipment off and on, the user is encouraged to try to correct the interference by
one or more of the following measures:
-Reorient or relocate the receiving antenna.
-Increase the separation between the equipment and receiver.
-Connect the equipment into an outlet on a circuit different from that to which the receiver is
connected.
-Consult the dealer or an experienced radio/TV technician for help.
Operation is subject to the following two conditions:
1) this device may not cause interference and
2) this device must accept any interference, including interference that may cause undesired
operation of the device.
Page 68

-64-
FCC RF Radiation Exposure Statement:
1. This Transmitter must not be co-located or operating in conjunction with any other
antenna or transmitter.
2. This equipment complies with FCC RF radiation exposure limits set forth for an
uncontrolled environment. This equipment should be installed and operated with a
minimum distance of 20 centimeters between the radiator and your body.
 Loading...