

Contents
CONSOLE USER MANUAL
F-ST & F-T CONSOLEF-ST & F-T CONSOLEF-ST & F-T CONSOLE
FREEDOM RANGEFREEDOM RANGEFREEDOM RANGE
P02 P09 P16
Console Explanation A/V Mode - Contrast & Brightness Exercising Posture 250F-ST
P03 P10 P17
Button Explanation A/V Mode - Channels & Volume Exercising Posture 260F-T
P04 P11 P18
Exercise Data Workout Screen Service Mode Exercising Posture 280F-ST
P05 P12 P19
Information & Option Button The Heart Rate Monitor Fitness Test Mode - Chart
P06 P13
Start Up & Program Modes Target Heart Rate Zone Chart
P07 P14
Program Example Exercising Posture 220F-ST
P08 P15
A/V Mode Exercising Posture 240F-ST
01

Assembly manual
A
B
C
D
E
F
G
H
I
J
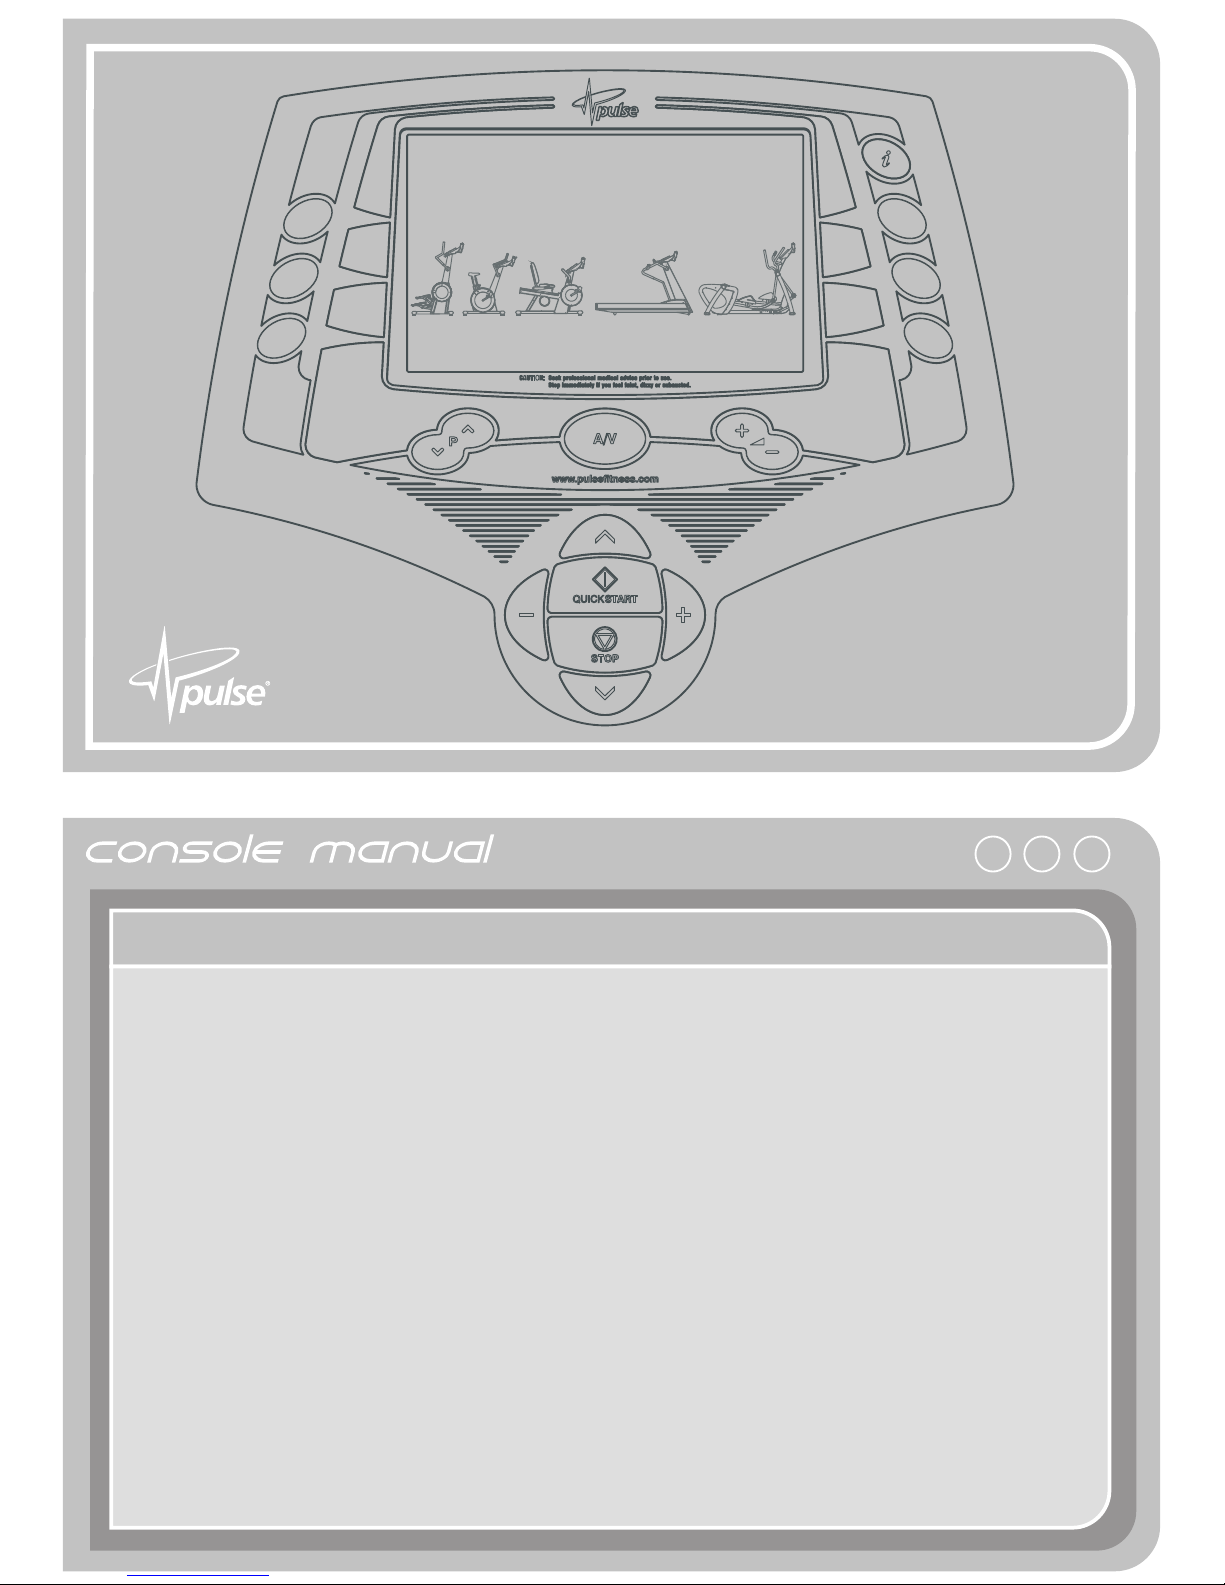
Console Explanation
A - Program Selection, Control and
Data Entry Buttons
B - A/V Channel Selection Buttons
C - A/V Mode Button
D - Buttons for increasing and
decreasing speed/effort
E - Buttons to Start/Stop Exercise
program
F - Buttons for increasing and
decreasing elevation on the 260
F-T Treadmill
G - A/V Volume
H - Graphics TFT display screen
I - Program selection, control and
data buttons.
J - Information button,
languages/Brightness/Metric/
Imperial
Assembly manual
P
Program Selection Control and data entry buttons provide the means of
selection, starting and stopping exercise programs, and entering operational
parameters such as duration, difficulty (effort), target heart rate, etc. In general
the buttons perform the following functions.
A - Buttons for general selection and entering numerical data
when requested.
B - Button for changing channels in A/V mode.
C - Button for Audiovisual mode when requested.
a) With Exercise Statistics
b) Wide/Full Screen
D - Buttons for decreasing/increasing the volume once in
Audiovisual mode.
E - START button to begin the selected exercise program.
STOP button to stop an exercise program at any time.
F - Press (+) to increase or (-) to decrease the effort level. When
exercising in circuit these buttons enables you to change
gear.
G - Buttons to increase/decrease elevation on 260F-T Treadmill
H - The information button enables you to access the option
screen, which gives you three options:
1 - Selection of 16 languages
2 - The units button allows you to change from imperial to
metric.
3 - Change the brightness and contrast of the TFT screen
When in A/V mode.
Button Explanation
03
02
Assembly manual
Assembly manual
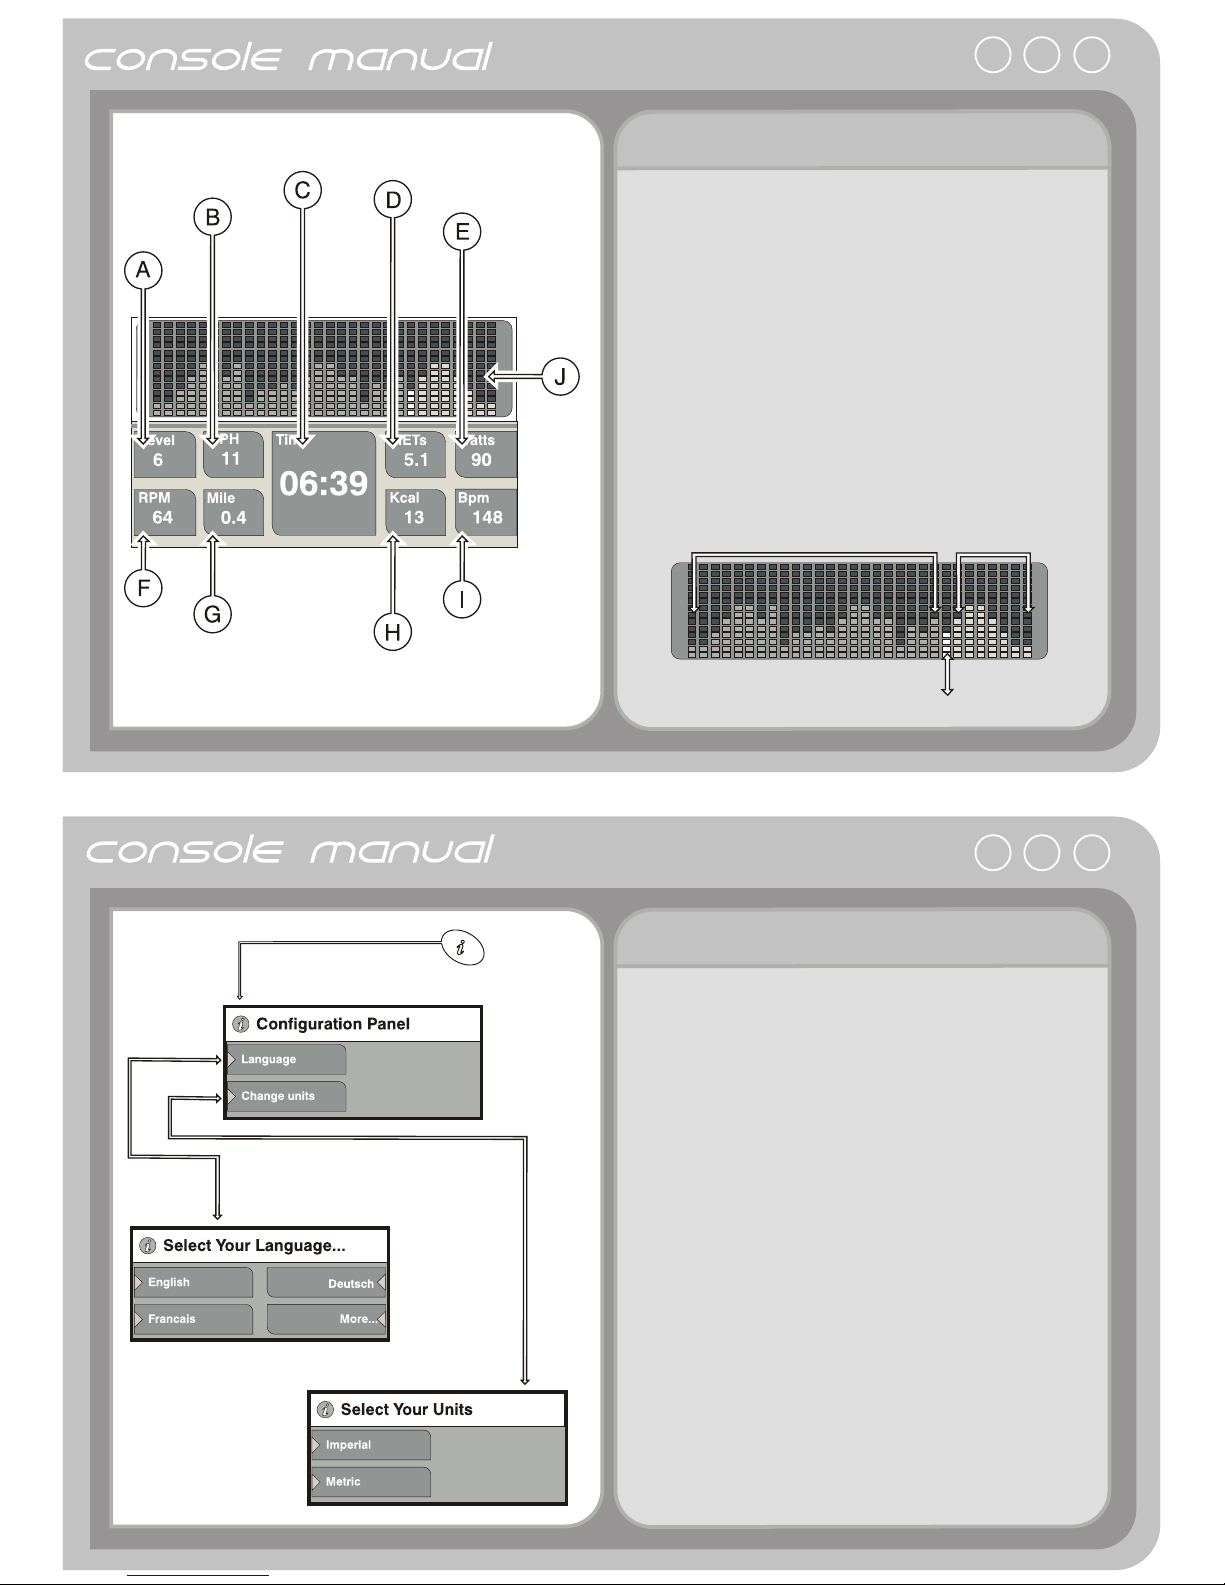
A - Level of effort/resistance (1-28).
B - Speed traveled per minute during exercise.
C - Time left to exercise or time that you been exercising.
D - Metabolic rate.
E - Power generated during exercise.
F - Rotations Per Minute.
G - Distance traveled during exercise (Miles or Km).
H - Energy used or been used during exercise.
I - Heart rate figures in beats per minute.
Effort raised and time exercised Exercise time remaining
J -
Current position indicated by flashing green row
Exercise Data Workout Screen Example
Functions
The information button enables you to access the option
screen, which gives the two options as shown in the left
column.
The two options are:
A1 - A selection of 16 Languages
A2 - The units button allows you to change from imperial to metric
Information & Option Button
05
04

Assembly manual
Start Up & Program Modes
General Information
This section describes in detail the F-ST Range* functions and
aspects of each of the five ( six if X-Train level mode is enabled)
operating modes.
Quick Start:
Allows user to enter a goal focussed exercise mode.
A - Goals Mode:
Motivational training programs set via: time, distance or
calories.
B - Pace Mode:
Based on a running track the user can set the machines
computerised pacer to challenge their own stamina.
Enables the user to compete against the computer-controlled
pacer. Over a set time/distance or distance/speed.
C - The Profile Manager Mode:
The database of pre-programed workouts has been enlarged
to encompass, stamina, weight loss, cardio, gluteal and
interval training. There are 12 programs, split into 4 subgroups:
Cross Country - Beginner/Intermediate/Advanced
Aerobic Training - Weightloss/Intermediate/Aerobic Capacity
Interval Course - Beginner/Escalating/Advanced
Gluteal Course Profile - Beginner/Intervals/Advanced
D - Heart Rate Control Mode:
An optimum pulse rate is first chosen by the user (weightloss or
cardio). A consistent training session is then delivered, keeping
the users heart rate at a constant level. Enables you to
Undertake general fitness training within medically approved
heart rates bands:
60% - 70% for weight management (weightloss),
70% - 80% for a aerobic exercise (Aerobic Capacity),
80%+ for competitive training. The computer calculates the
target rate* as beats per minute (bpm) from your data and
automatically adjusts the effort to turn the pedals in order to
achieve and maintain the target rate.*
Calculation for 100% heart rate (HRmax)=(220 - age)28 levels
of resistance (during the workout) allow users of all abilities a
challenging workout and offer a more precise gauge of their
progress.
E - Fitness Test Mode :
A completely automatic process, the test determines your
aerobic capacity (Åstrand sub-max V02 test).
A six minute test that enables your fitness trainer to measure
improvements in your level of fitness following a prescribed
program of exercise.
The objective of the test is to cycle at a constant 60rpm under an
increasing workload over the period of the Test.
260F-T Treadmill uses a one mile walk fitness test rather than
the Åstrand sub-max V02 test.
F - X-Train Mode (280F-ST only):
Enables you to work on arms, legs or a combination of both.
During exercise the computer will prompt you to concentrate
on certain aspects of your exercise program.
NOTE : This mode may not be implemented if not shown
Fitness option on the screen.
* The F-ST Range is Self Power design.
The screen will be switched off before you start
(pedaling/stepping) on the machine.
The selection screen program allows you to choose a suitable
program
06

Assembly manual
A
B
C
D
D1
E
F
Goal Mode:
Goal mode focuses on effort and endurance or weightloss.
Using calories, distance or time has been introduced to
maximise a users workout. These are displayed using a
count timer that the user can measure their progress
against their desired target, heightening motivation.
A - Select the Goals Program.
B - Choose your goal between Time/Distance/Calories
C - Set your workout Time/Distance/Calories
D - TFT Screen displaying all statistics and information of your
workout.
D1 - Pop Up Info:
Press(+) to increase (-) to decrease the effort
required
E - TFT Screen displaying Cool Down profile. The Cool Down
screen will appear only after a workout is completed.
0:00 - 9:59 No Cool Down Screen will appear
10:00 - 14:59 Cool Down for 3:00 minutes
15:00 - 19:59 Cool Down for 4:00 minutes
20:00 + Cool Down for 5:00 minutes
Cool Down mode is used to help reduce the heart rate of the
user to avoid any injury.
Note: Cool Down Mode can be bypassed by pressing the
stop button.
F - Exercise Statistics Screen shows your workout results &
and fitness level.
Ave. Speed
Max. Speed
Total Distance
Ave. Heart Rate
Ave. Power
Max. Power
Total Energy
Points System
Note:
It is possible to just press the “ QUICK START” key at the
main menu to begin a Manual Mode Session of 10 minutes.
Program Example
07

Assembly manual
Assembly manual
TIME
LEVEL
RPM
BPM
MPH
MILE
WATTS
CALS
02:19
7
6 5
1 1 8
1 1
1 . 1
4 6
3 6
A
B
C
Functions (by pressing A/V Mode)
Freedom Range, the TFT display can receive up to 4 different
video channels via a patented wireless transmitting and receiving
technology, by pressing (A/V mode). The 4 channels can be of
any A/V combination, you can display Satellite, terrestrial, run a
DVD or even play computer games. Use the arial to adjust to
obtain a clearer image. The antenna will tune in both the
picture and the sound.
A - Exercise Workout Screen
B - Press the A/V button during a workout to switch to mixed mode,
this will display the A/V picture and your workout information.
C - Press the A/V button again and it will switch to a full screen TV
mode.
A/V Mode
B
C
When in A/V mode, pressing the information button allows you
to change the brightness and contrast of the TFT screen.
A - Press the Information Button -
B - To increase or decrease the contrast of the TFT screen use the
top two selection buttons (as shown in diagram).
C - To increase or decrease brightness of the TFT screen use the
second two selection buttons (as shown in diagram).
Contrast Bar
Brightness Bar
A/V Mode - Contrast & Brightness
09
08

Assembly manual
0 1
A
B
A - To change channels in A/V mode use the up and down buttons as
shown in the diagram.
B - For decreasing /increasing the volume once in
Audiovisual mode, use the + and - button as shown in the
diagram.
Channel & Volume Bar
A/V Mode - Channels & Volume
0 1
Service Mode
Please contact Pulse Fitness for further information.
Options:
1 - Card Upgrade
This is used to change/update the software version and/or screen
types.
2 - Hardware Test
This gives you various options in which to test the key pad and
communications.
3 - Auto-Configure
Pressing this button will automatically set the console to the machine
type it is connected to.
Service Mode
To alter these options you have to enter Configuration
Mode, it is absolutely critical that when in Configuration
Mode you only alter the settings for these options,
adjusting any other settings could result in termal failure
of the machine.
11
10

Assembly manual
Elasticated Strap Lug Monitor Strip
Monitor Strip
B
A
C
To fit the heart rate monitor, proceed as follows:
A - Attach one end of the elasticated strap to one end of the
sensor strip as shown. Turn the end of the elasticated strap 90°
and insert lug through the rear of the hole in the end of the
monitor strip.
B - Then turn back through 90° and press on the circular lug so
that it is flush with the front of the sensor strip.
C - Hold the sensor strip against your chest while feeding the
elasticated strap around your back.
Attach the other end of the elasticated strap to the sensor strip.
If necessary, the length of the elasticated strap can be
adjusted using the adjustment buckle.
If the monitor fails to detect a heartbeat, moisten the
electrodes on the back of the strip (two ridged rectangular
blocks) with a wet finger and try again.
The Heart Rate Monitor
The sensor strips must be placed against your skin
(Manufacturer’s insignia facing outwards), otherwise it
may not detect a heartbeat. The chest strap must not be
rotated ( i.e. The writing should appear the right way up),
except in certain individuals who have a ‘reversed’ EGG
(this condition is extremely rare).
Select your age band and appropriate training zone according to your
fitness level (if in doubt, consult your health professional).
The chart has been designed to enable the user to easily select their
desired training zone, whether it be fat burning or cardiovascular
training. Shaded bands within their training zone assist the user as
‘stepping stones’ to improve their fitness level.
Fat burning zone is between 60% -75% of your theoretical maximum
heart-rate.
Cardiovascular training zone is between 75% -85% of your theoretical
maximum heart-rate (to improve your cardiovascular conditioning).
Target Heart Rate Zone Chart
When the che st strap moni tor is used it au tomatical ly overri de s any signa l from the hand p ulse monito rs.
If the batte ry fail s (it has an esti mated life in e xcess of thre e years) then t he plasti c st rip must be r ep laced. If y ou wish to moni tor
your heart r ate, you shou ld always fit t he heart rate m onitor befo re you sele ct o ne of the exe rcise progr ams.
85%
75%
60%
Max
65 60 55 50 45 40 35 30 25 20
Age
60% - 75%
Fat Burning Zone
75% - 85%
Cardiovascular Zone
200
190
180
170
160
150
140
130
120
110
100
Beats Per Minute (BPM)
T
raining Zone
13
12

Assembly manual
Assembly manual
When using Pulse Fitness equipment, to ensure that you obtain
the most from your workout, it is essential that you have the
correct posture on the machines as follows;
1 - Your back should be straight.
2 - You should only hold the handlebars for balance and not for
leaning or resting on.
3 - The balls of your feet should stay in contact with the pedals at
all times and should not allow the pedals to touch the upper or
lower stops.
4 - You should not try to force the pedals down, if you want to step
quicker increase the level.
5 - Always warm up before and warm down after completion of
exercise program by doing gentle stretches.
Correct Exercising Posture 220F-ST
1 - Always warm up before and warm down after completion of
exercise program by doing gentle stretches.
2 - Your back should be straight whilst pedaling.
3 - Place balls of your feet on pedals and secure with the foot
straps.
4 - Adjust the seat so that the knee is slightly bent when the
pedal is at the furthest position away from the body.
5 - Grip handlebars lightly.
6 - Your back should remain in contact with the backrest at all
times.
Correct Exercising Posture 240F-ST
15
14

Assembly manual
Assembly manual
1 - Always warm up before and warm down after completion of
exercise program by doing gentle stretches.
2 - Place balls of your feet on pedals and secure with the foot
straps.
3 - Adjust the seat so that the knee is slightly bent when the pedal
is at the furthest position away from the body.
4 - Grip handlebars lightly.
5 - Your back should remain in contact with the backrest at all
times.
Correct Exercising Posture 250F-ST
1 - Always warm up before and warm down after completion of
exercise program by doing gentle stretches.
2 - DO NOT get on or off the treadmill when the running belt is
moving.
3 - Enter a slow speed to start with and hold onto the
handlebars until you are comfortable with the speed.
4 - You should only hold the handlebars for balance and not for
leaning or resting on.
5 - Your back should be straight.
6 - Keep your body and head facing forward. Never attempt to
turn around on the treadmill when the belt is moving.
7 - Try to keep to the middle of the running belt.
Correct Exercising Posture 260F-T
17
16

Assembly manual
1 - Always warm up before and warm down after completion of
exercise program by doing gentle stretches.
2 - Place your feet carefully on the Foot Mouldings.
3 - Your back should be straight whilst exercising.
4 - Grip handlebars lightly.
Correct Exercising Posture 280F-ST
Once the test has finished you will be given a Fitness Level Mark out of five. The chart below shows how you rate between Excellent and Poor.
Note: This is a low intensity fitness test designed for unconditioned users.
Fitness Test mode - Chart
Male Age Groups female Age Groups
65
60
55
50
45
40
35
30
25
20
15
10
Fitness Rating
15-19
20-29 30-39 40-49 50+
65
60
55
50
45
40
35
30
25
20
15
10
Fitness Rating
15-19
20-29 30-39 40-49 50+
5/5
Excellent
4/5
Good
3/5
Average
2/5
Below
Average
1/5
Poor
19
18

User Notes
User Notes
21
20
User Notes
GB
Pulse Fitness
The Bromley Centre, Bromley Road,
Congleton, Cheshire, CW12 1PT.
Tel: +44(0)1260 294600
Fax: +44(0)1260 299282
Email: service@pulsefitness.com
D
Pulse Fitness GmbH
Rombacher Hütte 10
D - 44795 Bochum, Germany
Phone.: +49 (0)234-43623
Fax: +49 (0)234-9431330
Email: info@pulsefitness.de
S
Pulse Fitness Scandinavia AB
Box 70, 25054 Helsingborg, Sweden
Tel: +46 (0) 42 164075
Fax: +46 (0) 42 164076
135-396-2
22
Dc1170
 Loading...