

Page 1
1600 PSI Pressure Washer
Table Of Contents
Topic Page #
Important Safety
Tips, Precautions, Warnings,
and Usage Instructions
Assembly Instructions 6-8
Operating Instructions 9-12
Detergents 12-13
Clean-up and Storage 14-15
Cleaning Tips 16
2-5
Technical Data 17
Troubleshooting Tips 18
Limited Warranty 19- 20
Parts 21- 22
1
Page 2
1600 PSI Pressure Washer
1600 PSI Pressure Washer
IMPORTANT SAFETY PRECAUTIONS
GROUND FAULT CIRCUIT INTERRUPTER
(GFCI)
This pressure washer is provided with a ground fault circuit interrupter (GFCI) built into
the plug of the power supply cord. This device provides additional protection from the
risk of electric shock. Should replacement of the plug or cord become necessary, use
only identical replacement parts that include GFCI protection.
This unit is equipped with a Ground Fault Circuit Interrupter (GFCI). When connecting
the GFCI to the receptacle, the indicator should appear red. If the indicator is not red,
depress the RESET button on the GFCI until the indicator appears red. If the indicator
does not appear red, please see Section titled “Troubleshooting” for more information.
IMPORTANT SAFETY TIPS
Neverpoint the high pressure nozzle at people or animals.
Neverdrink alcohol oruse drugs while operating the pressure washer.
WARNING: When using this product, basic
precautions s hould always be followed,
including the following:
1. Read all instructions before using the product. Save all
safety instructions.
2. Do not operate the pressure washer when fatigued or under
the influence of alcohol or drugs.
3. Risk infection or injury do not direct the high pressure
water stream at any people or animals.
4. Do not allow children to operate the pressure washer at any
time.
5. To reduc e the risk of injury, close supe rvision is ne ce ssa ry
when the pressure washer is used near children.
6. Know how to stop the unit and reduce pressure immediately.
Be completely familiar with the controls.
7. Stay alert always be aware of where you are directing the
high pressure spray
8. Keep cleaning area clear of allpeople.
9. Main safe footing and balance at all times do not
overreach or stand on an unstable support.
10. The work area should have adequate drainage to reduce the
possibility of a fall due to slippery surfaces.
11. Follow the maintenance instructions specified in the manual.
12. To reduce the
and off the ground. Do not touch plug with wet hands.
risk of electrocution, keep all connectionsdry
the
Neveroperate thepressure washer whilestandingin water.
Nevertouch the
Never let electrical connections rest in water.
Neveroperate pressure washer without thewater turned on.
electrical plug with wet hands.
the
the
Neveruse hot water with this pressure washer.
2
GENERAL SAFETY PRECAUTIONS
1. Intended for outdoor household use only.
2. High pressure hose can develop leaks from wear, abuse,
kinking etc. Do not use a damaged hose.
3. Do not use the pressure washer in areas near combustible
mate rials, combustible fumes, or dust.
4. Some chemicals or detergents may be harmful if inhaled or
ingested causing severe injury. Use a respirator or mask
whenever there is a chance that vapors may be inhaled.
3
Page 3
1600 PSI Pressure Washer
1600 PSI Pressure Washer
Read all instructions included with the mask so you are certain
the mask will provide the necessary protection against inhaling
harmful vapors.
5. Before starting the pressure washer in cold weather, check all
of the parts of the equipment and be sure that ice has not
formed. Do not store the unit anywhere that the temperature
will fall below 0
6. DO NOT MAKE ANY MODIFICATIONS TO ANY OF THE
COMPONENTS! Units with broken or missing parts, or without
the protective housing or covers should NEVER be operated
7. Keep the high pressure hose connected to the pressure
washer and the spray gun while the system is pressurized.
Disconnecting the hose while the unit is pressurized is
dangerous, and may cause injury.
8. Do not leave the pressure washer unattended while the power
switch is ON.
9. Keep the water spray away from electrical wiring or fatal electric
shock may result.
°C(32° F).
SERVICING OF A DOUBLE-INSULATED
APPLIANCE
In a double insulated product, two systems of insulation are provided instead of
grounding. No me ans of grounding is provided on a double insulated product, nor
should a means for grounding be added to the product. Servicing a double insulated
product requires extreme care and knowledge of the system, and should be done
only by qualified service personnel. Replacement pa rts for a double insulated product
must be identical to the pa rts they replace. A double insulated product is marked with
the words “DOUBLE INSULATION” or “DOUBLE INSULATED”. This symbol may
alsobe marked on the product.
USE OF EXTENSION CORDS
Use of an extension cord with this product is NOT RECOMMENDED. If you must use an
extension cord, use only extension cords that are intended for outdoor use. These cords
are identified by a marking “ACCEPTABLE FOR USE WITH OUTDOOR APPLIANCES, STORE
INDOORS WHILE NOT IN USE.” Use only extension cords having an
electrical rating not less than the rating of the product. Examine the
use. Do not use damaged extension cords! Do not pull on cord to disconnect from
receptacle always disconnect bypulling on plug. Keep cord away from heat and sharp
edges. Always disconnect the extension cord from the receptacle before disconnecting
the product from the extension cord.
WARNING To reduce the risk of electrocution, keep all connections dry and off
the ground. Do not touch the plug with wet hands.
the
extension cord before
the
PROPER USE OF THE PRESSURE WASHER
THIS UNIT IS INTENDED FOR USE WITH COLD WATER ONLY!
DO NOT USE HOT WATER IN THIS PRESSURE WASHER.
Operate the pressure washer at no more than the fluid pressure
1.
rated for the pressure washer. Never run the pressure washer
without a water supply. Running the unit without a water supply
will cause irreparable damage to the unit.
2. Make sure that the water supply you use for the pressure
washer is not dirty, sandy, and does not hold any corrosive
chemical products. Using a dirty water supply will compromise
the life of the pressure washer.
3. CAUTION The pressure washer can be used for a variety of
applications including washing cars, boats, patios, decks,
garages etc. where high pressure is necessary to remove dirt
and debris.
High pressure water flow can damage the work surface if not
used properly! See the section titled “Operating Instructions” for
more details. Always test the spray in an open area first.
4. NEVER move the unit by pulling on the high pressure hose. Use
the handle provided on the top of the unit.
5. Always hold the high pressure gun and wand with two hands.
Keep one hand on the gun/trigger, while supporting the wand
with the other hand (see diagram).
6. When dispensing detergent, the pressure washer applies
detergent to the cleaning area at low pressure only. Once the
detergent has been applied, spray the detergent off of the work
area by using the adjustable nozzle.
4
5
Page 4

1600 PSI Pressure Washer
ASSEMBLY INSTRUCTIONS
Unpacking The Carton
After opening the carton, please remove all parts and check them against the following
list of components that a re included:
A. High Pressure Washer D. Adjustable Nozzle
B. Gun E. Water Intake Filter (Pre Installed)
C. High Pressure Hose F. Two Way Connector
1600 PSI Pressure Washer
Step 1
Take the hose lock to position A to unlock.
B
A
Attach the high pressure hose to the gun.
Then push the hose lock to position B to lock the
fitting.
B
A
Step 2
D
F
E
To assemble the enclosed parts, please refer to the steps that follow:
6
Insert the adjustable spray nozzle into the gun. Push and turn the adjustable nozzle
clockwise onto the gun until it is hand tight andto lock it in place. When the pieces
are joined
adjustable nozzle. All attachments must be inserted into the gun for proper use.
prope rly, you cannot sepa rate the two components by pulling out on the
B
D
7
Page 5
1600 PSI Pressure Washer
Step 3
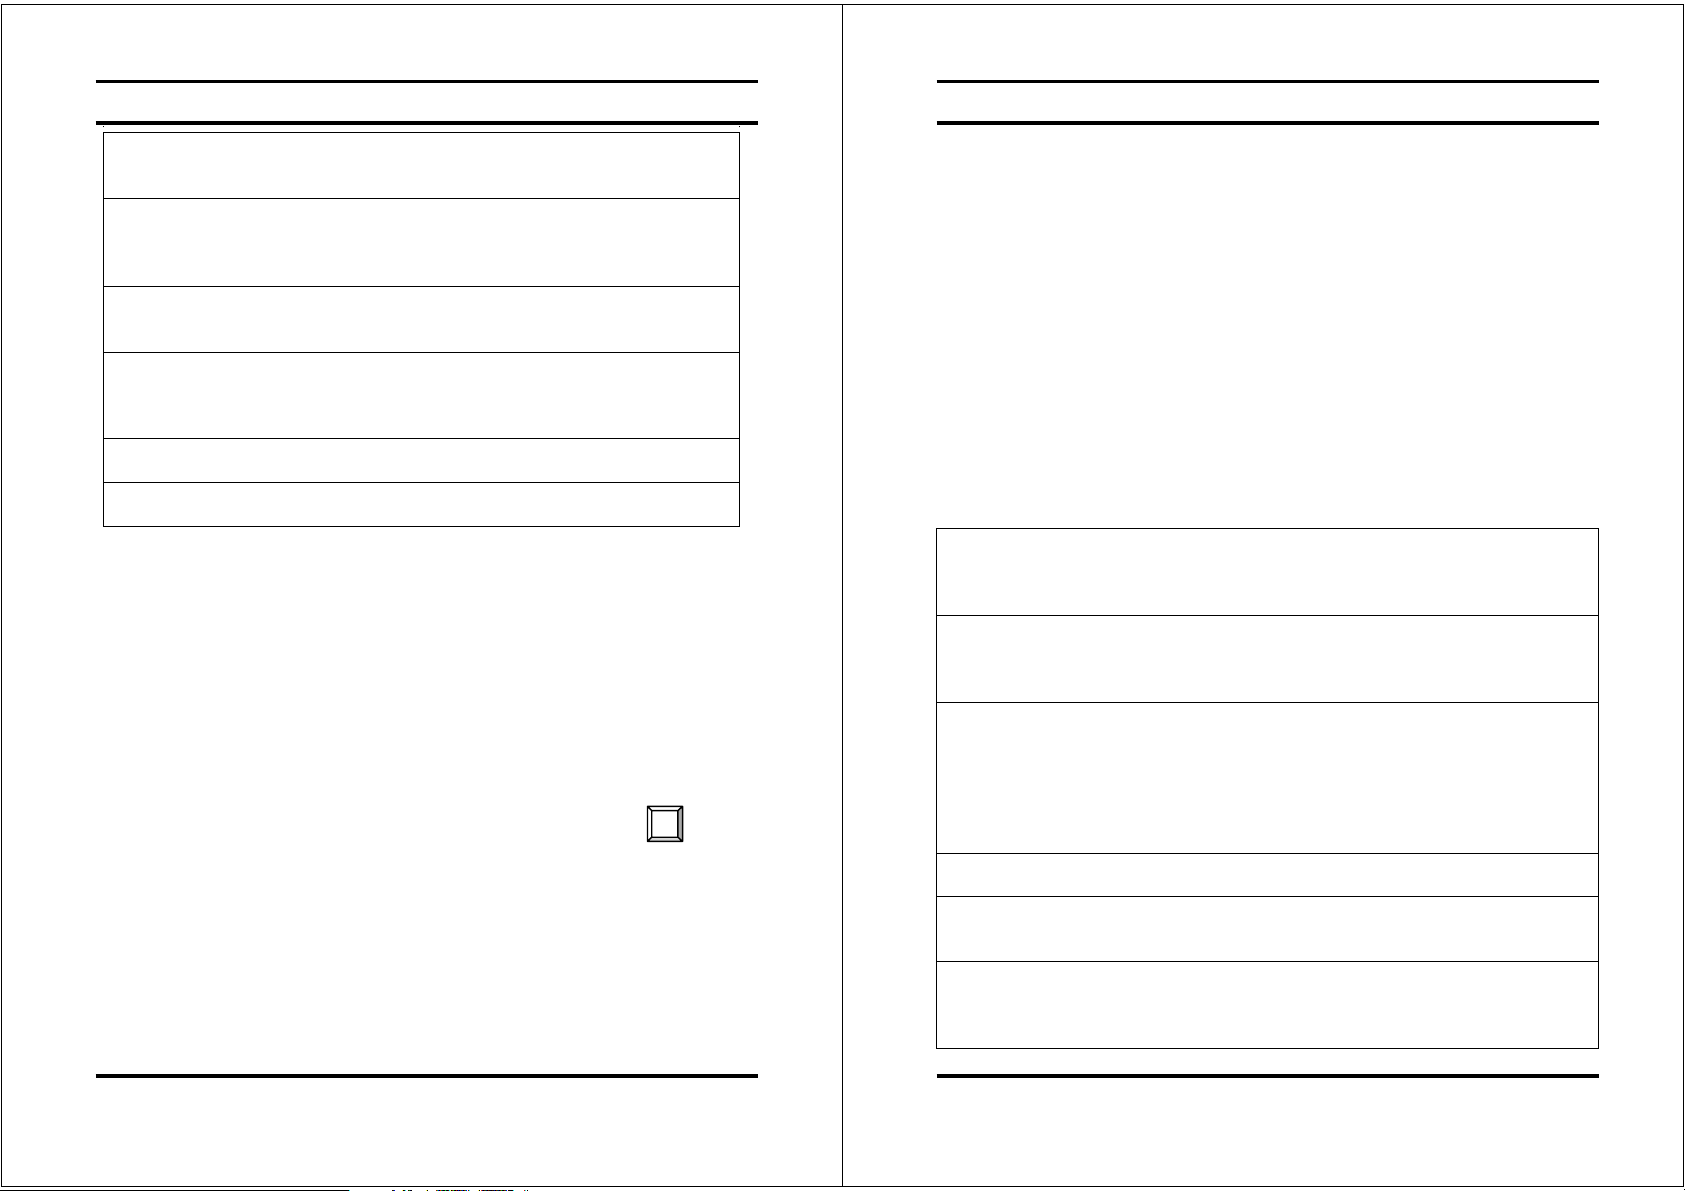
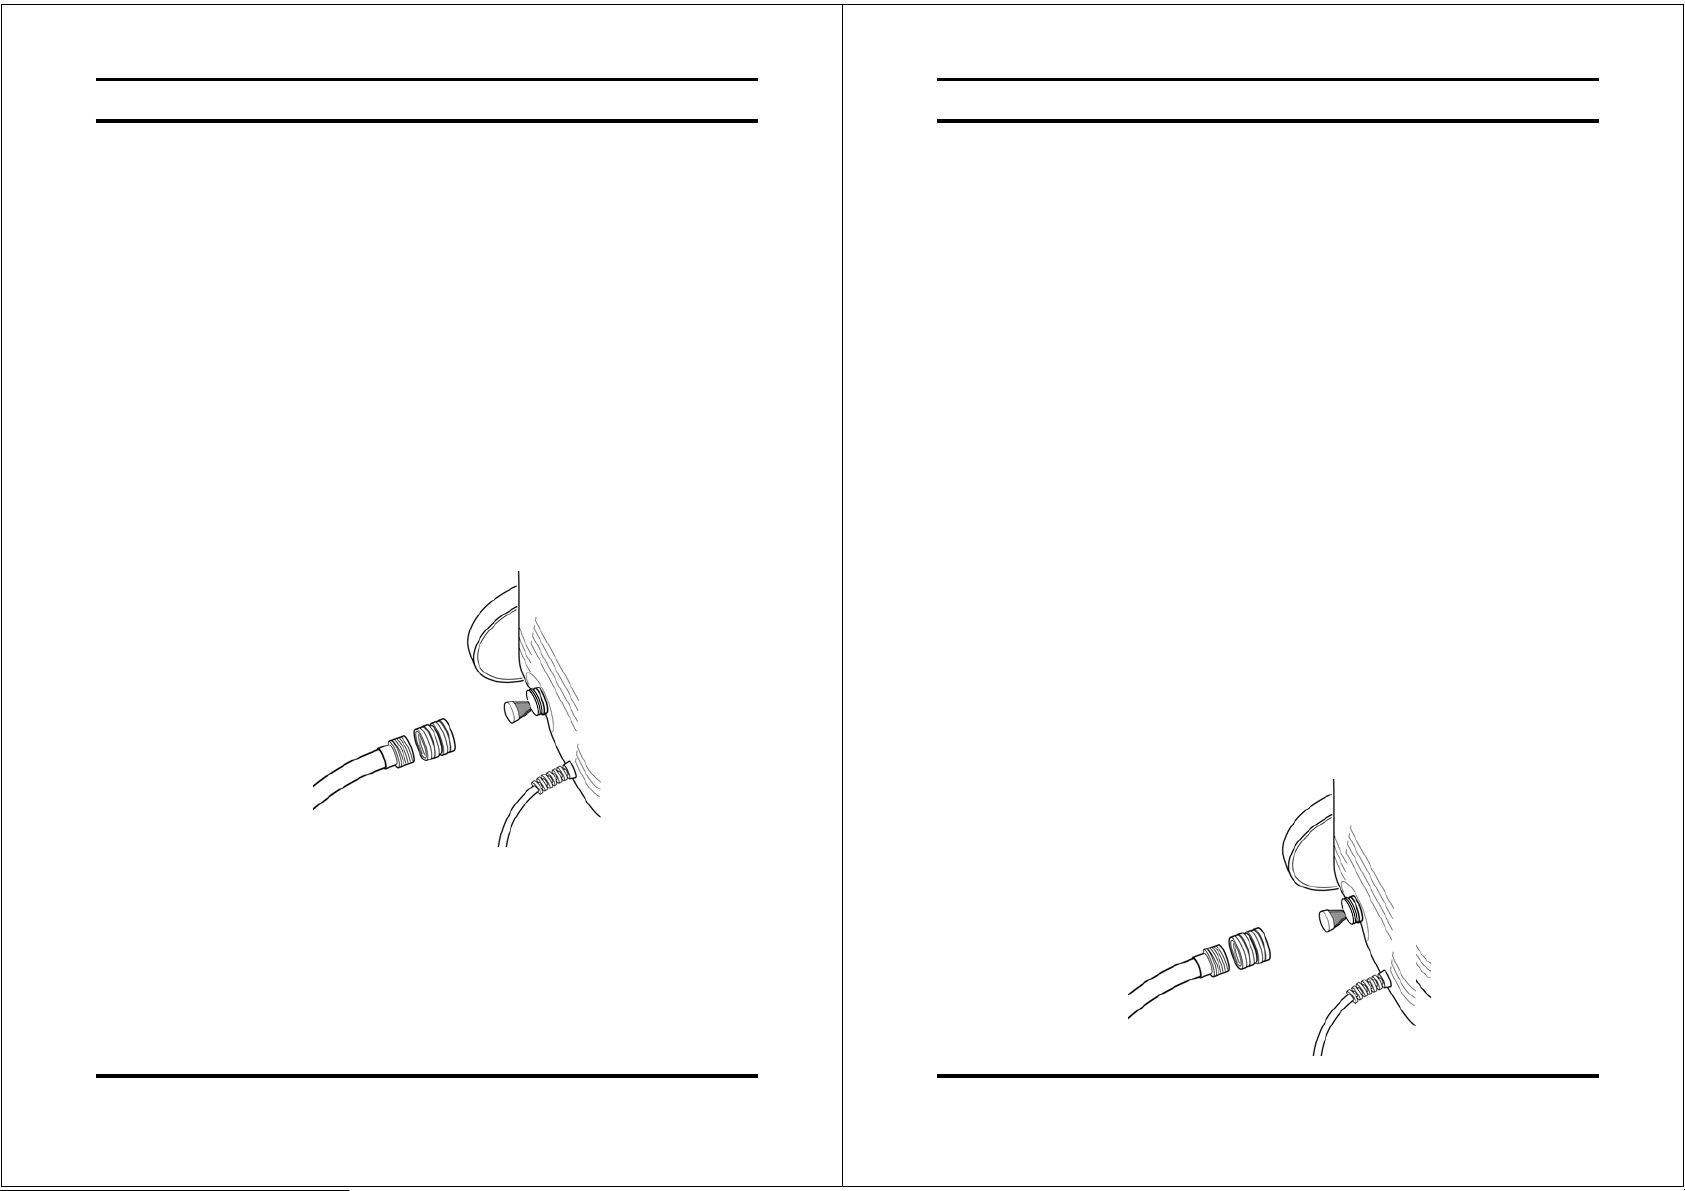
Attach the high pressure hose to the male fitting on the front of the pressure washer.
Before attaching the high pressure hose to the male fitting, remove the plastic cap,
which covers fitting before shipping. This plastic cap can be discarded
once removed. Hand tighten to av oid leakage.
Step 4
Attach the two way connector to pressure washer. Before attaching the connector to the male
fitting, remove the plastic cap, which is inserted onto the male fitting on the pressure washer
before shipping. This plastic cap can be discarded once removed. After both components have
been installed, attach the garden hose with connector screw on the pressure washer. Connect
the garden hose to the waterspout.
1600 PSI Pressure Washer
OPERATING INSTRUCTIONS
THIS UNIT IS INTENDED TO BE USED WITH COLD WATER ONLY!
DO NOT USE HOT WATER IN THIS PRESSURE WASHER!
Starting Up
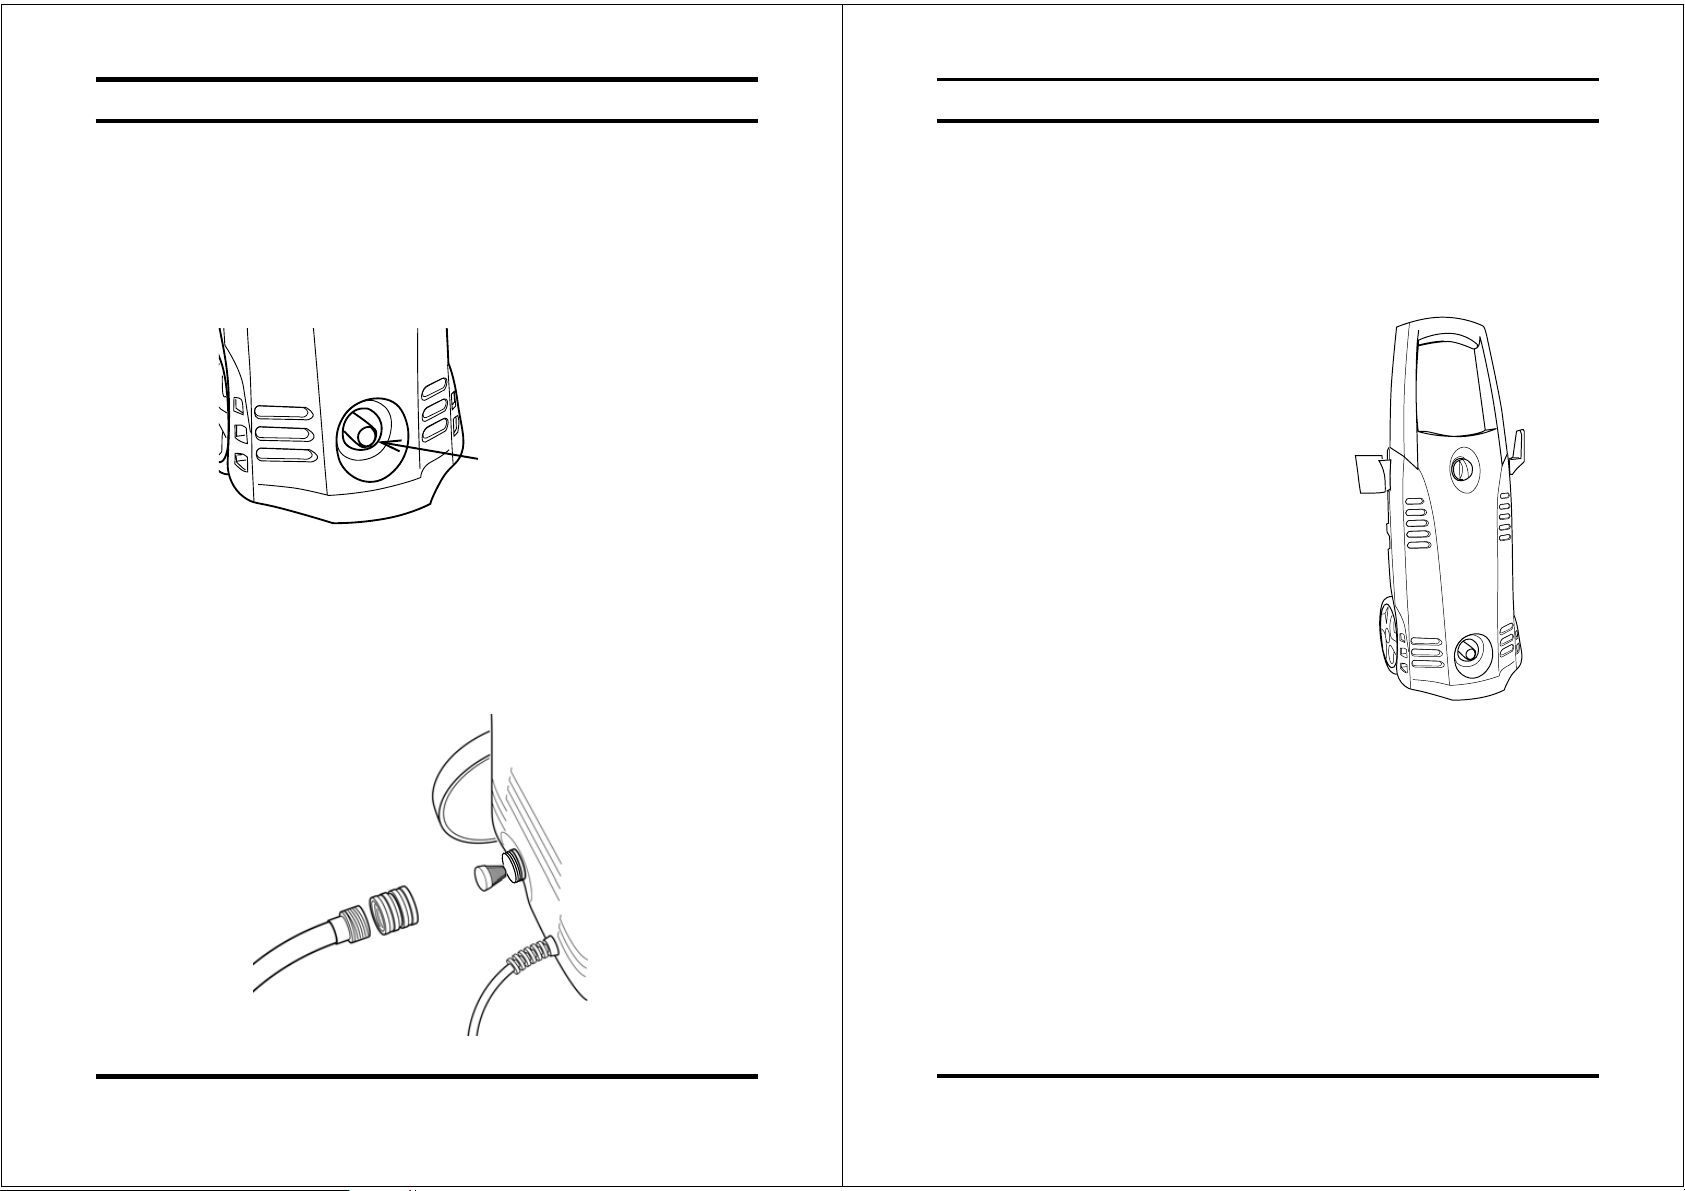
After connecting the pressure washer to your cold
water supply, proceed as follows:
Make sure that the on/off switch is
-
in the off position.
- Connect the garden hose with a quick
connect to the inlet fitting.
- Attach the hose to the gun as per
assembly instruction step #1.
- Insert the adjustable spray nozzle
into the gun as per assembly step
#2.
- Connect the high pressure hose to
thehighpressureoutletfittingas
per assembly step #3.
- Open the water supply valve completely.
- Before turning the unit on, press the gun trigger to bleed all the
remaining air out of the pump and hose.
- Start the pressure washer by turning the on/off switch to the
on position and squeeze the trigger.
REMINDER: Motor does not run continuously, only when theThe trigger is squeezed.
WARNING – R risk of inj Utheu nit will start spraying
when trigger is squeezed. When turning the unit off after
use, high pressure still exists inside the hose and unit. Point
the gun in a safe direction and discharge the excess
pressure. NEVER direct the high pressure water stream at
people or animals.
8
y
9
Page 6
1600 PSI Pressure Washer
Automatic On / Off
1600 PSI Pressure Washer
The pressure washer is equipped with an automatic on/off switch.The pressure washer
will only run when the power switch is in the ON position and the trigger on the gun is
squeezed. When you release the trigger to stop spraying water through the gun, the
motor on the pressure washer will automatically shut off. Simply squeeze the trigger
again to resume using the washer. To stop using the pressure washer, release the
trigger and switch the unit to the OFF position. The unit should be turned completely
OFF while not in use or while unattended.
Bleeding The Gun
It is very important to bleed all the air out of the pressure washer before using it.To do this
1. Release trigger lock.
2. Squeeze the trigger before turning the electrical supply on.This removes any air trapped
inside the pressure washer and lance before using the units.
3. Continue holding trigger for approximately one minute to allow any excess air out of the
unit.Water will flow through the gun at low pressure during this procedure.
4. Lock the trigger.
5. Plug the main power cord into the electrical outlet.
6. Release the trigger lock.
7. Turn the ON/OFF switch clockwise to the I/ON position.
The pressure washer is ready for operation.
Gun Safety Lock
Diagram 2
Diagram 1
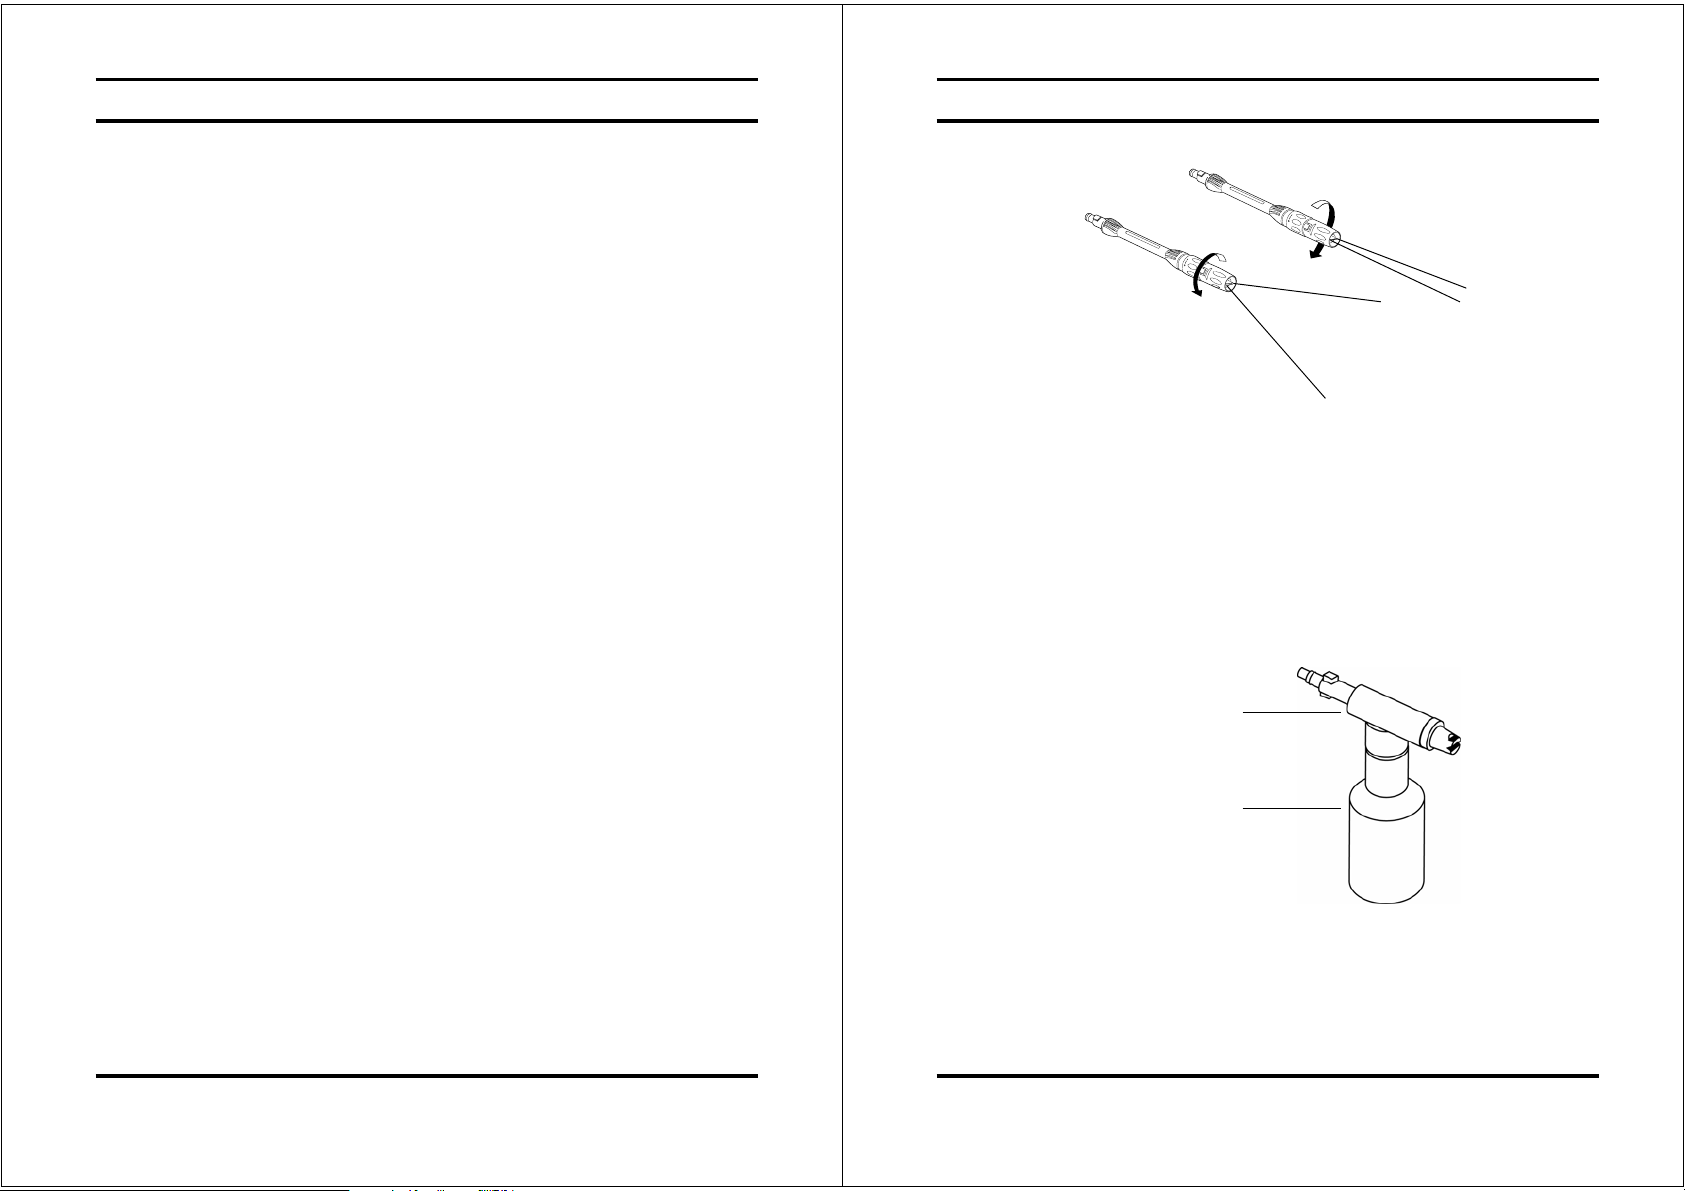
Detergent Nozzle
The detergent nozzle will allow you to apply many forms of liquid detergent onto the
work surface.Detergent application happens at low pressure only. Fill the container
with detergent only.Do not put any water into the container.The pressure washer will
mix water and detergent automatically. When finished applying the detergent to the
work surface, insert the adjustable spray nozzle, and remove the detergent by using
the high pressure spray.
Detergent nozzle
This pressure washer is equipped with a gun trigger safety lock. When not using the
pressure washer, use the safety lock to protect from accidentally engaging the high
pressure spray.
Adjustable Spray Nozzle
The adjustable nozzle will allow you to use a variety of spray patterns from a full fan
spray (Diagram 1) to a direct stream spray (Diagram 2). When using the pressure washer
to clean wood decks, siding, vehicles etc., always start using the fan spray and begin
spraying from a minimum 36” away to avoid damaging the surface of the material you are
cleaning. Always begin by spraying in a test area free and clear of people and objects.
01
Detergent bottle
11
Page 7
1600 PSI Pressure Washer
1600 PSI Pressure Washer
ADJUSTING THE PRESSURE
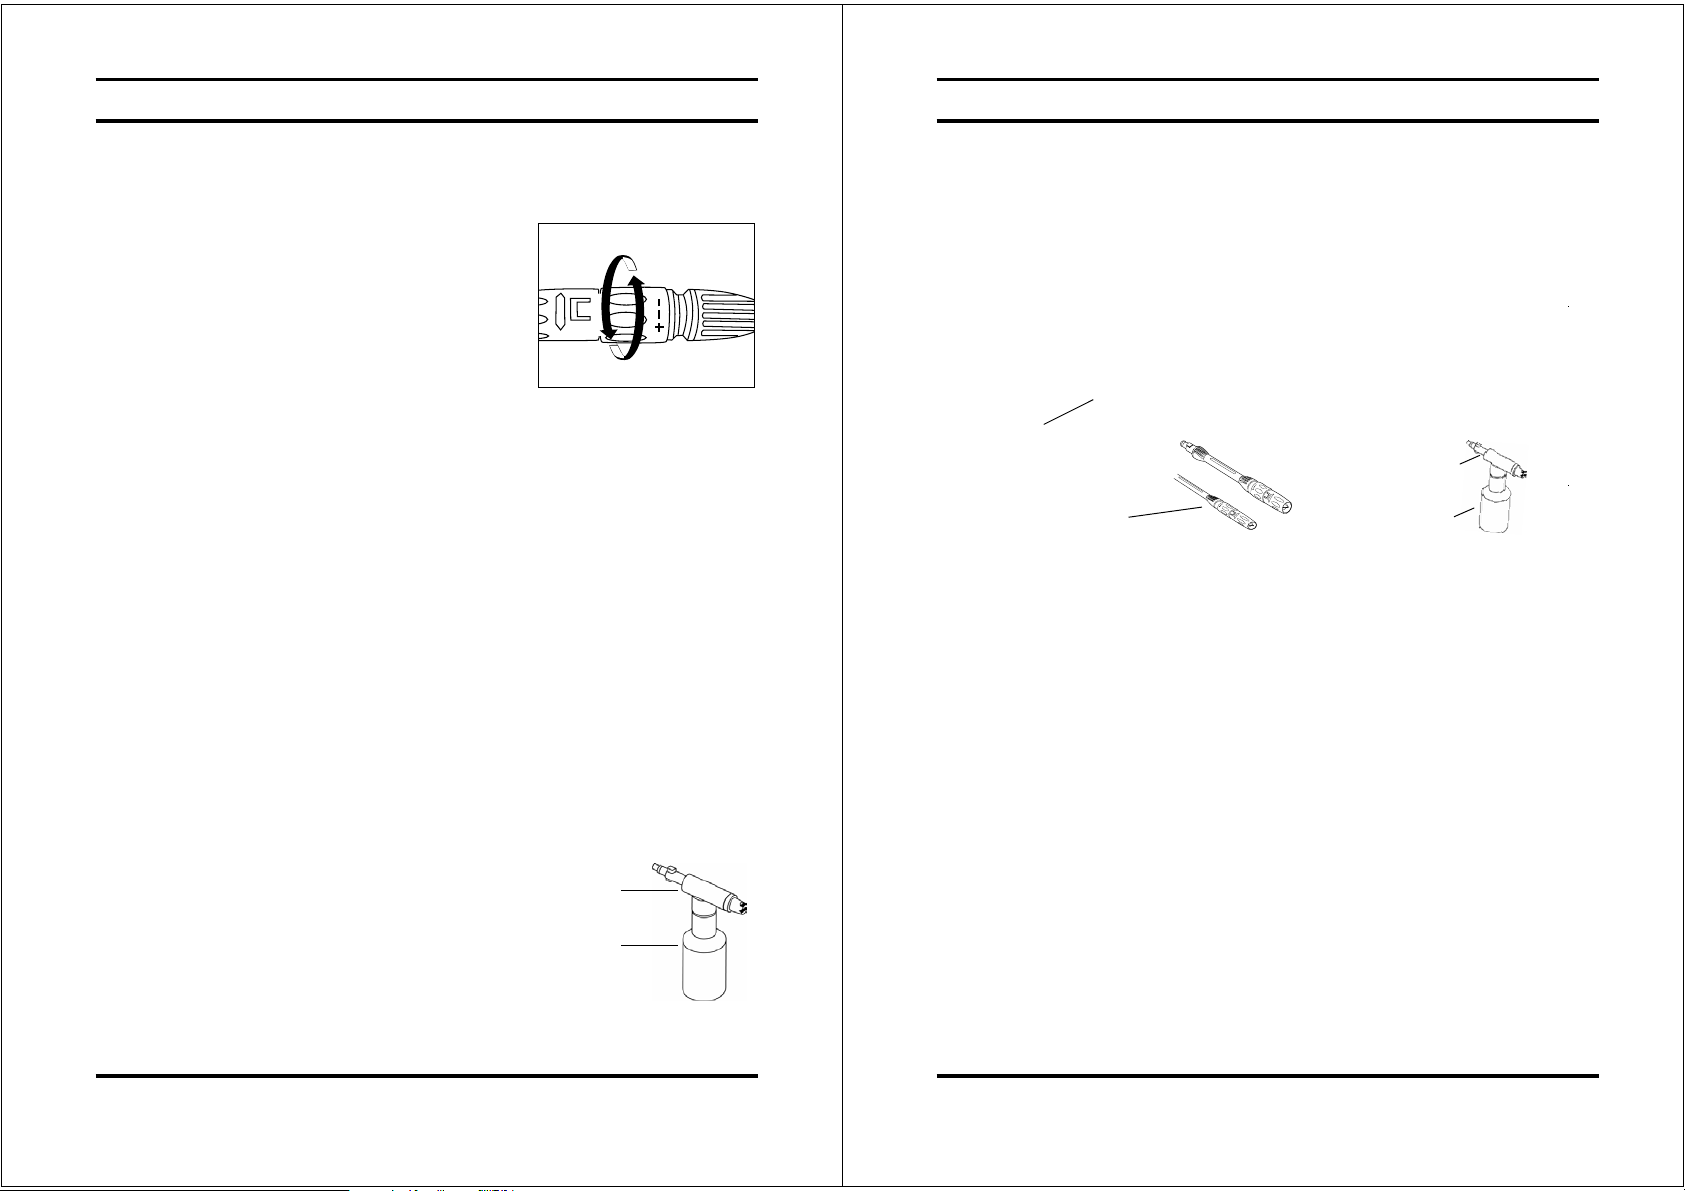
To adjust the pressure,proceed as follows:
1. Hold the shaft of the lance in one hand.
2. Turn the grey part of the nozzle clockwise
(to “+” end) to obtain the high pressure.
3. Turn the grey part of the nozzle anticlockwise
(to “ ” end) to obtain the low pressure.
Low Pressure Setting
High Pressure Setting
AUTO STOP SYSTEM
The pressure washer is fitted with an automatic stop system to protect the motor
when in use.
When the trigger is released the motor will stop.
When the trigger is squeezed the motor will start up again.
USING DETERGENTS
Biodegradable detergents are specifically formulated to protect the environment and
your pressure washer. These Detergents will not clog the filter and will protect the
internal parts of the pressure washer for a longer life.
Step 3
Remove the Front gun, and install the detergent nozzle with the bottle.
Back-gun
Detergent nozzle
Front-gun
Detergent bottle
Step 4
To apply the detergent to your work area. Turn the pressure washer switch
to the ON position. Pull the trigger to operate the unit. The pressure washer will mix
the detergent with water. Do not allow the detergent to dry on the object that you are
cleaning.
Step 1
Open the cover of the detergent bottle by twisting it off.
Step 2
Fill the detergent bottle with any approved liquid detergent.
Close the cover.
21
Detergent nozzle
Detergent bottle
WARNING: NEVER USE PRODUCTS WITH BLEACH OR CHLORINE
OR ANY OTHER CORROSIVE MATERIALS, INCLUDING LIQUIDS
CONTAINING SOLVENTS (I.E. GAS, OILS ETC), TRI-SODIUM
PHOSPHATE PRODUCTS, AMMONIA, OR ACID-BASED CLEANERS.
THESE CHEMICALS WILL HARM THE UNIT AND CAUSE DAMAGE
TO THE SURFACE BEING CLEANED. ALWAYS READ THE LABEL.
31
Page 8
1600 PSI Pressure Washer
1600 PSI Pressure Washer
CLEAN-UP AND STORAGE
Shutting Down the Pressure Washer
WHEN FINISHED USING THE PRESSURE WASHER,FOLLOW THESE
STEP S TO SHUT DOWN THE UNIT:
Ь Turn the pressure washer to the OFF position.
Ь Turn off the water supply.
Ь Before discon ne cting high pressu re hose connection, point the gun in a
safe direction and discharge the high pressure water.
Ь Disconnect high pressure hose from the pressure washer and gun.
Ь Disconnect ga rden hose from the pressure washer.
Ь Remove excess wate r from the
drain any remaining water from inlet and outlet fittings.
Ь Remove WThe ater Intake Filter and flush with water to remove dirt or debris.
Return filter once it is cleaned.
pump by tipping the unit on both sides to
the
Winterizing and Long-Term Storage
FOLLOW ALL OF THE ABOVE SHUT-DOWN PROCEDURES,ADDING
THE FOLLOWING STEPS….
After disconnecting the water supply, and before disconnecting the
Ь
high pressure hose, turn the pressure washer on for 2 3 seconds, until any
remaining water in the pump exits. Turn unit off immediately.
CONTINUED USE OF THE PRESSURE WASHER WITHOUT THE
WATER SUPPLY ATTACHED WILL CAUSE SEVERE DAMAGE TO
THE UNIT!
Always store the pressure washer, parts, and accessories in an area with a
Ь
temperature above 0° C (32° F).
WARNING: FAILURE TO COMPLY WITH THESE STORAGE
INSTRUCTIONS WILL RESULT IN DAMAGE TO THE PUMP
ASSEMBLY
.
the
Maintenance
Ь This pressure washer is supplied with a closed lubrication system, so no
addition of oil is nee ded.
Ь Check all hoses and accessoriesfor damage prior to use.
Ь Check the water intake filter periodically for deposits. Clean this filter
regula rly for maximum performance.
Ь Drain the detergent reservoir and flush with running water.
Ь Wipe away any remaining water on allparts and fittings.
Ь Engage the gun safety lock.
Ь Store the pressure washer, parts, and accessories in an
area with a temperature above 0°C (32°F).
41
51
Page 9
1600 PSI Pressure Washer
CLEANING TIPS
1600 PSI Pressure Washer
WARNING: ALWAYS TEST THE SPRAY IN AN AREA FREE AND
CLEAR OF PEOPLE AND OBJECTS BEFORE YOU AIMING AT THE
INTENDED CLEANING SURFACE.
Wood and Vinyl Decks
Rinse the area with fresh water. If using detergent, fill the detergent
reservoir and apply to the area being cleaned at low pressure. For optimal results,
reduce your work area to smaller sections and clean each section one at a time. Allow
the detergent to rest on the surface for a few minutes and then rinse at high pressure.
Do not let the cleanser dry. Always clean from left to right and top to bottom for best
results. Rinse at high pressure using the fan spray keeping the tip of the spray nozzle
at least 6 9 inches from the cleaning surface. Maintain a further distance from the
cleaning area when using a direct spray.
Caution: For softer woods, increase the distance from the cleaning area.
Cement Patios, Stone, and Brick
Rinse the area with fresh water. If using detergent, fill the
apply to the area being cleaned at low pressure. Rinse at high
fan spray in a sweeping motion keeping the tip of the spray nozzle
inches from the cleaning surface. Maintain a further distance from the
area when using a direct spray.
detergent
reservoir and
pressure using the
at least 3 6
cleaning
Maintain a greater rdistance from the cleaning area when using a direct spray. Wipe
the surface dry for a polished finish.
Barbecue Grills, Power Equipment, and Garden Tools
Rinse the area with fresh water. If using detergent, fillthe detergent reservoir and
applyto the area being cleaned at low pressure. Allow the detergent remain on the
surface for a few minutes, but do not let the dete rgent dry.
Rinseathighpressureusingthefanspraykeepingthetipofthespraynozzleatleast
1 3 inches from the cleaning surface. Maintain a greater distance from the cleaning
area when using a direct spray.
TECHNICAL DATA
Main voltage 120 V
Main frequency 60 Hz
Max. operating pressure 1600PSI
Water consumption 1.6 GPM
Max. pressure water supply 40-80PSI
Max. water temperature 40-140F(5-60°C)
Weight 18LBS
WARRANTY REGARDING
Refer to the enclosed guarantee conditionsfor the terms and conditions of guarantee.
Cars, Boats, and Motorcycles
Rinse the area with fresh water. If using detergent, fill the
and app
clean one side at a time. A
minutes, but
fan spray in a sweeping motion keeping the tip of the spray nozzle at least 8 inches
from the cleaning surface.
ly to the area being cleaned at low pressure. To achieve
llow the detergent to remain on the surface
do not let the detergent dry. Rinse at high pressure using the
61
detergent reservoir
the best results,
for a few
ENVIRONMENT
Should your machine need replacement after extended use, please do not dispose
with regular wash but dispose of it in an environmentally safe way.
71
Page 10
1600 PSI Pressure Washer
TROUBLESHOOTING TIPS
WHEN THE SWITCH IS IN THE “I” POSITION THE MACHINE WILL NOT START
PROBABLE CAUSE
Electrical socket is faulty Check plug, socket, and fuses
Voltage is inadequate Check that the voltage is adequate
GFCI trips Reset / Try anothe r outlet
Powercordisnotpluggedin Pluginpowercord
THE PUMP DOES NOT REACH ADEQUATE PRESSURE OR FLUCTUATES
PROBABLE CAUSE SOLUTION
Water Intake Filter is clogged Remove and clean filter
Pump is drawing air Tighten connections/bleed system
Suction valves are clogged/worn Clean or replace valves
Diameter of garden hose too small Replace with to 1” inch garden hose
Water supply is restricted Check hose for kinks or leaks
Insufficient water supply Fully open the water source
THE PRESSURE WASHER HAS OR WILL NOT MAINTAIN PRESSURE
PROBABLE CAUSE SOLUTION
Excessive air in waterline and pump Turn unit and water supply off
THEPRESSUREWASHERMAKESEXCESSIVENOISE
SOLUTION
and bleed lines
1600PSI PRESSURE WASHER
LIMITED WARRANTY
Pulsar Products, Inc.
application (personal, residential or household usage) that all products covered under this
warranty are free from defects in material and workmanship for one year from the date of
purchase. All products covered by this limited warranty which are used in commercial
applications (i.e. income producing) are warranted to be free of defects in material and
workmanship for 90 days from the date of original purchase. Products covered under this
warranty include air compressors, air tools, serivce parts, pressure washers and generators.
Pulsar Products, Inc.
components which have failed within the warranty period. Service will be scheduled
according to the normal work flow and business hours at the service center location, and
the availability of replacement parts. All decisions of Pulsar Products, Inc.with regard to this
limited warranty shall be final.
This warranty gives you specific legal rights, and you may also have other rights which vary
from state to state.
RESPONSIBILITY OF ORIGINAL PURCHASER(initial User):
To process a warranty claim on this product, DO NOT return item to the retailer. The
product must be evaluated by an Authorized Warranty Service Center. For the location of the
nearest Authorized Warranty Service Center contact the retailer or place purchase.
warrants to the original purchaser who uses the product in aconsumer
will repair or replace, at Pulsar Products, Inc.’s sole option, products or
PROBABLE CAUSE SOLUTION
Intake is blocked Check the intake valves
Valves are worn, dirty, or clogged Check, clean or replace valves
Water Intake Filter is dirty Check, clean, or replace filter
THE MOTOR STOPS RUNNING WHILE IN USE
PROBABLE CAUSE SOLUTION
Net voltage lower than suggested
Check to determine th
e voltage is adequate
81
Retain original cash your sales receipt as proof of purcgase for all warranty work.
Use reasonable care in the operation and maintenance of the product as described in the
Owner’s Manual(s).
Deliver or ship the product to the Authorized Warranty Service Center. Freight costs, if any
must be paid by the purchaser.
If the purchaser does not receive satisfactory results from the Authorized Warranty Service
Center, the purchaser should contact
Pulsar Products, Inc
..
19
Page 11
1600PSI PRESSURE WASHER
1600PSI PRESSURE WASHER
LIMITED WARRANTY (cont’d)
THIS WARRANTY DOES NOT COVER:
Merchandise sold as reconditioned, used as rental equipment, or floor or display models.
Merchandise that has become damaged or inoperative because of ordinary wear, misuse,
cold, heat, rain, excessive humidity, freeze damage, use of improper chemicals, negligence,
accident, failure to operate the product in accordance with the instrctions provided in the
Owner’s Manual(s) supplied with the product, improper maintenance, the use of
accessories or attachments not recommended by Pulsar Products, Inc.,or unauthorized
repair or alterations.
Repair and transportation costs of merchandise determind not to be defective.
Costs associated with assembly, required oil, adjustments or other installation and start up
costs.
Expendable parts or accessories supplied with the product which are expected to become
inoperative or unusable after a resonable period of use.
Merchandise sold by Pulsar Products, Inc. which has been manufactured by and
the product of another company, such as gasonline engines. The product
as
warranty, if any, will apply.
identified
manufacturer’s
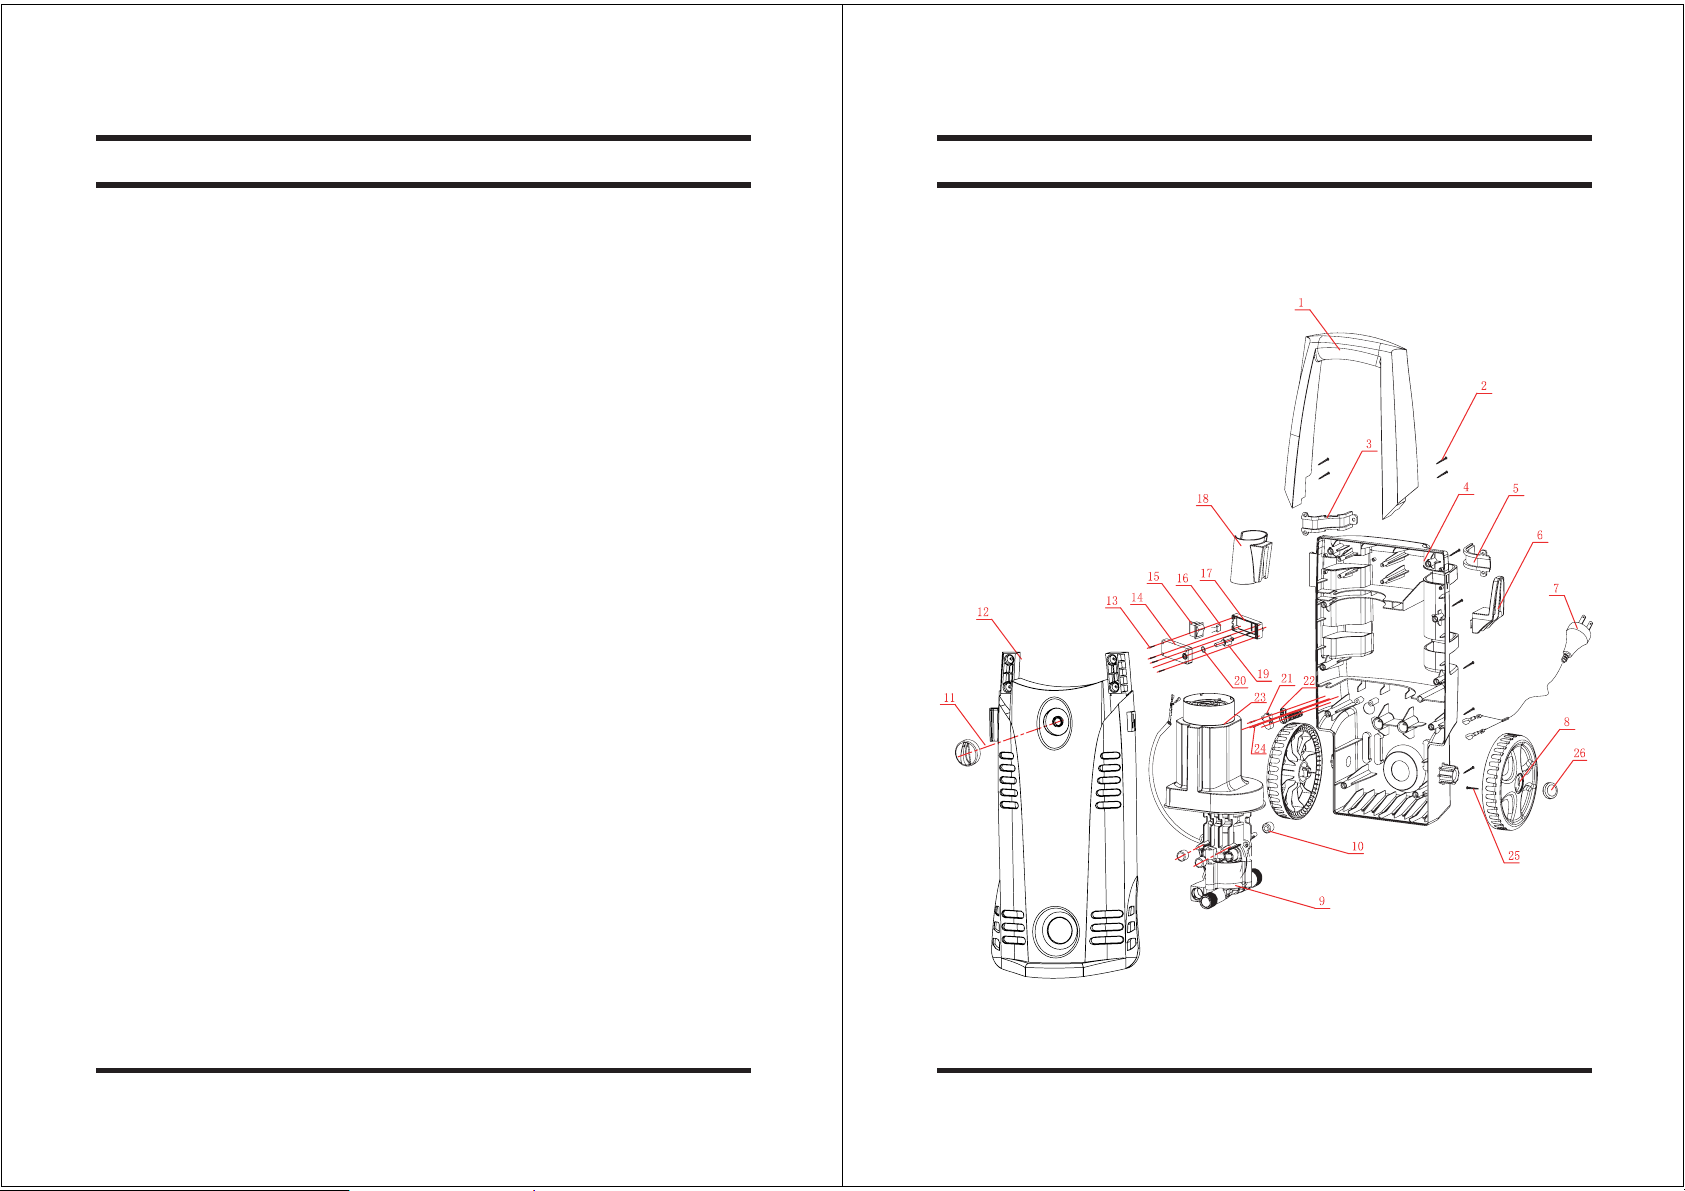
EXPLODED VIEW
ANY INCIDENTAL, INDIRECT OR CONSEQUENTIAL LOSS, DAMAGE, OR EXPENSE THAT
MAY RESULT FROM ANY DEFECTS, FAILURE OR MALFUNCTION OF THE PRODUCT IS
NOT COVERED BY THIS WARRANTY. Some states do not allow exclusion, so it may
not apply to you.
IMPLIED WARRANTIES, INCLUDING THOSE OF MERCHANTABLITY OR FITNESS FOR A
PARTICULAR PURPOSE, ARE LIMITED TO ONE YEAR FROM THE DATE OF ORIGINAL
PURCHASE. Some states do not allow limitations on how long an implied warranty lasts,
so the above limitations may not apply to you.
20
21
Page 12

1600PSI PRESSURE WASHER
PARTS LISTING
Part No. Description Part No.
HandlePWE1600-01
PWE1600-02 Screws(ST3.9X25) 2
PWE1600-03 Baffle(left) 3
PWE1600-04 Case(rear) 4
PWE1600-05 Baffle(right) 5
PWE1600-06 Hook 6
PWE1600-07 Plug and Power Cable
PWE1600-08 Wheels 8
PWE1600-09 Motor and Pump 9
PWE1600-10 Rubber Bands 10
PWE1600-11 Switch Knob 11
PWE1600-12 Case(front) 12
PWE1600-13 Screws(ST2.9X20) 13
PWE1600-14 Switch Case(front) 14
PWE1600-15 Switch 15
PWE1600-16 Capacitor 16
PWE1600-17 Switch Case(rear) 17
PWE1600-18 Shelves 18
PWE1600-19 Staff 19
PWE1600-20 O-Ring( ѫ7Xѫ1.8 ) 20
PWE1600-21 Clip Cover 21
PWE1600-22 Jacket 22
PWE1600-23 Motor Cover 23
PWE1600-24 Screws(ST3.9X16) 24
PWE1600-25 Screws(ST2.9X8) 25
PWE1600-26 Wheel Caps 26
1
7
22
 Loading...