

Page 1
2021-2022 FIRST
®
Tech Challenge
Basic ‘Bot Guide for REV
Part 1
Page 2

2 | FIRST® Tech Challenge Basic ‘Bot Guide for REV- Part 1
Revision 1: 6.16.2021
Sponsor Thank You
Thank you to our generous sponsors for your continued support of the FIRST® Tech Challenge!
Page 3

FIRST® Tech Challenge Basic ‘Bot Guide for REV- Part 1 | 3
Gracious Professionalism® - “Doing your best work while treating others with respect and kindness - It’s what makes FIRST, first.”
Revision History
Revision
Date
Description
1
6/16/2021
Initial Release
Contents
Contents .................................................................................................................................................................. 3
Introduction ............................................................................................................................................................. 5
What is FIRST® Tech Challenge?....................................................................................................................... 5
Gracious Professionalism® ..................................................................................................................................... 5
Introduction to this Guide ........................................................................................................................................ 6
About this Guide .................................................................................................................................................. 6
Parts .................................................................................................................................................................... 6
Tips and Tricks .................................................................................................................................................... 6
Drive Assemblies and Frame ................................................................................................................................. 7
Step 1: Build Drive Brackets ............................................................................................................................... 7
Step 2: Build Motor Assemblies .......................................................................................................................... 8
Step 3: Build the Right and Left Rail ................................................................................................................... 9
Parts Needed: ..................................................................................................................................................... 9
Step 4: Add Drive Wheels ................................................................................................................................. 10
Back Support Beam .............................................................................................................................................. 11
Step 1: Add Screws to Corner Brackets ........................................................................................................... 11
Step 2: Add Corner Brackets to Beam ............................................................................................................. 12
Step 3: Add Floating Screws to Beam .............................................................................................................. 13
Step 4: Add Back Support Beam ...................................................................................................................... 14
Front Support Beam.............................................................................................................................................. 15
Step 1: Add Screws to Corner Brackets ........................................................................................................... 15
Step 2: Add Corner Brackets to Beam ............................................................................................................. 16
Step 3: Add Floating Screws to Beam .............................................................................................................. 17
Step 4: Add Front Support Beam ...................................................................................................................... 18
Step 5: Add Switch Bracket .............................................................................................................................. 19
Caster Wheels....................................................................................................................................................... 20
Step 1: Build Caster Brackets ........................................................................................................................... 20
Step 2: Add Caster Brackets to Chassis .......................................................................................................... 21
Step 3: Add the Omni Wheels........................................................................................................................... 23
Control Hub ........................................................................................................................................................... 26
Step 1: Add the Support Plate .......................................................................................................................... 26
Step 2: Add the Rev Robotics Control Hub ...................................................................................................... 27
Page 4

4 | FIRST® Tech Challenge Basic ‘Bot Guide for REV- Part 1
Revision 1: 6.16.2021
Step 3: Add the Left Drive Motor Power Cable ................................................................................................ 28
Step 4: Add the Right Drive Motor Power Cable .............................................................................................. 29
Power Switch ........................................................................................................................................................ 30
Step 1: Add the Switch ...................................................................................................................................... 30
Step 2: Connect the Switch to the Motor and Sensor Controller ..................................................................... 31
Battery ................................................................................................................................................................... 32
Step 1: Add the Battery ..................................................................................................................................... 32
Step 2: Connect the Battery to the Switch ........................................................................................................ 33
Final Steps ............................................................................................................................................................ 34
What’s Next? ..................................................................................................................................................... 34
Resources ......................................................................................................................................................... 34
Appendix A – Resources ...................................................................................................................................... 35
Game Forum Q&A ............................................................................................................................................ 35
Volunteer Forum................................................................................................................................................ 35
FIRST Tech Challenge Game Manuals ............................................................................................................ 35
FIRST Headquarters Pre-Event Support .......................................................................................................... 35
FIRST Websites ................................................................................................................................................ 35
FIRST Tech Challenge Social Media................................................................................................................ 35
Feedback ........................................................................................................................................................... 35
Page 5

FIRST® Tech Challenge Basic ‘Bot Guide for REV- Part 1 | 5
Gracious Professionalism® - “Doing your best work while treating others with respect and kindness - It’s what makes FIRST, first.”
Introduction
What is FIRST
®
Tech Challenge?
FIRST® Tech Challenge is a student-centered program that focuses on giving students a unique and
stimulating experience. Each year, teams engage in a new game where they design, build, test, and program
autonomous and driver operated robots that must perform a series of tasks. To learn more about FIRST® Tech
Challenge and other FIRST® Programs, visit www.firstinspires.org.
Gracious Professionalism®
FIRST® uses this term to describe our programs’ intent.
Gracious Professionalism® is a way of doing things that encourages high-quality work, emphasizes the
value of others, and respects individuals and the community.
Watch Dr. Woodie Flowers explain Gracious Professionalism in this short video.
Learn more about the roles of volunteers on our Volunteer Resources page, “Volunteer Role Descriptions”.
Page 6

6 | FIRST® Tech Challenge Basic ‘Bot Guide for REV- Part 1
Revision 1: 6.16.2021
Introduction to this Guide
About this Guide
The Basic ‘Bot Guide was created as a resource for teams looking for a step-by-step instructional guide to
learn how to build a basic chassis and structure. There are multiple versions of this guide, previously called the
“Push Bot Guide”, this version the Basic ‘Bot Guide for REV Part 1 has been created to use the new and
differing parts in the 2020-2021 season’s REV kit of parts.
Parts
• REV FTC Competition Set
o Tools included with this kit
• Electronics Modules and Sensors Set
• Control & Communication Set 1 or 2
• (Optional) A ruler is not needed to build this robot, but it is necessary to make sure that the robot is
competition ready.
Tips and Tricks
• Secure the screws/nuts just enough, so parts do not slide/move relative to each other. Overtightening
the screws will damage the aluminum extrusions.
• Make sure that set screws are installed in every axle hub, motor hub, and axle collar.
• Refer to the legend provided in the Kit of Parts, if any parts are unfamiliar.
• Make sure that all assemblies are square. It is hard to drive a crooked robot straight!
• The drive wheels are powered by two DC motors, which are relatively heavy. The drive wheels are on
the back of the robot, because that is where the most weight is. This weight is needed to help the
wheels grip the surface better.
• Omni wheels are on the front of the robot, which allows the robot to turn more easily. The omni wheels
can slide sideways with very little friction due to the rollers.
• Unless otherwise noted, the top image in each step shows the necessary parts; the lower image shows
the completed assembly.
Page 7
FIRST® Tech Challenge Basic ‘Bot Guide for REV- Part 1 | 7
Gracious Professionalism® - “Doing your best work while treating others with respect and kindness - It’s what makes FIRST, first.”
Drive Assemblies and Frame
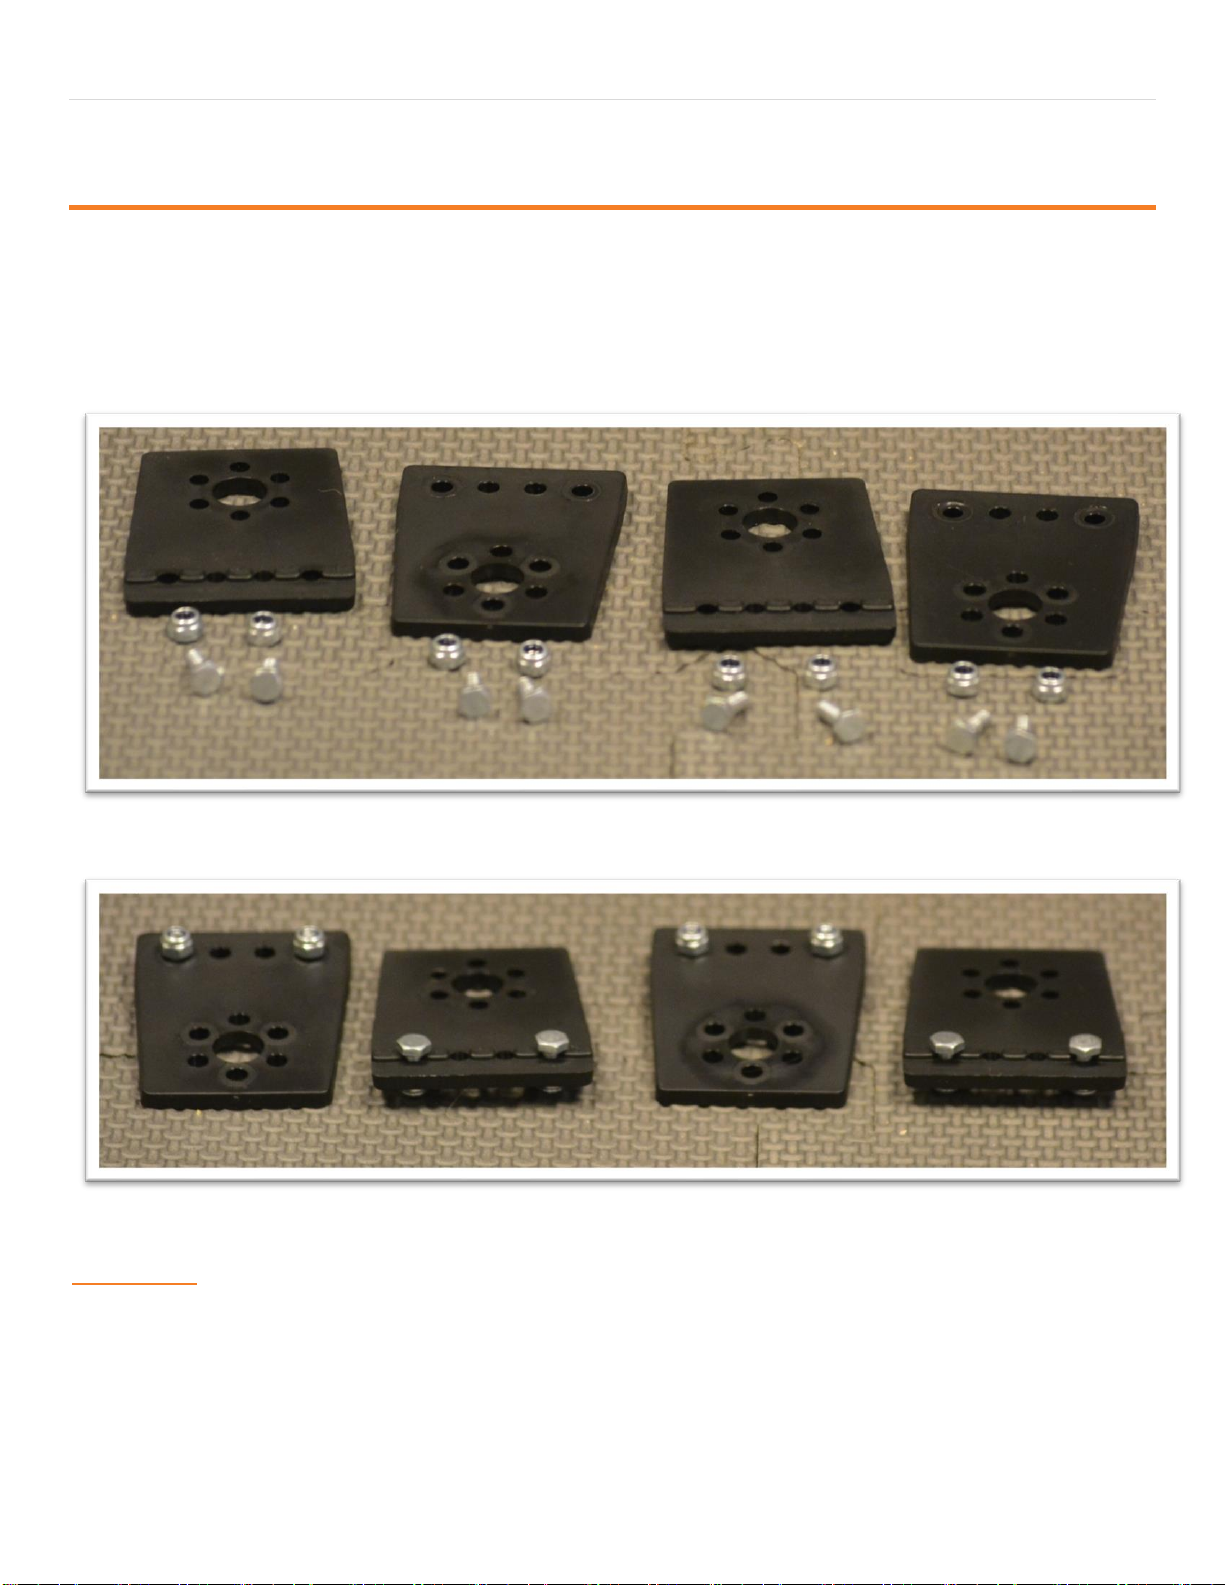
Step 1: Build Drive Brackets
Parts Needed
REV-41-1303 – Bracket, Motion (4)
REV-41-1361 – Nut, Locking, M3 (8)
REV-41-1359 – Screw, Hex Cap, M3, 8mm (8)
Figure 1- Unassembled view
Figure 2- Assembled view
Helpful Hints
• Screw the nuts onto the screws just until it’s difficult to turn them; just so that the nuts don’t fall off. The screw heads will need
to slide along the center of an extrusion in a later step.
Page 8
8 | FIRST® Tech Challenge Basic ‘Bot Guide for REV- Part 1
Revision 1: 6.16.2021
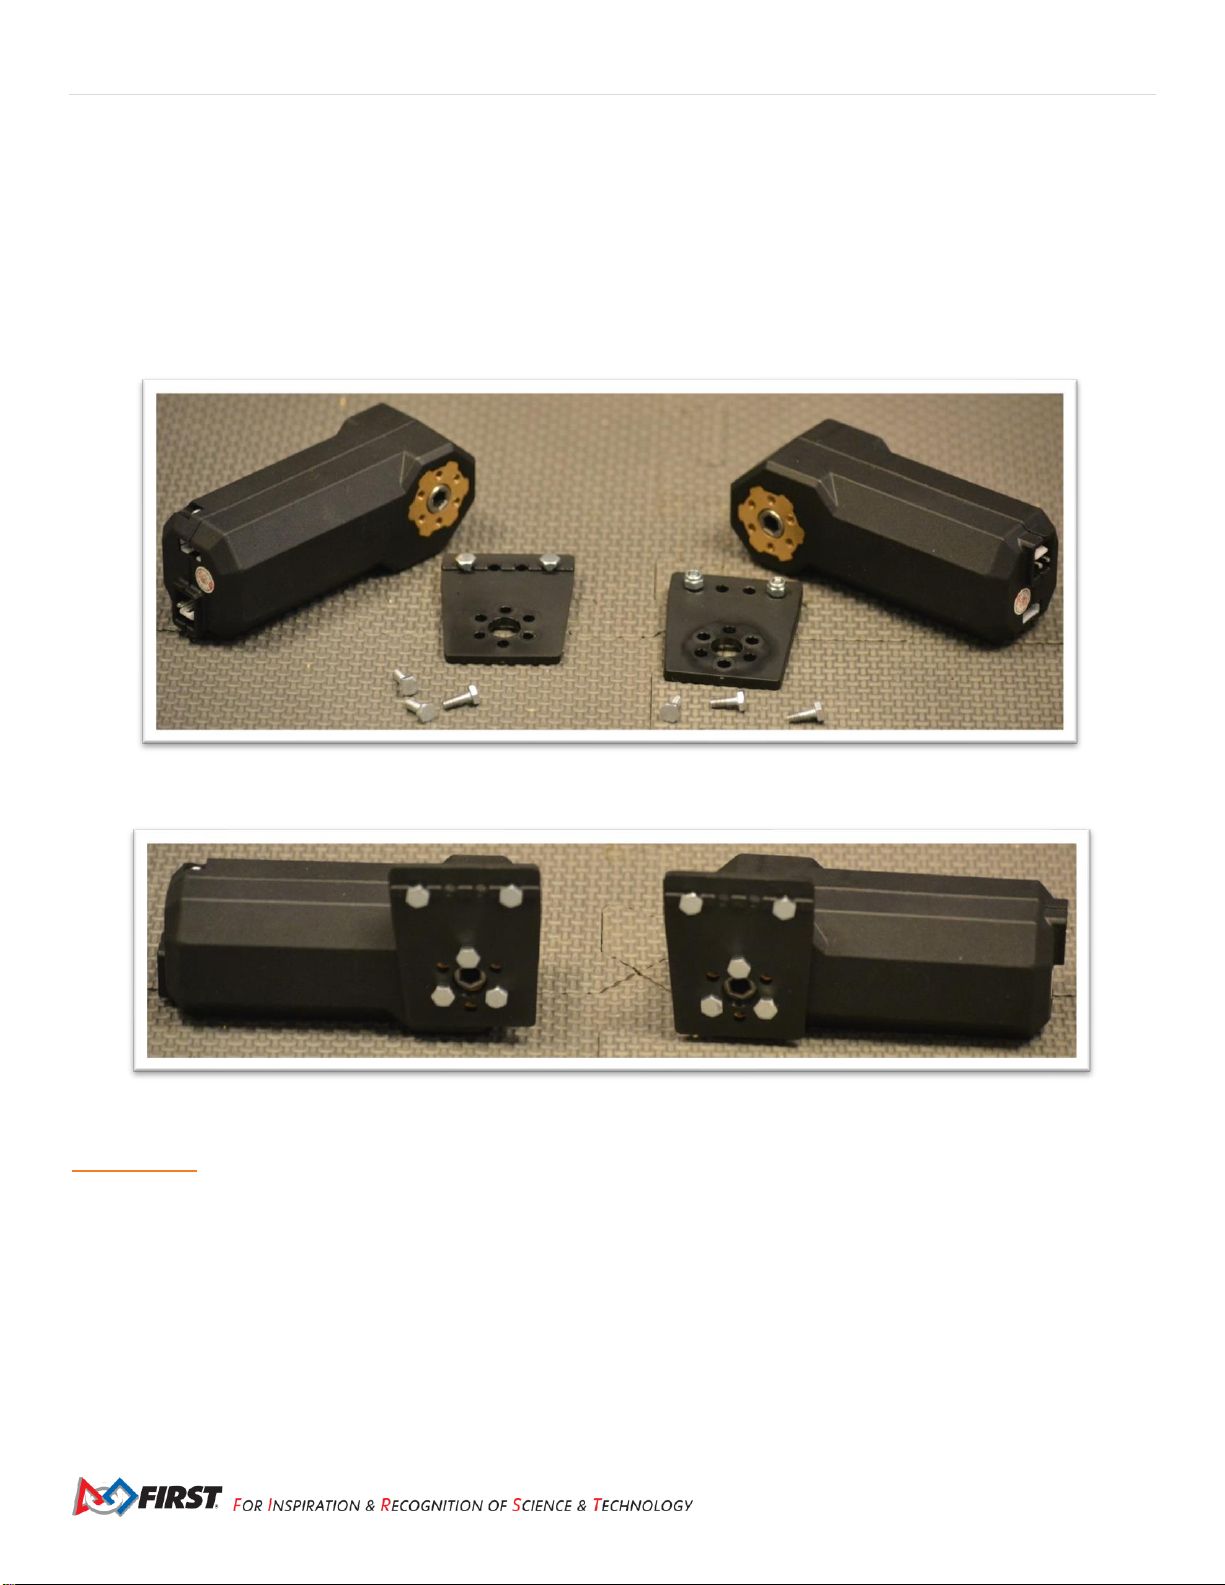
Step 2: Build Motor Assemblies
Parts Needed:
REV-41-1300 – Core Hex Motor w/cables
(2; do not plug cables into the motors yet)
Drive Bracket Assemblies
(1 per motor, 2 total – use only two of the assemblies from step 1)
REV-41-1359 – Screw, Hex Cap, M3, 8mm
(3 per motor, 6 total)
Figure 3- Unassembled view
Figure 4- Assembled view
Helpful Hints
• Make sure that the brackets are facing the correct direction; the alignment ribs should be on the side away from the motor.
• Note that motor directions are reversed – the power plug of the motor pictured on the left is on the bottom; the plug of the
motor on the right is on the top.
Page 9
FIRST® Tech Challenge Basic ‘Bot Guide for REV- Part 1 | 9
Gracious Professionalism® - “Doing your best work while treating others with respect and kindness - It’s what makes FIRST, first.”
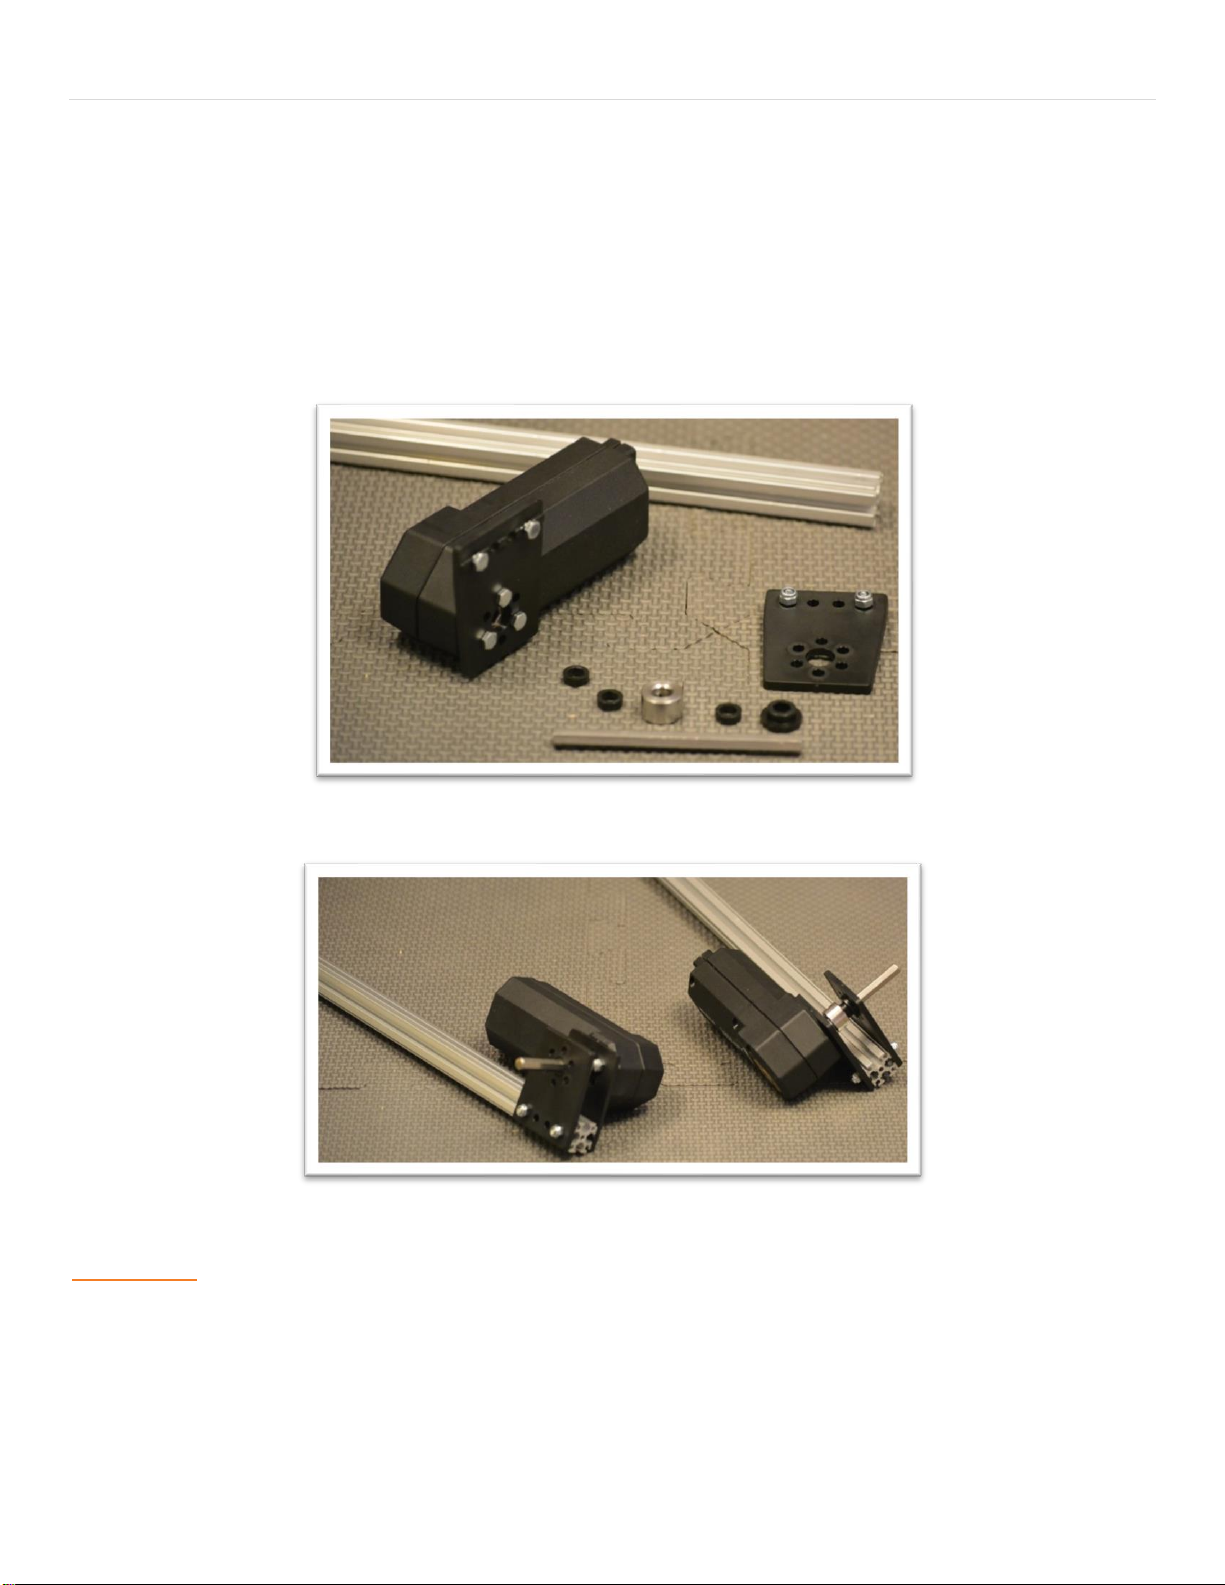
Step 3: Build the Right and Left Rail
Parts Needed:
REV-41-1432 – Extrusion, 420mm, 90-90 degree (1 per side, 2 total)
Motor Assemblies (1 per side, 2 total – from step 2)
Drive Bracket assemblies (1 per side, 2 total –the two remaining from step 1)
REV-41-1324 – Spacer, 3mm (3 per side, 6 total)
REV-41-1327 – Shaft Collar (1 per side, 2 total)
REV-41-1326 – Bearing, Through Bore, Short (1 per side, 2 total)
REV-41-1347 – Shaft, 5mm Hex, 75mm (1 per side, 2 total)
Figure 5- Unassembled view
Figure 6- Assembled view
Helpful Hints
• Slide the head of the screws down the center of the extrusions.
• The brackets should be flush with the end of the extrusions.
• bracket, bearing, spacer, collar, two spacers, bracket with attached motor. (Order from the outside in.)
Page 10
10 | FIRST® Tech Challenge Basic ‘Bot Guide for REV- Part 1
Revision 1: 6.16.2021
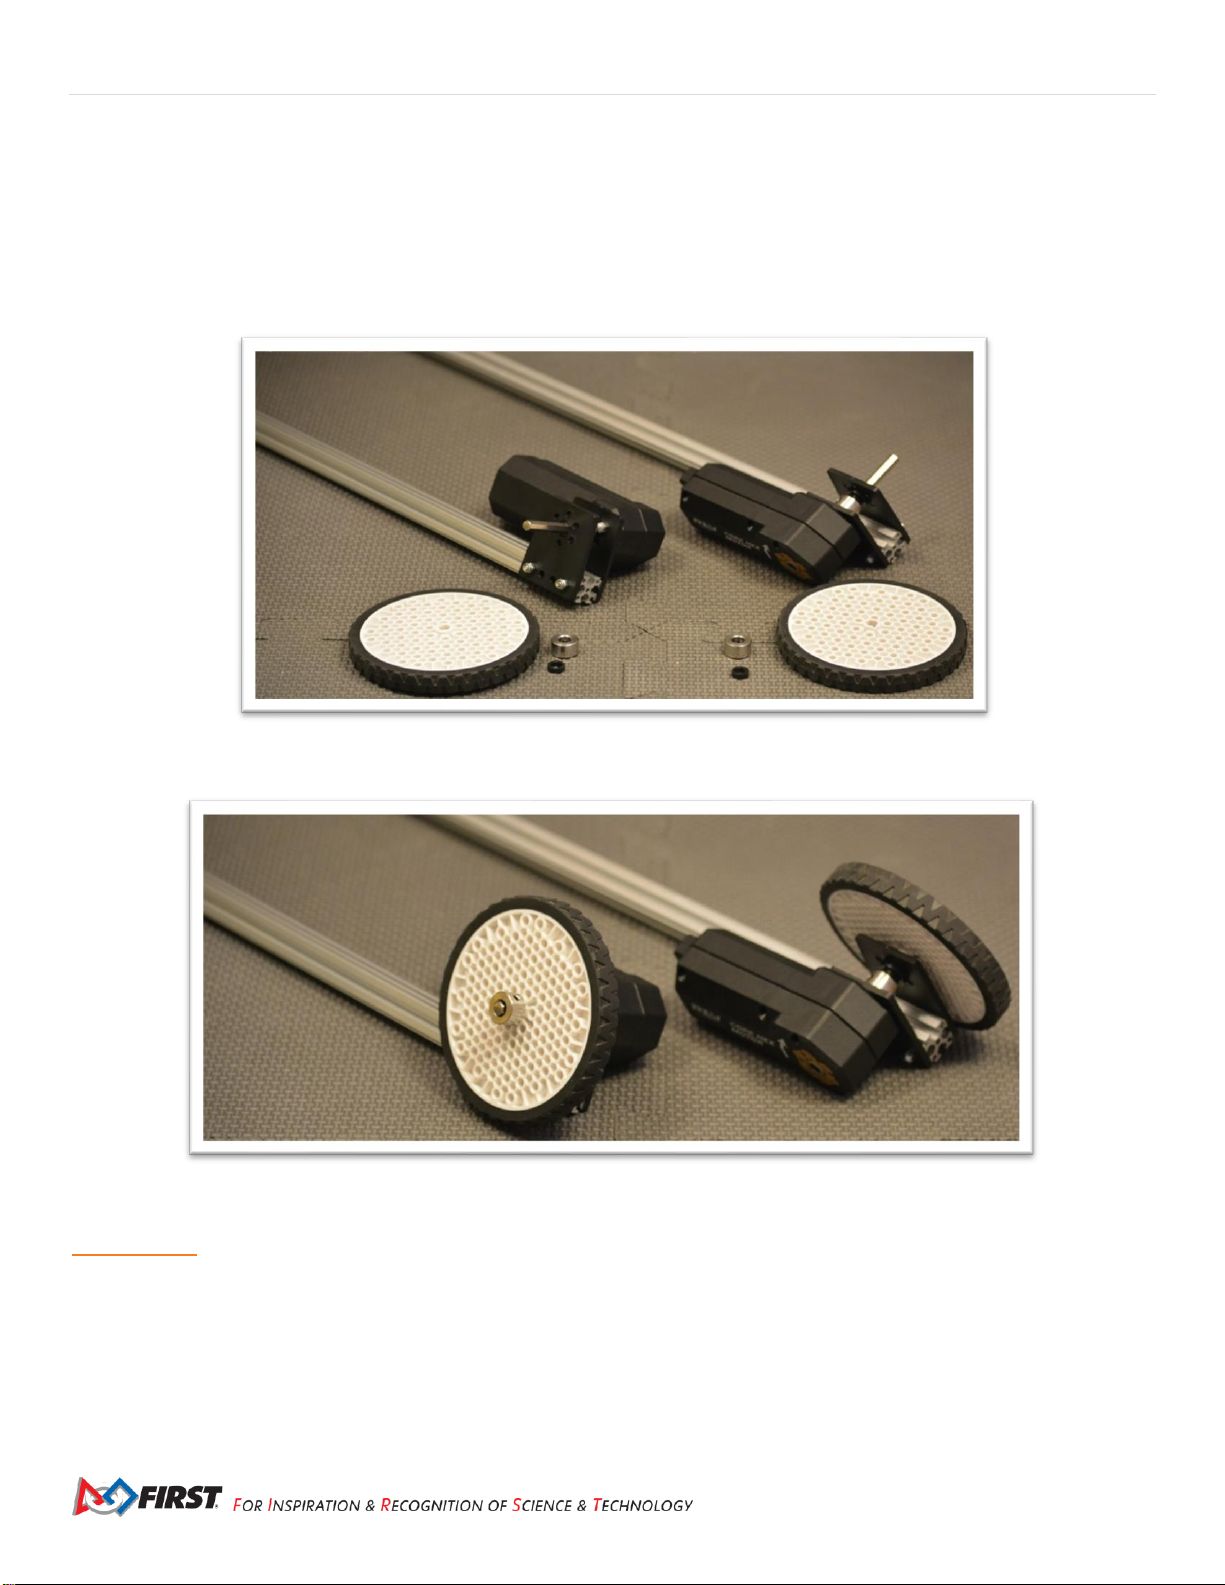
Step 4: Add Drive Wheels
Parts Needed:
Rail Assemblies (1 per side, 2 total – from step 3)
REV-41-1354 – Wheel, Traction 90mm (1 per side, 2 total)
REV-41-1327 – Shaft Collar (1 per side, 2 total)
REV-41-1324 – Spacer, 3mm (1 per side, 2 total)
Figure 7- Unassembled View
Figure 8- Assembled view
Helpful Hints
• Order from the outside in. (Collar, wheel, spacer, rail assembly.)
• Make sure that the wheels do not rub the nuts. If they do, then revisit previous steps to make sure the construction is
accurate.
• Adjust axle length, so it is flush with the collar.
Page 11
FIRST® Tech Challenge Basic ‘Bot Guide for REV- Part 1 | 11
Gracious Professionalism® - “Doing your best work while treating others with respect and kindness - It’s what makes FIRST, first.”
Back Support Beam
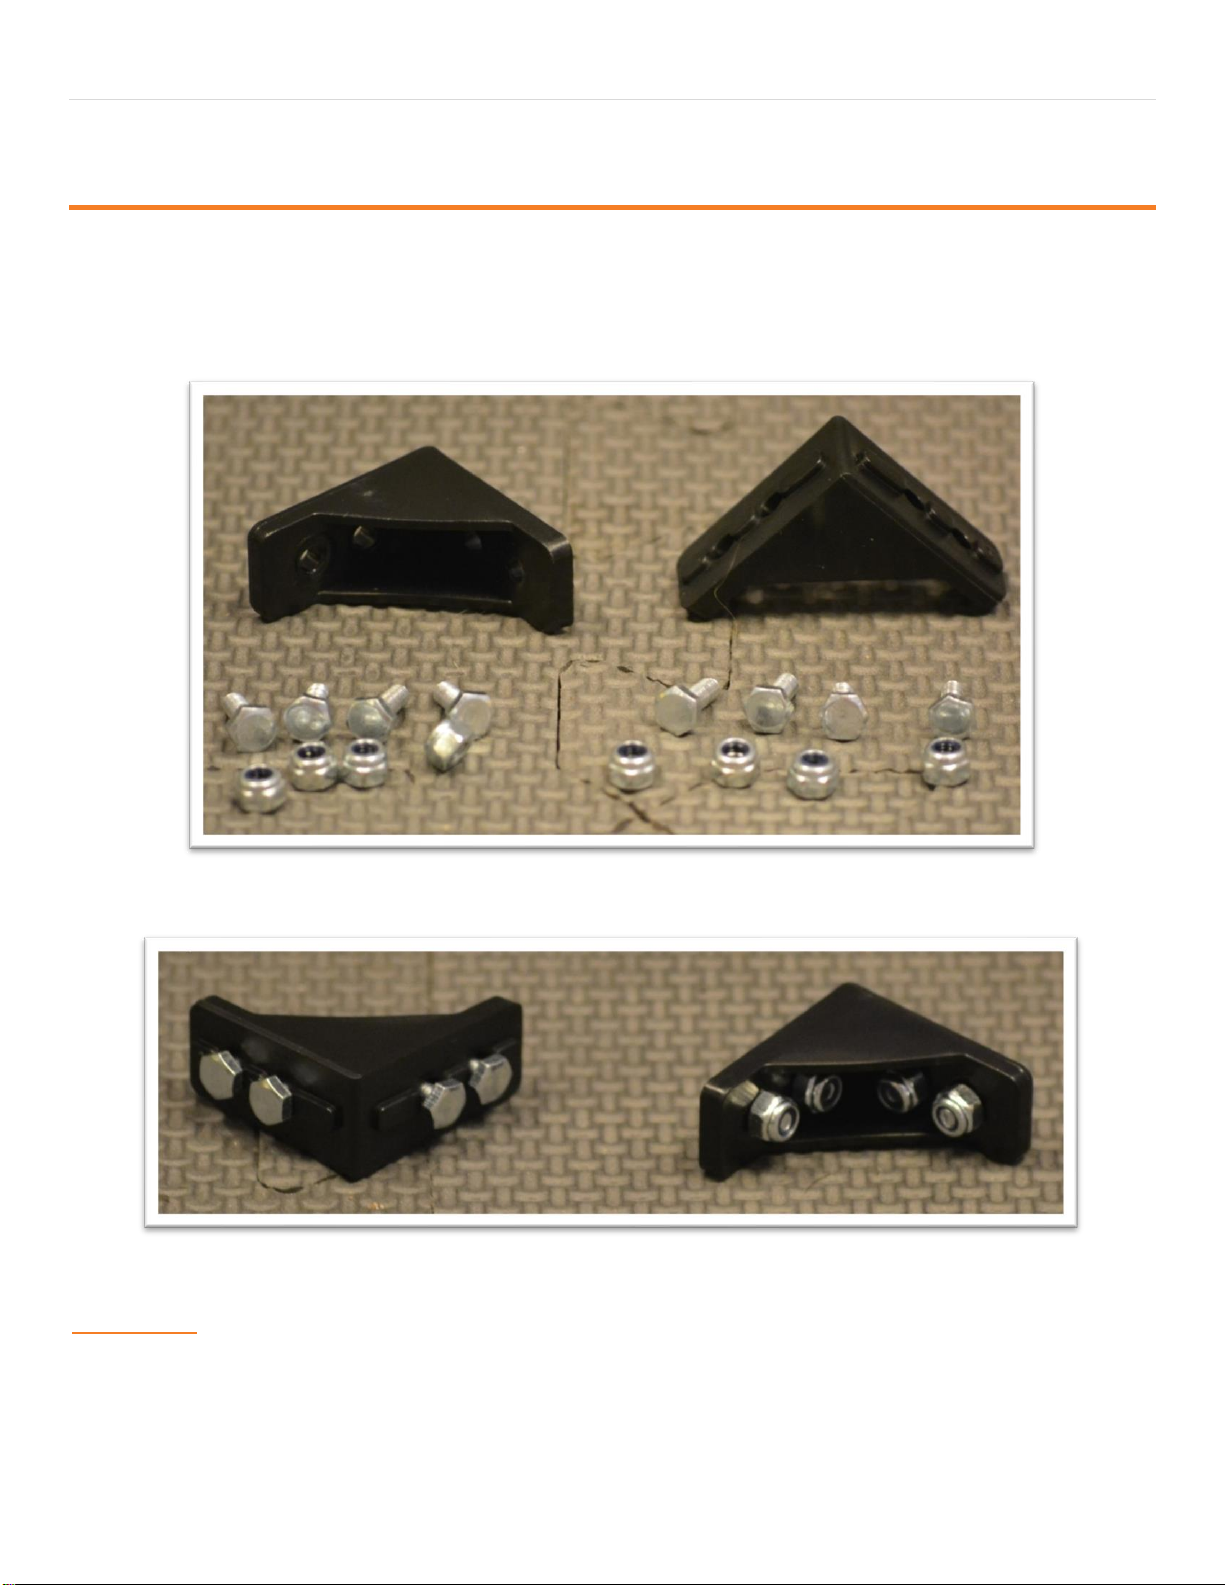
Step 1: Add Screws to Corner Brackets
Parts Needed:
REV-41-1320 – Bracket, Inside Corner (2)
REV-41-1359 – Screw, Hex Cap, M3, 8mm (8)
REV-41-1361 – Nut, Locking, M3 (8)
Figure 9- Unassembled view
Figure 10- Assembled view
Helpful Hints
• Screw the nuts onto the screws just until it’s difficult to turn them; just so that the nuts don’t fall off.
• The screw heads will need to slide along the center of an extrusion in a later step.
Page 12
12 | FIRST® Tech Challenge Basic ‘Bot Guide for REV- Part 1
Revision 1: 6.16.2021
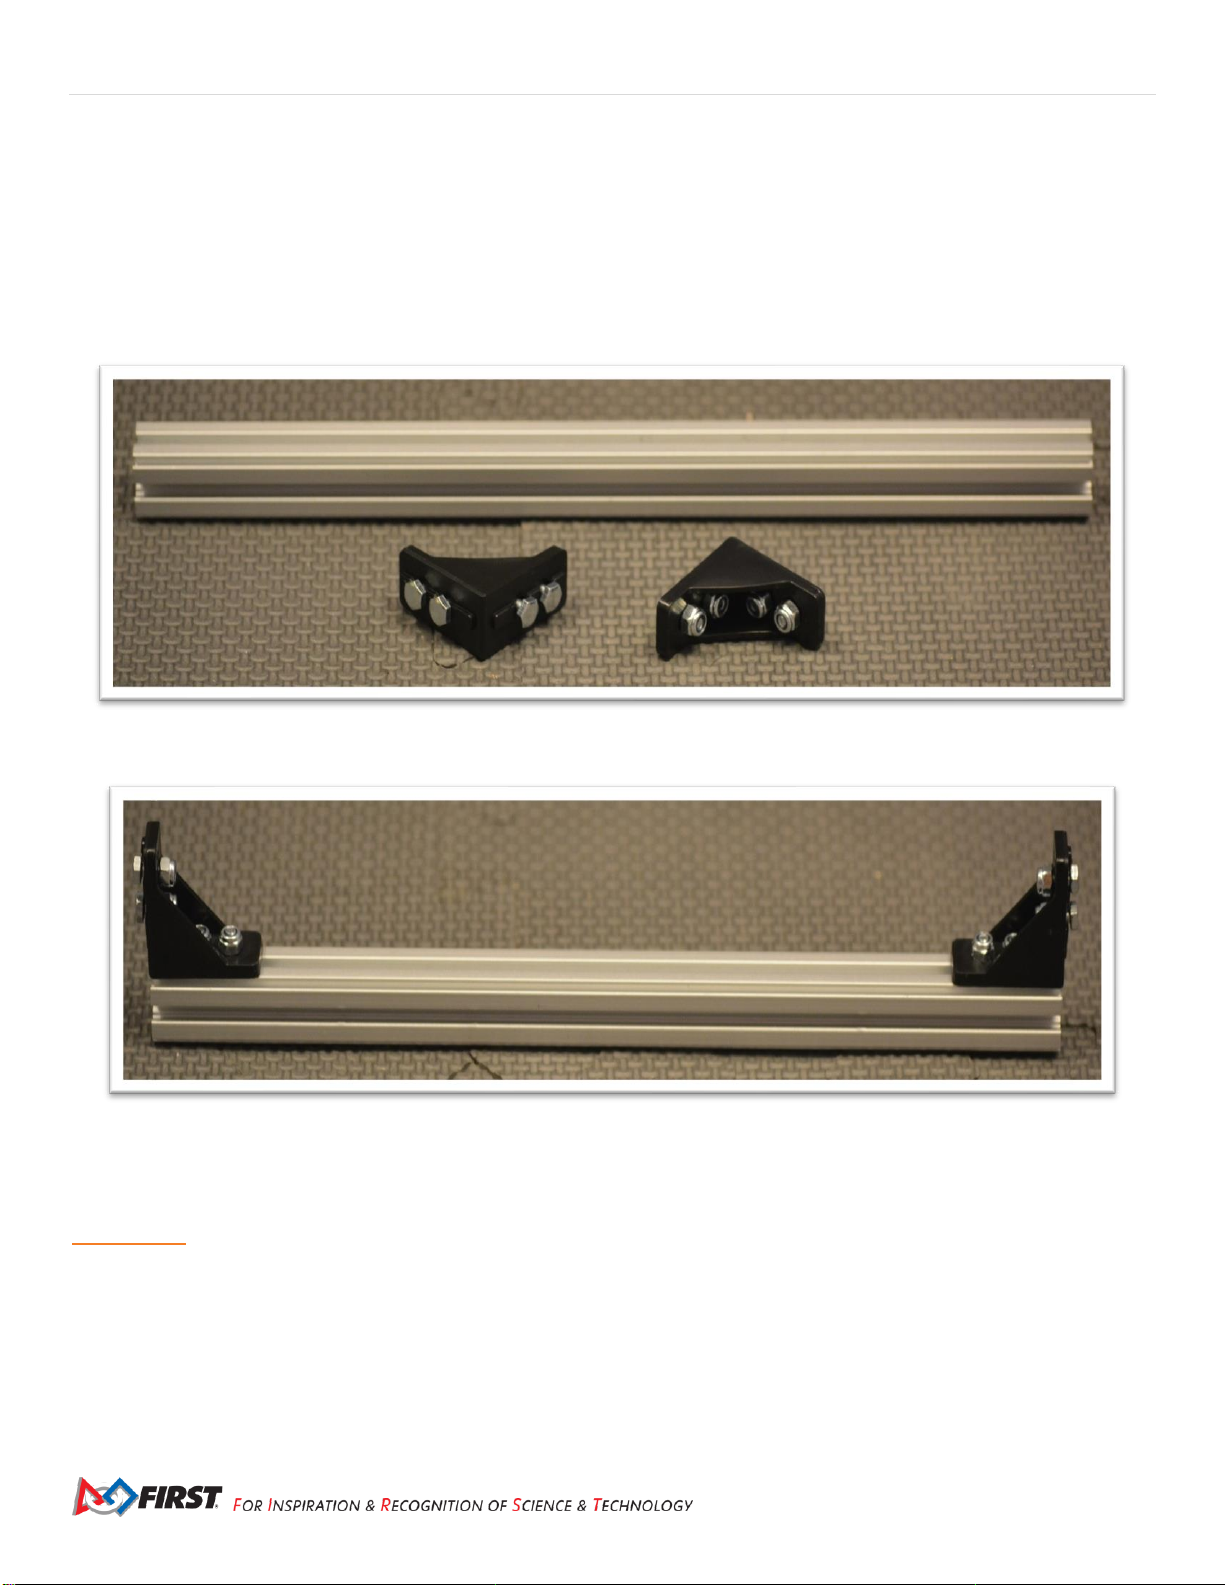
Step 2: Add Corner Brackets to Beam
Parts Needed:
REV-41-1431 – Extrusion, 225mm, 90-90 Degree (1)
Corner Bracket Assemblies (2 - from step 1)
Figure 11- Unassembled view
Figure 12- Assembled view
Helpful Hint
• Slide the head of the screws down the center of the extrusion.
Page 13
FIRST® Tech Challenge Basic ‘Bot Guide for REV- Part 1 | 13
Gracious Professionalism® - “Doing your best work while treating others with respect and kindness - It’s what makes FIRST, first.”
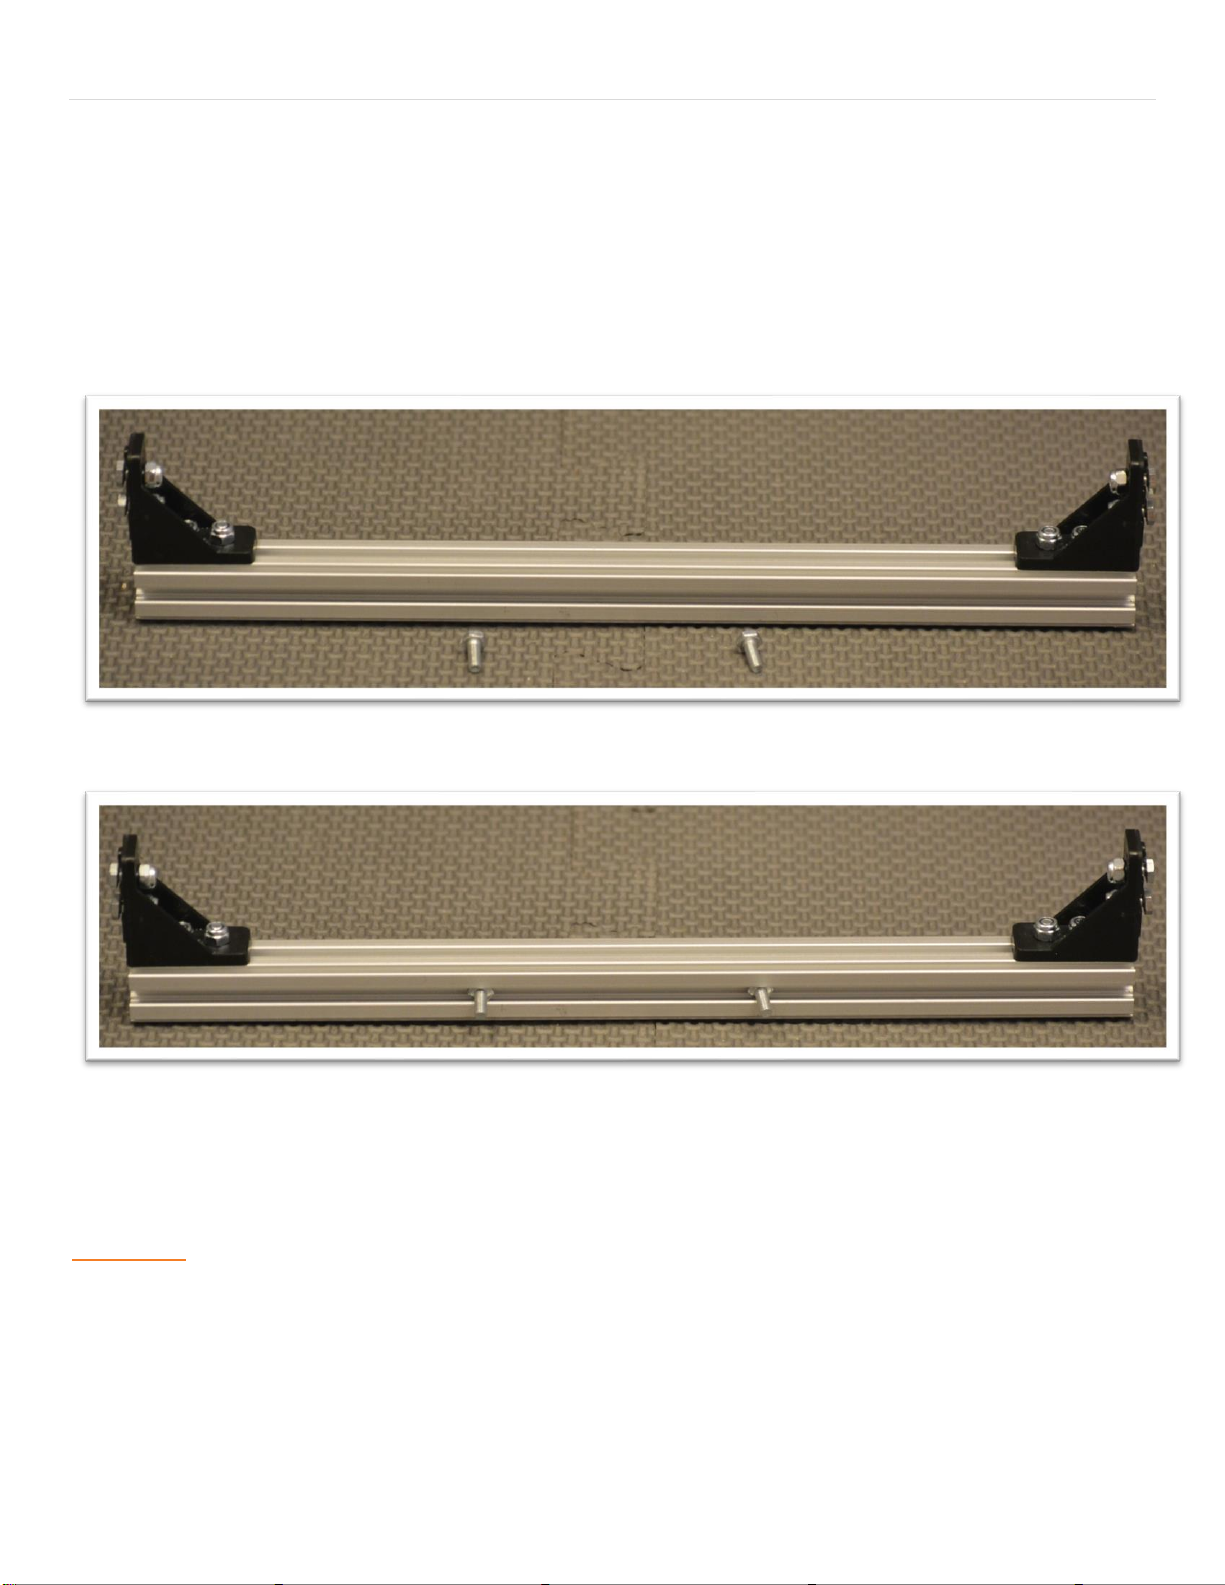
Step 3: Add Floating Screws to Beam
Parts Needed:
Back Support Assembly (1 - from step 2)
REV-41-1359 – Screw, Hex Cap, M3, 8mm (2)
Figure 13- Unassembled view
Figure 14- Assembled view
Helpful Hint
• The two 8mm screws are loaded onto what will become the top face of the beam.
Page 14
14 | FIRST® Tech Challenge Basic ‘Bot Guide for REV- Part 1
Revision 1: 6.16.2021
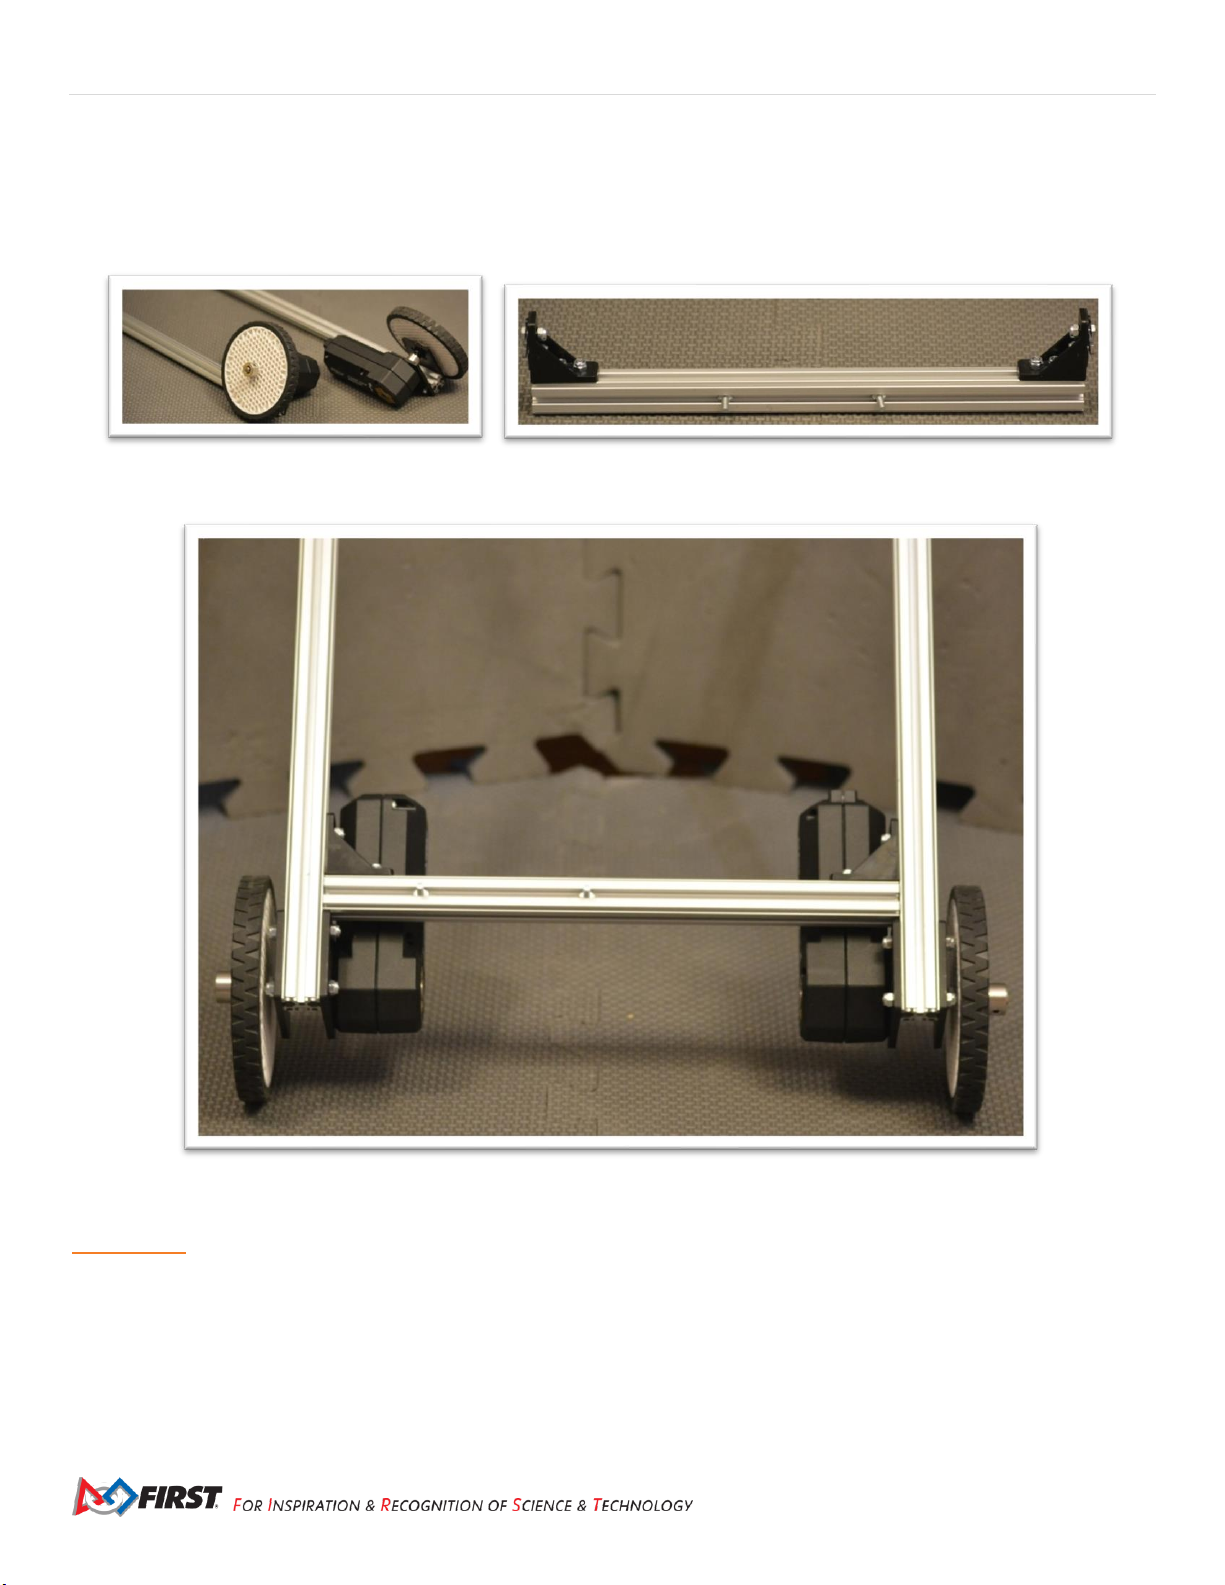
Step 4: Add Back Support Beam
Parts Needed:
Chassis (from Drive Assemblies and Frame, step 4)
Back Support Beam Assembly (from the previous step)
Figure 15- Unassembled view Figure 16- Unassembled view
Figure 17- Assembled view
Helpful Hint
• The beam should touch the drive wheel brackets.
Page 15
FIRST® Tech Challenge Basic ‘Bot Guide for REV- Part 1 | 15
Gracious Professionalism® - “Doing your best work while treating others with respect and kindness - It’s what makes FIRST, first.”
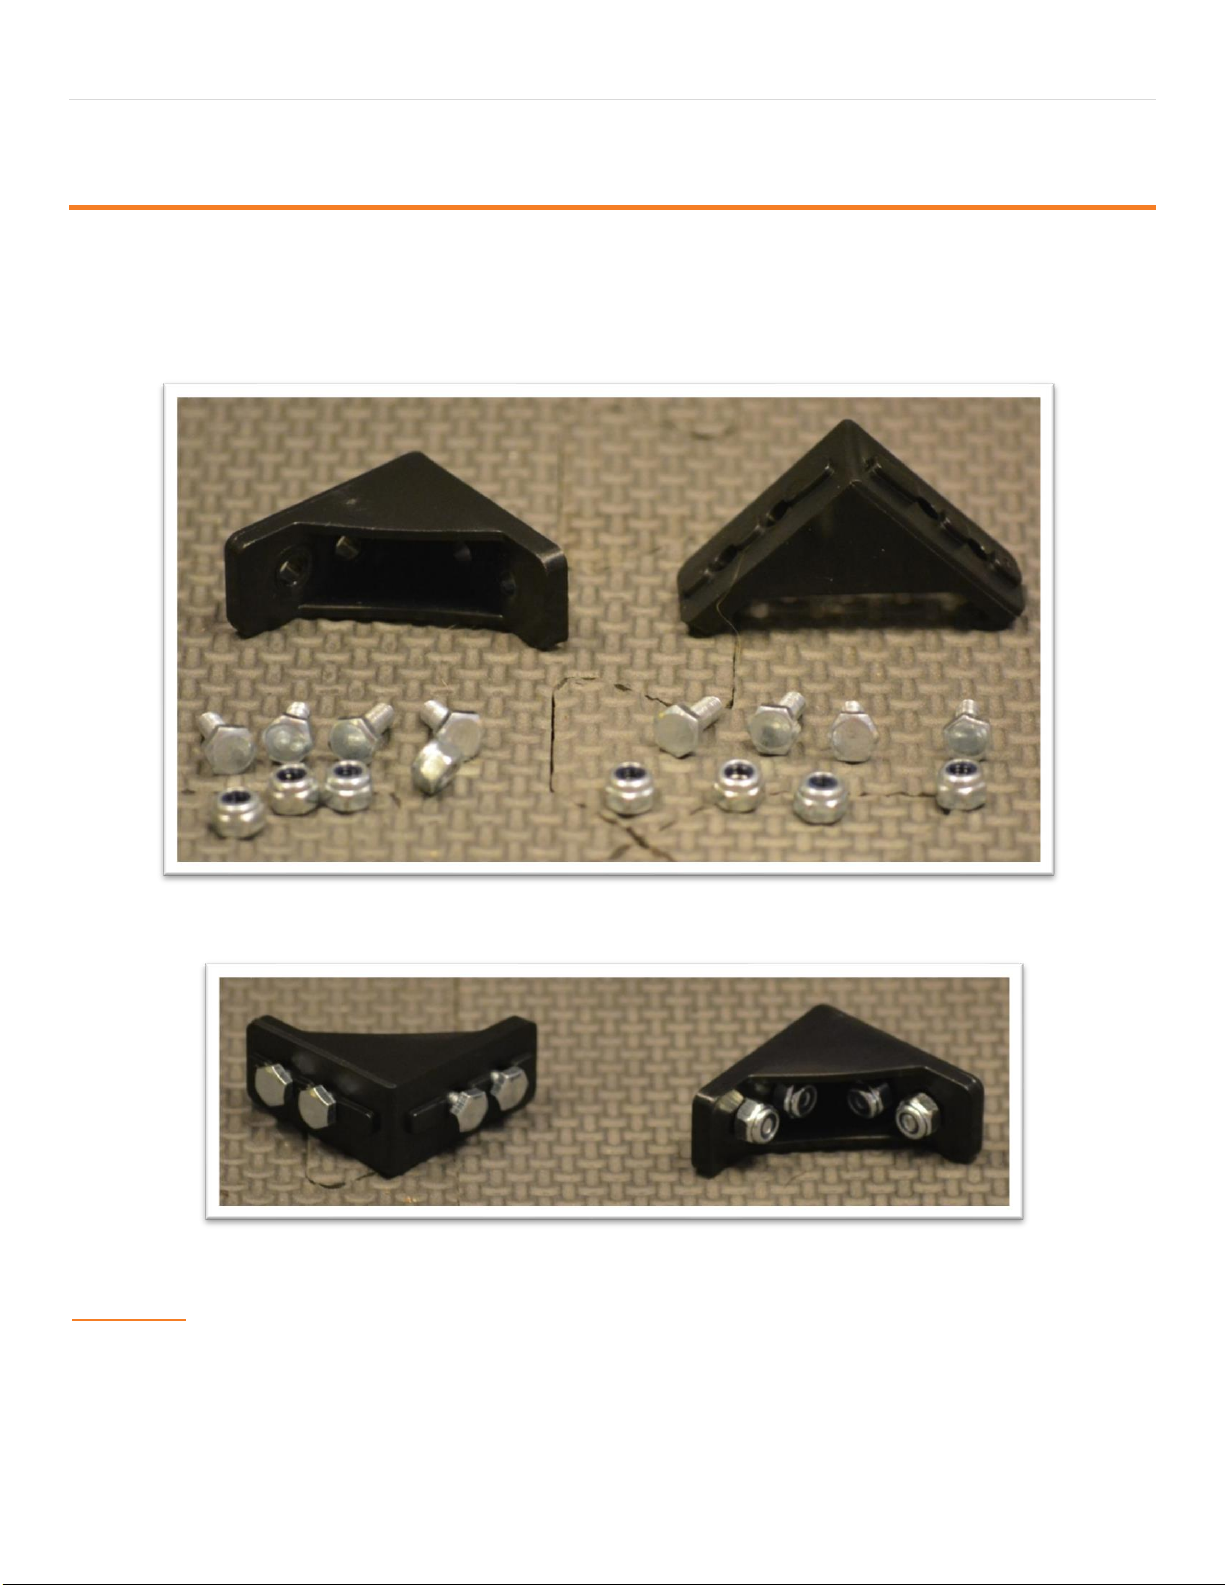
Front Support Beam
Step 1: Add Screws to Corner Brackets
Parts Needed:
REV-41-1320 – Bracket, Inside Corner (2)
REV-41-1359 – Screw, Hex Cap, M3, 8mm (8)
REV-41-1361 – Nut, Locking, M3 (8)
Figure 18- Unassembled view
Figure 19- Assembled view
Helpful Hint
• Screw the nuts onto the screws just until it’s difficult to turn them; just so that the nuts don’t fall off. The screw heads will need
to slide along the center of an extrusion in a later step.
Page 16
16 | FIRST® Tech Challenge Basic ‘Bot Guide for REV- Part 1
Revision 1: 6.16.2021
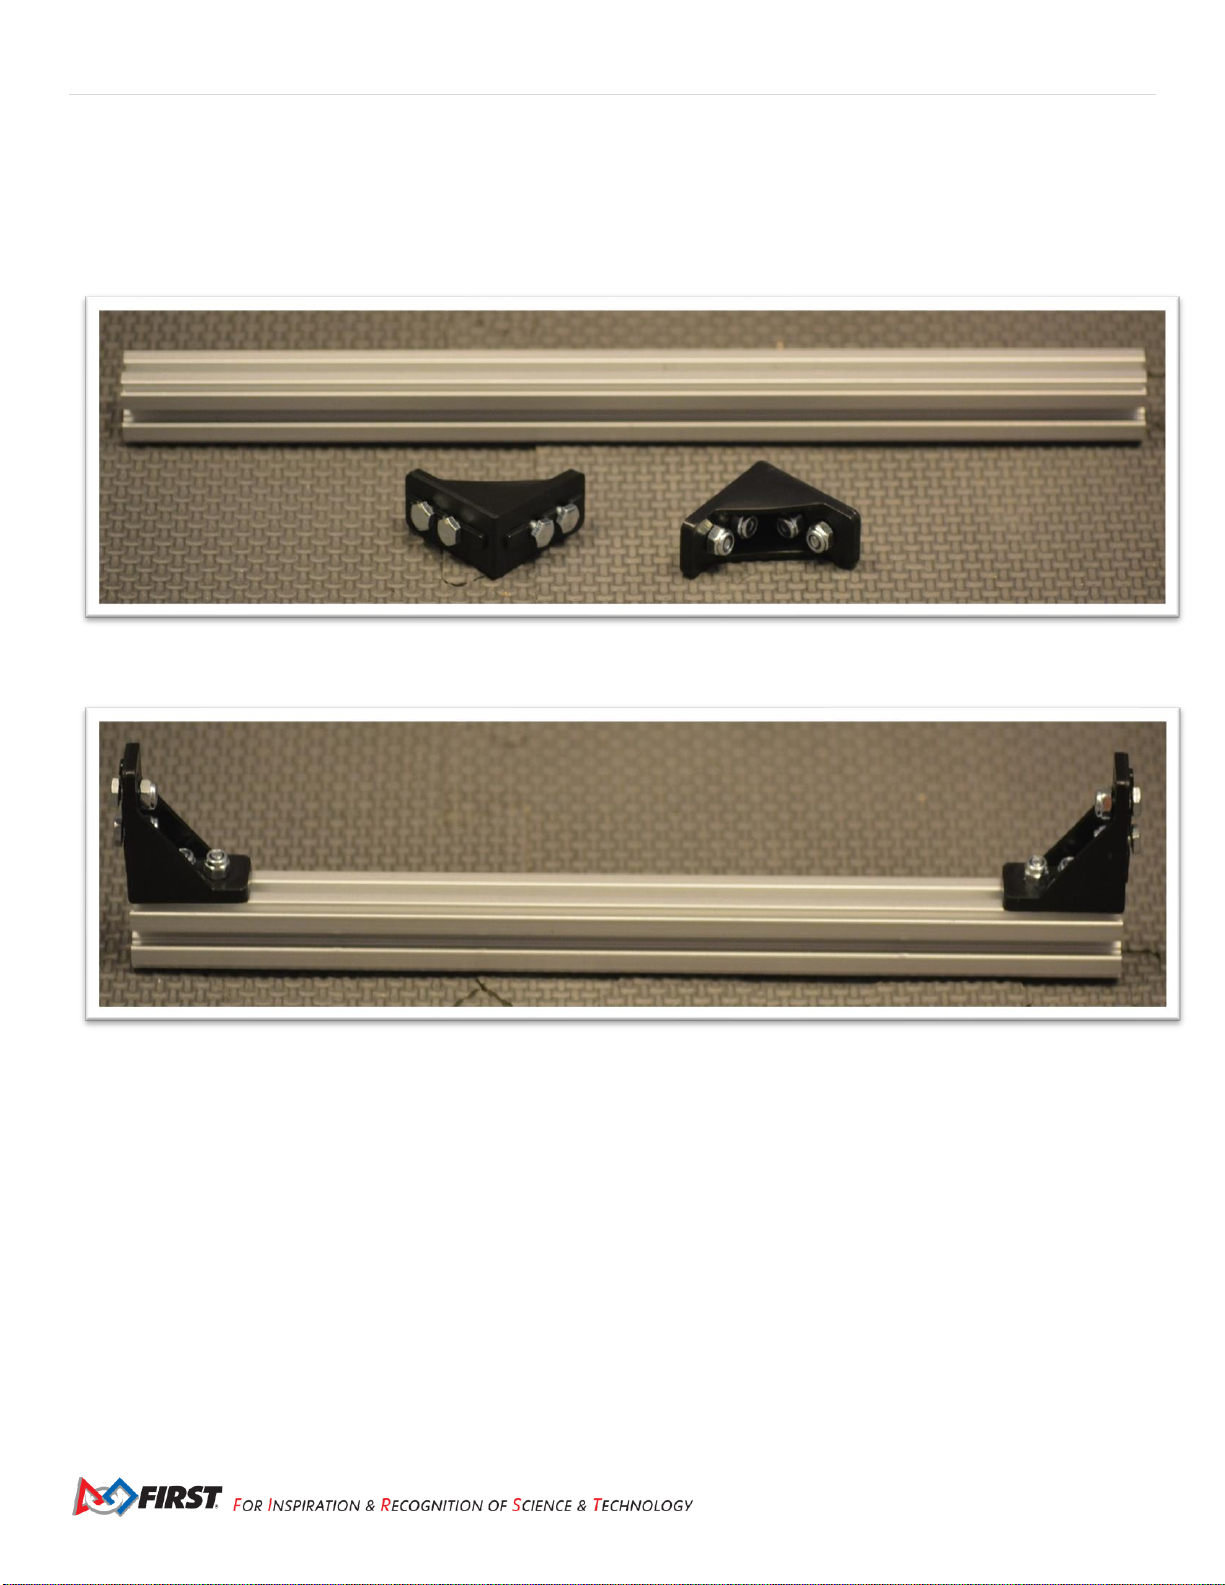
Step 2: Add Corner Brackets to Beam
Parts Needed:
REV-41-1431 – Extrusion, 225mm, 90-90 Degree (1)
Corner Bracket Assemblies (2 - from step 1)
Figure 20- Unassembled view
Figure 21- Assembled view
Page 17
FIRST® Tech Challenge Basic ‘Bot Guide for REV- Part 1 | 17
Gracious Professionalism® - “Doing your best work while treating others with respect and kindness - It’s what makes FIRST, first.”
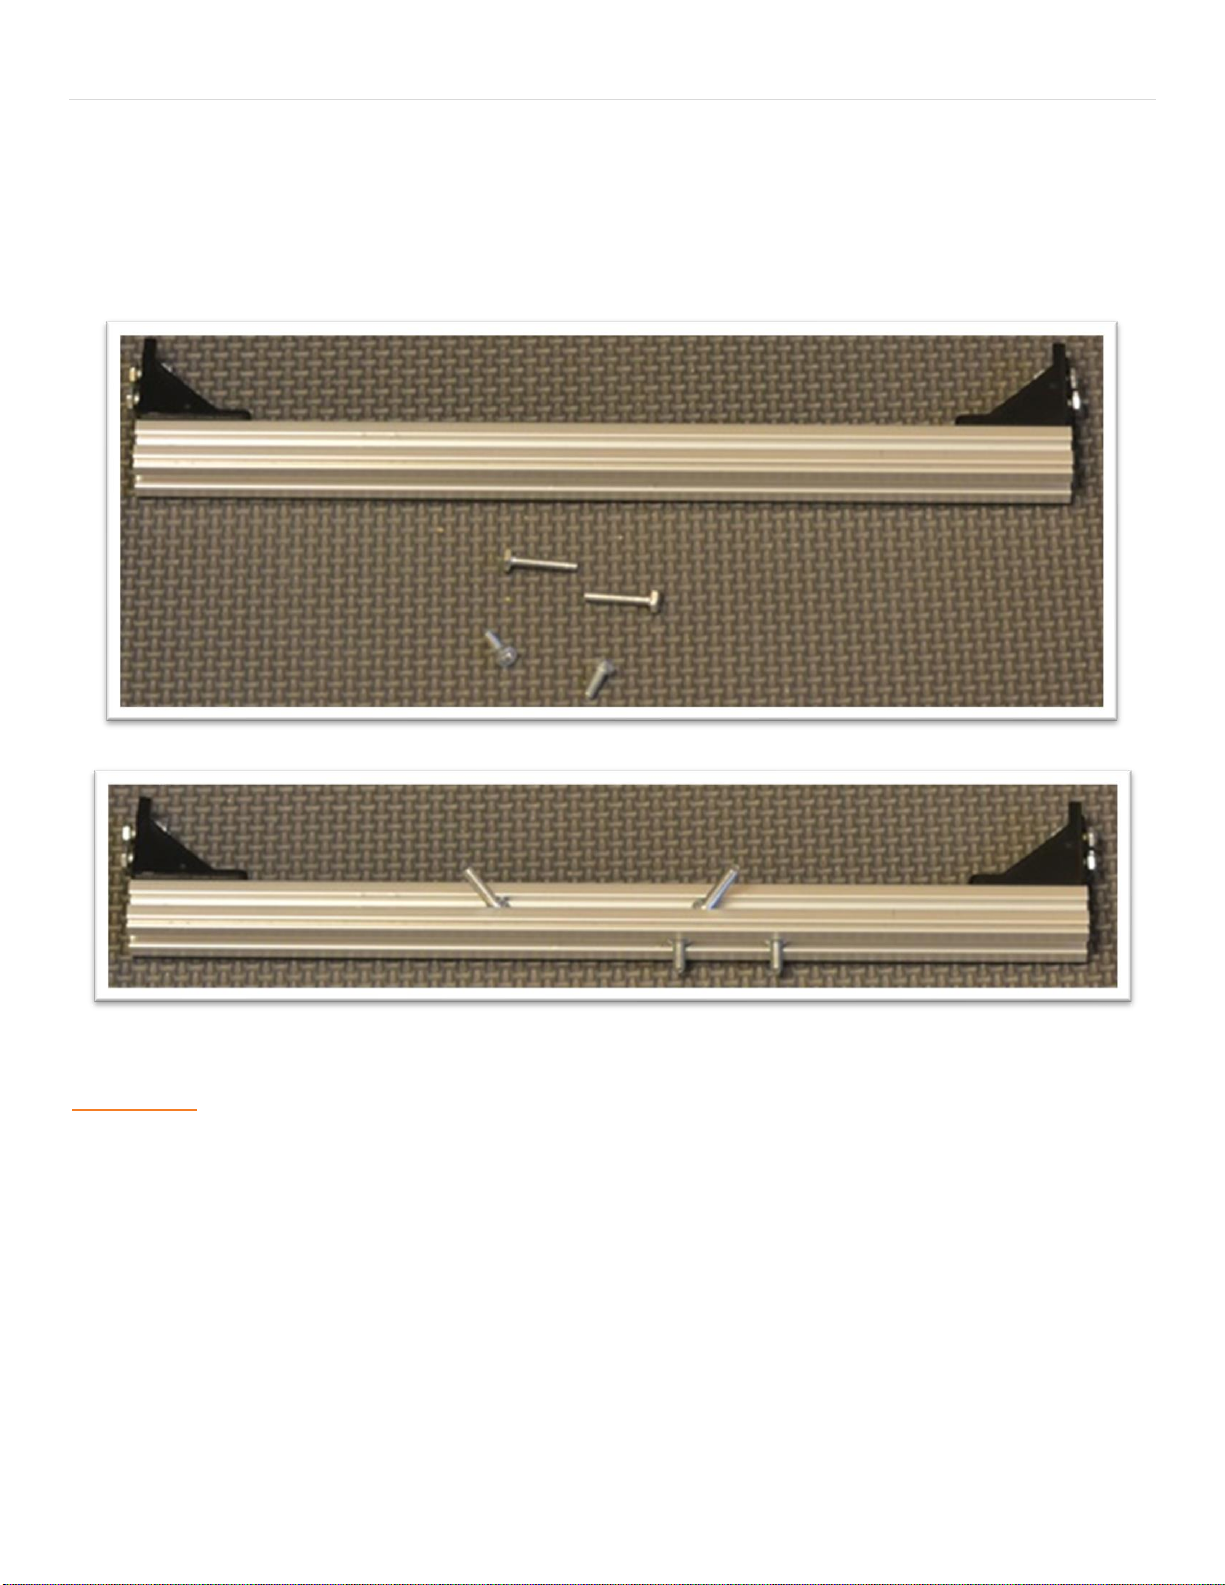
Step 3: Add Floating Screws to Beam
Parts Needed:
Front Beam Assembly (1 - from step 2)
REV-41-1359 – Screw, Hex Cap, M3, 8mm (2)
REV-41-1360 – Screw, Hex Cap, M3, 16mm (2)
Helpful Hints
• Two of the 8mm screws are loaded onto what will become the front face of the beam.
• One of the 8mm and two of the 16mm screws are loaded onto what will become the top face of the beam
Page 18
18 | FIRST® Tech Challenge Basic ‘Bot Guide for REV- Part 1
Revision 1: 6.16.2021
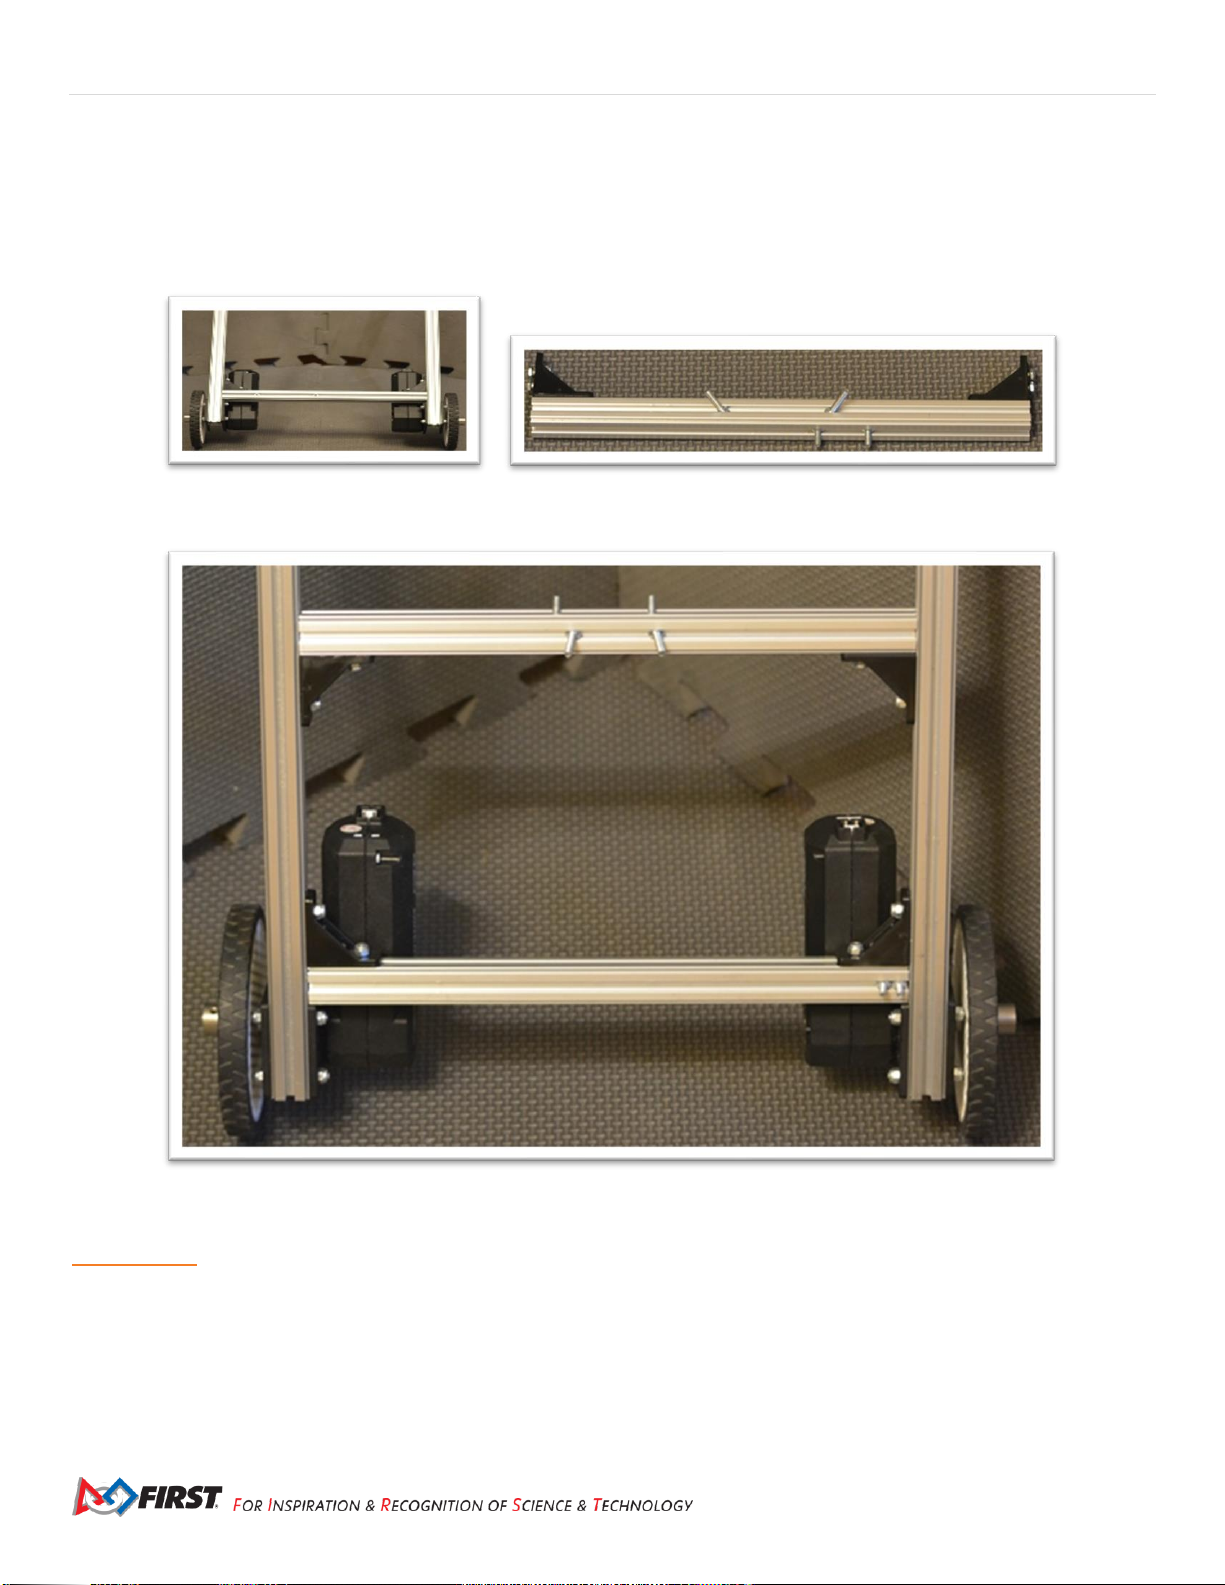
Step 4: Add Front Support Beam
Parts Needed:
Chassis (from Back Support Beam, step 4)
Front Support beam assembly (1 - from step 3)
Figure 22- Unassembled view Figure 23- Unassembled view
Figure 24- Assembled view
Helpful Hints
• There should be 121mm between the back support beam and the front support beam (there will be 136mm center to
center).
• If a ruler is not available, the position may need to be adjusted in a later step.
Page 19
FIRST® Tech Challenge Basic ‘Bot Guide for REV- Part 1 | 19
Gracious Professionalism® - “Doing your best work while treating others with respect and kindness - It’s what makes FIRST, first.”
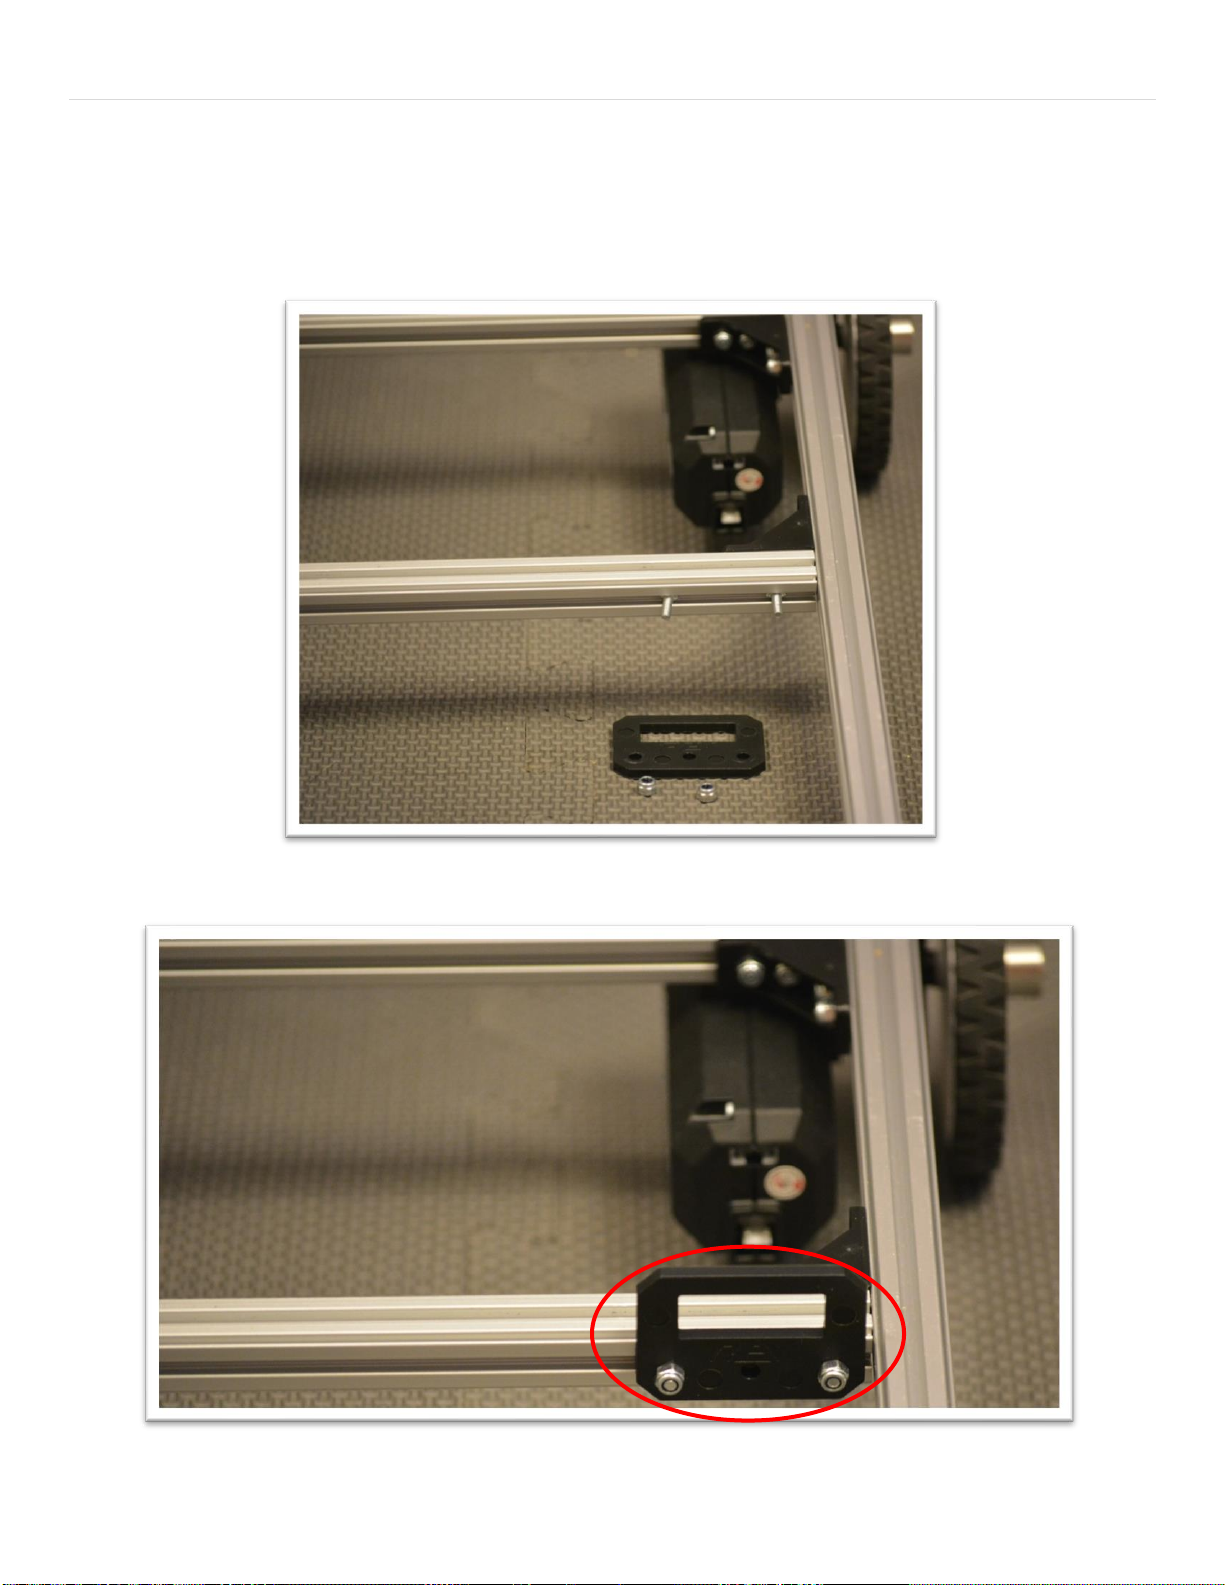
Step 5: Add Switch Bracket
Parts Needed:
Chassis Switch Plate (part of REV-31-1387)
REV-41-1361 – Nut, Locking, M3 (2)
Figure 25- Unassembled view
Figure 26- Assembled view
Page 20
20 | FIRST® Tech Challenge Basic ‘Bot Guide for REV- Part 1
Revision 1: 6.16.2021
Caster Wheels
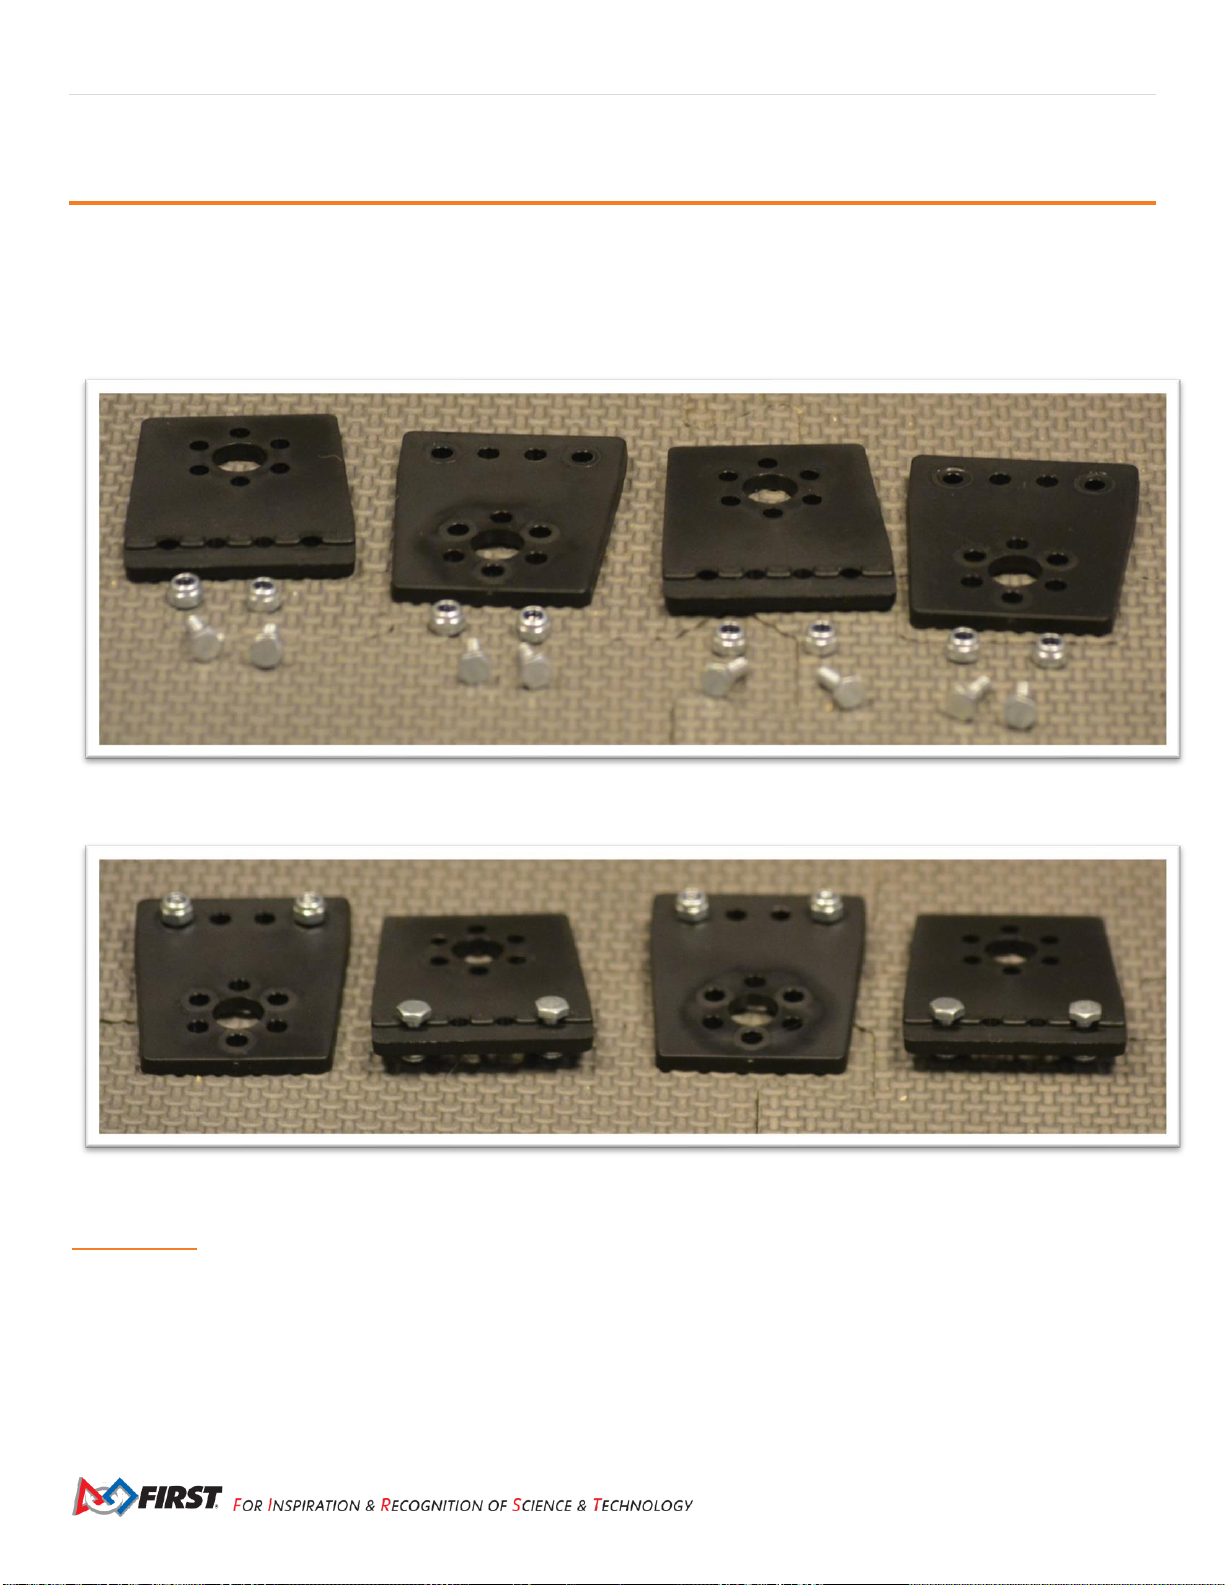
Step 1: Build Caster Brackets
Parts Needed:
REV-41-1303 – Bracket, Motion (2 per side, 4 total)
REV-41-1361 – Nut, Locking, M3 (2 per bracket, 4 per side, 8 total)
REV-41-1359 – Screw, Hex Cap, M3, 8mm (2 per bracket, 4 per side, 8 total)
Figure 27- Unassembled view
Figure 28- Assembled view
Helpful Hints
• Screw the nuts onto the screws just until it’s difficult to turn them; just so that the nuts don’t fall off.
• The screw heads will need to slide along the center of an extrusion in a later step.
Page 21
FIRST® Tech Challenge Basic ‘Bot Guide for REV- Part 1 | 21
Gracious Professionalism® - “Doing your best work while treating others with respect and kindness - It’s what makes FIRST, first.”
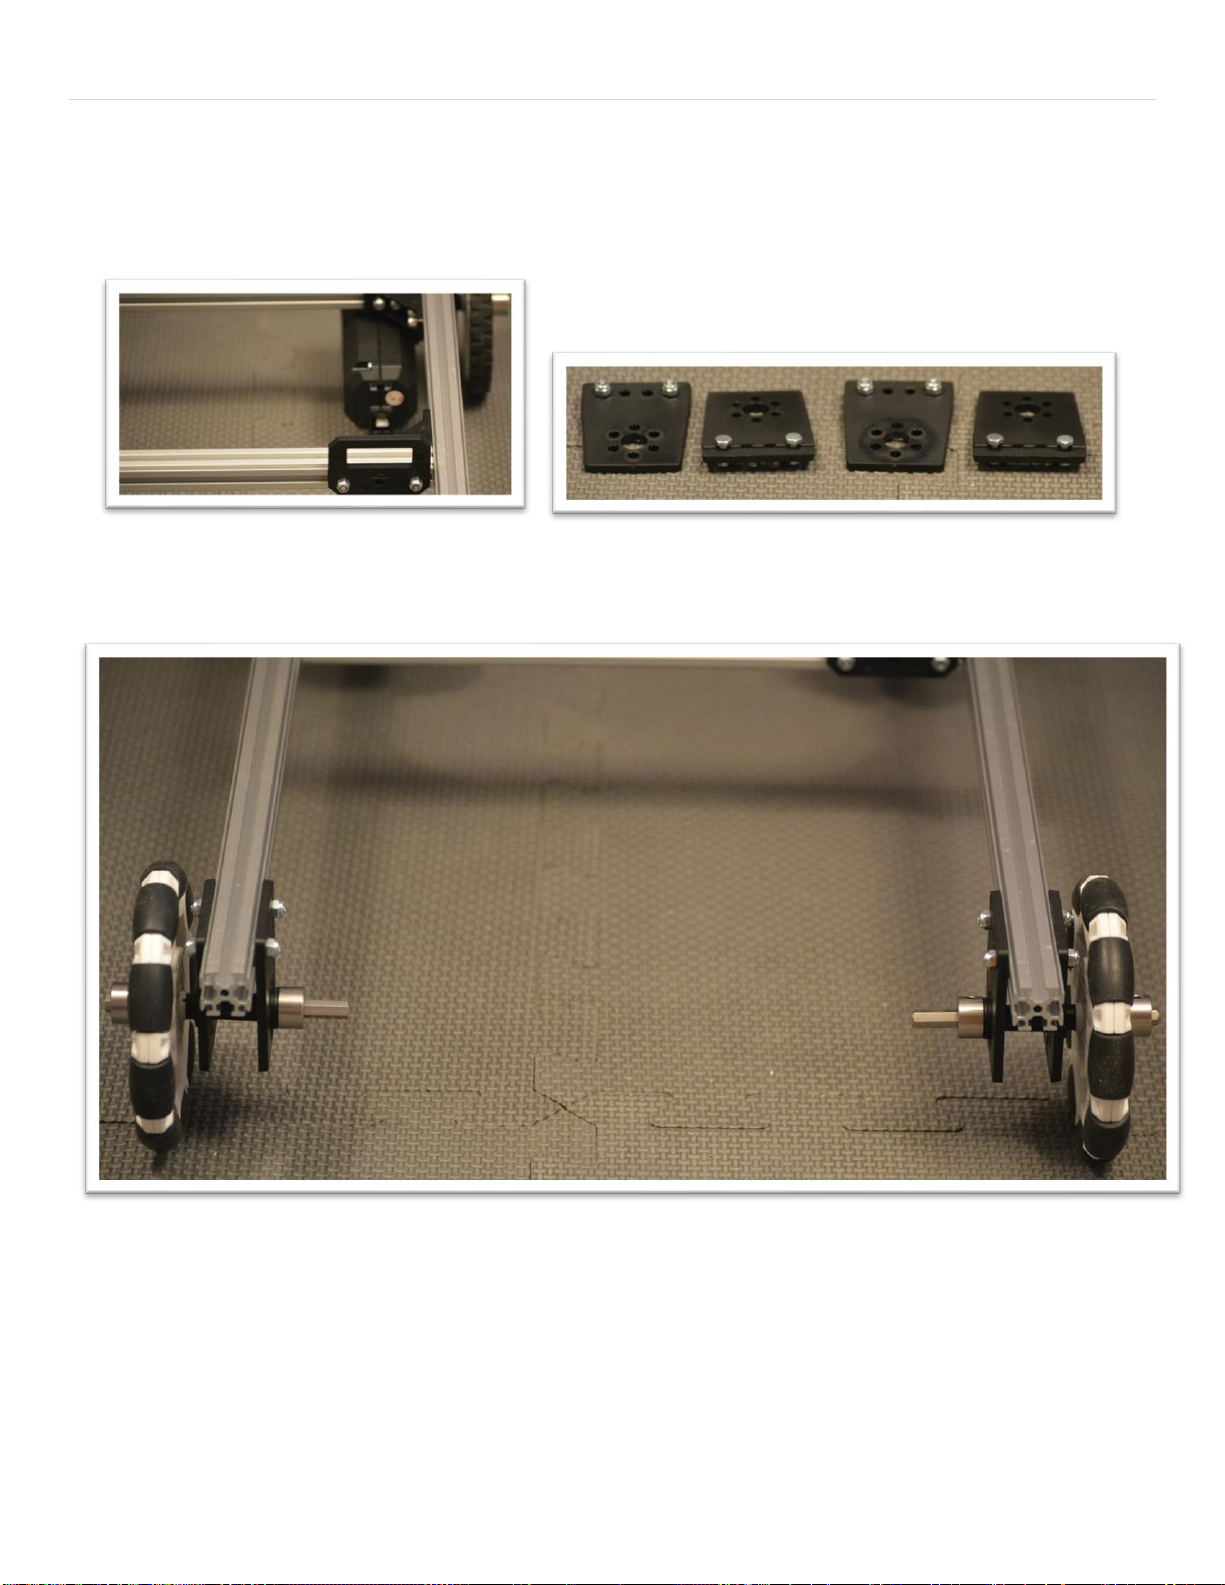
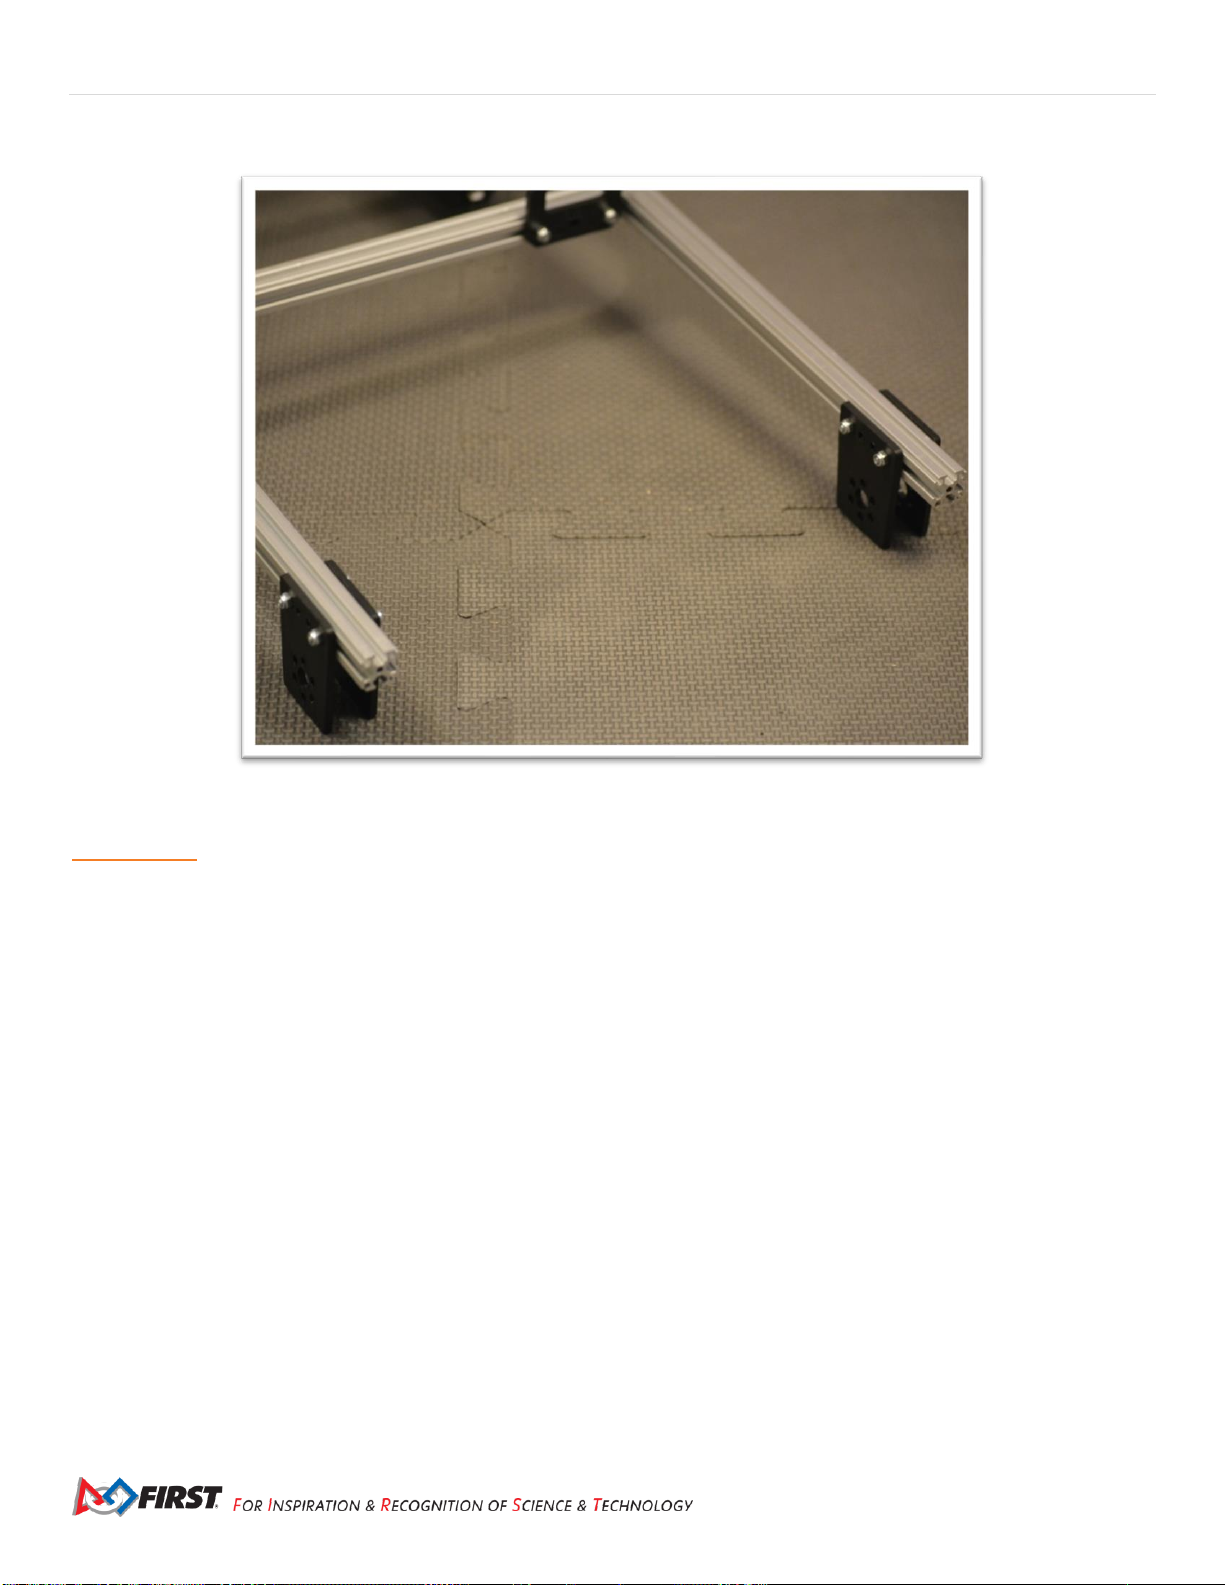
Step 2: Add Caster Brackets to Chassis
Parts Needed:
Caster Bracket Assemblies
(4 – from the previous step)
Figure 29- Unassembled view Figure 30- Unassembled view
Figure 31- Assembled view
[Continued on the next page, so detail can be seen more easily.]
Page 22
22 | FIRST® Tech Challenge Basic ‘Bot Guide for REV- Part 1
Revision 1: 6.16.2021
Figure 32- Assembled view
Helpful Hints
• Brackets must be installed 2 cm from the end of the extrusion, if used for competition, to fit within the sizing cube.
• Ensure that the pair of brackets on the same extrusion are the same distance from the end of the extrusion or the wheels will
not rotate properly.
Page 23
FIRST® Tech Challenge Basic ‘Bot Guide for REV- Part 1 | 23
Gracious Professionalism® - “Doing your best work while treating others with respect and kindness - It’s what makes FIRST, first.”
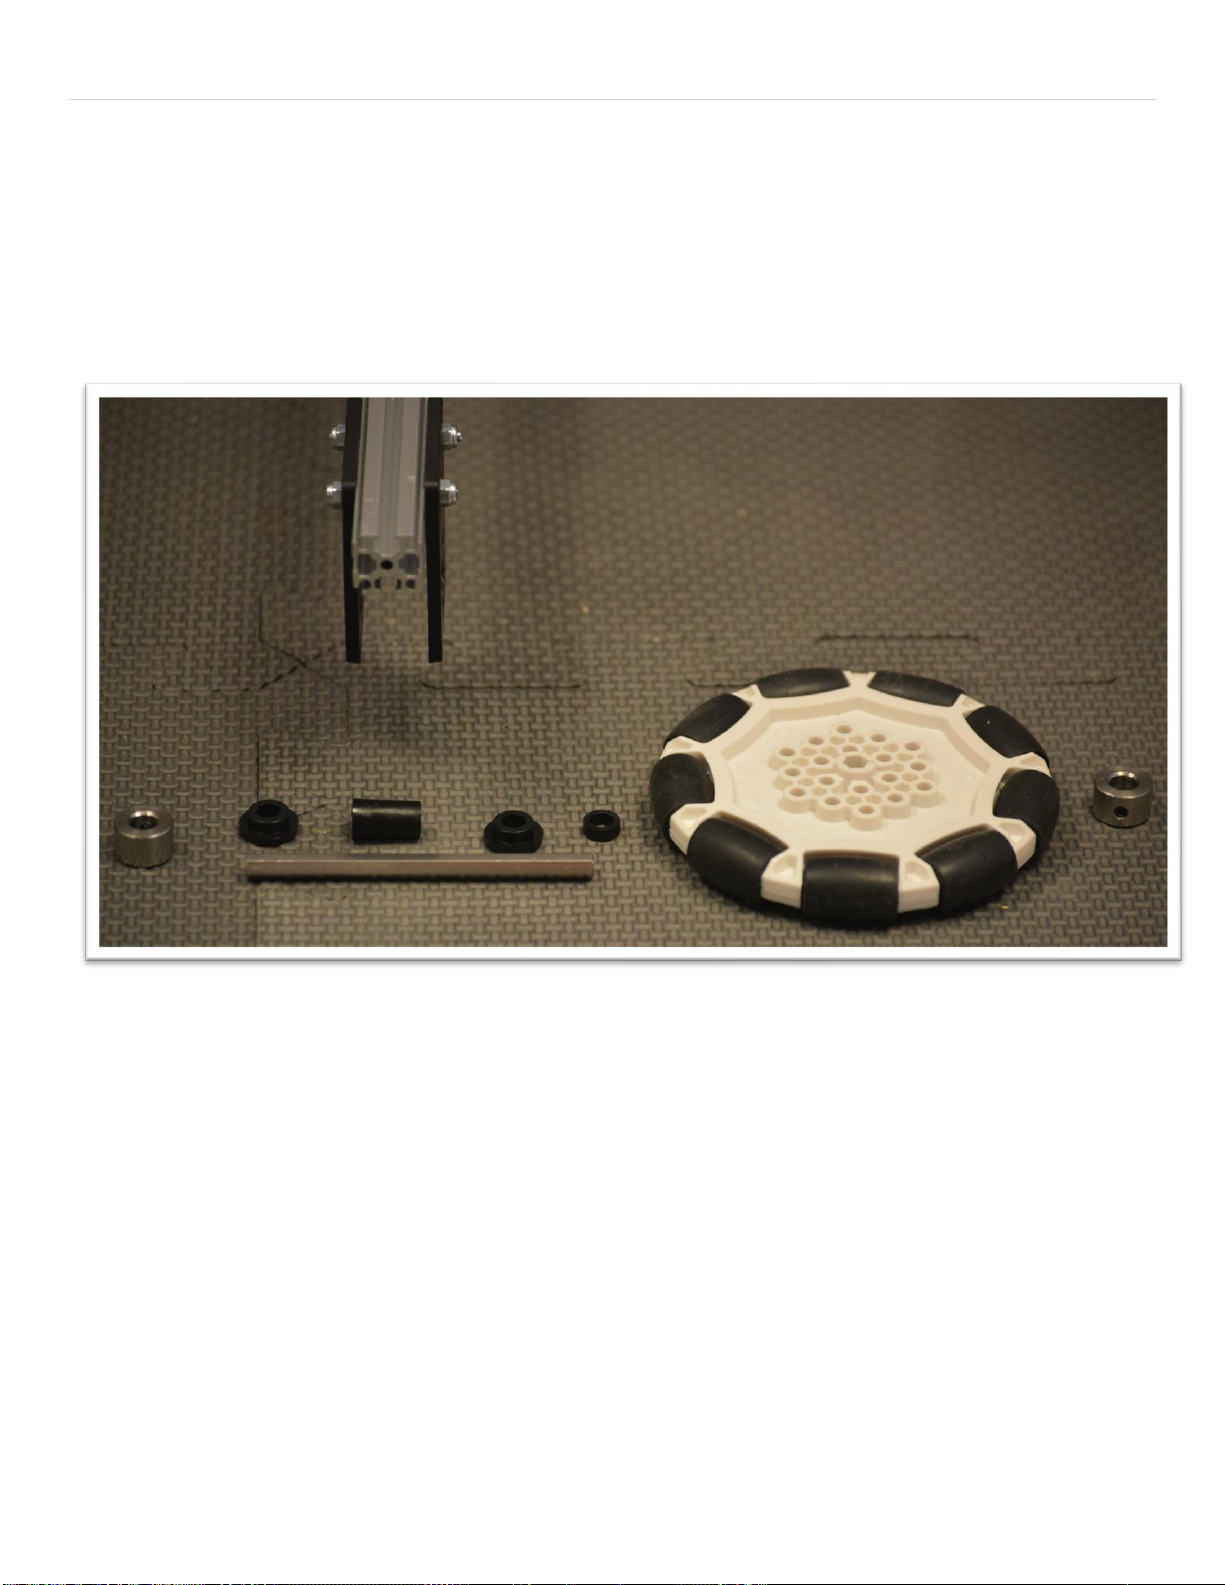
Step 3: Add the Omni Wheels
Parts Needed:
REV-41-1327 – Shaft Collar (2 per side – 4 total)
REV-41-1326 – Bearing, Through Bore, Short (2 per side – 4 total)
REV-41-1323 – Spacer, 15mm (1 per side – 2 total)
REV-41-1324 – Spacer, 3mm (1 per side – 2 total)
REV-41-1347 – Shaft, 5mm Hex, 75mm (1 per side – 2 total)
REV-41-1190 – Wheel, Omni 90mm (1 per side – 2 total)
Figure 33- Unassembled view of left wheel
[Continued on the next page, so detail can be seen more easily.]
Page 24
24 | FIRST® Tech Challenge Basic ‘Bot Guide for REV- Part 1
Revision 1: 6.16.2021
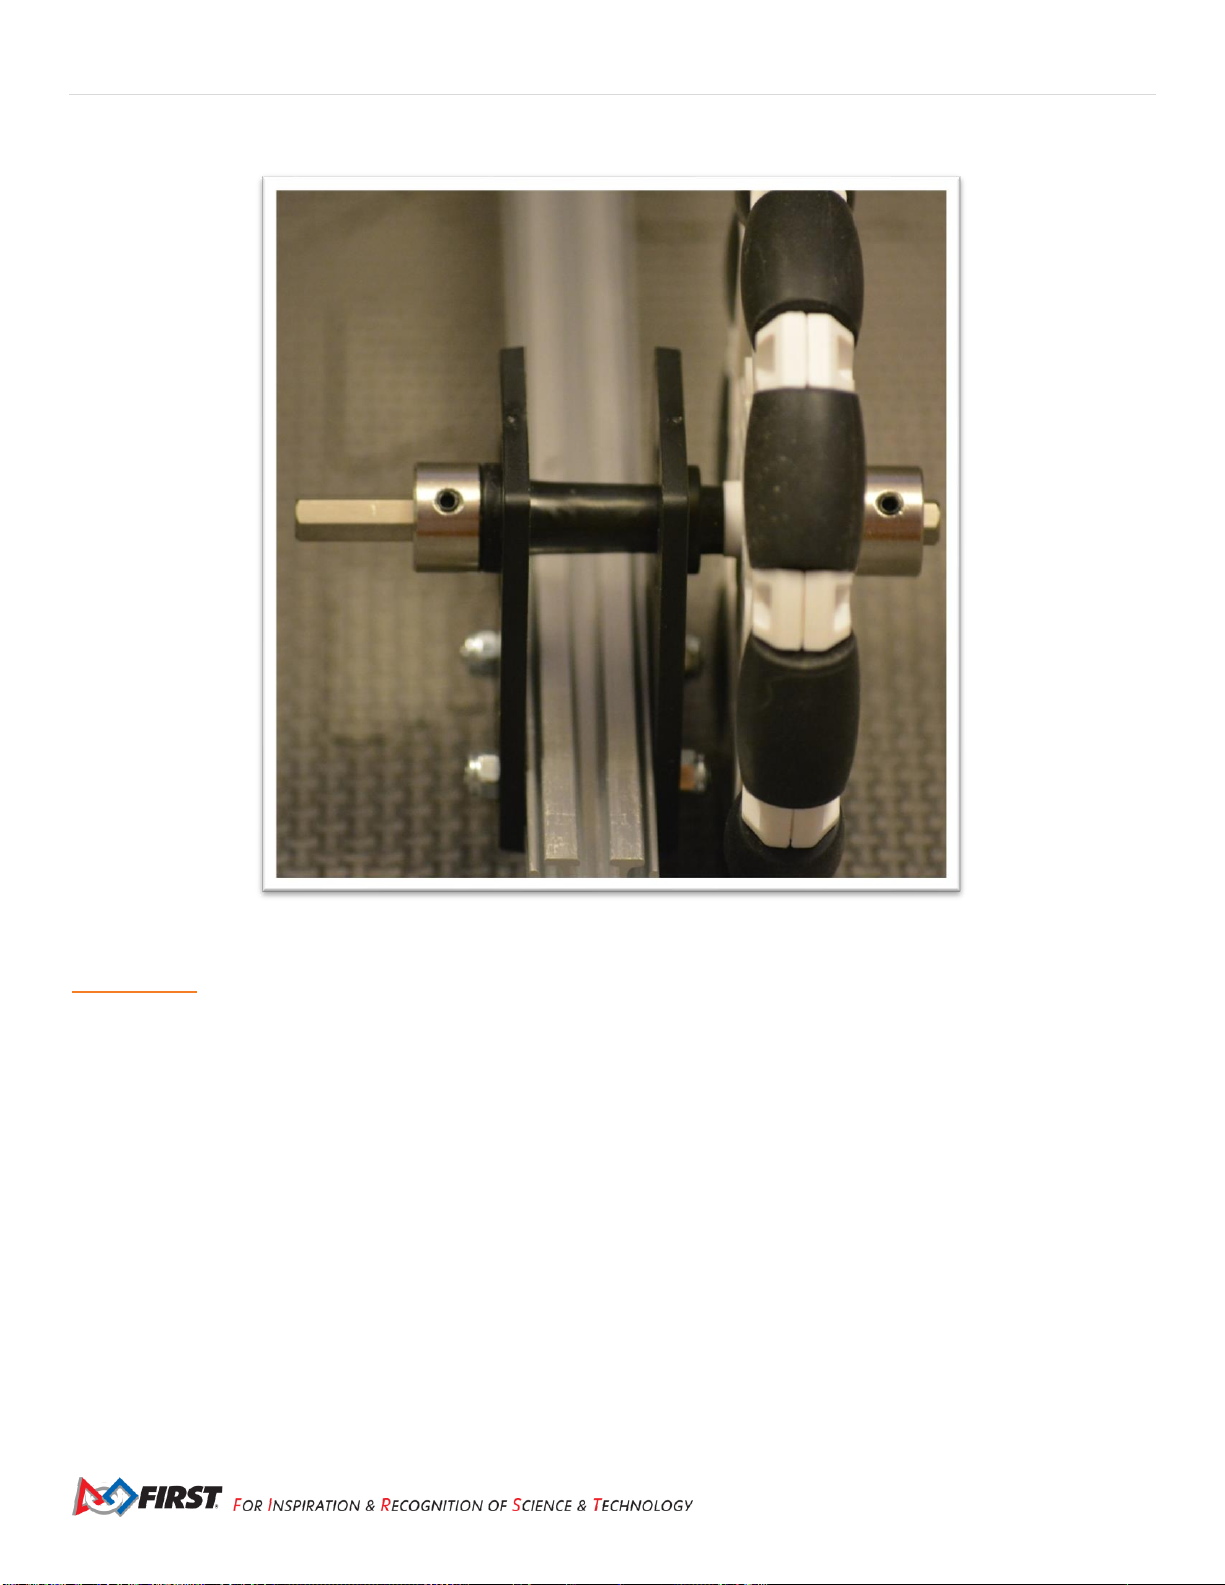
Figure 34- Assembled view of right wheel
Helpful Hints
• Order from the outside in: collar, omni wheel, 3mm spacer, bearing, bracket, 15mm spacer, bracket, bearing, collar.
• Adjust axle length, so it is flush with the collar.
[Continued on the next page, so detail can be seen more easily.]
Page 25
FIRST® Tech Challenge Basic ‘Bot Guide for REV- Part 1 | 25
Gracious Professionalism® - “Doing your best work while treating others with respect and kindness - It’s what makes FIRST, first.”
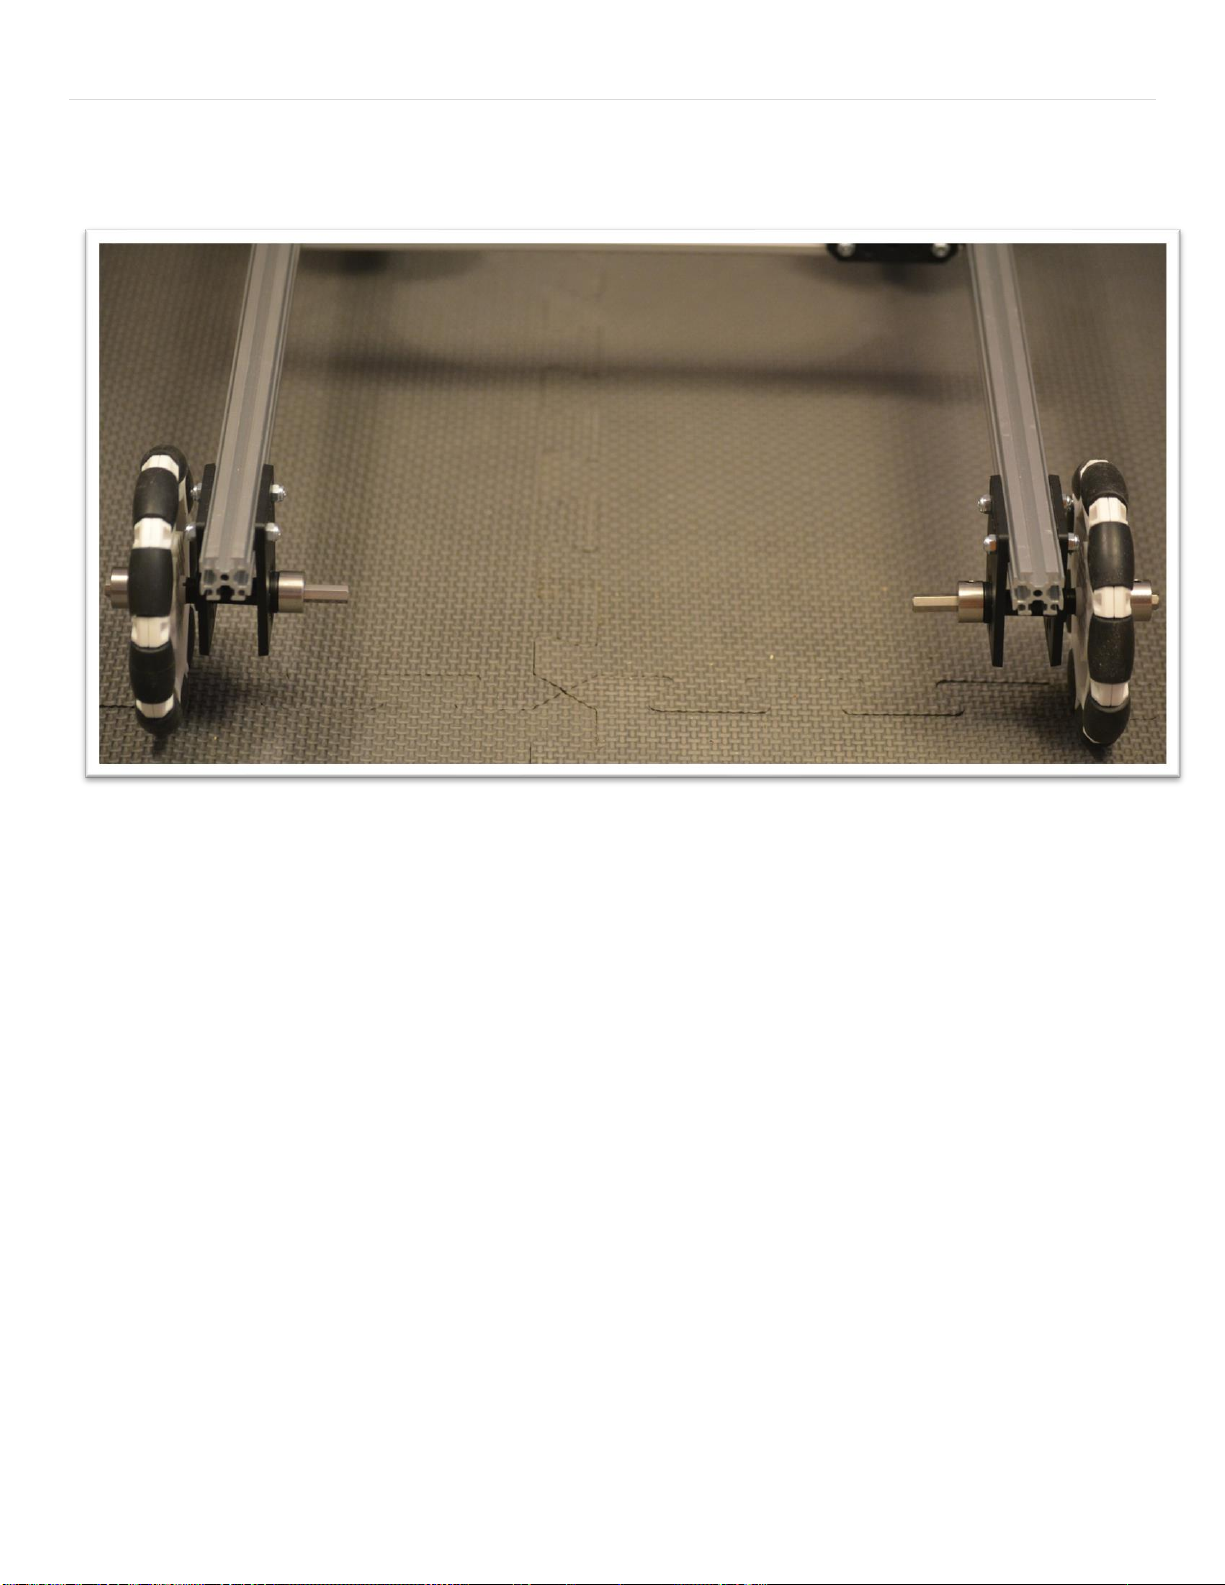
Figure 35- Assembled view
Page 26
26 | FIRST® Tech Challenge Basic ‘Bot Guide for REV- Part 1
Revision 1: 6.16.2021
Control Hub
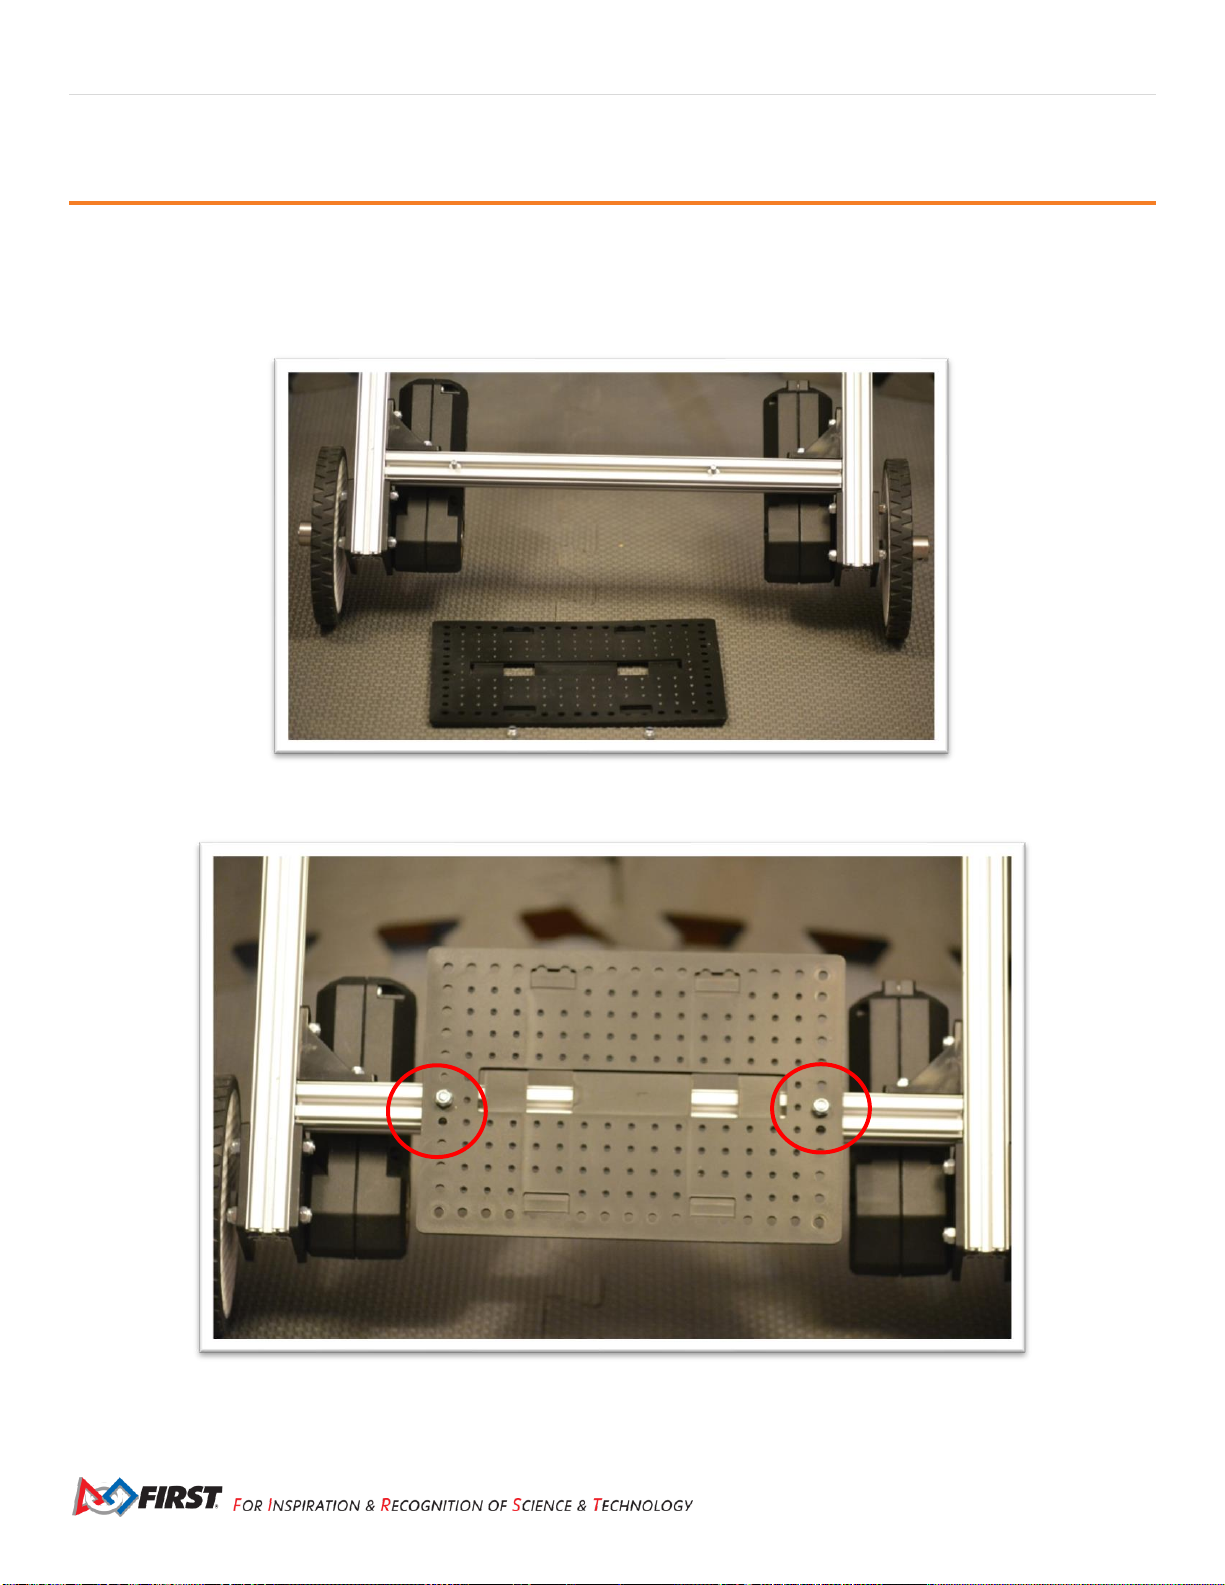
Step 1: Add the Support Plate
Parts Needed:
REV-41-1166 – Battery Holder Plate (1)
REV-41-1361 – Nut, Locking, M3 (2)
Figure 36- Unassembled view
Figure 37- Assembled view
Page 27
FIRST® Tech Challenge Basic ‘Bot Guide for REV- Part 1 | 27
Gracious Professionalism® - “Doing your best work while treating others with respect and kindness - It’s what makes FIRST, first.”
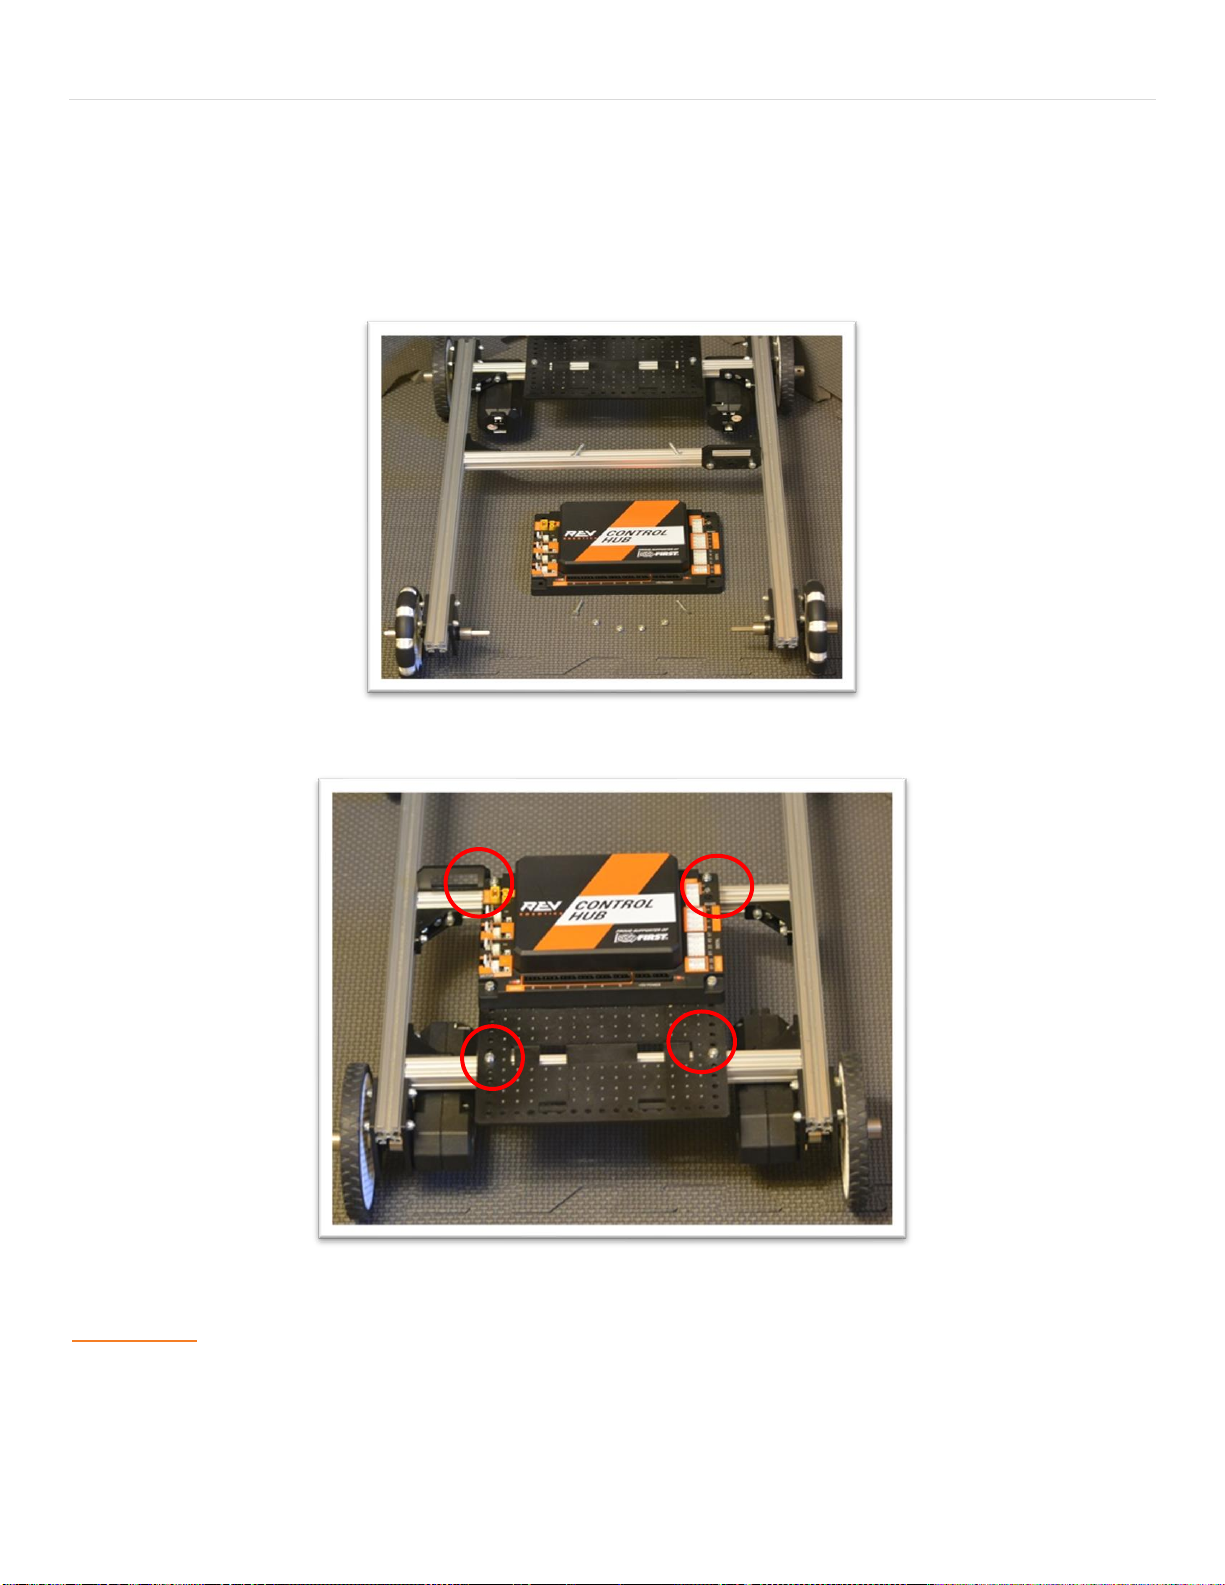
Step 2: Add the Rev Robotics Control Hub
Parts Needed:
REV-31-1153 – Control Hub (1)
REV-41-1360 – Screw, Hex Cap, M3, 16mm (2) (two other screws are already in the extrusion from an earlier step)
REV-41-1361 – Nut, Locking, M3 (4)
Figure 38- Unassembled view
Figure 39- Assembled view
Helpful Hints
• Reposition the front support beam, if necessary, to accomplish the proper spacing – the two floating screws on the front beam
need to be at the corners of the control hub.
Page 28
28 | FIRST® Tech Challenge Basic ‘Bot Guide for REV- Part 1
Revision 1: 6.16.2021
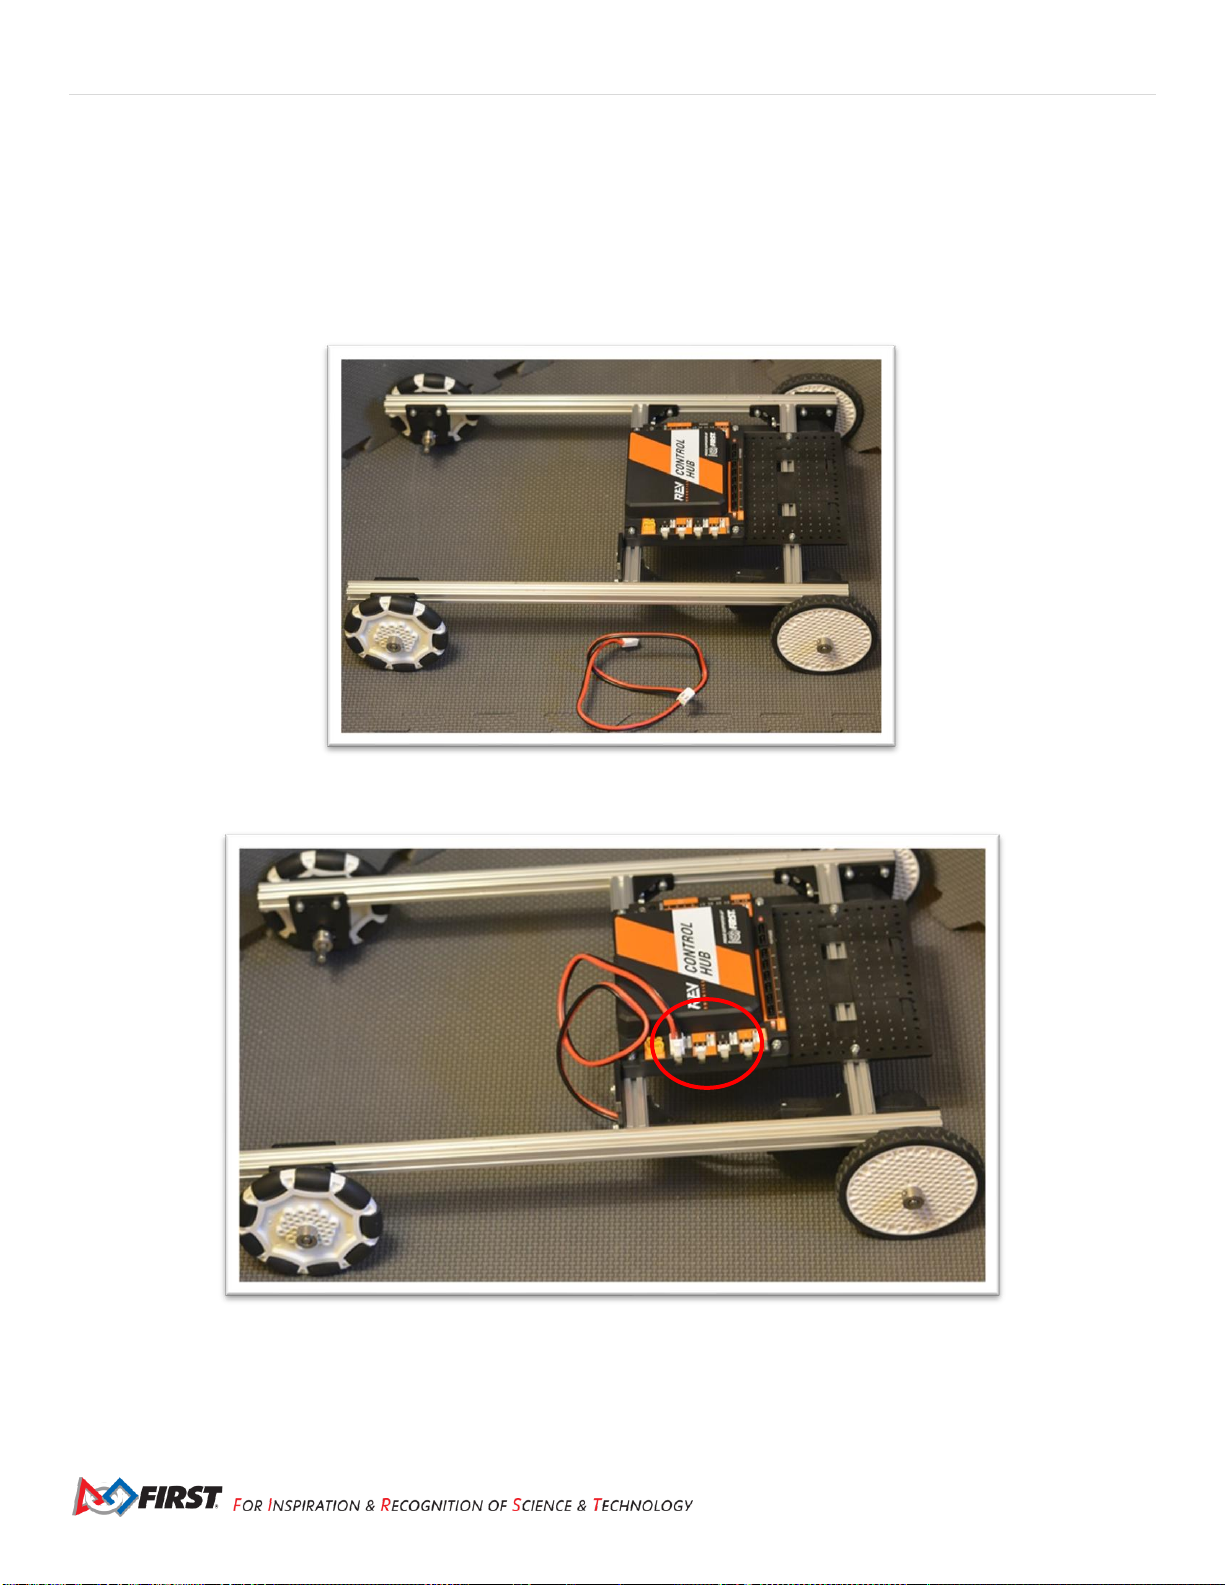
Step 3: Add the Left Drive Motor Power Cable
Parts Needed:
Motor Power Cable (1 – comes with the core hex motor – REV-41-1300)
Figure 40- Unconnected view
Figure 41- Connected view
Page 29
FIRST® Tech Challenge Basic ‘Bot Guide for REV- Part 1 | 29
Gracious Professionalism® - “Doing your best work while treating others with respect and kindness - It’s what makes FIRST, first.”
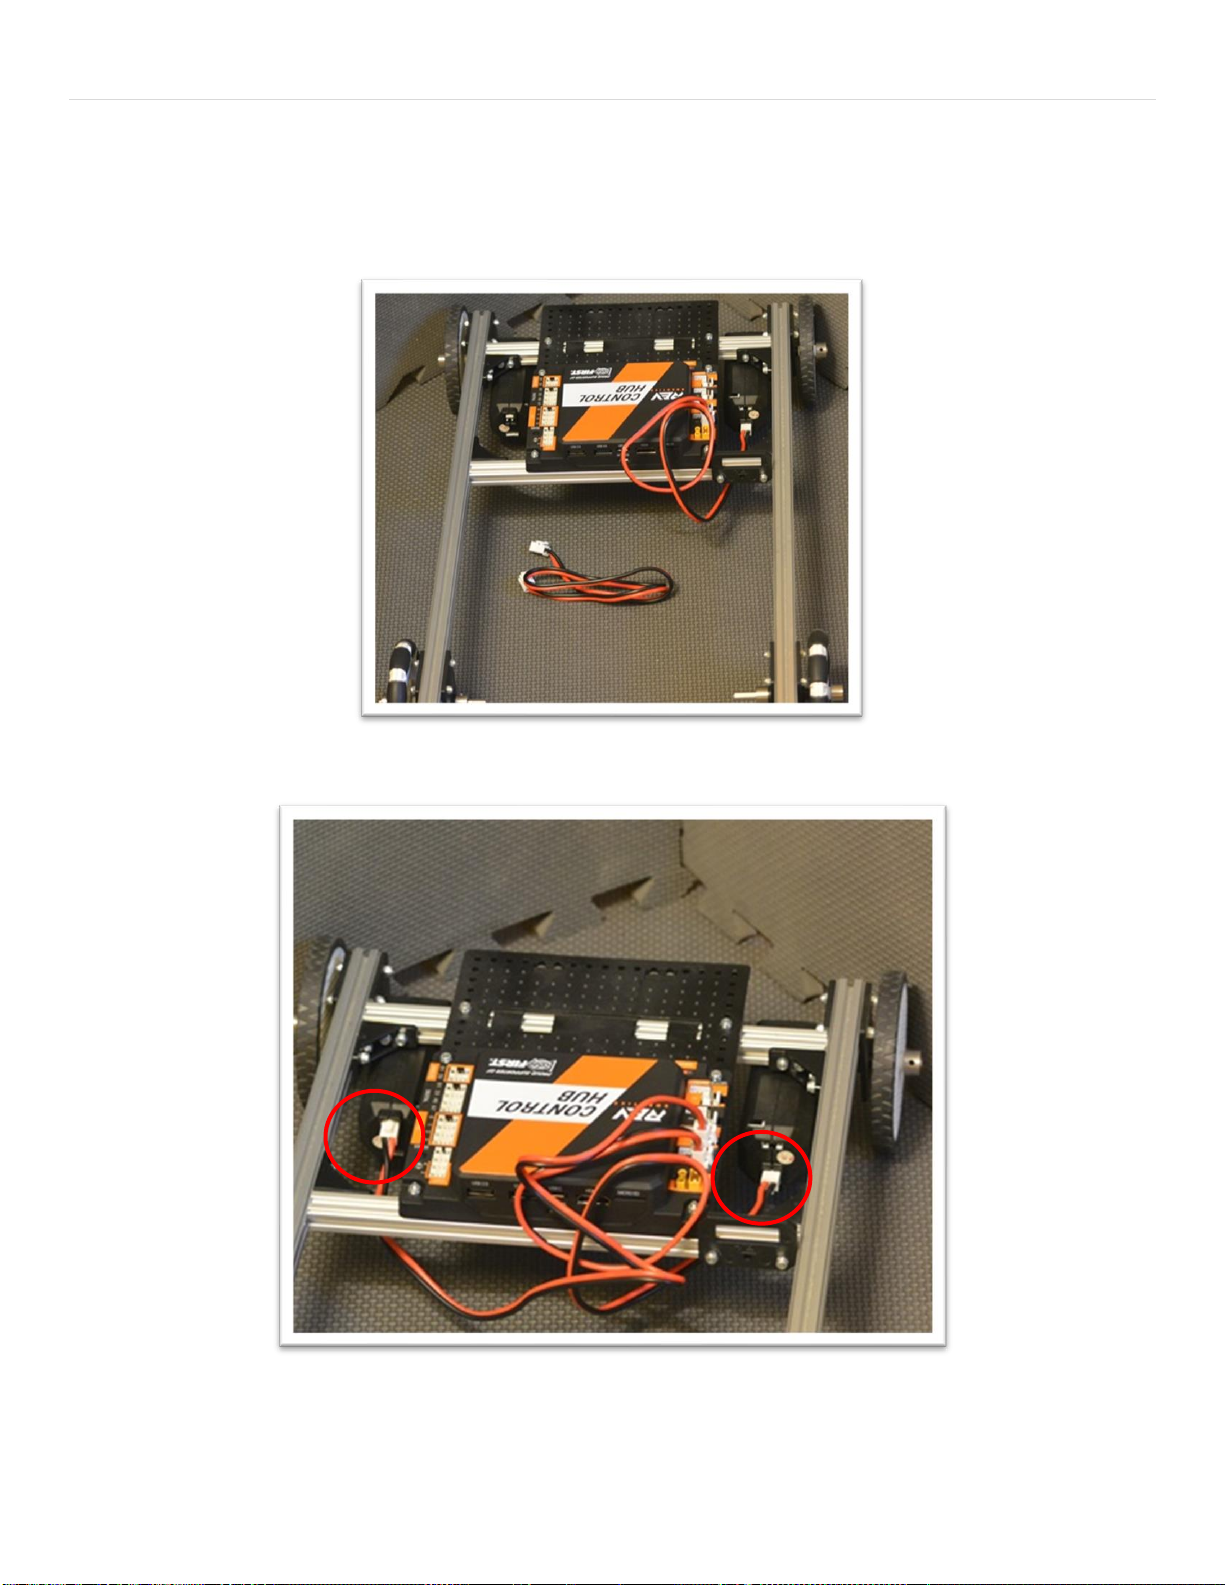
Step 4: Add the Right Drive Motor Power Cable
Parts Needed:
Motor Power Cable (1 – comes with the core hex motor – REV-41-1300)
Figure 42-Unconnected view
Figure 43- Connected view
Page 30
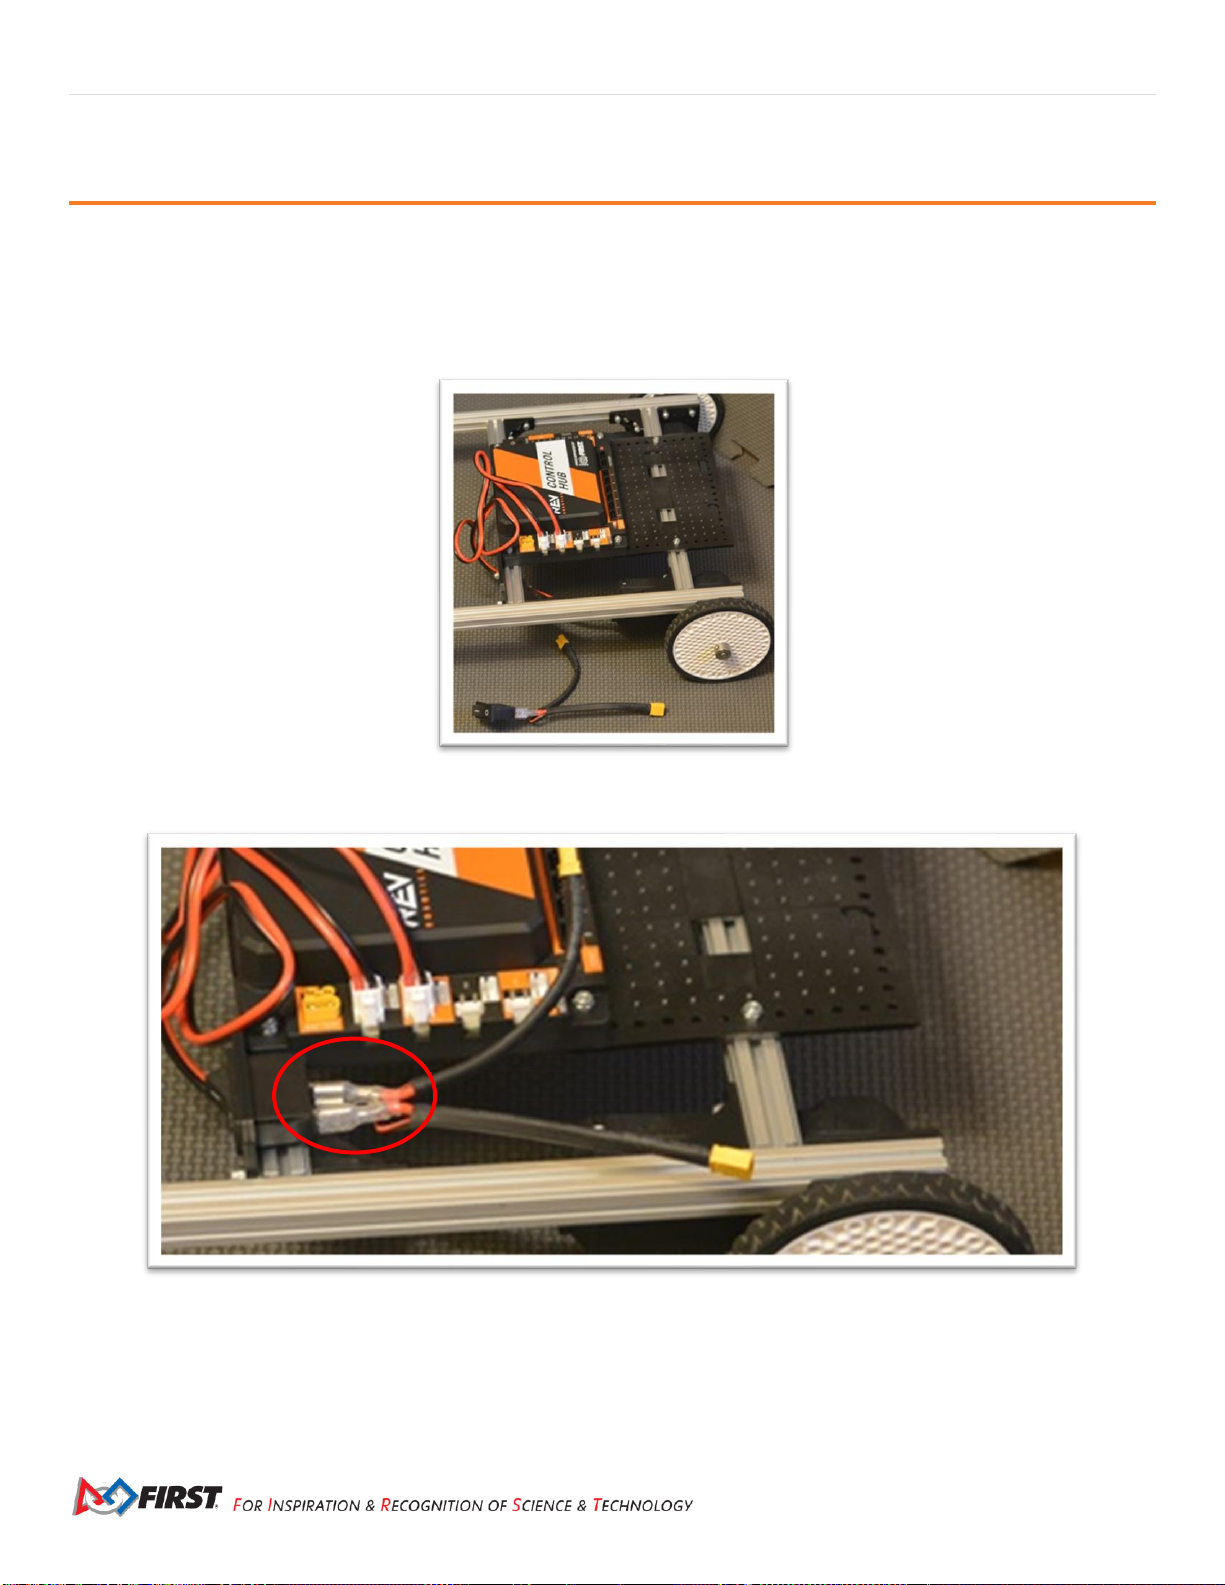
30 | FIRST® Tech Challenge Basic ‘Bot Guide for REV- Part 1
Revision 1: 6.16.2021
Power Switch
Step 1: Add the Switch
Parts Needed:
REV-41-1303 – Bracket, Motion (4)
REV-41-1361 – Nut, Locking, M3 (8)
REV-41-1359 – Screw, Hex Cap, M3, 8mm (8)
Figure 44- Unconnected view
Figure 45- Connected view
Page 31
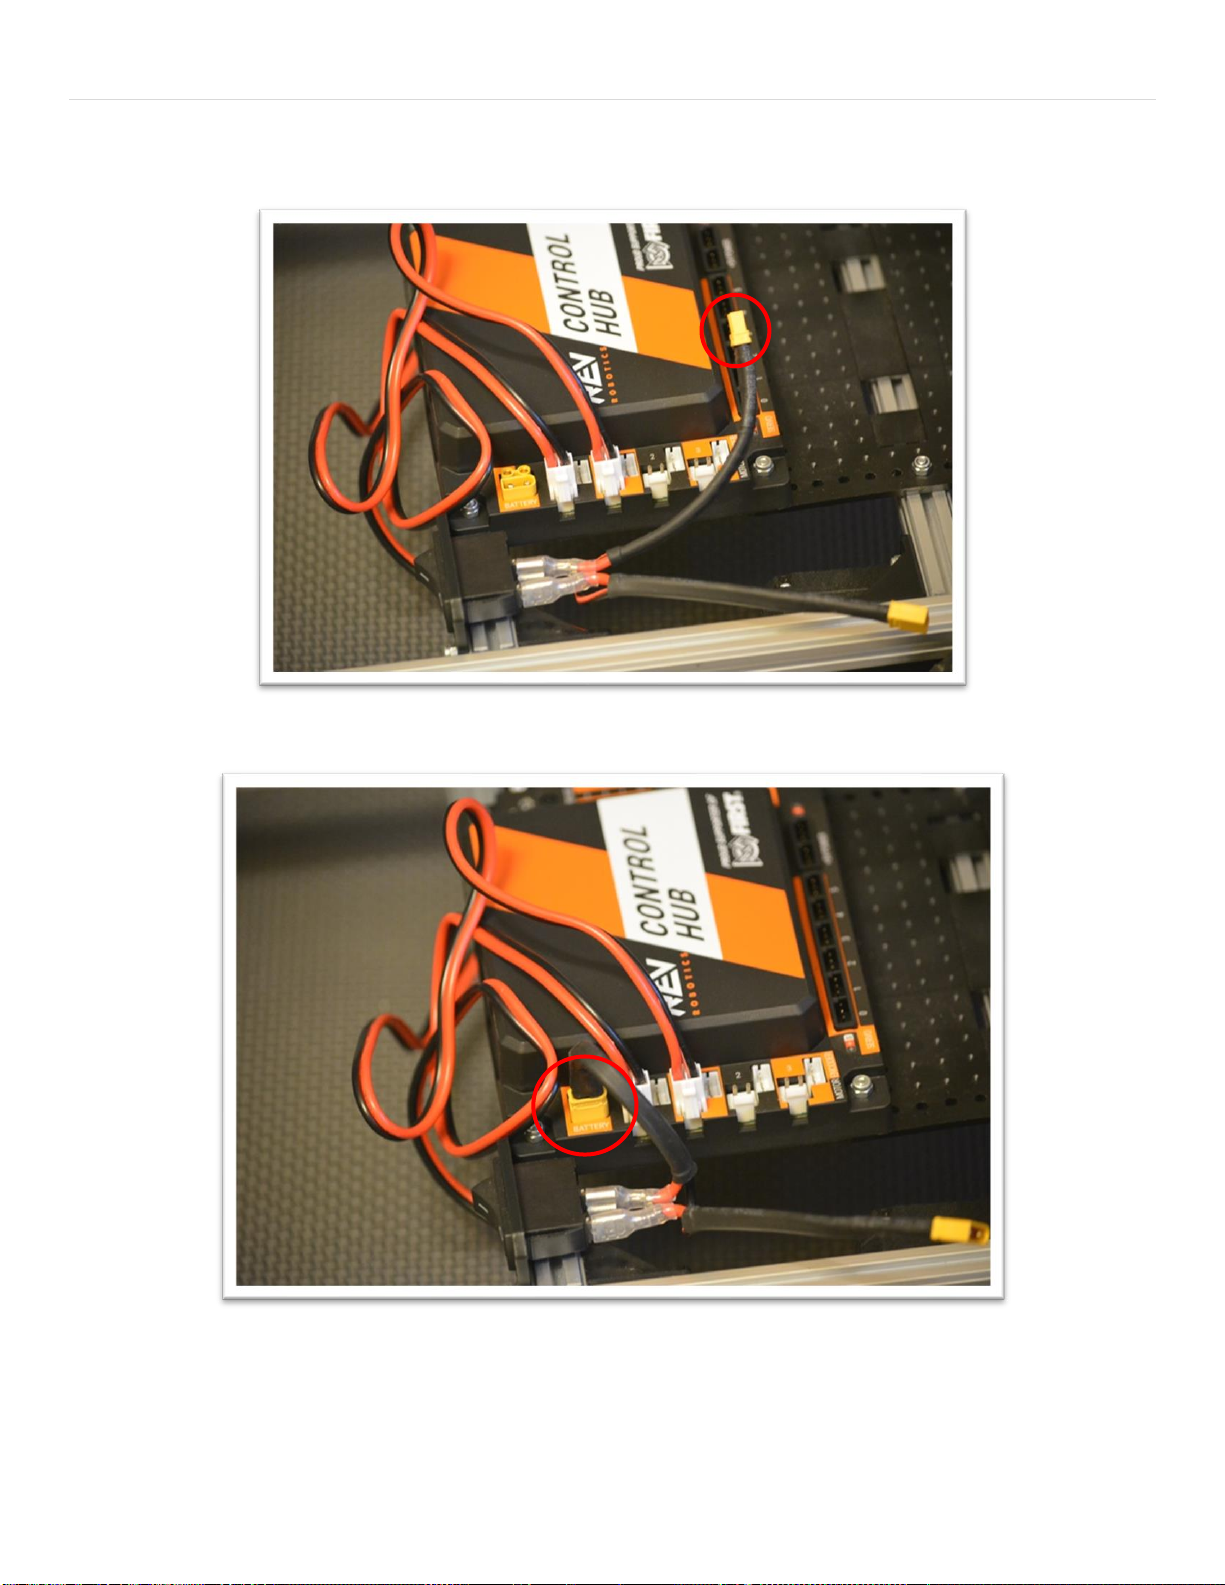
FIRST® Tech Challenge Basic ‘Bot Guide for REV- Part 1 | 31
Gracious Professionalism® - “Doing your best work while treating others with respect and kindness - It’s what makes FIRST, first.”
Step 2: Connect the Switch to the Motor and Sensor Controller
Figure 46- Unconnected view
Figure 47- Connected view
Page 32
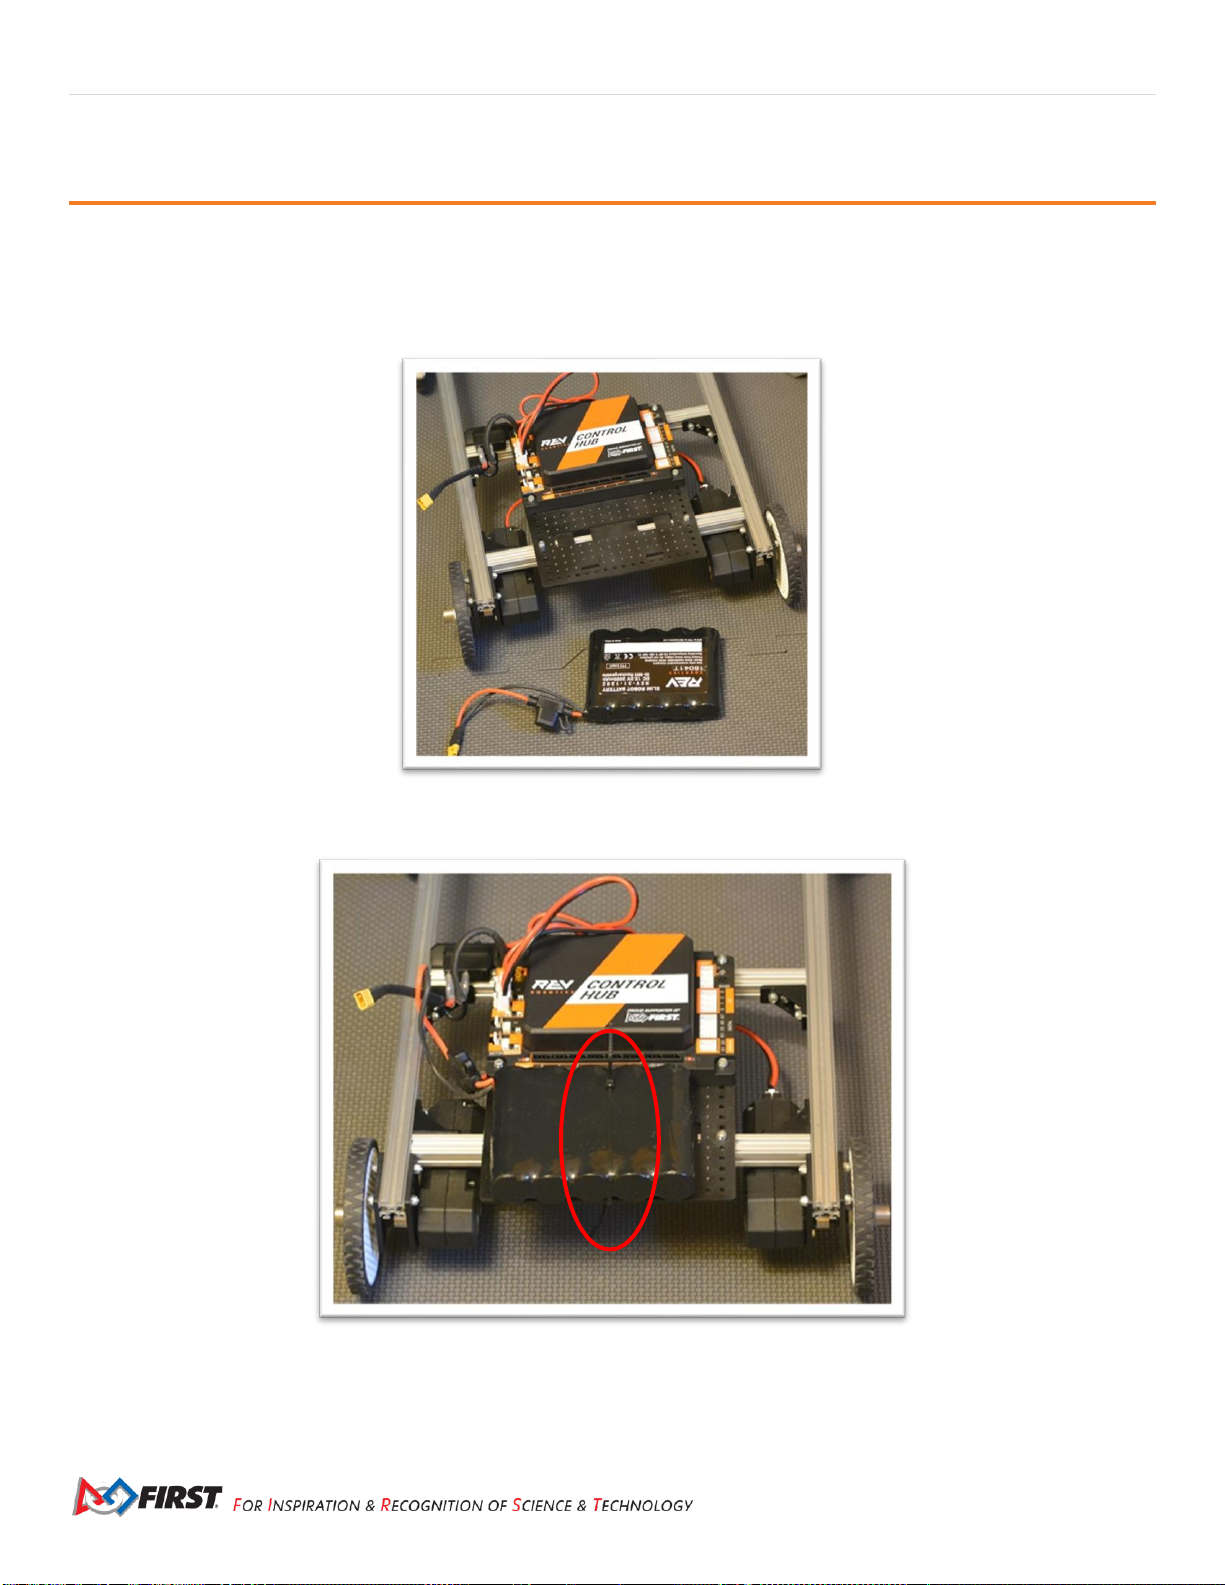
32 | FIRST® Tech Challenge Basic ‘Bot Guide for REV- Part 1
Revision 1: 6.16.2021
Battery
Step 1: Add the Battery
Parts Needed:
REV-31-1302 – Slim Battery, 3000mAh (1)
REV-41-1161 – Zip Tie, 160mm (2)
Figure 48- Unassembled view
Figure 49- Assembled view
Page 33
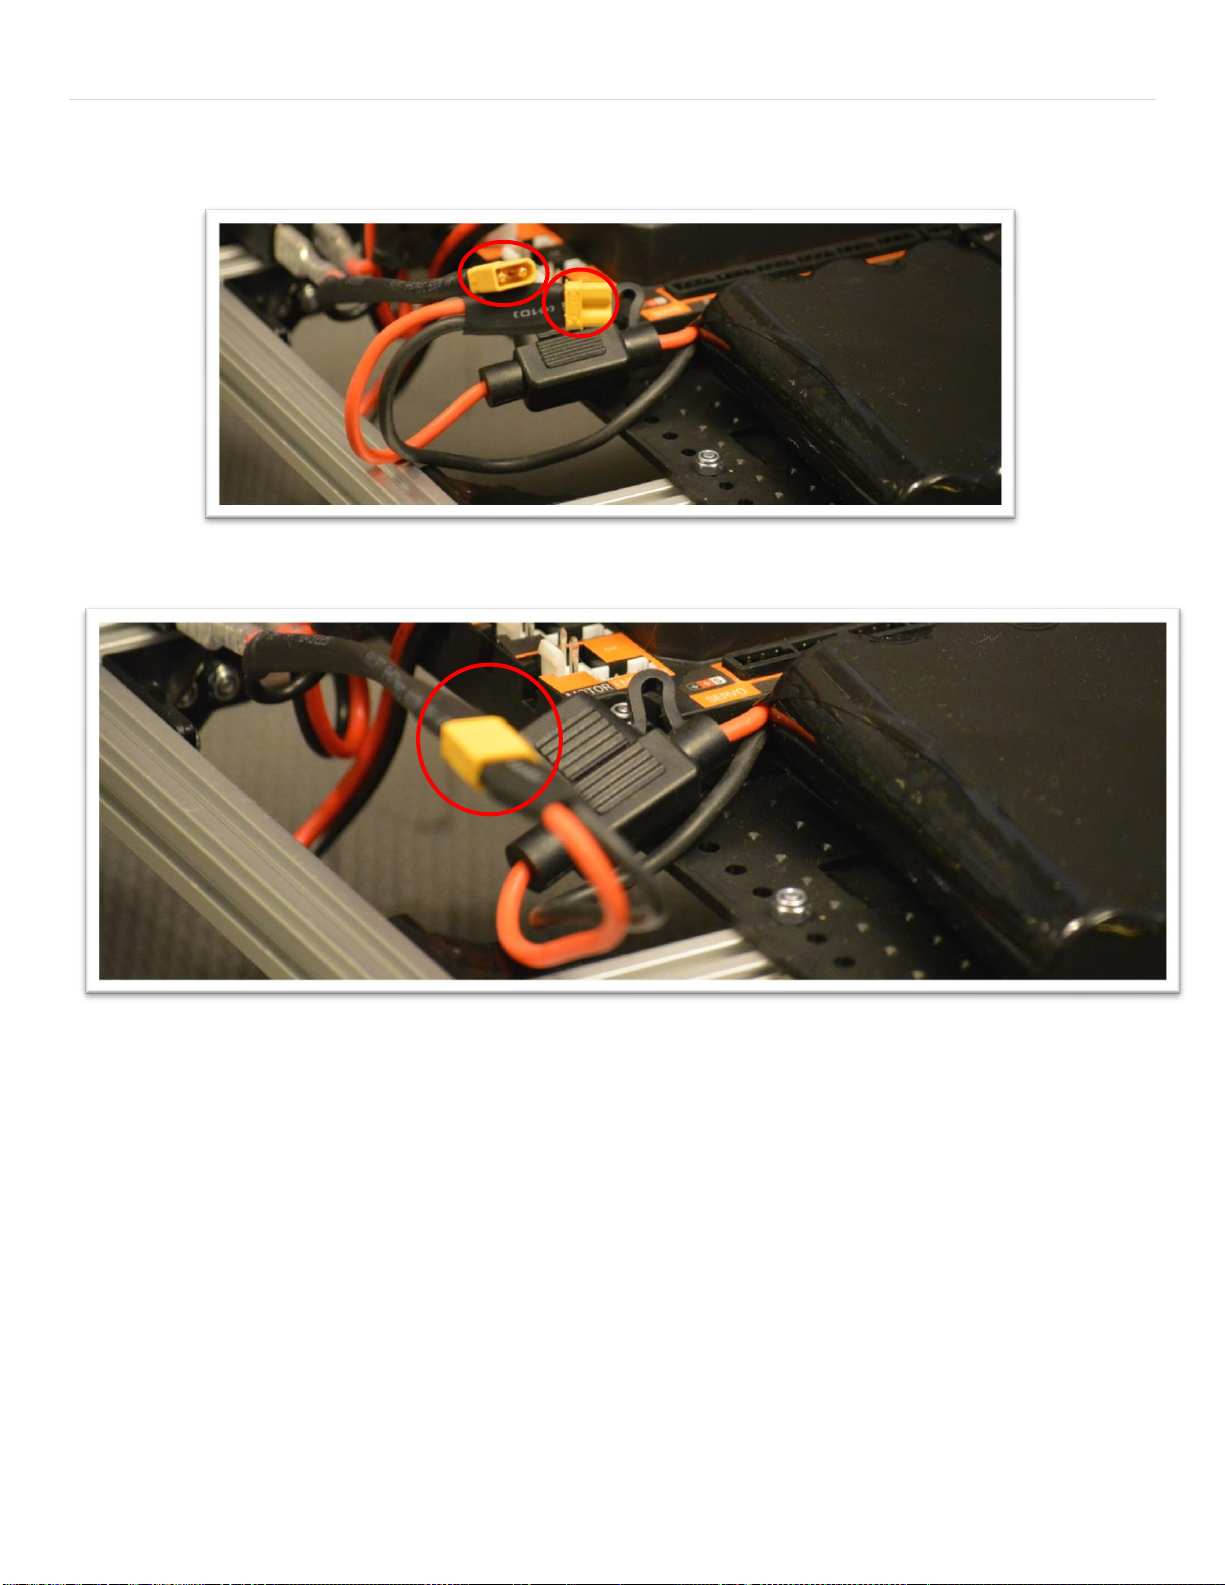
FIRST® Tech Challenge Basic ‘Bot Guide for REV- Part 1 | 33
Gracious Professionalism® - “Doing your best work while treating others with respect and kindness - It’s what makes FIRST, first.”
Step 2: Connect the Battery to the Switch
Figure 50- Unconnected view
Figure 51- Connected view
Page 34

34 | FIRST® Tech Challenge Basic ‘Bot Guide for REV- Part 1
Revision 1: 6.16.2021
Final Steps
What’s Next?
• You have now constructed the frame of your Basic ‘Bot, however, programming will be needed to make
the robot functional.
• Testing should be done to determine whether anything needs to be changed or optimized for the
season’s game rules. Testing will also show whether more cables need to be secured or re-routed.
• Check the game rules for all the applicable stickers
• Make sure to also go over the robot checklists:
o Robot Self-Inspection Checklist
o Robot Reliability Checklist
Resources
Visit the FIRST website for programming resources, robot building resources, more instructions and game
rules.
The robot can be even better with armature. Watch for the release (later in the season) of the Basic ‘Bot
Armature Guide by visiting our website (www.ssirobotics.lydean-david.net/) or Facebook page
(www.facebook.com/ssirobotics/).
Page 35

FIRST® Tech Challenge Basic ‘Bot Guide for REV- Part 1 | 35
Gracious Professionalism® - “Doing your best work while treating others with respect and kindness - It’s what makes FIRST, first.”
Appendix A – Resources
Game Forum Q&A
https://ftc-qa.firstinspires.org/
Anyone may view questions and answers within the FIRST® Tech Challenge game Q&A forum without a
password. To submit a new question, you must have a unique Q&A system user name and password for your
team.
Volunteer Forum
Volunteers can request access to role specific volunteer forums by emailing
[email protected]. You will receive access to the forum thread specific to your role.
FIRST Tech Challenge Game Manuals
Part 1 and 2 - https://www.firstinspires.org/resource-library/ftc/game-and-season-info
FIRST Headquarters Pre-Event Support
Phone: 603-666-3906
Mon – Fri
8:30am – 5:00pm
Email: [email protected]
FIRST Websites
FIRST homepage – www.firstinspires.org
FIRST Tech Challenge Page – For everything FIRST Tech Challenge.
FIRST Tech Challenge Volunteer Resources – To access public volunteer manuals.
FIRST Tech Challenge Event Schedule – Find FIRST Tech Challenge events in your area.
FIRST Tech Challenge Social Media
FIRST Tech Challenge Twitter Feed - If you are on Twitter, follow the FIRST Tech Challenge Twitter feed for
news updates.
FIRST Tech Challenge Facebook page - If you are on Facebook, follow the FIRST Tech Challenge page for news
updates.
FIRST Tech Challenge YouTube Channel – Contains training videos, game animations, news clips, and more.
FIRST Tech Challenge Blog – Weekly articles for the FIRST Tech Challenge community, including outstanding
volunteer recognition!
FIRST Tech Challenge Team Email Blasts – contain the most recent FIRST Tech Challenge news for teams.
Feedback
We strive to create support materials that are the best they can be. If you have feedback about this manual, please email
[email protected]. Thank you!
 Loading...