

Page 1
WORKABOUT PRO M/C
Hand-Held Computer
Quick Start Guide
March 11, 2004 PN 8000025.A
ISO 9001 Certified
Quality Management System
Page 2

© Copyright 2004 by Psion Teklogix Inc.,
Mississauga, Ontario
This document and the information it contains is the property of Psion
Teklogix Inc., is issued in strict confidence, and is not to be reproduced or
copied, in whole or in part, except for the sole purpose of promoting the sale
of Psion Teklogix manufactured goods and services. Furthermore, this document is not to be used as a basis for design, manufacture, or sub-contract, or
in any manner detrimental to the interests of Psion Teklogix Inc.
Page 3

All trademarks are the property of their respective holders.
Page 4

Return-T o-F actory Warranty
Psion T eklogix warrants a return-to-f actory warranty for a period of one year.
In some regions, the warranty exceeds this period. Please contact your local
Psion Teklogix office for details. For a list of offices, refer to “Support Services & Worldwide Offices” on page 29. The warranty on Psion Teklogix
manufactured equipment does not extend to any product that has been tampered with, altered, or repaired by any person other than an employee of an
authorized Psion Teklogix service organization. See Psion Teklogix terms
and conditions of sale for full details.
Service
When requesting service, please provide information concerning the nature
of the failure and the manner in which the equipment was used when the failure occurred. Type, model, and serial number should also be provided.
Before returning any products to Psion Teklogix, please call the Customer
Services Group for a Return Authorization number.
Support Services
Psion Teklogix provides a complete range of product support services to its
customers. For detailed information, please refer to “Support Services &
Worldwide Offices” on page 29.
Disclaimer
Every effort has been made to make this material complete, accurate, and upto-date. Psion T eklogix Inc. reserves the right to make changes without notice
and shall not be responsible for any damages, including but not limited to
consequential damages, caused by reliance on the material presented, including but not limited to typographical errors.
Page 5

T able Of Contents
1. Basic Preparation . . . . . . . . . . . . . . . . . . . . . . . . . . . . . . . . . 3
1.1 Charging The Battery. . . . . . . . . . . . . . . . . . . . . . . . . .3
1.2 Installing The Battery. . . . . . . . . . . . . . . . . . . . . . . . . . 3
1.3 Switching The Unit On. . . . . . . . . . . . . . . . . . . . . . . . . 4
1.4 Switching The Unit Off (Suspend). . . . . . . . . . . . . . . . 4
2. Getting To Know The WORKABOUT PRO . . . . . . . . . . . . 5
2.1 Features. . . . . . . . . . . . . . . . . . . . . . . . . . . . . . . . . . . . . 5
2.2 The Battery. . . . . . . . . . . . . . . . . . . . . . . . . . . . . . . . . . 7
2.2.1 Battery Swap And Runtime . . . . . . . . . . . . . . . . 9
2.3 The Keyboard. . . . . . . . . . . . . . . . . . . . . . . . . . . . . . . . 9
2.3.1 Modifier Keys. . . . . . . . . . . . . . . . . . . . . . . . . . . 10
2.3.2 The Keys. . . . . . . . . . . . . . . . . . . . . . . . . . . . . . . 10
2.3.3 Adjusting The Keypad Backlight . . . . . . . . . . . . 12
2.4 The Display. . . . . . . . . . . . . . . . . . . . . . . . . . . . . . . . . .12
2.4.1 Colour Display . . . . . . . . . . . . . . . . . . . . . . . . . . 13
2.4.2 Monochrome Display. . . . . . . . . . . . . . . . . . . . .14
2.4.3 Calibrating The Touchscreen . . . . . . . . . . . . . . . 14
2.5 Indicators . . . . . . . . . . . . . . . . . . . . . . . . . . . . . . . . . . . 15
2.5.1 The LED. . . . . . . . . . . . . . . . . . . . . . . . . . . . . . .15
2.5.2 Onscreen Indicators . . . . . . . . . . . . . . . . . . . . . .16
2.5.3 Audio Indicators. . . . . . . . . . . . . . . . . . . . . . . . .18
3. Navigating In Windows CE. . . . . . . . . . . . . . . . . . . . . . . . . . 19
3.1 Navigating A Touchscreen . . . . . . . . . . . . . . . . . . . . . . 19
3.2 Navigating Using The Keyboard . . . . . . . . . . . . . . . . . 19
Psion Teklogix WORKABOUT PRO Hand-Held Computer Quick Start Guide 1
Page 6

3.3 The Startup Desktop . . . . . . . . . . . . . . . . . . . . . . . . . . . 20
3.3.1 Accessing Desktop Icons . . . . . . . . . . . . . . . . . . 20
3.3.2 The Taskbar. . . . . . . . . . . . . . . . . . . . . . . . . . . . .21
3.4 The Start Menu . . . . . . . . . . . . . . . . . . . . . . . . . . . . . . . 21
3.5 Using A Dialogue Box . . . . . . . . . . . . . . . . . . . . . . . . .26
4. General Maintenance. . . . . . . . . . . . . . . . . . . . . . . . . . . . . . . 28
4.1 Caring For The Touchscreen. . . . . . . . . . . . . . . . . . . . . 28
4.2 Cleaning The WORKABOUT PRO . . . . . . . . . . . . . . .28
Approvals . . . . . . . . . . . . . . . . . . . . . . . . . . . . . . . . . . . . . . . . .33
Safety Summary . . . . . . . . . . . . . . . . . . . . . . . . . . . . . . . . . . . . 35
Program License Agreements. . . . . . . . . . . . . . . . . . . . . . . . . .38
2 Psion Teklogix WORKABOUT PRO Hand-Held Computer Quick Start Guide
Page 7

1. Basic Preparation
Important:
This quick start guide provides basic information on the operation
and features of the Psion Teklogix WORKABOUT PRO M (Monochrome) and WORKABOUT PR O C (Colour) Hand-Held Computer. For more detailed information, refer to the
M/C Hand-Held Computer User Manual (PN 8000024)
mentation supplied with the application you are using.
T ypically, WORKABOUT PROs are configured at the factory and
arrive ready for use.
All approval and safety information is outlined in the
‘WORKABOUT PRO Hand-Held Computer User Manual’
– part number 8000024. This manual is available on our
web site www.psionteklogix.com through the Teknet
extranet. It is important that you review all safety guidelines
before charging a battery or operating a scanner .
WORKABOUT PRO
or the docu-
1.1 Charging The Battery
Batteries shipped from the factory are not charged. They must be
fully charged prior to use. Full capacity may not be reached until at
least 5 full charge/discharge cycles have been performed.
1.2 Installing The Battery
• Turn the fasteners at the base of the battery cover counterclockwise to unlock the cover and remove it. The top of the
stylus is shaped to help you loosen the fasteners.
• Insert the
the fasteners at the base of the battery cover clockwise to lock
the battery in place.
charged
battery. Replace the battery co ver , and turn
Psion Teklogix WORKABOUT PRO Hand-Held Computer Quick Start Guide 3
Page 8

Note:
If you are using a docking station, you can insert an
uncharged battery, dock the unit and switch it on.
1.3 Switching The Unit On
• Press and hold down the <ENTER/ON> key for at least
one second to switch the unit on.
• When the LED flashes green, release <ENTER/ON>.
A splash screen displaying the
Microsoft® Windows CE .NET
startup desktop.
Note:
If the unit was already in use – the unit may be off (suspend
state) – pressing <ENTER/ON> ‘wakes’ the unit fr om this
state. The screen in which you were working prior to the suspend state is displayed.
Psion T eklogix
logo appears followed by the
logo and the
1.4 Switching The Unit Off (Suspend)
• Press the <BLUE> key, and then press <ENTER/ON> to
switch off the WORKABOUT PRO.
4 Psion Teklogix WORKABOUT PRO Hand-Held Computer Quick Start Guide
Page 9
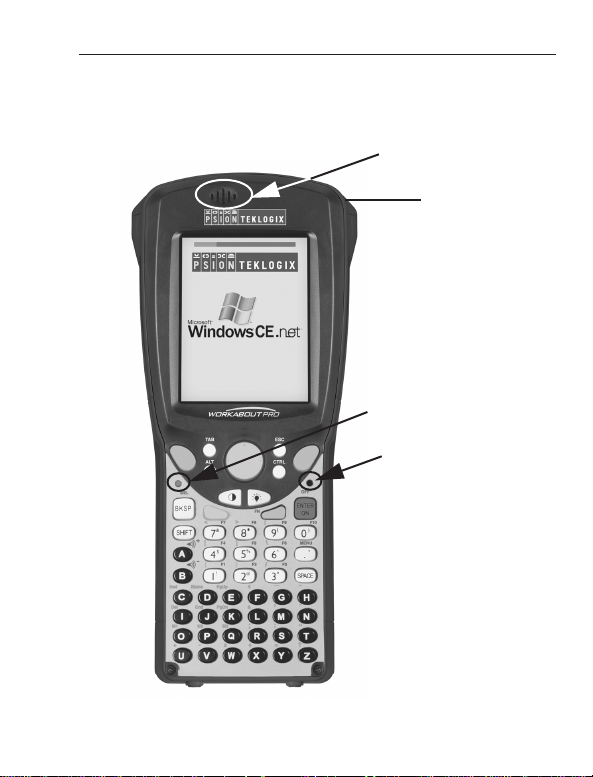
2. Getting T o Know The WORKABOUT PRO
2.1 Features
Sound Port
Stylus
(pointing tool)
LED
(Light Emitting Diode)
Microphone
Psion Teklogix WORKABOUT PRO Hand-Held Computer Quick Start Guide 5
Page 10

End Cap
Back Cover
Battery Cover
Battery Cover
Fasteners
Tether Port
Low Insertion
Force (LIF) Port
Audio Jack
6 Psion Teklogix WORKABOUT PRO Hand-Held Computer Quick Start Guide
Page 11

2.2 The Battery
The WORKABOUT PR O will operate with a standard 1800 mAh
Lithium Ion battery pack, a high-capacity 2700 mAh Lithium-Ion
battery pack or three AA alkaline batteries. If you are using a Lithium Ion battery pack, the battery pack must first be charged.
Warning:
Psion Teklogix Inc. Psion Teklogix Corp.
2100 Meadowvale Blvd. 1810 Airport Exchange Blvd.
Mississauga, Ontario Suite 500
Canada Erlanger, Kentucky
L5N 7J9 USA 41018
Psion Teklogix S.A.
La Duranne; 135 Rue Rene Descartes; BP 421000
13591 Aix-En-Provence
Cedex 3; France
Warning:
• The battery incorporates built-in safety devices. To ensure
• Do not short-circuit the battery by directly connecting any of
• Do not dispose of batteries in fire.
Before charging or using the battery pack, it is critical
safety information in this section be reviewed and that all warnings are strictly followed.
BATTERIES ARE CONSIDERED HAZARDOUS WASTE.
For proper disposal, forw ard all used batteries to one of:
that the
TO PREVENT the battery from leaking acid, generating
heat or exploding, adhere to precautions below.
their proper function, do not disassemble or alter any parts
of the battery.
the exposed terminals with metal objects such as wire. Do not
transport or store the battery together with metal objects such
as necklaces, hair pins, etc.
Psion Teklogix WORKABOUT PRO Hand-Held Computer Quick Start Guide 7
Page 12

• Do not use or leave the battery near a heat source such as a
fire or heater.
• Do not immerse the battery in water.
• When charging, use the battery charger specifically designed
for the battery.
• Do not pierce, strike, throw or step on the battery.
• Do not directly solder the battery.
• Do not connect the battery to an electrical outlet, vehicle
cigarette lighter, etc.
• Do not put battery into a microwave oven or pressurized
container.
• Do not use the battery in combination with primary batteries
(such as dry-cell batteries) or batteries of different capacities
or brands.
• Immediately remove the battery from the device or battery
charger and stop use if the battery gives off an odour, generates heat, becomes discoloured or deformed, or in any way
appears abnormal during use.
• Do not continue charging the battery if it does not recharge
within the specified charge time.
• The battery may burst or ignite if the battery leaks. Always
ensure that it is away from any exposed flames.
• If leaking electrolyte sprays into your eyes, rinse them with
clean running water, and immediately seek medical attention.
• Do not store the battery in extremely high temperatures
(e.g., a vehicle, strong direct sunlight, etc.). This may cause
the battery to overheat or ignite, and it may also reduce the
performance and service life of the battery.
• Do not use in areas where static electricity is greater than
what the manufacturer guarantees.
• Keep batteries out of reach of children
.
8 Psion Teklogix WORKABOUT PRO Hand-Held Computer Quick Start Guide
Page 13
2.2.1 Battery Swap And Runtime
Under normal operating conditions, fully charged 1800 mAh batteries hold a charge for up to 8 hours. 2700 mAh batteries can hold a
charge for up to 12 hours.
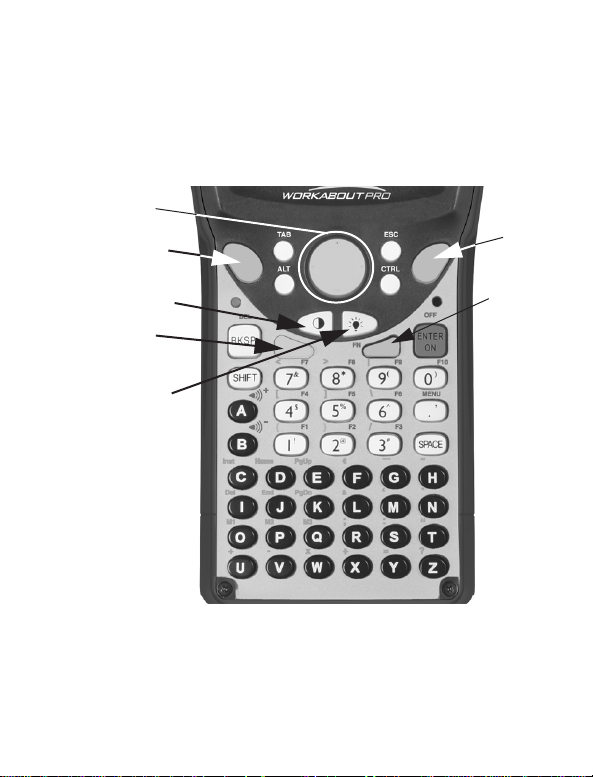
2.3 The Keyboard
Arrow Keys
Scan Key
Scan Key
Contrast Key
Orange Key
Display
Backlight Key
Blue Key
The keyboard is equipped with a set of standard keys along with a
<ORANGE> and a <BLUE> modifier key to provide access to additional keys and system functions. These additional keys are
colour coded in
Psion Teklogix WORKABOUT PRO Hand-Held Computer Quick Start Guide 9
orange
and
blue
print above the standard keys.
Page 14

2.3.1 Modifier Keys
The <SHIFT>, <CTRL>, <ALT>, <ORANGE> and <BLUE> keys
are
modifier
keys. Pressing a modifier key changes the function of
the next key pressed. For example, a square brack et is printed
in
orange
print above the <4> key. Pressing the <ORANGE> key
followed by the <4> key displays a square bracket rather than the
number 4.
The <SHIFT>, <CTRL> and <ALT> keys operate much like a desktop keyboard except that they are not chorded – two k e ys cannot be
held down simultaneously. The modifier key must be pressed first
followed by the key whose function you want modified.
Activating Modifier Keys
When a modifier key is pressed once, the modifier key icon displays the
key in
lowercase
once displays
modifier key becomes inactive and disappears from the taskbar.
letters in the taskbar. For e xample, pressing <CTRL>
ctrl key
in the taskbar. Once the next k ey is pressed, the
Locking Modifier Keys
When a modifier key is pressed twice, it is ‘locked’ on. A ‘locked’
modifier key icon displays the key in
For example, pressing the <BLUE> key twice locks it on – it is displayed as
The locked modifier key remains activ e until it is pressed a third time
to unlock or turn it off.
BLUE KEY
in the taskbar at the bottom of the screen.
uppercase
letters in the taskbar.
2.3.2 The Keys
The <SHIFT> Key
Used to display uppercase alpha characters and provide access to
the symbols above the numeric keys.
10 Psion Teklogix WORKABOUT PRO Hand-Held Computer Quick Start Guide
Page 15

The Arrow Keys
Contained in the round disk-shaped key at the top of the keyboard.
Moves the cursor around the screen – up, down, left and right.
The <BKSP/DEL> Key
Moves the cursor one character to the left, erasing the incorrectly
entered key stroke.
<DEL> key (<BLUE> <BKSP>) erases the character at the cur-
sor position.
The <CTRL> And <ALT> Key
Modify the function of the next key pressed and are application
dependent.
The <TAB> Key
Usually moves the cursor to the next field to the right or down-
ward. Pressing <ORANGE> <TAB> move the cursor backward.
The <ESC> Key
Generally used as a keyboard shortcut to close the current menu,
dialogue box or activity and return to the previous one.
The <SPACE> Key
Inserts a blank space between characters. In a Windows dialogue
box, the <SPACE> key enables (√) or disables a checkbox.
The <SCAN> Keys
Activate the scanner beam while pressed. For units without inter-
nal scanners, these keys are inoperable.
The Function Keys – <F1> to <F10>
Perform special, custom-defined functions. These keys are
accessed by pressing <BLUE> followed by numeric keys
<1> to <10>. They can be used with the Windows CE .NET
operating system or another application.
Psion Teklogix WORKABOUT PRO Hand-Held Computer Quick Start Guide 11
Page 16

The Macro Keys – <M1> to <M3>
d
Contain up to 20 programmable characters (“positions”) and executable keys. These keys are accessed by pressing <ORANGE>
followed by alpha keys <O>, <P> or <Q>. When pressed, the
macro key executes a custom-defined string of characters, including executable keys.
2.3.3 Adjusting The Keypad Backlight
T o adjust the intensity of the k eypad backlight and the conditions
under which this backlight is activated
• In the
Note:
• In the
Control Panel,
choose the
Keyboard
icon.
Access may be restricted to supervisory use.
Keyboard Properties
dialogue box, open the
Adjusts light intensity.
Determines the duration
of time that the keyboar
backlight stays on when
unit is not in use.
Backlight
tab.
2.4 The Display
Depending on the type of display – colour or monochrome – you can
adjust the backlight or contrast of the display to improve character
visibility.
12 Psion Teklogix WORKABOUT PRO Hand-Held Computer Quick Start Guide
Page 17

2.4.1 Colour Display
Adjusting The Backlight
The display backlight can be adjusted manually.
• Press the Backlight key < > to cycle through from light to
darkest, and then back to lightest. Press <ORANGE> < >
to cycle backward from darker to lighter.
T o set the range of the backlight:
• Choose the
• Display the
Note:
For units equipped with monochrome scr eens, the Backlight
key < > turns the backlight on or off. Backlight intensity
cannot be adjusted.
Note also that adjustments may be restricted to supervisory
use only.
Display
Backlight
icon in the
Control Panel.
tab.
Adjusts the light intensity of the
backlight.
Sets duration of time the backlight
stays on at the configured intensity
when the unit is not in use.
Sets duration of time the backlight
stays on at half the configured
intensity when the unit is not in use.
Psion Teklogix WORKABOUT PRO Hand-Held Computer Quick Start Guide 13
Page 18

2.4.2 Monochrome Display
Adjusting The Contrast
Note:
Contrast adjustment is only available on hand-helds
equipped with monochrome screens. Contrast has no effect
on units with colour screens.
The display contrast can be adjusted from the keyboard using the
Contrast key < > just below the arrow ke ys.
• Press this key until you are satisfied with the contrast adjustment. Press <ORANGE> < > to shift contrast backward.
T o set the range of the contrast on a monochrome screen:
• In the
Note:
Control Panel,
trast tab.
Keep in mind that this option may be restricted to supervisory use only.
choose the
Display
Adjusts the display contrast.
icon and select the
Con-
2.4.3 Calibrating The Touchscreen
Note:
This function may be restricted to supervisory use.
14 Psion Teklogix WORKABOUT PRO Hand-Held Computer Quick Start Guide
Page 19

If the touchscreen has never been calibrated or if the stylus pointer is
not accurate when you tap on an item:
• In the
Control Panel,
choose the
tab, and then tap on the
Stylus
<Recalibrate>
icon, select the
button.
Calibration
• Follow the onscreen directions to calibrate the display.
2.5 Indicators
WORKABOUT PROs use an LED (Light Emitting Diode),
onscreen messages and audio tones as indicators.
2.5.1 The LED
A single, two-coloured LED is located on the left side of the unit,
just above the <BKSP> key. When you press <ENTER/ON>, the
LED flashes green to indicate that the unit has been powered up. The
LED table below outlines the behaviour of the LED while the unit is
docked in a charger .
Keep in mind that the application running on the WORKABOUT
PRO can dictate how the LED operates. Review the documentation
provided with the application to determine LED behaviour.
Psion Teklogix WORKABOUT PRO Hand-Held Computer Quick Start Guide 15
Page 20

LED Behaviour Indication
Solid Green Battery charge complete.
Solid red Charge in progress.
Blinking red Alarm.
2.5.2 Onscreen Indicators
The taskbar at the bottom of the screen displays a variety of system
status indicators.
The taskbar changes dynamically, and only those icons that are
applicable are displayed. For example, if a Bluetooth radio is not
installed, this icon is not displayed in the taskbar. Double-tapping on
an icon displays the associated dialogue box.
Windows® Start Button
You can display the
button in the taskbar .
Start Menu
by tapping on the Windows® Start
16 Psion Teklogix WORKABOUT PRO Hand-Held Computer Quick Start Guide
Page 21

Modifier Key Indicators
<SHIFT>, <CTRL>, <ALT>, <BLUE> and <ORANGE> are modifier keys that have onscreen indicators to show when a key is active
or locked. If a modifier key is pressed once to activate it, the key is
displayed in the taskbar in
pressed twice, it is ‘locked on’ and the onscreen indicator is displayed in
uppercase
lowercase
letters in the taskbar.
characters. If a modifier key is
Battery Gauge
Battery icons are a visual indication of the remaining battery power .
If the unit is using external AC power, an AC icon is displayed.
Full 75% 50% 25% Empty AC Connection
Battery Charge
The battery charge icon is displayed in the taskbar when the handheld battery is being charged.
LIF and USB Devices
When a device such as a docking station or a charger is connected to
the USB (tether) port or the LIF (Low Insertion Force) port and is
activated, an associated icon appears in the taskbar.
New device connected: LIF Port New device connected: USB Port
Psion Teklogix WORKABOUT PRO Hand-Held Computer Quick Start Guide 17
Page 22

Security Level
Security levels can be set to limit access and prev ent inadvertent
changes to application settings.
Bluetooth Radio
If a Bluetooth radio is installed, this icon is displayed in the taskbar.
2.5.3 Audio Indicators
The audio speaker provides a variety of sounds and can be configured to emit a sound under various conditions. Refer to ‘Volume
Adjustment’ in the
Manual’
for details.
Note:
The volume can also be adjusted using the V
Properties
Adjusting The Speaker Volume
The volume keys are located abov e the <A> and <B> k e ys and are
used to adjust the volume emitted from your unit.
The
increase volume
decrease volume
T o adjust the speak er volume:
• Press the <BLUE> key twice to lock it ‘on’.
• Press the
volume <B> key until the volume meets your needs.
• Press the <BLUE> key again to ‘unlock’ it.
‘WORKABOUT PRO Hand-Held Computer User
olume & Sound
dialogue box in the
key is labelled with a plus symbol and the
key is labelled with a minus sign .
increase volume
Control Panel
<A> key or the
.
decrease
18 Psion Teklogix WORKABOUT PRO Hand-Held Computer Quick Start Guide
Page 23

3. Navigating In Windows CE
On WORKABOUT PR Os, the ‘point and click’ action associated
with a desktop computer mouse is accomplished by tapping a stylus
on the touchscreen. In addition, every ‘point and click’ action, an
equivalent ke yboard shortcut is also available.
3.1 Navigating A Touchscreen
All WORKABOUT PR Os are equipped with a touchscreen and a
stylus.
T o prev ent damage to the touchscreen, use only the stylus provided –
never use a screw driv er or other sharp objects.
T o open a file, launch an applet or open a folder:
• Tap the stylus on the appropriate icon.
Note: If the touchscreen is not registering your screen taps accu-
rately, it may need recalibration. Refer to “Calibrating The
Touchscreen” on page 14.
3.2 Navigating Using The Keyboard
Y ou can also use the k eyboard to choose icons and navig ate dialogue
boxes, display the desktop, and so on.
Unlike a desktop computer, the W ORKABOUT PRO does not support key chording (pressing two keys at the same time). You must
press one key followed by the next in sequence.
Operation Key or Key Combination
Switch between applications <ALT> <TAB>
Open task manager screen <ALT> <ESC>
Move cursor Arrow keys
Psion Teklogix WORKABOUT PRO Hand-Held Computer Quick Start Guide 19
Page 24

Open file, folder or icon <ENTER>
Exit & Save <ENTER>
Close/Exit & Do Not Save <ESC>
Navigate Dialogue Boxes Next field: <TAB>
Move cursor up: <SHIFT><TAB>
Display next tab : <CTRL> <TAB>
Select Radio Button/
Press Button
Go to Start Menu <BLUE><.>
<SPACE>
3.3 The Startup Desktop
When the unit boots up, the startup desktop is displayed. Applications stored in the Startup folder start up immediately. The Startup
folder is located in: \Windows\Startup and \Flash Disk\Startup.
3.3.1 Accessing Desktop Icons
• Double-tap on the icon to open a window or, in the case of an
application icon, launch an application.
20 Psion Teklogix WORKABOUT PRO Hand-Held Computer Quick Start Guide
Page 25

3.3.2 The Taskbar
A taskbar at the bottom of the screen displays icons through which
you can view the security level and battery capacity. A unit equipped
with a Bluetooth radio displays the appropriate icon in the taskbar. A
hand-held attached to a charger, cradle or docking station displays
the associated icon, and so on.
The taskbar also displays active modifier keys – <SHIFT>, <ALT>,
<CTRL>, <ORANGE> and <BLUE>. Keys that hav e been lock ed
“on” are displayed in uppercase letters.
Using The Taskbar
• Tap on an icon to display the associated dialogue box. For
example, tapping on the battery icon displays the
dialogue box that indicates the current battery capacity.
ties
Power Proper-
3.4 The Start Menu
The Start Menu lists operations you can access and work with. It is
available from the startup desktop or from within any application.
T o display the menu:
Psion Teklogix WORKABOUT PRO Hand-Held Computer Quick Start Guide 21
Page 26

• Tap on the Windows® Start button in the taskbar. Tap on the
item in the menu with which you want to work.
Note: If your touchscreen is disabled, press <BLUE> <.>.
The Desktop
Choosing Desktop from the Start Menu displays the desktop.
Security Settings
T o assign a security level:
• Choose S
• Select a security level from the dialogue box, and type the
appropriate password.
T o change the passw ord:
Note: Keep in mind that this is the same password as that assigned
through the
ecurity from the Start Menu.
Password control panel applet.
22 Psion Teklogix WORKABOUT PRO Hand-Held Computer Quick Start Guide
Page 27

• Choose a security level, and enter the existing password in
the
Password field.
• Choose the
Password Properties dialogue box:
In the
• Type the new password in the
the new password in the
Set Password button.
Password: text box, and retype
Confirm Password: text box.
The System Tray
Note: You’ll only need to use this option to access the icons in
the taskbar if your touchscreen has been disabled. If your
touchscreen is working, you can tap on the taskbar icons to
display associated dialogue boxes.
The Sy
stem Tray option allo ws k e yboard access to the icons in
the taskbar at the bottom of the screen. The taskbar displays indicators such as a battery capacity gauge and the security level. These
indicators are attached to dialogue boxes that provide additional
information.
• Choose Sy
stem Tray from the Start Menu.
When System Tray is chosen, the taskbar icons become accessible. To display the dialogue box attached to an icon:
• Use the <LEFT> and <RIGHT> arrow keys to highlight the
icon with which you want to work.
• Press <ENTER/ON> to display the associated dialogue box.
The Task Manager
The Task Manager option allows you to switch to another task or
to end an active task. To display the task manager window:
Psion Teklogix WORKABOUT PRO Hand-Held Computer Quick Start Guide 23
Page 28

• Tap on Task Manager in the Start Menu.
Cycle Tasks
When Cycle Tasks is selected (and the Task Manager is not
open), you can cycle through active applications. To cycle to the next
active task:
• Tap on C
ycle Tasks in the Start Menu.
Power Info
Selecting Power Info from the Start Menu displays the Power Prop-
erties
dialogue box. This dialogue box indicates the remaining charge
capacity of the battery.
Programs
Program displays a sub-menu of options with which you can work
access applications.
24 Psion Teklogix WORKABOUT PRO Hand-Held Computer Quick Start Guide
Page 29

Settings
T apping on Settings displays a sub-menu of options with which
you can access the
and Dial-up Connections)
Control Panel applets, configure your radio (Network
and customize the Taskbar and Start Menu.
Run
Choosing the Run option displays a dialogue box in which you can
enter the name of the program, folder or document you want to open.
Psion Teklogix WORKABOUT PRO Hand-Held Computer Quick Start Guide 25
Page 30

Shutdown
T apping on Shutdown displays options for a shutdown.
Suspends the unit immediately –
equivalent to turning the unit off.
Resets the unit, leaving all saved files and
(registry) settings intact. Unsaved data is
lost.
Resets the unit. Files stored outside of
permanent memory are lost.
Note: This menu varies depending on the security level. At User
level, the
–
Teklogix security level provides another option –
Shutdown sub-menu is replaced with a single option
Suspend. A sub-menu is not available.
Bootloader.
This option behaves like cold-reset, except that the unit
launches Bootloader rather than Windows CE .NET.
3.5 Using A Dialogue Box
Tabs
Radio Button
Textbox
Dropdown
Menu
Button
Checkbox
26 Psion Teklogix WORKABOUT PRO Hand-Held Computer Quick Start Guide
Page 31

Note: T ap the stylus on a dialogue box element to select or deselect
it, display a dropdown menu and so on. To use the ke yboard,
refer to “Navigating Using The Keyboard” on page 19.
Dialogue boxes like the samples in this section contain one or more
of the following elements:
Tab: Tabs separate different elements of a dialogue box. Tap the stylus on the tab with which you want to work.
Textbox: A textbox requires that you type information. Tap on the
textbox you want to work with to highlight it, and then type the
appropriate information.
Dropdown: This type of menu is identified by up and down arrows
next to the dropdown menu to indicate that additional options are
available. Tap on the menu to highlight it, and tap on the arrows
attached to the menu to cycle through the options.
Checkbox: This box allows you to select or deselect an option. To
select (√) or deselect a checkbox, tap the stylus in the checkbox.
Radio buttons: These buttons allow you to choose from a number
of options. For example, in the sample screen under section 3.5 on
page 26, you can choose to
IP address’.
T ap on a radio button to activate the option next to it.
‘Obtain an IP address via DHCP’
or ‘Specify an
Buttons: This type of button allows you to ‘Save’, ‘Delete’ and so
on the options you’ve chosen in a dialogue box. Tap on the button
you want to execute.
Saving Y our Choices: Once you’v e made all your changes, tap on
the <
OK> button to save your changes and exit the window.
Note: If an item in a dialogue box is displayed in gre y text, the item
is not currently available.
Psion Teklogix WORKABOUT PRO Hand-Held Computer Quick Start Guide 27
Page 32

4. General Maintenance
4.1 Caring For The Touchscreen
The touchscreen can be permanently damaged by harsh chemicals
and is susceptible to abrasions and scratches. Using sharp objects on
the touchscreen can scratch or cut the plastic or crack the internal
conductive coating.
Protect the touchscreen from the following chemicals:
• mustard,
• sodium hydroxide,
• concentrated caustic solutions,
• benzyl alcohol, and
• concentrated miner acids.
If touchscreens are used in harsh environments, apply disposable
screen protectors to dramatically extend the life of the touchscreen.
4.2 Cleaning The WORKABOUT PRO
Important: Do not immerse the unit in water . Dampen a soft cloth
• Use only mild detergent or soapy water to clean the unit.
• Avoid abrasive cleaners, solvents or strong chemicals. The
• T o clean ink marks from the ke ypad and touchscreen, use iso-
with mild detergent to wipe the unit clean.
plastic case is susceptible to harsh chemicals. The plastic is
partially soluble in oils, mineral spirits and gasoline. The
plastic slowly decomposes in strong alkaline solutions.
propyl alcohol.
28 Psion Teklogix WORKABOUT PRO Hand-Held Computer Quick Start Guide
Page 33

5. Support Services & Worldwide
Offices
Psion Teklogix provides a complete range of product support services to its customers worldwide.
5.1 Technical Support
Technical Support for Mobile Computing Products is provided via
e-mail through the Psion Teklogix customer and partner extranets.
T o reach the website, go to www.psionteklogix.com and click on the
appropriate Teknet link on the home page. Then click on the
“Log-in” button or the “Register” button, depending on whether you
have previously re gistered for Teknet. Once you have logged in,
search for the “Support Request Form”.
5.2 Product Repairs
International
For product repairs, please contact your local Psion Teklogix office
(see “Worldwide Offices” on page 30).
Canada/U.S.A
Canadian and U.S. customers can receive access to repair services,
by calling the toll-free number below, or via our secure website (see
Technical Support, above).
Note: Customers calling the toll-free number should have their
Psion Teklogix customer number or trouble tick et number
available.
Voice:1 800 387-8898 (press option “2”)
Fax:1 905 812-6304
Psion Teklogix WORKABOUT PRO Hand-Held Computer Quick Start Guide 29
Page 34

5.3 Worldwide Offices
COMPANY HEADQUARTERS AND
ANADIAN SERVICE CENTRE
C
Psion Teklogix Inc.
2100 Meadowvale Blvd.
Mississauga, Ontario
Canada L5N 7J9
Tel: +1 905 813 9900
Fax: +1 905 812 6300
E-mail: salescdn@psion.com
INTERNATIONAL SUBSIDIARIES
Psion Teklogix GmbH
Jakob Kaiser Straße 3
D-47877 Willich Münchheide
Deutschland
Tel: +49 2154 9282 0
Fax: +49 2154 9282 59
E-mail: info@teklogix.de
Psion Teklogix Danmark
Vesterballevej 4-6
7000 Fredericia
Danmark
Tel: +45 76 24 0133
Fax: +45 75 94 4679
E-mail: tedk@psion.com
NORTH AMERICAN
EADQUARTERS AND U.S.
H
S
ERVICE CENTRE
Psion Teklogix Corp.
1810 Airport Exchange Boulevard
Suite 500
Erlanger, Kentucky
USA 41018
Tel: +1 859 371 6006
Fax: +1 859 371 6422
E-mail: salesusa@psion.com
Psion Teklogix S.A.
La Duranne
135 Rue Rene Descartes
BP 421000
13591 Aix-En-Provence
Cedex 3; France
Tel: +33 4 42 90 88 09
Fax: +33 4 42 90 88 88
E-mail: tekeuro@psion.com
Psion Teklogix AB
Stora Badhusgatan 18-20
411 21 Göthenburg, Sweden
Tel: +46 31 13 15 50
Fax: +46 31 13 57 80
E-mail: info@teklogix.se
30 Psion Teklogix WORKABOUT PRO Hand-Held Computer Quick Start Guide
Page 35

Psion Teklogix (UK) Ltd.
Bourne End Business Centre
Cores End Road
Bourne End
Buckinghamshire SL8 5AR, England
Tel: +44 1628 648800
Fax: +44 1628 648810
WWW: www.teklogix.co.uk
E-mail: tekuk@psion.com
Psion Teklogix Finland
Metsänneidonkuja 8
02130 Espoo
Finland
Tel: +358 9 4307 8390
Fax: +358 9 4307 8395
E-mail: tekeuro@psion.com
Psion Teklogix Italia S.r.I
Via Galilei, 47
20092 Cinisello Balsamo
Milan, Italy
Tel: +39 02 6604 5410
Fax: +39 02 6604 5412
E-mail: tkxitalia@psion.com
Psion Asia Pacific Pte. Ltd.
210 South Bridge Road
#03-01 Singapore 058759
Tel: +65 673 58108
Fax: +65 673 35990
E-mail: teksing@teklogix.com
Psion Teklogix de Mexico, S.A.
de C.V.
Sierra Mojada 626, 2º Piso
Col. Lomas Barrilaco, C.P. 11010
Mexico, D.F., Mexico
Tel.: +5255 5 202 6802/6950
Fax: +5255 5 202 4505
E-mail: salesusa@psion.com
Psion Teklogix Benelux
Nieuwe weg 1,
2070 Zwijndrecht
Belgium
Tel: +32 3 250 22 00
Fax: +32 3 250 22 20
E-mail: info@psionteklogix.be
Psion Teklogix España, S.L.
Cityparc Ronda de Dalt
Ctra. Hospitalet 147-149
Edificio Atenas 2˚ 3ª
08940 Cornellà de Llobregat (Barcelona)
España
Tel: +34 9 3475 0220
Fax: +34 9 3475 0230
E-mail: teklogix@apdo.com
Psion Teklogix B.V.
Venrayseweg 57,
5928 NZ Venlo
Nederlands
Tel: +31 77 32400 44
Fax: +31 77 32400 53
Psion Teklogix WORKABOUT PRO Hand-Held Computer Quick Start Guide 31
Page 36

Psion Teklogix Africa
Postnet Suite 39, Private Bag x11
Halfwayhouse, 1685 Ground Floor
East
Waterfall Edge Phase 2, Waterfall
Park
Bekker Road MIDRAND 1685
South Africa
Tel: +27 11 805 7440/1/2
Fax: +27 11 805 7444
Psion Teklogix Systems India
Pvt. Ltd.
M-74, 1st Floor, “M” Block Market
Greater Kailash-Il
New Delhi - 110048
India
Tel: +91 11 26219257
Fax: +91 11 26219076
E-mail: tekind@psion.com
Psion Teklogix Wireless Technologies (Shanghai) Ltd.
Unit 1507-08
Mingshen Building
No.3131 Kai Xuan Rd
Shanghai 200030
China
Tel: +86 21 5407 1991
Fax: +86 21 5407 1992
Psion Teklogix Taiwan Co., Ltd.
15FL-5, No. 366 Boai 2nd Road,
Tzuo Ying District, KAOHSIUNG 813
Taiwan, R.O.C.
Tel: +886 7 558 2028
Fax: +886 7 558 3328
E-mail: jerry.chen@teklogix.com
5.4 World Wide Web
www.psionteklogix.com
32 Psion Teklogix WORKABOUT PRO Hand-Held Computer Quick Start Guide
Page 37

Approvals
Declaration Of Conformity
Product: 7525 WORKABOUT PRO
Application of Council R&TTE Directive: 1999/5/EEC
Directive(s): EMC Directive: 89/336/EEC
Conformity Declared ETSI EN 300 328-2
to Standards: ETSI EN 301 489-17
Manufacturer: ASKEY COMPUTER CORP.
Manufacturer s Address PSION TEKLOGIX S.A.
in the European La Duranne; 135 Rue Rene Descartes; BP 421000
Community: 13591 Aix-En-Provence
Year of Manufacture: 2004
Type of Equipment: Information Technology Equipment
Equipment Class: Commercial and Light Industrial
I the undersigned hereby declare that the equipment specified above conforms to the
above directives and standards.
Manufactur
Signature Signature
John Chiou
Full Name Full Name
Product Certification Manager
Position Position
ASKEY
Place Place
er: Legal Representative in Europe:
COMPUTER, TAIPEI PSION TEKLOGIX S.A. France
Low Voltage Directive: 73/23/EEC
EN 55022: 1998 Class B;
EN 61000-3-2; EN 61000-3-3
EN 55024:1998;
EN 60950: 2000
EN 60825-1: 2001 Class 2 Laser Product
10F, NO. 119, ChienKang Rd., Chung-Ho,
Taipei, Taiwan, R.O.C.
Cedex 3; France
Dominique Binckly
Vice President International Sales
Psion Teklogix WORKABOUT PRO Hand-Held Computer Quick Start Guide 33
Page 38

FCC DECLARATION OF CONFORMITY (DoC)
Applicant s Name & Address: ASKEY COMPUTER CORP.
US Representative s Name & Address: 1810 Airport Exchange Blvd., Suite 500
Equipment Type/Environment: Computing Devices
Trade Name / Model No.: WORKABOUT PRO, Model 7525
Year of Manufacture: 2004
Standard(s) to which Conformity is Declared:
The WORKABOUT PRO, model 7525, supplied by Askey Computer Corp., has been
tested and found to comply with FCC PART 15, SUBPART B - UNINTENTIONAL
RADIATORS, CLASS B COMPUTING DEVICES FOR HOME & OFFICE
USE.
I, the undersigned, hereby declare that the equipment as tested is representative within
manufacturing tolerance to units.
Applicant
Signature Signature
Piyang Chiang
Full Name Full Name
General Manager
Position Position
Askey International Corp
Place Place
February 4, 2004
Date Date
10F, NO. 119, ChienKang Rd., Chung-Ho,
Taipei, Taiwan, R.O.C.
Contact Person: Piyang Chiang
Telephone No.:(510) 440-8694
47849 FREMONT BLVD. FREMONT,
CA, 94538, USA
Erlanger, KY, 41018, USA
Contact Person: Kyle Day
Telephone No.: (859) 372-4329
Legal Representative in U.S.
Kyle Day
V.P. Channel Sales
Erlanger, KY 41018, USA
February 4, 2004
34 Psion Teklogix WORKABOUT PRO Hand-Held Computer Quick Start Guide
Page 39

Safety Summary
This equipment complies with Class B Part 15 of the FCC rules.
Operation is subject to the following two conditions:
1. This device may not cause harmful interference, and
2. This device must accept any interference received, including interference that may cause undesired operation.
Changes or modifications not expressly approved by Psion Teklogix,
the party responsible for compliance, may void the user's authority
to operate the equipment.
1. FCC Information to Users
For Class B Unintentional Radiators:
This equipment has been tested and found to comply with the limits
for a Class B digital device, pursuant to Part 15 of the FCC Rules.
These limits are designed to provide reasonable protection against
harmful interference in a residential installation. This equipment
generates, uses, and can radiate radio frequency energy and, if not
installed and used in accordance with the instruction manual, may
cause harmful interference to radio communications. However , there
is no guarantee that interference will not occur in a particular installation. If this equipment does cause harmful interference to radio or
television reception, which can be determined by turning the equipment off and on, the user is encouraged to try to correct the interference by one of more of the following measures:
• Reorient or relocate the receiving antenna
• Increase the separation between he equipment and receiver
• Connect the equipment into an outlet on a circuit different
from that to which the receiver is connected.
• Consult the dealer or an experienced radio/TV technician for help.
Psion Teklogix WORKABOUT PRO Hand-Held Computer Quick Start Guide 35
Page 40

2.Warning to Users
Warning:
Changes or modifications not expressly approved by Psion
T eklogix Inc. could v oid the user's authority to operate the
equipment.
This product complies with 21 CFR 1040.10, 1040.11 Class II and
EN 60825-1: 2001, Class 2 laser product.
LASER WARNINGS
For your own safety, it is critical that you comply with the following warnings:
C
AUTION
Do not look into the laser beam or point the beam at people or
animals.
C
AUTION
Using controls or adjustments, or performing procedures other
than those specified herein may result in hazardous radiation
exposure.
C
AUTION
The use of optical instruments with this product will increase eye
hazard.
This product may contain a laser scanner that emits less than 1.2
mW maximum radiant power at a wavelength of 650nm or
680nm. This product complies with 21 CFR 1040.10, 1040.11
and DIN EN 60825-1: 2001, and is classified as a Class 2 laser
product.
The SE1200 ALR has an maximum radiated po wer less than 1.4
mW.
36 Psion Teklogix WORKABOUT PRO Hand-Held Computer Quick Start Guide
Page 41

DO NOT OPERATE IN AN EXPLOSIVE ATMOSPHERE
Operating Psion Teklogix equipment where explosive gas is
present may result in an explosion.
DO NOT REMOVE COVERS OR OPEN ENCLOSURES
T o av oid injury , the equipment co vers and enclosures should only
be removed by qualified service personnel. Do not operate the
equipment without the covers and enclosures properly installed.
C
AUTION!
Danger of explosion if a battery is incorrectly handled, charged,
disposed of or replaced. Replace only with the same or equivalent
type recommended by the manufacturer. Dispose of used batteries according to the instructions listed under the heading “The
Battery” on page 7. Carefully review all battery safety issues.
V
ORSICHT!
Explosiongefahr bei unsachgemäßem Austausch der Batterie
Ersatz nur durch denselben oder einen vom Hersteller empfohlenen gleichwertigen Typ. Entsorgung gebrauchter Batterien
nach Angaben des Herstellers.
Psion Teklogix WORKABOUT PRO Hand-Held Computer Quick Start Guide 37
Page 42

Program License Agreements
Microsoft's End User License Agreement
You have acquired a device (“DEVICE”) that includes software licensed by Psion Teklogix Inc. from Microsoft Licensing Inc. or its affiliates (‘MS”). Those installed software
products of MS origin, as well as associated media, printed materials, and “online” or
electronic documentation (“SOFTWARE”) are protected by international intellectual
property laws and treaties. The SOFTWARE is licensed, not sold. All rights reserved.
IF Y OU DO NO T A GREE TO THIS END USER LICENSE A GREEMENT (“EULA”),
DO NOT USE THE DEVICE OR COPY THE SOFTWARE. INSTEAD, PROMPTLY
CONTACT PSION TEKLOGIX INC. FOR INSTRUCTIONS ON RETURN OF THE
UNUSED DEVICE(S) FOR A REFUND. ANY USE OF THE SOFTWARE,
INCLUDING BUT NOT LIMITED T O USE ON THE DEVICE, WILL CONSTITUTE YOUR AGREEMENT TO THIS EULA (OR RATIFICATION OF ANY
PREVIOUS CONSENT).
GRANT OF SOFTWARE LICENSE. This EULA grants you the following license:
• You may use the SOFTWARE only on the DEVICE.
• NOT FAUL T T OLERANT. THE SOFTWARE IS NOT F A ULT TOLERANT.
PSION TEKLOGIX INC. HAS INDEPENDENTLY DETERMINED HOW
TO USE THE SOFTWARE IN THE DEVICE, AND MS HAS RELIED
UPON PSION TEKLOGIX INC. TO CONDUCT SUFFICIENT TESTING
TO DETERMINE THAT THE SOFTWARE IS SUITABLE FOR SUCH USE.
• NO WARRANTIES FOR THE SOFTWARE. THE SOFTWARE is provided
“AS IS” and with all faults. THE ENTIRE RISK AS TO SATISFACTORY
QUALITY, PERFORMANCE, ACCURACY, AND EFFORT (INCLUDING LACK OF NEGLIGENCE) IS WITH YOU. ALSO, THERE IS NO
W ARRANTY AGAINST INTERFERENCE WITH YOUR ENJOYMENT
OF THE SOFTWARE OR AGAINST INFRINGEMENT. IF YOU HA VE
RECEIVED ANY WARRANTIES REGARDING THE DEVICE OR THE
SOFTWARE, THOSE WARRANTIES DO NOT ORIGINATE FROM, AND
ARE NOT BINDING ON, MS.
• Note on Java Support. The SOFTWARE may contain support for programs
written in Java. Java technology is not fault tolerant and is not designed, manufactured, or intended for use or resale as online control equipment in hazardous
environments requiring fail-safe performance, such as in the operation of
nuclear facilities, aircraft navigation or communication systems, air traffic control, direct life support machines, or weapons systems, in which the failure of
Java technology could lead directly to death, personal injury , or se vere ph ysical
or environmental damage. Sun Microsystems, Inc. has contractually obligated
MS to make this disclaimer.
• No Liability for Certain Damages. EXCEPT AS PROHIBITED BY LAW,
MS SHALL HAVE NO LIABILITY FOR ANY INDIRECT, SPECIAL,
38 Psion Teklogix WORKABOUT PRO Hand-Held Computer Quick Start Guide
Page 43

CONSEQUENTIAL OR INCIDENTAL DAMAGES ARISING FROM
OR IN CONNECTION WITH THE USE OR PERFORMANCE OF THE
SOFTWARE. THIS LIMITATION SHALL APPLY EVEN IF ANY REMEDY FAILS OF ITS ESSENTIAL PURPOSE. IN NO EVENT SHALL
MS BE LIABLE FOR ANY AMOUNT IN EXCESS OF U.S. TWO HUNDRED FIFTY DOLLARS (U.S.$250.OO).
• Limitations on Reverse Engineering, Decompilation, and Disassembly. You
may not reverse engineer, decompile, or disassemble the SOFTWARE, except
and only to the extent that such activity is expressly permitted by applicable
law notwithstanding this limitation.
• SOFTW ARE TRANSFER ALLOWED BUT WITH RESTRICTIONS.
You may permanently transfer rights under this EULA only as part of a perma-
nent sale or transfer of the Device, and only if the recipient agrees to this
EULA. If the SOFTWARE is an upgrade, any transfer must also include all
prior versions of the SOFTWARE.
• EXPORT RESTRICTIONS. You acknowledge that SOFTWARE is subject
to U.S. export jurisdiction. You agree to comply with all applicable international and national laws that apply to the SOFTWARE, including the U.S.
Export Administration Regulations, as well as end-user, end-use and destination restrictions issued by U.S. and other governments. For additional information see http://www.microsoft.com/exporting/.
Meetinghouse Data Communications, Inc. End User License Agreement
End User License Agreement:
ATTENTION: PLEASE READ THIS SOFTWARE LICENSE AGREEMENT
("LICENSE") CAREFULL Y BEFORE INSTALLATION. USE OF THE SOFTWARE
IS SUBJECT TO THE SOFTWARE LICENSE TERMS SET FORTH BELOW.
USING THE SOFTWARE INDICATES YOUR ACCEPTANCE OF THESE LICENSE
TERMS. IF YOU DO NOT A CCEPT THESE LICENSE TERMS, YOU MUST
RETURN THE SOFTWARE FOR A FULL REFUND. IF THE SOFTWARE IS SUPPLIED WITH ANO THER PRODUCT, YOU MA Y RETURN THE ENTIRE UNUSED
PRODUCT FOR A FULL REFUND.
Software License Terms:
The following terms govern your use of the enclosed Software unless you hav e a separate written agreement with Meetinghouse Data Communications, Inc. herein also known as “MDC”.
License Grant:
MDC grants you a non-exclusive and non-transferable license to Use one copy of the
Software. "Use" means storing, loading, installing, executing or displaying the Software.
“Software” means software, documentation and any fonts accompanying this License
whether on disk, in read only memory, on any other media or in an y other form. You
may not modify the Software or disable any licensing or control features of the Software. If the Software is licensed for "concurrent use", you may not allow more than the
maximum number of authorized users to Use the Software concurrently.
Psion Teklogix WORKABOUT PRO Hand-Held Computer Quick Start Guide 39
Page 44

The Software is licensed as a "Shareware" version, on one computer only. You may use
the Software distributed and licensed as Shareware on a trial basis only. The shareware
version of the Software may be distributed freely without any associated fees to other
parties who wish to try the software as long as the Software is distributed within an exact
copy of the original MDC self-extracting installation file. In other words, nothing may
be left out of the Shareware as distributed on MDC's web site at http://
www.mtghouse.com.
All permanent licenses are prepaid and the Software is licensed to you by MDC. You
own the media on which the Software is recorded but MDC and/or MDC’s licensor(s)
retain title to the Software. The Software and any copies which this License authorizes
you to make are subject to this License.
Permitted Uses and Restrictions:
This License allows you to install and use the Software on a single computer at a time.
This License does not allow the Software to exist on more than one computer at a time.
Y ou may make one cop y of the Software in machine-readable form for backup purposes
only. The backup copy must include all cop yright information contained on the original.
Except as expressly permitted in this License, you may not, in whole or part, decompile,
reverse engineer, disassemble, modify, rent, lease, loan, sublicense, distribute or create
derivative w orks based upon the Software, or transmit the Softw are o ver a netw ork. You
may not copy the Software onto any bulletin board or similar system. Y ou agree that you
will not utilize any information obtained from MDC or obtained or learned in the course
of using the Software, to develop or improve technology with similar functionality to the
Software, nor will you directly or indirectly assist any other party in doing so. You further agree that you will not separate the various modules of the software for their different purposes, if any.
High Risk Activities:
The Software is not fault-tolerant and is not designed, manufactured or intended for use
or resale as on-line control equipment in hazardous environments requiring fail-safe performance, such as in the operation of nuclear facilities, aircraft navigation or communication systems, air traffic control, direct life support machines, or weapons systems, in
which the failure of the Software could lead directly to death, personal injury, or severe
physical or environmental damage ("High Risk Activities"). Accordingly, MDC and its
suppliers specifically disclaim any express or implied warranty of fitness for High Risk
Activities. You agree that MDC and its suppliers will not be liable for any claims or
damages arising from the use of the Software in such applications.
Ownership:
The Software is licensed, not sold. The Software is owned and copyrighted by MDC or
its third party suppliers. Your license confers no title or ownership in the Software and is
not a sale of any rights in the Software. You ackno wledge such ownership and intellectual property rights and will not take any action to jeopardize, limit or interfere in any
manner with MDC's or its suppliers' ownership of or rights with respect to the Software.
40 Psion Teklogix WORKABOUT PRO Hand-Held Computer Quick Start Guide
Page 45

The Software is protected by copyright and other intellectual property laws and by international treaties. MDC's third party suppliers may protect their rights in the event of any
violation of these License Terms.
Termination:
Y our rights under this License will terminate automatically without notice from MDC if you
fail to comply with any term(s) of this License. Upon termination, you must immediately
destroy the Software, together with all copies, adaptations and merged portions in any form.
U.S. Government Restricted Rights:
The Software and documentation have been developed entirely at private expense and
are provided as "Commercial Computer Software" or "restricted computer software".
They are delivered and licensed as "commercial computer software" as defined in
DFARS 252.227-7013 (Oct 1988), DFARS 252.211-7015 (May 1991) or DFARS
252.227-7014 (Jun 1995), as a "commercial item" as defined in FAR 2.101 (a), or as
"Restricted computer software" as defined in FAR 52.227-19 (Jun 1987) (or an y equivalent agency regulation or contract clause), whichever is applicable. You have only those
rights provided for such Software and Documentation by the applicable F AR or DFARS
clause or the MDC standard software agreement for the product.
Export Law Assurances:
You may not use or otherwise export or reexport the Software except as authorized by
United States law and the laws of the jurisdiction in which the Software was obtained. In
particular, but without limitation, the Software may not be exported or ree xported (i)
into (or to a national or resident of) any U.S. embargoed country or (ii) to anyone on the
U.S. Treasury Department's list of Specially Designated Nationals or the U.S. Department of Commerce's T able of Denial Orders. By using the Softw are, you represent and
warrant that you are not located in, under control of, or a national or resident of any such
country or on any such list.
Limited Warranty on Media: (if applicable)
MDC warrants the media on which the Software is recorded to be free from defects in
materials and workmanship under normal use for a period of ninety (90) days from the
date of original retail purchase. Your exclusive remedy under this paragraph shall be, at
MDC's option, a refund of the purchase price of the product containing the Software or
replacement of the Software which is returned to MDC or a MDC authorized representative with a copy of the receipt. THIS LIMITED WARRANTY AND ANY IMPLIED
WARRANTIES ON THE MEDIA INCLUDING THE IMPLIED WARRANTIES OF
MERCHANTABILITY AND FITNESS FOR A PARTICULAR PURPOSE ARE LIMITED IN DURATION TO NINETY (90) DAYS FROM THE DATE OF ORIGINAL
RETAIL PURCHASE. SOME JURISDICTIONS DO NOT ALLOW LIMITATIONS
ON HOW LONG AN IMPLIED WARRANTY LASTS, SO THIS LIMITATION MAY
NOT APPLY TO Y OU. THE LIMITED W ARRANTY SET FORTH HEREIN IS
EXCLUSIVE AND IN LIEU OF ALL OTHERS, WHETHER ORAL OR WRITTEN,
EXPRESS OR IMPLIED. LICENSOR SPECIFICALL Y DISCLAIMS ALL OTHER
Psion Teklogix WORKABOUT PRO Hand-Held Computer Quick Start Guide 41
Page 46

WARRANTIES. THIS LIMITED WARRANTY GIVES Y OU SPECIFIC LEGAL
RIGHTS, AND YOU MAY ALSO HAVE OTHER RIGHTS WHICH VARY BY
JURISDICTION.
Disclaimer of Warranty on Software:
You expressly acknowledge and agree that use of the Software is at your sole risk. The
Software is provided "AS IS" and without warranty of any kind and MDC and MDC’s
licensor(s) (for the purposes of warranty and liability, MDC and MDC's licensor(s) shall
be collectively referred to as "MDC") EXPRESSLY DISCLAIM ALL WARRANTIES
AND/OR CONDITIONS, EXPRESS OR IMPLIED, INCLUDING, BUT NOT LIMITED TO, THE IMPLIED WARRANTIES AND/OR CONDITIONS OF MERCHANTABILITY OR SATISFACTORY QUALITY AND FITNESS FOR A
PARTICULAR PURPOSE AND NONINFRINGEMENT OF THIRD PARTY
RIGHTS. LICENSOR DOES NOT WARRANT THAT THE FUNCTIONS CONTAINED IN THE SOFTWARE WILL MEET YOUR REQUIREMENTS, OR THAT
THE OPERATION OF THE SOFTWARE WILL BE UNINTERRUPTED OR
ERROR-FREE, OR THAT DEFECTS IN THE SOFTWARE WILL BE CORRECTED.
FURTHERMORE, LICENSOR DOES NO T WARRANT OR MAKE ANY REPRESENTATIONS REGARDING THE USE OR THE RESULTS OF THE USE OF THE
SOFTWARE OR RELATED DOCUMENTATION IN TERMS OF THEIR CORRECTNESS, ACCURACY, RELIABILITY, OR OTHERWISE. NO ORAL OR WRITTEN INFORMATION OR ADVICE GIVEN BY LICENSOR OR AN LICENSOR
AUTHORIZED REPRESENTA TIVE SHALL CREATE A WARRANTY OR IN ANY
WAY INCREASE THE SCOPE OF THIS WARRANTY. SHOULD THE SOFTW ARE
PROVE DEFECTIVE, YOU (AND NOT LICENSOR OR AN LICENSOR AUTHORIZED REPRESENTATIVE) ASSUME THE ENTIRE COST OF ALL NECESSARY
SERVICING, REPAIR OR CORRECTION. SOME JURISDICTIONS DO NOT
ALLOW THE EXCLUSION OF IMPLIED WARRANTIES, SO THE ABOVE
EXCLUSION MAY NO T APPLY TO YOU. THE TERMS OF THIS DISCLAIMER
DO NOT AFFECT OR PREJUDICE THE STATUTOR Y RIGHTS OF A CONSUMER
ACQUIRING LICENSOR PRODUCTS OTHERWISE THAN IN THE COURSE OF
A BUSINESS, NEITHER DO THEY LIMIT OR EXCLUDE ANY LIABILITY FOR
DEATH OR PERSONAL INJURY CAUSED BY LICENSOR’S NEGLIGENCE.
Limitation of Liability:
UNDER NO CIRCUMSTANCES, EXCEPT T O THE EXTENT PROHIBITED BY
LOCAL LAW, INCLUDING NEGLIGENCE, SHALL LICENSOR, ITS SUBSIDIARIES,
AFFILIA TES, OR SUPPLIERS BE LIABLE FOR ANY DIRECT, INCIDENTAL, SPECIAL, INDIRECT OR CONSEQUENTIAL DAMAGES (INCLUDING LOST PROFIT,
LOST DATA, OR DO WNTIME COSTS) ARISING OUT OF OR RELA TING T O THIS
LICENSE, THE USE, INABILITY TO USE, OR THE RESULTS OF USE OF THE
SOFTW ARE, WHETHER B ASED IN WARRANTY, CONTRACT, TORT OR OTHER
LEGAL THEORY, AND WHETHER OR NOT ADVISED OF THE POSSIBILITY OF
42 Psion Teklogix WORKABOUT PRO Hand-Held Computer Quick Start Guide
Page 47

SUCH DAMAGES. In no e vent shall MDC's total liability to you for all damages exceed the
price paid for the license to use the Software, regardless of the form of the claim.
Government End Users:
If the Software is supplied to the United States Government, the Software is classified as
"restricted computer software" as defined in clause 52.227-19 of the FAR. The United
States Government's rights to the Software are as provided in clause 52.227-19 of the F AR.
Controlling Law and Severability:
This License shall be governed by the laws of the United States and the State of New
Hampshire. As to any dispute relating to this License or the Software, you further agree
to jurisdiction and venue in the Federal and State Courts located in the State of New
Hampshire. If for any reason a court of competent jurisdiction finds any provision, or
portion thereof, to be unenforceable, the remainder of this License shall continue in full
force and effect.
Acknowledgement:
Y our use of an y software produced by MDC is based only on your ackno wledgement that
you have read this License, understand it, and agree to be bound by its terms and conditions.
MDC Acknowledgments:
This product includes software developed by MDC and its licensors. This product
includes software developed by the OpenSSL Project for use in the OpenSSL Toolkit
(http://www.openssl.org/)". This product includes cryptographic softw are written by
Eric Young (eay@cryptsoft.com). This product includes software written by Tim Hudson (tjh@cryptsoft.com).
Complete Agreement:
This License constitutes the entire agreement between the parties with respect to the use
of the Software and supersedes all prior or contemporaneous understandings regarding
such subject matter. No amendment to or modification of this License will be binding
unless in writing and signed by MDC.
Note: EXCEPT TO THE EXTENT ALLOWED BY LOCAL LAW, THESE WAR-
RANTY TERMS DO NOT EXCLUDE, RESTRICT , OR MODIFY, AND ARE IN
ADDITION TO, THE MANDATOR Y STA TUTORY RIGHTS APPLICABLE TO
THE LICENSE OF THE SOFTWARE T O YOU.
Meetinghouse Data Communications, Inc.
150 Greenleaf Avenue, Unit F
Portsmouth, NH 03801
Revised 8/12/2002
5207-005160
Psion Teklogix WORKABOUT PRO Hand-Held Computer Quick Start Guide 43
Page 48

 Loading...