

Page 1
8580/8590
Vehicle-Mount Computer
User Manual
January 24, 2007 Part No. 8100119.A
ISO 9001 Certified
Quality Management System
Page 2

Page 3

© Copyright 2007 by Psion Teklogix Inc., Mississauga, Ontario
This document and the information it contains is the property of Psion Teklogix Inc.,
is issued in strict confidence, and is not to be reproduced or copied, in whole or in
part, except for the sole purpose of promoting the sale of Teklogix manufactured
goods and services. Furthermore, this document is not to be used as a basis for
design, manufacture, or sub-contract, or in any manner detrimental to the interests
of Psion Teklogix Inc.
All trademarks are the property of their respective holders.
Page 4

Return-To-Factory Warranty
Psion Teklogix provides a return to factory warranty on this product for a period of
twelve (12) months in accordance with the Statement of Limited Warranty and Limitation of Liability provided at www.psionteklogix.com/warranty. (If you are not
already a member of Teknet and you attempt to view this warranty, you will be asked
to register. As a member of Teknet, you’ll have access to helpful information about
your Psion Teklogix products at no charge to you.) In some regions, this warranty
may exceed this period. Please contact your local Psion Teklogix office for details.
For a list of offices, see Appendix A: “Support Services And Worldwide Offices”.
The warranty on Psion Teklogix manufactured equipment does not extend to any
product that has been tampered with, altered, or repaired by any person other than an
employee of an authorized Psion Teklogix service organization. See Psion Teklogix
terms and conditions of sale for full details.
Important:Psion Teklogix warranties take effect on the date of shipment.
Support Services
Psion Teklogix provides a complete range of product support services to its customers. For detailed information, please refer to Appendix A: “Support Services And
Worldwide Offices”. This section also provides information about accessing support
services through the Psion Teklogix web site.
Waste Electrical and Electronic Equipment (WEEE) Directive
2002/96/EC
This Product, and its accessories, comply with the requirements of the Waste Electrical and Electronic Equipment (WEEE) Directive 2002/96/EC. If your end-of-life
Psion Teklogix product or accessory carries a label as shown here, please contact
your local country representative for details on how to arrange recycling.
For a list of international subsidiaries, please go to:
www.psionteklogix.com/public.aspx?s=us&p=Contacts.
Restriction on Hazardous Substances (RoHS) Directive 2002/95/EC
What is RoHS?
The European Union has mandated that high environmental standards be met in the
design and manufacture of electronic and electrical products sold in Europe, to reduce
hazardous substances from entering the environment. The “Restriction on Hazardous
Substances Directive (RoHS)” prescribes the maximum trace levels of lead, cad-
Page 5

mium, mercury, hexavalent chromium, and flame retardants PBB and PBDE that
may be contained in a product. Only products meeting these high environmental
standards may be “placed on the market” in EU member states after July 1, 2006.
RoHS Logo
Although there is no legal requirement to mark RoHS-compliant products, Psion
Teklogix Inc. indicates its compliance with the directive as follows:
The RoHS logo located either on the back of the product or underneath the battery in
the battery compartment (or on a related accessory such as the charger or docking
station) signifies that the product is RoHS-compliant as per the EU directive. Other
than as noted below, a Psion Teklogix product that does not have an accompanying
RoHS logo signifies that it was placed on the EU market prior to July 1, 2006, and is
thereby exempt from the directive.
Note: Not all accessories or peripherals will have a RoHS logo due to physical
space limitations or as a result of their exempt status.
Disclaimer
Every effort has been made to make this material complete, accurate, and up-todate. In addition, changes are periodically added to the information herein; these
changes will be incorporated into new editions of the publication.
Psion Teklogix Inc. reserves the right to make improvements and/or changes in the
product(s) and/or the program(s) described in this document without notice, and
shall not be responsible for any damages, including but not limited to consequential
damages, caused by reliance on the material presented, including but not limited to
typographical errors.
Page 6

Page 7

TABLE OF CONTENTS
Program License Agreements ............................I
Approvals And Safety Summary.........................VII
Chapter 1: Introduction
1.1 About This Manual ............................3
1.1.1 Text Conventions . . .......................4
1.1.2 For Qualified Personnel ......................4
Chapter 2: Basic Checkout
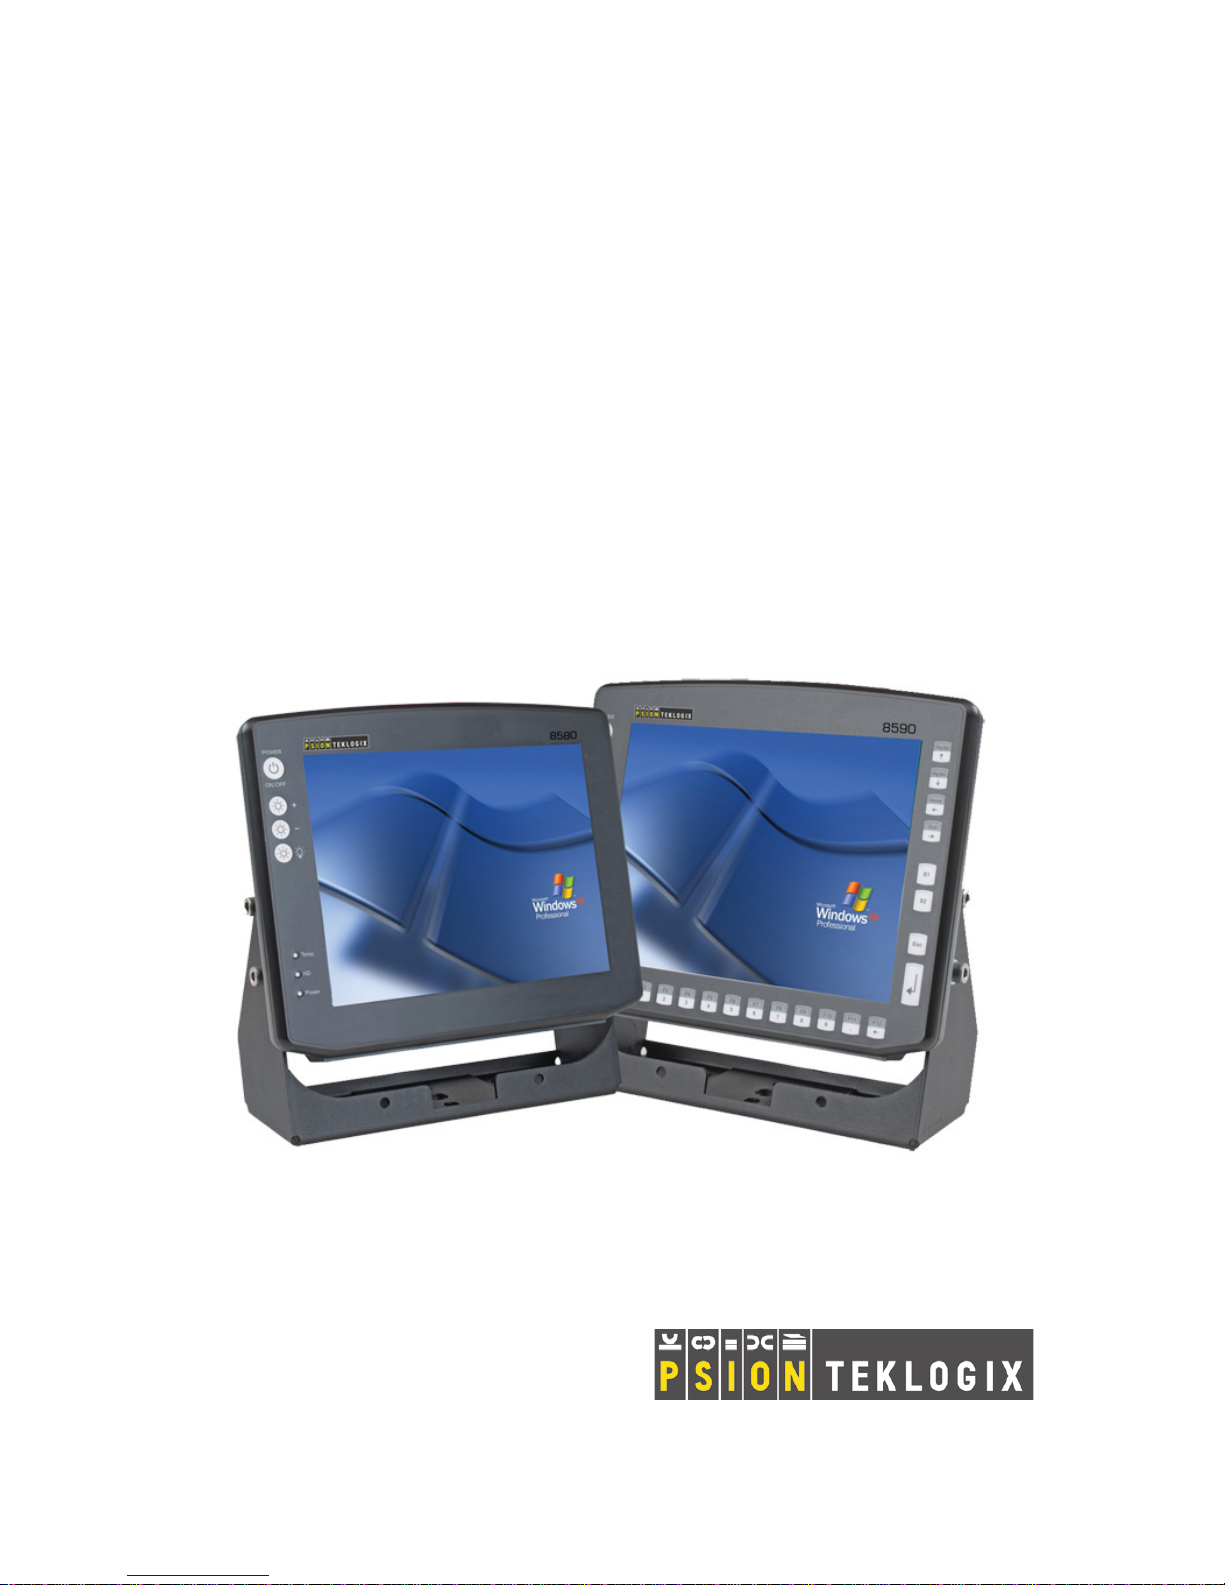
2.1 8580/8590 Description..........................7
2.2 Intended Use................................7
2.3 The Models: 8580 And 8590 .......................8
2.4 Abbreviations Used For 8580/90s & Accessories . . .......... 8
2.5 8580/90 Description And Type Identification ..............8
2.6 Technical Specifications..........................10
2.6.1 Mechanical.............................10
2.6.2 Motherboard............................10
2.6.3 LCD/CRT Interface........................12
2.6.4 Touchscreen (optional) ......................12
2.6.5 Network Interface.........................13
2.6.6 ADC/MDC Interface (optional)..................13
2.6.7 PCI Express® MiniCard Interface For WLAN (optional) ....13
2.6.8 Power Supply ...........................13
2.6.9 Maximum Power Available For Peripheral Devices.......15
2.6.10 Power Supply Fuses . .......................15
2.6.11 Ambient Conditions . .......................16
2.6.12Test Marks.............................17
2.6.13 8580/8590 Dimensions ......................18
8580/8590 Vehicle-Mount Computer User Manual i
Page 8

Contents
2.6.14 8580/8590 VESA Drill Holes ..................21
2.7 Unpacking The 8580/8590........................21
2.8 Packaging ................................22
2.9 Putting Your 8580/8590 In Operation ..................22
2.9.1 Cooling Through Unobstructed Air Circulation . . . ...... 22
2.9.2 Pin Configuration.........................22
2.9.3 External Connectors .......................23
2.10 Connecting External Devices . . . ...................26
2.10.1 Powering Down The 8580/8590 .................26
2.11 WLAN Settings.............................27
2.11.1Radio Performance........................27
2.11.2 8580/8590 Antenna Solutions for EU Countries. . . ...... 27
2.12Removing The Protective Film From The Display...........28
2.13 Powering Up The 8580/8590 . . . ...................28
2.14Protecting The TFT Display From Memory Effect........... 28
Chapter 3: Accessories
3.1 Keyboards................................33
3.1.1 The SMALL Keyboard. . . ................... 33
3.1.2 The 24-Key Keypad.......................34
3.2 Mouse..................................34
3.3 External CD-ROM Drive........................35
3.3.1 Operation.............................35
3.3.2 Resources And Drivers......................35
3.4 USB Stick................................35
3.5 Scanner..................................36
Chapter 4: 8580/8590 Installation
4.1 Complying With Protection Standard IP65...............39
4.1.1 Parts List For Cable Cover Kit..................39
4.1.2 The Cable Cover, Grounding Bar & Cables–Assembling ....40
4.2 Mounting Options For The 8580/8590 .................43
4.2.1 Mounting Bracket Toolkit....................43
4.2.2 Permitted Mounting Positions ..................44
4.2.3 Mechanical Dynamic Loading.................. 44
4.3 Power Supply ..............................44
ii 8580/8590 Vehicle-Mount Computer User Manual
Page 9

4.3.1 DC Power Pack..........................44
4.3.2 Installing Connecting Cables . . . ................45
4.4 Vehicle Applications (Such As Forklifts).................45
4.4.1 Wiring Vehicle Power To The 8580/8590 . . ..........47
4.5 Cable Cover (Splash Guard) .......................48
4.5.1 Protection Class IP65.......................48
Chapter 5: Operation Of The 8580/8590
5.1 Operation.................................51
5.2 4-Key Front Panel.............................51
5.3 10-Key Front Panel............................52
5.4 25-Key Front Panel............................53
5.4.1 Power Key.............................54
5.4.2 Manual Brightness Control (optional)...............54
5.4.3 LEDs................................54
5.4.4 Function And Number Keys....................55
5.4.5 Special Keys............................55
5.4.6 [ESCAPE] Key, [ENTER] Key And Scroll Keys.........56
5.5 Operating States..............................56
Contents
Chapter 6: Operating System & Software Applications
6.1 Operating System.............................61
6.1.1 OS Pre-installed On Hard Drive/Compact Flash.........61
6.1.2 Installing On The Hard Drive/Compact Flash...........61
6.1.3 Special Features Of The Operating System............62
6.2 Psion Teklogix Config Tool........................63
6.2.1 Overview Of The Config Functions................63
6.2.2 Installation.............................64
6.2.3 Psion Teklogix Config Menus...................67
6.3 The Software Keyboard. . . .......................82
6.3.1 Psion Teklogix Config And Software Keyboard .........82
6.3.2 Logon With The Software Keyboard ...............83
6.3.3 Installation.............................84
6.3.4 Launching The Program......................85
6.3.5 Operation .............................90
6.3.6 Configuring The Software Keyboard ...............91
8580/8590 Vehicle-Mount Computer User Manual iii
Page 10

Contents
Chapter 7: Serial Ports
Chapter 8: Internal Devices
6.3.7 Keyboard_Maximize Section ..................100
7.1 Serial Ports................................105
7.1.1 Resources.............................105
7.1.2 COM1 Options..........................105
7.1.3 COM1 As A Power Supply ...................105
7.1.4 Serial Port Printers........................105
7.1.5 Serial Port Bar Code Scanners..................105
7.1.6 Tips & Tricks...........................106
8.1 Chipset..................................109
8.1.1 Installing Chipset Drivers Under Windows XP.........109
8.2 VGA Adaptor ..............................110
8.2.1 VGA Driver Installation Under Windows XP ..........110
8.3 Network Adaptor (10/100)........................111
8.3.1 Network Driver Installation Under Windows XP........112
8.4 Onboard Sound Adaptor .........................113
8.4.1 Installing Onboard Sound Adaptor Drivers–Windows XP . . . 113
8.5 Touchscreen...............................115
8.5.1 Touch (Serial) For Windows XP & XP Embedded . ......115
8.5.2 Touch (PS2) For Windows XP & XP Embedded........117
8.5.3 Resistance Of The Touchscreen.................118
8.6 Automatic Switch-Off And Heating...................119
8.6.1 Automatic Shutdown Process..................120
8.6.2 Drivers..............................123
8.6.3 General Notes About Automatic Shutdown Software......123
Chapter 9: Maintenance
9.1 Maintenance...............................127
9.1.1 Cleaning The Housing......................127
9.1.2 Cleaning The Touchscreen....................127
iv 8580/8590 Vehicle-Mount Computer User Manual
Page 11

Chapter 10: Common Mistakes & Helpful Tips
10.1Common Mistakes In Usage......................131
10.1.1Powering Up/Down.......................131
10.1.2Cable Cover...........................131
10.1.3Installation............................131
10.1.4Mobile Application On Vehicles ................132
10.1.5Using The Touchscreen.....................132
10.1.6Use/Storage...........................132
10.1.7Disposal.............................132
Appendix A: Support Services And Worldwide Offices
A.1 Technical Support ............................A-1
A.2 Product Repairs . ............................A-1
A.3 Worldwide Offices ...........................A-2
Contents
Appendix B: System Resources
B.1 Part 1 ..................................B-1
B.2 Part 2 ..................................B-3
Appendix C: Pinouts
C.1 External Connectors...........................C-1
C.1.1 Keyboard And Mouse ......................C-1
C.1.2 USB...............................C-1
C.1.3 Serial Port COM1........................C-2
C.1.4 Serial Port COM2........................C-2
C.1.5 Network Connector . ......................C-3
Appendix D: Mechanical Dynamic Loading
D.1 Introduction . . . ............................D-1
D.2 Units Without Vibration Insulation (tuned to high frequency) . . . . . D-2
D.3 Passive Vibration Insulation (tuned to low frequency).........D-3
D.4 Dimensioning Example 8580......................D-3
D.4.1 Approximate Solution For Elastomer Spring Selection. . . . . D-5
D.4.2 Further Possible Steps For Optimization............D-6
8580/8590 Vehicle-Mount Computer User Manual v
Page 12

Contents
Appendix E: BIOS
D.4.3 Determining Insulating Effects .................D-7
D.5 Determining Natural Frequencies....................D-9
E.1 BIOS Setup Description.........................E-1
E.2 Entering The BIOS Setup Program...................E-1
E.3 Setup Menu And Navigation ......................E-1
E.4 Main Setup Screen............................E-2
E.5 Advanced Setup.............................E-4
E.5.1 ACPI Configuration Sub-Menu.................E-4
E.5.2 PCI Configuration Sub-Menu..................E-5
E.5.3 Graphic Configuration Sub-Menu................E-6
E.5.4 CPU Configuration .......................E-8
E.5.5 Chipset Configuration Sub-Menu................E-8
E.5.6 I/O Interface Configuration Sub-Menu.............E-9
E.5.7 IDE Configuration Sub-Menu.................E-10
E.5.8 USB Configuration Sub-Menu ................E-12
E.5.9 Keyboard/Mouse Configuration Sub-Menu ..........E-14
E.5.10 Remote Access Configuration Sub-Menu...........E-15
E.5.11 Hardware Monitoring Sub-Menu...............E-16
E.5.12 Watchdog Configuration Sub-Menu. . . ...........E-17
E.6 Boot Setup...............................E-18
E.6.1 Boot Device Priority......................E-19
E.6.2 Boot Settings Configuration..................E-20
E.7 Security Setup.............................E-21
E.7.1 Security Settings........................E-22
E.7.2 Hard Disk Security.......................E-22
E.8 Exit Menu...............................E-23
E.9 Additional BIOS Features.......................E-24
E.9.1 Updating The BIOS......................E-24
E.10BIOS Recovery ............................E-25
E.11BIOS Security Features........................E-26
E.12Hard Disk Security Features......................E-26
vi 8580/8590 Vehicle-Mount Computer User Manual
Page 13

PROGRAM LICENSE AGREEMENTS
Microsoft's End User License Agreement
You have acquired a device (“DEVICE”) that includes software licensed by Psion Teklogix Inc.
from Microsoft Licensing Inc. or its affiliates (“MS”). Those installed software products of MS origin, as well as associated media, printed materials, and “online” or electronic documentation
(“SOFTWARE”) are protected by international intellectual property laws and treaties. The SOFTWARE is licensed, not sold. All rights reserved.
IF YOU DO NOT AGREE TO THIS END USER LICENSE AGREEMENT (“EULA”), DO NOT
USE THE DEVICE OR COPY THE SOFTWARE. INSTEAD, PROMPTLY CONTACT PSION
TEKLOGIX INC. FOR INSTRUCTIONS ON RETURN OF THE UNUSED DEVICE(S) FOR A
REFUND. ANY USE OF THE SOFTWARE, INCLUDING BUT NOT LIMITED TO USE ON
THE DEVICE, WILL CONSTITUTE YOUR AGREEMENT TO THIS EULA (OR RATIFICATION OF ANY PREVIOUS CONSENT).
GRANT OF SOFTWARE LICENSE. This EULA grants you the following license:
• You may use the SOFTWARE only on the DEVICE.
• NOT FAULT TOLERANT. THE SOFTWARE IS NOT FAULT TOLER-
ANT. PSION TEKLOGIX INC. HAS INDEPENDENTLY DETERMINED HOW TO USE THE SOFTWARE IN THE DEVICE, AND MS
HAS RELIED UPON PSION TEKLOGIX INC. TO CONDUCT SUFFICIENT TESTING TO DETERMINE THAT THE SOFTWARE IS SUITABLE FOR SUCH USE.
• NO WARRANTIES FOR THE SOFTWARE. THE SOFTWARE is pro-
vided “AS IS” and with all faults. THE ENTIRE RISK AS TO SATISFACTORY QUALITY, PERFORMANCE, ACCURACY, AND
EFFORT (INCLUDING LACK OF NEGLIGENCE) IS WITH YOU.
ALSO, THERE IS NO WARRANTY AGAINST INTERFERENCE
WITH YOUR ENJOYMENT OF THE SOFTWARE OR AGAINST
INFRINGEMENT. IF YOU HAVE RECEIVED ANY WARRANTIES
8580/8590 Vehicle-Mount Computer User Manual I
Page 14

License Agreement
REGARDING THE DEVICE OR THE SOFTWARE, THOSE WARRANTIES DO NOT ORIGINATE FROM, AND ARE NOT BINDING ON,
MS.
• Note on Java Support. The SOFTWARE may contain support for programs written in Java. Java technology is not fault tolerant and is not
designed, manufactured, or intended for use or resale as online control
equipment in hazardous environments requiring fail-safe performance, such
as in the operation of nuclear facilities, aircraft navigation or communication systems, air traffic control, direct life support machines, or weapons
systems, in which the failure of Java technology could lead directly to
death, personal injury, or severe physical or environmental damage. Sun
Microsystems, Inc. has contractually obligated MS to make this disclaimer.
• No Liability for Certain Damages. EXCEPT AS PROHIBITED BY
LAW, MS SHALL HAVE NO LIABILITY FOR ANY INDIRECT,
SPECIAL, CONSEQUENTIAL OR INCIDENTAL DAMAGES
ARISING FROM OR IN CONNECTION WITH THE USE OR PERFORMANCE OF THE SOFTWARE. THIS LIMITATION SHALL
APPLY EVEN IF ANY REMEDY FAILS OF ITS ESSENTIAL PURPOSE. IN NO EVENT SHALL MS BE LIABLE FOR ANY
AMOUNT IN EXCESS OF U.S. TWO HUNDRED FIFTY DOLLARS
(U.S. $250.00).
• Limitations on Reverse Engineering, Decompilation, and Disassembly.
Yo u may not reverse engineer, decompile, or disassemble the SOFTWARE,
except and only to the extent that such activity is expressly permitted by
applicable law notwithstanding this limitation.
• SOFTWARE TRANSFER ALLOWED BUT WITH RESTRIC-
TIONS. You may permanently transfer rights under this EULA only as part
of a permanent sale or transfer of the Device, and only if the recipient
agrees to this EULA. If the SOFTWARE is an upgrade, any transfer must
also include all prior versions of the SOFTWARE.
• EXPORT RESTRICTIONS. You acknowledge that SOFTWARE is
subject to U.S. export jurisdiction. You agree to comply with all applicable
international and national laws that apply to the SOFTWARE, including the
U.S. Export Administration Regulations, as well as end-user, end-use and
destination restrictions issued by U.S. and other governments. For additional information see http://www.microsoft.com/exporting/.
II 8580/8590 Vehicle-Mount Computer User Manual
Page 15

License Agreement
Psion Teklogix Inc. End User License Agreement
IMPORTANT - READ CAREFULLY:
This License Agreement (“Agreement”) is a legal agreement between you and Psion Teklogix (“we”),
the licensor of this software package (“Software”), for your use of the Software only as authorized in
this Agreement.
By clicking on the “Accept” or other appropriate assent button and/or installing the Software, you
agree to be and are hereby bound by the terms and conditions of this Agreement. If you do not agree
with this Agreement, we do not grant you a license to the Software, and you may not install or use the
Software or any accompanying documentation.
The Software is the property of Psion Teklogix Inc. or its licensors and is protected by copyright laws
and international copyright treaties, as well as other intellectual property laws and treaties. The Software is licensed, not sold. Psion Teklogix Inc. provides the Software and licenses its use worldwide.
You assume responsibility for the selection of the Software to achieve your intended results, and for the
use and results obtained from it.
1. GRANT OF LICENSE
We hereby grant you and you hereby accept a non-exclusive, non-transferable,
limited license to install and use the Software in object code form only, subject to
the terms and restrictions set forth in this Agreement. Except as explicitly set forth
below, (i) you are not permitted to copy, sell, lease or rent, distribute or sublicense
the Software or to use the Software in a time-sharing arrangement or in any other
unauthorized manner; (ii) no license is granted to you in the human readable code of
the Software (source code); and (iii) this Agreement does not grant you any rights to
patents, copyrights, trade secrets, trademarks, intellectual property or any other
ownership rights with respect to the Software.
2. DESCRIPTION OF REQUIREMENTS, RESTRICTIONS, RIGHTS AND
LIMITATIONS
a. Copy. The right and license granted to you shall be limited to installation and use
of the Software up to but not exceeding the number of copies you have licensed.
However, you may make a copy of the Software for backup or archival purposes.
You shall not remove any copyright notice or proprietary notices, labels or marks
in or on the Software.
b. Evaluation. As part of evaluation, you may install and use the Software only
during the specified evaluation period. Unless you register the license as
described below, the evaluation license shall expire upon the expiration of the
evaluation period.
8580/8590 Vehicle-Mount Computer User Manual III
Page 16

License Agreement
c. License Registration. You will be required to provide a license ID, unique to
each device, for registering your Software license. As part of your software
license registration, we will provide you a corresponding license key for each
device.
d. No Modifications. You may not modify or create any derivative work of the
Software or any copy or portion thereof nor may you remove any Software
identification, copyright or other notices.
e. No Distribution. You may not distribute the Software, in whole or in part, to any
other third party.
f. Virus Program. You may not develop or knowingly incorporate any virus
program that may be harmful to a computer or a network in conjunction with the
Software, or use the Software for any other purpose as which may be harmful to
a third party.
g. Assignment. You may not assign or transfer the Software to a third party or
allow a third party to use the same.
h. Reverse Engineering. Modification, reverse engineering, reverse compiling,
disassembly, unbundling or extraction of the Software is expressly prohibited.
i. Export Restrictions. You agree to comply with all applicable laws and
regulations and that you will not export or re-export the Software, or any part or
copies thereof, or any products utilizing the Software in violation of applicable
laws or regulations of the United States or the country in which you obtained
them.
3. HIGH RISK ACTIVITIES
The Software is not fault-tolerant and is not designed, manufactured or intended for
use or resale as on-line control equipment in hazardous environments requiring failsafe performance, such as in the operation of nuclear facilities, aircraft navigation or
communication systems, air traffic control, direct life support machines, or weapons
systems, in which the failure of the Software could lead to death, personal injury, or
severe physical or environmental damage (“High Risk Activities”). We specifically
disclaim any express or implied warranty of fitness for High Risk Activities.
4. DISCLAIMER OF WARRANTY
We do not warrant uninterrupted or error free operation of the Software nor do we
warrant that the Software will meet your requirements. THE SOFTWARE IS
PROVIDED “AS-IS” WITHOUT ANY WARRANTY WHATSOEVER AND
WITHOUT ANY TECHNICAL SUPPORT OF ANY KIND. WE DISCLAIM
ANY AND ALL REPRESENTATIONS, WARRANTIES AND CONDITIONS,
IV 8580/8590 Vehicle-Mount Computer User Manual
Page 17

License Agreement
WHETHER EXPRESS OR IMPLIED, INCLUDING, BUT NOT LIMITED TO,
THE IMPLIED WARRANTIES OR CONDITIONS OF MERCHANTABLE
QUALITY OR FITNESS FOR A PARTICULAR PURPOSE. WE DO NOT
WARRANT OR MAKE ANY REPRESENTATIONS REGARDING THE USE
OR THE RESULTS OF THE USE OF THE SOFTWARE IN TERMS OF ITS
CORRECTNESS, ACCURACY, RELIABILITY, USE WITH FUTURE PSION
TEKLOGIX DEVICES INTRODUCED, OR OTHERWISE. YOU EXPRESSLY
ACKNOWLEDGE AND AGREE THAT USE OF THE SOFTWARE IS AT
YOUR SOLE RISK AND YOU ARE RESPONSIBLE FOR INSTALLATION OF
THE SOFTWARE ON YOUR COMPUTER.
5. LIMITATION OF LIABILITY
We are liable for no more than the value of the license fee that you paid for the
Software. This limitation is cumulative and our responsibility for multiple claims
will not exceed in aggregate this limit.
Under no circumstances are we or our third party suppliers liable for damages of
third parties claimed against you, or for harm to your records or data, or special,
incidental, indirect, or consequential damages, including but not limited to lost
profits, lost business revenue or failure to realize expected savings, loss of data, loss
of use of the Software or any associated equipment, downtime and user's time, even
if you informed us of their possibility, or for breach of any express or implied
warranty, breach of contract, negligence, strict liability or any other legal theory
related to the Software. This limitation applies whether you are entitled to claim
damages from us or our third party suppliers as a matter of contract or tort.
6. COPYRIGHTS, OWNERSHIP AND PROPRIETARY RIGHTS
All title and copyrights in and to the Software, and any copies thereof, are owned by
Psion Teklogix Inc. or its suppliers. The Software also contains copyrighted material
licensed from our suppliers or obtained from open source and all rights to such
copyrighted material rests with such suppliers. Additional third party license terms
and conditions may apply. We retain title to the Software and any copies made from
it. Any copies of the Software you made are subject to the restrictions of this
Agreement.
WE DISCLAIM ALL WARRANTIES AND INDEMNITIES, EXPRESS,
IMPLIED OR STATUTORY, FOR PATENT OR COPYRIGHT INFRINGEMENT.
7. CONFIDENTIALITY
You agree not to use or disclose any proprietary information provided by us, except
for the purposes of this Agreement. You agree not to reproduce any of the
copyrighted materials unless expressly permitted by this Agreement.
8580/8590 Vehicle-Mount Computer User Manual V
Page 18

License Agreement
8. ENDING THIS AGREEMENT
We may terminate this Agreement and your license immediately without notice if
(a) you fail to comply with any term of this Agreement, or (b) your rights are
assigned by you, by operation of law or otherwise. In such event, you must return or
destroy all copies and component parts of the Software and documentation, as well
as any other Psion Teklogix proprietary information in your possession, within
fourteen (14) days of the date of termination. Any rights and obligations under this
Agreement that by their nature continue after it ends will remain in effect until they
are completed.
9. GENERAL
The laws of the Province of Ontario and the federal laws applicable therein,
excluding the conflict of laws provisions, govern this Agreement. If any provision
of this Agreement is deemed invalid or unenforceable by any country, that particular
provision will be deemed modified to the extent necessary to make the provision
valid and enforceable, and the remaining provisions will remain in full force and
effect. Failure by us to insist on strict performance or to exercise a right when
entitled, does not prevent us from doing so at a later time, either in relation to that
default or any subsequent one.
No modifications of this Agreement shall be effective unless in writing and
approved by us.
You acknowledge that you have read this Agreement, understand it, and that it is the
complete agreement between you and Psion Teklogix with respect to the subject
matter hereof and supersedes all prior agreements, oral or written.
VI 8580/8590 Vehicle-Mount Computer User Manual
Page 19

APPROVALS AND SAFETY SUMMARY
CE Markings
When used in a residential, commercial or light industrial environment the product
and its approved UK and European peripherals fulfil all requirements for CE marking.
R&TTE Directive 1999/5/EC
This equipment complies with the essential requirements of EU Directive
1999/5/EC (Declaration available: www.psionteklogix.com).
Cet équipement est conforme aux principales caractéristiques définies dans la
Directive européenne RTTE 1999/5/CE. (Déclaration disponible sur le site:
www.psionteklogix.com).
Die Geräte erfüllen die grundlegenden Anforderungen der RTTE-Richtlinie
(1999/5/EG). (Den Wortlaut der Richtlinie finden Sie unter:
www.psionteklogix.com).
Questa apparecchiatura è conforme ai requisiti essenziali della Direttiva Europea
R&TTE 1999/5/CE. (Dichiarazione disponibile sul sito: www.psionteklogix.com).
Este equipo cumple los requisitos principales de la Directiva 1995/5/CE de la UE,
“Equipos de Terminales de Radio y Telecomu-nicaciones”. (Declaración disponible
en: www.psionteklogix.com).
Este equipamento cumpre os requisitos essenciais da Directiva 1999/5/CE do
Parlamento Europeu e do Conselho (Directiva RTT). (Declaração disponível no
endereço: www.psionteklogix.com).
Ο εξοπλισμός αυτός πληροί τις βασικές απαιτήσεις της κοινοτικής οδηγίας EU
R&TTE 1999/5/EΚ. (Η δήλωση συμμόρφωσης διατίθεται στη διεύθυνση:
www.psionteklogix.com)
Deze apparatuur voldoet aan de noodzakelijke vereisten van EU-richtlijn
betreffende radioapparatuur en telecommunicatie-eindappa-ratuur 199/5/EG.
(verklaring beschikbaar: www.psionteklogix.com).
Dette udstyr opfylder de Væsentlige krav i EU's direktiv 1999/5/EC om Radio- og
teleterminaludstyr. (Erklæring findes på: www.psionteklogix.com).
8580/8590 Vehicle-Mount Computer User Manual VII
Page 20

Approvals And Safety Summary
p
p
Dette utstyret er i overensstemmelse med hovedkravene i R&TTE-direktivet
(1999/5/EC) fra EU. (Erklæring finnes på: www.psionteklogix.com).
Utrustningen uppfyller kraven för EU-direktivet 1999/5/EC om ansluten
teleutrustning och ömsesidigt erkännande av utrustningens överensstämmelse
(R&TTE). (Förklaringen finns att läsa på: www.psionteklogix.com).
Tämä laite vastaa EU:n radio- ja telepäätelaitedirektiivin (EU R&TTE Directive
1999/5/EC) vaatimuksia. (Julkilausuma nähtävillä osoitteessa:
www.psionteklogix.com).
PSION TEKLOGIX tímto prohlašuje, že 8580/8590 je ve shodě se
základními požadavky a dalšími příslušnými ustanovenímisměrnice
1995/5/ES (NV č. 426/2000 Sb.) a Prohlášení o shodě je k dispozici na
www.PsionTeklogix.com.
Toto zařízení lze provozovat v České republice na základě
generální licence č. GL - 12/R/2000.
PSION TEKLOGIX týmto vyhlasuje, že 8580/8590 spĺňa základné
ožiadavky a všetky príslušné ustanovenia Smernice 1995/5/ES
(NV č. 443/2001 Z.z.) a Vyhlásenie o zhode je k dispozícii na
www.PsionTeklogix.com.
Toto zariadenie je možné prevádzkovať v Slovenskej republike
na základe Všeobecného povolenia č. VPR-01/2001.
Настоящото устройство е в съответствие с основните изисквания на
европейската Директива 1999/5/EC (Декларацията за съответствие може
да бъде намерена на адрес: www.psionteklogix.com)
Acest echipament satisface cerinţele esenţiale ale Directivei UE 1999/5/EC
(Declaraţia poate fi gasitã pe site-ul: www.psionteklogix.com
Įranga atitinka pagrindinius EU direktyvos 1999/5/EC reikalavimus (Deklaraciją
galima rasti www.psionteklogix/xyz
Käesolev seade vastab EU Direktiivile 1999/5/EC (selgitus saadaval:
www.psionteklogix.com/xyz
Šī aparatūra nodrošina nepieciešamas ES Direktīvas prasības (Deklarācija ir
ieejama: www.psionteklogix.com/xyz)
VIII 8580/8590 Vehicle-Mount Computer User Manual
)
)
)
Page 21

Approvals And Safety Summary
Dan l-apparat huwa konformi mal-kriterji tad-direttiva ta' l- EU 1999/5/EC.
(Din id-dikjarazzjoni tista ssiba fuq is sit www.psionteklogix/abc)
Oprema je skladna z bistvenimi zahtevami EU direktive 1999/5/EC
(Deklaracija je na voljo: www.psionteklogix.com/xyz
Az eszköz megfelel az EU 1999/5/EC fő direktíváinak (a nyilatkozat
megtalálható: www.psionteklogix.com/xyz
To urządzenie spełnia wymagania zasadnicze dyrektywy Unii Europejskiej
1999/5/EC (Deklarację zgodności można znaleźć pod adresem internetowym
)
)
L
Use of the 802.11 8580/8590 vehicle-mount in France:
Owing to French Government restrictions, the 802.11 8580/8590 vehicle-mounts
are limited to indoor use. They may be used outdoors, on private property, only with
prior authorization from the French Ministry of Defense.
FCC Information To Users
Federal Communication Commission Interference Statement
This equipment has been tested and found to comply with the limits for a Class B
digital device, pursuant to Part 15 of the FCC Rules. These limits are designed to
provide reasonable protection against harmful interference in a residential
installation. This equipment generates, uses and can radiate radio frequency energy
and, if not installed and used in accordance with the instructions, may cause harmful
interference to radio communications. However, there is no guarantee that
interference will not occur in a particular installation.
If this equipment does cause harmful interference to radio or television reception,
which can be determined by turning the equipment off and on, the user is
encouraged to try to correct the interference by one of the following measures:
• Reorient or relocate the receiving antenna.
• Increase the separation between the equipment and receiver.
• Connect the equipment into an outlet on a circuit different from that to which
the receiver is connected.
• Consult the dealer or an experienced radio/TV technician
for help.
8580/8590 Vehicle-Mount Computer User Manual IX
Page 22
Approvals And Safety Summary
This device complies with Part 15 of the FCC Rules. Operation is subject to the
following two conditions: (1) This device may not cause harmful interference, and
(2) this device must accept any interference received, including interference that
may cause undesired operation.
FCC Caution: Any changes or modifications not expressly approved by the party
responsible for compliance could void the user's authority to operate this equipment.
IMPORTANT NOTE:
FCC Radiation Exposure Statement:
This transmitter must not be co-located or operating in conjunction with any other
antenna or transmitter.
Some equipment in hospitals and aircraft are not shielded from radio frequency
energy. Do not use the 8580/8590 onboard aircraft, or in hospitals, without first
obtaining permission.
Do not use near pacemakers. The product may affect the operation of some
medically implanted devices such as pacemakers, causing them to malfunction.
Avoid placing your product next to such devices. Keep a minimum distance of 20
cm between the device and the product to reduce the risk of interference. If you have
any reason to suspect that interference is taking place, turn off the 8580/8590 and
contact your cardiologist for assistance.
Note: In August 1996 the Federal Communications Commission (FCC) of the
US adopted an updated safety standard for human exposure to radio frequency energy emitted by FCC regulated transmitters. The design of this
product complies with the FCC guidelines and those standards. To maintain compliance with the FCC RF exposure guidelines, ensure the
antenna is at least 20 cm from your body when transmitting.
Emissions Information For Canada
This Class B digital apparatus meets all requirements of the Canadian InterferenceCausing Equipment Regulations. When using the 802.11 radio option, to prevent
radio interference, this device is intended to be operated indoors and away from
windows to provide maximum shielding. Equipment (or its transmit antenna) that is
installed outdoors is subject to licensing.
Cet appareil numérique de la classe B respecte toutes les exigences du Règlement
sur le matériel brouilleur du Canada. En cas d’utilisation du module radio 802.11,
afin d'éviter toute interférence radio avec le service autorisé, l'appareil doit être
X 8580/8590 Vehicle-Mount Computer User Manual
Page 23

Approvals And Safety Summary
utilisé à l'intérieur, tout en tant éloigné de toute fenêtre afin de garantir le maximum
de protection. Si cet équipement (ou son antenne émettrice) est installé à l'extérieur,
il est alors soumis à licence.
Important Safety Notices
The 8580/8590 vehicle-mounts were designed and built according to modern
technology and accepted safety regulations. However, the operation of the vehiclemounts can endanger personnel or third parties and cause damage to the device and
other material assets when for example the device is:
• operated by untrained or uninformed personnel
• not operated correctly
• operated and maintained incorrectly
The operator commitments in regards to safety (accident prevention regulations,
work protection) are to be followed.
Initial Operation Of The Device
Area Of Application
The device is not designed for use in life-support systems or critical safety
systems where system malfunction can lead to the direct or indirect endangerment of human life. The operator shall take full responsibility for using the
device in these situations.
The device cannot be used in combination with safety functions for machines
and equipment which have to conform to the requirements of EN 954-1.
Choice Of Location
The ambient conditions at the point of installation must comply with the device's
protection class.
Installation/Initial Operation
The device is not supplied with a disconnector (switch) that can be accessed
externally. The power supply connector is therefore used as a disconnector.
Therefore it needs to be easily accessible. If it is necessary to establish a fixed
connection, an easily accessible disconnecting device (e.g. a switch such as a
circuit breaker) should be installed close to the device. Ensure that the power
cable is laid so that it is mechanically protected.
8580/8590 Vehicle-Mount Computer User Manual XI
Page 24

Approvals And Safety Summary
The power supply cables must be laid in accordance with the applicable local
installation regulations.
Radio Performance
Do not exceed the maximum permissible transmitting power which is specified
by each separate country. 8580/8590 users must verify this themselves.
Risk Of Injury
The unit could fall during transit or installation and cause injury. Always ensure
that there are two persons available when installing or removing the device.
Supply Of Fresh Air
The 8580/8590 is based on a passive cooling concept. As a result, the waste heat
which is produced inside the device is emitted over the surface of the housing.
For this system to function properly, sufficient fresh air circulation is required.
Never install the system in a closed environment where the cooling air is unable
to dissipate accumulated heat to the outside.
If the 8580/8590 is not able to draw in fresh cooling air, this may cause overheating and severe damage to the unit.
The maximum allowed ambient temperature for the system needs to be taken
into account for the concrete application area.
Power Supply/External Peripheral Devices
Operation In An Emergency
In case of emergency (such as damage to the power cable, or housing, or ingress
of liquid or other foreign bodies), the device must be disconnected immediately
from the power supply. Contact technical support staff at once.
Protection Of The Power Supplies
THERE ARE TWO POWER INPUT VERSIONS OF THE 8580/8590, AND SPECIAL PRECAU-
TIONS MUST BE CONSIDERED WHEN CONNECTING THE POWER TO THE TERMINAL!
If 12V is connected to a 24/48 V 8580/8590, the unit will not start up, but the unit
will not be damaged in any way.
If 18V or more is connected to a 12V 8580/8590, the unit WILL BE damaged; THE VEHICLE-MOUNT WILL NO LONGER FUNCTION.
XII 8580/8590 Vehicle-Mount Computer User Manual
Page 25

Approvals And Safety Summary
Danger Of Electrocution When Cleaning/Servicing The Device
In order to avoid electrocution always disconnect the vehicle-mount from the
power supply before cleaning or servicing the device.
Charging The Car Battery
While charging the car battery, the 8580/8590 has to be either disconnected from
the battery or it has to be determined that the maximum allowed input voltage of
the vehicle-mount is not exceeded. (see “Power Supply” on page 13 and “Power
Supply” on page 44).
Wiring
Do not use the 8580/8590 when a cable or plug is damaged. Have the damaged
parts replaced immediately!
Connecting Or Disconnect Cables During Storms
Never connect or disconnect data cables during an electrical storm.
External Peripheral Devices
The use of additional wiring and other peripheral devices, which are not recommended or sold by the manufacturer can result in fire, electrocution or personal
injury.
If a power supply is used, only use the power supply recommended by the manufacturer.
Before connecting or disconnecting peripheral devices (exception: USB
devices), the 8580/8590 must be disconnected from the power supply! Otherwise, this could seriously damage both the vehicle-mount and the connected
devices!
Make sure that external peripheral devices with their own power supply are
switched on at the same time or after you start the 8580/8590. If this is not possible, please ensure that the 8580/8590 is adequately protected from power leakage
caused by an external device.
8580/8590 Vehicle-Mount Computer User Manual XIII
Page 26

Approvals And Safety Summary
Repairs Only Through Psion Teklogix
Never carry out repairs on the device yourself. Always contact Psion Teklogix
technical support and send in your unit for repair if necessary.
On the back of the unit, you will find the device's type plate which has important
information about the device which you must quote for technical service. It provides
important information about the configuration and manufacture of the device in
abbreviated form. Always provide technicians with the full model name and serial
number.
For a service location near you, refer to appendix A in this manual.
XIV 8580/8590 Vehicle-Mount Computer User Manual
Page 27

INTRODUCTION 1
1.1 About This Manual..............................3
1.1.1 Text Conventions............................4
1.1.2 For Qualified Personnel ........................4
8580/8590 Vehicle-Mount Computer User Manual 1
Page 28

Page 29

Chapter 1: Introduction
About This Manual
1.1 About This Manual
This manual has been designed to make using the 8580/8590 vehicle-mounts as
simple as possible and provide expert assistance if problems should occur. It
contains important information on using the device safely and efficiently.
Adhering to the manual helps by avoiding dangers, reducing repair costs and
breakdown times and increasing the reliability and lifespan of the 8580/8590s.
Psion Teklogix Inc. will not assume responsibility for any damage caused by
improper use of the 8580/8590 vehicle-mounts and/or in disregard of the
instructions in this manual.
Within this manual, Psion Teklogix Inc. strives to provide all the information
required for using your 8580/8590s. However, because this is a versatile product
that can be used in many different scenarios, we cannot guarantee that the
information contained in this manual will cover every single aspect.
Should you require further information or if you have questions or issues needing
clarification, please contact your nearest Psion Teklogix representative.
Chapter 1: Introduction
provides a basic overview of this manual.
Chapter 2: Basic Checkout
outlines the setup features of the 8580/8590.
Chapter 3: Accessories
describes the accessories available with your 8580/8590.
Chapter 4: 8580/8590 Installation
describes the assembly of the cable cover and provides information about
mounting options.
Chapter 5: Operation Of The 8580/8590
describes the front panel options and how to operate them.
Chapter 6: Operating System & Software Applications
describes the 8580/8590 operating system and software applications.
Chapter 7: Serial Ports
details 8580/8590 serial ports.
Chapter 8: Internal Devices
provides details about the internal chipset, VGA adaptor, network adaptor,
touchscreen, and so on.
Chapter 9: Maintenance
provides steps to safely clean and maintain your 8580/8590.
8580/8590 Vehicle-Mount Computer User Manual 3
Page 30
Chapter 1: Introduction
Text Conventions
Chapter 10: Common Mistakes & Helpful Tips
provides some helpful troubleshooting tips.
Appendix A: Support Services And Worldwide Offices
provides the helpdesk phone number at the Mississauga, Ontario, Canada office
and details the support services available. This appendix also lists the worldwide office addresses and phone numbers.
Appendix B: System Resources
lists system resources for reference values. They may be useful as a guide and
for troubleshooting.
Appendix C: Pinouts
provides tables of terminal (pin) assignments.
Appendix D: Mechanical Dynamic Loading
provides information addressing the varied mechanical environmental conditions of the 8580/8590 in terms of vibrations, collisions and shocks and the
options available to counter these.
Appendix E: BIOS
details the BIOS setup.
1.1.1 Text Conventions
Note: Notes highlight additional, helpful information.
Important: These statements provide particularly important instructions
or additional information that is critical to the operation of
the equipment.
Warning: These statements provide critical information that may prevent
physical injury, equipment damage or data loss.
1.1.2 For Qualified Personnel
This manual was written for qualified personnel. The information is intended
exclusively to complement the expertise of qualified personnel, not to replace it.
For a list of Worldwide offices, refer to Appendix A of this manual or go to:
www.psionteklogix.com
4 8580/8590 Vehicle-Mount Computer User Manual
Page 31

BASIC CHECKOUT 2
2.1 8580/8590 Description . . . . . . . . . . . . . . . . . . . . . . . . . . . . 7
2.2 Intended Use .................................7
2.3 The Models: 8580 And 8590 . . . . . . . . . . . . . . . . . . . . . . . . . 8
2.4 Abbreviations Used For 8580/90s & Accessories . . . . . . . . . . . . . . 8
2.5 8580/90 Description And Type Identification . . . . . . . . . . . . . . . . 8
2.6 Technical Specifications ..........................10
2.6.1 Mechanical..............................10
2.6.2 Motherboard .............................10
2.6.3 LCD/CRT Interface..........................12
2.6.4 Touchscreen (optional)........................12
2.6.5 Network Interface...........................13
2.6.6 ADC/MDC Interface (optional) ...................13
2.6.7 PCI Express® MiniCard Interface For WLAN (optional) . . . . . . 13
2.6.8 Power Supply . . . . . . . . . . . . . . . . . . . . . . . . . . . . . 13
2.6.9 Maximum Power Available For Peripheral Devices . . . . . . . . . 15
2.6.10 Power Supply Fuses. . . . . . . . . . . . . . . . . . . . . . . . . 15
2.6.11 Ambient Conditions . . . . . . . . . . . . . . . . . . . . . . . . . 16
2.6.12 Test Marks..............................17
2.6.13 8580/8590 Dimensions . . . . . . . . . . . . . . . . . . . . . . . 18
2.6.13.1 8580 Front And Back Dimensions . . . . . . . . . . . . . 18
2.6.13.2 8580 Side Dimensions . . . . . . . . . . . . . . . . . . . 18
2.6.13.3 8590 Front And Back Dimensions . . . . . . . . . . . . . 19
2.6.13.4 8590 Side Dimensions . . . . . . . . . . . . . . . . . . . 20
2.6.14 8580/8590 VESA Drill Holes . . . . . . . . . . . . . . . . . . . . 21
2.7 Unpacking The 8580/8590 . . . . . . . . . . . . . . . . . . . . . . . . . 21
2.8 Packaging..................................22
2.9 Putting Your 8580/8590 In Operation. . . . . . . . . . . . . . . . . . . . 22
2.9.1 Cooling Through Unobstructed Air Circulation . . . . . . . . . . . 22
2.9.2 Pin Configuration...........................22
2.9.3 External Connectors .........................23
2.9.3.1 AC Voltage Connector. . . . . . . . . . . . . . . . . . . . 24
2.9.3.2 DC Voltage Supply . . . . . . . . . . . . . . . . . . . . . 24
8580/8590 Vehicle-Mount Computer User Manual 5
Page 32

Chapter 2: Basic Checkout
2.9.3.3 8580/8590 Adaptor Cables. . . . . . . . . . . . . . . . . . 25
2.10 Connecting External Devices .......................26
2.10.1 Powering Down The 8580/8590 . . . . . . . . . . . . . . . . . . . 26
2.10.1.1 Powering Up The 8580/8590 . . . . . . . . . . . . . . . . 27
2.11 WLAN Settings ..............................27
2.11.1 Radio Performance..........................27
2.11.2 8580/8590 Antenna Solutions for EU Countries . . . . . . . . . . 27
2.12 Removing The Protective Film From The Display . . . . . . . . . . . . 28
2.13 Powering Up The 8580/8590. . . . . . . . . . . . . . . . . . . . . . . . 28
2.14 Protecting The TFT Display From Memory Effect . . . . . . . . . . . . 28
6 8580/8590 Vehicle-Mount Computer User Manual
Page 33

Chapter 2: Basic Checkout
8580/8590 Description
Warning: IT IS CRITICAL that this information be reviewed and that any
guidelines applicable to your vehicle-mount be strictly followed.
2.1 8580/8590 Description
Thank you for choosing the 8580/8590 vehicle-mount computer.
The 8580/8590 is a multi-function PC designed for stationary and mobile use.
Thanks to its rugged design (aluminum housing), the device provides effective
protection against mechanical, electrical and chemical influences and extreme
ambient temperatures. It is designed without an external fan to reduce maintenance
requirements.
The particular advantage offered by the 8580/8590 is the extreme diversity of
functions combined with its compact design. By applying ultramodern technologies
for display and touchscreen, the 8580/8590 combines excellent image quality with
the simplest operability.
2.2 Intended Use
The 8580 and 8590 are multifunction vehicle-mount computers that are designed for
stationary and mobile use in commercial applications (for example logistics,
storage, manufacturing). A different or extraordinary usage is not permitted.
8580/8590 Vehicle-Mount Computer User Manual 7
Page 34

Chapter 2: Basic Checkout
The Models: 8580 And 8590
Should these units be used in unauthorized ways, the user/operator is solely
responsible for any resulting damage. This condition also applies to any changes
you make to the device.
It is critical that you comply with the safety regulations described in this manual in
order to safely operate the 8580/890. Review “Approvals And Safety Summary” on
page VII.
2.3 The Models: 8580 And 8590
This manual applies to the following models:
• 8580 with 10.4" display, and
• 8590 with 12.1" display
Any differences between the devices will be clearly noted in this manual.
2.4 Abbreviations Used For 8580/90s & Accessories
Please note that to save space on the 8580/8590 and supplied accessories, the
following abbreviations have been used:
Abbreviation Explanation
+DC+
-DCIgn Ignition
2.5 8580/90 Description And Type Identification
The device type plate on the 8580/8590 contains the following information:
8580/8590 Describes the 8580/8590 with a connection level
and a 10 inch or 12 inch display.
SVGA or XGA Display resolution.
AC or DC Type of power supply, the following numbers (1-9)
indicate the exact type of power supply with input
voltage or AC power supply with additional fre-
quency display.
H H stands for heating, further letters denote other
device options.
8 8580/8590 Vehicle-Mount Computer User Manual
Page 35

Chapter 2: Basic Checkout
8580/90 Description And Type Identification
e.g., 24/48V with 6.2A Input voltage of the DC power supply with
nominal current.
e.g., 800MHz Clock rate of the CPU.
S/N... 11 or 12 digit serial number composed of:
-Psion Teklogix specific device code (29 stands for
the 8580/8590 model range)
- Indication of the week of manufacture
- Indication of the year of manufacture.
- Five or six digits for internal Psion
Teklogix identification.
Figure 2.1 FCC Label
Figure 2.2 CE Label
8580/8590 Vehicle-Mount Computer User Manual 9
Page 36

Chapter 2: Basic Checkout
Technical Specifications
2.6 Technical Specifications
2.6.1 Mechanical
Housing Rugged aluminum-cast housing with integrated
Display Panel 10.4" SVGA, 400 cd/m
Bottom Cable cover (splash guard)
Top Optional antenna fitting for wireless LAN
heat sink
Protection class IP65
ESD safe
Weight of the 8580/8590 with a 10.4" front panel:
approx. 4.0 kg (depending on configuration)
2
, optional 4-wire resistive
touchscreen, with brightness adjustment
2
12.1" XGA, 400 cd/m
touchscreen, with brightness adjustment
, optional 8-wire resistive
2.6.2 Motherboard
CPU Intel® Celeron® M 800MHz, ULV
Intel® Celeron® M 373, 1 GHz, ULV
Chipset Intel® 82915GM Northbridge and graphic chip
Intel® 82801 FBM (ICH6-M) Southbridge
Bus Interface PCI bus (PCI 2.1)
Cache 64 kB level 1 cache: internal in the CPU
0 kB level 2 cache on the 800 MHz CPU: CPU-
internal
512 kB level 2 cache on the 1 GHz CPU: CPU-
internal
RAM 256 to 1024 MBytes in one SO-DIMM slot
Fully cacheable
DDR2 technology
BIOS AMIBIOS8® -1 MByte Flash BIOS with ACPI,
PnP
Programmable in the system
BIOS POST self test
Slots for standard plug-in A riser card is available for expansions:
10 8580/8590 Vehicle-Mount Computer User Manual
Page 37

Chapter 2: Basic Checkout
Motherboard
cards 1 PCI slot 32 bit 5 V
Real-time clock Real-time clock with a power reserve of up to 10
years
IDE Interface Supports up to two IDE devices from PIO Mode
3/4 to UDMA/33. Connection via a 44-pin connector (2 mm grid). Connectable devices:
2.5" hard drives (enquire which capacities are cur-
rently available)
2.5" Flash disks (IDE) (enquire which capacities
are currently available)
Compact Flash type I/II
Important notes for Compact Flash Cards:
Only use Compact Flash Cards approved and
released by Psion Teklogix to ensure the device
functionality. Otherwise data loss could increase.
The Compact Flash Cards used in the 8580/8590
must be industrial and non removable models.
Floppy disk drive Supports an external 3.5" USB floppy disk drive
Protected to ESD level 4 (according to EN 610004-2)
Fan Optional
Serial Ports 1st serial port:
115,200 Baud max (16550A compatible, 16 byte
FIFO),
supports RS-232 on an external 9-pin D-Sub connection
ESD level 4 protected (acc. to EN 61000-4-2)
2nd serial port:
115,200 Baud max (16550A compatible, 16 bytes
FIFO),
supports RS-232 on an external 9-pin D-Sub connection
ESD level 4 protected (acc. to EN 61000-4-2)
3rd serial port:
115,200 Baud max (16550A compatible, 16 bytes
FIFO),
8580/8590 Vehicle-Mount Computer User Manual 11
Page 38

Chapter 2: Basic Checkout
LCD/CRT Interface
Keyboard/mouse Keyboard/mouse: 6-pin mini DIN connector,
connection combination connector, Y cable for PS/2 keyboard
USB-connection 2 stacked USB connections (USB 2.0 HiSpeed)
Software compatibility Windows XP Professional
internal for the integrated environment controller
4th serial port:
115,200 Baud max (16550A compatible, 16 bytes
FIFO),
internal for integrated touch controller
and mouse required
Internally-protected power supply for keyboard
and mouse
ESD level 4 protected (acc. to EN 61000-4-2)
with 0.5 A per port protected by fuse
ESD level 4 protected (acc. to EN 61000-4-2)
Windows XP Embedded
2.6.3 LCD/CRT Interface
VGA controller Integrated Intel® Graphics Media Accelerator 900
with maximum 224 MByte Dynamic Video
Memory Technology (DVMT 3.0)
Shared memory architecture
Resolution up to 1600 x 1200 (UXGA) Up to 24
bit color depth, depending on which LCD is used
Simultaneous use of LCD/CRT
Multiple LCDs are supported
Drivers available for Windows XP Professional
and XP Embedded
2.6.4 Touchscreen (optional)
Analog touch controller 12bit touch controller for 4/5/8-wire resistive
touchscreens with RS232 and PS/2 interface.
Drivers available for Windows XP Professional
and XP Embedded
Analog touchscreens Available for 10.4" and 12.1" LCD displays, others
12 8580/8590 Vehicle-Mount Computer User Manual
Page 39

Chapter 2: Basic Checkout
Network Interface
on request
Analog touch connection Internal plug-in connector
Interface is ESD level 4 protected (acc. to EN
61000-4-2)
2.6.5 Network Interface
Network controller Intel® ICH6M with PHY Intel® 82562 controller:
10/100 MB/s
Drivers available for Windows XP Professional
and XP Embedded
Network connection RJ45 plug-in connector
Integrated transmitter
Two integrated status LEDs
2.6.6 ADC/MDC Interface (optional)
Properties 4 electrically-isolated outputs,
16 electrically-isolated inputs
PCI bus
Drivers available for Windows XP Professional
and XP Embedded
ADC/MDC connection A 37-pin D-Sub connector
2.6.7 PCI Express® MiniCard Interface For WLAN (optional)
PCI Express MiniCard slot 1 USB 2.0 High Speed
1x x1 PCI Express® Lane
No SIM card mounts available,
therefore, for example, no GSM, UMTS etc. cards
can be used
Driver support through Windows XP Professional
and XP Embedded (only operating system support,
plug-in card drivers from the manufacturer)
2.6.8 Power Supply
The device model is displayed on the device type plate.
DC power pack 24/48 VDC nominal (down to 11V for 20s max.)
8580/8590 Vehicle-Mount Computer User Manual 13
Page 40

Chapter 2: Basic Checkout
Power Supply
24/28VDC 60W Voltage range: 18 to 60VDC
internal type: DC-2 Covers power outages up to 5ms
DC power pack 24/48 VDC nominal (down to 11 V for 20 s max.)
24/48VDC 100W Voltage range: 18-60 VDC
internal type: DC-3 Covers power outages up to 5 ms
DC power pack 12 VDC nominal (down to 6 V for 20 s max.)
12VDC 100W internal Voltage range from 9 to 16 VDC
type: DC-1 Covers power outages up to 5 ms
80 W (at 6 to 9 VDC)
Electrically-isolated
Maximum output 60W
Optional automatic shutdown software, supports
Windows
Optional temperature display
Withstands bursts up to 2kV
Nominal current of 3.7A
2)
Connection to SELV circuit
only
Electrically-isolated
Maximum output 100 W
Optional automatic shutdown software, supports
Windows
Optional temperature display
Withstands bursts up to 2 kV
Nominal current 6.2 A
2)
Connection to SELV circuit
only
Electrically-isolated
Maximum output 100 W (at 9 to 16 VDC)
Optional automatic shutdown software, supports
Windows
Optional temperature display
Withstands bursts up to 2 kV
Nominal current of 15 A
Connection to SELV circuit3) only
14 8580/8590 Vehicle-Mount Computer User Manual
Page 41

Chapter 2: Basic Checkout
Maximum Power Available For Peripheral Devices
Power consumption Type:30 W (8580 SVGA with Compact Flash)
Max. 100 W (8580 VGA with Compact Flash in
heating mode)
Standby 1W (8580 with DC power pack in standby
mode)
1,2,3)
The SELV circuit is a secondary circuit that is designed and protected so that its volt-
ages will not exceed a safe value both when operating correctly or if a single error occurs.
2.6.9 Maximum Power Available For Peripheral Devices
Power Supply Motherboard
DC-1 800MHz 24W 28W
DC-1 1GHz 16W 20W
DC-3 800MHz 13.2W 26.2W
DC-3 1GHz 5W 18W
AC-1 800MHz 13.2W 26.2W
AC-1 1GHz 5W 18W
with no internal
fan
with internal fan
2.6.10 Power Supply Fuses
The symbol for the fuse is FA. You will find the exact position on the sticker located
on the connection plate (see “External Connectors” on page 23).
Power Supply Fuse Type Examples
DC-1,
DC-5
5x20mm T 16A
L/250V
Wickmann 195-2160 16A/250V
Siba 179120 (SIBA #. 7000135) 16A/250V
or similar devices produced by other manufacturers
DC-2
5x20mm T 6.3A
H/250V
Bussman S505-6.3A
Wickmann 181-6.3A
Littelfuse 215 06.3
Schurter 0001.2512
Siba 70 007 65 6.3A
Elu 179200 6.3A
or similar devices produced by other manufacturers
8580/8590 Vehicle-Mount Computer User Manual 15
Page 42

Chapter 2: Basic Checkout
Ambient Conditions
Power Supply Fuse Type Examples
DC-3,
DC-4
AC-1
5x20mm T 12.5A
L/250V
5x20mm T 1.25A
H/250V
Wickmann 195-2125 12.5 A/250 V
Siba 179120 (SIBA Nr. 7000135) 12.5 A/250 V
or similar devices produced by other manufacturers
Wickmann 181-1.25 A
or similar devices produced by other manufacturers
2.6.11 Ambient Conditions
Operating Temperature All specifications in accordance with
EN 60068-2-1/2
The permissible ambient temperature depends on
the display used:
Display
10.4" SVGA -20 to +50 -30 to +50
12.1" XGA -10 to +50 -30 to +50
Storage temperature All specifications in accordance with
Operating
Temperature [°C]
EN 60068-2-1/2
The permissible ambient temperature depends on
the display used:
Operating Temperature
With Heating [°C]
Display Storage Temperature [°C]
10.4" SVGA -20 to +80
12.1" XGA -20 to +80
Note: The storage temperature lower limit may exceed the permissible operat-
ing temperature range. In such cases, the unit may be powered up to the
minimum storage temperature and used in the full range of operating
temperatures after the heating phase.
16 8580/8590 Vehicle-Mount Computer User Manual
Page 43

Chapter 2: Basic Checkout
Relative humidity 10% to 90% at 40° C, non-condensing
In accordance with EN 60068-2-3
Mechanical vibration & Class 5M3 according to EN 60721-3-5: 1998
shock resistance (land vehicles), 5 hrs with 3.6 g effective noise and
36 vibrations with 30 g peaks or US highway truck
according to MIL-STD 810F: 2000 (Department of
Defense), 3 hrs with 1 g effective noise and 600
vibrations with 20 g peaks in operation, with Flash
disk
2.6.12 Test Marks
CE EN 55022 Class B
EN 55024, EN 61000-3-2, EN61000-3-3, EN
61000-6-2
IEC 60950-1, EN 60950-1, UL 60950-1
EN 300328-1 and EN 301489-17, in case Psion
Teklogix data transmission devices operating in the
2.4 GHz spectrum have been installed
Test Marks
8580/8590 Vehicle-Mount Computer User Manual 17
Page 44

Chapter 2: Basic Checkout
8580/8590 Dimensions
2.6.13 8580/8590 Dimensions
Note: All dimensions are represented in millimeters.
2.6.13.1 8580 Front And Back Dimensions
2.6.13.2 8580 Side Dimensions
18 8580/8590 Vehicle-Mount Computer User Manual
Page 45

2.6.13.3 8590 Front And Back Dimensions
Chapter 2: Basic Checkout
8590 Front And Back Dimensions
8580/8590 Vehicle-Mount Computer User Manual 19
Page 46

Chapter 2: Basic Checkout
8590 Side Dimensions
2.6.13.4 8590 Side Dimensions
20 8580/8590 Vehicle-Mount Computer User Manual
Page 47

Chapter 2: Basic Checkout
8580/8590 VESA Drill Holes
2.6.14 8580/8590 VESA Drill Holes
The VESA drill holes on the 8580/8590 are visible on this diagram. Dimensions
without add-ons (in mm):
2.7 Unpacking The 8580/8590
The delivery includes at least the following:
• 8580/8590 with strain relief rail
• Ordered assembly set
8580/8590 Vehicle-Mount Computer User Manual 21
Page 48

Chapter 2: Basic Checkout
Packaging
• Cable cover (standard = IP65 with strain relief rail)
• One DC or AC connecting cable
• One IPC/MPC driver CD per delivery
• One printed manual per delivery
Please verify the delivery contents immediately on receipt!
2.8 Packaging
The packaging material has been selected to optimally protect your device while
simultaneously offering the best possible ecological compatibility. We therefore
kindly request that you store the original packaging material or ensure it is used for
another suitable purpose such as transporting the unit or returning shipment.
Important: If you repack the device, please ensure that the cling wrap in the
cardboard frame is positioned towards the front of the device so
that it can provide the proper protection.
2.9 Putting Your 8580/8590 In Operation
2.9.1 Cooling Through Unobstructed Air Circulation
The 8580/8590 employs a passive cooling concept whereby the waste heat
generated inside the device is emitted from the surface of the housing. For this
system to function properly, sufficient fresh air circulation is required.
Never install the system in a closed environment where the cooling air is unable to
dissipate accumulated heat to the outside.
Important: If the 8580/8590 does not have access to fresh cooling air, it may
result in overheating and severe damage to the unit. The
maximum permissible ambient temperature for the entire system
needs to be taken into account for the concrete application area.
2.9.2 Pin Configuration
This section describes the pin configuration for all 8580/8590 plug-in connectors.
22 8580/8590 Vehicle-Mount Computer User Manual
Page 49

2.9.3 External Connectors
Figure 2.3 AC Version
Chapter 2: Basic Checkout
External Connectors
Figure 2.4 24/48VDC 60W Version
Figure 2.5 24/48VDC 100W Version
8580/8590 Vehicle-Mount Computer User Manual 23
Page 50

Chapter 2: Basic Checkout
AC Voltage Connector
2.9.3.1 AC Voltage Connector
Version: Standard power plug (IEC 320 compliant), 3-pin.
Figure 2.6 12VDC 100W Version
Figure 2.7 AC Power Supply Connector – Exterior View
2.9.3.2 DC Voltage Supply
Version: Phoenix Combicon, 3-pin.
Figure 2.8 DC Power Supply Connector – Exterior View
Explanation:
‘Ignition on’ means that a control signal must be routed to this connection (e.g.,
ignition of a vehicle) that matches the supply voltage level and is able to supply at
least 2 W to the 8580/8590. The signal reference is DC-.
24 8580/8590 Vehicle-Mount Computer User Manual
Page 51

Chapter 2: Basic Checkout
8580/8590 Adaptor Cables
2.9.3.3 8580/8590 Adaptor Cables
The 8580/8590 is shipped with one of 2 adaptor cables along with a power
extension cable (PN 13985-301). The power extension cable is connected to the
vehicle on one side and the adaptor cable on the other side. All cables can be used
with every voltage. Psion Teklogix offers either ‘ignition’ or ‘screen blanking’
(display-off). Keep in mind that you must choose either the ignition or screen
blanking option; both options cannot operate at the same time.
The ‘ignition’ adaptor cable is connected to the power input of the 8580/8590 only; the
‘screen blanking’ cable must be connected to the power input and COM1 or COM2.
Ignition Adaptor Cable Screen Blanking Adaptor Cable
PN 1616302 PN 1616303
Figure 2.9 8580/8590 Adaptor Cable Options
8580/8590 Vehicle-Mount Computer User Manual 25
Page 52

Chapter 2: Basic Checkout
Connecting External Devices
2.10 Connecting External Devices
Warning: The 8580/8590 must be disconnected from the power supply:
- before external devices (e.g., scanner, keyboard) can be connected
or disconnected, and
- before the 8580/8590 can be connected to a network.
All connections and interfaces on the 8580/8590 are located on the
underside of the unit.
Important: Before connecting or disconnecting peripheral devices (excep-
tion: USB devices), the 8580/8590 must be disconnected from the
power supply! If the 8580/8590 is equipped with an optional UPS
battery, only open the device after the power LED has gone out.
Otherwise, this could seriously damage both the 8580/8590 and
the connected devices!
Make sure that external peripheral devices with their own power
supply are switched on at the same time as the 8580/8590 or after
you start the 8580/8590. If this is not possible, please ensure that
the 8580/8590 is adequately protected from power leakage caused
by an external device.
2.10.1 Powering Down The 8580/8590
Always shut down the 8580/8590 as follows:
1. If your 8580/8590 has a DC power pack and automatic shutdown software, power down the device using the ignition input.
2. If your device has an AC power pack and automatic shutdown software, power it down using the power button.
3. Remove the cable cover.
4. Disconnect the device from the DC or AC supply voltage (pull the
plug).
The 8580/8590 is only shut down once the power LED has gone out.
26 8580/8590 Vehicle-Mount Computer User Manual
Page 53

Chapter 2: Basic Checkout
Powering Up The 8580/8590
2.10.1.1 Powering Up The 8580/8590
Only power up the 8580/8590 when all devices have been connected and the
vehicle-mount has been closed correctly (remember the cable cover!). Otherwise,
you may damage the 8580/8590!
2.11 WLAN Settings
2.11.1 Radio Performance
Warning: Do not exceed the maximum permissible transmitting power which
is specified by each separate country. 8580/8590 users must verify
this themselves.
Please keep in mind the configuration for the transmitting power:
• Wireless card (programmed driver capacity)
• Connecting cables
• Antenna
A help table with the correct settings is provided below:
2.11.2 8580/8590 Antenna Solutions for EU Countries
The integrated 8580/8590 antenna solutions are based on the prevailing
IEEE.802.11b standard, which allows wireless data transfer at rates from 54 Mbps
to 1 Mbps using the 2.4 GHz band.
Warning: According to regulations published in the gazette 89/2003 of the
RegTP (regulating body for telecommunications and mail), now:
Federal network agency for electricity, gas, telecommunications,
post and railway the maximum permissible transmitting power,
EIRP (equivalent isotropically radiated power), in the 2.4 GHz frequency band is set at 20 dBm.
The transmitting power of the two integrated antennas (4 dBi or
5 dBi) must be set to 30 mW (15 dBm) so that the EIRP limit value
is adhered to when using the antenna.
8580/8590 Vehicle-Mount Computer User Manual 27
Page 54

Chapter 2: Basic Checkout
Removing The Protective Film From The Display
To set the transmitting power of the wireless card, please read the documentation on
the wireless card.
2.12 Removing The Protective Film From The Display
The display of the 8580/8590 is protected during transport by a transparent film.
This film should remain on the display during assembly to avoid damage to the
display surface.
Only remove the film once all of the assembly work has been completed.
2.13 Powering Up The 8580/8590
Power up the 8580/8590 only after connecting all of the devices. If 18V or more is
connected to a 12V 8580/90, the vehicle-mount WILL BE DAMAGED AND
WILL NO LONGER FUNCTION.
The vehicle-mount is powered up by connecting it to an appropriate power supply
and then, depending on the version of the device, either using the power switch or
the ignition signal
Important: Make sure there is a suitable disconnecting device such as a
power switch or circuit breaker in the power supply circuit.
2.14 Protecting The TFT Display From Memory Effect
The TFT display of the 8580/8590 has to be protected from the burning in of a
motionless image. An image that has remained motionless for too long can cause
irreversible damage to the display. With TFT displays there no cathode rays burning
in an afterimage as in old TV sets or monitors, but TFT displays still have a
“memory effect”. This is because with a still image the liquid crystal molecules
align themselves in a certain way and become inert if they are not moved. Like
burning in the effect is irreversible, but can be avoided by regularly turning off the
display or by using a screen saver with changing content.
Define in the power management center of the utilized operating system that the
displays of the 8580/8590 should be turned off when no user input occurs.
A motionless image can stay on the display for a maximum of 12 hours. After more
than 12 hours there is the risk of the “memory effect”.
28 8580/8590 Vehicle-Mount Computer User Manual
Page 55

Chapter 2: Basic Checkout
Protecting The TFT Display From Memory Effect
Important: The following is important for the lifespan of the backlighting:
Choose a turn off time that is definitely not too short (not less
than 30 min) since frequent turning on of the backlighting will
noticeably reduce its lifespan. This particularly applies at low
temperatures. Here the backlighting of the display should never
be switched off but instead a screen saver should be used which
displays a changing or completely black screen in order to achieve
the maximum lifespan of the backlighting.
8580/8590 Vehicle-Mount Computer User Manual 29
Page 56

Page 57

ACCESSORIES 3
3.1 Keyboards..................................33
3.1.1 The SMALL Keyboard........................33
3.1.2 The 24-Key Keypad .........................34
3.2 Mouse....................................34
3.3 External CD-ROM Drive..........................35
3.3.1 Operation...............................35
3.3.2 Resources And Drivers........................35
3.4 USB Stick..................................35
3.5 Scanner...................................36
8580/8590 Vehicle-Mount Computer User Manual 31
Page 58

Page 59

Chapter 3: Accessories
Keyboards
3.1 Keyboards
On the 8580/8590, any keyboard with a 6-pin Mini-DIN plug can be connected
(PS/2). Resources for the keyboard controller are pre-defined in the system
architecture and automatically managed by the BIOS.
All keyboards can be used with all operating systems. No additional drivers are
required.
3.1.1 The SMALL Keyboard
A mountable, SMALL keyboard (English, German and French) is available for the
8580/8590, protection class IP 65.
The following SMALL keyboards are available through Psion Teklogix:
• Desktop SMALL keyboard (English, German and French versions)
• Add-on version. This add-on version can be attached to a stationary or
mobile mounting bracket with a mounting kit.
8580/8590 Vehicle-Mount Computer User Manual 33
Page 60

Chapter 3: Accessories
The 24-Key Keypad
3.1.2 The 24-Key Keypad
Psion Teklogix also provides a 24-key keypad which can be mounted onto the
device, with a protection class IP 65.
24-Key Keypad
3.2 Mouse
Any PS/2-compatible mouse with a standard Mini-DIN plug, USB connector or RS232 port can be connected to the 8580/8590. If the mouse has a PS/2 connection, a
Y-cable is also required
Note: It is not possible to use a PS/2 mouse during Touch operations if you use
the touch controller in PS/2 mode.However, a USB mouse or a RS-232
mouse can always be used in combination with touch mode.
Resources for the PS/2 mouse controller are pre-defined in the system architecture
and automatically managed by the BIOS. This is also the case for RS-232 and USB
mouse devices.
Special functions, such as those provided by wheel mouse devices, frequently
require additional drivers, which are to be supplied by the manufacturer.
34 8580/8590 Vehicle-Mount Computer User Manual
Page 61

Chapter 3: Accessories
External CD-ROM Drive
3.3 External CD-ROM Drive
An external CD-ROM drive can be attached to the 8580/8590. It is connected via
the USB port.
Important: When connecting an external USB CD-ROM drive which has its
own external power supply the 8580/8590 must be disconnected
from the power supply. The CD-ROM must be powered up simultaneously or after the 8580/8590 as otherwise this can cause startup problems, malfunctions, or even the destruction of the device.
Keep in mind also that not every device classified as a USB CDROM is a proper USB CD-ROM drive. Only use devices approved
by Psion Teklogix to ensure the device is fully compatible.
3.3.1 Operation
The CD-ROM drive port is provided via USB. The drive, which is supplied in a
separate housing, is connected to one of the sockets on the back of the 8580/8590.
Depending on the model, the external drive is powered either via the vehicle-mount
connecting cable or via a separate, external power supply.
If USB has been activated in the BIOS, the CD-ROM drive is automatically
recognized and made available by the BIOS.
The CD-ROM drive is bootable once it has been properly installed. To boot from a
CD-ROM, insert a bootable CD and start the system.
Note: In the BIOS USB CD-ROM must be entered as a boot device.
3.3.2 Resources And Drivers
Resources for the USB port are pre-defined in the system architecture and
automatically managed by the BIOS.
Drivers for the various operating systems need to be supplied by the drive
manufacturer (order if necessary).
3.4 USB Stick
You can connect a USB stick to the 8580/8590 with a USB-A connector.
8580/8590 Vehicle-Mount Computer User Manual 35
Page 62

Chapter 3: Accessories
Scanner
3.5 Scanner
You can connect scanners to either the USB, PS/2 or serial port. If connected to
COM1, the scanner can be powered through the port (optional).
Be sure to only use scanners that have been approved by Psion Teklogix.
36 8580/8590 Vehicle-Mount Computer User Manual
Page 63

8580/8590 INSTALLATION 4
4.1 Complying With Protection Standard IP65.................39
4.1.1 Parts List For Cable Cover Kit....................39
4.1.2 The Cable Cover, Grounding Bar & Cables–Assembling . . . . . . 40
4.2 Mounting Options For The 8580/8590 . . . . . . . . . . . . . . . . . . . 43
4.2.2 Permitted Mounting Positions....................44
4.2.3 Mechanical Dynamic Loading....................44
4.3 Power Supply................................44
4.3.1 DC Power Pack............................44
4.3.2 Installing Connecting Cables.....................45
4.4 Vehicle Applications (Such As Forklifts)..................45
4.4.1 Wiring Vehicle Power To The 8580/8590 . . . . . . . . . . . . . . 47
4.5 Cable Cover (Splash Guard) ........................48
4.5.1 Protection Class IP65.........................48
8580/8590 Vehicle-Mount Computer User Manual 37
Page 64

Page 65

Chapter 4: 8580/8590 Installation
Complying With Protection Standard IP65
Warning: In order to comply with the IP65 protection standards, you must
install the 8580/8590 cover guard, secure the cables and seal the
unit BEFORE mounting the unit using a mounting bracket.
4.1 Complying With Protection Standard IP65
The 8580/8590 is sealed against dust and protected against water jets (IP65),
provided that the following conditions are fulfilled:
• The cable cover is fitted.
• The sealing rings supplied are used for mounting the cables, and are sealed
with silicone.
• The unused cable sockets are blocked with sealing plugs and are sealed off
with silicone.
• The cables are secured in the cable cover with grounding plates
• The pressure equalisation element (PEE) in the cable cover should not be
sealed or otherwise made airtight.
4.1.1 Parts List For Cable Cover Kit
You’ll need the following parts in order to comply with IP65 standards (from left to
right in the Figure 4.1 on page 40):
• 1 cable cover with pressure equilisation element (7 partially threaded
screws are already fitted)
• 1 grounding bar
• 3 special screws
• 2 grounding plates
•8 M3 screws
• 1 Silicone syringe
• 4 sealing rings 3-6.5mm
• 2 sealing rings 5.5-9mm
8580/8590 Vehicle-Mount Computer User Manual 39
Page 66

Chapter 4: 8580/8590 Installation
The Cable Cover, Grounding Bar & Cables–Assembling
Figure 4.1 Cover Guard Parts
You will need the following tools:
• Size 3 screwdriver (for slotted screws)
• Size 1 screwdriver (Phillips)
•Knife
4.1.2 The Cable Cover, Grounding Bar & Cables–Assembling
1. Mount the grounding bar to the cable cover using the 3 special
screws.
40 8580/8590 Vehicle-Mount Computer User Manual
Grounding Bar
Cable Cover
Page 67

Chapter 4: 8580/8590 Installation
The Cable Cover, Grounding Bar & Cables–Assembling
2. Prepare the sealing rings:
• First, check how many cables are to be connected to the 8580/8590.
• Choose the sealing rings according to the cable diameter (3-6.5mm or
5.5-9mm).
• Then, prepare the corresponding number of sealing rings. Do this by
making an incision with a knife at the mark (only to the midpoint of the
sealing rings).
• Make certain that the remaining sealing rings are not cut open!
• Put the correct sealing rings around the cables
3. Fit cables to the 8580/8590:
• Connect all required cables (maximum 6) to the computer interface.
• Next, place the 8580/8590 onto a soft base
Important: The surface of the touchscreen should always be kept free of dirt,
dust, finger marks and so on to ensure full visibility of the display.
Make sure the screen does not get scratched or otherwise
damaged before placing the device face down.
4. Prepare cables and cable cover:
• Locate the cable cover in the position for mounting, at somewhat apart
from the computer.
• Loosely place the cables in loops in the cable sockets of the cable cover,
not in a straight-through position, but transposed, (see diagram). At this
point, push the sealing rings into the cable sockets.
8580/8590 Vehicle-Mount Computer User Manual 41
Page 68

Chapter 4: 8580/8590 Installation
The Cable Cover, Grounding Bar & Cables–Assembling
5. Fix grounding plates and insert sealing plugs:
• Lightly fix the cables in the cable cover using the earthing plates.
• Test the fit of the cable cover relative to the equipment.
• Release the cables from the sealing rings so that the silicone can be
applied.
• Insert the sealing rings and cables with silicone in the cable openings of
the cable cover.
• Fix the cables firmly to the grounding plate.
6. Insert sealing plugs into the unused cable openings, and seal off all of
these with silicone.
7. Fix cable cover:
• Now, fix the cable cover to the 8580/8590.
• Observe the following important points during this operation:
Important: There must be no damage to the lid seal of the cable cover. It must
be possible to fit the cable cover to the equipment's cable duct
without excessive force. The partially threaded screws must be
tightened 5 turns at a time, preferably diagonally opposed.
Retighten the screws after 2 days.
42 8580/8590 Vehicle-Mount Computer User Manual
Page 69

Chapter 4: 8580/8590 Installation
Mounting Options For The 8580/8590
Important: Please retain these mounting instructions. You must remove the
cable cover before connecting any other equipment and replace it
after connection. Please ensure you attach the cable cover following the instructions in this guide. The protection class can no
longer be guaranteed if the cable cover is attached incorrectly.
4.2 Mounting Options For The 8580/8590
The 8580/8590 can be mounted in a variety of ways:
• Horizontally – The unit can be positioned horizontally on a desk or
mounted on a steering wheel and vehicle console.
• Wall mounted – Wall mounts are also available for mounting the unit on
machines and operating panels.
• Roof mounted – The vehicle-mount can also be mounted on the roof, for
example, under the vehicle roof.
Depending on the vibration resistance and pivoting demands, mounting brackets,
clamp foots or RAM mount elements can also be used to attach the device. Please
contact your Psion Teklogix sales office (refer to Appendix A) to find out more
about the whole range of installation options available.
Warning: Risk of injury – The unit could fall during transit or installation
and cause injury. Always ensure that there are two persons available when installing or removing the device.
4.2.1 Mounting Bracket Toolkit
The following tools are required for positioning the 8580/8590 mounting bracket:
5mm Allen Key
6mm Allen Key
• For mounting and positioning the stationary mounting bracket: Hexagonal
socket wrench (Allen key) sizes 5 mm and 6 mm
• For mounting and positioning the mobile mounting bracket: Hexagonal
socket wrench (Allen key) size 6 mm
8580/8590 Vehicle-Mount Computer User Manual 43
Page 70

Chapter 4: 8580/8590 Installation
Permitted Mounting Positions
4.2.2 Permitted Mounting Positions
The permitted mounting positions of the 8580/8590 are defined as follows:
From a minimum of -90° Up to a maximum of +90°
Important: The unit can only be mounted in a range of 180° as illustrated.
4.2.3 Mechanical Dynamic Loading
Since the 8580/8590 is a weighted structure, the unit will be subject to mechanical
dynamic effects. Therefore optimizing the mounting can be very helpful.
Refer to Appendix D, “Mechanical Dynamic Loading.” for details.
4.3 Power Supply
An integrated, electrically isolated DC power supply is available for the 8580/8590.
The power pack is designed to fulfill the requirements for the full range of operating
temperatures of a 8580/8590 with standard extension modules.
In a system with a 800 MHz CPU, 512 MB RAM, HDD, a 10.4" display and an
external keyboard, this leaves approximately 20W for plug-in cards and/or external
devices.
4.3.1 DC Power Pack
Three different DC power packs, each fully integrated and electrically isolated, are
available for the 8580/8590:
• DC power packs with 18 to 60VDC input voltage, maximum output 60W
• DC power pack with 18 to 60VDC input voltage, maximum output 100W
• DC power pack with 9 to 16VDC input voltage, maximum output 100W
The heating option requires a 100W power pack.
44 8580/8590 Vehicle-Mount Computer User Manual
Page 71

Chapter 4: 8580/8590 Installation
Installing Connecting Cables
Power is connected to the underside of the unit using a Phoenix Contact plug. There
is no power switch.
Important: In DC applications the 8580/8590 must only be connected to a
SELV (Safety Extra Low Voltage) circuit.
Ensure that there is a suitable disconnecting device such as a
power switch or circuit breaker in the power supply circuit.
Ensure that the disconnecting device isolates all supply voltage
lines. See Appendix B: Pin configuration.
The DC+/- connecting cables must be protected by a fuse (30AT
maximum).
The ignition connecting cables must be protected by a fuse of the
following type: 5x20mm T 125mA L/250V, for example, a Wickmann 195-125mA/250V.
4)
The SELV circuit is a secondary circuit that is designed and protected so that its voltages
will not exceed a safe value both when operating correctly or if a single error occurs.
4
)
THERE ARE TWO POWER INPUT VERSIONS FOR THE 8580/8590;
SPECIAL PRECAUTIONS MUST BE CONSIDERED WHEN CONNECTING
POWER TO THE TERMINAL!
If 12V is connected to a 24/48 V 8580/8590, the vehicle-mount will not start up, but
the unit will not be damaged.
If 18V or more is connected to a 12V 8580/8590, the vehicle-mount WILL BE
DAMAGED; THE UNIT WILL NO LONGER FUNCTION.
4.3.2 Installing Connecting Cables
If possible, use the connecting cables supplied to connect the 8580/8590 to the
power supply. Make sure that the connecting cables are laid without kinks and are
protected.
4.4 Vehicle Applications (Such As Forklifts)
Pay special attention to the various electrical potentials when installing the unit on a
vehicle (such as a forklift). In the 8580/8590, the logic ground and the shield ground
are firmly linked.
The “logic ground” is the earth line (GND) for all of the internal electrical
components, such as the hard drive and the CPU.
8580/8590 Vehicle-Mount Computer User Manual 45
Page 72

Chapter 4: 8580/8590 Installation
Vehicle Applications (Such As Forklifts)
Warning: Carefully read the following warnings!
• Never connect a 12 VDC device to a 24/48 VDC vehicle! The
device model is identified on the device type plate, a warning
sticker is affixed to the unit and on the external connector strip.
• Some forklifts have a chassis that is connected to DC. Therefore,
the 8580/8590 chassis is also connected to DC. However, if you
use peripheral devices that supply DC- to the 8580/8590 via an
interconnector (such as a DC- serial port), this will cause a short
circuit. This will inevitably lead to malfunctions or even a total
system failure.
• In DC-powered devices, always attach ring tongues on the
supply voltage cable to the ground bolt situated on the
connector bay.
Position of ground bolt
• Make sure that the 8580/8590 connecting cable is attached as
close to the battery as possible. Connecting the vehicle-mount to
large electrical loads, such as converters for the forklift motor
may result in random restarts, malfunctions and/or irreparable
damage to the device.
• If you want to connect devices fed by other power sources to the
8580/8590, such as certain PS/2-Wedges, printers and so on, be
sure to power up the peripheral devices at the same time
or after
the vehicle-mount. Otherwise, you may encounter start-up problems, malfunctions or even irreparable damage to the device.
46 8580/8590 Vehicle-Mount Computer User Manual
Page 73

Chapter 4: 8580/8590 Installation
Wiring Vehicle Power To The 8580/8590
4.4.1 Wiring Vehicle Power To The 8580/8590
Warning: Applying a voltage above the input voltage rating or reversing
polarity may result in permanent damage to the 8580/8590 and will
void the product warranty.
A 1.8 meter (6 ft.) extension power cable (PN 13985–301) is supplied with your.
This cable should be wired to a filtered, fused (maximum 10A) accessory supply on
the vehicle. Any additional wiring (minimum 18 gauge), connectors or disconnects
used should be rated for at least 90 VDC, 10A.
When connecting PN 13985-301, ensure that the screen blanking wires (clearly
labelled) and the power wires (red/black leads) are reliably secured away from each
other, or are separated with reliably secured certified insulation. Minimum 2.8mm
distance, or 0.4mm distance through insulation is required for the separation.
The red lead of the power cable attaches to the positive vehicle supply. The black
lead connects to the negative supply – this should be connected to a proper terminal
block and not to the vehicle body. The 8580/90 is fully isolated and can be used with
both negative and positive chassis vehicles.
You may have the option of connecting power before or after the ‘key’ switch. It is
preferable to wire the 8580/8590 after the key switch – that is, the 8580/8590 cannot
be switched on without turning the vehicle key on. However, if the operator
switches the key off repeatedly for long periods during a shift, it may make more
sense to wire the 8580/90 before the switch.
Keep in mind that the 8580/8590 will continue to operate with or without vehicle
power as long as its backup battery has sufficient charge.
If an unfused power source must be used, a fuse assembly (PN 19440) must be
added to the extension power cable (the fuse and instructions are supplied with the
cable). Use only a 10A slow blow UL approved fuse in the fuse assembly. The fuse
assembly must be located as close as practical to the DC supply, and shall connect to
the positive side of the DC supply.
8580/8590 Vehicle-Mount Computer User Manual 47
Page 74

Chapter 4: 8580/8590 Installation
Cable Cover (Splash Guard)
4.5 Cable Cover (Splash Guard)
Important: For safety reasons, the supplied cable cover for the external ports
must be installed prior to using the 8580/8590. Refer to “The
Cable Cover, Grounding Bar & Cables–Assembling” on page 40
for details about installing the cable cover.
4.5.1 Protection Class IP65
Important: In order to comply with protection class IP65, please use the
optionally available IP65 assembly kit from Psion Teklogix. Carefully follow the installation instructions under the heading “The
Cable Cover, Grounding Bar & Cables–Assembling” beginning
on page 40.
After finishing the mounting process, the cables must be affixed using the included
strain relief rail.
Figure 4.2 Cable With Strain Relief
Important: Take care not to damage the opening seal of the cable cover! It
should be possible to attach the cable cover to the cable duct
without using force. The neck collar screws should be screwed
firmly, preferably diagonally and always using 5 rotations. The
screws need to be retightened after 2 days.
48 8580/8590 Vehicle-Mount Computer User Manual
Page 75

OPERATION OF THE 8580/8590 5
5.1 Operation..................................51
5.2 4-Key Front Panel..............................51
5.3 10-Key Front Panel.............................52
5.4 25-Key Front Panel.............................53
5.4.1 Power Key ..............................54
5.4.2 Manual Brightness Control (optional) . . . . . . . . . . . . . . . . 54
5.4.3 LEDs.................................54
5.4.4 Function And Number Keys.....................55
5.4.5 Special Keys.............................55
5.4.6 [ESCAPE] Key, [ENTER] Key And Scroll Keys . . . . . . . . . . 56
5.5 Operating States...............................56
8580/8590 Vehicle-Mount Computer User Manual 49
Page 76

Page 77

Chapter 5: Operation Of The 8580/8590
Operation
5.1 Operation
The 8580/8590 is available with three different front panels:
• 25-key front panel
• 10-key front panel
• 4-key front panel
Note: All front panel buttons are described in “25-Key Front Panel” beginning
on page 53.
5.2 4-Key Front Panel
The 8580/8590 with a 4-key front panel has the following controls:
• POWER ON/OFF toggle button to switch the unit on and off
• Manual brightness control indicated with the ‘+’ and ‘-’ symbols
• Backlight on/off toggle button (‘light bulb’ icon)
8580/8590 Vehicle-Mount Computer User Manual 51
Page 78

Chapter 5: Operation Of The 8580/8590
10-Key Front Panel
5.3 10-Key Front Panel
The 8580/8590 with a 10-key front panel has the following controls:
• POWER ON/OFF toggle button to switch the unit on and off
• Manual brightness control indicated with the ‘+’ and ‘-’ symbols
• Backlight on/off toggle button (‘light bulb’ icon)
• Arrow keys
• [ESC] and [ENTER]
52 8580/8590 Vehicle-Mount Computer User Manual
Page 79

5.4 25-Key Front Panel
Chapter 5: Operation Of The 8580/8590
25-Key Front Panel
The layout of the keys is the same for 10.4" and 12.1" displays.
Note: For all units equipped with brightness control, even after manually turn-
ing off the backlighting, the 8580/8590 will continue to respond to interaction via the keyboard, mouse or touchscreen. This means that you can
continue to enter commands and data even if the display lighting is off.
8580/8590 Vehicle-Mount Computer User Manual 53
Page 80

Chapter 5: Operation Of The 8580/8590
Power Key
5.4.1 Power Key
Turning the 8580/8590 on and off:
This button has been preconfigured by Psion Teklogix by default:
8580/8590 with DC power
supply and automatic shutdown software.
8580/8590 with DC power
supply without automatic shutdown software
Power key is not used for powering up the
unit. If the button is pressed before the
shutdown delay time has elapsed, the unit
is powered down immediately.
Power key is used to power up the unit. If
the button is pressed while the unit is operating, this results in a HARD shutdown.
This may lead to data loss!
5.4.2 Manual Brightness Control (optional)
+ button for manual brightness control (optional).
- button for manual brightness control (optional).
Turning the display backlight on and off.
5.4.3 LEDs
Te mp (red) LED indicates an excessively high or low temperature inside the
unit.
HD (green) LED indicates access of the hard drive/Compact Flash drive.
Power (green) LED indicates an available internal power supply.
54 8580/8590 Vehicle-Mount Computer User Manual
Page 81

Chapter 5: Operation Of The 8580/8590
Function And Number Keys
5.4.4 Function And Number Keys
Yellow LED: indicates the status of the [SHIFT] key.
[0]/[F1]: digit [0] or function key [F1] if the [SHIFT] key is pressed
to
[9]/[F10]: digit [9] or function key [F10] if the [SHIFT] key is pressed.
[.]/[F11]: decimal point or function key [F11] if the [SHIFT] key is pressed.
[ ]/[F12]: [BKSP] or [F12] if the [SHIFT] key is pressed.
5.4.5 Special Keys
[S1] Special key:
Pressing this key has the same effect as simultaneously pressing the
[CTRL] and [+] key on the keypad.
[S2] Special key:
Pressing this key has the same effect as simultaneously pressing the
[CTRL] and [-] key on the keypad.
8580/8590 Vehicle-Mount Computer User Manual 55
Page 82

Chapter 5: Operation Of The 8580/8590
[ESCAPE] Key, [ENTER] Key And Scroll Keys
5.4.6 [ESCAPE] Key, [ENTER] Key And Scroll Keys
[ESC] key
[ENTER] key, also called the [RETURN] key
/[PgUp] – “Cursor Up” or “Page Up” when pressing the [SHIFT] key
/PgDn – “Cursor Down” or “PageDown” when pressing the [SHIFT] key
/Home – “Cursor Left” or all the way left on that line when pressing the
[SHIFT] key
/End – “Cursor Right” or all the way right on that line when pressing the
[SHIFT] key
5.5 Operating States
The following operating states are possible for he 8580/8590:
Status of Internal LEDs 8580/8590 Status
Power (green) Temp (red)
OFF OFF
OFF FLASHING Temperature sensor malfunctioning.
OFF ON
ON OFF
Initial state, idle time - waiting for a new ignition signal after switch off; no power supply.
Heating is on at temperatures < 0 °C, or overheating warning at temperatures > 62 °C. The
computer will not start until the temperature
inside the unit is between 0 and 62 °C again.
Computer is starting up; normal operational
state; shutdown delay time is running.
56 8580/8590 Vehicle-Mount Computer User Manual
Page 83

Chapter 5: Operation Of The 8580/8590
Status of Internal LEDs 8580/8590 Status
ON ON Temp. < -25°C or Temp. > 70°C.
Operating States
ON FLASHING
Temperature sensor malfunctioning;
automatic shutdown software configuration.
8580/8590 Vehicle-Mount Computer User Manual 57
Page 84

Page 85

OPERATING SYSTEM & SOFTWARE APPLICATIONS6
6.1 Operating System..............................61
6.1.1 OS Pre-installed On Hard Drive/Compact Flash...........61
6.1.2 Installing On The Hard Drive/Compact Flash............61
6.1.2.1 Operating Systems Supplied On CD-ROM . . . . . . . . . 61
6.1.2.2 Operating System Images..................62
6.1.2.3 Operating Systems On Floppy Disk . . . . . . . . . . . . . 62
6.1.3 Special Features Of The Operating System .............62
6.1.3.1 Windows XP Embedded...................63
6.2 Psion Teklogix Config Tool.........................63
6.2.1 Overview Of The Config Functions.................63
6.2.2 Installation..............................64
6.2.2.1 System Requirements....................64
6.2.2.2 Preinstalled Software ....................64
6.2.2.3 Subsequent Installation . . . . . . . . . . . . . . . . . . . 64
6.2.2.4 Automatic Installation Of The Software Keyboard . . . . . 65
6.2.2.5 Files.............................65
6.2.2.6 Launching The Program . . . . . . . . . . . . . . . . . . . 65
6.2.2.7 Password Check.......................66
6.2.2.8 Loading Language Files...................66
6.2.3 Psion Teklogix Config Menus....................67
6.2.3.1 Hardware Monitor......................67
6.2.3.2 Environment.........................68
6.2.3.3 Automatic Switch Off....................69
6.2.3.4 Special Switch-On/Off Features...............72
6.2.3.5 Front Panel Keyboard....................73
6.2.3.6 Common System Settings..................74
6.2.3.7 Network Settings.......................75
6.2.3.8 Enhanced Write Filter....................77
6.2.3.9 Settings............................79
6.3 The Software Keyboard. . . . . . . . . . . . . . . . . . . . . . . . . . . 82
6.3.1 Psion Teklogix Config And Software Keyboard . . . . . . . . . . . 82
6.3.2 Logon With The Software Keyboard . . . . . . . . . . . . . . . . . 83
6.3.3 Installation..............................84
6.3.3.1 System Requirements....................84
8580/8590 Vehicle-Mount Computer User Manual 59
Page 86

Chapter 6: Operating System & Software Applications
6.3.3.2 Pre-Installed On The 8580/8590 . . . . . . . . . . . . . . . 84
6.3.3.3 Subsequent Software Keyboard Installation . . . . . . . . . 84
6.3.3.4 Standard Delivery Items...................84
6.3.4 Launching The Program .......................85
6.3.4.1 Call Parameters........................86
6.3.4.2 Creating A Registry Key...................86
6.3.4.3 Desktop Shortcut.......................87
6.3.4.4 Autostart Folder.......................88
6.3.4.5 Special Keys On The 8580/8590. . . . . . . . . . . . . . . 88
6.3.4.6 Exiting The Program.....................88
6.3.4.7 Software Keyboard And Taskbar . . . . . . . . . . . . . . 89
6.3.5 Operation...............................90
6.3.5.1 Keyboards Included In The Standard Delivery Version . . . 90
6.3.5.2 Keys With Special Functions . . . . . . . . . . . . . . . . 91
6.3.6 Configuring The Software Keyboard.................91
6.3.6.1 Structure Of The Keyboard.cfg File . . . . . . . . . . . . . 91
6.3.6.2 Rules For Editing The Keyboard.cfg File . . . . . . . . . . 92
6.3.6.3 General Options.......................92
6.3.6.4 Defining The Keys......................94
6.3.7 Keyboard_Maximize Section . . . . . . . . . . . . . . . . . . . . 100
6.3.7.1 MaxiMode And ExcludeChain Options . . . . . . . . . . 100
60 8580/8590 Vehicle-Mount Computer User Manual
Page 87

Chapter 6: Operating System & Software Applications
Operating System
6.1 Operating System
Units can be shipped with or without the operating system installed on your
8580/8590. This section outlines how to work with each of these scenarios.
6.1.1 OS Pre-installed On Hard Drive/Compact Flash
When a 8580/8590 with a pre-installed operating system is started, this operating
system is loaded following the BIOS boot messages.
System-specific device drivers such as those for display, audio and network
adaptors, and touchscreens are also pre-installed.
Refer to the relevant operating system manual for specific operating instructions.
In 8580/8590 units with a pre-installed operating system, the system is located on
the C partition. The size of this partition will not always be the same as the size of
the entire hard drive/Compact Flash. It is up to you to organize the usage of the
remaining hard drive/Compact Flash capacity.
With Windows XP Embedded, a small EWF partition (Enhanced Write Filter) is
required for the EWF functions.
6.1.2 Installing On The Hard Drive/Compact Flash
When a 8580/8590 is started up for the first time without a pre-installed operating
system, the user needs to carry out a number of steps that will vary depending on the
system to be installed. Refer to the relevant operating system manual for specific
instructions.
Note: The installation and configuration of the operating system should only be
carried out by professionals familiar with the system environment.
6.1.2.1 Operating Systems Supplied On CD-ROM
There are two ways to install operating systems which are supplied on CD-ROM:
• Using an external CD-ROM drive connected to a USB port. This
drive can be used to install, for example, Windows XP Embedded or
Windows XP Pro.
• Initializing the hard drive/Compact Flash using a bootable floppy disk and
then copying the operating system CD and driver CD contents onto the hard
drive/Compact Flash using the right network/CD drivers. The operating
system can then be installed directly from the hard drive/Compact Flash.
8580/8590 Vehicle-Mount Computer User Manual 61
Page 88

Chapter 6: Operating System & Software Applications
Operating System Images
Note: The installation CD must include Service Pack 1 or higher if Windows XP
is to be installed via a USB-connected CD-ROM. Service Pack 2 is
included with all current installation CDs from Psion Teklogix.
6.1.2.2 Operating System Images
If you have created an image of a master installer, there are many ways to copy it to
another computer:
For installation via USB CD-ROM a bootable image
From CD-ROM
Via Memory Stick
CD must be available The operating system image can
then simply be installed from the USB-connected
CD-ROM drive.
For installation via a USB memory stick a bootable
memory stick with an image must be available. The
operating system can then be installed from the
memory stick.
When installing via a network, you need to have an
Via The Network
external USB floppy disk drive and a bootable disk
with the right network driver. The operating system
image can then be installed from the network server.
6.1.2.3 Operating Systems On Floppy Disk
Operating systems supplied on floppy disk can be installed from an external USB
floppy disk drive.
There are three ways to install additional system-specific device drivers such as
those for display and network adaptors or touchscreen:
• If the 8580/8590 only contains a floppy disk drive, the device drivers need
to be copied from the IPC/HPC/MPC Drivers CD-ROM to the floppy disk.
• If a CD-ROM drive is available for the USB connection on the 8580/8590,
it is possible to install from the IPC/HPC/MPC Drivers CD-ROM.
• If a network connection is available, copy the IPC/HPC/MPC Drivers
CD-ROM to the network server and install the device drivers from there.
6.1.3 Special Features Of The Operating System
Always observe the documentation provided by the operating system’s
manufacturer when using a custom operating system.
62 8580/8590 Vehicle-Mount Computer User Manual
Page 89

Chapter 6: Operating System & Software Applications
Windows XP Embedded
6.1.3.1 Windows XP Embedded
If the 8580/8590 is running Windows XP Embedded, not all USB devices will be
supported.
6.2 Psion Teklogix Config Tool
Psion Teklogix Config is used for the configuration of 8580/8590 vehicle-mounts.
Important: The COM3 port of the 8580/8590 must remain free when starting
Psion Teklogix Config and throughout the entire running time of
this software. No cables, devices or machines may be connected.
Psion Teklogix Config requires the COM3 port to communicate
with the environment controller. Devices and machines connected
to the COM3 port could be severely damaged.
Psion Teklogix Config contains important settings for your vehicle-mount. Incorrect settings, such as those in the Automatic
Switch off menu, can disable the functions of your unit. Only
qualified technical personnel, e.g. persons qualified in computer/network/system administration may perform Psion Teklogix
Config settings.
If improper changes of the Psion Teklogix Config settings are
performed by the customer, this releases Psion Teklogix from all
liability for warranty claims.
6.2.1 Overview Of The Config Functions
These functions are detailed in “Psion Teklogix Config Menus” beginning on
page 67
8580/8590 Vehicle-Mount Computer User Manual 63
Page 90

Chapter 6: Operating System & Software Applications
Installation
Menu Function
Hardware Monitor
Environment
Automatic Switchoff
Front Panel
System Settings Configures Windows logon, taskbar display etc.
Network Manages IP address and DNS server.
Software Activation
Enhanced Write Filter
Settings
Information display: e.g. serial number of the device and
current operating temperature.
Information display: Statistics and data on the environment controller, such as ‘hard’ switch-offs.
Configures the automatic switch-off behaviour (delay
time, ignition, etc.).
Defines the assignment of Psion Teklogix 8580/8590
optional front panel keys.
Activates licenses for automatic switch-off and software
keyboard and releases them for use on this computer.
Exclusively for MS Windows XP Embedded: administers write protection function.
Sets password, language and further default settings for
the Psion Teklogix Config Tool.
6.2.2 Installation
This section outlines the requirements and the steps you’ll need to follow to install
the Psion Teklogix Config tool.
6.2.2.1 System Requirements
The following operating systems are supported on the 8580/8590:
• Microsoft Windows XP
• Microsoft Windows XP Embedded
6.2.2.2 Preinstalled Software
In most cases, Psion Teklogix Config is pre-installed on each 8580/8590.
6.2.2.3 Subsequent Installation
An installation program is available for subsequent installation.
• Start the PTXConfig.exe in the Tools/software directory on the 8580/8590
hard disk/PTX Restore DVD.
64 8580/8590 Vehicle-Mount Computer User Manual
Page 91

Chapter 6: Operating System & Software Applications
Automatic Installation Of The Software Keyboard
c:\Psion Teklogix is suggested as the standard installation directory. However, this path can be modified.
• Restart your computer once installation is complete. Psion Teklogix Config
will only be operable following rebooting.
6.2.2.4 Automatic Installation Of The Software Keyboard
The Psion Teklogix software keyboard is automatically installed as part of the Psion
Teklogix Config installation.
For further information about the software keyboard, please refer to “The Software
Keyboard” on page 82.
6.2.2.5 Files
The following important files are located in the Psion Teklogix Config installation
directory:
PTXCfg.exe Main Program For Configuration
Configuration file with Psion Teklogix Config settings - all
PTXCFG_Local.CFG
PTXKEYBOARD.EXE Software keyboard main program.
KEYBOARD.CFG
local settings that are not saved directly in the hardware are
saved here.
The layout and functionality of the software keyboard are
set here.
6.2.2.6 Launching The Program
• Launch Psion Teklogix Config through Start>Programs.
Important: The COM3 port of the 8580/8590 must be free when starting
Psion Teklogix Config, and throughout the entire running time of
this software. No cables, devices, or machines may be connected.
Psion Teklogix Config requires the COM3 port to communicate
with the environment controller. Devices and machines connected
to the COM3 port could be severely damaged.
8580/8590 Vehicle-Mount Computer User Manual 65
Page 92

Chapter 6: Operating System & Software Applications
Password Check
6.2.2.7 Password Check
If a password was entered in the Psion Teklogix Config Settings menu, it will be
requested when the program is launched. The password is case-sensitive; the
program terminates after three incorrect entries.
The default password is gold.
• Change the default password in the Settings menu to suit your needs.
6.2.2.8 Loading Language Files
Text files for Psion Teklogix Config are loaded when the program is started. If a text
file is not available in the desired language, the system default text is used for the
dialogs.
Supported Language Codes
The following language codes are supported during text file loading. Currently only
ENG and GER are available. Other languages can be created as needed. (Refer to
Command line parameters in the table below.)
ENG English CHS Chinese
GER German KOR Korean
FRA French DNK Danish
ESP Spanish JPN Japanese
SWE Swedish GRC Greek
ITA Italian
Only ASCII files can be loaded at this time. UNICODE is not supported.
Command Line Parameters
The parameter MAKETEXT is available to translate software into foreign languages.
This means text resources can be exported to *.txt files. Each time a file is created, a
message appears prompting the user to confirm it. You just need to add the language
code to the end of this newly generated text file.
For example, Psion TeklogixCfg_.txt would then be Psion TeklogixCfg_GER.txt if it
contained the German text. During text file generation, files with the same name are
automatically overwritten. English is the system default language. It does not need
to exist as a text file. The program terminates once the text files have been
generated.
66 8580/8590 Vehicle-Mount Computer User Manual
Page 93

Chapter 6: Operating System & Software Applications
Psion Teklogix Config Menus
6.2.3 Psion Teklogix Config Menus
6.2.3.1 Hardware Monitor
In the Hardware Monitor menu, system information is displayed: the Psion
Teklogix serial number, model, installed processor, firmware version and BIOS
version. Temperature information is also displayed here, including the inside
temperature of the computer and an indication of the heating status (on/off).
8580/8590 Vehicle-Mount Computer User Manual 67
Page 94

Chapter 6: Operating System & Software Applications
Environment
6.2.3.2 Environment
The environment controller in the 8580/8590 features monitoring and statistics
functions. The Environment menu provides information on the measured values.
Environment Description
Total running time of device Total time the device was on.
Backlight running time Total time that backlighting was on.
Power key switch-on count
Ignition switch-on count
Power key switch-off count
Automatic switch-off count
APM switch-off count
68 8580/8590 Vehicle-Mount Computer User Manual
Shows how often the computer was switched on
with the power key.
Shows how often the computer was switched on
via the vehicle ignition.
Shows how often the computer was switched off
with the power key.
Shows how often the computer was switched off
via the ignition.
Shows how often the computer was switched off
via Windows Advanced Power Management
(automatically following Windows shutdown).
Page 95

Chapter 6: Operating System & Software Applications
Environment Description
Automatic Switch Off
Hard switch-off count
Last switch-off reason The cause of the last switch-off.
Excess temp. switch-off count
Insufficient temp. switch-offs
Errors temperature sensor
Shows how often the computer was turned off
using ‘hard’ switch-off.
Shows how often the computer switched off due
to excess temperature.
Shows how often the computer switched off due
to insufficient temperature.
Shows how often temperature sensor errors
occurred. If this error message occurs frequently,
please send your unit in to be serviced.
6.2.3.3 Automatic Switch Off
In the Automatic Switch off menu, the behaviour of computer switch-on and
switch-off is defined. The top-left portion of the menu indicates whether the option
Automatic Switch off is available and activated. The option can be activated in the
Software Activation menu (after purchasing the option).
• Save these settings with the Save button.
8580/8590 Vehicle-Mount Computer User Manual 69
Page 96

Chapter 6: Operating System & Software Applications
Automatic Switch Off
Settings
After-run time
and
Timeout to terminate
programs on shutdown
If you do not want the computer to shut down immediately
after switching it off using the ignition or power key, but rather
it should remain on for a time, then enter an after-run time (in
seconds) here.
Shutdown times
The length of time until shutdown consists of two counters:
1. After-run time
The after-run time begins with the switching off of the ignition. The shutdown counter is displayed on the monitor
(according to the settings). In this countdown the after-run
time is counted down. If the after-run time has elapsed, a
message for the shutdown is displayed in the Shutdown dialog.
During this time, the computer can be returned to normal operating status with the ignition.
2. Timeout to terminate programs
Next, all applications are informed that Windows will shutdown.
After this, the timeout begins counting down - but a counter is
no longer displayed in the Shutdown dialog.
When the timeout elapses, there will be a ‘hard’ switch-off of
all applications that were still running. Then the system shutdown begins.
Switch-off time In order to allow enough time for the system shutdown after
the program timeout, set the switch-off time to at least 20 s
plus the program timeout. Settings lower than this value will
cause a warning to appear when data is being saved.
Block input if ignition
is off
Show taskbar icon Selecting this options creates a symbol for Psion Teklogix
70 8580/8590 Vehicle-Mount Computer User Manual
If the ignition of the connected vehicle is off, all input to the
computer may be blocked.
Config in the taskbar.
The symbol indicates the power status as follows:
Green: Power status is OK; ignition is on.
Flashing yellow and red: The ignition has been
switched off and the after-run time is counting down.
Red: The computer is in shutdown or switch-off mode.
Unable to read power status.
Double-click or right-click with the mouse to open a popup
menu where Psion Teklogix Config can be started.
Page 97

Chapter 6: Operating System & Software Applications
Automatic Switch Off
Show counter if ignition is off
Hide desktop completely
Info output for the
switch-off
Ignition off Text for the display time.
Shutdown Text for the display time.
A small dialog is displayed in the foreground where a counter
counts down the after-run time until shutdown. Depending on
the option Block input, a Shutdown button is also shown that
allows the user to immediately start the shutdown.
The displayed counter dialog is opened in Fullscreen mode,
covering the entire desktop. Large, easy-to-read text is displayed automatically.
Enter any text here for the after-run time counter and the shutdown process. A line break in the text can be entered with ‘\n’.
The after-run time counter is defined in '$m' for minutes and
‘$s’ for seconds. These text codes are case-sensitive.
Switch-On
with ignition (only for
DC devices)
Important: Switch-on with ignition is only allowed with DC devices; this
blocks AC devices and they cannot be restarted.
The computer switches on automatically when the ignition is
started. It cannot be switched on with the power key.
with ignition and
power key (only DC)
The computer can be switched on with the power key if the
ignition is on. It cannot be switched on with the power key
alone.
Important: Switch-on with ignition and power key is only allowed with DC
devices; this blocks AC devices and they cannot be restarted.
with power key The computer can be switched on with the power key.
always on The 8580/8590 switches on as soon as it is supplied with
power. It is not necessary to press the power key or start the
ignition.
Switch-Off
with ignition (only for
DC devices with automatic switch-off)
Automatic switch-off is activated when the ignition is
switched off.
8580/8590 Vehicle-Mount Computer User Manual 71
Page 98

Chapter 6: Operating System & Software Applications
Special Switch-On/Off Features
with ignition and
power key (only for
DC devices with automatic switch-off)
with power key The computer is shut down or switched off with the power key
only by system shutdown
Shutdown to hibernation mode
Automatic switch-off is activated when the ignition is
switched off. The power key shortens the defined after-run
time and initiates computer shutdown.
(if no automatic switch-off is available, a ‘hard’ switch-off
takes place).
The computer cannot be switched off using the ignition or the
power key; it has to be shut down in the Start menu.
If the computer is switched off using the ignition or the power
key, it goes into hibernation mode. When this happens, a copy
of the main memory is written to a file, accelerating the startup
of the computer. This option must be activated in the power
management centre of the computer (Power Properties).
6.2.3.4 Special Switch-On/Off Features
This message is displayed upon activating a switch-on option with ignition:
Figure 6.1 Automatic Switch-On Message
This information appears for safety reasons each time a switch-on with ignition
option is activated.
Important: Switch-on with ignition is only allowed with DC devices; this
blocks AC devices and they cannot be restarted.
Without Automatic Switch-Off
The following symbol will be displayed in the uppermost line of the dialog if the
automatic switch-off option is not available:
72 8580/8590 Vehicle-Mount Computer User Manual
Page 99

Chapter 6: Operating System & Software Applications
Front Panel Keyboard
All switch-on options are available; however, when switching off, the options with
ignition cannot be selected.
With Automatic Switch-Off
When the automatic switch-off option is available, the following symbol will be
displayed in the dialog:
When the switch-on option with ignition or always on is chosen, switching off using
the power key is not possible.
If the option Switch-off with power key was previously selected, a corresponding
message is displayed to the user. Then the switch-off option is automatically set to
only by system shutdown and the option with power key cannot be selected.
6.2.3.5 Front Panel Keyboard
In the Front Panel menu, the keys (also called soft keys) located on the 8580/8590
front panel can be programmed. This does not apply to the keys Power on/off, +/-
Brightness and Backlight on/off!
All keys depicted in grey/white can have two assignments. Use [SHIFT] to switch
between the assignments.
Character strings cannot be assigned to single keys. Only one character per key is
possible. The keys [ALT], [CTRL] and [SHIFT] may be used in combination, e.g.
[CTRL] [ALT] [F1].
8580/8590 Vehicle-Mount Computer User Manual 73
Page 100

Chapter 6: Operating System & Software Applications
Common System Settings
Procedure:
1. Select the key to be changed. It appears in the Current assignment field.
2. Tap the Change key button. The Define key input dialog appears.
3. Tap the desired key assignment. This selected key assignment appears
in the New assignment field.
4. Tap Save to save these new settings.
Note: In order to launch a program with a front panel key, create a link on the
desktop and define a key combination in Properties, e.g. [ALT] + 1. Then
program a 8580/8590 front panel key with this combination.
6.2.3.6 Common System Settings
In the Common System Settings menu, parts of the Windows System can be
configured.
74 8580/8590 Vehicle-Mount Computer User Manual
 Loading...