

Page 1

TOXIC™ & ENIGMA
™
CROSSBOW
®
OWNER’S GUIDE
READ THESE INSTRUCTIONS CAREFULLY BEFORE
OPERATING YOUR PSE CROSSBOW.
DREAM SEASON
RDX
DISTRIBUTED BY:
OWNER’S GUIDE
READ THESE INSTRUCTIONS CAREFULLY BEFORE
OPERATING YOUR PSE CROSSBOW
®
Page 2

®
CROSSBOW OWNER’S GUIDE
Thank you for purchasing your new PSE crossbow!
With proper use and care your crossbow will provide
years of enjoyment. Keep this manual with your crossbow
for reference.
LIMITED LIFETIME WARRANTY
PSE warranties every compound crossbow to be free of
defects in material and workmanship for the period as
dened below.
1) PSE crossbow stocks, prods and cams, if defective, will
be replaced at no charge for the
lifetime of the product.
2) Limbs, if defective, will be replaced at no charge for the
rst year, and at 50% of the replacement cost thereafter
for the life of the product.
3) Evidence of mishandling, abuse or modication of the
product or use of non-PSE replacement parts voids the
warranty.
4) Cables, strings, cable slides, and vibration dampers are
wearable items and are not covered by this warranty.
All warranty work shall be performed by PSE or your local
PSE Crossbow dealer.
PSE makes no other warranty claims whether expressed or
implied. This warranty applies to the original owner only, and
does not cover cables, strings, or vibration dampers.
NOTE: This manual covers only the PSE Dream Season
RDX crossbow model. If this is the incorrect manual for your
crossbow model, please contact PSE Customer Service.
2
Page 3

®
SAFETY
1) ALWAYS treat your crossbow as you would any weapon
or rearm. It is a powerful weapon that can be deadly if
mishandled.
2) ALWAYS keep your crossbow pointed in a safe direction.
Never point your crossbow at anything you don’t intend to
shoot.
3) NEVER enter a vehicle with a loaded crossbow. Always
uncock and properly stow your crossbow for transporting.
4) ALWAYS check your crossbow to make sure that it is in
proper mechanical order. Check for damaged, worn, loose
or missing parts.
5) NEVER DRY FIRE YOUR CROSSBOW. Firing the
crossbow without a bolt will cause damage not only to the
crossbow but possible bodily injury to you and anyone in the
area. It also voids the warranty.
6) DO NOT make changes or alterations to any parts of this
crossbow as it may cause an unsafe condition and will void
the warranty.
7) NEVER release the safety on your crossbow until you are
ready to shoot and are sure of your target.
8) NEVER shoot any bolt or other projectile from your
crossbow that has not been recommended by PSE. Use
only bolts of the proper size, weight and length.
9) ALWAYS keep your ngers and thumb out of the path of the
string and cables while shooting your crossbow. Failure to
do so will cause injury.
10) ALWAYS wear safety glasses when handling a crossbow.
WARNING:
Use extreme caution while operating this weapon. Never run,
crawl, ride a horse, operate an ATV, motorcycle or travel in a
vehicle with a loaded crossbow. Accidental discharge could
prove harmful or fatal.
3
Page 4

®
CROSSBOW OWNER’S GUIDE
DREAM SEASON RDX CROSSBOW
4x32 Multi-Range Scope
Machined Barrel/Stock
Prod Assembly
Large Boot Style Foot
Stirrup
Before assembling your crossbow please check to see if all crossbow parts are included:
1- Prod, 1- Stock, 1 - Scope, 1 - Prod Bolt, 1 - Washer (not shown), 2 - Allen Wrenches, 1
- Rail Lube (not shown), 1 - Quiver Mount, 1 - Mouting Bracket Extension, 1 - Foot Stirrup,
and 1-Quiver. (Fig. 1 & 2). If any of these parts are missing please contact PSE Customer
Service.
Quiver
Limbs
Precision Trigger / Auto Safety
Comfort Molded Grip
Cam
Full-length barrel foregrip
Fig. 1
Slide prod nut into hole just in front of barrel grip. Make sure center threaded hole lines up
with hole in front of barrel. Fig. 3.
Connect the barrel and the prod assembly by inserting the cable slide and cables into the
slot on the barrel as shown in Fig. 4. Be sure the concave side is facing up to match with the
contour on the inside of the barrel.
Insert the foot stirrup into the two holes on the front of the prod. Fig 4a. Make sure the two
notches in the foot stirrup are facing towards the bolt used to secure the stirrup and prod.
Use the hex key to tighten the bolt as shown in Fig. 4b.
NOTE: Cable damage WILL occur if you do not use the slide. Any damage incurred due to
improper set-up will not be covered by your warranty.
4
Page 5

®
Fig. 1a
Fig. 3
Fig. 2
Fig. 4
Fig. 4a
Fig. 4b
5
Page 6

®
CROSSBOW OWNER’S GUIDE
MOUNTING THE QUIVER
Parts to install quiver:
A.
Quiver
B.
Quiver mount bracket
C.
Hex Screws & Wrenches
1. Attach the mounting bracket to the base of the receiver as show in Fig. 5a.
Tighten it with the enclosed hex key. Fig. 5b
3. Tighten the mounting bracket’s screws with the attached hex wrench and
make sure it’s rmly attached. Fig. 6a
4. Slide the quiver into the groove on the quick release mounting
bracket. Make sure the locking lever is in the open position. Fig. 6b
5. Lock the quiver by turning the locking handle, you can unlock and remove the
quiver by opening the locking handle. Fig. 7a and Fig 7b.
A
B
C
SCOPE INSTALLATION & SETUP
1. Slide 4x32 scope (Fig. 8a) over rail mount. Tighten with included hex wrench.
Fig. 8b (Note: The scope will only slide if the mounting bolts are removed,
otherwise it must be located to a desired position on the scope rail.
2. Begin adjusting your scope by sighting your crossbow at the closest yardage
from which you plan to hunt. Ex. 10 yards = top line of crosshairs.
3. Once you’ve established your closest range, progressively move back in yardage
to determine the yardage points for the remaining lines in your crosshairs.
4. Because all of the sight lines move together, you will make adjustments based
on your closest sight point by using the Windage (side) and Elevation (top)
knobs.
NOTE: SCOPE RETICLE & KNOB MAY VARY FROM MODEL TO MODEL.
ALSO, BE CAREFUL NOT TO MOVE THE SCOPE BASE WHEN MAKING YOUR
ADJUSTMENTS.
6
Page 7

®
®
CROSSBOW OWNER’S GUIDE
CROSSBOW OWNER’S GUIDE
Fig. 5a Fig. 5b
Fig. 6a Fig. 6b
Fig. 7a Fig. 7b
Fig. 8a Fig. 8b
7
Page 8

®
CROSSBOW OWNER’S GUIDE
COCKING THE CROSSBOW
DO NOT cock or load your crossbow unless you
are in a safe area to shoot.
1. Before cocking your crossbow, move the safety into the “re”
position by pushing it up and pull the trigger to insure that the
mechanism is ready to accept the string.
2. With the stirrup of the crossbow resting on the ground, place
your foot well into the stirrup and lay the center of the cocking
rope into the groove above the grip of the stock just behind
the scope rail. (Fig 11, 11a). Set the cocking rope hooks
securely on the string facing up, on both sides of the rail. (Fig.
12). Pull straight up using the “T Handles” until the string is
fully engaged. (Fig. 12, 12a). DO NOT release the string
completely until you are certain it is engaged. If the trigger
latch did not capture the string, lower the string gently and
repeat steps 1 and 2.
3. When the crossbow is cocked, the safety is automatically in
the “safe” position. Always check to ensure that the safety is
into the “safe” position. Never assume that the safety is on!!
Fig. 11
Fig. 12 Fig. 12a
8
Fig. 11a
Page 9
®
LOADING AND SHOOTING
YOUR CROSSBOW
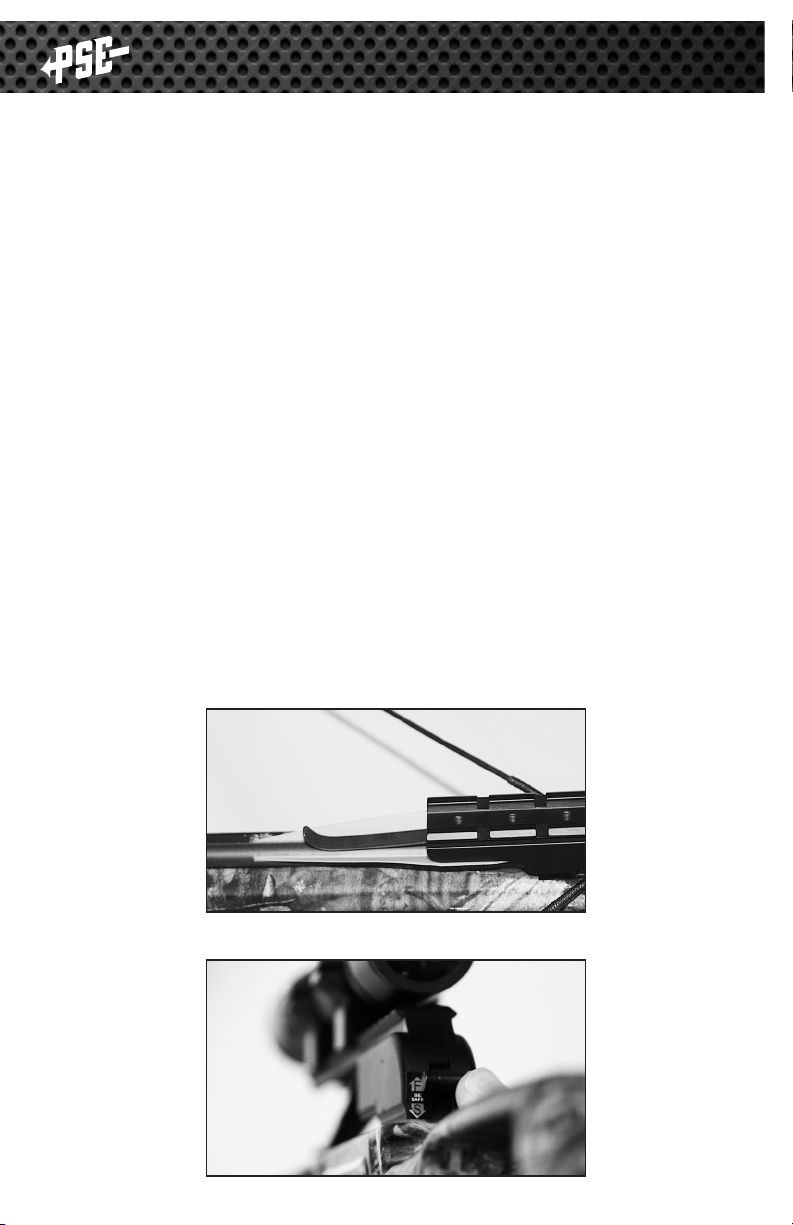
1. With the crossbow cocked and pointed safely down range,
place a bolt of the correct size in the groove on top of the
rail with the odd colored etching down (into the groove).
See Fig. 13. Slide the bolt back into the string under the
arrow retention spring until it makes complete contact
with the string. The crossbow is now loaded. Handle with
extreme care.
2. With the crossbow still pointed safely down range, place
the butt of the stock on your shoulder with the front hand
on the foregrip of the stock. IMPORTANT: Keep your
thumb and ngers well below the path of the string
and cables. Also keep your eye at least 2 inches
behind the rear sight or scope. Failure to follow these
safety precautions can result in serious injury.
3. Move the safety to the “re” position by pushing it up. See
Fig. 14. Take careful aim and squeeze the trigger smoothly
to re the crossbow.
Fig. 13
Fig. 14
9
Page 10

®
CROSSBOW OWNER’S GUIDE
®
CROSSBOW OWNER’S GUIDE
SHOULDER SLING INSTALLATION
DO NOT install your crossbow shoulder strap while
crossbow is cocked/loaded.
1. Attach the end of the shoulder sling with the spacer/
receiver clip onto the hole on the receiver bolt just below
the prod assembly on the riser. Align the sling anchor
over spacer and tighten the mounting screw, making sure
the anchor is rmly attached. Open swivel and slide clip
through the anchor located on the side of the barrel just
behind the riser. Tighten swivel into locking position. (Fig.
15)
2. Attach the opposite end of the shoulder sling to the
receiver hole just below the stock of the crossbow,
Fig. 15
Notes:
Fig. 16
10
Page 11

®
CROSSBOW OWNER’S GUIDE
UNLOADING AND UNCOCKING
The safest way for one person to unload and uncock a crossbow
is to discharge an bolt into a target at close range or into soft dirt
or sand. Be extremely careful if ring into the ground since the bolt
could ricochet and cause damage to person or property. Using
a crossbow bolt with a eld point installed would be suitable for
unloading purposes.
NEVER DRY FIRE
YOUR CROSSBOW!
Firing your crossbow without a bolt will damage the crossbow,
possibly cause bodily harm and void the warranty.
STRING
REPLACEMENT
The string on your crossbow will wear down over time and must
be replaced. If not properly cared for or replaced when necessary,
your string can fail leading to accidental ring and serious injury.
The string on your crossbow should be replaced every 500
shots or once a year, whichever comes rst. Failure to do so
will void your warranty.
Notes:
11
Page 12

®
CROSSBOW OWNER’S GUIDE
Visit www.pse-archery.com to browse and purchase
the latest PSE crossbow accessories.
Precision Shooting Equipment, Inc. P.O. Box 5487 Tucson, Arizona 85703
www.pse-archery.com
RDX Manual
rev. 12/16/2014
 Loading...