


Supported Equipment Manual
for the Falcon® 315 Portable Data Terminal manufactured by PSC
Copyright © 1996 - 2006 by Connect, Inc.
All rights reserved. This document may not be reproduced in full or in part, in any form, without prior written permission of Connect, Inc., 1701 Quincy Avenue, Suites 5 & 6, Naperville, IL 60540.
Connect, Inc. makes no representation or warranties with respect to the contents of this document and specifically disclaims any implied warranties of merchantability or fitness for any particular purpose. Further, Connect, Inc. reserves the right to revise this publication and to make changes to it from time to time without obligation to notify any person or organization of such revision or changes.
Trademarks
PowerNet OpenAir™, OpenAir Linux™, OpenAir Windows™, OpenAir 400™, PowerNet Twin Client™, and PowerNet AirLinc™ are trademarks of Connect, Inc.
Other product names mentioned in this manual may be trademarks or registered trademarks of their respective companies and are hereby acknowledged.
Production
This manual was written, edited, and produced by:
Connect, Inc.
1701 Quincy Avenue, Suites 5 & 6 Naperville, IL 60540 www.connectrf.com
Printed in the U.S.A.
Please let us know about any errors in this document at:
http://207.241.78.223/isoxpert/calltrak.nsf/WebTracking?OpenForm
Table of Contents
Chapter 1 • Introduction............................................................................................. |
1-1 |
Description………………… .......................................................................................... |
1-1 |
Picture………………………...........................................................................................1-1
Setup Requirements…….. ...........................................................................................1-2
Accessories……………….............................................................................................1-2
Bios…………………………............................................................................................1-2
Release Notes…………….............................................................................................1-3
Chapter 2 • Terminal Setup........................................................................................ |
2-1 |
Downloading from the WEB........................................................................................ |
2-1 |
Running Setup from a Download File ........................................................................ |
2-1 |
Installation………………… ........................................................................................... |
2-2 |
Running the Manager……. ..........................................................................................2-4 |
|
Quick Start…………………...........................................................................................2-5 |
|
Configuring the Manager.................................................................................... |
2-5 |
Downloading Files To Terminal........................................................................ |
2-11 |
Booting the Terminal ........................................................................................ |
2-12 |
Starting a Telnet Session ................................................................................. |
2-13 |
Standard Setup…………….........................................................................................2-14 |
|
Setup Using Twin Client Manager.................................................................... |
2-14 |
Terminal Setup Using Twin Client Menus ........................................................ |
2-20 |
Authorizing PowerNet....................................................................................... |
2-22 |
Software Management……........................................................................................2-27 |
|
Airloader Auto-Configuration ............................................................................ |
2-27 |
Mobile Device Manager (MDM) Features......................................................... |
2-33 |
Manual Download of Configuration Files.......................................................... |
2-43 |
Chapter 3 |
• Keypad Configuration ............................................................................ |
3-1 |
Keypad Figures…………… .......................................................................................... |
3-1 |
|
Keypad Table……………… .......................................................................................... |
3-5 |
|
Chapter 4 |
• Error Message Resolution Guide .......................................................... |
4-1 |
Supported Equipment Manual • May, 2006 |
iii |

This page is intentionally blank.
iv |
Supported Equipment Manual • May, 2006 |

Chapter 1 • Introduction
Description
The Falcon® 315 portable data terminal runs DOS 6.22 on a 32 bit, 386-based platform. This unit includes an 8 x 21 backlit graphics display, an RS-232 serial port, 2MB of RAM, 2MB of flash memory, and a choice of standard-range or long-range integrated laser scanners. Its keypad offers 41 large alphanumeric keys, 10 function keys, Direct Western-European character support, and 2 programmable side triggers.
The Falcon® 315 is powered by 3 AA alkaline batteries (supplied), a rechargeable NiCd battery pack, a rechargeable NiMH battery pack, a Falcon® dock, and a Falcon® battery charger. This terminal has an operating temperature of 14° to 122° F / -10° to 50° C, a storage temperature of -4° to 158° F / -20° to 70° C, and a humidity rating of 5 to 95% (noncondensing). Additionally, it withstands multiple 4.0' / 1.2m drops to concrete.
Wireless options include a choice of 2.4 GHz spread spectrum radios, long range mobility, high throughput network capacity, advanced power management, seamless roaming, access points, antennas and cables, and network and terminal emulation software. More information about the features of the Falcon® 315 terminal can be found at www.pscnet.com.
Picture
Supported Equipment Manual • May, 2006 |
1-1 |

Introduction
Setup Requirements
Installation of PowerNet Twin Client requires, at a minimum, the following:
•A Pentium-class processor
•32 MB of RAM
•10 MB of free hard disk space available
•Microsoft Windows 95, 98, ME, XP, or NT/2000 operating system
Accessories
•Single-Slot Dock, p/n: 00-980-005
•4-Slot Dock, p/n: 00-981-015
•Softcase with Laser, p/n: 00-910-00
•Holster, p/n: 00-908-00
•Belt for Holster, p/n: 00-906-00
•Vehicle Mount Cradle, p/n: 00-528-00
Bios
Version of BIOS
The most recent version of BIOS on a Falcon® 315 terminal is from 09/13/00.
Finding the Version of BIOS
The version of BIOS will appear on a terminal screen when the terminal is rebooted. For rebooting instructions, see Booting the Terminal in the Quick Start section.
1-2 |
Supported Equipment Manual • May, 2006 |

Release Notes
Release Notes
1)A Timer value of 999 will cause the back light timer to be "Always On".
2)The following describes the methods used to enable the EBCDIC~ASCII option for both the Thick and Thin client.
Thick Client
In order to enable the EBCDIC~ASCII option for the Thick client, you will need to edit the beginning of the rfiles.txt file:
#-------------------------- |
General ------------------------- |
[*;*;*;*] |
|
u_msgs.txt |
|
by adding the one or two lines below as required for the translation,
#-------------------------- |
General ------------------------- |
[*;*;*;*] |
|
u_msgs.txt |
|
a2ehex.tb |
|
e2ahex.tb |
|
and save it.
Note: If the file(s) do not exist, the reload on the terminal will fail. You can specify one or the other, or both, but the file(s) must exist.
Then place one or both of these files in the C:\PowerNet\TwinClient\terminal directory.
a2ehex.tb to translate from ASCII to EBCDIC e2ahex.tb to translate from EBCDIC to ASCII
Then reload the programs and configuration file into the terminal.
To translate from an ASCII "A" to an EBCDIC "b", this is the syntax:
#translate from an ASCII "A" to an EBCDIC "b" 41 82
To translate from an EBCDIC "A" to an ASCII "b", this is the syntax:
#translate from an EBCDIC "A" to an ASCII "b" C1 62
Thin Client
If you are using the Thin Client in Server mode, you will need to add the two files to the /home/crf directory.
Supported Equipment Manual • May, 2006 |
1-3 |

Introduction
Patch version A 09-07-05
This change will cause the DOS emulators to use a random source port between 2000 and 2100 on each outbound host connection.
Prior to this, they used the same source port number and this would cause problems with some IBM hosts and Firewalls. This would lead to long timeout periods (5-30 minutes) on IBM hosts and lockouts under Firewalls that looked at this as a possible denial of service attack.
1-4 |
Supported Equipment Manual • May, 2006 |
Chapter 2 • Terminal Setup
Downloading from the WEB
The PowerNet Twin Client software package can be downloaded from the Connect web site at http://www.connectrf.com. Click on Partner Services and then click on Software Downloads. Select the file named PowerNet Twin Client for PSC.
Running Setup from a Download File
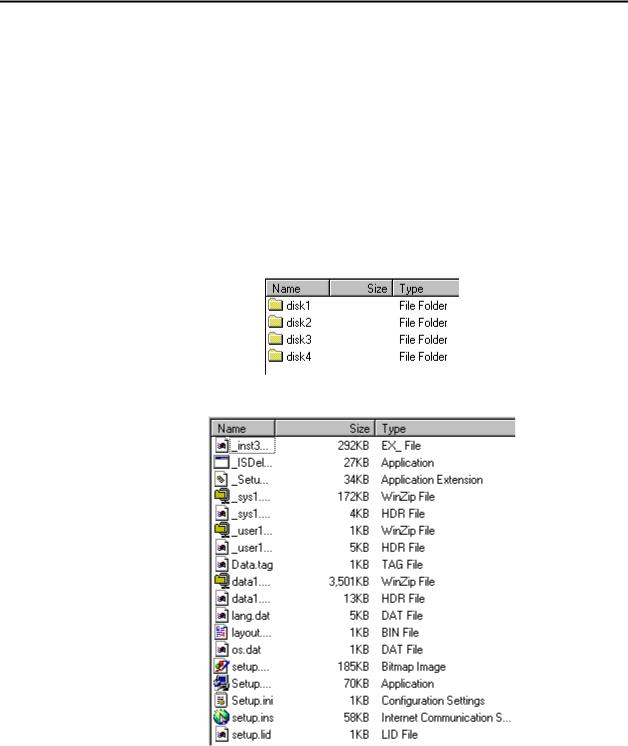
The downloaded file is a compressed archive. After extraction using a utility such as WinZip or PKWARE, folders are created on the hard disk as shown in the following figure.
Click on the Disk1 folder to view the files as shown in the following figure.
Supported Equipment Manual • May, 2006 |
2-1 |
Terminal Setup
Click on the Setup application and proceed to the following section entitled Installation for further instructions.
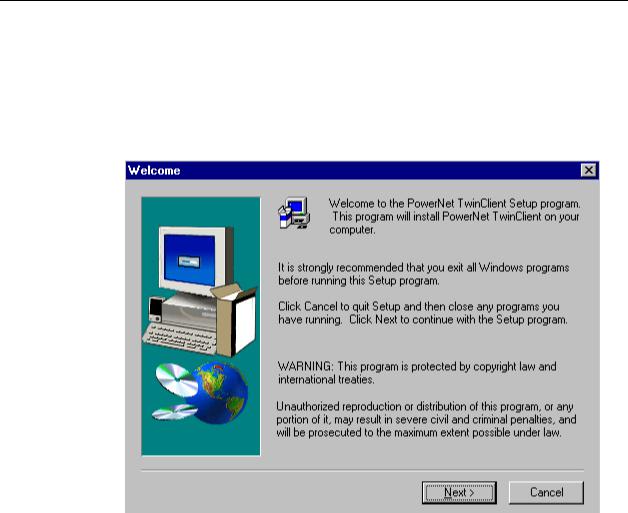
Installation
The InstallShield wizard runs and presents the following screen.
Click on Next to begin the installation process.
2-2 |
Supported Equipment Manual • May, 2006 |

Installation
To change the default Destination Location, click on Browse and select a location. Then click on Next.
The default folder is PowerNet. This default may be changed either by selecting an existing program group or by typing in a new name at the prompt. Then click on Next.
Supported Equipment Manual • May, 2006 |
2-3 |
Terminal Setup
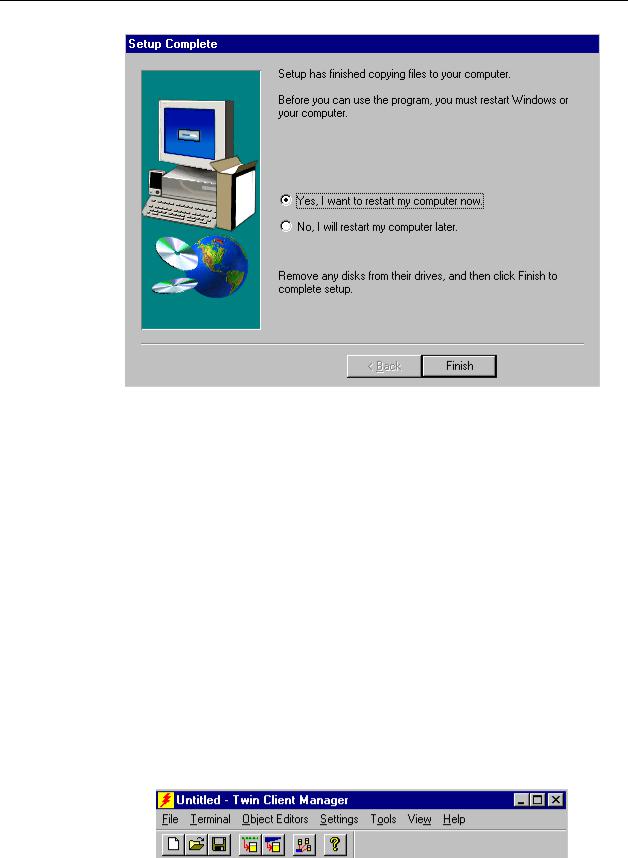
When the installation is complete, reboot the system to initialize the Twin Client software.
a.To reboot the system immediately, click on Finish.
b.To reboot later, click on the option to restart the computer later, and then click on
Finish.
Running the Manager
The PowerNet Twin Client Manager is the utility that manages the terminal software and configurations.
Select Start, Programs, PowerNet, and Twin Client Manager. The PowerNet Twin Client Manager screen appears as shown in the following figure. This is the administrator's main screen, and all functions are accessed from its menu bar, toolbar, and tabs.
Menu Bar
The menu bar provides access to the functions used to configure the terminals and manage their software.
2-4 |
Supported Equipment Manual • May, 2006 |

Quick Start
Toolbar
Found under the menu bar, the toolbar provides shortcuts to major features. The toolbar can be turned on or off by changing the Toolbar parameter found on the View menu. The shortcuts available from the toolbar are as follows.
Create a new terminal configuration.
Open an existing terminal configuration.
Save the current terminal configuration.
Download the configuration to the terminal.
Download software to the terminal.
Configure terminals automatically over the wireless network.
View the PowerNet Twin Client Manager version.
The PowerNet Twin Client Manager is now successfully installed and ready for use. Quick Start provides detailed instructions for quickly configuring the terminal and starting a Telnet session.
Quick Start
Quick Start describes how to prepare the Twin Client Manager and the PSC terminal for a Telnet session with the host. Following an initial setup procedure, the terminal software and configuration are managed automatically over the wireless network.
Configuring the Manager
The first step is to configure the Twin Client Manager to meet site-specific requirements, and then prepare it for the automatic management of the terminal software and IP addresses. This simple procedure will require only a few minutes to complete.
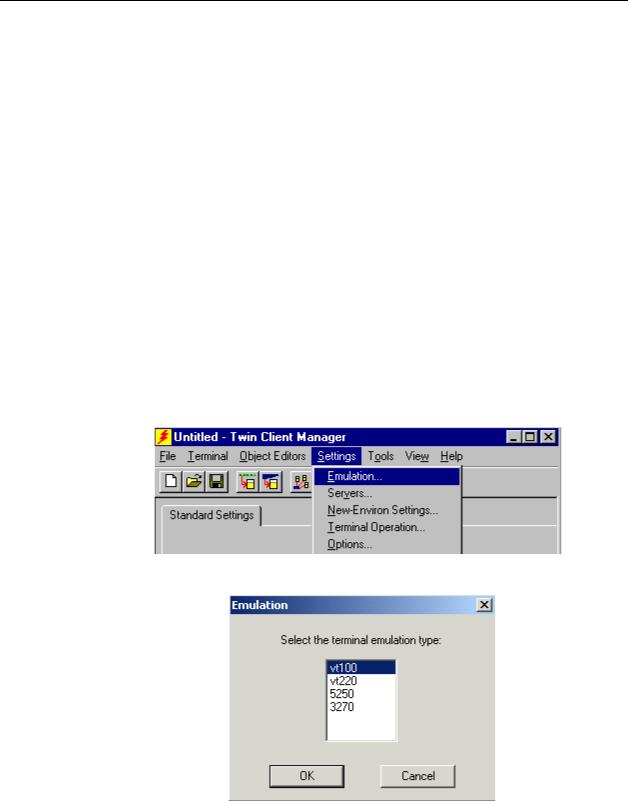
Setting the Emulation
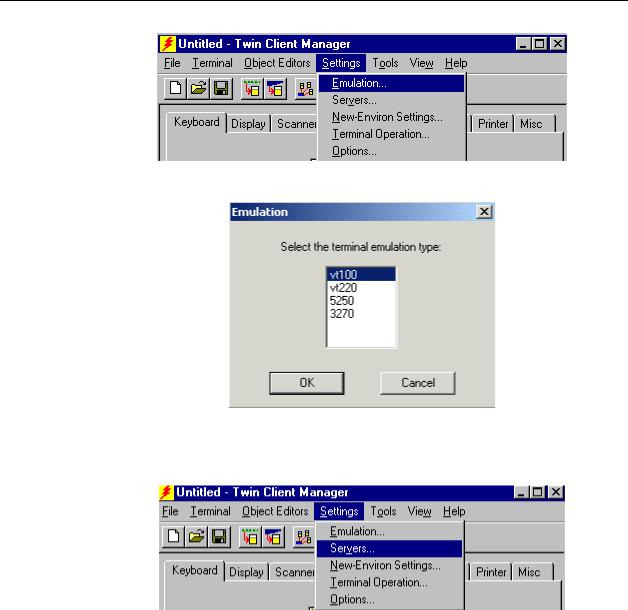
Click on Start, Programs, PowerNet, and Twin Client Manager. Select the Settings menu, as shown below.
Supported Equipment Manual • May, 2006 |
2-5 |
Terminal Setup
Click on Emulation, select the desired emulation, and click on OK.
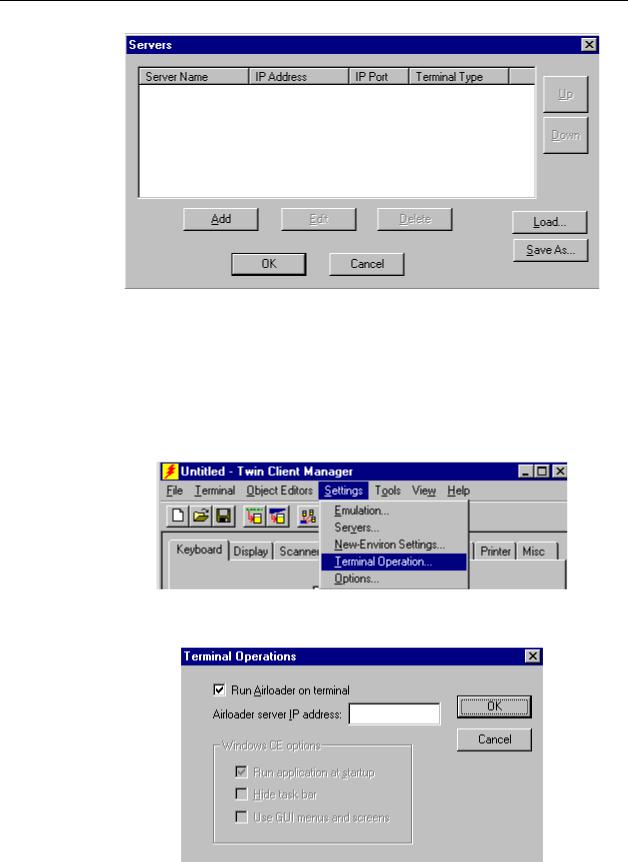
Setting the Servers
The Servers are the Telnet host systems the terminals will access.
To set these addresses from the Settings menu, click on Servers and then click on Add. Enter the name of each server, its IP address and IP port (normally 23 for Telnet servers), and emulation type. Then click on OK.
2-6 |
Supported Equipment Manual • May, 2006 |
Quick Start
Repeat this step for each Telnet server the terminals are required to access. If an error is made in the name, IP address, IP port number, or terminal emulation type, click on the line that is in error and then click on the Edit button to make the corrections. Use the Load button if you want to load an .svr file. Use the Save As button if you want to save your file as an .svr file.
Setting Terminal Operations
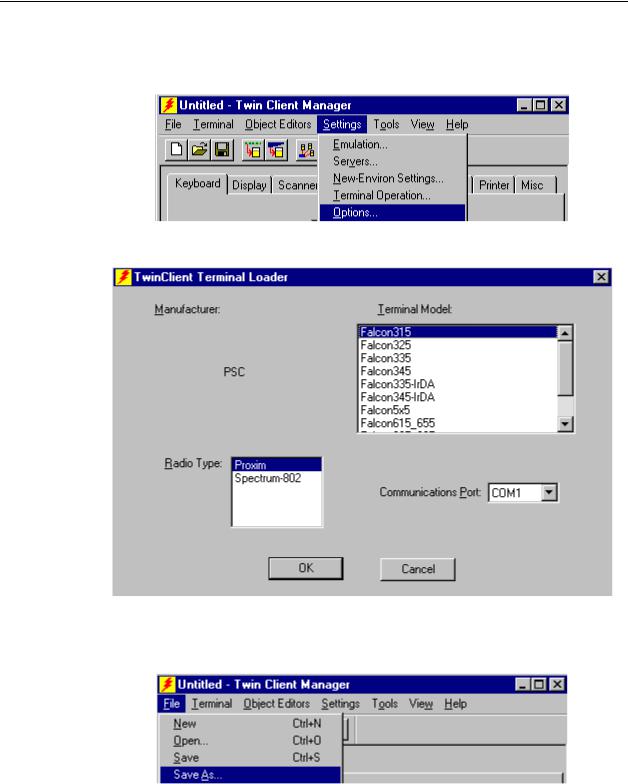
In the Twin Client menu under Settings, choose Terminal Operation.
Run AirLoader on terminal can be selected, and the AirLoader server IP address can be entered.
Click on OK when finished.
Supported Equipment Manual • May, 2006 |
2-7 |
Terminal Setup
Setting Terminal Model
Under Settings, choose the Options menu as shown.
Select terminal model, desired radio type, and COM port.
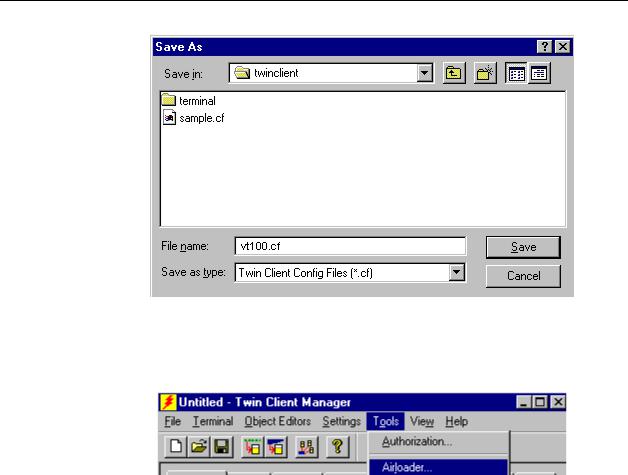
Saving the Configuration
Click on File and Save As. Enter a name for this configuration.
For the purposes of this example, the name is vt100.
2-8 |
Supported Equipment Manual • May, 2006 |
Quick Start
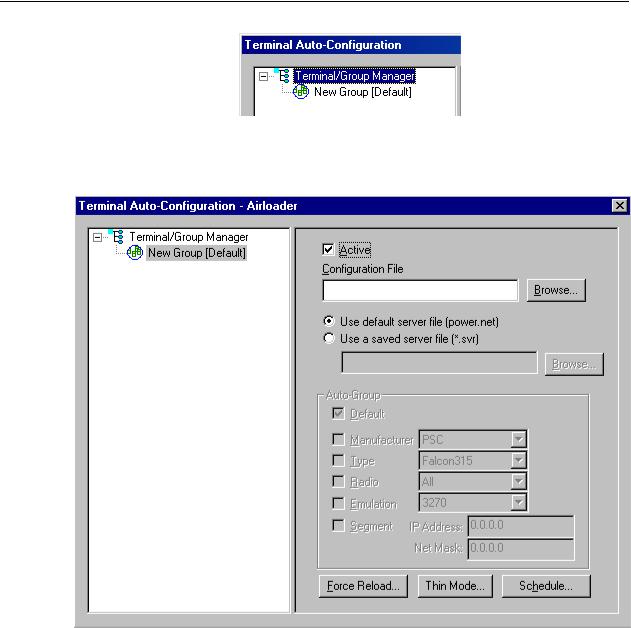
Setting Airloader Auto-Configuration
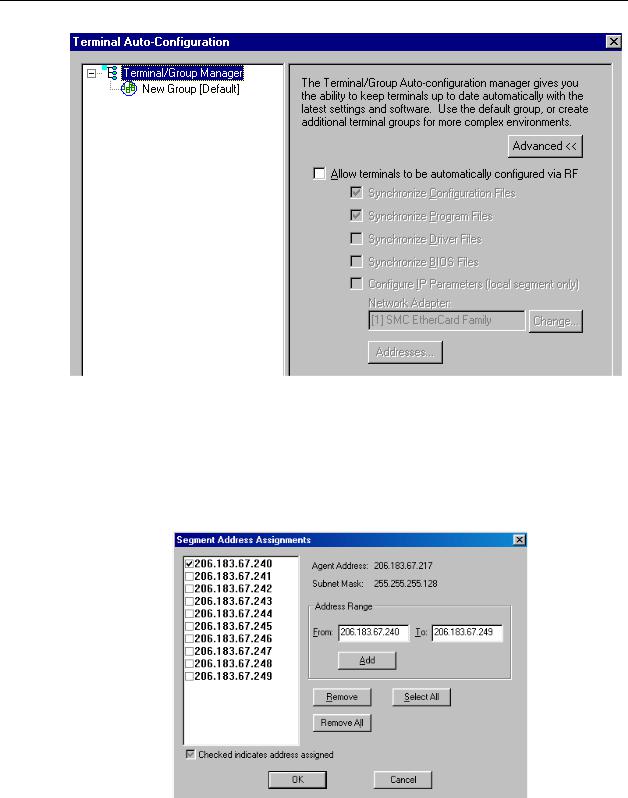
The configuration download and IP address assignment for each terminal will take place automatically by setting the Airloader Auto-Configuration options.
Click on the Airloader option in the Tools menu.
Note: If the Airloader Auto-Configuration window does not display the options, click on the Advanced<< button.
If multiple network adapters are installed on the PC, ensure that the desired network adapter is selected. The adapter selection can be changed by clicking on the Change button.
Supported Equipment Manual • May, 2006 |
2-9 |
Terminal Setup
This powerful software management tool is described in detail in Airloader AutoConfiguration. For now, it is sufficient simply to use it for assignment of the initial terminal configuration and IP address, both of which can be easily changed later. Ensure that all of the check boxes are checked as shown above.
To assign terminal IP addresses automatically over the wireless network, check all of the boxes as shown above. Then click on the Addresses button and enter the desired range in the From and To boxes as shown in the following figure.
After setting the address range, click on OK to return to the Airloader Auto-Configuration screen.
2-10 |
Supported Equipment Manual • May, 2006 |
Quick Start
Click on the + sign in front of Terminal/Group Manager to access the default terminal group. Next, click on the New Group icon and use the Browse button to select the configuration file saved earlier.
Check the Active box, and the system is now configured to automatically download IP addresses, software, and configuration files to the terminals. Click on the  box in the upper right corner to return to the main menu.
Note: The software does not need to be authorized now. It can be authorized later, after a Telnet session has been established. The procedure is described in Authorizing PowerNet.
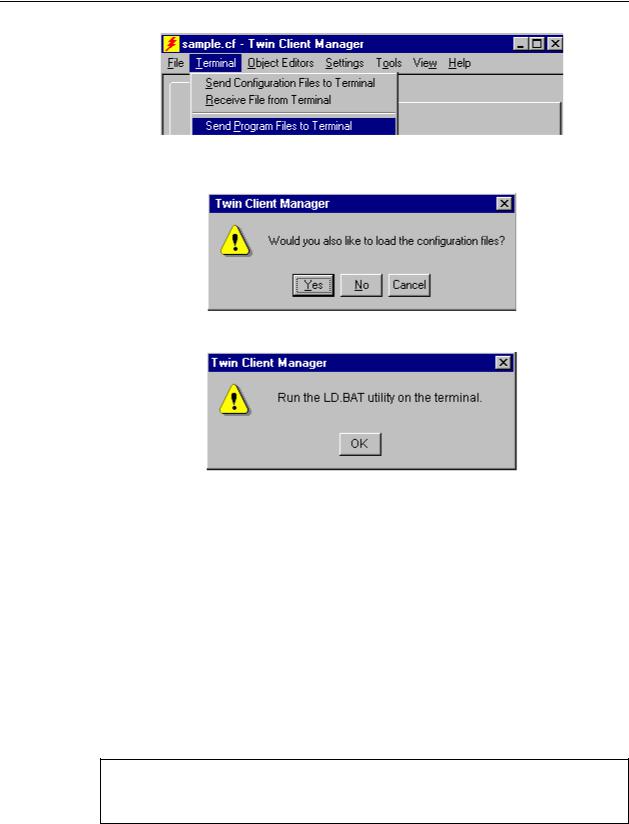
Downloading Files To Terminal
Twin Client program and configuration files are installed on the terminal with the following procedure. Boot the terminal according to the instructions in the next section. At the DOS prompt, type “LD” but do not Enter at this time.
Under the Terminal menu, click on the Send Program Files to Terminal menu option.
Supported Equipment Manual • May, 2006 |
2-11 |
Terminal Setup
At the prompt, choose Yes or No to download configurations. Choosing Yes is needed to run in Telnet mode.
The following screen will appear.
Now, choose Enter on the terminal, while choosing OK at the prompt above.
The files will transfer at this time. Watch the terminal to see that the correct files are loading. Boot the terminal according to the following section. The Twin Client Manager will then automatically manage the terminal software and configuration.
Booting the Terminal
At any time it is necessary to update the terminal software and/or configuration, the terminal must be booted. To cold boot the terminal, turn the unit Off, then press <Alt>+<FN2>+<Power>. Release all three keys simultaneously.
A warm boot is performed by pressing <Ctrl>+<Alt>+<Del>.
A successful wireless connection is indicated by the display of the Twin Client main menu shown below.
Twin Client
© 1991-2006, Connect, Inc.
Keypress to Continue
The date of 2006 is updated on the terminal at the time of a new release.
The terminal is now ready to establish a Telnet session with the host system.
2-12 |
Supported Equipment Manual • May, 2006 |
Quick Start
Starting a Telnet Session
At the Twin Client main menu on the terminal, press any key to establish the connection. Until the terminal has been authorized, the following screen is displayed.
RECOVERABLE ERROR
Terminal not
Authorized for
Twin Client
Keypress to Continue
It is not necessary to authorize the terminal at this time, so press any key to continue. The terminal will establish a connection with the host system and start emulation. If the terminal fails to connect to the host, refer to the following tables.
Failure Cause |
Corrective Action |
Incorrect Host IP address |
Correct the Host List address on the terminal. Refer to |
|
Terminal Setup Using Twin Client Menus. |
Incorrect netmask value |
Access the Edit Functions menu. Correct the netmask |
|
value. Refer to Terminal Setup Using Twin Client Menus. |
Error Indication |
Possible Cause |
NOT Associated |
Invalid NETID |
No AirLoad |
AirLoad Manager not |
Manager Found. |
active, or not installed |
|
on the LAN segment. |
Manager not Active |
Previously identified |
|
AirLoad Manager is no |
|
longer found. |
Unable to open |
IP stack on terminal |
connection |
failed to load. |
Timeout waiting for |
Transient |
data |
communications |
|
failure |
Download aborted |
Socket closed during |
|
download |
Manager inactive |
PC not operating |
Corrective Action
Run current radio setup program and set NETID to match the access point. See Terminal Setup Using Twin Client Menus.
Ensure that the PC with Twin Client Manager is on the same segment and that the PC is operating. If the PC is not on the same segment, enter the address of the PC in response to the terminal prompt.
Same as above
Reload Program Files and reboot.
Reboot terminal. If problem persists, check the RFSYNC.log in the PowerNetTN directory.
Ensure that PC is operating. Reboot terminal and retry.
Restart the Airload PC server.
After a Telnet session has been successfully established, the terminal will remain in session for a maximum of 30 minutes at a time until it has been authorized. Once authorized, there is no software restriction on the session time. The instructions for authorizing the terminal are presented in Authorizing PowerNet.
Supported Equipment Manual • May, 2006 |
2-13 |
Terminal Setup
Standard Setup
The default terminal setup is sufficient for most installations. However, to meet sitespecific requirements, it may be necessary to customize terminal operation. The standard setup options simplify this process and can be modified by the following methods:
•Using the Twin Client Manager.
•Using the Twin Client terminal menu system.
Standard Setup describes how to use the Twin Client Manager and the terminal menu systems to set up the terminal. Also described are the methods for authorizing the terminal software.
Setup Using Twin Client Manager
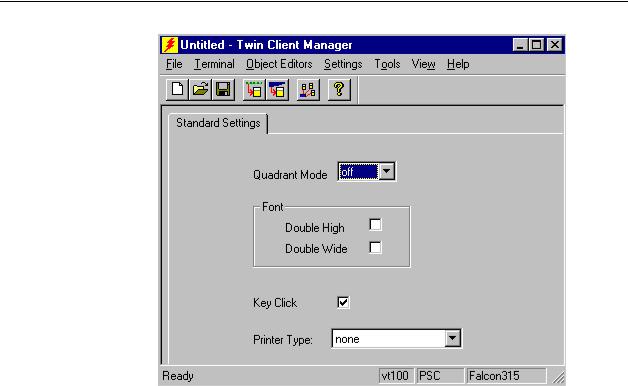
The Twin Client Manager provides a Standard Settings tab for the automatic setup of terminals. Choose Standard from under the View menu. The options within this tab vary according to the emulation selected, each of which is described below.
VT Settings
Select the VT emulation setup by clicking on the Settings menu and then the Emulation menu, as shown below.
Then click on the vt100 or vt220 selection, as shown below.
Click on OK after the selection is made, and return to the main Twin Client Manager menu. The standard settings tab will now reflect the settings for VT emulation.
2-14 |
Supported Equipment Manual • May, 2006 |
Standard Setup
Quadrant Mode
The scrolling list option defines the rules by which the terminal display is positioned in the larger host display. As defined by Twin Client, quadrants are fixed position “windows” in the host display, and the terminal display is located on whatever quadrant contains the current cursor position.
Off disables quadrant processing and Twin Client simply centers the current host input field in the terminal display.
On enables quadrant processing. However, input fields that cross quadrant boundaries result in a shift to the left in order to locate as much of the current input field on the terminal display.
Soft always positions on a quadrant boundary regardless of input field boundaries. Viewing keys are enabled.
Hard is the same as Soft except the viewing keys are disabled.
Lock locks the terminal display origin (upper left corner) to fixed row and column (x,y) coordinates in the host display. The coordinates are zero-based.
Font
These check boxes enable (checked) or disable (unchecked) the display of characters in double high and double wide font.
Key Click
This check box enables (checked) or disables (unchecked) audible key clicks from the terminal. The default value is on (checked).
Supported Equipment Manual • May, 2006 |
2-15 |
Terminal Setup
Printer Type
This scrolling list selects the attached printer type. The default value is none, indicating that no printer is attached.
5250 Settings
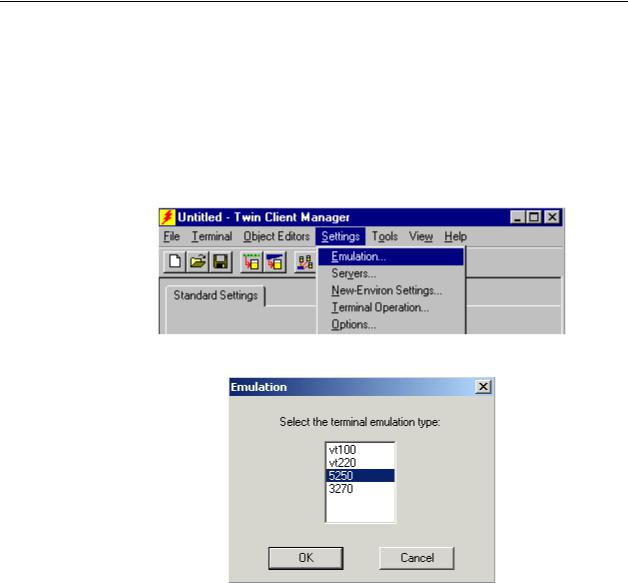
Select the 5250 emulation setup by clicking on the Settings menu and then the Emulation menu, as shown below.
Then click on the 5250 selection, as shown below.
Click on OK after the selection is made, and return to the main Twin Client Manager menu. The standard settings tab will now reflect the settings for 5250 emulation.
2-16 |
Supported Equipment Manual • May, 2006 |
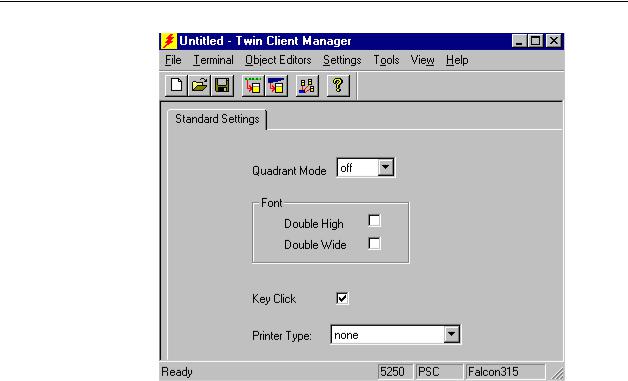
Standard Setup
Quadrant Mode
The scrolling list option defines the rules by which the terminal display is positioned in the larger host display. As defined by Twin Client, quadrants are fixed position “windows” in the host display, and the terminal display is located on whatever quadrant contains the current cursor position.
Off disables quadrant processing and Twin Client simply centers the current host input field in the terminal display.
On enables quadrant processing. However, input fields that cross quadrant boundaries result in a shift to the left in order to locate as much of the current input field on the terminal display.
Soft always positions on a quadrant boundary regardless of input field boundaries. Viewing keys are enabled.
Hard is the same as Soft except the viewing keys are disabled.
Lock locks the terminal display origin (upper left corner) to fixed row and column (x,y) coordinates in the host display. The coordinates are zero-based.
Font
These check boxes enable (checked) or disable (unchecked) the display of characters in double high and double wide font.
Supported Equipment Manual • May, 2006 |
2-17 |
Terminal Setup
Key Click
This check box enables (checked) or disables (unchecked) audible key clicks from the terminal. The default value is on (checked).
Printer Type
This scrolling list selects the attached printer type. The default value is none, indicating that no printer is attached.
3270 Settings
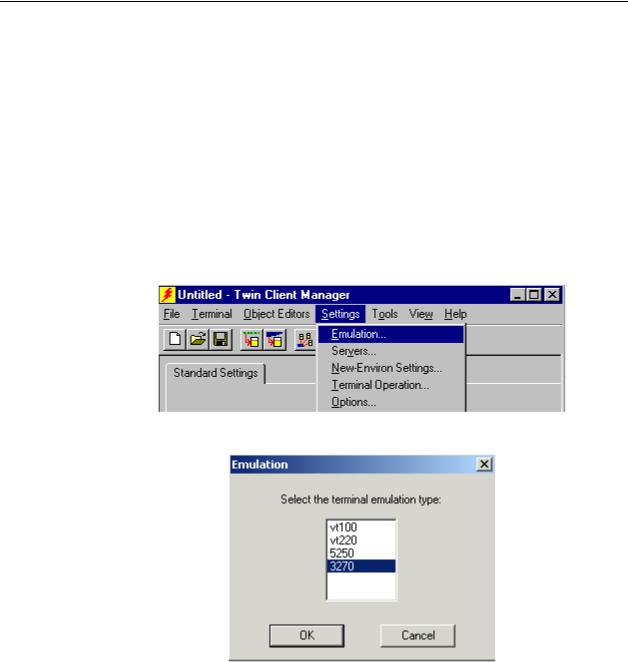
Select the 3270 emulation setup by clicking on the Settings menu and then the Emulation menu, as shown below.
Then click on the 3270 selection, as shown below.
Click on OK after the selection is made, and return to the main Twin Client Manager menu. The standard settings tab will now reflect the settings for 3270 emulation.
2-18 |
Supported Equipment Manual • May, 2006 |
 Loading...