

Page 1

Magellan® 2200VS/2200VSΩ
Quick Reference Guide
Page 2

PSC Inc
959 Terry Street
Eugene, Oregon 97402
Telephone: (541) 683-5700
Fax: (541) 345-7140
An Unpublished Work - All rights reserved. No part of the contents of this documentation or the procedures
described therein may be reproduced or transmitted in any form or by any means without prior written permission of
PSC Inc. or its wholly owned subsidiaries ("PSC"). Owners of PSC products are hereby granted a non-exclusive,
revocable license to reproduce and transmit this documentation for the purchaser's own internal business purposes. Purchaser shall not remove or alter any proprietary notices, including copyright notices, contained in this
documentation and shall ensure that all notices appear on any reproductions of the documentation.
Should future revisions of this manual be published, you can acquire printed versions by contacting your PSC representative. Electronic versions may either be downloadable from the PSC website (www.psc.com) or provided on
appropriate media. If you visit our website and would like to make comments or suggestions about this or other
PSC publications, please let us know via the “Contact PSC” page.
Disclaimer
PSC has taken reasonable measures to provide information in this manual that is complete and accurate, however,
PSC reserves the right to change any specification at any time without prior notice.
PSC is a registered trademark of PSC Inc. The PSC logo is a trademark of PSC. All other trademarks and trade
names referred to herein are property of their respective owners.
Magellan, FirstStrike and SurroundScan are registered trademarks of PSC Inc. All-Weighs, OmegaTek, Produce Rail, Productiv-
ity Index Reporting, SmartSentry and Any-Weighs are all trademarks of PSC Inc.
This product may be covered by one or more of the following patents: 4603262 • 4639606 • 4652750 • 4672215 • 4699447 • 4709369 • 4749879
4786798 • 4792666 • 4794240 • 4798943 • 4799164 • 4820911 • 4845349 • 4861972 • 4861973 • 4866257 • 4868836 • 4879456 • 4939355 •
4939356 • 4943127 • 4963719 • 4971176 • 4971177 • 4991692 • 5001406 • 5015831 • 5019697 • 5019698 • 5086879 • 5115120 • 5144118 •
5146463 • 5179270 • 5198649 • 5200597 • 5202784 • 5208449 • 5210397 • 5212371 • 5212372 • 5214270 • 5229590 • 5231293 • 5232185 •
5233169 • 5235168 • 5237161 • 5237162 • 5239165 • 5247161 • 5256864 • 5258604 • 5258699 • 5260554 • 5274219 • 5296689 • 5298728 •
5311000 • 5327451 • 5329103 • 5330370 • 5347113 • 5347121 • 5371361 • 5382783 • 5386105 • 5389917 • 5410108 • 5420410 • 5422472 •
5426507 • 5438187 • 5440110 • 5440111 • 5446271 • 5446749 • 5448050 • 5463211 • 5475206 • 5475207 • 5479011 • 5481098 • 5491328 •
5493108 • 5504350 • 5508505 • 5512740 • 5541397 • 5552593 • 5557095 • 5563402 • 5565668 • 5576531 • 5581707 • 5594231 • 5594441 •
5598070 • 5602376 • 5608201 • 5608399 • 5612529 • 5629510 • 5635699 • 5641958 • 5646391 • 5661435 • 5664231 • 5666045 • 5671374 •
5675138 • 5682028 • 5686716 • 5696370 • 5703347 • 5705802 • 5714750 • 5717194 • 5723852 • 5750976 • 5767502 • 5770847 • 5786581 •
5786585 • 5787103 • 5789732 • 5796222 • 5804809 • 5814803 • 5814804 • 5821721 • 5822343 • 5825009 • 5834708 • 5834750 • 5837983 •
5837988 • 5852286 • 5864129 • 5869827 • 5874722 • 5883370 • 5905249 • 5907147 • 5923023 • 5925868 • 5929421 • 5945670 • 5959284 •
5962838 • 5979769 • 6000619 • 6006991 • 6012639 • 6016135 • 6024284 • 6041374 • 6042012 • 6045044 • 6047889 • 6047894 • 6056198 •
6065676 • 6069696 • 6073849 • 6073851 • 6094288 • 6112993 • 6129279 • 6129282 • 6134039 • 6142376 • 6152368 • 6152372 • 6155488 •
6166375 • 6169614 • 6173894 • 6176429 • 6188500 • 6189784 • 6213397 • 6223986 • 6230975 • 6230976 • 6237852 • 6244510 • 6259545 •
6260763 • 6266175 • 6273336 • 6276605 • 6279829 • 6290134 • 6290135 • 6293467 • 6303927 • 6311895 • 6318634 • 6328216 • 6332576 •
6332577 • 6343741 • 6454168 • 6478224 • 6,568,598 • 6,578,765 • 6705527 • AU703547 • D312631 • D313590 • D320011 • D320012 •
D323492 • D330707 • D330708 • D349109 • D350127 • D350735 • D351149 • D351150 • D352936 • D352937 • D352938 • D352939 • D358588
• D361565 • D372234 • D374630 • D374869 • D375493 • D376357 • D377345 • D377346 • D377347 • D377348 • D388075 • D446524 •
EP0256296 • EP0260155 • EP0260156 • EP0295936 • EP0325469 • EP0349770 • EP0368254 • EP0442215 • EP0498366 • EP0531645 •
EP0663643 • EP0698251 • GB2252333 • GB2284086 • GB2301691 • GB2304954 • GB2307093 • GB2308267 • GB2308678 • GB2319103 •
GB2333163 • GB2343079 • GB2344486 • GB2345568 • GB2354340 • ISR107546 • ISR118507 • ISR118508 • JP1962823 • JP1971216 •
JP2513442 • JP2732459 • JP2829331 • JP2953593 • JP2964278 • MEX185552 • MEX187245 • RE37166 • Other Patents Pending
Page 3

PSC INC. MAGELLAN® END USER LICENSE AGREEMENT
Notice to End User: The PSC Product you have acquired contains embedded Software, which is integral to the product’s operation. This Software
is being provided to you under license, subject to the terms and conditions of this Agreement. If you use the PSC Product, you will be deemed to
have accepted the terms and conditions of this Agreement. If you do not intend to be bound to the terms of this Agreement, PSC is not willing to
license the Software to you, you may not use the PSC Product or the Software, and you must contact the party from whom you acquired the PSC
Product for instructions.
This End User Software License Agreement (“Agreement”) is a legally binding agreement governing the licensing of the Software and Documentation by PSC
Inc. and its wholly owned subsidiaries and affiliates (“PSC”) to the entity or person who has purchased or otherwise acquired a PSC Product (“End User”).
For purposes of this Agreement, any software that is associated with a separate end-user license agreement is licensed to you under the terms of that license
agreement. PSC and End User hereby agree as follows:
1. Definitions.
1.1 "Documentation" means materials such as user’s guides, program reference guides, quick reference guides, manuals, or similar materials associated
with or related to the PSC Product, whether in printed, “online”, or other form.
1.2 "Proprietary Information" means: (a) source code, object code, software, documentation, and any related internal design, system design, data base
design, algorithms, technology, technical data or information, implementation techniques, and trade secrets related to the Software, (b) any other trade
secrets marked appropriately or identified as proprietary or confidential, and (c) any information that End User, under the circumstances, should recognize as confidential. Proprietary Information does not include any information that the receiving party can establish was (1) in the public domain, (2)
already in the receiving party’s possession or rightfully known prior to receipt, (3) rightfully learned from a third party not in violation of any other's proprietary rights, or (4) independently developed without access to Proprietary Information.
1.3 “PSC Product” means the PSC Magellan® 9500 series, Magellan® 8500 series, Magellan® 8200 series, Magellan® 8100 series, and/or Magellan SL
series scanner and/or scanner/scale product, including all embedded Software in and all Documentation related to such product, which has been purchased or otherwise acquired by End User, whether obtained directly or indirectly from PSC.
1.4 "Software" means any software or computer programs of PSC or its third party licensors in machine readable form which is embedded in the PSC
Product, whether obtained directly or indirectly from PSC, including any replacement, update, upgrade, enhancement or modification.
2. Scope Of License Granted.
2.1 PSC grants to End User a non-exclusive, non-transferable, perpetual license to use the Software, solely on the PSC Product in which it is embedded
(“designated PSC Product”), in machine-readable form only, solely for End User's internal business purposes. This Agreement does not convey ownership of the Software to End User. Title to the Software shall be and remain with PSC or the third party from whom PSC has obtained a licensed right.
As used in this Agreement, the term “purchase” or its equivalents when applied to the Software shall mean “acquire under license.” End User is not
entitled to receipt or use of the source code to any Software.
2.2 End User shall not copy, modify, decompile, disassemble, reverse engineer, or otherwise reproduce or remanufacture the Software, whether modified
or unmodified, nor sell, assign, sublicense, distribute, lend, rent, give, or otherwise transfer the Software to any other person or organization, for purposes other than as expressly provided in this Agreement, without PSC’s prior written consent.
3. Transfers, Support.
3.1 Any copying, installing, reproduction, remanufacture, reverse engineering, electronic transfer, or other use of the Software on other than the designated PSC Product will be a material breach of this Agreement. However, PSC may elect not to terminate this Agreement or the granted licenses, but
instead may elect to notify End User that End User is deemed to have ordered and accepted a license for each breaching use. End User shall pay PSC
the applicable list price for such licenses as of the date of such breach.
3.2 End User shall not sell, assign, sublicense, distribute, lend, rent, give, or otherwise transfer the PSC Product to any third party unless such third party
agrees with PSC in writing to be bound by the terms and conditions of this Agreement. Any such transfer of the PSC Product absent such agreement
shall be null and void.
3.3 End User may obtain support for Software from PSC at PSC’s standard support fees and under PSC’s standard support terms and conditions in effect
at the time the support is requested.
4. Intellectual Property.
End User acknowledges that the Software constitutes valuable trade secrets of PSC or PSC’s third party licensors and that the Software is protected by intellectual property laws and treaties. The license set forth in this Agreement does not transfer to End User any ownership of PSC’s or its third party licensors'
copyrights, patents, trademarks, service marks, trade secrets, or other intellectual property rights and End User shall have no right to commence any legal
actions to obtain such rights. End User shall not remove, modify, or take any other action that would obscure any copyright, trademark, patent marking, or
other intellectual property notices contained in or on the PSC Product.
5. Proprietary Information.
5.1 End User acknowledges that Proprietary Information is the confidential, proprietary, and trade secret property of PSC and PSC’s third party licensors
and End User acquires no right or interest in any Proprietary Information.
5.2 End User shall not disclose, provide, or otherwise make available the Proprietary Information of PSC or its third par ty licensors to any person other
than End User’s authorized employees or agents who are under confidentiality agreement, and End User shall not use the Proprietary Information
other than in conjunction with use of the PSC Product exclusively for End User’s internal business purposes. End User shall take steps to protect the
Proprietary Information no less securely than if it were End User's own intellectual property.
5.3 The provisions of this Proprietary Information Section shall survive and continue for five (5) years after the termination of this Agreement.
6. Limited Warranty.
6.1 PSC warrants that, under normal use and operation, the PSC Product will conform substantially to the applicable Documentation for the period specified in the Documentation. During this period, for all reproducible nonconformities for which PSC has been given written notice, PSC will use commercially reasonable efforts to remedy nonconformities verified by PSC. End User agrees to supply PSC with all reasonably requested information and
assistance necessary to help PSC in remedying such nonconformities. For all defects reported to PSC within the warranty period, PSC’s liability is limited to providing End User with one copy of corrections or responding to End User's problem reports according to PSC's standard assistance practices.
PSC does not warrant that the product will meet End User's requirements or that use of the product will be uninterrupted or error free, or that PSC's
remedial efforts will correct any nonconformance. This limited warranty does not cover any product that have been subjected to damage or abuse,
whether intentionally, accidentally, or by neglect, or to unauthorized repair or unauthorized installation, and shall be void if End User modifies the prod-
®
Quick Reference Guide i
Page 4

uct, uses the product in any manner other than as established in the Documentation, or if End User breaches any of the provisions of this Agreement.
6.2 EXCEPT AS PROVIDED IN THIS AGREEMENT, THE PSC PRODUCT IS PROVIDED “AS IS” AND PSC MAKES NO WARRANTIES OF ANY KIND,
EXPRESS OR IMPLIED, WRITTEN OR ORAL, WITH RESPECT TO THE PRODUCT, AND SPECIFICALLY DISCLAIMS THE IMPLIED WARRANTIES OF MERCHANTABILITY AND FITNESS FOR A PARTICULAR PURPOSE.
7. Infringement.
7.1 PSC will defend End User against any claim in a lawsuit that the PSC Product furnished hereunder infringe a United States patent or copyright of a
third party and PSC will pay any damages finally awarded against End User by a court of competent jurisdiction that are attributable to such claim or
will pay End User’s part of any settlement that is attributable to such claim, provided, that 1) End User notifies PSC promptly in writing of the claim, 2)
PSC controls the defense or settlement of the claim, and 3) End User cooperates fully with PSC in such defense or settlement. All notices of a claim
should be sent to PSC Inc., Legal Department, 111 SW Fifth Ave. Suite 4100, Portland, OR 97204-3644.
7.2 In the defense or settlement of any such claim, PSC may, at its option, 1) procure for End User the right to continue using the PSC Product, 2) modify
the PSC Product so that it becomes non-infringing, 3) replace the PSC Product with an equivalent product not subject to such claim, or 4) provide End
User an opportunity to return the PSC Product and receive a refund of the purchase price paid, less a reasonable allowance for use.
7.3 PSC shall have no liability to End User for claims of infringement based upon 1) the use of any PSC Product in combination with any product which
PSC has not either furnished or authorized for use with such PSC Product 2) the use of any PSC Product designed, manufactured, or modified to the
specifications of End User, or 3) End User’s modification of the PSC Product without written authorization from PSC.
7.4 THE FOREGOING STATES PSC’S COMPLETE AND ENTIRE OBLIGATION CONCERNING CLAIMS OF PATENT, COPYRIGHT, OR OTHER INTELLECTUAL PROPERTY INFRINGEMENT, CANCELS AND SUPERCEDES ANY PRIOR AGREEMENTS, WHETHER ORAL OR WRITTEN,
BETWEEN THE PARTIES CONCERNING SUCH CLAIMS, AND WILL NOT BE MODIFIED OR AMENDED BY ANY PAST, CONTEMPORANEOUS,
OR FUTURE AGREEMENTS OR DEALINGS BETWEEN THE PARTIES, WHETHER ORAL OR WRITTEN, EXCEPT AS SET FORTH IN A FUTURE
WRITING SIGNED BY BOTH PARTIES.
8. Limitation Of Liability.
EXCEPT AS PROVIDED IN SECTION 7, PSC SHALL NOT BE LIABLE FOR ANY CLAIMS AGAINST END USER BY ANY OTHER PARTY. IN NO EVENT
SHALL PSC'S LIABILITY FOR DAMAGES, IF ANY, WHETHER BASED UPON CONTRACT, TORT (INCLUDING NEGLIGENCE), PRODUCT LIABILITY,
STRICT LIABILITY, WARRANTY, OR ANY OTHER BASIS, EXCEED THE PRICE OR FEE PAID BY END USER FOR THE PSC PRODUCT. UNDER NO
CIRCUMSTANCES SHALL PSC BE LIABLE TO END USER OR ANY THIRD PARTY FOR LOST PROFITS, LOST DATA, INTERRUPTION OF BUSINESS
OR SERVICE, OR FOR ANY OTHER SPECIAL, CONSEQUENTIAL, CONTINGENT, INDIRECT, INCIDENTAL, PUNITIVE, EXEMPLARY, OR OTHER SIMILAR DAMAGES, EVEN IF PSC HAS BEEN ADVISED OF THE POSSIBILITY OF SUCH DAMAGES.
9. Government Restricted Rights; International Use.
9.1 Use, duplication, or disclosure of the Software by the U.S. Government is subject to the restrictions for computer software developed at private
expense as set forth in the U.S. Federal Acquisition Regulations at FAR 52.227-14(g), or 52.227-19 or in the Rights in Technical Data and Computer
Software clause at DFARS 252.227-7013(c)(1)(ii), whichever is applicable.
9.2 If End User is using the PSC Product outside of the United States, End User must comply with the applicable local laws of the country in which the
PSC Product is used, with U.S. export control laws, and with the English language version of this Agreement. The provisions of the “United Nations
Convention on International Sale of Goods” shall not apply to this Agreement.
10. Termination.
10.1 Either party may terminate this Agreement or any license granted under this Agreement at any time upon written notice if the other party breaches any
provision of this Agreement.
10.2 Upon termination of this Agreement, End User immediately shall cease using any non-embedded software and shall return to PSC or destroy all nonembedded software covered by this Agreement, and shall furnish PSC with a certificate of compliance with this provision signed by an officer or authorized representative of End User. For embedded software, End User agrees to sign a waiver prepared by PSC concerning further use of the embedded Software. End User’s resumed or continued use of the embedded Software after termination shall constitute End User’s agreement to be bound
by the terms and conditions of this Agreement for such use.
11. General Provisions.
11.1 Entire Agreement; Amendment. This document contains the entire agreement between the parties relating to the licensing of the Software and supersedes all prior or contemporaneous agreements, written or oral, between the parties concerning the licensing of the Software. This Agreement may not
be changed, amended, or modified except by written document signed by PSC.
11.2 Notice
11.3 Waiver. A party’s failure to enforce any of the terms and conditions of this Agreement shall not prevent the party’s later enforcement of such terms and
11.4 Governing Law; Venue:This Agreement and the rights of the parties hereunder shall be governed by and construed in accordance with the laws of the
. All notices required or authorized under this Agreement shall be given in writing, and shall be effective when received, with evidence of receipt.
Notices to PSC shall be sent to the attention of Contract Administration, PSC Scanning Inc., 959 Terry Street, Eugene, OR 97402, or such other
address as may be specified by PSC in writing.
conditions.
State of Oregon U.S.A, without regard to the rules governing conflicts of law. The state or federal courts of the State of Oregon located in either Multnomah or Lane counties shall have exclusive jurisdiction over all matters regarding this Agreement, except that PSC shall have the right, at its absolute
discretion, to initiate proceedings in the courts of any other state, country, or territory in which End User resides, or in which any of End User's assets
are located.
11.5 Attorneys’ Fees
able attorneys’ fees, both at trial and on appeal.
. In the event an action is brought to enforce the terms and conditions of this Agreement, the prevailing party shall be entitled to reason-
- END -
ii Magellan
®
2200VS/2200VSΩ
Page 5

CONTENTS
English .................................................................................1
Français ...............................................................................5
Deutsch ...............................................................................9
Italiano ..............................................................................13
Español ..............................................................................17
Portugues ..........................................................................21
Chinese ..............................................................................25
Appendix A — Product Labeling .........................................29
Appendix B — Productivity Index Reporting Option ...........30
Appendix C — Laser Safety .................................................32
Appendix D — Warranty .....................................................38
Quick Reference Guide iii
Page 6

iv Magellan
®
2200VS/2200VSΩ
Page 7

Quick Reference Guide
Introduction
This guide offers a summary of basic scanner operation for first time users. Installers, system managers and other technical personnel can find installation, programming and further advanced information in the Product Reference Guide. Up-todate revisions of publications can be viewed, printed and downloaded from the
PSC website listed on the back cover of this manual. Printed manuals can also be
ordered from your dealer/distributor.
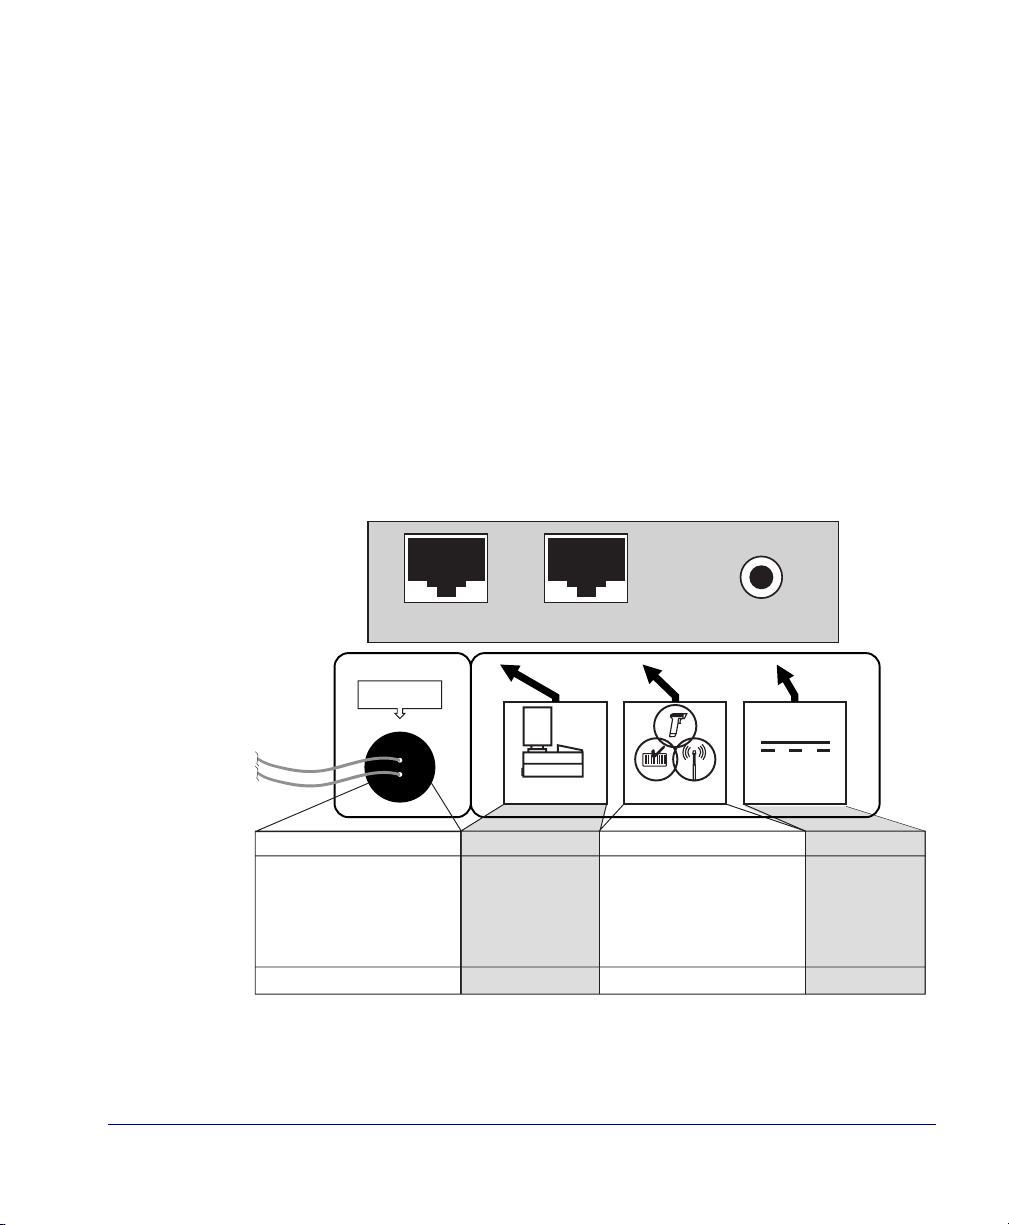
Connection
For your convenience, Figure 1 shows scanner connections and their functions.
Figure 1. Connections
EAS Opening
Power
· DC Brick Input· Label Data
EAS Connection
· Electronic Article Surveillance
Connection
Connection to this port is Optional
Aux. PortScanner Host
POS TERMINAL AUXILIARY PORT POWER
· Test Port
· Application Download
(where appropriate)
· On Screen
Programming (OSP)
· Application Download
· RS-232 Handheld Scanner Input
· Auxiliary RS-232 Label Data Output
Connection to this port is Optional
Quick Reference Guide 1
Page 8

Operation
Sca
r
em
Code
S
r
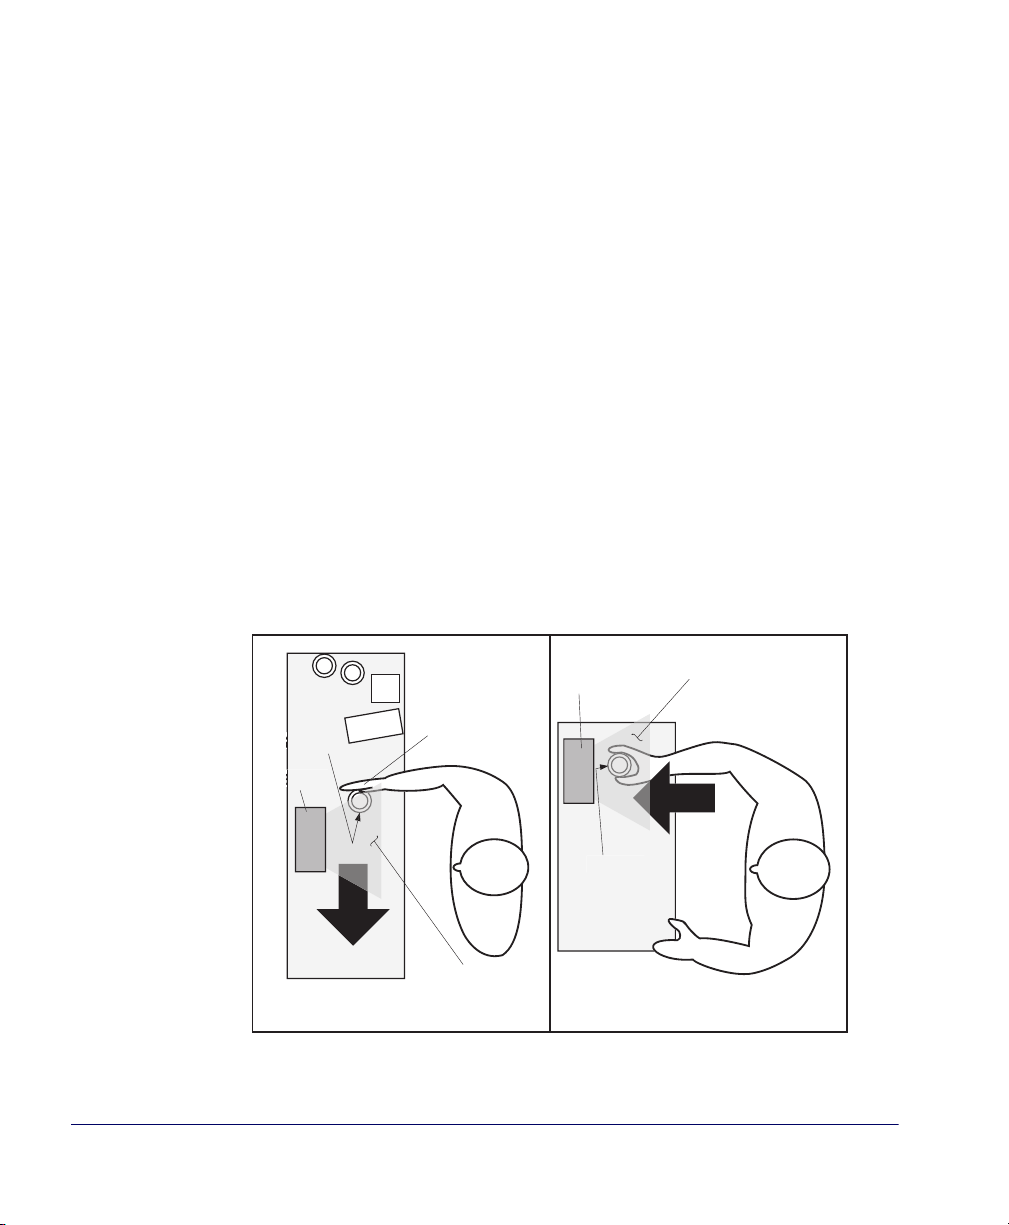
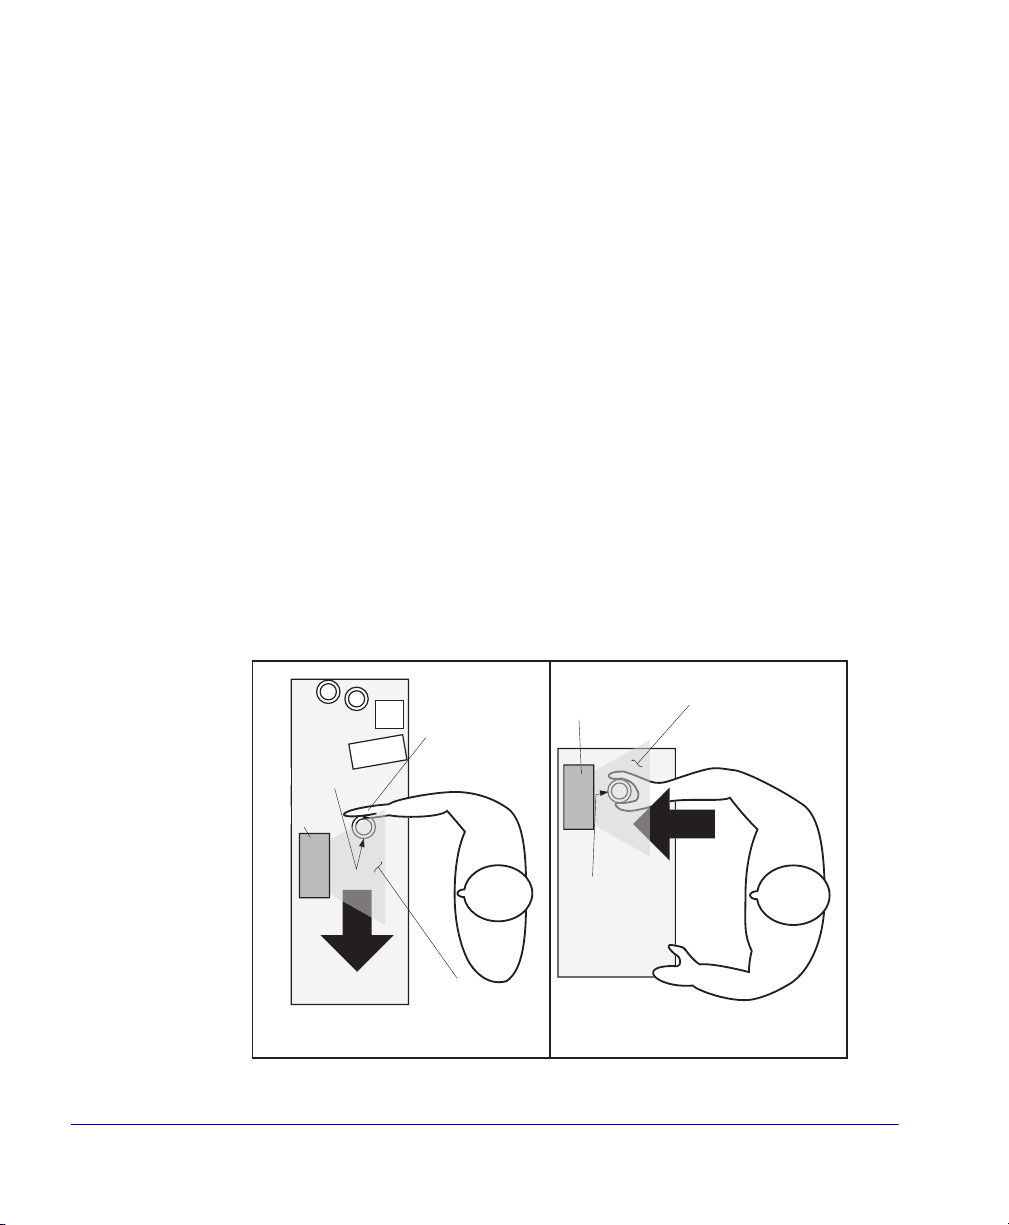
Scanning Items
Item bar codes are scanned by either...
• sliding or pushing items through the scan volume in a right-to-left or left-to-
right motion (see Figure 2a). This is known as “Sweep” scanning, and is the
best choice for high throughput super- and hypermarket installations where
it is necessary to minimize the need to grip or lift items.
• moving the bar code directly toward the scan window to be read (see
Figure 2b). This “Presentation” technique is most often used in low
throughput variety, convenience market and pharmacy applications where
useable countertop space is at a premium and “Sweep” scanning is not possible.
With FirstStrike
codes quickly and without excess orientation.
Figure 2. Sweep and Presentation Scanning Technique
TM
decoding software, the scanner can read most hard-to-read
Item
Bar
nne
Items are
pushed or
slid past
scanner
Scan Volume
canne
It
Bar Code
a Sweep Technique Presentation Techniqueb
2 Magellan
Scan Volume
®
2200VS/2200VSΩ
Page 9

Volume/Tone Push Button
The Volume/Tone Push Button also performs multiple functions depending upon
the duration of time it is pressed:
Volume changes made using the Volume/Tone Push Button are lost
when the scanner is powered-down and are reset to the configured setting. If you wish to permanently change the volume, use the special
NOTE
Table 1-1. Volume/Tone Push Button Functions
programming labels in the Product Reference Guide.
PRESS
DURATION
Momentary (when
scanner is asleep)
Momentary (when
scanner is awake)
Hold, then release
when the beeper
sounds
4 Seconds
8 Seconds
FUNCTION COMMENT
Wakes scanner from Sleep
Mode
Increments volume
Increments tone
Scanner Diagnostics Mode
Resets Scanner
b
Alternatively, the scanner can be awakened by:
- Moving an object through the scan zone.
- Scanning with an attached auxiliary scanner.
Press the push button momentarily to increase speaker
volume. When the loudest volume is reached, a
repeated press of the push button cycles volume back
to the lowest setting, then volume increases on subsequent press(es). Four volume levels are available.
Press the push button for approximately 2 seconds,
then release. Each time this is done, the beeper will
sound at one of three tones. Stop when the desired
tone (high, medium or low) is sounded.
This mode allows system support personnel to troubleshoot problems with the scanner and is used to deter-
a
mine if it can read bar codes. Press the button for eight
seconds or cycle power to exit Scanner Diagnostics
Mode and reset the scanner.
Only system support personnel should perform a reset.
a. By standard default, this function is normally disabled to prevent accidental activation by users.
b. Users should not perform scanner resets except under the direction of trained systems support person-
nel.
Quick Reference Guide 3
Page 10

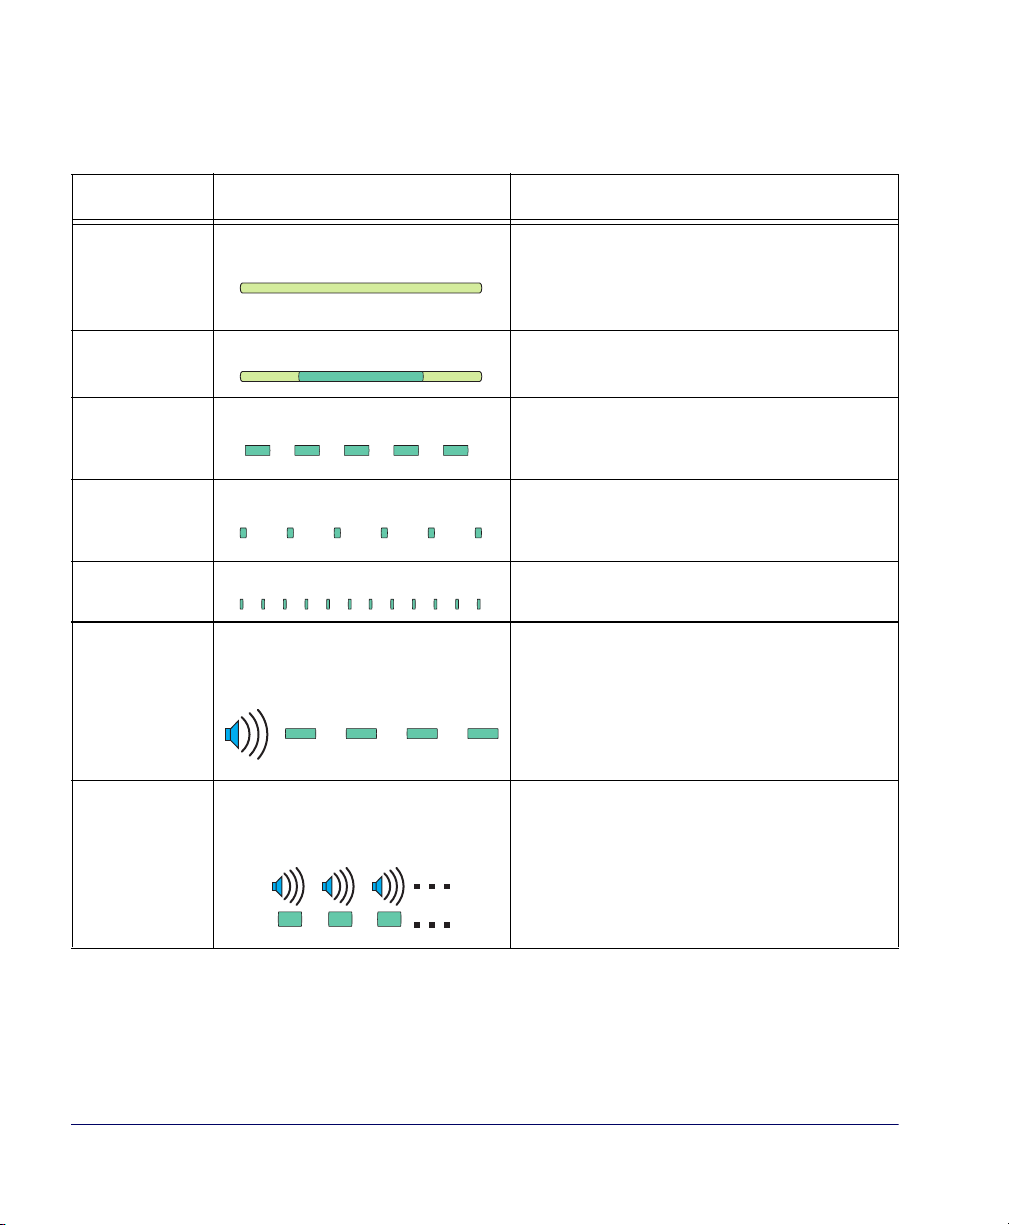
Green LED Indicator
The green LED indicates scanner status as shown in the table below..
Table 1-2. Green LED Indications
LED
INDICATION
Scanner Active
(Normal Mode)
Good Read
Indication
a
Program Mode
Indication
Sleep Mode
Indication
Host Disabled
Field Replaceable Unit (FRU)
Warning (Error
Mode)
DURATION COMMENT
a
Scanner (Green) LED on steady and
dim
Scanner (Green) LED - bright flash
Scanner (Green) LED - Continuous
flashing
Scanner (Green) LED flashes slowly
Scanner (Green) LED 1-second off, 1/
10-second on
Audible low tone 1 second. LED
flashes continuously.
The scanner is ready for operation. Scanning is
immediately available.
Indicates a bar code has been read and decoded.
Indicates the scanner is in Label Programming
Mode. Cycle power to exit Programming Mode.
The scanner motor and/or laser have automatically switched off and the unit has entered Sleep
Mode due to extended inactivity.
Host has disabled scanning.
Serves notice that a fatal FRU failure has been
detected. Call systems support for service.
Scanner (Green) LED flashes a
FRU Indication
coded sequence in concert with the
speaker.
Occurs ONLY upon Volume/Tone button push following a FRU warning. Enables service technicians to identify FRU failures.
a. Certain functions of the LED are selectable to be enabled or disabled. Your scanner may not be pro-
grammed to display all indications.
4 Magellan
®
2200VS/2200VSΩ
Page 11

Introduction
Ce guide présente une synthèse du fonctionnement de base du scanner à l'attention des utilisateurs novices. Les installateurs, les administrateurs de système et
autres personnels techniques pourront obtenir des informations sur l'installation,
la programmation ainsi que d'autres indications plus avancées dans le Guide de
référence du produit. Il est possible de consulter, d'imprimer et télécharger des
mises à jour des publications à partir du site de PSC à l'adresse reportée sur la couverture postérieure de ce manuel. Il est également possible de commander des
manuels imprimés auprès de votre vendeur/distributeur.
Raccordement
Pour vous aider, consulter la Figure 3 qui illustre les raccordements et les fonctions
du scanner.
Figure 3. Raccordements
EAS Opening
Power
· Entrée Brick CC
Raccordement EAS
· Système de surveillance
électronique d'articles (EAS)
Raccordement
Le raccordement à ce port est
facultatif
Terminal
d'encaissement (POS)
· Données étiquette
· Téléchargement de
l'application (le cas
échéant)
Aux. PortScanner Host
Port auxiliaire Alimentation
· Port d'essai
· Affichage de la programmation (OSP)
· Téléchargement de l'application
· Entrée scanner à main RS-232
· Sortie auxiliaire RS-232 données
étiquette
Le raccordement à ce port est
facultatif
Quick Reference Guide 5
Page 12

Fonctionnement
Sca
r
S
r
e
C
à
Lecture d’articles
Les codes à barres des articles sont numérisés selon deux procédures soit…
• en faisant glisser ou en poussant les articles à travers le volume de lecture de
la droite vers la gauche ou de la gauche vers la droite (voir Figure 4a). Il s'agit
du mode de lecture " Transfert " (par balayage) qui constitue la meilleure
solution pour la moyenne et la grande distribution, où il faut limiter au maximum la saisie ou le soulèvement des articles.
• en déplaçant le code à barres directement en face de la fenêtre de numérisation afin de le soumettre à la lecture (voir
" Présentation " est surtout utilisé pour les applications dans les pharmacies,
les magasins de proximité, les points de vente à faibles transactions où
l'espace utilisable sur le comptoir est réduit et le mode " transfert " est par
conséquent impossible.
Grâce au logiciel de décodage FirstStrike
et avec une orientation minime la plupart des codes de lecture difficile.
Figure 4. Mode de lecture " Transfert " et " Présentation "
Figure 4b). Ce mode de lecture par
TM
, le scanner peut capturer rapidement
Les articles
Code à
barres de
l'articl
sont poussés
ou glissés
devant le
scanner
canne
nne
ode
barres de
l'article
Volume de
lecture
a Mode Transfert Mode Présentationb
6 Magellan
Volume de
lecture
®
2200VS/2200VSΩ
Page 13

Bouton-poussoir volume/tonalité
Le bouton-poussoir volume/tonalité exécute également des fonctions
multiples selon la durée de son activation :
Les changements de volume rendent l'utilisation du Bouton de réglage
du Volume/Tonalité difficile lorsque le scanner est hors tension et est
réinitiliasé au paramètre configuré. Si vous désirez changer définitivement le volume, utilisez les étiquettes spéciales de programmation
NOTA
Tableau 5. Fonctions du bouton-poussoir Volume/tonalité
dans le Guide de référence du produit.
DURÉE
D'ACTIVATION
Momentané (lorsque
le scanner est en
mode de veille)
Momentané (lorsque
le scanner est en
mode d'éveil)
Maintenez la touche
enfoncée et relâchezla lorsque l'avertisseur sonore retentit
4 secondes
8 secondes
FONCTION COMMENTAIRE
Réveille le scanner du mode de
veille
Augmente le volume
Augmente la tonalité
Mode de diagnostic du scan-
a
ner
Remet le scanner à l'état initia
En alternative, le scanner peut être réveillé par :
- déplacement d'un objet à travers la zone de balayage.
- un changement de poids sur la balance.
- Lecture avec un scanner auxiliaire attaché
Pressez le bouton-poussoir momentanément pour augmenter
le volume du haut-parleur. Après avoir atteint le volume le
plus élevé, une pression répétée du bouton-poussoir reporte
progressivement le volume au niveau le plus bas, le volume
augmente ensuite en fonction des pressions successives.
Cinq niveaux de volume sont disponibles.
Pressez le bouton-poussoir pendant approximativement 2
secondes, puis relâchez. A chaque pression, l'avertisseur
retentira selon une des trois tonalités. Arrêtez lorsque la
tonalité désirée (élevée, moyenne ou faible) est obtenue.
Ce mode permet au personnel chargé de l'assistance du
système de remédier aux problèmes du scanner. Les diagnostics sont généralement lancés après la notification d'une
alarme du module interchangeable (voir Tableau 1).
Débranchez et rebranchez l'alimentation pour sortir du mode
diagnostic.
Seul le personnel chargé de l'assistance du système est
b
autorisé à exécuter la remise à l'état initial.
a. Par défaut, cette fonction est neutralisée pour empêcher l'activation accidentelle par des utilisateurs.
b. Les utilisateurs ne devraient pas procéder à la remise à l'état initial du scanner sauf sous la direction de
personnel agréé chargé de l'assistance des systèmes.
Quick Reference Guide 7
Page 14

Fonctions des voyant DEL Vert
Le voyant DEL vert (Figure 4d) indique l'état du scanner au Tableau 6 ci-des-
sous.
Tableau 6. Green LED Indications
LED
INDICATION
Scanner Actif
(Mode normal)
Lecture correcte
de l'indication
Indication du
mode programme
Indication du
mode de veille
Système invalide
Alarme de module interchangeable(Mode
d'erreur)
a
a
DURATION COMMENT
Voyant DEL vert en mode veille fixe
Voyant DEL vert - clignotement lumineux
Voyant DEL vert - Clignotement continu
Le voyant DEL vert clignote lentement
1 seconde éteint, 1/10è de seconde
allumé
Signal sonore bas 1 seconde. Voyant DEL
vert/jaune alternatif clignote de manière
continue.
Le scanner est prêt à fonctionner. Le balayage est
immédiatement disponible.
Indique la lecture et le décodage du code à barres.
Indique que le scanner est en mode de programmation
Étiquette. Débranchez et rebranchez l'alimentation pour
sortir du mode de programmation.
Le moteur du scanner et/ou le laser sont mis automatiquement hors tension et l'unité passe en mode de
veille à cause de l'inactivité prolongée.
Système invalide scanner.
Indique qu'une erreur fatale du module interchangeable
a été détectée.
Le voyant DEL vert clignote selon une
séquence codée en combinaison avec le
Indication de
module interchangeable
a. Il est possible de sélectionner certaines fonctions des voyants DEL vert et jaune afin de les activer ou
désactiver. Il n'est pas possible de programmer votre scanner pour afficher toutes les indications.
haut-parleur.
8 Magellan
UNIQUEMENT au cas où le bouton Volume/tonalité
serait activé suite à une alarme d’un module interchangeable. Ceci permet aux techniciens d'identifier les
défaillances du module interchangeable.
®
2200VS/2200VSΩ
Page 15

Einleitung
Diese Anleitung bietet eine Zusammenfassung der grundlegenden Scanner-Bedienung für neue Benutzer. Systemmanager, Installations- und anderes technisches
Personal finden Informationen zu Installation, Programmierung und weitere Angaben im Produktreferenzhandbuch. Aktuelle Änderungen der Publikationen finden Sie auf der PSC-Homepage; diese können Sie drucken und herunterladen. Die
Internet-Adresse finden Sie auf der Rückseite dieses Handbuchs.
Gedruckte Handbücher können Sie auch bei Ihrem Händler/Vertreter bestellen.
Anschliessen
Abbildung 7 zeigt die Scanner-Anschlüsse und ihre Funktionen.
Abbildung 7. Anschlüsse
EAS Opening
Power
· Gleichstrom Brickeingang
EAS-Anschluß
· Elektronische Artikelüberwachung
(EAS) Anschluß
Anschluß an diesen Port ist optional
Aux. PortScanner Host
POS-Terminal Zusätzlicher Port Stromversorgung
· Kennsatzdaten
· Applikations-Download
(falls zutreffend)
· Test-Port
· On Screen Programming (OSP)
· Applikations-Download
· Eingang für RS-232 Handheld Scanner
· Zusätzlicher RS-232 Kennsatz Datenausgang
Anschluß an diesen Port ist optional
Quick Reference Guide 9
Page 16
Bedienung
Sca
r
-
S
r
de
Scannen von Produkten
Artikel-Barcodes werden gescannt entweder durch...
• Schieben der Artikel durch den Scanbereich von rechts nach links oder von
links nach rechts (siehe Abbildung 8a). Dieses Verfahren ist als "Sweep"Scannen bekannt und die beste Methode für Super- und Hypermärkte mit
hohem Warendurchsatz, bei denen eine Minimierung von Greif- und Hebebewegungen notwendig ist.
• Plazieren des Barcode direkt vor das Scanfenster, damit er eingelesen werden
kann (siehe
Läden mit niedrigem Warendurchsatz - z. B. in Tankstellenshops und
Apotheken - eingesetzt, wo nur kleine Ablageflächen vorhanden sind und ein
"Sweep"-Scannen nicht möglich ist.
Mit Hilfe der FirstStrike
schwer lesbaren Codes schnell und ohne übermäßige Ausrichtung lesen.
Abbildung 8. Sweep- und Präsentationsscannen
Abbildung 8b). Diese "Präsentationstechnik" wird am meisten in
TM
Decodierungssoftware kann der Scanner die meisten
Artikel
werden an
canne
dem Scanner
Artikel-
vorbeigeschoben
Barco
nne
Artikel
Barcode
Scan-Volumen
a Sweep-Verfahren Präsentationstechnikb
10 Magellan
Scan-Volumen
®
2200VS/2200VSΩ
Page 17

Lautstärke/Tonschalter
Änderungen der Lautstärke, die über die Drucktaste "Volume/Tone"
erfolgt sind, werden beim Herunterfahren des Scanners gelöscht, und
es erfolgt ein Zurücksetzen auf die Werkseinstellungen. Eine dauerhafte Änderung der Lautstärke kann mit Hilfe der speziellen Program-
BEACHTEN SIE
Tabelle 3-1. Lautstärke/Tonschalter-Funktionen
Betätigungsdauer Funktion Bemerkung
kurz (wenn der Scanner im Bereitschaftsmodus ist)
kurz (wenn sich der
Scanner im Betriebsmodus befindet)
mierkenndaten im Produktreferenzhandbuch vorgenommen werden.
Der Scanner kann in den Bereitschaftsmodus versetzt werversetzt den Scanner vom
Bereitschafts- in den Betriebsmodus
Erhöhung der Lautstärke
den entweder durch:
- Bewegen eines Objektes durch den Scanbereich
- eine Gewichtsänderung auf der Waage
- Scannen mit einem extern angeschlossenen Handscanner
Durch kurzzeitiges Betätigen des Schalters wird die
Lautstärke erhöht. Wenn die höchste Stufe erreicht ist, wird
durch erneutes Betätigen die Lautstärke auf die niedrigste
Stufe zurückgesetzt. Danach steigt die Lautstärke wieder an.
Fünf Lautstärken können eingestellt werden.
Halten und beim
Hören des Signals
4 Sekunden
8 Sekunden
a. In der Standardeinstellung ist diese Funktion ausgeschaltet, um versehentliche Aktivierung durch den
Benutzer vorzubeugen.
b. Anwender sollten keinen Scanner-Reset durchführen außer unter der Anweisung ausgebildeten Servi-
cepersonals.
Erhöhung der Tonhöhe
Scannerdiagnosemodus
Scanner-Reset
b
a
Betätigen Sie den Schalter für ca. 2 Sekunden und lassen Sie
ihn dann los. Dadurch können die drei möglichen Tonhöhen
(hoch, mittel und tief) eingestellt werden.
Dieser Modus erlaubt dem technischen Personal die Identi-
fikation von Problemen, die beim Scanner aufgetreten sind.
Drücken Sie den Schalter für 8 Sekunden oder schalten Sie
zum Verlassen des Scannerdiagnosemodus' den Scanner
aus und ein und starten den Scanner neu.
Nur das technische Personal sollte einen Reset durchführen.
Quick Reference Guide 11
Page 18

Grüne LED Funktionen
Tabelle 3-2. Grüne LED Funktionen
LED Anzeige Dauer Bemerkung
a
Scanner ist aktiv
(Normalmodus)
Optisches Signal, das erfolgreiches
Scannen anzeigt
Die Grüne Anzeige ist dauerhaft an und
leuchtet schwach
Grüne Anzeige - helles Aufblinken
a
Der Scanner ist betriebsbereit. Scannen ist sofort
möglich.
Zeigt das erfolgreiche Lesen und Decodieren eines Barcodes an.
Programmiermodusanzeige
Bereitschaftsmodusanzeige
Host außer
Betrieb
Hardwarefehlerwarnung (Fehlermodus)
HardwarefehlerAnzeige (FehlerModus)
a. Bestimmte LED-Funktionen können wahlweise aktiviert oder deaktiviert werden.
Grüne Anzeige - wiederholtes Blinken
Die grüne LED-Anzeige blinkt im 2Sekunden-Takt.
1 Sekunde aus, eine zehntel Sekunde an
Akustischer tiefer Ton 1 Sekunde und die
grüne/gelbe Anzeige blinkt fortwährend
Grüne Anzeige blinkt in einer kodierten
Sequenz zusammen mit dem Lautsprecher.
Zeigt an, daß sich der Scanner im Barcode-Programmiermodus befindet. Zum Verlassen des Programmiermodus schalten Sie aus und ein.
Der Scanner- oder Lasermotor hat sich nach längerer
Nichtbenutzung automatisch abgeschaltet und ist in den
Bereitschaftsmodus übergegangen..
Host ermöglicht kein Scannen.
Zeigt an, daß ein schwerer Hardwarefehler entdeckt
wurde.
Tritt NUR auf, wenn der Lautstärke/Tonknopf betätigt
wurde und eine Hardwarefehlerwarnung auftritt. Diese
Anzeige ermöglicht dem Techniker, den Hardwarefehler
zu identifizieren..
12 Magellan
®
2200VS/2200VSΩ
Page 19

Introduzione
Questa guida offre un sommario delle operazioni principali dello scanner per
utenti inesperti. Installatori, amministratori di sistema e altro personale tecnico
possono trovare informazioni sull'installazione, programmazione ed altre questioni
avanzate nella guida di riferimento del prodotto. Revisioni aggiornate delle pubblicazioni possono essere visualizzate, stampate e scaricate dal sito web PSC indicato
sulla copertina posteriore di questo manuale. È possibile anche ordinare i manuali
su carta dal proprio rivenditore/distributore.
Connessione
Per comodità, la Figura 9 mostra le connessioni dello scanner e le relative funzioni.
Figura 9. Connessioni
EAS Opening
Power
· Ingresso Brick CC· Dati etichetta
Connessione EAS
· Sistemi per la sorveglianza
elettronica antitaccheggio
Connessione
La connessione su questa porta è
opzionale
Aux. PortScanner Host
Terminale POS Porta ausiliaria Accensione
· Porta di controllo
· Download
dell'applicazione
(dove appropriato)
· Programmazione su schermo (OSP)
· Download applicazione
· Ingresso RS-232 per il lettore palmare
· Uscita ausiliaria RS-232 dati etichetta
La connessione su questa porta è
opzionale
Quick Reference Guide 13
Page 20
Funzionamento
r
C
e
r
dell'
Utilizzo dello scanner
i codici a barre dell'articolo sono scansiti con uno dei metodi seguenti ...
• facendo scorrere o spingendo gli articoli attraverso il volume di scansione con
un movimento da destra a sinistra o da sinistra a destra (vedere Figura 10a).
Si tratta della scansione a scorrimento ed è la scelta migliore per installazioni
in supermercati e ipermercati a traffico elevato, dove è necessario minimizzare la necessità di afferrare o sollevare gli articoli.
• muovendo il codice a barre direttamente verso la finestra di scansione dove
avviene la lettura (vedere
utilizzata soprattutto nelle strutture a traffico ridotto, minimarket e farmacie
dove è importante lasciare libero il piano di lavoro e la scansione a "scorrimento" non è possibile.
Con il software di decodifica FirstStrike
più difficili da interpretare in modo rapido e senza bisogno di orientare eccessivamente l'articolo.
Figura 10. Tecnica di scansione a scorrimento e presentazione
Figura 10b). Questa tecnica a "presentazione" è
TM
, lo scanner può leggere anche i codici
Codice
a barre
Gli articoli
sono spinti
o fatti
scivolare oltre
canne
Volume di scansione
lo scanner
canne
odic
a barre
dell'articolo
Volume di
scansione
a Tecnica a scorrimento Tecnica a presentazioneb
14 Magellan
®
2200VS/2200VSΩ
Page 21

Tasto tono/volume
Il tasto tono/volume svolge molteplici funzioni in base alla durata della
pressione esercitata:
Le variazioni di volume effettuate con l'interruttore a pulsante Volume/
Tono sono annullate con lo spegnimento dello scanner e quindi
impostate nuovamente nel modo predefinito. Se si vuole modificare
permanentemente il volume, utilizzare le speciali etichette di program-
NOTA
Tabella 4-1. Funzioni del Tasto tono/volume
DURATA FUNZIONE NOTA
Momentanea (con
scanner in modalità
Sleep)
Momentanea (con
scanner operativo)
mazione illustrate nella guida di riferimento del prodotto.
In alternativa, lo scanner può essere riattivato:
Risveglia lo scanner dalla modalità Sleep
Aumenta il volume
- Muovendo un oggetto nell'area di scansione.
- Cambiando il peso sulla bilancia.
- Effettuando una scansione con uno scanner ausiliario collegato
Premere brevemente il pulsante per aumentare di un livello il
volume dell'altoparlante. Una volta raggiunto il livello
massimo, premendo nuovamente il pulsante si torna al livello
minimo di volume. Sono disponibili cinque livelli di volume.
Tenere premuto il pulsante per circa 2 secondi, quindi rilasciaTenere premuto fino
all'emissione del
segnale acustico
Tenere premuto per
4 secondi
Tenere premuto per
8 secondi
a. Tramite i parametri standard questa funzione è normalmente disabilitata per prevenire l'attivazione acci-
dentale da parte dell'utilizzatore.
b. L'utente non deve mai effettuare la reinizializzazione dello scanner a meno che non venga esplicita-
mente richiesto dal personale del servizio di assistenza.
Aumenta il tono
Modalità diagnostica
a
scanner
Reinizializzazione dello scanner
rlo. Ogni volta che si effettua questa operazione si cambia il
tono con cui viene emesso il segnale acustico. Ripetere
l'operazione fino ad impostare il tono desiderato tra quelli dis-
ponibili (alto, medio, basso).
Questa modalità consente al personale del servizio di assis-
tenza di identificare le anomalie rilevate sullo scanner. Nor-
malmente, tale modalità viene utilizzata dopo una
segnalazione di guasto FRU (Field Replaceable Unit) (vedi
Tabella 1). Premere ripetutamente il tasto power per uscire
dalla modalità diagnostica.
La reinizializzazione (reset) dello scanner deve essere effet-
b
tuata solo dal personale del servizio di assistenza.
Quick Reference Guide 15
Page 22
LED Verde
Tabella 4-2. Funzioni dei LED verde
SIGNIFICATO DURATA NOTA
Scanner attivoa
(Modalità normale)
Segnalazione di
corretta lettura
Segnalazione
modalità programmazione
Segnalazione
modalità Sleep
Host disabilitata
Anomalia FRU
(Field Replaceable Unit) (modalità di errore)
Indicazione FRU
a
a
LED verde acceso (intensità media)
LED verde acceso (intensità max)
LED verde - lampeggio continuo
LED verde - lampeggio lento
1 secondo spento, 1/10 secondo acceso
Tono basso udibile della durata di 1 secondo. Lampeggio continuo e alternato del
LED verde/giallo.
Il LED verde lampeggia con una
sequenza codificata in abbinamento ad
un segnale acustic.
Lo scanner è pronto per l'utilizzo. Funzione di scansione
immediatamente disponibile.
Segnala l'avvenuta lettura e decodifica di un codice a
barre.
Segnala che lo scanner è in modalità di programmazi-
one. Premere ripetutamente il tasto power per uscire da
tale modalità.
Il motore e/o il laser dello scanner si sono spenti auto-
maticamente e l'unità è passata in modalità Sleep per
inattività prolungata.
L'host ha disabilitato la scansione.
Segnala che è stato rilevato un guasto critico FRU.
Si verifica SOLO quando si preme il tasto tono/volume
dopo una segnalazione FRU. Consente al tecnico
riparatore di identificare il guasto FRU.
a. È possibile abilitare o disabilitare alcune funzioni del LED.
16 Magellan
®
2200VS/2200VSΩ
Page 23

Introducción
Esta guía presenta un resumen de la operación básica del escáner para quienes lo
utilizan por primera vez. Los instaladores, administradores de sistema y demás personal técnico pueden consultar la Guía de referencia del producto para obtener
detalles de instalación, programación y otra información avanzada. El sitio web de
PSC, cuya dirección figura en la contratapa de este manual, contiene diferentes
publicaciones actualizadas al momento, que se pueden ver, imprimir y descargar.
También se le pueden solicitar copias de los manuales impresos en papel a los representantes o distribuidores de PSC.
Conexión
Para mayor conveniencia, la Figura 11 muestra las conexiones del escáner y sus
respectivas funciones.
Figura 11. Conexiones
EAS Opening
Power
· Entrada para
corriente directa
en formato "brick"
Conexión de sistema electrónico
para vigilancia de mercancías
· Sistema electrónico para vigilancia
de mercancías Conexión
La conexión a este puerto es opcional
Terminal de
Punto de venta
· Datos de etiquetas
· Descarga de
aplicaciones (cuando
corresponda)
Aux. PortScanner Host
Puerto auxiliar Alimentación
· Puerto de prueba
· Programación en pantalla (PEP)
· Descarga de aplicaciones
· Entrada RS-232 para escáner manual
· Salida auxiliar RS-232 para datos
de etiquetas
La conexión a este puerto es opcional
Quick Reference Guide 17
Page 24

Funcionamiento
er
C
ó
e
p
e
sc
áner
o
Escaneo de objetos
Los códigos de barra de las mercancías se pueden escanear...
• deslizando o pasando las mercancías por el campo de lectura con un mov-
imiento de derecha a izquierda o de izquierda a derecha (ver Figura 12a).
Esto se conoce como "lectura de pasada", y constituye la mejor opción para
las instalaciones de supermercados e hipermercados porque permite obtener
rapidez en la operación de lectura y minimiza la necesidad de tener que asir o
levantar los productos.
• moviendo el código de barras directamente hacia la ventana de escaneado
para que ésta lo lea (
utilizada en farmacias y tiendas de conveniencia, donde no se requiere una
velocidad tan rápida de lectura y donde el espacio útil del mostrador es
pequeño, por lo que resulta imposible escanear los productos con "lectura de
pasada".
Con el software de decodificación FirstStrikeTM, el escáner puede leer rápidamente la mayoría de los códigos que son de difícil lectura, sin necesidad de maniobrar demasiado la mercancía.
Figura 12b). Esta técnica de "Presentación" es la más
Figura 12. Técnica de lectura de pasada y por presentación
Se pasan o se
Código de
barra del
r
Escán
deslizan las
mercancías
frente al
escáner
Campo de
lectura
E
digo d
barra del
producto
a Técnica de lectura de pasada Técnica de presentaciónb
18 Magellan
Cam
o d
®
2200VS/2200VSΩ
Page 25

Botón pulsador Tono/Volumen
Los cambios realizados en el volumen mediante el botón pulsador
para Volumen / Tono se pierden cuando se apaga el escáner y, cuando
se lo vuelve a encender, se recuperan los valores preestablecidos. Si
usted desea modificar el volumen de modo permanente, emplee las
NOTA
Tabla 5-1. Funciones del Botón pulsador Volumen/Tono
etiquetas de programación especial que figuran en la Guía de referencia del producto.
PRESIÓN DEL
BOTÓN
Momentánea (cuando
el escáner está en
Modo de ahorro de
energía)
Momentánea (cuando
el escáner está activo)
Mantener el botón
presionado y luego
soltarlo cuando se
escucha el tono
4 segundos
8 segundos
FUNCIÓN COMENTARIO
Despierta al escáner del Modo
de ahorro de energía
Incrementa el volumen
Aumenta el tono
Modo de diagnóstico del
a
escáner
Reinicia el escáner
b
También se puede despertar el escáner:
-Moviendo un objeto a través de la zona de escaneo.
-Pesando un artículo en la balanza.
-Escaneando con un escáner auxiliar conectado a este
escáner
Presione el botón pulsador momentáneamente para aumentar el volumen del parlante. Una vez alcanzado el volumen
máximo, volverá a oírse el volumen más bajo cuando se presione el botón otra vez, y luego el volumen irá subiendo con
cada pulsación del botón. Hay cinco niveles de volumen.
Presione el botón pulsador durante aproximadamente 2 segundos y luego suéltelo. Cada vez que haga esto, se oirán
diferentes tonos (alto, medio o bajo). Deténgase cuando haya
oído el tono deseado.
ste modo le permite al personal de mantenimiento del
sistema identificar los problemas que pudiese tener el
escáner. Por lo general, el diagnóstico se inicia cuando se ha
detectado una advertencia FRU (Unidad reemplazable de
campo) (vea la Tabla 1). Presione el botón de encendido para
salir del Modo de diagnóstico del escáner.
Esta operación debería ser realizada sólo por personal de
mantenimiento del sistema.
a. Por default, esta función es deshabilitada para prevenir activación accidental por el usuario.
b. Los usuarios no deberían reiniciar el escáner a menos que se reciba tal instrucción del personal capac-
itado en mantenimiento del sistema.
Quick Reference Guide 19
Page 26

Funciones de el indicador luminoso verde
Tabla 5-2. Funciones de el indicador luminoso verde
SIGNIFICADO
DEL
INDICADOR
Escáner activo
(Modo normal)
a
Indicador luminoso verde constante y
tenue
DURACIÓN COMENTARIO
El escáner está listo para operar. Se puede escanear
inmediatamente.
Lectura correcta
Modo de
programación
Modo de ahorro
de energía
Te r mi n a l
incapacitado
Advertencia de
Unidad reemplazable de
campo (FRU, en
inglés) (Modo de
error)
Unidad reemplazable de
campo, FRU
Indicador luminoso verde con parpadeo
a
brillante
Indicador luminoso verde con parpadeo
continuo
Indicador luminoso verde con parpadeo
lento
1 segundo apagado, 1/10 segundos prendido
Tono audible bajo 1 segundo. Los indicadores luminosos verde y amarillo parpadean continuamente en forma
alternada.
El indicador luminoso verde parpadea
siguiendo una secuencia codificada en
forma conjunta con el parlante.
Indica que se ha leído y decodificado un código de barras.
Indica que el escáner se encuentra en Modo de programación de etiqueta. Presione el botón de encendido
para salir del Modo de programación.
El motor del escáner y/o el láser se apagaron de manera automática y la unidad ingresó en el Modo de
ahorro de energía debido a que ha estado inactiva
durante un período extenso.
Terminal tiene lector incapacitador.
Indica que se ha detectado una falla FRU fatal.
Ocurre SÓLO si se presiona el botón de Volumen/Tono
después de haberse recibido una advertencia de error
FRU. Permite a los técnicos identificar las fallas FRU.
a. Algunas funciones del indicador luminoso son opcionales, por lo que se pueden activar o desactivar.
20 Magellan
®
2200VS/2200VSΩ
Page 27
Introdução
Esta guia oferece um sumário de operações básicas do leitor para principiantes.O
Instalador, administradores de sistema e outro pessoal técnico podem encontar
programação, instalação, e informações avançadas adicionais no Guia de Referência do Produto.
Revisões atualizadas das publicações podem ser visualizadas, impressas e baixadas
(download) do website da PSC, que está escrito atrás da capa deste manual. Manuais impressos podem também ser requisitados ao seu revendedor/distribuidor.
Conexão
Para a sua comodidade a Figura 13 mostra as conexões do scarnner e as suas
funções
Figura 13. Conexões
EAS Opening
Power
· Entrada de
Energia C.C.
Conexão EAS
· Conexão para o sistema de
Vigilância Eletrônica de Artigos
Conexão com esta porta é opcional
Aux. PortScanner Host
Terminal POS Porta Auxiliar Energia
· Legenda dos Dados
· Uso do Download
(onde apropriada)
· Porta de Teste
· Programação (OSP)
· Uso do Download
· Entrada RS-232 para pistolas
· Saída Auxiliar RS-232 Informações
de Leitura
Conexão com esta porta é opcional
Quick Reference Guide 21
Page 28

Operação
o
o
C
ó
e
scanner
r
go
Para usar seu leitor
Os códigos de barras nos artigos podem ser lidos por meio de...
• deslizar ou empurrar artigos pelo volume de leitura em um movimento da
direita para a esquerda ou da esquerda para a direita (veja Figura 14a). Isto é
conhecido como leitura por "Varredura", e é a melhor escolha para um alto
escoamento nas instalações de super- e hipermercados, onde é necessário
minimizar a necessidade de pegar ou levantar artigos.
• movendo perpendicularmente o código de barras em direção da janela para
ser lido (veja
frequênte é usada em situações com baixo escoamento, adequada para uso
em lojas e farmácias, onde o espaço da área de trabalho que pode ser usada é
limitada e o exame por "Varredura" não é possível.
Com o programa de descodificação FirstStrike
mente os códigos difíceis de se ler e sem excessiva orientação.
Figura 14. Técnica de Leitura por Varredura e Apresentação
Figura 14b). Esta "Apresentação" é a técnica que mais
TM
, o leitor pode ler mais rapida-
Código de
Barras do
Os artigos
são deslizados
ou empurrados
perto do
Leito
Volume de Leitura
Arti
Leit
digo d
Barras do
Artigo
Volume de Leitura
a Técnica de Varredura Técnica de Apresentaçãob
22 Magellan
®
2200VS/2200VSΩ
Page 29

Botão de Volume / Tonalidade
O Botão de Volume / Tonalidade também executa multíplas funções,
dependendo da duração que o mesmo foi pressionado:
As mudanças de intensidade feitas usando o Botão de Volume/Tonalidade são perdidas quando o leitor é desligado e volta para configuração de instalação. Se você deseja mudar o volume de forma
permanente, use as etiquetas de programação da Guia de Referência
Observação
Tabella 6-1. Funções do Botão de Volume / Tonalidade
do Produto.
PRESSÃO NO
BOTÃO
Momentária (quando
o leitor está em
repouso)
Momentária (quando
o leitor está ativo)
Aperte, e depois solte
quando emitir o sinal
sonoro
4 Segundos
8 Segundos
FUNÇÃO OBSERVAÇÃO
Retira o leitor do Modo de
Repouso
Incrementa o volume
Incrementa o Tom
Modo de Diagnóstico da Leitor
Reinicializa o Leitorr
b
Alternativamente, o leitor pode ser desperto por:
- Passando algum objecto pela zona de leitura.
- Uma troca de peso na balança.
- Fazendo uma leitura com uma pistola auxiliar conectada ao
leitor.
Pressione momentáriamente o botão para aumentar o volume do alto-falante. Qunado o volume mais alto for alcançado, pressionando o botão irá retornar o volume para o
nível mais baixo, aumentando a cada pressão no botão.
Cinco níveis de volume estão disponíveis.
Pressione o botão por aproximadamente 2 segundos e
depois solte. Cda vez que isto é efetuado, emitirá um sinal
sonoro em um dos três tons. Pare quando tiver o tom desejado (alto, médio, baixo).
Este modo permite que o pessoal da assistência técnica
possa detectar problemas com a balança. Pressione o botão
a
por 8 segundos, ou desligue/ligue a energia para sair do
Modo de Diagnóstico do Leitor e reinicializar o leitor.
Sómente pessoal da assistência técnica deve executar a reinicialização.
a. Pelo default de fábrica, esta função está normalmente desabilitada de forma a prevenir uma acidental
ativação pelos usuários..
b. Usuários não devem executar a reinicialização do leitor, excepto sob instruções por pessoal treinado da
assistência técnica.
Quick Reference Guide 23
Page 30

Funções do LED Verde
Tabella 6-2. Funções do LED Verde
INDICAÇÃO DURAÇÃO OBSERVAÇÃO
Leitor Ativo
(Modo Normal)
Indicação de Boa
Leitura
Indicação de
Modo de Programação
Indicação de
Modo de
Repouso
Te r mi n a l
Desabilitado
Field Replaceable Unit (FRU)
Advertência(Modo de
Erro)
Indicação de FRU
a
a
LED Verde aceso e meio-aceso
LED Verde - piscando forte
LED Verde - pisca continuamente
LED Verde - pisca lentamente
1 segundo apagado, 1/10 de segundo
aceso
Tom baixo audível 1 segundo. Pisca de
forma continua e alternada os LEDs
Verde e Amarelo
LED Verde - pisca uma determinada
sequencia em conjunto com o alto-falante.
O leitor está pronto para ser operado. Leitura está disponível de imediato.
Indica a leitura de um código de barras e sua decodificação.
Indica que o leitor está em Modo de Programação por
Etiquetas. Reclica a energia para sair do Modo de Programação.
O motor e/ou laser do leitor se apaga automaticamente
e a unidade entra em Modo de Repouso devido a um
longo período de inatividade.
Terminal desabilitou a leitura.
Avisa de uma falha fatal detectada em um FRU.
Ocorre SOMENTE pressionando o botão de Volume
depois que recebeu uma advertência de FRU. Permite
que a assistência técnica possa identificar falha no
equipamento.
a. Algumas funções do LED podem ser selecionadas para serem habilitadas ou desabilitadas.
24 Magellan
®
2200VS/2200VSΩ
Page 31
简介
连接
该指南向第一次使用扫描器的用户概要介绍扫描器的基本操作。安装人
员、系统管理员和其他技术人员可以在 《产品参考手册》中找到有关安
装、编程和更高级的信息。此手册以及该产品的其他手册在随扫描器所
带的手册 CD 中都有。有关这些出版物的最新修改可以从 PSC 网站上浏
览、打印和下载,该网址在本手册的封底上可以找到。您还可以从经销
商 / 分销商那里订购印刷好的手册。
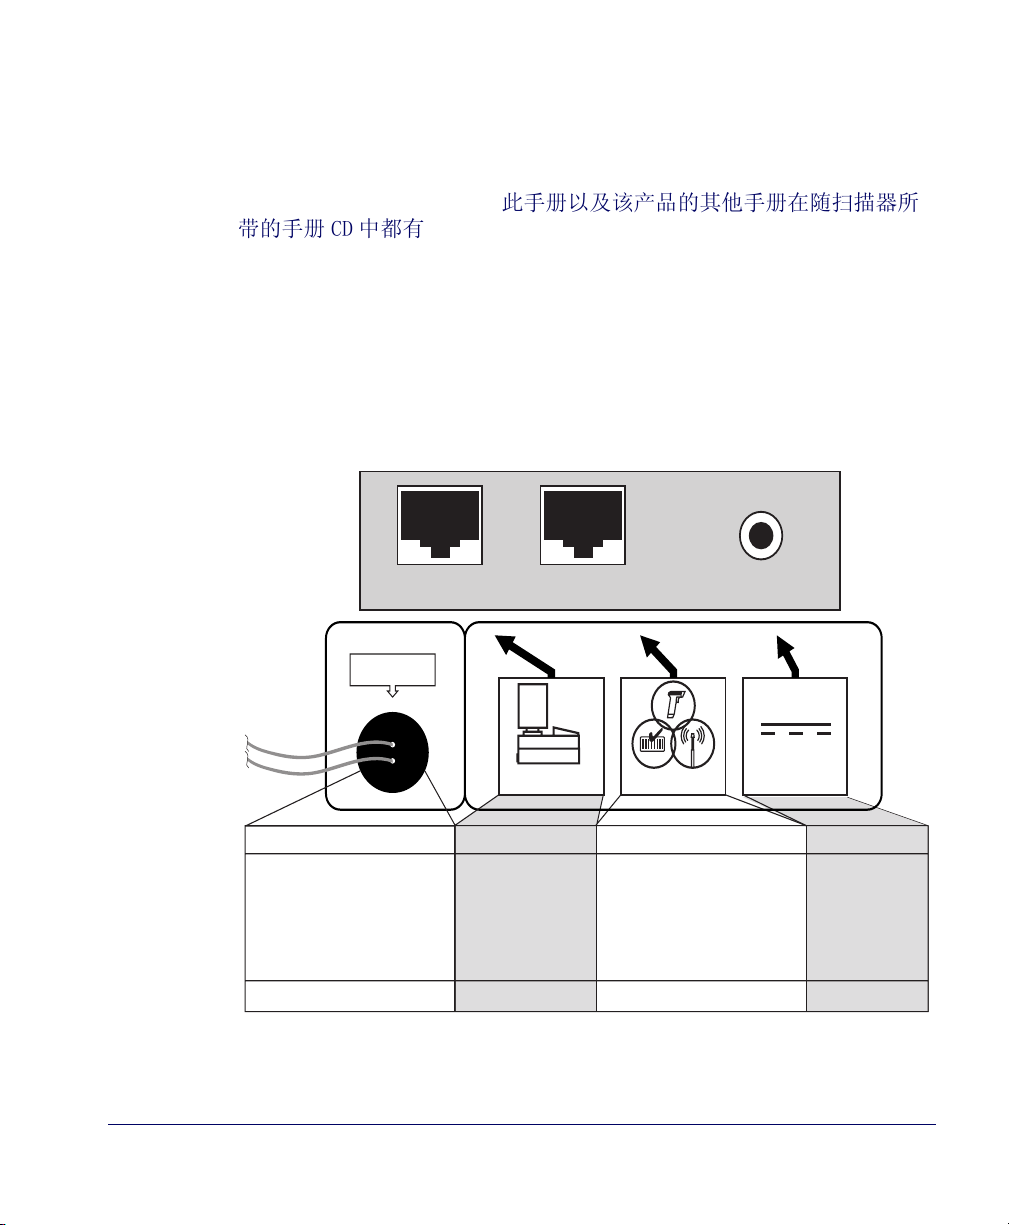
为了方便您了解,图 1 中介绍了扫描器连接及各部分的功能。
图 1. 连接
EASᦦষ
⬉⑤
⬉⑤
ʎⳈ⌕䕧ܹ
($6䖲
ʎ($6˄⬉ᄤଚકⲥ㋏㒳˅
䖲
䖲ℸッষᰃৃ䗝ⱘ
ᠿᦣ఼Џᴎ
326㒜ッ
ʎㅒ᭄
ʎᑨ⫼ᑣϟ䕑
˄བᵰ䗖⫼˅
䕙ࡽ䆒ッষ
䕙ࡽッষ
ʎ⌟䆩ッষ
ʎሣᐩ㓪˄263˅
ʎᑨ⫼ᑣϟ䕑
ʎ5ᣕᠿᦣ఼䕧ܹ
ʎ䕙ࡽ5ㅒ᭄䕧ߎ
䖲ℸッষᰃৃ䗝ⱘ
快速用户指南 25
Page 32
操作
Magellan® 2200VS/2200VS
Ω
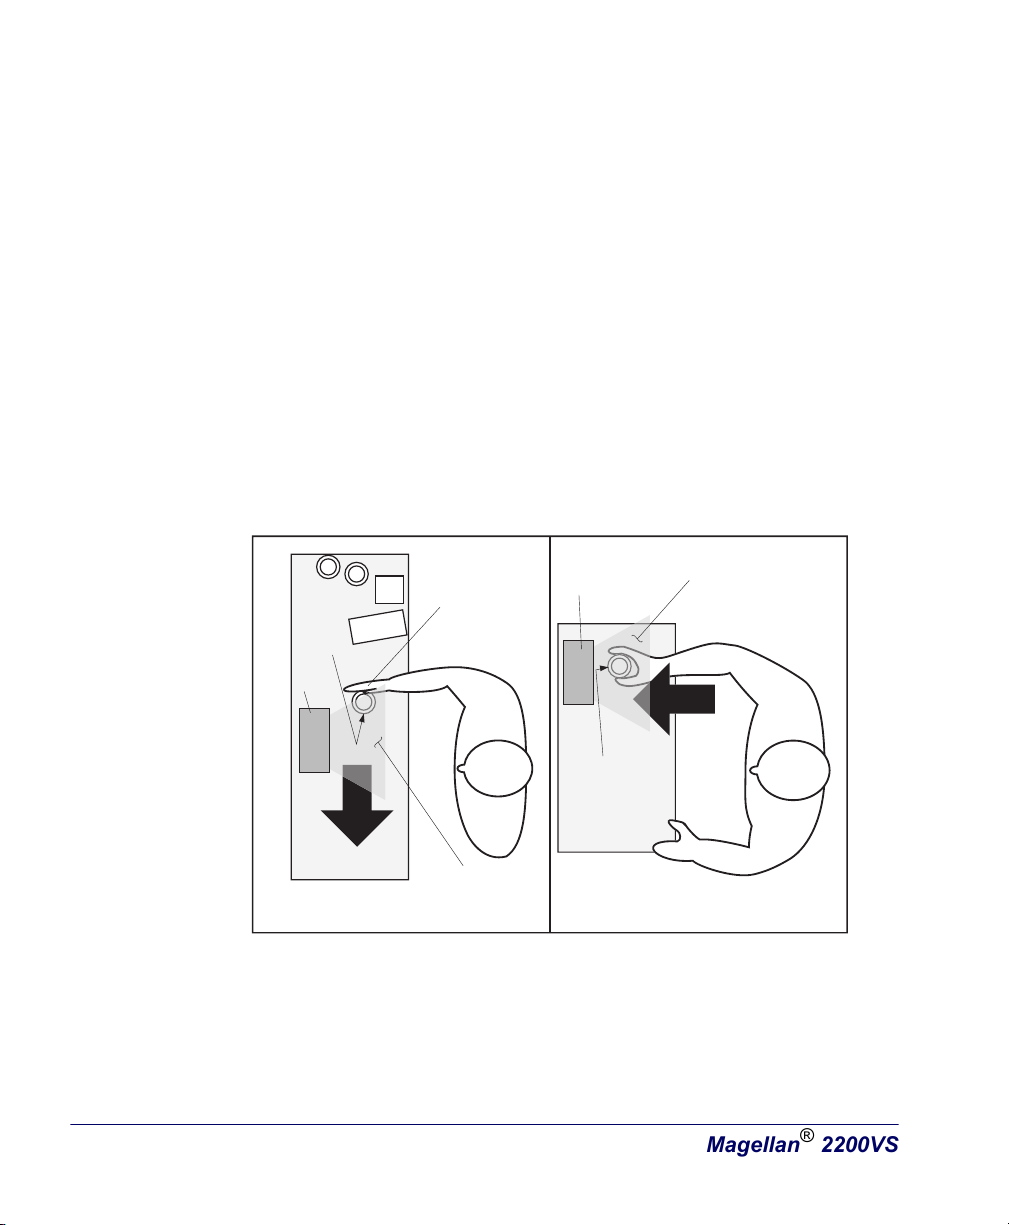
扫描单品
单品条码的扫描方式有两种 ...
• 将单品自左向右或自右向左滑过或推过扫描区 ( 见图 2 a)。这是
“扫过”式扫描,特别适用于超级市场,因为在超级市场应当尽可
能减少抓拿和搬动商品的机会。
• 将条码直接对准扫描窗 ( 见图 2b)。这种 “呈现”式扫描技术常用
在杂货店、便利店和药店里,因为在这些地方可用的柜台空间非常
珍贵,不可能采纳 “扫过”式扫描。
由于采纳了 FirstStrike
TM
解码软件,扫描器可以快速读取最难读取的条
码,且不需要更多调整物品方位。
图 2. 扫过与呈现两种扫描技术
ᠿᦣ
ଚક
ᴵⷕ
ᠿᦣ఼
ଚક㹿䖛
⒥䖛ᠿᦣ఼
ᠿᦣ
ᠿ䖛ᓣᠿᦣᮍ⊩
ᠿᦣ఼
ଚક
ᴵⷕ
⦄ᓣᠿᦣᮍ⊩
26 Magellan
®
2200VS
Page 33

音量 / 音调按钮
根据按下按钮时间的不同,音量 / 音调按钮也有多项功能:
当将扫描器关机后,使用音量 / 音调按钮对音量所作的修改会丢
失,并恢复到原来设定的状态。如果您想永久性地改变音量,请
使用 《产品指南》中的特殊编程标签。
注意
表 1-1. 音量 / 音调按钮的功能
按钮时间 功能 注解
瞬间 ( 当扫描器处于
休眠状态时 )
将扫描器唤醒
另外,还可以通过以下方式唤醒扫描器:
- 移动一件物品通过扫描区。
- 用辅助扫描器进行扫描。
瞬间按下按钮可以提高扬声器的音量。当扬声
瞬间 ( 当扫描器处于
活动状态时 )
提高音量
器到达最大音量时,继续按下按钮会使音量回
到最低,接着再按则会使音量逐步提高。音量
有 4 个等级。
按下按钮大约 2 秒钟,然后释放。每次这样
按下按钮,当听到扬
声器嘟声后释放
提高音调
做,蜂鸣器会以三种声调中的一种发出声音。
当听到想要的声调 (高、中、低)时停止按
按钮。
这种模式下系统支持人员可以对扫描器进行问
4 秒
扫描器诊断模式
a
题诊断。按下该按钮 8 秒钟或者关机后重新开
机,可以退出扫描器诊断模式和重新设置扫描
器。
8 秒
a. 为了防止用户不小心激活此项功能,该功能在标准设置下是关闭的。
b. 除非有受过训练的系统支持人员的指导,用户不能对扫描器进行重新设置。
重新设置扫描器
b
只有系统支持人员才能对扫描器进行重新设
置。
快速用户指南 27
Page 34
绿色指示灯
Magellan® 2200VS/2200VS
Ω
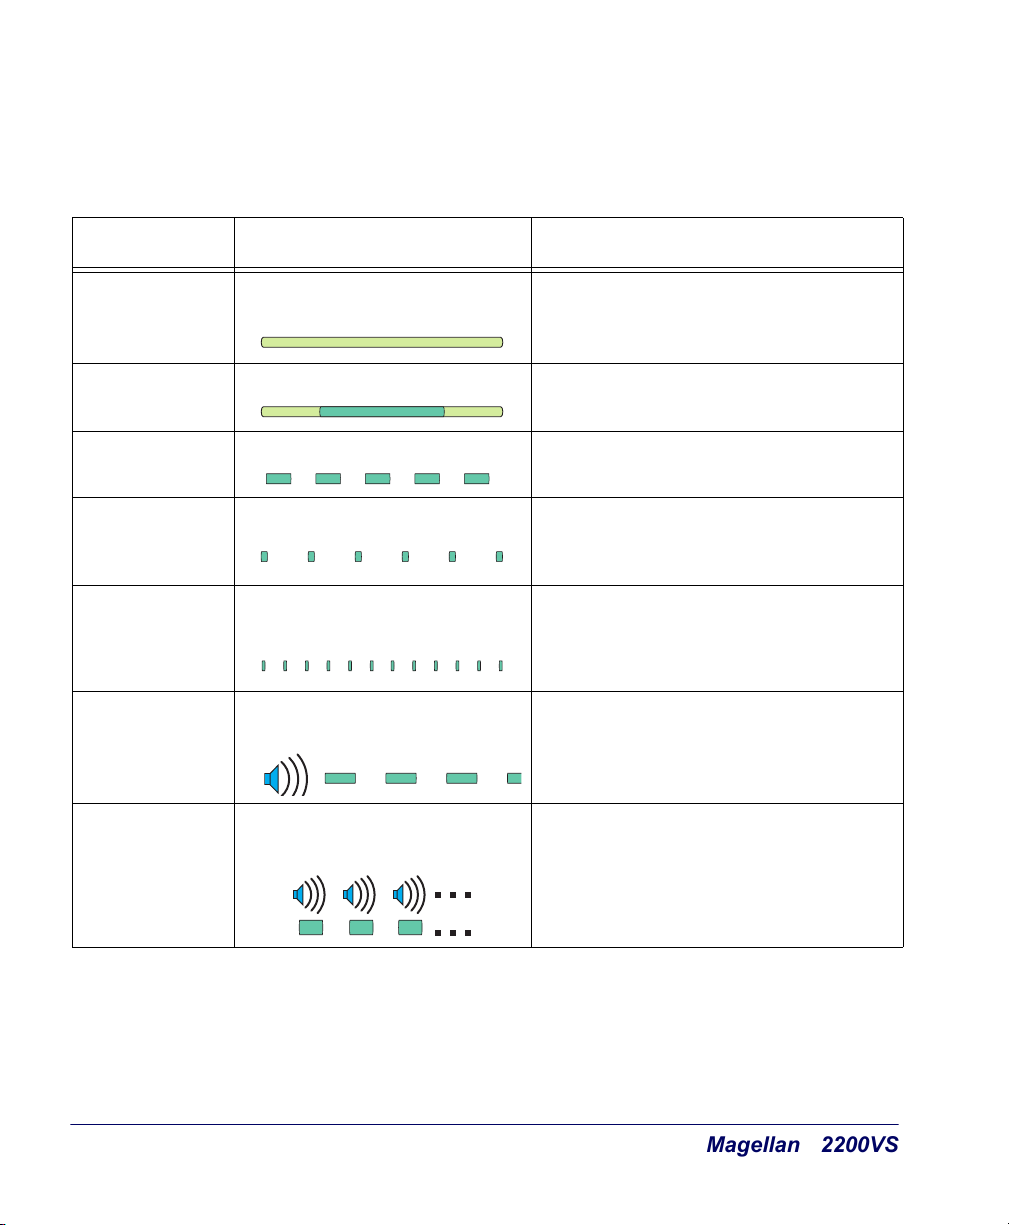
绿色指示灯所表示的扫描器状态如下表所列:
表 1-2. 绿色指示灯指示
表示内容 持续时间 注解
扫描器处于活
a
动状态
( 正常模式 )
读取正确 a
编程模式
休眠模式
主机禁用
现场可换部件
(FRU) 警告 ( 故
障模式 )
FRU 指示
扫描器绿色指示灯连续发光且
灯光暗淡
扫描器绿色指示灯亮闪一次
扫描器绿色指示灯连续闪烁
绿色指示灯每两秒闪烁一次
扫描器指示灯 1 秒钟关, 1/10
秒亮
发出低音调声响 1 秒钟。指示
灯连续闪烁。
扫描器绿色指示灯连续闪烁,
与扬声器的报警声交替回应。
扫描器准备就绪,可以随时工作。
表明条码已被读取和解码。
表明扫描器处在标签编程模式。关机后
再开机可以退出该模式。
由于长时间闲置,扫描器马达和 / 或激
光器已经自动关闭,系统进入休眠模
式。
主机禁止扫描。
表示发现致命的 FRU 故障。请给系统
支持人员打电话寻求帮助。
只有当按下音量 / 音调按钮后出现 FRU
警告时才会出现。请维修技术人员查找
FRU 故障。
a. 您可以选择启动或禁用指示灯的某些功能,但是您的扫描器可能不会显示所有的指示。
28 Magellan
®
2200VS
Page 35
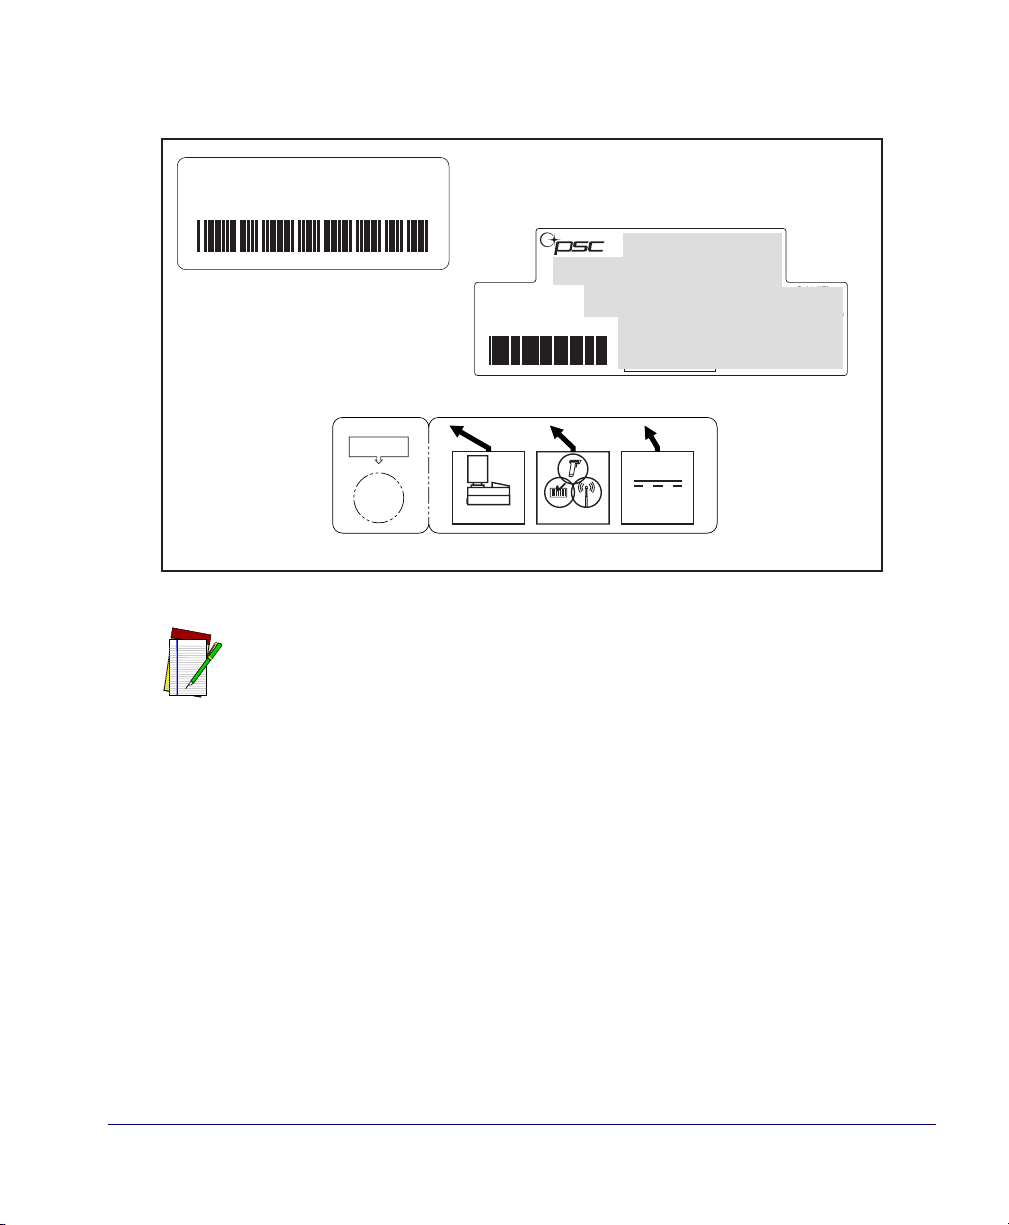
Appendix A. Product Labeling
IEC CLASS 1 LASER PRODUCT
Class IIa Laser Product. Avoid long term viewing of direct
laser light. Appareil á laser de classe IIa. Eviter toute
exposition prolongée de la vue à lumière laser directe.
NOTE
6-1018
This device complies with Part 15 of the FCC Rules.
Operation is subject to the following two conditions:
(1) this device may not cause harmful interference, and
(2) this device must accept any interference received,
including interference that may cause undesired operation.
THIS LASER PRODUCT COMPLIES WITH 21CFR 1040 AS APPLICABLE AS A CLASS IIA PRODUCT
This Class A digital apparatus complies with Canadian ICES-003.
Cet appareil numérique de la Classe A est confirme à la norme NMB-003 du Canada.
PSC Inc.
959 Terry Street
Eugene, OR 97402 USA
XXXXXXXXXXXX
6-1012
Use ONLY PSC INC. AC/DC Power Supply
Input: 50 - 60 Hz (0.5 - 0.25A)
100 - 240VAC (P/N 8-0582)
Power: 18 Watts (max)
Pro
moni
d
uc
tion
t
or
Safety
ed
tested
CAUTION - CLASS 3R LASER RADIATION WHEN OPEN.
PRODUCT SERVICE
NRTL
COVERED BY ONE OR MORE OF THE FOLLOWING U.S. PATENTS: 4,709,195
4,709,369 4,712,853 4,749,879 4,786,798 4,792,666 4,798,943 4,799,164
Output:
4,816,660 4,861,972 4,861,973 4,866,257 4,868,836 4,879,456 4,963,719
+5V
4,991,692 5,144,118 5,179,270 5,198,649 5,247,162 5,229,588 5,410,108
+12V
5,459,308 5,440,110 5,475,207 5,493,108 5,705,802 5,723,852 5,834,708
Product of USA
U S
AVOID DIRECT EYE EXPOSURE.
N263
EAS Opening
Scanner Host PowerAux. Port
Labels are shown here to illustrate their location only. Please view the labels
on your product for actual details.
Quick Reference Guide 29
Page 36

Appendix B — Productivity Index Reporting Option
Productivity Index Reporting™ Option.
the optional Productivity Index Reporting
Your scanner may be equipped with
™
feature. This feature allows for data
collection on the readability index of bar codes scanned by the scanner. This data
may be transmitted to the POS Terminal where it may be easily sorted for action
by the MIS department to improve bar code quality at the front end.
For additional information on how to enable Productivity Index Reporting in your
scanner, please refer to the Product Reference Guide (PRG)
Option "Productivity Index Reporting™".
Votre scanner peut être équipé de
l'option "Productivity Index Reporting™" qui permet la collecte de données sur
l'index de lecture des codes à barres scannés. Ces données peuvent être transmises
vers le Terminal POS où elles pourront être facilement exploitables par le service
informatique afin d'améliorer la qualité du code à barres en rayon.
Pour plus d'informations sur la manière d'activer PIR sur vos scanners, merci de
vous reporter au Product Reference Guide (PRG).
Productivity Index Reporting™ Option.
Ihr scanner kann optional mit der
Funktion Productivity Index Reporting™ ausgestattet werden. Diese Funktion
sammelt Daten zur Lesbarkeit von Barcodes. Diese Daten können ans POS Terminal übermittelt werden. Dort können die Daten durch die MIS Abteilung zur Verbesserung der Barcodequalität sortiert werden.
Für weitere Informationen, wie Sie das Productivity Index Reporting in Ihrem
Scanner aktivieren können, entnehmen Sie dem Product Reference Guide (PRG).
Opzione Indice di Produttività.
Productivity Index Reporting
™
Il scanner può essere fornito con l'opzione
. Quest'opzione permette il controllo della qualità
dei barcode letti dello scanner. Questi dati possono essere trasmessi al POS dove
possono essere facilmente analizzati dai sistemi informativi per migliorare la qualità
dei barcode stessi.
Per maggiori informazioni su come abilitare il Productivity Index Reporting nel
scanner far riferimento al Product Reference Guide (PRG).
30 Magellan
®
2200VS/2200VSΩ
Page 37

Opcion de Productivity Index Reporting.
Su escaner puede ser epuipado
con el opcional Indice de Productivity Index Reporting™. Esta funcion permite
colectar datos en el indice de la lectura de los codigos de barras por el escaner. Estos
datos pueden ser transmitidos a la Terminal POS donde puede ser facilmente clasificado por el departamento de MIS para meforar la calidad de el codigo de barra
en la parte frontera.
Para informacion adicional en como abilitar su escaner con el Indice de Productividad Reportada, por favor referirse a la Guia de Referencia de el Producto (PRG).
Opção de Informe de Índice de Produtividade (Productivity Index
TM
).
Reporting
O seu scanner pode estar equipado com a opção do Informe de
Índice de Produtividade. Esta opção permite coletar o dado do índice de leitura
dos códigos de barras lidos pelo scanner. Este dado pode ser transmitido para o terminal PDV, aonde pode ser fácilmente depurado para ações pelo Departamento de
Sistemas para melhorar a qualidade dos códigos de barras na frente de caixas.
Para informações adicionais ou como habilitar o Informe do Índice de Produtividade em seu scanner, por favor consultar o Guia de Referência do Produto (PRG Product Reference Guide).
Quick Reference Guide 31
Page 38

Appendix C. Laser Safety
International Caution Statements
Class I
English This scanner is certified in the U.S. to conform to the requirements of DHHS/CDRH 21CFR Subchapter J and to the requirements of IEC
825-1:2001.
Class I and Class IIa products are not considered to be hazardous. The scanner contains internally a Visible Laser Diode (VLD) whose
emissions do not exceed the maximum limits as set forth in the above regulations. The scanner is designed so that there is no human
access to harmful laser light during normal operation, user maintenance or during prescribed service operations.
CAUTION
• Use of controls or adjustments or performance of procedures other than those specified herein may result in hazardous laser
light.
• Do not attempt to open or otherwise service any component in the optics cavity. Opening or servicing any part of the optics
cavity by unauthorized personnel may violate laser safety regulations. The optics system is a factory only repair item.
• Use of optical instruments with the scanner will increase eye hazard. Optical instruments include binoculars, microscopes
and magnifying glasses. This does not include eye glasses worn by the user.
French Ce scanner est certifié conforme à la norme DHHS/CDRH 21CFR sous-chapitre J et à la norme IEC 825-1:2001.
Les produits de classe I et de classe II ne sont pas considérés dangereux. Le scanner contient une diode laser visible (VLD) dont les émissions ne dépassent pas les limites prescrites dans les normes précitées. Le scanneur est conçu de façon à ce qu’il ne soit pas possible
d’accéder à la lumière laser pendant l’utilisation normale, l’entretien par l’utilisateur et les fonctions de maintenance prescrites.
ATTENTION
• L’utilisation de procédures de contrôle, réglage ou utilisation autres que celles spécifiées dans ce document peut entraîner
une exposition dangereuse à la lumière du laser.
• Ne pas essayer d’ouvrir ni de réparer les composants de la cavité optique. L’ouverture ou la réparation d’une partie de la
cavité optique par une personne non qualifiée peut entraîner la violation des règles de sécurité relatives au laser. Le
système optique ne peut être réparé qu’en usine.
• Sont considérés comme instruments optiques les jumelles, les microscopes et les loupes. Les lunettes portées par l'utili-
sateur ne sont pas considérées comme tel.
German Dieser Scanner ist den in den Vereinigten Staaten geltenden Vorschriften des DHHS/CDRH 21 CFR Subchapter J und den Vorschriften
der IEC 825-1:2001 entsprechend bescheinigt.
Produkte der Klasse I oder der Klasse II sind als ungefährlich eingestuft. Im Inneren des Scanners befindet sich eine VLD (Visible Laser
Diode), deren Ausstrahlung die in den oben genannten Vorschriften angeführten Höchstgrenzen nicht überschreitet. Die Konstruktion des
Scanners garantiert, daß bei normalem Betrieb, bei Wartung durch den Benutzer oder im Laufe planmäßiger Wartungsarbeiten kein
Zugang zu schädlichem Laserlicht besteht.
VORSICHT
• Jegliche Anwendung von Streuungen, Reglern oder anderen Verfahren, die nicht in diesen Ausführungen erwähnt werden,
können eine gefährliche Laserlichtbestrahlung zur Folge haben.
• Das optische System darf nur vom Werk repariert werden. Das Öffnen oder Warten von Bestandteilen des optischen Hohl-
raums durch unbefugtes Personal verletzt die Laser-Sicherheitsbestimmungen.
• Der Gebrauch von optischen Instrumenten zusammen mit dem Scanner steigert die Gefahr der Augenschädigung. Zu optis-
chen Instrumenten gehören Ferngläser, Mikroskope und Lupen, aber nicht vom Benutzer getragene Brillengläser.
Italian È stato certificato che questo scanner si conforma ai requisiti della sezione J della normativa DHHS/CDRH 21CFR, e anche ai requisiti di
IEC 825-1:2001.
I prodotti di Classe I o Classe II non sono considerati pericolosi. Lo scanner contiene al suo interno un Visible Laser Diode (VLD), diodo
laser visibile, le cui emissioni non eccedono i limiti stabiliti dalle normative sunnominate. Lo scanner è progettato in modo che non ci sia
alcun accesso alla luce dannosa del laser nel corso di uso normale, di manutenzione da parte dell’utente o durante la manutenzione periodica stabilita.
32 Magellan
®
2200VS/2200VSΩ
Page 39

ATTENZIONE
• l’uso di comandi o di procedure diversi da quelli specificati in questa sede possono causare l’esposizione ad una luce laser
pericolosa.
• evitare di tentare di aprire o riparare dei componenti nella cavità ottica. L’apertura o la riparazione della cavità ottica da parte
di persone non autorizzate può essere in violazione dei regolamenti di sicurezza relativi all’impiego di raggi laser. Il sistema
ottico può essere riparato soltanto in fabbrica.
• l’impiego di strumenti ottici assieme al lettore fa aumentare il rischio di danni alla vista. Il termine “strumenti ottici” sta ad indi-
care binocoli, microscopi o lenti d’ingrandimento, ma esclude eventuali occhiali da vista indossati dall’utilizzatore.
Danish Denne scanner opfylder de amerikanske krav stillet i "DHHS/CDRH 21CFR Subchapter J" og opfylder også de krav, der stilles i IEC
825-1:2001.
Klasse I eller klasse II produkter anses for at være sikre. Scanneren indeholder en Visible Laser Diode (VLD), der ikke overskrider maksimumgrænserne, som beskrevet i ovenstående reglement. Scanneren er konstrueret, så der ikke er nogen menneskelig kontakt medskadelige niveauer af laserbestråling under normal brug, normal vedligeholdelse eller under foreskrevet servicering.
ADVARSEL
• Udførsel af eftersyn eller justeringer eller anvendelse af andre procedurer end foreskrevet i vejledningen, kan medføre at
man udsættes for skadeligt laser lys.
• Forsøg ikke at åbne eller på anden vis udføre service på komponenter i det optiske hulrum. Uautoriseret åbning eller service
af dele af det optiske hulrum, kan betyde overtrædelse af Laser sikkerheds regulativerne. Det optiske system må kun repareres af fabrikken.
• Brug af optiske instrumenter med scanneren vil forøge faren for øjenbeskadigelser. Optiske instrumenter indbefatter kik-
kerter, mikroskoper og forstørrelsesglas. Det indbefatter ikke briller båret af brugeren.
Dutch Deze scanner is in de V.S. goedgekeurd en voldoet aan de vereisten van DHHS/CDRH 21CFR Subchapter J een aan de vereisten van IEC
825-1:2001.
Producten van klasse I (Class I) en klasse II (Class II) worden niet geacht gevaarlijk te zijn.
De scanner bevat een inwendige Visible Laser Diode (VLD) waarvan de emissies de maximumgrenzen van bovenstaande reglementen
niet overschrijden.
De scanner is zo ontworpen dat men bij normaal gebruik, onderhoud of tijdens het uitvoeren van de voorgeschreven onderhoudswerkzaamheden niet aan schadelijke niveaus wordt blootgesteld.
WAARSCHUWING
• Men kan aan gevaarlijk laserlicht worden blootgesteld als de apparaten niet goed worden bediend of afgesteld, of als de pro-
cedures niet worden uitgevoerd zoals hierin beschreven staat.
• Probeer niet om onderdelen in de opticaruimte te openen of er op enige wijze onderhoud aan uit te voeren. Openen of
onderhoud van onderdelen van de opticaruimte door onbevoegd personeel kan in strijd zijn met de laserveiligheidsreglementen. Het opticasysteem mag alleen in de fabriek worden gerepareerd.
• Gebruik van optische instrumenten met de scanner vergroot het gevaar dat de ogen aan schadelijke niveaus van laserlicht
worden blootgesteld. Optische instrumenten zijn onder meer verrekijkers, microscopen en vergrootglazen. Zo de gebruiker
een bril draagt, valt die niet onder optische instrumenten.
Swedish Denna scanner uppfyller de amerikanska kraven DHHS/CDRH 21CFR Subchapter J samt kraven i IEC 825-1:2001.
Produkter i Klass I (Class I) och Klass II (Class II) anses ej farliga. Scannern är utrustad med en intern, synlig laserdiod (Visible Laser
Diode - VLD) vars emission inte överstiger max. värdena i ova stående säkerhetsföreskrifter. Scannern har konstruerats så att personer vid
normal användning, bruksunderhåll och föreskriven service inte utsätts för skadlig laserstrålning.
VARNING
• Om apparaten används på annat sätt än som specificerats i denna bruksanvisning kan användaren utsättas för farlig laser-
strålning.
• Försök inte öppna eller reparera komponenter i den optiska kammaren. Om icke auktoriserad personal öppnar eller repar-
erar delar i den optiska kammaren, kan detta vara ett brott mot säkerhetstföreskrifterna för laserutrustning. Det optiska systemet får endast repareras i fabriken.
• Om optiska instrument används tillsammans med scannern ökar risken för ögonskador. Optiska instrument omfattar kikare,
mikroskop och förstoringsglas. Glasögon som bärs av användaren omfattas ej av detta.
Quick Reference Guide 33
Page 40

Finnish Tämä tutkain on hyväksytty Yhdysvalloissa vastaamaan DHHS/CDRH 21CFR Subchapter J luokka II ja 825-1:2001 IEC-vaatimuksia.
Luokka I tai Luokka II tuotteiden ei katsota olevan vaarallisia. Tutkain sisältää sisäisen näkyvän laserdiodin (Visible Laser Diode (VLD),
jonka päästöt eivät ylitä yllä olevien säädösten asettamia maksimirajoja. Tutkain on suunniteltu siten, etteivät ihmiset altistu vaaralliselle
lasersäteilylle normaalikäytön, käyttäjän suorittaman huollon tai ohjeiden mukaisten huoltotoimenpiteiden aikana.
VAR OIT US
• Laitteen käyttö tai sääto muuten kuin näiden ohjeiden mukaan, voi aiheuttaa vaarallista laservaloa.
• Älä yritä avata tai muuten huoltaa mitään komponentteja optisessa osassa. Mikäli epäpätevä henkilö korjaa tai avaa jonkin
komponentin optisessa osassa, voidaan tämän katsoa olevan rikkomus turvallisuusohjeita vastaan. Optinen systeemi on
osa, joka voidaan korjata ainoastaan tehtaaalla.
• Optisten laitteiden käyttö tutkaimen kanssa lisää silmien vaaraa. Optisiin laitteisiin kuuluu mm. kiikarit, mikroskoopit ja
suurennuslasit. Käyttäjän silmälasit eivät kuulu näihin laitteisiin.
Norwegian Denne skanneren er godkjent i USA i samsvar med retningslinjene for DHHS/CDRH 21CFR, avsnitt J, og til IEC-kravene 825-1:2001.
Produkter i klasse I eller klasse II ansees ikke som helsefarlige. Skanneren inneholder en innvendig, synlig laserdiode (VLD, Visible Laser
Diode), som ikke overskrider maksimalgrensene som er fastsatt i retningslinjene ovenfor. Skanneren er konstruert, slik at personer ikke
utsettes for farlige doser med laserstråler ved normal drift, brukers vedlikehold eller ved foreskrevet service.
ADVARSEL
• Bruk av kontroller eller justeringer, eller utføring av andre prosedyrer enn de som er spesifisert her, kan føre til at man
utsettes for livsfarlige laserstråler.
• Forsøk ikke å åpne eller på annen måte reparere komponenter i det optiske kammeret. Ingen del av det optiske kammeret
må åpnes eller repareres av ikke-autorisert personale, da dette kan krenke forskrifter for sikker bruk av laserstråler. Det
optiske systemet kan bare repareres på fabrikken.
• Bruk av optiske instrumenter sammen med skanneren øker mulighetene for øyenskade. Optiske instrumenter, omfatter kik-
kert, mikroskop og forstørrelsesglass. Vanlige briller regnes ikke med i denne kategorien.
Portuguese Este scanner foi certificado nos EUA para atender os requisitos do subcapítulo J do DHHS/CDRH 21 CFR e os requisitos do IEC 825-
1:2001.
Os produtos da Classe I ou Classe II não são considerados perigosos. O scanner contém internamente um Diodo de Laser Visível (VLD Visible Laser Diode) cujas emissões não ultrapassam os limites definidos nos regulamentos mencionados acima. O scanner foi projetado
de maneira que não exista acesso humano à luz de laser nociva durante a operação normal, manutenção pelo usuário ou durante as operações recomendadas de serviço.
CUIDADO
• O uso de quaisquer controles, ajustes ou procedimentos além dos aqui especificados pode resultar em exposição perigosa
à luz laser.
• Não tente abrir a cavidade ótica nem consertar, de forma alguma, qualquer de seus componentes. A abertura da cavidade
ótica, ou o conserto de qualquer uma de suas peças por pessoal não autorizado poderá violar as normas de segurança do
sistema de laser. O sistema ótico só poderá ser consertado pelo fabricante.
• O uso de instrumentos óticos com o scanner aumenta o perigo aos olhos. Instrumentos óticos incluem binóculos, microscó-
pios e lentes de aumento. Estes não incluem os óculos do próprio usuário.
Spanish Este escáner está certificado en los EE.UU. porque reúne los requisitos DHHS/CDRH 21CFR Sección J y los requisitos de IEC 825-
1:2001.
Los productos de Clase I o Clase II no se consideran como peligrosos. El escáner tiene en su interior un Diodo Láser Visible (VLD) cuyas
emisiones no exceden los límites máximos fijados en los reglamentos mencionados anteriormente. El escáner está diseñado de modo que
las personas no tengan acceso a la luz láser peligrosa durante la operación normal, el mantenimiento por parte del usuario o durante las
operaciones de servicio prescritas.
PRECAUCIÓN
• el uso de controles o ajustes o la ejecución de procedimientos diferentes de los aquí especificados puede dar lugar a luz
láser peligrosa.
• no trate de abrir o prestar servicio en forma alguna a ningún componente en la cavidad óptica. La apertura o reparación de
cualquier parte de la cavidad óptica por personal no autorizado puede infringir las regulaciones de seguridad láser. El
sistema óptico se puede reparar únicamente en la fábrica.
• el uso de instrumentos ópticos junto con el escáner, incrementará el daño visual. Los instrumentos ópticos incluyen los
prismáticos, microscopios y lentes de aumento. Éstos no incluyen las gafas que lleve el usuario.
34 Magellan
®
2200VS/2200VSΩ
Page 41

Chinese
Japanese
Quick Reference Guide 35
Page 42

Hebrew
36 Magellan
®
2200VS/2200VSΩ
Page 43

NOTES
Quick Reference Guide 37
Page 44

Appendix D. Warranty
Warranty
PSC warrants to Customer that PSC's products will be free from defects in materials and workmanship for a period of
1 year from product shipment. In order to obtain service under this Warranty, Customer must notify PSC of the claimed
defect before the expiration of the Warranty period and obtain from PSC a return authorization number for return of the
product to designated PSC service center. If PSC determines Customer’s claim is valid, PSC will repair or replace
product without additional charge for parts and labor. Customer shall be responsible for packaging and shipping the
product to the designated PSC service center, with shipping charges prepaid. PSC shall pay for the return of the product to Customer if the shipment is to a location within the country in which the PSC service center is located. Customer shall be responsible for paying all shipping charges, duties, taxes, and any other charges for products returned
to any other locations.
Warranty is subject to the limitations and exclusions set forth in the paragraphs that follow.
WARRANTY SET FORTH ABOVE IS IN LIEU OF ANY OTHER WARRANTIES, EXPRESS OR IMPLIED, INCLUD-
ING MERCHANTABILITY AND FITNESS.
Exclusions
Warranty coverage shall not apply to any claimed defect, failure or damage which PSC determines was caused by:
improper use of product; failure to provide product maintenance, including but not limited to cleaning of the upper window in accordance with product manual; installation or service of product by other than PSC representatives; use of
product with any other instrument, equipment or apparatus; modification or alteration of product. External cables and
replacement of upper window/cartridge due to scratching, stains or other degradation will not be covered under the
Warranty. External power supplies returned for service must be accompanied by the original product for performance
of service.
Limitation of Liability
PSC's REPAIR OR REPLACEMENT OF DEFECTIVE PRODUCT AS SET FORTH ABOVE IS THE CUSTOMER’S
SOLE AND EXCLUSIVE REMEDY ON ACCOUNT OF CLAIMS OF BREACH OF WARRANTY OR PRODUCT
DEFECT. UNDER NO CIRCUMSTANCES WILL PSC BE LIABLE TO CUSTOMER OR ANY THIRD PARTY FOR ANY
LOST PROFITS, OR ANY INCIDENTAL, CONSEQUENTIAL IN-DIRECT, SPECIAL OR CONTINGENT DAMAGES
REGARDLESS OF WHETHER PSC HAD ADVANCE NOTICE OF THE POSSIBILITY OF SUCH DAMAGES.
Assignment
Customer may not assign or otherwise transfer its rights or obligations under Warranty except to a purchaser or transferee of product. No attempted assignment or transfer in violation of this provision shall be valid or binding upon PSC.
Risk of Loss
Customer shall bear risk of loss or damage for product in transit to PSC. PSC shall assume risk of loss or damage for
product in PSC's possession or product being returned to Customer by PSC, except such loss or damage as may be
caused by the negligence of Customer, its agents or employees. In the absence of specific written instructions for the
return of product to Customer, PSC will select the carrier, but PSC shall not thereby assume any liability in connection
with the return shipment.
38 Magellan
®
2200VS/2200VSΩ
Page 45

Quick Reference Guide 39
Page 46

NOTES
40 Magellan
®
2200VS/2200VSΩ
Page 47

DECLARATION OF CONFORMITY
PSC hereby declares that the Equipment specified below has been tested and found
compliant to the following Directives and Standards:
Directives: EMC 89/336/EEC
Low Voltage 73/23/EEC
Standards: EN55022-13:1998 Generic Emissions
EN60950:2000 ITE Safety
EN55024:1998 Generic Immunity-ITE
CISPR 22-B:1997 Generic Emissions
EN60825-1:2001 Laser Safety
Equipment Type: Barcode Scanning Equipment
Product: Magellan
Brad West
Vice President
Quality and Process Management
PSC, Inc.
959 Terry Street
Eugene, OR 97402
U.S.A.
®
2200VS
Peter Lomax
Vice President
Europe, Middle East & Africa
PSC Bar Code Ltd.
Axis 3, Rhodes Way
Watford
Hertfordshire WD24 4TR
UK
Page 48

Asia Pacific
PSC Hong Kong
Hong Kong
Telephone: [852]-2-584-6210
Fax: [852]-2-521-0291
Italy
PSC S.p.A.
Vimercate (MI), Italy
Telephone: [39] (0) 39/62903.1
Fax: [39] (0) 39/6859496
Australia
PSC Asia Pacific Pty Ltd.
North Ryde, Australia
Telephone: [61] 0 (2) 9878 8999
Fax: [61] 0 (2) 9878 8688
France
PSC S.A.R.L.
LES ULIS Cedex, France
Telephone: [33].01.64.86.71.00
Fax: [33].01.64 46.72.44
Germany
PSC GmbH
Darmstadt, Germany
Telephone: 49 (0) 61 51/93 58-0
Fax: 49 (0) 61 51/93 58 58
Japan
PSC Japan K.K.
Shinagawa-ku, Tokyo, Japan
Telephone: 81 (0)3 3491 6761
Fax: 81 (0)3 3491 6656
Latin America
PSC S.A., INC.
Miami, Florida, USA
Telephone: (305) 539-0111
Fax: (305) 539-0206
United Kingdom
PSC Bar Code Ltd.
Watford, England
Telephone: 44 (0) 1923 809500
Fax: 44 (0) 1923 809 505
www.psc.com
PSC Inc.
959 Terry Street
Eugene, OR
Telephone: (541) 683-5700
Fax: (541) 345-7140
©2002-2005 PSC INC. R44-2364 (Rev. G) 5/05
 Loading...