

Page 1
Repair your PSP with this Repair Guide
PS3 Repair Guide - Don't spend Big bucks to have it fixed!
Do you have a PS3 that needs repair?
This Repair Guide contains repairs for some
of the most common PS3 Problems:
● How to clean the Blu-Ray lens in your PS3
● Fix the Blinking Playstation 3 problem
● fix the PS3 Bluetooth controller issue
● Freezing games - and Movies
● No - Display
● Other common video issues
This Guide is for you!
Page 2

Index
Index
Cover
Index
Legal Disclaimer
Disassembly
1. PS3 Disassembly
2. PS3 Controller Disassembly
Fix Common Problems
1. The Mystery of the Blinking PlayStation 3
2. The dirt on Blu-ray lens (and how to clean it)
3. PS3 Owners Report Blu-ray Problems After 1.5 Upgrade
4. PS3 Bluetooth Controller Issues
5. Playstation 3 HDMI Problem and Fix!
6. Display/Video Fixes
7. PS3 Error Codes (With Some Advice)
8. How to Change From HDMI > Composite Easier
9. PS3 3 Beep & Blinking Red Light Fix
PS3 Modifications
1. PS3 3.5" SATA HDD Mod
2. Adding IR Remote Control to the Sony PS3
3. PS3 HDD Replacement Mini-Guide
4. USB Flash Memory, USB Hard Drive (External Use)
Controller Modifications
1. PS3 Controller Light Mod
2. PS360: Microsoft Controller, Meet Sony Controller
3. PS3 Controller Light Mod 2
file:///C|/Documents%20and%20Settings/Bean/My%20Documents/My%20Webs/ps3rg/index.html (1 of 4) [11/12/2007 12:47:46 PM]
Page 3

Index
4. PS3 Controller Button Contacts, Add extra buttons to the PS3 controller
Other Modifications
1. Charging Station Headset Mod
Blu-Ray
1. Decrypt Blu-Ray Movies with a PS3 WITHOUT keys
2. Blu-Ray Unique Volume Keys
3. Blu-Ray Media Links
4. Play BluRay movies without disk FULL INSTRUCTIONS
5. Convert HD-DVD To Blu-ray (works On PS3), No Loss Of Quality
Other Media/Video
1. Set up media servers for your PS3
2. Transfer files from PC to PS3 via WmP11/Nero (via DLNA/MediaServers)
3. How to stream AVI files on PS3 via Tversity
4. Copy music/videos from your iPod to PS3
5. Getting your PS3 to recognize your External Hard Drive
6. How to create a PS3 HD-MPG from HD-TS (Best Result For Below 1.6FW)
7. How to install your game saves
8. Downloading PS3 Game Saves
Audio
1. How to connect PS3 to PC speakers
Networking
1. How to change from 'NAT type 3' to 'NAT type 2'
2. Make a Lag Switch
3. Who Needs SIMPLE DNS
4. Remote Play On-The-Go
Playstation Network
1. PSN Game Sharing Instructions
file:///C|/Documents%20and%20Settings/Bean/My%20Documents/My%20Webs/ps3rg/index.html (2 of 4) [11/12/2007 12:47:46 PM]
Page 4

Index
2. How to download Japanese Demos/Create Jap PSN account
3. Create Different Region PSN Accounts
4. View PS3 Store, Download Demos on your PC and install Demos To PS3
5. Play Online And Access Sony Store No Updating
6. View Playstation store on PC
Firmware Modifications
1. PS3 Firmware Version Check Bypassed (Linux)
2. PS3 Firmware Version Check Bypassed (Windows)
3. Ettercap Windows
4. PS3 Demonstration Mode "Unlock" Code
5. Use SIMPLEDNS To Bypass The Firmware Check (Windows)
6. How to UPDATE your PS3
Linux
1. How to install Fedora Core 6 Linux for PS3
2. PS3 Linux - The void has been filled...Full install instructions for Fedora Core 5
3. PS3 Linux FAQ
4. GUI Kboot
5. Yellow Dog Linux Free Version
6. Yellow Dog Linux 5.0 Installation
7. Partitioning and readying your PS3 for Linux
8. Gentoo
9. Uninstalling Linux
10. Installing YDL+VLC+Mplayer+Snes9x
11. Installing Mplayer on PS3
12. Installing VLC player on PS3
13. Installing "Other OS" on PS3
14. How to get Wi-Fi to work with YDL
15. Set up a Linux UPnP media server w/PS3 support
16. Run Ubuntu Linux 7.04 (Feisty Fawn) on PS3
17. Ubuntu, Kubuntu, Xubuntu, and Edubuntu onto a PlayStation 3
18. Emulate WinXP in PS3 under Linux
Downloads
1. Homebrew Loaders
Page 5

Index
2. Linux
3. Utilities
4. Firmware Updates
5. "Other OS" Bootable Homebrew
6. Drivers
7. Proof-Of-Concept Exploits
8. Game Saves
PS2/PS1 on PS3
1. Do your PS2 games look too jaggy on the PS3? Here's a semi-fix...
2. PS3 SWAP to play PS2 and PSX Games!
3. How to play/install to play PS2 backups on PS3
Miscellaneous
1. PS3 Features
2. Finding RAM locations on resistance
3. PS3 Parental Controls How-to
4. 20 ways to get the most out of your PS3
5. PS3 BiOS Flash Diagram Rev 1.0 BETA
Parts, Accessories, etc..
Previous/Next
Page 6

Legal Disclaimer
Legal Disclaimer:
Opening your PS3 will void any remaining warranty you have left on your PS3
For more repair guides click here to see my other auctions.
Page 7

Disassembly Index
Disassembly Index
PS3 Disassembly
PS3 Controller Disassembly
Previous/Next
Page 8
PS3 Disassembly
PS3 Disassembly
Taking the PS3 apart is a long and involved process, so make sure you have at least a couple of hours
to do this if it’s the first time. Also make sure you have proper lighting and the right tools.
You will need:
● Torx screwdriver
● Phillips head screw driver
● Small flathead screw driver (for removing the rubber foot)
● Somewhere with plenty of space that is well lit and that wont build up static electricity. (Mainly
anywhere but carpet)
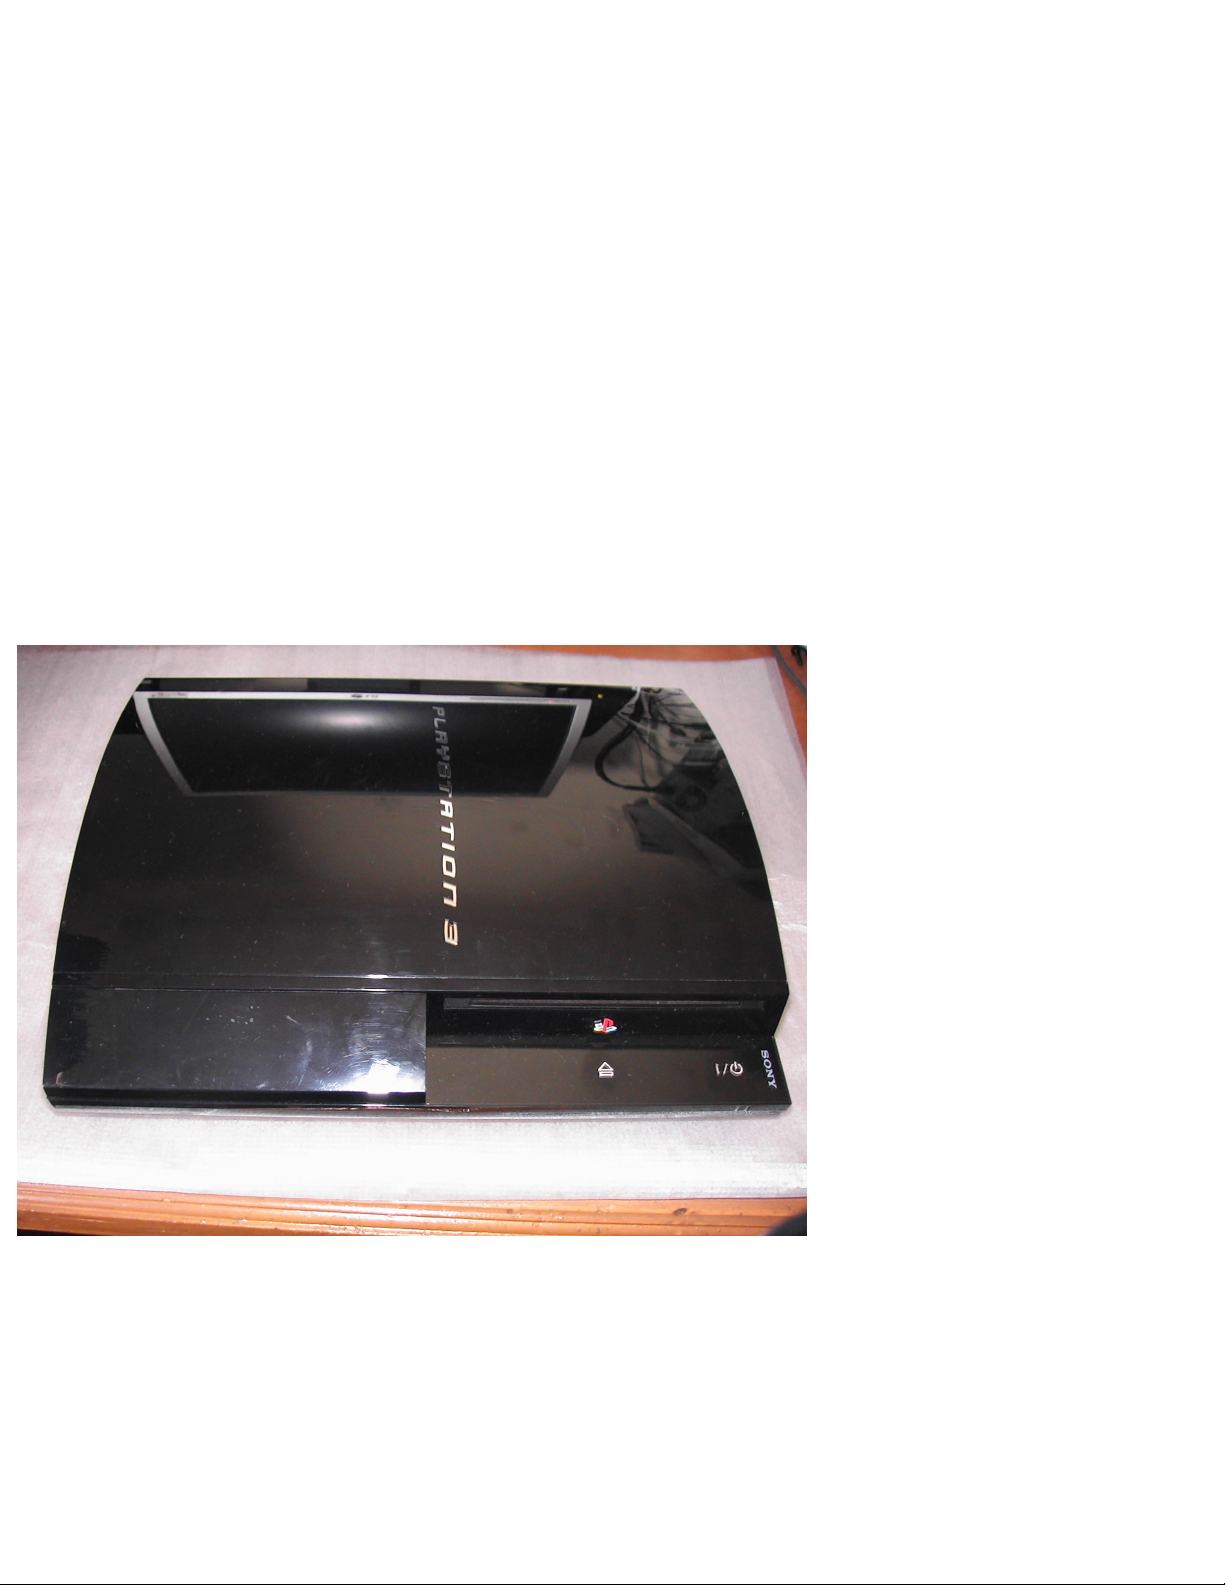
So, here we have a brand spanking new PS3…..all ready to be taken part…..
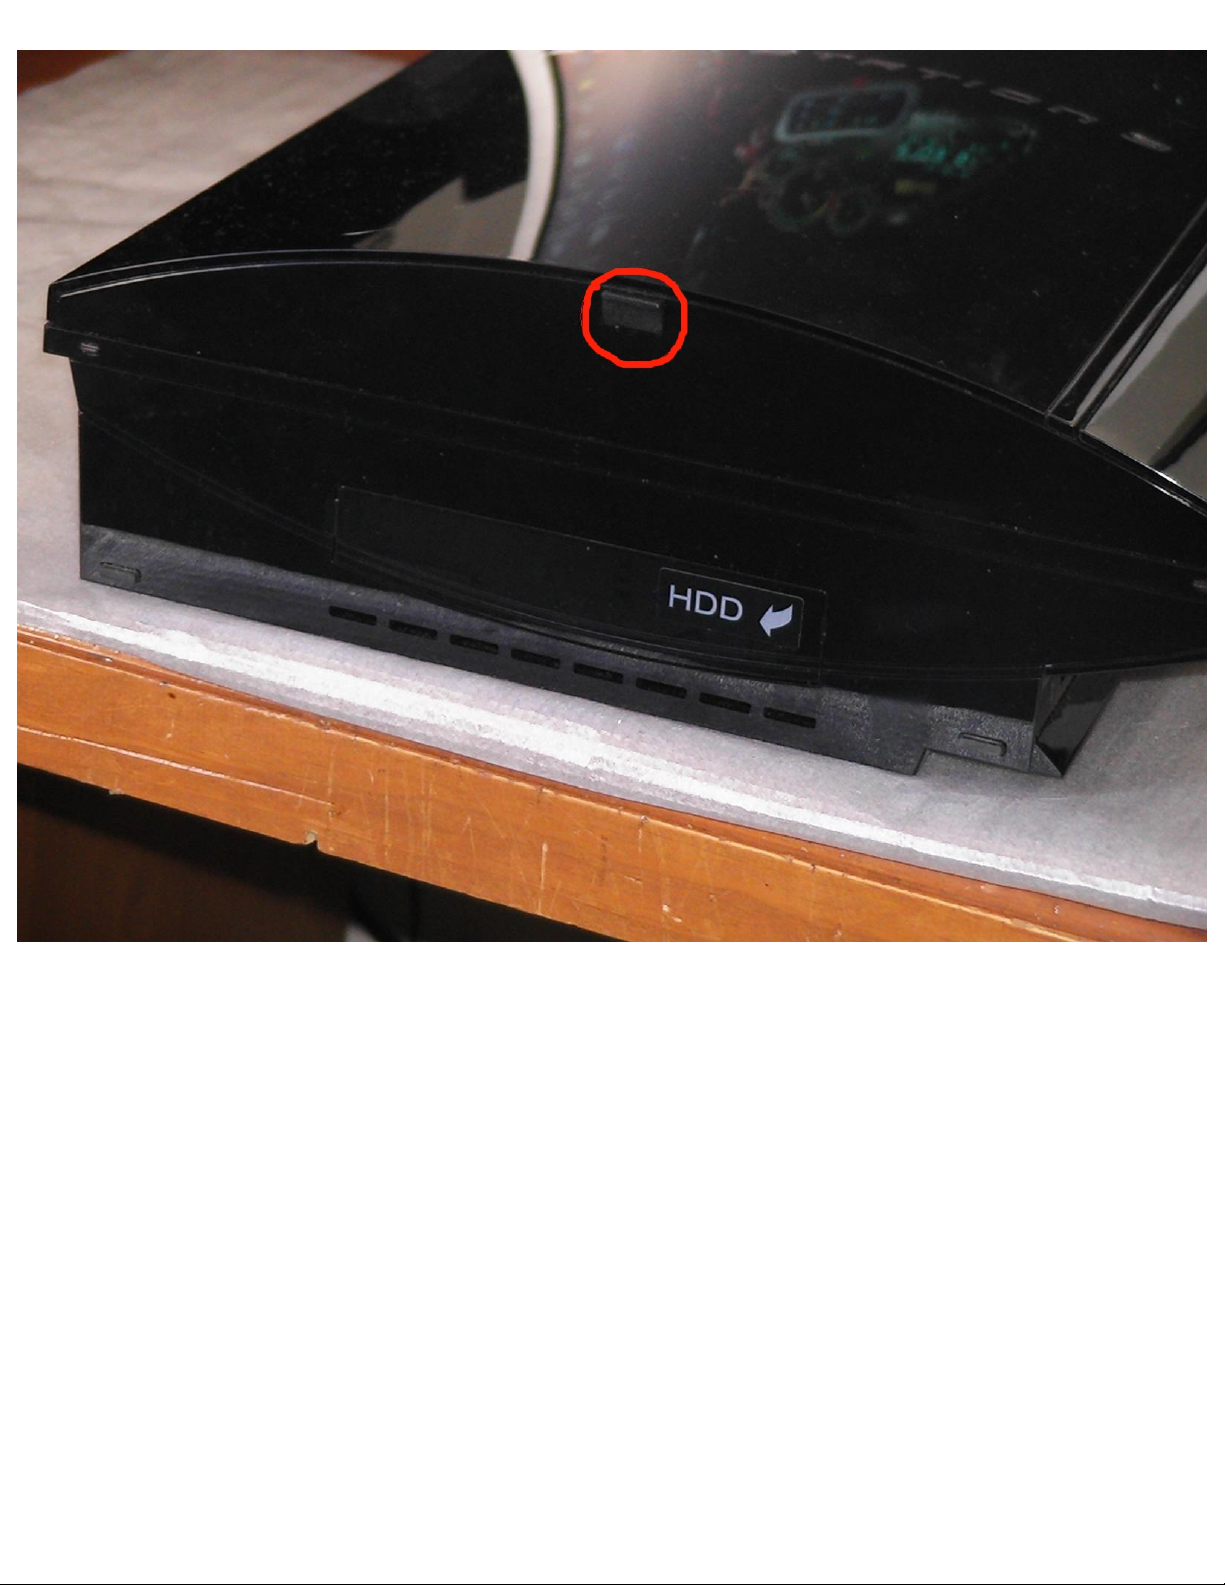
On the left side of the console you will see a few rubber feet. The first screw to be removed is
underneath the rubber foot circled in red in the pic below. The foot can be pried out with a small screw
driver. Then underneath is a Torx security screw. You will either need a Torx screwdriver, or a flat
head screwdriver that will fit in the screw.
Page 9
PS3 Disassembly
Page 10
PS3 Disassembly
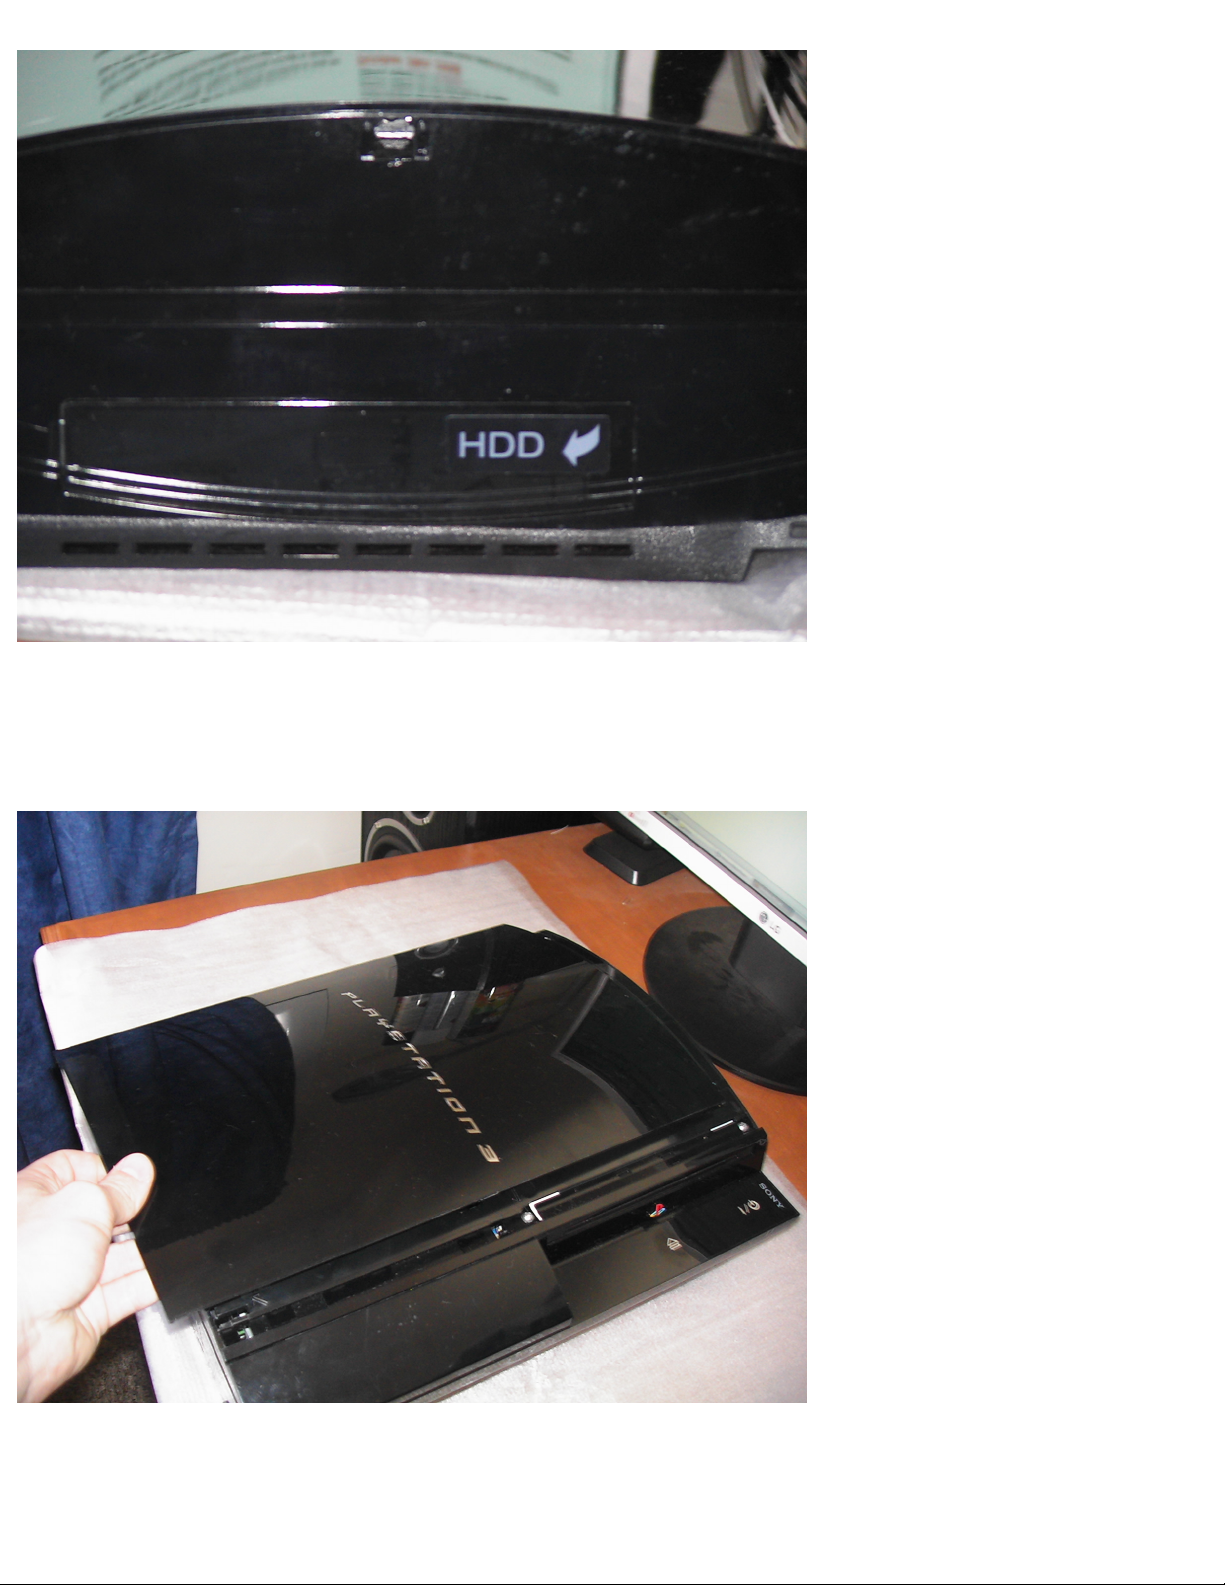
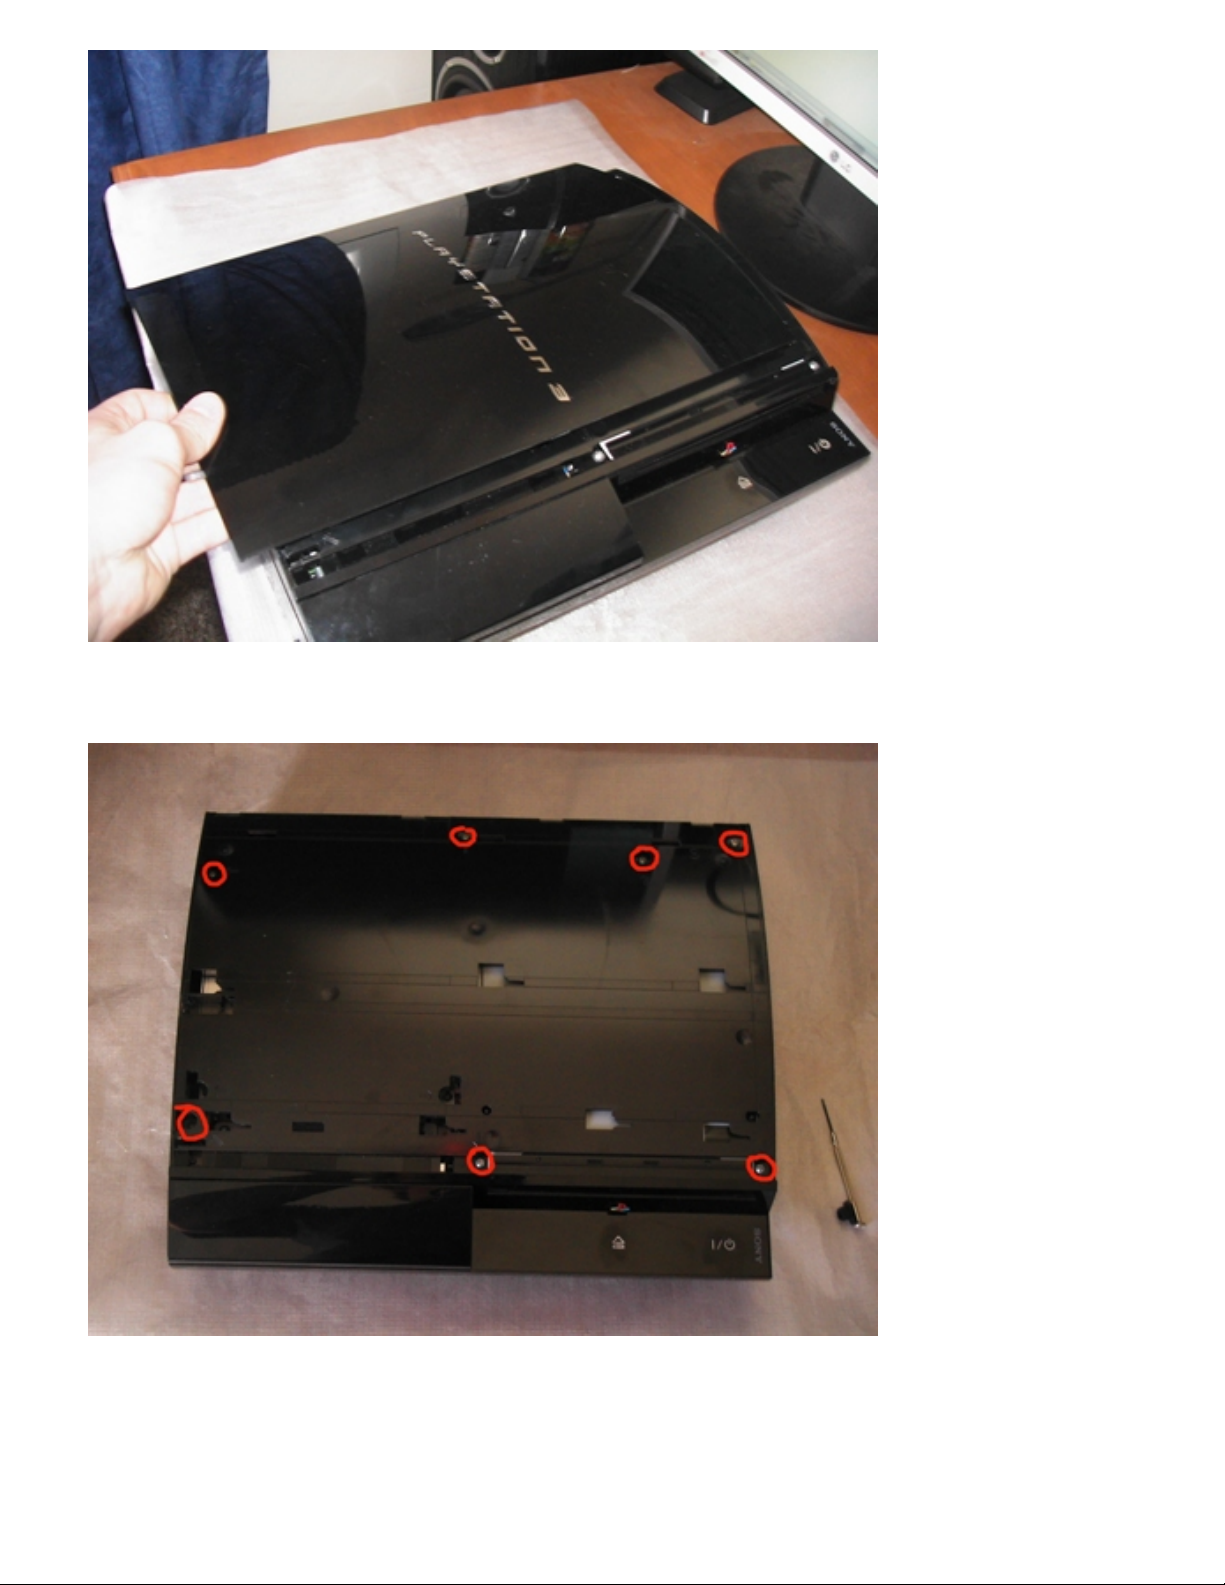
Once the screw is removed, slide the top of the case to the left. It may require a bit of force to slide if
your opening the console for the first time. After the top slides as far as it will go, lift the top and it
should come off as seen in the pic below:
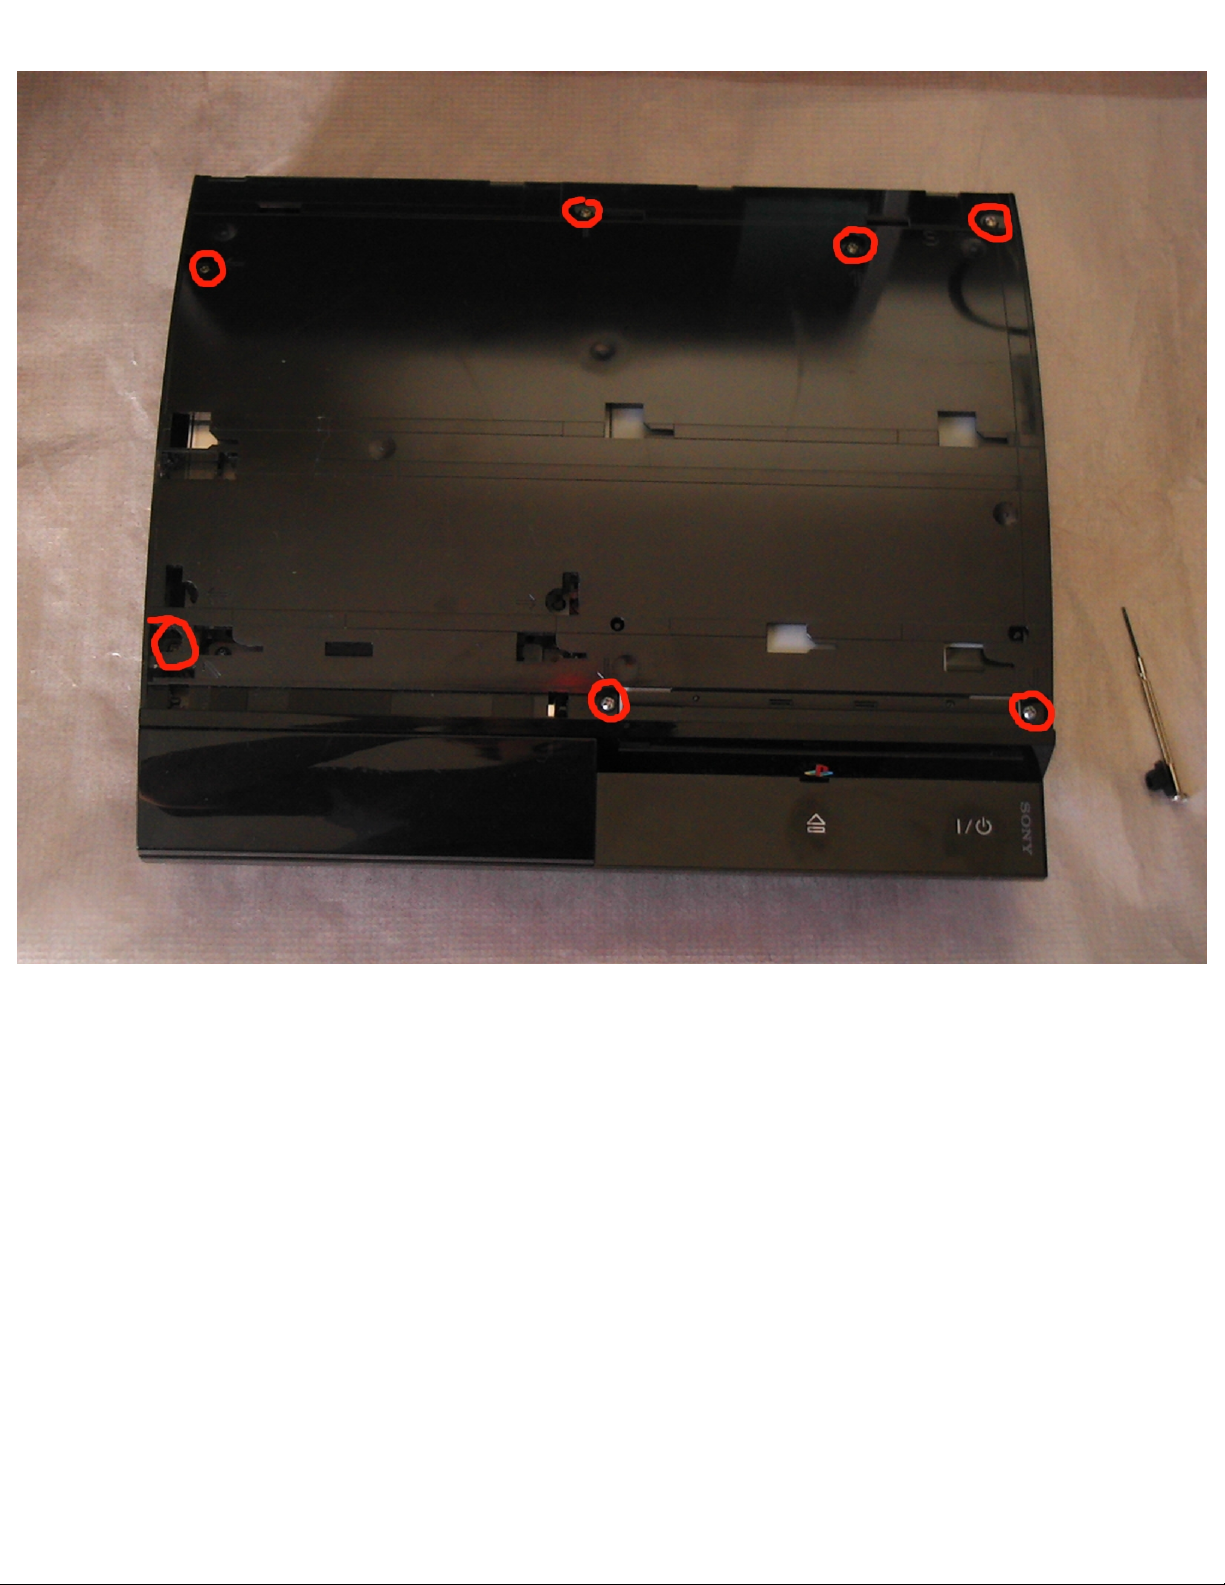
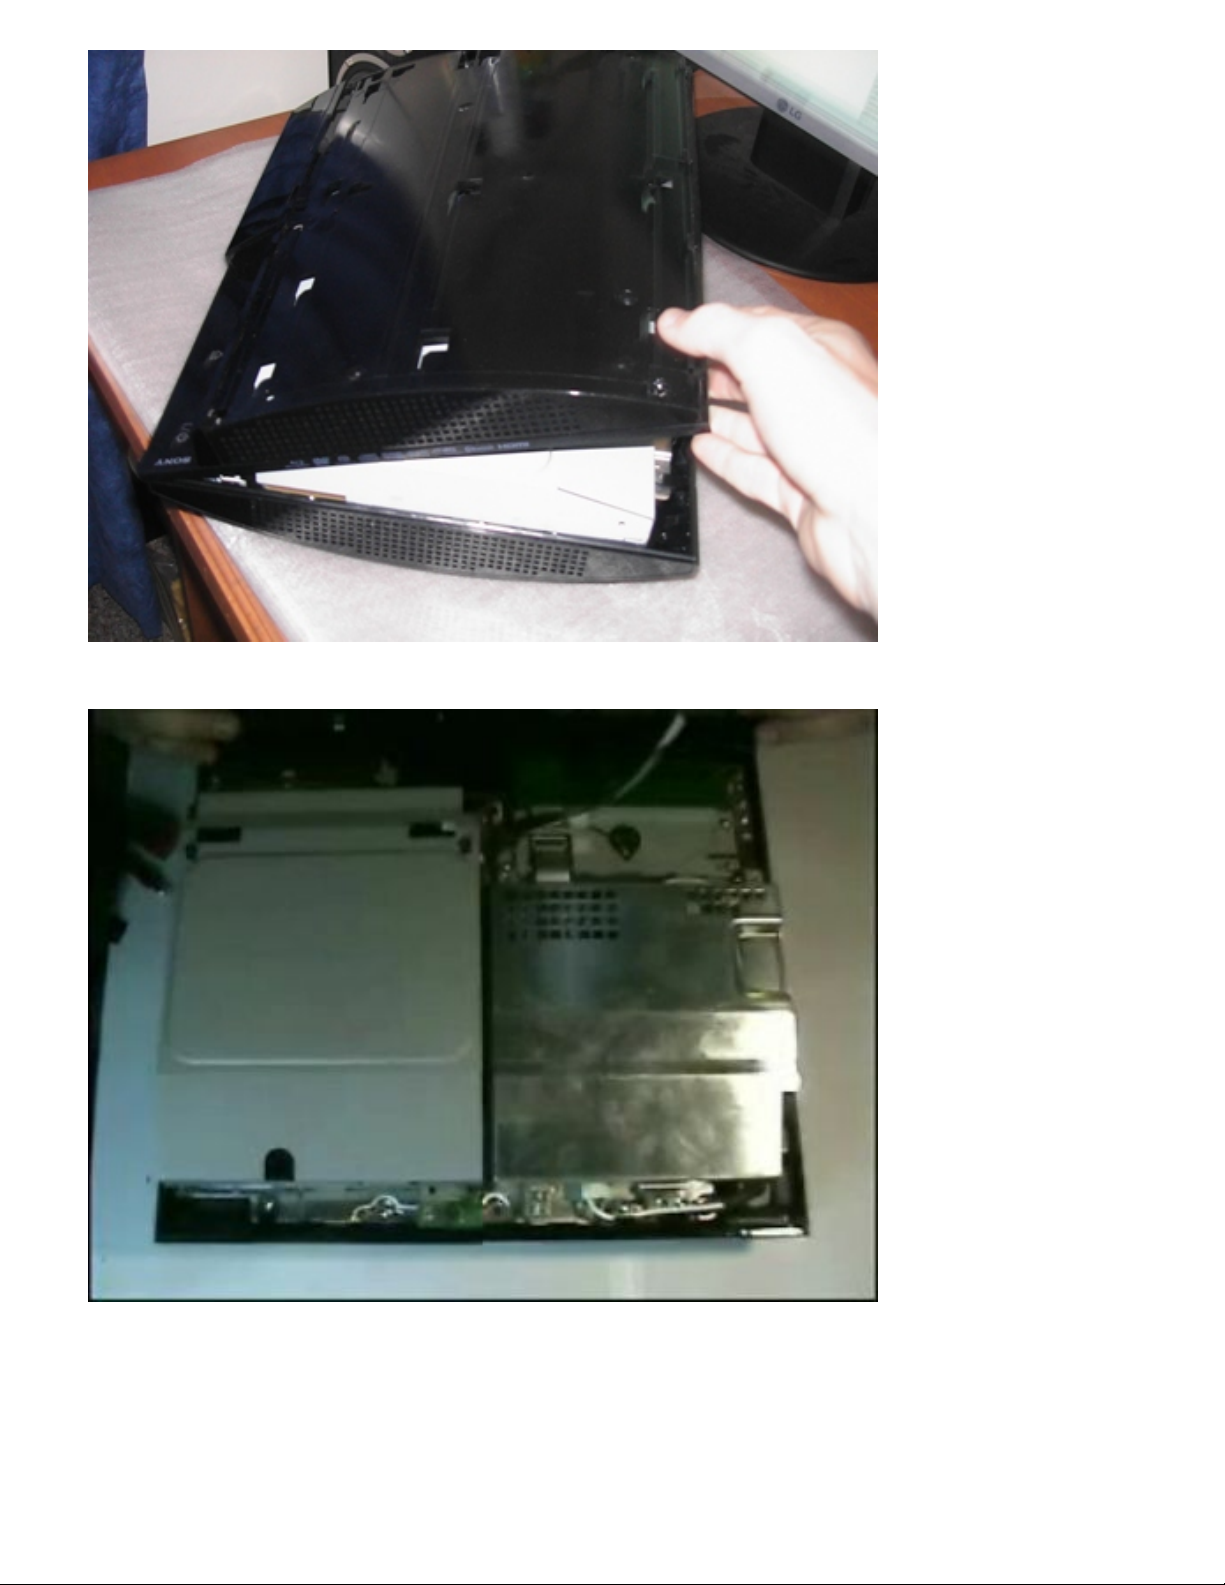
After the top is off, there will be another cover. You will need to remove the 7 long screws circled in
red.
Page 11
PS3 Disassembly
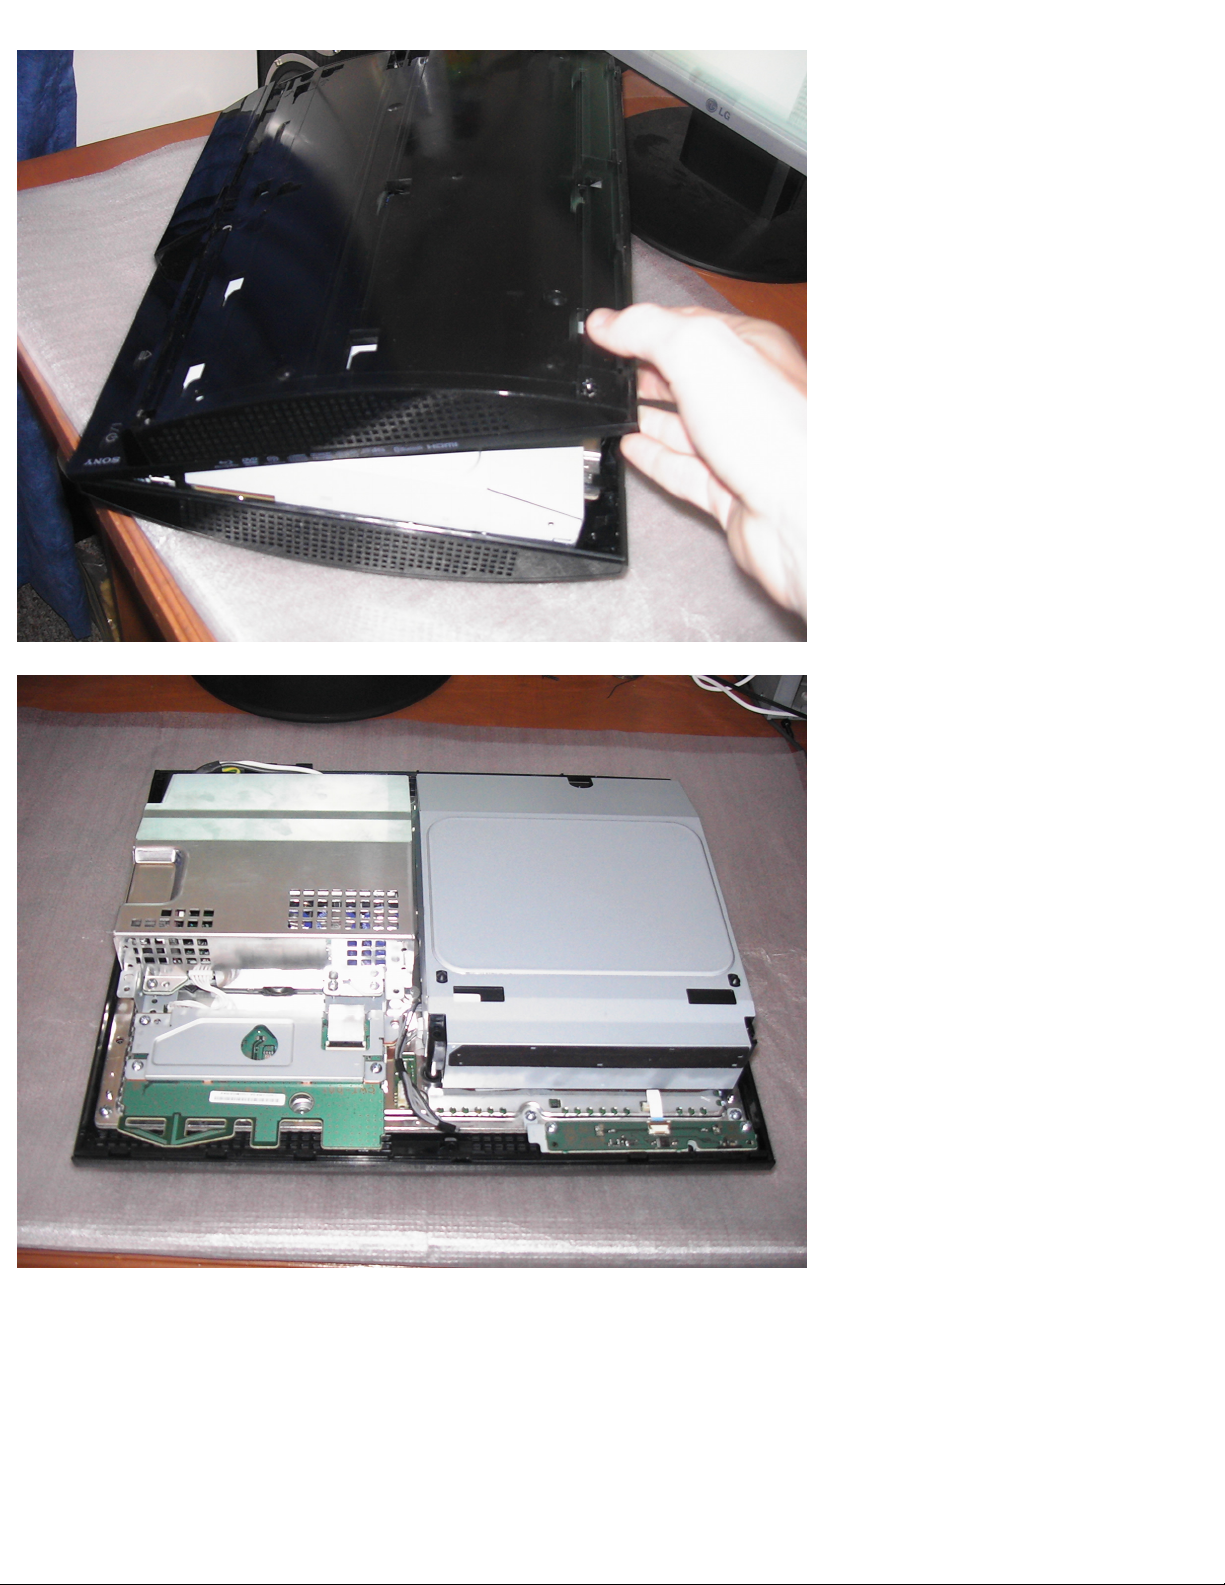
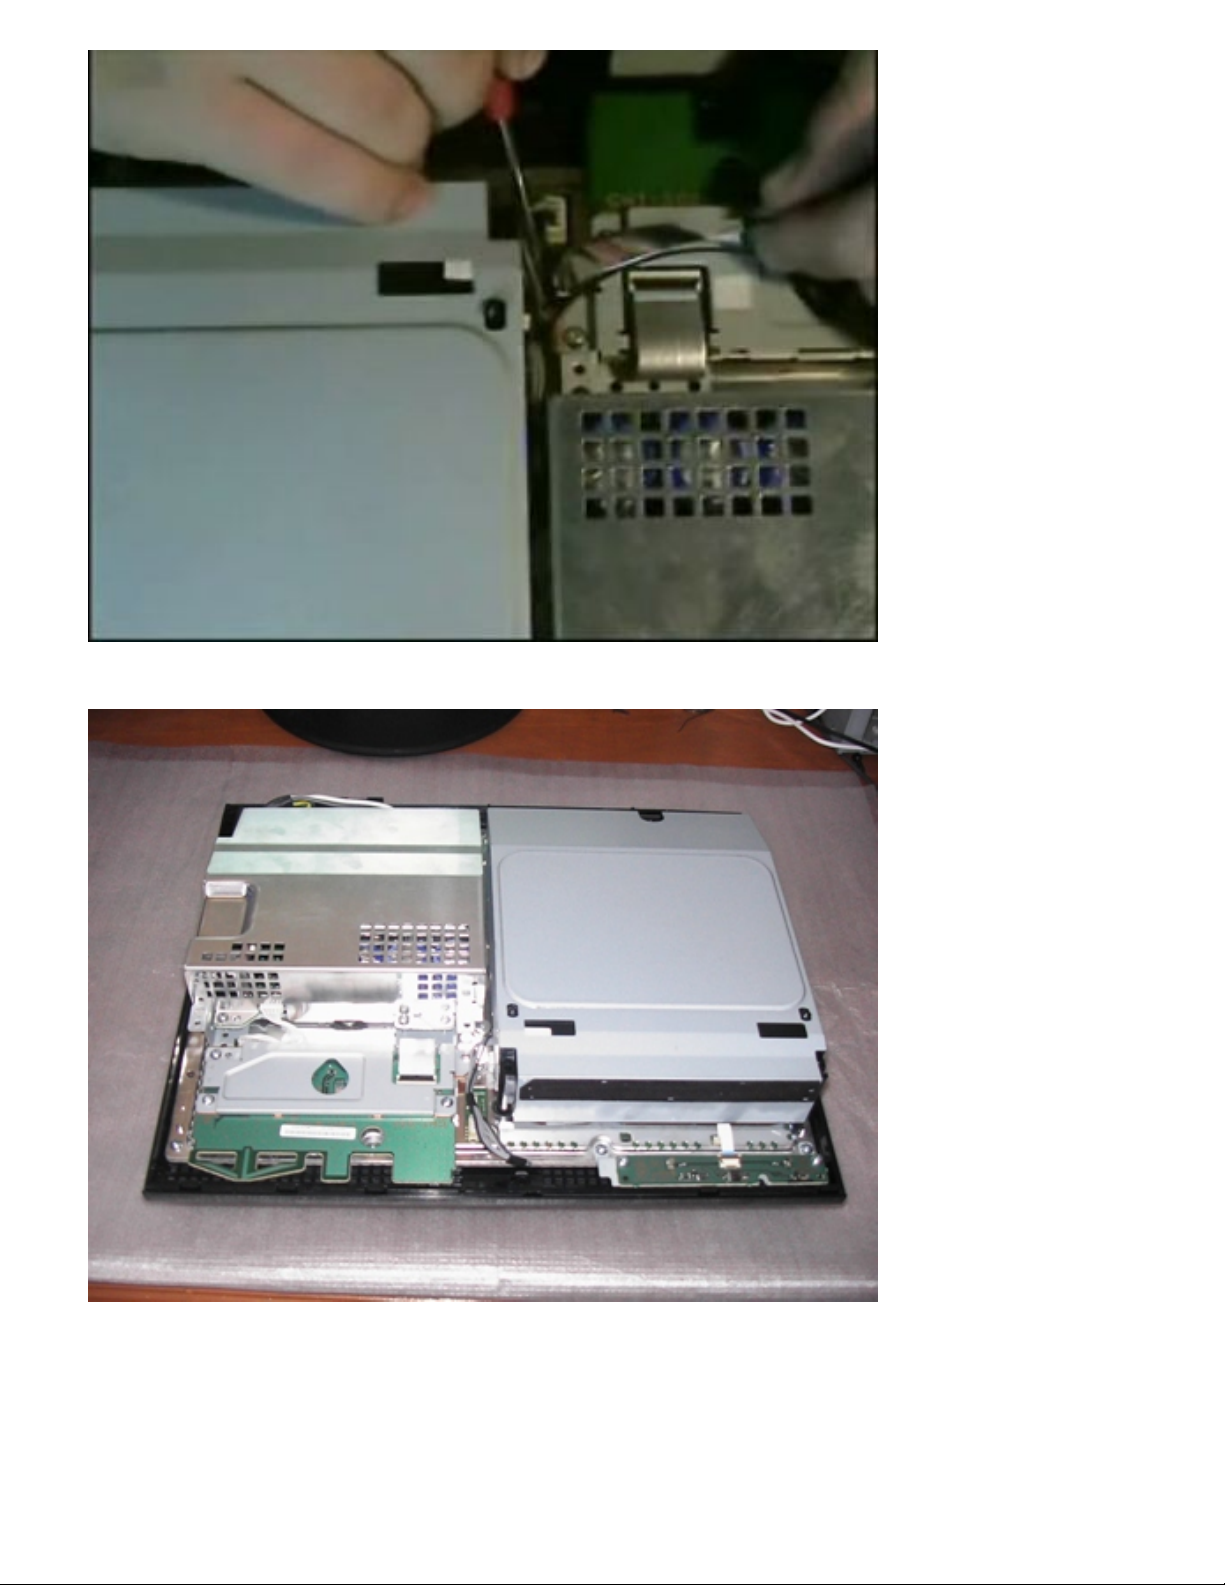
After the 7 screws are removed, gently lift up the back corners of the top half of the console. There are
2 small clips near the back you may need to undo with a small screw driver. Now the top of the console
should just lift off (with a bit of gentle force) and you will see the guts of the PS3.
Page 12
PS3 Disassembly
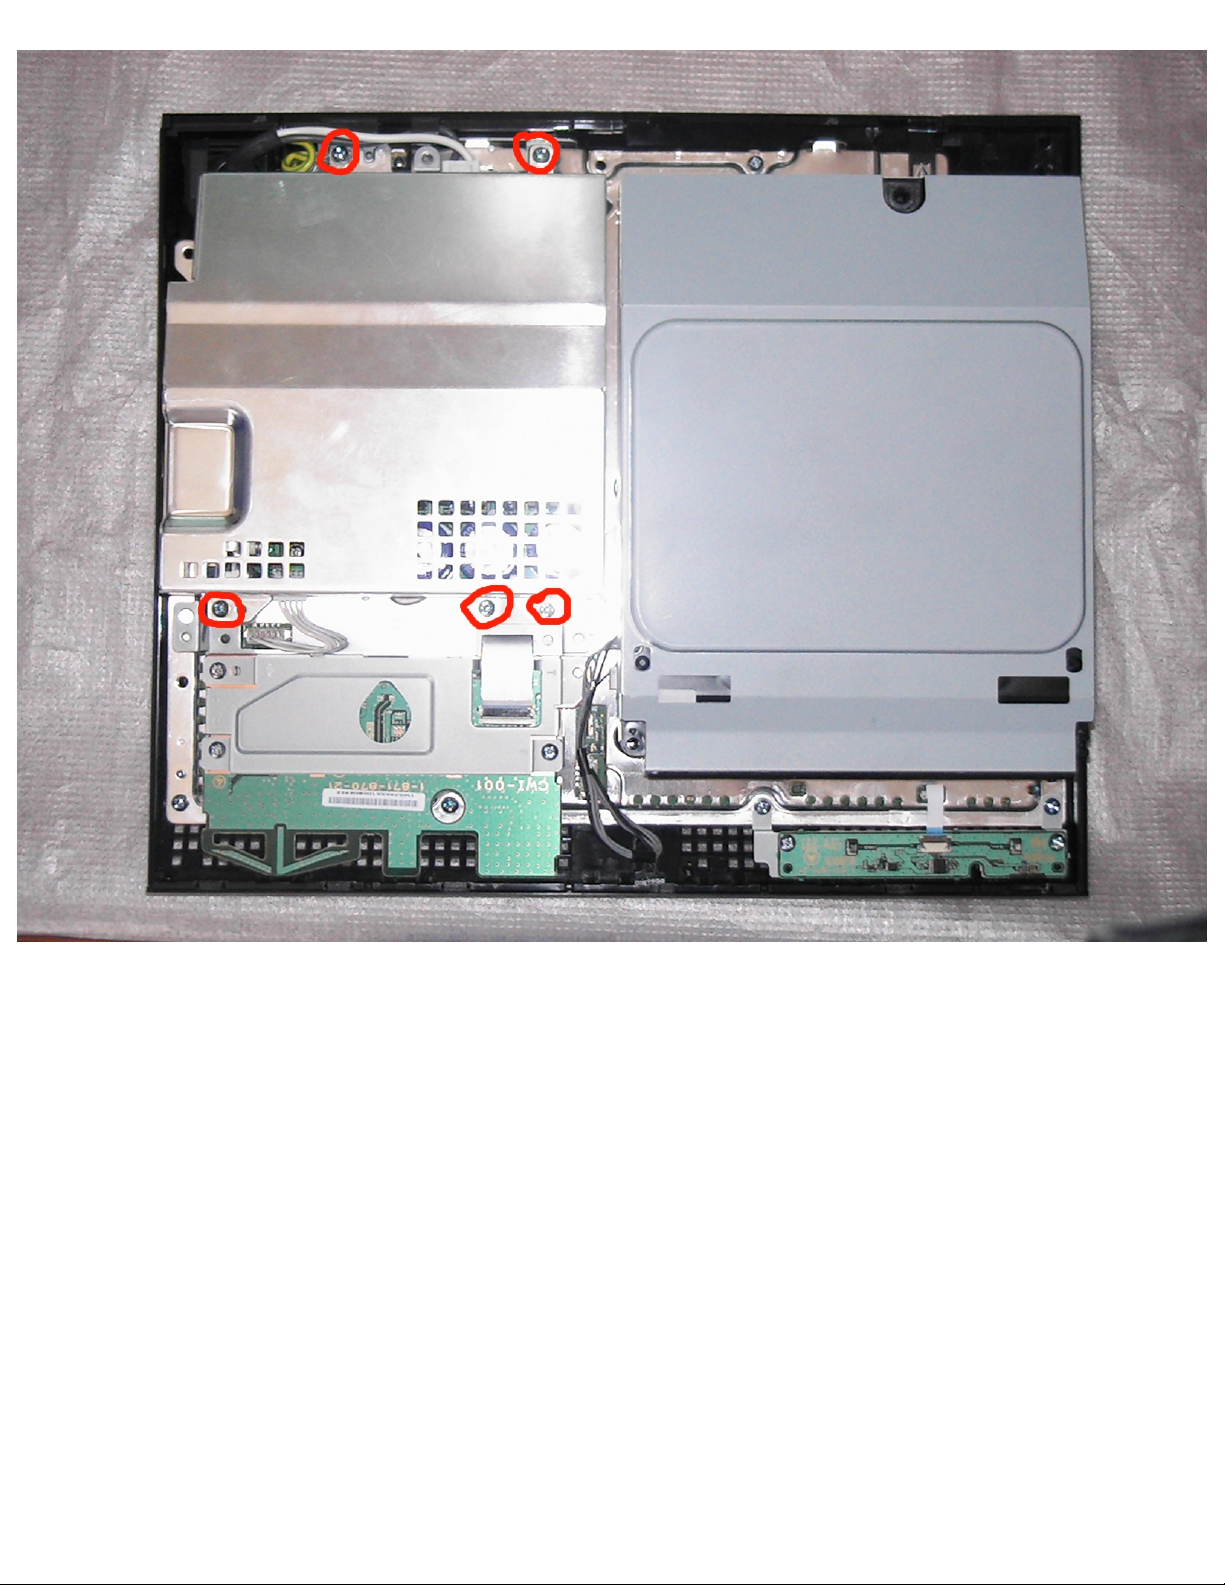
First, the power supply (The silver box on the left) has to be removed. Remove the screws circled in
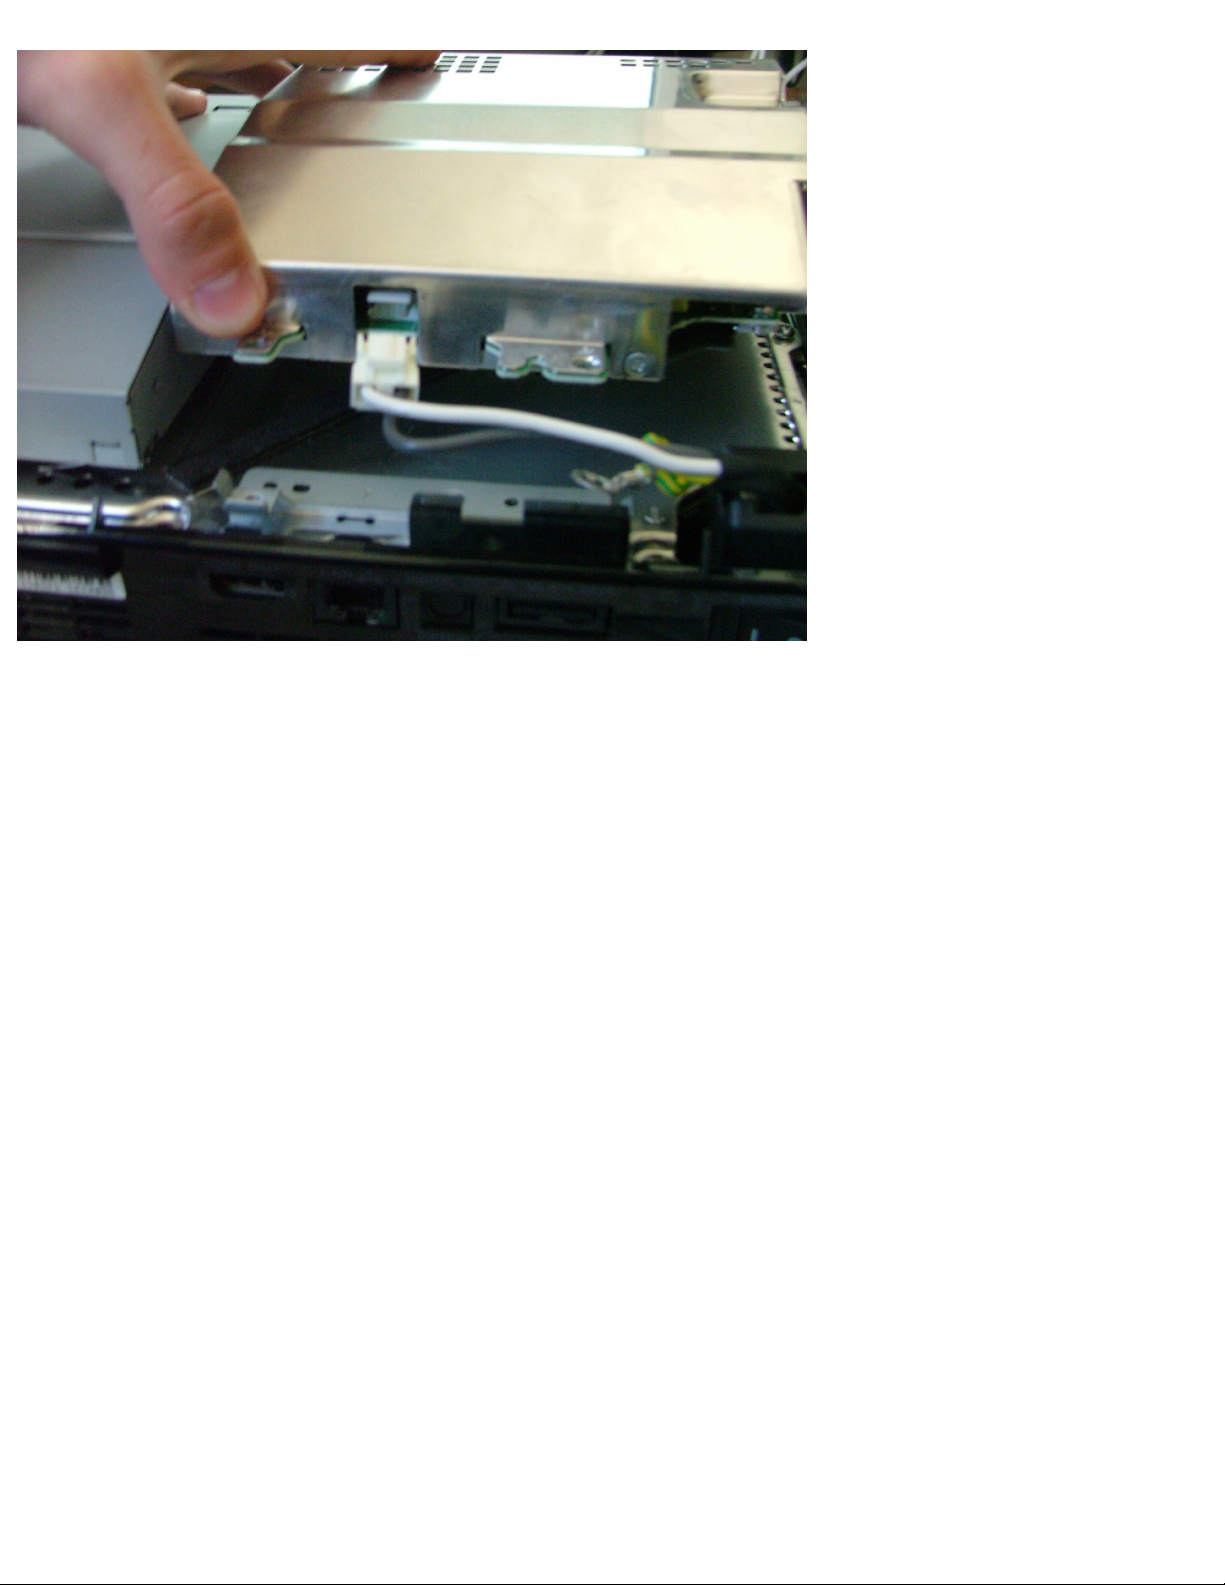
red, and take out the plug, the power supply will just lift out.
Page 13
PS3 Disassembly
Also, take out the mains plug in the back of the power supply. The power supply should now be
completely disconnected from the PS3.
Page 14
PS3 Disassembly
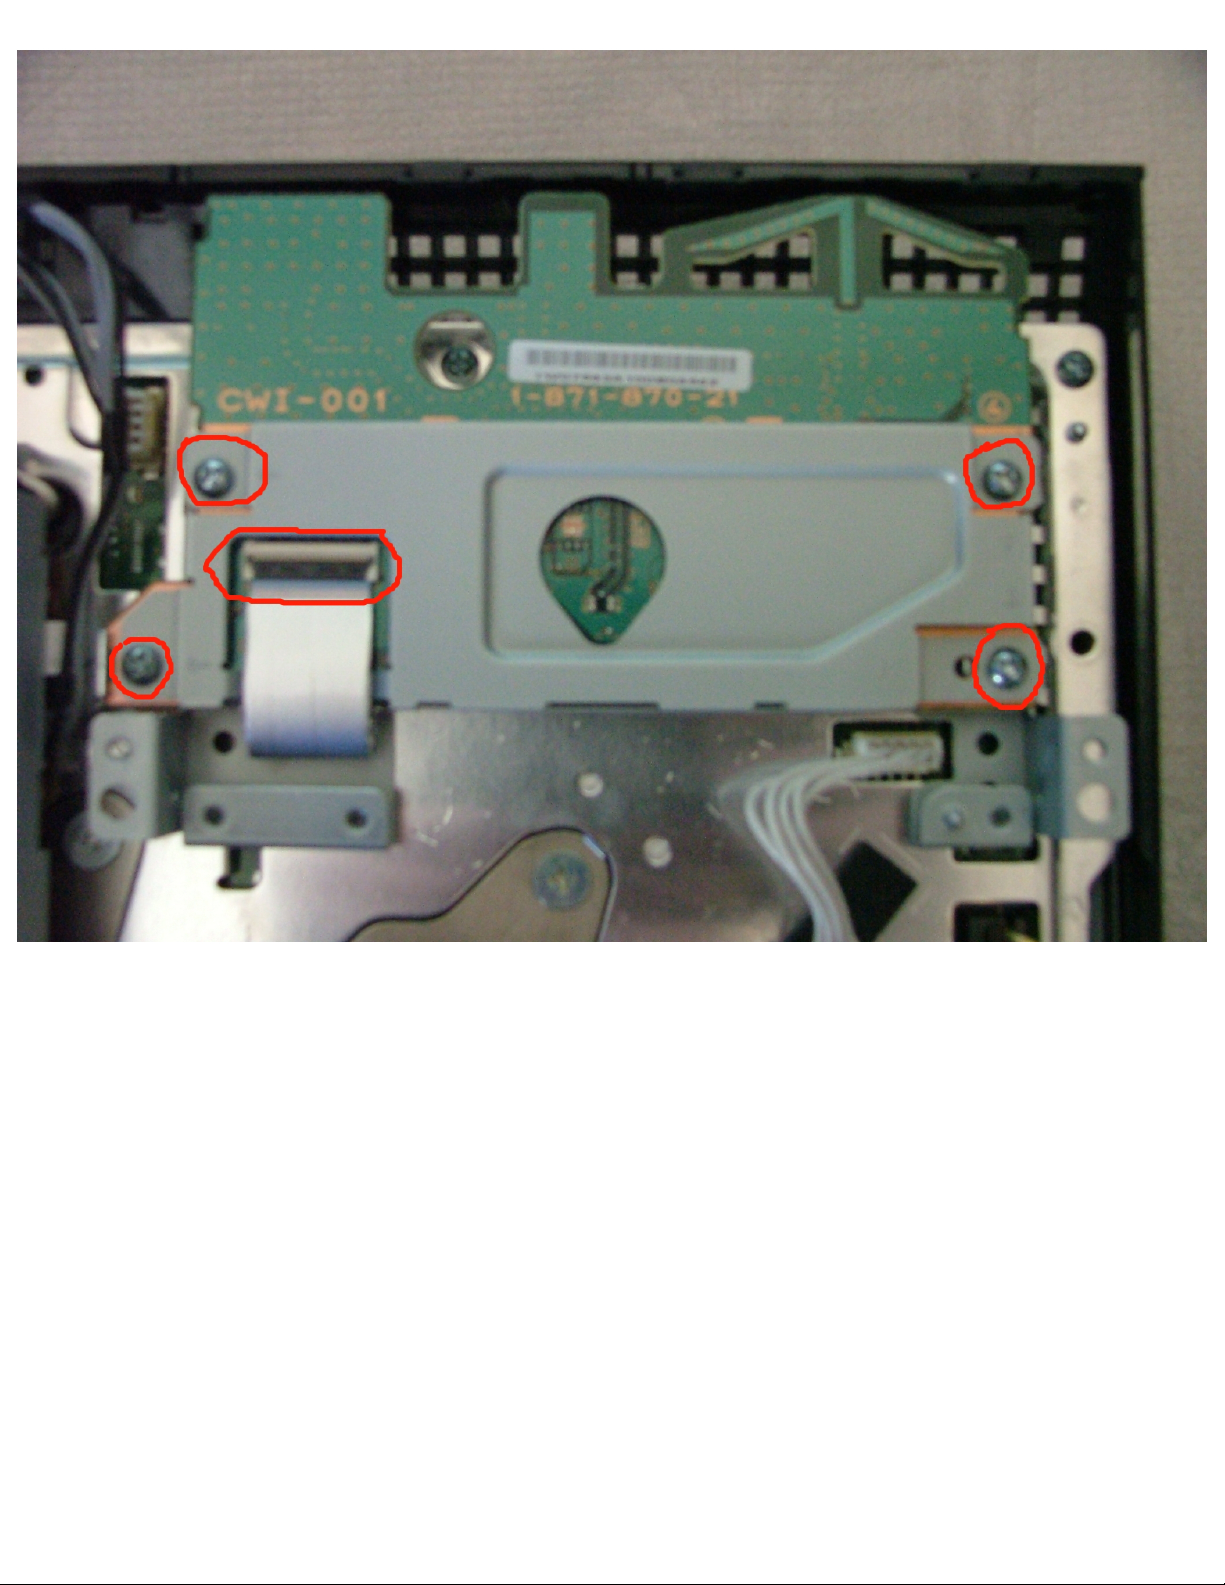
After the power supply is removed, the Bluetooth board (in the 60GB models, it also has wireless).
Unscrew the 4 screws and unplug the ribbon cable and the board will just lift out:
Page 15
PS3 Disassembly
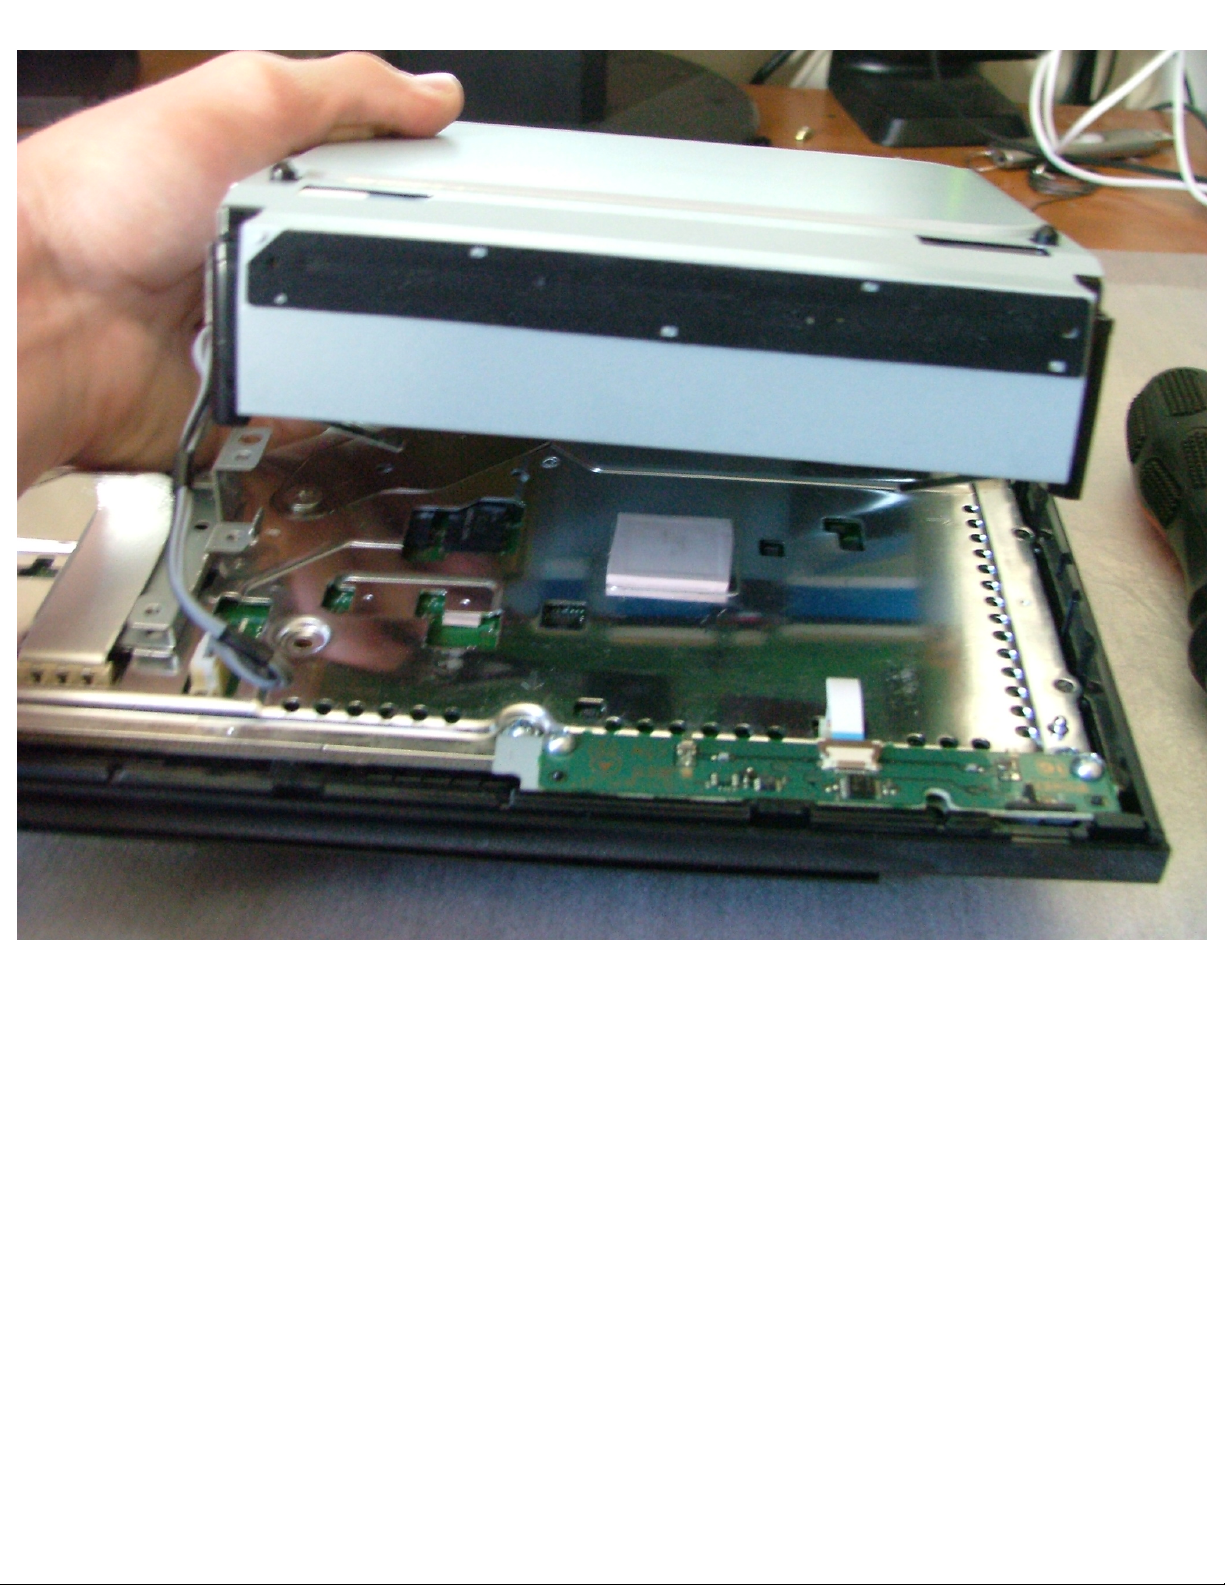
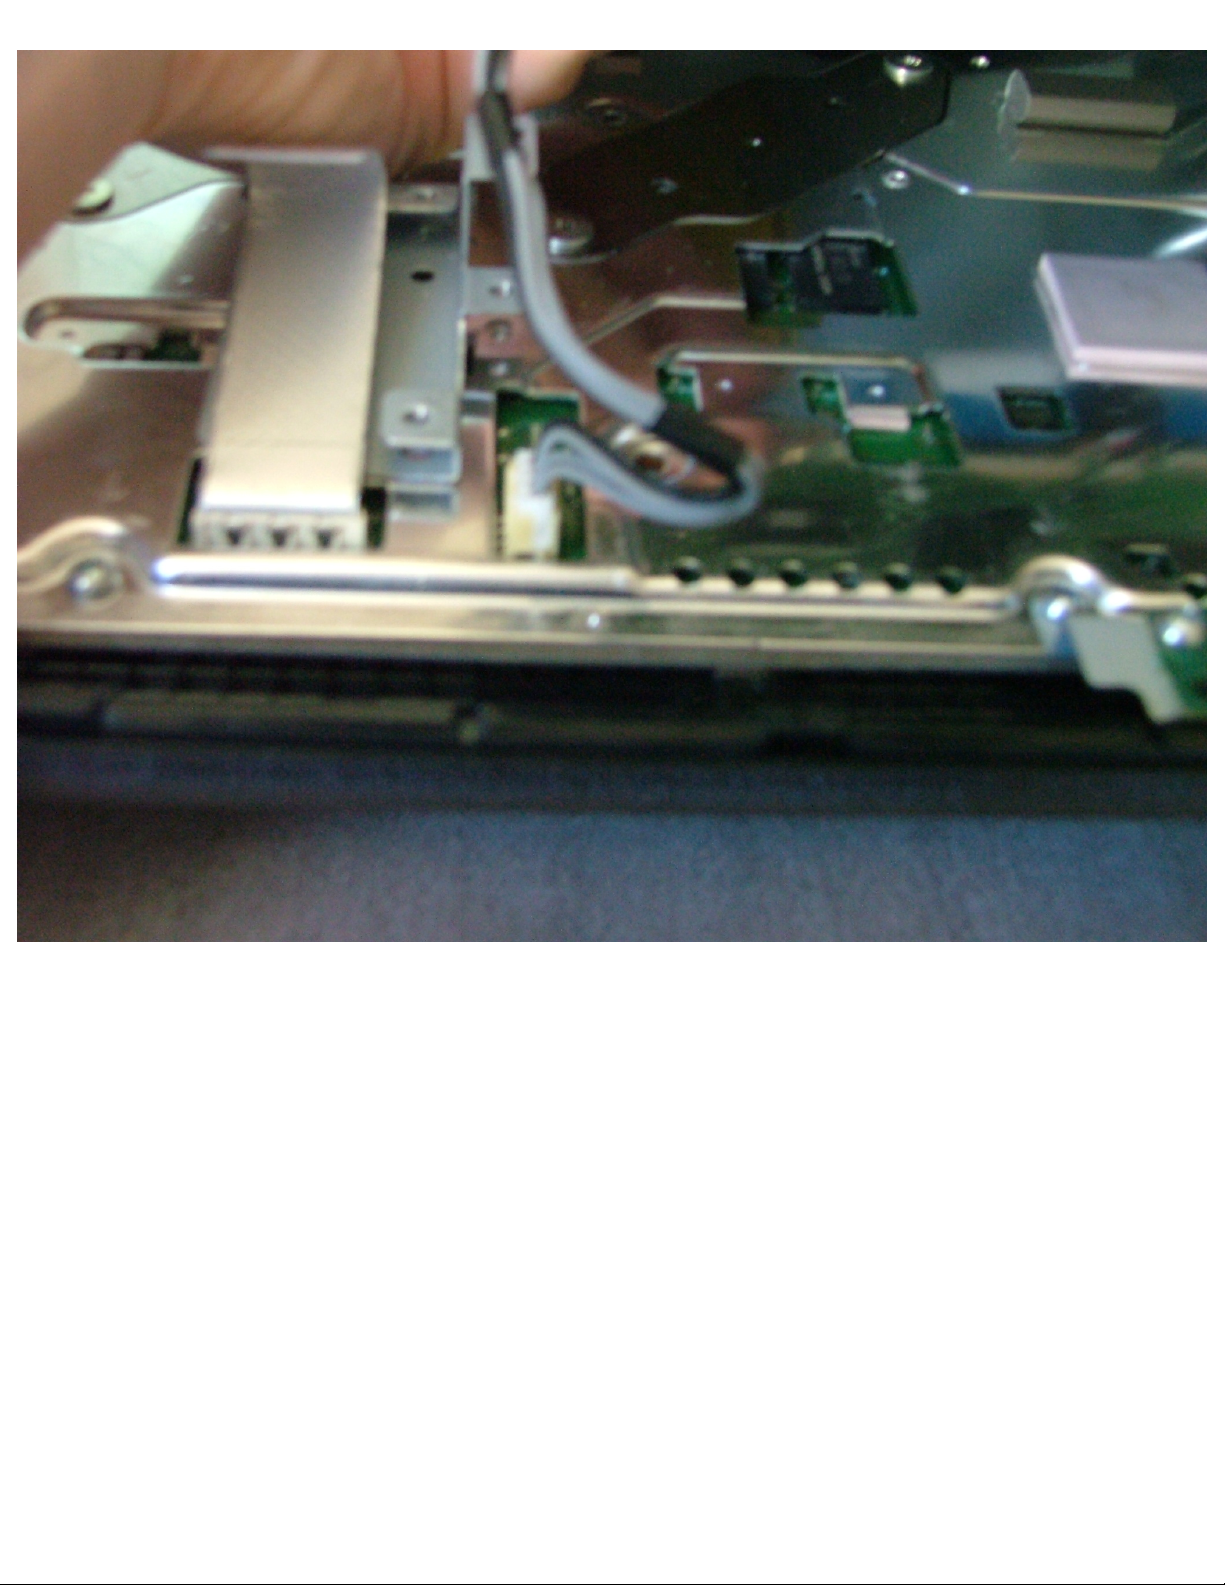
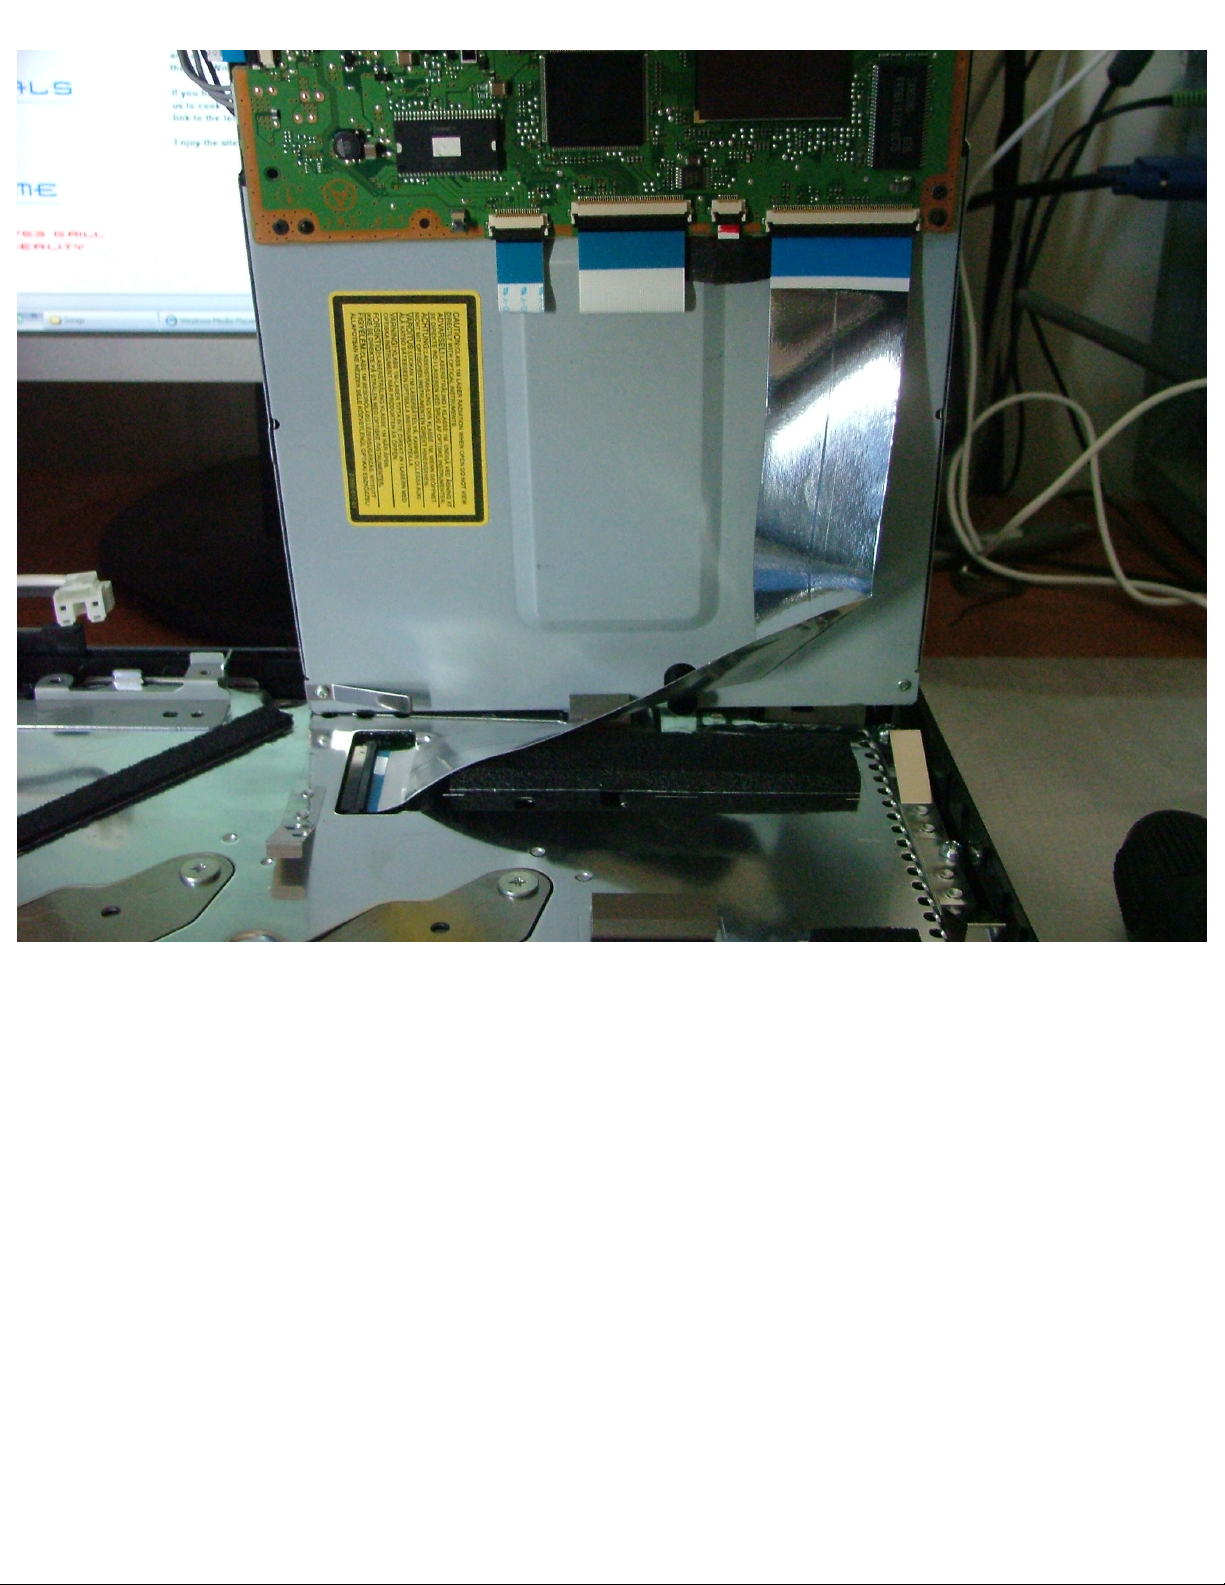
Now to remove the Blu-ray drive. This is relatively easy. Lift the drive up about 2” and you will see a
really wide ribbon cable connecting the drive to the motherboard. Unplug it. There will also be a plug
near the front of the Blu-ray drive. Unplug it as well. The drive will then just lift out.
Page 16
PS3 Disassembly
Page 17
PS3 Disassembly
Page 18
PS3 Disassembly
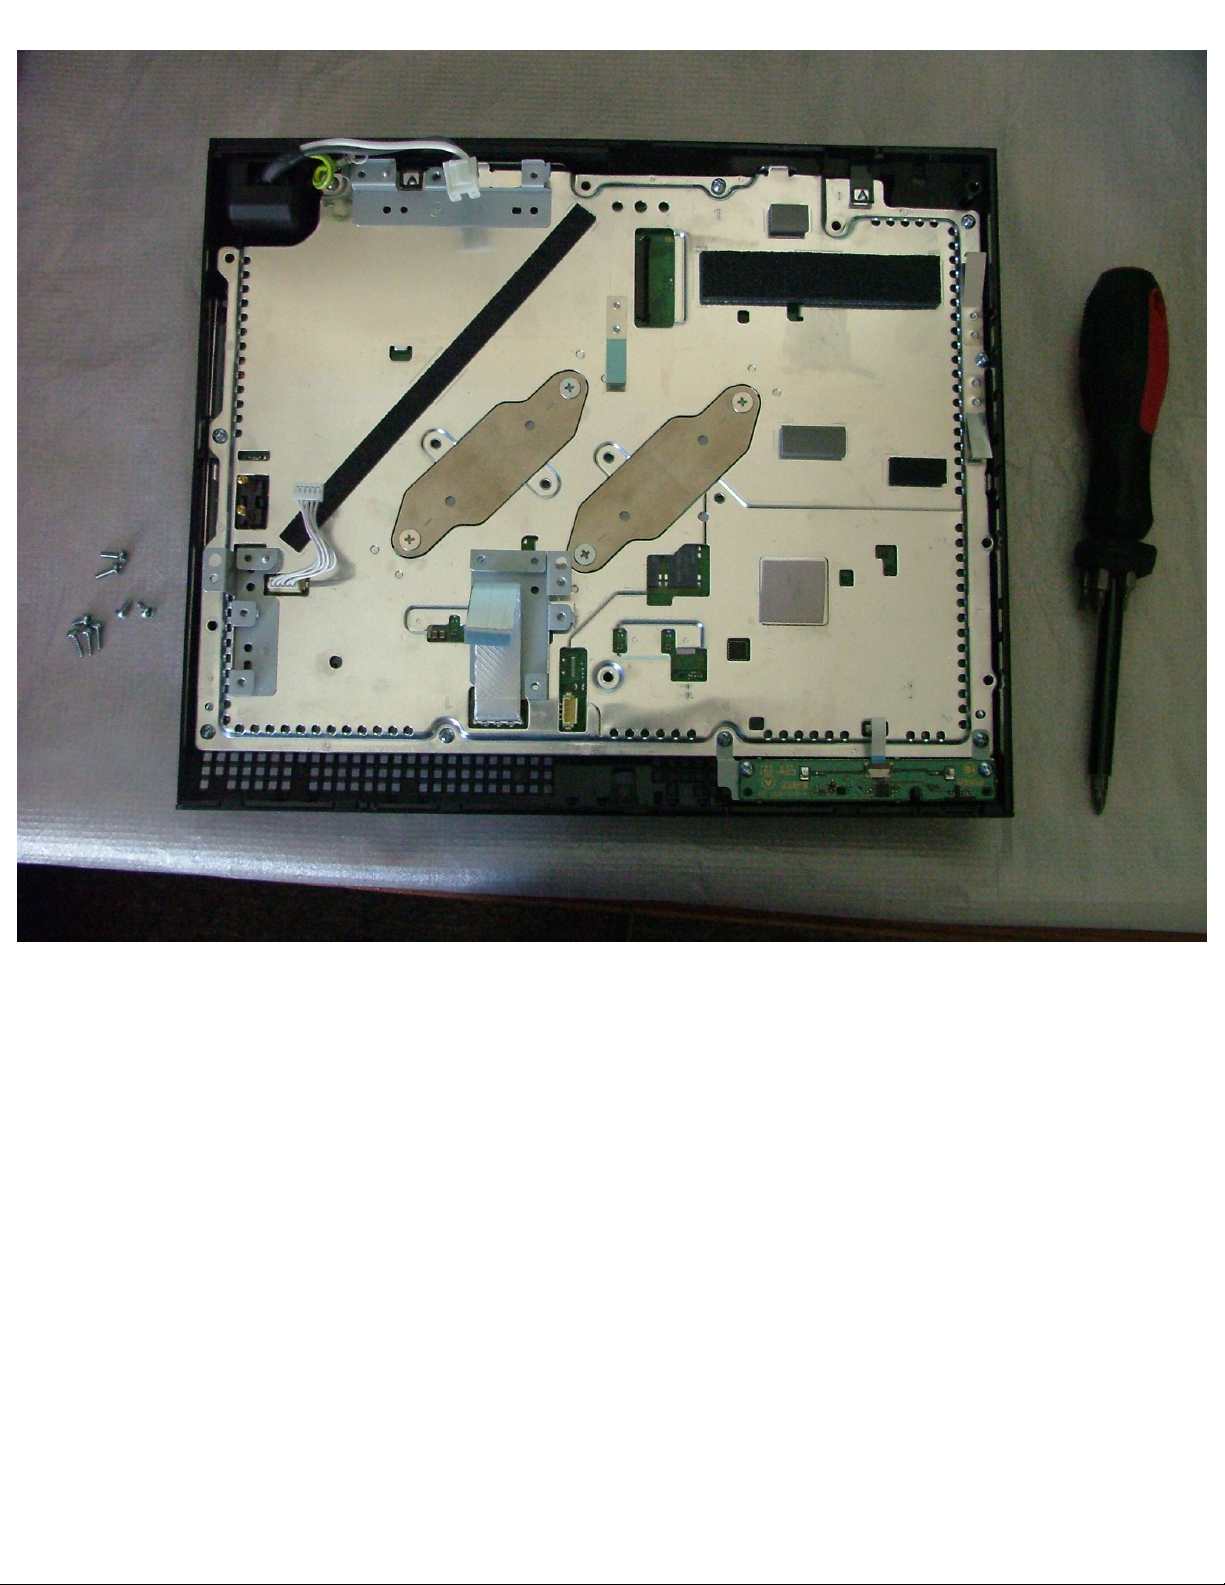
Now you will (hopefully) see the same as what is in the pic below:
Page 19
PS3 Disassembly
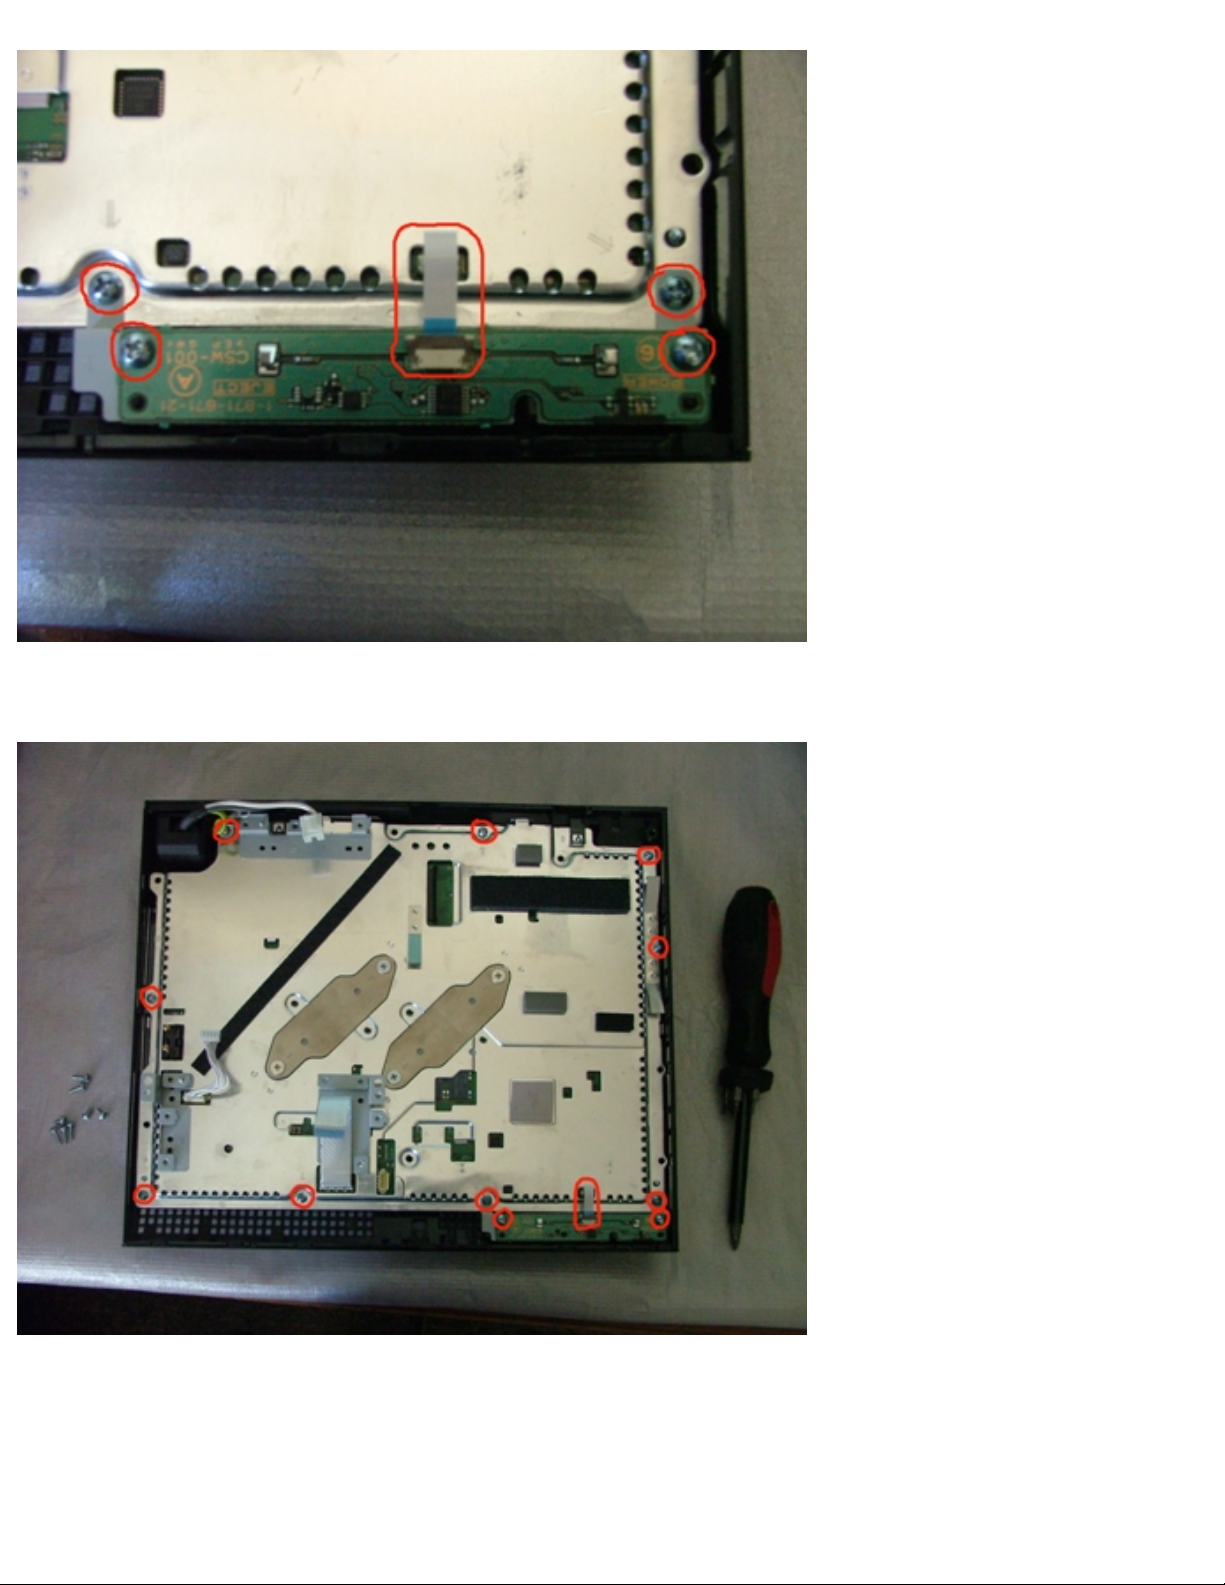
Next, we have to remove the small circuit board that has the Reset and Eject buttons. This board is
attached to a small metal bracket. Remove the 4 screws holding the board and the metal bracket and
unplug the small ribbon cable. The board should now easily lift out.
Page 20
PS3 Disassembly
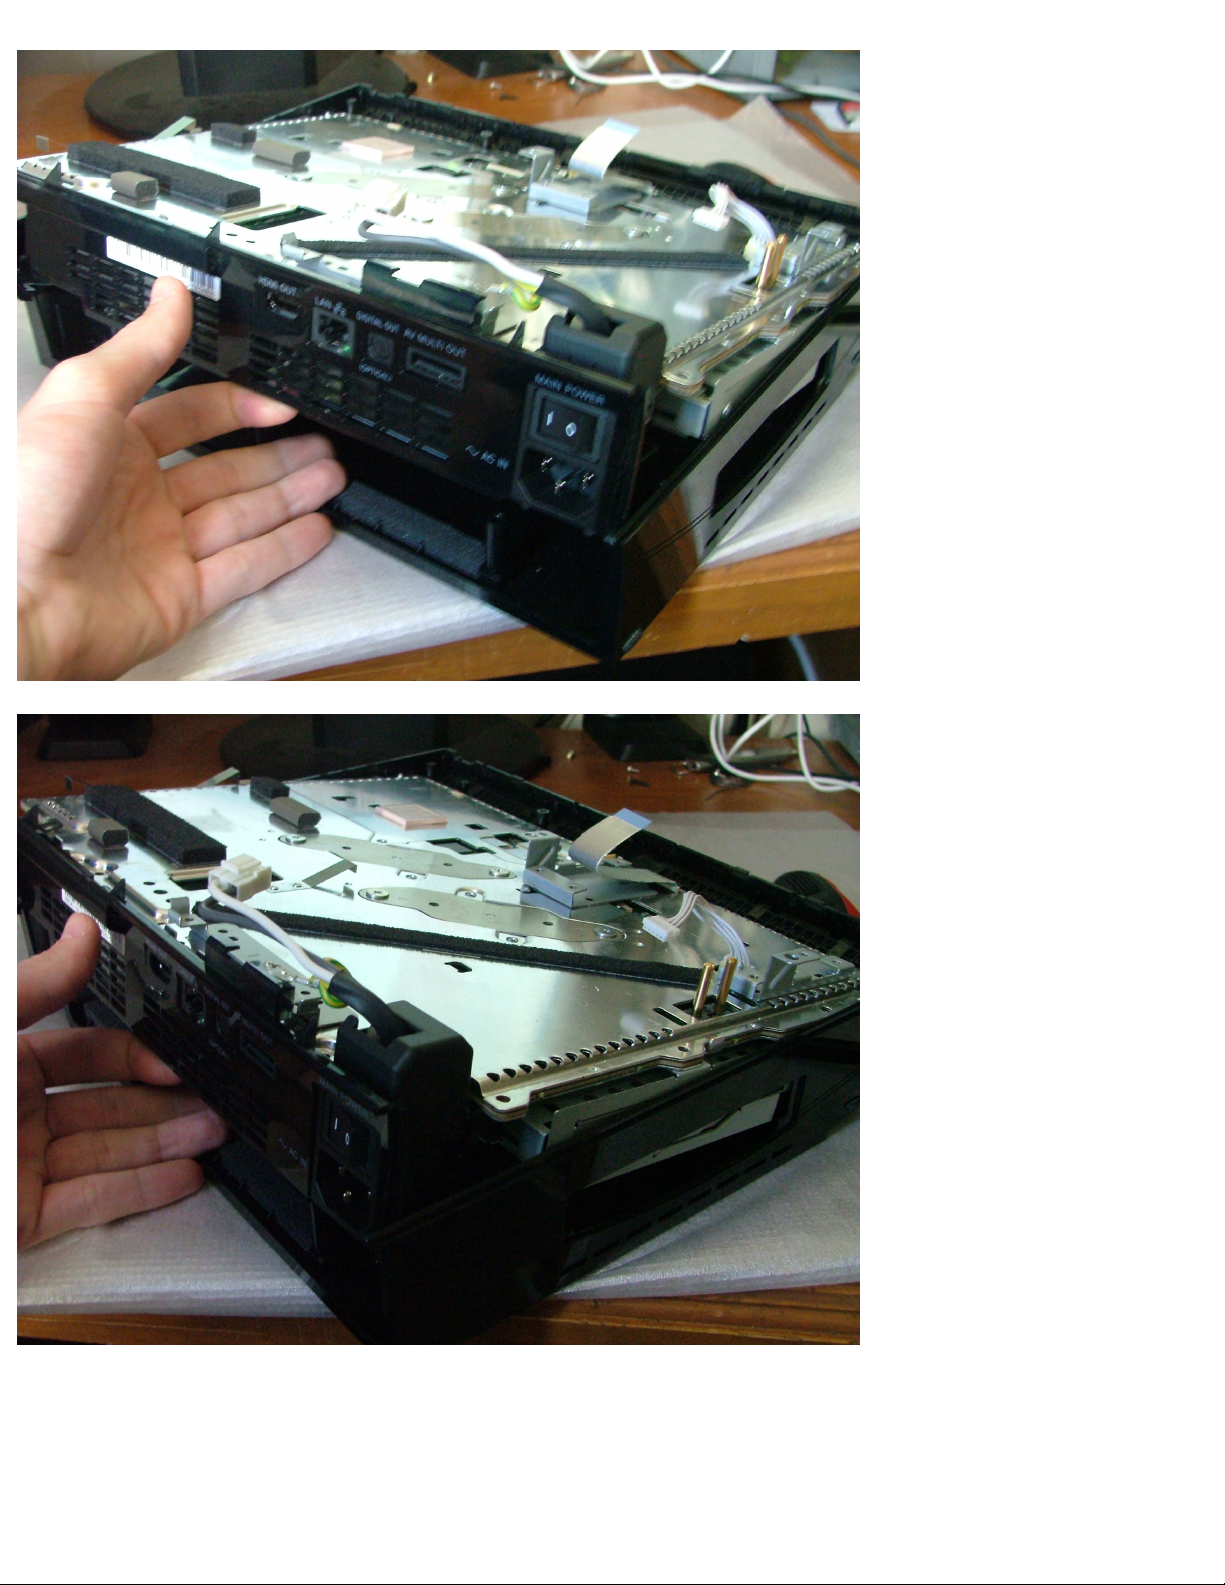
Now remove the screws circled in red in the pic below.
After the screws are removed, gently lift out the whole motherboard along with the back panel like the
pics below: Make sure you have taken out the plastic cover with the HDD sticker on it! Otherwise the
clips on it will get bent!
Page 21
PS3 Disassembly
After the bottom of the PS3 case is out of the way, you can admire the huge-ass cooling system on the
bottom of the motherboard.
Page 22
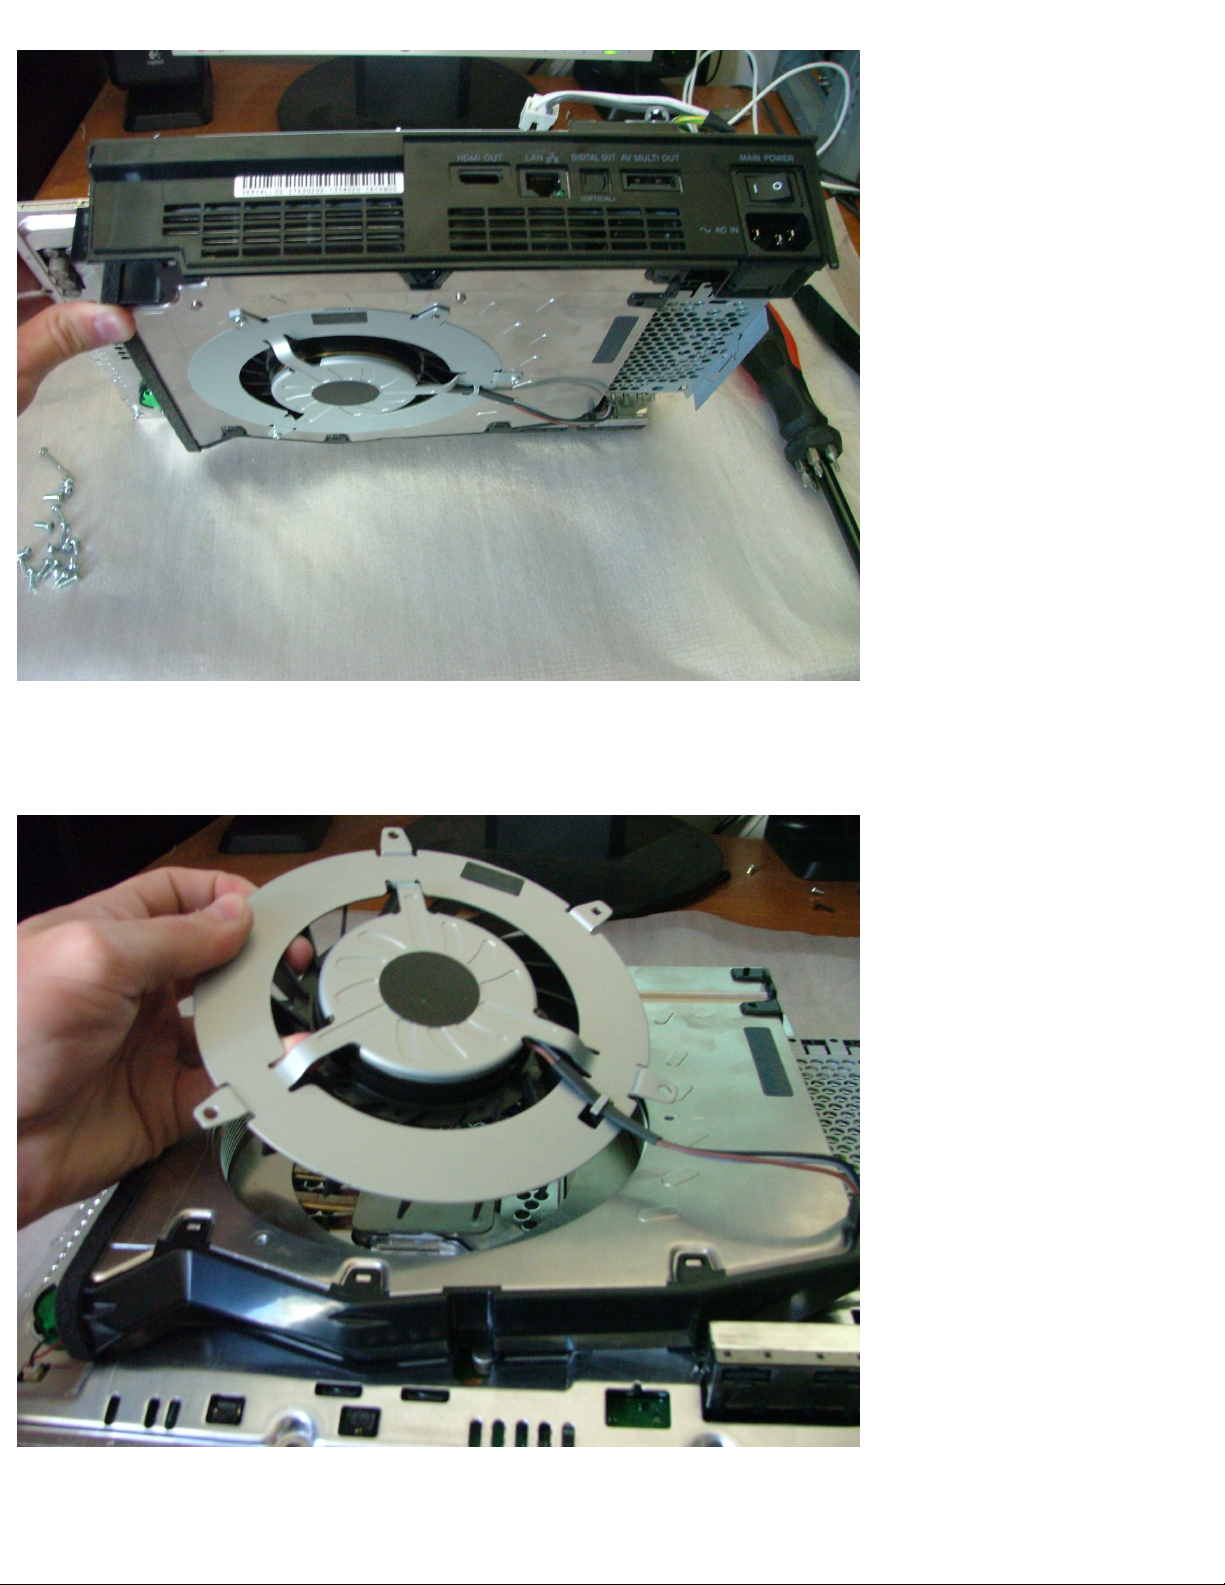
PS3 Disassembly
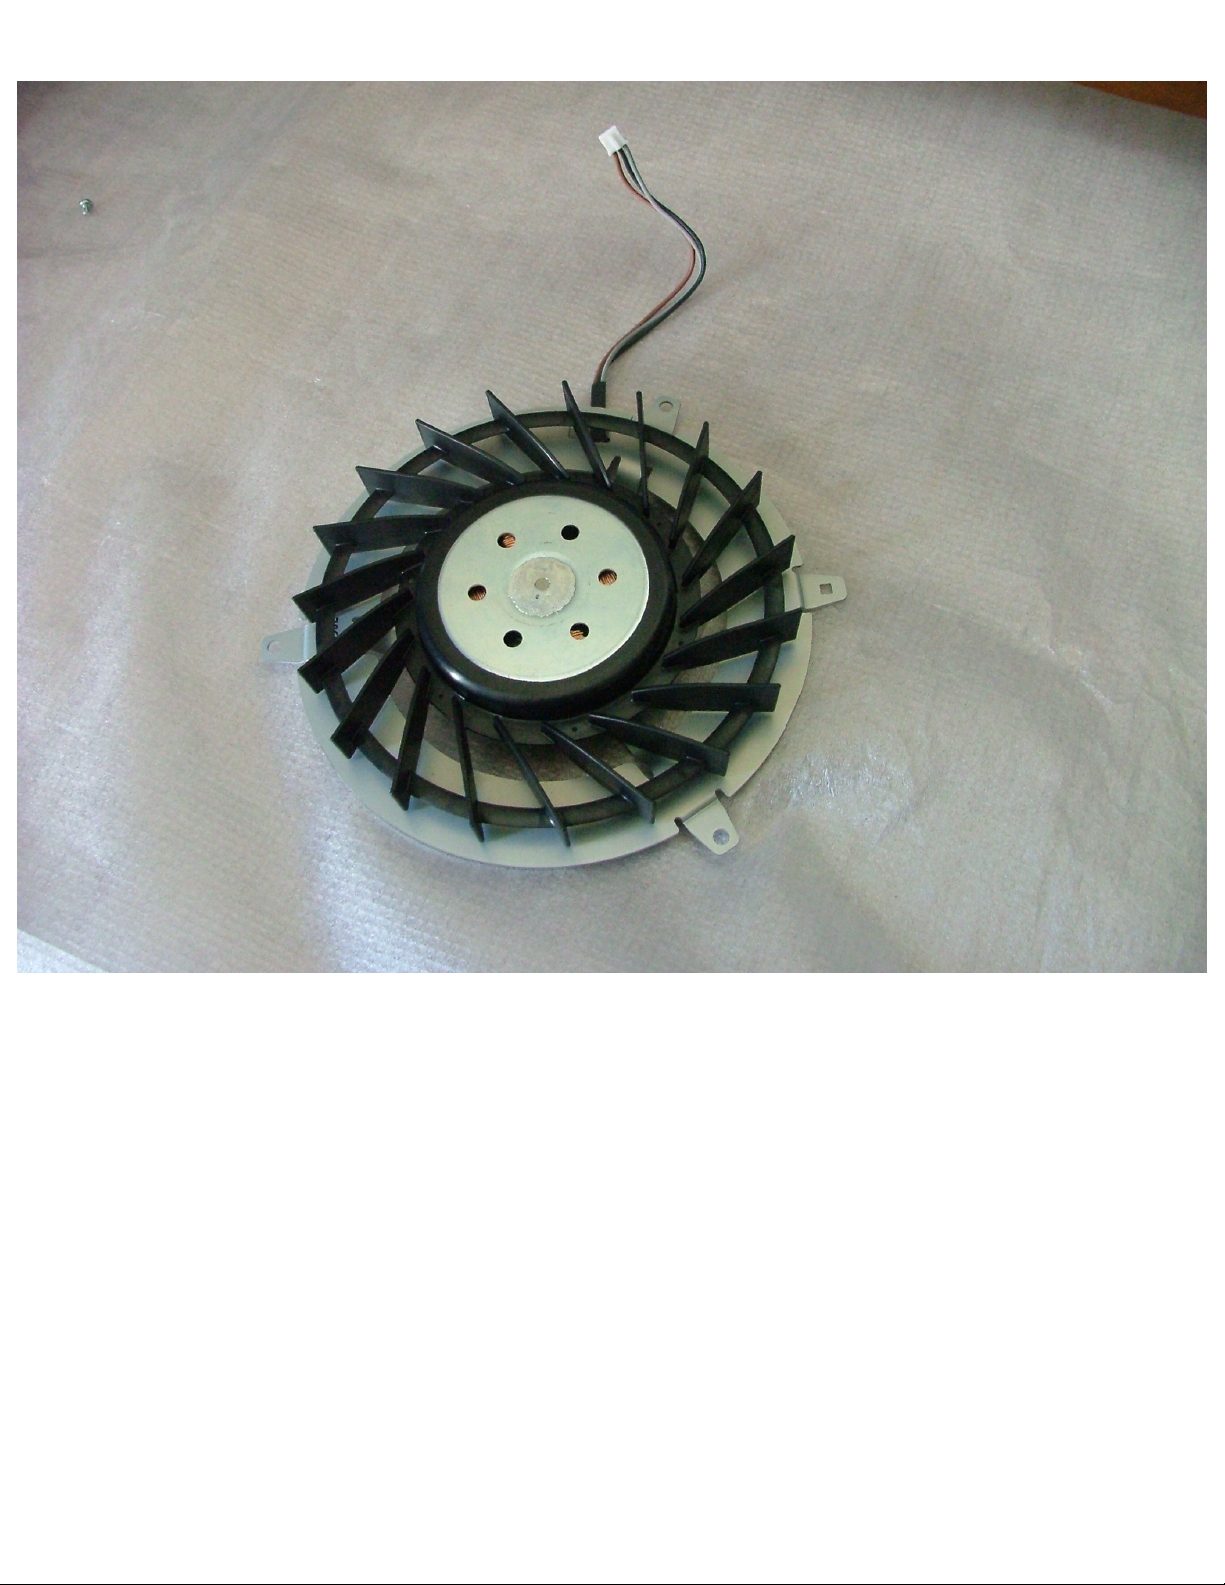
After your done ogling at the hugeness of the fan, remove the plastic back panel. The are 4 small
plastic clips (2 on either side of the motherboard) that you need to lift to take off the back panel.
Check out the size of the fan! (It looks a lot bigger in real life.)
Page 23
PS3 Disassembly
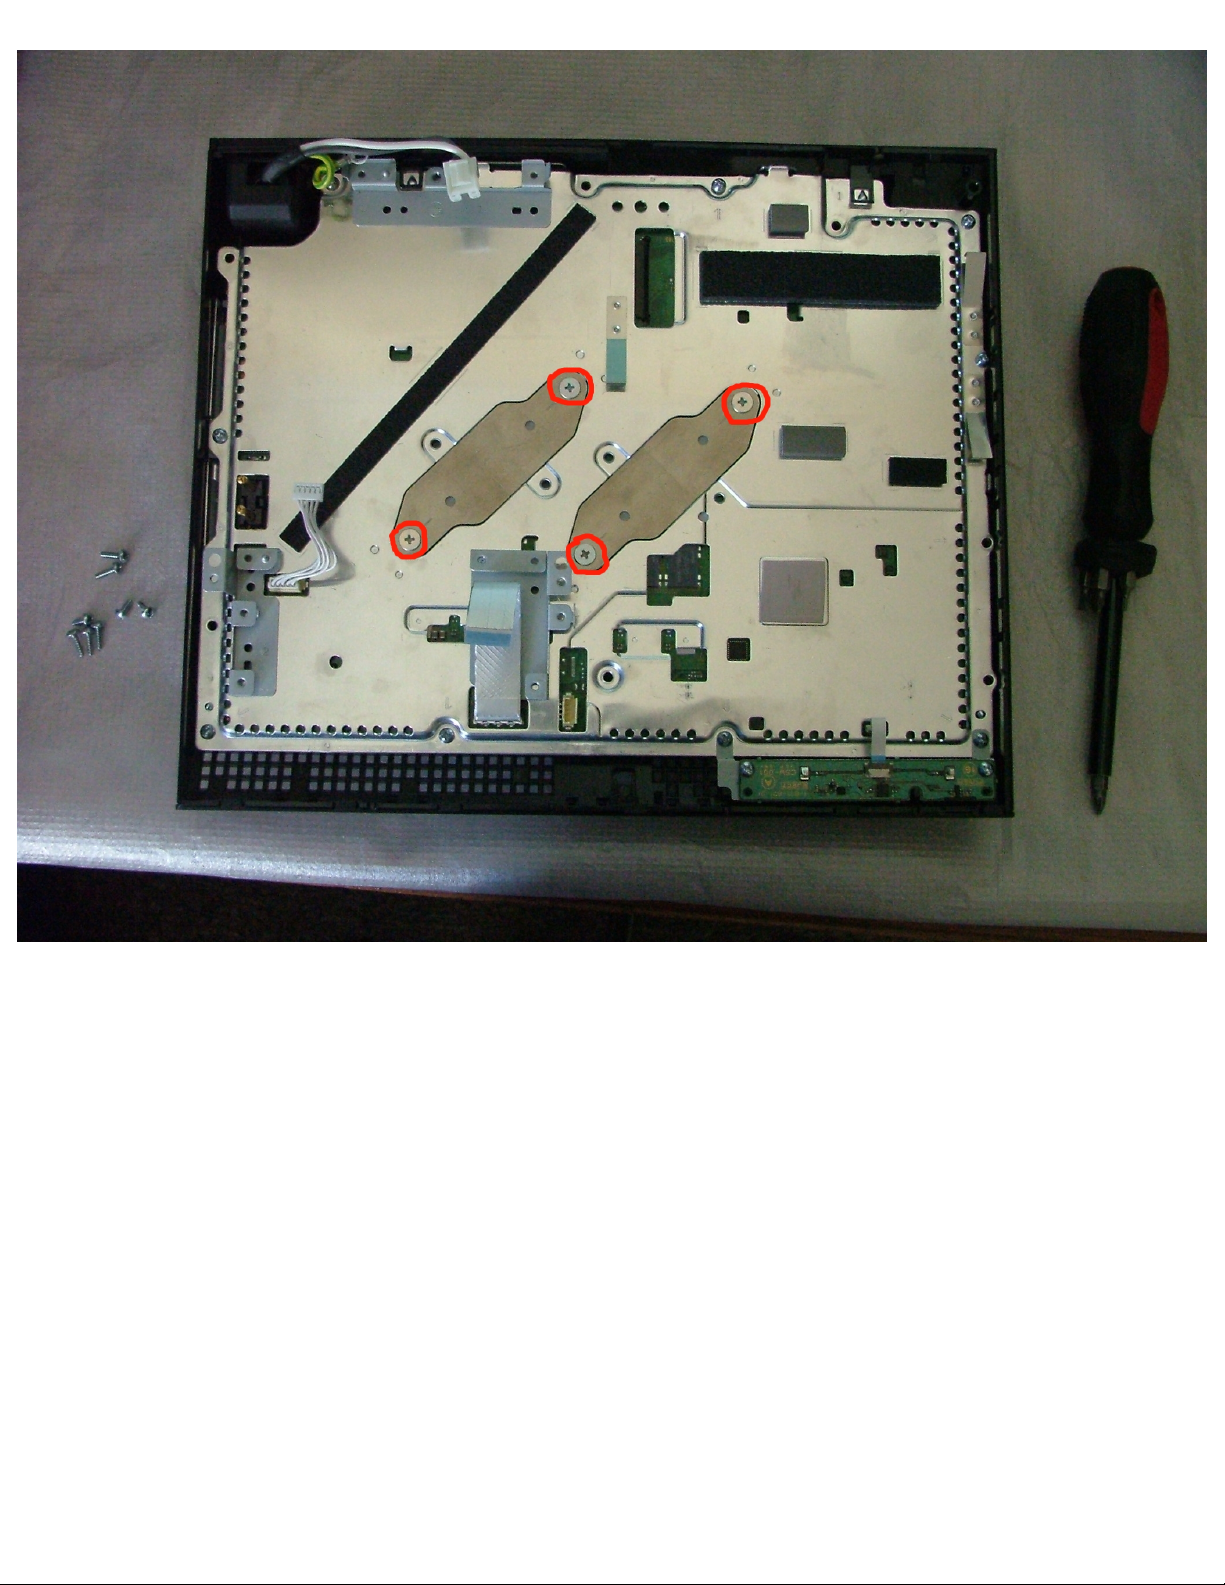
Anyway, back to the tutorial. Flip the motherboard back over. Unscrew the 4 screws (circled in red)
holding 2 metal brackets down. Once these screws are undone, take off the 2 metal brackets.
Page 24
PS3 Disassembly
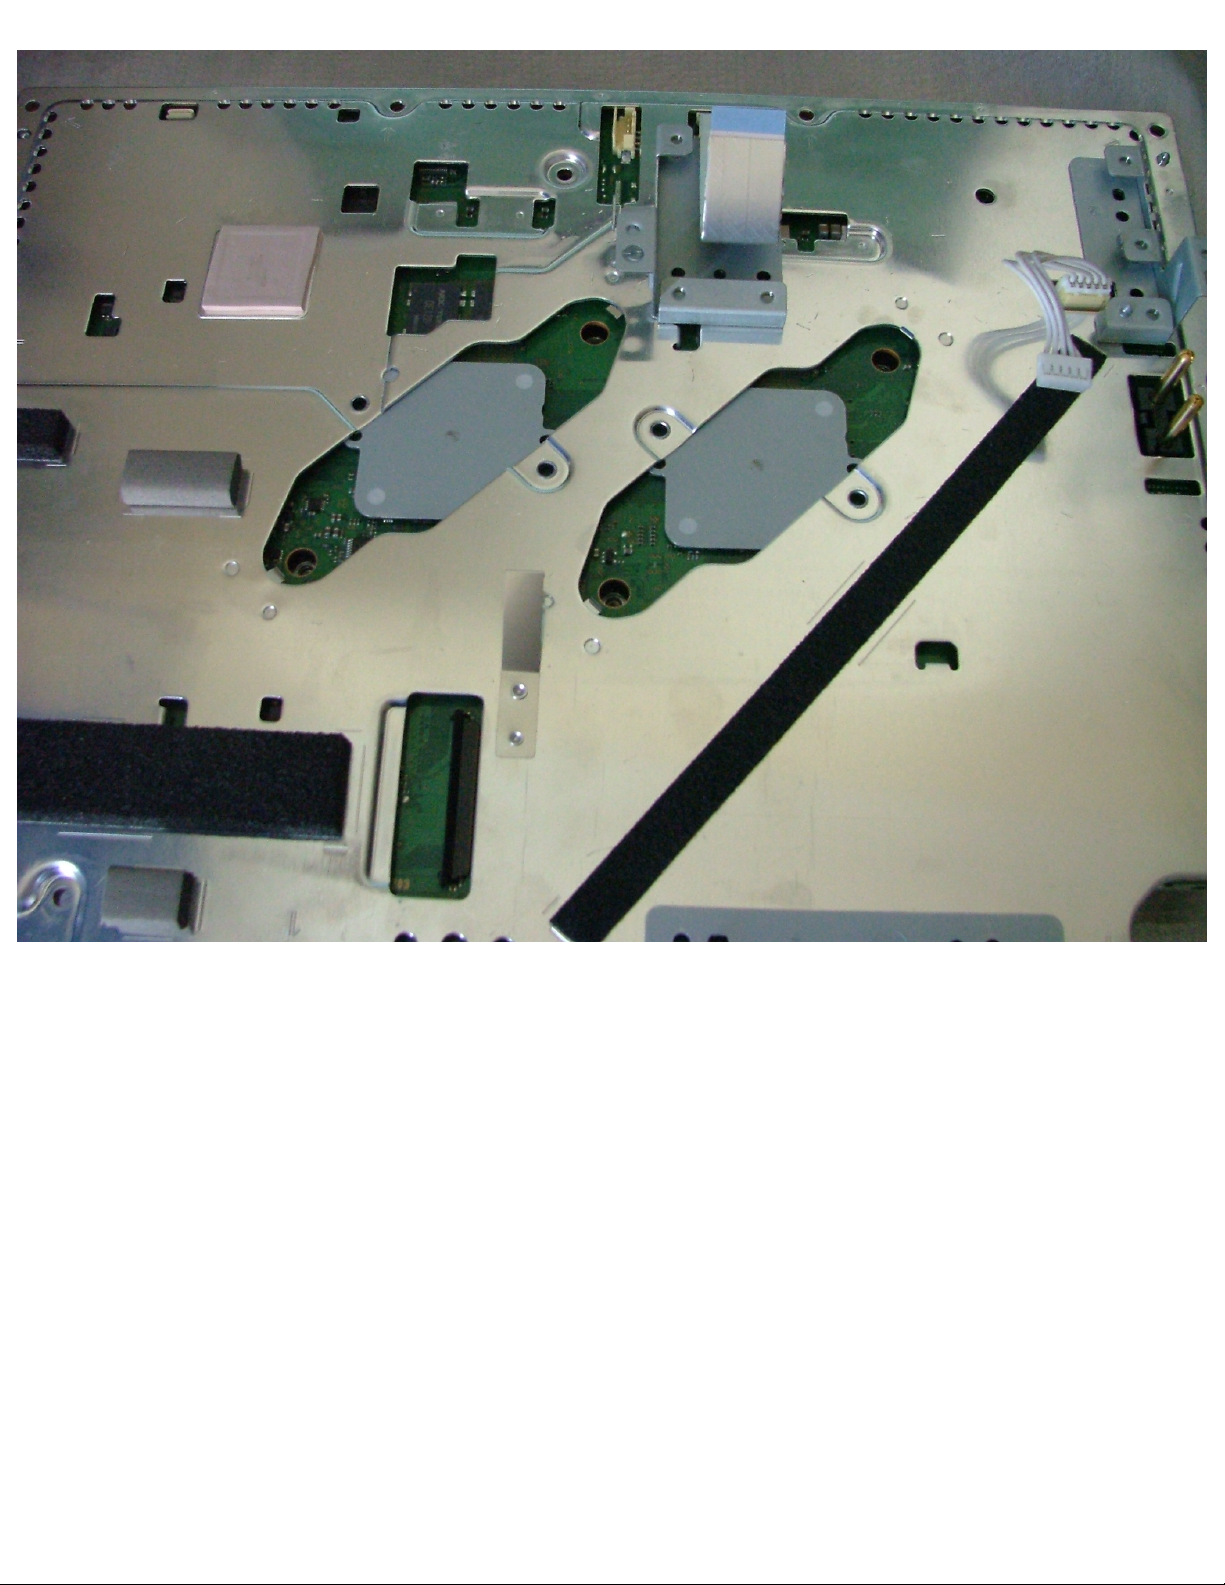
It will now look like this:
Page 25
PS3 Disassembly
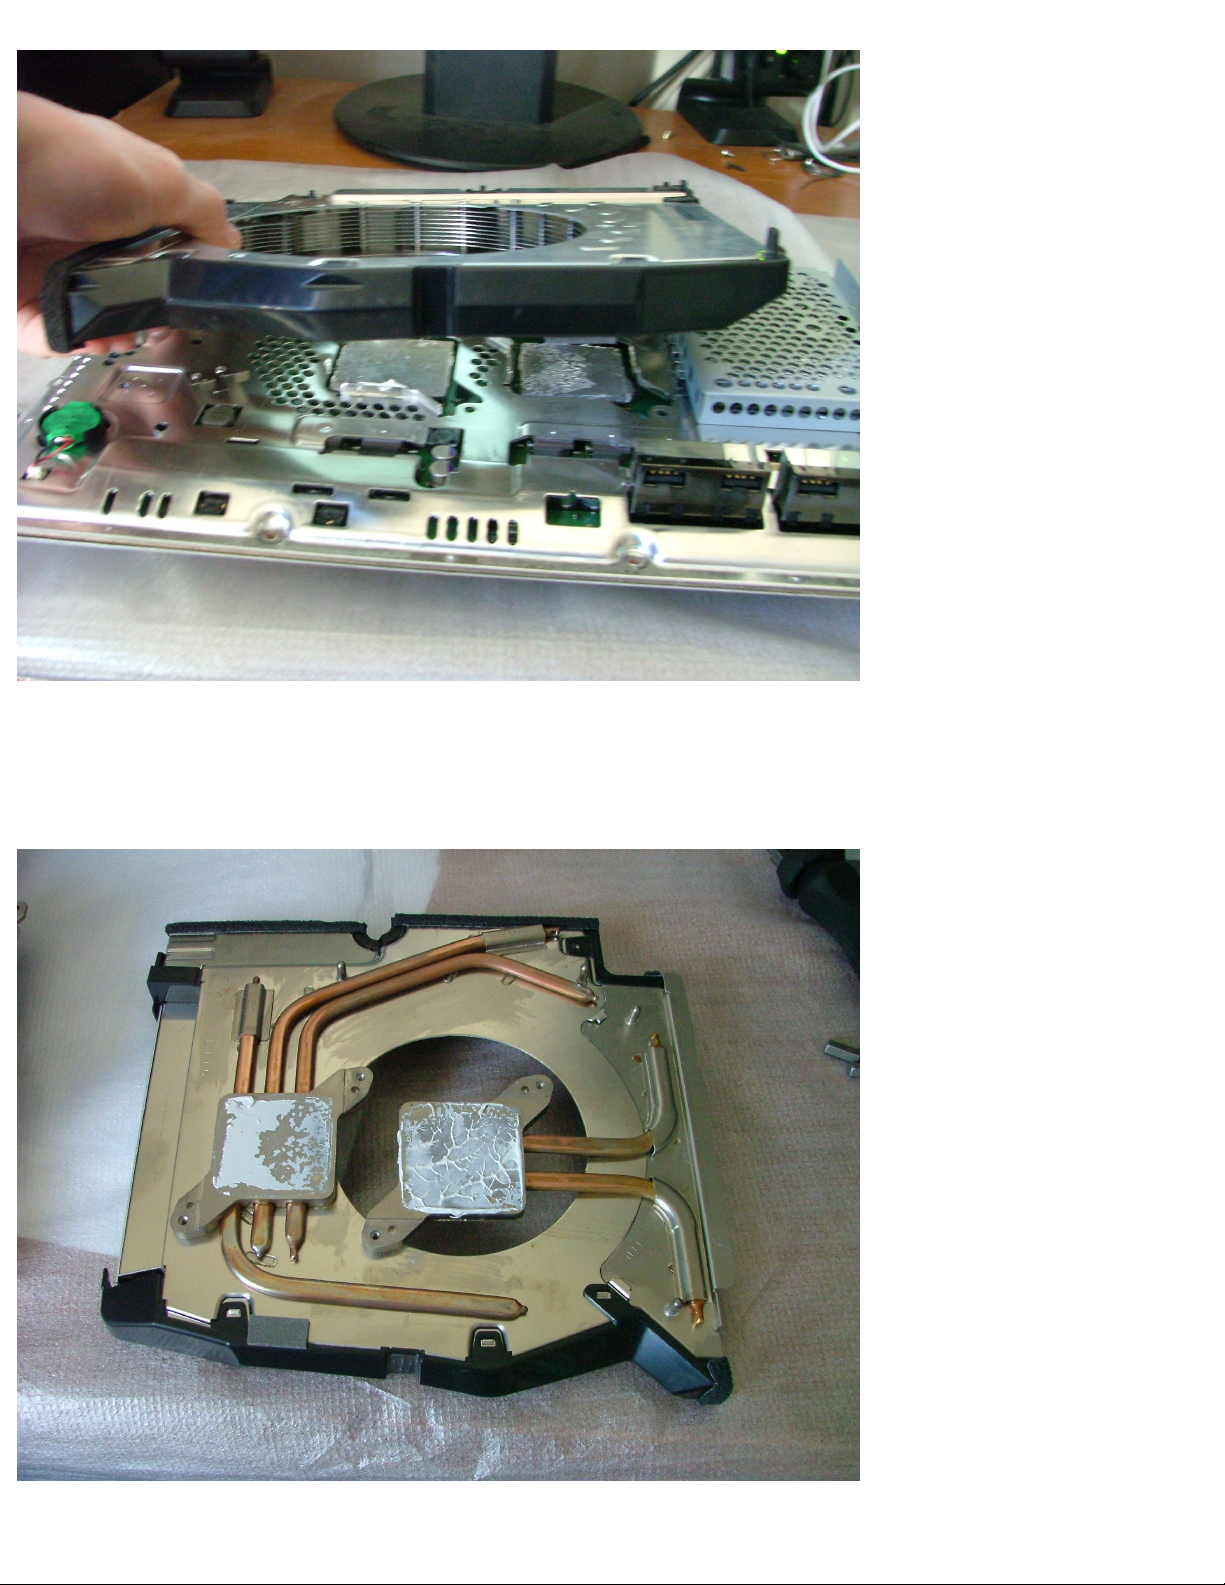
After that, flip the motherboard over again. Now gently pull up on the heat sink. Be gentle here. The
cooling system will lift up off the CPU and GPU and come off completely. A bit of force will be
required here as the heat sink will be stuck down to the CPU and GPU with white thermal paste.
Page 26
PS3 Disassembly
On the bottom of the heat sink and on the CPU and GPU will be white thermal paste. This is used to
help transfer heat from the chip to the heat sink. Do not touch or eat this stuff! Don’t bother cleaning it
off either, unless you have fresh thermal paste to put on it again when you reassemble the PS3.
Page 27
PS3 Disassembly
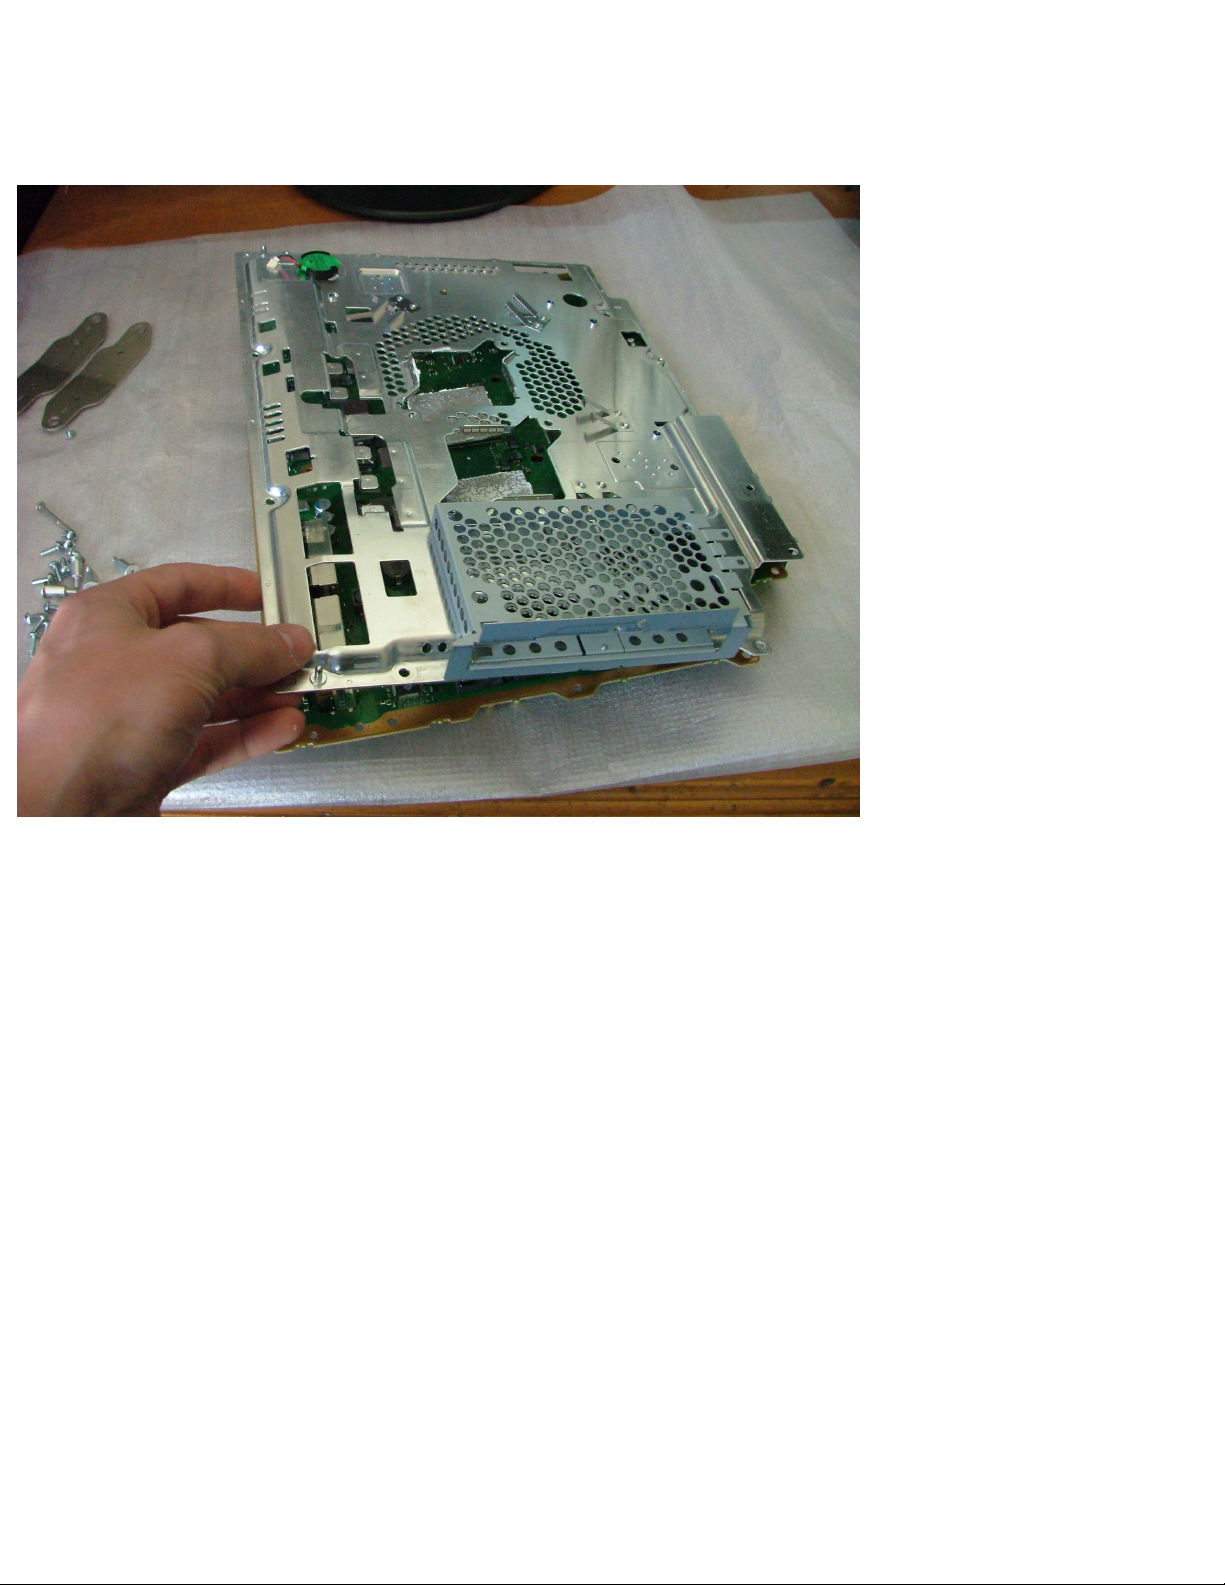
After you get the heat sink off, you can lift up the metal shielding. Be gentle with this as the shielding
as it is very thin and bending it could possibly cause the shielding to short out something on the
motherboard when the PS3 is reassembled.
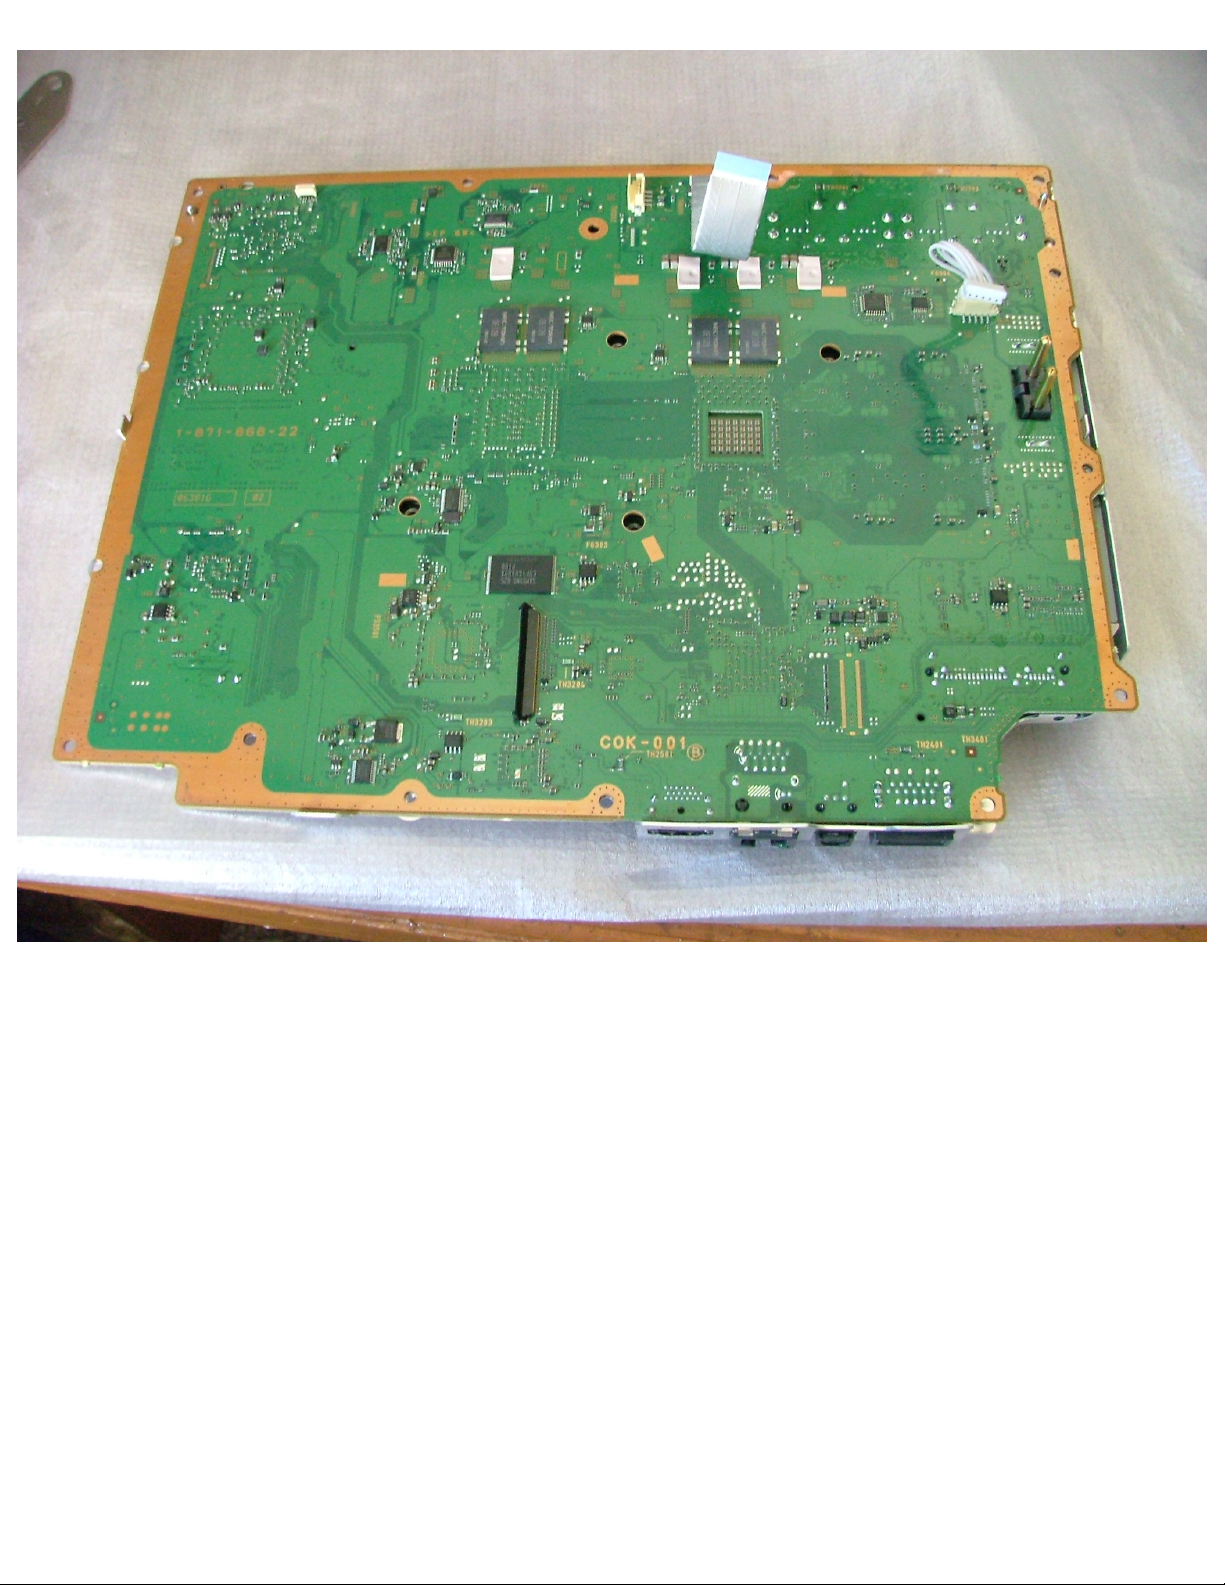
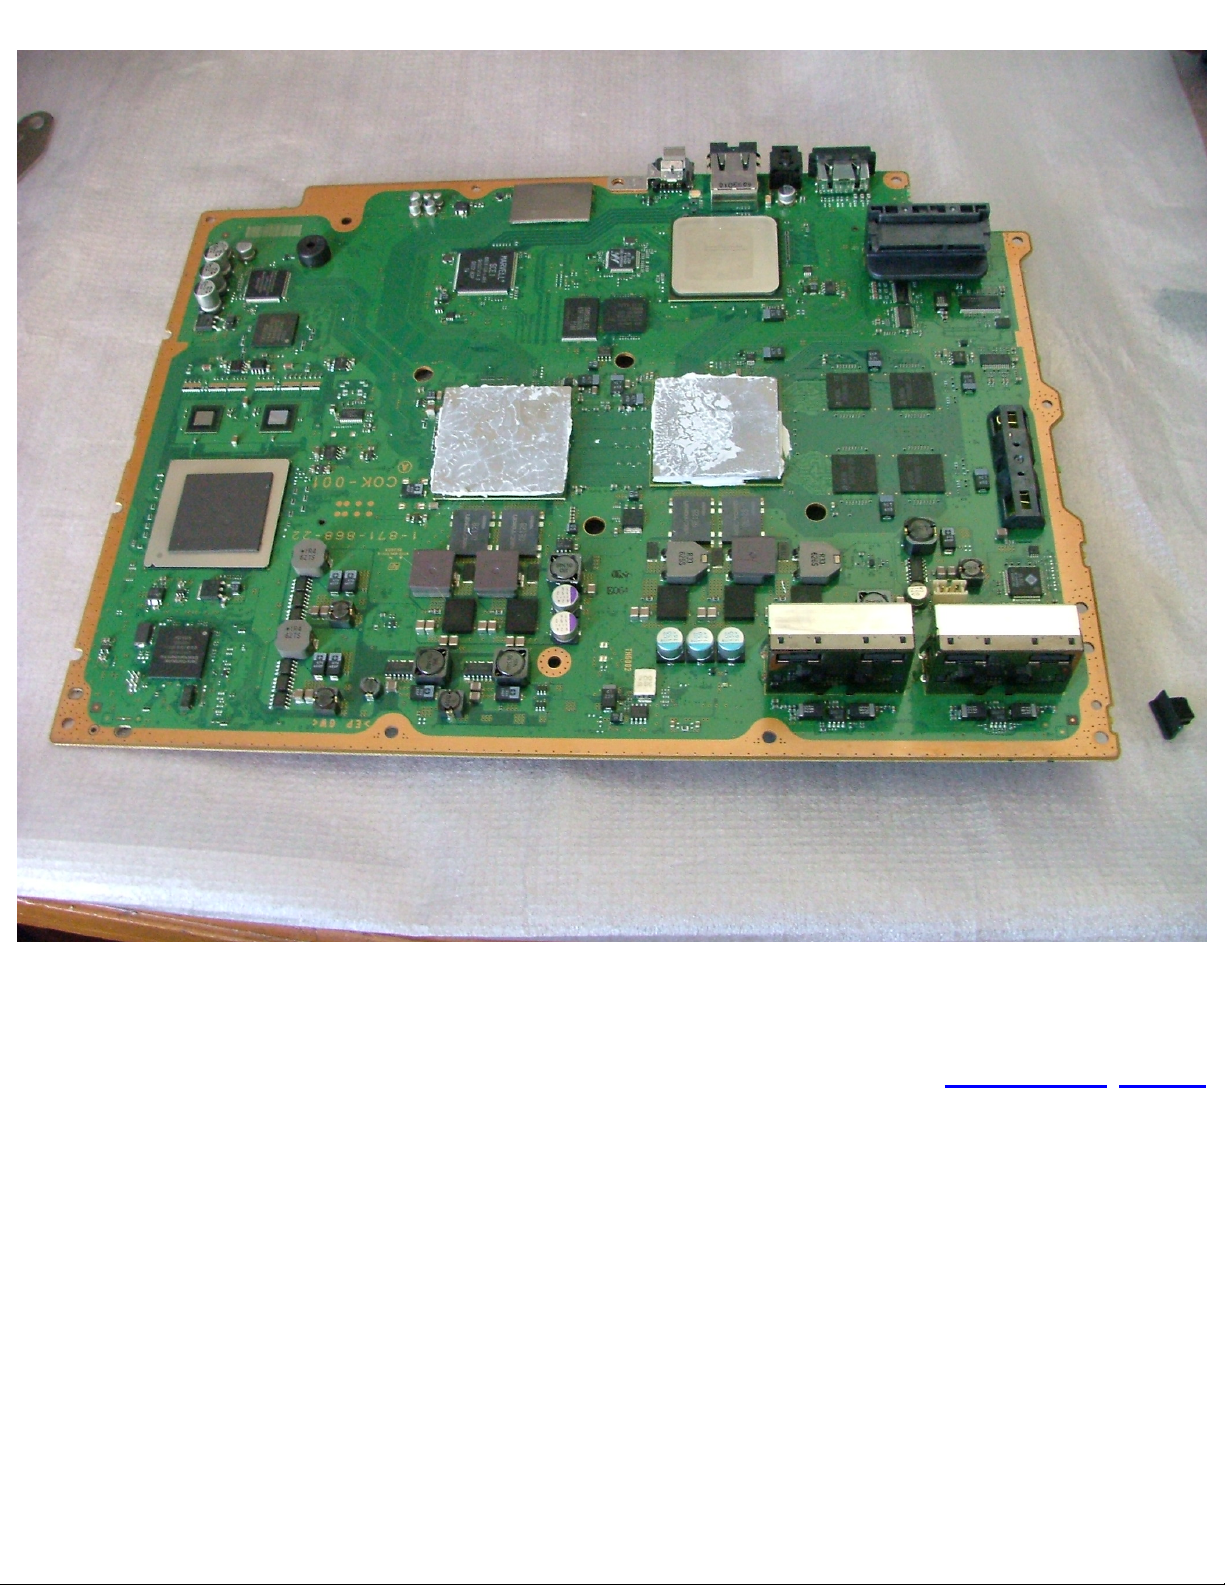
Now flip the motherboard over again, and remove the metal shielding on the other side and you will
now see the naked motherboard:
Top Side:
Page 28
PS3 Disassembly
Bottom Side:
Page 29
PS3 Disassembly
Congratulations! You now have a completely disassembled Playstation 3!
Previous/Next
Page 30
PS3 Controller Disassembly
PS3 Controller Disassembly
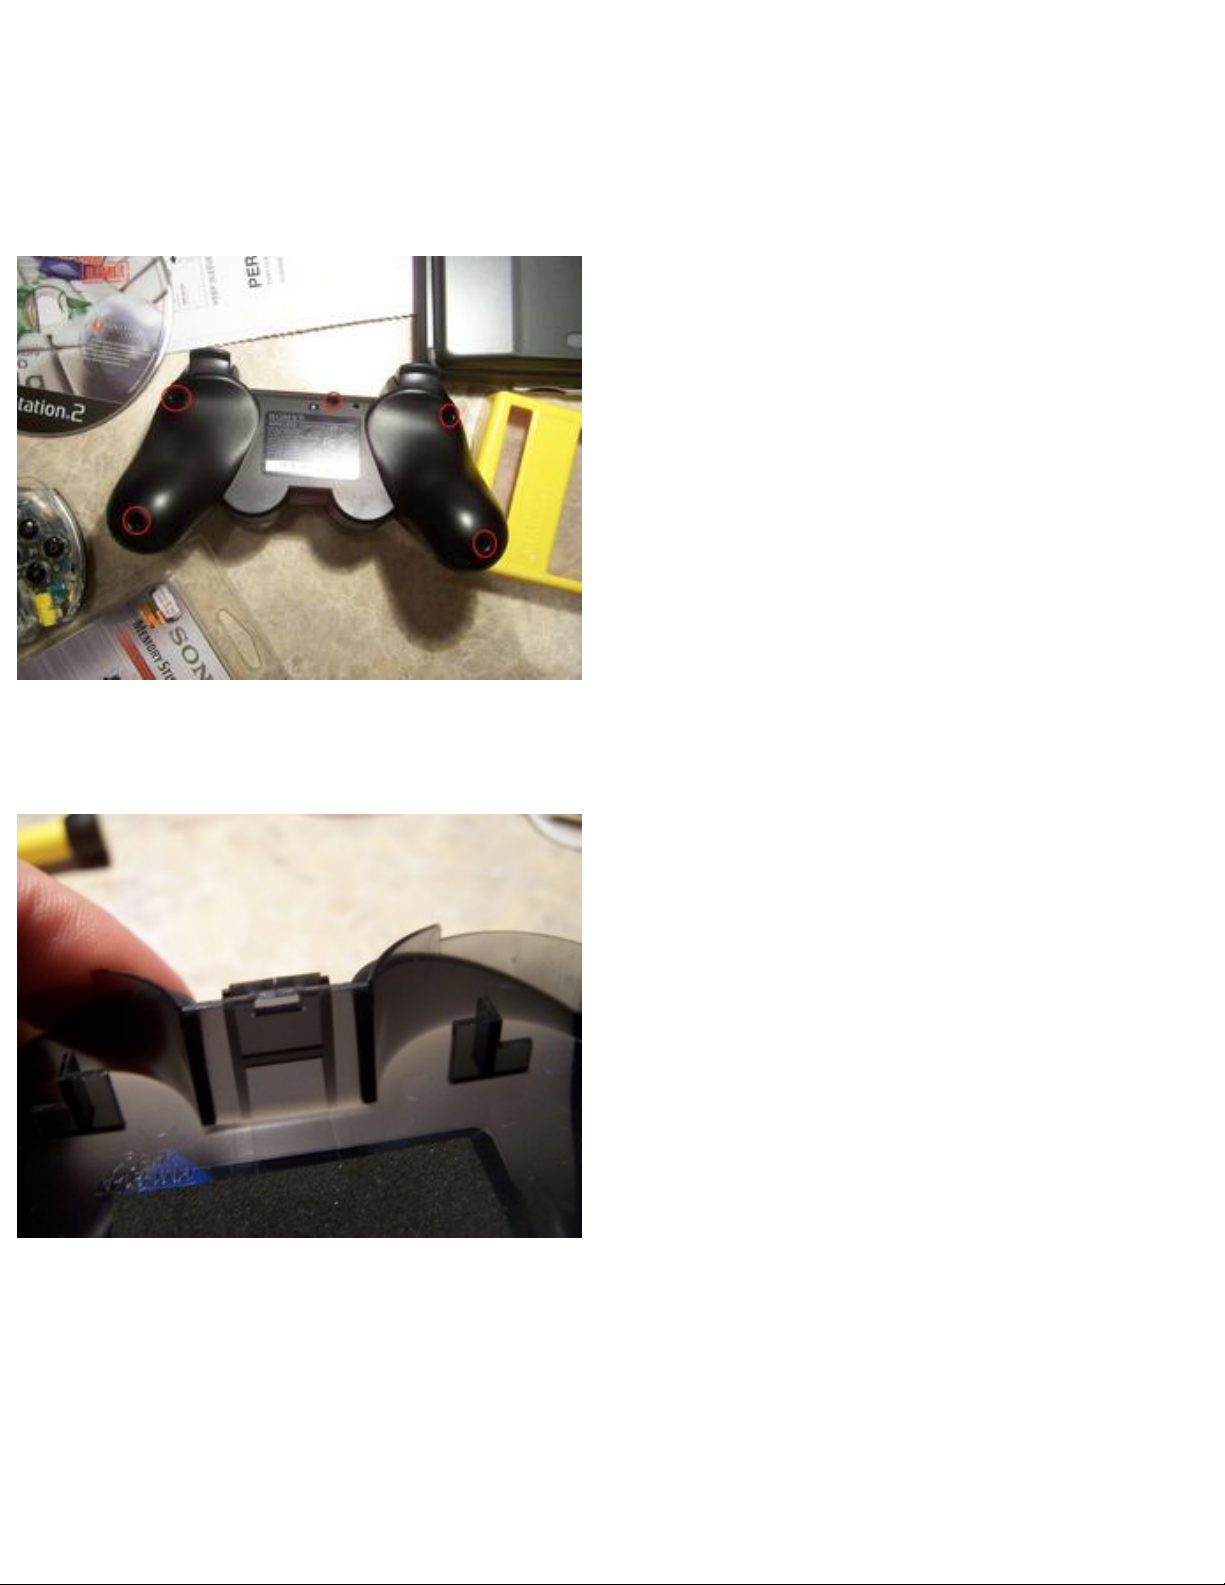
Take a #0 Philip screwdriver and take out the five screws on the back of the case.
Now before we can pull it apart we have to unclip the clip on the front of the controller between the
two analog sticks. This is the part I broke the clip off.
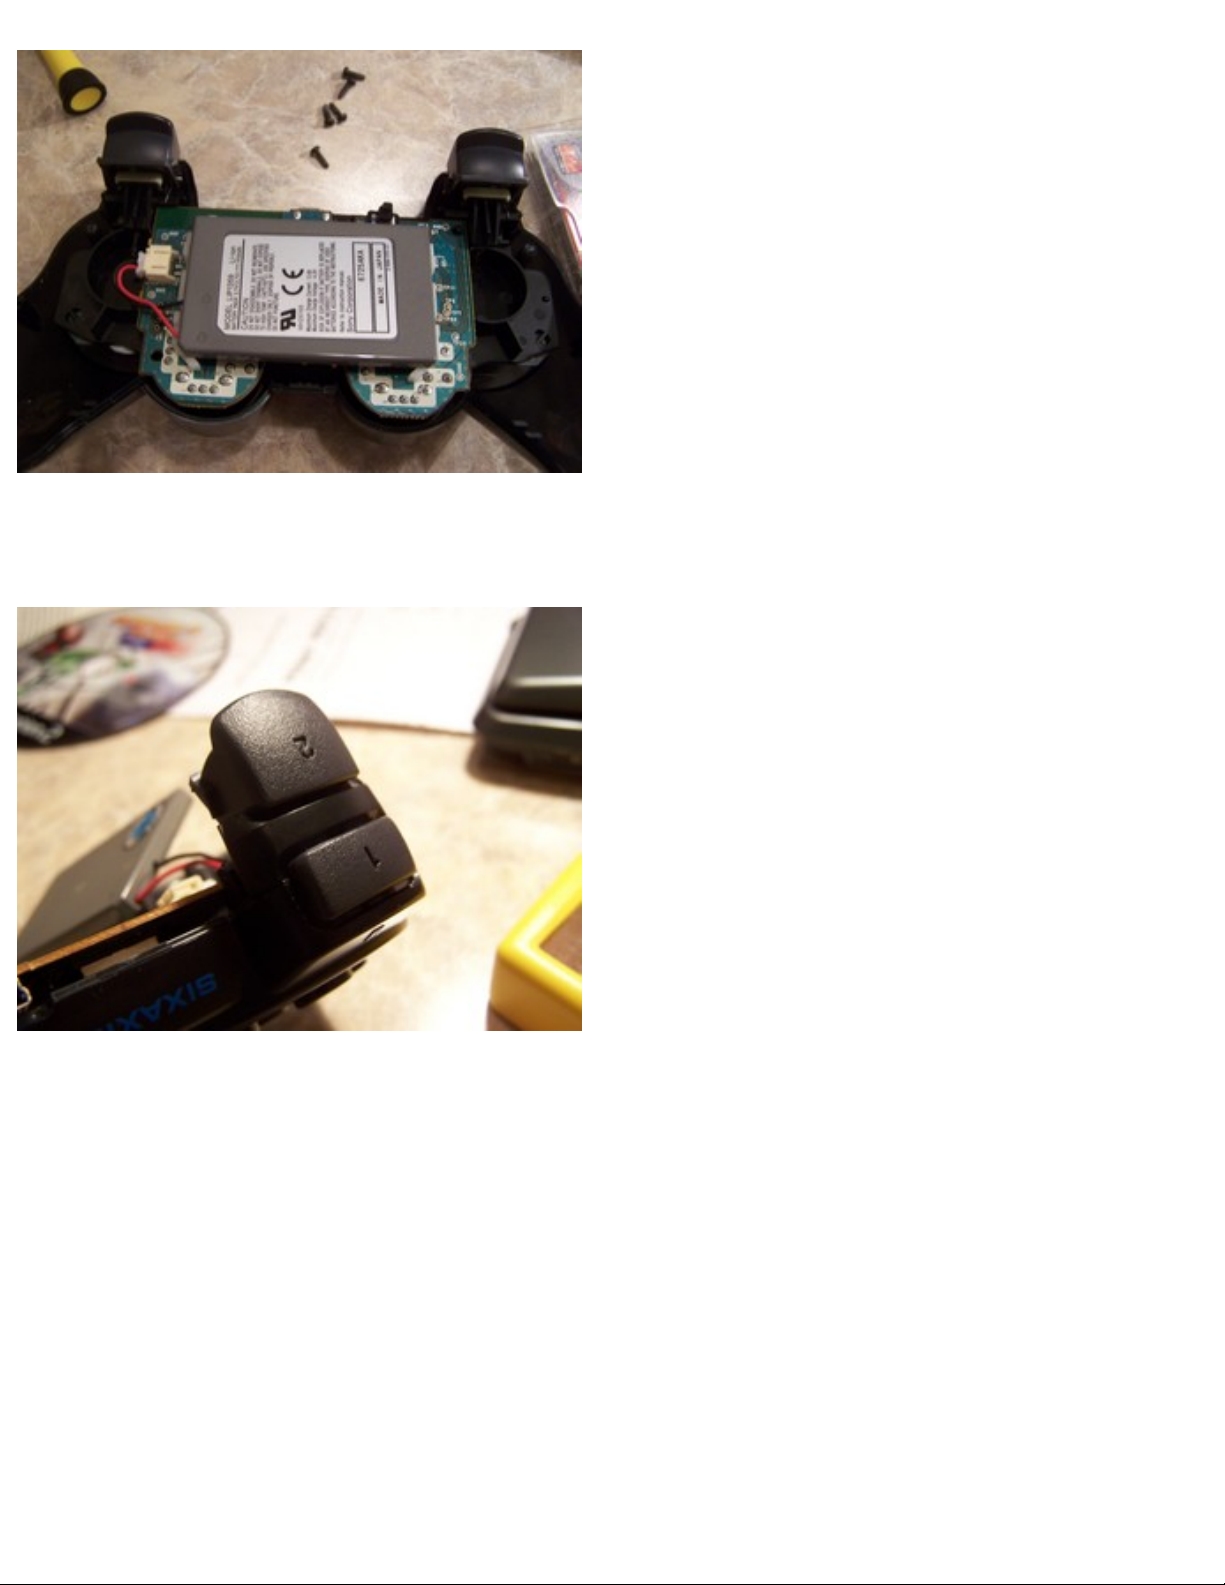
Now you should have something that looks like this.
Page 31
PS3 Controller Disassembly
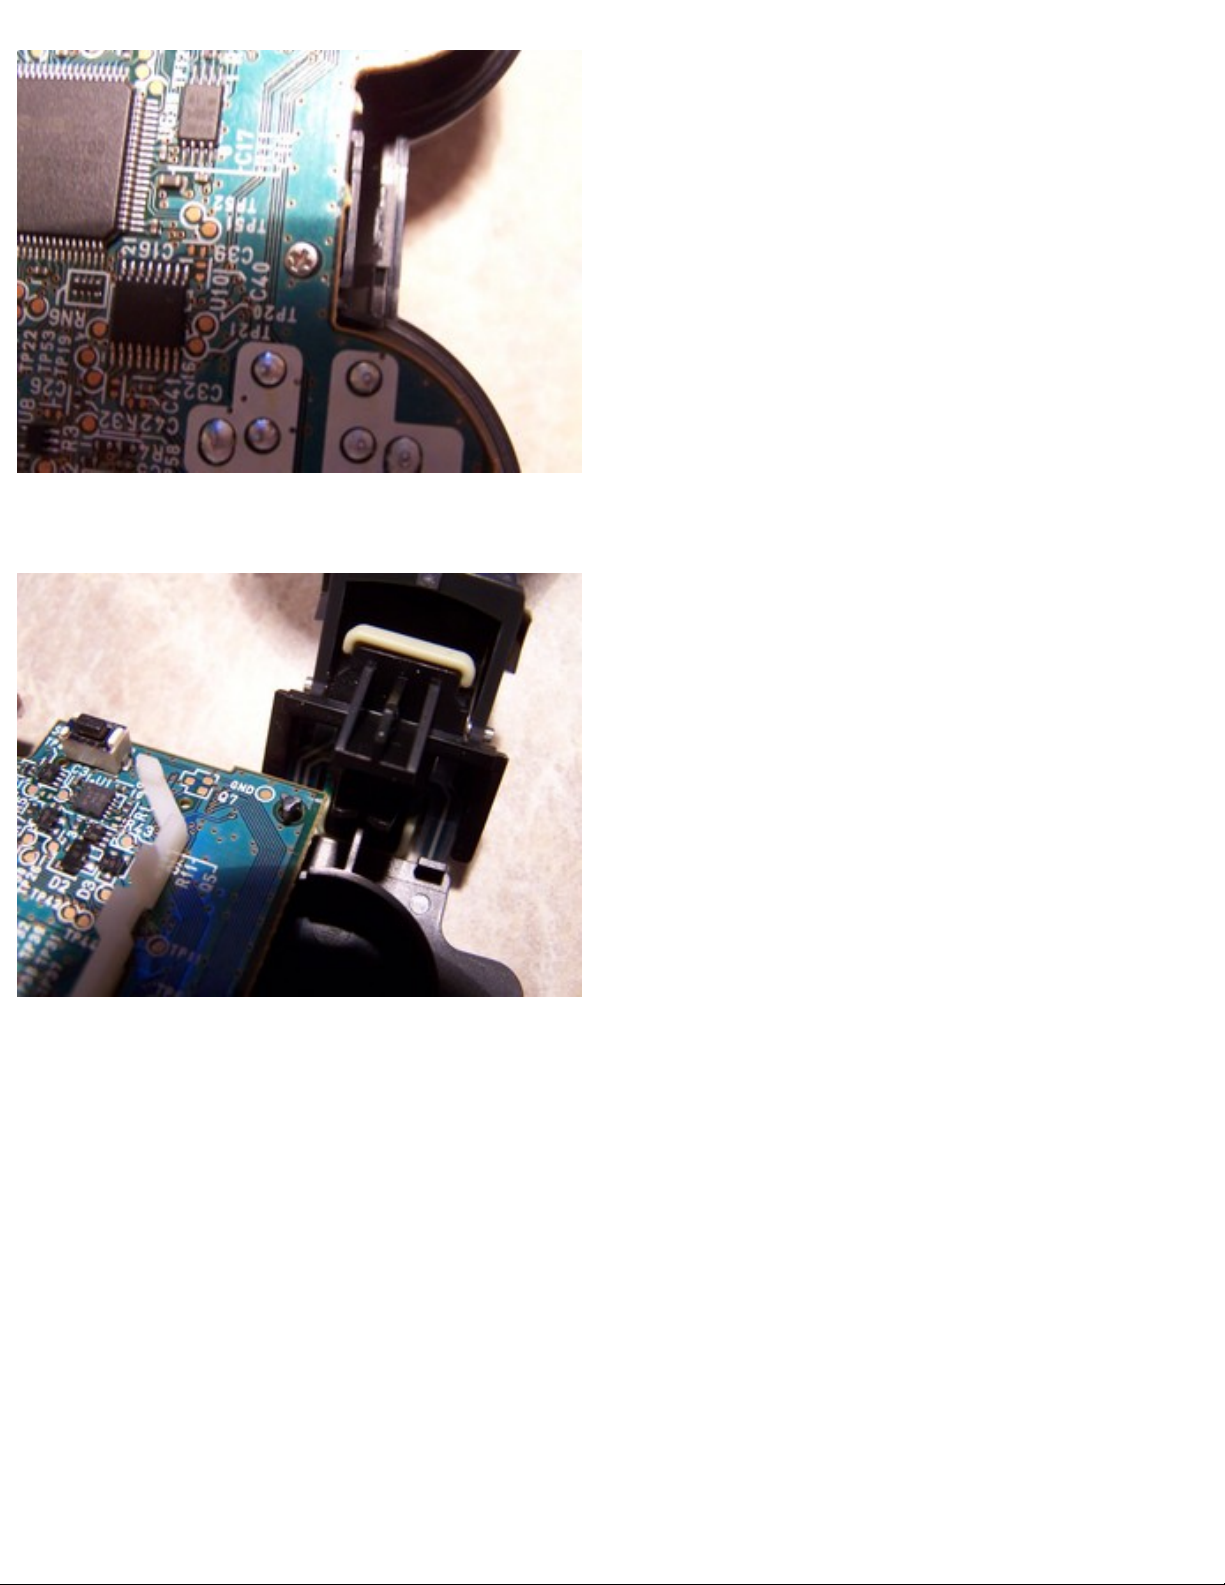
Now detach the battery by pulling it straight out. Take off the piece of plastic that is between the r1 and
r2 buttons and the one between the l1 and l2 buttons.
Now in order to get the main board off you must unscrew the screw on the board. Once that's out you
should be able to lift it out of there.
Page 32
PS3 Controller Disassembly
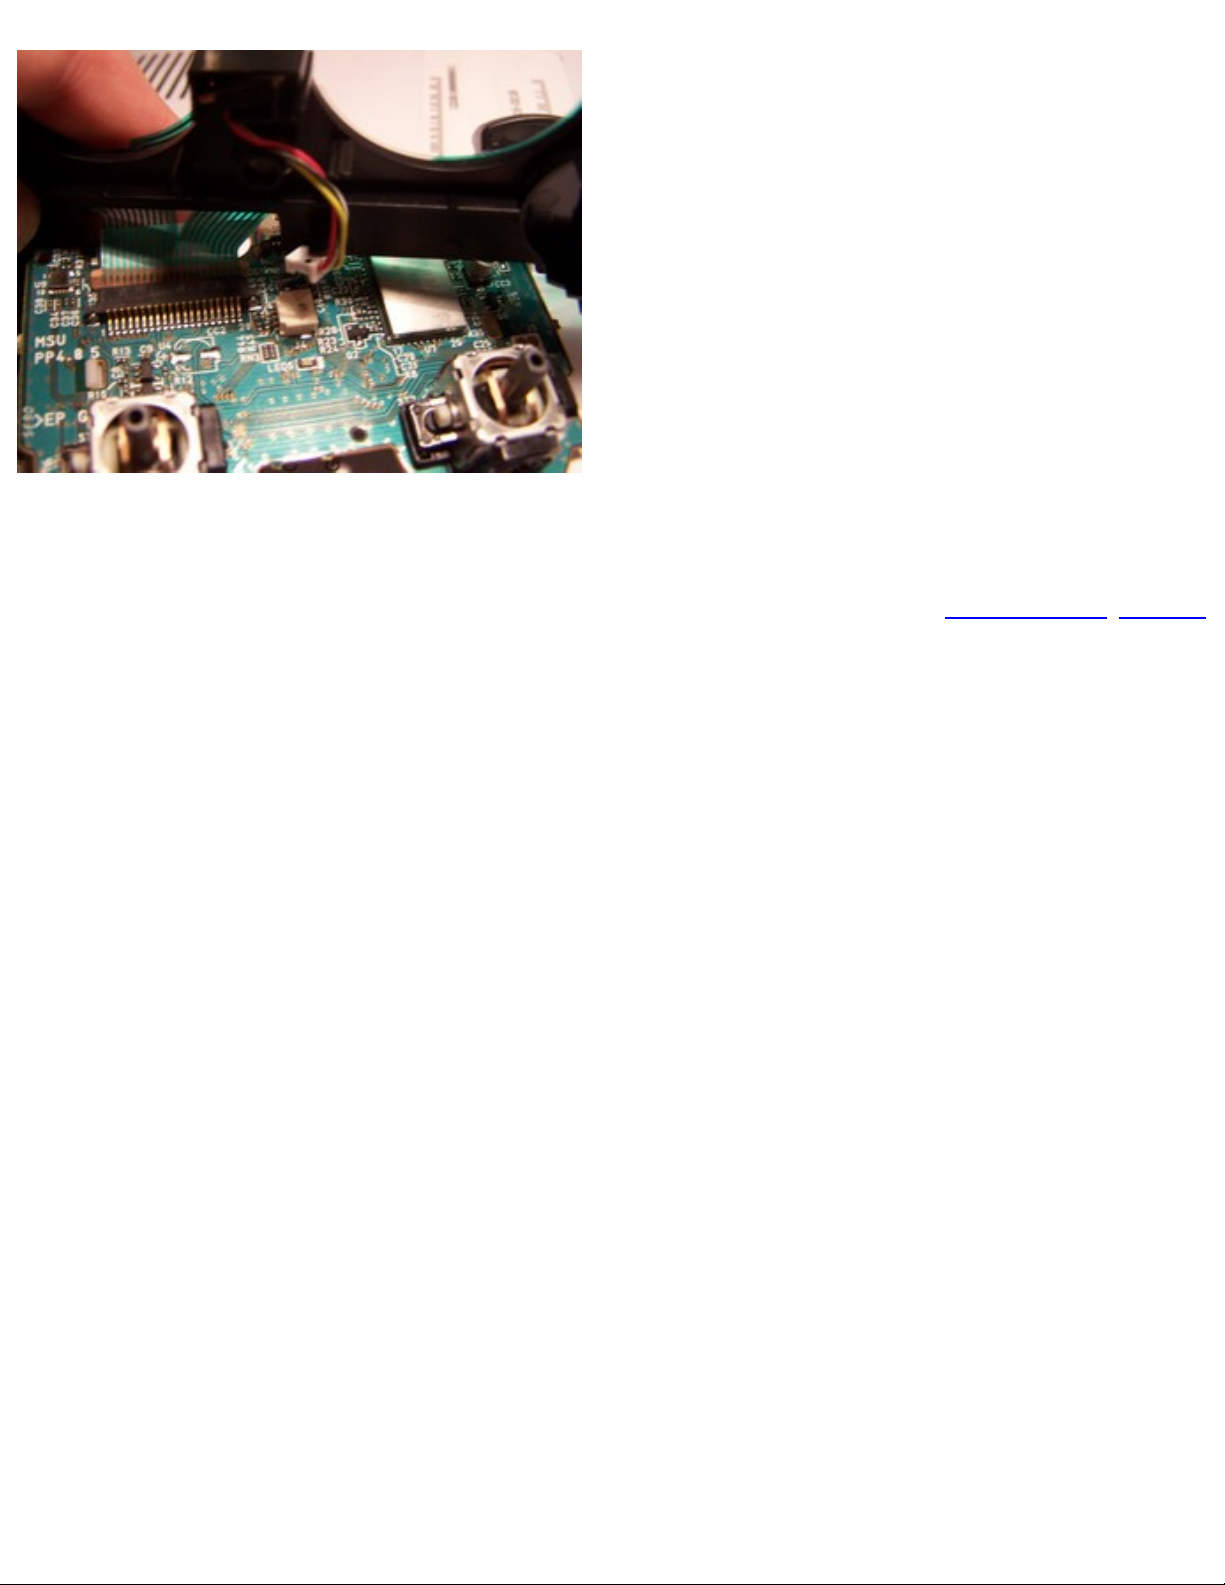
Lift the board apart to get the peg out of the hole.
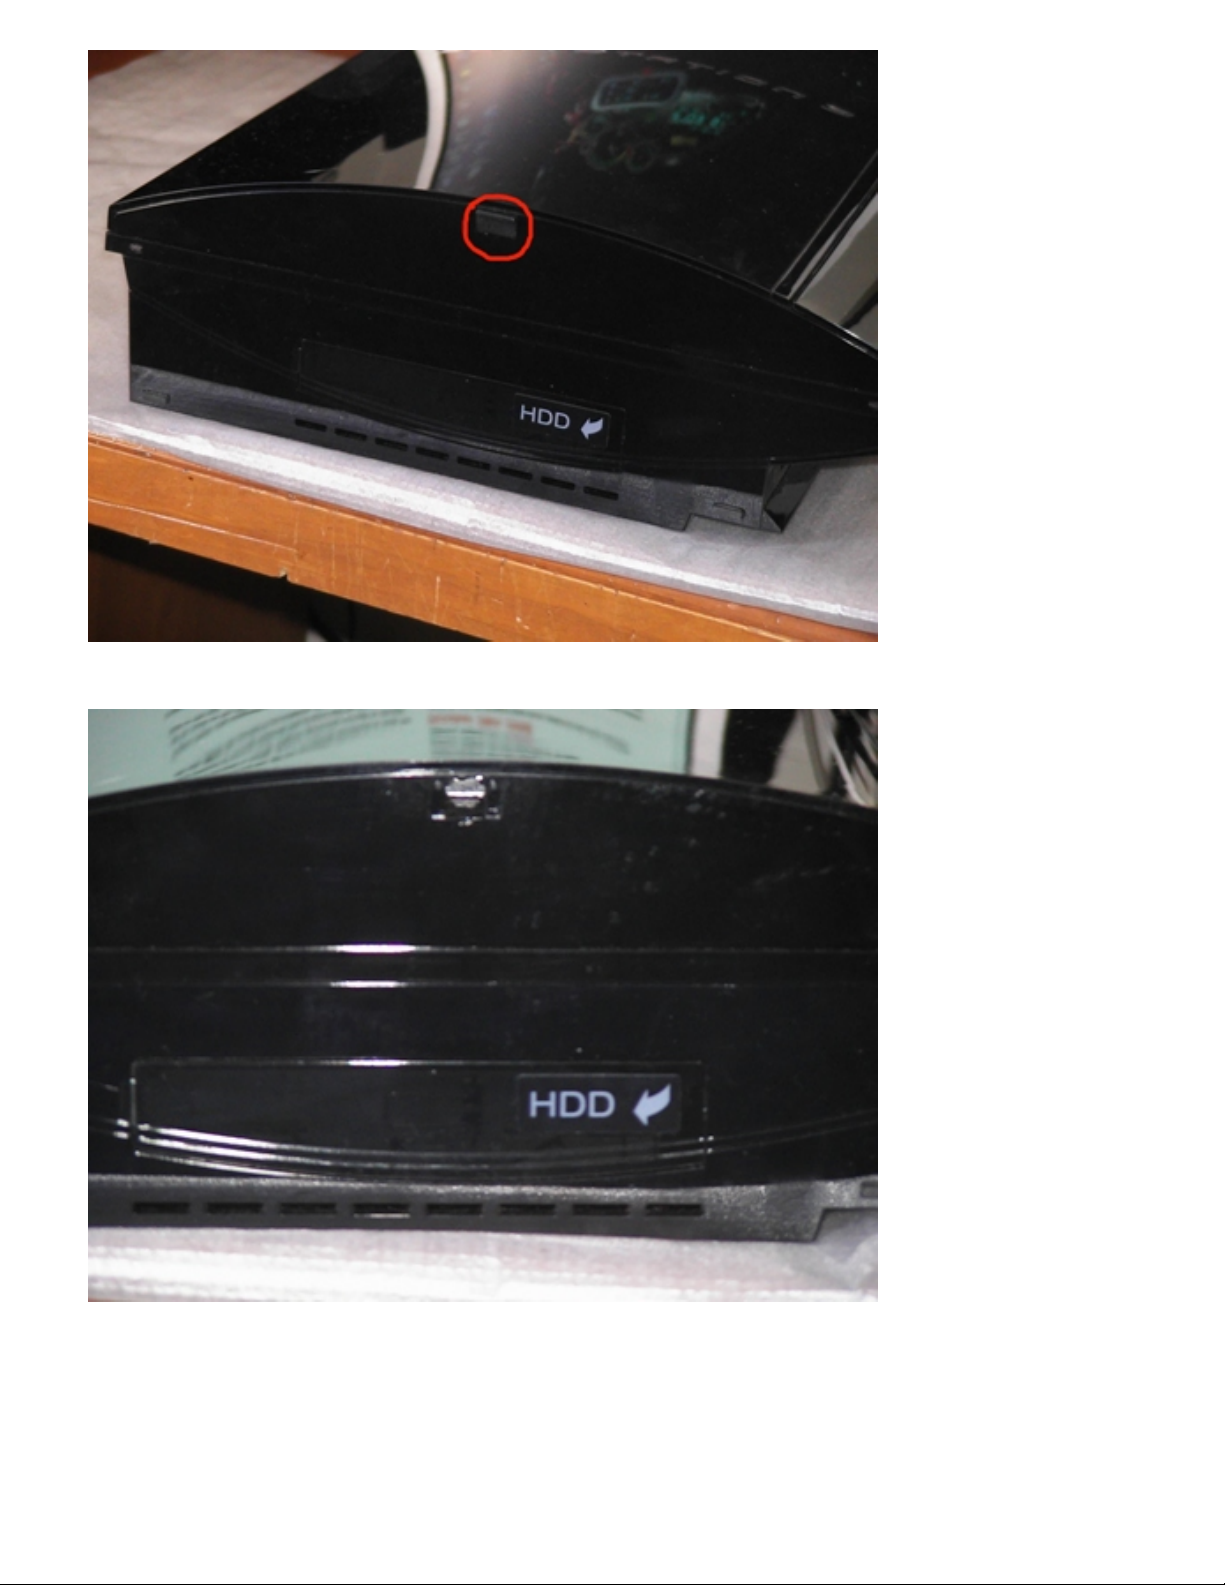
Next you have to unplug the next plug, which I believe is the tilt sensor wires.
Page 33
PS3 Controller Disassembly
Next pull out the ribbon cable and the board should be separated.
Previous/Next
Page 34

Fix Common Problems Index
Fix Common Problems Index
The Mystery of the Blinking PlayStation 3
The dirt on Blu-ray lens (and how to clean it)
PS3 Owners Report Blu-ray Problems After 1.5 Upgrade
PS3 Bluetooth Controller Issues
Playstation 3 HDMI Problem and Fix!
Display/Video Fixes
PS3 Error Codes (With Some Advice)
How to Change From HDMI > Composite Easier
PS3 3 Beep & Blinking Red Light Fix
Previous/Next
Page 35

The Mystery of the Blinking PlayStation 3
The Mystery of the Blinking PlayStation 3
From responses on our site, we realized we weren’t the only ones with this blinking image issue.
Many PS3 owners, who had their console connected via an HDMI (high definition multimedia
interface) cable to a Westinghouse LCD—ours is the LVM-37w3—reported the same problem.
Westinghouse customer support said they knew about the problem and advised using a component
cable instead of HDMI—and to call back in a few weeks for a real fix. Unplugging and re-plugging
the HDMI cable was our temporary workaround—a decidedly low-tech fix for a high-tech problem.
Here is also a video for the fix:
If you are unable to view, the video click here.
Previous/Next
Page 36

The dirt on Blu-ray lens (and how to clean it)
The dirt on Blu-ray lens (and how to clean
it)
In an interview with Hexus, Toshiba Storage Device Division personnel Jim Armour dished the dirt on
the Blu-ray's built-in drawbacks. One of the weak spot of the Blu-ray according to Jim is its drive lens.
To allow the drive to read 25GB worth of info, the Blu-ray lens is placed very close to the disc surface
- somewhere between 0.1 and 0.3 millimeters. Here's the potential problem. The Blu-ray disc is
coated with Zircon, a substance almost as tough as diamond. When the disc heats up it could undergo
warping. Since the Zircon is stiffer than Al Gore, the disc can only warp downwards towards the lens.
"Guess what happens when you run Zircon over glass at 2000rpm?" asks Jim. The heart-stopping
answer: you're going to need a new Blu-ray lens. What does that mean to PS3 gamers? "Who can
say? To be honest, I'd expect any drive or disc to fail in some way if it was being rattled about whilst
trying to run and the Xbox 360 is a prime example, " says Jim. "But it'll be interesting to see how the
PS3 is treated by the public when in use and to see what errors are thrown up by the Blu-ray drives. As
I said, the tolerances in the Blu-ray system unlike HD DVD, don’t leave much room for 'user error.'"
Okay, so he works for Blu-ray's arch enemy HD DVD, but it doesn't mean he's making this stuff up,
right?
Anyway, now that you know the dirt, we bring you a video on cleaning your Blu-ray lens in case it gets
dirty (not warped!). We are not suggesting you do this to your PS3, but it can be used. Even the video
tutorial from Xtreme Tekno warns about the system's delicate nature. Sure the hands make it looks
easy. The same way Martha Stewart makes you think renovating your kitchen will take only 20
minutes out of your life. That's a big "Ha!"
Page 37

The dirt on Blu-ray lens (and how to clean it)
If you are unable to view, the video click here.
Accessing & Removal of the Blu-Ray:
1. Turn the console to the left so that the rubber foot that is circled in red in the picture below can
been seen. Use a small flathead screw driver to remove the rubber foot off. Now that the foot is
removed used the Torx screwdriver to unscrew the screw.
Page 38
The dirt on Blu-ray lens (and how to clean it)
2. Once the Screw has been removed it should look like the picture below.
3. Now face the ps3 towards you and slide the top of the ps3 to the left this may take some force if
it your first time opening the console. When the case has slid as far left as it will go lift the case
upwards as shown in the picture below.
Page 39
The dirt on Blu-ray lens (and how to clean it)
4. After the top is removed you will be faced with yet another cover to remove this cover start by
removing the 7 long screw circled in red in the picture below using a Phillips head screw driver.
5. Now undo the two small clips at the back of the console using a small screw driver then lift the
cover off the console as shown in the picture below this may take a bit of gentle force.
Page 40
The dirt on Blu-ray lens (and how to clean it)
6. While taking the cover off you will see a connector as shown in the picture below.
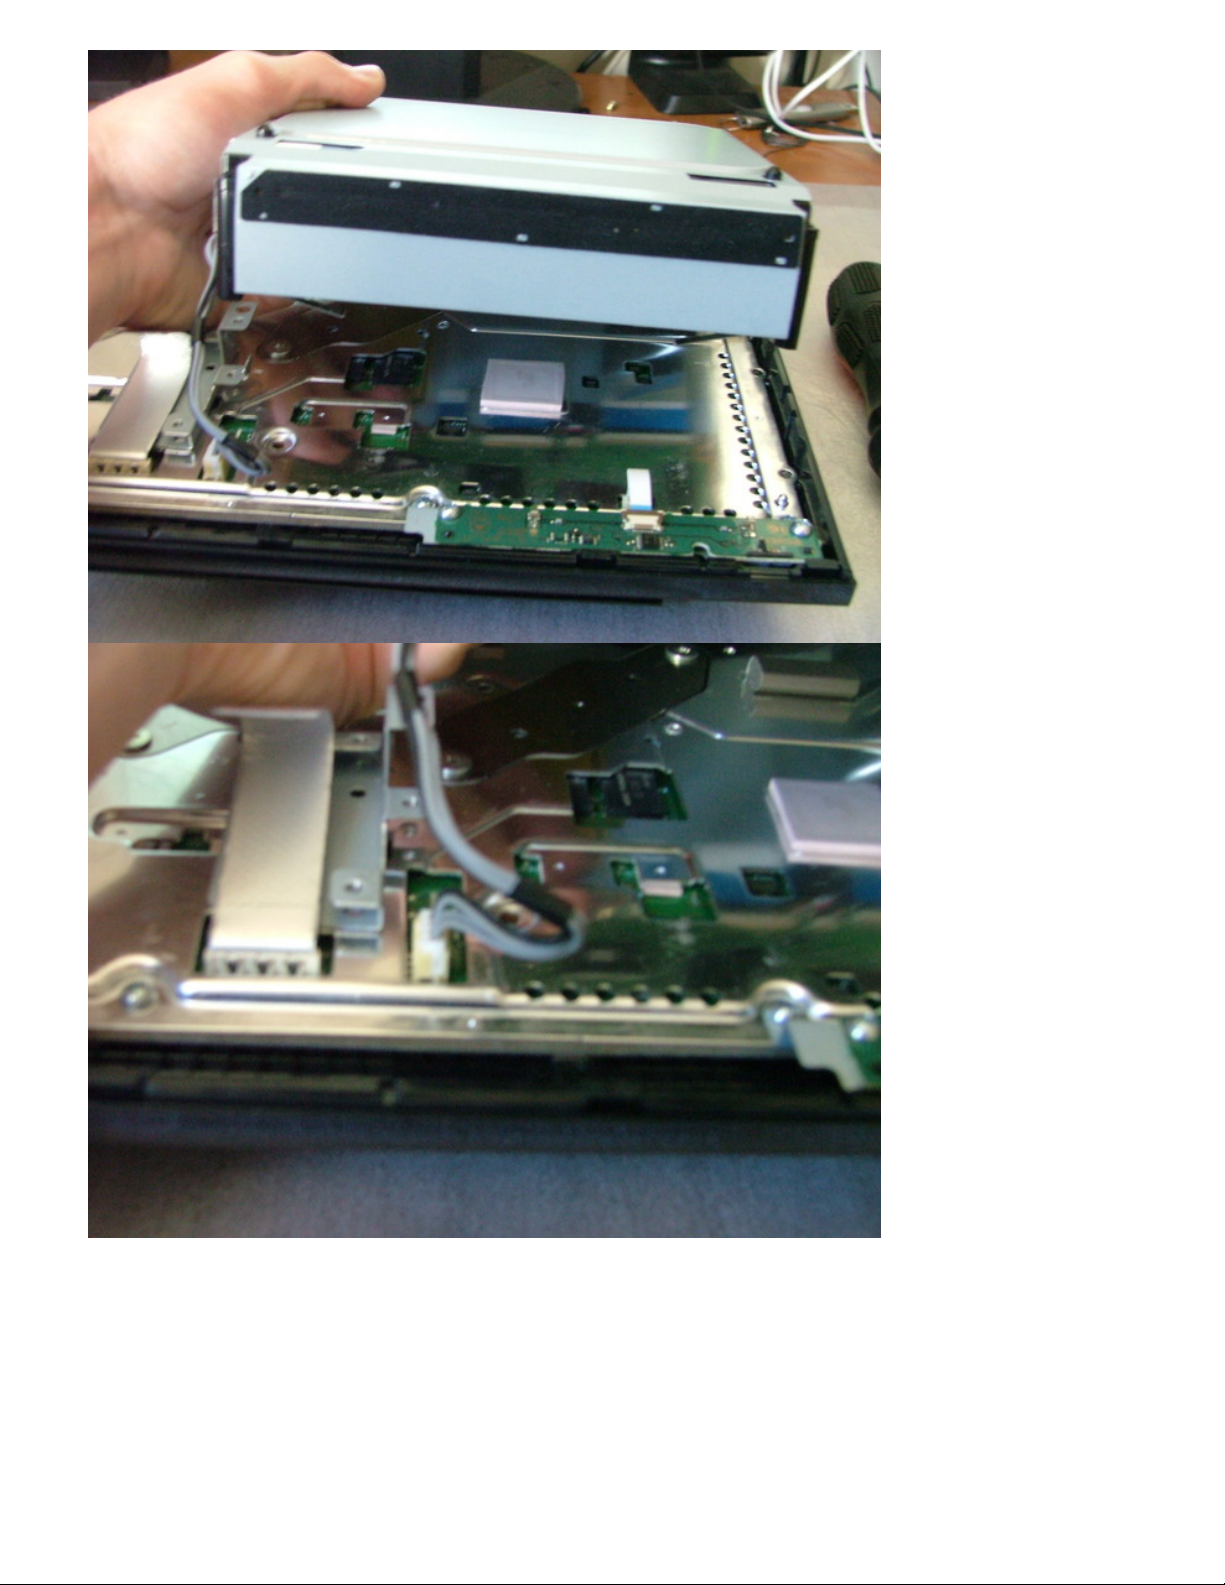
To remove the silver connector use a Small flathead screw driver as shown in the picture below
to help you wedge it out.
Page 41
The dirt on Blu-ray lens (and how to clean it)
7. You will now be able to see the ps3 insides as shown in the picture below.
8. Now to remove the Blu-ray drive. This is relatively easy. Lift the drive up about 2” and you will
see a really wide ribbon cable connecting the drive to the motherboard. Unplug it. There will also
be a plug near the front of the Blu-ray drive. Unplug it as well. The drive will then just lift out.
Page 42
The dirt on Blu-ray lens (and how to clean it)
What you will need in order to clean the Blu-Ray drive:
● Screwdriver
● Q-tip
● Clean lens liquid
Page 43

The dirt on Blu-ray lens (and how to clean it)
Disassembling the Blu-Ray drive:
1. Turn the drive over so as that the board on the Blu-Ray drive is facing up towards you.
2. Take out the 2 screws that are on the bottom left & right hand corners. (Not on the board of the
Blu-Ray but on the metal part of the drive.)
❍ When they are unscrewed, take the 2 screws out along with the metal piece that is with
them.
❍ REMEMBER: when you assemble the Blu-Ray drive, screw the 2 screws back in with the
metal piece.
3. Now unscrew the 5 screws on the board of the Blu-Ray drive. (1 top right, 1 top left, 1 bottom
left, 1 bottom almost right, 1 bottom right.)
❍ Bottom right screw: comes with metal piece that will need to be reattached upon
reassembly.
4. Once the screws are out, you will be able to disconnect the motherboard's connectors.
❍ To extract the connectors, you will need to lift the lid (on each connector) & pull the
connector out.
5. Now, lift the motherboard to your right as it is still connected, to the Blu-Ray drive, with a cable.
6. To extract the cable from the motherboard, you only have to pull the cable from the motherboard.
❍ Now you can remove the motherboard, as nothing else is holding it on.
7. Now turn the Blu-Ray drive over (as you will have to be able to lift & extract the upper case).
8. Once you have turned the Blu-Ray drive over, lift up the on the upper case to take it off.
❍ Be sure that when taking it off the push back on the case while lifting it up, as the case is
hooked into some tabs.
9. Now you will need to take out 4 screws on the drive (1 top right, 1 top left, 1 in the middle on
the left side, above the white piece, & 1 straight across, from the one above the white piece,
on the right).
10. Once you have taken out those 4 screws you will need to remove 1 screw in the middle on the
bottom.
11. Now, you will need to move remove the white part that holds the Blu-Ray disc.
12. Once you do that, you can lift the black case towards your right side.
13. Now take a Q-tip & dampen it with the lens cleaner liquid.
14. Now take the dampened Q-tip & make smooth circular movements on the lens (located in the
square black part).
❍ NOTE: You will want to be careful as the Blu-Ray is very delicate.
15. Now use the dry end of the Q-tip to dry the lens.
❍ You will want to make the same smooth circular movements on the lens, as you just used
to clean it.
❍ NOTE: You will want to be careful as the Blu-Ray is very delicate.
16. Now put the black case back on that you turned to your right.
17. Put the white part back on.
18. Screw back in all the screws that you took out & be sure to put the metal pieces that they came
with back on too!
Page 44

The dirt on Blu-ray lens (and how to clean it)
Previous/Next
Page 45

PS3 Owners Report Blu-ray Problems After 1.5 Upgrade
PS3 Owners Report Blu-ray Problems
After 1.5 Upgrade
An unusually high number of reports of intermittent playback freezes during Blu-ray movies and some
games have been posted to Sony's PlayStation 3 forum, as well as to the AVS Forum and other sources,
after PS3 owners upgraded to version 1.5 of the system firmware.
Tests run by these users since having noticed the bugs appear to eliminate Blu-ray discs themselves as
the cause of these freezes, most of which are said to be momentary and not terminal. Time codes
displayed at the time of freezes are dispersed, indicating that the discs are not defective.
The common elements among those reporting problems appear to be the use of the wireless controller
for navigating the BD, and wireless connection to the Internet. Though Sony itself has given no official
justification for the problem or suggestions,
expert forum contributors are suggesting that users
reconnect their wireless controllers, and attach their PS3 to their Internet router with a direct Ethernet
cable.
The key purpose of the v1.5 firmware patch was reportedly to eliminate scaling problems users
experienced when playing PS2 and older games in compatibility mode, with lower resolution being
scaled up to high-res displays. The firmware also adds new support for online functionality - which,
ironically, may be the indirect cause of the freeze problem.
The level of exasperation expressed by some users only two months after the console's North American
release reveals that patience among early adopters in consumer electronics doesn't compare with the
levels of ten or twenty years ago.
"We shelled out $600 big ones for this console and were loyal to buy the console as soon as we could
get our hands on one,"
one owner wrote on Sony's forum. "We should not have to rig the PS3 by
making sure we have our controllers off and the wireless setting is set to work only on Tuesdays and
the sun has to be shining and it can't be colder than 30 degrees outside then our Blu-Ray reader should
work properly."
Users who have already contacted Sony's technical support report that agents told them this was the
first they'd heard of the problem, and are being advised to disclose their troubles to the PS3 forums
online to see if expert users can help.
One contributor to the AVS Forum wrote, "I just called in [to Sony] and got the same soft reset
recommendation. I assume this is their standard script, as I got no sense this was a recommendation
tied to this particular problem. I probed on whether they were aware of or tracking the problem, but I
Page 46

PS3 Owners Report Blu-ray Problems After 1.5 Upgrade
got nothing beyond generics."
At least one upgrader to version 1.5 received an e-mail back from Sony technical support advising him
to upgrade to version 1.5 to see if that fixes the problem. Some upgraders, however, are reporting no
trouble whatsoever, though some admit they have a direct Internet connection and not a wireless one.
So for now (until something better comes along), the best "fix" is to reconnect your wireless
controllers and attach your PS3 to your Internet router with a direct Ethernet cable. Since, the problem
is mainly with Wi-Fi users. This is fixing about 65% of most people's issues.
Previous/Next
Page 47

PS3 Bluetooth Controller Issues
PS3 Bluetooth Controller Issues
Here's an issue that's been nagging me since I got my PlayStation 3 on Friday. I'm playing Resistance
online, and suddenly the map will come up, or the score. I didn't hit the controls to bring these up...they
just pop up on their own. Then at times I'll lose control, spin around, or sometimes even fire without
wanting to. At first I thought it might be my general suckage at FPS games, but several readers have
now complained about similar situations. Doesn't seem to happen when I am plugged in via the USB
cable...only when I am wireless, and generally only when I am playing online.
PC-Doc touches on the same issue in his PS3 rant, suggesting it is a problem with the Bluetooth
screwing up, which makes complete sense. Will I have to just buy a really long USB cable like he did?
The answer is YES! (For now this is a widely used solution, until a better fix is in place. This has
worked for about 60% of the people that have tried this.)
Previous/Next
Page 48

Playstation 3 HDMI Problem and Fix!
Playstation 3 HDMI Problem and Fix!
Those of you who have the new Playstation 3 and want to use it with your HDTV and the HDMI
interface, take note.
First, if you have an older HDTV, i.e. one that doesn't support 720p resolution, prepare to be
disappointed. The PS3 will down-rev your revolution to 480p, not up-rev it to 1080i. Sad.
Next, it's being reported that there are small, non-fatal, glitches when using the HDMI interface. You
can see the report from the
CheapAssGamer.com of view the YouTube video from CheapyD.
What you may not notice is that buried in the comments are a fix from CheapyD himself:
"I've learned that there is a auto HDMI setup built into the PS3. They say to do the following:
● Turn on TV and set input to HDMI port being used
● Make sure PS3 is connected via HDMI
● Power on PS3 via power button and HOLD IT for 5 seconds.
It should automatically configure your PS3 to the TV's native res for all settings. "
Previous/Next
Page 49

Display/Video Fixes
Display/Video Fixes
I have had a few people ask me now about how to fix some sort of display/video problem, i.e. blank
screen, sound but no display, etc.. So I have decided to put together a troubleshooting reference of
common possible fixes for display/video problems that most people might be experiencing.
1. First off check your connections. Make sure that whichever display/video cable you might be
currently using, is connected all the way & properly hooked up to your TV & PS3. This will fix
most display/video problems.
2. Check your display/video cables to make sure that there is nothing wrong with your cables. If
you suspect there is a problem with your cables but are not sure, try them on another PS3 (one
that you know for sure is working & does not have display/video problems).
3. Hold the power button on the ps3 for 5 seconds until you hear a beep. If this doesn't work, try a
few times. It should work. This will also fix most display/video problems (i.e. no display/
video). (When turning on your PS3, be sure to hold the power button down. DO NOT
LET GO! If you turn it on, then repress the power button again for 5 sec. until you hear a
beep, IT WILL NOT WORK!)
As more problems arise, I will add more fixes.
Previous/Next
Page 50

PS3 Error Codes (With Some Advice)
PS3 Error Codes (With Some Advice)
Hi found these error codes thought they might be a little helpful
80710102 - DNS Error; No DNS server available.
8001050B - Will not play demo hard drive games, when blue-ray disc is inserted - Cause unknown
80010510 - Will not play hard drive games - Cause unknown
8002b241 - DVI has no audio.
80028EA5 - Unknown
80029023 - Exchanging Key Information exchange has timed out
80029024 - The attempt to obtain an IP address has timed out
80029564 - Downloaded Game will not install - Cause unknown
8002F997 - Cannot update XMB firmware
8003051E - Game will not Save
80031150 - System Settings Fail to Save - Possible Blue Screen "Setting information is corrupted.
Press the x button to repair and restore default"
80130203 - PS3 connects to internet but not to network - Typically means that the required ports
are not open to connect to store but PS3 can connect to internet.
80710092 - "An error has occurred. you've been signed out from the ps network" (connection
dropped?)
80710102 - PS3 Cannot connect to the router with current IP information - Try rebooting your router
80710541 - The connection to the server timed out.
80710B23 - PS3 Network is Down or PS3 Network is too busy to respond
80710D23 - Turn the PS3 off for a bit (30 minutes give or take) with the power toggle (not standby
mode).
80029024 - "Cannot Obtain an IP address".
Page 51

PS3 Error Codes (With Some Advice)
80028EA5 - Unknown - User cannot connect to PS3 network.
8001050B - "Will not play demo hard drive games, (when blue-ray disc is inserted) - cause
unknown".
8002F997 - Trying to Update the Firmware, copying to a file and installing from a USB drive failed".
80710016 - Playstation Network is down.
8013013E - WEP Key error, change WEP key to all numbers (on router homepage) and try again, or
which to WPA.
8013030F - Check Router Page, SSID Broadcasting possibly off.
8002F994 - To many people downloading the update just sit back until the morning around 5am -
11am and you should be able to get it.
80410A0B - Internal PSP error, hardware fault. Send back to be replaced/fixed.
80028F10 - Go to Display Settings then HDMI (or whatever your connection is) and choose
Automatic, not Custom. I always had it on Custom before.
8002A705 - Unable to connect to server/host. Check router port configuration.
80030920 - An error occurred during the copy operation. The file may be corrupt or there isn't enough
memory. Try copying data from original source.
PlayStation Network Required Ports:
TCP 80
TCP 443
TCP 5223
UDP 3478
UDP 3479
UDP 3658
Previous/Next
Page 52

How to Change From HDMI > Composite Easier
How to Change From HDMI > Composite
Easier
Just made this easy tutorial because when I play my ps3 in HD, and the next day I take it to a standard
tv, I would have to go back to the HDTV, plug in the HDMI, go to settings, set it to composite input
and then go back to the standard and then I could play. Another scenario would be... You just played
your ps3 on your 1080p Sony bravia lcd. Your friend calls you over and asks to bring your ps3 for
some WarHawk. When you get to his house, he only has a standard definition tv. What the hell would
you do lol. You need an HDMI to see the screen.
From HDMI to Composite:
1. Turn on your ps3 and wait a few seconds (approx. 10 seconds)
2. If you have multiple accounts on the ps3, Press ( X ), If you don't then just skip to number 3
3. Press Left arrow 4 Times ( <<<< )
4. Press Down Arrow 9 Times ( vvvvvvvvv )
5. Press ( X ) 2 times
6. Press Down arrow 2 times ( vv )
7. Press ( X ) 2 times
8. Your Done! the screen should be shown now in your standard definition Tv.
Previous/Next
Page 53

PS3 3 Beep & Blinking Red Light Fix
PS3 3 Beep & Blinking Red Light Fix
The Red light is due to the HDD (hard drive).
There is one of 2 problems:
1. The connection is loose or
2. The HDD is just bad.
This was an issue that has been discussed over in the Playstation forums and it seems that re-seating
(removing & reinstalling) the HDD has solved the problem for many but some people have just
received bad hard drives period.
If you reinstall the HDD & it still beeps 3 times & gives you the red light, then you will have to replace
your HDD.
If I remember correctly, PS3s use Hitachi Laptop Drives. IMO, Hitachi is not well known for good
drives. I replaced mine with a 160GB Western Digital drive I got for free a few months ago. I haven't
had any problems since.
Hitachi makes a good drive, but the ones that fail seem to fail really bad. Western Digital seems to
make the best drives and they offer a very good warranty service as well.
Previous/Next
Page 54

PS3 Modifications Index
PS3 Modifications Index
PS3 3.5" SATA HDD Mod
Adding IR Remote Control to the Sony PS3
PS3 HDD Replacement Mini-Guide
USB Flash Memory, USB Hard Drive (External Use)
Previous/Next
Page 55
PS3 3.5" SATA HDD Mod
PS3 3.5" SATA HDD Mod
Intro
If you're like me, my 60GB PS3 does not have the storage capacity that I require. I am running Yellow
Dog Linux and I'm going to need more room on the HD for installs and files that I want locally. That
little 10GB partition the PS3 XMB is using is going quick; all those demos and videos that the Sony
store is dumping is really beginning to add up. Not only that, what about my music and PS1 downloads
for the PSP.
I already have a DIY NAS server at home. My server has a P4 2.8Ghz, 1GB ram, GbE NIC and 1TB of
storage. It does SMB/CIFS, NFS, FTP, HTTP and RSYNC, yadda, yadda, yadda. It's freaking fast but
using the PS3's Web browser sucks at the moment so for now while I am waiting to be able mount my
server's disk to the PS3's XMB I'm going to upgrade the PS3's HDD. Forget Team Xecuter's lame PS3
HDD mod (sorry Team Xecuter). They have not said anything about it for some time and it looks
fugly.
I'll provide at least one simple solution using a 3.5" SATA HD. 3.5" drives are all around much much
faster, cheaper and larger than 2.5" laptop HDD's like the one installed in your PS3. No the 3.5" drive
will not fit in to your PS3...
Towards the bottom of the page is for people who want bigger, better, faster equipment; developers,
researchers, hackers, modders, pirates, music and movie freaks apply.
Simple 3.5" HDD Mod Requirements
■ Your brain (or a borrowed one from a retarded baby monkey).
■ Enough of #1 to figure out how to remove the OEM HDD. (If you can't figure this part out
read
this...)
■ 1 medium Phillips screw driver. (for removing the old drive)
Page 56
PS3 3.5" SATA HDD Mod
■ 1 3.5" SATA HDD (find one yourself start here...)
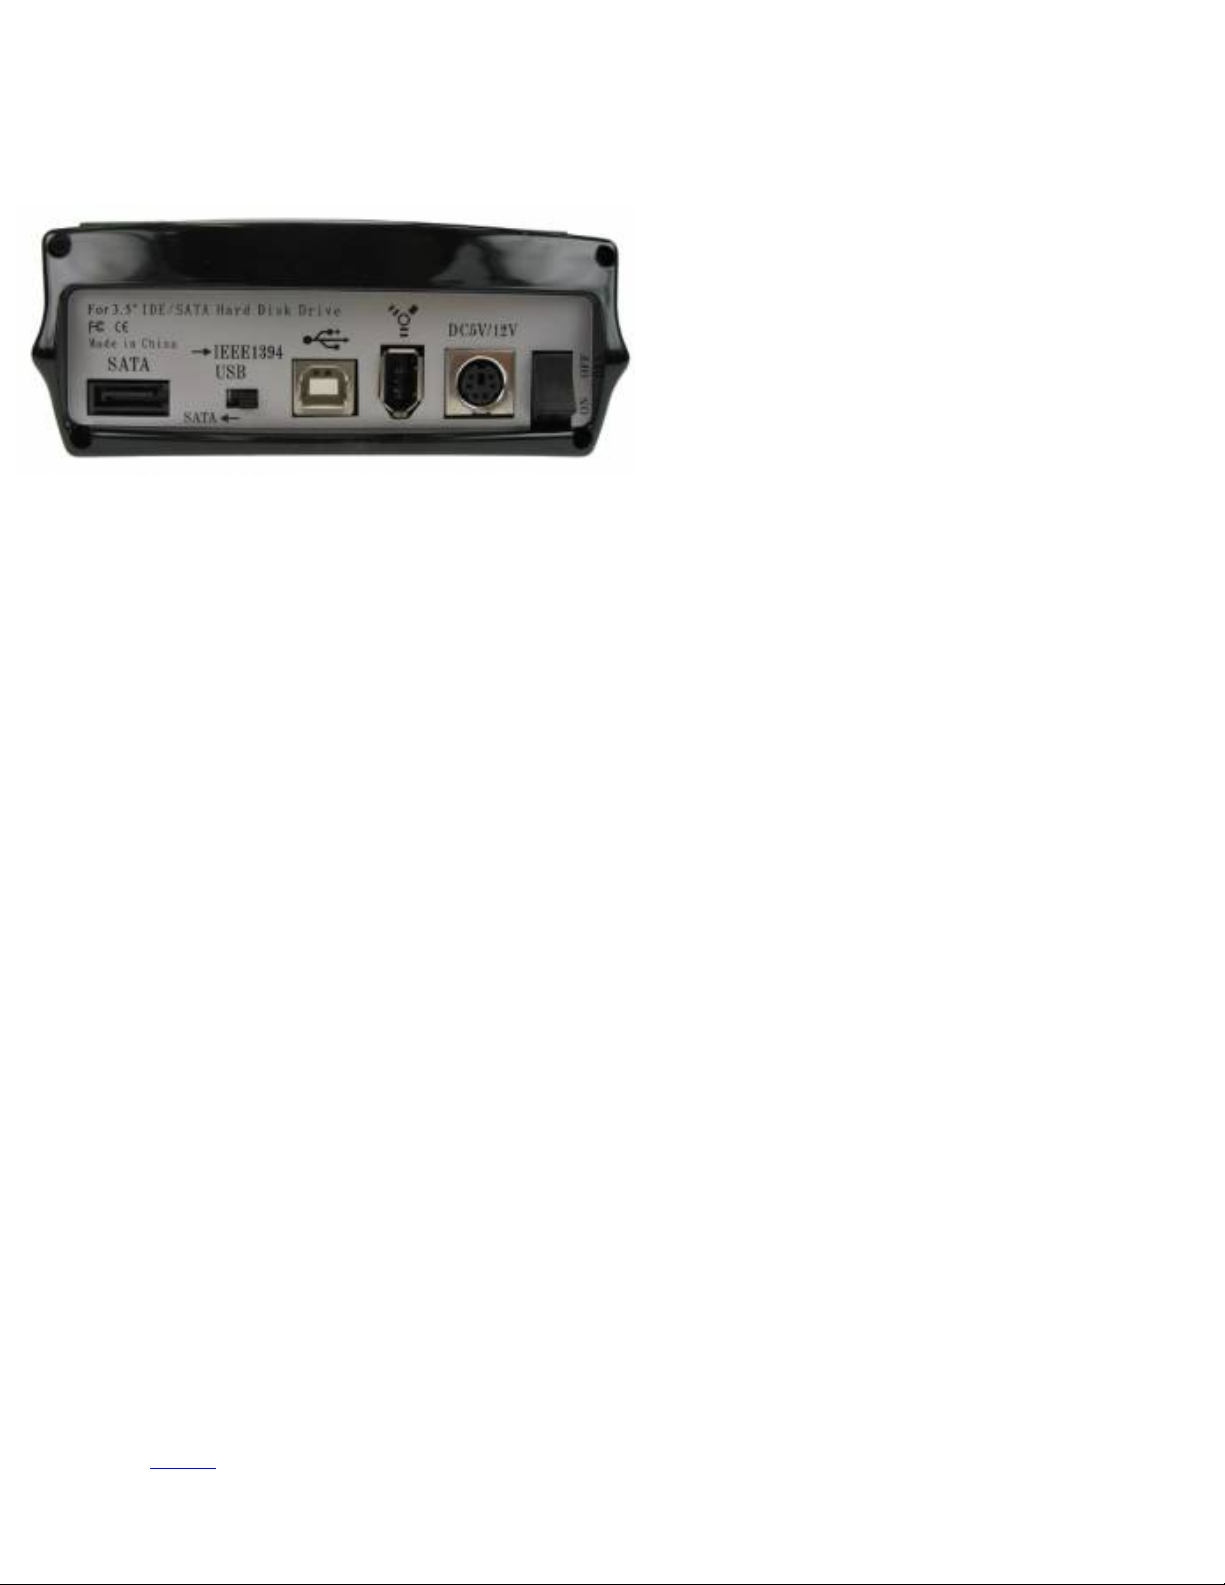
■ 1 3.5" SATA HDD enclosure. (Like this one here...)
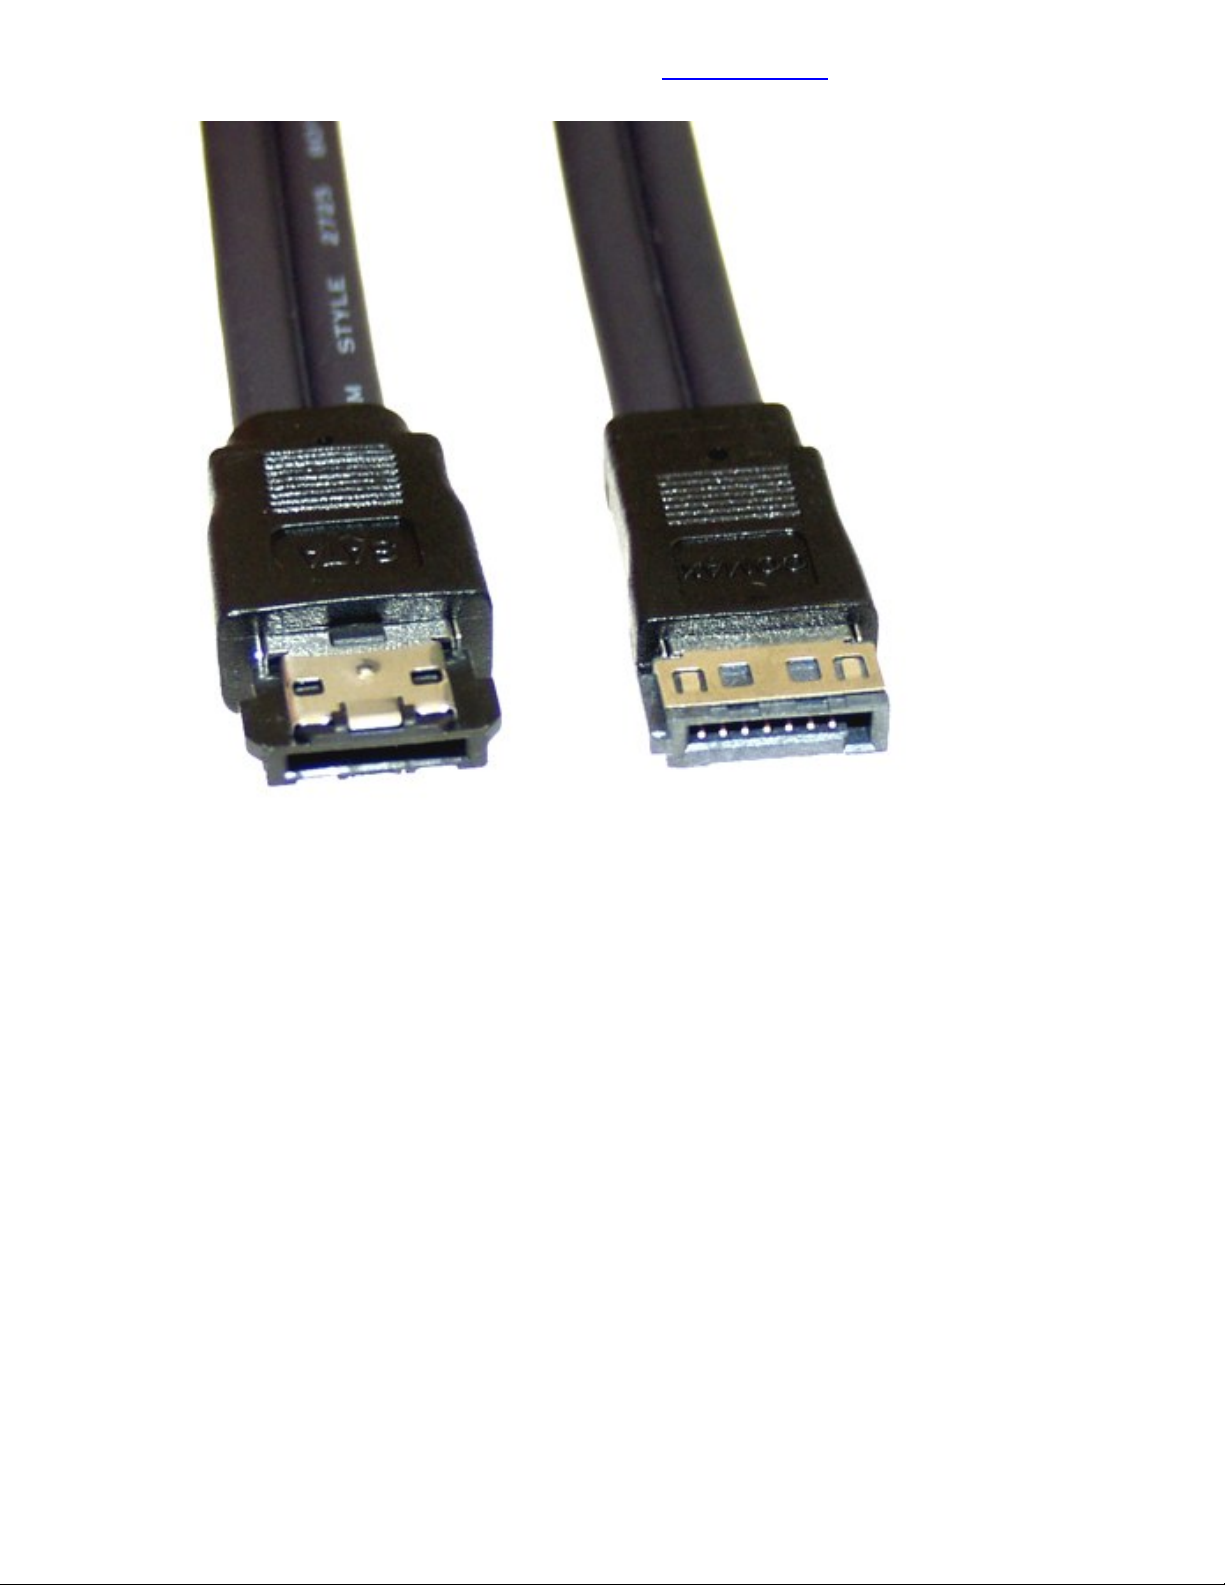
■ 1 Male SATA 7-Pin DATA to Female SATA 7-Pin Cable. (I'm using a 20") Got mine here...
■ You may need a set of needle nose pliers or a pair of snips.
Pictures & Instructions (sort of)
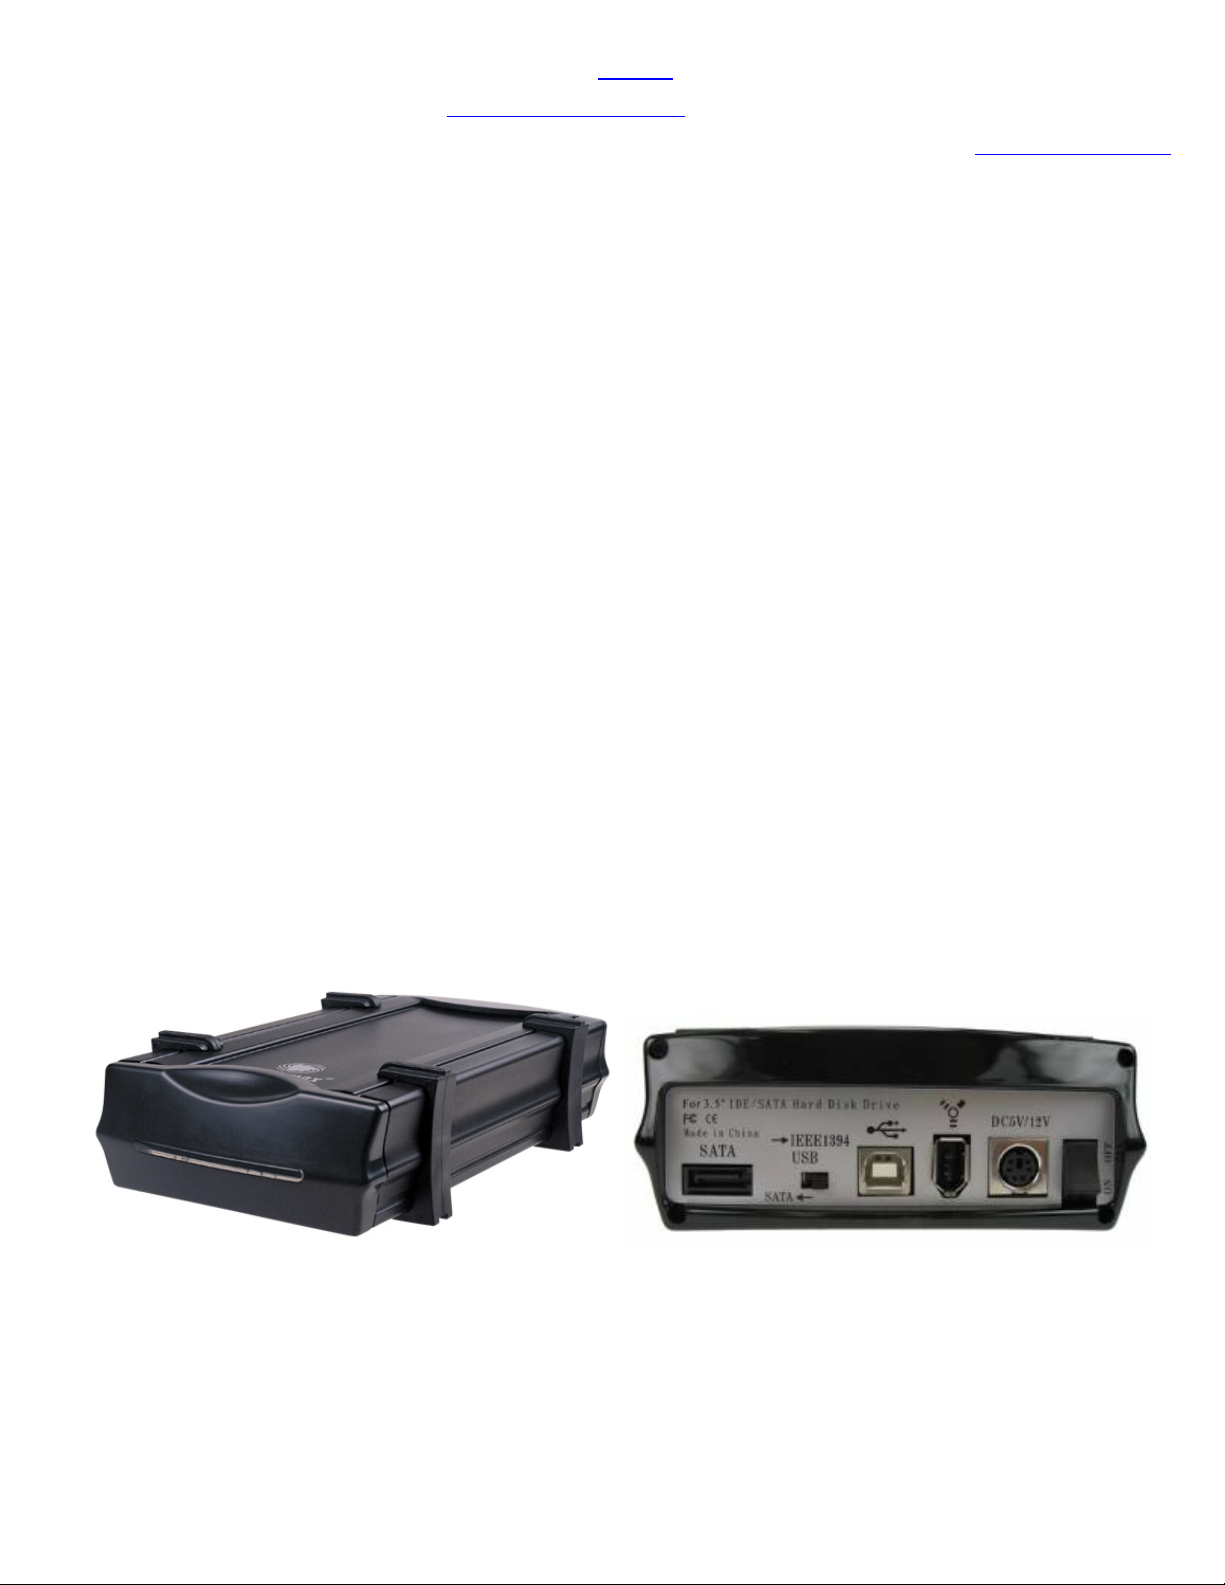
■ CoolMax CD-311-SATA COMBO - or an equivalent
Reasons I chose this model
■ It's black, the PS3 is black.
■ Uses SATA or IDE drives.
■ Has a SATA connection which the PS3 uses.
■ Also has USB & Firewire.
■ It was cheap, only 50 bones at NewEgg. There are less expensive ones available, you'll
have to look.
A few other nice things, you can safely carry this unit over to your PC, Mac, & Linux boxes or
another PS3. Take it with you to your friends' places, work and school. It will be easy to hook
up; it has USB and Firewire as well as the all important SATA. There is little or no risk of ESD
to the drive; in it's enclosure.
So put your stinking 3.5" SATA drive in this, if you really have to; use the instructions that came
with the enclosure, gosh!
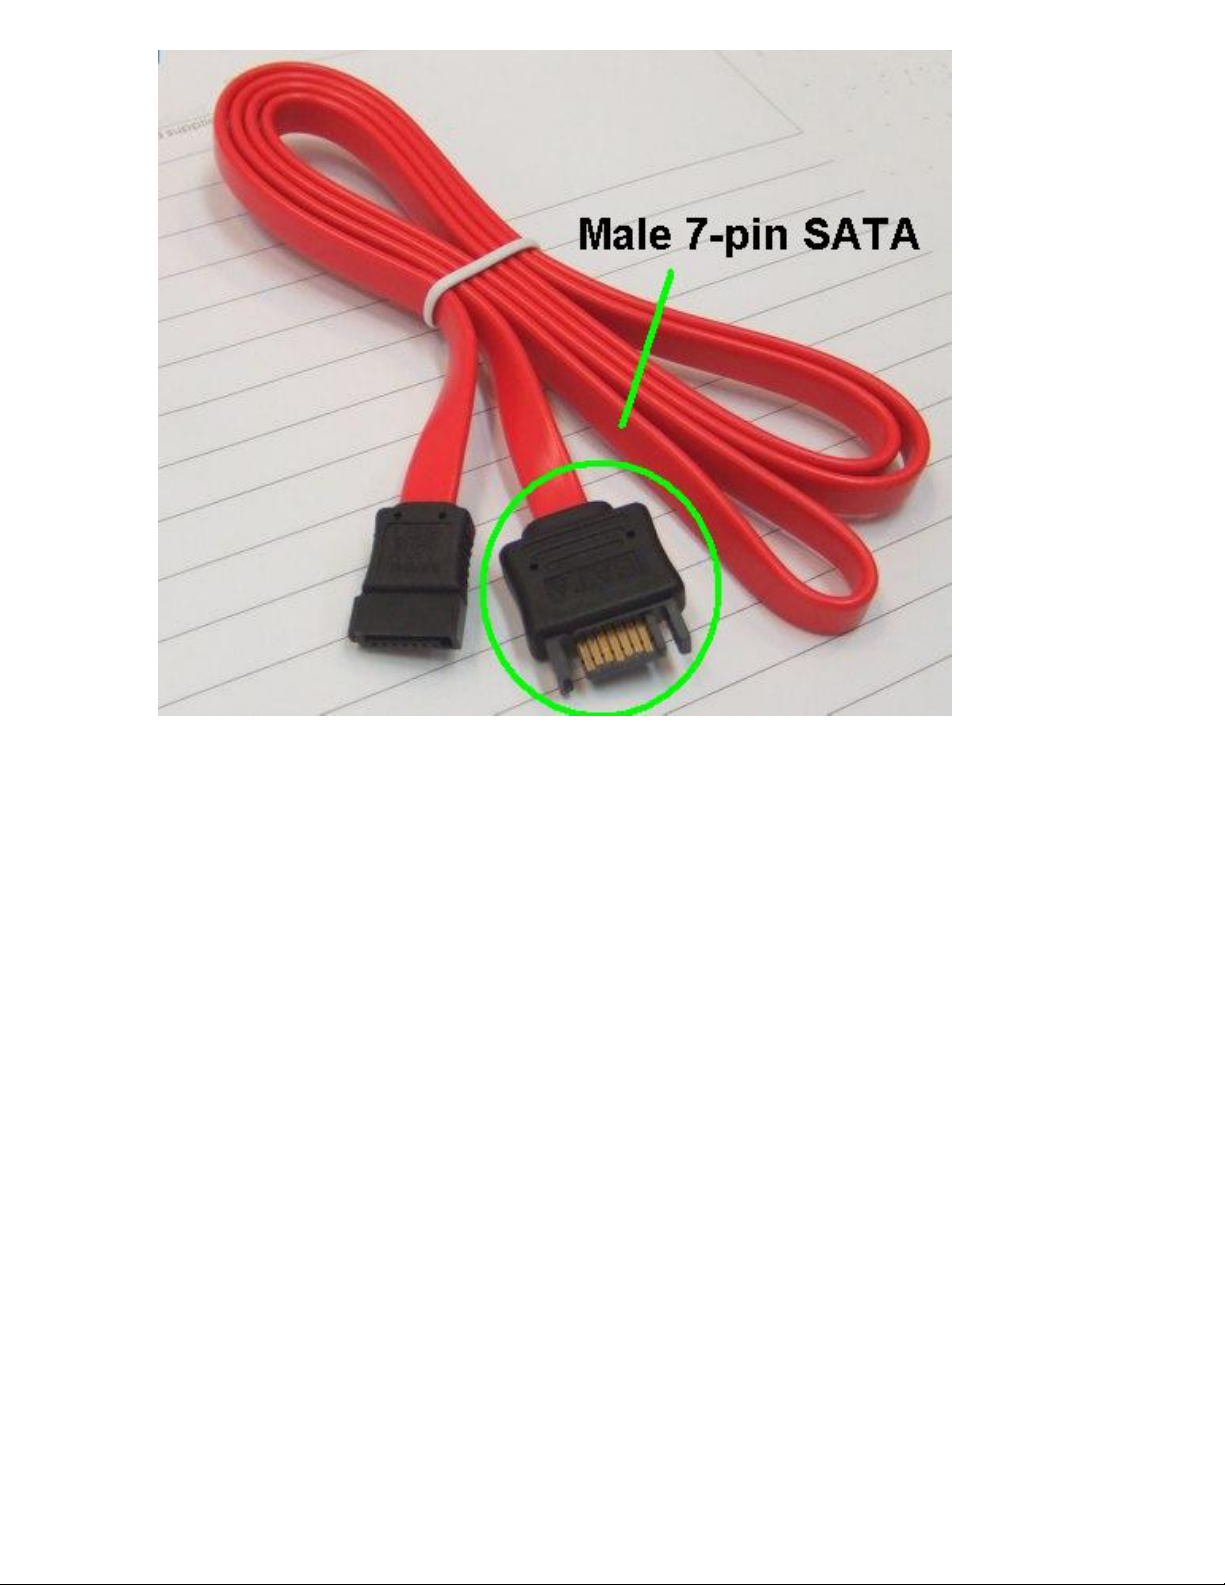
■ Male SATA 7-Pin DATA to Female SATA 7-Pin Cable
It should look like this. The male end goes to the PS3 and the female end to the HDD
enclosure.
Page 57
PS3 3.5" SATA HDD Mod
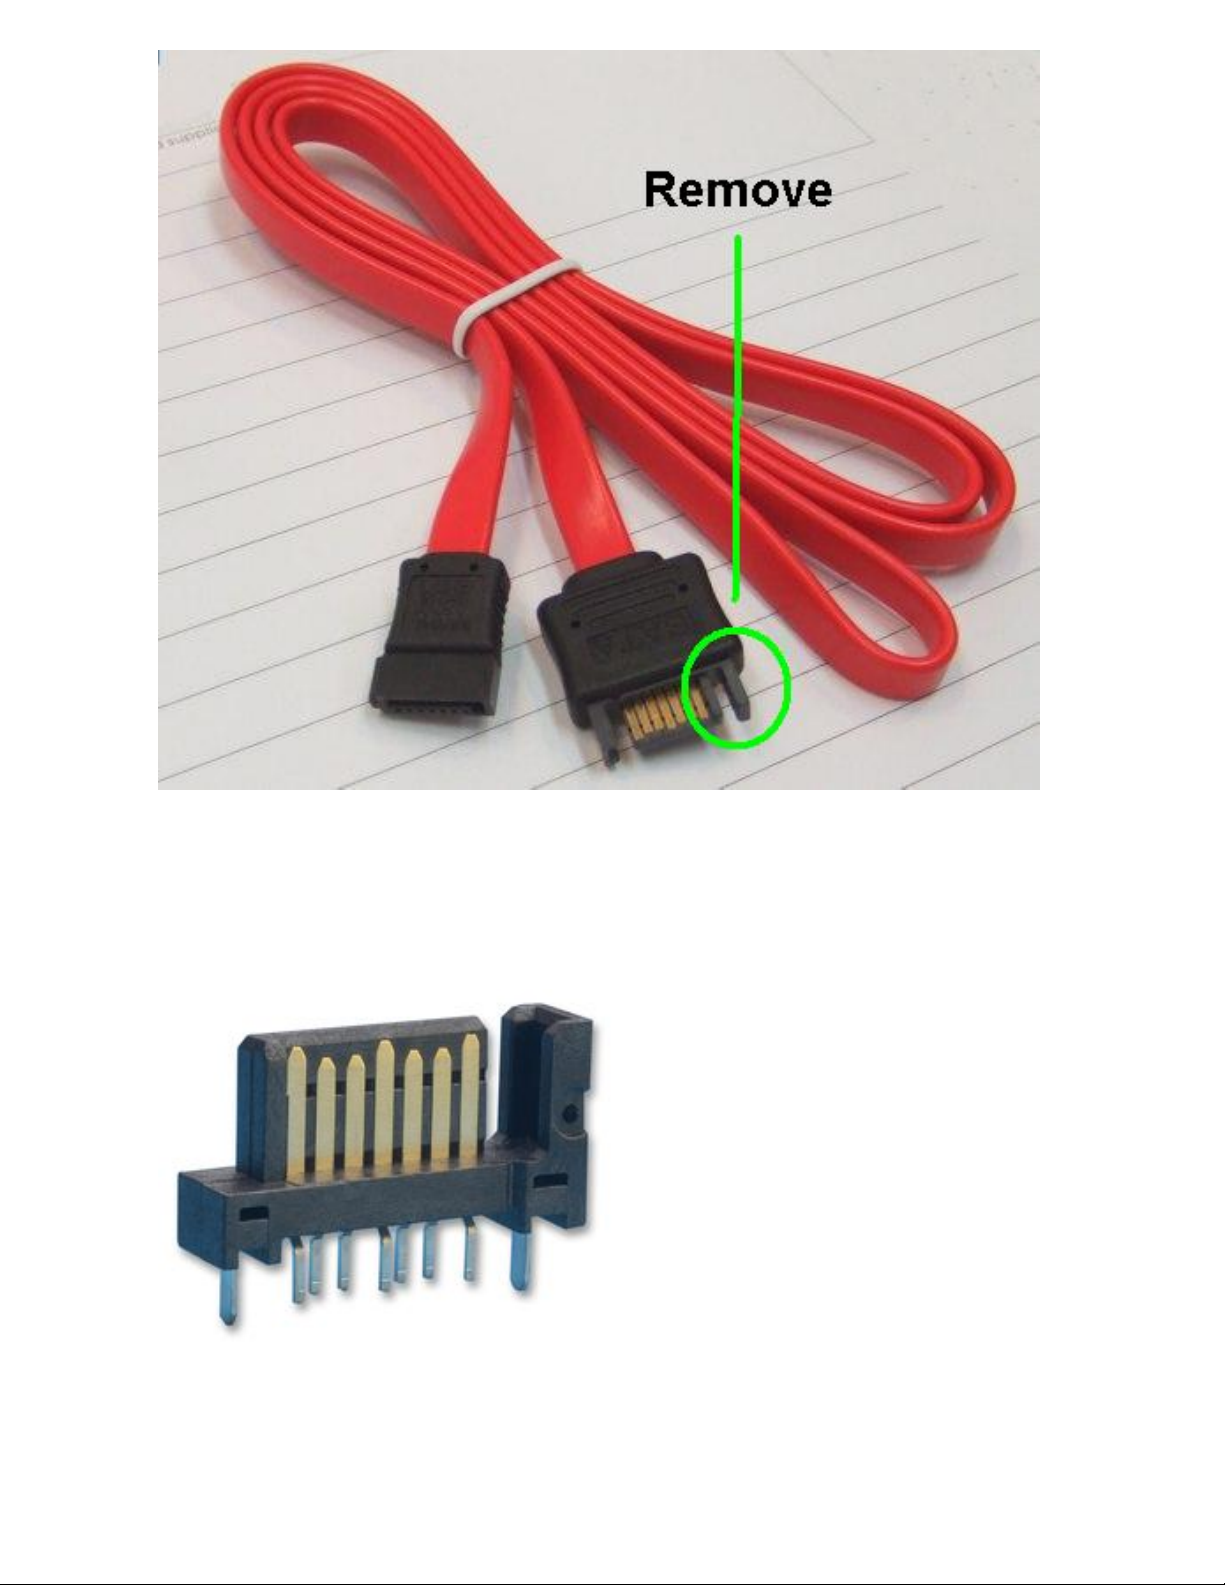
■ You will need to remove part of the male end as shown below. I used a pair of chef
scissors and a small file to smooth it down flush. Use a utility knife if you like but don't cry
to me if you trash the cable or your hand.
Page 58
PS3 3.5" SATA HDD Mod
■ When you are done cutting it should look like the male connector pictured here. And if you
look at this picture and say to yourself that you need to cut the connector from the cable,
don't! If you do why do you have a knife to begin with? Maybe you should go play in the
corner with a plush toy by yourself.
Notes
■ ***Important*** SATA is not Hot-Swappable, in other words turn off the PS3 or computer
Page 59
PS3 3.5" SATA HDD Mod
before connecting or disconnecting the drive.
■ ***Important*** If you plan to disconnect the drive a lot leave the extension cable plugged into
the PS3. If you plan on hooking it up to another PS3 or computer via SATA buy another cable.
SATA connections were not designed to be disconnected and reconnected more the fifty times, it
will wear out. Buying another $6 cable and or $30-50 drive enclosure is much cheaper than
having your PS3 repaired or replaced, so don't screw up your PS3.
■ The PS3 does not have the power to handle most 3.5" SATA drives. It is best that you get an
enclosure like the one I recommend; it has it's own power source. Some people have suggested
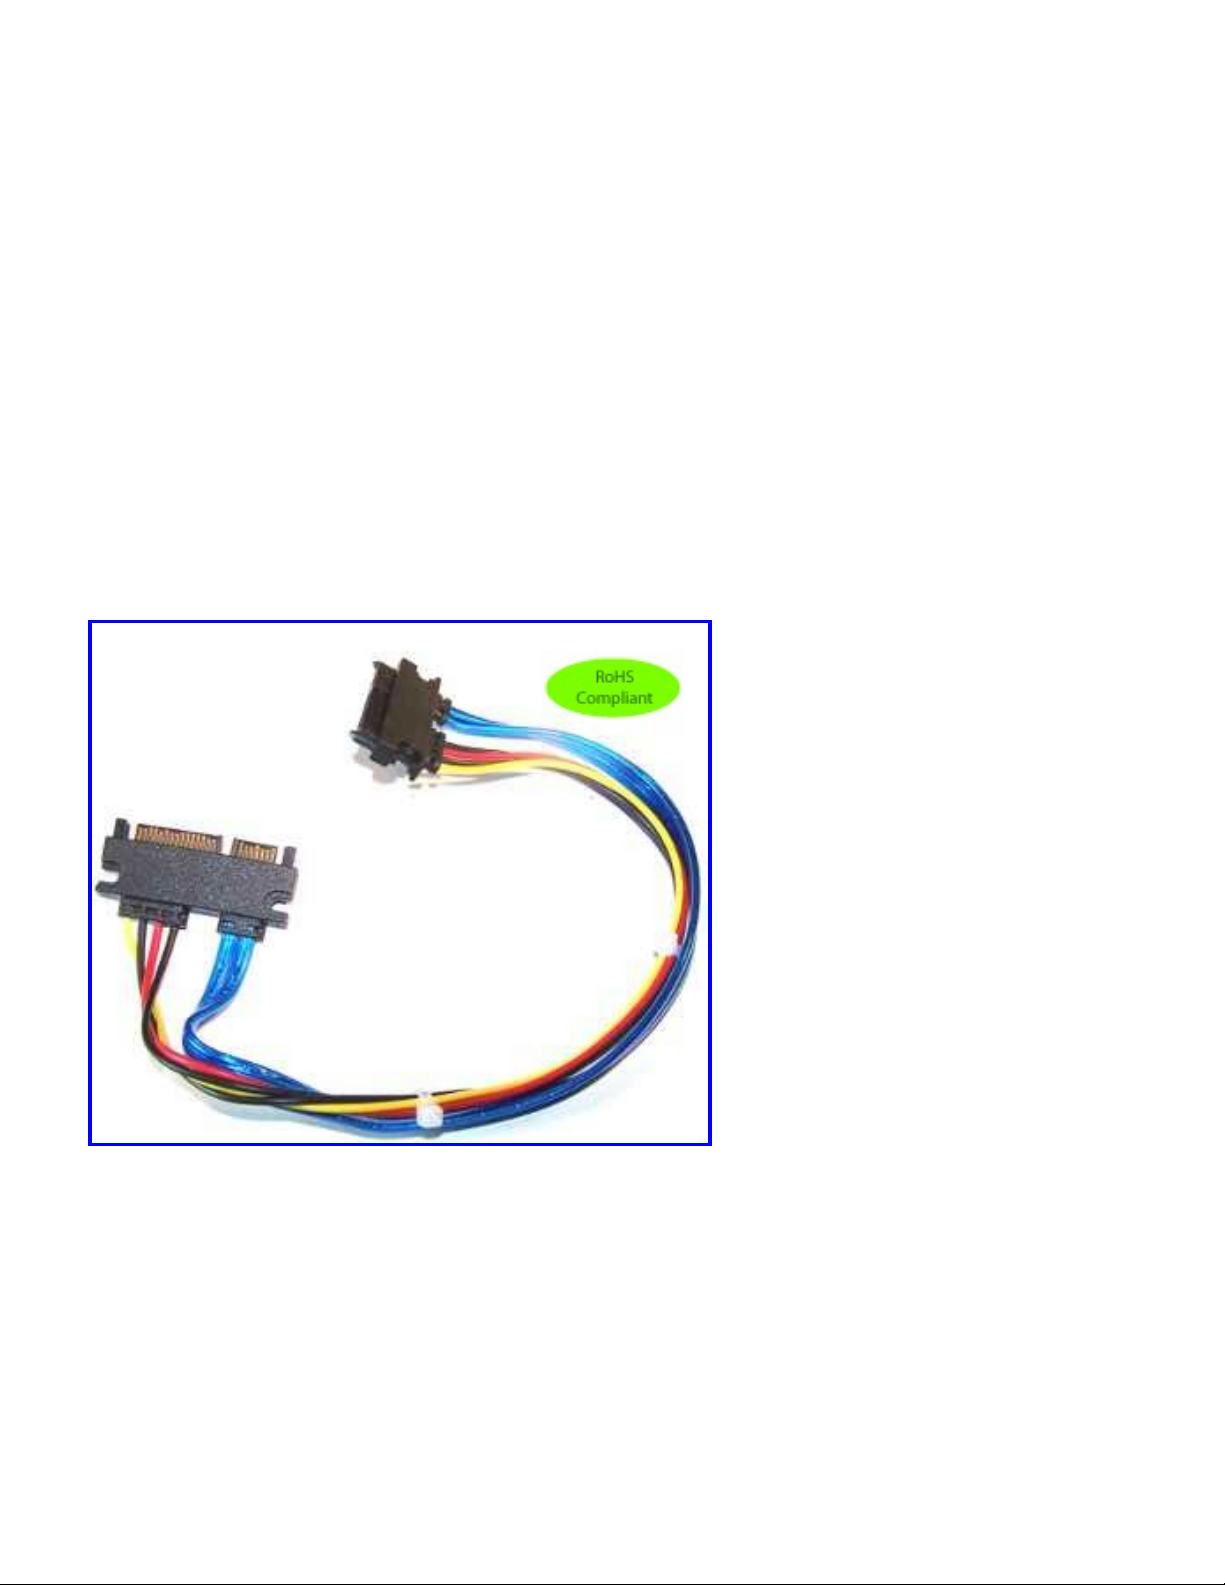
that you can use a 22 pin male to female power and data SATA adapter (picture w/link below)
with a 3.5" drive. Your 3.5" HDD will draw too much power from the PS3 and make it freeze up.
These work great if you want to leave your 2.5" drive outside of the PS3 or if you are swapping
drives all the time, otherwise forget it.
■ If you want proof of concept (i.e. pics) don't ask me it works. I used a loose 160GB SATA drive
to test it out. I'm not dumping the change for a 750GB drive yet, though a 500GB is looking
kinda sweet right now.
Thoughts
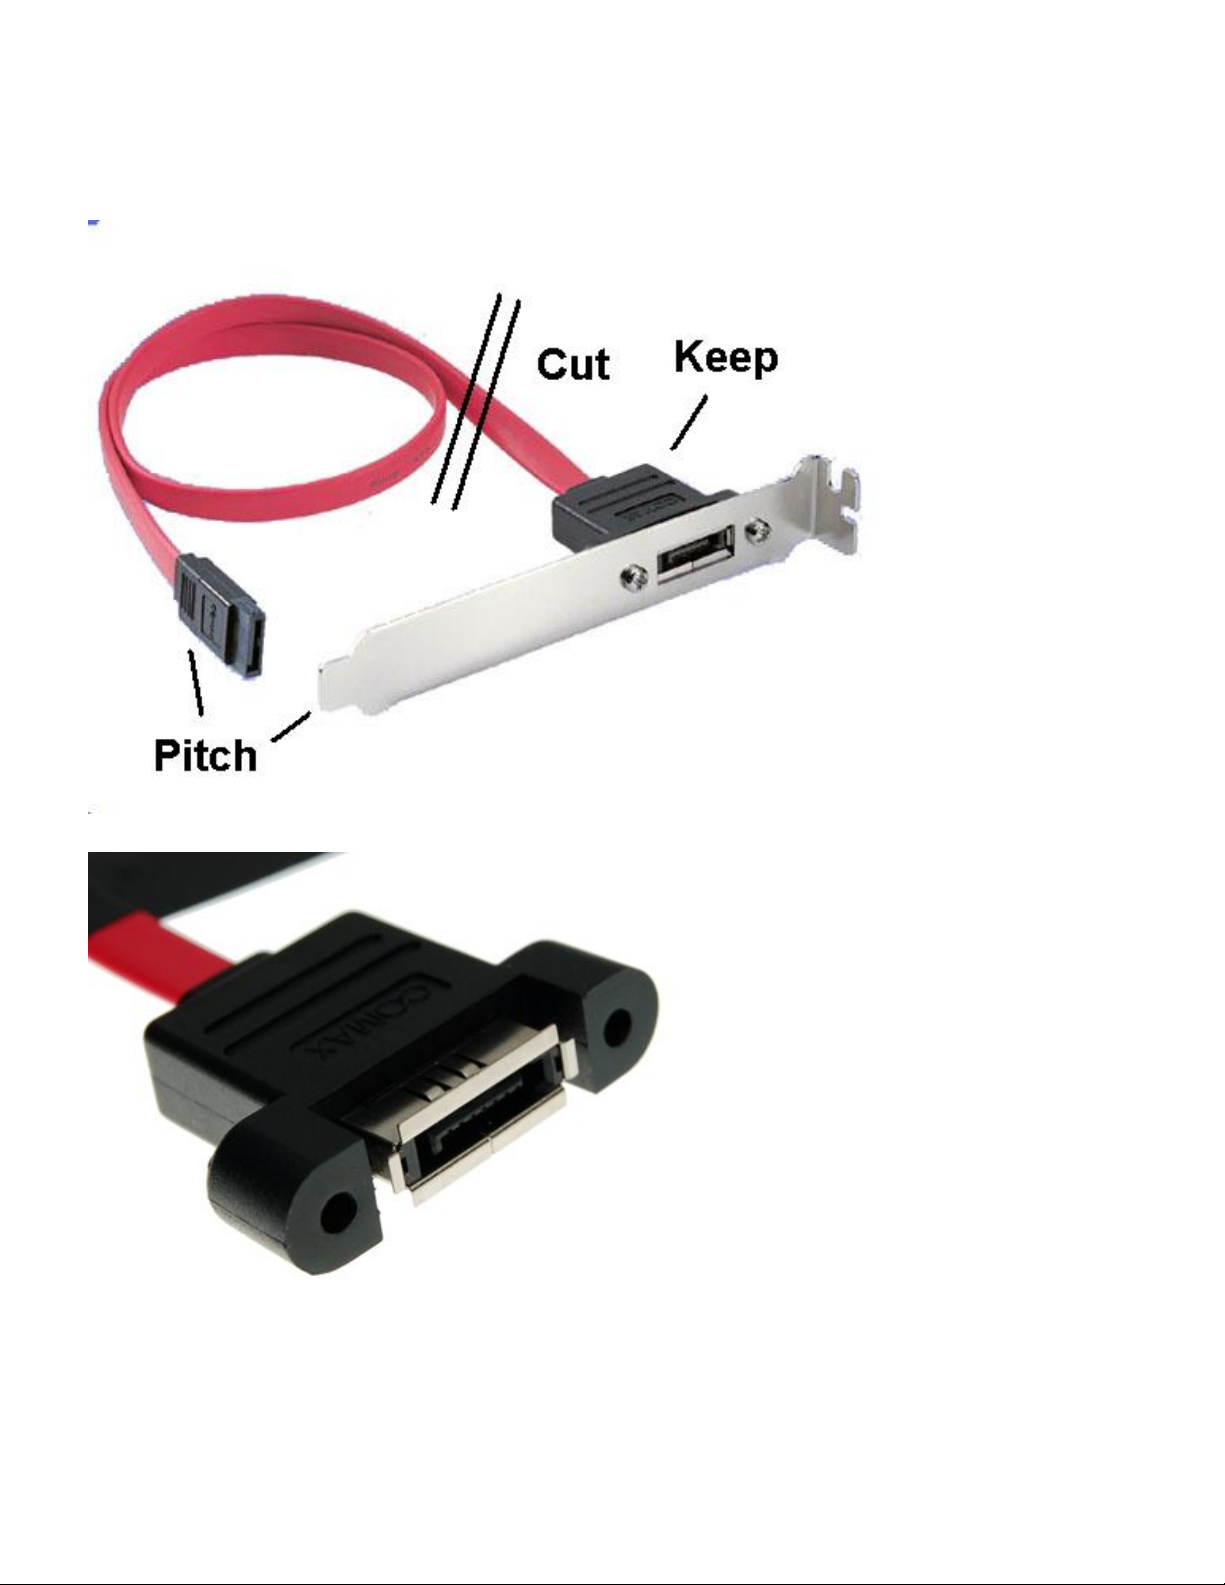
■ If you want cut, a hole in your PS3's HDD cover and run the cable through go ahead. However, I
may at a later time make a male to male SATA cable. I will likely use the extension cable I
Page 60
PS3 3.5" SATA HDD Mod
already have and a cable from a SATA cable bracket like in the following pics. I will cut a hole
of the appropriate size in the HDD cover and attach the bracket end to the cover. Figure this part
out yourself. For now I'll keep the PS3 in a vertical position with the cable hidden running
through a hole below to the drive enclosure.
■ An individual on Team Xecuter's forums asked about the use of RAID with the PS3. A Team
Xecuter forum Mod said, 'No.' That is B.S. Let us look at it this way You can buy a RAID sub-
Page 61
PS3 3.5" SATA HDD Mod
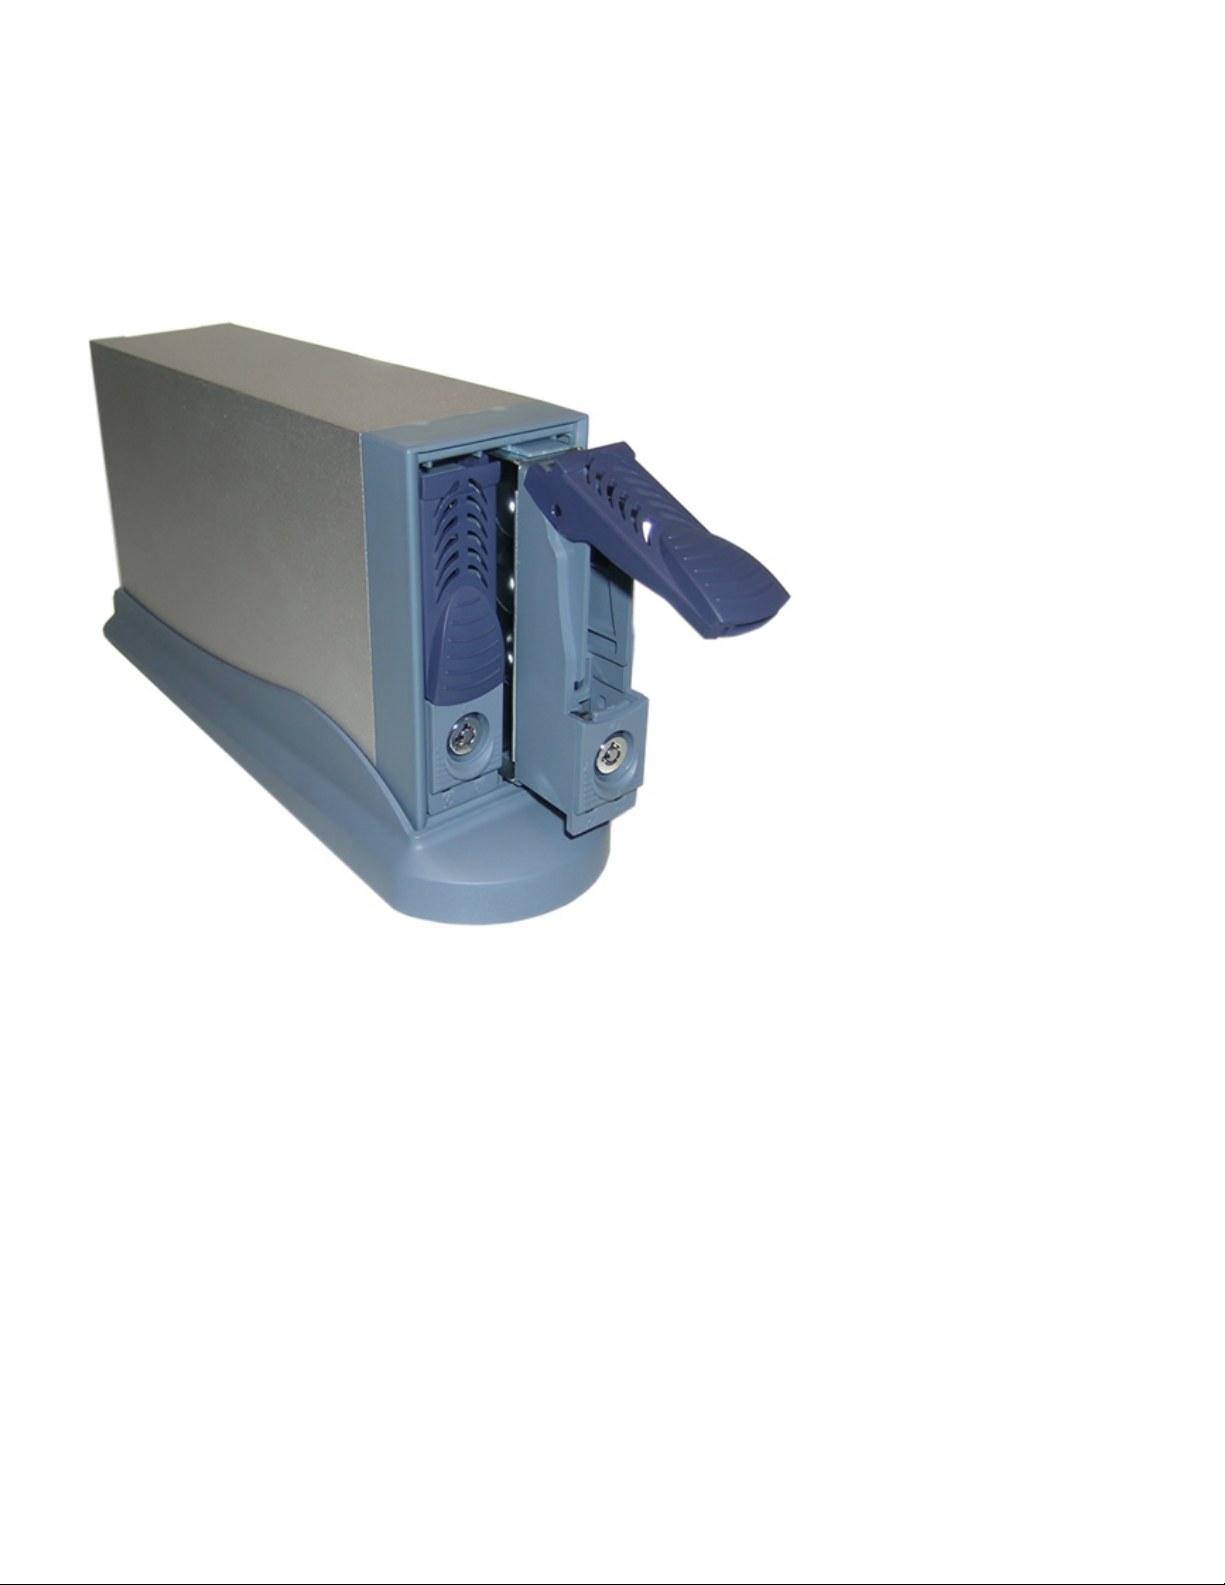
system that has a single SATA channel and hook it right up to your PS3, Bam!!! Can you say
Tera Bytes? I knew you could. A RAID sub-system or DAS with have an embedded RAID
controller. This embedded RAID controller will make the RAID array tranparent to the PS3, in
other words the PS3 will see it as one device.
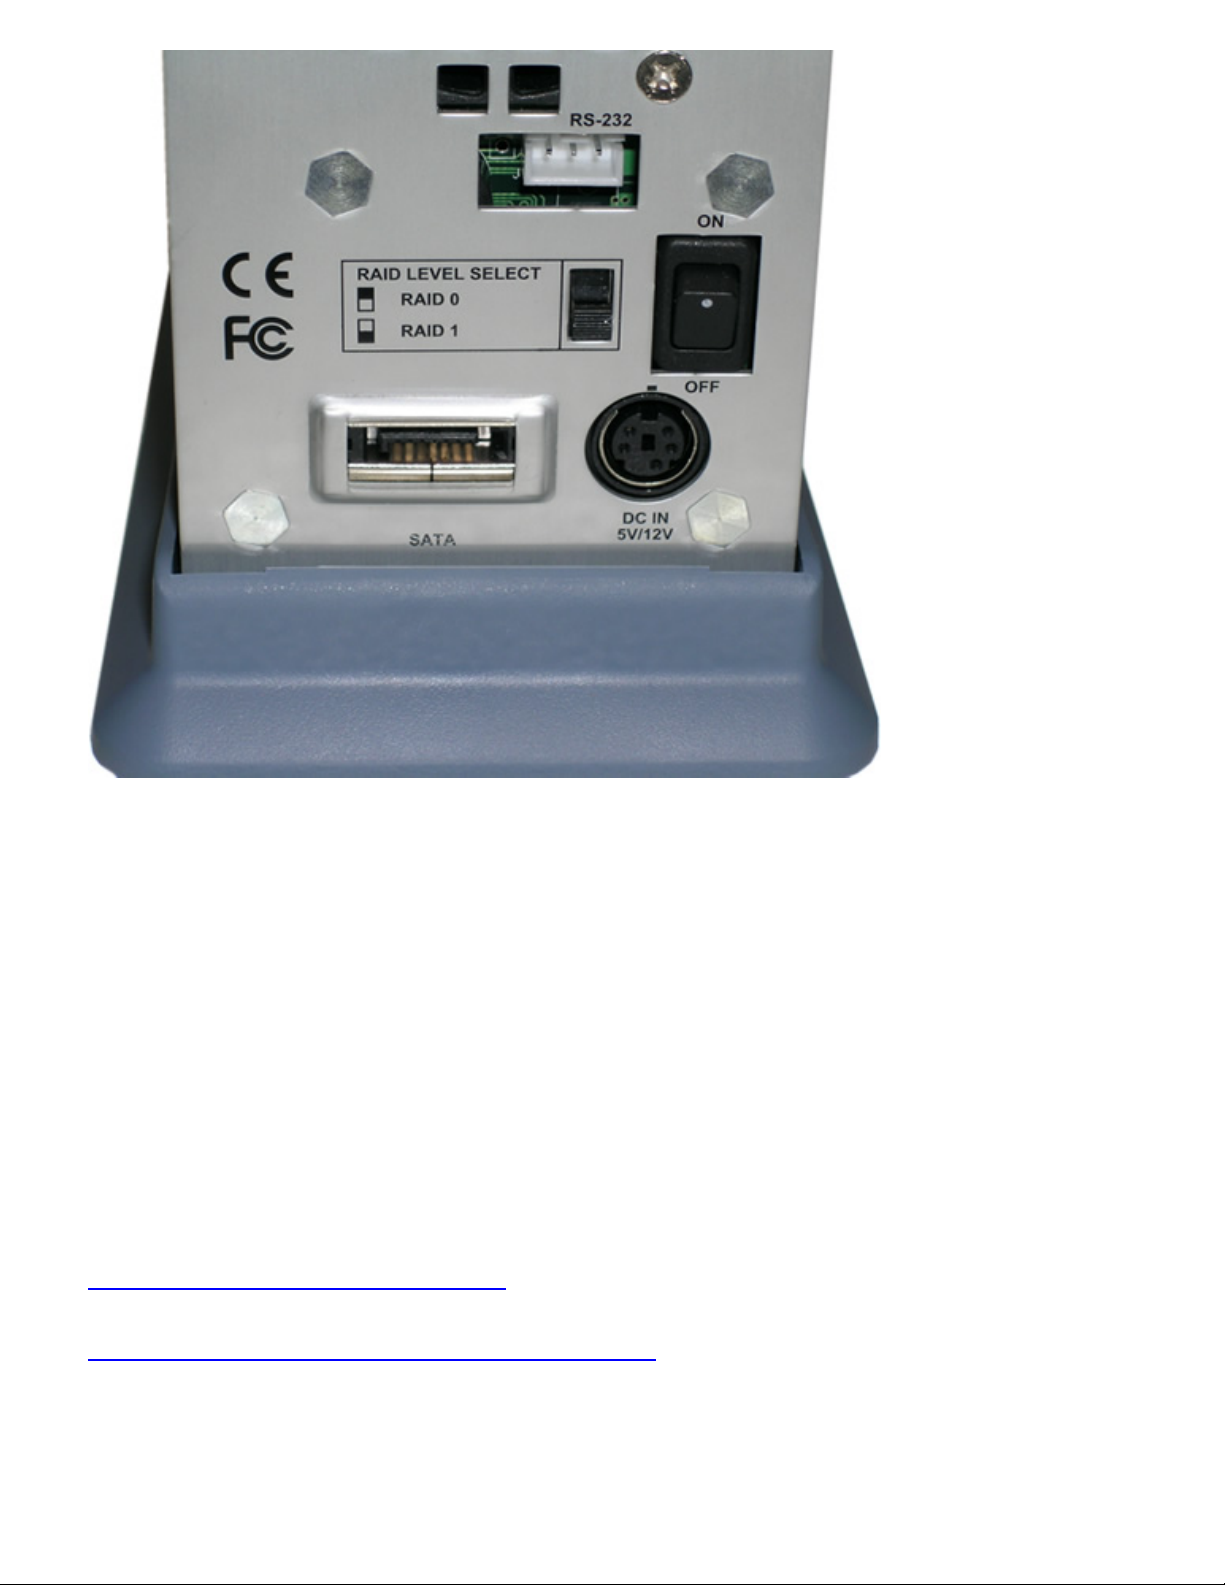
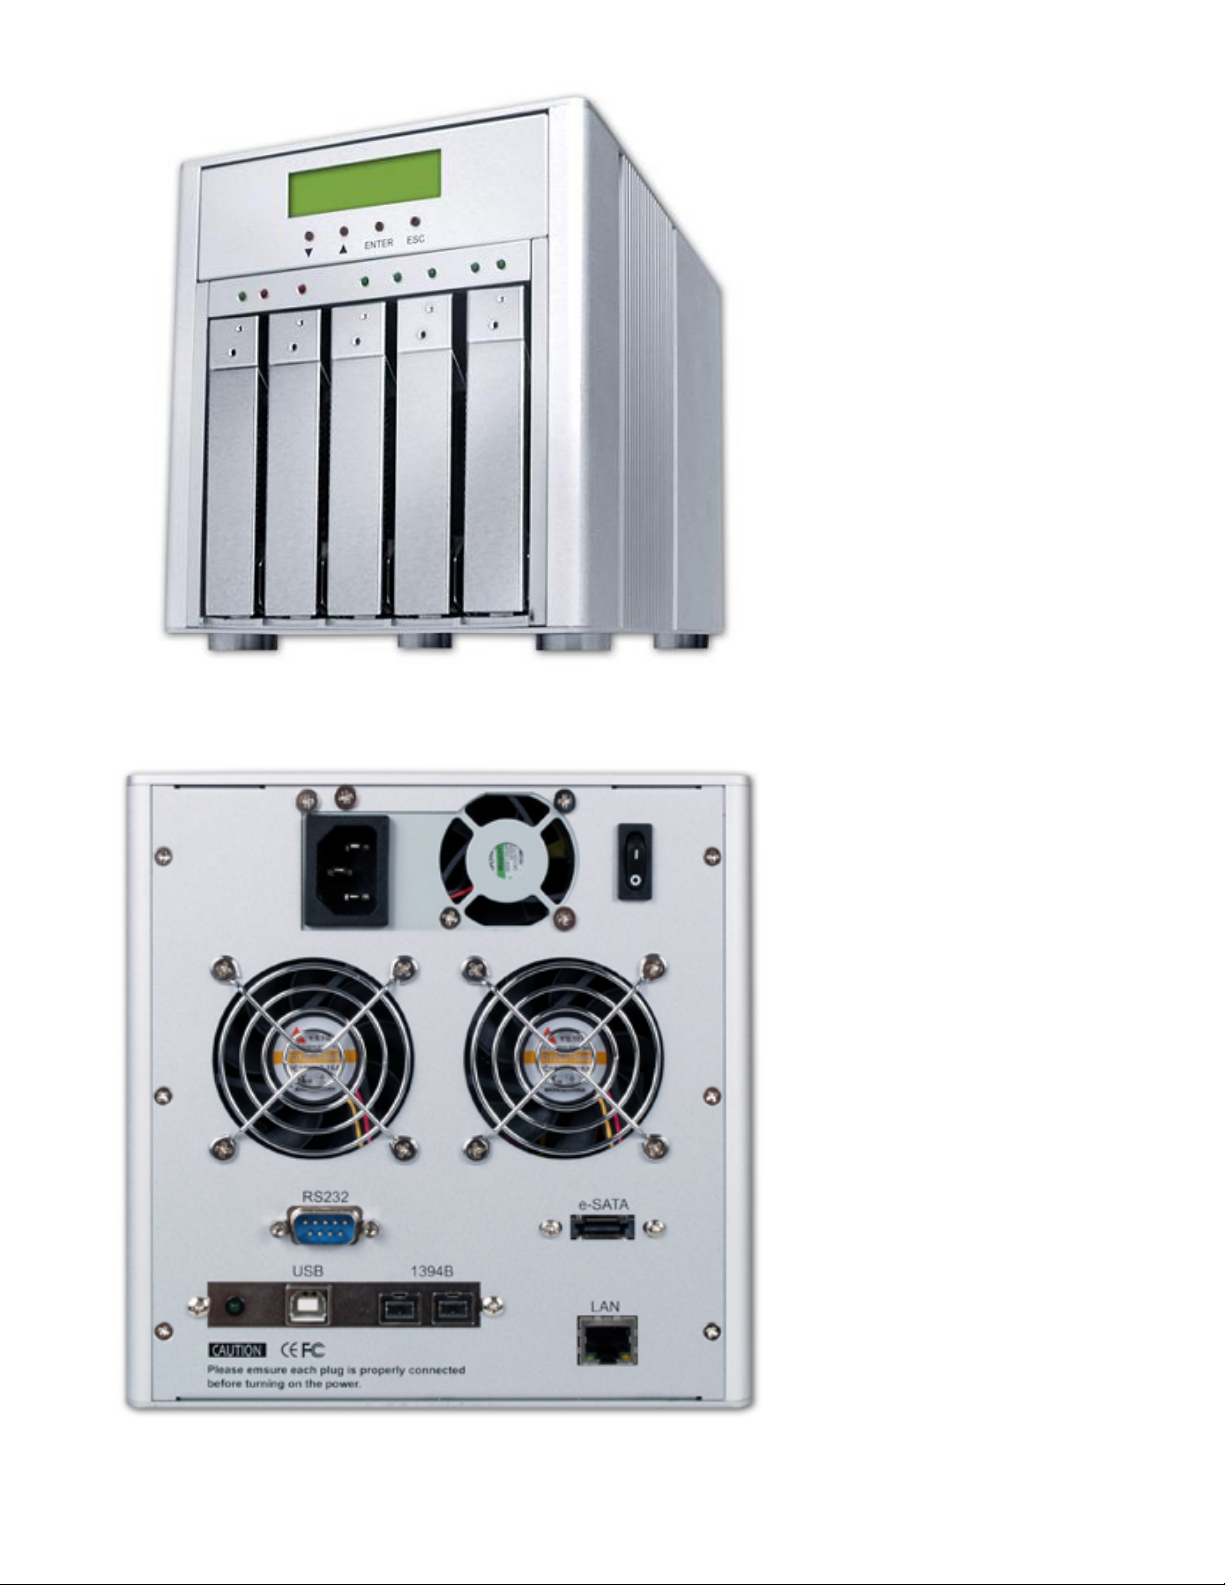
Here is an example of a two disk RAID sub-system. This means that it has it's own RAID
hardware and the Host (PS3) that you connect it to will see it as a single SATA device.
Take note of the switch.
Page 62
PS3 3.5" SATA HDD Mod
■ Attention!!!
You say you're made of money and you need to make up up for the lack of something else. You
want the most for your PS3. You want 3.75TB of local storage capacity for your PS3.
Then this and others like it are for you, meet the MR5CT1. The MR5CT1 is a 5 Disk RAID subsystem costing roughly $1500 w/out drives ($1300 from Newegg.com). You can figure out how
much you want to spend on 1-5 drives of the capacity of your choosing. At the time I orignaly
create this page I ran a search and with 5 750GB drives at Newegg and it will run you about
$3000 for a big ol fat 3.75TB storage device.
Here is a RAID calculator for you.
Here is the link to the manufacturer's web site.
Page 63
PS3 3.5" SATA HDD Mod
Page 64
PS3 3.5" SATA HDD Mod
You will need a Shielded eSATA to SATA cable. Buy one here.
Personally Tested USB Devices
(+) = working, (-) = not working, (*) = not tested
XMB Linux
SmartDisk USB 3.5" floppy - +
Atech Flash PRO-9 USB 2.0 MultiCard Reader + +
Logitech Wingman Rumblepad + +
USB Mass Storage** + +
Logitech Quickcam Pro4000 - *
Sony PS2 IR remote via RadioShack USB + *
SonY PS2 Dual Shock controller + *
USB Keyboard and Mice*** + +
**Multiple branded USB flash drives, 2.5" HDDs, 3.5" HDDs
***Dynex USB Keyboard and Mouse Combo, Logitech Cordless Duo MX, others.
Page 65

PS3 3.5" SATA HDD Mod
Previous/Next
Page 66
Adding IR Remote Control to the Sony PS3
Adding IR Remote Control to the Sony
PS3
The Sony PS3 is the jack-of-all-trades of the console world. Not only does it represent some of the
most advanced hardware ever to be dedicated to the business of gaming, but it also has a surprising
number of secondary skills including web browser and media player. But one of the most important
supplementary functions of the PS3 is the unit’s built-in Blu-ray Disc (BD) movie playback. In fact, for
some folks this is the primary reason for purchasing the system – the PS3 is not only one of the best
BD players currently available on the market, but it costs barely half as much as the next
cheapest standalone model.
With Sony’s heavy hyping of the PS3’s extensive media capabilities, it’s disappointing to discover that
they didn’t seem to learn from past history when it comes to integrating the PS3 with audio/video
components.
Back when the original PS2 was released, one of its primary secondary features was that it could play
DVD movies. However, beyond using the wired controller, it lacked any real remote control
capabilities – which made it far from most people’s first choice when it came to DVD playback.
Wireless remote or bust! Sony (et al) listened, and official add-on wireless remote controls began
popping up on the market, each of which included a separate consumer infrared (CIR) receiver that
plugged into one of the PS2’s controller ports. Eventually when the company redesigned the PS2 into
the newer “slim” version in 2004, they built that CIR receiver right into the unit to make the unit more
attractive for movie playback out-of-the-box.
Page 67
Adding IR Remote Control to the Sony PS3
Things looked bright for the PS3’s future when the PlayStation Portable (PSP) was released, as it came
with a built-in CIR receiver/transmitter (even though there is still no “official” use for this). But
then, just before the PS3 was released, disaster struck for universal remote controls everywhere. Sony
revealed that the PS3 would not have an infrared receiver after all, and the optional BD movie remote
control would be based on Bluetooth technology. Nooooo!
Now, there’s nothing particularly wrong with Bluetooth. It’s a great wireless solution that doesn’t
require line of sight to operate, and since the PS3 is already using Bluetooth for its controllers this
would seem like a natural and cost effective extension. However, the one thing Bluetooth is not is
friendly with home theater systems. No commonplace equipment available in the audio/video world
uses Bluetooth for control. There are no remote automation systems designed to handle Bluetooth –
everything is either more traditional RF, or standard infrared.
So not only does this Bluetooth-only solution make it absolutely impossible to integrate that optional
BD remote – and thus control over the PS3 – into any universal remote control, but it also makes it
impossible for that Bluetooth remote to perform any regular home theater functions such as turning on
the television or adjusting the volume. Bluetooth just isn’t a good match for the audio/video world, and
with Sony pushing use of the PS3 with high-end home theater systems it’s unthinkable that such a basic
necessity would be overlooked.
The parts you’ll need:
Well, necessity is the mother of invention, and using only off-the-shelf hardware it’s possible to add a
basic level of infrared remote control capabilities to today’s PS3. Here’s what you need:
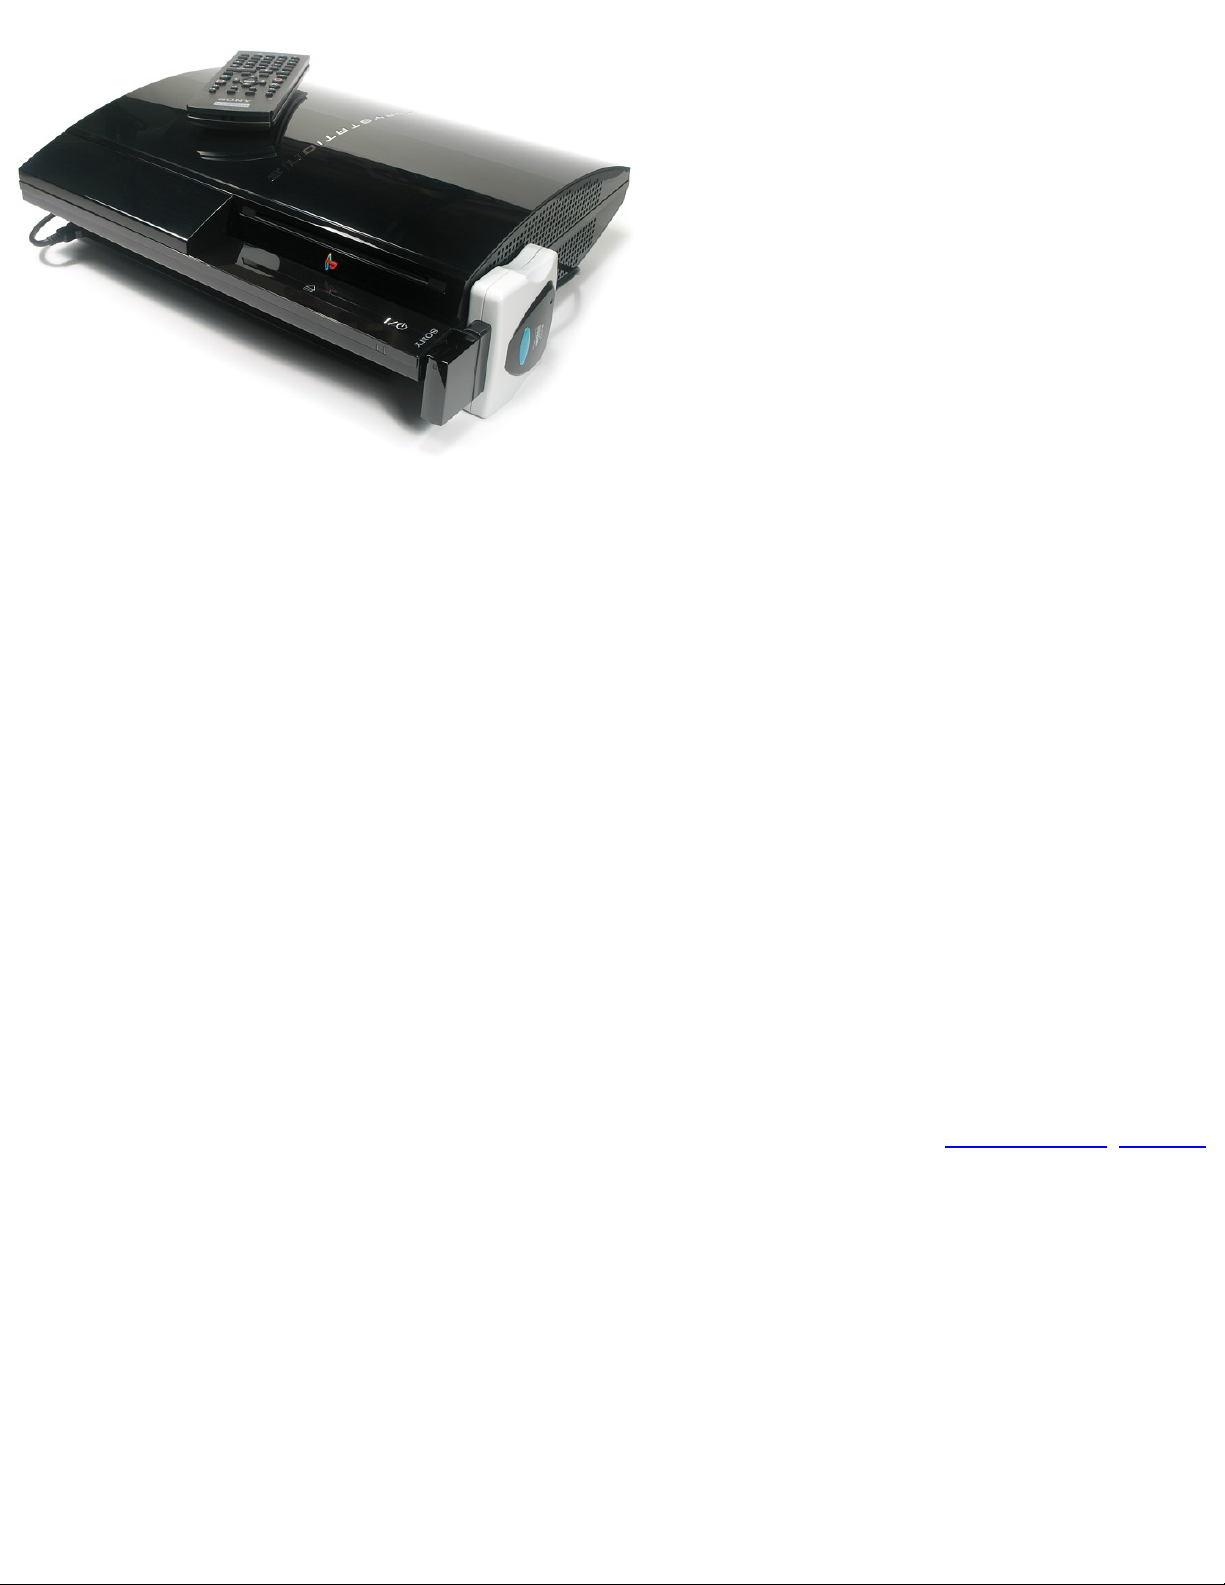
● A Sony PS3 system (20gb or 60gb)
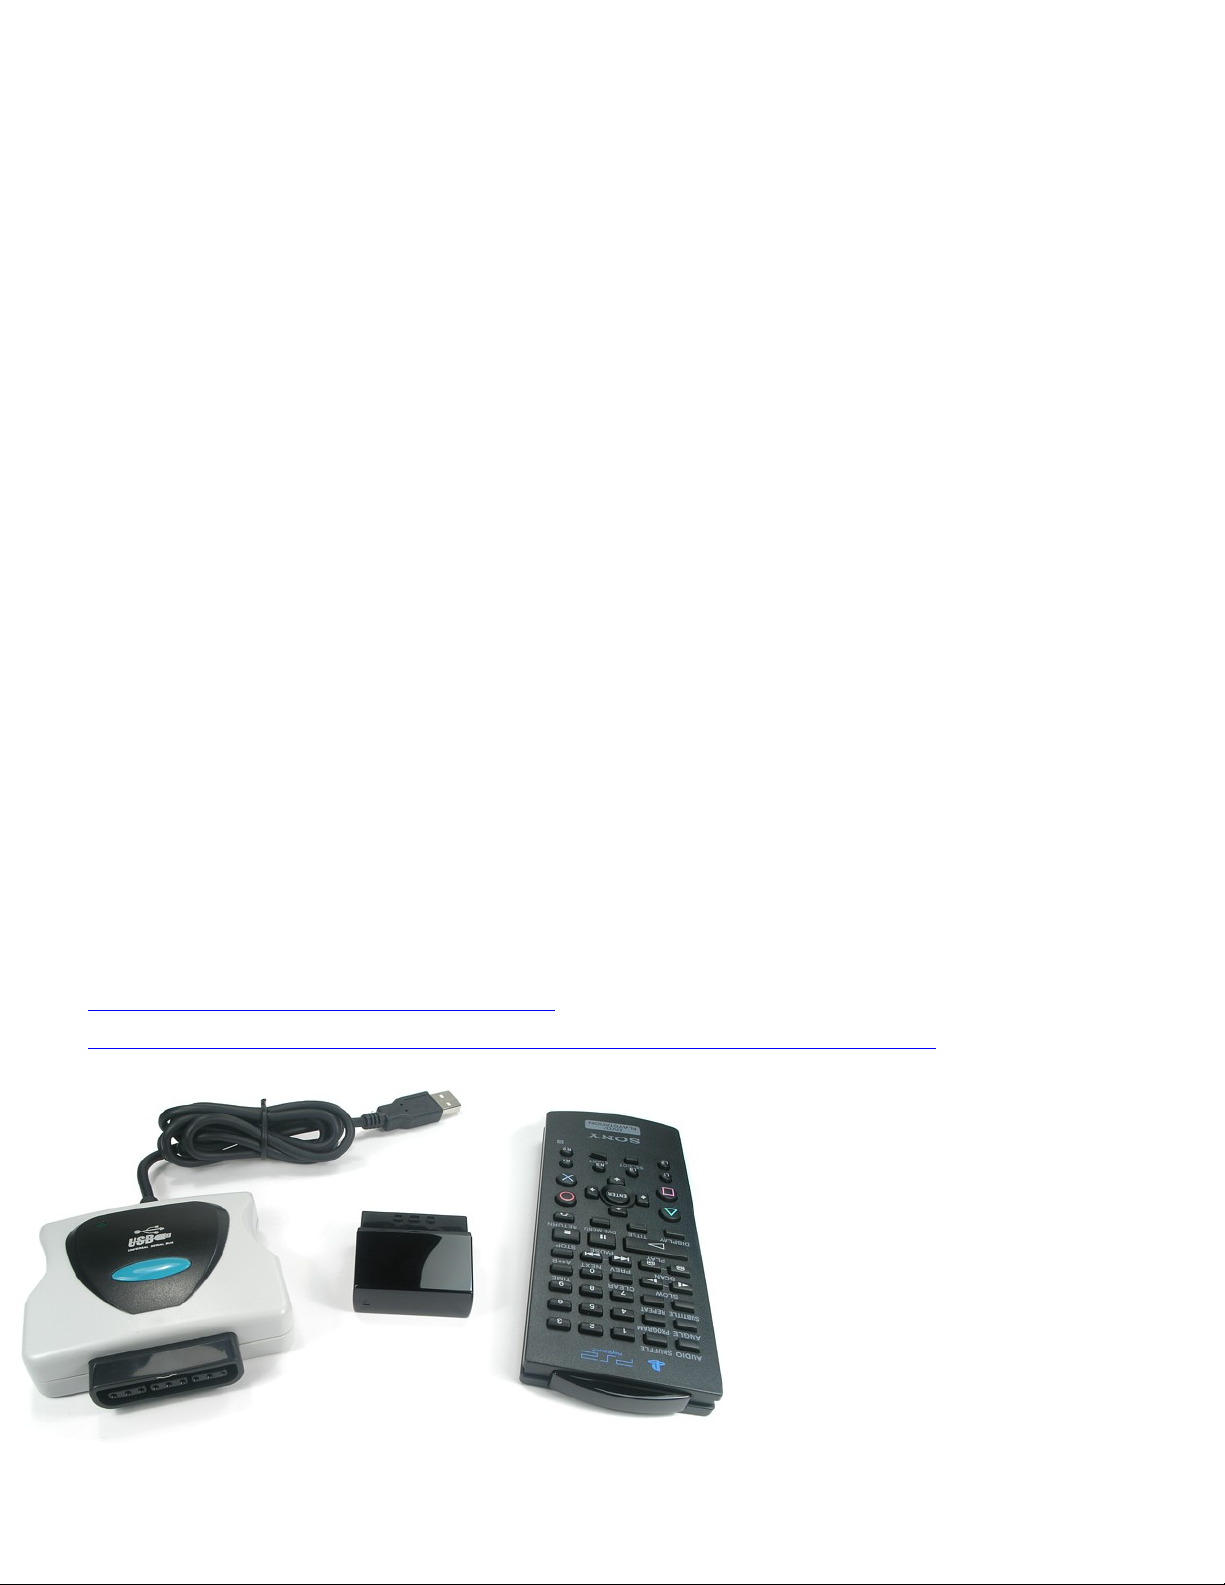
● A PSX/PS2 Controller to USB adapter (Location: Home | PS3 | Cables and Adapters)
● An original DVD remote control for the PS2 with external IR receiver (Try here first)
Some further explanation may be required for two of these items.
Page 68

Adding IR Remote Control to the Sony PS3
The “PSX/PS2 Controller to USB adapter” is a conversion cable designed to make PlayStation
controllers compatible with traditional home computers. It does not appear to matter exactly which
adapter you purchase.
The trickiest item to obtain will be the original DVD remote control for the PS2 – at least one that
comes with an external IR receiver. All currently marketed DVD add-on remotes do not include that
external IR receiver, since one is already built into the slim PS2. So, you’ll need to find an add-on
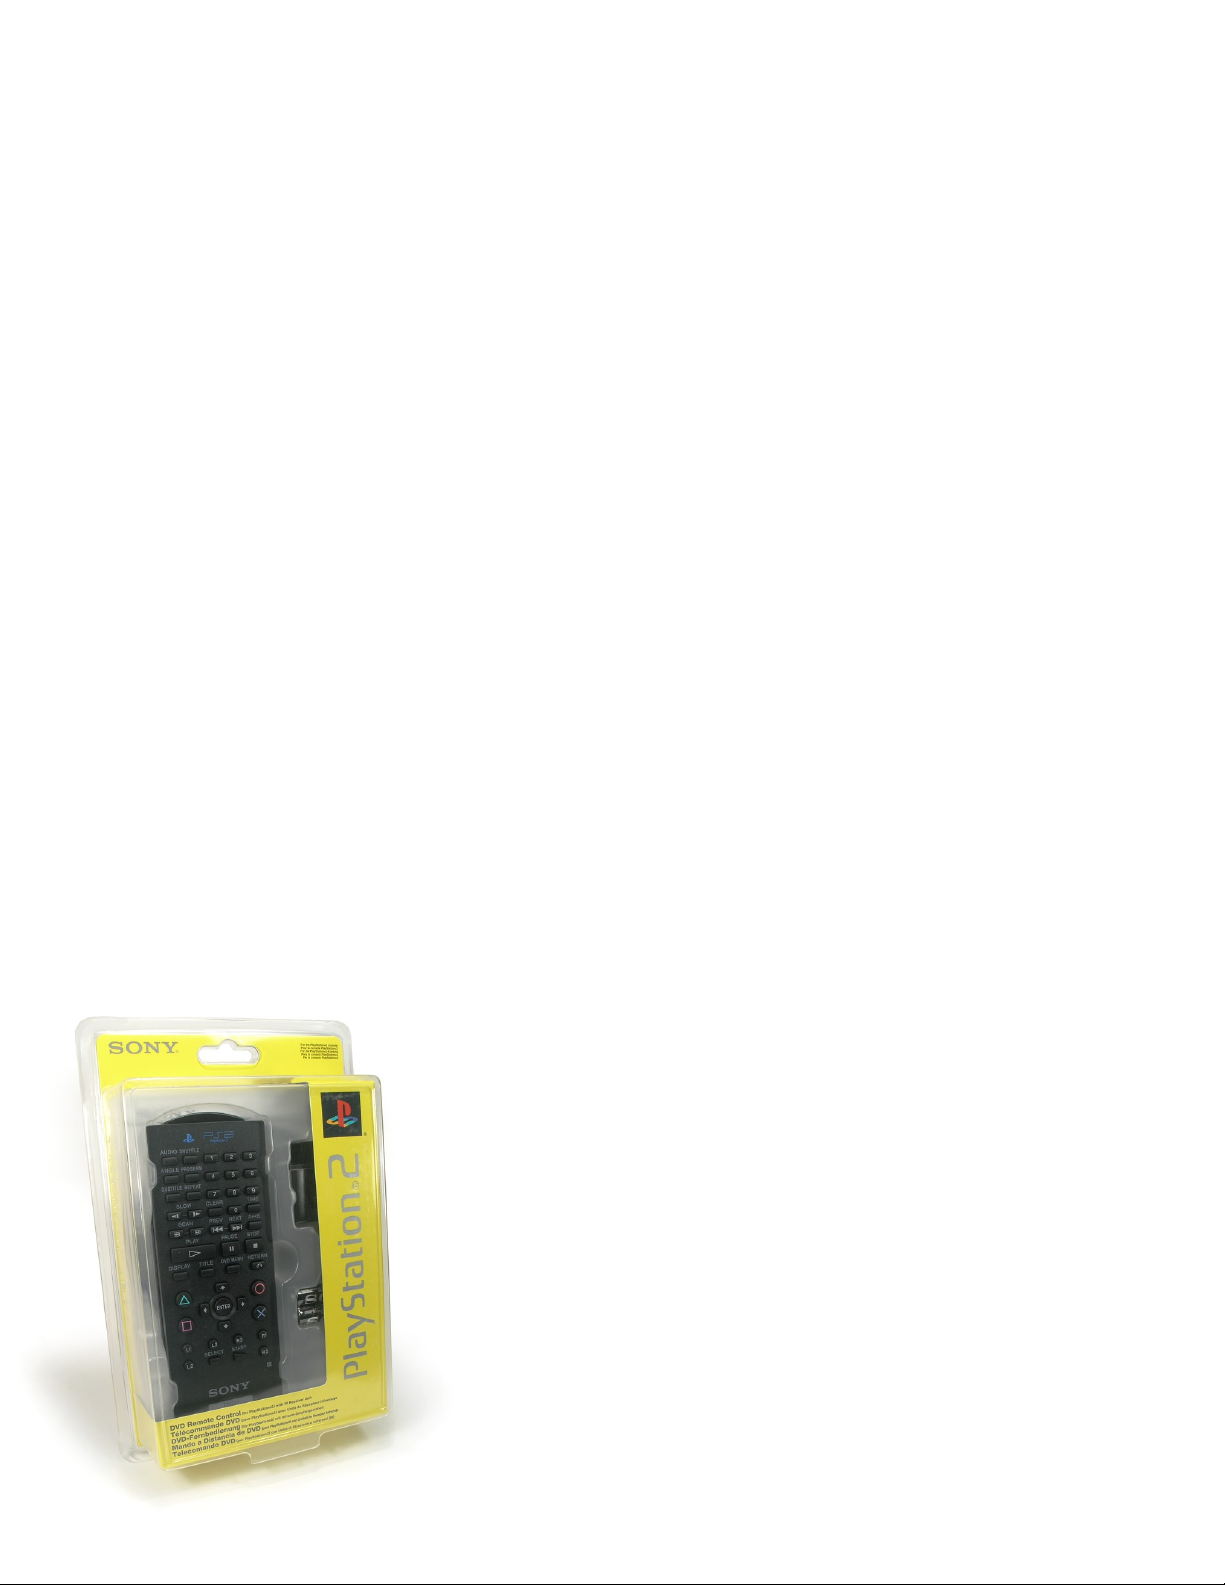
remote designed for the original PS2. For this test I used the official Sony PlayStation 2 DVD Remote
Control model SCPH-10172, which specifically mentions “with IR receiver unit” on the package front.
The part number of the IR receiver is SCPH-10160. To find one check out the usual suspects for noncurrent hardware – eBay, bulk liquidators, and so forth.
To assemble this contraption, plug the IR receiver into the PS2 controller end of the adapter cable, and
then plug the USB end of the adapter into one of the PS3’s front mounted USB ports. The end result
may look a little bit ungainly, but it’s better than nothing!
Here’s what works:
Remote Button PS3/BD Command
Up Up
Down Down
Left Left
Right Right
Triangle*
Options Menu
Circle*
Quit Player
Square*
BD Menu
Cross*
Enter
L1 Previous Chapter
L2 Scan R1 Next Chapter
R2 Scan +
Select Display
Start Pause
* Works on all PS3 screens; other commands only function while in the BD player.
Page 69
Adding IR Remote Control to the Sony PS3
So, that’s 14 functional buttons. Using a universal remote control this way works fairly well, although
the PS3 is a little less quick to respond to repeated commands from the adapter, so you can’t press “upup-up” as rapidly as with the Bluetooth controller. The 35 other commands on the Sony PS2 DVD
remote control? They don’t do anything. There’s also no way to power on the unit using infrared nor
navigate the Cross Media Bar, although this isn’t as inconvenient as it sounds since the PS3 will turn
on and automatically play a movie when one is inserted.
Note that if you purchase a different brand of PS2 remote you may need to map its commands to their
PS3 equivalents yourself, using the original remote control. I also do not recommend using the Mad
Catz add-on PS2 DVD remote with IR receiver for the original PlayStation 2, as its non-standard
commands are notoriously difficult for universal remote controls to learn.
If there’s enough demand for infrared remote control of the PS3 I’m sure that an accessory company
will step up to the plate and offer an official – and more elegant – IR remote control solution,
hopefully with a level of control that at least matches the official PS3 Bluetooth remote (which has 51
commands). But for now, this collection of non-intended hardware and adapters makes a practical and
inexpensive way to integrate your PS3 with your universal remote control.
Previous/Next
Page 70
PS3 HDD Replacement Mini-Guide
PS3 HDD Replacement Mini-Guide
We here at GR, never content to leave well enough alone, have replaced our puny Playstation 3 HDD
with a monster 120 GB HDD. We also wrote this mini-guide on just how to do it for those of you who
may be a tad afraid to try it.
You will need:
1 NOTEBOOK 2.5MM HDD SATA ANY SIZE (We recommend staying with the same RPM as
the PS3’s original HDD, 5400RPM. You can upgrade to 7200RPM, of course, but we cannot
promise that it will not have ill-effects on your machine.)
1 MINI PHILLIPS HEAD SCREWDRIVER
1 MINI FLATHEAD SCREWDRIVER
1 SOLID PLACE TO WORK
We cannot stress enough the importance of buying the correct HDD. The one we used cost $93 USD at
Newegg. If you get a regular old IDE Notebook drive, you will be out of luck, so make sure you order
the right part.
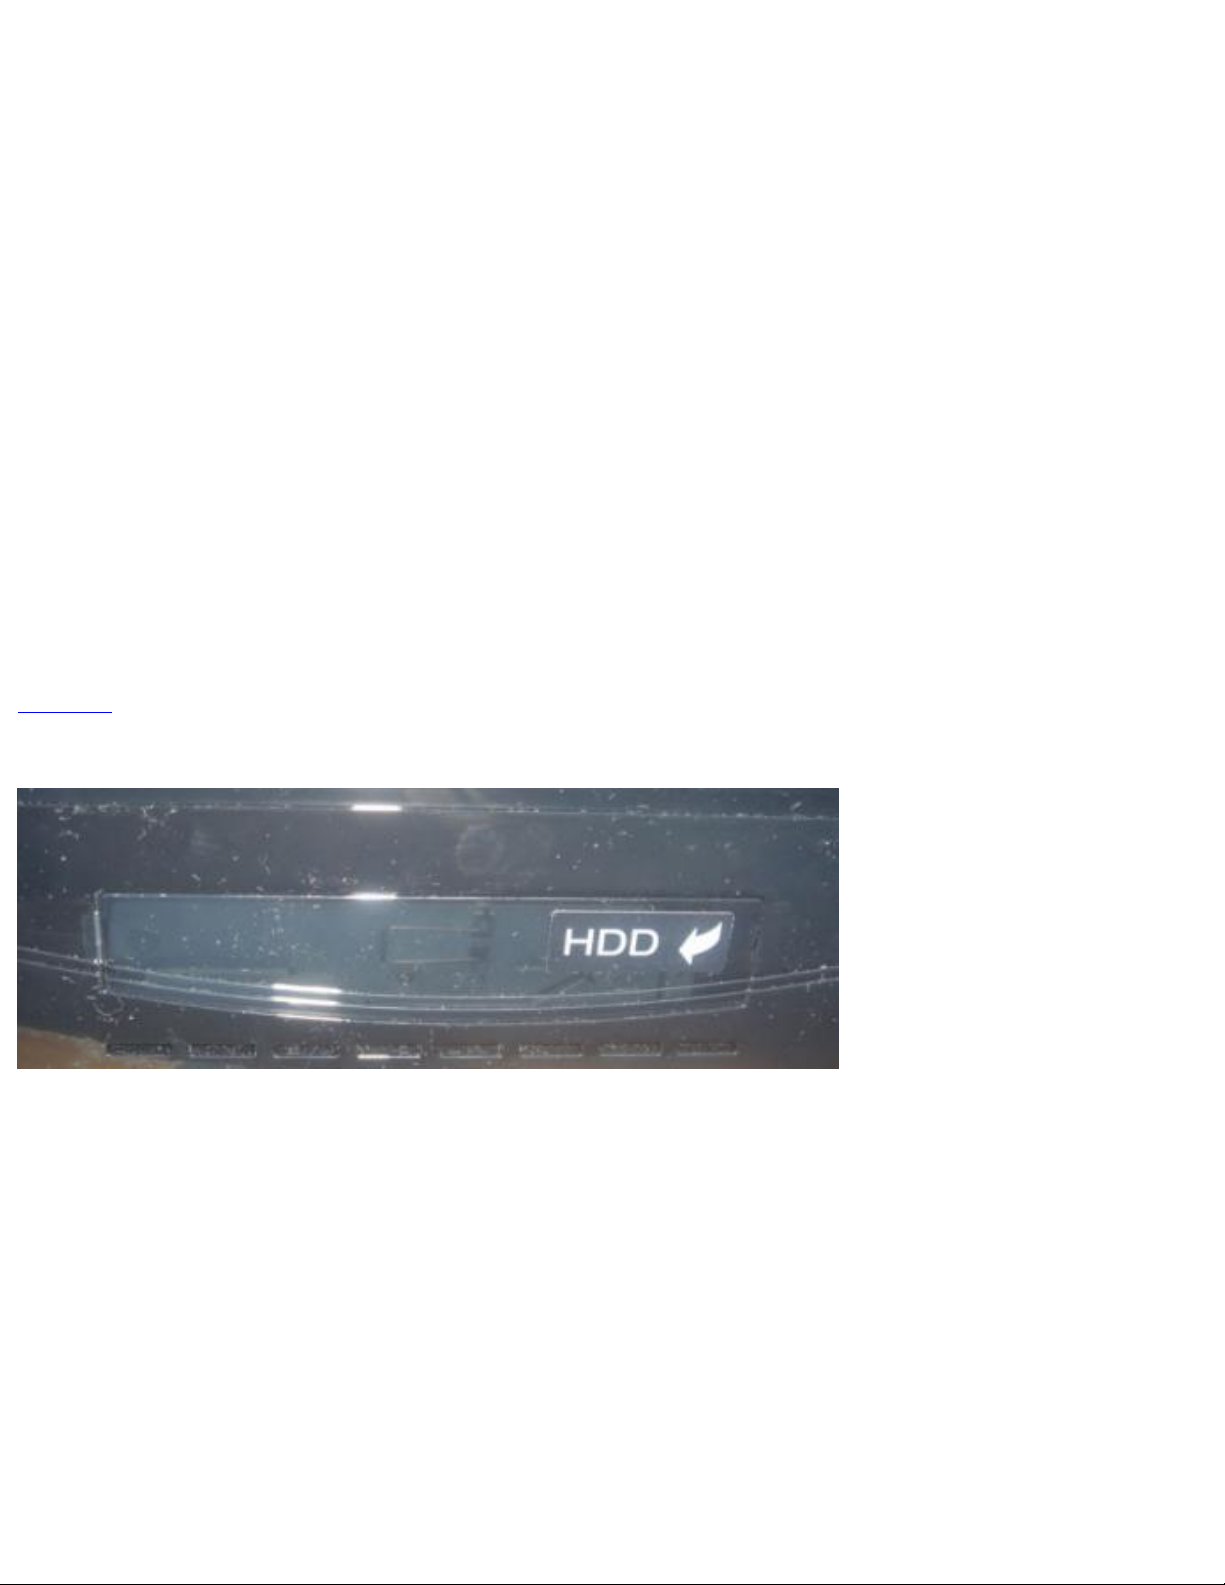
The first step is to find the HDD Bay on your Playstation 3. It is located on the left side of the console,
and it is marked with HDD. Easy enough. Use your flat head screwdriver to pop off the plastic cover.
You now have access to the actual HDD caddy.
Page 71
PS3 HDD Replacement Mini-Guide
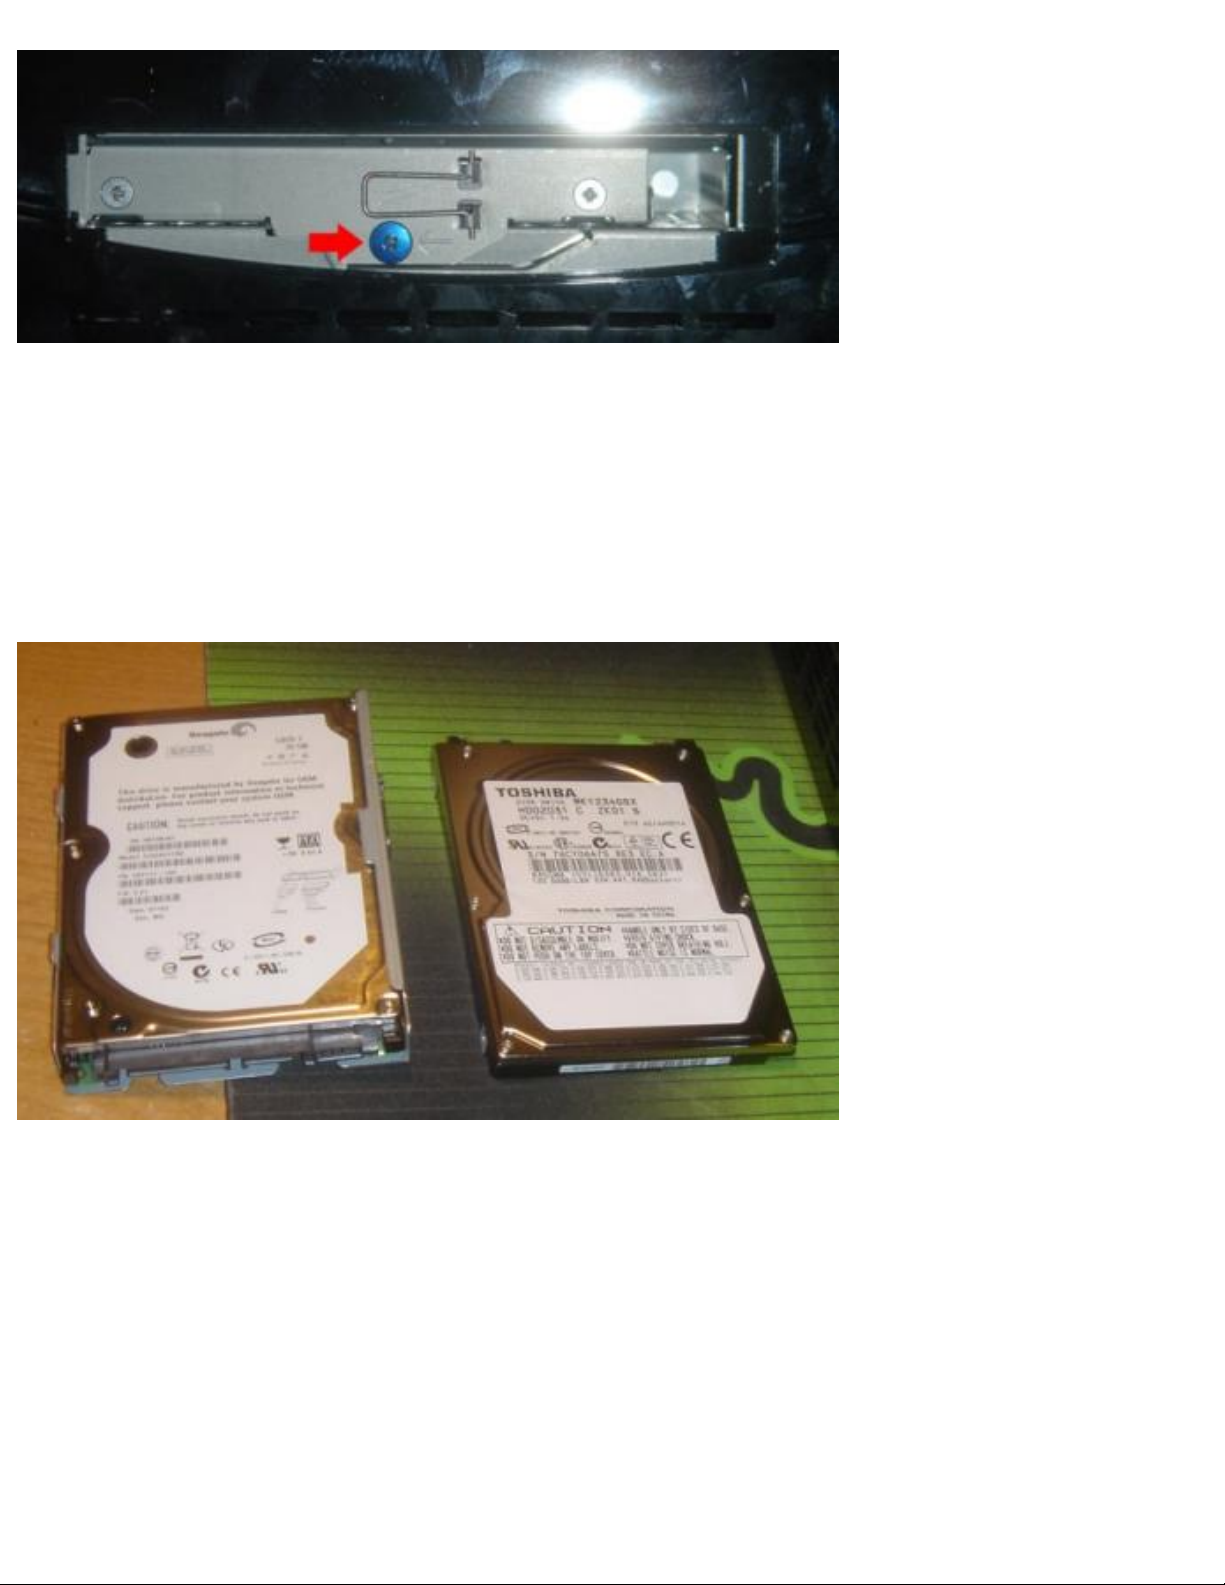
The next step is to remove the blue screw that holds the HDD caddy in place using the Phillips head
screwdriver. Once you have done so, flip up the metal handle that is on the front of the caddy, and slide
the HDD towards the FRONT of the Playstation 3 to dislodge it. Once you have done so you can
remove the HDD tray.
Once you have access to the tray outside the PS3, you can take out the 4 screws which hold the original
Playstation 3 HDD in place, and swap in your new 2.5MM SATA Notebook HDD.
Once the new HDD is secured in the HDD caddy, you need to place the caddy back inside the PS3 unit,
and slide it toward the REAR of the console to lock it in place. Once you have done so, the final step is
to use your Phillips head screwdriver to replace the blue screw which anchors the HDD caddy to the
Playstation 3. Pop on the plastic cover, and boot up the console.
Page 72
PS3 HDD Replacement Mini-Guide
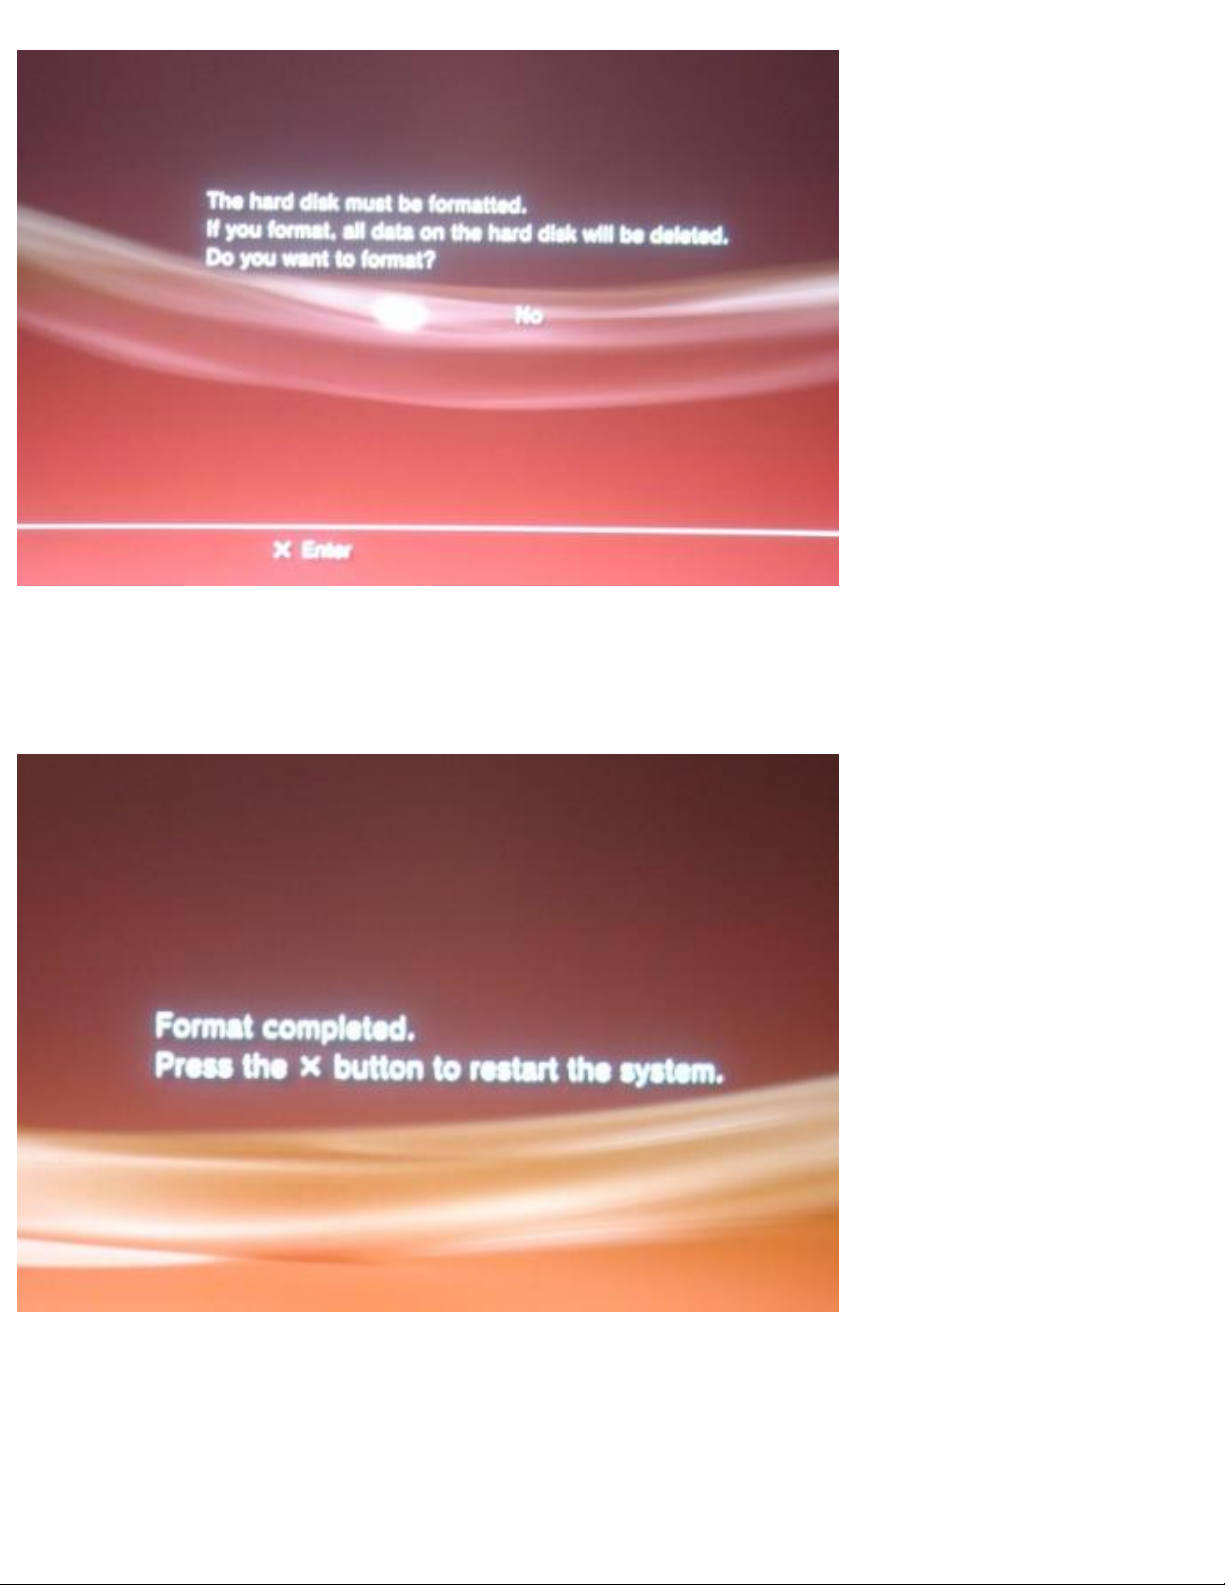
As soon as you boot up the console, the PS3 will detect that the HDD is not formatted, and it will ask
you if you would like to format. You must select yes twice, because they want you to be sure that you
realize you will be destroying all the data. Of course, you pick yes.
Once the HDD is formatted, which takes less than 2 minutes, the unit will ask you to reboot. Once you
have done so, you can do into the settings menu option in the PS3 OS. Then choose system settings,
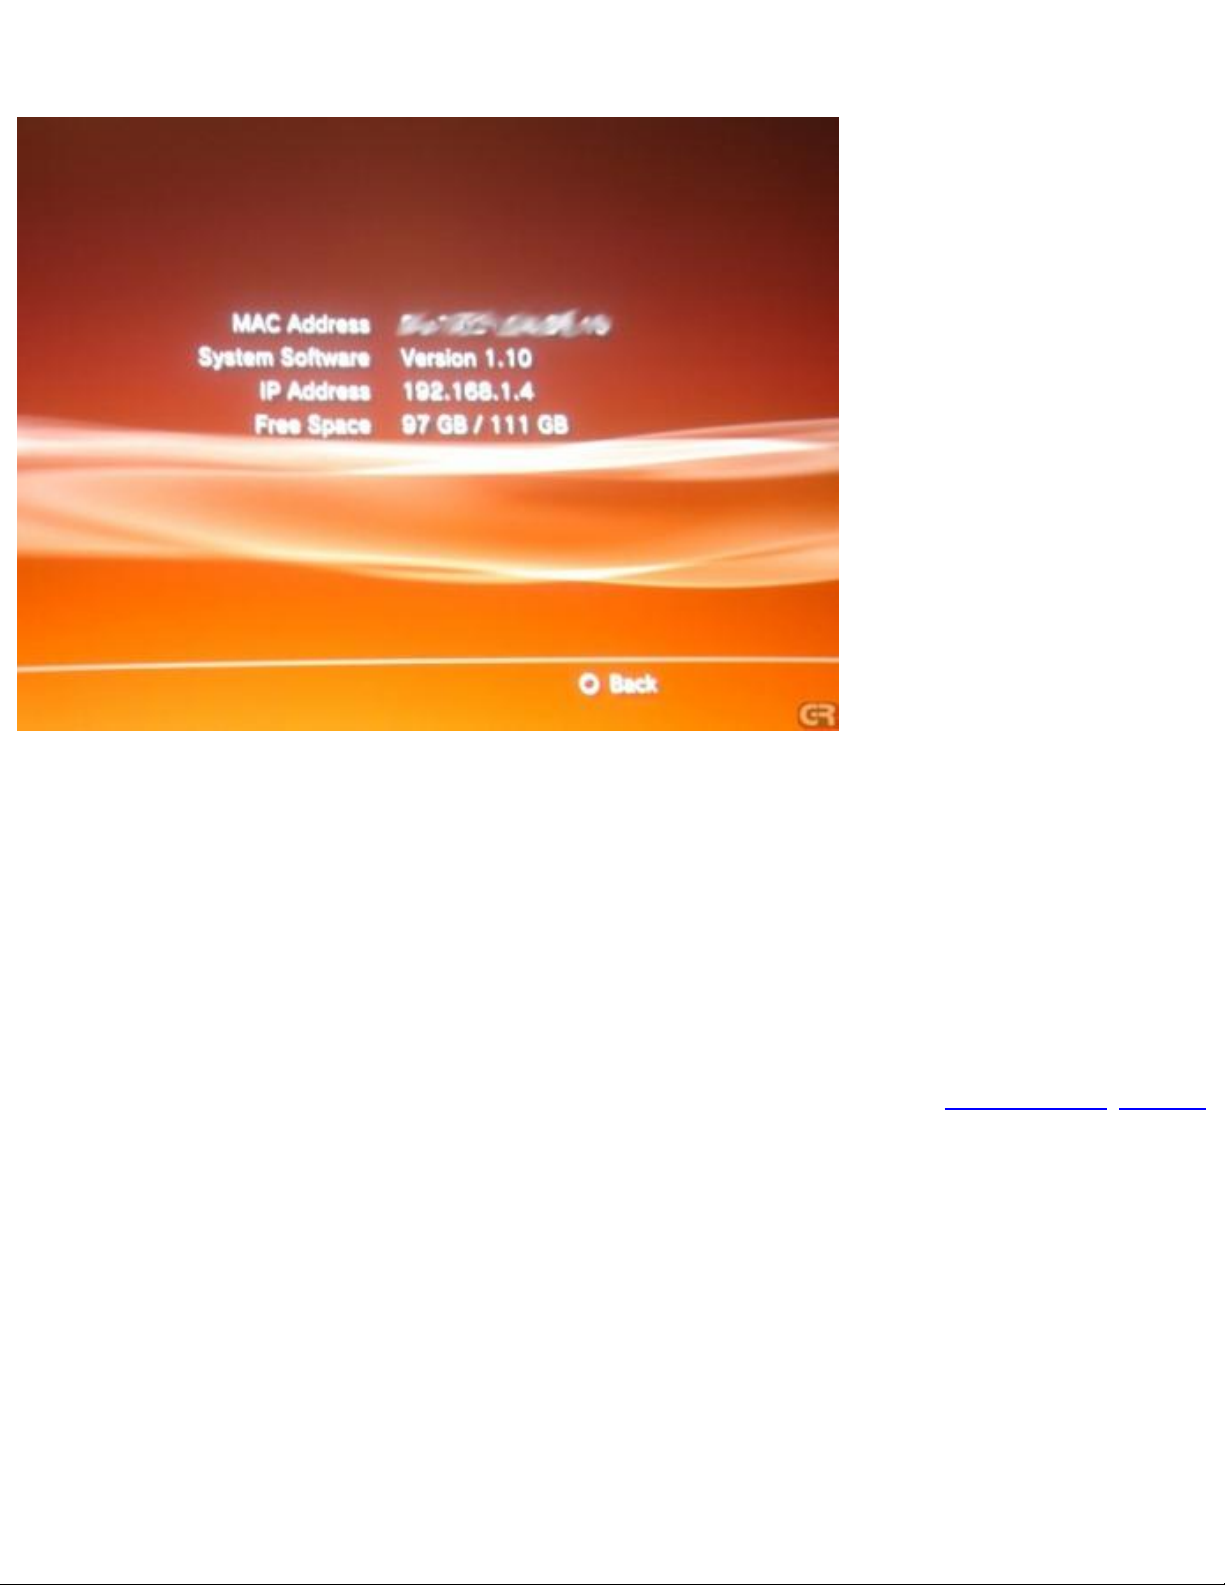
and then finally system information. There you will see a display of the HDD space on your console. If
you have done everything correctly, you will see that the HDD space now reflects the amount of space
on the replacement drive. Keep in mind, about 15 to 20 GB of space will be taken up by the PS3 for
Page 73
PS3 HDD Replacement Mini-Guide
system use, so do not be alarmed when the HDD space measurement comes up short.
To answer your question before you ask, the only thing that gets erased is game saves. Your network
ID info, your console settings, and even the 1.10 update all remain in place when you do this HDD
swap. Neat eh?
There you have it folks, easy as pie. Of course, if you choose to perform this modification,
GamersReports or anyone else for that matter accepts no responsibility if you break or otherwise harm
your console. As always, if you are not sure you can perform the mod without damaging your
hardware, do not do it at all.
Previous/Next
Page 74

USB Flash Memory, USB Hard Drive (External Use)
USB Flash Memory, USB Hard Drive
(External Use)
You can now plug your USB 200GB or whatever you have onto your PS3. All you need to do is follow
the below steps:
1. Format your External Hard Drive or Flash Memory (FAT32)
2. Create the Following Folders
❍ PICTURE
❍ MUSIC
❍ VIDEO
3. Your External Hard Drive is ready to be used.
With the 60GB/20GB you will also have (External HDD which can be more than 500GB)
Previous/Next
Page 75

Controller Modifications Index
Controller Modifications Index
PS3 Controller Light Mod
PS360: Microsoft Controller, Meet Sony Controller
PS3 Controller Light Mod 2
PS3 Controller Button Contacts, Add extra buttons to the PS3 controller
Previous/Next
Page 76
PS3 Controller Light Mod
PS3 Controller Light Mod
First you will need to disassemble the PS3 controller. You can find that here.
Now that you have disassembled the PS3 controller we can begin.
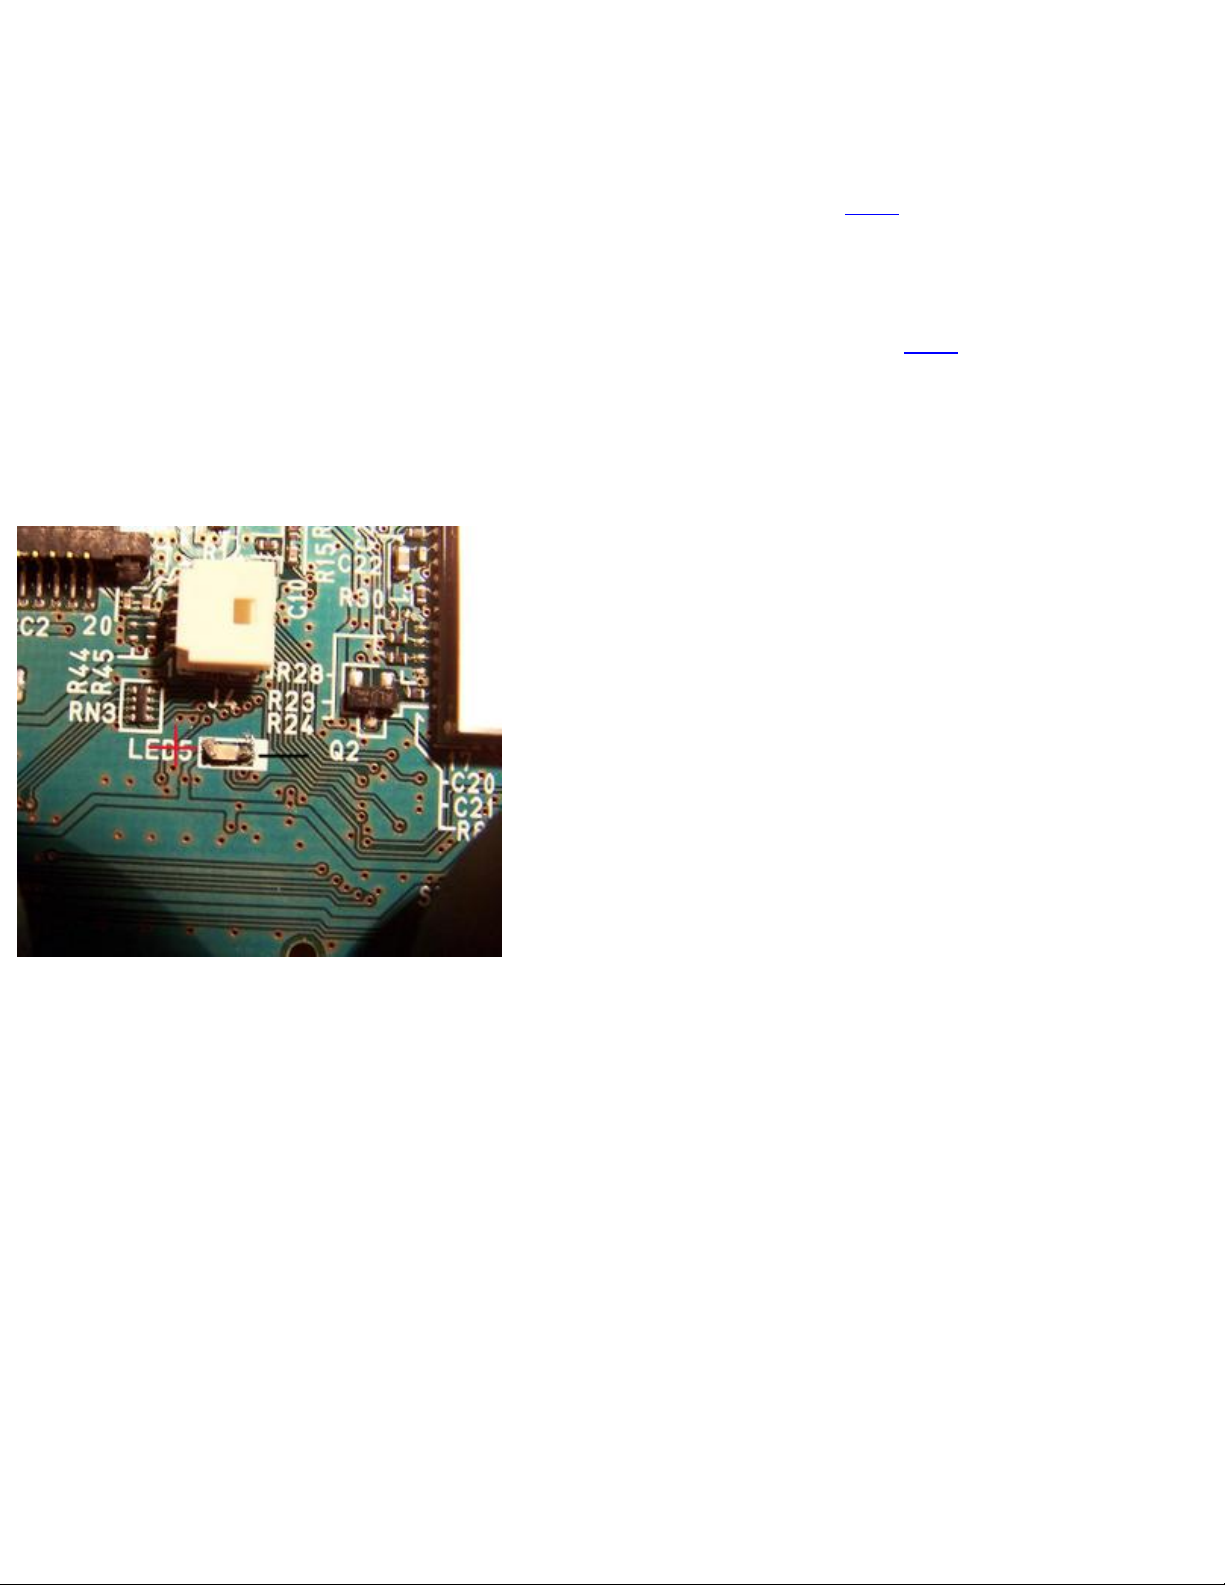
Start out by getting some 0603 surface mount leds available at llamma's shop
here (or from
somewhere else, if you'd prefer) and some basic soldering skills would be helpful.
Start off with soldering the led to the LED5 spot on the board with the positive on the left and the
negative on the right as shown in the picture,
Sony must have some ideas for putting a led there but never did. The spot still has a positive but no
negative so we have to add a negative to the led, the led in this tutorial is always on because I haven't
found a negative source that turns one when power goes through it.
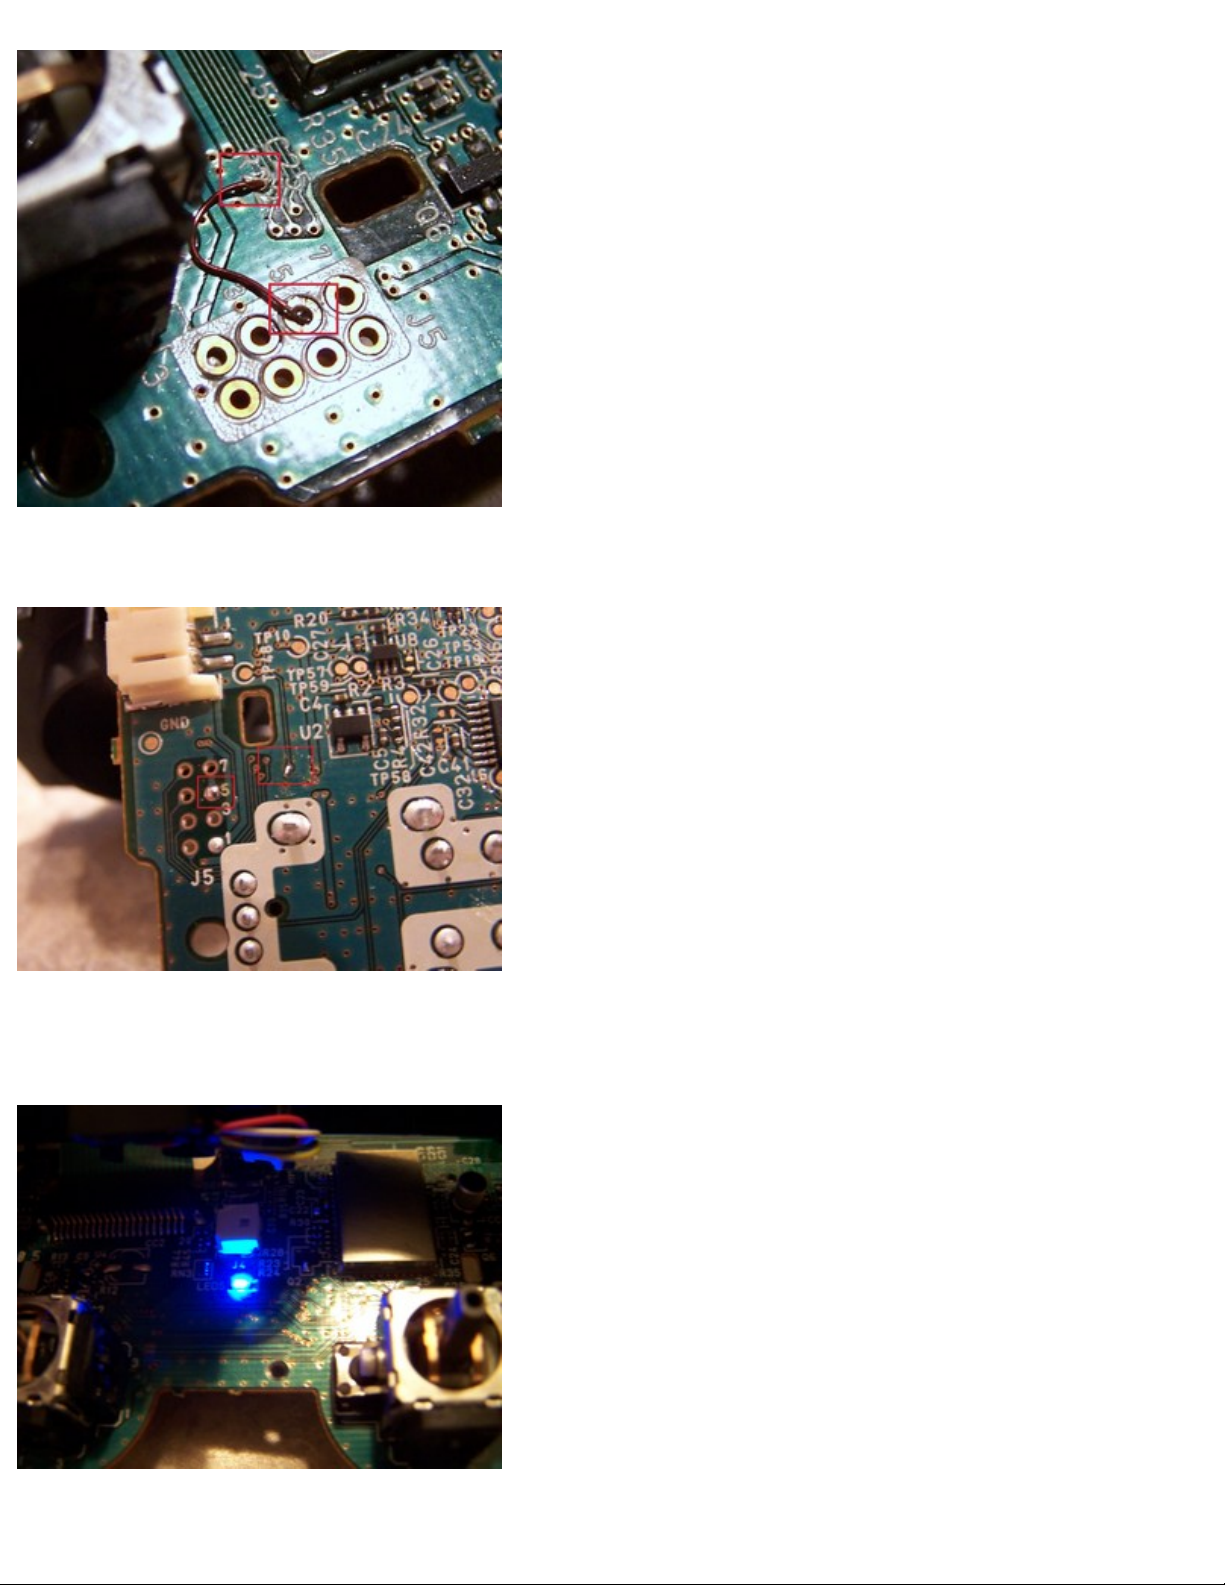
Ok continuing on the next step is to add the negative so I connected the hole the led connects to to hole
5 on the board (see the pictures).
Page 77
PS3 Controller Light Mod
here's a picture of the other side.
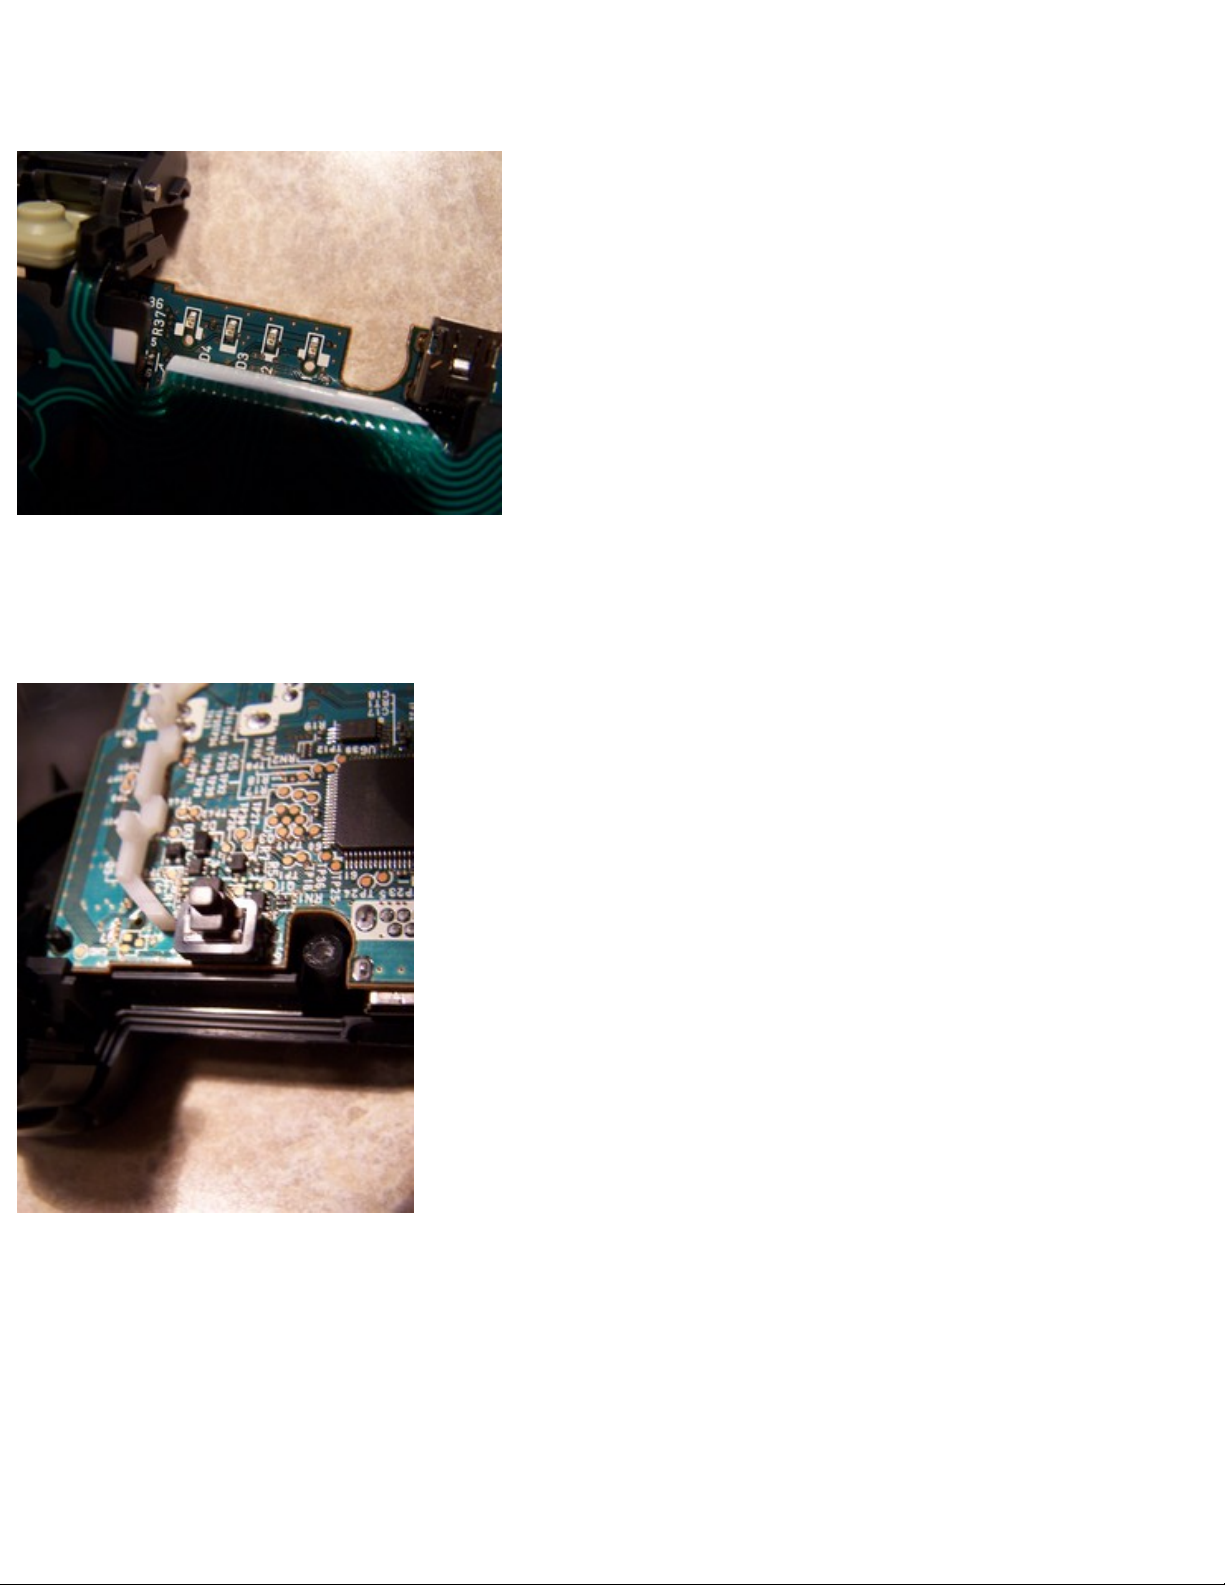
now plug the battery back in and test to see if it works. if everything works then great if not check your
soldering points to make sure everything is connected and make sure the led is on in the right direction.
Page 78
PS3 Controller Light Mod
Now if you want to change the red led's you have to replace the old ones with your own use the led 1-4
near the top of the board for that. I didn't do that because I think red look fine.
once your done do all the steps in reverse order to get it back together. the first time i put it back
together I thought I ruined it because it wouldn't do anything then I found out I put the reset switch on
backwards and it was causing it to always be pressed down so be careful with that.
Page 79
PS3 Controller Light Mod
That's the end of my tutorial I hope it helped some of you.
Previous/Next
Page 80
PS360: Microsoft Controller, Meet Sony Controller
PS360: Microsoft Controller, Meet Sony
Controller
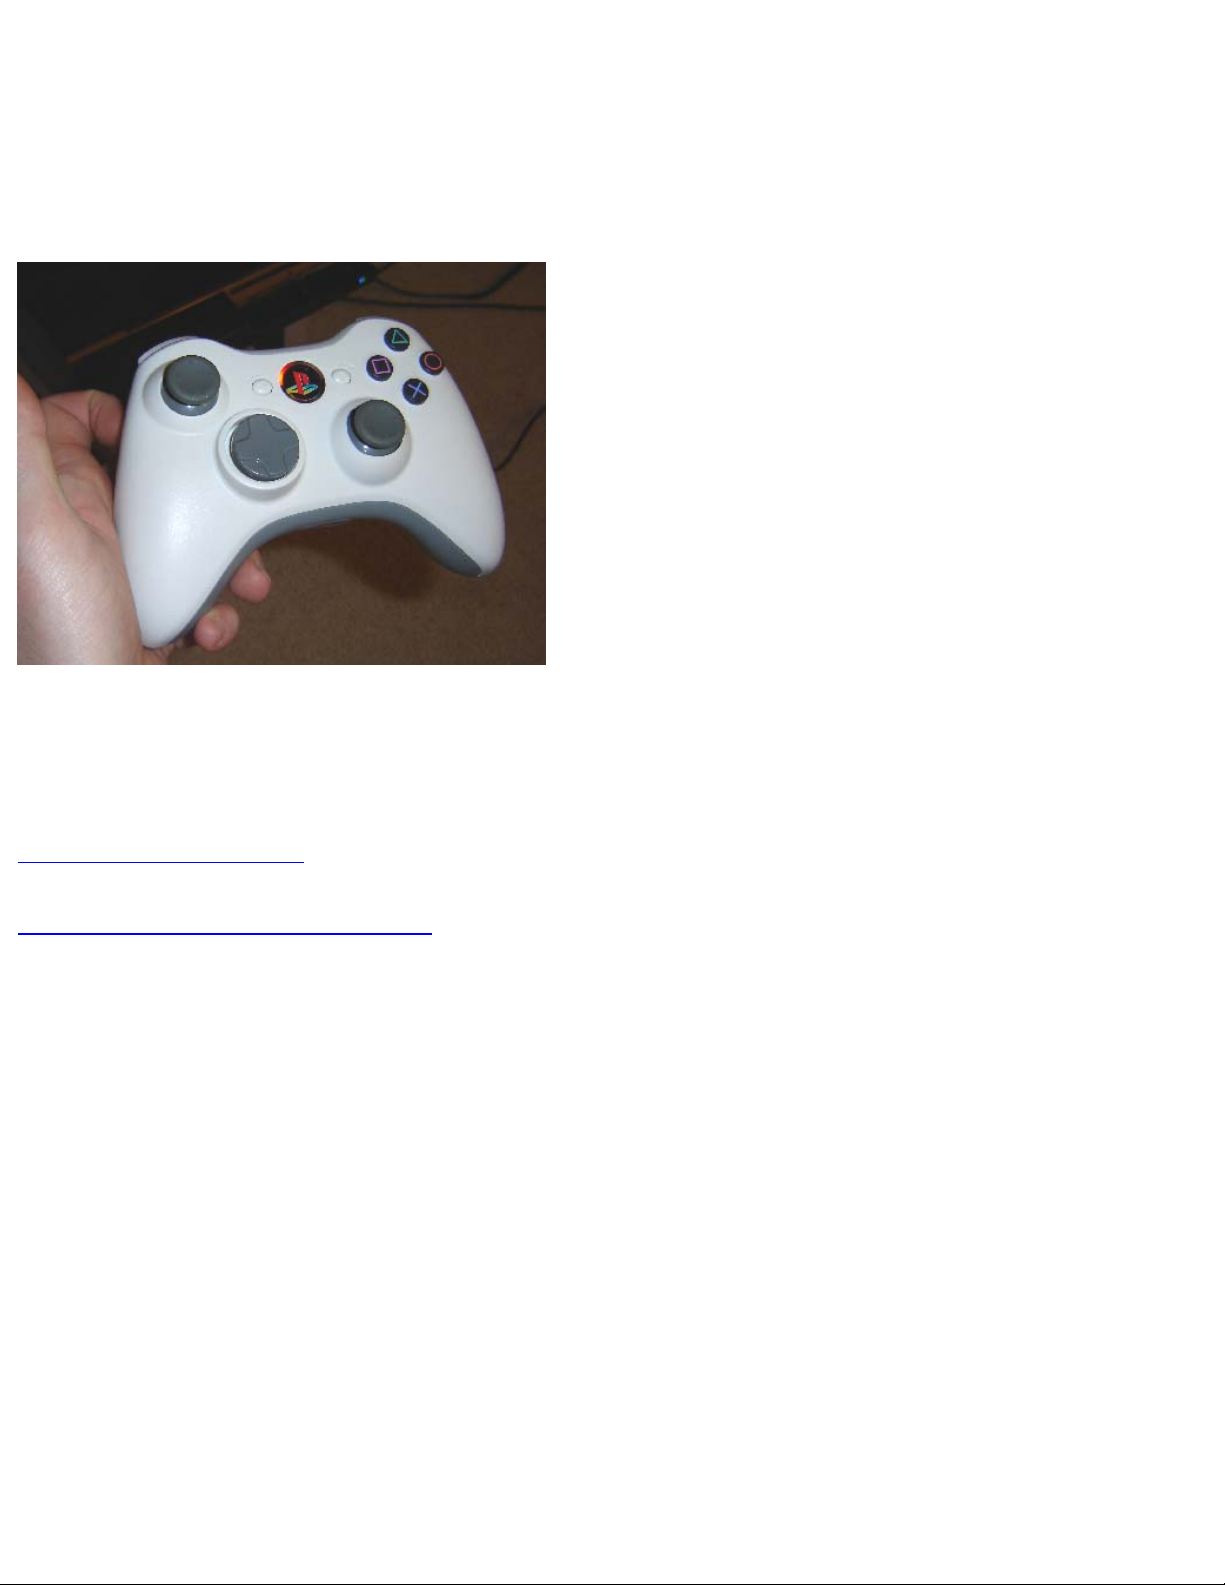
Done on consignment, it’s quite obviously PS3 Sixaxis controller guts in the [much better shaped]
Xbox 360 controller shell. Check out a video of this thing in action, and see below for more photos and
details of how it was constructed.
Demo Video, iPod sized
Demo Video, Legacy MPG format
Page 81
PS360: Microsoft Controller, Meet Sony Controller
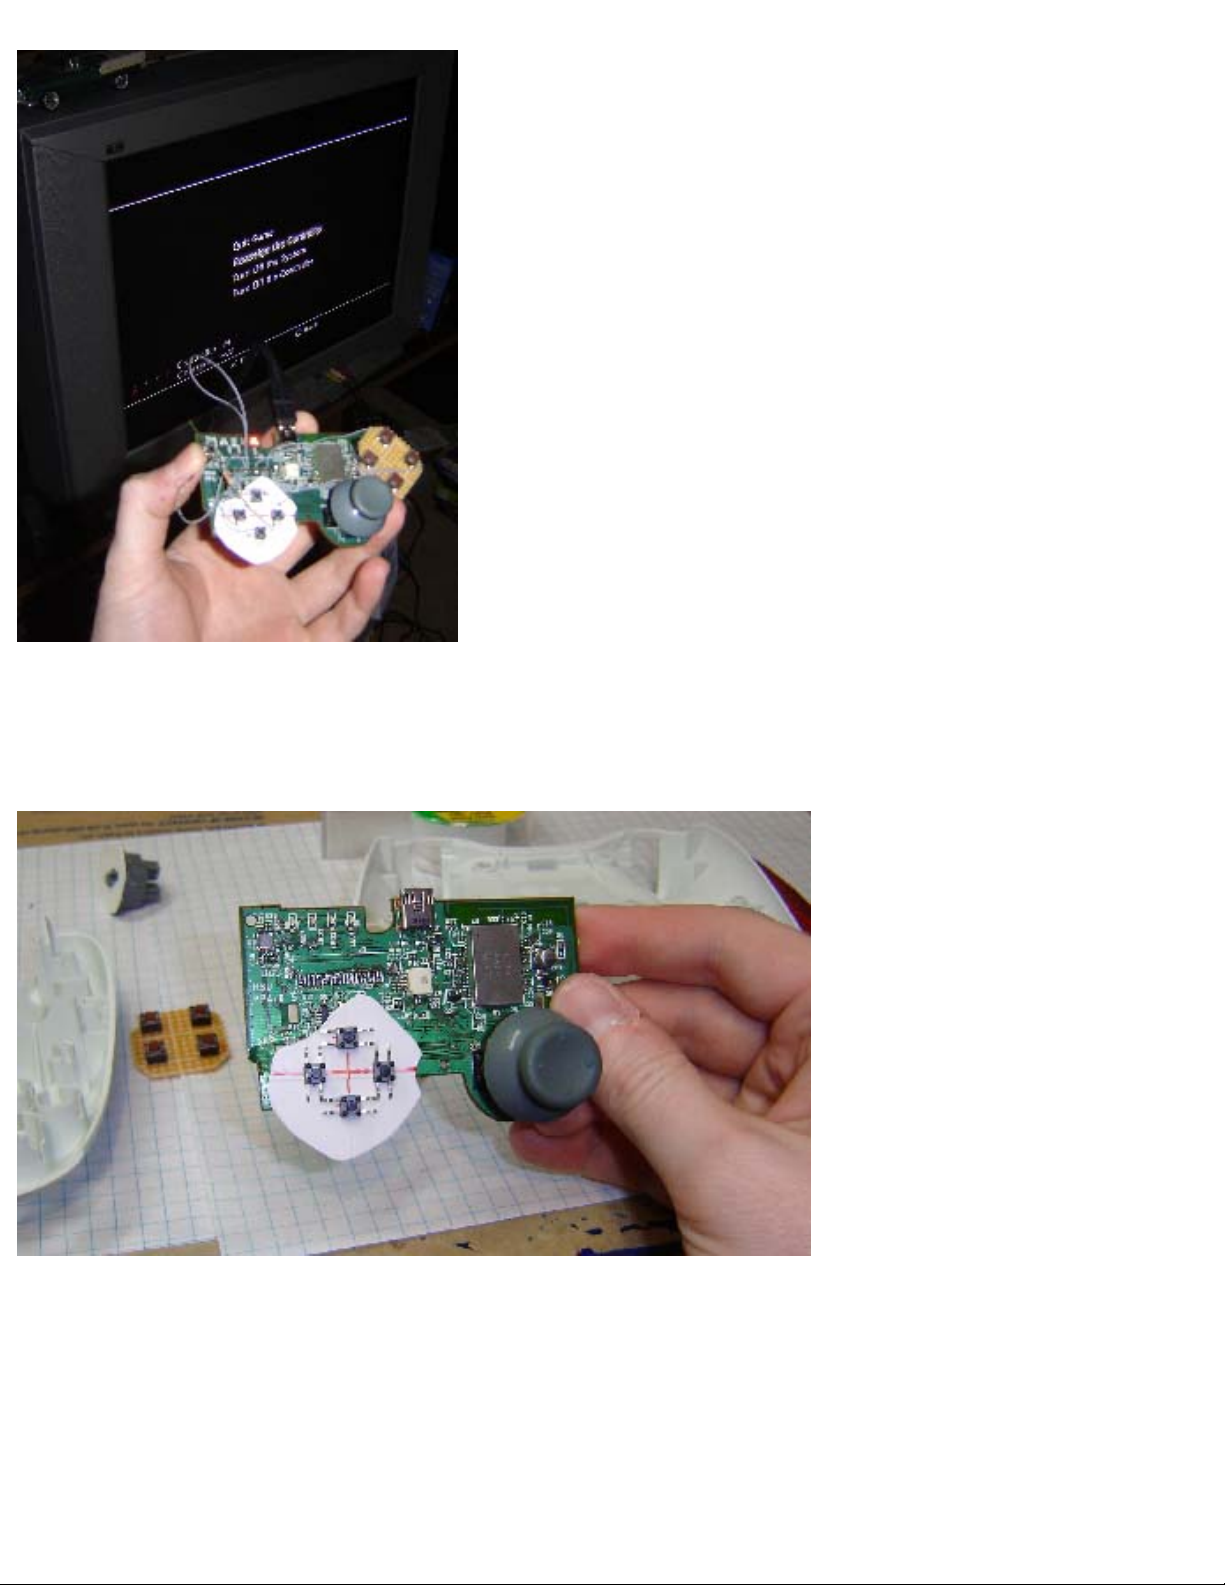
An early test of the guts. I’ve rewired many a Sony controller in the past, but it’s always good to check
if things are working. Of course this time I’ll have to deal with the “analog” L2 and R2 buttons of the
Sixaxis…
A better view of the main PCB in the Sixaxis. Amazingly, it’s exactly the same shape and size as a
Dual Shock board. The actual “tilt” device is a little IC at the end of a cord, not much too look at. On
the original Sixaxis / Dual Shock most of the trigger buttons are on a plastic sheet set against a separate
plastic frame, much like a keyboard is inside. Again I say, why didn’t they update the controller this
time? I mean, a REAL change? It’s getting pretty pathetic…
Page 82
PS360: Microsoft Controller, Meet Sony Controller
If Sony made cars.
Here’s the inside of the 360 shell. As you can see I’ve used standard-issue Radio Shack perfboard for
both the action buttons and the left analog stick. OK the Sixaxis is a little different, it uses slightly
smaller analog sticks than the Dual Shock or Xbox 360. Well, they’re smaller on the inside at least,
kind of like the Gamecube.
Page 83
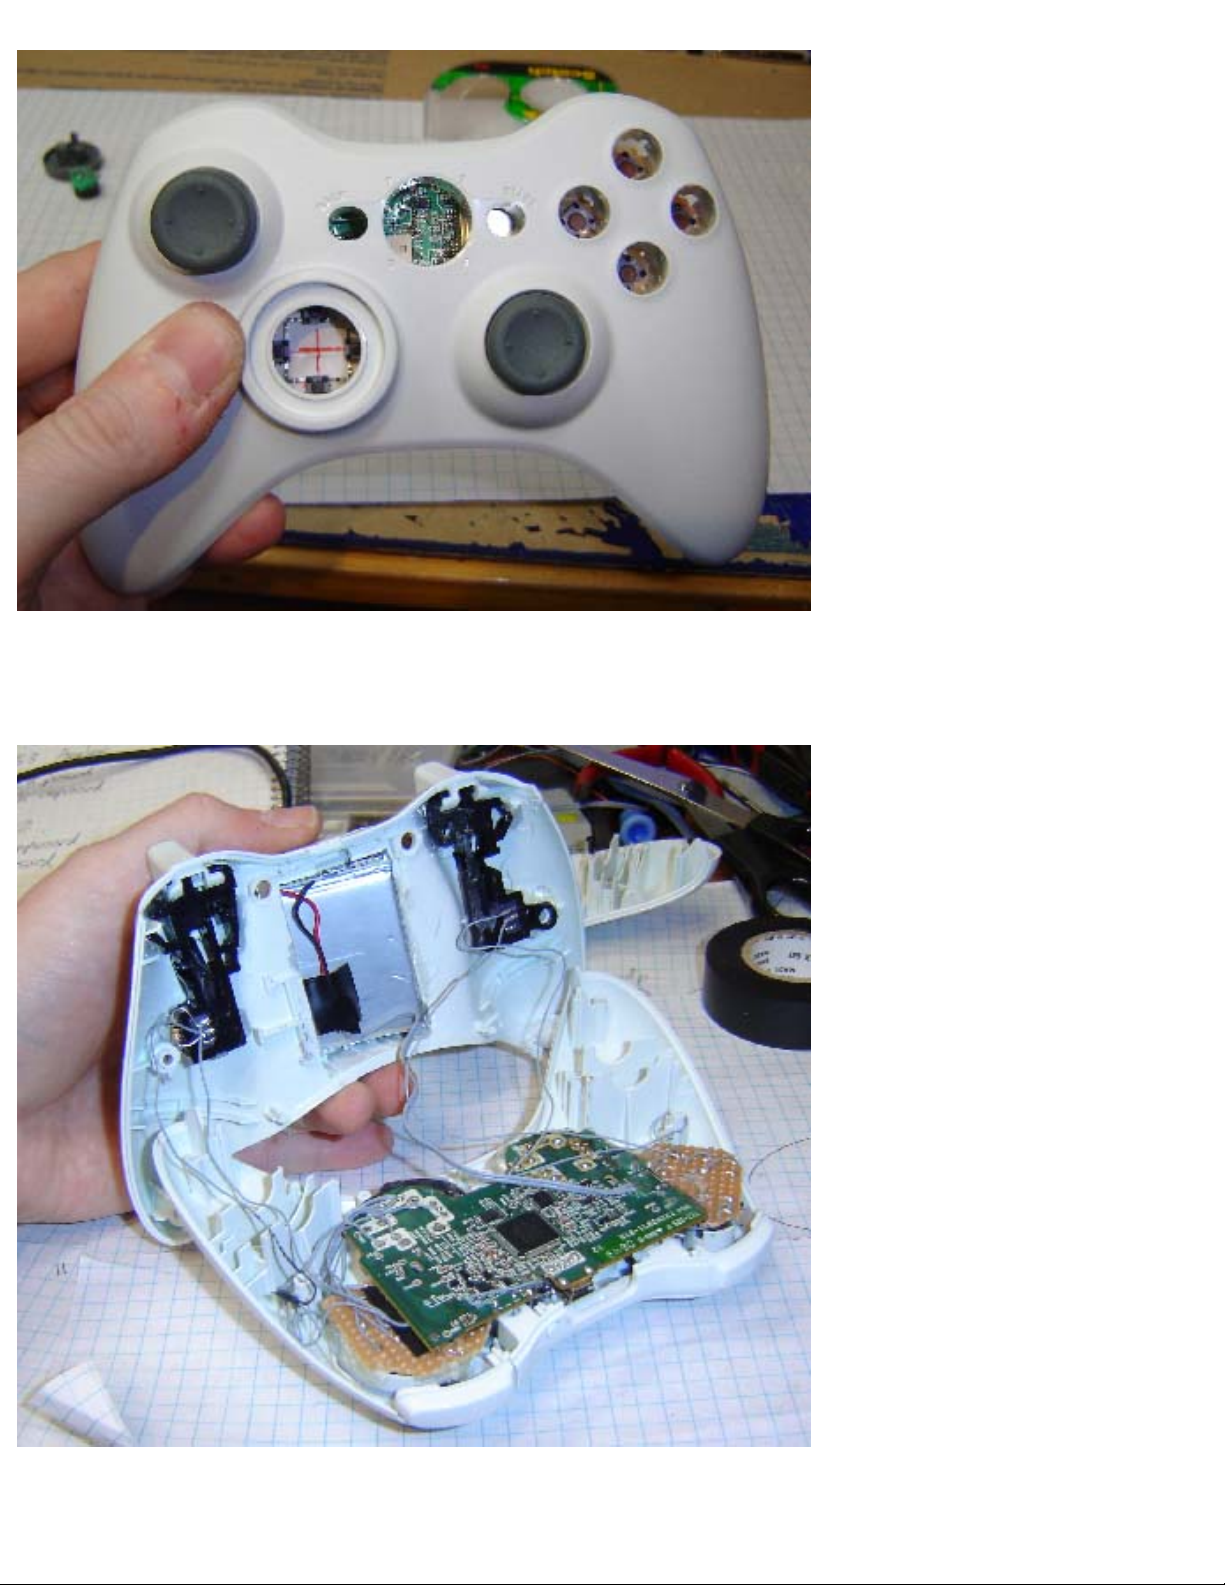
PS360: Microsoft Controller, Meet Sony Controller
The controller shell with the circuit board and new tact switches for the d-pad visible. Unfortunately, I
had to keep the wanky 360 d-pad, oh well.
Here’s the insides finished and ready to go. The Sixaxis battery has been taken out of its shell and
Page 84
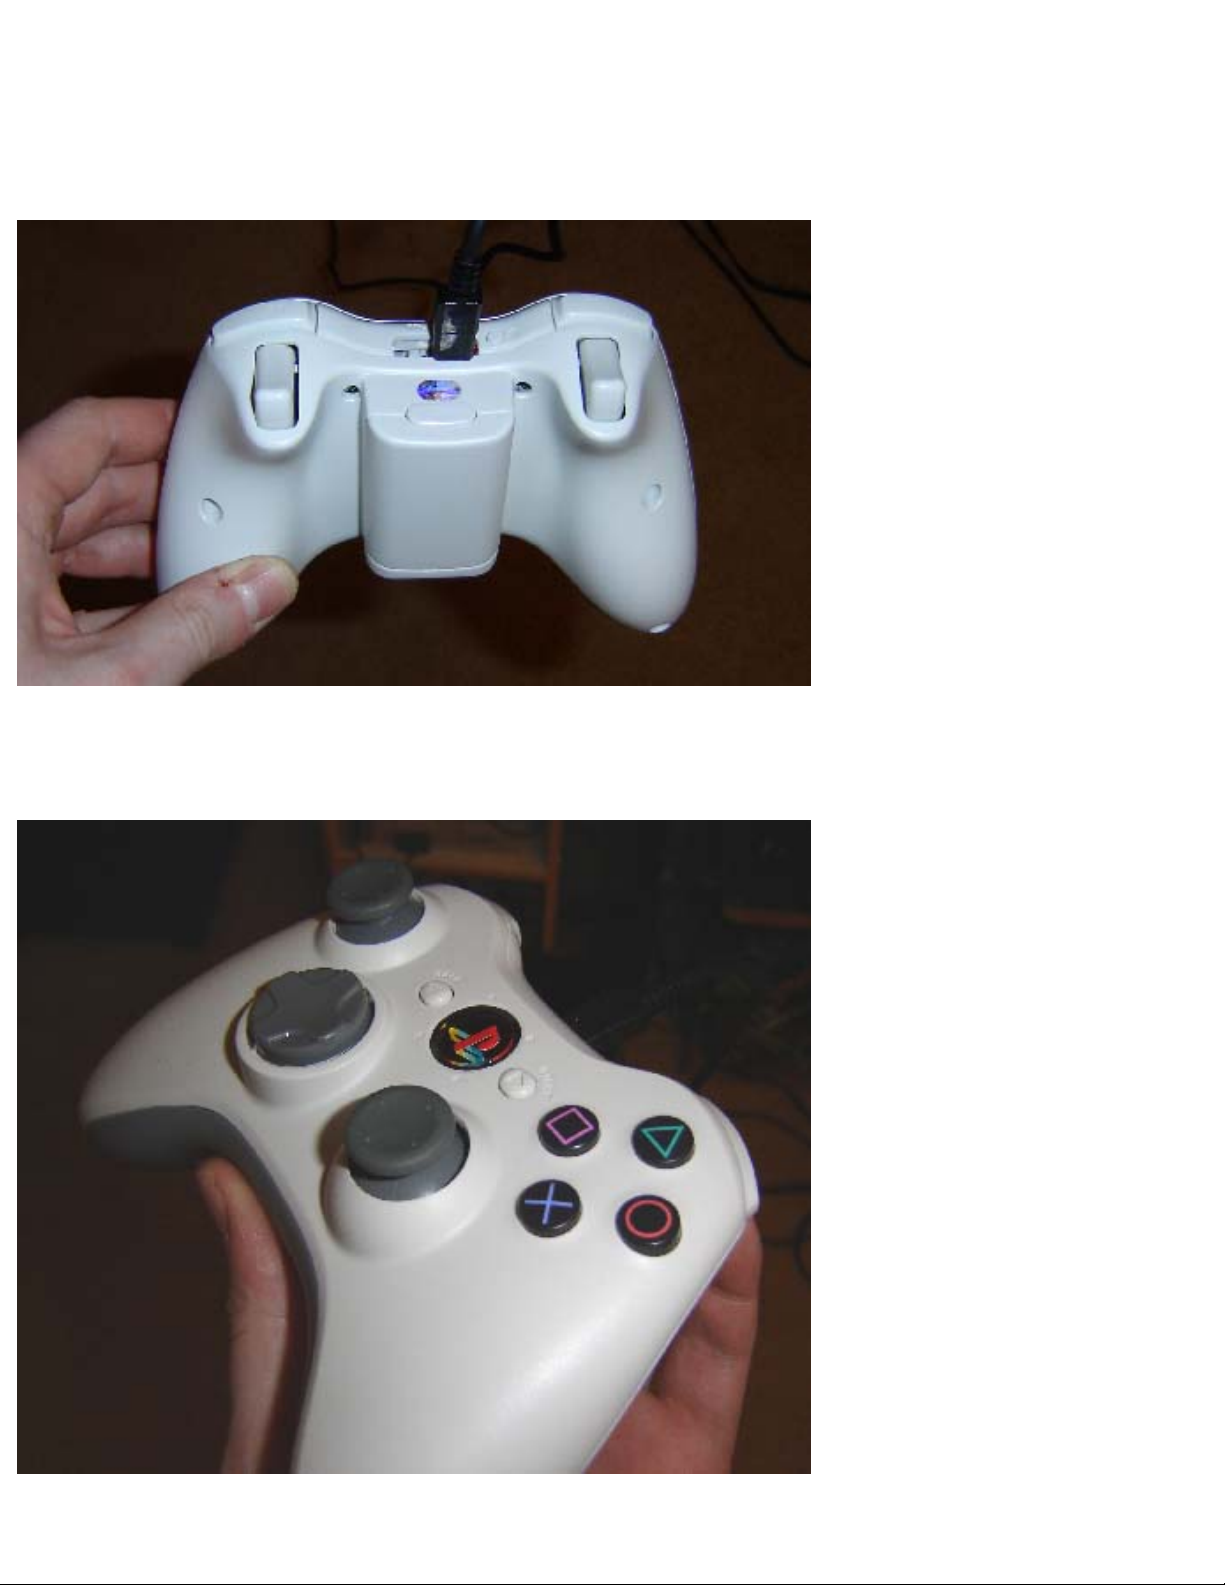
PS360: Microsoft Controller, Meet Sony Controller
crammed into the back battery area of the 360 controller. The left and right analog sticks from the 360
are kept stock and a resistor adjusts them to work with the PS3. It may not look like much but there
was a good deal of finagling to get everything to fit and work correctly, especially the right analog
stick. (Left at its original position on the PCB, but lifted .075″)
The top/back of the unit. The USB cable plugs in where the Charge and Play port used to be. Luckily
the Microsoft hologram sticker is there, letting you know at least the case plastic is genuine.
Page 85
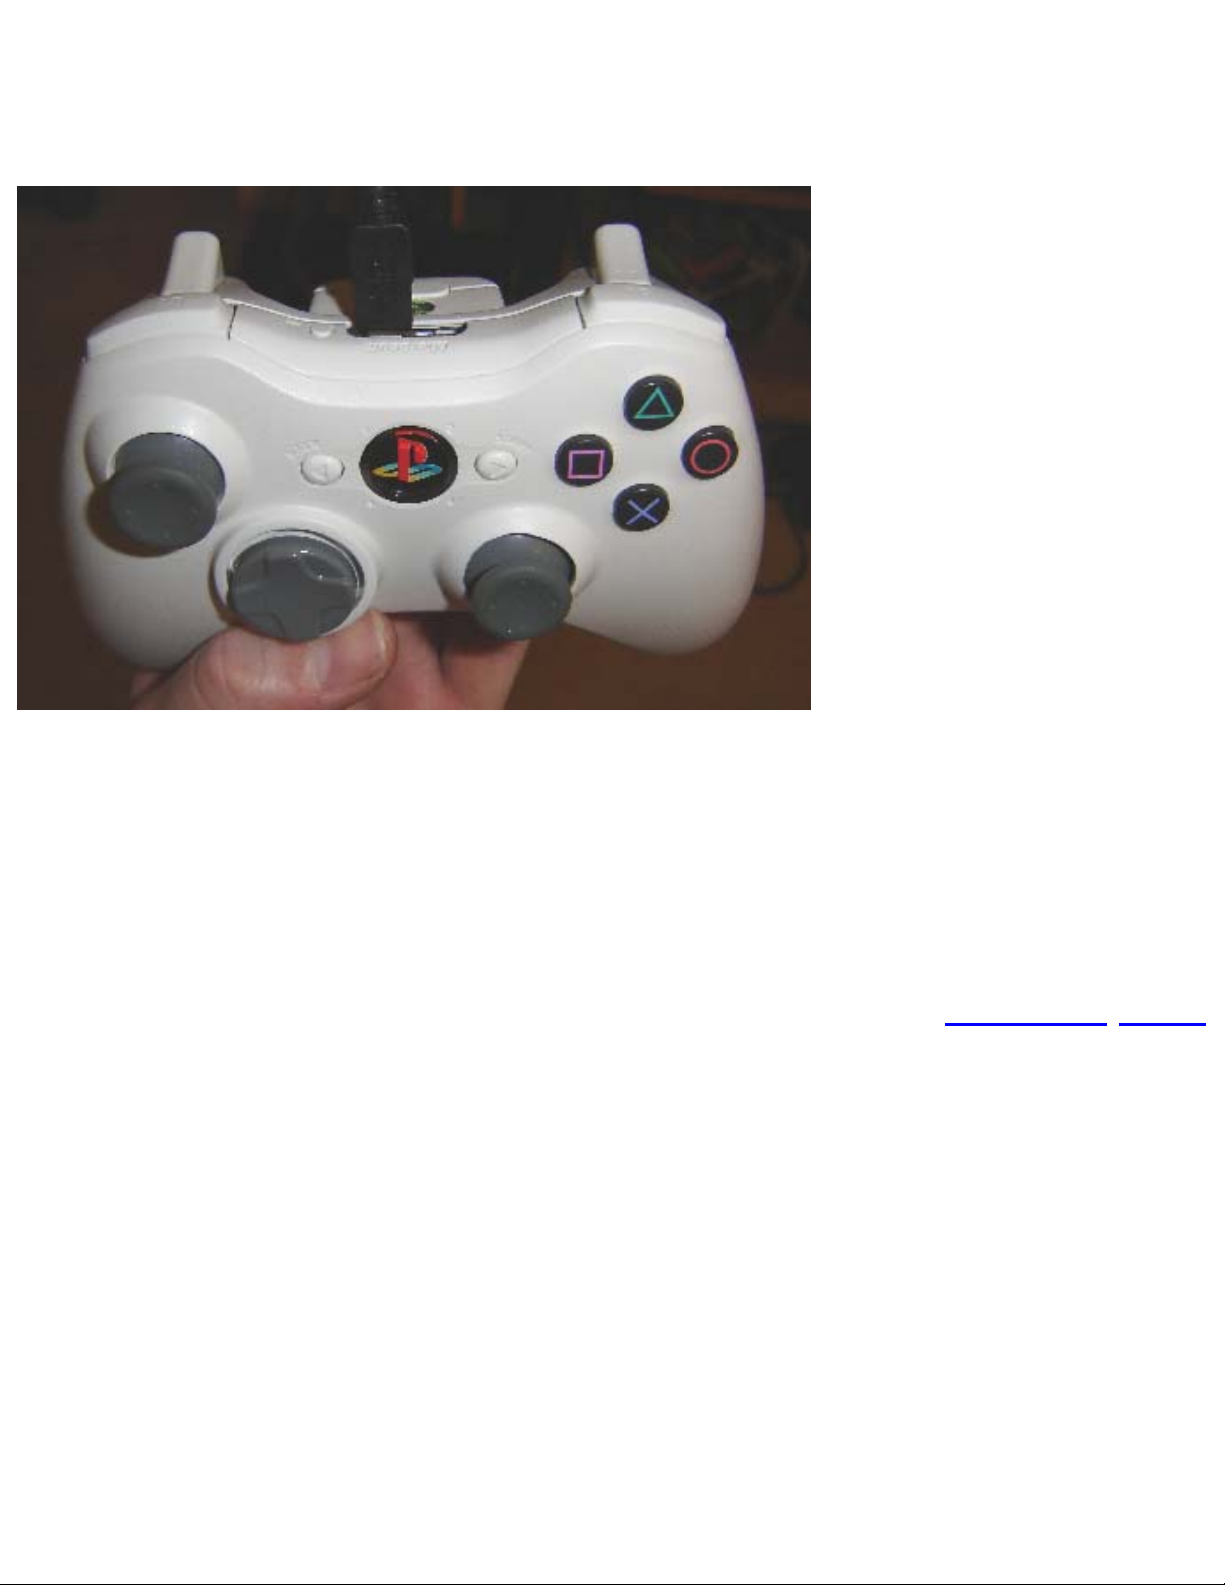
PS360: Microsoft Controller, Meet Sony Controller
A closer view of the buttons. Unlike Sony’s Sixaxis I took the effort to use a COLOR “PS” logo, thank
you very much. The action buttons “more or less” fit the holes in the 360 controller, a little shaving on
their sides sealed the deal. I should just graft an X-Acto knife to my arm, I use them enough.
Another view of the top. The USB cable plugs in a little off center, but I can live with it. In the video
you can see the Ring of Light with the new red LED’s… sure to strike fear into Xbox 360 owners the
world over!
Well that’s about all I have to say about this mod/hack. I’d best get back to some other projects, so I’ll
see you all later!
Previous/Next
Page 86
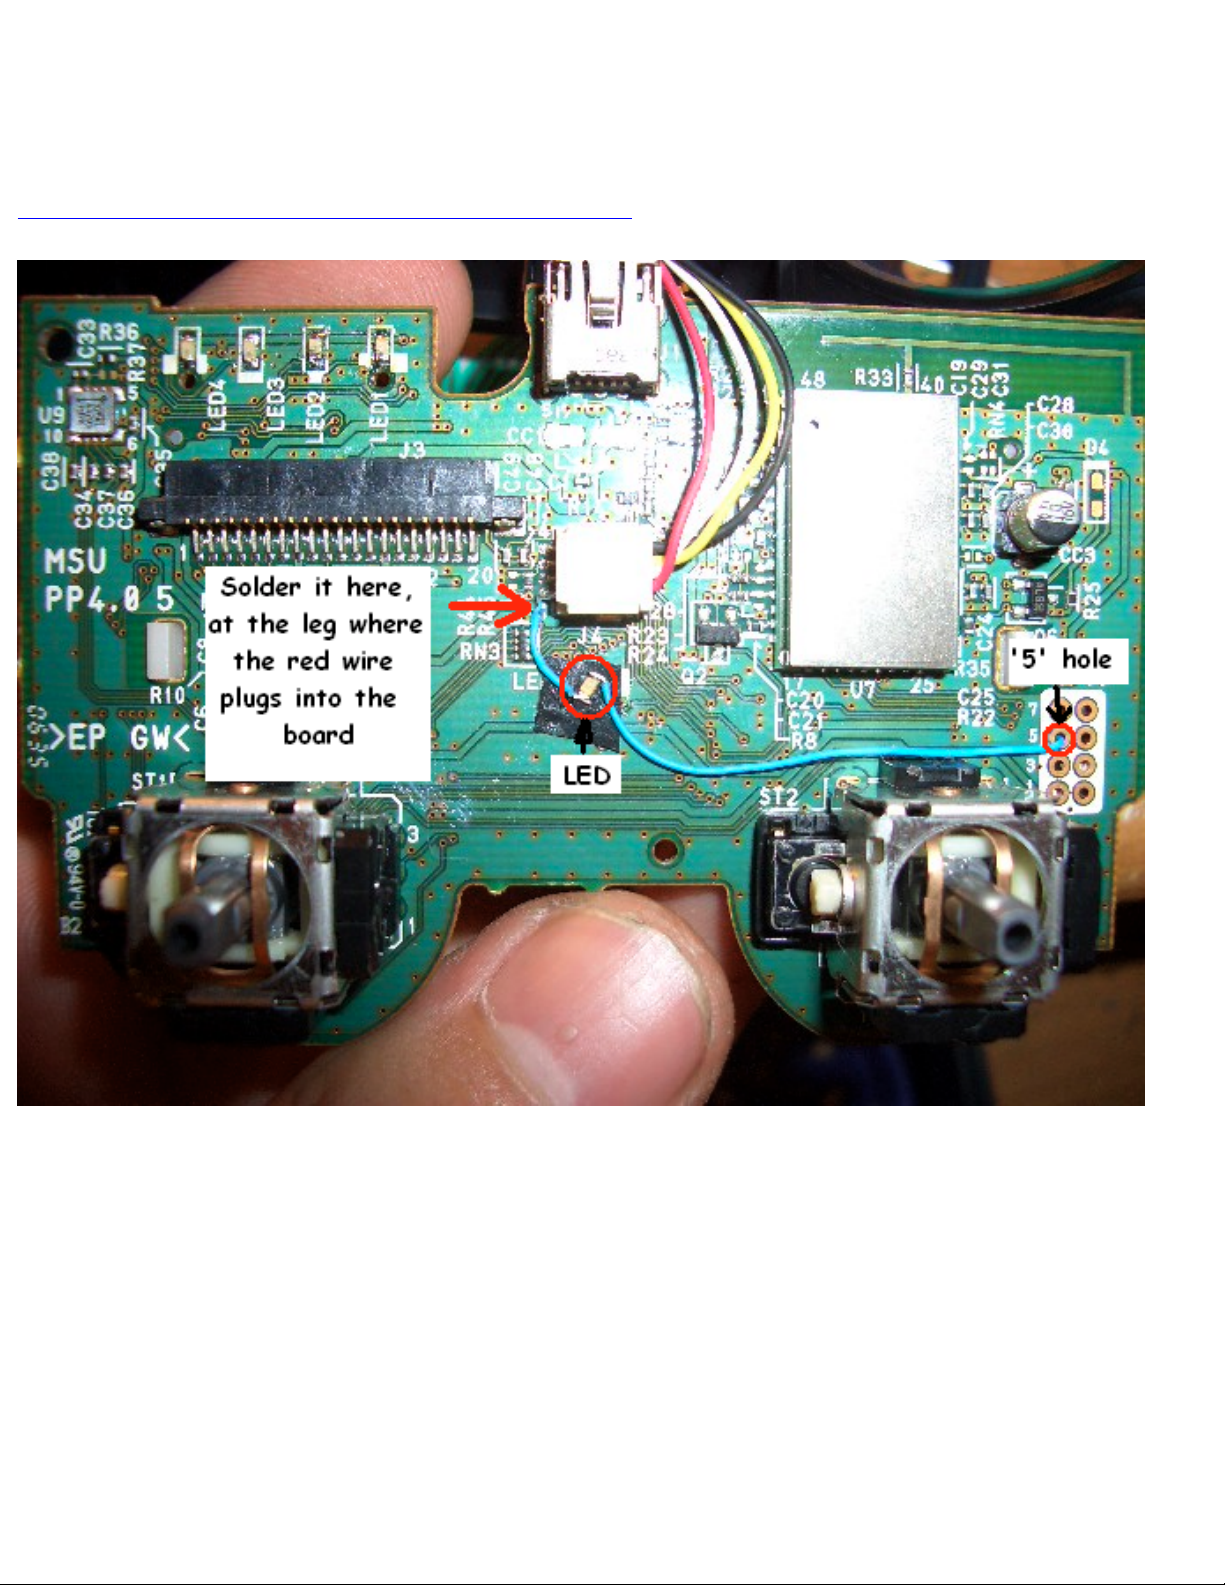
PS3 Controller Light Mod 2
PS3 Controller Light Mod 2
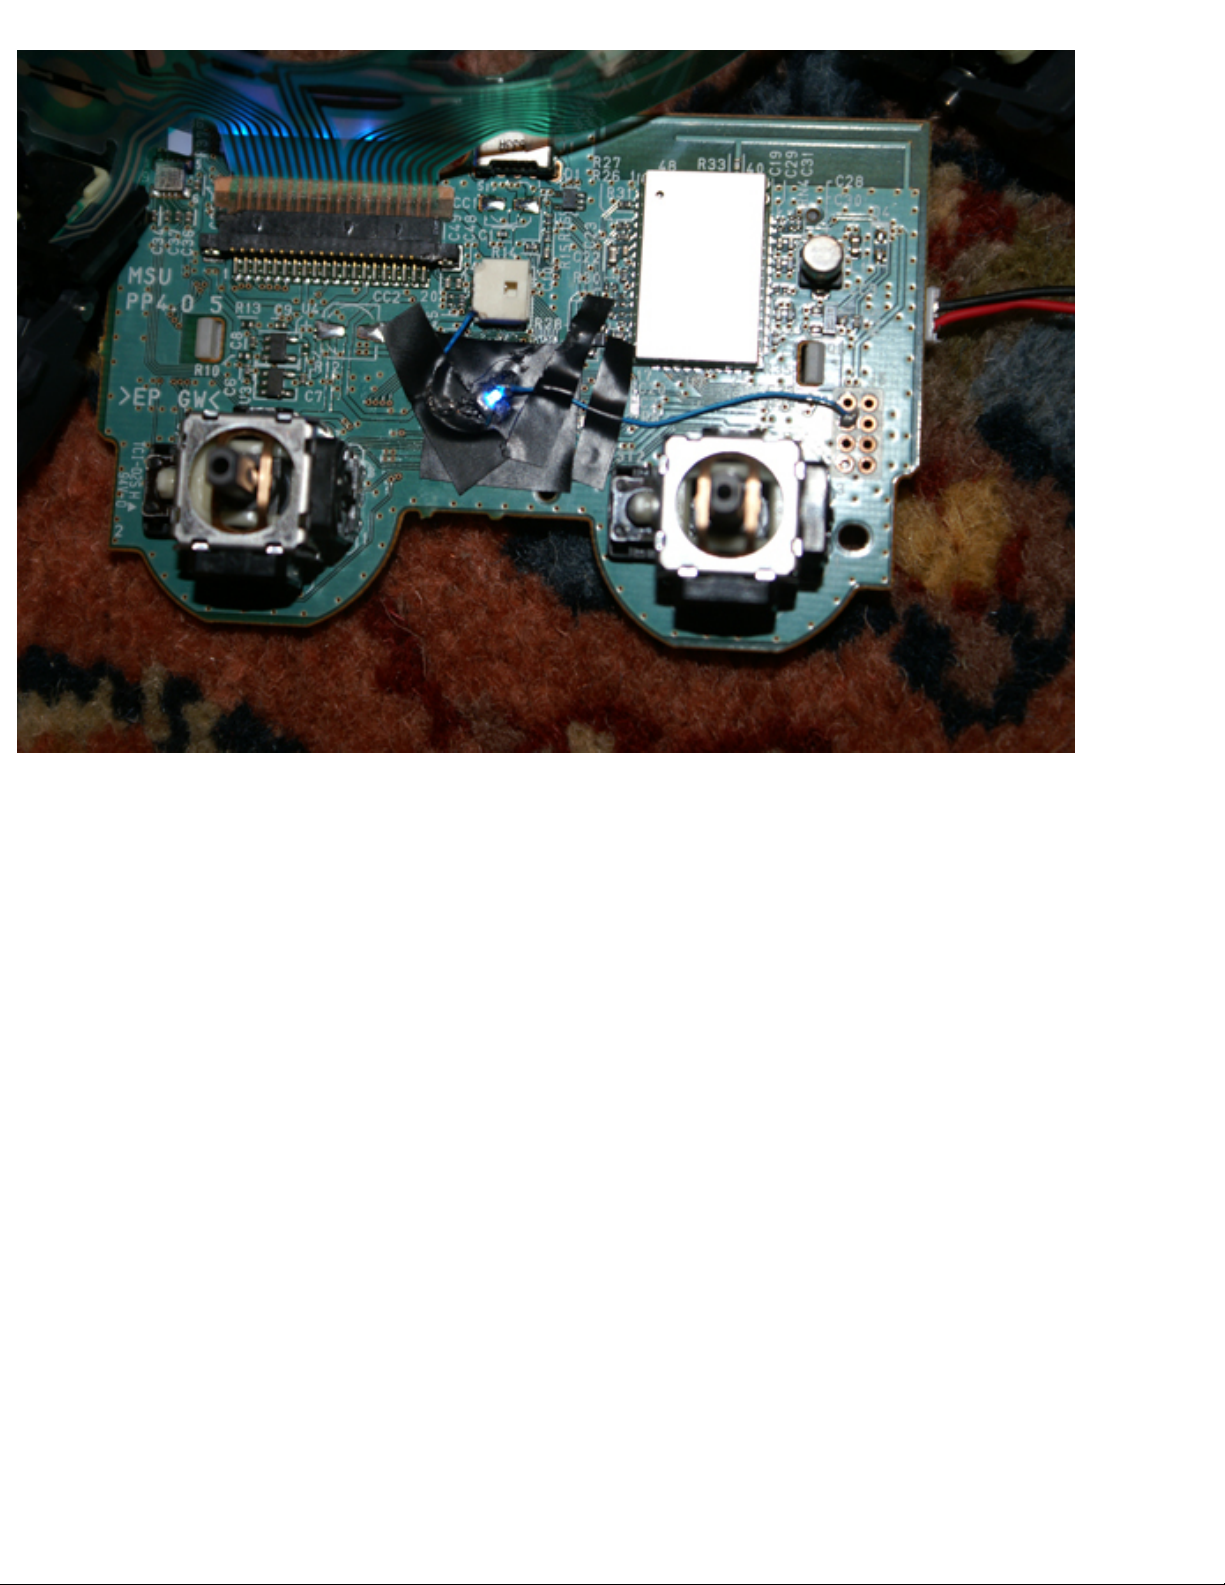
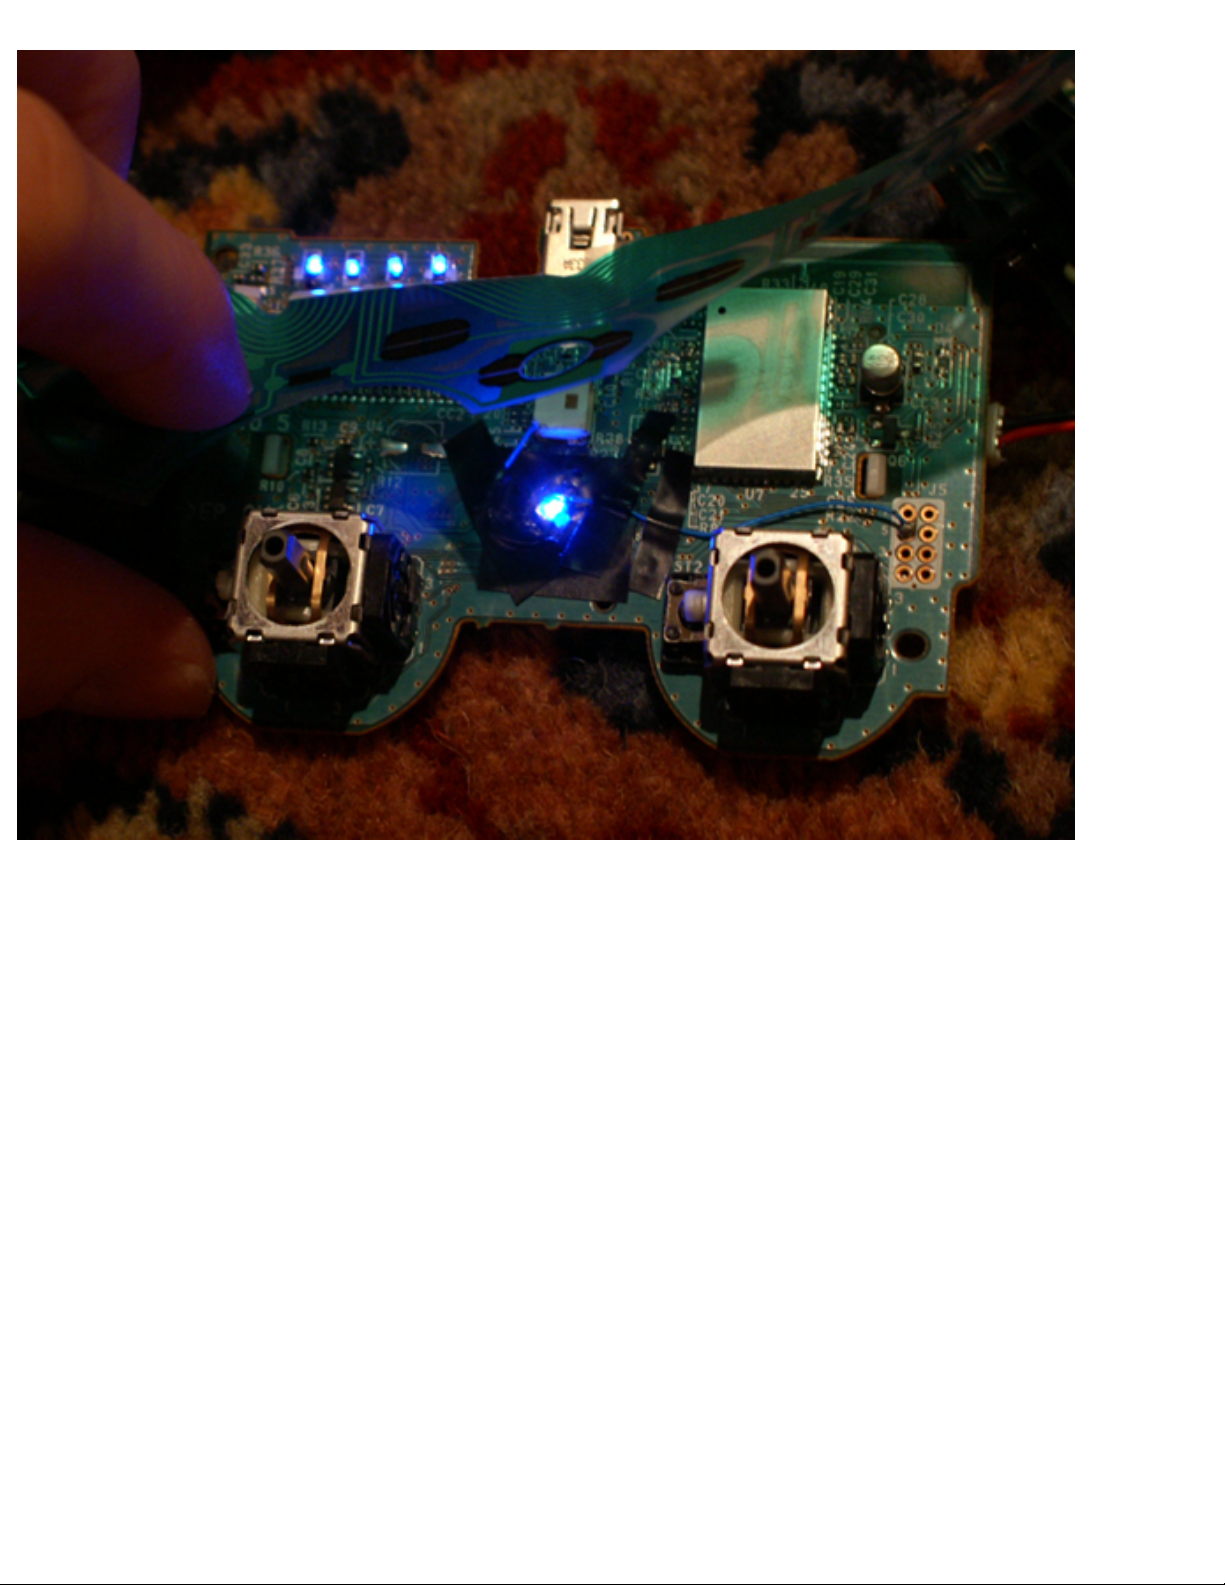
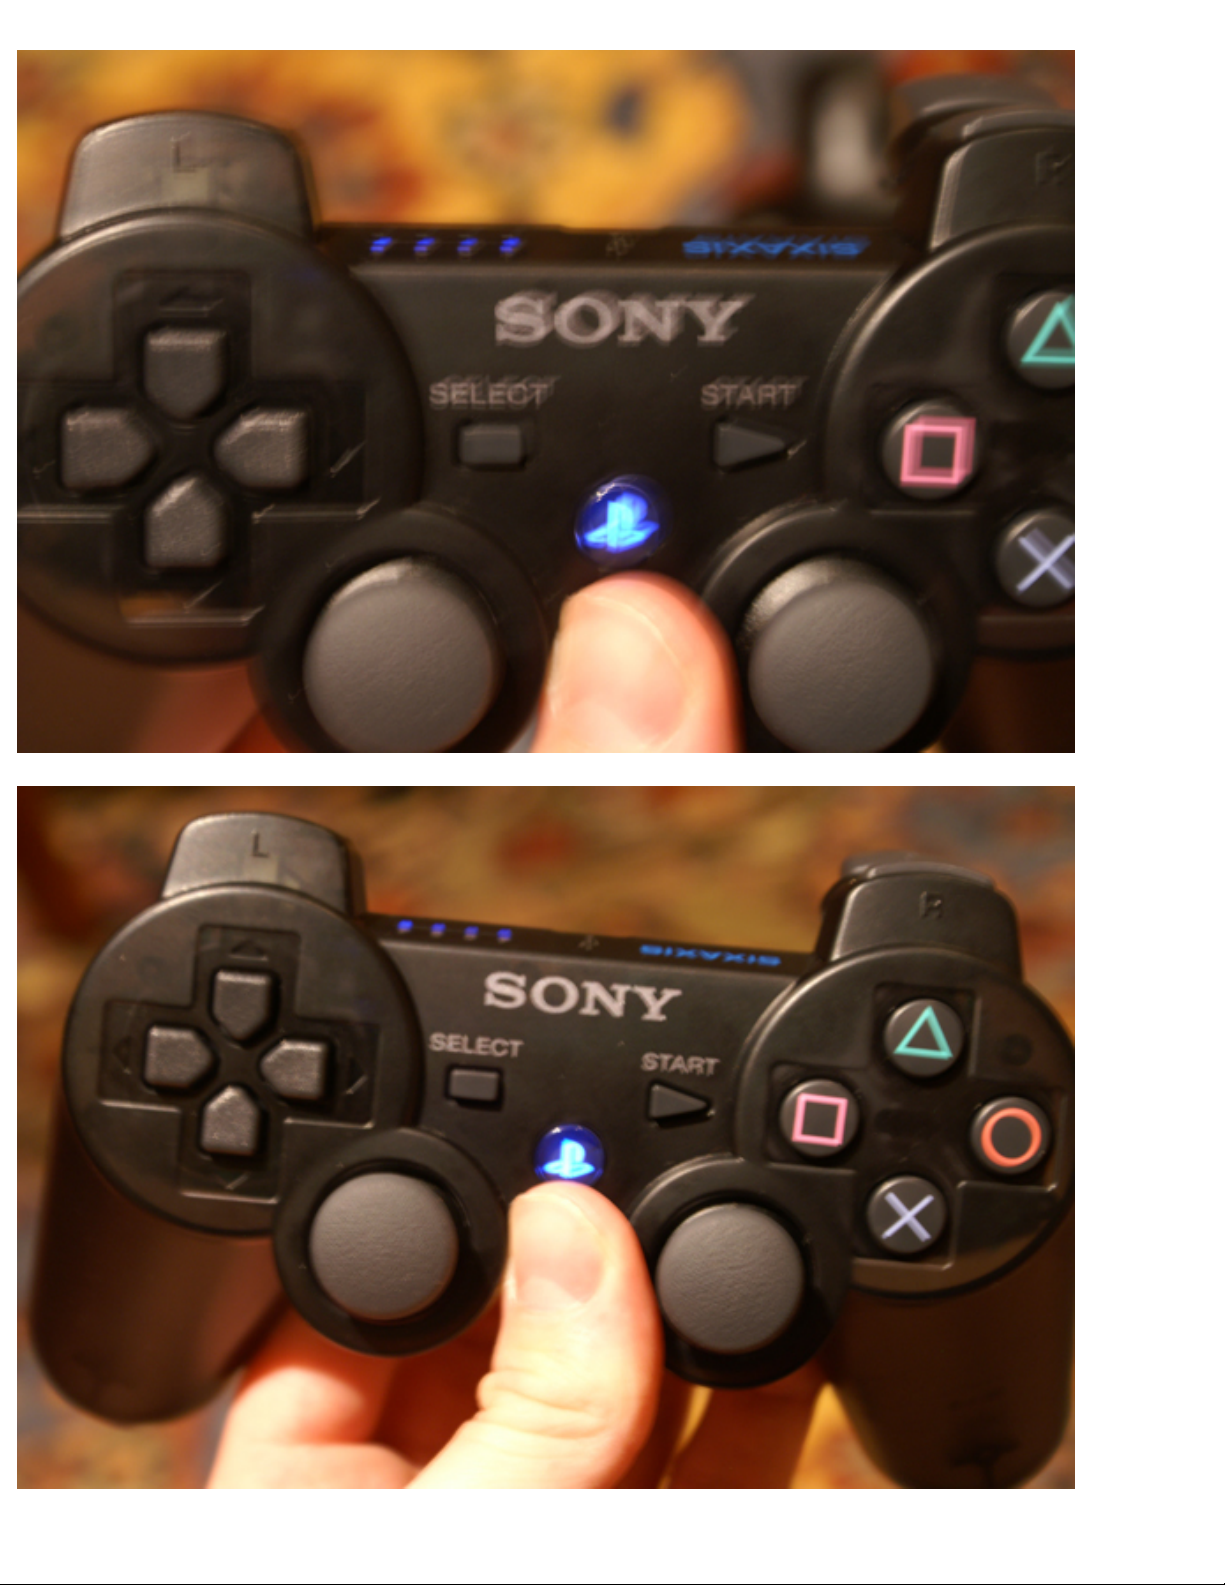
First you'll need to take apart your PS3 controller.
Page 87
PS3 Controller Light Mod 2
Page 88
PS3 Controller Light Mod 2
Page 89
PS3 Controller Light Mod 2
Page 90

PS3 Controller Light Mod 2
Yes, a minor mod but you should be able to do it from these pics! (You can use any color you like.)
Previous/Next
Page 91
PS3 Controller Button Contacts, Add extra buttons to the PS3 controller
PS3 Controller Button Contacts, Add
extra buttons to the PS3 controller
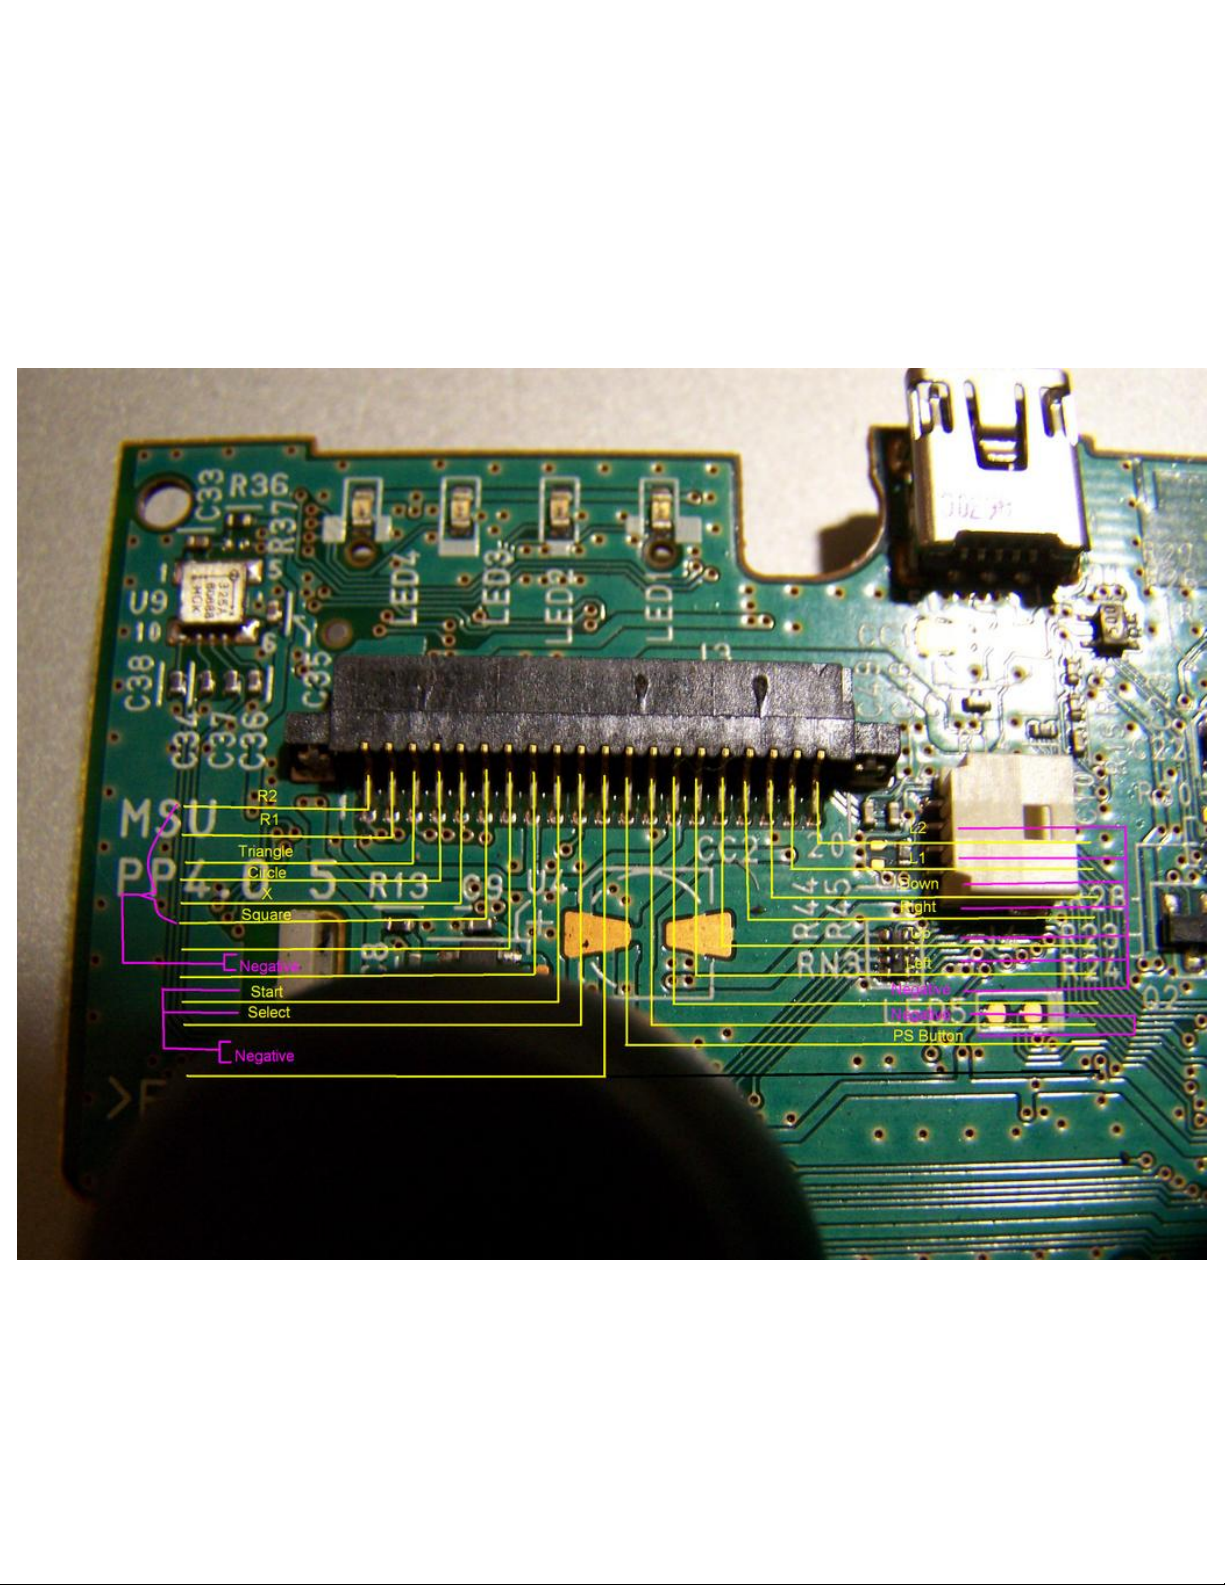
Here's a picture I made up for anyone wanting to know what contacts you need to add extra buttons.
The second pic is the analog contacts for anyone wanting to do joystick mods.
Page 92
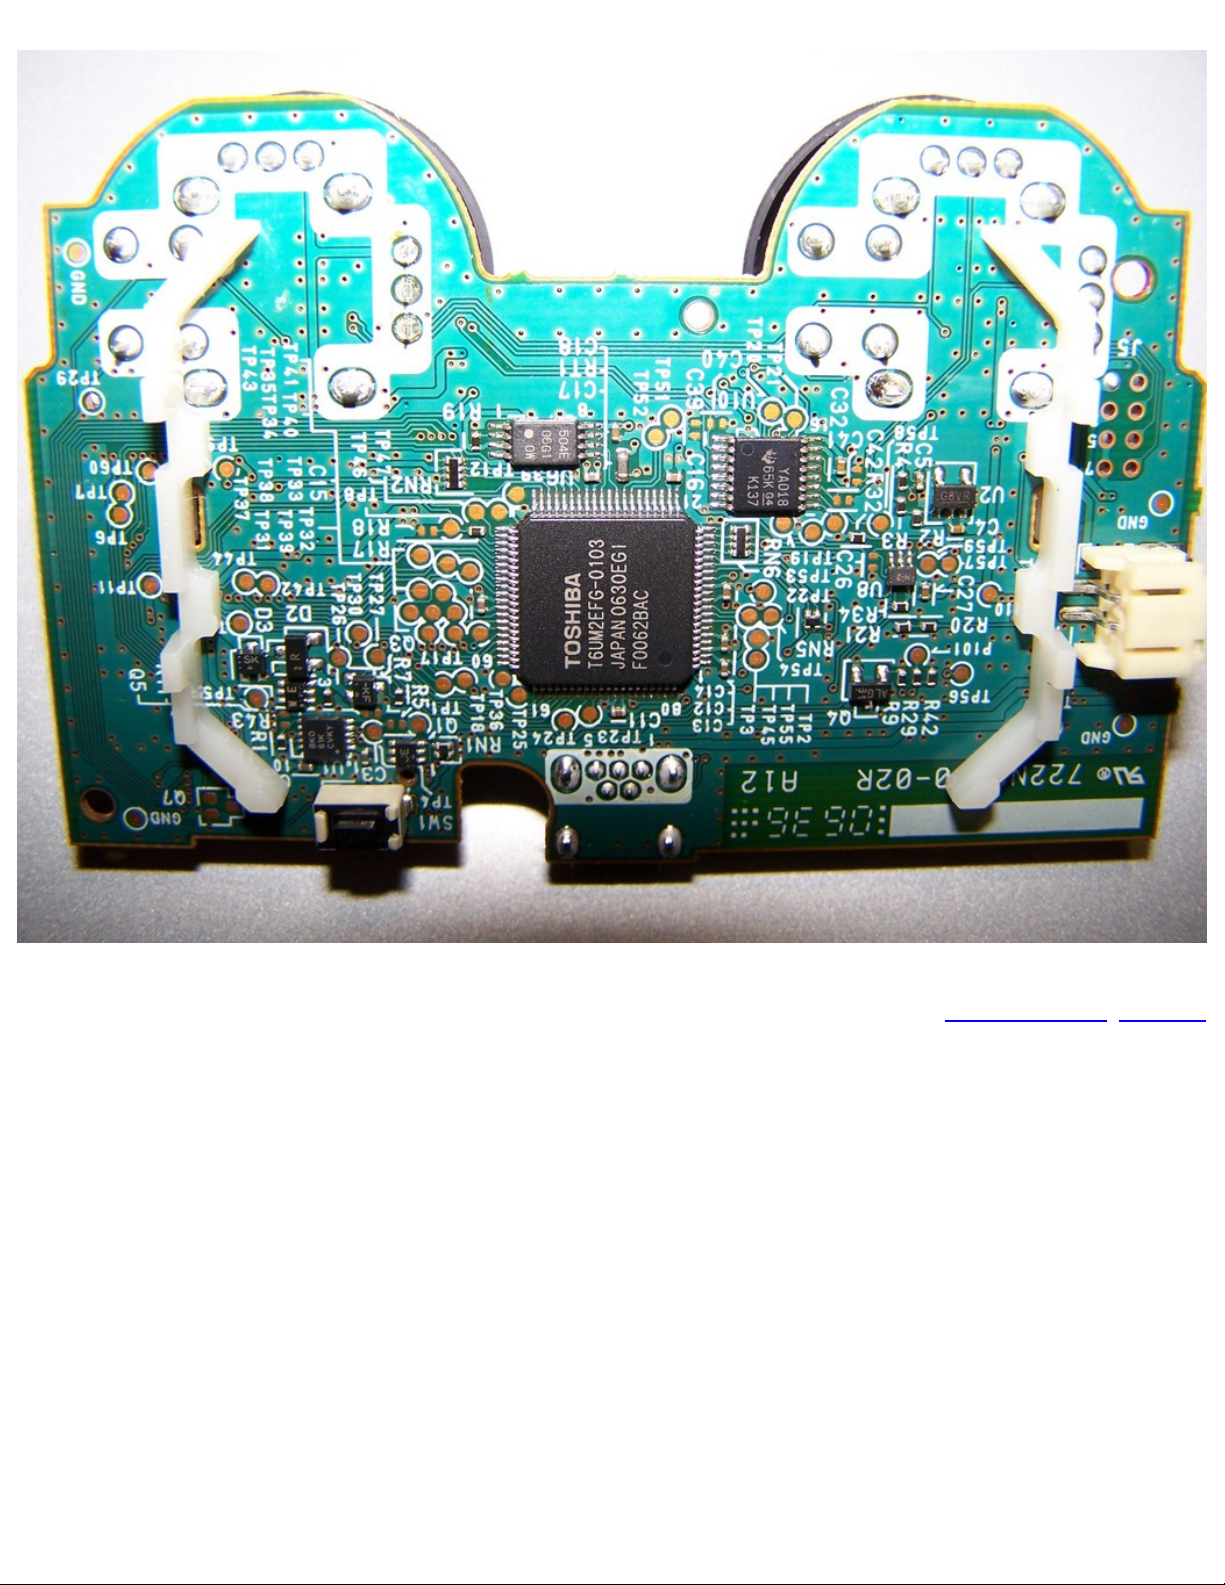
PS3 Controller Button Contacts, Add extra buttons to the PS3 controller
Previous/Next
Page 93

Other Modifications Index
Other Modifications Index
Charging Station Headset Mod
Previous/Next
Page 94
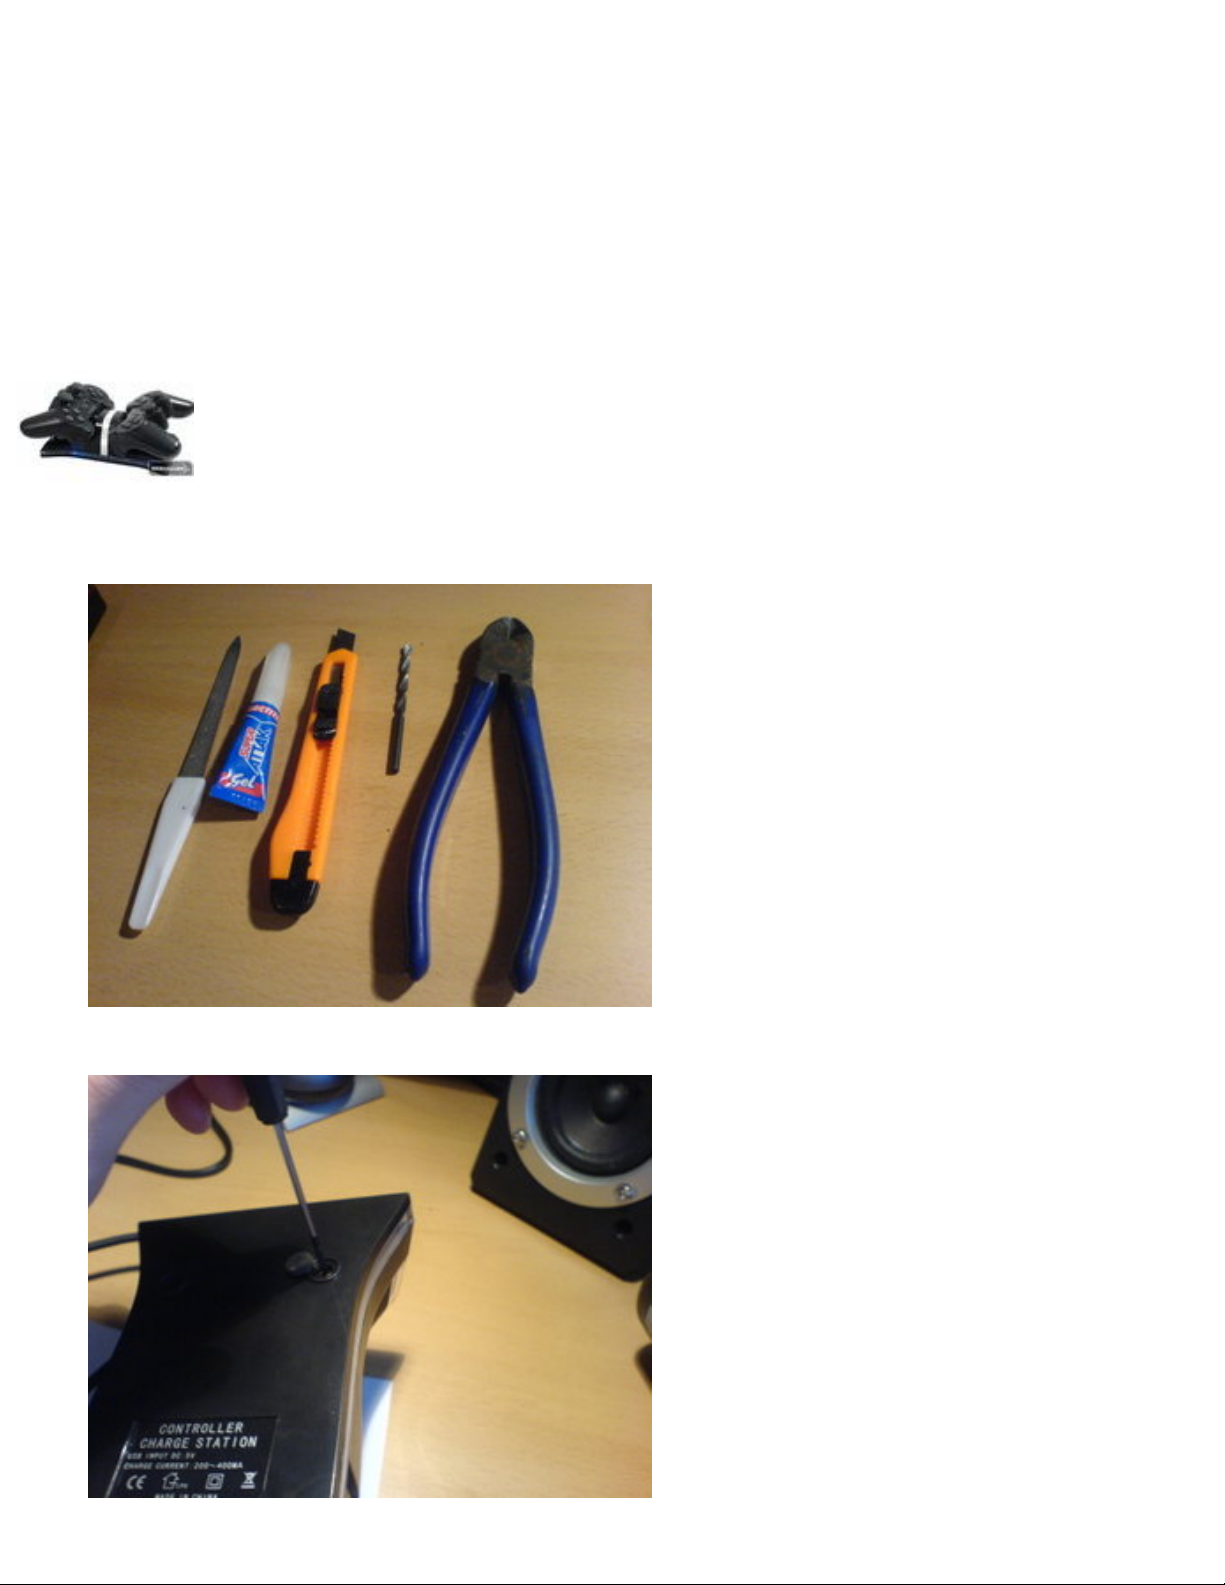
Charging Station Headset Mod
Charging Station Headset Mod
I didn't have a place to put my Bluetooth headset, so I thought I'd build in the headset charging cable to
the controller charging station it's nice to have all things in one place.
here is the original charging station
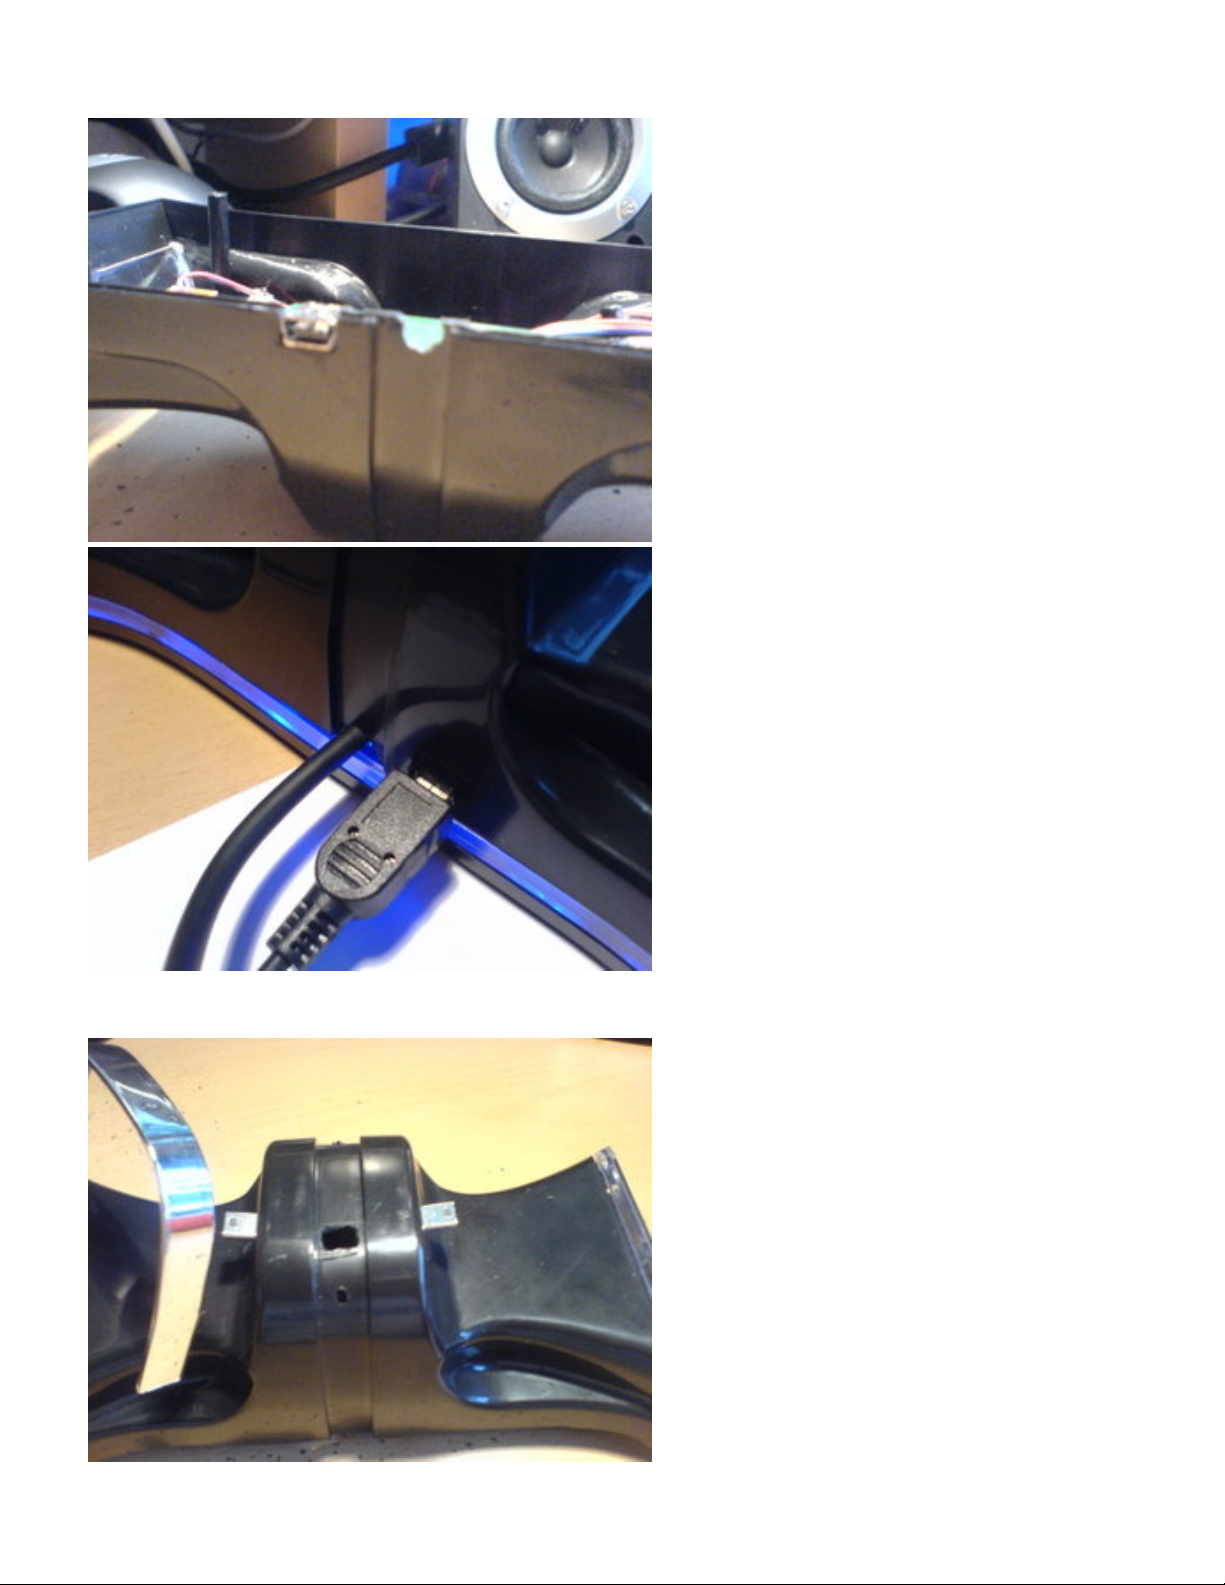
1. tools needed
file, glue, knife, drill, cutting pliers and a screwdriver.
2. open
Page 95
Charging Station Headset Mod
start with opening up the case.
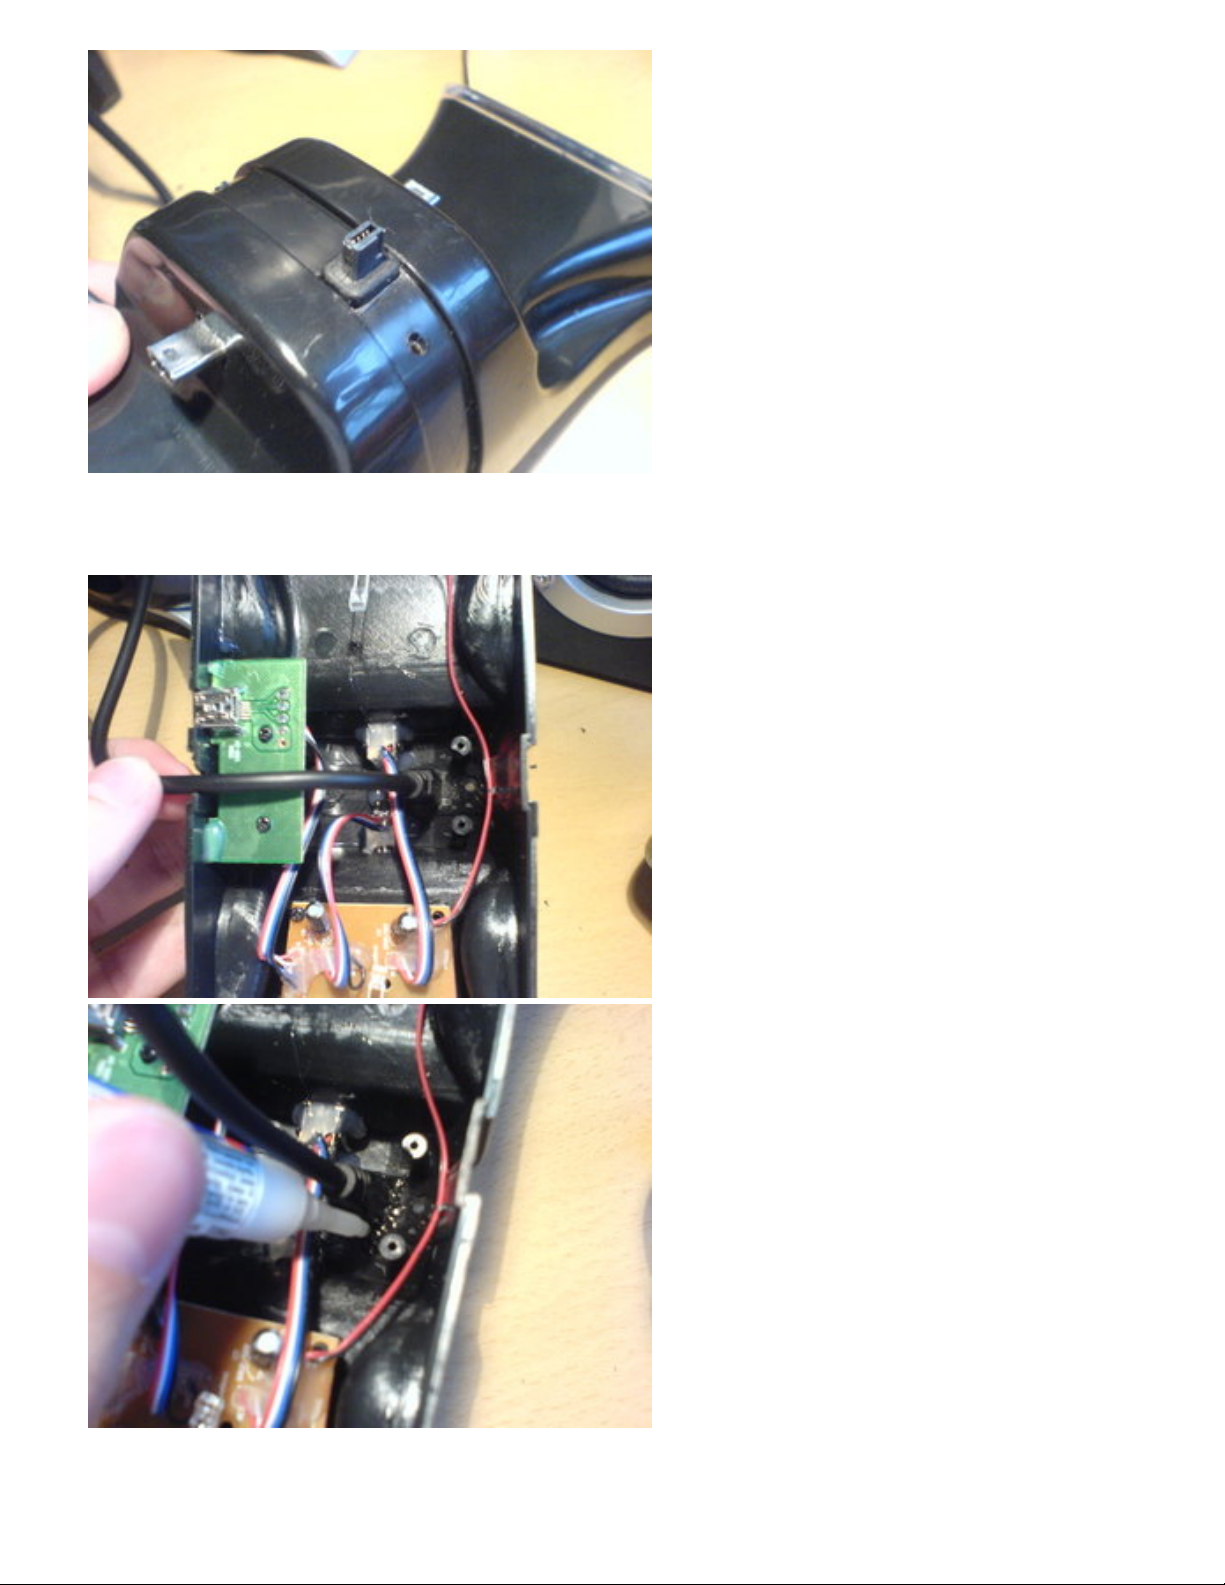
3. Make the cable hole
use the drill and knife to get a half-circle hole that the headset charging cable fits in.
4. make the other cable hole
Page 96
Charging Station Headset Mod
remove the shiny plastic thing and start to drill and cut until the end of the cable fits precisely in
the hole.
5. Glue
make sure the cables is in the right position then glue it from below.
6. Shiny thing
Page 97
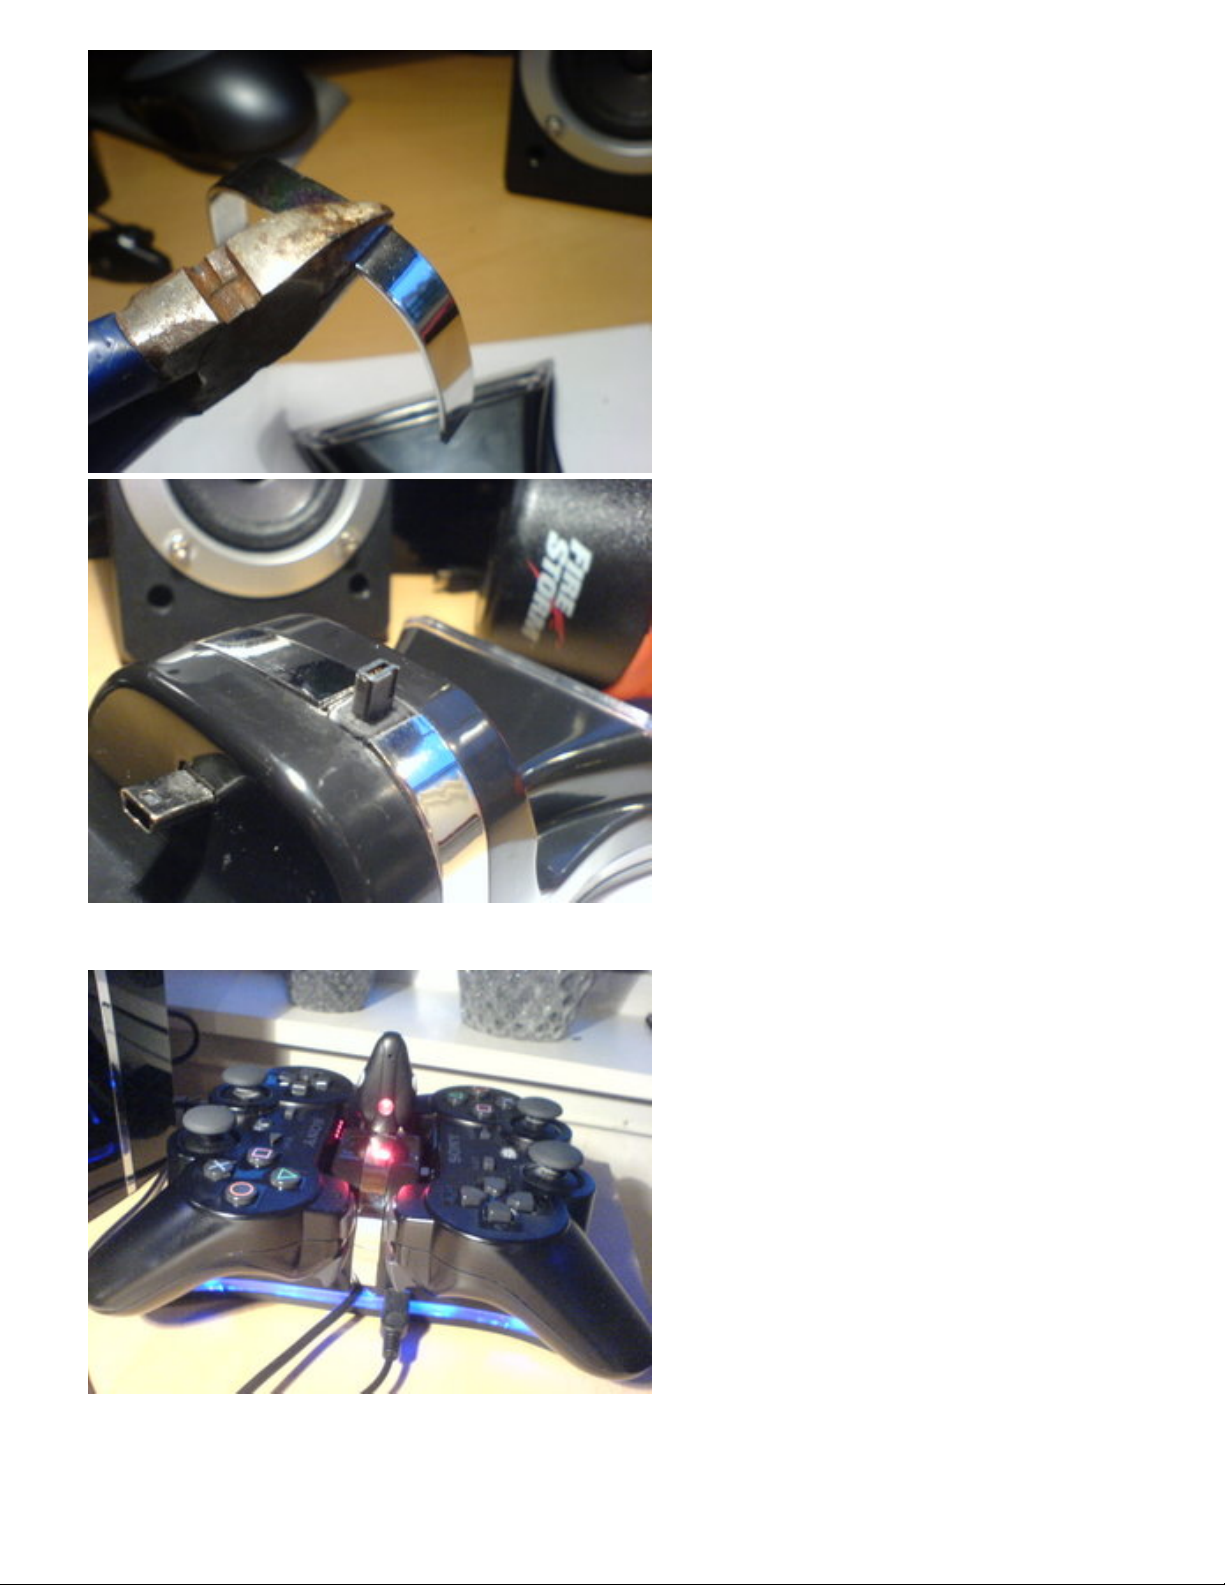
Charging Station Headset Mod
cut the shiny thing so that it fits around the end of the cable.
7. Done!
Page 98
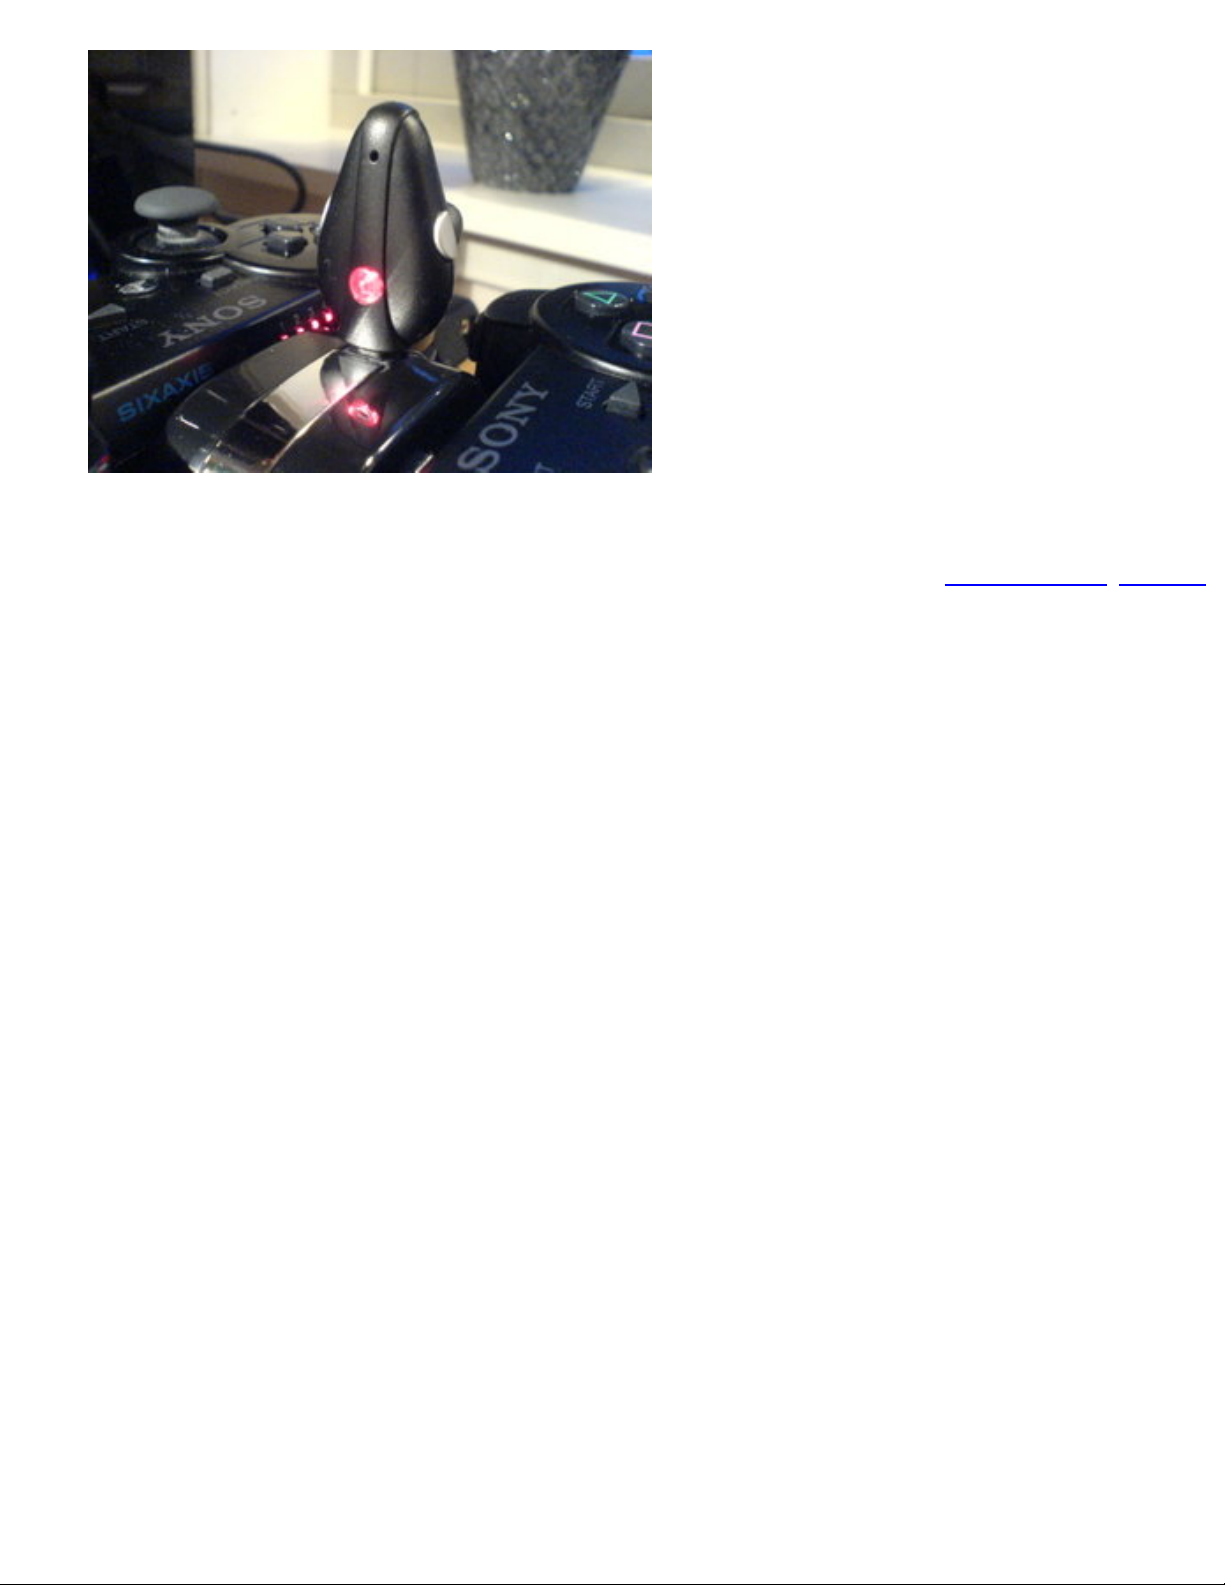
Charging Station Headset Mod
now you have an all in one charging station!
Previous/Next
Page 99

Blu-Ray Index
Blu-Ray Index
Decrypt Blu-Ray Movies with a PS3 WITHOUT keys
Blu-Ray Unique Volume Keys
Blu-Ray Media Links
Play BluRay movies without disk FULL INSTRUCTIONS
Convert HD-DVD To Blu-ray (works On PS3), No Loss Of Quality
Previous/Next
Page 100

Decrypt Blu-Ray Movies with a PS3 WITHOUT keys
Decrypt Blu-Ray Movies with a PS3
WITHOUT keys
Guys, I will elaborate with pics and much more later, but I thought you guys would like the gist of it so
you can get started. Here is how I do it.
1. Install SAK (Swiss Army Knife) to the PS3 OtherOS and boot into it. I use the network
connection and do it via the ps3 instead of the web browser and transfer the ISO over the
network. You can hook up a FAT32 hard drive and get the ISO that way as well.
2. If you put the ISO on FAT32 hard drive, join them into 1 big iso with copy /b, then put it into a
directory. If you did a network connection, then go to step 3.
3. Install Nero Premium v7.8.5.0 and once installed, go to StartSmart, Extras Tab, make sure its in
Advanced Mode and then choose Mount ISO image. Mount the ISO of the blu-ray movie you
have. It is VERY important to use Nero, as Daemon Tools DOES NOT WORK PROPERLY
FOR THIS METHOD.
4. Install AnyDVD HD 6.1.3.6. Once installed, go to windows explorer and check the mounted ISO
drive to see if the AACS Directory has been renamed to SLY!. If so, you should be good.
5. In AnyDVD HD, right click on the icon in the taskbar, and you will see: Rip Video HD-DVD /
Blu-Ray to Hard disk. Choose that, make sure the drive being chosen is the one with the Nero
mounted Blu-Ray image and let it rip. I suggest not doing much while it works its magic.
5a. Now, a lot of people talked about how AnyDVD HD has errors with blu-ray, but that is
because they fixed the ripping in the latest version ONLY if you use the special rip tool. If you
go to windows explorer and copy over the files to your hard drive, THEY WILL ERROR. This
is the ONLY way to do it properly, and I will show you how to verify next.
6. Once complete, you should have the full blu-ray in your hard drive and ready to go. As a test,
close AnyDVD HD and try to play any of the .m2ts's on the image mounted, THEY WILL
NOT WORK. But the ones off of the hard drive you decrypted will. Now, you need to check for
errors. Most blu-ray movies come with MPEG2 Trailers which are ~100-300 megs a piece for
other blu-ray movies. Copy 2-3 of them into a empty directory. You will need to check these for
errors. When AnyDVD HD errors, it happens on every file, so you want to check at least 2-3
files for errors and make sure they are ok using MPEG2Repair.
7. MPEG2Repair WILL NOT accept Decrypted .m2ts files. You need to convert them to .ts. The
program i use is called: m2tstots. It is command line based and lightening fast. Once you convert
those files you have, go ahead and run them through MPEG2 repair, 1 by 1. You will have a
stream error, don't worry about that, its because ALL blu-rays give that error. Once done, the
only thing you want to look for is errors in the video/audio areas. I did this with 4 different
movies I had no keys for and they worked perfectly.
Enjoy!
 Loading...