

Page 1
I
O
1
2
3
4
5
6
TG125/E
Manual
Page 2
1
2
3
4
5
6
12
I
O
8
7
13
10
1
2
3
4
5
6
I
O
1
2
3
4
5
6
I
O
Fig. 1
Fig. 2
Fig. 3
-4-
5
1
2
3
4
5
6
I
O
Fig. 4
Page 3
-5-
1
2
3
4
5
6
I
O
1
2
I
O
1
2
3
4
5
6
1
2
3
4
5
6
I
O
31
45°
40°
35°
30°
25°
20°
15°
10°
5°
0°
2
4
Fig. 5
Fig. 7
2
1
3
4
Fig. 6
Page 4

-11-
Translation of the Original Operating
Instructions TG 125/E disc grinding
machine
Contents:
1General view (fig. 1) 11
2Description of the machine 12
3Scope of delivery 12
4Technical data 12
5Beforework 12
5.1 Setting up your disc grinding machine
(fig. 2): 12
5.2 Removing and inserting the grinding
table (fig.3): 13
5.3 Affixing and replacing grinding wheels
(fig. 4): 13
5.4 Adjusting the grinding table angle
(fig. 5): 13
5.5 Connecting the dust exhaust
(fig. 6): 14
6Working with the TG 125/E disc
grinding machine 14
6.1 Working with the angle stop (fig. 7): 14
6.2 Notes on grinding speed 14
7Careand maintenance 15
8Disposal 15
9CEconformity declaration 15
Dear customer!
Using these instructions
•makes it easier to get familiar with the device
•prevents malfunctions caused by improper
handling, and
•lengthens the service life of your device.
Please keep these instructions readily accessible at all times.
Use the device only when you have understood
it exactly and always adheretothe instructions.
PROXXON is not liable for the safe functioning
of the device in cases of:
•handling that does not conform to the usual
usage,
•purposes of use not designated in the
instructions,
•disregardofthe safety instructions.
Youare not entitled to guarantee claims in
cases of:
•operator errors,
•inadequate maintenance.
For your own safety,please follow the safety
instructions exactly.
Use only genuine PROXXON replacement parts.
We reserve the right to make improvements in
the sense of technical progress. We wish you
much success with the device.
WARNING!
Read all safety warnings and
instructions. Failuretofollow all safety
warnings and instructions listed below may
result in electric shock, fireand/or serious injury.
KEEP ALL SAFETY WARNINGS AND
INSTRUCTIONS FOR THE FUTURE!
Do not use damaged bits and cutters.Before
each use, inspect bits and cutters such as
sanding discs for chips and cracks, grinding
discs for cracks, strong wear or tear.After
you have inspected and installed the bits and
cutters, keep yourself and any other persons
in the vicinity away from the plane of the
rotating bits and cutters and run the device
at maximum rotational speed for one minute.
Damaged bits and cutters usually break during
this test time.
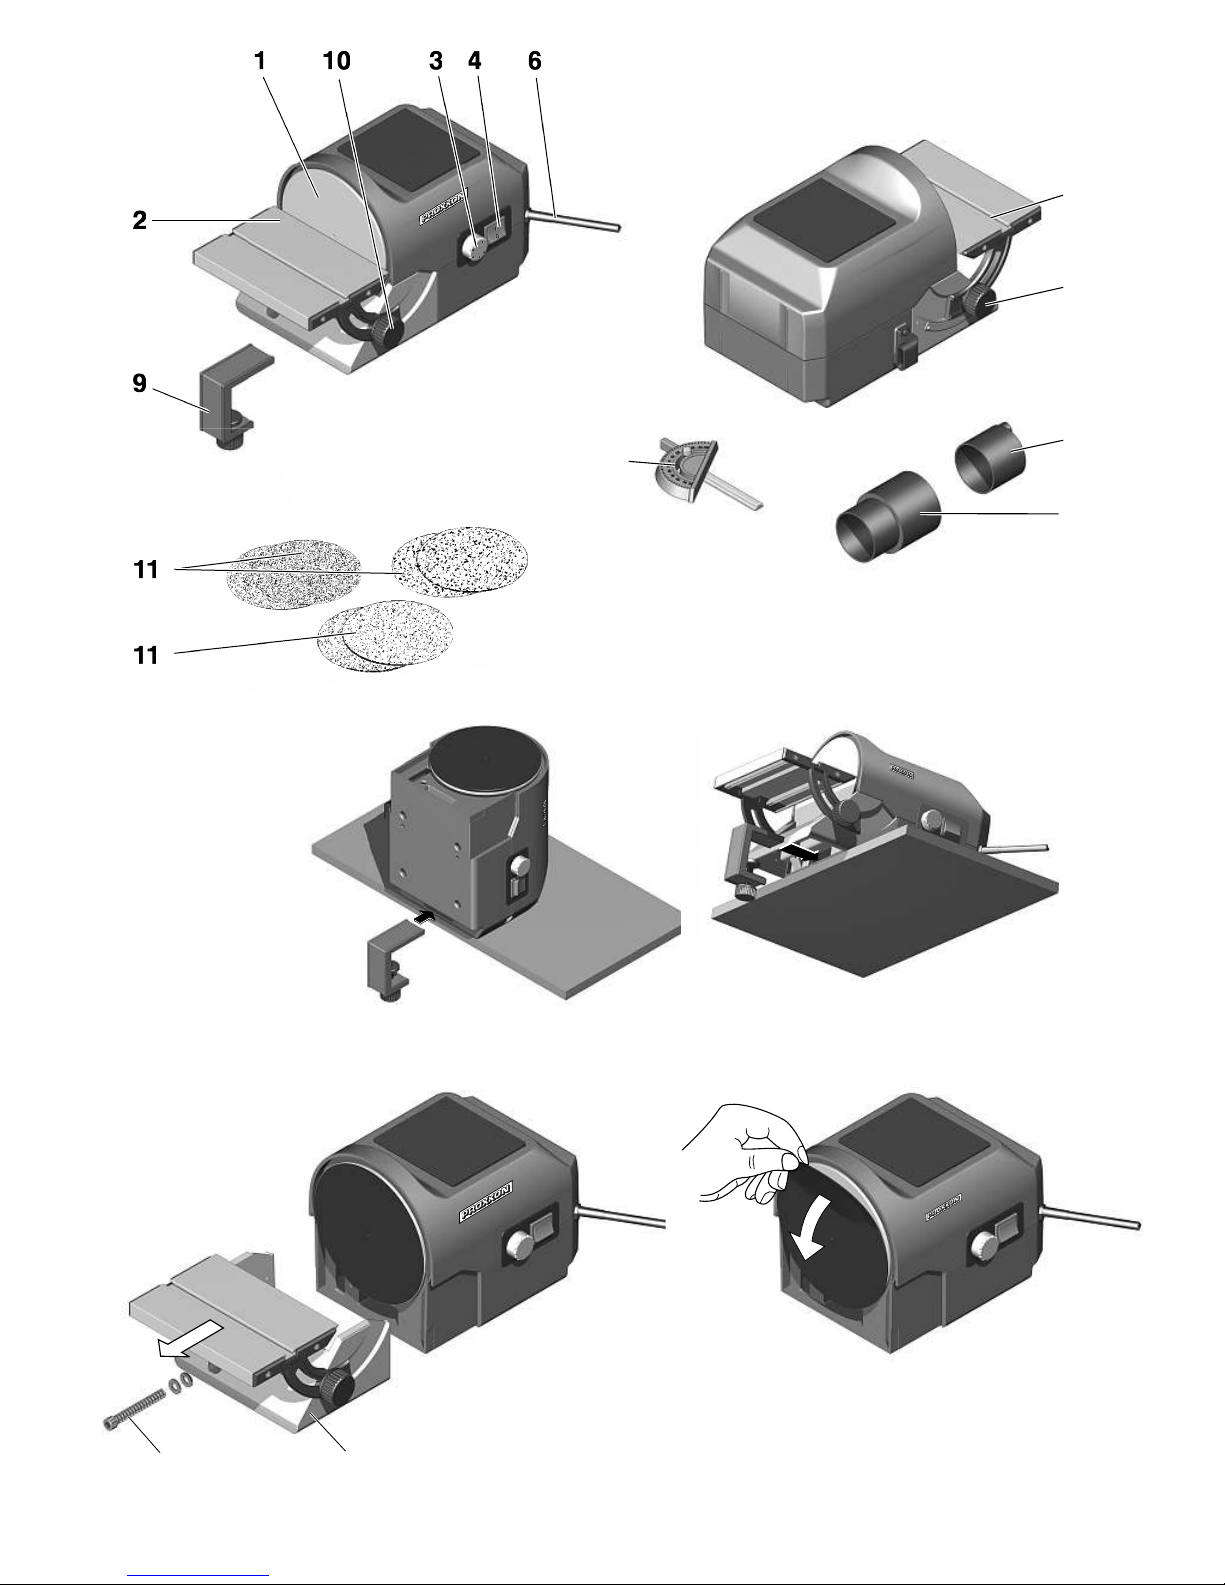
1General view (fig. 1)
1. Grinding disc
2. Swivel-mountedgrinding table
3. Rotary knob for speed control
4. On-offswitch
5. Angle stop
6. Mains cable
7. Connecting piece
8. Guide slot for angle stop
9. Clamp
10. Locking button for angle adjustment
11. Grinding discs
13. Rubber connector
GB
Page 5

2Description of the machine
Thank you for purchasing the TG 125/E disc
grinding machine. Younow own ahigh-precision machine to use in grinding work for which
complete accuracy is required.
Ahigh-precision manufactured and carefully
balanced grinding disc with double ball-bearing
direct drive guarantees excellent smoothness,
precision concentricity and minimum wear.
In this way,soft and hardwoods, plates, nonferrous metal or steel, even plastic, cork, rubber
and many further materials can be processed
with high precision at grinding speeds of
approx. 250-800 m/min (adjustable).
The various fixing possibilities ensureparticular
flexibility: Your TG 125/E can be operated both
in "normal position" and in standing, with the
grinding table removed. To this end, it is fixed
with the enclosed clamp.
The grinding table is made of high-grade aluminium and can be adjusted upwards by 10°
and downwards by 50°. This also includes the
guide slot for the angle stop that is also
included in the scope of delivery.
Twogrinding wheels in each of the grain sizes
offered of 80, 150 and 240 areincluded in the
scope of delivery.
In order that the swarf goes directly whereit
should, namely into the vacuum cleaner,thereis
aconnecting piece to which the vacuum cleaner
can be connected. So you areoptimally
equipped for the grinding work.
3Scope of delivery
1x TG 125/E disc grinding machine
1x Angle stop
1x Connecting piece
1x Rubber connector
2x Grinding wheels grain 80
2x Grinding wheels grain 150
2x Grinding wheels grain 240
1x Operating instructions
1x Brochurewith safety instructions
1x Vice
4Technical data
Dimensions and weights:
Length: approx. 300 mm
Width: approx. 140 mm
Height: approx. 160 mm
Weight: approx. 3kg
ØGrinding disc: 125 mm
Dimensionsgrinding table: 98 x140 mm
Motor:
Voltage: 230 volt,
50/60 Hz
Power input: 140 watt
KB 15 min
Speed: max. 3600 rpm
Grinding speed: approx. 250-800 rpm
Noise development: <55dB(A)
Vibration: ≤ 2,5 m/ s
2
Only in dry rooms
Please do not dispose of this electrical
machine in the household refuse!
Wear safety glasses!
5Beforework
5.1 Setting up your disc grinding
machine (fig. 2):
Note:
When setting up the machine,make surethat
the ground below it is level and secure! Asecure
stand is indispensable for working with the
machine!
Note:
When setting up and fixing the machine, always
disconnect the mains plug to prevent the disc
being started up accidentally. Risk of injury!
Caution:
During all adjusting and assemblywork, such as
when adjusting the angle stop or when attaching or removing the grinding table, disconnect
the mains plug to prevent the device from starting up unintentionally!
-12-
Page 6

-13-
The disc grinding machine can be operated in
two different positions: Once in the normal horizontal position or standing vertically (for sharpening tools and blades for example).
In both positions, the machine should be
securely clamped with the enclosed vice, as
shown in fig. 2.
5.2 Removing and inserting the grinding
table (fig.3):
Caution:
Before removingand inserting the grinding table,
always disconnect the mains plug to prevent the
disc being started up accidentally.Risk of injury!
Normally,your TG 125/E is operated with the
attached grinding table (as in delivery condition). Additionally,thereisalso the possibility,
whererequired, of removing the grinding table,
if this is necessary for certain tasks or for
changing the grinding wheels.
Caution:
Please note that when working particularly in
the operating mode without the grinding table,
always make suretocontrol the work piece by
holding it firmly and securely in order to prevent
it from being flung about.
Use the machine in the horizontal position with
attached grinding table, if possible!
1. Remove Allen head screw 1
2. Remove the grinding table with grinding
table holder 2bypulling out from the front
3. To insert, simply push into the normal
position
4. Turn in Allen head screw 1again
Caution:
If the grinding disc is blocked due to awork
piece that is jammed between the grinding disc
and the grinding table, immediatelyshut offthe
device using the On/Offswitch and disconnect
the mains plug. Only put the device back into
operation after the jammed work piece has
been removed!
5.3 Affixing and replacing grinding
wheels (fig. 4):
Note:
Beforeaffixing or replacing the grinding wheels,
always disconnect the mains plug to prevent the
disc being started up accidentally.Risk of injury!
Twogrinding wheels in each of the grain sizes
80, 150 and 240 aresupplied as initial equipment with your disc grinding machine; these
can also be easily obtained as spareparts. It is
thereforenoproblem to change wheels,
whether because of wear or because discs with
various grain sizes arerequired when working.
Caution:
When replacing the wheels, it is advisable to
remove the grinding table as described in the
previous section!
1. Remove the rear protective foil above the
adhesive surface from the desired wheel,
2. Push the wheel evenly and bubble-free onto
the grinding disc.
3. To replace, simply remove the grinding wheel
again and push on the new wheel.
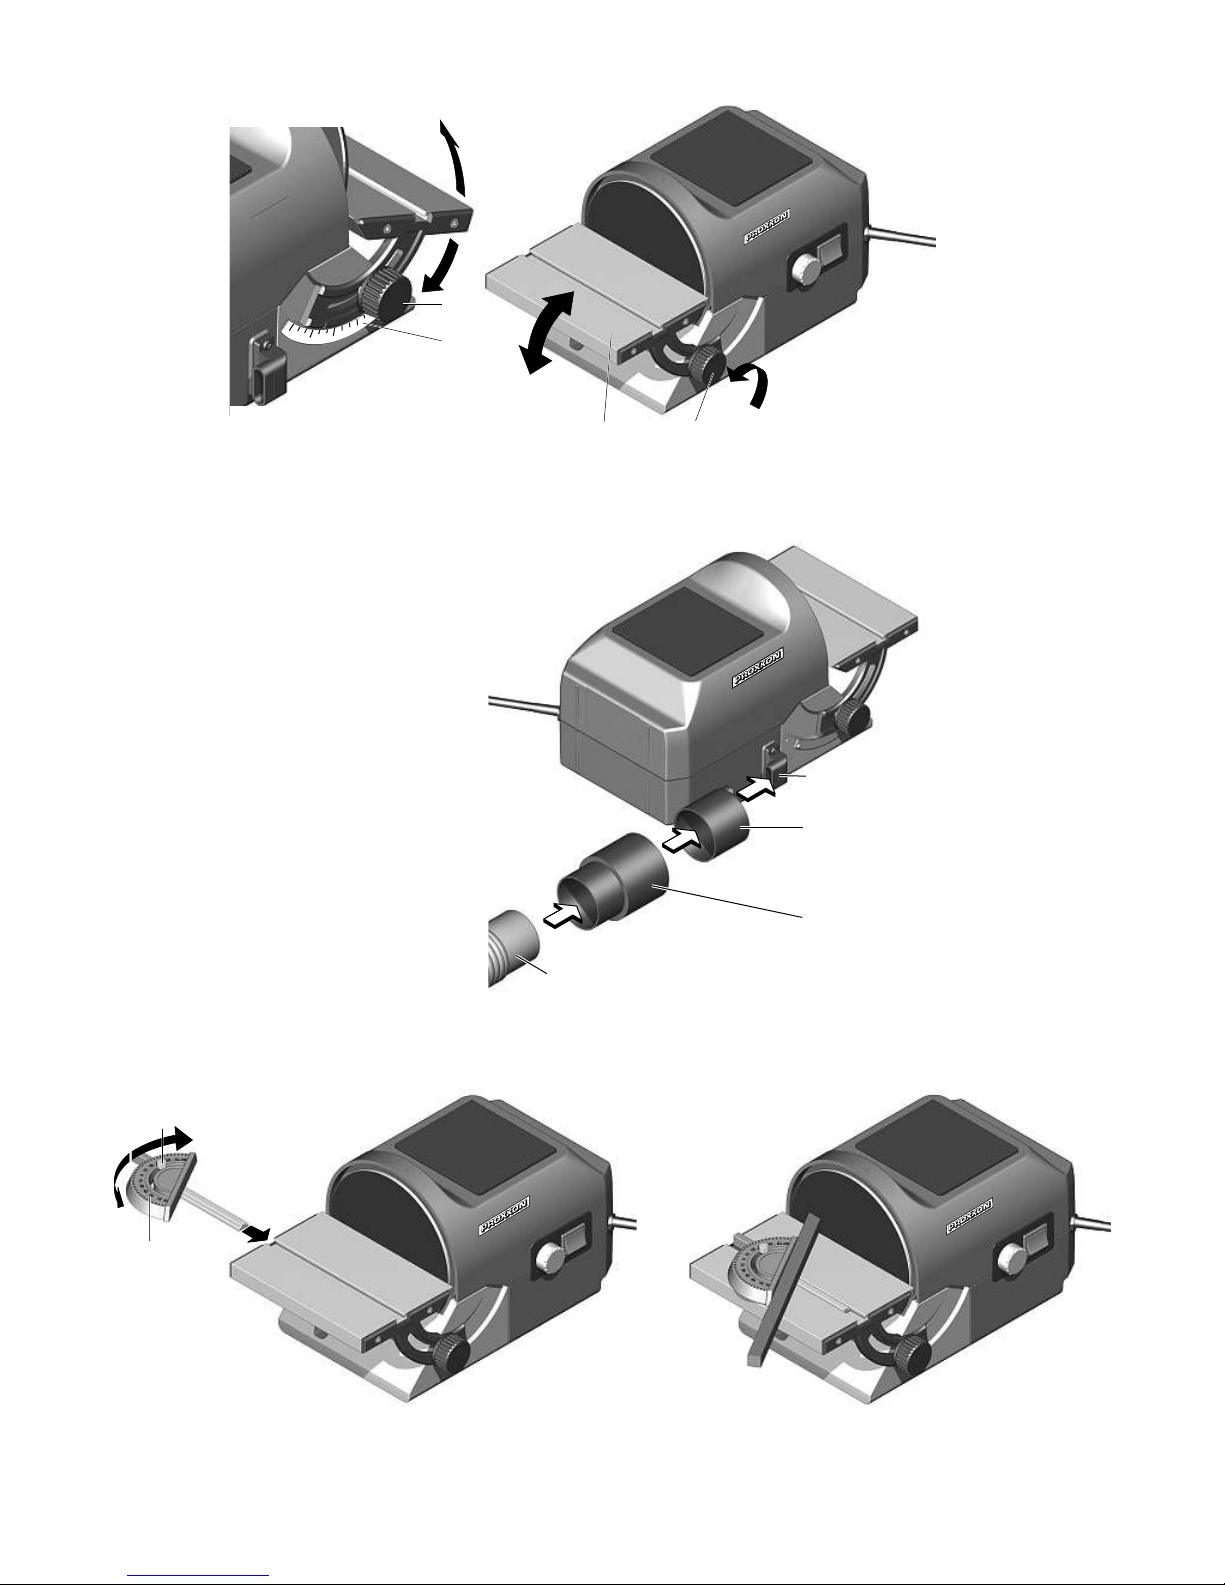
5.4 Adjusting the grinding table angle
(fig. 5):
Caution:
Beforeadjusting the grinding table, always disconnect the mains plug to prevent the disc
being started up accidentally.Risk of injury!
1. Loosen rotary knob 1Atthe same hold rotary
knob 2
2. Swing grinding table 3into the desired angle
position and check the set value on angle
scale 4.
3. Tighten rotary knob 1. At the same hold
rotary knob 2
Page 7

5.5 Connecting the dust exhaust
(fig. 6):
Caution:
Beforeconnecting the dust exhaust, always disconnect the mains plug to prevent the disc
being started up accidentally.Risk of injury!
It is recommended to always work with the dust
exhaust! This not only guarantees clean working, it also reduces the hazardous effect of
some dusts!
1. Push adapter piece 1onto connecting piece
2ofthe machine
2. Push rubber adapter 3onto adapter piece 1
3. Insert vacuum cleaner nozzle 4into rubber
adapter 3
4. Switch on vacuum cleaner when working
Another small tip:
When using the Proxxon CW-matic vacuum
cleaner,manual switching on and offisno
longer necessary.The CW-matic is fitted with
an automatic control device; it automatically
switches on and offwhen the power tool is
switched on and off. The same effect can be
obtained with traditional vacuum cleaners by
using our vacuum control device.
6Working with the TG 125/E disc
grinding machine
Caution:
Please note that the grinding disc turns to the
left! If you use the left side when working with
the attached grinding table, the work piece can
be guided easily and securely,thus effectively
preventing it from being hurled away!
Caution:
When grinding metallic work pieces, such as
when grinding knife blades for example, or
when grinding stone or ceramics the material to
be ground can become very hot! Do not hold
the material to be ground near the grinding surface in order to avoid burns!
Caution:
Wear suitable gloves to avoid abrasions especially when working with coarse sandpaper and
when processing smaller work pieces!
1. If mitres aretobeground, adjust the grinding
angle as described above
2. Insert the mains plug
3. Switch on the machine at On-Off-Switch
4. Set the required speed on the speed control
button (pos. 3, fig. 1)
Please adjust the size of the work piece to the
size of the machine! Awork piece that is too
large and too heavy can overburden the drive or
the construction of the machine and cause
damage or injuries!
6.1 Working with the angle stop (fig. 7):
If, for example, the ends of somewhat thinner
strips areground for mitre, it is advantageous to
use the angle stop included in the scope of
delivery.
1. Loosen knurled screw 1
2. Set the desired angle on scale 2
3. Turn the knurled screw tightly and insert into
the intended table groove
4. Guide the desired workpiece up to the stop
against the grinding wheel as shown in the
illustration
6.2 Notes on grinding speed
The grinding speed of your TG 125/E is infinitely
adjustable from approx. 250 –800 m/min. In
this way,optimal adaptation to various material
conditions is possible. Please note that the circumferential speed of the grinding disc is greatest at the edge and reduces towards the middle.
General recommendations on the selection of
the grinding speed aredifficult; it may be necessary to experiment somewhat to find out the
correct grinding speed for "its" material and
workpiece.
Based on experience, non-ferrous metals and
plastic requirelower grinding speeds than soft
and hardwood; this also applies for ceramics
and glass.
-14-
Page 8

-15-
But as stated: Recommendations aredifficult,
the correct speed depends on the material, contact pressureand friction and grain size of the
grinding wheels.
7Careand maintenance
Caution:
Beforecleaning, adjusting, service or repair,disconnect the mains plug!
Note:
The machine is largely maintenance free. To
ensurealong service life, however,the machine
should be cleaned with asoft cloth, handbrush
or paintbrush after each time it is used. Avacuum cleaner is also recommended here. Avacuum cleaner should always be used during
work!
The outside of the housing can be cleaned with
asoft, possibly damp cloth. In this process, mild
soap or another suitable cleaning agent can be
used. Solvents or cleaning agents containing
alcohol (e.g. petrol, cleaning alcohols etc.)
should be avoided, since these can attack the
plastic cases.
8Disposal
Please do not dispose of this machine in household refuse! The machine contains materials
that can be recycled. If you have any questions
about his, please contact your local recycling
company or other relevant communal facilities.
9ECDeclaration of Conformity
Name and address:
PROXXON S.A.
6-10, Härebierg
L-6868 Wecker
Product designation: TG 125/E
Article No.: 27060
In sole responsibility,wedeclarethat this
product conforms to the following directives
and normative documents:
EU EMC Directive 2014/30/EC
DIN EN 55014-1/05.2012
DIN EN 55014-2/02.2016
DIN EN 61000-3-2/03.2015
DIN EN 61000-3-3/03.2014
EU Machinery Directive 2006/42/EC
DIN EN 62841-1/07.2016
DIN EN 62841-3-4/12.2016
Date: 07.12.2016
Dipl.-Ing. JörgWagner
PROXXON S.A.
Machine Safety Department
The CE document authorized agent is identical
with the signatory.
Page 9

-66-
G 125/E Art. 27060
27060 - 0
27060 - 0
27060 - 0
27060 - 0
27060 - 0
27060 - 0
27060 - 0
27060 - 0
27060 - 1
27060 - 1
27060 - 1
27060 - 1
27060 - 1
27060 - 1
27060 - 1
27060 - 1
27060 - 1
27060 - 1
27060 - 2
27060 - 2
27060 - 2
27060 - 2
27060 - 2
27060 - 2
27060 - 2
27060 - 2
27060 - 3
27060 - 3
27060 - 3
27060 - 3
27060 - 3
27060 - 3
27060 - 3
27060 - 3
27060 - 3
27060 - 4
27060 - 4
27060 - 4
27060 - 4
27060 - 4
27060 - 4
27060 - 4
27060 - 4
27060 - 4
27060 - 9
Page 10

-67-
Page 11

GB Service note
All PROXXON products are thoroughly inspected after production.Should adefect
occur nevertheless, please contact the dealer from whom you purchased the
product. Only the dealer is responsible for handling all legal warranty claims
which refer exclusively to material and manufacturer error.
Improper use, such as capacityoverload, damage due to outside influences
and normal wear are excluded from the warranty.
You will find further notes regarding "Service and Spare Parts Management" at
www.proxxon.com.
Art. Nr.27060-99 PR 712716706 J
 Loading...