

Page 1

DSH
MANUAL
Page 2
2
1
- 4 -
0
15
30
45
Zum
Auswechsel
der
Sägeblätter
Zum
Auswechsel
der
Sägeblätter
Zum
Auswechsel
der
Sägeblätter
Zum
Auswechsel
der
Sägeblätter
Zum
Auswechsel
der
Sägeblätter
De
ku
pi
er
s
äg
e
Spannung
220-230V
50Hz
Hub
1
Stufe
990/min
Dekupiersäge
DSH^
CE
D-54518
Niersbach
Input
205/145
Watt
Hub
2
Stufe
1500/min
Ampere
0,907
KB
30
Artikel-Nr.
28
092
Conforme
aux
règlements
du
ministère
du
travail
à
la
date
de
fabrication
Hubhöhe
19
mm
De
ku
pi
er
s
äg
e
Spannung
220-230V
50Hz
Hub
1
Stufe
990/min
Dekupiersäge
DSH^
CE
D-54518
Niersbach
Input
205/145
Watt
Hub
2
Stufe
1500/min
Ampere
0,907
KB
30
Conforme
aux
règlements
du
ministère
du
travail
àl
ad
ate
def
abrication
4
5
2
3
17
1
6
7
10
12
13
14
15 17
11 8
169
Fig. 1a
Fig. 3
Fig. 4
Fig. 1b
Fig. 2
)
9
)
<
T
3
)
eä
%
rg
ä
!
?
*
,
G
B
,
,
%
>
4
>
>
D
<
1
.
E
&
B
,
6
4
<
>
M
)
g
r
@
ie
9
;
p
)
u
4
k
T
)
e
D
)
;
)
<
?
:
)
?
%
)
S
%
D
#
;
P
4
D
?)?
;
=
'
>
=
5
3
se
>
!
?
E
B
U
U
)
'
4
6
1
.
A
4
O
N
O
B
&
0
B
*
>
!
?
E
B
B
&
.
)
'
4
6
1
,
A
4
O
6
6
D
/
&
(
.
$
-
DA
9
;
)
!
K
V
.
&
(
&
G
3
R
5
H
O
1
3
"
B
U
I
B
,
U
B
V
,
F
;
K
G
S
)
T
!
6
;
:
B
*
7
L
>
=
!
6
D
-
!
;
A
D
?
'
)
+
)
6
D
+
D
S
C
S
!
D
2
D
;
6
4
+
)
;
#
6
9
!
>
!
?
4
+
9
6
>
)
?
?
U
.
)
$
8
$
A
4
O
Q
9
4
:
?
4
J
Q
9
4
:
?
4
J
)
Q
9
4
:
?
4
J
)
Q
9
4
:
?
4
J
-
)
Q
9
4
:
?
4
J
;
)
6
6
@
S
A
)
%
@
1
;
)
+
S
)
9
$
-
)
Q
;
)
6
6
@
S
A
)
%
@
1
;
)
+
S
)
9
$
-
)
Q
;
)
6
6
@
S
A
)
%
@
1
;
)
+
S
)
9
$
-
)
;
)
6
6
@
S
A
)
%
@
1
;
)
+
S
)
9
$
-
;
)
6
6
@
S
A
)
%
@
1
;
)
+
S
)
9
$
-
Fig. 3a
1
3
2
4
5
Page 3

7
1
3
4
5
2
6
5
1
3
2
4
Zum
Auswechsel
der
Sägeblätter
Zum
Auswechsel
der
Sägeblätter
Zum
Auswechsel
der
Sägeblätter
Zum
Auswechsel
der
Sägeblätter
Zum
Auswechsel
der
Sägeblätter
De
ku
pi
er
s
äg
e
Spannung
220-230V
50Hz
Hub
1S
tufe
990/min
Dekupiersäge
DSH^
CE
D-54518
Niersbach
Input
205/145
Watt Hub
2S
tufe
1500/min
Ampere
0,907
KB
30
Artikel-Nr.
28
092
Conforme
auxrèglements
du
ministère
du
travail
àl
ad
ate
de
fabrication
Hubhöhe
19
mm
1
Fig. 5a
Fig. 7
Fig. 5b
Fig. 6
- 5 -
2
1
3
Page 4

1 Mechanical fret saw DSH ..........................12
2 General SafetyInformation.........................
12
3Legend (fig. 1) ...................................13
4Description ofmachine (also see fig. 1aand 1b) ........13
5 Technical data..................................
14
6 Set-up and commissioning of the saw................14
6.1 Unpacking (fig. 1aand 1b) .........................
14
6.2 Setting up the saw...............................
14
6.3 Adjust and set angle display (fig. 2) ..................14
6.4 Assembling the air nozzle (fig. 3) ....................
14
6.5 Sawblade guard ................................14
6.6Connect
ing the vacuum cleaner (fig. 4) ...............15
6.7 Sawblades.....................................15
6.7.1Clamping in the sawblade (fig. 5aand 5b) .............15
6.7.1.1 Sawbladeswithcro
ss pin (fig. 5a) ...................15
6.7.1.2 Sawbladeswithflat ends
(hand orleaf sawblades, see fig. 5b) .................
15
6.7.2 Finely setting the correct saw tensioning (fig. 6) .........15
6.7.3 Removing sawblade (fig. 5aand 5b) ...
..............15
6.7.3.1 Sawbladeswithcross pin (fig. 5a) ...................15
6.7.3.2
Sawbladeswithflats ends (fig. 5b) ..................15
7 Working with the saw.............................
15
7.1 General informationforworking withmechanical fret saw..15
7.1.1 Selecting the sawblade ...........................
16
7.1.2 Selecting the speed..............................
16
7.1.3 Possible causes offaults..........................16
7.1.3.1
Set sawblade alignment (fig. 2) .....................16
7.2 Sawing (fig. 7) ...................................
16
7.2.1 Inside cuts (fig. 8) ................................
17
7.2.2 Grain cuts......................................
17
8 Service and maintenance ..........................17
9Disposal .......................................
17
10 EC Declaration of Conformity.......................
17
Translation of the Original Operating Instructions
Contents
1 Mechanical fret saw DSH
Dear customer!
Using these instructions
• makesit easier to get familiar with the device
• preventsmalfunctions causedbyimproperhandling, and
• lengthens the service life ofyour devic
e.
Please keep these instructions readily accessible at all times.
Use the device only whenyouhave understoodit exactly and always
adhere to the instructions.
PROXXONisnot liable for the
safe functioning of the device in cases
of:
• handling that doesnot conform to the usual usage,
• purposes ofuse not designatedinthe instructions,
• disregard of the safetyinstructions.
Youare not entitled to guarantee claims in cases of:
•operator errors,
• inadequate maintenance.
Foryour own safety, please follow the safetyinstructions exactly.
Use only genuine PROXXONr
eplacement parts.
We reserve the right to make improvementsinthe sense of techni-
cal progress. We wish youmuch success with the device.
2 General Safety Information
CAUTION! When using electric power tools, the following safety measures must be observed for protection from electric
shock, risk of injury, and fire hazards.
Read and take note of all these instructions before you start
up the product. Keep these safety instructions in a safe place.
Safe working
Always keep your working area tidy.
1. Disorderinthe working areacan lead to accidents.
Take account of surrounding influences.
1. Do not expose tools to the rain.
2. Do not use tools in damp orwet surroundings.
3. Ensure that the lighting is good.
4. Do not use tools in the
vicinity ofcombustible liquids or gases.
Protect yourself from electric shocks.
1.Avoid body partsfromcoming into contact with earthedparts.
Keep other people away.
1. Do not let otherpeople, especially children, touch the tool or the
cable.
Keep themwell away from the working area.
Keep unused tools in a safe place.
1.Unused equipment should be kept in adry, closedlocation out
of the reach ofchildren.
Do not overload your tool.
1.Youwill be able to work
betterand saferwithin the givenpower
range.
Always use the correct tool.
1. Do not use lowpowermachinesforheavywork.
- 12 -
GB
Page 5

- 13 -
2. Do not use tools forpurposesforwhich theywere not designed.
For example do not use manually-operatedcircular saws for
cutting branches orfirewood.
Wear suitable working clothing.
1. Do not wear loose clothing
orjewellery, theycan get caught up
by moving parts.
2.Whenworking in the openair we recommend the use ofnon-
slip footwear.
3.Wear ahair net if youhave l
ong hair.
Use the protective equipment.
1.Wear safety glasses.
2.Wear abreathing mask whencarrying out dust-generating work.
Connect to the dust extraction equipment.
1.Ifconnections are available to dust extractionand collection
equipment,
make sure that theyare properly connectedand
used.
Do not use the cable for purposes for which it was not designed.
1. Do not use the cable to pull the plug out ofitssocket.Protect
the cable fromheat, oil and sharp edges.
Secure the tool.
1.Use the clamping fixture orav
ice to hold the tool tightly.It is
thus held more safely than withyour hand.
Avoid abnormal postures.
1. Ensure that youare standing safely and always maintain your
balance.
Take great care of your tools.
1. Keep the tools sharp and cle
an so as to be able to work better
and safer.
2.Follow the maintenance instructions and the advice about tool
changing.
3.Regularly check the toolcable and have it replacedbyanau-
thorizeds
pecialist if it is damaged.
4.Regularly check the extensioncablesand replace themifthey
are damaged.
5. Keephandlesdry and free from oil and grease.
Pull the plug out of the socket:
1.Whenthe toolisn
ot in use, before maintenance and when
changing tools such as the sawblade, drill ormilling cutters, always take the plug out of the socket.
Do not leave any tool spanners or setting keys in place.
1. Before switching onalways check that spanners, keys and set-
ting tools have beenremoved.
Avoid unintentional starting.
1.Always make sure that the switch is in the OFF positionwhen
youplug the toolinto the socket.
Extension cables in the open air.
1.Inthe openair always use extensioncablesw
hich are author-
izedforthe purpose and which are correspondingly marked.
Always be attentive.
1. Be aware ofwhat youare doing. Carry out your work sensibly.
Do not use the toolifyouare tired.
Check the tool for damage.
1. Before furtheruse of the tool, examine protective devices or
slightly-damagedparts to ensure that the functionisperfect and
meets the requirements.
2. Check that the moving
partsfunctionperfectly and do not stick
and that partsare not damaged. All partsmust be correctly
mountedand all the conditions fulfilled to ensure trouble-free
tool operation.
3. Damagedprotective equipment and partsmust be properly repaired or exchangedbyanauthorizedspecialist workshopifno
otherinformationisgiveninthe instructions foruse.
4.Arrange fordamagedswitches to be exchangedbyacustomer
servicesworkshop.
5.Neveruse tools onwhich the switch cannot be switched onand
off.
WARNING!
1.The use of
other toolinsertsand accessoriescan present arisk
ofinjury.
Arrange for your tool to be repaired by a specialist electrician
1.This toolmeets the relevant safetyregulations. Repairs may only
be carried out by electrical specialistsand
original spare parts
must be used. Otherwise accidentscan happen to the user.
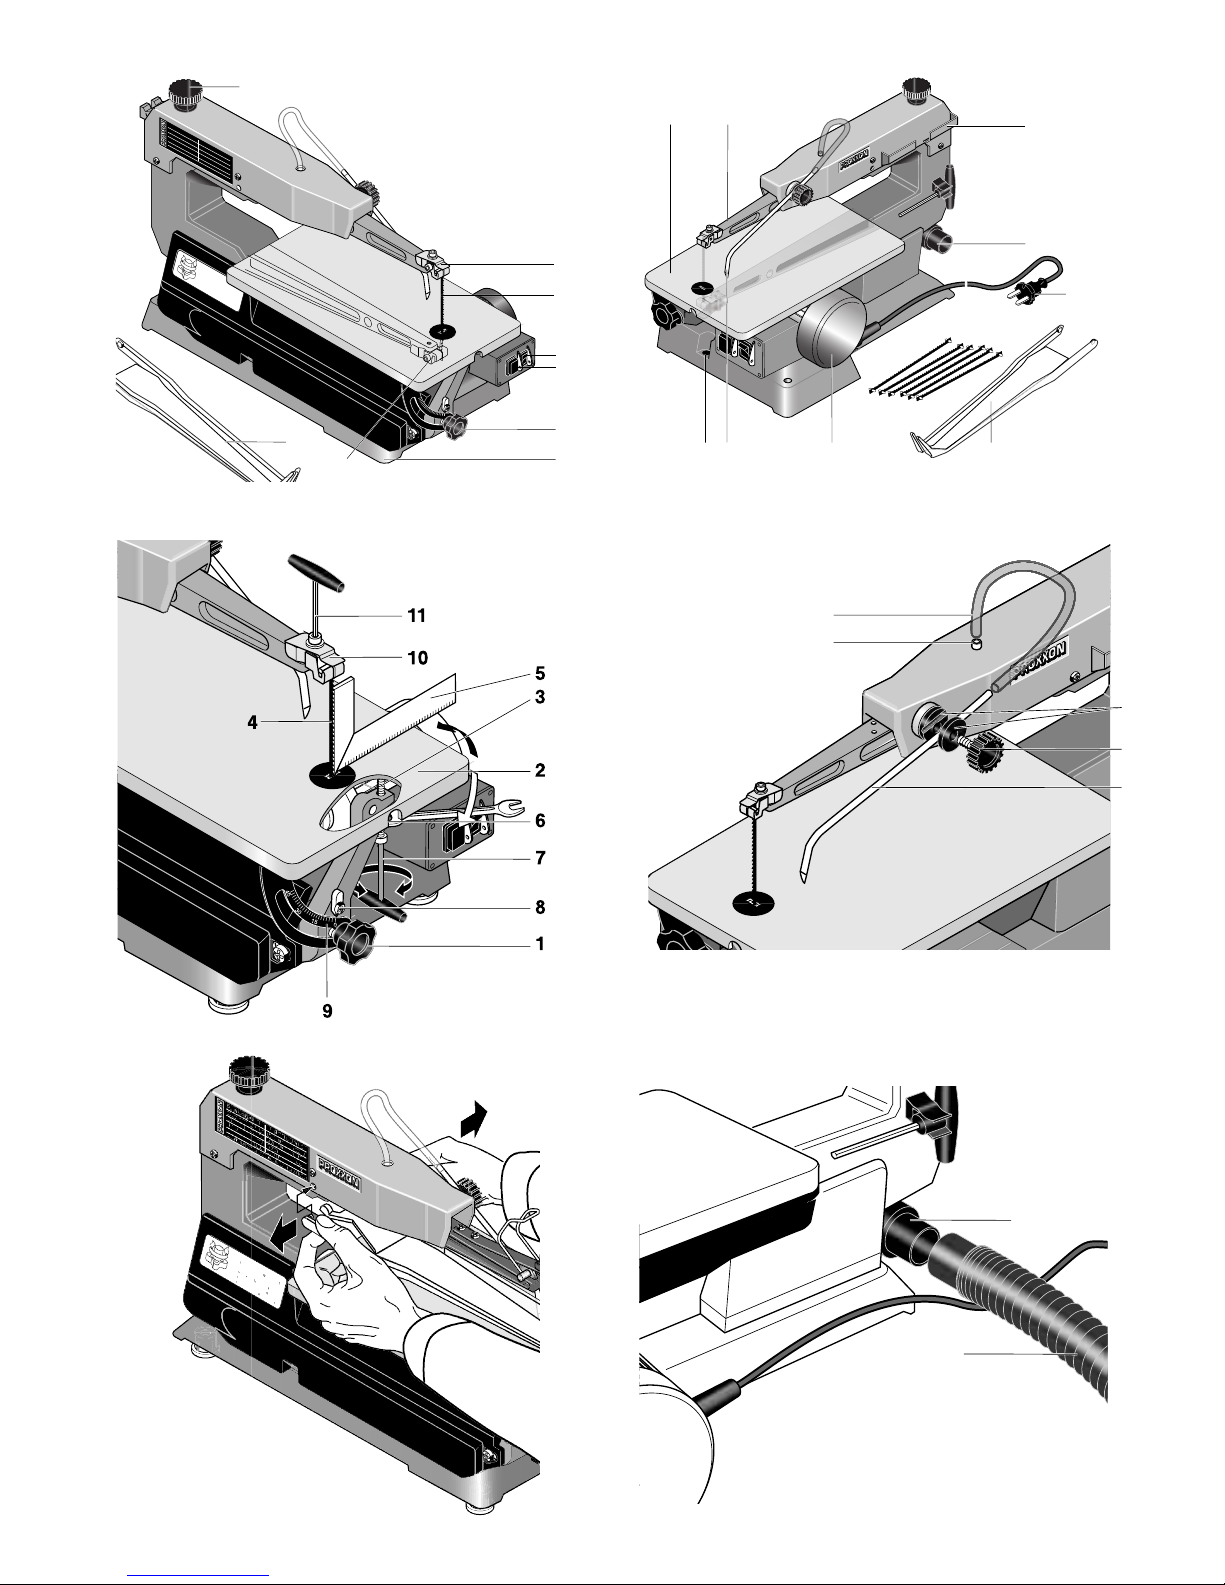
3 Legend (fig. 1)
1.Adjusting knobforsaw blade tensioning
2.Saw bladesholder, top
3.Saw blade
4. ON - OFF - switch
5.Stroke rate adjusting knob
6. Clamping screwforthe inclination of the work table
7.Foot made
ofcast steel
8.Air nozzle
9.Saw table
10.Saw blade holder, bottom
11. Drill holesforattachment screws
12.Storage compartment forsaw blades
13. Connectionforvacuum cleane
r
14.Network cable
15.Inductionmotor
16.Saw arm (top)
17.Saw blade guard
4 Description of machine (also see fig. 1a and 1b)
The PROXXONmechanical fret sawisavery solid and robustly
designeddevice.The heavybase made ofcast material, item 7, forms
asolid basis for the expensive mechanism of the machine that is
elaborately and precisely supportedand drivenbyaparticularly quiet-
running and reliable inductionmotorwith2 adjustable speeds
(900/1400 rpm).
The areas ofapplicationare multifaceted. Your
DSH is particularly
suitable formould construction, precision engineering modelbuild-
Page 6

ing and toymanufacture.Forthis reason, it is precisely the right tool
fordesigners, architects (modelbuilding) and carpenters.
The large-area, saw table 9 formitre cutscan be titledupto 45°, is
manufacturedfromaluminium die casting for the highest precision
and stability, and is then ground for optimal glide properties.
The arrangement of the sawblade holders item 2 and 10 allow the
use ofbothsaw bladeswithand without cross pin depending on the
area ofapplicationand the material of the tool. In the Proxxon
accessoriesrange youwill find the corresponding sawbladesforthe
respective task. We recommend that youuse only Proxxonsaw blades!
The replacement sawbladesare storedinthe “sawblade garage"
12, on the side of the panelling of the toparm.
The DSH saws soft woodupto a thickness of 50 mm, plastic up to
30 mm and non-ferrous metals up to 10 mm.
The sawcan also be usedwithout problemforseparating Plexiglas,
GRP, foam, rubber, leatherand cork.
And so that the dust doesnot obscure the view of the cutting line
whenworking, there are automatically drivenbellows withadjustable
air nozzle 8.Anadditional vacuum cleanercan also be connected. The
connecting piece 13 is
positionedat 90° to save space.
This guaranteesclean work.
5 Technical data
No. ofstrokes:900 or 1400/min
Stroke height: 19 mm
Max. cutting depth:50 mm
(in wood) at 45°: 25 mm
Cutting blade length:127 mm (withcross pin)
125-130 mm (without cross pin)
Noise development: < 70 dB(A)
Vibration:<2.5 m/s
Measurements:
LxBxH:53 x 27 x 33 (in cm)
Table: 360 x 180 mm
Sawframe radius:400 mm
Motor:
Voltage: 220/240 Volt, 50/60 Hz
Powerconsumption:145/205 W
Foruse in dry environments only
Please do
not dispose off the machine!
6Set-up and commissioning of the saw
6.1 Unpacking (fig. 1a and 1b)
1.Unpack the device and remove it from the box. Ensure that the de-
vice is not liftedbythe plastic panelling around the toparm 16.
2.For transport reasons, the saw table 9 is foldedupat an angle of
about 45°.Turn the toggle 6 to tilt the table back into the horizon-
tal position (the precise setting is describedbelow).Thenclose the
toggle 6 again.
6.2 Setting up the saw
Note:
Safe and precise work is only possible withcareful fixing!
1.Secure sawwithtwo screws (Ø 6 mm, not includedinscope ofde-
livery) onasolid workbench. Use the drill holesintendedforthis
purpose (11, fig. 1) which are locatedat the front and back of the
sawbase.
6.3 Adjust and set angle display (fig. 2)
1.Slightly loosen toggle 1 (fig. 2) and fold saw table 2 up to stop
screw 3.
2.Clampsaw blade 4! See the corresponding section 6.7.1 of these
instructions. Caution! Mains plug must not be connected.
3.Using an angle 5 on the saw table 2, check the right-hand angle
to the sawblade.The stopscrewispreset.Ifthis still has to be ad-
justed, youcan adjust the setting yourself using an Allenkey7, as
shown in fig. 2,once the counternut has beenloosened.Aftercor-
rectsetting, tighten the counternut.Make sure that the stopscrew
doesnot go out ofpositioninthis process.
4.Check the “zero”setting of the indicator 8,
if necessary, correct after the fastening screwhas beenloosened. Forprecise working,
carry out sawing sample.
5.Saw asample fromapiece ofwoodand check the angle again, if
necessaryadjust the saw table 2, indicator 8 orstopscrew 3 as
shown in fig. 2.
6.4 Assembling the air nozzle (fig. 3)
1.Take partsforsecuring the air nozzlesfromthe bag.
2.Screw the knurledscrew 1 withclampingpieces 2 into the sawframe.
3.Introduce the air nozzle pipe 3 into the hole on the openedclamp
pieces, adjust the pipe and slightly tighten the toggle 1.
4.Place the air hose 4 onpipe 3 and nipple 5.
6.5 Saw blade guard
Caution!
The scope ofdelivery
ofyour scroll sawincludesasaw blade guard.
This is simply mountedinthe upperplastic cover of the sawarm.
Fig. 3ashows how to assemble the sawblade guard. Bothpins at the
sawblade guard are clippedinto the designateddrill holes. Please
note that the sawblade guard is an important safety tooland the saw
may not be operatedwithout it! Injuriescould be the result.
The following describesactivitiesinwhich the guard may be disas-
sembled expediently. But it must be clearly noted that the sawblade
guard must be mountedagain when this work is completed: Opera-
tionwithout this important safetyaccessory is not permitted!
Further graphics in these instructions sometimesshowthe device
without asaw blade guard. This only servesasoptical clarification of
the illustratedactions and is in no way intended to convey that the
machine may be operatedwithout the sawblade guard!
- 14 -
Page 7

6.6 Connecting the vacuum cleaner (fig. 4)
1.Place the vacuum hose 1 of the vacuum cleanerinthe connecting
piece 2.
2.Switch on the vacuumcleanerbefore sawing so that the sawdust is
vacuumedand the suctiondevice doesnot get blocked.
Forpracti-
cal reasons, the PROXXONsuctioncontroldevice is recommended.
6.7 Saw blades
Caution!
Always remove the mains plug before performing the activities
describedh
ere.
6.7.1 Clamping in the saw blade (fig. 5a and 5b)
Standard bladeswithcross pins and hand(leaf) bladeswithout cross
pin can be clampedinto the sawblade mount.
Replace damaged orworn sawbladesimmediately.Theyre
present
asafetyrisk and worsen the work result.The best cutting perform-
ance and precisioncan only be achievedwithperfect sawblades.
Use PROXXON original sawb
ladesand carefully select suitable saw
bladesforthe intendedpurpose and material to be cut.WithProxxon,
there are also various fine toothings, flat and round blades, and some
withand without cross pin. Youwill find suggestions in these instructions.
6.7.1.1 Saw blades with cross pin (fig. 5a)
Sawbladeswithcross pin are particularly suitable forworking with
manyclosedinside cuts.
The sawblade can be quickly and comfort-
ably removedfromthe uppermount, looped through the work piece
and repositioned. Youwill find more precise informa tioninthe sec-
tion"Inside cuts".
Caution!
Sawbladeswithcross pins may only be hung in position. Do not
clamp the sawbladeswiththe cross pin additionally by means of the
cheese-head
screws. Risk offracture!
1.The the rotaryknob1 (Fig. 6) forsaw blade tensioning to the left
until the sawblade is loose.
2.Place sawblade 1 with the toothing pointing downwards through
the table opening 2 and fit in the bottommount 3.
3.Press lightly on the toparm 5 and fit blade in the uppermount 6,
see fig. 5a).
4.Release arm and by turning the rotarykno
b1 (Fig. 6) to the right,
set the sawblade tensioning.
5.Ifrequired, finely adjust the sawblade clamp as describedunder
6.7.2.
6.7.1.2 Saw blades with flat ends
(hand or leaf saw blades, see fig. 5b)
1.Turn rotaryknob1 (Fig. 6) forsaw blade tensioning to the left
until
the sawblade is loose.
2.Place sawblade 1 with the toothing at the bottom through the
table opening 2 and fit in the bottommount 3.The cheese-head
screw 4 may not be tightened!
Thenclamp the blade in the
mount by tightening the cheese-head screw 4 with the supplied
AllenkeywithTgrip 5. Caution: Make sure that the blade is
clampedreally far forward! This is where the clamping force is
at its greatest.
3.Press lightly on the toparm 6, introduce the sawblade into the
upperholder 7 and tensioninthe same way.
4.Release the arm and set the
sawblade tensioning by turning the
rotaryknob1 (Fig. 6) to the right.
5.Ifrequired, adjust the sawblade clamp as describedunder 6.7.2
6.7.2 Finely setting the correct saw tensioning (fig. 6)
Correct saw tensioning is an essential factorforac
lean work result.
This must, therefore, be carefully set.Ifoverorundertensioned, the
sawblade can lightly crack. Turn knurledbutton 1 to set the ten-
sioning.Ifthe buttonismovedto the right (clockwise), the sawblade
is more tightly tensioned. If it is turned to the left (anticlockwise) the
blade is loosened.
Acorrectly tensionedblade sounds aslight
tone if "plucked" like a
string.
6.7.3 Removing saw blade (fig. 5a and 5b)
6.7.3.1 Saw blades with cross pin (fig. 5a)
1.The the rotaryknob1 (Fig. 6) forsaw blade tensioning to the left
until the sawblade is loose.
2.Press toparm 5 slightly down so that the sawblade 1
can be
releasedfromthe topmount 6.Take out sawblade.
3.Take out sawblade frombottommount 3 and remove through
table opening 2.
6.7.3.2 Saw blades with flat ends (fig. 5b)
1.The the rotaryknob1 (Fig. 6) forsaw
blade tensioning to the left
until the sawblade is loose.
2.Openwingnut 8, the sawblade 1 releasesfromthe topmount 7.
3.
Opencheese-head screw 7 with the T grip Allenkey5, release saw
blade from the lowermount 3 and remove through the table opening.
7 Working with the saw
7.1 General information for working with mechanical fret saw
The mechanical fret sawispredominantly amachine forsawing
curvesand precise sections. A typical applicationisshown in fig. 7.
The work piece must be carefully guidedbythe opera
tor.
Note:
Me-
chanical fret saws are normally operatedwithout lengthstop, as the
sawblade losesitsline íf forcedin, particularly in the grain ofwood.
Please note that the sawblade only saws in
reverse motioninthe di-
rectioninwhich the teethpoint.
For goodresults, please note the following points:
– Whensawing, press the work piece onto the work pla
te (fig. 7),
guide by feeling and withlittle power; more pressure on the work
plate, less pressure against the sawblade.
– Make sure that the work piece is lying properly on the saw table
(norburrs orsawdust)
- 15 -
Page 8

– Adapt the feed to the requirementsbysaw blade, speedand work
piece material.
– Hard materials, fine sawbladesand thickerwork piecesdo not “tol-
erate”asmuch feedassoft materials, roughsaw bladesand thin
work pieces. Youcan also experiment withvarious speeds.
– Guide the work piece slowly into the sawblade, particularly if the
blade is very thin and the teethvery fine orifthe work piece is very
thick.
–Only use perfect sawblades.
–Donot let the device operate unsupervised.
–Carefully mark out/block the check line.
– Make sure there is goodlighting.
– Always work withconnectedvacuum cleanerand carefully set the
air nozzle (8, fig. 1).
– Youwill achieve the best resultsifthe wood thickness is under
25 mm
.
– Withwood thicknesses of greater than 25 mm, the work piece
must be very carefully guided to stop the sawblade fromjam-
ming, bending, twisting orbreaking.
– Forprecise cutting, note that the sawblade will always try to fol-
low the direction of the fibre (appliesparticularly to thin sawblades).
7.1.1 Selecting the saw blade
As alreadymentioned, the correct selection ofmaterial has avery
great influence on the quality of the result.The table belowshould
serve as asmall guide.
Extensive experience withmanymaterials and
types ofsaw blade is, ofcourse, always helpful withselection. You
can experiment here.
Tip:
The sawbladesare mostly only particularly worn at placeswhere
the teethare particularly highly utilisedwhensawing and, therefore,
become blunt very quickly.To “use up” the non-worn teethand thus
increase the edge life of the sawing blades, youcan artificially“raise”
the bearing surface for the work piece somewhat.
To do this, simply secure asmooth, table-sizedunderlay with the required
thickness to the saw table, using, for example,double-sidedsticky tape.
The non-worn parts of the sawblade are nowsawing the work piece.
This is particularly sensible if you oftensaw very hard and wear-intensive materials with thin blades.
The numerical dataforcharacterising the “fineness” of the toothing
is related to the number of teethperinch ofsaw blade length:
Teeth/inches Material
approx. 10-14 Soft and hard wood (fromapprox. 6-50 mm),
plastics, soft materials, thickerwork pieces
approx. 17-18 Fine sawing work, wood (up to 6 mm), plastics,
soft
materials, thinnerwork pieces
approx. 25-28 Plastic, GRP, non-ferrous metal, Plexiglas, iron
withrestrictionPertinax
approx. 41 Iron, Pertinax
Round sawing blades (withflat ends) can ideally be usedforplastic,
hard and soft wood. Theycut onall sides, so it is not necessary to
turn the work piece whensawing.
7.1.2 Selecting the speed
This representationcan, ofc
ourse, only give instructions on the gen-
eral direction to take.Asinthe previous section, youhave to "exper-
iment”alittle to find the optimal result.The appropriate speedalso,
ofcourse, depends on the blade used, the material of the work piece,
the feed etc.
Level Material
900 strokes/min Steel, brass, non-ferrous metals, GRP,plastics
1400 strokes/min Aluminium,wood, polystyrene, rubber, leather,
cork
7.1.3 Possible causes of faults
The following causesmay break the sawblade:
– If blade is tensioned too tightly ornot tightly enough
– Mechanical overloading of the blade by feeding too quickly.
–Bending or twisting of the blade when turning the work piece too
quickly whencutting curves.
– When the wear limit of the sawblade has beenreached.
– If the screws are tightened
onsaw bladeswithcross pin.
7.1.3.1 Set saw blade alignment (fig. 2)
In avery fewcases (slantedcutting edge in the work piece, strong
blade drift during operation) it could be necessary to make minoradjustments to the blade alignment at the uppersaw blade mount (see
pos. 2, fig. 2). Byrotating the sawblade mount, the sawblade alignment will be changedasdesired.
1. Clamp
the sawblade and check the parallelism of the sawblade
using an angle 5 (orangledwork piece) arrangedasshown in the
graphic.
2.The sawblade can be alignedifnecessary. Release screw 11 us-
ing an Allenkeyand swivel the sawblade mount into the correct
position to align the sawblade in parallel to the angle.
3.Tighten the sawblade mount in the correctly set positionusing the
Allenkey11.
7.2 Sawing (fig. 7)
Afteryouhave fixed the saw to the work space, adjusted the work
table, prepared the dust exhaust and air nozzle and have clamped the
suitable sawblades,
switch on the machine and guide the work piece
as shown in fig. 7.
Remember: Adapt the feedaccording to the material, the sawblade
and the work piece thickness. Hard materials, fine sawbladesand
thick work piecesdo not “tolerate”asmuch feedassoft materials,
roughsaw bladesand thin materials.
Youcan also experiment withvarious speeds.
Note:
Safe and precise work is only possible withcareful fixing!
The mechanical fret sawispredominantly amachine forsawing
curves. For goodresults, please note the following points:
- 16 -
Page 9

Please note:
–Only use perfect sawblades.
– Always remove the mains plug formaintenance and upkeepwork.
–Donot let the device operate unsupervised.
7.2.1 Inside cuts (fig. 8)
Caution!
Always remove the mains plug before releasing the sawblade.
If youmust also make inside cutswhenworking withyour mechanical fret saw, proceedasfollows:
1.Drill ahole in the inside part 1 to be cut out ofyour work piece.
2.Take the sawbladefrom the topsawblade guide 2.Proceedasshown
in 6.7.3.1.and in 6.7.3.2, depending on the type ofsaw blade used.
3.Push the sawblade through the drill hole.Reattach sawblade at
the top. Tension the sawblade properly again.
4.Cut out the opening and remove the work piece once the sawblade
has beenremovedagain.
Tip:
If youdrill the hole in such away that it doesnot touch the later
inside contour, youcan allow the sawline to run tangentially into the
contour.This producesanice evensawing edge.
7.2.2 Grain cuts
For grain cuts, the table is simply tiltedbythe requiredamount.This
works as follows:
1.Slightly loosenknurledscrew 1 (fig. 2) and alignsaw table 2 to the
requiredvalue, using
scale 9 onindicator 8.
2.Tightenknurledscrew 1.
3.Press the work piece particularly firmly against the table foragrain
cut.
8 Service and maintenance
Caution!
Pull the mains plug before making anyadjustments, performing maintenance work, orcarrying out repairs!
Note:
The scroll sawisbasically maintenance free.However, to ensure a
long service life youshould clean the device after each use withasoft
cloth, swab, orbrush. Avacuum cleanerisalso advisable for this.
9 Disposal
External cleaning of the housing can be carried out using asoft,pos-
sibly moist cloth. While doing so, amild detergent or othersuitable
cleansing agent can be used. Do not use solvents orcleansing agents
containing alcohol (e.g.benzene, cleaning alcohol, etc.) as these can
corrode the plastic housings.
10 EC Declaration of Conformity
Name and address of the manufacturer:
PROXXONS.A.
6-10, Härebierg
L-6868 Wecker
Product designation: DSH
Article No.: 28092
In sole responsibility, we declare that this product conforms to the
following directivesand normative documents:
EU EMC Directive 2004/108/EC
DIN EN 55014-1 / 02.2012
DIN EN 55014-2 / 06.2009
DIN EN 61000-3-2 / 03.2010
DIN EN 61000-3-3 / 07.2012
EU Machinery Directive 2006/42/EC
DIN EN 61029-1 / 01.2010
Date: 08.04.2013
Dipl.-Ing. Jörg Wagner
PROXXONS.A.
Machine Safety Department
The CE document authorizedagent is identical with the signatory.
- 17 -
Page 10

- 78 -
Spare Parts List
PROXXON DSH Art.-Nr. 28092
Page 11

- 79 -
192
193
111
113
113
184
134
115
202
203
204
221
123
142
120
133
132
103
217
172
171
121
138
216
129
127
128
140
152
108
108
109
219
201
120
171
121
105
187
189
187
188
186
185
136
135
141
151
150
151
149
164
154
153
151
155
158
161
162
157
152
163
159
146
177
182
183
178
176
179
175
166
212
165
181
158
190
145
222
224
101
110
208
187
188
186
187
189
185
139
215
188
186
185
187
191
189
187
211
210
116
200
143
209
156
148
160
160
169
214
213
220
220
181
181
218
225
Page 12

GB Service note
All PROXXON products are thoroughly inspected after production. Should a defect
occur nevertheless, please contact the dealer from whom you purchased the
product. Only the dealer is responsible for handling all legal warranty claims
which refer exclusively to material and manufacturer error.
Improper use, such as capacity overload, damage due to outside influences
and normal wear are excluded from the warranty.
You will find further notes regarding "Service and Spare Parts Management" at
www.proxxon.com.
Rev. 3 / 2013-04
 Loading...