


USER GUIDE


 ULTRALIGHTTM X350
English
Deutsch
Français
Español
Italiano
Português
Norsk

WARRANTY (US, Latin America and Canada only)
Proxima Corporation warrants that the projector product manufactured by Proxima is free from defects in materials and workmanship under normal use during the Warranty Period. The Warranty Period commences on the day of purchase by the end user. The Warranty Period of the projector is two years. The lamp Warranty Period is 90 days or 500 hours which ever comes first. Each Proxima product is manufactured from new parts, or new and some used parts. In some cases,
the product may have been delivered to another end-user and then returned. In all cases, the product has undergone testing and quality inspection, and Proxima’s full warranty terms apply. The end-user’s sales receipt or invoice showing the date of purchase of the product and the name of the Reseller is proof of date of purchase. The Warranty extends only to the original purchaser and is not transferable. During the Warranty Period, Proxima will, at no additional charge, repair or replace defective parts or at the option of Proxima, replace the entire unit.
This limited Warranty does not extend to any Proxima product thas has been damaged or been rendered defective (a) as a result of accident, misuse or other abuse; (b) by the use of parts not manufactured or sold by Proxima; (c) by modification of the product; or (d) as a result of servicing by non-authorized personnel.
ProXchange Coverage (US and Canada only)
ProXchange TM is offered as part of the standard warranty for this projector product within the United States and Canada. ProXchange offers the original purchaser the option of having a replacement unit shipped (in mos cases) the next business day to the location within the covered regions of their choice.
By choosing ProXchange, the original purchaser will receive either a new or “like new” unit which they will keep. The replacement projector will be covered by the remaining balance of the original Warranty Period or any Extended Warranties if applicable. Proxima will not return the non-working projector originally purchased. If the original purchaser requires their original projector to be returned, they must return (at their cost) the non-working unit to Proxima for repair.
To execute the ProXchange process, proof of date of purchase and a valid credit card number for security are required. If the non-working unit returned to Proxima is damaged or the warranty has been voided, the original purchaser will be responsible for the cost to repair the out of warranty conditions. All other in-warranty repairs will be covered by Proxima. ProXchange is part of the standard warranty and as such expires at the end of two year Warranty Period.
Limitation of Warranties
The foregoing Warranty is expressly in lieu of any other expressed or implied warranties including, without limitations, warranties of merchantability or fitness for a particular purpose. To the extent not prohibited by law, all statutory warranties are hereby waived and excluded from this Warranty. Proxima expressly disclaims all warranties not stated in this Limited Warranty.
Trademarks
Proxima is a registered trademark of Proxima Corporation. Desktop Projector, Desktop Projection, ProXchange and Laser F/X are trademarks of Proxima Corporation. Other trademarks are the property of their respective owners.
© 2000 Proxima Corporation. All rights reserved. Specifications are subject to change without notice.
For Americas: |
For Europe/Middle |
For Asia: |
Proxima Corporation |
East/Africa: |
Proxima Singapore |
9440 Carroll Park Drive |
Proxima Netherlands |
29, Int Business Park |
|
Horsterweg 24 |
# 04-02 Acer Bldg, Tower B |
San Diego, CA 92121-2298 |
|
609923 Singapore |
USA |
6191 RX Beek |
Singapore |
Phone (800) 447-7692, option 2. |
The Netherlands |
Tel: +65 566 8102 |
Fax (858) 457-9647 |
Tel: +31 (0)43 358 52 00 |
Fax: +65 565 1080 |
http://www.proxima.com |
Fax: +31 (0)43 358 52 01 |
http://www.proxima.com |
|
http://www.proxima.com |
|
|
|
|
|
|
|

TABLE OF CONTENTS
INHALTSVERZEICHNIS TABLE DES METIERES INDICE INDICE ÍNDICE INNHOLDSFORTEGNELSE
A. SUPPLIED MATERIAL................................................ |
4 |
|
|
LIEFERUMFANG |
|
|
EQUIPEMENT FOURNI |
|
|
MATERIAL SUMINISTRADO |
|
|
MATERIALE FORNITO |
|
|
MATERIAL FORNECIDO |
|
|
VEDLAGT MATERIELL |
|
B. SETTING UP PROCEDURE.............................................. |
6 |
|
|
ANSCHLUSS |
|
|
INSTALLATION |
|
|
PROCEDIMIENTO DE CONEXIÓN |
|
|
PROCEDIMENTO DI IMPOSTAZIONE |
|
|
INSTALAÇÃO |
|
|
OPPSETT |
|
C. OVERVIEW........................................................................ |
8 |
|
|
ÜBERSICHT |
|
|
PRESENTATION |
|
|
VISTA GENERAL |
|
|
PROSPETTO |
|
|
VISTA GERAL |
|
|
OVERSIKT |
|
D. START - STOP................................................................. |
10 |
|
|
START - STOP |
|
|
MISE EN/HORS SERVICE |
|
|
ENCENDIDO - APAGADO |
|
|
AVVIO - ARRESTO |
|
|
LIGAR - DESLIGAR |
|
|
START - STOPP |
|
E. IMAGE ADJUSTMENTS.................................................. |
11 |
|
|
BILDEINSTELLUNGEN |
|
|
MISE AU POINT DE L’IMAGE |
|
|
AJUSTE DE LA IMAGEN |
|
|
REGOLAZIONE DELL’IMMAGINE |
|
|
AJUSTES DA IMAGEM |
|
|
JUSTERE BILDET |
|
F.2 |
REMOTE CONTROL & KEYPAD.................................... |
12 |
|
FERNBEDIENUNG UND BEDIENFELD |
|
|
TELECOMMANDE ET CLAVIER |
|
|
CONTROL REMOTO Y TECLADO |
|
|
TELECOMANDO E TASTIERA |
|
|
CONTROLE REMOTO E TECLADO |
|
|
FJERNKONTROLL OG TASTATUR |
|
G. MENU ADJUSTMENTS................................................... |
15 |
|
|
MENÜ EINSTELLUNGEN |
|
|
OPTIONS DE MENU |
|
|
MENÚ DE AJUSTES |
|
|
IMPOSTAZIONI DAL MENU |
|
|
AJUSTES DO MENU |
|
|
MENYINNSTILLINGER |
|
H. USER'S LOGO................................................................ |
22 |
|
|
LOGO DES BENUTZERS |
|
|
LOGO DE L’UTILISATEUR |
|
|
LOGOTIPO DEL USUARIO |
|
|
LOGO DELL’UTENTE |
|
|
LOGOTIPO DO USUÁRIO |
|
|
BRUKERDEFINERT LOGO |
|
I.2 |
LIGHT MESSAGES........................................................ |
23 |
|
LEUCHTANZEIGEN |
|
|
INDICATEURS LUMINEUX |
|
|
INDICADORES LUMINOSOS |
|
|
MESSAGGI LUMINOSI |
|
|
INDICADORES LUMINOSOS |
|
|
LYSIGNALER |
|
J.2 |
POWER MANAGEMENT (DPMS)................................. |
25 |
|
POWER MANAGEMENT (DPMS) |
|
|
GESTION DE L’ALIMENTATION (DPMS) |
|
|
FUENTES DE ENERGÍA (DPMS) |
|
|
CONTROLLO DELL’OPERATIVITÀ (DPMS) I |
|
|
CONTROLE DA POTÊNCIA |
|
|
STRØMSPARING (DPMS) TEKNISKE DATA |
|
K. TROUBLESHOOTING.................................................... |
26 |
|
|
FEHLERBEHEBUNG |
|
|
SOLUTION AUX PROBLÈMES LES PLUS |
|
|
FRÉQUENTS |
|
|
SOLUCIÓN DE PROBLEMAS |
|
|
SOLUZIONE DEI PROBLEMI |
|
|
LOCALIZAÇÃO DE DEFEITOS |
|
|
FEILSØKING |
|
L. |
TECHNICAL DATA......................................................... |
28 |
|
TECHNISCHE DATEN |
|
|
CARACTERISTIQUES TECHNIQUES |
|
|
DATOS TÉCNICOS |
|
|
DATI TECNICI |
|
|
DADOS TÉCNICOS |
|
|
TEKNISKE DATA |
|
M. SERVICE INFORMATION.............................................. |
31 |
|
|
SERVICEHINWEIS |
|
|
RÉPARATIONS |
|
|
INFORMACIÓN SOBRE ASISTENCIA TECNICA |
|
|
ASSISTENZA TECNICA |
|
|
INFORMAÇÃO DE SERVIÇOS |
|
|
SERVICEINFORMASJON |
|
N. MAINTENANCE...................................................................... |
32 |
|
|
WARTUNG |
|
|
ENTRIEN |
|
|
MANTENIMIENTO |
|
|
MANUTENZIONE |
|
|
MANUTENÇÃO |
|
|
VEDLIKEHOLD |
|
O. FCC STATEMENT.......................................................... |
33 |
3

A |
SUPPLIED MATERIAL |
LIEFERUMFANG EQUIPEMENT FOURNI MATERIAL SUMINISTRADO MATERIALE FORNITO MATERIAL FORNECIDO VEDLAGT MATERIELL |
DLP Projector with lenscap |
Remote control with batteries |
Video module |
DLP Projektor mit Schutzkappe |
Fernbeienung mit Batterien |
Videomodul |
Projecteur DLP avec protection lentille |
Télécommande avec batteries |
Module vidéo |
Proyector DLP con tapa del lente |
Control remoto con pilas |
Módulo de vídeo |
Proiettore DLP con coperchietto |
Telecomando con batterie |
Modulo video |
Projetor DLP com protetor de lente |
Controle remoto com pilhas |
Módulo de vídeo |
DLP-projektor med linsedeksel |
Fjernkontroll med batterier |
Videomodul |
7 |
*) |
1 |
2 |
4 |
*) |
|
|
|
|
|
|
Power cord |
Digital Computer Cable DVI to VGA |
Digital Computer Cable (DVI) |
S-Video Cable |
Netzkabel |
Digitales Computerkabel (DVI) für VGA |
Digitalkabel (DVI) |
S-Videokabel |
Cordon d’alimentation |
Câble ordinateur digital (DVI) à VGA |
Câble ordinateur digital (DVI) |
Câble S-Video |
Cable de alimentaciòn |
Cable Digital (DVI) para VGA |
Cable para ordenador digital (DVI) |
Cable de Vídeo S |
Cavo alimentazione |
Cavo da computer digitale (DVI) a VGA |
Cavo digitale per il computer (DVI) |
Cavo S-Video |
Cabo de alimentação |
Cabo (DVI) de Computador Digital para VGA |
Cabo de Computador Digital (DVI) |
Cabo de S-Video |
Strømledning |
Digital Datamaskinkabel (DVI) til VGA |
Digital Datamaskinkabel (DVI) |
S-Videokabel |
|
|
|
|
3 |
6 |
*) |
5 |
|
|
|
|
Audio/Video Cable |
Audio Cable |
Audio Cable Jack/RCA |
Audio/Videokabel |
Audiokabel |
Audiokabelstecker / RCA |
Câble audio/vidéo |
Câble audio |
Câble audio Jack/RCA |
Conexión de audio/vídeo |
Cable de audio |
Cable de audio Jack/RCA |
Cavo audio/video |
Cavo audio |
Cavo audio Jack/RCA |
Cabo de Áudio/Vídeo |
Cabo de Áudio |
Cabo de Áudio Jack/RCA |
Audio/Videokabel |
Audiokabel |
Audiokabel-Jack/RCA |
USB Mouse Cable USB Mauskabel Câble souris USB Cable raton USB Cavo mouse USB Cabo de Mouse USB USB-musekabel
*) Country dependent Länder abhängig Dépendant du pays Depende del país Dipendentemente al paese di destinazione Dependendo do país Områdeavhengig
4
SUPPLIED MATERIAL
LIEFERUMFANG EQUIPEMENT FOURNI MATERIAL SUMINISTRADO MATERIALE FORNITO MATERIAL FORNECIDO VEDLAGT MATERIELL
Soft Case |
User guide |
Projector CD |
Tragetasche |
Benutzer Handbuch |
CD-Projektor |
Etui souple |
Guide d’utilisateur |
Projecteur CD |
Funda |
Guía del usario |
CD del proyector |
Valigetta |
Manuale d’uso |
CD del proiettore |
Maleta |
Guia do usuário |
CD Projetor |
Myk veske |
Bruker veiledning |
Projektor-CD |
*)
SCART adapter
SCART-Anschluß
Adaptateur audio
Adaptador de Scanner
Presa scart
Adaptador SCART
SCART-adapter
*) Country dependent Länder abhängig Dépendant du pays Depende del país Dipendentemente al paese di destinazione Dependendo do país Områdeavhengig
5

|
B |
SETTING UP PROCEDURE |
|||
|
ANSCHLUSS INSTALLATION |
PROCEDIMIENTO DE CONEXIÔN PROCEDIMENTO DI IMPOSTAZIONE INSTALAÇÃO OPPSETT |
|||
|
|
1. |
Connect the projector to: |
-the data source with the “Digital Computer Cable (DVI) to VGA (1)” to COMPUTER or |
|
|
|
|
|
-the data source with the “Digital Computer Cable (DVI) (2)” to COMPUTER |
|
|
|
|
|
-the video source with the “Audio/Video Cable (3)” to VIDEO/AUDIO L/AUDIO R |
|
|
|
|
|
-the video source with the “S-Video Cable* (4)” to S-VIDEO |
|
|
|
2. |
For the mouse control use the “USB mouse cable (5)” to USB MOUSE |
||
|
|
3. |
For computer sound connection, use the “Audio Cable (6)” to LINE IN |
||
|
|
4. |
Connect “Power cord” to projector (7) |
||
|
|
5. Turn on the projector, then the source(s) |
|||
|
|
|
|
|
|
|
|
1. |
Projektor anschließen: |
- mit dem “Digitales Computerkabel (DVI) für VGA (1)” an COMPUTER (Datenquelle) oder |
|
-mit dem “Digitalkabel (DVI) (2)” an COMPUTER (Datenquelle)
-mit “Audio/Videokabel (3)” an VIDEO/AUDIO L/AUDIO R (Videoquelle)
-mit “S-Videokabel* (4)” an S-VIDEO (Videoquelle)
2.Für Steuerung per Maus das “USB-Mauskabel (5)” in den Anschluss USB MOUSE stecken
3.Für Klang aus dem Computer das “Audiokabel (6)” in den Anschluss LINE IN stecken
4.Netzstecker des Projektors einstecken (7)
5.Zuerst Projektor und dann Quellgerät(e) einschalten
1. Connectez le projecteur à: |
- la source de donnée avec le “Câble ordinateur digital (DVI) à VGA (1)” à la COMPUTER |
-la source de donnée avec le “Câble ordinateur digital (DVI) (2)” à la COMPUTER
-la source vidéo avec le “Câble audio/video (3)” à la prise VIDEO/AUDIO L/AUDIO R
-la source vidèo avec le “Câble S-Video* (4)” à la prise S-VIDEO
2.Pour le contrôle de la souris, reliez le “câble souris USB (5)” à USB MOUSE
3.Pour la connexion au son de l’ordinateur, reliez le “Câble audio (6)” à LINE IN
4.Branchez le “cordon d’alimentation” sur le projecteur (7)
5.Allumez d’abord le projecteur, puis la (les) source(s).
1.Conectar el proyector a: - la fuente de datos conectando el “Cable Digital (DVI) para VGA (1)” al COMPUTER o
-la fuente de datos conectando el “Cable para ordenador digital (DVI) (2)” al COMPUTER
-la fuente de video conectando el “Cable de audio/video (3)” a la entrada VIDEO/AUDIO L/AUDIO R
-la fuente de video conectando el “Cable de VÍDEO S* (4)” al S-VIDEO
2.Para controlar el ratón conecte el “cable de ratón USB (5)” al USB MOUSE
3.Para conectar el sonido del ordenador, conecte el “cable de audio (6)” a la entrada LINE IN
4.Conectar el “cable de alimentación” al proyector (7)
5.Poner en marcha el proyector, luego la(s) fuente(s)
1. Collegare il proiettore: |
- alla sorgente dei dati con il “Cavo da computer digitale (DVI) a VGA (1)” al COMPUTER o |
-alla sorgente dei dati con il “Cavo digitale per computer (DVI) (2)” al COMPUTER
-Alla sorgente video con il “Cavo audio/video (3)” sulla presa VIDEO/AUDIO L/AUDIO R
-Alla sorgente video con il “Cavo S-Video* (4)” sulla presa S-VIDEO
2.Per il controllo del mouse, usare il “Cavo mouse USB (5)” collegato a USB MOUSE
3.Per il collegamento audio con il computer, usare il “Cavo audio (6)” collegato a LINE IN
4.Collegare il “Cavo di alimentazione” al proiettare (7)
5.Accendere prima il proiettore e poi la/e sorgente/i
1. Conecte o projetar à: |
- fonte de dados com o “Cabo (DVI) de Computador Digital para VGA (1)” em COMPUTER ou |
-fonte de dados com o “Cabo de Computador Digital (DVI) (2)” em COMPUTER
-fonte de video com o “Cabo de Áudio/Video (3)” em VIDEO/AUDIO L/AUDIO R
-fonte de video com o “Cabo de S-Video* (4)” em S-VIDEO
2.Para o controle do mouse, use o “Cabo de mouse USB (5)” em USB MOUSE
3.Para a conexäo do computador, use o “Cabo de Áudio (6)” em LINE IN
4.Conecte o “Cabo de alimentaçâo” no projetor (7)
5.Ligue o projetor, depois a(s) fonte(s)
1. Koble projektoren til: |
- datakilden med den “Digitale datamaskinkabelen (DVI) til VGA (1)” til COMPUTER eller |
-datakilden med den “Digitale datamaskinkabelen (DVI) (2)” til COMPUTER
-videokilden med “Audio/Videokabelen (3)” til VIDEO/AUDIO L/AUDIO R
-videokilden med “S-VIDEO-kabelen* (4)” til S-VIDEO
2.Musekontroll kobles til med “USB-musekabelen (5)” til USB MOUSE
3.Lyd fra datamaskinen kobles til med “Audiokabelen (6)” til LINE IN
4.Koble “Strømledningen” til projektoren (7)
5.Slå på projektoren, og deretter kilden(e)
*) Country dependent Länder abhängig Dépendant du pays Depende del país Dipendentemente al paese di destinazione Dependendo do país Områdeavhengig
6

SETTING UP PROCEDURE
ANSCHLUSS INSTALLATION PROCEDIMIENTO DE CONEXIÒN PROCEDIMENTO DI IMPOSTAZIONE INSTALAÇÂO OPPSETT
|
|
Video |
Audio L |
|
|
|
Line in |
USB Mouse |
Computer |
|
|
|
|
|
|
Computer |
USB Mouse |
S-Video |
Audio R |
|
|||
|
|
||
|
|
|
Line out |
|
AUDIO |
S-VIDEO |
|
VIDEO |
L |
R |
|
7
6
3
1 or 2
5 |
*) |
4 |
Switch to external monitor
Schalter für externen Monitor
Commutateur pour écran autonome
Enchufe para monitor externo
Interruttore per monitor esterno
Interruptor para monitor externo
Bytt til ekstern skjerm
*) Country dependent Länder abhängig Dépendant du pays Depende del país Dipendentemente al paese di destinazione Dependendo do país Områdeavhengig
7

C |
OVERVIEW |
|
|
BESTANDTEILE PRESENTATION |
VISTA GENERAL PROSPETTO VISTA GERAL OVERSIKT |
|
|
|
IR Sensor |
Zoom |
Keypad |
|
IR-Sensor |
Bedienfeld |
|
|
|
||
|
Senseur IR |
|
Clavier |
|
Sensor de IR |
|
Teclado |
|
Sensore IR |
|
Tastiera |
|
Sensor IR |
|
Teclado |
|
IR-Sensor |
|
Tastatur |
Focus |
|
|
|
Fokus |
|
|
|
Poignée |
|
|
|
Foco |
|
|
|
Messa a fuoco |
|
|
|
Foco |
|
|
|
Fokus |
|
|
|
Ventilation in Lufteintritt Entrée ventilation
Entrada de ventilación Griglia di ventilazione di entrata
Entrada de ventilação Ventilasjon inn
Ceiling mount (use 1/4" screw). Min. distance from ceiling/rear wall: 30/50 cm, 12/20 inch for proper ventilation
Deckenmontage (1/4"-Schrauben verwenden). Mindestabstand von der Decke/rückwand 30/50 cm, damit eine korrekte Belüftung gewährleistet ist Montage au plafond (utilisez un tournevis 1/4"). Distance minimum au plafond/mur arrière: 30/50 cm, pour garantir une ventilation adéquate Soporte de techo (utilice un tornillo de 1/4”). Distancia mínima desde el techo/pared posterior: 30/50 cm, para que exista una ventilación correcta Montaggio a soffitto (utilizzare viti da 1/4”). Distanza minima dal soffitto/muro posteriore 30/50 cm, per una ventilazione adeguata Montagem de teto (use parafuso de 1/4"). Distância mín. teto/parede traseira: 30/50 cm, para uma ventilação adequada
Takbeslag (bruk 1/4" skrue). Min. distanse fra tak/bakvegg: 30/50 cm, 12/20 tommer, for å få tilstrekkelig ventilasjon
Lamp housing
Lampenfach
Support de lampe
Lugar para la lámpara
Scomparto lampadina
Compartimento da lâmpada
Lampehus
Power
Netzanschluß
Alimentation
Alimentación
Alimentazione elettrica
Alimentação elétrica
Strøm
Ventilation out
Luftaustritt
Sortie ventilation
Salida de ventilación
Griglia di ventilazione di uscita
Saída de ventilação
Ventilasjon ut
Ventilation in Lufteintritt Entrée ventilation
Entrada de ventilación
Griglia di ventilazione di entrata Entrada de ventilação Ventilasjon inn
Ventilation out Luftaustritt Sortie ventilation
Salida de ventilación
Griglia di ventilazione di uscita Saída de ventilação Ventilasjon ut
Foot release
Fußauslöser
Releaser de pied
Liberación del pie
Sblocco il piede
Soltura dos pés
Fotutløser
Ventilation in Lufteintritt Entrée ventilation
Entrada de ventilación
Griglia di ventilazione di entrata Entrada de ventilação Ventilasjon inn
Adjustable foot
Höhenverstellbarer Fuß
Pieds réglables
Pata ajustable
Piede regolabile
Pé ajustável
Justerbar fot
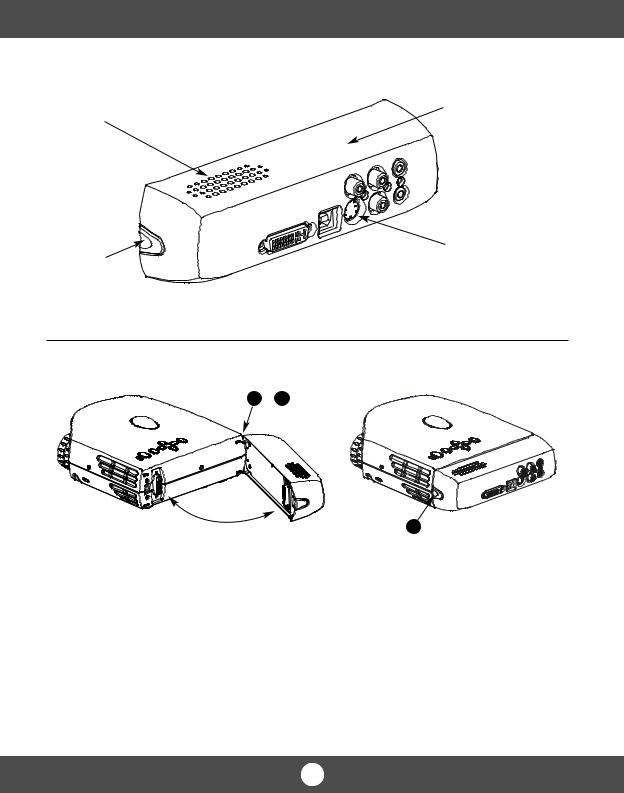
Connectors
Anschlüsse
Connecteurs
Conectores
Connettori
Conectores
Kontakter
8
OVERVIEW
BESTANDTEILE PRESENTATION VISTA GENERAL PROSPETTO VISTA GERAL OVERSIKT
Speaker
Lautsprecher
Haut-parleur
Altavoz
Altoparlante
Alto-falante
Høyttaler
Release Button
Auslöser
Touche de déclenchement
Botón de Liberación
Pulsante di sblocco
Botão de soltura
Utløserknapp
Video Module
Videomodul
Module vidéo
Módulo de vídeo
Modulo video
Módulo de vídeo
Video modul
Connectors
Luftaustritt Sortie ventilation
Salida de ventilación
Griglia di ventilazione di uscita Saída de ventilação Ventilasjon ut
1 & 2
3
In order to attach the video module, insert the two hooks on the module (1) into the two slots on the projector (2). Press the button on the side of the module (3) and at the same time insert the DVI plug into the DVI connector on the back of the projector
Fü den Anschluss des Videomoduls stecken Sie die beiden Haken des Moduls (1) in die beiden Schlitze am Projektor (2). Drücken Sie auf den Knopf an der Seite des Moduls (3) und schließen Sie gleichzeitig den DVI-Stecker in die DVI-Buchse an der Rückseite des Projektors an
Pour relier le module vidéo, insérer les deux crochets sur le module (1) dans les deux fentes du projecteur (2). Appuyer sur le bouton situé sur le côté du module (3) et au même moment insérer la prise DVI dans la prise DVI à l’arrière du projecteur
Para poder incorporar el módulo de vídeo, deberá insertar los dos ganchos del módulo (1) en las dos ranuras del proyector (2). Pulse el botón situado en el lateral del módulo (3) y, al mismo tiempo, introduzca el enchufe DVI en su conexión, situada en la parte trasera del proyector
Per collegare il modulo video, inserire i due ganci sul modulo (1) nelle due fessure sul proiettore (2). Premere il pulsante sul lato del modulo (3) e, contemporaneamente, inserire la spina DVI nel connettore DVI sul retro del proiettore
De modo a anexar o módulo de vídeo, insira as duas presilhas do módulo (1) nas duas aberturas do projetor (2). Pressione o botão lateral do módulo (3) e, ao mesmo tempo, insira o plugue DVI no conector na parte traseira do projetor
Du fester videomodulen ved å sette de to krokene på modulen (1) inn i de to åpningene på projektoren (2). Trykk inn knappen på siden av modulen (3), og sett samtidig DVI-pluggen inn i DVI-kontakten bak på projektoren
9

D |
START - STOP |
START - STOP MISE EN/HORS SERVICE ENCENDIDO - APAGADO AVVIO - ARRESTO LIGAR - DESLIGAR START - STOP |
Install batteries
Batterien einlegen
Mettre des piles en place
Colocar las baterías
Inserimento pile
Colocar as pilhas
Sett inn batteriene
Switch ON to operate remote control
Auf ON stellen, um die Ferbedienung einzuschalten
Mettez sur position ON pour utiliser la télécommande
Poner el conmutador en ON para activar el control remoto
Posizionare su ON per attivare il telecomando
Coloque em on para ligar o controle remoto
Trykk på ON for å slå på fjernkontrollen
10
 Loading...