

Proxima Multimedia LCD Projectors, DP2400, DP2810, Multimedia LCD Projectors Halogen User Manual
Page 1

USER’S GUIDE
Multimedia LCD Projectors
Halogen Models
This manual covers all of the Desktop Projector halogen models. These
projectors have many aspects in common. Unless otherwise indicated,
the information contained within this manual is common to all models.
Page 2

Proxima Corporation warrants that the Proxima® Desktop Projector™ product
manufactured by Proxima is free from defects in materials and workmanship under
normal use during the Warranty Period. The Warranty Period commences on the day of
purchase by the end-user. The Warranty Period is one year. The projector lamp is not
covered by this Warranty.
Each Proxima product is manufactured from new parts, or new and some used parts. In
some cases, the product may have been delivered to another end-user and then returned.
In all cases, the product has undergone testing and quality inspection, and Proxima's full
warranty terms apply.
The end-user’s sales receipt or invoice showing the date of purchase of the product and
the name of the Reseller is proof of date of purchase. The Warranty extends only to the
original purchaser and is not transferable.
During the Warranty Period, Proxima will, at no additional charge, repair or replace
defective parts or at the option of Proxima, replace the entire unit.
This limited Warranty does not extend to any Proxima product that has been damaged or
been rendered defective (a) as a result of accident, misuse or other abuse; (b) by the use of
parts not manufactured or sold by Proxima; (c) by modification of the product; or (d) as a
result of servicing by non-authorized
personnel.
The foregoing Warranty is expressly in lieu of any other expressed or implied warranties,
including, without limitation, warranties of merchantability or fitness for a particular
purpose. To the extent not prohibited by law, all statutory warranties are hereby waived and
excluded from this Warranty. Proxima expressly disclaims all warranties not stated in this
Limited Warranty.
Warning: This equipment generates, uses and can radiate radio frequency energy and, if not
installed and used in accordance with the instruction manual, may cause interference to radio
communications. It has been tested and found to comply with limits for a Class “A”
computing device pursuant to Subpart B of Part 15 of the FCC Rules, which are designed to
provide reasonable protection against such interference when operated in a commercial
environment. Operation of this equipment in a residential area is likely to cause interference
in which case the user, at his own expense, will be required to take whatever measures may be
necessary to correct the interference.
Proxima and Cyclops are registered trademarks; Desktop Projector, Desktop Projection,
LightBoard, and Fit-To-View are trademarks of Proxima Corporation. The appearance of
the projector housing of the DP2XXX family is a registered trademark of Proxima
Corporation. IBM is a registered trademark of International Business Machines Corporation. Macintosh is a registered trademark of Apple Computer, Inc. Other trademarks are
the property of their respective owners. This product is covered by one or more of the
following U.S. and foreign patent numbers: 5,062,001, 5,137,484, 5,153,568, 5,177,629,
5,181,015, 5,225,875, 5,264,835, 5,276,436, 5,298,892, 5,299,039, 5,300,944,
5,302,946, 5,321,450, 5,400,095, 5,453,803, 5,459,484, 5,483,382, 5,489,923,
5,499,036, 5,502,459, 5,504,501, 5,510,861, 5,512,967, 5,515,079, and DES. 360,426.
Foreign patent numbers Canada Registered Design No.74980 D Proxima Corporation
1994, British Registered Design No.2 038 977, Germany Registered Design No. M 94
03 987.9 geschutztes Muster, Under Geschmacksmusterschutz, China Patent for Design
No.94303399.3, Japan Registered Design No.948294, South Korea Registered Design
No.174628, Australia Pat. Nos. 644 852, 668 823. Other US and foreign patents applied
for.
© 1996 Proxima Corporation. All rights reserved. Specifications are subject to change
without notice.US and foreign patents applied for.
FCC
Statement
Trademarks,
Patents, and
Copyright
Limitation of
Warranties
Warranty
Page 3

Contents
Chapter 1
Introducing the
Proxima
Desktop
Projector
Cyclops Interactive Pointer System..................................1–2
What’s in the Box?...........................................................1–2
Quick Start......................................................................1–4
Desktop Computers .................................................1–4
Notebooks/Laptops..................................................1–4
Control Panel...........................................................1–6
Warning and Alert Lights.........................................1–7
Levels Menu.............................................................1–7
Setup Menu .............................................................1–8
Remote Control .......................................................1–9
Getting Help..........................................................1–10
Your Proxima Desktop Projector.....................................2–1
Getting Started ................................................................2–2
Opening the Projector..............................................2–2
Closing the Projector................................................2–6
Transporting the Projector.......................................2–7
Connecting the Desktop Projector ..................................2–8
COMPUTER ..........................................................2–9
RS–232 ..................................................................2–12
VIDEO IN.............................................................2–12
S–VHS...................................................................2–13
COMPUTER AUDIO IN.....................................2–14
AUDIO IN ............................................................2–14
Connecting a Microphone .....................................2–15
AUDIO OUT........................................................2–16
Powering Up .................................................................2–18
Applying Power to the Projector ............................2–18
Turning On/Off the Lamp .....................................2–21
Projecting the Image......................................................2–22
Image Size ..............................................................2–22
Focusing.................................................................2–23
Keystoning .............................................................2–24
Chapter 2
Detailed Setup
Page 4

Chapter 3
Using the
Desktop
Projector
The Control Panel...........................................................3–1
Arrow Keys...............................................................3–1
BRIGHTNESS Keys................................................ 3–2
LAMP Key ...............................................................3–2
MENU/ (CYCLOPS) Key ..................................3–2
SYNC Keys ..............................................................3–3
VIDEO Key .............................................................3–3
VOLUME Keys .......................................................3–4
Menu Settings .................................................................3–4
Selecting and Changing Settings ..............................3–4
Saving Changes ........................................................3–4
Levels Menu .................................................................... 3–5
BRIGHTNESS ........................................................3–5
SYNC.......................................................................3–5
VOLUME................................................................ 3–6
RGB Controls: RED, GREEN & BLUE .................3–6
TINT .......................................................................3–6
SIG LEVEL..............................................................3–6
Setup Menu.....................................................................3–7
SOURCE .................................................................3–7
IMAGE....................................................................3–8
COLORS.................................................................3–8
PROJECTION........................................................ 3–9
FREQUENCY .........................................................3–9
LANGUAGE .........................................................3–10
STORE?.................................................................3–10
SETTINGS............................................................ 3–10
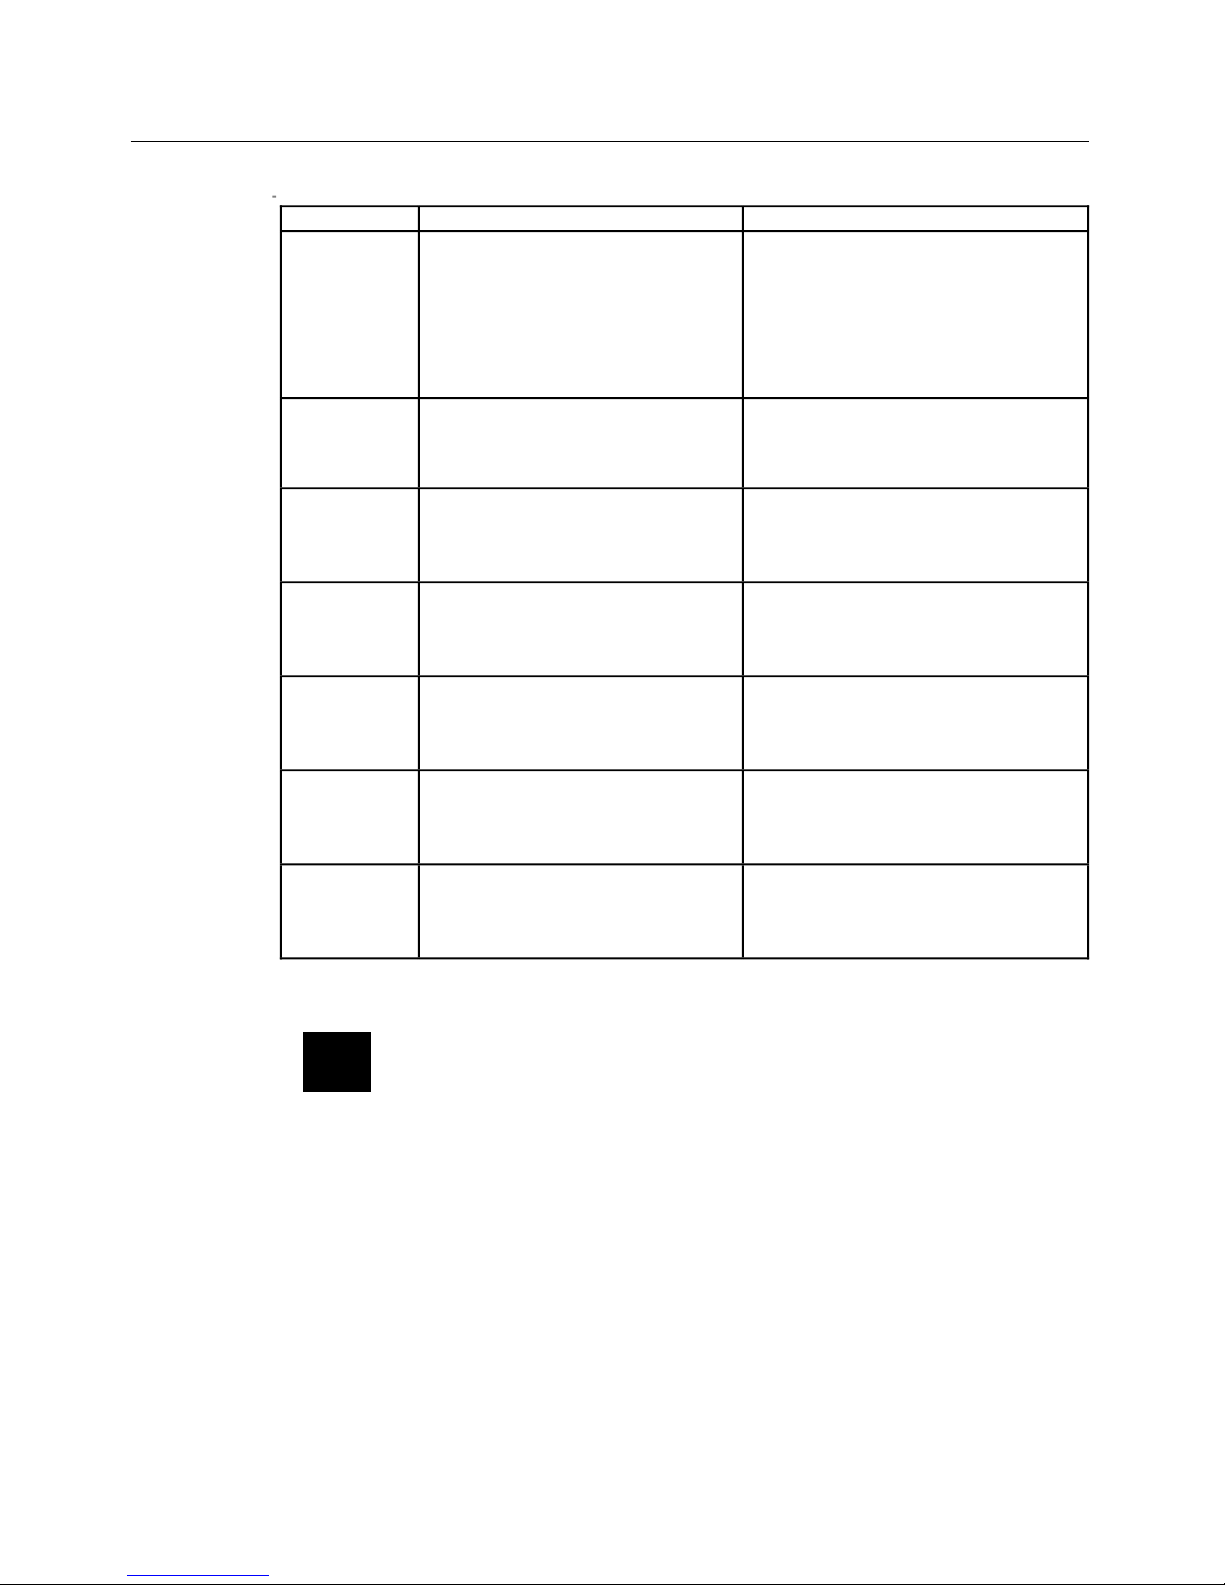
Warning and Alert Lights ..............................................3–11
OVERTEMP Warning Light.................................3–11
REPLACE LAMP Alert Light ................................ 3–12
Remote Control.............................................................3–13
MUTE Key ............................................................3–13
TEXT Key .............................................................3–14
REV, PAUSE and FWD Keys................................3–14
Page 5

Cleaning the Lens and Mirror .........................................4–1
General Maintenance .......................................................4–2
Switching Lamps......................................................4–2
Replacing Lamps ......................................................4–3
Changing Air Filters.................................................4–5
Changing the Remote Control’s Batteries ................4–9
Temperature Extremes ...........................................4–10
Troubleshooting Chart ....................................................5–1
Where to Get Help..........................................................5–4
Appendix A
Specifications
Appendix B
Accessories & Replacement Parts
Index
Chapter 4
Maintenance
Chapter 5
Troubleshooting
Page 6
User’s Guide • 1–1
Chapter 1 • Introducing the Proxima
®
Desktop Projector
Chapter 1
Introducing
the Proxima
Desktop
Projector
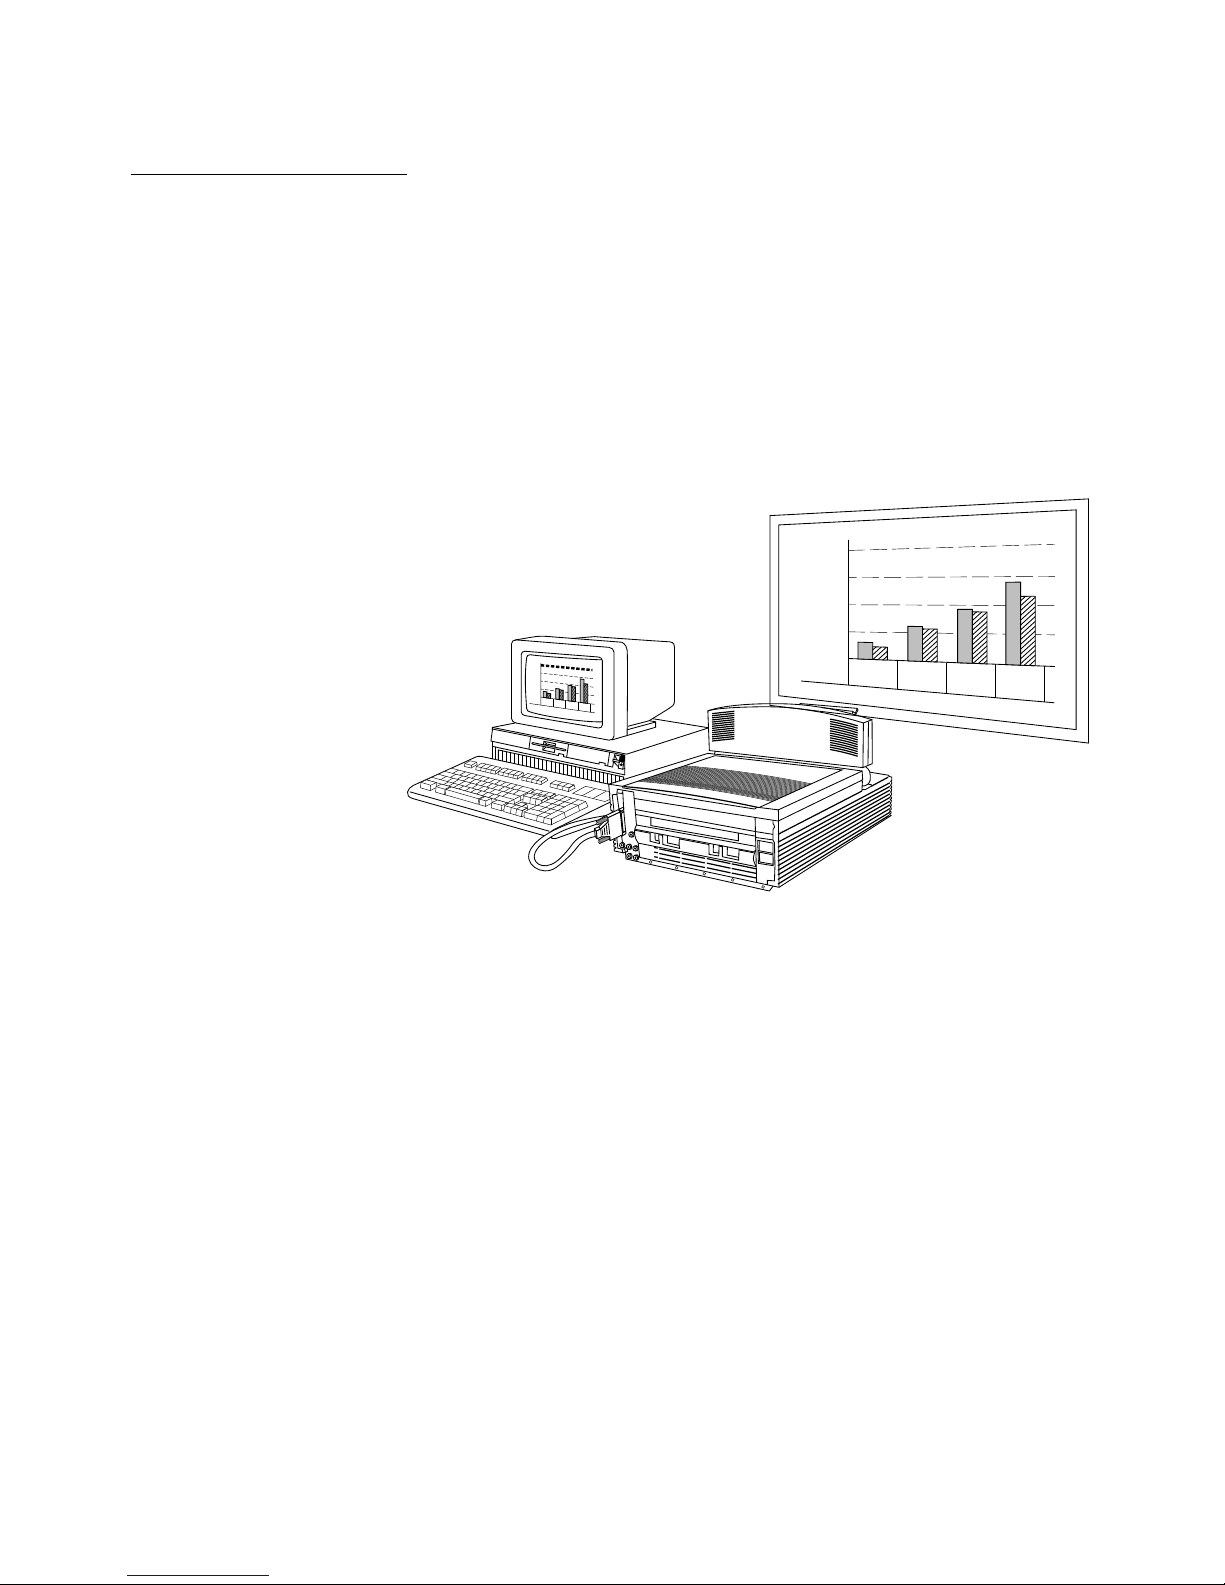
The Proxima® Desktop Projector™ family consists of portable,
color data and video LCD desktop projection products that make
sharing data and presenting information as easy as connecting
your computer to your monitor.
800
600
400
200
0
APR
MAY
JUN
JUL
800
600
400
200
0
APR
MAY
JUN
JUL
PROXIMA
Figure 1-1
The Proxima Desktop Projector in use
Page 7

1–2 • User’s Guide
Chapter 1 • Introducing the Proxima
®
Desktop Projector
This manual covers all of the Desktop Projector halogen models.
These projectors have many aspects in common. Unless otherwise
indicated, the information contained within this manual is
common to all models.
Where controls, operations, or other aspects differ between
models, the projectors will be distinguished with regard to video
compatibility. Models that support video will be referred to as
audio/video-enabled. Models that do not support video will be
referred to as audio-enabled.
All Proxima Desktop Projector halogen models come Cyclopscapable. Cyclops is an interactive pointer system that functions
like a cordless mouse and lets you control your computer and
software from the projection screen.
After you’ve opened the box and removed the Desktop Projector
and shrink-wrapped accessory packs, make sure you have all of the
items shown in Figure 1-2.
CAUTION! The Desktop Projector should be treated like any
other precision optical instrument. Handle it carefully.
☞
What’s in the
Box?
Cyclops
Interactive
Pointer
System
Page 8

User’s Guide • 1–3
Chapter 1 • Introducing the Proxima
®
Desktop Projector
Proxima Desktop
Projector
Remote Control
(A26)
Power Cord
(C1002–6)
VGA Video Y-Cable
(C454-6)
Macintosh Video
Y-Cable (C464-6)
Also included but not shown:
• Mac and VGA Video Terminators
• Dust Cover
• (2) AAA Alkaline Batteries
• User's Guide
• Product Registration Card
Composite
Video/Audio Cable*
(C497-6)
S-Video Cable*
(C466-6)
Computer Audio Cable*
(C498-6)
RCA "Y" Adapter*
(C496)
VIDEO
MENU
FREEZE
LAMP
<
REV
FWD
>
MUTE
P
AUSE
–
BRIGHTNESS
+
Blue keys = PC/MAC Remote software
TEXT
–
VOLUME
+
–
SYNC
+
CYCLOPS
* Audio/video-enabled models only
Figure 1-2
Items included with the Desktop Projector
The international version has three extra power cords for Europe
(part number C1003-6), Great Britain (part number C1011-6),
and Italy (part number C1012-6).
Page 9

1–4 • User’s Guide
Chapter 1 • Introducing the Proxima
®
Desktop Projector
Quick Start 1. Place the projector on a solid flat surface at a right angle
(perpendicular) to the projection screen, parallel to the floor.
2. Raise the cover assembly until it clicks into place.
3. Raise the mirror assembly into its fully open position.
For steps 4 through 7, follow the appropriate section for your
system.
Desktop Computers
4. Make sure that the computer and the monitor are turned off.
5. Unplug the monitor cable from the computer and attach it to
the MONITOR end of the “Y” cable.
6. Plug the “Y” cable’s COMPUTER (or CPU) end into the
computer’s monitor port.
7. Insert the “Y” cable’s LCD end into the projector’s
COMPUTER port.
If these steps complete your preliminary configuration, continue
with Step 8 at the bottom of the page.
Notebooks/Laptops
4. Make sure that the computer is turned off.
5. Plug the “Y” cable’s COMPUTER (or CPU) end into the
computer’s monitor port.
6. Insert the “Y” cable’s LCD end into the projector’s
COMPUTER port.
7. Attach the Macintosh or VGA video terminator to the “Y”
cable’s MONITOR end or plug in an external monitor.
8. Connect video and audio sources to the projector:
Page 10
User’s Guide • 1–5
Chapter 1 • Introducing the Proxima
®
Desktop Projector
✍
CAUTION: The lamp comes on automatically when you turn
on the projector. DO NOT LOOK DIRECTLY INTO THE
LENS WHEN THE LAMP IS ON! Your vision can be damaged
by the brightness of the light.
9. Plug in the projector. Turn on the projector and any external
monitor before you turn on the computer, so that the
computer properly senses the projector during its start-up
routine.
10.Rotate the projector’s focus ring until the title screen image is
clear and sharp.
Connector Function/Cable Connections
RS-232
For optional Cyclops system or
Presentation Control
Software
- Din 8-to-DB9 IBM serial data
cable (C936-6)
- Macintosh ADB data cable
(C470-6) for Cyclops
- Macintosh serial data cable
for Mac Remote (C934-6)
Installation instructions included
with Cyclops system or
Presentation Control software
COMPUTER
Connects computer video to
projector
- VGA video “Y” cable (C454-6)
- Macintosh video “Y” cable
(C464-6)
Projector: LCD
Monitor: MONITOR
IBM: COMPUTER/VGA
Mac: CPU/MAC II
S-VHS
(Audio/video enabled
models)
S-VHS or S-Video input
- S-Video cable (C466-6)
Projector: S-VHS
- Mini Din 4
Source: VIDEO OUT
- Mini Din 4
VIDEO IN
(Audio/video enabled
models)
Video input from NTSC, PAL, or
SECAM
- Composite video/audio cable
(C497-6)
Projector: VIDEO IN
- Yellow RCA plug
Source: VIDEO OUT
- Yellow RCA plug
AUDIO IN
Audio input from
NTSC/PAL/SECAM/S-VHS
source or microphone
- Composite video/audio cable
(C497-6)
Projector: L/R AUDIO IN
- White (L)/Red (R) RCA plugs
Source: L/R AUDIO OUT
- White (L)/Red (R) RCA plugs
COMPUTER
AUDIO IN
Audio input from computer or
microphone
- Computer audio cable
(C498-6)
Projector: COMPUTER AUDIO IN
- RCA plugs
Source: AUDIO OUT
- Mini jack
AUDIO OUT
Connects an external speaker
system
- Computer audio cable (C498 -
6)
Projector: AUDIO OUT
- Mini jack
External Amplifier: L/R AUDIO IN
- L/R RCA plugs
Page 11
1–6 • User’s Guide
Chapter 1 • Introducing the Proxima
®
Desktop Projector
Control Panel
Brightness
Sync
Volume
Video
Menu/
Lamp
O
VER
TEMP
REPLA
CE LAMP
Figure 1-3
The control panel
CONTROL FUNCTION
VOLUME
Adjusts audio level of the projector's internal speakers.
BRIGHTNESS Increases/decreases brightness of the projected image.
SYNC Compensates for fine variations in the timing of the
computer video signal.
VIDEO
Switches between computer video, NTSC/PAL/SECAM
video, or S-VHS.
MENU/
Press once to display the Levels menu.
Press again to display the Setup menu.
Press a third time to exit the Menu window.
Hold down for several seconds to initiate (optional)
Cyclops light measurement sequence.
Hold down when powering up projector to disable
Cyclops.
LAMP
Toggles the projection lamp ON/OFF.
ARROWS Make small adjustments to the projected image's position.
Changes Menu Window settings when in MENU mode.
- Press the Right/Left arrow key to move to the setting.
- Press the Up/Down arrow key to change the setting.
Page 12
User’s Guide • 1–7
Chapter 1 • Introducing the Proxima
®
Desktop Projector
Warning and Alert Lights
Warning and alert lights on the control panel indicate the
Desktop Projector’s operating condition.
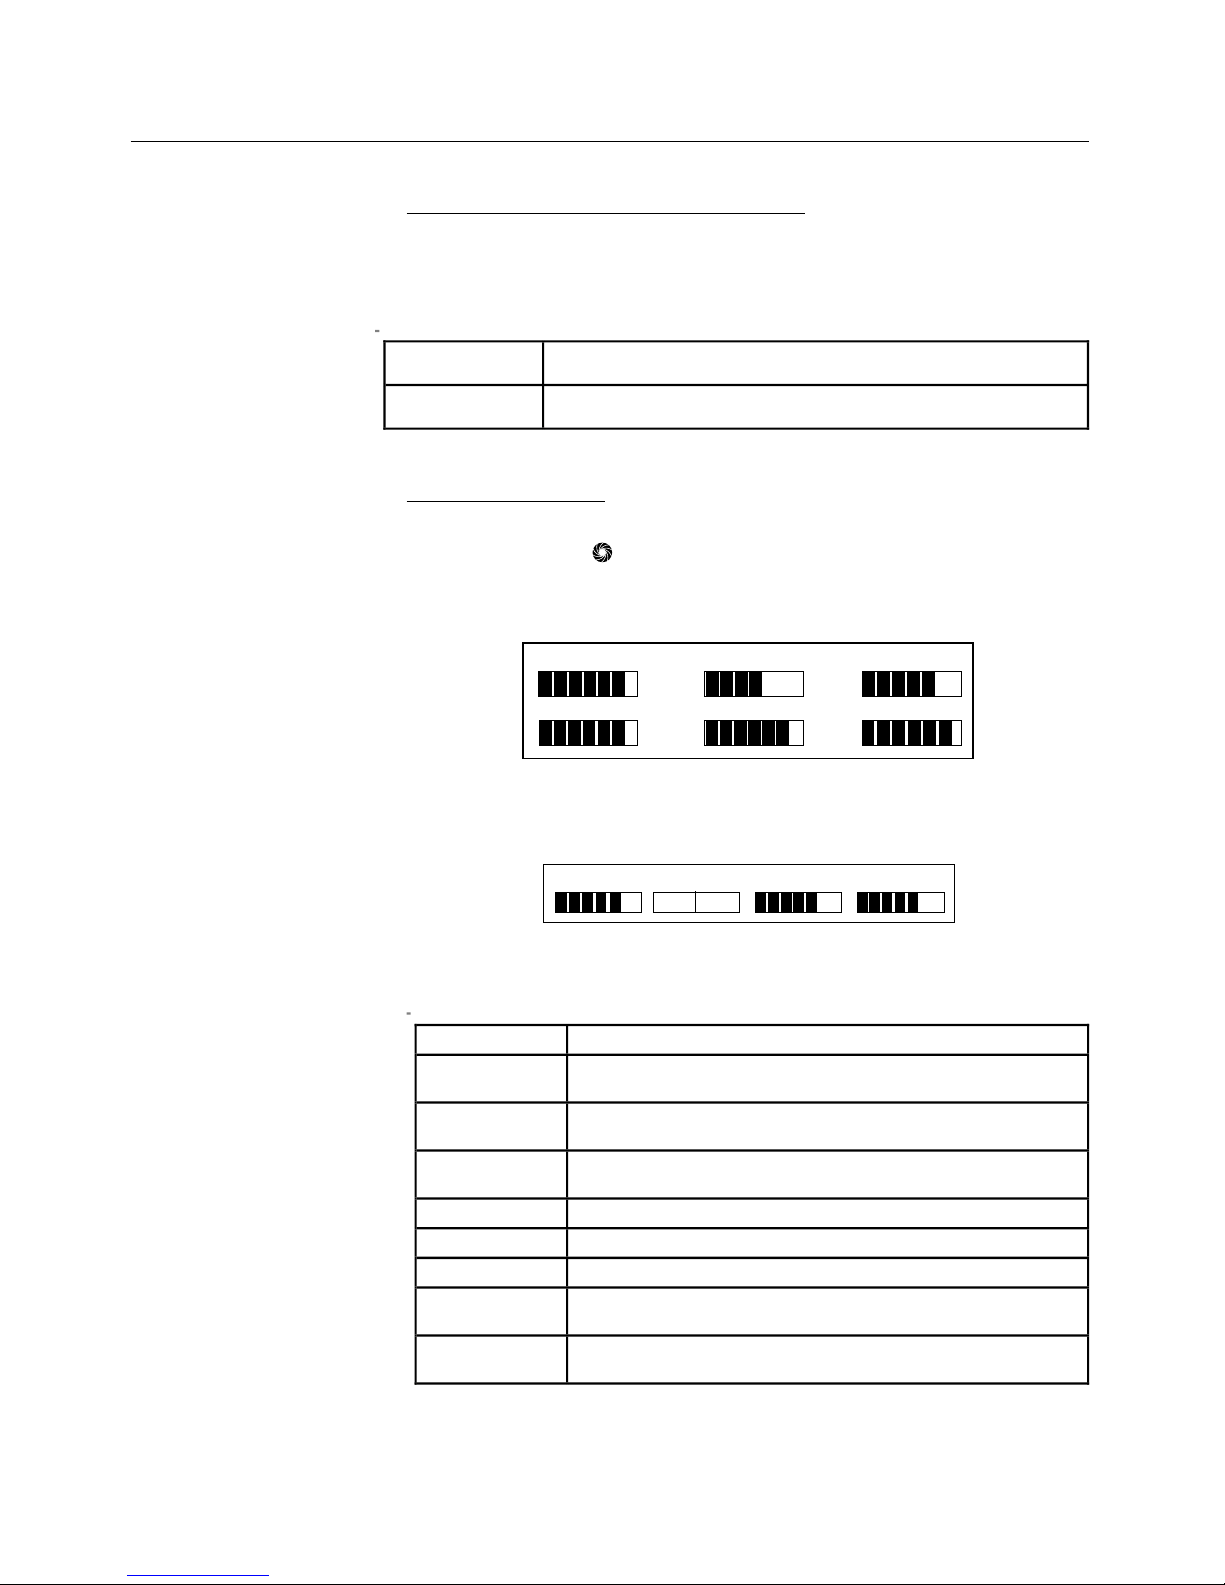
Levels Menu
Press the MENU/ key once to display the Levels Menu. This
menu varies automatically based on the type of video source
displayed.
BRIGHTNESS
SYNC
VOLUME
RED
GREEN
BLUE
Figure 1-4
Levels Menu for computer video
BRIGHTNESS
R TINT G
SIG LEVEL
VOLUME
Figure 1-5
Levels Menu for NTSC/PAL/SECAM and S–VHS video
OVERTEMP Illuminates in the unlikely event the projector reaches
an over–temperature condition.
REPLACE
LAMP
Illuminates if the active and/or spare projector lamp
burns out.
CONTROL FUNCTION
BRIGHTNESS Increases/decreases the overall brightness of the
projected image.
SYNC Compensates for fine variations in the timing of the
computer video signal.
VOLUME Adjusts the audio level of the projector’s internal
speakers.
RED Adjusts the red color signal for computer video.
GREEN Adjusts the green color signal for computer video.
BLUE Adjusts the blue color signal for computer video.
TINT Adjusts the Red and Green color balance for
NTSC/PAL/SECAM/S-VHS video.
SIG LEVEL Adjusts the difference between light and dark
segments of the projected image.
Page 13

1–8 • User’s Guide
Chapter 1 • Introducing the Proxima
®
Desktop Projector
Setup Menu
Press the MENU/ key a second time to display the Setup Menu.
SOURCE IMAGE COLORS PROJECTION
FREQUENCY LANGUAGE STORE? SETTINGS
VGA640x480 NORMAL 226981 FORWARD
800 ENGLISH NO FACTORY
Figure 1-6
Setup Menu
CONTROL FUNCTION
SOURCE Lists the name of the input source detected by the
projector.
Accessible in modes where other choices are
available, based on the type of signal the projector
is receiving.
IMAGE Switches between NORMAL and REVERSE modes.
REVERSE is used primarily for viewing text
screens.
COLORS Selects the color mode most suitable for the
projected image.
PROJECTION Flips the displayed image for use with a rear
projection screen.
FREQUENCY Synchronizes the projector with the video source.
Note: Adjust SYNC before changing FREQUENCY.
LANGUAGE Switches the language set used in the Menu
Window: English, French, German, Italian, and
Spanish.
STORE? Saves settings currently displayed in both Menus.
SETTINGS Retrieves factory–set or stored settings, or saves
the current settings.
Page 14

User’s Guide • 1–9
Chapter 1 • Introducing the Proxima
®
Desktop Projector
Remote Control
The Remote Control contains all the key functions available on
the Control Panel and provides access to additional functions not
available on the Control Panel or through the Menu Window.
Blue keys = PC/MAC Remote soft
w
VIDEO
– SYNC +
MENU
CYCLOPS
LAMP
- BRIGHTNESS + - V OLUME +
< REV
PAUSE FWD >
MUTE
TEXT
Active Matrix
FREEZE
Figure 1-7
Remote control unit
CONTROL FUNCTION
MUTE Toggles sound OFF/ON to the internal
and external speakers
TEXT Toggles between VGA text mode of
640 x 400 lines and DOS text mode
of 720 x 400 lines. DOS text is
easier to view when using Text mode.
REV
PAUSE
FWD
Works with Proxima’s Presentation
Control Software, which can be used
to sequence electronic slides.
Detailed instructions are included
with the software.
FREEZE Freezes the image. Press it a second
time to continue.Use this to skip
over a slide, or to do a freeze-frame
during video or animation.
Page 15

1–10 • User’s Guide
Chapter 1 • Introducing the Proxima
®
Desktop Projector
Getting Help
For technical support, please contact your dealer or call Proxima
at:
U.S.A. and Canada Outside U.S.A. and
Canada
Europe
(619) 457-5500
Press 1 for
Customer Service.
(619) 457-8542
(fax)
(619) 457-5500
Press 1 for Customer
Service.
(619) 622-0173 (fax)
+31-43-358-5200
+31-43-358-5201
(Fax)
Page 16
User’s Guide • 2–1
Chapter 2 • Detailed Setup
Chapter 2
Detailed
Setup
Your Proxima
Desktop
Projector
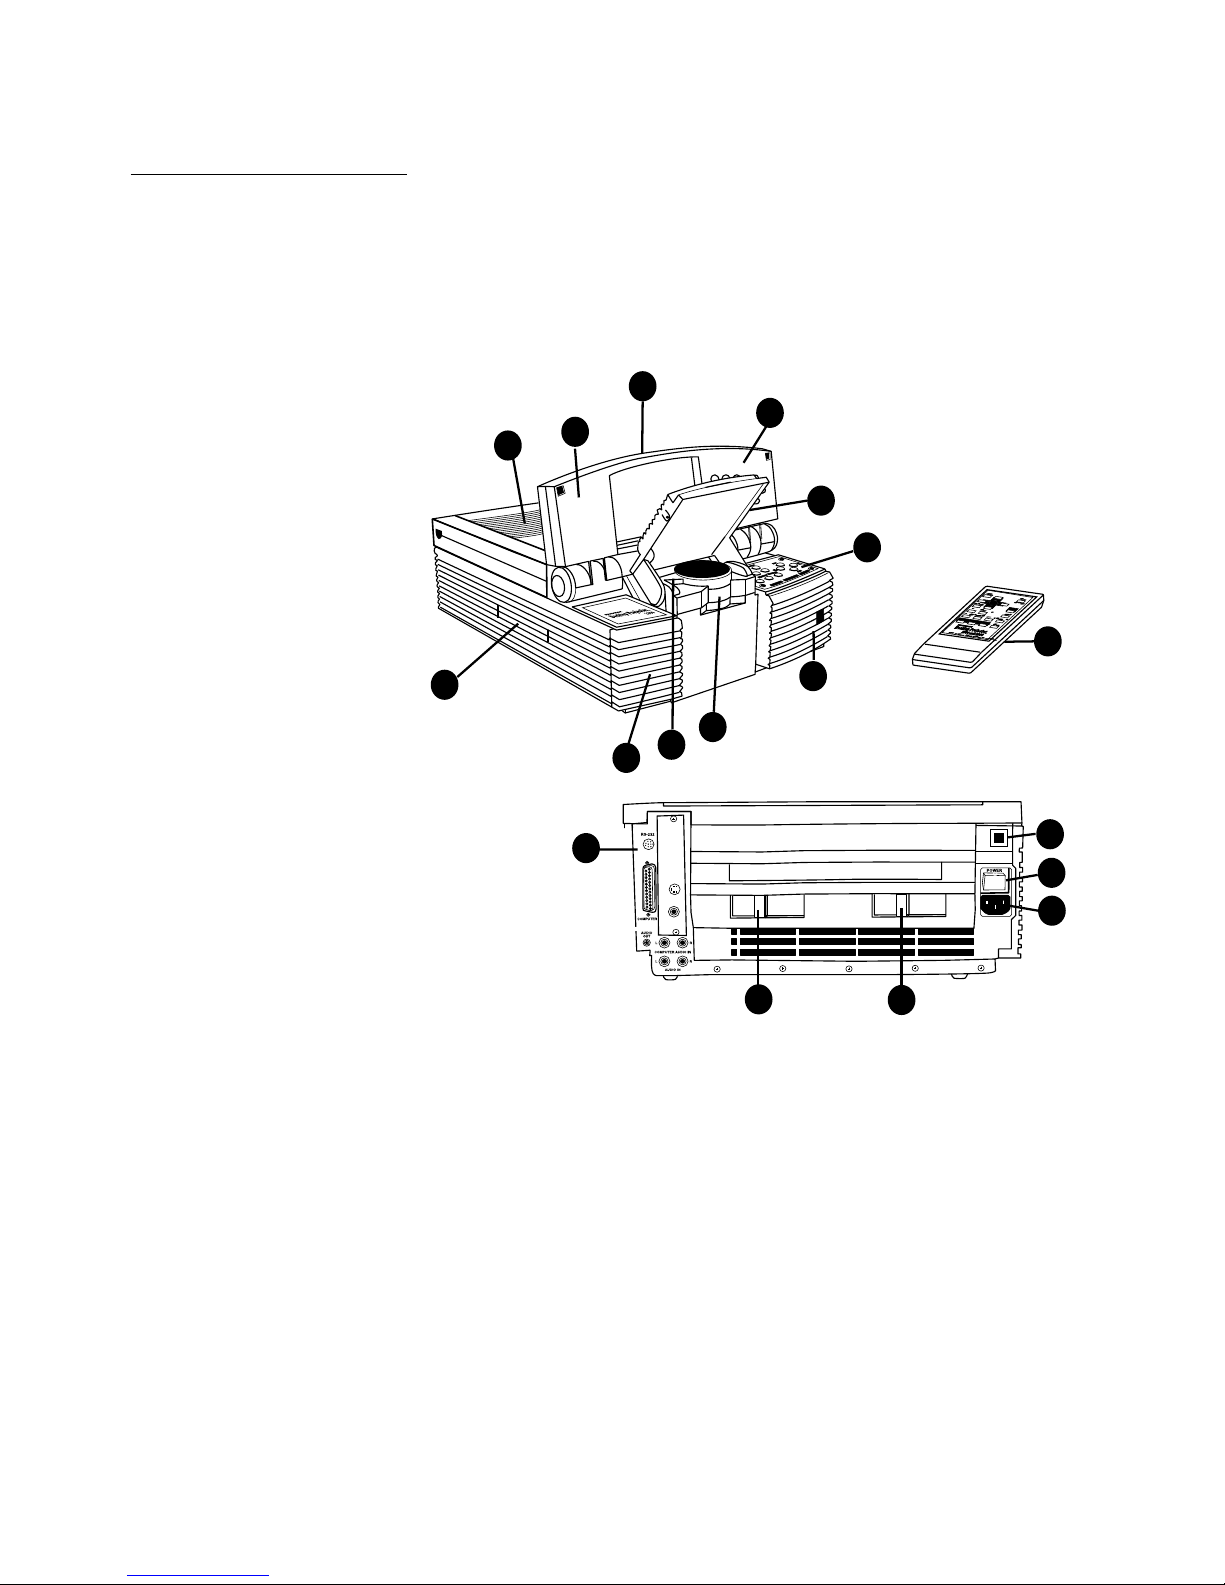
Before you begin, examine the components of the projector.
4
1
2
3
5
9
7
6
VIDEO
MENU
FREEZE
LAMP
<
REV
FWD
>
MUTE
P
AUSE
–
BRIGHTNESS
+
Blue keys = PC/MAC Remote software
TEXT
–
VOLUME
+
–
SYNC
+
CYCLOPS
12
11
3
13
14
15
7
8
10
16
S-VHS
VIDEO IN
Figure 2-1
The Proxima Desktop Projector and Remote Control
(1) Control Panel (9) Projection Lens Assembly
(2) Mirror Assembly and Focus Ring
(3) Internal Speakers (10) Remote Control
(4) Cover Assembly (11) Connector Panel
(5) Top Air Intake Filter (12) Lamp Selector
(6) Recessed Handle (13) Lamp Chamber Latch
(7) Front Air Intake Filters (14) Power Cord Receptacle
(8) Cyclops Lens (15) AC Power Switch
(16) Circuit Breaker Reset Button
Page 17
2–2 • User’s Guide
Chapter 2 • Detailed Setup
Opening the Projector
1. Place the projector on a solid, flat surface at a right angle
(perpendicular) to the projection screen and parallel to the
floor. If you’re using a media cart, make sure the wheels are
locked to prevent it from moving.
Perpendicular to the
projection screen
Parallel to the floor
Top View
Side View
Projection Screen
Figure 2-2
Positioning the Desktop Projector
Getting
Started
Page 18
User’s Guide • 2–3
Chapter 2 • Detailed Setup
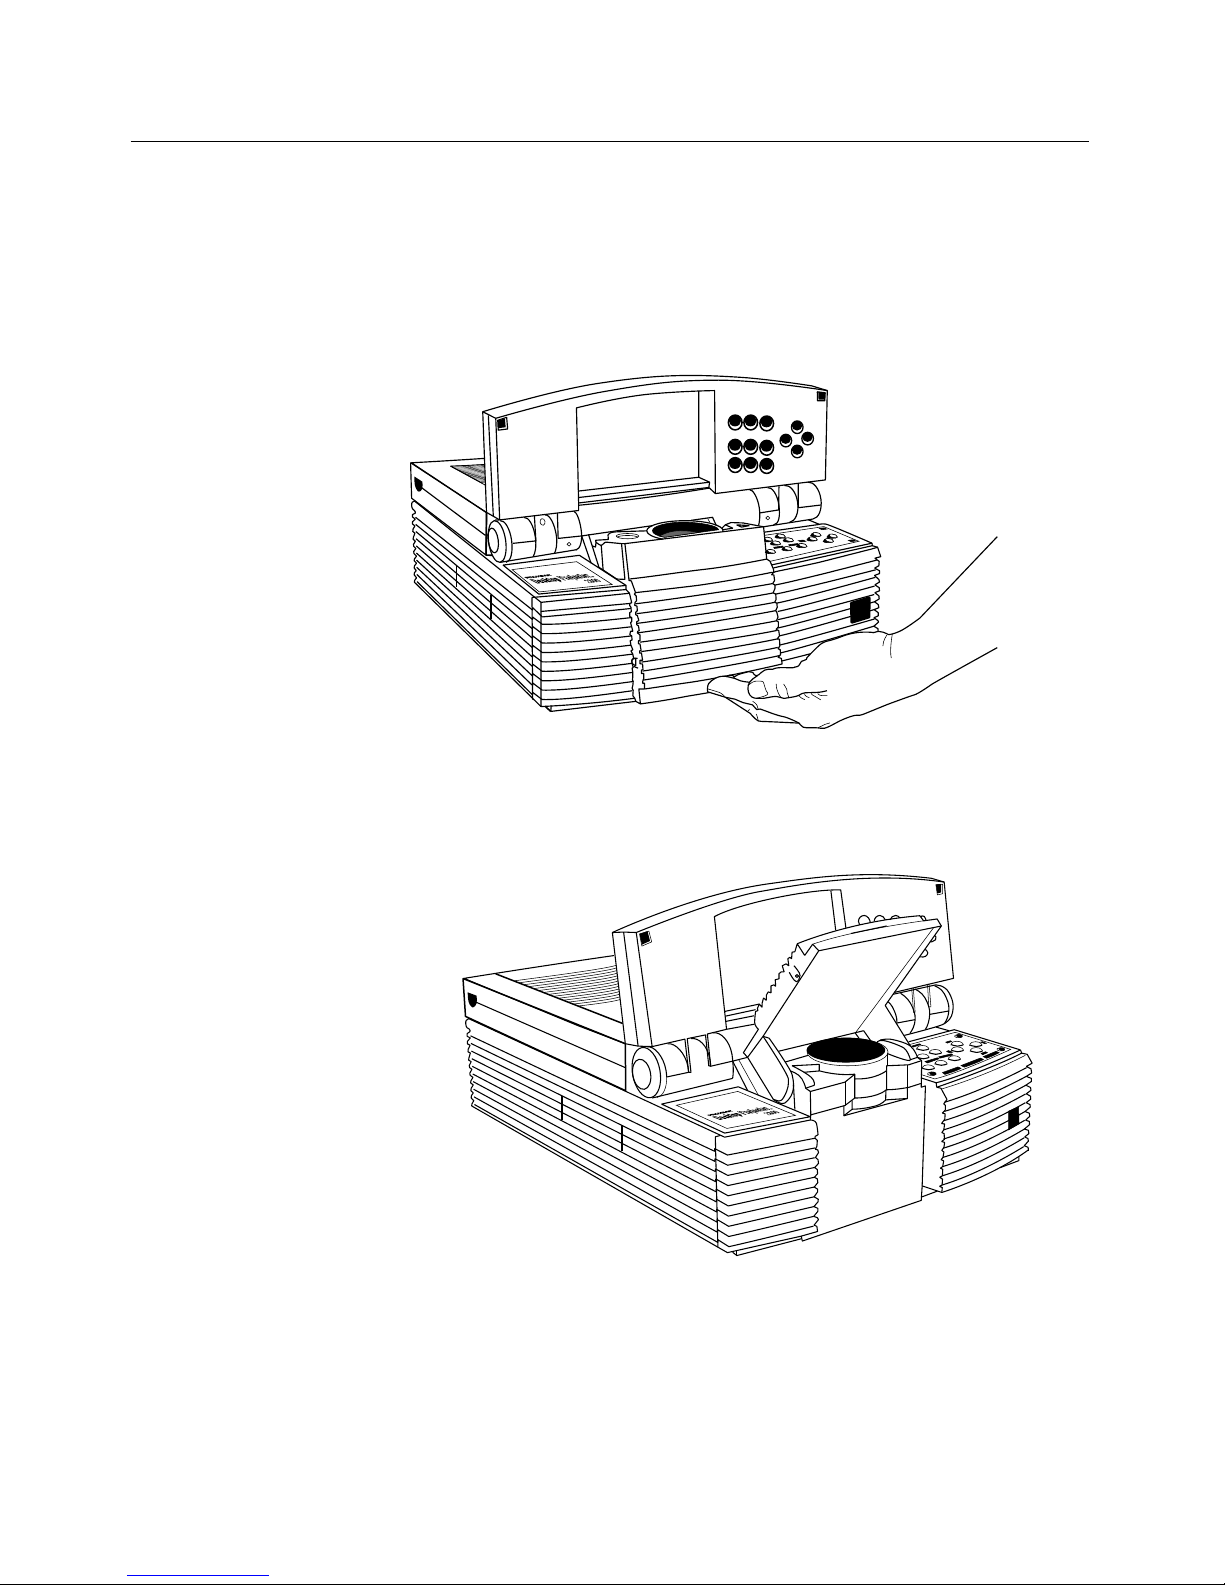
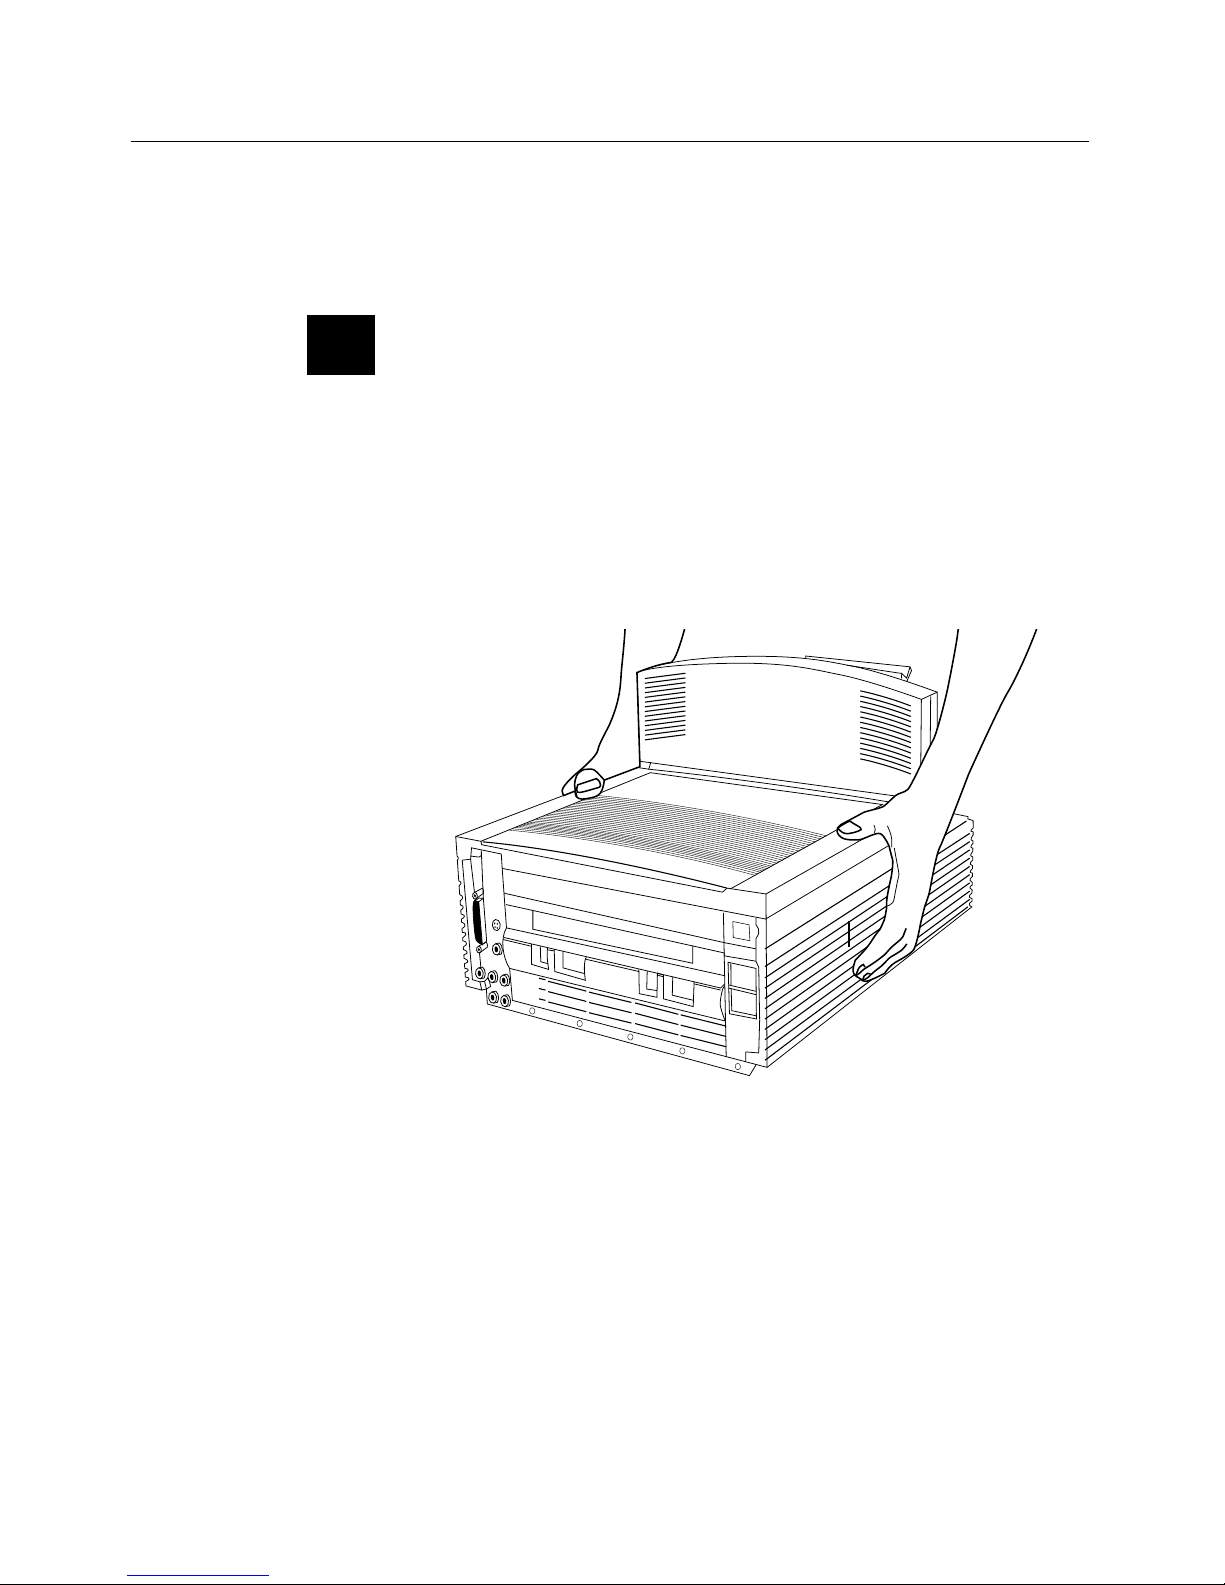
2. Grasp the front edge of the cover assembly at the upper front
of the projector and raise it until it reaches the first stop. You
can use the projector in this position, or raise the cover
assembly to the second stop; whichever you prefer.
Figure 2-3
Opening the cover assembly
CAUTION! The Desktop Projector's cover and projection
mirror assemblies have been designed to limit over-extension.
Applying excessive pressure can damage the projector.
☞
Page 19
2–4 • User’s Guide
Chapter 2 • Detailed Setup
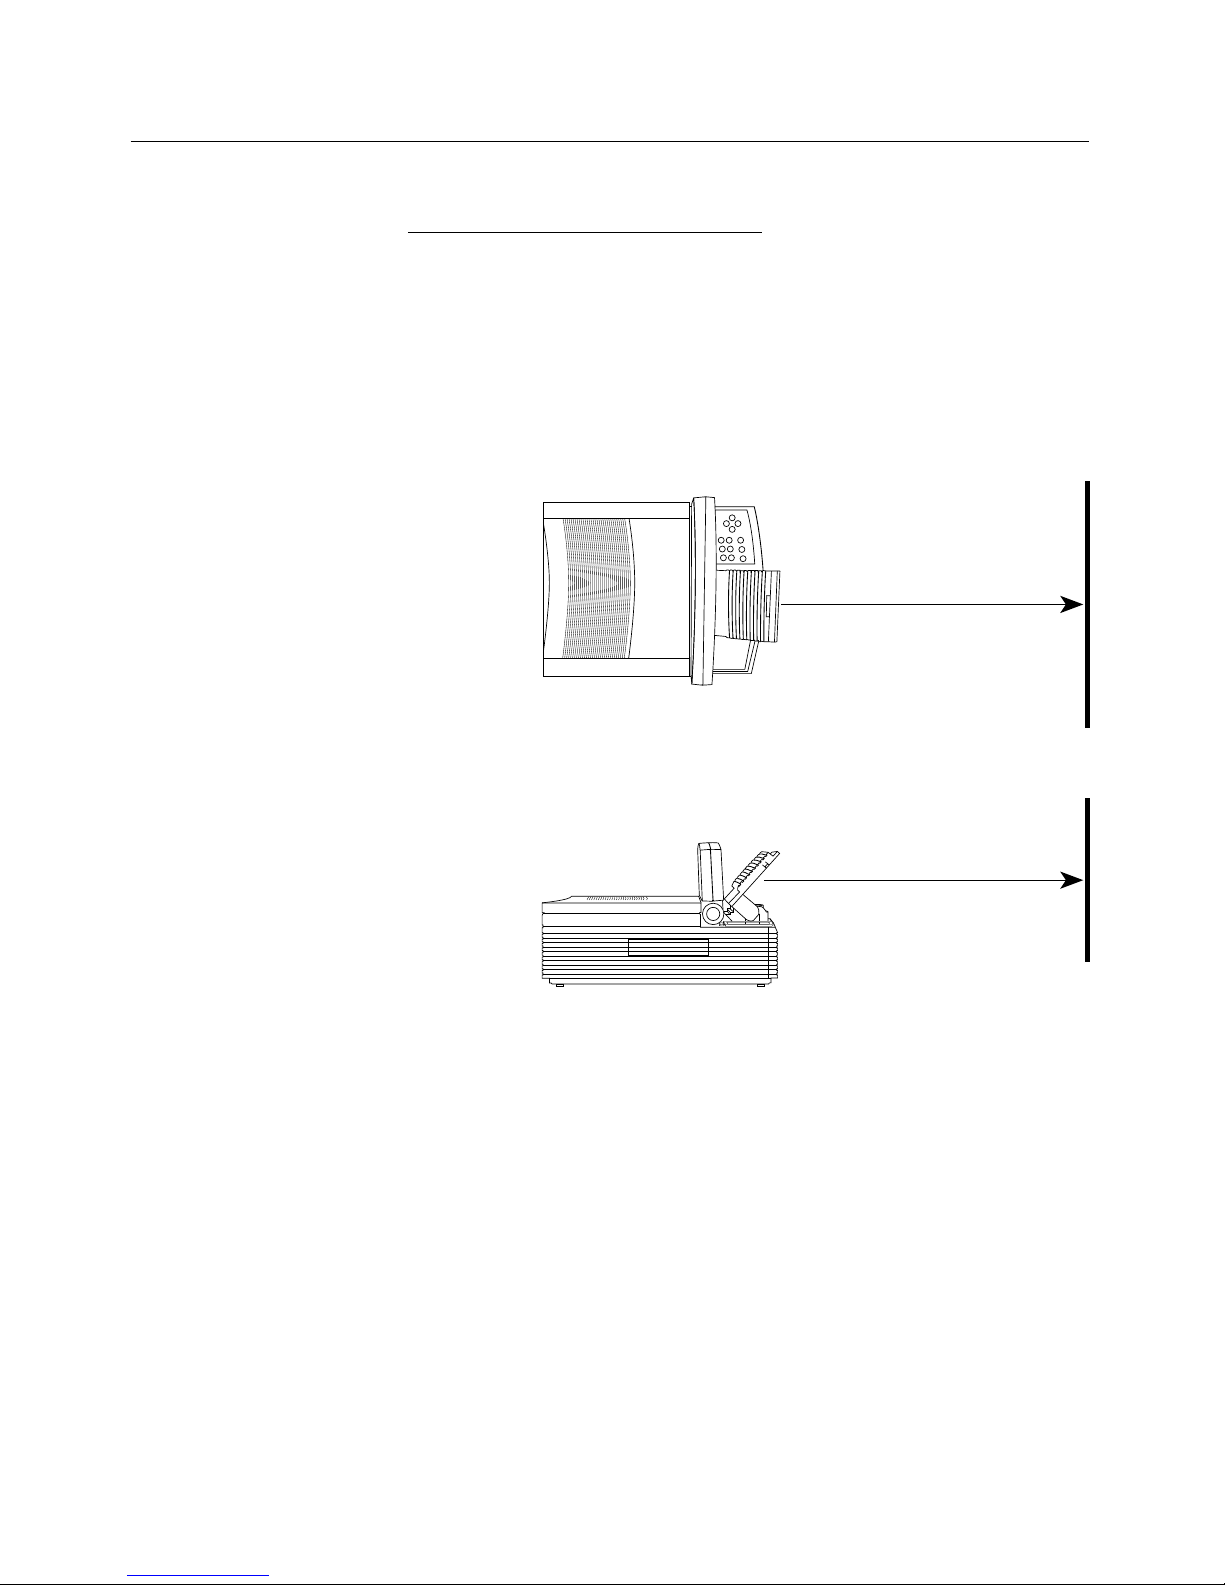
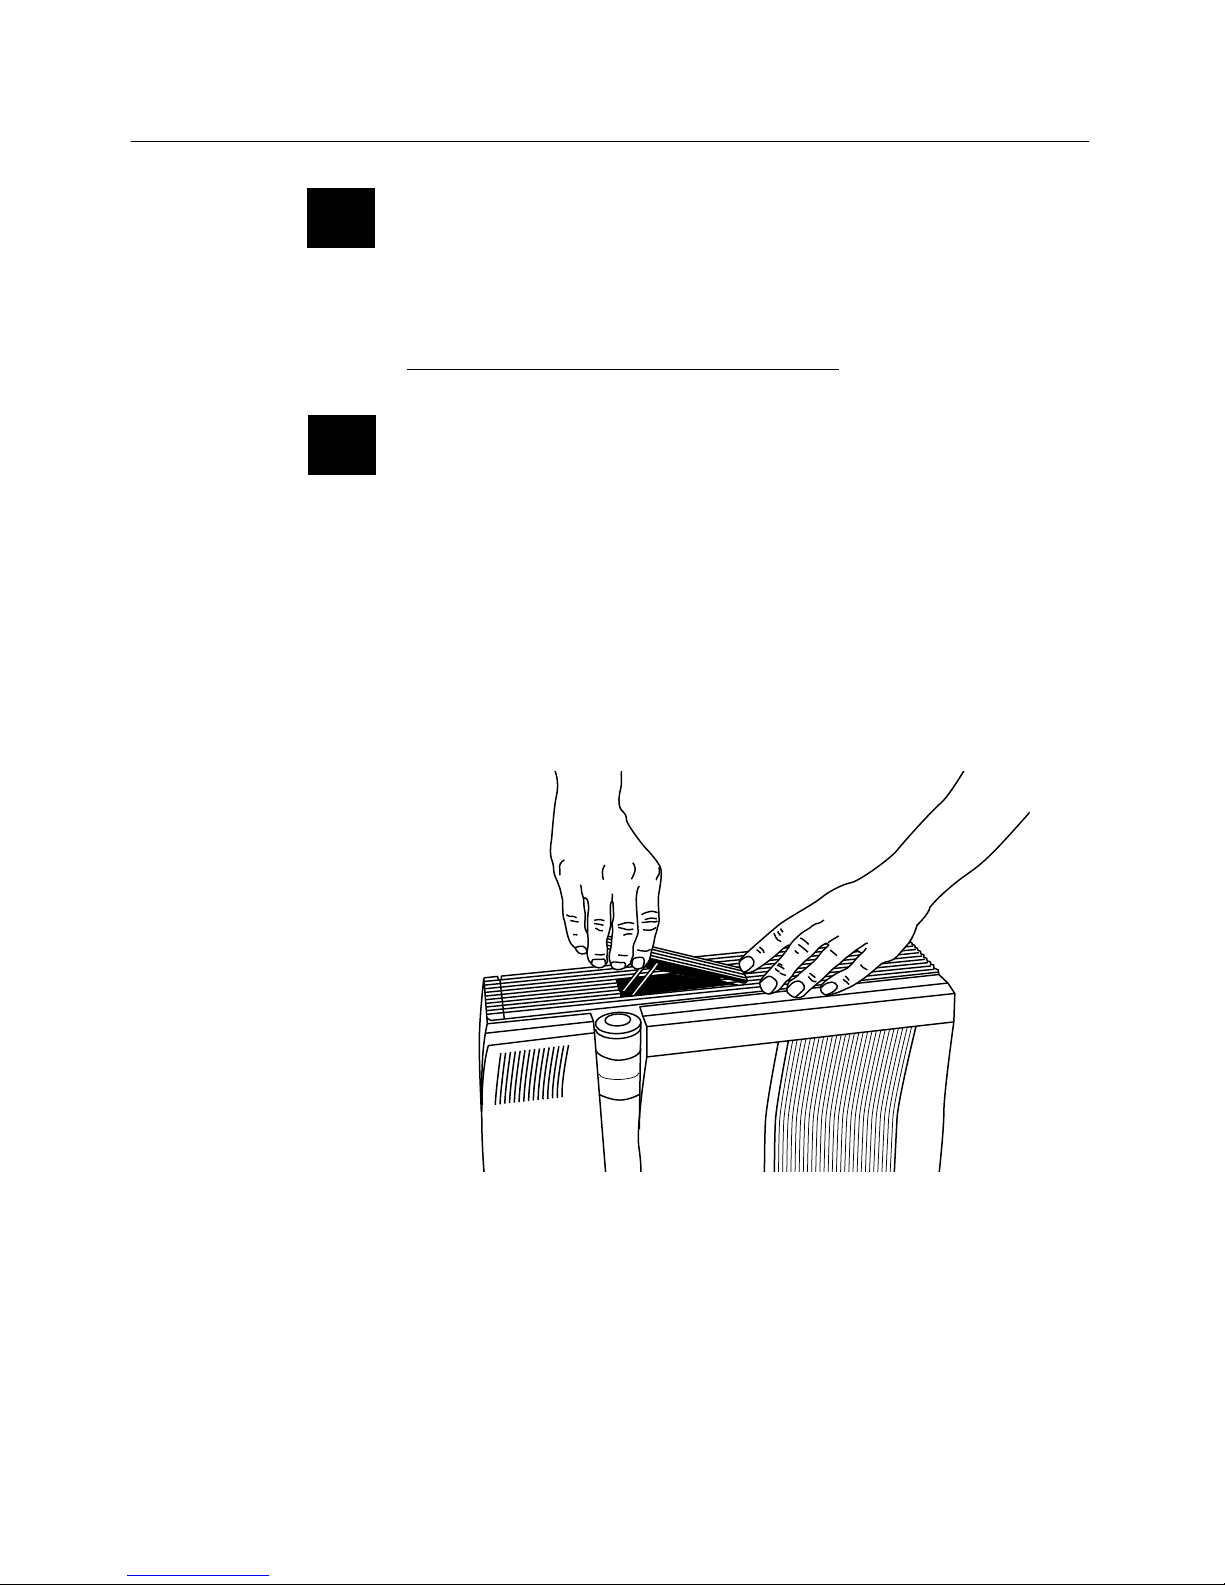
3. Place your fingers beneath the mirror assembly at the lower
center of the front panel and raise it until it reaches a 45˚ angle
(approximately) relative to the top of the lens assembly.
Figure 2-4
Raising the mirror assembly
Figure 2-5
The Desktop Projector in the open position
Page 20
User’s Guide • 2–5
Chapter 2 • Detailed Setup
4. After you turn on the projector and computer, if you want to
raise or lower the projected image, just move the mirror
assembly to the appropriate angle.
CAUTION! DO NOT use the assembly cover or projection
mirror as a handle. TO AVOID DAMAGE, YOU MUST
COMPLETELY CLOSE THE PROJECTOR BEFORE
MOVING IT.
If you must move the projector while it is open, grasp it securely
at the sides by the lower part of the housing to support the weight
of the unit.
PROXIMA
Figure 2-6
Moving the projector when open
Using an AV Tripod
On the bottom of the projector there is a connector that you can
connect to a tripod. Use only a heavy-duty, industrial audio-visual
tripod that can support at least 25 pounds.
☞
Page 21

2–6 • User’s Guide
Chapter 2 • Detailed Setup
☞
CAUTION! Be extremely careful when you use the projector
with a tripod. You should observe the following precautions:
• You can mount the projector on a tripod by yourself.
However, it is easier to do this if someone else is holding the
projector while you connect the tripod.
• Make sure the tripod’s legs and camera mount are securely
locked.
• Do not place the tripod and projector in any pathways that
you or your audience will be using during the presentation.
• Make sure that all cables are secured and out of the way. In
particular, be extremely careful of the power cord and any
extension cords.
To attach the tripod to the projector:
1. Grasp the projector by the handle and stand it on its side.
2. Holding the tripod sideways, screw its threaded camera mount
into the connector on the bottom of the projector.
3. Extend and lock the tripod’s legs.
4. Grasp the projector by its handle and place your other hand
under the unit (the side opposite the handle). Lift and turn the
projector to its normal operating position on top of the tripod.
Closing the Projector
To close the projector, reverse the opening procedures.
1. Gently rotate the projection mirror assembly forward and
down until it is in the fully closed position.
2. Gently rotate the hinged cover assembly forward and down
until it is in the fully closed position.
Page 22
User’s Guide • 2–7
Chapter 2 • Detailed Setup
CAUTION! Forcing the mirror and hinged cover assembly to
snap into place may damage the mirror assembly. Do not attempt
to close the projector by only moving the cover assembly.
Transporting the Projector
CAUTION! Do not move or transport the Desktop Projector
without securely closing the projector and disconnecting all of the
cables.
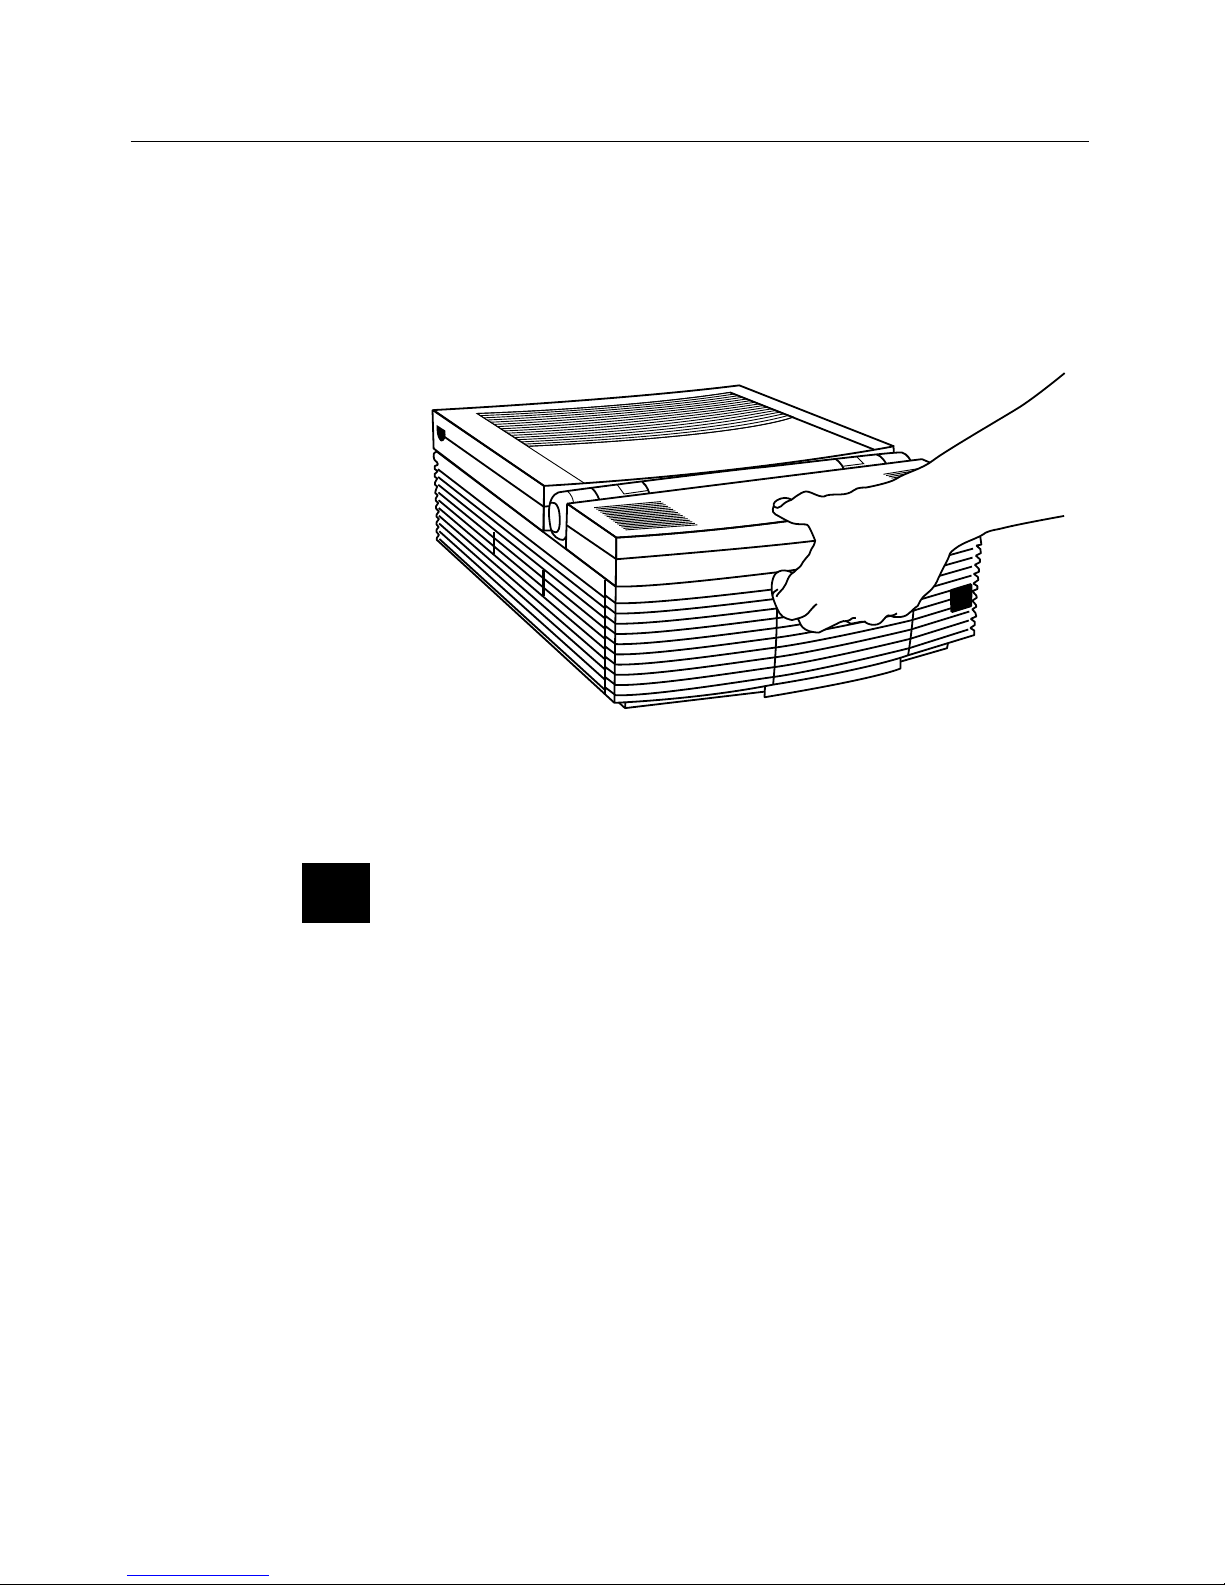
The Desktop Projector has a recessed carrying handle located in
one of the side panels.
1. Push in on either end of the handle. Pull the handle up.
2. Release the handle. The spring-loaded mechanism will retract
it back into the body of the projector.
The projector has protective feet on the side opposite the handle
as well as on the bottom.
Figure 2-7
Accessing the handle
☞
☞
Page 23
2–8 • User’s Guide
Chapter 2 • Detailed Setup
Take a moment to look at the projector’s rear connector panel.
RS-232
COMPUTER AUDIO IN
AUDIO IN
L R
L R
AUDIO
OUT
Audio/Video-
enabled models
RS-232
Audio-enabled
models
COMPUTER
COMPUTER
S-VHS
VIDEO IN
1
2
3
1
2
4
5
6
7
COMPUTER AUDIO IN
L R
L R
5
6
4
5
AUDIO
OUT
3
Figure 2-8
The Connector Panels
Note: If you would like to add video to audio-enabled models,
you can order the Video Adapter kit (A195); see Appendix B for
ordering information.
Connecting
the Projector
ITEM DESCRIPTION
1 RS-232 For using optional Cyclops system or Presentation
Control Software.
2 COMPUTER Connects computer video to the projector.
3 AUDIO OUT
Stereo output to external powered speakers or external
sound system.
4 AUDIO IN
Left and right inputs from VCR or other audio source, or
amplified or wireless microphone.
5 COMPUTER
AUDIO IN
Left and right inputs from computer audio source, or
amplified or wireless microphone.
6 VIDEO IN
NTSC/PAL/SECAM input from VCRs, laserdisc players,
and camcorders (Audio/video-enabled models only).
7 S-VHS
Input from S-VHS or S-video source (Audio/video-enabled
models only).
Page 24

User’s Guide • 2–9
Chapter 2 • Detailed Setup
COMPUTER
The video Y-cable allows you to connect your computer to both
the Desktop Projector and to a separate computer monitor, so
that you can view computer video output on the monitor and
projection screen simultaneously.
Desktop Computers
The same procedure is used to connect a PC or a Macintosh to
your projector. Use the Y-cable appropriate for your system.
Figure 2-9
VGA and Macintosh connections
1. Make sure that the computer and monitor are turned off.
2. Unplug the monitor cable from your computer’s video
monitor port and attach it to the MONITOR end of the
Y-cable.
Note: To connect your desktop computer without a monitor,
connect one of the supplied video terminators to the MONITOR
end of the Y-cable. Use the appropriate terminator for your
system.
3. Locate the Y-cable's common end, marked CPU/MAC II for
Macintosh systems and COMPUTER/VGA for IBM–
compatibles. Plug it into the computer's monitor port.
VGA
(C454–6)
Macintosh
(C464–6)
Page 25

2–10 • User’s Guide
Chapter 2 • Detailed Setup
4. Insert the Y-cable’s large, 25–pin connector (marked LCD)
into the Desktop Projector's COMPUTER port.
MONITOR
COMPUTER
/VGA
LCD
PROXIMA
Figure 2-9
VGA connections
MONITOR
MAC II/CPU
LCD
PROXIMA
Figure 2-10
Macintosh connections
Page 26

User’s Guide • 2–11
Chapter 2 • Detailed Setup
Notebooks/Laptops
Use the Y-cable appropriate for your system. For IBM compatibles, use part number C454-6; for Macintosh systems, use
part number C464-6. If you are using your notebook or laptop
computer with an external monitor, follow the procedure
described in the section titled Desktop Computers.
1. Make sure that the computer is turned off.
2. Locate the Y-cable’s common end, marked CPU/MACII for
Macintosh systems or COMPUTER/VGA for IBM
compatibles. Plug it into the computer’s monitor port.
3. Insert the Y-cable’s large, 25-pin connector marked LCD into
the projector’s COMPUTER port.
4. Attach the appropriate video terminator to the MONITOR
end of the Y-cable. For IBM compatibles, use part number
C936; for Macintosh systems, use part number C935.
Note: If your Desktop Projector is unable to project an image
at the same time your laptop monitor displays an image, refer to
your laptop documentation for information on switching between
the internal screen and the video port.
Special Configurations
If your computer has an internal monitor but no external video
capability (such as Macintosh Performa 575, PowerMac 5200,
and certain PowerBooks), you need a video adapter card in order
to attach the projector.
Setup for a third-party adapter is identical to the procedures
outlined in the previous section Desktop Computers. Contact your
dealer, Proxima Customer Service, or third-party supplier for
more information about an appropriate video adapter.
Page 27

2–12 • User’s Guide
Chapter 2 • Detailed Setup
RS–232
The RS–232 port allows you to use the optional Cyclops
interactive pointer system or the Proxima Presentation Control
Software. Instructions for connecting the appropriate serial or
ADB cables are included with each of these products.
VIDEO IN
Audio/video-enabled models can project video from NTSC, PAL
or SECAM sources (VCRs, laserdisc players, and video
recorders).
VIDEO RECORDER – VCR
VIDEO OUT
AUDIO OUT
PROXIMA
Figure 2-11
The Desktop Projector connected to a video source
Note: If you would like to add video to audio-enabled models,
you can order the Video Adapter Kit (A195); see Appendix B for
ordering information.
Page 28

User’s Guide • 2–13
Chapter 2 • Detailed Setup
To connect an NTSC, PAL, or SECAM source to your Desktop
Projector:
1. The composite audio/video cable (C497–6) is made up of 3
cables with yellow, red, and white RCA plugs. Insert the
yellow RCA plug into the circular connector on your
camcorder, laserdisc player, or VCR marked VIDEO OUT,
TO MONITOR, or something similar.
2. Insert the other yellow RCA plug into the projector's VIDEO
IN port.
The red and white cables are for audio input from the video
source. Refer to the AUDIO IN section later in this chapter.
S–VHS
Audio/video-enabled models can project video from an
S-VHS or S-Video source.
1. Connect one end of the S-Video (Y-C) cable (C466–6) to your
video source connector marked VIDEO OUT, TO
MONITOR, or something similar. The cable has identical
round 4-pin connectors on either end.
2. Connect the other end of the cable to the Desktop Projector's
input connector marked S-VHS.
Note: With the installation of an optional Video Adapter Kit
(A195), audio-enabled models can also display video images from
an NTSC, PAL, or SECAM source. Appendix B explains how to
order accessories such as the adapter kit.
Page 29

2–14 • User’s Guide
Chapter 2 • Detailed Setup
COMPUTER AUDIO IN
The COMPUTER AUDIO IN connector allows all Desktop
Projector models to receive audio input from a computer or a
microphone.
Connecting Your Computer’s Audio
1. Insert the mini jack end of the computer audio cable (C498-6)
into the AUDIO OUT connector of a Macintosh or the sound
card of an IBM compatible.
2. Insert the RCA jacks at the other end of the computer audio
cable into the projector’s left and right COMPUTER AUDIO
IN connectors.
AUDIO IN
All Desktop Projector models have left and right stereo connectors
for audio input from VCRs, laserdisc players, and other video
equipment, or from a microphone.
Connecting a Video Audio Source
The composite audio/video cable (C497-6) is made up of 3 cables
with yellow, red, and white RCA plugs.
1. Insert a white RCA plug into your video source’s left AUDIO
OUT connector. Insert the other white RCA plug into the
projector's left AUDIO IN port.
2. Insert a red RCA plug into your video source’s right AUDIO
OUT connector. Insert the other red RCA plug into the
projector's right AUDIO IN port.
Page 30

User’s Guide • 2–15
Chapter 2 • Detailed Setup
Note: Although both COMPUTER AUDIO IN and AUDIO
IN may be connected simultaneously, only one is active.
• If computer video is selected, COMPUTER AUDIO IN is
active.
• If NTSC/PAL/SECAM/S-VHS video is being viewed,
AUDIO IN is active.
Connecting a Monaural Source
If you have a monaural source that you want to play through the
Desktop Projector’s left and right speakers, use the RCA “Y”
adapter cable (C496) to connect the source to the projector’s left
and right AUDIO IN connectors. If you are using computer
audio, connect the source to the projector’s Left and Right
COMPUTER AUDIO IN connectors.
Connecting a Microphone
When you need to address a larger audience while projecting an
NTSC, PAL, SECAM or S-VHS video image, plug an amplified
or wireless microphone equipped with a line level output
(maximum level of 1 volt, peak-to-peak) into the Left and Right
AUDIO IN connectors. The microphone will work when an
NTSC, PAL, SECAM or S-VHS video image is projected. If you
wish to address a larger audience while projecting a computer
image, connect the source to the projector’s Left and Right
COMPUTER AUDIO IN connectors.
If your microphone’s amplifier has only one output, use the RCA
“Y” adapter cable (part number C496) and a standard RCA cable
to connect it to both of the projector’s AUDIO IN or
COMPUTER AUDIO IN connectors.
Page 31

2–16 • User’s Guide
Chapter 2 • Detailed Setup
AUDIO OUT
All Desktop Projector models contain an internal stereo system
consisting of an amplifier and two speakers. Although this system
provides high quality stereo output, a multimedia presentation
may require connecting the projector to external powered speakers
or an external sound system.
External Speakers
When connecting external speakers, use the optional Proxima
Powered Loudspeaker System (part number A55) or a similar
system. References in the following procedure are to Figure 2-12.
To connect your Desktop Projector to external powered speakers:
1. Insert the mini plug of the stereo cable (supplied with your
powered speakers) into the projector’s AUDIO OUT
connector.
2. Insert the other end of the cable into speaker A.
3. Connect speaker A to speaker B using the cables supplied with
the speaker system.
Note: The projector’s internal speakers can’t be disabled or
turned off.
Page 32

User’s Guide • 2–17
Chapter 2 • Detailed Setup
PROXIMA
A
B
Figure 2-12
Connecting the Desktop Projector to external speakers
External Stereo System
To connect your Desktop Projector to an external stereo system:
1. Using the computer audio cable (C498–6), insert the mini jack
end into the projector’s AUDIO OUT connector.
2. Insert the RCA connectors at the other end of the cable into
the external amplifier’s left and right AUDIO IN connectors.
Page 33

2–18 • User’s Guide
Chapter 2 • Detailed Setup
STEREO RECEIVER / AMPLIFIER
LEFT
RIGHT
PROXIMA
Figure 2-13
Connecting the Desktop Projector to an external stereo
system
Your Desktop Projector and external monitor (if you are using
one) must be turned on before you turn on your computer, so that
the computer properly senses each display during its boot-up
sequence.
Applying Power to the Projector
On the rear connector panel of the projector, you'll find a power
cord receptacle and an AC POWER switch.
Powering Up
Page 34

User’s Guide • 2–19
Chapter 2 • Detailed Setup
1
2
3
Figure 2-14
Power receptacle (1), AC POWER switch (2), and circuit
breaker reset switch (3)
To power up the projector:
1. Plug the power cord into the Desktop Projector's power
receptacle at the rear of the unit.
CAUTION! Plug the AC power cord into the Desktop
Projector BEFORE connecting it to an electrical outlet. If you
plug the power cord into the wall first, you might damage the
projector.
2. Connect the power cord to a properly-grounded wall outlet or
surge protector.
3. Move the AC POWER switch to the ON position. The lamp
comes on and the projector's fan begins to run. If you do not
hear the fan, refer to Chapter 5.
4. Turn on your monitor and computer. To raise or lower the
projected image, tilt the mirror assembly to the appropriate
angle.
☞
Page 35

2–20 • User’s Guide
Chapter 2 • Detailed Setup
CAUTION! Locate the air intake and exhaust grills on the top
cover and to the left and right sides of the projection mirror
assembly, and the exhaust grills on the rear panel and side of the
projector. Never operate the projector if these grills are clogged or
obstructed, or if the electric fans are not running.
Figure 2-15
Allow for proper air flow!
CAUTION! The lamp chamber gets very hot during
operation. In particular, the ceramic socket at the lamp’s base can
get extremely hot! Use appropriate care when opening the lamp
chamber or changing lamps. Make sure that the lamp chamber
and lamp have cooled for at least 6 minutes with the fan running.
To do so, press the LAMP button to turn off the lamp and allow
the fan to operate for several minutes.
Note: If you turn the Desktop Projector off while the rest of
your computer system is running, your external monitor will go
blank. This is normal. Just turn the Desktop Projector on again
and your monitor display will return.
☞
☞
Page 36

User’s Guide • 2–21
Chapter 2 • Detailed Setup
Turning On/Off the Lamp
When you first turn on the projector, the lamp will be on. To
turn the Desktop Projector's lamp off, press the LAMP key on the
Control Panel or remote control. Pressing the LAMP key again
will turn the lamp on. The lamp turns on slowly to prolong lamp
life.
Brightness
Sync
Volume
Video
Menu/
Lamp
O
VER
TEMP
REPLA
CE LAMP
Figure 2-16
The LAMP key
Note: Turning the lamp off does not cut power to the
projector. The fans will still operate. You must move the AC
POWER switch to the OFF position to completely power down
the projector.
Page 37

2–22 • User’s Guide
Chapter 2 • Detailed Setup
Projecting
the Image
Your next step is to adjust the projected image for size and clarity.
Image Size
The size of the projected image varies according to the distance
from the Desktop Projector to the projection screen. The
following table shows the projected image size (measured
diagonally) based on the distance from the projector to the screen.
Distance from Screen Diagonal Image Size
4 ft/1.2 m 35”/88.9 cm
6 ft/1.8 m 53.5”/135.9 cm
8 ft/2.4 m 72”/182.9 cm
10 ft/3.0 m 90.5”/229.9 cm
12 ft/3.6 m 109.7”/278.6 cm
14 ft/4.3 m 128”/325.1 cm
128"/325.1 cm
Figure 2-17
Diagonal measurement of projected image when Desktop
Projector is 14’ (4.3 m) from projection screen
Page 38

User’s Guide • 2–23
Chapter 2 • Detailed Setup
Focusing
You can use the title screen image that appears when you first
start up the projector to make your adjustments.
Using a thumb or fingertip, rotate the focus ring to the right or
left for the clearest displayed image.
Figure 2-18
The projector lens focus ring
Page 39

2–24 • User’s Guide
Chapter 2 • Detailed Setup
Correcting Keystoning
The normal projected image will have a rectangular shape.
Keystoning is when the projected image becomes trapezoidal.
Normal Image Keystoned Image
Figure 2-19
Normal vs. keystoned images
Keystoning occurs when the front of the Desktop Projector is not
perpendicular to the projection screen (the vertical plane) or when
it’s not placed parallel to the floor (the horizontal plane). Keystoning also occurs when the projector is tilted sideways.
To correct keystoning, always make sure that the projector is at a
right angle to the screen in the horizontal plane. The projector is
properly aligned if the top and bottom of the projected image are
equal in length and parallel to the floor.
Page 40

User’s Guide • 2–25
Chapter 2 • Detailed Setup
Perpendicular to the
projection screen
Parallel to the floor
Top View
Side View
Projection Screen
Figure 2-20
Positioning the Desktop Projector
In order to allow you to project images high enough for the entire
audience to view, the Desktop Projector has been designed to
minimize keystoning. A 10.5° correction for keystoning is built
into the projector.
Page 41

User’s Guide • 3–1
Chapter 3 • Using the Desktop Projector
This chapter provides detailed information on the Desktop
Projector settings, the Control Panel keys, the Menu windows,
and the warning indicators.
The following figure shows the Control Panel:
Brightness
Sync
Volume
Video
Menu/
Lamp
O
VER
TEMP
REPLA
CE LAMP
Figure 3-1
Desktop Projector Control Panel
Arrow Keys
The four arrow keys allow you to:
• Make small adjustments to the position of the projected
image. The image shifts in the direction indicated by the
arrow, or
• Access and modify settings in the Menu windows.
For more information, see Menu Settings later in this chapter.
Chapter 3
Using the
Desktop
Projector
The Control
Panel
Page 42

3–2 • User’s Guide
Chapter 3 • Using the Desktop Projector
BRIGHTNESS Keys
The BRIGHTNESS keys increase and decrease the intensity level
of the projected image. Press the top key to increase brightness
and the bottom key to decrease it.
LAMP Key
The LAMP key toggles the projection lamp on and off.
• If you turn the lamp off but leave the projector on, the fan
will continue to run.
• You can turn the projector off without allowing the fan to
cool down the unit. However, the projector will take a little
longer to cool.
MENU/ (CYCLOPS) Key
This key allows you to display and change the current projector
settings in the Menu window. You can also use this key to
calibrate the optional Cyclops interactive pointer system. The
Menu/
(Cyclops key) will also disable Cyclops so that you can
use Proxima’s Presentation Control Software.
• Press the MENU key to display the Levels Menu.
• Press it again to display the Setup Menu.
• Press the menu key a third time to exit the menus.
For more information, see Menu Settings later in this chapter.
Page 43

User’s Guide • 3–3
Chapter 3 • Using the Desktop Projector
Note: Press the MENU key twice in rapid succession to:
• Go directly to the Setup Menu, or
• Exit the Menu Window from the Levels Menu.
Hold down the MENU key for several seconds to calibrate
Cyclops. For more information, refer to the Cyclops User’s Guide.
Note: You cannot use Cyclops and Proxima’s Presentation
Control Software at the same time. To disable Cyclops and use
the software, hold the MENU key on the Control Panel down
when you turn the projector power on. This procedure will not
work with the remote control. To re-enable Cyclops, turn the
projector off and then turn it back on.
SYNC Keys
The SYNC keys compensate for fine variations in the timing of a
computer's video signal. Sync is only used with computer video.
Adjust this setting if you see uneven horizontal features, streaks or
shimmering in a graphic image. Press the upper or lower SYNC
key until the image stabilizes.
VIDEO Key
The VIDEO key is used to switch between computer video input,
NTSC/PAL/SECAM video input, or S-VHS input. This key is
only operational on Audio/video-enabled models.
Note: If you would like to add video to audio-enabled models,
you can order the Video Adapter Kit (A195). See Appendix B for
ordering information.
Page 44

3–4 • User’s Guide
Chapter 3 • Using the Desktop Projector
VOLUME Keys
The VOLUME keys are used to adjust the audio level of the
projector’s internal speakers. Press the Up or Down key to
increase or decrease the speakers’ audio level.
The Menu window displays the current settings for the Desktop
Projector. To display the Menu window in the lower portion of
the projected image:
1. Press the MENU key on the Control Panel or the remote
control to display the Levels Menu.
2. Press the MENU key a second time to display the Setup
Menu.
Selecting and Changing Settings
To select and change a setting:
1. Use the right or left arrow key to move to the setting that you
wish to change.
2. Use the up or down arrow key to change the setting.
Note: The active setting (the one that you can change) has a red
outline.
Saving Changes
To save any modifications you make to the projector settings:
1. Access the Setup Menu.
2. Use the right or left arrow key to move to the STORE setting.
3. Use the Up or Down arrow key to choose YES.
Menu Settings
Page 45

User’s Guide • 3–5
Chapter 3 • Using the Desktop Projector
Press the MENU key once to display the Levels Menu. From
here, you can change the levels for the projector’s image and audio
controls. The menus vary according to the current video source.
BRIGHTNESS
SYNC
VOLUME
RED
GREEN
BLUE
Figure 3-2
Levels Menu for computer video
BRIGHTNESS
R TINT G
SIG LEVEL
VOLUME
Figure 3-3
Levels Menu for NTSC/PAL/SECAM and S–VHS video
BRIGHTNESS
Adjust this setting to increase and decrease the image intensity. It
functions the same way as the BRIGHTNESS key on the control
panel. Use the up or down arrow key to increase or decrease the
intensity of the image.
SYNC
Adjust this setting if you see uneven horizontal features, streaks or
shimmering in a computer video image. Press the up or down
arrow key until the image stabilizes.
The Levels
Menu
Page 46

3–6 • User’s Guide
Chapter 3 • Using the Desktop Projector
VOLUME
Use this setting to adjust the volume. Use the up or down arrow
key to increase or decrease the volume level.
Note: For optimal sound control when using an external
amplifier (such as a stereo system), preset the VOLUME setting
to 50% (5 bars) before adjusting the volume on the amplifier to a
comfortable listening level.
RGB Controls: RED, GREEN & BLUE
The RED, GREEN and BLUE controls are used to individually
adjust the color signals. Use the up or down arrow key to increase
or decrease the color signal level. These settings are simultaneously
increased or decreased when the BRIGHTNESS control is
adjusted.
TINT
The TINT setting (R and G) adjusts the Red or Green color
balance for NTSC/PAL/SECAM video or S-video sources. It has
no effect in other video modes. Use the up or down arrow keys to
adjust the color signal balance.
SIG LEVEL
The SIG LEVEL setting is used by Audio/video-enabled models
for NTSC/PAL/SECAM or S-VHS video contrast adjustment.
Use the up or down arrow key to adjust the contrast in the
projected image.
Note:
If you would like to add video to audio-enabled models,
you can order the Video Adapter Kit (A195). See Appendix B for
ordering information.
Page 47

User’s Guide • 3–7
Chapter 3 • Using the Desktop Projector
To access the Setup Menu, do either of the following:
• Push the MENU key to access the Levels Menu. Press the
MENU key again to access the Setup Menu, or
• Press the MENU key twice to skip the first window and go
directly to the Setup Menu.
SOURCE IMAGE COLORS PROJECTION
FREQUENCY LANGUAGE STORE? SETTINGS
VGA640x480 NORMAL 226981 FORWARD
800 ENGLISH NO FACTORY
Figure 3-4
Setup Menu
SOURCE
SOURCE is both a status and selection box. When you connect a
video input to an Audio/video-enabled model, this setting
identifies the input source detected by the projector.
If the projector detects an NTSC source, it defaults to that
setting. The projector cannot tell the difference between PAL or
SECAM. When PAL or SECAM is used, the Desktop Projector
defaults to PAL. The SOURCE setting allows you to select
SECAM as the video source input. (Use the STORE command to
set SECAM as the default.)
The Desktop Projector selects the best possible value based on the
incoming signal. If the image doesn’t look right (wrong colors,
image is off screen, image won’t sync properly, etc.), use the up or
down arrow keys to make an alternate selection.
The Setup
Menu
Page 48

3–8 • User’s Guide
Chapter 3 • Using the Desktop Projector
The projector can store a full set of values for each video mode.
This allows you to switch between video inputs and retain your
adjusted settings. When the projector starts up, it automatically
returns to the last-stored entries for each video mode.
Note: If you would like to add video to audio-enabled models,
you can order the Video Adapter Kit; see Appendix B for ordering
information.
IMAGE
This control allows you to switch between NORMAL and
REVERSE video modes.
Note: REVERSE video inverts the colors your monitor and
projector normally display. For example, a text screen with a light
background and dark characters will display light colored text and
a dark background in reverse video mode. REVERSE video is
used primarily for viewing text screens.
COLORS
This setting allows you to select the color mode most suitable for
the type of image you’re projecting. Use the Up or Down arrow
key to cycle through the choices.
Page 49

User’s Guide • 3–9
Chapter 3 • Using the Desktop Projector
Color
Mode
Description Primary Use
8 Typically results
in lower color
resolution but
brighter image
Text screens
3,375 Best for
VGA/Macintosh
business
graphics or
other
applications
requiring bright,
high contrast
colors
Computer video
226,981* Best for complex
computer
graphics
Graphics, animation or
NTSC/PAL/SECAM/S-VHS
2M* For NTSC, PAL,
SECAM or S VHS video
NTSC/PAL/SECAM/S-VHS
* Not available in EGA/CGA/MDA/Hercules computer video mode.
PROJECTION
This function flips the projected image for rear screen projection.
PROJECTION can be used in all video modes. Use the up or
down arrow keys to switch between FORWARD and REAR
options.
FREQUENCY
This adjustment allows you to synchronize the Desktop Projector
with your video source. For example, if your computer has a video
card with non-standard signal components (i.e., h-sync or v-sync),
the projected image may look jittery, contain bands, or appear
out-of-focus. Use the up or down arrow keys until you find the
setting that projects the best image.
Note: Always try to adjust SYNC to correct image problems
before changing the FREQUENCY setting.
Page 50

3–10 • User’s Guide
Chapter 3 • Using the Desktop Projector
LANGUAGE
LANGUAGE allows you to select the language for the Menu
Window. You can choose between English, German, Italian,
French and Spanish. Use the Up or Down arrow key to cycle
through the choices.
STORE?
This function lets you save the current settings in both menus.
The saved settings will be used until you either define new settings
or return to the factory-configured defaults. If you change the
settings but don’t store them, they will revert to the last-stored
settings the next time you turn on the projector.
When you store new settings, they overwrite any values previously
defined for that particular mode. Stored settings are retained even
after the projector is turned off.
SETTINGS
This function allows you to retrieve the default factory settings for
the current option in the SOURCE field. Use the up or down
arrow keys to cycle through the following options:
• FACTORY – Recalls the initial factory settings. These will
be used until you define new settings.
• STORED – Recalls your last saved settings for the current
video source.
• CURRENT – Indicates that changes have been made, are in
use, and have not yet been saved.
Page 51

User’s Guide • 3–11
Chapter 3 • Using the Desktop Projector
Factory Defaults
The first time you turn the Desktop Projector on, the initial
factory settings are used. If you change any of these settings, you
can recall all of the factory defaults by choosing FACTORY from
the SETTINGS function.
Warning and alert lights located on the projector's control panel
indicate the projector's operating condition.
Brightness
Sync
Volume
Video
Menu/
Lamp
O
VER
TEMP
REPLA
CE LAMP
Overtemp
Warning Light
Replace Lamp
Alert Light
Figure 3-5
Warning lights
OVERTEMP Warning Light
The OVERTEMP light illuminates in the unlikely event that the
projector overheats. A thermostat automatically turns off power to
the lamp until the projector cools.
Warning and
Alert Lights
Page 52

3–12 • User’s Guide
Chapter 3 • Using the Desktop Projector
CAUTION! DO NOT TURN OFF THE PROJECTOR!
Leave the power on so that the fans can cool the projector.
If an OVERTEMP condition occurs, perform the following
checks while you allow the projector to cool:
• Verify that the room temperature is below 80° F (27° C).
• Check the intake grills and exhaust vents. Clear any
obstruction to the air flow.
• Check the filter elements. Clean or replace them if
necessary. For more information, please refer to Chapter 4.
• Check the rear and side exhaust vents. If the projector has
reached an OVERTEMP condition and the fans are
working, you should feel a strong rush of hot air from the
vents. If the fans are not working, the projector needs
service.
After the projector returns to its normal operating temperature,
the OVERTEMP light will go out. To turn the lamp back on
again, you must press the LAMP key on the control panel.
Note: The remote control’s LAMP key will not function after
an OVERTEMP condition until the lamp is turned on from the
control panel.
REPLACE LAMP Alert Light
The REPLACE LAMP alert light will illuminate if one or both of
the active projection lamps have burned out. It will also
illuminate if the lamp selector is not fully engaged.
If one lamp has burned out, you can continue your presentation
with the alternate lamp. The REPLACE LAMP indicator remains
on to remind you to replace the burned out lamp.
☞
Page 53

User’s Guide • 3–13
Chapter 3 • Using the Desktop Projector
The remote control contains all the key functions available on the
control panel. For best results, aim the remote control at the
projection screen or at the projector’s front edge. Never obstruct
the red infrared receiver eye located beneath the control panel.
Blue keys = PC/MAC Remote soft
w
VIDEO
– SYNC +
MENU
CYCLOPS
LAMP
- BRIGHTNESS + - V OLUME +
< REV
PAUSE FWD >
MUTE
TEXT
Active Matrix
FREEZE
Figure 3-6
Remote control unit
Note: The MENU/CYCLOPS key on the remote control
cannot be used to disable Cyclops. Use the MENU/
(Cyclops)
key on the control panel to disable Cyclops.
The remote control also provides access to additional functions
not available on the Control Panel or through the menus.
MUTE Key
This key is used to momentarily shut down audio output.
Pressing it again toggles the sound back on.
Remote
Control
Page 54

3–14 • User’s Guide
Chapter 3 • Using the Desktop Projector
TEXT Key
The TEXT key toggles between VGA text mode of 640 x 400
lines and DOS text mode of 720 x 400 lines. Text screens (such as
DOS screens) are easier to view in DOS mode.
REV, PAUSE and FWD Keys
These three keys work with Proxima’s Mac Remote and PC
Remote Presentation Control Software. The Presentation Control
Software can be used to sequence electronic slides. For more
information, please refer to the Presentation Control Software
Guide that comes with your software.
FREEZE Key
This key freezes a video image; press it again to continue. Use this
key when you want to skip over a slide in a presentation, or to do
a freeze-frame during video or animation. It is also useful when
you are transitioning from one presentation to another; your
audience will not see the behind-the-scene images.
Page 55

User’s Guide • 4–1
Chapter 4 • Maintenance
Chapter 4
Maintenance
There is very little effort required to care for and maintain your
Desktop Projector. Common sense and periodic maintenance will
ensure top performance.
An optional maintenance kit is available. It includes the following
materials:
• Two Halogen lamps
• Lens cleaning fluid
• Lens tissue
• Top and front air filters
• Can of compressed air
The lamps, lenses, mirrors, and LCD panel have been carefully
aligned at the factory to give you the clearest, brightest image
possible. However, mishandling your projector can misalign or
damage the optical elements. Be careful when you use or move
your projector.
CAUTION! The projector contains sensitive circuitry and
optics. Protect it from potential fluid spills.
From time to time, you’ll need to clean the optics on the lens and
mirror assembly. To clean the projection lens or the mirror:
1. Take a piece of lens tissue and form it into a loose swab. Wet it
with lens cleaning fluid or denatured alcohol, and gently move
it over the lens or mirror surface.
2. Take a part of the lens tissue that you haven’t touched, and
repeat the process, going over the lens or mirror in another
direction.
☞
Cleaning the
Lens and
Mirror
Page 56

4–2 • User’s Guide
Chapter 4 • Maintenance
3. Repeat steps 1 and 2 until no smudges or particles can be seen
when the lens or mirror is illuminated by a strong light. DO
NOT LOOK DIRECTLY INTO THE LENS WHEN THE
LAMP IS ON!
If the lens or mirror is extremely dirty, use several pieces of lens
tissue. Water may be used if denatured alcohol is unavailable.
CAUTION! Do not use acetone to clean the lens–it may
remove the paint from the metal near the lens or mirror mount
and leave a residue on the glass surface.
Switching Lamps
If your projector lamp burns out during a presentation, the
LAMP SELECTOR switch allows you to quickly change to a
backup lamp.
Figure 4-1
The lamp selector
You can switch lamps on the fly, without turning off your
projector or interrupting your presentation. Push the LAMP
SELECTOR switch to its opposite position. It will click into
place and the alternate lamp will illuminate.
☞
General
Maintenance
Page 57

User’s Guide • 4–3
Chapter 4 • Maintenance
Replacing Lamps
Follow these steps to remove the lamp and install a new one.
Removing the Old Lamp
1. Leave the projector running with the lamp off for at least 6
minutes before you change the lamp (to do this, press the lamp
button to turn the lamp off). This allows the fan to cool the
lamp chamber. Do not open the lamp chamber until the
projector has cooled.
2. After the lamp chamber has cooled sufficiently, turn off the
projector, unplug the power cord from the wall socket, and
remove the power cord from the projector’s power receptacle.
As a safety feature, you cannot open the lamp chamber unless
the cord is removed.
3. Move the lamp chamber latch to the right. The cover will
unlatch and partially open.
Figure 4-2
Opening the lamp chamber latch
Page 58

4–4 • User’s Guide
Chapter 4 • Maintenance
4. Lift the cover until it stops. Do not force the cover! The lamp
chamber is now accessible.
Figure 4-3
Opening the lamp chamber
CAUTION! The lamp and chamber get very hot. Be careful
when you open the lamp chamber or change the lamp. Make sure
that the fan has cooled the lamp and chamber for at least 6
minutes.
Note: Do not touch the lamp with your bare hands–use a soft
cloth or tissue.
5. Find the lamp release lever at the base of the ceramic lamp
socket. Push the lever to the outside to release the lamp.
Remove the old lamp and replace it with a new one.
☞
Page 59

User’s Guide • 4–5
Chapter 4 • Maintenance
Figure 4-4
Push the release lever to release the lamp
6. To close the chamber, firmly press down on the center rear
edge of the cover until it latches. The lamp chamber latch will
return to the center position. The power plug is now
accessible.
7. Replace the power cord.
Changing Air Filters
To assure proper cooling, change or clean the three air intake
filters after every 250 hours of operation. These filters are located
on the left and right sides at the front of the projector’s lower case
and under the grill in the top cover.
Page 60

4–6 • User’s Guide
Chapter 4 • Maintenance
Top Air
Filter Grill
Front Air
Filter Grills
Figure 4-5
The air intake filter grill assemblies
Front Air Intake Filter Assemblies
1. Release latches are located on the lower portion of the two
front filter grill assembly frames. Push these up as you pull the
grill assemblies out.
Figure 4-6
Removing the lower front air filter grill assemblies
Page 61

User’s Guide • 4–7
Chapter 4 • Maintenance
2. Remove the foam air filters.
Figure 4-7
Separating the air filter from the filter grill
3. Depending on their condition, clean or replace the filters.
• To clean a filter, wash it in a mild solution of soapy water,
rinse and let it dry.
• To replace a filter, refer to Appendix B for ordering
information.
4. Clean the grill vents using a cloth or a can of compressed air.
5. Reassemble the air filter grill assemblies and replace them.
Top Air Intake Filter Assembly
1. To release the top air filter assembly, place both thumbs into
the two depressions located on the rear of the top filter grill
assembly frame. Press down and back towards the rear of the
unit. The front edge of the grill will pop up.
Page 62

4–8 • User’s Guide
Chapter 4 • Maintenance
Figure 4-8
Removing the top air filter grill assembly
2. Grasp the front edge of the grill and lift it out.
3. On the bottom side of the assembly there is a retaining grid.
Grasp the tab at the center and remove it.
Figure 4-9
Separating the air filter from the filter grill
4. Remove the foam air filter.
Page 63

User’s Guide • 4–9
Chapter 4 • Maintenance
5. Depending on its condition, clean or replace the filter.
6. Clean the grill vents using a cloth or a can of compressed air.
CAUTION! Be careful not to aim the stream of air directly
into the fans’ intake as this could force dust particles inside the
unit.
7. Reassemble the air filter assembly and replace it.
Changing the Remote Control’s Batteries
To install or change the two AAA alkaline batteries in the remote
control unit:
1. Locate the battery compartment at the lower rear of the case.
Slide the cover off the battery compartment.
2. Remove the old batteries and replace them with new ones.
Make sure to align the batteries in the proper direction.
Figure 4-10
Installing batteries
3. Replace the cover on the battery compartment.
☞
Page 64

4–10 • User’s Guide
Chapter 4 • Maintenance
Temperature Extremes
The projector should not be stored in excess of 140° F (60° C).
The ideal operating temperature is below 80° F (27°C). If the
projector has been exposed to extremely low temperatures, allow it
to warm up to room temperature before operating.
Page 65
User’s Guide • 5–1
Chapter 5 • Troubleshooting
Chapter 5
Troubleshooting
Problem Likely Cause Possible Solution(s)
No image projected No power to projector Turn power ON
Check AC cord
Check power to
electrical outlet
Lamp not on Turn lamp ON
Circuit breaker engaged Correct overload
situation; press circuit
breaker reset button
to disengage
OVERTEMP indication Allow projector to cool;
turn projector ON
REPLACE LAMP
indication
Burned out lamp(s) Move lamp selector
switch to opposite
position
Replace lamp(s)
Displayed image not
square (keystoned)
Projector not placed at
proper angle to
projection screen
Adjust relative positions
of projector and
screen
Projector not horizontal Level projector
Projected image out
of focus
Projection lens not
focused
Adjust projection lens
focus
Projected image
larger than screen
Projector too far from
screen
Move projector closer to
screen
Projected image
smaller than screen
Projector too close to
screen
Move projector away
from screen
No computer image
projected
Loose cable Check and secure cable
connections
No power to computer Turn on computer
Incompatible video
system
If possible, check
computer with another
monitor
No external monitor Use included video
terminator appropriate
to your system
Switch between internal
screen and video port
Page 66

5–2 • User’s Guide
Chapter 5 • Troubleshooting
Problem Likely Cause Possible Solution(s)
No image on
computer screen
Power switch off or
projector not on
Projector must be on for
computer monitor to
display; turn on
projector.
Cable not connected Connect cable
Monochrome on
color monitor
Computer was turned
on before projector
Turn projector on and
re-boot computer
Computer’s external
video port set
incorrectly
Set computer’s external
port to “color”
Streaks on monitor Video cable plugged
into computer is
upside-down
Check and re-set cable
connections
Faint screen Low intensity Adjust BRIGHTNESS and
CONTRAST
Jittery, fuzzy letters Out of sync Adjust SYNC control
Image off-center Position controls (arrow
keys)
Adjust position controls;
if image will not center,
check for compatibility
problems
Compatibility problems Verify projector is image
compatible with one of
the standards listed in
Appendix A
Misalignment or damage
to optical elements
Projector requires
servicing
Cannot get entire
image on screen;
scrambled image
Compatibility problems Verify that the projector
is image compatible with
one of the standards
listed in Appendix A
“Shimmering” colors SYNC or BRIGHTNESS
out of adjustment
Adjust SYNC or
BRIGHTNESS
No video image
projected
Video source(s) Check video source(s)
(composite or S-VHS)
for power ON and
proper operation
Loose/improper cabling Check and secure cabling
between video source(s)
and projector
Page 67

User’s Guide • 5–3
Chapter 5 • Troubleshooting
Problem Likely Cause Possible Solution(s)
Colors weak in video
mode (NTSC, PAL,
SECAM or S-VHS)
Weak video signal Check for faulty video
source, bad connection,
or frayed cable
TINT setting may be too
low
Adjust TINT level
Getting excess white
or washout in TV
video mode (NTSC,
PAL, SECAM or
S-VHS)
CONTRAST too high Adjust CONTRAST, then
adjust BRIGHTNESS
Black and white image
from color SECAM
input
Video signal ambiguous Use the Setup Menu to
select SECAM as the
video source
No audio Audio source(s) Make sure that the audio
source is turned on and
functioning properly.
Loose/improper cabling Check and secure cabling
between audio source(s)
and projector
OVERTEMP
indication
Air vent(s) clogged Allow projector to cool;
clear obstructions from
vents
Clean and replace filters
as necessary
Fan malfunction Allow projector to cool
Check for fan and blower
operation; service if
necessary
Remote Control
doesn’t work
Batteries upside-down
or old
Check battery placement
or replace with new
batteries
Projector’s IR receiver
window blocked
Remove object
obstructing red IR
receiver on front of
projector
Cyclops and
Presentation
Control Software
don't work at the
same time
Compatiblity problem Disable Cyclops by
holding down the MENU
key while turning on the
projector (you must use
the MENU key on the
projector; it will not
work using the MENU
key on the remote)
Page 68

5–4 • User’s Guide
Chapter 5 • Troubleshooting
Where to Get
Help
If you need help:
1. Check the Troubleshooting Chart.
2. Call your dealer’s technical support line and explain your
problem.
3. Call Proxima at:
U.S.A. and Canada:
(619) 457–5500
(619) 457-8542 (Fax)
Outside U.S.A. and Canada:
(619) 457–5500
(619) 622-0173 (Fax)
Europe:
+31-43-358 5200
+31-43-358 5201 (Fax)
Page 69

User’s Guide • 5–5
Chapter 5 • Troubleshooting
Returns
If the Desktop Projector or any of its accessories are determined to
be defective:
1. Contact Proxima Customer Service to request a Return
Material Authorization (RMA) number.
2. Send the defective unit, including any accessories, cables, and
the remote control, with the RMA number clearly marked on
the outside of the shipping box, freight prepaid, to:
U.S.A. and Canada:
Proxima Corporation
RMA # ___________
9440 Carroll Park Drive
San Diego, CA 92121
Europe:
Proxima Corporation
RMA # ___________
Horsterweg 24
6191 RX Beek
The Netherlands
3. Pack the projector in its original box for safe shipment (include
accessories, cables, and the remote control). If you no longer
have the original shipping materials, contact Proxima
Customer Service for packaging.
Page 70

User’s Guide • A–1
Appendix A • Specifications
Appendix A
Specifications
Proxima Desktop Projector
1
Cables for these systems are not included
2
Apple PowerBook 100, 140, and 170 require 3rd party external video adapter
3
Requires 3rd party external video adapter
4
Requires A195 Video Adapter Kit
Projector Type Audio/video-enabled
Audio-enabled
Portable Multimedia Projector
Portable Color Data Projector with
optional video
Computer
Compatibility
All models IBM PC, PS/2 and compatibles (VGA,
EGA1, CGA1, VESA 640 x 480,
72Hz)
Olivetti®/AT&T® (VGA, EGA, CGA)
NEC 9801 (VGA, EGA, CGA)
Hercules1, Hercules Plus
1
Apple Macintosh II, LC, Quadra,
Centris, Performa, PowerMac, and
PowerBook
2
Apple Macintosh Classic, Classic II,
compact Macintosh family
3
Video
Compatibility
Audio/Video-enabled NTSC M 3.58 MHz
PAL B, G, H, I 4.42 MHz
SECAM 4.43 MHz
Audio-enabled
4
NTSC M 3.58 MHz
PAL B, G, H, I 4.42 MHz
SECAM 4.43 MHz
Interface
Connectors
Computer DB-25 to appropriate video
Y-cable
RS-232 Full duplex w/ Mini DIN 8
Cyclops Recessed card edge connector
Audio Two female RCA jacks for
COMPUTER AUDIO IN; Two female
RCA jacks for VIDEO AUDIO IN; Mini
stereo jack for AUDIO OUT (low level)
Audio/Video-enabled
models
Video: Female RCA composite and
4-pin Mini DIN S-Video (Y/C)
Audio-enabled
4
models
Video: Female RCA composite and
4-pin mini DIN S-Video (Y/C)
Page 71

A–2 • User’s Guide
Appendix A • Specifications
LCD Panel All models Active matrix color TFT (Thin-Film
Transistor)
Resolution All models 640 x 480 pixels
Number of Colors All models 2 million colors from a palette of 16.7
million colors
Response Time All models 30 - 50 milliseconds (typical)
Contrast Ratio All models 100:1 (typical)
Lamp All models FXL 410 watt Tungsten Halogen
Quartz
Dimensions All models 13.1” W x 17” L x 5.9” H
33.3 cm W x 43.2 cm L x 14.9 cm H
Weight Audio/v`ideo-enabled
Audio-enabled
21.3 lbs (9.6 kg)
20.3 lbs (9.2 kg)
Projection
Distance
All models 4’ (1.2 m) to 14’ (4.3 m) from screen
Screen Image
Size
All models 35” (88.9 cm) to 128” (325.1 cm)
diagonal
Lens All models F/S, 260 - 280 mm focus length
Keystone
Correction
All models
Normal at +10.5o projection angle
Audio All models Stereo speakers, rear facing
Dual 3 watt amplifiers
Dual stereo inputs (Audio follows
Video):
COMPUTER AUDIO IN
AUDIO IN
Low level stereo audio output
Note: COMPUTER AUDIO IN and
AUDIO IN may be used as
microphone input w/ line level signals
Power
Requirements
All models Auto switching from 90 - 130 VAC
and 200 - 240 VAC, 47 to 65 Hz
Operating
Temperature
All models 50˚ F to 80˚ F (10˚ C to 27˚ C)
Operating
Altitude
All models Max: 5000' (1524 m) above sea level
(operating temperature drops 1˚ C
for every 1000' (305m) above sea
level)
Storage
Temperature
All models
-4o F to 140o F (-20o C to 60o C)
Humidity
Tolerance
All models 10% to 85% non-condensing
Approvals All models FCC Class A, UL, TÜV, CSA
Warranty All models One year on parts and labor. No
warranty on projector lamp.
Page 72

User’s Guide • B–1
Appendix B • Accessories & Replacement Parts
Appendix B
Accessories &
Replacement
Parts
Proxima Desktop Projector
Accessory Description Part No.
Cyclops Camera and
Wand
Interactive pointer system A2060
Dual Intensity Laser
Pointer
Activates Cyclops sensor
from up to 25’ away
A90
Video Adapter Adds full-motion video
capabilities to Audio-enabled
models
A195
Desktop Projector
Soft Carrying Case
Accomodates the Desktop
Projector and accessories
A294
Desktop Projector
Hard Carrying Case
Accomodates the Desktop
Projector and accessories
A295
Video Y-Cable Connects to IBM EGA/CGA,
Hercules, Hercules+, and
Olivetti OEC video standards
C456-6
Video Y-Cable Connects to NEC
PC-9801 computer
C465-6
Interface Kit Connects Mac SE or SE/30
to Desktop Projector
A33
Interface Kit Connects Mac Classic to
Desktop Projector
A35
RCA Cable Male RCA connects
Audio/video-enabled models
to male RCA video source
C400-6
BNC to RCA Cable Connects Desktop Projector
to a video source w/ a BNC
connector
C468-6
Computer-grade
Surge Protector
Protects projector and other
attached equipment from
power surges and spikes.
North America use only.
Comes with $10,000
equipment guarantee.
S100
Video Terminator Kit Video Terminator Kit A41
Maintenance Kit Contains extra halogen lamps,
lens cleaning fluid, lens
tissue, extra air filters, and
can of compressed air
A60
Page 73

B–2 • User’s Guide
Appendix B • Accessories & Replacement Parts
You can order accessories and replacement parts through your
local dealer or by contacting Proxima at the following numbers:
U.S.A. and Canada:
(619) 457–5500
Press 1 for Customer Service.
(619) 457–8542 (Fax)
Outside U.S.A. and Canada:
(619) 457–5500
Press 1 for Customer Service.
(619) 622–0173 (Fax)
Europe:
+31-43-358 5200
+31-43-358 5201 (Fax)
Replacement Parts Part No.
Air Filter, Top 140-00680-1
Air Filters, Front (2) 140-00684-1
Halogen Lamp 160-00040
Power Cord: British C1011-6
Power Cord: European C1003-6
Power Cord: Italian C1012-6
Power Cord: North American C1002-6
Dust Cover 705-00046-1
S-Video Cable C466-6
RCA Y Adapter C496-6
Composite Video/Audio Cable C497-6
Computer Audio Cable C498-6
Video Teminator, Macintosh C935
Video Terminator, VGA C936
Video Y-Cable: MAC II/IIsi/LC/Quadra C464-6
Video Y-Cable: VGA C454-6
Programmable Remote Control A26
Page 74

Index
A
Applying power to the projector 2–18
Arrow keys 3–1
AUDIO OUT 2–16
external speakers 2–16
external stereo system 2–17
AV tripod
attaching 2–6
B
BRIGHTNESS control 3–2, 3–6
C
Changing air filters 4–5
Cleaning
projection lens 4–1
projection mirror 4–1
Closing the projector 2–6
COLORS 3–8
Computer hookups 2–9
Computer audio cable 2–16
COMPUTER AUDIO IN 2–14
Conflict, internal screen/video port 2–11
Connecting
computer audio 2–14
projector 2–8
video audio 2–14
Connector Panel 2–8
AUDIO IN 2–14
AUDIO OUT 2–16
COMPUTER 2–9
COMPUTER AUDIO IN 2–14
RS–232 2–12
S–VHS 2–13
VIDEO IN 2–12
Control Panel
arrow keys 3–1
Cover assembly 2–3
Cyclops 3–3
calibrating 3–2
D
Desktop Projector
closing 2–6
components 2–1
connecting 2–8
desktop computers 2–9
Macintosh computers 2–9
VGA and Macintosh connectors 2–9
opening 2–2
positioning 2–25
transporting 2–7
E
External speakers 2–16
External stereo system 2–17
Page 75

F
Factory defaults 3–11
Focusing the image 2–23
FREQUENCY 3–9
Front air intake filter assemblies 4–6
I
IMAGE 3–8
Image size 2–22
K
Keystoning 2–24
L
LAMP alert light 3–12
LAMP key 2–21, 3–2
Lamp release latch 4–3
Lamps 4–3, 4–4
LANGUAGE 3–10
Levels menu 3–5
BRIGHTNESS 3–5
RGB Controls 3–6
SIG LEVEL 3–6
SYNC 3–5
TINT 3–6
VOLUME 3–6
M
Macintosh Connections 2–9
Maintenance Kit 4–1, B-1
Menu window 3–4
Levels menu 3–5
saving changes 3–4
selecting and changing settings 3–4
Setup menu 3–7
Microphone
AUDIO IN 2–15
Mirror assembly 2–4
MUTE key 3–13
O
Opening the projector 2–2
OVERTEMP warning light 3–11
P
PAUSE key 3–14
Positioning the projector 2–25
PROJECTION 3–9
Projector lens focus ring 2–23
Proper air flow 2–20
R
Remote Control 3–13
MUTE key 3–13
REV, PAUSE and FWD keys 3–14
TEXT key 3–14
Replacing lamps 4–3
REV (Reverse) key 3-14
Reverse video mode 3-8
RGB controls 3–6
RS–232 port/cable 2–8, 2–13
Page 76

V
VGA and Macintosh connectors 2–9
VGA connections 2–9
Video adapter 2–11
VIDEO IN 2–12
Video terminators 2–11
Video Y cable 2–9
VOLUME 3–6
W
Warning lights 3–11
S
S–VHS 2–13
Setup menu 3–7
COLORS 3–8
FREQUENCY 3–9
IMAGE 3–8
LANGUAGE 3–10
PROJECTION 3–9
SETTINGS 3–10
SIG LEVEL 3–6
SOURCE 3–7
STORE? 3–10
SOURCE 3–7
Special configurations 2–11
Specifications A–1
STORE? 3–10
Switching Lamps 4–2
SYNC 3–5
T
TEXT key 3–14
TINT 3–6
Top air intake filter assembly 4–7
Transporting the projector 2–7
carrying handle 2–7
Troubleshooting chart 5–1
Turning on/off the lamp 2–21
 Loading...