

Page 1
WARRANTY
Proxima Corporation warrants that all Proxima® products purchased from Proxima are free from defects in materials
and workmanship under normal use during the Warranty Period. The Warranty Period commences on the day of
purchase by the end-user. The Warranty Period is one year.
Each Proxima product is manufactured from new parts, or new and some used parts. In some cases, the product may
have been delivered to another end-user and then returned. In all cases, the product has undergone testing and quality
inspection, meets all of Proxima's requirements for a new product, and our full warranty terms apply. The end-user’s
sales receipt or invoice showing the date of purchase of the product and the name of the Reseller is proof of date of
purchase. The Warranty extends only to the original purchaser and is not transferable.
During the Warranty Period, Proxima will, at no additional charge, repair or replace defective parts or at the option of
Proxima, replace the entire unit.
LIMITATION OF WARRANTIES
This Limited Warranty does not extend to any Proxima product that has been damaged or been rendered defective (a)
as a result of accident, misuse, or other abuse; (b) by the use of parts not manufactured or sold by Proxima; or (c) by
modification of the product.
The foregoing warranty is expressly in lieu of any other express or implied warranties, including, without limitation,
warranties of merchantability or fitness for a particular purpose. To the extent not prohibited by law, all statutory
warranties are hereby waived and excluded from this warranty. Proxima expressly disclaims all warranties not stated in
this Limited Warranty.
FCC STATEMENT
Warning: This equipment generates, uses and can radiate radio frequency energy and, if not installed and used in
accordance with the instruction manual, may cause interference to radio communications. It has been tested and found
to comply with the limits for a Class A computing device pursuant to Subpart B of Part 15 of the FCC Rules, which are
designed to provide reasonable protection against such interference when operated in a commercial environment.
Operation of this equipment in a residential area is likely to cause interference in which case the user at his own
expense will be required to take whatever measures may be required to correct the interference.
Warning: This is a Class A product. In a domestic environment this product may cause radio interference, in which case
the user may be required to take adequate measures.
TRADEMARKS AND PATENTS
Proxima and Cyclops are registered trademarks; Desktop Projector, Desktop Projection, and MediaExpress are
trademarks of Proxima Corporation. Other trademarks are the property of their respective owners. This product is
covered by one or more of the following U.S. and foreign patent numbers: 5,062,001, 5,137,484, 5,153,568, 5,177,629,
5,181,015, 5,225,875, 5,264,835, 5,276,436, 5,298,892, 5,299,039, 5,300,944, 5,302,946, 5,321,450, 5,400,095,
5,453,803, 5,459,484, 5,483,382, 5,489,923, 5,499,036, 5,502,459, 5,504,501, 5,510,861, 5,512,967, 5,515,079, and
DES. 360,426.
Adobe, the Adobe logo, Acrobat, the Acrobat logo, Distiller, Exchange, and PostScript are trademarks of Adobe Systems
Incorporated or its subsidiaries and may be registered in certain jurisdictions.
Australia Pat. Nos. 644 852, 668 823
Canada Registered Design No. 74980 D Proxima Corporation 1994
British Registered Design No. 2 038 977
Germany Registered Design No.
M 94 03 987.9 geschutztes Muster, Under
Geschmacksmusterschutz
China Patent for Design No. 94303399.3
Japan Registered Design No. 948294
South Korean Registered Design No. 174628
Other US and foreign patents applied for.
© 1996 Proxima Corporation. All rights reserved. Specifications are subject to change without notice.
Page 2
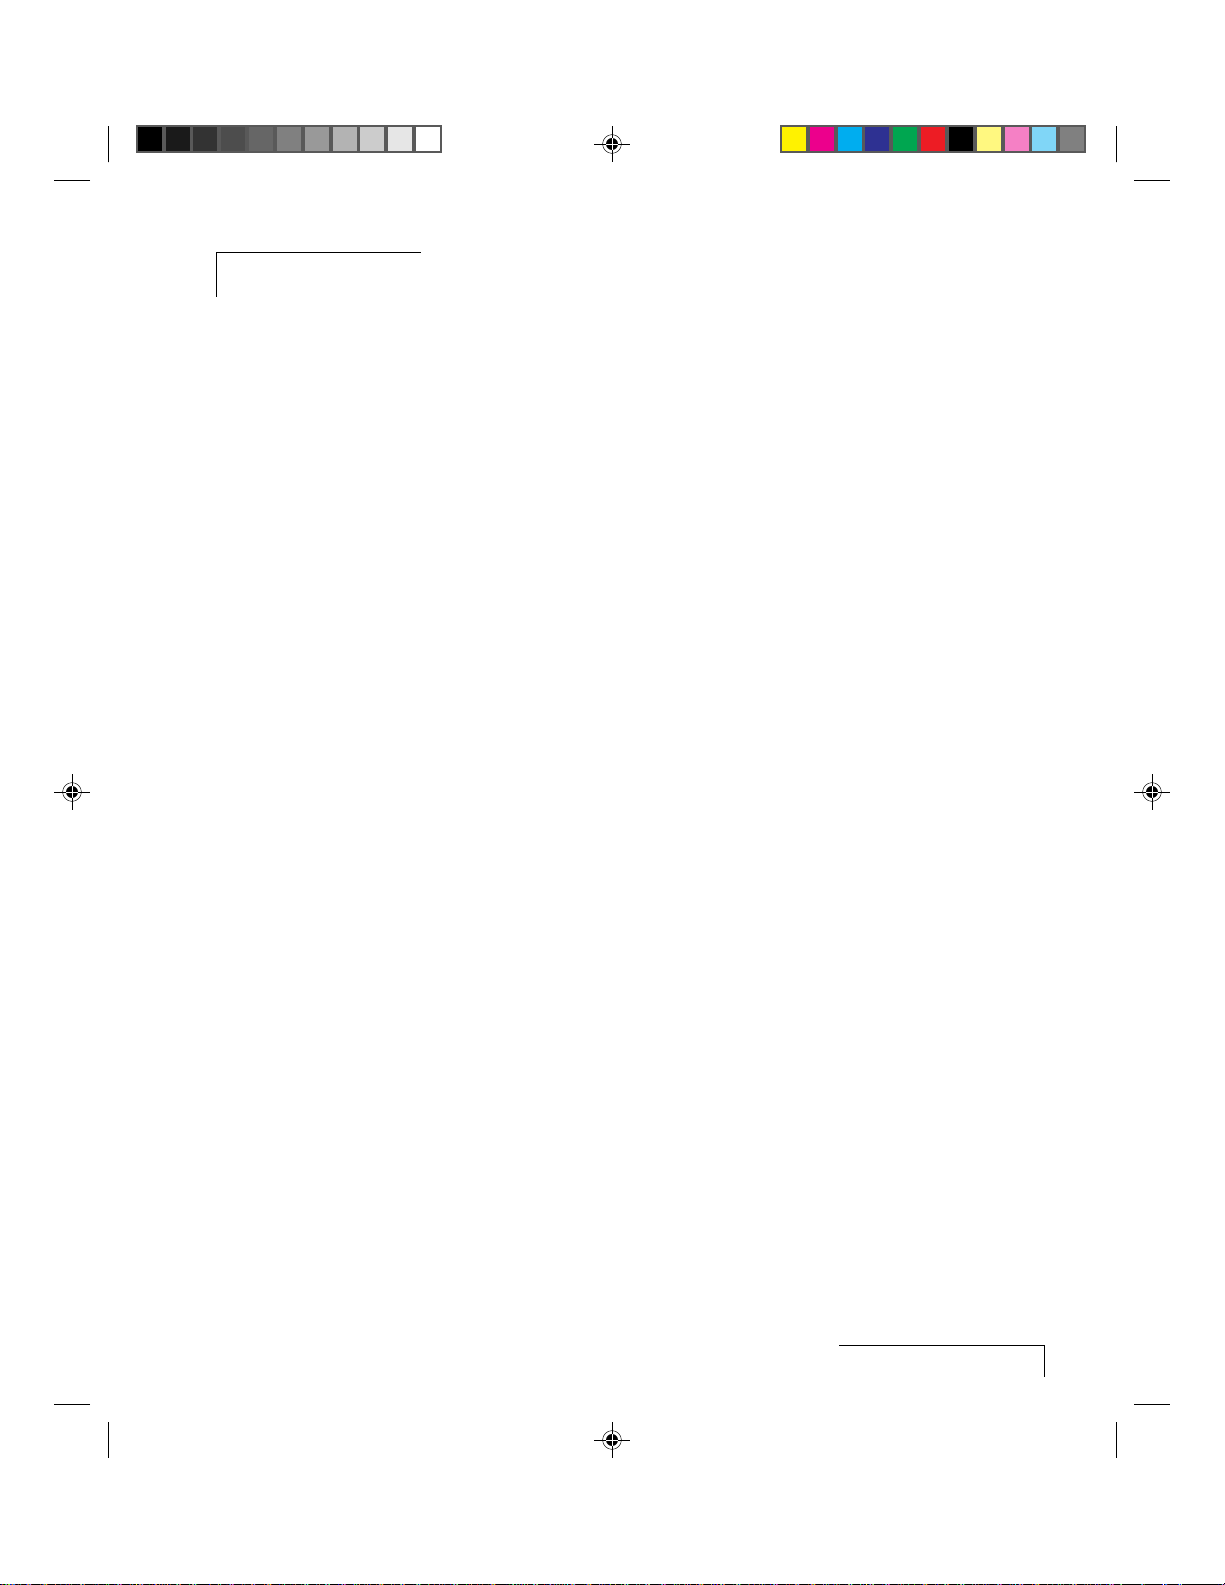
Table of Contents
Introduction ....................................................................................... i-1
About Acrobat® Exchange™ ................................................................................ i-2
How to Get Started................................................................................................. i-2
Installing the Acrobat Software ............................................................................ i-2
Installing the Acrobat Exchange Presenter and Optimizer Plug-Ins
(Macintosh Only) .............................................................................................. i-3
Conventions............................................................................................................ i-4
Playing an Existing PDF File ................................................................................. 1-1
Using Acrobat PDF Writer .................................................................................... 1-1
Creating PDF files from Windows applications ............................................ 1-1
Creating PDF files from Macintosh applications........................................... 1-2
Optimizing a PDF file....................................................................................... 1-3
Giving Presentations ......................................................................... 2-1
Quick Start ............................................................................................................. 2-1
Navigating In the MediaExpress Dialog Boxes................................................... 2-1
Keys on the Cyclops remote control.............................................................. 2-2
Navigating with the Cyclops wand or laser pointer ..................................... 2-3
About the cursor.............................................................................................. 2-3
The Presentation Selector .................................................................................... 2-4
Changing to a different directory................................................................... 2-5
Deleting a file or directory .............................................................................. 2-5
The Presentation Options Dialog Box ................................................................. 2-5
Running a Presentation ........................................................................................ 2-6
The Wait Cue.................................................................................................... 2-8
The Toolbar ...................................................................................................... 2-8
Previewing and skipping slides.................................................................... 2-10
Zooming a slide............................................................................................. 2-11
Jumping to other slides using hot links ...................................................... 2-11
Customizing Presentations ............................................................... 3-1
Working with Your Presentation .......................................................................... 3-2
The Slide Sorter............................................................................................... 3-2
Selecting slides.......................................................................................................3-3
Selecting slides with the remote control....................................................... 3-3
Hiding slides and inserting blank pages .............................................................. 3-7
Viewing slides.........................................................................................................3-9
Saving your changes ............................................................................................. 3-9
Table of Contents
Page 3

Adding transition effects and timing ............................................................. 3-9
The Transition Editor ..................................................................................... 3-11
Initial settings and default settings.............................................................. 3-12
Assigning transition effects.......................................................................... 3-12
Other Acrobat Exchange Tools..................................................................... 3-12
Cropping pages .................................................................................................... 3-12
Rotating Pages......................................................................................................3-13
The Cyclops Remote Control................................................................................A-1
Control Panel ......................................................................................................... A-2
Index
Table of Contents
Page 4
Introduction
The MediaExpress™ Image Display System is a hybrid, next-generation
product that brings the functionality of computers and projectors much
closer together.
The MediaExpress system eliminates the need to hook a computer up to the
projector. Just print your presentation from whatever application you’re
using to a special kind of file (called a .PDF file), copy or store the file on a
disk, then place the disk in the MediaExpress disk drive and start the show.
You can also develop a slideshow from any popular graphics product, then
save the presentation as a .PDF file. This lets you use your existing files and
training—there’s no need to learn a new presentation tool.
This unique technology is the result of a strategic relationship between
Proxima and Adobe Systems Incorporated. Adobe® is a leader in electronic
document products, specializing in tools that make communicating and
sharing information easier and more immediate.
Figure i-1 Placing a disk containing a presentation file in the MediaExpress disk drive
Introducing the MediaExpress Image Display System
i-1
Page 5

ABOUT ACROBAT® EXCHANGE
™
In order to run your presentations from a disk, you must convert them to
.PDF files. You’ll use the Adobe Acrobat Exchange program that was
included in your MediaExpress package to do this. In most cases it's as
simple as choosing the Print command in your source application, then
choosing the .PDF driver as your printer. Instead of printing the document
on your printer, you print the document to a .PDF file, which is in a special
format that the MediaExpress system can use. You then copy that file to a
disk and place it into the MediaExpress disk drive.
The Acrobat Exchange program is very full-featured; for the sake of brevity,
this User's Guide only explains those features that you need to use in order to
save your presentations in .PDF format. We suggest that you review the
online help files that are included in this product to explore the numerous
other features of Acrobat Exchange.
Note: The Proxima Adobe Acrobat Exchange software has additional
features not found in other versions of Acrobat Exchange.
HOW TO GET STARTED
To get started, install the MediaExpress hardware and Acrobat Exchange
software. Refer to the MediaExpress Installation Card that came with your
MediaExpress kit for hardware installation instructions. Refer to the next
section for software installation instructions.
i-2
Introduction
INSTALLING THE ACROBAT SOFTWARE
To install the Adobe Acrobat software:
1. Insert the disk labeled Installer Disk 1 into your computer's floppy drive.
2. Do one of the following:
• Windows users choose File, then Run, and type a:\setup
(or the drive letter of your floppy disk drive) and press Enter.
• Macintosh users double-click the Installer icon.
3. The License Agreement screen appears. Click Accept to continue the
installation. The Acrobat Exchange Installer dialog box appears.
Page 6

4. Do one of the following:
• Windows users, click the boxes next to the programs that you want to
install. Adobe Type Manager (ATM) is a utility that will help Acrobat,
and other Windows programs, to more easily handle your PostScript
and True Type fonts.
• Macintosh users, choose between Easy Install (recommended) or
Custom Install (for advanced users only).
5. Do one of the following:
• Windows users enter the target directory for the Acrobat Exchange file
and click Install.
• Macintosh users select the disk onto which you want the software
installed, and click Install.
6. Information about personalizing your software appears. Click OK.
7. Personalize your copy of Acrobat Exchange by entering your name,
organization, and serial number (located on your registration card).
Click OK.
8. Follow the on-screen instructions. When installation is complete,
click OK.
Installing the Acrobat Exchange Presenter and
Optimizer Plug-Ins (Macintosh Only)
Your MediaExpress package comes with two special plug-ins designed to
make your presentations even simpler and more effective. The Acrobat
Exchange Presenter plug-in provides you with a variety of transition effects
and special tools that allow you to create MediaExpress presentations on
your computer—without having to use your projector. Acrobat Exchange
Presenter also has transition effects and other tools that make your
presentations more attractive and effective.
The Optimizer plug-in reduces the size of your PDF files, making them even
easier to transport and display.
If you have a Macintosh, you need to install the plug-ins from a separate
disk. If you are a Windows 3.x or Windows 95 user, the plug-ins are
automatically installed with the Acrobat Exchange software.
Introducing the MediaExpress Image Display System
i-3
Page 7

To install the Acrobat Exchange Presenter and Optimizer plug-ins to your
Macintosh:
1. Insert the disk labeled Presenter and Optimizer Plug-Ins into your
computer's floppy drive.
2. Double-click the Installer icon.
3. Click Continue to get past the title screen.
4. Carefully read the Release Notes screen. When y ou finish, click Continue.
5. When the Main Installation screen appears, click Install to accept the
default folder. If you've installed the Adobe Acrobat Exchange software to
another location, select that folder and click Install.
That's all there is to it! Now you're ready to start creating .PDF files for your
presentations.
CONVENTIONS
This User's Guide should be easy to follow. Here’s all you need to
remember:
• Words shown in italics are book titles (with a few exceptions).
• Words or phrases in boldface are items on a menu or dialog box (except
for warnings, which you should read carefully).
i-4
Introduction
• Words or characters shown in mono-spaced type are a string of
characters you must type.
Here are some terms and phrases you’ll run across in the documentation.
Please take a moment to familiarize yourself with these terms before you
read the rest of this manual.
TERM DESCRIPTION
Click Choose a button in a dialog box that is projected on the screen.
Press a key Press a physical key on the Cyclops remote control, wand, or laser
pointer.
Slide A single image in a presentation.
Screen The fabric or material onto which you are projecting an image.
Dialog box A window projected onto the screen; dialog boxes usually offer
options with various settings.
Presentation A series of slides organized sequentially in a file.
Page 8

Chapter 1
PDF files
Once you have installed the Acrobat Exchange software and connected the
MediaExpress hardware to your projector, you should understand how to
work with PDF files. This chapter explains how to play and create PDF files.
PLAYING AN EXISTING PDF FILE
To play an existing PDF file, such as the sample PDF files included with your
MediaExpress kit:
1. Insert a disk containing a PDF file into the MediaExpress disk drive.
2. Press the center of the MouseDisk to bring up the Presentation Selector
3. Double-click the PDF file (or select the name of the file and click Run).
The next step is to turn your existing presentation into a PDF file.
USING ACROBAT PDF WRITER
Your Acrobat Exchange software includes a utility called Acrobat PDF Writer.
With it, you can use the Print command in your Windows or Macintosh
application to save a copy of a document as a PDF file.
dialog box.
In general, follow these steps to create a PDF file with Acrobat PDF Writer
(specific Windowsand Macintosh instructions follow):
1. Make sure that Acrobat PDF Writer is the current printer driver.
2. Go into your application and load the file.
3. Choose Print, select the Print to File option, and print the file.
Creating PDF files from Windows applications
1. Start your application and load the file.
2. Choose File, Print.
If the current printer is not Acrobat PDF Writer on DISK, click Print
Setup. Select Acrobat PDF Writer on DISK from the Specific Printer list,
then close the dialog box.
PDF Files
1-1
Page 9

3. In the Print dialog box, click OK.
4. Name the file (make sure to give it a .PDF extension), and select a
destination directory.
5. If you want, you can view the PDF file in the Acrobat Exchange window;
choose the View PDF File option. You can also enter information about
the file; just choose Prompt for Document Info.
6. Click OK.
Creating PDF files from Macintosh applications
Macintosh users must use PC-formatted disks to save PDF files. Most
Macintoshes are equipped with a disk drive that will read and write
PC-formatted disks. If you're having trouble using PC-formatted disks,
consult your Macintosh documentation for more information.
1. Start your application and load the file.
2. Hold down the Command (Apple key) and choose File, Print.
If the PDF Writer dialog box does not appear, select Acrobat PDF Writer
from the Chooser and try again.
3. Select the Select Short (DOS) File Names option to truncate the default
filename in the Save dialog box to a DOS filename (eight characters, a
period, and a .PDF extension).
1-2
Chapter One
Note: Make sure you give your presentation a .PDF extension. This is to
ensure that the MediaExpress system “sees” the presentation on the floppy
disk.
4. If you want, you can view the PDF file in the Acrobat Exchange window;
select the View PDF File option. You can also enter information about
the file; just select Prompt for Document Info.
5. Click OK. The Save As dialog box appears with the name of the PDF file.
6. Rename the file as needed. Select a destination folder, then click Save.
Note: The PDF file appears on screen if you selected the View PDF File
option.
Page 10

Optimizing a PDF file
Your Acrobat Exchange software comes with a special plug-in called
Optimizer. Acrobat Exchange Optimizer reduces file sizes by deleting
thumbnails and repeated bitmapped images. Deleting repeated images
won't affect the appearance of your presentation, as graphics are reused each
time they appear.
To optimize a PDF file:
1. Click File and Optimize And Save As.
2. Select Delete Thumbnails, Delete Redundant Bitmapped Images, or
both.
3. Click OK.
4. Specify a name for the document in the Save As dialog box.
5. Click OK.
PDF Files
1-3
Page 11
Chapter 2
Giving presentations
Now that you've created a presentation, this chapter shows you how to run
it using the Cyclops® remote control, wand, or optional laser pointer. In
order to give a presentation, the MediaExpress hardware must be installed
and connected to the projector.
QUICK ST ART
Note: There are times when it might be helpful for you to preview your slide
show on your computer. You can preview a slide show with the Slide Show
option in Adobe Acrobat Exchange. Click Slide Show or choose Slide and
Slide Show. Your slide show will display on your computer exactly as it will
using the MediaExpress system. Press the ESC key on your keyboard to stop
the slide show.
When you’re ready to start your presentation, follow these steps:
1. Turn on the projector. If the MediaExpress title screen is not shown, press
the key once, or the Source key until it appears.
2. Press the MouseDisk to bring up the Presentation Selector dialog box.
3. Press the edges of the MouseDisk or the Forward/Reverse keys to move to
the desired PDF file. Press the center of the MouseDisk once to select the
file.
4. Double-click the PDF file (or select the name of the file and click Run).
You’ll see the Presentation Options Dialog box.
NAVIGATING IN THE MEDIAEXPRESS DIALOG BOXES
Before you can play your presentation, you should understand how to
navigate through the MediaExpress system. This section details how to use
the Cyclops remote, wand, or laser pointer to navigate through the various
MediaExpress dialog boxes.
The MediaExpress system was designed to be used with the Cyclops remote
control, wand, or laser pointer. If you temporarily misplace your Cyclops
remote control or wand during a presentation, you can perform most
actions using the keys on the projector’s control panel (see Appendix A).
Giving Presentations
2-1
Page 12
You will use three dialog boxes to work with your presentation: one to
choose the file, one to adjust the sequence of the slides, and a third to adjust
timing and add transition effects.
There are only a few keys on the Cyclops remote control that you’ll use to
navigate and make selections: the MouseDisk and the forward/reverse keys.
A few simple actions are all you need to know.
Many of the dialog boxes and commands in Acrobat Exchange are identical
to those in the MediaExpress system. You can use your computer's mouse
just like the Cyclops remote, wand, or optional laser pointer to navigate
through the screens.
Keys on the Cyclops remote control
• To select a button, checkbox, or list box, or any item in a list box, press
the edges of the MouseDisk to point to the item. You can also use the
forward and reverse buttons to select a file or slide in a list box.
• To click a button or check a checkbox (once you’ve pointed to it), press
the center of the MouseDisk.
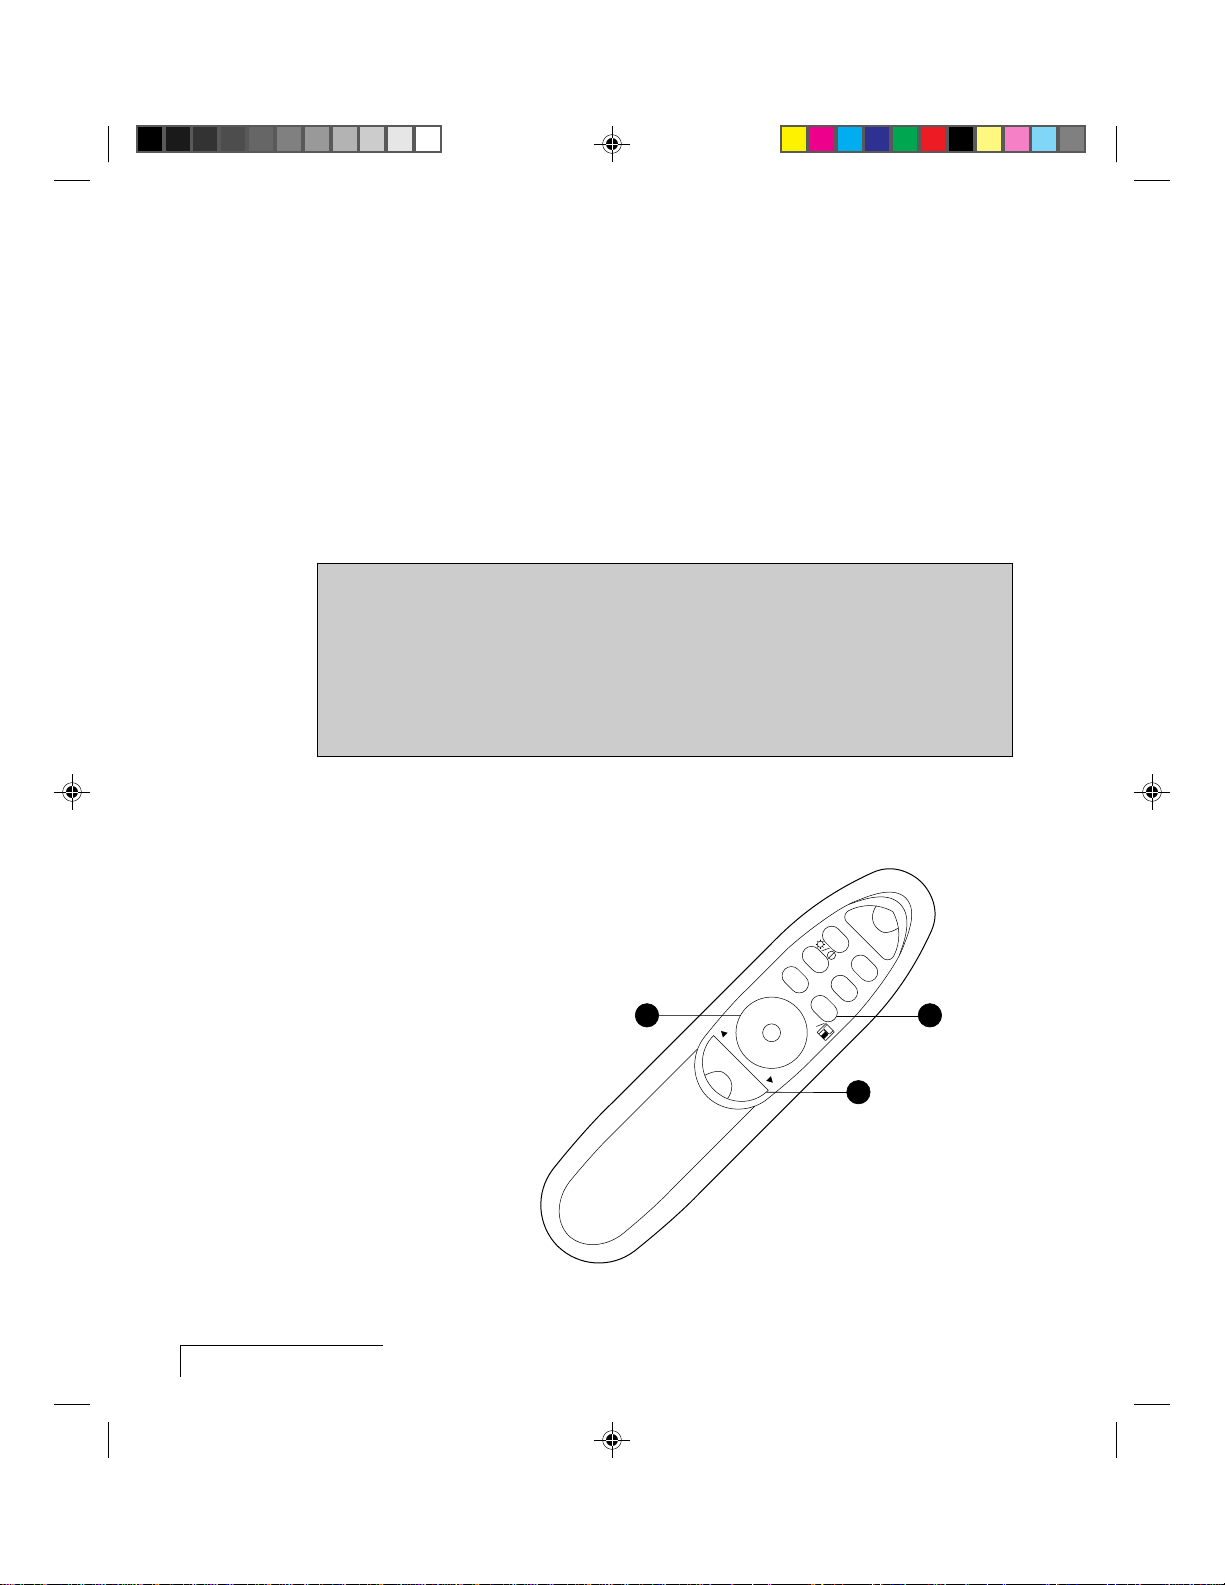
Please study the following illustration before you continue—you may want
to explore a bit on your own in order to get comfortable with the Cyclops
remote control.
2-2
Chapter T wo
Figure 2-1 The Cyclops remote control
MUTE
–+
VOLUME
MENU
SETUPSOURCE
1 3
ll
PROXIMA
®
PROG 2PROG 1
2
Page 13

1. MouseDisk - Press the edges of the disk to move among the controls in
dialog boxes, and to select an item from a list box.
Press the MouseDisk to choose a button or check a checkbox. To make a
selection without moving the mouse, make sure you press the center of
the disk without moving the edges.
2. Forward/Reverse - If you prefer, you can press these keys to move among
the items in a list box.
3. Prog2/ - Press the MediaExpress key to exit a slide show or to quick
select buttons outlined in blue on your screen.
With some projectors, it may be necessary to set the default operation for
this key to work with the MediaExpress system. Consult your projector's
user's guide for more information.
Navigating with the Cyclops wand or laser pointer
You can also use the Cyclops wand or optional laser pointer to select items
in the dialog boxes:
1. Point to the button, checkbox, or file.
2. Press and release the button on the Cyclops wand or activate the
high-intensity laser spot.
About the cursor
The cursor changes from an arrow pointer to different icons, depending on
your actions. For example, it changes to a page with an arrow when you’re
moving slides, and it changes to a when you are out of bounds for the
current activity.
Giving Presentations
2-3
Page 14

THE PRESENTATION SELECTOR
In order to work with a presentation, you need to understand how to find
and select presentation files. This section shows how to use the Presentation
Selector dialog box to change directories and copy files.
When you first switch to MediaExpress mode, the title screen appears. Press
the MouseDisk on the Cyclops remote control, the wand button, or activate
the
high-intensity laser spot to reach the Presentation Selector.
All of the MediaExpress dialog boxes are organized in a similar way; action
buttons are found on the right, and hint messages appear near the bottom.
These hints briefly describe the current item or action.
Floppy Disk: \
KICKOFF.PDF
SALES_NE.PDF
1
2
3
3
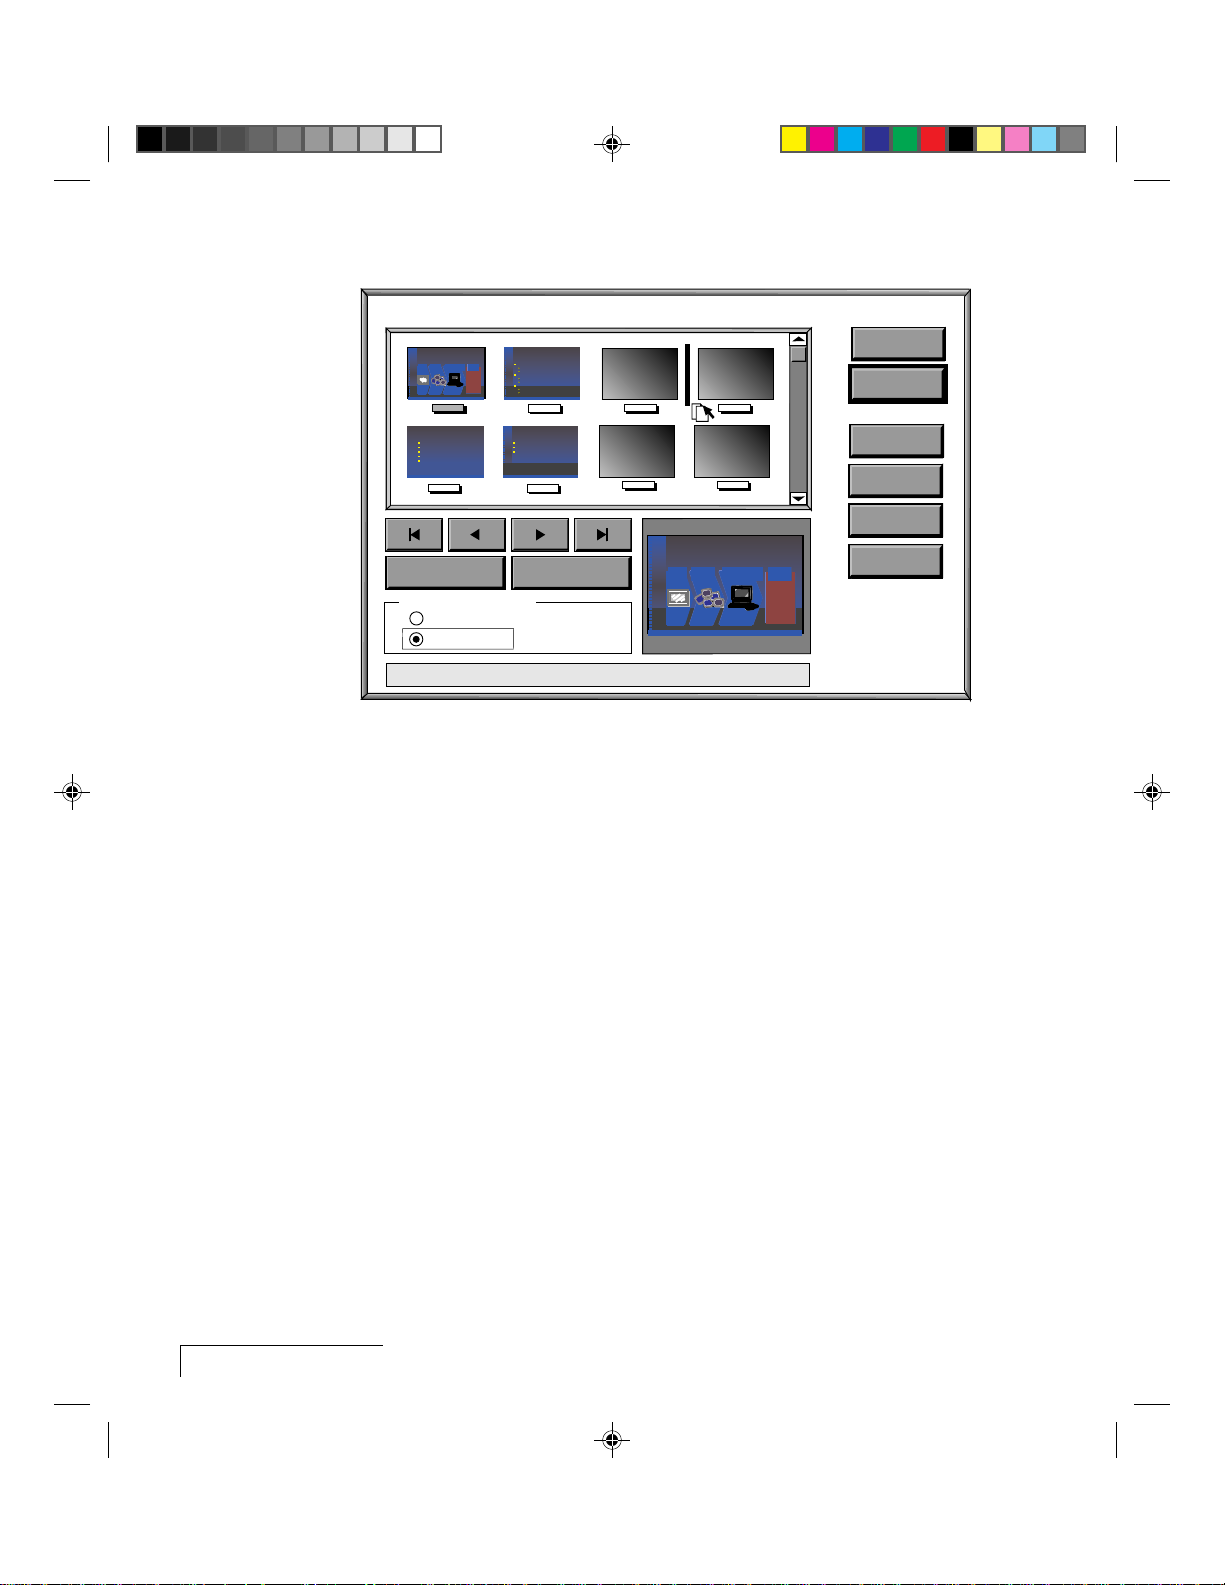
Figure 2-2, A sample Presentation Selector dialog box
SALES_NE.PDF
SALES_NW.PDF
SALES_SE.PDF
TEMP\
YTD.PDF
Show only PDF files
Select a file, then click a button on the right.
3
PRESENTATION SELECTOR
Goto
Goto
Goto
Run
Modify
Delete
Exit
Figure 2-2 shows the Presentation Selector. If you have the MediaExpress
model that comes with a hard drive, your Presentation Selector dialog box
will look slightly different.
1. The Floppy Disk list box shows the files on the floppy disk currently in
the drive. Directories are followed by a backslash (\) after the name (such
as the directory TEMP\ shown in Figure 2-2).
To scroll the list, point to one of the arrows on the scroll bar and click it,
or click somewhere in the bar between the arrows.
2-4
Chapter T wo
2. The Show Only PDF Files checkbox lets you choose between viewing all
the files on the disk or only presentation files.
3. The Hint Message status bar gives information that describes the current
item or action.
Page 15

Use the Presentation Selector to:
Set presentation characteristics.
PRESENTATION OPTIONS: SALES.PDF
OK
Cancel
Advance
Manual
Enable automatic advance
Show Slides
All
From
To
10
1
Loop continuously
Show presentation toolbar
1
2
3
4
• Choose a presentation to run.
• Choose a presentation to edit.
• Delete a presentation file from disk.
Changing to a different directory
To switch to a different directory, double-click the name of the directory. You
can also select the directory and click Goto. The path, including the
directory, appears at the top of the list box.
To move up to the parent directory, double-click the ..\ string in the list box.
Deleting a file or directory
To delete a file or directory, select it and click Delete. The MediaExpress
system prompts you to confirm your selection. Click OK to continue. If you
are deleting a directory that contains files, the system confirms that you
want to delete the directory and associated files.
THE PRESENTATION OPTIONS DIALOG BOX
The Presentation Options dialog box offers several settings that affect how
your presentation runs. These settings are not saved with the presentation
file; they must be set before you start your presentation.
Figure 2-3 Presentation Options dialog box
Giving Presentations
2-5
Page 16

1. The Show Slides setting lets you run the entire presentation, or a
sequential part of it. To run a part of the presentation, indicate the
numbers of the first and last slides in the sequence.
2. The Advance setting lets you choose whether to manually advance from
slide to slide. If you choose Enable automatic advance, each slide will
advance according to the timing you indicate for it in the Advance section
of the Transition Selector dialog box.
3. The Loop Continuously setting lets you play the presentation over and
over until you stop it manually. Press the MediaExpress key on the
Cyclops remote control or Stop on the toolbar to stop the presentation.
4. The Show Presentation toolbar setting lets you use the toolbar during
the presentation. The Toolbar has buttons that make it easier to advance
or reverse through slides with the Cyclops wand or laser pointer. It also
offers a Preview window that you can use to skip or preview slides.
Note: The settings you choose in this dialog box will remain in effect until
you turn off the projector (except for the From xx to xx setting). After the
projector has been turned off, the MediaExpress settings revert to the factory
defaults. The settings are: show all slides, manual advance, continuous loop
off, and the Show Presentation toolbar on.
2-6
Chapter T wo
RUNNING A PRESENTATION
To begin the presentation, adjust the following settings as needed and click
OK (if you want to use the Preview feature, make sure you check the Show
presentation toolbar checkbox).
The next illustration shows how to run a presentation using the Cyclops
remote control. You can also run your presentation from the Toolbar using
the Cyclops wand or optional laser pointer. See the section “The Toolbar”
for details.
Page 17

MUTE
–+
VOLUME
1
MENU
SETUPSOURCE
PROG 2PROG 1
3
ll
PROXIMA
®
2
Figure 2-4 Running the presentation from the Cyclops remote control
1. Forward/Reverse - Move to the next or previous slide.
2. Pause - Pauses a presentation or continues from a pause.
3. Prog2/ - Stops the presentation. With some projectors, it may be
necessary to program this key to work with the MediaExpress system.
Consult your projector's user's guide for more information.
Note: The mouse pointer does not appear until you move it. This is so that it
does not distract your audience.
There are several tables in Appendix A that explain the function of each key
on the Cyclops remote control and on the projector panel.
Giving Presentations
2-7
Page 18

The Wait Cue
Whenever you perform a function in the MediaExpress system, such as
advancing through your presentation, opening a presentation, or jumping to
a linked slide, you will see the wait cue in the upper left hand of the screen
(see Figure 2-5).
■ User transparent solution User transparent solution
◆ Computer platform support
◆ Computer platform support
◆ Application software support
■ The next presentation media
◆ Presentation media replacement
◆ Foundation for digital multimedia
Figure 2-5 The Wait Cue
The Proxima Vision
The wait cue indicates that MediaExpress is busy re-drawing the screen. If
you are opening a complicated slide, the wait cue may display for a short
time. This is normal. When the wait cue disappears, you can continue with
your presentation.
2-8
Chapter T wo
The Toolbar
The MediaExpress presentation toolbar has two functions:
• The toolbar makes it easy to run presentations with the Cyclops wand or
laser pointer by offering the same features as the remote control.
• The toolbar lets you use a Preview window, where you can preview the
next slide or search for a slide without using the entire screen.
Page 19

To display the toolbar, select Show presentation toolbar in the Presentation
Options dialog box. The toolbar appears near the bottom right corner of the
screen. Its buttons are similar to those found on most VCRs and laserdisc
players.
Figure 2-6 Cyclops Toolbar
BUTTON FUNCTION
Previous returns to the previous slide.
Pause suspends the timer if the slide is set to automatically
advance. Click this button a second time to resume the advance
timer.
Stop ends the presentation.
Return brings the slide back to normal magnification (if you
previously zoomed the slide). Or, if you just selected a hot link,
this button returns you from the link.
Preview displays a small window in the lower right corner of the
screen that you can use to view or find any slide in the
presentation (see the next section).
Next advances to the next slide.
Giving Presentations
2-9
Page 20

Previewing and skipping slides
Use the Preview window when you want to preview the next slide, or to
search for another slide without using the entire screen.
To use the Preview window, click Preview on the Toolbar. A small window
appears above the Toolbar.
Goto
Figure 2-7 The Preview window
Cancel
Page 2
While the Preview window is visible, all actions you perform only affect the
Preview Window. In other words, if you click the Next button, the Preview
Window will show the next slide, but the larger projected image will not
change.
When you are ready to show your audience the full slide displayed in the
Preview Window, just click Goto.
For example, to skip over several slides, follow these steps:
1. Click Preview on the Toolbar to turn on Preview mode. The Preview
Window appears, showing the next slide.
2. Click Next on the Toolbar to skip slides until the Preview Window shows
the desired slide.
2-10
3. Click Goto above the Preview Window to display the slide in the window
on the entire screen. When you click Goto, the Preview Window
disappears.
If you want to close the Preview Window without changing the image on the
screen, click Cancel.
Chapter T wo
Page 21

Zooming a slide
To zoom in on part of a slide, just drag a box around that area of the slide.
You can zoom as many times as you want. Click the MouseDisk once to
return the slide to normal magnification (or click the Return button on the
Toolbar).
Be careful not to start the drag operation on top of a hot link; if you do, the
MediaExpress system will jump to the linked slide. (When the pointer is on
a link, the cursor changes from an arrow to a hand.)
To zoom a slide:
1. Press and hold the center of the MouseDisk for at least one second, or
press the Cyclops wand button or high-intensity laser.
2. Drag your cursor (a selection box will appear as you drag) to select the
area to zoom.
3. Release the Cyclops wand button or deactivate the high-intensity laser, or
click the center of the MouseDisk to zoom.
4. Click the center of the MouseDisk again, or press the Cyclops wand
button or high-intensity laser to return to normal view.
Jumping to other slides using hot links
Some application programs let you add “hot” buttons—buttons that jump
to specific (usually related) slides within the same file. The MediaExpress
system supports these hot links.
If your presentation includes hot links, just click them to jump to the
designated screen. To return from a jump, press the Pause key (or click the
Return button in the Toolbar).
Note: If the slide is set to automatically advance, you must click the Return
button on the Toolbar—pressing the Pause button will just suspend the
slide’ s timer.
Giving Presentations
2-11
Page 22

To jump to a hot link:
1. Position the cursor over the link. The cursor will change to a finger
pointing to the link (see Figure 2-8).
Agenda
■ 9:00 to 10:00 Welcome
■ 10:00 to 11:00 Solution Overview
☞
■ 11:00 to 12:00 Technical Discussion
■ 12:00 to 1:00 Working Lunch
■ 1:00 to 2:00 Business Terms
■ 2:00 to 3:00 Wrap Up
Figure 2-8 Positioning the cursor over a link
2. Click the MouseDisk or press the Cyclops wand button or high-intensity
laser.
3. The MediaExpress system will jump to the desired slide.
2-12
Chapter T wo
Page 23

Chapter 3
Customizing presentations
Once you install the MediaExpress hardware in your projector and create a
.PDF file, you’re ready to customize your presentation. This chapter shows
how to rearrange slides in a slide show, add transitions, and adjust timing.
Some of the steps discussed in this chapter can be performed using the
MediaExpress system, the Acrobat Exchange Presenter plug-in, or both. The
text indicates steps that are exclusive to either one.
There are two convenient ways to customize your presentation:
• Use the MediaExpress system and the Cyclops remote to customize your
presentation while it displays through your projector.
• Use the Acrobat Exchange Presenter plug-in to add transitions, adjust
timing, or rearrange slides on your computer before you start your
presentation. You then copy the presentation to a PC-formatted disk and
play it in the MediaExpress disk drive.
To use the MediaExpress system to perform the steps in this chapter:
1. Plug in the projector and turn it on.
2. If the MediaExpress title screen is not shown, press the Source key on the
remote control until the MediaExpress title screen appears.
3. Place the disk containing the .PDF file into the MediaExpress disk drive
(PC-formatted disks only).
4. Press the MouseDisk to bring up the Presentation Selector dialog box.
To use Acrobat Exchange Presenter, install the plug-in (See the Introduction
to this User's Guide), turn on your computer, and start the Acrobat Exchange
program.
Customizing Presentations
3-1
Page 24

WORKING WITH YOUR PRESENTATION
Use the Slide Sorter to rearrange slides and set slide transitions and timing.
The Slide Sorter in MediaExpress mode is very similar to the Slide Sorter in
the included Acrobat Exchange software. Most of the steps explained in this
section apply to both the MediaExpress system and the Acrobat Exchange
software. The only difference is that you use your computer's mouse instead
of the Cyclops remote, wand, or optional laser pointer.
Follow these steps to select a presentation file and switch to the Slide Sorter
dialog box:
1. In the Presentation Selector, select the desired .PDF file.
2. Click Modify.
The Slide Sorter
Before you begin, examine the Slide Sorter dialog box.
SLIDE SORTER: SALES.PDF
Target Customers
The Next Evolution
The Next Evolution
35mm
Electronic
OHP
Slides
Presentations
Films
Integrating the best attributes
1
1
Target Customers
Early Adopters
Early Adopters
IDS
Frequent electronic presenters
Frequent electronic presenters
System
In-house advocates
In-house advocates
Traditional Presenters
Traditional Presenters
Frequent hardcopy presenters
Frequent hardcopy presenters
Users of traditional media
Users of traditional media
?
Executive Presenters
Executive Presenters
Simple user interface
Simple user interface
Low risk environment
Low risk environment
2
Traditional Presenters
Traditional Presenters
Familiarity
Familiarity
Convenience
Convenience
Linear delivery
Linear delivery
Low risk environment
Low risk environment
Easy access to media
Easy access to media
3 4
Executive Presenters
Executive Presenters
Don’t create presentations
Don’t create presentations
Low risk environment is a must
Low risk environment is a must
Quality is important
Quality is important
Transition
5
6
7 8
2
The Next Evolution
The Next Evolution
35mm
Electronic
3
4
Select All Deselect All
Multiple Select Mode
On
Off
OHP
Slides
Films
Integrating the best attributes
Presentations
System
IDS
?
Click a button on the right to work with the selected slides.
Figure 3-1 The Slide Sorter dialog box
1. The Slide list box shows the slides in sequential order. To scroll this list
box, click the arrows in the scroll bar, or click between the arrows. The
current slide has a blue background in the label. To select a different slide,
press the edges of the MouseDisk to point to the slide, then press the
MouseDisk (or just press the forward or reverse key).
Save
Exit
5
Hide
View
Move
6
3-2
Chapter Three
Page 25

2. The four arrow buttons let you move quickly between the slides. You can
go to the first, previous, next, and last slides, respectively.
3. Select All and Deselect All let you work with the entire slide show. These
buttons help you assign common transitions or timing to all slides.
4. Multiple Select Mode lets you select individual slides or work with
several slides as a group. This is useful when you want to modify or move
several slides at once.
Note: Multiple Select Mode is automatically turned off when you click
Deselect All.
5. The action buttons on the right of the screen let you customize the
presentation.
6. The Close-up window shows an enlarged version of the current slide.
Double-click this window to display your slide show. This window also
previews each slide’s transition effect as you move among the slides in the
list box.
Selecting slides
When you choose one of the four action buttons in the lower group
(Transition, Hide, View, or Move), the operation will be carried out on
either the current slide or on a group of slides that you select. Selecting
slides is easy; follow the steps in the box below.
Selecting slides with the remote control
• To select a single slide, press the edges of the MouseDisk to point to the
slide, then press the center of the MouseDisk (or just press forward or
reverse until you reach the slide).
• To select several slides, turn on Multiple Select Mode, then press the edges
of the MouseDisk to point to each slide and press the center of the
MouseDisk.
• If you prefer to drag select several slides at once, move the pointer above
the first slide in the group, press the center of the MouseDisk for at least
one second, then drag a selection box around all of the desired slides.
Click again to exit the drag operation.
Customizing Presentations
3-3
Page 26

Selecting a single slide
The current slide has a blue background in the label. To select a different
slide, point to the slide and press the MouseDisk or Cyclops wand button,
or activate the high-intensity laser spot.
Selecting multiple slides
To select multiple slides so that you can move or modify them as a group,
just turn on Multiple Select Mode, then select each slide, one at a time with
the Cyclops remote (press the edges of the MouseDisk to reach a slide, then
press the center of the MouseDisk), wand, or optional laser pointer. Selected
slides are surrounded by a blue outline.
If you select a slide by mistake, choose it again to “deselect” it.
Note: Selected slides have a blue outline around them. This is different from
the current slide, which has a blue label. A slide can be selected yet not be
the current slide.
Dragging to select multiple slides
To drag select consecutive slides, start just before the first slide in the group,
then drag a selection box around the slides you want. When you release the
selection box, a blue outline appears around each slide in the group you
chose.
3-4
Chapter Three
Note: After you finish, it’s a good idea to turn Multiple Select Mode off.
Dragging is easy—just click and drag as you would with a mouse.
To drag select several slides, follow these steps:
1. Use the Cyclops remote control, wand, or optional laser pointer to move
the mouse pointer above and to the left of the first slide that you want to
select.
2. Press the MouseDisk for at least one second then release, or press and
hold the Cyclops wand button or high-intensity laser.
3. Press the edges of the MouseDisk, or move the Cyclops wand or laser
pointer while holding down the button, to move to the last slide that you
want to select. As you drag, the box expands, as shown in Figure 3-2.
Page 27

SLIDE SORTER: SALES.PDF
The Next Evolution
The Next Evolution
35mm
OHP
Slides
Presentations
Films
Integrating the best attributes
1
Traditional Presenters
Traditional Presenters
Familiarity
Familiarity
Convenience
Convenience
Linear delivery
Linear delivery
Low risk environment
Low risk environment
Easy access to media
Easy access to media
5
Target Customers
Target Customers
Early Adopters
Electronic
Early Adopters
IDS
Frequent electronic presenters
Frequent electronic presenters
System
In-house advocates
In-house advocates
Traditional Presenters
Traditional Presenters
Frequent hardcopy presenters
Frequent hardcopy presenters
Users of traditional media
Users of traditional media
?
Executive Presenters
Executive Presenters
Simple user interface
Simple user interface
Low risk environment
Low risk environment
2
Executive Presenters
Executive Presenters
Don’t create presentations
Don’t create presentations
Low risk environment is a must
Low risk environment is a must
Quality is important
Quality is important
6
3 4
7 8
Save
Exit
Transition
Hide
View
The Next Evolution
Select All Deselect All
Multiple Select Mode
On
The Next Evolution
35mm
OHP
Slides
Presentations
Films
Integrating the best attributes
Electronic
System
IDS
?
Move
Off
Click a button on the right to work with the selected slides.
Figure 3-2 Dragging to select a group of slides
4. Click the MouseDisk, or release the Cyclops wand button or
high-intensity laser spot to define the group. The slides are selected (they
all show a blue outline around them), and the MediaExpress system has
switched to Multiple Select mode.
Moving slides
You must use either the Cyclops remote, wand, or optional laser pointer to
move slides. You can move slides only within the current presentation file.
To move a slide or a group of slides with the Cyclops remote, wand, or
optional laser pointer, follow these steps.
1. In the slide list box, select the slide (or slides) that you want to move
(see page 3-4).
2. Click Move in the Slide Sorter.
3. Press the edges of the MouseDisk to reach the desired location. An
insertion bar (a solid vertical bar between slides) shows where the slides
will be placed, as shown in Figure 3-3.
Customizing Presentations
3-5
Page 28
SLIDE SORTER: SALES.PDF
The Next Evolution
The Next Evolution
35mm
OHP
Slides
Presentations
Films
Integrating the best attributes
1
Traditional Presenters
Traditional Presenters
Familiarity
Familiarity
Convenience
Convenience
Linear delivery
Linear delivery
Low risk environment
Low risk environment
Easy access to media
Easy access to media
5
Target Customers
Target Customers
Early Adopters
Electronic
Early Adopters
IDS
Frequent electronic presenters
Frequent electronic presenters
System
In-house advocates
In-house advocates
Traditional Presenters
Traditional Presenters
Frequent hardcopy presenters
Frequent hardcopy presenters
Users of traditional media
Users of traditional media
?
Executive Presenters
Executive Presenters
Simple user interface
Simple user interface
Low risk environment
Low risk environment
2
Executive Presenters
Executive Presenters
Don’t create presentations
Don’t create presentations
Low risk environment is a must
Low risk environment is a must
Quality is important
Quality is important
6
3 4
7 8
Save
Exit
Transition
Hide
View
The Next Evolution
Select All Deselect All
Multiple Select Mode
On
The Next Evolution
35mm
OHP
Slides
Presentations
Films
Integrating the best attributes
Electronic
System
IDS
?
Move
Off
Click a button on the right to work with the selected slides.
Figure 3-3 Moving a group of slides
To scroll, just move the cursor above or below the list box. (You can’t click
a scroll bar while dragging a slide.)
4. When the insertion bar is in the right position, press the MouseDisk,
Cyclops wand button, or high-intensity laser once quickly to place the
slide(s).
3-6
Chapter Three
5. Click Save to save your changes.
Note: After a move, the MediaExpress system automatically renumbers the
slides (in sequential order) and turns off Multiple Select mode.
Dragging slides to a new position
If you prefer, you can drag a slide (or group of slides) to a new position. To
drag a slide or slides to a new position, follow these steps:
1. Select the slide or group of slides (see page 3-4).
2. Point to the slide’s label (or the label of one of the selected slides) and
press the MouseDisk for at least one second then release, or press and
hold the Cyclops wand button or high-intensity laser. The mouse pointer
changes to an arrow with a page.
Note: You must drag the label, not the slide.
Page 29

3. Press the edges of the MouseDisk to move the slide or slides. An insertion
bar (a vertical bar between slides) indicates where the slides will be
placed, as shown in Figure 3-3.
To scroll, just move the cursor above or below the list box. (You can’t click
a scroll bar while dragging a slide.)
4. When the slides are in the desired location, press and release the
MouseDisk, Cyclops wand button, or high-intensity laser once quickly.
5. Click Save to sa ve your changes.
Hiding slides and inserting blank pages
There are times when you might want to hide certain slides in your
presentation. For example, if you converted a user's guide or a piece of
marketing literature to a PDF file, there may be parts of your document that
you do not want to display. Copyright pages, acknowledgments, or tables of
contents are the sorts of pages that you'll probably want to hide for your
presentations. You can hide and unhide slides one at a time, or as a group.
You may also want to insert blank pages to act as dividers if your
presentation falls into sections.
To hide pages or display hidden pages:
1. In the Slide list box, select the slide (or slides) that you want to hide.
Note: In Acrobat Exchange use Slide Sorter view to select the thumbnails
you want to hide or show.
2. Click Hide. The slide still appears in the slide list box, but with a large “X”
through it, as shown in Figure 3-4.
Customizing Presentations
3-7
Page 30

SLIDE SORTER: SALES.PDF
The Next Evolution
The Next Evolution
35mm
Electronic
OHP
Slides
Presentations
Films
Integrating the best attributes
1
Traditional Presenters
Traditional Presenters
Familiarity
Familiarity
Convenience
Convenience
Linear delivery
Linear delivery
Low risk environment
Low risk environment
Easy access to media
Easy access to media
5
Target Customers
Target Customers
Early Adopters
Early Adopters
IDS
Frequent electronic presenters
Frequent electronic presenters
System
In-house advocates
In-house advocates
Traditional Presenters
Traditional Presenters
Frequent hardcopy presenters
Frequent hardcopy presenters
Users of traditional media
Users of traditional media
?
Executive Presenters
Executive Presenters
Simple user interface
Simple user interface
Low risk environment
Low risk environment
2
Executive Presenters
Executive Presenters
Don’t create presentations
Don’t create presentations
Low risk environment is a must
Low risk environment is a must
Quality is important
Quality is important
6
3 4
7 8
Save
Exit
Transition
Hide
View
The Next Evolution
Select All Deselect All
Multiple Select Mode
On
The Next Evolution
35mm
OHP
Slides
Presentations
Films
Integrating the best attributes
Electronic
System
IDS
?
Move
Off
Click a button on the right to work with the selected slides.
Figure 3-4 Two hidden slides in the slide list box
3. Click Save to save your changes.
To unhide a hidden slide, select it and click Hide again.
Hiding multiple slides
When working with a group of selected slides, what happens when you click
Hide depends on the condition of the selected slides. If any of the selected
slides are unhidden, clicking Hide will hide all of them. If all slides are
hidden, clicking Hide will unhide all of them.
3-8
Chapter Three
Inserting Blank Pages
You can also use the Acrobat Exchange Slide Sorter to insert blank pages:
1. In the Acrobat Exchange software, select the thumbnail (not the page
number) for the page after which you want a blank page to appear. The
Color Picker dialog box appears. Use this dialog box to select a color for
your blank page.
2. In the Color Picker dialog box, select a color for the page and click OK. A
blank page is inserted after the current slide.
Page 31

Viewing slides
You can run your presentation from the Slide Sorter to check your changes.
Select the slide (or slides) you want to view, then click View (or double-click
the Close-up window).
The Presentation Options dialog box appears, with the current slide (or the
first selected slide) as the “from” slide, and the last slide in the file (or the
last selected slide) as the “to” slide. See Chapter 2 for an explanation of how
to advance through the slides in your presentation.
Note: When you are ready to give your presentation, we recommend that
you go to the Presentation Selector and start the presentation from there.
Saving your changes
After you’ve customized your presentation, click Save in the Slide Sorter to
save your changes before you exit. If you choose Exit before saving recent
changes, you’re prompted to save those changes.
Adding transition effects and timing
Transitions are special effects that determine how a slide appears on the
screen. If you assigned transition effects through your application software,
such as Freelance or PowerPoint, those transitions will not work with the
MediaExpress system. However, you can use Acrobat Exchange to assign
transition effects to your presentation prior to showing it in the
MediaExpress system.
Acrobat Exchange is the best and easiest way to assign transition effects to
your presentation. It's the convenient way to work on your presentation
while traveling to your destination, or before you leave the office.
If you have an existing MediaExpress presentation, or you don't have access
to your computer, you can assign transition effects in the MediaExpress
system—without using your computer. Simply press the Transition button
in the Slide Sorter and assign effects to the selected slides.
Customizing Presentations
3-9
Page 32

There are many transitions available in the Acrobat Exchange software and
the MediaExpress system. Most transition effects are self-explanatory; here
are brief descriptions:
EFFECT NAME RESULT
Random Assigns transitions to each slide at random.
Blinds vertical, Opens slats onto the screen.
horizontal
Box in, out Opens the screen to or from the center.
Dissolve Dissolves the slide.
Glitter right, Wipes the screen from one side to the other, with sparkling
down, across effects.
Split horizontal Peels the screen to or from the middle.
in, out; Split
vertical in, out
Wipe left, right, Wipes the screen from one side to the other.
up and down
You can tell which transition is designated for the current slide by looking at
the Close-up window. As you move among the slides in the list box, the
Close-up window displays each slide’s transition effect.
3-10
Chapter Three
To set (or change) a slide’s transition in the MediaExpress system:
1. In the Slide Sorter, select the slide(s) you want to change.
2. Click Transition.
3. Select the desired transition effect.
To set (or change) a slide’s transition in the Acrobat Exchange software,
open the Transition Editor:
1. In the Slide Sorter, select the slide(s) you want to change.
2. Click Transition in the Slide Sorter or choose Slide and Transition.
3. Select the desired transition effect.
Page 33

The Transition Editor
The Transition Editor is where you assign transition effects to slides and set
how (and when) the presentation advances to the next slide.
Note: These settings determine how the slide arrives on the screen, not how
it leaves the screen.
Transition
KICKOFF.PDF
No Transition
1
Random Effect
Blinds Horizontal
Blinds Vertical
TRANSITION EDITOR
OK
Cancel
Speed
2
Slow
Medium
Fast
Advance
3
Figure 3-5 The Transition Editor dialog box
Manual
Automatic after seconds
Add transition effects for current slides.
5
1. The Transition list box shows all of the transition effects available,
including No Transition (which replaces one slide with another with no
visual effect) and Random Effect (which applies transition effects to slides
at random).
2. The Speed setting determines how quickly the slide arrives onscreen, not
how long it remains on the screen. Slow = 2 seconds, Medium = 1 second,
Fast = less than 1 second.
3. The Advance setting controls whether the slide advances automatically or
manually. If you choose Automatic, indicate how many seconds you want
the slide to remain on the screen before the presentation advances to the
next slide.
Customizing Presentations
3-11
Page 34

Initial settings and default settings
The following are the default transition settings:
• Transition is set to No Transition.
• Transition Speed is set to Medium.
• Advance is set to Manual.
Assigning transition effects
To adjust transitions:
1. Select the transition effect, speed, and advancement settings.
2. When you’re satisfied with your settings, click OK in the Transition
Selector.
3. When you return to the Slide Sorter, click Save to save your changes.
Other Acrobat Exchange Tools
You can use Acrobat Exchange to further customize the look and feel of your
presentation. With Acrobat Exchange, you can crop and rotate pages or play
a slide show on your computer.
Cropping pages
3-12
Chapter Three
Your PDF file may have areas of unnecessary white space, or may include
printer's marks—especially if your document was originally designed to be
printed. You can use the Crop Page button to resize a document according
to a printed page's crop marks, adjust the page margins of all the pages in a
PDF file, or define different margins for different pages.
To adjust page margins:
1. In Slide Sorter view in Acrobat Exchange , click Crop Pages. The Crop
Pages dialog box appears.
2. Enter the size for the top, bottom, left, and right margins. As you enter
the new sizes, lines will appear to indicate the new margins. You can also
click the arrows to adjust the margins.
3. When you are satisfied with your changes, enter the pages to which the
new margins should apply.
4. Click OK.
Page 35

Rotating Pages
You can rotate selected pages or all of the pages in a PDF file. For example,
you might want to rotate a page from a document that was originally
designed to be printed in portrait mode so that it displays as a landscape
page.
To rotate one or more pages:
1. In the Slide Sorter in Acrobat Exchange, click Rotate Pages. The Rotate
Pages dialog box appears.
2. Select either Left, to rotate the pages 90 degrees counterclockwise, or
Right to rotate them 90 degrees clockwise.
3. Enter the pages you want to rotate.
4. Click OK.
Customizing Presentations
3-13
Page 36

Appendix A
Controls
There are three ways to control the MediaExpress system, your computer,
and your projector:
• The included Cyclops remote control.
• The optional Cyclops camera system with the wand or optional laser
pointer.
• The control panel on your projector.
Chapter 2 has a detailed explanation of how to control the MediaExpress
system using the included remote or the optional Cyclops camera system.
THE CYCLOPS REMOTE CONTROL
The easiest and most convenient way to work with the MediaExpress system
is using the included remote control. The remote has the following keys:
KEY FUNCTION
Source Cycles to start the MediaExpress system.
PROG2/ Exits a presentation. Also brings up the initial MediaExpress
screen. Selects the buttons outlined in blue on your screen.
MouseDisk Moves the cursor through the MediaExpress screens and dialog
boxes. Acts as a mouse click when you press the center of the
button.
Forward/Reverse Moves forward or backward through your presentation.
Pause/Return Freezes a slide show that contains automatic advancing. Also
returns from a link or zoom if automatic advance is not set for a
slide.
Controls
A-1
Page 37

CONTROL PANEL
All Proxima projectors have a control panel that you can use to work with
the MediaExpress system if you forget or lose your Cyclops remote. Use the
following keys to work with your MediaExpress presentation:
KEY FUNCTION
Left/Right Arrows Navigate between buttons, list boxes, menus, and slides. In a slide
show, this button navigates backwards and forwards through your
presentation.
Up/Down Arrows Navigate within list boxes and move sliders and scroll bars.
Works like a mouse click or return key on your keyboard. Selects
buttons and check boxes. If you have a DP4100 or DP4200, this
button also starts Media Express.
A-2
Appendix A
Page 38

Index
A
Acrobat Exchange
installing i-2
Macintosh i-2
Windows i-2
online help i-2
Optimizer Plug-in
Installing i-3
Presenter Plug-in 3-1
installing i-3
User's Guide
using .PDF files with i-2
Acrobat PDF Writer 1-1
Macintosh 1-2
step-by-step instructions 1-1
Windows 1-1
Acrobat PDF Writer on DISK 1-1
Advance 3-11
Automatic 3-11
i-2
C
Changing to a different directory 2-5
Click i-4
Close-up window 3-3
Conventions i-3
boldface i-4
italics i-4
mono-spaced type i-4
Custom Install i-3
Customizing your presentation 3-1
Cyclops 2-1
laser pointer 2-1
selecting items 2-3
remote control 2-1
wand 2-1
selecting items 2-3
D
default transition settings 3-12
Deleting a file or directory 2-5
Deselect All 3-3
Desktop Projector family A-1
Dialog box i-4
Dragging to select multiple slides 3-4
E
Easy Install i-3
F
Floppy Disk list box 2-4
G
Getting Started i-2
Giving presentations 2-1
H
Hiding slides 3-7
multiple slides 3-8
I
insertion bar 3-7
Installing
Plug-ins
Optimizer i-3
Presenter i-3
Introduction A-1
L
Loop Continuously 2-6
Index
Page 39

M
S
MediaExpress dialog boxes 2-1
navigating in 2-1
organization 2-4
MediaExpress title screen 3-1
mouse pointer 2-3
appearance 2-3
MouseDisk 2-2
Moving slides 3-5
groups of slides 3-6
Multiple Select Mode 3-3
O
online help i-2
Optimizing a PDF file 1-3
P
PDF files i-1
creating 1-1
Presentation i-4
Presentation Options Dialog box 2-1
Advance 2-6
Loop Continuously 2-6
Show Presentation toolbar 2-6
Show Slides 2-6
Presentation Selector dialog box 2-1, 3-1
Floppy Disk list box 2-4
sample 2-4
Show only PDF Files checkbox 2-4
using to...
delete a file or directory 2-5
switch directories 2-5
work with files 2-4
Press a key i-4
Preview Window 2-6
Cancel button 2-10
Goto button 2-10
Previewing and skipping slides 2-10
R
running your presentation 2-1
Screen i-4
Selecting slides 3-3
deselecting 3-4
dragging to select 3-4
multiple select 3-4
single slide 3-4
with the remote 3-3
selection box 3-4
Show Only PDF Files checkbox 2-4
Show Presentation toolbar 2-6
Next 2-9
Pause 2-9
Preview 2-9
window 2-6
Previous 2-9
Return 2-9
Stop 2-9
Show Slides 2-6
Slide i-4
Slide list box 3-2
Slide Sorter 3-2
dialog box 3-2
Deselect All button 3-3
Select All button 3-3
Slide list box 3-2
software installation i-2
Source key 2-1, 3-1
Speed 3-11
switching directories 2-5
T
terms and phrases i-4
timing 3-9
Transition Editor 3-11
Advance 3-11
Automatic 3-11
default settings 3-12
dialog box 3-11
list box
No Transition 3-11
Random Effect 3-11
Speed 3-11
Index
Page 40

transition effects 3-9
assigning 3-12
Blinds vertical, horizontal 3-10
Box in, out 3-10
Close-up window 3-10
Dissolve 3-10
explanation 3-9
Glitter right, down, across 3-10
No Transition 3-11
Random 3-10
Random Effect 3-11
Split horizontal in, out 3-10
Split vertical in, out 3-10
Wipe left, right, up, down 3-10
V
View PDF File option 1-2
Viewing slides 3-9
Z
Zooming a slide 2-11
Index
 Loading...