

Page 1
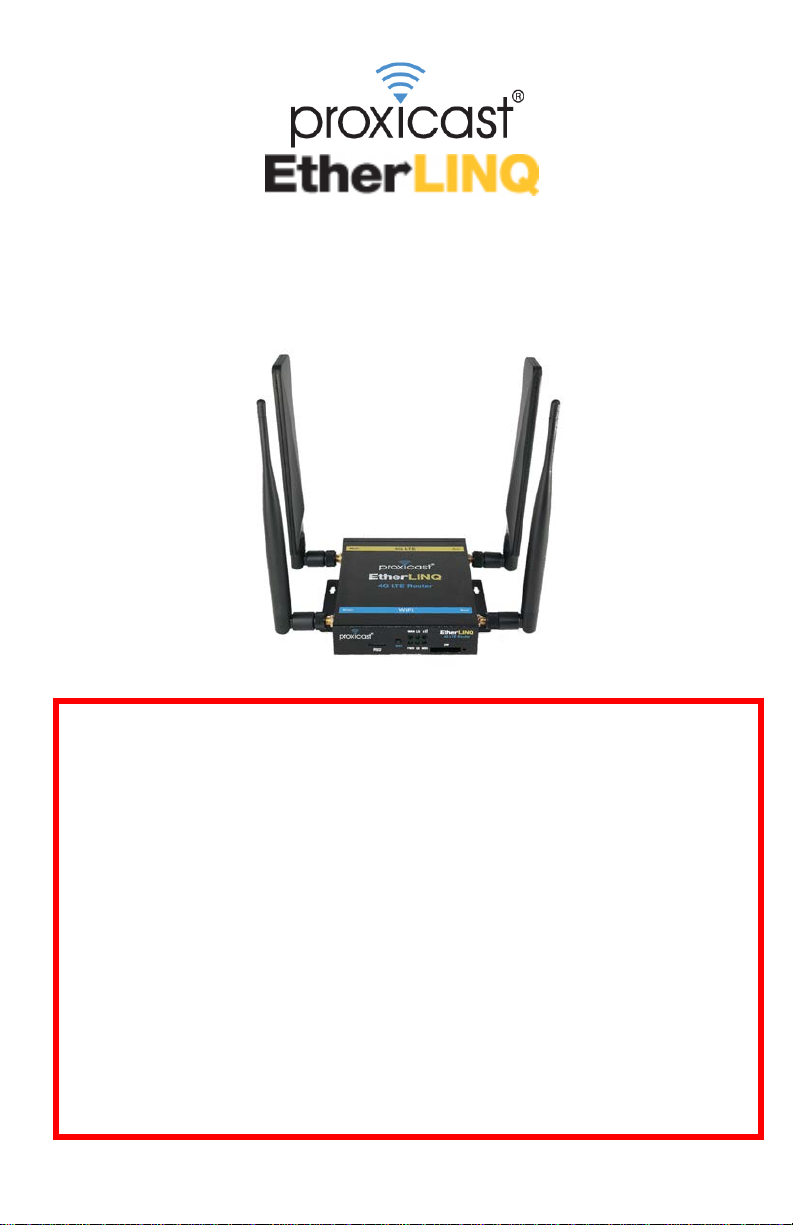
4G LTE Router + WiFi + VPN
Quick Start Guide
The REALLY QUICK Start Guide
1. Attach the external antennas
2. Insert an activated SIM
3. Connect power to the EtherLINQ
4. Wait 90 sec. for the OS and LTE LEDs to stop flashing
5. Connect a DHCP-enabled PC to the LAN port or scan for a WiFi network named
EtherLINQ-xxxx and enter the 8 digit password printed on the EtherLINQ’s label
The EtherLINQ automatically attempts to connect to the default APN for your 4G carrier.
If you are using a different APN or the modem fails to connect to the Internet:
• Browse to http://192.168.1.1:8080 Username/Password: admin/1234
• Select the LTE tab
• Ent er the correct APN f or your SIM
• Click the Save & Apply button
• The EtherLI NQ will reboot and connect to the Internet
Click the “Check For Updates” button to install the latest firmware
Page 2
Introducing the EtherLINQ
• Integrated 4G LTE Modem
• WiFi b/g/n Access Point (300 Mbps)
• NAT Router Mode with NAT/PAT
• IPSec VPN Client & Server
• Bridge Mode (WAN IP Pass-Through)
• Integrated GPS (select models)
• Virtual Cable Mode
• USB Webcam Server
• WAN Fa il-Over / Fall-Back
• Serial Device Server
• 1 LAN + 1 WAN or 2 LAN Port Options
• Metal Chassis & Wide Voltage Range
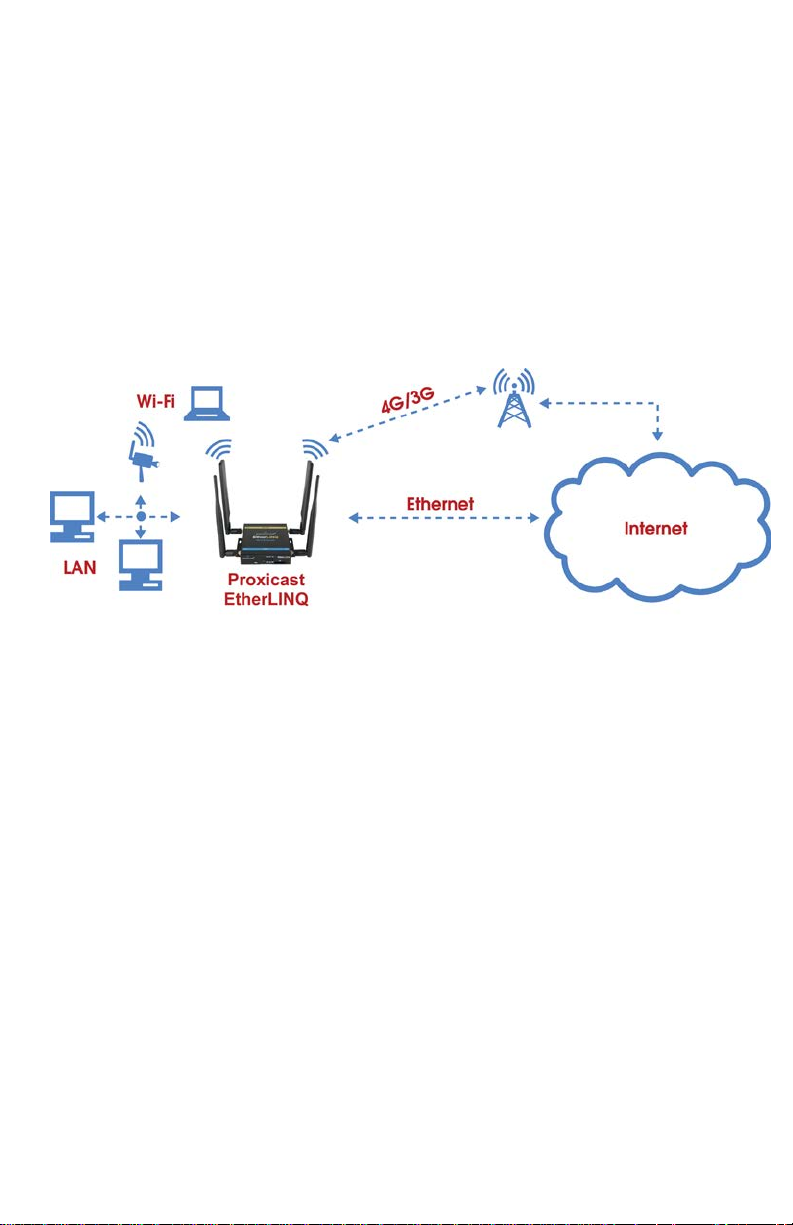
The EtherLINQ can be used to provide access to remote equipment, gather
telemetry or other M2M data, establish Internet service in temporary loca t io ns, or
back-up wired Internet service with a 4G/LTE cellular connection.
Key Features
Figure 1: Typical EtherLINQ Network Configuration
See the EtherLINQ User’s Guide for a complete list of features and configuration
settings. Also refer to Proxicast’s Support Web Site (http://support.proxicast.com) for
technical notes, application configuration examples and knowledgebase articl es.
Package Contents
• EtherLINQ
• 120/240 VAC to 12 VDC Locking Power Adapter
• 2x 5 dBi LTE Antennas (Flat)
• 2x 5 dBi WiFi Antennas (Round)
• SIM Size Adapter Kit
• 8 GB microSD Card (installed)
• CAT5e Cable
• Mounting Hardware Kit
• Quick Start Guide
1
Page 3
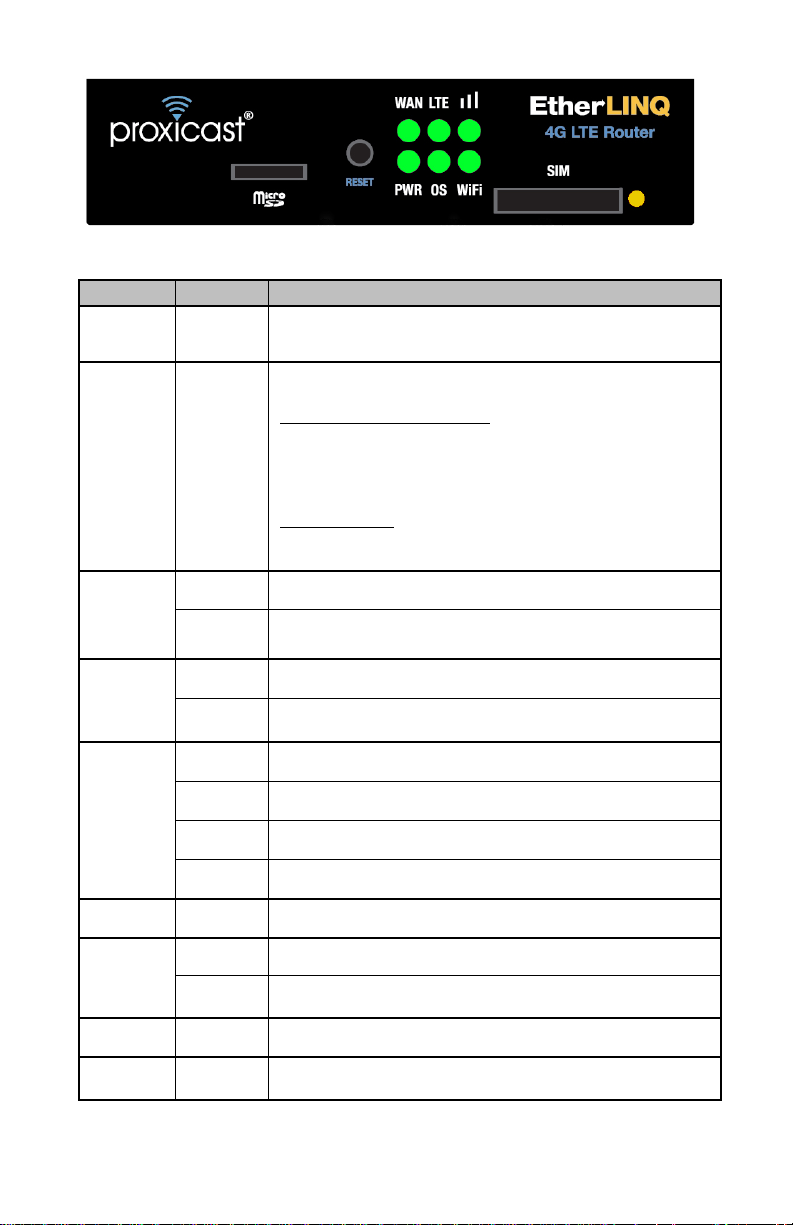
Indicators & Connections
LABEL
LED
DESCRIPTION
Press & hold for 2 seconds until the OS LED begins
Username/Password = admin/1234
The wired WAN Ethernet port is attempting to
connect
Press yellow button on the lower right to eject. The
EtherLINQ uses “mini” (2FF) sized SIMs
Figure 2: EtherLINQ Front Panel
MicroSD
RESET
WAN
LTE
Bars
Solid The wired WAN Ethernet port is the active WAN
Flashing
Solid The LTE Modem is the active WAN
Flashing The LTE Modem is attempting to connect
Off The LTE Modem is not receiving a cellular signal
1 Hz The LTE signal is POOR
10 Hz The LTE signal is GOOD
Solid The LTE signal is EXCELLENT
Slot for microSD cards. Must be formatted with the
FAT32 file system.
to flash. This places the EtherLINQ in
CONFIGURATION MODE
LAN IP = 192.168.1.1:8080
Press & hold for 10 seconds until the top row of LEDs
flash in sequence. This returns the EtherLINQ to its
factory default
LAN IP = 192.168.1.1:8080
settings:
and forces the
PWR
OS
WiFi
SIM
Solid Power is on
Flashing The EtherLINQ is booting
Solid The EtherLINQ is operating normally
Solid The EtherLINQ’s internal WiFi radio is enabled
2
Page 4
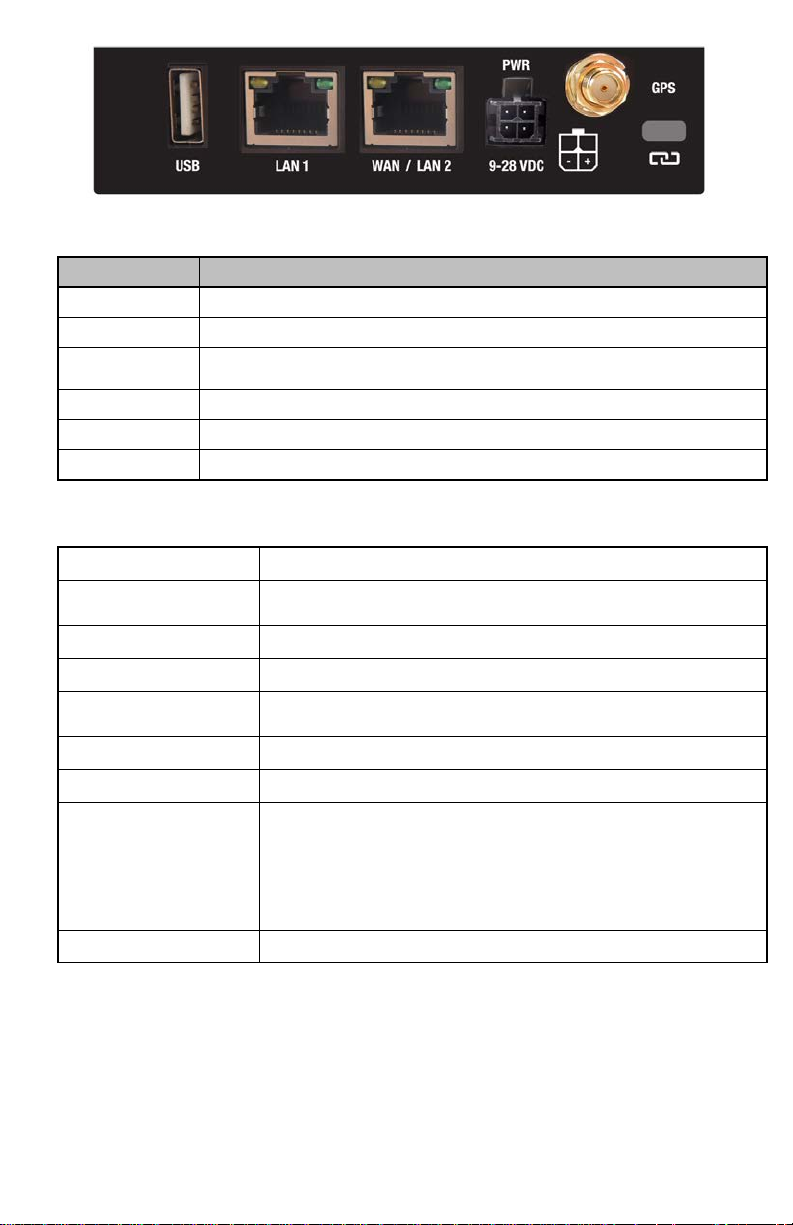
Figure 3: EtherLINQ Rear Panel
Connect a cable/DSL modem or other Ethernet-bas ed WAN
equipment to this port. Can also be defined as a second LAN port.
HTTP Management
Access
1. Ethernet WAN
2. LTE WAN
Enabled
WPA2 Password = 8 digit number from the EtherLINQ label
LABEL DESCRIPTION
USB
LAN 1
WAN / LAN 2
USB 2.0 port for webcams, USB serial devices and flash drives
Connect equipment to this port with an Ethernet cable
PWR
GPS
LOCK
Connect the included 12V DC power adapter to this jack
Connect an external GPS antenna to this SMA Female jack
Kensington Lock port
EtherLINQ Default Settings
LAN IP Address
Operating Mode
LAN DHCP Server
WAN Priority
Ethernet WAN
LTE APN
WiFi Access Point
Security
192.168.1.1 / 255.255.255. 0
admin / 1234 on port 8080
NAT Router
Enabled
DHCP Client Enabled
Carrier Default
SSID = EtherLINQ-nnnn where nnnn are the last 4
characters of the EtherLINQ’s serial number
All TCP/UDP ports closed. Remote Management disabled
Press the RESET button for 10 seconds to return the EtherLINQ to these settings.
External Antenna Connections
The EtherLINQ has 2 SMA Female antenna jacks for 4G LTE external antennas
and 2 RP-SMA (reverse polarity) Female jacks for WiFi. Some models also have
an SMA Female jack on the rear panel for GPS antennas.
3
Page 5
Configuring the EtherLINQ
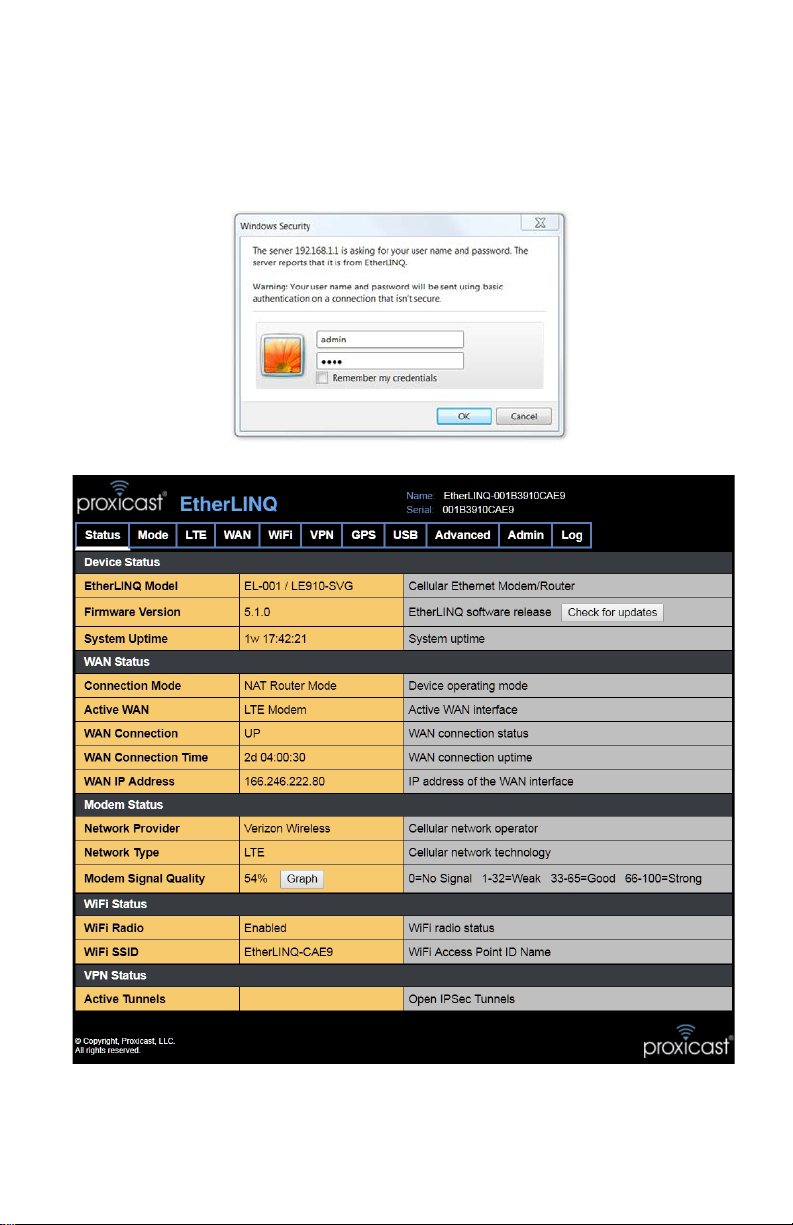
Step 1: Enter http://192.168.1.1:8080 in a web browser
Step 2: At the Login screen (Figure 4), enter the default Username : admin
and the default Password: 1234
Step 3: The EtherLINQ Status screen will be displayed (Figure 5)
Figure 4: Login Screen
Figure 5: EtherLINQ Status Screen
4
Page 6

Common Tasks
HOW TO
WHERE
ACTION
Change the LAN
IP Address
Configure the
LTE APN
Change the WiFi
Password
Forward Ports to
LAN Devices
Set up a VPN VPN Tab Enable IPSec and Add new rules for each
Configure WAN
Fail-Over
Restart
Periodically
Change the
System Name
Change the
EtherLINQ
Password
Change the
Administration
Ports
Backup / Restore
Settings
Enable Bridge
Mode
Enable Virtual
Cable Mode
Update Firmware Status Tab> Check
Mode Tab Enter the IP address to be assigned to the
EtherLINQ and select the subnet mask for
the LAN. The DHCP Server will
automatically adjust to the new subnet.
LTE Tab Enter the Access Point Name (APN)
assigned to your SIM. Also configure LTE
Keep-Alive settings.
WiFi Tab Configures the Access Point’s SSID and
security settings.
Mode Tab > NAT
Router Mode
WAN Ta b Set WAN priority, fail-over and connection
Advanced Tab >
Scheduled Reboot
Advanced Tab >
Device Access
Advanced Tab >
Device Access
Advanced Tab >
Device Access
Admin Tab >
Configuration
Settings
Mode Tab > IP
Pass-Through
Mode Tab > Virtual
Cable
For Updates button
Enter up to 10 port-forward / translation
rules.
VPN tunnel.
Keep-Alive settings.
Select the frequency for the EtherLINQ to
automatically reboot.
Enter the System Identification.
Passwords are case sensitive. The
username cannot be changed from
“admin” however, multiple users may log
in concurrently.
HTTP and HTTPS can be assigned to any
port or disabled as necessary to avoid
port conflicts or increase security.
Settings can be saved or restored;
EtherLINQ can be reset to factory default
settings.
Passes the WAN IP address to first LAN
device that requests a DHCP address.
Bridges the EtherLINQ to other
EtherLINQs and PocketPORTs through
any intervening network toplogy.
Requires an active WAN connection to
check the Proxicast server for updates.
Consult the EtherLINQ User’s Guide for more detailed information on how to
configure all of the EtherLINQ’s features.
5
Page 7

Troubleshooting
PROBLEM
CORRECTIVE ACTION
None of the LEDs
turn on
Cannot access the
EtherLINQ from a
PC on the LAN
Cannot ping the
EtherLINQ from
the LAN
Cannot make (or
maintain) a
cellular data
connection
(i.e. no LTE WAN
IP address)
Cellular Signal
Quality is low
Ensure that the correct power adapter is connected to the
EtherLINQ and plugged in to an appropriate power source. If
the LEDs still do not turn on, there may be a hardware failure.
Check the cable between the computer (or hub/switch) and the
EtherLINQ. Check that the corresponding LAN port LED is ON.
Configure the PC to receive its IP settings via DHCP
(automatic assignment).
Confirm that any other network interfaces on the PC (such as
WiFi) are disabled.
If the LAN LEDs are off, check the cable connections.
Verify that the IP address and subnet of the EtherLINQ is in the
same range as the computers on the LAN and that the
EtherLINQ is the default gateway for all LAN devices.
Confirm that the SIM has been provisioned & activated with the
correct type of Internet access data service.
Ensure that the SIM/RUIM card (if required) is properly
inserted.
Network registration may take several minutes.
Connections may be unreliable if the signal quality is < 33%.
Check that the proper external antenna is securely attac hed.
Use coax extension cables to locate the antennas to a more
favorable location.
Move the EtherLINQ to a location where the carrier’s sig nal is
stronger or use a higher-gain antenna or amplifier.
Cannot get a
WAN IP address
from the Ethernet
WAN ISP
After pressing
RESET, cannot
make a WAN
connection
The WAN IP address may not be provided until after the ISP
verifies the MAC address. Confirm the verification method used
by the ISP.
Check the EtherLINQ’s connection to the wired WAN
(cable/DSL modem). Check whether the Ethernet WAN
connection requires a crossover or straight cable.
The RESET button returns the EtherLINQ to its factory default
settings including clearing the LTE APN and WAN parameters.
6
Page 8

Common Carrier-Specific Issues
CARRIER
COMMENT
Verizon
Wireless 4G/LTE
AT&T Wireless
Also see our online Knowledge Base at http://support.proxicast.com for more
troubleshooting tips, documentation, TechNotes and configuration examples.
Verizon Wireless’ default APN (vzwinternet) provides only NAT’d
IP addresses. This prevents all Internet initiate d inbou nd (remote
access) connections from reaching the EtherLINQ.
Use the EtherLINQ’s VPN features to make an outbound
connection to a VPN server on another network; or
Purchase a static public IP address from Verizon for an
additional fee.
AT&T’s default APN (broadband) blocks all packets originating
from the Internet. To access the EtherLINQ or other equipment
remotely, request that AT&T provide you access to the i2gold
APN or another APN which offers mobile terminated data service;
Or use the EtherLINQ’s VPN features to make an outbound
connection to a VPN server on another network; or
Purchase a static public IP address from AT&T for an
additional fee.
Proxicast also manufactures an extensive line of cellular & WiFi antennas,
coaxial extension cables and other accessories for various applications.
Visit our online store at:
https://shop.proxicast.com
312 Sunnyfield Drive, Suite 200
Glenshaw, PA 15116-1936
1-877-77PROXI (1-877-777-7694)
1-412-213-2477 (outside USA)
[email protected]
© Copyright 2000 - 2018. Proxicast, LLC. All rights reserved.
Proxicast is a registered trademark and EtherLINQ, LAN-Cell and PocketPORT are
trademarks of Proxicast LLC. All other trademarks/servicemarks mentioned are the
property of their respective owners.
7 rev 180709
 Loading...