

Page 1

Page 2

©2006 by Proview®. All rights reserved.
Copyright protection claimed includes all forms and matters of copyrightable material and
information now allowed by statutory judicial law or hereinafter granted, including without
limitation, material generated from the software programs which are displayed on the screen
such as icons, screen displays, looks, etc.
All Proview® product names mentioned in this publication are trademarks of Proview. Other
company trademarks are also acknowledged.
Changes are periodically made to this document. Changes, technical
inaccuracies, and typographic errors will be corrected in subsequent editions.
This TV incorporates High-Denition Multimedia Interface(HDMITM) technology.
HDMI, the HDMI logo and High-Denition Multimedia Interface are trademarks or registered
trademarks of HDMI Licensing LLC.
Page 3

ENGLISHENGLISH
1
FCC
Federal Communications
Commission Statement
This equipment has been tested and found to comply with the limits of a class B digital device,
pursuant to Part 15 of the FCC Rules. These limits are designed to provide reasonable protection
against harmful interference in a residential installation. This equipment generates, uses and can
radiate radio frequency energy and, if not installed and used in accordance with the instructions, may
cause harmful interference to radio communications. However, there is no guarantee that
interference will not occur in a particular installation. If this equipment does cause harmful
interference to radio or television reception, which can be determined by turning the equipment off
and on, the user is encouraged to try to correct the interference by one or more of the following
measures:
1. Reorient/Relocate the receiving antenna.
2. Increase the separation between the equipment and receiver.
3. Connect the equipment into an outlet on a circuit which is different from what the receiver is
connected to.
4. Consult the dealer or an experienced radio/TV technician for help.
Changes or modifications not expressly approved by the manufacturer
responsible for compliance could void the user authority to operate the
equipment.
Page 4
2
Warnings and Precautions
Warnings and Precautions
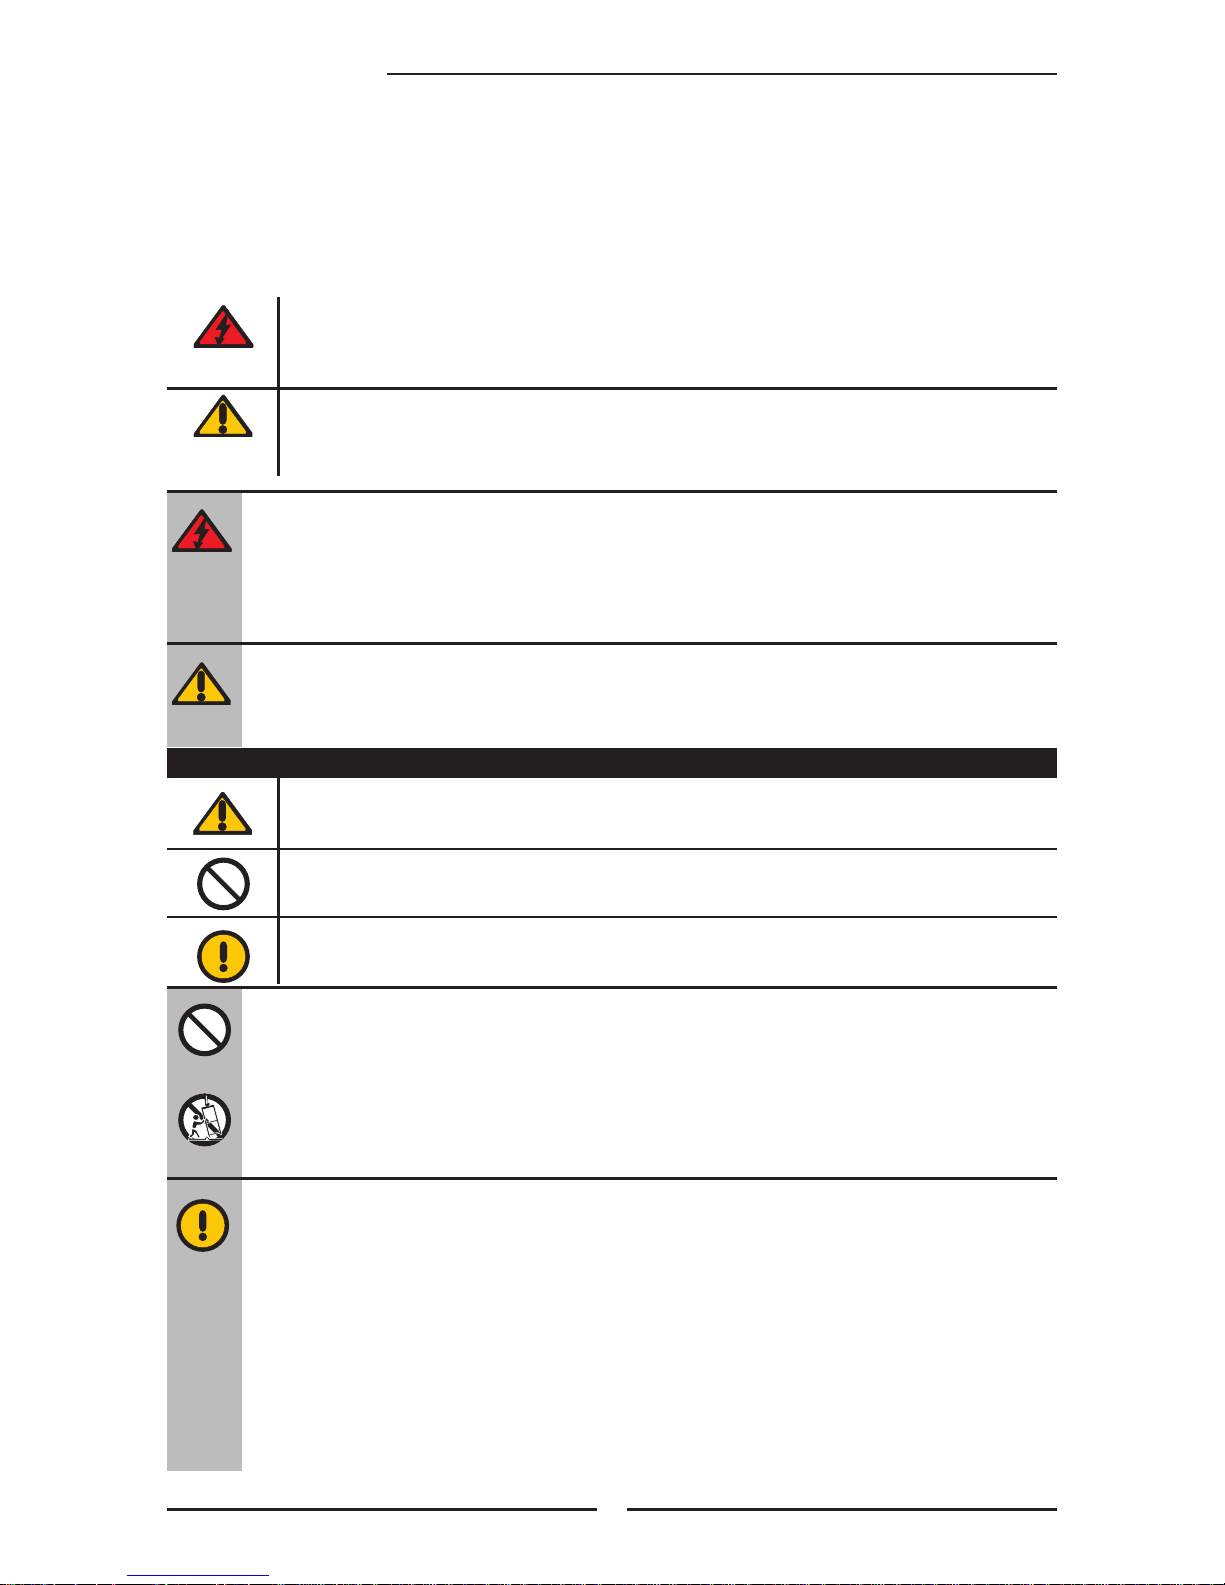
To reduce the risk of re or electric shock, do not expose this equipment to rain or moisture.
This symbol is intended to alert the user to avoid the risk of electric shock.
This equipment must not be disassembled by anyone except qualied service personnel.
This symbol is intended to alert the user to the presence of important operating and
maintenance instructions in the literature accompanying the appliance.
▪ TO REDUCE THE RISK OF ELECTRIC SHOCK,
▪ DO NOT REMOVE COVER (OR BACK).
▪ NO USER-SERVICEABLE PARTS INSIDE.
▪ REFER SERVICING TO QUALIFIED SERVICE PERSONNEL.
Use of controls, adjustments or performance of procedures other than those specied herein
may result in hazardous radiation exposure.
CAUTION
Important Safety Instructions
To prevent any injuries, the following safety precautions should be observed in the installation, use,
servicing and maintenance of this equipment.
Before operating this equipment, please read this manual completely, and keep it nearby for future
reference.
WARNING
▪ Do not place the equipment on any uneven or unstable carts, stands, tables, shelves etc.
The equipment may fall, causing serious injury to children or adults and serious damage to
the equipment itself.
▪ Use only a cart or stand recommended by the manufacturer. This equipment and
recommended cart or stand should be handled with care. Quick stops, excessive force, and
uneven surfaces may cause the equipment and cart/stand to overturn.
▪ Do not disable the 3-wire grounding type plug. The grounding pin on the 3-prong plug is an
important feature. Removing the grounding pin will increase the risk of damaging the
equipment.
▪ If you can not t the plug into the electrical outlet, contact an electrician to install a grounding
outlet.
▪ Always operate this equipment from the type of power source indicated on the rear of the
serial/model information label.
▪ Never overload wall outlets and extensions.
This symbol indicates caution points.
This symbol indicates actions that should not be done.
This symbol indicates actions that must be performed.
Page 5

ENGLISHENGLISH
3
Warnings and Precautions
▪ Use and handle the power cord with care. Do not place any heavy objects on the AC
power cord.
▪ Do not pull the AC power cord. Do not handle the AC power cord with a wet hand.
▪ Do not touch the power cord and antenna cable during lightning.
▪ Remove the plug from the wall outlet, if the equipment will not be used for a long period
of time.
▪ Do not place, use or handle this equipment near water.
▪ Never expose the equipment to liquid, rain, or moisture.
Seek for service if any of the above is spilled into the equipment.
▪ Do not expose the equipment to extreme temperature or to direct sunlight, as the
equipment may heat up and suffer damage.
▪ Do not install the equipment near any heat sources such as radiators, heat registers,
stoves, or any other apparatus that might produce heat.
▪ Do not attempt to service the equipment yourself.
▪ Opening and removing the covers may expose you to dangerous voltage or other
hazards and may void your warranty. Refer service to qualied personnel.
▪ Do not place or drop any other objects on top.
▪ Do not insert anything into the ventilation holes of your equipment.
Inserting any metal or ammable objects may result to re or electric shock.
▪ Do not place the equipment on uneven or unstable carts, stands, tables, shelves etc. The
equipment may fall, causing serious injury to children or adults and serious damage to
the equipment itself. Always place the equipment on the oor or on a surface that is
sturdy, level, stable and strong enough to support the weight of the equipment.
▪ Do not block any ventilating openings. Leave an open space around the equipment.
Never place the equipment :
on a bed, sofa, rug, or any other similar surfaces; too close to drapes/curtains/walls, in a
bookcase, built-in cabinet, or any other similar places that may cause poor ventilation.
▪ Unplug this apparatus during lightning storms or when unused for long periods of time.
▪ Refer all servicing to qualified service personnel. Servicing is required when the
apparatus has been admaged in any way, such as power-supply cord or plug is
damaged, liquid has been spilled or objects have fallen into the apparatus, the apparatus
has been exposed to rain or moisture, does not operate normally, or has been dropped.
▪ Always remove the power cord from the outlet before cleaning the equipment.
▪ Never use liquid or aerosol cleaners on the equipment.
Clean only with a soft dry cloth.
▪ Only use attachments/accessories specified by the manufacturer.
Page 6

4
Warnings and Precautions
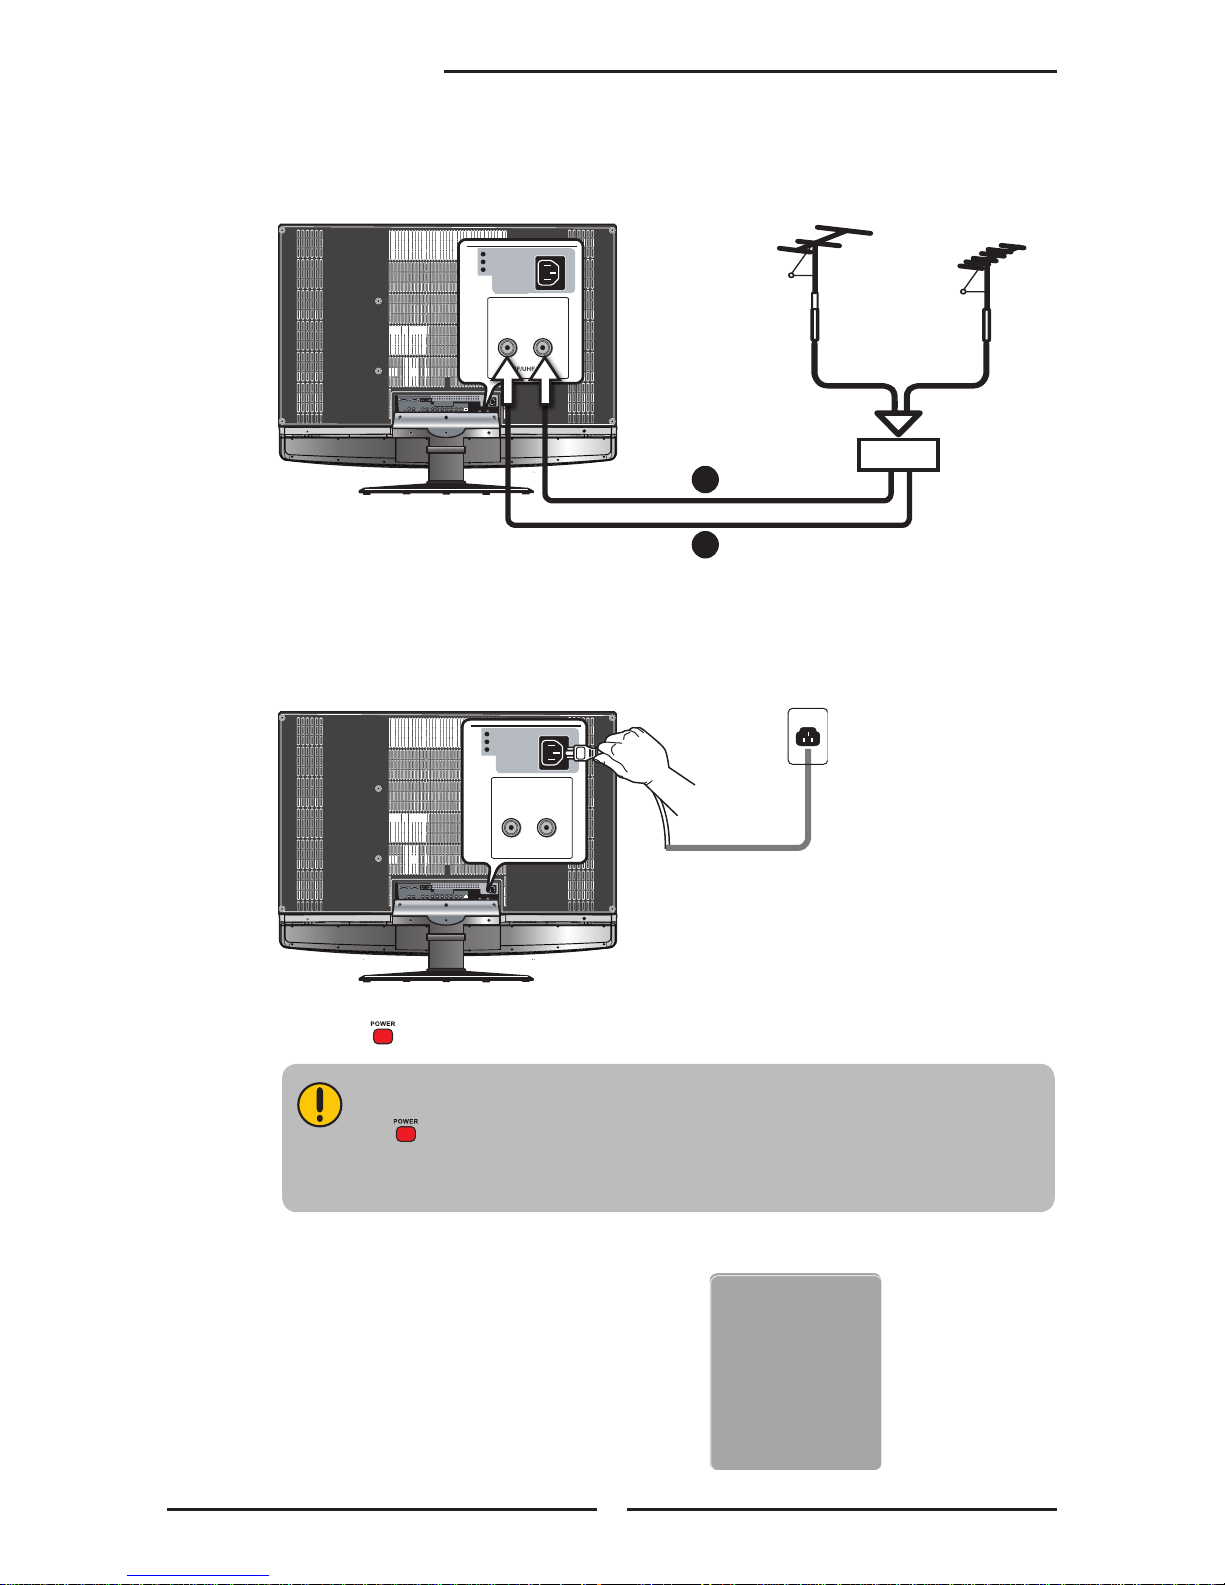
Outdoor Antenna Safety Instructions
Antenna lead-in wire
Antenna discharge unit
(NEC section 810-20)
Grounding conductors
(NEC section 810-20)
Ground clamps
Power service grounding
(NEC Art250 part H)
Ground clamps
Electric service
equipment
NEC : National Electrical code
If an outdoor antenna is connected, follow the precautions below:
EXAMPLE OF OUTDOOR ANTENNA GROUNDING
Section 810 of National Electrical Code (NEC) provides information with respect to proper grounding of the
mast and supporting structure, grounding of the lead-in wire to an antenna discharge unit, size of grounding
conductors, location of antenna discharge unit, connection to grounding electrodes, and requirements for
the grounding electrode.
▪ An outdoor antenna should not be located in any area where it could come in contact with
overhead power lines, or any other electric light or power circuits.
▪ When installing an outdoor antenna system, extreme caution should be taken to prevent
contact with power lines. Direct contact with power lines may be fatal and should be avoided
at all costs.
Page 7

ENGLISHENGLISH
5
CONTENTS
Federal Communications Commission Statement
...........................................................................................................................................1
Warnings and Precautions
Important Safety Instructions ....................................................................................... 2
Antenna Safety Instructions ......................................................................................... 4
Chapter 1 Introducing the LCD TV
Key Features ............................................................................................................... 6
Package Contents ....................................................................................................... 7
Setting Your LCD TV .................................................................................................... 8
Your LCD TV ...............................................................................................................11
Your Remote Control ................................................................................................. 13
Chapter 2 Installing the LCD TV
Connecting a TV Cable or an Antenna ...................................................................... 15
Connecting a VCR ..................................................................................................... 19
Connecting a Video Camera or Game Console......................................................... 20
Connecting a DVD Player .......................................................................................... 21
Connecting a Digital TV Cable Box or Digital Satellite Receiver ............................... 23
Connecting an AV Equipment with HDMI Connector ................................................. 24
Connecting an AV Equipment with DVI Connector .................................................... 25
Connecting a PC........................................................................................................ 26
Connecting an Audio Receiver or a Dolby Digital 5.1 Sound System........................ 27
Chapter 3 USING THE FEATURES
Using Picture-In-Picture ...................................................................................28
Wide Screen Viewing ......................................................................................30
Operating the Menu ........................................................................................31
Setting up the HDTV Function ..........................................................................33
Customizing the VIDEO Settings ......................................................................37
Customizing the AUDIO Settings ......................................................................39
Customizing the SETUP Settings..................................................................... 40
Using the V-CHIP Settings ...............................................................................42
Using the Parental Settings ..............................................................................44
Customizing the TV Settings ............................................................................45
TroubleShooting
......................................................................................................................................... 46
Speciction
......................................................................................................................................... 48
Page 8

6
Chapter 1 Introducing the LCD TV
Various Audio/Video terminals for external equipment connection
▪ 2 set of composite A/V input terminals
▪ 1 set of S-VIDEO terminals
▪ 2 set of component Video input terminals
▪ 1 VGA/ Audio input terminal
▪ 2 HDMI/Auido input terminals
▪ 1 sets of Audio(L/R) output terminals
▪ 2 SPDIF output terminals (Optical x 1 /Coaxial x 1)
▪ 1 Headphone terminal
The built-in TV tuner to receive HD ATSC
▪ This function allows the reception of HD broadcasting without the addition of a set top
box.
High Definition Multimedia Interface (HDMI)
▪ High Denition Multimedia Interface (HDMI) is a small, user-friendly interconnect that
can carry up to 5 Gbps of combined video and audio in a single cable. This system
eliminates the cost, complexity and confusion of multiple cables used to connect
current A/V systems.
Precise Touch Control Buttons
▪ The Precise Touch Control Buttons is a touch-sensitive technology to replace the
conventional buttons.
HDTV Component Video Inputs
▪ Offers the best video quality for DVD(480p) and digital set-top-box (HD: 720p, 1080i)
connections.
3D Digital Noise Reduction
▪ This function can digitally reduce image noise to provide better picture quality.
Film-Mode Detection (3:2 Reverse Pull Down)
▪ This function can automatically detect content derived from lm and adjust the
interlacer’s frame matching to provide a more natural-looking, clearer image of the
moving picture.
PIP Function
▪ Provides viewing of two programs simultaneously, in either picture-in-picture mode or
picture-on-picture (side by side) mode.
Chapter 1
Introducing the LCD TV
Key Features
Page 9

ENGLISH
7
Chapter 1 Introducing the LCD TV
þ LCD TV
Make sure all of the following contents are included.
These items are all you need to set up and operate the LCD TV in its basic configuration.
Package Contents
þ
VIDEO Cable
Power Cord
AUDIO Cable
Remote Control/
AAA Batteries x 2
þ Quick Guide þ User’s Guide
þ Warranty Card þ Attention Card
CH CHVOL.- VOL.+ MENU SOURCE
/I
O
K
P
O
W
E
R
G
U
I
D
E
E
X
I
T
I
N
F
O
L
I
S
T
F
A
V
.
C
H
T
I
M
E
R
F
R
E
E
Z
E
M
E
N
U
S
.
M
O
D
E
S
L
E
E
P
S
W
A
P
P
I
P
P
.
M
O
D
E
M
T
S
M
U
T
E
C
A
P
T
I
O
N
P
.
S
I
Z
E
1
2
3
4
5
6
7
8
9
J
U
M
P
0
.
V
O
L
.
C
H
.
A
I
R
/
C
A
B
L
E
S
O
U
R
C
E
Most devices (VCRs, DVD player, etc.) come with the necessary cable for
connection. If you want to set up a complex system, you may need to buy
extra cable, connector, etc.
1-877-532-8176, Monday thru Friday 8:00 am to 6:0 0 pm (PST )
To obtain customer service and technical support by phone:
7373 Hunt Ave.
Please call(1-877 - 53 2-8176 )to loc ate yo u re neares t
þ
þ
þ
Page 10

8
Chapter 1 Introducing the LCD TV
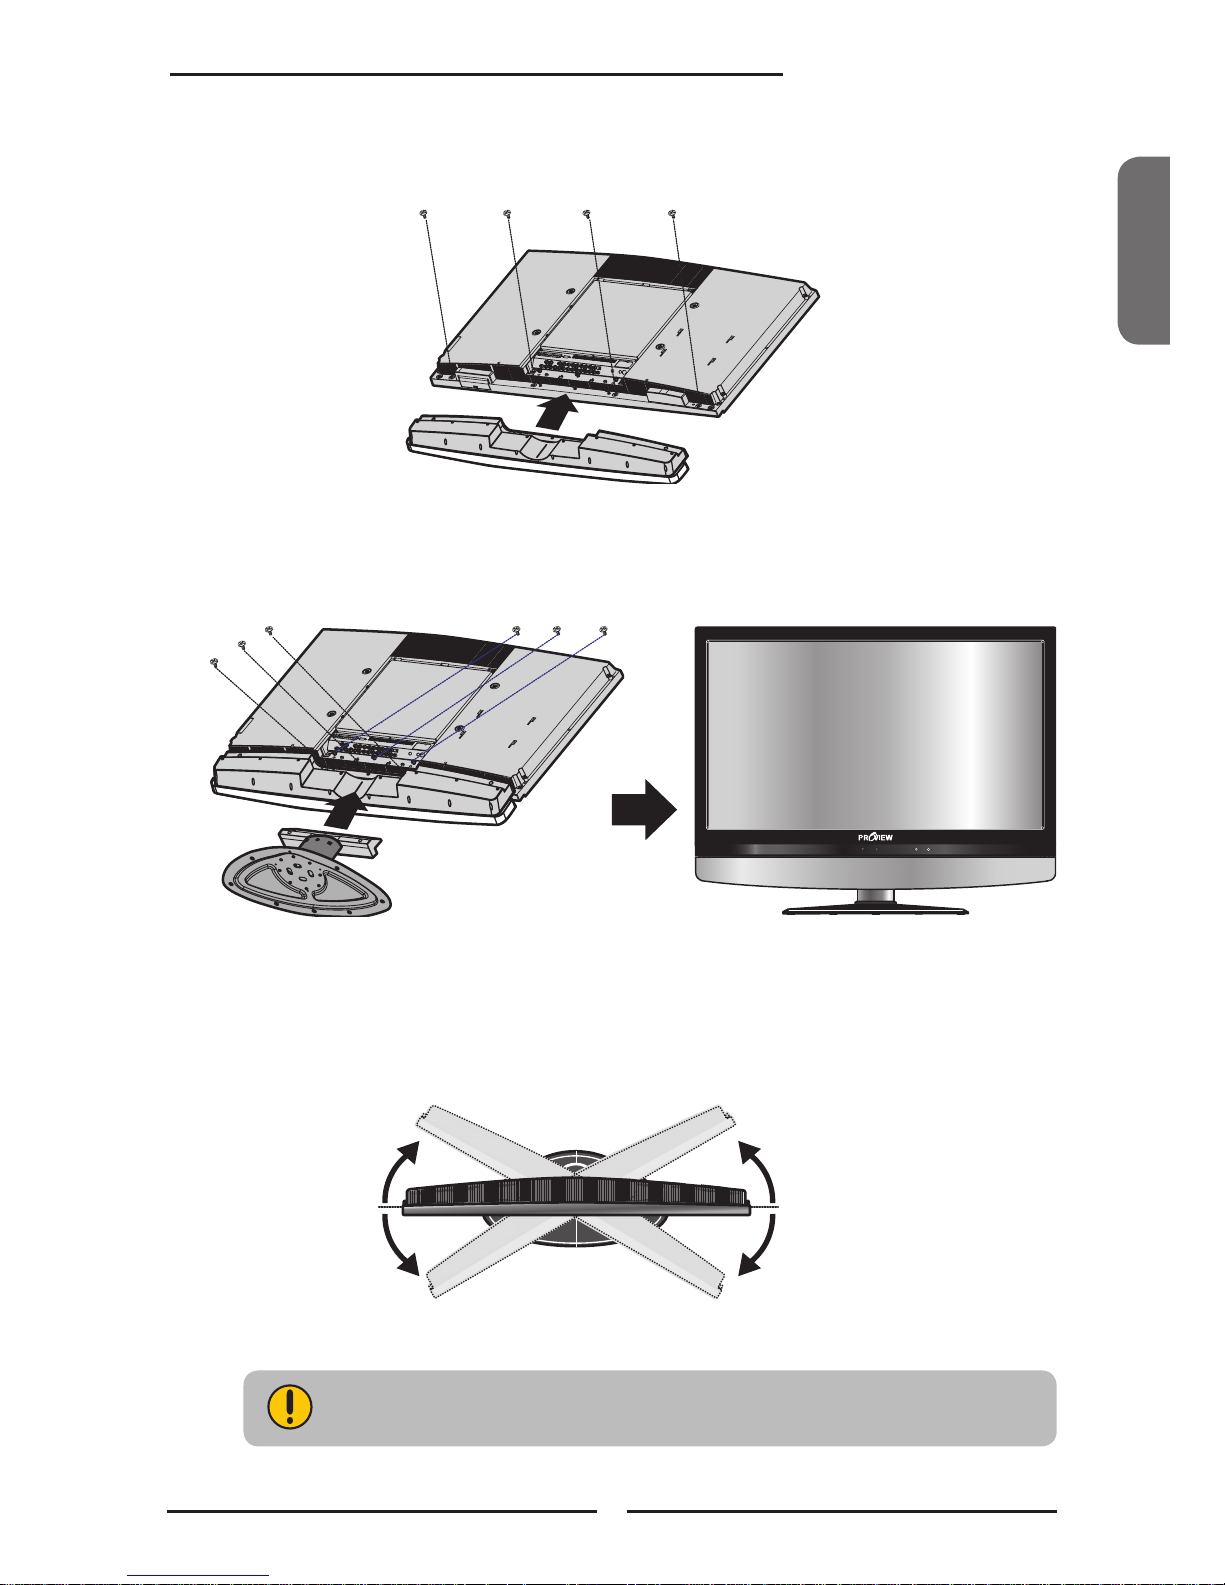
Follow the instructions below to install the TV stand:
Open the box, and make sure all necessary parts are in the box.
The package contains:
Setting Up Your LCD TV
How to install the TV Stand
LCD TV
Stand
Speaker
Screws(10)/
Screwdriver
Cover an even stable surface with a soft cloth. Place the LCD TV unit face-down on the
cloth.
Page 11
ENGLISH
9
Chapter 1 Introducing the LCD TV
If you prefer to mount your LCD TV on a wall instead of attaching it to the
stand, please reference the instructions included in the wall mounting kit
(not included).
Hold the TV stand and place it on the six screw holes on the back of the unit as shown. Use
the screwdriver to tighten the six screws on the rear of the speaker until the screw is rmly
xed in place.
Fit the speaker onto the back of the display unit as shown below. Use the screwdriver to
tighten the four screws on the rear of the speaker until the screw is rmly xed in place.
Adjust the stand to your desired angle. The stand angle can be rotated 30
O
to the right and
left.
CH CHVOL.- VOL.+ MENU SOURCE
/I
completed
30
o
30
o
Page 12
10
Chapter 1 Introducing the LCD TV
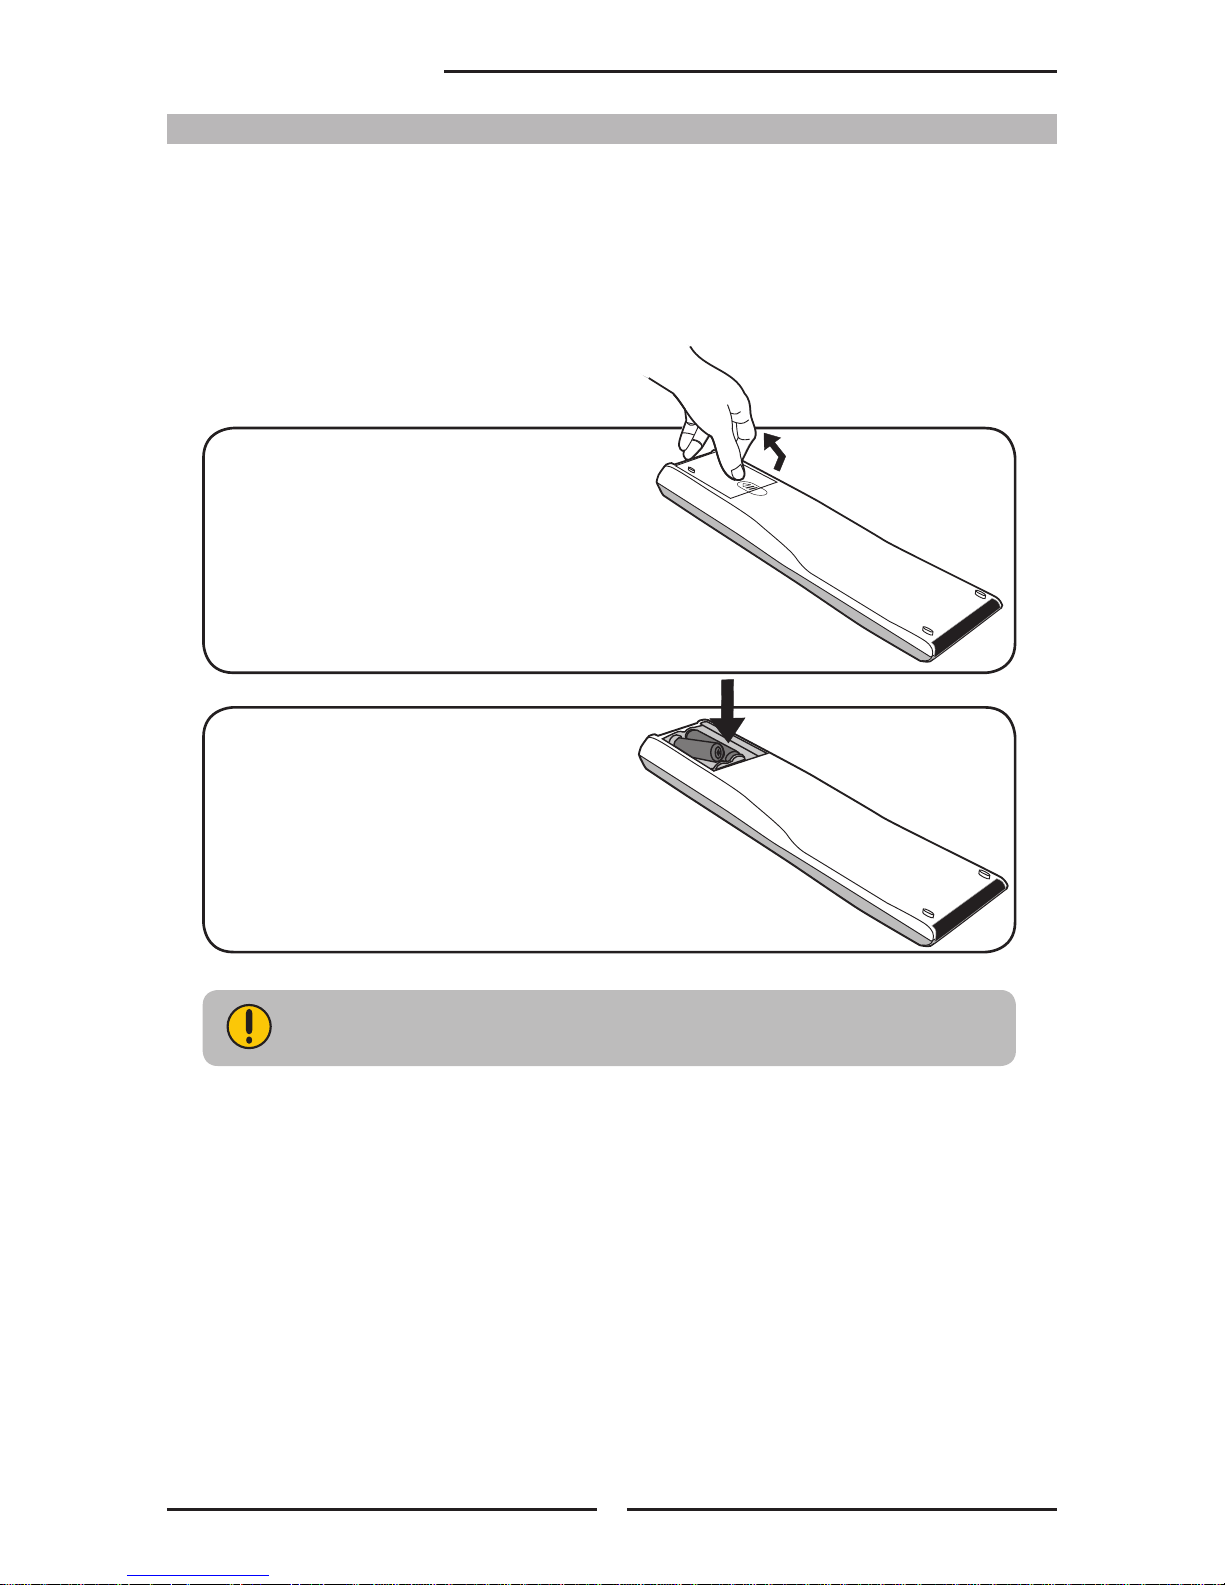
Do not use caustic cleaners (porcelain, stainless steel, toilet, or oven cleaner
etc.) on the remote, as it may suffer damage.
Use an antenna cable to connect the VHF/UHF signal to the LCD TV’s ANT. terminal
(refer to page18).
Connect the AC power cord at the back of the TV and connect the power cord to wall outlet.
Insert the 2 batteries supplied in remote control.
Connect other an external A/V device (refer to page 19-27).
Step1 Slide the back cover up to open the
battery compartment of the remote
control.
Step2 Insert two AAA size batteries.
Make sure to match the (+) and
( - ) ends of the batteries with
the (+) and ( - ) ends indicated
in the battery compartment.
Slide the cover back into place.
How to setup the TV
Page 13

/I
ENGLISH
11
Chapter 1
Introducing the LCD TV
CH CHVOL.- VOL.+ MENU SOURCE
/I
Your LCD TV
VOL +/-
Adjusts the volume up and down.
Selects the main-menu item and change
values for items when in the OSD mode.
CH
Scans up and down through channels.
Selects sub-menu item when in the OSD mode.
Front/Right Side View and Controls
EARPHONE
Connects to the external
headhone for private
listening.
VIDEO1 IN
Connects to the
composite Video and
Audio output jacks on
external video equipment.
Front View
R
L
AUDIO
VIDEO
Right Side View
LED
The LED light indicates when the LCD TV is activated.
SOURCE
Chooses from different input signal sources.
MENU
Press once to display the OSD (on
screen display), press again to turn the
OSD off.
/ I
Turns the LCD TV on and into standby mode.
IR
Infrared Receiver
R
L
AUDIO
VID EO
Page 14

HDMI1 IN HDMI2 IN
AUDIO
L R
L R L R
L R
L
R
L R
L R
AUDIO
VGA IN
VIDEO2 IN
VIDEO AUDIO
S-VIDEO IN
S-VIDEO AUDIO
YPbPr1 IN
AUDIO OUT
STEREO
DIGITAL
OPTICAL
COAXIAL
TV
CABLE
HDTV
AIR
VHF/UHF IN
Y Pb Pr AUDIO
YPbPr2 IN
Y Pb Pr AUDIO
12
Chapter 1 Introducing the LCD TV
Rear View and Jacks
VHF/UHF IN-TV-CABLE
Connects RF input from VHF/UHF antenna or cable.
VGA IN
Connects the PC, or other AV equipment with VGA and AUDIO(L/R)
output jacks.
YPbPr1 IN/YPbPr2 IN
Connects to the DVD player, Digital Set-Top-Box, or other AV
equipment with component(YPbPr) video and audio output jacks.
VIDEO2 IN
Connects to the composite VIDEO and AUDIO(L/R) output jacks on external video equipment.
AC IN
Connects to the AC power cord.
AUDIO OUT-STEREO
Connects to the AUDIO(L/R) input jacks on AV equipment.
AUDIO OUT-DIGITAL-OPTICAL/COAXIAL
Connects to the OPTICAL AUDIO jack on the digital/standard 5.1 audio system.
VHF/UHF IN-HDTV-AIR
Connects RF input from VHF/UHF antenna or cable to receive high/standard denition television.
S-VIDEO IN
Connects to the S-VIDEO and AUDIO(L/R) output jacks on external
video equipment.
HDMI1 IN/ HDMI2 IN
Connects the all digital AV equipment with HDMI connector.HDMI supports enhanced, highdenition video and two-channel digital audio. The AUDIO(L/R) of HDMI IN is for DVI connection.
Page 15

ENGLISH
13
Chapter 1 Introducing the LCD TV
OK
POW ER
GUI DE
EXI T
INF O
LIS T FAV .CH TIM ER FREE ZE
MEN U
S.M ODE
SLEE P
SWAP PIPP.MO DE
MTS M UTE
CAPT ION P.SI ZE
1 2
3
4
5
6
7
8 9
JUM P
0
.
VOL .
CH.
AIR /CABL E
SOU RCE
Your Remote Control
POWER Turns the LCD TV on and off
SWAP Swaps between
the main and sub
window in PIP/POP mode
P.MODE Selects picture mode: Vivid/Standard/
Cinema/Sport/User
PIP Turns PIP/POP on and off
MTS Cycles through the multi-channels TV
sound(MTS) options: SAP/MONO/
STEREO
S.MODE Selects
sound
effect options: Surround/
Live/Dance/Techno/Classic/Soft/Rock/
Pop/Off
MUTE Mutes and restores the audio
CAPTION Cycles through the Closed Caption:
OFF/CC1/CC2/CC3/CC4/TT1/TT2/TT3/
TT4/Off
SLEEP Cycles through the LCD TV sleep timer:
OFF/30/60/90/120 mins
P-SIZE Cycles through Wide mode settings:
NORMAL/FULL/WIDE/ZOOM
0-9 Select and switch to a channel by using
0-9 buttons
Ÿ In HDTV mode, use with 0-9 and Ÿ
buttons to select a digital channels
JUMP Returns to previously selected channel
AIR/CABLE Cycles through the TV receiving signal:
AIR: antenna
Cable: STD/IRC/HRC
VOL.+- Increases and decreases volume
CH. Scans up and down the channels
SOURCE Pressing SOURCE to display a source list,
use buttons to select the video
equipment connected to the video inputs
of your LCD TV: TV/HDTV/VIDEO1/
VIDEO2/VIDEO3/VIDEO4/VIDEO5/
VIDEO6/VIDEO7/COMPUTER
1
2
2
3
4
5
6
7
8
9
10
2
6
1
7
8
9
13
14
11
12
15
10
11
12
13
14
4
3
5
15
16
16
Page 16

14
Chapter 1 Introducing the LCD TV
OK
POW ER
GUI DE
EXI T
INF O
LIS T FA V.CH T IMER F REEZ E
MEN U
S.M ODE
SLEE P
SWAP PIPP.MO DE
MTS M UTE
CAPT ION P.S IZE
1 2
3
4
5
6
7
8 9
JUM P
0
.
VOL .
CH.
AIR/CABL E
SOURCE
20
18
19
21
22
23
Effective range:
The remote can control the LCD TV from up to 5m away, if pointed directly at the receiver.
GUIDE
In HDTV mode, pressing GUIDE displays
the Program Guide on the screen
EXIT
Exits the OSD menu
▲▼►◄ Cycles through OSD options and
OK selects individual menu items. OK
conrms option settings
INFO
Pressing once displays a variety of
information such as the current channel
and the input source
MENU
Displays the OSD menu on the screen
For European TV system only
LIST
In HDTV mode, press LIST button to
display the received channel list
TIMER
Allows you to set up the time, program the
TV to turn on and off, and to tune to a
specific channel
17
18
19
20
21
17
26
25
24
22
23
24
25
26
▪ Time:
Select to set the current time by hour,
minute, second
▪ Start Time:
Select to set the time that you want
the TV to turn on
▪ Stop Time:
Select to set the time that you want
the TV to turn off
▪ Channel:
Select to set the specic channel
you want the TV to tune to when turned on
▪ Activate:
Select to turn on/off/once the timer
▪ Confirm:
Select to conrm
FREEZE Pressing FREEZE to freeze the current
picture, press again to restore the
picture.
FAV.CH Pressing FAV.CH to display favorite
channels.
Page 17

ENGLISH
15
Chapter 2 Installing the LCD TV
Chapter 2
Installing the LCD TV
Refer to the owner’s manual of any external equipment to be connected.
When connecting any external equipment, do not connect any AC power cords to wall outlets
until all other connections are completed.
Antenna Connection
The antenna requirements for good color TV reception are more important than those for a black &
white TV reception. For this reason, a good quality outdoor antenna is strongly recommended.
The following is a brief explanation of the type of connection that is provided with the various antenna
systems.
75-ohm coaxial cable (round)
F-type connector
300-ohm twin-lead cable (flat)
■ A 75-ohm system is generally a round cable (not included) with F-
type connector that can easily be attached to a terminal without
tools.
■ A 300-ohm system is a flat twin-lead cable (not included) that can
be attached to a 75-ohm terminal through a 300-75-ohm adapter
(not included).
Connecting a TV Cable or an Antenna
Page 18
16
Chapter 2 Installing the LCD TV
OUT
IN
300-ohm twinlead cable
300-ohm twinlead cable
75-ohm
coaxial cable
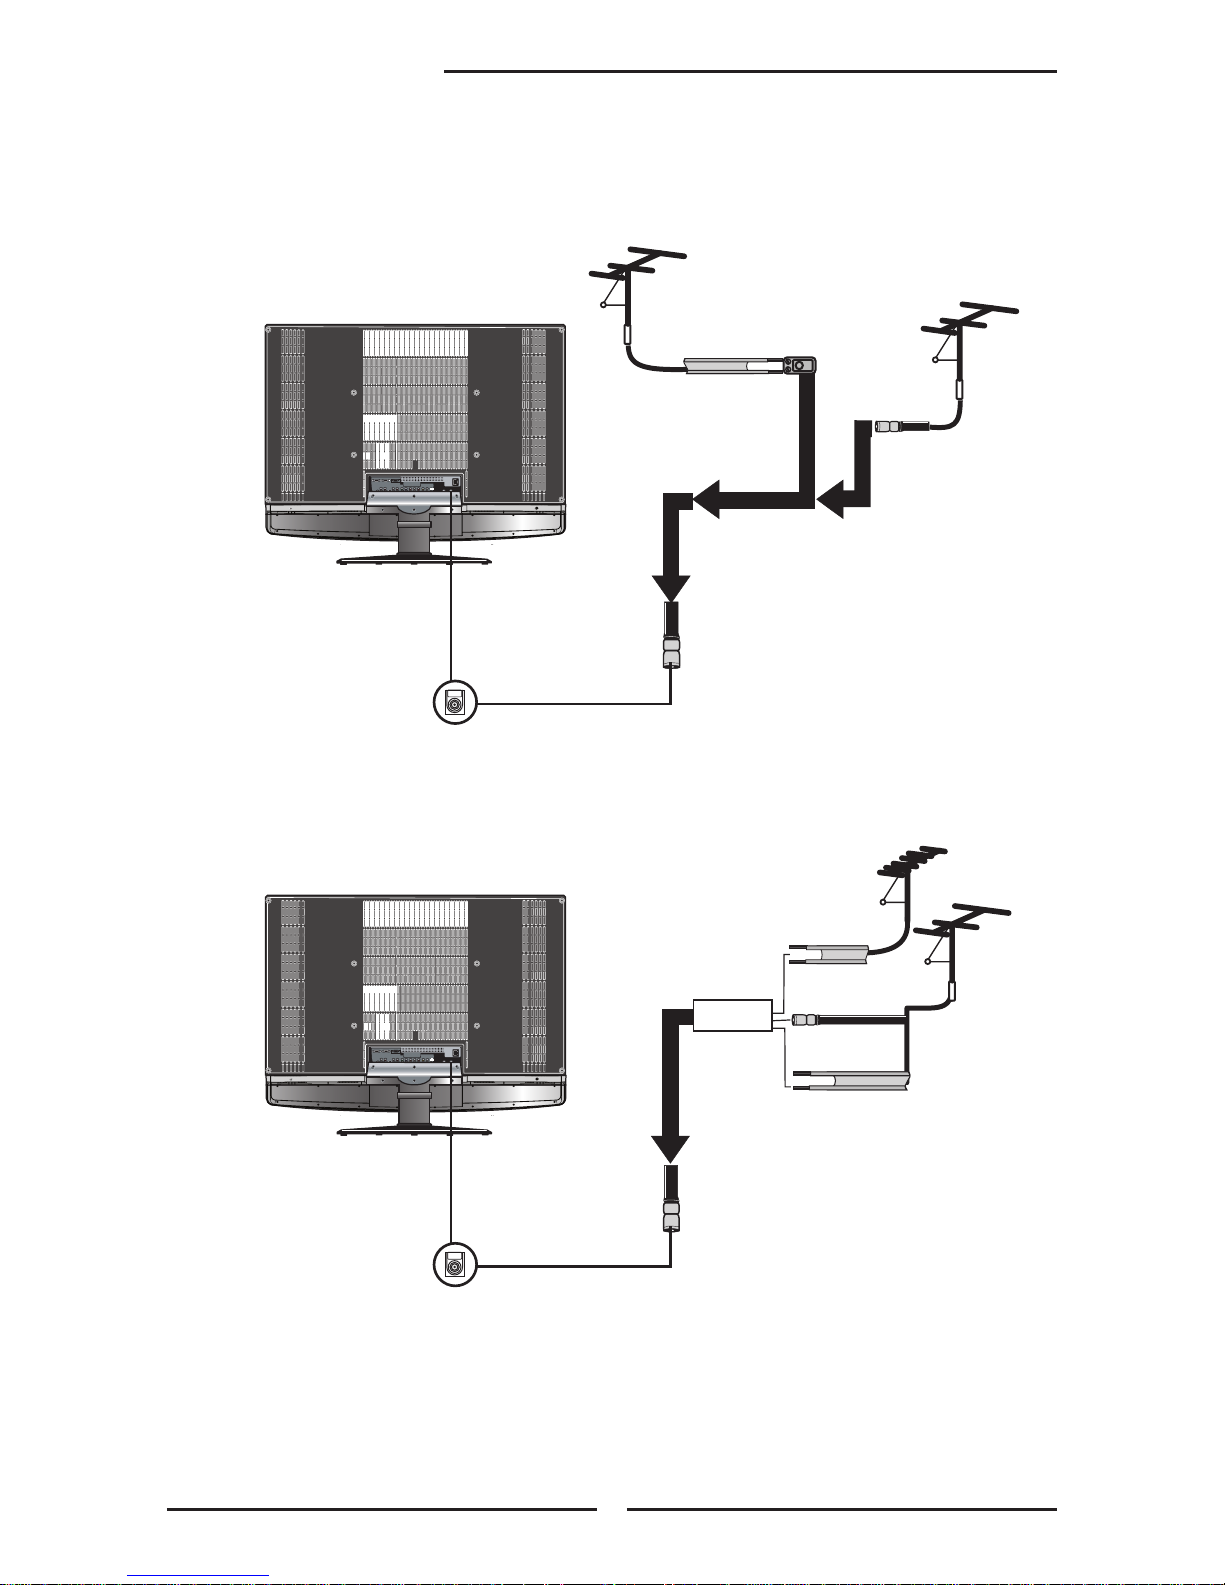
UHF
Antenna
VHF
Antenna
Combiner
(not included)
A. Combination VHF/UHF antenna
300-ohm twinlead cable
75-ohm
coaxial cable
VHF/UHF
Antenna
VHF/UHF
Antenna
300/75-ohm adapter
(not included)
B. Separate VHF and/or UHF antennas
Use one of the following two diagrams when connecting an outdoor antenna.
A: Shows how to use a VHF/UHF combination outdoor antenna.
B: Shows how to use a separate VHF and/or UHF outdoor antenna.
Page 19

ENGLISH
17
Chapter 2 Installing the LCD TV
This reminder is provided to call the CATV system installer’s attention to Article 820-40 of the
National Electrical Code (NEC) that provides guidelines for proper grounding and, in particular,
species that the cable ground shall be connected to the grounding system of the building
accurately, or as close to the point of cable entry as possible. Use of this TV for other than
private viewing of programs broadcasted on UHF, VHF or transmitted by cable companies for
the use of the general public may require authorization from the broadcast/cable company, and/
or program owner.
A
IN
B
OU T
Cable TV Line
2 set signal
splitter
(not included)
RF switch
(not included)
Cable TV converter/
descrambler
(not included)
Cable TV (CATV) Connection
■ The RF switch (not included) is required to provide two inputs (A and B). Setting
the RF switch to position A allows viewing of all unscrambled channels by using
the TV channel keys.
■ Setting the RF switch to position B allows viewing of all scrambled channels via
the converter/descrambler by using the converter channel keys.
■ A 75-ohm coaxial cable connector is built into the set for easy hookup.
When connecting the 75-ohm coaxial cable to the set, connect the 75-
ohm cable into the ANT. terminal.
■ Some cable TV companies offer premium pay channels. Since the
signals of these premium pay channels are scrambled, a cable TV
converter/descrambler is generally provided to the subscriber by the
cable TV company.
This converter/descrambler is necessary for normal viewing of scrambled channels.
(Set your TV to channel 3 or 4, typically one of these channels is used. If this is unknown,
consult your cable TV company.)
For more specic instructions on installing cable TV, consult your cable TV company.
One possible method of connecting the coverter/descrambler provided by your cable TV
company is shown in the diagram below.
VHF/UHF IN
Page 20
18
Chapter 2 Installing the LCD TV
METHOD A:
Use an antenna cable to connect the NTSC signal to the LCD TV’s TV CABLE
terminal.
METHOD B:
Use an antenna cable to connect the ATSC signal to the LCD TV’s
HDTV AIR terminal.
Connect the AC power cord at the back of the TV and connect the power cord to wall
outlet.
Press the button on the remote to turn on the LCD TV.
Always disconnect the LCD TV from the power outlet when the LCD TV will
not be used for a long period of time.
The button on the front panel is only used for switching the LCD TV into
standby, it does not disconnect the device from the main voltage. To
completely disconnect the main voltage, please remove the power plug from
the socket.
Press the SOURCE button on the remote to
display the Source List. Use the ▲▼ buttons to
select TV( METHOD A), or HDTV (METHOD
B), and press the OK button.
TV
CABLE
HDTV
AIR
VHF/UHF IN
A
B
Main:
TV(CABLE/AIR)
HDTV (CABLE/AIR)
VIDEO1 (SIDE)
VIDEO2 (REAR)
VIDEO3 (S-VIDEO)
VIDEO4 (YPbPr1)
VIDEO5 (YPbPr2)
VIDEO6 (HDMI1)
VIDEO7 (HDMI2)
COMPUTER (VGA)
TV
CABLE
HDTV
AIR
VHF/UHF IN
Page 21

HDMI1 IN HDMI2 IN
AUDIO
L R
L R L R
L R
L
R
L R
L R
AUDIO
VGA IN
VIDEO2 IN
VIDEO AUDIO
S-VIDEO IN
S-VIDEO AUDIO
YPbPr1 IN
AUDIO OUT
STEREO
DIGITAL
OPTICAL
COAXIAL
TV
CABLE
HDTV
AIR
VHF/UHF IN
Y Pb Pr AUDIO
YPbPr2 IN
Y Pb Pr AUDIO
A B
Rear of TV
AUDIO Cable
S-VIDEO Cable
A/V Cable
ENGLISH
19
Chapter 2 Installing the LCD TV
METHOD A:
Use a composite cable to connect the VCR’s composite video/audio jacks to the LCD TV’s
VIDEO2 IN jacks.
METHOD B:
Use an audio cable to connect the VCR’s audio output jacks to the LCD TV’s audio
inputs. Use a S-Video cable to connect the VCR’s S-Video output jack to the LCD TV’s
S-VIDEO IN input jack.
Connect all AC power sources, before turning on the power switch of the LCD TV or
other connected equipment.
Press the button on the remote to turn on the LCD TV.
To watch a videotape, press the SOURCE button on the remote to select
VIDEO2 (METHOD A), or VIDEO3 (METHOD B).
Connecting a VCR
Page 22

HDMI1 IN HDMI2 IN
AUDIO
L R
L R L R
L R
L
R
L R
L R
AUDIO
VGA IN
VIDEO2 IN
VIDEO AUDIO
S-VIDEO IN
S-VIDEO AUDIO
YPbPr1 IN
AUDIO OUT
STEREO
DIGITAL
OPTICAL
COAXIAL
TV
CABLE
HDTV
AIR
VHF/UHF IN
Y Pb Pr AUDIO
YPbPr2 IN
Y Pb Pr AUDIO
A
B
R
L
AUDIO
VIDE O
Right Side
or
AUDIO Cable
S-VIDEO Cable
A/V Cable
Rear of TV
20
Chapter 2 Installing the LCD TV
METHOD A:
Use a composite cable to connect the video camera’s or game console's composite video/
audio jacks to the LCD TV’s VIDEO2 IN jacks or VIDEO1 IN jacks.
METHOD B:
Use an audio cable to connect the video camera’s or game console's audio output jacks to
the LCD TV’s audio inputs. Use a S-Video cable to connect the video camera’s or game
console's S-Video output jack to the LCD TV’s S-VIDEO IN input jack.
Connect all AC power sources, before turning on the power switch of the LCD TV or
other connected equipment.
Press the button on the remote to turn on the LCD TV.
To watch a video camera or game console, press the SOURCE button on the remote to
select VIDEO1/VIDEO2 (METHOD A), or VIDEO3 (METHOD B).
Connecting a Video Camera or Game Console
Not all cameras have the ability to connect to a TV. Please check your video camera
user guide for compatibility.
Game Console
Page 23

HDMI1 IN HDMI2 IN
AUDIO
L R
L R L R
L R
L
R
L R
L R
AUDIO
VGA IN
VIDEO2 IN
VIDEO AUDIO
S-VIDEO IN
S-VIDEO AUDIO
YPbPr1 IN
AUDIO OUT
STEREO
DIGITAL
OPTICAL
COAXIAL
TV
CABLE
HDTV
AIR
VHF/UHF IN
Y Pb Pr AUDIO
YPbPr2 IN
Y Pb Pr AUDIO
Rear of TV
C
A
B
or
ENGLISH
21
Chapter 2 Installing the LCD TV
METHOD A:
Use a composite cable to connect the DVD player’s composite video/audio jacks to the LCD
TV’s VIDEO2 IN jacks.
METHOD B:
Use an audio cable to connect the DVD player’s audio output jacks to the LCD TV’s
audio inputs. Use a S-Video cable to connect the DVD player’s S-Video output jack to the
LCD TV’s S-VIDEO IN input jack.
METHOD C:
Use a component cable to connect the DVD player’s component output jacks to the LCD TV’s
YPbPr1 IN or YPbPr2 IN input jacks.
Use an audio cable to connect the DVD player’s component audio jacks to the LCD TV’s
audio input jacks.
DV D PL AYE R
PrPb
PrPb
Connecting a DVD Player
The component video jacks on your DVD player are sometimes labeled
YPbPr, or YCbCr. For an explanation of component video, see your DVD
player’s user guide.
AUDIO Cable
S-VIDEO Cable
A/V Cable
COMPONENT/AUDIO Cable
Page 24

22
Chapter 2 Installing the LCD TV
For best picture quality, if your equipment has component video output, use
a component cable instead of a composite video or S-Video cable.
Connect all AC power sources, before turning on the power switch of the LCD TV or
other connected equipment.
Press the button on the remote to turn on the LCD TV.
To watch a DVD, press the SOURCE button on the remote to select
VIDEO2 (METHOD A), or VIDEO3 (METHOD B), or VIDEO4/VIDEO5 (METHOD C).
Page 25

HDMI1 IN HDMI2 IN
AUDIO
L R
L R L R
L R
L
R
L R
L R
AUDIO
VGA IN
VIDEO2 IN
VIDEO AUDIO
S-VIDEO IN
S-VIDEO AUDIO
YPbPr1 IN
AUDIO OUT
STEREO
DIGITAL
OPTICAL
COAXIAL
TV
CABLE
HDTV
AIR
VHF/UHF IN
Y Pb Pr AUDIO
YPbPr2 IN
Y Pb Pr AUDIO
or
Rear of TV
ENGLISH
23
Chapter 2 Installing the LCD TV
Use a component cable to connect the satellite receiver’s/TV Cable Box’s component
(YPbPr1) output jacks to the LCD TV’s component input jacks.
Use an audio cable to connect the satellite receiver’s/TV Cable Box’s component audio
jacks to the LCD TV’s audio input jacks.
Connect all AC power sources, before turning on the power switch of the LCD TV or
other connected equipment.
Press the button on the remote to turn on the LCD TV.
To watch programs via satellite receiver or TV Cable Box, press the SOURCE button on
the remote to select VIDEO4/VIDEO5.
PrPb
PrPb
Connecting a Digital TV Cable Box or Digital Satellite Receiver
COMPONENT/AUDIO Cable
Page 26

24
Chapter 2 Installing the LCD TV
HDMI1 IN HDMI2 IN
AUDIO
L R
L R L R
L R
L
R
L R
L R
AUDIO
VGA IN
VIDEO2 IN
VIDEO AUDIO
S-VIDEO IN
S-VIDEO AUDIO
YPbPr1 IN
AUDIO OUT
STEREO
DIGITAL
OPTICAL
COAXIAL
TV
CABLE
HDTV
AIR
VHF/UHF IN
Y Pb Pr AUDIO
YPbPr2 IN
Y Pb Pr AUDIO
Rear of TV
Use a HDMI cable to connect the AV equipment’s HDMI output jack to the LCD TV’s HDMI1/
HDMI2 IN jacks.
Connect all AC power sources, before turning on the power switch of the LCD TV or
other connected equipment.
Press the button on the remote to turn on the LCD TV.
Press the SOURCE button on the remote to select VIDEO6 or VIDEO7.
Connecting an AV Equipment with HDMI Connector
The HDMI connector provides both video and audio signals. It’s not
necessary to connect the audio cable.
HDMI Cable
AV EQUIPMENT
Page 27

ENGLISH
25
Chapter 2 Installing the LCD TV
HDMI1 IN HDMI2 IN
AUDIO
L R
L R L R
L R
L
R
L R
L R
AUDIO
VGA IN
VIDEO2 IN
VIDEO AUDIO
S-VIDEO IN
S-VIDEO AUDIO
YPbPr1 IN
AUDIO OUT
STEREO
DIGITAL
OPTICAL
COAXIAL
TV
CABLE
HDTV
AIR
VHF/UHF IN
Y Pb Pr AUDIO
YPbPr2 IN
Y Pb Pr AUDIO
Rear of TV
Use a HDMI-to-DVI cable to connect the AV equipment’s DVI output jack to the LCD TV’s
HDMI1/HDMI2 IN jacks.
Use an audio cable to connect the AV equipment’s audio output jacks to LCD TV’s HDMI
AUDIO jacks.
Connect all AC power sources, before turning on the power switch of the LCD TV or
other connected equipment.
Press the button on the remote to turn on the LCD TV.
Press the SOURCE button on the remote to select VIDEO6 or VIDEO7 .
Connecting an AV Equipment with DVI Connector
If the LCD TV is connected to AV equipment’s DVI connector, you will need
a HDMI-to-DVI cable or a HDMI adaper (not included).
AV EQUIPMENT
HDMI-to-DVI Cable
AUDIO Cable
DVI IN
AUDIO
L R
Page 28

26
Chapter 2 Installing the LCD TV
HDMI1 IN HDMI2 IN
AUDIO
L R
L R L R
L R
L
R
L R
L R
AUDIO
VGA IN
VIDEO2 IN
VIDEO AUDIO
S-VIDEO IN
S-VIDEO AUDIO
YPbPr1 IN
AUDIO OUT
STEREO
DIGITAL
OPTICAL
COAXIAL
TV
CABLE
HDTV
AIR
VHF/UHF IN
Y Pb Pr AUDIO
YPbPr2 IN
Y Pb Pr AUDIO
Rear of TV
Use a VGA cable to connect the PC’s VGA output jack to the LCD TV’s VGA input
jack. Use an audio cable to connect the PC’s audio output jacks to LCD TV’s.
Connect all AC power sources, before turning on the power switch of the LCD TV or
other connected equipment.
Press the button on the remote to turn on the LCD TV.
Press the SOURCE button on the remote to select COMPUTER.
Connecting a PC
VGA Cable
AUDIO Cable
PC
Page 29

Audio Receiver
Audio Amplifier
AB
ENGLISH
27
Chapter 2 Installing the LCD TV
HDMI1 IN HDMI2 IN
AUDIO
L R
L R L R
L R
L
R
L R
L R
AUDIO
VGA IN
VIDEO2 IN
VIDEO AUDIO
S-VIDEO IN
S-VIDEO AUDIO
YPbPr1 IN
AUDIO OUT
STEREO
DIGITAL
OPTICAL
COAXIAL
TV
CABLE
HDTV
AIR
VHF/UHF IN
Y Pb Pr AUDIO
YPbPr2 IN
Y Pb Pr AUDIO
Rear of TV
Connecting to Audio Receiver:
Use an audio cable to connect the audio receiver’s audio LINE IN jacks to LCD TV’s
AUDIO OUT jacks.
Connecting to Digital 5.1 Sound System:
METHOD A:
Use an optical cable to connect the audio amplier’s OPTICAL IN jack to LCD TV’s
OPTICAL OUT jack.
METHOD B:
Use a coaxial cable to connect the audio amplier’s COAXIAL IN jack to LCD TV’s
COAXIAL OUT jack.
Note: Above mentioned function is only available under HDTV (cable/air) mode.
Connect all AC power sources, before turning on the power switch of the LCD TV or
other connected equipment.
Press the button on the remote to turn on the LCD TV.
Connecting an Audio Receiver or a Dolby Digital 5.1 Sound System
AUDIO Cable
For better sound quality, you may want to play the LCD TV audio through your stereo system.
Page 30
CH CHVOL.- VOL.+ MENU SOURCE
/I
28
Chapter 3 Using the Features
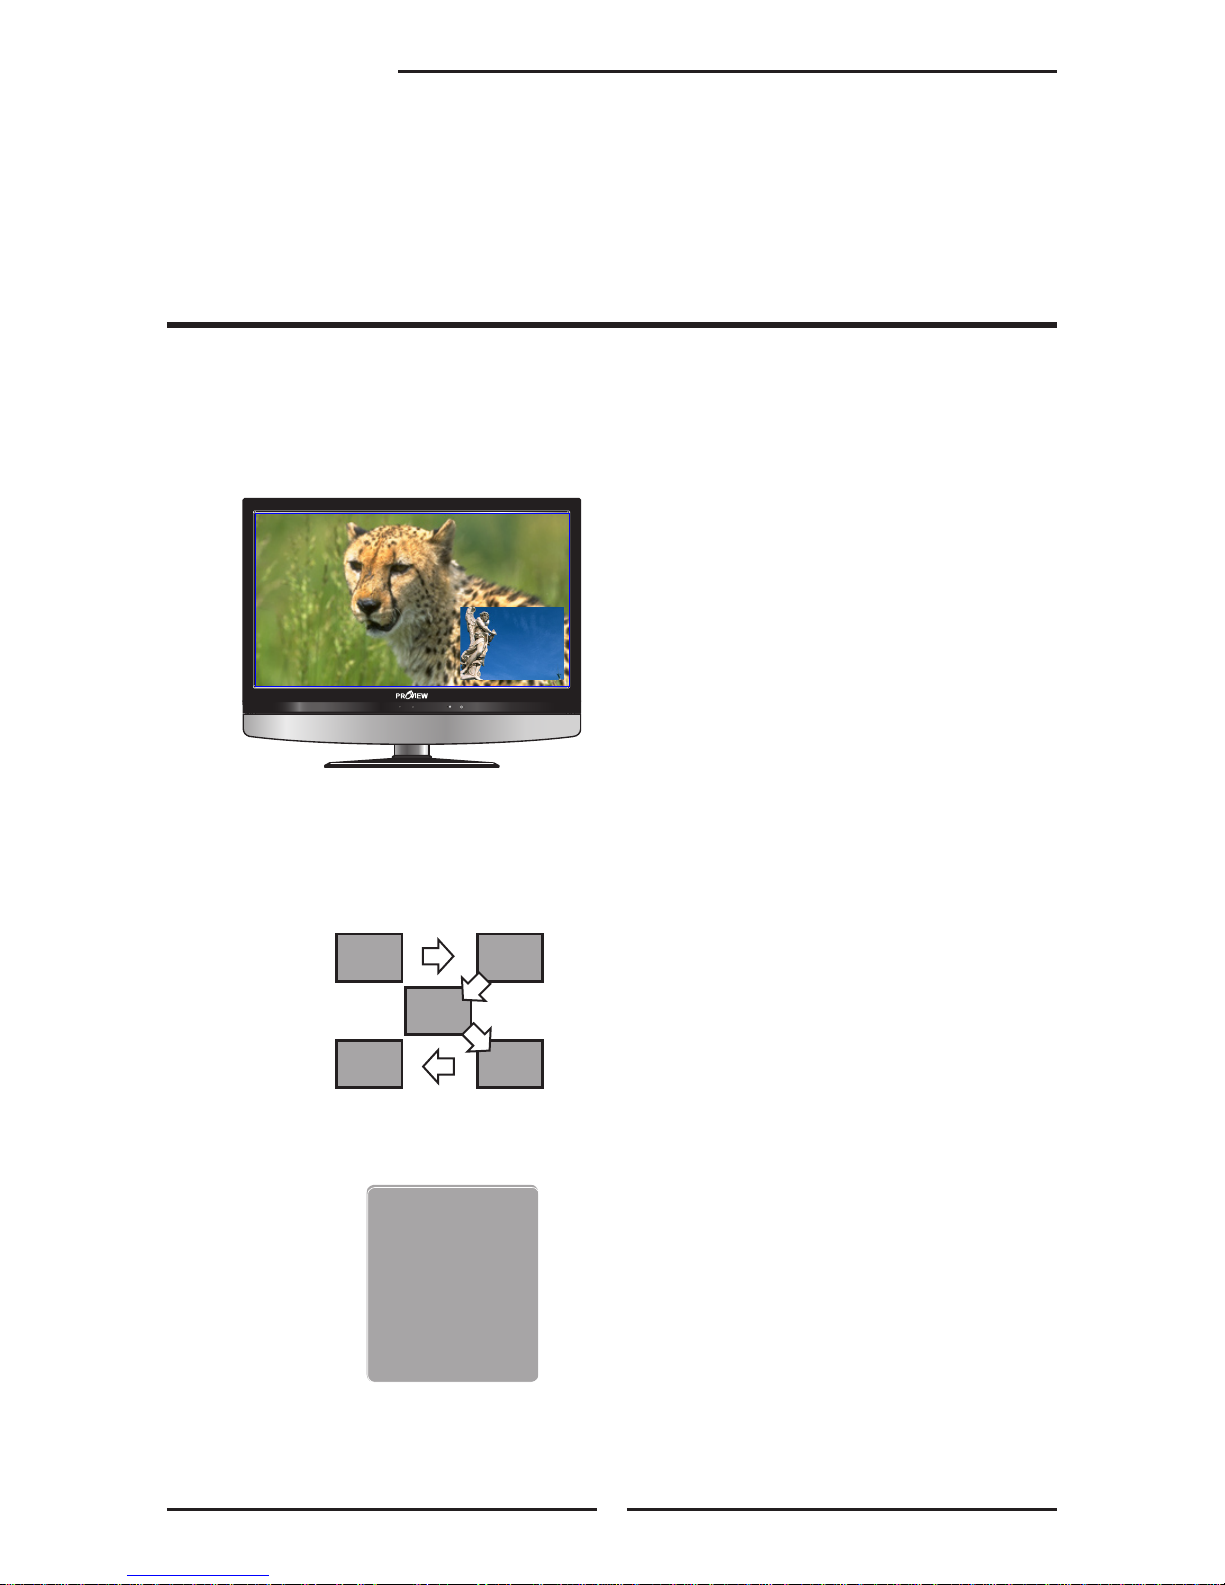
The PIP/POP feature allows simultaneous viewing of video from two sources (TV, VCR, DVD etc).
Only one source audio is played at a time. The user may select which source audio is heard.
Press the PIP button once to enter picture in picture mode.
Main
Sub
MAINSUB
Using Picture-In-Picture
▪ Press ◄ ► to toggle the audio source between the main window and
the sub window.
▪ Press the OK button to change the position of the second window.
1
3
5
2
4
▪ Press ◄ ► to activate either the main or sub window, then press the SOURCE
button to display the Input List:
Sub
VIDEO1 (SIDE)
VIDEO2 (REAR)
VIDEO3 (S-VIDEO)
VIDEO4 (YPbPr1)
VIDEO5 (YPbPr2)
COMPUTER (VGA)
▪ Press ▲▼ to change input source and press the OK button.
Chapter 3
USING THE FEATURES
Page 31

ENGLISH
29
Chapter 3 Using the Features
CH CHVOL.- VOL.+ MENU SOURCE
/I
CH CHVOL.- VOL.+ MENU SOURCE
/I
Press the PIP button again to view images side by side.
▪ Press ◄ ► to toggle the audio source between the main window and the sub window.
▪ Press the SWAP button to swap the pictures between the main and sub windows.
▪ Press ◄ ► to activate either the main or sub window, then press the SOURCE button to
display the Input List:
Press ▲▼ to change input source and press the OK button.
Press the PIP button again to exit.
Sub
VIDEO1 (SIDE)
VIDEO2 (REAR)
VIDEO3 (S-VIDEO)
VIDEO4 (YPbPr1)
VIDEO5 (YPbPr2)
COMPUTER (VGA)
SubMain
Page 32
30
Chapter 3 Using the Features
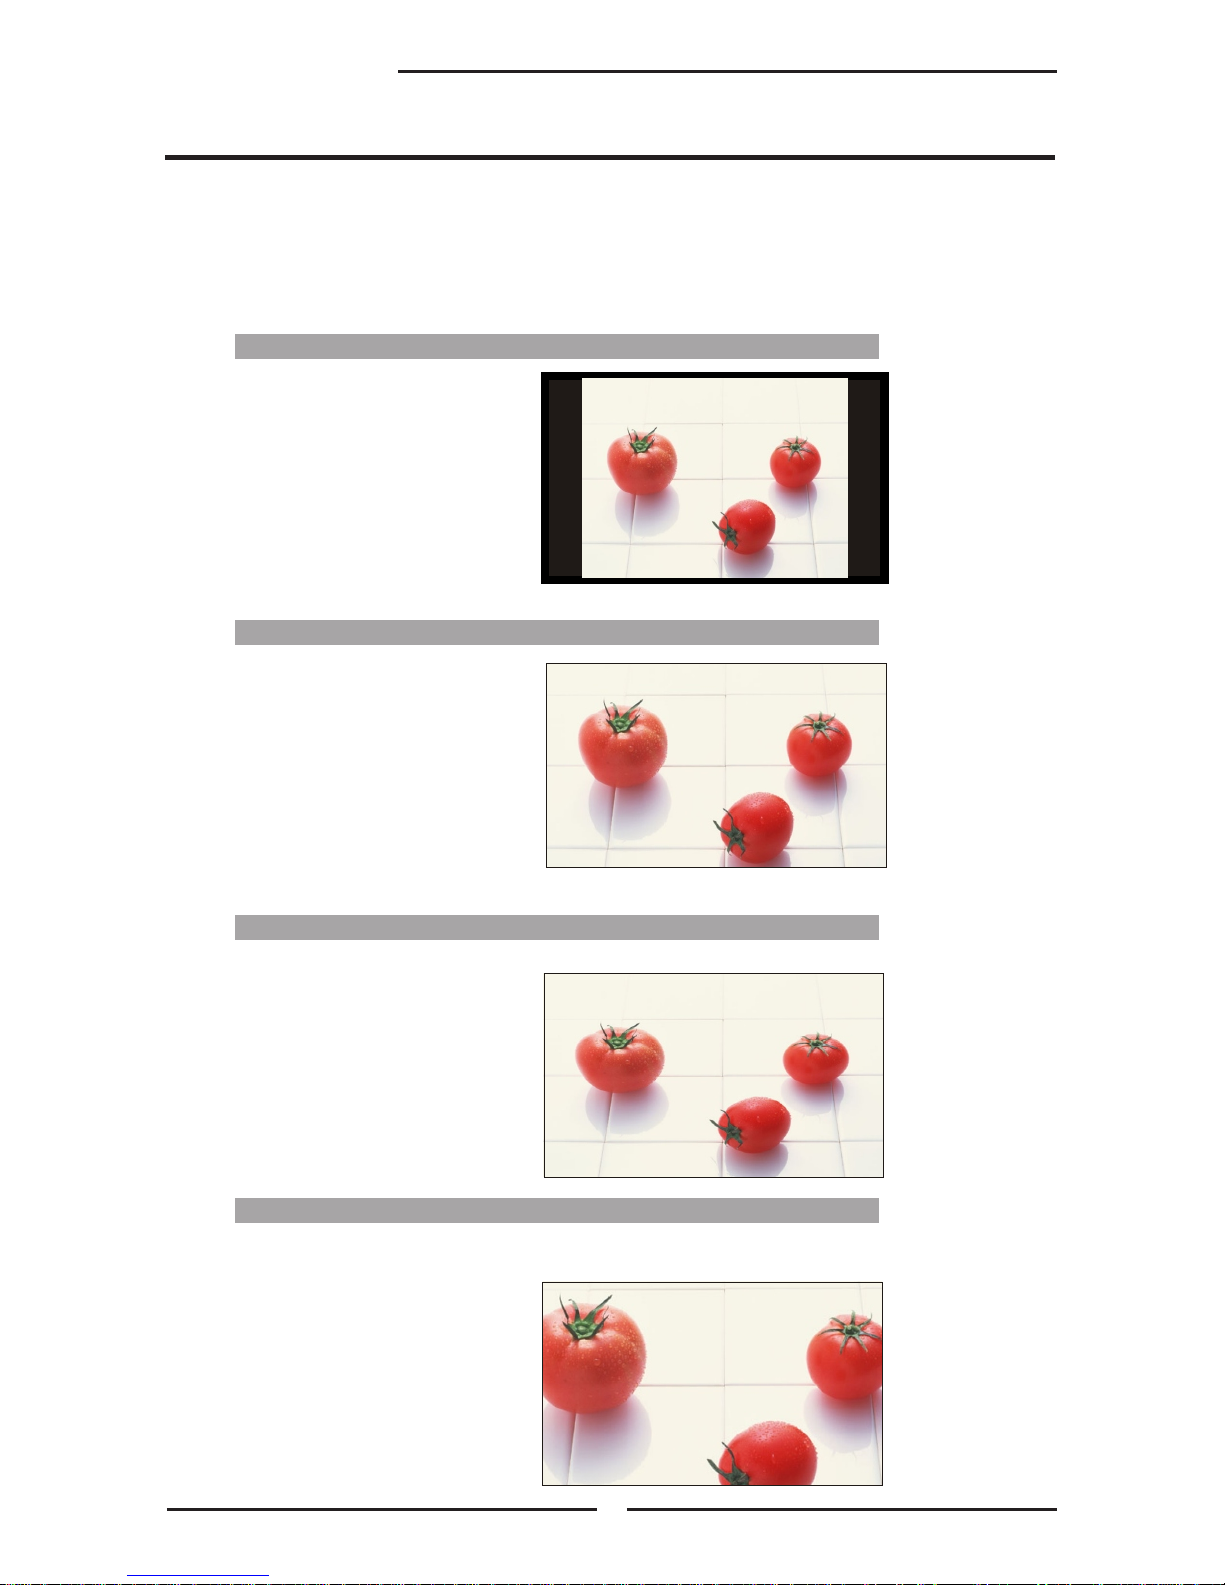
WIDE
Stretches the image vertically and
horizontally to ll the screen at
1:1.85 aspect ratio
Wide Screen function allows viewing of 4:3/16:9 images in wide screen mode, cycling through
the following wide screen settings. Press the P.SIZE button repeatedly to select the screen
format you want.
NORMAL
Displays at 4:3 aspect ratio
ZOOM
Stretches the image vertically and
horizontally to ll the screen at 1:2.35
aspect ratio
Wide Screen Viewing
FULL
Stretches the image vertically and
horizontally to keeps the image
size consistent in the center of
the screen and stretches the
sides
Page 33

ENGLISH
31
Chapter 3 Using the Features
Press the button to turn the LCD TV on.
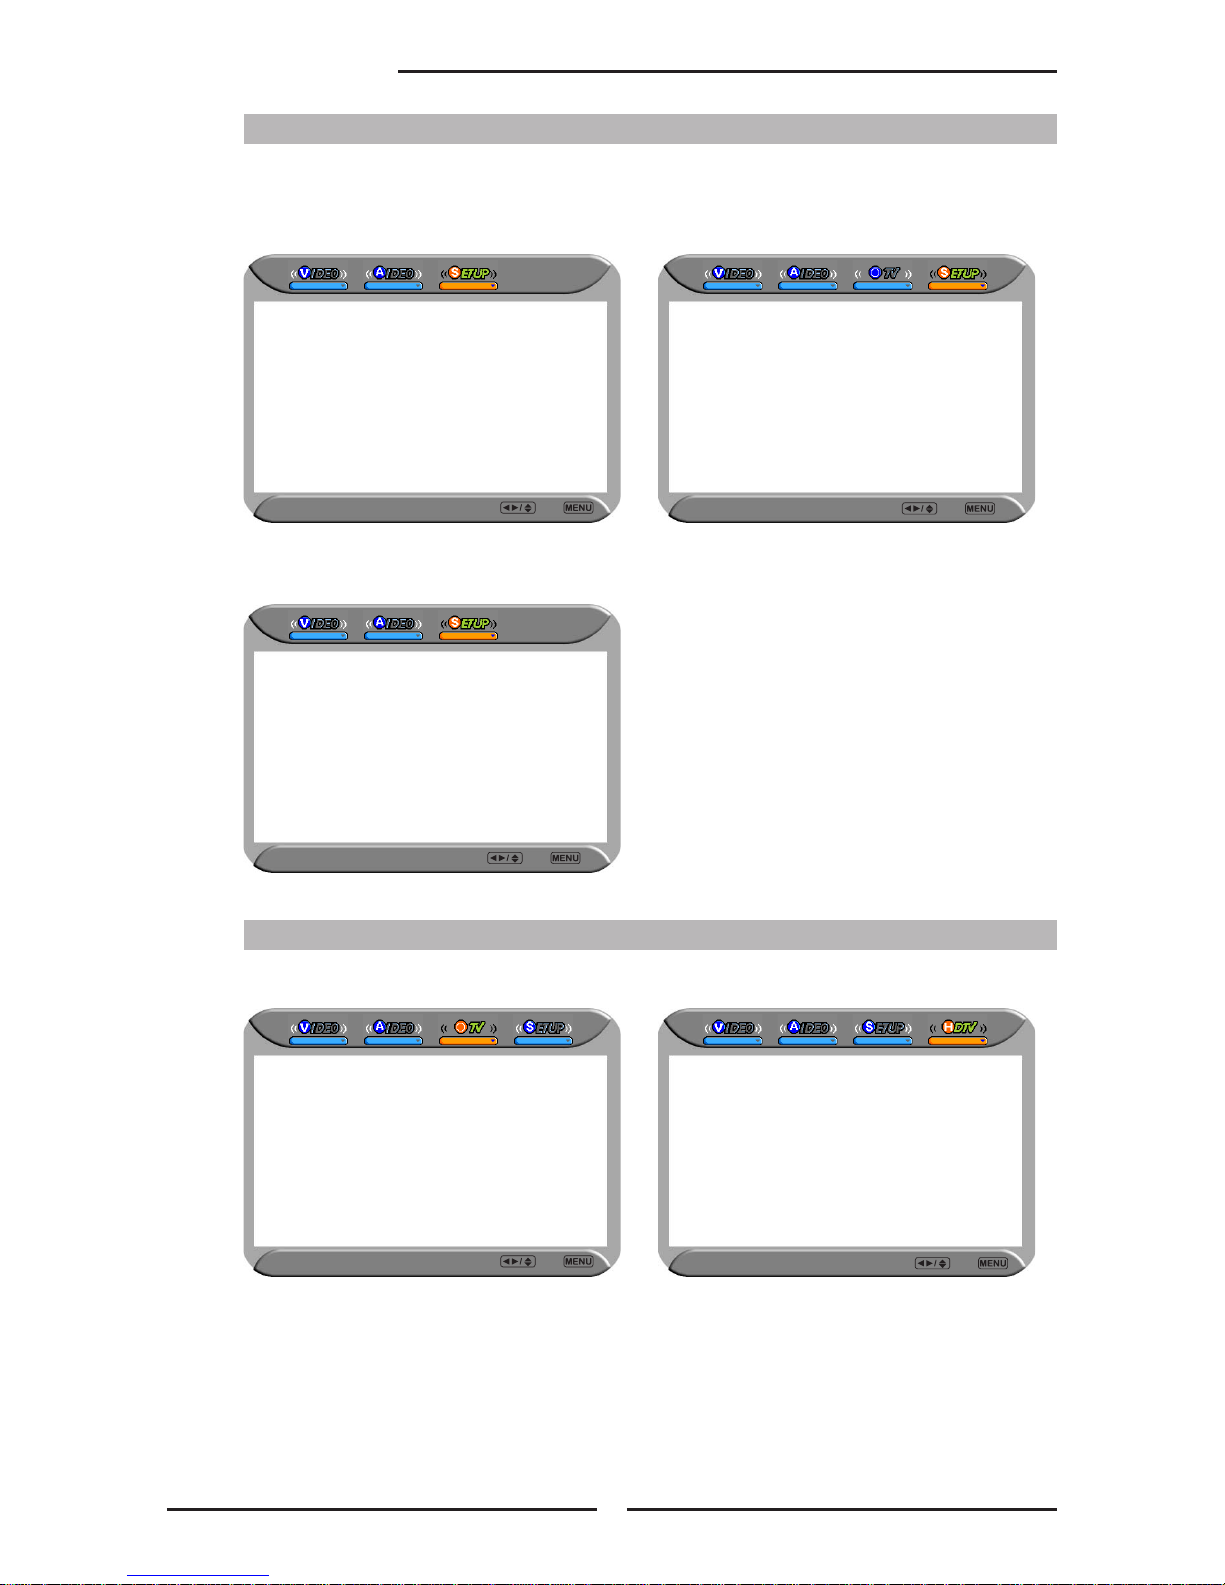
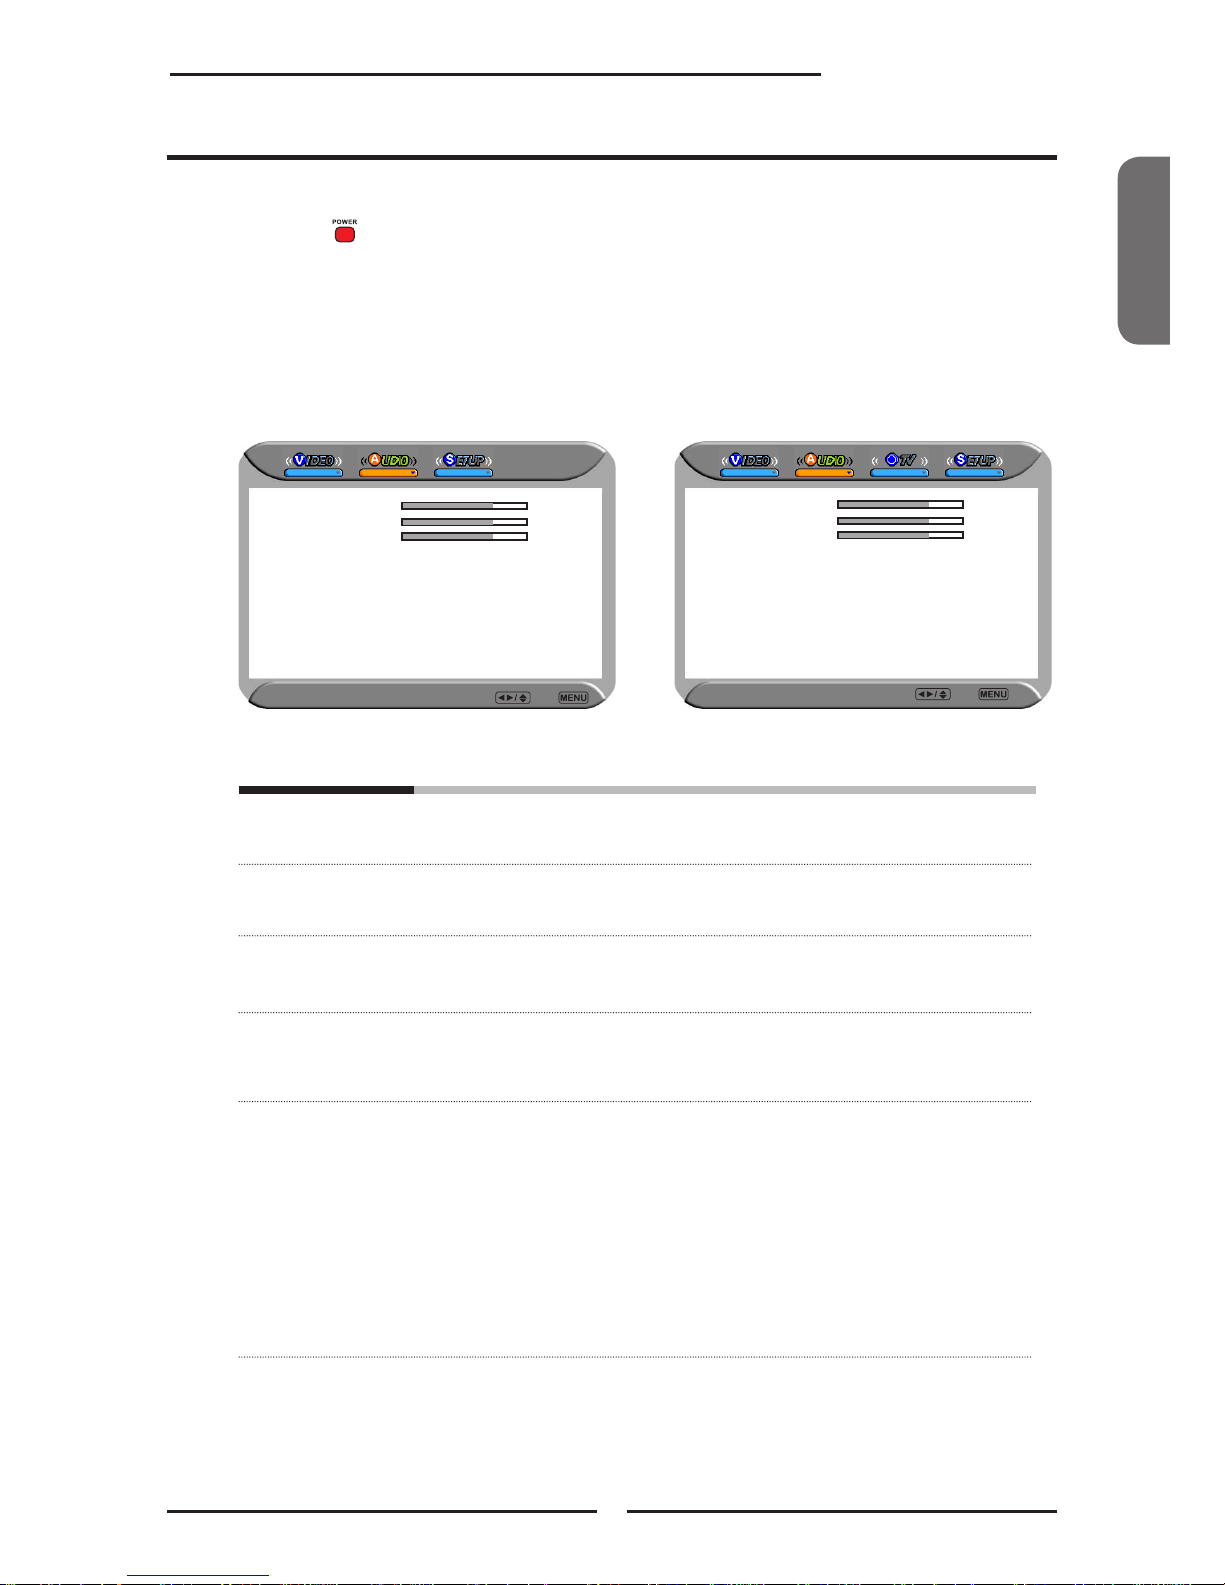
Press the MENU button on the remote control, the on-screen menu will appear on the
screen. Use the ◄► buttons to select your main menu option.
VIDEO MENU:
AUDIO MENU:
Operating the Menu
Bass 50
Treble 50
Balance 0
Sound Effect Off
▪ If the signal source is VIDEO/SVIDEO/YPbPr/
HDMI/VGA, the AUDIO MENU appears as:
Audio Select Exit
Bass 50
Treble 50
Balance 0
Sound Effect Off
MTS System Stereo
▪ If the signal source is TV, the AUDIO MENU
appears as:
▪ If the signal source is VGA, the VIDEO MENU
appears as:
Picture Mode Vivid
Contrast 75
Brightness 55
Saturation 62
Hue +22
Sharpness 4
Color Temperature Nature
Noise Reduction Low
Video Select Exit
▪ If the signal source is TV/HDTV/VIDEO/SVIDEO/
YPbPr/HDMI, the VIDEO MENU appears as:
Allows you to make adjustments to your picture settings.
Allows you to customize the audio options and effects.
Audio Select Exit
Bass 50
Treble 50
Balance 0
Sound Effect Off
▪ If the signal source is HDTV, the AUDIO MENU appears as:
Vivid
Contrast 75
Brightness 65
Auto Setting
Phase 20
Manual Clock 128
Display Adjustment
Color Temperature Nature
Noise Reduction Low
Video Select Exit
Audio Select Exit
Audio Select Exit
Page 34
32
Chapter 3 Using the Features
Use the ▲▼ buttons to select an option of the sub-menu, and press the OK button. While in
adjustment mode, and use the ◄► buttons to change the value of the item.
Press the EXIT button to exit the menu.
SETUP MENU:
Setup Select Exit
Closed Caption Off
V-Chip
Parental
Language English
Osd Transparent On
Gamma Dark
Default
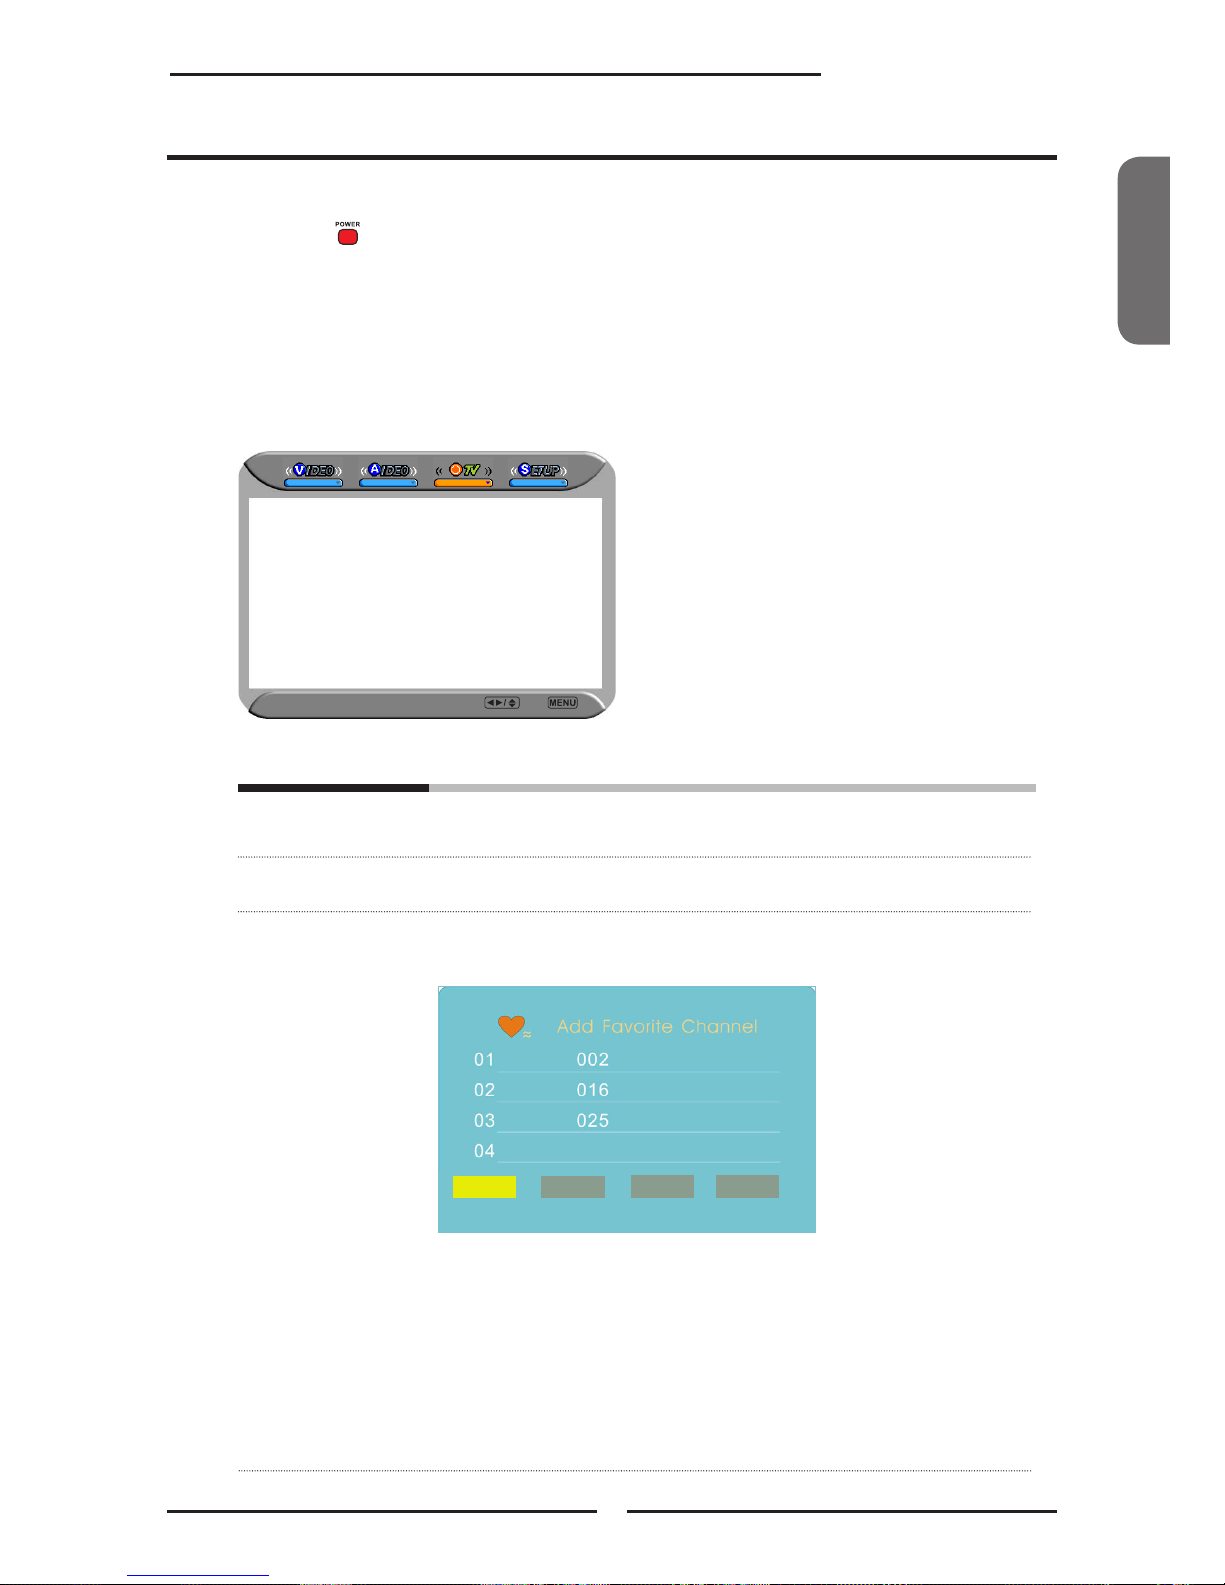
TV MENU:
Channel Skip On
Channel Name
Favorite
TV Select Exit
HDTV MENU:
Allows you to set up a variety of features: Language, Closed Caption, factory reset, V-Chip,
Parental Control, sleep timer.
Allows you to edit and label channels.
Allows you to set up the HDTV program
function.
Channel Searching
Tuner Mode Cabel-STD
Closed Caption OFF
V-Chip
Parental
Language English
Osd Transparent On
Gamma Dark
Default
Setup Select Exit
▪ If the signal source is VIDEO/S-VIDEO, the Setup
menu appears as:
▪ If the signal source is TV/HDTV, the Setup menu
appears as:
▪ If the signal source is YPbPr/HDMI/VGA, the Setup
menu appears as:
Setup Select Exit
Parental
Language English
Osd Transparent On
Gamma Dark
Default
HDTV Select Exit
Audio Language ◄ English ►
Time Zone Eastern Time
SPDIF Type PCM
Manual Scan
Channel Skip
Channel Block
Caption
(CABLE/AIR)
Page 35

ENGLISH
33
Chapter 3 Using the Features
With the LCD TV connected to a television programming source, press the SOURCE
button on the remote to display the Source List. Use the ▲▼ buttons to select HDTV, and
press the OK button.
Press the MENU button on the remote control to display the Main menu, and use
the ◄► buttons to select the SETUP.
Automatically scans and stores all the TV channels
Setting up the HDTV Function
Press the OK button or LIST button to display the received channel list, then press ▲▼
buttons to select a channel. Or, use the ▪ button with 0-9 buttons to select digital channel
(
for example 9.1).
Press the ▼ button to select Channel Searching, and press the OK button.
The Channel Searching automatically creates a list of receivable channels from VHF/UHF
antenna or Cable TV if the source is connected. Select the Cancel button at any time to
interrupt the memorization process. (the list will not be created if interrupted)
Channel List
9-1 KQED-HD
9-2 KOED-SD
The digital main channel might include many subchannels (for example
9-1, 9-2..) that are showing program at the same time.
Channel Searching
Tuner Mode Cabel-STD
Closed Caption OFF
V-Chip
Parental
Language English
Osd Transparent On
Gamma Dark
Default
Setup Select Exit
The Channel Searching will create a list of receivable channels for the current
input (antenna or cable). You will be required to run Channel Searching for each
RF input to create a list of available channels from both inputs.
Aut o Pr ogr am
Cha nn el Se arc hin g
Fou nd
0
Analo g
Ple as e wai t a few m inu tes for c omp let ion .
Pre ss E nte r or Se tup k ey to can cel .
Cab le -S TD
0
Dig it al
Can ce l
Page 36

34
Chapter 3 Using the Features
The HDTV menu includes the following options:
Audio Language Allows selection of audio languages:
English/Spanish/French
Time Zone
Allows selection of time zones in the USA: Eastern
Time/Indiana/Central time/Mountain Time/Arizona/Pacic Time/Alaska/Hawaii
SPDIF Type
Allows selection of external audio system: PCM/OFF/Dolby Digital
▪ PCM:
The external audio system is connected to the AUDIO
OUT (L/R) of the LCD TV
▪ Dolby Digital: The external audio system is connected to the AUDIO
OUT DIGITAL (OPTICAL or COAXIAL) of the LCD TV
▪ OFF:
Select OFF to turn off the external audio system
Manual Scan
Allows to set up TV channel manually
HDTV Select Exit
Audio Language ◄ English ►
Time Zone Eastern Time
SPDIF Type PCM
Manual Scan
Channel Skip
Channel Block
Caption
(CABLE/AIR)
Channel Skip
Allows addition/removal of digital channels
Channel Block Allows to block digital channels
Use the Channel Block function, must enter a four-digit password. The
factory password is 0000.
HDTV Select Exit
Scan Mode Range Mode
From Channel 1
To Channel 8
(CABLE/AIR)
Scan with a range of channels.
Page 37

ENGLISH
35
Chapter 3 Using the LCD TV
Caption Allows to set closed caption
HDTV Select Back
Analog Closed Caption ◄ OFF ►
Digital Closed Caption OFF
Caption Style
(CABLE/AIR)
HDTV Select Back
Caption Style ◄ Custom ►
Font Size Large
Font Color White
Font Opacity Solid
Background Color Black
Background Opacity Solid
Window Color Black
Window Opacity Translucent
(CABLE/AIR)
▪
Analog Closed Caption:
Press the ◄► buttons to select the basic analog closed caption
options: OFF/CC1/CC2/CC3 CC4
Note: The setting here will be applied to each DTV channel
▪
Digital Closed Caption:
Press the
◄► buttons
to
select the digital closed caption options:
Service1/Service2/Service3/Service4/Service5/Service6/OFF
▪ Caption Style:
Press OK button to customize the settings for digital closed caption
option:
Page 38

36
Chapter 3 Using the Features
With the LCD TV connected to a television programming source, press the TV button on the
remote control.
Press the GUIDE button on the remote control, the Program Guide will appear on the
screen:
The Program Guide feature brings all sorts of information to your screen, such as program
title, program duration, time remaining, rating information, closed caption, availability, etc.
Monday 29 April 2005 2:36:26 PM
9-1 ◄ 9-2 KQED-SD ► 9-1
Today 5:00 PM Calfornia’s Gold CC
Today 5:30 PM Antiques Roadshow
Today 6:00 PM The NewHour with Jim Lehrer CC
Today 7:30 PM Zoboomafoo CC
Today 7:30 PM Arthur
Today 11:00 PM Antiques Roadshow CC
5:00 PM - 5:30 PM Mon, 29 Apr Not Rated
Clubs: Dongwa doesn’t communicate with his parents.
Eplisode: Explorer’s club/Time for everything
9 - 2 KOED-SD
Press the ▲▼ button to select the program from a list, the Program Guide provides
introduction about the current program being shown on each channel.
Monday 29 April 2005 2:36:26 PM
9-1 ◄ 9-2 KQED-SD ► 9-1
5:00 PM - 5:30 PM Mon, 29 Apr Not Rated
Clubs: Dongwa doesn’t communicate with his parents.
Eplisode: Explorer’s club/Time for everything
9 - 2 KOED-SD
Today 5:00 PM Calfornia’s Gold CC
Today 5:30 PM Antiques Roadshow
Today 6:00 PM The NewHour with Jim Lehrer CC
Today 7:30 PM Zoboomafoo CC
Today 7:30 PM Arthur
Today 11:00 PM Antiques Roadshow CC
Using the Program Guide
Press the GUIDE button again on the remote control to exit the Program Guide
Page 39

ENGLISH
37
Chapter 3 Using the Features
Press the button to turn the LCD TV on.
Press the MENU button on the remote control to display the Main menu, and use the
◄► buttons to select the VIDEO.
Use the ▲▼buttons to highlight an individual VIDEO option, use the ◄► buttons to
change the setting, and press the MENU to exit the menu
The VIDEO menu includes the following options:
Picture Mode Cycles among display types: Vivid/Standard/Cinema/Sport/User
Contrast
Controls the difference between the brightest and darkest regions of the
picture
Brightness
Controls the overall brightness of the picture
Saturation
Controls the color intensity
Hue
Controls the difference between the green and red regions of the
picture
Sharpness
Increase this setting to see crisp edges in the picture, decrease it for
soft edges
Auto Setting
Press the OK button to automatically adjust the display settings to
optimize performance based on the VGA mode
Phase
Controls the signal phase, which can improve focus clarity and image
stability based on the VGA mode
Manual Clock
Controls the width of the picture based on the VGA mode
Customizing the VIDEO Settings
Picture Mode Vivid
Contrast 75
Brightness 55
Saturation 62
Hue +22
Sharpness 4
Color Temperature Nature
Noise Reduction Low
Video Select Exit
Picture Mode Vivid
Contrast 75
Brightness 65
Auto Setting
Phase 20
Manual Clock 128
Display Adjustment
Color Temperature Nature
Noise Reduction Low
Video Select Exit
or
Page 40

38
Chapter 3 Using the Features
Display adjustment Press the OK button to enter the Display adjustment setting:
H Position 128
V Position 22
Video Select Exit
▪ H Position Adjusts the position of the picture left and right in
the window
▪ V Position Adjusts the position of the picture up and down in
the window
Color temperature Adjusts color components independently to achieve a warm or cool
effect: Cool/Middle/Warm/User
▪ Warm: Increases red tint
▪ Nature: Increases natural tint
▪ Cool: Increases blue tint
▪ User: Allows the user to adjust red, green and blue color
component levels independently
Color R 124
Color G 120
Color B 120
Video Select Exit
Noise Reducion: Select to reduce the noise level of connected
equipment: Off/On/Strong/Middle
Page 41
ENGLISH
39
Chapter 3 Using the Features
Press the button to turn the LCD TV on.
Press the MENU button on the remote control to display the Main menu, and use the
◄► buttons to select the AUDIO.
Use the ▲▼buttons to highlight an individual AUDIO option, use the ◄► buttons to
change the setting, and press the MENU to exit the menu
The AUDIO menu includes the following options:
Bass
Controls the relative intensity of lower-pitched sounds
Treble
Controls the relative intensity of higher pitched sounds
Balance
Adjusts the relative volume of the speakers in a multiple speaker
system
Sound Effect
Allows selection of an audio-enhancement technique from among the
following options: Surround/Live/Dance/Techno/Classic/Soft/Rock/Pop/
Off
MTS System Allows you to listen to high-delity stereo sound while watching TV
▪ Stereo:
Use separate audio tracks for left and right speakers, if available
▪ SAP:
You can enjoy a second audio program from the speakers while
watching a scene in the original program
▪ Mono:
Allows mono output (useful when stereo is noisy or inconsistent)
Customizing the AUDIO Settings
or
Audio Select Exit
Bass 50
Treble 50
Balance 0
Sound Effect Off
Bass 50
Treble 50
Balance 0
Sound Effect Off
MTS System Stereo
Audio Select Exit
Page 42

40
Chapter 3 Using the Features
Press the button to turn the LCD TV on.
Press the MENU button on the remote control to display the Main menu, and use the
◄► buttons to select the SETUP.
Use the ▲▼buttons to highlight an individual SETUP option, use the ◄► buttons to
change the setting, and press the MENU to exit the menu.
The SETUP menu includes the following options:
Channel Searching Press the OK button, will automatically create a list of receivable
channels
Tuner Mode Allows selection between CATV cable and antenna signal sources:
▪ AIR
Choose this setting if you are receiving TV channels with an antenna
(over the air)
▪ Cable STD/IRC/HRC
Choose this setting if you are receiving TV channels with a CATV (cable TV).
Customizing the SETUP Settings
Setup Select Exit
Closed Caption Off
V-Chip
Parental
Language English
Osd Transparent On
Gamma Dark
Default
Channel Searching
Tuner Mode Cabel-STD
Closed Caption OFF
V-Chip
Parental
Language English
Osd Transparent On
Gamma Dark
Default
Setup Select Exit
Setup Select Exit
Parental
Language English
Osd Transparent On
Gamma Dark
Default
or
Page 43

ENGLISH
41
Chapter 3 Using the Features
Closed Caption Allows to select from 4 closed caption modes:
▪ CC1/CC2/CC3/CC4:
Display a printed version of the dialog and sound effects of the
program being viewed
▪ T1/T2:
Display station information presented using either half or the whole
screen
▪ T3/T4:
Extended Data Services. For example: Network name, program
name, program length, etc
V-Chip
Allows to setup the TV and MPAA Rating Lock options (refer to “Using
the V-CHIP Setting”)
Parental
Allows to setup the Parental Lock options
Language
Select to display all on-screen menus in your language of choice:
English/French/Spanish
OSD Transparent Controls the translucence of the OSD`s (on screen display) background
Gamma
Allows adjustment of the display’s gamma correction, which ne-
tunes both brightness and red/green/blue ratios: On/Off/Middle
Default
Restores factory settings
Page 44

42
Chapter 3 Using the Features
Use the V-CHIP function, must enter a four-digit password. The factory password is
0000.
The US has 2 rating system for viewing content: Movie blocking(MPAA) and TV Blocking.
The TV Blocking conjuncts with the V-CHIP to help parents block inappropriate programs from their
children.
The Movie blocking(MPAA) is used for original movies rated by the Motion Picture Association of
America(MPAA) as broadcasted on cable TV and not edited for television.
The V-CHIP can also be set to block MPAA-rated movies.
Use the ▼ button to select the V-Chip, and press the OK to display the V-Chip menu.
The MPAA includes the following options:
RATING DESCRIPTION
G General Audiences. Movie is appropriate for all ages.
PG Parental Guidance Suggested. May contain material not suited for younger
viewers
PG-13 Contains content that may not be appropriate for viewers under the age of 13.
R Restricted. Contains adult content, no one under 17 admitted without parent.
NC-17 No one 17 and under admitted.
Use the ▲▼ buttons to select the rating you want and press the OK button repeatedly to select
BLOCK() or UNBLOCK().
Using the V-CHIP Settings
Inout Your Password Please
* * * *
OK Cancel
Channel Searching
Tuner Mode Cabel-STD
Closed Caption OFF
V-Chip
Parental
Language English
Osd Transparent On
Gamma Dark
Default
Setup Select Exit
Page 45

ENGLISH
43
Chapter 3 Using the Features
CONTENT-BASED
FV D L S V
AGE-BASED
TV-Y
TV-Y7
TV-G
TV-PG
TV-14
TV-MA
: To block programs by both content and age.
The TV GUIDELINE has 2 rating methods: Content-Based Rating and Age-Based Rating.
The TV GUIDELINE includes the following options:
Use the ▲▼ buttons to select the rating you want and press the OK button repeatedly to select
BLOCK() or UNBLOCK().
The V-CHIP menu includes the following options:
Block MPAA Rating Select to activate the MPAA Rating programs
Block TV Rating
Select to activate the TV Rating programs.
Block MPAA Unrated ▪ YES:
Blocks all movies that are broadcast without a MPAA rating.
▪ NO:
Allows all movies that are broadcast without a MPAA rating
Block TV None Rating ▪ YES:
Blocks all movies that are broadcast without a TV rating
▪ NO:
Allows all movies that are broadcast without a TV rating
AGE-BASED
RATING DESCRIPTION
TV-Y All children
TV-Y7 Directed to children age 7 and older
TV-G General Audience
TV-PG Parental Guidance suggested
TV-14 Parents strongly cautioned
TV-MA Mature Audience only
CONTENT-BASED
RATING DESCRIPTION
FV Fantasy violence
D Suggestive dialogue
L Strong language
S Sexual situations
V Violence
Page 46

44
Chapter 3 Using the Features
The Parental blocking can be set up to the TV to block a Channel or a Video Source.
Use the ▼ button to select the Parental, and press the OK to display the Parental
menu.
Using the Parental Settings
Use the V-CHIP function, must enter a four-digit password. The factory password is
0000.
You will need your password for any future access into the V-Chip and
Parental Setting.
The Parental menu includes the following options:
Channel Lock
Select to block a TV channel
Video Lock
Select to block a Input source signal
Change Password Select to change your password
Inout Your Password Please
* * * *
OK Cancel
Closed Caption Off
V-Chip
Parental
Language English
Osd Transparent On
Gamma Dark
Default
SETUP Select Exit
MENU
Page 47
ENGLISH
45
Chapter 3 Using the Features
Press the button to turn the LCD TV on.
Press the MENU button on the remote control to display the Main menu, and use the
◄► buttons to select the TV.
Use the ▲▼buttons to highlight an individual TV option, use the ◄► buttons to
change the settings,
and press the MENU exits the menu.
The TV menu includes the following options:
Channel Skip
Allows addition/removal of channels on the channel list
Channel Name Allows channel labels to be edited
Favorite Select Favorite from the TV option and press the OK button.
Favorite Channel list appears:
Customizing the TV Settings
Channel Skip On
Channel Name
Favorite
TV Select Exit
Edit Delete Empty View
▪ Edit
To add the current channel to the list of Favorite Channels
Press 0-9 buttons to enter the desired channels
▪ Delete
To remove a channel from the list of Favorite Channels
▪ Empty
To clear all Favorite Channels
▪ View
To watch the selected channel of Favorite Channels
Page 48

46
Troubleshooting
Before consulting service personnel, check the following chart for a possible
cause of the trouble and for a possible solution.
Poor picture, sound OK
Check the interface cable between TV and antenna/cable TV.
Try another channel, the station may have broadcast difculties.
Adjust the Brightness/Contrast options in the VIDEO ADJUST Menu.
Audio noise
Move any interfering equipment away from the TV.
VOLUME 50
TV will not turn on
Make sure the power cord is plugged in, then press the button on the remote.
The batteries in the remote control may be exhausted.
Replace the batteries.
No picture, no sound
Check the interface cable between TV and antenna/cable TV.
Press the button on the remote.
Press the SOURCE button on the remote, then press button to select the
connected video sources.
Picture OK, poor sound
Sound may be muted. Press the MUTE button on the remote.
Press the TV button on the remote, then press the VOL+ button to increase the
volume.
TROUBLESHOOTING
Page 49

ENGLISHENGLISHENGLISH
47
Specifications
DISPLAY MODE
The screen resolutionhas been optimized during manufacture for the display modes listed below.
If the signal from the system equals the standard signal mode, the screen is adjusted automatically. If the
signal from the system does not equal the standard signal mode, adjustingthe screen resolutionby referring
to your videocard user guide otherwise there may be no display.
Video signal: (VGA/DVI VESA Standard)
Resolution
Vertical
Frequency(Hz)
Horizontal
Frequency(kHz)
640 x 350 85 37.9
640 x 400 85 37.9
720 x 400 85 37.9
640 x 480 60 31.5
72 37.9
75 37.5
85 43.3
800 x 600 56 35.1
60 37.9
72 48.1
75 46.9
85 53.7
1024 x 768 60 48.4
70 56.5
75 60.0
85 68.7
1152 x 864 75 67.5
1280 x 960 60 60.0
1280 x768 60 47.7
1366 x 768 60 48.5
Page 50

48
Specifications
SPECIFICATIONS
MODEL
PA-32JK1A/PA-32JK1SA PA-37JK1A/PA-37JK1SA
LCD Panel Panel Size 32” TFT LCD 37” TFT LCD
Brightness 500 500
Contrast Ratio 800:1 1000:1
Max. Resolution 1366x768 1366x768
Input Connector VIDEO/AUDIO(L/R) 2 2
S-VIDEO/AUDIO(L/R) 1 1
YPbPr/AUDIO(L/R) 2 2
VGA/AUDIO(L/R) 1 1
HDMI/AUDIO(L/R) 2/1 2/1
AUDIO OUT(L/R) 1 1
OPTICAL/COAXIAL 1 1
HEADPHONE 1 1
Power Source AC100~240V, 50/60HZ, AC100~240V, 50/60HZ,
Power Consumption 180 W, standby < 5 W 275 W, standby < 8 W
Dimension
31.2 w x 11.3 d x 26.1 h inches 36.5 w x 12.3 d x 29.2 h inches
WEIGHT 38.5 lbs 52.8 lbs
Page 51

ENGLISHENGLISHENGLISH
49
Specifications
MODEL
PA-40JK1A/PA-40JK1SA
LCD Panel Panel Size 40” TFT LCD
Brightness 500
Contrast Ratio 1200:1
Max. Resolution 1366x768
Input Connector VIDEO/AUDIO(L/R) 2
S-VIDEO/AUDIO(L/R) 1
YPbPr/AUDIO(L/R) 2
VGA/AUDIO(L/R) 1
HDMI/AUDIO(L/R) 2/1
AUDIO OUT(L/R) 1
OPTICAL/COAXIAL 1
HEADPHONE 1
Power Source AC100~240V, 50/60HZ,
Power Consumption 275 W, standby < 8 W
Dimension
38.8 w x 12.3 h x 29.9 d inches
WEIGHT 66 lbs
Page 52

©2006 par Proview®. Tout droits réservés.
Les droits réservés couvrent toutes formes et matières de matériel protégé et informations
actuellement autorisées par la lois juridique statutaire ou indiquées ci-après, y compris sans
limitation, matières générées du programme de logiciel qui s’afche sur l’écran sous forme
d’icons, menus d’écran, images, etc.
Tous les noms de produits Proview® mentionnés dans cette édition sont marques
commerciales de Proview. Les marques commerciales d’autres sociétés sont également
reconnues.
Ce document se voit un changement d’information régulier. Tous les changements,
inexactitudes techniques, et erreurs d’impression seront corrigés dans les éditions ultérieures.
Ce téléviseur est issu de la technologie de High-Denition Multimedia Interface (HDMITM). H
DMI, le logo HDMI et High-Denition Multimedia Interface sont marques commerciales ou
marque commerciales enregistrées de HDMI Licensing LLC.
Page 53

ENGLISHFrançais
1
FCC
FCC
Déclaration de Federal Communica-
tions Commission
Ce matériel a été testé et prouvé conforme aux normes d’appareil numérique de catégorie B selon la
partie 15 des règles FCC. Ces normes sont conçues pour assurer une protection sufsante contre
interférence négative dans une installaton résidentielle. Cet apparel génère, utilise et peut émettre
de l’énergie de radio-fréquence et, en cas de non respect des instructions d’utilisation et
d’installation, les communications radio peuvent être contrariées par interférence négative.
Néanmoins, cette interférence peut se produire également en cas d’intallation spéciale. Les
procédés suivants pouvant éliminer une interférence négative sont proposés aux utilisateurs s’il est
déterminé, en mettant l’appareil en arrêt et marche, que celle-ci n’est pas générée par cet appreil:
1. Re-orientez/Replacez l’antenne de réception.
2. Séparez davantage l’appareil et le récepteur.
3. Connectez l’appareil à une sortie sur un circuit autre que celui sur lequel est connecté le
récepteur.
4. Faites appel au vendeur ou à un technicien de radio/téléviseur expérimenté en cas de
nécessité.
Echec de commande de l’appareil possible par tout changement ou
modification de la part de l’utilisateur non approuvés explicitement par le
fabricant respobsable des techniques.
Page 54

2
Alerte et Précaution
Alerte et Précautions
Exposition sous pluie ou humidite interdite pour écarter tout risque d’incendie ou de choc
électrique.
Ce symbole signale le risque de choc électrique.
Aucun démontage effectué par une personne non qualiée n’est autorisé.
Ce symbole signale les instructions importantes de commande et entretien à
consulter dans le document fourni avec l’appareil.
▪ AFIN DE REDUIRE LE RISQUE DE CHOC ELECTRIQUE,
▪ VEUILLEZ NE PAS ENLEVER LE COUVERCLE (OU LA PARTIE ARRIERE).
▪ PIECES INTERIEURES NON-UTILISABLES PAR L’UTILISATEUR.
▪ REPARATION PAR PERSONNEL QUALIFIE EXIGEE.
Risque de radiation accidentelle en cas de non respect d’instructions ici précisées dans les
manipulations, réglages ou réalisaton de procédures techniques.
AVERTISSEMENT
Instructions de sécurité importantes
Les consignes de sécurité sont é respecter dans l’installation, l’utilisation et la réparation et l’entretien de
l’appareil pour écarter tout risque d’accident.
Lisez attentivement ce manuel devant être gardé près de vous pour utilisation future avant toute mise ne
marche de l’appareil.
ALERTE
▪ Ne pas mette l’appareil sur tout chariot, support, étagère etc instable ou non plan.
Risque de blessure corporelle et de sérieux dégât matériel en cas de chute de l’appareil.
▪ Utilisez seulement un chariot ou support recommandé par le fabricant. L’appareil et son
support doit être manipulés attentivement. Risque de renversement évident en cas d’arrét
brusque, de force excessive et de chariot/support non plan.
▪ Utilisez seulement un chariot ou support recommandé par le fabricant. L’appareil et son
support doit être manipulés attentivement. Risque de renversement évident en cas d’arrét
brusque, de force excessive et de chariot/support non plan.
▪ Si la fiche ne correspond par à votre prise, faites installer une prise adaptée par un
électricien.
▪ Assurez toujours une tension d’alimentation conforme aux indications figurées sur le dos de
l’étiquette d’information de série/modèle.
▪ Ne jamais surcharger les prise murales ni les extensions.
Ce symbole indique points d’avertissement.
Ce symbole indique actions interdites.
Ce symbole indique actions à mener.
Page 55

ENGLISHFrançais
3
Alerte et Précaution
▪ Manipulation de câble d’alimentaion avec soin. Aucune suspension de charge importante
sur le câble d’alimentation AC n’est autorisée.
▪ Ne jamais arracher le câble d’alimentation AC, pas de manipulation du câble
d’alimentation AC avec mains mouillées.
▪ Ne jamais toucher le câble d’alimentation et l’antenne par temps orageux.
▪ Débranchement recommandé pour toute non-utilisation du matériel de longue durée.
▪ Pas de disposition de l’appareil à la proximité de l’eau.
▪ Pas d’exposition de l’appareil à liquide, pluie, ou humidité.
Traitement professionnel obligatoire lors d’éclaboussement des éléments susvisés sur
l’appareil.
▪ Risque d’endommagement élevé à l’exposition de l’appareil à température extrême ou
rayon de soleil direct.
▪ Pas de disposition de l’appareil à la proximite de source de chaleur telle que radiateur,
chauffage, réchaud, ou autres producteurs de chaleur.
▪ Pas de réparation non professionnelle.
▪ Fort danger électrique ou d’autres nature et annulation de garantie à l’ouverture de
couvercles. Traitement professionnel obligatoire.
▪ Aucune tolérance de pose et chute d’objet sur l’appareil.
▪ Aucun objet étranger autorisé dans trous de ventilation de l’appareil.
Risque d’incendie ou de choc électrique par introduction d’objet métallique ou
inflammable.
▪ Ne pas poser l’appareil sur chariot, support, table, étagères etc non plans et instables.
Sérieux risque de blessure corprelle, et d’endommagement matériel en cas de chute.
Toujours poser l’appareil sur sol ou une surface solide, plane, stable et suffisamment
robuste pour supporter son poids.
▪ Ne jamais boucher la bouche d’aération. Un espace libre est nécessaire autour de
l’appareil.Ne jamais placer l’appareil:
sur lit, divant, petit tapis ou tout autre surface similaire, un espace sufsant est
nécessaire entre l’appareil et drap/rideau/mur, bibliothèque, armoire incorporée, ou
équivalent pour une bonne ventilation.
▪ Débrahcher l’appareil par temps orageux ou lors de non utilisation de longue durée.
▪ Réparation professionnelle obligatoire. Tout endommagement, tel que celui de câble
d’alimentation, causé par éclaboussement ou chute d’objet, exposition à pluie ou
humidité, ou chute de l’appareil même nécessite une réparation.
▪ Débranchement obligatoire avant tout nettoyage de l’appareil.
▪ Ne jamais utiliser liquid ou aéosol pour nettoyer l’appareil.
Utilisez un chiffon sec et doux pour nettoyage.
▪ Utilisation exclusive de pièces jointes/accessoires spécifiés par fabicant.
Page 56

4
Alerte et Précaution
OutdoorInstruction de Sécurité d’Antenne
Câble d’entrée d’antenne
Unité de décharge d’antenne
(NEC section 810-20)
Conducteurs de sol
(NEC section 810-20)
Pattes de sol
Pose de service d’alimentaion
((NEC Art250 partie H))
Pattes de sol
Matériel de service
électrique
NEC : code Electrique National
Instructions pour l’installation d’une antenne extérieure:
EXMPLE DE POSE D’ANTENNE EXTERIEURE
Les informations pour pose de mât et structure de support, mise à la masse de câble d’entrée à l’unité de
décharge de l’antenne, taille de conducteurs au sol, disposition de l’unité de décharge de l’antenne,
connection aux électrodes de sol, et critères concernant électrode de sol sont fournies dans Section 810 de
National Electrical Code (NEC)
▪ Evitez absolument tout contact de l’antenne avec câbles électriques ou tout autre circuit
d’éclairage ou d’alimentaion.
▪ Prévention de contact avec câbles électriques absolue pour toute installation d’antenne
extérieure. Faute de quoi, des conséquences fatales peuvent étre générées.
Page 57

ENGLISHFrançais
5
CONTENUS
Déclaration de Federal Communications Commission
...........................................................................................................................................1
Alerte et Précautions
Instructions de sécurité importantes ............................................................................ 2
Instruction de Sécurité d’Antenne ................................................................................ 4
Chapitre 1 Description Téléviseur écran crystal
Caractéristiques clés ................................................................................................... 6
Elements Emballés ...................................................................................................... 7
Mise en service de votre Téléviseur écran crystal ....................................................... 8
Votre Téléviseur écran crystal ....................................................................................11
Connection au câble d’alimentation AC ..................................................................... 13
Chapitre 2 Installation de Télé écran crystal
Connection à un Câble Télé ou à une Antenne ......................................................... 15
Connection à VCR ..................................................................................................... 19
Connection d’une Caméra Vidéo ou Console de Jeu ................................................ 20
Connection à Lecteur DVD ........................................................................................ 21
Connection d’un Boîtier Câble Télé Numérique ou d’un Récepteur
Satellite Numérique................................................................................................... 23
Connection d’un appareil AV avec Connecteur HDMI ............................................... 24
Connection d’un appareil AV avec un Connecteur DVI ............................................. 25
Connection a PC........................................................................................................ 26
Connection d’un Récepteur Audio ou un Système Son Dolby Digital 5.1 ................. 27
Chapitre 3 UTILISATION DE FONCTIONS
Fonction Image – Dans – Image .......................................................................28
Fonction Ecran Large .....................................................................................30
Afchage Menu ..............................................................................................31
Conguration de fonction HDTV .......................................................................33
Personnalisation de Congurations VIDEO ........................................................37
Personnalisation de congurations AUDIO .........................................................39
Personnalisation de CONFIGURATIONS ........................................................ 40
Utilisaton de congurations PUCE-V ................................................................42
Utilisation de Congurations Parentales .............................................................44
Personnalisez les Congurations TV ................................................................45
REPERAGE DE PANNE
......................................................................................................................................... 46
MODE AFFICHAGE
......................................................................................................................................... 48
Page 58

6
Chapitre 1 Description Téléviseur écran cristal
Divers terminaux Audio/Vidéo pour connection de matériels externes
▪ 2 lots de terminaux d’entrée A/V composés
▪ 1 Un lot de terminaux S-VIDEO
▪ 2 lots de terminaux d’entrée Vidéo composants
▪ 1 terminal d’entrée VGA/Audio
▪ 2 terminaux d’entrée HDMI/Audio
▪ 1 lot de terminaux d’entrée Audio(L/R)
▪ 2 terminaux de sortie SPDIF(Optiquex 1 /Coaxial x 1)
▪ 1 terminal Ecouteur
Tuner de télé incorporé pour réception HD ATSC
▪ Cette fonction permet réception de diffusion HD sans installation d’un boîtier récepteur.
Interface Multimedia Haute Definition (HDMI)
▪ High Definition Multimedia Interface (HDMI) est un petit connecteur interne à utilisation
facile pouvant conduire 5 Gbps de vidéo et audio dans un simple câble. Ce système
vous évite les coûts, compexité et confusion de multiples cables à connection de
systèmes A/V existants.
Boutons de Contrôle Tactile de Précision
▪ Remplacement de boutons conventionnels par boutons de technologie tactile.
Entrees Video Composant de HDTV
▪ Offre une qualité vidéo pour connections DVD (480p) et boîtier numérique (HD: 720p,
1080i)
Réduction de Bruits Numérique 3D
▪ Réduction numérique de bruit d’image pour une meilleure qualité d’imgage.
Détection Mode-Film( 3:2 Régulaton de Fond)
▪ Détection automatique de diffusion issue d’un film et régulation de correspondance de
cadre d’interligne pour une image en mouvement plus naturelle, plus nette.
Fonction PIP
▪ Ecran à deux programmes simultanés soit en mode image-dans-image ou image-sur-
image (côte à côte).
Chapitre 1
Description Téléviseur écran cristal
Caractéristiques clés
Page 59

Français
7
Chapitre 1 Description Téléviseur écran cristal
Téléviseur écran cristal
Vérifez que tous les élémentss suivants sont présents:
Tous ces éléments sont demandés pour installation et utilisation de Téléviseur écran
cristal dans sa conguration de base.
Elements Emballés
Câble VIDEO
Câble d’alimentation
Câble AUDIO Télécommande/
Piles AAA x 2
Guide Rapide
Guide d’Utilisation
Fiche de Garantie
Fiche de Consigne
CH CHVOL.- VOL.+ MENU SOURCE
/I
La plupart des appareils. (VCRs, lecteur DVD etc)sont munis de câble de
connection. Câbles, connecteur, etc supplémentaires seront demandés pour
montage d’un système complexe.
1-877-532-81 76, Mo nday thru Friday 8:00 am to 6:00 pm (PST )
To obtain customer service an d technical suppo rt by phone:
7373 Hunt Ave.
Please call(1-877- 532- 8176 )to locat e you re neares t
O
K
P
O
W
E
R
G
U
I
D
E
E
X
I
T
I
N
F
O
L
I
S
T
F
A
V
.
C
H
T
I
M
E
R
F
R
E
E
Z
E
M
E
N
U
S
.
M
O
D
E
S
L
E
E
P
S
W
A
P
P
I
P
P
.
M
O
D
E
M
T
S
M
U
T
E
C
A
P
T
I
O
N
P
.
S
I
Z
E
1
2
3
4
5
6
7
8
9
J
U
M
P
0
.
V
O
L
.
C
H
.
A
I
R
/
C
A
B
L
E
S
O
U
R
C
E
Page 60

8
Chapitre 1 Description Téléviseur écran cristal
Suivez les instructions suivantes:
Ouvrez le carton, et vériez que tous les éléments nécessaires sont présents
Les éléments emballés sont:
Mise en service de votre Téléviseur écran cristal
Comment installer le support télé
Téléviseur écran cristal
Support
Haut-parleur
Vis (10)/Tournevis
Posez le Téléviseur écran cristal sur sa face avant sur un tissu doux couvrant une surface
plane et solide.
Page 61

Français
9
Chapitre 1 Description Téléviseur écran cristal
Pour l’installation murale de votre téléviseur écran cristal, consultez les
instructions correspondantes fournies dans le coffret d’installation murale
(non inclu).
Tenez le support TV et placez le dans les six trous de vis au dos de l’unité comme montré.
Serrez les six vis solidement à l’arrière du haut-parleur avec tournevis.
Fixez le haut-parleur à l’arrière de l’unité de diffusion comme montré dessous. Serrez
solidement les quatre vis à l’arrière du haut-parleur avec tourevis.
Réglez le support à l’angle désiré. Rotation du support possible à 30O à droite et à gauche.
CH CHVOL.- VOL.+ MENU SOURCE
/I
Monte
30
o
30
o
Page 62

10
Chapitre 1 Description Téléviseur écran cristal
Risque d’endommagement de télécommande par nettoyage avec objet
caustique (porcelaine, inox, nettoyant de toilette et de micro-onde etc).
Utilisez un câble d’antenne pour connection de signal VHF/UHF à Terminal ANT de
Téléviseur écran cristal (voir page 18).
Brancher le câble d’alimentation AC à l’arrière du téléviseur et sur une prise murale.
Mettez les deux piles fournies dans la télécommande.
Connectez un autre dispositif externe A/V (voir page 19 - 27)
Etape 1 Glissez le couvercle vers le haut pour
ouvrir le compartiment de pile de la
télécommande.
Etape 2 Insérez les deux piles AAA en
vériant la correspondance de
polarités (+) et ( - ) indiquées
dans le compartiment de pile.
Rentrez le covercle à sa place.
Comment mettre en service le Téléviseur
Page 63

/I
Français
11
Chapitre 1 Description Téléviseur écran cristal
CH CHVOL.- VOL.+ MENU SOURCE
/I
Votre Téléviseur écran cristal
VOL +/-
Montée et baisse de son.
Sélection d’objet de menu-principal et changment de leurs valeurs
en écran OSD.
CH ▲▼
Recherche de chaînes dans l’ordre croissant ou diminuant.
Sélection de sub-menu en écran OSD.
Vue Avant/Côté Droit et Contrôles
ECOUTEUR
Connection à casque
d’écouteur pour écoute
individuelle.
VIDEO1 ENTREE
Connection aux prises de
sortie Vidéo et Audio
composées sur appareil
vidéo externe.
Vue d’Avant
R
L
AUDIO
VID EO
R
L
AUDIO
VIDEO
Vue de Côté Droit
LED
Indication de mise en marche de Téléviseur écran cristal
SOURCE
Sélection de différentes sources de signal d’entrée
MENU
Appuyez une fois pour afcher OSD
(afchage sur écran), une autre fois pour
en sortir.
/ I
Mise en marche et en mode de veille de
Téléviseur écran cristal
IR
Récepteur Infrarouge
Page 64

HDMI1 IN HDMI2 IN
AUDIO
L R
L R L R
L R
L
R
L R
L R
AUDIO
VGA IN
VIDEO2 IN
VIDEO AUDIO
S-VIDEO IN
S-VIDEO AUDIO
YPbPr1 IN
AUDIO OUT
STEREO
DIGITAL
OPTICAL
COAXIAL
TV
CABLE
HDTV
AIR
VHF/UHF IN
Y Pb Pr AUDIO
YPbPr2 IN
Y Pb Pr AUDIO
12
Chapitre 1 Description Téléviseur écran cristal
Vue d’Arrière et Prises
VHF/UHF ENTREE- CABLE -TELE
Connection d’entrée RF à l’antenne ou au câble VHF/UHF.
VGA ENTREE
Connection de PC, ou autre appareil AV aux prises de sortie VGA et
AUDIO(L/R)
YpbPr1 IN/YpbPr2 ENTREE
Connection de lecteur DVD, boitier récepteur numérique, ou autre
appareil AV aux prises de sortie composantes (YPbPr) vidéo et audio.
VIDEO2 ENTREE
Connection d’appareil vidéo externe sur prises de sortie VIDEO et AUDIO(L/R) composées.
AC ENTREE
Connection au câble d’alimentation AC
AUDIO SORTIE-STEREO
Connection d’appareil AV aux prises d’entrée AUDIO(L/R)
AUDIO SORTIE-DIGITAL-OPTIQUE/COAXIAL
Connection de système 5.1 audio digital/standard à la prise OPTIQUE AUDIO.
VHF/UHF ENTREE-HDTV-AIR
Connection d’entrée RF à l’antenne ou au câble VHF/UHF pour réception de programme haute /standard
dénition
S-VIDEO ENTREE
Connection d’appareil vidéo externe aux prises de sortie S-VIDEO
et AUDIO(L/R)
HDMI1 ENTREE/ HDMI2 ENTREE
Connection de connecteur HDMI à tout appareil AV numérique. HDMI soutient vidéo enrichie,
haute dénition et audio numérique deux canaux. L’AUDIO(L/R) de HDMI ENTRÉE permet
connection DVI
Page 65
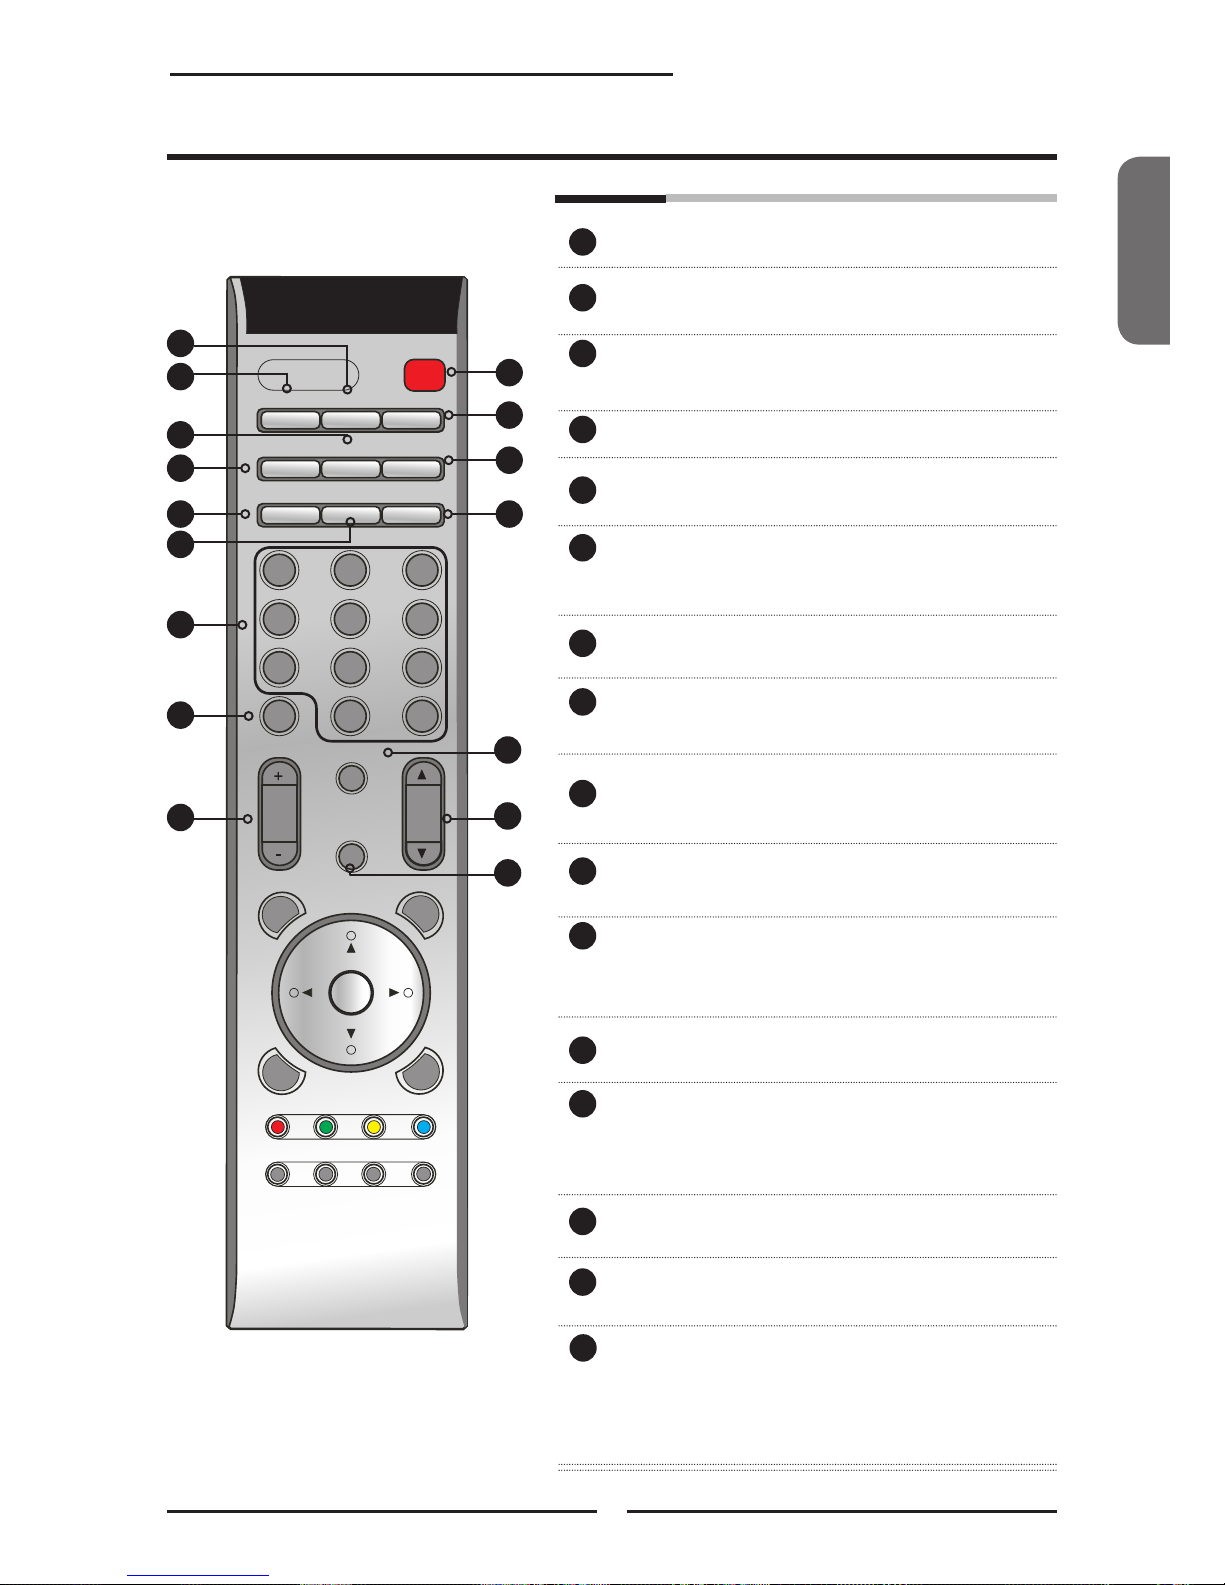
Français
13
Chapitre 1 Description Téléviseur écran cristal
OK
POW ER
GUI DE
EXI T
INF O
LIS T FA V.CH T IMER F REEZ E
MEN U
S.M ODE
SLEE P
SWAP PIPP.MO DE
MTS M UTE
CAPT ION P.S IZE
1 2
3
4
5
6
7
8 9
JUM P
0
.
VOL .
CH.
AIR/CABL E
SOURCE
Connection au câble d’alimentation AC
ALIMENTATION Mise en marche et arrêt de Téléécran cristal
COMMUTER Commutation entre fenêtre principale et fenêtre
annexe dans PIP/POP.
MODE P Sélection mode image: Vivid/Standard/
Cinéma/Sport/Personnalisé.
PIP Mise en marche et arrêt de PIP/POP.
MTS Parcours des options son de télé mutil-canaux
(MTS): SAP/MONO/ STEREO.
MODE S Sélection des options effet son: Stéréo/ Vif/
Danse/Techno/Classique/Soft/Rock/ Pop/Arrêt.
MUET Mise à muet et restitution audio.
SOUS-TITRE Parcours à travers Sous-titre Fermé: ARRET/
CC1/CC2/CC3/CC4/TT1/TT2/TT3/ TT4/Arret.
REPOS Parcours à travers l’horloge repos de télé écran
cristal: ARRET/30/60/90/120 mins.
FORMAT P Parcours à travers options mode écran:
NORMAL/PLEIN/ELARGI/ZOOM.
0-9 Sélection d’une chaîne en utilisant boutons 0-9.
En mode HDTV, utilisez boutons 0-9 pour
sélection d’une chaîne numérique.
SAUT Retours à la chaîne précédente.
AIR/CABLE Parcours à travers signal réception de
programme télé:
AIR: antenne
Câble: STD/IRC/HRC
VOL.+- Montée et baisse de son.
CH.▲▼ Recherche de chaîne dans l’ordre croissant et
diminuant.
SOURCE Appuyez pour afcher une liste de source,
utilisez boutons ▲▼pour sélection l’appareil
connecté aux entrées vidéo de votre Télé écran
cristal: TV/HDTV/VIDEO1 / VIDEO2/ VIDEO3/
VIDEO4/ VIDEO5/ VIDEO6/ VIDEO7/
ORDINATEUR.
1
2
3
4
5
6
7
8
9
10
2
6
1
7
8
9
13
14
11
12
15
10
11
12
13
14
4
3
5
15
16
16
Page 66

14
Chapitre 1 Description Téléviseur écran cristal
OK
POW ER
GUI DE
EXI T
INF O
LIS T FA V.CH T IMER F REEZ E
MEN U
S.M ODE
SLEE P
SWAP PIPP.MO DE
MTS M UTE
CAPT ION P.S IZE
1 2
3
4
5
6
7
8 9
JUM P
0
.
VOL .
CH.
AIR/CABL E
SOURCE
20
18
19
21
22
23
Portee effective:
La télécommande est effective à distance de l’ordre métrique si pointée directement sur
récepteur.
GUIDE En mode HDTV, appuyez pour afchage
de Guide Programme sur écran.
EXIT Quitter le menu OSD.
▲▼►◄ Parcours à travers options OSD et
OK sélection de contenu menu individuel. OK
pour conrmer option choisie.
INFO Appuyez une fois pour afcher un
ensemble d’infos telles que chaîne
actuelle et source d’entrée.
MENU Afchage de menu OSD sur écran.
Pour système Télé européen seulement.
LIST En mode HDTV, appuyez sur bouton
LISTE pour afcher liste de chaîne reçue.
TIMER Vous permet d’instaurer l’heure, de
programmer mise en marche et arrêt de
la télé, et d’aller à une chaîne spécique.
17
18
19
20
21
17
26
25
24
22
23
24
25
26
▪ Heure:
Instauration de l’heure en heure,
minute, seconde.
▪ Heure de début:
L’heure à laquelle la télé s’allume.
▪ Heure Arret:
L’heureà laquelle la télé s’éteint.
▪ Chaine:
Sélection d’une chaîne spécique sur
laquelle vous souhaitez que la télé
aille.
▪ Activer:
Mise en marche/arrêt une fois de
l’horloge.
▪ Confirmer:
Conrmation.
FREEZE Appuyez une fois pour pause sur
l’image courante, une autre fois pour la
relancer.
FAV.CH Appuyez pour lancer vos chaînes
préférées.
Heure
Heure de début
Heure d’arrêt
Chaîne
Activer
Conrmer
07:23:32
00:00:00
00:00:00
001
Marche/Arrêt/Une fois
Marche/Arrêt
Page 67

Français
15
Chapitre 1 Description Téléviseur écran cristal
Chapitre 2
Installation de Télé écran cristal
Consultation de manuel correspondant indispensable pour toute connection d’appareil externe,
branchement de câbles d’alimentation AC sur prise murale interdite avant que toute autre
connection ne soit terminée.
Connection Antenne
Une bonne réception de programme en couleur impose des critères plus importants sur l’antenne
que pour une réception de programme en noir et blanc. Une antenne extérieure est ainsi fortement
recommandée. Les explications suivantes portent sur le type de connection à de divers systèmes
d’antenne.
Cable coaxial 75-ohm (rond)
Connecteur type-F
Câble à double fils 300-ohm (plat)
■ Un système 75-ohm représente généralement un câble rond (non
inclu) avec connecteur type-F qui se connecte facilement à terminal
sans outil.
■ Un système 300-ohm représente un câble plat à double fils (non
inclu) qui peut se connecter à terminal 75 –ohm à travers un
adaptateur 300-75-ohm (non inclu).
Connection à un Câble Télé ou à une Antenne
Page 68

16
Chapitre 1 Description Téléviseur écran cristal
OUT
IN
Câble à double ls
300-ohm
Câble à double ls
300-ohm
Cable coaxial
75-ohm
Antenne
UHF
Antenne
VHF
Combineur
(non inclu)
A. Antenne combinaison VHF/UHF
Câble à double
ls 300-ohm
Câble coaxial
75-ohm
Antenne VHF/UHF
Antenne
VHF/UHF
Adaptateur 300/75-ohm
(non inclu)
B. Antennes de VHF et/ou UHF séparée
Utilisez les deux diagrammes suivants pour connecter une antenne extérieure.
A: montre comment utiliser une antenne extérieure de combinaison VHF/UHF.
B: montre comment utiliser une antenne extérieure de VHF et/ou UHF séparée.
Page 69

Français
17
Chapitre 1 Description Téléviseur écran cristal
Ce rappel dirige toute installation de CATV à une consultation préalable de l’Article 820-40 de
National Electrical Code (NEC) qui fournit des instructions pour la pose au sol et, en particulier,
précise que le sol de câble doit être connecté précisément au système de sol de bâtiment, ou
être au plus près possible du point d’entrée de câble. Toute utilisation de ce téléviseur pour
réception de programmes en dehors de ceux diffusés en UHF, VHF ou transmis par sociétés de
câble pour utilisation du grand public fait l’objet d’une autorisation de la société de diffusion/
câble, et/ou du propritaire de programme.
A
IN
B
OU T
Ligne Télé
Câblée
diviseur
dignal 2 lots
(non inclu)
Interrupteur RF
(non inclu)
Convertisseur/
décodeur de chaîne
câblée (non inclu)
Câble connection Télé (CATV)
■ L’interrupteur RF (non inclu) est demandé pour fournir deux entrées (A et B).
Position A permet réception de toutes chaînes non codées en utilisant les
touches de chaîne de télé.
■ Position B permet réception de toutes chaînes codées via le convertisseur/
décodeur en utilisant leur touches de chaîne.
■ Le connecteur coaxial A –75 ohm est incorporé dans l’ensemble pour un
accrochage facile. Connectez câble 75 –ohm dans l’ANT pour connection de
câble coaxial 75-ohm à l’ensemble.
■ Certaines sociétés de chaîne câblée mettent en place des chaînes payables
avec diffusions codées, un convertisseur/décodeur de chaîne câblée est
généralement fourni par ces sociétés.
Le convertisseur/décodeur est nécessaire pour visionner les chaînes codées. (Mettez votre télé
à chaîne 3 ou 4 qui sont généralement utilisées à cette n, consultez la société de chaîne codée
en cas de non-fonctionnement)
Consultez la société de chaîne câblée pour plus d’infos sur installation de télé câblée. Le
diagramme suivant montre l’une des methodes possibles pour connection au convertisseur/
décodeur fourni par une société de chaîne câblée.
VHF/UHF ENTREE
Page 70

18
Chapitre 1 Description Téléviseur écran cristal
METHODE A:
Utilisez un câble d’antenne pour connection de signal NTSC au terminal CABLE TELE
de la Télé écran cristal.
METHODE B:
Utilisez un câble d’antenne pour connection de signal ATSC au terminal AIR
HDTV de la Télé écran cristal.
Connectez le câble d’alimentation AC à l’arrière de la télé et le câble d’alimentation à la
prise murale.
Appuyez sur le bouton sur la télécommande pour allumer la Télé écran cristal.
Débranchement obligatoire de la Télé écran cristal pour toute non
utilisation de longue durée.
Le bouton sur le panneau frontal met seulement la Télé écran cristal en
veille, pour couper l’alimentation principale de l’appareil, débranchez la
fiche d’alimentation.
Appuyez sur le bouton SOURCE sur le
télécommande pour afcher la liste de
Source. Utilisez les boutons ▲▼pour
sélection TV( METHODE A), ou HDTV
(METHODE B), et appuyez sur le bouton
OK pour valider.
TV
CABLE
HDTV
AIR
VHF/UHF IN
A
B
Main:
TV(CABLE/AIR)
HDTV (CABLE/AIR)
VIDEO1 (SIDE)
VIDEO2 (REAR)
VIDEO3 (S-VIDEO)
VIDEO4 (YPbPr1)
VIDEO5 (YPbPr2)
VIDEO6 (HDMI1)
VIDEO7 (HDMI2)
COMPUTER (VGA)
TV
CABLE
HDTV
AIR
VHF/UHF IN
Page 71

HDMI1 IN HDMI2 IN
AUDIO
L R
L R L R
L R
L
R
L R
L R
AUDIO
VGA IN
VIDEO2 IN
VIDEO AUDIO
S-VIDEO IN
S-VIDEO AUDIO
YPbPr1 IN
AUDIO OUT
STEREO
DIGITAL
OPTICAL
COAXIAL
TV
CABLE
HDTV
AIR
VHF/UHF IN
Y Pb Pr AUDIO
YPbPr2 IN
Y Pb Pr AUDIO
A B
L’arrière de Télé
Câble AUDIO
Câble S-VIDEO
Câble A/V
Français
19
Chapitre 1 Description Téléviseur écran cristal
METHODE A:
Utilisez un câble composé pour connection entre prises vidéo/audio composée de VCR et
prises VIDEO 2 ENTRÉE de Télé écran cristal.
METHODE B:
Utilisez un câble audio pour connection entre entrées audio de Télé écran cristal et
prises de sortie audio de VCR. Utilisez un câble S-Vidéo pour connection entre prise de
sortie S-Vidéo VCR et prise d’entrée S-VIDEO ENTRÉE de Télé écran cristal.
Connectez toutes sources d’alimentation AC avant d’allumer interrupteur d’alimentation
de Télé écran cristal ou autre appareil connecté.
Appuyez sur bouton sur la télécommande pour allumer la Télé écran cristal.
Appuyez sur bouton SOURCE sur télécommande pour sélectionner VIDEO2
(METHODE A), ou VIDEO 3 (METHODE B) pour visionner une bande vidéo
Connection à VCR
Page 72

HDMI1 IN HDMI2 IN
AUDIO
L R
L R L R
L R
L
R
L R
L R
AUDIO
VGA IN
VIDEO2 IN
VIDEO AUDIO
S-VIDEO IN
S-VIDEO AUDIO
YPbPr1 IN
AUDIO OUT
STEREO
DIGITAL
OPTICAL
COAXIAL
TV
CABLE
HDTV
AIR
VHF/UHF IN
Y Pb Pr AUDIO
YPbPr2 IN
Y Pb Pr AUDIO
A
B
R
L
AUDIO
VIDE O
Côté Droit
or
Câble AUDIO
Câble S-VIDEO
Câble A/V
L’arriere de Télé
20
Chapitre 1 Description Téléviseur écran cristal
PLAY STATION
METHODE A:
Utilisez un câble composé entre prises vidéo/audio composées de caméra vidéo ou de
console de jeu et prises VIDEO2 ENTRÉE OU prises VIDEO1 ENTRÉE de Télé écran cristal.
METHODE B:
Utilisez un câble audio pour connection entre prises de sortie audio de caméra vidéo ou
de console de jeu et entrées audio de Télé ércan cristal. Utilisez un câble S-Vidéo pour
connection entre prise de sortie S-Vidéo de caméra vidéo ou de console de jeu et prise
d’entrée S-VIDEO ENTRÉE de Télé écran cristal.
Connectez toutes sources d’alimentation AC avant d’allumer interrupteur d’alimentation
de Télé écran cristal ou autre appareil connecté.
Appuyez sur bouton sur la télécommande pour allumer la Télé écran cristal.
Appuyez sur bouton SOURCE sur télécommande pour sélectionner VIDEO1/VIDEO2
(METHODE A), ou VIDEO3 (METHODE B) pour visionner un enregistrement de
caméra vidéo ou lancer console de jeu.
Connection d’une Caméra Vidéo ou Console de Jeu
Toutes les caméras ne se connectent pas forcément à une télé. Consultez le guide de
votre caméra pour information.
Console de Jeu
Page 73

HDMI1 IN HDMI2 IN
AUDIO
L R
L R L R
L R
L
R
L R
L R
AUDIO
VGA IN
VIDEO2 IN
VIDEO AUDIO
S-VIDEO IN
S-VIDEO AUDIO
YPbPr1 IN
AUDIO OUT
STEREO
DIGITAL
OPTICAL
COAXIAL
TV
CABLE
HDTV
AIR
VHF/UHF IN
Y Pb Pr AUDIO
YPbPr2 IN
Y Pb Pr AUDIO
L’arrière de Télé
C
A
B
Ou
Français
21
Chapitre 1 Description Téléviseur écran cristal
METHODE A:
Utilisez un câble composé pour connection entre prises vidéo/audio composées de lecteur
DVD et prises VIDEO2 ENTRÉE de Télé écran cristal.
METHODE B:
Utilisez un câble audio pour connection entre prises de sortie audio de lecteur DVD et
entrées audio de Télé écran cristal. Utilisez un câble S-Vidéo pour connection entre
prise de sortie S-Vidéo de lecteur DVD et prise d’entrée S-VIDEO ENTRÉE de Télé
écran cristal.
METHODE C:
Utilisez un câble composant pour connection entre prises de sortie comopsant de lecteur
DVD et prises d’entrée YPbPr1 ENTREE ou YPbPr2 ENTRÉE de Télé écran cristal.
Utilisez un câble audio pour connection entre prises audio composant de lecteur DVD et
prises d’entrée audio de Télé écran cristal.
DV D PL AYE R
PrPb
PrPb
Connection à Lecteur DVD
Les prises vidéo composant sur votre lecteur DVD sont parfois étiquetées
YPbPr, ou YCbCr. Consultez le guide de votre lecteur DVD pour explication
sur vidéo composant.
Câble AUDIO
Câble S-VIDEO
Câble A/V
Câble COMPOSANT/AUDIO
Page 74

22
Chapitre 1 Description Téléviseur écran cristal
Utilisez un câble composant au lieu d’un câble vidéo composé ou S-Vidéo
pour une meilleure qualité d’image si votre appareil est muni d’une sortie
vidéo composant.
Connectez toutes sources d’alimentation AC avant d’allumer interrupteur d’alimentation
de Télé écran cristal ou autre appareil connecté.
Appuyez sur bouton sur la télécommande pour allumer la Télé écran cristal.
Appuyez sur bouton SOURCE sur la télécommande pour sélection de VIDEO
2(METHODE A) ou VIDEO 3(METHODE B), Ou VIDEO 4 / VIDEO 5 (METHODE C)
pour visionner un programme DVD.
Page 75

HDMI1 IN HDMI2 IN
AUDIO
L R
L R L R
L R
L
R
L R
L R
AUDIO
VGA IN
VIDEO2 IN
VIDEO AUDIO
S-VIDEO IN
S-VIDEO AUDIO
YPbPr1 IN
AUDIO OUT
STEREO
DIGITAL
OPTICAL
COAXIAL
TV
CABLE
HDTV
AIR
VHF/UHF IN
Y Pb Pr AUDIO
YPbPr2 IN
Y Pb Pr AUDIO
Ou
L’arrière de Télé
Français
23
Chapitre 1 Description Téléviseur écran cristal
Utilisez un câble composant pour connection entre prises de sortie composant
(YPbPr1) de récepteur satellite / Boîtier Câble Télé et prises d’entée composant de Télé
écran cristal.
Utilisez un câble audio pour connection entre prises audio composant de récepteur
satellite/Boîtier Câble Télé et prises d’entrée audio de Télé écran cristal.
Connectez toutes sources d’alimentation AC avant d’allumer interrupteur d’alimentation
de Télé écran cristal ou autre appareil connecté.
Appuyez sur bouton sur la télécommande pour allumer la Télé écran cristal.
Appuyez sur bouton SOURCE sur télécommande pour sélectionner VIDEO 4/VIDEO 5
pour visionner programmes via récepteur satellite ou Boîtier Câble Télé.
PrPb
PrPb
Connection d’un Boîtier Câble Télé Numérique ou d’un Récepteur
Satellite Numérique
Câble COMPOSANT/AUDIO
Câble
antenne
satellite
RECEPTEUR SATELLITE
BOITIER CABLE TELE
Page 76

24
Chapitre 1 Description Téléviseur écran cristal
HDMI1 IN HDMI2 IN
AUDIO
L R
L R L R
L R
L
R
L R
L R
AUDIO
VGA IN
VIDEO2 IN
VIDEO AUDIO
S-VIDEO IN
S-VIDEO AUDIO
YPbPr1 IN
AUDIO OUT
STEREO
DIGITAL
OPTICAL
COAXIAL
TV
CABLE
HDTV
AIR
VHF/UHF IN
Y Pb Pr AUDIO
YPbPr2 IN
Y Pb Pr AUDIO
L’arrière de Télé
Utilisez un câble HDMI pour connection entre prise de sortie HDMI d’appareil AV et prises
HDMI1/HDMI2 ENTRÉE de Télé écran cristal.
Connectez toutes sources d’alimentation AC avant d’allumer interrupteur d’alimentation
de Télé écran cristal ou autre appareil connecté.
Appuyez sur bouton sur la télécommande pour allumer la Télé écran cristal.
Appuyez sur bouton SOURCE sur télécommande pour sélectionner VIDEO 6 ou
VIDEO 7.
Connection d’un appareil AV avec Connecteur HDMI
Le connecteur HDMI fournit signaux vidéo et audio. Connection de câble
audio non nécessaire.
Câble HDMI
AV EQUIPMENT
APPAREIL AV
Page 77
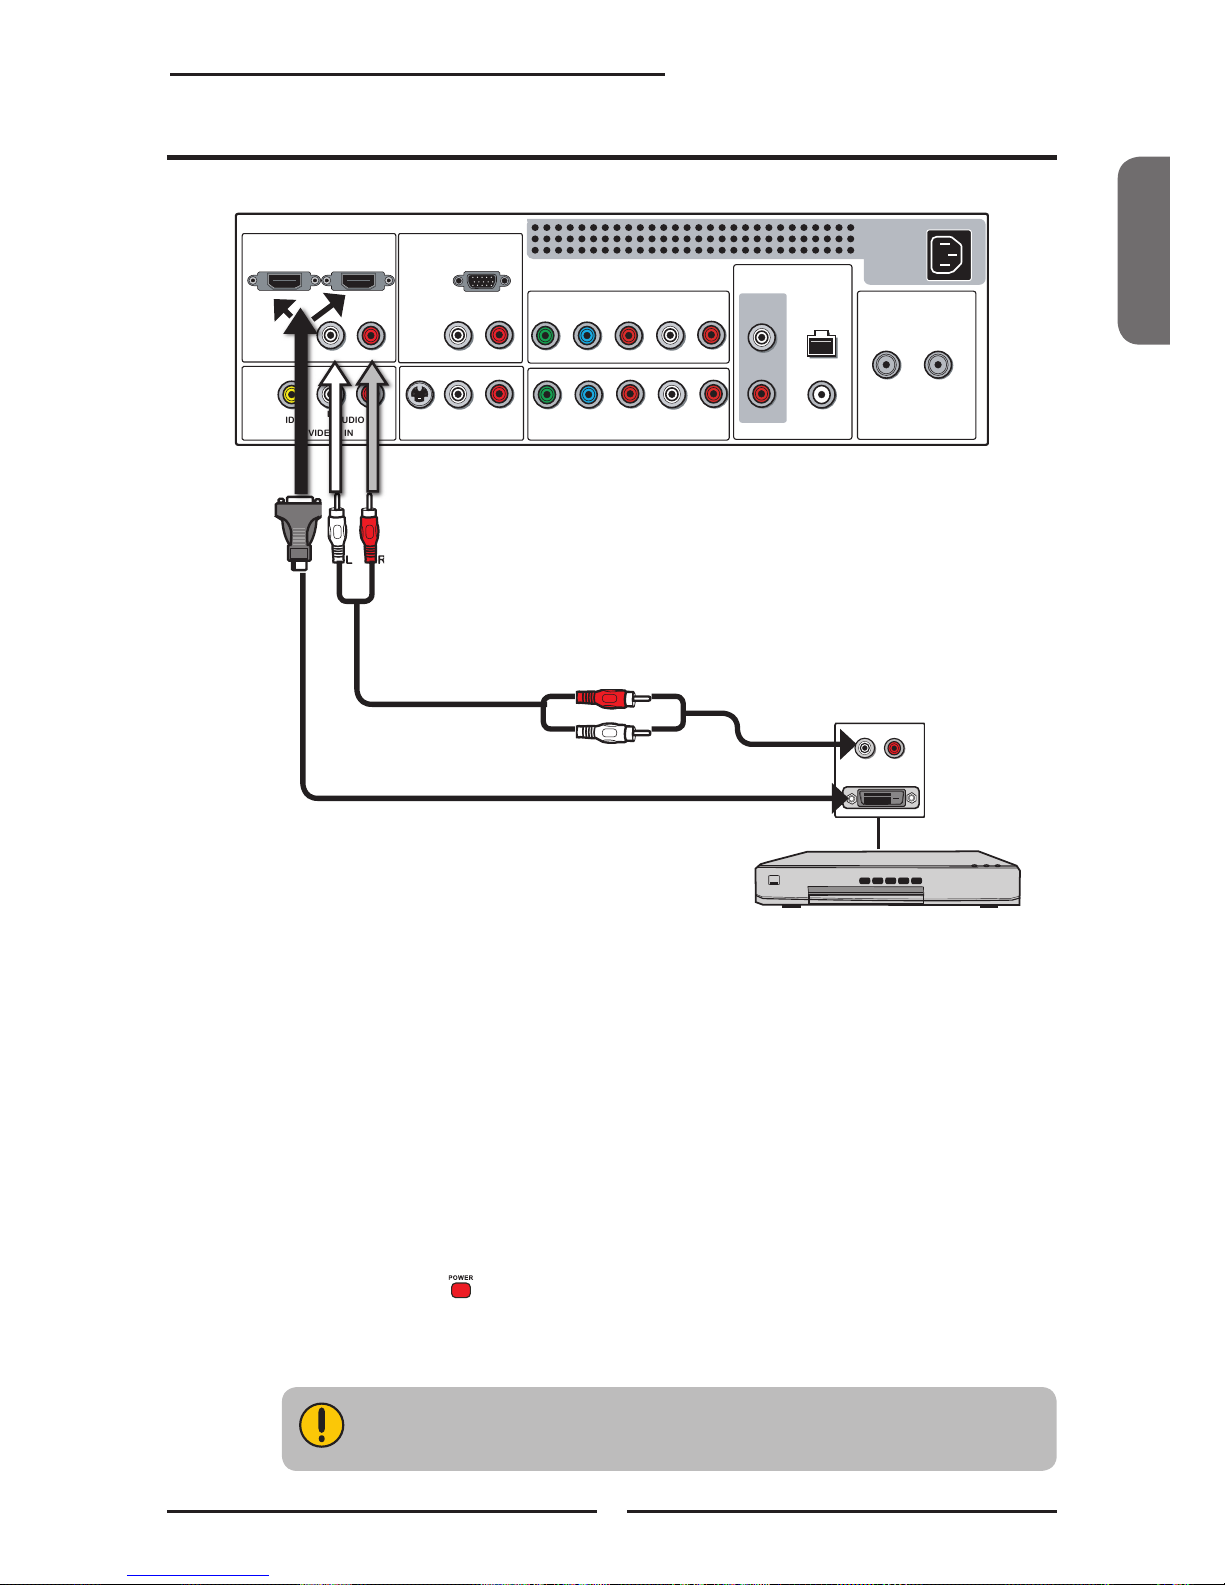
Français
25
Chapitre 1 Description Téléviseur écran cristal
HDMI1 IN HDMI2 IN
AUDIO
L R
L R L R
L R
L
R
L R
L R
AUDIO
VGA IN
VIDEO2 IN
VIDEO AUDIO
S-VIDEO IN
S-VIDEO AUDIO
YPbPr1 IN
AUDIO OUT
STEREO
DIGITAL
OPTICAL
COAXIAL
TV
CABLE
HDTV
AIR
VHF/UHF IN
Y Pb Pr AUDIO
YPbPr2 IN
Y Pb Pr AUDIO
L’arrière de Télé
Utilisez un câble HDMI-à-DVI pour connection entre prise de sortie DVI d’appareil AV et prises
HDMI1/HDMI2 ENTRÉE.
Utilisez un câble audio pour connection entre prises de sortie audio d’appareil AV et prises
HDMI AUDIO de Télé écran cristal.
Connectez toutes sources d’alimentation AC avant d’allumer interrupteur d’alimentation
de Télé écran cristal ou autre appareil connecté.
Appuyez sur bouton sur la télécommande pour allumer la Télé écran cristal.
Appuyez sur bouton SOURCE pour sélectionner VIDEO6 ou VIDEO7.
Connection d’un appareil AV avec un Connecteur DVI
Vous avez besoin d’un câble HDMI-à-DVI ou un adaptateur (non inclu) si la
Télé écran cristal est connectée à un connecteur DVI d’appareil AV.
AV EQUIPMENT
Câble HDMI-à-DVI
Câble AUDIO
DVI OUT
AUDIO
L R
APPAREIL AV
Page 78

26
Chapitre 2 Installation de Télé écran cristal
HDMI1 IN HDMI2 IN
AUDIO
L R
L R L R
L R
L
R
L R
L R
AUDIO
VGA IN
VIDEO2 IN
VIDEO AUDIO
S-VIDEO IN
S-VIDEO AUDIO
YPbPr1 IN
AUDIO OUT
STEREO
DIGITAL
OPTICAL
COAXIAL
TV
CABLE
HDTV
AIR
VHF/UHF IN
Y Pb Pr AUDIO
YPbPr2 IN
Y Pb Pr AUDIO
L’arrière de Télé
Utilisez un câble VGA pour connection entre prise de sortie VGA de PC et prise d’entrée
VGA de Télé écran cristal. Utilisez un câble audio pour connecer prises de sortie audio
de PC à celles de Télé écran cristal.
Connectez toutes sources d’alimentation AC avant d’allumer interrupteur d’alimentation
de Télé écran cristal ou autre appareil connecté.
Appuyez sur bouton sur la télécommande pour allumer la Télé écran cristal.
Appuyez sur bouton SOURCE sur télécommande pour sélectionner ORDINATEUR.
Connection a PC
Câble VGA
Câble AUDIO
PC
Page 79

Audio Receiver
Audio Amplifier
AB
Français
27
Chapitre 2 Installation de Télé écran cristal
HDMI1 IN HDMI2 IN
AUDIO
L R
L R L R
L R
L
R
L R
L R
AUDIO
VGA IN
VIDEO2 IN
VIDEO AUDIO
S-VIDEO IN
S-VIDEO AUDIO
YPbPr1 IN
AUDIO OUT
STEREO
DIGITAL
OPTICAL
COAXIAL
TV
CABLE
HDTV
AIR
VHF/UHF IN
Y Pb Pr AUDIO
YPbPr2 IN
Y Pb Pr AUDIO
L’arrière de Tele
Connection a Recepteur Audio:
Utilisez un câble audio pour connecter prises LIGNE ENTRÉE audio de récepteur audio
à celles de Télé écran cristal.
Connection à Système Son Digital:
METHODE A:
Utilisez un câble optique pour connecter prise OPTIQUE ENTRÉE d’amplicateur audio
à prise SORTIE OPTIQUE de Télé écran cristal.
METHODE B:
Utilisez un câble coaxial pour connection de prise COAXIALE ENTRÉE d’amplicateur
audio à prise COAXIALE SORTIE de Télé écran cristal.
Note: Les fonctions susvisées sont disponibles seulement en mode HDTV (câble/air).
Connectez toutes sources d’alimentation AC avant d’allumer interrupteur d’alimentation
de Télé écran cristal ou autre appareil connecté.
Appuyez sur bouton sur télécommande pour allumer la Télé écran cristal.
Connection d’un Récepteur Audio ou un Système Son Dolby Digital 5.1.
Câble AUDIO
Vous pouvez souhaiter mettre l’audio de Télé écran cristal sous le système stéréo pour une
meilleure qualité de son.
Récepteur Audio
Amplicateur Audio
Page 80

CH CHVOL.- VOL.+ MENU SOURCE
/I
28
Chapitre 3 Utilisation de Fonctions
La fonction PIP/POP permet lecture simultanée de vidéo sur deux sources (TV, VCR, DVD etc)
Seulement une source audio fonctionne à la fois. Vous pouvez choisir quelle source à faire
fonctionner.
Appuyez une fois sur bouton PIP pour entrer en mode image dans image.
Principal
Sub
MAINSUB
Fonction Image – Dans – Image
▪ Appuyez sur ◄ ►pour lier la source audio entre la fenêtre principale et
la sub fenêtre.
▪ Appuyez sur bouton OK pour changer le position de la seconde fenêtre.
1
3
5
2
4
▪ Appuyez sur ◄ ►pour activer soit la principale ou la sub fenêtre, appuyez
ensuite sur bouton SOURCE pour afcher la Liste Entrée:
Sub
VIDEO 1 (COTE)
VIDEO 2 (ARRIERE) √
VIDEO 3 (S-VIDEO)
VIDEO 4 (YPbPr 1)
VIDEO 5 (YPbPr 2)
ORDINATEUR (VGA)
▪ Appuyez sur ▲▼pour changer source entrée et appuyez sur bouton OK.
Chapitre 3
UTILISATION DE FONCTIONS
Page 81

ENGLISHENGLISHFrançais
29
Chapitre 3 Utilisation de Fonctions
CH CHVOL.- VOL.+ MENU SOURCE
/I
CH CHVOL.- VOL.+ MENU SOURCE
/I
Appuyez sur bouton PIP une nouvelle fois pour visionner images côte à côte..
▪ Appuyez sur ◄ ►pour lier la source audio entre la fenêtre principale et la sub fenêtre.
▪ Appuyez sur bouton COMMUTER pour communter les images entre la principale et la
sub fenêtre.
▪ Appuyez sur pour activer soit la principale ou la sub fenêtre, ensuite appuyez sur bouton
SOURCE pour afcher la Liste Entrée:
Appuyez sur ▲▼pour changer source entrée et appuyez sur bouton OK.
Appuyez sur bouton PIP une nouvelle fois pour sortir.
Sub
VIDEO 1 (COTE)
VIDEO 2 (ARRIERE) √
VIDEO 3 (S-VIDEO)
VIDEO 4 (YPbPr 1)
VIDEO 5 (YPbPr 2)
ORDINATEUR (VGA)
SubPrincipal
Page 82

30
Chapitre 3 Utilisation de Fonctions
ELARGI
L’image sera étirée verticalement et
horizontalement pour remplir l’écran à un
ratiode présentation à 1:1.85.
La fonction Ecran Large permet la lecture d’image de 4:3/16:9 en mode écran large en effectuant
les procédés d’écran large suivants. Appuyez sur bouton FORMAT P de façon répétitive pour
sélectionner le format écran désiré.
NORMAL
Format à ratio de présentation 4:3.
ZOOM
L’image sera étirée verticalement et
horizontalement pour remplir l’écran à un
ratio de présentation à 1:2.35.
Fonction Ecran Large
PLEIN
L’image sera étirée verticalement et
horizontalement par les côtés tout en
gardant le format d’image régulier à partir
du centre de l’écran.
Page 83

ENGLISHENGLISHFrançais
31
Chapitre 3 Utilisation de Fonctions
Appuyez sur bouton pour allumer la Télé écran cristal.
Appuyez sur bouton MENU sur télécommande pour afcher le menu écran sur l’écran.
Utilisez les boutons ◄►pour sélectionner option menu principal.
MENU VIDEO:
MENU AUDIO:
Afchage Menu
▪ Si la source signal est VIDEO/SVIDEO/YPbPr/
HDMI/VGA, le MENU AUDIO apparaît comme:
▪ Si la source signal est TV, le MENU AUDIO
apparaît comme:
▪ Si la source signal est TV/HDTV/VIDEO/SVIDEO/
YPbPr/HDMI, le MENU VIDEO apparaît comme:
▪ Si la source signal est VGA, le MENU VIDEO
apparaît comme:
Vous permet de régler vos configurations d’image.
Vous permet de personnaliser options audio et effets.
▪ Si la source signal est HDTV, le MENU AUDIO apparaît comme:
Audio Sélectionner Quitter
Picture Mode Vivid
Contrast 75
Brightness 65
Auto Setting
Phase 20
Manual Clock 128
Display Adjustment
Color Temperature Nature
Noise Reduction Low
Video Select Exit
Picture Mode Vivid
Contrast 75
Brightness 55
Saturation 62
Hue +22
Sharpness 4
Color Temperature Nature
Noise Reduction Low
Video Select Exit
Audio Select Exit
Bass 50
Treble 50
Balance 0
Sound Effect Off
Bass 50
Treble 50
Balance 0
Sound Effect Off
MTS System Stereo
Bass 50
Treble 50
Balance 0
Sound Effect Off
Audio Select Exit
Page 84

32
Chapitre 3 Utilisation de Fonctions
Utilisez boutons ▲▼pour sélectionner une option du sub-menu, et appuyez sur bouton OK.
En mode de réglage, utilisez boutons ◄►pour changer la valeur de l’objet.
Appuyez sur bouton QITTER pour quitter le menu.
MENU CONFIGURATION:
MENU TV: MENU HDTV:
Vous permet de lancer un ensemble de fonctions: Langue, Sous-Titre Fermé, Retour
configuration usine, Puce-V, Contrôle Parental, Horloge de Repos.
Vous permet de combiner et étiqueter les
chaînes.
Vous permet de lancer la fonction
programme HDTV.
▪ Si la source signal est VIDEO/S-VIDEO, le menu
Configuration apparaît comme:
▪ Si la source signal est TV/HDTV, le menu
Configuration apparaît comme:
▪ Si la source signal est YPbPr/HDMI/VGA, le menu
Configuration apparaît comme:
Setup Select Exit
Closed Caption Off
V-Chip
Parental
Language English
Osd Transparent On
Gamma Dark
Default
Channel Searching
Tuner Mode Cabel-STD
Closed Caption OFF
V-Chip
Parental
Language English
Osd Transparent On
Gamma Dark
Default
Setup Select Exit
Setup Select Exit
Parental
Language English
Osd Transparent On
Gamma Dark
Default
Channel Skip On
Channel Name
Favorite
TV Select Exit
HDTV Select Exit
Audio Language ◄ English ►
Time Zone Eastern Time
SPDIF Type PCM
Manual Scan
Channel Skip
Channel Block
Caption
(CABLE/AIR)
Page 85

ENGLISHENGLISHFrançais
33
Chapitre 3 Utilisation de Fonctions
Avec la Télé écran cristal connectée à une source de programme de télévision,
appuyez sur bouton SOURCE sur télécommande pour afcher Liste de Source.
Utilisez boutons ▲▼ pour sélectionner HDTV, appuyez ensuite sur bouton OK.
Appuyez sur bouton MENU sur télécommande pour afcher le menu principal, et
utilisez boutons ◄►pour sélectionner la CONFIGURATION.
Recherche et mémorisation des chaînes de télé automatiques.
Conguration de fonction HDTV
Appuyez sur bouton OK ou LISTE pour afcher liste de chaînes reçues, appuyez ensuite
sur boutons ▲▼pour sélectionner une chaîne. Ou, utilisez bouton ▪ avec boutons 0-9 pour
sélectionner chaîne numérique (par exemple 9.1).
Appuyer sur ▼bouton pour sélectionner Recherche de Chaîne, et appuyez sur bouton OK.
La Recherche de Chaîne crée une liste de chaînes recevables à partir d’antenne VHF/UHF
ou de TV Cablée si cette source est bien connectée. Interruption de processus de
mémorisation à tout moment par sélection de bouton Annuler. (la liste ne sera pas créée
dans ce cas)
Channel List
9-1 KQED-HD
9-2 KOED-SD
La chaîne numérique principale peut contenir beaucoup de chaînes annexes
(par exemple 9-1, 9-2…) qui montrent programme en même temps.
La Recherche de Chaîne crée une liste de chaînes recevables pour l’entrée
courante (antenne ou câble). Il sera nécessaire de lancer Recherche de Chaîne
pour chaque entrée RF pour créer une liste de chaînes disponibles depuis les
deux entrée.
Channel Searching
Tuner Mode Cabel-STD
Closed Caption OFF
V-Chip
Parental
Language English
Osd Transparent On
Gamma Dark
Default
Setup Select Exit
Aut o Pr ogr am
Chann el Se arc hin g
Fou nd
0
Analo g
Ple as e wai t a few m inu tes for c omp let ion .
Pre ss E nte r or Se tup k ey to c an cel .
Cable -S TD
Cance l
0
Digit al
Page 86

34
Chapitre 3 Utilisation de Fonctions
Le menu HDTV inclut options suivantes:
Langue Audio Sélection de langues audio: anglais/espagnole/français
Fuseau Horaire Sélection de fuseaux horaires aux USA: Heure d Est/ Indiana/heure
Centrale/Heure Montagne/ Arizona/Heure Pacique/ Alaska/Hawaii
Type SPDIF Sélection de systéme audio externe: PCM/OFF/Dolby Digital
▪ PCM: Le système audio externe est conecté à SORTIE
AUDIO(L/R)de Télé écran cristal
▪ Dolby Digital: Le système audio est connecté à SORTIE DIGITALE
AUDIO (OPTIQUE ou COAXIAL) de Télé écran cristal
▪ DESACTIVER: Sélectionnez DESACTIVER pour désactiver le
système audio externe.
Recherche Manuelle permet conguration de chaîne de télé manuelle
HDTV Select Exit
Audio Language ◄ English ►
Time Zone Eastern Time
SPDIF Type PCM
Manual Scan
Channel Skip
Channel Block
Caption
(CABLE/AIR)
Saut de Chaîne Addition/enlèvement de chaînes numériques.
Verrouillage de Chaîne Verrouillage de chaîne numérique. Cette fonction demande un mot
de passe à quatre chiffres, celui d’usine est 0000.
HDTV Select Exit
Scan Mode Range Mode
From Channel 1
To Channel 8
(CABLE/AIR)
Scan with a range of channels.
Page 87

ENGLISHENGLISHFrançais
35
Chapitre 3 Utilisation de Fonctions
Ous-Titre Permet de lancer sous-titire.
HDTV Select Back
Analog Closed Caption ◄ OFF ►
Digital Closed Caption OFF
Caption Style
(CABLE/AIR)
HDTV Select Back
Caption Style ◄ Custom ►
Font Size Large
Font Color White
Font Opacity Solid
Background Color Black
Background Opacity Solid
Window Color Black
Window Opacity Translucent
(CABLE/AIR)
▪ Sous-Titre Fermé Analogue:
Appuyez sur boutons ◄►pour sélectionner options sous-titre fermé
analogue: DESACTIVER/CC1/CC2/CC3/CC4
▪ Sous-Titre Fermé Digital:
Appuyez sur boutons ◄►pour sélectionner options sous-titre fermé
digital: Service1/ Service2/ Service3/ Service4/ Service5/ Service6/
DESACTIVER
Attention:Le réglage d’ici sera appliqué à chaque chaîne de TVD
▪ Style Sous-Titre:
Appuyer sur bouton OK pour personnaliser les configurations pour
option sous-titre fermé digital:
Page 88

36
Chapitre 3 Utilisation de Fonctions
Avec la Télé écran cristal connectée à une source de programme de télévision, appuyez sur
bouton TV sur télécommande.
Appuyez sur bouton GUIDE sur télécommande, le Guide Programme apparaît sur l’ecran:
La fonction Guide Programme apporte tout types d’informations à votre écran, telles que titre de
programme, durée de programme, temps restant, information de classement, sous-titre fermé,
disponibilité, etc.
Monday 29 April 2005 2:36:26 PM
9-1 ◄ 9-2 KQED-SD ► 9-1
Today 5:00 PM Calfornia’s Gold CC
Today 5:30 PM Antiques Roadshow
Today 6:00 PM The NewHour with Jim Lehrer CC
Today 7:30 PM Zoboomafoo CC
Today 7:30 PM Arthur
Today 11:00 PM Antiques Roadshow CC
5:00 PM - 5:30 PM Mon, 29 Apr Not Rated
Clubs: Dongwa doesn’t communicate with his parents.
Eplisode: Explorer’s club/Time for everything
9 - 2 KOED-SD
Appuyez sur bouton ▲▼pour sélectionner le programme sur une liste, le Guide Programme
fournit présentation du programme courant diffusé sur chaque chaîne.
Monday 29 April 2005 2:36:26 PM
9-1 ◄ 9-2 KQED-SD ► 9-1
5:00 PM - 5:30 PM Mon, 29 Apr Not Rated
Clubs: Dongwa doesn’t communicate with his parents.
Eplisode: Explorer’s club/Time for everything
9 - 2 KOED-SD
Today 5:00 PM Calfornia’s Gold CC
Today 5:30 PM Antiques Roadshow
Today 6:00 PM The NewHour with Jim Lehrer CC
Today 7:30 PM Zoboomafoo CC
Today 7:30 PM Arthur
Today 11:00 PM Antiques Roadshow CC
Utlisation de Guide Programme
Appuyez une nouvelle fois sur bouton GUIDE sur télecommande pour quitter le
Guide Programme.
Page 89

ENGLISHENGLISHFrançais
37
Chapitre 3 Utilisation de Fonctions
Appuyez sur bouton pour allumer la Télé écran cristal.
Appuyez sur bouton MENU sur télécommande pour afcher le menu Principal, et utilisez
boutons ◄► pour sélectionner VIDEO.
Utilisez boutons ▲▼pour sélectionner une option VIDEO individuelle, utilisez boutons ◄►
pour changer la conguration, et appuyez sur MENU pour quitter le menu.
Le menu VIDEO inclut les options suivantes:
Mode Image Parcours sur types d’afchage: Vif/Standard/Cinéma/Sport/
Utilisateur
Contrast Contrôle la différence entre zones les plus brillantes et les plus
sombres de l’image.
Luminosité Contrôle l’ensemble de luminosité de l’image.
Saturation Contréle l’intensité couleur.
Ton Contrôle la différence entre zones vertes et rouges de l’image.
Vivacite Montez pour un contour d’image vif et baissez pour un coutour d’image
adouci.
Configuration Auto Appuyez sur bouton OK pour régler automatiquement congurations
d’afchage pour optimiser performance basée sur mode VGA.
Phase Contrôle phase signal qui peut améliorer clarité de foyer et stabilité
d’image basées sur mode VGA.
Horloge manuelle Contrôle largeur d’image basée sur mode VGA.
Personnalisation de Congurations VIDEO
Picture Mode Vivid
Contrast 75
Brightness 55
Saturation 62
Hue +22
Sharpness 4
Color Temperature Nature
Noise Reduction Low
Video Select Exit
Picture Mode Vivid
Contrast 75
Brightness 65
Auto Setting
Phase 20
Manual Clock 128
Display Adjustment
Color Temperature Nature
Noise Reduction Low
Video Select Exit
Ou
Page 90

38
Chapitre 3 Utilisation de Fonctions
Réglage d’affichage Appuyez sur boutn OK pour entrer conguration de réglage
d’Afchage:
H Position 128
V Position 22
Video Select Exit
▪ Position H Règle la position de l’image à gauche et à droite
dans la fenêtre.
▪ Position V Règle la position de l’image en haut et en bas dans
la fenêtre.
Style couleur Règle composants couleur indépendamment pour réaliser un ton
chaud ou froid: Froid/Medium/Chaud/Utilisateur
▪ Chaud: Montée de teinte rouge
▪ Nature: Montée de teinte naturelle
▪ Froid: Montée de teinte bleue
▪ Utilisateur: Utilisateur: Réglage indépendant de niveaux de
composant de couleurs rouge, verte et bleue
Color R 124
Color G 120
Color B 120
Video Select Exit
Réduction Bruit: Sélectionnez pour réduire niveau de bruit d’appareil connecté:
Désactiver/Activer/Fort/Médium
Page 91

ENGLISHENGLISHFrançais
39
Chapitre 3 Utilisation de Fonctions
Appuyez sur bouton pour allumer la Télé écran cristal.
Appuyez sur bouton MENU sur télécommande pour afcher le menu principal, et utilisez
boutons ◄► pour sélectionner AUDIO.
Utilisez boutons ▲▼ pour sélectionner une option AUDIO individuelle, utilisez boutons ◄►
pour changer la conguration, et appuyez sur le MENU pour quitter le menu.
Le menu AUDIO inclut les options suivantes:
Bass Contrôle l’intensité relative de sons graves.
Aigu Contrôle l’intensité relatice de sons aigus.
Balance Régle le volume relatif de haut-parleurs dans une système haut-parleur
multiple.
Effet Son Sélection d’une technique enrichissement-audio parmi les options
suivantes: Stéréo/Vive/Danse/Techno/Classique/Soft/Pop/Désactiver.
Système MTS Un son stéréo haure délité pour regarder la télé.
▪ Stéréo:
Utilisez voies audio séparées pour haut-parleurs de gauche et de
droite si possible.
▪ SAP:
Un deuxième programme audio à partir des haut-parleurs lors de
diffusion d’une scène en programme original
▪ Mono:
Sortie mono (utile lorsque le mode stéréo est bruyant et irrégulier).
Personnalisation de congurations AUDIO
or
Audio Select Exit
Bass 50
Treble 50
Balance 0
Sound Effect Off
Bass 50
Treble 50
Balance 0
Sound Effect Off
MTS System Stereo
Audio Select Exit
Page 92

40
Chapitre 3 Utilisation de Fonctions
Appuyez sur bouton pour allumer la Télé écran cristal.
Appuyez sur bouton MENU sur télécommande pour afcher le menu Principal, et
utilisez boutons ◄► pour sélectionner CONFIGURATION.
Utilisez boutons ▲▼ pour sélectionner une option de CONFIGURATION individuelle,
utilisez boutons ◄► pour changer la conguration, et appuyez sur MENU pour quitter
le menu.
Le menu CONFIGURATION inclut les options suivantes:
Recherche de Chaîne Appuyez sur bouton OK pour créer une liste de chaînes recevables.
Mode Tuner Sélection entre câble CATV et sources signal antenne:
▪ AIR
Choisissez cette conguration pour recevoir chaînes de télé avec une
antenne (dans l’air)
▪ Câble STD/IRC/HRC
Choisissez cette configuration pour recevoir chaînes de télé avec un
CATV (TV Câblée)
Personnalisation de CONFIGURATIONS
Setup Select Exit
Closed Caption Off
V-Chip
Parental
Language English
Osd Transparent On
Gamma Dark
Default
Channel Searching
Tuner Mode Cabel-STD
Closed Caption OFF
V-Chip
Parental
Language English
Osd Transparent On
Gamma Dark
Default
Setup Select Exit
Setup Select Exit
Parental
Language English
Osd Transparent On
Gamma Dark
Default
or
Page 93

ENGLISHENGLISHFrançais
41
Chapitre 3 Utilisation de Fonctions
Sous-Titre Fermé Sélection parmi 4 modes de sous-titre fermé:
▪ CC1/CC2/CC3/CC4:
Afcher une version de dialogue et effects son du programme en
diffusion.
▪ T1/T2:
Afcher information de station en utilisant soit moitié ou totalité de
l’écran.
▪ T3/T4:
Service Données Prolongé. Par exemple: Nom de réseau, nom de
programme, longueur de programme, etc Permet conguration d’options
Verrouillage Classement TV et MPAA (consultez “Utilisation de
Conguration Puce-V”).
Puce -V Verrouillage Classement TV et MPAA (consultez “Utilisation de
Conguration Puce-V”).
Parental Permet conguration d’options Verrouillage Parental.
Langue Sélectionnez pour afcher tous les menus d’écran en votre langue choisie:
Angalis/Français/Espagnol
Osd Transparent Contrôle la translucidité du fond de OSD (en afchage écran)
Gamma Permet réglage de correction de gamma d’afchage, qui rafne luminosité
et ratios rouge/vert/bleu: Activer/Désactiver/Médium
Par défaut Restitue congurations usine.
Page 94

42
Chapitre 3 Utilisation de Fonctions
Un mot de passe à quatre chiffres est demandé pour utilisation de fonction PUCE-V. Celui
d’usine est 0000.
2 systèmes de classement existent aux US pour contenu visionné: Verrouillage Film (MPAA) et
Verrouillage Télé.
Le Verrouillage Télé se combine avec PUCE-V pour aider les parents à verrouiller programmes
inappropriés à leurs enfants.
Le verrouillage Film (MPAA) est utilisé pour lms originaux classés par la Motion Picture Association
of America(MPAA) comme diffusions sur chaîne câblée et non pas sur chaîne classique.
La PUCE-V peut aussi être congurée pour verrouiller lms classement-MPAA.
Utilisez bouton ▼pour sélectionner Puce-V, et appuyerz sur OK pour afcher le menu
Puce-V.
MPAA inclut les options suivantes:
CLASSEMENT DESCRIPTION
G Audience Générale: Film tout âges.
PG Accord Parental Souhaité. Possible contenu non adapté a jeune audience.
PG-13 Contenu probablement inapproprié pour enfant de moins de 13 ans.
R Limité. Contenu adult, interdit à adolescent de moins de 17ans sans accord
parental.
NC-17 Interdit à adolescent de 17ans ou moins.
X Interdit à adolescent de 17ans ou moins.
Utilisez boutons pour sélectionner le calssement désiré et appuyez sur bouton OK de façon
répétitive pour sélectionner VERROUILLER (√) ou DEVERROUILLER (×).
Utilisaton de congurations PUCE-V
Input Your Password Please
* * * *
OK Cancel
Channel Searching
Tuner Mode Cabel-STD
Closed Caption OFF
V-Chip
Parental
Language English
Osd Transparent On
Gamma Dark
Default
Setup Select Exit
Page 95

ENGLISHENGLISHFrançais
43
Chapitre 3 Utilisation de Fonctions
PAR CONTENU
FV D L S V
PAR AGE
TV-Y
TV-Y7
TV-G
TV-PG
TV-14
TV-MA
: Pour verrouillage aussi bien par contenu que par âge..
GUIDE TV propose 2 méthodes de classement: Classement par Contenu et Classement par Age.
GUIDE TV inclut les options suivantes:
Utilisez boutons ▲▼ pour sélectionner le classement désiré et appuyez sur bouton OK de façon
répétitive pour sélectionner VERROUILLER (√) ou DEVERROUILLER (×)
Le menu PUCE-V inclut les options suivantes:
Verrouillage Classement MPAA Sélectionnez pour activer programme à classement MPAA
Verrouillage Classement TV Sélectionnez pour activer programmes à classement TV
Verrouillage Non Classement MPAA
▪ OUI:
Verrouillage de tout lms diffusés sans classement MPAA
▪ NON:
Permission de tout lms diffusés sans classement MPAA
Verrouillage Non Classment TV
▪ OUI:
Verrouillage de tout lms diffusés sans classement TV
▪ NON:
Permission de tout lms diffusés sans classement TV
PAR AGE
CLASSEMENT DESCRIPTION
TV-Y Tout enfants
TV-Y7 Enfants de 7 ans ou plus
TV-G Audience Générale
TV-PG Accord parental souhaité
TV-14 Permission parentale demandée
TV-MA Audience Adulte
PAR CONTENU
CALSSEMENT DESCRIPTION
FV Fantaisie violente
D Dialogue suggestif
L Language grossier
S Scènes sexuelles
V Violence
Page 96

44
Chapitre 3 Utilisation de Fonctions
Le verrouillage parental peut être conguré pour verrouiller une Chaîne ou une Source Vidéo.
Utilisez bouton ▼ pour sélectionner Parental, et appuyez sur OK pour afcher le menu
Parental.
Utilisation de Congurations Parentales
Utilisation de fonction PUCE-V demande un mot de passe à quatre chiffres. Celui
d’usine est 0000.
Le mot de passe vous sera demandé pour accès futur à Puce-V et à
Configuration Parentale.
Le menu Parental inclut les options suivantes:
Verrouillage Chaîne Sélectionnez pour verroiller une chaîne de télé
Verroillage Vidéo Sélectionnez pour verrouiller un signal source d’entrée
Changement de Mot
de Passe Sélectionnez pour changer votre mot de passe
Input Your Password Please
* * * *
OK Cancel
Closed Caption Off
V-Chip
Parental
Language English
Osd Transparent On
Gamma Dark
Default
SETUP Select Exit
MENU
Page 97
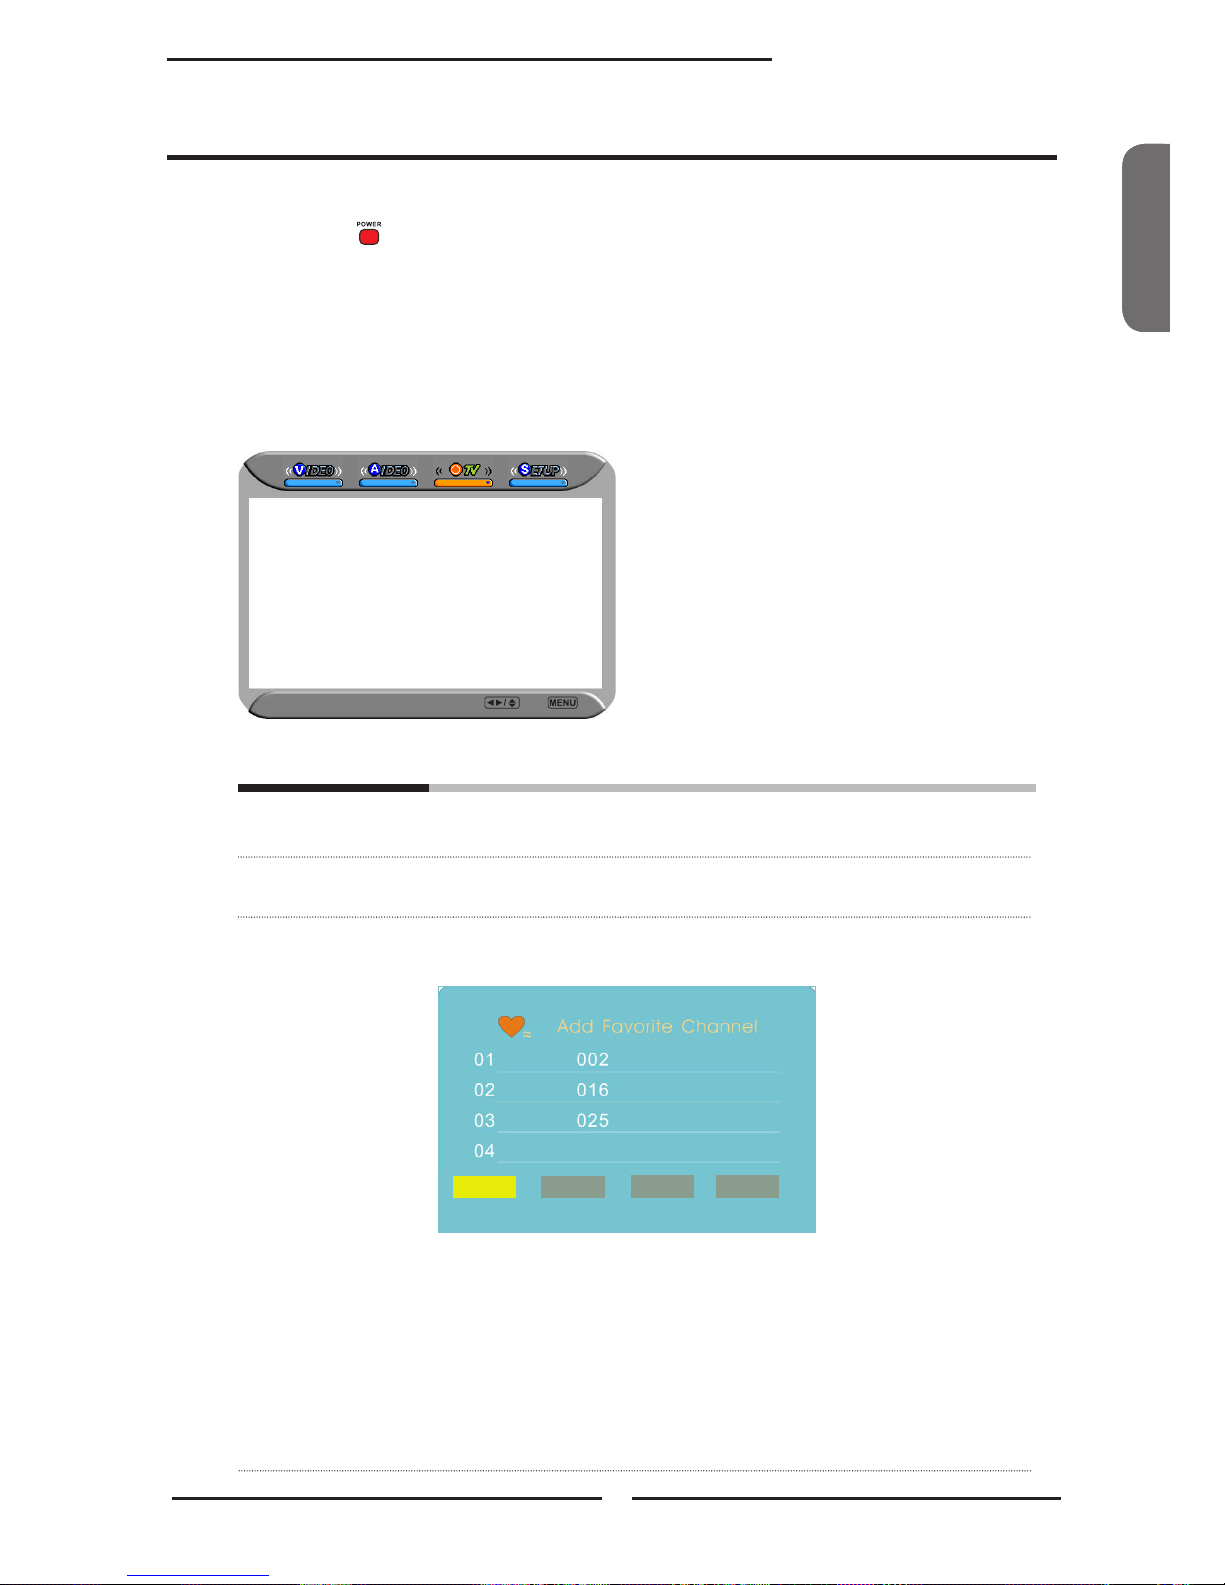
ENGLISHENGLISHFrançais
45
Chapitre 3 Utilisation de Fonctions
Appuyez sur bouton pour allumer la Télé écran cristal.
Appuyez sur bouton MENU sur télécommande pour afcher le menu Principal, et
utilisez boutons ◄► pour sélectionner TV.
Utilisez boutons ▲▼ pour sélectionnez une option TV individuelle, utilisez boutons
◄►pour changer les congurations, et appuyez sur MENU pour quitter le menu.
Le menu TV inclut les options suivantes:
Saut de Chaîne Permet addition/enlèvement de chaînes sur la liste de chaîne.
Nom de Chaîne Permet rédaction d’étiquettes de chaîne.
Favori Sélectionnez Favori dans option TV et appuyez sur bouton OK.
Liste de Chaîne Favorite apparaît:
Personnalisez les Congurations TV
Channel Skip On
Channel Name
Favorite
TV Select Exit
Edit Delete Empty View
▪ Rédiger
Pour ajouter une chaîne courante à la liste de Chaînes Favorites
Appuyez sur boutons 0-9 pour entrer les chaînes désirées.
▪ Supprimer
Pour enlever une chaine de la liste de Chaines Favorites.
▪ Vide
Pour effacer toutes les Chaînes Favorites.
▪ Vision
Pour visionner une chaîne choisie parmi Chaînes Favorites.
Page 98

46
Spécifications
Avant de consulter un service professionnel, vérifier le tableau pour
eventuellement repérer la cause de panne et adopter une solution proposée.
Image mauvaise, son OK
Vériez le câble interface entre la télé et l’antenne/TV cablée.
Essayez une autre chaîne, la station peut avoir des difcultés de transmission.
Réglez Luminosité/Contrast dans le Menu REGLAGE VIDEO.
Bruit audio
Enlevez tout objet interférent autour de la télé.
La télé ne s’allume pas
Vériez que le câble d’alimentation est bien branché, et appuyez sur bouton sur
télécommande.
Il se peut que les piles dans la télécommande soientépuisées.
Remplacez les piles.
Absence d’image et de son
Vériez le câble interface entre la télé et l’antenne/TV cablée.
Appuyez sur bouton sur télécomnde.
Appuyez sur bouton SOURCE sur télécommande, ensuite appuyez sur bouton ▲▼
pour sélectionner les sources vidéo connectées.
Image OK, son mauvais
Le son peut étre mis à muet. Appuyez sur bouton MUET sur télécommande.
Appuyez sur bouton TV sur télécommand, ensuite sur bouton VOL+ pour
augmenter le son.
VOLUME 50
REPERAGE DE PANNE
Page 99

ENGLISHENGLISHFrançais
47
Spécifications
MODE AFFICHAGE
La résolution écran a été optimisée durant la fabrication pour les modes listés dessous. Si le signal du
système égale le mode signal standard, l’écran est régulé automatiquement. Si le signal du système ne
correspond pas au mode signal standard, réglez la résolution écran en consultant votre guide utilisateur de
cartevidéo pour éviter tout échec d’afchage.
Signal vidéo: (VGA/DVI VESA Standard)
Résolution
Fréquence Verticale
(Hz)
Fréquence
Horizontale(kHz)
640 x 350 85 37.9
640 x 400 85 37.9
720 x 400 85 37.9
640 x 480 60 31.5
72 37.9
75 37.5
85 43.3
800 x 600 56 35.1
60 37.9
72 48.1
75 46.9
85 53.7
1024 x 768 60 48.4
70 56.5
75 60.0
85 68.7
1152 x 864 75 67.5
1280 x 960 60 60.0
1280 x 768 60 47.7
1360 x 768 60 48.5
Page 100

48
Spécifications
SPECIFICATIONS
MODELE
PA-32JK1A/PA-32JK1SA PA-37JK1A/PA-37JK1SA
Panneau
écran cristal
Taille de Panneau 32” TFT LCD 37” TFT LCD
Luminosité 500 500
Ratio Contrast
800:1 1000:1
Résolution Max 1366x768 1366x768
Connecteur
Entrée
VIDEO/AUDIO(L/R) 2 2
S-VIDEO/AUDIO(L/R) 1 1
YPbPr/AUDIO(L/R) 2 2
VGA/AUDIO(L/R) 1 1
HDMI/AUDIO(L/R)
2/1 2/1
AUDIO SORTIE(L/R) 1 1
OPTIQUE/COAXIAL 1 1
ECOUTEUR 1 1
Source Alimentation AC100~240V, 50/60HZ, AC100~240V, 50/60HZ,
Consommation Energie 180 W, en veille < 5 W 275 W, en veille < 8 W
Dimension
31.2 w × 11.3 d ×
26.1 h pouces
36.5 w × 12.3 d ×
29.2 h pouces
POIDS 48.9 LBs 54 LBs
 Loading...