


page 1
User Guide for Maurice, Maurice
C. and Maurice S.
Copyright © 2016 ProteinSimple. All rights reserved.
ProteinSimple
3001 Orchard Parkway
San Jose, CA 95134
Toll-free: (888) 607-9692
Tel: (408) 510-5500
Fax: (408) 510-5599
email: support@proteinsimple.com
web: www.proteinsimple.com

User Guide for Maurice, Maurice C. and Maurice S.
P/N 046-295
Revision 1, February 2016
For research use only. Not for use in diagnostic procedures
Patents and Trademarks
ProteinSimple's Maurice and iCE technology is covered by issued and pending patents in the U.S. and other
countries. For more information please see http://www.proteinsimple.com/Intellectual_Property.html.
ProteinSimple and the ProteinSimple logo are trademarks or registered trademarks of ProteinSimple. Other
marks appearing in these materials are marks of their respective owners.

Table of Contents
page 1
Chapter 1:
Let’s Get Started. . . . . . . . . . . . . . . . . . . . . . . . . . . . . 1
Welcome . . . . . . . . . . . . . . . . . . . . . . . . . . . . . . . . . . . . . . . . . . . . . 2
Maurice Systems. . . . . . . . . . . . . . . . . . . . . . . . . . . . . . . . . . . . . . 2
Chapter 2:
Getting Your Lab Ready . . . . . . . . . . . . . . . . . . . . 3
Introduction . . . . . . . . . . . . . . . . . . . . . . . . . . . . . . . . . . . . . . . . . . 4
Space Requirements . . . . . . . . . . . . . . . . . . . . . . . . . . . . . . . . . . 4
Physical Specifications. . . . . . . . . . . . . . . . . . . . . . . . . . . . . . . . 5
Electrical Requirements . . . . . . . . . . . . . . . . . . . . . . . . . . . . . . . 5
Environmental Requirements. . . . . . . . . . . . . . . . . . . . . . . . . 5
Software and Computer Requirements . . . . . . . . . . . . . . . 6
General Guidelines and Information. . . . . . . . . . . . . . . . . . 6
Intended Use. . . . . . . . . . . . . . . . . . . . . . . . . . . . . . . . . . . . . 6
Lifting and Moving the System: Lift Maurice
Correctly . . . . . . . . . . . . . . . . . . . . . . . . . . . . . . . . . . . . . . . . . 6
Chapter 3:
Maurice. . . . . . . . . . . . . . . . . . . . . . . . . . . . . . . . . . . . . . . 7
Maurice Systems. . . . . . . . . . . . . . . . . . . . . . . . . . . . . . . . . . . . . . 8
External Components. . . . . . . . . . . . . . . . . . . . . . . . . . . . . . . . . 9
System Door . . . . . . . . . . . . . . . . . . . . . . . . . . . . . . . . . . . . . 9
Status Light . . . . . . . . . . . . . . . . . . . . . . . . . . . . . . . . . . . . .10
Internal Components . . . . . . . . . . . . . . . . . . . . . . . . . . . . . . . . 10
Cartridge Slot . . . . . . . . . . . . . . . . . . . . . . . . . . . . . . . . . . .10
Sample and Reagent Platform . . . . . . . . . . . . . . . . . . 12
Rear Panel . . . . . . . . . . . . . . . . . . . . . . . . . . . . . . . . . . . . . . 14
System Labels . . . . . . . . . . . . . . . . . . . . . . . . . . . . . . . . . . .14
Computer Workstation . . . . . . . . . . . . . . . . . . . . . . . . . . . . . . 16
Compass for iCE Overview . . . . . . . . . . . . . . . . . . . . . . . . . . .18
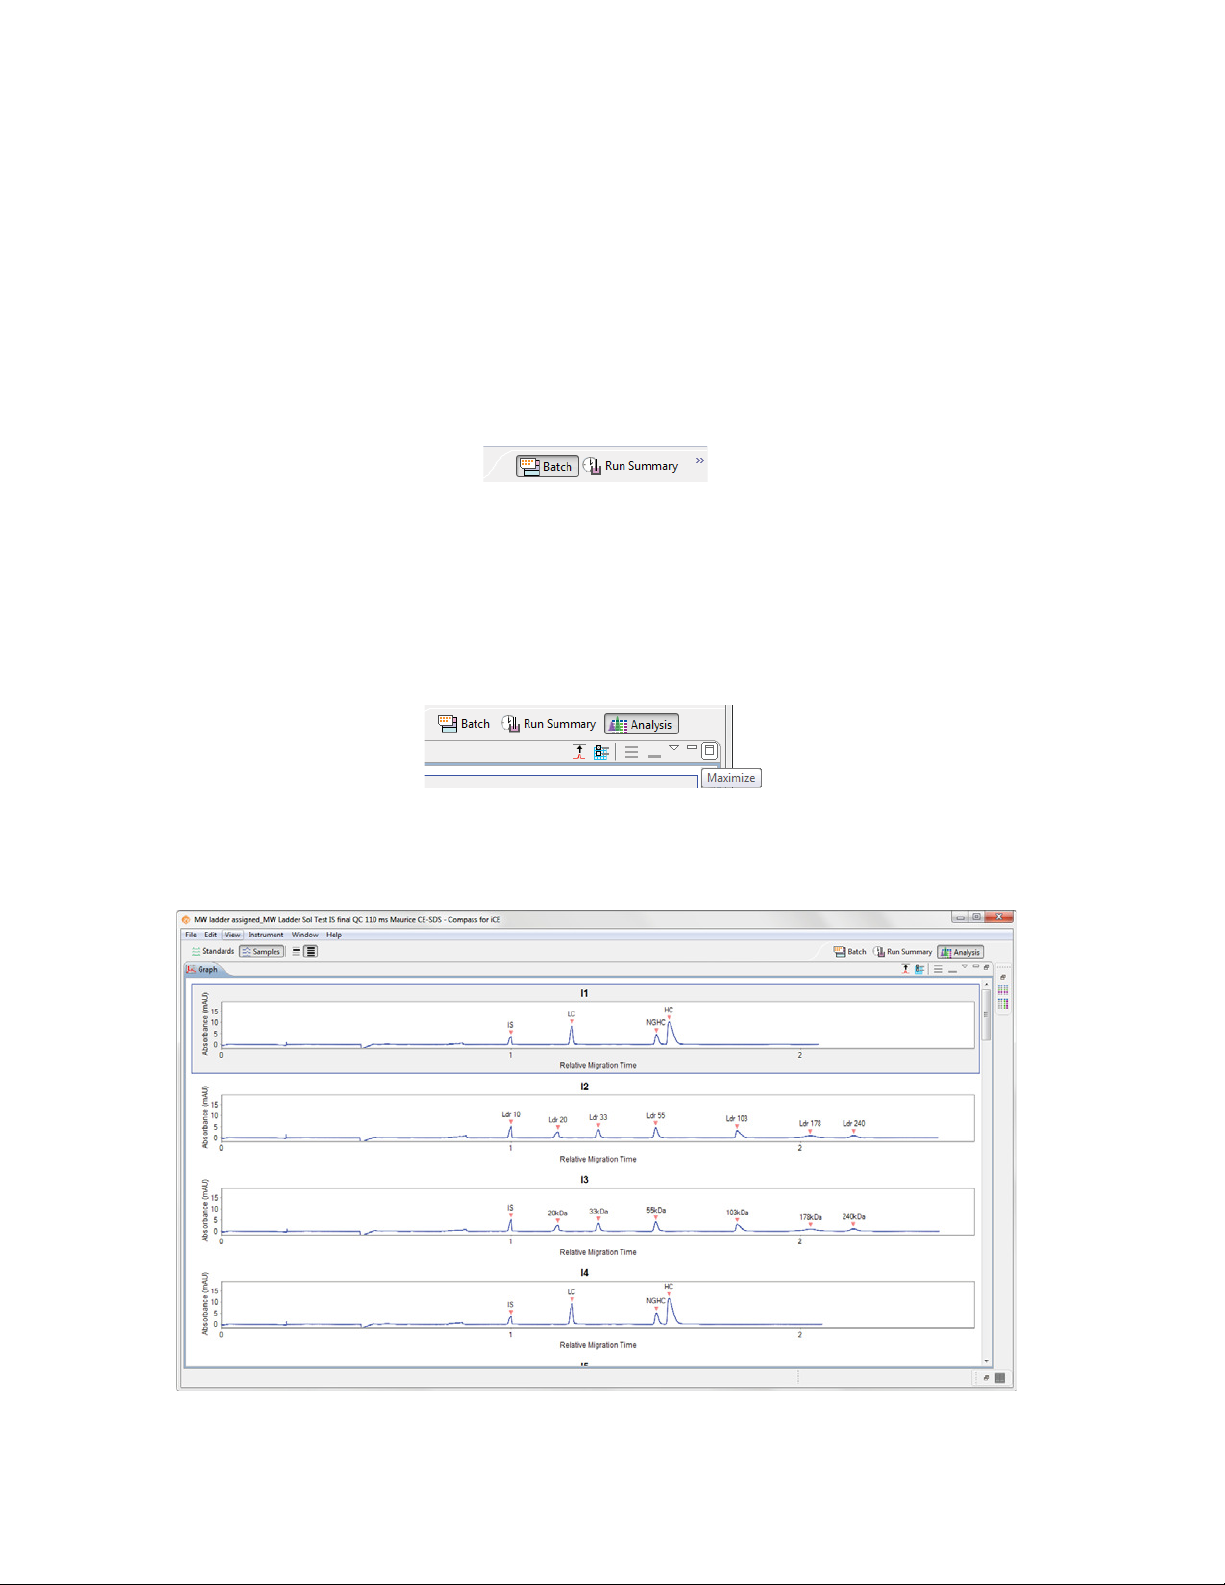
Changing the Screen View . . . . . . . . . . . . . . . . . . . . . . 19
Batch Screen . . . . . . . . . . . . . . . . . . . . . . . . . . . . . . . . . . . . 19
Run Summary Screen . . . . . . . . . . . . . . . . . . . . . . . . . . .20
Analysis Screen. . . . . . . . . . . . . . . . . . . . . . . . . . . . . . . . . .22
Screen Panes . . . . . . . . . . . . . . . . . . . . . . . . . . . . . . . . . . . .24
Title Bar . . . . . . . . . . . . . . . . . . . . . . . . . . . . . . . . . . . . . . . . . 24
Main Menu . . . . . . . . . . . . . . . . . . . . . . . . . . . . . . . . . . . . . 24
Instrument Status Bar . . . . . . . . . . . . . . . . . . . . . . . . . . . 24
Screen Tab . . . . . . . . . . . . . . . . . . . . . . . . . . . . . . . . . . . . . .25
View Bar. . . . . . . . . . . . . . . . . . . . . . . . . . . . . . . . . . . . . . . . . 25
Compass for iCE Status Bar. . . . . . . . . . . . . . . . . . . . . . 25
Software Menus . . . . . . . . . . . . . . . . . . . . . . . . . . . . . . . . . . . . .25
File Menu . . . . . . . . . . . . . . . . . . . . . . . . . . . . . . . . . . . . . . .26
Edit Menu . . . . . . . . . . . . . . . . . . . . . . . . . . . . . . . . . . . . . . . 26
View Menu . . . . . . . . . . . . . . . . . . . . . . . . . . . . . . . . . . . . . .27
Instrument Menu . . . . . . . . . . . . . . . . . . . . . . . . . . . . . . .27
Window Menu . . . . . . . . . . . . . . . . . . . . . . . . . . . . . . . . . . 27
Help Menu . . . . . . . . . . . . . . . . . . . . . . . . . . . . . . . . . . . . . .28
Changing the Compass for iCE Main Window
Layout . . . . . . . . . . . . . . . . . . . . . . . . . . . . . . . . . . . . . . . . . . . . . . . 28
Resizing the Main Compass for iCE Window . . . . 28
Resizing the Screen Tab . . . . . . . . . . . . . . . . . . . . . . . . .29
Resizing Screen Panes . . . . . . . . . . . . . . . . . . . . . . . . . . .29
Changing the Location of Screen Panes. . . . . . . . .30
Restoring the Main Window to the Default
Layout . . . . . . . . . . . . . . . . . . . . . . . . . . . . . . . . . . . . . . . . . .32
Software Help. . . . . . . . . . . . . . . . . . . . . . . . . . . . . . . . . . . . . . . .32
Chapter 4:
Compass for iCE Overview . . . . . . . . . . . . . . . . 17
Launching Compass for iCE . . . . . . . . . . . . . . . . . . . . . . . . . 18
User Guide for Maurice, Maurice C. and Maurice S.
Checking for and Installing New Versions of Compass
for iCE . . . . . . . . . . . . . . . . . . . . . . . . . . . . . . . . . . . . . . . . . . . . . . . 32
Viewing Release Notes . . . . . . . . . . . . . . . . . . . . . . . . . . . . . . .32

page 2
Viewing the Software Log. . . . . . . . . . . . . . . . . . . . . . . . . . . .33
Compass for iCE Version Information . . . . . . . . . . . . . . . . 33
Directory and File Information. . . . . . . . . . . . . . . . . . . . . . . 34
File Types. . . . . . . . . . . . . . . . . . . . . . . . . . . . . . . . . . . . . . . . 35
Chapter 5:
cIEF Batches. . . . . . . . . . . . . . . . . . . . . . . . . . . . . . . . . 37
Batch Screen Overview . . . . . . . . . . . . . . . . . . . . . . . . . . . . . .38
Batch Screen Panes . . . . . . . . . . . . . . . . . . . . . . . . . . . . .38
Software Menus Active in the Batch Screen . . . . .39
Opening a Batch . . . . . . . . . . . . . . . . . . . . . . . . . . . . . . . . . . . .41
Creating a New Batch . . . . . . . . . . . . . . . . . . . . . . . . . . . . . . . 42
Step 1 - Open a Template Batch. . . . . . . . . . . . . . . . .42
Step 2 - Assign Your Samples. . . . . . . . . . . . . . . . . . . .43
Step 3 - Assign Your Method Parameters. . . . . . . .46
Step 4 - Set Up Your Injections. . . . . . . . . . . . . . . . . . .49
Step 5 - Add Batch Notes (Optional). . . . . . . . . . . . .51
Step 6 - Modify Default Analysis Parameters
(Optional). . . . . . . . . . . . . . . . . . . . . . . . . . . . . . . . . . . . . . . 52
Step 7 - Save Your Batch . . . . . . . . . . . . . . . . . . . . . . . .52
Viewing Replicate Injections . . . . . . . . . . . . . . . . . . . . . . . . . 53
Batch History . . . . . . . . . . . . . . . . . . . . . . . . . . . . . . . . . . . . . . . .54
Making Changes to a Batch . . . . . . . . . . . . . . . . . . . . . . . . .55
Viewing and Editing Batches in Completed Runs . . . .56
Batch Reports. . . . . . . . . . . . . . . . . . . . . . . . . . . . . . . . . . . . . . . .57
Step 1 - Open a Template Batch. . . . . . . . . . . . . . . . .64
Step 2 - Assign Your Samples. . . . . . . . . . . . . . . . . . . .65
Step 3 - Assign Your Method Parameters . . . . . . . .68
Step 4 - Set Up Your Injections. . . . . . . . . . . . . . . . . . .70
Step 5 - Add Batch Notes (Optional). . . . . . . . . . . . .73
Step 6 - Modify Default Analysis Parameters
(Optional). . . . . . . . . . . . . . . . . . . . . . . . . . . . . . . . . . . . . . . 73
Step 7 - Save Your Batch . . . . . . . . . . . . . . . . . . . . . . . .74
Viewing Replicate Injections . . . . . . . . . . . . . . . . . . . . . . . . .75
Batch History . . . . . . . . . . . . . . . . . . . . . . . . . . . . . . . . . . . . . . . .76
Making Changes to a Batch . . . . . . . . . . . . . . . . . . . . . . . . .77
Viewing and Editing Batches in Completed Runs . . . .78
Batch Reports . . . . . . . . . . . . . . . . . . . . . . . . . . . . . . . . . . . . . . . .79
Chapter 7:
Running cIEF Applications on
Maurice and Maurice C. . . . . . . . . . . . . . . . . . . . 81
Before You Throw the Switch . . . . . . . . . . . . . . . . . . . . . . . .82
Power Up . . . . . . . . . . . . . . . . . . . . . . . . . . . . . . . . . . . . . . . . . . . . 82
Running cIEF Applications . . . . . . . . . . . . . . . . . . . . . . . . . . .82
What You’ll Need. . . . . . . . . . . . . . . . . . . . . . . . . . . . . . . .82
Step 1: Prep Your Markers, Samples and
Reagents . . . . . . . . . . . . . . . . . . . . . . . . . . . . . . . . . . . . . . . .83
Step 2: Prep the Cartridge . . . . . . . . . . . . . . . . . . . . . . .86
Step 3: Install the Cartridge. . . . . . . . . . . . . . . . . . . . . .88
Step 4: Load Samples and Reagents. . . . . . . . . . . . .90
Chapter 6:
CE-SDS Batches. . . . . . . . . . . . . . . . . . . . . . . . . . . . . 59
Batch Screen Overview . . . . . . . . . . . . . . . . . . . . . . . . . . . . . .60
Batch Screen Panes . . . . . . . . . . . . . . . . . . . . . . . . . . . . .60
Software Menus Active in the Batch Screen . . . . .61
Opening a Batch . . . . . . . . . . . . . . . . . . . . . . . . . . . . . . . . . . . .63
Creating a New Batch . . . . . . . . . . . . . . . . . . . . . . . . . . . . . . . 64
User Guide for Maurice, Maurice C. and Maurice S.
Step 5: Create a Batch . . . . . . . . . . . . . . . . . . . . . . . . . . .91
Step 6: Start the Batch. . . . . . . . . . . . . . . . . . . . . . . . . 100
Post-batch Procedures. . . . . . . . . . . . . . . . . . . . . . . . . . . . . 102
Checking Your Data . . . . . . . . . . . . . . . . . . . . . . . . . . . . . . . 105
Step 1: Select Your Detection Mode . . . . . . . . . . . 105
Step 2: Check Your pI Markers . . . . . . . . . . . . . . . . . 105

page 3
Step 3: Checking Sample Peaks . . . . . . . . . . . . . . . .108
Step 4: Assigning Peak Names . . . . . . . . . . . . . . . . .111
Chapter 8:
Running CE-SDS Applications on
Maurice and Maurice S. . . . . . . . . . . . . . . . . . . .112
Before You Throw the Switch . . . . . . . . . . . . . . . . . . . . . . .113
Power Up . . . . . . . . . . . . . . . . . . . . . . . . . . . . . . . . . . . . . . . . . . .113
Running CE-SDS Applications . . . . . . . . . . . . . . . . . . . . . .113
What You’ll Need . . . . . . . . . . . . . . . . . . . . . . . . . . . . . .113
Step 1: Prep Your Internal Standard, Samples and
Reagents. . . . . . . . . . . . . . . . . . . . . . . . . . . . . . . . . . . . . . .114
Internal Standard . . . . . . . . . . . . . . . . . . . . . . . . . . . . . .114
Step 2: Prep the Cartridge . . . . . . . . . . . . . . . . . . . . . .120
Step 3: Install the Cartridge. . . . . . . . . . . . . . . . . . . . .122
Step 4: Load Samples and Reagents . . . . . . . . . . .124
Step 5: Create a Batch. . . . . . . . . . . . . . . . . . . . . . . . . .125
Step 6: Start the Batch. . . . . . . . . . . . . . . . . . . . . . . . . .133
Post-batch Procedures. . . . . . . . . . . . . . . . . . . . . . . . . . . . . .135
Opening One Run File. . . . . . . . . . . . . . . . . . . . . . . . . 156
Opening Multiple Run Files. . . . . . . . . . . . . . . . . . . . 156
Batch Injection Information . . . . . . . . . . . . . . . . . . . . . . . 157
Injection Flags . . . . . . . . . . . . . . . . . . . . . . . . . . . . . . . . 158
Run Status Information . . . . . . . . . . . . . . . . . . . . . . . . . . . . 159
Viewing the Focus Series (cIEF Only) . . . . . . . . . . . . . . . 161
Viewing the Separation (CE-SDS Only) . . . . . . . . . . . . . 162
Current and Voltage Plots. . . . . . . . . . . . . . . . . . . . . . . . . . 163
Run History . . . . . . . . . . . . . . . . . . . . . . . . . . . . . . . . . . . . . . . . 165
Viewing Multiple Events. . . . . . . . . . . . . . . . . . . . . . . 165
Copying History Info . . . . . . . . . . . . . . . . . . . . . . . . . . 167
Viewing Run Errors. . . . . . . . . . . . . . . . . . . . . . . . . . . . . . . . . 167
Injection Reports . . . . . . . . . . . . . . . . . . . . . . . . . . . . . . . . . . . 168
Example Analysis and Injection Report: CE-SDS169
Example Analysis and Injection Report: cIEF. . . 172
Switching Between Open Run Files . . . . . . . . . . . . . . . . 174
Closing Run Files . . . . . . . . . . . . . . . . . . . . . . . . . . . . . . . . . . . 175
Checking Your Data . . . . . . . . . . . . . . . . . . . . . . . . . . . . . . . .139
Step 1: Check Your Internal Standard . . . . . . . . . .139
Step 2: Set Your Molecular Weight (MW)
Markers . . . . . . . . . . . . . . . . . . . . . . . . . . . . . . . . . . . . . . . .143
Step 3: Checking Sample Peaks . . . . . . . . . . . . . . . .147
Step 4: Assigning Peak Names . . . . . . . . . . . . . . . . .150
Chapter 9:
Run Status. . . . . . . . . . . . . . . . . . . . . . . . . . . . . . . . . .151
Run Summary Screen Overview. . . . . . . . . . . . . . . . . . . . .152
Run Summary Screen Panes . . . . . . . . . . . . . . . . . . .152
Software Menus Active in the Run Summary
Screen. . . . . . . . . . . . . . . . . . . . . . . . . . . . . . . . . . . . . . . . . .154
Opening Run Files . . . . . . . . . . . . . . . . . . . . . . . . . . . . . . . . . .156
User Guide for Maurice, Maurice C. and Maurice S.
Chapter 10:
Controlling Maurice, Maurice C. and
Maurice S.
Instrument Control . . . . . . . . . . . . . . . . . . . . . . . . . . . . . . . . 178
Starting a Run. . . . . . . . . . . . . . . . . . . . . . . . . . . . . . . . . 178
Cleaning . . . . . . . . . . . . . . . . . . . . . . . . . . . . . . . . . . . . . . 178
Stopping a Run . . . . . . . . . . . . . . . . . . . . . . . . . . . . . . . . . . . . 180
Status Modes . . . . . . . . . . . . . . . . . . . . . . . . . . . . . . . . . . . . . . 181
Shutdown . . . . . . . . . . . . . . . . . . . . . . . . . . . . . . . . . . . . . . . . . 181
Instrument Software (Embedded) Updates . . . . . . . . 181
Self Test . . . . . . . . . . . . . . . . . . . . . . . . . . . . . . . . . . . . . . . . . . . . 183
Viewing and Changing System Properties . . . . . . . . . 184
Checking Cartridge Status . . . . . . . . . . . . . . . . . . . . . . . . . 185
. . . . . . . . . . . . . . . . . . . . . . . . . . . . . . . . . . 177

page 4
Viewing Log Files . . . . . . . . . . . . . . . . . . . . . . . . . . . . . . . . . . .186
Runs Log . . . . . . . . . . . . . . . . . . . . . . . . . . . . . . . . . . . . . . .186
System Logs. . . . . . . . . . . . . . . . . . . . . . . . . . . . . . . . . . . .187
Error Log . . . . . . . . . . . . . . . . . . . . . . . . . . . . . . . . . . . . . . .189
Self Test Logs. . . . . . . . . . . . . . . . . . . . . . . . . . . . . . . . . . .192
Command Log. . . . . . . . . . . . . . . . . . . . . . . . . . . . . . . . .194
Chapter 11:
CE-SDS Data Analysis . . . . . . . . . . . . . . . . . . . . .195
Analysis Screen Overview . . . . . . . . . . . . . . . . . . . . . . . . . . .196
Analysis Screen Panes. . . . . . . . . . . . . . . . . . . . . . . . . .196
Software Menus Active in the Analysis Screen . .197
Opening Run Files . . . . . . . . . . . . . . . . . . . . . . . . . . . . . . . . . .199
Opening One Run File. . . . . . . . . . . . . . . . . . . . . . . . . .199
Opening Multiple Run Files. . . . . . . . . . . . . . . . . . . . .199
How Run Data is Displayed . . . . . . . . . . . . . . . . . . . . . . . . .201
Experiment Pane: Batch Injection Information .201
Graph Pane: Electropherogram Data . . . . . . . . . .201
Peaks Pane: Calculated Results. . . . . . . . . . . . . . . . .202
Injections Pane: User-Specified Peak Names . . .204
Viewing Run Data . . . . . . . . . . . . . . . . . . . . . . . . . . . . . . . . . .205
Switching Between Samples and Standards Data
Views . . . . . . . . . . . . . . . . . . . . . . . . . . . . . . . . . . . . . . . . . .205
Selecting and Displaying Injection Data . . . . . . .208
Switching Between Single and Multiple Views of
Injections . . . . . . . . . . . . . . . . . . . . . . . . . . . . . . . . . . . . . .211
Hiding Injection Data . . . . . . . . . . . . . . . . . . . . . . . . . .213
Data Notifications and Warnings. . . . . . . . . . . . . . . . . . .214
Checking Your Results . . . . . . . . . . . . . . . . . . . . . . . . . . . . . .215
Group Statistics. . . . . . . . . . . . . . . . . . . . . . . . . . . . . . . . . . . . .216
Using Groups . . . . . . . . . . . . . . . . . . . . . . . . . . . . . . . . . .216
Viewing Sample Injection Groups . . . . . . . . . . . . . .217
Viewing Statistics . . . . . . . . . . . . . . . . . . . . . . . . . . . . . 217
Hiding or Removing Injections in Group
Analysis . . . . . . . . . . . . . . . . . . . . . . . . . . . . . . . . . . . . . . . 219
Copying Results Tables and Graphs. . . . . . . . . . . . . . . . 220
Copying Results Tables . . . . . . . . . . . . . . . . . . . . . . . . 220
Copying the Graph. . . . . . . . . . . . . . . . . . . . . . . . . . . . 220
Saving the Graph as an Image File . . . . . . . . . . . . 220
Exporting Run Files. . . . . . . . . . . . . . . . . . . . . . . . . . . . . . . . . 221
Exporting Results Tables. . . . . . . . . . . . . . . . . . . . . . . 221
Exporting Raw Sample Electropherogram
Data . . . . . . . . . . . . . . . . . . . . . . . . . . . . . . . . . . . . . . . . . . 221
Changing Sample Protein Identification . . . . . . . . . . . 222
Adding or Removing Sample Data. . . . . . . . . . . . 222
Hiding Sample Data . . . . . . . . . . . . . . . . . . . . . . . . . . 224
Changing Peak Names for Sample Data . . . . . . 225
Changing the Electropherogram View . . . . . . . . . . . . . 226
Autoscaling the Electropherogram. . . . . . . . . . . . 227
Customizing the Data Display . . . . . . . . . . . . . . . . 227
Stacking Multiple Electropherograms . . . . . . . . . 233
Overlaying Multiple Electropherograms. . . . . . . 234
Zooming . . . . . . . . . . . . . . . . . . . . . . . . . . . . . . . . . . . . . . 235
Selecting Data Viewing Options. . . . . . . . . . . . . . . 236
Adding and Removing Baseline Points . . . . . . . . 240
Selecting the Graph X-axis Range . . . . . . . . . . . . . 241
Closing Run Files . . . . . . . . . . . . . . . . . . . . . . . . . . . . . . . . . . . 243
Analysis Settings Overview. . . . . . . . . . . . . . . . . . . . . . . . . 244
Advanced Analysis Settings . . . . . . . . . . . . . . . . . . . . . . . . 246
Internal Standard Settings . . . . . . . . . . . . . . . . . . . . 246
Advanced Analysis Settings Groups . . . . . . . . . . . 247
Creating a New Analysis Group . . . . . . . . . . . . . . . 247
Changing the Default Analysis Group. . . . . . . . . 248
User Guide for Maurice, Maurice C. and Maurice S.

page 5
Modifying an Analysis Group . . . . . . . . . . . . . . . . . .249
Deleting an Analysis Group . . . . . . . . . . . . . . . . . . . .249
Applying Analysis Groups to Specific Run Data 250
Markers Analysis Settings . . . . . . . . . . . . . . . . . . . . . . . . . . .252
Markers Settings . . . . . . . . . . . . . . . . . . . . . . . . . . . . . . .253
Changing the Injection Used for the CE-SDS MW
Markers . . . . . . . . . . . . . . . . . . . . . . . . . . . . . . . . . . . . . . . .253
Standards Analysis Settings Groups. . . . . . . . . . . .254
Creating a New Standards Group . . . . . . . . . . . . . .255
Changing the Default Standards Group . . . . . . .258
Modifying a Standards Group. . . . . . . . . . . . . . . . . .258
Deleting a Standards Group . . . . . . . . . . . . . . . . . . .258
Applying Standards Groups to Specific Run
Data . . . . . . . . . . . . . . . . . . . . . . . . . . . . . . . . . . . . . . . . . . .259
Peak Fit Analysis Settings . . . . . . . . . . . . . . . . . . . . . . . . . . .261
Range Settings . . . . . . . . . . . . . . . . . . . . . . . . . . . . . . . . .262
Baseline Settings . . . . . . . . . . . . . . . . . . . . . . . . . . . . . . .263
Peak Find Settings . . . . . . . . . . . . . . . . . . . . . . . . . . . . .263
Peak Fit Analysis Settings Groups . . . . . . . . . . . . . .264
Creating a New Peak Fit Group. . . . . . . . . . . . . . . . .265
Changing the Default Peak Fit Group . . . . . . . . . .267
Modifying a Peak Fit Group . . . . . . . . . . . . . . . . . . . .267
Deleting a Peak Fit Group . . . . . . . . . . . . . . . . . . . . . .268
Applying Peak Fit Groups to Specific Run
Data . . . . . . . . . . . . . . . . . . . . . . . . . . . . . . . . . . . . . . . . . . .268
Peak Names Settings . . . . . . . . . . . . . . . . . . . . . . . . . . . . . . .271
Peak Names Analysis Settings Groups. . . . . . . . . .271
Creating a Peak Names Group . . . . . . . . . . . . . . . . .272
Modifying a Peak Names Group . . . . . . . . . . . . . . .275
Deleting a Peak Names Group . . . . . . . . . . . . . . . . .275
Applying Peak Names Groups to Run Data . . . .276
Injection Reports . . . . . . . . . . . . . . . . . . . . . . . . . . . . . . . . . . . 278
Example Analysis and Injection Report. . . . . . . . 280
Importing and Exporting Analysis Settings. . . . . . . . . 283
Importing Analysis Settings . . . . . . . . . . . . . . . . . . . 283
Exporting Analysis Settings. . . . . . . . . . . . . . . . . . . . 283
Chapter 12:
cIEF Data Analysis. . . . . . . . . . . . . . . . . . . . . . . . . 285
Analysis Screen Overview . . . . . . . . . . . . . . . . . . . . . . . . . . 286
Analysis Screen Panes . . . . . . . . . . . . . . . . . . . . . . . . . 286
Software Menus Active in the Analysis Screen . 287
Opening Run Files . . . . . . . . . . . . . . . . . . . . . . . . . . . . . . . . . 289
Opening One Run File. . . . . . . . . . . . . . . . . . . . . . . . . 289
Opening Multiple Run Files. . . . . . . . . . . . . . . . . . . . 289
How Run Data is Displayed . . . . . . . . . . . . . . . . . . . . . . . . 291
Experiment Pane: Batch Injection Information 291
Graph Pane: Electropherogram Data . . . . . . . . . 291
Peaks Pane: Calculated Results. . . . . . . . . . . . . . . . 292
Injections Pane: User-Specified Peak Names. . . 293
Viewing Run Data . . . . . . . . . . . . . . . . . . . . . . . . . . . . . . . . . 295
Switching Between Samples and Markers Data
Views. . . . . . . . . . . . . . . . . . . . . . . . . . . . . . . . . . . . . . . . . . 295
Selecting and Displaying Injection Data . . . . . . 298
Switching Between Single and Multiple Views of
Injections. . . . . . . . . . . . . . . . . . . . . . . . . . . . . . . . . . . . . . 301
Hiding Injection Data . . . . . . . . . . . . . . . . . . . . . . . . . 303
Data Notifications and Warnings. . . . . . . . . . . . . . . . . . 304
Checking Your Results . . . . . . . . . . . . . . . . . . . . . . . . . . . . . 305
Group Statistics . . . . . . . . . . . . . . . . . . . . . . . . . . . . . . . . . . . . 305
Using Groups . . . . . . . . . . . . . . . . . . . . . . . . . . . . . . . . . 306
Viewing Sample Injection Groups . . . . . . . . . . . . . 306
Viewing Statistics . . . . . . . . . . . . . . . . . . . . . . . . . . . . . 307
User Guide for Maurice, Maurice C. and Maurice S.

page 6
Hiding or Removing Injections in Group
Analysis . . . . . . . . . . . . . . . . . . . . . . . . . . . . . . . . . . . . . . . .309
Copying Results Tables and Graphs. . . . . . . . . . . . . . . . .310
Copying Results Tables. . . . . . . . . . . . . . . . . . . . . . . . .310
Copying the Graph. . . . . . . . . . . . . . . . . . . . . . . . . . . . .310
Saving the Graph as an Image File. . . . . . . . . . . . .310
Exporting Run Files . . . . . . . . . . . . . . . . . . . . . . . . . . . . . . . . .311
Exporting Results Tables . . . . . . . . . . . . . . . . . . . . . . .311
Exporting Raw Sample Electropherogram
Data . . . . . . . . . . . . . . . . . . . . . . . . . . . . . . . . . . . . . . . . . . .311
Changing Sample Protein Identification. . . . . . . . . . . .312
Adding or Removing Sample Data. . . . . . . . . . . . .312
Hiding Sample Data . . . . . . . . . . . . . . . . . . . . . . . . . . .314
Changing Peak Names for Sample Data . . . . . . .315
Changing the Electropherogram View. . . . . . . . . . . . . .316
Autoscaling the Electropherogram . . . . . . . . . . . .317
Customizing the Data Display . . . . . . . . . . . . . . . . .317
Stacking Multiple Electropherograms. . . . . . . . . .323
Overlaying Multiple Electropherograms . . . . . . .324
Zooming. . . . . . . . . . . . . . . . . . . . . . . . . . . . . . . . . . . . . . .325
Selecting Data Viewing Options . . . . . . . . . . . . . . .326
Adding and Removing Baseline Points. . . . . . . . .330
Selecting the Graph X-axis Range . . . . . . . . . . . . . .331
Closing Run Files. . . . . . . . . . . . . . . . . . . . . . . . . . . . . . . . . . . .333
Analysis Settings Overview. . . . . . . . . . . . . . . . . . . . . . . . . .334
Advanced Analysis Settings. . . . . . . . . . . . . . . . . . . . . . . . .336
pI Markers Settings. . . . . . . . . . . . . . . . . . . . . . . . . . . . .336
Advanced Analysis Settings Groups . . . . . . . . . . . .337
Creating a New Analysis Group . . . . . . . . . . . . . . . .337
Changing the Default Analysis Group. . . . . . . . . .338
Modifying an Analysis Group . . . . . . . . . . . . . . . . . .339
Deleting an Analysis Group . . . . . . . . . . . . . . . . . . . 339
Applying Analysis Groups to Specific Run Data 340
Detection Settings . . . . . . . . . . . . . . . . . . . . . . . . . . . . . . . . . 343
Changing the Detection Method. . . . . . . . . . . . . . 343
Changing the Detection Exposure . . . . . . . . . . . . 344
Peak Fit Analysis Settings . . . . . . . . . . . . . . . . . . . . . . . . . . 345
Range Settings . . . . . . . . . . . . . . . . . . . . . . . . . . . . . . . . 346
Baseline Settings . . . . . . . . . . . . . . . . . . . . . . . . . . . . . . 346
Peak Find Settings. . . . . . . . . . . . . . . . . . . . . . . . . . . . . 346
Peak Fit Analysis Settings Groups. . . . . . . . . . . . . . 348
Creating a New Peak Fit Group. . . . . . . . . . . . . . . . 348
Changing the Default Peak Fit Group . . . . . . . . . 350
Modifying a Peak Fit Group . . . . . . . . . . . . . . . . . . . 350
Deleting a Peak Fit Group . . . . . . . . . . . . . . . . . . . . . 351
Applying Peak Fit Groups to Specific Run Data 351
Peak Names Settings. . . . . . . . . . . . . . . . . . . . . . . . . . . . . . . 354
Peak Names Analysis Settings Groups. . . . . . . . . 354
Creating a Peak Names Group . . . . . . . . . . . . . . . . 355
Modifying a Peak Names Group . . . . . . . . . . . . . . 358
Deleting a Peak Names Group . . . . . . . . . . . . . . . . 358
Applying Peak Names Groups to Run Data. . . . 359
pI Markers Analysis Settings. . . . . . . . . . . . . . . . . . . . . . . . 362
Markers Analysis Settings Groups . . . . . . . . . . . . . 362
Creating a New Markers Group . . . . . . . . . . . . . . . 363
Changing the Default Markers Group . . . . . . . . . 365
Modifying a Markers Group . . . . . . . . . . . . . . . . . . . 366
Deleting a Markers Group . . . . . . . . . . . . . . . . . . . . . 366
Applying Markers Groups to Specific Run Data 367
Injection Reports . . . . . . . . . . . . . . . . . . . . . . . . . . . . . . . . . . . 369
Example Analysis and Injection Report . . . . . . . . 371
User Guide for Maurice, Maurice C. and Maurice S.

page 7
Importing and Exporting Analysis Settings . . . . . . . . .374
Importing Analysis Settings . . . . . . . . . . . . . . . . . . . .374
Exporting Analysis Settings . . . . . . . . . . . . . . . . . . . .374
Chapter 13:
Setting Your Preferences . . . . . . . . . . . . . . . . .377
Customize Your Preferences . . . . . . . . . . . . . . . . . . . . . . . .378
Enabling Access Control . . . . . . . . . . . . . . . . . . . . . . . . . . . .379
Setting Data Export Options . . . . . . . . . . . . . . . . . . . . . . . .379
Selecting Custom Plot Colors for Graph Overlay . . . .380
Grouping Options . . . . . . . . . . . . . . . . . . . . . . . . . . . . . . . . . .382
Setting Up Maurice Systems to Send Tweets . . . . . . . .383
Chapter 14:
Compass Access Control and
21 CFR Part 11 Compliance . . . . . . . . . . . . . .389
Overview . . . . . . . . . . . . . . . . . . . . . . . . . . . . . . . . . . . . . . . . . . .390
Enabling Access Control . . . . . . . . . . . . . . . . . . . . . . . . . . . .391
Logging In to Compass for iCE . . . . . . . . . . . . . . . . . . . . . .392
Locking and Unlocking the Application. . . . . . . .393
Resolving Log In Issues . . . . . . . . . . . . . . . . . . . . . . . . .393
Saving Changes . . . . . . . . . . . . . . . . . . . . . . . . . . . . . . . . . . . .394
Password Policy Settings . . . . . . . . . . . . . . . . . . . . . . 406
LDAP Settings . . . . . . . . . . . . . . . . . . . . . . . . . . . . . . . . . 407
Encryption Details. . . . . . . . . . . . . . . . . . . . . . . . . . . . . 407
Chapter 15:
Maintenance and Troubleshooting. . . . . 409
Cartridge Handling and Care . . . . . . . . . . . . . . . . . . . . . . 410
cIEF Cartridge . . . . . . . . . . . . . . . . . . . . . . . . . . . . . . . . . 410
CE-SDS Cartridge. . . . . . . . . . . . . . . . . . . . . . . . . . . . . . 411
Maintenance . . . . . . . . . . . . . . . . . . . . . . . . . . . . . . . . . . . . . . 412
Daily . . . . . . . . . . . . . . . . . . . . . . . . . . . . . . . . . . . . . . . . . . 412
Yearly . . . . . . . . . . . . . . . . . . . . . . . . . . . . . . . . . . . . . . . . . 413
Changing the Fuse . . . . . . . . . . . . . . . . . . . . . . . . . . . . 413
Spare Parts. . . . . . . . . . . . . . . . . . . . . . . . . . . . . . . . . . . . . . . . . 414
Software Updates. . . . . . . . . . . . . . . . . . . . . . . . . . . . . . . . . . 414
Instrument Software (Embedded) Updates . . . . . . . . 415
Frequently Asked Questions: cIEF Applications. . . . . 415
Troubleshooting . . . . . . . . . . . . . . . . . . . . . . . . . . . . . . . . . . . 419
cIEF Application Troubleshooting . . . . . . . . . . . . . 419
CE-SDS Application Troubleshooting . . . . . . . . . 421
Signing Files . . . . . . . . . . . . . . . . . . . . . . . . . . . . . . . . . . . . . . . .395
Instrument Command Log . . . . . . . . . . . . . . . . . . . . . . . . .395
Run File History . . . . . . . . . . . . . . . . . . . . . . . . . . . . . . . . . . . . .398
Troubleshooting Problems and Suggested
Solutions . . . . . . . . . . . . . . . . . . . . . . . . . . . . . . . . . . . . . . . . . . .398
Authorization Server . . . . . . . . . . . . . . . . . . . . . . . . . . . . . . . .399
Server Administration . . . . . . . . . . . . . . . . . . . . . . . . . .400
Adding Non-admin Users . . . . . . . . . . . . . . . . . . . . . .400
Adding Admin Users . . . . . . . . . . . . . . . . . . . . . . . . . . .404
Resetting User Passwords . . . . . . . . . . . . . . . . . . . . . .405
Audit Trail. . . . . . . . . . . . . . . . . . . . . . . . . . . . . . . . . . . . . .406
User Guide for Maurice, Maurice C. and Maurice S.
Chapter 16:
General Information . . . . . . . . . . . . . . . . . . . . . . 423
Compliance. . . . . . . . . . . . . . . . . . . . . . . . . . . . . . . . . . . . . . . . 424
Safety Guidelines. . . . . . . . . . . . . . . . . . . . . . . . . . . . . . . . . . . 425
Chemical Hazards . . . . . . . . . . . . . . . . . . . . . . . . . . . . 425
Chemical Waste Hazards . . . . . . . . . . . . . . . . . . . . . 426
Waste Production and Disposal. . . . . . . . . . . . . . . 427
Safety Data Sheets . . . . . . . . . . . . . . . . . . . . . . . . . . . . 427
Instrument Safety Labels . . . . . . . . . . . . . . . . . . . . . . 428
Consumables and Reagents . . . . . . . . . . . . . . . . . . . . . . . 429

page 8
Maurice CE-SDS Consumables, Kits and
Reagents. . . . . . . . . . . . . . . . . . . . . . . . . . . . . . . . . . . . . . .429
Maurice cIEF Consumables, Kits and Reagents .431
Maurice Systems Consumables and Reagents .433
Customer Service and Technical Support . . . . . . . . . . .433
Legal Notices . . . . . . . . . . . . . . . . . . . . . . . . . . . . . . . . . . . . . . .435
Maurice Disclaimer of Warranty . . . . . . . . . . . . . . .435
Compass Software and Authorization Server
License Agreement. . . . . . . . . . . . . . . . . . . . . . . . . . . . .435
User Guide for Maurice, Maurice C. and Maurice S.

Chapter 1:
Let’s Get Started
Chapter Overview
•Welcome
page 1
•Maurice Systems
User Guide for Maurice, Maurice C. and Maurice S.

Welc ome page 2
Welcome
Congratulations on bringing Maurice into your lab! We welcome you as a new user and are excited to be a
part of your work. This user guide will provide you with details on system hardware, operating the system,
how to use Compass for iCE software, maintenance procedures and other useful information.
To help you get the most from you new lab addition, we've added some attention phrases to guide you
through the user guide:
NOTE Points out useful information.
IMPORTANT Indicates information necessary for proper operation of Maurice systems.
CAUTION Cautions you about potentially hazardous situations that could result in injury to you or
damage to the system.
!WARNING! Warns you that serious physical injury can result if the listed precautions aren’t followed.
Maurice Systems
Maurice, Maurice C. and Maurice S. systems give you identity, purity and heterogeneity data on your biologics, and get you to results faster with short development times and simple workflows!
• They're fluent in cIEF and CE-SDS. They take cIEF up a notch, and CE-SDS is a breeze. You'll get pI
and charge heterogeneity data in less than 10 minutes flat — with the added bonus of same-time
absorbance and native fluorescence for sensitivity down to 0.7 μg/mL. Their size applications have
the high res and wide molecular weight range you need and they're done in 35 minutes.
• They make it easy. Just pop in a ready-to-go cartridge, drop in your sample vials or a 96-well plate,
and hit start — they'll do the rest!
• They're time-savers. Develop methods fast so you get to results even faster. Your cIEF and CE-SDS
methods are done in a day. The icing? You can develop platform methods and use them for multiple
molecules. No maintenance and clean-up needed between the two applications.
• They're dependable. Get reproducible results with tight CVs day in and day out. Your data is reliable
no matter what — across samples, users, instruments or labs.
User Guide for Maurice, Maurice C. and Maurice S.

Chapter 2:
Getting Your Lab Ready
Chapter Overview
•Introduction
page 3
• Space Requirements
• Physical Specifications
• Electrical Requirements
• Environmental Requirements
• Software and Computer Requirements
• General Guidelines and Information
User Guide for Maurice, Maurice C. and Maurice S.

Introduction page 4
Introduction
This chapter will help you prepare the lab for Maurice. Please have the space, electrical and environmental
requirements ready prior to scheduling your installation.
NOTE: Please wait for an authorized ProteinSimple Field Service Engineer to unpack and install Maurice
for you. Don’t try doing this yourself. Handling Maurice incorrectly could cause injury to yourself or damage to the system.
Space Requirements
You need a lab bench or table that can support 100 lb (46 kg) and has enough space for both Maurice and
his computer. There should be sufficient clearance for both heat ventilation and to provide access if Maurice
needs service.
IMPORTANT
Maurice needs a stable surface and must remain level to work properly. The lab bench or table can’t
shift or wobble under heavy weight. Don’t use anti-vibration tables either, since Maurice may not
stay level while he’s working.
Dimension Meters Feet
Width 1.5 5.0
Depth 0.8 2.5
Height 0.5 1.5
Recommended space requirements for Maurice.
User Guide for Maurice, Maurice C. and Maurice S.
Physical Specifications page 5
Physical Specifications
Description Specification
Maurice’s Dimensions (Door Closed) 0.44 m x 0.42 m x 0.61m (H x W x D)
1.46’ x 1.38’ x 2.0’ (H x W x D)
Maurice’s Dimensions (Door Open) 0.44 m x 0.57 m x 0.61m (H x W x D)
1.46” x 2.43’ x 2.0’ (H x W x D)
Maurice’s Weight 46 kg (100 lb)
Computer Workstation Dimensions 0.41 m x 0.66 m x 0.76 m (H x W x D)
1.35' x 2.17' x 2.49' (H x W x D)
For indoor use only. Use up to altitudes of 1524 meters (5000 feet).
Table 2-1: Physical Specifications
Electrical Requirements
Maurice requires a dedicated, grounded circuit capable of delivering the appropriate current and voltage for
your country. The power requirements for all three Maurice systems are 100 V- 240 V (AC), 50/60 Hz, 500 W.
In addition to these requirements, Maurice needs the grounded circuits terminate at the receptacles, and
receptacles must be located within 10 ft (3 m) of the instrument.
Environmental Requirements
Maurice likes a consistent temperature in the lab (not too hot – not too cold). He works best when conditions stay within these ranges:
Requirement Specification
Operating temperature range 18 - 25 °C (64 - 77 °F)
Operating humidity range 20-80% relative, non-condensing
Table 2-2: Environmental requirements.
User Guide for Maurice, Maurice C. and Maurice S.

Software and Computer Requirements page 6
Software and Computer Requirements
Maurice brings his own computer to the lab with Compass for iCE software pre-installed. Compass for iCE is
used to run cIEF and CE-SDS applications on Maurice and analyze resulting data. Just in case you need it, a
CD containing Compass for iCE software also comes in the box. If you don't want to analyze your data at
Maurice's workstation in the lab, Compass for iCE software can also be installed on a separate workstation,
such as your desktop computer. Your computer must meet the recommended requirements listed below to
run Compass for iCE software and process data.
Component Recommended
Operating System Windows 7
Processor Core i5
Memory 6 GB
Free Disk Space 100 GB
Ethernet Ports 2 - One is required to connect to Maurice, the other is
used for network access
USB Ports 2 - To connect the keyboard and mouse
Table 2-3: Computer requirements.
General Guidelines and Information
Intended Use
NOTE: Maurice is for research use only. Not for use in diagnostic procedures.
Lifting and Moving the System: Lift Maurice Correctly
IMPORTANT
Take all the standard precautions when lifting or moving Maurice. Since Maurice systems weigh 46
kg (100 lb), you should not lift him by yourself. Two people should lift him onto the lab bench.
User Guide for Maurice, Maurice C. and Maurice S.

Chapter 3:
Maurice
Chapter Overview
•Maurice Systems
page 7
• External Components
• Internal Components
•Rear Panel
•Computer Workstation
User Guide for Maurice, Maurice C. and Maurice S.
Maurice Systems page 8
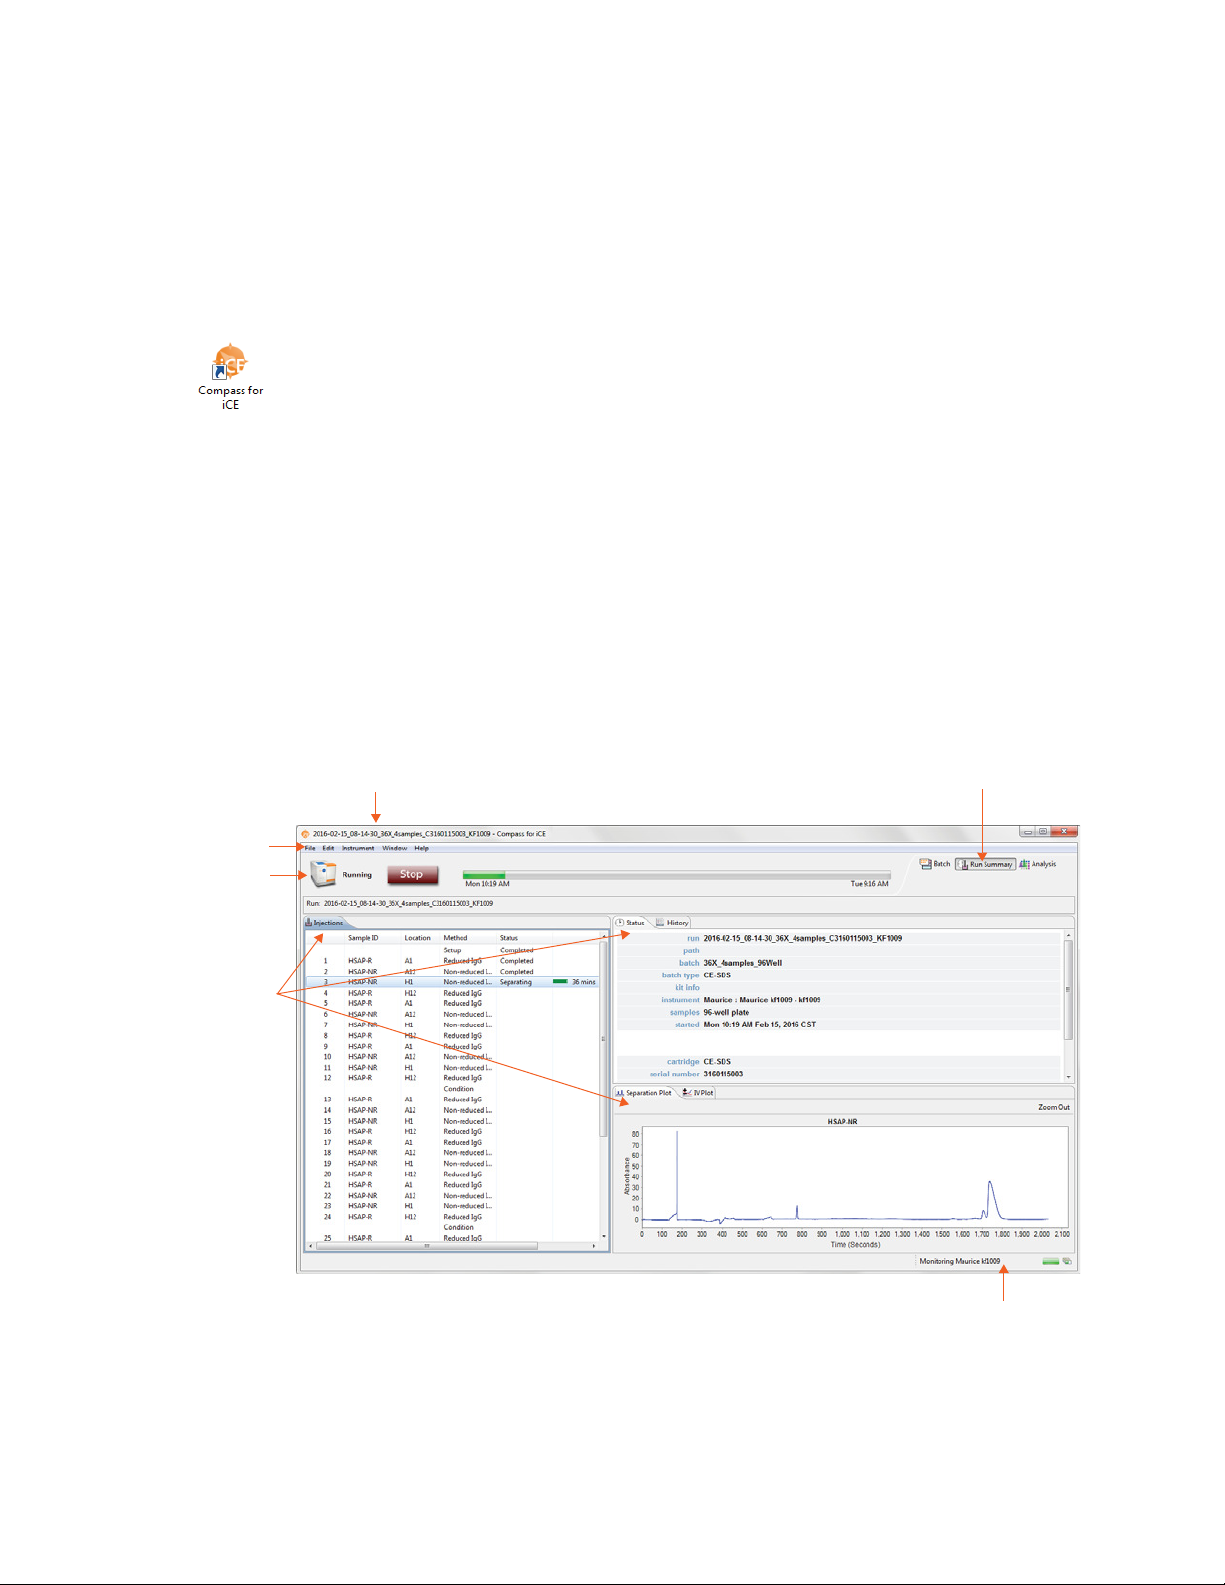
Maurice Systems
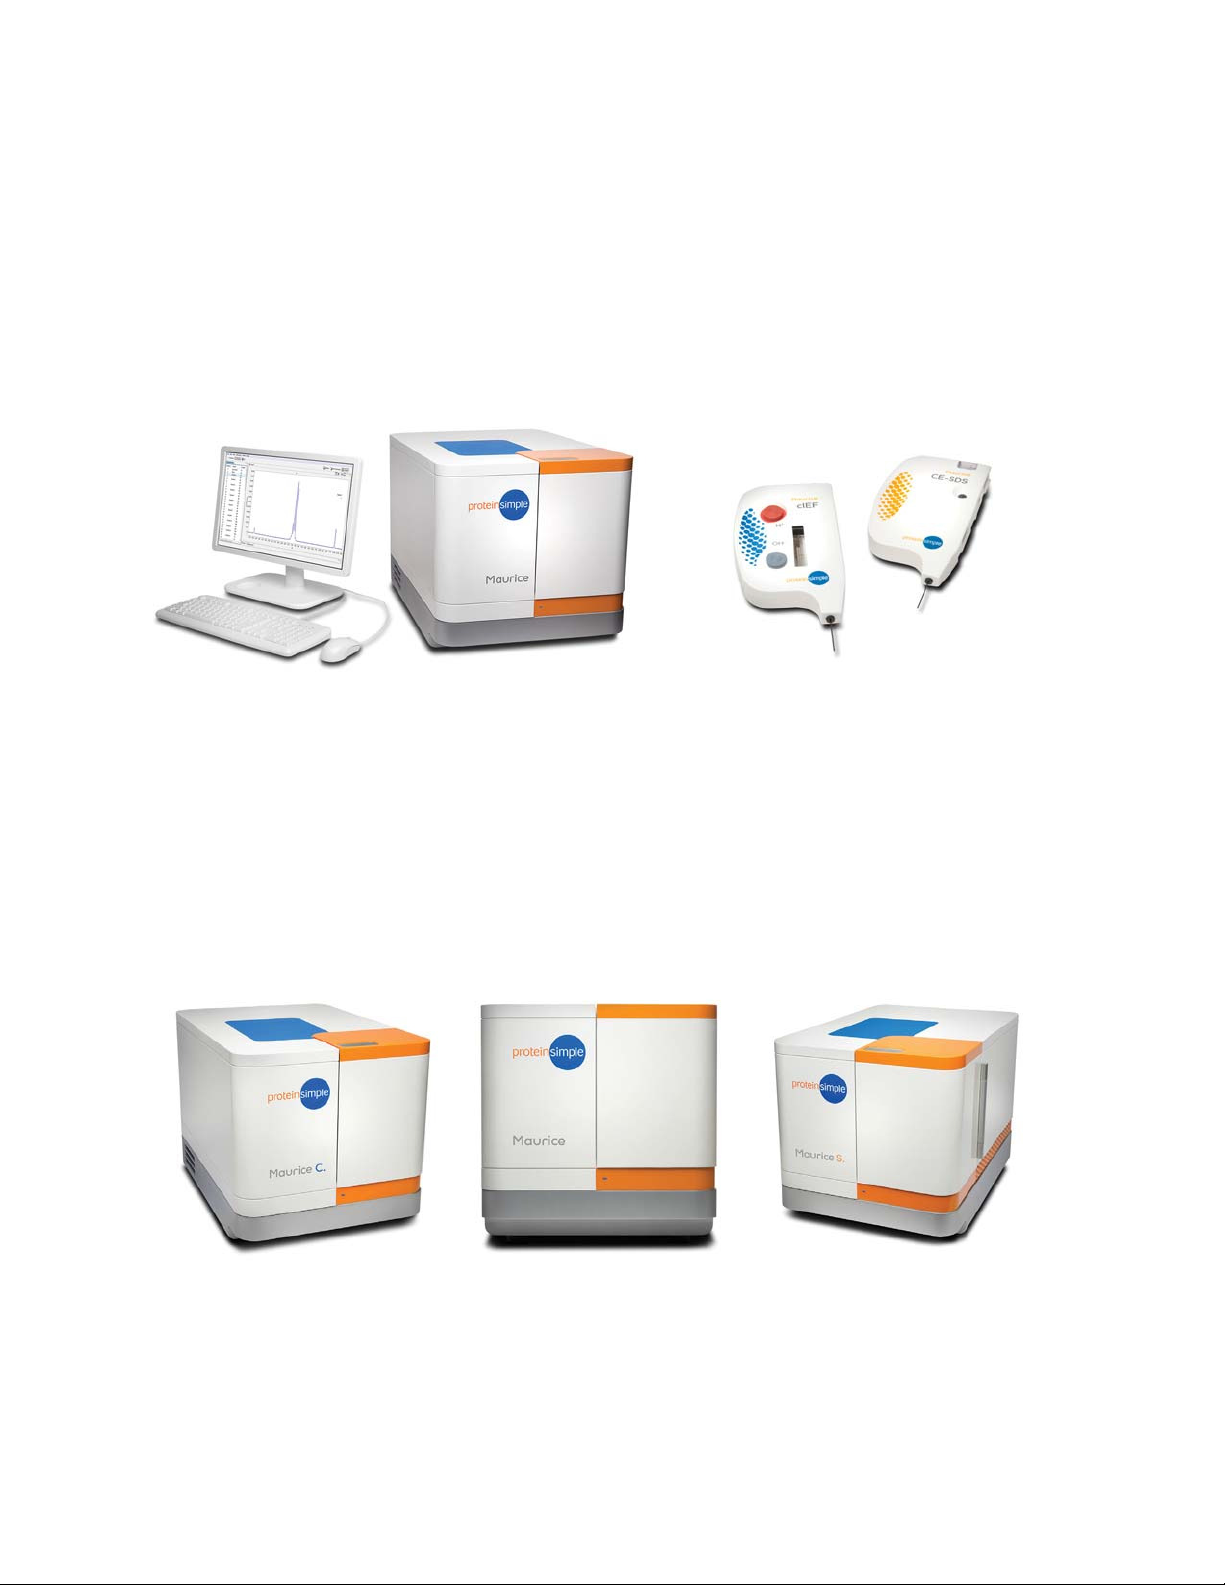
Maurice, Maurice C. and Maurice S. systems include the instrument, computer workstation, Compass for iCE
software and cIEF or CE-SDS Cartridges.
Maurice with Computer Workstation
cIEF and CE-SDS Cartridges
All systems have the same hardware components, computer and software, the only difference between
them are the applications you can run:
• Maurice: cIEF and CE-SDS applications
• Maurice C.: cIEF applications only
• Maurice S.: CE-SDS applications only
You can run samples in 96-well plates or in up to 48 sample vials with integrated 0.2 mL inserts on all three
systems.
Maurice C. Maurice Maurice S.
User Guide for Maurice, Maurice C. and Maurice S.
External Components page 9
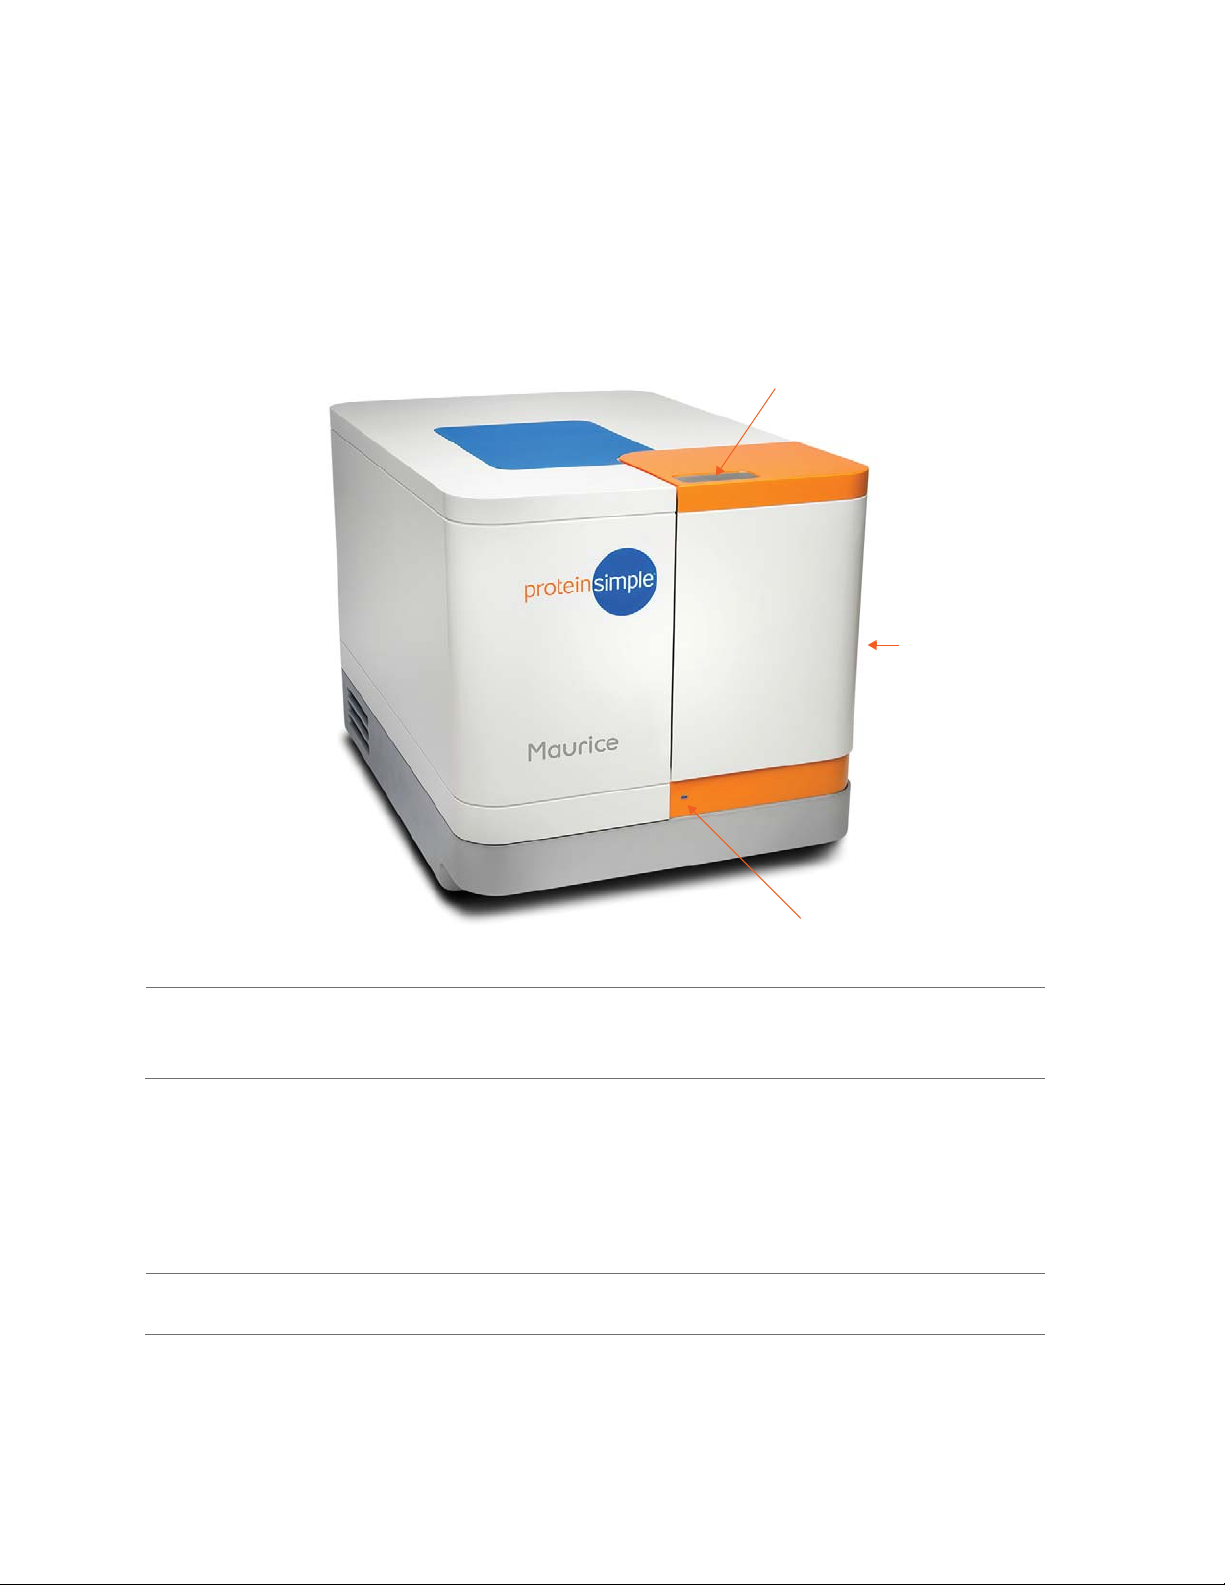
External Components
Tou ch Pla te t o
Open Door
System Door
Status Light
!WARNING!
You can’t replace or service any parts on Maurice systems except for the power entry fuse.
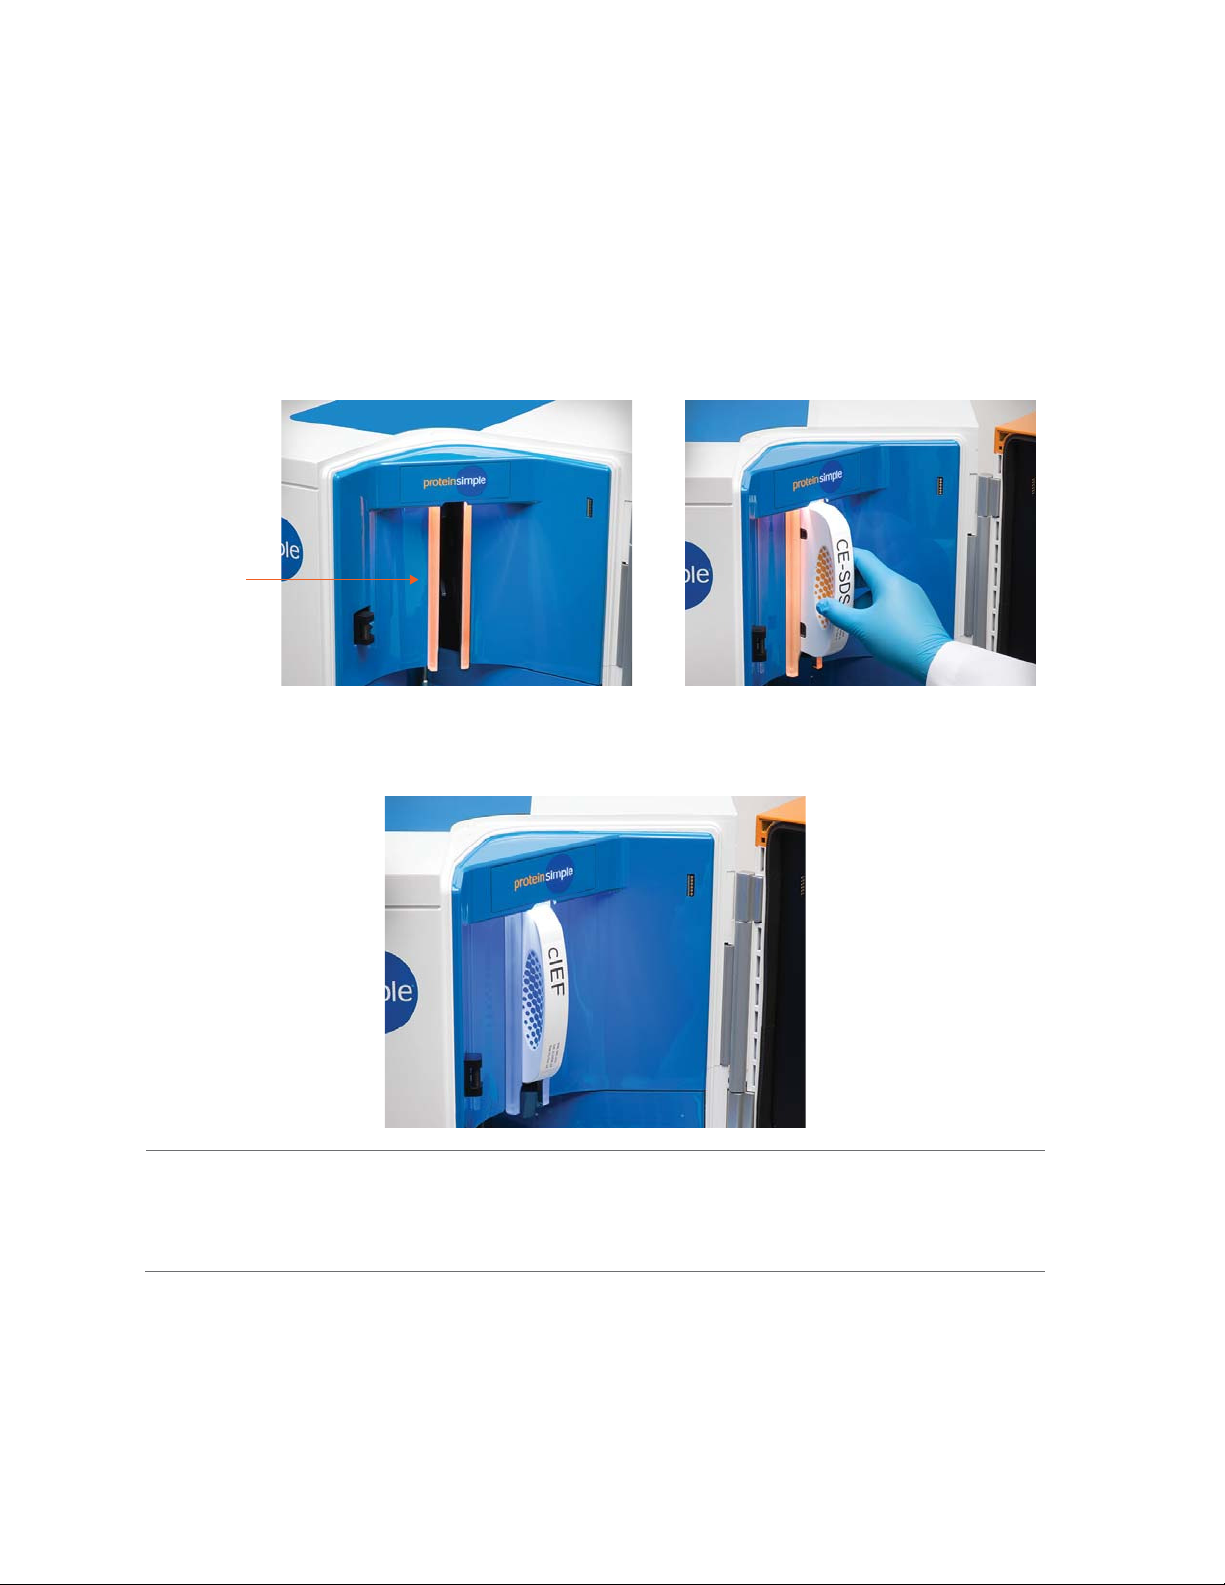
System Door
Maurice's door gives you access to the inside of the instrument to load cartridges, reagents and samples. To
open the door, first make sure the status light is a steady blue. Then just touch the metal touch plate on the
top of the door to open it. Close it by pushing the door until you hear the latch engage.
NOTE: Maurice’s door must be closed before starting a batch.
User Guide for Maurice, Maurice C. and Maurice S.
Internal Components page 10
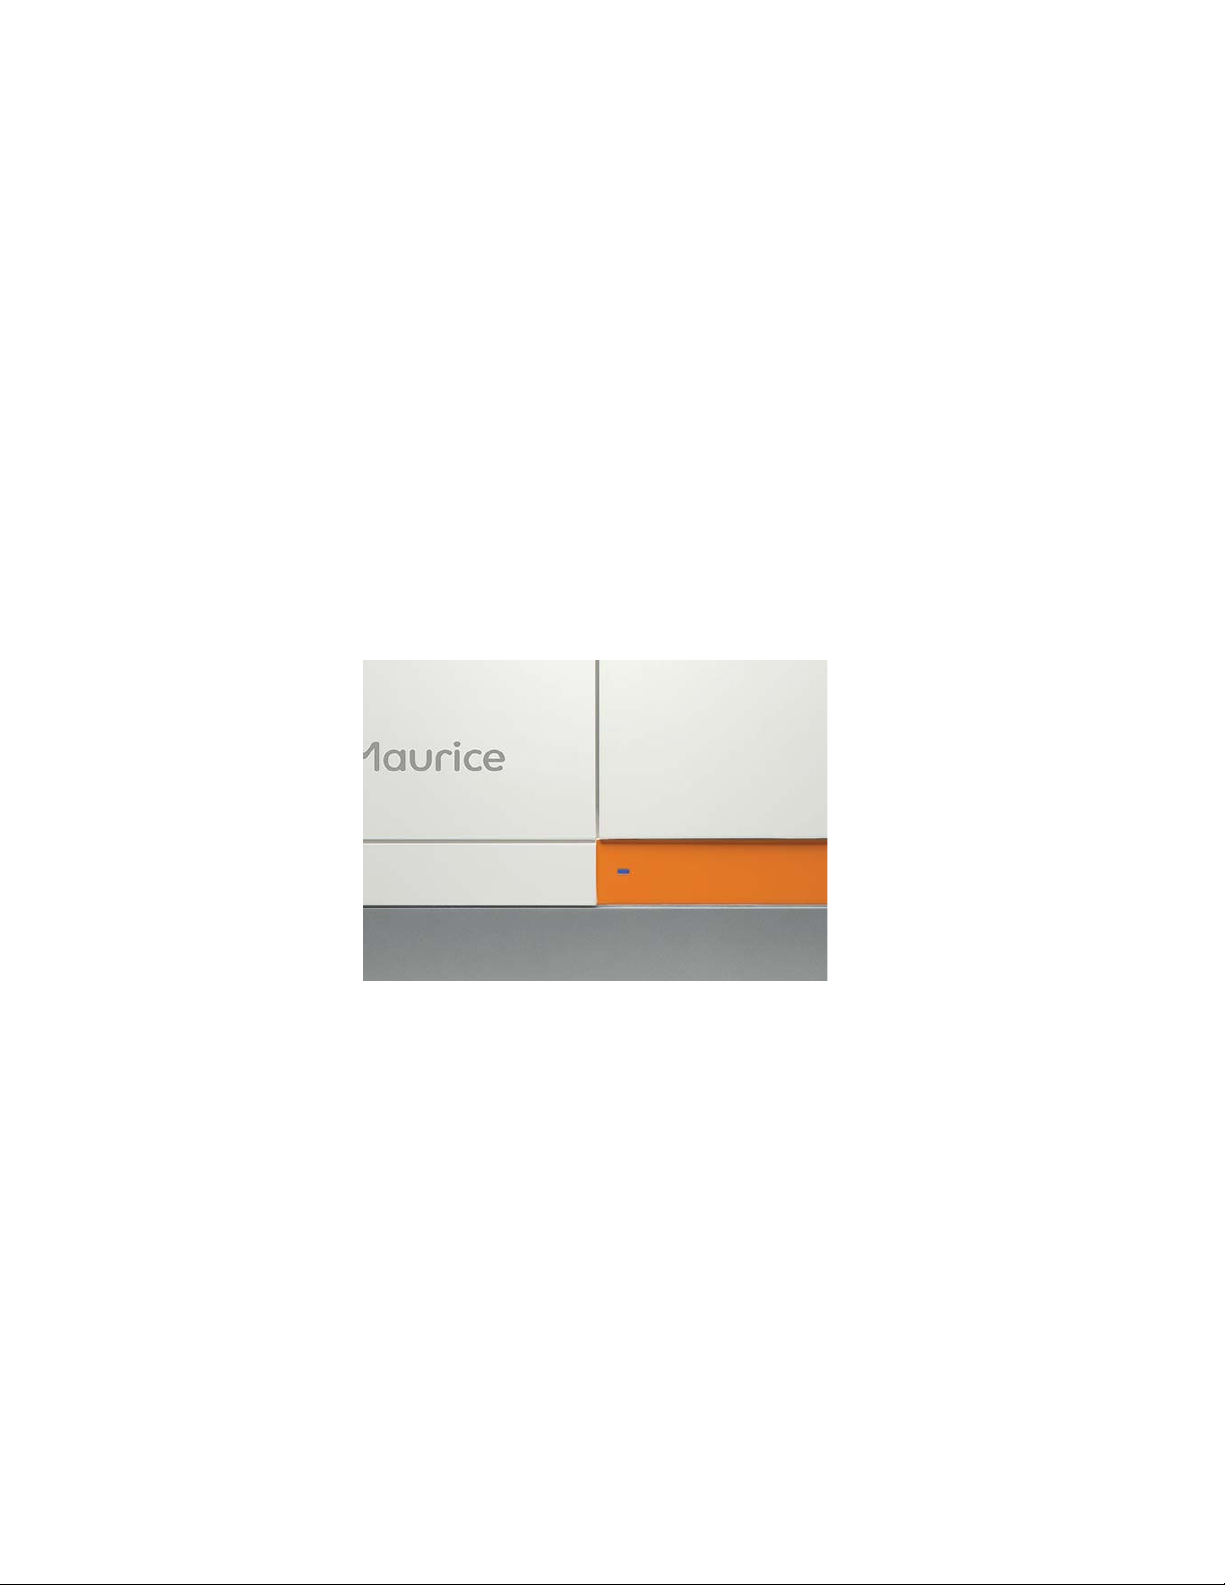
Status Light
The LED on Maurice’s front panel tells you what he’s doing. Here’s what his different status lights mean:
• Start-up (magenta): You've just turned on the power and Maurice is warming up.
• Ready (steady blue): Maurice is powered on and ready to go.
• Opening Door (long blue flash followed by blue pulses): Maurice’s door is opening.
• Running (pulsing blue): Maurice is running a batch.
• Trying to Open Door While Running (red flash): Maurice’s door can’t be opened when he’s running.
• Error (steady red): Maurice has detected an error. To get more information on the error, check the
Status pane in the Run Summary Screen in Compass for iCE.
Internal Components
Cartridge Slot
The cartridge slot holds Maurice’s ready-to-go application cartridges. The cartridge it holds depends on the
system:
• Maurice: cIEF and CE-SDS Cartridges
• Maurice C.: cIEF Cartridges only
• Maurice S.: CE-SDS Cartridges only
User Guide for Maurice, Maurice C. and Maurice S.
Internal Components page 11
Cartridge
Slot
The lights on either side of the cartridge slot will be orange after Maurice disengages the cartridge when
the door is opened at the end of a batch, and whenever the slot is empty.
The lights change to
blue once a cartridge is installed correctly.
NOTE: You can find cartridge prep, installation and post-run procedures in Chapter 7, “Running cIEF Applications on Maurice and Maurice C.“ and Chapter 8, “Running CE-SDS Applications on Maurice and Maurice S.“
User Guide for Maurice, Maurice C. and Maurice S.
Internal Components page 12
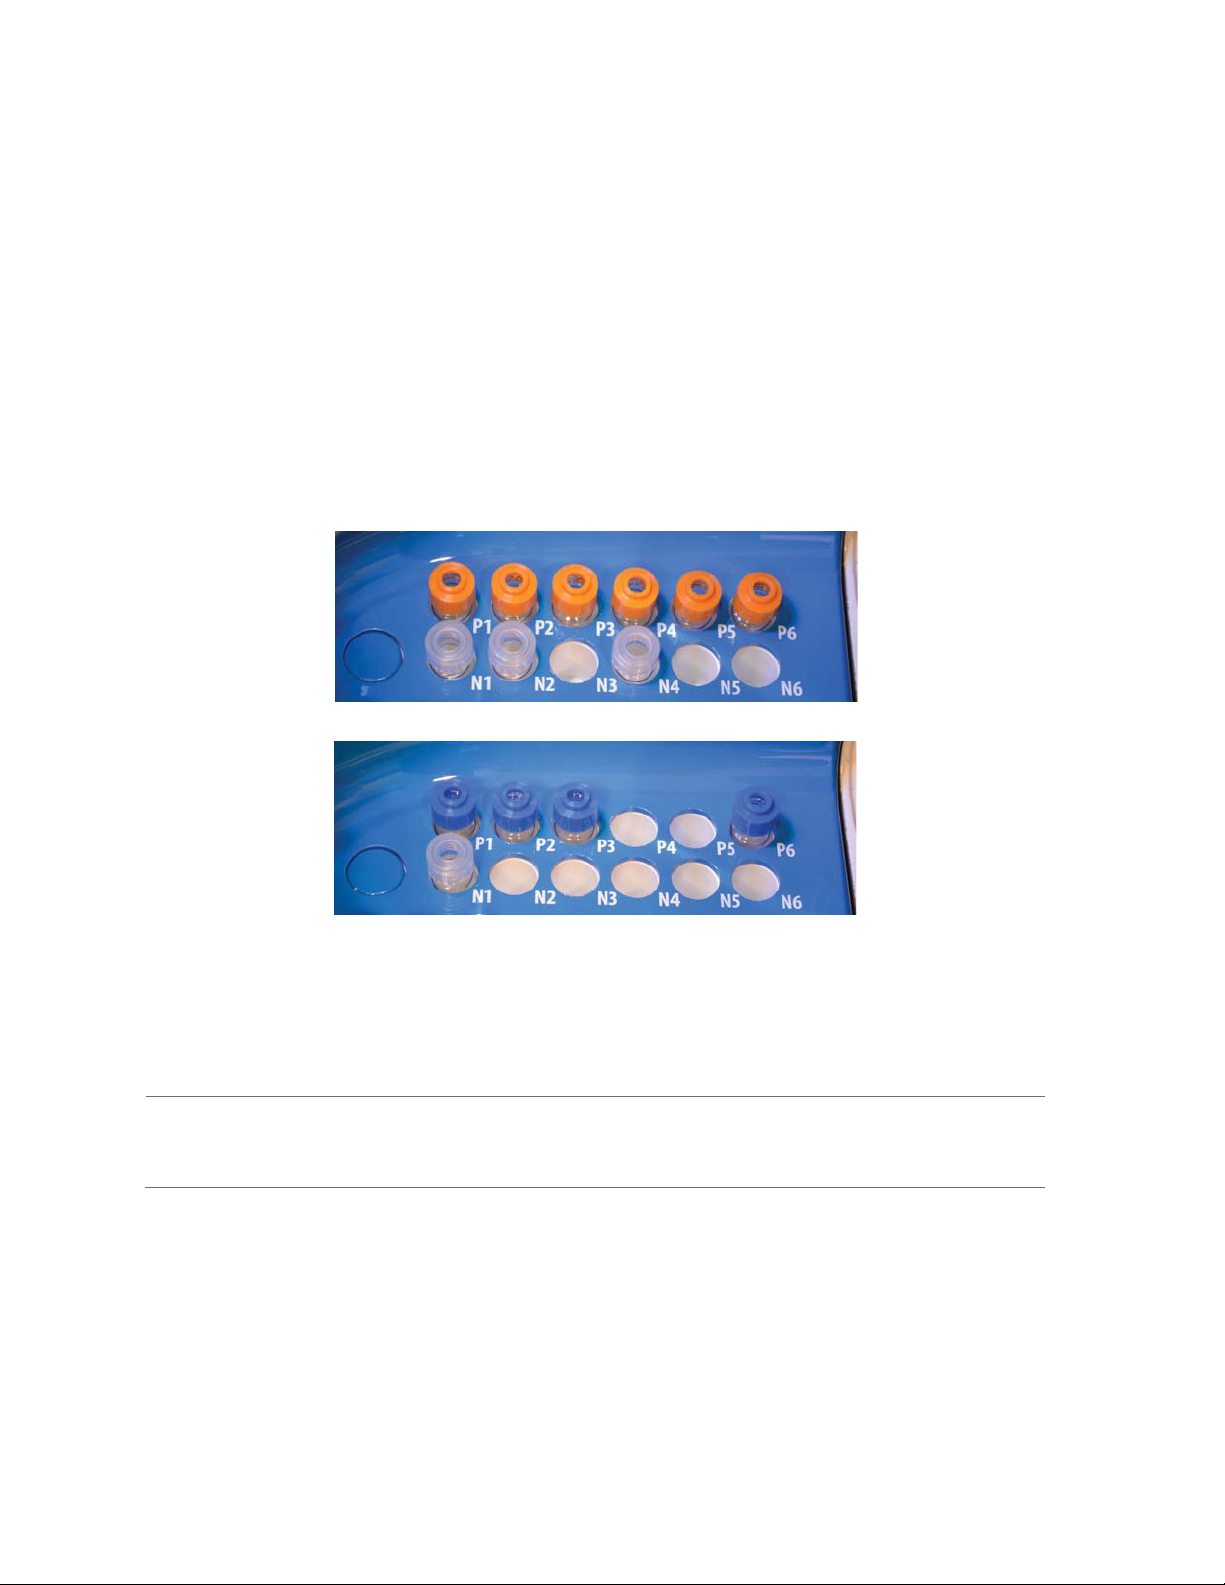
Sample and Reagent Platform
Maurice’s sample and reagent platform has two rows for batch reagents. These reagents are kept at room
temperature.
• Row P (top): These reagents are loaded under pressure during the batch. Only use glass reagent
vials with pressure caps in this row. Use
sure caps with CE-SDS reagents.
• Row N (bottom): Only use reagent vials with clear screw caps in this row.
blue pressure caps with cIEF reagents and orange pres-
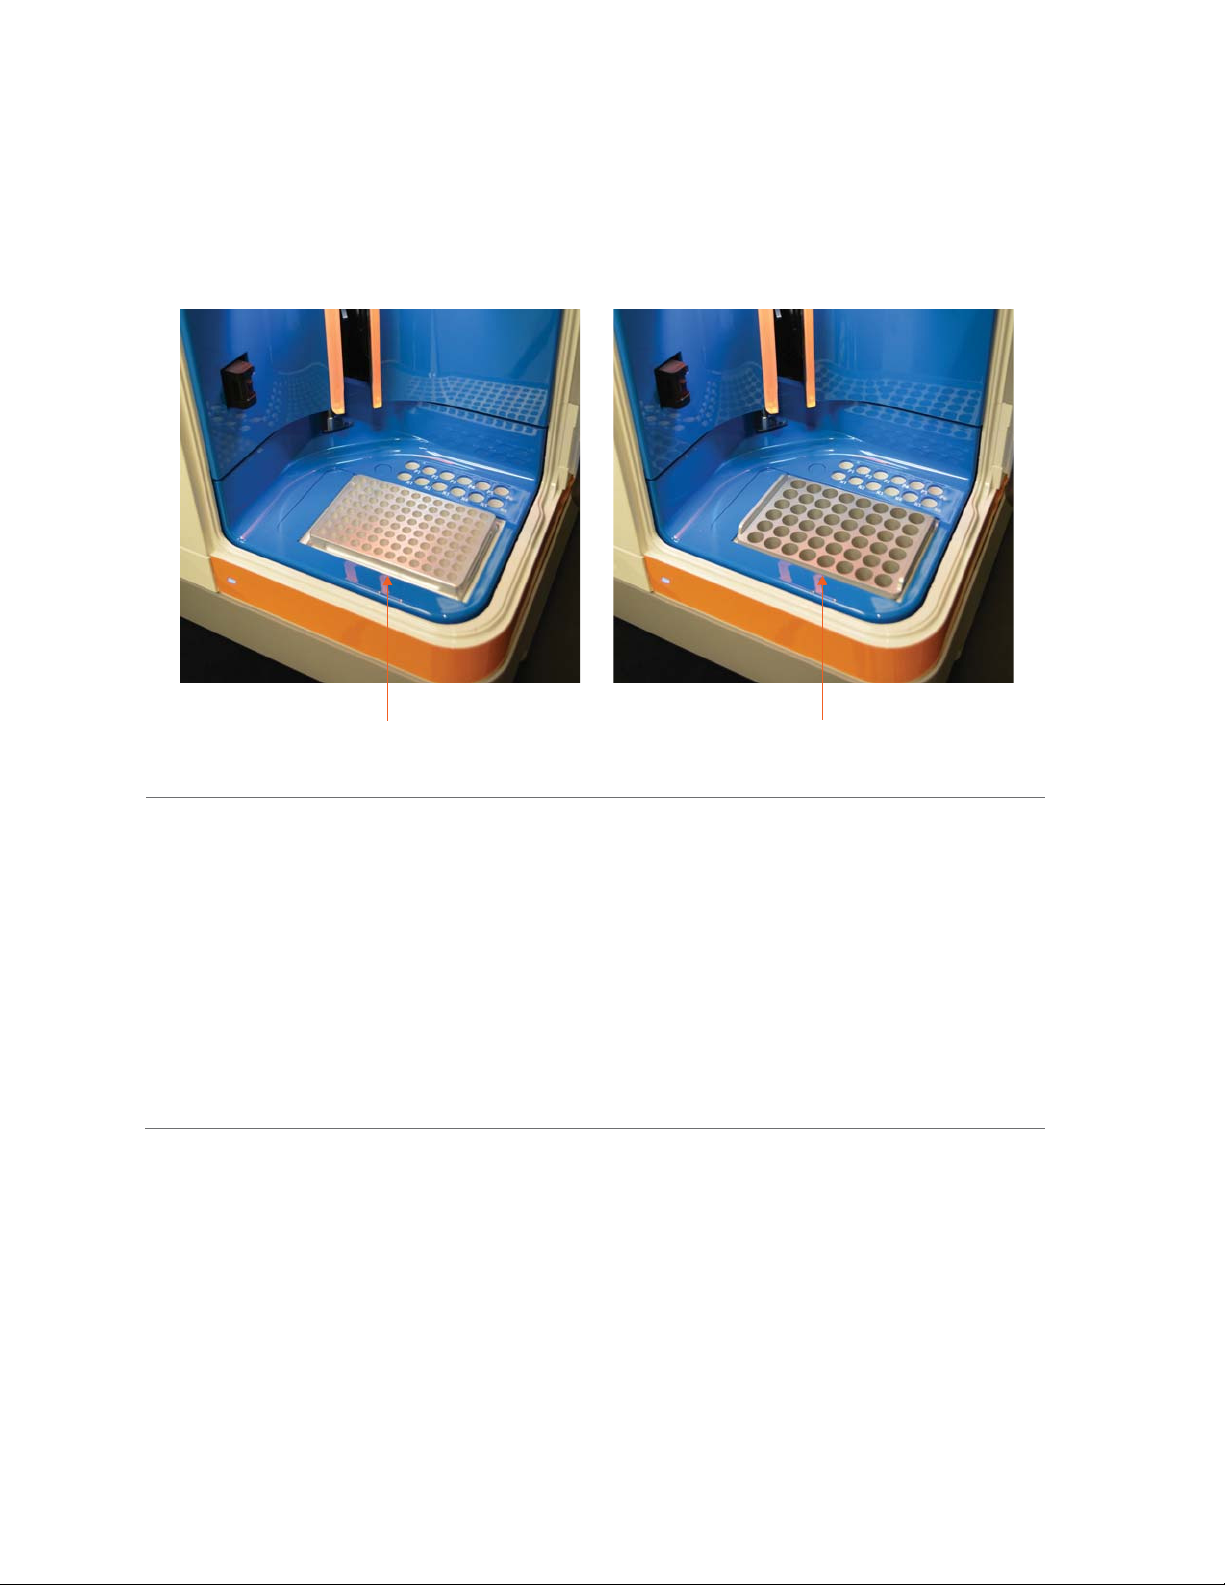
The sample block holds either a 96-well plate or 48-vial metal insert and is temperature-controlled. You can
set it to 4 °C, 10 °C, 15 °C or turn the temperature control off in Compass for iCE software.
Sample cooling turns on when the run starts, and takes a few minutes to reach the temperature setting.
After a run, the sample block stays at the set temperature until you open Maurice’s door, then it shuts off
until you start the next run. This prevents excess condensation.
NOTE: Because Maurice holds the sample block temperature after a run until you open the door, samples
are still viable for your next run and after overnight runs.
User Guide for Maurice, Maurice C. and Maurice S.
Internal Components page 13
96-well Plate
Insert
NOTES:
When you’re using a 96-well plate, well A1 should be in the top left corner of the insert.
48-vial
Insert
You can only use V-bottom plates with the 96-well plate insert.
Remove plate lids before inserting a 96-well plate into Maurice.
You can find info on where to load reagents and samples for cIEF applications in “Step 4: Load Samples
and Reagents” on page 90 and for CE-SDS applications in “Step 4: Load Samples and Reagents” on
page 124.
User Guide for Maurice, Maurice C. and Maurice S.
Internal Components page 14
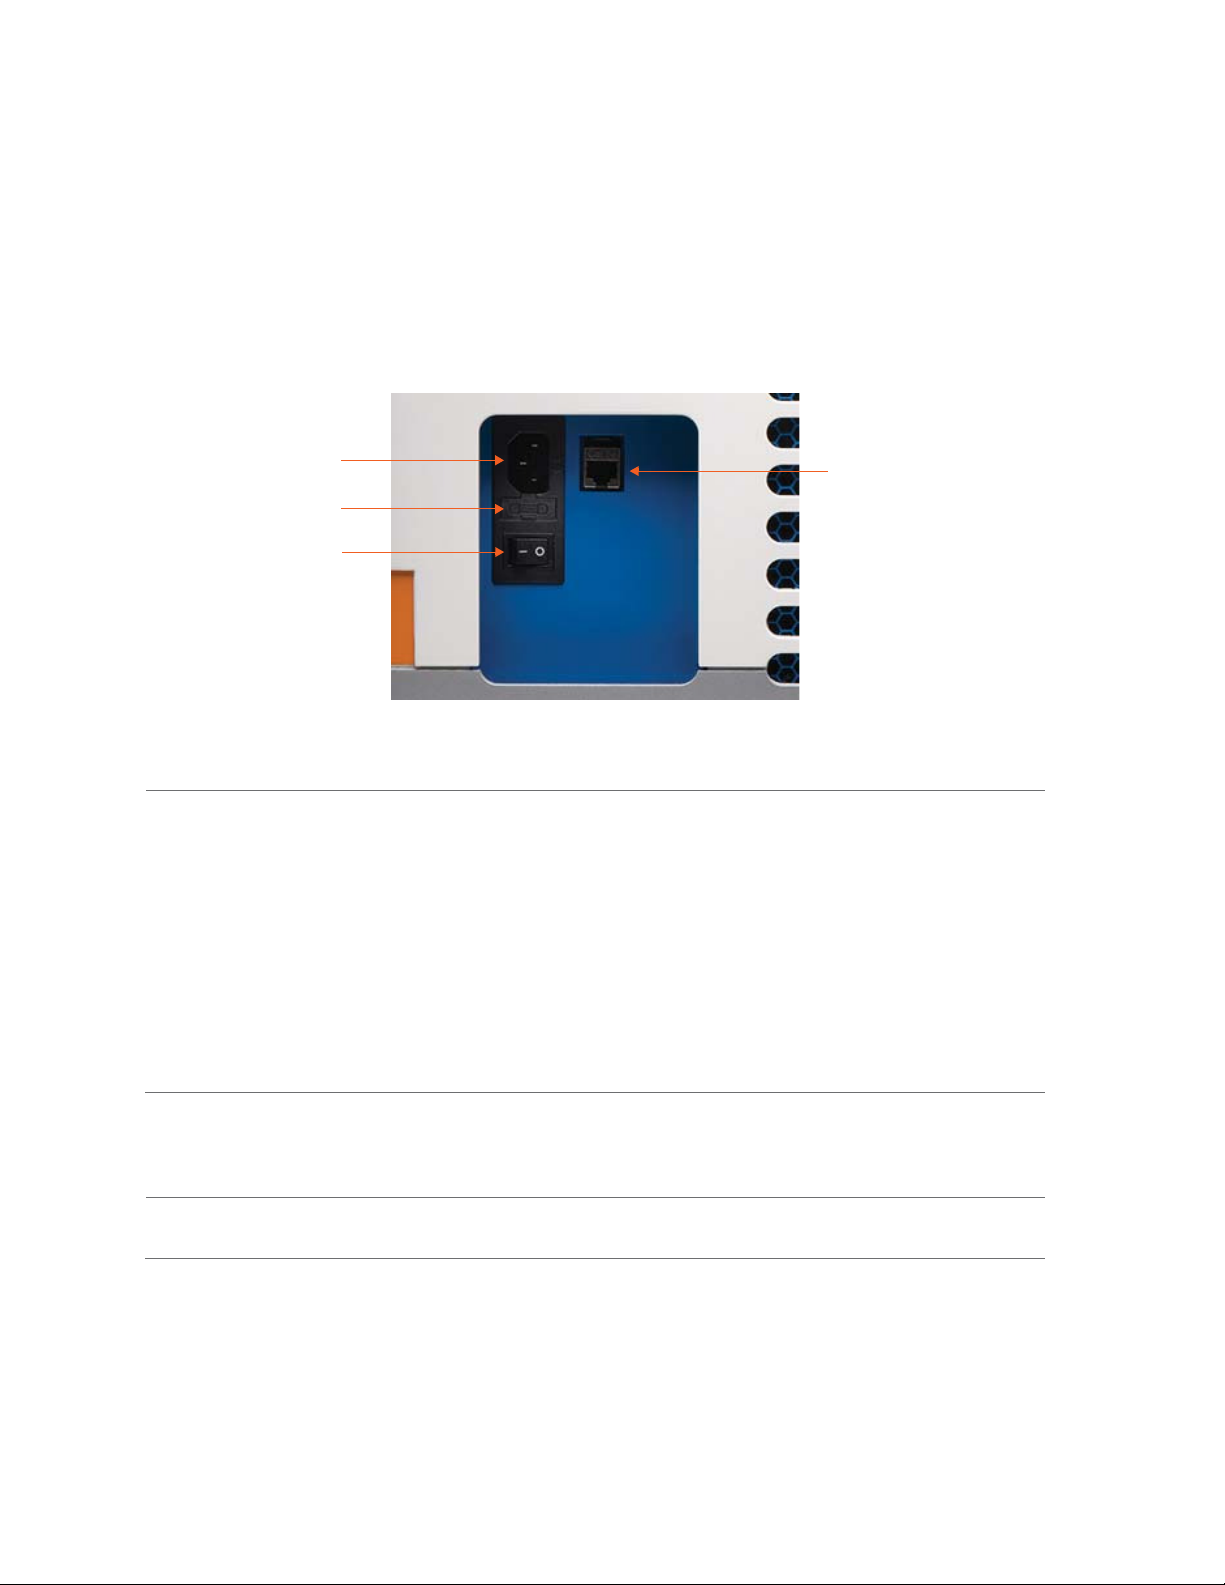
Rear Panel
Located on Maurice’s rear panel is the power entry, power switch and network connector.
Power
Entry
Fuse
Power
Switch
Network
Connector
• System Power - The main system power components consist of the power input, fuse and power
switch
!WARNING!
Only use the power supply cord provided with Maurice. If the cord is damaged, please contact ProteinSimple Technical Support.
!WARNING!
You can't replace or service any parts on Maurice except the power entry fuse.
!WARNING! SHOCK HAZARD
Disconnect the power cord from Maurice’s power input to disconnect power to the instrument.
• Network connection - A 10/100/1000 Mbps Ethernet (RJ-45 connector) is used to connect Maurice
to a computer or local network.
NOTE: Serial numbers are used to identify individual instruments.
System Labels
A full system label is located on the rear panel. It includes the ProteinSimple location, system model, power
requirements, serial number and certification markings.
User Guide for Maurice, Maurice C. and Maurice S.

Internal Components page 15
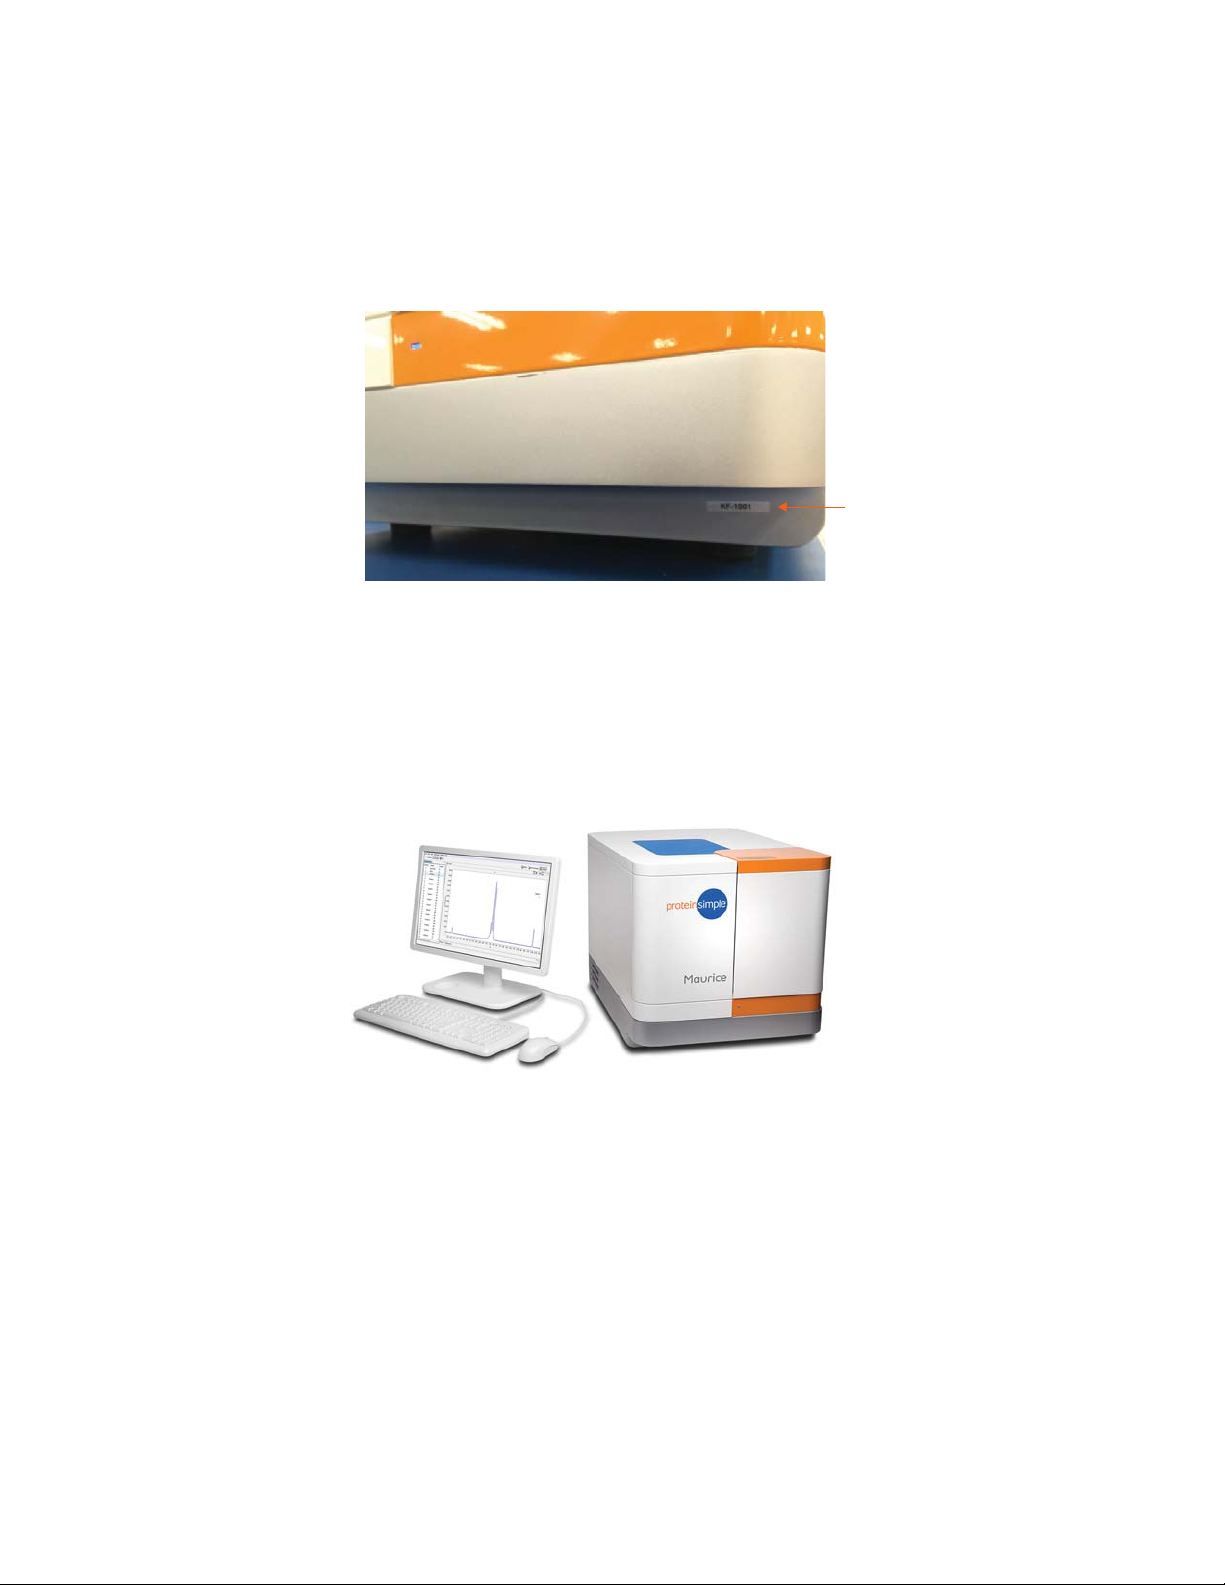
A serial number label is located on the Maurice system’s front lower right side, on the silver system base.
User Guide for Maurice, Maurice C. and Maurice S.
Computer Workstation page 16
Computer Workstation
The PC has two built-in Ethernet ports, one is used for Maurice and the other is available for your company’s
network. ProteinSimple configures one port to have a fixed IP for a local link connection to the instrument,
the other is configurable by users and will typically use a DHCP for dynamic IP.
User Guide for Maurice, Maurice C. and Maurice S.

Chapter 4:
Compass for iCE Overview
Chapter Overview
• Launching Compass for iCE
• Compass for iCE Overview
page 17
•Software Menus
• Changing the Compass for iCE Main Window Layout
• Software Help
• Checking for and Installing New Versions of Compass for iCE
•Viewing Release Notes
• Viewing the Software Log
• Compass for iCE Version Information
• Directory and File Information
User Guide for Maurice, Maurice C. and Maurice S.
page 18 Chapter 4: Compass for iCE Overview
Instrument
Status Bar
Screen Panes
Title bar
Screen Tabs
Status Bar
Main Menu
Launching Compass for iCE
To open Compass for iCE, just double-click the icon on the computer desktop.
Compass for iCE Overview
Compass for iCE has three main screens:
• Batch - You’ll create and review your batch.
• Run Summary - Check out the status of your run.
• Analysis - Take a look at the data from your experiment.
Each screen has these components:
User Guide for Maurice, Maurice C. and Maurice S.

Compass for iCE Overview page 19
Changing the Screen View
To toggle between the Batch, Run Summary and Analysis screens, just click the button in the screen tab
located in the upper right corner of the main window.
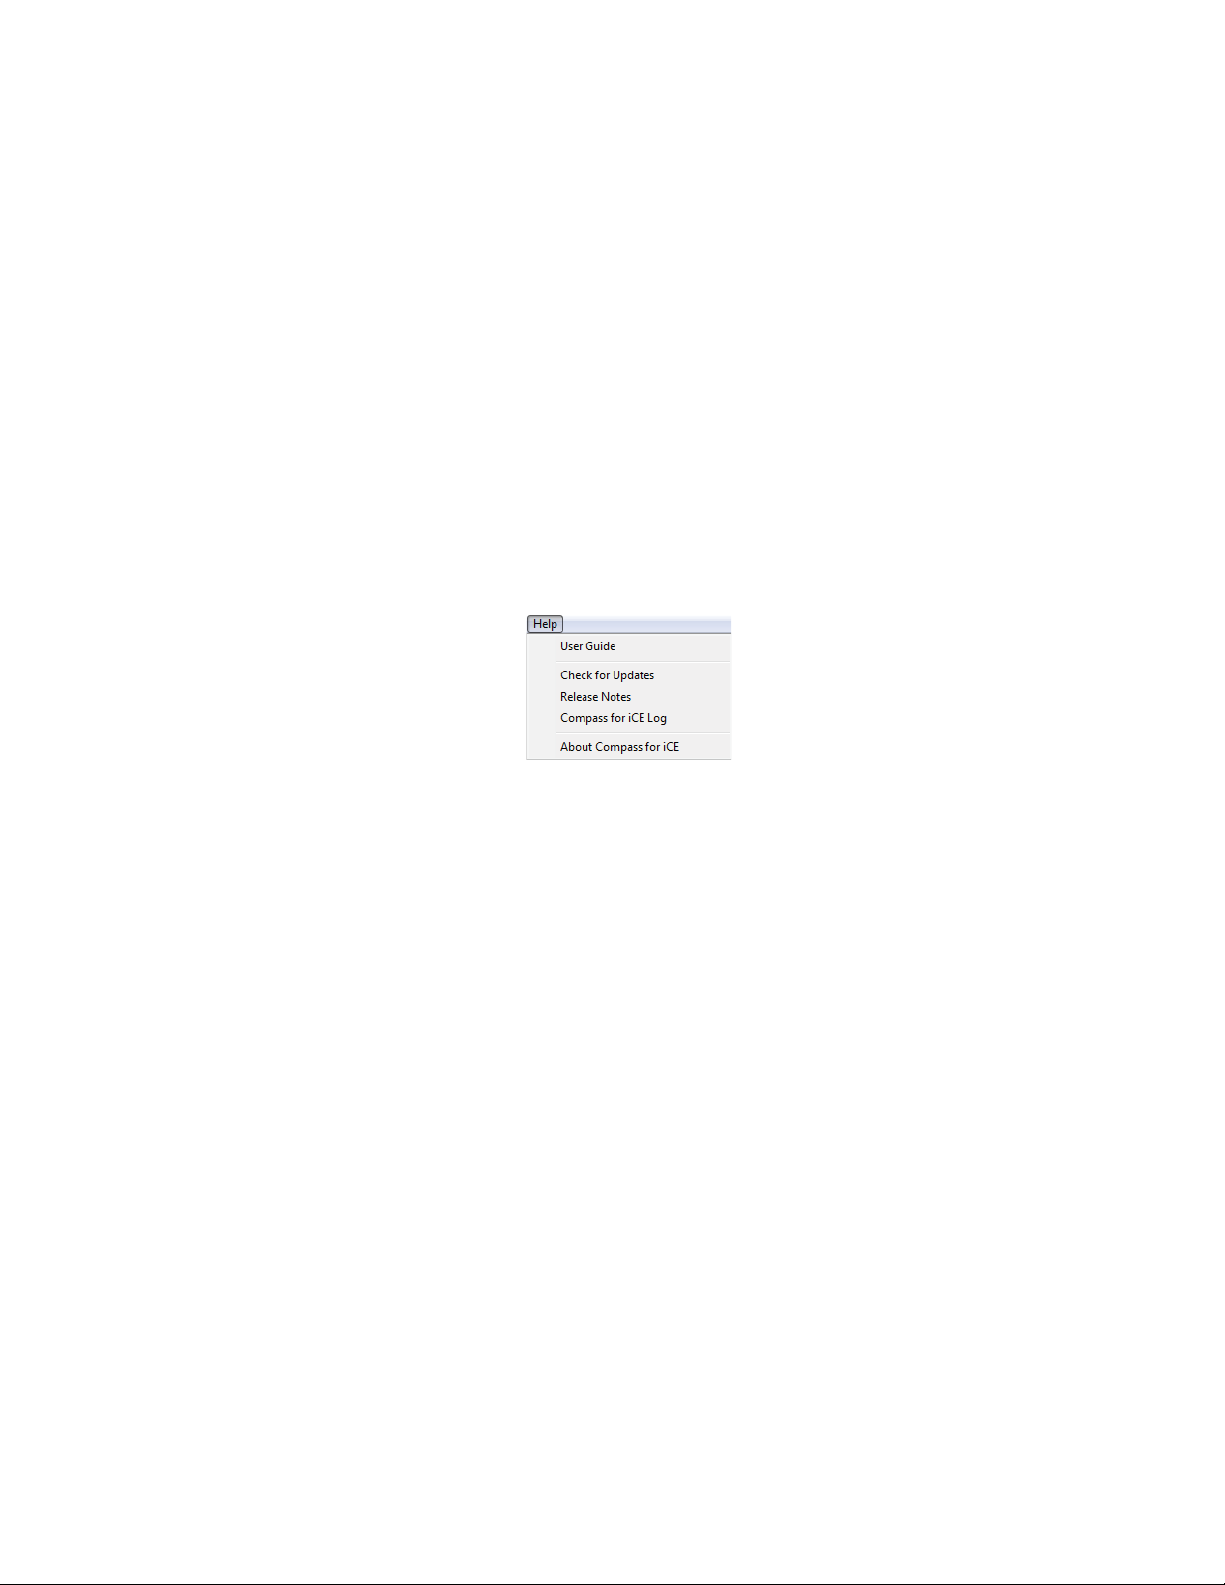
Batch Screen
The Batch screen is used to create, view, and edit batches. You can assign samples to 96-well plate wells or
vials, create and modify methods, customize your injection list and assign methods to each of your injections.
User Guide for Maurice, Maurice C. and Maurice S.
page 20 Chapter 4: Compass for iCE Overview
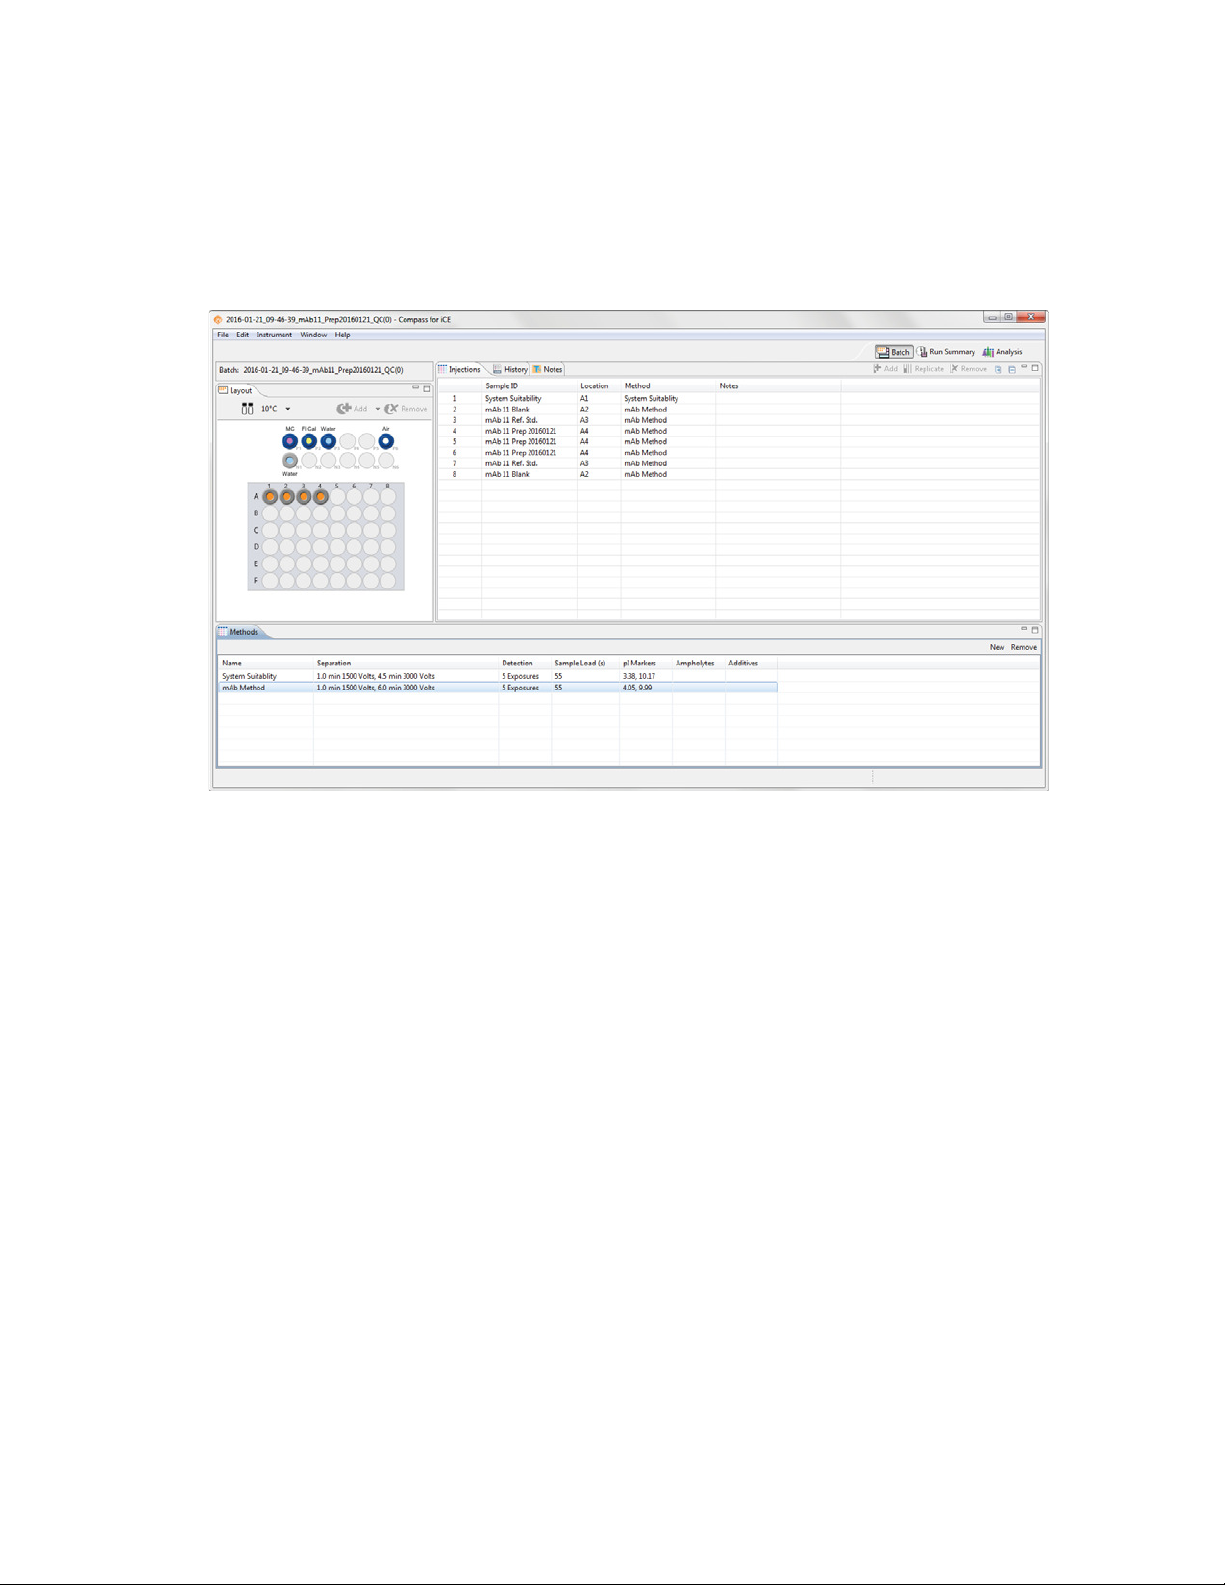
Run Summary Screen
The Run Summary screen is used to monitor status of a batch in progress, the CE-SDS separation or cIEF
Focus series for each injection and the current and voltage plots for each injection.
User Guide for Maurice, Maurice C. and Maurice S.

Compass for iCE Overview page 21
User Guide for Maurice, Maurice C. and Maurice S.

page 22 Chapter 4: Compass for iCE Overview
Analysis Screen
The Analysis screen is used to view data from your batch, including the graph view (electropherograms) and
a table with your results. You can also analyze your data for completed runs.
User Guide for Maurice, Maurice C. and Maurice S.

Compass for iCE Overview page 23
User Guide for Maurice, Maurice C. and Maurice S.

page 24 Chapter 4: Compass for iCE Overview
Screen Panes
Each of the Batch, Run Summary and Analysis screens have multiple panes that let you view the individual
components of a batch, method or data file. Each pane has a labeled tab and a unique icon. We'll describe
panes specific to each screen later in the individual screen sections.
The active pane in a screen is blue. To view a pane, click in the pane or on its tab. The example below shows
panes in the Batch screen, and the Graph pane is active:
Title Bar
In the title bar you will see the batch file name and the icons that allow the main Compass for iCE window to
be minimized, maximized or closed.
Main Menu
Access to various software, instrument and screen operations is available through the main menu. More
details on menu commands can be found in “Software Menus” on page 25.
Instrument Status Bar
The instrument status bar is used to start batches and cleaning protocols, indicate system status and show
run progress. More details on instrument control and status can be found in Chapter 10, “Controlling Maurice,
Maurice C. and Maurice S.“.
User Guide for Maurice, Maurice C. and Maurice S.

Software Menus page 25
NOTE: You will only see the instrument status bar when Compass for iCE is connected to an instrument.
There is no status bar on computer workstations that you're only using for data analysis.
Screen Tab
The screen tab lets you move between Batch, Run Summary or Analysis screens and is located in the upper
right corner of the main window. Just click a button to view a screen.
View Bar
The view bar is only displayed in the Analysis screen as part of the main menu, and allows you to switch
between viewing standards or sample data, data for a single injection or all injections in the batch, or
grouped injection data. View bar options are in “Viewing Run Data” on page 295 for cIEF applications or
page 205 for CE-SDS applications.
Compass for iCE Status Bar
The status bar is in the lower right corner of the main window. It displays active software processes and their
progress.
Software Menus
Some of the items in the Compass for iCE main menu are available in specific screens only, and menu commands change depending on which screen is active. You can find menus and commands available for each
screen in the Chapter 5, “cIEF Batches“, Chapter 6, “CE-SDS Batches“, Chapter 9, “Run Status“, Chapter 12, “cI EF
Data Analysis“ and Chapter 11, “CE-SDS Data Analysis“.
User Guide for Maurice, Maurice C. and Maurice S.

page 26 Chapter 4: Compass for iCE Overview
File Menu
The File menu contains basic file commands.
Edit Menu
The Edit menu contains basic editing commands, analysis and preferences options. Specific details on preferences are described in Chapter 13, “Setting Your Preferences“.
User Guide for Maurice, Maurice C. and Maurice S.

Software Menus page 27
View Menu
The View menu is only available in the Analysis screen, and allows you to change how your data is displayed.
For more info on view options check out “Viewing Run Data” on page 295 for cIEF applications or page 205
for CE-SDS applications, and “Using Groups” on page 306 for cIEF applications or page 216 for CE-SDS applications.
Instrument Menu
The Instrument menu is only available when the software is connected directly to your instrument. You can
lean more about instrument control options in Chapter 10, “Controlling Maurice, Maurice C. and Maurice S.“
Window Menu
The Window menu lets you to switch between the Batch, Run Summary or Analysis screens, and restore
screens to the default layout.
• Batch - Displays the Batch screen where you create, view, and edit batches.
User Guide for Maurice, Maurice C. and Maurice S.
page 28 Chapter 4: Compass for iCE Overview
• Run Summary - Displays the Run Summary screen which lets you view the status of a batch in progress.
• Analysis - Displays the Analysis screen that lets you view electropherograms and results and change
analysis parameters
• Default Layout - Restores the individual panes in the current screen back to their default size and
location.
Help Menu
The Help menu gives you access to Help, software updates, release notes and other software info.
• User Guide - Displays the User Guide for Maurice, Maurice C. and Maurice S.
• Check for Updates - Automatically checks to see if a new version of Compass for iCE is available.
• Release Notes - Displays the software release notes for the current and prior versions.
• Compass for iCE Log - Displays the software log file.
• About Compass for iCE - Displays the software version and build information.
Changing the Compass for iCE Main Window Layout
You can easily resize the main window and the individual panes in each screen. Screen panes can also be
moved outside of the main window.
Resizing the Main Compass for iCE Window
To resize the main window, roll the mouse over a corner or border until the sizing arrow appears. Then just
click and drag to resize.
User Guide for Maurice, Maurice C. and Maurice S.
Changing the Compass for iCE Main Window Layout page 29
Resizing the Screen Tab
The screen tab can be sized to show all or just some of the screen buttons. To resize, roll the mouse over the
left edge of the tab until the sizing arrow appears, then click and drag to resize. If a screen button is hidden,
a double arrow will display in the tab. Just click to display and select the hidden screen.
Resizing Screen Panes
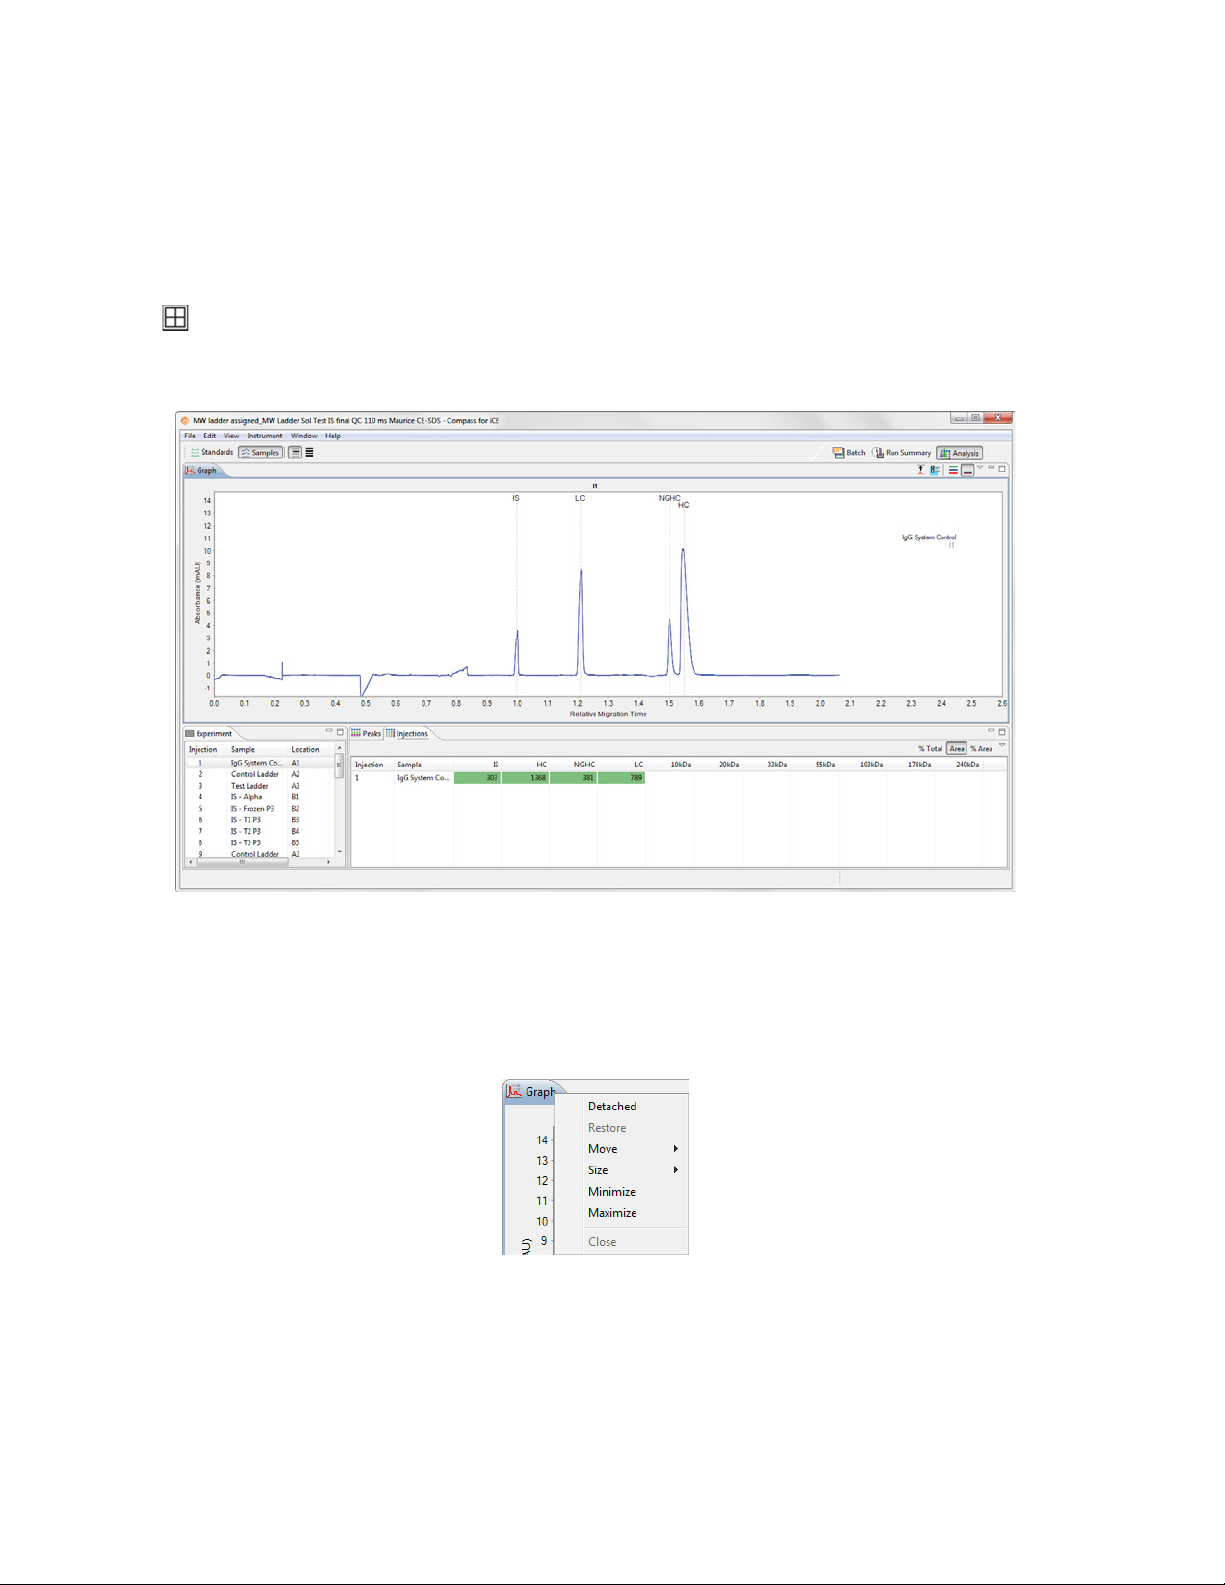
• To re size a pane - Roll the mouse over the pane border until the sizing arrow appears. Then just click
and drag to resize.
• To maximize a pane - Click the maximize button in the upper right corner or double-click the tab.
The other panes in the screen will automatically minimize to pane bars in the task area along the window border.
User Guide for Maurice, Maurice C. and Maurice S.

page 30 Chapter 4: Compass for iCE Overview
• To restore all minimized panes - Click Restore on the minimized pane bar.
• To restore only one minimized pane - Click the pane icon on the minimized pane bar.
• To restore a maximized pane to its original size - Double-click the tab or right click the tab and
click
Restore.
• To restore all panes to their original sizes - Select Window in the main menu and click Default
Layout.
Changing the Location of Screen Panes
Panes can be moved to different locations within a screen.
• To move a pane - Click on its tab and drag it to the new location. As the pane is moved, area guides
will display to assist you in choosing a drop location.
Area guides with a black arrow let you know that if the pane is dropped at that location, it will
be resized and relocated as an individual pane in that area of the screen.
Area guides with a folder let you know that if the pane is dropped at that location, it will be
added as a new tab in an area with one or more pane tabs.
User Guide for Maurice, Maurice C. and Maurice S.
Changing the Compass for iCE Main Window Layout page 31
Area guides with a window let you know that if the pane is dropped at that location, it will be a
separate window outside the Compass for iCE main window.
This example shows the Analysis screen after moving the Graph pane:
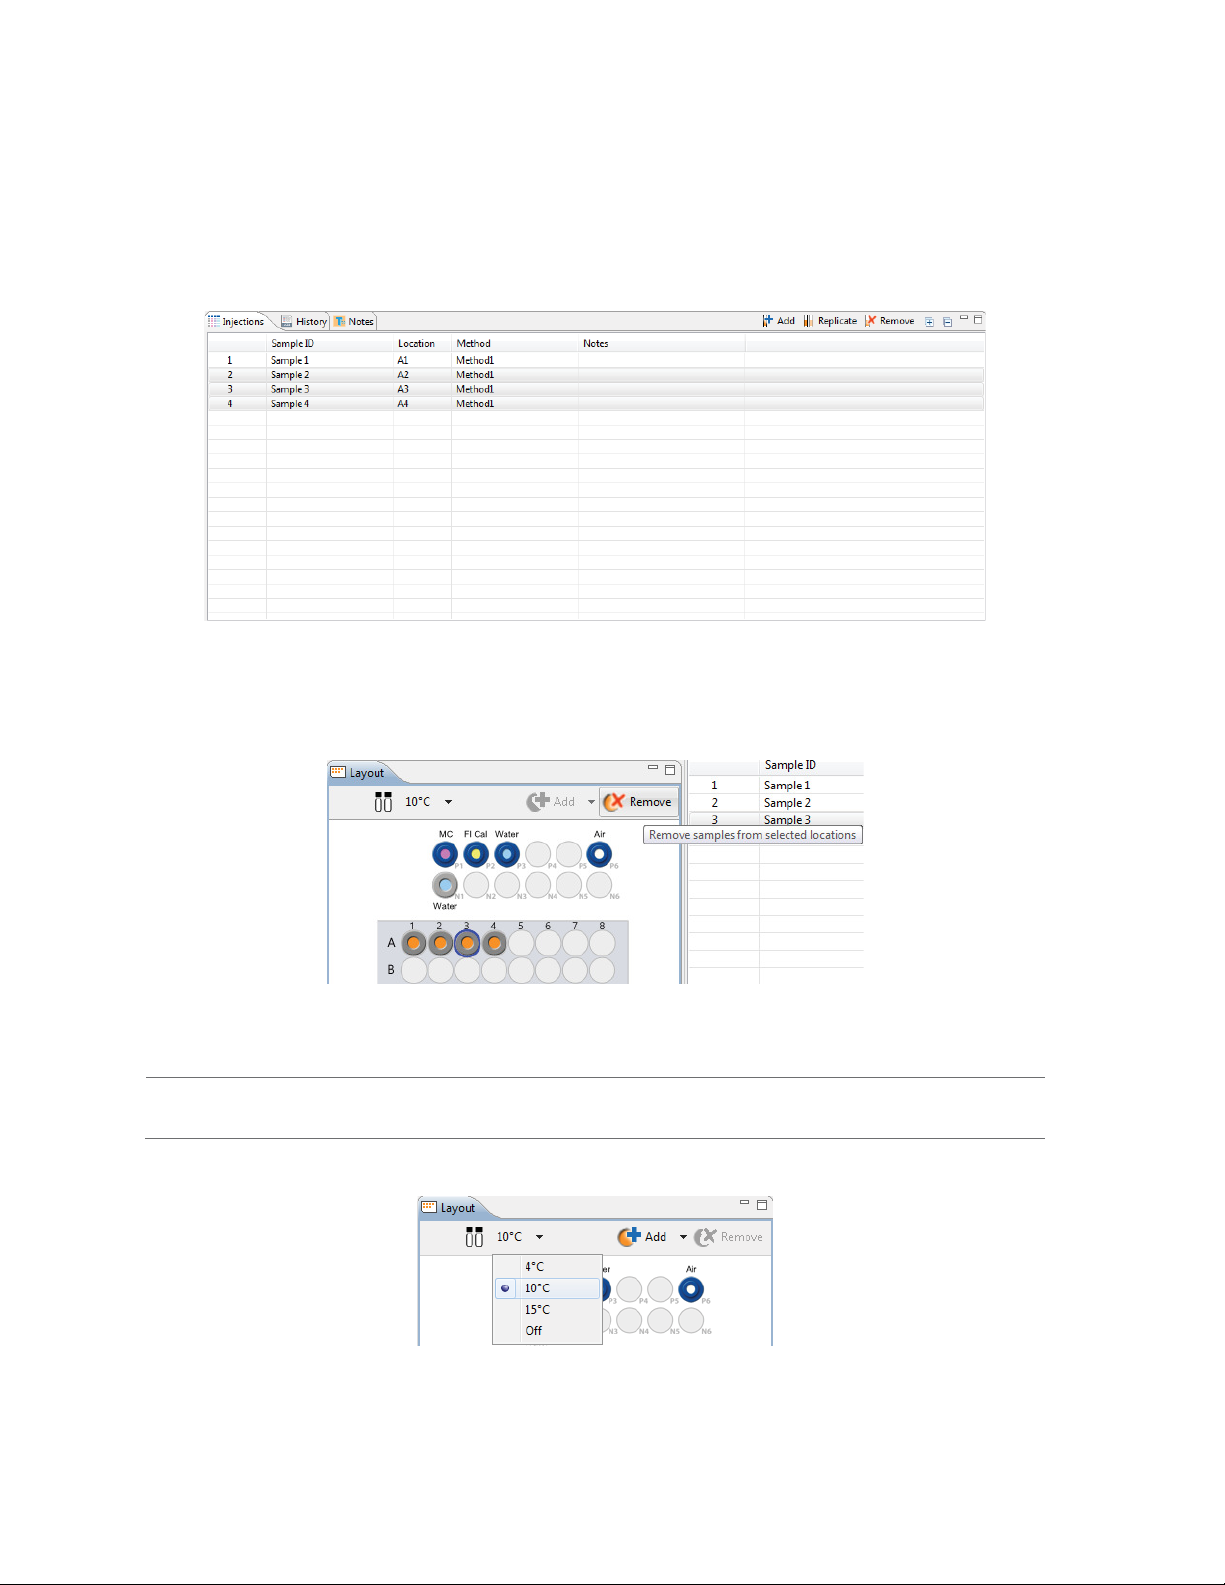
• To detach a pane from the main window - Click on its tab and drag it outside the main Compass for
iCE window or right click the tab and click Detached.
• To move a detached pane back inside the main window - Right click the tab and deselect
Detached.
• To restore all panes to their original locations - Select
Window in the main menu and click
Default Layout.
User Guide for Maurice, Maurice C. and Maurice S.

page 32 Chapter 4: Compass for iCE Overview
Restoring the Main Window to the Default Layout
To restore screen pane sizes and locations to the original Compass for iCE layout, select
main menu and click Default Layout.
Window from the
Software Help
Help and click User Guide to view Maurice Systems User Guide.
Select
Checking for and Installing New Versions of Compass for iCE
The software can automatically check to see if a newer version of software is available. To do this:
1. Make sure the computer being used has an active internet connection.
2. Select
3. Click
4. Follow the on-screen instructions to complete the software installation.
5. Reboot the computer before using the new version of software.
Help and click Check for Updates. If an update is found, a screen will display with the new ver-
sion that’s available.
Finish to start the download and install the update.
Viewing Release Notes
Select Help and click Release Notes to view a PDF with feature updates and bug fixes for new and past ver-
sions of Compass for iCE. We recommend you review these notes whenever a software update is installed.
NOTE: You can contact ProteinSimple Technical Support to request the release notes for new versions of
Compass for iCE before you install it.
User Guide for Maurice, Maurice C. and Maurice S.

Viewing the Software Log page 33
Viewing the Software Log
Help and click Compass Log to view the software log file.
Select
Compass for iCE Version Information
Help and click About Compass for iCE to view the software version and build number information.
Select
User Guide for Maurice, Maurice C. and Maurice S.

page 34 Chapter 4: Compass for iCE Overview
Directory and File Information
The main Compass for iCE directory is located in the Program Files folder, and also contains PDF files of the
User Guide for Maurice, Maurice C. and Maurice S.
Batch and run files are located in the Documents folder in the User directory on your computer:
• Batches Folder - Contains all batch files that you’ve saved.
• New Batches Folder - Contains Maurice batch template files.
• Runs Folder - Contains all batch data files. Data is automatically written to this folder.
User Guide for Maurice, Maurice C. and Maurice S.

Directory and File Information page 35
NOTE: When a Compass for iCE software update is performed, the template s in the New Batch folder are
overwritten. If you have customized these batches, we recommend saving them in a unique subfolder
prior to updating the software, then transferring them back to the New Batch folder after the update to
avoid losing your customizations.
File Types
These file types are used by Compass for iCE:
• Batch Files - Use a *.batch file extension.
• Run Files - Use a *.mbz file extension. The default file format for run files is Date_Time_BatchName.
An example run file name would be 2016-01-28_18-50-53_CE-SDS.mbz.
• Analysis Settings Files - Exported analysis settings files use a *.settings file extension.
User Guide for Maurice, Maurice C. and Maurice S.

page 36 Chapter 4: Compass for iCE Overview
User Guide for Maurice, Maurice C. and Maurice S.

Chapter 5:
cIEF Batches
Chapter Overview
• Batch Screen Overview
• Opening a Batch
page 37
• Creating a New Batch
• Viewing Replicate Injections
•Batch History
• Making Changes to a Batch
• Viewing and Editing Batches in Completed Runs
•Batch Reports
User Guide for Maurice, Maurice C. and Maurice S.

page 38 Chapter 5: cIEF Batches
Batch Screen Overview
You can use the Batch screen to create, view, and edit batches. To get to this screen, click the
tab:
Batch Screen Panes
The Batch screen has five panes:
• Layout - Displays a map of either the 96-well plate or 48-vial tray of batch sample locations.
• Injections - Lists the injections, sample ID, sample locations and methods that Maurice or Maurice C.
will execute for each sample in the batch.
• History - Lists all batch file events from initial creation to the most current update.
• Notes - Lets you enter specific information about your batch.
• Methods - Lets you create methods and enter method parameters used in the batch.
Batch screen
User Guide for Maurice, Maurice C. and Maurice S.

Batch Screen Overview page 39
Software Menus Active in the Batch Screen
These main menu items are active in the Batch screen:
•File
•Edit
• Instrument (when the software is connected to Maurice or Maurice S.)
•Window
•Help
File Menu
These File menu options are active:
• New Batch - Creates a new batch from a starter template.
• Open Batch - Opens an existing batch.
• Save/Save As - Saves the open batch.
• Batch Report - Exports a table of sample and method details for each injection in the batch as a PDF
file.
• Exit - Closes Compass for iCE.
User Guide for Maurice, Maurice C. and Maurice S.

page 40 Chapter 5: cIEF Batches
Edit Menu
The following Edit menu options are active in the Batch screen:
• Cut - Cuts the information currently selected.
• Copy - Copies the information currently selected.
• Paste - Pastes the copied information.
NOTE: Cut, Copy and Paste work differently depending on the pane you’re in. How and when you can use
them is described throughout the chapter.
• Plate Layout - Lets you select between a 96-well plate or a 48-vial tray to run samples in.
• Default Analysis - Displays the default settings that will be used to analyze the data generated with
your batch.
• Preferences - Lets you set and save your preferences for data export, graph colors, grouped data and
Twitter settings. See Chapter 13, “Setting Your Preferences“ for more information.
User Guide for Maurice, Maurice C. and Maurice S.

Opening a Batch page 41
Opening a Batch
To open an existing batch:
1. Select
File in the main menu and click Open Batch.
2. A list of the last five batches opened will display. Select one of those or click Browse to open the
Batches folder and select a different one.
3. To make changes to the batch, see the steps in “Creating a New Batch” on page 42. When you’re done,
select
File from the main menu and click Save.
User Guide for Maurice, Maurice C. and Maurice S.

page 42 Chapter 5: cIEF Batches
Creating a New Batch
To create a new batch, we recommend that you use one of the template methods and make any necessary
modifications from there.
Step 1 - Open a Template Batch
1. Select File in the main menu and click New Batch:
NOTE: If you’re using a Maurice system, both cIEF and CE-SDS template batches are available in the menu.
2. Select
Maurice cIEF. A batch using the default method will display.
User Guide for Maurice, Maurice C. and Maurice S.

Creating a New Batch page 43
Step 2 - Assign Your Samples
The Layout pane shows the default locations of where batch reagent should be placed in your Maurice system’s samples and reagents platform, and a map of either the 96-well plate or the 48-vial tray used for samples.
The same reagent locations are used for every batch:
• P1 - 0.5% Methyl Cellulose with
blue pressure cap
• P2 - Fluorescence Calibration Standard with blue pressure cap
• P3 - Water vial with blue pressure cap
• P6 - Empty vial (air) with blue pressure cap
• N1 - Water vial with clear screw cap
1. To assign samples, select 48 vials or a 96-well plate depending on what you’re running. Clicking on the
vial/plate icon toggles between formats.
2. To select samples:
• Add samples and select methods later: Use your mouse to highlight the well or vial positions
your samples are located in, then click
Add. For this example we’re using vials.
User Guide for Maurice, Maurice C. and Maurice S.

page 44 Chapter 5: cIEF Batches
NOTE: The template batch automatically adds a sample in well or vial A1 by default, but if you don’t have
a sample in this position you can remove it after you’ve added new positions for your samples.
• Add samples with preassigned methods: Highlight the well or vial positions your samples are
located in, then right-click and select a method.
Either option of adding samples populates the Injections table:
User Guide for Maurice, Maurice C. and Maurice S.
Creating a New Batch page 45
To remove samples, just highlight the ones you want to remove and click
Remove. They’ll also be
removed in the Injections table. You can also right-click well(s) or vial(s) in the Layout pane and click
Remove Sample(s).
3. The sample platform is temperature controlled with a default setting of 10 °C. To change the temperature or turn it off, click the
down arrow next to the temperature and select an option.
NOTE: The two reagent rows are kept at room temperature.
User Guide for Maurice, Maurice C. and Maurice S.

page 46 Chapter 5: cIEF Batches
Step 3 - Assign Your Method Parameters
NOTE: We recommend using the default method parameters. Please see the Maurice cIEF Method Development Guide for more information on method optimization.
The Methods pane lists all of the methods used in a batch. You can add and remove methods here and
change method parameters.
1. In the Methods table, click the first cell in the Name column and enter a new method name if needed.
2. Click the first cell in the Separation column, then click the selection button
[...] to set the pre-focusing
and focusing time (in minutes) and voltage (V ).
• To change time and voltage parameters: Just click in a cell under Time or Voltage and type
the new value(s).
• To add a profile step: Click
Add. A new row will be added in the table. Then just type in a load
time (in minutes) and voltage value (in V).
• To remove a profile step: Select the row you want to remove and click
Remove.
User Guide for Maurice, Maurice C. and Maurice S.

Creating a New Batch page 47
3. Click the first cell in the Detection column the selection button [...] to set your exposure times for
absorption and fluorescence detection modes.
• To change the exposure time: Just click in a cell under
Exposure and type the new value(s) in
seconds.
NOTES:
The first exposure is an instrument default setting and can’t be changed.
Fluorescence is the default detection for the remaining exposures and can’t be changed.
• To add a profile step: Click
Add. A new row will be added in the table. Then just type in an expo-
sure time (in seconds).
• To remove a profile step: Select the row you want to remove and click
Remove.
4. Click the first cell in the Sample Load(s) column and set the load time in seconds.
NOTE: We recommend using the default Sample Load time of 55 seconds. Please contact ProteinSimple
Technical Support if you have questions on the Sample Load time to use for your application.
User Guide for Maurice, Maurice C. and Maurice S.

page 48 Chapter 5: cIEF Batches
5. Click the first cell in the pI Markers column to select pI markers. Add new markers or remove existing
ones then click
OK.
NOTE: When you edit the pI markers in the method for a batch, Compass for iCE automatically creates a
Markers group in the pI Markers Analysis settings for you.
• To add a pI marker: Click
Add. A new row will be added in the table. Then just type in a pI and a
position (in pixels).
• To remove a pI marker: Select the row you want to remove and click
Remove.
6. Optional: Click the first cell in the Ampholytes column and enter the ampholytes you’re using.
User Guide for Maurice, Maurice C. and Maurice S.

Creating a New Batch page 49
7. Optional: Click the first cell in the Additives column and enter any additives you’re using.
8. You can now:
•Click
New in the upper right corner of the Methods pane to add a new one if you want to use dif-
ferent methods for different samples. Then just repeat the steps above for the new method.
• Make updates to the remaining methods by repeating the prior steps.
• Select a method and click
Remove in the upper right corner of the Methods pane to delete it.
Step 4 - Set Up Your Injections
The Injection pane lists all sample injections for the batch. Any samples that were added in “Step 2 - Assign
Your Samples” are automatically added to this list.
Selecting an injection in the table also selects the sample the injection will be made from in the plate or vial
map in the Layout pane and vice-versa.
User Guide for Maurice, Maurice C. and Maurice S.

page 50 Chapter 5: cIEF Batches
1. To add sample names, click the
Sample ID cell for the injection and type a name.
The sample name also displays when you hover the mouse over the sample in the plate or vial map:
2. Assign your methods to each injection. Just click the
Method cell for the injection and select a method
from the drop down menu. If you added your samples with pre-assigned methods and don’t need to
make any changes, skip to the next step.
User Guide for Maurice, Maurice C. and Maurice S.

Creating a New Batch page 51
Hovering over a method name displays the method parameters:
3. You can add or remove injections as needed using a few different options. If you don’t need to make any
changes here, just skip to the next step.
• To add sequential replicate injections: Highlight an injection and click
Replicate. A new injec-
tion will be added under the row you selected
• To add injections at the end of the batch: Click on any sample position in the Layout pane or
sample injection in the Injection table and click
Add. A new injection using the same sample will
be added to the end of the table. Assign the method if needed.
• To copy and paste injections: Right-click on an injection in the Injection table and select
Click on the injection number above where you want to insert the copied injection, right click
and select
Paste. The copied injection will be inserted under the row you selected.
Step 5 - Add Batch Notes (Optional)
1. Click on the
2. Click in the notes area and type any information you want to add about your batch.
User Guide for Maurice, Maurice C. and Maurice S.
Notes pane.
Copy.

page 52 Chapter 5: cIEF Batches
Step 6 - Modify Default Analysis Parameters (Optional)
You can preset the parameters used to analyze data generated with the batch. We recommend using the
default parameters for cIEF applications, but if you need to modify parameters:
1. Select
Edit from the main menu and click Default Analysis. The following screen will display:
2. Change the parameters you want to, then click OK. For detailed information on analysis parameters,
please refer to “Analysis Settings Overview” on page 334.
User Guide for Maurice, Maurice C. and Maurice S.

Viewing Replicate Injections page 53
Step 7 - Save Your Batch
1. Once all of your sample, method and injection info is entered, select
on the batch if you want, then click Save.
2. Enter a name for your batch then click
Save.
File > Save. Enter any comments
Viewing Replicate Injections
Injections with replicates have an arrow next to the injection number. You can expand or collapse the list of
replicate injections by toggling the arrow:
• To show all replicate injections in the batch, click the
User Guide for Maurice, Maurice C. and Maurice S.
Expand All Injections button.
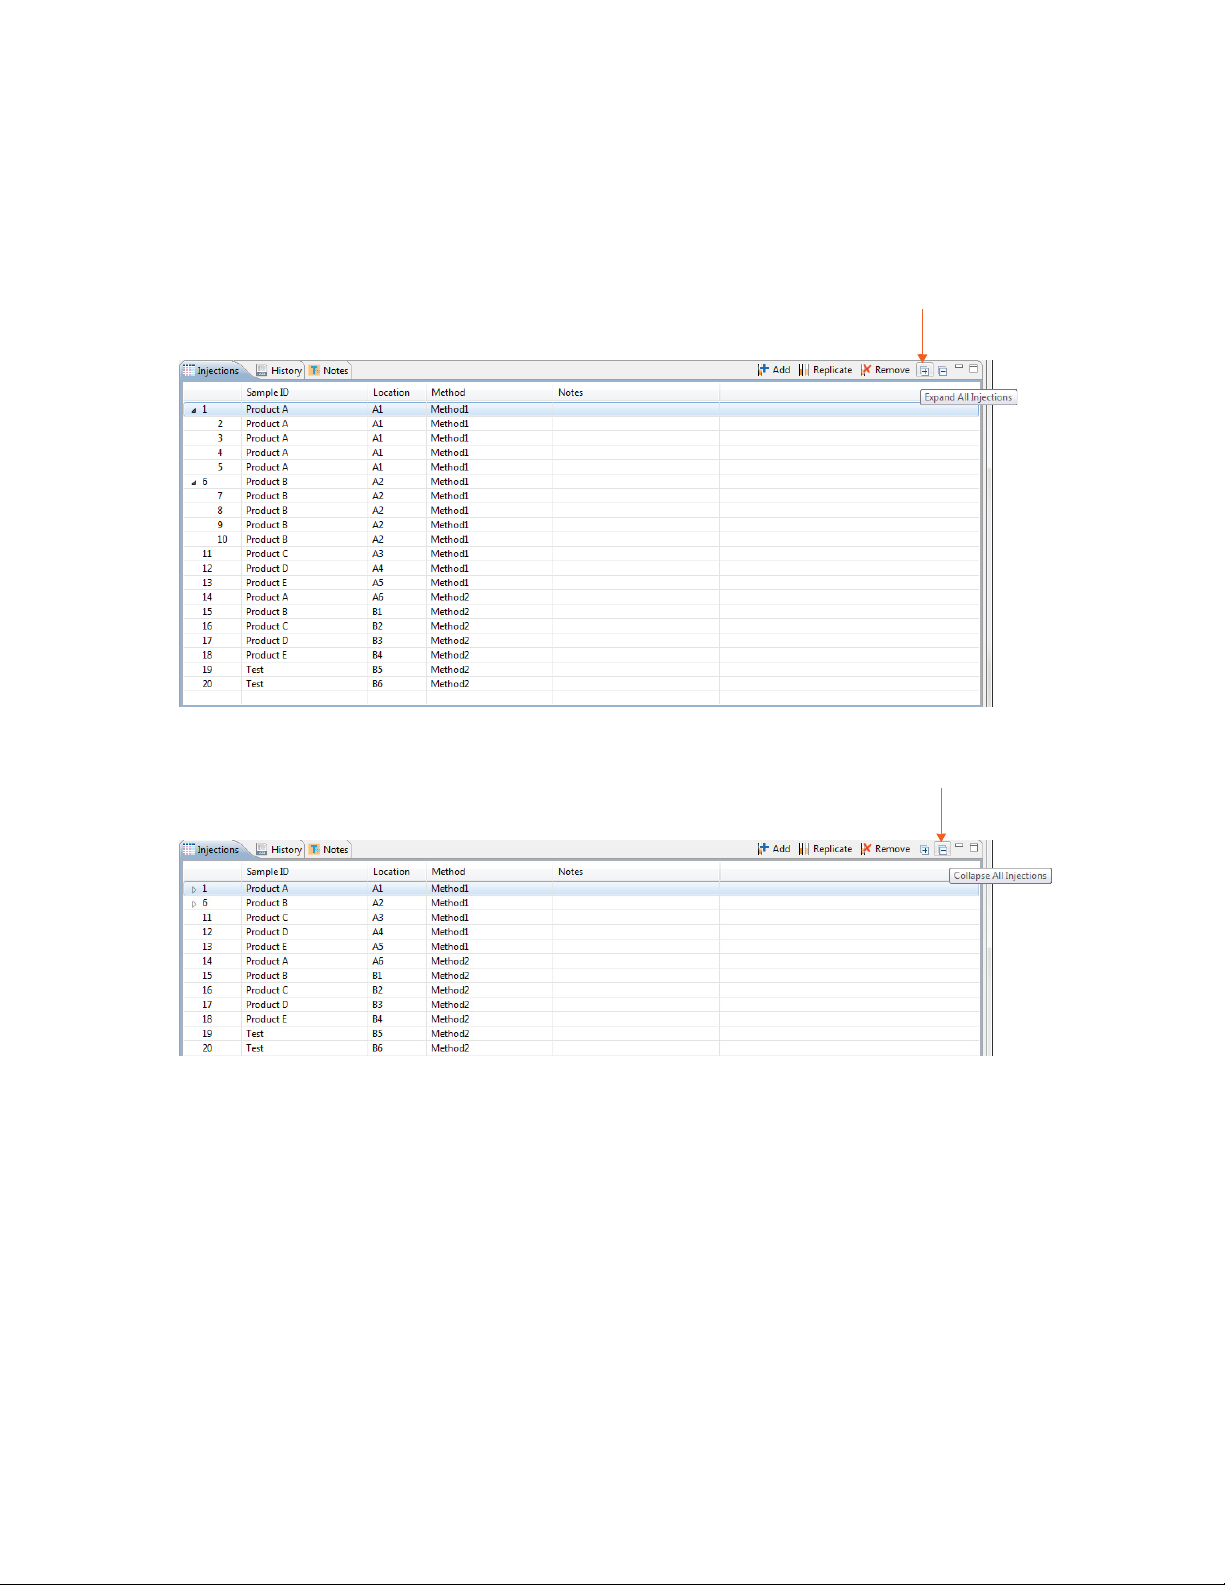
page 54 Chapter 5: cIEF Batches
• To hide all replicate injections in the batch, click the
Collapse All Injections button.
Batch History
Clicking on the History pane shows the batch event history, starting with the date and time the batch was
created through the most current event. Clicking on a row in the table displays the full event details in the
box under the table.
User Guide for Maurice, Maurice C. and Maurice S.

Making Changes to a Batch page 55
• Date: Date and time of the batch event.
• User Name: User that initiated the event. User names only display if you’re using the Access Con-
trol feature to help satisfy the 21CFR Part 11 data security requirements. Go to “Enabling Access
Control” on page 391 to learn how to set it up.
• Message: Description of the event that took place.
• Comment: Comments entered by the user when the batch was saved.
You can copy the information in the History pane to use in other documents:
1. Click the
2. Click
3. Open a document and click
History pane to make sure it’s active.
Edit in the main menu and select Copy.
Paste.
Making Changes to a Batch
1. Select
User Guide for Maurice, Maurice C. and Maurice S.
File in the main menu and click Open Batch.

page 56 Chapter 5: cIEF Batches
2. A list of the last five batches opened will display.
• Select one of these files or click
• To open a batch used in a run file, click
Browse to open the Batch folder and select a different one.
Browse. Go to the Run folder in the Compass for iCE direc-
tory and select the run file that uses the batch you want to edit.
3. To make changes to the batch, see the steps in “Creating a New Batch” on page 42. Then select
the main menu and click Save or Save As.
Viewing and Editing Batches in Completed Runs
1. Click the
2. After the run opens, click the
Analysis screen and open your run file(s).
Batch screen to view the batch used with the run.
File from
If you opened more than one run file, you can switch between viewing batches for each file. Just click
the
down arrow in the Run box and select the batch you want to view from the drop down list.
3. In completed run files, you can only make edits to the sample and method names in a batch, and these
changes are saved to the run file only. Update sample and method names as needed.
4. Click the
Analysis screen. Then select File from the main menu and click Save or Save As to save the
new changes to the run file.
User Guide for Maurice, Maurice C. and Maurice S.

Batch Reports page 57
Batch Reports
You can export a PDF file of sample and method details for each injection in the batch for completed run
files.
1. Go to the
Analysis or Run Summary screen, then click File > Open Run and select a run file (if you
don’t have one open already).
2. After the run opens, go to the
3. Select
File from the main menu and click Batch Report.
Batch screen.
4. The report name defaults to the run file name. If you want to change it, type in the Report Name box to
make updates.
5. The Batch Report PDF is exported to the Runs folder in the Compass for iCE directory. It’ll be in a folder
with the report name used in the prior step. When the reports are done, the folder opens for you automatically.
User Guide for Maurice, Maurice C. and Maurice S.

page 58 Chapter 5: cIEF Batches
Here’s an example Batch Report:
User Guide for Maurice, Maurice C. and Maurice S.

Chapter 6:
CE-SDS Batches
Chapter Overview
• Batch Screen Overview
• Opening a Batch
page 59
• Creating a New Batch
• Viewing Replicate Injections
•Batch History
• Making Changes to a Batch
• Viewing and Editing Batches in Completed Runs
•Batch Reports
User Guide for Maurice, Maurice C. and Maurice S.

page 60 Chapter 6: CE-SDS Batches
Batch Screen Overview
You can use the Batch screen to create, view, and edit batches. To get to this screen, click the
tab:
Batch Screen Panes
The Batch screen has five panes:
• Layout - Displays a map of either the 96-well plate or 48-vial tray of batch sample locations.
• Injections - Lists the injections, sample ID, sample locations and methods that Maurice or Maurice S.
will execute for each sample in the batch.
• History - Lists all batch file events from initial creation to the most current update.
• Notes - Lets you enter specific information about your batch.
• Methods - Lets you create methods and enter method parameters used in the batch.
Batch screen
User Guide for Maurice, Maurice C. and Maurice S.

Batch Screen Overview page 61
Software Menus Active in the Batch Screen
These main menu items are active in the Batch screen:
•File
•Edit
• Instrument (when the software is connected to Maurice or Maurice S.)
•Window
•Help
File Menu
These File menu options are active:
• New Batch - Creates a new batch from a starter template.
• Open Batch - Opens an existing batch.
• Save/Save As - Saves the open batch.
• Batch Report - Exports a table of sample and method details for each injection in the batch as a PDF
file. This menu item is only active for batches in completed runs.
• Exit - Closes Compass for iCE.
User Guide for Maurice, Maurice C. and Maurice S.

page 62 Chapter 6: CE-SDS Batches
Edit Menu
The following Edit menu options are active in the Batch screen:
• Cut - Cuts the information currently selected.
• Copy - Copies the information currently selected.
• Paste - Pastes the copied information.
NOTE: Cut, Copy and Paste work differently depending on the pane you’re in. How and when you can use
them is described throughout the chapter.
• Plate Layout - Lets you select between a 96-well plate or a 48-vial tray to run samples in.
• Default Analysis - Displays the default settings that will be used to analyze the data generated with
your batch.
• Preferences - Lets you set and save your preferences for data export, graph colors, grouped data and
Twitter settings. See Chapter 13, “Setting Your Preferences“ for more information.
User Guide for Maurice, Maurice C. and Maurice S.

Opening a Batch page 63
Opening a Batch
To open an existing batch:
1. Select
File in the main menu and click Open Batch.
2. A list of the last five batches opened will display. Select one of those or click Browse to open the
Batches folder and select a different one.
3. To make changes to the batch, see the steps in “Creating a New Batch” on page 64. When you’re done,
select
File from the main menu and click Save.
User Guide for Maurice, Maurice C. and Maurice S.

page 64 Chapter 6: CE-SDS Batches
Creating a New Batch
To create a new batch, we recommend that you use one of the template methods and make any necessary
modifications from there.
Step 1 - Open a Template Batch
1. Select File in the main menu and click New Batch:
NOTE: If you’re using a Maurice system, both cIEF and CE-SDS template batches are available in the menu.
2. Select
Maurice CE-SDS. A batch using the default method will display.
User Guide for Maurice, Maurice C. and Maurice S.

Creating a New Batch page 65
Step 2 - Assign Your Samples
The Layout pane shows the default locations of where batch reagent should be placed in your Maurice system’s samples and reagents platform, and a map of either the 96-well plate or the 48-vial tray used for samples.
The same reagent locations are used for every batch:
• P1 - Conditioning Solution 1 with
orange pressure cap
• P2 - Conditioning Solution 2 with orange pressure cap
• P3 - DI water with orange pressure cap
• P4 - Separation Matrix with orange pressure cap
• P5 - Wash Solution vial with orange pressure cap
• P6 - Empty vial (air) with orange pressure cap
• N1 - Wash Solution vial with clear screw cap
• N2 - Wash Solution vial with clear screw cap
• N4 - Running Buffer - Bottom with clear screw cap
1. To assign samples, select a 96-well plate or 48 vials depending on what you’re running. Clicking on the
vial/plate icon toggles between formats.
User Guide for Maurice, Maurice C. and Maurice S.

page 66 Chapter 6: CE-SDS Batches
2. To select samples:
• Add samples and select methods later: Use your mouse to highlight the well or vial positions
your samples are located in, then click
Add. For this example we’re using a 96-well plate.
NOTE: The template batch automatically adds a sample in well or vial A1 by default, but if you don’t have
a sample in this position you can remove it after you’ve added new positions for your samples.
• Add samples with preassigned methods: Highlight the well or vial positions your samples are
located in, then right-click and select a method.
Either option of adding samples populates the Injections table:
User Guide for Maurice, Maurice C. and Maurice S.

Creating a New Batch page 67
To remove samples, just highlight the ones you want to remove and click
Remove. They’ll also be
removed in the Injections table. You can also right-click well(s) or vial(s) in the Layout pane and click
Remove Sample(s).
3. Compass for iCE can monitor the current during a separation for you, stop it if the current drops below
the minimum value and reinject the sample for you automatically. Reinjections are enabled by default,
but if you don’t want to use this feature just click the reinject icon to toggle it off.
NOTES:
If a sample was reinjected, the injection row will be flagged in the Injections pane in the Run Summary
screen. See “Injection Flags” on page 158 for more info.
A maximum of 10 reinjections are allowed per batch.
User Guide for Maurice, Maurice C. and Maurice S.

page 68 Chapter 6: CE-SDS Batches
4. The sample platform is temperature controlled with a default setting of 10 °C. To change the temperature or turn it off, click the down arrow next to the temperature and select an option.
NOTE: The two reagent rows are kept at room temperature.
Step 3 - Assign Your Method Parameters
NOTE: There are three default methods. We recommend using the default method parameters for the
listed sample types. Please see the Maurice CE-SDS Application Guide for more information on method
optimization.
The Methods pane lists all of the methods used in a batch. You can add and remove methods here and
change method parameters.
1. In the Methods table, click the first cell in the Name column and enter a new method name if needed.
User Guide for Maurice, Maurice C. and Maurice S.

Creating a New Batch page 69
2. Click the first cell in the Sample Load column, then click the selection button [...] to set your sample load
profile time (in seconds) and voltage.
• To change time and voltage parameters: Just click in a cell under Time or Voltage and type
the new value(s).
• To add a profile step: Click
Add. A new row will be added in the table. Then just type in a load
time (in seconds) and voltage value.
• To remove a profile step: Select the row you want to remove and click
3. Click the first cell in the Separation column the selection button
[...] to set your separation profile
Remove.
parameters (in minutes) and voltage.
NOTE: Run your reduced IgG samples and IgG Standard for 25 minutes and the CE-SDS MW Markers for 30
minutes. Run your non-reduced IgG samples and IgG Standard for 35 minutes. The default separation
voltage for all sample types is 5750 volts.
User Guide for Maurice, Maurice C. and Maurice S.

page 70 Chapter 6: CE-SDS Batches
• To change time and voltage parameters: Just click in a cell under
Time or Voltage and type
the new value(s).
• To add a profile step: Click
Add. A new row will be added in the table. Then just type in a load
time (in seconds) and voltage value.
• To remove a profile step: Select the row you want to remove and click
Remove.
4. You can now:
•Click
New in the upper right corner of the Methods pane to add a new one if you want to use dif-
ferent methods for different samples. Then just repeat the steps above for the new method.
• Make updates to the remaining methods by repeating the prior steps.
• Select a method and click
Remove in the upper right corner of the Methods pane to delete it.
Step 4 - Set Up Your Injections
The Injection pane lists all sample injections for the batch. Any samples that were added in “Step 2 - Assign
Your Samples” are automatically added to this list.
Selecting an injection in the table also selects the sample the injection will be made from in the plate or vial
map in the Layout pane and vice-versa.
User Guide for Maurice, Maurice C. and Maurice S.

Creating a New Batch page 71
1. To add sample names, click the
Sample ID cell for the injection and type a name.
The sample name also displays when you hover the mouse over the sample in the plate or vial map:
2. Assign your methods to each injection. Just click the Method cell for the injection and select a method
from the drop down menu. If you added your samples with pre-assigned methods and don’t need to
make any changes, skip to the next step.
User Guide for Maurice, Maurice C. and Maurice S.

page 72 Chapter 6: CE-SDS Batches
Hovering over a method name displays the method parameters:
3. You can add or remove injections as needed using a few different options. If you don’t need to make any
changes here, just skip to the next step.
• To add sequential replicate injections: Highlight an injection and click
Replicate. A new injec-
tion will be added under the row you selected
• To add injections at the end of the batch: Click on any sample position in the Layout pane or
sample injection in the Injection table and click
Add. A new injection using the same sample will
be added to the end of the table. Assign the method if needed.
User Guide for Maurice, Maurice C. and Maurice S.

Creating a New Batch page 73
• To copy and paste injections: Right-click on an injection in the Injection table and select Copy.
Click on the injection number above where you want to insert the copied injection, right click
and select
Paste. The copied injection will be inserted under the row you selected.
Step 5 - Add Batch Notes (Optional)
1. Click on the
Notes pane.
2. Click in the notes area and type any information you want to add about your batch.
Step 6 - Modify Default Analysis Parameters (Optional)
You can preset the parameters used to analyze data generated with the batch. We recommend using the
default parameters for CE-SDS applications, but if you need to modify parameters:
User Guide for Maurice, Maurice C. and Maurice S.

page 74 Chapter 6: CE-SDS Batches
1. Select Edit from the main menu and click Default Analysis. The following screen will display:
2. Change the parameters you want to, then click OK. For detailed information on analysis parameters,
please refer to “Analysis Settings Overview” on page 244.
Step 7 - Save Your Batch
1. Once all of your sample, method and injection info is entered, select
on the batch if you want, then click Save.
User Guide for Maurice, Maurice C. and Maurice S.
File > Save. Enter any comments

Viewing Replicate Injections page 75
2. Enter a name for your batch then click
Save.
Viewing Replicate Injections
Injections with replicates have an arrow next to the injection number. You can expand or collapse the list of
replicate injections by toggling the arrow:
• To show all replicate injections in the batch, click the
Expand All Injections button.
User Guide for Maurice, Maurice C. and Maurice S.

page 76 Chapter 6: CE-SDS Batches
• To hide all replicate injections in the batch, click the
Collapse All Injections button.
Batch History
Clicking on the History pane shows the batch event history, starting with the date and time the batch was
created through the most current event. Clicking on a row in the table displays the full event details in the
box under the table.
User Guide for Maurice, Maurice C. and Maurice S.

Making Changes to a Batch page 77
• Date: Date and time of the batch event.
• User Name: User that initiated the event. User names only display if you’re using the Access Control feature to help satisfy the 21CFR Part 11 data security requirements. Go to “Enabling Access
Control” on page 391 to learn how to set it up.
• Message: Description of the event that took place.
• Comment: Comments entered by the user when the batch was saved.
You can copy the information in the History pane to use in other documents:
1. Click the
2. Click
3. Open a document and click
History pane to make sure it’s active.
Edit in the main menu and select Copy.
Paste.
Making Changes to a Batch
1. Select
User Guide for Maurice, Maurice C. and Maurice S.
File in the main menu and click Open Batch.

page 78 Chapter 6: CE-SDS Batches
2. A list of the last five batches opened will display.
• Select one of these files or click
• To open a batch used in a run file, click
Browse to open the Batch folder and select a different one.
Browse. Go to the Run folder in the Compass for iCE direc-
tory and select the run file that uses the batch you want to edit.
3. To make changes to the batch, see the steps in “Creating a New Batch” on page 64. Then select
the main menu and click Save or Save As.
Viewing and Editing Batches in Completed Runs
1. Click the
2. After the run opens, click the
Analysis screen and open your run file(s).
Batch screen to view the batch used with the run.
File from
If you opened more than one run file, you can switch between viewing batches for each file. Just click
the
down arrow in the Run box and select the batch you want to view from the drop down list.
3. In completed run files, you can only make edits to the sample and method names in a batch, and these
changes are saved to the run file only. Update sample and method names as needed.
4. Click the
Analysis screen. Then select File from the main menu and click Save or Save As to save the
new changes to the run file.
User Guide for Maurice, Maurice C. and Maurice S.

Batch Reports page 79
Batch Reports
You can export a PDF file of sample and method details for each injection in the batch for completed run
files.
1. Go to the
Analysis or Run Summary screen, then click File > Open Run and select a run file (if you
don’t have one open already).
2. After the run opens, go to the
3. Select
File from the main menu and click Batch Report.
Batch screen.
4. The report name defaults to the run file name. If you want to change it, type in the Report Name box to
make updates.
5. The Batch Report PDF is exported to the Runs folder in the Compass for iCE directory. It’ll be in a folder
with the report name used in the prior step. When the reports are done, the folder opens for you automatically.
User Guide for Maurice, Maurice C. and Maurice S.

page 80 Chapter 6: CE-SDS Batches
Here’s an example Batch Report:
User Guide for Maurice, Maurice C. and Maurice S.

Chapter 7:
Running cIEF Applications on
Maurice and Maurice C.
page 81
Chapter Overview
• Before You Throw the Switch
•Power Up
• Running cIEF Applications
• Post-batch Procedures
•Checking Your Data
User Guide for Maurice, Maurice C. and Maurice S.

Before You Throw the Switch page 82
Before You Throw the Switch
Ensure that everyone using Maurice have:
• Received instruction in general safety practices for laboratories.
• Received instruction in specific safety practices for Maurice.
• Received instruction on handling of biohazards (if biohazardous materials are to be used on Maurice).
• Read and understood all Product Inserts and related Safety Data Sheets (SDS).
Power Up
1. Turn on the computer connected to Maurice.
2. Turn on Maurice’s main power switch.
3. Wait for Maurice to initialize. His indicator light will turn from magenta to blue when he’s done.
4. Double-click the Compass for iCE software icon on the computer desktop to open the application.
5. Connect Maurice to Compass for iCE.
Running cIEF Applications
What You’ll Need
• Maurice cIEF Cartridges
• Maurice cIEF Method Development Kit (optional)
• Maurice System Suitability Kit (optional)
• Maurice cIEF Fluorescence Calibration Standard
• Maurice cIEF pI Markers (3.38, 4.05, 5.85, 6.14, 7.05, 8.4, 9.99, or 10.17)
• 0.5% Methyl Cellulose Solution
• 1% Methyl Cellulose Solution
• iCE Electrolyte Kit
• Deionized (DI) water
• Glass reagent vials, 2 mL
• 96-well plate or vials with integrated inserts for samples
•Clear screw caps for vials
User Guide for Maurice, Maurice C. and Maurice S.

Running cIEF Applications page 83
• Blue pressure caps for vials
• P10, P20, P200, P1000 pipettes and tips
• Electrolyte pipette
•Vortexer
• Table-top centrifuge with plate adapter or vial adapter (12 mm, 2 mL vials)
Step 1: Prep Your Markers, Samples and Reagents
NOTES:
You can prepare your samples to run either in 96-well plates or vials.
If you need to seal the 96-well plate during your run, we recommend the 4titude Pierceable Film (PN 4ti0566, 4titude). It can be used in both absorbance and native fluorescence modes. If you’re currently using
X-Pierce adhesive film (PN XP-100, Excel Scientific), we recommend using it for absorbance mode only.
System Suitability Peptide Panel (Optional)
NOTES:
Run the System Suitability Peptide Panel when you need to confirm performance on Maurice.
The System Suitability Peptide Panel is lyophilized. Always reseal the foil bag containing the unopened
tubes with desiccant to prevent moisture absorption.
1. Using scissors, carefully cut the top the package off leaving the sealing strip intact.
2. Take out the strip of tubes and cut one clear tube of lyophilized System Suitability Peptide Panel from
the strip. Return the remaining tubes to the original package, reseal tightly and store at 2-8°C.
3. Pierce the foil on the tube with a clean pipette tip.
4. Add 40 μL of DI water to the tube. Gently resuspend by pipetting up and down to mix.
5. Add 160 μL of the System Suitability Test Mix to the freshly reconstituted Peptide Panel. Gently mix by
pipetting up and down. Transfer this solution to a 1.5 mL microcentrifuge tube.
6. Vortex the tube 3 times, 5 seconds each.
7. Centrifuge the tube at 10,000 xg for 3 minutes to sediment any particulates.
User Guide for Maurice, Maurice C. and Maurice S.

Running cIEF Applications page 84
8. Carefully aspirate the top 160 μL of the solution and pipette it into a sample vial with integrated insert or
well of a 96-well plate. You’ll want to insert the pipette tip all the way to the bottom of the insert or well
when you dispense the solution to avoid introducing bubbles.
NOTE: Make sure to check for and remove any bubbles at the bottom of the sample vial or well.
9. If you're using vials, close the sample vial with a clear screw cap.
Clear screw cap
Sample vial with
integrated inser t
Samples
1. In a microcentrifuge tube, prepare your sample at a concentration of 1 mg/mL in a final volume of 40 μL
in DI water.
2. In a separate tube, prepare IEF Separation Mix containing your chosen pI marker(s).
NOTE: Check out the Method Development Guide for suggested IEF Separation Mix recipes.
3. Add 160 μL of IEF Separation Mix to the 40 μL of your sample.
4. Vortex the tube 3 times, 5 seconds each.
5. Centrifuge the tube at 10,000 xg for 3 minutes to sediment any particulates
6. Carefully aspirate the top 160 μL of the sample and pipette it into your sample vial with integrated insert
or well of a 96-well plate by inserting the pipette tip all the way to the bottom to avoid introducing bubbles.
Note: Make sure to check for and remove any bubbles at the bottom of the sample vial or well.
User Guide for Maurice, Maurice C. and Maurice S.

Running cIEF Applications page 85
7. If you're using vials, close the sample vial with a clear screw cap.
pI Markers
1. Open the vial of lyophilized pI marker by lifting the center tab and gently pulling it back to break the
metal seal. Slowly remove the rubber stopper.
2. Add 210 μL of DI water to the vial.
3. Put the rubber stopper back in the vial and vortex 3 times, 5 seconds each time to completely reconstitute the lyophilized cake. Repeat this step for all pI markers you're using.
4. Aliquot 20 μL of each reconstituted pI marker into separate tubes for storage.
NOTES:
Keep your reconstituted pI markers on ice until you're ready to add them to your sample or IEF Separation
Mix.
If you'll use the pI markers within a month, store the aliquots at 2-8 °C. Otherwise, store the aliquots at
-20 °C. They'll be stable up to 6 months.
5. Use 2 μL of each pI marker for every 200 μL of sample.
Reagents
NOTE: Don't reuse reagents, vials or the clear screw caps. Always keep the blue pressure caps paired with
their respective reagents. If you want to reuse pressure caps, first wash them thoroughly with DI water,
soak overnight in DI water, rinse caps thoroughly with DI water again and air dry them before reusing.
1. Pipette 2 mL of 0.5% Methyl Cellulose into a glass reagent vial, label and close with a
blue pressure cap.
User Guide for Maurice, Maurice C. and Maurice S.

Running cIEF Applications page 86
Pressure cap
Glass reagent vial
2. Pipette 500 μL of Fluorescence Calibration Standard in a glass reagent vial, label and close with a
blue
pressure cap.
3. Pipette 2 mL of DI water into a glass reagent vial, label and close with a
4. Close an empty glass reagent vial with a
blue pressure cap.
blue pressure cap.
5. Pipette 2 mL of DI water into a glass reagent vial, label and close with a clear screw cap.
Clear screw
cap
Glass reagent vial
Step 2: Prep the Cartridge
1. Take the cIEF Cartridge out of its packaging. Save the packaging, you’ll need it later to store the cartridge.
NOTE: When you remove the cartridge from its packaging, make sure the cartridge inlet doesn’t come in
contact with any surface.
User Guide for Maurice, Maurice C. and Maurice S.

Running cIEF Applications page 87
2. Put the cartridge on a flat surface with its electrolyte tanks facing up.
3. Remove the stoppers from both electrolyte tanks.
Anolyte
Tan k
4. Add 2 mL of Catholyte solution to the OH
5. Add 2 mL Anolyte solution to the H
+
electrolyte tank (red port).
NOTE: Make sure you don’t overfill the electrolyte tanks.
Optical
Window
Catholyte
Tan k
-
electrolyte tank (white port).
Cartridge
Inlet
User Guide for Maurice, Maurice C. and Maurice S.

Running cIEF Applications page 88
6. Seal each tank with the rubber stoppers. Use the grey stopper for the OH- tank and the red one for the
H+ tank. If excess liquid comes out of the tank, make sure to wipe it with a laboratory wipe.
Step 3: Install the Cartridge
1. Open Maurice’s door by touching the metal plate on top of the door.
NOTE: The indicator light on Maurice’s front panel will blink rapidly as the door disengages.
2. Swing the door open to access the cartridge slot and the reagents and samples platform. The lights on
either side of the slot will be
User Guide for Maurice, Maurice C. and Maurice S.
orange.

Running cIEF Applications page 89
3. Double check to make sure you’ve got electrolytes loaded and the tanks are properly sealed with the
stoppers.
4. Lift the cartridge and hold it vertically using the finger holds on either side, cartridge inlet down, with
the cIEF label facing you.
5. Gently insert it into the slot. You’ll feel the alignment groove on the cartridge align inside the slot when
you insert it.
User Guide for Maurice, Maurice C. and Maurice S.

Running cIEF Applications page 90
6. Continue to slide the cartridge into the slot until the locking mechanism engages. The lights on either
side of the slot will change to blue once the cartridge is installed correctly.
Step 4: Load Samples and Reagents
1. Place the reagent vials into their respective positions on the sample and reagents platform:
NOTES:
The two reagent rows in Maurice’s reagent and sample platform are kept at room temperature.
Pressure caps are blue and have a raised, ringed surface. They should only be used in Reagent Row P. Use
reagent vials with clear screw caps in Row N.
• P1 - 0.5% Methyl Cellulose with
blue pressure cap
• P2 - Fluorescence Calibration Standard with blue pressure cap
• P3 - Water vial with blue pressure cap
• P6 - Empty vial (air) with blue pressure cap
• N1 - Water vial with clear screw cap
User Guide for Maurice, Maurice C. and Maurice S.
 Loading...