

LED TV
PLED4274A-B
INSTRUCTION MANUAL
Table of Contents
1
Caution
Important Safety Precautions
Top/Side panel diagram
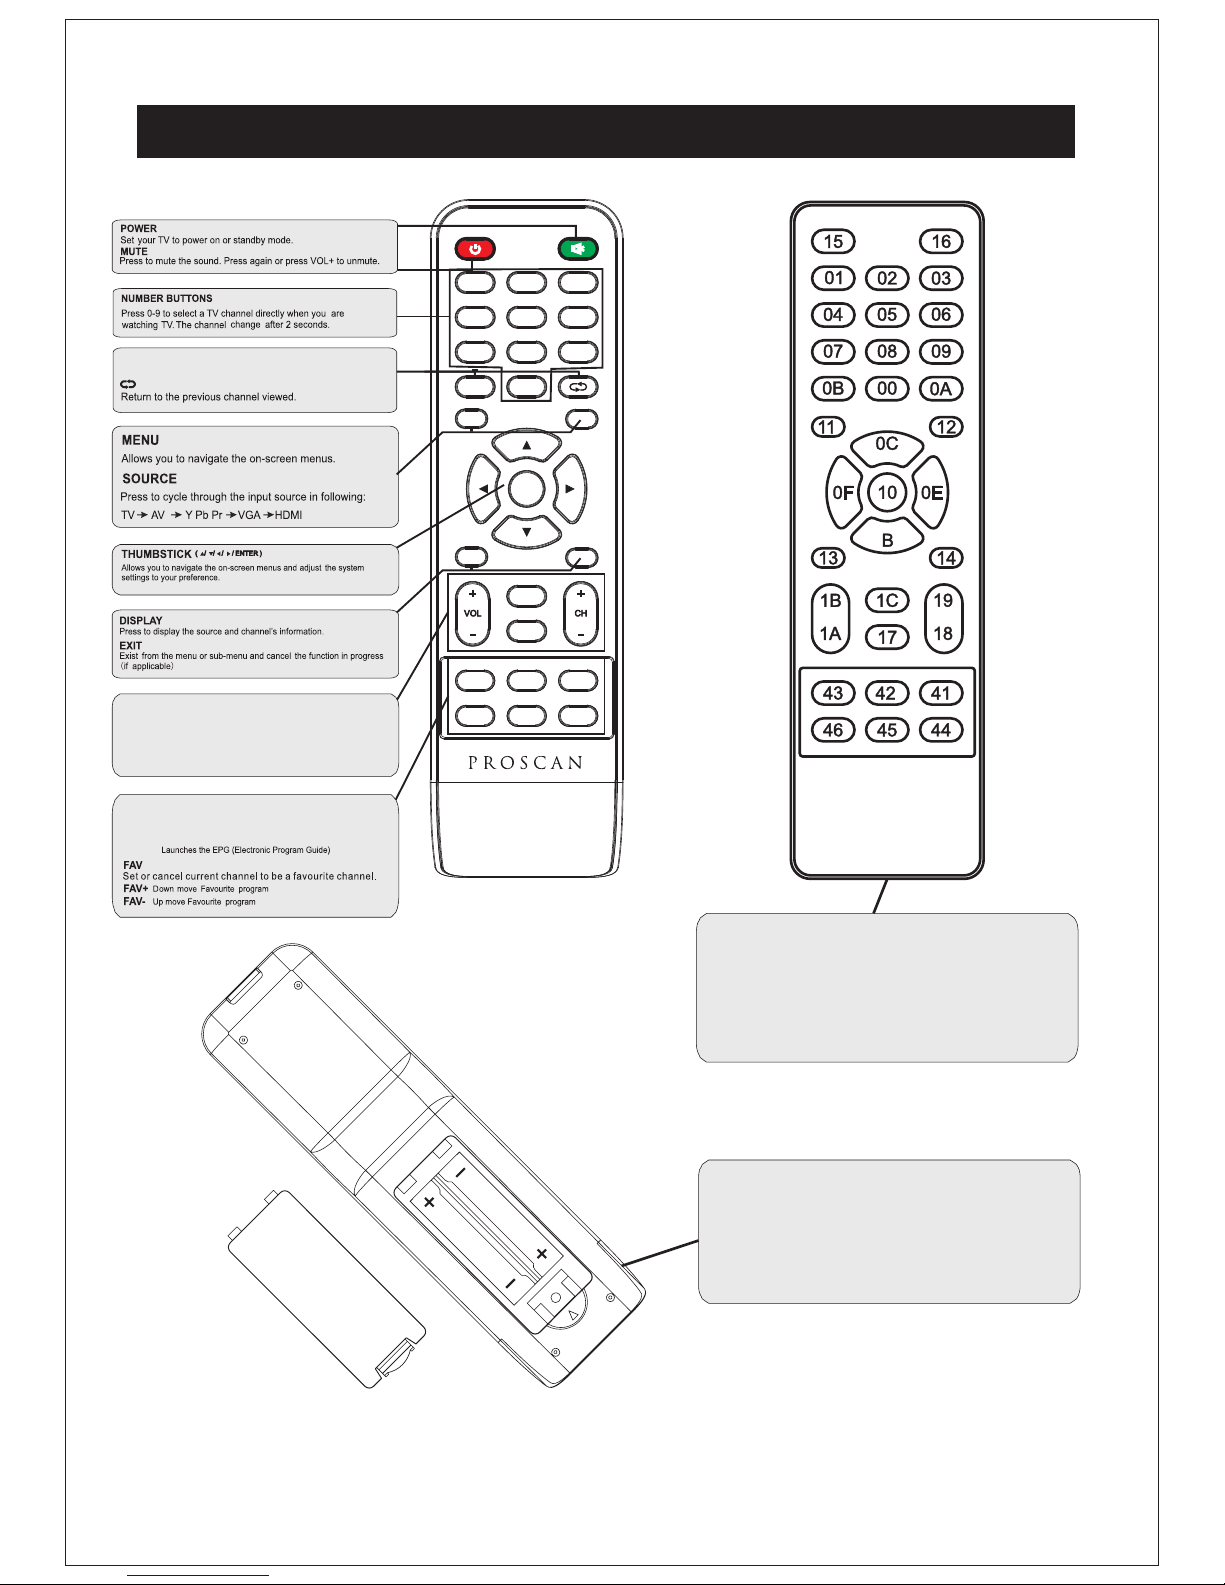
Remote Controller
Battery Installation
Using the Remote Control
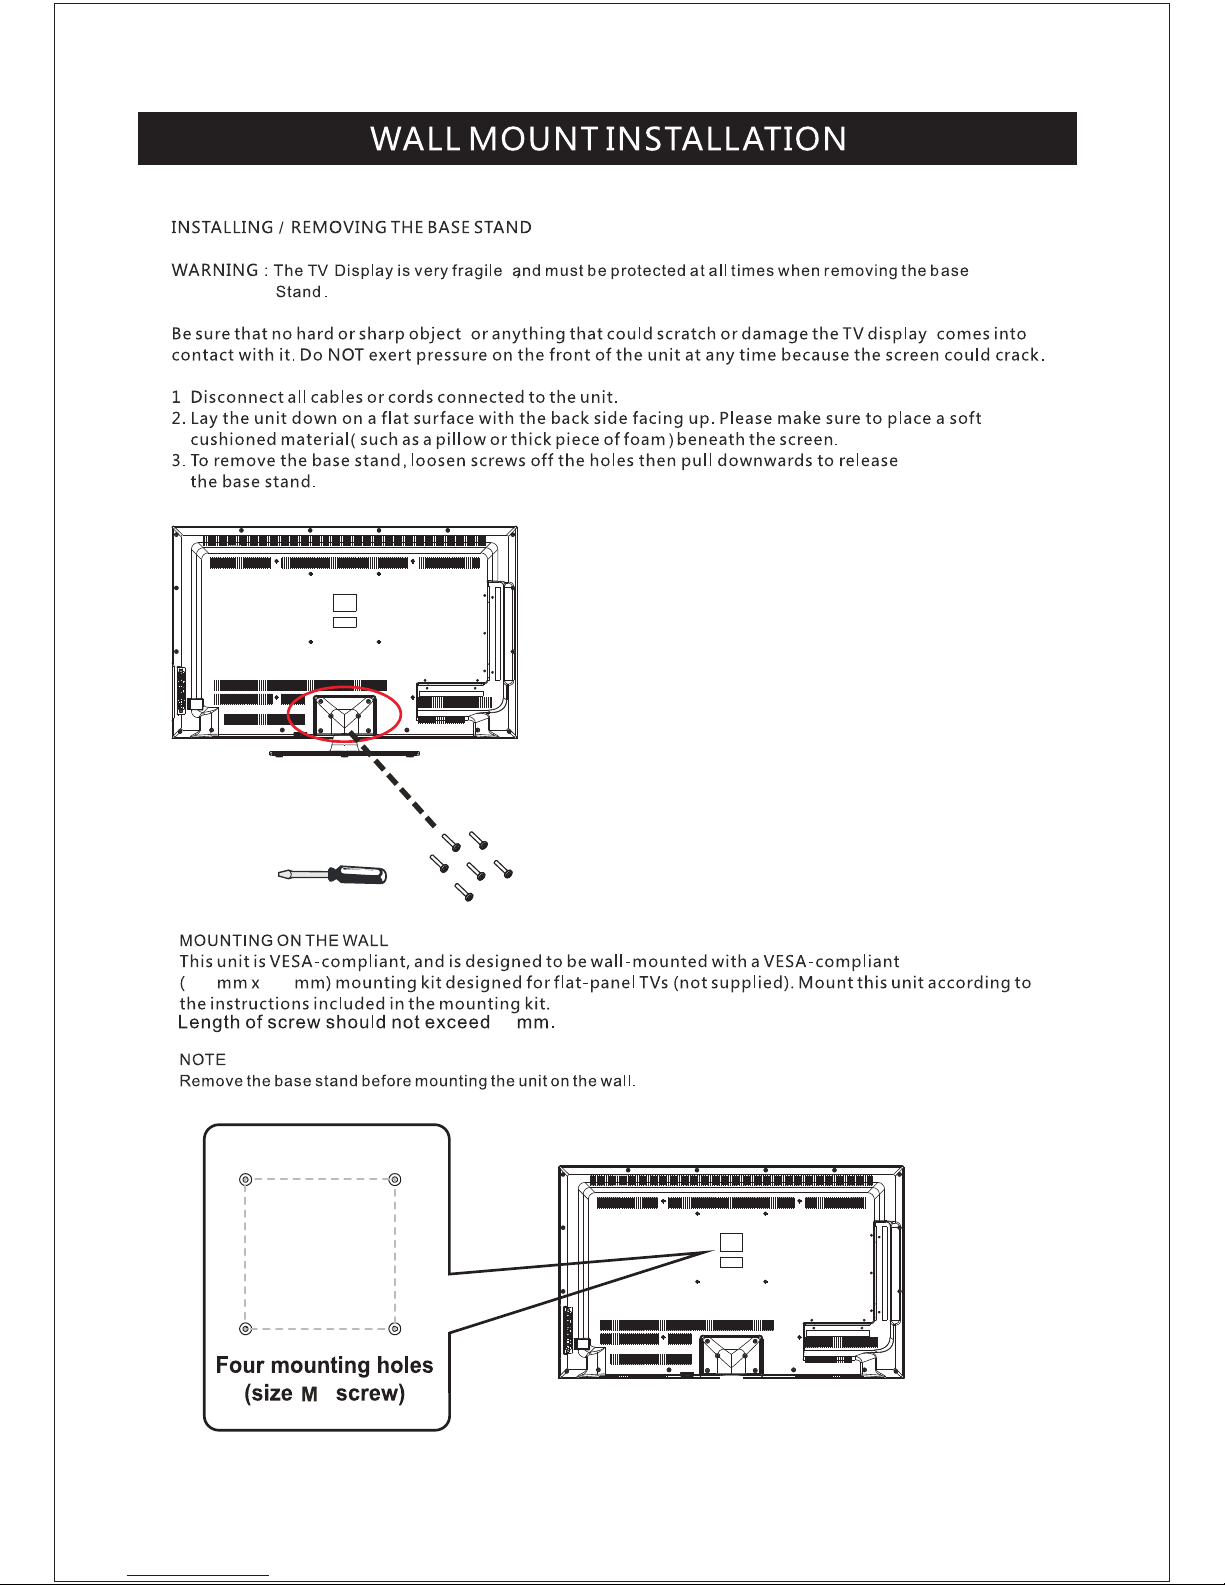
Install TV
Set your TV
Connect Antenna and power
Turn On TV
Help
2
3
4
6-7
8
9
10-11
12
13-25
26
27
TV Bracket assembly
5
Specifications
Select Input Source
Wall Mount In Stallation
24-25
Picture Menu
Sound Menu
Time Menu
Setup Menu
Close Caption
Lock Menu
Channel Menu
PC Menu
13-14
15-16
17
18-19
19
20-21
22-23
The lighte nin g fla sh wi th ar rowhead symb ol, w ith in an e qui lateral triangl e is
intended t o ale rt th e use r to th e presence of un-in sul ate d "da nge rous voltage "
within the p rod uct s enc los ure that may be of suff ici ent m agnitude to const itu te a
risk of elec tri c sho ck to t he pe rso ns.
The exclam ati on po int w ith in an equilateral t ria ngl e is in tend to alert the use r to
the presen ce of i mpo rta nt op erating and maint ena nce ( ser vicing) instruc tio ns in
the litera tur e acc omp any ing the applia nce .
Co r r ect dis p osal of t his Pr o duct
W aste E lec tri cal & E lec tro nic Equipmen t (WE EE)
Your product i s des ign ed an d manufactured wi th hi gh qu ali ty ma terials and
componen ts wh ich c an be r ecy cled and reuse d.
This symbol mea ns th at el ect ric al and electro nic e qui pme nt, a t their end-of -li fe,
should be di spo sed o f sep ara tely from your hous eho ld wa ste .
Please dis pos e of th is eq uip ment at your local co mmu nit y was te
collection/ rec ycl ing c ent re.
In the Europ ean U nio n the re ar e separate col lec tio n sys tem s for u sed electrical
and electr oni c pro duc ts. P lease help us to c ons erv e the e nvi ronment we liv e in!
Caution
2
To reduce t he risk of fi re or elect ric shock , do not expo se thi s app arat us to r ain or m oisture .2
Caution:
These s ervicin g instruc tions are f or use b y qua lifi ed servic e personn el only. To reduce t he risk of
elect ric shock d o not perfo rm any serv icin g oth er tha n tha t cont ain ed in th e operati ng instru ctions.
unless you are q uali fied t o do so.
19) Do no t place any s ources of d anger on th e apparat us (e.g. li quid fill ed obj ect s, lig hte d cand les).
20) Wall or C eiling Mo unting - The applia nce sh oul d be mou nte d to a wal l or ceilin g only as
recom mended by t he manufa cturer.
3
4
8
7.87”
7.87”
6
3.95 ” x 3.95”
100 100

TV Bracket assembly
5
(PWB4*10)
STAND POLE
STAND POLE
STAN D POL E
Indicator on(Red) Standby mode
Indicator on(Green) Power on mode
(IR) Infrared Receiver: Receives IR signals from the remote control.
(Power on/Standby) LED Indicator: Press
to turn on and off
VOL
The functions of the buttons on the are as follows:TV
CH+/-:When watching TV: select channels.
MENU:
1.Press Menu.
2.Press SOURCE to enter.
3.Use CH+/- to shift UP/DOWN.
4.Press SOURCE to confirm, then press VOL+/-to adjust.
5.Press SOURCE to confirm
Top panel diagram
6
SOURCE
MENU
CH+
-
CH
-
VOL
VOL+
SOURCE External signal input selection and confirm the
item selected.
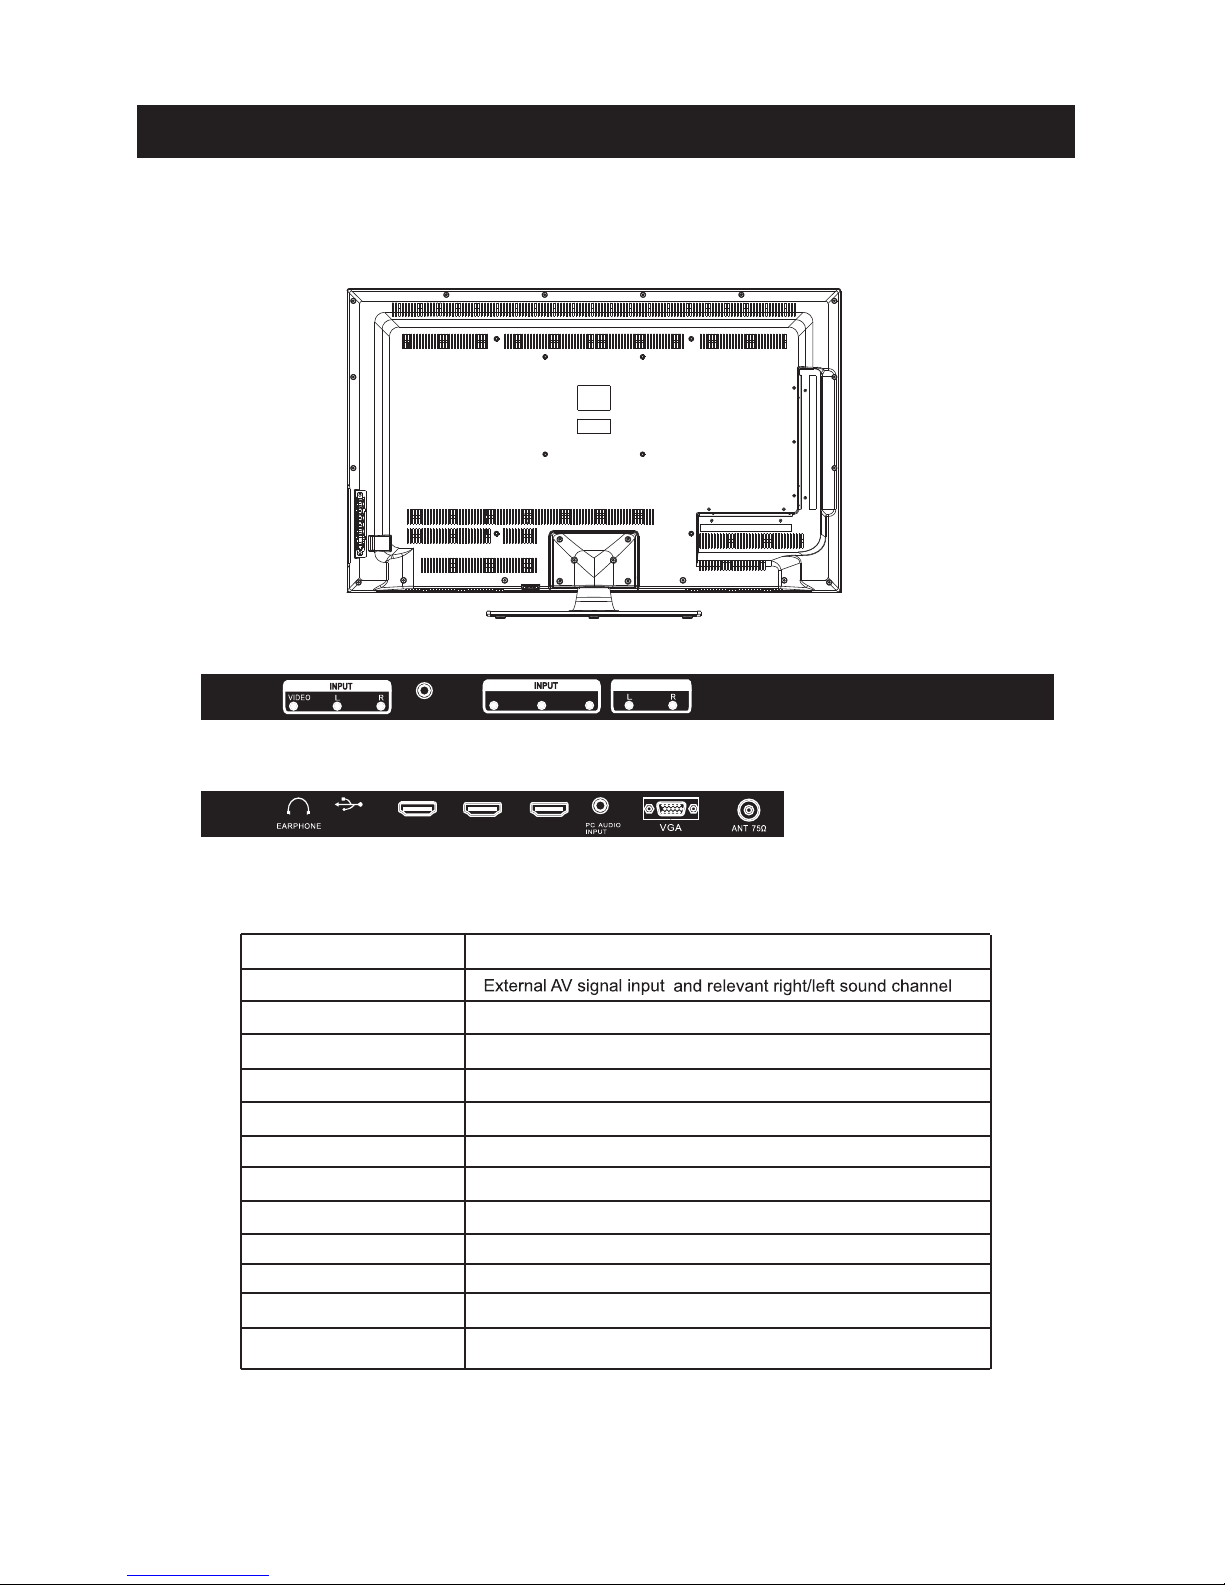
Side panel diagram
7
(Left Side)
(Back Side)
Y
Pb
Pr
COAXIAL
OUT PUT
HDM I2
HDM I1
HDM I3
Ser vice Por t
Connect to ANT or cable sour ce
PC AUDIO IN
PC audio input
VGA IN
VGA signal from computer output
YPbPr
Connect to the composite terminal of your DVD/VCR
ANT 75 Ω
EARPHONE
For Upgrad e Use .
AV INPUT
Earphone o utp ut
COAXIAL
Digital Aud io Ou tpu t
Service Port
HDMI1 IN
Connect to HDMI of DVD or other equipment
Name
Function Description
Audio Output Audio Out R/L
HDMI2 IN
Connect to HDMI of DVD or other equipment
HDMI3 IN
Connect to HDMI of DVD or other equipment
S.MODE: Press to cycle through the different sound settings
P.MODE: Press to cycle through the different picture settings
CH +/ - : Press to scan thr ough or to selec t a chann el.
V +/- : Press to increa se / decr ease t he soun d level .
Pres s "-" to ent er a pr ogram numb er fo r mult iple pr ogram
chan nel, su ch as 2- 1 etc.
SLEEP: Select amount of time before TV turn
off
automatically.
MTS:
Pres s to sel ect the au dio mode ,yo u can sel ect ster eo,
Mon o,or SAP( seco nd audi o prog ram).
GUIDE:
1
5
9
2
6
0
3
7
4
8
ENTER
MENU
SOURCE
EXIT DISPLAY
P.
MODE
S.
MODE
SLEEP MTS GUIDE
FAV FAV- FAV+
Unive rsa l rem ote code
This is t he co de fo r remote co ntr ol of
PLED4 274 A-B,if you wan t to ch ange to a
unive rsa l rem ote contr ol, you can edi t
this co de in to yo ur univer sal r emote con tro l.
(1)Open the battery compartment cover
on the back side
(2)Insert two 1.5V batteries of AAA type
with correct polarity
(3)Close the battery compartment cove r
on the back side
Universal Remote Control code:007F
(Universal Remote control is not included)
Remote Controller
8
 Loading...