

ProScan PLDED4022-UK Instruction Manual

Model:PLDED4022-UK

CONTENTS
2
3
6
7
4
8
9
SAFETY
PRECAUTION
IMPORTANT
SAFETY
INSTRUCTION
ACCESSORIES
GETTING
STARTED
5
CONTROL
REFERENCE
GUIDE
WALL MOU NT
INSTALLATION
INITIAL SETUP
TV SETUP
CONNECTIONS
1
English
15
18
19
21
23
1
2
3
3
9
10
10
11
11
4
7
7
8
13
14
14
14
Remote Control
Front View
Back View
Side View
Antenna Connection
AV Connection
YPbPr Connection
HDMI Connection
VGA Connection
Headphone Connection
Power Cord Connection
Coax(SPDIF) Connection
Putting The Unit On A Proper Place
Source Selection
Turning The Un it On For The Firs t Time
TV(CHANNEL) Menu
Picture Menu
Sound Menu
Lock System M enu
Setup Menu
12
9
11

CONTENTS
26
10
27
11
PC S ETUP
PC Menu
SAFETY CLASS :This is an IEC safety class I product
and it must be grounded for safety.
12
28
US B MEUN
Photo
31
13
33
14
15
34
DISPLAY
MODE
SPECIFICATION
TROUBLESHOOTING
GUIDE
PC Formats
Video Formats
TV Symptom
32
ATV/SCART/
HDMI/AV/YPbPr
PC
Music
Movie
Tex t
29
29
30

*
SAFETY PRECAUTION
CAUTION
•
•
•
PLACEMENT INFORMATION
SAFETY INFORMATION
RATING PL ATE LOCATION
WARNING:
WARNI NG:
1
CAUTION MARKING WAS LOCATED AT THE REAR
OF THE A PPARA TUS.
WARNING: TO REDUCE THE RISK OF ELECTRIC
SHOCK,DO NOT REMOVE COVER(OR BACK)
NO USER SERVICEABLE PARTS INSIDE.
REFER SERVICING TO QUALIFIED SERVICE
PERSONNEL.
The lightning flash with arrowhead symbol,
within an equilateral triangle,is intended to
alert the user to the presence of uninsulated
“dangerous voltage”within the product's enclosure
that may beof sufficient magnitude to constitute a
risk of electric shock to persons.
The exclamation point within an equilateral
Triangle is intended to alert the user to
The presence of important operating and
maintenance (servicing) instructions in the literature
accompanying the appliance.
DANG ER OF EXP LOSIO N IF B ATTER Y IS
INCO RRECT LY REPL AC ED. REP LACE ON LY
WITH T HE SAME O R EQUIV AL ENT TYP E.
USE OF C ONTRO LS OR ADJ US TMENT S OR
PERFORMANCE OF PROCEDURES OTHER
THAN THOSE SPECIFIED MAY RESULT IN
HAZARDOUS RADIATION EXPOSURE.
•
•
TO RED UCE THE R ISK OF FI RE O R ELECT RIC
SHOC K, DO NOT E XPOSE T HI S APPLI ANCE TO
RAIN O R MOIST URE.
TO REV ENT FIR E OR SHOC K HA ZARD, D O NOT
EXPO SE THIS U NIT TO RA IN O R MOIST URE. DO
NOT PL ACE OBJ ECTS FI LL ED WITH L IQUID S ON
OR NEA R THIS UN IT.
SHOU LD ANY TR OUBLE O CC UR, D IS CONNE CT
THE AC P OWER CO RD AND RE FE R SERVI CING
TO A QUA LIFIE D TECHN IC IAN.
Do not u se this u nit in pl ac es that a re extr emely
hot, c old, du sty or hu mi d.
Do not r estri ct the ai rf low of th is unit b y placi ng it
some where w ith poo r airfl ow , by cove ring it w ith
a cloth, by placing it on bedding or carpeting.
When connecting or disconnecting the AC power
cord , grip th e plug an d not the c or d itsel f. Pull ing
the co rd may da mage it a nd crea te a h azard .
When y ou are no t going t o use the u ni t for a lon g
period of time, disconnect the AC power cord.
The rating plate is located on the rear of the unit.
Changes or modifications to this
unit
not expressly approved by the party responsible
for compliance could void the user authority
to operate the unit.
•
•
•
•
“HDMI , the HDM I logo an d Hi gh- De finit ion Mul timed ia
Interface are trademarks or registered trademarks of
HDMI Licensing LLC.”

IMPORTANT SAFETY INSTRUCTIONS
2
1)Read these instructions.
2)Keep these instructions.
3)Heed all warnings.
4)Follow all instructions.
5)Do not use this apparatus near water.
6)Clean only with a dr y cloth .
7)Do not block any ventilation openings.
Inst all in ac corda nce wit h th e
manufacturer's instructions.
8)Do no t insta ll near a ny heat s ou rce s su ch
as radiators, heat registers, stoves, or
other apparatus (Including amplifiers) that
produce heat.
9)Do not defect the safety purpose of the
polarized or grounding-type plug.
A polarized plug has two blades with one
wide r than th e other .
A grou nding type plug has two blades
and a third grounding prong.
The wi de blad e or the th ird pro ng i s
prov ided fo r your sa fety.
If the p rovid ed plug d oes not f it i nto you r
wall o utlet , consu lt an ele ct ricia n for
replacement of the obsolete outlet.
10)Protect the power cord from being walked on
or pin ched pa rticu larly a t pl ugs, co nveni ence
rece ptacl es, and t he poin t wh ere the y exit
from t he appa ratus .
11)On ly use at tachm ents / ac ce ssori es spec ified
by the m anufa cturer.
12)Us e only wi th the ca rt, sta nd ,
trip od, bra cket, o r ta ble
spec ified b y the manufacturer,
or sol d with th e appar atus.
When a c art is us ed, use c autio n when
movi ng the ca rt / appa ratus c om binat ion to
avoi d injury from tip-over.
13)Unplug this apparatus during lightning
Stor ms or whe n unuse d for lon g pe riods o f
time .
14)Refe r all ser vicin g to qual if ied s er vice
pers onnel . Servi cing is r equired when the
appa ratus has bee n damag ed i n any w ay ,
such a s the pow er cord o r plug is d am aged,
liqu id has be en spilled or objects have fallen
into t he appa ratus , the app ar atus ha s been
expo sed to ra in or moi sture , do es not op erate
norm ally, o r has bee n dropped.
15)To pre vent el ectri c shock , en sure th e groun ding
pin on t he AC cor d power p lug is se cu rely
conn ected .
ACCESSORIES
Please check and identify the supplied accessories.
GETTING STARTED
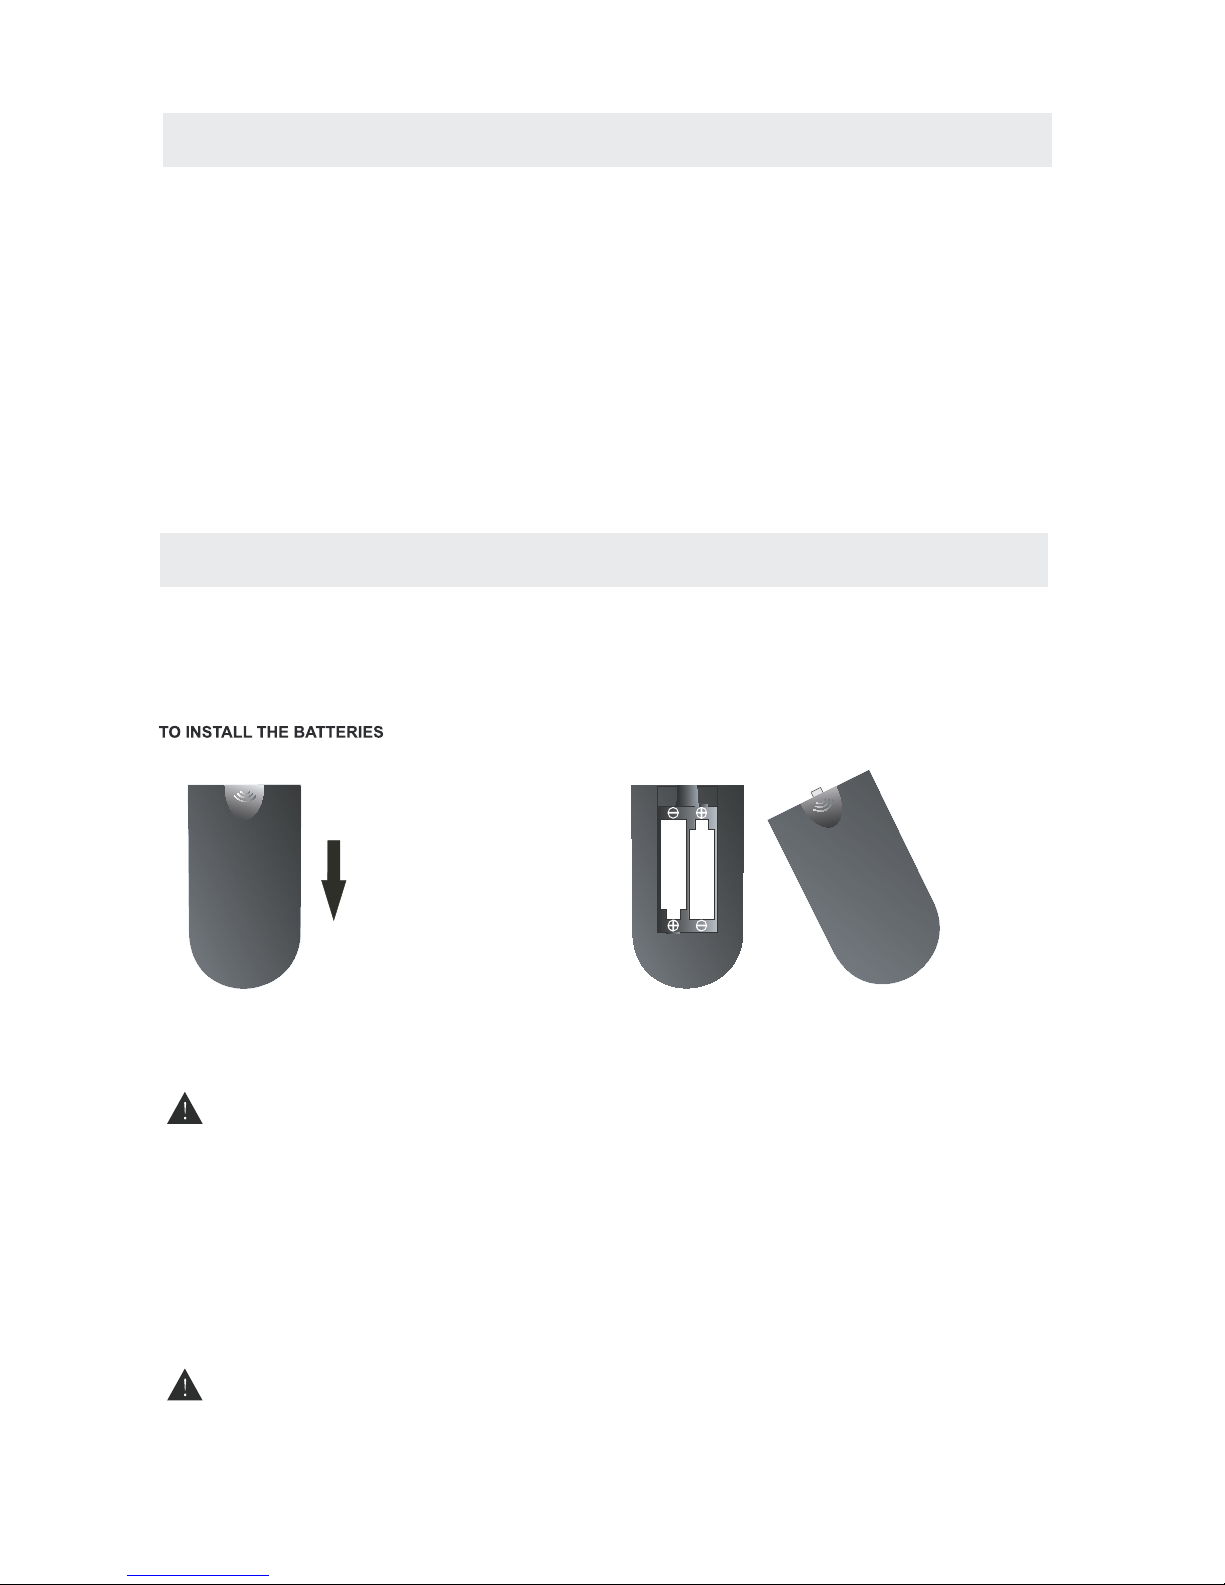
USING THE REMOTE CONTROL
BATTERY REPLACEMENT
CAUTION
: Danger of explosion if battery is incorrectly replaced.
NOTES
WARNING :
3
·Poin t the rem ote con trol at t he remo te s ens or l ocate d on the un it.
·When t here is a s trong a mbient light source, the performance of the infrared remote sensor
·may be degraded, causing unreliable operation.
·The recommended effective distance for remote operation is about 16 fee t (5 mete rs).
When the batteries become weak, the operating distance of the remote control is greatly
reduced and you will need to replace the batteries.
·If the remote control is not going to be used for a long ti me, rem ove the b atter ies to avoid
damage caused by battery leakage corrosion.
·Do not mix old and new batteries. Do not mix ALKALINE, standard (CARBON-ZINC) or
rechargeable (NICKEL-CADMIUM) batteries.
·Always remove batteries as soon as they become weak.
·Weak batteries can leak and severely damage the remote control.
Do not d ispos e batte ries in a f ire. Ba tteri es m ay expl ode or le ak.
Batt eries s hall no t be expo sed to ex cessi ve h eat such as sunshine, fire or the like.
1.Open the battery door 2.Insert2"AAA" batteries
................................................................................................................
...........................................................................................................
x 2
x 1
x 1
x 1
Remote control .................................................................................................................
Remote control
Battery(AAA)
Warr anty Ca rd
Instruction Manual
Base stand and 4 screwsbase stand
..........................................................................
x 1
Column bracket and 5 column bra cke t scr ews
...........................................................
x 1
...................................................................................................................
Screw driver
................................................................................................................
x 1
4
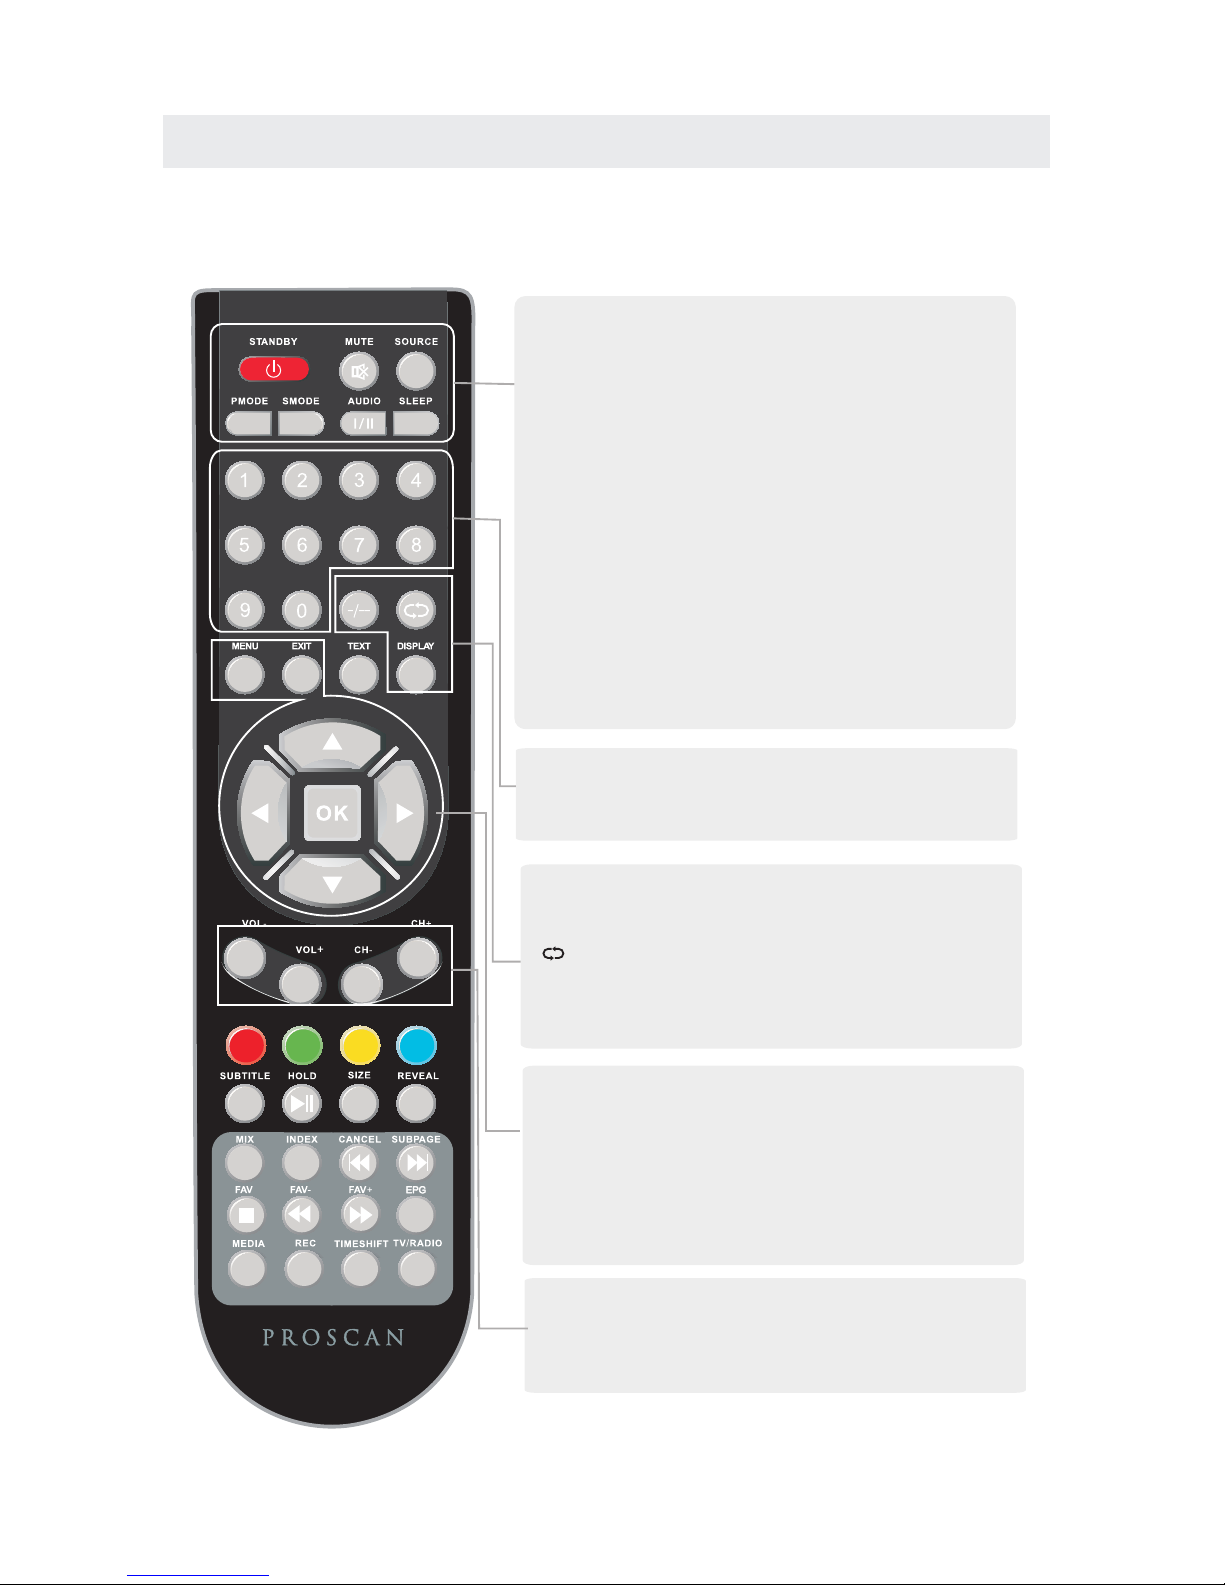
STANDBY
Turn the TV ON or OFF.
MUTE
Press to mute the sound. Press again or press V+ to
unmute the TV.
SOURCE(INPUT)
Press to cycle through the input source.
PMODE
Press it to cycle through the available video
picture modes.
SMODE
Press to cycle through the different sound settings.
I/II
Press to search the NICAM modes.
SLEEP
Select amount of time. Let your TV turn off automatically.
NUMBER BUTTONS
Press 0-9 to select a TV channel directly when you are
watching TV. The channel change after 2 seconds.
THUMBSTICK(▲/▼/◄/►OK ENTER)
Allows you to navigate the on-screen menus and
adjust the system settings to your preference.
MENU
Brings up the main TV menu to the screen.
EXIT
Exit the main TV menu to the screen.
VOL+/VOLPress to increase/decrease the sound level.
CH+/CHPress to scan through channels.
-/-Press this button to enter a program number for
multiple program channel such as 2-1,etc, or to display channel
Return to the previous channel viewed.
DISPLAY
Press to display the source and channel’s information.
list under TV model.
CONTROL REFERENCE GUIDE
REMOTE CONTROL
ATV MODE:
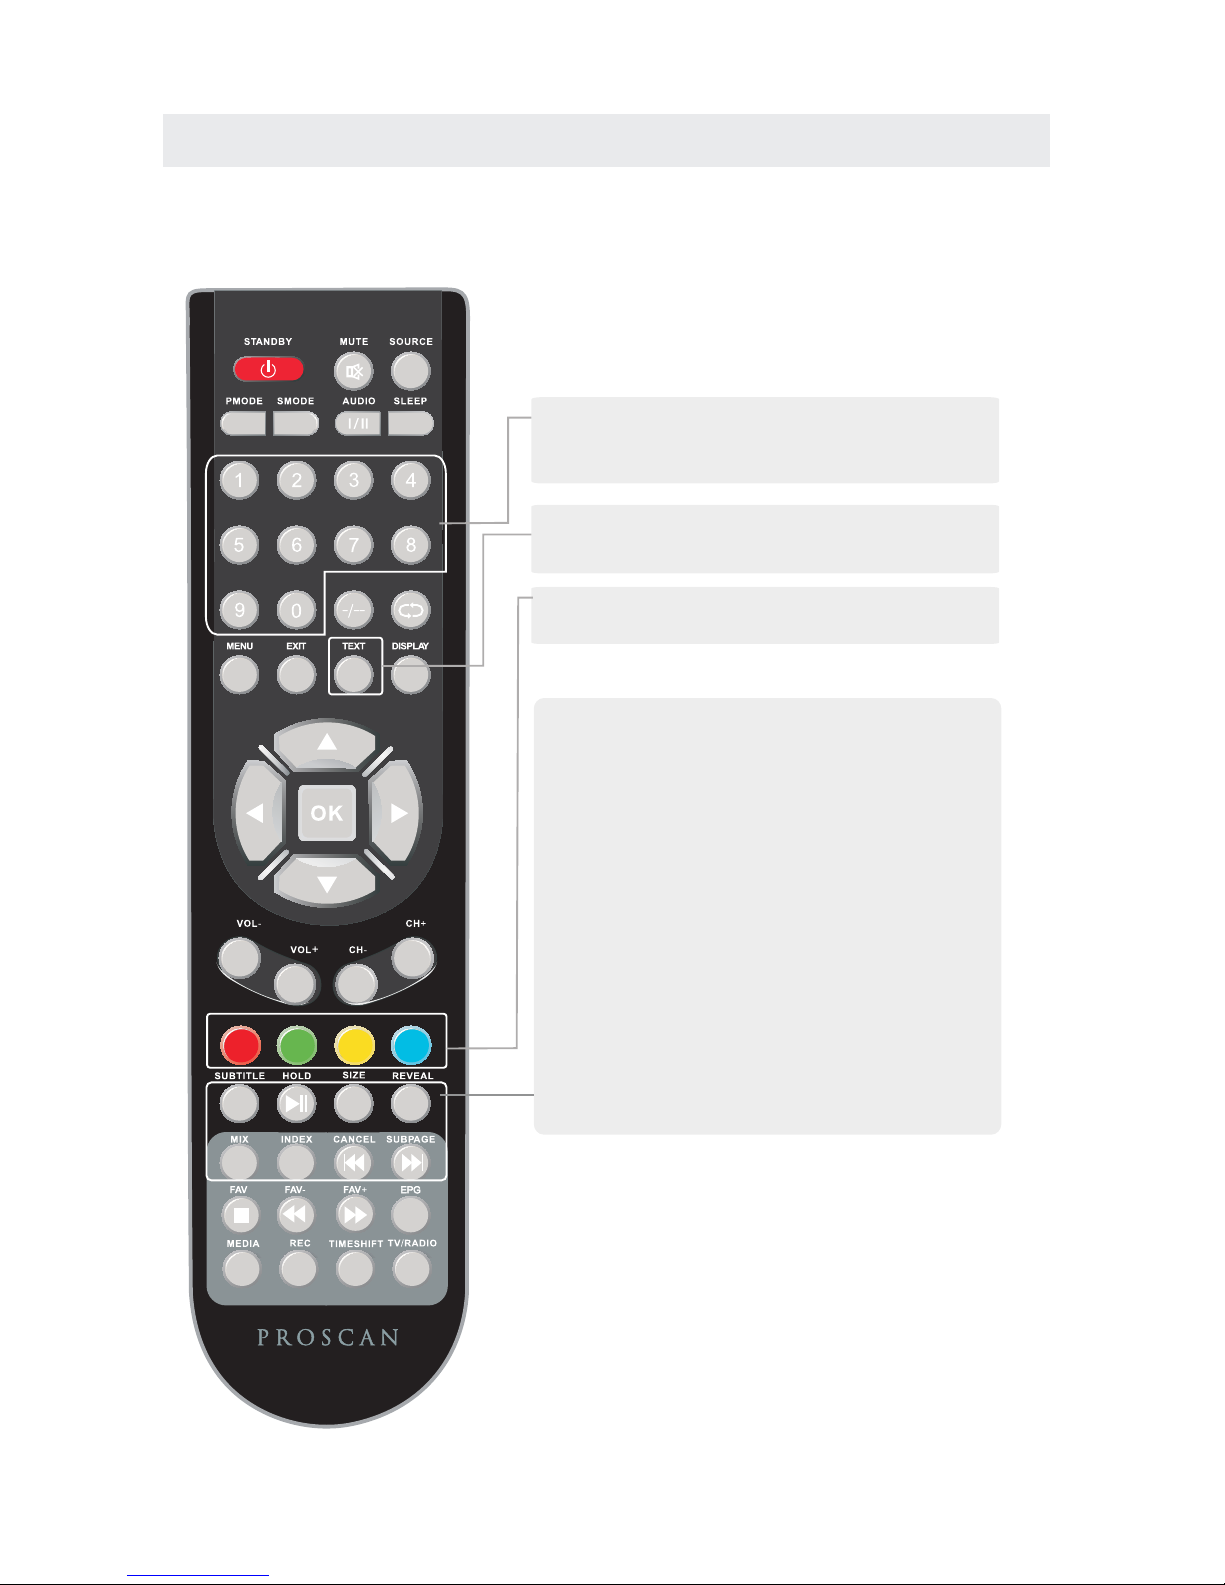
CONTROL REFERENCE GUIDE
REMOTE CONTROL
DTV MODE:
NUMBER BUTTONS
Press 0-9 to select a teletext page.
TEXT
Press to switch between TV and Teletext mode.
COLOUR BUTTONS
Select 4 Preferred TELETEXT page.
SUBTITLE
To display subtitle.
HOLD
Freeze the current page.
SIZE
Change the picture size.
REVEAL
Reveal or hide the hidden words.
CANCEL
Teletext Cancel.
INDEX
Request index page when index link is valid.
MIX
TV and TXT picture are mixed together in
transparent background.
SUBPAGE
TELETEXT Subpage.
5
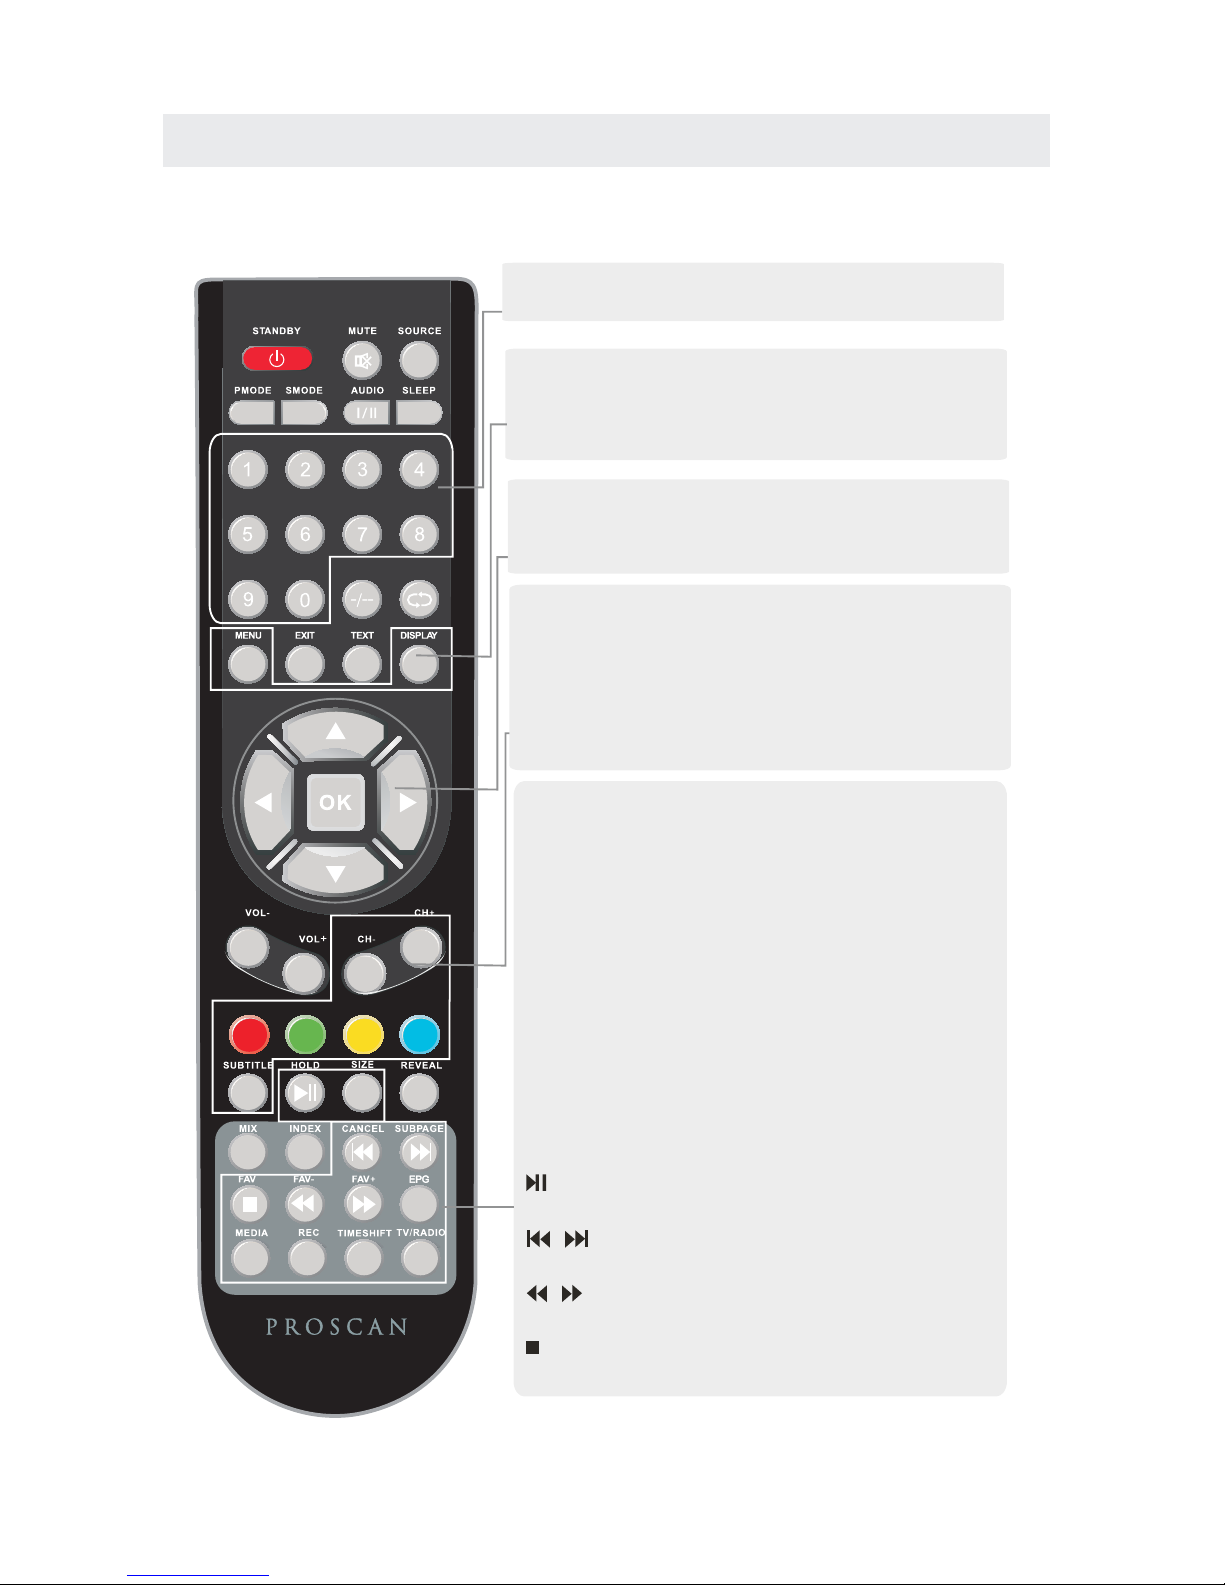
NUMBER BUTTONS
Press 0-9 to select a channel.
TV MENU
Brings up the main DTV menu to the screen.
DISPLAY
Press to display the source and channel’s information.
SIZE
Change the picture format.
FAV+/FAV/FAVPress to increase/decrease your favourite program in DTV mode.
EPG
Launches the EPG (Electronic Program Guide) in DTV mode.
MEDIA
Press to select MEDIA mode.
REC
Record the program in DTV mode.
TIMESHIFT
Press to select TIMESHIFT function.
TV/RADIO
Select TV or Radio modes.
PLAY/PAUSE in TIMESHIFT and MEDIA mode.
Jump to previous and next track in MEDIA mode.
Fast reverse and forward key in MEDIA mode.
Stop in MEDIA mode or exit the REC or TIMESHIFT mode.
THUMBSTICK(▲/▼/◄/►/OK ENTER)
Allows you to navigate the on-screen menus and
adjust the system settings to your preference.
CH+/CHWhen watching a channel, changes the channel.
COLOUR BUTTONS
Colour buttons ( respectively red, green, yellow and blue )
used in a few sub-menus.
SUBTITLE
To display subtitle.
CONTROL REFERENCE GUIDE
REMOTE CONTROL
6
CONTROL REFERENCE GUIDE
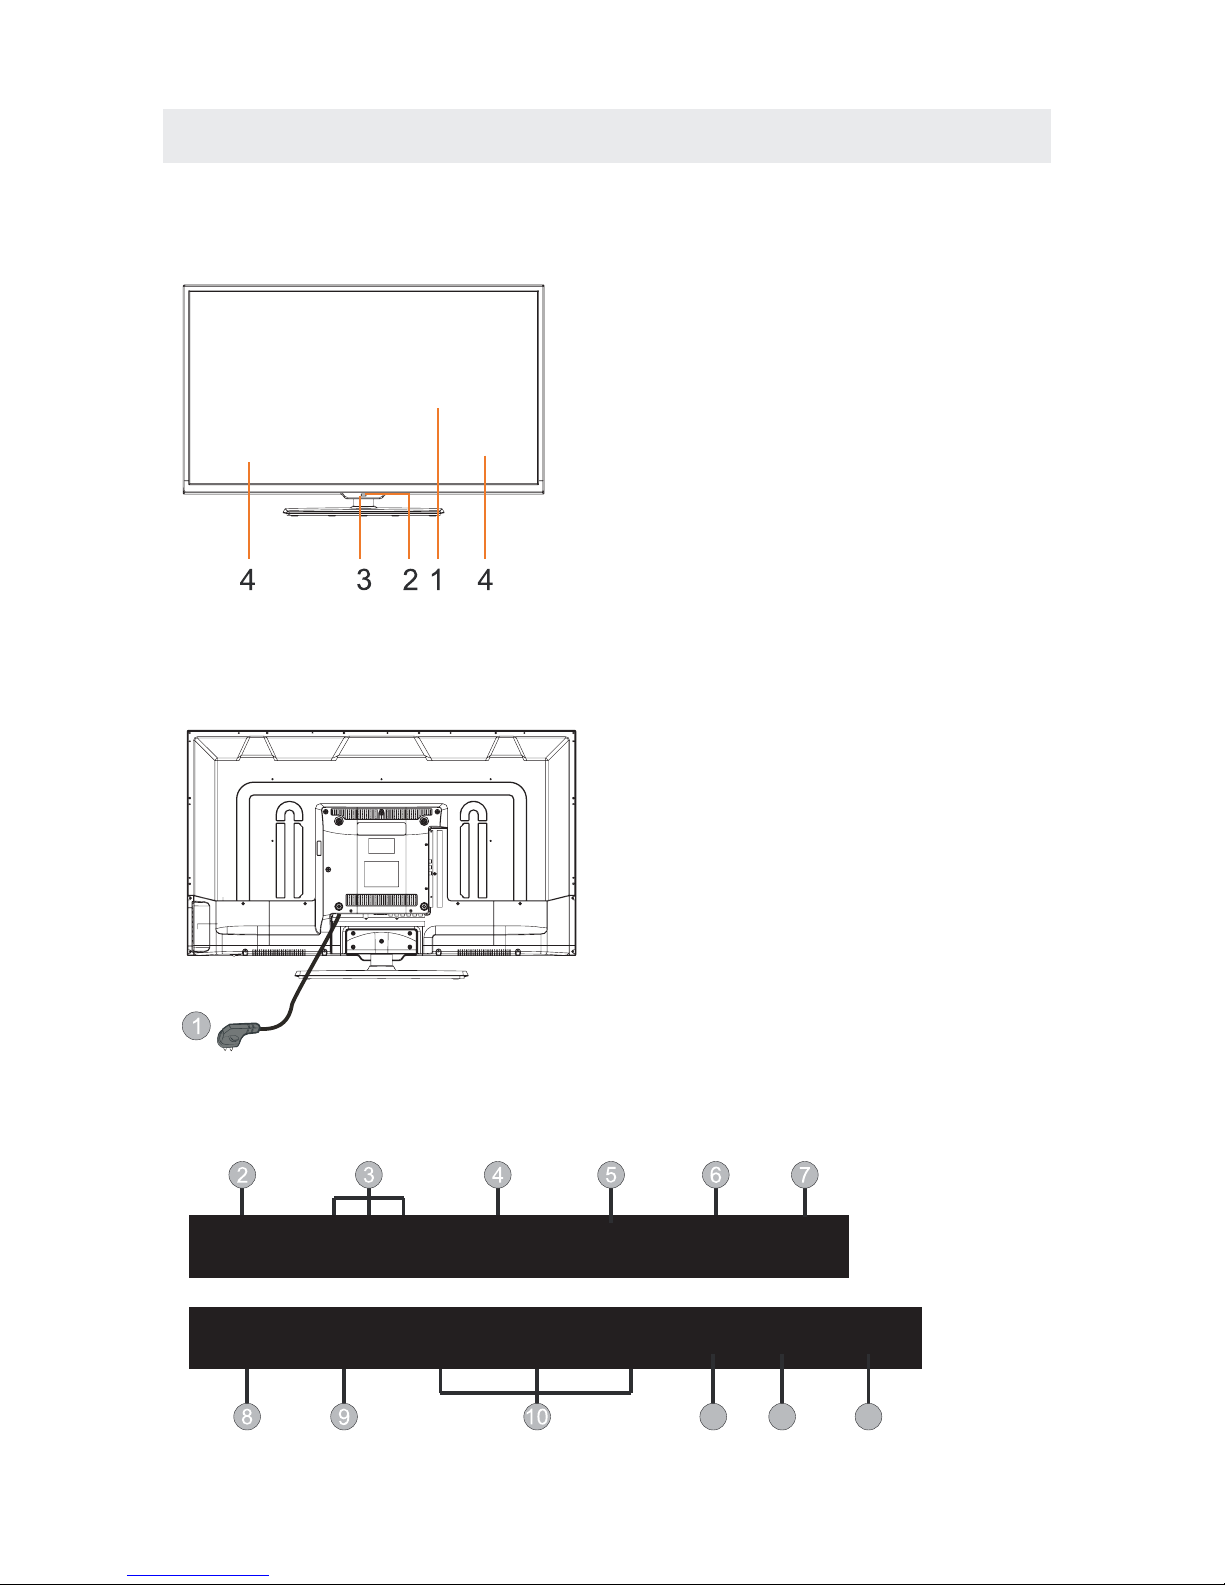
FRONT VIEW
7
BACK VIEW
1.Color Screen
2.Remote Sensor
Do not block thi s sensor or the
remote contr ol will not work.
3.Standby Indicator
Indicates whether the unit is ON
or in STANDBY (OFF) mode.
Light in red: The unit is in STANDBY.
Light in blue:The unit is turned ON.
4. Speakers
Video
R
L
SCART
VGA RF
YPbPr
Head
Phone
HDMI1 HDMI2
HDMI3
CI COAX
USB
1.Power Cord.
2.Video:Connect the Video output jack
of DVD or VCR.
3. R/L AUDIO:Connect the Video/YPbPr
AUDIO output ja ck of DVD.
4.SCART:Connect the SCART jack of VCR
or DVD.
5.PC AUDIO: Connect the Audio output
jack of PC.
6.VGA:
RF IN: Connect the antenna.
8.YPbPr:Component in jack.
9.Headphone: Connect the earphone.
10.HDMI1/2/3: Connect the HDMI output
jack of DVD.
11.CI:Conn ect to the CI card.
12.USB: Connect to portable usb device.
13.Coax: Coax output.
Connect a comp uter to these jacks.
7.
PC
Audio
11 12 13
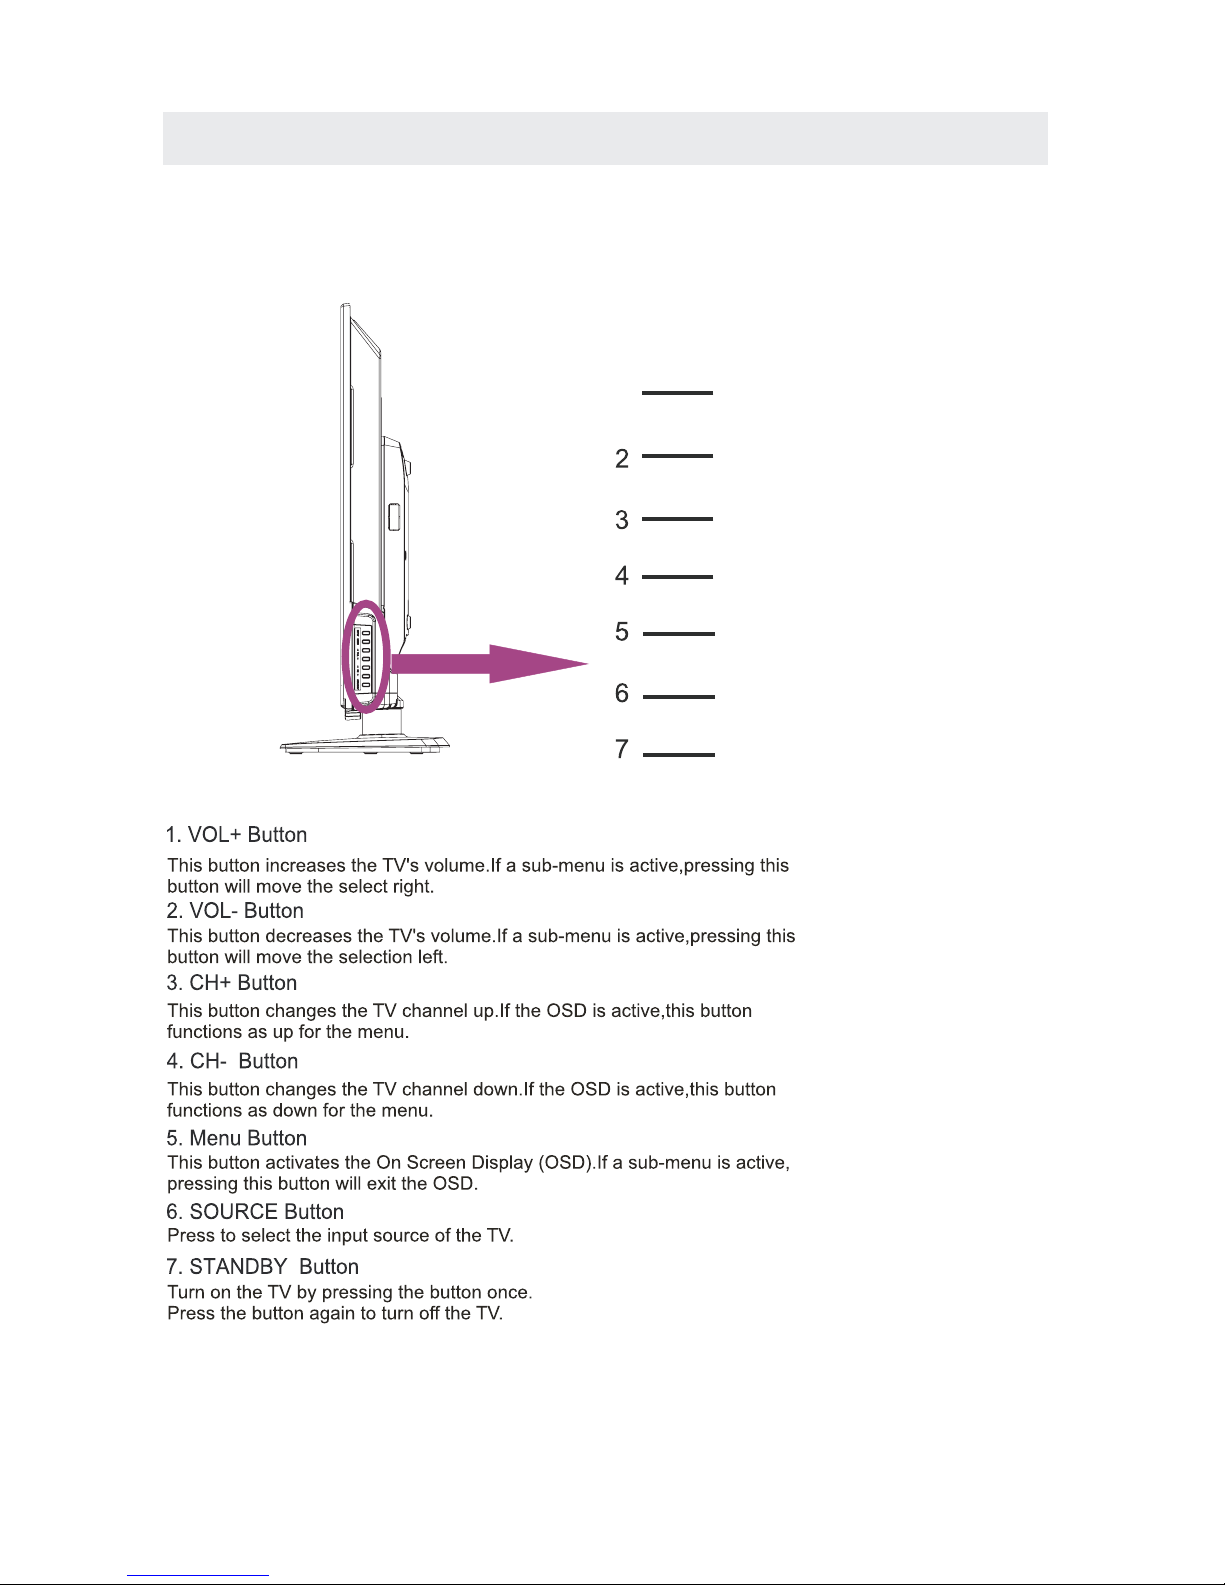
CONTROL REFERENCE GUIDE
8
SIDE VIEW
1
VOL+
VOL-
CH+
CH-
MENU
SOURCE
STANDBY
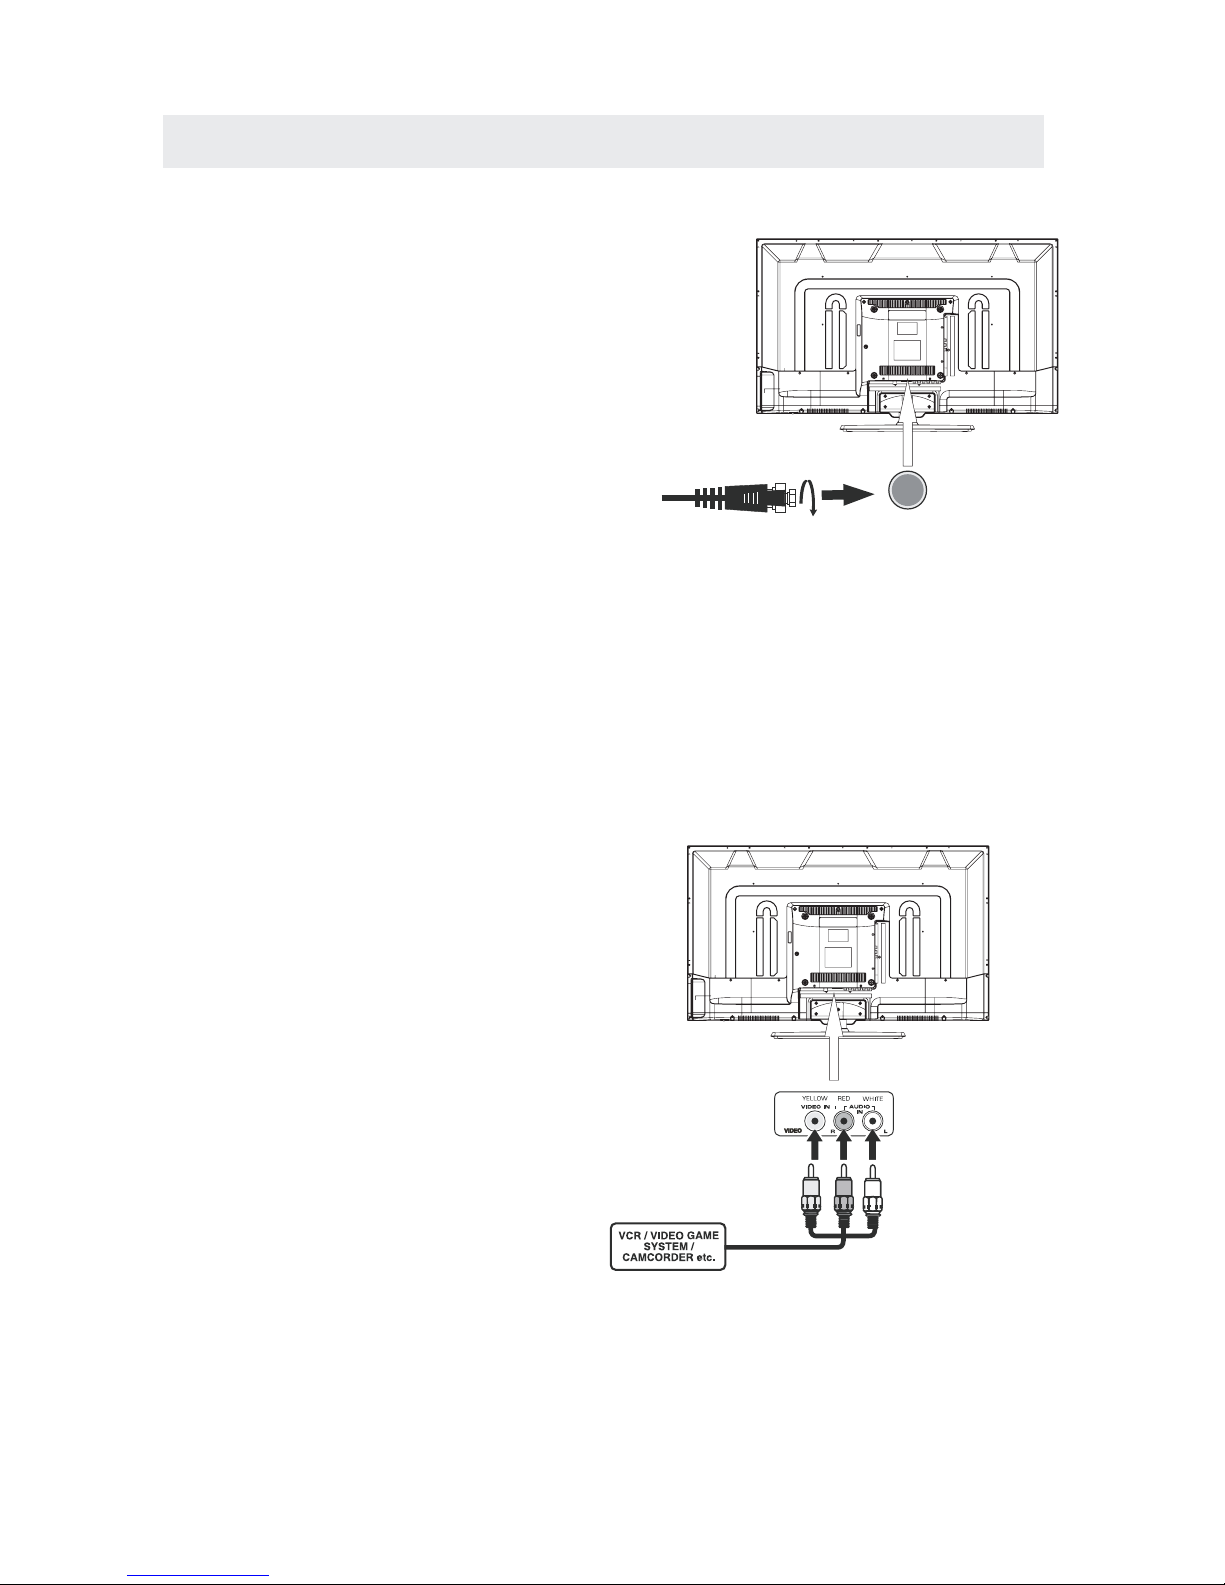
CONNECTIONS
CONNECTING A TV ANTENNA / CABLE / SATELLITE
To view television channels correctly, a signal must
be received from one of the following sources:
- An indoor or outdoor aerial antenna
- A cable system
- A satellite system
For receiving over-the-air TV broadcasts, we
recommend that you use an external fixed antenna.
Should you require the use of a temporary antenna,
please ensure that you purchase an antenna with
sufficient ability to receive in weak signal areas.
Only when you are in close proximity to a transmitter
will a temporary antenna reproduce a signal as
strongly as a fixed antenna.
To connect to other equipment such as a VCR, camcorder, satellite system or cable, etc.
CONNECTING AN A/V DEVICE
NOTE
CONNECTING DEVICES WITH A COMPOSITE
VIDEO OUTPUT
Connecting to a VCR / Video Game System / Camcorder
AUDIO VIDEO OUT
NOTE
To con nec t A/V de vic es su ch as a VCR, v ideo game s ystem or c amcorder.
Connect the AUDIO / VIDEO cable (not included) as shown.
Make sure you connect the cable from the other equipment ( and ) to this unit
P. lease refer to the user manual
fo r the o the r equi pme nt fo r
more information.
Satellite, cable or TV antenna
cable to TV ANTENNA
terminal (cable not included)
9
(AV in)
To AUD IO / VIDEO
IN jacks
To AUD IO / VID EO
OUT jacks
 Loading...