

Page 1

DF-383
INSTRUCTION MANUAL
Power Zoom AF DSLR Flash
®
Page 2

Page 3

Thank you for your purchase of the ProMaster FL1 Professional Flash.
This advanced digital flash provides a variety of automatic and manual features that allows you
maximum creativity and flexibility in your flash photography.
Please take a few minutes to read this instruction manual and familiarize yourself with the features
and benefits of the FL1 flash.
INTRODUCTION
Introduction | 1
Page 4

COMPATIBILITY
2 | Compatibility & Warranty
The ProMaster FL1 flash is available to fit a variety of camera makes. Please find the model below
that fits your camera.
Code 1240: For Canon DSLR & digital E-TTL, E-TTL II cameras & E-TTL film cameras
Code 1247: For Nikon DSLR & digital TTL, i-TTL cameras & TTL, i-TTL film cameras
Code 1254: For Pentax P-TTL DSLR, digital & film cameras
Code 1261: For Olympus and Panasonic DSLR & digital TTL cameras
Code 1268: For Sony Alpha ADI system DSLR, digital & TTL film cameras
ONE YEAR UNCONDITIONAL GUARANTEE
If for any reason, this ProMaster product fails within ONE YEAR of the date of purchase, return this
product to your ProMaster dealer and it will be exchanged for you at no charge.
ProMaster products are guaranteed for ONE FULL YEAR against defects in workmanship and
materials. If at any time after one year, your ProMaster product fails under normal use, we invite you
to return it to ProMaster for evaluation.
Page 5

FEATURES
Features | 3
• Auto and manual zoom from 24-28-35-50-70-85-105mm
• TTL metering
• Wireless TTL function
• High speed synchronization
• 7 levels of power ratio 1/1, 1/2, 1/4, 1/8, 1/16, 1/32 & 1/64
• 2” LCD Control Panel
• Secondary fill flash
• Focus assist beam for low light focusing
• Front and rear curtain synchronization
• Slow synchronization
• Red eye reduction pre-flash (for Nikon, Olympus-Panasonic and Pentax mount)
• Built-in optical slave sensor
• Power save function
• Detachable wide angle diffuser
• Firmware upgrade possible
Page 6
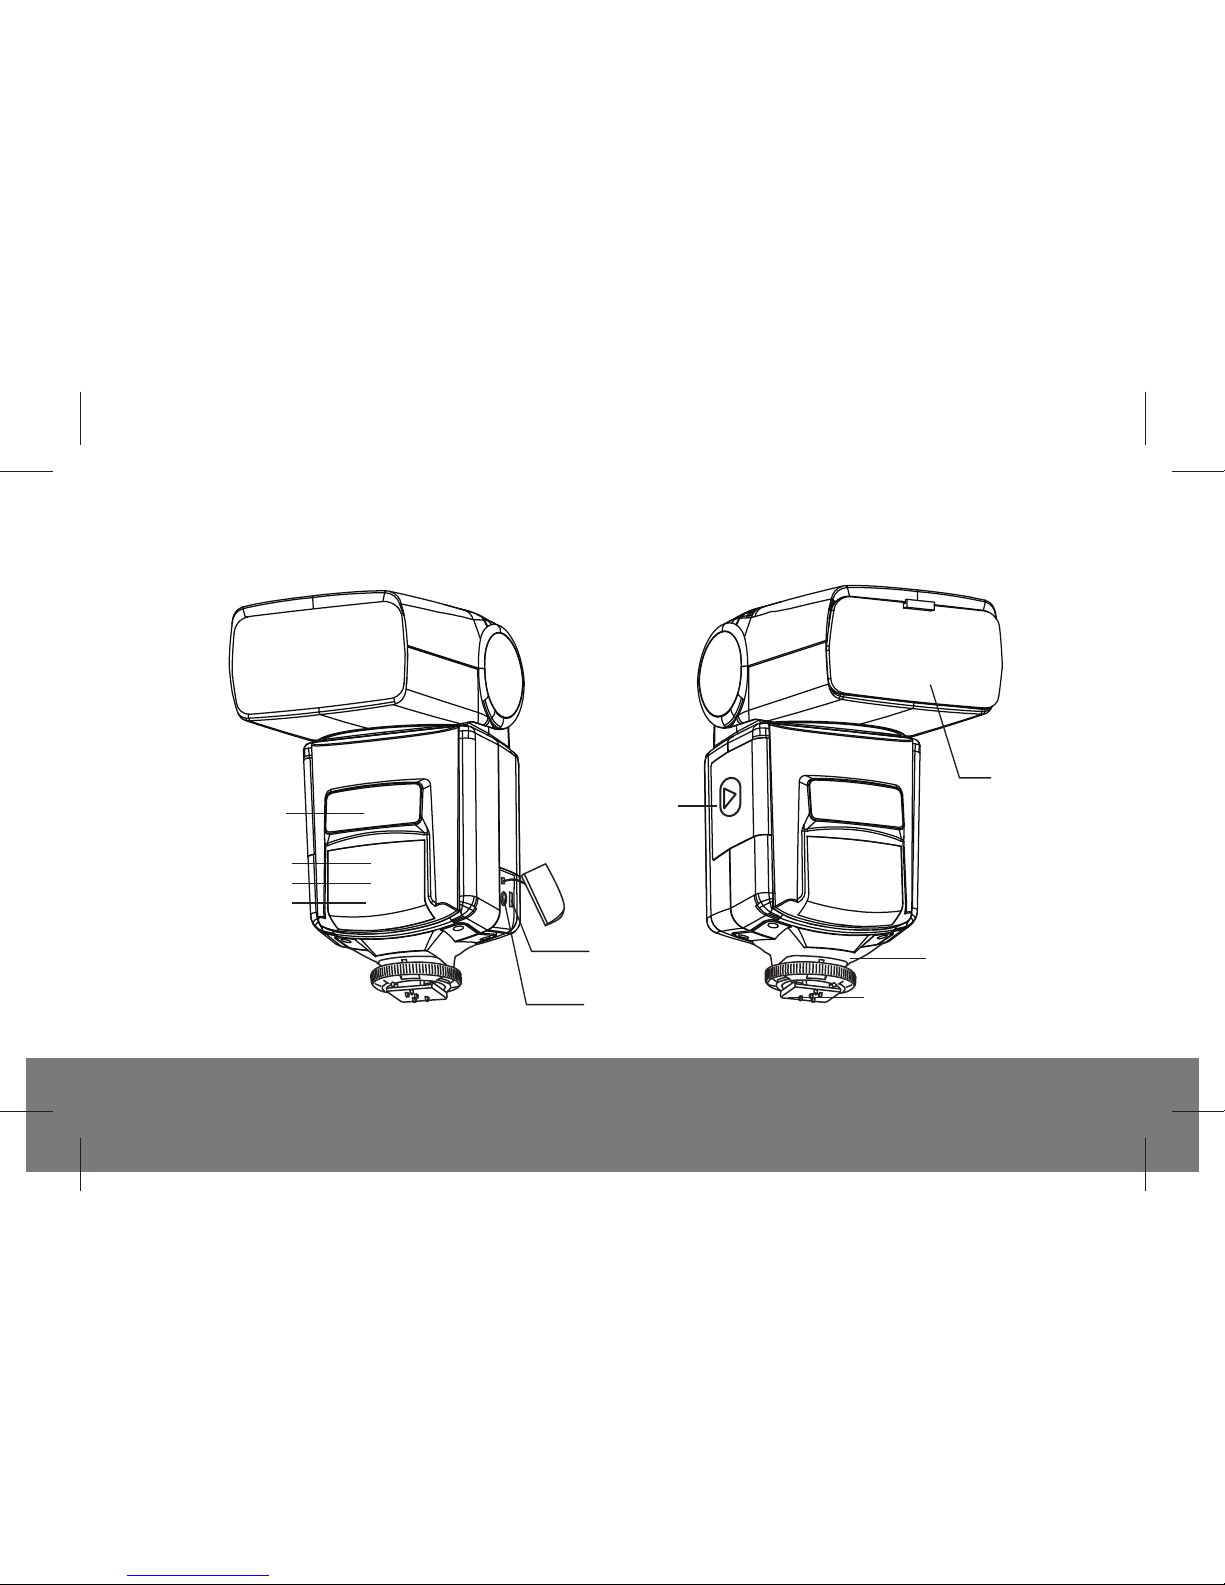
Overview | 4
Battery
chamber
cover
Mounting foot
Metal Base
Wide Angle
Diffuser
Slave sensor
AF Red Light
Wireless TTL sensor
Secondary
Flash
Firmware
Update Socket
PC Sync
Terminal
OVERVIEW - FRONT
Page 7
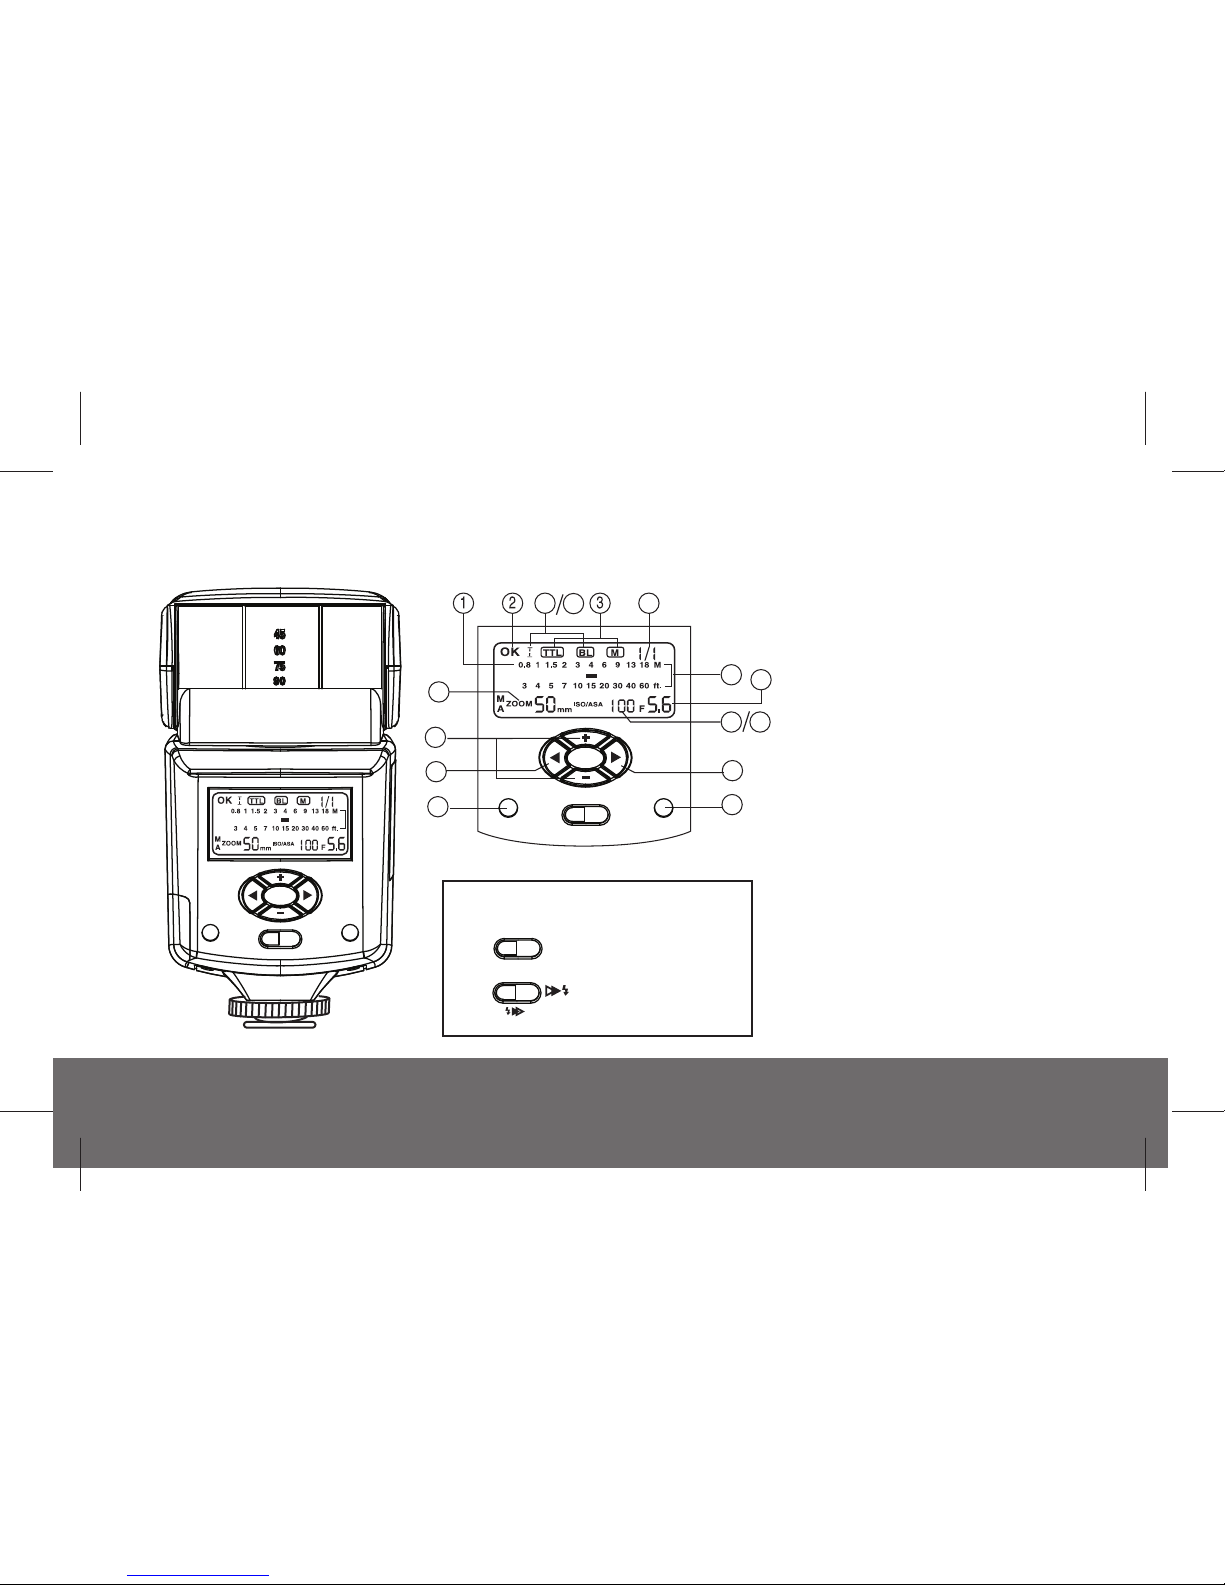
OVERVIEW - BACK
Overview | 5
OFF ON
READY
/ TEST
TEST
TTL OK
MODE ZOOM
11
12
15
13
14
5
8
9
10
4
6
7
16
MODE ZOOM
OFF ON
READY
/ TEST
TEST
TTL OK
POWER ON / OFF SWITCH
OFF ON
Type C/N/OP/SA
Type P
OFF
1. LCD Display
2. Exposure Confirmation Indicator
3. Flash Mode Indicator
4. Manual Mode Output Power Indicator
5. Flash Range Distance Indicator
6. Power Save / Secondary Flash Indicator
7. Zoom Indicator
8. Film Speed Indicator
9. f-Stop Indicator
10. iTTL / BL Indicator (for Nikon only)
11. Mode Selection Button
12. + / - Button
13. Zoom Position Selection Button
14. Exposure OK Light
15. Ready Light / Test Button
16. High Speed Sync / Slave Mode
Indicator
Page 8

SAFETY INSTRUCTIONS
6 | Safety Instructions
• Do not fire flashes from a short distance directly into the eyes of people or animals. This can cause
damage to the retina and may even lead to blindness.
• Always use batteries of the same type, brand, and age. Do not combine different types, brands, old,
or new batteries. This could cause the batteries to overheat, leak, or explode.
• Install the batteries in proper orientation as indicated in the battery chamber. Installing the batteries
in reverse orientation could cause the batteries to overheat, leak, or explode.
• Always switch off the flashgun before changing the batteries.
• Do not attempt to open the flashgun because the electronic circuit contains high voltage.
• If the flashgun is badly damaged and internal components are exposed, remove the batteries from
the flash. Contact customer service. Never try to repair the flashgun by yourself.
• This product is not water-resistant. Keep it away from rain, snow, and high humidity areas.
• Do not clean the flash with agents containing corrosive or flammable substances. Also, do not store
or use the flash in flammable conditions.
Before using this flash, please read the instructions below to ensure safe use and avoid unnecessary
damage to the flash and injury to yourself and others:
Page 9
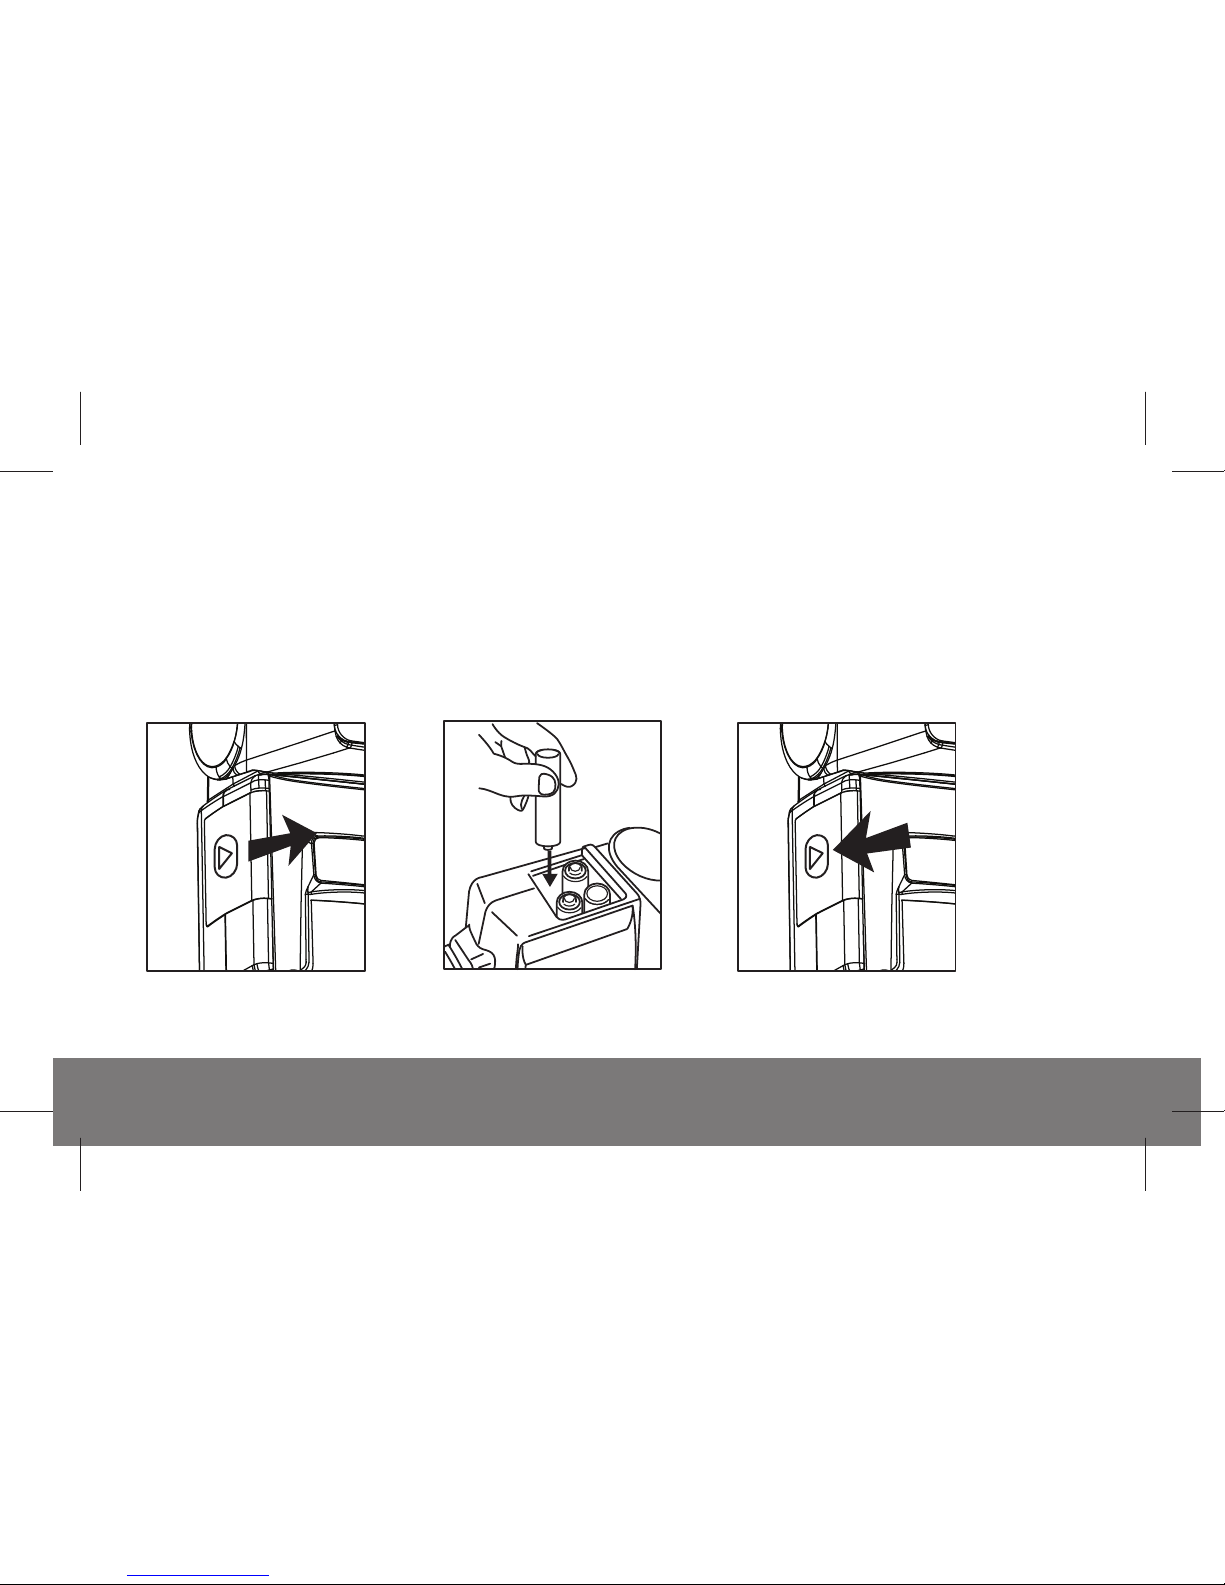
INSTALLING BATTERIES
Installing Batteries | 7
• Slide the battery chamber door in the direction of the arrow to remove it;
• Insert the batteries in the orientations as indicated in the battery chamber;
• Slide the battery chamber door back into place, in the opposite direction of the arrow.
To install batteries, make sure that the flash is turned off and follow the steps below:
1 2 3
Page 10
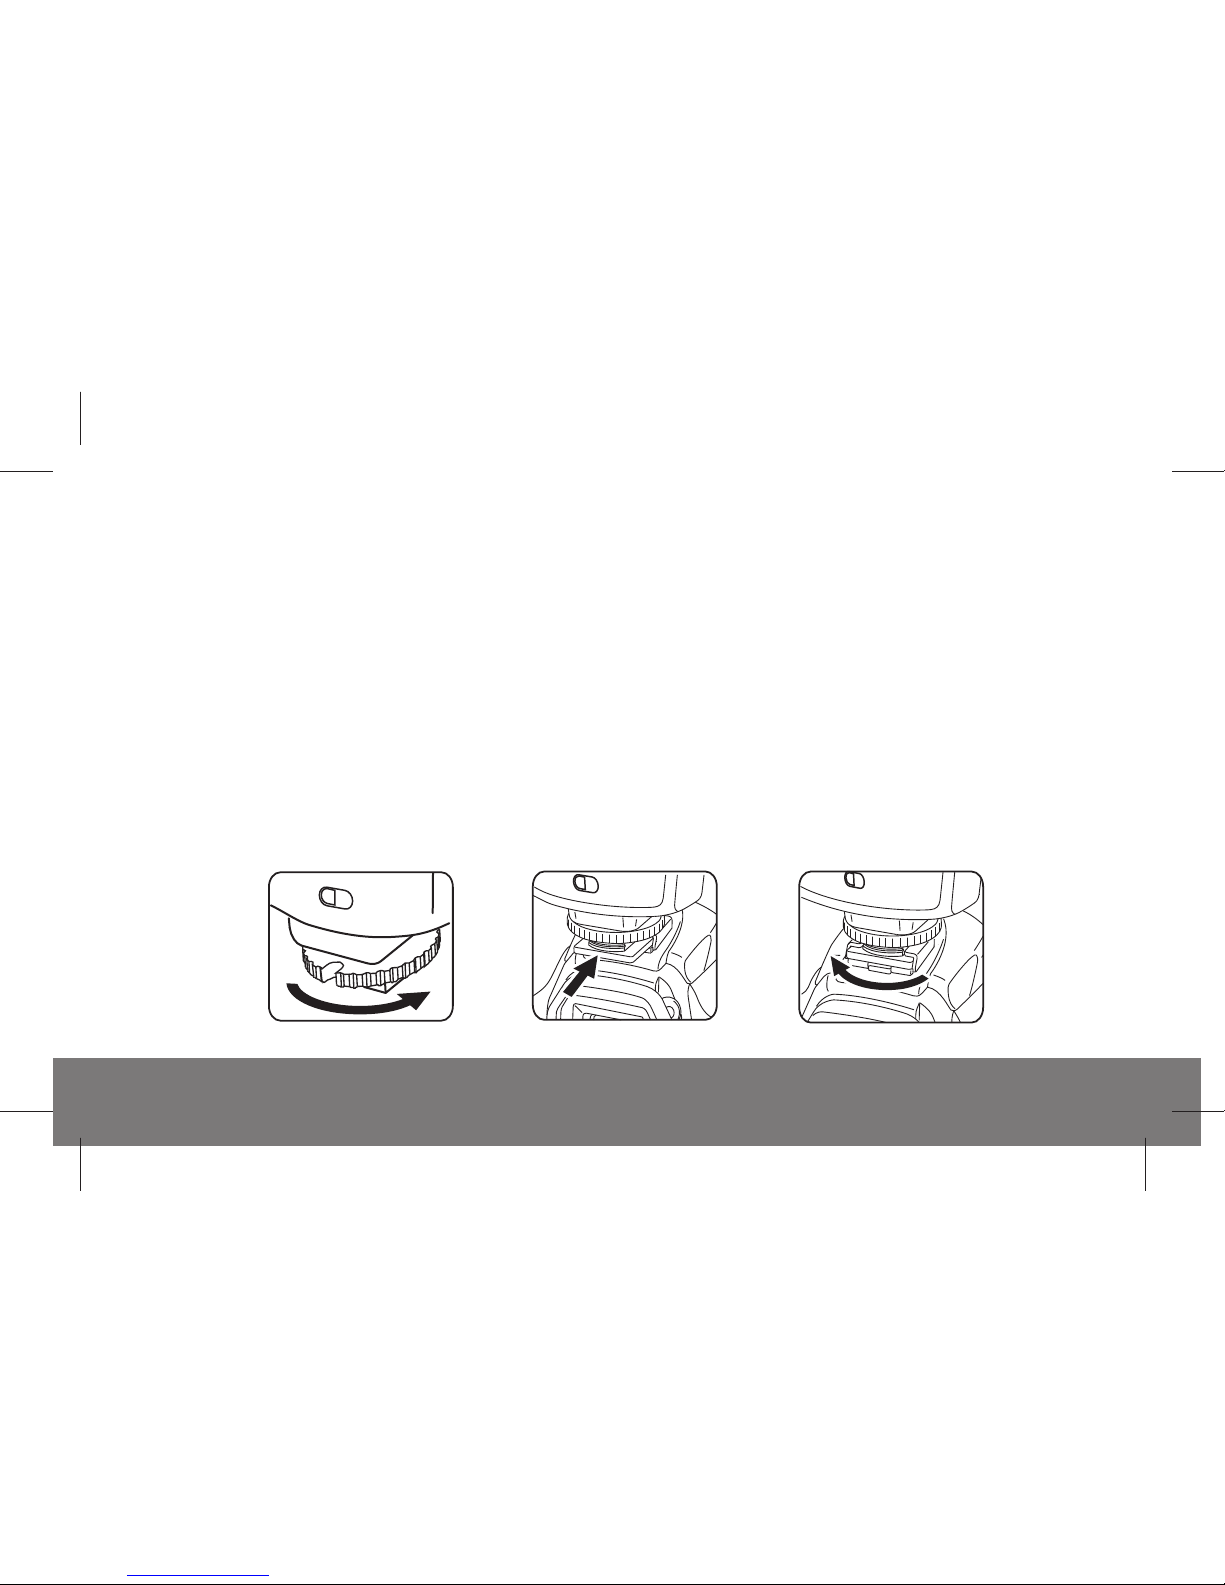
MOUNTING AND REMOVING THE FLASH FROM THE CAMERA
8 | Mounting and Removing Flash
• FOR Canon, Nikon, Pentax and Olympus/Panasonic flash
(1) Mounting the flash
With the back of the flash facing you, loosen the locking ring by turning it to the right until you can easily
slide the flash forward into your camera’s hot shoe. Then tighten the locking ring by turning it to the left
until the flash is firmly mounted onto the camera.
(2) Removing the flash
Carefully turn the locking ring to the right so it becomes loose. Once you can no longer easily turn the
locking ring, slide the flash towards you to remove the flash from the camera’s hot shoe.
1a 1b 2
Page 11

MOUNTING AND REMOVING THE FLASH FROM THE CAMERA
Mounting and Removing Flash | 9
• FOR Sony flash
(1) Mounting the flash
Ensure the PUSH button is not pressed into the flash. Slide the mounting foot all the way into the
camera's hot shoe. The lock will automatically engage and hold the flash in place. A safety catch can be
heard.
(2) Removing the flash
Press the PUSH button inside and downward while simultaneously sliding the flash away from the
camera’s hot shoe. After removing the flash from the camera, make sure you release the PUSH button
so that it is not pressed into the flash.
1a 1b 2
Page 12

TO TEST THE FLASH
10 | Test Flash / Selecting the Flash Mode
Turn on the flash by sliding the ON / OFF switch to the ON position.
The READY indicator will glow red when the flash is ready to fire. If the flash is mounted onto the camera,
a flash icon will appear in the camera’s viewfinder.
Press the READY/Test button to fire a test flash to ensure the flash works properly. When the ready
indicator glows again, the flash is ready to fire.
SELECTING THE FLASH MODE
The ProMaster FL1 offers “TTL”, “Manual”, “Slave”, “Wireless TTL”, “Sub Flash”, and “High Speed Sync”
flash modes.
To change between different modes, press the MODE button on the LCD panel and the flash mode will
change in the following sequence: TTLM (Manual)S (Slave)STTL (Wireless TTL)Sub Flash
(Sub)H (High Speed Sync, only available in C/OP/P/SA flash)back to TTL
To choose your desired mode, press the MODE button until the corresponding indicator appears on the
LCD. When you press the MODE button, or any other buttons on the back panel, the LCD will illuminate
for approximately 5 seconds.
Page 13

TTL FLASH MODE
TTL Flash Mode | 11
When your flash is mounted to a compatible camera, the ProMaster FL1 flash’s advanced programming
and computerized circuitry will produce the correct exposure using the camera's TTL metering data.
To use the TTL mode, follow the steps below:
(1) The camera should be set to P, Auto, or any priority mode such as aperture-priority.
(2) When you first power the flash unit, it will automatically be set to TTL mode, and the “TTL” indicator
will be visible on the LCD. If the flash has been set to another mode, press the MODE button
repeatedly until the “TTL” indicator shows on the LCD.
(3) Press the shutter release button on your camera halfway to ensure that the camera is communicating
with the flash. The camera’s ISO and aperture setting will be displayed on the flash’s LCD, and a flash
icon will appear in the camera’s viewfinder.
(4) Make sure that the subject is not farther away than the suggested distance indicated on the LCD.
(5) Press your camera’s shutter release button fully to take the picture. An ‘OK’ indicator will show up
momentarily on the LCD. The green OK light will also glow to indicate that a proper exposure has been
attained.
• FOR NIKON flash: The LCD will show TTL, I-TTL or BL depending on your camera model. Please refer to your camera's
instruction manual for details.
• The ISO and aperture indication on this flash provide readouts up to ISO 800 and f/11 in full-stop increments. The
indicator will show the ISO number and f/stop value closest to your current camera settings.
Page 14

HIGH SPEED SYNC
12 | High Speed Sync
The ProMaster FL1 will allow the use of shutter speeds higher than your camera’s top flash sync speed
in TTL mode by activating the High Speed Sync. This allows you to use shutter speeds as fast as 1/8000
second. The use of High Speed Sync is particularly useful when using large apertures in bright situations
or freezing motion.
•
FOR Nikon flash
The High-Speed Sync is automatically set by the camera. No special operation on the flash is required.
Please consult your camera’s manual for details.
•
FOR Canon, Pentax, Sony, or Olympus/Panasonic flash
(1) Press the MODE button until you reach the high speed sync
mode. The “H” indicator will show on the LCD.
(2) Press the “ + ” or “ - ” selector button to toggle between On and
Off status. The setting will automatically be saved into the
internal memory.
Page 15

FRONT AND REAR CURTAIN SYNC
Front and Rear Curtain Sync | 13
When you take photos of a moving subject using a slow (1/30 second or longer) shutter speed and a
flash, the flash will freeze the subject and the long exposure will cause light trails and motion blur to
appear in the image.This technique, referred to as slow sync, can be achieved in the following ways:
The ‘front-curtain’ or ‘first-curtain’ sync allows you to synchronize the flash with the camera’s shutter
release so that the flash fires at the instant the front curtain has fully opened. This causes the light
trails and motion blur to appear ahead of the moving subject.
The ‘rear-curtain’ or ‘second-curtain’ sync synchronizes the flash so that the flash fires just before
the second curtain closes. This freezes motion at the end of the exposure and creates light trails and
motion blur effect behind the main subject.
•
FOR Pentax flash
You can select the sync mode as either front-curtain ( ) or rear-curtain ( ) using the POWER switch
of the flash. The flash will fire according to the mode selected.
The camera controls the sync mode, therefore no setting is required on the flash. Please consult your
camera’s instruction manual to determine how to set this feature on your camera.
•
FOR all other models of flash
Page 16

RED EYE REDUCTION
14 | Red Eye Reduction & AF Assist Light
AUTOFOCUS ASSIST LIGHT
In low light situations, a cameras’ auto focus system can have difficulty locking focus on the subject.
When the ambient light level is low, the ProMaster FL1 flash emits a red autofocus assist beam when the
camera’s shutter release button is pressed halfway. This assist beam will help your camera’s autofocus
system to achieve focus lock.
Not all camera’s autofocus modes work with an external autofocus assist beam for focusing. Please
check your camera’s instruction manual to find out more.
"Red-eye" occurs when the light from the flash reflects off of the retinas in your subject’s eyes.
Many cameras include a "red-eye reduction" feature. When this feature is activated, the camera will
instruct the flash to fire pre-flashes before the picture is taken to help eliminate the red eye effect.
The ProMaster FL1 flash supports your camera’s red-eye reduction function. Please refer to your
camera’s instruction manual for details on how to activate it.
Page 17

Manual Mode | 15
(1) Press the MODE button until you reach the manual mode. The “M” indicator will show on the LCD.
(2) Then press the “ + ” or “ - ” selector button to set your desired output. The setting will then be automati-
cally saved into the internal memory.
(3) Set your camera accordingly. For shutter speed, the highest you can set is the camera’s flash sync
speed unless you activate the High Speed Sync feature. Please refer to the section “HIGH SPEED
SYNC” for details.
(4) Make sure that your subject is within the suggested maximum flash-to-subject distance as indicated
on the LCD and take a test shot. Check the result on your camera.
(5) Adjust your camera’s setting and the level of the light output of the flash if needed.
(6) Press the camera’s shutter release button to take the picture.
MANUAL MODE
You can set the ProMaster FL1 flash’s output level manually to create special lighting effects. Seven
manual settings are available: 1/1, 1/2, 1/4, 1/8, 1/16, 1/32, and 1/64. The flash fires full power at the 1/1
setting, and each successive setting halves the light output.To use the manual mode:
To avoid overheating or damage to the flash, please wait for at least 10 minutes after making 15 continuous shots at full power. Your flash will automatically shut off if overheated.
Page 18

16 | Zoom Control
AUTOMATIC MOTOR ZOOM CONTROL
The ProMaster FL1 flash supports automatic motor zoom control with cameras allowing digital data
transmission to the flash. The available zoom positions are 24, 28, 35, 50, 70, 85, and 105mm.
When you turn the flash on, the zoom mode indicator on the LCD will display an “A” indicating that
automatic motor zoom head control is activated and zoom head is at the default 35mm position.
When the camera's shutter release is pressed half way, the flash zoom head will adjust to match the focal
length of the lens, and the closest zoom setting will be displayed on the LCD. When you change the lens
focal length, the flash zoom setting will change accordingly.
When the flash head is tilted or swiveled to the side, the flash zoom setting will be automatically set to
50mm.
MANUAL ZOOM CONTROL
You can adjust the flash zoom setting independent of the focal length of the lens. Press the ZOOM button
to make the “M” indicator to appear. Then continue to press to cycle through the available focal length
settings.
Page 19

Wide Angle Diffuser | 17
WIDE ANGLE DIFFUSER
If your camera lens is wider than 24mm full frame/16mm digital, you can use the provided wide angle
diffuser to extend the flash’s angle of coverage to 18mm full frame/12mm digital.
To install the diffuser:
(1) Make sure that the snap is facing downward. Hold the diffuser at
the attachment clip. Slide the bottom of the diffuser into the lower
side of the flash head;
(2) Press the diffuser into the flash head and it will snap into place.
snap
attachment clip
To remove the diffuser from the flash head, just hold the diffuser at
the attachment clip and then pull the diffuser out.
Page 20

18 | Indirect Lighting Techniques
INDIRECT LIGHTING TECHNIQUES
Using direct flash to illuminate a subject may result in images that have unattractive shadows. The
ProMaster FL1 allows you to tilt the flash head to an angle of -7
o
, 45o, 60o, 75o, or 90o and/or rotate it
horizontally 180
o
to the left and 120o to the right allowing for softer lighting options.
Tilting the flash head or swiveling it to the side allows you to bounce the light off the ceiling or walls. While
shooting indoors, this technique can help to create more natural-looking pictures of people with softer
shadows. When the flash head is tilted or rotated to the side, the flash zoom setting will be locked to
50mm. You may need to adjust your camera’s settings (such as the aperture value), since the light falling
on the subject will be reduced. You can change the zoom setting by pressing the ZOOM button until you
achieve the desired position.
Bouncing the flash off a white or neutral-colored surface
will not alter the color of the light. Bouncing the flash off a
colored surface can create a color cast in your images.
Bouncing the flash off a gold-toned surface can give the
portraits a warmer look. Other colors can be used for
creative effects.
0°
90°
75°
60°
45°
-7°
0
°
30
°
°
09
°
021
0
°
2
1
°
051
°
180
°
09
°
°
30
°
60
60
Page 21

Indirect Lighting Techniques | 19
• SUB flash
Using bounce flash may still cause unwanted shadows on your
portraits. The ProMaster FL1 features a small secondary flash
below the main flash which provides a fill-in light to help reduce
shadows.
To activate or deactivate the secondary flash, press the MODE
button until the “ --- ” indicator shows up on the LCD. Then press
the “ + ” or “ - ” button to toggle between the “Sub On” and “ --- ”
(Sub Off) status.
• Sub flash deactivated
• Sub flash activated
When the flash-to-subject distance is less than 2m (6.6ft), tilt the flash head down to ensure sufficient
illumination of the lower part of the subject. The ProMaster FL1 allows you to tilt the head down -7
o
to
achieve this purpose.
Page 22

20 | Indirect Lighting Techniques
• SUB flash (cont’d)
After you have activated the secondary flash, it may be used in the TTL, Manual, or Slave mode. Press the
MODE button until you enter your desired flash mode. Make sure that the correct mode indicator is displayed
on the LCD. The “Sub” indicator will be displayed at the bottom right of the LCD if the secondary flash is
activated.
Please note that when the flash head is not in one of the bounce or swivel positions, or when the high speed
sync is activated, the secondary flash will be turned off automatically. The “Sub” indicator will not appear on
the LCD.
TTL
• TTL mode display when
sub flash is activated
• Manual mode display when
sub flash is activated
• Slave mode display when sub
flash is activated
Page 23

Manual Slave Flash | 21
MANUAL SLAVE FLASH
You can use the ProMaster FL1 off of the camera as a manual slave unit by activating the optical slave
feature. When this feature is activated, the flash will fire whenever it “sees” another flash firing. This works
optically, using the built-in optical slave sensor. To use as a manual slave flash:
(1) Press the MODE button until you enter Manual mode. The “M” indicator will show on the LCD.
(2) Select your desired power level by pressing the “ + ” or “ - ” button. The setting will be automatically
saved into the memory.
(3) Then press the MODE button till you enter Slave mode. The “S” indicator will show on the LCD.
(4) Press the “ + ” or “ - ” button to set the appropriate slave setting 0, 1, or 2 (please refer to the next
section for details).
(5) You may also want to adjust the flash coverage angle. Do
this by pressing the ZOOM button to manually select the
desired focal length for the zoom head.
(6) Finally, make sure that the master flash is on and set up
correctly. Fire the master flash and the slave flash will fire
with the master flash’s main flash.
Page 24

22 | Choosing the manual slave mode
CHOOSING THE MANUAL SLAVE MODE
Your Master Flash (the flash used to trigger the slave) may emit more than one burst of light in quick
succession before the main flash. These are called pre-flashes, which are controlled by the camera and
fired to help the camera to determine the correct exposure for the photograph or to reduce the "red-eye"
effect. If the slave flash is not set to the correct mode, it may fire before the camera’s shutter opens.
To ensure that the slave flash fires at the correct time, there are three slave modes available in this flash to
help you to synchronize with the master flash:
If you are using your camera’s built-in flash or an external flash attached to the camera as the master
flash, you should note that this flash may emit a series of quick flashes lasting for a second or more when
the camera’s red eye reduction feature is activated. As a result, no appropriate slave modes can be
selected for synchronization. You should turn off the red eye reduction feature in your camera when using
this flash as a slave flash.
Mode 0
Mode 1 & 2 The slave flash ignores 1 (Mode 1) or 2 (Mode 2) pre-flashes. These modes should
be used when the master flash is set to TTL or any automatic modes. Always take a
test shot to check which mode you should use in order to synchronize the slave flash
with the master flash’s main flash.
The slave flash fires instantly when it “sees” the first light burst from the master flash
Page 25

Wireless TTL Slave Operation | 23
WIRELESS TLL SLAVE OPERATION
The ProMaster FL1 is equipped with advanced wireless TTL flash feature, so that it can be used off
camera while still maintaining full TTL control. Take a moment to familiarize yourself with the following
terms in order to understand how to work with multiple wireless TTL flash units:
Master
Remote or
Slave Flash
Channel
This can be the camera’s built-in flash, a flash mounted on the camera, or a dedicated
wireless controller. Only one master flash is allowed in a wireless multiple flash photography setting. It controls how the slave flashes operate in wireless TTL mode.
Flash units that are not directly connected to the camera, and are controlled by a master
flash or controller are called “slave” or “remote” units. There is no limitation on the number
of remote units that can be used at one time.
Master and Slave units exchange data through channels. Four channels (1, 2, 3, 4) are
available in the flash. You can pick the channel you prefer for communication between the
master and remote flash units. You can use this option to prevent your remote flash units
from being triggered by the master unit of another photographer working with the system
nearby.
Group You can assign remote flash units to one of the three groups (A, B, or C) and set the
mode and output power level of each group.
Page 26

24 | Wireless TTL Slave Operation
To use this flash as Wireless TTL slave flash:
(1) Make sure that the master flash or controller is on and set to TTL automatic mode.
(2) Set the setting for each group of flash units in the master flash or controller. Assign the master to one
of the channels. Please refer to your master flash’s manual on how to do this.
(3) Press the MODE button of this flash until you reach the Wireless TTL mode. The “STTL” indicator will
show on the LCD. Then press the “ + ” or “ - ” button to cycle through the available channels and
groups.
(4) Select the channel that matches your master flash or controller.
Each time you press the “+” button, the channel and group setting will change in the following
sequence: 1A1B1C2A2B2C3A3B3C4A4B4C
(5) The setting will automatically be saved into the internal memory of the flash. You will notice that the
front red light blinks, indicating that the flash is now in Wireless TTL mode.
(6) You may want to adjust the flash coverage. To do this, use the ZOOM button.
Page 27

Slave Flash Setup | 25
SLAVE FLASH SETUP
You can create a professional lighting setup by putting slave flash units into different groups to function
as main, fill, accent, side, or other lights. Set the output power level of each group appropriately to
achieve specific effects for your photographs.
While positioning the slave flash units, please keep in mind the following points:
(1) The effective shooting distance between
the master and remote flash units is
approx. 10m (33 ft.) or less in the front
position, and approx. 5 to 7m (16 to 23 ft.)
at both sides. These ranges may vary
depending on the ambient light.
(2) Make sure that the TTL sensor (when
using wireless TTL mode) or the optical
slave sensor (when using the manual
slave mode) of the slave flash units are
facing the master flash or controller, and
there is no obstruction in between.
>=30°
>=30°
Group B
Less than approx.
10m (33 ft.)
Approx. 5 to 7 m
(16 to 23 ft.)
Group C
Group A
Master flash
Approx. 5 to 7 m
(16 to 23 ft.)
Page 28

26 | Slave Flash Setup / PC Sync Terminal
PC SYNC TERMINAL
(3) When taking pictures outdoors or under bright ambient light, the sensitivity of the sensors may be
reduced.
(4) To avoid interference between flash units, using more than three flashes in a group is not
recommended.
(5) Avoid aiming the flash directly into the camera lens.
The ProMaster FL1 can be used with cameras without a hot shoe. Some cameras have an x-terminal
to allow flash synchronization. You can connect this flash’s PC Sync Terminal to the camera’s
x-terminal using a sync cord to enable the camera to trigger this flash.
Page 29

Flash Exposure Compensation and Power Saving | 27
FLASH EXPOSURE COMPENSATION
POWER SAVE MODE
In TTL mode, you can apply flash exposure compensation by pressing the flash exposure compensation
button on your camera and adjust the flash exposure level up and down with your camera’s controls.
The range and control of flash exposure compensation vary between different camera models. Consult
your camera manual for more information about this feature.
If there is no communication between the flash and the camera for approximately 3 minutes, the flash will
automatically enter power save mode to conserve battery power. In this mode, "OFF" will appear on the
LCD. The Ready light will be off in power save mode.
To reactivate the flash, press any button on the LCD panel or the camera’s shutter release button.
If you are not going to use your flash for an extended period, we recommend that you power the flash off
completely, using the power switch.
Page 30

28 | Firmware Upgrade and Guide Number Chart
FIRMWARE UPGRADE
The firmware of the ProMaster FL1 can be upgraded to allow compatibility with future camera
releases. For more details on the upgrade of the firmware, please contact your local dealer.
GUIDE NUMBER CHART (AT ISO 100)
Zoom Position (mm) GN - Feet GN - Meters
70 161 49
50 151 46
35 141 43
28 131 40
24 121 37
85 174 53
105 180 55
Page 31

SPECIFICATIONS
Type: On-Camera and Wireless TTL Automatic and Manual Flash with Secondary Fill-in Flash
Guide No: 55(m) / 180(ft) at 105mm position and ISO 100
Full Frame Flash Coverage: 24 - 28 - 35 - 50 - 70 - 85 - 105mm (18mm with wide angle diffuser)
High Speed Synchronization: Yes
Flash Recycle Time and Duration: 0.5 - 9 seconds with duration from 1/20,000 - 1/1,000 second
Manual Mode Power Output: 1/1, 1/2, 1/4, 1/8, 1/16, 1/32 & 1/64
Wireless Transmission Method and Range: Optical Pulse up to 10 meters (33 feet)
Wireless Channels and Groups: 3 Channels and 4 Groups
Slave Modes: Instant Sync, Skip one flash, Skip two flashes (S0, S1, S2)
PC Sync Terminal: Yes
Power Source: 4 AA Alkaline, Ni-MH, or Lithium batteries
Bounce/Tilt Range: Up 45
o
, 60o, 75o, 90o; Down -7o; Right 0o - 120o; Left 0o - 180
o
Dimensions (W x L x H): Approx. 75 x 110 x 130 mm / 2.95 x 4.33 x 5.12 inches
Weight (without batteries): Approx. 300 grams / 10.58 ounces
Included Accessories: Flash Stand, Pouch, Wide Angle Diffuser Panel
Page 32

DF-383
INSTRUCTION MANUAL
Power Zoom AF DSLR Flash
 Loading...