

Page 1

Vectra MIC-1 Electret Condenser Microphone
The Vectra MIC-1 stereo microphone fits most digit al video and DSLR cameras. This
microphone offers more natural improved sound over what you will normally get with the mic
built in to your camera or camcorder. Its high sensitivity and strong directional capability gives
you superb clarity for subjects that are further away. The Vectra MIC-1 of fers a selectable pickup pattern to get the best sound depending on the scene you are recording.
Important Notes:
The microphone is a sensitive precision instrument. DO NOT subject it to impact or
excessive vibration. Keep it away from high temperatures and humidity.
If the microphone is operated near an amplifier you will experience feedback. If this
happens, move the microphone away from the amplifier or turn down the volume of the
amplifier.
Changing the mode switch while recording will cause the switch noise to be recorded.
If the windscreen gets wet from rain or other sources, it should be dried in a cool, dry
place. Avoid drying in direct sunlight to prevent deterioration of the foam.
Package includes:
MIC-1 Electret Condenser Microphone
Wind Screen
CR2 battery
Storage bag
Instruction Manual
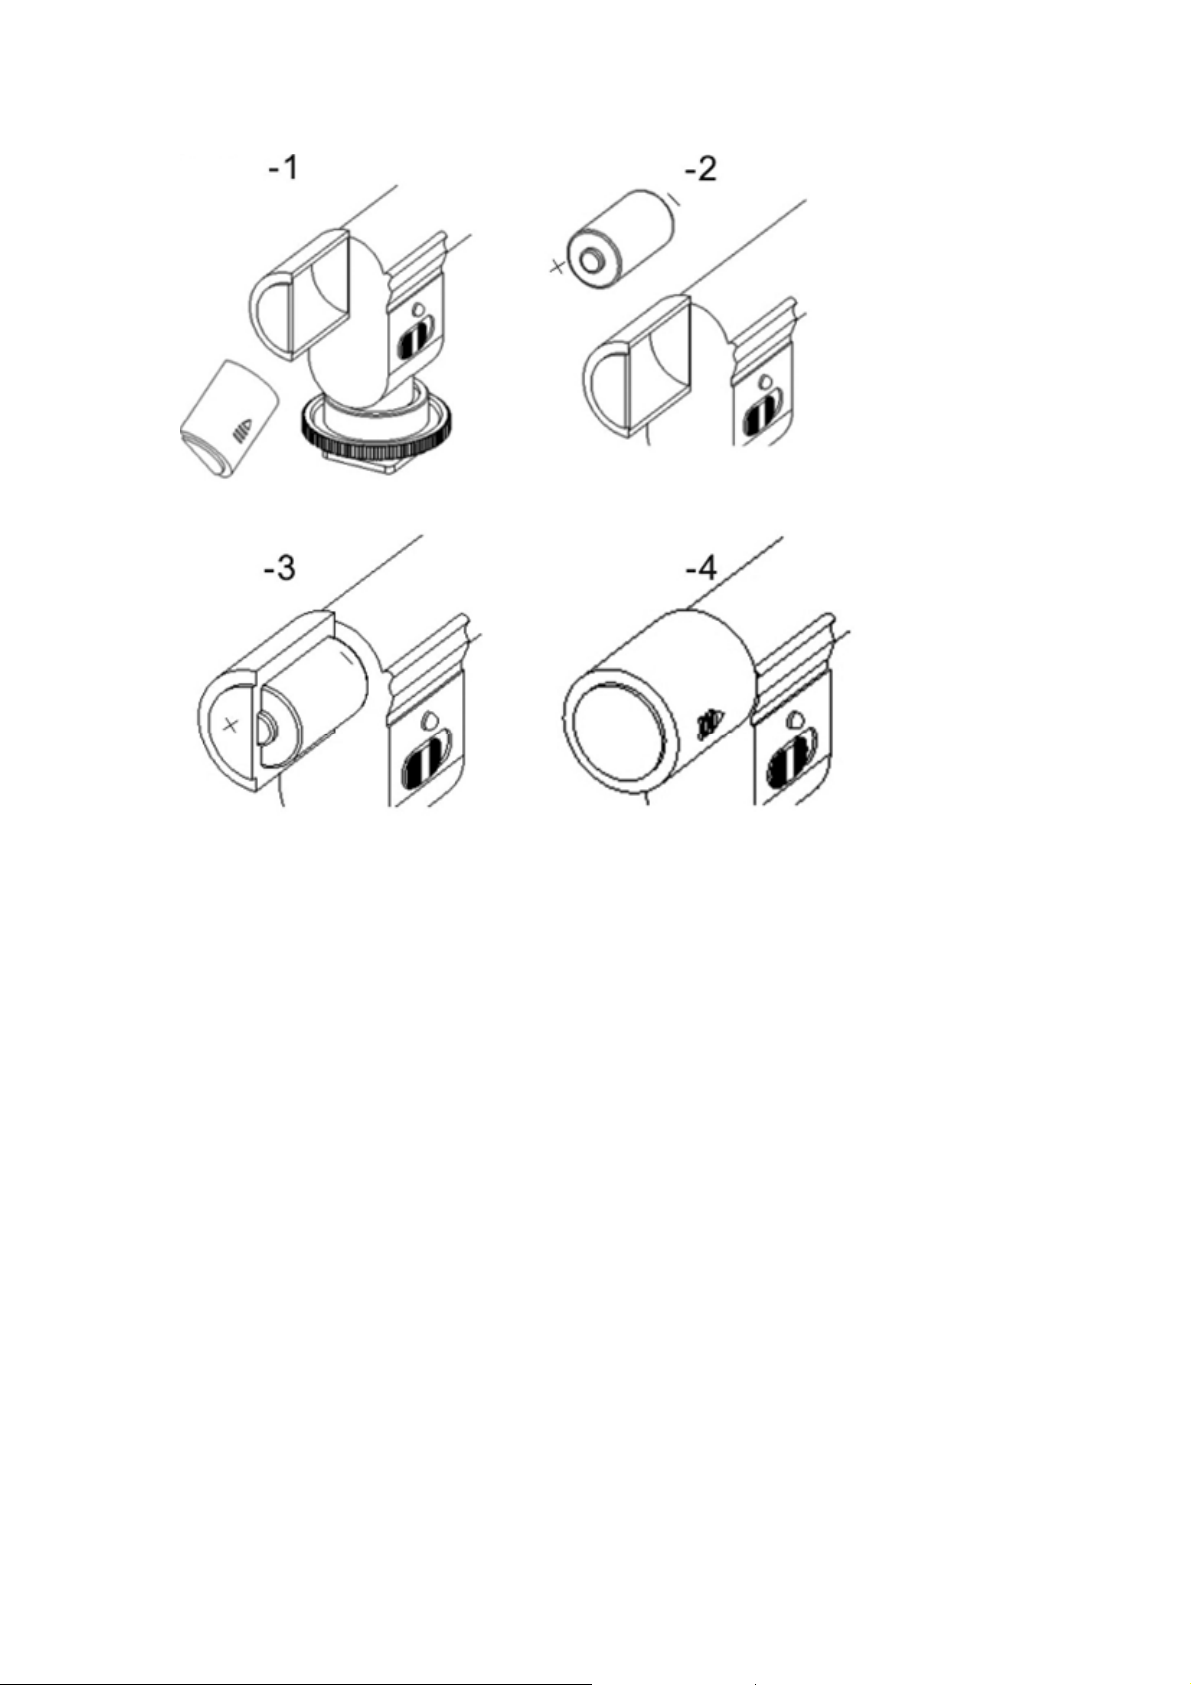
Installing or changing the battery
The battery must be installed in order for the microphone to operate.
1. Push the battery cover backward and lift off.
2. Push the battery towards the front of the microphone to remove.
3. Put the new battery into the battery compartment. Be sure to observe the correct polarity.
4. Replace the battery cover and slide into place.
Page 2
When to change the battery
The indicator light above the off and on switch will flash when the microphone is turned on if
the battery is good. When the battery level reaches approximately one hour of remaining use,
the indicator light will glow and the battery should be replaced. A CR2 battery wil l normally last
for up to 800 hours depending on the frequency and pattern of use.
Caution
1. Use only a primary (non rechargeable) CR2 lithium battery. The battery supplied cannot
be recharged.
2. If you will not be using the microphone for an extended period of time, remove the battery
before storage.
3. If the battery leaks, be sure to thoroughly clean the battery compartment before installing
a new battery.
Connection
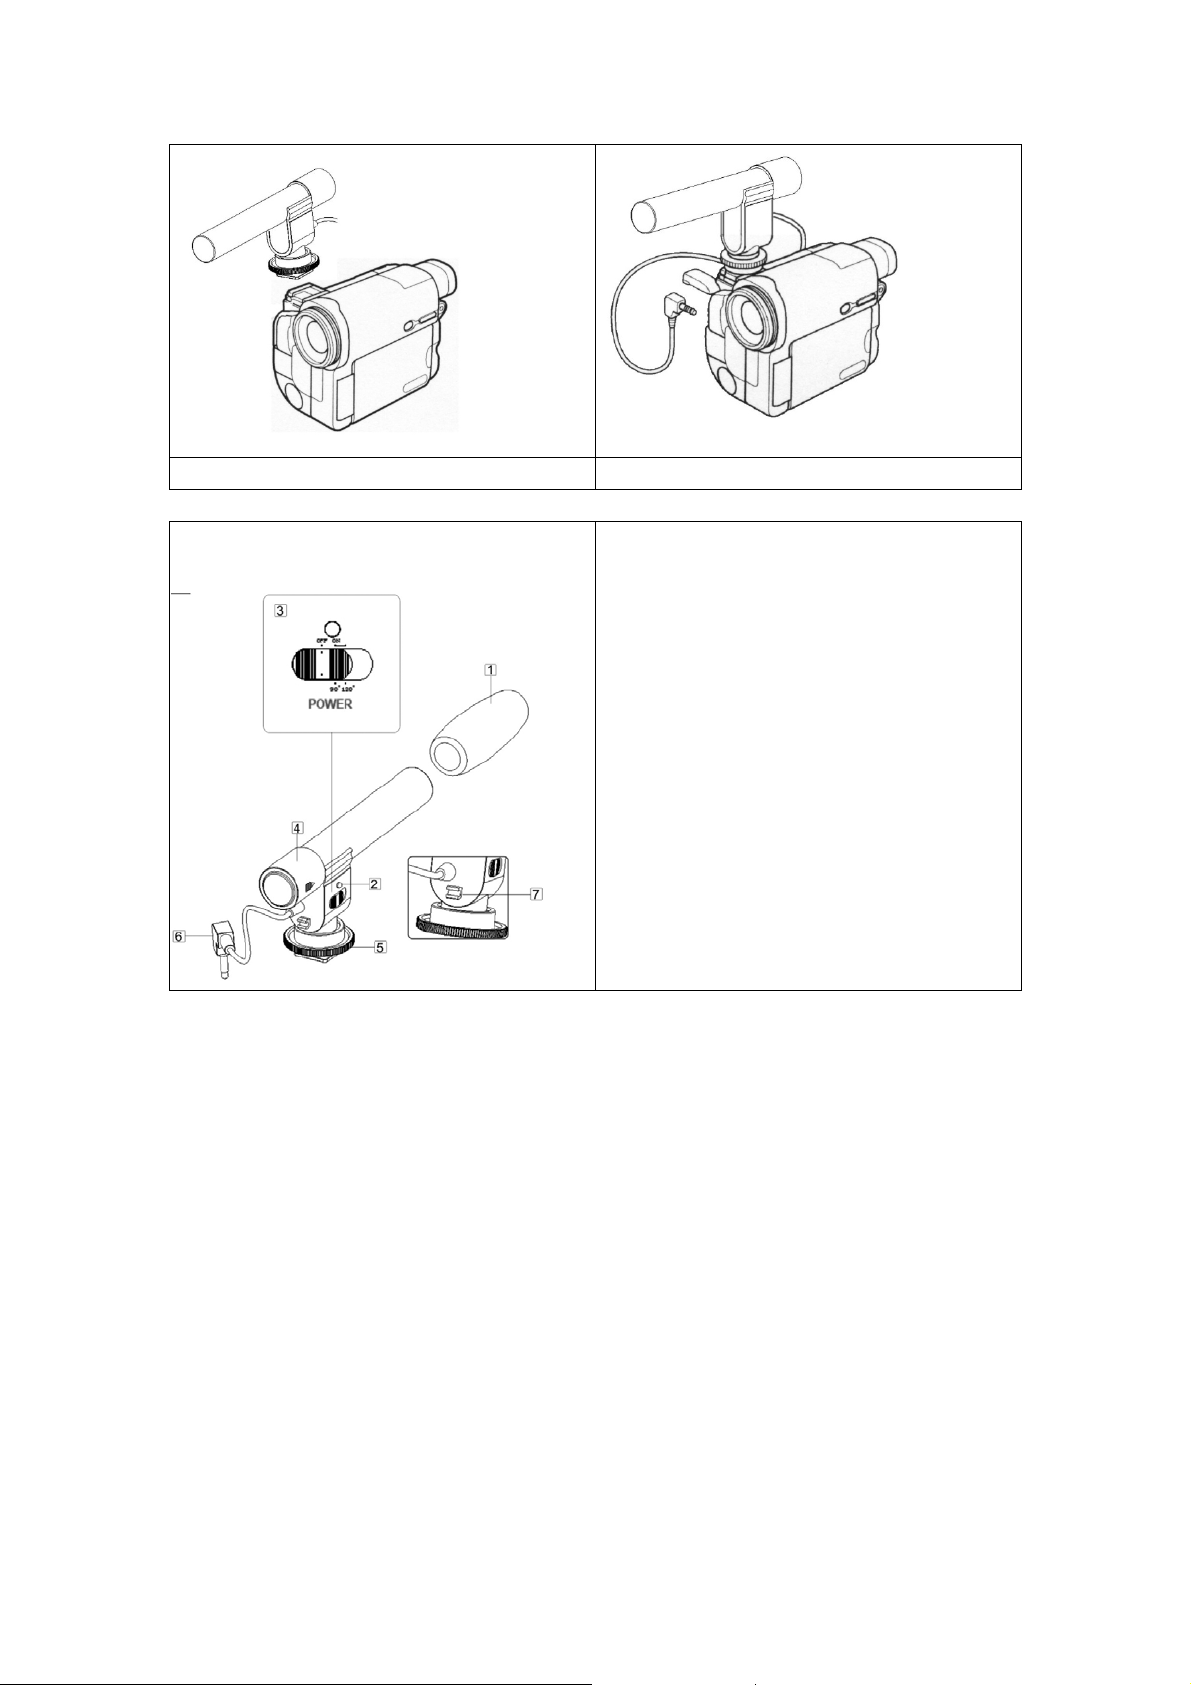
Slide the foot of the microphone into to the accessory shoe of your camcorder or DSLR (see
Figure 1). Turn the locking wheel to fix the micropho ne in place. Be sure that your camcorder
or DSLR is POWERED OFF. Insert the mini stereo plug of the microphone into the external
microphone input of your camcorder or DLSR. (See Figure 2)
Page 3
Mode switch
Figure 1 Figure 2
1. Wind Screen: Cover on the microphone
to reduce the wind noise and sound of
breath.
2. AF light: When you switch "OFF" to
"ON", the light will flash then off. When
the light flashes or glows during use it
indicates low power and the battery
should be replaced.
3. Power/Mode switch
4. Battery cover
5. Accessory shoe connector
6. Mini stereo plug
7. Cable clip: Use this to remove slack in
the cable.
Page 4
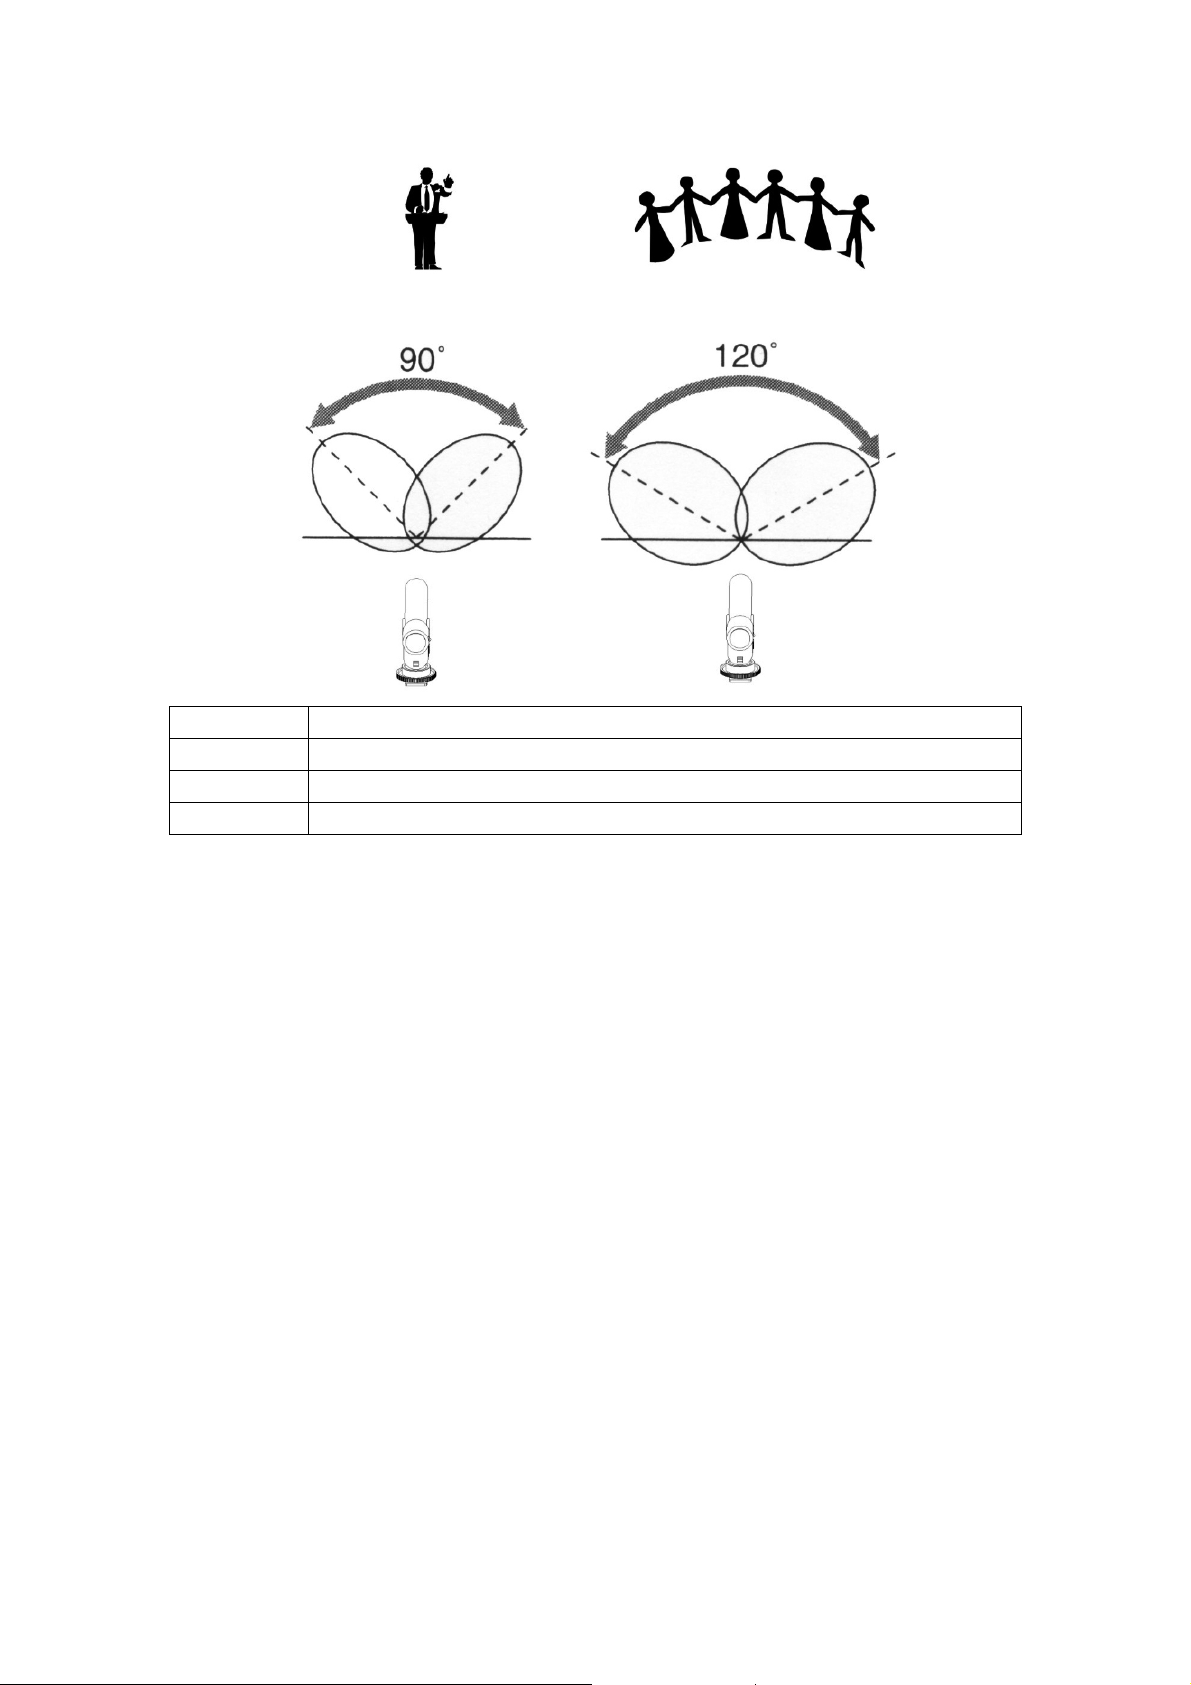
ON
OFF
90°
120°
Picks up sound in a limited area or from a further distance
Picks up sound in a big area or a closer distance
Microphone is on
Microphone is off
Specifications:
Frequency response: 30-1800Hz
Sensitivity: -40dB (0dB=1V/Pa at 1KHz)
Direction: Uni-direction
Output Impendency: 200
S/N Radio: 76dB (1KHz at 1Pa)
Max SPL: 120dB (at 1KHzs1%T.H.D.)
Power Requirements: DC 3V (CR2 battery)
Length of Cable: 11 in./28cm
Dimensions: .98 x 5.12 x 2.36"/25 x 130 x 60mm
Weight: 1.59 oz/45g (without battery)
Code 8026
Made in China
Vectra • Fairfield, CT 06825
 Loading...