

Page 1
Page 2
Instruction
Mode
d'emploi
Manual
de
manual
instrucciones
PROWSTER'
Page 3
23
www.orphancameras.com
23
13
111
20
12
19
17
18
16
14
15
21
Page 4
DESCRIPTION
1. Shutter
Exposure
2.
3. Autofocus
inder
4. Viewf
Flash
5.
Flash Lever
6.
7. Lens
Light Sensor
B. CdS
9. Lens Cover
.10.
11.
12. Eyepiece
13. Flash Ready
14.
15. Battery
16. Rewind
17. Film
18. Film Chamber
19. DX Read-off
20. Sorocket
21.
22. Film
23.
24. Strap
Cover
Back
Film Transport Signal
Film Window
Cover
Rewind
Film Pressure
Take-up
Film Loading
OF
Release
Counter
Windows
Reflector
Slider
Latch
Lamp
Compartment
Lever
Shaft
Contacts
Spool
Indicator
Eyelets
PARTS
Button
Plate
M ENCLATURE
NO
1. Bouton du
Compteur
2.
Fenetres
3.
4. Viseur
R6f
5.
Levier du
6.
7. Objectif
Cellule
8.
Curseur
9.
I'objectif
10. Bouton
boitier
ll.lndicateur
12. Piece occulaire
13.T6moin de
14. Fen6tre
15. Couvercle
16. Levier de
17. Axe de
18. Logement
19.
Contacts
de
20. Entrainement
21. Plaque
22. Bobine r6ceptrice
23. Indicateur de
oellicule
24. Oeillets de
d6clencheur
prises
de
mise au
de
lecteur du
la
flash
f lash
photo6lectrique
couvercle
du
de verrouillage
d'avancement
charge
de la
oellicule
logement
du
rebobinage
rebobinage
de la
de d6tection
pellicule
de
presse-pellicule
chargement
courroie
pellicule
(contacts
la
vue
de
point
Cd
de
du dos
flash
du
des
de la
de
Pellicule
pellicule
la
de
automatique
protection
du
pellicule
la
de
Piles
pellicule
la
sensibilit6
DX)
la
de
DESCRIPCION
1.
Bot6n
2. Contador
Ventanillas
3.
Visor
4.
Ref
5.
Palanca
6.
7. Objetivo
8. Sensor
de
Deslizador
9.
10. Seguro
11. Sefral
Lente
12.
13. Ldmpara
f lash
Ventanilla
14.
15.Tapa
Palanca
16.
17.Eje
Compartimiento
18.
pelicula
19. Contactos
2O. Eje
21.Placa
22.Carrete
23.Indicador
Ojetes
24.
disparador
exPosiciones
de
de enfoque
lector del
de
f lash
flash
del
luz
de
de
taPa
la
de
de transporte
de enfoque
de
Puesta
la
de
compartimiento
del
rebobinado
de
rebobinado
de
dentado
presi6n
de
bobinado
de
de.carga
para
la
LAS
DE
automdtico
Cds
del objetivo
la tapa
Posterior
la
de
a
Punto
Pelicula
la
de
del cartucho
DX
lectura
la
de
Pelicula
de
la
de
correa
PARTES
pelicula
del
pilas
de
pelicula
de
,
pelicula
la
pelicula
.
la
Page 5
INTRODUCTION
www.orphancameras.com
AUTO
with
is a full automatic
This
FOCUS
Before attempting
instruction
the correct
formances.
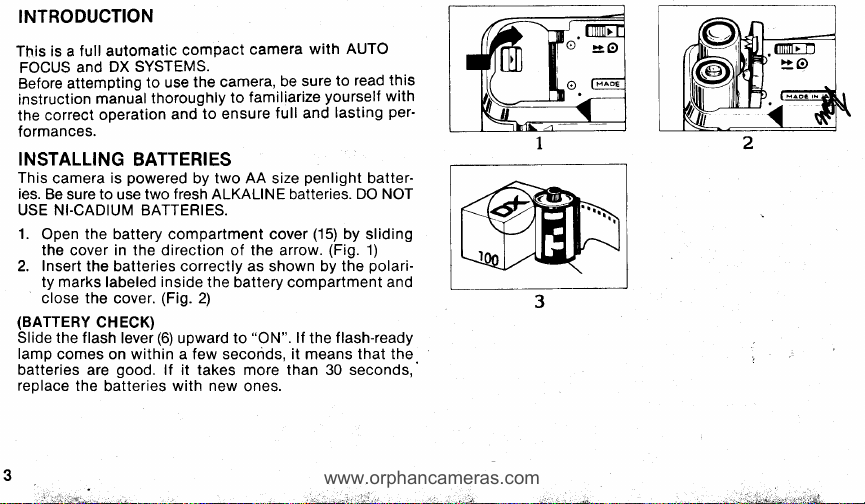
INSTALLING
This
ies.
Be sure to use two
USE NI-CADIUM BATTERIES.
1.
Open the battery compartment cover
the cover in the direction of the arrow.
2. Insert the batteries correctly as shown by the
ty
close the
(BATTERY
Slide the f lash
lamp
batteries are
replace
DX SYSTEMS.
and
manual
operation
is
camera
marks
labeled
cover.
CHECK)
the
batteries
lever
good.
comes on within a few seconds, it means that the
compact
to use
thoroughly
and
BATTERIES
powered
fresh
inside
(Fig.
(6)
upward to
lf it takes more than 30 seconds,
with new
camera
read
to
the camera,
to ensure
by two AA size
ALKALINE batteries.
the battery compartment and
2)
be sure
familiarize
to
full and
"ON".
ones.
yourself
lasting
penlight
(15)
by sliding
(Fig.
lf
f lash-ready
the
batter-
DO
NOT
1)
polari-
this
with
per'
3
.-:,.t
Page 6

INTRODUCTION
appareil
d'un
ll s'agit
automatique
point
automatique
Avant
ment
fonctionnement
MISE
appareil
Cet
"AA".
LISER
1. Ouvrir
faisant
lnstaller les
2.
tes
cle.
(vERlFtcATtoN
Faire coulisser le
position "ON".
charge du
suivent. S'il
par
des
qui
automatique
d'utiliser
ce
EN PLACE
Utiliser deux oiles
DE BATTERIES
dans
(Fig.
la
de
cet
mode d'emploi
et d'obtenir
photo
le
couvercle
coulisser
piles
le logement des
2)
DE L'ETAT DES PTLES)
Les
flash
s'allume
plus
faut
piles
neuves.
photo compact,
est 6quipe
(AUTO
FOCUS)
sensibilit6
appareil
est aliment6
levier du flash
piles
photo,
in de vous familiariser
af
de bons
DES PILES
ALCALINES neuves. NE PAS
NICKEL-CADNIUM.
du logement des
la
dans
direction de
respectant les
en
piles
en bon 6tat si le
sont
dans
de 30 secondes,
entidrement
systOmes de
de
de selection
et
pellicule
la
de
veuillez
par
deux
refermer le
et
(6)
vers le
quelques
les
remplacer les
r6sultats.
la f ldche.
polarit6s
mise au
(DX).
lire
attentive'
avec son
piles
de type
piles
(15)
(Fig.
inscri-
couver-
haut,
t6moin de
secondes
UTI-
en le
sur
qui
piles
INTRODUCCION
Esta es una
autom6tica, con enfoque
y
sistemas
Antes de usar
te este
procedimientos
los
de obtener un
se
INSTALACION
Esta
ra, tamafro
nas nuevas.
1. Abra
1)
la
zando
la flecha.
Inserte
2.
de
pilas.
(PARA
Deslice
quede
tb Oet
q,uiere
para
las
ce
DX.
manual
cdmara
"AA".
la tapa
para
las
polaridad
Cierre
CONTROLAR
hacia arriba
posici6n
la
en
f lash se
que
decir
demora
pilas por
y
cdmara compacta
la cilmara, aseg0rese de
instrucciones
de
correctos
rendmiento
DE LAS
funciona con
Aseg0rese
NO USE
(Fig.
mds
PILAS
del compartimiento
la tapa
ello
1)
pilas
correctamente,
impresas dentro
(Fig.
la taPa.
ESTADO
EL
palanca
la
"ON". Si
dentro
ilumina
pilas
estdn
las
segundos
de 30
nuevas.
unas
tota'lmente
automdtico
para
de manejo,
6ptimo
PILAS
pilas
dos
de
NIQUEL-CADMIO.
DE
la direcci6n
en
del
2)
del
la ldmpara
unos
de
en buen
en
(AUTO
FOCUS)
leer detenidamen-
familiarizarse con
y
aslasegurar'
y
duradero.
linterna miniatu-
de
pilas
dos
usar
pilas
LAS
flash
puesta
de
pocos
estado.
(15),
indicada
las marcas
P_ILAS)
(6)
hata
segundos,
Si
reempla'
de
siguiendo
compartimiento
DE
ilumi,narse,
alcali'
desli'
por
de
que
pun-
a
la l6m-
4
Page 7

LOADING
www.orphancameras.com
The camera
encoded
ISO 100 film. Always
OR UNLOAD
LIGHT.
1.
Open the back
back cover
4)
Insert the bottom
2.
the
Pull
3.
the
Close the back
4.
With
5.
Open the
6.
(9).
closed.
Depress
7.
posure
The film
vancing. lf it does
(Fis.
THE FILM
is
designed
films. lf DX
FILM IN
(Fig.
3)
latch
film
chamber
the film so as the
out
film loading indicator
"DX"
film, the
lens cover by sliding the
Camera will
(Fig.
shutter button
the
counter
transport
e)
for
encoded
load film in
BRIGHT LIGHT
cover of the camera by
(10)
in the
part
(18).
cover.
film
not
operate
7)
(2)
shows
signal(11)willspin
not
spin,
with ISO 100 & 400 DX
use
films are not available, use
shade. NEVER LOAD
the
direction
film cassette first
of the
(Fig.
5)
tip
of
(23).
speed
while the
(1)
few times
"1".
reload the
DIRECT SUN-
OR
pushing
of the arrow.
the film
(Fig.
6)
is
automatically
lens
lens
(Fig.
8)
if
the
film
aligns
cover slider
until
film is adcorrectly.
(Fig.
into
with
set.
cover
the ex-
the
is
0;,:l
9
'.ot.,'
Page 8

CHARGEMENT
Cet appareil
pellicules
des
ne
on
dispose
pellicule
les
NE JAMAIS CHARGER
SOUS UN
(Fis.
'1.
2.
3.
4. Refermer le dos de
5.
6. Ouvrir
7.
de
dans un
ECLAIRAGE
3)
le dos de
Ouvrir
verrouillage du
fleche.
Engager d'abord
licule
dans
Tirer
sur
le
d6but de
chargement de
de
La sensibilit6 de
169l6e lorsqu'on utilise des
le couvercle de
sant coulisser
I'objectif
de
que
le couvercle de
(Fig.
7)
Appuyer
pour
(1)
(2)
sur la
DE LA PELLICULT
photo
est congu
encod6es
pellicules
pas
de
100 ISO(ASA).
sombre.
endroit
(Fig.
l'amorce de la
plusieurs
faire avancer
position "1".
OU DECHARGER DE PELLICULE
I'appareil en
dos du boitier
4)
partie
la
le logement de
pellicule
la
pellicule
la
le curseur du couvercle
(9).
L'appareil ne fonctionnera
protection
fois
pour
(DX)
de
encod6es
Toujours
INTENSE
inferieure du rouleau de
la
pellicule
soit align6
I'appareil.
pellicule
protection
le bouton du d6clencheur
sur
le
compteur
(Fig.
8) L'indicateur d'avance-
utilisation
une
100 a 400
charger
EN
OU
PLEIN SOLEIL.
poussant
(10)
dans
pellicule
manidre a ce
de
avec
(23). (Fig.
est automatiquement
pellicules
de l'objectif en
l'objectif est ferm6.
de
de
avec
ISO(ASA). Si
DX, utiliser une
pellicu-
les
le
le sens de la
(18).
l'indicateur
6)
"DX".
de
prises
de
bouton
pel-
(Fig.
5)
que
fai-
protection
pas
tant
vue
de
CARGA
Esta cdmara
culas
se
l[culas ISO
sombreados.
.LA
LUZ DIRECTA
1. Abra la tapa
2.
3. Desenrolle
4.
5.
o.
7. Presione el bot6n
DE LA PELICULA
ha
sido disefrada
ISO 100
puede
EN LUGARES CON
ra ello el seguro de
cion
Inserte
licula en el compartimiento
cula
6sta
pelicula
Cierre
Al
usar
automAticamente
Abra la tapa del objetivo
la tapa del objetivo
tando la tapa del objetivo
que
8) La sefral
do
rase,
y pelfculas
peliculas
disponer
indicada
(18). (Fig.
quede
la tapa
el contador
pelfcula
la
vuelva a cargar
de
100.
Cargue siempre
NO CARGUE Nl DESCARGUE
primero
(23).
pelicula "DX",
de transporte de
FUERTE LUZ. NITAMPOCO
DEL
SOL.
posterior
la tapa
por
la
parte
la
5)
pelicula
la
alineado
(Fig.
6)
posterior.
ajustada.
(9).
disparador
de exposiciones
avanzando. En caso
est6
para
ser usada con
codificadas
(Fig.
la
de
flecha.
inferior del cartucho de
de tal
con el
la velocidad de
moviendo el
La cdmara
pelicula
la
de 400 DX. Si no
icadas DX, use
codif
pelicula
la
3)
c6mara,
posterior (10)
abierta.
la
presionando
(Fig.
a)
del cartucho de
que
modo
indicador de carga de
(1)
pelicula (11)
el extremo de
la
i1eslizador de
fUnci6nard es-
no
(Fig.
algunas
(2)
muestre
correctamente.
peli-
lugares
en
LA PELICU-
A LA
la
en
direc-
la
pell-
la
pelicula
serd
7)
veces hasta
"1". (Fig.
girar6
cuan-
que
no
de
(Fig.
pe-
pa-
pe-
la
gi-
9)
Page 9

TAKING
www.orphancameras.com
Shooting
1.
Compose
the
outer
2. Keep
light
3. Hold
prevent
to
jects
subjects in
shutter
and keeping
your
subjects
line
and if
does not
the
shutter.(Fig.
4. The
film
shutter is
For
subject
subject
within
PICTURES
range
is from
your
subject
bright line
your
fingers
(8).
sensor
the
camera f irmly
camera shake. lf
standing
side by
center
(1)
button
the shutter
so that
the
LED
glow, press
will
advance
released.
from 1.2
inner
the
1.2 meters
frame
and
of the viewfinder
away
from
the lens
your
to
you
side, f irst
of the frame
halfway
11 + 12\
meters
which
button
they are
signal lamp
the button
bright line.
within
automatically
2.3
to
meters,
infinity.
to
your
subject within
(4). (Fig.
(7),
with
eye
are to
bring
gently
and
will lock
depressed
the bright frame
in the viewfinder (4)
all
the
as soon
(Fig.
(5)
flash
both hands
take two
one of the
depress
the focus
re-compose
way
release
to
as the
compose
13)
10)
and
sub-
two
the
your
tl
lo
:I
l3
,
Page 10

pellicule
la
de
ment
Dans
avance.
pellicule
PRISE
Cet appareil
l'infini.
et
Cadrer
1.
lant ext6rieur
Faire
2.
(7),
tif
Maintenir
3.
le tenant
devez
situ6s
objets
bouton
riser la
ton du d6clencheur
votre sujet
vent dans
trouve
enfoncer
(Fig.
La
4.
oellicule
est
le sujet se
Si
metres et
brillant
faqon correcte.
de
VUE
DE
permet
le
sujet
attention
le flash
fermement
d deux
prendre
d c6te,
c6te
centre du
au
d6clencheur
du
mise
au
de
le cadre
le
dans
le bouton A
11 + 12)
avance
orise.
trouve
2,3 mdtres,
inte16rieur.
(11)
le
du
de
(5)
en
manidre
viseur
il ne
cas ou
prendre
de
qui
doit se
(4). (Fig.
viseur
pas
ne
la cellule
et
I'appareil au
pour
mains
photo
amener
cadre
(1)
point.
Puis, tout en
enfonce
d ce
brillant.
(4)
ne s'allume
fond
automatiquement
distance
d une
cadrer
(Fig.
13)
tourner
doit
tourne
(Fig.
9)
photo
des
trouver
10)
laisser un
photo6lectrique
niveau
tout bouger.
6viter
objets
deux
d'abord
tout
et enfoncer
mi-course
A
mi-course,
d
que
les deux
le t6moin
Si
afin de
comprise
en
le sujet
pellicule
la
si
pas,
recharger
1,2 mdtres
entre
le cadre
dans
sur
doigt
des
personnes)
(ou
ces deux
un de
doucement
in de
af
maintenant
objets
LED
a
pas
vous
prendre
que
dds
utilisant
la
entre
la
bril-
I'objec'
(B).
yeux
en
vous
Si
le
m6mo'
le bou-
recadrer
se trou-
qui
se
pouvez
photo.
photo
la
1,2
le cadre
TOMAR
PARA
La escala
Componga
1.
dentro
(4). (Fig. 10)
visor
No toque
2.
(B).
Sujete
3.
manos
fotografiar
ponga
marco
del
(1)
dor
tenga
imagen
de
tes
(4)
visor
para
ton
pelicula
La
4.
el obturador
mo
objetos
Para
componga
brillante
FOTOGRAFiAS
de enfoque
el objeto
limites
los
de
objetivo
el
la cdmara
para
evitar
dos objetos
primero
uno de
presione
y
mitad.
la
hasta
disparador
bot6n
el
poniendo
linea brillante
la
tlumina,
no se
disparar
avanzarA
a ser
la imagen
(Fig.
interior.
va
desde
fotograf
a ser
la linea brillante
de
(7),
f lash
el
f irmemente
que
6sta se
que
estdn
los dos
suavemente
Esto trabard
oprimido
los
objetos dentro
dos
marco. Si
del
presione
el obturador.
automdticamente
haya
sido
iados
fotograf
dentro de
13)
jS+,
'1,2
metros a
iado y enm6rquelo
(5)
ni
sensor
el
su ojo
hacia
disparado.
entre
los lfmites
Si usted
mueva.
completamente
uno al
objetos
el boton
el enfoque.
y
recomponga
la sefral
(Fig.
11
1;2
lado del
tan
y
infinito'
exterior
de
con ambas
el centro
en
dispara-
Man-
los limi-
de
LED
el
12)
+
pronto
metros,
2,3
la
de
del
luz
va a
otro,
la
del
bo'
co-
linea
Page 11

will
www.orphancameras.com
show
rewind
pushed
f ilm is
and
THE FILM
film, the motor
the
release the shutter.
will not
last exposure
the
(16)
lever
exposure counter
until the
rewounded to its
the back cover
processing
it for
send
UNLOADING
At the end of
release button
counter
Push the
the lever
(Fig.
14)
When the
will stop. Open
tor
cassette
film counter automatically
(marked "S").
will stop and shutter
number of the
reverts
the arrow and
f ilm
cassette,
and
without delay.
to the starting
towards
The
returns to
remove
exposure
f ilm.
keep
"S".
mo-
the
film
the
The
point
m
l4
J.
I'ITIITI;T']
O>@
o
r)
IN
Page 12

REBOBINAGE DE LA PELLICULE
La fin
et
cheur.
le num6ro de la derniere vue
levier de rebobinage
tenir le levier
ses de vue retourne
Le moteur
rebobin6e.
de
teur de
tion de d6part
la
de
qu'il
oellicule est atteinte lorsoue
impossible
est
Le
compteur de
(16)en
pouss6
lorsque
s'arr6te
Ouvrir le dos de I'appareil et
pellicule que
prises
l'on fera
vue revient
de
(position
d'actionner
orises
jusqu'dr
"S".
A
d6velopper au
vue doit alors indiquer
de
la
de
direction
que
ce
(Fig.
14)
pellicule
la
automatiquement d sa
"S").
.
.
r..
le moteur
le bouton du d6clen-
pellicule.
la fleche
de
le compteur de
est
retirer le rouleau
plus
s'arr6te
pousser
main-
et
entidrement
t6t. Le
comp-
posi-
DESCARGA DE LA
Al llegar
bot6n disoarador del obturador
dor de exoosiciones
posici6n
le
Empuje
pri-
mant6ngala
posiciones
Cuando
motor
el
el cartucho de
demora. El contador de oelicula
te al
final de la
al
de la
palanca
la
en esa
retorne a la indicaci6n
pelicula
la
se detendrd.
pellcula.
punto
de.partida
pelicula,
mostrara
pelicula.
rebobinado
de
posici6n
haya
Abra la tapa
PELICULA
el motor se detendrd y el
no f
uncionard.
numero
el
(16)
hacia la f lecha,
que
hasta
rebobinada a
sido
Mande
(marcado
el contador de ex-
"S".
posterior y
procesar
a
retornard automdticamen-
"S").
la
de
(Fig.
su
la
El
conta-
fltima ex-
1a)
cartucho,
extraiga
pelicula
y
sih
10
Page 13

FLASH PHOTOGRAPHY
www.orphancameras.com
you
When
lighting conditions, the red LED signal lamp
viewfinder will
depressed
lever
take a
(Fig.16
The main subject should be within the
from the camera:
NOTE:
seconds to
WARNING:
To
take camera apart. Because we continually strive
prove
ance
take indoor
halfway
(6)
upward. When the
picture
17)
+
100 f ilm: 1.3
tso
400 film: 2 meters
When flash ready
glow, please
any risk
avoid
products
our
and specifications without
pictures,
glow
when
(Fig.
thr-' flash ready
or
the shutter
15), in this
flash
meters to
lamp
replace
of electrical shock,
we may
change
to
(13)
11
pictures
outdoor
release button is
push
case,
is charged
(13)
lamp
7 meters
batterres.
notice.
will
following
4 meters
more than 30
takes
not
do
the camera appear-
poor
in
inside the
flash
the
enough to
glow.
range
attempt to
to im-
€
-o-
L-
l5
Page 14

PHOTOGRAPHIE
Lorsque vous
les
conditions
rouge
que
vous
Dans
ce cas vous
le
haut.
Le
t6moin de charge du flash
est suffisamment
16+17)
Lors
de
trouver
Pellicule
Pellicule
NOTE: ll est n6cessaire
le temoin
poui
des
AVERTISSEMENT:
Afin
d'6viter tout risque
ter
de d6monter I'appareil
A
des fins
I'aspect
ceptibles
prenez
d'6clairage sont insuffisantes,
qui
LED
d
(Fig.
prise
dans une certaine
de cet appareil et ses caract6ristiques
se trouve
enfoncez le bouton
devez
15)
vues
de
100 ISO(ASA):
de
ISO(ASA):
de 400
de charge
s'allumer.
d'am6liorations constantes de nos
de modification
FLASH
AU
photo
des
dans
du d6clencheur i mi-course.
pousser
(13)
pour prendre
charg6
flash,
au
plage
remplacer
de
(13)
flash
du
de choc 6lectrique, ne
photo.
sans
en int6rieur
le viseur
le levier du f lash
s'allume lorsque le flash
principal
le
sujet
de distances de I'appareil:
1,3 mdtres i 4 mdters
mdters A 7 mdters
2
les
plus
met
pr6avis.
lorsque
ou
le t6moin
s'allume lors-
(6)
vers
photo.
la
piles
de 30
(Fig.
doit se
lorsque
secon-
pas
ten-
produits,
sonr
suc-
FOTOGRAFiA
Cuando
riores
del visor
sionado hasta
del flash
ya
tografia, la ldmpara
iluminard.
El
de
NOTA:
(13)
emplace las
ADVERTENCIA:
cas, no intente
nuamente
productos,
cdrmara
usted tome fotografias
con malas
se iluminard
(6)
cargado
objeto
la
cdmara
Pelicula ISO
Pelicula
Cuando-la l6mpara
se demore mds
podrdn
CON
condiciones de luz,
la mitad. En
hacia
arriba.
lo
suficiente como
(Fig.
16+ 17)
principal
que
corresponda
100:
ISO 400:
pilas
por
Para evitar riesgos
desarmar la
nos
esf orzamos
la apariencia
ser
FLASH
cuando
este caso,
(Fig.
puesta
de
deberd
encontrarse
'1,3
metros
2 metros
de
de 30
segundos
unas nuevas.
cimara. Debido
y
las
cambiadas
en interiores,
la serial
el bot6n disparador
empuje la
15)Cuando
para
poder
punto
a
a los
siguientes intervalos:
a 4 metros
a 7 metros
puesta
en
de descargas
por
mejorar nuestros
especificaciones
previo
sin
o en exte-
LED dentro
f lash
el
tomar una fo-
del flash
a una distancia
punto
del flash
iluminarse,
en
que
a
aviso.
pre-
sea
palanca
se ha-
(13)
se
re-
el6ctri-
conti-
de esta
12
Page 15

TECH
www.orphancameras.com
NICAL SPECI FICATIONS
FILM FORMAT:
x
24
36mm.
LENS:
35mm
VIEWFINDER: Bright-line frame
LED Low
FOCUSING:
range
1.2m to
SHUTTER: Electronic
sec.)
FILM
SPEED:
ISO 100
ed
EXPOSURE
Automatic exposure range
control.
100).
FILM LOADING: Easy loading
FILM TRANSPORT: Automatic
frame is
last
rewind lever
tion of
cassette.
EXPOSURE
reset.
BUILT-IN FLASH:
Pop-up; Flash ready lamp. Flash
ISO 400: 2
BATTERIES: Two 1.5V "AA"
Ni-Cd batteries not
DIMENSIONS: 124.5(W)
WEIGHT:
13
35mm standard cassette
F3.8,
3 elements 3
Light signal.
Infrared
Active
infinity.
programmed
Automatic
400.
to
CONTROL:
film speed setting with DX
Programmed
exposed. Automatic rewinding
and stops when f ilm is rewound
COUNTER: Additive
Guide Number 11
to 7m
usable.
x
230
grams
71(H)
(without
(DX
coded)
groups
finder, 0.38 x with Red
(optical
glass
lens)
autofocus system. Focusing
shutter
1/360
-
(1/90
cod-
automatic
EV10.5 to EV14.5
winding
exposure
(lSO
and stops when
with actua-
into
with
type
(lSO
range ISO 100:
penlight
automatic
100.m);
Manual
1.3to4m
alkaline batteries.
x47(D)mm
batteries)
CARACTERISTIQUES
FORMAT:
DX).
OBJECTIF: 35mm,
optique).
VISEUR:
t6moin
MISE AU POINT: Systeme actif
matique d
A
OBTURATEUR:
d
SENSIBILITE
de la
a
COMMANDE D'EXPOSITION:
automatique
que
CHARGEMENT
AVANCEMENT DE
que
Rebobinage automatique
binage ef arr6t
rebobin6e.
COMPTEUR
z6ro automatique.
FLASH INCORPORE: Nombre
6jection
flash
24 x 26mm,
Cadre de
rouge a LED de sous-exposition.
l'infini.
1/360 sec.)
400 rso(ASAi.
inf rarouge, distance de
Obturateur
DE LA PELLICULE:
sensibilit6
de
et arr6t aprds
A 100ISO(ASA):
avec des
programm6e,
EV10,5 a EV14,5
DE
lorsque.la
DE PRISES
manuelle; t6moin
TECH N IQU ES
pellicule
F3,8, 3 6l6ments, 3
lignes
vis6e d
6lectronique
pellicules
plage
(a
100 ISO(ASA)).
LA
PELLICULE:
LA PELLICULE:
la dernidre
par
action sur
pellicule
DE VUE: Additif avec remise
guide
de charge du
4m, i 400 ISO(ASA):
1,3 i
standard de 35mm
groupes (verre
brillantes, 0,38x
de mise au
mise au
programm6
R6glage automatique
encod6es
Commande d'exposition
d'exposition automati-
Chargement
Armement automati-
prise
vue de
le le.vier de rebo-
est
(100
11
flash.
(codee
avec
point
auto-
point
1,2m
de
(1/90
DX de 100
facile.
pellicule
la
'entierement
ISO(ASA).m);
Port6e du
7m.
2 d
A
Page 16

PILES:
pas
Ne
DIMENSIONS:
POIDS:
ESPECIFICACION ES TECN ICAS
FORMATO DE LA PELiCULA:
(codificado
OBJETIVO: 35mm F3,B 3
vidrio 6ptico).
VISOR:
sefral LED roja de luz baja.
ENFOQUE:
infrarrojo. Escala
de 1,2m a infinito.
DISPARADOR: Disparador
(1/90
do
VELOCIDAD DE
r
velocidad de la
!
1oo a
I
ccot.ttRoLDEEXPos|C|6N:Contro|deexposici6nauto.i
mAtica
EV10.5 a EV14.5
I
CARGA
lI
TRANSPORTE DE
lf
qu"
se detiene una
il
puesto.
I
I'
I
I
piles
Deux
utiliser de
230
Visor con marco de lineas brillantes.
-
4oo.
programada.
DE LA PELICULA:
Rebobinado automdtico mediante
alcalines
124,5(L) x
grammes
DX\
24
Sistema
de
1/360
seg.)
LA PELICULA: Ajuste automdtico de la
pel[cula,
(lso
LA PELICULA:
de
batteries Ni-Cd.
x 26mm.
enfoque
Intervalo
vez
type bAton
71(H) x
47(P)mm
piles)
(sans
35mm cartucho standard
elementos 3
activo
de enfoque automAtico
3
elect16nicamente
pelicula
con
de exposici6n automdtica:
100).
procedimiento
F6cil
que
el riltimo cuadro ha sido
grupos
DX codif icada
Bobinado automdtico
("AA")
(lente
0.38x con
programa-
de carga.
palanca
de 1,5V.
de
ISO
ex-
de re-
bobinado.
rebobinada
CONTADOR DE EXPOSICIONES:
ajuste
FLASH
Eyecci6n
Escala
PILAS: Dos
"AA",
pilas
DIMENSIONES:
PESO:
Se detiene
en el cartucho.
automdtico.
INCORPORADO:
manual.
de flash
pilas
del
tipo linterna
de Niquel-Cadmio.
gramos
230
una vez
Numero
Ldmpara
ISO 100:
de 1,3
alcalinas
miniatura.
de
124,5(ancho)
(sin pilas)
que
pellcula
la
Del
tipo aditivo
guia
de
puesta
de
a 4m
1,5
de
V tamario
x
71(alto) x 47(prof.)mm
(lSO
11
punto
a
ISO 400:
No compatible
ha
sido
con re-
100.m).
del f lash.
de 2a7m.
con
14
 Loading...