

Page 1

Thank you for purchasing the PROMASTER BLUETOOTH® TIMER REMOTE CONTROL
RECEIVER. To get the most from your remote, be sure to read the instructions and
familiarize yourself with the remote prior to use.
The PROMASTER BLUETOOTH® TIMER REMOTE CONTROL RECEIVER allows you
trigger your camera using your Bluetooth® enabled iPhone, iPad, or iPod Touch. Use a
ProMaster Camera Release Cable (separate purchase required) to connect this control to
your camera, make the Bluetooth® connection between your “i” device and the control and
you will be ready to take perfect photos in a variety of modes. Take pictures instantly, use
the timer mode, or select the scheduled timer mode which allows you set six different
timer exposure plans to meet your needs.
Page 2

Package Includes:
1 ea. Remote Control Receiver
2 ea. AAA Batteries
User Manual
Note: This remote REQUIRES the use of a ProMaster Camera Release Cable which
is purchased separately for your specific camera.
Parts Identification:
① Shutter button
② Power/Scan button
③ Status Indicator
④ 1/4"-20 tripod mount socket
⑤ Cold shoe mount
⑥ Lock nut
⑦ Battery cover
Page 3

⑧ Remote socket
Replacing the batteries
1. To remove the battery cover, slide the cover in
the direction of the “OPEN” sign.
2. Insert the fresh batteries. Be sure to install the
batteries in the correct orientation following the
diagram inside the battery compartment.
Installing the batteries in the reverse direction as
this could cause the batteries to leak corrosive
liquids, generate heat or explode.
3. Replace the battery cover in the reverse direction of the “OPEN” sign.
Page 4

Download the PROMASTER TIMER REMOTE
App to your “i” device
Go to App STORE on your “i” device and search for
“ProMaster Timer Remote.”
Compatibility:
Requires iOS 6.0 or later. Compatible with iPhone, iPad, and
iPod touch. This app is optimized for iPhone.
Attach the receiver to your camera
1. Slide the receiver gently into your camera’s hot shoe as shown below. Rotate the lock
nut clockwise to tighten the receiver.
2. Attach the mini plug connector of ProMaster Camera Release Cable to the receiver
as shown. Plug the other end of the cable to the camera remote socket. (NOTE: The
appearance of this end of the cable will vary based on your camera.)
Page 5

Connect your “i” device to the receiver
Controller
Press Power/Scan button on the receiver for 3 seconds. The indicator will slowly flash red
and the receiver is now powered on. Press Power/Scan button again and the indicator will
flash green and be ready to connect with your “i” device.
To turn off the receiver, press Power/Scan button for 3s, the indicator will rapidly flash red
three times and then power off.
Page 6

On your “i” device
① Turn on your “i” device and select the
PROMASTER Timer Remote App. Press
the SCAN icon.
②Then your device will search for the
receiver and display it on the screen. Press
the CONNECT icon to connect your device
and the receiver.
③ After connecting your device, you will
see the main menu:
Receiver is connected
Signal strength
Battery indicator of the receiver
The Receiver only supports the FOCUS,
SHUTTER, Timer Remote, and Scheduled
Timer Remote functions.
Page 7

Operating modes:
Manual mode (Focus, Shutter)
Press FOCUS, the camera will focus. Press SHUTTER to take a photo.
Timer Remote mode
Option
Description
Supported Setting
DELAY
Operates like the self timer on your camera.
The remote allows you to set any delay up to
99hrs 59min 59s 900ms.
0s to 99hrs 59min 59s
900ms
BULB
BULB allows you to take timed exposures up
to 99hrs 59min 59s 900ms in length.
1s to 99hrs 59min 59s
900ms
INTERVAL
The Interval Timer can be set to any interval up
to 99hrs 59min 59s 900ms. Example: Set the
interval to 10 minutes and one exposure will be
taken every 10 minutes until the Exposure
Count “#” limit has been reached.
1s to 99hrs 59min 59s
900ms
#
This setting permits you to set the number of
exposures that will be taken up to 999 shots.
1 to 999 shots or
-- (Infinite)
Page 8
Press “DELAY”, “BULB”, “INTERVAL” and
“#” icon to choose the delay time, bulb time
interval time and exposure counts you
want. Then press “START”.
Pressing “START” transmits the instructions
to the receiver. Press “STOP” to stop the
timer. If you press “START” again, the timer
resets to the beginning of the program.
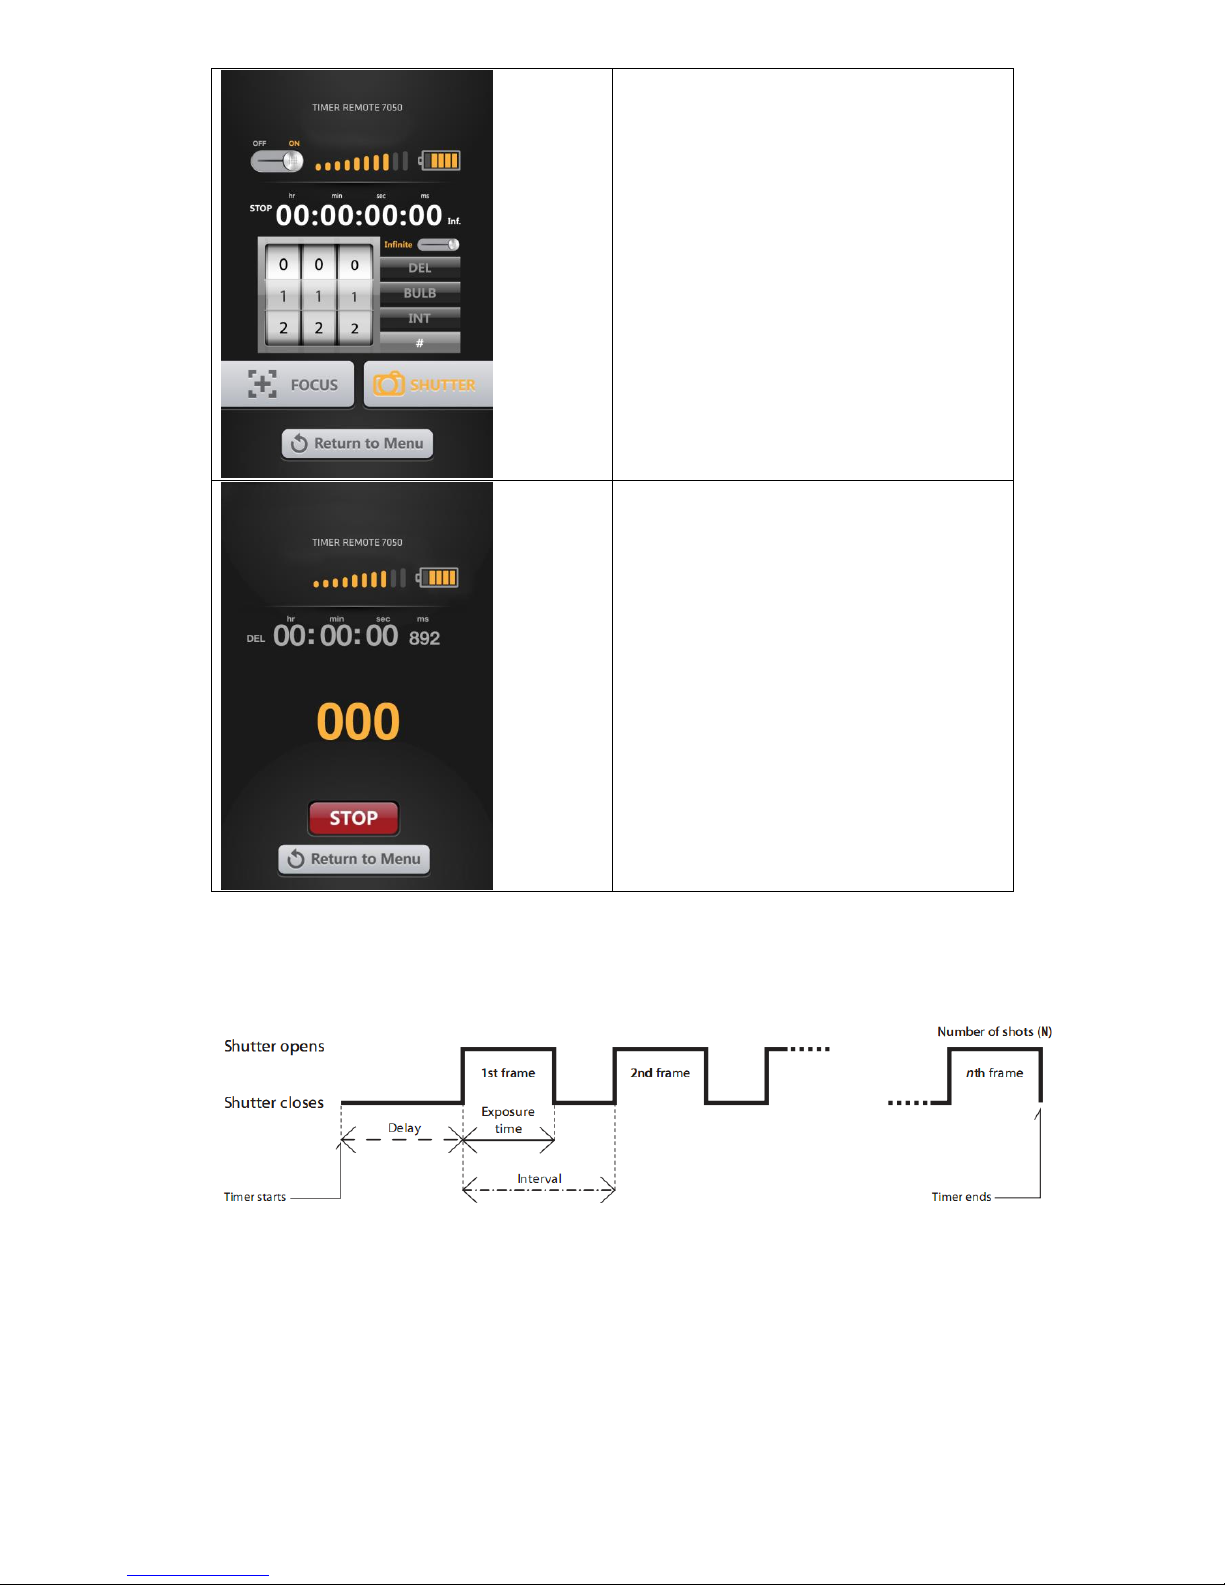
The diagram below illustrates the Timer Remote function DELAY time, BULB time
(Exposure time) and Interval Settings:
Delay time is the time you set under DELAY icon
Exposure time is the time you set under BULB icon
Interval time is the time you set under INTERVAL icon
Number of shots is the exposure count you set under “#” icon
IMPORTANT:
INTERVAL TIME is the time between when one picture starts to be taken and the next
picture starts to be taken. Please ensure that the interval time is longer than exposure
time (BULB time).
Page 9

Scheduled Timer Remote mode
The Scheduled Timer Remote mode allows
you to set a specified future exposure time
accurate to second. You may set up to six
different future exposure plans.
Press Schedule 01 to go to the first
exposure plan and so on.
Note:
1. The maximum delay time is 100
hours (approx. 4.17days).
2. If you set a time before the current
time, the delay time will default to
0s.
Press “DATE” “TIME” “BULB” “INT” “#” icon
to go into the corresponding settings menu.
After you have made the desired settings,
touch the “Return to Menu” icon to store the
settings. Press SCHEDULE 01 again, then
press “START” to execute the schedule
program.
Using the receiver as a Wired
Remote Switch
The receiver may be used as a wired
shutter release. Press the shutter button
half way to focus. Pressing the shutter
button completely will activate the shutter
and take the picture.
Page 10

Care and Storage
1. When the receiver is not in use for an extended period of time, please remove the
batteries from the receiver.
2. Do not expose the receiver to excessive heat or humidity.
3. Do not leave the receiver on or near a television, refrigerator, or other appliance with
a magnetic field.
4. If the receiver gets wet, wipe it with a dry towel as soon as possible.
5. Do not use organic solvents, such as alcohol or paint thinner when cleaning the
receiver.
Specifications:
Maximum Operating Range: 164’ / 50m
Type: FSK2.4G frequency system
Bluetooth® Version: 4.0
Power Source: 2 1.5v AAA batteries
Dimensions: 2 11/16 x 1 ½ x 11/16” / 69 x 38 x 18mm
Weight: 1.02 oz. / 29g
REQUIRES SEPARATE PURCHASE OF PROMASTER CAMERA RELEASE CABLE
FOR YOUR SPECIFIC CAMERA
Product specifications and external appearance are subject to change without notice.
One Year Unconditional Guarantee
If for any reason, this ProMaster product fails within ONE YEAR of the date of purchase,
return this product to your ProMaster dealer and it will be exchanged for you at no charge.
ProMaster products are guaranteed for ONE FULL YEAR against defects in workmanship
and materials. If at any time after one year, your ProMaster product fails under normal use,
we invite you to return it to ProMaster for evaluation.
Code 7050
Made in China
www.promaster.com
Fairfield, CT 06825
The Bluetooth® word mark and logos are registered trademarks owned by Bluetooth SIG, Inc. and any
use of such marks by ProMaster is under license. Other trademarks and trade names are those of their
respective owners.
 Loading...