

Promaster 100SL Troubleshooting Manual


Contents
Precautions
Foreword
Basic Operation
Turning On The Power
Custom Settings
8
5
Parts Identification
Attaching And Detaching The Speedlight
7
Inserting The Batteries
6
9
Icons
10
LCD Panel
11
11
22
12
13
Repeat Mode
14
16
17
18
19
TTL Mode
M(Manual) Mode
Wireless Modes
Slave Mode( )F1/F2
Advanced Applications
Adjusting The Flash Coverage
Bounce Flash Operation
Troubleshooting Guide
Operation
LED Video Light
21
LED Catchlights
Key Lock
20
23
Appendix
24
Specifications
On Camera Interface
Slave Mode

2
1. Do not disassemble, open, or repair this speedlight by yourself.
2. Always use batteries of the same type, brand, and age. Always replace all
4 batteries at the same time. Do not combine different types, brands, old,
or new batteries. This could cause the batteries to overheat, leak, or
explode.
3. This product is not water-resistant. Keep it away from rain, snow, and high
humidity areas.
4. Install the batteries in proper orientation as indicated in the battery
chamber. Installing the batteries incorrectly could cause them to overheat,
leak, or explode.
5. If you change the batteries after a period of sustained continuous firing of
the speedlight, the batteries may become warm or hot. This is normal,
however you should be careful when handling these batteries.
6. Always switch the speedlight off before changing batteries.
7. Do not fire the speedlight from a short distance directly into the eyes of
people or animals. This can cause damage to the retina and may even
lead to blindness.
8. Avoid corrosive or flammable substances when cleaning this speedlight.
9. To prevent overheating and damage to the flash head, do not fire more
than 25 continuous flashes in rapid sequence at full power (1/1 level). In
this case the overheating mode will be activated and the flash will shut
down. Allow it to return to normal operating temperature before using.
This takes about 15 minutes.
10.Do not touch the speedlight with wet hands.This could cause an electrical
shock.
11.Remove batteries from the unit before storing.
Precautions

The Speedlight is a high performance flash unit for Fuji
with a guide number of 100 ft (ISO 100 at the 50mm zoom position). The
100SL can easily perform various types of flash operations, such as
manual flash, TTL auto flash, and HSS. It is also equipped with an LED light
for videography and to function as a catchlight.
[Pro]Master 100SL
Thank you for purchasing the [pro]master 100SL.
Here are some of the 100SL's features:
■ TTL mode
In this Fuji System, monitor pre-flashes are fired at all times, the
subject is correctly exposed, and the exposure is less affected by challenging
ambient light conditions.
■ Manual mode
By setting the aperture and the flash output leve , you can manually control the
exposure.
■ R T mode
The 100SL fires repeatedly to create stroboscopic multiple-exposure effects in
RPT mode. This operation is useful when shooting fast-moving subjects.
■ HSS High-Speed Sync
High-Speed flash synchronization occurs at the compatible camera’s highest
shutter speed. This is useful when you want to use a wider aperture to achieve
shallow depth of field to blur the background or create a "stop-motion" effect in
your photograph.
TTL
l
P
■ F1/F2 Mode
While in wireless manual slave mode, the F1 mode is used in a manual flash
environment. The F2 mode is used in a TTL flash environment although the
100SL only functions as a manual wireless slave.
■ Rear-Curtain sync
Rear-Curtain flash sync creates a picture in which the blur of a moving subject
appears behind the subject and not in front. In this mode, the flash fires just
before the rear curtain starts to close.
3
Foreword

4
● Read this instruction manual while also referring to your
camera’s instruction manual.
Before using the Speedlight, read this instruction manual and your
camera’s instruction manual to familiarize yourself with the
Speedlight's operations.
■ Bounce Flash
By tilting or rotating the flash head, you can bounce the light off of a ceiling
or wall to make use of reflected light.
■ Key lock
The speedlight's control buttons can be locked to prevent them from being
pressed accidentally.
■ Standby function
This function automatically puts the 100SL in standby mode to conserve
battery power after a period of inactive use.
■ Thermal Cut-out protection
This function protects the 100SL from high operating temperatures. If the
temperature of the unit rises to a certain level, the 100SL will switch to
protective shutdown mode.
■ Sound monitor
Receive audible feedback each time a button is pressed and when the 100SL
reaches a full charge indicating it is ready to fire. You can choose to shut off
this feature in the Utility Menu.
■ LED light
The LED light is ideal for shooting video. It can also function as an AF assist
in dim lighting conditions and it can be used as a Catchlight in still
photography (these functions are dependent on your camera's flash modes).
2
4
5
6
7
1
21
22 23
3
8
9
10
11
12
13
14
15
16
17
18
19
20
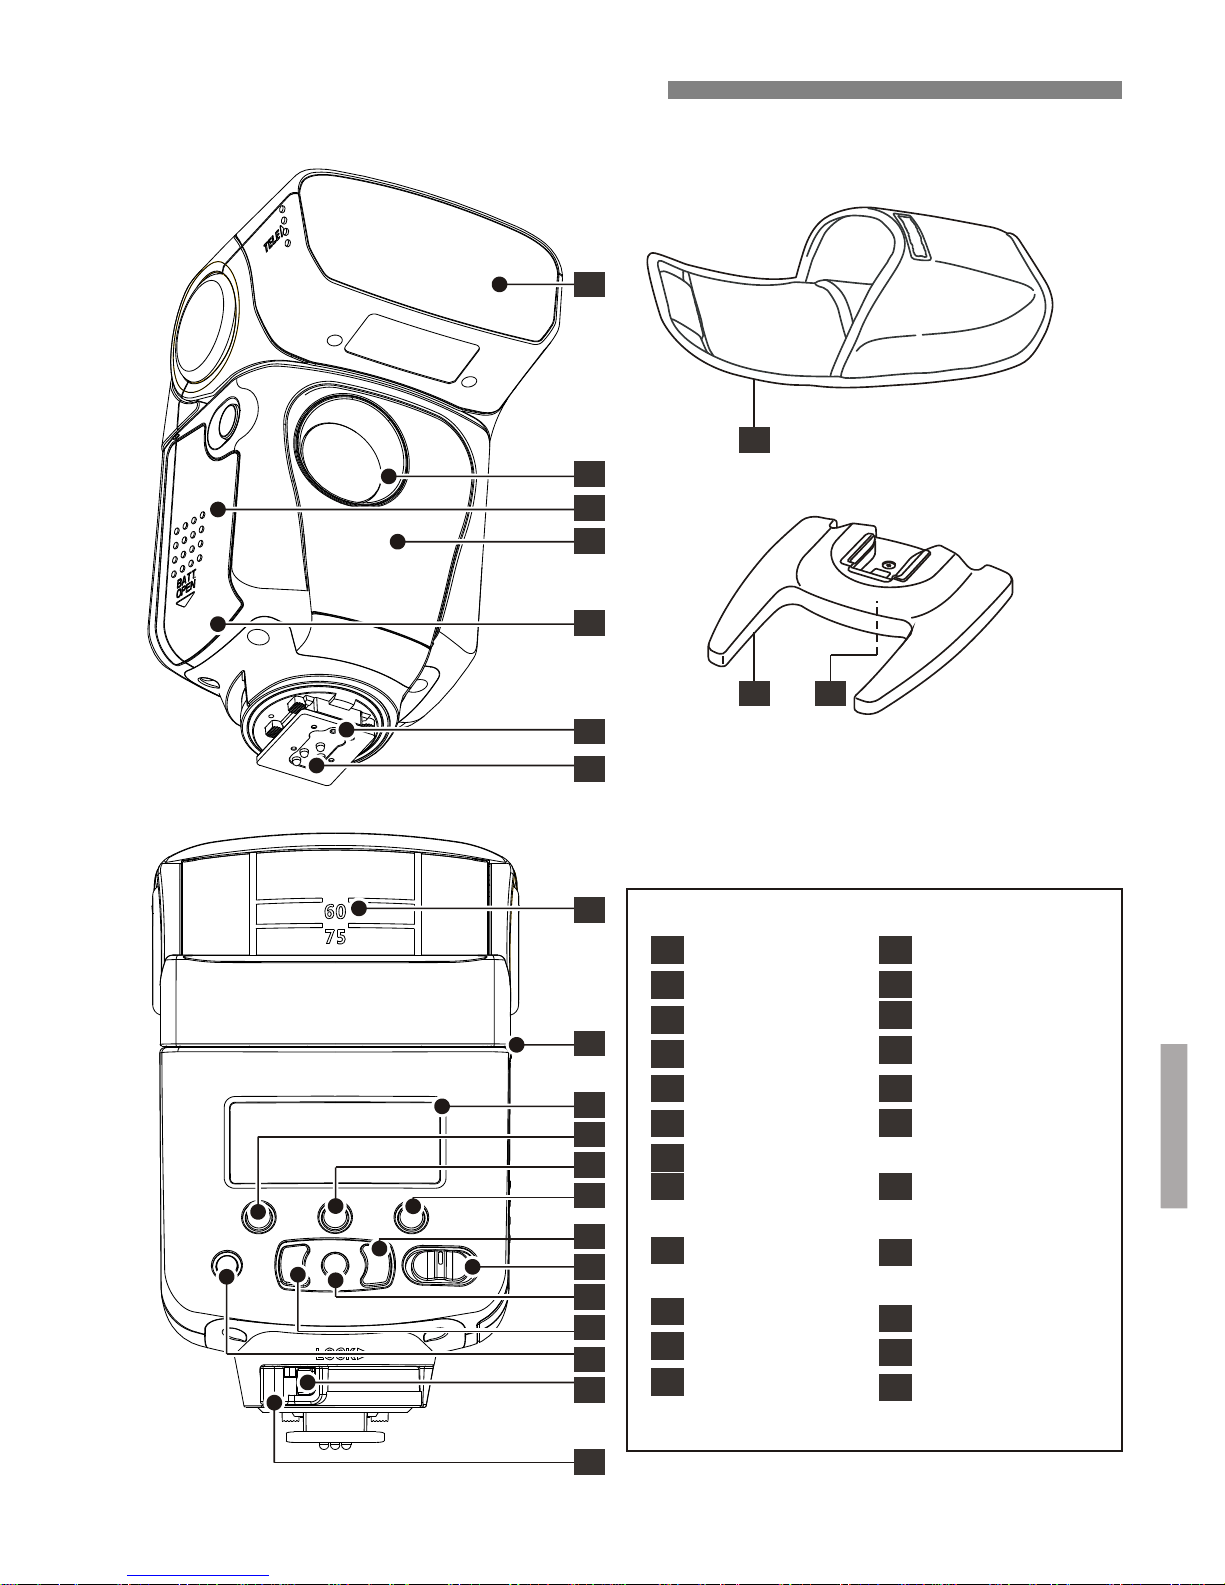
5
1
2
3
LED light
4
5
Wireless sensor
6
Battery cover
7
Camera contacts
Locking pin
12
8
9
Tilting angle
scale
10
Rotating angle
scale
11
LCD display
Mode button
Set button
13
14
LED light button
Right button
Flash head
Micro USB
15
16
Power switch
Confirm button
17
18
Left button
19
Lock-release
button
20
Ready light /
test button
21
Soft Case
22
Mini stand
23
Tripod mount
Mounting foot’s
locking lever
Parts Identification
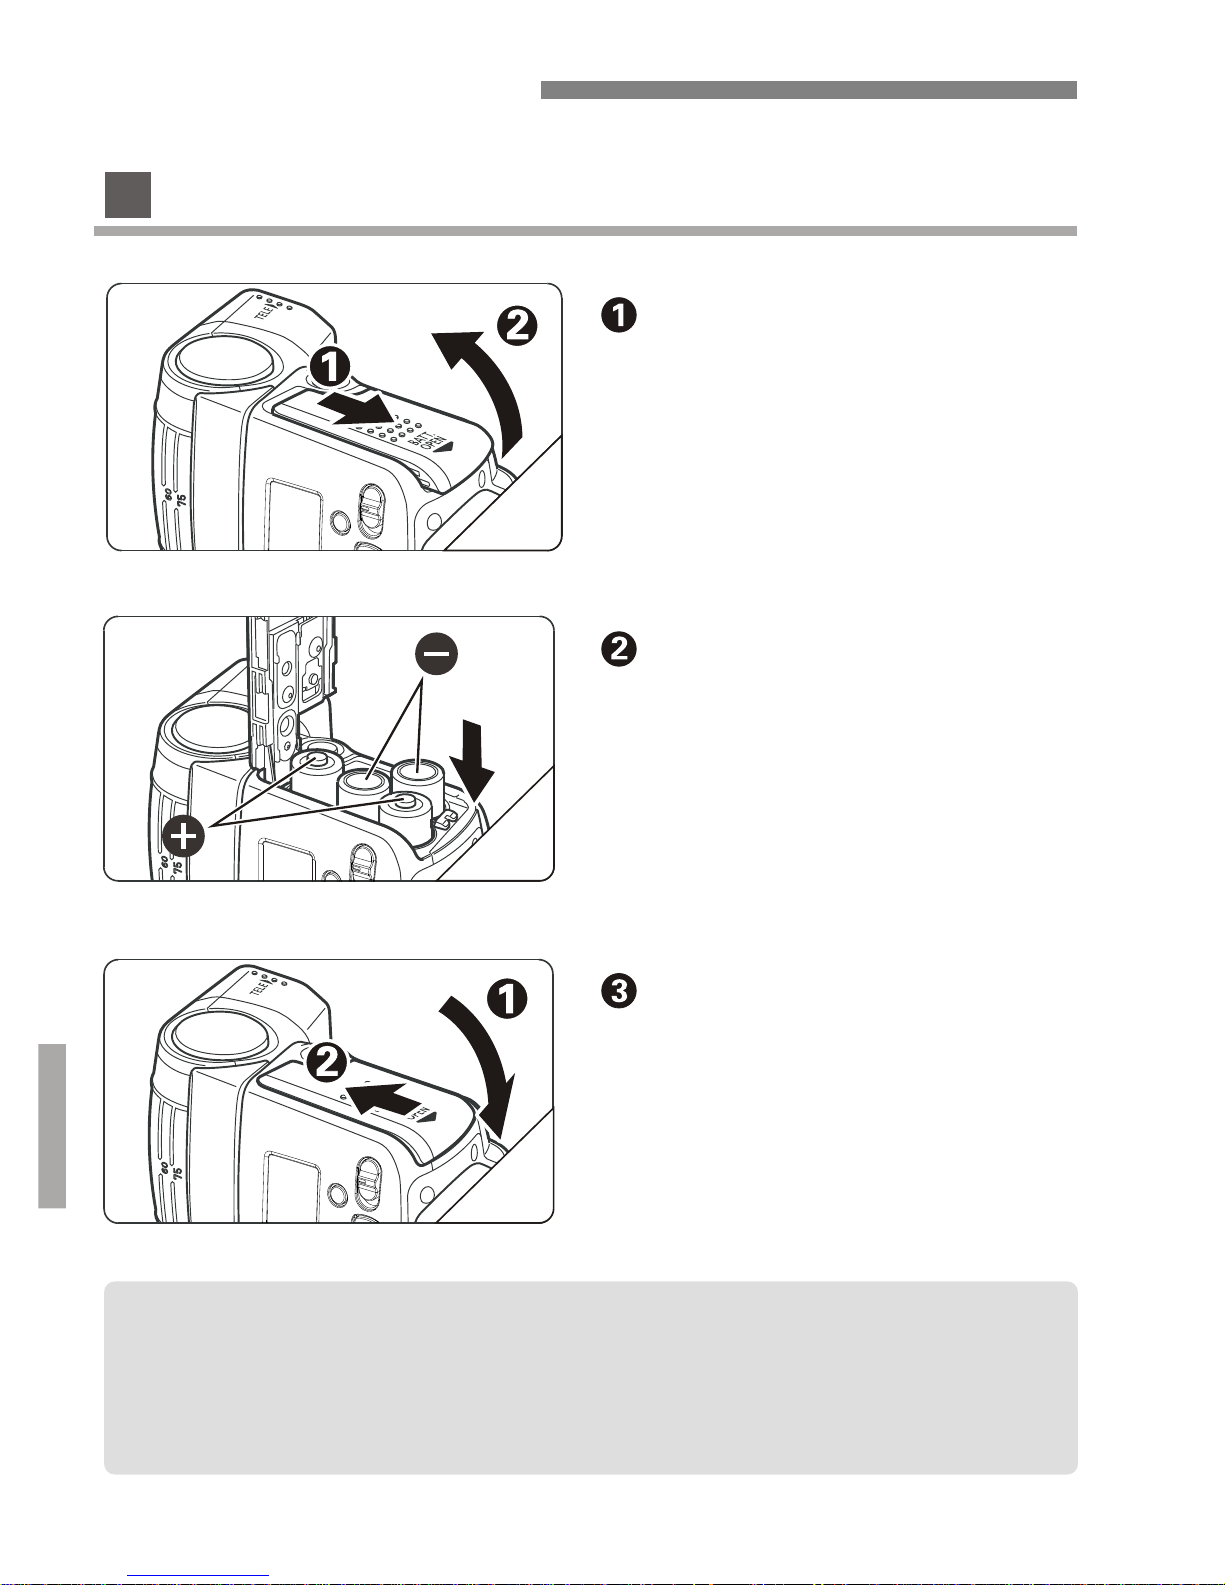
● Only use size AA alkaline or Ni-MH batteries.
● If you change the batteries after firing many continuous flashes
be aware that the batteries might be hot.
● Before changing the batteries, be sure to turn off the speedlight.
6
Basic Operation
Open the cover.
Slide it in the direction of the
arrow and flip open.
Install the batteries.
Make sure the + and - battery
contacts are properly oriented
as shown inside the battery
compartment.
Close the cover.
Close the battery compartment
cover by flipping it down,
pressing, and sliding it closed.
Inserting The Batteries
7
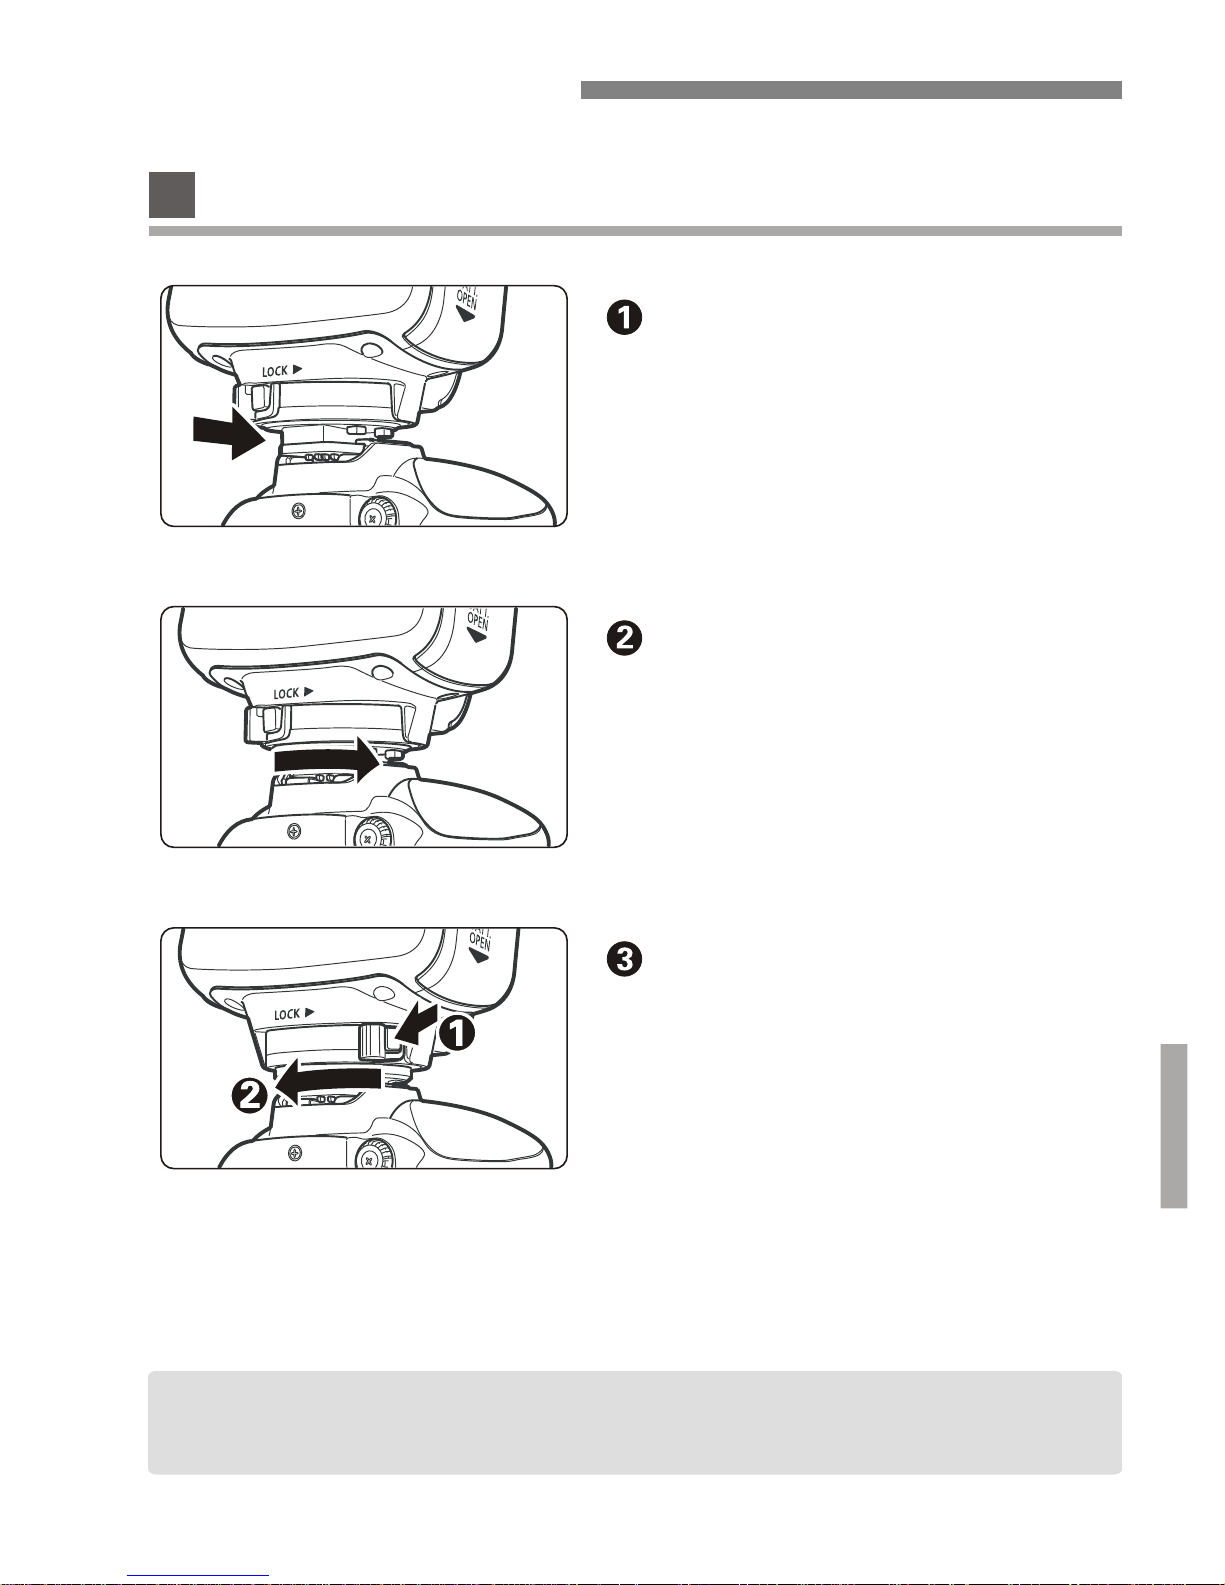
●
speedlight.
Before attaching or detaching the speedlight, be sure to turn off the
Attaching the speedlight.
Mount the speedlight into the
camera’s hot shoe all the way.
Securing the speedlight.
On the mounting foot, slide the
lock lever to the right until it locks
in place.
While pressing the lock-release
button, slide the lock lever to the left
and detach the speedlight by sliding
it out of the camera's shoe.
Detaching the speedlight.
Attaching And Detaching The Speedlight
Basic Operation
 Loading...