

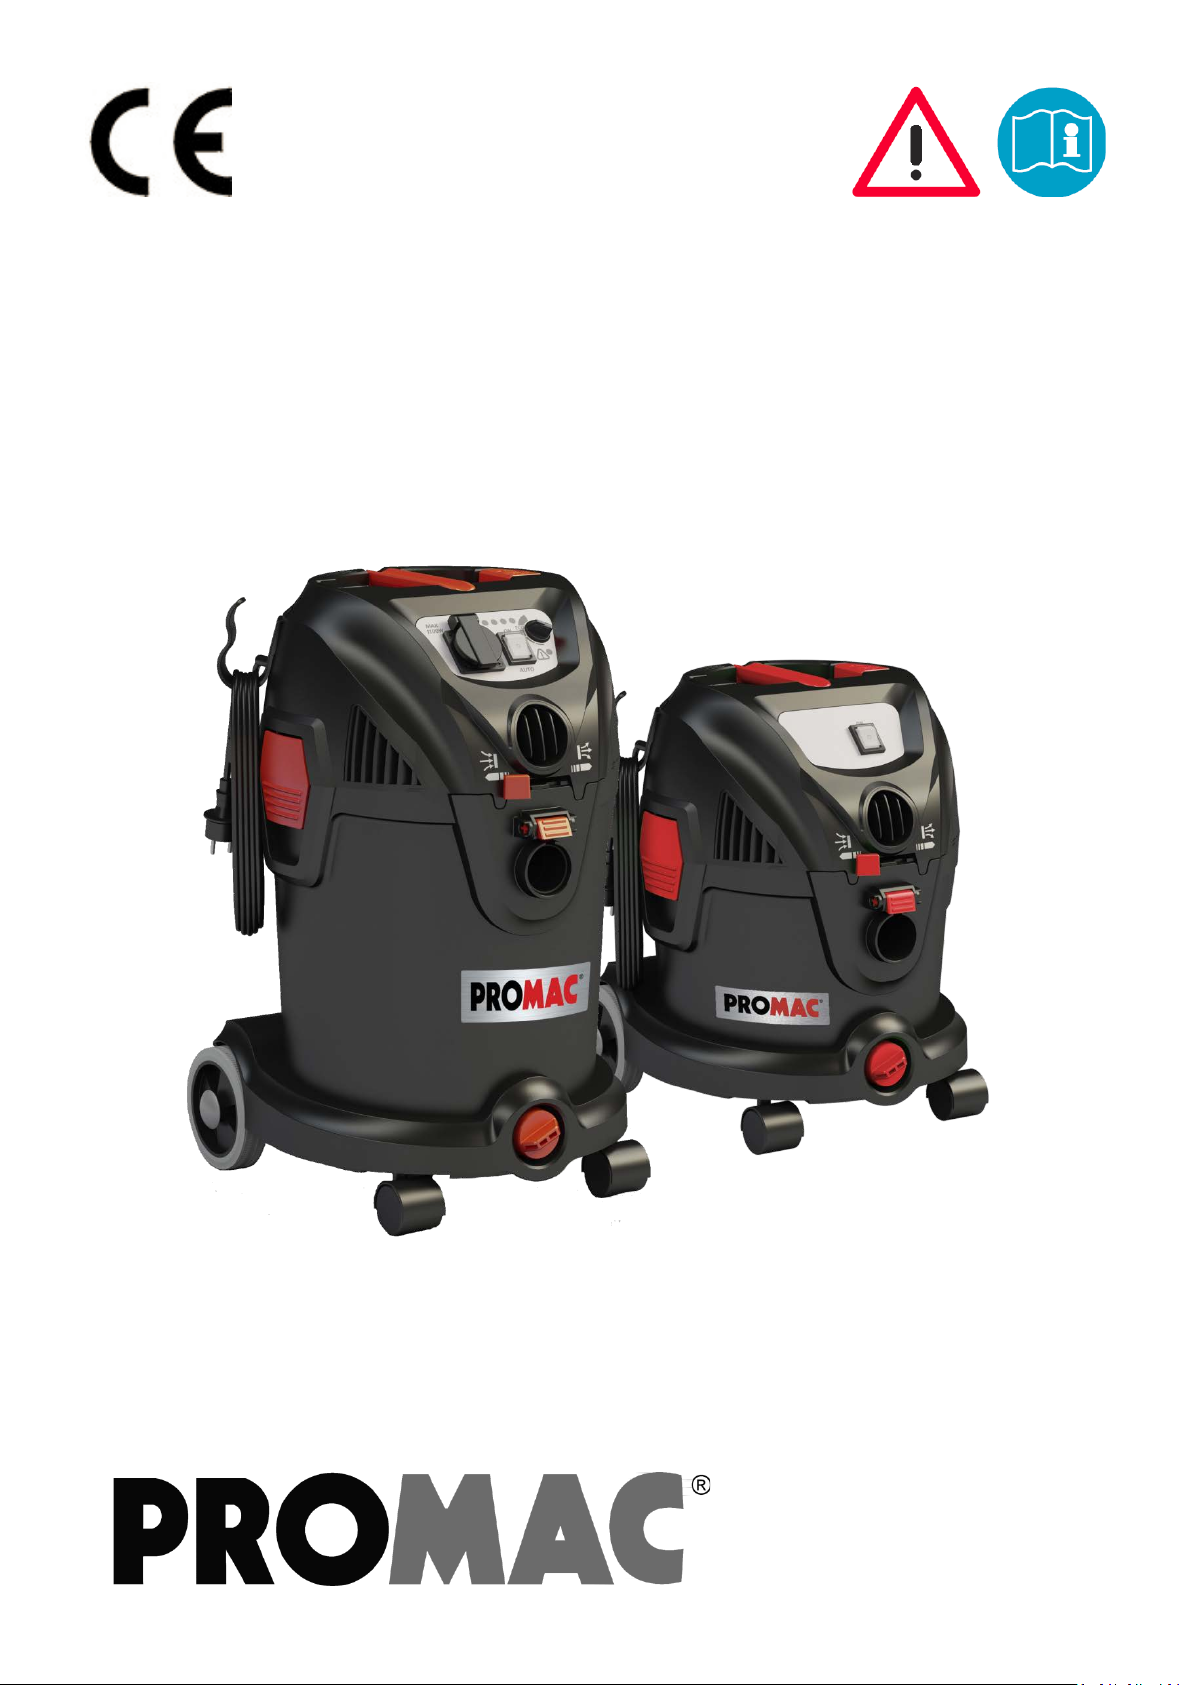
Promac VAC-20PC, VAC-30PC-R User Manual
USER MANUAL
(Original instructions)
VAC-20PC
VAC-30PC-R

DEAR CUSTOMER
PURPOSE AND INTENDED USE
1. IMPORTANT SAFETY INSTRUCTIONS
Congratulations on the purchase of your new wet/dry vacuum cleaner.
Prior to using the appliance for the first time, be sure to read this document through and keep
it ready to read instructions of use.
This vacuum cleaner is designed, developed and andrigorously tested to function efficiently and safely
when properly maintained and used in accordance with the following instructions. This vacuum cleaner
is to be used for commercial (hotels, schools, hospitals, factories, offices and rental business) and/or for
household use. Accidents due to misuse can only be prevented by those using the machine.
CAUTION: READ AND FOLLOW ALL SAFETY INSTRUCTIONS.
This machine is suitable for picking up dry, nonflammable dust and liquids.
Any other use is considered as improper use. The manufacturer accepts no liability for any damage
resulting from such use. The risk for such use is borne solely by the user. Proper use also includes proper
operation, servicing and repairs as specified by the supplier.
! ATTENTION: REVIEW IMPORTANT SAFETY INSTRUCTIONS BEFORE ATTEMPTING TO USE THIS
VACUUM CLEANER. RETAIN FOR FUTURE REFERENCE
! DANGER: Never operate this unit when flammable materials or vapors are present because
electrical devices produce arcs or sparks that can cause a fire or explosion.
NEVER OPERATE UNATTENDED!
! WARNING: Always wear eye protection to prevent rocks or debris from being blown or
ricocheting into the eyes or face which can result in serious injury.
1.1 INSTRUCTIONS FOR USE:
The appliance must:
• only be used by persons, who have been instructed in its correct usage and explicitly
commissioned with the task of operating it
• only be operated under supervision
• This appliance is not intended for use by persons (including children) with reduced physical,
sensory or mental capabilities, or lack of experience and knowledge.
• Children shall be supervised to make sure that they do not play with the appliance.
• Do not use any unsafe work techniques.
• Never use the vacuum cleaner without a filter.
• Switch off the appliance and disconnect the mains plug in the following situations:
o Prior to cleaning and servicing
o Prior to replacing components
o Prior to changing over the appliance
o If foam develops or liquid emerges
Besides the operating instructions and the binding accident prevention regulations valid in the country
of use, observe recognised regulations for safety and proper use.
2 ENGLISH

1.2 IMPORTANT WARNINGS:
• To reduce the risk of fire, electric shock, or injury, please read and follow all safety instructions
and caution markings before use. This vacuum cleaner is designed to be safe when used for
cleaning functions as specified. Should damage occur to electrical or mechanical parts, the
cleaner and / or accessory should be repaired by a competent service station or the supplier
before use in order to avoid further damage to the machine or physical injury to the user.
• Do not leave the machine when it is plugged in. Unplug from the socket when not in use and
before maintenance.
• Do not use with damaged cord or plug. To unplug grasp the plug, not the cord. Do not handle
plug or cleaner with wet hands. Turn off all controls before unplugging.
• Do not pull or carry by cord, use cord as a handle, close a door on cord, or pull cord around sharp
edges or corners. Do not run cleaner over cord. Keep cord away from heated surfaces.
• Keep hair, loose clothing, fingers and all parts of the body away from openings and moving parts.
• Do not put any objects into openings or use with opening blocked. Keep openings free of dust,
lint, hair, and anything else that could reduce the flow of air.
• WARNING: This machine is not suitable for picking up hazardous dust.
• Do not use to pick up flammable or combustible liquids such as gasoline, or use in areas where
they may be present.
• Do not pick up anything that is burning or smoking, such as cigarettes, matches or hot ashes.
• Use extra care when cleaning on stairs.
• Do not use unless filters are fitted.
• If the cleaner is not working properly or has been dropped, damaged, left outdoors, or dropped
into water, return it to a service center or supplier.
• If foam or liquid escapes from the machine, switch off immediately.
• The vacuum cleaner may not be used as a water pump. The vacuum cleaner is intended for
vacuuming air and water mixtures.
• Connect the vacuum cleaner to a properly earthed mains supply. The socket outlet and the
extension cable must have an operative protective conductor.
• Provide for good ventilation at the working place.
• Do not use the vacuum cleaner as a ladder or step ladder. The vacuum cleaner can tip over and
become damaged.
• Never vacuum up the following materials: explosive or combustible gases, liquids and dust
particles (reactive dust particles), reactive metal dust particles (such as aluminum, magnesium,
zinc) in combination with highly alkaline or acidic detergents, undiluted and strong acids and
alkalis or organic solvents such as petrol, paint thinners, acetone, heating oil and similar
products.
• Risk of fire. Do not vacuum up any burning or glowing objects.
• Do not not pick up flammable or combustible liquids such as gasoline, liquids, reactive dust
particles or use in areas where they may be present.
• Do not use your vacuum cleaner as a sprayer of flammable liquids such as oil base paints,
lacquers, household cleaners, etc.
• Do not attempt to vacuum hot or warm ashes. Maximum temperature of ashes should not be
warmer than 102 degrees Fahrenheit / 40 degrees Celsius.
• Do not vacuum toxic carcinogenic, combustible or other hazardous materials such as asbestos,
arsenic, barium, beryllium, lead, pesticides or other health endangering materials.
• To avoid spontaneous combustion, empty tank after each use.
3 ENGLISH

• NOTE: A static shock may occur if the environment is too dry. This will not affect the use of the
vacuum cleaner. To eliminate shock, add humidity to the air with a console or a humidifier.
• STAY ALERT and use common sense. Do not use vacuum cleaner when you are under the
influence of drugs, alcohol, medication, or if you are tired or distracted.
• Do not leave cord lying on the floor once you have finished the cleaning job. It can become a
tripping hazard.
• If the supply cord is damaged, it must be replaced by the manufacturer, its service agent or
similary qualified persons in order to avoid hazard
• Do not allow to be used as a toy. Close attention is necessary when used by or near children.
• Keep packaging material away from children. There is a risk of suffocation!
• Protect the unit from rain. Store indoors only.
• CAUTION: The machine is for indoor use only.
• Do not operate the vacuum cleaner in the rain.
• Wear protection mask, when tank is emptied for fine dust of all kinds.
• Unplug before connecting hose and any attachments.
• Do not leave appliance when plugged in. Unplug from outlet when not in use and before
servicing it.
• Connect to a properly grounded outlet only. See Grounding Instructions.
• WARNING: Operators shall be adequately instructuted on the use of these machines
• CAUTION: Clean the water level limiting device regularly and examine it for signs of damage.
• The floater has the function to stop the vacuuming when the tank is full of fluids or in case of
overturning;carry out routine cleaning,checking that it has no damage and change it if necessary.
1.3 ONLY APPLICABLE IN UK
Please read these essential instructions.
These instructions have been prepared with safety and efficiency paramount. The machine operator
must be trained by a suitably qualified instructor and must understand these instructions for use, and be
made aware of any relevant regulations and legislation in force at the time of use.
This 240 volt 50 Hz. machine are fitted with a 13 amp. 3 pin moulded plug. The plug is fitted with a 13
amp. detachable fuse. The correct replacement for the fuse is identified by marking or colour coding.
Only fuses that are ASTA approved to BS 1362 should be fitted. Never use the plug without the fuse
cover fitted. Replacement fuse covers are available at any electrical retail outlet.
1.4 Tests and approvals
Electrical tests must be performed in accordance with the provisions of safety regulations EN 62638.
These tests must be performed at regular intervals and after repairs or modifications. The vacuum
cleaner has been approved in accordance with IEC/EN 60335-2-69.
Note: All the drawings and pictures are merely indicative and given only as a guide.
4 ENGLISH
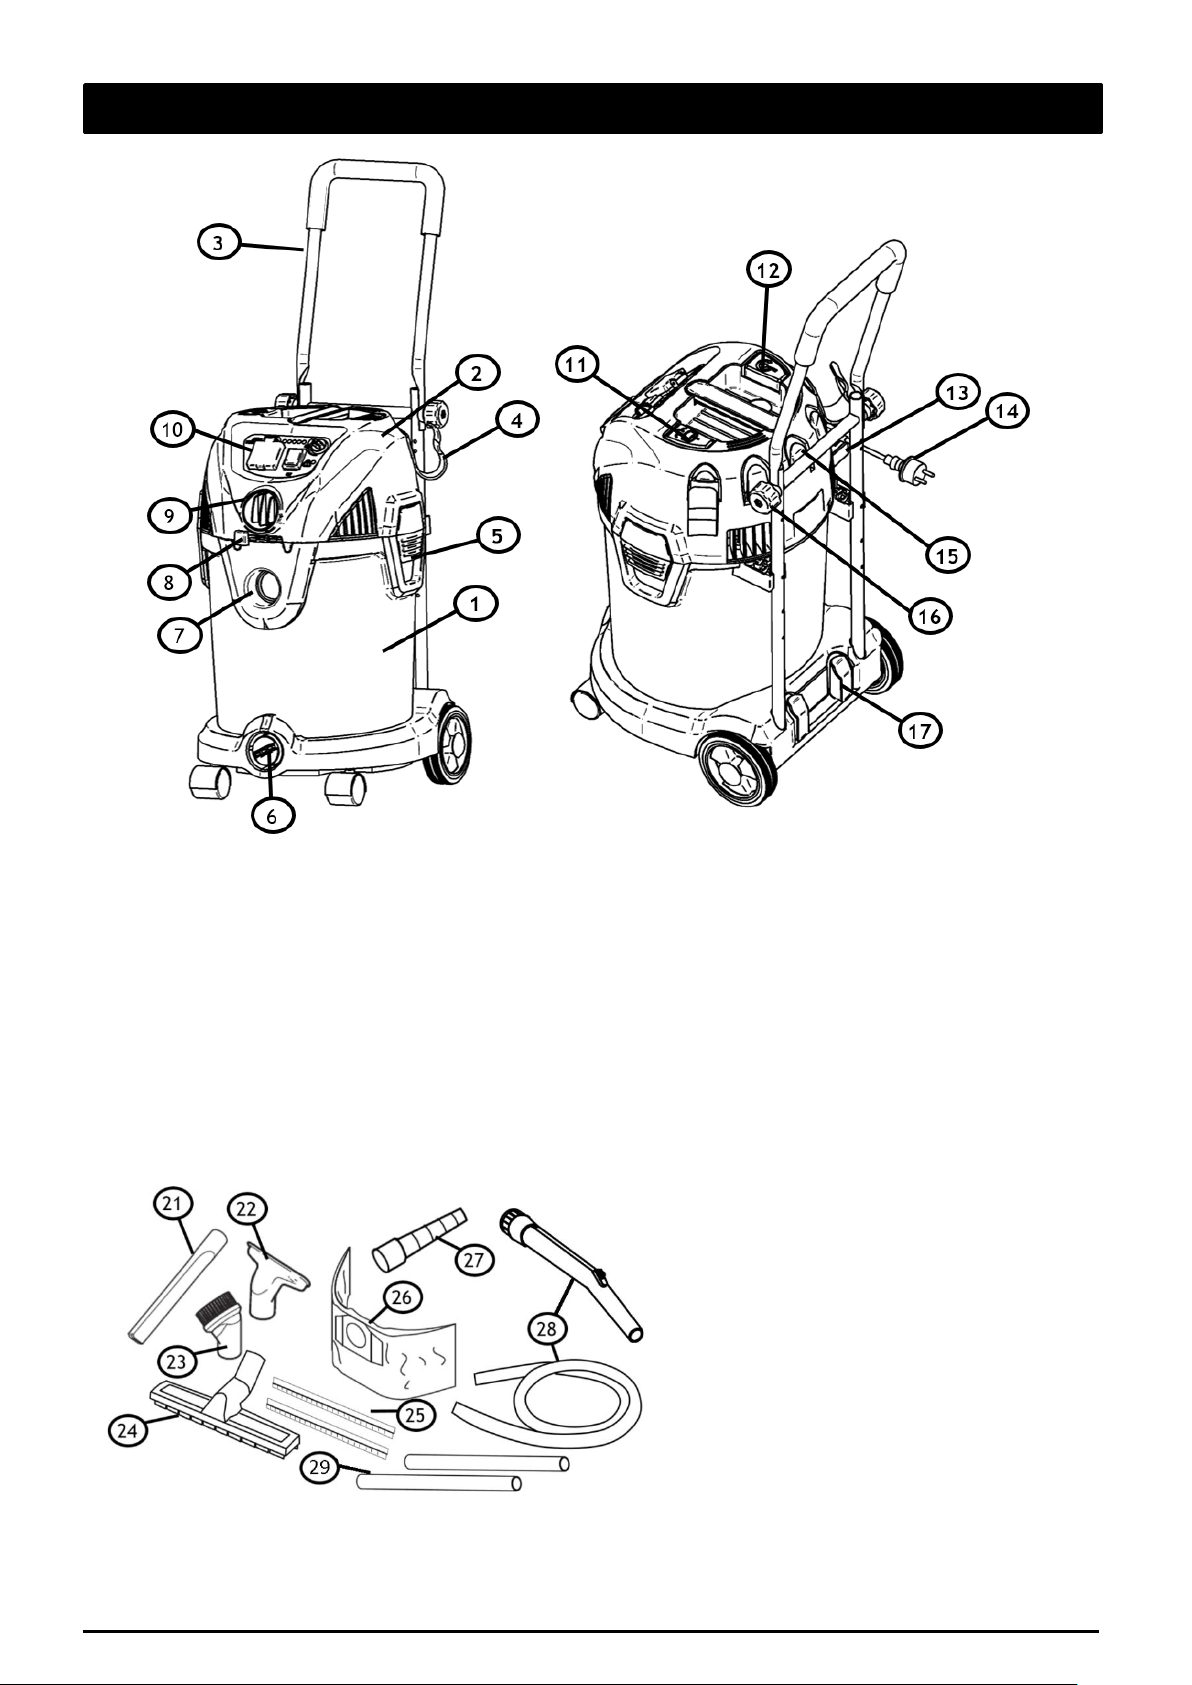
2. OVERVIEW
FIG. 1
11. Filter Cleaning Button (optional)
1. Tank
10. Control panel
21. Crevice Nozzle
FIG. 2
FIG. 1
2. Head
3. Trolley (optional – KTRI05071)
4. Hose and cord storage hook (optional)
5. Clamp
6. Drain outlet
7. Suction inlet
8. Blow regulation
9. Blow outlet
12. Cord rewind button (optional)
13. Plug seat
14. Cord Plug
15. Nozzle storage holders
16. Trolley lock screw (KTRI05080)
17. Tube storage holders
22. Upholstery nozzle (optional)
23. Brush nozzle
24. Floor nozzle (dry pickup)
25. Squeegee insert (wet pickup)
26. Dust bag
27. Power tool adapter (optional)
28. Hose with handtube
29. Hoses
Some of these accessories are packed inside
the tank. If parts are missing, contact our
Customer Service Dep.
5 ENGLISH
Read chapter 1 – IMPORTANT SAFETY INSTRUCTIONS of this manual thoroughly before setting up and
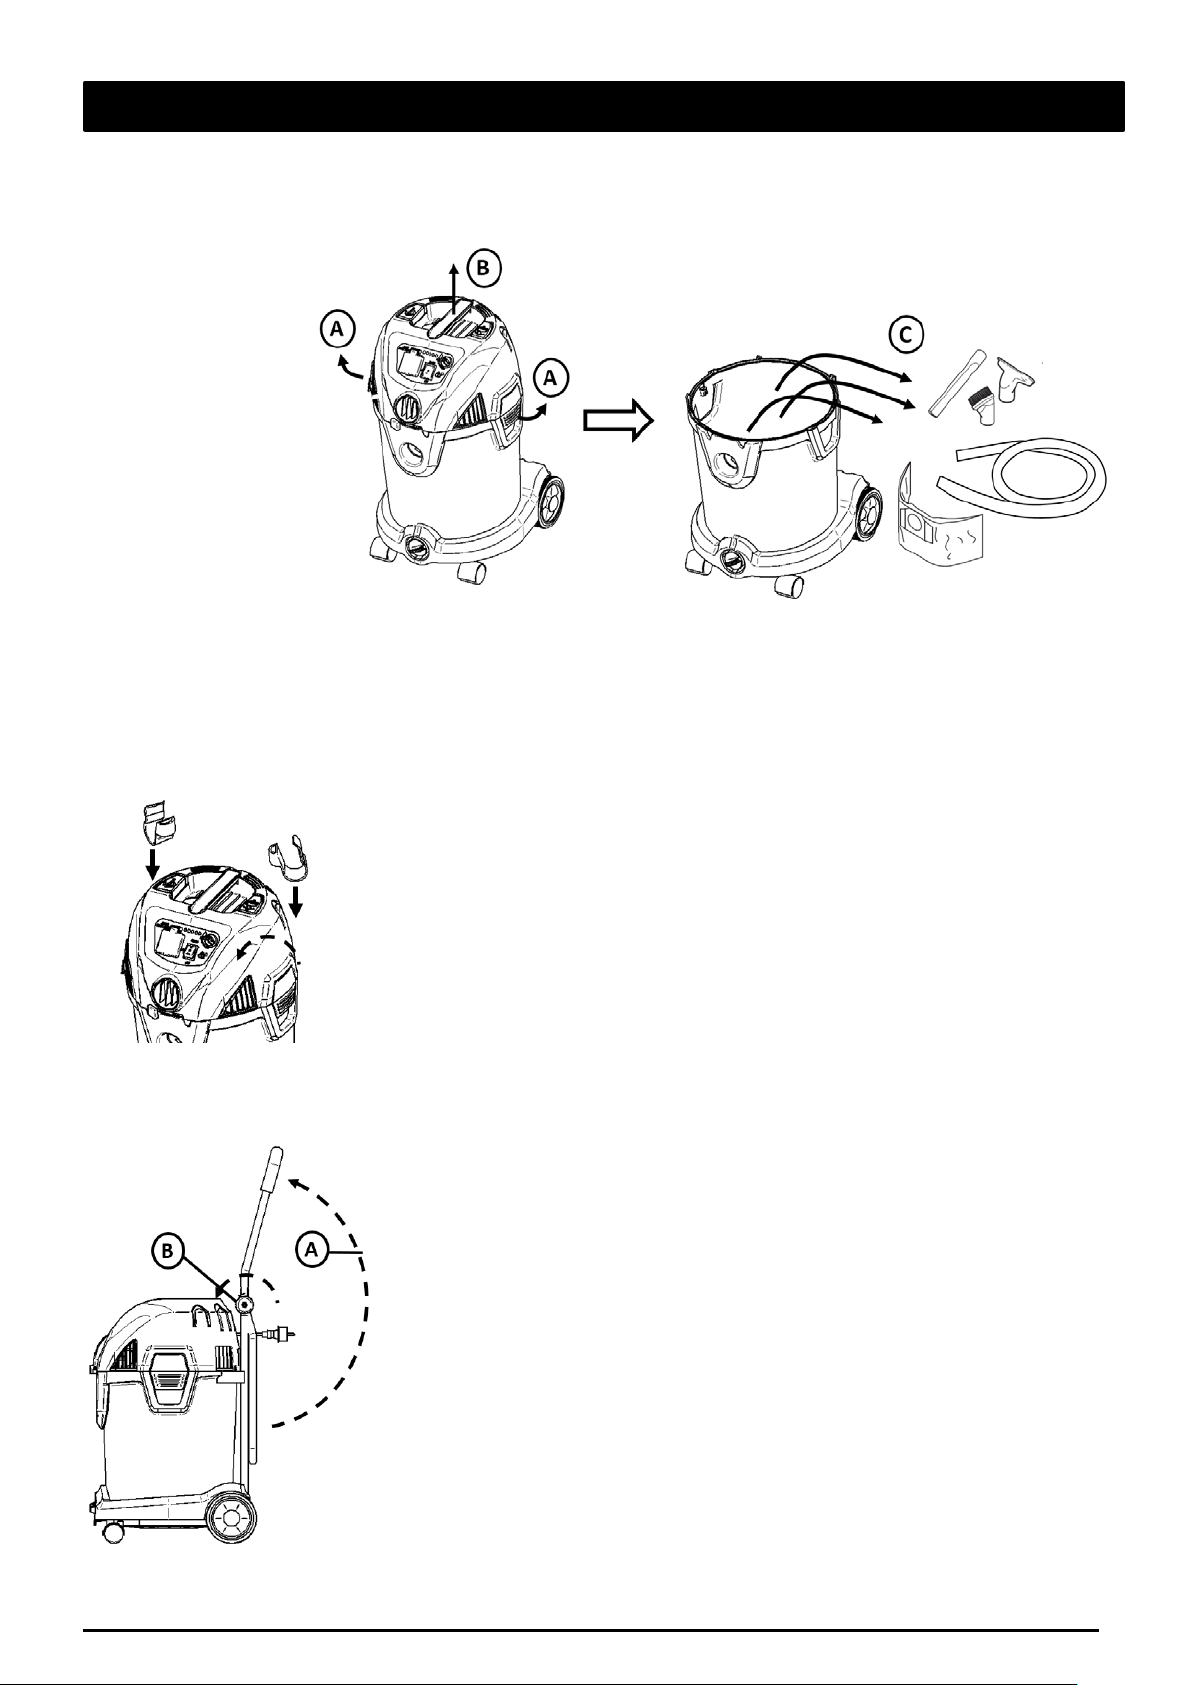
3. FIRST TIME SET UP INSTRUCTIONS
FIG. 5
FIG. 3
FIG. 4
using this vacuum cleaner.
3.1 ACCESSORIES
The nozzles and
accessoires for the
machine is during
shipping stored in tank. To
open the tank open the
clamps and take off the
head. Take out the items
and put on the head
again. Secure the head
with the clamps.
See chapter 6 where to store the accessories on the machine.
3.2 MOUTING OF HOSE AND CORD HOLDER
Add the two hose/cord holders in the appropriate receptable on the head
3.3 PREPARING THE TROLLEY (OPTIONAL)
The trolley can be folded during transpotation. To fix it in the upright
position swing the top trolley part up (A) and fix it with the 2 screws
(B). Make sure to tighten both sides equal.
6 ENGLISH
4. USING THE VACUUM CLEANER
FIG. 9
FIG. 7
Read chapter 1 – IMPORTANT SAFETY INSTRUCTIONS of this manual thoroughly before setting up and
using this vacuum cleaner.
FIG. 6
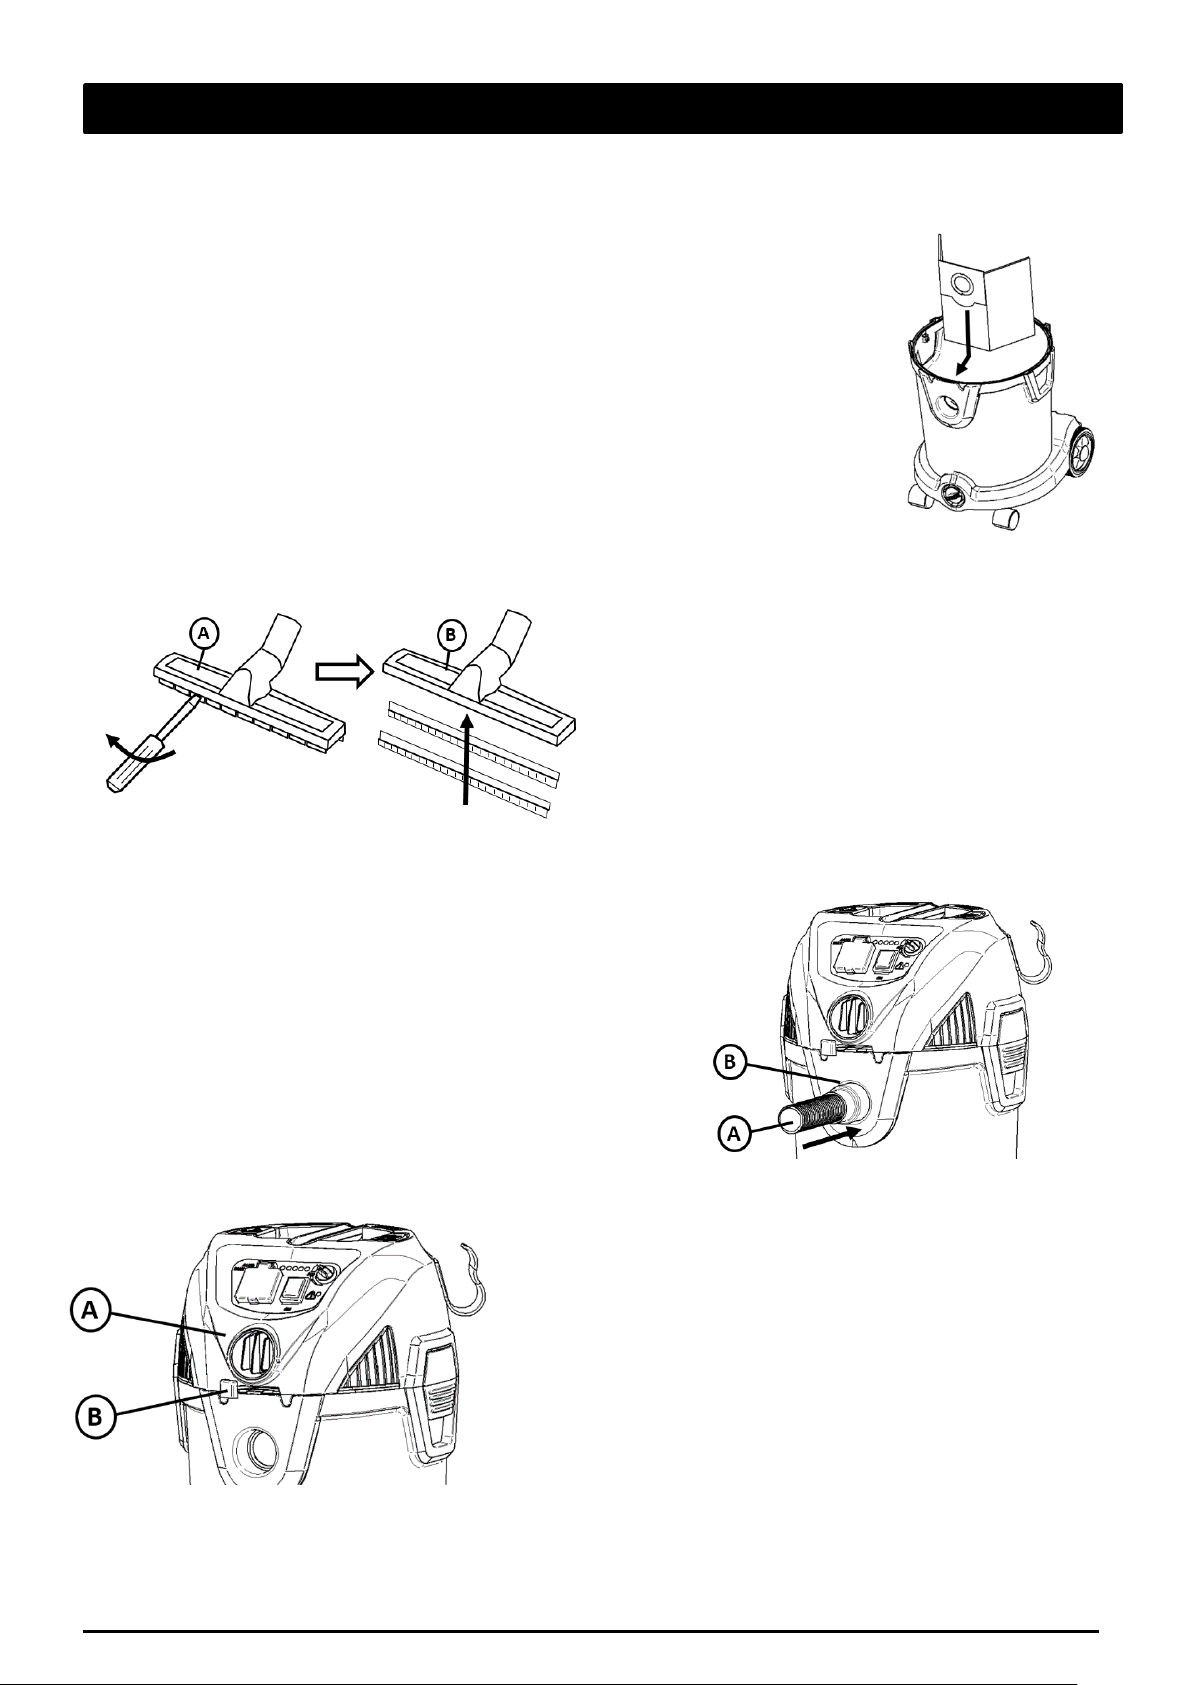
4.1 WORKING WITH DUST BAGS
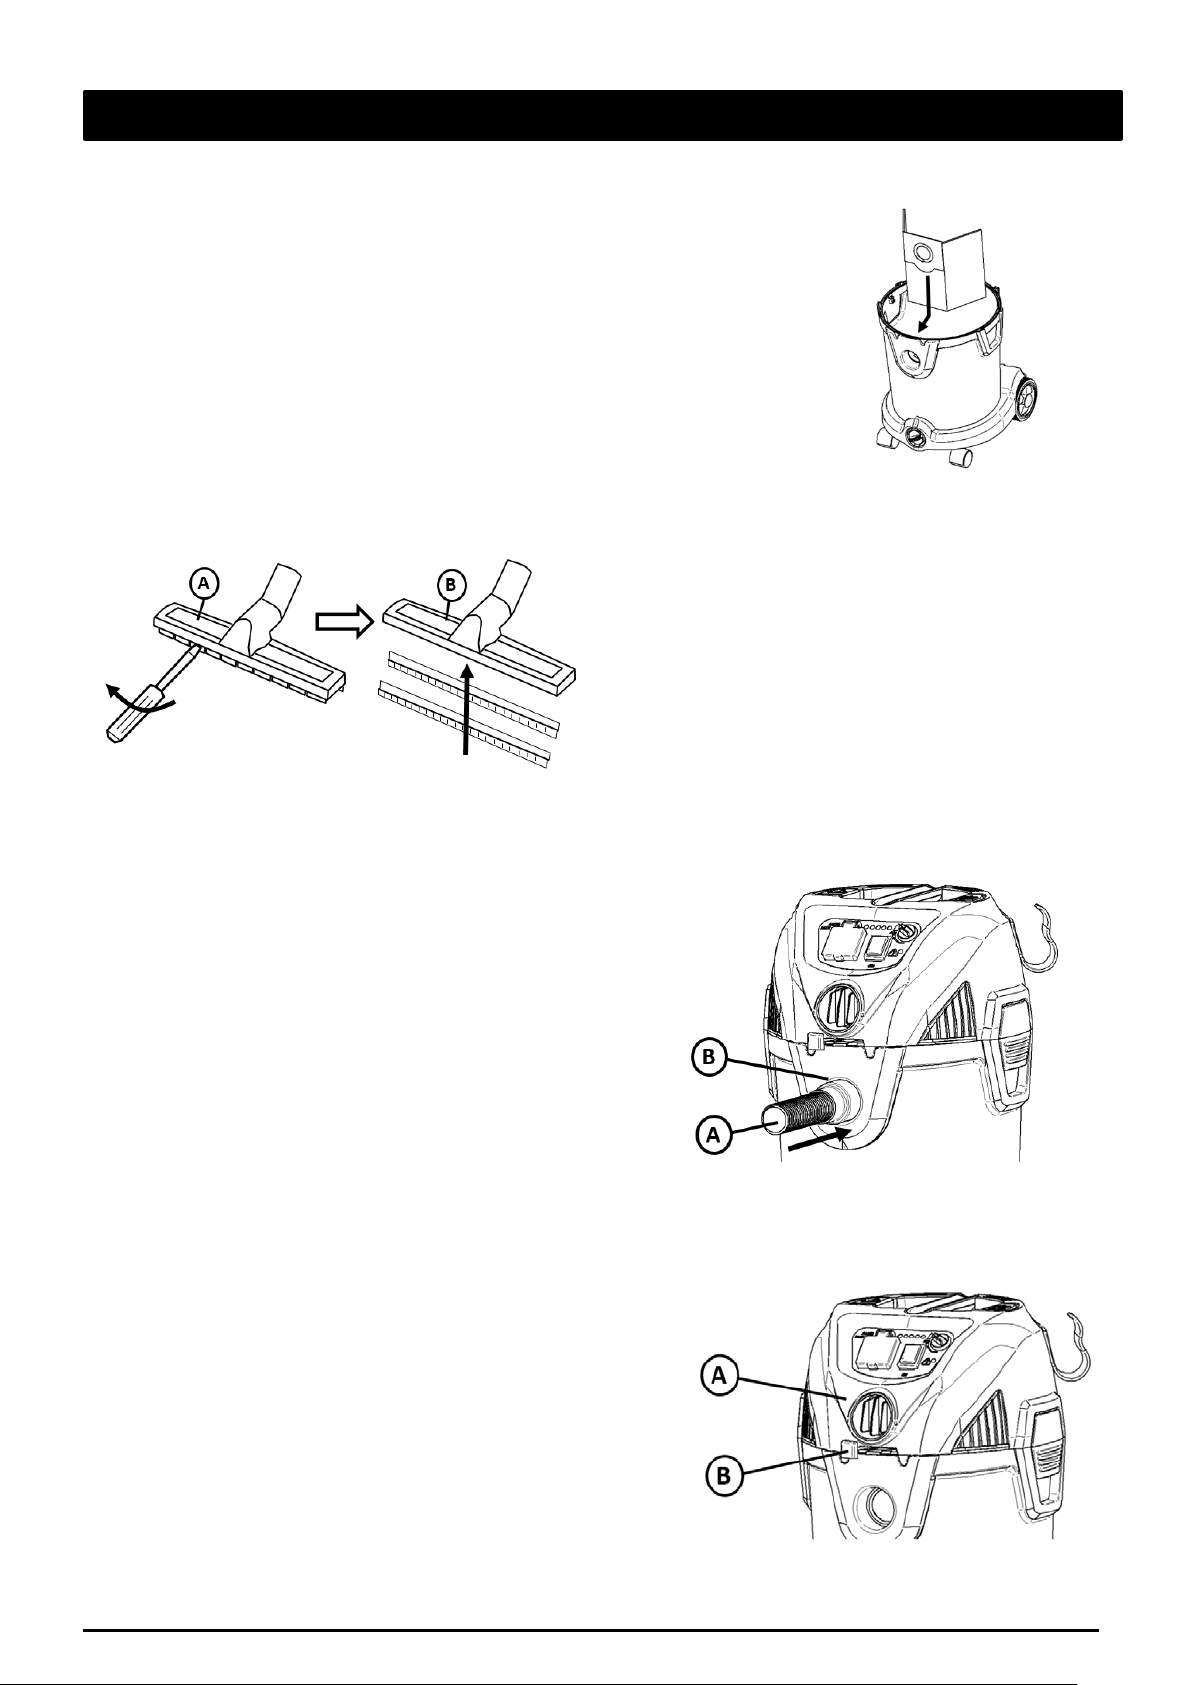
If sucking up dry dust an optional dust bag can be used to collect the dust and
ease the disposal. To insert the dust bag take off the head (see also figure 3).
Insert the dustbag like shown on figure 6. Put on the head again and secure
the head with the clamps.
4.2 DRY OR WET FLOOR SUCTION
To suck up dry dust and debris use the dry floor
nozzle (A) with the bristles rim.
To suck up wet debris replace the brush rim with
a screwdriver and insert the rubber squeegees
4.3 VACUUMING - INSERTING AND REMOVING
THE HOSE
To vacuum insert the hose (A) into the suction inlet (B).
FIG. 8
4.4 BLOWING - INSERTING AND REMOVING THE
HOSE
The machine can also be used for blowing. In some cases it is
easier first to blow the debris away and then afterwards
collect it.
To use the blow function insert the hose into the blow outlet
(A) in the same way for the suction inlet. See above. The
blowing can be controlled by the lever (B)
7 ENGLISH
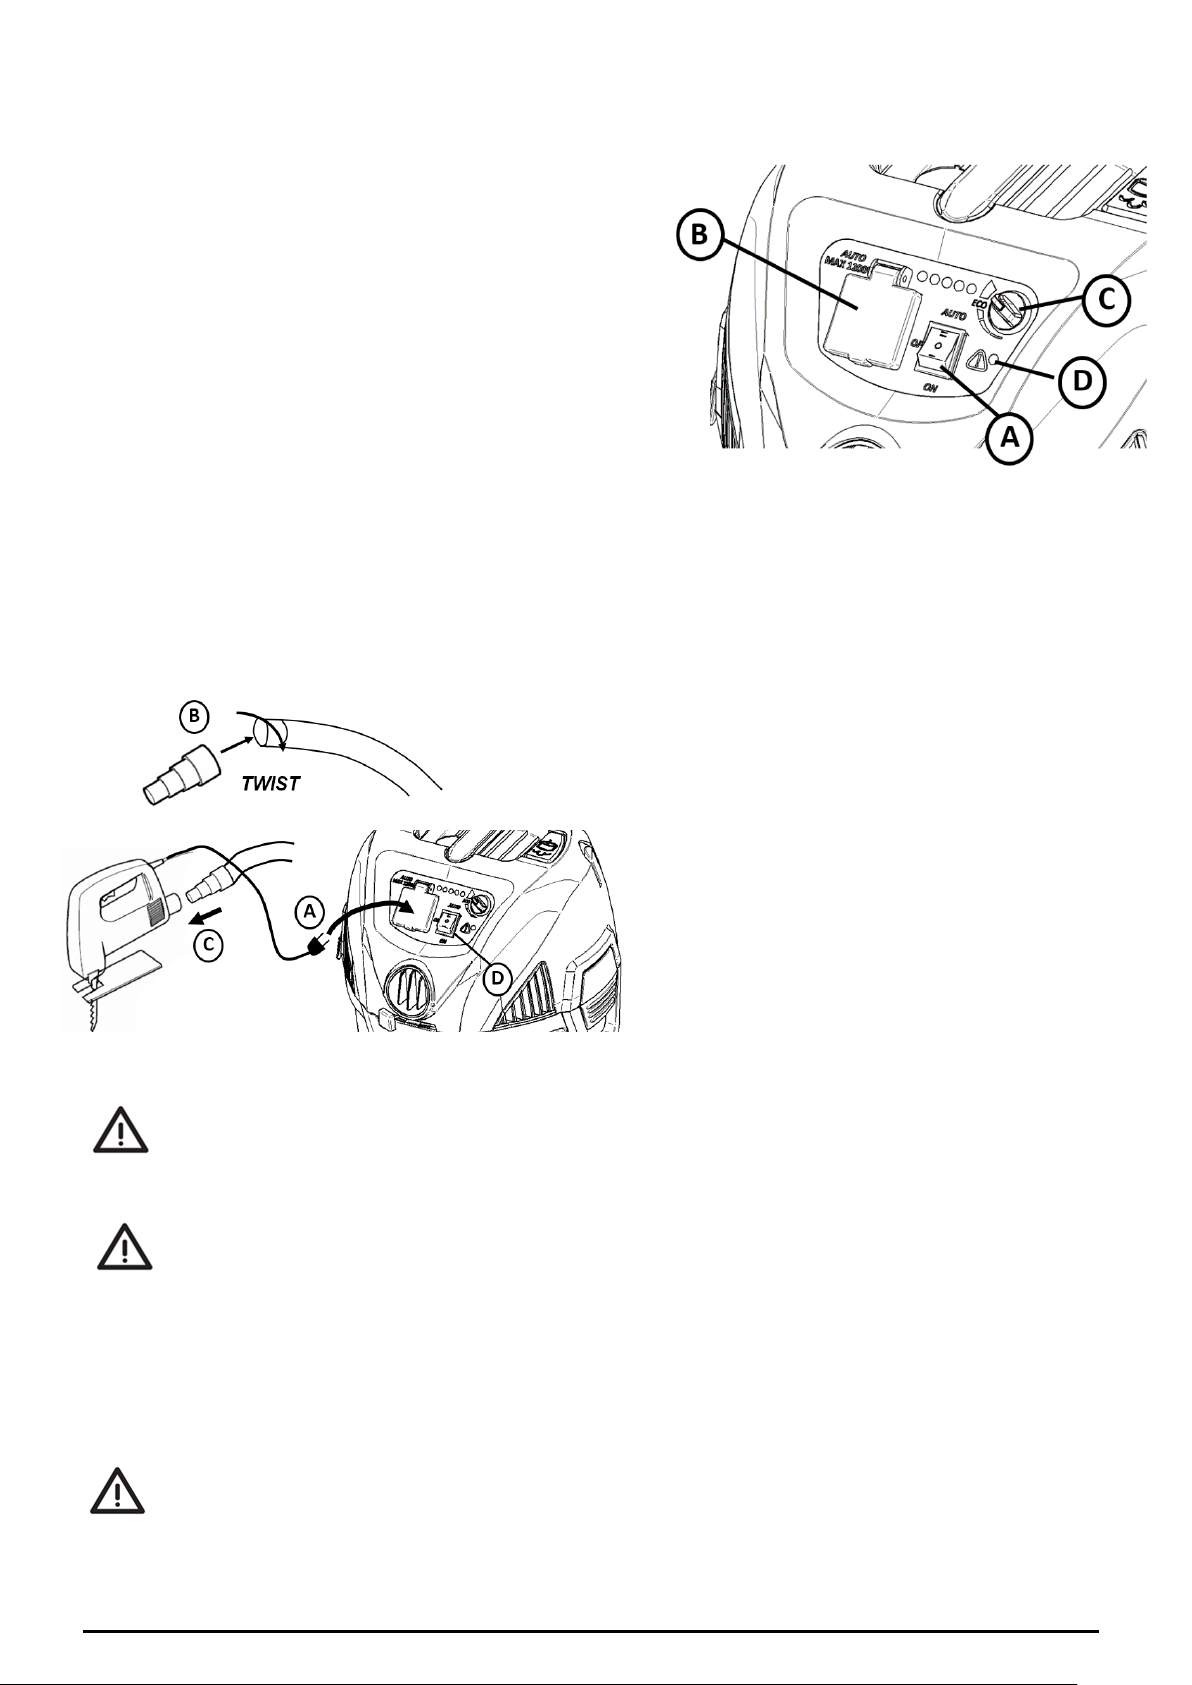
4.5 TURNING THE MACHINE ON
FIG. 10
FIG. 11
The machine is turned on/off by pressing the start/ stop
button (A).
The machine can optionally be equipped with LEDs with
power control (C). By turning the knob the suction of the
machine can be controlled. The suction performance is
st
also shown by the LEDs. If equipped with LED the 1
from left, when the machine is plugged in, will be ON.
To use the optional socket (B) see next chapter.
The machine can optionally be configured with an indicator (D). The indicator goes on, when the
underpressure is high. This can be due to the filter being clogged and needs to be cleaned (see later
chapter) or the bag is full and need to be replaced.
LED
4.6 MACHINE WITH SOCKET AND AUTO
START/STOP (OPTIONAL)
The machine can optionally be equipped with
a socket that can be used in connecting with a
power tool. Connect the power tool to the
socket (A). Remove the handtube and fix the
conical adapter (B). Insert the conical adapter
to the power tool (C). Turn the machine to
AUTO mode with the switch (D). The machine
will then start, when the power tool is turned
on and stop with a delay (in order to empty the
hose) when the power tool is turned off.
! WARNING - Do not operate without filter basket and float, as they prevent liquid from
entering the impeller and damaging the motor. Do not suck up any liquids without a sponge
filter installed.
! WARNING - To reduce the risk of back injury or falls, do not lift a vacuum cleaner heavy with
liquid or debris. Scoop or drain enough contents out to make the vacuum cleaner light
enough to lift in a comfortable manner.
NOTE: IF ACCIDENTALLY TIPPED OVER, THE VACUUM COULD LOSE SUCTION. IF THIS OCCURS, PLACE
VAC IN UPRIGHT POSITION AND TURN SWITCH OFF. THIS WILL ALLOW THE FLOAT TO RETURN TO ITS
NORMAL POSITION, AND YOU WILL BE ABLE TO CONTINUE OPERATION.
! WARNING - Read the Safety Warnings and Instructions concerning the types of wet materials
that cannot be vacuumed with this product.
8 ENGLISH
! DANGER - This equipment incorporates parts such as switches, motors or the like that tend to
FIG. 13
produce arcs or sparks that can cause an explosion. Do not pick up flammable, combustible, or
hot materials. Do not use around explosive liquids or vapors, as electrical devices produce arcs or
sparks which can cause a fire or explosion - do not use at filling stations or anywhere gasoline is
stored or dispensed.
This vacuum cleaner has a built in thermal overload protector to protect the motor from high
temperatures. This can occur under heavy use. If the motor temperature shuts off during
operation, turn the switch off and allow the motor to cool for 5 minutes. Turn switch on and
resume operation.
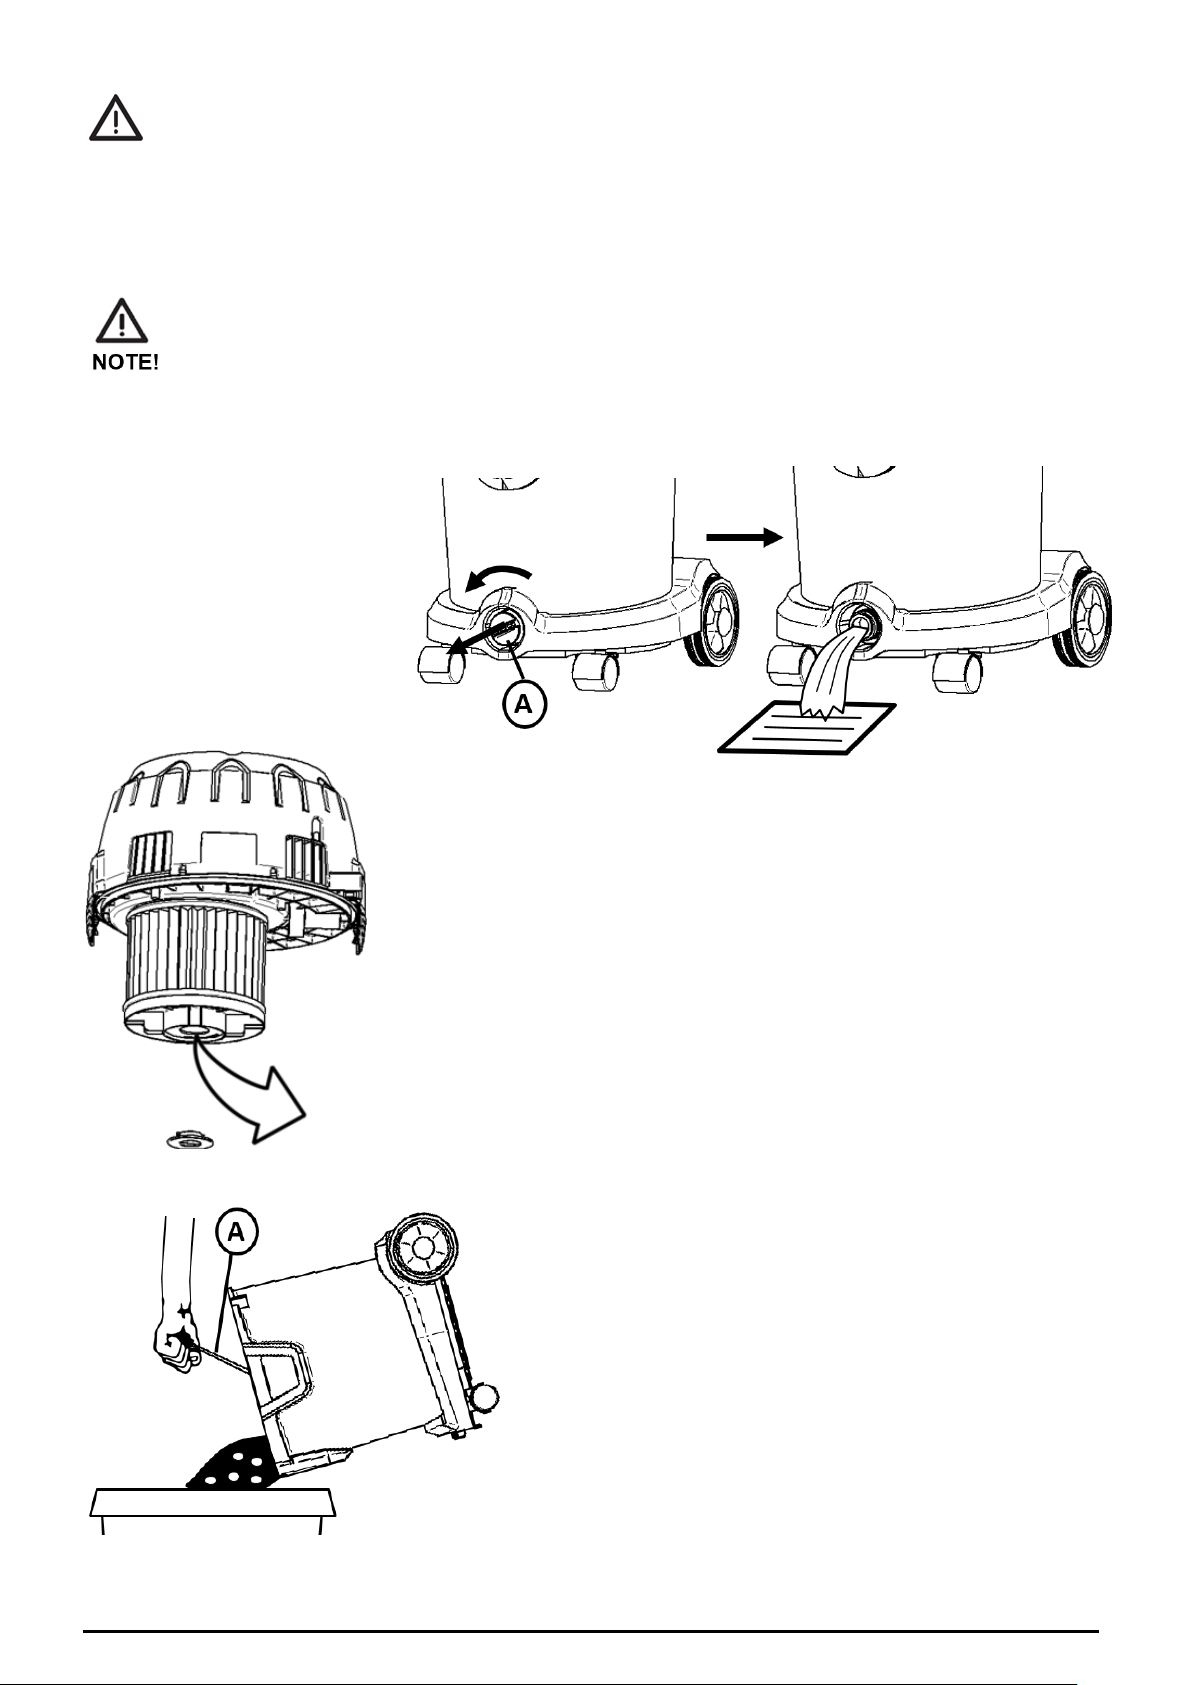
4.7 EMPTYING THE TANK
FOR LIQUID
To empty the tank for liquid
unscrew the drain plug (A) and
remove it.
Discharge water from filter.
FIG. 12
4.8 EMPTYING THE TANK FOR DUST/DEBRIS
To empty the tank for dust/debris take off the head (see
chapter 3.1). If using a dust bag remove the dust bag and
insert a new.
Machines with 20l and 30l plastic tanks are equipped with a
handle (A) that can be using during disposal of the
dust/debris.
9 ENGLISH
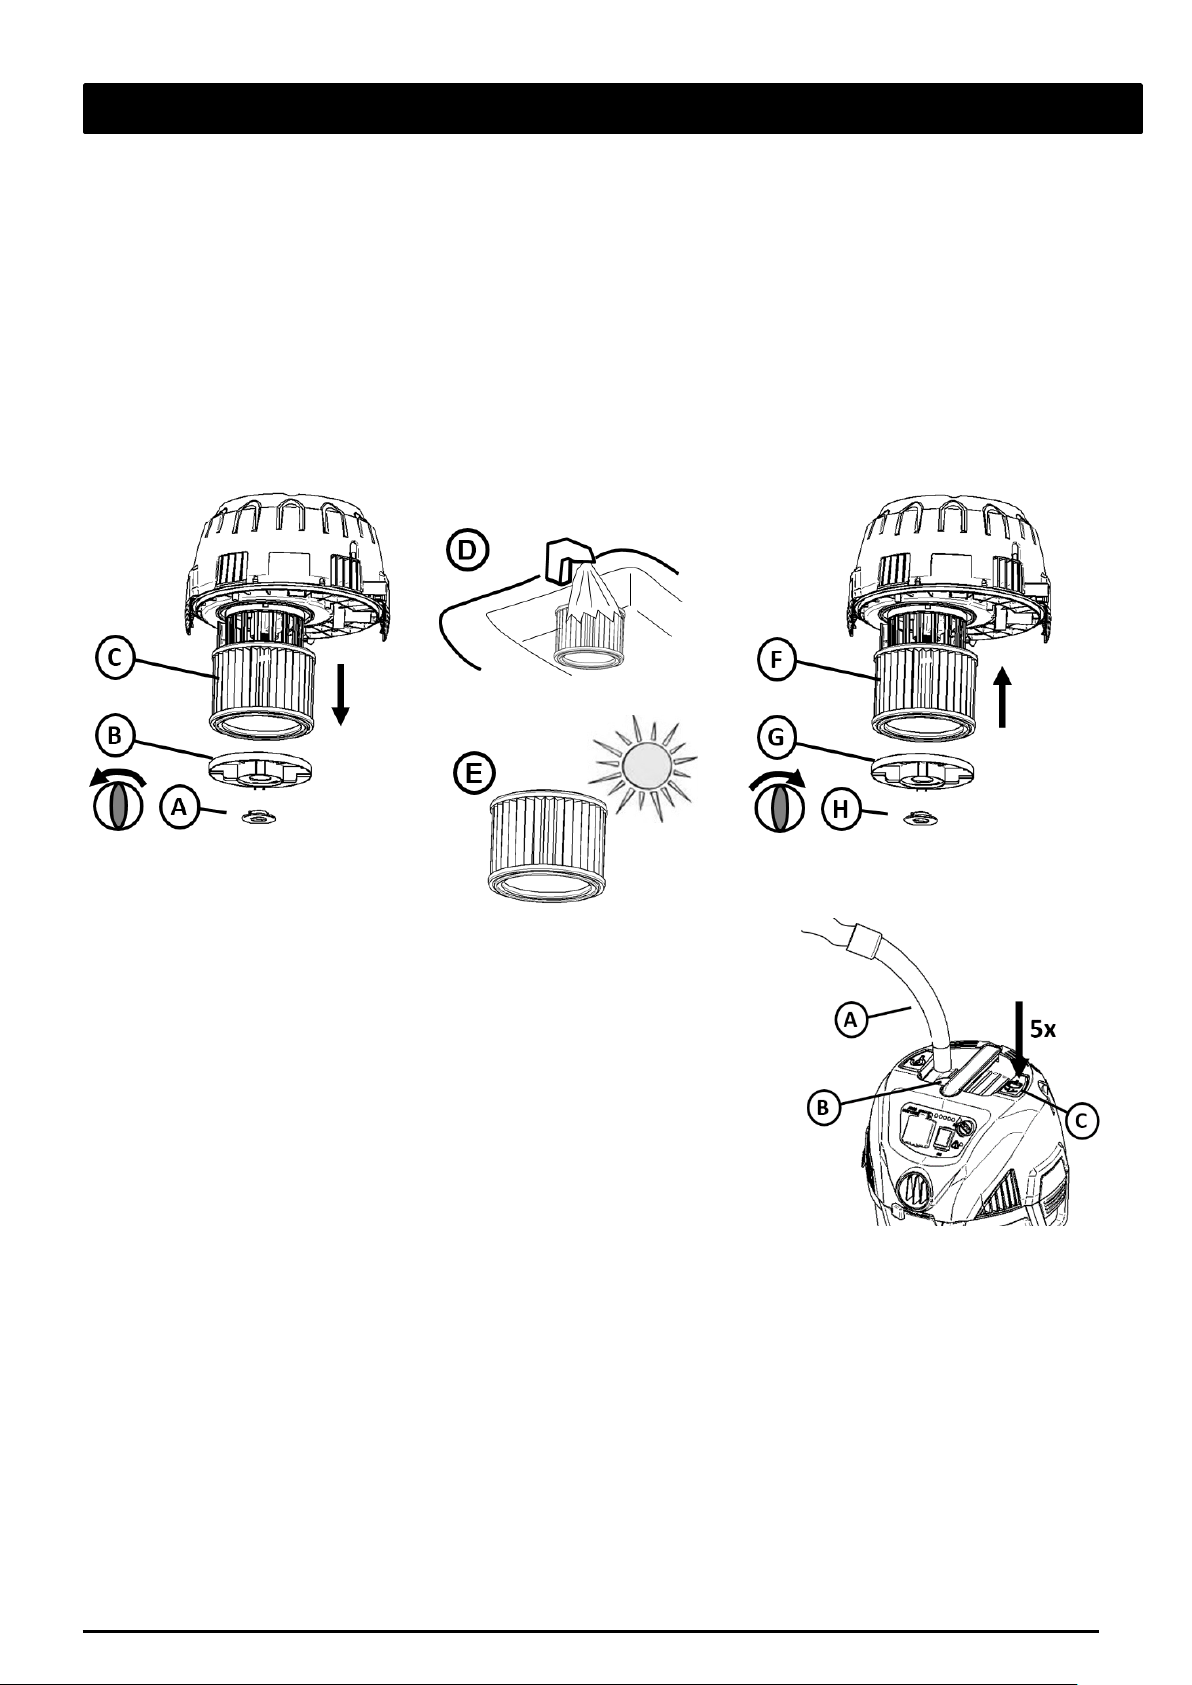
5. FILTER CLEANING
The machine can optionally be equipped with a semi automatic filter cleaning system or fully automatic
filter cleaning system.
5.1 MANUAL FILTER CLEANING
When sucking fine dust the filter will eventually get clogged and suction will go down. The filter
therefore needs to be cleaned to restore suction. If the machine is not equipped with semi- or fully
automatic filter cleaning system (see next chapters), the filter can be cleaned in the following manual
way. Turn the knob (A) and remove the knob from the filter disc (B). Remove the filter (C). Clean the
filter under cold water (D). Let is dry (E) until completely dry. Install backwards by adding filter (F). Fixing
the filter disc (G) and securing it with the knob (H).
FIG. 14
5.2 SEMI AUTOMATIC FILTER CLEANING (OPTIONAL)
When the machine is equipped with the semi automatic filter
cleaning system, the filter can be cleaned by closing the inlet of the
handtube (A). However, first turn the machine to max. power if
equipped with power control (see figure 10). Close the inlet which
can be done with your hand or the receptable/hole in the machine
(B) can be used. After closing the inlet wait 2-3 seconds until the
maximum underpressure has been built up. Press the filter cleaning
button (C) 5 times fast after each other. This action will clean the
filter and restore suction performance.
FIG. 15
5.3 FULLY AUTOMATIC FILTER CLEANING (OPTIONAL)
The fully automatic filter cleaning system cleans the filter automatically approx. every 20 seconds. The
filter cleaning takes less than a second and a very little interruption of the suction performance takes
place during the filter cleaning. A small “bang” can be heard. The automatic filter cleaning system works
best, when the underpressure in the machine is high. If filter for some reason should be clogged and
suction is low then turn the machine to max. power (if configured with power controller) then close the
inlet of the machine and wait until a small “bang” can be heard. The filter will then be cleaned and
suction restored.
10 ENGLISH
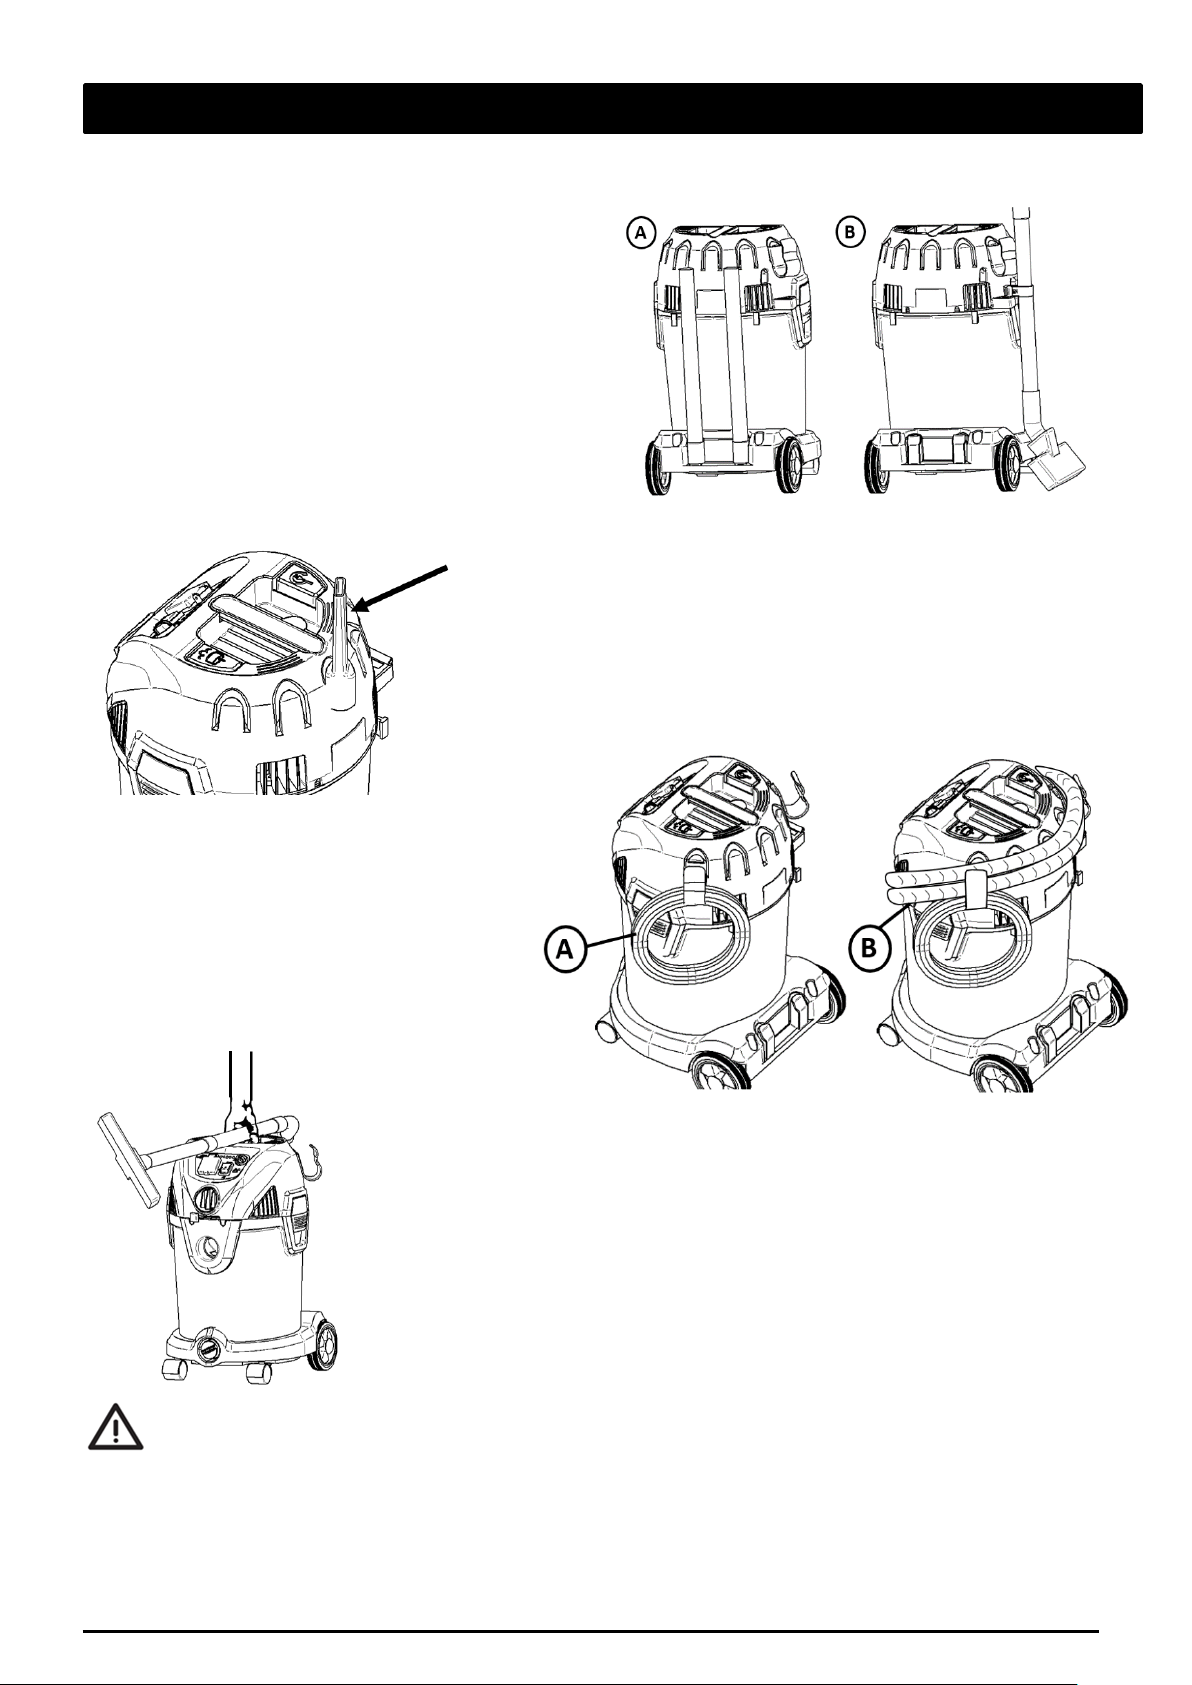
6. DURING OR AFTER USE, STORAGE
FIG. 16
FIG. 17
FIG. 18
Store vacuum cleaner INDOOR in a room above 0°C and store in a dry room.
The tubes can be stored either single (A) on the
back of the machine e.g. when the machine is
being moved from one place to the other or
together (B) via the parking hook/function in
between use.
The nozzles can be stored in the accessory holders on the head
For machine without cord rewinder the
cord (A) can be stored in the hooks. These
hooks can also be used for storing the hose
(B) by coiling it around the machine
FIG. 19
WARNING! When not in use: disconnect the power cord from the electrical outlet.
When transporting from one place to another the tubes can be put on the
handle as seen on figure
11 ENGLISH

Vacuum does not start:
• Check to see that the plug is correctly inserted in the electrical outlet and
Motor does not run in
• Power tool defective or not connected properly. Check that the power tool
rating is P>50W
Motor stops:
• A thermal overload protector will shut off the motor if the motor
Suction power is reduced:
• The tank may be full and needs to be emptied. See chapter 4.7 and 4.8.
Static shocks:
• If the environment is too dry, add moisture to air. If possible, use a
7. TROUBLE SHOOTING
Repair or service of electrical components such as cord or motor, must only be carried out by an
authorized service center.
that there is power at receptacle.
• A circuit breaker may have tripped. Check the circuit breaker box.
• The cord or plug may be damaged. Call the Customer Service Department to
get the nearest authorized service center.
automatic mode
works or that the plug is inserted correctly.
• The power rating of the electrical tool is too low. Note that minimum powe
temperature is too high. If this occurs, turn the switch off. Wait 10 minutes
for the motor to cool. Turn switch on and resume operation.
• The wands, hose and nozzle may be clogged and need to be cleaned.
• Any of the above may be damaged and need to be replaced.
• The filter may be clogged. Use the Filter Cleaning System (see chapter 5), to
clean the filter.
• Check the filter and replace it, if it’s necessary. Make sure that is installed
properly.
• The hose connection is loose and need to be tightened.
humidifier.
• In case the relative humidity of air is low, please note that this situation will
not have any effect on use of the vacuum cleaner.
12 ENGLISH
8. DECLARATION OF CONFORMITY
2006/42/CE - 2014/30/UE - 2011/65/CE
Legal Representative
Federico De Angelis
Person authorised to compile the technical file
We:
IP Cleaning S.p.A.
via E.Fermi,2
26022 Castelverde (Cremona) - ITALIA
declare under our responsibility that the product
VAC-20PC
220-240 V / 50-60 Hz
1200 W nom / 1200 W max
to which this declaration relates is in conformity with the following standards or other normative
document(s):
• IEC 60335 -1:2010+A1:2013
• IEC 60335 - 2 - 69:2012
• IEC 62233: 2008
• EN 55014 - 1:2006+A1:2009+A2:2011
• EN 55014 - 2:1997+A1:2001+A2:2008
• EN 61000 - 3 - 2: 2014
• EN 61000 - 3 - 3: 2013
following the provisions of the Directives: 2006/42/EC (Machinery directive)
2014/30/UE (Electromagnetic compability EMC) 2011/65/EC (Directive RoHS II)
Castelverde, 01/06/2017
Via E.Fermi, 2 26022 Castelverde
IP Cleaning S.p.A.
Cremona - ITALIA
1400 W nom / 2300 W max
VAC-30PC-R
220-240 V / 50-60 Hz
13 ENGLISH
Voltage
220-240V
220-240V
Frequency
50Hz/60Hz
50Hz/60Hz
Power
1200 W
1400 W
Connected load for appliance
Total Power
1200 W
2300 W
Protection Class
I
II
Type of protection
IPX4
IPX4
Tank volume
20L
30L
Vibration
ah< 2.5 m/s2
ah< 2.5 m/s2
Pressure level at a distance of 1
m, EN 60704-1
Power level
86 +/ -2 dB(A)
86 +/ -2 dB(A)
N.A.
Antistatic
9. PRODUCT SPECIFICATIONS
Model name
socket
VAC-20PC VAC-30PC-R
- 1100 W
76 +/ -2 dB(A) 76 +/ -2 dB(A)
N.A.
14 ENGLISH
MANUALE DI
ISTRUZIONI
(Istruzioni originali)
VAC-20PC
VAC-30PC-R

Congratulazioni per l’acquisto del tuo nuovo aspiratore per materiali secchi/liquidi.
CARO CLIENTE
UTILIZZO PREVISTO
1. ISTRUZIONI DI SICUREZZA IMPORTANTI
Prima di utilizzare l’apparecchio per la prima volta, accertati di aver letto attentamente
questo documento e tieni le istruzioni a portata di mano.
Questo aspirapolvere è stato progettato, sviluppato e rigorosamente testato per funzionare in modo
efficiente e sicuro qualora sia utilizzato in modo proprio e in accordo con le istruzioni riportate su questo
manuale. Questo aspirapolvere è per uso commerciale (hotel, scuole, ospedali, fabbriche, uffici e per
noleggio) o domestico. Infortuni dovuti al cattivo utilizzo possono essere evitati da chi utilizza la
macchina.
ATTENZIONE: LEGGERE E SEGUIRE TUTTE LE ISTRUZIONI DI SICUREZZA.
Questa macchina è adatta per aspirare polvere non infiammabile secca e liquidi. Qualsiasi altro utilizzo è
da considerarsi improprio. Il produttore declina ogni responsabilità per qualsiasi danno risultante da un
uso improprio. Il rischio di tale uso nasce esclusivamente dall’utilizzatore. L’uso proprio include anche il
funzionamento proprio, manutenzione e riparazioni specificati dal fornitore.
! ATTENZIONE: LEGGERE LE ISTRUZIONI DI SICUREZZA PRIMA DI UTILIZZARE QUESTO
APSIRATORE. TENERE PER FUTURI RIFERIMENTI.
! ATTENZIONE: Non utilizzare mai questa unità quando materiali infiammabili o vapori sono presenti,
questo perché gli apparecchi elettrici producono scintille che possono causare incendi o esplosioni.
NON LASCIARE MAI L’APPARECCHIO FUNZIONANTE INCUSTODITO!
!ATTENZIONE: Indossare sempre le protezioni per gli occhi per evitare che i detriti che
rimbalzano possano causare gravi lesioni.
1.1 ISTRUZIONI PER L’UTILIZZO:
L’apparecchio deve:
• Essere usato solamente da persone che siano state istruite riguardo il suo corretto utilizzo ed
esplicitamente incaricate dell’utilizzo dell’apparecchio.
• Essere messo in funzione solo se supervisionato.
• Questo apparecchio non è inteso per l’uso da parte di persone (bambini inclusi) con ridotte
capacità fisiche, sensoriali o mentali, o senza esperienza e conoscenza.
• I bambini devono essere supervisionati in modo tale che non giochino con l’apparecchio.
• Rispettare sempre le procedure di sicurezza.
• Non utilizzare mai l’aspiratore sprovvisto di filtro.
• Spegnere la macchina e staccare la presa dall’alimentazione nelle seguenti situazioni:
o Prima di pulire e fare manutenzione
o Prima di sostituire i componenti
o Quando il lavoro è terminato
o Se dovesse svilupparsi schiuma o fuoriuscire del liquido
Oltre alle istruzioni per l’utilizzo e la vincolante norma di prevenzione degli infortuni valida nel paese di
utilizzo, è necessario osservare le norme riconosciute per la sicurezza e l’uso proprio.
2 ITALIANO

1.2 AVVERTENZE IMPORTANTI:
• Per ridurre il rischio di incendi, shock elettrico o infortuni, si prega di leggere e seguire tutte le
istruzioni di sicurezza e la segnaletica di sicurezza prima dell’utilizzo. Questo aspirapolvere è
stato progettato per essere sicuro quando utilizzato in modo proprio, come specificato in questo
manuale. Se dovesse verificarsi un danno alle parti elettriche o meccaniche, l’apparecchio e/o i
ricambi devono essere riparati da assistenza tecnica qualificata oppure dal produttore, prima che
l’apparecchio sia utilizzato, in modo tale da evitare ulteriori danni alla macchina oppure danni
fisici all’utilizzatore.
• Non lasciare la macchina incustodita se il cavo di alimentazione è inserito in una presa.
Disconnettere dalla presa se non si sta utilizzando l’apparecchio e prima delle operazioni di
manutenzione.
• Non utilizzare se il cavo o la presa sono danneggiati Per staccare la spina dalla presa tirare la
presa e non il cavo. Non toccare, non collegare all’alimentazione, non pulire l’apparecchio con le
mani bagnate. Spegnere tutti gli interruttori prima di scollegare l’alimentazione.
• Non tirare o trasportare la macchina tirando il cavo, non utilizzare il cavo come se fosse una
maniglia, o tirare il cavo in prossimità di bordi taglienti o angoli. Non schiacciare il cavo. Tenere il
cavo lontano da superfici riscaldate.
• Tenere mani, capelli, vestiti e tutte le altre parti del corpo lontane dalle aperture e dalle parti in
movimento.
• Non mettere nessun oggetto contro al bocchettone o altre aperture. Non utilizzare se le aperture
sono bloccate. Tenere le aperture libere da polvere, pelucchi, capelli o qualsiasi altra cosa che
possa impedire il flusso dell’aria
• ATTENZIONE: Questa macchina non è adatta per raccogliere polveri pericolose.
Non aspirare liquidi combustibili o infiammabili, per esempio benzina, o utilizzare in aree dove
possano essere presenti.
• Non aspirare tizzoni ardenti o fumanti come sigarette, fiammiferi o ceneri ancora calde.
• Prestare particolare attenzione quando si utilizza sulle scale.
• Non utilizzare se i filtri non sono montati.
• Se l’aspiratore non funziona correttamente, se è caduto o danneggiato, se è stato lasciato
all’aperto o se è caduto nell’acqua, spedirlo al centro di assistenza.
• Se liquido o schiuma dovessero fuoriuscire dalla macchina, spegnere immediatamente
l’apparecchio.
• L’aspiratore non deve essere utilizzato come una pompa per i liquidi. Deve essere utilizzato per
aspirare aria mista ad acqua.
• Connettere l’aspiratore ad un’appropriata rete con messa a terra. La presa di corrente della rete
e la prolunga devono avere una messa a terra adeguata.
• Assicurarsi che sul posto di lavoro ci sia un’adeguata ventilazione.
• Non utilizzare l’apparecchio come scala o come gradino. Potrebbe ribaltarsi e danneggiarsi.
• Non aspirare mai I seguenti materiali: gas combustibili o esplosivi, particelle di polvere o liquidi
reattivi, particelle di metalli reattivi (come alluminio, magnesio, zinco) in combinazione con
detergenti altamente acidi o alcalini, acidi forti non diluiti, sostanze alcaline o solventi organici
come carburanti, diluenti, acetone, oli combustibili o prodotti simili.
• Pericolo di incendio. Non aspirare nessun oggetto incandescente o ardente.
• Non aspirare liquidi infiammabili o combustibili come benzina o particelle di polvere reattiva;
non aspirare in aree dove possano essere presenti.
• Non utilizzare l’aspiratore come dispositivo per spruzzare liquidi come per esempio vernici ad
olio, smalti, detergenti casalinghi, eccetera.
3 ITALIANO

• Non tentare di aspirare ceneri tiepide o calde. La temperatura massima delle ceneri aspirate
deve essere 102°F/40°C.
• Non aspirare materiali tossici, cancerogeni o combustibili, come per esempio amianto, arsenico,
bario, berillio, piombo, pesticidi altre sostanze che possano mettere in pericolo la salute.
• Per evitare fenomeni di combustione spontanea, svuotare il fusto dopo ogni utilizzo.
• NOTA: Possono verificarsi scariche di elettricità statica se l’ambiente è troppo secco. Questo non
influirà sull’utilizzo dell’aspiratore. Per evitare scosse, aggiungere umidità all’aria con un
umidificatore.
• RESTARE VIGILI e usare il buonsenso. Non utilizzare l’aspiratore sotto l’effetto di droghe, alcool,
medicinali, o se si è stanchi o distratti.
• Non lasciare il cavo di alimentazione svolto sul pavimento una volta finite il lavoro. Potrebbe
diventare un pericolo di inciampo.
• Se il cavo di alimentazione è danneggiato, deve essere sostituito dal produttore,o da assistenza
tecnica specializzata, in modo tale da evitare pericoli.
• Non permettere che l’aspiratore sia utilizzato come giocattolo. Particolare attenzione deve
essere prestata quando utilizzato da bambini o in prossimità di bambini.
• Tenere i materiali dell’imballo lontani dai bambini. Rischio di soffocamento.
• Proteggere l’unità dalla pioggia. Riporre in ambienti chiusi.
• ATTENZIONE: Questa macchina non va utilizzata all’aperto.
• Non utilizzare l’aspiratore sotto la pioggia.
• Indossare maschere protettive quando si svuota il fusto da polveri sottili di qualsiasi tipo.
• Sconnettere l’alimentazione prima di connettere il tubo o altri accessori.
• Non lasciare incustodito l’apparecchio connesso all’alimentazione. Disconnettere dalla presa in
caso di inutilizzo e prima di effettuare manutenzione.
• Connettere solo a prese munite di messa a terra. Vedere le istruzioni per la messa a terra.
• ATTENZIONE: gli operatori dovrebbero essere adeguatamente istruiti sull’utilizzo di questa
macchina.
• ATTENZIONE: Pulire regolarmente il dispositivo che limita il livello dell’acqua e controllare la sua
integrità.
• Il sensore di livello (galleggiante) ha la funzione di arrestare l’aspirazione quando il fusto è pieno
di liquido o in caso di ribaltamento; procedere regolarmente alla sua pulizia controllando anche
che non presenti danneggiamenti e sostituirlo se necessario.
1.3 APPLICABILE SOLO NEL REGNO UNITO:
Si prega di leggere le seguenti istruzioni essenziali.
Queste istruzioni sono state redatte secondo norme di efficienza e sicurezza. L’operatore deve essere
istruito da un istruttore qualificato e deve capire queste istruzioni, ed essere informato su ogni
normativa rilevante e su ogni legislazione in vigore nel momento dell’utilizzo.
Questa macchina da 240 V-50 Hz è equipaggiata con una presa stampata da 13A con 3 contatti. La presa
è dotata di un fusibile staccabile da 13 A. Il ricambio corretto per il fusibile è identificato da un codice a
colori o da un marchio. Devono essere montati solo i fusibili approvati ASTA con BS 1362. Non usare mai
la spina sprovvista del porta fusibile.
Ricambi del porta fusibile sono disponibili in ogni negozio per ricambi elettrici.
1.4 Test e permessi
Test elettrici devo essere eseguiti in base a quanto previsto alle norme di sicurezza EN 62638. Questi
test devono essere eseguiti ad intervalli regolari e dopo riparazioni o modifiche. L’aspiratore è stato
approvato conformemente alla IEC/EN 60335-2-69.
NOTA BENE: Tutte le immagini e i disegni sono puramente indicativi.
4 ITALIANO

2. PANORAMICA
FIG. 1
11. Pulsante pulizia filtro (optional)
1. Fusto
FIG. 1
21. Lancia piatta
FIG. 2
2.Testa
3. Carrello (optional – KTRI05071)
4. Cavo e avvolgicavo (optional)
5. Ganci
6. Scarico
7. Bocchettone
8. Regolazione funzione soffiante
9. Uscita aria soffiante
10. Pannello di controllo
12. Pulsante di avvolgimento cavo (optional)
13. Sede spina
14. Spina
15. Porta accessori (per bocchetta e pennello)
16. Pomolo blocca carrello (KTRI05080)
17. Porta accessori (per tubo)
22. Bocchettina (optional)
23. Pennello
24. Spazzola polvere
25. Ventosa liquidi
26. Sacco carta
27. Adattatore (optional)
28. Tubo con curvetta
29. Tubi
Alcuni di questi accessori sono riposti all’interno
del fusto. Se dovessero mancare alcuni pezzi,
contattare il servizio clienti.
5 ITALIANO
Leggere scrupolosamente il capitolo 1 – ISTRUZIONI DI SICUREZZA IMPORTANTI di questo manuale
3. ISTRUZIONI DI INSTALLAZIONE
FIG. 5
FIG. 3
FIG. 4
prima di installare e di usare questo aspiratore.
3.1 ACCESSORI
Le bocchette e gli
accessori per la
macchina sono
riposti all’interno del
fusto. Per aprire il
fusto, aprire i ganci e
togliere la testata.
Estrarre gli accessori
e rimontare la testa.
Agganciare
nuovamente la
testata tramite i ganci.
Vedere il capitolo 6 per capire dove riporre gli accessori sulla macchina.
3.2 MONTAGGIO DELL’AVVOLGICAVO/PORTATUBO
Inserire i due avvolgicavo/portatubo nelle apposite sedi sulla testa della
macchina
3.3 PREDISPOSIZIONE DEL CARRELLO (OPTIONAL)
Il carrello può essere piegato durante il trasporto. Per fissarlo in
posizione verticale far ruotare la parte alta del carrello (A) e fissarla
con le due viti (B). Assicurarsi di fissare entrambi i lati alla stessa
altezza.
6 ITALIANO
4. UTILIZZO DELL’ASPIRATORE
FIG. 7
Leggere scrupolosamente il capitolo 1 – ISTRUZIONI DI SICUREZZA IMPORTANTI di questo manuale
prima di installare e di usare questo aspiratore.
4.1 MONTAGGIO DEL SACCO CARTA
Qualora si dovesse aspirare polvere (modalità dry), è possibile montare un
sacco carta (optional) per raccogliere e smaltire la polvere.
Per inserire il sacco carta togliere la testata motore (vedere anche figura 3).
Inserire il sacco carta come mostrato in figura 6. Rimettere la testata e
serrarla tramite i ganci.
4.2 ASPIRAZIONE SECCO O LIQUIDI
Per raccogliere polvere e piccoli detriti usare la
spazzola dry (A) con le setole.
Per aspirare liquidi (modalità wet) staccare le
setole aiutandosi con un cacciavite e inserire la
striscia in gomma.
FIG. 6
4.3 ASPIRAZIONE - INSERIRE E
TOGLIERE IL TUBO
Per aspirare inserire il tubo (A) nel
bocchettone di aspirazione (B).
FIG. 8
4.4 FUNZIONE SOFFIANTE - INSERIRE E TOGLIERE
IL TUBO
La macchina può essere utilizzata anche in funzione
soffiante. A volte è più facile prima accumulare i detriti
tramite la funzione soffiante, e poi aspirarli. Per utilizzare
l’aspiratore in modalità soffiante inserire il tubo nell’uscita
soffiante (A). Vedi figure sopra. La funzione soffiante può
essere controllata dalla leva (B).
7 ITALIANO
FIG. 9

4.5 ACCENSIONE
L’aspiratore può essere acceso o spento tramite
l’interruttore on/off (A).
L’aspiratore può essere dotato di LED e di
regolatore di potenza (C) (optional). Il regolatore
permette di variare il potere aspirante. Il primo led
a sinistra (se presente) è acceso quando la
macchina è in funzione.
Per utilizzare la presa supplementare (B) vedere il
prossimo capitolo.
L’aspiratore può essere munito di indicatore (D), che si accende quando la pressione diminuisce. Questa
situazione si crea quando il filtro è intasato e deve essere pulito (vedere ultimo capitolo), oppure il sacco
è pieno e deve essere sostituito.
FIG. 10
4.6 APPARECCHIO CON PRESA SUPPLEMENTARE E FUNZIONE START/STOP
AUTOMATICA (OPTIONAL)
! ATTENZIONE - Non mettere in funzione l’aspiratore se i filtri e il galleggiante non sono nella
loro sede, in quanto impediscono ai liquidi di filtrare nella testata e di danneggiare il motore.
! ATTENZIONE - Per ridurre il rischio di infortuni o cadute, non alzare l’aspiratore se il fusto è
carico di liquidi o residui. Svuotare il fusto del suo contenuto in modo tale da rendere
l’aspiratore abbastanza leggero, per poi poterlo alzare in tutta sicurezza.
NOTA: SE ROVESCIATO ACCIDENTALMENTE, L’ASPIRATORE PUO’ PERDERE PARTE DELLA SUA
POTENZA ASPIRANTE. IN QUESTO CASO RIPORTARE PRIMA L’ASPIRATORE IN POSIZIONE VERTICALE,
POI PREMERE IL PULSANTE DI SPEGNIMENTO. QUESTO PERMETTERA’ AL GALLEGGIANTE DI TORNARE
NELLA SUA NORMALE POSIZIONE, E POTRETE CONTINUARE A LAVORARE.
L’aspiratore può essere equipaggiato di
una presa supplementare a cui si può
FIG. 11
collegare un utensile elettrico. Collegare
l’utensile alla presa (A), togliere la
curvetta e collegare l’adattatore conico
(B) all’utensile (C). Mettere l’apparecchio
in modalità AUTO tramite l’interruttore
(D). In questo caso l’apparecchio si
accenderà quando l’utensile verrà acceso,
e si spegnerà con un leggero ritardo
quando l’utensile verrà spento (per
permettere lo svuotamento del tubo).
8 ITALIANO
 Loading...