

Promac SX-821DA Operating Instructions Manual
SX-821DA
METAL BANDSAW
Original:
GB
Operating Instructions
Translations:
D
Gebrauchsanleitung
F
Mode d´emploi
Schweiz / Suisse France
JPW (TOOL) AG. TOOL FRANCE SARL
Tämperlistrasse 5 9 Rue des Pyrénées, 91090 LISSES, France
CH-8117 Fällanden Switzerland www.promac.fr
www.promac.ch
M- SX-821DA 2019-07

CE-Conformity Declaration
CE-Konformitätserklärung
Déclaration de Conformité CE
Product / Produkt / Produit:
Metal band saw
Metallbandsäge
Scie à ruban portable
SX-821DA
Brand / Marke / Marque:
PROMAC
Manufacturer / Hersteller / Fabricant:
TOOL FRANCE SARL
9 Rue des Pyrénées, 91090 LISSES, France
We hereby declare that this product complies with the regulations
Wir erklären hiermit, dass dieses Produkt der folgenden Richtlinie entspricht
Par la présente, nous déclarons que ce produit correspond aux directives suivantes
2006/42/EC
Machinery Directive
Maschinenrichtlinie
Directive Machines
2014/30/EU
electromagnetic compatibility
elektromagnetische Verträglichkeit
compatibilité électromagnétique
designed in consideration of the standards
und entsprechend folgender zusätzlicher Normen entwickelt wurde
et été développé dans le respect des normes complémentaires suivantes
EN ISO 12100:2010
EN 13898:2003+A1:2009
EN 60204-1:2006+A1:2009
EN 61000-6-2:2005
EN 61000-6-4:2007+A1:2011
Responsible for the Documentation / Dokumentations-Verantwortung / Résponsabilité de Documentation:
Head Product-Mgmt. / Leiter Produkt-Mgmt. / Resp. Gestion des Produits
TOOL FRANCE SARL
2018-11-29 Christophe SAINT SULPICE, General Manager
TOOL FRANCE SARL
9 Rue des Pyrénées, 91090 LISSES, France
2

GB - ENGLISH
Operating Instructions
Dear Customer,
Many thanks for the confidence you have shown in us with the purchase of your new Promac-machine. This manual has been prepared for the owner
and operators of a Promac SX-821DA, metal band saw to promote safety during installation, operation and maintenance procedures. Please read and
undertand the information contained in these operating instructions and the accompanying documents. To obtain maximum life and efficiency from
your machine, and to use the machine safely, read this manual thoroughly and follow instructions carefully.
…Table of Contents
1. Declaration of conformity
2. Warranty
3. Safety
Authorized use
General safety notes
Remaining hazards
4. Machine specifications
Technical data
Noise emission
Contents of delivery
Machine description
5. Transport and start up
Transport and installation
Assembly
Mains connection
Starting operation
6. Machine operation
7. Setup and adjustments
Changing blade speed
Changing sawblade
Blade guides adjustment
Guide bearing adjustment
Blade tracking adjustment
Feed speed adjustment
Vise adjustment
Saw arm adjustment
8. Maintenance and inspection
9. Troubleshooting
10. Environmental protection
11. Available accessories
1. Declaration of conformity
On our own responsibility we hereby declare
that this product complies with the
regulations* listed on page 2. Designed in
consideration with the standards**.
2. Warranty
JPW (Tool) AG guarantees that the supplied
product(s) is/are free from material defects
and manufacturing faults.
This warranty does not cover any defects
which are caused, either directly or indirectly,
by incorrect use, carelessness, damage due
to accidents, repairs or inadequate
maintenance or cleaning as well as normal
wear and tear.
Further details on warranty (e.g. warranty
period) can be found in the General Terms
and Conditions (GTC) that are an integral
part of the contract.
These GTC may be viewed on the website of
your dealer or sent to you upon request.
JPW (Tool) AG reserves the right to make
changes to the product and accessories at
any time.
3. Safety
3.1 Authorized use
This machine is designed for sawing
machinable metal and plastic materials only.
Machining of other materials is not
permitted and may be carried out in specific
cases only after consulting with the
manufacturer.
Never cut magnesiumhigh danger to fire!
The proper use also includes compliance
with the operating and maintenance
instructions given in this manual.
The machine must be operated only by
persons familiar with its operation and
maintenance and who are familiar with its
hazards.
The required minimum age must be
observed
The machine must only be used in a
technically perfect condition.
When working on the machine, all safety
mechanisms and covers must be mounted.
In addition to the safety requirements
contained in these operating instructions and
your country’s applicable regulations, you
should observe the generally recognized
technical rules concerning the operation of
metalworking machines.
Any other use exceeds authorization.
In the event of unauthorized use of the
machine, the manufacturer renounces all
liability and the responsibility is transferred
exclusively to the operator.
3.2 General safety notes
Metalworking machines can be dangerous if
not used properly. Therefore the appropriate
general technical rules as well as the
following notes must be observed.
Read and understand the entire instruction
manual before attempting assembly or
operation.
Keep this operating instruction close by the
machine, protected from dirt and humidity,
and pass it over to the new owner if you part
with the tool.
No changes to the machine may be made.
Daily inspect the function and existence of
the safety appliances before you start the
machine.
Do not attempt operation in this case,
protect the machine by unplugging the mains
cord.
Remove all loose clothing and confine long
hair.
Before operating the machine, remove tie,
rings, watches, other jewellery, and roll up
sleeves above the elbows.
Wear safety shoes; never wear leisure shoes
or sandals.
Always wear the approved working outfit
Do not wear gloves while operating this
machine.
For the safe handling of saw blades wear
work gloves.
Insure that the workpiece does not roll when
cutting round pieces.
Use suitable table extensions and supporting
aids for difficult to handle workpieces.
Always adjust the blade guide close to the
workpiece.
Remove cut and jammed workpieces only
when motor is turned off and the machine is
at a complete standstill.
3
Install the machine so that there is sufficient
A
B
C
D
E
U
K L M
N
O
P
S
T
H
IJ Q
R
space for safe operation and workpiece
handling.
Keep work area well lighted.
The machine is designed to operate in closed
rooms and must be placed stable on firm and
levelled ground.
Make sure that the power cord does not
impede work and cause people to trip.
Keep the floor around the machine clean and
free of scrap material, oil and grease.
Stay alert!
Give your work undivided attention. Use
common sense.
Do not operate the machine when you are
tired.
Do not operate the machine under the
influence of drugs, alcohol or any medication.
Be aware that medication can change your
behaviour.
Keep children and visitors a safe distance
from the work area.
Never reach into the machine while it is
operating or running down.
Never leave a running machine unattended.
Before you leave the workplace switch off
the machine.
Do not operate the electric tool near
inflammable liquids or gases.
Observe the fire fighting and fire alert
options, for example the fire extinguisher
operation and place.
Do not use the machine in a dump
environment and do not expose it to rain.
Specifications regarding the maximum or
minimum size of the workpiece must be
observed.
Do not remove chips and workpiece parts
until the machine is at a complete standstill.
Never operate with the guards not in place –
serious risk of injury!
Connection and repair work on the electrical
installation may be carried out by a qualified
electrician only.
Have a damaged or worn cord replaced
immediately.
Make all machine adjustments or
maintenance with the machine unplugged
from the power source.
Remove defective saw blades immediately.
3.3 Remaining hazards
When using the machine according to
regulations some remaining hazards may still
exist
The moving saw blade in the work area can
cause injury.
Broken saw blades can cause injuries.
Thrown cutting chips and noise can be health
hazards.
Be sure to wear personal protection gear
such as safety goggles and ear protection.
The use of incorrect mains supply or a
damaged power cord can lead to injuries
caused by electricity.
4. Machine specifications
4.1 Technical data
SX-821DA:
Wheel diameter 295 mm
Cutting capacity 90° dia. 225mm
200 x 200mm
240 x 160mm
Cutting capacity 45° dia. 160mm
140 x 140 mm
155 x 115mm
Cutting capacity 60° dia. 90mm
90 x 90 mm
Arm swivel range 0° - 60°
Sawblade length 2455 mm
Blade width 27 mm
Blade thickness 0,9 mm
Cutting speeds 2 35/ 70 m/min
Coolant tank 8 litre
Coolant pump 0,07 HP
Overall(LxWxH) 1500x1100x1750mm
Weight 220 kg
Mains 400V ~3/PE 50Hz
Output power 1,1 kW (1,5 HP)-S1
Reference current 3.9 A
Extension cord (H07RN-F): 4x1,5mm²
Installation fuse protection 16 A
4.2 Noise emission
Acoustic pressure level (EN 11202):
Idling 75,2 dB (A)
Operating 86,2 dB (A)
The specified values are emission levels and
are not necessarily to be seen as safe
operating levels.
As workplace conditions vary, this
information is intended to allow the user to
make a better estimation of the hazards and
risks involved only.
4.3 Contents of delivery
Machine stand
Bimetal sawblade
Adjustable material stop
Hydraulic cylinder
Coolant facility
Assembly kit
Operating manual
Spare parts list
4
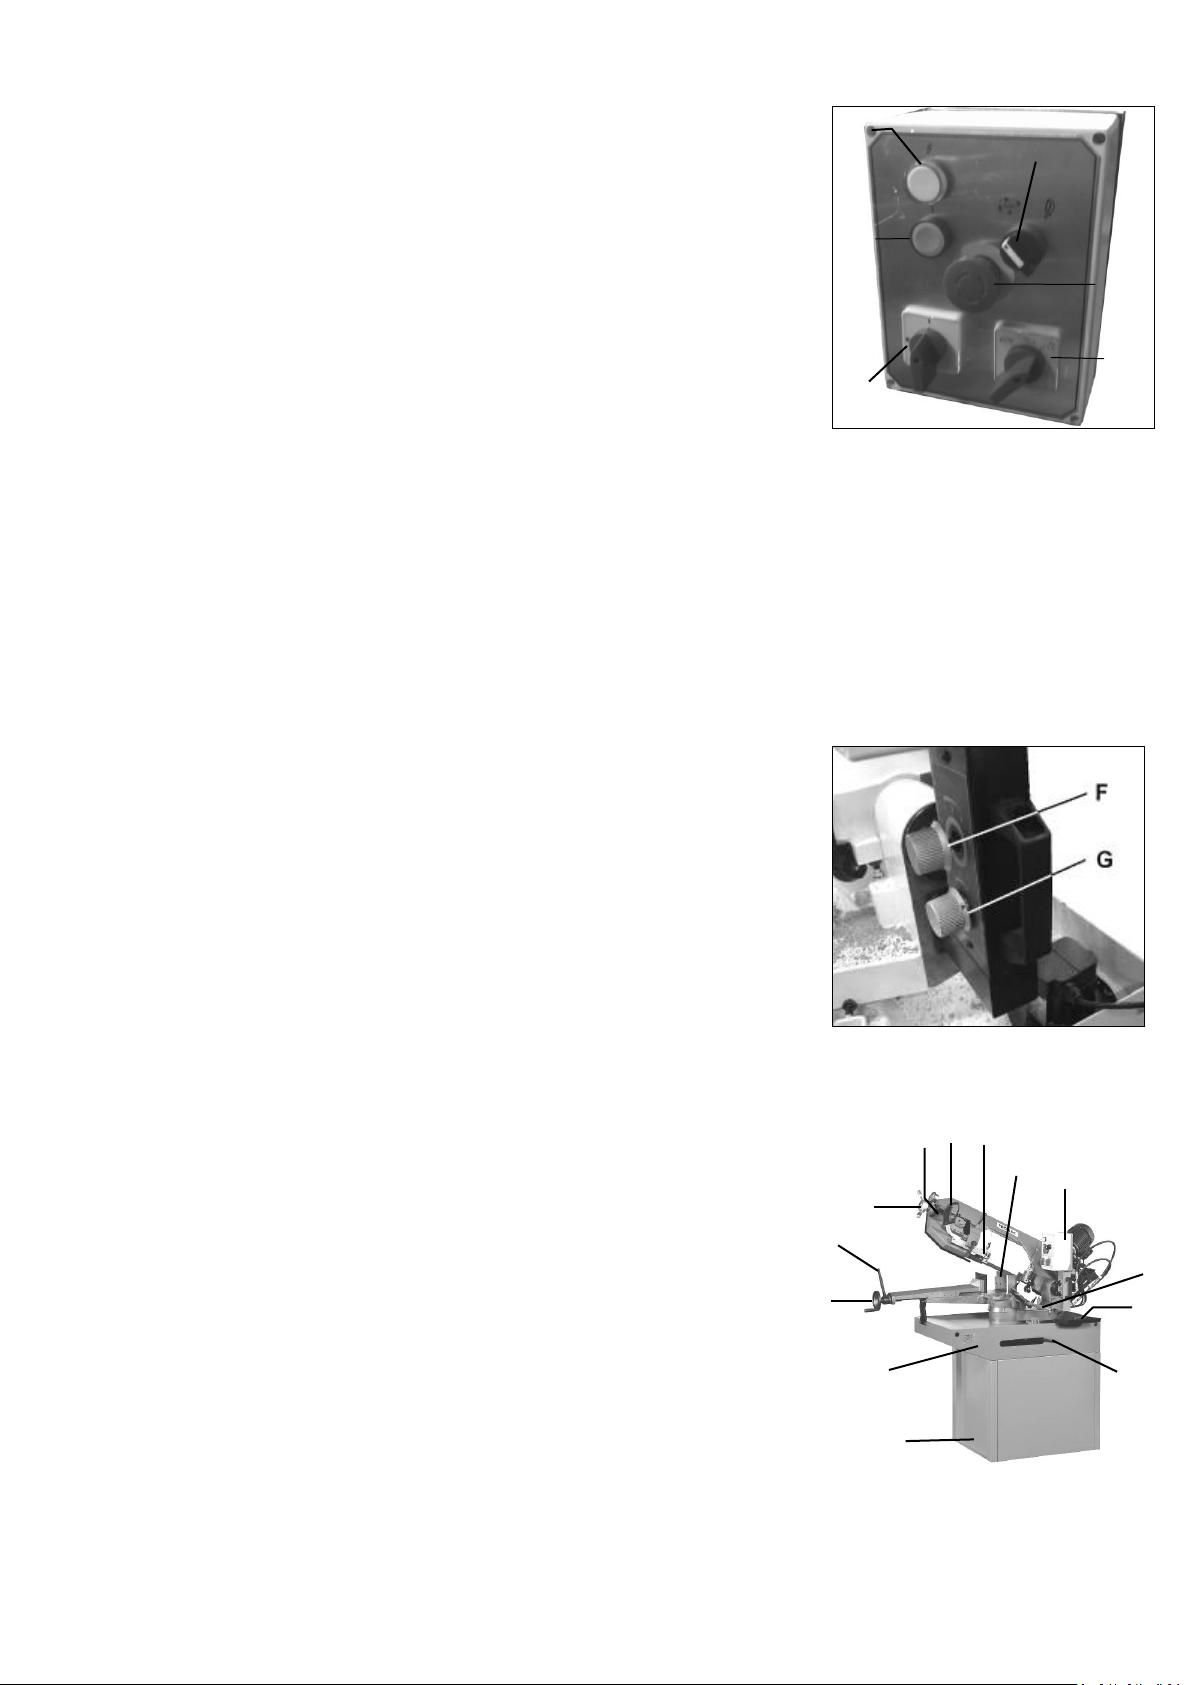
4.4 Machine description
Fig 1
A….Power indicator light
B….ON-button
C…. STOP/ Emergency off-button
D….Low / High speed switch
E….ON/OFF switch
U….Auto/Manual switch
F….Feed control valve
G….Feed ON/OFF valve
SX-821DA
Fig 2
H….Arm swivel lock
I.....Vise operating handwheel
J.....Quick lock for vise
A B C D E
U
K….Blade tension handwheel
L….Blade tension indicator
M…Sawarm downfeed handle with trigger
N.....Adjustable Blade guides
O…..Machine Vise
P…..Control box
Q….Coolant pump
R.....Material stop
S….Lifting holes
T…..Bolt down holes
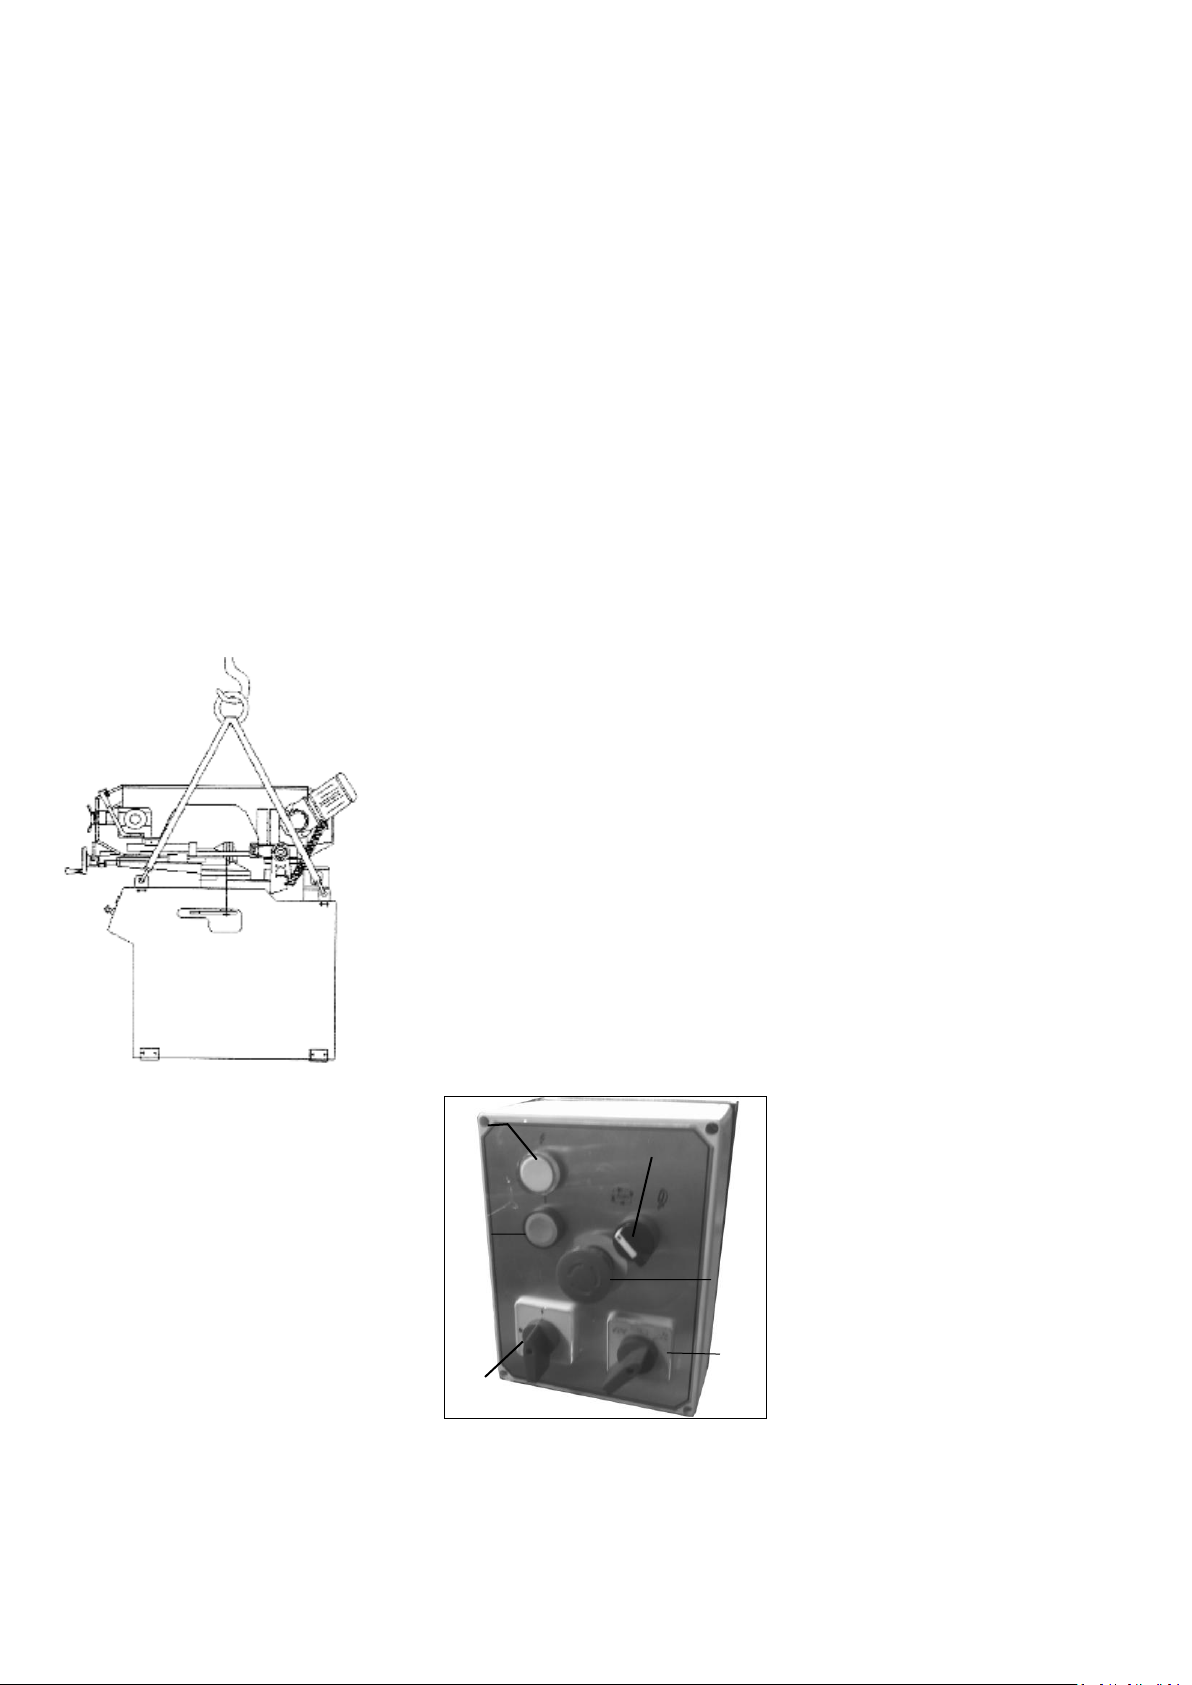
5.1 Transport and installation
Lift machine off the pallet to the desired
location.
Use lifting straps and place them as shown in
Fig 3.
Fig 3
Warning:
The machine weight is:
SX-821DA ….…. 220 kg.
Assure the sufficient load capacity and
proper condition of your lifting devices.
Never step underneath suspended loads.
The machine is designed to operate in closed
rooms and must be placed stable on firm and
levelled ground.
The machine must be bolted to the floor.
For packing reasons the machine is not
completely assembled.
5.2 Assembly
If you notice any transport damage while
unpacking, notify your supplier immediately.
Do not operate the machine!
Dispose of the packing in an environmentally
friendly manner.
Clean all rust protected surfaces with a mild
solvent.
5.3 Mains connection
Mains connection and any extension cords
used must comply with applicable
regulations.
The mains voltage must comply with the
information on the machine licence plate.
The mains connection must have a 16A
surge-proof fuse.
Only use power cords marked H07RN-F
Connections and repairs to the electrical
equipment may only be carried out by
qualified electricians.
5.4 Starting operation
You can start the machine with the green
ON-button (B). The red Stop / Emergency
off-button (C) on the control box stops the
machine.
The ON/OFF (E) can be switched on and off
independently.
The High Speed/ Low Speed switch (D) may
only be operated when motor power has
been stopped before.
Auto and Manual switch (U) can be slected
for Auto or Manual swing. In manual mode,
the trigger(M) can used to control the turn
On/Off.
WARNING:
Do not change the speed while machine is
running.
Improper operation may damage the switch.
Fig 4
Note:
The saw is equipped with an automatic ShutOff.
The saw should stop just after the cut has
been completed. The stop tip has to be
adjusted accordingly.
6. Machine operation
Support long workpieces with helping roller
stands.
Work only with a sharp and flawless
sawblade.
Don’t take measurements when the machine
is running
Don’t chuck too short in vice.
Use the coolant facility to keep cutting
temperatures down, reduce friction and
extend the life of your sawblade.
Make sure the cutting liquid is properly
contained to the machine.
Use only water soluble cutting emulsions and
dispose of it in an environmentally friendly
manner.
Don’t cut magnesiumhigh danger to fire!
7. Setup and adjustments
General note:
Setup and adjustment work may only be
carried out after the machine is protected
against accidental starting by pulling the
mains plug.
7.1 Changing blade speed
The general rule is the harder the material
being cut, the slower the blade speed.
Low Speed (35 or 40 m/min)
for mild steel, alloy steel and bronzes.
High Speed (70 or 80 m/min)
for aluminium or other light materials.
WARNING:
Do not change the speed while machine is
running.
7.2 Changing sawblade
Disconnect the machine from the power
source.
The sawblade has to meet the technical
specification.
Check sawblade for flaws (cracks, broken
teeth, bending) before installation. Do not
use faulty sawblades.
5
Always wear suitable gloves when handling
H
sawblades.
Raise the saw arm to the vertical position
and lock in place (close both valves F and G).
Remove the wheel cover.
Move the blade guide assembly (N, Fig 2)
away from the wheel.
Remove the brush assembly.
Release the blade tension and remove the
blade.
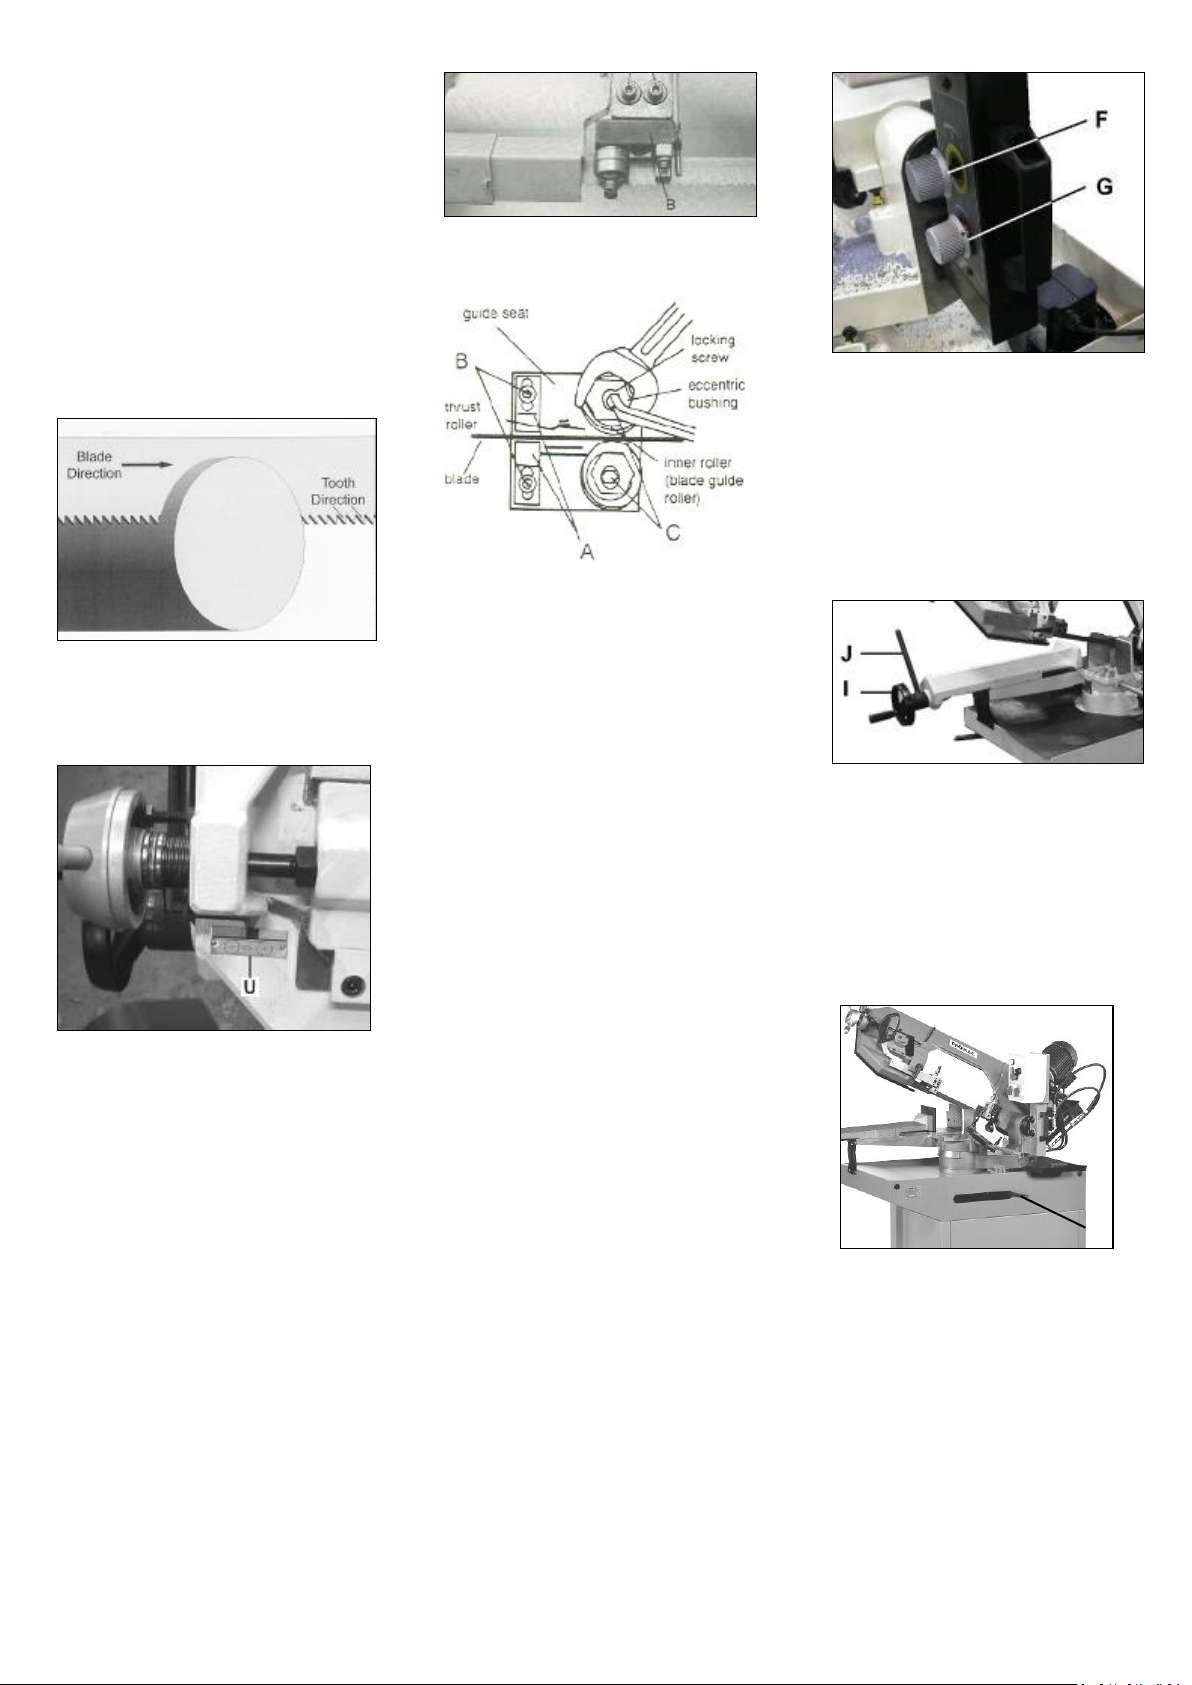
Place new blade and make sure the teeth are
pointing the cutting direction (Fig 5).
Fig 5
Turn the blade tension knob until the proper
blade tension is achieved at green block of
tension scale (U)
Fig 6
Place a few drops of lightweight oil on the
blade.
Install the red blade guard, the brush
assembly and the wheel cover.
Connect to the power source.
7.3 Blade guide adjustment
Slide the blade guide assembly (N, Fig 2) as
close as possible to the material being cut.
7.4 Guide bearing adjustment
Disconnect the machine from the power
source.
Loosen bolts and adjust assembly (B) so that
back roller bearing is approximately 0,1mm
from the back of the blade. Tighten bolt.
Fig 7
Fig 10….SX-821DA
The cutting of thin-walled workpieces
(profiles, tubes etc.) requires slow feeding to
avoid excessive wear of sawblade.
7.7 Vise adjustment
Use the quick lock handle (J) to open and
Fig 8
Loosen blade guides (A, Fig 8) by loosening
screws (B). Slide blade guides away from the
blade.
(SX-821DA only).
Loosen locking nuts with a hex wrench.
Turn eccentric shaft (C) to adjust bearing to a
clearance of 0,05mm.
Tighten nut to lock.
Slide blade guides (A) back into contact with
the blade and tighten screws (B).
(SX-821DA only).
7.5 Blade tracking adjustment
Warning:
Blade tracking adjustment requires running
the saw with the wheel cover open. This
adjustment must be completed by qualified
persons only.
Failure to comply may cause serious injury!
The blade tracking has been set at the
factory and should not need adjustments.
The tracking is sensitive, in case of need start
with minor( ¼ turn) adjustments.
7.6 Feed speed adjustment
You can control the sawblade downward
feeding with the valve control knob (F) and
lock the saw with the on/off valve (G).
close the vise for clamping.
For vise adjustment use the handwheel (I).
Fig 11
7.8 Saw arm adjustment
The saw arm can be adjusted for square and
mitre cuts.
Loosen handle (H) and move saw arm to the
desired angle.
Fig 12
Always check the angle setup with a
combination square against the blade and
vice.
8. Maintenance and inspection
General notes:
Maintenance, cleaning and repair work may
only be carried out after the machine is
protected against accidental starting by
pulling the mains plug.
6
 Loading...