

Page 1

www.prolink2u.com
USER MANUAL
PROLiNK® PWH2004
3G HPSA Wireless Router
Revision 1.0 (Aug’09)
Page 2

PROLiNK® PWH2004 User Manual www.prolink2u.com
COPYRIGHT
The contents of this publication may not be reproduced in any part or as a whole, stored, transcribed in
an information retrieval system, translated into any language, or transmitted in any form or by any
means, mechanical, magnetic, electronic, optical, photocopying, manual, or otherwise, without the prior
written permission.
TRADEMARKS
All products, company, brand names are trademarks or registered trademarks of their respective
companies. They are used for identification purpose only. Specifications are subject to be changed
without prior notice.
FCC INTERFERENCE STATEMENT
This equipment has been tested and found to comply with the limits for a Class B digital device pursuant
to Part 15 of the FCC Rules. These limits are designed to provide reasonable protection against radio
interference in a commercial environment. This equipment can generate, use and radiate radio
frequency energy and, if not installed and used in accordance with the instructions in this manual, may
cause harmful interference to radio communications. Operation of this equipment in a residential area is
likely to cause interference, in which case the user, at his own expense, will be required to take
whatever measures are necessary to correct the interference.
CE DECLARATION OF CONFORMITY
This equipment complies with the requirements relating to electromagnetic compatibility, EN 55022/A1
Class B.
Revision 1.0 (Aug’09) i
Page 3

PROLiNK® PWH2004 User Manual www.prolink2u.com
TABLE OF CONTENTS
TABLE OF CONTENTS.........................................................................................................................I
CHAPTER 1 – PACKAGE CONTENTS....................................................................................................2
CHAPTER 2 – INTRODUCTION ........................................................................................................... 3
CHAPTER 3 – OPERATION MODES .....................................................................................................6
CHAPTER 4 – CONFIGURATION ......................................................................................................... 9
CHAPTER 5 – PC CONFIGURATION .................................................................................................. 42
APPENDIX A – TROUBLESHOOTING ................................................................................................. 49
APPENDIX B – ABOUT WIRELESS LAN.............................................................................................. 51
APPENDIX C – TECHNICAL SUPPORT ............................................................................................... 54
Revision 1.0 (Aug’09) i
Page 4
PROLiNK® PWH2004 User Manual www.prolink2u.com
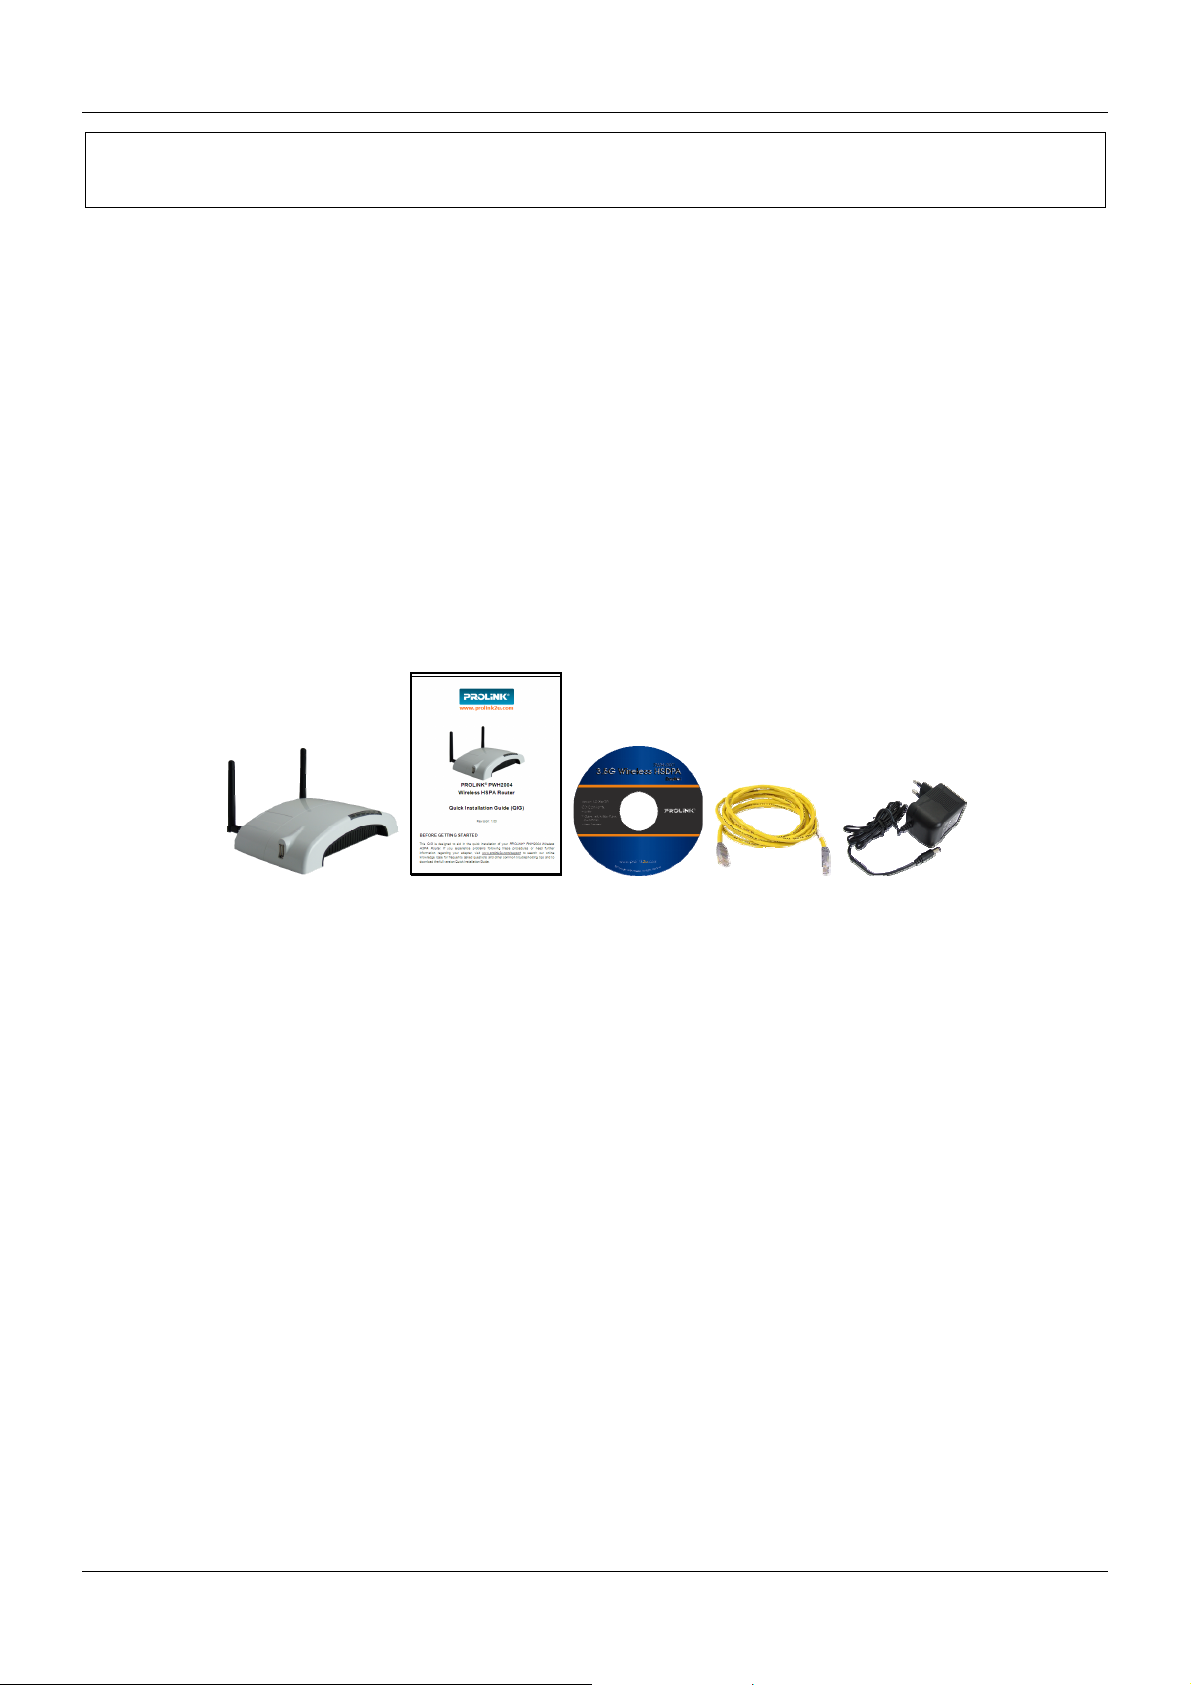
CHAPTER 1 – PACKAGE CONTENTS
Importance: Check your product package contents FIRST.
®
The PROLiNK
the items are missing, please contact your reseller immediately!
n
o
p
q
r
PWH2004 Wireless HSPA Router package should contain the items listed below. If any of
One (1) Unit of PROLiNK® PWH2004 3G HSPA Wireless Router with 2 antennas
One (1) Piece of Quick Installation Guide
One (1) Piece of Setup CD
One (1) Piece of RJ-45 Cable (≈1M length)
One (1) Unit of Power Adapter
n o p q r
CAUTION:
Using a power supply with a different voltage rating than the one included with the PROLiNK
PWH2004 Wireless HSPA Router will cause damage and void the warranty for this product.
System Requirements for Configuration
1. A compatible either USB HSPA modem with service,
2. Computers with Windows, Macintosh, or Linux-based operating systems with an installed Ethernet adapter,
3. Internet Explorer version 6.0 or Netscape Navigator version 7.0 and above.
Note: Subject to services and service terms available from your carrier.
Wi-Fi System Requirements
A 802.11b, 802.11g, or 802.11n USB Dongle (USB Wireless Adapter)
•
®
Revision 1.0 (Aug’09) 2
Page 5
PROLiNK® PWH2004 User Manual www.prolink2u.com
CHAPTER 2 – INTRODUCTION
®
The PROLiNK
Router with 4-port Fast Ethernet Switch. It is designed with the latest Draft 802.11n technology that
delivers up to 150Mbps wireless, provides multi-functional capabilities, particularly the high-performance
throughput and high-quality security to propose an integrated, thorough SOHO solution. The incredible
speed of the PROLiNK
streaming video, gaming, and Voice over IP technology, ensure optimum performance and maximum
coverage with an external antenna. With the PROLiNK
employees or corporate users can create a wireless network and provide colleagues with remote access
to their secure private networks. By installing the PROLiNK
train, or even a boat, you can allow passengers to check e-mail or chat online while commuting.
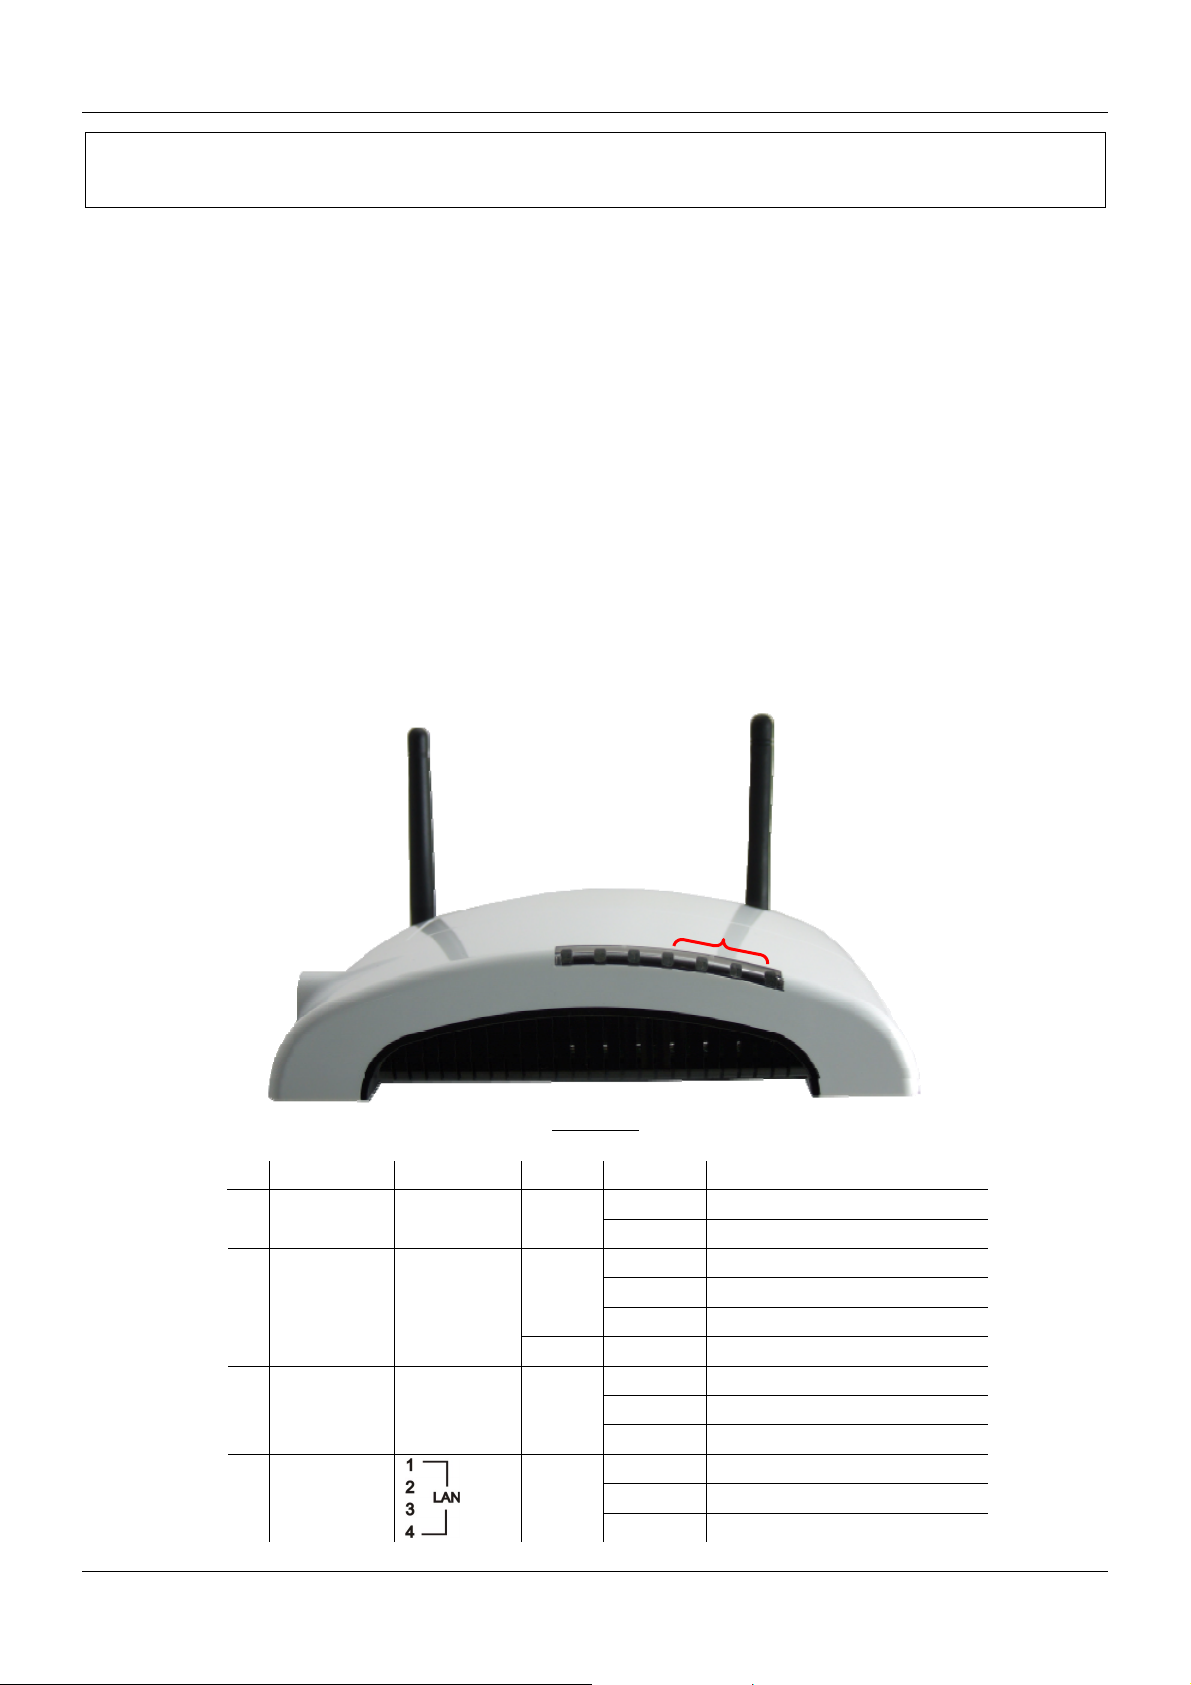
2.1 Overview of the Device
2.1.1 Front View
PWH2004 Wireless HSPA Router is a draft 802.11n/b/g compliant Wireless Broadband
®
PWH2004 Wireless HSPA Router makes it ideal for media-centric applications like
®
PWH2004 Wireless HSPA Router, government
®
PWH2004 Wireless HSPA Router on a bus,
n o p q
Front View
LED Label Color Behavior Indication
POWER Power Green
n
WLAN/WPS WLAN/WPS
o
WAN WAN Green
p
LAN1 ~ LAN4
q
Green
Orange Blinking WPS is enabled to make connection
Green
ON Power On
OFF Power Off
On WLAN link or WPS Active
Off WLAN Off
Blinking WLAN traffic transmitting
On WAN link or active
Off WAN Off
Blinking WAN traffic transmitting
On LAN link or active
Off LAN Off
Blinking LAN traffic transmitting
Revision 1.0 (Aug’09) 3
Page 6
PROLiNK® PWH2004 User Manual www.prolink2u.com
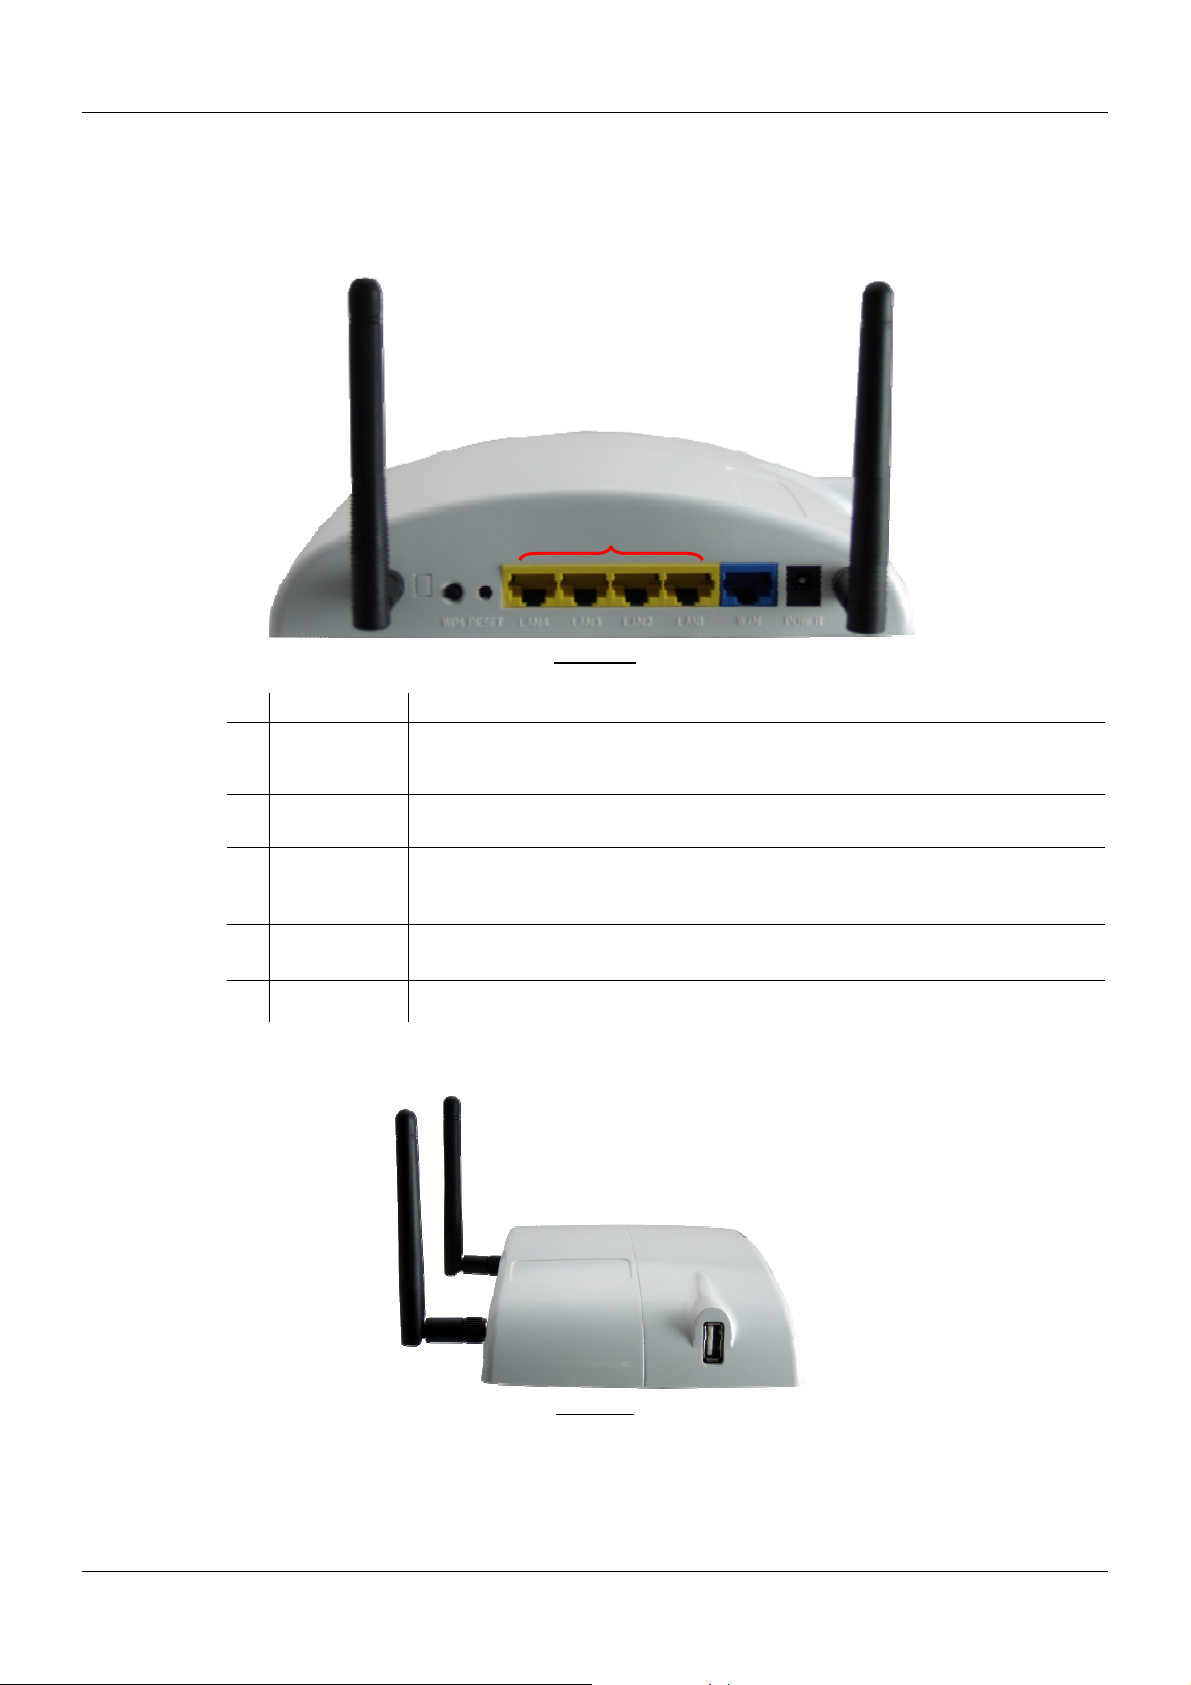
2.1.2 Rear View
n o p q r
Rear View
Port / Button Indication
To enable the WPS function via web configuration (Wireless f WPS), then press the WPS
button once on the Wireless Router; the WPS LED will start to flash. To make a connection with
other WPS supported device within 3 minutes.
Keep on pressing the Reset button more than 3 seconds, the Wireless Router will set all setting
back to factory default values.
n
o
WPS
RESET
LAN 1~4
p
WAN
q
POWER
r
2.1.3 Side View
USB 2.0 Port Insert the USB 3.5G card that provided by your ISP (Internet Service Provider) here.
n
Use standard LAN cables (RJ45 connectors) to connect your PCs to the port. If required, any
port can be connected to another hub. Any LAN port will automatically function as an "Uplink"
port when necessary.
Connect the ADSL or Cable Modem here with RJ45 cable. If your modem came with a cable,
use the supplied cable, otherwise, use a standard LAN cable.
n
Side View
Revision 1.0 (Aug’09) 4
Page 7

PROLiNK® PWH2004 User Manual www.prolink2u.com
2.2 Features of the Device
• Support the IEEE 802.11n/b/g standard, high speed date rate up to 300Mbps.
• Support USB 2.0 storage function device
• Support WPS (Wi-Fi Protected Setup) with reset button.
• High security with build-in Security: WEP 64/128, WPAPSK,WPA2PSK, WPA, WPA2, 802.1x
and 802.11i
• Support Router, WDS (Bridge + Repeater)
• Wireless Quality of Service (QoS) - 802.11e,WMM
• Easy configuration for home user setup.
Revision 1.0 (Aug’09) 5
Page 8
PROLiNK® PWH2004 User Manual www.prolink2u.com
CHAPTER 3 – OPERATION MODES
Please go to the WirelessfWDS to set up the WDS function (Bridge or Repeater) of the Wireless Router.
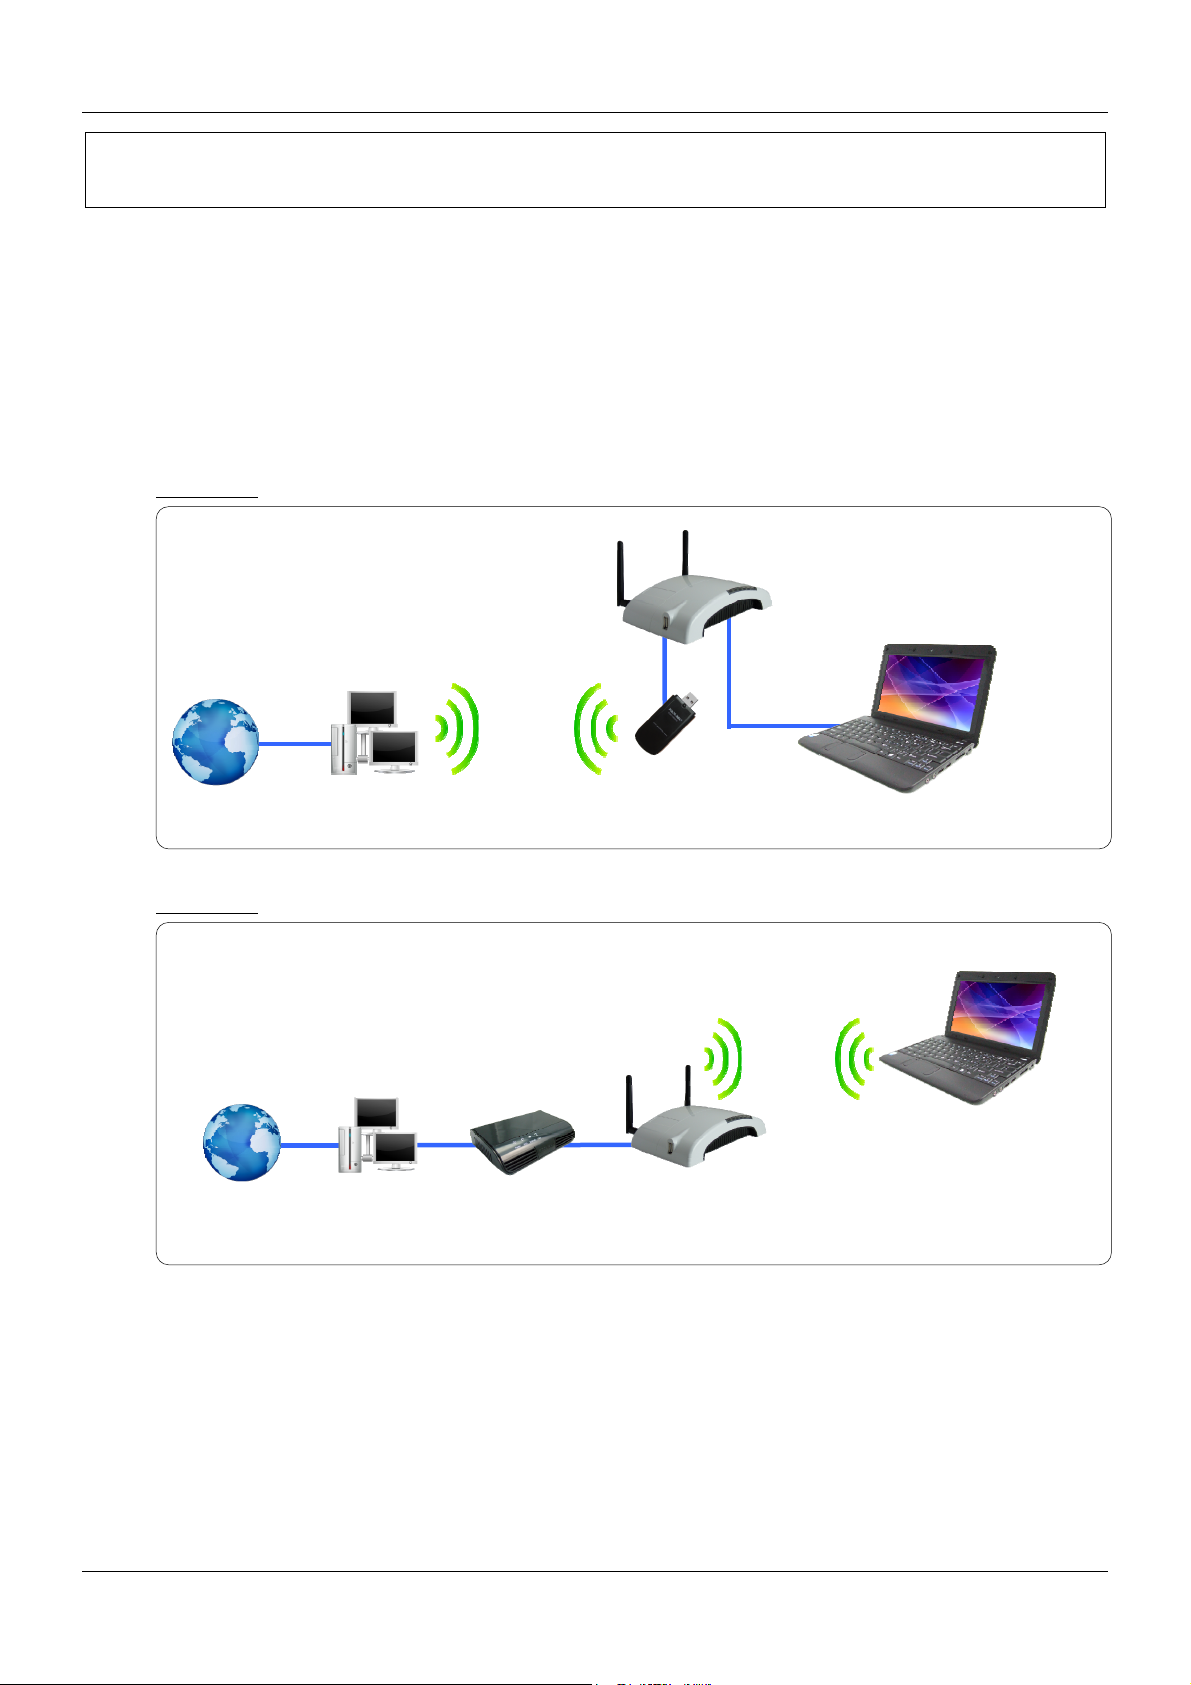
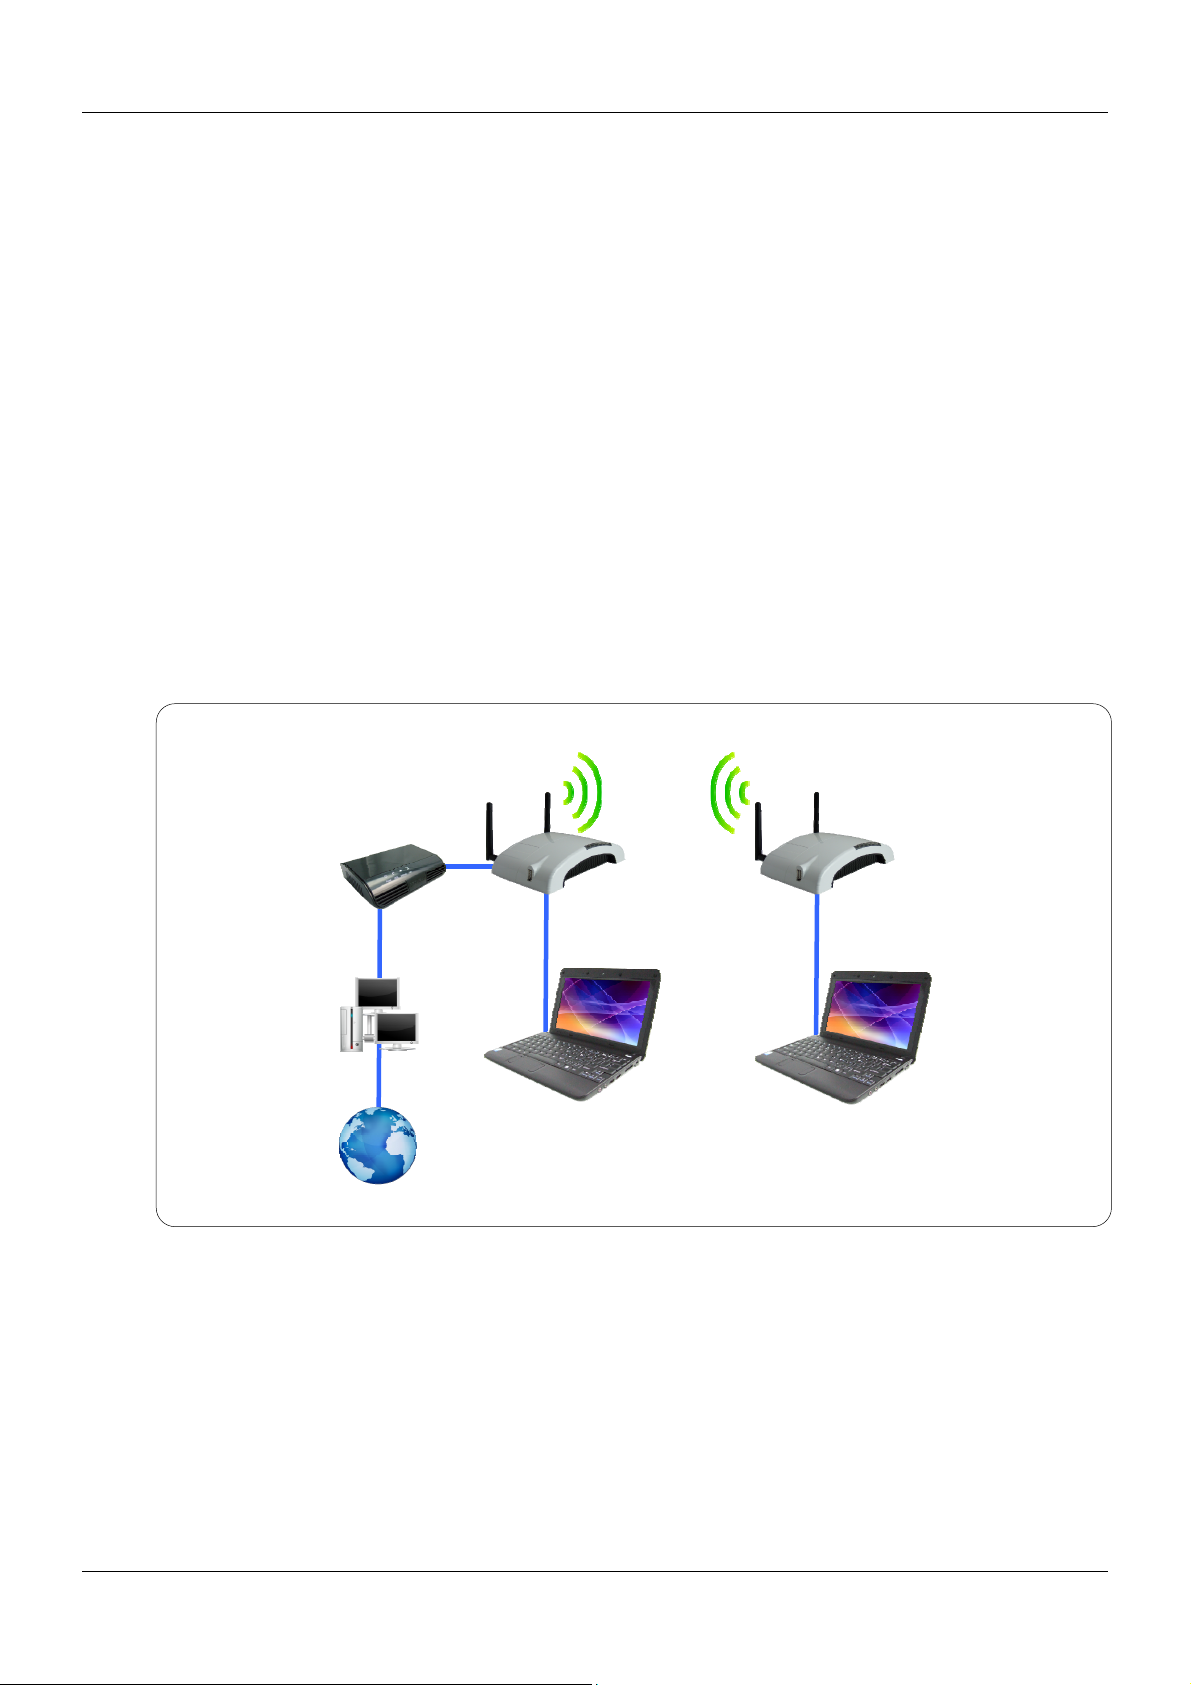
3.1 Gateway Mode
The wireless connection will be set up from a point-to-point local LAN into a point-to-multipoint
WAN. This device connects all the stations (PC/notebook with wireless function) to a wireless
network. All stations can have the Internet access if only the device has the Internet connection.
Scenario 1
PROLiNK
PWH2004
3G Router
WWW ISP
Scenario 2
WWW ISP
PROLiNK
PWH2004
3G Router
PROLiNK PHS100
3G Modem
PROLiNK
H5201C
ADSL Modem
PROLiNK TA009
Netbook
PROLiNK TA009
Netbook
Revision 1.0 (Aug’09) 6
Page 9
PROLiNK® PWH2004 User Manual www.prolink2u.com
3.2 Bridge Mode (WDS)
The WDS (Wireless Distributed System) function lets this access point act as a wireless LAN
access point and repeater at the same time. Users can use this feature to build up a large
wireless network in a large space like airports, hotels and schools and so on. This feature is also
useful when users want to bridge networks between buildings where it is impossible to deploy
network cable connections between these buildings.
In this mode, all Ethernet ports and wireless interface are bridge together and NAT function is
disabled. All the WAN related function and firewall are not supported.
Wireless Distribution System uses wireless media to communicate with other APs, like the
Ethernet does. To do this, you must set these APs in the same channel and wireless MAC address
to each other APs that you want to communicate with.
PROLiNK
PWH2004
3G Router
ISP
PROLiNK TA009
WWW
Netbook
PROLiNK
H5201C
ADSL Modem
PROLiNK TA009
Netbook
Revision 1.0 (Aug’09) 7
Page 10
PROLiNK® PWH2004 User Manual www.prolink2u.com
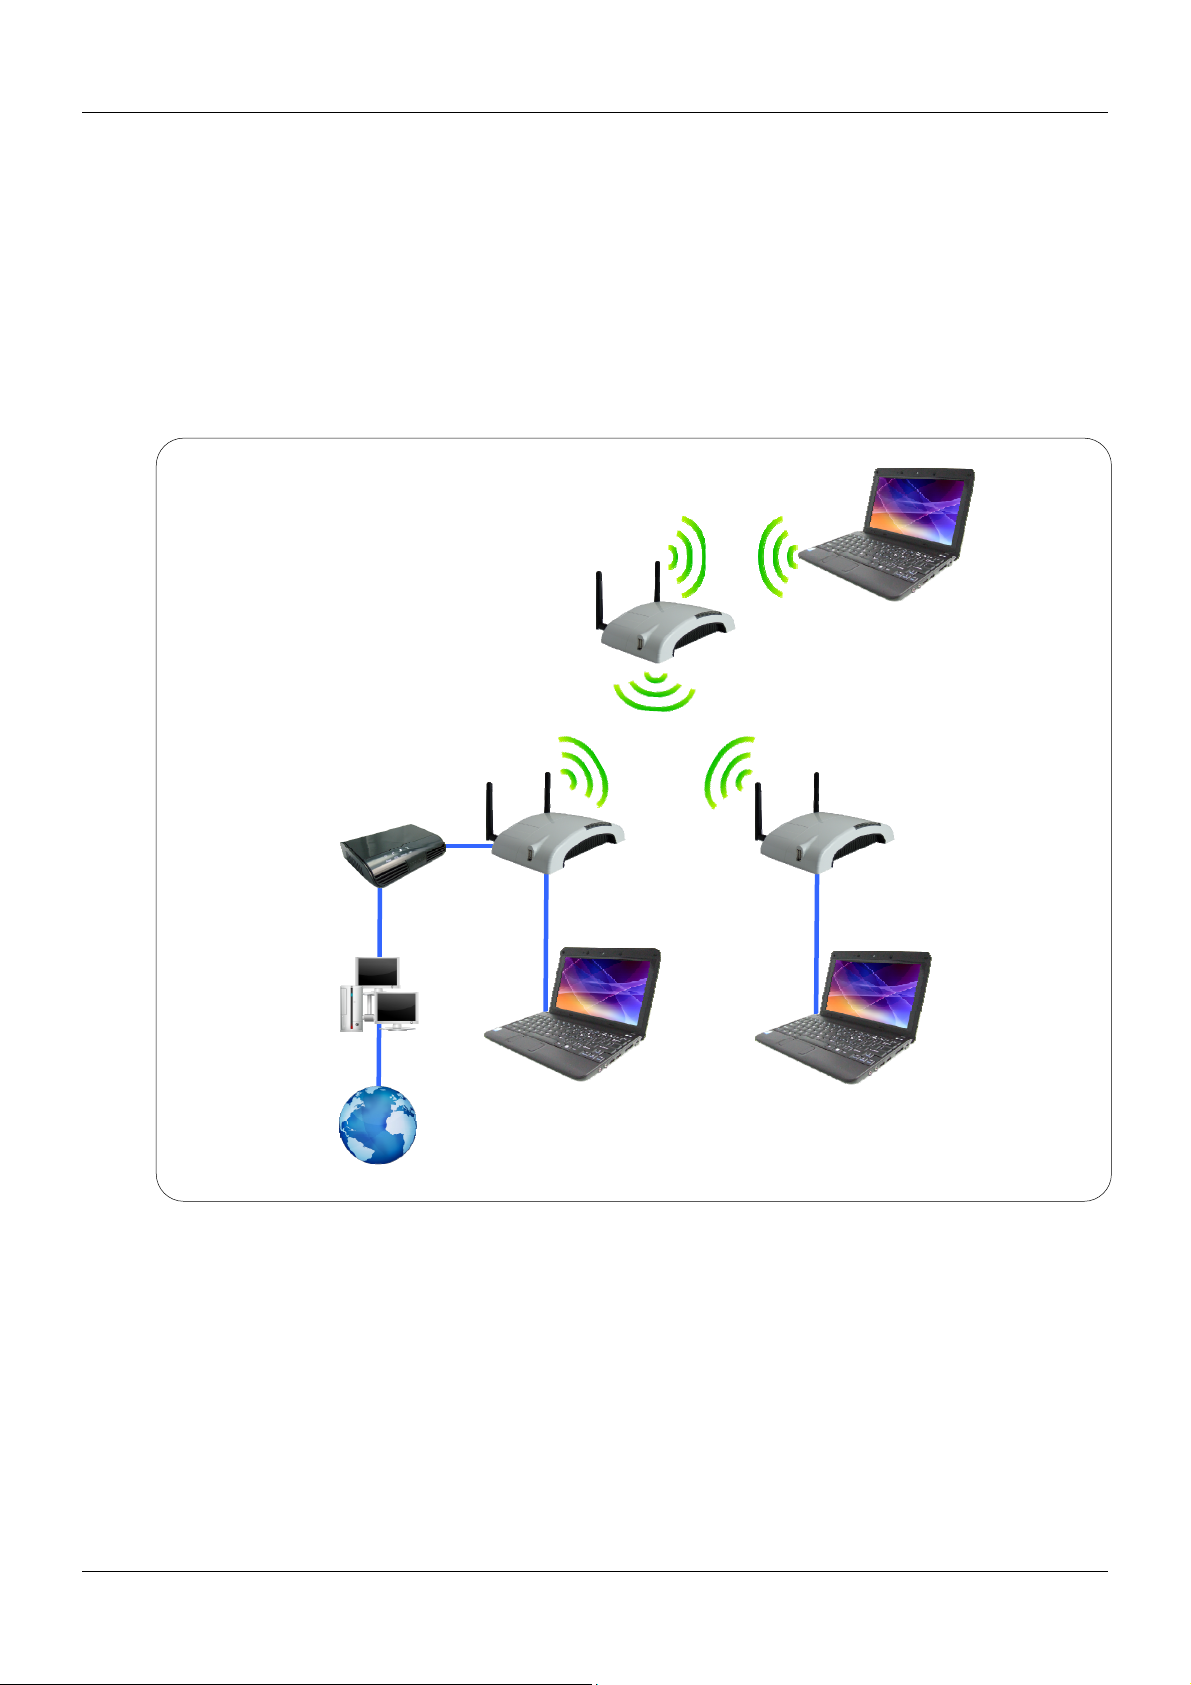
3.3 Repeater Mode (WDS+AP)
If set to Repeater mode, a device connects to each other through an access point or a base
station (gateway or router.) This device can also work like a wireless station when it’s connected
to a computer directly, so that the computer can send packets from wired end to wireless
interface.
PROLiNK
PWH2004
3G Router
ISP
WWW
PROLiNK
H5201C
ADSL Modem
PROLiNK TA009
Netbook
PROLiNK TA009
Netbook
PROLiNK
H5201C
ADSL Modem
PROLiNK TA009
Netbook
Revision 1.0 (Aug’09) 8
Page 11

PROLiNK® PWH2004 User Manual www.prolink2u.com
CHAPTER 4 – CONFIGURATION
4.1 Hardware Connection
4.1.1 Connect one end of the Ethernet cable to the LAN port of the PWH2004 Wireless HSPA Router,
another end to your PC or Notebook
4.1.2 There are two connection methods to connect to Internet (Only one can be selected):
X Connection via HSPA (3G) Modem
X Connection via ADSL Modem
4.1.3
Finally, connect the PWH2001 Wireless HSPA Router with a power to an outlet.
Revision 1.0 (Aug’09) 9
Page 12
PROLiNK® PWH2004 User Manual www.prolink2u.com
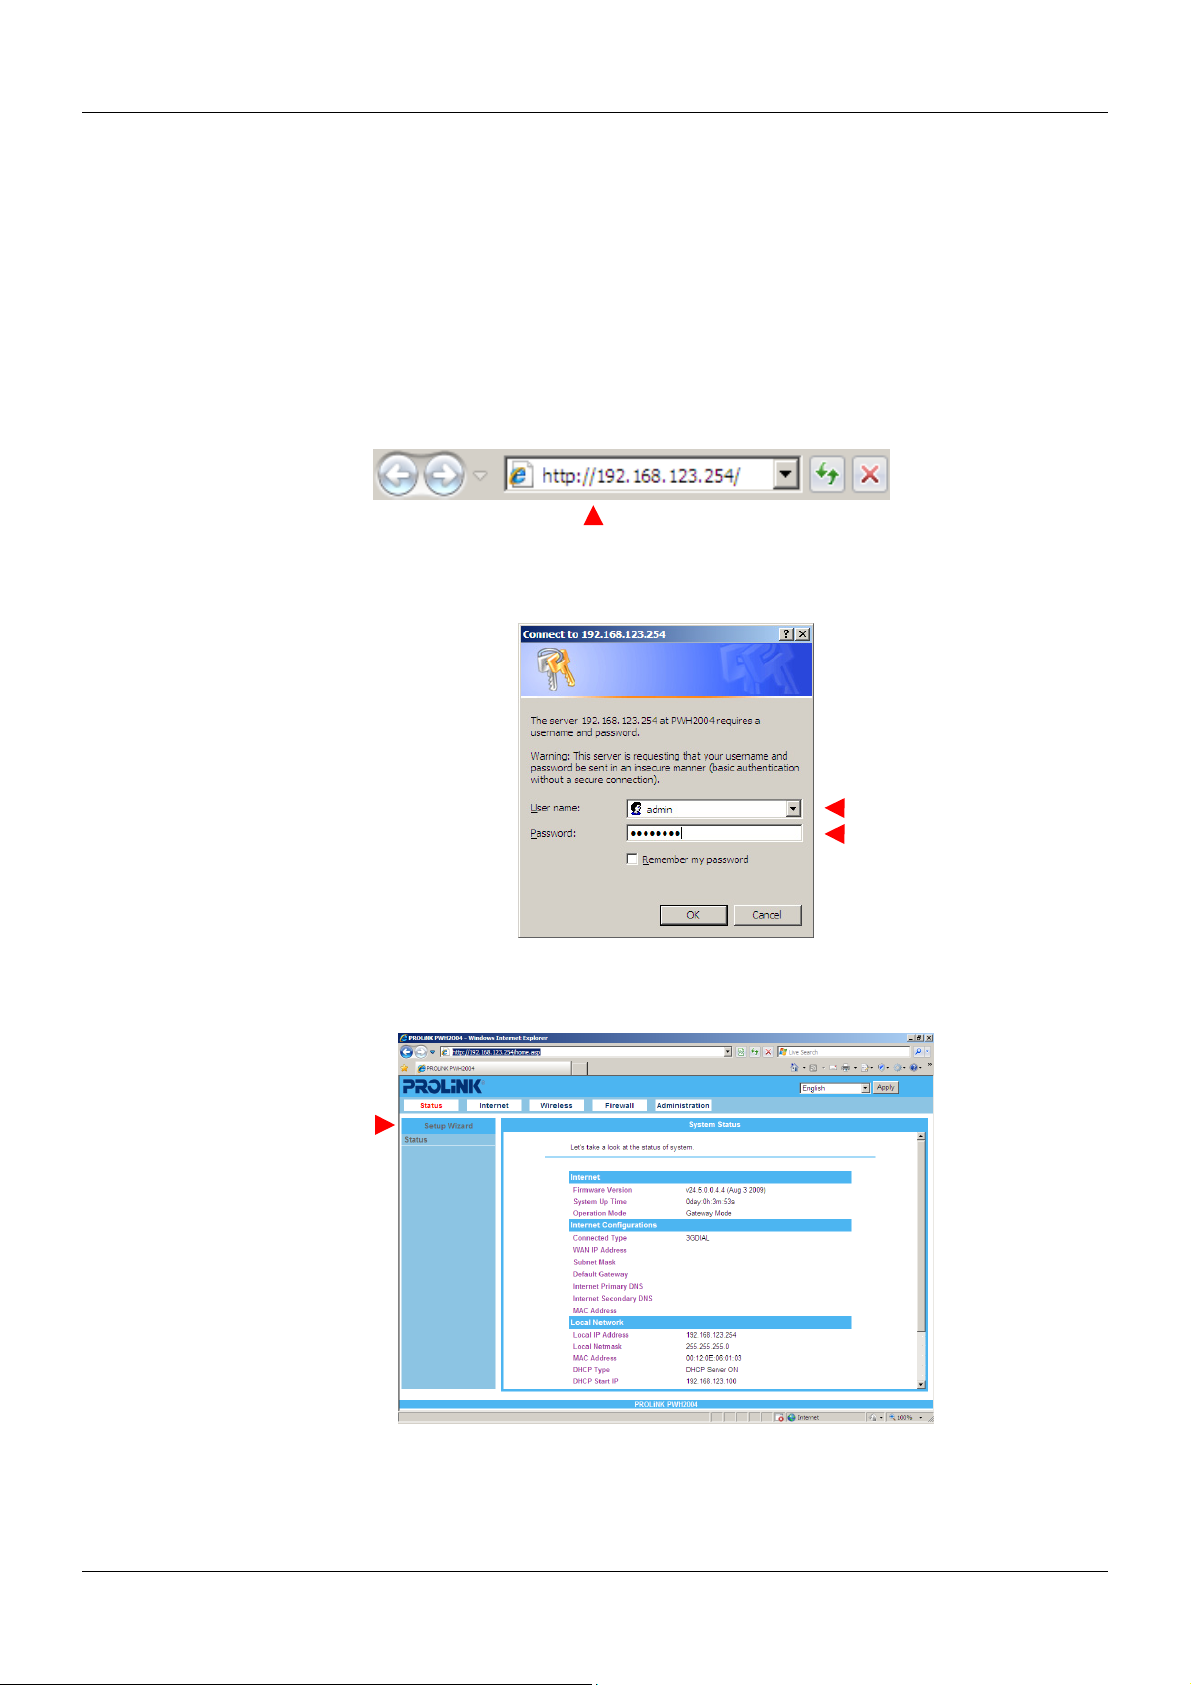
4.2 Login to Router
4.2.1. Start your computer and make sure the connection by an Ethernet cable between your
computer and the PWH2004 Wireless HSPA Router.
4.2.2.
4.2.3. After connected successfully, the login screen will be prompted on screen. Default username is
Start a web browser, type IP address “192.168.123.254” into address box
admin
‘
’ and password is ‘
password’
.
4.2.4. Click the Setup Wizard item that provides a primary configuration of the PWH2004 Wireless HSPA
Router.
NOTE:
If you have difficult in connecting the PWH2004 Wireless HSPA Router, refer to Appendix A for
troubleshoots.
Revision 1.0 (Aug’09) 10
Page 13

PROLiNK® PWH2004 User Manual www.prolink2u.com
4.3 Common types of connections
4.3.1. Cable Modems
Type Details ISP Data required
Usually, none. However, some ISP's
may require you to use a particular
Hostname, Domain name, or MAC
(physical) address.
Dynamic IP
Address
Your IP Address is allocated
automatically, when you connect to
you ISP.
IP Address allocated to you. Some
Static (Fixed) IP
Address
Your ISP allocates a permanent IP
Address to you.
ISP's may also require you to use a
particular Hostname, Domain name,
or MAC (physical) address.
4.3.2. DSL Modems
Type Details ISP Data required
Dynamic IP
Address
Static (Fixed) IP
Address
PPPoE
4.3.3. HSPA Modems
Type Details ISP Data required
Your IP Address is allocated
automatically, when you connect to
you ISP.
Your ISP allocates a permanent IP
Address to you.
You connect to the ISP only when
required. The IP address is usually
allocated automatically.
None.
IP Address allocated to you.
User name and password.
Your IP Address is allocated
Dynamic IP Address
Revision 1.0 (Aug’09) 11
automatically, when you connected to
your HSPA ISP.
The ISP may require you to use a
particular Hostname, Domain name, or
MAC (Physical) address
Page 14
PROLiNK® PWH2004 User Manual www.prolink2u.com
4.4 Wizard (Gateway Mode)
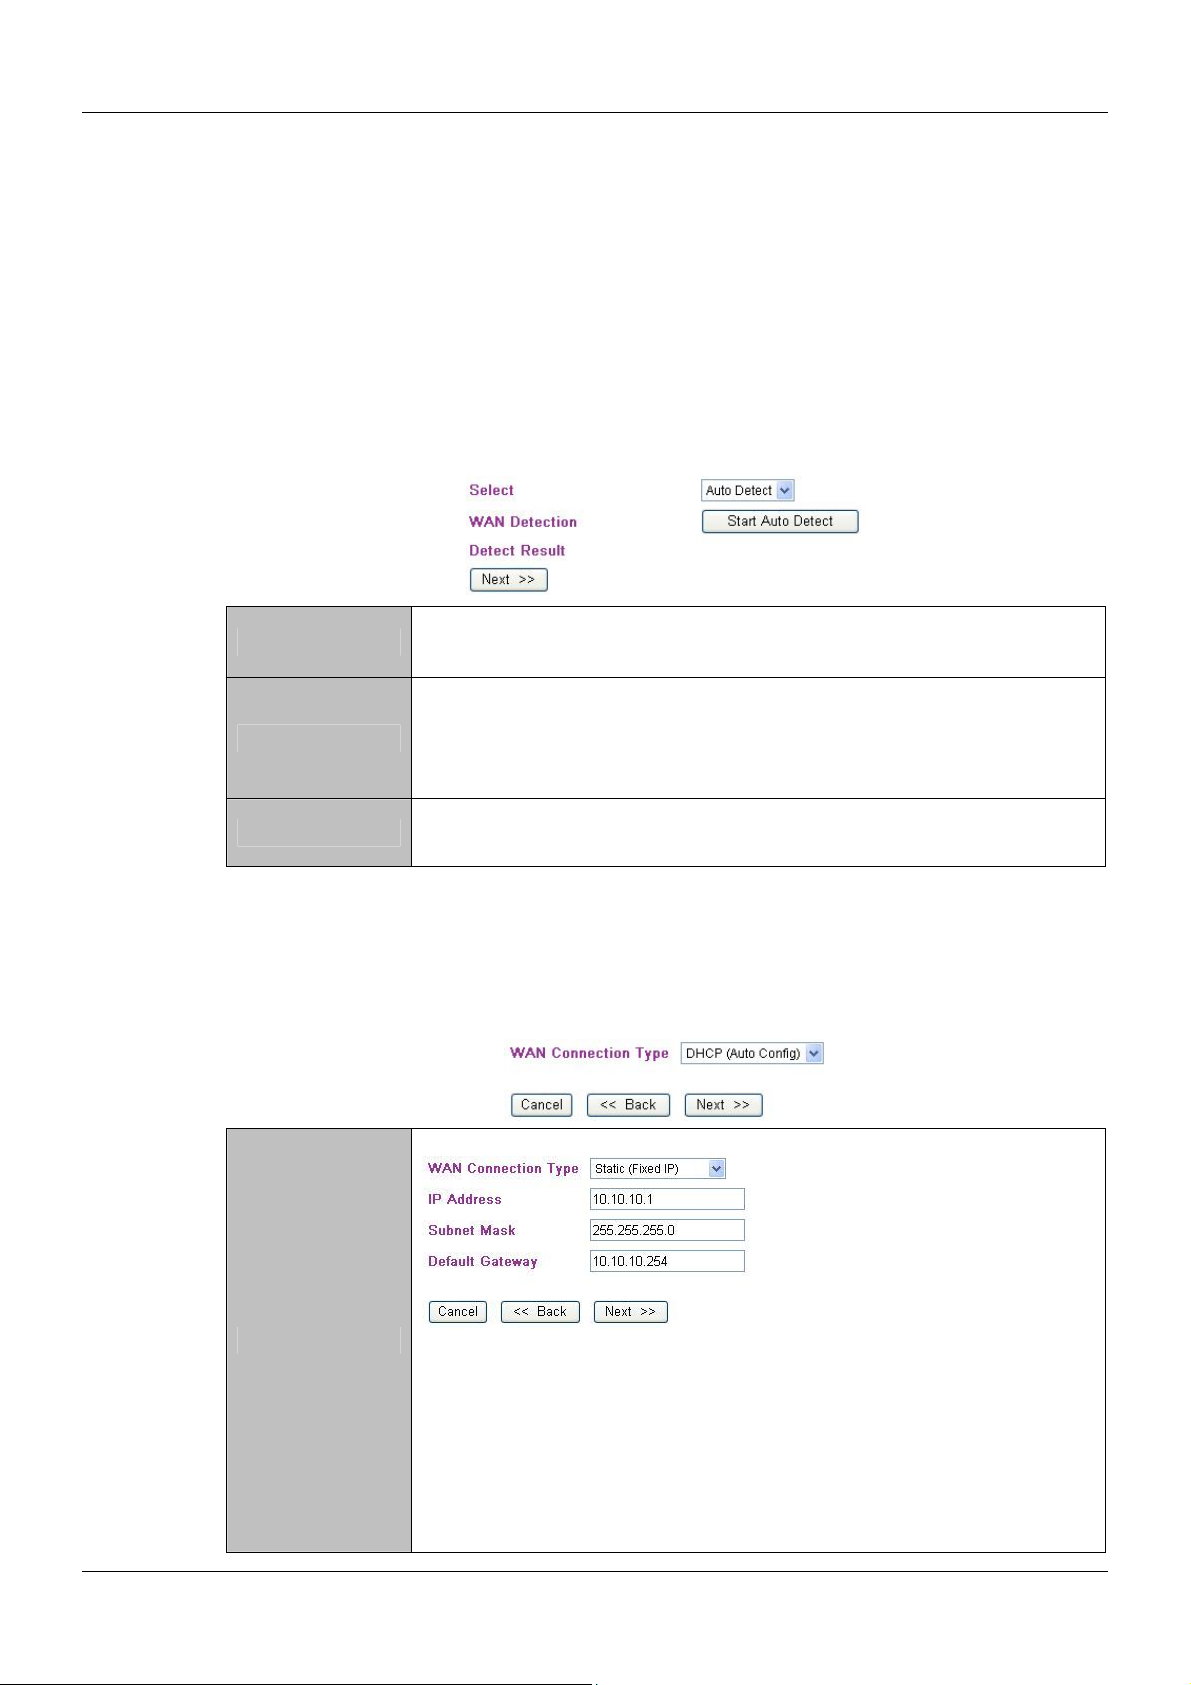
4.4.1. WAN Connect Detection
This page is used to detect the WAN connection of network. User can select Auto Detect form the pull-down
menu and click Start Auto Detect button, the system will detect whether there is WAN connection or not. If
user wants to set up the WAN detection manually, please select Manual form the pull-down menu, then click
Next to continue.
Select
WAN Detection
Detect Result
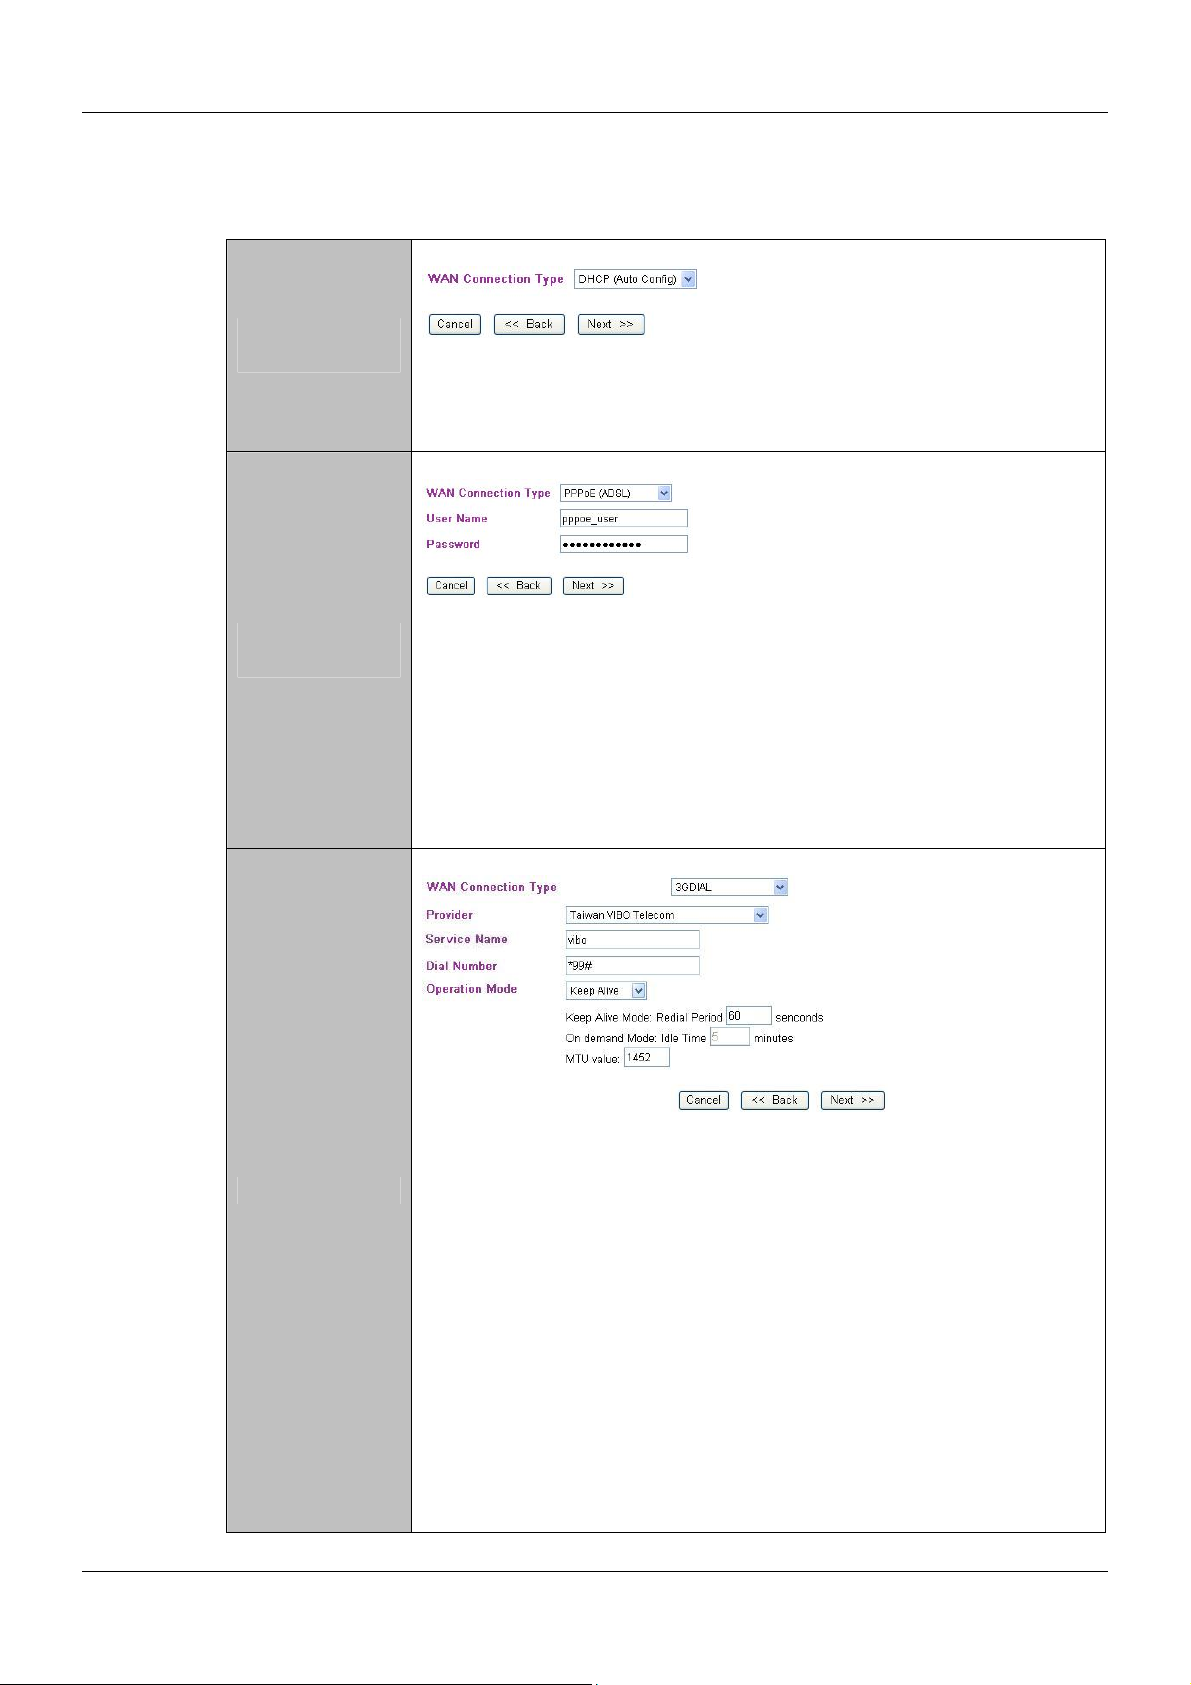
4.4.2. WAN Access Types
Here user can set up the WAN connection type easily. Select the WAN Connection Type Static (Fixed IP),
DHCP (Auto Config), PPPoE (ADSL), or 3G (DIAL) and click Next to continue.
To use the WAN detect function, user can select Manual or Auto Detect form the
pull-down menu.
Select Auto Detect form the pull-down menu and click Start Auto Detect button, the
detecting screen will be pop-up to detect whether there is WAN connection or not.
If user wants to set up the WAN detection manually, please select Manual form the
pull-down menu, then click Next to continue.
Here shows the WAN detection result. If there is no WAN connection, the system
will show NONE or Unplugged Cable.
Static (Fixed IP)
Revision 1.0 (Aug’09) 12
If the Static IP be selected, user has to set up the IP address, subnet mask and
default gateway according to the ISP that provided the related information.
IP Address: Enter the WAN IP address provided by your ISP here.
Subnet Mask: Enter the subnet mask here.
Default Gateway: Enter the default gateway IP address provided by your ISP here.
Page 15
PROLiNK® PWH2004 User Manual www.prolink2u.com
DHCP
(Auto Config)
PPPoE (ADSL)
If the DHCP (Auto Config) be selected, the PC will obtain the IP address
automatically.
If the PPPoE (ADSL) be selected, user has to set up the user name and password
according to the ISP that provided the related information.
User Name: Enter the username that provide by your ISP provider. Maximum
input is 32 alphanumeric characters (case sensitive).
Password: Enter the password that provide by your ISP provider. Maximum
input is 32 alphanumeric characters (case-sensitive).
User have to insert USB card therefore, the 3G (DIAL) function can be used.
3G Dial
Provider: Select the ISP (Telecommunications) that provide the USB card
from the pull-down list.
Service Name: Enter the service name that the ISP provided.
Dial Number: Enter the dial number that the ISP provided.
Operation Mode: Select Keep Alive, On Demand or Manual form the pull-down list.
• Keep Alive Mode: Enter the Redial Period seconds in the box.
• On demand Mode: Enter the Idle Time minutes in the box.
• MTU Value: MTU (Maximum Transmission Unit, namely the maximum
Revision 1.0 (Aug’09) 13
packet size, the default value is 1452) for your application. Reducing
the packet size can help connecting to certain web sites or speeding
up packet transfer rate. If the incorrect selection is entered, you may
not be able to open certain web sites.
Page 16

PROLiNK® PWH2004 User Manual www.prolink2u.com
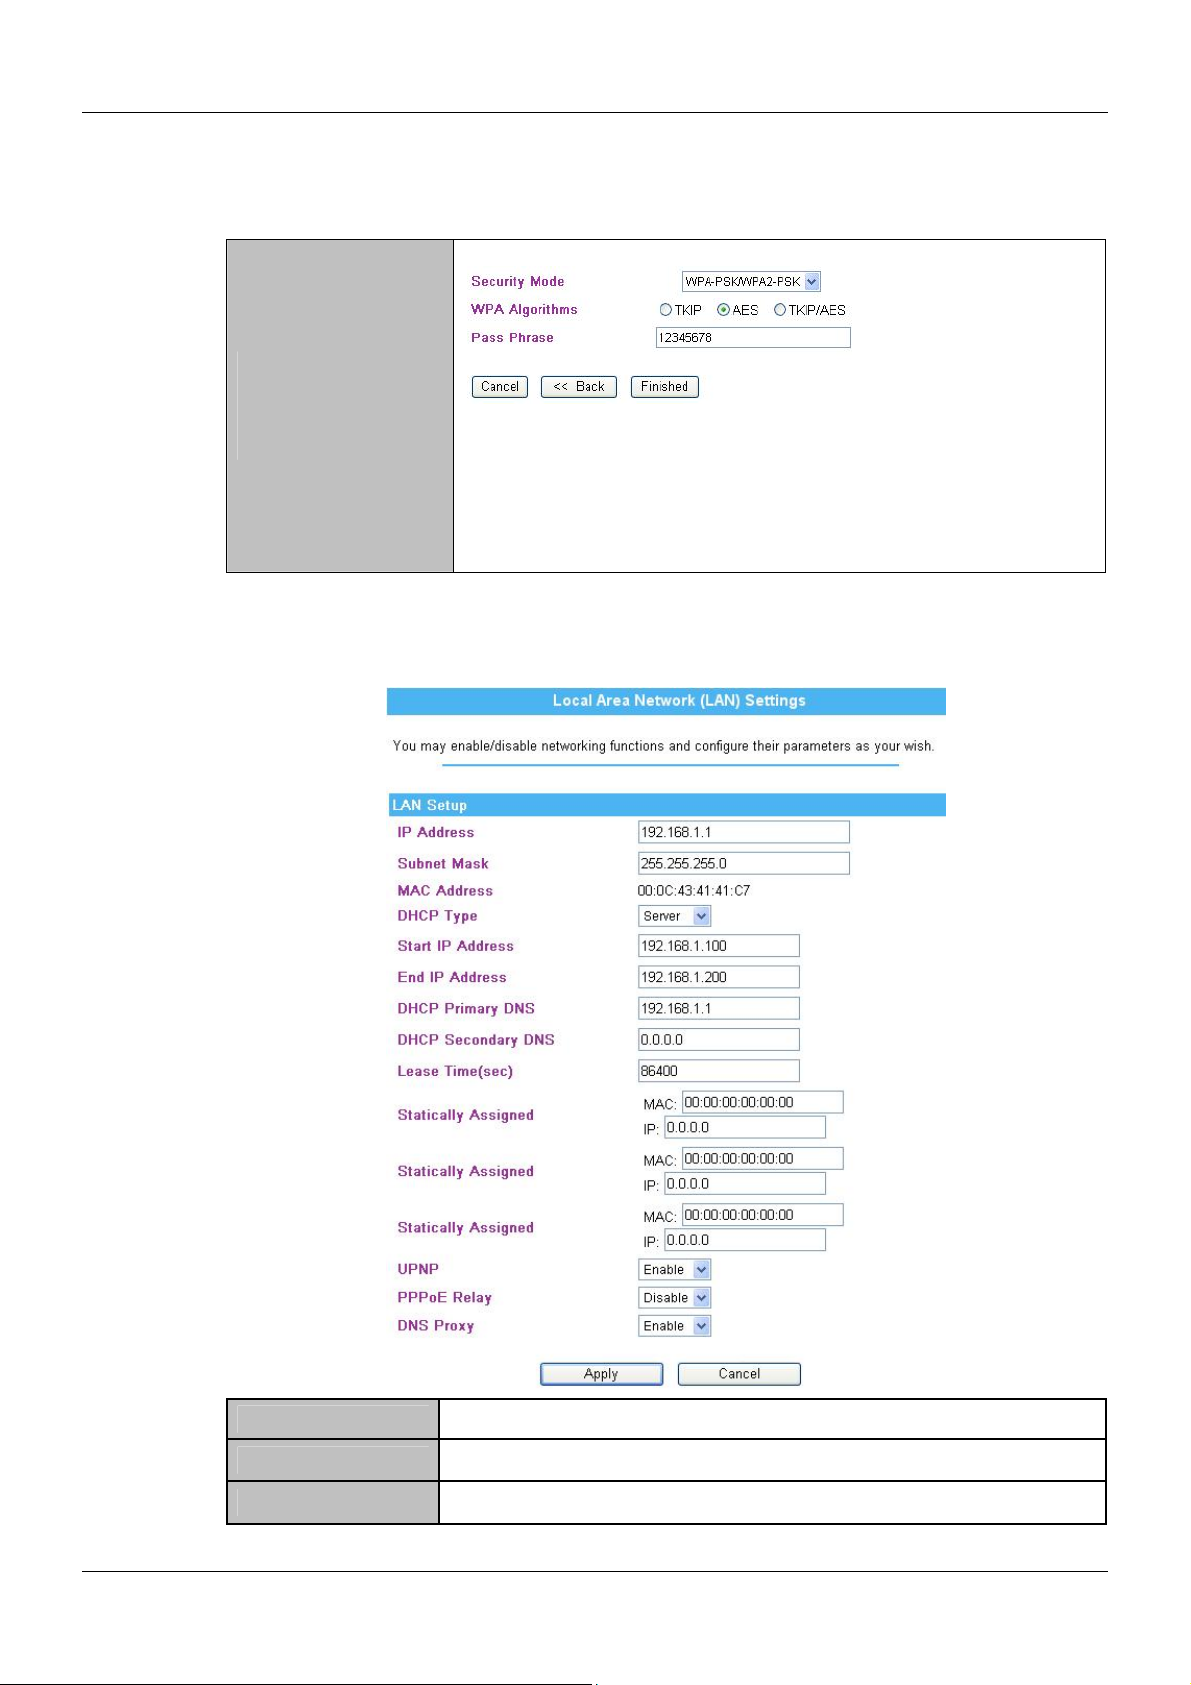
4.4.3. LAN
This step can set up local area network of the Wireless Router, such as IP address, subnet mask, DHCP type,
DHCP IP addresses range, and DHCP subnet mask and DHCP lease time.
IP Address Shows the IP address of the Wireless Router (Default IP address is 192.168.1.1).
Subnet Mask The subnet mask of the Wireless Router (Default subnet mask is 255.255.255.0).
Disable: Select to disable this Wireless Router to distribute IP addresses to
connected clients.
DHCP Type
Start IP Address
End IP Address
Server: Select to enable this Wireless Router to distribute IP Addresses (DHCP
Server) to connected clients. And the following field will be activated for
you to enter the starting IP Address.
The starting addresses of this local IP network address pool. The pool is a piece of
continuous IP address segment. Keep the default value 192.168.1.100 should work
for most cases.
The end IP address, the maximum is 254. If “Start IP Address” is set at
192.168.1.100 and the “End IP address” is 192.168.1.200, the device will distribute
IP addresses from 192.168.1.100 to 192.168.1.200 to all the computers in the
network that request IP addresses from DHCP server (Router).
Subnet Mask
Primary &
Secondary
DNS Server
Default Gateway Enter the default gateway IP address provided by your ISP in this column.
Lease Time The lease time of the distribute IP Addresses. Default settings are 86400 seconds.
Revision 1.0 (Aug’09) 14
The subnet mask of the distribute IP addresses clients, the subnet mask must be
set at the same segment as the Wireless Router.
The DNS should be set to the address provided by your ISP.
Page 17
PROLiNK® PWH2004 User Manual www.prolink2u.com
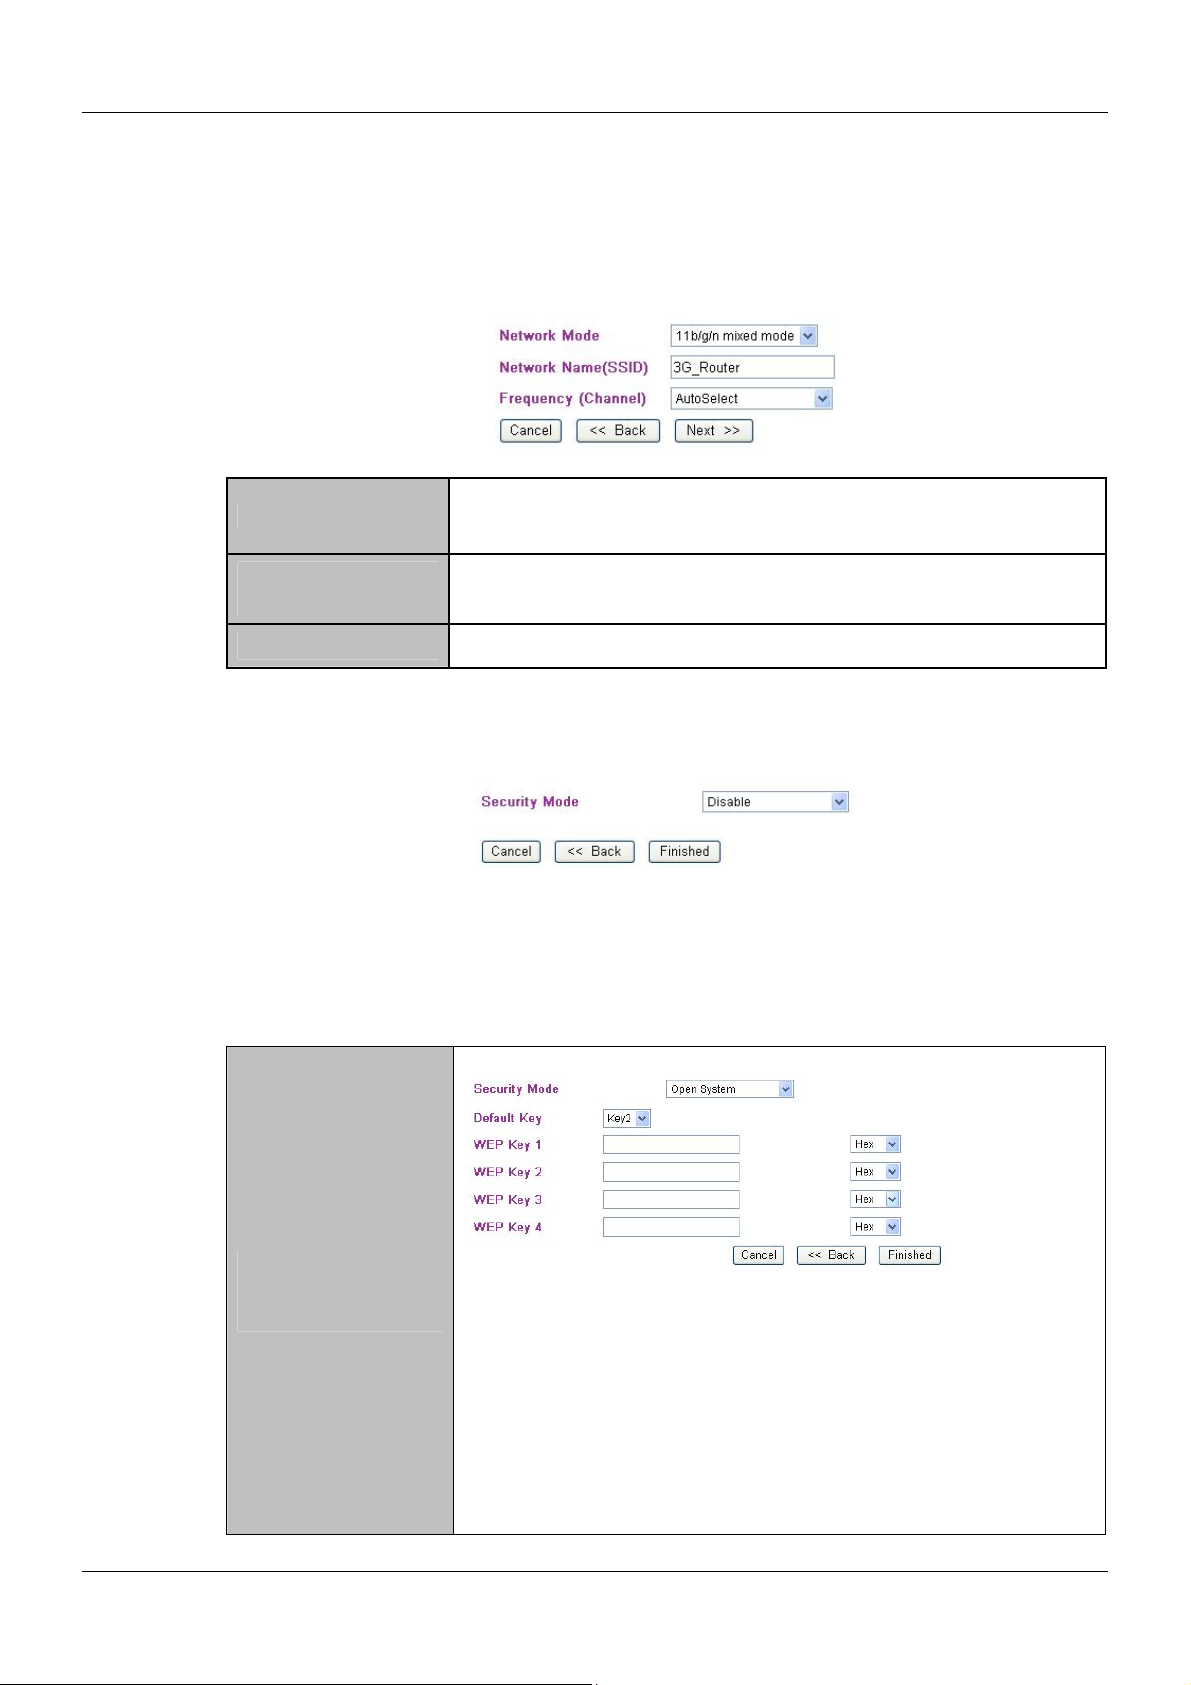
4.4.4. Network Mode
This step can set up wireless network mode, network name and channel.
Network Mode
Network Name
(SSID)
Frequency (Channel) Select 1~11 or Auto Select from the pull-down menu.
4.4.5. Security
Here can set up the wireless security of the Wireless Router.
Select desired security type from the pull-down menu Disable, Open System, Shared Key, AUTO
(Open/Shared), WPA-PSK, WPA2-PSK, and WPA-PSK/WPA2-PSK. The default setting is Disable. It is strongly
recommended to set up security mode (Open, Shared, AUTO (Open/Shared), WPA-PSK, WPA2-PSK, WPAPSK/WPA2-PSK) to prevent any unauthorized accessing.
Select 11b/g mixed mode, 11b only, 11g only, or 11b/g/n mixed mode from the
pull-down menu (Default is 11b/g/n mixed mode).
A SSID is referred to a network name because essentially it is a name (casesensitive) that identifies a wireless network.
Open System
Shared Key
AUTO (Open/Shared)
Revision 1.0 (Aug’09) 15
Default Key: Select the default key Key1~4.
WEP Key 1~4: Enter the key in the selected key field. Only valid when
using WEP encryption algorithm. The key must match with
the AP’s key. There are several formats to enter the keys.
• Hexadecimal (WEP 64 bits): 10 Hex characters (0~9, a~f).
• Hexadecimal (WEP 128 bits): 26 Hex characters (0~9, a~f).
• ASCII (WEP 64 bits): 5 ASCII characters (case-sensitive).
• ASCII (WEP 128 bits): 13 ASCII characters (case-sensitive).
Page 18
PROLiNK® PWH2004 User Manual www.prolink2u.com
WPA-PSK
WPA2-PSK
WPA-PSK
WPA2-PSK
4.5 Internet
4.5.1. LAN Interface Setup
WPA Algorithms: Select the type of algorithm, TKIP or AES for WP-PSK; and
TKIP, AES or TKIP/AES for WPA2-PSK, WPA-PSK/WPA2- PSK.
Pass Phrase: Enter the pass phrase 8~63 ASCII or 64 hexadecimal
characters in the column.
IP Address Shows the IP address of the Wireless Router (Default IP address is 192.168.1.1).
Subnet Mask The subnet mask of the Wireless Router (Default subnet mask is 255.255.255.0).
MAC Address Shows the MAC address of this Wireless Router.
Revision 1.0 (Aug’09) 16
Page 19

PROLiNK® PWH2004 User Manual www.prolink2u.com
Disable: Select to disable this Wireless Router to distribute IP addresses to
DHCP Type
Start IP Address
End IP address
connected clients. Server: Select to enable this Wireless Router to distribute IP
Addresses (DHCP Server) to connected clients. And the following field will be
activated for you to enter the starting IP Address.
The starting addresses of this local IP network address pool. The pool is a piece
of continuous IP address segment. Keep the default value 192.168.1.100 should
work for most cases.
The end IP address, the maximum is 254. If “Start IP Address” is set at
192.168.1.100 and the “End IP address” is 192.168.1.200, the device will
distribute IP addresses from 192.168.1.100 to 192.168.1.200 to all the
computers in the network that request IP addresses from DHCP server (Router).
Subnet Mask
DHCP Primary
DNS Server
DHCP Secondary
DNS Server
Default Gateway Shows the default gateway IP address.
Lease Time
Statically Assigned
UPNP
The subnet mask of the distribute IP addresses clients, the subnet mask must be
set at the same segment as the Wireless Router.
You can specify your own preferred DNS server IP address(es).
Secondary DNS Server is optional. You can enter another DNS server’s IP
address as a backup.
The lease time of the distribute IP Addresses. Default settings are 86400
seconds.
MAC: Enter the MAC address of a certain station, and then the DHCP Server will
to distribute a fixed IP address to the station automatically once be connected.
IP: Enter the fixed IP address that DHCP Server assigned to a certain connected
station. User can set up 3 set of fixed IP addresses that distribute form the
Wireless Router when the DHCP Type function be selected to Server.
Universal Plug and Play (UPnP) is a set of computer protocols promulgated by
the UPnP Forum. The goals of UPnP are to allow devices to connect seamlessly
and to simplify the implementation of networks in the home (data sharing,
communications, and entertainment) and in corporate environments for
simplified installation of computer components. UPnP achieves this by defining
and publishing UPnP device control protocols built upon open, Internet-based
communication standards. The term UPnP is derived from plug-and-play, a
technology for dynamically attaching devices directly to a computer. Select
Disable or Enable from the pull-down menu.
PPPoE Relay Select Disable or Enable from the pull-down menu.
DNS Proxy Select Disable or Enable from the pull-down menu.
Apply
Cancel Click Cancel to restore to default values.
After completing the settings on this page, click Apply button to save the
settings.
Revision 1.0 (Aug’09) 17
Page 20

PROLiNK® PWH2004 User Manual www.prolink2u.com
4.5.2. Internet Service Setup
Select the WAN Connection Type Static (Fixed IP), DHCP (Auto Config), PPPoE (ADSL), or 3G (DIAL). Default
setting is DHCP (Auto Config) enabled.
DHCP
(Auto Config)
Static (Fixed IP)
If the DHCP (Auto Config) be selected, the PC will obtain the IP address automatically.
Hostname (optional): Enter the hostname that assigned IP address to user’s
computer in this field. Maximum input is 32 alphanumeric
characters (case sensitive).
If the Static (fixed IP) be selected, user has to set up the IP address, subnet mask
and default gateway according to the ISP that provided the related information.
IP Address: Enter the WAN IP address provided by your ISP here.
Subnet Mask: Enter the subnet mask here.
Default Gateway: Enter the default gateway IP address provided by your ISP
here.
Primary DNS Server: Enter the DNS server IP address(es) that provided by your
ISP, or you can specify your own preferred DNS server IP
address(es).
Secondary DNS Server: Secondary DNS Server is optional. You can enter another
DNS server’s IP address as a backup.
Revision 1.0 (Aug’09) 18
Page 21

PROLiNK® PWH2004 User Manual www.prolink2u.com
If the PPPoE (ADSL) be selected, user has to set up the user name and password
according to the ISP that provided the related information.
PPPoE (ADSL)
User Name: Enter the username that provide by your ISP provider.
Maximum input is 32 alphanumeric characters (case
sensitive).
Password: Enter the password that provide by your ISP provider.
Maximum input is 32 alphanumeric characters (case-
sensitive).
Verify Password: Enter the password again to confirm.
MTU Value: MTU (Maximum Transmission Unit, namely the maximum
packet size, the default value is 1452) for your application.
Reducing the packet size can help connecting to certain
web sites or speeding up packet transfer rate. If the
incorrect selection is entered, you may not be able to open
certain web sites.
Auth Mode: Select the authentication mode form the pull-down list.
Revision 1.0 (Aug’09) 19
Page 22

PROLiNK® PWH2004 User Manual www.prolink2u.com
User have to insert USB card therefore, the 3G(DIAL) function can be used.
3G (DIAL)
Provider: Select the ISP that provides the USB card from the pull-
down list.
Service Name: Enter the service name that ISP provided.
Dial Number: Enter the dial number that ISP provided.
Pin code: Enter the SIM card Pin code that ISP provided.
Authentication: Check the box to enable to authentication function.
• User Name: Enter the user name that provide by your ISP.
• Password: Enter the password that provide by your ISP.
• Auth Mode: Select the authentication mode form the pull-
down list.
Operation Mode: Select Keep Alive, On Demand or Manual form the pull-
down list.
• Keep Alive Mode: Enter the Redial Period seconds in the box.
• On demand Mode: Enter the Idle Time minutes in the box.
• MTU Value: MTU (Maximum Transmission Unit, namely the
maximum packet size, the default value is 1452) for your
application. Reducing the packet size can help connecting to
certain web sites or speeding up packet transfer rate. If the
incorrect selection is entered, you may not be able to open
certain web sites.
Revision 1.0 (Aug’09) 20
Page 23

PROLiNK® PWH2004 User Manual www.prolink2u.com
Your ISP may require a particular MAC address in order for you to connect to the
Internet. This MAC address is the PC’s MAC address that your ISP had originally
connected your Internet connection to. Type in or click Fill my MAC to replace the
WAN MAC address with the MAC address of that PC.
MAC Clone
Apply After completing the settings on this page, click Apply button to save the settings.
Default setting is Disable. User can select Enable form the pull-down list, and click Fill
my MAC button to fill in your PC’s MAC address in the blank field.
Cancel Click Cancel to restore to default values.
4.5.3. DHCP Clients
Here shows the IP assigned clients that computer in the network requests IP addresses from DHCP server
(Wireless Router).
Revision 1.0 (Aug’09) 21
Page 24

PROLiNK® PWH2004 User Manual www.prolink2u.com
4.5.4. Advance Routing
If you connect several routers with this Wireless Router, you may need to set up a predefined routing rule to
have more effective network topology/traffic, this is called static route between those routers and the
Wireless Router.
To set static routers, enter the settings including route IP address, route mask route gateway the route
Interface from LAN or WAN.
The network address of the destination LAN segment. When a packet with
Destination
Range Select Host or Net from the pull-down menu.
Gateway Enter the Gateway IP address in the field.
Interface
Comment Enter note or remark here.
Dynamic Routing
Settings
Apply After completing the settings on this page, click Apply button to save the settings.
Reset Click to discard current setting.
Revision 1.0 (Aug’09) 22
destination IP address that matches to this field, it will route to the device set in
the Route Gateway field.
You can select to use LAN, WAN or Custom as the physical interface from where
the packets will be sent.
Select Disable or Enable form pull-dowm list to use the RIP function.
Page 25

PROLiNK® PWH2004 User Manual www.prolink2u.com
4.5.5. VPN Passthrough
VPN passthrough configurations including: L2TP, IPSec, and PPTP passthrough.
L2TP, Layer Two Tunneling Protocol (L2TP). Use the L2TP with VPN that user can
L2TP Passthrough
access the personal network via Internet.
Select Enabled or Disabled from the pull-down menu.
IPSec Passthrough
PPTP Passthrough
IPSec, Internet Protocol Security. Select Enabled or Disabled from the pull-down
menu.
PPTP, Point-to-Point Tunneling Protocol. Select Enabled or Disabled from the pulldown menu.
Revision 1.0 (Aug’09) 23
Page 26

PROLiNK® PWH2004 User Manual www.prolink2u.com
4.6 Wireless
4.6.1. Basic
Radio On/Off Click Radio ON/OFF button to turn on or off the radio function.
Network Mode
Network Name
(SSID)
Multiple SSID 1~3
Broadcast Network
Name(SSID)
AP Isolation Select Enable or Disable to enable this function.
MBSSID AP
Isolation
Revision 1.0 (Aug’09) 24
Select 11b/g mixed, 11b only, 11g only, or 11b/g/n mixed mode from the pulldown menu. (Default is 11b/g/n mixed mode.)
A SSID is referred to a network name because essentially it is a name that
identifies a wireless network (case-sensitive).
A multiple SSID is referred to a network name because essentially it is a name
that identifies a wireless network.
Enable: This wireless AP will broadcast its SSID to stations. Disable: This wireless
AP will not broadcast its SSID to stations. If stations want to connect to this
wireless AP, this AP’s SSID should be known in advance to make a connection.
Select Enable or Disable to enable this function.
Page 27

PROLiNK® PWH2004 User Manual www.prolink2u.com
BSSID Shows the MAC address of the Wireless Router.
Frequency
(Channel)
Select 1~11 or Auto Select from the pull-down menu.
HT Physical Mode
Channel Band
Width
Guard Interval Select Long or Auto. (Default setting is Auto.)
MCS Select form the pull-down menu 0~7 or Auto. (Default setting is Auto.)
Decline BA Request Select Disable or Enable. (Default setting is Disable.)
4.6.2. Security
Select 20 or 20/40. (Default setting is 20/40.)
Wireless Security/Encryption Settings
SSID Choice Select SSID to set up the security form the pull-down list.
Revision 1.0 (Aug’09) 25
Page 28

PROLiNK® PWH2004 User Manual www.prolink2u.com
There are eleven types of authentication modes including Disable, Open System, Shared Key, AUTO
(Open/Shared), WPA, WPA-PSK, WPA2, WPA2-PSK, WPA-PSK/ WPA2-PSK, WPA1/WPA2 and 802.1X. The
security default setting is Disable.
Note:
• WPA and WPA-PSK only support TKIP and AES as encryption method.
• Shared Key only supports WEP as encryption method.
• AUTO (Open/Shared) means AP can accept STA connect to it using OPEN-WEP or SHARED-WEP.
If your wireless router is using Open System or AUTO (Open/Shared) authentication,
then the wireless adapter will need to be set to the same authentication type.
AUTO
(Open/Shared)
Default Key: Select the default key.
WEP Key 1~4: Enter the key in the selected key field. Only valid when using WEP
encryption algorithm. The key must match with the AP’s key. There
are several formats to enter the keys.
• Hexadecimal (WEP 64 bits): 10 Hex characters (0~9, a~f).
• Hexadecimal (WEP 128 bits): 26 Hex characters (0~9, a~f).
• ASCII (WEP 64 bits): 5 ASCII characters (case-sensitive).
• ASCII (WEP 128 bits): 13 ASCII characters (case-sensitive).
Revision 1.0 (Aug’09) 26
Page 29

PROLiNK® PWH2004 User Manual www.prolink2u.com
Shared key is when both the sender and the recipient share a secret key.
Shared Key
Encryption Type: The encryption type is WEP.
Default Key: Select the default key 1~4.
WEP Key 1~4: Enter the key in the selected key field. Only valid when using WEP
encryption algorithm. The key must match with the AP’s key. There
are several formats to enter the keys.
• Hexadecimal (WEP 64 bits): 10 Hex characters (0~9, a~f).
• Hexadecimal (WEP 128 bits): 26 Hex characters (0~9, a~f).
• ASCII (WEP 64 bits): 5 ASCII characters (case-sensitive).
• ASCII (WEP 128 bits): 13 ASCII characters (case-sensitive).
Revision 1.0 (Aug’09) 27
Page 30

PROLiNK® PWH2004 User Manual www.prolink2u.com
WPA
WAP2
WPA1 WPA2
WPA Algorithms: Select the type of algorithm TKIP or AES for WPA, and TKIP,
AES or TKIP/AES for WPA2, WPA/WPA2.
Key Renewal Interval: Enter the renewal security time (seconds) in the column.
Default is 3600 seconds. Set 0 to disable re-key.
RADIUS Server: RADIUS is an authentication, authorization and accounting
client-server protocol. The client is a Network Access Server
that desires to authenticate its links. The server is a server
that has access to a user database with authentication
information.
IP Address: Enter the RADIUS Server’s IP Address provided by your ISP.
Port: Enter the RADIUS Server’s port number provided by your ISP.
(The default is 1812.)
Shared Secret: Enter the password that the Wireless Router shares with the
RADIUS Server.
Session Timeout: Session timeout interval is for 802.1x re-authentication setting.
Set to zero to disable 802.1x re-authentication service for each
session. Session timeout interval unit is second and must be
larger than 60.
Idle Timeout: Enter the idle timeout in the column.
• PMK Cache Period: Only valid in WPA2 security. Set WPA2 PMKID cache timeout period, after
time out, the cached key will be deleted. PMK Cache Period unit is minute.
• Pre-Authentication: Only valid in WPA2 security. The most important features beyond WPA to
become standardized through 802.11i/WPA2 are: pre-authentication, which enables secure
fast roaming without noticeable signal latency.
Revision 1.0 (Aug’09) 28
Page 31

PROLiNK® PWH2004 User Manual www.prolink2u.com
WPA-PSK
WAP2-PSK
WPA-PSK
WPA2-PSK
WPA Algorithms: Select the type of algorithm TKIP or AES for WP-PSK, and
TKIP, AES or TKIP/AES for WPA2-PSK, WPA1 PSK WPA2 PSK.
Pass Phrase: Enter the pass phrase 8~63 ASCII or 64 HEX characters in the
column.
Key Renewal Interval: Enter the renewal security time (seconds) in the column.
Default is 3600 seconds. Set 0 to disable re-key.
WEP: Select Disable or Enable to this function.
802.1x
Revision 1.0 (Aug’09) 29
RADIUS Server: RADIUS is an authentication, authorization and accounting client-
server protocol. The client is a Network Access Server that desires to
authenticate its links. The server is a server that has access to a user
database with authentication information.
IP Address: Enter the RADIUS Server’s IP Address provided by your ISP.
Port: Enter the RADIUS Server’s port number provided by your ISP. (The
default is 1812.)
Shared Secret: Enter the password that the Wireless Router shares with the RADIUS
Server.
Session Timeout: Session timeout interval is for 802.1x re-authentication setting. Set to
zero to disable 802.1x re-authentication service for each session.
Session timeout interval unit is second and must be larger than 60.
Idle Timeout: Enter the idle timeout in the column.
Page 32

PROLiNK® PWH2004 User Manual www.prolink2u.com
Access Policy
Policy
Add a station
Mac
4.6.3. WDS
Making a connection between access points by using WDS function, please follow below steps.
4.6.3.1. The APs must support WDS function.
4.6.3.2. To set the same SSID on the APs.
4.6.3.3. To set the same channel on the APs.
4.6.3.4. To set the same Wireless MAC address (BSSID) on the APs.
4.6.3.5. To set same security (WEP or WPA) on the APs.
Set access control policy of the stations. Select Disable, Allow or Reject form the pulldown menu.
Enter a station MAC in the blank field. The maximum rule count is 8.
(To set WDS must use the same wireless product (the same model will be better); due to
different wireless products might support different WDS settings. Thus, it is suggested to use the
same wireless products that support WDS function.)
Select the mode from the pull-down menu, Disable, Bridge Mode or Repeater Mode. (Default WDS mode is
Disable.) If the users would like to set up the WDS function, please go to WirelessfBasic to set up APs that
should use the same SSID(case-sensitive) and Channel , then go back to WirelessfWDS to enter Wireless
MAC address(BSSID) of each other to make the WDS connection.
Step 1:
Setup the same SSID and Channel on wireless APs.
Step 2:
Enter Wireless MAC address (BSSID) to each other.
Revision 1.0 (Aug’09) 30
Page 33

PROLiNK® PWH2004 User Manual www.prolink2u.com
If the Bridge mode be selected, set up Wireless MAC address to both APs to enable
WDS function.
Bridge Mode
Phy Mode: Select CCK, OFDM, HTMIX or GREENFIELD from the pull-down
menu. Each AP should be setup to the same Phy mode.
AP1~AP4 Encrypt Type: Users should go to the main web page of the Wireless
Router Wireless settingsfSecurity page to set up security
mode under Open System, Shared Key, AUTO(Open/Shared),
WPA, WPA-PSK, WPA2, WPA2-PSK, WPA-PSK/ WPA2-PSK,
WPA/WPA2.
Select NONE, WEP, TKIP and AES encryption type from pulldown menu. (Default encryption type is NONE.)
Encrypt Key: Enter the corresponding encryption keys in the field. Select
the type of Open System, Shared Key, AUTO(Open/Shared)
authentication, for WEP encryption.
• Hexadecimal (WEP 64 bits): 10 Hex characters (0~9, a~f).
• Hexadecimal (WEP 128 bits): 26 Hex characters (0~9, a~f).
• ASCII (WEP 64 bits): 5 ASCII characters (case-sensitive).
• ASCII (WEP 128 bits): 13 ASCII characters (case-sensitive).
Select the type WPA, WPA-PSK, WPA2, WPA2-PSK, WPA-PSK/
WPA2-PSK, WPA/WPA2 authentication, for TKIP or AES
encryption.
If users select TKIP or AES encryption, please enter the
password in the Encryption Key column that must be filled
with characters longer than 8 and less than 64 lengths to set
up the security.
AP1~AP4 MAC Address: Enter Wireless MAC of each other to make the WDS
connection.
Revision 1.0 (Aug’09) 31
Page 34

PROLiNK® PWH2004 User Manual www.prolink2u.com
If the Repeater mode be selected, set up Wireless MAC address to each other to enable
WDS function.
Repeater Mode
Phy Mode: Select CCK, OFDM, HTMIX or GREENFIELD from the pull-down
menu. Each AP should be setup to the same Phy mode.
AP1~AP4 Encrypt Type: Users should go to the main web page of the Wireless
Router Wireless settingsfSecurity page to set up security
mode under Open, Shared, WEP Auto, WPA, WPA-PSK, WPA2,
WPA2-PSK, WPA-PSK/ WPA2-PSK, WPA/WPA2.
Select NONE, WEP, TKIP and AES encryption type from pulldown menu. (Default encryption type is NONE.)
Encrypt Key: Enter the corresponding encryption keys in the field. Select
the type of Open, Shared, WEP Auto authentication, for WEP
encryption.
• Hexadecimal (WEP 64 bits): 10 Hex characters (0~9, a~f).
• Hexadecimal (WEP 128 bits): 26 Hex characters (0~9, a~f).
• ASCII (WEP 64 bits): 5 ASCII characters (case-sensitive).
• ASCII (WEP 128 bits): 13 ASCII characters (case-sensitive).
Select the type WPA, WPA-PSK, WPA2, WPA2-PSK, WPA-PSK/
WPA2-PSK, WPA/WPA2 authentication, for TKIP or AES
encryption. If users select TKIP or AES encryption, please
enter the password in the Encryption Key column that must be
filled with characters longer than 8 and less than 64 lengths to
set up the security.
AP1~AP4 MAC Address: Enter Wireless MAC of each other to make the WDS
connection.
Revision 1.0 (Aug’09) 32
Page 35

PROLiNK® PWH2004 User Manual www.prolink2u.com
4.6.4. WPS
WPS Config
Select Enable then click Apply to use WPS (Wi-Fi Protected Setup) function,
WPS
and then push physical WPS button on Wireless Router to make a WPS
connection. Default setting is Disable.
WPS Summary
After enabling the WPS function, if there is connection the status will show
Configured, otherwise, the status will show Idle.
WPS Current Status
Revision 1.0 (Aug’09) 33
Page 36

PROLiNK® PWH2004 User Manual www.prolink2u.com
WPS Configured
WPS SSID Shows the Wireless Router network name.
WPS Auth Mode
WPS Encrypt Type
WPS Default Key
Index
WPS Key(ASCII)
AP PIN
Reset OOB Reset WPS AP to the OOB (out-of-box) configuration.
Trigger WPS AP to do simple config with WPS Client. If WPS configured, here
shows Yes, otherwise, NO.
The WPS authentication type supports Open, Shared, WEP Auto, WPA-PSK,
WPA2, WPA2-PSK, WPA-PSK/ WPA2-PSK. Please go to the configuration
page Wireless SettingsfSecurity to set up the WPS security.
For Open authentication mode, the selection of encryption type are NONE and
WEP. For WPA-PSK, WPA2-PSK and WPA-PSK/ WPA2-PSK authentication
mode, the encryption type supports TKIP, AES and TKIP/AES.
Shows the WEP default key (1~4).
Shows the WPS security keys (ASCII). The key can be used to ensure the
security of the wireless network.
Here shows the AP’s PIN code (Personal Identification Number) that the
enrollee should enter the registrar’s PIN code to make a connection.
WPS Process
WPS mode
PIN Number Personal Identification Number. Input Enrollee’s Pin Code to AP-Registrar.
WPS Status
4.6.5. Station List
Here shows the station information that connected with the Wireless Router.
PIN: Personal Identification Number. Select PIN then click Apply to make
a WPS connection. BC: Push Button Communication. Select PBC then click
Apply to make a WPS connection.
Here shows the current status of the WPS. If there is connection the status
shows WSC Success, otherwise, the status shows Idle.
Revision 1.0 (Aug’09) 34
Page 37

PROLiNK® PWH2004 User Manual www.prolink2u.com
4.7 Firewall
4.7.1. DMZ
If the DMZ Host Function is enabled, it means that you set up DMZ host at a
particular computer to be exposed to the Internet so that some
DMZ Settings
applications/software, especially Internet / online game can have two-way
connections. Select Enable or Disable from the pull-down menu. Default setting
is Disable.
DMZ IP Address
Apply Click to save and apply the current settings.
Reset Press to discard current settings.
4.7.2. System Firewall Settings
Remote management
(via WAN)
Enter the IP address of a particular host in your LAN that will access the local
host from WAN side.
Select Deny or Allow form the pull-down list to enable or disable the remote
client to control the Wireless Router via WAN. Default setting is Deny.
Ping form WAN Filter Select Disable or Enable from the pull-down list. Default setting is Disable.
Stateful packet inspection (SPI) is a firewall that keeps track of the state of
network connections (such as TCP streams, UDP communication) traveling
across it. The firewall is programmed to distinguish legitimate packets for
SPI Firewall
Revision 1.0 (Aug’09) 35
different types of connections. Only packets matching a known connection state
will be allowed by the firewall; others will be rejected.
Select Disable or Enable the SPI firewall function from the pull-down list.
Default setting is Disable.
Page 38

PROLiNK® PWH2004 User Manual www.prolink2u.com
4.7.3. URL Filtering Settings
Webs URL Filtering Select Disable or Enable from the pull-down menu. Default setting is Disable.
URL Enter the IP address or URL to restrict the improper content access.
URL Here shows the URL information that added in the URL filter list.
Number Here shows the number that URL listed. The maximum rule count is 32.
4.7.4. MAC Filtering
MAC Filtering Select Enable or Disable from the pull-down list. Default setting is Disable.
MAC Address Enter the client MAC address that user would like to disconnect.
MAC Address Here shows the MAC address that added in the filter list.
Number
Revision 1.0 (Aug’09) 36
Here shows the number that MAC address listed. The maximum rule count is
32.
Page 39

PROLiNK® PWH2004 User Manual www.prolink2u.com
4.7.5. IP Filtering
IP Filtering Select Enable or Disable from the pull-down list. Default setting is Disable.
Dest IP Address Enter the local server’s IP address.
Source IP Address Enter the source IP address.
Dest IP Address Here shows the Dest IP address that added in the filter list.
Source IP Address Here shows the Source IP address that added in the filter list.
Number Here shows the number that IP address listed. The maximum rule count is 32.
4.7.6. Virtual Server
Virtual Server Settings Select Enable or Disable from the pull-down menu.
IP Address Enter the local server’s IP address.
For TCP and UDP services enter the beginning of the range of port numbers
Port Range
Protocol
Comment Please key in a description for the IP address.
No. IP address Port
range Protocol
Revision 1.0 (Aug’09) 37
used by the service. If the service uses a single port number, enter it in both
the start and finish fields.
Select the protocol (TCP, UDP or TCP&UDP) used to the remote system or
service.
Here shows the IP address, Port range, Protocol information that added in
the list. The maximum rule count is 32.
Page 40

PROLiNK® PWH2004 User Manual www.prolink2u.com
4.8 Administration
4.8.1. Management
Administrator Settings
Account Key in a new login user name in the blank field.
Password Maximum input is 36 alphanumeric characters (case-sensitive.)
NTP Settings
Current Time Click Sync with host button to synchronize the time with the host PC.
Time Zone Select the time zone area that you located from the pull-down list.
NTP Server
NTP synchronization
Enter the Network Time Protocol Server here. Ex: time.nist.gov,
ntp0.broad.mit.edu, or time.stdtime.gov.tw.
The device will synchronize time with the server according to the hour(s) that
entered.
Green AP
Duration
Action
After the Action (WiFi TX power) be enabled, then the duration time can be set
up. Set up a period of time to enable or disable the wireless TX function.
Select Disable, WiFi TX power OFF, WiFi TX power 25%, WiFi TX power 50%, or
WiFi TX power 75% from the pull-down menu, to enable or disable the wireless
TX function of the Wireless Router.
Revision 1.0 (Aug’09) 38
Page 41

PROLiNK® PWH2004 User Manual www.prolink2u.com
4.8.2. DDNS
DDNS Settings
Dynamic DNS
Provider
Account Enter your account that registered in DNS provider website.
Password Enter passwords that registered.
DDNS Apply for a Domain Name, and ensure it is allocated to you.
Result Here shows the DDNS status.
4.8.3. Upload Firmware
Select the DNS provider form the pull-down list. DNS provider is a company that
provides access to the internet.
Location
Click the Browse… button, find and open the firmware file (the browser will
display to correct file path) then click Apply to upgrade the Wireless Router’s
firmware.
Notice!
Please DO NOT power OFF the Wireless Router while upgrading
firmware.
Revision 1.0 (Aug’09) 39
Page 42

PROLiNK® PWH2004 User Manual www.prolink2u.com
4.8.4. Settings Management
Export
Import Settings
Click the Export button to save the current device settings to located
computer.
Click the Browse… button, find and open the settings file (the browser will
display to correct file path), then click the Import Settings button to use the
device settings that previous saved.
Cancel Click to discard the file that you selected form your located computer.
Load Default
4.8.5. Statistics
This page shows all system memory, WAN/LAN, all interfaces statistics.
Click to Load Default button to set the Wireless Router back to factory default
settings.
Revision 1.0 (Aug’09) 40
Page 43

PROLiNK® PWH2004 User Manual www.prolink2u.com
4.8.6. System Log
Here shows the system log file information. Click Refresh button to update system log file, or click Clear
button to review the log file.
4.8.7. Reboot
Click the Reboot button to restart the Wireless Router.
Revision 1.0 (Aug’09) 41
Page 44

PROLiNK® PWH2004 User Manual www.prolink2u.com
CHAPTER 5 – PC CONFIGURATION
5.1 Overview
For each PC, the following may need to be configured:
• TCP/IP network settings
• Internet Access configuration
• Wireless configuration
5.2 Windows Clients
• This section describes how to configure Windows clients for Internet access via the Wireless
Router.
• The first step is to check the PC's TCP/IP settings.
• The Wireless Router uses the TCP/IP network protocol for all functions, so it is essential that the
TCP/IP protocol be installed and configured on each PC.
5.2.1 TCP/IP Settings - Overview
If using default Wireless Router settings, and default Windows TCP/IP settings, no changes need to
be made.
• By default, the Wireless Router will act as a DHCP Server, automatically providing a
suitable IP Address (and related information) to each PC when the PC boots.
• For all non-Server versions of Windows, the default TCP/IP setting is to act as a DHCP
client.
If using a Fixed (specified) IP address, the following changes are required:
• The Gateway must be set to the IP address of the Wireless Router.
• The DNS should be set to the address provided by your ISP.
5.2.2 Checking TCP/IP Settings - Windows 2000
a. Select Control Panel - Network and Dial-up Connection.
b. Right - click the Local Area Connection icon and
select Properties.
Revision 1.0 (Aug’09) 42
Page 45

PROLiNK® PWH2004 User Manual www.prolink2u.com
c. Select the TCP/IP protocol for your network card.
d. Click on the Properties button.
5.2.2 Ensure your TCP/IP settings are correct, as described below.
5.2.3.1 Using DHCP
• To use DHCP, select the radio button Obtain an IP Address automatically. This is the
default Windows setting. Using this is recommended. By default, the Wireless Router
will act as a DHCP Server.
• Restart your PC to ensure it obtains an IP Address from the Wireless Router.
5.2.3.2 Using a fixed IP Address ("Use the following IP Address")
If your PC is already configured, check with your network administrator before making the
following changes.
• Enter the Wireless Router’s IP address in the Default gateway field and click OK. (Your
LAN administrator can advise you of the IP Address they assigned to the Wireless
Router.)
• If the DNS Server fields are empty, select Use the following DNS server addresses,
and enters the DNS address or addresses provided by your ISP, then click OK.
Revision 1.0 (Aug’09) 43
Page 46

PROLiNK® PWH2004 User Manual www.prolink2u.com
5.2.4 Checking TCP/IP Settings - Windows XP
a. Select Control Panel - Network Connection.
b. Right click the Local Area Connection and choose Properties. You should see a screen like the
following:
c. Select the TCP/IP protocol for your network card.
d. Click on the Properties button. You should then see a screen like the following.
e. Ensure your TCP/IP settings are correct.
5.2.4.1 Using DHCP
• To use DHCP, select the radio button Obtain an IP Address automatically. This is the
default Windows setting. Using this is recommended. By default, the Wireless Router
will act as a DHCP Server.
• Restart your PC to ensure it obtains an IP Address from the Wireless Router.
• Using a fixed IP Address ("Use the following IP Address")
• If your PC is already configured, check with your network administrator before making
the following changes.
Revision 1.0 (Aug’09) 44
Page 47

PROLiNK® PWH2004 User Manual www.prolink2u.com
• In the Default gateway field, enter the Wireless Router’s IP address and click OK. Your
LAN administrator can advise you of the IP Address they assigned to the Wireless
Router.
• If the DNS Server fields are empty, select Use the following DNS server addresses, and
enters the DNS address or addresses provided by your ISP, then click OK.
5.2.5 Internet Access
To configure your PCs to use the Wireless Router for Internet access:
• Ensure that the ADSL modem, DSL modem, Cable modem, or other permanent connection is
functional.
• Use the following procedure to configure your Browser to access the Internet via the LAN,
rather than by a Dial-up connection.
5.2.5.1 For Windows 2000
a. Select Start Menu - Settings - Control Panel - Internet Options.
b. Select the Connection tab, and click the Setup button.
c. Select "I want to set up my Internet connection manually, or I want to connect
through a local area network (LAN)" and click Next.
d. Select "I connect through a local area network (LAN)" and click Next.
e. Ensure all of the boxes on the following Local area network Internet Configuration
screen are unchecked.
f. Check the "No" option when prompted "Do you want to set up an Internet mail
account now?"
g. Click Finish to close the Internet Connection Wizard. Setup is now completed.
5.2.5.2 For Windows XP
a. Select Start Menu - Control Panel - Network and Internet Connections.
b. Select Set up or change your Internet Connection.
c. Select the Connection tab, and click the Setup button.
d. Cancel the pop-up "Location Information" screen.
e. Click Next on the "New Connection Wizard" screen.
f. Select "Connect to the Internet" and click Next.
g. Select "Set up my connection manually" and click Next.
h. Check "Connect using a broadband connection that is always on" and click Next.
i. Click Finish to close the New Connection Wizard. Setup is now completed.
Revision 1.0 (Aug’09) 45
Page 48

PROLiNK® PWH2004 User Manual www.prolink2u.com
5.2.5.3 Accessing AOL
To access AOL (America On Line) through the Wireless Router, the AOL for Windows
software must be configured to use TCP/IP network access, rather than a dial-up
connection. The configuration process is as follows:
a. Start the AOL for Windows communication software. Ensure that it is Version 2.5, 3.0
or later. This procedure will not work with earlier versions.
b. Click the Setup button.
c. Select Create Location, and change the location name from "New Locality" to "Wireless
Router".
d. Click Edit Location. Select TCP/IP for the Network field. (Leave the Phone Number
blank.)
e. Click Save, then OK.
f. Configuration is now complete.
g. Before clicking "Sign On", always ensure that you are using the “Wireless Router”
location.
5.3 Macintosh Clients
From your Macintosh, you can access the Internet via the Wireless Router. The procedure is as follows.
a. Open the TCP/IP Control Panel.
b. Select Ethernet from the Connect via pop-up menu.
c. Select Using DHCP Server from the Configure pop-up menu. The DHCP Client ID field can be left
blank.
d. Close the TCP/IP panel, saving your settings.
Note:
If using manually assigned IP addresses instead of DHCP, the required changes are:
• Set the Router Address field to the Wireless Router’s IP Address.
• Ensure your DNS settings are correct.
Revision 1.0 (Aug’09) 46
Page 49

PROLiNK® PWH2004 User Manual www.prolink2u.com
5.4 Linux Clients
To access the Internet via the Wireless Router, it is only necessary to set the Wireless Router as the
"Gateway".
Ensure you are logged in as "root" before attempting any changes.
5.4.1 Fixed IP Address
By default, most Unix installations use a fixed IP Address. If you wish to continue using a fixed IP Address,
make the following changes to your configuration.
• Set your "Default Gateway" to the IP Address of the Wireless Router.
• Ensure your DNS (Domain Name server) settings are correct.
5.4.2 To act as a DHCP Client (Recommended)
The procedure below may vary according to your version of Linux and X -windows shell.
1. Start your X Windows client.
2. Select Control Panel – Network.
3. Select the "Interface" entry for your Network card. Normally, this will be called "eth0".
4. Click the Edit button, set the "protocol" to "DHCP", and save this data.
5. To apply your changes:
• Use the "Deactivate" and "Activate" buttons, if available.
• OR, restart your system.
5.5 Other Unix System Clients
To access the Internet via the Wireless Router:
• Ensure the "Gateway" field for your network card is set to the IP Address of the Wireless Router.
• Ensure your DNS (Name Server) settings are correct.
Revision 1.0 (Aug’09) 47
Page 50

PROLiNK® PWH2004 User Manual www.prolink2u.com
5.6 Wireless Station Configuration
• This section applies to all wireless stations wishing to use the Wireless Router’s access point,
regardless of the operating system that is used on the client.
• To use the Wireless Router, each wireless station must have compatible settings, as following:
Mode The mode must be set to Infrastructure.
SSID (ESSID)
Open
Shared Key
WEP auto
WPA-PSK
WPA2-PSK
WPA-PSK
WPA2-PSK
The network name must match the value used on the Wireless Router.
Note! The SSID is case sensitive.
If there is no security is enabled on the Wireless Router, the security of each
station should be disabled as well. And, you can connect the Wireless Router
without security, but it is NOT recommended.
By default, WEP on the Wireless Router is disabled.
If WEP remains disabled on the Wireless Router, all stations must have WEP
disabled.
If WEP is enabled on the Wireless Router, each station must use the same
settings as the Wireless Router.
WPA-PSK (TKIP/AES)/ WPA2-PSK (TKIP/AES)/ WPA-RADIUS (TKIP/AES)/
WPA2 -RADIUS (TKIP/AES): If one of these securities is enabled on the
Wireless Router. To make a connection, each station must use the same
algorithms and pass phrase as the Wireless Router.
WPA
RADIUS Server: RADIUS is an authentication, authorization and accounting
client-server protocol. The client is a Network Access Server that desires to
WPA2
authenticate its links. The server is a server that has access to a user
WPA WPA2
database with authentication information. Each station must set up the
802.1x
RADIUS Server’s IP address, port and passwords that provided by your ISP.
Note:
By default, the Wireless Router will allow 802.11b, 802.11g and 802.11n connections.
Revision 1.0 (Aug’09) 48
Page 51

PROLiNK® PWH2004 User Manual www.prolink2u.com
APPENDIX A – TROUBLESHOOTING
A.1 Overview
This chapter covers some common problems that may be encountered while using the Wireless Router and some
possible solutions to them. If you follow the suggested steps and the Wireless Router still does not function
properly, contact your dealer for further advice.
A.2 General Problems
Problem 1: Can't connect to the Wireless Router to configure it.
Solution 1: Check the following:
1. Check the Wireless Router is properly installed, LAN connections are OK, and it is
powered ON.
2. Ensure that your PC and the Wireless Router are on the same network segment.
3. If your PC is set to "Obtain an IP Address automatically" (DHCP client), please restart
it.
4. If your PC uses a Fixed (Static) IP address, ensure that it is using an IP Address within
the range 192.168.10.1 to 192.168.10.253 and thus compatible with the Wireless
Router's default IP Address of 192.168.10.254.
Also, the Network Mask should be set to 255.255.255.0 to match the Wireless Router.
In Windows, you can check these settings by using Control Panel-Network to check the
Properties for the TCP/IP protocol.
A.3 Internet Access
Problem 1: When I enter a URL or IP address I get a time out error.
Solution 1: A number of things could be causing this. Try the following troubleshooting steps.
• Check if other PCs work. If they do, ensure that your PCs IP settings are correct. If
using a Fixed (Static) IP Address, check the Network Mask, Default gateway and DNS
as well as the IP Address.
• If the PCs are configured correctly, but still not working, check the Wireless Router.
Ensure that it is connected and ON. Connect to it and check its settings. (If you can't
connect to it, check the LAN and power connections.)
• If the Wireless Router is configured correctly, check your Internet connection
(DSL/Cable modem etc) to see that it is working correctly.
Revision 1.0 (Aug’09) 49
Page 52

PROLiNK® PWH2004 User Manual www.prolink2u.com
Problem 2: Some applications do not run properly when using the Wireless Router.
Solution 2: The Wireless Router processes the data passing through it, so it is not transparent.
Use the Content Filter Settings feature to allow the use of Internet applications, which do
not function correctly.
If this does solve the problem you can use the DMZ function. This should work with almost
every application, but:
• It is a security risk, since the firewall is disabled.
• Only one (1) PC can use this feature.
A.4 Wireless Access
Problem 1: My PC can't locate the Wireless Router.
Solution 1: Check the following:
1. Your PC is set to Infrastructure Mode. (Access Points are always in Infrastructure Mode)
2. The SSID on your PC and the Wireless Router are the same.
Remember that the SSID is case-sensitive. So, for example "Workgroup" does NOT
match "workgroup."
3. Both your PC and the Wireless Router must have the same setting for security. The
default setting for the Wireless Router security is disabled, so your wireless station
should also have security disabled.
4. If security is enabled on the Wireless Router, your PC must have security enabled, and
the key must be matched.
5. To see if radio interference is causing a problem, see if connection is possible when
close to the Wireless Router.
Remember that the connection range can be as little as 100 feet in poor environments.
Problem 2: Wireless connection speed is very slow.
Solution 2: The wireless system will connect at the highest possible speed, depending on the distance
and the environment. To obtain the highest possible connection speed, you can experiment
with the following:
1. Wireless Router location
Try adjusting the location and orientation of the Wireless Router.
2. Wireless Channel
If interference is the problem, changing to another channel may show a marked
improvement.
3. Radio Interference
Other devices may be causing interference. You can experiment by switching other
devices off, and see if this helps. Any "noisy" devices should be shielded or relocated.
4. RF Shielding
Your environment may tend to block transmission between the wireless stations. This
will mean high access speed is only possible when close to the Wireless Router.
Revision 1.0 (Aug’09) 50
Page 53

PROLiNK® PWH2004 User Manual www.prolink2u.com
APPENDIX B – ABOUT WIRELESS LAN
B.1 BBS
A group of Wireless Stations and a single Access Point, all using the same ID (SSID), form a Basic Service
Set (BSS).
Using the same SSID is essential. Devices with different SSIDs are unable to communicate with each other.
B.2 Channels
The Wireless Channel sets the radio frequency used for communication.
• Access Points use a fixed Channel. You can select the Channel used. This allows you to choose a
Channel which provides the least interference and best performance. In the USA and Canada, 11
channels are available. If using multiple Access Points, it is better if adjacent Access Points use
different Channels to reduce interference.
• In "Infrastructure" mode, Wireless Stations normally scan all Channels, looking for an Access Point.
If more than one Access Point can be used, the one with the strongest signal is used. (This can
only happen within an ESS.)
Note to US model owner: To comply with US FCC regulation, the country selection function has been
completely removed from all US models. The above function is for non-US models only.
B.3 Security
B3.1 WEP
WEP (Wired Equivalent Privacy) is a standard for encrypting data before it is transmitted. This is
desirable because it is impossible to prevent snoopers from receiving any data which is transmitted
by your Wireless Stations. But if the data is encrypted, then it is meaningless unless the receiver
can decrypt it.
If WEP is used, the Wireless Stations and the Access Point must have the same security settings
for each of the following:
WEP 64 Bits, 128 Bits.
Key
For 64 Bits encryption, the Key value must match.
For 128 Bits encryption, the Key value must match.
WEP Authentication Open System or Shared Key.
Revision 1.0 (Aug’09) 51
Page 54

PROLiNK® PWH2004 User Manual www.prolink2u.com
B3.2 WPA/WPA2
WPA/WPA2 (Wi-Fi Protected Access) is more secure than WEP. It uses a “Shared Key” which
allows the encryption keys to be regenerated at a specified interval. There are several encryption
options: TKIP, AES, TKIP-AES and additional setup for RADIUS is required in this method. The most
important features beyond WPA to become standardized through 802.11i/WPA2 are: pre-
authentication, which enables secure fast roaming without noticeable signal latency.
If WPA or WPA2 is used, the Wireless Stations and the Access Point must have the same security
settings.
B3.3 WPA-PSK/WPA2-PSK
WPA/WPA2 (Wi-Fi Protected Access using Pre-Shared Key) is recommended for users who are not
using a RADIUS server in a home environment and all their clients support WPA/WPA2. This
method provides a better security.
If WPA-PSK or WPA2-PSK is used, the Wireless Stations and the Access Point must have the same
security settings.
Encryption WEP Key 1~4 Passphrase
TKIP
Encryption
B3.4 802.1x
With 802.1x authentication, a wireless PC can join any network and receive any messages that are
not encrypted, however, additional setup for RADIUS to issue the WEP key dynamically will be
NOT REQUIRED 8-63 characters
required.
RADIUS is an authentication, authorization, and accounting client-server protocol. The client is a
Network Access Server that desires to authenticate its links. The server is a server that has access
to a user database with authentication information.
Revision 1.0 (Aug’09) 52
Page 55

PROLiNK® PWH2004 User Manual www.prolink2u.com
B.4 Wireless LAN Configuration
To allow Wireless Stations to use the Access Point, the Wireless Stations and the Access Point must use the
same settings, as follows:
Mode The mode must be set to Infrastructure.
SSID (ESSID)
Open
Shared Key
WEP AUTO
WPA-PSK
WPA2-PSK
WPA-PSK
WPA2-PSK
WPA
WPA2
WPA WPA2
802.1x
The network name must match the value used on the Wireless Router.
Note! The SSID is case sensitive.
If there is no security is enabled on the Wireless Router, the security of each station
should be disabled as well. And, you can connect the Wireless Router without
security, but it is NOT recommended.
By default, WEP on the Wireless Router is disabled.
If WEP remains disabled on the Wireless Router, all stations must have WEP disabled.
If WEP is enabled on the Wireless Router, each station must use the same settings as
the Wireless Router.
WPA-PSK (TKIP/AES)/ WPA2-PSK (TKIP/AES: If one of these securities is enabled on
the Wireless Router. To make a connection, each station must use the same
algorithms and pass phrase as the Wireless Router.
RADIUS Server: RADIUS is an authentication, authorization and accounting clientserver protocol. The client is a Network Access Server that desires to authenticate its
links. The server is a server that has access to a user database with authentication
information. Each station must set up the RADIUS Server’s IP address, port and
passwords that provided by your ISP.
Revision 1.0 (Aug’09) 53
Page 56

PROLiNK® PWH2004 User Manual www.prolink2u.com
APPENDIX C – TECHNICAL SUPPORT
REGISTER ONLINE FOR FREE WARRANTY.
FREE TECHNICAL SUPPORT HOTLINE:
Monday to Friday, 9.00 am – 6.00 pm
(Closed on Saturdays, Sundays and Public Holidays)
• Singapore : (65) 6357 0666
• Malaysia : (60) 3 8023 9151
• Indonesia :
WALK-IN SUPPORT:
(62) 21 628 3205
Monday to Friday, 9.00 am – 6.00 pm
(Closed on Saturdays, Sundays and Public Holidays)
• Singapore
FIDA INTERNATIONAL (S) PTE LTD
Block 16 Kallang Place, #06-02 Kallang Basin Industrial Estate, Singapore 339156.
• Malaysia
FIDA SYSTEMS (M) SDN BHD
29 Jalan USJ 1/31, 47600 Subang Jaya, Selangor Darul Ehsan, Malaysia.
• Indonesia
PROLiNK INDONESIA
P. Jayakarta Komplek 85 BR/AJ, Jakarta Pusat - Indonesia.
ONLINE TECHNICAL SUPPORT:
• Singapore : support@fida.com
• Malaysia : support_my@fida.com
• Indonesia : support@prolink.co.id
Revision 1.0 (Aug’09) 54
Page 57

Register Online For Your Product Warranty
www.prolink2u.com
SINGAPORE
FIDA INTERNATIONAL (S) PTE LTD
Block 16 Kallang Place, #06-02 Kallang Basin Industrial Estate, Singapore 339156.
Tel : (65) 6357 0668 Email : support@fida.com
MALAYSIA
FIDA SYSTEMS (M) SDN BHD
29 Jalan USJ 1/31, 47600 Subang Jaya, Selangor Darul Ehsan, Malaysia.
Tel : (60) 3 8024 9151 Email : support_my@fida.com
INDONESIA
PROLiNK INDONESIA
P. Jayakarta Komplek 85 BR/AJ, Jakarta Pusat - Indonesia.
Tel : (62) 21 628 3205 Email : support@prolink.co.id
PROLiNK is a trademark of Fida International (S) Pte Ltd and is manufactured under its authority. All other brands,
products, services, logos and company names mentioned herein are trademarks of their respective owners. All
specifications, designs and contents are subject to changes without prior notice. © Copyright 2009. PROLiNK all
rights reserved.
 Loading...