

Page 1

PROLiNK PPL1201 User Manual www.prolink2u.com
PROLiNK PPL1201
200Mbps Powerline AV Ethernet Adapter
User Manual
Single Pack
Version 1.00 English
Page 2

PROLiNK PPL1201 User Manual www.prolink2u.com
CE Radiation Norm
This equipment has been tested and found to comply with the limits of the European Council
Directive 89/336/EEC on the approximation of the law of the member states relating to EN
55022 Class B, EN61000-3-2, EN 61000-3-3, EN50412-2-1,CISPR/I/XX/CDV OptB and Safety EN
60950-1.
Safety Warning
We recommend observing the following connection rules to eliminate possible sources of interference:
• Avoid extension strips. This may impair the transmission of the Powerline Adaptor signals. Free wall outlets
are preferable.
• Also position the adaptor away from your computer, as it may interfere with the adaptor’s operation.
• Plug the devices into different outlets and avoid using the same extension strip.
Version 1.00 i PPL1201
Page 3

PROLiNK PPL1201 User Manual www.prolink2u.com
Important Safety Instructions
1. DO NOT open this product or attempt to service this product; it may expose you to dangerous high voltage
and other risks.
2. DO NOT operate this product near water.
3. DO NOT place or operate near or over radiator or heat register.
4. DO NOT expose this product to dampness, dust or corrosive liquids.
5. DO NOT connect this product and Disconnect from wall socket during a lightning or thunderstorm
6. DO NOT obstruct this product ventilation slots, as insufficient airflow may harm this product.
7. DO NOT put anything on this product.
8. Plug directly into wall socket (100Vac~240Vac). DO NOT use an extension cord between this product and
the AC power source.
9. When plugging this product into wall socket, make sure that electrical socket are not damaged, and no
leakage for gas or water pipes to begin with.
10. Place the connecting cables carefully so people won’t stumble or walk on it.
11. The Powerline Adaptor should be operated from the type of power indicated on the marking label. If you
are not sure of the type of power available, consult the qualified technician.
12. Unplug the Powerline Adaptor from the mains and refer the product to qualified service personnel for the
following conditions:
- If liquid has been spilled on the product
- If the product has been exposed to rain or water
13. Unplug from the wall socket before cleaning. Use a damp cloth for cleaning. DO NOT use liquid cleaners or
aerosol cleaners.
Disposal Notice
This symbol on the product or in the instructions means that your electrical and electronic
equipment should be disposed at the end of its life separately from your household waste. There
are separate collection systems for recycling in the EU
For more information, please contact the local authority or your retailer where you purchased the
product.
Version 1.00 ii PPL1201
Page 4

PROLiNK PPL1201 User Manual www.prolink2u.com
Copyright
The contents of this publication may not be reproduced in any part or as a whole, stored,
transcribed in an information retrieval system, translated into any language, or transmitted in any
form or by any means, mechanical, magnetic, electronic, optical, photocopying, manual, or
otherwise, without the prior written permission.
Trademarks
PROLiNK® is a trademark of Fida International (S) Pte Ltd and is manufactured under its authority.
All products, company, brand names are trademarks or registered trademarks of their respective
companies. They are used for identification purpose only. Specifications are subject to be changed
without prior notice.
Version 1.00 iii PPL1201
Page 5

PROLiNK PPL1201 User Manual www.prolink2u.com
Table of Contents
CE RADIATION NORM......................................................................................................................................................................i
SAFETY WARNING .............................................................................................................................................................................i
IMPORTANT SAFETY INSTRUCTIONS....................................................................................................................................... ii
DISPOSAL NOTICE ........................................................................................................................................................................... ii
COPYRIGHT........................................................................................................................................................................................ iii
TRADEMARKS ................................................................................................................................................................................... iii
TABLE OF CONTENTS .................................................................................................................................................................... iv
SECTION 1 : INTRODUCTION....................................................................................................................................................... 1
SECTION 2 : CONNECTING MECHANISM ...............................................................................................................................4
SECTION 3 : INSTALLATION OF THE MANAGEMENT UTILITY ........................................................................................8
SECTION 4 : USING THE MANAGEMENT UTILITY ..............................................................................................................11
SECTION 5 : ADVANCE FEATURES - HOW TO USE THE PUSH BUTTONS ................................................................21
APPENDIX A : TROUBLESHOOTING ........................................................................................................................................23
APPENDIX B : ENERGY-RELATED PRODUCTS INFORMATION......................................................................................24
APPENDIX C : TECHNICAL SUPPORT ......................................................................................................................................25
Version 1.00 iv PPL1201
Page 6

PROLiNK PPL1201 User Manual www.prolink2u.com
Congratulations on your purchase of this outstanding PROLiNK® PPL1201 Powerline AV Ethernet Adapter. This
Section 1
device is a 200Mbps Powerline AV Ethernet Adapter which transforms your house’s existing electrical wiring into an
ubiquitous networking infrastructure. Simply plug this PROLiNK® PPL1201 Powerline AV Ethernet Adapter into an
ordinary AC power outlet which will easily extend your Cable/xDSL broadband connection or existing Ethernet (LAN)
network to any other electrical outlet in any room of a house without the need of any new cabling.
PROLiNK® PPL1201 Powerline AV Ethernet Adapter supports up to 200Mbps data rate over the existing household
power circuit. With data rates of 200Mbps, full multimedia application can easily be supported throughout the
whole house in addition to Internet access. This PROLiNK® PPL1201 Powerline AV Ethernet Adapter uses the
existing power lines installed in a home as a path to transmit digital data, voice, audio and video between devices.
To ensure data communication’s security and multimedia applications, the PROLiNK® PPL1201 Powerline AV
Ethernet Adapter support built-in 128-bit AES encryption and Quality of Service (QoS) features.
With minimum setup, you can install and use this PROLiNK® PPL1201 Powerline AV Ethernet Adapter within
minutes. The adaptor adds two new functions to be useful:
Section 1 : Introduction
Section 1
1. Push button support
a. Enhance simple connect set-up
b. Enhance pairing feature includes chaining
c. Restore the device configuration to factory default.
2. Green Low Power operation mode
When PC or other Ethernet devices are completely power off, PROLiNK® PPL1201 Powerline AV Ethernet
Adapter will automatically enter power saving mode which will help to reduce power consumption by at
least 60%.
• Device goes into Standby when there is no Ethernet link
• Any device in the network can enter Standby
Version 1.00 Page 1 of 25 PPL1201
Page 7

PROLiNK PPL1201 User Manual www.prolink2u.com
1.1 Features
Section 1
1.1.1 Powerline AV
• High speed data transfer rate up to 200Mbps
• HomePlug AV standard compliant
• Works with AC input of 100V ~ 240V
• Plug-and-Play (PnP) configuration
• High-speed Powerline adaptor with Ethernet interface
• Reduce power consumption by at least 60% during power saving mode
• OFDM techniques for high data reliability in noisy media conditions
• Intelligent channel adaptation maximizes throughput under harsh channel conditions
• Build-in QoS and Error Correction feature
• 128-bit AES Link Encryption with key management for secure power-line communications
• Transmission range up to 200m over household power supply grid
• Support two Push Button “Pair” and “Reset”
• RoHS (Lead-Free) compliant
1.1.2 System Requirement
• At least two AC 100V ~ 240V power outlets with standard home power wiring
• A computer with the following:
• Operating System with TCP/IP installed
• Pentium III compatible processor and above
• Ethernet LAN card installed with TCP/IP protocol
• 64 MB RAM or more
• 50 MB of free disk space (Minimum)
• CD-ROM Drive
1.1.3 Target Application
• Powerline Adaptors
• Ethernet-enabled TVs
• Ethernet-enabled set top boxes
• Game consoles
• Blue-ray / DVR / NAS drives
• Broadband gateways
• Over the top video devices ( i.e. Apple TV,Roku )
• Security cameras
Section 1
Version 1.00 Page 2 of 25 PPL1201
Page 8

PROLiNK PPL1201 User Manual www.prolink2u.com
1.2 Packet Contents
Section 1
The PROLiNK® PPL1201 Powerline AV Ethernet Adapter package contains the following items:
a. One PROLiNK® PPL1201 Powerline AV Ethernet Adapter
b. One CAT-5 Ethernet (LAN) Cable or Two for Twin pack
c. One Quick Installation Guide
d. One CD-ROM (Utility / Manual / Quick Installation Guide/Acrobat Reader)
If any of the above items are damaged or missing, please contact your dealer immediately.
Section 1
Version 1.00 Page 3 of 25 PPL1201
Page 9
PROLiNK PPL1201 User Manual www.prolink2u.com
The PROLiNK® PPL1201 Powerline AV Ethernet Adapter supports up to 200Mbps data rate. With this high speed
connection rate, the PROLiNK® PPL1201 Powerline AV Ethernet Adapter allows you to setup a high speed home
network by using your home existing electrical wiring. Simply plug the PROLiNK® PPL1201 Powerline AV Ethernet
Adapter into an ordinary power outlet to extend your Cable/xDSL broadband connection or existing LAN network to
any other electrical outlet in any rooms of your house.
Take notes that the PROLiNK® PPL1201 Powerline AV Ethernet Adapter works in pairs. You need to plug one
Section 2
PROLiNK® PPL1201 Powerline AV Ethernet Adapter into a power outlet for each computer (connect to the
computer LAN card) you want to connect (Network access); you will also need another PROLiNK® PPL1201
Powerline AV Ethernet Adapter connected to your Cable/xDSL broadband (Ethernet port) in order to extend your
broadband connection or Internet surfing.
Section below describes the PROLiNK® PPL1201 Powerline AV Ethernet Adapter’s LED indicators, physical interface
and hardware connection mechanism.
Section 2 : Connecting Mechanism
Section 2
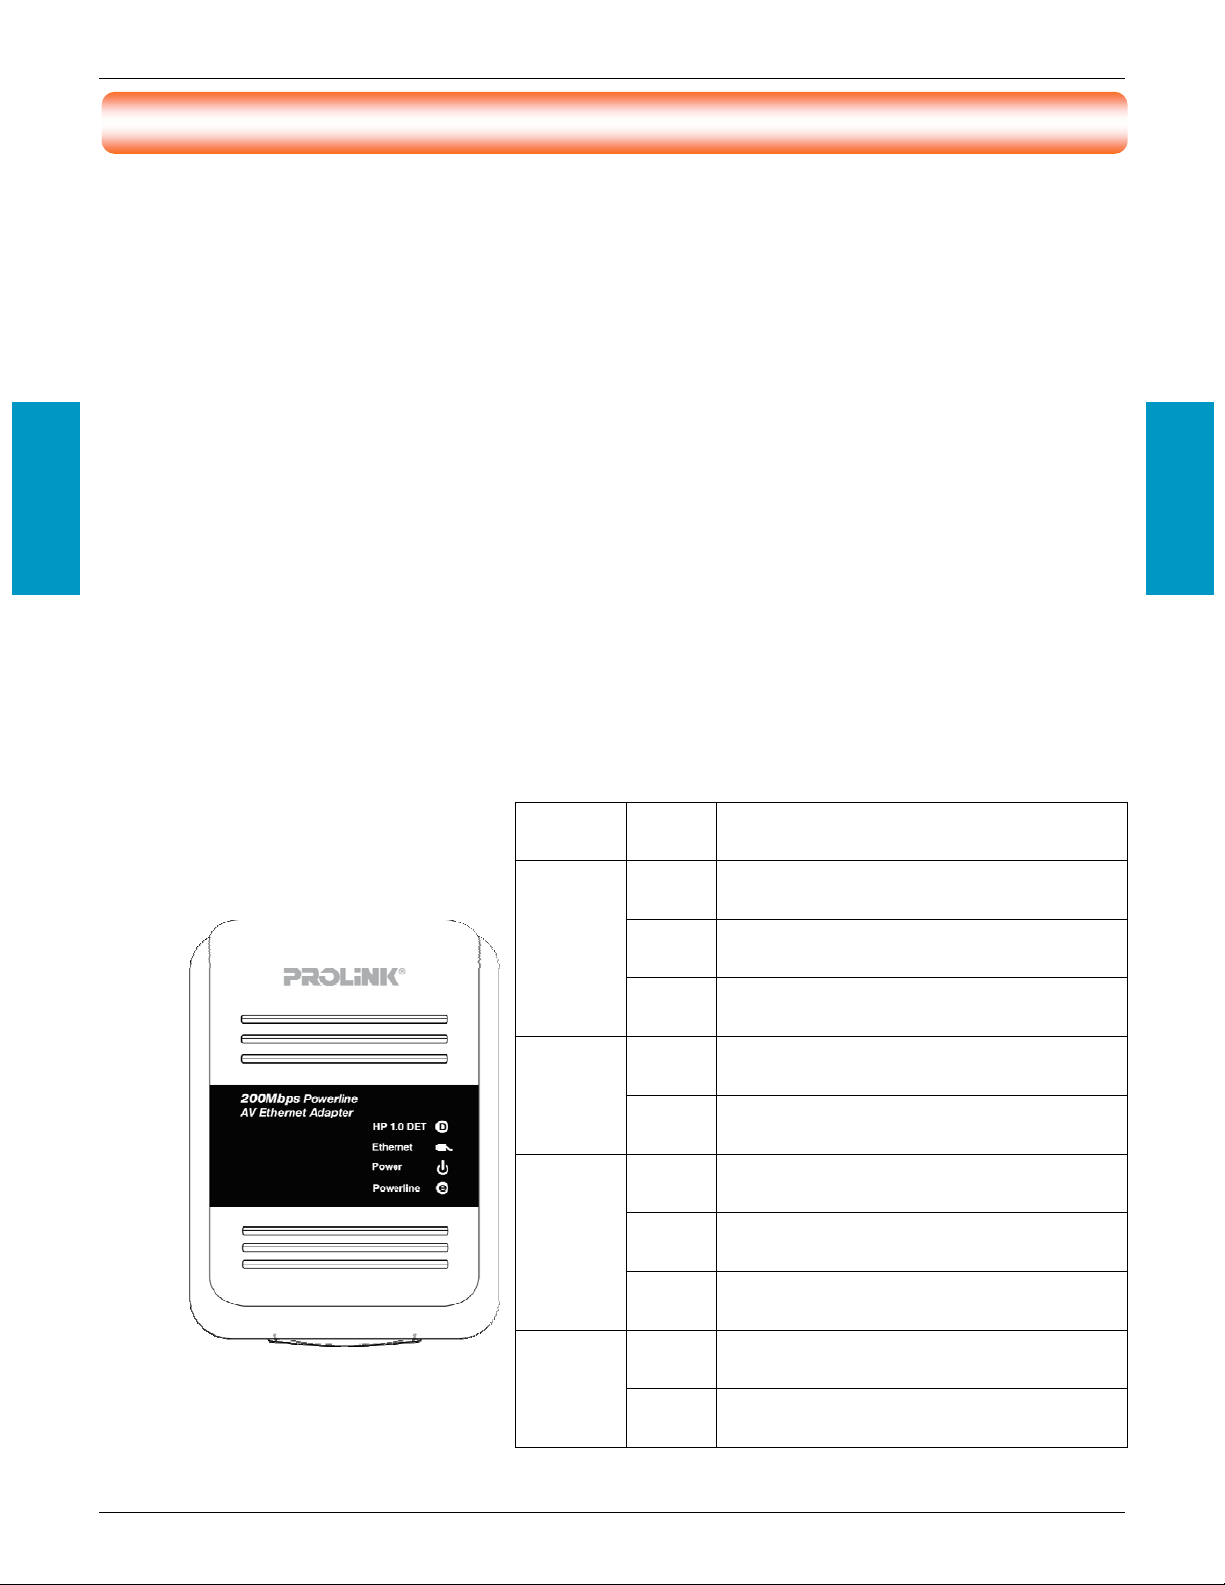
2.1 LED Indicator
The LED indicator displays information about the device’s status.
Label Status Description
Powe rline
Powe r
Ethernet
OFF
Blinking The data is received or transmitted via Powerline
OFF
OFF The Ethernet port is not connected or not power on
Another powerline adaptor is detected on the same
ON
powerline network
Did not detect any other powerline adaptor on the same
powerline network
PROLiNK® PPL1201 Powerline AV
The
ON
Ethernet Adapter
PROLiNK® PPL1201 Powerline AV
The
Ethernet Adapter
The Ethernet port is on and ready to
ON
receiving/transmitting data
is power on
is not receiving power
Blinking The Ethernet port is receiving/transmitting data
OFF
HP 1.0 DET
Blinking
Did not detect any HomePlug 1.0 device on the same
powerline network
Another HomePlug 1.0 device is detected on the same
powerline network
Version 1.00 Page 4 of 25 PPL1201
Page 10
PROLiNK PPL1201 User Manual www.prolink2u.com
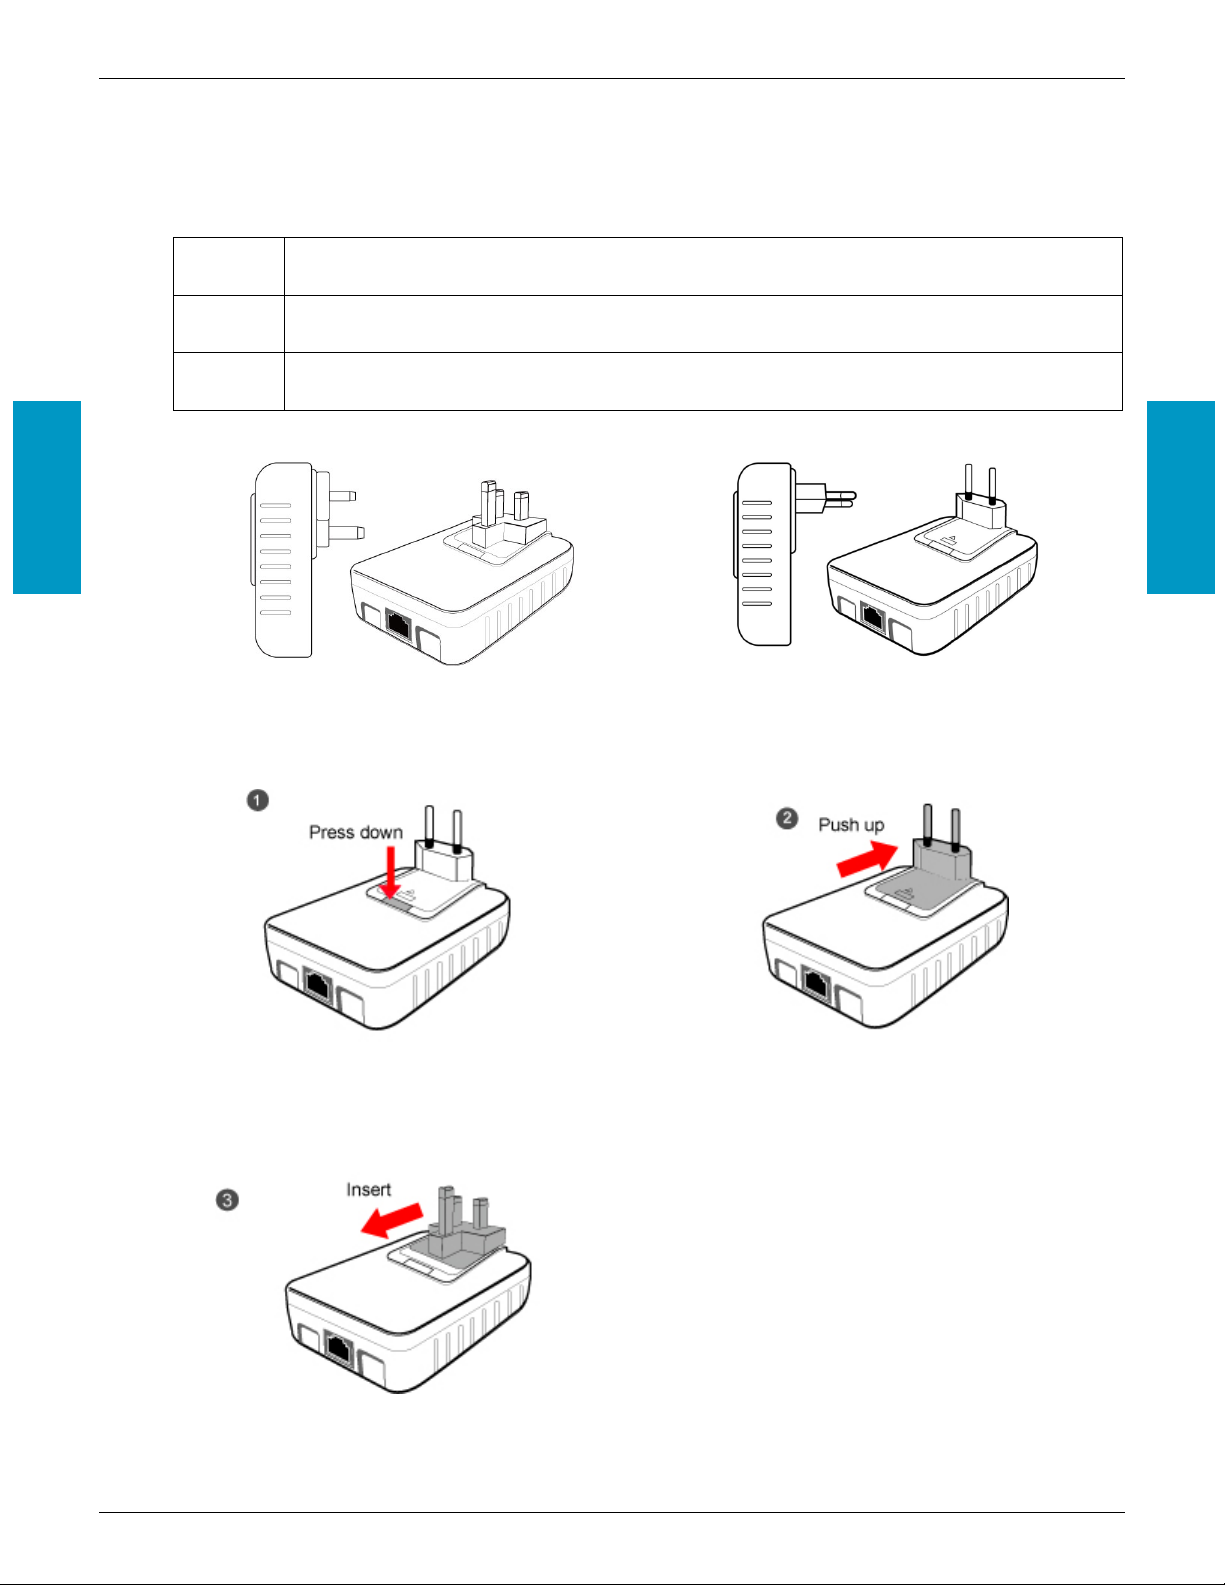
2.2 Physical Interface
There are two physical interfaces on this PROLiNK® PPL1201 Powerline AV Ethernet Adapter.
Interface Description
Ethernet One 10/100Mbps Ethernet port connected to PC LAN card or broadband device.
Section 2
Power Plug
Power Plug connected to any 100 ~ 240V AC power socket.
UK 3-Pin Plug
EU 2-Pin Plug
Below is the instruction procedure in changing Pin Plug from EU 2-Pin to UK 3-Pin.
Section 2
Version 1.00 Page 5 of 25 PPL1201
Page 11
PROLiNK PPL1201 User Manual www.prolink2u.com
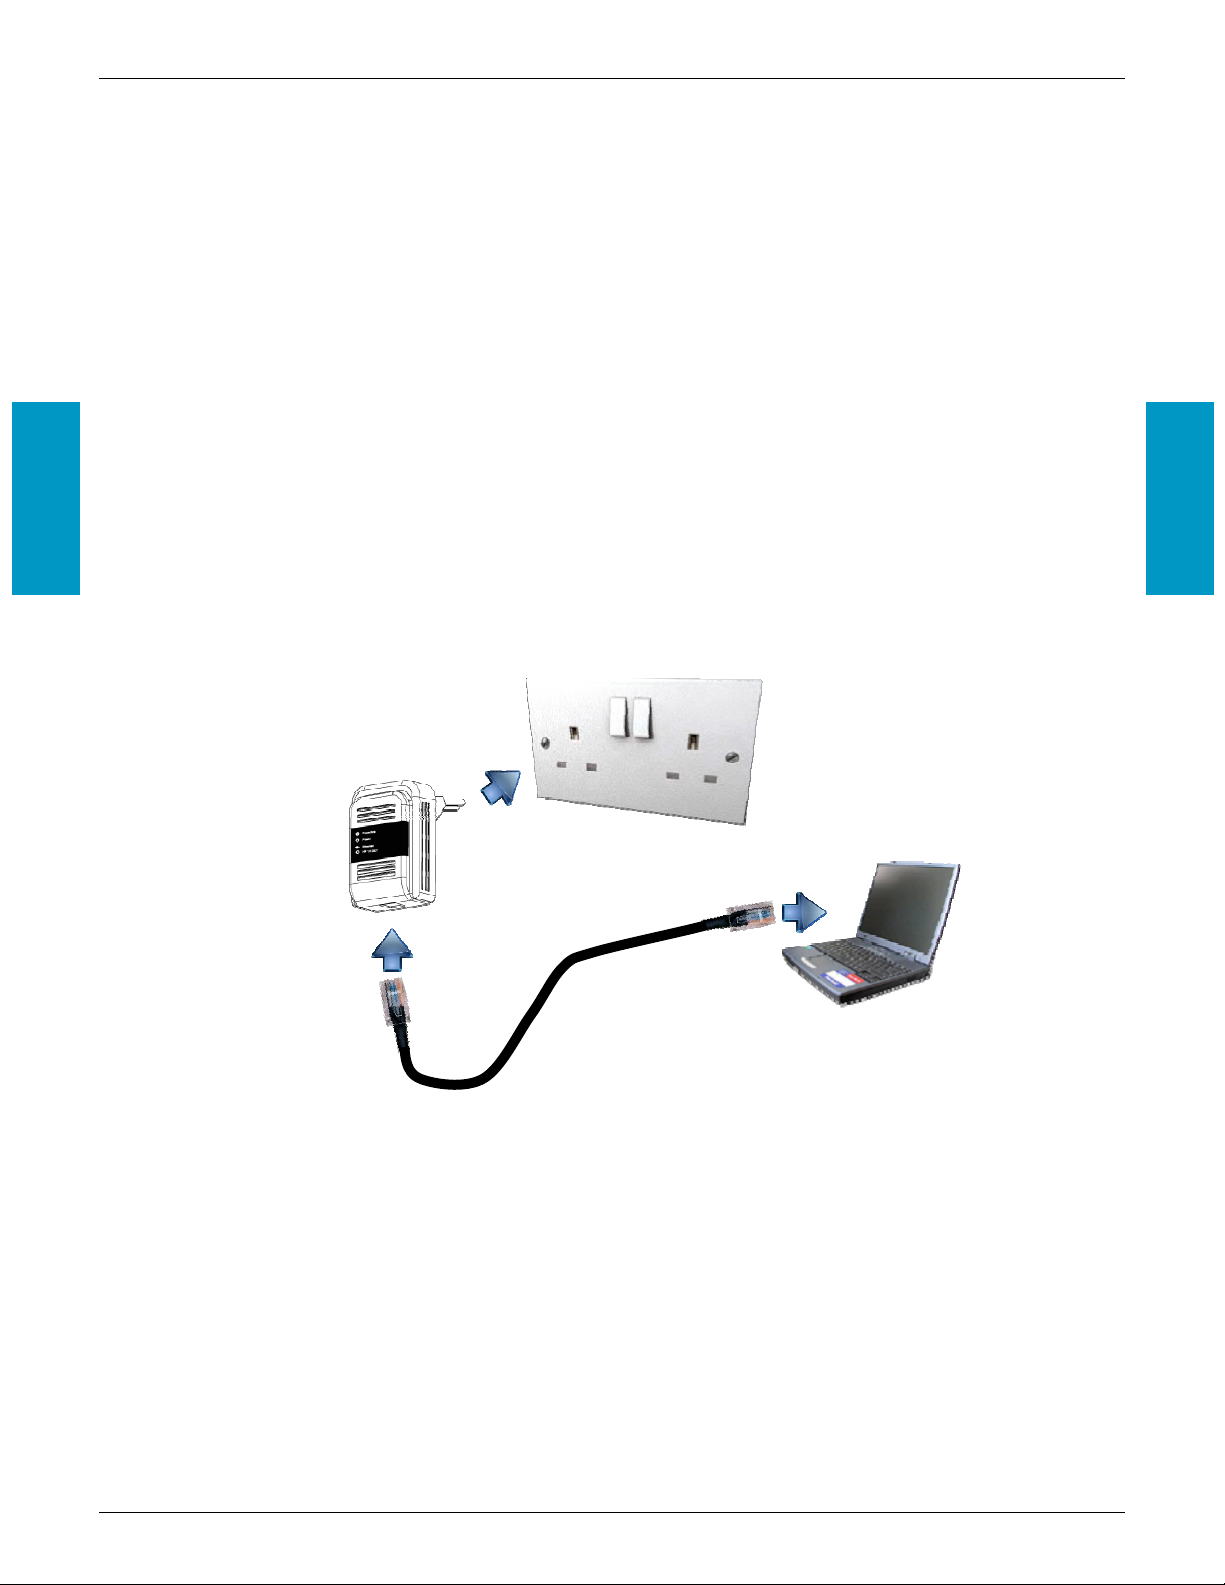
2.3 Hardware Connection – Computer
Section 2
For those computers you wish to be networked by PROLiNK® PPL1201 Powerline AV Ethernet Adapter, each
of the computers must be properly connected with a PROLiNK® PPL1201 Powerline AV Ethernet Adapter
through an Ethernet (RJ-45) cable. Following are the steps to properly connect the PROLiNK® PPL1201
Powerline AV Ethernet Adapter to your computer:
a. Power off your PC or Notebook.
b. Connect the provided Ethernet (RJ-45) cable to the PROLiNK® PPL1201 Powerline AV Ethernet
Adapter’s Ethernet port.
c. Connect the other end of the Ethernet (RJ-45) cable to you computer’s LAN port.
d. Plug the PROLiNK® PPL1201 Powerline AV Ethernet Adapter into a wall socket next to the computer.
e. Turn on your computer.
f. Check and confirm that the Power and Ethernet LEDs on the PROLiNK® PPL1201 Powerline AV
Ethernet Adapter are ON.
The hardware connection mechanism is shown below:
Section 2
Y
[
Z
Version 1.00 Page 6 of 25 PPL1201
Page 12
PROLiNK PPL1201 User Manual www.prolink2u.com
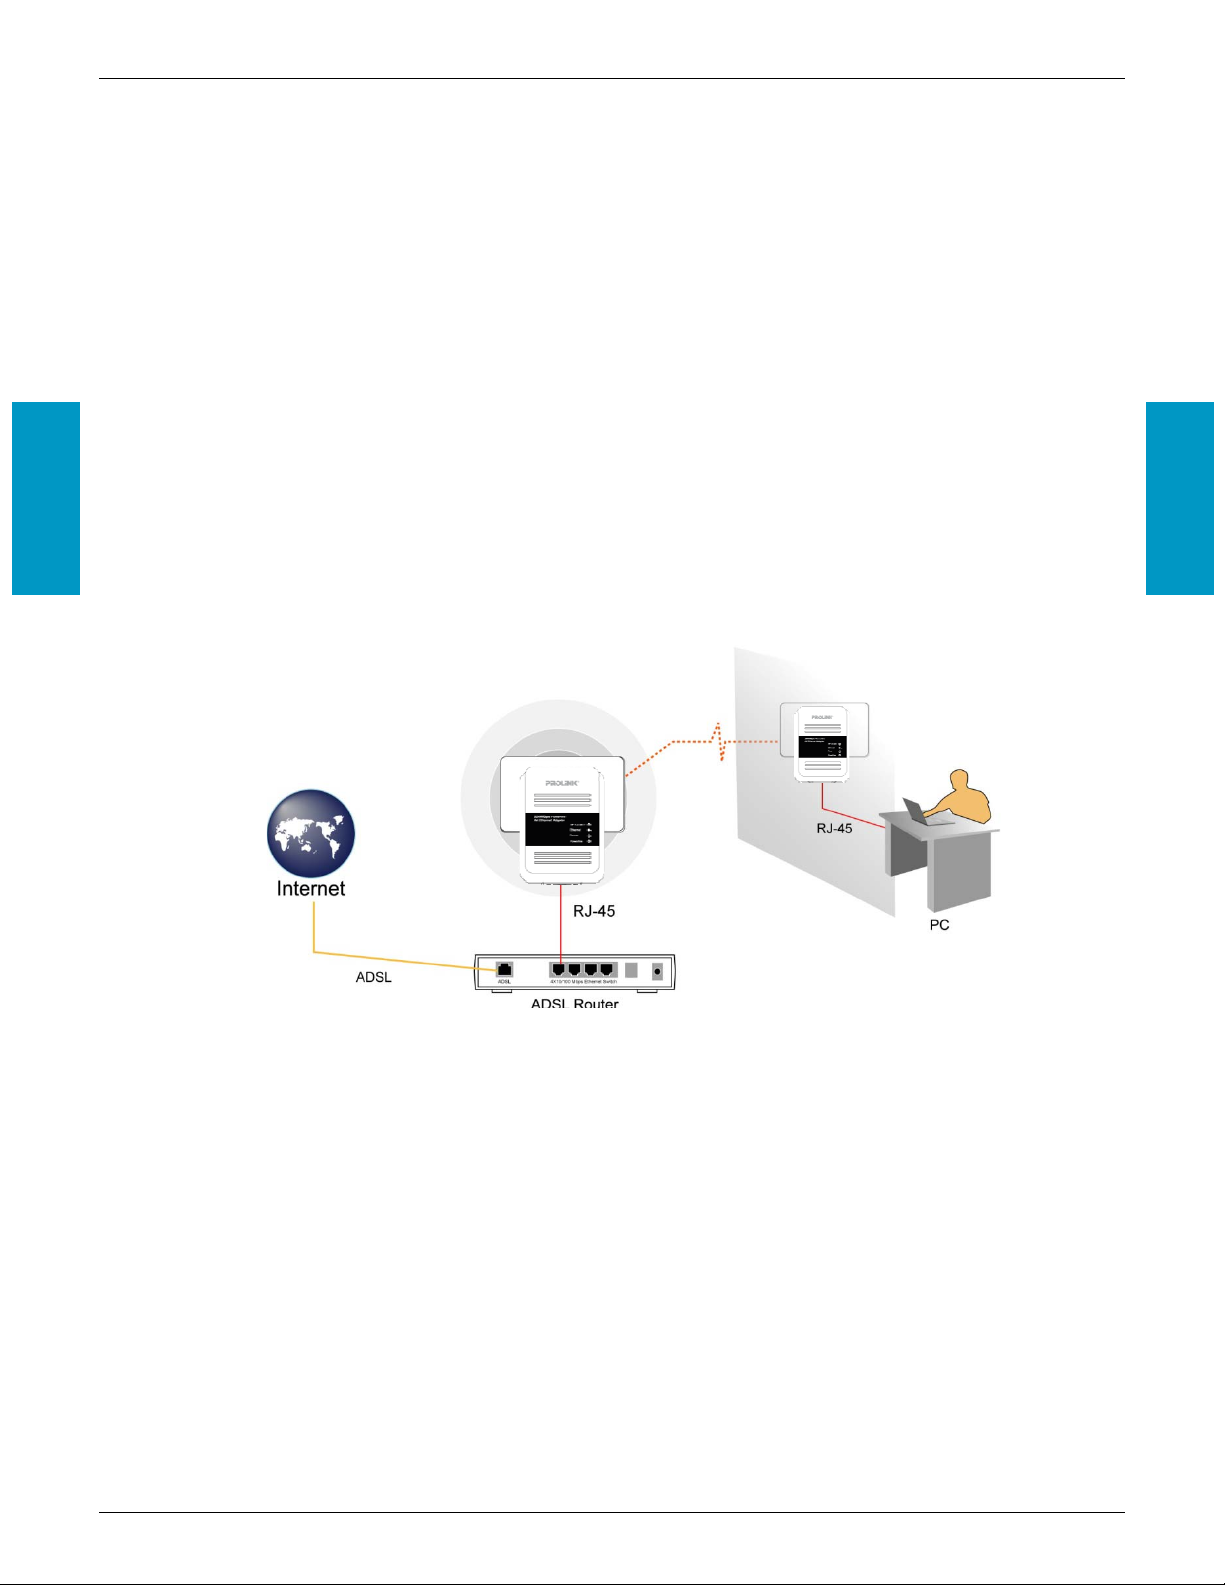
2.4 Hardware Connection – Internet
Section 2
This section describes how to connect the PROLiNK® PPL1201 Powerline AV Ethernet Adapter into your
existing ADSL broadband connection via ADSL Ethernet port. Follow the procedures describe below to
connect the PROLiNK® PPL1201 Powerline AV Ethernet Adapter to your ADSL broadband connection:
a. Power off your PC or Notebook.
b. Connect the provided Ethernet (RJ-45) cable to the PROLiNK® PPL1201 Powerline AV Ethernet
Adapter’s Ethernet port.
c. Connect the other end of the Ethernet (RJ-45) cable to an available Ethernet port of your ADSL
broadband Router.
d. Plug the PROLiNK® PPL1201 Powerline AV Ethernet Adapter into a wall socket next to the computer.
e. Turn on your computer.
f. Check and confirm that the Power, Powerline and Ethernet LEDs on the PROLiNK® PPL1201
Powerline AV Ethernet Adapter are ON.
The hardware connection mechanism is shown below:
Section 2
Remark:
Do not connect the Powerline adaptor to an extension lead, power strip, extension cord, surge protector as
this may degrade the network performance.
Version 1.00 Page 7 of 25 PPL1201
Page 13
PROLiNK PPL1201 User Manual www.prolink2u.com
Section 3 : Installation of the Management Utility
Please verify that no other PROLiNK® PPL1201 Powerline AV Ethernet Adapter or any Encryption Management
Utilities are installed before installing the provided software. If other Powerline Utilities are installed, uninstall them
and restart your personal computer before installing this provided software.
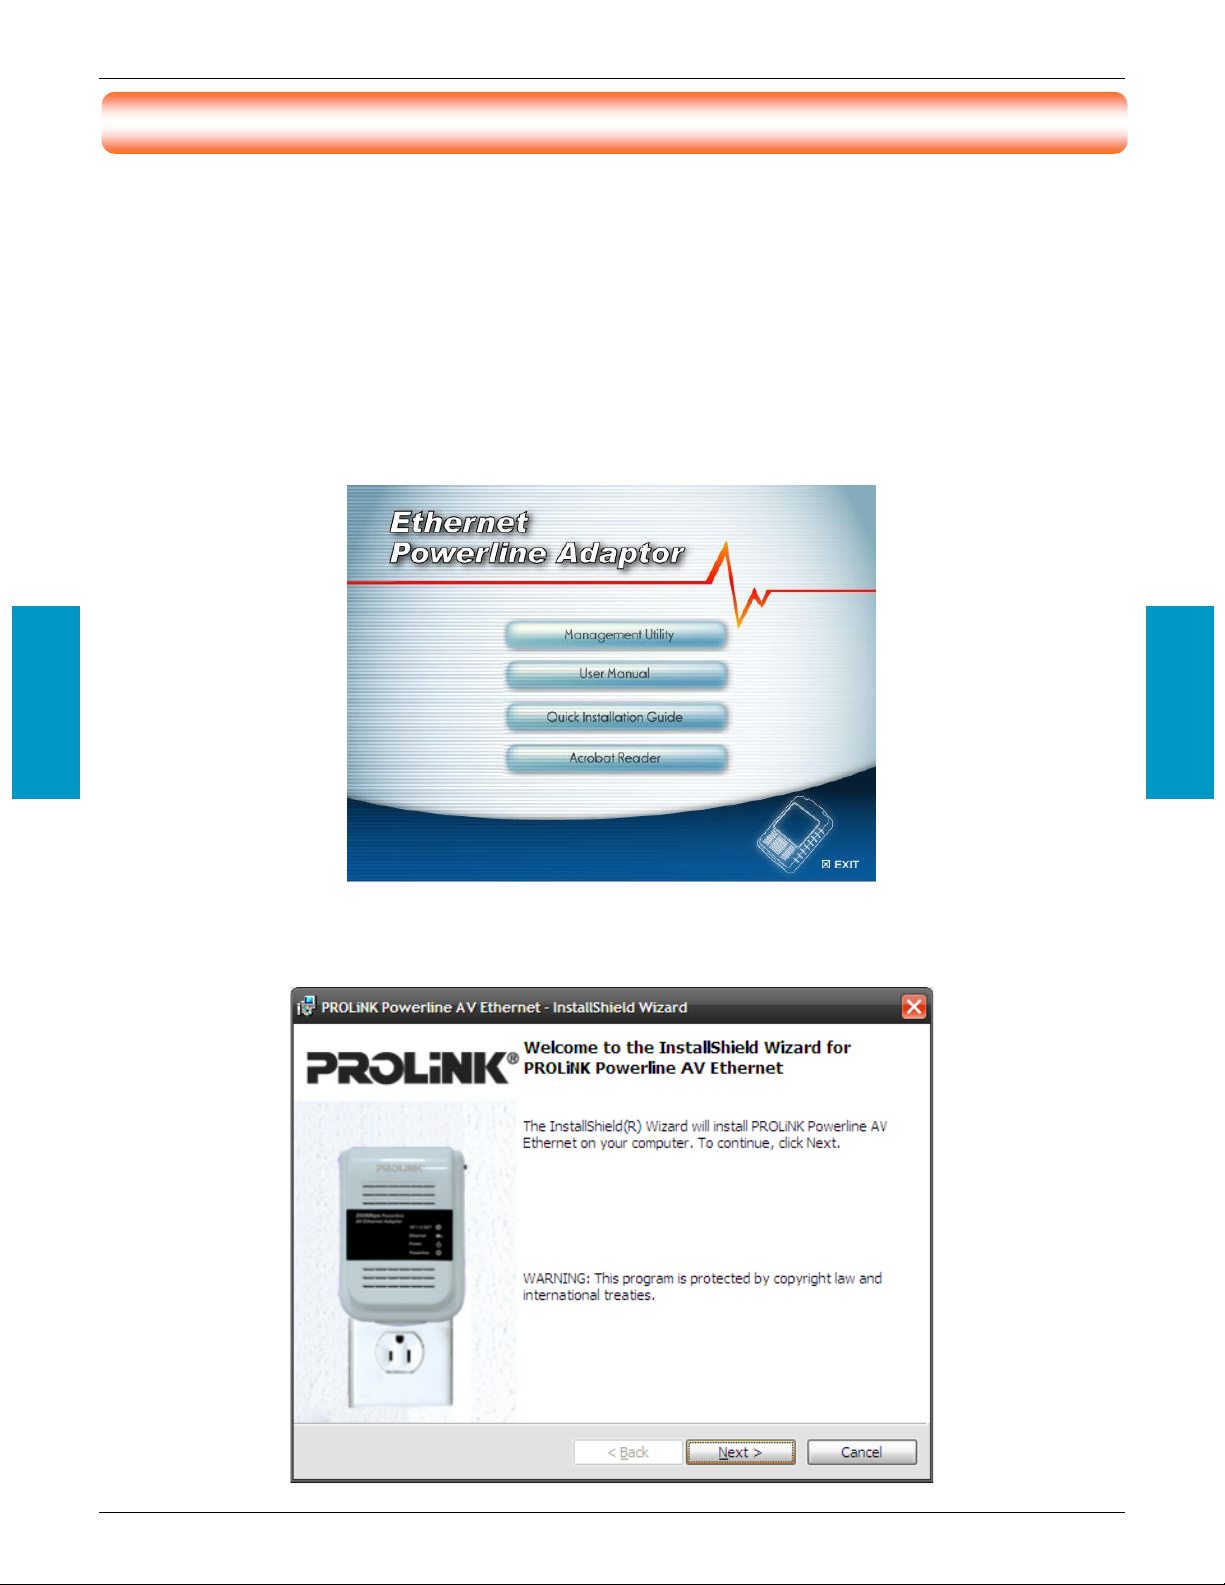
Follow the following procedures to properly installing the provided Management Utility:
Step 1: Power on your computer and insert the provided CD into the CD-ROM drive, the following screen will pop-
up automatically. Click on “Management Utility” to install the Management Utility.
Section 3
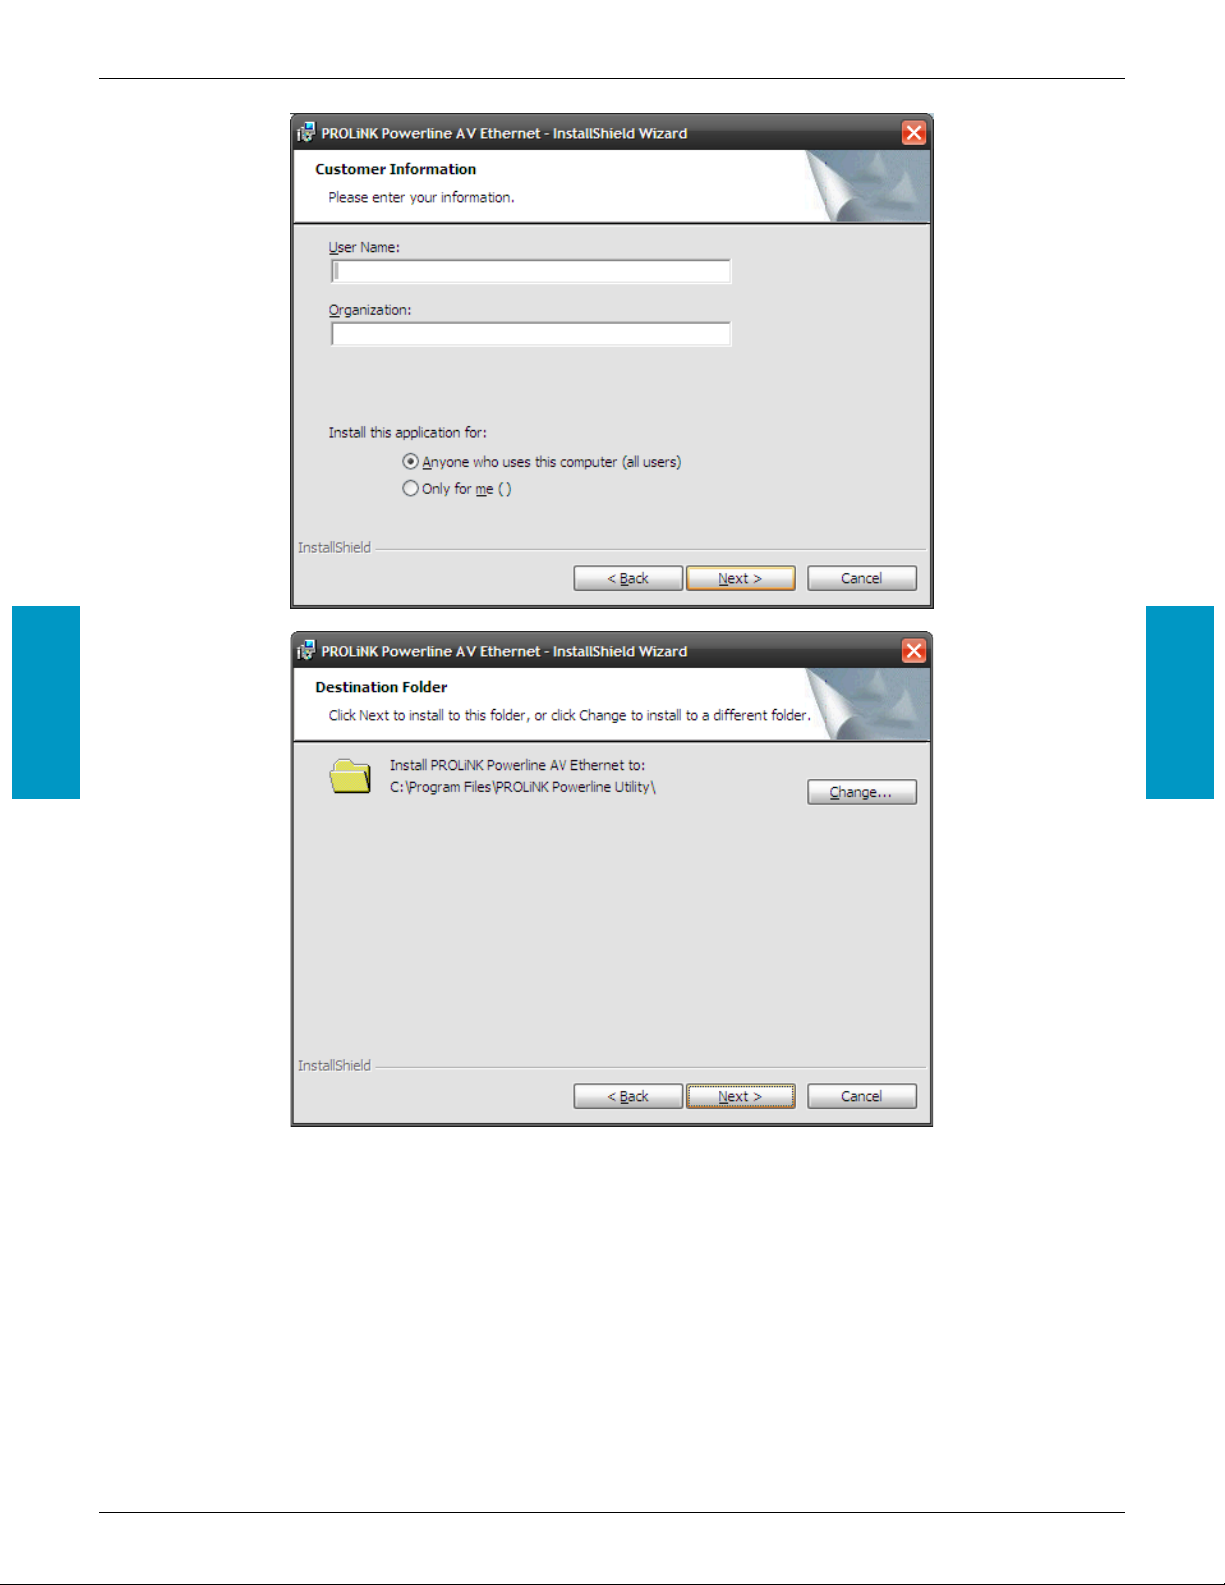
Step 2: The program installation process will carry out and copying all the necessary files to your system.
Section 3
Version 1.00 Page 8 of 25 PPL1201
Page 14
PROLiNK PPL1201 User Manual www.prolink2u.com
Section 3
Section 3
Version 1.00 Page 9 of 25 PPL1201
Page 15
PROLiNK PPL1201 User Manual www.prolink2u.com
Section 3
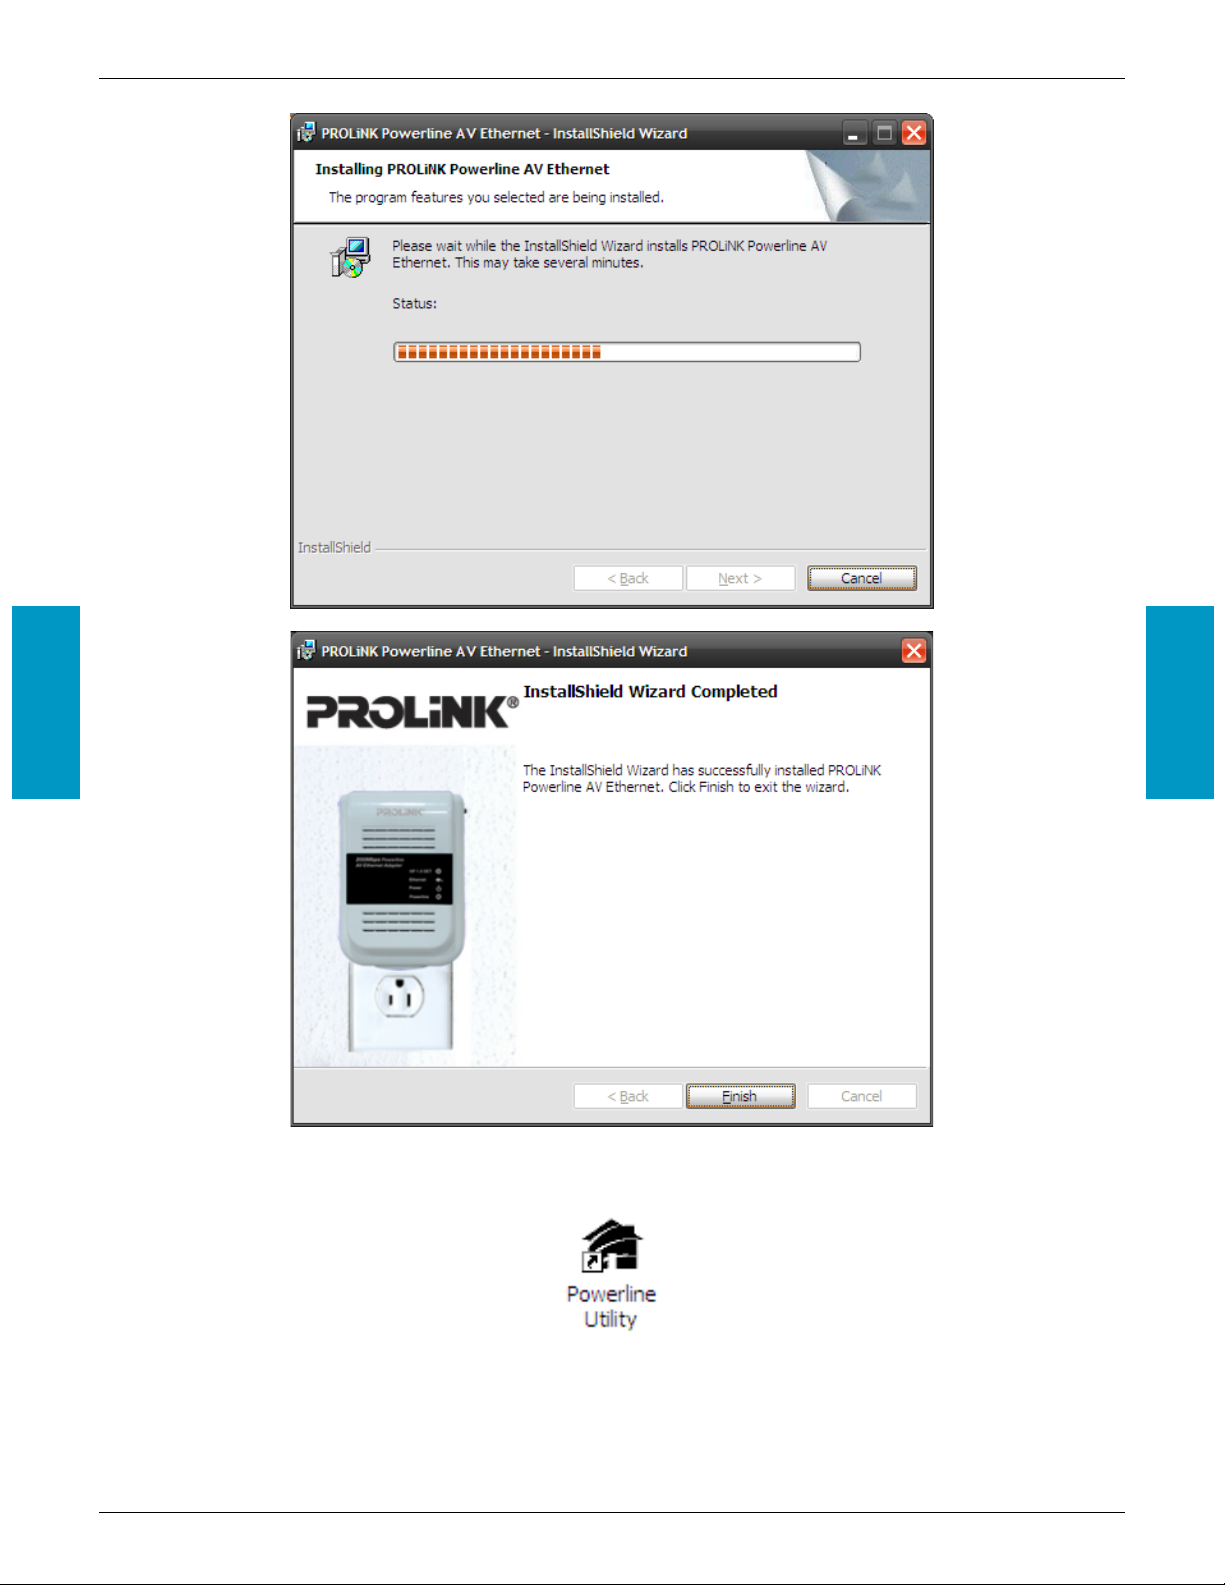
Step 3: After the installation, a shortcut to the “PowerPacket Utility” application icon is provided on the windows
Section 3
desktop.
Version 1.00 Page 10 of 25 PPL1201
Page 16
PROLiNK PPL1201 User Manual www.prolink2u.com
Section 4 : Using the Management Utility
After you’d successfully installed the PROLiNK® PPL1201 Powerline AV Ethernet Adapter hardware and
Management Utility software, you can setup or configure the devices according to your need.
This PROLiNK® PPL1201 Powerline AV Ethernet Adapter Configuration Utility enables the users to identify
powerline devices on the powerline network; measures data rate performance, ensures privacy and performs
diagnostics by setting user defined secure powerline networks.
Double click on the “Power Packet Utility” from your windows desktop, the following screen display. This
Management Utility consists of a set of five property sheets, viz., “Main”, “QOS”, “Privacy”, “Diagnostics” and “About”.
Section 4
Section 4
Version 1.00 Page 11 of 25 PPL1201
Page 17
PROLiNK PPL1201 User Manual www.prolink2u.com
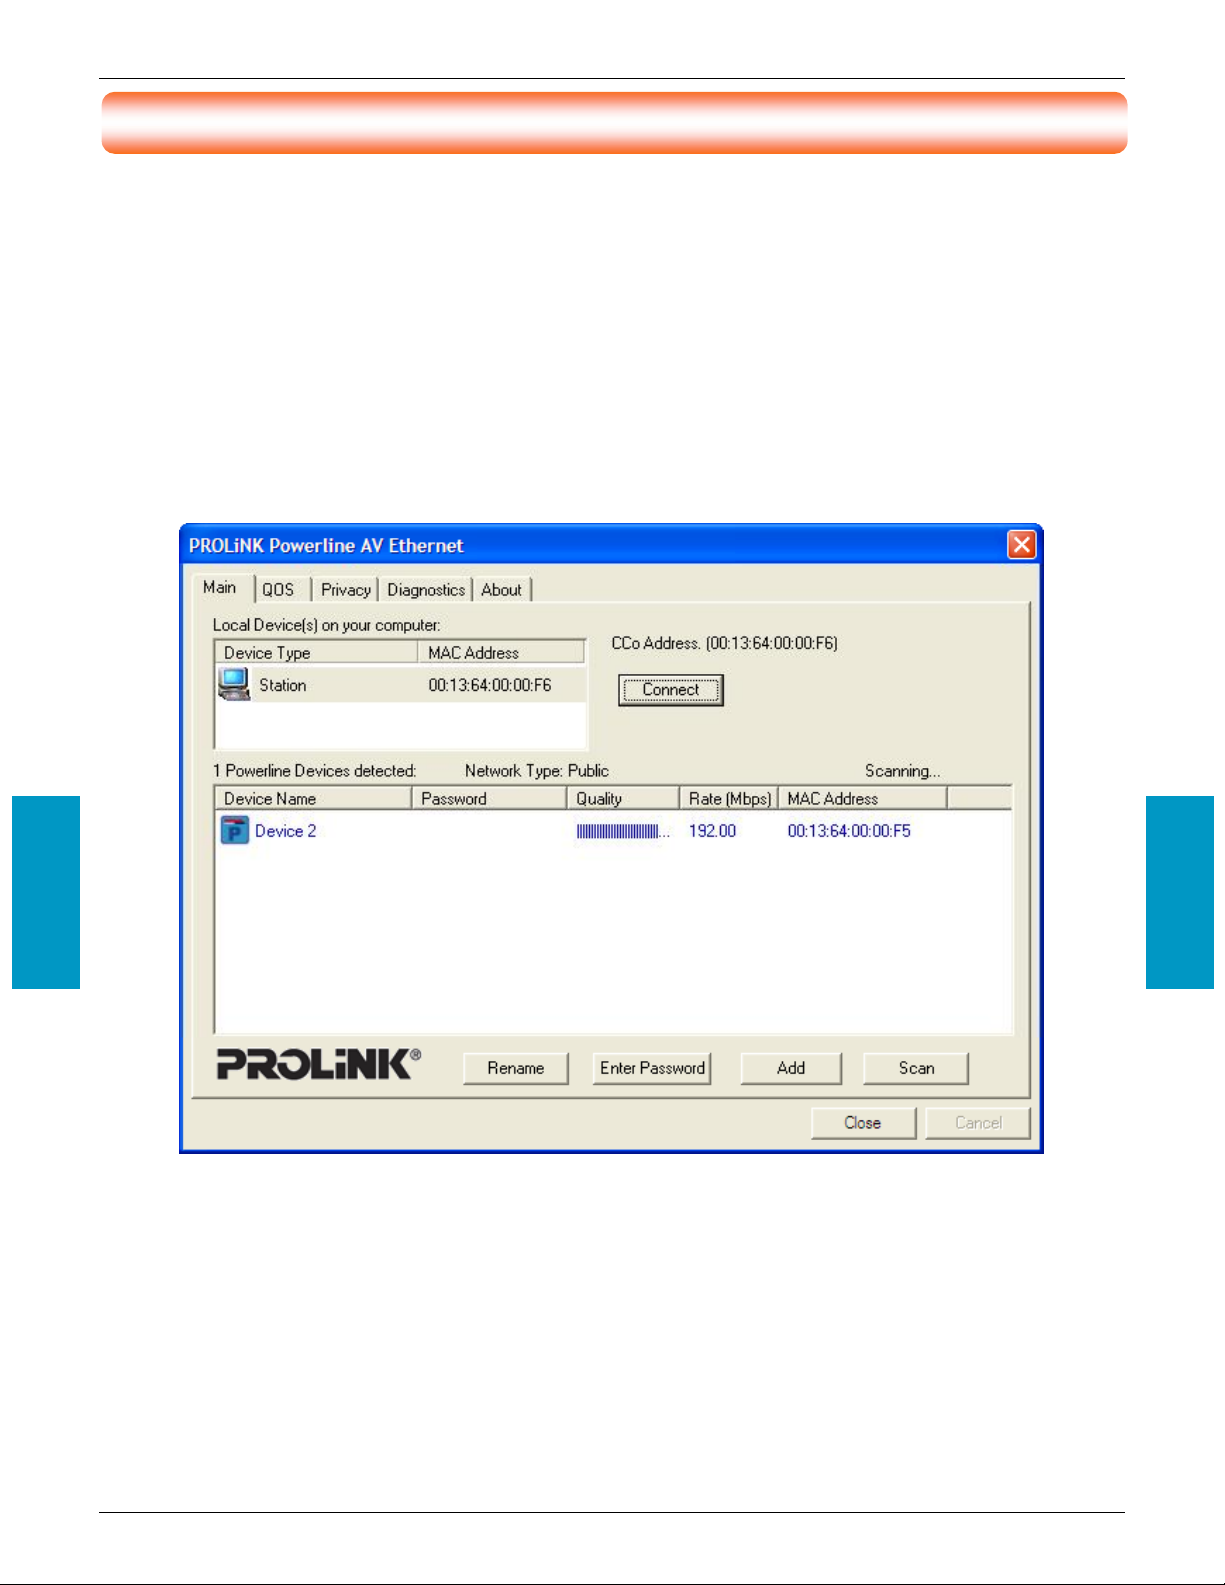
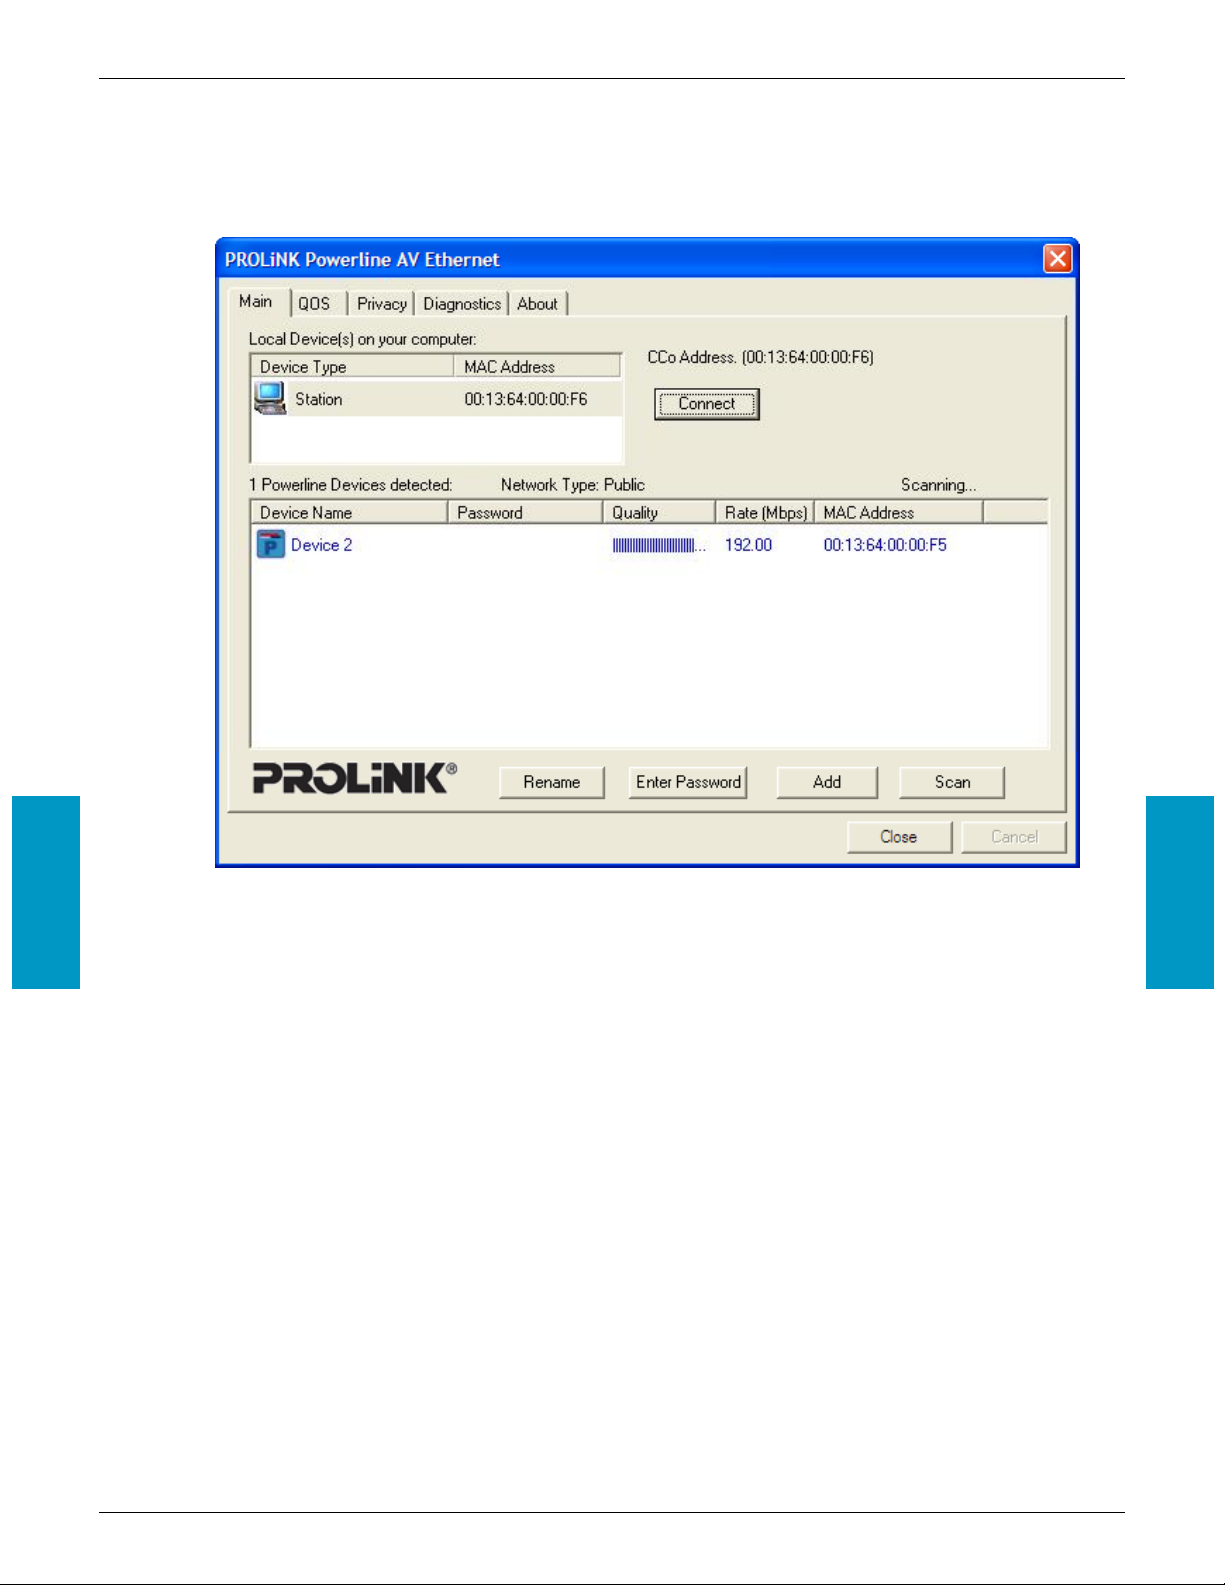
4.1 Main
The Main tab shows all the PROLiNK® PPL1201 Powerline AV Ethernet Adapter that is logically connected to
the current computer where the Management Utility is running.
Section 4
Section 4
• Local Device(s) on your computer
This shows all local PROLiNK® PPL1201 Powerline AV Ethernet Adapter found connected to the
computer’s LAN card. In most cases, only one device will display in this panel. Click and select the local
device shown on the screen then click “Connect” tab to manage the PROLiNK® PPL1201 Powerline AV
Ethernet Adapter. The status message will be shown above the “Connect” button indicates that your PC
is connected to the same device. Once the chosen PROLiNK® PPL1201 Powerline AV Ethernet Adapter
is properly connected, this Management Utility will automatically scan the power line periodically for
any other existing powerline devices.
• Network Type
Displayed the type of logical network: “Public” or “Private”.
Version 1.00 Page 12 of 25 PPL1201
Page 18

PROLiNK PPL1201 User Manual www.prolink2u.com
Section 4
• Autoscan
Shows the scanning status (Default is “ON”).
o Device Name
Show the default device name. One may redefine or change the name by clicking on the name
and editing in place or by clicking the “Rename” button.
o Password
Show the current password of the PROLiNK® PPL1201 Powerline AV Ethernet Adapter.
o Quality
Shows the quality of the PROLiNK® PPL1201 Powerline AV Ethernet Adapter connection.
o Rate (Mbps)
Display the current transmission rate of the selected PROLiNK® PPL1201 Powerline AV Ethernet
Adapter.
o MAC Address
Show the PROLiNK® PPL1201 Powerline AV Ethernet Adapter’s MAC address.
• Rename
Click to change the name of the selected PROLiNK® PPL1201 Powerline AV Ethernet Adapter.
• Enter Password
Shows the supplied PROLiNK® PPL1201 Powerline AV Ethernet Adapter’s password (Initially left blank).
To set the PROLiNK® PPL1201 Powerline AV Ethernet Adapter password (Which is required when
creating a private network), click and select the device shown in the lower panel and click on the “Enter
Password” button. Follow the pop-up dialog box to complete your password setting.
• Add
Click this button to add a remote PROLiNK® PPL1201 Powerline AV Ethernet Adapter to your network
that is not on the lower panel displayed list. You will advice to locate the passwords for all PROLiNK®
PPL1201 Powerline AV Ethernet Adapter you wish to manage and add them to the local logical network
by clicking the “Add” button. Follow the pop-up dialog box to complete your setting.
• Scan
Click the “Scan” button to perform an immediate search of the PROLiNK® PPL1201 Powerline AV
Ethernet Adapter connected to the computer. The Management Utility will automatically perform the
scanning process and update the display every few seconds by default.
Section 4
Version 1.00 Page 13 of 25 PPL1201
Page 19

PROLiNK PPL1201 User Manual www.prolink2u.com
4.1.1 Rename
This Management Utility allows you to change the name of the listed PROLiNK® PPL1201 Powerline AV
Ethernet Adapter. Click and select the PROLiNK® PPL1201 Powerline AV Ethernet Adapter you wish to
change from the list, then click on the “Rename” tab and editing-in-place to change the name.
Section 4
4.1.2 Enter Password
To set or change your PROLiNK® PPL1201 Powerline AV Ethernet Adapter’s password, click and select the
PROLiNK® PPL1201 Powerline AV Ethernet Adapter you wish to change from the list, then click on the
“Enter Password” tab, the following screen display.
Enter your Password (Take note to the password format) and click “OK” after setup.
Note:
The PROLiNK® PPL1201 Powerline AV Ethernet Adapter
device must be present on the power line (plugged in) in
order for the password to be confirmed and added to the
network. If the PROLiNK® PPL1201 Powerline AV Ethernet
Adapter device could not be located, a warning message will
be shown.
Note:
The Password field accepts the Device password in any case
formats, with or without dashed between them.
Section 4
Version 1.00 Page 14 of 25 PPL1201
Page 20

PROLiNK PPL1201 User Manual www.prolink2u.com
4.1.3 Add Device
The following dialog box pop-up when clicking the “Add” button under Main configuration homepage. The
dialog box allows you to enter both the selected device’s name and password. Noted that the PROLiNK®
PPL1201 Powerline AV Ethernet Adapter must be present on the power grid in order to activate the set
password and added to the local network.
Enter your Device Name and Password (Take note to the password format) and click “OK” after setup.
Section 4
The following screen display after the naming and password setting process, which is also the Diagnostics
configuration homepage.
Section 4
Version 1.00 Page 15 of 25 PPL1201
Page 21

PROLiNK PPL1201 User Manual www.prolink2u.com
4.2 QoS
The second tabbed window, labeled ‘QoS’ for Quality of Service, is shown in Figure.
Section 4
Section 4
QoS requirements are different for various data types such as streaming video or music, voice and raw data.
To provide higher QoS for streaming data, priority levels can be set using tags at the beginning of data
frames. Virtual Local Area Network (VLAN) 802.1p priority tags on Ethernet frames are used to specify 8
(0~7) levels of ‘user priority’. Powerline AV powerline allows for 4 levels of Channel Access Priority (CAP(0-
3)). Therefore, the 8 levels of VLAN Ethernet tags must be mapped to the 4 levels of CAP priority, where
CAP 3 is the highest priority and CAP 0 is the lowest. CAP 3 priority might be used for voice and network
management frames, CAP 2 is used for streaming video-and music while CAP 1 can CAP 0 are used for data.
Mapping VLAN tags or TOS bits to CAP levels is easily done using the VLAM Priority Mapping function on
the QoS tab window.
The ‘Priority Mapping’ group contains both VLAN and TOS Bit mapping capability. When selected, packets
matching the VLAN or TOS Bit priority will be assigned the Powerline contention priority (channel Access
Priority, CAP) as set in the corresponding dropdown box. If a packet has both VLAN and TOS in it, VLAN will
override TOS.
Version 1.00 Page 16 of 25 PPL1201
Page 22

PROLiNK PPL1201 User Manual www.prolink2u.com
The ‘Default CAP’ group allows for default priority mapping of packets that do not have a VLAN or TOS bit
(or if these are disabled). Settings are available for Unicast (directed to a host).
• IGMP - (default CAP 3) – sets the channel access priority for IGMP frames – these are the group
management frames, not the stream data
• Unicast – (default CAP 1) – sets the default channel access priority for unicast frames not matching any
other classification or mapping.
• IGMP managed Multicast Stream (Fixed to CAP 2) – sets the default channel access priority for stream
data belonging to a snooped IGMP multicast group.
• Multicast/Broadcast – sets the default CAP for multicast frames not in a snooped group and for
broadcast frames.
After making CAP settings, click the Update button to update the value, and then click the Close button to
save new setting.
4.3 Privacy
Section 4
The Privacy configuration page provides a means for managing the local network and providing additional
security for the logical network and also to select the devices that has to be included in the network. All
Powerline devices are shipped using a default logical network (network name), which is normally
“HomePlugAV”
The Privacy configuration homepage allows you to change the Network Name of the PROLiNK® PPL1201
Section 4
Powerline AV Ethernet Adapter that is currently connected to this computer into a private network. Reset the
private network to universal public network by clicking on the “Use Default (Public Network)” or
entering/editing “HomePlugAV” under column of “Private Network Name” is always available.
Note that every PROLiNK® PPL1201 Powerline AV Ethernet Adapter on your home network MUST have the
same Network Password for connectivity to be established throughout your home.
Note:
Changing the network name to anything other than “HomePlugAV” will show the network type on the Main
configuration screen as “Private”.
Version 1.00 Page 17 of 25 PPL1201
Page 23

PROLiNK PPL1201 User Manual www.prolink2u.com
Section 4
• Set Local Device Only
The button is used to change the network name of the local PROLiNK® PPL1201 Powerline AV Ethernet
Adapter only. All PROLiNK® PPL1201 Powerline AV Ethernet Adapter devices seen on the Main
configuration homepage prior to this will be no longer present in the new network, effectively making
the local devices not to communicate to the devices that were in the old logical network. Devices
previously set up with the same logical network (same network name) will appear in the device list
afterward selecting this option.
• Set All Devices
The button is used to change the logical network of all devices that appear on the Main tab screen
whose Device Password had been entered for the same logical network. A dialog window will appear to
report the success of this operation. For devices whose device passwords were not entered, this
operation will fail and will report a failure message.
Section 4
Version 1.00 Page 18 of 25 PPL1201
Page 24

PROLiNK PPL1201 User Manual www.prolink2u.com
4.4 Diagnostics
The Diagnostics homepage shows the System Information and a history of all remote devices seen over a
period of time. Click on the “Diagnostics” tab and the following screen display.
Section 4
Section 4
The Diagnostics information displayed can be saved to a text file. One can email the saved text file to the
local supplier when there’s technical support require or print the saved text file as reference during a
technical support conference.
The Upper Panel shows technical data concerning software and hardware present on the host computer
which were used to communicate over PROLiNK® PPL1201 Powerline AV Ethernet Adapter on the Powerline
network. The data includes the following:
• Operating System Platform/Version
• Host Network Name
• User Name
• MAC Address of all NICs (Network interface card) connected to the host
• Identify versions of all Driver DLLs and Libraries used (NDIS) and optionally
• MAC addresses of all devices connected locally to the host
Version 1.00 Page 19 of 25 PPL1201
Page 25

PROLiNK PPL1201 User Manual www.prolink2u.com
The Lower Panel contains a history of all remote PROLiNK® PPL1201 Powerline AV Ethernet Adapter devices
seen on the computer over a certain period of time. All devices that were on the powerline network are
listed here along with a few other parameters. PROLiNK® PPL1201 Powerline AV Ethernet Adapter devices
that are active on the current logical network will show a transfer rate in the Rate column; devices on other
networks, or devices that may no longer exist are shown with a “?” in the Rate column. The following
remote PROLiNK® PPL1201 Powerline AV Ethernet Adapter devices information is available from the
diagnostics screen:
• Device Alias Name
• Device MAC Address
• Device Password
• Device Last known rate
• Device Last Known Network name
• Date device last seen on the network
The diagnostics information displayed may be saved to a text file for later use, or can be printed for
reference for a technical support call. PROLiNK® PPL1201 Powerline AV Ethernet Adapter devices, which are
not part of the network anymore, can be deleted using the delete button. A dialog window pops up with a
confirmation message if we try to delete a device whose password has been entered.
4.5 About
Section 4
The About homepage show the Management Utility software version.
Section 4
• AutoScan:
When enabled (Place a check), the Management Utility will automatically scan for PROLiNK®
PPL1201 Powerline AV Ethernet Adapter devices on the local network every few seconds and
updated the scanning information on the Main configuration homepage.
Version 1.00 Page 20 of 25 PPL1201
Page 26

PROLiNK PPL1201 User Manual www.prolink2u.com
Section 5 : Advance Features - How to use the Push Buttons
5.1 Pair( Secure with 128 bits-AES)
The Powerline AV standard uses 128-bit AES (Advanced Encryption Standard) to safely transmit data
between powerline adaptors. For the powerline adaptors to communicate with each other they all need to
use the same Network Membership Key (NMK). Otherwise, they cannot unscramble the encrypted data
sent in the powerline network.
The Pair button allows you to set up a secure powerline connection with other HomePlug AV compliant
powerline devices which also support the Pair feature.
5.2 Set Up a Powerline Network with the Pair button
You can connect a number of devices on a powerline network, but you can use the Pair button on only two
devices at a time.
Section 5
Version 1.00 Page 21 of 25 PPL1201
Device A want to form a network group with another device B:
Step 1: Hold the Pair button of device A for 2 seconds, the Power LED will start blinking.
Step 2: Hold the Pair button of device B for 2 seconds, the Power LED will start blinking
Step 3: Wait for the Power LED of both devices to light up then you will now have both devices being in
the same network group.
Section 5
Page 27

PROLiNK PPL1201 User Manual www.prolink2u.com
Device C wants to join an existing network group AB:
Step 1: Hold down the Pair button of device C for more than 10 seconds until both the Powerline and
Power LED are off, then release the Pair button. The Power LED of device C will start blinking.
Step 2: Then hold down the Pair button of device (A or B) for 2 seconds.
Step 3: Hold down the Pair button of device C again for 2 seconds
Note: This must be done within 120 seconds after pressing the Pair button of device (A or B).
Step 4: Wait for the Power LED of device C and device (A or B) to light up. Now you will have device A join
the network group BC.
5.3 Pair Button Behavior
The following table summarizes the actions that occur when the Pair button is pressed for specific time.
Pair button Action Status Power LED Light Behavior
less than 3 seconds
Section 5
more than 10 seconds
5.4 Reset
Restore the Powerline adaptor configuration to factory default.
a. Please make sure unplug (remove) the Ethernet cable first, and then press the Reset button.
b. Hold down the Reset button for 2 seconds. The default settings have been restored.
Be careful, don’t power off when the device is in reset process.
The adaptor joins a network. It
shares the same network name as
other adaptors on the Powerline
network.
The adaptor leaves any network it is
associated with and its network
name assumes a random value.
The Power LED turns on if your
adaptor is connected to another
Powerline adaptor or a Powerline
network.
Section 5
The Power LED turns off when it
disconnects from the Powerline
network.
Version 1.00 Page 22 of 25 PPL1201
Page 28

PROLiNK PPL1201 User Manual www.prolink2u.com
Appendix A : Troubleshooting
The Troubleshooting Guide provides answers to common problems regarding the PROLiNK® PPL1201 Powerline AV
Ethernet Adapter.
Q1. The Power LED does not light up.
Ans. Check the following:
a. Make sure that the PROLiNK® PPL1201 Powerline AV Ethernet Adapter is properly plugged into a
power outlet.
b. Make sure the power outlet is active (working) by plugging another electric device into it.
c. Re-plug the PROLiNK® PPL1201 Powerline AV Ethernet Adapter to the power outlet again. If the Power
LED still failed to light up, contact your local dealer for technical support.
Q2. The Ethernet LED does not light up.
Ans. Check the following:
a. Make sure that the Ethernet cable (RJ-45) is properly connected to the PROLiNK® PPL1201 Powerline
AV Ethernet Adapter’s Ethernet port.
b. Make sure that the other end of the Ethernet cable (RJ-45) is properly connected to the computer LAN
card or to you Cable/xDSL Ethernet port.
c. Make sure your computer LAN card is properly installed and configured.
d. Make sure your Cable/xDSL broadband access is working and configured correctly.
e. Contact your local dealer for technical support if the Ethernet LED still failed to lights up after the above
procedures.
Q3. Powerline LED does not light up.
Ans. Check the following:
a. Double click to enable the Management Utility and click the “Scan” tab under the Main configuration
homepage. The Management Utility will automatically detect all other PROLiNK® PPL1201 Powerline
AV Ethernet Adapter on your power line network.
b. Try to plug a second PROLiNK® PPL1201 Powerline AV Ethernet Adapter into a near by power outlet
and check whether the Powerline LED lights up or not.
c. Contact your local dealer for technical support if the Powerline LED still failed to lights up after the
above procedures.
Q4. My Powerline device is unable to detect my other Powerline device.
Ans. This may due to the accidental change of the device password.
Access the Management Utility and select Privacy Tab. Enter the password ”HomePlugAV” in the blank
provided. Then press the “Set to Local Device Only” button. Repeat the same procedure to the other
Powerline device.
Version 1.00 Page 23 of 25 PPL1201
Page 29

PROLiNK PPL1201 User Manual www.prolink2u.com
Appendix B : Energy-Related Products Information
In order to conform to the CE Energy–Related Products Directive 2009/125/EC, please ask the local distributor,
supplier or importer below information:
• The related information of Recycle or disposal
• The related information of spare parts issue --- The product doesn't have the function of upgrading.
• The related information of Energy–Related Products Directive 2009/125/EC Implementing Measure is
added to the Energy–Related Products testing report.
Version 1.00 Page 24 of 25 PPL1201
Page 30

PROLiNK PPL1201 User Manual www.prolink2u.com
Appendix C : Technical Support
FREE TECHNICAL SUPPORT HOTLINE
Monday to Friday, 9.00am – 6.00pm
(Closed on Saturdays, Sundays and Public Holidays)
• SINGAPORE : (65) 6357 0666
• MALAYSIA : (60) 3 8023 9151
• INDONESIA : (62) 21 3483 1777
WALK-IN SUPPORT
Monday to Friday, 9.00am – 6.00pm
(Closed on Saturdays, Sundays and Public Holidays)
• SINGAPORE
FIDA INTERNATIONAL (S) PTE LTD
Block 16 Kallang Place, #06-02 Kallang Basin Industrial Estate, Singapore 339156.
• MALAYSIA
FIDA SYSTEMS (M) SDN BHD
29 Jalan USJ 1/31, 47600 Subang Jaya, Selangor Darul Ehsan, Malaysia.
• INDONESIA
PROLiNK INDONESIA
Jl. Cideng Barat No. 79 Jakarta Pusat 10150 Indonesia.
ONLINE TECHNICAL SUPPORT
• SINGAPORE : support@fida.com
• MALAYSIA : support_my@fida.com
• INDONESIA : support@prolink.co.id
Register Online For Your Product Warranty
www.prolink2u.com
Version 1.00 Page 25 of 25 PPL1201
Page 31

PROLiNK PPL1201 Buku Manual www.prolink2u.com
PROLiNK PPL1201
200Mbps Powerline AV Ethernet Adapter
Buku Manual
Satu Set
Version 1.00 Bahasa Indonesia
Page 32

PROLiNK PPL1201 Buku Manual www.prolink2u.com
Aturan Tingkat Radiasi CE
Peralatan ini telah diuji dan dinyatakan sesuai dengan batas-batas Dewan Eropa Directive
89/336/EEC pada pendekatan hukum negara-negara anggota yang berkaitan dengan EN
55022 Class B, EN61000-3-2, EN 61000-3-3, EN50412-2-1,CISPR/I/XX/CDV OptB dan Safety EN
60950-1.
Peringatan Keamanan
Kami menyarankan untuk mengamati sambungan berikut untuk menghilangkan sumber-sumber gangguan:
• Hindari ekstensi strip. Hal ini dapat mengganggu transmisi sinyal Powerline Adaptor. Dinding outlet yang
lebih baik.
• Juga posisi adaptor jauh dari komputer Anda, karena dapat mengganggu operasi adaptor.
• Pasang perangkat ke berbagai outlet dan hindari menggunakan ekstensi strip.
Version 1.00 i PPL1201
Page 33

PROLiNK PPL1201 Buku Manual www.prolink2u.com
Petunjuk Penting Keselamatan
1. JANGAN buka produk ini atau mencoba memperbaiki produk ini, atau akan membahayakan anda dari
terkena tegangan tinggi dan risiko lainnya.
2. JANGAN mengoperasikan produk ini di dekat air.
3. JANGAN menempatkan atau mengoperasikan produk ini di dekat radiator atau di tempat yang panas.
4. JANGAN mengekspos produk ini dari kelembaban, debu atau cairan korosif.
5. JANGAN menghubungkan produk ini ke stopkontak di dinding selama ada petir.
6. JANGAN menghalangi slot ventilasi produk ini, karena jika tidak cukup aliran udara maka akan dapat
membahayakan produk ini.
7. JANGAN memasukkan benda apa pun kedalam produk ini.
8. Hubungkan langsung ke stopkontak di dinding (100Vac ~ 240Vac). JANGAN gunakan kabel sambungan
antara produk ini dan sumber listrik AC lainnya.
9. Ketika menghubungkan produk ini ke stopkontak di dinding, pastikan bahwa soket listrik tidak rusak, dan
tidak ada kebocoran gas atau pipa air untuk memulai.
10. Tempatkan kabel penghubung dengan hati-hati sehingga orang tidak akan tersandung olehnya.
11. Adaptor Powerline harus dioperasikan sesuai dengan petunjuk yang ada pada label. Jika Anda tidak yakin,
konsultasikan masalah ini dengan teknisi yang mengerti dengan masalah ini.
12. Lepaskan steker Powerline Adaptor ini apabila menemukan kondisi sebagai berikut:
- Jika produk ini tertumpah oleh cairan.
- Jika produk telah terkena hujan atau air.
13. Lepaskan steker dari stopkontak di dinding sebelum pembersihan. Gunakan kain basah untuk
membersihkan. JANGAN menggunakan cairan pembersih atau pembersih aerosol.
Pemberitahuan untuk Pembuangan
Simbol pada produk ini atau dalam petunjuk berarti bahwa peralatan listrik dan elektronik harus
dibuang secara terpisah dari limbah rumah tangga Anda. Ada sistem pengumpulan terpisah untuk
daur ulang di Uni Eropa.
Untuk informasi lebih lanjut, silahkan hubungi dealer lokal atau penjual di tempat Anda membeli.
Version 1.00 ii PPL1201
Page 34

PROLiNK PPL1201 Buku Manual www.prolink2u.com
Hak Cipta
Isi publikasi ini tidak boleh direproduksi dalam setiap bagian atau secara keseluruhan, disimpan,
ditulis dalam sebuah sistem pencarian informasi, diterjemahkan ke dalam bahasa apa pun, atau
ditransmisikan dalam bentuk apapun atau dengan cara apapun, mekanik, magnetik, elektronik,
optik, fotokopi , manual, atau sebaliknya, tanpa izin tertulis.
Merk Dagang
PROLiNK® adalah merek dagang dari Fida International (S) Pte Ltd dan diproduksi di bawah
otoritas. Semua produk, perusahaan, nama merek adalah merek dagang atau merek dagang
terdaftar dari masing-masing perusahaan. Mereka digunakan hanya untuk tujuan identifikasi.
Spesifikasi ini dapat berubah tanpa pemberitahuan.
Version 1.00 iii PPL1201
Page 35

PROLiNK PPL1201 Buku Manual www.prolink2u.com
Daftar Isi
ATURAN TINGKAT RADIASI CE .................................................................................................................................................... I
PERINGATAN KEAMANAN............................................................................................................................................................. I
PETUNJUK PENTING KESELAMATAN........................................................................................................................................ II
PEMBERITAHUAN UNTUK PEMBUANGAN............................................................................................................................. II
HAK CIPTA..........................................................................................................................................................................................III
MERK DAGANG................................................................................................................................................................................III
DAFTAR ISI .........................................................................................................................................................................................IV
BAGIAN 1 : PENDAHULUAN......................................................................................................................................................... 1
BAGIAN 2 : MEKANISME KONEKSI ............................................................................................................................................ 4
BAGIAN 3 : INSTALLATION OF THE MANAGEMENT UTILITY.......................................................................................... 8
BAGIAN 4 : USING THE MANAGEMENT UTILITY................................................................................................................11
BAGIAN 5 : FITUR ADVANCE – CARA MENGGUNAKAN TOMBOL PUSH .................................................................21
LAMPIRAN A : PERMASALAHAN..............................................................................................................................................23
LAMPIRAN B : ENERGY – TERKAIT INFO PRODUK.............................................................................................................24
TECHNICAL SUPPORT...................................................................................................................................................................25
Version 1.00 iv PPL1201
Page 36

PROLiNK PPL1201 Buku Manual www.prolink2u.com
Selamat atas pembelian Anda yang luar biasa ini PROLiNK® PPL1201 Powerline Ethernet Adapter. Perangkat ini
Bagian 1
adalah 200Mbps AV Powerline Ethernet Adapter yang mengubah rumah Anda yang ada kabel listrik menjadi
infrastruktur jaringan di mana-mana. Cukup dengan menghubungkan PROLiNK® PPL1201 Powerline Ethernet
Adapter ke outlet listrik AC biasa yang akan dengan mudah memperpanjang Cable / xDSL koneksi broadband atau
ada Ethernet (LAN) untuk jaringan listrik lainnya di setiap ruangan rumah tanpa perlu kabel baru.
PROLiNK® PPL1201 Powerline Ethernet Adapter ini dapat mendukung hingga 200Mbps data rate di atas sirkuit
listrik rumah tangga yang ada. Dengan laju data 200Mbps, full aplikasi multimedia dengan mudah dapat didukung
seluruh rumah di samping akses Internet. Powerline Ethernet Adaptor ini menggunakan kabel listrik yang ada
dipasang di rumah sebagai jalan untuk mengirimkan data digital, suara, audio dan video antara perangkat.
Untuk menjamin keamanan komunikasi data dan aplikasi multimedia, yang PROLiNK® PPL1201 Powerline
Ethernet Adapter mendukung fitur built-in 128-bit enkripsi AES dan Quality of Service (QoS).
Dengan pengaturan minimal, Anda dapat menginstal dan menggunakan PROLiNK® PPL1201 Powerline Ethernet
Adapter dalam beberapa menit. Adaptor menambahkan dua fungsi baru yang akan berguna:
Bagian 1 : Pendahuluan
Bagian 1
1. Push button support
a. Mempermudah set-up
b. Meningkatkan fitur pairing termasuk chaining
c. Mengembalikan kondisi alat ke semula.
2. Modus operasi Hemat Daya
Bila PC atau perangkat Ethernet lainnya sepenuhnya dimatikan, Prolink AV ® PPL1201 Powerline Ethernet
Adapter akan secara otomatis masuk ke modus hemat daya yang akan membantu untuk mengurangi
konsumsi daya oleh sekurang-kurangnya 60%.
• Alat ini akan standby jika Ethernet link tidak terhubung
• Setiap perangkat dalam jaringan dapat masuk ke modus standby Standby
Version 1.00 Page 1 of 25 PPL1201
Page 37

PROLiNK PPL1201 Buku Manual www.prolink2u.com
1.1 Fitur
Bagian 1
1.1.1 Powerline AV
• Transfer data berkecepatan tinggi hingga 200Mbps.
• HomePlug AV yang telah memenuhi persyaratan standar.
• Bekerja dengan input AC 100V ~ 240V, 50 ~ 60Hz.
• Plug-and-Play (PnP) konfigurasi.
• Powerline berkecepatan tinggi dengan interface Ethernet adaptor.
• Mengurangi konsumsi daya oleh sekurang-kurangnya 60% selama dalam modus hemat daya.
• Teknik OFDM data yang tinggi kehandalan dalam kondisi media bising.
• Saluran cerdas memaksimalkan throughput adaptasi di bawah kondisi saluran yang keras.
• Build-in QoS dan fitur Koreksi Kesalahan.
• 128-bit AES Link dengan manajemen kunci enkripsi untuk mengamankan kekuasaan-line
komunikasi.
• Jangkauan transmisi hingga 200m di atas grid listrik rumah tangga.
• Dukungan Push Tombol "pasangan" dan "Reset".
• RoHS (Lead-Free) compliant.
1.1.2 Persyaratan System
1. Setidaknya dua AC 100V ~ 240V power outlet dengan kabel listrik rumah standar.
2. Sebuah komputer dengan spesifikasi berikut ini:
- Operating System dengan TCP / IP terinstal.
- Prosesor Pentium III atau ke atas.
- Ethernet LAN card yang terinstal dengan TCP / IP protocol.
- 64 MB RAM atau lebih.
- 50 MB space disk kosong (Minimum).
- CD-ROM Drive
1.1.3 Aplikasi
• Powerline Adaptors
• Ethernet-enabled untuk TVs
• Ethernet-enabled untuk set top boxes
• Game consoles
• Blue-ray / DVR / NAS drives
• Broadband gateways
• Over the top video devices ( i.e. Apple TV,Roku )
• Security cameras
Bagian 1
Version 1.00 Page 2 of 25 PPL1201
Page 38

PROLiNK PPL1201 Buku Manual www.prolink2u.com
1.2 Isi Paket
Bagian 1
PROLiNK® PPL1201 Powerline Ethernet Adapter berisi item berikut:
1. Satu PROLiNK® PPL1201 Powerline Ethernet Adapter
2. Satu kabel CAT-5 Ethernet (LAN).
3. Satu Panduan Instalasi Singkat.
4. Satu CD-ROM (Utility / Manual / Panduan Instalasi Singkat / Acrobat Reader).
Jika salah satu item di atas rusak atau hilang, segera hubungi agen PROLiNK Anda segera.
Bagian 1
Version 1.00 Page 3 of 25 PPL1201
Page 39

PROLiNK PPL1201 Buku Manual www.prolink2u.com
PROLiNK® PPL1201 Powerline AV Ethernet Adapter mendukung kecepatan sampai dengan 200Mbps data rate.
Dengan koneksi kecepatan seperti ini, PROLiNK® PPL1201 Powerline AV Ethernet Adapter memungkinkan Anda
untuk men-setup sebuah jaringan rumah berkecepatan tinggi dengan menggunakan kabel listrik rumah yang ada.
Cukup colokkan Prolink AV ® PPL1201 Powerline Ethernet Adapter ke outlet listrik biasa untuk memperpanjang
Cable / xDSL koneksi broadband atau jaringan LAN yang ada ke outlet listrik lainnya dalam ruang-ruang rumah
Anda.
Bagian 2
Mencatat bahwa Prolink AV ® PPL1201 Powerline Ethernet Adapter bekerja berpasangan. Anda perlu plug satu
Prolink AV ® PPL1201 Powerline Ethernet Adapter ke outlet listrik untuk setiap komputer (terhubung ke komputer
kartu LAN) Anda ingin menghubungkan (akses jaringan), Anda akan juga perlu Prolink lain AV ® PPL1201 Powerline
Ethernet Adapter terhubung ke Anda Cable / xDSL broadband (Ethernet port) untuk memperpanjang koneksi
broadband atau surfing internet.
Bagian di bawah ini menggambarkan Prolink AV ® PPL1201 Powerline Ethernet Adapter's LED indikator, interface
fisik dan koneksi perangkat keras mekanisme.
Bagian 2 : Mekanisme Koneksi
Bagian 2
2.1 Indikator LED
Informasi status Indikator LED.
Label Status Keterangan
HIDUP
Powe rline
Powe r
Ethernet
MATI
Berkedip Transmisi data pada Powerline
HIDUP
MATI
HIDUP
MATI Ethernet port tidak terhubung
Powerline adaptor yang lain terdeteksi pada jaringan
yang sama
Powerline adaptor yang lain tidak terdeteksi pada
jaringan yang sama
PROLiNK® PPL1201 Powerline AV Ethernet
Adapter
dalam keadaan menyala
PROLiNK® PPL1201 Powerline AV Ethernet
Adapter
Ethernet port terhubung dan siap untuk mentransmisi
data
dalam keadaan mati.
Blinking Transmisi data pada Ethernet Port
MATI
HP 1.0 DET
Blinking
Tidak terdeteksi HomePlug 1.0 yang lain yang terhubung
dalam 1 jaringan
HomePlug 1.0 yang lain terdeteksi pada satu jaringan
yang sama
Version 1.00 Page 4 of 25 PPL1201
Page 40

PROLiNK PPL1201 Buku Manual www.prolink2u.com
2.2 Interface Fisik
Bagian 2
Ada 2 interface fisik pada PROLiNK® PPL1201 Powerline AV Ethernet Adapter.
Interface Description
Ethernet Satu 10/100Mbps Ethernet port yang terhubung untuk PC LAN card atau broadband.
Power Plug Power Plug yang terhubung ke 100 ~ 240V AC power socket.
Bagian 2
UK 3-Pin Plug
EU 2-Pin Plug
Below is the instruction procedure in changing Pin Plug from EU 2-Pin to UK 3-Pin.
Version 1.00 Page 5 of 25 PPL1201
Page 41

PROLiNK PPL1201 Buku Manual www.prolink2u.com
2.3 Koneksi Hardware – Komputer
Bagian 2
Bagi Anda yang ingin membuat jaringan dengan Prolink ® AV PPL1201 Powerline Ethernet Adapter,
masing-masing komputer harus terhubung dengan benar dengan Prolink AV ® PPL1201 Powerline
Ethernet Adapter melalui kabel Ethernet (RJ-45). Berikut adalah langkah-langkah untuk menghubungkan
dengan benar PROLiNK® PPL1201 Powerline Ethernet Adapter ke komputer Anda:
1. Matikan PC atau Notebook.
2. Hubungkan Ethernet (RJ-45) kabel ke PROLiNK® PPL1201 Powerline Ethernet Adapter Ethernet
port.
3. Hubungkan ujung Ethernet (RJ-45) kabel ke komputer Anda (LAN port).
4. Pasang PROLiNK® PPL1201 Powerline Ethernet Adapter ke stopkontak di dinding sebelah
komputer.
5. Hidupkan komputer Anda.
6. Periksa dan pastikan bahwa Power dan Ethernet LED pada PROLiNK® PPL1201 Powerline
Ethernet Adapter ON.
Mekanisme koneksi hardware adalah sebagai berikut:
Bagian 2
Y
[
Z
Version 1.00 Page 6 of 25 PPL1201
Page 42

PROLiNK PPL1201 Buku Manual www.prolink2u.com
2.4 Koneksi Hardware – Internet
Bagian 2
Pada bagian ini akan menjelaskan bagaimana caraya untuk menghubungkan PROLiNK® PPL1201 Powerline
AV Ethernet Adapter ke ADSL broadband anda melalui ADSL Ethernet port. Ikuti prosedur di bawah ini
untuk menghubungkan Ethernet Powerline Adaptor untuk koneksi broadband ADSL Anda:
1. Matikan Broadband ADSL Router Anda.
2. Hubungkan Ethernet (RJ-45) kabel ke PROLiNK® PPL1201 Powerline Ethernet Adapter Ethernet
port.
3. Hubungkan ujung lain Ethernet (RJ-45) kabel ke port Ethernet yang tersedia dari broadband
ADSL Router Anda.
4. Pasang PROLiNK® PPL1201 Powerline Ethernet Adapter ke stopkontak di dinding sebelah
komputer.
5. Hidupkan Broadband ADSL Router Anda.
6. Periksa dan pastikan bahwa Power, Broadband ADSL Router dan Ethernet LED pada PROLiNK®
PPL1201 Powerline Ethernet Adapter ON.
Mekanisme koneksi hardware adalah sebagai berikut:
Bagian 2
Catatan:
Jangan menghubungkan Powerline Adaptor ke sambungan kabel listrik apapun, karena hal ini akan dapat
menurunkan kinerja jaringan.
Version 1.00 Page 7 of 25 PPL1201
Page 43

PROLiNK PPL1201 Buku Manual www.prolink2u.com
Bagian 3 : Installation of the Management Utility
Mohon di perhatikan bahwa tidak ada Prolink lain AV ® PPL1201 Powerline Ethernet Adapter atau apapun Utilitas
Pengelolaan Enkripsi diinstal sebelum menginstal perangkat lunak yang disediakan. Jika Powerline Utilitas lain
terinstal, uninstall mereka dan restart komputer pribadi Anda sebelum menginstal perangkat lunak yang disediakan.
Ikuti prosedur berikut ini untuk menginstal secara benar Manajemen Utility yang disediakan:
Langkah 1: Hidupkan komputer Anda dan masukkan CD yang disediakan ke dalam CD-ROM drive, layar berikut
akan pop-up secara otomatis. Klik pada "Manajemen Utility" untuk menginstal Management Utility.
Bagian 3
Langkah 2: Program proses instalasi akan meng copy semua file yang diperlukan ke sistem anda.
Bagian 3
Version 1.00 Page 8 of 25 PPL1201
Page 44

PROLiNK PPL1201 Buku Manual www.prolink2u.com
Bagian 3
Bagian 3
Version 1.00 Page 9 of 25 PPL1201
Page 45

PROLiNK PPL1201 Buku Manual www.prolink2u.com
Bagian 3
Langkah 3: Setelah instalasi selesai, shorchut icon "PowerPacket Utility" akan muncul di desktop.
Bagian 3
Version 1.00 Page 10 of 25 PPL1201
Page 46

PROLiNK PPL1201 Buku Manual www.prolink2u.com
Bagian 4 : Using the Management Utility
Setelah Anda telah berhasil menginstal Prolink AV ® PPL1201 Powerline Ethernet Adapter Manajemen Utility
hardware dan software, anda dapat men-setup atau mengkonfigurasi perangkat sesuai kebutuhan Anda.
Prolink AV ® PPL1201 Powerline Ethernet Adapter Configuration Utility ini memungkinkan para pengguna untuk
mengidentifikasi perangkat Powerline pada jaringan Powerline; mengukur kinerja data rate, menjamin privasi dan
melakukan diagnosa dengan menetapkan ditetapkan pengguna jaringan Powerline aman.
Klik icon “Power Packet Utility” dari file yang ada pada windows desktop, lalu ikuti petunjuk yang muncul pada layar.
Management Utility ini terdapat lima sub menu. “Main”, “QOS”, “Privacy”, “Diagnostics” and “About”.
Bagian 4
Bagian 4
Version 1.00 Page 11 of 25 PPL1201
Page 47

PROLiNK PPL1201 Buku Manual www.prolink2u.com
4.1 Main
Tab Utama menunjukkan semua Prolink AV ® PPL1201 Powerline Ethernet Adapter yang secara logic
terhubungkan pada komputer saat ini di mana Manajemen Utility sedang berjalan.
Bagian 4
Bagian 4
• Local Device(s) on your computer
Ini menunjukkan semua Prolink lokal AV ® PPL1201 Powerline Ethernet Adapter ditemukan dan
terhubung ke komputer melalui LAN port. Dalam kebanyakan kasus, hanya satu perangkat yang akan
ditampilkan dalam panel ini. Klik dan pilih perangkat lokal yang ditampilkan pada layar, kemudian klik
"Connect" untuk mengelola Prolink AV ® PPL1201 Powerline Ethernet Adapter. Pesan status akan
ditampilkan di atas tombol "Connect" menunjukkan bahwa PC Anda terhubung ke perangkat yang
sama. Setelah dipilih Prolink AV ® PPL1201 Powerline Ethernet Adapter terkoneksi dengan benar, Utility
Manajemen ini akan secara otomatis memindai listrik secara berkala untuk setiap perangkat Powerline
lain yang ada.
• Network Type
Menampilkan jenis jaringan: “Public” atau “Private”.
Version 1.00 Page 12 of 25 PPL1201
Page 48

PROLiNK PPL1201 Buku Manual www.prolink2u.com
Bagian 4
• Autoscan
Menampilkan hasil dari status scanning (secara default “ON”).
o Device Name
Menampilkan nama peralatan secara default. Kita dapat mendefinisikan kembali atau
mengubah nama dengan mengklik nama dan pengeditan di tempat atau dengan mengklik
tombol "Rename ".
o Password
Menampilkan password saat ini dari PROLiNK® PPL1201 Powerline AV Ethernet Adapter.
o Quality
Menampilkan kualitas koneksi dari PROLiNK® PPL1201 Powerline AV Ethernet Adapter.
o Rate (Mbps)
Menampilkan kecepatan transmisi yang tersedia saat ini dari PROLiNK® PPL1201 Powerline AV
Ethernet Adapter.
o MAC Address
Menampilkan alamat MAC dari PROLiNK® PPL1201 Powerline AV Ethernet Adapter.
• Rename
Klik untuk mengubah nama dari PROLiNK® PPL1201 Powerline AV Ethernet Adapter.
• Enter Password
Menampilkan password (default adalah kosong) dari PROLiNK® PPL1201 Powerline AV Ethernet
Adapter. Untuk mengatur password pada Prolink AV ® PPL1201 Powerline Ethernet Adapter (Yang
diperlukan saat membuat jaringan pribadi), klik dan pilih perangkat ditunjukkan pada bagian bawah
panel dan klik pada tombol "Enter Password". Ikuti pop-up kotak dialog untuk menyelesaikan
pengaturan password Anda.
• Add
Klik tombol ini untuk menambahkan Klik tombol ini untuk menambahkan Prolink AV ® PPL1201
Powerline Ethernet Adapter untuk jaringan anda yang tidak terlihat pada panel. Ikuti pop-up kotak
dialog untuk menyelesaikan pengaturan Anda.
• Scan
Klik tombol “Scan” untuk melakukan pencarian langsung dari Prolink AV ® PPL1201 Powerline Ethernet
Adapter yang terhubung ke komputer. Pengelolaan Utility akan secara otomatis melakukan proses
scanning dan update layar setiap beberapa detik secara default.
Bagian 4
Version 1.00 Page 13 of 25 PPL1201
Page 49

PROLiNK PPL1201 Buku Manual www.prolink2u.com
4.1.1 Rename
Utility Manajemen ini memungkinkan Anda untuk mengubah nama yang tercantum Prolink AV ® PPL1201
Powerline Ethernet Adapter. Klik dan pilih Prolink AV ® PPL1201 Powerline Ethernet Adapter yang ingin
Anda ubah dari daftar, kemudian klik pada tombol "Rename" lalu edit untuk mengubah nama.
Bagian 4
4.1.2 Enter Password
Untuk mengatur atau mengubah password dari Prolink AV ® PPL1201 Powerline Ethernet Adapter, klik dan
pilih Prolink AV ® PPL1201 Powerline Ethernet Adapter yang ingin Anda ubah dari daftar, kemudian klik
pada tombol "Enter Password ", tampilan layar berikut.
Masukkan kata sandi anda lalu klik “OK” setelah selesai.
Catatan:
PROLiNK® PPL1201 Powerline AV Ethernet Adapter ini harus
ditemukan disaat power line ini terhubung ke outlet listrik.
Jika PROLiNK® PPL1201 Powerline AV Ethernet Adapter ini
tidak ditemukan ,maka tanda warning secara otomatis akan
muncul.
Catatan:
Kolom Sandi pada Device akan menerima sandi dalam format
apapun, tanpa ada spasi.
Bagian 4
Version 1.00 Page 14 of 25 PPL1201
Page 50

PROLiNK PPL1201 Buku Manual www.prolink2u.com
4.1.3 Add Device
Kotak dialog pop-up berikut akan muncul ketika menekan tombol "Add" di bawah konfigurasi pada
halaman utama. Kotak dialog ini memungkinkan Anda untuk memasukkan kedua perangkat yang dipilih
nama dan passwordnya. Perhatikan bahwa Prolink AV ® PPL1201 Powerline Ethernet Adapter ini harus
terhubung ke listrik untuk pengaktifkan password dan ditambahkan ke jaringan lokal.
Masukkan Nama Device Anda lalu klik “OK” setelah selesai.
Bagian 4
Tampilan layar berikut muncul setelah nama dan password telah di set, yang juga merupakan konfigurasi
Diagnostics.
Bagian 4
Version 1.00 Page 15 of 25 PPL1201
Page 51

PROLiNK PPL1201 Buku Manual www.prolink2u.com
4.2 QoS
Menus kedua, dengan nama ‘QoS’ adalah Quality of Service, ditunjukan pada Gambar.
Bagian 4
Persyaratan QoS yang berbeda untuk berbagai jenis data seperti streaming video atau musik, suara dan
data mentah. Untuk menyediakan QoS yang lebih tinggi untuk streaming data, tingkat prioritas dapat
diatur menggunakan tag pada awal frame data. Virtual Local Area Network (VLAN) 802.1p prioritas tag
pada frame Ethernet digunakan untuk menetapkan 8 (0 ~ 7) tingkat 'prioritas pengguna'. Powerline AV
Powerline memungkinkan untuk 4 tingkat akses Channel Prioritas (CAP (0-3)). Oleh karena itu, tingkat 8 tag
Ethernet VLAN harus dipetakan ke dalam 4 tingkat prioritas CAP, di mana CAP 3 adalah prioritas tertinggi
dan CAP 0 adalah yang terendah. CAP 3 prioritas dapat digunakan untuk suara dan manajemen jaringan
frame, CAP 2 digunakan untuk streaming video dan musik sambil CAP 0 CAP 1 dapat digunakan untuk data.
Pemetaan VLAN tag atau KL bit untuk tingkat CAP mudah dilakukan dengan menggunakan fungsi VLAM
Pemetaan Prioritas QoS.
'Priority Mapping' grup yang berisi baik VLAN maupun TOS Bit memiliki kemampuan pemetaan. Ketika
dipilih, paket-paket yang cocok dengan VLAN atau TOS Bit akan diberi prioritas (saluran Prioritas akses, CAP)
sebagaimana ditetapkan dalam kotak dropdown yang sesuai. Jika sebuah paket baik VLAN dan TOS telah di
dalamnya, maka fungsi VLAN akan menimpa TOS.
Bagian 4
Version 1.00 Page 16 of 25 PPL1201
Page 52

PROLiNK PPL1201 Buku Manual www.prolink2u.com
Group 'Default CAP' memungkinkan untuk pemetaan prioritas default paket yang tidak memiliki VLAN atau
TOS Bit (atau jika ini dinonaktifkan). Pengaturan yang tersedia untuk Unicast (diarahkan ke host).
• IGMP - (default CAP 3) - menetapkan prioritas akses saluran frame IGMP - ini adalah frame pengelolaan
kelompok, bukan arus data
• Unicast - (default CAP 1) - menetapkan prioritas akses saluran standar untuk frame unicast tidak sesuai
klasifikasi lain atau pemetaan.
• IGMP Multicast dikelola Stream (Fixed untuk CAP 2) - set default prioritas akses saluran untuk stream
data milik sebuah grup multicast IGMP.
• Multicast / Broadcast - set default frame multicast CAP untuk tidak dalam kelompok dan untuk
disiarkan frame.
Setelah membuat pengaturan CAP, klik tombol Update untuk memperbarui nilai, dan kemudian klik tombol
Close untuk menyimpan pengaturan baru.
4.3 Privacy
Bagian 4
Halaman konfigurasi Privasi menyediakan sarana untuk mengelola jaringan lokal dan menyediakan
keamanan tambahan untuk jaringan logis dan juga untuk memilih perangkat yang harus disertakan dalam
jaringan. Semua perangkat Powerline dikirimkan menggunakan jaringan logis default (nama jaringan), yang
biasanya "HomePlugAV"
Konfigurasi Privasi homepage memungkinkan Anda untuk mengubah Nama Jaringan Prolink AV ® PPL1201
Powerline Ethernet Adapter yang saat ini terhubung ke komputer ini ke dalam jaringan pribadi. Reset
jaringan pribadi universal jaringan publik dengan mengklik pada "Use Default (Public Network)" atau masuk
/ pengeditan "HomePlugAV" di bawah kolom "Private Network Name" adalah selalu tersedia.
Perhatikan bahwa setiap Prolink AV ® PPL1201 Powerline Ethernet Adapter pada jaringan rumah Anda
HARUS memiliki jaringan Password yang sama untuk konektivitas yang akan didirikan di sekitar rumah anda.
Catatan:
Mengubah nama jaringan apa pun selain "HomePlugAV" akan menampilkan jenis jaringan pada layar
konfigurasi utama sebagai "Private".
Bagian 4
Version 1.00 Page 17 of 25 PPL1201
Page 53

PROLiNK PPL1201 Buku Manual www.prolink2u.com
Bagian 4
• Set Local Device Only
Tombol ini digunakan untuk mengubah nama jaringan lokal ® Prolink PPL1201 Powerline Ethernet
Adapter AV saja. Semua Prolink ® PPL1201 Powerline Ethernet Adapter AV perangkat dilihat pada
konfigurasi Utama homepage sebelum ini tidak lagi akan hadir dalam jaringan baru, secara efektif
membuat perangkat lokal tidak berkomunikasi dengan perangkat yang ada di jaringan logis tua.
Perangkat yang telah ditetapkan sebelumnya dengan jaringan logis yang sama (nama jaringan yang
sama) akan muncul dalam daftar perangkat setelah memilih pilihan ini.
• Set All Devices
Tombol ini digunakan untuk mengubah jaringan logis dari semua perangkat yang muncul di layar tab
Utama Device Password yang telah dimasukkan untuk jaringan logis yang sama. Sebuah dialog akan
muncul jendela untuk melaporkan keberhasilan operasi ini. Untuk perangkat sandi perangkat yang
tidak masuk, operasi ini akan gagal dan akan melaporkan pesan kegagalan.
Bagian 4
Version 1.00 Page 18 of 25 PPL1201
Page 54

PROLiNK PPL1201 Buku Manual www.prolink2u.com
4.4 Diagnostics
Diagnostik homepage ini menunjukkan Sistem Informasi dan sejarah semua perangkat remote dilihat
selama periode waktu. Klik pada "Diagnostics" tab dan tampilan layar berikut.
Bagian 4
Bagian 4
Informasi Diagnostik yang ditampilkan dapat disimpan ke file teks. Satu email dapat disimpan ke file teks
pemasok lokal ketika ada dukungan teknis memerlukan atau mencetak file teks yang disimpan sebagai
referensi dalam sebuah konferensi dukungan teknis.
Panel Upper menunjukkan data teknis tentang perangkat lunak dan perangkat keras yang ada pada
komputer host yang digunakan untuk berkomunikasi melalui Prolink ® AV PPL1201 Powerline Ethernet
Adapter di jaringan Powerline. Data meliputi:
• Platform Sistem Operasi / Versi
• Nama Host Jaringan
• Nama User
• MAC Address dari semua NIC (Network interface card) yang terhubung ke host
• Identifikasi semua versi dari Driver DLL dan Perpustakaan digunakan (NDIS) dan opsional
• Alamat MAC dari semua perangkat yang terhubung ke host lokal
Version 1.00 Page 19 of 25 PPL1201
Page 55

PROLiNK PPL1201 Buku Manual www.prolink2u.com
Panel Bawah berisi sejarah semua perangkat Prolink ® PPL1201 Powerline Ethernet Adapter AV pada
komputer selama jangka waktu tertentu. Semua perangkat yang berada di jaringan Powerline terdaftar di
sini bersama dengan beberapa parameter lainnya. Prolink ® PPL1201 Powerline Ethernet Adapter AV
perangkat yang aktif di jaringan logis saat ini akan menunjukkan tingkat transfer dalam kolom Rate;
perangkat di jaringan lain, atau perangkat yang mungkin tidak lagi ada yang ditunjukkan dengan tanda "?"
Di kolom Rate. Berikut informasi Prolink ® PPL1201 Powerline Ethernet Adapter AV yang tersedia di layar
diagnostik:
• Nama Alias Device
• MAC Address Device
• Password Device
• Kecepatan Device terakhir
• Nama jaringan Device terakhir
• Tanggal terakhir Deivce yang terlihat pada jaringan
Informasi yang ditampilkan pada diagnostik akan disimpan ke file teks untuk digunakan, atau dapat dicetak
sebagai referensi untuk panggilan dukungan teknis. Perangkat Prolink ® PPL1201 Powerline Ethernet
Adapter AV yang bukan bagian dari jaringan lagi, dapat dihapus dengan menggunakan tombol hapus.
Sebuah jendela dialog muncul dengan pesan konfirmasi jika kita mencoba untuk menghapus sandi
perangkat yang telah dimasukkan.
4.5 About
Bagian 4
Ini merupakan tampilan Versi perangkat lunak yang digunakan oleh Management Utility.
Bagian 4
• AutoScan:
Bila diaktifkan (cek), Manajemen Utility akan secara otomatis memindai Prolink ® PPL1201
Powerline Ethernet Adapter AV perangkat di dalam jaringan lokal setiap beberapa detik dan
memperbarui informasi pemindaian pada konfigurasi Utama homepage.
Version 1.00 Page 20 of 25 PPL1201
Page 56

PROLiNK PPL1201 Buku Manual www.prolink2u.com
Bagian 5 : Fitur Advance – Cara Menggunakan Tombol Push
5.1 Pair( Secure dengan 128 bits-AES)
Powerline AV menggunakan standard 128-bit AES (Advanced Encryption Standard) untuk mengirimkan data
secara aman antara Powerline Adaptor. Powerline adaptors berkomunikasi dengan satu sama lain mereka
semua harus menggunakan Network Membership Key (NMK) yang sama. Jika tidak, mereka tidak dapat
menguraikan data yang dienkripsi yang dikirim melalui jaringan Powerline.
Tombol Pair yang memungkinkan anda untuk mengatur koneksi yang aman Powerline HomePlug ke
Powerline AV lainnya yang mendukung jaringan fitur Pair juga.
5.2 Set Up sebuah Powerline Jaringan dengan tombol Pair
Anda dapat menghubungkan beberapa perangkat Powerline pada jaringan, namun Anda hanya dapat
menggunakan tombol Pair hanya pada dua perangkat pada satu waktu.
Bagian 5
Version 1.00 Page 21 of 25 PPL1201
Bagian 5
Perangkat A yang ingin membentuk kelompok jaringan dengan perangkat B:
Langkah 1: Tahan tombol Pair pada perangkat A selama 2 detik, Power LED akan mulai berkedip.
Langkah 2: Tahan tombol Pair pada perangkat B selama 2 detik, Power LED akan mulai berkedip.
Langkah 3: Tunggu sampai Power LED dari kedua perangkat menyala bersama setelah ini Anda sekarang
memiliki kedua perangkat berada dalam kelompok jaringan yang sama.
Page 57

PROLiNK PPL1201 Buku Manual www.prolink2u.com
Perangkat C yang ingin bergabung kedalam kelomok jaringan AB:
Langkah 1: Tahan tombol Pair pada perangkat C untuk 10 detik sampai kedua LED pada Powerline and
Power mati, lalu lepas. LED Power LED pada perangkat C akan mulai berkedip.
Langkah 2: Lalu tahan tombol Pair pada perangkat (A atau B) selama 2 detik.
Langkah 3: Tahan tombol Pair pada perangkat C lagi selama 2 detik.
Catatan: Proses ini harus selesai sebelum 120 detik disaat tombol Pair pada perangkat A
atau B ditekan.
Langkah 4: Tunggu sampai LED Power pada perangkat C dan perangkat A atau B menyala bersamaan,
setelah ini perangkat C telah terhubung pada jaringan A dan B.
5.3 Efek Penekanan tombol Pair
Bagian 5
5.4 Reset
The following table summarizes the actions that occur when the Pair button is pressed for specific time.
Tahan Tombol Pair Status Efek LED Power LED
kurang dari 3 detik
Lebih dari 10 detik
Powerline adaptor akan kembali kekonfigurasi default pabrik.
a. Pastikan mencabut kabel Ethernet yang terhubung, lalu kemudian tekan tombol Reset.
b. Tahan tombol RESET selama 2 detik. Pengaturan default telah dipulihkan.
Hati-hati, jangan matikan saat perangkat ini dalam proses reset.
Perangkat tergabung dengan
jaringan. Semua informasi pada
perangkat akan saling berbagi.
Perangkat akan meninggalkan
jaringan dan nama jaringan akan
berubah secara.
LED Power menyala jika perangkat
terhubung dengan perangkat
Powerline lainnya didalam satu
jaringan.
LED Power mati ketika perangkat
terputus hubungan nya dengan
perangkat Powerline yang.
Bagian 5
Version 1.00 Page 22 of 25 PPL1201
Page 58

PROLiNK PPL1201 Buku Manual www.prolink2u.com
Lampiran A : Permasalahan
Panduan Pemecahan Masalah menyediakan jawaban atas masalah-masalah umum mengenai Prolink AV ® PPL1201
Powerline Ethernet Adapter.
Q1. LED Power tidak mau Menyala.
Ans. Periksa beberapa hal berikut:
a. Pastikan PROLiNK® PPL1201 Powerline AV Ethernet Adapter ini betul-betul terkoneksi ke listrik.
b. Pastikan outlet listrik tidak bermasalah dengan cara mencoba untuk mengkoneksikan oulet ini kealat
yang lain..
c. Cabut dan koneksikan kembali PROLiNK® PPL1201 Powerline AV Ethernet Adapter ke outlet listrik.
Jikan LED Power tetap tidak mau menyala, contact local dealer anda untuk technical support.
Q2. LED Ethernet LED tidak mau Menyala.
Ans. Periksa beberapa hal berikut:
a. Pastikan kabel Ethernet (RJ-45) benar-benar terpasang dengan baik ke PROLiNK® PPL1201 Powerline
AV Ethernet Adapter’s Ethernet port.
b. Pastikan kabel Ethernet (RJ-45) yang satunya benar-benar terkoneksi pada LAN card yang ada di
computer anda atau pada Cable/xDSL Ethernet port anda.
c. Pastikan LAN card pada computer anda betul-betul terinstall dengan baik/aktif.
d. Pastikan Cable/xDSL broadband access anda menyala dan bekerja dengan baik.
e. Contact local dealer anda untuk technical support jika LED Ethernet tetap tidak mau menyala.
Q3. LED Powerline tidak mau Menyala.
Ans. Periksa beberapa hal berikut:
a. Klik icon Management Utility yang ada pada desktop anda lalu klik “Scan”. Management Utility akan
secara otomatis mendetek semua PROLiNK® PPL1201 Powerline AV Ethernet Adapter yang terpasang
pada jaringan istrik anda.
b. Coba untuk mengkoneksikan PROLiNK® PPL1201 Powerline AV Ethernet Adapter yang kedua pada
outlet listrik di dekat anda untuk memastikan apakah LED Powerline menyala atau tidak.
c. Contact local dealer anda untuk technical support jika LED Powerline tetap tidak mau menyala.
Q4. Powerline device saya tidak mau mendeteksi Powerline device yang lainnya.
Ans. Hal ini mungkin disebabkan oleh perubahan password yang disengaja.
Jalankan Manajemen Utility lalu pilih Privacy. Masukkan password "HomePlugAV" di tempat yang telah
disediakan. Lalu tekan tombol "Set to Local Device Only ". Ulangi prosedur yang sama untuk perangkat
Powerline lain.
Version 1.00 Page 23 of 25 PPL1201
Page 59

PROLiNK PPL1201 Buku Manual www.prolink2u.com
Lampiran B : Energy – Terkait Info Produk
In order to conform to the CE Energy–Related Products Directive 2009/125/EC, please ask the local distributor,
supplier or importer below information:
• The related information of Recycle or disposal
• The related information of spare parts issue --- The product doesn't have the function of upgrading.
• The related information of Energy–Related Products Directive 2009/125/EC Implementing Measure is
added to the Energy–Related Products testing report.
Dalam rangka untuk menyesuaikan diri dengan CE Energy-Related Products Directive 2009/125/EC, silahkan
meminta informasi ke pihak distributor lokal, pemasok atau importir di bawah ini:
• Informasi yang terkait dengan Recycle atau pembuangan
• Informasi yang terkait dengan masalah suku cadang --- Produk ini tidak memiliki fungsi upgrade.
• Informasi yang terkait dengan Energi-Related Products Directive 2009/125/EC Pelaksana Ukur
tambakan ke laporan pengujian Energi-Related Products.
Version 1.00 Page 24 of 25 PPL1201
Page 60

PROLiNK PPL1201 Buku Manual www.prolink2u.com
Technical Support
FREE TECHNICAL SUPPORT HOTLINE
Senin – Jum’at, 9.00am – 6.00pm
(Tutup pada hari Sabtu, Minggu, dan Hari Besar lainnya)
• SINGAPORE : (65) 6357 0666
• MALAYSIA : (60) 3 8023 9151
• INDONESIA : (62) 21 3483 1777
WALK-IN SUPPORT
Senin – Jum’at, 9.00am – 6.00pm
(Tutup pada hari Sabtu, Minggu, dan Hari Besar lainnya)
• SINGAPORE
FIDA INTERNATIONAL (S) PTE LTD
Block 16 Kallang Place, #06-02 Kallang Basin Industrial Estate, Singapore 339156.
• MALAYSIA
FIDA SYSTEMS (M) SDN BHD
29 Jalan USJ 1/31, 47600 Subang Jaya, Selangor Darul Ehsan, Malaysia.
• INDONESIA
PROLiNK INDONESIA
Jl. Cideng Barat No. 79 Jakarta Pusat 10150 Indonesia.
ONLINE TECHNICAL SUPPORT
• SINGAPORE : support@fida.com
• MALAYSIA : support_my@fida.com
• INDONESIA : support@prolink.co.id
Register Online For Your Product Warranty
www.prolink2u.com
Version 1.00 Page 25 of 25 PPL1201
 Loading...