

Page 1

MODEL NO:
PIC1007WP
Quick Installation Guide
Wireless-N IP Camera with Pan/Tilt
Version 1.30
(English / Indonesian)
BEFORE GETTING STARTED
This document is designed to aid you to get started with the device. If you experience problems following
these guides or need further information pertaining to the device, please visit our website at
www.prolink2u.com. All specifications are subject to the manufacturer’s configuration at the time of
shipping and may change without prior notice, written or otherwise.
Page 2

Page 3
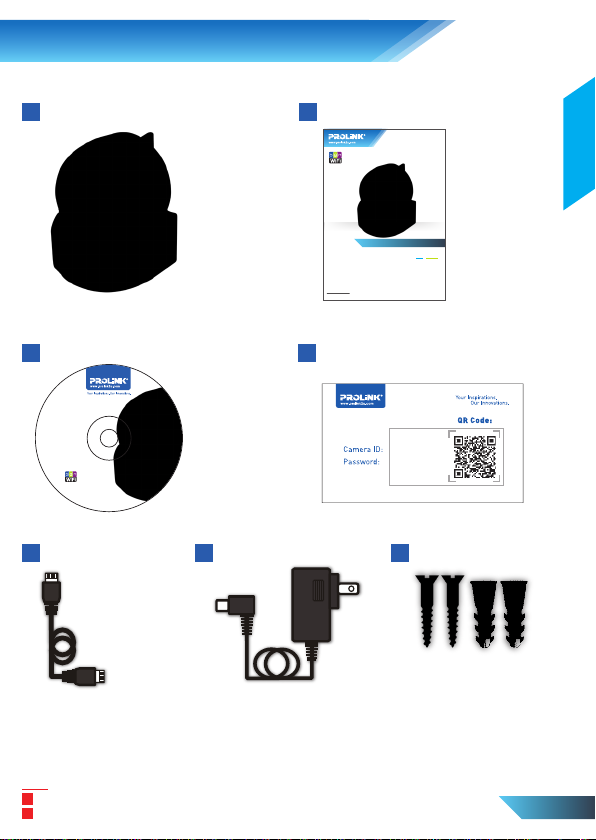
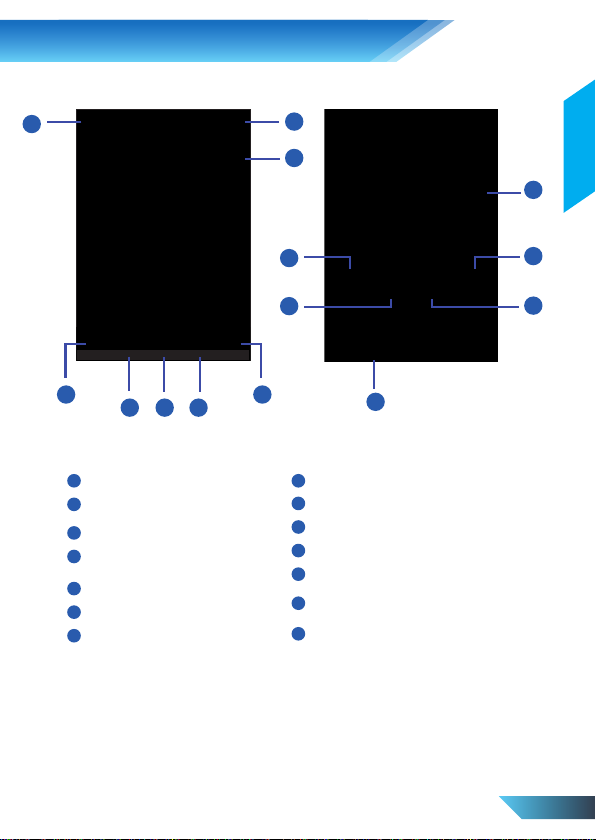
1. Package Contents
IP Camera Quick Installation Guide
1
Setup CD
3
PIC1007WP
Wireless IP
Camera
CD Contents:
•
Management Software
•
Quick Installation
Guide
Version 1.0 (Apr’13)
©
C
.
o
d
p
e
y
v
r
r
i
e
g
s
h
e
t
R
2
0
s
t
1
h
3
g
i
P
R
R
l
O
l
L
A
i
N
K
Ethernet Cable Power Adapter Anchors & Screws
5
6
2
Quick Installation Guide
BEFORE GETTING STARTED
This document is designed to aid you to get started with the device. If you experience problems following
these guides or need further information pertaining to the device, please visit our website at
www.prolink2u.com. All specifications are subject to the manufacturer’s configuration at the time of
shipping and may change without prior notice, written or otherwise.
ID/Password Card
4
Wireless-N IP Camera with Pan/Tilt
(English / Indonesian )
xxxxxx
xxxxxx
7
PIC1007WP
MODEL NO:
Version 1.00
English
Note:
The illustrations in this document may appear different from your model.
1
2
If any of above item is not packed in your package when open, please consult your reseller immediately.
EN 1
Page 4

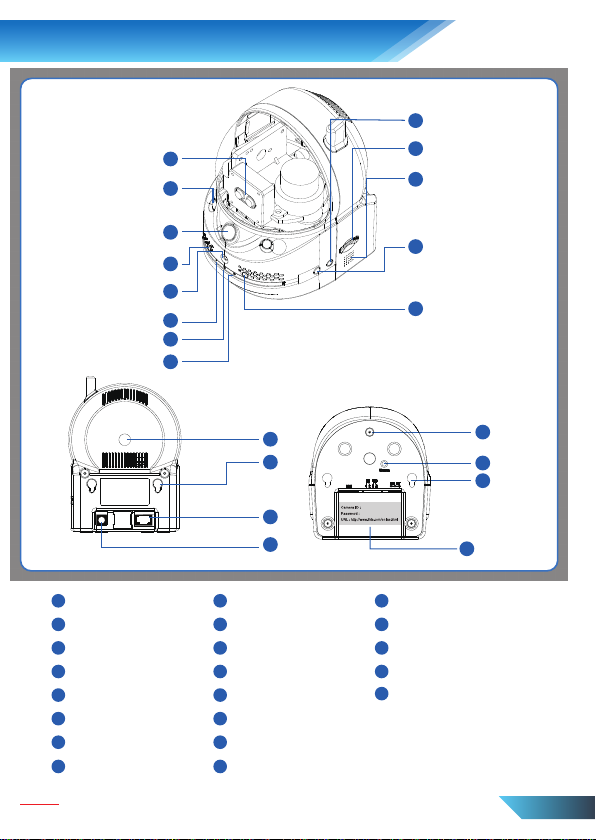
2. Overview
9
1
2
10
11
3
4
5
6
7
8
14
15
16
17
1
Dual Lens
IR LED
2
PIR3
Microphone4
Thermometer5
Ethernet Indicator LED6
Internet Indicator LED
7
SD Card LED
8
Note:
The illustrations in this document may appear different from your model.
9
External Speaker Jack
Micro-SD Card Slot
10
Internal Speaker11
WPS Button12
Light Detector13
Bracket Screw Jack14
Wall Mount
15
16
Ethernet Jack
12
13
17
Power Jack
Bracket Screw Jack
18
Reset Button19
Wall Mount20
Camera ID & Password21
18
19
20
21
EN 2
Page 5

3.
Important Notes Before Installation
Before you start, make sure you have a router ready with Internet connection.
1
2
mLiveView for Android device requires Android v2.3 or higher.
3
mLiveView for iPhone/iPad requires iOS v4.3 or higher.
4
LiveView for Windows requires Windows XP SP2 or higher.
Your PC/Laptop computer should be at least 2.0 GHz (dual-core recommended) and memory
2GB.
5
LiveView for Mac requires OS X 10.6.8 Snow Leopard or higher.
Your Mac PC/Laptop should be at least 2.0 GHz (dual-core recommended) - Intel Processors
only and memory 2GB.
6
If recording on local PC/Laptop, hard drive should have minimum 5~10 GB free space available.
7
To change settings of the camera, use the below default login credentials;
Username: admin
Password: (Leave Blank)
8
To play video of the camera, use the login credentials on the provided ID/Password card or from
the label at the bottom of the camera.
Note:
The LiveView installation guide is for Microsoft Windows OS platform only.
1
2
Before installing LiveView on your PC or Laptop, please make sure you have correctly installed the IP Camera. It is
highly recommended to close other Windows applications to prevent the installation from any possible confliction.
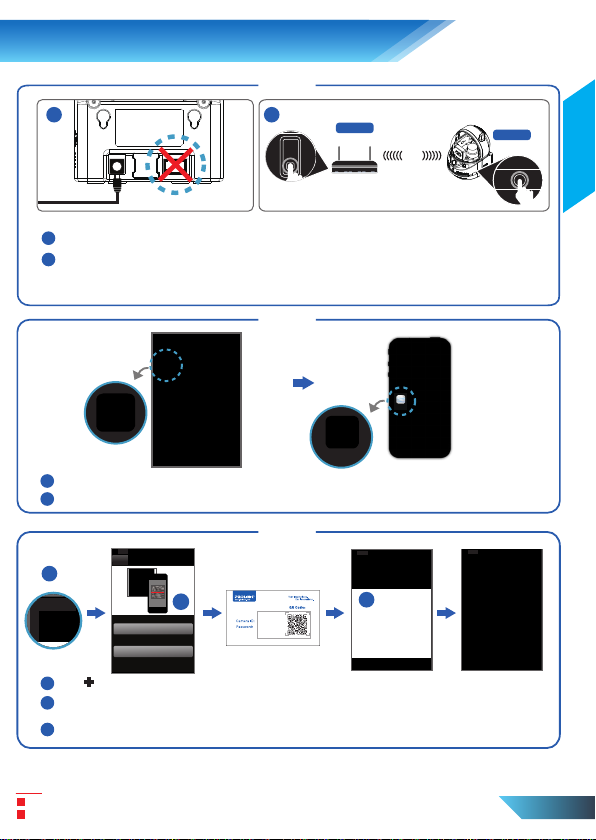
4.
Choosing An Installation Method
Wired Connection Setup: Use this method if using Ethernet cable to establish connection from
1
camera to router.
2
Smart WiFi Setup: This method is the easiest to setup wireless connection for your camera.
Requires camera with built-in WPS button and mLiveView version with Smart WiFi Setup
feature.
3
WPS Push Button Setup: This is another method to setup wireless connection for your camera.
Equally easy to setup but requires both camera and router to have built-in WPS button to
establish wireless connection.
4
Manual Wireless Setup: This manual method requires a wired connection initially from camera
to router. Then use either mobile or PC/Laptop to setup the wireless settings.
English
EN 3
Page 6
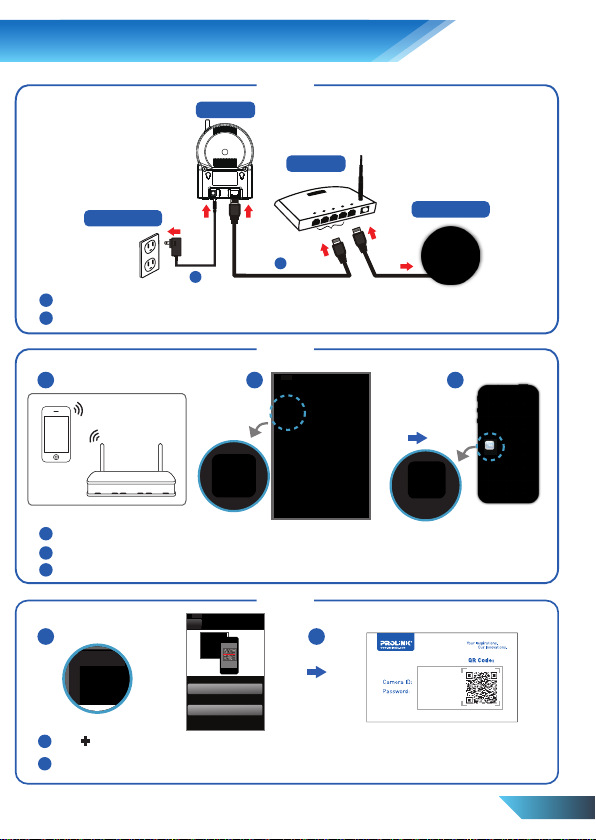
5. Wired Connection Setup
Step 1
PIC1007WP
NAT/Router
Power Adapter
1
1
Connect power jack to camera and switch on the power
2
Connect one end of Ethernet cable to the camera and another end to the NAT/Router
2
WAN
LAN
Internet
Step 2
Pro
mLiveView
mLiveView
1
Download and install mLiveView app.
2
Open mLiveView app from your mobile homescreen
Step 3
1
2
xxxxxx
Scan QR code
or
Manual input
1
Tap + to add a camera
Select Scan QR code and align your mobile's camera to the ID/Password card. The camera
2
will be automatically added to the camera list
3
Click on the Camera ID you have just created to connect to the camera
xxxxxx
3
EN 4
Page 7
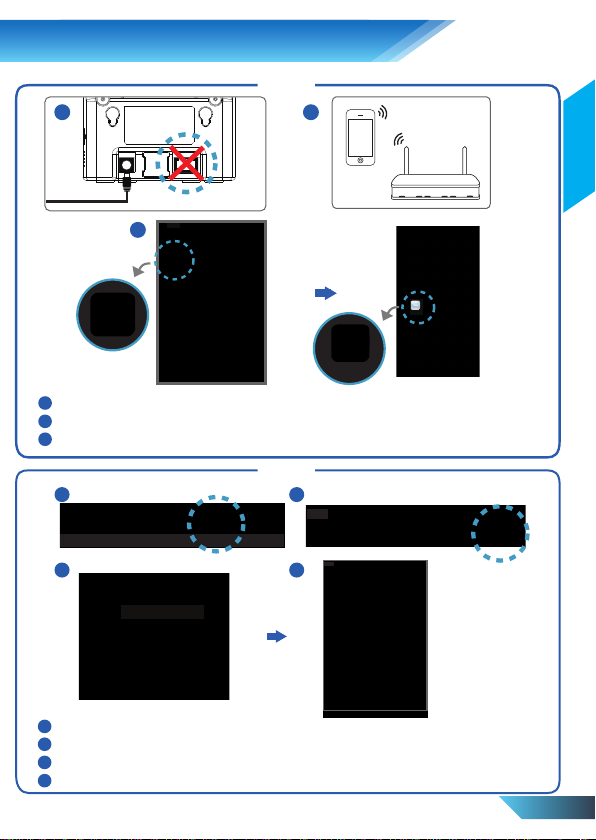
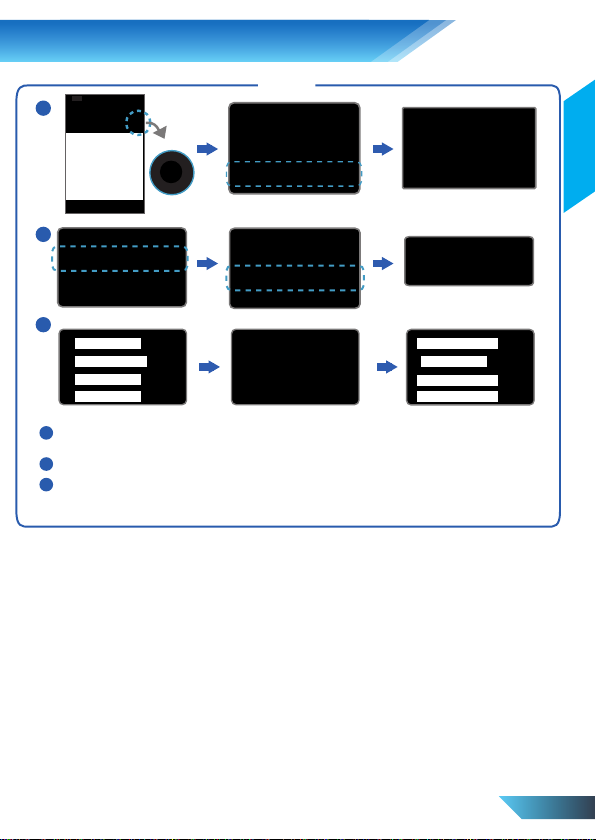
6. Smart WiFi Setup
1
Step 1
2
English
3
Pro
mLiveViewPro
mLiveViewPro
1
Power on the camera. Do not connect the Ethernet cable to the camera
2
Connect your mobile device to the WiFi router that will be used to connect the camera
3
Install mLiveView app on your device and open the app from your mobile homescreen
Step 2
1
Play Back Camera List Local Search WiFi Setup Information
3
PROLiNK- Network
1
Click on the WiFi Setup button to launch the Smart WiFi Setup process
2
Read through the instructions or click Next to continue setup
3
Key in the password of the WiFi router used by your mobile device for the wireless connection
4
Wait for a QR code to be generated
2
4
EN 5
Page 8
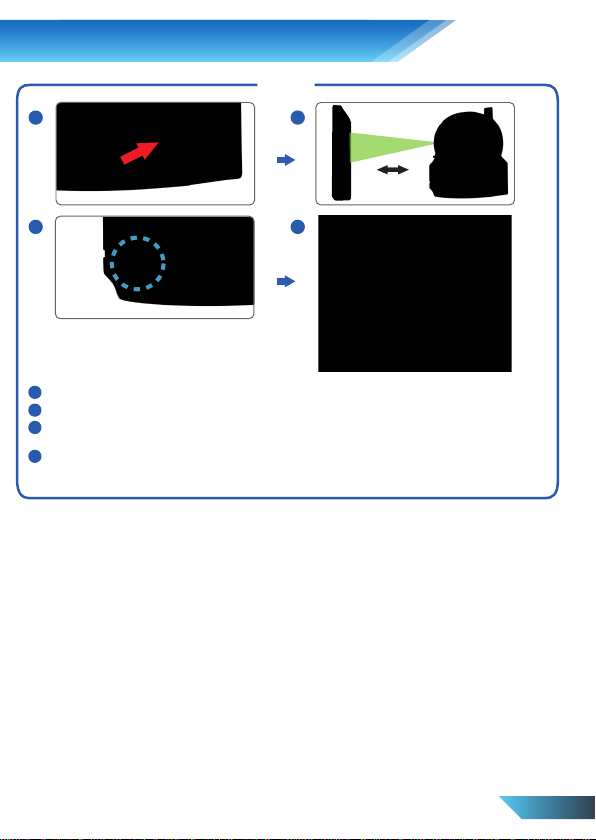
6. Smart WiFi Setup
1 2
Step 3
WPS
3 4
1
Press the WPS button on the camera. The LEDs will start to flash in running order
2
Align your mobile device with the QR code facing the camera in approximately 10~20cm distance
3
Wait for the LEDs to flash simultaneously 3 times (or beep sound on models with built-in speaker)
to indicate it has successfully scanned the QR code
4
Remove your mobile device from the camera and wait for a pop-up message to prompt you to
key in a name for your camera. Click OK and the camera will be added to the camera list and the
setup is done
10-20cm
EN 6
Page 9
WPS
7. WPS Push Button Setup
Step 1
1 2
Power on the camera. Do not connect the Ethernet cable to the camera
1
2
Push the WPS button on both the router and the camera. The LEDs on the camera will start
to flash in running order. Wait for the LEDs to flash simultaneously for 3 times indicating the
wireless connection is established
Step 2
Pro
1
Download and install mLiveView app.
2
Open mLiveView app from your mobile homescreen
Step 3
1
2
Scan QR code
or
Manual input
1
Tap + to add a camera
Select Scan QR code and align your mobile's camera to the ID/Password card. The camera
2
will be automatically added to the camera list
3
Click on the Camera ID you have just created to connect to the camera
xxxxxx
xxxxxx
NAT/Router
mLiveView
(Wireless)
WPS
mLiveView
3
PIC1007WP
WPS
English
Note:
1
If your router is not configured for WPS, please refer to your device manufacturer for assistance.
2
If you router does not support WPS, please use Manual Wireless Setup or Smart WiFi setup instead.
EN 7
Page 10
8.
Manual Wireless Connection Setup
Step 1
PIC1007WP
NAT/Router
Power Adapter
1
1
Connect power jack to camera and switch on the power
2
Connect one end of Ethernet cable to the camera and another end to the NAT/Router
2
WAN
LAN
Internet
Step 2
1
1
Connect your mobile device to the WiFi router that will be used to connect the camera
2
Download and install mLiveView app.
3
Open mLiveView app from your mobile homescreen
2
Pro
3
mLiveView
Step 3
1
Scan QR code
or
Manual input
1
Tap + to add a camera.
Select Scan QR code and align your mobile's camera to the ID/Password card
2
The camera will be automatically added to the camera list
2
xxxxxx
xxxxxx
mLiveView
EN 8
Page 11
8.
Manual Wireless Connection Setup
MAXIS
1
Step 4
2
3
PROLiNK_H5004N
PROLiNK_PPL1501N_000002
PROLiNK_WNR1008
Other...
1
Tap Arrow button then Camera Settings. Enter the admin username and password.
(Default username is admin and leave the password blank)
2
Tap Network then WiFi network. Enable WiFi feature of the camera.
Select your WiFi network from the list and enter the WiFi password. Wait for the update to
3
complete and your selected WiFi network will be highlighted in blue. Remove the Ethernet
cable from the camera and the camera will now activate wireless connection to the router.
PROLiNK_PPL1501N_000002
PROLiNK_WNR1008
PROLiNK_PHA1061
New Tulip
English
EN 9
Page 12
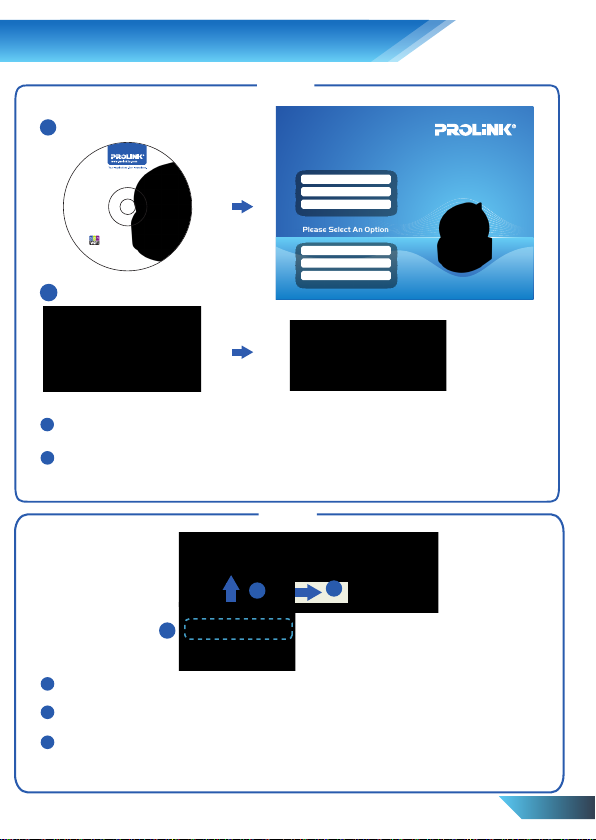
9.
LiveView Installation & Overview
Step 1
1
Wireless Pan/Tilt IP Camera
PIC1007WP
Wireless IP
Camera
CD Contents:
•
Management Software
•
Quick Installation
Guide
Version 1.0 (Apr’13)
©
C
.
o
d
p
e
v
y
r
r
i
e
g
s
h
e
t
R
2
s
0
t
1
h
3
g
i
P
R
R
l
O
l
L
A
i
N
K
Video Management Software
Quick Installation Guide
User Manual
Please Select An Option
Browse CD
Product Registration
Exit
www.prolink2u.com
2
Insert the installation CD into your CD-ROM drive and the Main Menu will auto load.
1
Select Video Management Software to initiate the setup process.
2
Select your prefered language and click OK to continue setup. Follow the instructions to
complete the installation. LiveView and LivePlay shortcuts icon will be created on the
desktop homescreen. Start the LiveView software by double-clicking on the icon.
Step 2
3
1
Once LiveView is started, it will automatically search for all cameras that are connected to
1
your Local Area Network (LAN) and display the Camera ID in the Auto Search column.
2
To play the video, simply double-click on the Camera ID or drag it to one of the video play
window and enter the camera password.
3
To better organize your camera and allow access from remote, it is recommended to add
your camera to the Camera List. Just drag your camera from the Auto Search column and
drop it in the Camera List column and it will be saved.
2
EN 10
Page 13

9.
LiveView Installation & Overview
Step 3
3
1
2
If you want to remotely view a camera from outside of your local LAN and the camera
1
ID/Password is not stored in the Camera List, you can manually add the camera by
right-click on the Camera List to show options
2
Select New Camera
Give a name for your remote camera and enter the Camera ID and Password
3
Current
Date Info
Multi-Channel
Display Mode
Recording
Snapshot
Video Display Area
Camera List
Camera
Status
Settings
Set Schedule
Recording
LivePlay View
Recording
Camera Name/ID
Camera Name
Auto Search List
Pan/Tilt Control Panel
Change
Language
Software
Version
Execute Options
For All Channels
Disk Space Available
For Recording
Minimize
Maximize
Screen
Mute/Unmute
Speaker
Exit LiveView
Enable
Microphone
EN 11
English
Page 14

9. mLiveView App Installation
mLiveView is available for Android and iOS devices.
For installation use either one of the methods below :
Using QR Code to install
1
Requires a QR Code scanner app installed on your mobile/tablet device.
2
Open the scanner app and point the device's camera to the below QR Code. The QR Code is also
printed on the packaging box.
iPhoneiPad Android
Manual install
For Android devices:
1
Open Google Play Store in your device.
2
Type mLiveView in the search box to locate the app.
3
Follow instructions to install the app.
For iOS devices:
1
Open App Store in your device.
2
Type mLiveViewPro (iPhone/iPod) or mLiveViewHD+ (iPad) in the search box to locate the app.
3
Follow instructions to install the app.
EN 12
Page 15
10. mLiveView App Overview
1
Play Back Camera ListLocal Search WiFi Setup Information
2
3 4 5
1
Add New IP Camera
Playback recorded video
2
from mobile
Camera list3
Search camera in local
4
area network
Smart WiFi setup5
mLiveView version info6
Arrange camera order
7
7
8
9
10
6
8
9
10
12
13
14
14
Change camera settings
Record live video to mobile storage
Take snapshot of live video
Live video stream from camera11
Enable microphone for 2-way Communication
(only available in certain models)
Instant Alarm button
(only available in certain models)
Camera Information
English
11
12
13
EN 13
Page 16

11. Web Conguration Page
Access
Web Configure
1
1
Start the LiveView software. Your camera will be detected in the Auto Search column,
right-click on the Camera ID to see the Web Configure option
2
You will be prompted with a security dialog, login with the below credential and click OK.
Username: admin and default is without any password
2
EN 14
Page 17

11. Web Conguration Page
1
2
3
4
7
5
6
Information
1
Displays the camera current settings, information and recording status.
Network
2
Wired Network: Setup wired network settings. Default is set to obtain IP automatically.
WiFi Security: Setup WiFi connection and security. Built-in WiFi scan for easy setup.
Advanced: Setup PPOE network settings.
Video
3
Display: Display live video with Pan/Tilt and Patrol feature.
Video Settings: Adjust camera settings and change play video password.
Mobile Video: Adjust video streaming settings for mobile devices.
Night Mode: Change Day/Night mode settings. Default is set to automatic detection.
4
Schedule
Email/FTP Alarm: Setup Email/FTP trigger and send email alert.
Speaker Alarm: Setup Speaker Alarm trigger for camera with built-in or external speaker.
NAS Settings: Setup your NAS storage so it can be used for recording video from the camera.
SD-Card: Select mode of recording for SD-Card. Provide direct access to SD-Card for file management.
Thermometer: Set the temperature trigger range. Only available for camera with built-in thermometer.
Scheduling: Set schedules rules for recording and alarm trigger.
5
Admin
Admin Login: Set administrator login credentials for the camera settings.
LED Control: Set the LED indicator preference.
Date/Time: Set NTP server and Time Zone with Daylight Saving Time. Option for manual Setting.
Upgrade: Upgrade firmware from FTP server or from local file.
Reboot: Reboot the camera.
6
Change the Web Configure page language
7
Information and settings display window.
English
EN 15
Page 18

12. Frequently Asked Questions
1. Why the LED indicators on the camera are flashing in sequence?
Please ensure your Ethernet or WiFi connection are setup properly and check you
have an Internet connection.
When connected to local network, the blue LED will be constant. When connected to Internet, red
LED will be constant.
2. When the camera is connected to the network via wireless, the video quality is not good,
how could I fix this problem?
The distance of camera and WiFi router might be too far or there are too many devices connected
to router. It is also possible that the WiFi antenna is not in the best position.
3. Can I adjust the focus of the camera?
This camera has a fixed iris and there is no need to adjust the focus of the lens. Effective focus
range is from 30cm to infinity.
4. Why can't I hear any sound from my camera?
a) Ensure that your pc or mobile audio is enabled. Try playing an audio file to verify if it is
working.
b) Check if microphone of camera is enabled. Login to web configure page or open "video
settings" from LiveView, select the "video" tab and enable the Microphone feature.
5. What should I do if I have forgotten the camera password?
To retrive the Video Password, please go to the web configuration page of the camera >
Login Credential>Video>Video Settings, the password should be visible from the Password
(play video) column.
6. I can see the video from remote location, but the video quality is not good and sometimes
the video will disconnect and reconnect again by itself.
This is probably caused by the poor Internet bandwidth (speed) or congestion during peak hours.
Try to decrease the bandwidth settings of the camera. You can adjust the bandwidth requirement
from the LiveView software or login to the web configure page to do the modification.
7. Can I use LiveView in Macintosh OS X?
Install the software from Setup CD provided or download from our website at
www.prolink2u.com.This beta version is still work in progress therefore some functions may not
work or being disabled until a full version is being released.
8. How can I trigger the Zoom function of the camera in LiveView?
You can zoom-in by using a mouse to click and scroll on the display screen in LiveView.
EN 16
Page 19

1. Package Contents
IP Camera Lembar Panduan Instalasi
1
Setup CD
3
PIC1007WP
Wireless IP
Camera
CD Contents:
•
Management Software
•
Quick Installation
Guide
Version 1.0 (Apr’13)
©
C
.
o
d
p
e
y
v
r
r
i
e
g
s
h
e
t
R
2
0
s
t
1
h
3
g
i
P
R
R
l
O
l
L
A
i
N
K
Kabel Ethernet Power Adaptor Sekrup
5
6
2
Quick Installation Guide
BEFORE GETTING STARTED
This document is designed to aid you to get started with the device. If you experience problems following
these guides or need further information pertaining to the device, please visit our website at
www.prolink2u.com. All specifications are subject to the manufacturer’s configuration at the time of
shipping and may change without prior notice, written or otherwise.
Kartu ID/Sandi
4
Wireless-N IP Camera with Pan/Tilt
xxxxxx
xxxxxx
7
PIC1007WP
(English / Indonesian )
MODEL NO:
Version 1.00
Indonesian
Catatan:
Ilustrasi didalam dokumen ini mungkin akan berbeda dari model perangkat yang Anda miliki.
1
2
Jadi terdapat item diatas yang tidak ditemukan pada isi kemasan, silahkan untuk menhubungi dealer
Anda secepatnya.
ID 1
Page 20
2. Penjelasan
9
1
2
10
11
3
4
5
6
7
8
14
15
16
17
1
Dual Lens
LED IR
2
PIR3
Microphone4
Thermometer5
Indicator LED Ethernet6
Indicator LED Internet
7
LED Kartu Micro SD
8
Catatan:
Ilustrasi didalam dokumen ini mungkin akan berbeda dari model perangkat yang Anda miliki.
9
External Speaker Jack
Slot Kartu Micro-SD
10
Speaker11
Tombol WPS12
Detector Cahaya13
Bracket Scrup Jack14
Gantungan dinding
15
16
Ethernet Jack
12
13
17
Power Jack
Bracket Scrup Jack
18
Tombol Reset19
Gantungan Dinding20
Camera ID & Password21
18
19
20
21
ID 2
Page 21

3.
Catatan Penting Sebelum Instalasi
Sebelum Anda mulai, pastikan Anda memiliki router siap dengan koneksi internet.
1
2
mLiveView untuk perangkat Android membutuhkan Android v2.3 atau lebih tinggi.
3
mLiveView untuk iPhone / iPad membutuhkan iOS v4.3 atau lebih tinggi.
4
LiveView untuk Windows memerlukan Windows XP SP2 atau lebih tinggi.
PC / Laptop komputer harus setidaknya 2,0 GHz (disarankan dual-core) dan memori 2GB.
LiveView untuk Membutuhkan Mac OS X 10.6.8 Snow Leopard atau lebih tinggi.
5
Mac PC / Laptop harus setidaknya 2,0 GHz (disarankan dual-core) - Prosesor Intel saja dan
memori 2GB
6
Jika rekaman pada PC / Laptop lokal, hard drive harus memiliki minimal 5 ~ 10 GB ruang bebas
yang tersedia.
7
Untuk mengubah pengaturan kamera, gunakan bawah standar login;
Username: admin
Sandi:
8
Untuk memutar video dari kamera, menggunakan kredensial login pada disediakan ID / Password
kartu atau dari label di bagian bawah kamera.
Catatan:
Ilustrasi LiveView adalah untuk Microsoft platform OS Windows saja.
1
2
Sebelum menginstal LiveView pada PC atau Laptop, pastikan Anda telah memasang IP camera dengan benar. Sangat
dianjurkan untuk menutup aplikasi Windows lainnya untuk mencegah konflik instalasi yang mungkin terjadi.
4.
Memilih Sebuah Metode Instalasi
Pengaturan Koneksi Kabel: Gunakan metode ini jika menggunakan kabel Ethernet untuk
1
membuat sambungan dari kamera ke router.
2
Pengaturan WiFi Cerdas: Metode ini adalah yang paling mudah untuk koneksi nirkabel dari
kamera Anda.Membutuhkan kamera dengan tombol WPS dan versi mLiveView dengan
Pengaturan WiFi
3
Pengaturan Tombol WPS: Ini adalah metode lain untuk Pengaturan koneksi nirkabel untuk
kamera Anda.Sama mudah untuk pengaturannya tetapi membutuhkan baik pada kamera dan
router harus memiliki Fungsi tombol WPS untuk membuat sambungan nirkabel.
4
Pengaturan Manual Wireless: Metode manual ini memerlukan sambungan kabel awalnya dari
kamera ke router. Kemudian gunakan baik ponsel atau PC / Laptop untuk setup pengaturan
nirkabel.
Indonesian
ID 3
Page 22

5. Pengaturan Koneksi Kabel
Langkah 1
PIC1007WP
NAT/Router
Power Adaptor
1
1
Hubungkan colokan listrik ke kamera dan mengaktifkannya
2
Sambungkan salah satu ujung kabel Ethernet ke kamera dan ujung lainnya ke NAT / Router
2
WAN
LAN
Internet
Langkah 2
Pro
mLiveView
mLiveView
1
Unduh dan install aplikasi mLiveView
2
Buka aplikasi dari homescreen mLiveView ponsel anda
Langkah 3
1
2
xxxxxx
Scan QR code
or
Manual input
1
Tekan + untuk menambahkan kamera
Pilih Pindai kode QR dan menyelaraskan kamera ponsel Anda pda kartu ID / Sandi. Kamera
2
akan secara otomatis ditambahkan ke daftar kamera
3
Klik pada ID Kamera Anda untuk terhubung ke kamera
xxxxxx
3
ID 4
Page 23

6. Pengaturan WiFi Cerdas
Langkah 1
1
2
3
1
Hidupkan kamera. Jangan hubungkan kabel Ethernet ke kamera
2
Hubungkan perangkat mobile Anda ke router WiFi yang akan digunakan untuk
menghubungkan kamera
3
Instal mLiveView aplikasi pada perangkat Anda dan membuka aplikasi dari homescreen
ponsel anda
Pro
mLiveViewPro
mLiveViewPro
Langkah 2
1
Play Back Camera List Local Search WiFi Setup Information
3
PROLiNK- Network
1
Klik pada tombol Pengaturan WiFi untuk memulai proses penataan WiFi Cerdas
2
Bacalah petunjuk atau klik Next untuk melanjutkan setup
3
Masukkan password dari router WiFi yang digunakan oleh perangkat mobile Anda untuk
koneksi nirkabel
4
Tunggu kode QR yang akan dihasilkan
2
4
Indonesian
ID 5
Page 24

6. Pengaturan WiFi Cerdas
Langkah 3
1 2
WPS
3 4
1
Tekan tombol WPS pada kamera. LED akan mulai berkedip dalam menjalankan perintah
2
Sejajarkan perangkat mobile Anda dengan kode QR menghadap kamera di jarak sekitar 10 ~
20cm.
3
Tunggu LED berkedip secara bersamaan 3 kali (atau suara bip pada model dengan built-in
speaker)untuk menunjukkan telah berhasil memindai kode QR.
4
Hapus perangkat mobile Anda dari kamera dan menunggu pesan pop-up untuk meminta Anda
memasukan kunci dalam kolom nama kamera Anda. Klik OK dan kamera akan ditambahkan ke
daftar kamera setelah itu pengaturan selesai.
10-20cm
ID 6
Page 25

WPS
7. Pengaturan Tombol WPS
Langkah 1
1 2
Hidupkan kamera. Jangan hubungkan kabel Ethernet ke kamera
1
2
Tekan tombol WPS pada keduanya, router dan kamera. LED pada kamera akan mulai
ke berkedip dalam menjalankan perintah. Tunggu LED berkedip secara bersamaan selama 3
kali menunjukkan koneksi nirkabel telah terhubung
Langkah 2
Pro
1
Unduh dan instal mLiveView
2
Buka mLiveView dari tampilan ponsel anda
Langkah 3
1
2
Scan QR code
or
Manual input
1
Tekan + untuk menambahkan kamera
Pilih Pindai kode QR dan menyelaraskan kamera ponsel Anda pda kartu ID / Sandi. Kamera
2
akan secara otomatis ditambahkan ke daftar kamera
3
Klik pada ID Kamera baru Anda untuk terhubung ke kamera
xxxxxx
xxxxxx
NAT/Router
mLiveView
(Wireless)
WPS
mLiveView
3
PIC1007WP
WPS
Indonesian
Catatan:
1
Jika router anda tidak dapat mengkonfigurasi WPS, silakan melihat pada petunjuk dari pabrikan router anda.
2
Jika router anda tidak mendukung WPS, silakan gunakan Manual Pengaturan Wireless atau pengaturan Wifi
cerdas
.
ID 7
Page 26

8. Pengaturan Manual Wireless
Langkah 1
PIC1007WP
NAT/Router
Power Adaptor
1
1
Hubungkan colokan listrik ke kamera dan mengaktifkannya
2
Sambungkan salah satu ujung kabel Ethernet ke kamera dan ujung lainnya ke NAT / Router
2
WAN
LAN
Internet
Langkah 2
1
1
Hubungkan perangkat mobile Anda ke router WiFi yang akan digunakan untuk
menghubungkan kamera
2
Unduh dan instal mLiveView
Buka mLiveView dari tampilan ponsel anda
3
2
Pro
3
mLiveView
mLiveView
Langkah 3
1
Scan QR code
or
Manual input
1
Tekan + untuk menambahkan kamera
Pilih Pindai kode QR dan menyelaraskan kamera ponsel Anda pda kartu ID / Sandi. Kamera
2
akan secara otomatis ditambahkan ke daftar kamera
2
xxxxxx
xxxxxx
ID 8
Page 27

8. Pengaturan Manual Wireless
MAXIS
1
Langkah 4
2
3
PROLiNK_H5004N
PROLiNK_PPL1501N_000002
PROLiNK_WNR1008
Other...
1
Tekan tombol Panah kemudian Pengaturan Kamera. Masukkan admin username dan sandi
(Username default adalah admin dan Sandi biarkan kosong)
2
Tekan Jaringan setelah itu jaringan WiFi. Aktifkan fitur WiFi kamera
Pilih jaringan WiFi Anda dari daftar dan masukkan password WiFi. Tunggu pembaharuan
3
selesai dan jaringan WiFi yang dipilih akan disorot dengan warna biru. Lepaskan kabel
Ethernet dari kamera dan kamera sekarang akan mengaktifkan koneksi nirkabel ke router
PROLiNK_PPL1501N_000002
PROLiNK_WNR1008
PROLiNK_PHA1061
New Tulip
Indonesian
ID 9
Page 28

9. Instalasi LiveView& Penjelasan
Langkah 1
1
PIC1007WP
Wireless IP
Camera
CD Contents:
•
Management Software
•
Quick Installation
Guide
Version 1.0 (Apr’13)
Wireless Pan/Tilt IP Camera
Video Management Software
Quick Installation Guide
User Manual
Please Select An Option
Browse CD
©
C
.
o
d
p
e
v
y
r
r
i
e
g
s
h
e
t
R
2
s
0
t
1
h
3
g
i
P
R
R
l
O
l
L
A
i
N
K
Product Registration
Exit
www.prolink2u.com
2
Masukkan CD instalasi ke dalam drive CD-ROM Anda dan Maka instalasi akan berjalan
1
otomatis. Pilih Software Video Management untuk memulai proses pengaturan
Pilih bahasa yang di inginkan lalu klik OK untuk melanjutkan pengaturan. Ikuti petunjuk
2
untukmenyelesaikan instalasi. LiveView dan LivePlay ikon akan dibuat pada tampilan di
Desktop. Jalankan perangkat lunak LiveView dengan mengklik dua kali pada icon
Langkah 2
3
1
1
Setelah LiveView dimulai, maka secara otomatis akan mencari semua kamera yang
terhubung pada Local Area Network (LAN) dan menampilkan Kamera ID di kolom
AutoSearch.
2
Untuk memutar video, cukup klik dua kali pada ID Camera atau masukan ID Camera ke
salah satu pemutar video Windows dan masukkan sandi kamera.
Untuk lebih mengatur kamera Anda dan memungkinkan akses dari jarak jauh, disarankan
3
untuk menambahkan kamera ke Daftar Kamera. Hanya dengan menarik kamera Anda dari
kolom Cari AutoSearch dan menjatuhkannya di kolom Daftar Kamera setelah itu akan
secara automatis disimpan
2
ID 10
Page 29

9. Instalasi LiveView & Penjelasan
Langkah 3
3
1
2
Jika Anda ingin melihat kamera dari luar jaringan lokal Anda dan apabila kamera ID / Sandi
1
tidak disimpan dalam Daftar Kamera, Anda dapat secara manual menambahkan kamera
dengan klik kanan pada Daftar Kamera untuk menampilkan opsi
2
Pilih New Camera
Berikan nama untuk kamera jauh Anda dan masukkan ID dan Sandi Kamera
3
Kapasitas penyimpanan
yang tersedia
untuk perekaman
Recording
Snapshot
Area tampilan video
Daftar Kamera
Status
Kamera
Nama/ID kamera
Nama Kamera
Auto Search List
Version
Perangkat lunak
Info tanggal
Minimize
Keluar dari
LiveView
Indonesian
Settings
Set Schedule
Recording
LivePlay View
Recording
Pan/Tilt Control Panel
Change
Language
Execute Options
For All Channels
Layar mode Multi-Channel
Maximize
Screen
Mute/Unmute
Speaker
Enable
Microphone
ID 11
Page 30

9. Instalasi mLiveView
mLiveView tersedia untuk perangkat Android dan iOS.
Untuk penggunaanya dapat di lakukan dengan cara salah satu dari metode berikut:
Menggunakan QR Kode untuk menginstalasi
1
Membutuhkan scanner Kode QR aplikasi diinstal pada ponsel Anda / perangkat tablet.
2
Buka aplikasi scanner dan arahkan kamera QR Code. QR Code juga dicetak pada kotak kemasan.
iPhoneiPad Android
Manual install
Untuk perangkat Android:
1
Buka Google Play Store pada perangkat Anda.
2
Ketik mLiveView di kotak pencarian untuk menemukan app.
3
Ikuti petunjuk untuk menginstal aplikasi.
Untuk perangkat iOS
1
Buka App Store pada perangkat Anda.
2
Jenis mLiveViewPro (iPhone / iPod) atau mLiveViewHD + (iPad) di kotak pencarian untuk
menemukan app.
Ikuti petunjuk untuk menginstal aplikasi
3
ID 12
Page 31

10. Penjelasan mLiveView
1
Play Back Camera ListLocal Search WiFi Setup Information
2
1
2
4
7
3 4 5
Tambahkan IP kamera baru
Putar rekaman video dari ponsel
Data kamera3
Pencarian kamera pada local area
network
Pengaturan WiFi cerdas5
Informasi versi mLiveView information6
Pengaturan kamera yang di masukan
7
8
9
10
6
8
9
10
12
13
14
14
Ganti setingan kamera
Rekam langsung video ke penyimpanan ponsel
Mengambil gambar langsung dari video
Video langsung dari camera11
Hidupkan microphone untuk komunikasi 2 arah
(hanya terdapat pada model tertentu)
Tombol Alarm
(hanya terdapat pada model tertentu)
Informasi kamera
11
12
13
Indonesian
ID 13
Page 32

11. Pengaturan Web base
Access
Web Configure
1
1
Jalankan LiveView. Kamera Anda akan terdeteksi di kolom AutoSearch,
klik kanan pada ID Kamera untuk melihat opsi Configurasi web
2
Anda akan diminta untuk mengisi kolom login dan isikan seperti bawah ini lalu klik OK.
Username: admin dan pada kolom sandi di kosongkan
2
ID 14
Page 33

11. Pengaturan Web base
1
2
3
4
7
5
6
1
Informasi
Tampilan konfigurasi kamera, information dan status rekaman.
Network
2
Wired Network:
WiFi Security: Pengaturan koneksi WiFi dan keamanan. Di lengkapi dengan WiFi scan untuk memudahkan
pengaturan.
Advanced: Pengaturan setting jaringan PPOE.
3
Video
Display:
Video Settings: Penyesuaian setting kamera dan penggantian sandi pemutar video.
Mobile Video: Penyesuaian setting video streaming untuk ponsel.
Night Mode: Setting untuk mengubah mode Day/Night. Setingan awal pabrikan adalah automatic detection.
Schedule
4
Email/FTP Alarm:
Speaker Alarm: Pengaturan pemicu Alarm Speaker untuk kamera dengan internal atau external speaker.
NAS Settings: Pengaturan penyimpanan NAS anda agar dapat di gunakan untuk perekaman video dari
Kamera.
SD-Card: Pilih mode perekaman untuk kartu SD. Penyediaan akses langsung kartu SD untuk management file.
Thermometer: Atur rentang pemicu temperature. Hanya ada pada kamera dengan built-in thermometer.
Scheduling: Pengaturan aturan jadwal untuk perekaman dan pemicu alarm.
5
Admin
Admin Login:
LED Control:
Date/Time: Set NTP server dan Time Zone with Daylight Saving Time. (Option for manual Setting)
Upgrade: Upgrade firmware from FTP server or from local file.
Reboot: Reboot the camera.
6
Rubah Bahasa konfigurasi Web.
Tampilan informasi settings display window.
7
Pengaturan konfigurasi jaringan kabel. Settingan awal adalah obtain IP automatically.
Tampilan Layar langsung dengan Pan/Tilt dan fitur Patrol.
Pengaturan Email/FTP pemicu dan pengiriman email peringatan.
Pengaturan administrator login untuk konfigurasi kamera.
Set indikator LED preference.
Indonesian
ID 15
Page 34

12. Pertanyaan yang sering diajukan
1. Mengapa indikator LED pada kamera berkedip secara berurutan?
Pastikan Ethernet atau koneksi WiFi setup dengan benar dan periksa apakah anda
memiliki sambungan Internet. Ketika terhubung ke jaringan lokal, LED biru akan konstan. Dan bila
tersambung ke Internet, LED Merah akan konstan.
2. Bila kamera terhubung ke jaringan melalui nirkabel, kualitas video tidak baik,bagaimana
saya bisa memperbaiki masalah ini?
Jarak kamera dan WiFi router mungkin terlalu jauh atau terlalu banyak perangkat yang terhubung ke
router. Hal ini juga mungkin bahwa antena WiFi tidak dalam posisi terbaik.
3. Dapatkah saya mengatur fokus kamera?
Kamera ini memiliki iris tetap dan tidak perlu untuk menyesuaikan fokus lensa. fokus efektif
Kisaran adalah dari 30cm hingga tak terbatas.
4. Mengapa saya tidak bisa mendengar suara apapun dari kamera saya?
a) Pastikan bahwa komputer Anda atau audio ponsel diaktifkan. Coba mainkan file audio untuk
memverifikasi apakah bekerja.
b) Periksa apakah mikrofon kamera diaktifkan. Login ke web konfigurasi atau buka video "
Pengaturan " dari LiveView, pilih" Video "tab dan mengaktifkan fitur Mikrofon.
5. Apa yang harus saya lakukan jika saya lupa sandi kamera?
Untuk melihat retrive Sandi Video, silahkan ke halaman konfigurasi web kamera>Login Credential>
Video> Pengaturan Video, sandi akan terlihat dari kolom Password (memutar video).
6. Aku bisa melihat video dari lokasi terpencil, tapi kualitas video tidak baik dan
kadang-kadang video akan terputus dan menyambung kembali lagi dengan sendirinya.
Hal ini kemungkinan disebabkan oleh bandwidth internet miskin (kecepatan) atau kemacetan pada
jam sibuk. Cobalah untuk mengurangi pengaturan bandwidth kamera. Anda dapat menyesuaikan
kebutuhan bandwidth dari perangkat lunak LiveView atau login ke mengkonfigurasi halaman web
untuk melakukan modifikasi.
7. Dapatkah saya menggunakan LiveView dalam Macintosh OS X?
Instal perangkat lunak dari CD Setup disediakan atau download dari website kami di
www.prolink2u.com. Applikasi ini masih versi beta oleh karena itu beberapa fungsi mungkin tidak
bekerja atau dinonaktifkan sampai versi lengkap selesai dirilis.
8. Bagaimana saya bisa memicu fungsi Zoom kamera di LiveView?
Anda dapat melakukan zoom-in dengan menggunakan mouse untuk mengklik dan gulir pada layar
di LiveView.
ID 16
Page 35

(for Indonesia region only)
KETENTUAN GARANSI
Kami mengucapkan terima kasih atas kepercayaan Anda memilih produk kami dan selaku distributor di Indonesia,
kami memberikan garansi produk selama1 (satu) tahun.
1. Garansi Hanya Berlaku Jika :
a. Diisi dengan jelas, lengkap dan benar.
b. Jika telah dikirimkan dan diterima oleh PT. Prolink Intidata Nusantara.
c. Memperlihatkan kartu garansi asli dan nota pembelian pada saat klaim service.
2. Garansi Tidak Berlaku Apabila :
a. Kerusakan yang disebabkan oleh, kelalaian pemakai, bencana alam, kebakaran, tegangan listrik yang
terlalu tinggi / rendah, terkena cairan.
b. Kerusakan yang diakibatkan karena transportasi / pengiriman, pemasangan / pengoperasian yang tidak sesuai
dengan buku petunjuk, penyambungan dengan alat lain.
c. Barang yang diservice tidak sesuai dengan kartu garansi.
d. Serial number rusak / robek / tidak ada.
3. Ruang Lingkup Garansi :
a. Garansi hanya mencakup bagian-bagian / komponen perangkat keras dari kongurasi standar yang terdapat
pada spesikasi produk sesuai dengan faktur.
b. Khusus netbook garansi baterai hanya berlaku selama 6 bulan sejak tgl. pembelian.
* Biaya pengiriman ditanggung pembeli
Page 36

(for Indonesia region only)
Tgl. Pembelian
—————— :
Purchase Date
Dealer :
S/N :
Model :
———
Toko :
Kota :
———
City :
Cap Toko
PT. Prolink Intidata NusantaraPelanggan
KARTU GARANSI / WARRANTY CARD
Barang
————:
Produk
Nama
———:
Name
Alamat
————:
Address
Kota: Kode Pos:
Tel / Fax :
Email :
Page 37

(for Indonesia region only)
Tgl. Pembelian
—————— :
Purchase Date
Dealer :
S/N :
Model :
———
Toko :
Kota :
———
City :
Cap Toko
PT. Prolink Intidata NusantaraPelanggan
KARTU GARANSI / WARRANTY CARD
Barang
————:
Produk
Nama
———:
Name
Alamat
————:
Address
Kota: Kode Pos:
Tel / Fax :
Email :
Page 38

disini.
Tempelkan perangko
Hanya untuk pengeposan
di Indonesia
Kepada Yth.
(for Indonesia region only)
KARTU GARANSI
Customer Service
PT. PROLINK INTIDATA NUSANTARA
Jl. Cideng Barat No.79
Jakarta Pusat 10150 - Indonesia
Page 39

Page 40

Worldwide Customer Care Centers
SINGAPORE Office
FIDA INTERNATIONAL (S) PTE LTD
Walk-In : Block 16 Kallang Place #06-02, Kallang Basin Industrial Estate, Singapore 339156.
Telephone : +65 6357 0668
Email Support : suppor t@fida.com
MALAYSIA Office
FIDA SYSTEMS (M) SDN BHD
Walk-In : 29 Jalan USJ 1/31, 47600 Subang Jaya, Selangor Darul Ehsan, Malaysia.
Telephone : +60 3 8024 9151
Email Support : suppor t_my@fida.com
INDONESIA Office
PT PROLiNK INTIDATA NUSANTARA
Walk-In : Jl. Cideng Barat No. 79, Jakarta Pusat 10150, Indonesia.
Telephone : +62 21 3483 1777
Email Support : suppor t@prolink.co.id
Technical Support Hotline
SINGAPORE : +65 6357 0666
MALAYSIA : +60 3 8023 9151
INDONESIA : +62 21 3483 1717
Note: Closed on Saturdays, Sundays and local/regional Public Holidays.
Register Online For Your Product Warranty @ www.prolink2u.com/register
PROLiNK® is a trademark of FIDA INTERNATIONAL (S) PTE LTD and is manufactured under its authority. All other brands, products, services, logos and
company names mentioned herein are trademarks of their respective owners. All specifications, designs and contents are subject to changes without prior
notice. © Copyright 2013. PROLiNK® all rights reserved.
 Loading...