

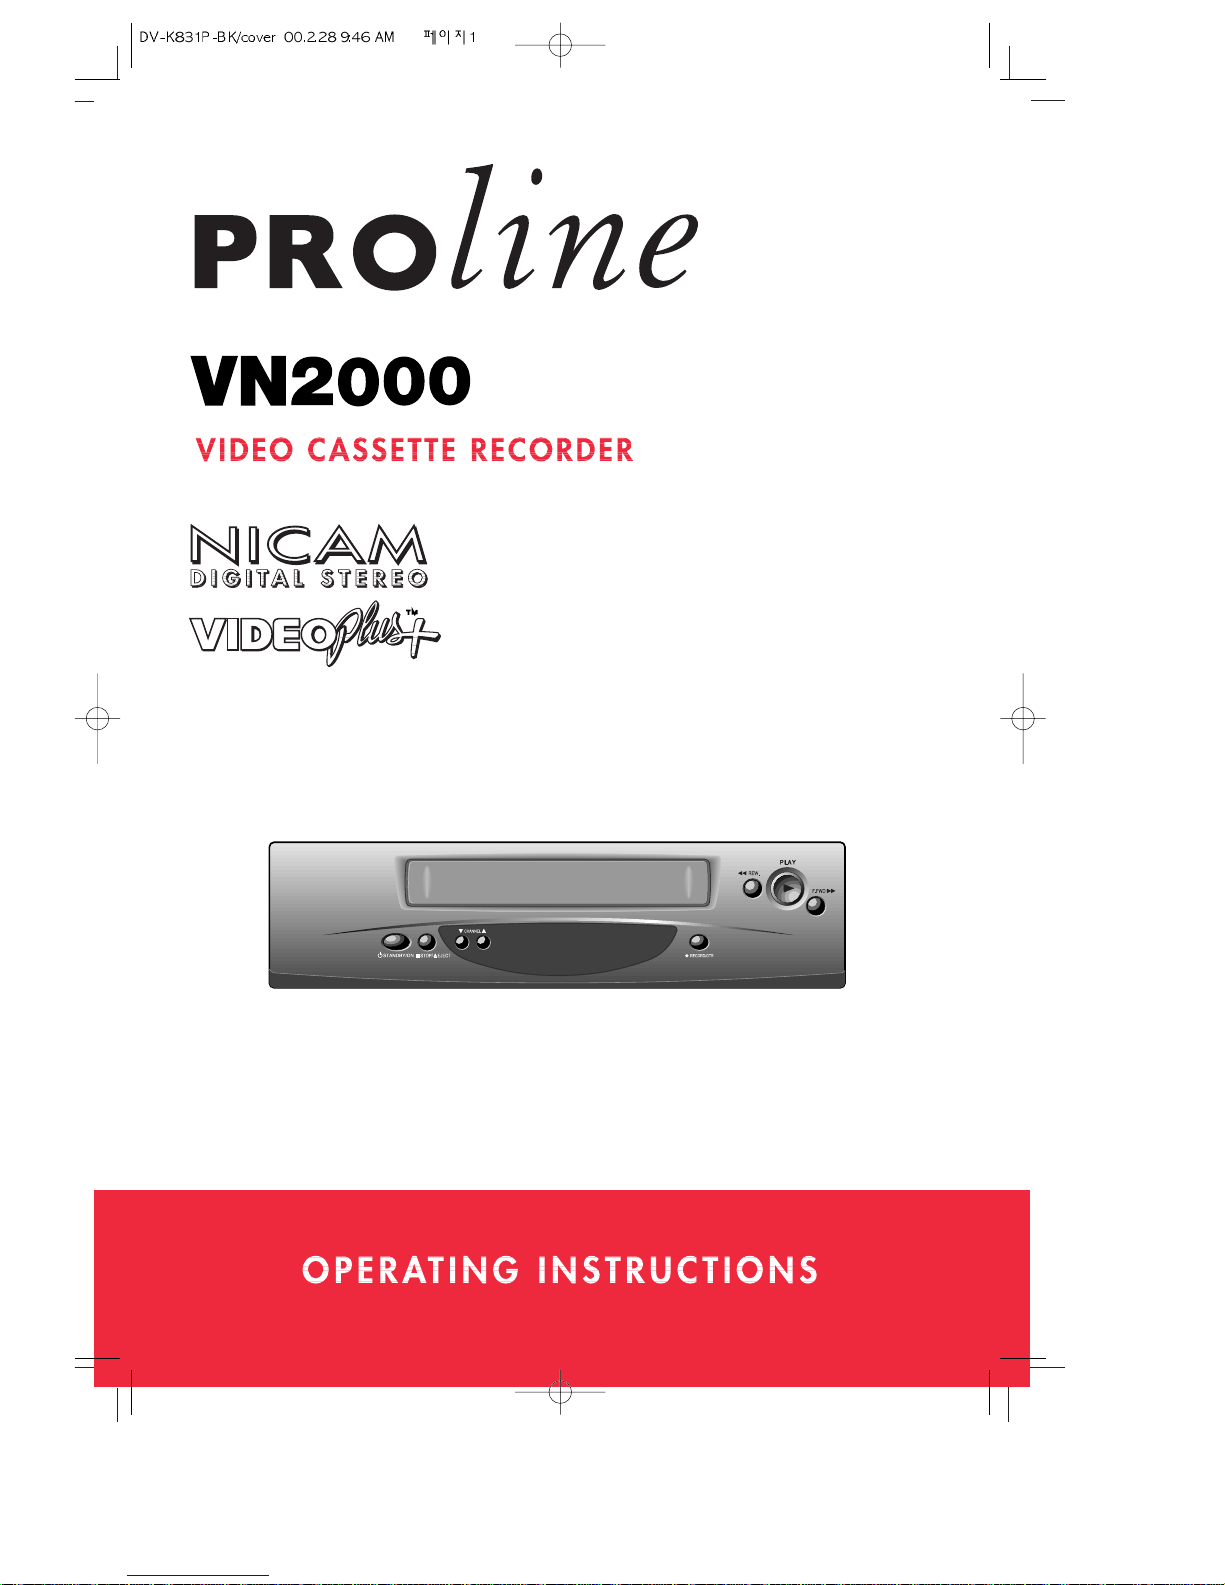
Page 1
Page 2
Setting up the video recorder
Safety instructions, Important points .............................................................................. 2
Cleaning your video recorder, The mains plug ................................................................ 3
Safety symbols, Power Cuts............................................................................................. 4
The controls ..................................................................................................................... 5
The remote control .......................................................................................................... 6
The front of the video recorder, On-screen display ......................................................... 7
Getting started ................................................................................................................8
Automatic video channel selection, Connecting extra equipment ................................ 10
The stand-by button ...................................................................................................... 11
What to do if you get picture interference ................................................................... 12
Auto set ...................................................................................................................... ... 13
Manual channel search ................................................................................................. 14
Changing programme numbers ...................................................................................... 16
Changing programme names ........................................................................................ 17
Erasing programmes ...................................................................................................... 18
Using the video recorder as a tuner, Child lock ............................................................ 19
Setting or checking the time and date, Sound type ...................................................... 20
About video cassettes
Types of video cassette, Recording and playback time of video cassettes
(SP and LP), Protecting cassettes from being recorded over.................................... 21
Playing video cassettes
Load the cassette, Play, Picture scanning, Stop,
Fast forward and Rewind, Eject the cassette........................................................... 22
Still picture and slow-motion, Commercial skip, NTSC playback.................................. 23
Choosing the sound track, Wide-screen pictures .......................................................... 24
Index search, Tracking and picture quality..................................................................... 25
On-screen information display....................................................................................... 26
Tape control menu .......................................................................................................... 28
Recording
Long play........................................................................................................................ 29
Recording from other equipment,
Protecting cassettes from being recorded over ............................................................ 30
Auto-assembling ........................................................................................................... 31
One-time recording (OTR) .............................................................................................. 32
Programmed recordings
Programme delivery control (PDC), Programmed recording with VIDEOPlus+ ............... 33
Setting the timer ........................................................................................................... 35
Changing a timer programme, How to erase a timer programme ................................ 36
How to stop a programmed recording,
Important notes about VIDEOplus+ and programmed recordings ................................. 37
Appendix
Before you call an engineer (problems and what to do about them)............................. 38
Interference, Appendix1, Appendix2 ............................................................................. 39
Serial number record, Technical information ................................................................ 41
Contents
1
Page 3
Safety instructions
video recorder
Setting up the
◆ Thank you for buying this Goodmans video recorder.
◆ Please read this instruction book before you use your video recorder.
◆ This video recorder can record and play cassettes with the VHS-standard
mark.
2
• Do not take the cover off this video recorder. If something goes wrong, don’t try and fix it
yourself. Contact Comet after-sales service for advice.
• When the video recorder is plugged into the power supply there are some parts that are
always working. To switch off the video recorder completely you must unplug it from the
power supply.
• This video recorder is designed to run from the UK standard mains supply of 230 volts, 50
Hertz.
• Make sure air can flow freely through the ventilation slots on the video recorder.
• Don’t put objects containing liquid on the video recorder. If liquid spills into the video
recorder, unplug it immediately and contact Comet after-sales service for advice.
• Pull the mains plug out of the wall socket and disconnect the aerial lead during
thunderstorms. (The clock and timer settings will be lost after about one hour.)
• Do not let anyone push objects into holes and ventilation slots.
Important points
• Condensation can damage your video recorder. If the video recorder is cold when you
unpack it, leave it for several hours to become room temperature. Do not use the video
recorder immediately after moving from a cold room to a hot room or a hot room to a cold
room. Do not use the video recorder in very damp conditions.
• Most televisions switch automatically to the AV (audio video) channel when a video
cassette is played. If your television does not do this automatically you will have to turn it
to ‘EXT’, ‘0’, ‘AV’ or ‘scart’.
• Under normal circumstances keep your video recorder plugged into the mains all the time,
otherwise the aerial connection to your television will be interrupted and the television
picture will be poor.
• If there is a power cut, the video recorder will keep the time and record timer set for up
to an hour. After that, the video recorder will tell you to start the automatic installation
procedure again, as described on page 13. You will also have to re-set the timer
programmes.
• Throw away old remote control batteries at a battery disposal point.
• Please recycle your video recorder’s packaging. When your video recorder is worn out,
take it to your local recycling point.
• The video recorder switches on automatically and the green front-panel display gets
brighter when you put a cassette in or press a control button.
Page 4
video recorder
The mains plug
3
Setting up the
Please remove the fuse from the old moulded plug and throw it away to prevent
anyone from plugging it into the mains and getting an electric shock.
We have fitted this video recorder with a moulded 13-amp plug. To change a fuse in this
type of plug:
• prise open the fuse cover on the connecting-pin face of the plug with a small screwdriver
and lift out the fuse cover with the fuse;
• put a new BS1362, 3-amp, ASTA or BSI-approved fuse in the cover; and
• replace the fuse cover and fuse.
Do not use this kind of plug without the fuse cover fitted.
If your moulded plug is not suitable for your mains supply socket, buy an adapter to match
the moulded plug to your supply socket. Or cut the moulded plug off and fit an appropriate
plug in its place. The plug you fit or the distribution board feeding your mains supply socket
must have a fuse rated at no more than 5 amps.
Cleaning your video recorder
Unplug the video recorder and use only a lightly dampened soft cloth . Do not use chemical
solvents or strong detergents as these may damage the cabinet finish.
• By law, you may need to get the permission of the copyright owner before you record
anything.
• VIDEOPlus+ and PlusCode are trademarks of the Gemstar Development Corporation.
• The VIDEOPlus+ system is made under licence from Gemstar Development Corporation.
• This video recorder is not designed for use in tropical climates.
• This video recorder is designed for use only in the UK and cannot be modified.
Page 5
video recorder
Setting up the
4
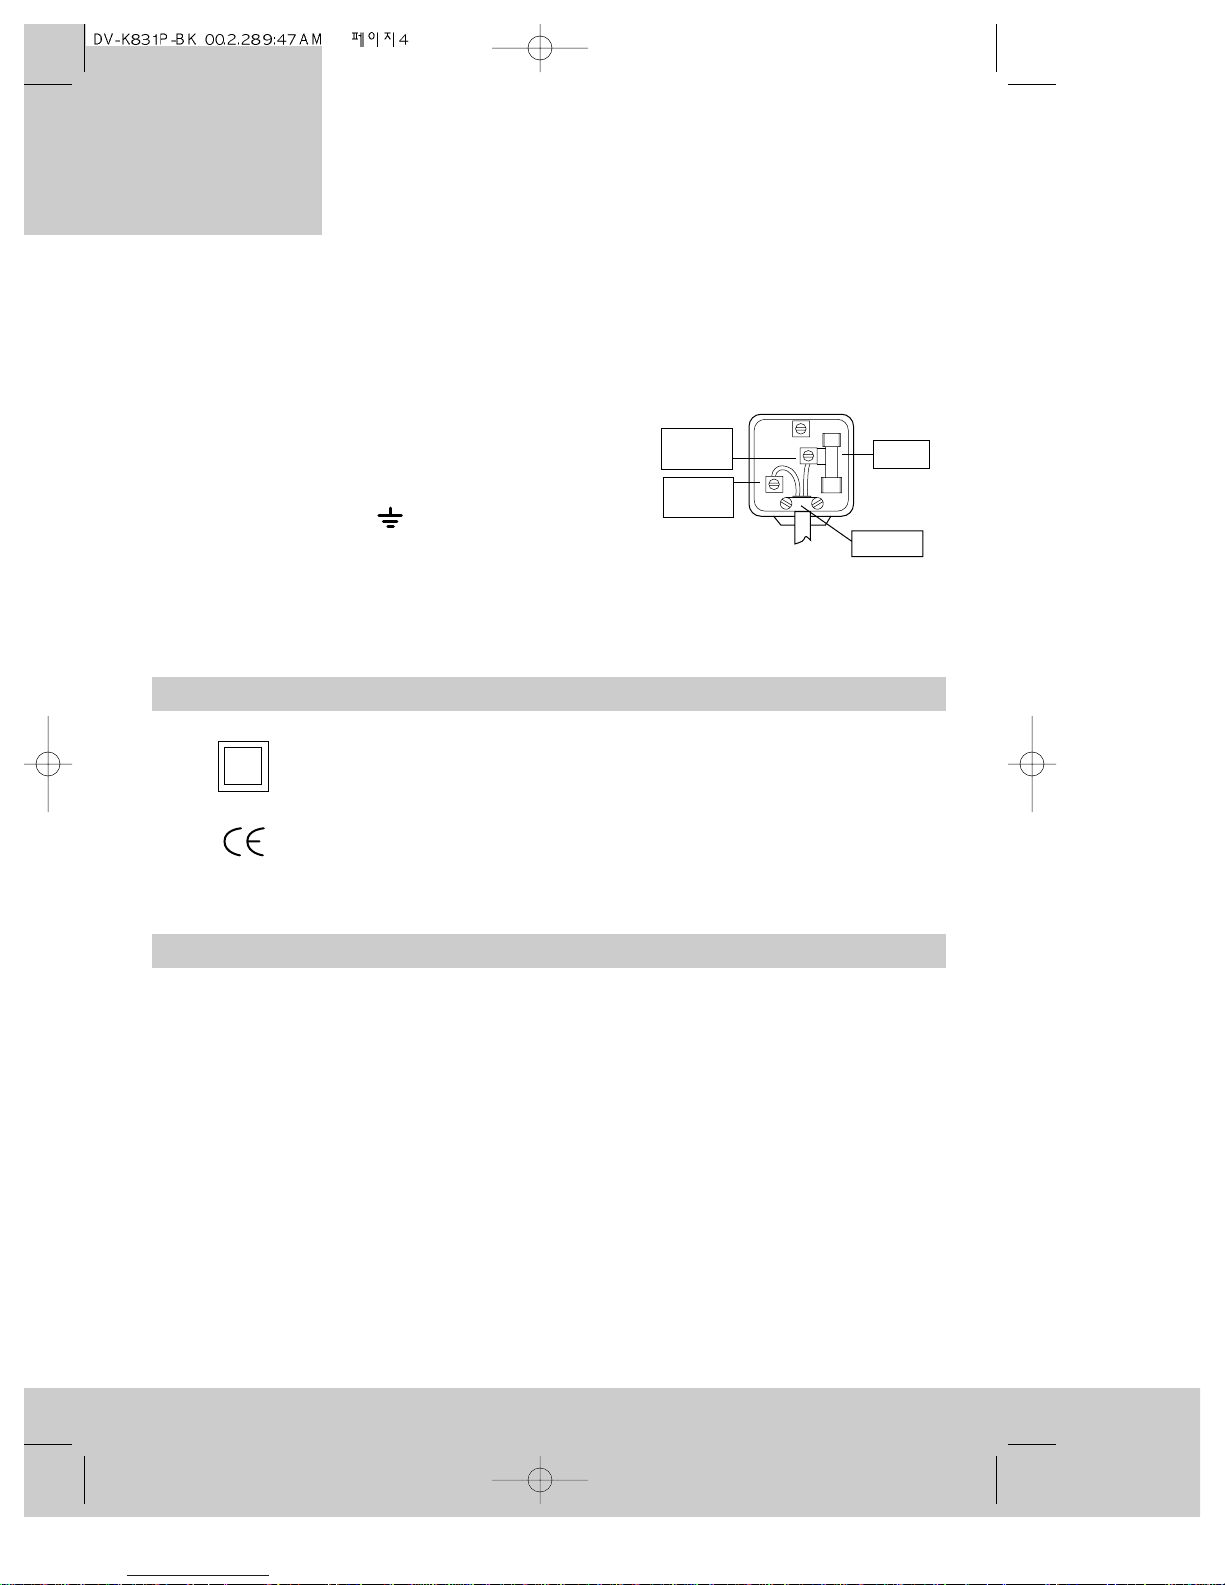
How to connect a plug
• The blue wire must be connected to the terminal which is marked with the letter ‘N’ or
coloured black.
• The brown wire must be connected to the terminal
which is marked with the letter ‘L’ or coloured red.
• Do not connect any wires to the earth terminal in the
plug which is marked with the letter ‘E’ or by the
safety earth symbol or coloured green or green
and yellow.
• You must make sure the lead is firmly secured under
the cord grip.
Safety symbols
This symbol means this unit is double insulated and does not need an earth
connection.
This symbol means this unit meets European regulations concerning safety
and electromagnetic interference.
E
L
N
Cord grip
3A fuse
Brown
live
Blue
neutral
Power Cuts
If there is a power cut, the video recorder will keep the time and record timer programming
for about one minute. If the power returns after that the video recorder will prompt you to
start the automatic installation procedure again, as described on page 13. Don’t worry, you
don’t have to tune everything in again: just press the MENU button to clear the ‘Auto Set’
display. You will have to re-set the timer programmes.
Page 6
The controls
5
For the remote control to work properly, you have to point it directly at the video
recorder.
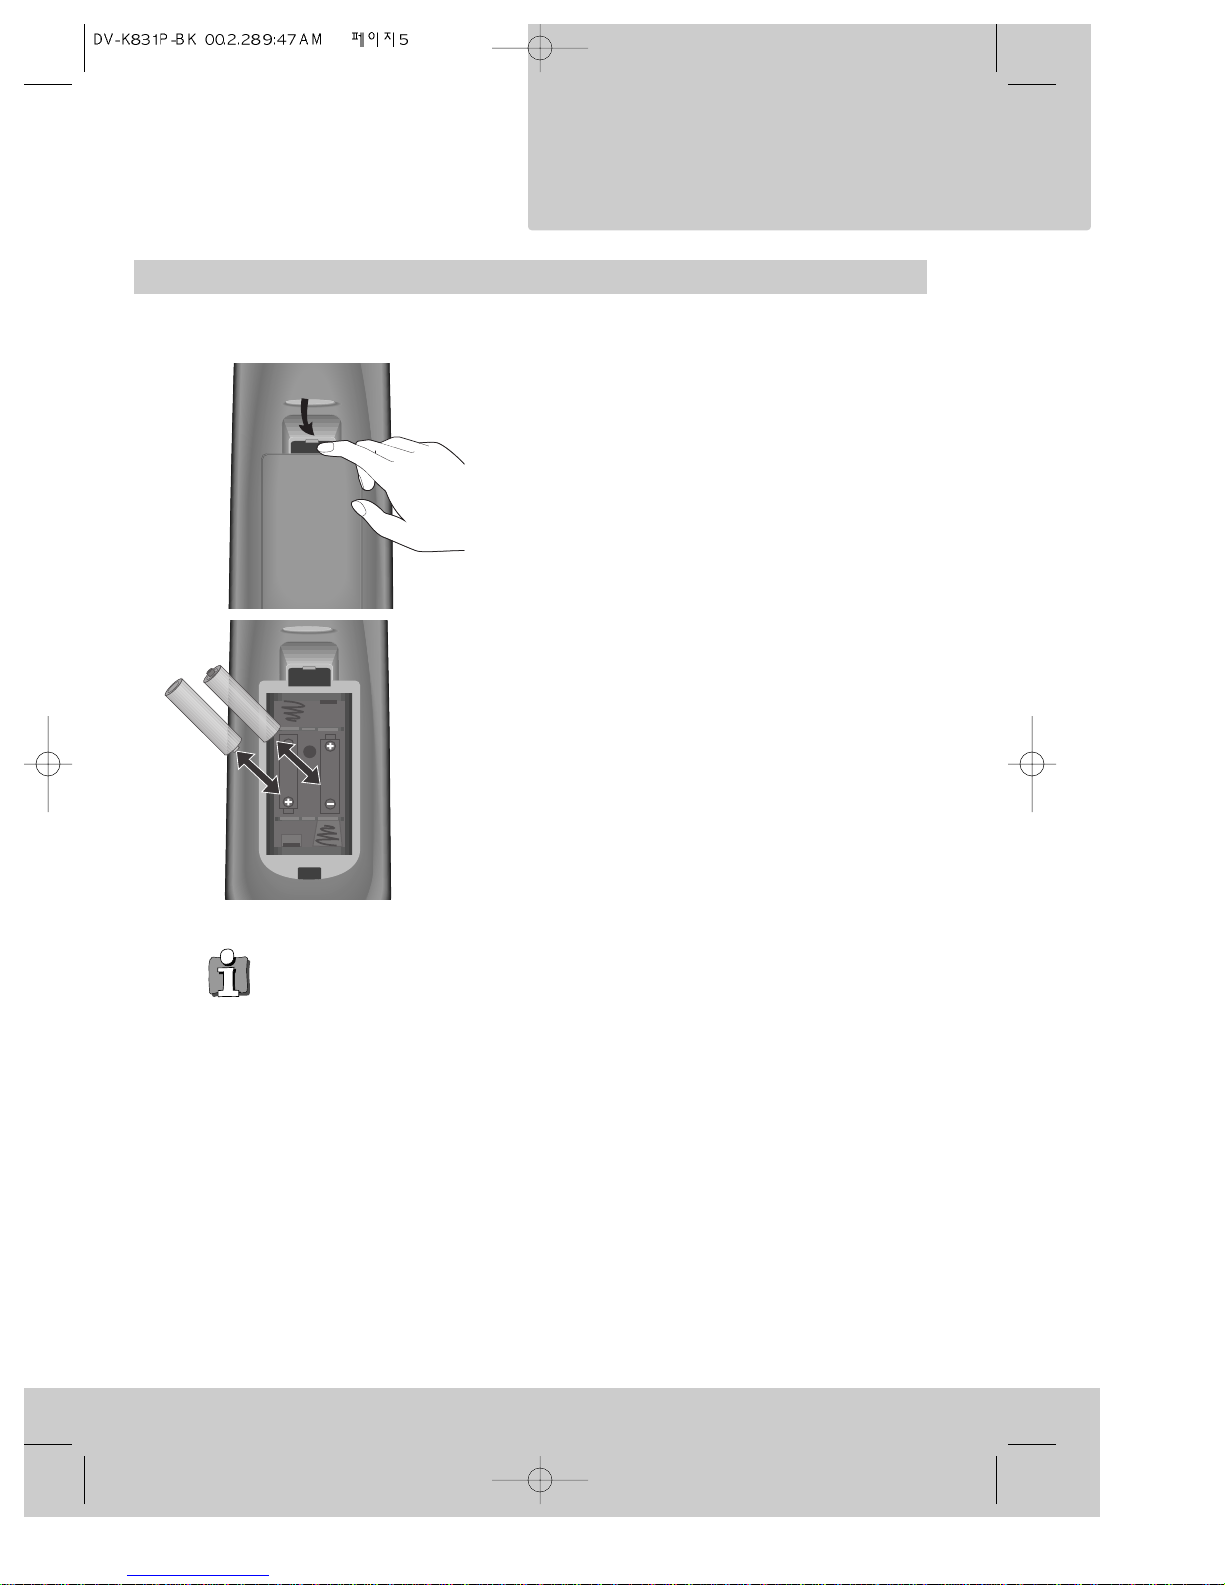
1 Press your thumb nail against the slot in the
battery cover on the back of the remote
control. Lift the cover off.
2 Put two AAA-size or LR3-type batteries into
the battery compartment. Make sure the (+)
and (-) marks on the batteries agree with the
(+) and (-) marks inside the battery
compartment. Push the cover back on.
UM-4
(AAA)
DC 1,5Vx2
+
–
+
–
How to put the batteries in the remote control
video recorder
Setting up the
Page 7
6
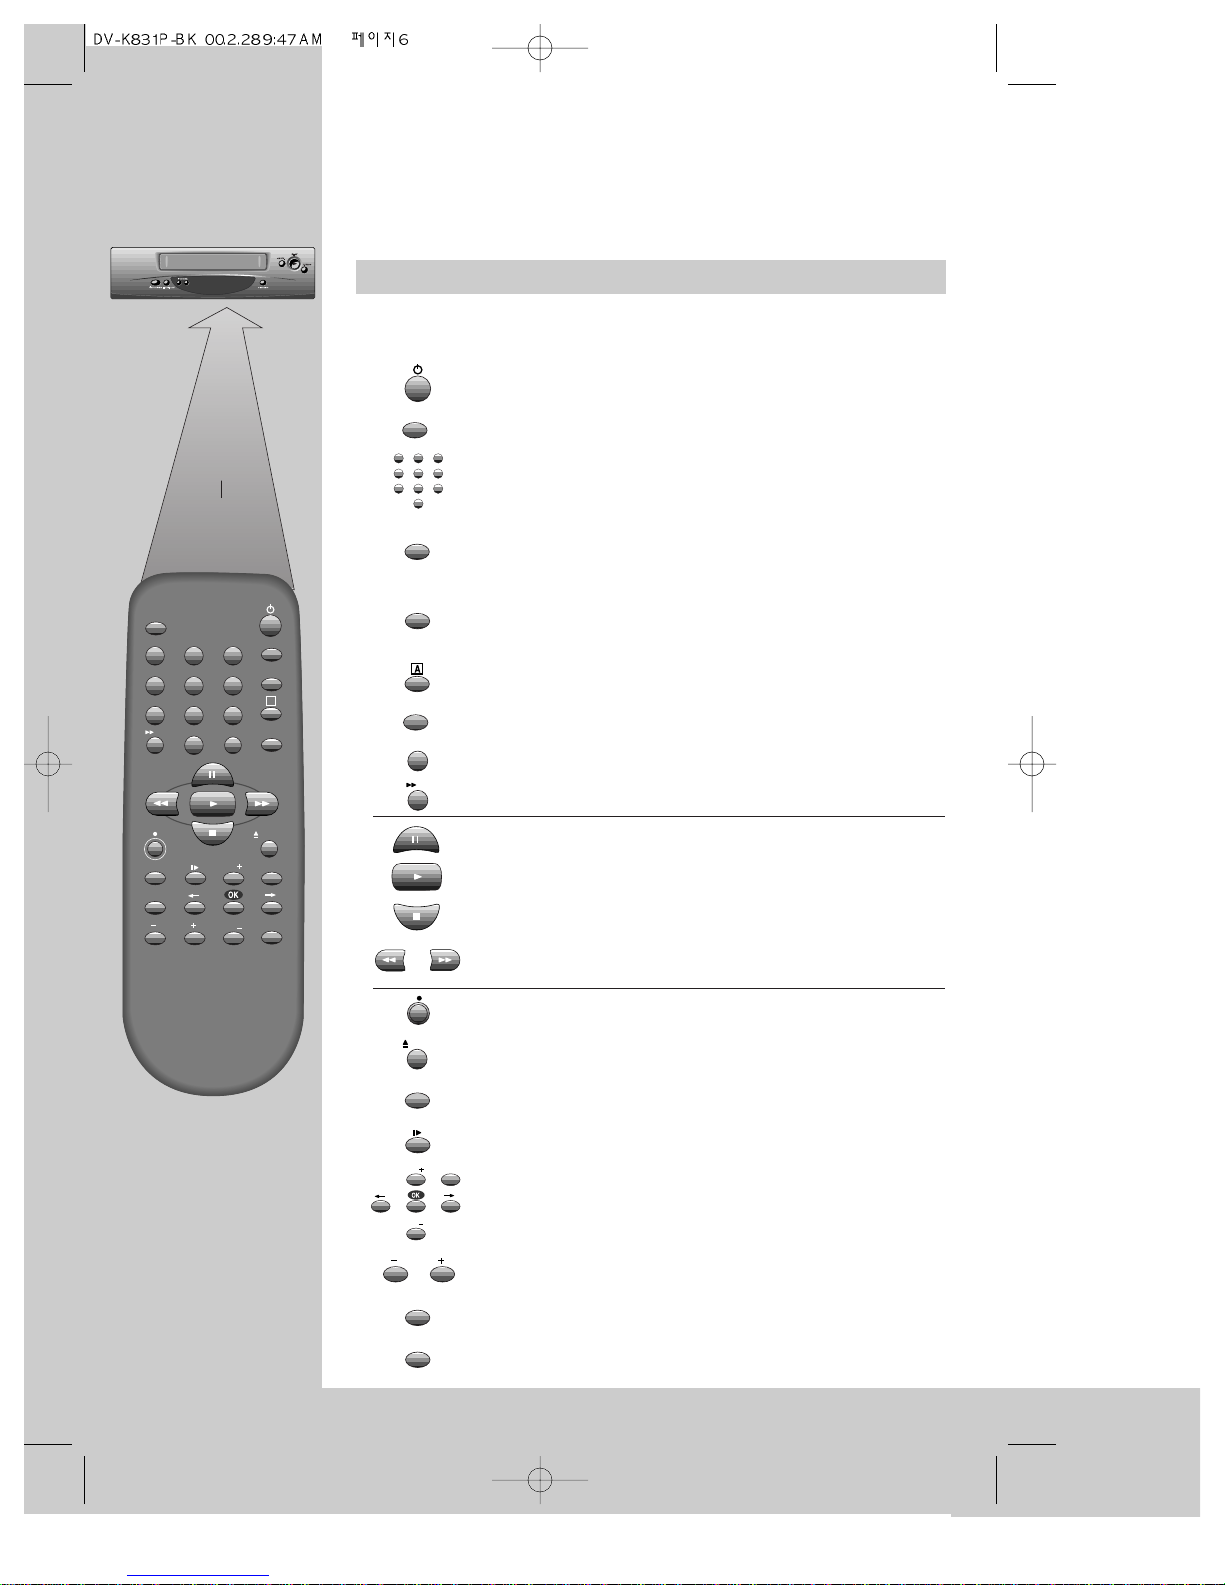
max. 7 m.
30°
30°
TV/VCR
SV/V+
PR
PR
MENU
EJECT
PAL/SEC
A.SEL
A.D
AV
SP/LP
Q.S
INDEX
1
2
3
456
789
0
30
A
Power on or stand-by
(see page 11).
Sets the record timer using VIDEOPlus+ numbers
(see page 33)
.
If there is a scart cable connection, this button makes the
television show the picture from the video recorder
(see ‘Automatic video channel selection’ on page 10).
Selects the back EURO AV1(scart) input,back EURO AV2(scart)
input, the front AV input or the video recorder tuner, one after
the other
(see ‘Recording from other equipment’ on page 30).
Changes the on-screen information display
(see page 26)
.
Not used for this model.
Not used for this model.
The commercial skip button plays a cassette for 30 seconds.
Ejects the video cassette.
Variable speed slow-motion playback. Used after pressing
the play button
(see page 23).
Not used for this model.
These buttons find the start of the next (+) or previous (-)
recording
(see page 25).
Selects the recording speed - standard play or long play
(see page 21).
Records
(see page 29)
.
Pauses recording or freezes the playback picture.
Plays a video cassette
(see page 22)
.
Stops play, fast forward, rewind, and so on
(see page 22)
.
Fast forwards or rewinds a cassette. Picture search during
playback
(see page 22)
.
Number buttons 0 to 9 for entering information and
selecting television programmes.
Buttons used with the on-screen control menus (
see page 7)
.
PR+ and PR- select television programmes as well.
Selects the sound type:stereo or mono for broadcast sound; L+R (stereo),
left, right or off (mono) for playback sound
(see pages 20 and 24).
video recorder
Setting up the
The remote control
Aim the remote control at the front of the video recorder, keep
within 7 meters and a 30 degrees angle to the receiver.
TV/VCR
AV
Q.S
A.D
30
EJECT
SP/LP
PR
PR
MENU
A.SEL
PAL/SEC
INDEX
1
2
3
456
789
0
SV/V+
Page 8
The front of the video recorder
7
On-screen display
Selects television programmes.
Records (see page 29).
OTR (one-time recording). Press this button once to record for 30 minutes.
Then, each time you press the button it makes the video record for 30
minutes longer before switching off (see page 32).
Plays a video cassette.
Fast forwards or rewinds a cassette. Picture search during playback (see page 22).
Power on or stand-by (see page 11).
Stops play, fast forward, rewind, and so on (see page 22).
Ejects the video cassette.
MAIN MENU
Timer Program
PR Preset
VCR Setup
Tape Control
PR+/-:select
OK:confirm MENU:end
VCR SETUP
Clock Set
RF Output Set
2nd Scart Set
16:9 Set
PR+/-:select
OK:confirm MENU:end
example
The menus show you which
button to press at the next step.
Some menus go off after a
while if you do not press any
buttons.
The tape-control menu only
appears when there is a
cassette in the video recorder.
When you press a
control button, other
information appears on
the screen temporarily.
You can change some of
the information which
appears by pressing the
button
(see page 26).
REW SP PR01 BBC1
The MENU button brings
up the main menu.
The video recorder’s menu
system gives you
easy-to-understand access to
less-used functions such as
tuning the stations, setting the
clock and so on.
◆ Control menus ◆ Status information
STEREO ON
MENU
PR
video recorder
Setting up the
Page 9
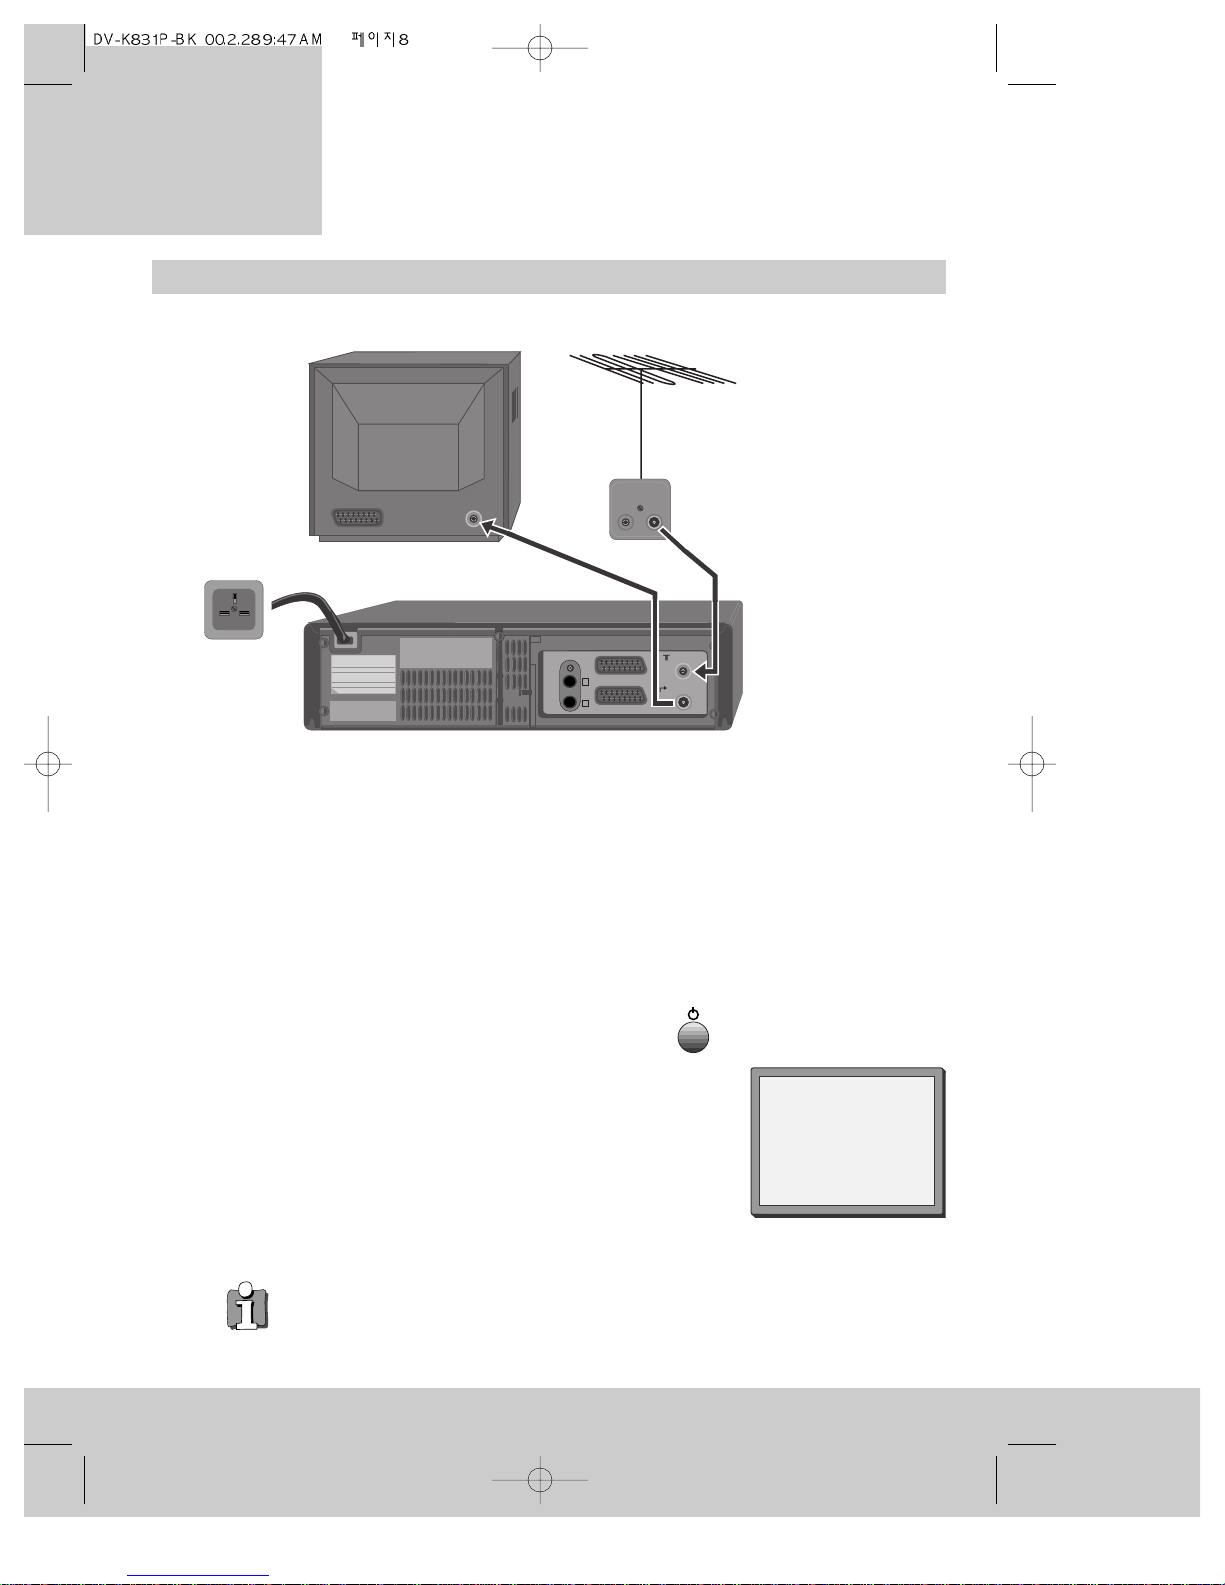
Getting started
1 Unplug the aerial cable from the back of your television and plug it into the ANT IN
socket on the back of your video recorder.
2 Plug one end of the aerial cable provided into the aerial socket on your television. The
cable only fits one way round, so look at the ends to see which one matches the
television aerial socket. Plug the other end of the cable into the ANT OUT socket on the
back of the video recorder.
3 Plug the moulded mains plug on the end of the mains cable into the mains socket on your
wall and switch on the power (if there is a power switch).
4 Switch your television on and select the programme number that you have chosen for the
video channel (see the instruction book for your television).
5 Press the POWER button once on the video recorder
(the display will get brighter).
6 Tune the television in the UHF waveband until a picture like
the one below appears, and memorise it under the video
programme number. (Please read the instruction book for
your television to see how to do this.)
7 Switch your video recorder off by pressing the POWER button
again.
8
EURO AV2 DECODER
AUDIO
L
R
Mains cable
Aerial cable
(provided)
Aerial
cable
Auto Set!
OK:confirm MENU:end
◆ If you cannot get a clear picture, please read ‘What to do if you get picture
interference’ on page 12.
◆ If you don’t see the picture in step 6, put a pre-recorded video cassette in the
video recorder at step 6 and try again. Pre-recorded video cassettes that you buy
or hire automatically play when you put them into the video recorder, so the
picture that appears on your television will be the picture from the video
cassette. We have described how to load a video cassette on page 22.
video recorder
Setting up the
For televisions without a Scart socket
ANT. IN
ANT. OUT
EURO-AV
Page 10
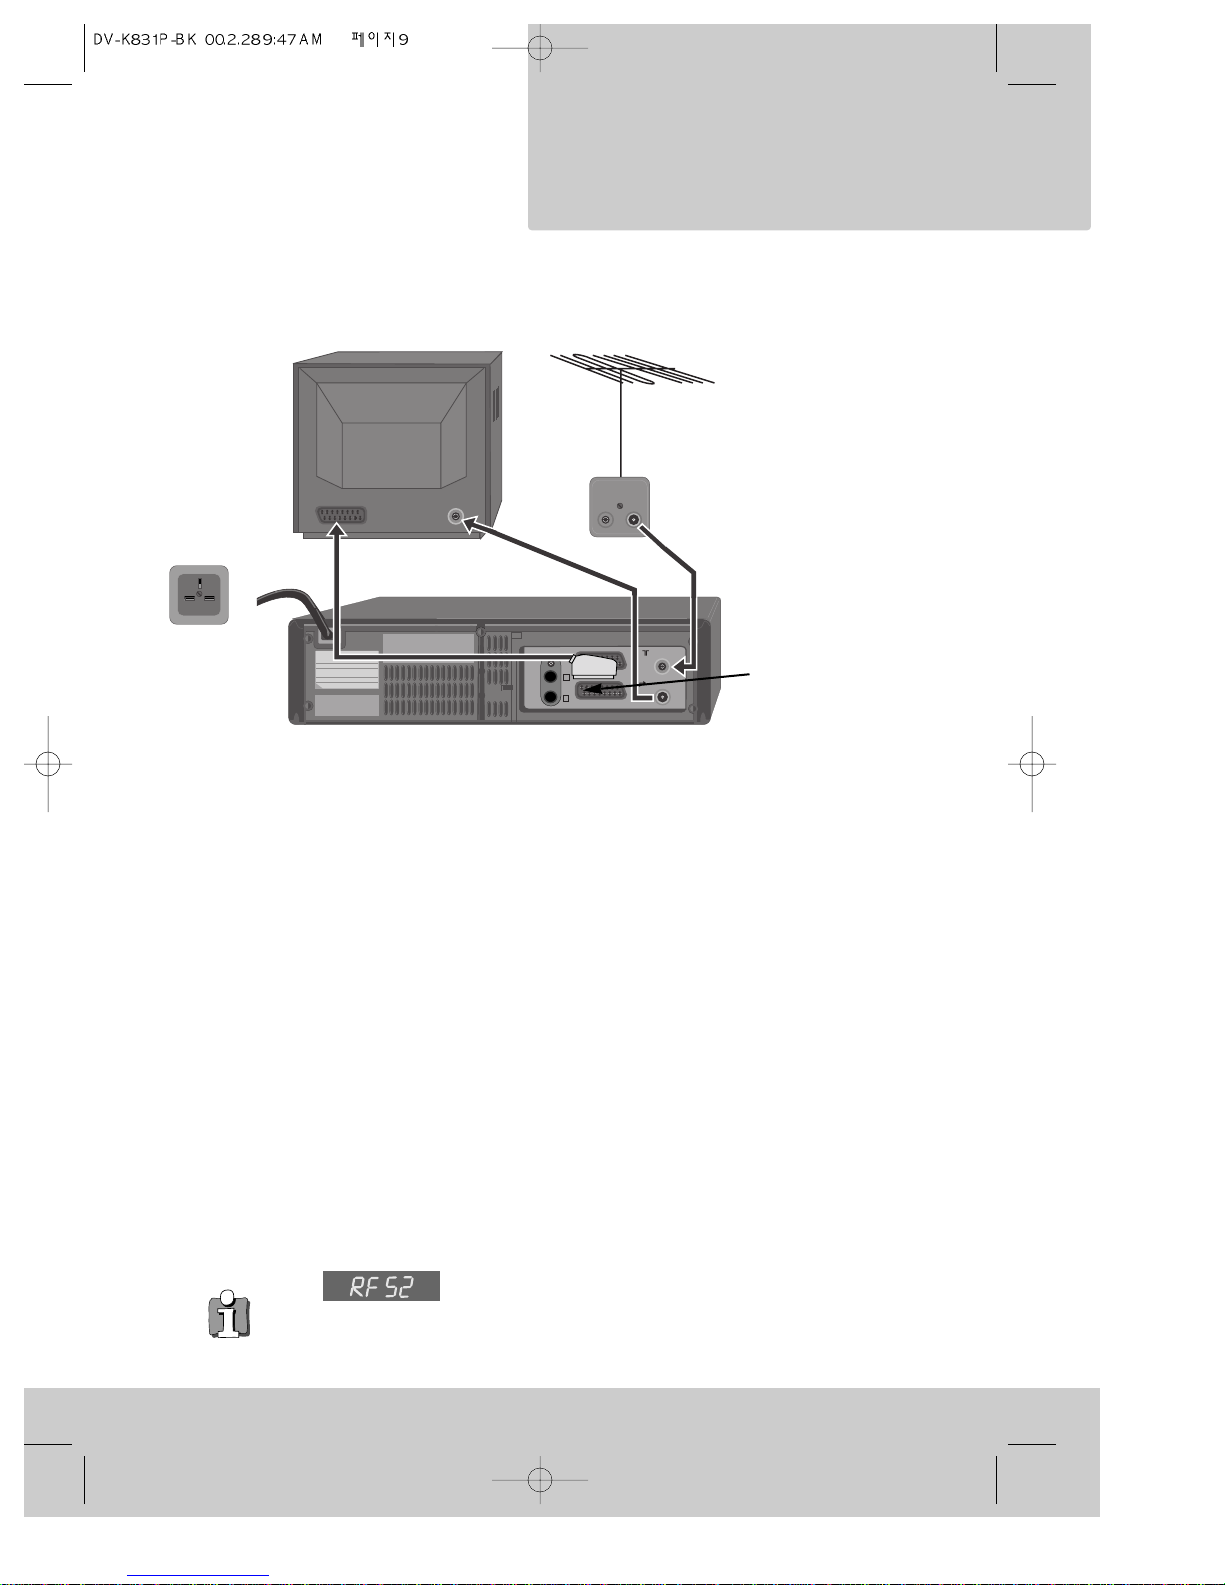
9
1 Unplug the aerial cable from the back of your television and plug it into the ANT IN
socket on the back of your video recorder.
2 Plug one end of the aerial cable provided into the aerial socket on your television. The
cable only fits one way round, so look at the ends to see which one matches the
television aerial socket. Plug the other end of the cable into the ANT OUT socket on the
back of the video recorder.
3
Plug the scart cable into the lower scart socket marked EURO AV1 at the back of your video
recorder. If your television has more than one scart socket it is best to connect your video
recorder to the one that has automatic video switching (please see ‘In step three’ below).
4 Plug the moulded mains plug on the end of the mains cable into the mains socket on your
wall and switch on the power (if there is a power switch).
5 Switch your video recorder off by pressing the POWER button again.
In step three, if you are not sure which scart socket to use you will have to:
• read your television instructions; or
• find out which scart socket lets you see a picture from the video recorder as soon as you
play a video cassette or press the remote control MENU button.
How to play a video cassette is described on page 22.
Next you will have to tune in the television stations as described under ‘Auto-set’ on page 13.
EURO AV2 DECODER
AUDIO
L
R
Mains
cable
Aerial cable
(provided)
Aerial
cable
◆ In step 6 under ‘For televisions without a scart socket’ the
number after the flashing letters ‘RF’ on the video recorder
display is telling you which broadcast channel number the video recorder is using.
Some televisions let you use this information to tune in the video recorder. ‘What
to do if you get picture interference’ on page 12 tells you more about broadcast
channel numbers.
Scart cable
Lower scart
socket
For televisions with a Scart socket
*You must use a scart
connection for reproducing
stereo sound through a
stereo television.
video recorder
Setting up the
EURO-AV
ANT. IN
ANT. OUT
Page 11
Automatic video channel selection
If the video recorder is connected to the television with a scart cable you will normally see the
video recorder picture when you play a video cassette. You will also see the video recorder
picture when you select one of the on-screen menus (see ‘Control menus’ on page 7).
You might not see the video recorder picture if your television does not have automatic video
channel selection. To find out if you have automatic video channel selection, keep pressing the
TV/VCR button and see if the picture changes between the television picture and the video
recorder picture. When a small ‘VCR’ symbol shows on the front of the video recorder, the
television should be showing the video recorder picture.
If you don’t have automatic video channel selection, select the video channel with your
television remote control.
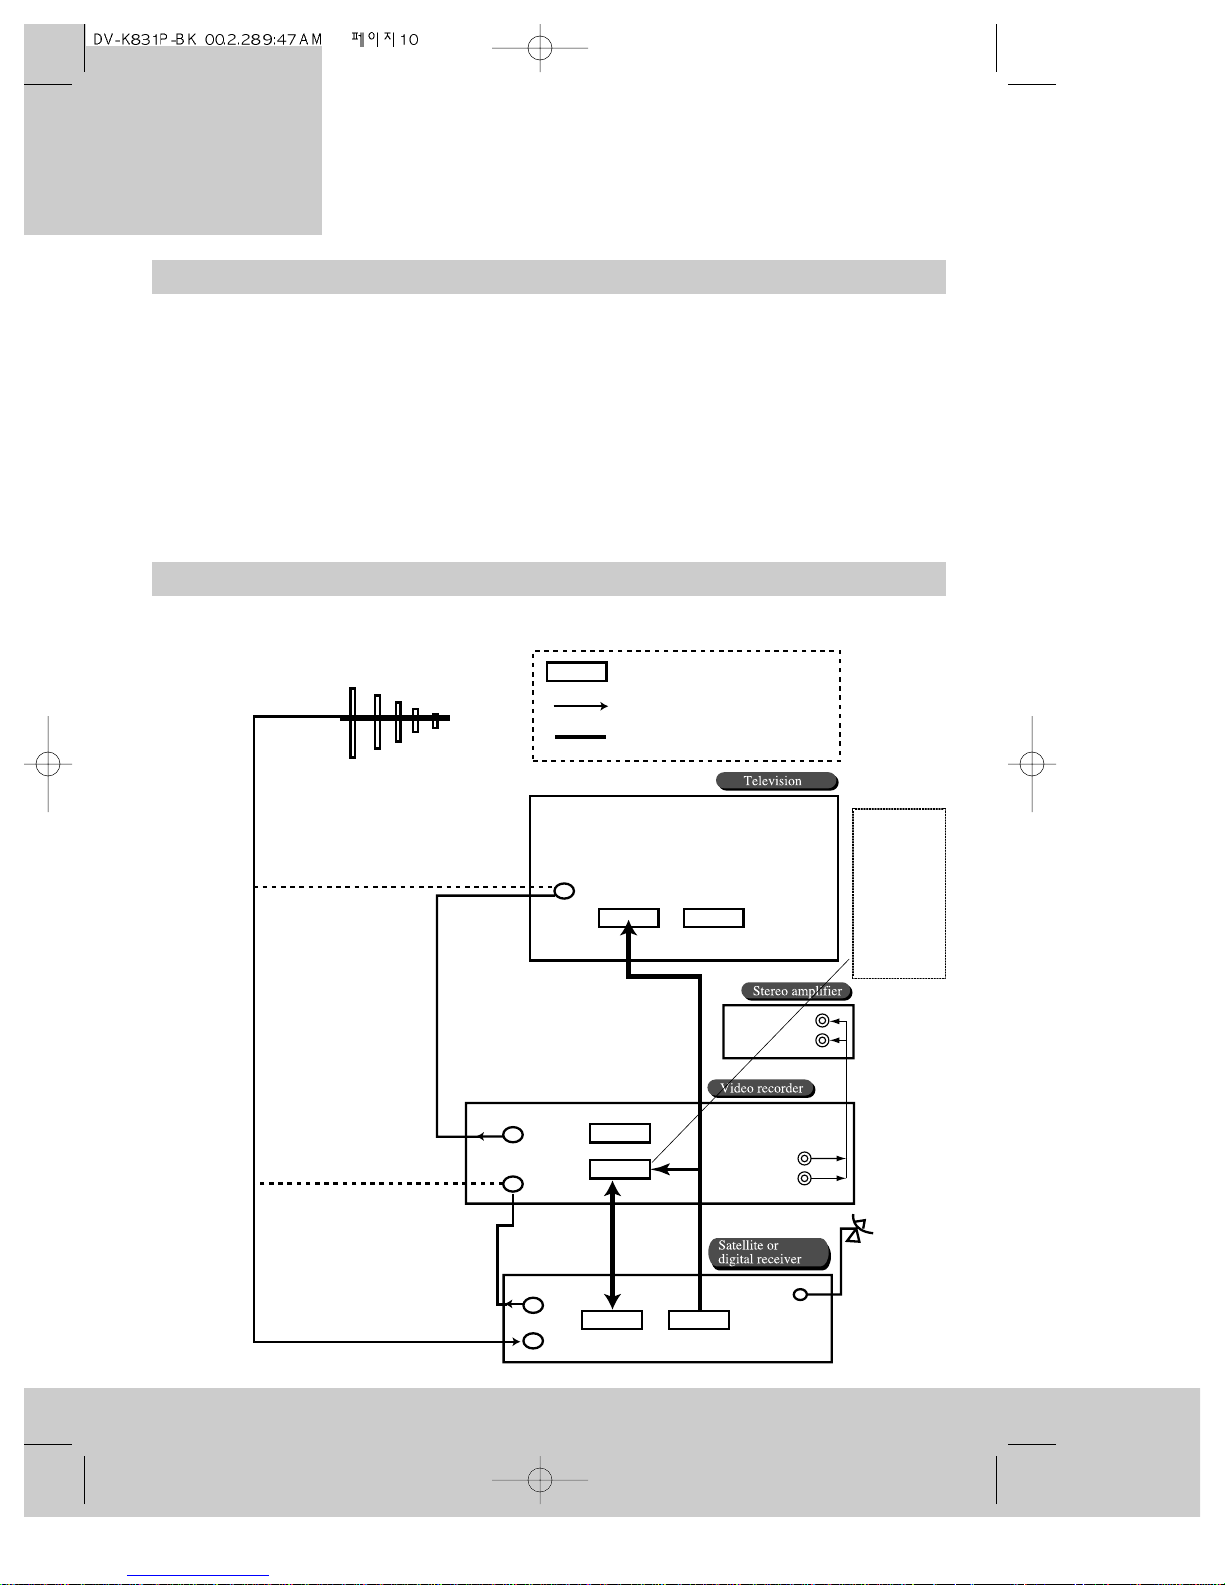
Connecting extra equipment
10
Typical connections for a satellite or digital receiver with a video recorder and a hi-fi amplifier
This is a scart socket
Arrows show the direction the signal
will flow through the wiring.
Thick lines represent scart cables.
Televsion aerial
Connect the aerial here
for a television alone.
Connect the aerial here
for a television with a
video recorder.
Connect the aerial here
for a television with a
video recorder and digital
or satellite receiver.
Aerial in
Scart AV1
Scart AV2
Aerial out
Aerial in
EURO AV2/DECODER
Aerial cable
Scart
cable
Scart
cable
VCR
TV
Satellite dish
input
Connect the
scart cable
here for a
television
with a video
recorder
only.
Aerial
cable
Aerial out
Aerial in
video recorder
Setting up the
L
R
L
R
EURO AV1
Page 12
11
Through the aerial cable
You can also connect extra equipment between the external aerial cable and your video recorder. Set the
equipment to produce a picture you will recognise (please read the equipment’s instruction book to find out
how to do this). Then tune one of the video recorder’s programme numbers to the new equipment. ‘Manual
channel search’ on page 14 tells you how to do this. Please also read ‘What to do if you get picture
interference’ on page 12. The television sound will be mono if you listen through this connection.
Through the EURO AV2 / DECODER scart socket
You can connect extra equipment such as a satellite receiver or a decoder to the EURO AV2/DECODER
scart socket. Some satellite and digital television ‘set-top boxes’ have scart sockets labelled especially
for your video recorder and television. Please read the user instructions for your ‘set-top box’ for details.
Select and monitor the AV2 input by pressing the AV button until ‘AV2’ appears on the screen. How to
make a recording from equipment connected to the AV2 scart socket is described under ‘Recording from
other equipment’ on page 30 and ‘Tips for using a decoder’ on page 40.
You can set the EURO AV2 scart socket to work either as a normal scart socket or as a decoder socket.
In the UK, decoders are usually part of a satellite receiver or digital television ‘set-top box’, so you
would not normally need to use the decoder feature. Appendix 2 at the back of this booklet tells you
how to use a decoder with this video recorder.
Through the front AV input
You can connect a camcorder, video game and so on to the front
audio and video (AV) input sockets if you have a connecting cable
ending in RCA phono plugs. Select and monitor the front AV input
by pressing the AV button until ‘F. AV’ appears on the screen.
Please read the instructions for the equipment and see ‘Recording
from other equipment’ on page 30.
Amplifier
A hi-fi amplifier or a surround-sound amplifier will reproduce sound from your video recorder if it is
connected using the RCA sockets marked ‘AUDIO-L’ and ‘R’ at the back of your video recorder. Please
read the amplifier instruction book to find out how to do this. We have shown the amplifier connection
in ‘Typical connections for a satellite or digital receiver with a video recorder and a hi-fi amplifier’ on
the previous page.
The stand-by button
Power saving
When the video recorder is on stand-by, it is nearly all switched off, uses
little power and is ready to make timed recordings. The stand-by button
switches the video recorder on with one press and back to stand-by with
another press. The front-panel display of the video recorder gets dimmer
when the video recorder is on stand-by.
When you load a video cassette tape or press a control button, stand-by is
cancelled and the video recorder switches on.
Emergency exit
If you get into difficulties or you are not sure you are pressing the right
buttons, just press the stand-by button and start again. No matter which
buttons you press, you cannot damage your video recorder.
On the remote control
On the video recorder
An RCA phono plug
video recorder
Setting up the
Page 13
What to do if you get picture interference
Each television programme uses a certain broadcast channel in the broadcast band. An
electronic part called the ‘modulator’ inside your video recorder sends a signal to the aerial
input of your television just like the signals sent by the television transmitters. So, the
modulator uses part of the broadcasting band and we might talk about the ‘modulator
channel’.
Sometimes the modulator channel will already be used by another television station in your
reception area. In this case the picture quality on your television will be poor when the
television is receiving one or more broadcasts and the video recorder is switched on. In
severe cases of interference you may not even recognise the video recorder picture. Here is
what to do about it.
After ‘Getting started - For televisions without a scart socket’ on page 8...
• Switch your television on and select the programme number you have chosen for the
video channel (see the instruction book for your television).
• Press the POWER button on the video recorder to switch it on. In the video
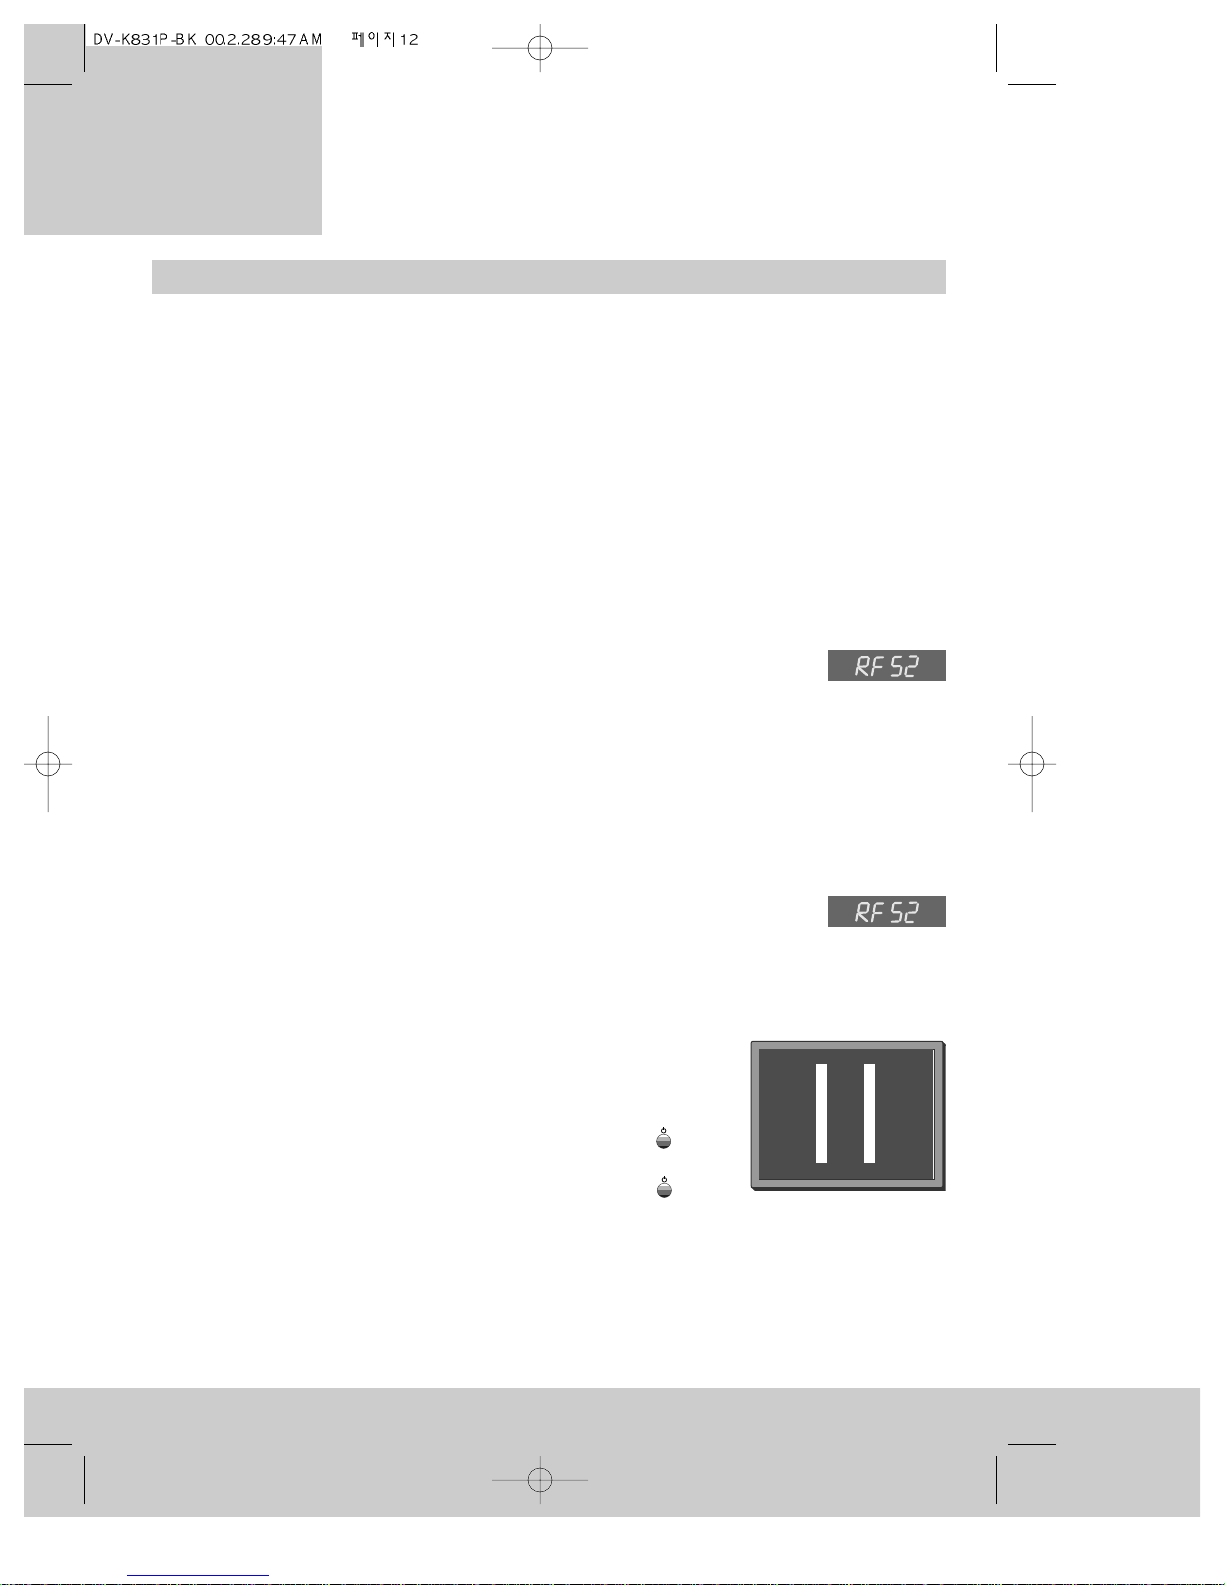
recorder’s panel display, you should see ‘RF’ (flashing) followed by the
modulator channel number. If this does not appear in the display, follow ‘After auto-set’
below.
• Change the modulator channel number by pressing the number buttons 0 to 9 on the
remote control. You must choose a number from 21 to 69. The new modulator channel
number will show on the display.
• Go back to step 6 of ‘For televisions without a scart socket’ on page 8 and try again.
After ‘Auto-set’ on page 13...
• Press and hold the OK button on the remote control for at least five
seconds until ‘RF’ flashes in the video recorder display. The number next to
‘RF’ is the modulator channel number.
• Change the modulator channel number by pressing the number buttons 0 to 9 on the
remote control. You must choose a number from 21 to 69. The new modulator channel
number will show on the display.
• Tune the television in the UHF waveband until a picture like
the one below appears, and memorise it under the video
programme number. (Please read the instruction book for
your television to see how to do this.)
• Press the POWER button on the video recorder or the
button on the remote control.
• Press the POWER button on the video recorder or the
button on the remote control again, to turn the video recorder back on.
• Check all the programme numbers that are tuned to the broadcast stations, your video
recorder and any other equipment to check there is no picture interference.
There is another way of changing the modulator channel, which is described in Appendix 1
on page 39.
12
video recorder
Setting up the
Page 14

Auto-set
The video recorder will search the broadcast band for all television programmes. This is
known as ‘auto-set’. It stores the television programmes it finds in the following order:
BBC1, BBC2, ITV, Channel 4 or S4C, Channel 5, Sky, others.
If your television and video recorder are connected with a scart cable, select the AV channel
on your television. If your television and video recorder are connected with an aerial cable,
select the programme number that you have tuned to the video recorder under ‘Getting
started - for televisions without a scart socket’ on page 8.
Use the remote control for the following steps.
13
2 Press the OK button. Auto-set will start and
the screen will show its progress.
3 The video recorder sorts the programmes
into their proper order.
4 To allow you to use VIDEOPlus+ it is
important that the programmes are stored in
standard order - BBC1 on programme number
one, BBC2 on programme number two, ITV on
programme number 3, Channel 4 or S4C on
programme number four, Channel 5 on
programme number five and so on. Check
they are in the right order by looking at the
picture opposite, which will appear after
sorting has finished. If the programmes are
not in the right order, please read ‘Changing
programme numbers’ on page 16 after you
have finished step 5 below.
5 Press the MENU button to finish.
MENU
Auto Set!
OK:confirm MENU:end
AUTO SET
MENU:end
PR03
UHF - - - - - - - - - - - - - -
76%
Please wait...
AUTO SET
1 Press the button so that the auto-set
picture appears on the television screen.
MANUAL SET
PR01 BBC1 PR08 SKYS
PR02 BBC2 PR09 MTVE
PR03 ITV PR10 P-10
PR04 CHA4 PR11 P-11
PR05 SKY1 PR12 ---PR06 SKYN PR13 ---PR07 SKYM PR14 ----
PR+/-:select
OK:confirm MENU:end
continued over the page...
Setting
video recorder
Setting up the
Page 15

Auto-set (continued)
If you do not see the auto-set picture when you switch on the
video recorder in step 2 above, your video recorder has probably
already been tuned in to some television programmes.
To start auto-set again, press the MENU button until the main
menu appears.
• Press the PR- button once. This moves the pointer to
‘PR preset’.
• Press the OK button to see the programme pre-set menu.
The pointer will be on ‘Auto Set’.
• Now go to step 3 above.
14
PR PRESET
Auto Set
Manual Set
PR Erase
PR Align
PR+/-:select
OK:confirm MENU:end
MAIN MENU
Timer Program
PR Preset
VCR Setup
PR+/-:select
OK:confirm MENU:end
MAIN MENU
Timer Program
PR Preset
VCR Setup
PR+/-:select
OK:confirm MENU:end
Manual channel search
Select the video channel on your television so that you can see the menus. See ‘Automatic
video channel selection on page 10.
In certain cases the auto-set tuning function may not be able to find all the broadcast
channels. Or you might want to set a programme number to a new piece of equipment such
as a satellite receiver. In these cases you can set programmes without using auto-set again
(Auto-set is explained on page 13).
1 Press the MENU button until the main menu appears.
2 Press the PR- button once. This moves the pointer to
‘PR preset’.
3 Press the OK button to see the programme pre-set menu.
4 Press the PR- button once. The pointer will move to
‘Manual set’.
PR PRESET
Auto Set
Manual Set
PR Erase
PR Align
PR+/-:select
OK:confirm MENU:end
video recorder
Setting up the
Page 16

15
5 Press the OK button to see the manual set menu.
6 Press the PR- and PR+ buttons to move the flashing pointer to
the programme number you want to set to a new broadcast
channel.
7 Press the OK button to see the manual set search menu. If
you need to check the picture, press the button. You will
see this is ‘PR view’ in the on-screen instructions.
8 Press the PR- button or PR+ button to search for a broadcast
channel, according to the on-screen instructions. The picture
will change to show the progress of the search.
When the video recorder finds a broadcast or the signal from
some other equipment, the picture from it will appear briefly
before the manual set search menu re-appears.
If you want to have another look at the picture the video
recorder has found, press the button. If it is the wrong
picture, press the PR- or PR+ buttons to continue searching as
before.
9 Press the OK button to set the broadcast channel to the
programme number you choose.
10Press the MENU button to finish, or repeat from step 6 for
other programme numbers.
• Canal+ will appear in the programme pre-set menu if the
second scart socket has been set up to connect to a decoder.
Please see appendix 2 on page 39.
MANUAL SET
PR01 BBC1 PR08 SKYS
PR02 BBC2 PR09 MTVE
PR03 ITV PR10 P-10
PR04 CHA4 PR11 P-11
PR05 SKY1 PR12 ---PR06 SKYN PR13 ---PR07 SKYM PR14 ----
PR+/-:select
OK:confirm MENU:end
MANUAL SET
PR01 BBC1 PR08 SKYS
PR02 BBC2 PR09 MTVE
PR03 ITV PR10 P-10
PR04 CHA4 PR11 P-11
PR05 SKY1 PR12 ---PR06 SKYN PR13 ---PR07 SKYM PR14 ----
PR+/-:select
OK:confirm MENU:end
MANUAL SET
PR29 P-29
PR+/-:search up/down
: name correct
: PR view
OK:confirm MENU:end
MANUAL SET
PR+/-:search up/down
MENU :end
PR29
UHF ----------- -----
68%
MANUAL SET
PR+/-:search up/down
:name correct
:PR view
OK:confirm MENU:end
PR29 P-29
video recorder
Setting up the
Page 17

Changing programme numbers
16
MAIN MENU
Timer Program
PR Preset
VCR Setup
PR+/-:select
OK:confirm MENU:end
You can move any television channel the video recorder has found onto a different
programme number.
Select the video channel on your television so that you can see the menus.
See ‘Automatic video channel selection ‘ on page 10.
If a programme has not been named before, the video recorder automatically names the
programme after its programme number. So, if you move programme 6 to programme 10,
you will see ‘PR10 P-06’ on the list of programme numbers and channel names. How to
change channel names is described on page 17.
1 Press the MENU button until the main menu appears.
2 Press the PR- button once. This moves the pointer to
‘PR preset’.
3 Press the OK button to see the programme pre-set menu.
4 Press the PR+ button once. The pointer will move to
‘PR align’.
5 Press the OK button to see the programme alignment menu.
6 Press the PR- and PR+ buttons to move the flashing pointer to
the channel you want to move. Press the button if you
want to check the picture.
7 Press the OK button. The channel you are going to move will
start flashing.
8 Press the PR- and PR+ buttons to move the channel to a
different programme number.
9 Press the OK button to confirm the move.
10Press the MENU button to finish.
PR PRESET
Auto Set
Manual Set
PR Erase
PR Align
PR+/-:select
OK:confirm MENU:end
PR ALIGN
PR+/-:align
:PR view
OK:confirm MENU:end
PR01 BBC1 PR08 SKYS
PR02 BBC2 PR09 MTVE
PR03 ITV PR10 P-10
PR04 CHA4 PR11 P-11
PR05 SKY1 PR12 ---PR06 SKYN PR13 ---PR07 SKYM PR14 ----
video recorder
Setting up the
Page 18

Changing programme names
17
Select the video channel on your television so that you can see the menus. See ‘Automatic
video channel selection ‘ on page 10.
1 Follow steps 1 to 5 under ‘Manual channel search’ on pages
14 and 15.
2 Press the PR- and PR+ buttons to move the flashing pointer to
the programme number you want to re-name.
3 Press the OK button. The selected programme’s picture will
appear briefly, then you will see the search menu under
‘Manual set’. If you want to check the picture again, press
the button.
4 Press the button to see the name change menu under
‘Manual set’.
5 You can pick a ready-made name by pressing the PR+ and PR-
buttons.
You can make up a name by pressing the button, then
pressing the PR+, PR-, and buttons following the
instructions on the screen . ‘Select position’ makes the
character that you can change flash on and off.
6 Press the OK button to confirm the name.
7 Press the MENU button to finish.
MANUAL SET
PR+/-:select character
/ :select position
OK:confirm MENU:end
PR01 E-01
MANUAL SET
PR+/-:search up/down
:name correct
:PR view
OK:confirm MENU:end
PR01 P-01
video recorder
Setting up the
Page 19

Erasing programmes
1 Press the MENU button until the main menu appears.
2 Press the PR- button once. This moves the pointer to
‘PR preset’.
3 Press the OK button to see the programme pre-set menu.
4 Press the PR+ button twice. The pointer will move to
‘PR erase’.
5 Press the OK button to see the programme erase menu.
6 Press the PR- and PR+ buttons to move the flashing pointer to
the channel you want to erase. Press the button if you
want to check the picture.
7 Press the OK button to display the erase warning shown
opposite.
8 If you want to erase the programme, press the OK button. If
you don’t want to erase the programme, press the menu
button.
9 Press the MENU button to finish or go back to step 6.
18
PR ERASE
PR+/-:select
:PR view
OK:erase MENU:end
PR03 P-03
IMPORTANT!
The ‘OK’button will
erase this PR.
:PR view
OK:confirm MENU:end
PR01 BBC1 PR08 SKYS
PR02 BBC2 PR09 MTVE
PR03 ITV PR10 P-10
PR04 CHA4 PR11 P-11
PR05 SKY1 PR12 ---PR06 SKYN PR13 ---PR07 SKYM PR14 ----
MAIN MENU
Timer Program
PR Preset
VCR Setup
PR+/-:select
OK:confirm MENU:end
PR PRESET
Auto Set
Manual Set
PR Erase
PR Align
PR+/-:select
OK:confirm MENU:end
video recorder
Setting up the
Page 20

Child lock
Programmed recordings can still be made when the child lock is on.
1 To switch the child lock on
Press the button on the remote control for at least five
seconds until a red key symbol appears in the video recorder
display panel. The child lock is now on.
2 To switch the child lock off
Press the button on the remote control for at least five
seconds until the red key symbol disappears.
19
Using the video recorder as a tuner
Select the video channel on your television so that you can see the pictures from the video
recorder. If you connected the television and video recorder together with a scart cable you
will probably have to press the TV/VCR button on the remote control to see the video
recorder picture. (See ‘Automatic video channel selection’ on page 10.)
Press the PR+ and PR- buttons or the programme number buttons 0 to 9 to choose the
programme number. You have to press two number buttons, for example 0 and 2 for
programme number two (PR02 on the screen).
The child lock stops the buttons on the front of the video recorder and all of the buttons on
the remote control from working.
video recorder
Setting up the
Page 21

20
Setting or checking the time and date
1 Press the MENU button to see the main menu.
2 Press the PR- button twice to move the pointer to
‘VCR set-up’.
3 Press the OK button to see the video recorder set-up menu.
4
The pointer will be on ‘Clock set’. Press the OK button to see the
clock set menu.
5
Press the and buttons to make the hour, minute, day,
month or year numbers flash. While one of the numbers is
flashing, you can change it by pressing the number buttons 0 to 9.
As you fill in the numbers, the next item starts flashing
automatically. Just press the last two numbers of the year and
the video will decide the century, for example 9 and 9 gives
‘1999’ and 0 and 1 gives ‘2001’. The date is in day/month/year
format.
If you don’t press any buttons, the control menus go off after
about one minute.
6 You can finish without saving any changes by pressing the
MENU button at this step.
7 To keep changes to the time and date, press the OK button.
You will see the main menu again.
8 Press the MENU button to finish.
You do not normally need to set the time and date because the video recorder gets this
information from the television transmitter.
MAIN MENU
Timer Program
PR Preset
VCR Setup
PR+/-:select
OK:confirm MENU:end
CLOCK SET
0-9:setup(minute)
/ :correct
OK:confirm MENU:end
Time 16:05
Date 19/05/1999(WED)
VCR SETUP
Clock Set
RF Output Set
2nd Scart Set
16:9 set
PR+/-:select
OK:confirm MENU:end
video recorder
Setting up the
This video recorder can receive hi-fi sound transmissions in NICAM. You can turn stereo on or off by
pressing the A.SEL button. Sometimes right and left channels can carry different languages. In this
case, the following on-screen messages tell you the type of sound you have selected, when you
press the A.SEL button.
BIL OFF : normal sound
BIL I : one language
BIL II: the other language
BIL I + II: both languages together
If the broadcast is not NICAM there is no on-screen message and you can only hear mono sound.
You need to select ‘stereo on’ to get proper surround-sound effects from a surround-sound effect
amplifier.
Sound type
Page 22

21
video cassettes
About
The beginning of the cassette The end of the cassette
Play
• Keep video cassettes away from direct sunlight, heaters, dusty places, damp, violent
vibration or shocks and strong magnetic fields (near a motor, transformer or magnet).
• Keep cassettes in their cases.
• Only use cassettes with the VHS mark in this video.
Types of video cassette
Only use cassettes with the mark in this video.
Recording and playback time of video cassettes (SP and LP)
‘Recording’ on page 29 explains how to use the SP/LP button.
Protecting cassettes from being recorded over
All video cassettes have a safety tab to prevent them from being accidentally recorded over.
When you remove the tab you cannot record onto the cassette. If you want to record onto a
cassette that has had its tab removed, cover the hole with sticky tape.
Maximum recording and playback time in hours
Type of cassette SP mode (standard play) LP mode (long play)
E-30
1
/2hour 1 hour
E-60 1 hour 2 hours
E-90 1
1/2
hours 3 hours
E-120 2 hours 4 hours
E-180 3 hours 6 hours
E-240 4 hours 8 hours
• Cassette with its safety tab
in place.
• After recording,
break off the
safety tab with a
screwdriver if you
want to protect
your recording.
• To record
again, cover
the hole
with sticky
tape.
Safety tab
Page 23

◆ When the video recorder plays or picture-scans to the end of the tape, it will
rewind back to the beginning.
Load the cassette
Push the cassette smoothly and squarely into the cassette slot with
its windows pointing up.
Play
Press the (play) button. ‘Play’ flashes in the display while the
video recorder automatically adjusts tracking for best picture quality.
If you load a cassette with the safety tab broken out, it will play
without you pressing the play button (see ‘Protecting cassettes from
being recorded over’ on page 21).
Picture scanning
This allows you to fast forward and rewind a cassette while you can
still see the picture, although the picture quality will deteriorate and
the sound will be switched off. Press the (rewind) button to scan
backwards or the (fast forward) button to scan forwards. There
are two scanning speeds. The video recorder changes from one to
the other when you keep pressing the rewind or fast forward button.
To stop picture scanning, press the (stop) button on the
remote control or the STOP/EJECT button on the video recorder.
Fast forward and rewind
Press the (stop) button if the cassette is playing. Then press
the rewind or fast forward button. Press the stop button again to end
fast forward or rewind.
• You might hear a small screech when the reel brakes work near
the end of the tape or when you press the stop buttons: Don’t
worry, this is quite normal.
Eject the cassette
If a cassette is playing or fast forwarding and so on, press the
(stop) button. Then press the EJECT button on the remote
control or the STOP/EJECT button on the video recorder.
22
AUTO SET
20 : 10
VHS
This symbol
means the
cassette is in.
VCR
+
VCR
-
video cassettes
Playing
◆ Some functions (such as pause, still picture and picture scanning) switch off
automatically after a while. This helps to protect the cassette and uses less
power.
VCR
L R
VCR
VCR
L R
L R
Page 24

Still picture and slow-motion
Still picture
While you are playing a cassette, press the (pause) button
to see a still picture.
Each time you press the pause button, the picture will move on
one step.
• You can reduce vertical vibration of the still picture if you
keep pressing PR- or PR+ button.
Slow-motion
While you are playing a cassette keep pressing the button
to control the slow-motion speed in 6 steps.
As with the still picture, you will get some picture interference.
• If you see interference stripes during slow motion playback,
keep pressing the PR+ or PR- button until you get the best
picture.
23
video cassettes
Playing
VCR
VCR
• If still picture or slow-motion lasts longer than five minutes the video recorder will stop,
to protect the video tape.
Commercial skip
If you press the button on the remote control while a cassette is playing, the video
recorder quickly skips 30 seconds of the recording.
30
NTSC playback
NTSC is American standard video. Great Britain uses a different video standard (called PAL).
This video recorder can play video cassettes that have been recorded with NTSC video through
most televisions used in Great Britain. A few televisions may not display a proper picture. This
is not a fault with your video recorder and the television cannot be modified. You cannot
record NTSC video on this video recorder.
Page 25

Wide-screen pictures
You can record and play wide-screen pictures with this video recorder. This ‘16:9 set’ feature
(see below) only works if your television has a wide-screen feature and is connected to the
video recorder with a scart cable. The ratio 16:9 is the ratio of the width to the height of a
wide-screen picture.
16:9 set
1 Press the MENU button.
2 Press the PR+ button until the pointer moves to ‘VCR setup’. Then press the OK button.
3 Press the PR+ button until the pointer moves to ‘16:9 set’. Then press the OK button.
4 Move the pointer with the PR+ button until it points to one of the settings below.
• Auto The video recorder recognises whether the recorded programme is wide-screen
or normal (4:3) format.
• On The video recorder always plays the programme as a wide-screen recording.
• Off The video recorder always plays the programme as a normal recording.
5 Press the OK button to memorise your chosen setting or press the MENU button to finish
without saving the setting.
24
VCR SETUP
Clock Set
RF Output Set
2nd Scart Set
16:9 set
PR+/-:select
OK:confirm MENU:end
16:9 SET
AUTO
OFF
ON
PR+/-:select
OK:confirm MENU:end
video cassettes
Playing
When the video recorder is playing a hi-fi recording you can press the A.SEL button to change
the sound track. The following messages on the screen tell you what sound track you have
selected.
hi-fi L+R : normal stereo
hi-fi LEFT: the left channel comes from both the left and right speakers
hi-fi RIGHT: the right channel comes from both the left and right speakers
hi-fi OFF: lower quality mono sound track
If the recording is not hi-fi you cannot change the sound track, there is no on-screen message,
and the video recorder can only play mono sound.
You need to select ‘hi-fi L+R’ to get proper surround-sound effects from a surround-sound
effect amplifier.
Choosing the sound track
Page 26

Index search
At the beginning of each recording, the video recorder marks the
cassette with an index mark. You can search for these index
marks on a cassette.
Press the INDEX + button to find later index marks (FF shows
forward searching) or the INDEX - button to find earlier index
marks (REW shows backward searching).
Once the video recorder finds the index mark it will play for
about five seconds then search for the next index mark. Press
the (play) button to return to normal playback.
Tracking and picture quality
Normally while a cassette is playing, the video recorder automatically adjusts the video
heads until they accurately track the original recording. This gives you the best picture.
If you still get picture interference when you are playing a cassette, hold the PR+ or
the PR-button to try and reduce the interference.
• If horizontal lines or grain still affects the picture, you either have a poor-quality video
cassette or your video heads need cleaning. Normally they will clean themselves if you
play back a good-quality video cassette for half an hour. If this does not work, you can
either buy a head-cleaning cassette, or take your video to your nearest Comet after-sales
service for cleaning.
25
FF SP
INDEX 01
0:11:09
Direction
Tape positon
Number of
index marks
found
The index search
on-screen display
video cassettes
Playing
Page 27

On-screen information display
◆ You cannot see the information display when the video recorder is adjusting the tracking
(please see ‘Tracking and picture quality’ on page 25).
◆ You cannot see the information display when there is no playback or broadcast picture.
Press the button once.
When the cassette is stopped, the video recorder display shows the programme number or
the AV channel for a few seconds, then it shows the time of day.
‘AV 1’ shows that the lower (EURO AV1) scart (audio video) channel has been selected.
‘AV 2’ shows that the upper (EURO AV2) scart channel has been selected.
‘AV F’ shows that the audio and video input sockets on the front of the video recorder have
been selected.
Please see ‘Recording from other equipment’ on page 30.
It takes about 30 seconds for the video recorder to measure the remaining recording time to
the end of the cassette. If the wrong cassette type is set, the remaining recording time will
be wrong.
• Press the button again to turn off the information display.
26
STOP SP PR01 BBC1
17:28 14/03 E180 02:28
17:28 14/03
Tape mode
Tape speed
Programme number
Programme name,
‘AV1’ or ‘AV F’
Time
Date
Cassette type (please
see ‘Tape control menu’
on page 28.)
Remaining
recording time
After a few seconds,
just the time and date
will be displayed.
video cassettes
Playing
STEREO ON
Sound status
Page 28

Press the button twice.
The information on the screen is the same as when you press the button once, except
as shown below.
How long a cassette has been playing for is shown in the display. The time is shown in
hours, minutes and seconds. The counter only registers recorded sections of the video tape.
If you want to set the counter to zero (00:00:00) or automatically rewind the tape to the zero
position, please see ‘Tape-control menu’ on page 28.
The counter is automatically set to zero when you put a cassette into the video recorder.
• When the cassette is stopped, the video recorder display shows the programme number
or the AV channel for a few seconds, then it shows the play time in hours and minutes.
• Press the button again to turn off the information display.
27
STOP SP PR01 BBC1
0 : 33 : 12 E180 02:28
0 : 33 : 12
Cassette play-time counter
After a few seconds,
just the play time is
displayed.
STEREO ON
video cassettes
Playing
Page 29

◆ You can only see the tape-control menu when there is a cassette in the video recorder.
1 Press the MENU button.
2 Press the PR+ button once to put the pointer on ‘Tape control’.
3
Press the OK button to display the tape-control menu. The pointer will be on ‘Tape remain’.
4 Press the OK button to see a table of cassette types (E-180, E-240, E-300). The cassette
type is usually marked on the back of the cassette or the cassette case. For more
information, please see ‘About video cassettes - types of video cassette’ on page 21.
5
Move the pointer to the type of video cassette you are using by pressing the PR+ and PR- buttons.
6 Press the OK button to confirm the type of cassette. The video recorder will display the
cassette type back to you for a few seconds.
28
◆ At step 6, if you decide not to change the cassette type, press the MENU button
instead of OK.
◆ How to see the remaining time is described in ‘On-screen information display’ on
page 26.
TAPE CONTROL
TAPE REMAIN
E-240 01:27
Tape Remain
Go To Zero
Counter Reset
E-180
E-240
E-300
PR+/-:select
OK:confirm MENU:end
PR+/-:select
OK:confirm MENU:end
1 Follow steps 1 to 3 above to get the tape-control menu.
2 Press the PR- button once to move the pointer to ‘Go to zero’.
3 Press the OK button. The video recorder will display the
picture opposite, and rewind or fast forward the cassette
until the counter is at zero.
1 Follow steps 1 to 3 above to get the tape-control menu.
2 Press the PR+ button once to move the pointer to ‘Counter
reset’.
3 Press the OK button. The video recorder will display the
picture opposite and set the counter to zero.
COUNTER RESET
0:00:00
REW SP
GO TO ZERO
0:02:13
video cassettes
Playing
Tape control menu
Resetting the counter to zero
Finding counter zero position of a cassette
Remaining time and cassette length
Page 30

◆ At step 3 above, if you press the record button more than once, a timed recording
will start and ‘TMR’ will light up red in the video recorder display panel (please
read ‘OTR’ on page 32). You can stop timed recording by pressing and holding the
STOP button for at least five seconds, until ‘TMR’ goes off.
◆ You can usually change programme on your television without affecting the
recording, because programmes are normally recorded from the video recorder’s
own tuner. Be careful not to change the programme or channel on any other
equipment you are recording from.
◆ If the video recorder reaches the end of the cassette during a programmed
recording it will eject the cassette. If this happens, you can continue the
recording by loading a fresh cassette and pressing the POWER button on the
video. ‘REC’ will re-appear on the video recorder’s front panel display.
1 Put a cassette into the video recorder. Make sure the safety
tab is in place (see ‘Protecting cassettes from being recorded
over ‘ on page 21).
2 Use the PR- or PR+ button or the programme number buttons
0 to 9 to select the channel you want to record, for example
‘PR01 BBC1’.
3 Press the RECORD/OTR button on the video recorder or the
record (red dot) button on the remote control just once. ‘REC’
will appear in the video recorder display panel.
4 If you want to interrupt the recording briefly, press the
button. ‘REC’ will flash. If the recording is paused for longer
than five minutes, the video recorder will stop to protect the
video cassette.
5 To stop recording, press the or STOP/EJECT button.
◆ To record at long-play speed, press the SP/LP button so that ‘LP’ appears on the
screen and the video recorder display. It is best to do this before you start
recording.
◆ Long play improves the lines of interference during picture scanning (see page
22), but reduces picture and sound quality during normal playback.
◆ To record at standard speed again, press the SP/LP button so that ‘SP’ appears on
the screen and the video recorder display.
29
Long play
You can make the video recorder record at half its normal speed.
This means you can record eight hours instead of four hours on
an ‘E-240’ cassette, and so on. The recording times for different
types of cassette are shown under ‘About video cassettes’ on
page 21.
Recording
L R
VCR
L R
VCR
L R
LP
20 : 10
AUTO SET
VHS
Page 31

Recording from other equipment
Recording
◆ Select the video channel on your television so you can monitor the recording.
Recording through the aerial cable
Please read ‘Connecting extra equipment - Through the aerial cable’ on page 11. Press the
PR+ or PR- button to select the video recorder programme number that you have tuned to
that piece of equipment, then record as usual.
Recording through the scart cable
If the equipment is connected with a scart cable, press the AV button on the remote control
to make ‘AU1’ or ‘AU2’ appear in the video recorder display panel. ‘AU1’ means the lower
scart socket (EURO AV1) is being used for the recording. ‘AU2’ means the upper scart socket
(EURO AV2/ DECODER) is being used for the recording. After a few seconds, ‘AU’ will
change to either the time or the tape counter, depending on whether or not you selected the
tape counter with the information display button . You can check again that you have
selected the AV channel by using the information display button (please see ‘On-screen
information display’ on page 26).
Change back to programme numbers by pressing the AV button until a ‘PR’ number appears
briefly in the video recorder display.
• ‘AU’ on the video recorder display appears as ‘AV’ on the television picture.
Protecting cassettes from being recorded over
Please see page 21.
30
Page 32

Auto-assembling
◆ When you are recording from another cassette, you will get best results if it is
already playing when you start recording.
◆ After you press the record button, you might need to press the TV/VCR button to
see the picture you are going to join onto the first recording.
◆ At step 6, you can press the (pause) button to pause the recording. During the
pause you can prepare another video source to assemble or just pause the
cassette to leave out part of the source material. Do not pause for longer than
five minutes (see step 3).
◆ Where the recordings join, you might get slight colour disturbance for a few
seconds during playback.
1 You can use the auto-assembling function in this video
recorder to join separate recordings without any major picture
disturbance between the recordings.
2 Prepare to record from other equipment as described under
‘Recording from other equipment’ on page 30. This is the
‘source’.
3 Play the cassette on which you are assembling the recordings
in this video recorder to search for the position where you
want the next recording to start and then press the
(pause) button. ‘PLAY’ will flash in the video recorder display
panel. Do not wait more than five minutes before you start
recording, otherwise the video record will stop and you will
have to find the assembly point again.
4 Press the RECORD/OTR button on the video recorder or the
record (red dot) button on the remote control. ‘REC’ will flash
in the display. The video is paused, ready to record. You can
check the source picture, change programme number or select
another AV source at this point.
5 Start recording by pressing the RECORD/OTR button on the
video recorder or the record (red dot) button on the remote
control (once). ‘REC’ will light steadily in the video recorder
display panel and the recording will start.
6 Press the (pause) button while you prepare a fresh source
or leave out a segment of source video, then repeat from
step 5. Do not pause for longer than five minutes (see step 3).
7 Stop recording by pressing the or STOP/EJECT button.
31
VCR
VCR
L R
VCR
L R
Recording
Page 33

One-time recording (OTR)
One-time recording lets you set the video to record for between half an hour and 10 hours.
32
1 Put in a cassette and choose a programme or the other
equipment you want to record from, as described under
‘Recording’ on page 29.
2 Press the RECORD/OTR button on the video recorder or the
record (red dot) button on the remote control once, then once
more for every 30 minutes you want to record. You can record
for up to 10 hours if there is enough tape on the cassette.
◆ The video recorder display confirms the recording time. For example, ‘R1:30’ in
the video recorder display panel means the recording will last for one hour and
thirty minutes. This time reduces as the recording is made.
◆ A red ‘TMR’ in the display panel shows that a timed recording is running.
◆ If the cassette reaches its end, it will just stop.
◆ You can stop timed recording by pressing and holding the (stop) button for at
least five seconds, until ‘TMR’ and the recording time (R-:--) go off the display.
VCR
TMR
L R
Recording
Page 34

The video recorder needs the following information for every programmed recording.
• The date on which the recording is to be made.
• The programme number for the television channel.
• The time it should start and stop recording.
• Whether PDC is on or off (see below).
The video recorder stores all this information in a ‘timer block’. You can programme up to
eight timer blocks, up to one month beforehand.
With PDC (programme delivery control), the television station controls the start time and the
length of the programmed recording. This means that the video recorder switches itself on and
off at the right time, even if a television programme begins earlier or later than expected.
If the television guide gives a different PDC time to the programme’s advertised start time, for
example ‘20:15 (PDC 20:14)’, you have to enter ‘20:14’ as the start time for the recording.
If you want to set the start time at a different time from the PDC time, you have to switch off PDC.
◆ ‘PDC-ON’ recordings might not work if the broadcaster does not offer a full PDC
service. If that is the case, switch PDC off. (See ‘VIDEOplus+’ below and ‘Setting
the timer’ on page 35.) You can get advice on PDC from teletext.
recordings
Programmed
33
Programmed recording with VIDEOPlus+
All the information your video recorder needs to make a programmed recording is given in
the PlusCode programming number. This is printed in most television guides next to the start
times of television programmes.
1 Switch your television on and select the video channel.
2 Press the SV/V+ button on the remote control.
3 Use the number buttons 0 to 9 to enter the PlusCode number
(up to 9 digits). If you make a mistake, press the button
to clear the mistake, then enter the correct number.
4 Press the OK button when the PlusCode number is complete.
5 The next on-screen display asks how often you want to make
the recording. The pointer will be on ‘Once’. You can use the
PR+ and PR- buttons to move the pointer to repeat the
recording at the same time once a week, at the same time
each day - Monday to Friday, at the same time each day Monday to Saturday, or at the same time every day.
continued over the page...
VideoPlus
0-9:VideoPlus Number
:correct
OK:confirm MENU:end
VideoPlus Number
83077----
How often do you want
to record this program?
PR+/-:select
OK:confirm MENU:end
Once
Weekly(Once a Week)
Daily(Mon-Fri)
Daily(Mon-Sat)
Daily(Mon-Sun)
Programme delivery control (PDC)
Page 35

• If you decide to change anything else in the timer programme,
please leave this section for now and read ‘Setting the timer’
on page 35.
7 Press the MENU button to finish.
If you have made a mistake, please see ‘How to erase a timer
programme’ on page 36.
8 Press the OK button to confirm the timer programme. The
video timer is now set. The information has been stored in a
timer block.
• If you have set the video to start recording a second
programme, before the first programme has finished, you will
get a warning and the video recorder will go back to step 6.
9 Put a cassette (with a safety tab) into the video recorder.
Switch the video recorder to stand-by with the POWER button
or the button. ‘TMR’ will light up red in the video
recorder display.
• The video recorder will only make the recording if it is
switched to stand-by with the POWER or button.
TIMER PROGRAM (Once)
PR 03
Start Time 21:20
End Time 22:20
Start Date 24/05(MON)
Tape Speed LP
PDC ON
/ :correct
OK:confirm MENU:end
1. Insert the cassette.
2. Turn the VCR off.
TMR
Programmed recording with VIDEOPlus+ (continued)
6 Press the OK button to confirm your choice in step 5 and
display the timer programme information. If you do not press
another button within one minute, the timer display will go
off and you will have to start from step 2 again.
• When you use VIDEOplus+ for the first time for a television
channel, the ‘PR’ line at step 6 will be flashing ‘- -’. Press the
number buttons 0 to 9 for the television channel you want to
record, for example if you have a satellite receiver on video
recorder programme number 6 (PR 06), press 0 and 6. If you
want to record from other equipment that is connected with a
scart cable, press the PR+ button on the remote control to
make ‘AV’ appear on the ‘PR’ line. After you have used
VIDEOplus+ for a television channel, the video recorder
remembers the right programme number or the AV channel
(scart cable) when you use a PlusCode number again for that
channel.
• PDC will be on. Please read ‘ Programme delivery control’ on
page 33 if you do not understand PDC.
PR+/- :select (AV1/AV2)
0-9 :setup(PR)
/ :correct MENU:end
PR -Start Time 21:20
End Time 22:40
Start Date 24/05 (MON)
Tape Speed SP
PDC OFF
TIMER PROGRAM (Once)
recordings
Programmed
34
Page 36

Setting the timer
1 Switch your television on and select the video channel.
2 Press the MENU button once. The pointer will be on ‘Timer
program’.
3 Press the OK button to get the timer programme review
display.
4 Each line on the screen represents one timer programme.
Press the PR+ and PR- buttons to move the pointer to a blank
line (all dashes).
5 Press the OK button. The next on-screen display asks how
often you want to make the recording. The pointer will be on
‘once’. You can use the PR+ and PR- buttons to move the
pointer to repeat the recording at the same time once a week,
at the same time each day - Monday to Friday, at the same
time each day - Monday to Saturday, or at the same time
every day.
6 Press the OK button to confirm your choice in step 5 and
display the timer programme information. If you do not press
another button within one minute, the timer display will go
off and you will have to start from step 2 again.
The dashes on the ‘PR’ line will be flashing. Press the number
buttons 0 to 9 for the television channel you want to record. If
you want to record from other equipment that is connected
with a scart cable, press the PR+ button on the remote
control to make ‘AV’ appear on the ‘PR’ line.
7 Press the OK button and enter the start time, end time and
start date by pressing the appropriate number buttons 0 to 9.
As you enter each detail, the next one flashes to show it is
ready to be set. On-screen prompts will appear to remind you
what the buttons do.
8 Adjust the tape speed (SP or LP) and PDC (on or off) by
pressing the PR+ button.
9 If you need to step back to correct an entry, press the
button. To skip forward over an entry, press the button.
The entry you select will flash. When you have entered all
the details, press the button until ‘OK confirm’ appears on
the bottom line.
• You can press the MENU button to abandon programming and
start again.
continued over the page...
You can set the record timer without VIDEOplus+.
PR+/-:set (AV1/AV2)
0-9 :setup(PR)
/ :correct MENU:end
PR -Start Time --:-End Time --:-Start Date --/-Tape Speed SP
PDC OFF
TIMER PROGRAM (Weekly)
How often do you want
to record this program?
PR+/-:select
OK:confirm MENU:end
Once
Weekly(Once a Week)
Daily(Mon-Fri)
Daily(Mon-Sat)
Daily(Mon-Sun)
TIMER PROGRAM
PR START END DATE
-- -- : -- -- : -- -- / --
-- -- : -- -- : -- -- / --
-- -- : -- -- : -- -- / --
-- -- : -- -- : -- -- / --
-- -- : -- -- : -- -- / --
PR+/-:select
OK:confirm MENU:end
35
recordings
Programmed
Page 37

36
Setting the timer (continued)
10Press the OK button to confirm the timer programme. The
video timer is now set. The information has been stored in a
timer block.
• If you have set the video to start recording a second
programme, before the first programme has finished, you will
get a warning and the video recorder will go back to step 6.
11 Put a cassette (with a safety tab) into the video recorder.
Switch the video recorder to stand-by with the POWER button
or the button. ‘TMR’ will light up red in the video
recorder display.
• The video recorder will only make the recording if it is
switched to stand-by with the POWER or button.
1. Insert the cassette.
2. Turn the VCR off.
Changing a timer programme
1 Follow steps 1 to 3 above.
2 Press the PR+ and PR- buttons to move the pointer to the line
for the timer programme you want to change.
3 Follow steps 7, 8 and 9 above to select and change (rather
than fill) entries in the timer programme.
4 Finish with steps 10 and 11.
How to erase a timer programme
1 Switch your television on and select the video channel.
2 Press the MENU button once.
3 Press the OK button to get the timer programme review display.
4 Press the PR+ and PR- buttons to move the pointer to the timer
programme you want to erase.
5 Press the OK button. The video recorder will display the timer
programme information shown opposite.
6 Press the ‘0’ button.
7 The video recorder will display a warning message. You can
change your mind and go back by pressing the MENU button.
8 Press the OK button to erase the timer programme and return to
the programme review display.
9 Repeat from step 4 to erase more timer programmes.
10Press the MENU button twice to turn off the menu displays.
TIMER PROGRAM (Once)
PR 01
Start Time 22:30
End Time 23:20
Start Date 24/05(MON)
Tape Speed SP
PDC OFF
0 :erase
/ :correct MENU:end
PR03 P-03
IMPORTANT!
The ‘OK’button will
erase this PR.
:PR view
OK:confirm MENU:end
recordings
Programmed
Page 38

37
How to stop a programmed recording
• Press and hold the (stop) button for at least five seconds, until the recording stops and
‘TMR’ goes off the display.
• Press the (power) button to put the video recorder back on stand-by ready for any
more programmed recordings. ‘TMR’ will light up again.
Important notes about VIDEOplus+ and programmed recordings
• If you enter a VIDEOplus+ number, and choose the repeat status of the timer programme,
but the VIDEOplus+ number entry display comes back on, there was probably something
wrong with the PlusCode number you entered. If the video recorder is set with the wrong
time or date, this could have the same effect. It is unlikely they would be wrong, but you
can check (please see ‘Setting or checking the time and date’ on page 20).
• When the video recorder will not let you enter a particular date (or time), you have
probably pressed a wrong number. Possibly you have selected a daily recording ‘Monday
to Friday’ or ‘Monday to Saturday’ and the date you entered was on one of the days the
recording should not take place.
• If you set the video recorder to record every day, the start date of the first recording must
be within one week.
• If you try to set the timer after you have set all eight timer blocks, ‘Important - All timer
programmes have already been programmed’ will appear on the television screen for a
few seconds.
• After you have set a recording and switched the video to stand-by, if ‘TMR’ is flashing in
the front panel, there is something wrong which will stop the recording from taking place.
Check you have loaded a cassette.
• If the video recorder ejects the cassette when you press the or POWER button, the
safety tab on the cassette is broken out. Please read ‘Protecting cassettes from being
recorded over’ on page 21.
• Before a programmed recording can work, you must put the video recorder on stand-by by
pressing the POWER or button.
• You can use the video recorder as normal when it is not making a programmed recording,
but don’t forget to put it on stand-by afterwards. You will get no warning if you are using
the video recorder when the programmed recording is due to start.
• You cannot use the video recorder while a programmed recording is being made. If you
want to stop the programmed recording, please read ‘How to stop a programmed
recording’ above.
• If the video recorder reaches the end of the cassette during a programmed recording, it
will eject the cassette.
• You can check how much recording time is left on a cassette by using the information
display described on page 26.
• If there is not enough ‘SP’ recording time left on a cassette, the video will switch to ‘LP
speed’ to double the recording time.
recordings
Programmed
Page 39

38
Before you call an engineer (problems and what to do about them)
Appendix
◆ If something seems to be wrong with your video recorder, please check
through the list on this page before you contact Comet Service or your
Comet store.
◆ If there is something about this video recorder that you do not understand,
please phone the Comet Helpline on 0113 2793520.
◆ You cannot book service calls through this number.
Problem: The video recorder does not respond to any button being pressed.
Possible causes
: •No power supply.
•A programmed recording is currently being made.
•The child lock is switched on.
•Technical disturbance. Unplug the video recorder for thirty seconds then plug it back in
and try again. If this does not work, unplug the video recorder for two hours before you
try again. You should see the ‘auto-set’ display when you press a button on the video
recorder. Make sure all your equipment is switched on (not on stand-by) before you
press OK to ‘auto-set’ again (page 13).
If you do not want to disturb the television and equipment set-up, you can press the
MENU button to leave ‘auto-set’ display and manually re-set the time and date.
In either case, you will have to re-enter any timed recording programmes.
Problem: A cassette is jammed in the video recorder.
Possible causes
: •Unplug the video recorder for a moment, then plug it back in and try to eject the
cassette again. Don’t force it. If it still won’t eject, contact Comet service.
Problem: The remote control does not work.
Possible causes
: •The remote control is not pointed at the video recorder.
•The batteries have run out.
Problems: The video recorder will not play.
You change programme number (channel) on the video but the television
picture does not change.
Possible causes
: •The video channel on your television isn’t set properly.
•You haven’t switched your television to the video channel.
•The connecting cable between your television and video recorder has come loose.
•You haven’t pressed the TV/VCR button (if the video recorder is connected with a
scart cable).
Problem: The picture from the video recorder is of poor quality.
Possible causes
: •The television is not tuned in properly.
•You have picture interference from another channel (please read ‘What to do if you
get picture interference’ on page 12).
•The cassette you are playing is badly worn or of poor quality.
Problem: The video recorder will not record.
Possible causes
: •The television channel is not on the programme number you have selected on the
video recorder.
•You have loaded a cassette without its safety tab (the video recorder will eject it).
Problem: The video recorder does not record when you have set a programmed recording.
Possible causes
: •You have not set the timer properly.
•You did not set the time and date correctly.
•PDC was switched on, but the PDC time was not set correctly.
Problem: The video recorder records the wrong programme.
Possible causes
: •If you have used VIDEOplus+, the video recorder remembers the programme number
goes with PlusCode numbers for a particular channel. You may have changed the
programme number entry the last time you used a PlusCode number for the channel
the programme should have been on. Try again and make sure the programme
number (PR - -) is correct in the timer programme information display.
•The channel you expected to record is on a different programme number.
Page 40

39
Appendix
Interference
The Department of Trade and Industry runs a Radio Investigation Service to help people
improve the reception of television programmes if they are being spoilt by interference. Ask
at a main post office for the booklet ‘How to improve television and radio reception’.
Appendix 2
Setting the EURO AV2/ DECODER socket to work with a decoder.
1 Press the MENU button to display the main menu.
2 Press the PR- button to move the pointer to ‘VCR setup’.
3 Press the OK button to see the video recorder set-up menu.
4 Press the PR- button to move the pointer to ‘2nd scart set’. The pointer will not stop at ‘2nd
scart set’ if AV2 is being used for the programme you are watching, or AV2 is used in one of
the timer programmes.
5 Press the OK button to get the second scart socket set-up menu.
6 Press the PR- button to move the pointer to ‘Decoder(Pay TV)’.
7 Press the OK button to confirm the change and go back to the main menu.
8 Press the MENU button to turn off the main menu display.
9 Connect the decoder to the EURO AV2/ DECODER socket. Please read the decoder
instructions.
Appendix 1
Another way of changing the modulator channel
This method steps through the control menus, but you will only see the menus if you have a
reasonably clear television picture from the video recorder.
• Press the MENU button once, to get the main menu.
• Press the PR- button twice.
• Press the OK button. This selects the ‘VCR setup’ menu.
• Press the PR- button once.
• Press the OK button. This selects the ‘RF output set’ menu.
• Change the modulator channel number by pressing the number buttons 0 to 9 on the remote
control. You must choose a number from 21 to 69. The new modulator channel number will
show on the display.
• Press the OK button on the remote control to memorise the new modulator channel number.
• Tune the television in the UHF waveband until you see a picture like the ‘RF output set’,
menu, and memorise it under the video programme number. (Please read the instruction
book for your television to see how to do this.)
• Check all the programme numbers that are tuned to the broadcast stations, your video
recorder and any other equipment to check there is no picture interference.
RF OUTPUT SET
0-9:setup(21-69)
OK:confirm MENU:end
PR 52
continued over the page...
Page 41

40
Appendix
Appendix 2 (continued)
Canal+
•
When you have selected ‘Decoder (Pay TV)’ as the AV2 socket function, ‘Canal+ set’ will appear
on the ‘Program pre-set’ menu. Canal+ is a French cable television service which is not
used the UK, but we have described below how you change the Canal+ setting.
1 Press the MENU button until the main menu appears.
2 Press the PR- button once. This moves the pointer to
‘PR preset’.
3 Press the OK button to see the programme pre-set menu.
4
Press the PR- button twice. The pointer will move to ‘Canal+ set’.
5
Press the OK button to see the ‘Canal+ set’ menu.
6 Press the PR- and PR+ buttons to move the flashing pointer to
the channel you want to change. Press button if you
want to check the picture. In the top right you will see
‘CANAL+ OFF’ or ‘CANAL+ ON’. Press the OK button to
change between the two settings.
7 Press the MENU button to confirm the setting and finish.
8 Press the MENU button to finish.
MAIN MENU
Timer Program
PR Preset
VCR Setup
PR+/-:select
OK:confirm MENU:end
PR PRESET
Auto Set
Manual Set
Canal+ Set
PR Erase
PR Align
PR+/-:select
OK:confirm MENU:end
CANAL+ SET
PR+/-:select
:PR view
OK:ON/OFF MENU:end
PR01BBC1 PR08 SKYS
PR02 BBC2 PR09 MTVE
PR03 ITV PR10 P-10
PR04 CHA4 PR11 P-11
PR05 SKY1 PR12 ---PR06 SKYN PR13 ---PR07 SKYM PR14 ----
CANAL+ ON
Tips for using a decoder
•
When you have connected your television and video recorder by scart, and set the second scart
socket for a decoder, you can select the source you want to decode.
1
If you press the TV/VCR button. ‘ VCR’ will appear in the video recorder display, and the
video recorder tuner signal will be decoded. You can record the decoded video recorder signal.
2
If you press the TV/VCR button. ‘ VCR’ will disappear from the video recorder display, and the
signal input to the EURO AV1 scart socket will be decoded. Normally this will be the signal from
the tuner in the television. You can record the decoded television signal.
•
Normally the decoded programme will appear on the television as soon as the decoder is
switched on, as long as you have connected the television through the EURO AV1 scart socket.
•
When you connect the decoder by scart and the television by its aerial socket, you have to press
the TV/VCR button to make ‘VCR’ appear in the video recorder display, otherwise you cannot see
the decoded signal.
Page 42

Technical information
Dimensions
Width x height x depth 360 x 90 x 288 mm
Weight 3.85 Kg
Power supply
Input voltage 230V ~ 50Hz
Power consumption Up to 17 watts
System
Video PAL-I
Channel range UHF 21 - 69
Channel locations 01 to 99 and AV
RF output UHF channels 12 to
69 (channel 52
ex-factory)
Recording timer 8 events, 1 month
Video
System VHS
Speeds SP and LP
Hi-fi
Frequency response 20Hz-20KHz
Dynamic range > 80dB
Signal-to-Noise-Ratio > 60dB
General
Temperature range 5°C to 35°C
Humidity range Relative humidity
less than 80%
This technical information may change.
Serial number record
Write the serial number from the back panel of your video recorder in the box below.
Model number : VN2000
Serial number : _______________________
Appendix
Setting the EURO AV2/ DECODER socket back to normal
1
Follow steps 1 to 5 above.
2
Press the PR- button to move the pointer to ‘AV2 (second AV input)’.
3
Press the OK button to confirm the change and go back to the main menu.
4 Press the MENU button to turn off the main menu display.
41
 Loading...