

Page 1
UPRIGHT FREEZER
UFZ 180
INSTRUCTION MANUAL
Page 2
ELECTRICAL CONNECTION (UK ONLY)
For your safety please read the following information
Warning: This appliance must be earthed.
The appliance must be connected to a 220-240 volts 50 cycle AC supply by means of a
three pin socket, suitably earthed and should be protected by a 13 amp fuse in the plug or
a15 amp fuse in the consumer unit.
The appliance is supplied with a molded 13 amp 3 pin plug fitted with a 13 amp fuse.
Should the fuse require replacement, it must be replaced with a fuse rated at 13 amp and
approved to BS1362.
If the mains plug is unsuitable for the socket outlet in your home or is removed for any
other reason, then the cut off plug should be disposed of safely to prevent the hazard of
electric shock.
There is a danger of electric shock if the cut off plug is inserted into any 13 amp socket
outlet.
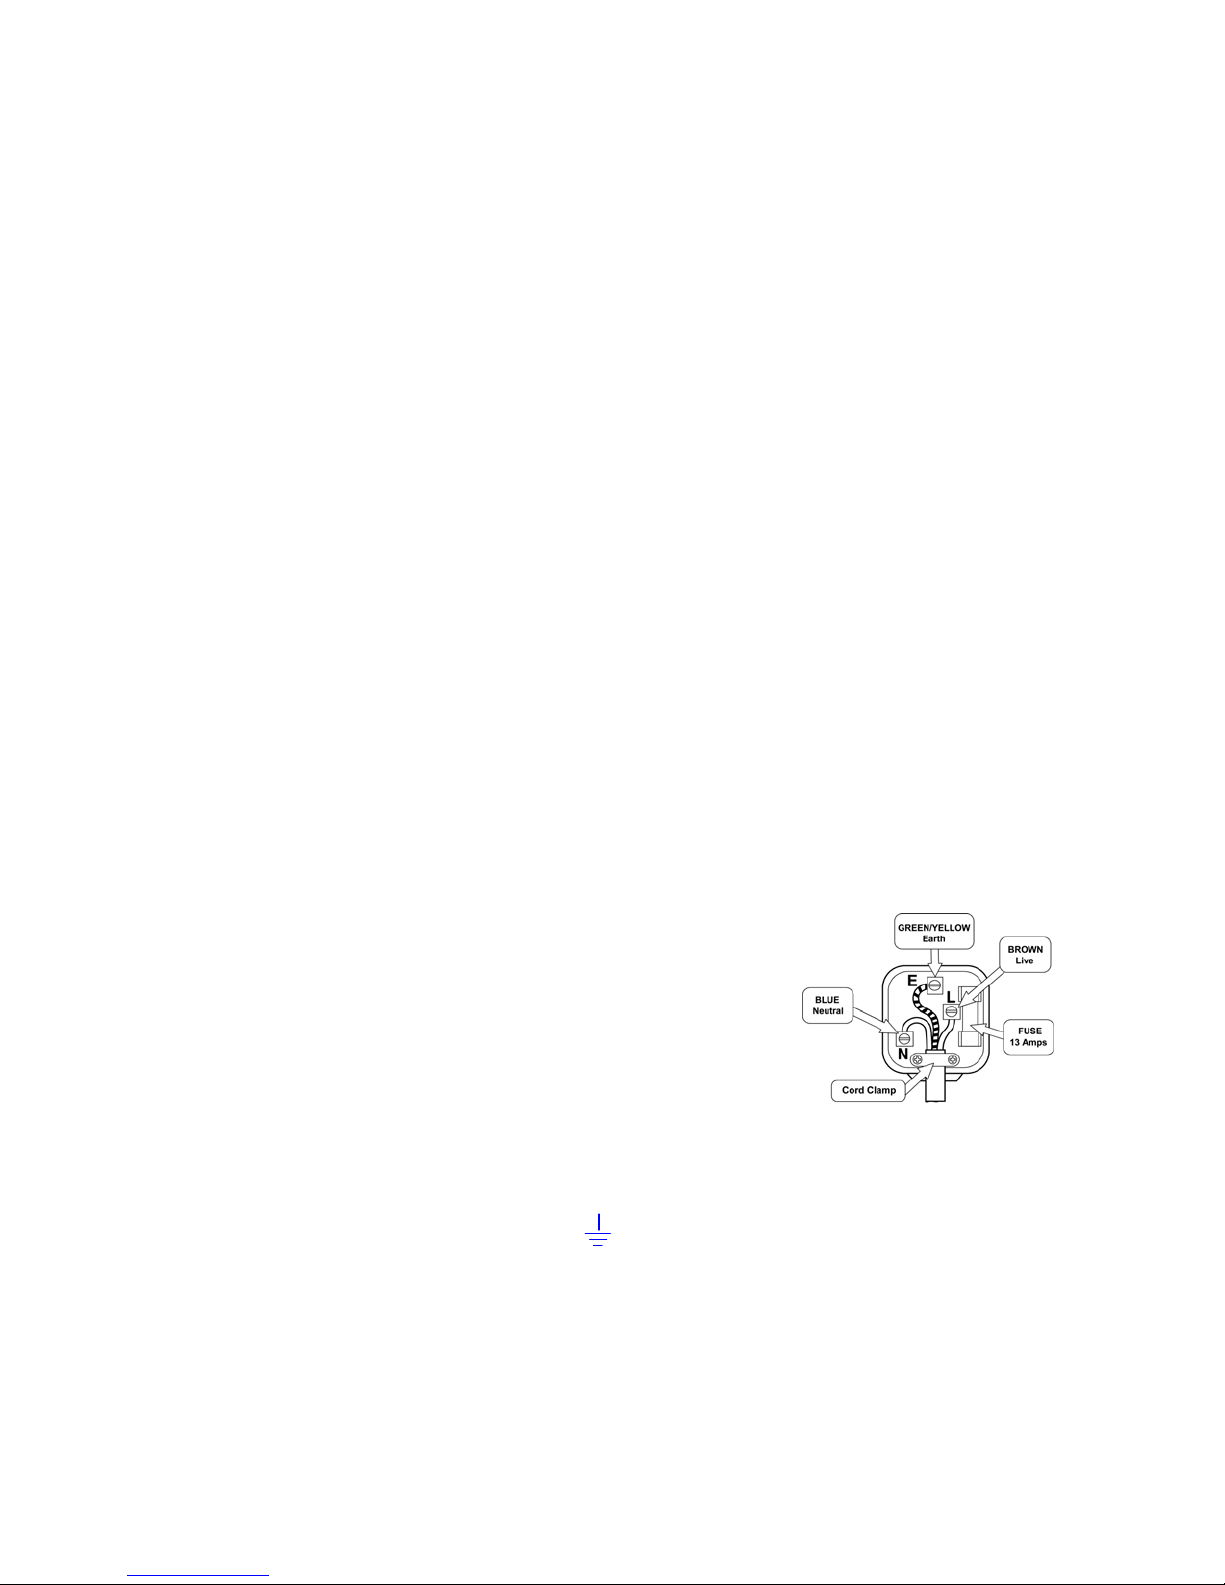
How to wire a 13 amp plug.
Important
The wires in the mains lead on this appliance are coloured in accordance with the
following code:
Green and Yellow - Earth
Blue – Neutral
Brown – Live
As the colours may not correspond with the markings identifying
the terminals in your plug proceed as follows.
The green and yellow wire must be connected to the terminal in the plug which is marked
with the letter E or with the earth symbol or coloured green and yellow.
The blue wire must be connected to the terminal marked N or coloured black.
The brown wire must be connected to the terminal marked L or coloured red.
Page 3
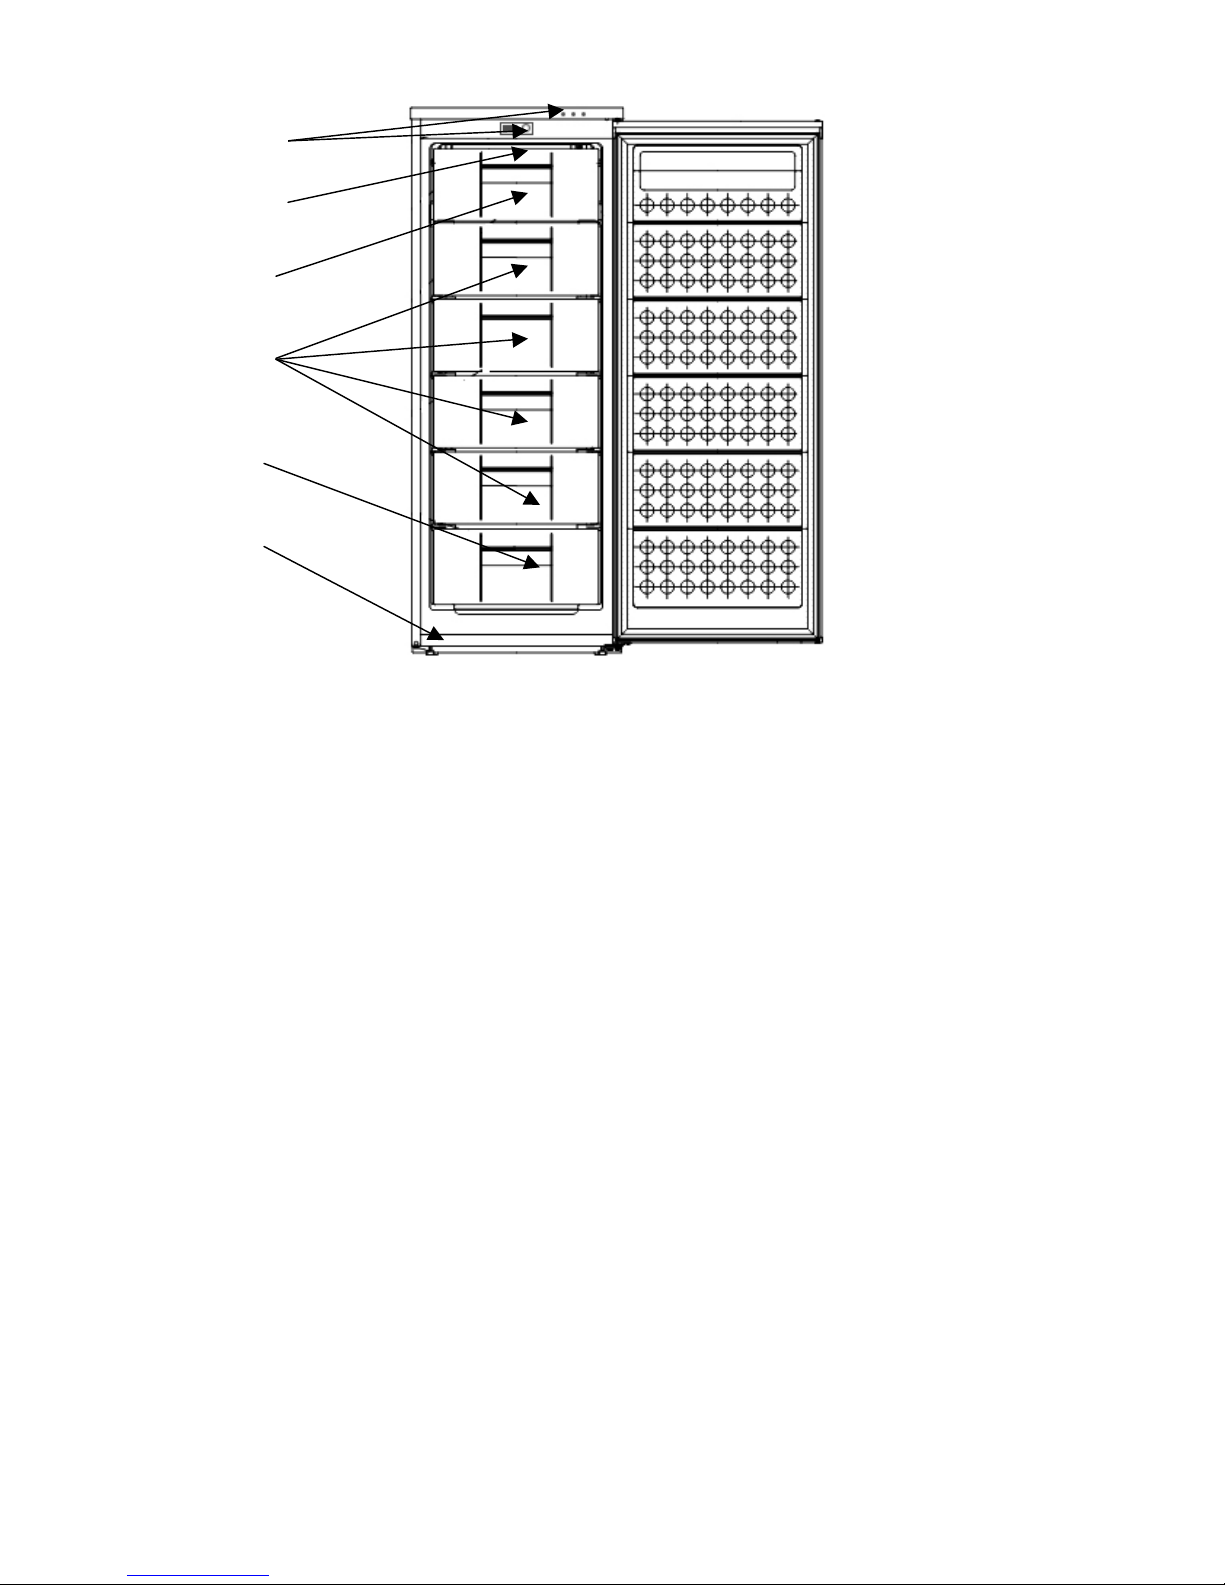
General Description
1
2
3
4
5
6
1. Status Indicator Lights. Red = Over temperature warning.
Amber = Fast Freeze switched on. Green = Power on.
Thermostat Knob and Fast Freeze switch
2. Ice Bank
3. Freezer Flap.
4. Middle Drawer
5. Low Drawer
6. Adjustable feet
The thermostat is located on the front of the cabinet just inside the top of the door recess.
Transportation and Handing
When moving the unit, always hold the base, and lift carefully while keeping the unit
upright. The unit should never be tilted beyond 45 degrees, placed upside down, or laid
on its side, back, or front. Never hold onto the door for support while moving the unit. It
may damage the hinges.
Installation
1. Place the freezer on a flat, firm surface. This will help eliminate noise
caused by vibration.
2. Choose a well ventilated area. There should be at least 10 cm of open space along the
sides, top, and back of the freezer.
Page 4

3. Select a location which, is away from heating sources, direct sunlight, ovens, etc.
Also, the area should be dry, and free of damp, stale air.
Spacers are supplied that clip on the radiator on the back of this appliance for guidance as
to distance the unit can be located adjacent to a wall.
Before First Use
1. Clean the freezer with lukewarm water and detergent, and wipe dry.
2.Turn the thermostat control to the " 3" position, and plug the freezer into the wall
outlet.
The compressor will begin to run.
3. Check, after 30 minutes of operation, to ensure that the freezer is cold.
Temperature Control
1.The temperature control (thermostat control is turned with a coin) is located near the
top of the unit.
2.Turning the thermostat control adjusts the temperature of the freezer.
3.The marks on the control dial represent different settings. Setting 1 is the warmest and
setting 4 is the coolest.
4. The factory recommended setting is 2.5 for normal operating conditions.
LED Warnings:
On the front of the Freezer at the top there are 3 LED lights. The meaning of these lights
is as follows:
The GREEN light is on when the appliance is plugged in and running.
The RED light is on when the internal temperature is too warm, select a cooler setting, if
the light is still on after an hour, check for breakdown or thawed food being stored in the
freezer also make sure that the food is stored correctly. (see Hints and Tips)
The Yellow LED is on when the Fast Freeze switch is in the on position.
1
2
0
4
3
Page 5

Hints and Tips
*Fresh foods such as fish and meat can be frozen to maintain freshness, and keep the
nutrients in the food.
*Food should be wrapped in aluminum foil, or some other type of airtight packing.
*Do not allow frozen food in freezer to touch foods just placed into freezer. It can
damage the food.
*Frozen foods from the store should be placed in the freezer promptly, so they do not
thaw.
Freezing Fresh Food
To freeze fresh food, follow these instructions:
the maximum, quantity of fresh food that can be frozen in 24 hours is 10 Kg.
− two hours before introducing fresh food turn the fast freeze switch which is located
next to the thermostat control at the front of the unit just inside the door, to the ON
position, in order to cool the already frozen foods as much as possible. Empty the
two top fast freeze compartments at the top of the unit before you introduce your
fresh food to be frozen.
Place the fresh food to be frozen so that it is in direct contact with the shelves 24hr
after you have introduced the food the freezing can be considered finished and you
can turn off the fast freeze switch.
− During freezing try not to open the freezer door.
Do not place glass containers with liquids or fizzy drink into the freezer as they
could break or burst.
Foods to be frozen like meat or vegetables must be packed before being put into
the freezer.
Reduce dimensions of each package to a minimum.
For liquids, soups etc, you can use plastic containers.
It is very important that the items are packed tightly. Use tape to seal them. Place on
each package a label showing the contents and date of freezing.
− Iced lollies, or similar item, should not be consumed too cold as freezer burns may
occur.
Making ice cubes
Page 6

Fill the ice cube tray with fresh drinking water and place in the low temperature ice bank
(located above the top compartment.)
After the ice cubes are made you can remove them from the tray by twisting the try
slightly and or placing the tray under running water for a short time.
Don’t- Give children ice-cream or ice direct from the low temperature compartment. The
low temperature may cause cold temperature burns on the lips.
Fast Freezing
*Fast freezing is to protect food from damage by large ice crystals that form when food is
frozen at a slow rate. With fast freeze, smaller ice crystals form, which does not penetrate
the “cell membranes” of the food. This helps keep the nutrients and freshness of the food
*Fresh fish and meat, which will be stored for long periods of time, should be fast frozen.
To operate fast freeze, set the fast freeze switch to the on position. Once the food is
frozen, return the switch to off.
WHAT NOT TO FREEZE
Bananas, Pomegranates, Pears or carbonated liquids
Defrosting
1.When the freezer operates for a long period of time, the surface of the evaporator and
the drawers may become covered with a layer of white frost. This frost will reduce the
energy efficiency of the unit, and make the freezer less effective. When this frost forms,
it should be promptly removed.
2.When defrosting, unplug the freezer, and remove all items from the freezer. Either
allow the frost to melt naturally from the warm air in the room, or carefully use a plastic
scraper. Finally, wipe away any remaining ice and water, plug the freezer in, and return
the food to the freezer.
Power Failure
If there is a power failure for a short time then keep the door closed
Frozen food should not be affected if the failure is for a short time only.
Extra protection can be given by covering the appliance with two or three thick blankets.
If a long power failure is anticipated, try to get the foodstuff into another appliance or
cold store, if possible.
If the power cut lasts a long time then check the content of the freezer.
If the food as defrosted cook and refreeze the food or it should be eaten immediately.
Never refreeze food that as been defrosted.
CAUTION: Never use sharp tools to chip ice away.
Precautions:
*The freezer should be located in a place that allows easy access to the plug.
*This unit is intended for operation indoors, and is not intended for exposure to rain.
Page 7

*Do not place hazardous or flammable materials inside, or directly next to, the freezer.
*Do not sit on freezer, or place heavy objects on top of freezer.
*Do connect your freezer to an independent power outlet. Always make sure to use a safe
ground wire. The voltage should be limited within the ranges from 220V to 240V, or the
main motor will be damaged.
*After a power outage, wait 5 minutes before turning freezer on. Otherwise, the
compressor may become damaged.
*Always allow for proper air circulation to the back, sides, and top of unit. Also, make
sure the packing base is removed from the bottom of the unit prior to operation.
*Keep the power cord away from the compressor and condenser to prevent damage to the
cord due to high temperatures.
Always use the baskets supplied or poor performance may result.
If the door is opened too often (or left open) temperature adjustment with the thermostat
may be needed to compensate.
For best energy efficiency, open the freezer infrequently. Frequent opening of the door
requires extended compressor run time, which increases the energy consumption.
*Clean freezer after each defrost.
*Do not touch frozen food with wet hands, as you can suffer frostbite.
*Do not use the extended power cords.
*Warning-Do not damage the door seal and keep it clean.
*Warning-Do not use electrical appliances inside the freezer.
*Before disposing of this freezer at the end of it’s useful life, disable the lock to stop
children getting trapped when playing.
The appliance must be positioned so that the plug is accessible.
If the supply cord is damaged, the manufacturer or its service agent or a similarly
qualified person must replace it in order to avoid a hazard.
Keep ventilation openings, in the appliance enclosure or in the built-in structure, clear of
obstruction.
Do not use mechanical devices or other means to accelerate the defrosting process, other
than those recommended by the manufacturer.
Do not damage the refrigerant circuit.
General Instructions for Care and Maintenance
Clean the freezer regularly. See below for cleaning instructions.
If you wish to stop using the freezer for a long period of time, make sure you unplug the
freezer from the outlet, remove all food, clean and dry the freezer, and leave the freezer
Page 8

door open, to eliminate any unpleasant odors.
Cleaning your freezer
Remove the mains plug from the wall socket, open the door and remove all the food to a
cool place. Use a solution of lukewarm water and a teaspoon of bicarbonate of soda w ith a
soft cloth to clean the internal cavity and dry well. Remember to clean the condenser
located at the rear of the appliance, use a dry brush or a vacuum cleaner to remove dust
from the condenser.
After cleaning re-insert the mains plug.
We recommend that you polish the metal parts of the product (i.e. door exterior,
cabinet and sides), with a silicone wax (car polish) to protect the high quality paint
finish. Check door seals regularly to ensure they are clean and free from food
particles.
Reversing the door
1.) Unplug the product from the mains supply.
2.) Tilt the product backwards and lean it against a wall.
3.) Remove the four bolts fixing the bottom hinge and remove the hinge plate.
4.) Lift the bottom of the door and slide downward to remove the door.
5.) Remove the hinge pin insert from the door.
6.) Remove the blanking cap from the opposite side and insert it in the original hole.
7.) Insert the hinge pin insert in the remaining hole.
8.) Remove the two screws holding the hinge pin to the top of the door cavity and
transpose to the opposite recess.
9.) Transfer the door hinge and door-stop screws to the other side of the bottom hinge
plate.
10.) Re-fit the door to the top hinge pin and align with the door cavity.
11.) Remove the self-tapping screw from the new position of the bottom door hinge plate
and re fit to other side (see NOTE).
12.) Re-assemble the bottom door hinge in the reverse order of removal.
13.) Check the door is aligned and that the seals are in contact with the door cavity all
around the door.
NOTE:
Use the self tapping screw to clear the bottom hinge plate holes if required. Re-fit to
opposite side for storage.
Page 9

NOTE: The following are normal phenomenon.
These are not indications of improper operation.
1. Refrigerant may make a gentle sound similar to running water.
2.In humid areas, some moisture may gather on the outside of the freezer. Just wipe
away.
3.The compressor becomes very hot. Do not touch the compressor.
4.Heat around the door frame is normal.
Do’s and don’ts
Do- Clean and defrost your appliance regularly (See “Defrosting”)
Do- Leave lettuce, cabbage, parsley and cauliflower on the stem.
Do- Wrap raw meat and poultry loosely in polythene or aluminium foil. This preve nts
drying. Do- Wrap fish and offal in polythene bags.
Do- Check contents of the compartments every so often.
Do- Store commercially prepared food in accordance with the instructions given on
the packets.
Do- Always choose high quality fresh food and be sure it is thoroughly clean
before freezing it.
Do- Wrap all food in aluminium foil or food quality poly thene bag s and make sure any air
is excluded.
Don’t- Cover the shelves with any protective materials which may obstruct air
circulation. Don’t- Store poisonous or any dangerous substances in y our freezer. It has been
designed for the freezing of edible foodstuffs only.
Don’t- Consume food which has been frozen for an excessive length of time.
Don’t- Leave the door open for long periods, as this will make the appliance more costly
to run and cause excessive ice formation.
Don’t- Use sharp edged objects such as knives or forks to remove the ice.
Don’t- Never use hairdryers, or electrical appliances for defrosting only use
item recommended by the manufacturer.
Don’t- Put hot food into the appliance. Let it cool down first.
Don’t- Put liquid-filled bottles or sealed cans containing carbonated liquids into the
freezer as they may burst.
Don’t- Give children ice-cream and water ices direct from the freezer The low
temperature may cause ‘freezer burns’ on the lips.
Don’t- Try to keep frozen food which has thawed; it should be eaten within 24
hours or cooked and re-frozen
Page 10

Troubleshooting
Before calling for service please check the following points.
The freezer is not working
Check the plug is inserted correctly into the wall socket.
Check there is power to the wall socket by plugging in another appliance, if the
other appliance works check the fuse in the freezer plug.
The freezer is noisy when running
Check the freezer is level and it is not in contact with another appliance or kitchen
furniture.
The freezer does not cool sufficiently
If the door has been opened too often, or it has been left open for a while it will take time
for the freezer to reach its set temperature.
Check the airflow over the rear of the freezer has not been reduced due to insufficient
clearance.
The following characteristics should not be looked upon as a problem
A gentle trickling sound caused by coolant flowing through the pipe.
Compressor operating at high temperatures.
Prolonged idle periods
If you are going to leave the freezer idle for any period of time, proceed as follows:
Disconnect the freezer from the mains supply by removing the plug from the wall socket.
Clean and dry the inside as instructed under the heading of cleaning the freezer.
Leave the door open to prevent any unpleasant smells from building up while the freezer is
not in use.
Maintenance
Moving your Freezer
Hold the freezer around its sides or base when moving it. Under no circumstance should
it be lifted with the edges of the top surface.
Do not locate your Freezer near a heat source, E.G. cooker, boiler or radiator. Also avoid
direct sunlight in lean-to’s or sun lounges.
Location
Page 11

Leveling the Freezer
Make sure the Freezer is level. Use the rotating leveling feet at the front. If the Freezer is
not level, the doors and magnetic seal alignments will be affected.
Servicing
Qualified service personnel should perform repairs and maintenance of the appliance
only.
It is our policy to continually seek new ways of improving our products. Therefore
we reserve the right to change the specification of items illustrated and described, at
any time and without notice.
UK Help line
If you have read these instructions and
troubleshooting guide, but there is something about
this equipment which you do not understand, you
can phone our help line during normal office hours
on: 0113 279 3520
Calls are charged at standard rates.
If you need a service engineer please phone the number
on your sales receipt.
We have made every effort to ensure these instructions
are as accurate as possible, however we apologise for
any inconvenience caused by minor inconsistencies
which may occur as a result of product improvement and
development.
Page 12

Technical data
m
Brand Proline
Appliance type UFZ180
Star rating 4 Star
Total gross volume (l.) 208L
Total usable volume (l.) 183L
Freezer usable volume (l.) 183L
Refrigerator useful volume n/a
Freezing capacity (kg/24h) 10.0kg/24h
Climate Class +Ambient Range ST
Energy class (1) A class
Energy consumption (kWh/year) (2) 259 Kwh/Year
Supply voltage (Vac/Hz) 220-240V/50Hz
Noise [dB(A)re 1 pW] 40dB
Refrigerating agent R600a / 60g
Outside dimensions (W x D x H) 542×566×1440
Refrigerating Blowing Gas C-Pentane
(1) Energy class: A…..G (A=economical…G=less economical)
(2) The real power consumption depends on using conditions and
appliance location.
542mm
Depths with door open
1065m
Page 13

 Loading...