

Page 1

9.7” DIGITAL PHOTO FRAME
PL-DPF 1007B
USER MANUAL
Thank you for purchasing this 9.7” Digital Photo Frame. You can play your favourite images (*.jpg) directly from a memory
card or a USB thumb drive without a computer. Read the following instructions for more details.
Page 2

CONTENTS
WARNING ................................................................................................................................................................................................ 2
IMPORTANT SAFETY INSTRUCTIONS ................................................................................................................................................. 2
CONTROLS AND CONNECTIONS ......................................................................................................................................................... 3
1. [MENU] Menu button: Press to open OSD menu. ........................................................................................................................... 3
ATTACHING THE MOUNT ...................................................................................................................................................................... 4
CONNECTING TO THE POWER............................................................................................................................................................. 4
SELECTING A PREFERRED OSD LANGUAGE .................................................................................................................................... 5
INSERTING A MEMORY CARD OR USB FLASH DRIVE ...................................................................................................................... 6
VIEWING PHOTOS AND SLIDE SHOWS ............................................................................................................................................... 7
PICTURE SETTINGS ............................................................................................................................................................................... 9
MANAGING FILES ................................................................................................................................................................................ 10
Copying Files ...................................................................................................................................................................................... 11
Deleting Files ...................................................................................................................................................................................... 12
OSD SETTINGS ................................................................................................................................................................................. 13
SPECIFICATIONS .................................................................................................................................................................................. 15
TROUBLESHOOTING ........................................................................................................................................................................... 16
1
Page 3

WARNING
This appliance is intended for domestic household use only and should not be used
for any other purpose or in any other application, such as for non domestic use or in a commercial environment.
Cet appareil est destiné à un usage domestique uniquement. Toute utilisation autre que celle prévue pour cet appareil, ou
pour une autre application que celle prévue, par exemple une application commerciale, est interdite.
IMPORTANT SAFETY INSTRUCTIONS
y Keep away from water or moisture and dusty areas.
y Working temperature 0~40 . Never store in very hot or very cold places. ℃
y Be careful not to drop the product or subject it to strong impact.
y Do not use the product if the mains adapter or its lead becomes damaged.
y Do not use the product if you have split liquids in it, if it does not work as expected or if it is damaged in any way.
y Do not try to open the case alone without technical support.
y Only use attachments/accessories specified by the manufacturer.
y When left unused for a long period of time, the unit should be unplugged from the household AC outlet.
y Never place a naked flame source such as lighted candles on or near this product.
y Do not expose this product to dripping or splashing or place any objects containing water such as vases on the
product.
y Do not use abrasive cleaners or strong detergents to clean this product as they may damage the cosmetic surfaces.
y If the mains adapter or its lead becomes damaged, it must be replaced with an adapter of the same type and rating.
2
Page 4
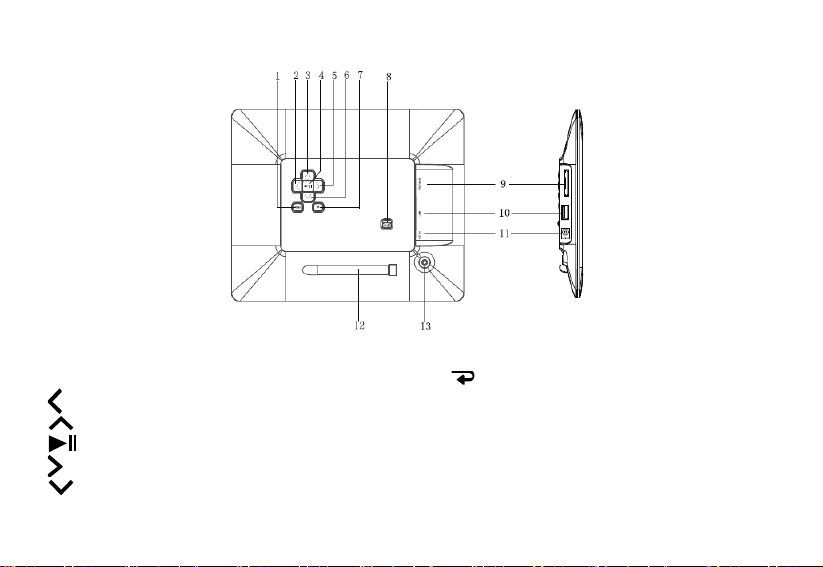
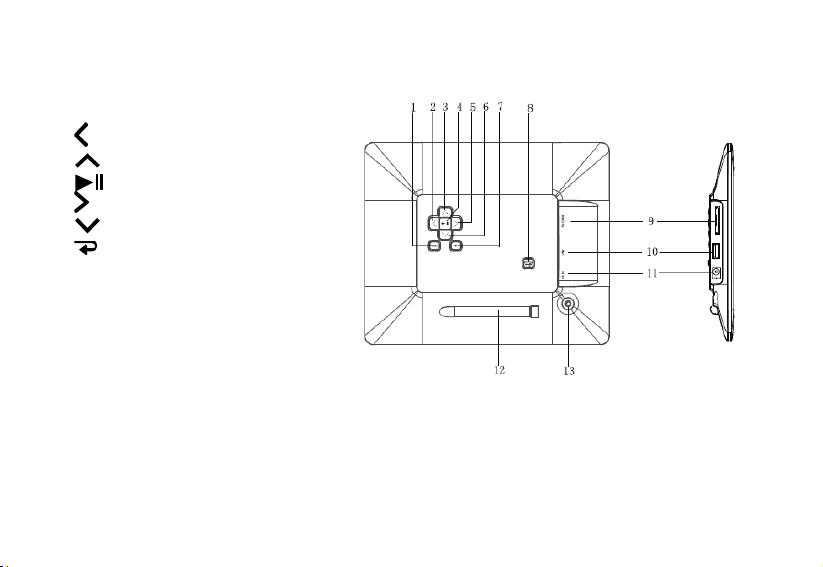
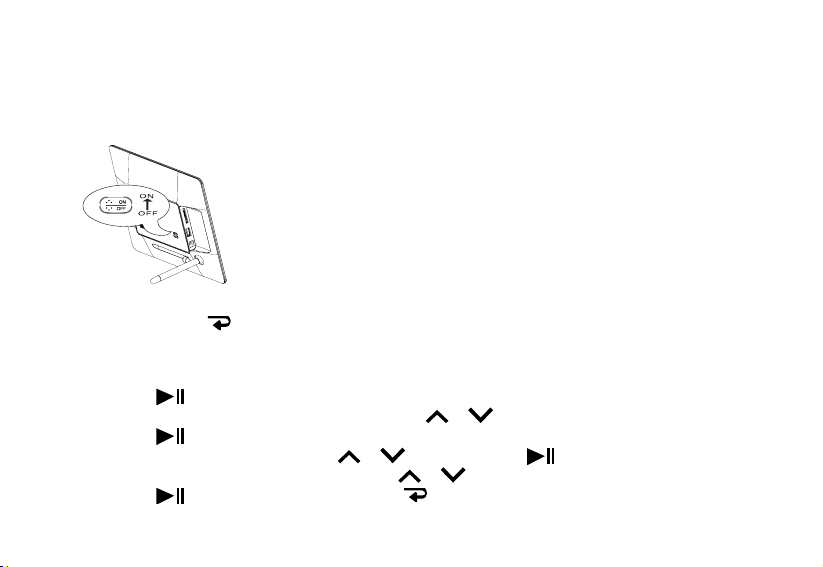
CONTROLS AND CONNECTIONS
1. [MENU] Menu button: Press to open OSD menu.
] Right/Next button
2. [
3. [
] Up button
4. [
] Play/Pause/Confirm button
5. [
] Left/Previous button
6. [
] Down button
] Exit button
7. [
8. On/Off switch
9. SD/MMC/MS card slot
10. USB port
11. DC IN jack
12. Mount
13. Screw hole
3
Page 5
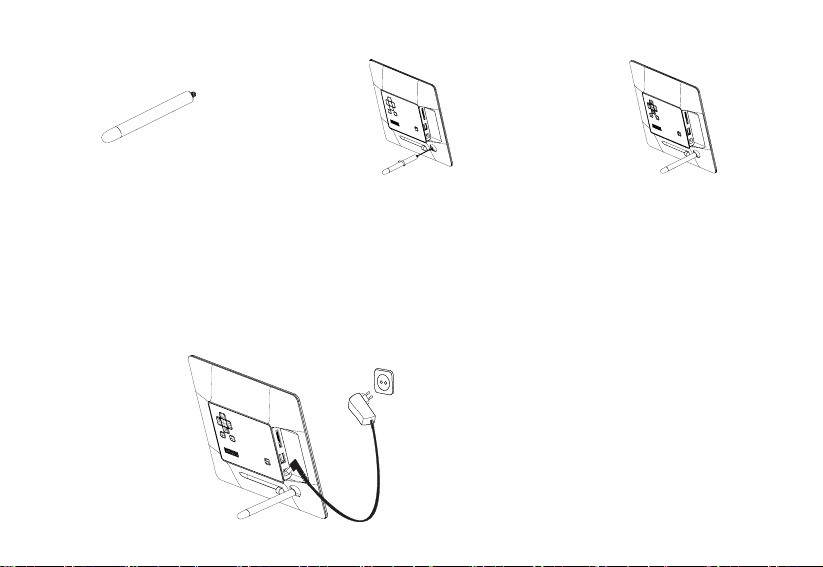
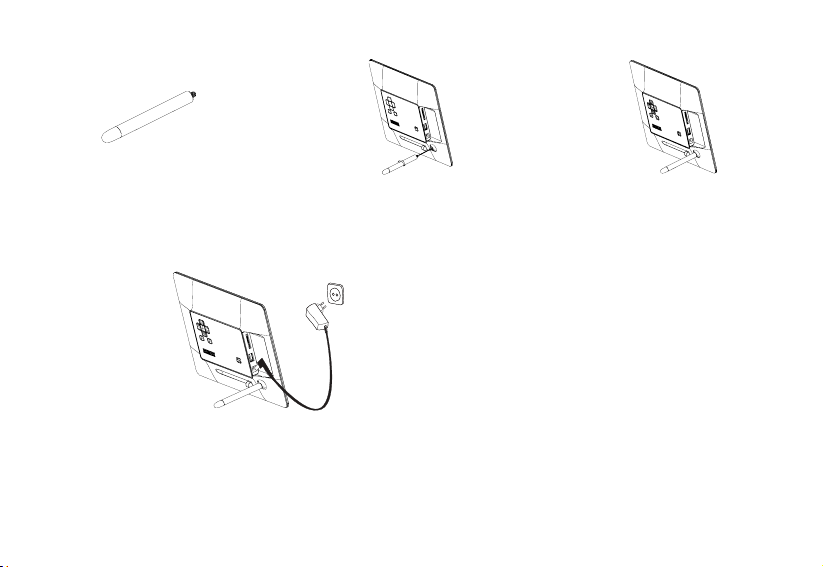
ATTACHING THE MOUNT
1. Insert the mount straight into the screw hole.
2. Twist the mount clockwise until it locks in place.
Note: The photo frame can be placed vertically or horizontally for either landscape or portrait display.
CONNECTING TO THE POWER
1. Connect the supplied AC power adapter cable to the photo frame, and plug the power adapter to the wall outlet.
4
Page 6
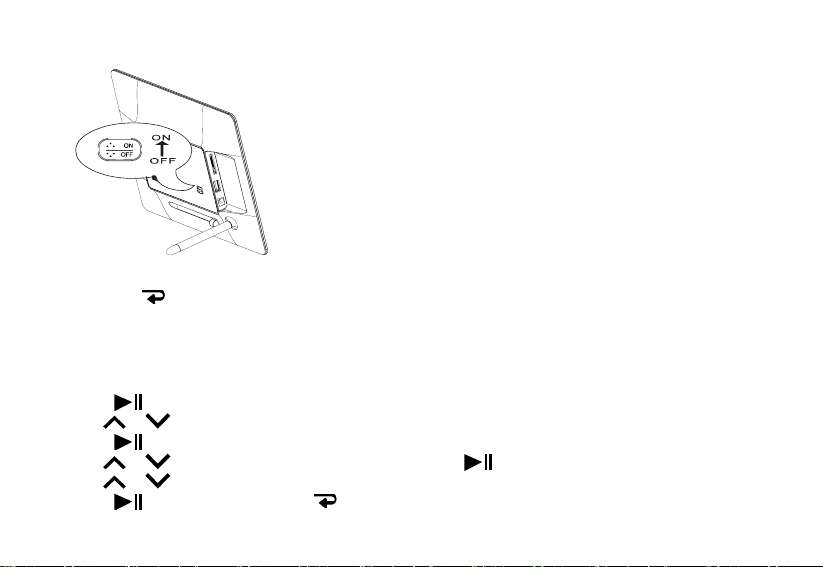
2. Switch the power to “ON” to turn on the unit.
3. The pre-stored opening screen displays in a loop sequence after the power is turned on.
4. To stop it, press
.
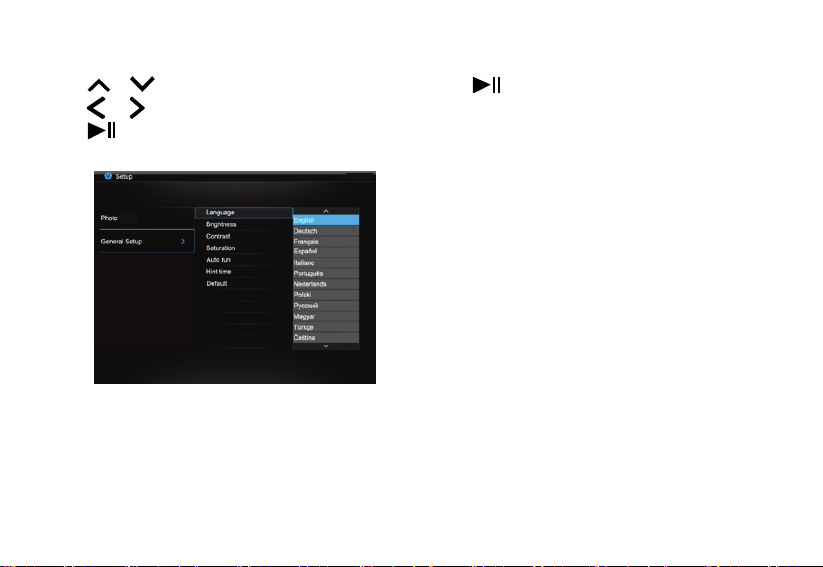
SELECTING A PREFERRED OSD LANGUAGE
The SETUP logo will appear when the power is turned on.
1. Press
2. Use
3. Press
4. Use
5. Use
6. Press
to show the main menu.
/ to highlight the “General Setup” option.
to enter the option.
/ to highlight the “Language” option then press to enter it.
/ to select the desired language.
to confirm and then press twice to return to the main menu.
5
Page 7
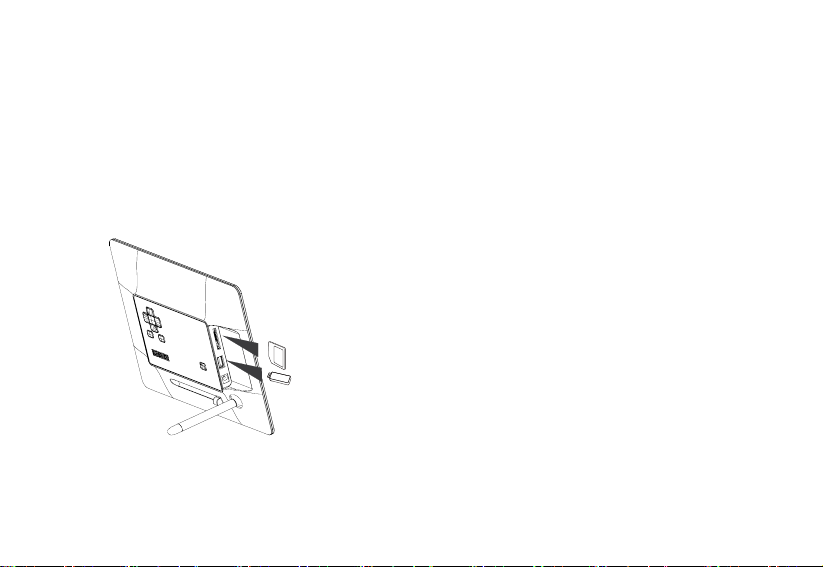
INSERTING A MEMORY CARD OR USB FLASH DRIVE
y This unit can only display one storage media’s contents at a time.
y This frame can only play image (*.jpg). If playing other formats, please convert the images to readable format on your
computer.
1. Insert your memory card to the appropriate slot.
Note: To remove SD/MMC/MS card, pull the card straight out.
2. Insert a USB drive to the USB port.
6
Page 8
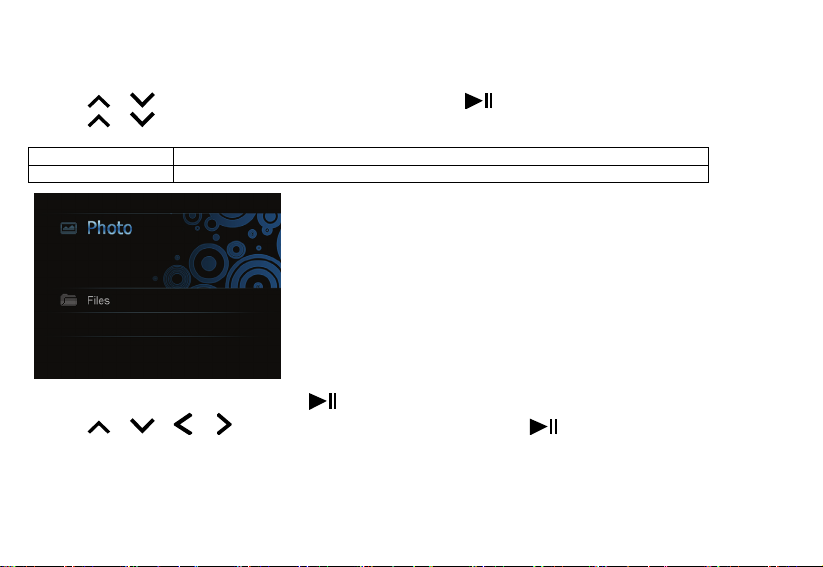
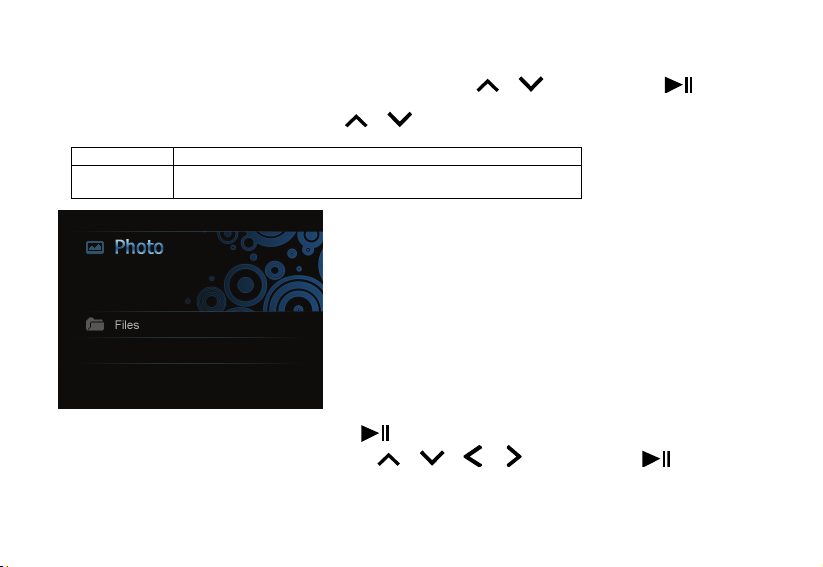
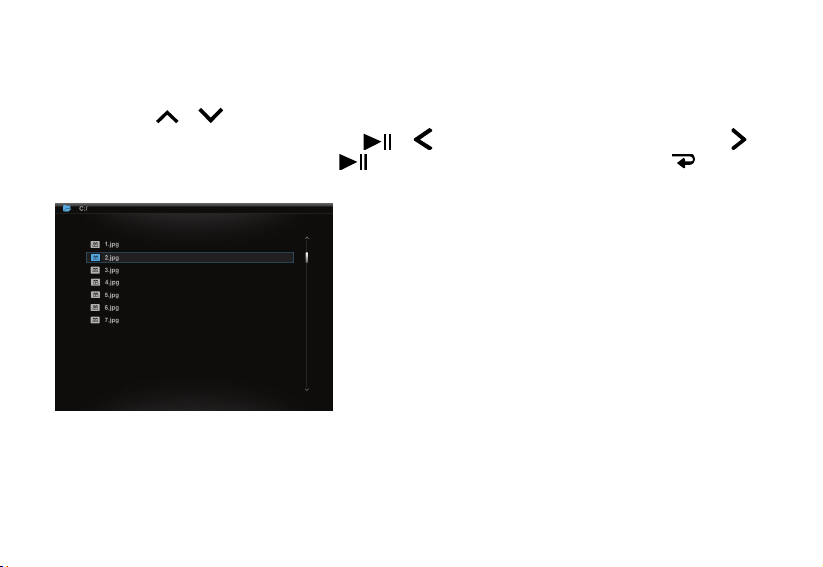
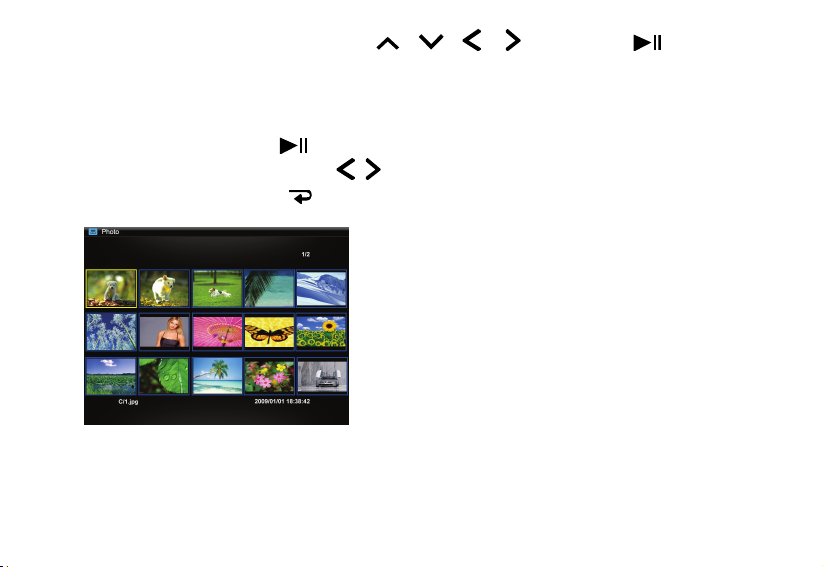
VIEWING PHOTOS AND SLIDE SHOWS
1. Press MENU to display the main menu screen.
2. Press
3. Press
Photo View photos of the memory source.
Files Browse all files of the memory source; copy or delete files.
4. When the “Photo” option is selected, press
5. Press
/ to select SD/MMC/MS or USB drive, then press to show the following screen.
/ to highlight the desired option.
. The photos are displayed on the screen as thumbnails.
/ / / to select the photo you wish to play, then press .
7
Page 9
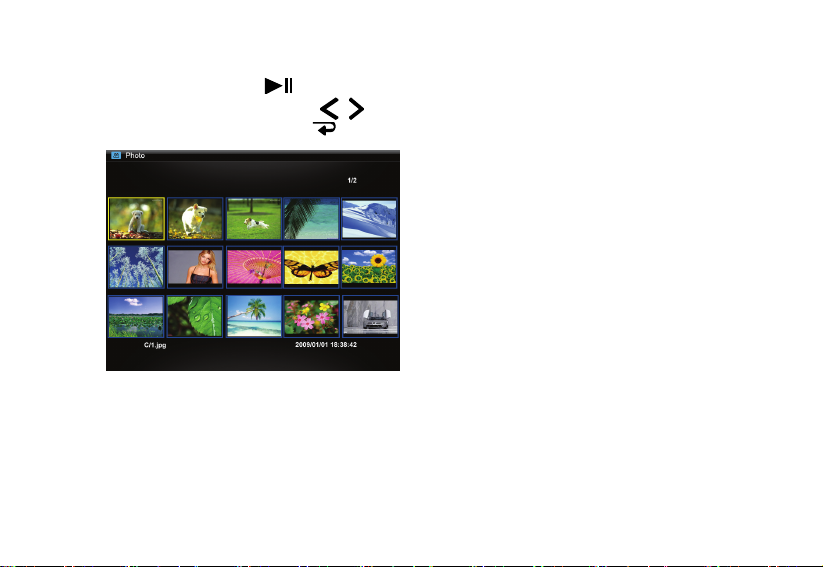
6. The slide show starts to play with the photo selected.
y To pause the slide show, press
y To select previous or next photo, press
y To return to the thumbnail mode, press
. Press it again to resume the slide show.
/ .
.
8
Page 10
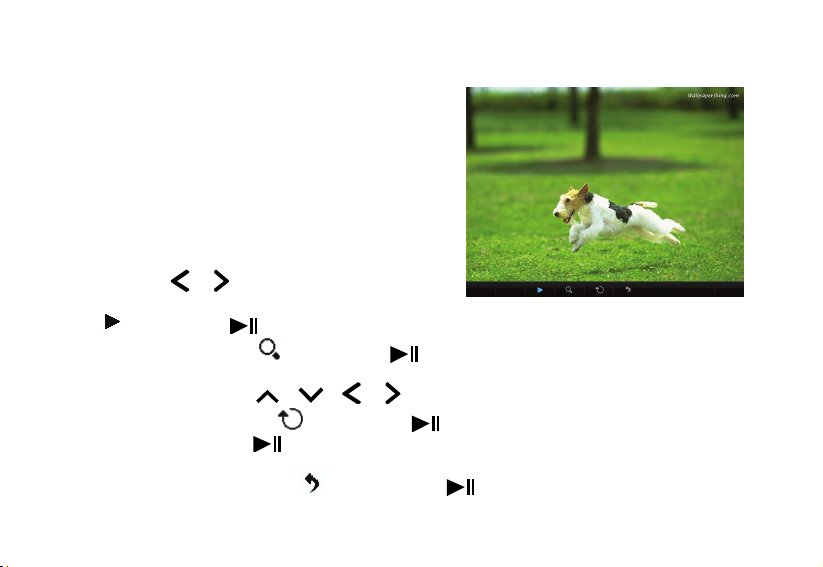
PICTURE SETTINGS
1. Press MENU during viewing a photo. The menu will appear on the bottom of the screen.
2. Press
y Highlight
y To zoom in a photo, highlight
y To rotate a photo, highlight
y To return to the thumbnail mode, highlight
/ to navigate between icons on the menu.
and press to start or resume slideshow from the current photo.
and press repeatedly to magnify a photo in the following sequence: x2, x4, x8
and x16. When a photo is magnified, press MENU to close the menu then press
through the photo.
and press repeatedly to rotate by 90 degrees. Each press of will rotate the
photo by 90 degree clockwise. All the rotation effects will be cancelled when returning to the thumbnail mode.
and press .
/ / / to navigate
9
Page 11
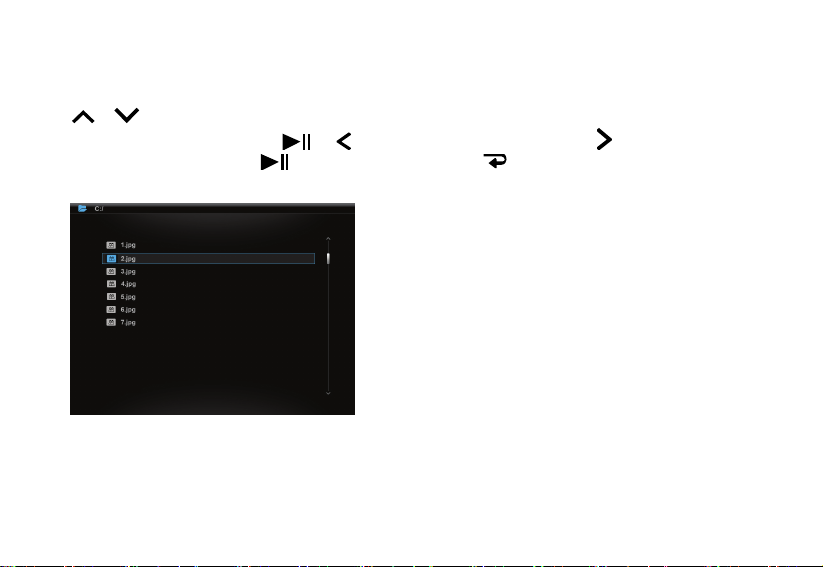
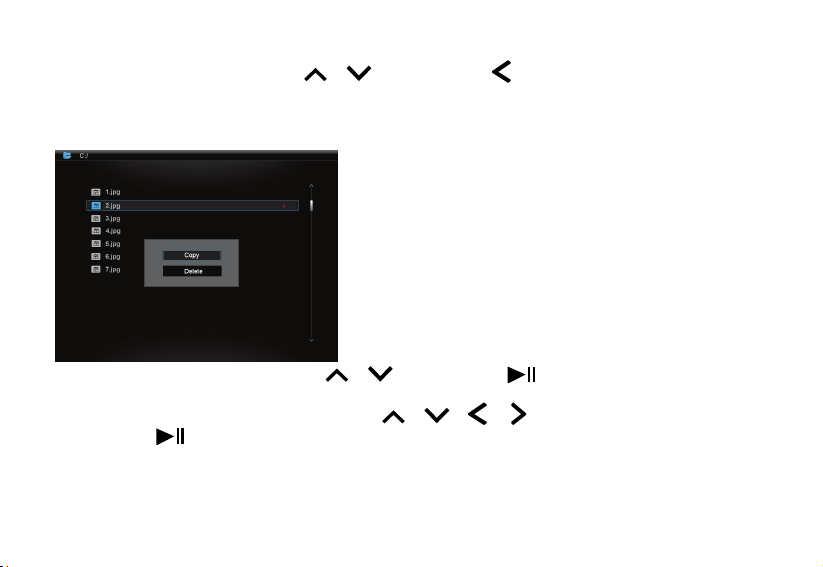
MANAGING FILES
In the File mode, you can view all playable files and folders on the memory source. You also can copy files from a memory
device to another one or delete files.
Press
y To open a folder, highlight it and press
y To play a file, highlight it and press
/ to navigate between files and folders.
or . To return to the previous menu, press .
. To return to the file list, press .
10
Page 12
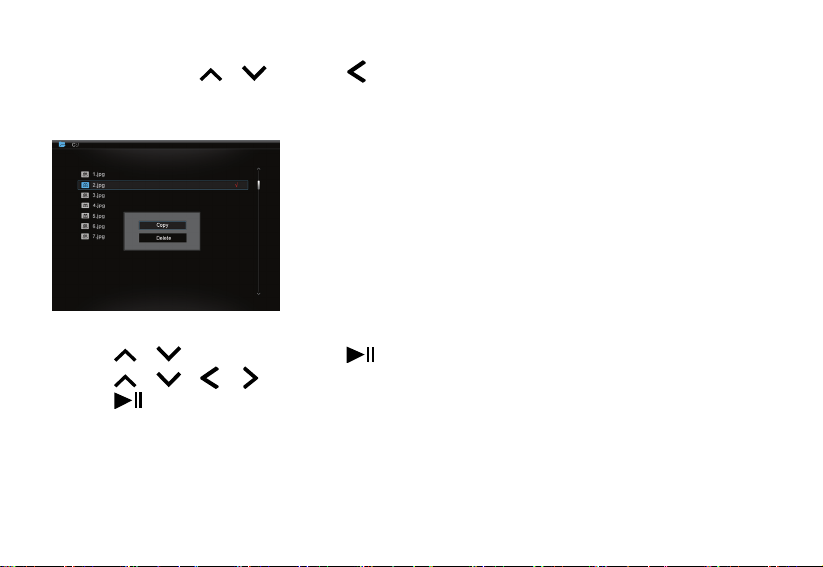
Copying Files
Highlight a file by pressing / then press . A check mark 9 will display next to the file.
To select more files, repeat the above operation.
1. Press MENU. The following screen pops up.
2. Press
3. Press
4. Press
Note: If a desired device does not appear in the destination list, the memory device may be write-protected. Please unlock
and try again the operation.
/ to select Copy and press . The memory device connected to the unit displays.
/ / / to select a memory device.
to start copying.
11
Page 13
Deleting Files
1. Follow the step 1 in ‘Copying files’.
2. Press
3. Press
4. Press
/ to select Delete in the pop up screen, then press .
/ to select YES or NO to delete the selected file or exit without deleting.
to confirm.
12
Page 14
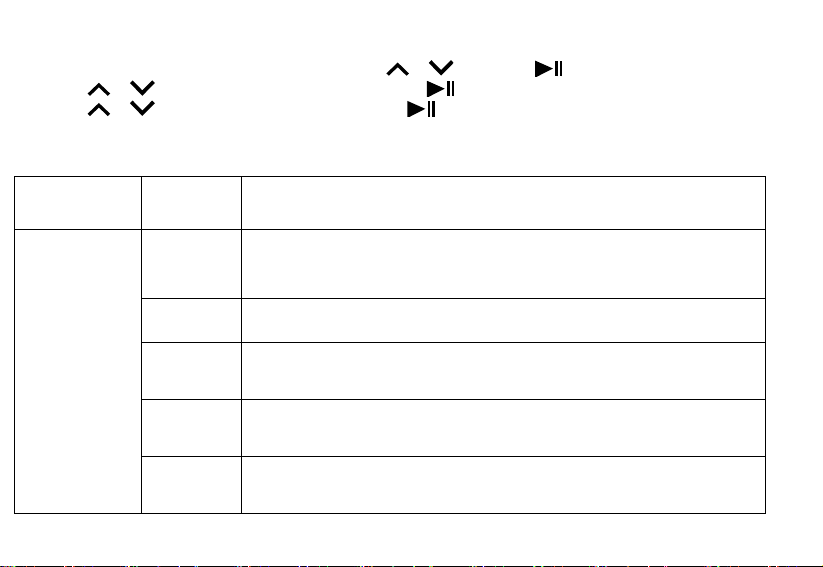
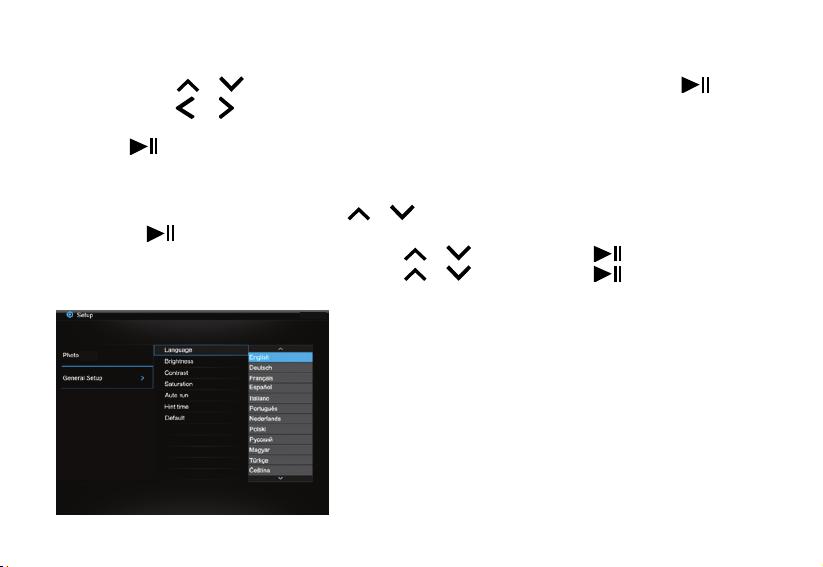
OSD SETTINGS
1. In setup mode, to select photo or general setup, press / then press .
2. Press
3. Press
4. Press MENU to return to the main menu.
OSD menus Sub-menus Description of operations
/ to select the desired submenu then press .
/ to select the desired option then press to confirm.
Photo
Sliding
show time
Photo Mode Set photos to Full Screen or Standard Screen when you are viewing them.
Transition
Effect
Date Stamp Display the detail information of photos when you are viewing them.
Shuffle To play photos in a random order or in order while playing a slideshow.
Set up the interval time for slide show.
The available options include: 3s, 5s, 15s, 1 min and 15mins.
Set up the style of transition while playing a slide show.
13
Page 15

Language Set up the language of the OSD menu.
General Setup
Brightness
Contrast
Saturation
Auto run
Hint time
Default Reset all settings to the default settings.
Adjust the brightness of the screen.
The available options include: +3, +2, +1, 0, -1, -2 and -3.
Adjust the contrast of the screen.
The available options include: +3, +2, +1, 0, -1, -2 and -3.
Adjust the saturation of the screen.
The available options include: +3, +2, +1, 0, -1, -2 and -3.
Set the Digital Photo Frame to run a specified mode automatically when you
switch on it.
Set how long to display the hint for button operation while playing a slideshow.
The available options include: 0s, 5s, 10s and 20s.
14
Page 16

SPECIFICATIONS
Digital LCD, TFT
Display
I/O DC in
Power Supply AC Adapter (Input: 100~240V AC, 50~60Hz; Output: DC 5V 2A)
USB port USB Host 2.0 (High Speed)
Supported peripheral
devices
Panel size: 9.7 inches
Screen aspect ratio: 4:3
Resolution: 1024*768 pixels
SD™ (Secure Digital Card), MMC™ (MultiMedia Card), MS™ (Memory Stick),
Supported photo
format
Size L*W*H: (mm) 265.5 x 215 x 22.5mm
Weight (g) 689.5g
JPEG, Maximum resolution: 8000*8000 pixels
15
Page 17

TROUBLESHOOTING
No power
y Check to make sure the power plug is plugged into the power outlet.
y Make sure there is power to the outlet.
Unable to view photos on the Digital Photo Frame
y Not all JPEG files are compatible. Please open the files in the computer and resave them as JPEG files and try to
playback in the device.
y Check if using compatible memory cards.
If the picture display is distorted or cannot display properly
y Go to the Photo Setup menu, then the photo mode setting and change the mode the match your photo, Full or Standard
screen.
If picture display seems slow.
y Use lower resolution picture.
We apologise for any inconvenience caused by minor inconsistencies in these instructions, which may occur as a result of
product improvement and development.
Kesa Electricals © UK: EC1N 6TE 02 / 08 / 2012
16
Page 18

CADRE PHOTO NUMÉRIQUE 9,7"
PL-DPF 1007B
Merci d'avoir acheté ce cadre photo numérique 9,7 pouces. Il vous permet de visionner vos photos favorites sous format *.jpg
directement à partir d'une carte mémoire ou d'une clé USB sans passer par un ordinateur. Lisez le présent mode d'emploi pour
plus de détails.
MODE D’EMPLOI
Page 19

TABLE DES MATIÈRES
ATTENTION ............................................................................................................................................................................................. 3
MISES EN GARDE IMPORTANTES ....................................................................................................................................................... 3
CONTRÔLES ET BRANCHEMENTS ...................................................................................................................................................... 4
1. [MENU] Menu: Accéder au menu OSD. ............................................................................................................................................ 4
MISE EN PLACE DU SUPPORT ............................................................................................................................................................. 5
CONNEXION À UNE SOURCE D’ALIMENTATION ................................................................................................................................ 6
INSERTION D’UNE CARTE MÉMOIRE OU D’UN PÉRIPHÉRIQUE FLASH USB ................................................................................ 7
PHOTOS ET DIAPORAMAS ................................................................................................................................................................... 8
RÉGLAGES DES PHOTOS ................................................................................................................................................................... 10
GESTION DES FICHIERS ..................................................................................................................................................................... 11
Copier des fichiers .............................................................................................................................................................................. 12
Supprimer un fichier ........................................................................................................................................................................... 13
RÉGLAGES OSD................................................................................................................................................................................... 13
SPÉCIFICATIONS .................................................................................................................................................................................. 16
DÉPANNAGE ......................................................................................................................................................................................... 17
2
Page 20

ATTENTION
Cet appareil est destiné à un usage domestique uniquement. Toute utilisation autre que celle prévue pour cet appareil, ou
pour une autre application que celle prévue, par exemple une application commerciale, est interdite.
MISES EN GARDE IMPORTANTES
y L'appareil ne doit pas être exposé à l'eau et à l'humidité en général, ni à la poussière.
y Température de fonctionnement: 0-40°C. Cet appareil ne doit en aucun cas être rangé dans une pièce très froide ou
très chaude.
y Cet appareil ne doit pas subir de chute ou d'impacts violents.
y N'utilisez pas cet appareil si le câble ou l'adaptateur secteur sont endommagés.
y N’utilisez pas cet appareil s’il fonctionne de manière anormale, s’il est endommagé de quelque manière que ce soit
ou si vous avez renversé du liquide à l’intérieur.
y N’essayez jamais de démonter le boîtier vous-même sans la présence d’un technicien qualifié.
y Utilisez uniquement les pièces de rechange/accessoires spécifiés par le fabricant.
y Débranchez l’appareil de la prise de courant avant toute période d’inutilisation prolongée.
y Aucune source de flamme nue (ex: bougie allumée) ne doit être placée sur ou à proximité de l'appareil.
y Cet appareil ne doit pas être mis à un endroit où il risquerait d’être exposé à des gouttes ou des éclaboussures.
Aucun objet rempli de liquide (ex : vase) ne doit être placé sur ou à proximité de l’appareil.
y N'utilisez pas de solvants abrasifs ou de détergents durs, cela pourrait abîmer la finition du produit.
y Si l'adaptateur secteur (ou son fil) est endommagé, il doit être remplacé par un adaptateur du même type et avec les
mêmes spécifications.
3
Page 21
CONTRÔLES ET BRANCHEMENTS
1. [MENU] Menu: Accéder au menu OSD.
2. [ ] Droite/suivant
3. [
4. [
5. [
6. [
7. [
8. Bouton marche/arrêt
9. Logement pour cartes SD/MMC/MS
10. Port USB
11. Prise d’alimentation
12. Support
13. Orifice de montage de la vis
] Haut
] Lecture/pause/confirmer
] Gauche/précédent
] Bas
] Quitter
4
Page 22
MISE EN PLACE DU SUPPORT
1. Insérez le support droit dans l’orifice.
2. Tournez-le dans le sens des aiguilles d'une montre pour le verrouiller.
Remarque: Vous pouvez placer le cadre photo verticalement ou horizontalement pour que l’affichage soit en mode portrait
ou paysage.
5
Page 23
CONNEXION À UNE SOURCE D’ALIMENTATION
1. Reliez au cadre le câble de l'adaptateur secteur fourni, puis branchez l'adaptateur sur une prise de courant.
2. Allumez l'appareil en mettant le bouton marche/arrêt sur "ON".
3. Une fois l'appareil allumé, l'écran d'accueil pré-enregistré s'affiche en boucle.
4. Pour l'arrêter, appuyez sur
CHOIX DE LA LANGUE D'AFFICHAGE
Le logo PARAMÈTRES apparaît lorsque l'appareil est allumé.
1. Appuyez sur
2. Allez sur "Paramètres généraux" en utilisant les touches
3. Appuyez sur
4. Allez sur "Langue" en utilisant les touches
5. Choisissez la langue souhaitée à l'aide des touches
6. Appuyez sur
.
pour afficher le menu principal.
/ .
pour accéder aux options.
/ puis appuyez sur pour confirmer.
/ .
pour confirmer, puis deux fois sur pour revenir au menu principal.
6
Page 24

INSERTION D’UNE CARTE MÉMOIRE OU D’UN PÉRIPHÉRIQUE FLASH USB
y Ce cadre ne peut lire que les fichiers d'un seul périphérique de stockage à la fois.
y Il ne peut lire que des photos au format *.jpg. Les photos dans d'autres formats doivent être converties sur votre
ordinateur au préalable.
1. Insérez votre carte mémoire dans la fente correspondante.
Remarque: Pour enlever la carte mémoire SD/MMC/MS, tirez dessus en la maintenant droite.
2. Insérez votre périphérique flash USB dans le port USB de l’appareil.
7
Page 25
PHOTOS ET DIAPORAMAS
1. Appuyez sur MENU pour afficher l'écran du menu principal.
2. Sélectionnez SD/MMC/MS ou périphérique USB à l'aide des touches
l'écran suivant.
3. Allez sur l'option souhaitée à l'aide des touches
Photo Visionner les photos du périphérique de stockage.
Fichiers Parcourir la liste des fichiers de la source mémoire, copier ou
supprimer des fichiers.
4. Une fois l'option "Photo" sélectionnée, appuyez sur
5. Sélectionnez la photo souhaitée à l'aide des touches
/ .
. Les photos s'affichent à l'écran sous forme de vignettes.
/ / / puis appuyez sur .
8
/ puis appuyez sur pour passer à
Page 26

6. Le diaporama commence à partir de la photo sélectionnée.
y Pour interrompre le diaporama, appuyez sur
y Utilisez les touches
y Appuyez sur
pour revenir au mode vignettes.
. Appuyez à nouveau pour reprendre le diaporama.
/ pour revenir à la photo précédente ou pour passer à la photo suivante.
9
Page 27
RÉGLAGES DES PHOTOS
1. Lorsqu'une photo est affichée à l'écran, appuyez sur MENU. Le menu s'affiche en bas de l'écran.
2. Utilisez les touches
y Allez sur
y Pour agrandir une photo, allez sur
défilent dans l'ordre suivant: x2, x4, x8 et x16. Lorsqu’une photo est agrandie, appuyez sur MENU pour fermer le
menu puis utilisez les touches
y Pour faire pivoter une photo, allez sur
chaque pression de la touche
effets de rotation sont annulés quand vous retournez au mode vignettes.
y Pour revenir au mode vignettes, allez sur
et appuyez sur pour lancer le diaporama ou pour le reprendre à partir de la photo en cours.
/ pour parcourir les icônes du menu.
et appuyez sur le nombre de fois souhaité; les taux d'agrandissement
/ / / pour vous déplacer sur la photo.
et appuyez sur (chaque pression fait tourner la photo de 90°). À
, la photo pivote de 90 degrés dans le sens des aiguilles d’une montre. Tous les
puis appuyez sur .
10
Page 28
GESTION DES FICHIERS
Dans le mode Fichiers, vous pouvez visualiser tous les fichiers et dossiers lisibles de la source mémoire. Vous pouvez
copier des fichiers du périphérique source vers un autre périphérique, ou supprimer des fichiers.
Utilisez les touches
y Pour ouvrir un dossier, allez dessus et appuyez sur
y Pour lire un fichier, allez dessus et appuyez sur
/ pour parcourir la liste des fichiers et des dossiers.
ou . Pour revenir au menu précédent, appuyez sur .
. Pour revenir à la liste des fichiers, appuyez sur .
11
Page 29
Copier des fichiers
Sélectionnez un fichier à l'aide des touches / puis appuyez sur . Le symbole 9 s'affiche à côté du fichier.
Pour sélectionner d'autres fichiers, répétez la procédure ci-dessus.
1. Appuyez sur MENU. L'écran suivant apparaît:
2. Allez sur Copier en utilisant les touches
à l'appareil s'affiche.
3. Sélectionnez le périphérique à l'aide des touches
4. Appuyez sur
Remarque: Si votre mémoire de destination ne s’affiche pas dans la liste, c’est parce qu’elle est protégée. Débloquez-la et
réessayez.
pour lancer la copie.
/ puis appuyez sur . Le périphérique de stockage connecté
/ / / .
12
Page 30
Supprimer un fichier
1. Suivez l'étape 1 de la section "Copier des fichiers".
2. À l'aide des touches
3. À l'aide des touches
fichier.
4. Appuyez sur
/ , sélectionnez Supprimer dans le menu contextuel, puis appuyez sur .
/ , sélectionnez OUI pour confirmer la suppression, ou NON pour quitter sans supprimer le
pour confirmer.
RÉGLAGES OSD
1. Dans le mode des réglages, utilisez les touches
appuyez sur
2. Sélectionnez le sous-menu souhaité à l'aide des touches
3. Sélectionnez le sous-menu souhaité à l'aide des touches
4. Appuyez sur MENU pour revenir au menu principal.
.
/ pour sélectionner Photo ou Réglages généraux, puis
/ , puis appuyez sur .
/ , puis appuyez sur pour confirmer.
13
Page 31

Menus OSD Sous-menus Description de l’opération
Délai d'affichage
Mode Photo
Sélectionner le délai d'affichage entre deux photos pendant le
diaporama.
Les options disponibles sont les suivantes: 3s, 5s, 15s, 1 min et
15min.
Réglage de l’affichage en plein écran ou en taille originale durant la
visualisation des photos.
Photo
Réglages généraux
Effet de Transition Réglage du style de transition durant la visualisation d’un diaporama.
Date Affichage des informations sur les photos durant leur visualisation.
Aléatoire
Langue Réglage de la langue du menu OSD.
Luminosité
Lecture des photos en ordre aléatoire ou en ordre normal durant la
visualisation d’un diaporama.
Réglage de la luminosité de l'écran.
Les options disponibles sont les suivantes: +3, +2, +1, 0, -1, -2 et -3.
14
Page 32

Contraste
Réglage du contraste de l'écran.
Les options disponibles sont les suivantes: +3, +2, +1, 0, -1, -2 et -3.
Saturation
Fonctionnement
automatique
Durée d’affichage
des informations
Réglages par
défaut
Réglage de la saturation de l'écran.
Les options disponibles sont les suivantes: +3, +2, +1, 0, -1, -2 et -3.
Réglage d’un mode spécifique qui sera automatiquement activé
lorsque le cadre sera mis en marche.
Réglage de la durée d’affichage des informations sur le
fonctionnement des boutons durant la visualisation d’un diaporama.
Les options disponibles sont les suivantes: 0s, 5s, 10s et 20s.
Rétablir tous les réglages par défaut.
15
Page 33

SPÉCIFICATIONS
Écran numérique LCD, TFT
Écran
I/O Entrée DC
Alimentation
Port USB USB Host 2.0 (haute vitesse)
Périphériques compatibles
Formats photo compatibles JPEG, Résolution maximum: 8000x8000 pixels
Taille du panneau: 9,7 pouces
Format d'écran: 4:3
Résolution: 1024x768 pixels
Adaptateur secteur (entrée: 100~240V AC, 50~60Hz; sortie: DC 5V
2A)
SD™ (Carte numérique sécurisée), MMC™ (Carte multimédia), MS™
(Périphérique de mémoire)
Taille Longueur x Largeur x Hauteur
(mm)
Poids (g) 689,5g
265,5 x 215 x 22,5mm
16
Page 34

DÉPANNAGE
L'appareil ne s'allume pas
y Vérifiez que la fiche est correctement insérée dans une prise électrique.
y Vérifiez que la prise électrique est réellement alimentée.
Impossible d’afficher des photos sur le cadre
y Tous les fichiers JPEG ne sont pas compatibles. Ouvrez les fichiers avec votre ordinateur et réenregistrez-les au format
JPEG, puis réessayez de les lire avec le cadre.
y Vérifiez que les cartes mémoire utilisées sont compatibles.
Les photos sont déformées ou ne s’affichent pas correctement
y Allez dans le menu de réglage des photos, allez dans mode photo puis choisissez le mode qui convient pour la photo (en
plein écran ou en taille originale).
L’affichage des photos est lent.
y Utilisez des photos dont la résolution est moindre.
En raison des mises au point et améliorations constamment apportées à nos produits, de petites incohérences peuvent
apparaître dans le mode d'emploi. Veuillez nous excuser pour la gêne occasionnée.
17
Kesa Electricals © UK: EC1N 6TE 02 / 08 / 2012
Page 35

9.7 ” DIGITALE FOTOKADER (24,6)
PL-DPF 1007B
GEBRUIKSAANWIJZING
Wij danken u voor uw aankoop van deze 9.7” Digitale Fotokader. U kan uw favoriete beelden (*.jpg) rechtstreeks van een
geheugenkaart of USB stick weergeven zonder een computer te moeten gebruiken. Lees de volgende instructies voor meer
informatie.
1
Page 36

INHOUDSOPGAVE
WAARSCHUWING................................................................................................................................................................................... 3
BELANGRIJKE VEILIGHEIDSVOORZORGEN ...................................................................................................................................... 3
BEDIENINGSKNOPPEN EN AANLSUITINGEN ..................................................................................................................................... 4
DE STAANDER BEVESTIGEN................................................................................................................................................................ 5
AANSLUITEN OP DE NETVOEDING ..................................................................................................................................................... 6
EEN OSD TAAL NAAR KEUZE INSTELLEN ......................................................................................................................................... 6
EEN GEHEUGENKAART OF USB FLASH DRIVE PLAATSEN ............................................................................................................ 7
FOTO’S EN DIAVOORSTELLINGEN BEKIJKEN .................................................................................................................................. 8
FOTOINSTELLINGEN ........................................................................................................................................................................... 10
BESTANDEN BEHEREN ....................................................................................................................................................................... 11
Bestanden kopiëren ............................................................................................................................................................................. 12
Bestanden wissen ................................................................................................................................................................................ 13
OSD INSTELLINGEN ............................................................................................................................................................................ 13
TECHNISCHE GEGEVENS ................................................................................................................................................................... 15
PROBLEEMGIDS .................................................................................................................................................................................. 16
2
Page 37

WAARSCHUWING
Dit apparaat is uitsluitend bestemd voor huishoudelijk gebruik en mag niet worden gebruikt voor andere doeleinden of in
andere toepassingen, zoals niet-huishoudelijk gebruik of gebruik in een commerciële omgeving.
BELANGRIJKE VEILIGHEIDSVOORZORGEN
y Houd uit de buurt van water, vocht en stoffige plaatsen.
y Werktemperatuur van 0~40℃. Bewaar nooit op heel warme of heel koude plaatsen.
y Zorg ervoor dat U het toestel niet laat vallen of blootstelt aan hevige schokken.
y Gebruik het toestel niet indien de stroomadapter of het snoer beschadigd zijn
y Gebruik dit toestel niet indien U er vloeistoffen op gemorst heeft, indien het niet naar behoren werkt of indien het
enigszins beschadigd is.
y Probeer de behuizing niet zelf te openen zonder technische ondersteuning.
y Gebruik enkel hulpstukken/accessoires gespecificeerd door de fabrikant.
y Trek de stekker uit het stopcontact indien U het toestel gedurende lange tijd niet gebruikt.
y Plaats geen open vlammen, zoals aangestoken kaarsen, bovenop of nabij dit product.
y Stel dit toestel niet bloot aan druppels of spatten en plaats nooit een voorwerp gevuld met vloeistof op het toestel
zoals een vaas.
y Gebruik geen bijtend schoonmaakmiddel of sterke detergenten om dit toestel schoon te maken aangezien deze de
afwerklagen kunne beschadigen.
y Indien de stroomadapter of het snoer beschadigd geraken moet deze vervangen worden door een adapter van
hetzelfde type.
3
Page 38

BEDIENINGSKNOPPEN EN AANLSUITINGEN
1. [MENU] Menutoets: Druk in om OSD-menu te openen.
2. [ ] T oet s recht s/v olgende
3. [
4. [ ] Toets Weergave/Pauze/Bevestigen
5. [
6. UP toets;
7. [ ] Toets Exit
8. Schakelaar aan/uit
9. Sleuf voor SD/MMC/MS-Kaart
10. USB Poort
11. 9. Contact voor gelijkstroomingang
12. Staander
13. Schroefopening
] Toets op
] toets Links/voorgaande
. DOWN toets:
4
Page 39

DE STAANDER BEVESTIGEN
1. Stop de staander recht in de schroefopening.
2. Draai de staander rechtsom tot deze vastklikt.
Opmerking: De fotokader kan verticaal of horizontaal geplaatst woorden voor zowel landschap- als portretweergave.
5
Page 40

AANSLUITEN OP DE NETVOEDING
1. Sluit de kabel van de meegeleverde wisselstroomadapter aan op het fotokader en steek de stekker in het stopcontact.
2. Schuif de voedingschakelaar naar ON om het toestel in te schakelen.
3. Het vooraf opgeslagen openingscherm zal in lussequentie worden weergegeven nadat de voeding is ingeschakeld.
4. Druk op
om dit te stoppen.
EEN OSD TAAL NAAR KEUZE INSTELLEN
Het SETUP logo zal verschijnen wanneer de voeding is ingeschakeld.
1. Druk op
2. Gebruik
3. Druk op
4. Gebruik
5. Gebruik
6. Druk
om het hoofdmenu op te roepen.
/ om de optie “Algemene Instelling” te selecteren.
om de optie te bevestigen.
/ om de “Taal” optie te selecteren en druk om te bevestigen.
/ om de gewenste taal te selecteren.
om te bevestigen en druk vervolgens tweemaal op om terug te keren naar het hoofdmenu.
6
Page 41

EEN GEHEUGENKAART OF USB FLASH DRIVE PLAATSEN
y Dit toestel kan slechts de inhoud van een opslagkaart per keer weergeven.
y Deze fotokader kan slechts één afbeeldingformaat afspelen (*.jpg). Indien U andere formaten wil afspelen moet U deze
beelden eerst met uw computer in het leesbare formaat converteren.
1. Plaats uw geheugenkaart in de geschikte sleuf.
Opmerking: Om de SD/MMC/MS kaart te verwijderen trekt U de kaart er simpelweg uit.
2. Sluit een USB toestel aan op de USB poort.
7
Page 42

FOTO’S EN DIAVOORSTELLINGEN BEKIJKEN
1. Druk MENU in om het hoofdmenu op te roepen.
2. Druk
3. Druk
Foto Bekijk foto’s op de geheugenbron.
Bestanden Blader doorheen alle bestanden van de geheugenbron en kopieer of wis bestanden.
4. Druk op
5. Druk
/ om een SD/MMC/MS of USB schijf te selecteren, druk vervolgens op om het volgende scherm op
te roepen.
/ om de gewenste optie te selecteren.
wanneer de “Foto”-optie is geselecteerd. De foto’s worden op het scherm weergegeven als thumbnails.
/ / / om de foto te selecteren die U wenst weer te geven en druk vervolgens op .
8
Page 43

6. De weergave van de diavoorstelling zal beginnen bij de geselecteerde foto.
y Druk op
y Om de voorgaande/volgende foto te selecteren: druk op
y Druk
om de diavoorstelling te pauzeren. Druk opnieuw in om de diavoorstelling te hernemen.
om terug te keren naar de thumbnail-modus.
/ .
9
Page 44

FOTOINSTELLINGEN
1. Druk op MENU wanneer U een foto bekijkt. Het menu zal onderaan het scherm verschijnen.
2. Druk
y Selecteer
y Om in te zoomen op een foto selecteert U
y Om een foto te roteren selecteert U
/ om te navigeren tussen de iconen op het scherm.
en druk om de diavoorstelling te starten of te hernemen vanaf de huidige foto.
orde: x2, x4, x8 en x16. Wanneer een foto w ordt vergroot drukt U op MENU om het menu te sluiten en v ervolgens dr ukt
U op
U drukt op
wanneer er teruggekeerd wordt naar het hoofdmenu.
/ / / om door de foto te navigeren.
zal de foto 90 graden rechtsom gedraaid worden. Alle roteereffecten zullen geannuleerd worden
en drukt U herhaaldelijk op om de foto te vergroten in de volgende
en drukt U herhaaldelijk op om telkens met 90 graden te roteren. Elke keer
10
Page 45

y Selecteer en druk op om terug te keren naar thumbnail-modus.
BESTANDEN BEHEREN
U kunt in de Bestandenmodus alle weergeefbare bestanden en mappen op de geheugenbron zien. U kunt bestanden ook
van het ene geheugenapparaat naar een ander geheugenapparaat kopiëren of bestanden wissen.
Druk op [
y Om een map te openen: highlight de map en druk op [
y Om een bestand weer te geven: highlight het bestand en druk op [ ].Om terug te keren naar de bestandenlijst: druk op
] of [ ] om doorheen de bestanden en mappen te navigeren.
] of [ ].Om terug te keren naar een hoger overzicht: druk op [ ].
[ ].
11
Page 46

Bestanden kopiëren
Highlight een bestand door te drukken op [ ] of [ ] en druk dan op [ ].Een vinkje 9 verschijnt naast het bestand.
Herhaal deze stap om meer bestanden te selecteren.
1. Druk op MENU. Het volgende scherm wordt weergegeven.
2. Druk op +/- om het Het geheugenapparaat dat op de fotolijst is aangesloten wordt op het scherm aangegeven.
3. Druk op [
4. Druk op [ ] om bestanden te kopiëren.
Opmerking: wanneer uw bestemmingsapparaat niet op de lijst verschijnt is uw geheugenapparaat wellicht beveiligd.
Gelieve het te ontgrendelen voordat u de bewerking opnieuw probeert
]. [ ], [ ] of [ ] om een geheugenapparaat te selecteren.
12
Page 47

Bestanden wissen
1. Volg stap 1 in ‘Bestanden Kopiëren’.
2. Druk op [ ] of [ ] om Delete (wissen) in het geopende venster te selecteren en druk dan op [ ].
3. Druk op [
4. Druk op
] of [ ] om “Yes” (ja) of “No” (neen) te selecteren om de bestanden te wissen of het menu zonder wissen te
verlaten.
om te bevestigen
OSD INSTELLINGEN
1. In de instellingmodus druk U op / om een foto of de algemene instellingmodus te selecteren en vervolgens
drukt U op
2. Druk
3. Druk
4. Druk op MENU om terug te keren naar het hoofdmenu.
.
/ om het gewenste submenu te selecteren en druk vervolgens op .
/ om de gewenste optie te selecteren en druk vervolgens op om te bevestigen.
13
Page 48

OSD menu’s Sub-menu’s Beschrijving van de bedieningen
Weergaveduur diavoorstelling
Fotomodus
Foto
Algemene
instellingen
Transitie-effect
Datumstempel
Willekeurige volgorde
Taal Voor het instellen van de taal van het OSD-menu.
Helderheid
Contrast
Verzadiging
Automatische modus
Hinttijd
Fabrieksinstellingen
Stel de tijdsinterval in voor de diavoorstelling.
De beschikbare opties zijn: 3s, 5s, 15s, 1 min en 15min.
Voor het bekijken van de foto’s op het volledige scherm of het
standaardscherm.
Voor het instellen van de overgangsstijl tussen twee foto’s in een
diavoorstelling.
Voor het op display aangeven van gedetailleerde informatie bij
iedere foto.
Om de foto’s in willekeurige volgorde in een diavoorstelling weer
te geven.
Voor het instellen van de beeldhelderheid.
De keuzemogelijkheden zijn: +3, +2, +1, 0, -1, -2 en -3.
Voor het instellen van het beeldcontrast.
De keuzemogelijkheden zijn: +3, +2, +1, 0, -1, -2 en -3.
Voor het instellen van de kleurverzadiging.
De keuzemogelijkheden zijn: +3, +2, +1, 0, -1, -2 en -3.
Voor het instellen van de Digitale Fotolijst om na het inschakelen
automatisch naar een geselecteerde modus over te gaan.
Voor het instellen van de duur dat het bedieningspaneel tijdens
de diavoorstelling op het scherm blijft.
De keuzemogelijkheden zijn: 0s, 5s, 10s en 20s.
Voor het terugstellen van alle instellingen naar de oorspronkelijke
fabrieksinstellingen.
14
Page 49

TECHNISCHE GEGEVENS
Digitale LCD, TFT
Display
I/O Gelijkstroomingang
Stroomvoeding
USB Poort USB-contact 2.0 (hoge snelheid)
Ondersteunden Randapparatuur SD™ (beveiligde digitale kaart), MMC™ (multimediakaart), MS™ (geheugenstick),
Ondersteunde foto-opmaak JPEG, maximum resolutie: 8000*8000 pixels
Afmetingen L*B*H: (mm) (mm) 265.5 x 215 x 22.5mm
Gewicht(g) 689.5g
Schermafmeting: 9.7 Inch (25,6 cm)
Schermverhouding: 4:3
Resolutie: 1024*768 pixels
Wisselstroomadapter (Ingang: 100~240V wisselstroom, 50~60Hz; Uitgang: 5V 2A
Gelijkstroom)
15
Page 50

PROBLEEMGIDS
Geen Stroom
y Controleer of de stroomstekker is aangesloten op het stopcontact.
y Controleer of het stopcontact is voorzien van stroom.
Het Digitaal Fotokader geeft geen foto’s weer.
y Niet alle JPEG bestanden zijn compatibel. Open de bestanden op een computer, bewaar ze opnieuw als JPEG bestanden
en probeer ze opnieuw weer te geven op het toestel.
y Controleer of U compatibele geheugenkaarten gebruikt.
De beeldweergave is vervormd of kan niet juist worden weergegeven.
y Ga naar het Fotoinstelling-menu, roep vervolgens de Instelling Fotomodus op en verander de modus zodat deze
overeenkomt met uw foto, Vol of Standaard Scherm
De fotoweergave is traag.
y Gebruik een foto met een lagere resolutie.
Wij verontschuldigen ons voor eventuele ongemakken veroorzaakt door kleine onnauwkeurigheden, die in deze
gebruiksaanwijzing kunnen voorkomen als gevolg van voortdurende productverbetering en –ontwikkeling.
16
Kesa Electricals © UK: EC1N 6TE 02 / 08 / 2012
Page 51

MARCO DE FOTOGRAFÍAS DIGITAL 9.7”
PL-DPF 1007B
MANUAL DE INSTRUCCIONES
Le agradecemos que haya adquirido este Marco de Fotografías Digital 9.7”. Puede reproducir sus imágenes (*.jpg)
favoritas directamente desde una tarjeta de memoria o un lápiz de memoria USB sin utilizar un ordenador. Lea las
siguientes instrucciones donde se incluye información más detallada.
Page 52

ÍNDICE
ADVERTENCIA ........................................................................................................................................................................................ 2
INSTRUCCIONES IMPORTANTES DE SEGURIDAD ............................................................................................................................ 2
CONTROLES Y CONEXIONES ............................................................................................................................................................... 3
1. [MENU] Botón de menú: Pulse para abrir el menú OSD en pantalla. ........................................................................................... 3
INSTALACIÓN DEL SOPORTE .............................................................................................................................................................. 4
CONEXIÓN A LA RED ELÉCTRICA ....................................................................................................................................................... 4
SELECCIÓN DEL IDIOMA OSD PREFERIDO PARA MENSAJES EN PANTALLA .............................................................................. 5
INTRODUCCIÓN DE UNA TARJETA DE MEMORIA O LÁPIZ USB ...................................................................................................... 6
VISUALIZACIÓN DE FOTOGRAFÍAS Y PRESENTACIONES DE IMÁGENES..................................................................................... 7
CONFIGURACIÓN DE LA IMAGEN ........................................................................................................................................................ 9
GESTIÓN DE ARCHIVOS ..................................................................................................................................................................... 10
Copiar Archivos .................................................................................................................................................................................. 11
Eliminar Archivos ................................................................................................................................................................................ 12
CONFIGURACIÓN EN PANTALLA OSD .............................................................................................................................................. 12
ESPECIFICACIONES ............................................................................................................................................................................ 15
RESOLUCIÓN DE PROBLEMAS ......................................................................................................................................................... 16
1
Page 53

ADVERTENCIA
Este aparato ha sido concebido solo para uso doméstico y no debe ser utilizado con ningún otro objetivo o aplicación, por
ejemplo el uso no doméstico o en una aplicación comercial.
INSTRUCCIONES IMPORTANTES DE SEGURIDAD
y Mantener alejado del agua o la humedad y de zonas con polvo.
y Temperatura de funcionamiento 0~40
y Tenga mucho cuidado y evite que el producto caiga o sufra algún impacto fuerte.
y No utilice el producto cuando el adaptador eléctrico o el cable estén dañados.
y No utilice el producto después de que se haya derramado líquido encima, cuando no funcione del modo esperado o
esté dañado.
y No intente abrir la carcasa vd. mismo sin apoyo técnico.
y Utilice solo las piezas/accesorios especificados por el fabricante.
y El aparato se debe desenchufar de la toma de corriente AC cuando no vaya a ser utilizado durante un largo periodo
de tiempo.
y No coloque ninguna llama encendida, por ejemplo una vela encendida, encima o cerca de este producto.
y No exponga este producto al goteo o salpicaduras de agua y no coloque ningún objeto que contenga agua, por
ejemplo un jarrón encima del producto.
y No utilice ningún producto de limpieza abrasivo ni detergentes fuertes para limpiar este producto porque podrían
dañar su superficie.
y Si el adaptador eléctrico o el cable están dañados, deberá ser sustituido por un adaptador del mismo tipo y
características.
℃
. No guarde el producto en lugares muy calientes o muy fríos.
2
Page 54

CONTROLES Y CONEXIONES
1 [MENU] Botón de menú: Pulse para abrir el menú OSD en pantalla. 8 Interruptor Encender/Apagar
2 [ ] Botón Derecha/Siguiente 9 Ranura para la tarjeta SD/MMC/MS
3 [
]Botón Arriba 10 Toma USB
4 [
]Botón Reproducir/Pausa/Confirmar 11 Toma DC IN (ENTRADA CC)
5 [
]Botón Izquierda/Anterior 12 Soporte
6 [
]Botón Abajo 13 Orificio con rosca
]Botón Salir
7 [
3
Page 55

INSTALACIÓN DEL SOPORTE
1. Introduzca el soporte en el orificio con rosca.
2. Gire el soporte en el sentido de las agujas del reloj hasta que esté ajustado.
Nota: El marco de fotos se puede colocar vertical u horizontalmente en formato paisaje o retrato.
CONEXIÓN A LA RED ELÉCTRICA
1. Conecte el cable del adaptador eléctrica AC suministrado al marco de fotos, y enchufe el adaptador eléctrico a la toma
de corriente.
4
Page 56

2. Sitúe el interruptor en la posición “ON” (“ENCENDER”) para encender el aparato.
3. La pantalla de apertura programada se visualizará en una secuencia cerrada, después de encender el marco.
4. Para detenerlo, pulse
.
SELECCIÓN DEL IDIOMA OSD PREFERIDO PARA MENSAJES EN PANTALLA
El logo de CONFIGURACIÓN aparecerá después de encender el dispositivo.
1. Pulse
2. Utilice
3. Pulse
4. Utilice
5. Utilice
6. Pulse
para ver el menú principal.
/ para seleccionar la opción “Configuración General”.
para confirmar la opción seleccionada.
/ para seleccionar la opción “Idioma” y después pulse para confirmarla.
/ para seleccionar el idioma deseado.
para confirmar y después pulse dos veces para regresar al menú principal.
5
Page 57

INTRODUCCIÓN DE UNA TARJETA DE MEMORIA O LÁPIZ USB
y Este dispositivo permite ver el contenido de un solo soporte de memoria cada vez.
y Este marco solo reproduce imágenes (*.jpg). Para reproducir otros formatos, primero deberá convertir las imágenes al
formato compatible mediante el ordenador.
1. Introduzca su tarjeta de memoria en la ranura apropiada.
Nota: Para extraer la tarjeta SD/MMC/MS, tire de la tarjeta hacia fuera.
2. Introduzca un lápiz USB en la toma USB.
6
Page 58

VISUALIZACIÓN DE FOTOGRAFÍAS Y PRESENTACIONES DE IMÁGENES
1. Pulse MENU para ver la pantalla del menú principal.
2. Pulse
3. Pulse
4. Después de seleccionar la opción “Photo” (“Fotografía”), pulse
5. Pulse
/ para seleccionar SD/MMC/MS o dispositivo USB, después pulse para ver la pantalla siguiente.
/ para seleccionar la opción deseada.
Photo Ver las fotos de la fuente de memoria.
Files Navegar por todos los archivos de la fuente de memoria; y copiar o eliminar archivos.
. Las fotos aparecerán en la pantalla en formato
de miniatura.
/ / / para seleccionar la fotografía que desea reproducir, después pulse .
7
Page 59

6. La presentación de imágenes se iniciará con la fotografía seleccionada.
y Realice una pausa en la presentación de imágenes, pulsando
presentación de imágenes.
y Seleccione la fotografía anterior o siguiente, pulsando
y Regrese al modo de miniatura, pulsando
/ .
.
8
. Púlselo de nuevo para reanudar la
Page 60

CONFIGURACIÓN DE LA IMAGEN
1. Pulse MENU durante la visualización de una fotografía. El menú aparecerá en la parte inferior de la pantalla.
2. Pulse
y Seleccione
y Para ampliar el tamaño de una foto con el zoom, seleccione
y Si desea rotar una fotografía, seleccione
y Regrese al modo de miniatura, seleccionando
/ para navegar por los iconos del menú.
y pulse para iniciar o reanudar la presentación de imágenes a partir de la fotografía actual.
tamaño de la foto en el orden siguiente: x2, x4, x8 y x16. Después de incrementar el tamaño de una foto, pulse
MENU para cerrar el menú y después pulse
rotará la fotografía 90 grados en el sentido de las agujas del reloj. Todos los efectos de rotación pueden ser
cancelados al regresar al modo de miniatura.
/ / / para navegar por la fotografía.
y pulse varias veces para rotar 90 grados. Cada pulsación de
y pulsando .
y pulse varias veces para incrementar el
9
Page 61

GESTIÓN DE ARCHIVOS
En el modo File (Archivos), podrá ver todos los archivos y las carpetas reproducibles de la fuente de memoria. Podrá
copiar archivos desde un dispositivo de memoria a otro dispositivo de memoria o podrá eliminar archivos.
Pulse
y Para abrir una carpeta, deberá seleccionarla y pulsar
y Para reproducir un archivo, deberá seleccionarlo y pulsar
/ para navegar por los archivos y las carpetas.
o . Para regresar a un directorio superior, pulse .
. Para regresar a la lista de archivos, pulse .
10
Page 62

Copiar Archivos
Seleccione un archivo pulsando / y después pulse . La siguiente marca de selección 9 aparecerá junto al
archivo.
Para seleccionar más archivos, repita el paso anterior.
1. Pulse MENU. El dispositivo mostrará la siguiente pantalla.
2. Pulse
conectado al aparato.
3. Pulse
4. Pulse
Nota: Si el dispositivo de destino no aparece en la lista, el dispositivo de memoria estará protegido contra la escritura.
Desbloquee esta prestación e inténtelo de nuevo.
/ para seleccionar Copiar y pulse . En la pantalla podrá ver el dispositivo de memoria
/ / / para seleccionar un dispositivo de memoria.
para comenzar a copiar los archivos.
11
Page 63

Eliminar Archivos
1. Siga el paso 1 de la sección ‘Copiar archivos’.
2. Pulse
3. Pulse
4. Pulse
/ para seleccionar Eliminar en la ventana de la pantalla, y pulse .
/ para seleccionar SÍ o NO para eliminar el archivo seleccionado o salir sin eliminarlo.
para confirmar.
CONFIGURACIÓN EN PANTALLA OSD
1. En el modo de configuración, para seleccionar configuración de fotografías o general, pulse / y a
continuación pulse
2. Pulse
3. Pulse
4. Pulse MENU para regresar al menú principal.
/ para seleccionar el submenú deseado y después pulse .
/ para seleccionar la opción deseada y después pulse para confirmar.
.
12
Page 64

Menús OSD Sub-menús Descripción de las acciones
Fotografía
Configuración
General
Tiempo de la presentación
de diapositivas
Modo de Fotografía
Efecto de Transición
Visualización de Fecha Indica la información de las fotos durante su visualización.
Aleatorio
Idioma Configura el idioma del menú de la pantalla OSD.
Brillo
Configura el intervalo de tiempo entre imágenes de una presentación
de diapositivas.
Las opciones disponibles son: 3 seg, 5 seg, 15 seg, 1 min., 15mins.
Configura las fotografías como Pantalla Completa o Pantalla Estándar
durante su visualización.
Configura el estilo de transición durante una presentación de
diapositivas.
Reproduce las fotos en orden aleatorio u ordenadamente durante una
presentación de diapositivas.
Ajusta el brillo de la pantalla.
Las opciones disponibles son: +3, +2, +1, 0, -1, -2 y -3.
13
Page 65

Contraste
Ajusta el contraste de la pantalla.
Las opciones disponibles son: +3, +2, +1, 0, -1, -2 y -3.
Saturación
Activación automática
Tiempo de ayuda
Configuración de fábrica Restaura la configuración de fábrica para todas las variables.
Ajusta la saturación de la pantalla.
Las opciones disponibles son: +3, +2, +1, 0, -1, -2 y -3.
Configura el Marco de Fotos Digital para que automáticamente active
el modo especificado al encender el marco.
Configura el tiempo de visualización de ayuda para la utilización de
botones durante una presentación de diapositivas.
Las opciones disponibles son: 0 seg, 5 seg, 10 seg y 20 seg.
14
Page 66

ESPECIFICACIONES
LCD, TFT Digital
Pantalla
I/O Entrada DC
Alimentación
Puerto USB Puerto USB 2.0 (Alta Velocidad)
Aparatos periféricos compatibles
Formato compatible de fotografías JPEG, Resolución máxima: 8000*8000 píxeles
Dimensiones Largo*Ancho*Alto: (mm) 265.5 x 215 x 22.5mm
Peso (g) 689.5g
Tamaño del panel: 9.7 pulgadas
Proporción de pantalla: 4:3
Resolución: 1024*768 píxeles
Adaptador eléctrico AC (Entrada: 100~240V AC, 50~60Hz; Salida: DC 5V
2A)
SD™ (Tarjeta Secure Digital), MMC™ (Tarjeta MultiMedia), MS™ (Tarjeta
Memory Stick),
15
Page 67

RESOLUCIÓN DE PROBLEMAS
No se enciende
y Compruebe que el cable eléctrico está enchufado en la toma de corriente.
y Compruebe que la toma de corriente funciona.
No se pueden ver fotografías en el Marco de Fotografías Digital
y No todos los archivos JPEG son compatibles. Abra los archivos en el ordenador y vuelva a guardarlos como archivos
JPEG e intente reproducirlos en el dispositivo.
y Compruebe si está utilizando tarjetas de memoria compatibles.
Si la imagen está distorsionada o no se puede ver correctamente
y Seleccione el menú de Configuración de Fotografía, después seleccione la configuración del modo fotografía y
seleccione el modo que se adapte a su fotografía, pantalla Completa o Estándar.
Si la imagen parece lenta.
y Utilice una resolución inferior para la imagen.
Rogamos disculpas por cualquier inconveniente que pueda generarse por inconsistencias menores en estas instrucciones,
las cuales podrían aparecer como resultado del desarrollo y mejora del producto.
16
Kesa Electricals © UK: EC1N 6TE 02 / 08 / 2012
Page 68

Cornice fotografica digitale 9,7"
PL-DPF 1.007B
MANUALE PER L'UTENTE
Grazie per aver acquistato questa cornice fotografica digitale da 9,7" . Potete riprodurre le vostre immagini preferite (*.jpg)
direttamente da una memory card o da una chiavetta senza necessità del computer. Leggere le istruzioni che seguono per
ulteriori dettagli.
0
Page 69

INDICE
ATTENZIONE: .......................................................................................................................................................................................... 2
IMPORTANTI ISTRUZIONI RELATIVE ALLA SICUREZZA ................................................................................................................... 2
COMANDI E COLLEGAMENTI ............................................................................................................................................................... 3
Collegare il sostegno ............................................................................................................................................................................. 4
Collegamento alla corrente ................................................................................................................................................................... 5
SELEZIONARE LA LINGUA OSD PREFERITA...................................................................................................................................... 5
INSERIRE UNA MEMORY CARD O UN FLASH DRIVE USB ................................................................................................................ 6
VEDERE FOTO E PRESENTAZIONI ...................................................................................................................................................... 7
IMPOSTAZIONE IMMAGINI .................................................................................................................................................................... 8
Gestione File ......................................................................................................................................................................................... 10
Copiare i file ....................................................................................................................................................................................... 11
Cancellare i file ................................................................................................................................................................................... 12
SPECIFICHE .......................................................................................................................................................................................... 15
RISOLUZIONE DEI PROBLEMI ............................................................................................................................................................ 16
1
Page 70

ATTENZIONE:
Questo apparecchio è inteso solo per uso domestico e non va usato per altri scopi, al di fuori dell'ambiente domestico, ad
esempio in ambienti commerciali.
IMPORTANTI ISTRUZIONI RELATIVE ALLA SICUREZZA
y Tenere lontano dall'acqua o dalla condensa e da zone polverose.
y Temperatura di funzionamento 0~40℃. Non riporre mai in posti troppo caldi o freddi.
y Fare attenzione a non far cadere il prodotto o assoggettarlo a bruschi impatti.
y Non usare il prodotto se il trasformatore o il suo cavo sono danneggiati.
y Non usare il prodotto se vi si sono versate sopra delle sostanze liquide, se non funziona come ci si aspetta o se è
altrimenti danneggiato.
y Non cercare di aprire l'involucro senza l'assistenza di un tecnico.
y Usare solo gli accessori/parti specificati dal produttore.
y Quando non la si usa per periodi di tempo prolungati l'unità va scollegata dalla presa di corrente.
y Non sistemare mai fiamme vive come candele accese sopra o nelle vicinanze del prodotto
y Non esporre questo prodotto a schizzi o sgocciolamenti e non collocare sopra o vicino al prodotto oggetti contenenti
acqua come ad esempio vasi.
y Non usare prodotti per la pulizia abrasivi come detergenti forti per pulire il prodotto dal momento che potrebbero
danneggiarne le finiture.
y Se il trasformatore o il suo cavo sono danneggiati vanno sostituiti con altri dello stesso tipo e classificazione.
2
Page 71

COMANDI E COLLEGAMENTI
1. [MENU] Tasto menù: Premere per aprire il menù OSD.
2. [ ]Tasto destra/successivo
3. [
4. [ ]Tasto Play/Pausa/Conferma
5. [ ]Tasto sinistra/precedente
6. [
7. [ ]Tasto Esci
8. Tasto On/Off
9. Card slot SD/MMC/MS
10. Porta USB
11. Presa DC IN
12. Sostegno
13. Foro vite
]Tasto su
]Tasto giù
3
Page 72

Collegare il sostegno
1. Inserire il sostegno direttamente nel foro della vite.
2. Ruotare il supporto in senso orario finché si blocca in posizione.
Nota: Si può sistemare la cornice sia verticalmente che in orizzontale per visualizzazione in formato panorama o ritratto.
4
Page 73

Collegamento alla corrente
1. Collegare il cavo AC in dotazione alla cornice, e inserire il trasformatore nella presa di corrente.
2. Spostare il tasto dell'interruttore sulla posizione "ON" per accendere l'unità.
3. Dopo che l'apparecchio è stato acceso viene visualizzata in sequenza la schermata d'apertura preinstallata.
4. Per fermarla premere
.
SELEZIONARE LA LINGUA OSD PREFERITA
Quando si accende l'apparecchio compare il logo di SETUP (IMPOSTAZIONE).
1. Premere
2. Usare
3. Premere
4. Usare
5. Usare
6. Premere
per mostrare il menù principale.
/ per evidenziare l'opzione “Impostazione generale".
per accedere all'opzione.
/ per evidenziare l'opzione “Lingua” e premere per accedere.
/ per selezionare la lingua desiderata.
per confermare poi premere due volte per tornare al menù principale.
5
Page 74

INSERIRE UNA MEMORY CARD O UN FLASH DRIVE USB
y Questa unità può solo visualizzare il contenuto di un supporto di memoria alla volta.
y Questa cornice può solo riprodurre immagini (*.jpg). Se si desidera riprodurre altri formati occorre prima convertirli in un
formato riproducibile con il computer.
1. Inserire la memory card nell'apposita fessura.
Nota: Per togliere la Card SD/MMC/MS, tirarla verso l'esterno.
2. Inserire una chiavetta USB nella porta USB.
6
Page 75

VEDERE FOTO E PRESENTAZIONI
1. Premere MENU per mostrare la schermata del menù principale.
2. Premere
segue.
3. Premere
Foto Visualizza la foto dalla fonte di memoria.
File Naviga tra tutti i file della memoria; e copia o cancella i file.
4. Quando si seleziona l'opzione “Foto” premere
5. Premere
/ per selezionare SD/MMC/MS o porta USB poi premere per mostrare la schermata che
/ per evidenziare l'opzione desiderata.
. Le immagini sono visualizzate sullo schermo come provini.
/ / / la foto che si desidera riprodurre poi premere .
7
Page 76

6. La presentazione inizia dalla foto selezionata.
Per mettere in pausa la riproduzione premere . Premere di nuovo per riprendere la presentazione.
y Per selezionare la foto precedente o seguente premere / .
y Per tornare alla modalità provino premere
.
IMPOSTAZIONE IMMAGINI
1. Premere MENU mentre si vede una foto. In fondo allo schermo comparirà il menù.
8
Page 77
2. Premere / per navigare tra le icone del menù.
y Evidenziare
y Per ingrandire una foto evidenziare
x4, x8 e x16. Quando è ingrandita una foto premere MENU per chiudere il menù poi premere
per navigare nella foto.
y Per ruotare una foto evidenziare
tasto
torna al menù provini.
e premere per avviare o riprendere la presentazione dalla foto corrente.
la foto ruoterà di 90 gradi in senso orario. Tutti gli effetti della rotazione saranno cancellati quando si
e premere ripetutamente per ingrandire con la sequenza che segue: x2,
e premere ripetutamente per ruotare di 90 gradi. Ogni volta che si preme il
/ / /
y Per tornare alla modalità provino premere
e poi .
9
Page 78

Gestione File
In modalità File, è possibile vedere tutti file e le cartelle riproducibili presenti nella memoria. È possibile copiare i file dalla
memoria ad un altro dispositivo di memoria o cancellare i file.
Premere [
y Per aprire una cartella, evidenziarla e premere [
y Per riprodurre un file, evidenziarlo e premere [
] o [ ] per navigare tra file e cartelle.
] o [ ]. Per tornare alla directory superiore, premere [ ].
]. Per tornare alla lista dei file, premere [ ].
10
Page 79

Copiare i file
Evidenziare un file premendo [ ] o [ ] e quindi premere [ ]. Viene mostrato ilo segno 9accanto al file.
Per selezionare più file, ripetere il passaggio sopra.
1. Premere MENU. Compare il seguente menù.
2. Premere [
all’unità.
3. Premere [
4. Premere [
Nota: Se il dispositivo di destinazione non appare nella lista, il dispositivo di memoria potrebbe essere protetto da scrittura.
Si prega di sbloccarlo e ripetere l’operazione.
] o [ ] per selezionare Copia, e premere [ ]. Viene mostrato il dispositivo di memoria collegato
]. [ ], [ ] o [ ] per selezionare una dispositivo di memoria.
] per iniziare a copiare i file.
11
Page 80

Cancellare i file
1. Seguire il passaggio 1 in 'Copiare i file’.
2. Premere [
3. Premere [
4. Premere [
Impostazioni OSD
1. In modalità impostazioni per selezionare foto o impostazioni generali premere
2. Premere
3. Premere
4. Premere MENU per tornare al menù principale.
] o [ ] per selezionare Cancella nella finestra pop-up, e quindi premere [ ].
] o [ ] per selezionare “Sì” o “No” per cancellare i file o uscire senza cancellare.
] per confermare.
/ per selezionare il sottomenù desiderato poi premere .
/ per selezionare l'opzione che volete poi premere per confermare.
12
/ poi .
Page 81

Menù OSD Sotto menù Descrizione del funzionamento
Foto
Setup Generale
Tempo di
scorrimento
immagini
Modalità Foto Imposta le foto in Schermo Intero e Schermo Standard quando si
Effetto di transizione Imposta lo stile di transizione mentre si riproduce lo scorrimento.
Stampa data Mostra le informazioni dettagliate delle foto quando si visualizzano.
Casuale Per riprodurre le foto in ordine casuale o ordinatamente quando si
Lingua Imposta la lingua del menù OSD.
Luminosità
Contrasto
Imposta l’intervallo di tempo per lo scorrimento delle immagini.
Le opzioni disponibili includono: 3s, 5s, 15s, 1 min, 15min.
visualizzano.
riproduce in scorrimento.
Regola la luminosità dello schermo.
Le opzioni disponibili includono: +3, +2, +1, 0, -1, -2, -3.
Regola il contrasto dello schermo.
Le opzioni disponibili includono: +3, +2, +1, 0, -1, -2, -3.
13
Page 82

Saturazione
Esecuzione
automatica
Tempo di consigli Imposta la durata di visualizzazione del suggerimento per il funzionamento
Default Resetta tutte le impostazioni a quelle di default.
Regola la saturazione dello schermo.
Le opzioni disponibili includono: +3, +2, +1, 0, -1, -2, -3.
Imposta la Cornice Digitale per avviare automaticamente una modalità
specifica quando la si accende.
del tasto quando è in scorrimento.
Le opzioni disponibili includono: 0s, 5s, 10s, 20s.
14
Page 83

SPECIFICHE
LCD Digitale, TFT
Display
I/O DC in
Corrente elettrica
Dimensione pannello: 9,7 pollici
Aspect ratio schermo: 4:3
Risoluzione 1024*768 pixel
Adattatore AC (Ingresso: 100~240V AC, 50~60Hz; Uscita: DC 5V 2A)
Porta USB
Dispositivi periferici
supportati:
Formato foto
supportato
Dimensione L*P*A:
(mm)
Peso (g) 689.5g
USB Host 2.0 (Alta Velocità)
SD™ (Secure Digital Card), MMC™ (Multi Media Card), MS™ (Memory Stick),
JPEG, Massima risoluzione: 8000**8000pixels
265.5 x 215 x 22.5mm
15
Page 84

RISOLUZIONE DEI PROBLEMI
Non si alimenta
y Controllare per assicurarsi che la spina sia inserita nella presa di corrente.
y Assicurarsi che ci sia corrente nella presa.
Non si vedono le foto nella cornice digitale
y Non tutti i file JPEG sono compatibili. Aprire i file nel computer e salvarli in JPEG e cercare di riprodurli nell'apparecchio.
y Controllare se si usano memory card compatibili.
Se l'immagine è distorta o non viene riprodotta correttamente
y Andare al menù d'impostazione delle foto e cambiare la modalità in modo che corrisponda a quella delle foto, a schermo
intero o standard.
Se la visualizzazione sembra lenta
y Usare una risoluzione d'immagine più bassa.
Ci scusiamo per qualsiasi disagio causato da discrepanze minori in queste istruzioni, dovute a miglioramenti e sviluppi
operati sul prodotto.
Kesa Electricals © UK: EC1N 6TE 02 / 08 / 2012
16
Page 85

9,7” DIGITÁLNÍ FOTORÁMEČEK
PL-DPF 1007B
UŽIVATELSKÁ PŘÍRUČKA
Děkujeme, že jste si zakoupili tento 9,7” digitální fotorámeček. Můžete si v něm zobrazovat své oblíbené fotografie (*.jpg)
přímo z paměťové karty nebo z USB paměti bez nutnosti použít počítač. Pro více informací si přečtěte následující
instrukce.
Page 86

OBSAH
UPOZORNĚNÍ ......................................................................................................................................... 错误!未定义书签。
DŮLEŽITÉ BEZPEČNOSTNÍ POKYNY .................................................................................................. 错误!未定义书签。
OVLÁDÁNÍ A PŘIPOJENÍ ....................................................................................................................... 错误!未定义书签。
MONTÁŽ OPĚRY .................................................................................................................................... 错误!未定义书签。
PŘIPOJENÍ K NAPÁJENÍ ....................................................................................................................... 错误!未定义书签。
VÝBĚR POŽADOVANÉHO JAZYKA PRO NABÍDKU NA OBRAZOVCE ............................................... 错误!未定义书签。
VLOŽENÍ PAMĚŤOVÉ KARTY NEBO USB PAMĚTE ............................................................................ 错误!未定义书签。
PROHLÍŽENÍ SNÍMKŮ A PREZENTAC .................................................................................................. 错误!未定义书签。
NASTAVENÍ OBRÁZKŮ .......................................................................................................................... 错误!未定义书签。
SPRÁVA SOUBORŮ ............................................................................................................................... 错误!未定义书签。
Kopírování souborů ........................................................................................................................... 错误!未定义书签。
Mazání souborů .................................................................................................................................. 错误!未定义书签。
NASTAVENÍ MOŽNOSTI OBRAZOVKY ................................................................................................. 错误!未定义书签。
Technické údaje ..................................................................................................................................... 错误!未定义书签。
ŘEŠENÍ PROBLÉMŮ .............................................................................................................................. 错误!未定义书签。
1
Page 87

UPOZORNĚNÍ
Tento přístroj je navržen pouze pro domácí použití, nesmí být použit na žádné jiné účely a nesmí se tedy používat např.
mimo domácnosti nebo pro komerční účely.
DŮLEŽITÉ BEZPEČNOSTNÍ POKYNY
y Udržujte z dosahu vody, vlhkosti a prachu.
y Provozní teplota 0–40 °C. Neuchovávejte na velmi horkých nebo velmi studených místech.
y Buďte opatrní a přístrojem neházejte a ani jej nevystavujte nárazům.
y Pokud je napájecí kabel nebo adaptér poškozený, přístroj nepoužívejte.
y Pokud se na přístroj vylila tekutina nebo pokud nepracuje jak má nebo je jakkoli poškozený, přístroj nepoužívejte.
y Nepokoušejte se otevírat kryt sami bez technické podpory.
y Používejte pouze příslušenství/doplňky doporučené výrobcem.
y Pokud nebudete přístroj delší dobu používat, odpojte ho z napájení.
y Na přístroj nebo do jeho blízkosti nepokládejte zdroje otevřeného ohně, např. zapálené svíčky.
y Přístroj nevystavujte kapající nebo stříkající vodě a nepokládejte na něj předměty naplněné tekutinami, např. vázy.
y Na čistění výrobku nepoužívejte abrazivní čisticí prostředky nebo silná rozpouštědla, protože mohou poškodit
povrchovou úpravu přístroje.
Pokud je napájecí adaptér nebo kabel poškozen, musí být vyměněný za adaptér stejného typu a výkonu.
2
Page 88

OVLÁDÁNÍ A PŘIPOJENÍ
1. [MENU] (nabídka) Tlačítko nabídky: Stiskněte
pro zobrazení nabídky na obrazovce.
2. [ ] Tlačítko vpravo/další
3. [ ] Tlačítko nahoru
4. [ ]Tlačítko přehrávání/pauza/potvrdit
5. [ ] Tlačítko vlevo/předchozí
6. [ ] Tlačítko dolů
7. [ ] Tlačítko ukončení
8. Spínač On/Off (Zapnout/vypnout)
9. Čtečka karet SD/MMC/MS
10. USB port
11. Vstup pro napájení
3
Page 89

12. Opěra 13. Otvor se závitem
MONTÁŽ OPĚRY
1. Vložte opěru přímo do otvoru se závitem.
2. Opěrou otáčejte doprava, dokud nezapadne na místo.
Poznámka: Fotorámeček můžete postavit svisle nebo vodorovně pro prohlížení na šířku nebo na výšku.
PŘIPOJENÍ K NAPÁJENÍ
1. Dodaný napájecí kabel zapojte do fotorámečku a druhý konec kabelu zapojte do zástrčky.
4
Page 90

2. Pro zapnutí přístroje přepněte přepínač do polohy „ON“ (zapnuto).
3. Po zapnutí přístroje se bude opakovaně zobrazovat uložená úvodní obrazovka.
4. Pro zastavení stiskněte
.
VÝBĚR POŽADOVANÉHO JAZYKA PRO NABÍDKU NA OBRAZOVCE
Po zapnutí napájení se zobrazí logo SETUP (nastavení).
1. Pro zobrazení hlavní nabídky stiskněte
2. Pro označení možnosti „General Setup“ (obecná nastavení) použijte
3. Pro vstup do nabídky stiskněte
4. Pro označení možnosti „Language“ (jazyk) použijte
5. Pro výběr požadovaného jazyka použijte
6. Pro potvrzení stiskněte
a pro návrat do hlavní nabídky dvakrát stiskněte tlačítko .
.
/ .
.
/ a pro vstup do nabídky stiskněte .
/ .
5
Page 91

VLOŽENÍ PAMĚŤOVÉ KARTY NEBO USB PAMĚTE
y Toto z ařízení dokáže zobrazit obsah pouze jednoho digitálního média.
y Tento fotorámeček přehrává pouze obrázky (*.jpg). Pro přehrání jiných formátů je nutné je nejdříve převést v počítači na
podporovaný formát.
1. Paměťovou kartu vložte do příslušné čtečky.
Poznámka: Pro odebrání SD/MMC/MS karty ji jednoduše vytáhněte.
2. USB paměť vložte do USB portu.
6
Page 92

PROHLÍŽENÍ SNÍMKŮ A PREZENTACE
1. Pro zobrazení hlavní nabídky stiskněte MENU (nabídka).
2. Pro výběr SD/MMC/MS karty nebo USB paměti stiskněte / a poté pro zobrazení následující obrazovky
stiskněte
3. Pro označení požadované možnosti použijte / .
Photo (Snímek) Prohlížení snímků z paměti.
Files (Soubory) Prohlíží všechny soubory; a kopíruje nebo maže soubory.
4. Když je zvolena možnost „Photo” (snímek), stiskněte . Na obrazovce se zobrazí náhledy snímků.
.
7
Page 93
5. Pro výběr snímku, který si přejete zobrazit, stiskněte / / / a poté stiskněte .
6. Spustí se prezentace od vybraného snímku.
y Pro pozastavení prezentace stiskněte
y Zvolte předchozí/následující snímek stisknutím / .
y Pro návrat do režimu náhledů stiskněte .
. Pro pokračování přehrávání jej znovu stiskněte.
8
Page 94

NASTAVENÍ OBRÁZKŮ
1. Během prohlížení snímku stiskněte MENU (nabídka). Ve spodní části obrazovky se zobrazí nabídka.
2. Pro výběr ikon v nabídce stiskněte
y Pro spuštění nebo pokračování prezentace od aktuálního snímku označte
y Pro přiblížení snímku označte a opakovaně stiskněte pro zvětšení snímku následujícím způsobem: 2x, 4x,
8x a 16x. Když je snímek přiblížen, stiskněte MENU (nabídka) pro zavření nabídky a použitím tlačítek
/ můžete snímek prohlížet.
y Pro otočení snímku označte
otočí snímek o 90 stupňů doprava. Všechny efekty otočení budou zrušeny po návratu do režimu náhledů.
y Pro návrat do režimu náhledů označte
/ .
a stiskněte .
/ /
a poté opakovaně stiskněte pro otočení o 90 stupňů. Každé stisknutí tlačítka
a stiskněte .
9
Page 95

SPRÁVA SOUBORŮ
V režimu File (soubor) můžete prohlížet všechny přehrávatelné soubory a složky uložené na paměťovém médiu. Můžete
kopírovat soubory z paměťového média na další paměťové médium nebo mazat soubory.
Pro pohyb mezi soubory a složkami mačkejte
y Pro otevření složky označte a stiskněte
y Pro přehrání souboru označte a stiskněte
/ .
nebo . Pro návrat do nadřazené složky stiskněte .
. Pro návrat do seznamu souborů stiskněte .
10
Page 96

Kopírování souborů
Stiskněte / pro označení souboru a pak stiskněte . Vedle souboru se objeví značka výběru .
Opakováním výše uvedeného kroku vyberte více souborů.
1. Stiskněte MENU (nabídka). Zobrazí se následovní obrazovka.
2. Stiskněte
připojené k rámečku.
3. Pro výběr paměťového média stiskněte
4. Stiskněte
Poznámka: Pokud se vaše cílové zařízení neobjeví v seznamu, bude paměťové médium chráněno proti zápisu.
Odemkněte jej prosím a zkuste znovu.
/ pro výběr pro výběr Copy (kopírovat) a stiskněte . Zobrazí se paměťové médium
/ / / .
pro spuštění kopírování souborů.
11
Page 97

Mazání souborů
1. Postupujte podle kroku 1 v části „Kopírování souborů“.
2. Stiskněte
3. Stiskněte
4. Potvrďte stisknutím
/ pro výběr Delete (smazat) ve vyskakovacím okně a pak stiskněte .
/ pro výběr YES (ano) nebo NO (ne) pro smazání souborů nebo ukončení bez mazání.
.
NASTAVENÍ MOŽNOSTI OBRAZOVKY
1. Pro výběr snímku nebo hlavního nastavení stiskněte v režimu nastavení
2. Pro výběr požadované podnabídky stiskněte
3. Pro výběr požadované nabídky stiskněte
4. Pro návrat do hlavní nabídky stiskněte
/ a poté stiskněte .
/ a pro potvrzení stiskněte .
12
/ a poté stiskněte .
Page 98

MENU (nabídka).
Možnosti
obrazovky
Snímek
Podnabídky Popis operací
Sliding show time (doba mezi
přechody)
Photo Mode (režim snímek)
Transition Effect (přechodový
efekt)
Nastavuje čas pro prezentaci.
K dispozici jsou následující možnosti: 3s, 5s, 15s, 1 min,
15min.
Nastavuje snímky na celou obrazovku nebo standardní
obrazovku, když je prohlížíte.
Nastavuje styl přechodu během prohlížení prezentace.
Date Stamp (časové razítko)
Shuffle (náhodně)
General Setup Language (Jazyk) Nastavuje jazyk OSD nabídky
Zobrazuje podrobné informace o snímku během jeho
prohlížení.
Na displeji se snímky přehrávají v náhodném pořadí nebo
následném pořadí během prezentace.
13
Page 99

(všeobecné
nastavení)
Brightness (Jas)
Nastavení jasu obrazovky.
K dispozici jsou následující možnosti: +3, +2, +1, 0, -1, -2, -3.
Contrast (Kontrast)
Saturation (Sytost )
Auto run (Atomat. spuštění)
Hint time (čas nápovědy)
Default (Výchozí) Obnoví výchozí nastavení u všech nastavení.
Nastavení kontrastu obrazovky.
K dispozici jsou následující možnosti: +3, +2, +1, 0, -1, -2, -3.
Nastavení sytosti obrazovky.
K dispozici jsou následující možnosti: +3, +2, +1, 0, -1, -2, -3.
Nastavuje digitální fotorámeček pro automatické spuštění
určitého režimu, když jej zapnete.
Nastavuje, jak dlouho se bude zobrazovat vyskakovací okno
s nápovědou pro práci s tlačítkem během prezentace.
K dispozici jsou následující možnosti: 0s, 5s, 10s, 20s.
14
Page 100

Technické údaje
Digitální LCD, TFT
Displej
Konektory I/O Stejnosměrný (DC) vstup
Zdroj napájení
USB konektor USB host 2.0 (high speed-vysoká rychlost)
Podporované periferní zařízení
Podporovaný formát snímků JPEG, maximální rozlišení: 8000*8000 pixelů
Rozměry D*Š*V: (mm) 265,5 x 215 x 22,5 mm
Hmotnost (g) 689,5 g
Úhlopříčka: 9,7 palců
Poměr stran obrazovky: 4:3
Rozlišení: 1024*768 pixelů
Síťový adaptér (vstup: 100~240 V AC (střídavých), 50~60 Hz; výstup: DC
(stejnosměrných) 5 V, 2 A)
SD™ (Secure Digital Card), MMC™ (Multi Media Card), MS™ (Memory
Stick)
15
 Loading...