

Page 1
PLEASE READ THE USER S OPERATION MANUAL CAREFULL Y BEFORE USING
PLC185FFW
Frost Free
Fridge Freezer
USER'S MANUAL
Page 2

Structure Illustration ...........................................................................01
....................................
....................................
Safety information ............ ...............................02
Installation ......................................... .............02
Electrical Connection (UK ONLY) .......................................................03
Instructions for use ..............................................................................04
Temperature Control ............................................................................04
The Internal Light ................................................................................04
Storage of fresh food in the refrigerator ................................................05
Store frozen food .................................................................................05
Freezing fresh food (Freezer) ..............................................................05
Making ice cubes .................................................................................05
Refrigerator defrost process .................................................................06
Freezer defrost process ........................................................................06
Cleaning and maintenance ...................................................................06
Changing the light bulb .......................................................................06
Power Failure ......................................................................................06
If the appliance is not operating correctly .............................................07
Prolonged off periods ..........................................................................07
Before calling for service ....................................................................07
Do's and don'ts ....................................................................................08
Technical data .....................................................................................09
INDEX
Page 3
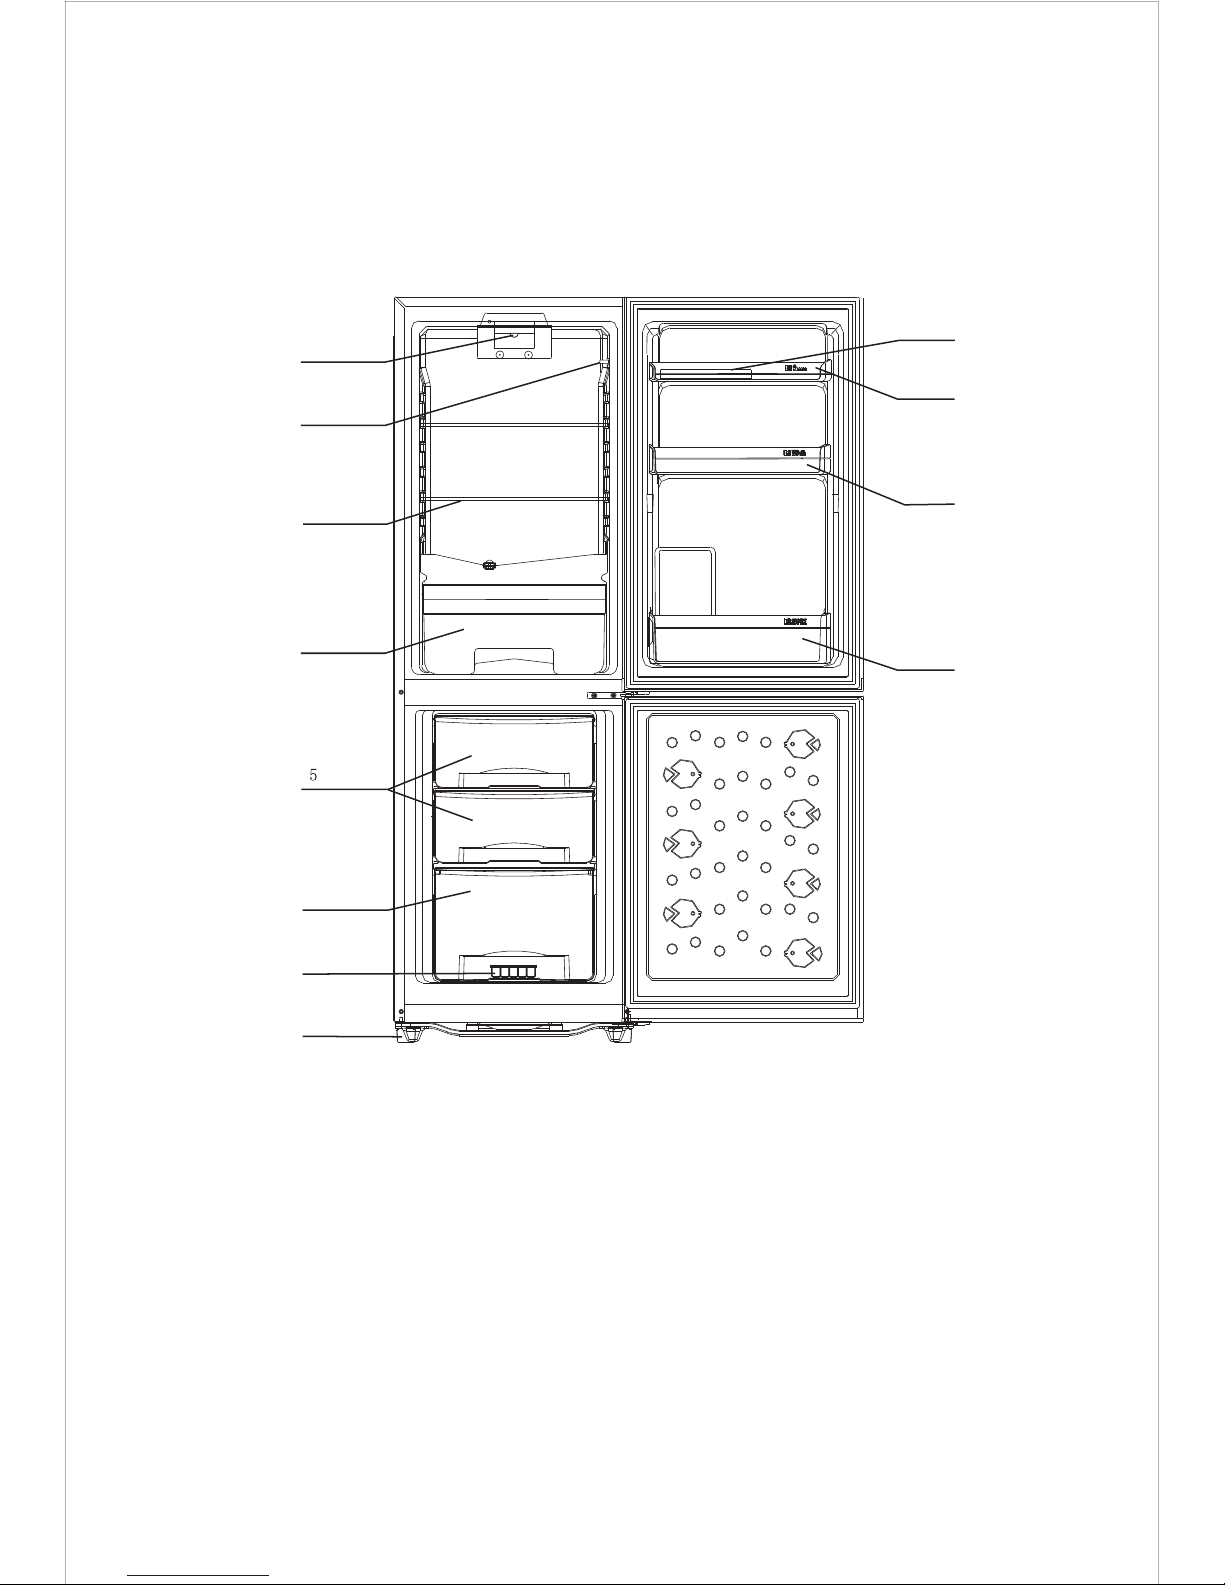
STRUCTURE ILLUSTRATION
11
Note : Compartment design may change due to product improvement, No prior notice will
be given.
1.T emperature control knob
5.Freezer drawer A
2.Lamp switch
7.Ice-making case
9.Egg tray
11.Can rack
4.Crisper
12.Bottle rack
8.Adjustable feet
The sample cutline is representation of this series of refrigerator, which have similar
structure and different capacity .
3.
Refrigerator shelf
1
2
3
4
6
8
9
10
11
12
7
6.Freezer drawer B
10.
Egg rack
Page 4

22
This booklet contains the information you will require to install and operate your new
appliance.
It is important and worthwhile spending time to fully read this booklet so you will
understand how to operate the appliance safely and efficiently.
Please keep this booklet in a safe place so that you can refer to it when required.
Safety information
This information is provided in the interest of your safety. Please read the following
carefully before carrying out the installation or use of the appliance.
If you are discarding an old freezer or refrigerator with a lock / catch fitted to the door,
ensure that it is left in a disabled condition to prevent the entrapment of children whilst
playing.
As old refrigeration equipment may contain CFC's which will damage the ozone layer,
when disposing of any refrigeration equipment please contact your local waste disposal
facility for advice on the correct method of disposal.
This appliance must only be used for its intended purpose i.e. the freezing and storage
of domestic edible foodstuffs and should not be used for any other purpose
If the mains cable requires replacement, this must only be undertaken by a suitably
qualified person, as special purpose tools are required.
WARNING:
This appliance is intended for domestic use only, any other use may invalidate the
warranty and might be dangerouus.
Install on a good firm level surface, and any unevenness of the floor should be corrected
prior to installation, slight unevenness can be overcome by adjusting the front feet.
Position the appliance and allow to stand for two to three hours before it is turned on for
the first time to allow the system to settle. Do not position next to any heat source e.g.
cooker, boiler or in direct sunlight etc.
Installation
NOTE: If the appliance is positioned on a carpet, soft floor covering you should
re-adjust the front feet once the appliance has had time to settle.
A clearance of 10 cm must be left between the sides of the appliance and any adjacent
cabinets or walls to allow for adequate air circulation. The appliance is not designed for
recessed installation ( building in ).
Page 5

33
The appliance must be connected to a 220-240 volts 50 cycle AC supply by means of a
three pin socket, suitably earthed and should be protected by a 13 amp fuse in the plug.
The appliance is supplied with a rewireable 13 amp 3 pin plug fitted with a 13 amp fuse.
Should the fuse require replacement, it must be replaced with a fuse rated at 13 amp and
approved to BS1362.
If the mains plug is unsuitable for the socket outlet in your home or is removed for any
other reason, then the cut off plug should be disposed of safely to prevent the hazard of
electric shock.
There is a danger of electric shock if the cut off plug is inserted into any 13 amp socket
outlet.
Warning: This appliance must be earthed.
For your safety please read the following information
ELECTRICAL CONNECTION (UK ONLY)
How to wire a 13 amp plug.
The blue wire must be connected to the terminal marked N.
The brown wire must be connected to the terminal marked L.
The green and yellow wire must be connected to the terminal in the plug which is
marked with the letter E or with the earth symbol or coloured green and yellow.
As the colours may not correspond with the markings identifying
the terminals in your plug proceed as follows.
Green and Yellow - Earth
Blue Neutral
Brown Live
Important
The wires in the mains lead on this appliance are coloured in accordance with the
following code:
Make sure the cord is held tight by the cord clamp
Page 6

44
Temperature Control
The refrigerator is designed to maintain an internal storage temperature in the
refrigerator compartment between +2C to + 5C.
Instructions for use
Remove all packing materials and wash the interior of the appliance using lukewarm
water containing a little bicarbonate of soda in the proportion of 1 teaspoon to 1.2 liters
(2 pints) of water. Do not use detergents or soaps as they may taint the food. After
cleaning, dry all parts thoroughly.
Never place hot or warm foods into the cabinet or leave the doors open for longer than
necessary as this will raise the temperature and cause excessive amounts of moisture thus
increasing the amount of ice in the refrigerator / freezer compartment.
The Internal Light
The internal light will automatically switch ON and OFF whenever the refrigerator door
is opened or closed. To change the light bulb, please see the chapter on changing the light
bulb.
To obtain a lower internal temperature turn the thermostat temperature control to a
higher number. To obtain a higher internal temperature turn the thermostat control
to a lower number. However, the internal temperature and temperature control
setting is dependent on a number of factors:
1. Varying ambient temperatures.
2. The number of times the appliance doors are opened and how long the doors remain
open.
3. The amount and temperature of the food and drink introduced into the appliance.
4. The weather conditions and time of year e.g. summer / winter.
5. The positioning of the appliance and an adequate air circulation to the sides and
back of the cabinet.
To enable adjustment of the temperature in the appliance it is fitted with an adjustable
thermostat located in the fridge compartment, which can be adjusted from setting 1
(warmest) to 7 (coldest). For normal working temperature it is recommended to adjust
the thermostat control to the midway position, after a few hours readjust the thermostat
to the desired temperature. There is also an off position 0 . Which turns OFF the
refrigerator and freezer compartments. Please Note this dose not disconnect the
appliance from the mains supply. To do this you must remove the mains plug from the
socket.
Page 7

55
Making ice cubes
Pour water into the ice cube tray until it is two thirds full and place into the freezer. Ice
cubes will form in approximately 2 to 3 hours. The ice cube can be easily removed by
twisting the ice cube tray or running under cold water for a short time.
Freezing fresh food (Freezer)
Ensure that your freezing operations are carried out under the most hygienic conditions,
as freezing alone does not sterilize the food. Never put hot or even warm foodstuffs into
the freezer. Prior to storing the food, pack it in plastic bags, aluminum foil or freezer
containers and place into the freezer without putting them in contact with food that has
already been frozen. See the technical data sheet at the rear of this booklet for the
maximum permissible amount in kilograms of fresh food that can be frozen in any 24
hour period with a room temperature of 25C Never freeze more than the maximum
permissible.
Store frozen food
When using the freezer for the first time or after defrosting, turn the thermostat
temperature control to setting 7 for at least two hours before introducing the food to be
stored, Then adjust to your preferred setting.
All frozen food products you purchase should be placed in the freezer as soon as
possible to avoid the frozen food from defrosting.
Storage recommendations printed on the packaging of frozen food by the
manufactures should always be followed.
Storage of fresh food in the refrigerator
Food should always be covered tightly with foil, plastic film, placed in bags or stored in
airtight containers. This will prevent food from dehydrating and prevent the strong smell
of some foods transferring to milder ones.
To store raw meat wrap in polythene bags or airtight containers and place on the
lowest shelf.
Do not allow raw meat to come into contact with cooked foods. For safety, only store raw
meat for two or three days. Fruit and vegetables should be thoroughly cleaned and
placed in the vegetable/ salad bin.
Milk and other liquids should be sealed with lids and placed in the bottle shelf on the
door.
Page 8

66
Lamp
Lamp cover
Power Failure
If there is a power failure for a short time less than 12 hrs keep the door closed
Frozen food should not be affected if the failure lasts for more than 12 hrs.
Extra protection can be given by covering the appliance with two or three thick blankets.
If a long power failure is anticipated, try to get the foodstuff into another appliance or
cold store, if possible.
If the power cut is longer than 12 hrs then check the content of the freezer.
If the food has defrosted, cook and refreeze the food or it should be eaten immediately.
Never refreeze food that as been defrosted.
Disconnect the appliance from the mains supply.
Pull the lamp cover forwards, to gain accesses to the lamp holder. Unscrew the light
bulb in an anti clockwise direction from the holder.
Replace the bulb with one of the correct type and size (10 watt SES E14 base).
Replace the cover by Pushing the cover Backwards along the grooves.
Reconnect the appliance to the mains supply.
Changing the light bulb
Note. Light bulbs are not covered by the warranty
If the appliance is not to be used for a long period of time then it is recommended to
remove all the food stuff, clean the inside of the appliance and leave the door open to
allow the air to circulate thus avoiding unpleasant odors.
Cleaning and maintenance
Before any cleaning or maintenance is carried out you must disconnect the appliance
from the mains supply by removing the plug, never remove the plug by pulling on the
mains cord. Remove the plug by pulling on the plug itself.
It is recommended that when cleaning the appliance, both the inside and outside, can be
cleaned using warm water and a little bicarbonate of soda. Use 1 teaspoon to 1.2 litres
of water.
Warning: The refrigerating system must not be damaged at any time.
This Freezer is frost-free and does not need de frosting.
Freezer defrost process
Refrigerator defrost process
The refrigerator defrosting process is carried out automatically every time the
compressor stops.
The defrost water drains from the cabinet into a tray placed on the top of the
compressor to the rear of the unit where it evaporates.
Page 9

77
If the appliance is not operating correctly:
Please check the following points.
Is there a power failure? (Check by turning on a house light)
Has the fuse blown or has the circuit breaker tripped.
Has the door been closed correctly?
Check the thermostat has been set correctly.
Check the mains plug is seated in the wall socket correctly and the socket switch is on.
Check the power outlet is working, Try another appliance.
Is the room temperature too cold or too hot. ( working temperature range 16 to 32 )
Prolonged off periods
If the refrigerator is not in use for a long period of time, proceed as follows:
Disconnect the refrigerator from the main supply by removing the plug from the socket.
Clean and dry the inside as instructed under the heading of cleaning the appliance.
Leave the do or open to prevent any unpleasant smells from building up while the
appliance is not in use.
If there is a power failure for a short time keep the door closed check the contents of
the refrigerator every so often.
Before calling for service
Please check the following points:
1. The refrigerator is not working
Check the plug is inserted correctly into the wall socket
Check there is power to the wall socket by plugging in another appliance, if the other
appliance works, check the fuse in the appliance plug.
2. The refrigerator is noisy when running
Check the appliance is level and is not in contact with another appliance or kitchen
furniture.
3. The refrigerator does not cool sufficiently.
If the door has been opened too often, or it has been left open for a while it will take
time for the appliance to reach its set temperature.
Check the air flow around the refrigerator has not been reduced due to insufficient
clearance.
NOTE: The following characteristics should not be looked upon as a problem.
A gentle tricking sound caused by coolant flowing through the pipe.
Compressor operating at high temperature.
Reversing the Doors
The doors are unable to be reversed on this model.
Page 10

88
Don't- Cover the shelves with any protective materials which may obstruct air circulation.
Don't- Store poisonous or any dangerous substances in your fridge. It has been
designed for the storage of edible foodstuffs only.
Don't- Consume food which has been refrigerated for an excessive length of time.
Don't- Store cooked and fresh food together in the same container. They should be
packaged and stored separately.
Don't- Let defrosting food or food juices drip onto already stored food.
Don't- leave the door open for long periods, as this will make the appliance more costly
to run and cause excessive ice formation.
Don't- Use sharp edged objects such as knives or forks to remove the ice.
Don't- Never use hairdryers, or electrical appliances for defrosting only use item
recommended by the manufacturer.
Don't- put hot food into the appliance. Let it cool down first.
Don't- put liquid-filled bottles or sealed cans containing carbonated liquids into the
freezer section, as they may burst.
Don't- Give children ice cream and water ices direct from the freezer section. The low
temperature may cause 'freezer burns' on the lips.
Don't- Try to keep frozen food which has thawed; it should be eaten within 24 hours or
cooked and refrozen.
Don't- Damage the refrigerant circuit at any time
Do's and don'ts
Do- keep raw meat and poultry below cooked food and dairy products.
Do- Leave lettuce, cabbage, parsley and cauliflower on the stem.
Do- Wrap cheese firstly in greaseproof paper and then in a polythene bag, excluding As
much air as possible. For best results, take out of the fridge compartment an hour before
eating.
Do- Wrap raw meat and poultry loosely in polythene or aluminium foil. This prevents
drying.
Do- Wrap fish and offal in polythene bags.
Do- Wrap food with a strong odour or which may dry out, in polythene bags, or
aluminium foil or place in airtight container.
Do- Wrap bread well to keep it fresh.
Do- Chill white wines, beer, larger and mineral water before serving.
Do- Check contents of the low temp compartment every so often.
Do- Keep food for as short a time as possible and adhere to est before and Use by
etc. dates.
Do- Store commercially prepared food in accordance with the instructions given on the
packets.
Do- Always choose high quality fresh food and be sure it is thoroughly clean before
Storing it.
Do- Wrap all food in aluminium foil or food quality polythene bags and make sure any
air is excluded.
Do-Keep ventilation openings, in the appliance enclosure clear of obstruction.
Do-ensure that frozen food does not rise in temperature while defrosting, a rise in
temperature during defrosting may shorten the storage life of your food.
Page 11

99
Technical data
Brand
Appliance type
Star rating
Frequency ( Hz )
Light Power (Watts)
Net Freezer volume
Net Refrigerator Volume
Freezing capacity (kg/24h)
Rated Voltage ( V )
Climate Class +Ambient Range
Gross Weight (Kg)
Energy consumption (kWh/24h)
Energy Consumption (kwh/per year)
Input Power (Watts)
DEFROST POWER
Refrigerating agent
Outside dimensions (W x D x H)
Refrigerating Blowing Gas
870mm
50 Hz
10W
55L
115L
2.5kg/24h
220-240V~
N
58.5Kg
0.70kWh/24h)
256kwh/per year
80W
145W
R600a/50g
491 567 1521
Pentane
900mm door open
Fridge freezer
Page 12

We apologise for any inconvenience caused by minor inconsistencies in these
instructions, which may occur as a result of product improvement and development.
Calls are charged at standard rates.
If you need a service engineer please phone the number on your sales receipt.
If something doesn't seem to work
If there is something about your appliance which you do not understand and you live in
the UK you can phone our help in normal office hours on: 0113 2793520
Kesa U.K HU1 3AU 12/12/2006
Disposal
Packaging materials should be recycled using local facilities.
Waste electrical and electronic products must not be disposed
of with household waste. Please refer to the retailer from whom
you purchased this item for disposal instructions.
 Loading...